
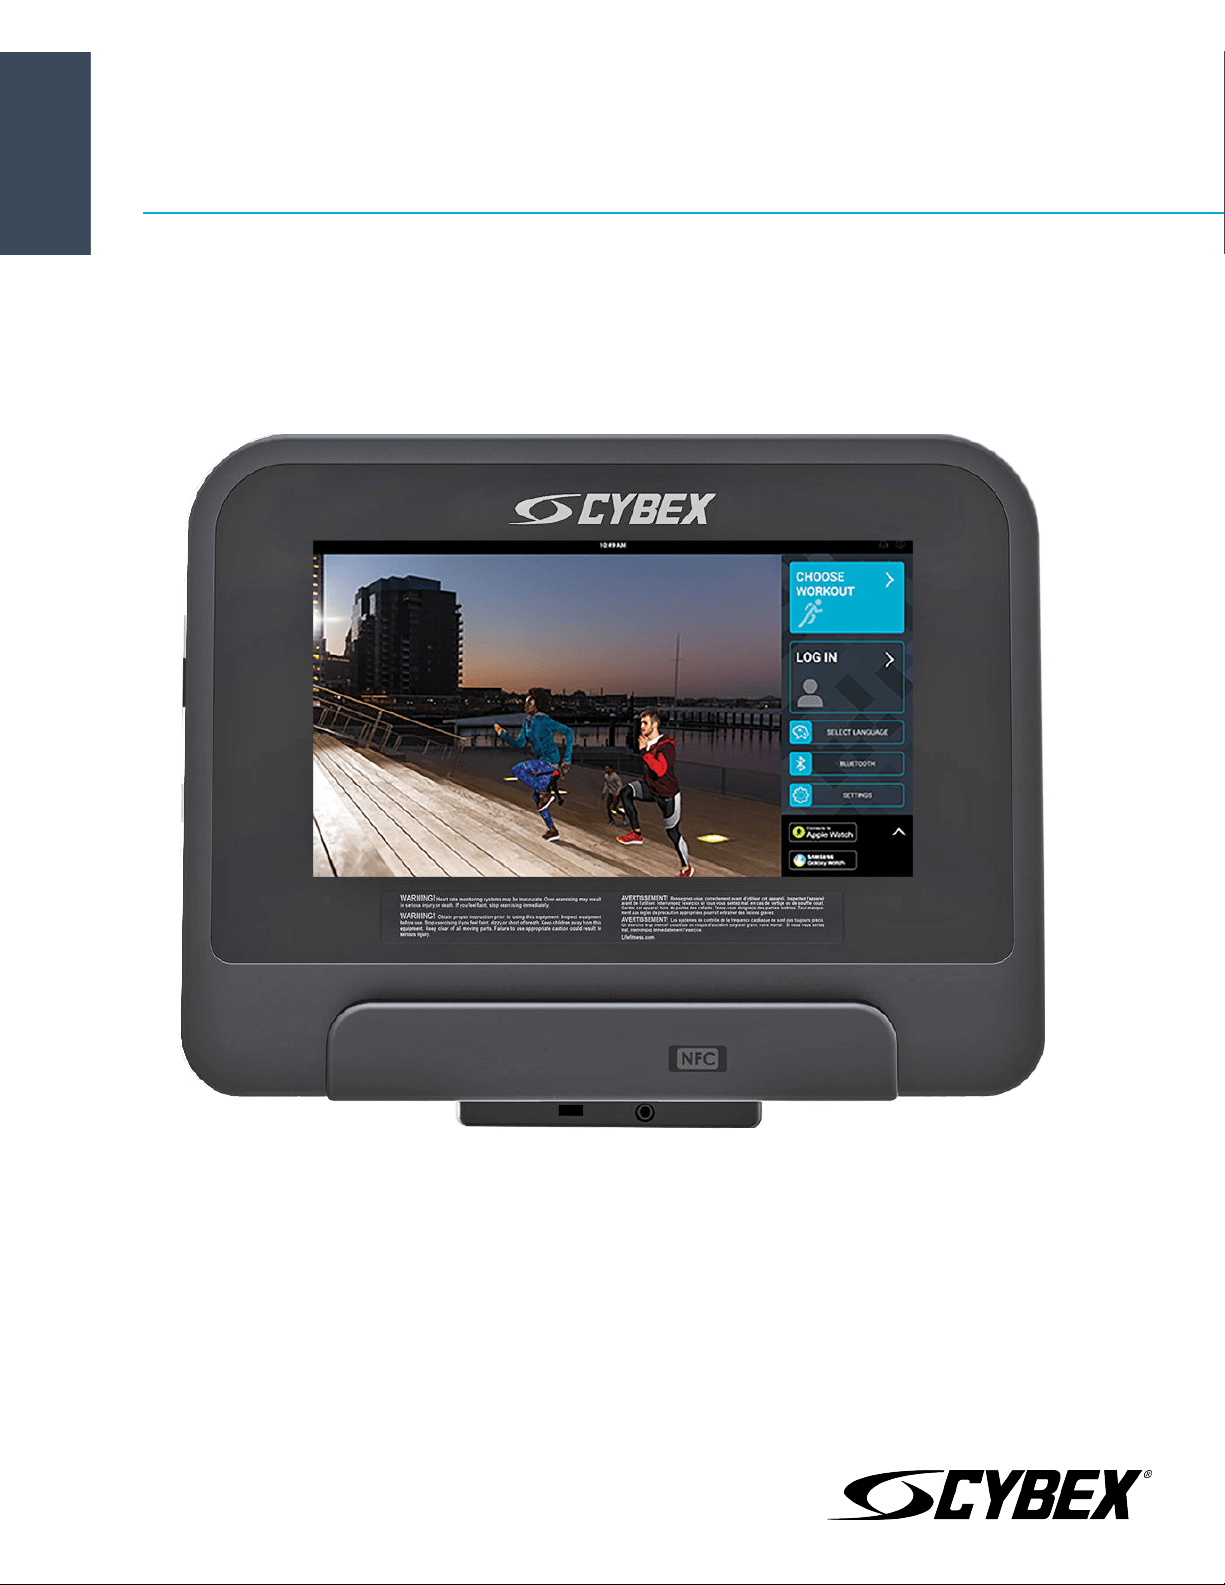
Cybex 70T Console
Owner's Manual
Part Number
1008851-0001 AC


Corporate Headquarters
Columbia Centre III, 9525 West Bryn Mawr Avenue, Rosemont, Illinois 60018 • U.S.A.
847.288.3300 • FAX: 847.288.3703
Service phone number: 800.351.3737 (toll-free within U.S.A., Canada)
Global Website: www.cybexintl.com
International Oices
AMERICAS
North America
Cybex International Inc.
Columbia Centre III
9525 West Bryn Mawr Avenue
Rosemont, IL 60018 U.S.A.
Telephone: (847) 288 3300
Service Email: [email protected]om
Sales/Marketing Email:
commercialsales@lifefitness.com
United Kingdom
Life Fitness UK LTD
Queen Adelaide
Ely, Cambs, CB7 4UB
Telephone: General Oice (+44) 1353.666017
Customer Support (+44) 1353.665507
Service Email: [email protected]
Sales/Marketing Email: life@lifefitness.com
All Other EMEA Countries and Distributor Business EMEA*
Bijdorpplein 25-31
2992 LB Barendrecht
THE NETHERLANDS
Telephone: (+31) 180 646 644
Service Email: EMEAService[email protected]
Brazil
Life Fitness Brasil
Av. Rebouças, 2315
Pinheiros
São Paulo, SP 05401-300
BRAZIL
SAC: 0800 773 8282 option 2
Telephone: +55 (11) 3095 5200 option 2
Service Email: [email protected]om
Sales/Marketing Email: vendasbr@lifefitness.com
Germany, Austria, and Switzerland
Life Fitness Europe GMBH
Neuhofweg 9
85716 Unterschleißheim
GERMANY
Telephone:
+49 (0) 89 / 31775166 Germany
+43 (0) 1 / 6157198 Austria
+41 (0) 848 / 000901 Switzerland
Service Email: [email protected]om
Sales/Marketing Email: vertrieb@lifefitness.com
ASIA PACIFIC (AP)
Japan
Life Fitness Japan, Ltd
4-17-33 Minami Aoyama 1F/B1F
Minato-ku - Tokyo 107-0062
Japan
Telephone: (+81) 0120.114.482
Fax: (+81) 03-5770-5059
Service Email: service.lfj@lifefitness.com
Sales/Marketing Email: sales@lifefitnessjapan.com
Latin America and Caribbean*
Life Fitness, Inc.
Columbia Centre III
9525 West Bryn Mawr Avenue
Rosemont, IL 60018 U.S.A.
Telephone: (847) 288 3300
Service Email: [email protected]om
Sales/Marketing Email:
commercialsales@lifefitness.com
Spain
Life Fitness IBERIA
C/Frederic Mompou 5,1º1ª
08960 Sant Just Desvern Barcelona
SPAIN
Telephone: (+34) 93.672.4660
Service Email: servicio.tecnico@lifefitness.com
Sales/Marketing Email: info[email protected]
Hong Kong
Life Fitness Asia Pacific LTD
32/F, Global Trade Square
21 Wong Chuk Hang Road
Hong Kong
Telephone: (+852) 2575.6262
Service Email: Service.HK@lifefitness.com
Sales/Marketing Email: hongkong.sales@lifefitness.com
EUROPE, MIDDLE EAST, and AFRICA (EMEA)
Netherlands and Luxemburg
Life Fitness Atlantic BV
Bijdorpplein 25-31
2992 LB Barendrecht
THE NETHERLANDS
Telephone: (+31) 180 646 666
Service Email: service.benelux@lifefitness.com
Sales/Marketing Email:
marketing.benelux@lifefitness.com
Belgium
Life Fitness Benelux NV
Parc Industrial de Petit-Rechain
4800 Verviers
BELGIUM
Telephone: (+32) 87 300 942
Service Email: service.benelux@lifefitness.com
Sales/Marketing Email:
marketing.benelux@lifefitness.com
All Other Asia Pacific countries and distributor business Asia
Pacific*
32/F, Global Trade Square
21 Wong Chuk Hang Road
Hong Kong
Telephone: (+852) 2575.6262
Fax: (+852) 2575.6894
Service Email: Service.AP@lifefitness.com
Sales/Marketing Email:
Marketing.HK.Asia@lifefitness.com
*Also check www.cybexintl.com for local representation or distributor/dealer
Page 1 of 80

Table of Contents
Safety
Safety Instructions........................................................................ 3
Consignes de Sécurité..................................................................5
Before Use.......................................................................................7
Functional Information................................................................7
Immobilization Method................................................................8
Icons Used in this Manual............................................................9
Getting Started
Log In To Customize................................................................... 10
Select Language..........................................................................11
Connects to Apple Watch
®
.........................................................12
Connects to Samsung Galaxy Watch
®
.....................................13
Specifications.............................................................................. 14
Overview
Console Overview....................................................................... 15
Touch Screen Overview............................................................. 16
Operation
Choose Your Workout.................................................................17
Workout Mode............................................................................. 33
My Stats.........................................................................................35
Bluetooth
®
Devices......................................................................36
Select Entertainment................................................................. 37
Select Entertainment - DTV and STB IPTV..............................38
Settings......................................................................................... 39
Expanded Stats............................................................................40
Pause Workout screen................................................................41
Cool Down Screen.......................................................................42
Workout Results.......................................................................... 43
Manager Configuration
Accessing System Options........................................................ 44
Configuration Menu....................................................................45
Manager - Default Settings........................................................46
Media Center................................................................................48
Wireless Connectivity................................................................. 72
Maintenance and Troubleshooting
Approved and Compatible Cleaners.......................................74
Troubleshooting..........................................................................75
Copyrights and Trademarks
List of Copyrights and Trademarks..........................................77
Warranty
What is Covered...........................................................................78
Who is Covered............................................................................78
How Long It is Covered.............................................................. 78
Who Pays Transportation and Insurance For Service..........78
What We Will Do To Correct Covered Defects........................78
What is Not Covered...................................................................78
What You Must Do....................................................................... 78
How to Get Parts and Service................................................... 78
Exclusive Warranty......................................................................78
Changes in Warranty Not Authorized......................................79
Eects of State Laws...................................................................79
Warranty Information.................................................................79
Cybex
®
and the Cybex logo are registered trademarks of Cybex International, Inc.
DISCLAIMER: Cybex International, Inc. makes no representations or warranties regarding the contents of this manual. We reserve the right to revise this
document at any time or to make changes to the product described within it without notice or obligation to notify any person of such revisions or
changes.
©
Copyright 2019, Life Fitness, LLC. All Rights Reserved. Life Fitness, Hammer Strength, Cybex, ICG and SCIFIT are registered trademarks of Life Fitness,
LLC and its ailiated companies and subsidiaries. Brunswick and related trademarks used under license from Brunswick Corporation. Disclaimer: Images
and specifications are current as of the date of publication and are subject to change.
Columbia Center III - 9525 West Bryn Mawr Ave, Rosemont, IL 60018 • 800-351-3737 • 847-288-3700 • FAX 800-216-8893
www.cybexintl.com • 1008851-0001 AC • 2019
Page 2 of 80

Safety
Safety Instructions
Read all instructions before using.
All Products
CAUTION: Any changes or modifications to this equipment could void the product warranty.
WARNING: To reduce the risk of burns, fire, electric shock, or injury, it is imperative to connect each product to a properly
grounded electrical outlet.
WARNING: Heart rate monitoring systems may be inaccurate. Over exercising may result in serious injury or death. If you feel
faint, stop exercising immediately.
DANGER: To reduce the risk of electrical shock or injury from moving parts, always unplug product before cleaning or
attempting any maintenance activity.
• Never operate the product if it has a damaged power cord or electrical plug, or if it has been dropped, damaged, or even partially
immersed in water. Contact Customer Support Services.
• Position the product so that the power cord plug to the wall is accessible to the user. Make sure that the power cord is not knotted
or twisted and that it is not trapped under any equipment or other objects.
• If the electrical supply cord is damaged, it must be replaced by the manufacturer, an authorized service agent, or a similarly
qualified person to avoid a hazard.
• Always follow the console instructions for proper operation.
• This appliance is not intended for use by persons (including children) with reduced physical, sensory, or mental capabilities, or lack
of experience or knowledge unless they have supervision or been given instruction concerning the use of the appliance by a person
responsible for their safety.
• Do not use this product outdoors, near swimming pools or in areas of high humidity.
• Never operate the product with the air openings blocked. Keep air openings free of lint, hair, or any other obstructing material.
• Never insert objects into any opening in these products. If an object should drop inside, turn o the power, unplug the power cord
from the outlet, and carefully retrieve it. If the item cannot be reached, contact Customer Support Services.
• Never place liquids of any type directly on the unit, except in an accessory tray or holder. Containers with lids are recommended.
• Do not use these products in bare feet. Always wear shoes. Wear shoes with rubber or high-traction soles. Do not use shoes with
heels, leather soles, cleats or spikes. Make sure no stones are embedded in the soles.
• Keep all loose clothing, shoelaces, and towels away from moving parts.
• Do not reach into, or underneath, the unit or tip it on its side during operation.
• This equipment is not intended for use by children. Keep children under the age of 14 away from the machine.
• Do not allow other people to interfere in any way with the user or equipment during a workout.
• Use these products for their intended use as described in this manual. Do not use attachments that have not been recommended
by the manufacturer.
• Allow LCD consoles to “normalize” with respect to temperature for one hour before plugging the unit in and using.
• Free standing equipment shall be installed on a stable and leveled surface.
• Read all warnings on each product prior to starting a workout.
• If warnings are missing or damaged, please contact Customer Support Services immediately for replacement warning labels.
Warning labels are shipped with every product and should be installed before product is used. Life Fitness is not responsible for
missing or damaged warning labels.
Page 3 of 80
Treadmill
CAUTION: Risk of injury to persons – to avoid injury, use extreme caution when stepping onto or o of a moving belt. Read
assembly instruction manual before using.
WARNING: Keep the area 6.5 . (2 m) by 3 . (0.9 m) behind the treadmill clear of any obstructions, including walls, furniture,
and other equipment. Contact Customer Support Services for an optional longer power cord if necessary.
WARNING: Be sure the emergency stop lanyard is clipped to the user and in proper position on the treadmill before beginning
any workout.
WARNING: The belt centering adjustment must be performed if the belt is not between the marks indicating the maximum
allowed lateral positions. Refer to Treadmill Assembly Instructions.
WARNING: This product can expose you to chemicals including Acrylonitrile, which is known to the State of California to
cause cancer and birth defects or other reproductive harm. For more information go to http://www.P65Warnings.ca.gov
• The product should never be le unattended when plugged in. Disconnect from the electrical outlet when not in use, and before
putting on or taking o parts. To disconnect, turn power OFF at the ON/OFF switch, then remove plug from electrical outlet.
• Keep the power cord away from heated surfaces. Do not pull the equipment by the power cord or use the cord as a handle.
• Handrails may be held to enhance stability as needed, but are not for continuous use.
• Never mount or dismount the treadmill while the running belt is moving. Use the handrails whenever additional stability is
required. In case of an emergency, such as tripping, grasp the handrails, and place the feet on the side platforms.
• Never walk or jog backwards on the treadmill.
• Do not use this product in areas where aerosol spray products are being used or where oxygen is being administered. Such
substances create the danger of combustion and explosion.
• In conformity with the European Union Machinery Directive 2006/42/EC, this equipment unloaded runs at sound pressure levels
below 70 dB (A) at the average operating speed of 12 km/hr. Noise emission under load is higher than without load.
Arc Trainer
WARNING: Ensure that there is at least 1 . (0.3 m) of clearance in front of the Arc Trainer and at least 2 . (0.6m) on the side.
WARNING: The Arc Trainer is not equipped with a free-wheeling feature. Therefore, the product cannot be stopped
immediately.
WARNING: This product can expose you to chemicals including Di-2-ethylhexyl-phthalate, which is known to the State of
California to cause cancer and birth defects or other reproductive harm. For more information go to http://
www.P65Warnings.ca.gov
• Do not stand or sit on the rear plastic covers of the Arc Trainer.
• The individual human power required to perform an exercise may be dierent than the mechanical power displayed on the Arc
Trainer.
• Use caution when mounting or dismounting the Arc Trainer. Before mounting, use the moving arms to bring the pedal nearest to
you to the lowest position. Use the stationary handlebars whenever additional stability is required. While exercising, hold onto the
moving arms.
• Never face backward while using the Arc Trainer.
Bikes
WARNING: Allow a distance of 16 in. (41 cm) between the widest part of the bike and other objects on either side. Provide at
least 3 . (0.9 m) between the front or rear of the bike to any other objects and 2 . (0.6 m) in the direction the equipment is
accessed from.
WARNING: This product can expose you to chemicals including Acrylonitrile, which is known to the State of California to
cause cancer and birth defects or other reproductive harm. For more information go to http://www.P65Warnings.ca.gov
• Do not stand or sit on plastic shrouds.
• Use caution when mounting or dismounting the bike. Use the stationary handlebar whenever additional stability is required.
SAVE THESE INSTRUCTIONS FOR FUTURE REFERENCE.
Page 4 of 80

Consignes de Sécurité
Veuillez lire toutes les instructions avant d'utiliser les produits .
Tous les équipements
ATTENTION : Toute modification apportée à cet équipement pourrait en annuler la garantie.
AVERTISSEMENT : Pour réduire les risques de brûlures, d’incendies, de décharges électriques ou de blessures, il est essentiel
de brancher chaque appareil sur une prise électrique correctement mise à la terre.
AVERTISSEMENT : Les systèmes de surveillance de la fréquence cardiaque peuvent être inexacts. Un exercice trop intensif
peut entraîner des blessures graves, voire mortelles. En cas de malaise, interrompez immédiatement l’exercice.
DANGER : Pour réduire les risques de chocs électriques ou de blessures en raison des pièces mobiles, débranchez toujours les
produits avant de les nettoyer ou de procéder aux tâches d’entretien.
• Ne faites jamais fonctionner le produit dont la fiche ou le cordon d’alimentation sont altérés ni aucun appareil qui serait tombé,
aurait été endommagé ou même partiellement plongé dans l’eau. Contactez le service d’assistance à la clientèle.
• Placez l’appareil de façon à ce que l’utilisateur ait accès à la fiche du cordon d’alimentation. Assurez-vous que le cordon
d’alimentation n’est pas noué ou tordu et qu’il n’est pas coincé sous un autre appareil ou sous tout autre objet.
• Si le cordon d’alimentation électrique est endommagé, il doit être remplacé par le fabricant, par un réparateur agréé ou par une
personne qualifiée afin d’éviter tout danger.
• Pour un fonctionnement correct, suivez toujours les instructions de la console.
• Cet appareil n’est pas destiné à être utilisé par des personnes ou des enfants présentant des capacités physiques, sensorielles ou
mentales réduites, ou un manque d’expérience et de connaissances, sauf en cas de supervision ou d’instructions relatives à son
utilisation par une personne responsable de leur sécurité.
• N’utilisez pas ce produit à l’extérieur, près d’une piscine ou dans des endroits très humides.
• N’utilisez jamais le produit avec les ouvertures d’air bloquées. Maintenez les bouches d’aération exemptes de peluches, de cheveux
ou de toute autre obstruction.
• N’insérez jamais d’objet dans les ouvertures de cet appareil. Si un objet tombe dans l’appareil, mettez ce dernier hors tension,
débranchez le cordon d’alimentation et récupérez l’objet avec précaution. Si vous ne pouvez pas l’atteindre, contactez le service
d’assistance à la clientèle.
• Ne placez jamais de liquides d’aucune sorte directement sur l’appareil, sauf si vous disposez d’un support ou d’un plateau pour
accessoires. Nous vous recommandons de n’utiliser que des récipients pourvus d’un bouchon.
• N’utilisez pas l’appareil avec les pieds nus. Portez toujours des chaussures. Portez des chaussures à semelles en caoutchouc ou
antidérapantes. N’utilisez pas de chaussures à talon, à semelle en cuir, à crampons ou à pointes. Assurez-vous qu’aucun caillou ne
s’est incrusté dans les semelles.
• Éloignez les vêtements amples, les lacets de chaussure et les serviettes des parties mobiles de l’appareil.
• Ne placez pas les mains à l’intérieur ou sous l’appareil. Ne le faites pas basculer sur le côté durant son fonctionnement.
• Cet équipement n’est pas destiné à être utilisé par les enfants. Tenez les enfants âgés de moins de 14 ans à l’écart de la machine.
• Ne laissez aucune personne gêner l’utilisateur ou le fonctionnement de l’appareil pendant l’exercice.
• Utilisez cet équipement uniquement aux fins auxquelles il est destiné et de la manière décrite dans le présent manuel. N’utilisez
pas d’accessoires non recommandés par le fabricant.
• Laissez les consoles LCD s'adapter à la température ambiante pendant une heure avant de brancher l'appareil et de l'utiliser.
• L’appareil utilisé de manière autonome doit être installé sur une surface stable et plane.
• Lisez les avertissements sur chaque produit avant de commencer à vous entraîner.
• Si certaines étiquettes d’avertissement sont manquantes ou endommagées, contactez immédiatement le service d’assistance à la
clientèle. Nous vous en fournirons de nouvelles. Les étiquettes d’avertissement sont expédiées avec les appareils et doivent être
installées avant utilisation de ces derniers. Life Fitness n’est pas responsable des étiquettes manquantes ou endommagées.
Page 5 of 80
Tapis de course
ATTENTION : Risque de blessures - pour éviter toute blessure, faire preuve d’extrême prudence pour monter sur un tapis en
mouvement, ou pour en descendre. Lisez les instructions d’assemblage avant toute utilisation.
AVERTISSEMENT : Laissez un espace de 2 m sur 0,9 m (6,5 pi. sur 3 pi.) autour de la machine. Ne placez pas cette dernière
près de murs, meubles ou autres équipements qui pourraient en obstruer l’accès. Contactez le service à la clientèle pour
obtenir un cordon plus long au besoin.
AVERTISSEMENT : Avant de commencer tout exercice, il convient de s’assurer que le cordon de sécurité est bien fixé à
l’utilisateur et correctement placé sur le tapis de course.
AVERTISSEMENT : La surface de course doit être recentrée si elle ne se situe pas entre les marques indiquant les positions
latérales maximales autorisées. Consultez les instructions d’assemblage du tapis de course.
• Ne laissez jamais l’appareil sans surveillance lorsqu’il est branché. Débranchez-le systématiquement après son utilisation, et avant
l’ajout et le retrait de pièces. Pour débrancher l’appareil, placez l’interrupteur de marche/arrêt sur ARRÊT et ôtez la prise électrique
du mur.
• Maintenez le cordon d’alimentation à l’écart des surfaces chaudes. Ne tirez pas l’appareil par son cordon et n’utilisez pas celui-ci
comme une poignée.
• Les barres d’appui latérales peuvent servir à améliorer la stabilité, le cas échéant, mais elles ne sont pas conçues pour être utilisées
de façon continue.
• Ne montez et ne descendez jamais du tapis de course lorsqu’il est en marche. Le cas échéant, utilisez les barres latérales pour
renforcer votre stabilité. En cas d’urgence, si vous trébuchez par exemple, saisissez les barres latérales et placez les pieds sur les
plates-formes latérales.
• Ne reculez jamais sur le tapis, que ce soit en marchant ou en courant.
• N’utilisez pas l’appareil en présence d’aérosols ou en cas d’administration d’oxygène. Ces substances pourraient entraîner des
risques d’incendie et d’explosion.
• Conformément à la directive Machines 2006/42/CE de l’Union européenne, à vide, cet équipement sans charge fonctionne à des
niveaux de pression acoustique inférieurs à 70 dB(A) à une vitesse de fonctionnement moyenne de 12 km/h. L’émission sonore
sous charge est plus élevée que sans charge.
Arc Trainer
AVERTISSEMENT : Veillez à laisser un dégagement d’au moins 30 cm (1 pi) devant l’Arc Trainer et d’au moins 60 cm (2 pi) sur
les côtés.
AVERTISSEMENT : L’Arc Trainer n’est pas équipé d’une option roue libre. Par conséquent, il ne peut être arrêté
instantanément.
• Ne vous mettez ni debout, ni assis sur les caches en plastique situés à l’arrière de l’Arc Trainer.
• La puissance nécessaire à chaque utilisateur pour eectuer un exercice peut diérer de la puissance mécanique aichée sur l’Arc
Trainer.
• Montez et descendez avec précaution de l’Arc Trainer. Avant de monter, placez la pédale située de votre côté en position basse, en
vous aidant des bras mobiles. Utilisez les poignées fixes lorsque vous avez besoin de renforcer votre équilibre. Pendant les
exercices, tenez les bras mobiles.
• Ne montez jamais à l’envers sur l’Arc Trainer.
Vélos
AVERTISSEMENT : Laissez une distance de 41 cm (16 po) entre la partie la plus large du vélo et les objets se trouvant de part
et d’autre. Laissez un dégagement d’au moins 0,9 m (3 pi.) entre l’avant et l’arrière du vélo et les objets alentour, et d’au moins
0,6 m (2 pi.) dans la direction qui permet d’accéder à l’appareil.
• Ne vous mettez ni debout, ni assis sur les caches en plastique.
• Montez et descendez avec précaution du vélo. Utilisez le guidon fixe lorsque vous avez besoin de renforcer votre équilibre.
CONSERVEZ PRÉCIEUSEMENT CES INSTRUCTIONS POUR CONSULTATION ULTÉRIEURE.
Page 6 of 80

Before Use
Before using this product, it is essential to read this ENTIRE operation manual and ALL assembly instructions. It describes equipment
setup and instructs members on how to use it correctly and safely.
Avant d’utiliser ce produit, il est impératif de lire ce manuel d’utilisation en ENTIER, ainsi que TOUTES les instructions de montage. Ce
manuel explique comment installer l’équipement, et comment l’utiliser correctement et sans danger.
FCC Warning - Possible Radio / Television Interference
NOTE: This equipment has been tested and found to comply with the limits for a Class A digital device, pursuant to part 15 of the FCC
rules. These limits are designed to provide reasonable protection against harmful interference when the equipment is operated in a
commercial environment. This equipment generates, uses and can radiate radio frequency energy, and if not installed and used in
accordance with the instruction manual, may cause harmful interference to radio communications. Operation of this equipment in a
residential area is likely to cause harmful interference in which case the user will be required to correct the interference at his own
expense.
EN ISO 20975 Class SB (Treadmill only): Professional and / or commercial use.
EN ISO 20975 Class SA (Bikes and Arc Trainer only): Professional and / or commercial use.
CAUTION: Any changes or modifications to this equipment could void the product warranty.
ATTENTION : Toute modification apportée à cet équipement pourrait en annuler la garantie.
Any service, other than cleaning or user maintenance, must be performed by an authorized service representative.
Functional Information
This Operation Manual describes the functions of the following products:
• R-Series Treadmill
• R-Series Recumbent Exercise Bike
• R-Series Upright Exercise Bike
• R-Series Arc Trainer (Total Body and Lower Body)
See Specifications in this manual for product specific features.
Statements of Purpose:
• The Cybex Treadmill is an exercise machine that enables users to walk or run, in place, indoors on a moving surface.
• The Cybex Arc Trainer is a non-impact, weight bearing cross trainer, used by applying force to the foot pedals.
• The Cybex Bike is a machine that simulates the movements of riding a bicycle indoors at various speeds and levels of resistance.
WARNING: Health-related injuries may result from incorrect or excessive use of exercise equipment. Life Fitness STRONGLY
recommends seeing a physician for a complete medical exam before undertaking an exercise program, particularly if the user
has a family history of high blood pressure or heart disease, is over the age of 45, smokes, has high cholesterol, is obese, or has
not exercised regularly in the past year. If, at any time while exercising, the user experiences faintness, dizziness, pain, or
shortness of breath, he or she must stop immediately.
AVERTISSEMENT : Une utilisation incorrecte ou excessive de l'appareil peut entraîner des blessures. Life Fitness
Recommande VIVEMENT aux utilisateurs de passer un examen médical complet avant d'entamer un programme
d'entraînement, et tout particulièrement dans les cas suivants : antécédents familiaux d'hypertension (pression sanguine trop
élevée) ou de pathologies cardiaques, utilisateurs de 45 ans ou plus, tabagisme, hypercholestérolémie (taux de cholestérol
sanguin trop élevé), obésité, absence d'exercice physique depuis un an ou plus. Si, pendant l'usage de l'appareil, l'utilisateur
éprouve un malaise, des vertiges, des douleurs ou des diicultés à respirer, il doit s'arrêter immédiatement.
Page 7 of 80
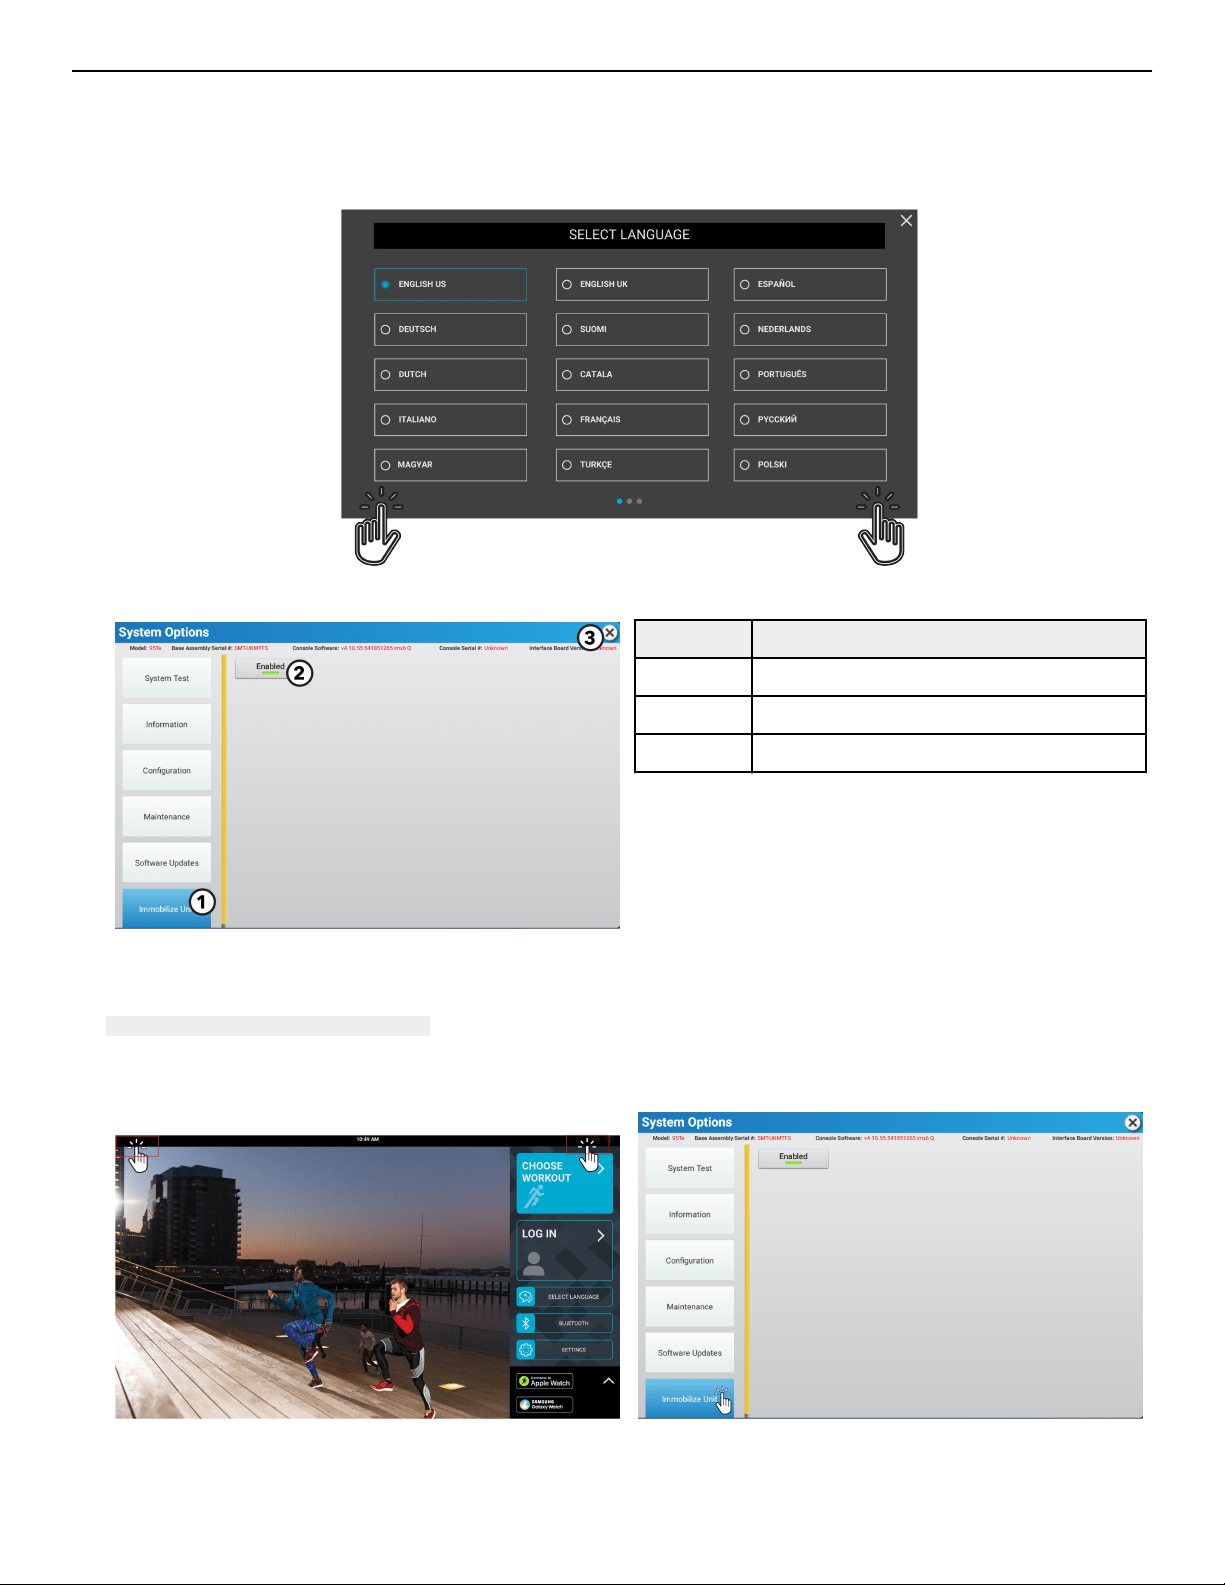
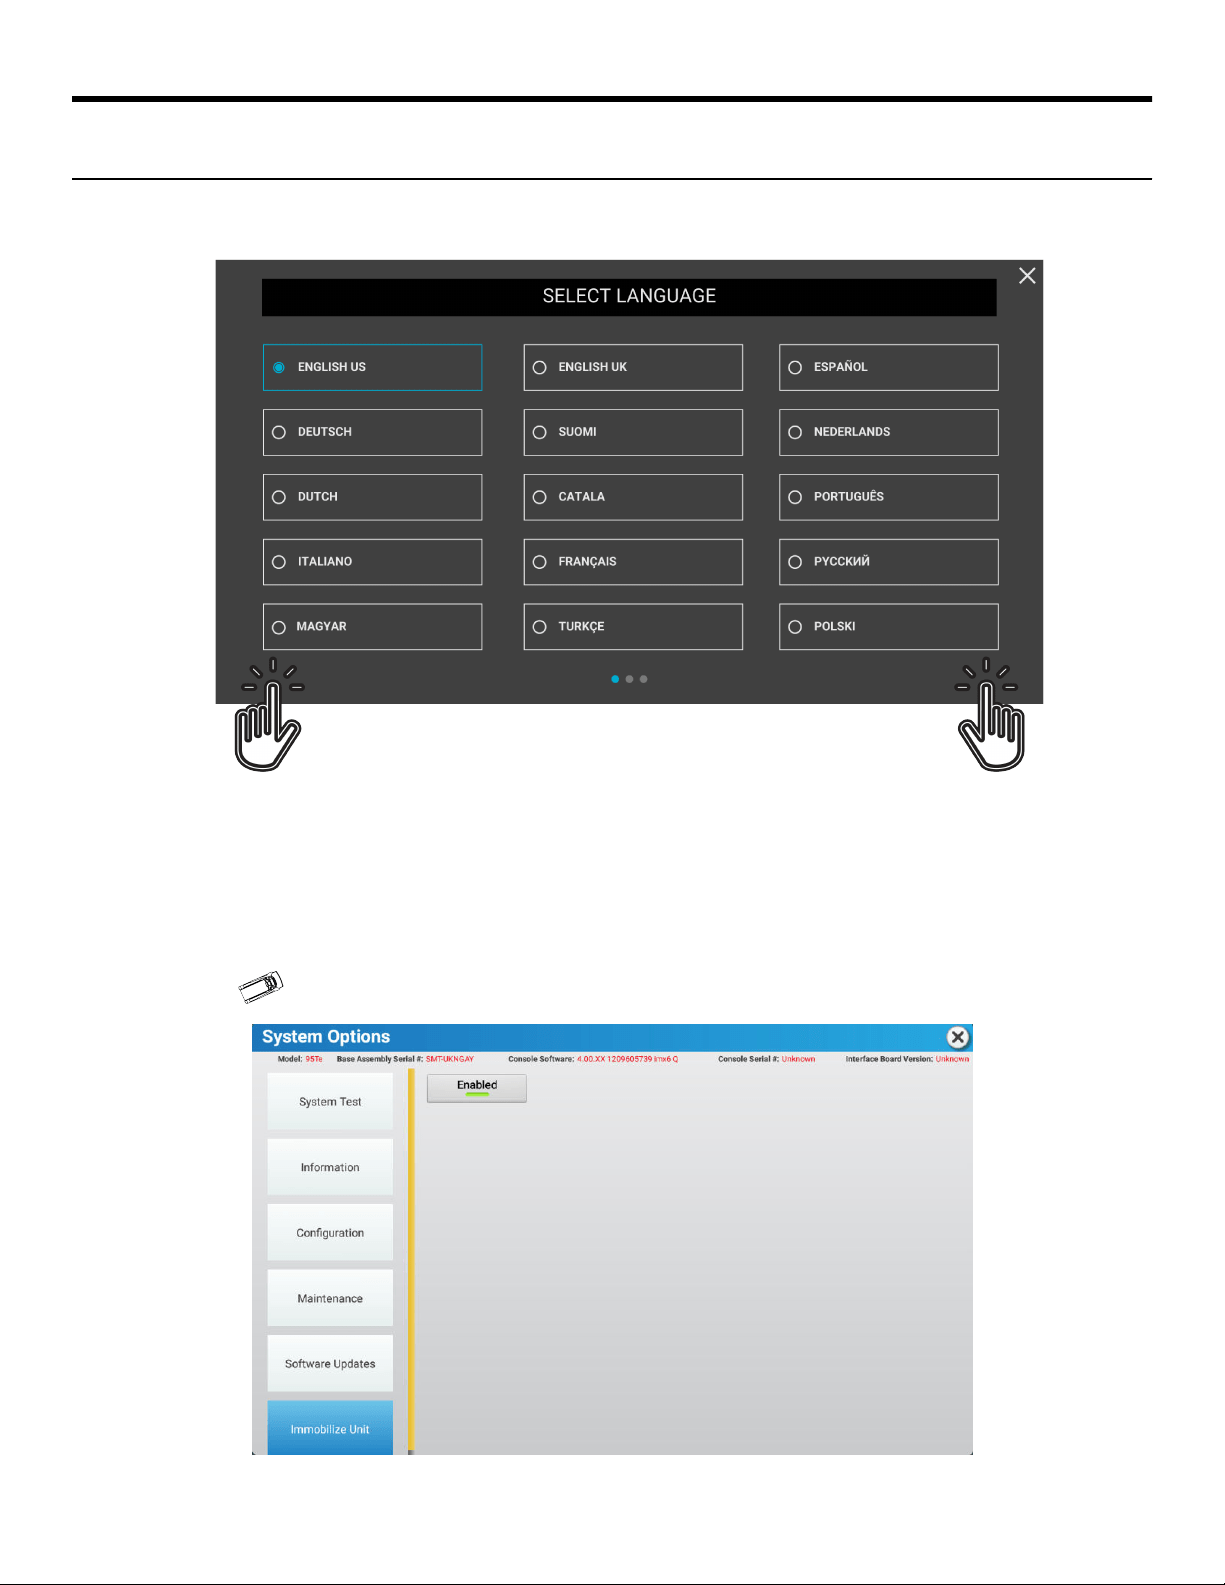
Immobilization Method
The purpose of immobilizing the treadmill is to prevent unauthorized use. The system causes immobilization of the treadmill when
activated.
1. Tap the LANGUAGE icon to access the SELECT LANGUAGE screen.
2. Tap the lower part of the screen in the following sequence: Lower-Le, Lower-Right, Lower-Le, and Lower-Right.
3. Tap the Immobilize Unit icon. Enabled will be displayed.
Item Description
1 Immobilize Unit icon
2 Enabled icon
3 Exit icon
4. Tap the exit icon X to exit System Options.
5. Unit will shutdown.
6. UNIT IMMOBILIZED BY MANAGER message appears on screen.
7. Tap the upper part of the ATTRACT SCREEN in the following sequence: Upper-Le, Upper-Right, Upper-Le, and Upper-Right to
enter System Options.
8. Tap the Immobilize Unit icon to disable.
Page 8 of 80
Icons Used in this Manual
The 70T manual covers information for multiple cardio products. To help dierentiate we use the following icons.
Treadmill-Only Feature
Bike-Only Feature
Arc Trainer-Only Feature
Page 9 of 80
Getting Started
Log In To Customize
Log in to the console to track and save your workouts to the LFconnect app.
1. Bluetooth / NFC
• On an Apple mobile device, enable Bluetooth, open the LFconnect app and turn on Bluetooth proximity login feature.
• On an Android mobile device, enable NFC and open the LFconnect app.
• Touch your mobile device to the upper right-hand corner of the console to automatically connect.
2. Scan QR Code
• Open the LFconnect app on your mobile device.
• Select the QR code reader in the upper right-hand corner.
• Scan the QR code with your mobile device.
3. Log In Manually
Press Log In Manually to access the screen with the prompts to log in manually.
4. Follow the prompts to log in to your account.
• Press User Name, and enter a user name.
• Press Password, and enter a password.
• Press Log in to access your account.
5. Forgot Password
Enter the email address associated with the LFconnect account.
Page 10 of 80
6. Press the X to exit the Log In Manually screen and return to the Home screen.
7. Exit the Log In screen and return to the Home screen.
Select Language
1. Language Options
Users can select a language to use during a workout.
NOTE: Only the specific languages enabled by the manager will be displayed.
Aer a selection is made, the language is saved, the Select Language screen is closed and the Home screen appears in the
selected language.
2. Press the X to exit the Select Language screen and return to the Home screen.
Page 11 of 80
Connects to Apple Watch
®
1. Connect to Apple Watch: Press to learn more about connecting your Apple Watch device.
2. At any time prior to the workout summary screen, place your Apple Watch at the bottom right-hand corner of the tablet holder
where it reads NFC. The watch face must be facing the tablet holder to connect.
3. The Apple Watch is connected when the ∞ symbol is apparent in the upper, right-hand corner of the screen.
Page 12 of 80

Connects to Samsung Galaxy Watch
®
1. Samsung Galaxy Watch: Press to learn more about connecting your Samsung Galaxy watch device.
2. At any time prior to the workout summary screen, place your Samsung Galaxy Watch at the bottom right-hand corner of the tablet
holder where it reads NFC. The side of the watch must be facing the tablet holder to connect.
3. The Samsung Galaxy Watch is connected when the watch symbol is apparent in the upper, right-hand corner of the screen.
Page 13 of 80
Specifications
Console Screen Type: LCD surface capacitive touch screen
70T HD LCD Touch Screen Size: 16” diagonal for all bases (Treadmill, Bikes, Arc Trainer)
LCD Touch Screen Power
Requirement:
20.5 -25.5 VDC @ 3.5 A
Ports: Type RJ45, interchangeable Network ready connection and Fitness Entertainment port (power
compliant with FitLinxx CSAFE specification dated August 4, 2004: 4.75VDC to 10VDC; maximum
current of 85mA).
Headphone Jack: 3.5mm Stereo
Ambient Temperature Range
(Operating)
10C - 40C (nominal 25C)
Temperature Range (Storage /
Shipping)
-20C - 60C (key limiting item: LCD Touch Screen)
Humidity Range (Operating) 5% - 85% RH (nominal 40% RH, non-condensing)
Heart Rate Monitoring Systems:
Patented Lifepulse
™
digital contact heart rate and Polar
®
telemetry-compatible heart rate
monitoring system
Speed Range (Treadmill): 0.5 - 14.0 MPH / 0.8 - 23 KPH
Incline Range (Arc Trainer): 0-20
Incline Range (Treadmill): 0-15%
Resistance Levels:
Bikes: 26 (0 - 25)
Arc Trainer: 0-100
USB Device Charging: Can be used with a USB type A device charger.
Broadcast Receiver
Capabilities:
NTSC/ATSC, PAL/DVB-T/DVB-T2, NTSC/ISDB-T, or Pro-Idiom (four separate tuners).
Japan has its own tuner due to conditional access card (B-CAS).
NTSC/ATSC supports PAL-M and PAL-N (unique PAL encoding for Argentina, Brazil, Paraguay, and
Uruguay where no digital broadcasting is available).
PAL/SECAM/DVB-T/DVB-T2 tuner supports PAL, PAL-M, PAL-N, SECAM-B/G, SECAMD/ K and DVB-T/-
T2.
Treadmill sound pressure level: Less than 70 db(A) at 7.5 MPH (12 KPH), at user’s ear position, belt unloaded. Noise emission under
load is higher than without load.
Dimensions
Physical Dimensions Shipping Dimensions
Depth Width Height Weight Depth Width Height Weight
70T HD Console
(Treadmill)
5.1 in. (13
cm)
20.8 in.
(52.8 cm)
17.4 in.
(44.2 cm)
13.9 lbs.
(6.32 kg)
9.06 in. (23
cm)
26.38 in.
(67 cm)
21.26 in.
(54 cm)
19.0 lbs.
(8.60 kg)
70T HD Console (Bikes,
Arc Trainer)
5.0 in. (12.7
cm)
16.3 in.
(41.4 cm)
15.1 in.
(38.4 cm)
12.3 lbs.
(5.58 kg)
7.48 in. (19
cm)
21.26 in.
(54 cm)
18.11 in.
(46 cm)
15.7 lbs.
(7.10 kg)
Page 14 of 80
Overview
Console Overview
Treadmill shown
1. Touch Screen Display
• Use to select, set up, monitor and save workouts.
• Access entertainment options.
2. Optional RFID (Radio Frequency Identification): Fitness facility owners can order this option for their users allowing them to swipe
their facility identification card on the console. The console’s hardware is compatible with the two main frequencies (125kHz and
13.56Mhz) used for RFID cards.
3. Reading Rack / Tablet Holder: Place traditional reading material as well as mobile devices and tablets in this built-in holder.
4. USB: Charge USB devices.
5. Headphones: Plug in headphones to listen to TV and entertainment options.
6. NFC (Near Field Communication): Connect to NFC enabled mobile devices, Apple Watch and Samsung Galaxy Watch for seamless
pairing and data share.
Page 15 of 80
Touch Screen Overview
1. Choose Workout: Select a workout from the following categories:
• Interactive Terrains
• Standard Goals
• Fitness Tests
• Quick Start
2. Log In: Press to log in to your LFconnect or Halo account.
3. Language: Select a language to use during a workout.
4. Bluetooth
®
: Scan for Bluetooth enabled headphones or Heart Rate devices.
5. Settings: Press to enter your weight or change your units (imperial or metric).
6. Connects to Apple Watch
®
: Press to learn more about connecting your Apple Watch device.
7. Samsung Galaxy Watch:
®
Press to learn more about connecting your Samsung Galaxy Watch device.
Page 16 of 80

Operation
Choose Your Workout
Scroll the Choose Workout screen to view available workout options.
Workouts include:
• Interactive Terrains - Select an interactive terrain and work out with friends or other exercisers anywhere in the world in real time.
• Standard Goals - Choose a workout based on desired goal.
• Fitness Tests - Select from available fitness tests.
• Quick Start - Begin a workout immediately without setup or selecting a goal.
Press on desired workout to access a description about the selected workout and workout setup.
Page 17 of 80
Interactive Terrains
The Interactive Terrains are video courses, shot in first person perspective through landscapes, cityscapes, and events from around the
world. This feature interacts with the fitness equipment to provide an immersive experience.
NOTE: The incline of the treadmill automatically increases or decreases to correspond with the virtual hills on the course.
• Choose desired course.
Page 18 of 80
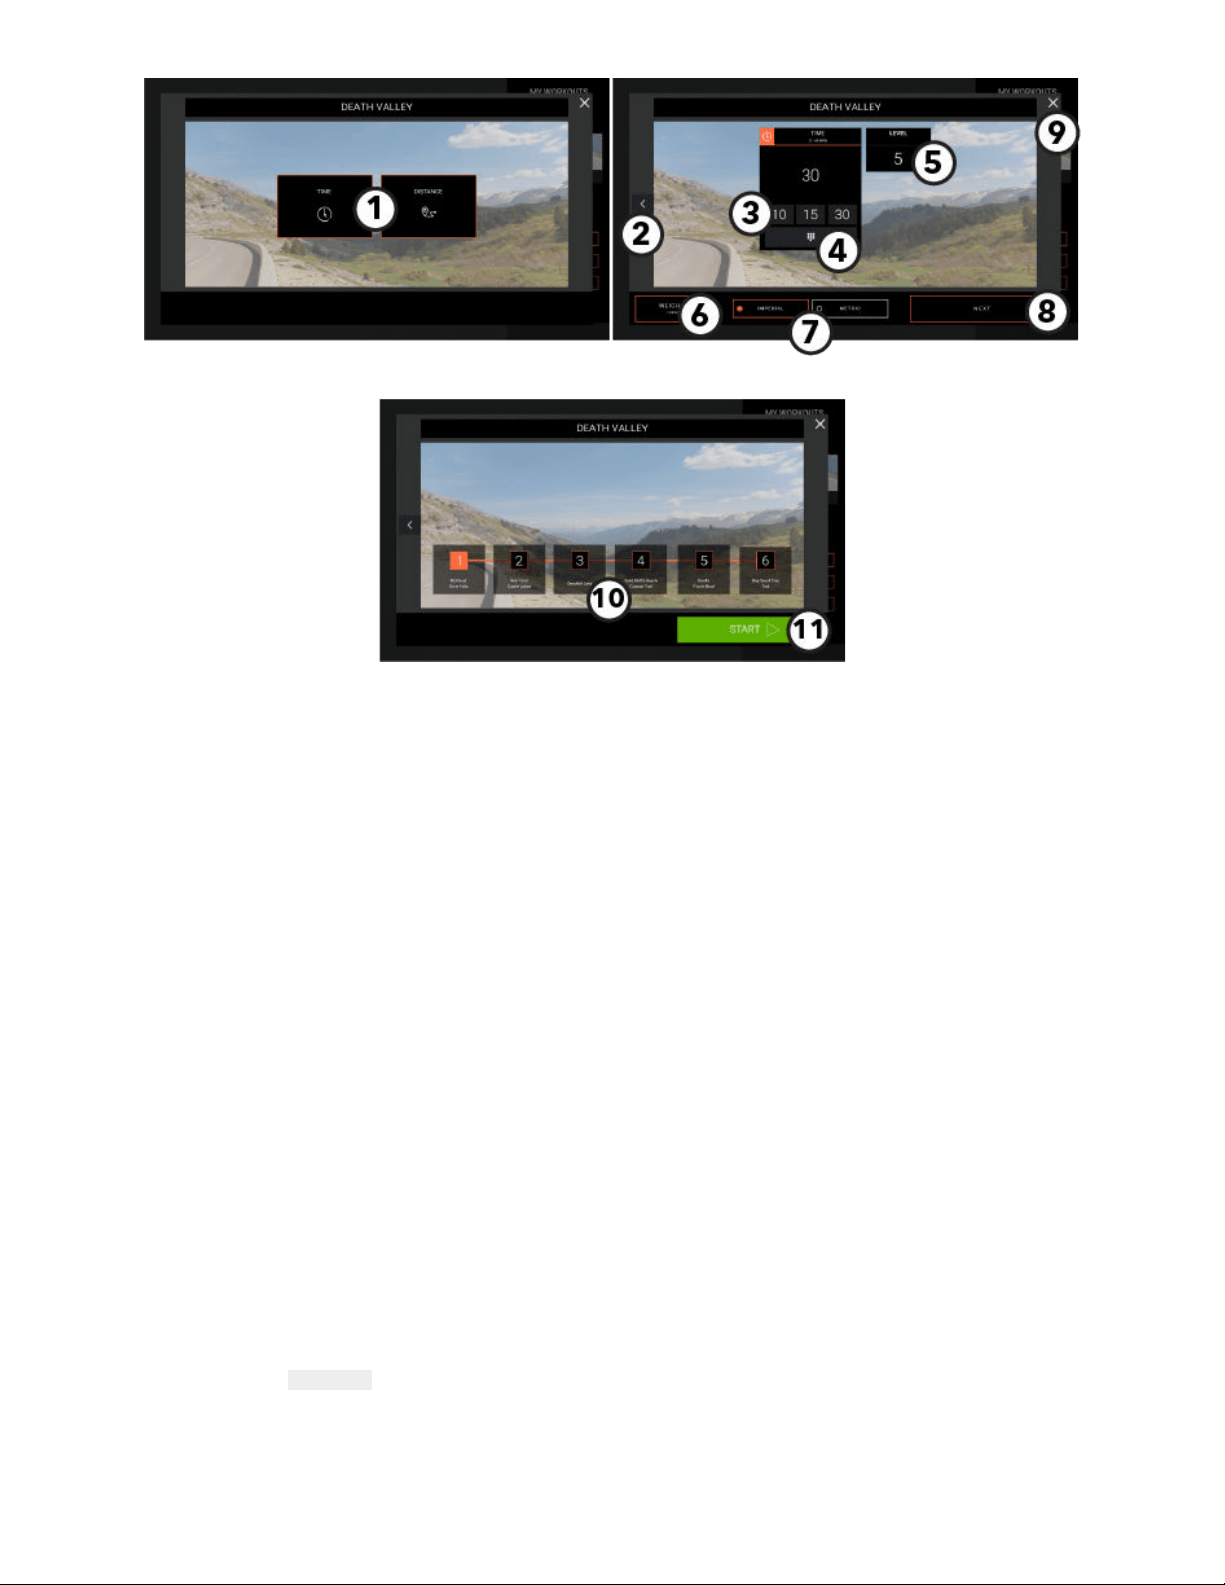
Workout Setup - Interactive Terrains
1. Choose Goal
• Time
• Distance
2. Back Arrow
Press to return to previous screen.
3. Preset Time Values
Choose from default values.
4. Time Keypad
Press to use a numeric keypad to input a workout time value.
5. Level (if applicable)
Press to choose a preset level or input a level value.
6. Enter Weight
Press to use a numeric keypad to input a weight value.
7. Choose Measurement Unit
• Metric
• Imperial
8. Next
Press to go to the next setup screen.
9. Exit the Setup Screen and return to the Interactive Terrains Workout Selection Screen.
10. Course Markers
Choose a starting point for the course.
11. Start Interactive Terrain
A workout countdown 3, 2, 1 screen appears and then the course begins.
Page 19 of 80
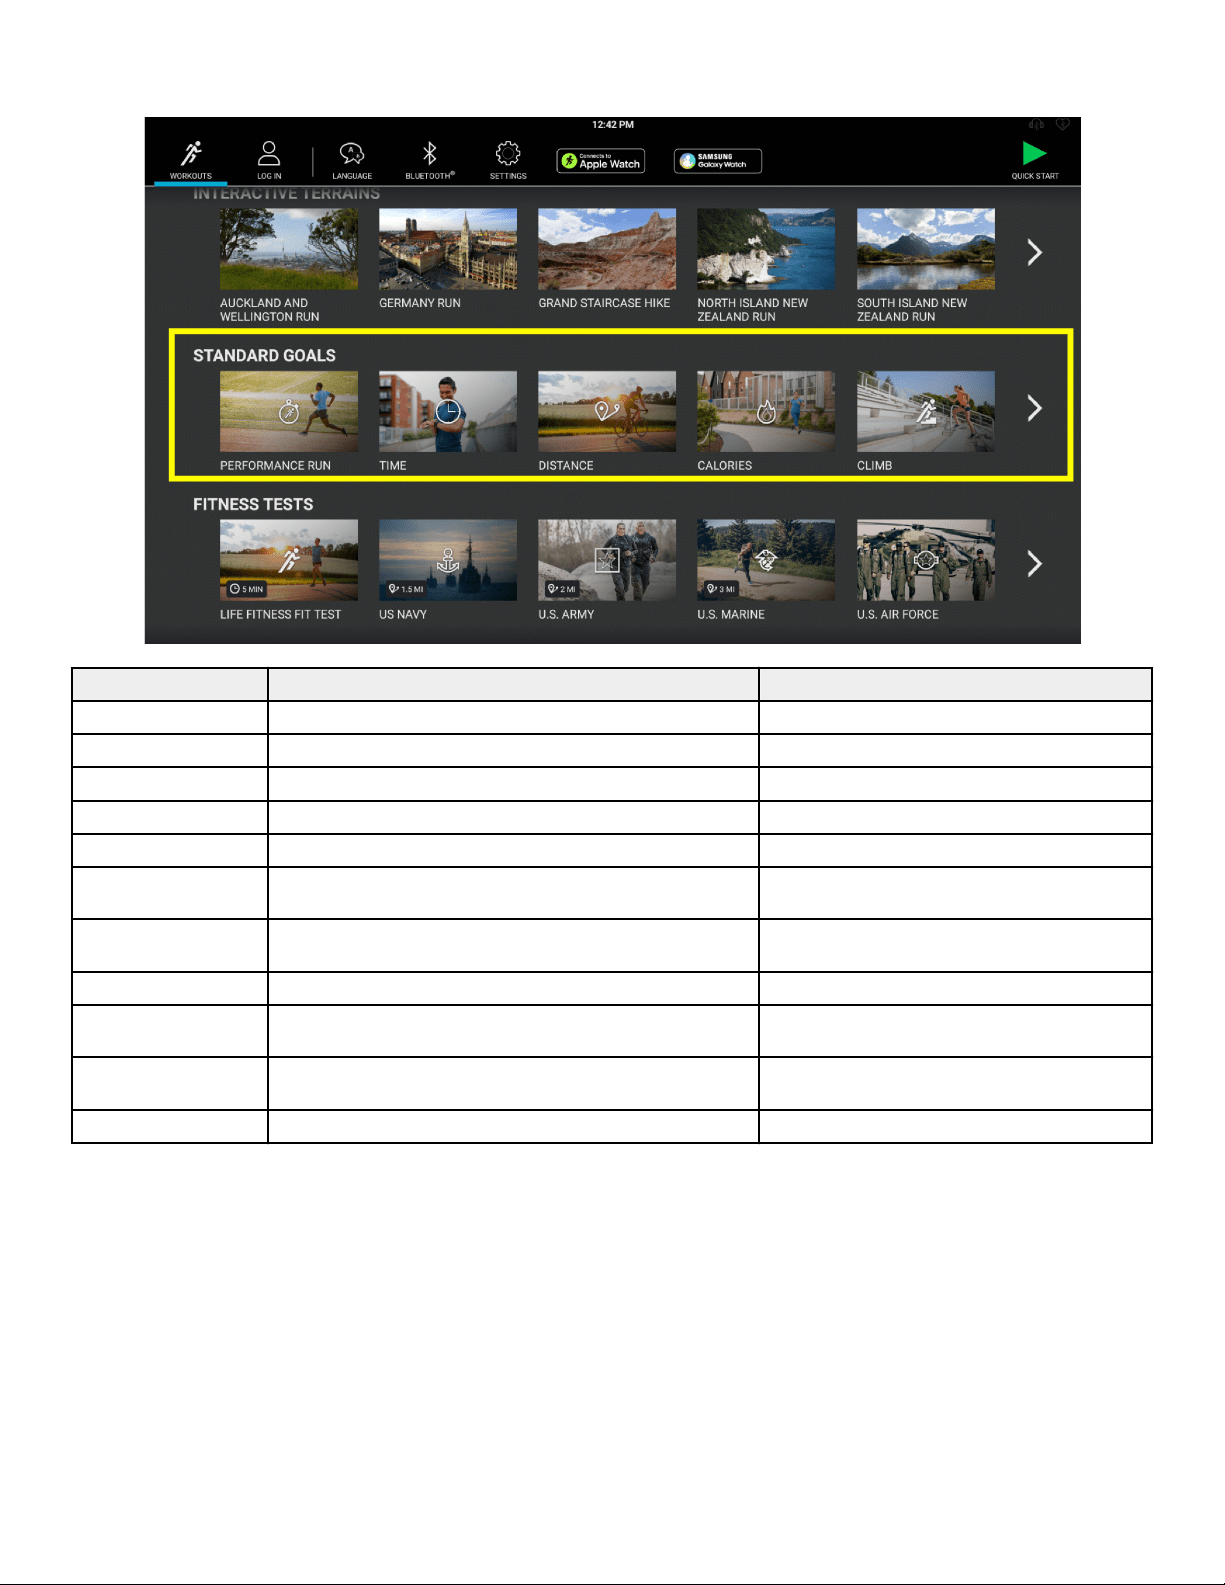
Standard Goals
Goals vary depending on base type.
Workout Type Description Base Type
Time Choose your terrain and the total time of your workout. Treadmill, Bikes, Arc Trainer
Distance Pick a distance goal. Choose terrain and total distance of workout. Treadmill, Bikes, Arc Trainer
Calories Choose terrain and how many calories you want to burn. Treadmill, Bikes, Arc Trainer
Climb Choose terrain and total distance you want to climb. Treadmill
Heart Rate Select a workout based on your target heart rate. Treadmill, Bikes, Arc Trainer
Constant Power A workout with constant intensity. Watts remain constant during the
workout and torque varies according to speed changes.
Arc Trainer
Adaptive Power An ideal HIIT workout. Resistance increases exponentially with increases
in speed.
Arc Trainer
Watts Choose the constant Watts intensity for your workout. Bikes
METs Choose your calorie burn by selecting constant METs intensity during your
workout.
Bikes
Starter Interval A challenging 1:1 interval workout that progresses from low-intensity to
high-intensity intervals.
Treadmill, Bikes
Aerobics A guided workout that varies the muscles used and intensity. Bikes
Page 20 of 80

Data Entry Options
Reference the charts on the following pages for a list user inputs required for each workout category and workout type.
Arc Trainer
Standard Goals Workout User Input
Time
• 3 preset values or use keypad to input desired time
• Terrain (Flat, Random, Hills, Rolling Hills)
• Resistance
• Weight (enter at bottom le of screen)
Distance
• 3 preset values or use keypad to input desired time
• Terrain (Flat, Random, Hills, Rolling Hills)
• Resistance
• Weight (enter at bottom le of screen)
Calories
• 3 preset values or use keypad to input desired calories
• Weight
• Terrain (Flat, Random, Hills, Rolling Hills)
• Resistance
Heart Rate Control
• Age
• Heart Rate Goal
• Workout Level
Constant Power
• Weight
• Time
• Watts
Adaptive Power
• Weight
• Time
• Level
Bikes
Standard Goal Workout
User Input
Time
• 3 preset values or use keypad to input desired time
• Terrain (Flat, Random, Hills, Rolling Hills)
• Level
• Weight (enter at bottom le of screen)
Distance
• 3 preset values or use keypad to input desired distance
• Terrain (Flat, Random, Hills, Rolling Hills)
• Level
• Weight (enter at bottom le of screen)
Calories
• 3 preset values or use keypad to input desired calories
• Weight
• Terrain (Flat, Random, Hills, Rolling Hills)
• Level
Heart Rate
• Goal (Time, Distance, Calories, Time in Zone)
• Age
• Workout (Moderate Burn, Vigorous Burn, Fixed Time)
• Target Heart Rate
• Level
• Weight (enter at bottom le of screen)
Page 21 of 80
Standard Goal Workout User Input
Aerobics
• Goal (Time, Distance, Calories)
• Level
• Weight (enter at bottom le of screen)
Watts
• 3 preset values or use keypad to input desired time
• Watts
• Weight
Mets
• 3 preset values or use keypad to input desired time
• Mets
• Weight
Starter interval
• 3 preset values or use keypad to input desired time
• Level
• Weight (enter at bottom le of screen)
Treadmill
Standard Goals Workout
User Input
Time
• 3 preset values or use keypad to input desired time
• Terrain (Flat, Random, Hills, Rolling Hills)
• Level (if Hill, Random, or Rolling Hills is chosen)
• Speed
• Weight (enter at bottom le of screen)
Distance
• 3 preset values or use keypad to input desired distance
• Terrain (Flat, Random, Hills, Rolling Hills)
• Level (if Hill, Random, or Rolling Hills is chosen)
• Speed
• Weight (enter at bottom le of screen)
Calories
• 3 preset values or use keypad to input desired calories
• Weight
• Terrain (Flat, Random, Hills, Rolling Hills)
• Level (if Hill, Random, or Rolling Hills is chosen)
• Speed
Climb
• 3 preset values or use keypad to input desired floors
• Terrain (Flat, Random, Hills, Rolling Hills)
• Level (if Hill, Random, or Rolling Hills is chosen)
• Incline (Level if Flat is chosen)
• Speed
• Weight (enter at bottom le of screen)
Heart Rate
• Goal (Time, Distance, Calories, Climb, Time in Zone)
• Age
• Workout (Moderate Burn, Vigorous Burn, Fixed Time, Various Time)
• Target Heart Rate
• Speed
Starter Interval
• 3 preset values or use keypad to input desired time
• Low Speed
• High Speed
• Weight (enter at bottom le of screen)
Page 22 of 80

User Input Ranges
Time 1 - 60 minutes
Weight 75 - 400 lbs. (34 -181 kg)
Incline 0.0 - 15.0
Speed 0.5 - 14.0 MPH
Age 10 - 99 years
Height 36 - 90 inches
Average Level 1 - 20
Level refers to a range of incline percentages.
Level % Incline Level % Incline
1 0.0 - 1.5 11 2.0 - 8.5
2 0.0 - 2.2 12 3.0 - 9.2
3 0.0 - 2.9 13 3.5 - 9.9
4 0.0 - 3.6 14 5.0 - 10.6
5 0.0 - 4.3 15 5.5 - 11.3
6 0.0 - 5.0 16 6.5 - 12.0
7 0.0 - 5.7 17 7.0 - 12.7
8 0.0 - 6.4 18 8.0 - 13.4
9 0.5 - 7.1 19 8.7 - 14.1
10 1.5 - 7.8 20 9.0 - 15.0
Page 23 of 80
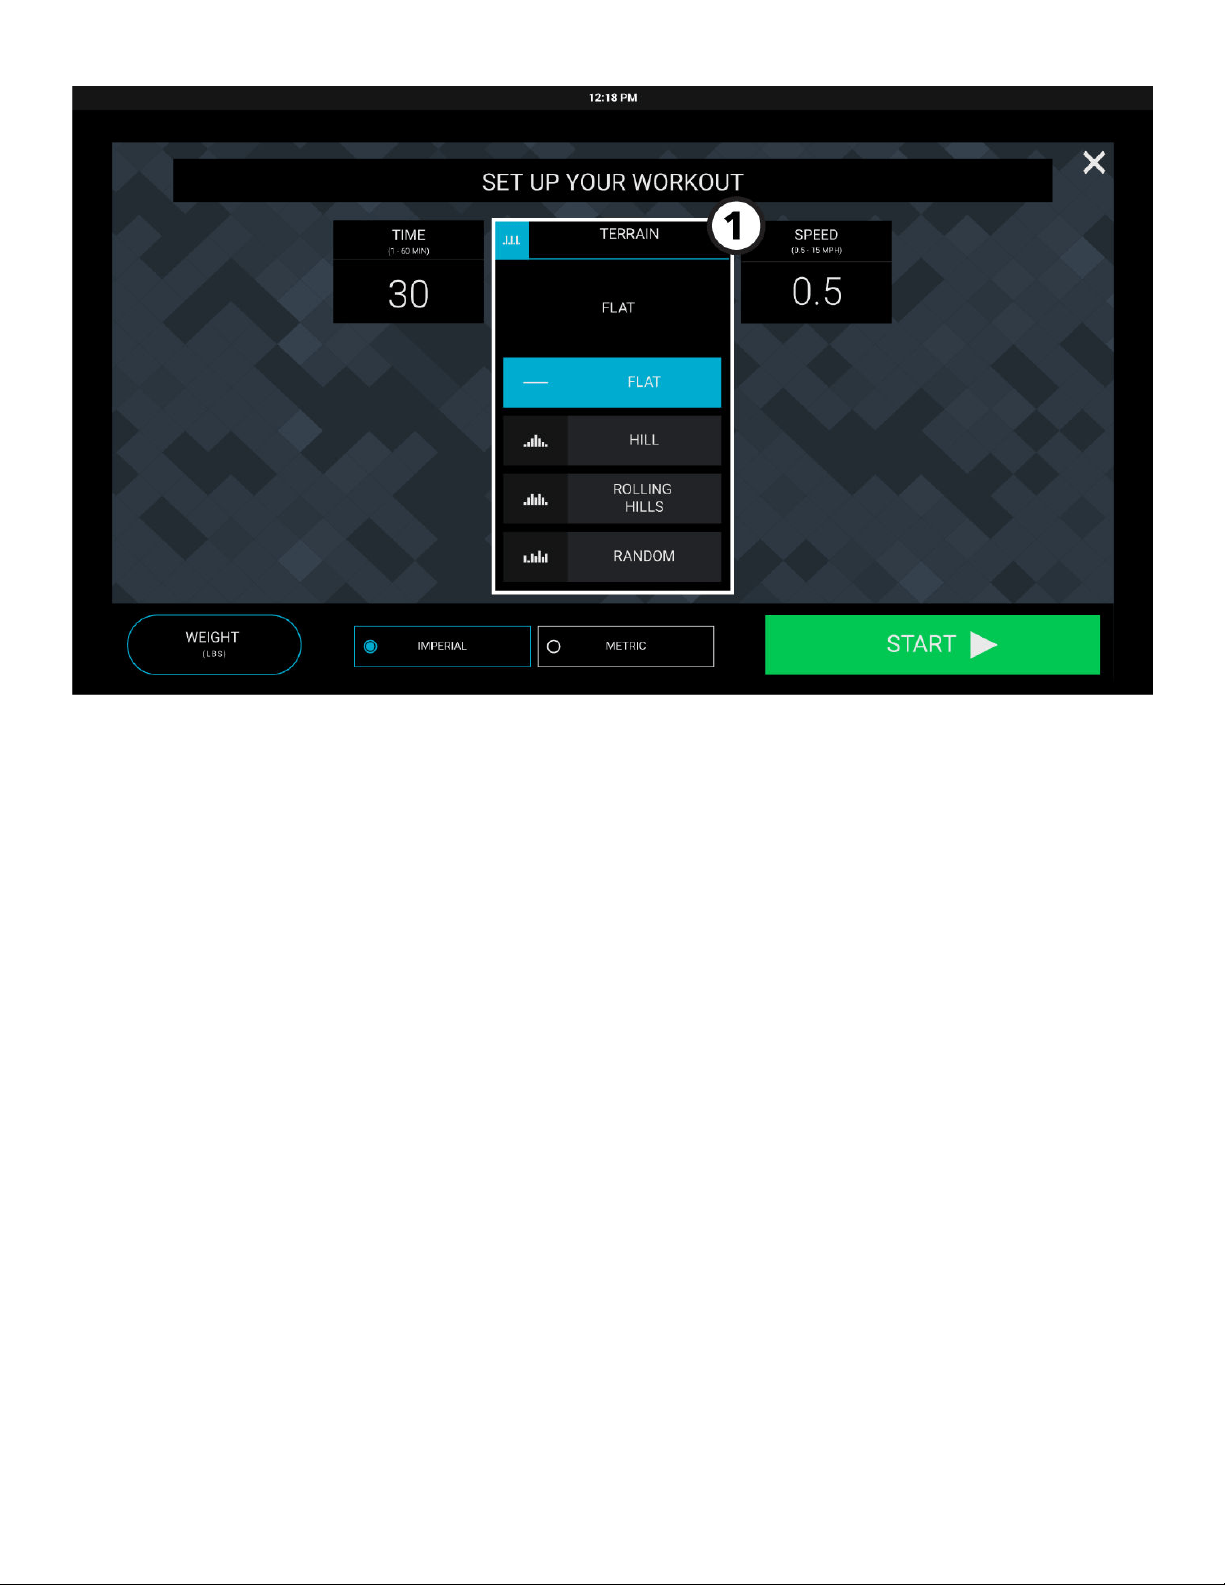
Set Up Your Workout - Terrain
1. Choose Terrain
• Flat is a constant eort workout in which the user can change incline, level or speed at any time.
• Hill involves increasing resistance until halfway through the workout, then decreases the remainder of the workout.
• Rolling Hills is similar to Hill, but has several up-and-downs throughout the workout.
• Random is an interval training workout of constantly changing intensity levels that occur in no regular pattern or progression.
Page 24 of 80
Performance Run
Only available on treadmills.
This workout is intended to help exercisers shape their own interval training by selecting the incline, speed, and time. The user defines
a low speed and a high speed and can manually toggle between them via buttons.
1. Press
to manually create an incline.
2. Press any percentage to select a preprogrammed incline.
3. Press the
and to increase incline and decrease incline by 0.5% intervals.
4. Press to stop or pause a workout.
5. Press the and to increase speed and decrease speed by 0.1 intervals.
6. Press any number to select a preprogrammed incline.
7. Press to manually create a speed.
Page 25 of 80
Heart Rate Goals Workouts
Research shows that maintaining a specific heart rate while exercising is the optimal way to monitor the intensity of a workout and to
achieve maximum results. Zone Training identifies an exerciser’s ideal heart rate range, or zone, for burning fat or increasing
cardiovascular fitness. The zone is a percentage of the theoretical maximum (HRmax), and its value depends on the workout. The
maximal heart rate formula is defined by the American College of Sports Medicine’s Guidelines for Exercise Testing and Prescription,
8th Edition, 2010. HRmax equals to 206.9 minus the total of 0.67 multiplied by a person’s age.
HR Max = 206.9 - (0.67 * age)
Theoretical Maximum Heart Rates and Target Heart Rates
Reference the chart below for Theoretical Maximum Heart Rates and Target Heart Rates. Listed as BPM (Beats per Minute).
Age Theoretical
Maximum Heart Rate
65% (Moderate Burn) 80% (Vigorous Burn)
10 200 130 160
20 194 126 155
30 187 121 149
40 180 117 144
50 173 113 139
60 167 108 133
70 160 104 128
80 153 100 123
90 147 95 117
99 141 91 112
Wear the optional Polar
®
telemetry heart rate chest strap, or grip the Lifepulse
™
sensors, to enable the on-board computer to monitor
the heart rate during a workout. The computer automatically adjusts the incline level (Treadmills only) to maintain the target heart rate
based on the actual heart rate.
Page 26 of 80
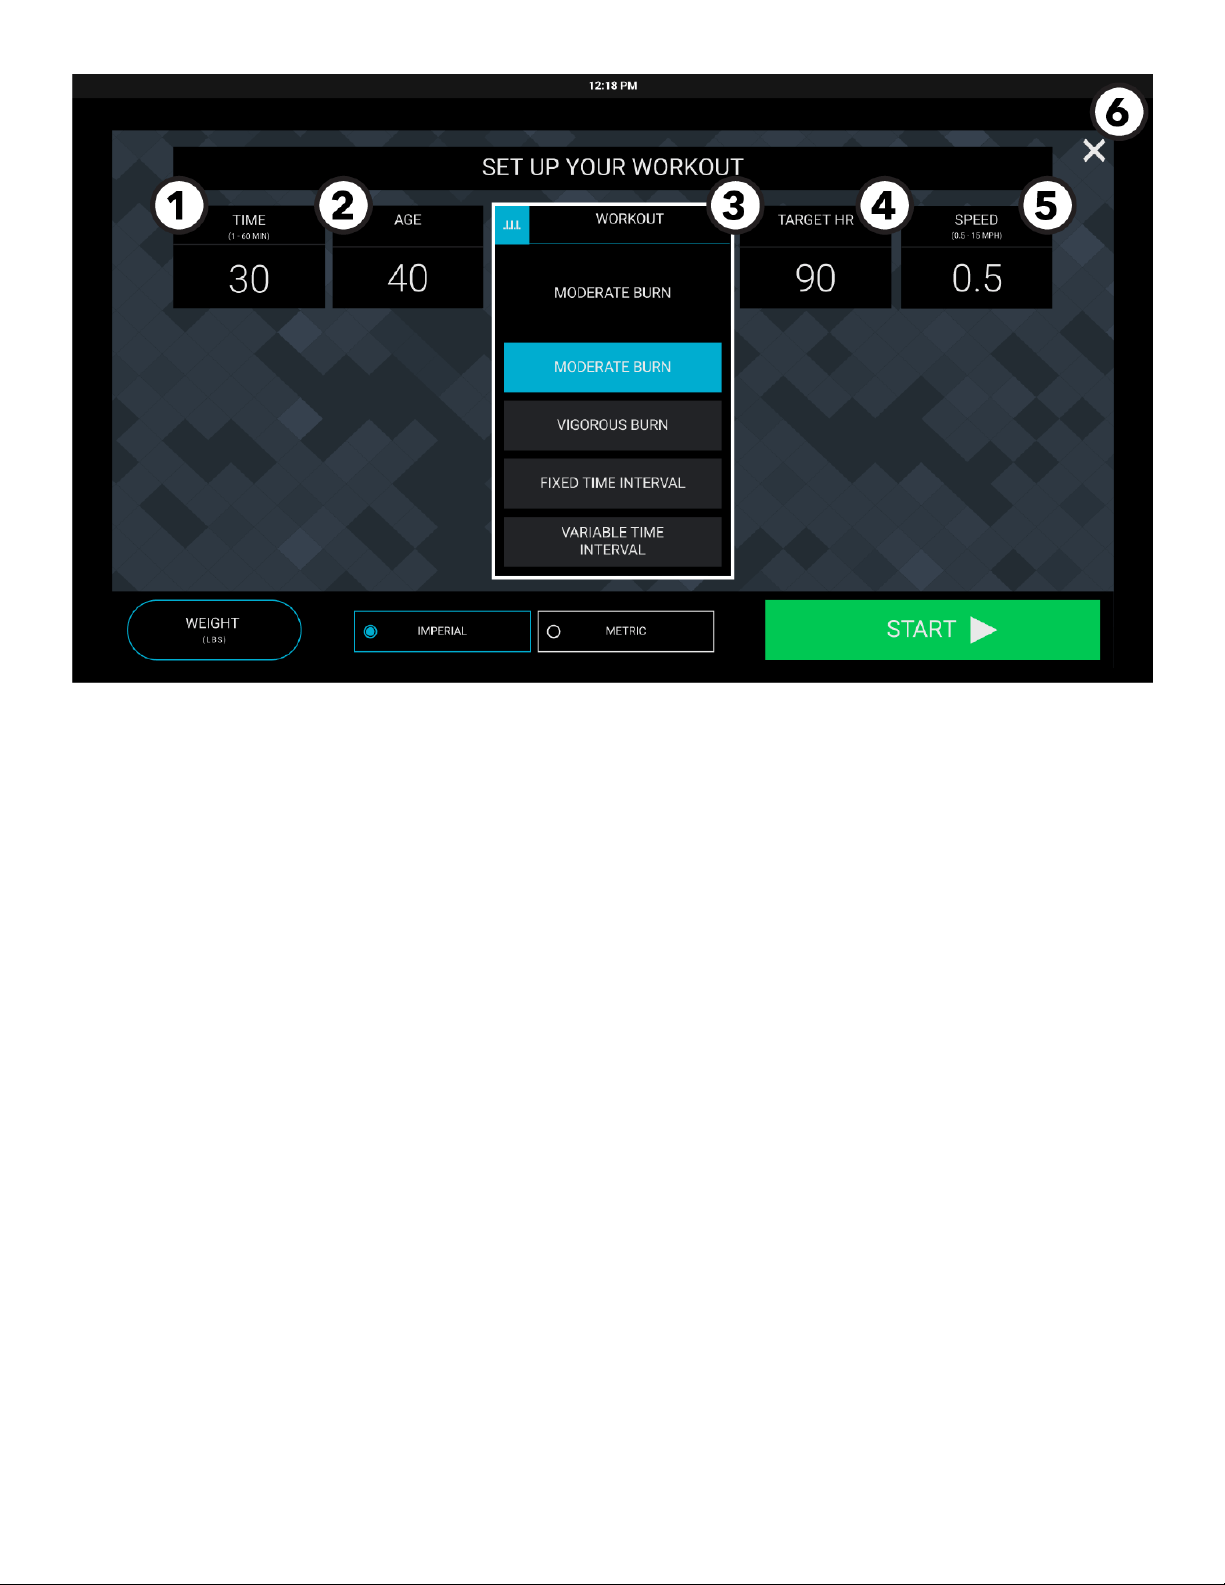
Set Up Your Workout - Heart Rate
1. Time
Press to use numeric keypad to enter a workout time value.
2. Age
Press to use the numeric keypad to enter an age value.
3. Heart Rate Workout
• Moderate Burn is a low-intensity cardio workout. The program adjusts the intensity level through changing the incline
(elevation), based on the actual heart rate, to maintain the rate at 65% of the theoretical maximum.
• Vigorous Burn is a higher-intensity workout for more fit users, maximizing cardiovascular benefits and total calories burned.
The program adjusts the intensity level, based on the actual heart rate, to maintain the rate at 80% of the theoretical
maximum.
• Fixed Time takes the user through three dierent hills based on targeting three dierent heart rate goals.
• Variable Time alternates between a hill and a valley based on the target heart rate.
4. Target HR
Press to use the numeric keypad to enter a target heart rate value.
5. Level or Speed
Press to use the numeric keypad to enter a level or speed value.
6. Press to exit the Set Up Your Workout screen, and return to the Goal Selection screen.
Page 27 of 80
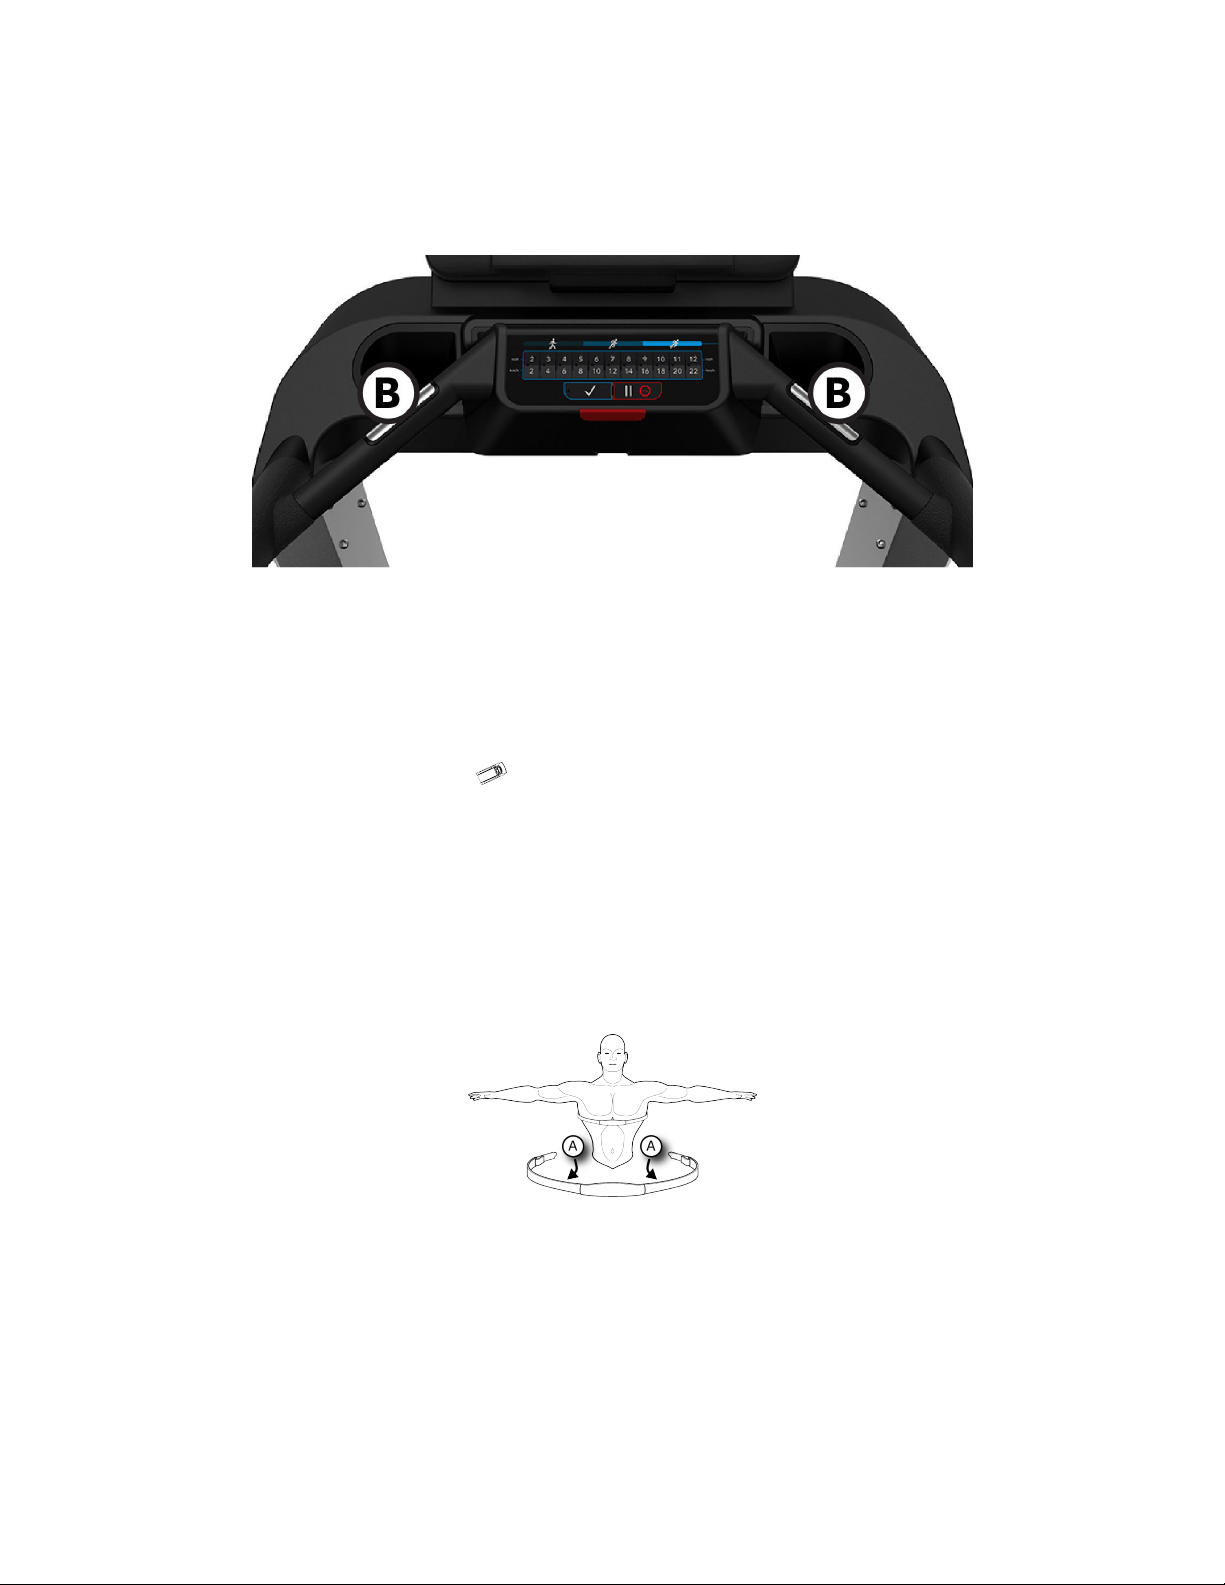
The Lifepulse
™
System
The patented Lifepulse system sensors (B) are the built-in heart rate monitoring system on this product. For the most accurate reading
possible, during a workout:
• Grasp the sensors firmly.
• Hold each sensors at the midpoint.
• Keep hands steady and in place.
Treadmill
The console displays the heart rate within 10 to 40 seconds aer the user grasps the sensors. The following factors may aect a
Lifepulse reading:
• incorrect hand placement on the sensors
• upper body activity, lotion or dirt on hands
• excessive or insuicient pressure when gripping the sensors
NOTE: Do not attempt to grasp the sensors on a treadmill at speeds above 4.5 MPH or 7.2 KPH. For these speeds, the use of a Polar
telemetry heart rate chest strap is recommended.
The Optional Polar
®
Telemetry Heart Rate Chest Strap
The Polar telemetry heart rate monitoring system transfers heart rate signals to the console when electrodes are pressed against the
skin. These electrodes are attached to a Polar telemetry heart rate chest strap that the user wears during the workout. The Polar
telemetry heart rate chest strap is optional. Contact Life Fitness Customer Support Services to order.
See diagram for correct positioning of the Polar telemetry heart rate chest strap. The electrodes (A), which are the two grooved
surfaces on the underside of the strap, must remain wet to transmit accurately the electrical impulses of the heart back to the receiver.
Moisten the electrodes. Then, secure the Polar telemetry heart rate chest strap as high under the chest muscles as possible. The strap
should be snug, but comfortable enough to allow for normal breathing.
The transmitter strap delivers an optimal heart rate reading when the electrodes are in direct contact with bare skin. However, it
functions properly through a thin layer of wet clothing. If it becomes necessary to re-moisten the Polar telemetry heart rate chest strap
electrodes, grasp the center of the strap, pull it away from the chest to expose the two electrodes, and re-moisten them.
NOTE: If the Lifepulse system sensors are grasped while the chest strap is worn, and if the signals from the sensors are valid, the on-
board computer uses these sensor signals for calculating the heart rate instead of those transmitted by the Polar telemetry heart rate
chest strap.
NOTE: During the setup of a heart rate zone training workout, the user will be required to enter a start-up speed. If a Polar telemetry
heart rate chest strap is not detected, the maximum allowable speed is 4.5 MPH / 7.2 KPH (Treadmills only). If a Polar telemetry heart
rate chest strap is detected, users can workout at the maximum allowed speed set in System Options > Configuration > Manager menu.
Page 28 of 80
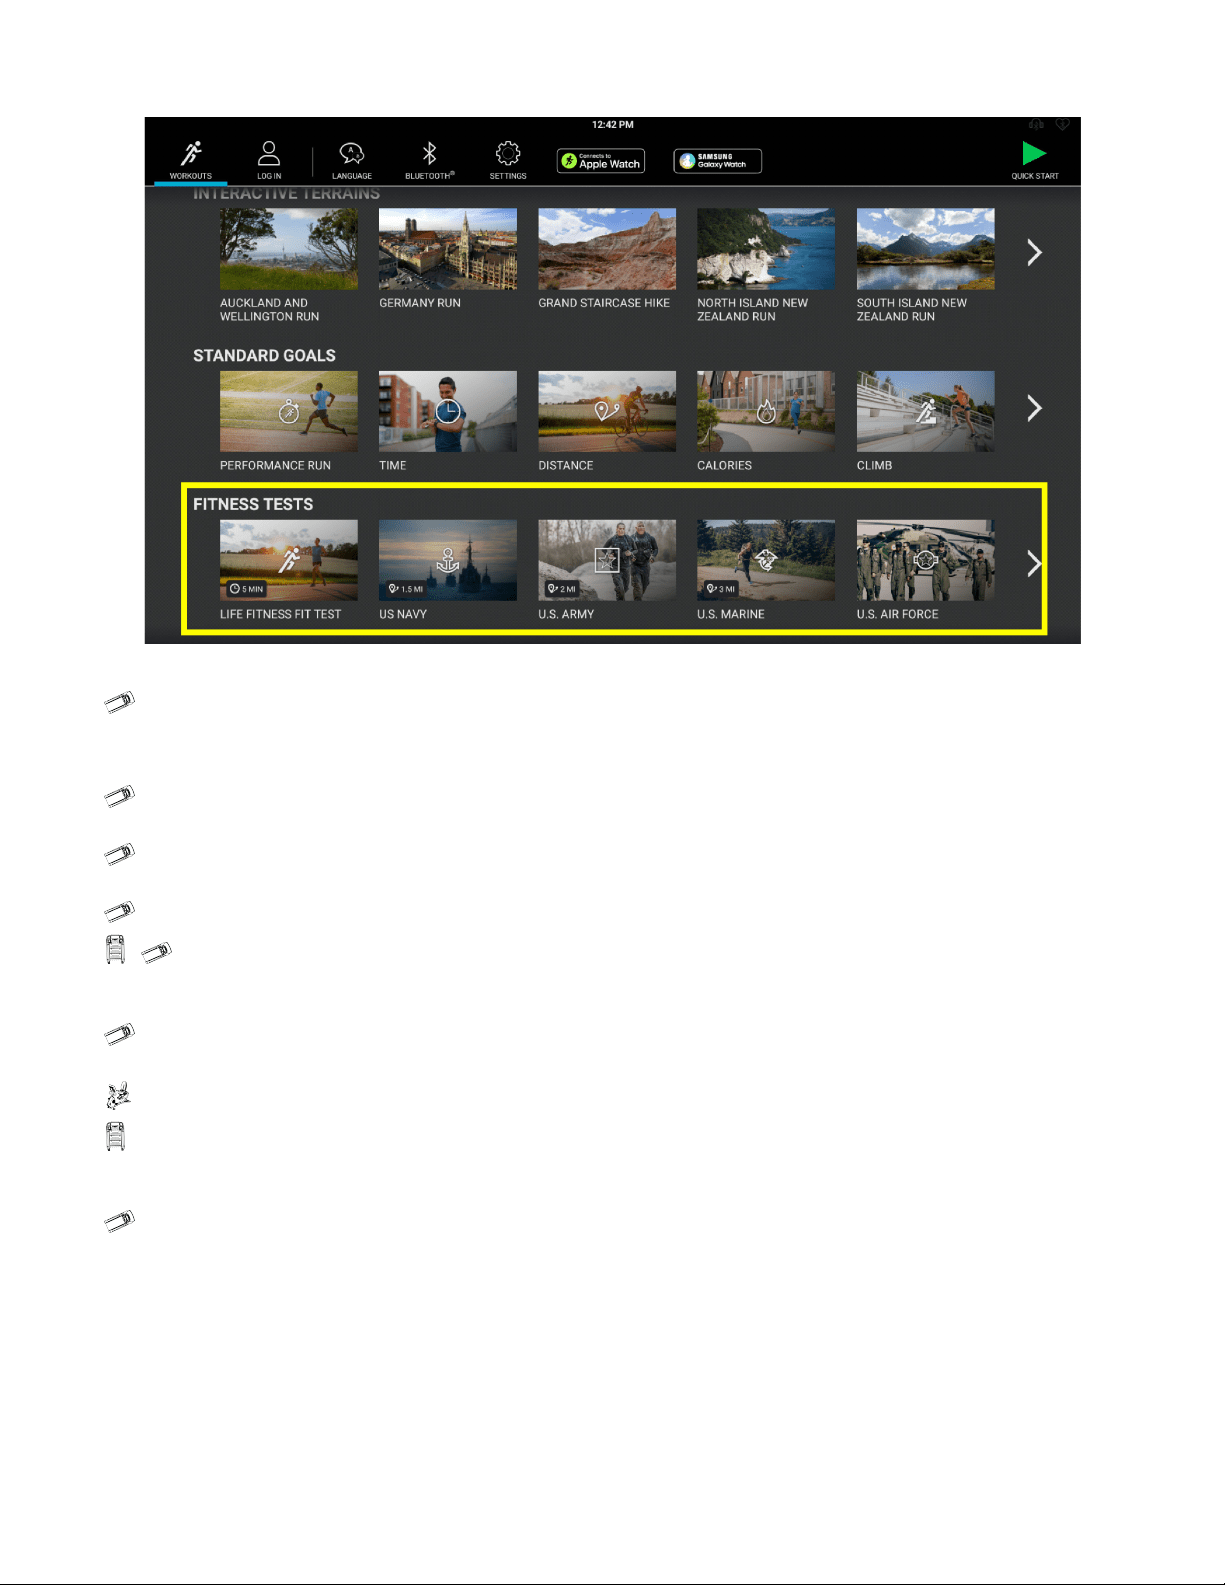
Fitness Tests
Choose desired fitness test.
• Life Fitness Fit Test estimates cardiovascular fitness and can be used to monitor improvements in endurance every 4 - 6 weeks.
• U.S. Navy Physical Readiness Test (PRT) is a 5-minute distance goal test based on the time needed to complete the required
distance and is used by the U.S. Navy and Naval academies to measure aerobic capacity.
NOTE: Not available on FlexStrider or PowerMill.
•
U.S. Army Physical Fitness Test (PFT) is a 5-minute physical performance test used to assess muscular endurance and cardio
respiratory fitness.
• U.S. Marines Physical Fitness Test (PFT) is a physical performance test used to assess muscular endurance and cardio
respiratory fitness.
•
U.S. Air Force Fitness Test is a physical performance test used to assess muscular endurance and cardio respiratory fitness.
•
, WFI Submax Protocol is a graded submax assessment used to predict a fire fighter's aerobic capacity. This test
automatically increases speed and incline (treadmill only) until a target heart rate is reached. This assessment replaces the Gerkin
assessment. Once the target heart rate has been exceeded for 15 seconds, the program goes into a cool down mode.
•
Physical Eiciency Battery (PEB) is used by U.S. Federal Law Enforcement, U.S. Federal Bureau of Investigation, and other
federal organizations for the hiring and maintenance of federal jobs.
•
FAMS is a 12-minute cycle test. This test is a 1.5 mile run alternative.
• Candidate Physical Ability Test is used to predict the ability to perform basic fire fighting tasks developed by the International
Association of Fire Fighters. The test starts out with a 20-second warm up period at a set stepping rate of 50 steps per minute
followed by the 3-minute test at a set stepping rate of 60 steps per minute.
• Individual Physical Proficiency Test (IPPT) is the 2.4 kilometer portion of a standard physical fitness test utilized by the
Singaporean Armed Forces, Police Force and Civil Defense Force.
Page 29 of 80

Life Fitness Fit Test
• The Life Fitness Fit Test estimates cardiovascular activity and can be used to monitor improvements in endurance every 4 - 6
weeks.
• The Fit Test is considered to be a submax VO2 (volume or oxygen) test and gauges how well the heart supplies oxygenated blood to
the exercising muscles and how eiciently those muscles receive oxygen from the blood.
• Physicians and exercise physiologists generally regard this test as a good measure of aerobic capacity.
• Workout duration is 5 minutes total.
• Take the Fit Test under similar circumstances each time. For the most accurate Fit Test results, you should perform the Fit Test on
three consecutive days and average the three scores.
• To receive a proper Fit Test score, the work done must be within a training heart rate zone that is 60% to 85% of the theoretical
maximum heart rate (HRmax).
The user must grasp the hand sensors when prompted, or wear a Polar telemetry heart rate chest strap as the test score calculation is
based on a heart rate reading.
NOTE: The workout will be terminated if a heart rate is not detected aer 2.5 minutes.
Your heart rate is dependent on many factors, including:
• amount of sleep the previous night (at least 7 hours is recommended)
• time of day
• time you last ate (2 - 4 hours aer the last meal is recommended)
• time since you last drank a liquid containing caeine or alcohol, or smoked a cigarette (at least 4 hours is recommended)
• time since you last exercised (at least 6 hours is recommended)
Suggested exertion levels should be used as a guideline for setting up the Fit Test program. The goal is to elevate the user’s heart rate
to a level that is between 60%-85% of their theoretical maximum heart rate.
Inactive Active Very Active
Treadmill 2 - 3 mph (3.2 - 4.8 kph) 3 - 4 mph (4.8 - 6.4 kph) 3.5 - 4.5 mph (5.6 - 7.2 kph)
Cross-Trainer
L 2-4 men
L 1-2 women
L 3-10 men
L 2-5 women
L 7-15 men
L 3-10 women
Lifecycle Exercise Bikes
L 4-6 men
L 2-4 women
L 5-10 men
L 3-7 women
L 8-14 men
L 6-10 women
PowerMill Climber L1 - L4 L3 - L7 L6 - L11
FlexStrider L6 - L10 L8 - L10 L10 - L14
Within each suggested range, use these additional guidelines:
Lower Half of Range Upper Half of Range
higher age lower age
lower weight higher weight (in cases of excessive weight, use lower half of
range)
shorter taller
Aer the 5-minute FIT TEST is completed, a FIT TEST score and rating will be displayed.
Please note that the estimated VO2 max scores achieved will be 10-15% lower on stationary exercise bikes than those achieved on
other Life Fitness cardiovascular equipment. Stationary cycling has a higher rate of isolated muscle fatigue of the quadriceps when
compared to walking / running on a treadmill or utilizing a bike. This higher rate of fatigue corresponds to lower levels of estimated
VO2 max scores.
Page 30 of 80
Relative Fitness Classification for MEN
Rating Elite Excellent Very Good Above
Average
Average Below
Average
Low Very Low
Estimated V02 Max (ml/kg/min) per Age category
20 - 29 years 55+ 53 - 54 50 - 52 45 - 49 40 - 44 38 - 39 35 - 37 <35
30 - 39 years 52+ 50 - 51 48 - 49 43 - 47 38 - 42 36 - 37 34 - 35 <34
40 - 49 years 51+ 49 - 50 46 - 48 42 - 45 37 - 41 34 - 36 32 - 33 <32
50 - 59 years 47+ 45 - 46 43 - 44 39 - 42 34 - 38 32 - 33 29 - 31 <29
60+ years 43+ 41 - 42 39 - 40 35 - 38 31 - 34 29 - 30 26 - 28 <26
Relative Fitness Classification for WOMEN
Rating Elite Excellent Very Good Above
Average
Average Below
Average
Low Very Low
Estimated V02 Max (ml/kg/min) per Age category
20 - 29 years 47+ 45 - 46 43 - 44 38 - 42 33 - 37 31 - 32 28 - 30 <28
30 - 39 years 44+ 42 - 43 40 - 41 36 - 39 31 -35 29 - 30 27 - 28 <27
40 - 49 years 42+ 40 - 41 38 - 39 34 - 37 30 - 33 28 - 29 25 - 27 <25
50 - 59 years 37+ 35 - 36 33 - 34 30 - 32 26 - 29 24 - 25 22 - 23 <22
60+ years 35+ 33 - 34 31 - 32 27 - 30 24 - 26 22 - 23 20 - 21 <20
Life Fitness developed this rating scale based on VO2 max percentile distributions referenced in American College of Sports Medicine’s
Guidelines for Exercise Testing and Prescription (8th E. 2010). It is designed to provide a qualitative description of a user’s VO2 max
estimation, and a means of assessing initial fitness level and tracking improvement.
Page 31 of 80
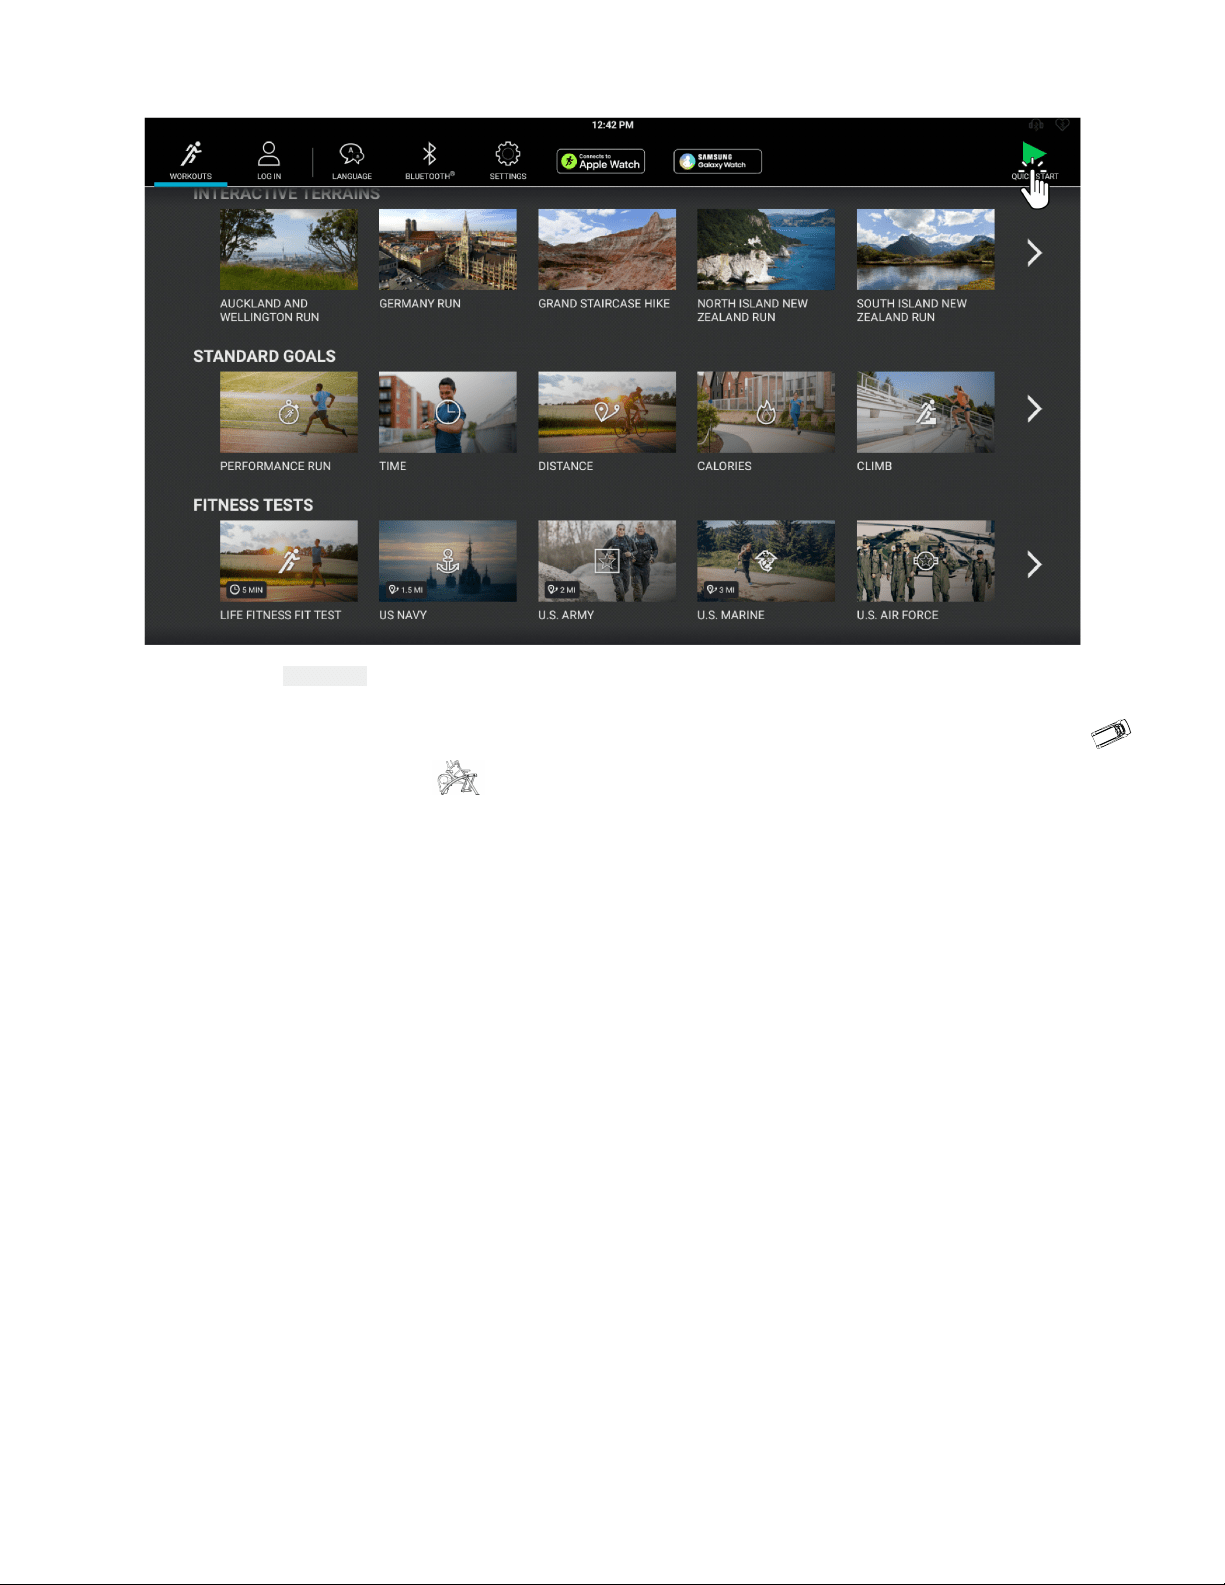
Quick Start
Press the Green Arrow Quick Start button at the top of the Choose Workout screen.
• A workout countdown 3, 2, 1 screen appears.
• Users can make adjustments to the workout aer starting a workout.
• A Quick Start workout begins at a speed of 0.5 Miles Per Hour (MPH) / 0.8 Kilometers Per Hour (KPH) and an incline of 0.0%.
• A Quick Start workout begins at Incline 6.
NOTE: The user must be logged into LFconnect to see the information.
Page 32 of 80
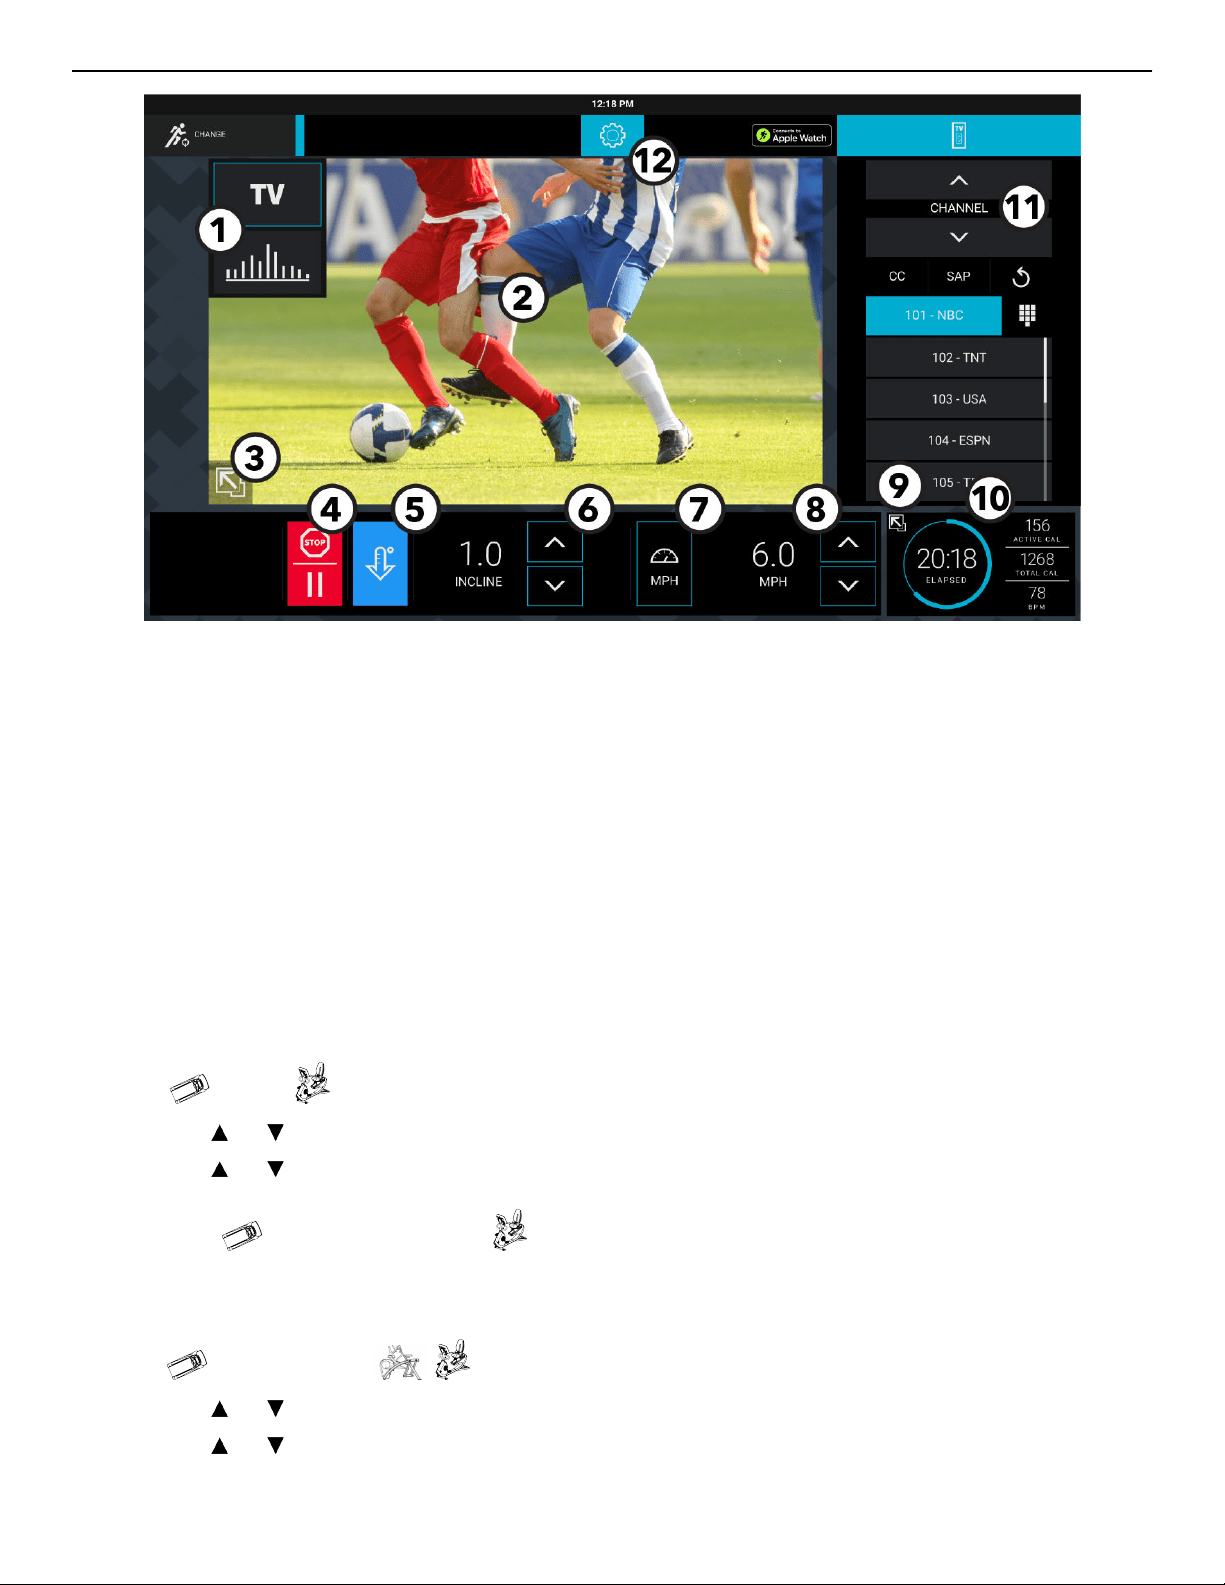
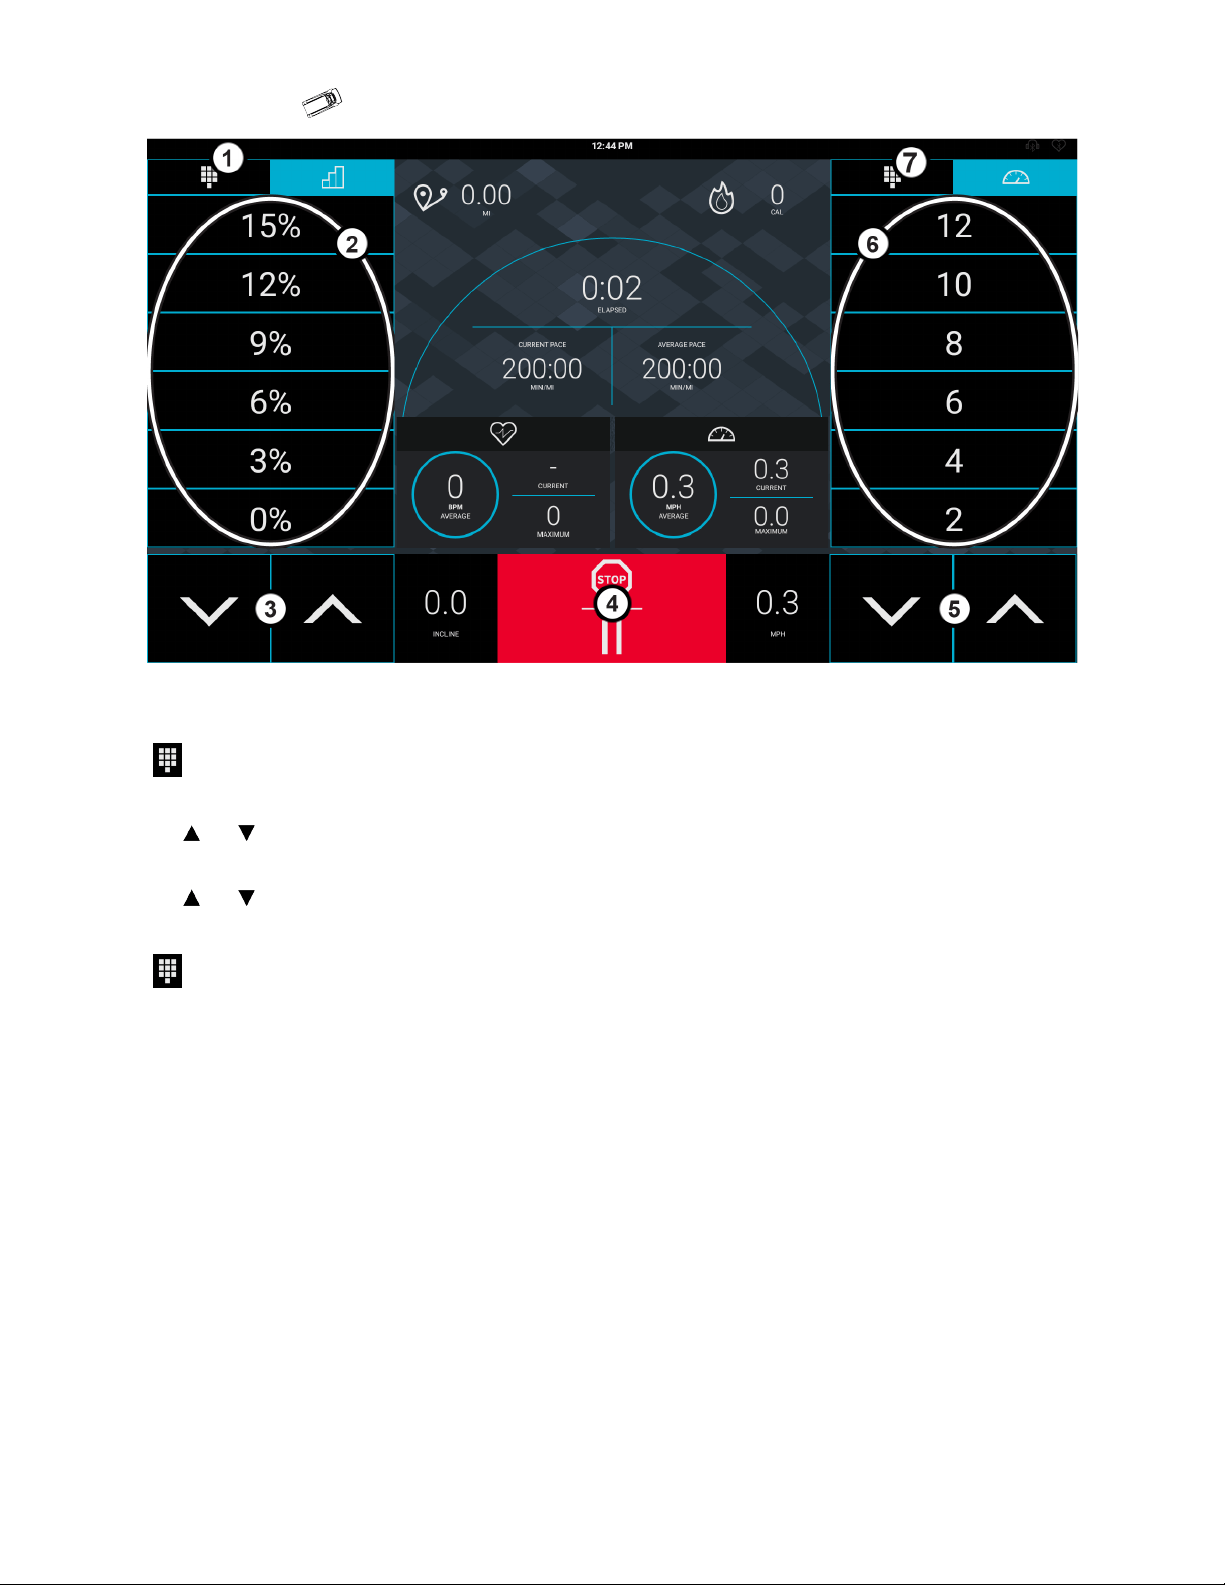
Workout Mode
1. Workout Profile
• Choose the TV view or Classic view.
• A colored frame surrounding a workout profile view represents the current view.
2. Current Workout Profile
NOTE: TV view is shown.
3. Screen Size
• Press the icon to toggle between Standard view screen (shown) and Full Workout view screen sizes.
4. Stop / Pause
• Press to stop or pause a workout.
• Choose Cool Down, Resume, or End Workout.
5. Cool Down
• Press during workout to begin a cool down period.
• Choose Cool Down, Resume, or End Workout.
6. Incline or Level
• Press the and to increase incline and decrease incline by 0.5% intervals.
• Press the and to increase levels and decrease levels by 1.
7. Preset Speed or Preset Resistance Level
• Press to select a preset speed.
• Press to select present resistance level.
8. Speed
or Resistance Level
• Press the and to increase speed and decrease speed by 0.1 MPH intervals.
• Press the and to increase SPM and decrease SPM by 1.
• Displays speed in MPH.
Page 33 of 80

9. Expanded Stats
• Press to show real-time workout stats.
10. Primary Goal Workout Stats
• Primary workout goal stat is displayed.
11. Select Television Station
• Use the
and to select an available channel.
12. Menu
• Press the gear to log in to LFconnect or to see the My Stats screen if logged in.
• Scan for Bluetooth
®
devices.
• Set measurement units and enter weight for accurate calories.
Page 34 of 80
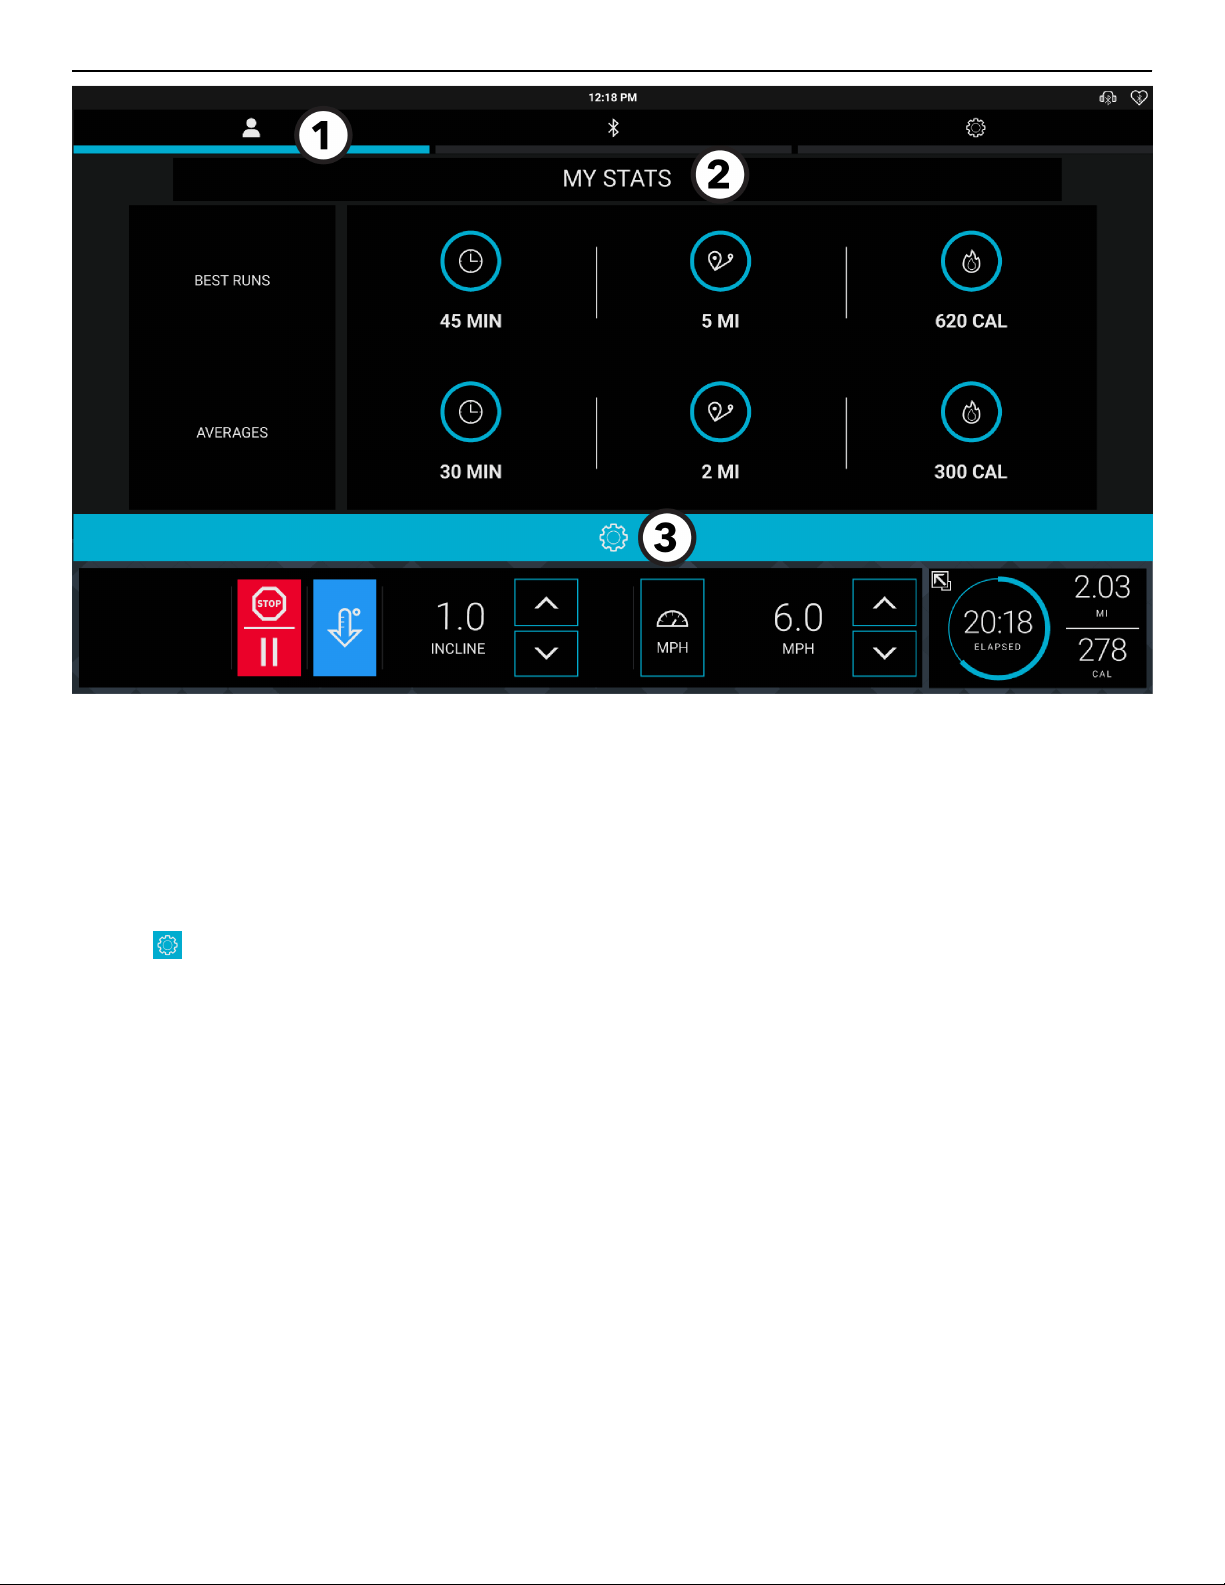
My Stats
1. Logged In / Profile Menu
Press Logged In / Profile icon to do the following:
• Log in to LFconnect.
• View previously saved stats (if logged in).
2. Stats
View previous saved workout stats and averages.
3. Menu icon
Press to exit the My Stats screen and return to Workout Profile View.
Page 35 of 80

Bluetooth
®
Devices
Bluetooth Device menu oers two scanning options:
• Headphone
• Heart rate chest strap
1. Headphone
Press to scan for available Bluetooth Devices.
NOTE: Make sure your headphones are in pairing mode. Headphones using a low energy Bluetooth signal or single ear
headphones are not compatible.
NOTE: STB Sync and Set Top Box on the floor configurations do not allow Bluetooth audio to be streamed from TV to
headphones.
2. Heart Rate Chest Strap
Press to scan for available Bluetooth Devices.
3. Available Devices
Scroll through the list of available devices.
4. Plus Sign
Click the + symbol to pair your device.
Page 36 of 80
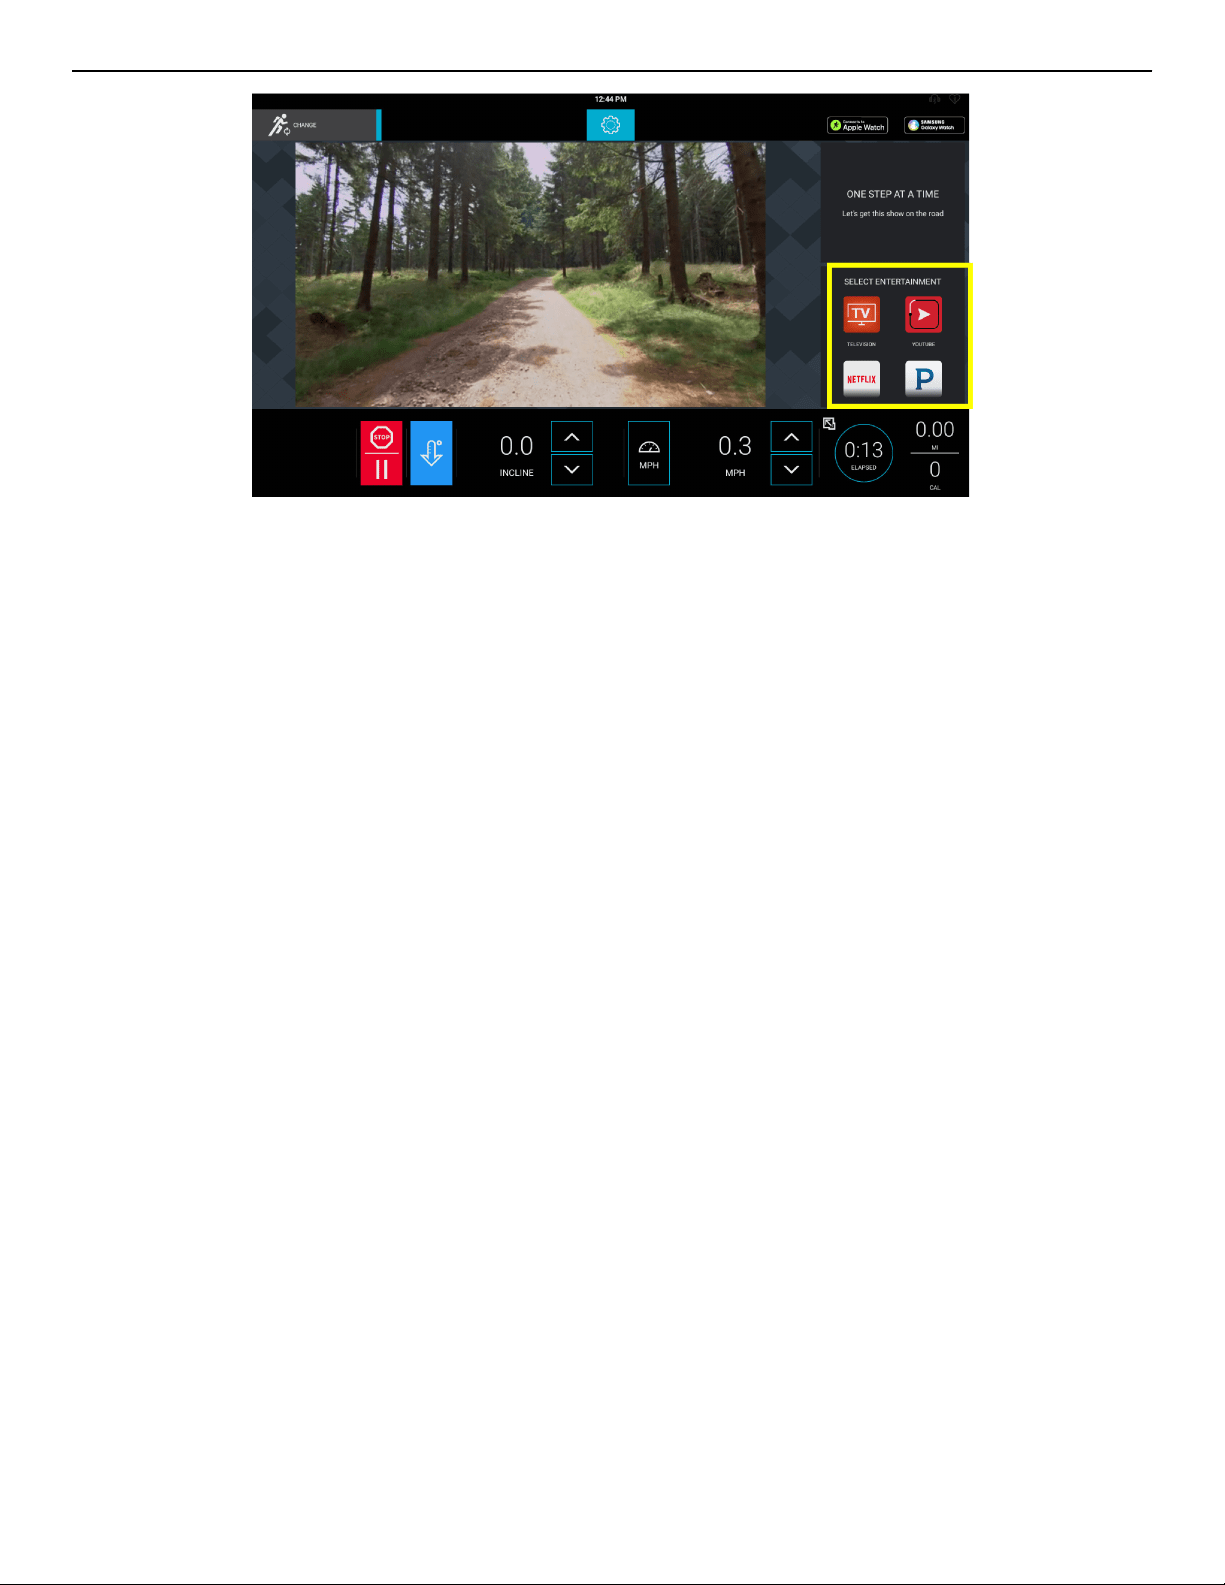
Select Entertainment
NOTE: This feature is only available in Workout Mode.
Select Entertainment Option
Watch traditional TV or log into your personal Netflix account. The following apps are integrated into the console:
• TV
• Internet Browser
• Netflix
• Pandora Radio
• Spotify
• YouTube
• ESPN
• BBC
• Economist
• Chess
• Sudoku
• Solitaire
Page 37 of 80

Select Entertainment - DTV and STB IPTV
Full screen with channel list
NOTE: This feature is only available in Workout Mode
1. TV Option
Press to watch TV during a workout session.
2.
and
• Press to select a channel.
• Press to select a channel.
3. CC (Closed Caption)
Press to turn Closed Caption On / O.
NOTE: DVB-T2 tuner configurations replace Closed Captioning Subtitles. Press Subtitles to turn On / O.
4. SAP (Secondary Audio Programming)
Press to activate SAP.
NOTE: SAP broadcasting must be available for usage.
5. Previous Channel
Press the Previous Channel button to jump back to the previous channel viewed.
6. Channel List and Channel Keypad
Press the icon to toggle between Channel List and Channel Keypad.
7. Channel List
List of all available channels.
8. Screen Size Toggle
Press to toggle between Full and Minimized screen sizes.
9. TV Audio Controls
(Speaker icon displays only when headphones are plugged into the headphone jack or Bluetooth headphones are paired.) Press
corresponding icons to increase and decrease volume.
Page 38 of 80
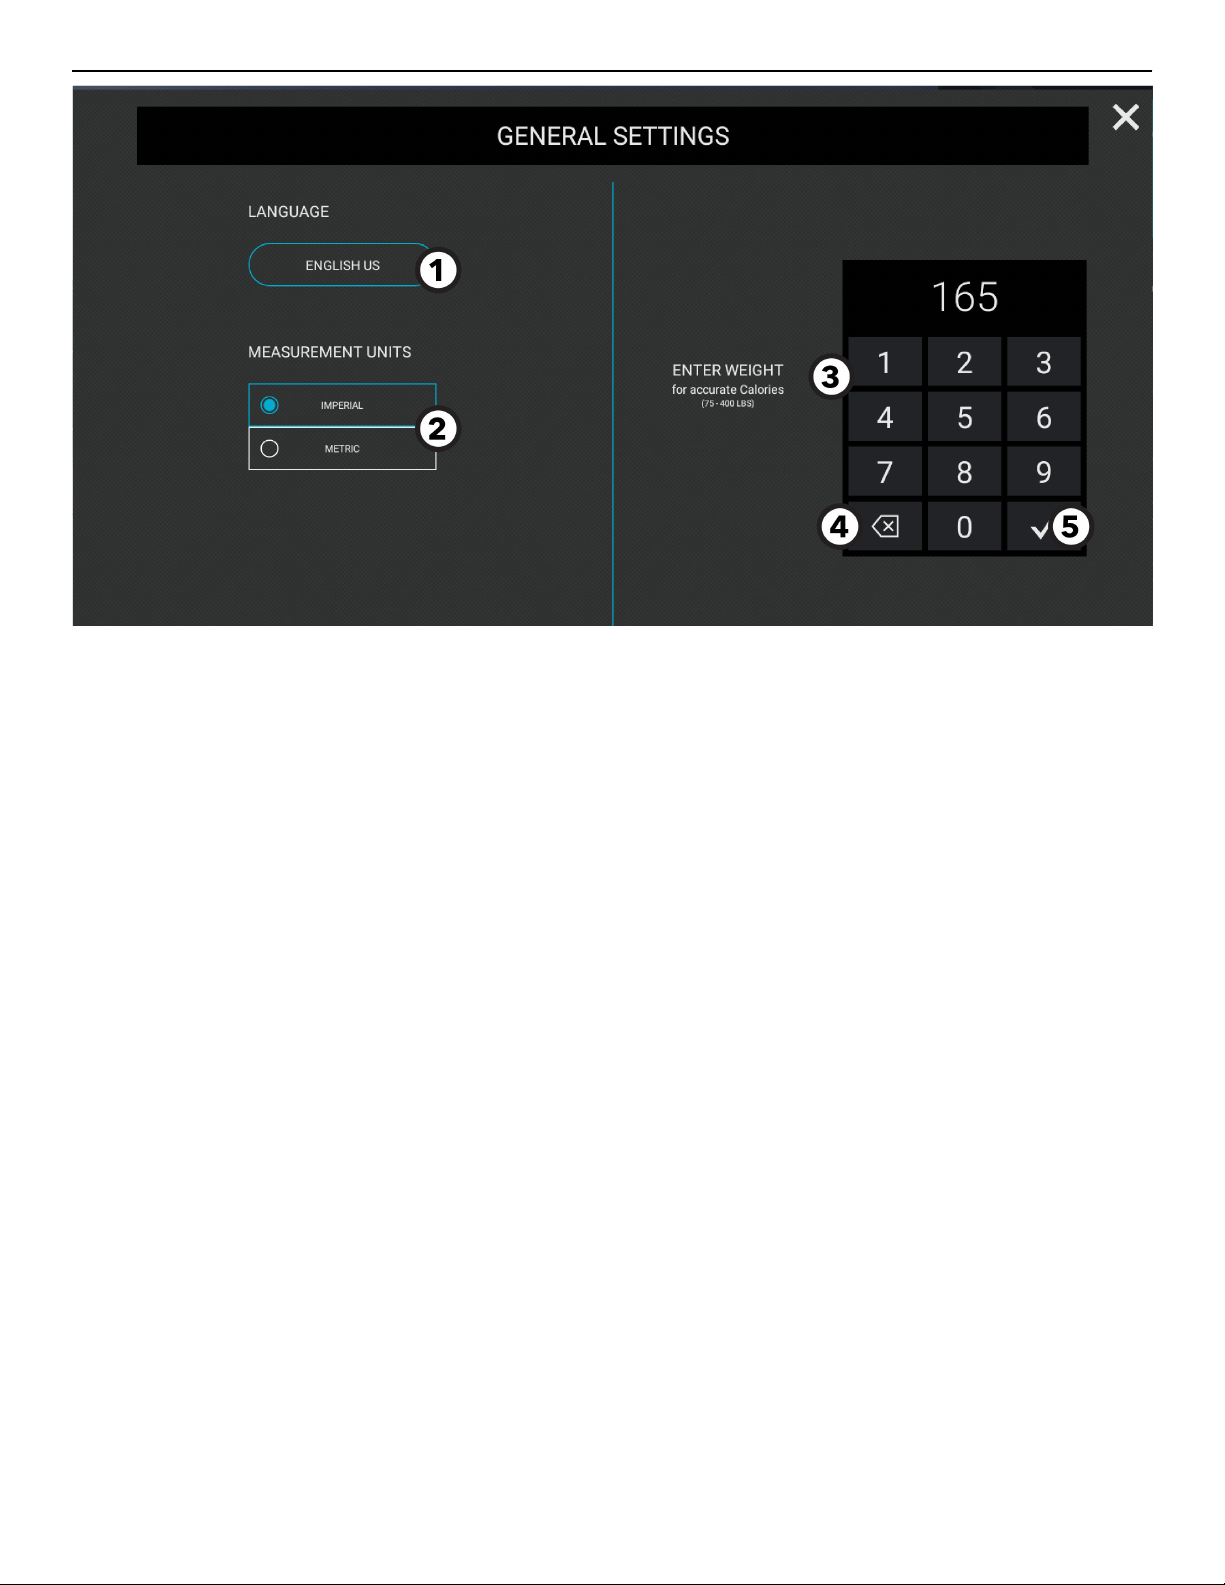
Settings
Press the Settings icon anytime during a workout.
1. Language
Selected language is shown.
2. Choose Measurement Unit
• Imperial
• Metric
3. Enter Weight
Use numeric keypad to input a weight value.
4. Clear
Press the icon to clear an incorrectly entered weight value.
5. Enter
Press the check mark to enter weight value.
Page 39 of 80
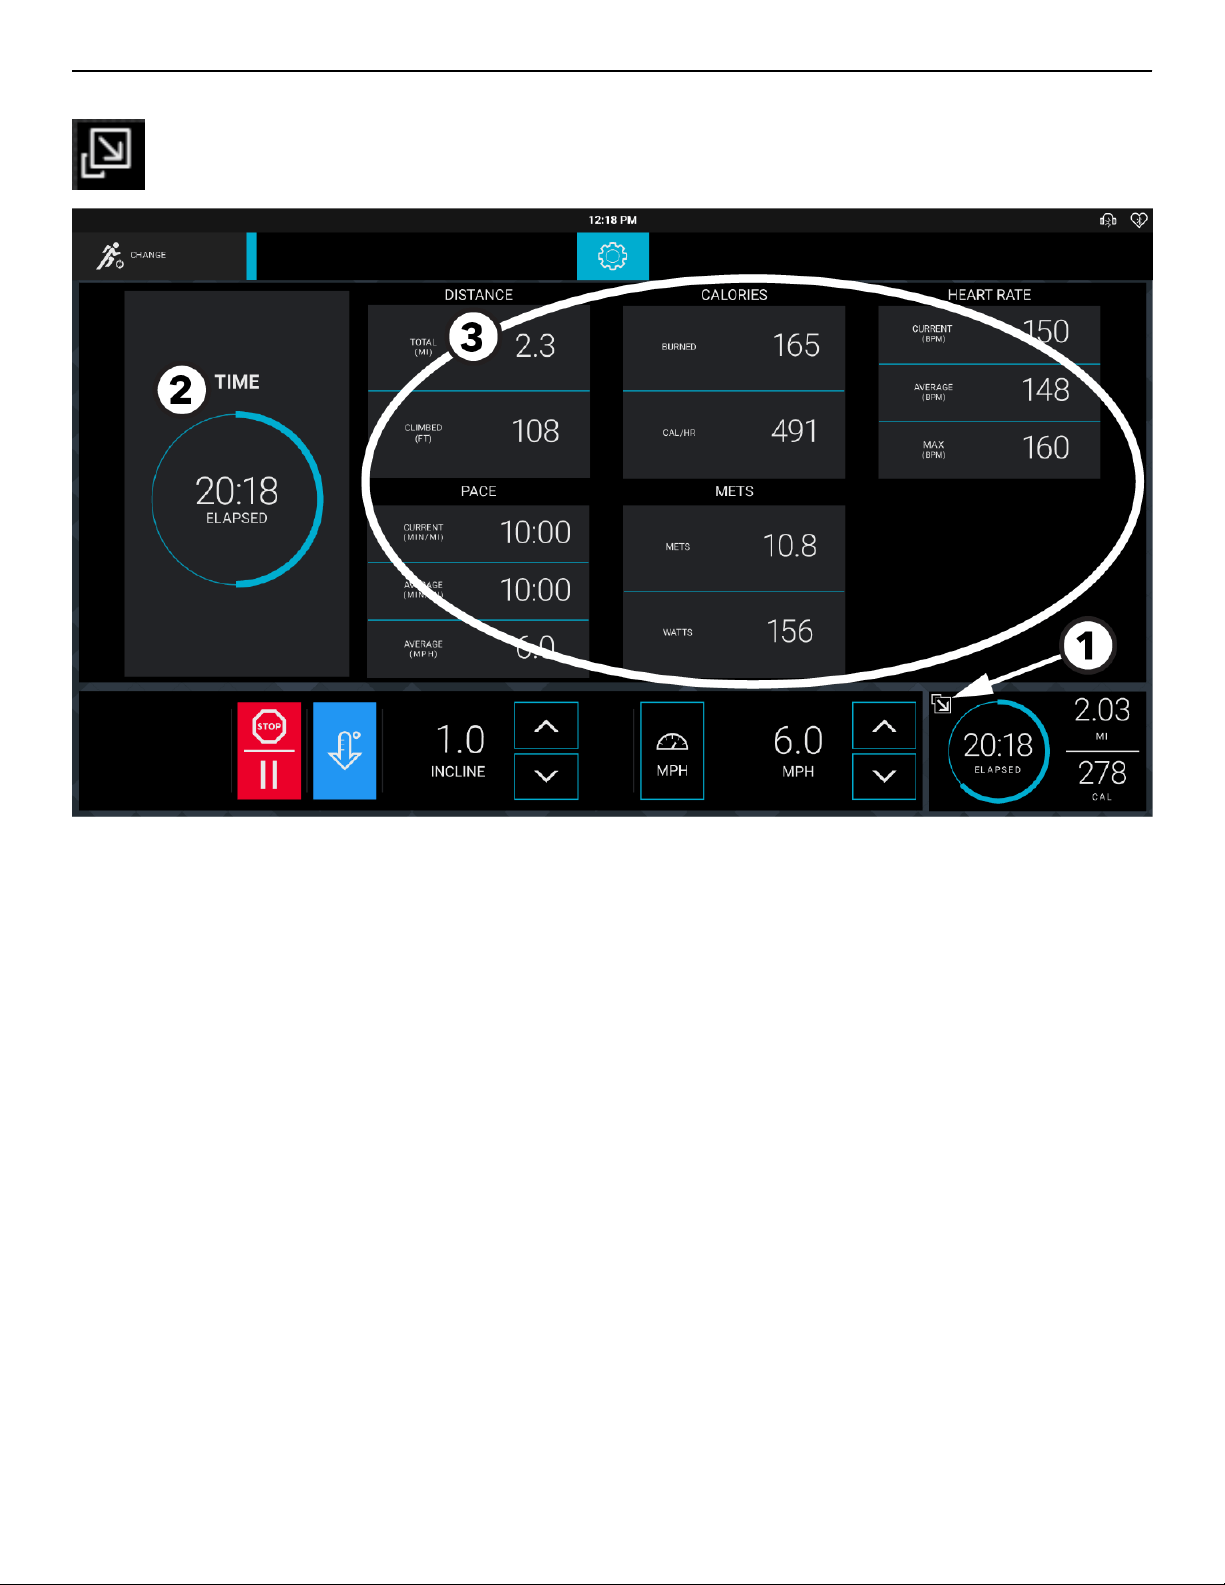
Expanded Stats
Treadmill shown
1. Expanded Stats
• Press during a workout to view real-time workout stats.
• Press in Expanded Stats view to go back to Workout Mode view.
2. Primary Goal
Primary Goal is shown in the dial.
3. Additional Stats
Additional workout stats are displayed depending on workout and goal selected.
Page 40 of 80
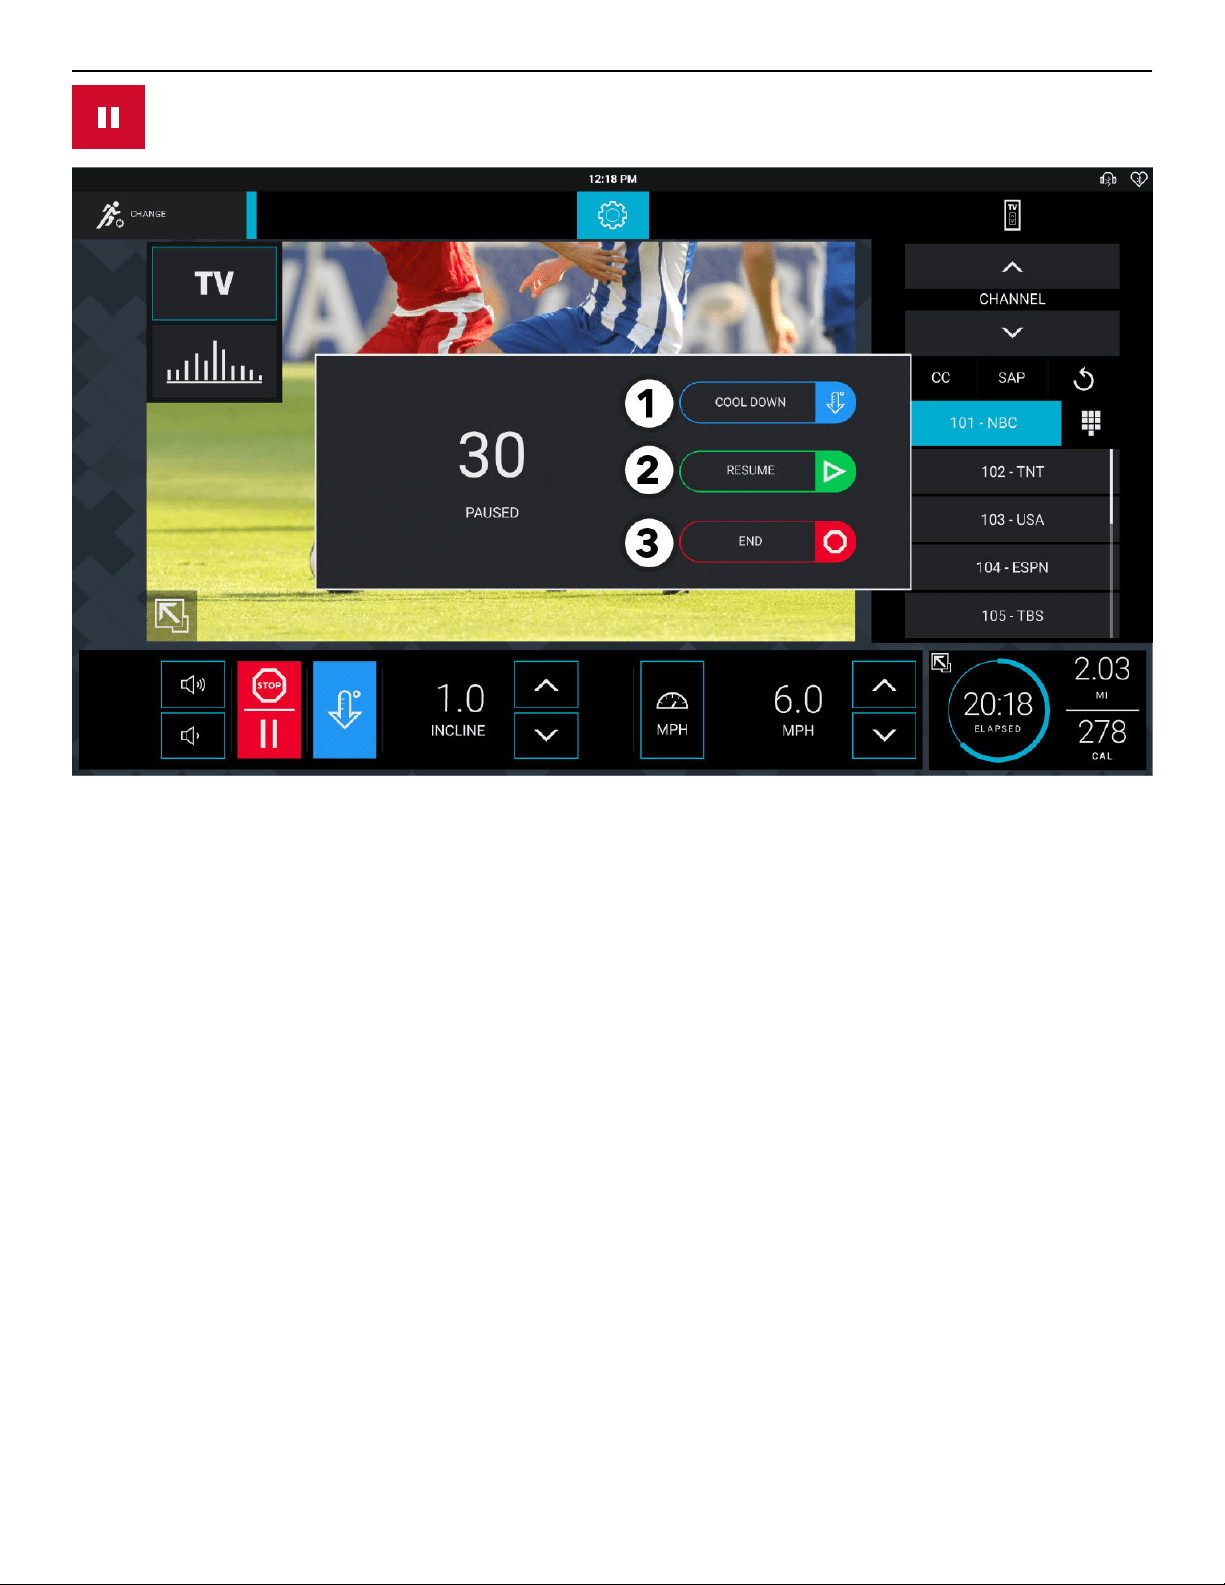
Pause Workout screen
Press the Pause / Stop button to pause a workout.
Choose one of the following options while in Pause mode:
1. Cool Down
Press to enter a cool down mode.
2. Resume
Press to continue current workout.
3. End
Press to end current workout and view workout summary.
Page 41 of 80
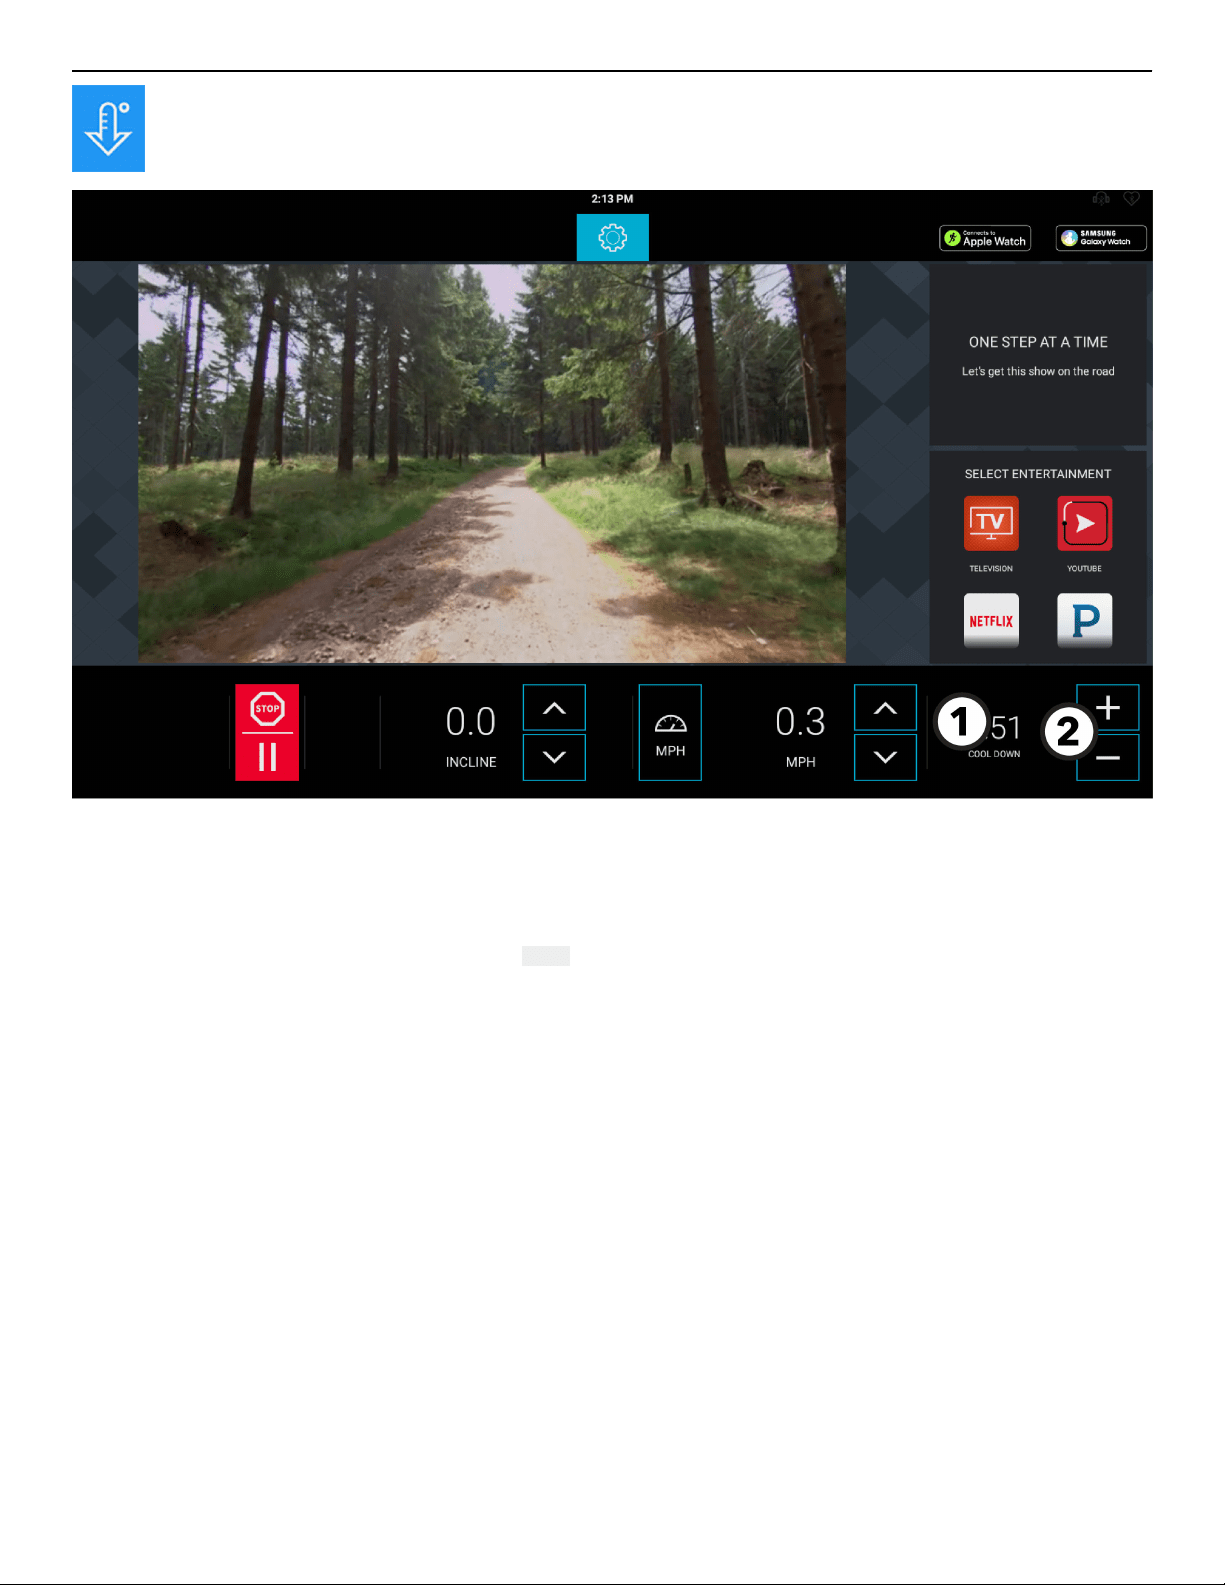
Cool Down Screen
Press the Cool Down button anytime during a workout to start a Cool Down mode (displayed).
1. Time Display
• Time will change to Cool Down when the Cool Down mode is entered.
• The time display initially shows the amount of time in minutes that a specific workout is required to be in Cool Down mode.
• The time display will countdown until it reaches 0:00.
2. Increase / Decrease Time
• Press - to decrease the cool down time by 1-minute intervals.
• Press + to increase the cool down time by 1-minute intervals.
Page 42 of 80
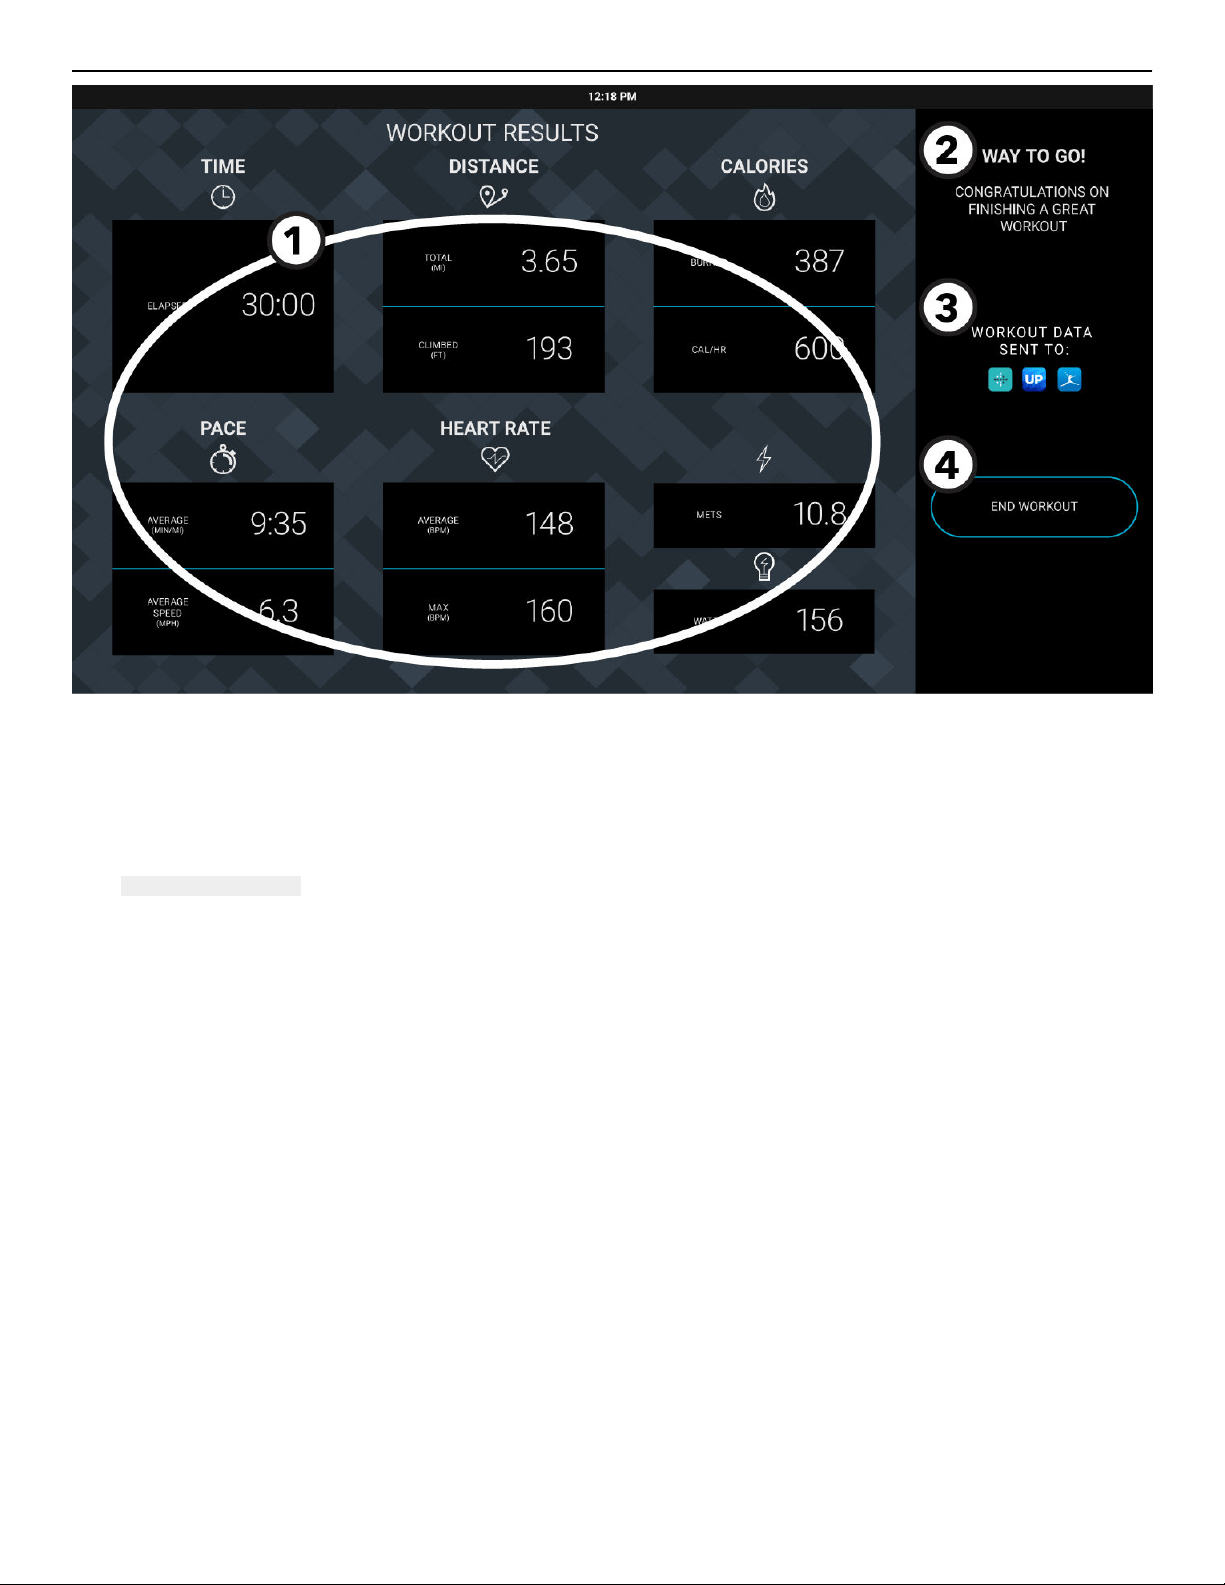
Workout Results
The Workout Results screen is displayed once the workout session ends or is terminated by the user.
1. Summary of Workout Parameters
• Data for workout parameters is displayed for 60 seconds.
• The data displayed depends on the selected workout / goal.
2. Message
A Congratulations message is displayed.
3. Save Your Workout
Workouts are automatically saved. Upload the data to mobile applications.
4. End Workout
Press to exit the Workout Summary screen, log out of any connections, and return to the Home screen.
Page 43 of 80
Manager Configuration
Accessing System Options
1. Tap the LANGUAGE icon to access the SELECT LANGAUGE screen.
2. The touch sequence is LOWER-LEFT, LOWER-RIGHT, LOWER-LEFT, and LOWER-RIGHT.
Systems Options
• System Test
• Information
• Configuration
• Maintenance
• Soware Updates
• Immobilize Unit
Page 44 of 80

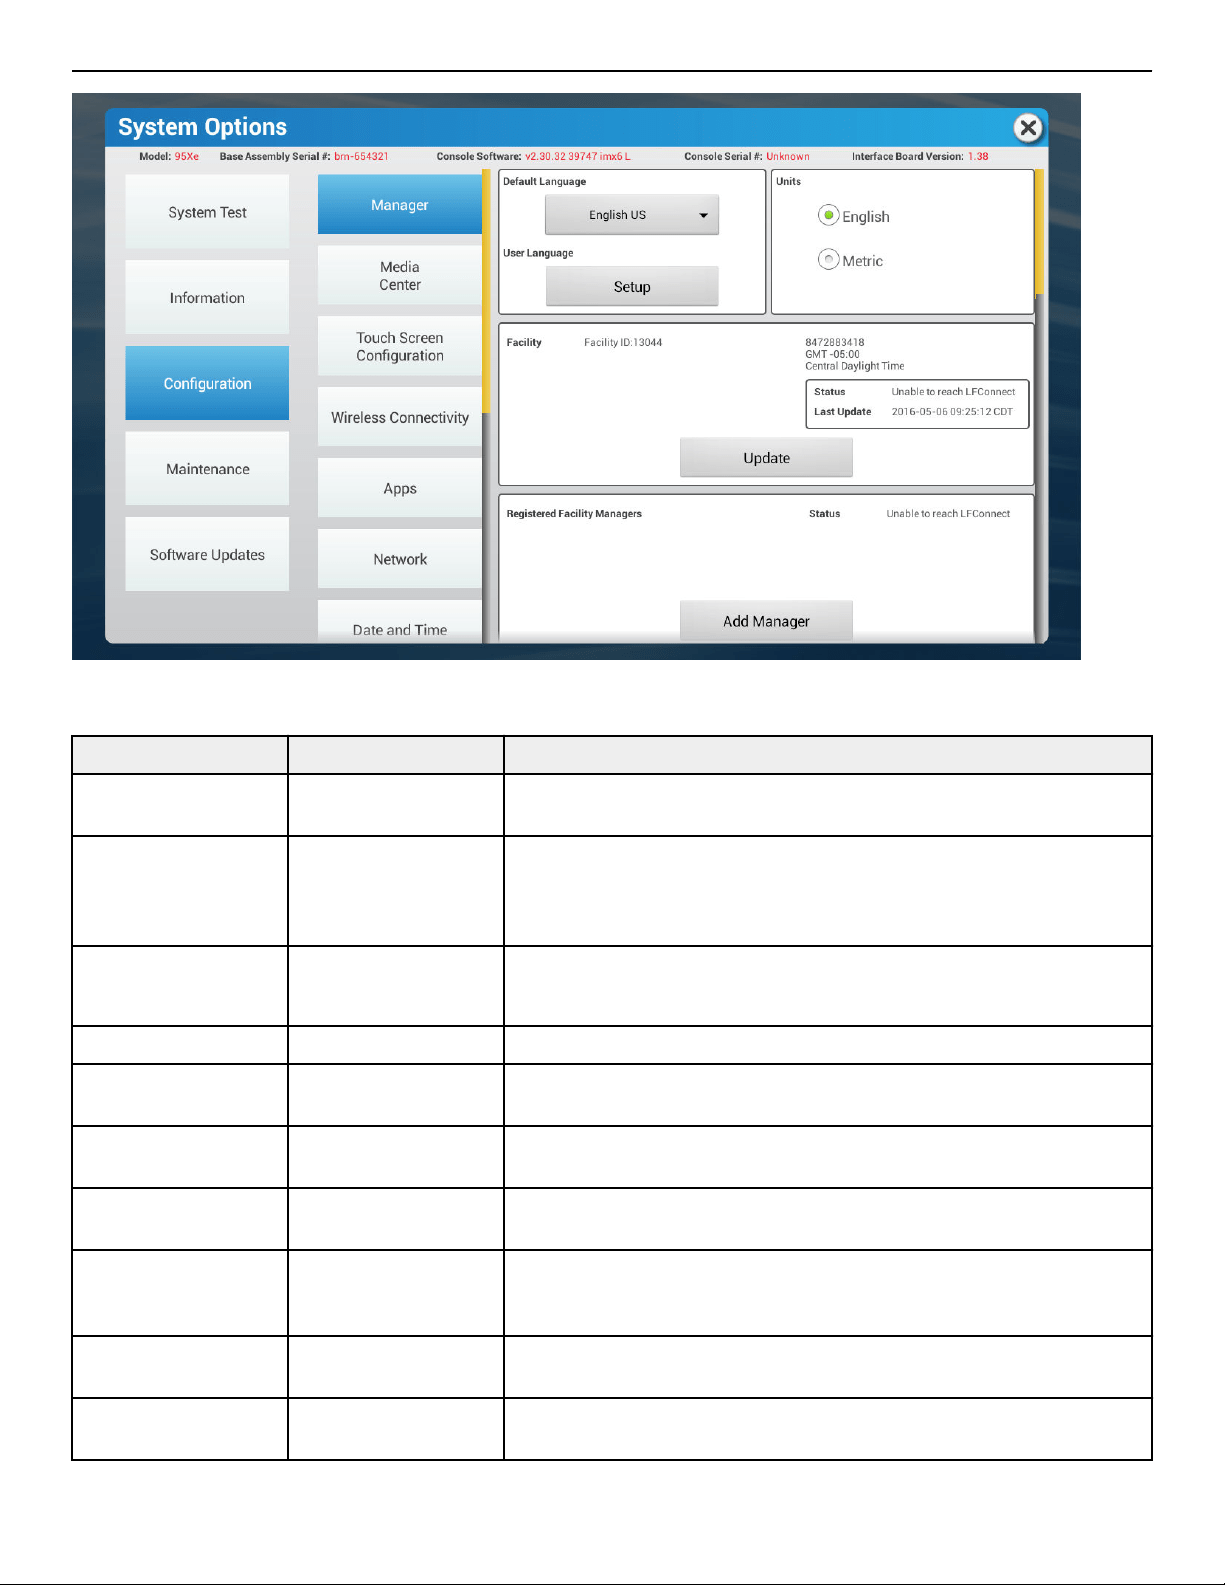
Configuration Menu
The Configuration menu allows fitness facility managers to configure basic functionality of the product as well as network and media
settings. The button of the selected option is blue. When a selection is made, the System option menu screen appears to the right.
Manager Set unit defaults.
Media Center
• TV
• Lifescape
• Audio Setup
• Picture Setup
Touch Screen
Configuration
Follow the instructions on the screen to recalibrate the Touch Screen. Contact Customer Support Services
if repeated attempts at calibration were unsuccessful.
Wireless Connectivity
• Enable or disable Wireless Connectivity.
• Option to add wireless network.
• Disable wireless connectivity to change the frequency band.
Apps Featured apps on the console are listed.
Network
• Identification
• Level of Internet access
• Google SafeSearch
• Require user identification for internet access?
Date / Time Set date and time.
Export / Import Settings
• Export settings to USB stick.
• Import settings from USB stick.
Ethernet Ethernet advanced settings
Bluetooth Enable/Disable Bluetooth.
RFID
• Enable RFID
• Select tag type.
Media Setup
• Equipment type (treadmill or non tread)
• Archive media files
• Available Space & Required Space
Page 45 of 80
Manager - Default Settings
70T Console Cardio Products
Setting Default Description
Default Language English US This option sets a new default language. Choices include: English, Spanish, and
French.
User Language English US This option sets the language of user messages and service messages. Choices
include: English, Japanese, Italian, Turkish, Arabic, English UK, Dutch, French,
Polish, Catalan, Simplified Chinese, Traditional Chinese, Spanish, Russian,
Finnish, Basque, German, Portuguese, Korean, Hungarian, Hebrew and Welsh.
Units English Set the measurement unit type for weight, distance, height, and speed.
NOTE: Metric available.
Facility On This option creates facility information.
Registered Facility
Manager
On This option creates facility management information.
Workout Duration
Configuration
60 minute max Set maximum workout duration limits. 99 minutes maximum.
Pause Time 1 minute Set the maximum time during which a workout can remain in pause mode. 99
minutes maximum.
Program Timeout 30 seconds The amount of time, ranging from 0 - 255 seconds, a user can go without
touching the LCD touch screen during workout setup before the unit returns to
the Home Screen.
InActivity Timer On, 2 hours Set the desired amount of time of inactivity before the system automatically
turns o the LCD touch screen backlight.
Auto O / Auto On O Set the time of day for the system to automatically turn o the LCD touch
screen backlight.
Page 46 of 80
Setting Default Description
System Sounds On This option controls whether the system speaker beep is generated on key
presses.
Marathon Mode Enabled This option allows the user to workout indefinitely.
Telemetry Enabled
Switching on the telemetry feature makes it possible to use the Polar
®
-
compatible Heart Rate Zone Training exercises with a Polar telemetry heart
rate chest strap for monitoring the heart rate.
Speed Increase Limiting
with Up Key
O When enabled, the user cannot press and hold the speed button to increase
the speed.
Fit Test Plus On Turns on/o the US Navy test and FAMS
Treadmill Only
Setting Default Description
Maximum Speed 14.0 MPH (23 KPH) Set the fastest speed the treadmill can operate.
Minimum Speed 0.5 MPH (0.8 KPH ) Set the slowest speed the treadmill can operate.
Maximum % Incline 15.0 This option changes the maximum incline grade to a value lower than 15%.
Activity Zone Speed Keys Enabled This option allows the user to assign belt speed to Walk / Jog / Run values.
Deceleration Rate 3 The rate at which the treadmill decelerates to the selected speed, ranging from
1 (slowest) to 5 (fastest).
Acceleration Rate 3 The rate at which the treadmill accelerates to the selected speed, ranging from
1 (slowest) to 5 (fastest).
Turn OFF Stride Sensor
Notification
Stride Sensor Button On
Pause Button Disabled
This option detects a user using a treadmill but will not go into Pause mode if a
user is not detected.
Page 47 of 80
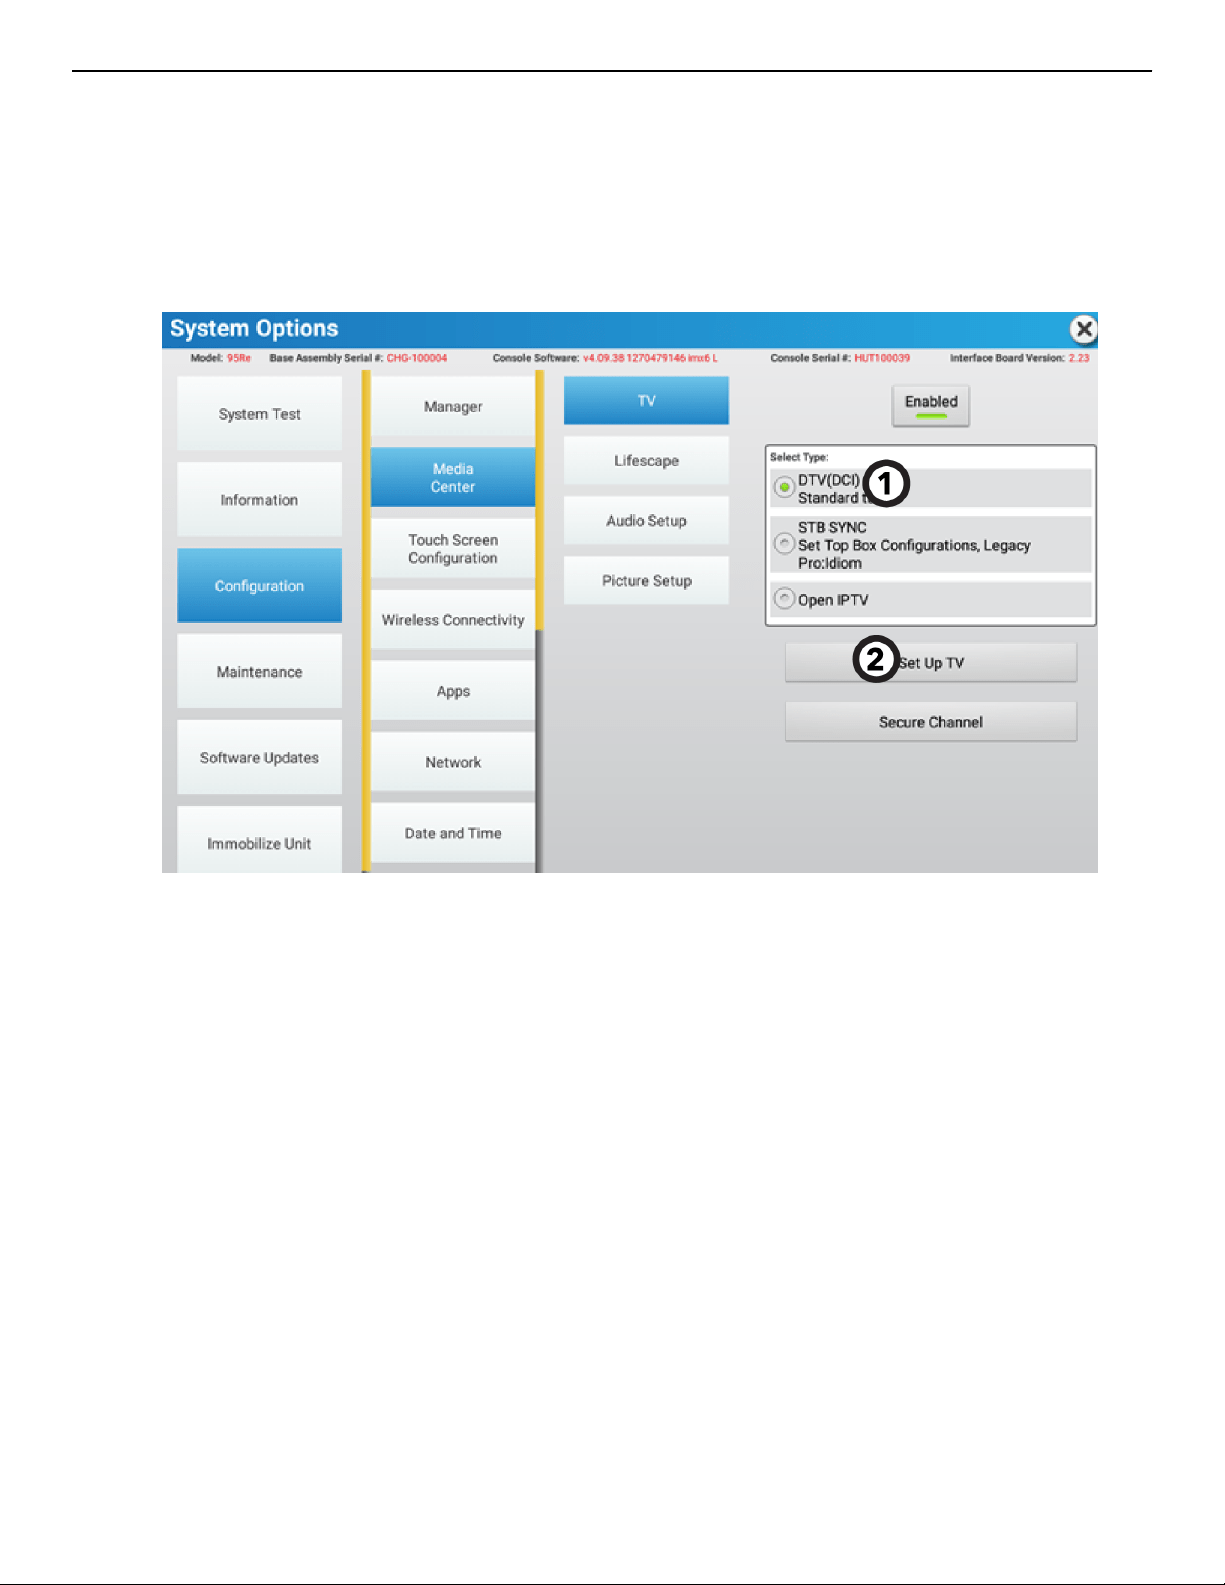
Media Center
TV
1. Select Tuner Type.
• DTV is the default selection for ATSC, PRO:IDIOM, DVB and ISDB configurations.
• USBTV is default selection for ATSC and DVB-T2 USB tuner configurations.
• STB SYNC is the default selection for STB SYNC, STB Connector Kit, and Legacy PRO:IDIOM configurations.
• Open IPTV is the default selection for streaming media on IP using RTP, UDP, and similar protocols.
2. Press Set Up TV to view the screen for the chosen tuner type.
Page 48 of 80
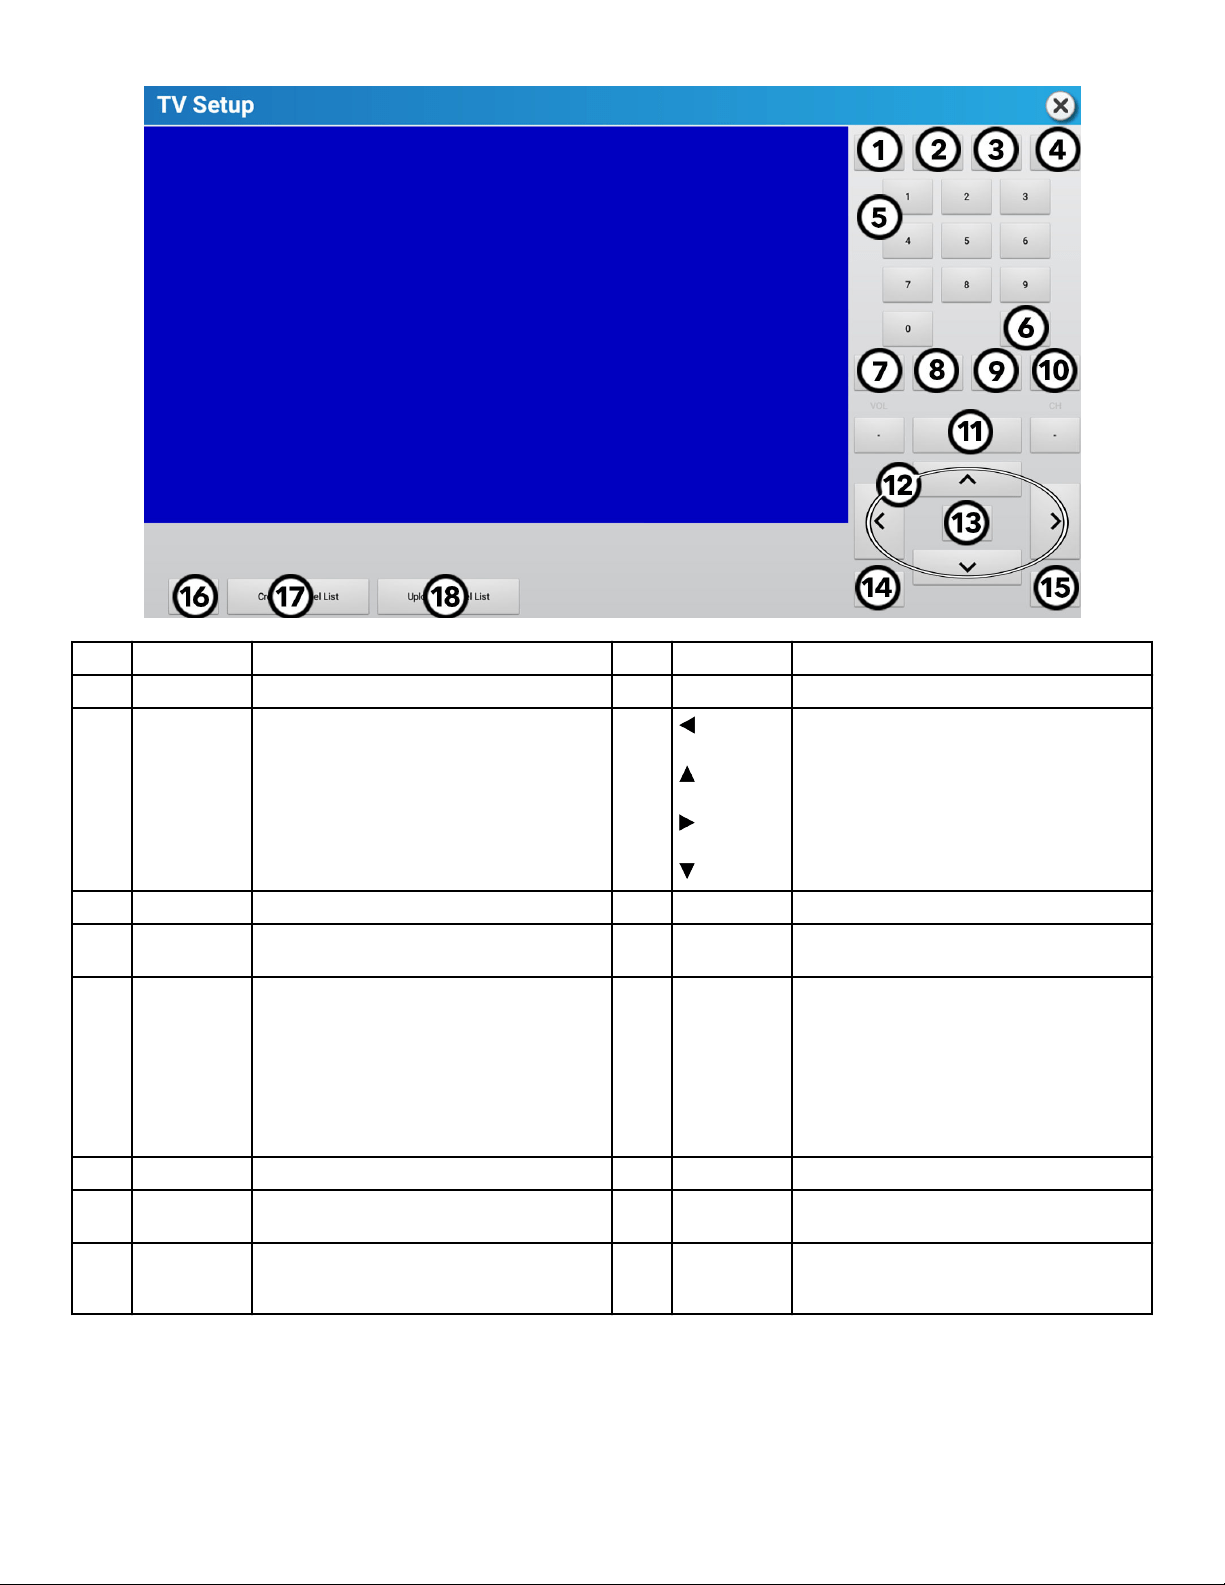
DTV
1 PMode Set Picture Mode. 10 CH Press + and - to change channels.
2 Zoom Picture Size. 11 Display Current channel information is shown.
3 EPG (if
available)
Lists current and upcoming programs for selected
channels.
12 Press to navigate the TV Setup menu options.
4 Mute Silence TV audio. 13 Enter Make Selections.
5 Keypad Use for manual channel input. Use the hyphen (-) to
input major-minor channel numbering.
14 Exit Press to exit the TV Setup menu.
6 Prev Press to view previous channel. 15 Menu
Press to access:
• Channel settings
• Picture settings
• Sound settings
• Time settings
• Lock settings
• Setup settings
7 VOL Press + and - to change audio volume. 16 Reset Resets tuner to default state.
8 SAP (if
available)
Press to activate Secondary Audio Programming
(SAP).
17 Create Channel
List
Create a list of channels for users to access during
workouts.
9 CC Press to turn Closed Caption (or Subtitles) On / O. 18 Upload Channel
List
Uploads channel list to Halo Fitness Cloud (if
connected) and instantly to all other units in the
facility if units are connected to the internet.
Page 49 of 80

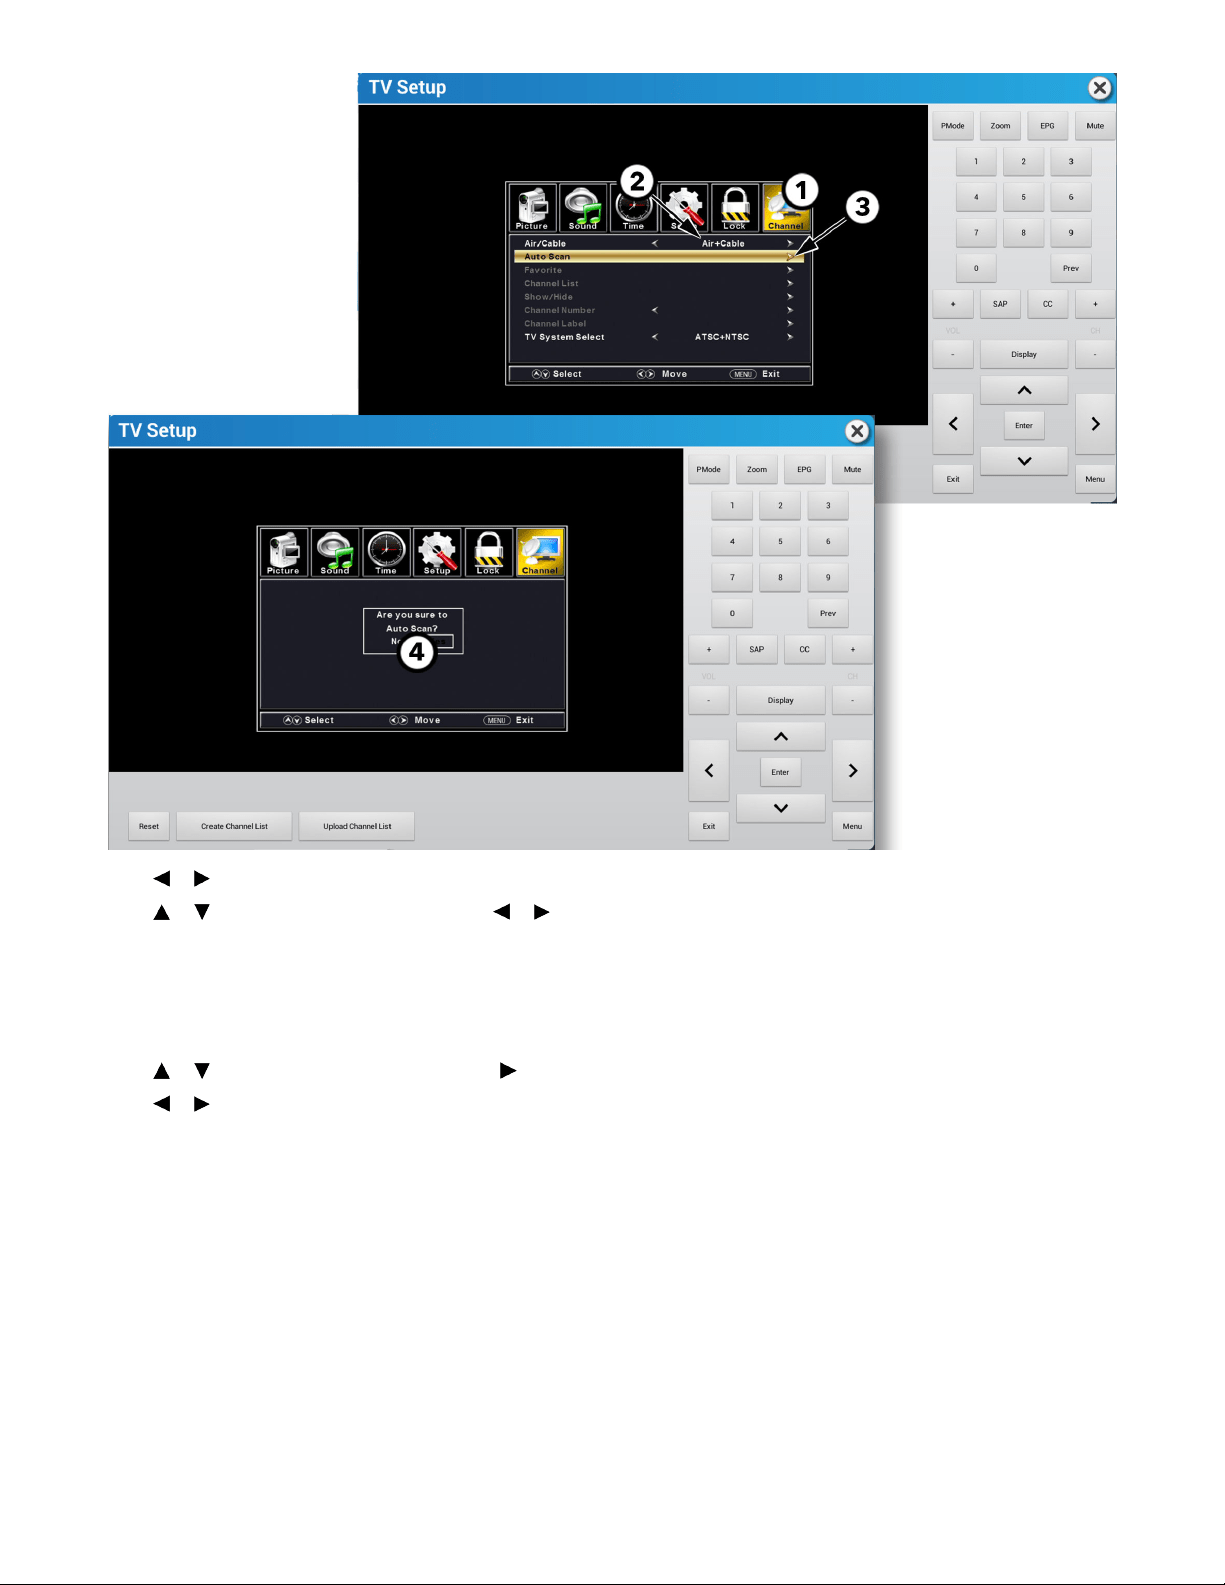
TV Channel Scan for ATSC Tuner
1. Press or to navigate to Channel.
2. Press or to navigate to Air/Cable, and press or to select your configuration.
3. Press or to navigate to Auto Scan, and press or Enter to scan for channels.
4. Press or to select No or Yes, and press Enter.
Page 50 of 80
TV Channel Scan for Pro:Idiom Tuner
1. Press or to navigate to Channel.
2. Press or to navigate to Air/Cable, and press or to select your configuration.
NOTE:
• Cable scans for Pro:Idiom encrypted digital, clear digital, and analog channels.
• Air scans for digital channels from local terrestrial antenna.
• Air + Cable scans for all signal types.
3. Press or to navigate to Auto Scan, and press or Enter to scan for channels.
4. Press or to select No or Yes, and press Enter.
Page 51 of 80
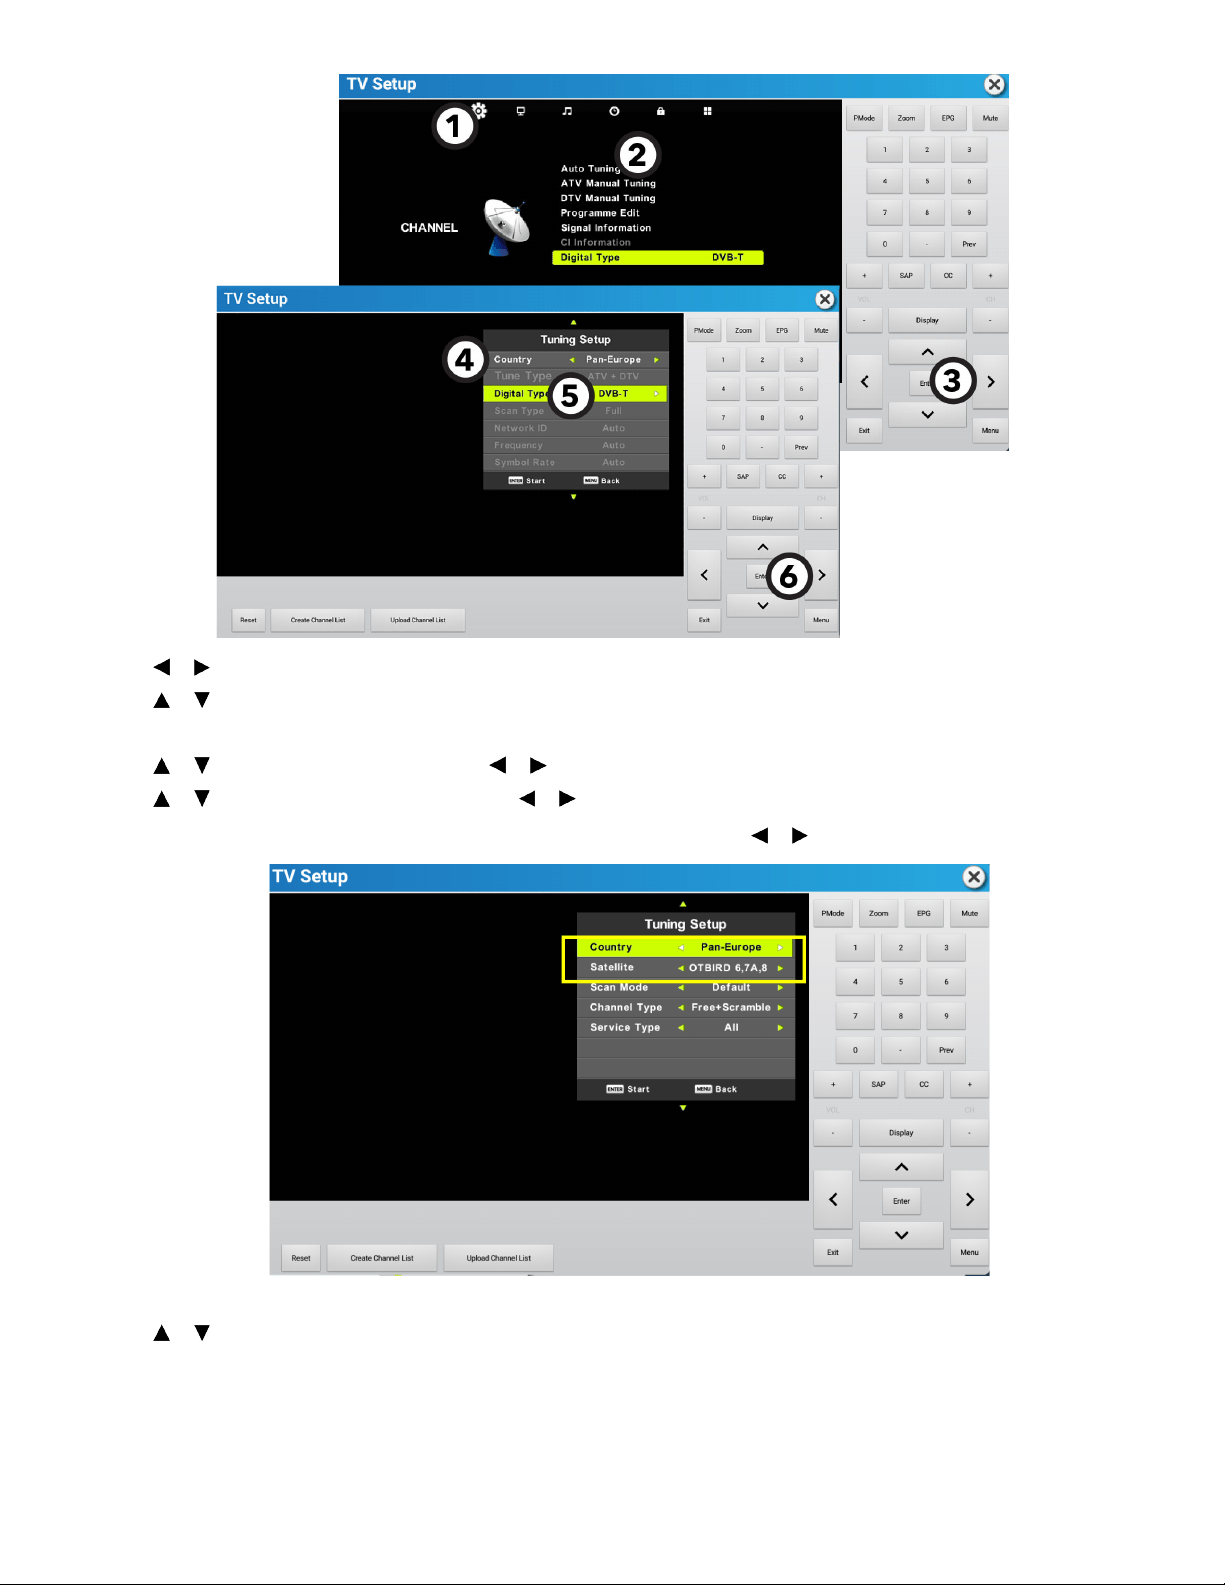
TV Channel Scan for Legacy DVB Tuner
1. Press or to navigate to Channel.
2. Press or to navigate to Auto Tuning.
3. Press Enter.
4. Press or to navigate to Country, then press or to select your country.
5. Press or to navigate to Digital Type, then press or to select your digital TV standard.
6. Press Enter to scan for channels.
Page 52 of 80
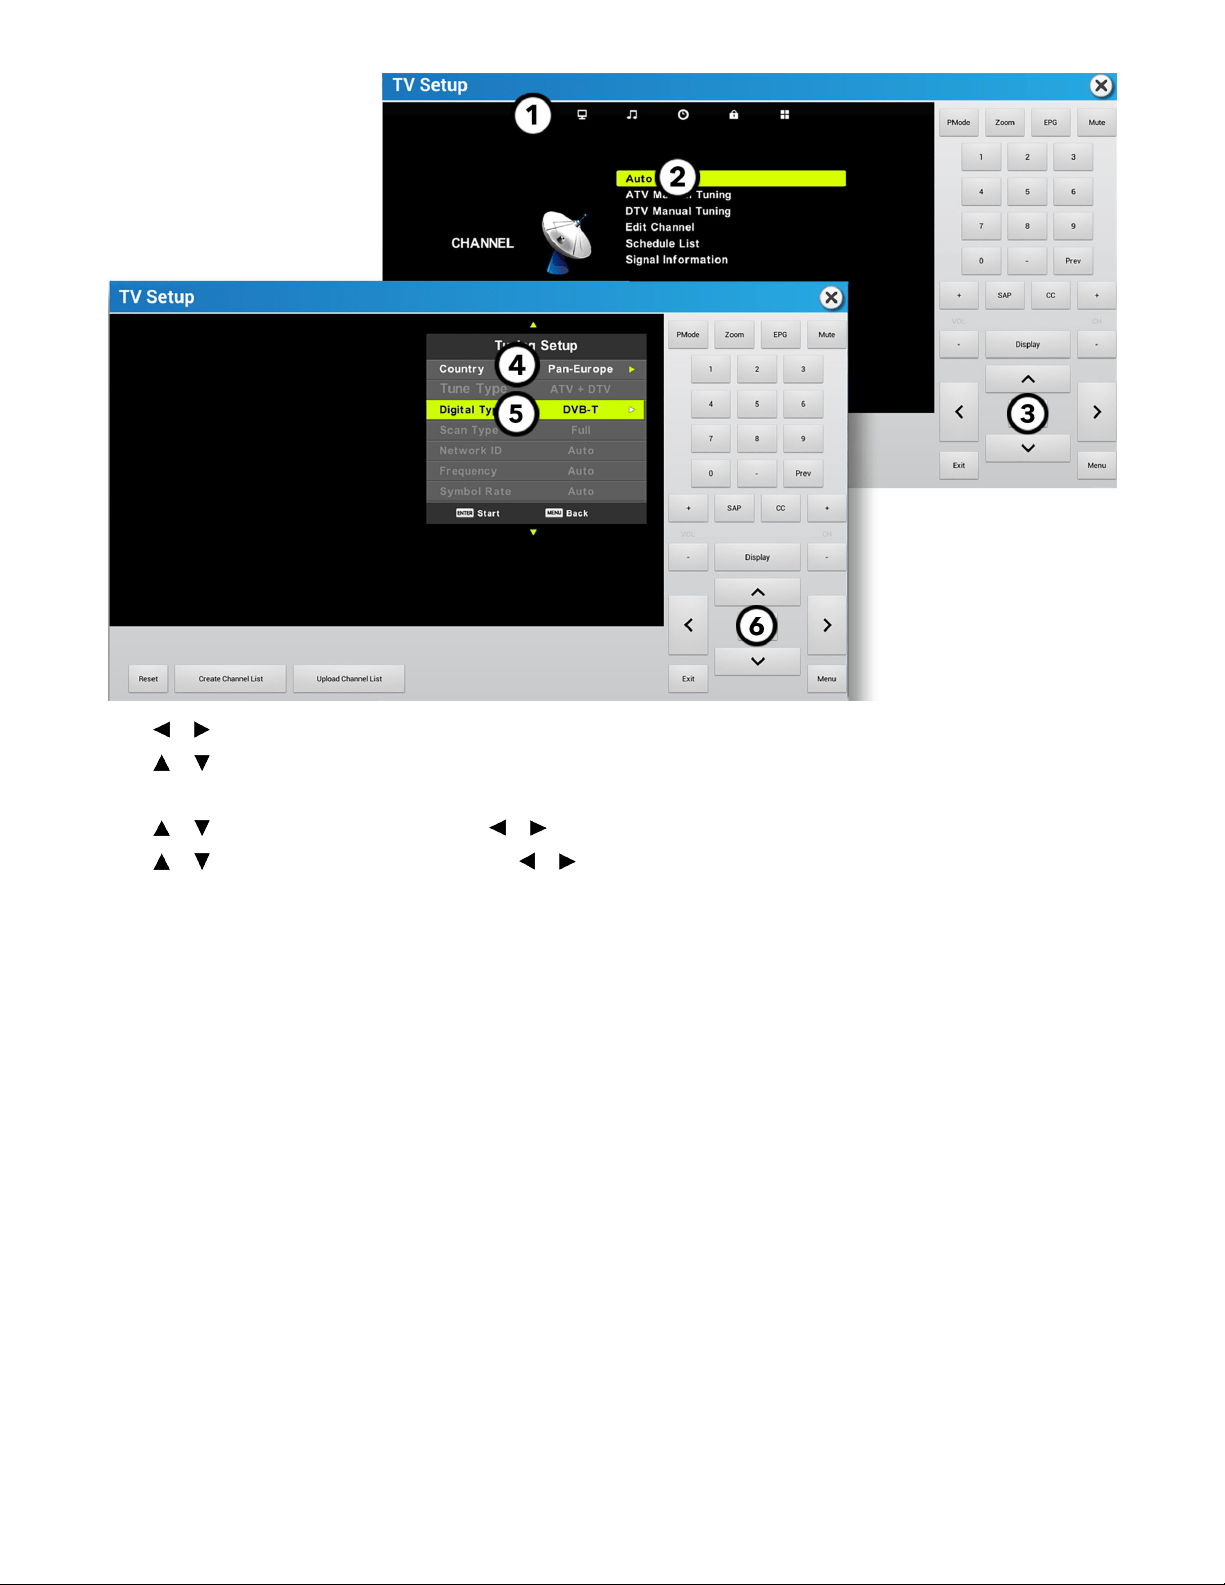
TV Channel Scan for DVB Tuner
1. Press or to navigate to Channel.
2. Press or to navigate to Auto Tuning.
3. Press Enter.
4. Press or to navigate to Country, then press or to select your country.
5. Press or to navigate to Digital Type, then press or to select your digital TV standard.
If DVB-S is chosen for the Digital Type select Country and Satellite type using the
or before initiating the channel scan.
6. Press Enter to scan for channels.
7. Press
or to navigate signal type if DVB-S is selected as the Digital Type.
Page 53 of 80
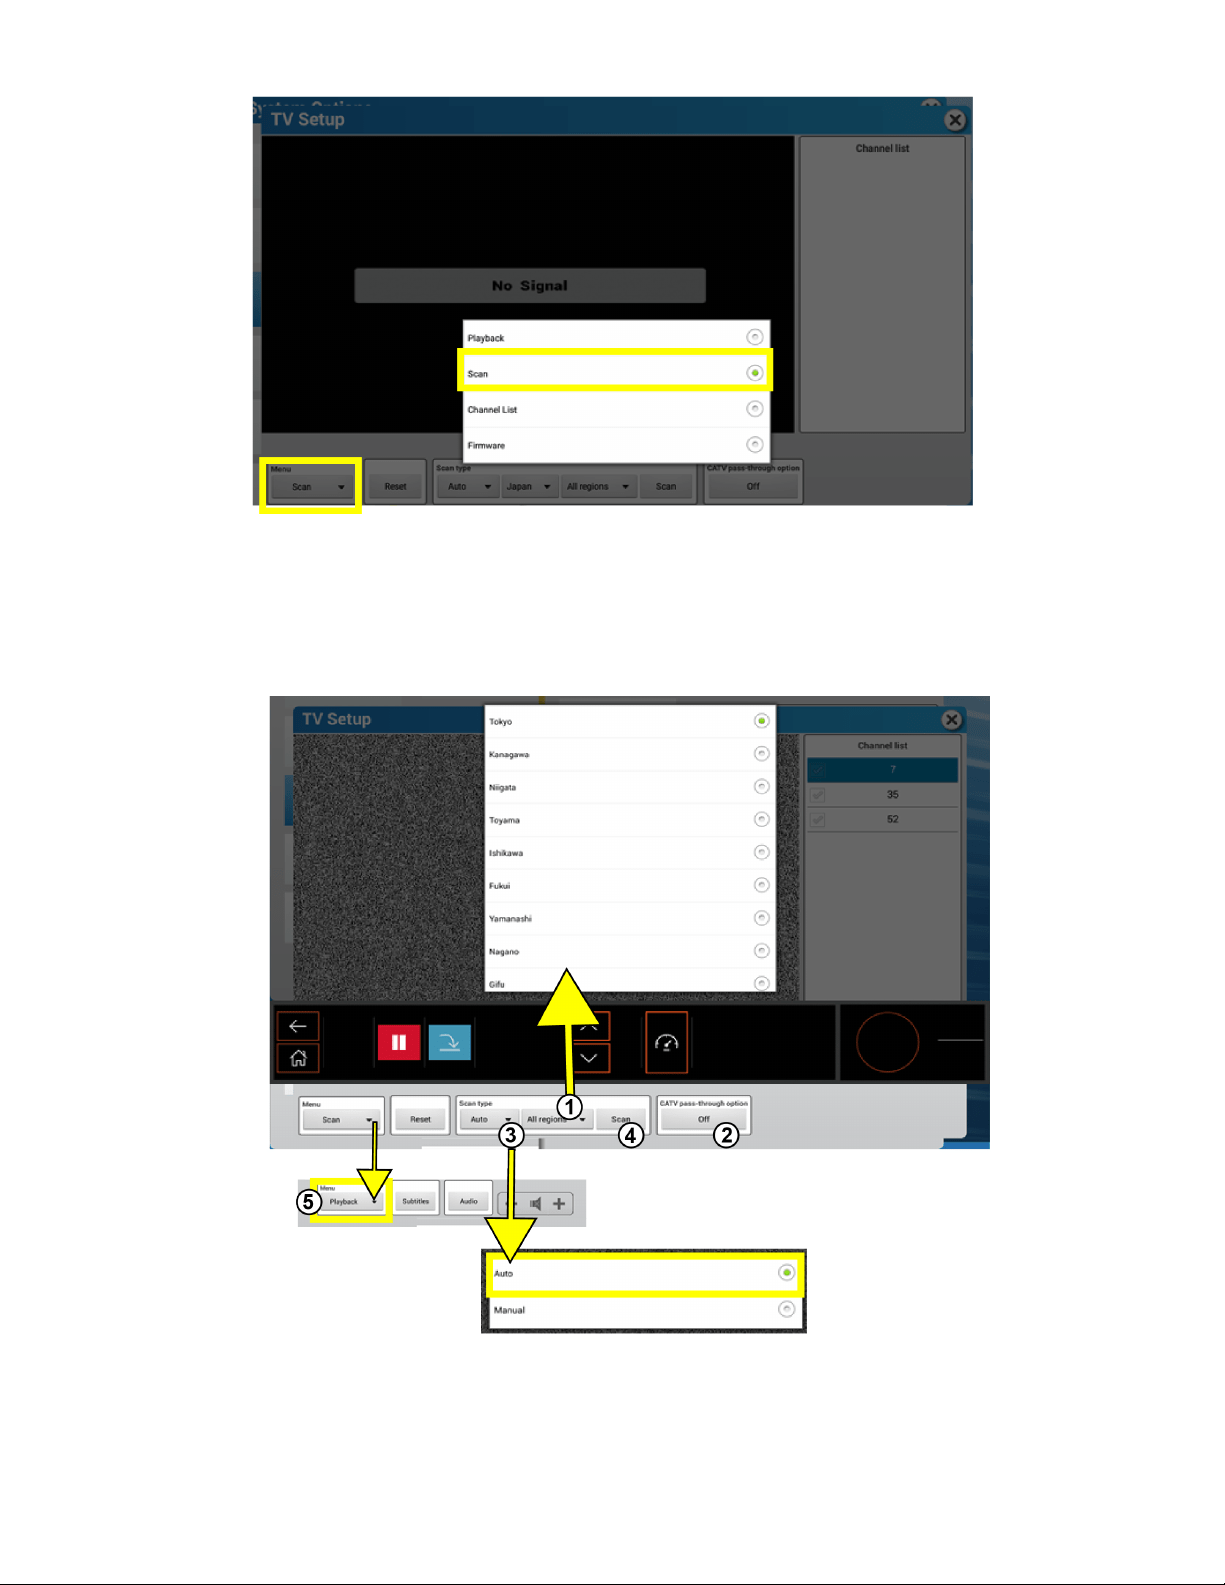
TV Channel Scan for ISDB-T Tuner
Select Scan from the TV Setup Menu options.
1. Select All Regions to pull up a list of regions. Choose applicable region.
2. Set the CATV Pass Through Option to OFF.
3. Choose Auto for Scan Type selection.
4. Press Scan to start scanning for channels.
5. Choose Playback from Menu options to view the video.
NOTE: If the tuner doesn't pick up channels, set the CATV Pass Through Option to ON and rescan for channels.
Page 54 of 80

Channel List Management for ISDB-T Tuner
Select Channel List from the TV Setup Menu options.
1. Select Upload Channel List to upload a channel list to Halo Fitness Cloud (if connected).
Page 55 of 80
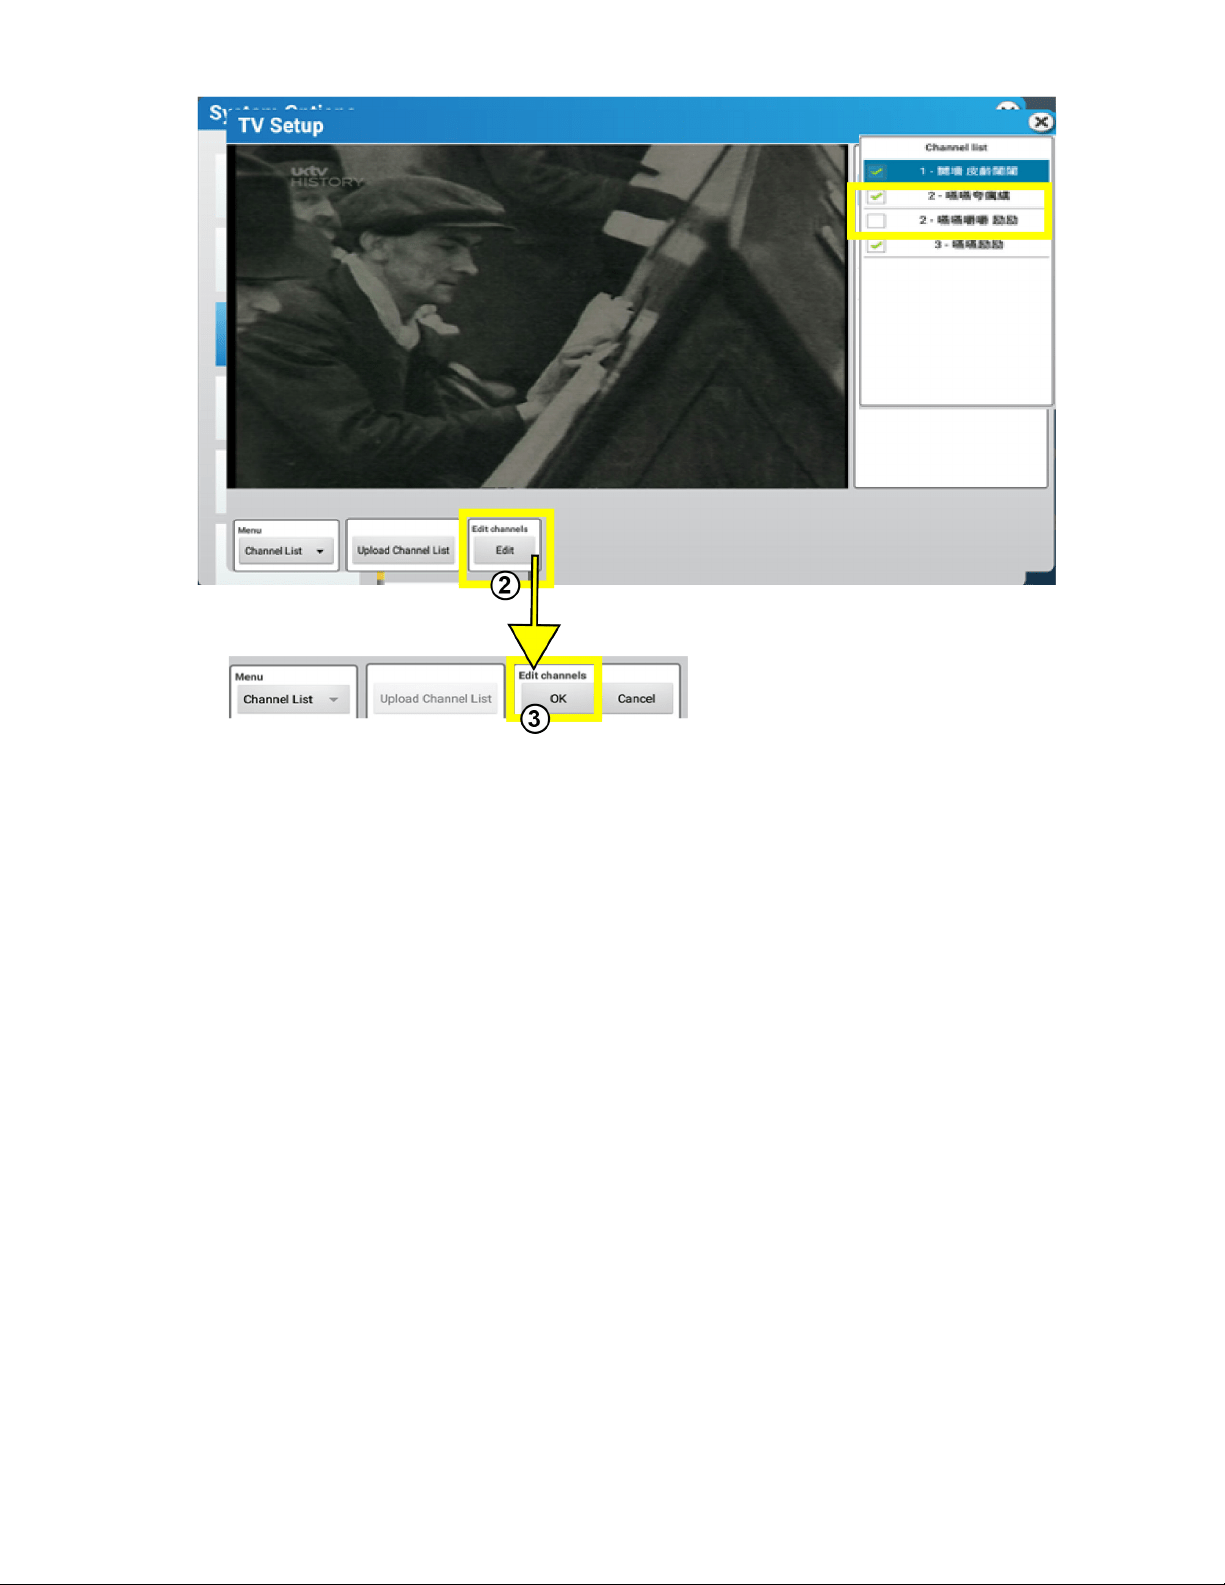
2. Select Edit to edit the channel list. Uncheck channels to hide the channels from the user. Hidden channels will not be options
during workouts.
Page 56 of 80
USB TV
USB TV Setup for ATSC Tuner
1. Menu
• Playback (Default)
• Scan
• Channel List
2. Playback Menu
• Signal Info (provides current signal status)
• CC (On / O)
• SAP (toggles between audio sources when multiple are available)
3. Scan Menu
• Scan Type
• Auto / Manual
• Cable / Air
• Scan
• Spectral Inversion
Used with channel scan to enable the capture of inverted channels produced from the TV headend.
NOTE: Consult A/V Integrator if unsure if inversion is used.
4. Channel List Menu
• Upload Channel List (send channel list to LF Connect)
• Sort Channel List (reorder channels)
• Edit Channels (change channel names)
Page 57 of 80
USB TV Setup for DVB Tuner
Pressing the button in the Menu field will display the following options:
• Playback
• Scan
• Channel List
1. Select Scan.
2. Select Auto or Manual.
3. Select Air or Cable.
4. Select your country.
5. Press Scan to scan for channels.
Page 58 of 80

STB SYNC
NOTE: Select the IPTV Setting at installation to match the Set Top Box (STB) brand / model in the facility’s AV closet.
Page 59 of 80

These commands are sent to the corresponding STB. The STB determine the actions. See the STB manufacturer’s documentation for
detailed functionality and descriptions.
1. IPTV Setting
Select Change.
Search for the STB brand and model.
a. Scroll through the list of brands and models, or type the name of the brand or model in the Search Brand or Model box.
b. Select the row with your desired brand and model.
c. The selected brand and model is displayed.
d. Press the checkmark to confirm.
NOTE: Select the IPTV Setting at installation to match STB brand / model in the facility’s AV closet.
NOTE: There may be multiple rows for the same brand and model. Each row will have dierent STB remote control codes, so
multiple rows may need to be attempted during configuration.
NOTE: Rows containing the model description Legacy Product - do not use for new console installs should not be selected
manually during installation of new consoles, regardless of whether the corresponding STB is new or not.
2. Generic Color buttons
STB defines the actions.
3. EPG (if available)
Lists current and upcoming programs for selected channels.
4. SAP (if available)
Toggles between normal and SAP audio channel.
5. Subtitles
Press to turn Subtitles On/O.
6. Menu
STB menu (if available)
7. TV Resolution
Change TV resolution.
• The TV resolution default setting is selected.
• The TV resolution change only applies within the TV Setup menu and will be reset back to the default aer exiting the TV Tuner
Setup menu.
Page 60 of 80
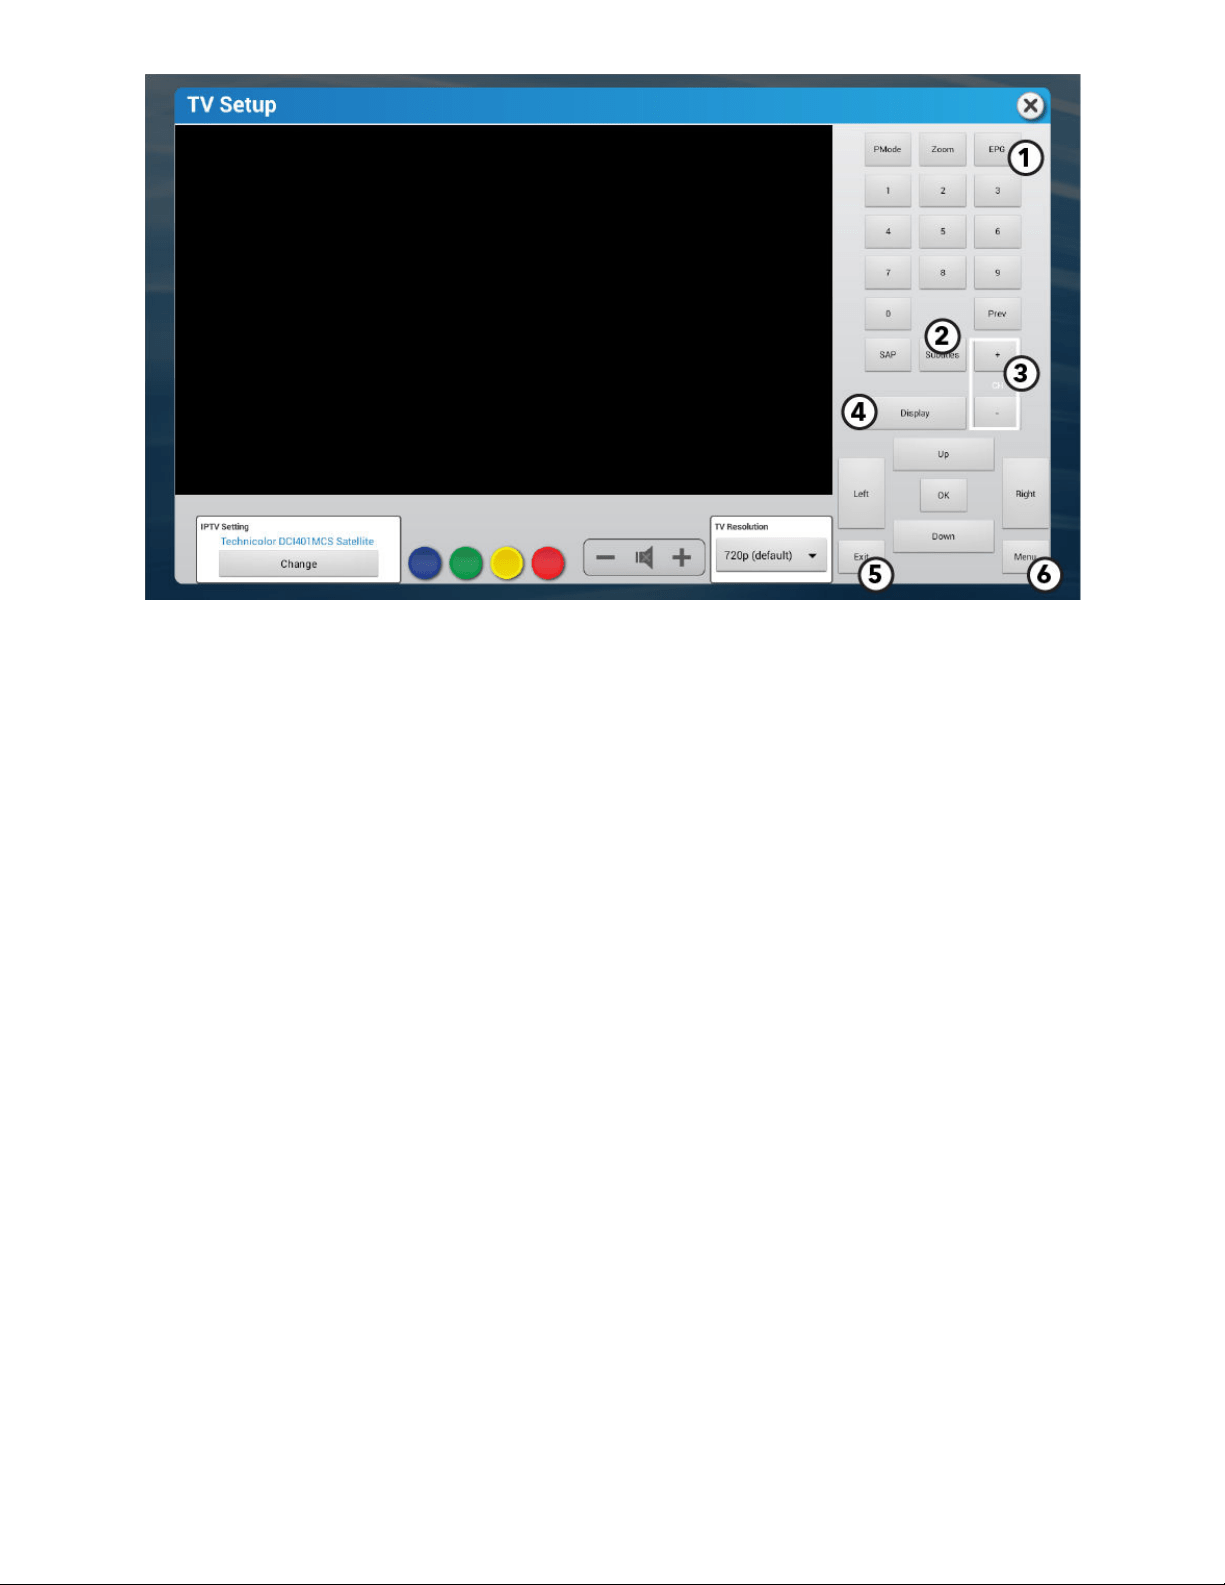
Legacy Pro:Idiom
To access the Pro:Idiom TV Setup menu, use tuner type STB IPTV.
1. EPG
Press to access the Electronic Program Guide (EPG).
2. Subtitles
Press to turn Subtitles On / O.
3. Channel keys
Use to move channels up (+) or down (-).
4. Display
Current channel information is shown.
5. Exit
Press to exit the TV Setup menu.
6. Menu
Access Tuner Setup menu options:
• Tuner Setup
• Video
• Channel
• V Chip
For the IPTV Setting, the default should be set to Technicolor DCI401MCS satellite receiver. If control of the Pro:Idiom solution is not
working, please make sure this setting is correct.
Page 61 of 80
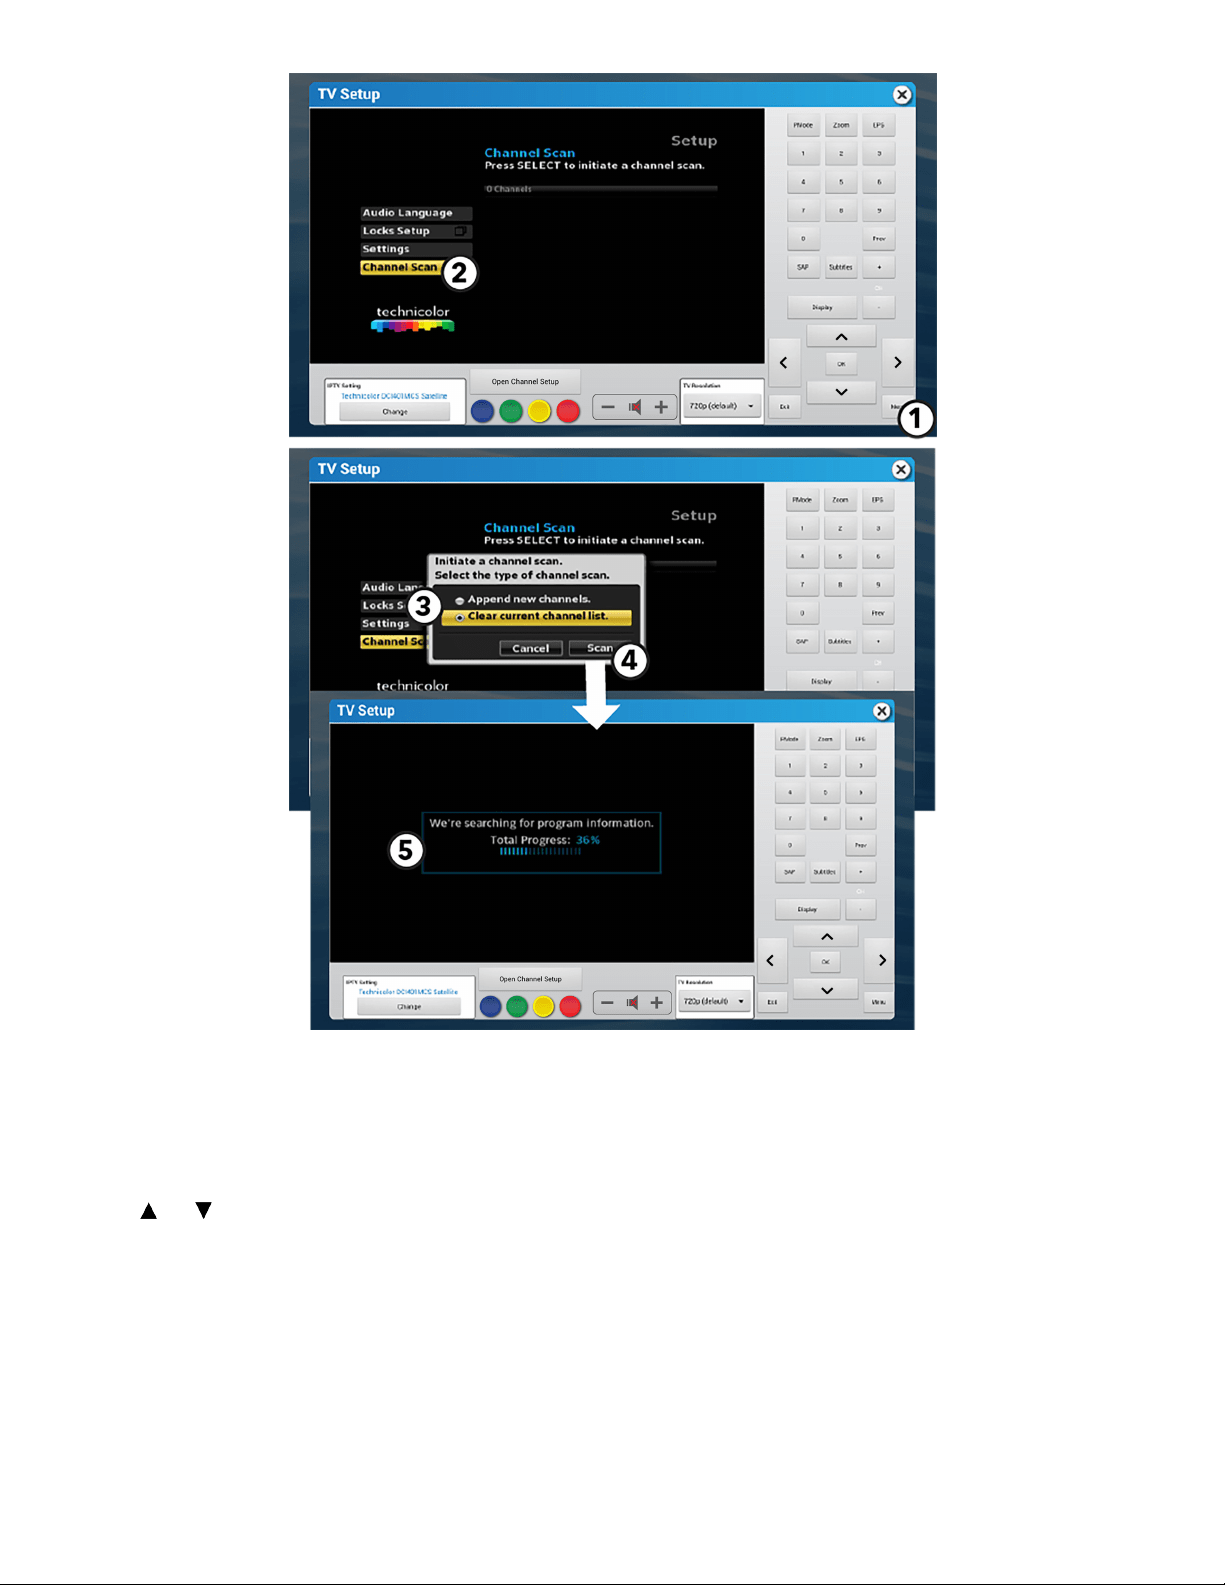
Channel Scan
These commands are sent to the corresponding Set-Top Boxes. The Set-Top-Boxes determine the actions. See the Set-Top-Box
manufacturer’s documentation for detailed functionality descriptions.
1. Menu
Press to access TV Setup menu.
2. Channel Scan
Use and to scroll to the Channel Scan option. Press Ok to enter the selection.
3. Initiate a channel scan
Choose Clear Current Channel List.
4. Scan
Press to begin channel scan.
5. Progress Screen
Displays scan progress.
Page 62 of 80
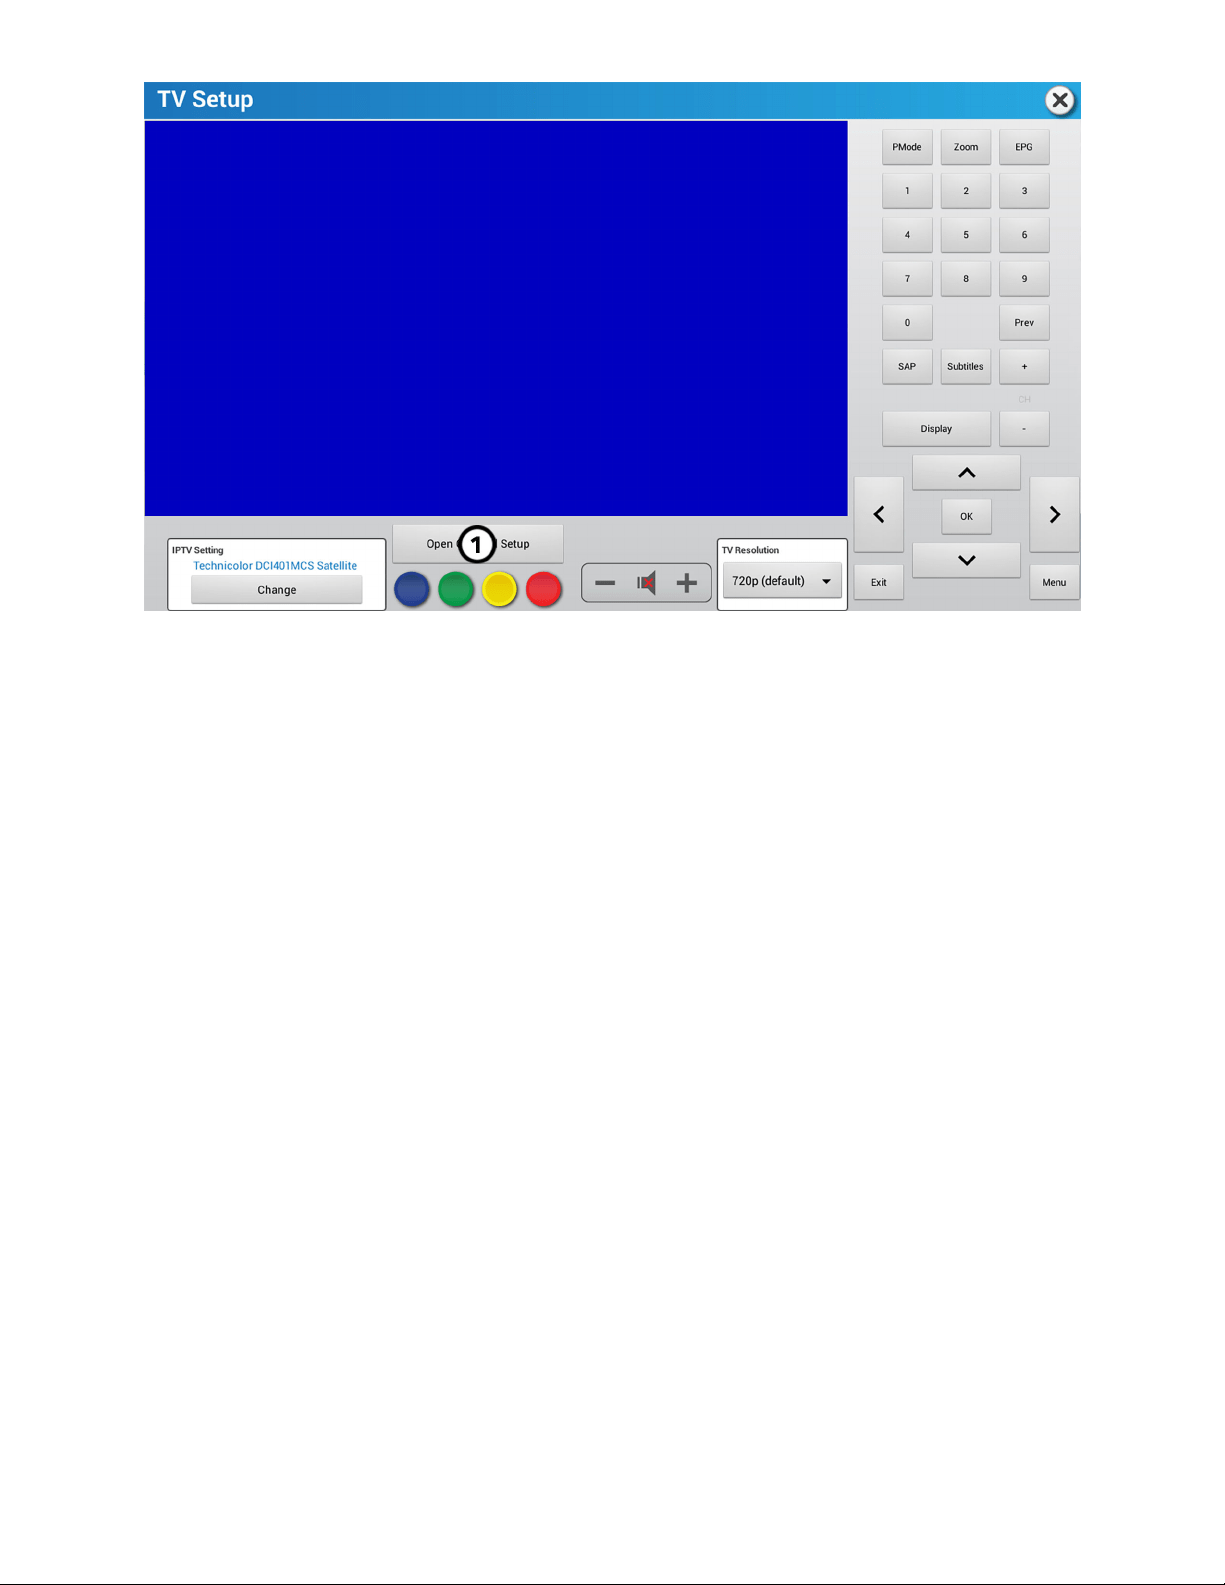
Open Channel Setup
Aer scanning for channels or installing a STB, press Open Channel Setup to customize your channel list for the Workout Screen.
The Open Channel Setup menu has four options:
• Edit Current - Edit titles, add titles, remove titles, and save titles.
• Clear Current - Deletes existing channel lists.
• Import New - Replicates a channel list from a dierent unit.
• Export Current - Saves a channel list to a USB flash drive for replication on dierent units.
Page 63 of 80
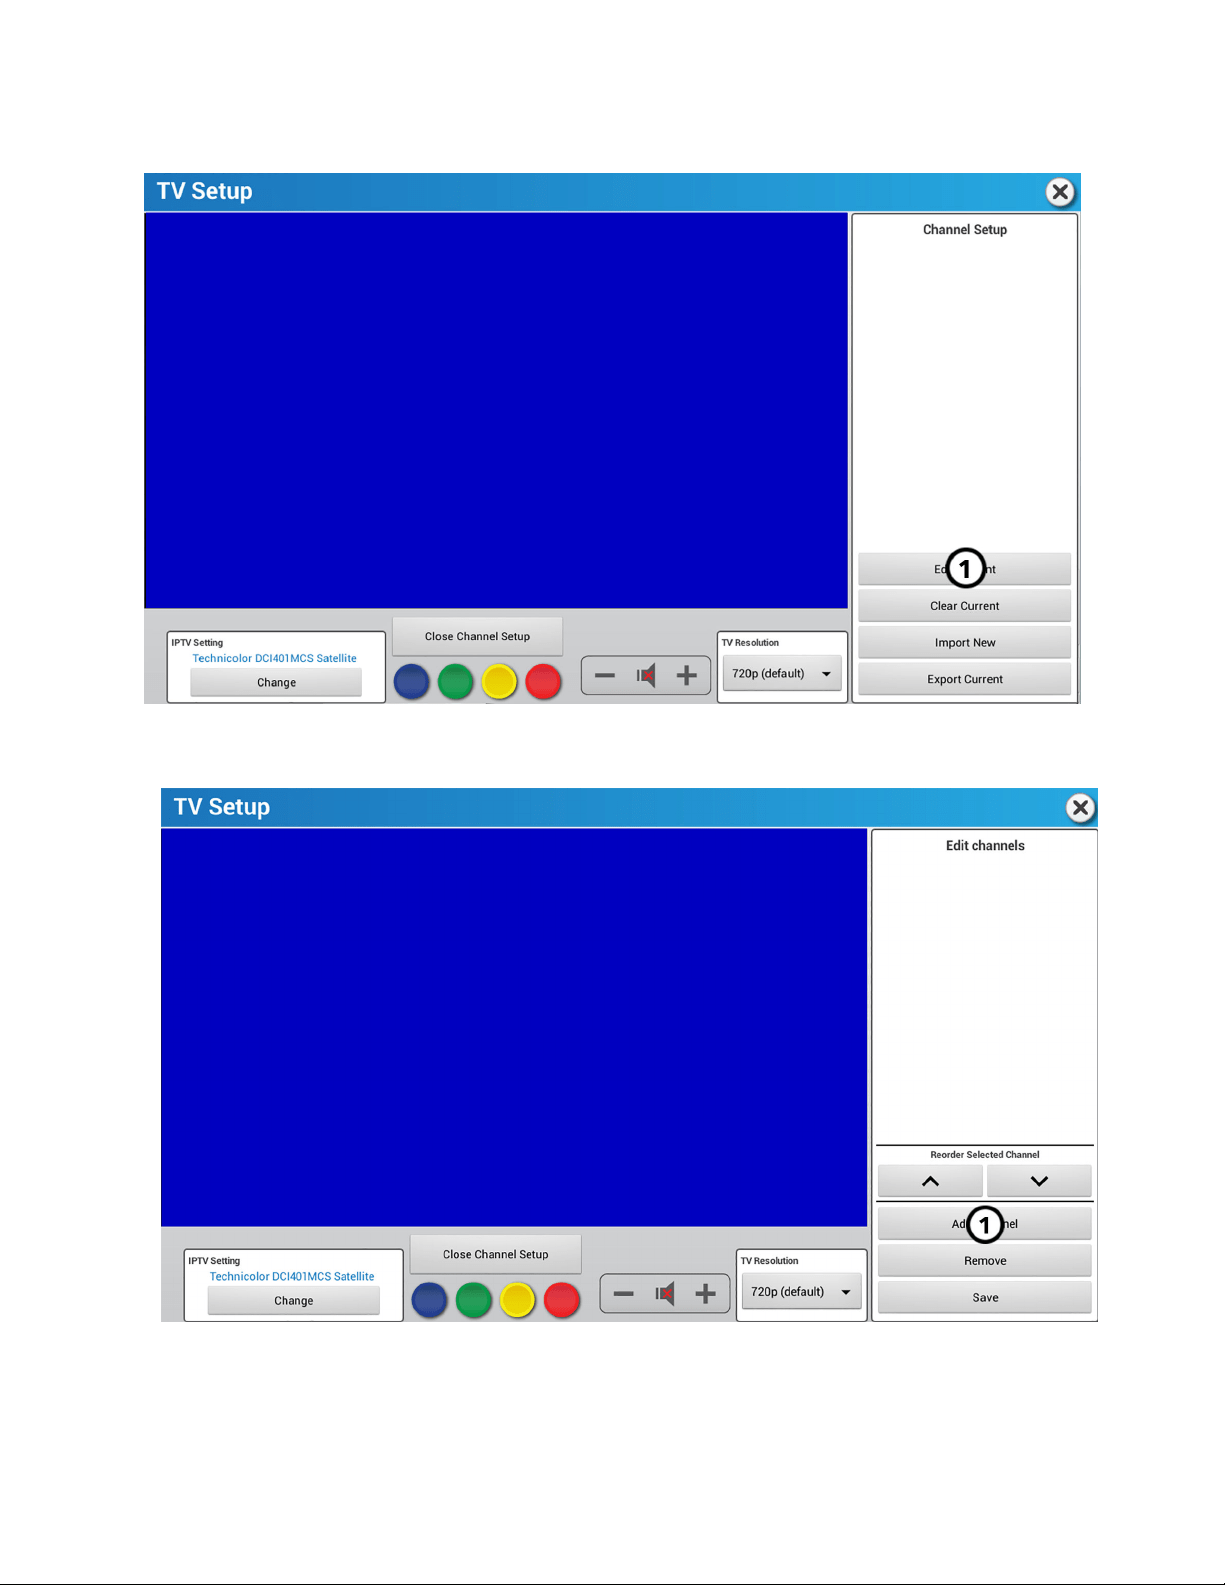
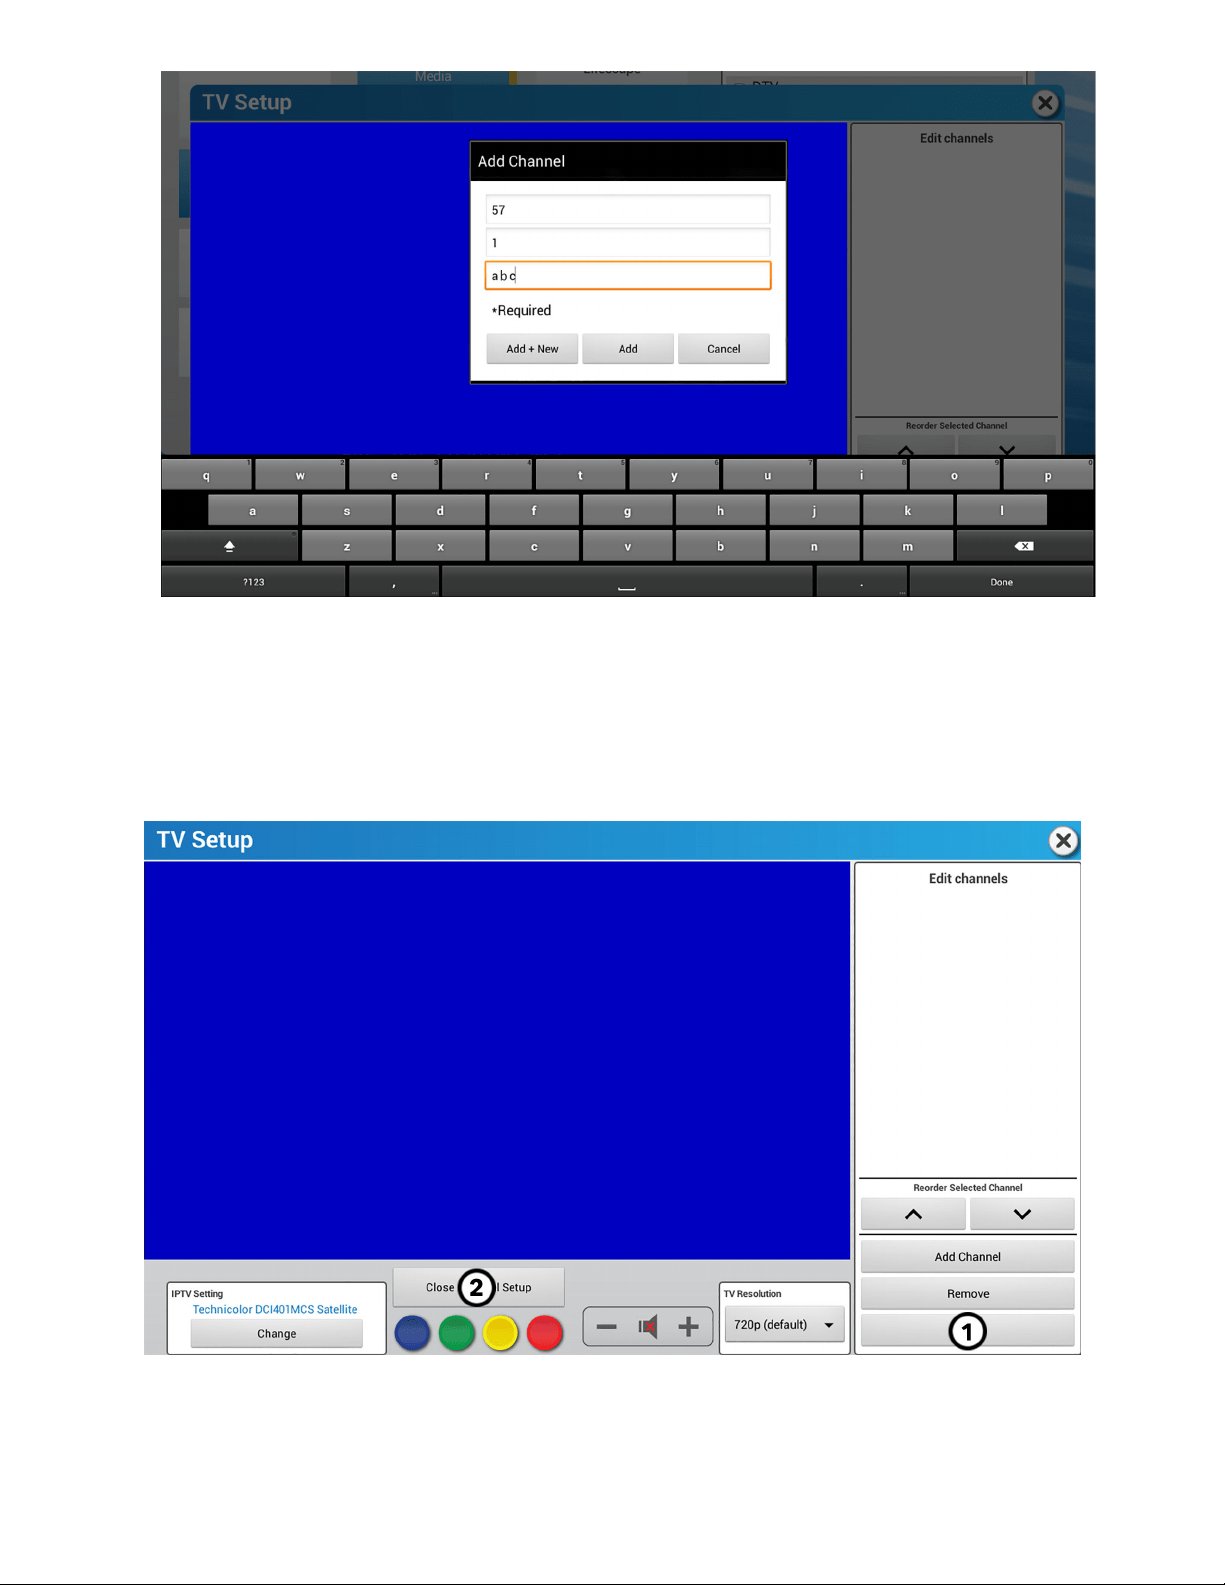
2. Type the channel number in the Major number* box.
3. Type the channel sub-number or program number in the Minor number box.
4. Type the channel name in the Channel name* box.
5. Choose one of the following:
• Press Add + New if you have more channels to add to your channel list.
• Press Add if you have only one channel to add to your channel list.
• Press Cancel if you do not want to add your channel.
1. Press Save when you are finished adding channels.
2. Press Close Channel Setup if you are finished with your channel list.
Page 65 of 80

Reorder Selected Channel
1. Press on the channel you want to reorder on your channel list.
NOTE: The order of the channel list that you create will appear within the workout menu.
2. Press or to rearrange the channel on your channel list.
1. Press Save when you are finished reordering your channels.
2. Press Close Channel Setup if you are finished with your channel list.
Page 66 of 80
Remove
1. Press on the channel you want to remove from your channel list.
2. Press Remove.
1. Press Save when you are finished removing channels.
2. Press Close Channel Setup if you are finished with your channel list.
Page 67 of 80
Clear Current
Press Clear Current to delete an existing list of channels, and create a new list of channels.
Import New
The Import New feature requires a channel list on a dierent unit and a USB flash drive. You will use the Export Current feature on
another unit before using the Import New feature.
Import a channel list from a dierent unit:
1. Locate another unit with a current channel list.
2. Insert a USB flash drive into that unit's USB port.
3. Perform an Export Current on the that unit.
4. Remove the USB flash drive from that unit.
5. Install the USB flash drive on your unit.
Page 68 of 80
6. Press Import New.
7. Verify that your unit has imported the channel list from the other unit.
Export Current
The Export Current feature is used when you want to save your current channel list on multiple machines. You will use the Import New
feature aer using the Export Current feature.
To export a unit's current channel list:
1. Insert a USB flash drive into the front USB port of a unit with a current channel list.
2. Press Export Current.
See Import New for directions about importing your channel list on the USB flash drive to other machines.
Page 69 of 80
Open IPTV
Open IPTV allows custom channel creation.
1. Tuner Type
The Open IPTV tuner type only shows when the console is configured for Open IPTV.
2. TV Setup
Press to access the Open IPTV TV Setup menu.
3. Custom Channel
• Input URL address - Enter each UDP address assigned to each channel.
NOTE: The format should use udp://@(IP Address: Port)
• Create channel name
4. Press the checkmark to save the channel to the channel list.
5. Channel Table
URL address and channel name populate in a channel table.
6. Press the X to delete the selected channel.
7. Preview Channel
Press to open a separate window to preview the selected channel.
8. Import Channels
Import channel list from an inserted USB stick.
Page 70 of 80

9. Export Channels
Export channel list to an inserted USB stick.
10. Upload Channel List
Uploads your channel list to Halo Fitness Cloud (if connected) and instantly to all units in the facility if units are connected to the
internet.
11. Buer Configuration
Change the amount of buered data to optimize video streaming.
Page 71 of 80
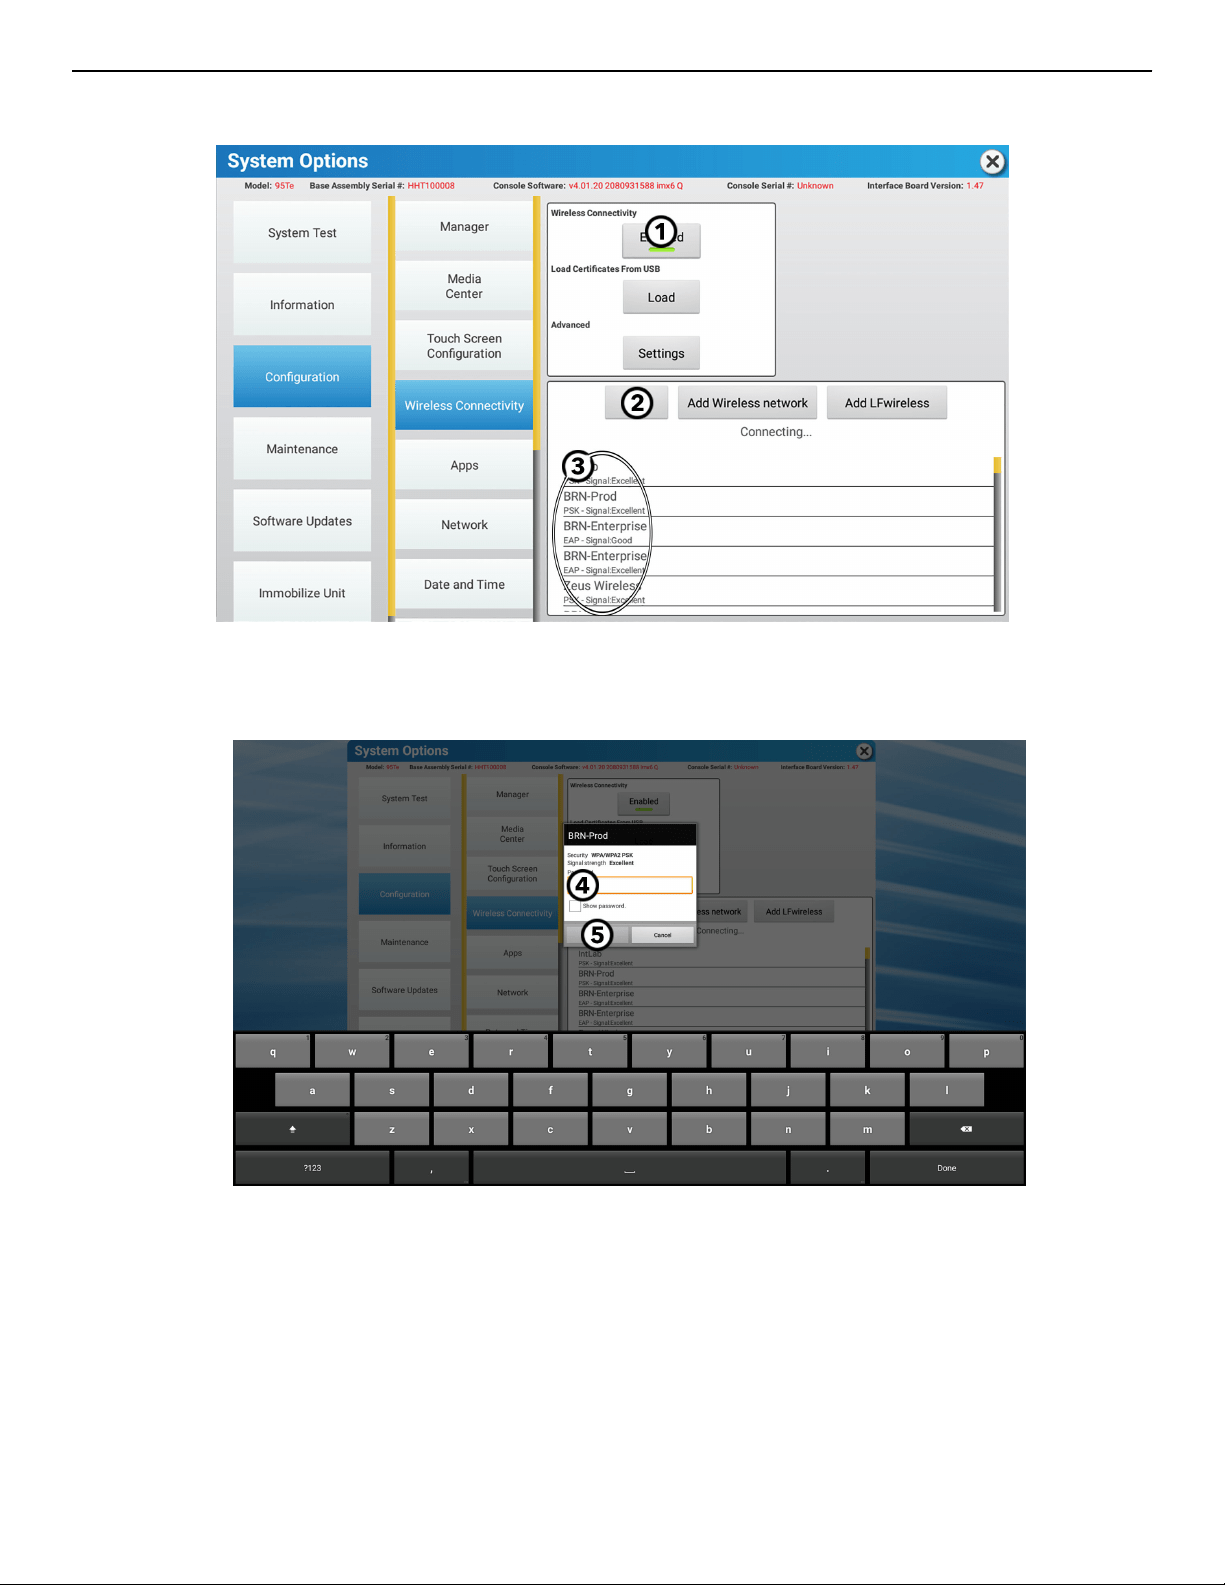
Wireless Connectivity
NOTE: If your equipment is connected to the internet with an Ethernet cable, please see the Ethernet section in the Configuration
Menu.
1. Press Enable/Disable to activate or deactivate wireless abilities.
2. Press Scan to scan for wireless networks in your area.
3. Find and select your wireless router by pressing on the screen.
4. Enter your wireless router's password.
5. Press Confirm to establish a connection to your wireless router.
Page 72 of 80

Internet Requirements
Minimum download bandwidth requirements for 1-16 units:
• 2.5 mbps
• +0.25 mbps for more than 16 units.
Minimum upload bandwidth requirements for 1-20 units:
• 0.5 mbps
• +0.25 mbps for more than 20 units.
Wired Local Area Network (LAN) requirements:
You will need to provide the DHCP addresses for all of your units if your units are wired to the internet using an Ethernet cable. You will
need a switch capable of aggregating the individual Ethernet cables.
1-7 units
• 8-port 10/100/1000
8-23 units
• 24-port 10/100/1000
24-47 units
• 48-port 10/100/1000
Wireless Local Area Network (LAN) requirements:
• Dual band 2.4/5 GHz wireless router
• WPA2-PSK wireless router security
• Equipment must be mounted to the ceiling or wall. Do not place your wireless routers on the floor.
Page 73 of 80

Maintenance and Troubleshooting
NOTE: Safety of the equipment can be maintained only if the equipment is examined regularly for damage or wear. Keep the
equipment out of use until defective parts are repaired or replaced.
NOTE: Pour assurer la sécurité du matériel, il convient de l’inspecter régulièrement afin de déceler tout signe d’usure ou
d’endommagement. N’utilisez pas l’appareil avant d’avoir réparé ou remplacé les pièces défectueuses.
The following preventive maintenance tips will keep the product operating at peak performance:
• Locate the product in a cool, dry place.
• Clean the display console and all exterior surfaces with an approved or compatible cleaner (see Approved and Compatible
Cleaners) and a microfiber cloth.
• Long fingernails may damage or scratch the surface of the console; use the pad of the finger to press the selection buttons on the
console.
Approved and Compatible Cleaners
Two preferred cleaners have been approved by reliability experts: PureGreen 24 and Gym Wipes. Both cleaners will safely and
eectively remove dirt, grime and sweat from equipment. PureGreen 24 and the Antibacterial Force formula of Gym Wipes are both
disinfectants that are eective against MRSA and H1N1.
PureGreen 24 is available in a spray which is convenient for gym sta to use. Apply the spray to a microfiber cloth and wipe down the
equipment. Use PureGreen 24 on the equipment for at least 2 minutes for general disinfection purposes and at least 10 minutes for
fungus and viral control.
Gym Wipes are large, durable pre-moistened wipes to use on the equipment before and aer workouts. Use Gym Wipes on the
equipment for at least 2 minutes for general disinfection purposes.
Contact Customer Support Services to order these cleaners (1-800-351-3737 or email: customer[email protected]om).
Mild soap and water or a mild non-abrasive household cleaner can also be used to clean the display and all exterior surfaces. Use a
so microfiber cloth only. Apply the cleaner to the microfiber cloth before cleaning. DO NOT use ammonia or acid based cleaners. DO
NOT use abrasive cleaners. DO NOT use paper towels. DO NOT apply cleaners directly to the equipment surfaces.
Page 74 of 80
Troubleshooting
Malfunction Probable Cause Corrective Action
No Power. ON / OFF switch is not in proper position. Turn the switch to the ON position.
Power source is insuicient. Plug treadmill into a dedicated 20 amp circuit.
Using a voltmeter, verify power at outlet. If no
power exists, reset circuit breaker at panel.
Line cord is damaged. Replace line cord. Contact Cybex Customer Support
Services.
Line cord is improperly seated in socket. Inspect power connection at wall outlet and at
machine for proper contact.
NOTE: Treadmills only: You may be in “Energy
Saving Mode”.
Treadmill will go into Energy Saving Mode aer 5
minutes of inactivity. To wake the console, step on
the treadmill belt. The treadmill will automatically
wake and the console will light up. Waking up the
treadmill takes approximately 50 seconds aer
stepping onto the belt.
NOTE: Arc Trainers and Bikes only: You may be in
“Energy Saving Mode”.
Unit will go into Energy Saving Mode aer 5 minutes
of inactivity. To wake the console, pedal until you
hear a beep. The unit will automatically wake and
the console will light up. Waking the unit takes
approximately 50 seconds aer beginning to pedal.
Treadmill striding belt
slips o-center.
Floor surface is uneven. Check levelers and level treadmill. Check striding
belt and re-tension as necessary. Refer to Treadmill
and Bike Assembly Instructions.
Maximum treadmill
speed is reduced.
User is pushing striding belt. This occurs when the
runner is running faster than the striding belt will
travel, with the result of the striding belt being
pushed with the runner’s feet.
Instruct users not to push striding belt in either
direction.
User is stalling striding belt. This will occur with
heavier users at lower striding belt speeds. The
striding belt will “stall” if the user is traveling slower
than the striding belt speed.
Striding belt/deck malfunctions. The deck laminate
is worn through or the underside of striding belt is
glazed over (hard, glossy).
Replace belt and deck. Contact Cybex Customer
Support Services.
Power source is insuicient. Plug treadmill into a dedicated 20 amp circuit.
Rubbing sound comes
from underneath
treadmill.
Foreign objects may be stuck underneath the
machine.
Inspect underneath striding belt and machine.
Remove any debris or objects that may cause
interference with the treadmill.
Display does not
illuminate when
machine is powered on.
Loose connection at display console or motor
control board.
Check all electrical connections for proper
attachment. Contact Cybex Customer Support
Services..
Troubleshooting the Polar
®
Heart Rate Chest Strap
Heart rate reading is erratic or absent entirely
Probable Cause Corrective Action
Belt transmitter electrodes are not wet enough to pick up
accurate heart rate readings.
Wet the belt transmitter electrodes.
Page 75 of 80
Probable Cause Corrective Action
Belt transmitter electrodes are not laying flat against the skin. Ensure the belt transmitter electrodes are laying flat against the
skin.
Belt transmitter needs cleaning. Wash the belt transmitter with mild soap and water.
Belt transmitter not properly set up. Setup of the belt transmitter is accomplished by initially bringing
it with in 1 foot of the receiver. The receiver is in the console. Aer
the heart rate is displayed on the console the range is extended
to 3 feet.
Chest strap battery is depleted. Contact Customer Support Services for instructions on how to
have the chest strap replaced.
Abnormally elevated heart rate readings
Probable Cause Corrective Action
Electromagnetic interference from television sets and/or
antennas.
Move the exercise equipment a few inches away from the
probable cause, or move the probable cause a few inches away
from the exercise equipment, until the heart rate readings are
accurate.
Electromagnetic interference from cell phones.
Electromagnetic interference from computers.
Electromagnetic interference from cars.
Electromagnetic interference from high voltage power lines.
Electromagnetic interference from motor driven exercise
equipment.
Page 76 of 80

Copyrights and Trademarks
List of Copyrights and Trademarks
Bluetooth
®
is a registered trademark owned by Bluetooth SIG, Inc.
Polar
®
is a registered trademark of Polar Electro, Inc.
iPad
®
, iPhone
®
, iPod
®
, and Apple Watch
®
are registered trademarks of Apple Inc.
Android
™
is a trademark of Google Inc. PM-038-13. (3.14)
Gym Wipes
®
is a registered trademark of The 2XL Corporation.
PureGreen 24
™
is a trademark of Pure Green.
Samsung Galaxy Watch
®
Samsung, Galaxy S and Shop Samsung are all trademarks of Samsung Electronics Co., Ltd.
Page 77 of 80

Warranty
What is Covered
This Cybex commercial exercise equipment product is warranted to be free of all defects in material and workmanship.
Who is Covered
The original purchaser or any person receiving the product as a gi from the original purchaser. Warranty will be voided on subsequent
transfers.
How Long It is Covered
All coverage is provided by specific Product according to the guidelines listed in Warranty Information.
Who Pays Transportation and Insurance For Service
If the Product or any covered part must be returned to a service facility for repairs, We, Life Fitness, will pay all transportation and
insurance charges for the first year. You are responsible for transportation and insurance charge aer the first year.
What We Will Do To Correct Covered Defects
We will ship to you any new or rebuilt replacement part or component, or at our option, replace the Product. Such replacement parts
are warranted for the remaining portion of the original warranty period.
What is Not Covered
Any failures or damage caused by unauthorized service, misuse, accident, negligence, improper assembly or installation, debris
resulting from any construction activities in the Product’s environment, rust or corrosion as a result of the Product’s location,
alterations or modifications without our written authorization or by failure on your part to use, operate and maintain the Product as
set out in your Operation Manual (“Manual”).
One type RJ45 interchangeable Network ready and Fitness Entertainment port is supplied with the Product. This port complies with
the FitLinxx CSAFE specification dated August 4, 2004 stating: 4.75VDC to 10VDC; maximum current of 85mA. Any Product damage
caused by a load exceeding this FitLinxx CSAFE specification is not covered by warranty.
All terms of this warranty are void if this product is moved beyond the continental borders of the United States of America (excluding
Alaska, Hawaii and Canada) and are then subject to the terms provided by that country’s local authorized Cybex representative.
What You Must Do
Retain proof of purchase. use, operate and maintain the Product as specified in the Manual; notify the place of purchase of any defect
within 10 days aer discovery of the defect; if instructed, return any defective part for replacement or, if necessary, the entire Product
for repair. Cybex reserves the right to decide whether or not a product is to be returned for repair.
How to Get Parts and Service
Refer to the Corporate Headquarters section of this manual for your local service contact information. Reference your name, address
and the serial number of your Product (consoles and frames may have dierent serial numbers). They will tell you how to get a
replacement part, or, if necessary, arrange for service where your Product is located.
Exclusive Warranty
THIS LIMITED WARRANTY IS IN LIEU OF ALL OTHER WARRANTIES OF ANY KIND EITHER EXPRESSED OR IMPLIED, INCLUDING BUT NOT
LIMITED TO THE IMPLIED WARRANTIES OF MERCHANTABILITY AND FITNESS FOR A PARTICULAR PURPOSE, AND ALL OTHER
OBLIGATIONS OR LIABILITIES ON OUR PART. We neither assume nor authorize any person to assure for us any other obligation or
liability concerning the sale of this Product. Under no circumstances shall we be liable under this warranty, or otherwise, of any
damage to any person or property, including any lost profits or lost savings, for any special, indirect, secondary, incidental or
consequential damages of any nature arising out of the use of or inability to use this Product. Some states do not allow the exclusion
or limitation of implied warranties or of liability for incidental or consequential damages, so the above limitations or exclusions may
not apply to you.
Page 78 of 80
Changes in Warranty Not Authorized
No one is authorized to change, modify or extend the terms of this limited warranty.
Eects of State Laws
This warranty gives you specific legal rights, and you may have other rights which vary from state to state and country by country.
Warranty Information
Lifetime 10 years 7 years 3 years 2 years 1 Year 6 Months
Console Electrical and
Mechanical
Parts
Labor Overlay,
Headphone
Jack, and USB
Port
R Series Treadmill Frame,
Lifespring
™
Shock
Absorbers,
and Motor
Electrical
Components
Mechanical
Components
and Labor
R Series Upright
Bike
Electrical and
Mechanical
Parts
Labor
R Series
Recumbent Bike
Electrical and
Mechanical
Parts
Labor
R Series Arc
Trainer (Lower
Body and Total
Body)
Electrical and
Mechanical
Parts
Labor
Warranties outside the U.S. may vary.
Page 79 of 80

Columbia Center III - 9525 West Bryn Mawr Ave, Rosemont, IL 60018 • 800-351-3737 • 847-288-3700 • FAX 800-216-8893
www.cybexintl.com


