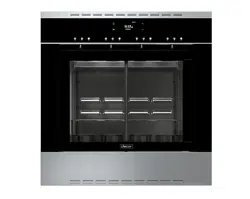
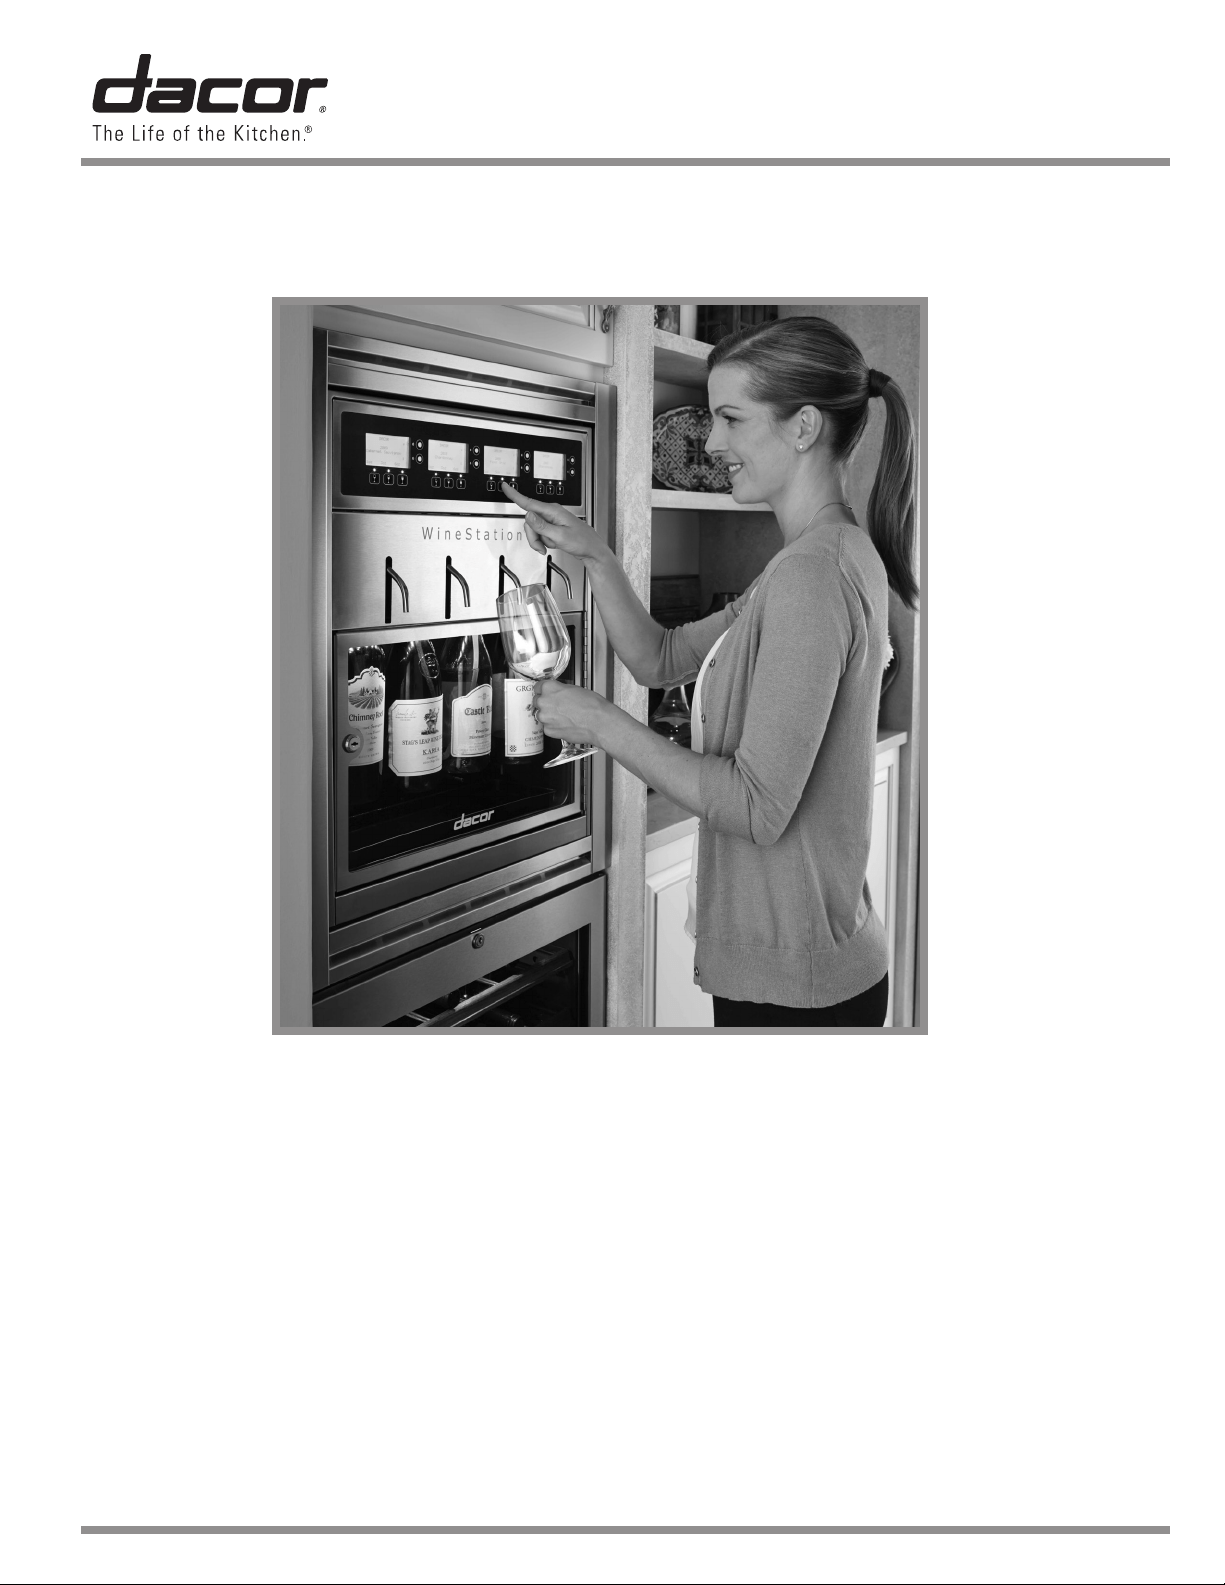
Use and Care Manual
Wine Dispensing System
Part No. 107375 Rev. G
* WineStation is a registered trademark of Napa Technology
Model DYWS4
Table of Contents
Important Safety Instructions ................................. 1
Getting to Know Your Wine Dispensing System ....... 3
Setting Up Your Wine Dispensing System
............... 7
Operating Your Wine Dispensing System ............... 8
Parts and Accessories ........................................ 22
Before You Call for Service
................................. 22
Warranty and Service .......................................24
Warranty Card
.....................................Back Cover
Shown with optional wall mount trim kit
© 2013 Dacor, all rights reserved
READ AND SAVE THESE INSTRUCTIONS
1
Important Safety Instructions
Installer: Leave this manual with the appliance.
Consumer: Read this use and care manual com-
pletely before using this appliance. Save it for future
reference. It contains important use and care infor-
mation.
For service and warranty information, see
page 24.
If you have any questions, other than warranty
questions, call:
Dacor Customer Service
(800) 793-0093 (U.S.A. and Canada)
Monday - Friday 6:00 A.M. to 5:00 P.M. Pacific Time
Have the model and serial number of your appliance
ready when you call. The label with these numbers
is located on the back of the unit. Write the num-
bers below for reference.
Model number ____________________________
Serial number ____________________________
Date of purchase __________________________
Since we continually improve the quality and per-
formance of our products, we may make changes
to the appliance without updating this manual. Visit
www.dacor.com to download the latest version.
Important Information About
Safety Instructions
The Important Safety Instructions and warnings
in this manual cannot cover all possible problems
and situations that can occur. Use common sense
and caution when installing, maintaining or operat-
ing this or any other appliance.
Always contact Dacor Customer Service about prob-
lems or situations that you do not understand.
Safety Symbols and Labels
DANGER
Immediate hazards that WILL result in severe personal
injury or death.
WARNING
Hazards or unsafe practices that COULD result in severe
personal injury or death.
CAUTION
Hazards or unsafe practices that COULD result in minor
personal injury or property damage.
DANGER
IMPORTANT:
• Do not store or use combustible, flammable or
explosive vapors and liquids (such as gasoline) inside
or in the vicinity of this or any other appliance.
• Use only the argon gas cylinder type specified in this
manual with this appliance. Use of any other type
of gas or cylinder may result in explosion, fire and
personal injury.
WARNING
ELECTRIC SHOCK HAZARD:
• Never touch the power cord with damp hands.
• NEVER unplug the appliance by pulling on the power
cord. Always grip the plug firmly and pull it straight out
from the electrical outlet.
• When moving the appliance away from the wall, be
careful not to roll over or damage the power cord.
• Do not repair or replace any part of this appliance
unless specifically recommended in the literature
accompanying it. A qualified service technician should
perform all other service. Do not remove the cover(s).
There are no user serviceable parts inside the unit.
If the appliance is faulty, turn it off, unplug it from the
electrical outlet and call a qualified service technician.
WARNING
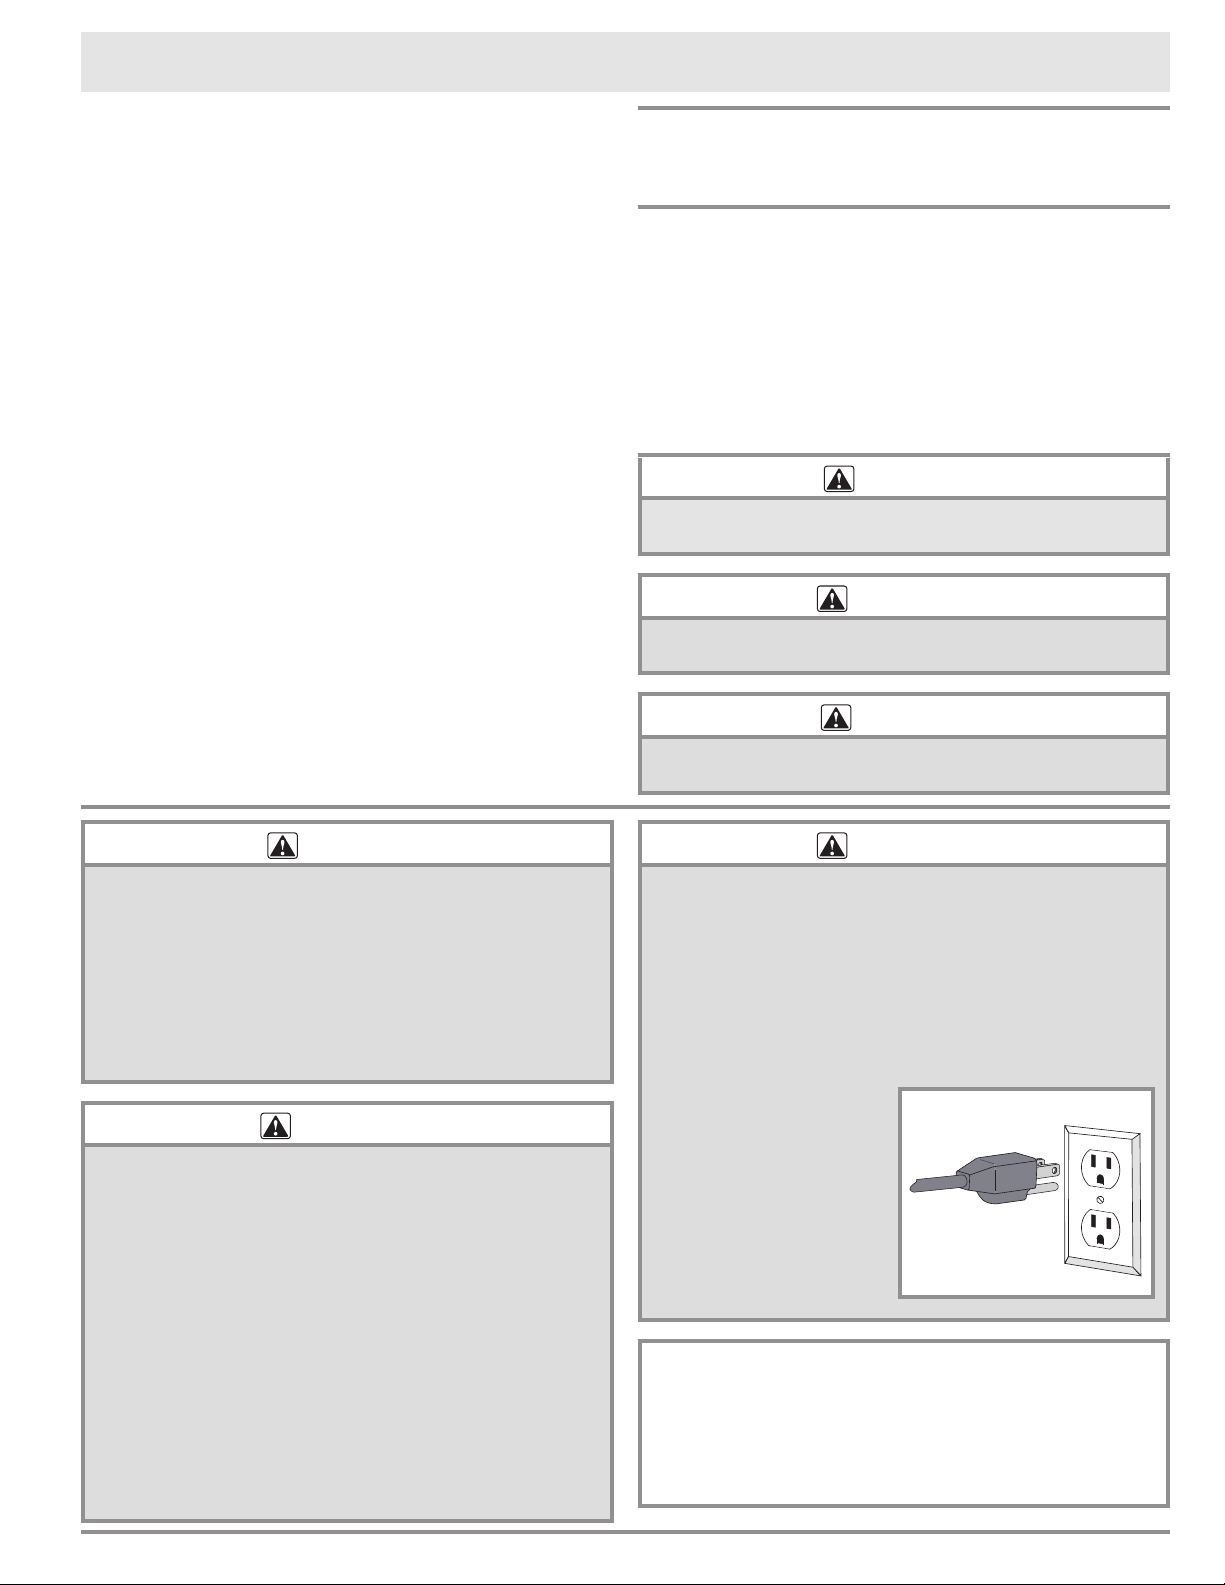
IMPORTANT: The power supply for this appliance is
equipped with a three prong grounding power plug for
protection against possible electric shock hazards. It
must be plugged into a dedicated, grounded electrical
outlet. If only a two prong electrical outlet is available, it
is the responsibility of the customer to have it replaced
with the proper type by a licensed electrician. Do not
under any circumstances:
• Cut or remove the
third (ground) prong
from the power cord.
• Use an adapter plug.
• Modify the power cord.
• Use an extension
cord.
• Use a power cord that
is frayed or damaged.
State of California Proposition 65 Warnings:
WARNING: This product contains one or more chemi-
cals known to the State of California to cause cancer.
WARNING: This product contains one or more chemi-
cals known to the State of California to cause birth
defects or other reproductive harm.
Power cord with
3 prong plug
Grounded type
electrical outlet
2
Important Safety Instructions
• This appliance must be properly installed according
to the accompanying installation instructions before
use.
• Read this use and care manual completely before
operating this appliance.
• Failure to follow the instructions in this manual
properly may result in personal injury or damage to
the appliance. Dacor cannot be held responsible for
damage to property or injury to persons caused by
failure to comply with the instructions contained in
this handbook.
• If you receive a damaged product, immediately
contact your dealer. Do not install or use a damaged
appliance.
• Keep all packaging materials away from children.
Plastic sheets and bags can cause suffocation.
• Excessive weight hazard - Use two or more people
to move and install the wine dispensing system.
Failure to do so can result in back or other injury.
• Before cleaning or performing any type of service,
turn the unit off and disconnect the power plug from
the electrical outlet or turn off power at the circuit
breaker panel or fuse box.
• Use this appliance only for tasks for which it is
designed (dispensing wine). This appliance is not
intended for commercial or industrial use.
• To prevent bursting, do not expose the argon gas
cylinders to open flame. Store and use the cylinders
at temperatures below 130°F (54°C). Do not dispose
of the gas cylinders in fire or an incinerator.
• To avoid an electric shock hazard or other personal
injury, do not put body parts or any other objects into
any opening, air vent, the base grille or the bottom of
the appliance.
• Do not leave children alone or unattended in the area
around the appliance. Do not allow children to play
with the controls, open and close the doors or touch
other parts of the appliance. Keep the argon gas
cylinders out of reach of children.
• Do not tamper with the controls.
• Only allow individuals to use the wine dispensing
system who are able to operate it properly.
• Store and use the appliance and the argon gas
cylinders only in areas with adequate ventilation. Do
not directly inhale argon gas.
• Keep all cleaning solutions out of reach of children.
• Never allow anyone, including children, to sit, stand,
or climb on any part of the appliance. Doing so may
cause damage, serious injury or death. Do not allow
children to play with the controls, or touch other parts
of the appliance.
• Clean and maintain this appliance and the parts
that come with it regularly according to the Care
and Cleaning section of this manual. Clean it only
in the manner instructed. Use only the cleaning
agents specified. Check the drip tray regularly for
condensation build up.
• DO NOT remove the leveling feet or place the unit
in the upright position without the feet attached.
Failure to attach the feet and maintain the required
ventilation space of 1” (2.5 cm) above and below the
unit will void the warranty and may cause countertop
damage.
• Care should always be taken when handling
pressurized gas. Make sure the specified tubing and
regulator assembly are always used.
• This appliance is not suitable for installation in an
area where a water jet could be used.
WARNING
WARNING
General Safety Precautions
To reduce the risk of fire, electric shock, serious injury or death when using your wine dispensing system,
follow basic safety precautions, including the following:
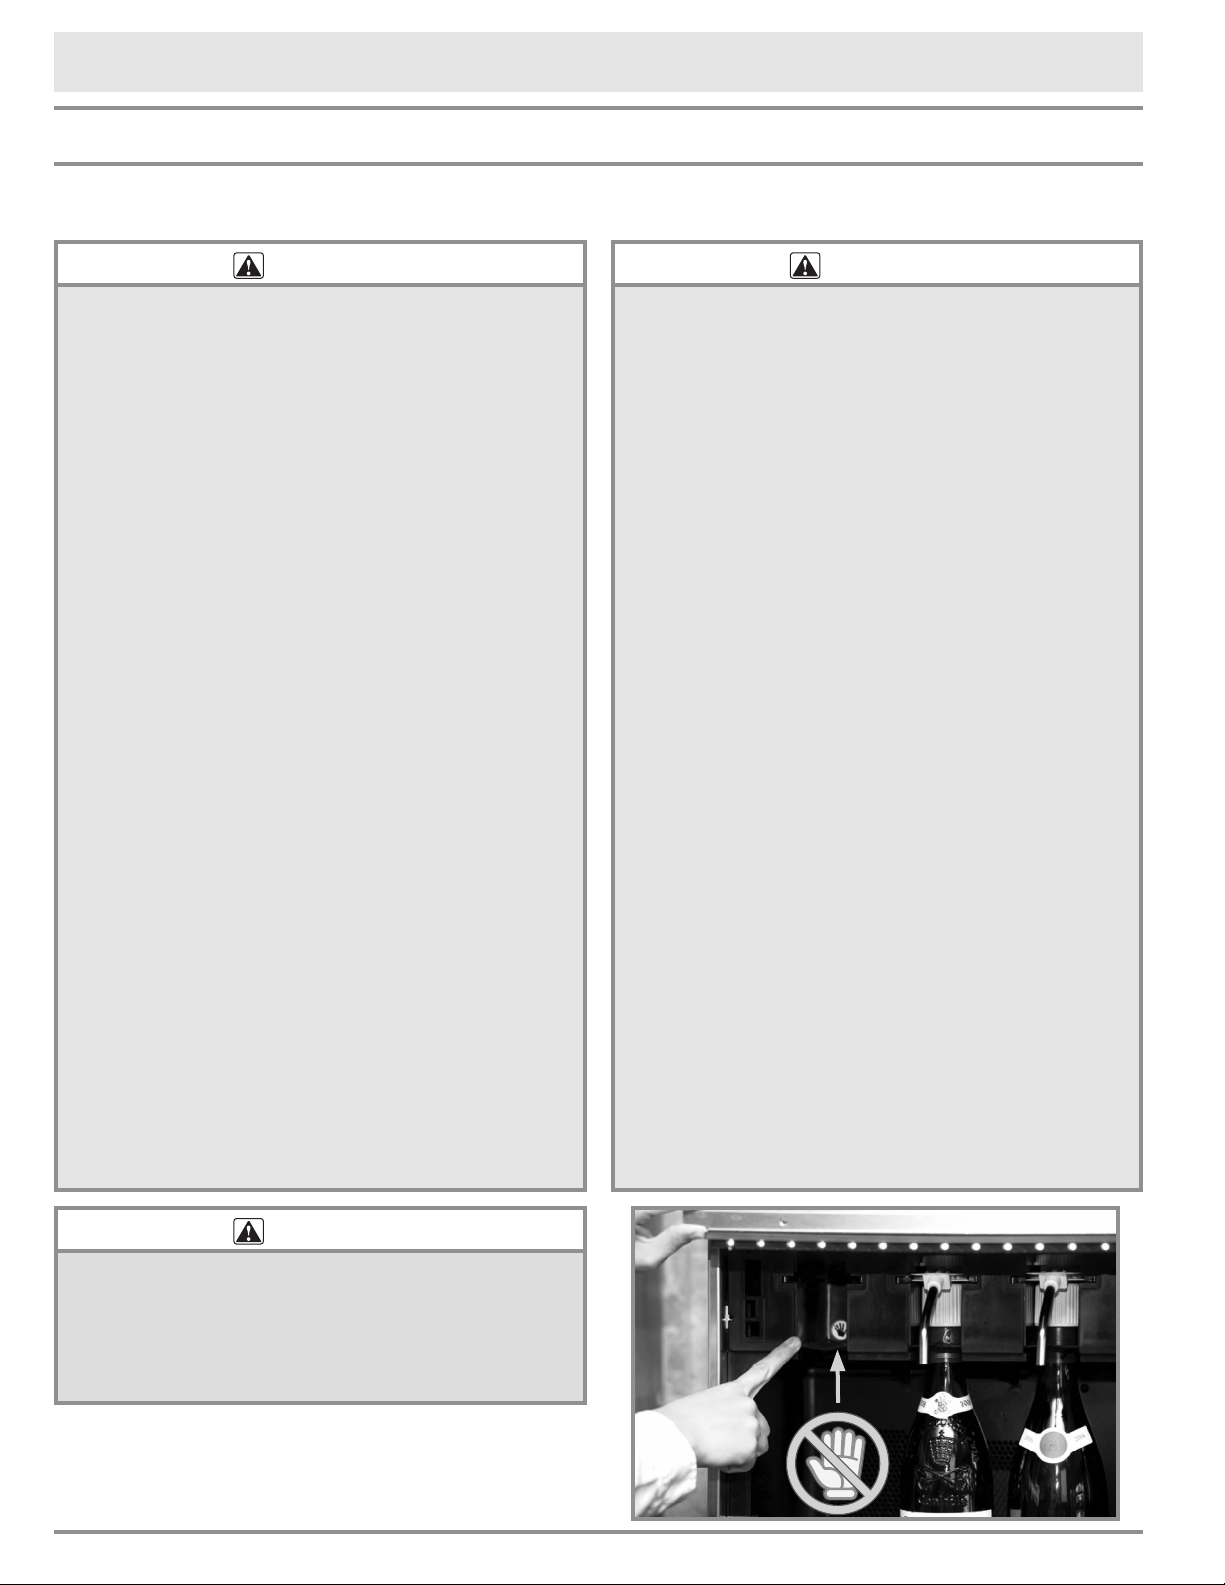
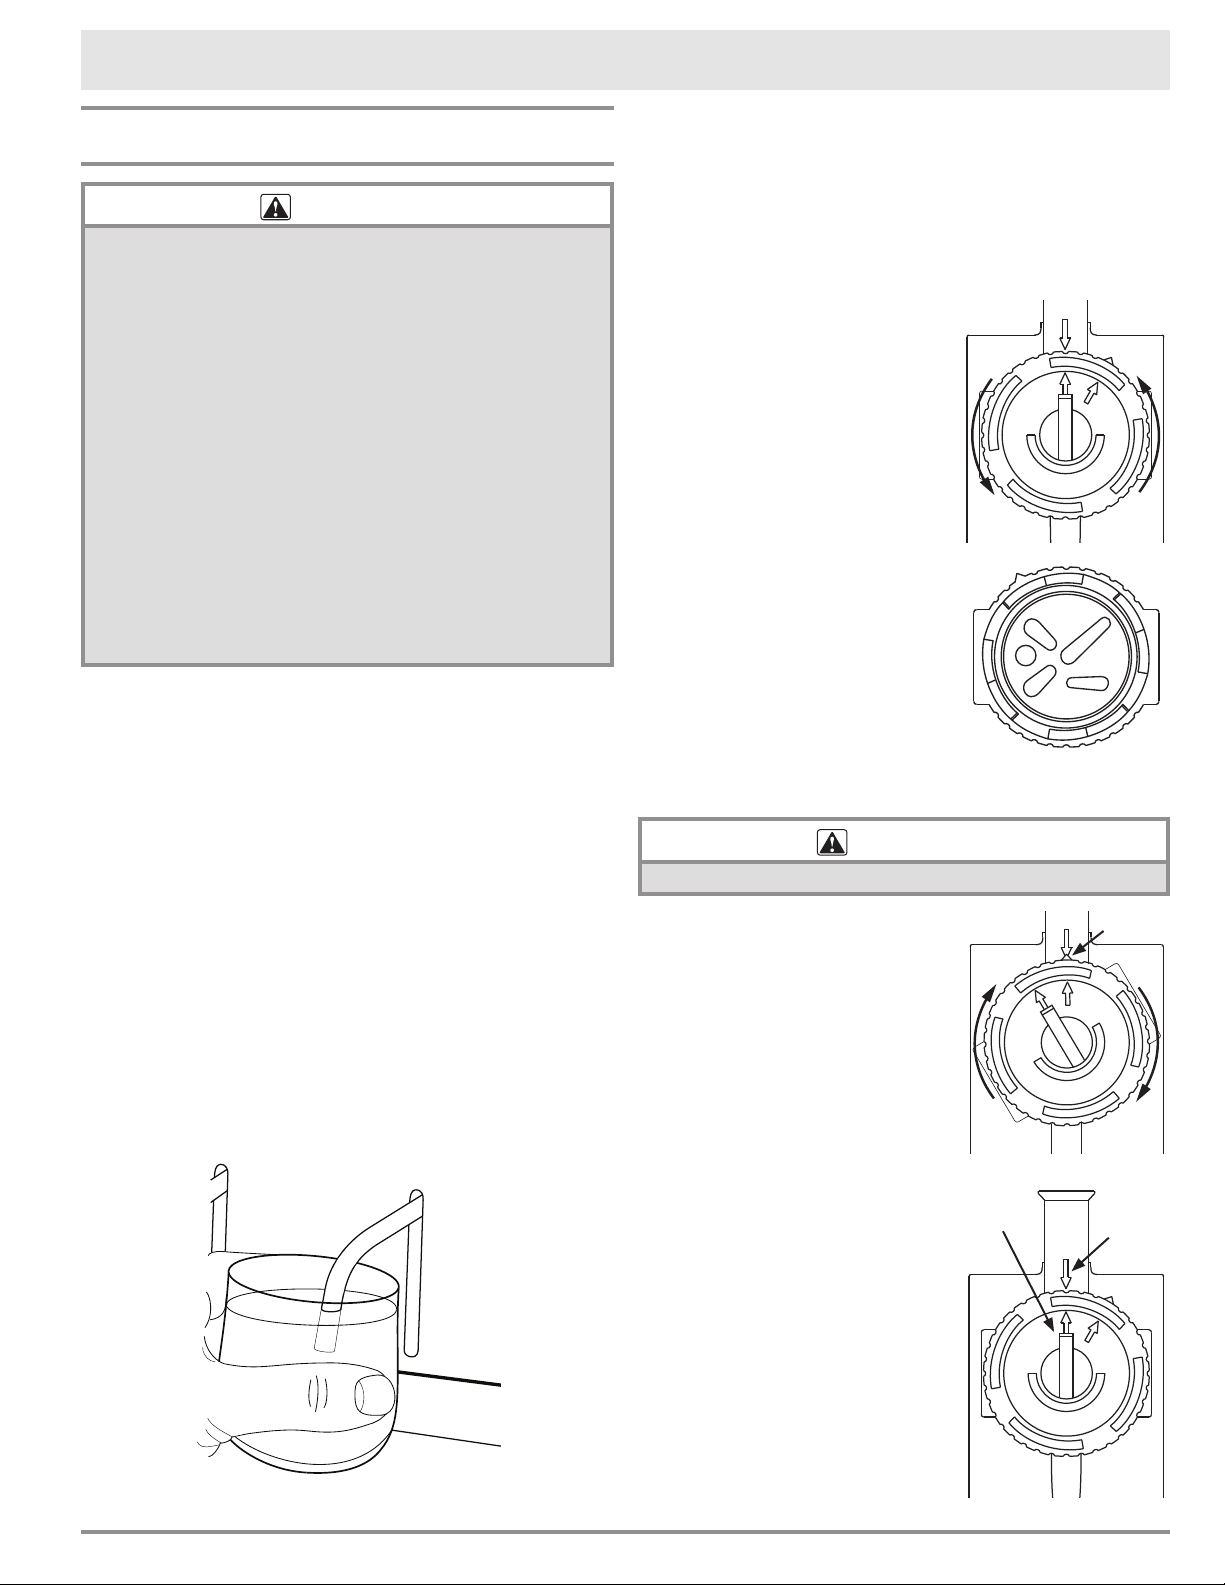
WARNING
Do not place your hands or fingers in areas with
moving parts. NEVER place fingers or hands into the
dispensing head slot inside the bottle bay (see photo,
right). Personal injury may result. Call a qualified service
technician to diagnose any problems inside the bottle bay
or behind enclosed panels.

3
Getting to Know Your Wine Dispensing System
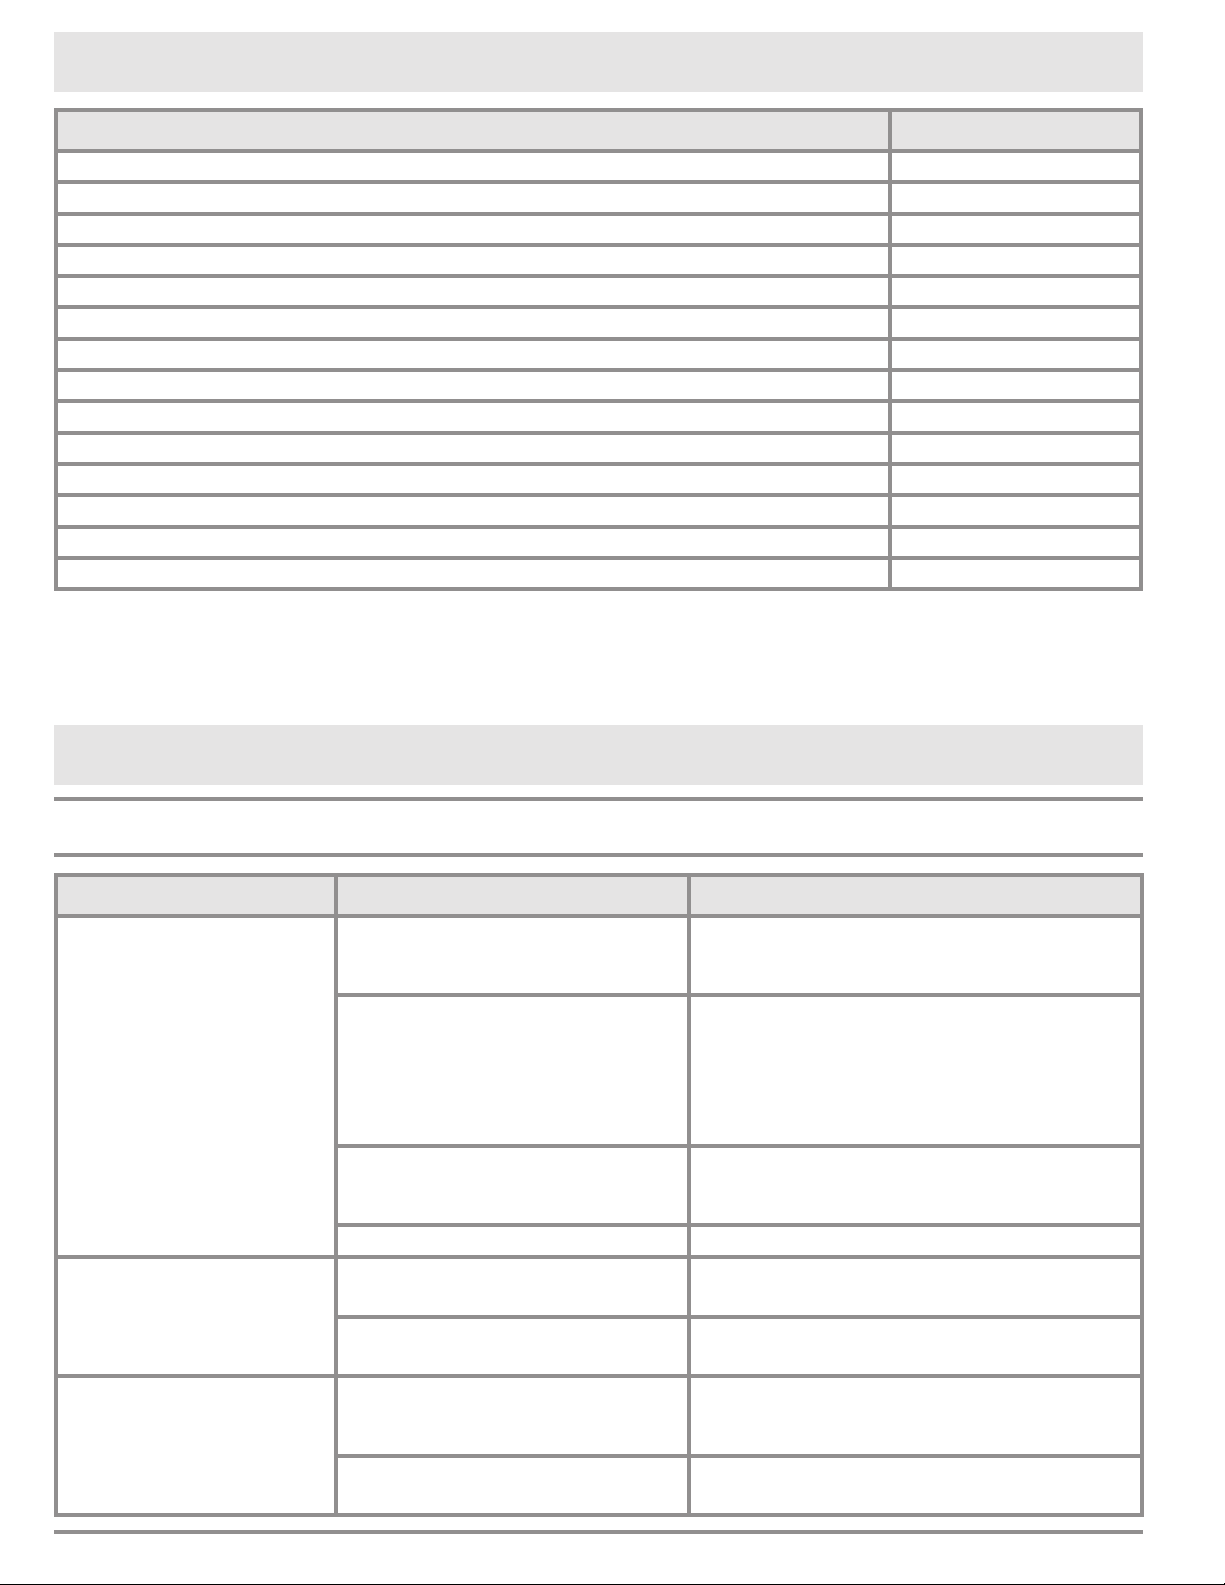
Specifications
Internal temperature
(bottle bay)
Approx. 25°F/3.9°C
below room temperature
Power supply input
requirements
120 Vac, 60 Hz.,
2 Amps.
Operating (room)
temperature*
Min. 50°F (10°C)
Max. 80°F (26.7°C)
System weight 80 lbs/31.75 kg (empty)
Gas type Food grade argon
*This appliance is designed for indoor use. It may
be used outdoors provided it is installed under cover
in a dry location and operated within the required
room temperature. This system is equipped with a
low power consumption, TEC cooling system, that
cools the inside of the bottle bay to a temperature
approximately 20°F (11°C) less than the tempera-
ture outside the unit. Therefore, the ability to cool
wine is limited by higher room temperatures.
Introduction
• There are three factors that affect wine preser-
vation; oxidation, temperature and light. Your
wine dispensing system limits the effects of
these factors to provide a winery fresh taste for
up to 60 days after opening the bottle.
Your wine dispensing system uses argon gas,
which is heavier than air. The system injects
argon into the wine bottle and displaces any
residual air so that the wine is exposed only to
the argon, not oxygen. The unit's cooling system
and tinted door minimize the effects of tempera-
ture and light on the wine as well.
These features allow you to uncork and serve
multiple vintages from your personal wine collec-
tion without having to throw away left over wine
at the end of the evening. With the purchase of
additional dispensing heads, you can remove
bottles of wine (with the dispensing head still
attached) that you are not currently using and
store them for later use in the refrigerator. The
wine will continue to be preserved for up to two
weeks because the argon gas stays in the bottle
as long as the dispensing head is attached.
• All of the parts of the wine dispensing system
that touch the wine can be easily cleaned to
maintain sanitary dispensing.
• The optional two zone temperature kit, is for
storing red wines at a higher temperature than
white wines. When the kit is installed, the tem-
perature for the two left bottles stays approxi-
mately 13°F (7°C) higher than the temperature
for the two right bottles. See page 22.
Important Things to Know
• Your wine dispensing system is NOT designed
for the dispensing of sparkling wine such as
Champagne. Dispensing sparkling wines from
your wine dispensing system will cause a large
amount of splatter when the carbon-dioxide in
the wine hits the air outside the spout.
• Your wine dispensing system is not designed to
dispense beverages other than wine. Other bev-
erages may be dispensed, but the (wine) pour
detection system must be turned off. If bever-
ages other than wine are dispensed from the
unit, the argon gas will continue to be depleted
at the normal rate and will still need to be
replaced for the unit to function, whether wine is
being dispensed or not.
• Wine cannot be dispensed from two bottles at
the same time.
4
Getting to Know Your Wine Dispensing System
Switch Positions
ON
SERVICE MODE
RESERVED
OFF
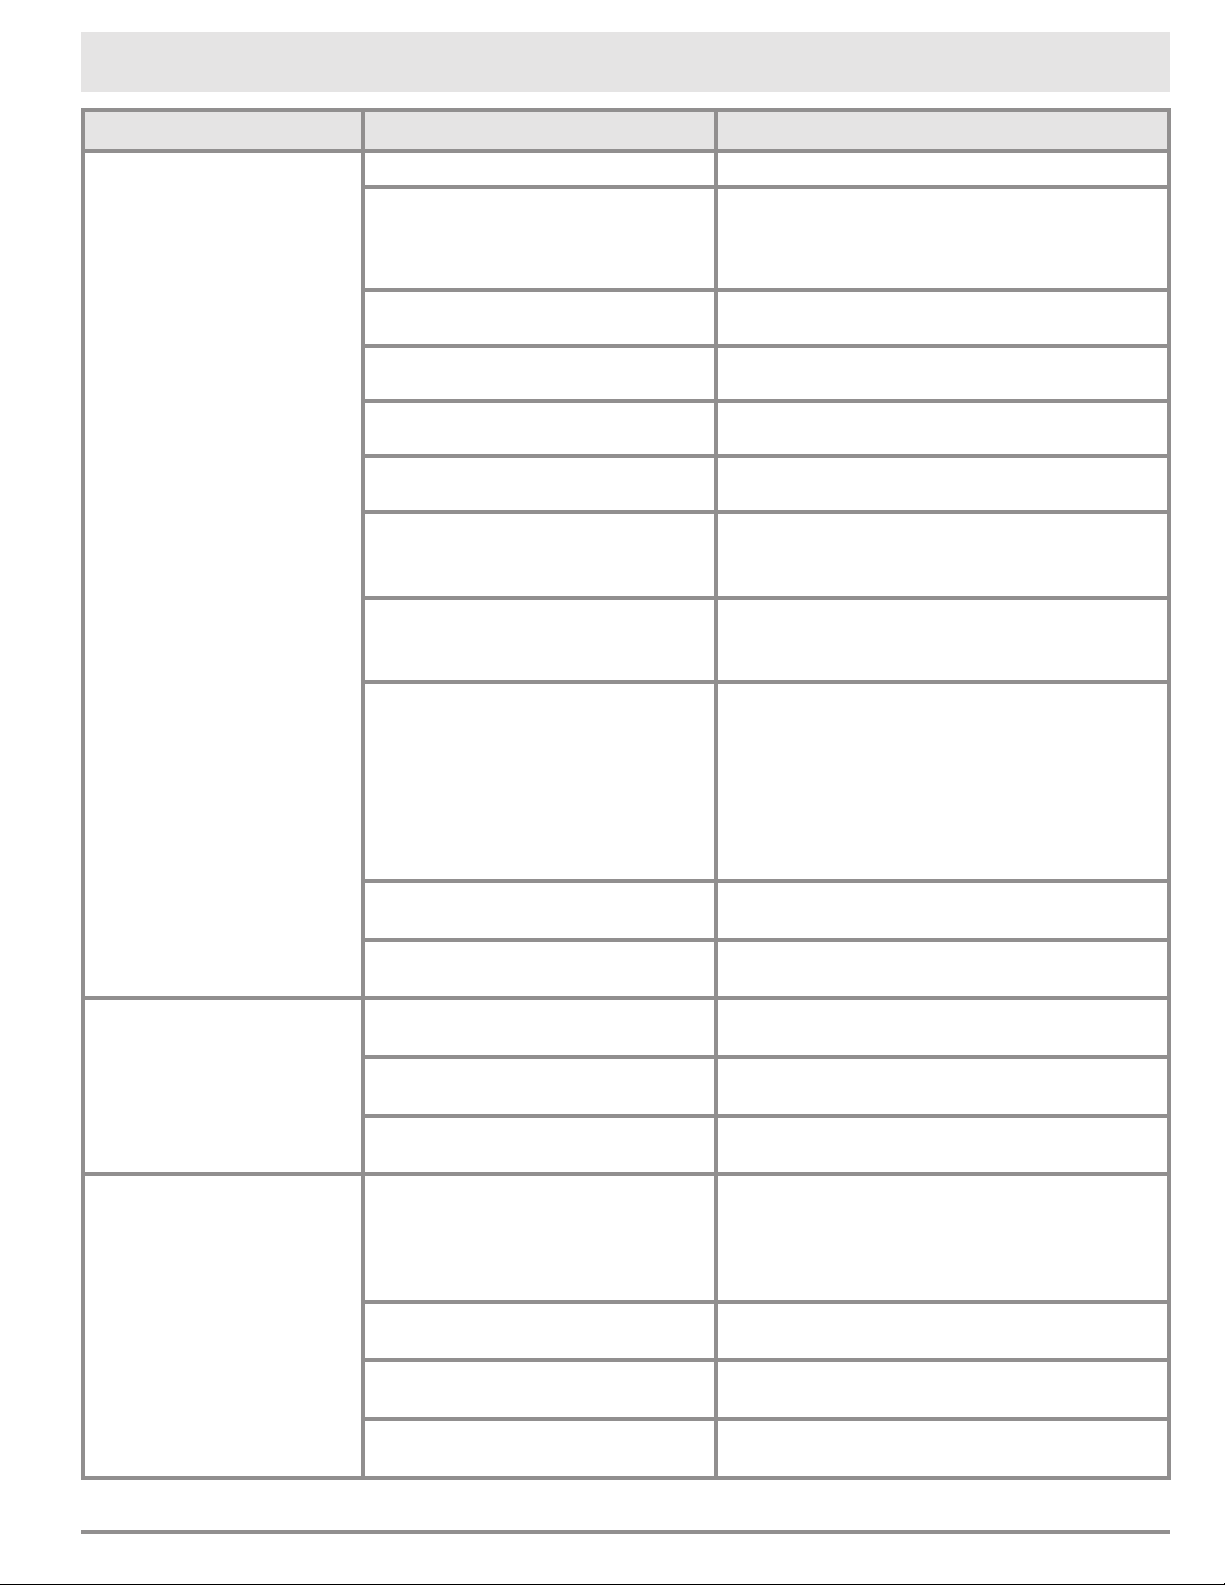
System
Main Power Switch
(under spout cover)
For use by
authorized
service
personnel only
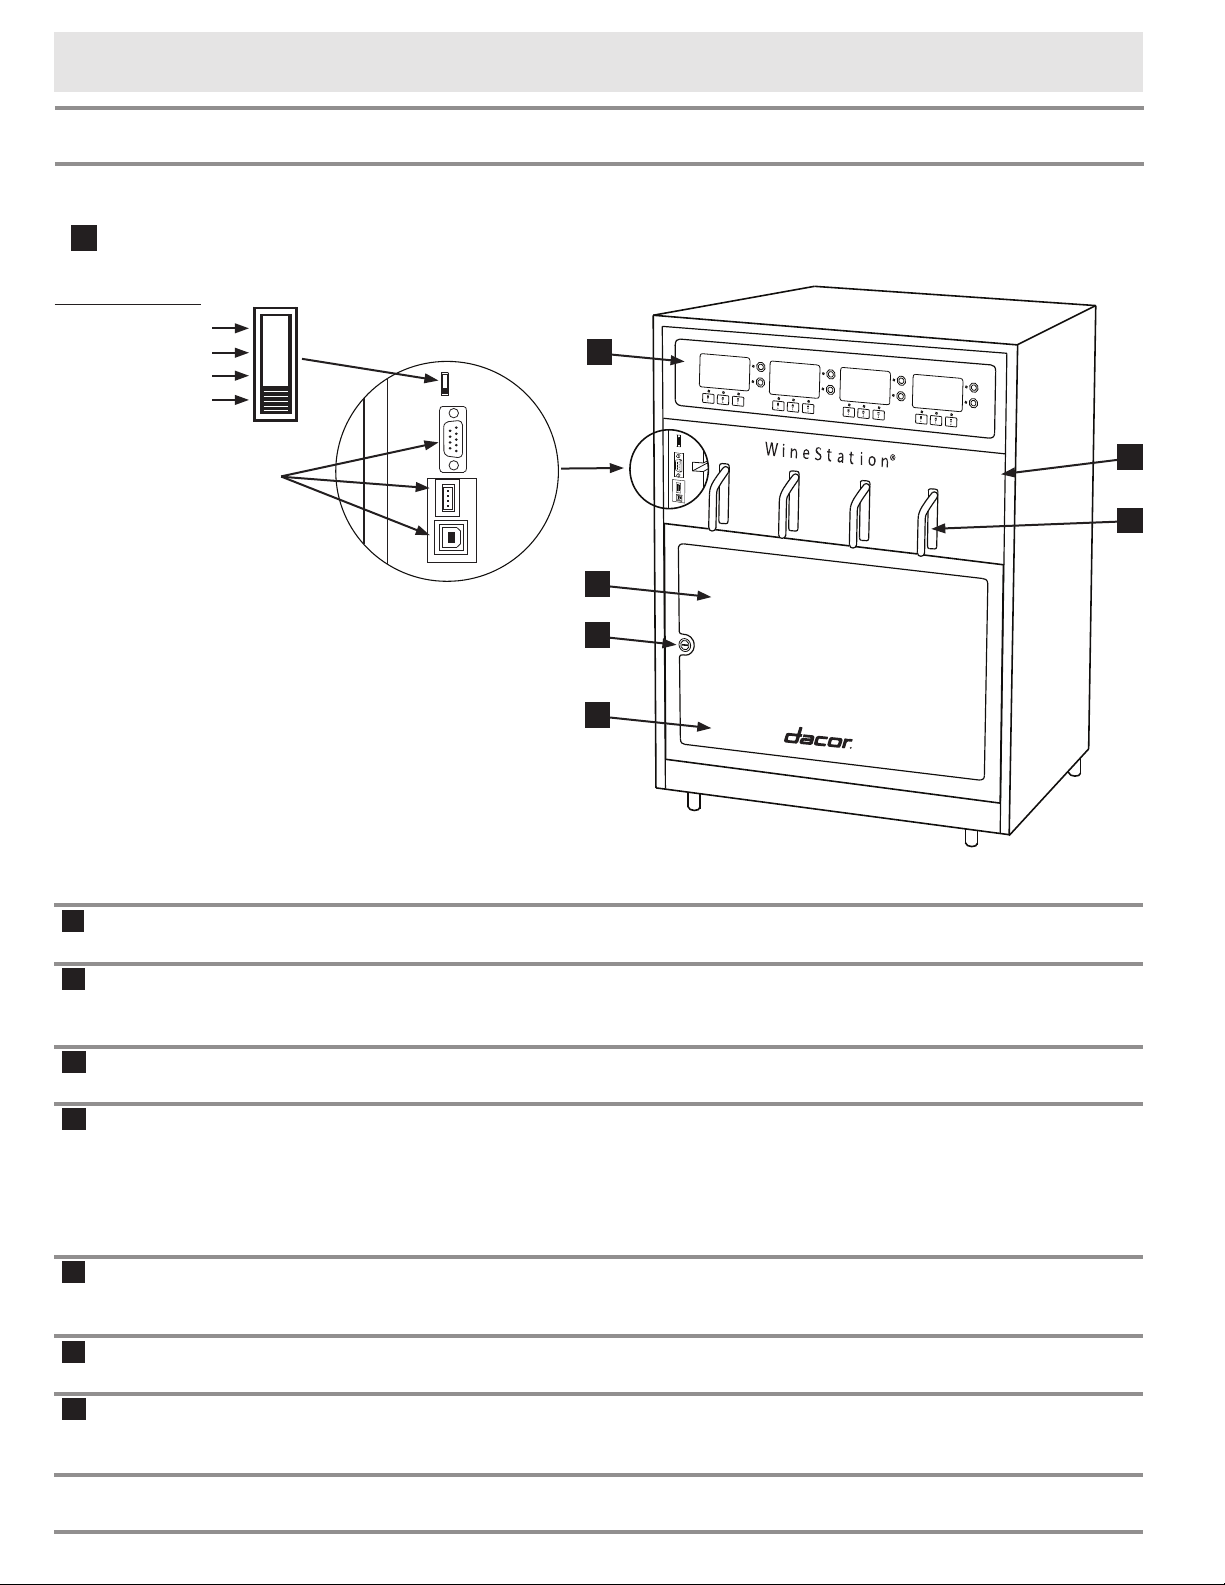
A
Main power
switch
Use the switch to turn the system ON and OFF and to access the main service
menu (see page 11).
B
Control panel The control panel has a display and set of pour control buttons for each wine
bottle. The control panel is also used to change the settings on the unit, such as
amount of wine poured with each button push and the temperature settings.
C
Bottle bay The bottle bay can hold up to four bottles of wine at a time, ready for pouring at
the touch of a button.
D
Bottle bay door The locking bottle bay door is see-through to allow you to read the bottle labels
with the door closed. When the key is removed, the lock on the door prevents
access to the wine bottles in two ways. First, it prevents direct access to the
wine bottles by keeping the door from opening. Second, when the control panel
is locked (see page 15), the lock on the door prevents access to the main
power switch which is required to unlock the control panel and dispense wine.
E
Drip tray Inside the bottle bay. The drip tray is removable and washable. It helps protect
against spills and catches condensation build up. Empty regularly to prevent
overflow.
F
Spout cover Open the door and lift up the spout cover to insert the wine bottles (with dis-
pensing heads attached) into the system and to access the power switch.
G
Spouts Attached to the removable Clean-Pour
®*
dispensing heads (see page 6) that
are inserted into the bottle bay, the spouts allow quick and clean dispensing of
your favorite wines.
D
E
C
G
B
A
F
* Clean-Pour is a registered trademark of Napa Technology
5
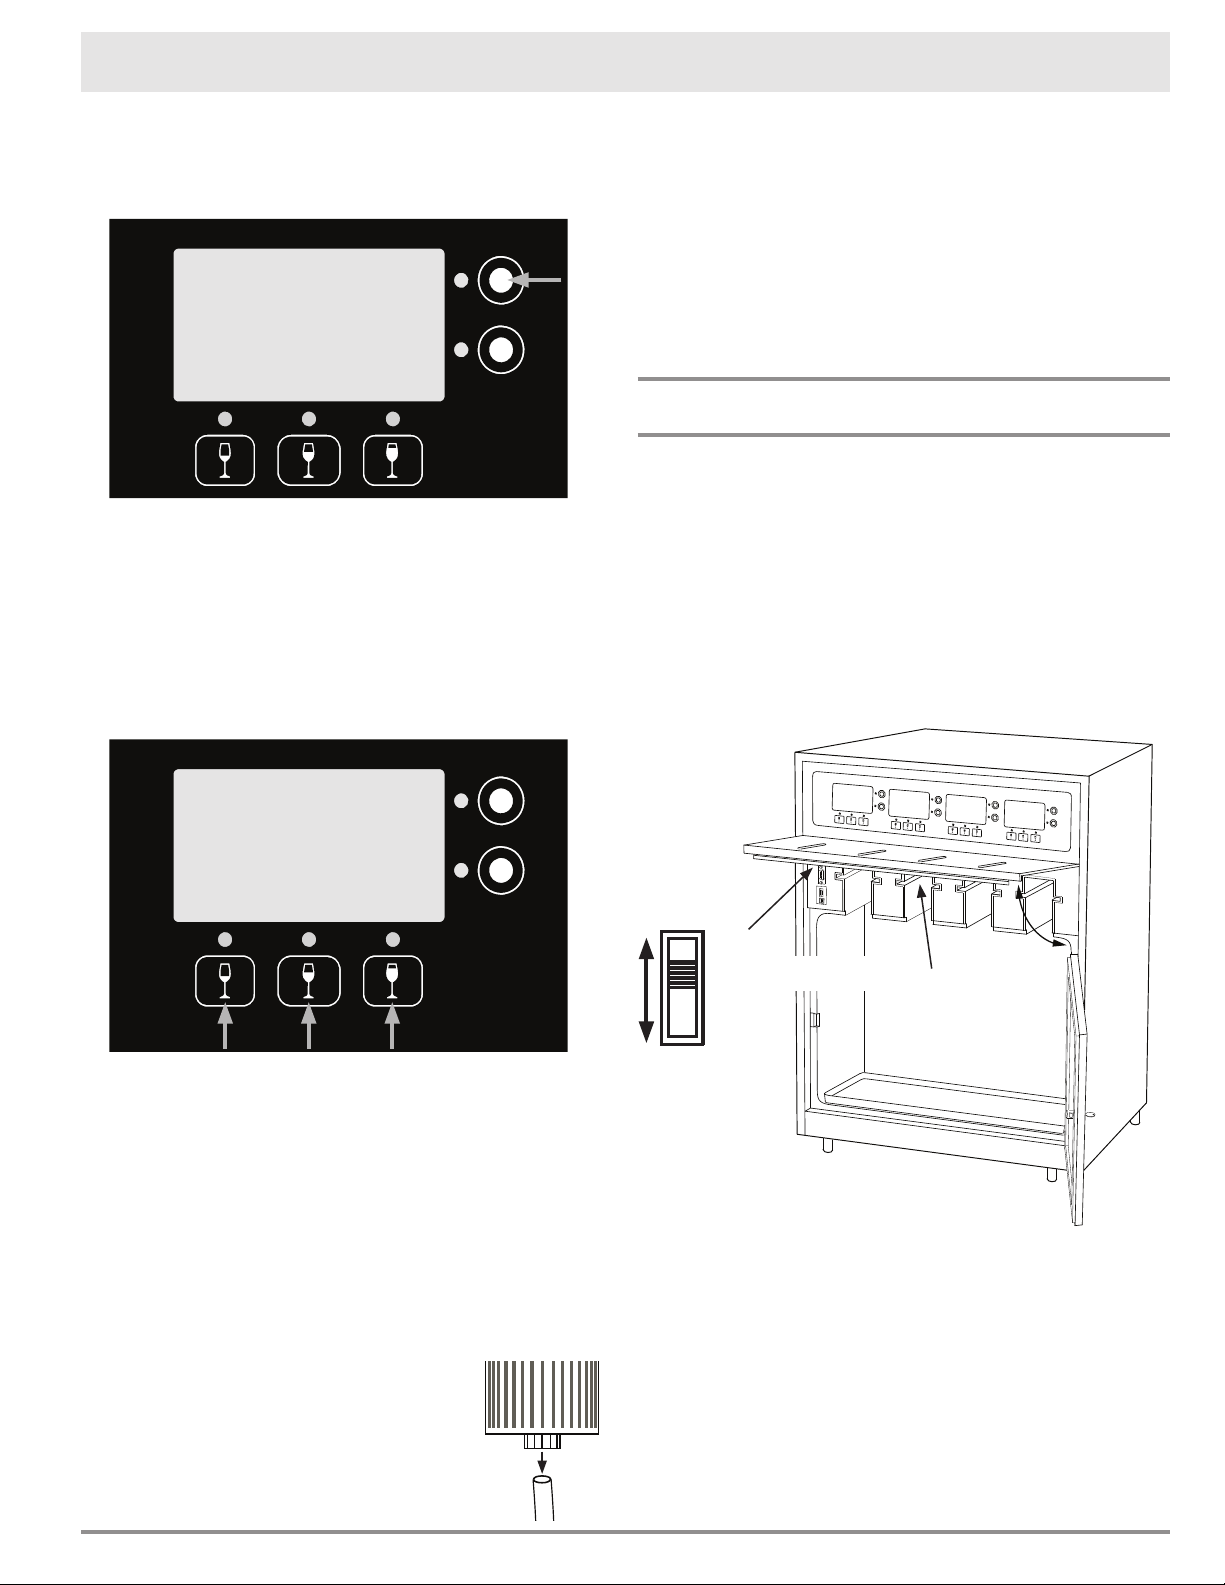
Getting to Know Your Wine Dispensing System
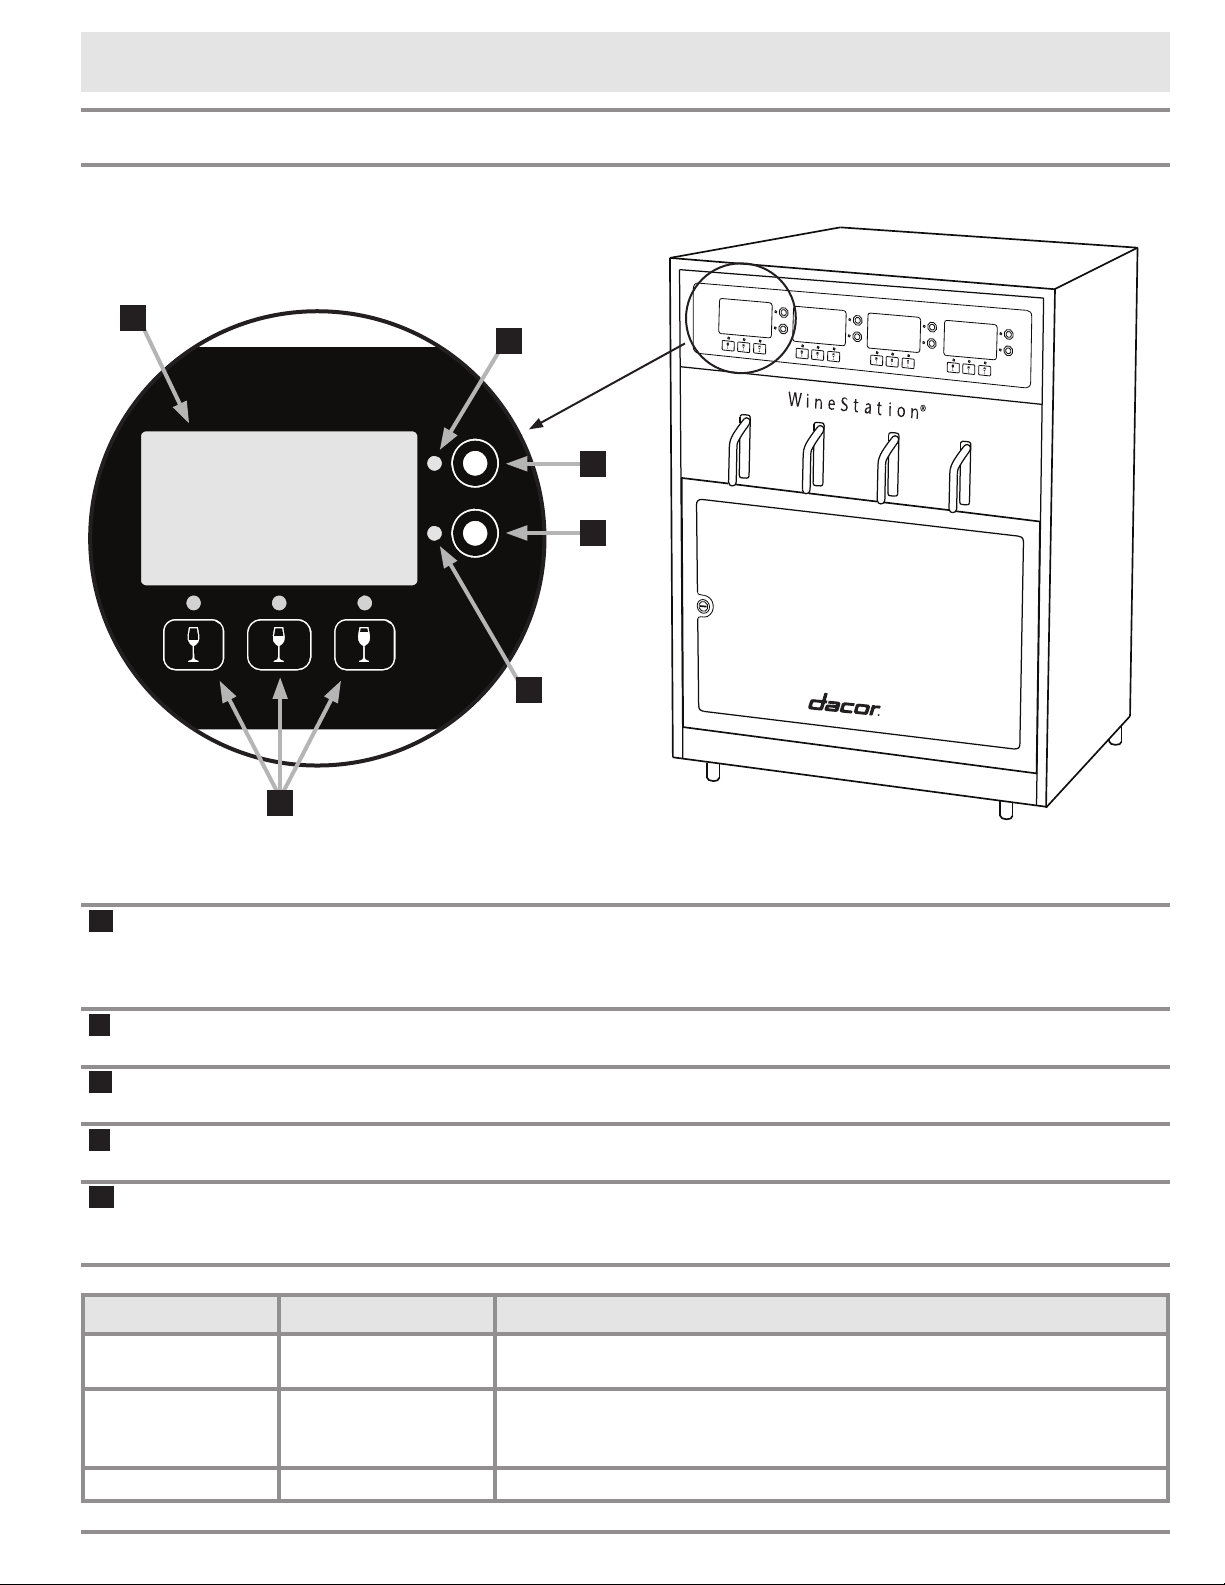
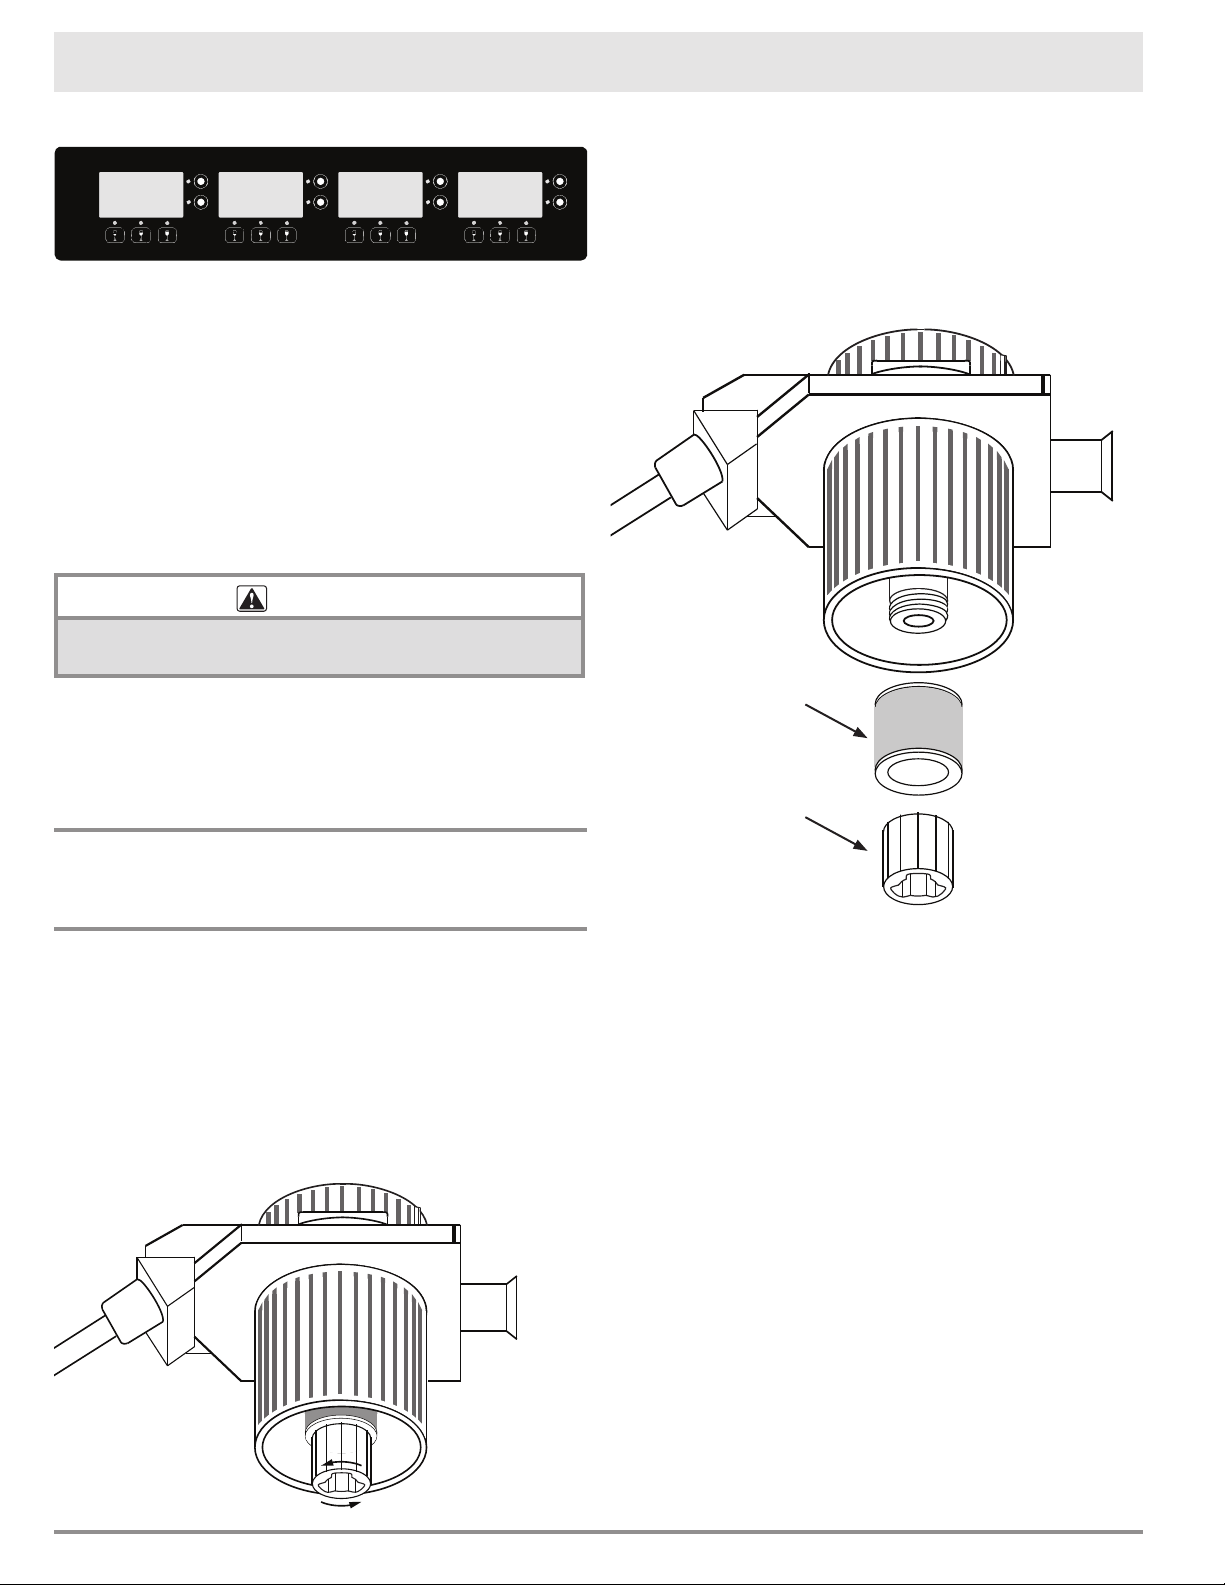
Control Panel
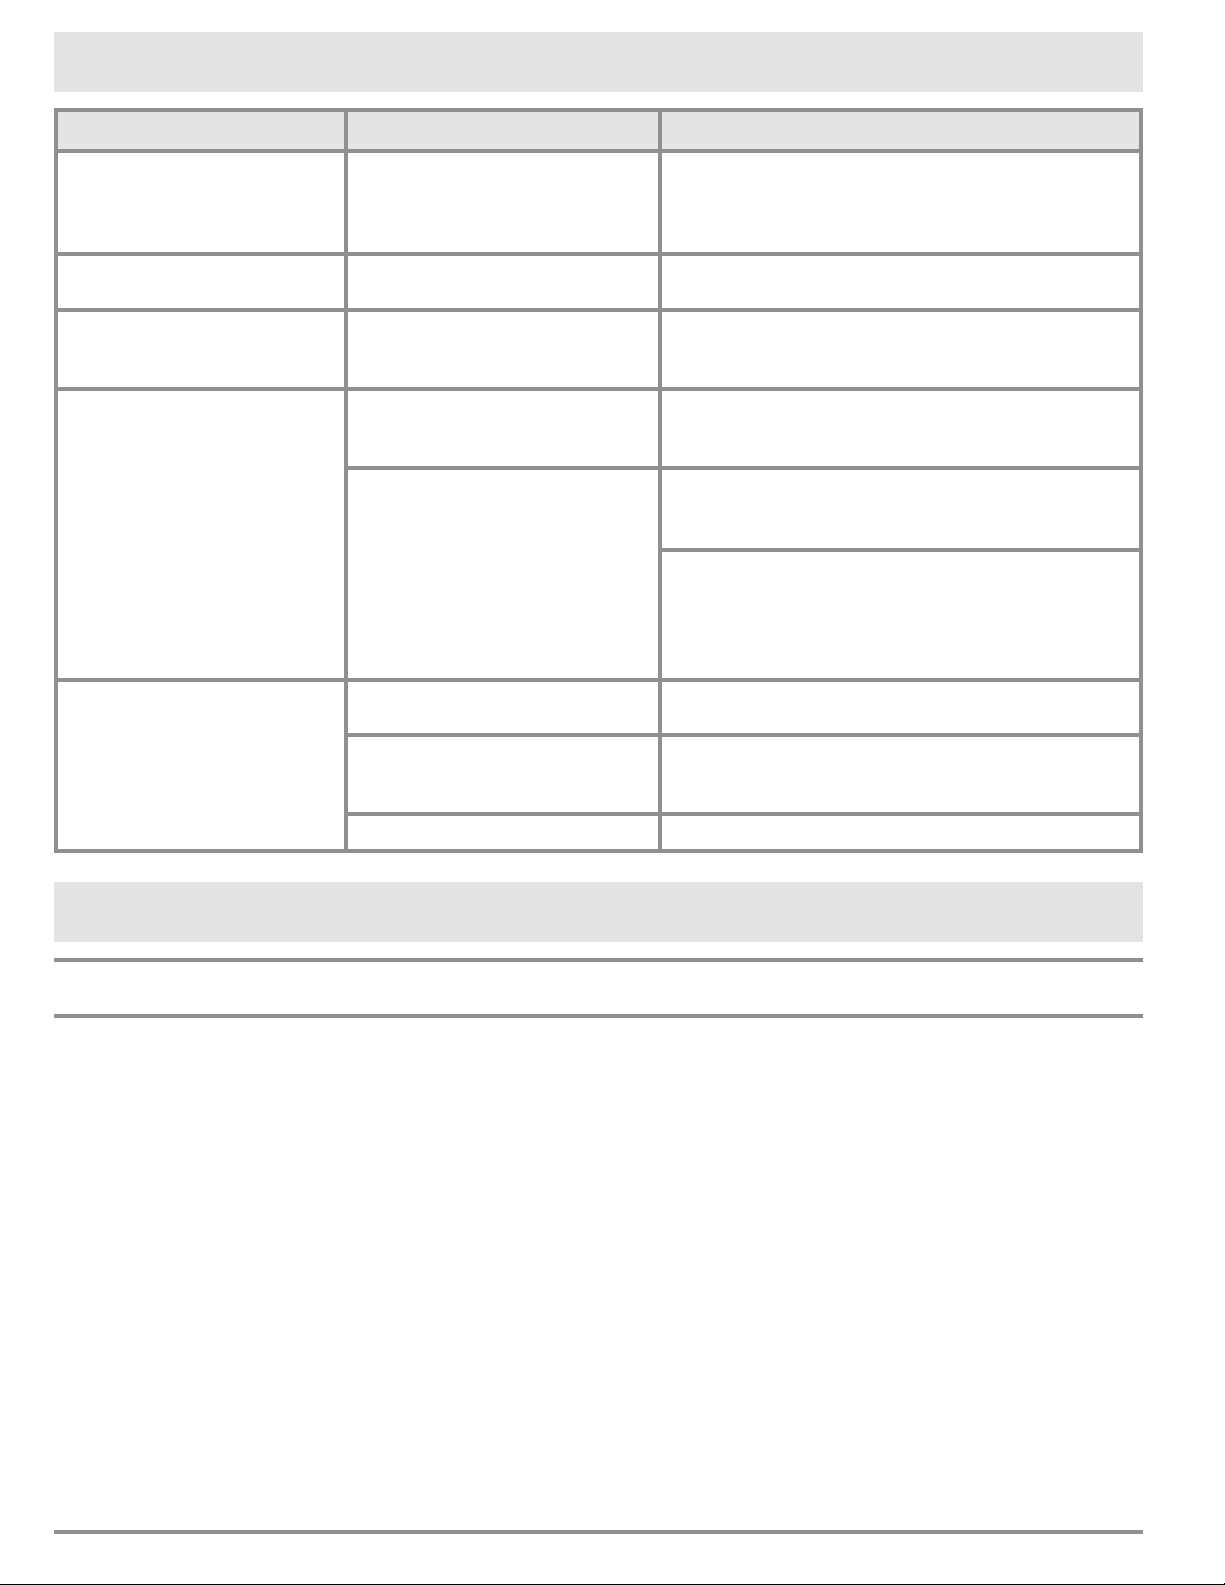
Light Location Condition Indicates
Upper left
red light
Flashing
Power failure
(system is shutting down)
Any red light On solid
Bottle below is empty
NOTE: If bottle still has wine in it, either the pickup tube has
not been inserted or the gas cylinder is depleted.
4 red lights On solid No gas pressure. Argon gas cylinder needs to be replaced.
H
J
J
K
L
M
Red Wine
1oz 3oz
P
C
6oz
2008
DACOR
H
Display The display provides the system status and information for the wine bottle
installed below the particular display. It can be programed with specific informa-
tion about each type of wine being served (see page 12). The display is also
used for programming the various system functions.
J
Status lights
(red)
These lights come on to help inform you of the status of your wine dispensing
system. See the table below.
K
Purge (P) button Push this button once to purge air from the bottle when a new bottle of wine is
installed.
L
Clean (C) button Use this button to clean the dispensing head and spout while still installed in the
system.
M
Pour buttons Push the pour buttons to serve the wine from the bottle installed directly below.
There are three buttons so that you can program them with different pour vol-
umes (1/4 to 8 ounces).
6
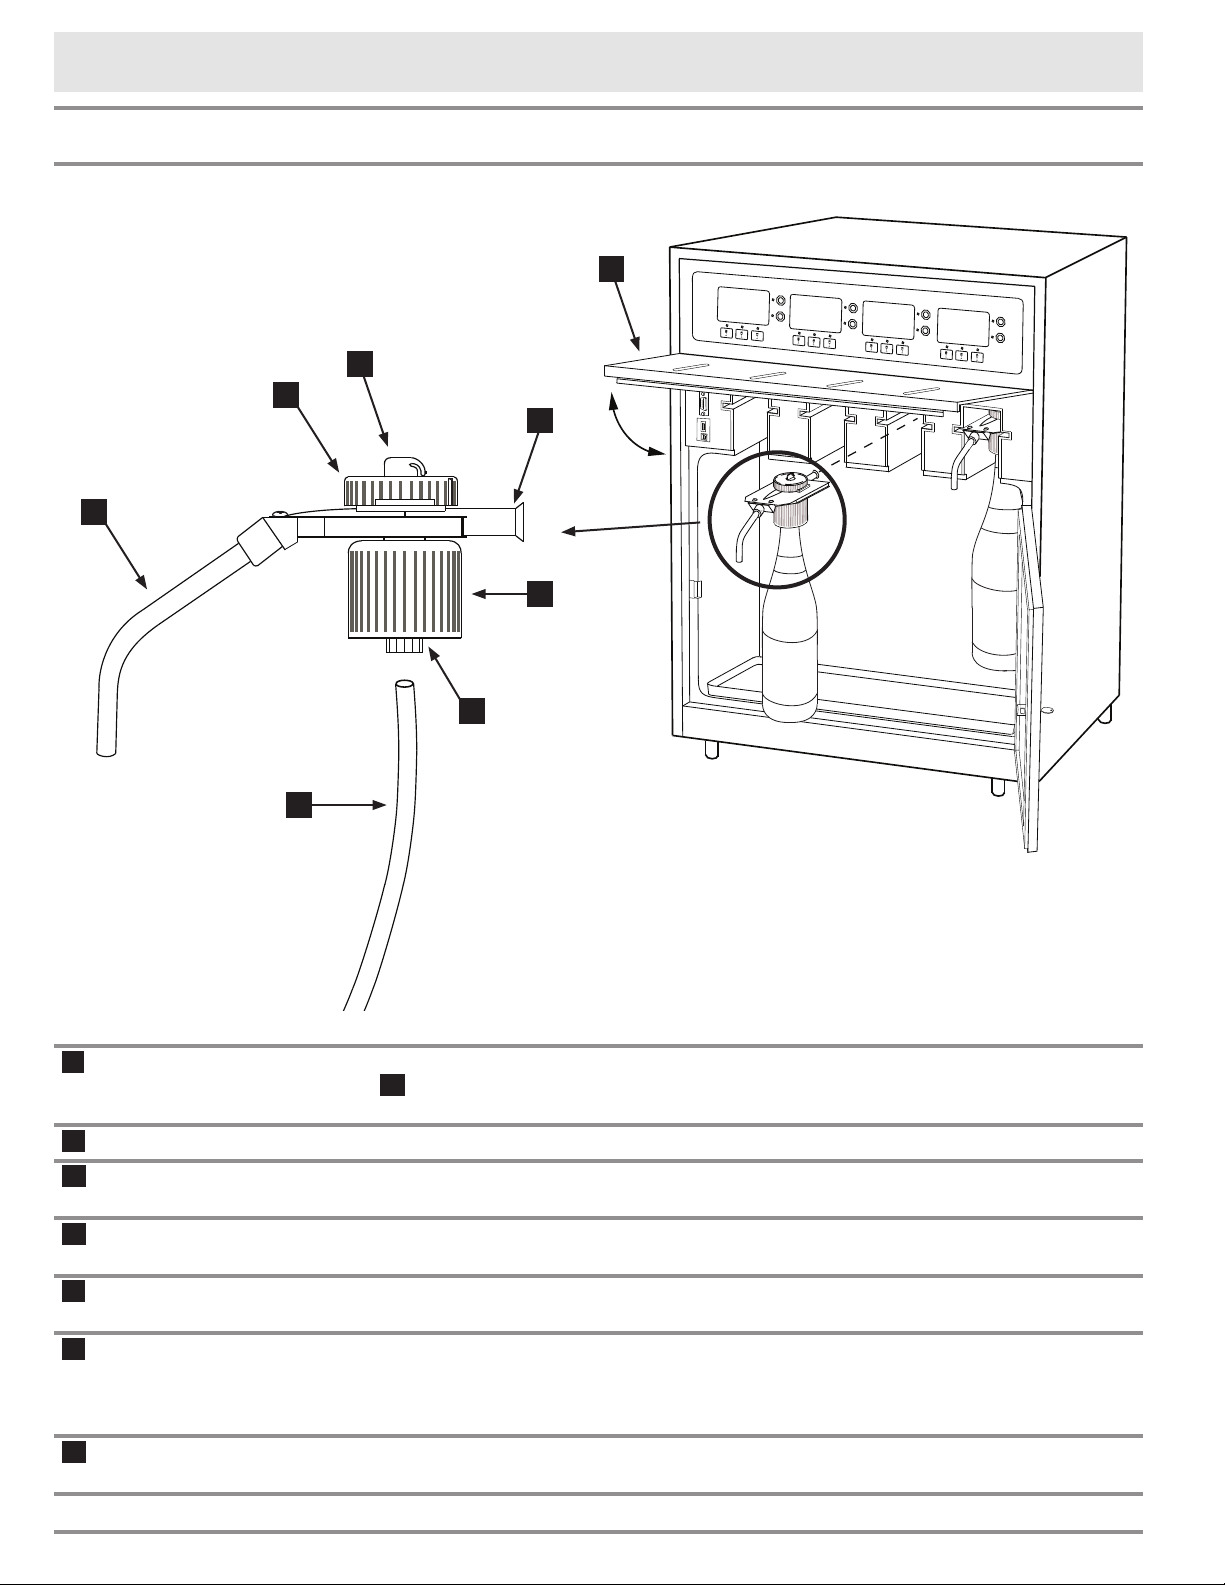
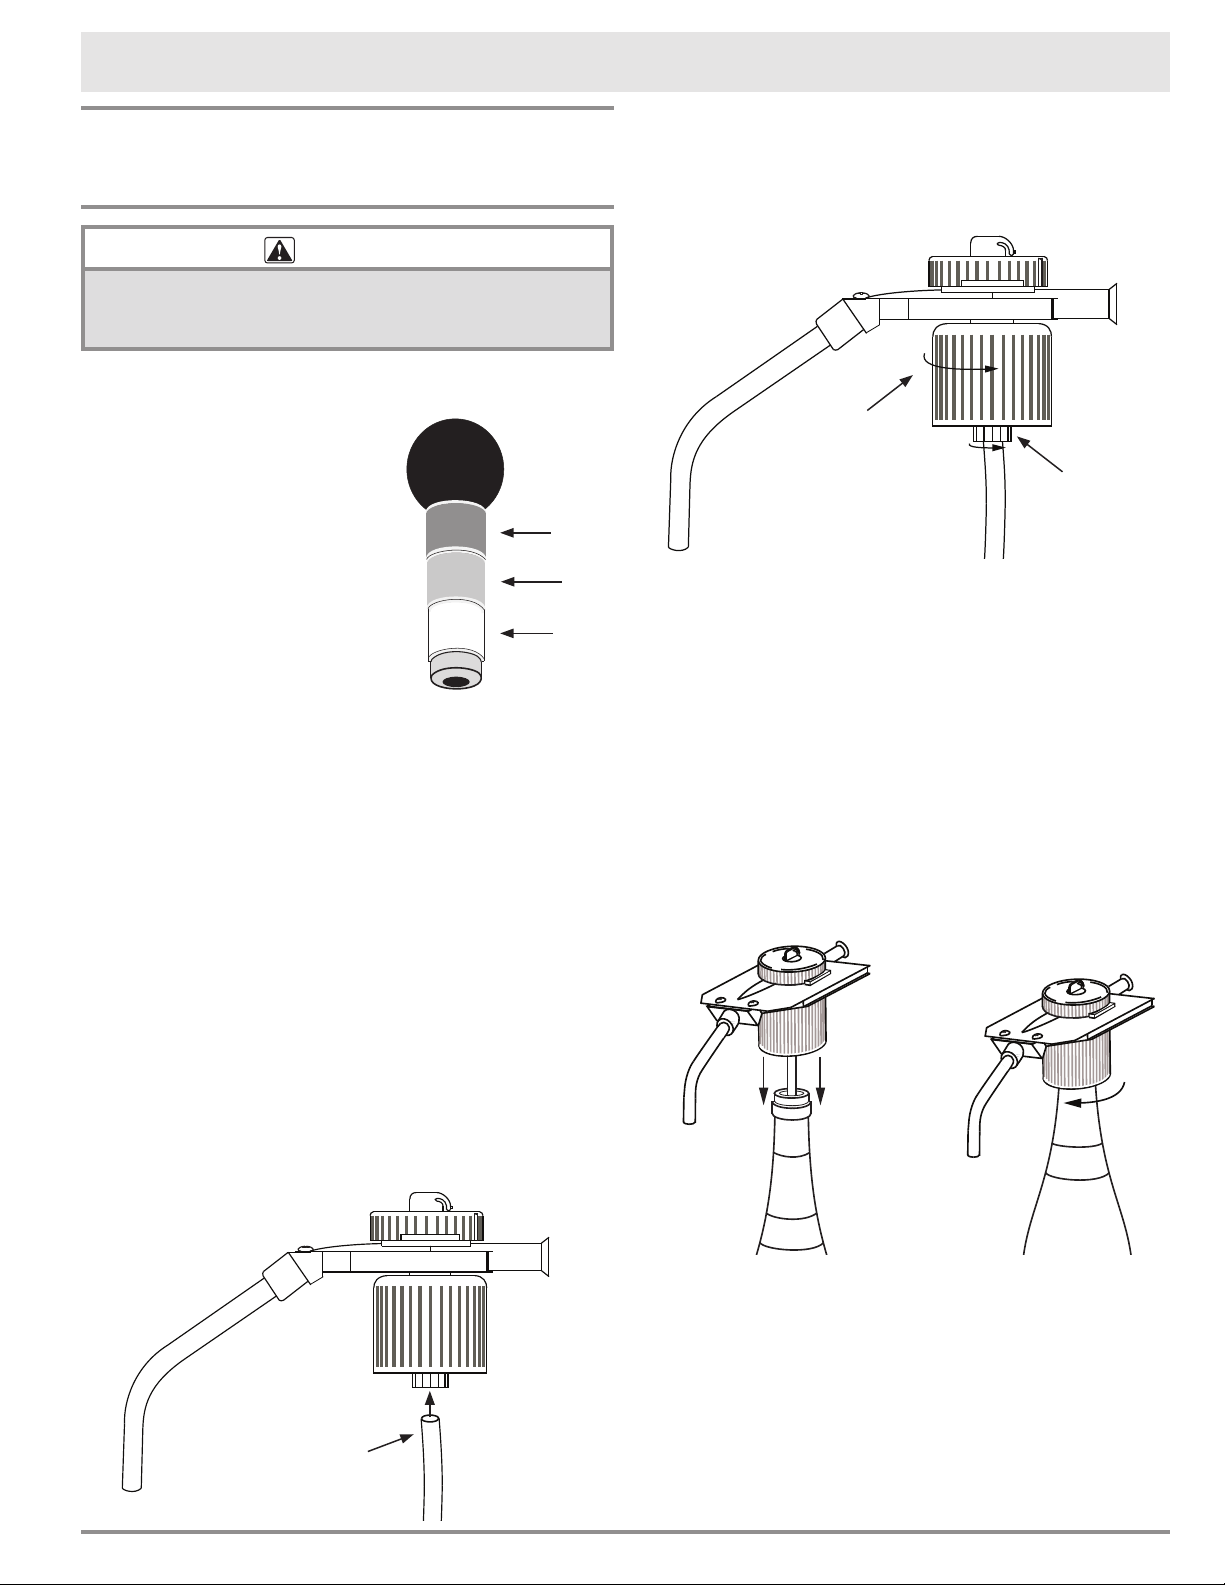
Dispensing Head
Getting to Know Your Wine Dispensing System
A
Spout
The stainless steel spout protrudes from the front of the unit when the spout
cover H is closed and delivers the wine to your glass when one of the pour but-
tons above it is pushed.
B
Head cap The removable head cap allows the inside of the dispensing head to be cleaned.
C
Rotor switch The rotor switch is used by your dispensing system to control wine and argon
gas flow when the system is in use.
D
Main body The main body is cleanable to help assure that everything that touches the wine
is sanitary.
E
Collar Expands the gasket underneath it. Turn it to secure the head on top of the
bottle.
F
Gasket The gasket is located under the collar. When it is expanded, it seals air out and
keeps the argon gas in, in addition to holding the head in place on top of the
bottle. The gaskets are interchangeable to fit different size bottle necks. There
are three sizes, wide (green), standard (red) and narrow (white).
G
Pickup tube The pickup tube draws wine out of the bottle and into the head for dispensing. It
is removable for replacement or cleaning.
A
B
C
H
D
E
F
G
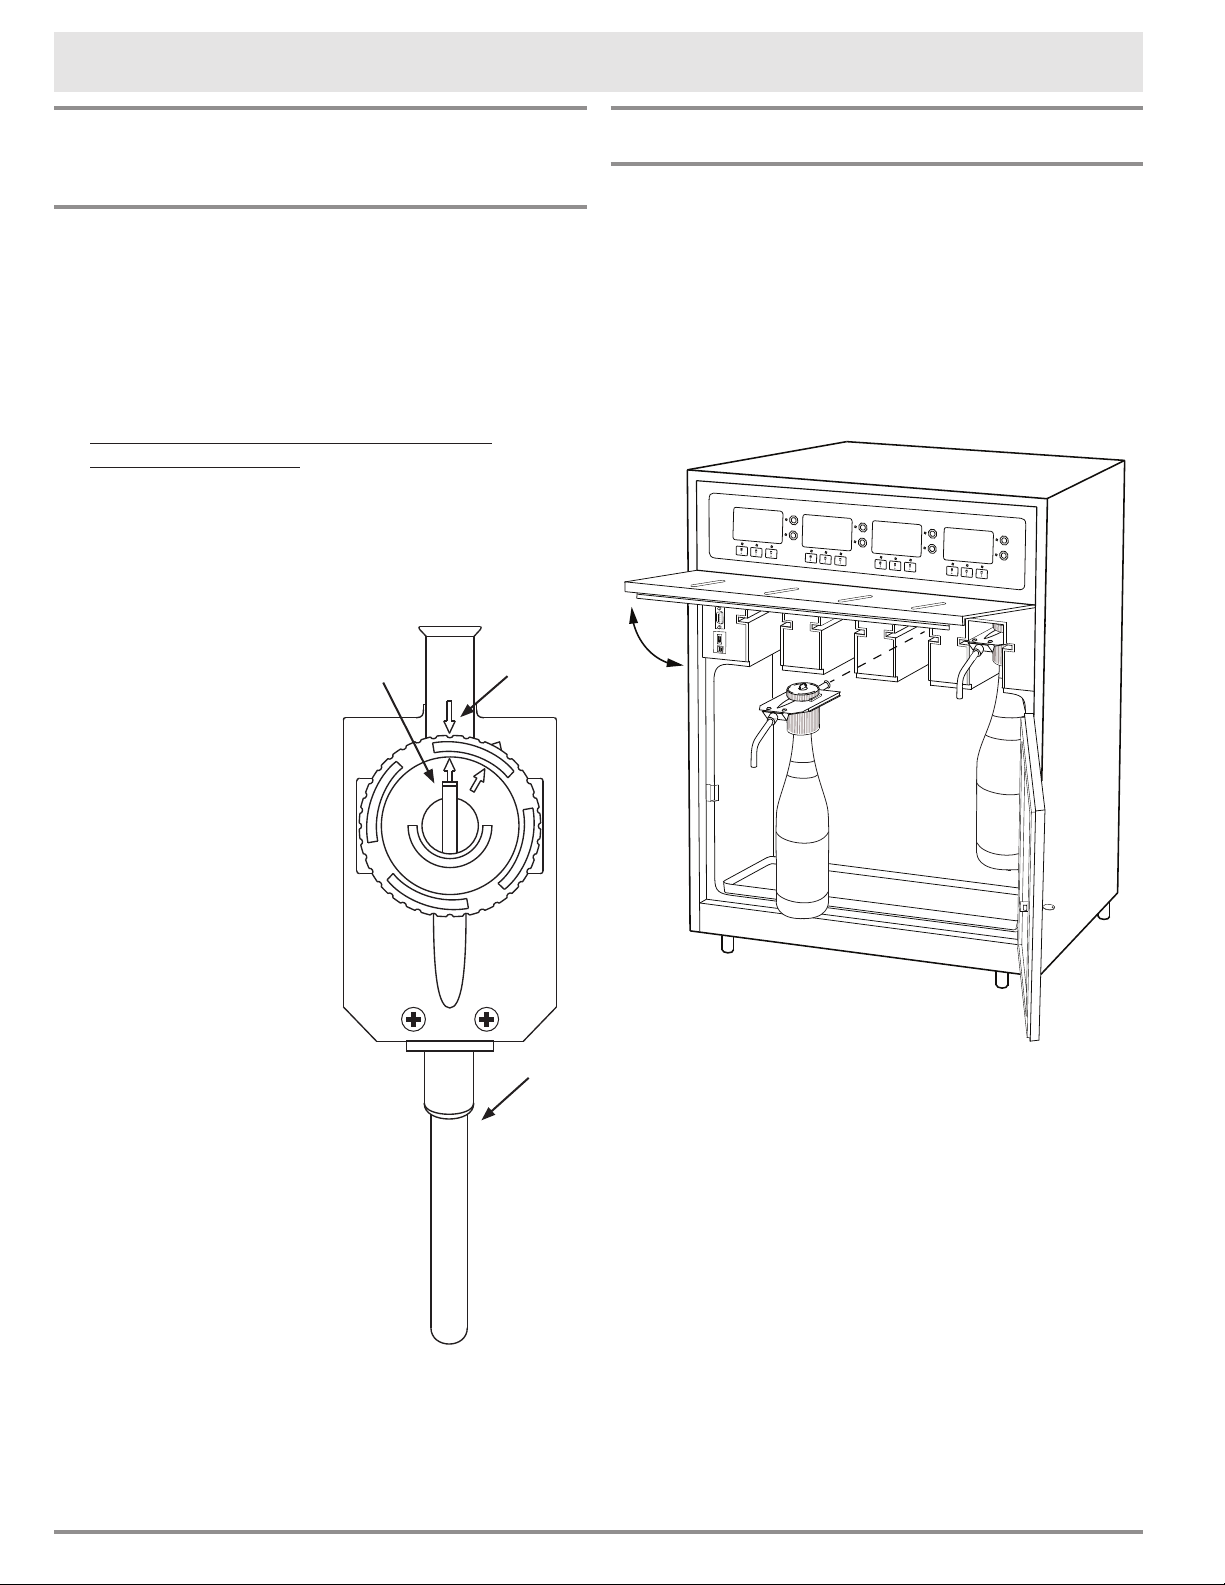
7
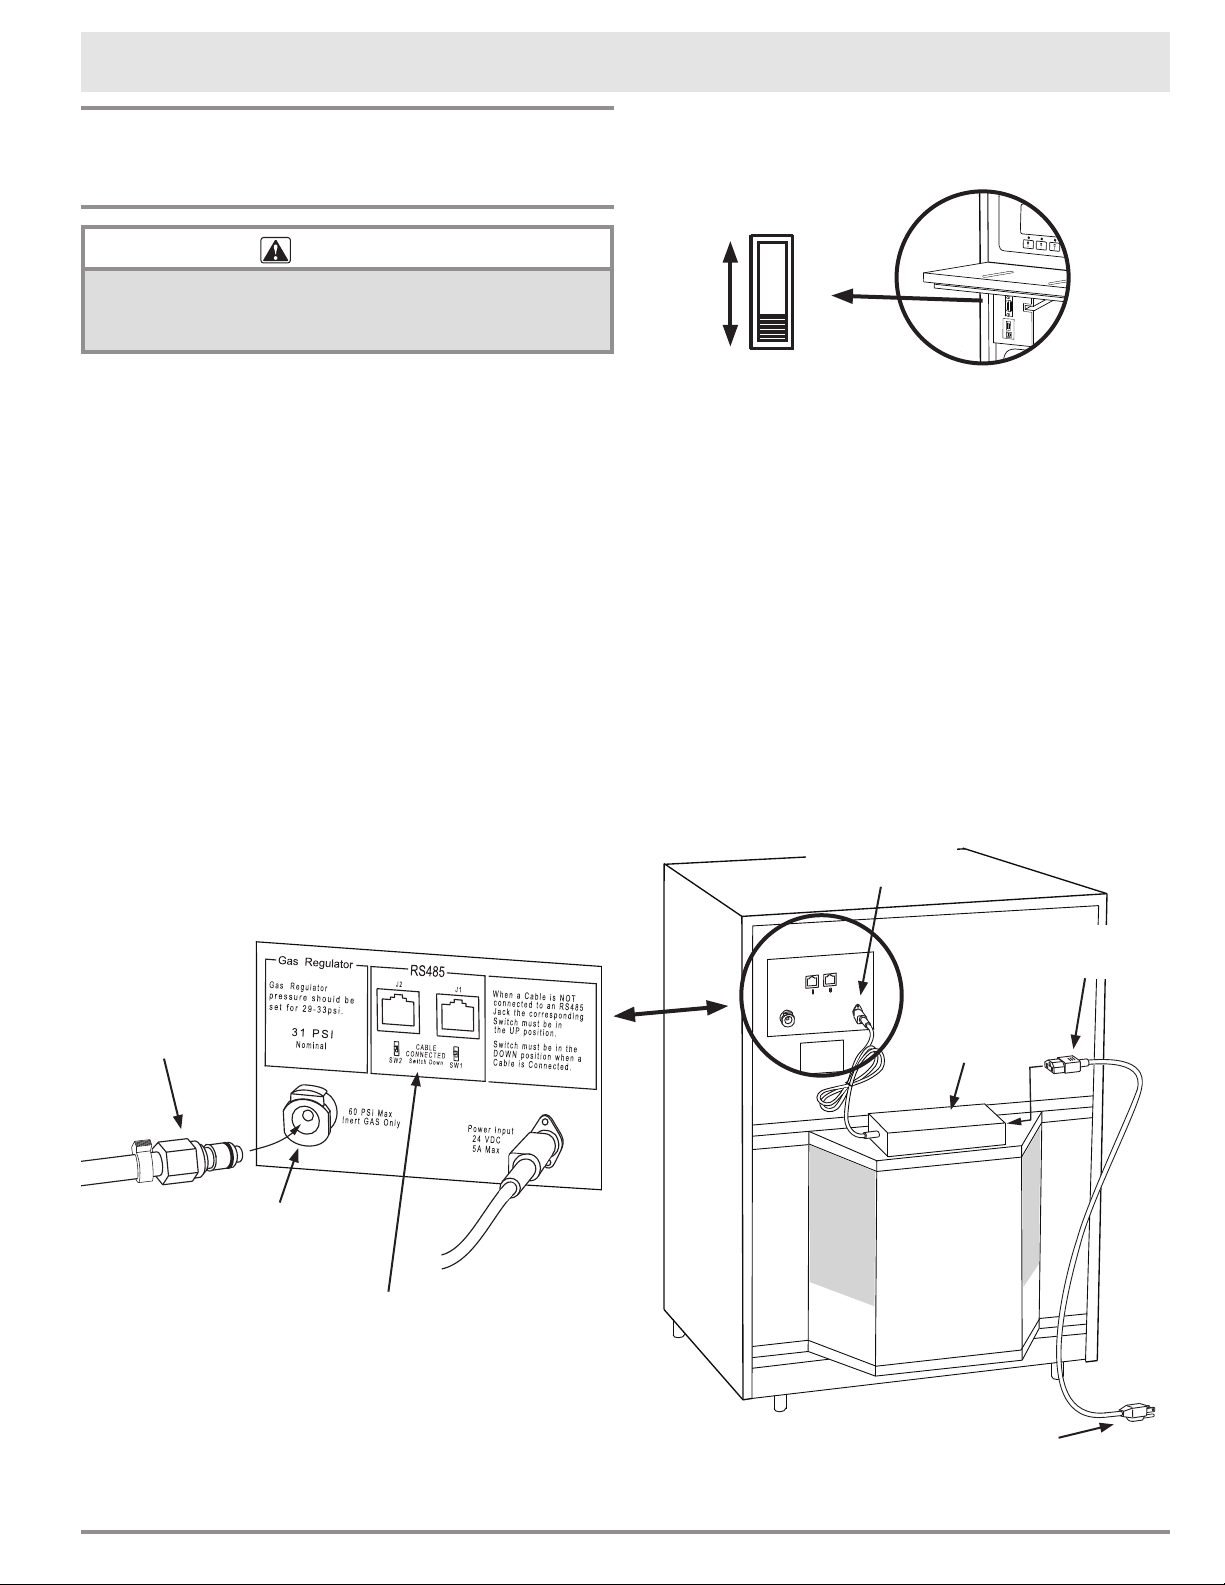
Power Supply and Inert Gas Connections
Preparing to Use Your Wine
Dispenser for the First Time
WARNING
Do not use any power supply other than the one provided
with the system or a Dacor approved replacement. Do
not attempt to modify or bypass the power supply.
1. If not already connected, plug one end of the
plastic gas tubing (provided) into the inert gas
connector at the back of the wine dispensing
system. IMPORTANT: Do not cut or shorten the
gas supply line.
2. Make sure the cable coming from the power
supply (opposite the power cord that connects
to the wall) is connected to the Power Input
connector on the back of the unit. Also, check
to make sure that both of the micro-switches
located on the back of the unit are in the up
position.
3. Plug the power cord (provided) into the power
plug on the power supply (black rectangular
box) mounted on the back of the wine dispens-
ing system.
4. Slowly and gently lift the unit up and into the
final location. Exercise care to make sure that
the power cord and gas lines do not become
kinked or damaged. Make sure the required 1"
(2.5 cm) space is maintained above and below
the unit.
Setting Up Your Wine Dispensing System
Connect power
supply output
here
120 Vac
power cord
Connect to 120 Vac, 60 Hz.
electrical outlet
Power
supply
Plastic gas
tubing
These connectors
for use by qualified
service personnel only
Inert gas
connector
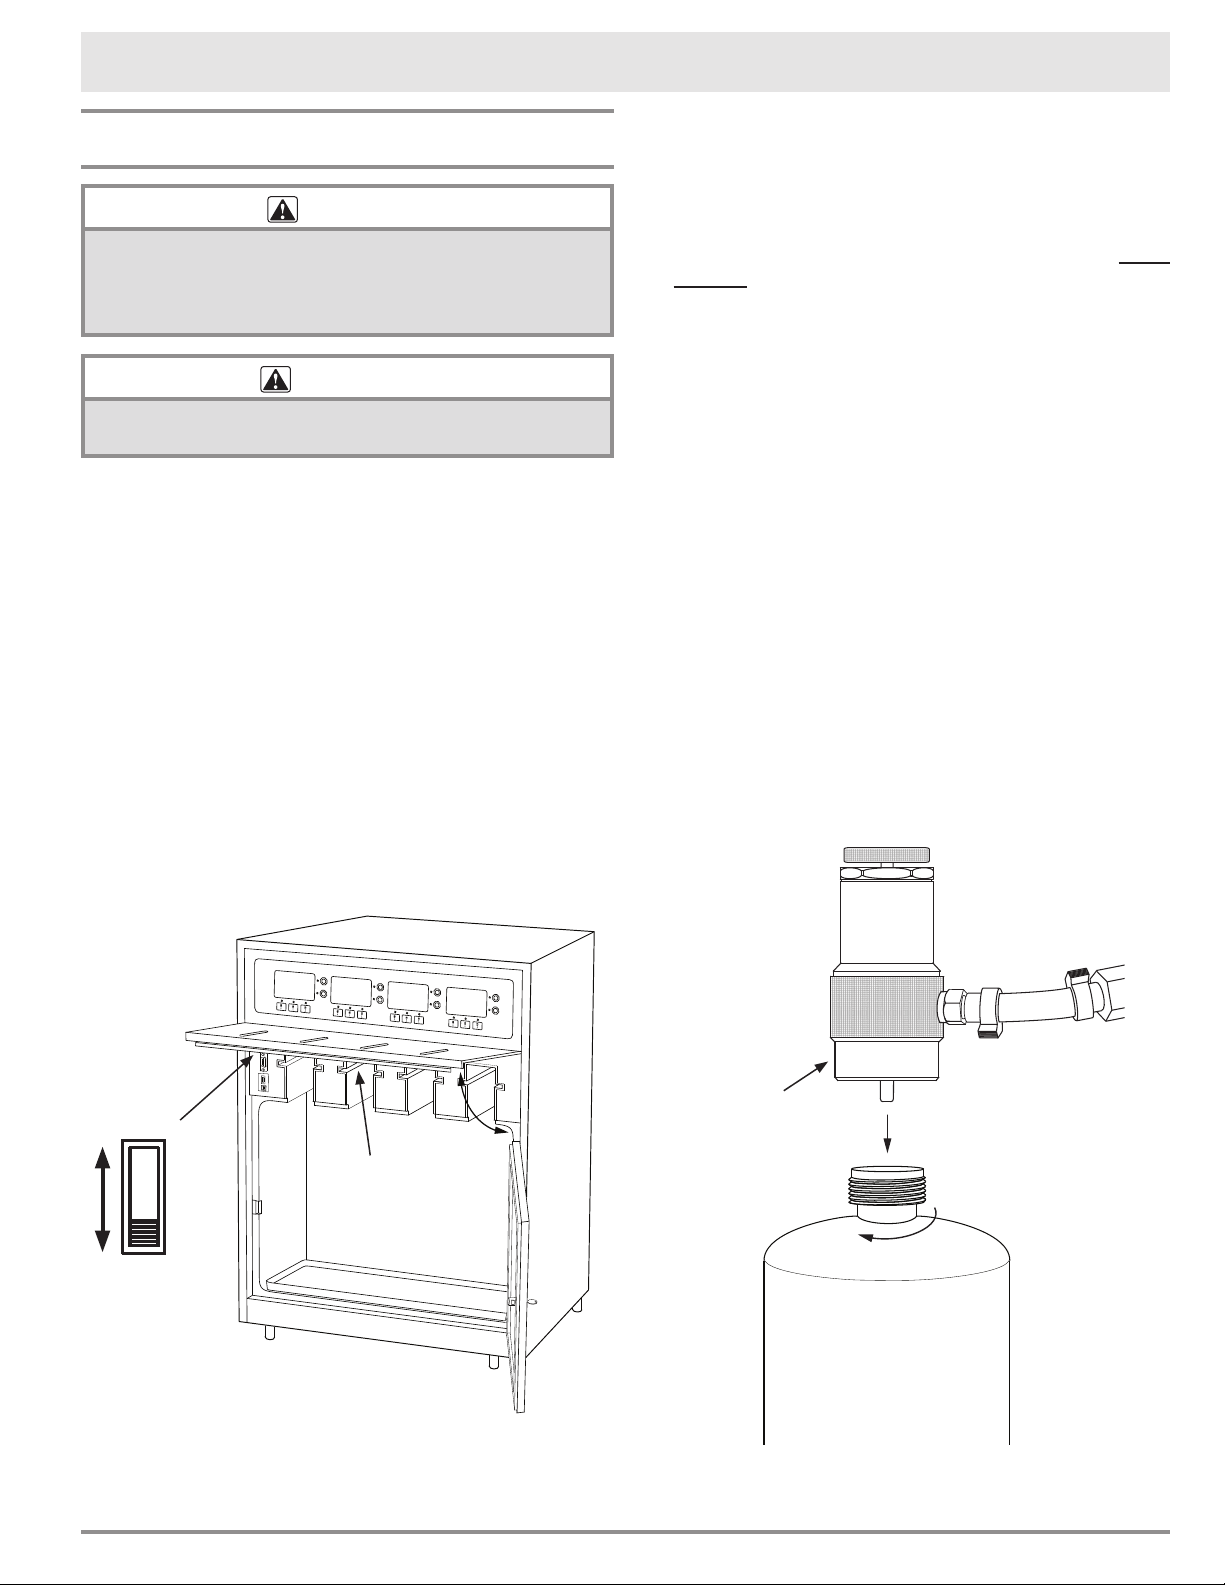
5. Open the door on the front of the unit. Swing the
spout cover to the up position as shown on the
facing page.
6. Make sure the power switch, located on the left
side of the bottle bay, is slid all the way down, to
the OFF position.
7. Lower the spout cover by pushing up and hold-
ing the lever on the bottom as you lower it
down. See diagram on bottom of page 8.
CAUTION: Do not push down on the spout
cover without pushing up on the lever. Damage
to the lever will result.
8. Once the spout cover is closed, close the bottle
bay door. Push in slightly just above the lock
until it snaps shut.
continued...
ON
OFF
8
Operating Your Wine Dispensing System
Turning the System ON/OFF
1. Open the door on the front of the unit. Swing the
spout cover to the up position.
2. To turn the unit on, slide the power switch all
the way up to the ON position. When powering
on, the unit will run through a series of diagnos-
tics, which will take several seconds.
NOTE: If the control panel is LOCKED see page
15 to unlock. The control panel may lock when
the system is turned OFF or after a power fail-
ure. The lock may also be turned on intentionally
from the control panel. See page 15.
3. To turn the unit off, slide the power switch all
the way down to the OFF position.
4. Lower the spout cover by pushing up and hold-
ing the lever on the bottom as you lower it
down. CAUTION: Do not push down on the
spout cover without pushing up on the lever.
Damage to the lever will result.
5. Once the spout cover is closed, close the bottle
bay door. Push in slightly just above the lock
until it snaps shut.
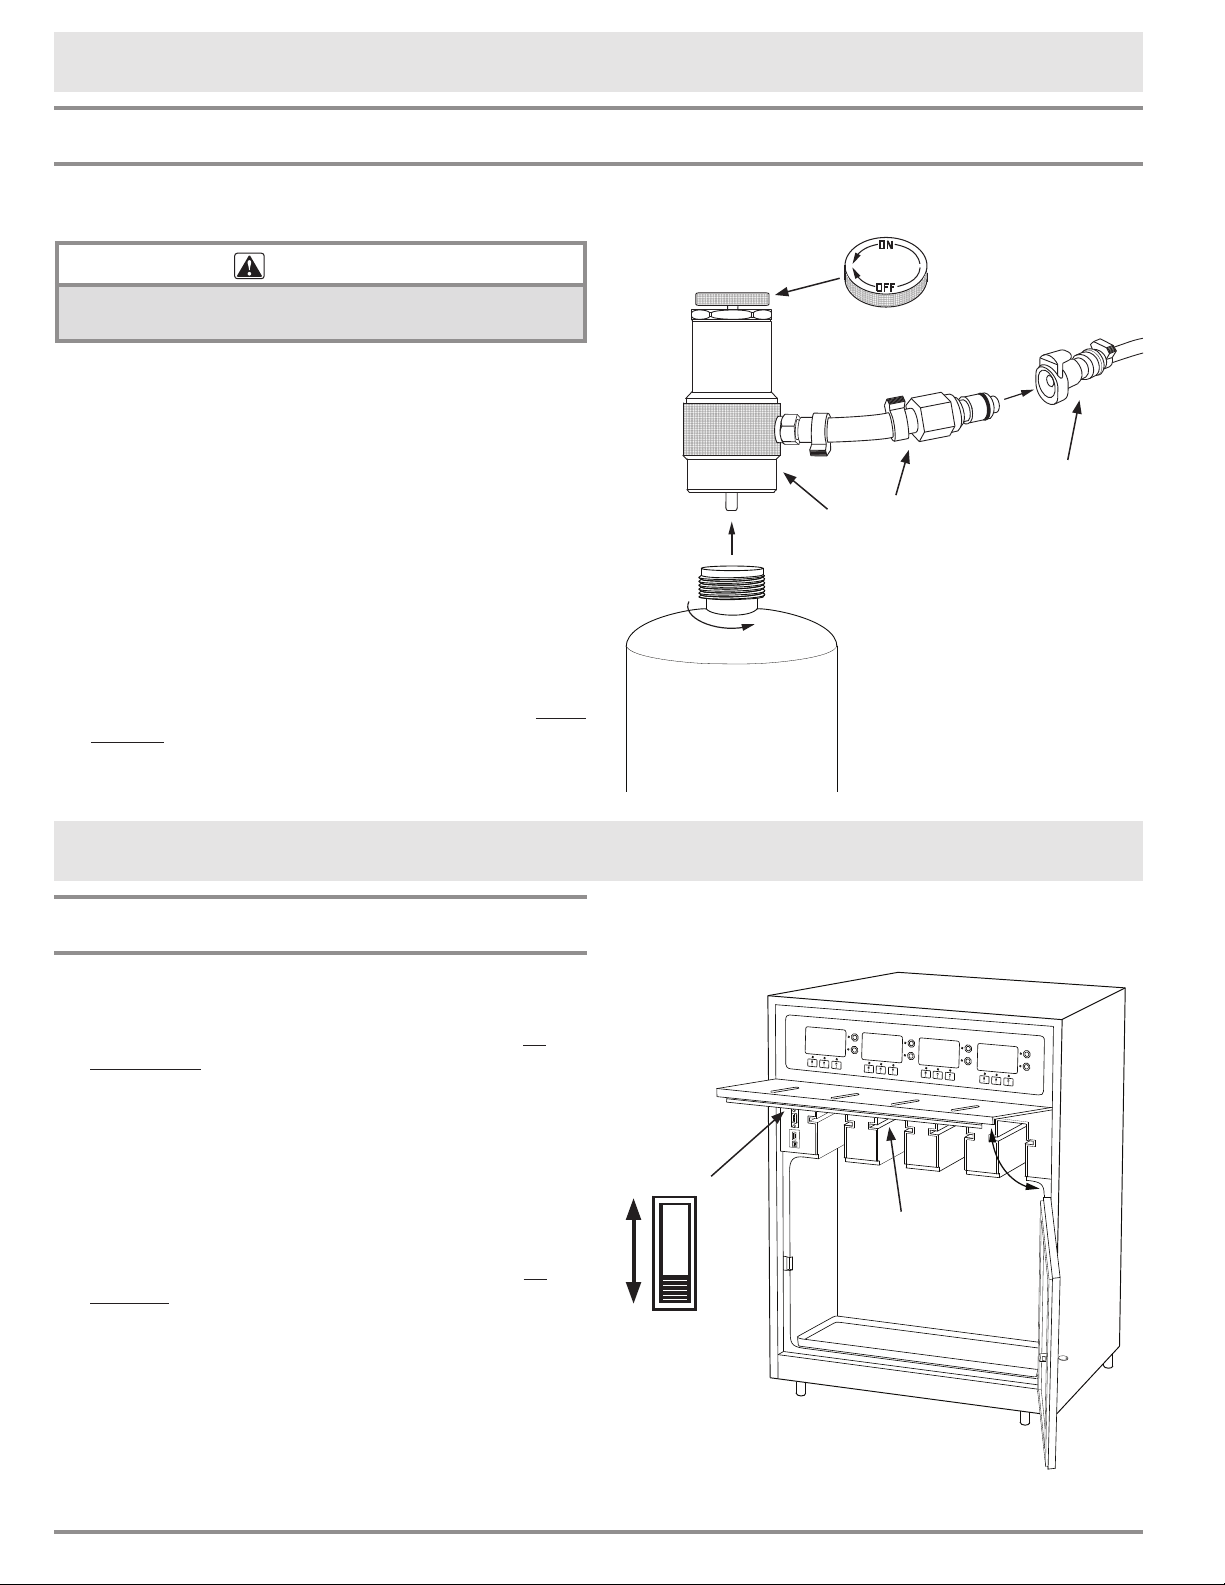
Regulator
adjustment
knob
Gas supply
line from wine
dispensing
system
Regulator
assembly
Argon
gas
cylinder
Spout cover
release lever
(on bottom of
spout cover)
9. Find the gas regulator assembly that comes with
the unit.
WARNING
To avoid personal injury, use only the included gas
pressure regulator or a Dacor specified replacement.
11. Make sure the regulator adjustment knob is
turned all the way in the OFF direction.
12. Connect the gas supply line from the wine
dispensing system to the gas connector on the
regulator assembly. Make sure the line is not
kinked or obstructed.
13. Remove the plastic cap from the top of the
argon gas cylinder (must be ordered separately,
see page 22).
14. Insert the top of the gas cylinder into the
bottom of the gas regulator assembly and turn it
clockwise, by hand, until it is snug. Do not use a
wrench or overtighten.
15. Turn the regulator knob in the ON direction until
it stops.
16. Plug the power cord into the grounded 120 Vac.,
60 Hz. electrical outlet.
Setting Up Your Wine Dispensing System
Preparing to Use Your Wine Dispenser for the First Time (cont.)
ON
OFF
9
6. The gasket must be fully un-tightened (collar all
the way up, touching the main body) before you
insert the head. Turn the collar as shown until it
stops.
7. Turn the gasket nut with your fingers as shown
to make sure the gasket is secure.
8. Carefully insert the dispensing head (with the
pick up tube still attached) into the bottle. The
head should go in easily with one arm extended
forward. Do not lean on the head or force it in,
as this may damage the gasket and/or the bot-
tleneck. If the head gasket will not insert, check
to make sure the collar is fully un-tightened and
the correct gasket size is being used.
The head should rest firmly on top. Do not
let the tube push the head out of the bottle.
(instead, the tube should coil slightly inside at
the bottom).
9. Turn the head to align the spout with the bottle
label.
10. While pressing down on the head with one hand,
tighten the collar as shown with your other
hand. Use only two fingers and your thumb to
turn (there is no need to use the entire force of
your hand). As you turn, the gasket will expand
inside the bottleneck, sealing and holding the
bottle from the inside. Do not over-tighten.
continued...
Attaching the Clean-Pour
Dispensing Heads
CAUTION
To avoid dropping a wine bottle when carrying it around
with the dispensing head attached, always hold the bottle
itself (not just the head).
1. Open the bottle and place it on a flat, dry sur-
face.
2. Insert the head selection
tool into the bottleneck
to determine the correct
(color coded) gasket size.
NOTE: The red gasket
should work with most
wines bottled in North
America. If you need to
change the gasket, see
page 20 for instructions.
If you do not have a head
selection tool, try insert-
ing different heads into the bottle, from wide to
narrow (green, red, white), until you find the
correct size that fits.
3. Take a clean dispensing head of the size you
have selected. Check that the gasket is in good
condition and the cap is properly installed on
top. (See the Cleaning and Care section for
more details).
4. Insert a clean pick up tube into the bottle. (It is
normal for the upper end of the tube to extend
beyond the tip of the bottle at this point).
5. Insert the pick up tube firmly into the opening
on the bottom of the head, as shown. (Keep the
rest of the tube inside the bottle while doing
this). NOTE: If the pick-up tube is not properly
attached, the system will not be able to draw
wine out of the bottle and it will assume the
bottle is empty.
Operating Your Wine Dispensing System
Green
Red
White
Un-tighten
collar
completely
Tighten
gasket nut
Insert
pick-up tube
10
Attaching the Dispensing Heads
(cont.)
11. Inspect the dispensing head. If more than three
threads are visible between the top of the collar
and the bottom of the main body, either the
gasket is damaged or the gasket could be the
wrong size. Un-tighten the collar, remove the
head, check the gasket for damage, verify the
correct size, wipe the gasket and bottleneck dry,
and try again.
12. While holding the bottle over a table or
countertop for safety, lift the bottle up about 1
to 2”, holding it only by the head. Gently pull up
the head a bit higher and lower it down a few
times, to check if it holds the bottle properly.
The bottle should not slip out, and you should
not feel any looseness of the gasket inside the
bottleneck.
13. Turn the rotor switch
on the top of the head
so that it lines up
with the arrow on the
back of the head body
(opposite the spout).
You are now ready to
insert the bottle into the
wine dispensing system.
If the bottle begins
to slip, or the gasket
feels loose, put the
bottle down and do
the following:
• Hold the head in place
with one hand.
• With your other hand,
fully un-tighten the
collar (until it touches
the main body).
• Remove the dispensing
head from the bottle
and detach it from the
pickup tube.
• Check the gasket for
damage. If needed,
replace with an undam-
aged head.
• Check the correct
gasket size. If needed, switch to a wider gasket
size.
• Wipe the gasket and inner part of the bottleneck
dry, and try again.
Operating Your Wine Dispensing System
Basic Operation
NOTE: The control panel must be unlocked for the
unit to operate. If the control panel is locked, see
page 15 (Unlocking the Control Panel).
Installing Wine Bottles in the Bottle Bay
1. Open the bottle bay door by turning the key in
the lock.
2. With the door open, lift up on the spout cover
until it locks in the up position.
3. Insert the dispensing head (with wine bottle
attached) into the slot in the desired position in
the bottle bay. NOTE: When inserting the head
into the bottle bay, be sure to push in on the
head, not the bottle.
4. Lower the spout cover by pushing up and hold-
ing the lever on the bottom as you lower it
down. Once the spout cover is closed, close the
bottle bay door. Push in slightly just above the
lock until it snaps shut.
Arrow on
head body
Rotor
switch
Spout
11
Operating Your Wine Dispensing System
5. Push the purge (P) button next to the display
above the bottle that has just been inserted,
once. The food grade argon will replace the air in
the bottle, assuring preservation.
The wine is now ready for serving.
NOTE: If a Check Bottle message and/or a red
light show on the control panel, they will clear after
the first pour with the new bottle.
Dispensing Wine
To dispense, hold a glass under the spout and push
one of the serving size buttons above the bottle.
When a bottle is empty, the message Check Bottle
and/or a red light will show on the control panel.
Changing Wine Bottles
1. Open the bottle bay door by turning the key in
the lock.
2. With the door open, lift up on the spout cover
until it locks in the up position as shown on the
facing page.
3. Gripping the top of the bottle and the spout,
gently pull the bottle and the head straight out
of the unit.
4. Remove the pick-up tube from the
head by pulling it straight down.
5. Clean the head according to the
instructions in the Care and
Cleaning section.
NOTE: Dacor recommends replacing the pickup
tube with each bottle change, but the pick-up
tube may be washed out in a mild solution of
warm water and dishwashing soap, rinsed out
and reused.
6. Attach the dispensing head to a new bottle of
wine according to the instructions starting on
page 9. Insert the new wine bottle into the
system according to the instructions on the
facing page.
Accessing the Main Service Menu
1. Open the front door.
2. Lift the spout cover as shown on the facing
page.
3. Slide the power switch, located on the left side
of the bottle bay, all the way up, to the ON posi-
tion. Wait for the unit to come on.
4. Slide the power switch down one notch to the
SERVICE MODE position to access the main
service menu.
NOTE: When you are done using the service
menu, you will need to slide the power switch up
to the ON position in order to use the dispensing
function of the system.
After setting the switch to ON, lower the spout
cover by pushing up and holding the lever on
the bottom as you lower it down. Once the spout
cover is closed, close the bottle bay door. Push in
slightly just above the lock until it snaps shut.
Red Wine
1oz 3oz
P
C
6oz
2008
DACOR
Red Wine
1oz 3oz
P
C
6oz
2008
DACOR
ON
SERVICE MODE
OFF
Spout cover
release lever
(on bottom of
spout cover)
12
Changing the Individual Bottle
Settings
The volume (amount in ounces), display settings
and pour detect function may be changed for the
individual bottle positions.
• From the main service menu (see page 11),
push Bottle Service next to the display for
the bottle bay that needs to have the settings
changed.
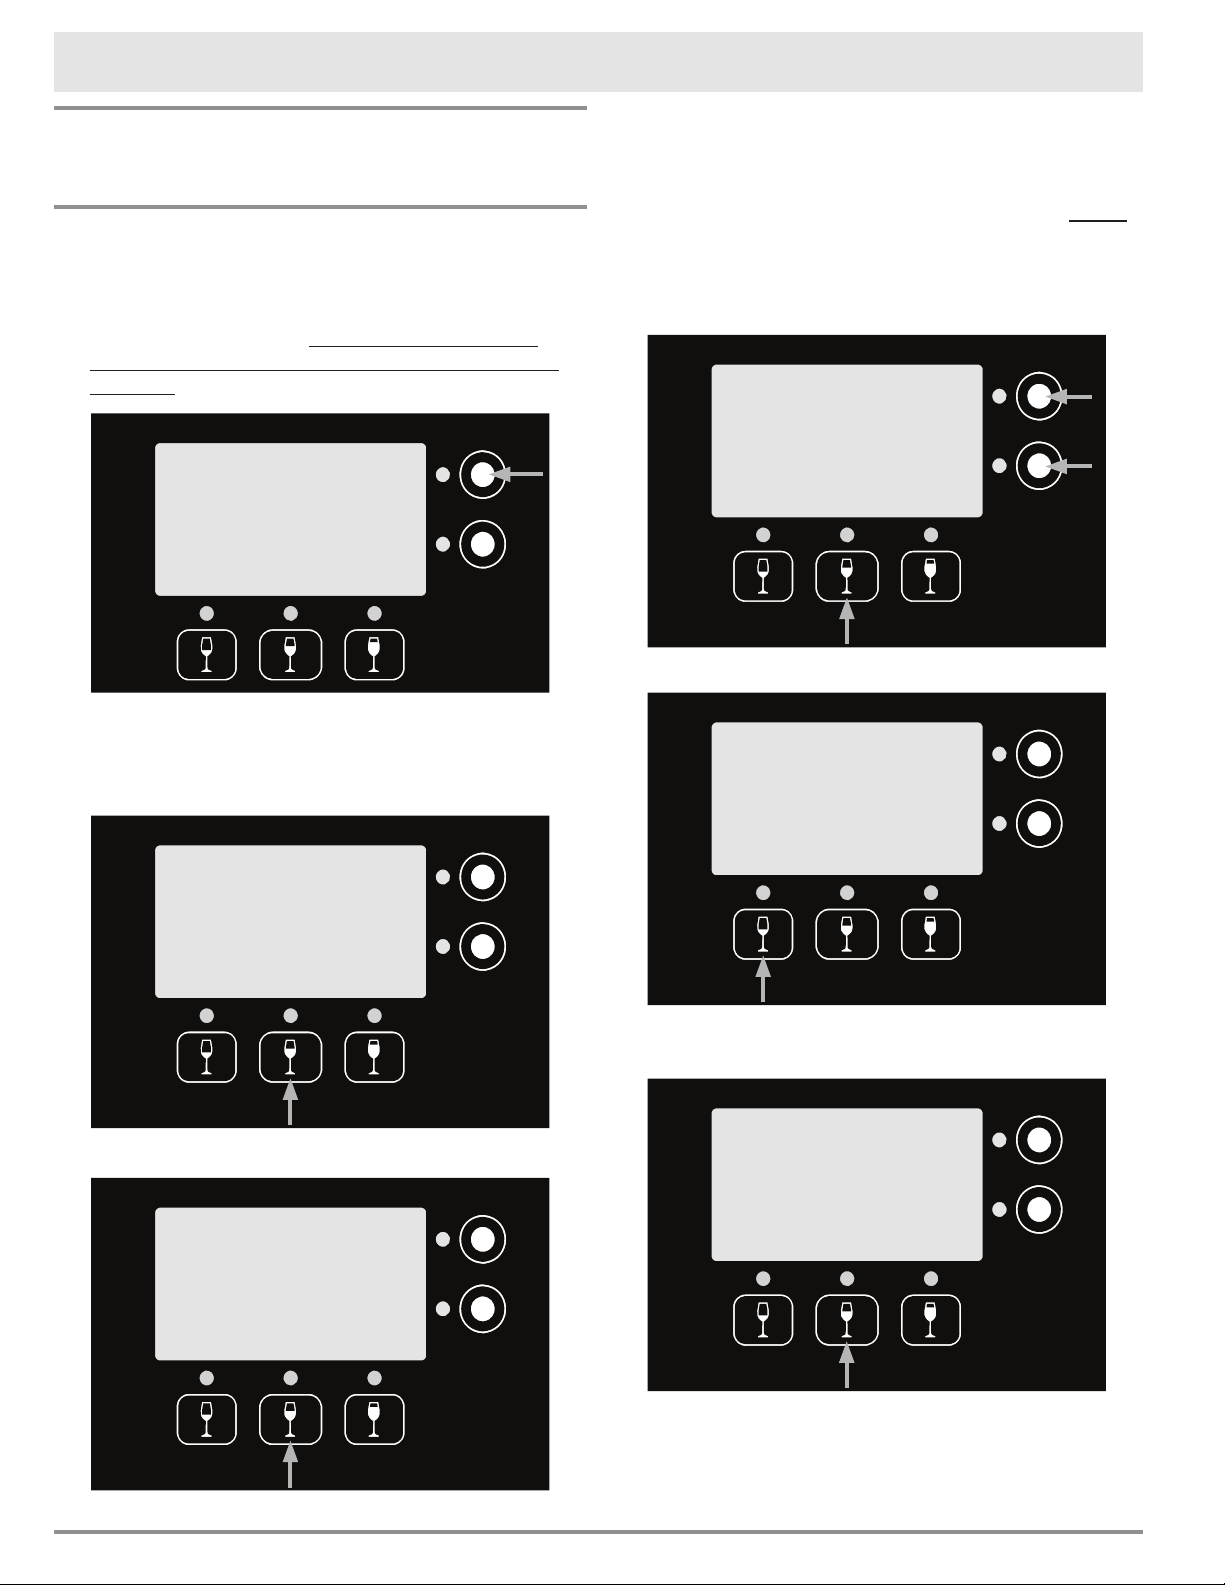
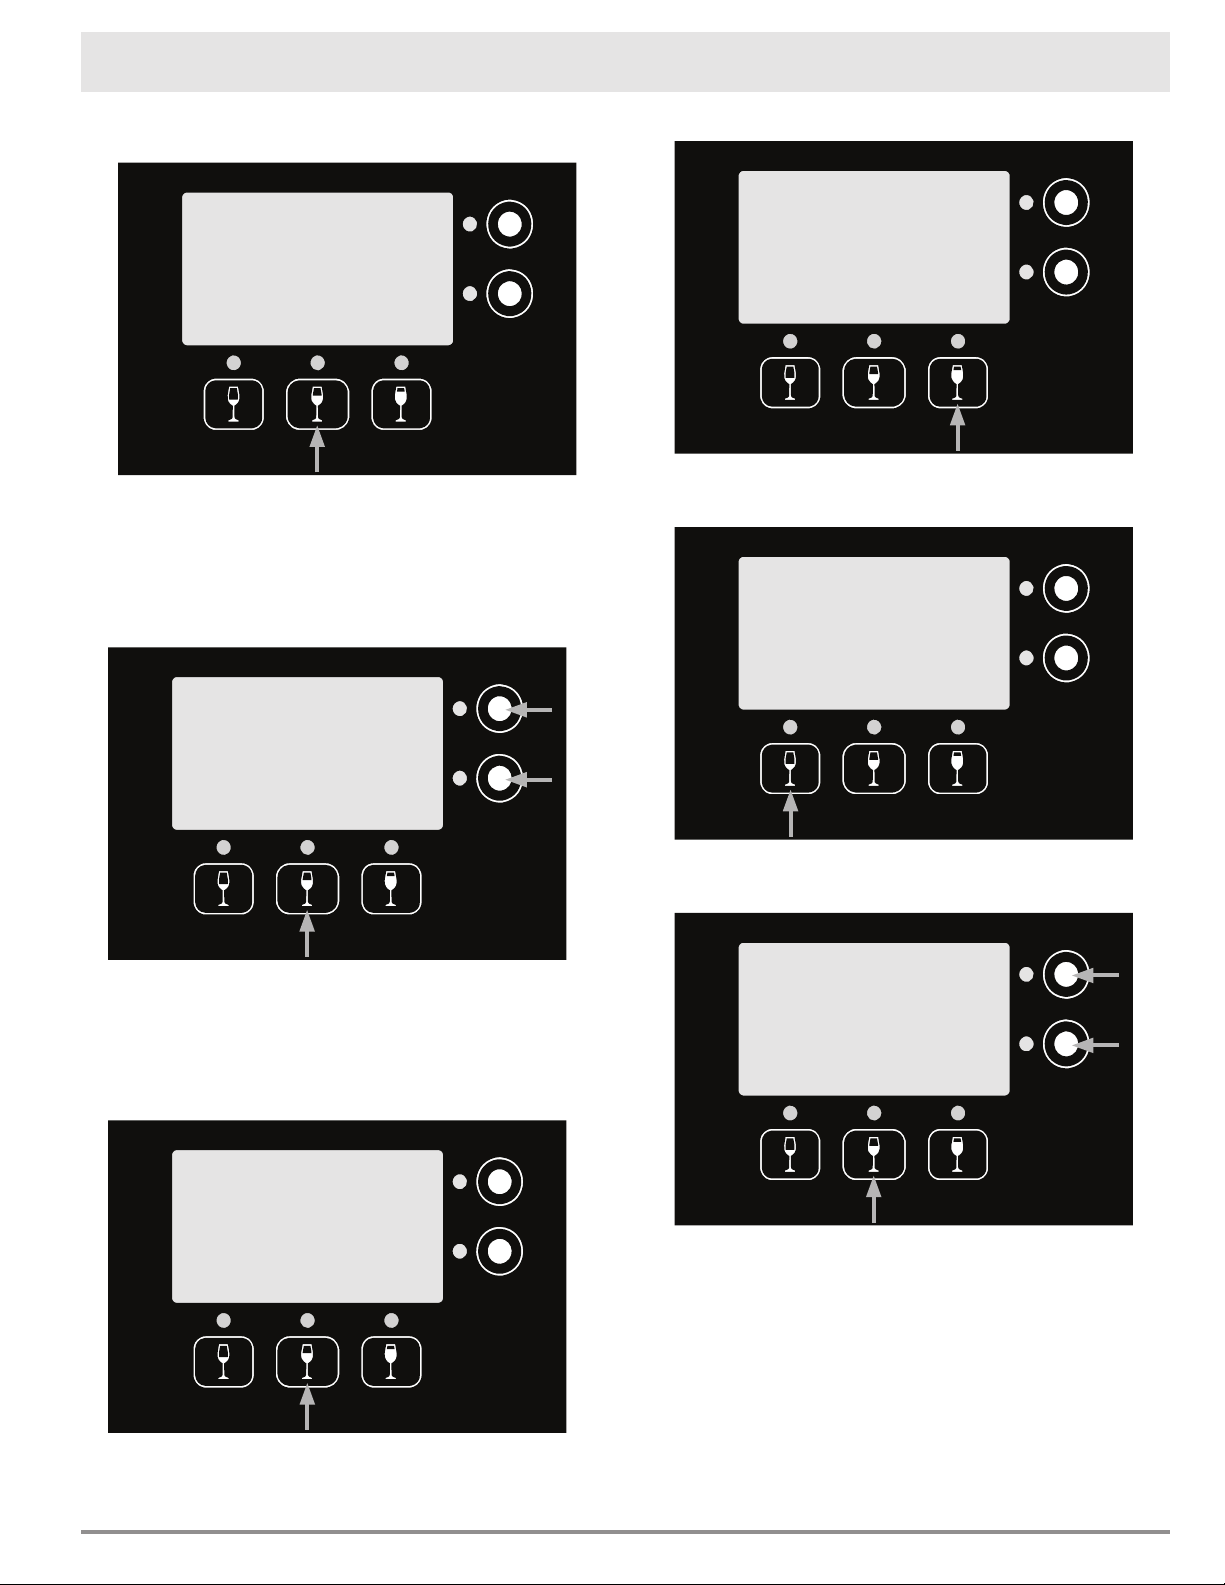
Changing the Bottle Description on the
Display
1. Push Wine Display.
2. Push Set Year.
Operating Your Wine Dispensing System
3. Push the center button below the display repeat-
edly to select ±1 Year, ±10 Year or No Year.
When the display is set to ±10 Year, the display
jumps 10 years every time the up (▲) and down
(▼) buttons on the right are pushed. You must
push Select Wine to exit after changing the
year. NOTE: When large year changes need to
be made, adjust the last digit first then the 10
year increments.
Push Select Wine.
◊ Push Red, White or Other, to select the
wine type.
Bottle Service
WineStation Service
Purge
Bottle
Display
Wine
Exit
Detect
Pour
Bottle Service
Wine
Select
Year
Set
Exit
VOL
Set
2008
Red Wine
Wine
Select
Year
±1
▲
▼
VOL
Set
2010
Red Wine
Wine
Select
Year
±1
▲
▼
VOL
Set
2010
Red Wine
Red White
Exit
Other
2010
Red Wine
13
Operating Your Wine Dispensing System
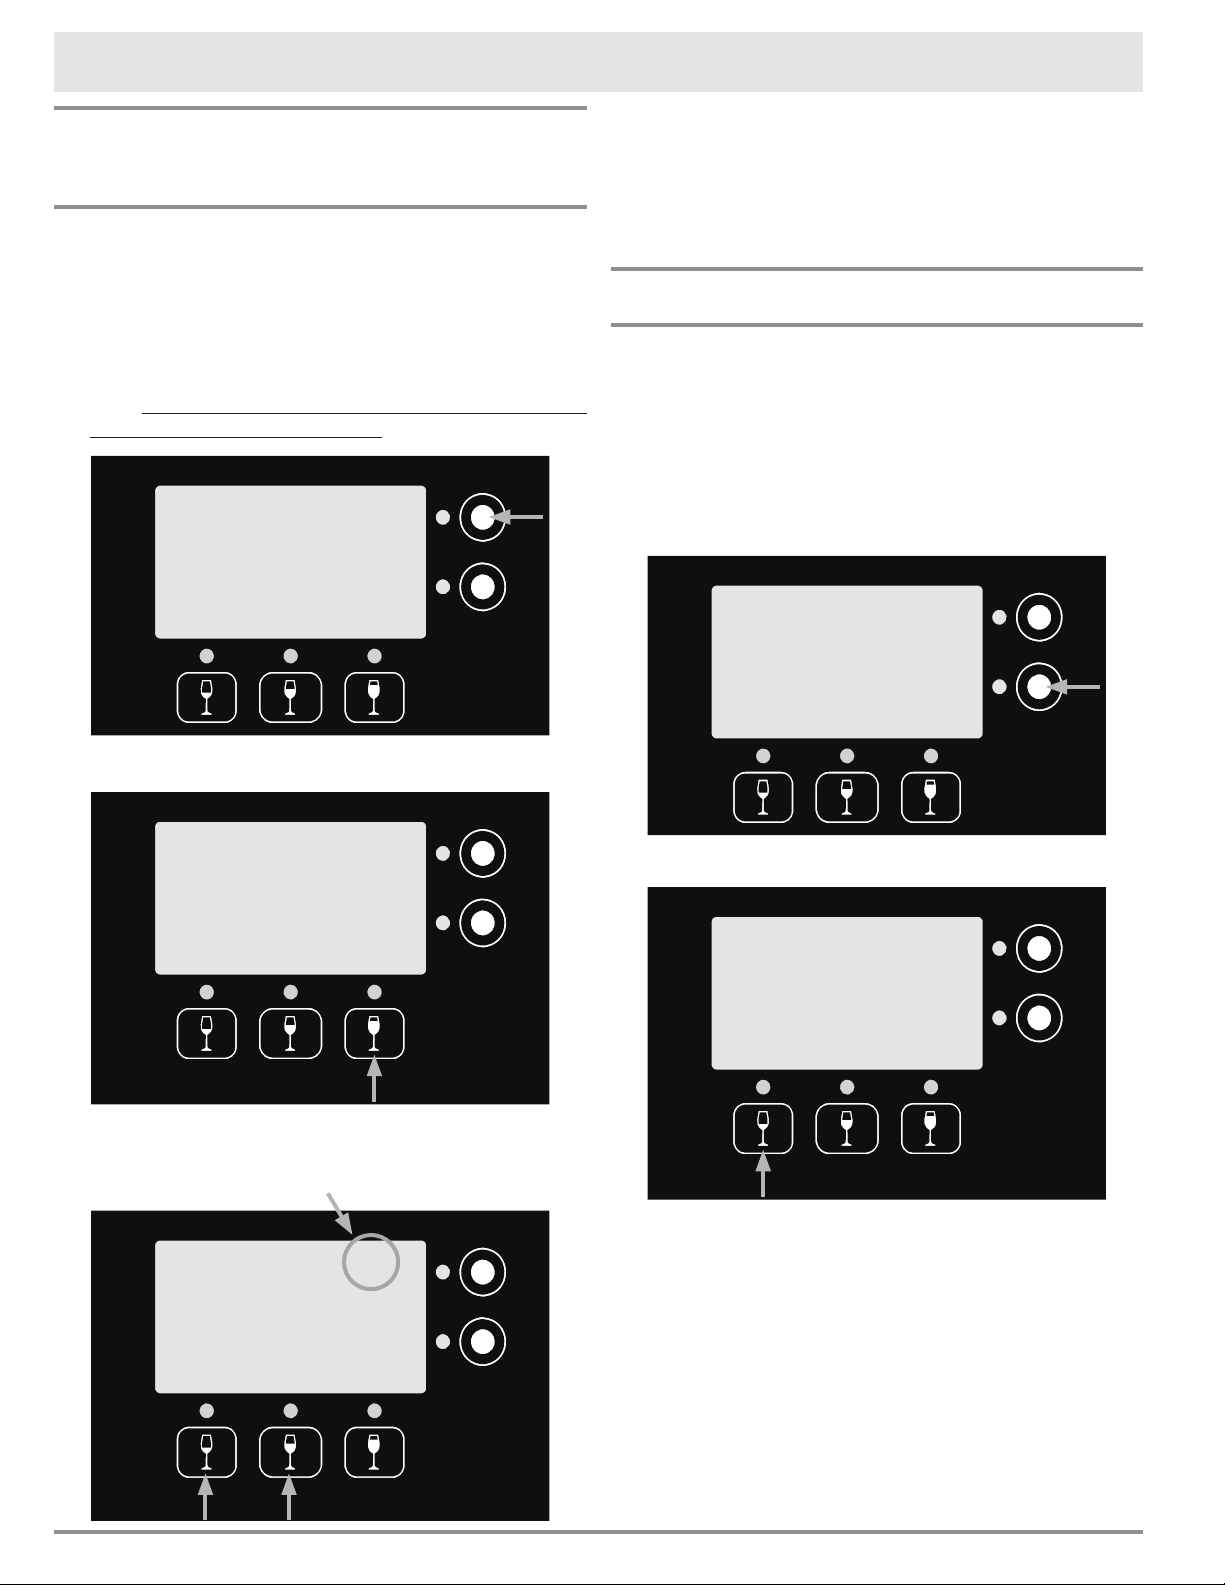
◊ To leave the generic display on the screen
(for example White Wine) push Exit.
◊ To select a specific wine type push the up
(▲) and down (▼) buttons on the right to
select a specific wine (for example Sauvi-
gnon Blanc), then push Exit. A list of the
specific wine types programmed into the
system appears on page 18.
• Push Exit twice.
Changing the Volume (ounces) Dispensed
and/or Display Bottle Description
1. Push Wine Display.
2. Push Set VOL.
3. Push the button for which you want to adjust the
pour volume (for example 1oz).
4. Push the up (▲) and down (▼) buttons on the
right to select the pour volume, then push Exit.
5. You may select another button to adjust the
volume, or push Exit.
continued...
Purge
Bottle
Display
Wine
Exit
Detect
Pour
Bottle Service
Wine
Select
Year
Set
Exit
VOL
Set
2008
Red Wine
1oz 3oz
Exit
6oz
Select Volume
Red White
Exit
▲
▼
Other
2010
White Wine
Red White
Exit
▲
▼
Other
2010
Sauvignon Blanc
1oz
Exit
3oz
▲
▼
6oz
14
4. Push Exit.
• When you are done adjusting the bottle position
settings. Slide the power switch up to the ON
position.
• Lower the spout cover and close the front door.
Control Panel Settings
Standby Power
Standby power turns off the displays to conserve
energy when the wine station is not being used.
To turn on standby power:
1. From the main service menu (see page 11),
push WineStation Service next to any of the
displays.
2. Push PWR STBY. The displays will go dark.
3. Slide the power switch up to the ON position.
4. Lower the spout cover and close the front door.
The control panel will re-light when any button on
the control panel is pushed.
Operating Your Wine Dispensing System
Changing Individual Bottle Settings
(cont.)
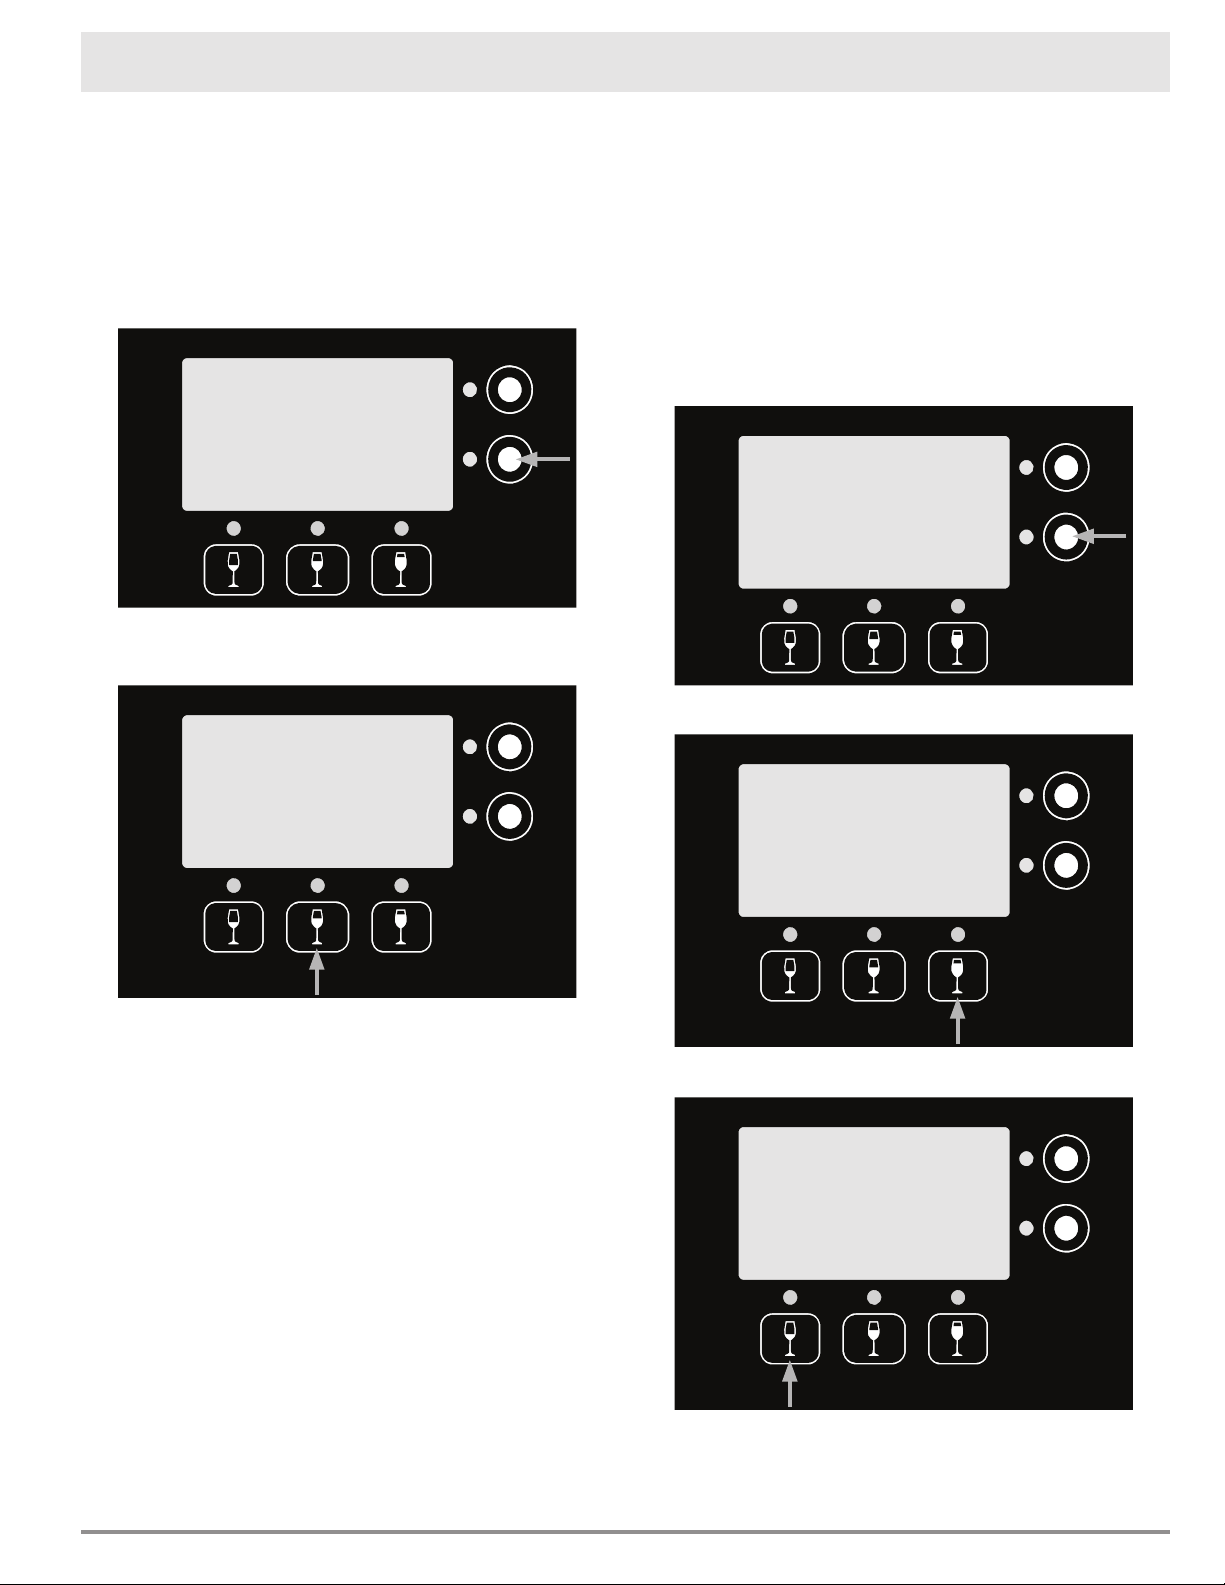
Turning Pour Detect On or Off
The wine dispensing system can detect if there is a
fault in the pouring capabilities of each bottle posi-
tion.
1. Turn Pour Detect on or off from the main ser-
vice menu (see page 11). Push Bottle Ser-
vice next to display for the bottle bay that needs
to have the settings changed.
2. Push Pour Detect.
3. From the pour detect menu, you can turn off
pour detect altogether or just the LED.
Bottle Service
WineStation Service
Purge
Bottle
Display
Wine
Exit
Detect
Pour
Bottle Service
STBY
PWR
LOCK
Exit
More
Bottle Service
WineStation Service
Off
PD
Off
LED
Exit
Pour Detection
On
PD Warning LED
Default Mode. Pour
volume is monitored.
Detects empty bottle.
On
Current setting
15
Operating Your Wine Dispensing System
Locking the Control Panel
The control panel lock may be set from the front
panel to avoid undesired operation.
To lock the control panel:
1. From the main service menu (see page 11),
push WineStation Service next to any of the
displays.
2. Push LOCK. The lock notice will appear on the
display.
3. Slide the power switch up to the ON position.
4. Lower the spout cover and close the front door.
5. The entire control panel is now locked.
Unlocking the Control Panel
To unlock the control panel:
1. From the main service menu (see page 11),
push WineStation Service next to any of the
displays.
2. Push Exit.
3. Slide the power switch up to the ON position.
4. Lower the spout cover and close the front door.
5. The entire control panel is now unlocked.
NOTE: There is no "unlock" button. The process of
entering the service menu and exiting unlocks the
display.
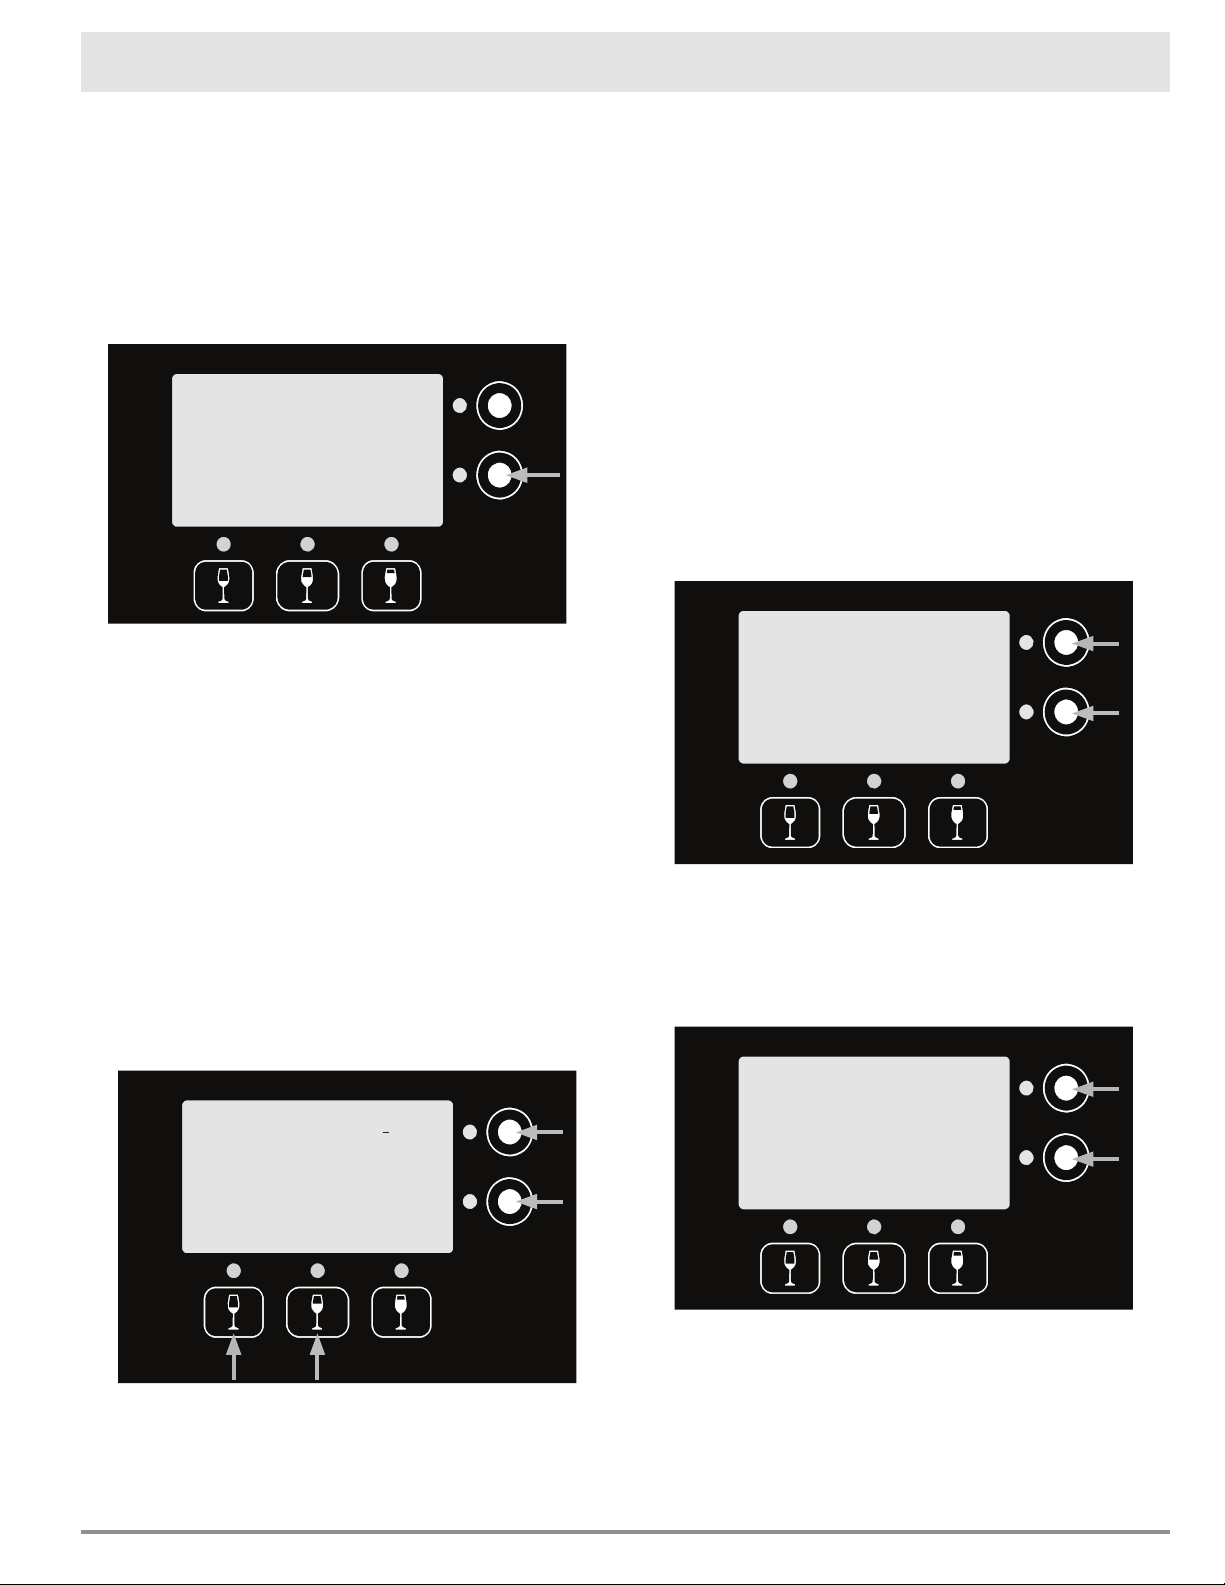
Setting the System Temperature, System Fan
and Temperature Scale(F/C)
The system has three temperature settings, OFF,
ON and MAX. When the the system is set to ON,
the fan will run less making the system quieter, but
the bottle bay will take longer to cool.
To access the temperature/fan settings:
1. From the main service menu (see page 11),
push WineStation Service next to any of the
displays.
1. Push More.
2. Push Set Temp.
continued...
STBY
PWR
LOCK
Exit
More
STBY
PWR
LOCK
Exit
More
Bottle Service
WineStation Service
Bottle Service
WineStation Service
Temp
Set
Screen
Diag.
Exit
More
GLT

16
Accessing the temperature/fan settings
(cont.)
3. Set desired “Wine” temperature by pushing the
buttons next to the up (▲) and down (▼) sym-
bols on the display repeatedly. Because of the
systems energy efficient design, actual cooling
temperature is limited to 25°F lower than the
room temperature displayed, even if the “Wine”
temperature is set lower. NOTE: The bottle bay
temperature rises when the door is opened.
4. Push the Units button repeatedly to switch
between degrees F and degrees C. When you
push the button, the current setting will appear
next the the Room, Wine and Set temperatures
on the display.
5. To select the fan setting, push the bottom left
button to switch between the OFF, ON and MAX
settings. The higher the fan setting, the more
fan noise will be heard.
6. Push Exit.
7. Slide the power switch up to the ON position.
8. Lower the spout cover and close the front door.
Diagnostic Screen
When calling Dacor with questions about your wine
dispensing system, the Customer Service represen-
tative may ask you to access this screen for infor-
mation.
To access the diagnostic screen:
1. From the main service menu (see page 11),
push WineStation Service next to any of the
displays.
1. Push More.
2. Push Diag. Screen. The diagnostic screen will
appear on the display. To exit, push any button
on the control panel.
3. To go back to normal operation, slide the power
switch up to the ON position, then lower the
spout cover and close the front door.
Operating Your Wine Dispensing System
Max Units
°C
▲
▼
Exit
44°F
Set
Room 68°F
Wine 47°F
Cooling On
Current
setting
Measured room
temperature
Measured
bottle bay
temperature
Max Units
°C
▲
▼
Exit
44°F
Set
Room 68°F
Wine 47°F
Cooling On
Current unit setting
Max Units
°C
▲
▼
Exit
44°F
Set
Room 68°F
Wine 47°F
Cooling On
Current setting
Bottle Service
WineStation Service
17
System Name Change
If you want you can change the name on the top of
the display from DACOR to anything you want, up to
20 characters long (for example Our Wine Cellar).
To change the system name display:
1. From the main service menu (see page 11),
push WineStation Service next to any of the
displays.
2. Push More twice.
3. Push System Name.
4. Push the left (<) and right (>) buttons below
the display to select the position of each charac-
ter to change.
You can scroll through the available letters/num-
bers by pushing the buttons next to the up (▲)
and down (▼) symbols repeatedly. When the
desired character appears on the display, push
(<) or (>) to put the cursor on the next charac-
ter to be changed. There is also a "space" avail-
able. Inserting spaces to the right and left allows
you to center the text on the display.
NOTE: Pushing the up (▲) button selects upper
case letters, while pushing the down (▼) button
selects lower case letters.
5. Repeat steps 3 and 4 until all of the desired let-
ters/numbers have been changed, then push
Exit.
Operating Your Wine Dispensing System
< >
▲
▼
Exit
Our Wine Cellar
6. Slide the power switch up to the ON position.
The new system name will appear on all four
displays.
7. Lower the spout cover and close the front door.
Display Contrast/Brightness Settings
The contrast and brightness of each LCD screen can
be adjusted separately.
To adjust the display contrast/brightness:
1. From the main service menu (see page 11),
push WineStation Service next to any of the
displays.
2. Push More twice.
3. Push Adjust Cont.
4. Select the desired contrast level by pushing the
buttons next to the up (▲) and down (▼) sym-
bols on the display repeatedly.
5. Push Prev.
6. Push Adjust Bright.
7. Select the desired brightness level by pushing
the buttons next to the up (▲) and down (▼)
symbols on the display repeatedly.
8. Push Exit.
9. Repeat steps 1 - 8 for any of the other displays
you wish to adjust, then slide the power switch
up to the ON position.
10. Lower the spout cover and close the front door.
Bottle Service
WineStation Service
Prev
▲
▼
Exit
Adjust LCD
Contrast
Max
Set
▲
▼
Exit
Adjust
Display
Brightness
18
Operating Your Wine Dispensing System
Barolo Cabernet Sauvignon Mourvedre/Mataro Sangiovese
Bordeaux Chianti Nebbiolo Shiraz
Brunello Grenache Petit Verdot Syrah
Burgundy Malbec Petite Sirah Tempranillo
Cabernet Franc Merlot Primitivo Zinfandel
Chardonnay Pino Blanc Pinot Gris Rose
Gewurztraminer Riesling White Zinfandel
Meritage Sauvignon Blanc Fume Blanc
Pinot Grigio Viognier Ice Wine
Albarino Colombard Meunier Semillon
Alicante Bouschet Cortese Mission Seyval Blanc
Aligote Corvina Morio-Muskat Sherry
Amarone Counoise Muller-Thurgau Soave
Arneis Duriff Muscadelle Souzao
Auslese Eiswein Muscardin St. Laurent
Baco Noir Fiano Muscat Terret Blanc
Barbaresco Frascati Negrette Terret Gris
Bardolino Gamay Neuburger Terret Noir
Beaujolais Garganega Niagra Tinta Cao
Black Corinth Grappa Picpoul Blanc Tinta Narroca
Blush Grenache Blanc Picpoul Tinta Negra Mole
Bourboulenc Grenache Gris Piedmont Ugni Blanc/Trebbiano
Carignan Grignolino Pinot Meunier Vaccarese/Camarese
Carmenere Gros Verdot Pinot Noir Valdepenas
Carnelian Gruner Veltliner Pinot St. George Valdiguie
Chancellor Kerner Pinotage Verdelho
Charbono Lambrusco Priorat Vernaccia
Chelois Maccabeo Roussanne Verndicchio
Chenin Blanc Marechal Foch Rubired Vidal Blanc
Cinsault Marsanne Ruby Cabernet
Clairette Blanche Melon Sauternes
Claret Meritage Scheurebe
Pre-programmed Wine Selections
Red Wines
White Wines
Other Wines
19
Cleaning
WARNING
• Clean only the parts of the appliance listed in this
manual. Clean them only in the manner specified. Do
not use any chemicals, abrasive materials or razor
blades to clean any part of the appliance.
• ELECTRIC SHOCK HAZARD - Before performing
any cleaning operations on the appliance, unplug the
power cord from the electrical outlet.
• Protect your countertop area! When moving the wine
dispensing system for cleaning, always lift and pull
the unit straight out. Do not wiggle or walk the unit,
because this may damage the countertop or the
product. Moving the wine dispensing system requires
a minimum of two people.
• Never immerse the wine dispensing system in water
or steam clean it. Damage caused by cleaning the
unit in this manner could result in electric shock, fire
or explosion.
The dispensing heads, including the spout tips must
be cleaned regularly. If the pickup tubes are not
replaced between bottle changes, they must be
cleaned before reuse.
Drip Tray
The drip tray is located on the bottom of the bottle
bay, behind the door. Remove and empty it regu-
larly to avoid overflow due to condensation build-
up. Condensation build-up will occur more rapidly
in humid environments. Wash the drip tray in warm
water and dishwashing detergent, as needed.
Cleaning the Spout Tips
Submerge the tips of the spouts in a glass of warm
water as needed, to clean any remaining drops that
may have accumulated at the tip of the spouts. Do
this regularly at the end of each day the wine dis-
pensing system is used.
Cleaning the Dispensing Heads
Dacor recommends cleaning the heads and pick up
tubes with each bottle change. To clean the dispens-
ing head follow these steps:
1. Remove the pick up tube and discard or wash it
out in a mild solution of warm water and dish-
washing soap, then rinse it out.
2. Remove the cap from the
head body by turning the
cap counterclockwise. The
cap will pop off.
3. Place both the cap and the
head body in a dishwasher
and set it for a normal wash
cycle.
4. After washing, place the
head cap on the counter
with the top down. Spray
a small amount of food-
grade silicone spray on the
vinyl cap gasket so that the
cap rotates properly when
it is reinstalled. A can of
food grade silicone spray is
included with the system.
See page 22 for reorder
information.
WARNING
Use only food grade silicone that is NSF approved.
6. Re-position the cap on the
head, with the triangular
pointer on the side of the
cap pointing towards the
arrow on the head body as
shown.
7. Push the cap down and turn
it clockwise.
8. Line up the rotor switch (at
the center of the cap) with
the arrow on the head body.
9. Attach a pickup tube to the
bottom of the head body.
IMPORTANT:
• Store the heads and tubes
in a clean, closed container
when not in use.
• When the head is not in
use, always make sure the
collar is fully un-tightened,
to minimize any unneces-
sary pressure on the
gasket.
Care and Cleaning
Bottom of Cap
Arrow
on head
body
Rotor
switch
Pointer
20
Care and Cleaning
Cleaning the Control Panel
The display and touch panel may be wiped with a
damp clean cloth, as needed. Do not use chemicals
or any abrasive materials. Be careful not to use
sharp objects that may damage the surface of the
touch panel or displays.
Plexiglass Door Window
You may use a mild glass cleaner and a soft cloth to
remove finger prints on the Plexiglass door window.
Do not use a razor blade, chemicals or abrasives.
Exterior Stainless Steel Surfaces
CAUTION
Always wipe stainless steel (silver colored) surfaces with
the grain.
Clean stainless steel surfaces with a mild solution
of detergent and warm water. Rinse and dry with a
soft, lint-free cloth. You may also use Dacor Stain-
less Steel Cleaner. Use it according to the directions
on the package.
Changing/Replacing the Clean-
Pour Head Gasket
The Clean-Pour head is designed to provide ease of
use and cost effective replacement when damaged.
To replace the head gasket:
1. Locate the threaded nut on the bottom of the
head assembly. Un-thread and remove it by
turning it in a counter clockwise direction. If it is
difficult to turn, you may use needle-nose pliers.
Be careful not to damage the plastic threads.
2. Remove gasket from stem.
3. Select the gasket color to be used (green, red or
white).
4. After placing the gasket onto the stem, carefully
thread the nut back onto the stem by turning
clockwise. It should thread easily. IMPORTANT:
Do not force. Make sure the nut is secure.
Gasket
Gasket
nut
21
Replacing the Gas Cylinder
DANGER
IMPORTANT: Use only the argon gas cylinder type
specified in this manual with this appliance. Use of any
other type gas or cylinder may result in explosion, fire
and personal injury.
WARNING
To avoid personal injury, use only the included gas
pressure regulator or a Dacor specified replacement.
Replace the gas cylinder when any of the red lights
come on solid or when Check Gas Supply message
appears on the screen.
1. Open the door on the front of the unit. Then
swing the spout cover to the up position.
2. Slide the power switch, located on the left side
of the bottle bay, all the way down to the OFF
position.
3. Grasp the regulator assembly with one hand and
turn the used gas cylinder counter-clockwise
until is comes loose. Discard the empty canister
in your regular trash. The canister is not refill-
able and therefore should not be disposed of in
the recycle bin.
Care and Cleaning
Spout cover
release lever
(on bottom of
spout cover)
ON
OFF
4. Remove the plastic cap from the top of the new
gas cylinder.
5. Insert the top of the new gas cylinder into the
bottom of the gas regulator assembly and turn
clockwise until snug. Do not over-tighten.
6. Turn the regulator knob in the ON direction until
it stops.
7. Slide the power switch all the way up to the ON
position. The system will run through a series of
self-tests, which could take up to approximately
5 minutes. Once this process is completed, the
blue lights below the LCD screens will be illumi-
nated, indicating that the unit is ready for use.
8. Push firmly up on the lever on the bottom of
the spout cover and hold it up as you lower the
cover into place. CAUTION: Do not push down
on the spout cover without pushing up on the
lever. Damage to the lever will result.
9. Close the door.
Gas Cylinder Removal
Regulator
assembly
Argon
gas
cylinder
22
Parts and Accessories
Description Dacor Part Number
Dacor Stainless Steel Cleaner A302
Package of pickup tubes (package of 10) AWSPT
Silicon spray, food grade (11 oz. spray can) AWSSS
Bottle sizing tool AWSSZ
Clean-Pour dispensing head gaskets, package of 20 (8 red, 8 white, 4 green) AWSCPG20
Regulator assembly AWSHXR
Argon gas canister - 34 L, package of 3* AWSAGC
Dispensing heads, package of 4 (2 red, 2 white) AWSCPM
Dispensing heads with green gasket, package of 4 AWSCPG
Dispensing heads with red gasket, package of 4 AWSCPR
Dispensing heads with white gasket, package of 4 AWSCPW
Drip cloth AWSDC
Drip tray AWSDT
Two zone temperature kit AWSDZ
Visit www.everythingdacor.com to order additional parts and accessories.
*Each 34 L disposable tank of argon gas provides preservation and dispensing for approximately 40 bottles
of wine. One complementary gas cylinder may be ordered with each wine dispensing system purchased.
Visit http://dacor.com/Customer-Care/Warranty.aspx to order your free argon gas cylinder.
Before You Call for Service
Problem Solution Guide
Problem May Be Caused By What to Do
Nothing works, display is
dark.
Power switch is off. Make sure main power switch is in ON
position See page 8 for location. Slide
all the way up.
System not connected to electri-
cal power.
Check to make sure power plug is con-
nected to electrical outlet and to power
supply on back of unit. Also make sure
cable from back of power supply to con-
nector on back of unit is connected. See
page 8 for location.
Power to electrical outlet is off. Turn on power at circuit breaker or fuse
box for electrical outlet. Check for tripped
breaker or blown fuse.
Power outage. Contact power company.
Nothing works, display is
lit.
Power switch is set to service
mode.
Slide power switch to ON position. See
page 8.
See also “Empty Bottle Message”
on facing page.
One or more red lights
flashing or Check Gas
Supply is displayed.
Low gas pressure detected. Although system may continue to work,
gas cylinder needs to be replaced as soon
as possible.
Gas line cut, shortened or
obstructed.
Check gas supply line. If the gas supply
line is modified it may not work properly.
23
Problem May Be Caused By What to Do
Empty bottle message/
red light on solid in bottle
position.
Wine bottle empty. Replace the wine bottle. See page 11.
Pickup tube not installed. Remove bottle and dispensing head.
Remove dispensing head from bottle
and check to make sure pickup tube is
attached.
Dispensing head is loose. Check to make sure head is tight on bottle.
See page 9.
Gas regulator knob in OFF posi-
tion.
Turn gas regulator knob in ON direction
until it stops.
Gas pressure too low for system
to function.
Replace gas cylinder.
Spout cover/door open. Check that the spout cover and door are
fully closed.
Beverage other than wine being
dispensed.
For beverages other than wine (including
water), set Pour Detect to Off. See page
14.
Dispensing head contacts are
wet or dirty.
Wipe the stainless steel head contacts with
clean warm water and dry with a clean
cloth. Reinstall head and retry.
Appliance contact pins are wet or
dirty.
Carefully clean the contact pins located
in the rear of the bottle bay. Use the soft
rubber eraser on top of a pencil. Carefully
push on the pins. They should be springy.
If they are “sticky” they may need to be
carefully cleaned using a “contact cleaner”
and aerosol spray, that can be purchased
at most hardware stores.
Dispensing head is loose. Check to make sure head is tight on bottle.
See page 9.
Dispensing head cap is on back-
wards.
Check to make sure cap is in the right ori-
entation. See page 19.
Multiple red lights on
solid.
Gas regulator knob in OFF posi-
tion.
Turn gas regulator knob in ON direction
until it stops.
Gas pressure too low for system
to function.
Replace gas cylinder.
Power switch is set to SERVICE
MODE.
Slide power switch to ON position. See
page 8.
Wine is too warm. Room temperature too high.
Operating temperature must be
50°F (10°C) Max 80°F (26.7°C).
Because of the system's energy efficient
design, cooling is limited to 25°F lower
than the temperature outside the unit. To
lower the temperature, move the unit to a
cooler location.
Cooling temperature set too low. See page 15 to set the system cooing
temperature.
Cooling fan setting set to OFF. Set the fan setting to ON or MAX. See
page 15.
Cooling fan set too low. To cool the bottle bay down faster, set the
fan setting to MAX. See page 15.
continued...
Before You Call for Service
24
Problem May Be Caused By What to Do
System is noisy. Cooling fans set too high. See page 15 to change the fan setting.
NOTE: Changing the fan setting may extend
the time it takes for the bottle bay to cool
after door openings and closings.
Bottle will not slide into
bottle bay.
Cap on clean pour head mis-
aligned.
Check that the cap and rotor switch are in the
correct position. See page 9.
Wine comes out during
purge or clean process.
New wine bottle is very full. Sometimes if a new wine bottle is very full, a
little wine will come out during the purge or
clean process. This is normal.
Hissing noise. Normal sound at end of wine
dispensing, purge or clean
function.
Hissing sound is normal during these normal
system operations.
Argon gas leak. If hissing is coming from gas line. Remove
gas cylinder from regulator and call Dacor for
replacement gas line.
If hissing is coming from regulator area.
Check to make sure gas cylinder is connected
firmly to regulator. If hissing continues,
remove gas cylinder from regulator and call
Dacor for replacement regulator assembly.
Suspected gas leak/Gas
cylinder emptying too
quickly.
One or more dispensing head
caps loose.
Check all dispensing heads to ensure that the
caps are correctly engaged and secure.
Purge (P) button pushed too
often.
Push the purge (P) button only once to purge
air from the bottle. Pushing the button more
than once wastes gas.
Leak in gas supply system. Call for service.
Before You Call for Service
Warranty and Service
Getting Help
Before you request service:
1. Review the Before You Call for Service sec-
tion of this manual (page 22).
2. Use the helpful tips found in our Problem Solu-
tion Guide.
3. Become familiar with the warranty terms and
conditions of your product on the following page.
4. If none of these tips or suggestions resolves
your problem, call our Customer Service center
at the number shown.
Dacor’s Customer Service center is available 6:00
A.M. – 5:00 P.M. Pacific Time
For warranty repairs or questions and for Dacor Dis-
tinctive Service (DDS) in the US and Canada
Phone: (800) 793-0093, extension 2822
For non-warranty repairs or questions in the US and
Canada
Phone: (800) 793-0093, extension 2813
Contact us through our web site at:
www.dacor.com /contact-us
25
What Is Not Covered
• Slight color variations may be noticed because of dif-
ferences in painted parts, kitchen lighting, product
placement and other factors; this warranty does not
apply to color variation.
• Service calls to educate the customer on proper use
and care of the product.
• Service fees for travel to islands and remote areas,
which include but are not limited to, ferries, toll roads
or other travel expenses.
• Consequential or incidental damage, including but not
limited to wine spoilage or time away from work.
• Failure of the product when used for commercial,
business, rental or any application other than for resi-
dential consumer use.
• Failure of the product caused by improper product
installation.
• Replacement of house fuses, fuse boxes or resetting
of circuit breakers.
• Damage to the product caused by accident, fire, flood,
power interruption, power surges or other acts of God.
• Liability or responsibility for damage to surrounding
property including cabinetry, floors, ceilings and other
structures or objects around the product.
• Breakage, discoloration or damage to glass, metal
surfaces, plastic components, trim, paint or other cos-
metic finish caused by improper usage, care, abuse or
neglect.
Out of Warranty
Should you experience a service issue beyond the stan-
dard warranty period, please contact us. Dacor reviews
each issue and customer concern to provide the best pos-
sible solution based on the circumstances.
THE REMEDIES PROVIDED FOR IN THE ABOVE EXPRESS
WARRANTIES ARE THE SOLE AND EXCLUSIVE REMEDIES.
THEREFORE, NO OTHER EXPRESS WARRANTIES ARE
MADE, AND OUTSIDE THE FIFTY STATES OF THE UNITED
STATES, THE DISTRICT OF COLUMBIA AND CANADA, ALL
IMPLIED WARRANTIES, INCLUDING BUT NOT LIMITED
TO, ANY IMPLIED WARRANTY OF MERCHANTABILITY OR
FITNESS FOR A PARTICULAR USE OR PURPOSE, ARE
LIMITED IN DURATION TO ONE YEAR FROM THE DATE OF
ORIGINAL PURCHASE. IN NO EVENT SHALL DACOR BE
LIABLE FOR INCIDENTAL EXPENSE OR CONSEQUENTIAL
DAMAGES. NO WARRANTIES, EXPRESS OR IMPLIED, ARE
MADE TO ANY BUYER FOR RESALE.
Some states do not allow limitations on how long an
implied warranty lasts, or do not allow the exclusion or
limitation of inconsequential damages, so the above limi-
tations or exclusions may not apply to you. This warranty
gives you specific legal rights, and you may also have
other rights that vary from state to state.
Warranty and Service
Warranty
What is Covered
CERTIFICATE OF WARRANTIES:
DACOR WINE DISPENSING SYSTEM
WITHIN THE FIFTY STATES OF THE U.S.A., THE
DISTRICT OF COLUMBIA AND CANADA:
FULL ONE-YEAR WARRANTY
The warranty applies only to the Dacor appliance sold to
the first use purchaser, starting from the date of origi-
nal retail purchase or closing date for new construction,
whichever period is longer. Warranty is valid on products
purchased brand new from a Dacor Authorized Dealer or
other seller authorized by Dacor.
If your Dacor product fails to function within one year of
the original date of purchase, due to a defect in material
or workmanship, Dacor will remedy it without charge to
you.
All cosmetic damage (such as scratches on stainless steel,
paint/porcelain blemishes, etc.) to the product or included
accessories must be reported to Dacor within 60 days of
the original purchase date to qualify for warranty cover-
age.
Consumable parts such as, but not limited to, filters and
light bulbs are not covered and are the responsibility of
the purchaser.
LIMITATIONS OF COVERAGE
Service will be provided by a Dacor designated service
company during regular business hours. Please note ser-
vice providers are independent entities and are not agents
of Dacor.
Dealer display and model home display products with a
production date greater than 5 years, products sold “As
Is,” and products installed for non-residential use, which
include but are not limited to religious organizations, fire
stations, bed and breakfast and spas carry a one year
parts warranty only. All delivery, installation, labor costs
and other service fees are the responsibility of the pur-
chaser.
Warranty will be null and void on product that has altered,
defaced or missing serial numbers and tags. The owner
must provide proof of purchase or closing statement for
new construction upon request. All Dacor products must
be accessible for service.
OUTSIDE THE FIFTY STATES OF THE U.S.A.,
THE DISTRICT OF COLUMBIA AND CANADA:
LIMITED FIRST YEAR WARRANTY
If your Dacor product fails to function within one year of
the original date of purchase due to a defect in material or
workmanship, Dacor will furnish a new part, F.O.B. factory
to replace the defective part.
All delivery, installation, labor costs and other service fees
are the responsibility of the purchaser.

26
Notes

27
Notes

28
fold here
DACOR
ATTN WARRANTY PROCESSING DEPT
PO BOX 90070
CITY OF INDUSTRY CA 91715-9907
NO POSTAGE
NECESSARY
IF MAILED
IN THE
UNITED STATES
BUSINESS REPLY MAIL
FIRST-CLASS MAIL CITY OF INDUSTRY CAPERMIT NO 1600
POSTAGE WILL BE PAID BY ADDRESSEE
Web site: www.dacor.com
Corporate phone: (800) 793-0093
WARRANTY INFORMATION
IMPORTANT:
Your warranty will not be activated until you activate it online or return this form to Dacor. If you have purchased more
than one Dacor product, please return all forms in one envelope or activate the warranty for each product online.
Please rest assured that under no conditions will Dacor sell your name or any of the information on this form for mailing list purposes. We
are very grateful that you have chosen Dacor products for your home and do not consider the sale of such information to be a proper way
of expressing our gratitude!
Your willingness to take a few seconds to fill in the section below will be sincerely appreciated. Thank you.
1. How were you first exposed to Dacor products? (Please check one only.)
A. T.V. Cooking Show F Builder
B. Magazine G. Architect/Designer
C. Appliance Dealer Showroom H. Another Dacor Owner
D. Kitchen Dealer Showroom I. Model Home
E. Home Show J. Other
2. Where did you buy your Dacor appliances?
A. Appliance Dealer D. Builder
B. Kitchen Dealer E. Other
C. Builder Supplier
3. For what purpose was the product purchased?
A. Replacement only C. New Home
B. Part of a Remodel D. Other
4. What is your household income?
A. Under $75,000 D. $150,000 – $200,000
B. $75,000 – $100,000 E. $200,000 – $250,000
C. $100,000 – $150,000 F. Over $250,000
5. What other brands of appliances do you have in your kitchen?
A. Cooktop C. Dishwasher
B. Oven D. Refrigerator
6. Would you buy or recommend another Dacor product?
Yes No
Comments:
Owner’s Name:
Street:
City: State: Zip:
Purchase Date: Email: Telephone:
Dealer:
City: State: Zip:
(Please Print or Type)
Last First Middle
cut here cut here
Please visit www.dacor.com to activate your warranty online.
Thank you very much for your assistance. The information you have
provided will be extremely valuable in helping us plan for the future
and giving you the support you deserve.