
W11507956A
TOP-MOUNT REFRIGERATOR OWNER'S MANUAL
MANUEL D’UTILISATION DU RÉFRIGÉRATEUR AVEC
CONGÉLATEUR EN HAUT
Table of Contents/Table des matières
REFRIGERATOR SAFETY.................................................2
Refrigerator Safety .........................................................2
MAINTENANCE AND CARE ..............................................3
Cleaning ......................................................................3
Changing the Light Bulbs.................................................3
Vacations .....................................................................4
Moving ........................................................................4
INSTALLATION INSTRUCTIONS ........................................5
Unpack the Refrigerator ..................................................5
Location Requirements ...................................................5
Electrical Requirements ..................................................6
Water Supply Requirements.............................................6
Connect the Water Supply ...............................................7
Install Air Filter ..............................................................8
REFRIGERATOR DOORS..................................................8
Door and Handle Instructions ...........................................8
Remove Doors and Hinges ..............................................9
Reverse Doors and Hinges (optional) ............................... 10
Replace Doors and Hinges ............................................ 13
Final Steps ................................................................. 13
Reversibility Kit Instructions ........................................... 13
Adjust the Doors .......................................................... 14
REFRIGERATOR AND FREEZER FEATURES..................... 14
Refrigerator Shelves..................................................... 14
Freezer Shelf .............................................................. 14
Door Rails or Trivets ..................................................... 15
Can Racks and Bins (on some models) ............................ 15
Deli or Meat Drawer...................................................... 16
Crisper ...................................................................... 16
Utility Compartment...................................................... 17
Ice Maker ................................................................... 17
SÉCURITÉ DU RÉFRIGÉRATEUR .................................... 18
Sécurité du réfrigérateur................................................ 18
ENTRETIEN ET RÉPARATION ......................................... 19
Nettoyage .................................................................. 19
Remplacement des ampoules d’éclairage ......................... 20
Vacances ................................................................... 21
Déménagement........................................................... 21
INSTRUCTIONS D’INSTALLATION ................................... 22
Déballage du réfrigérateur ............................................. 22
Exigences d’emplacement ............................................. 22
Spécifications électriques .............................................. 23
Spécifications de l’alimentation en eau ............................. 23
Raccordement à la canalisation d’eau .............................. 24
Installation du filtre à air................................................. 25
PORTES DU RÉFRIGÉRATEUR ....................................... 26
Instructions pour la porte et la poignée ............................. 26
Démontage des portes et charnières................................ 26
Inversion du sens d’ouverture des portes et d’installation des
charnières (facultatif) .................................................... 27
Réinstallation des portes et charnières ............................. 30
Étapes finales ............................................................. 31
Instructions pour l’ensemble d’inversion du sens
d’ouverture ................................................................. 31
Ajustement des portes .................................................. 32
CARACTÉRISTIQUES DU RÉFRIGÉRATEUR ET DU
CONGÉLATEUR ............................................................ 32
Tablettes du réfrigérateur............................................... 32
Tablette de congélateur ................................................. 32
Tringles de la porte ou balconnets ................................... 33
Cannettes et balconnets de porte (sur certains modèles)...... 33
Tiroir à viande ou à charcuterie ....................................... 34
Bac à légumes ............................................................ 34
Compartiment utilitaire .................................................. 35
Machine à glaçons ....................................................... 35
2
REFRIGERATOR SAFETY
Your safety and the safety of others are very important.
We have provided many important safety messages in this manual and on your appliance. Always read and obey all safety
messages.
This is the safety alert symbol.
This symbol alerts you to potential hazards that can kill or hurt you and others.
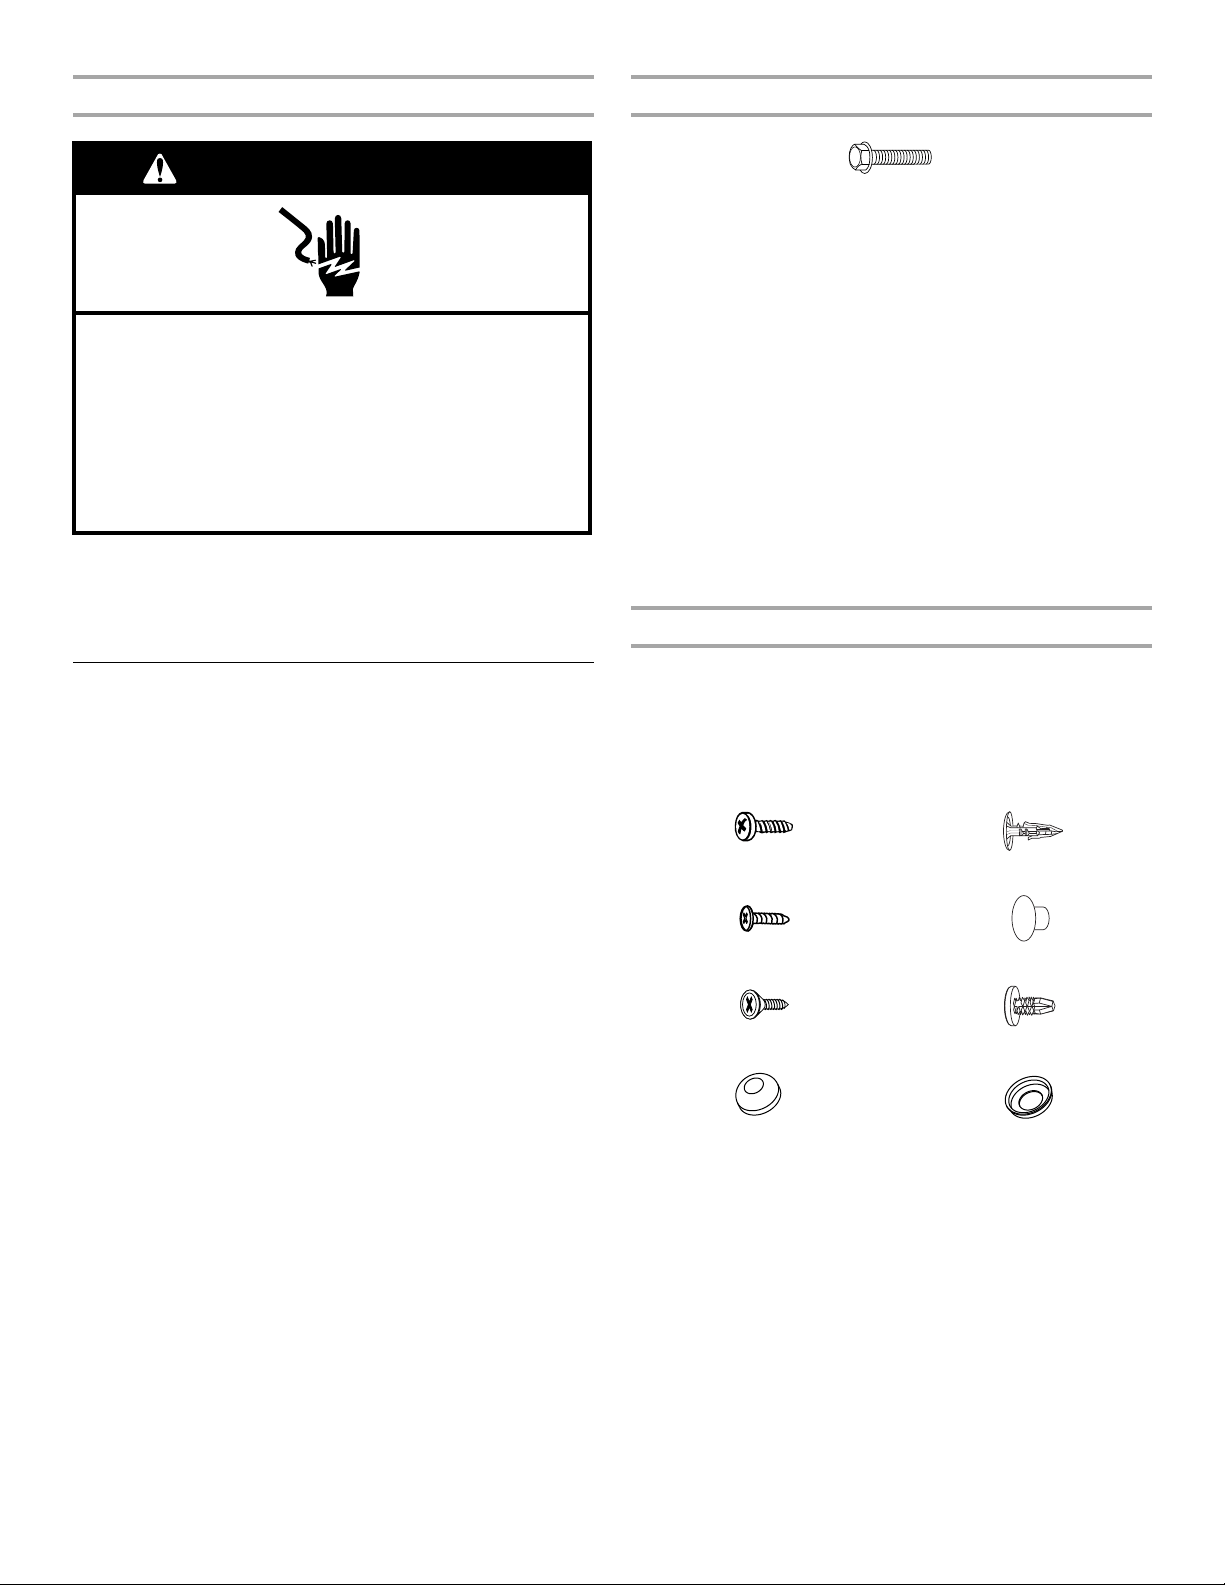
All safety messages will follow the safety alert symbol and either the word “DANGER” or “WARNING.” These
words mean:
DANGER
You can be killed or seriously injured if you don't
immediately follow instructions.
WARNING
You can be killed or seriously injured if you don’t follow
instructions.
All safety messages will tell you what the potential hazard is, tell you how to reduce the chance of injury, and tell you what can
happen if the instructions are not followed.
IMPORTANT SAFETY INSTRUCTIONS
WARNING: To reduce the risk of fire, electric shock, or injury to persons when using your appliance, follow basic precautions,
including the following:
� Children should be supervised to ensure that they do not
play with the appliance.
� This appliance is not intended for use by persons (including
children) with reduced physical, sensory, or mental
capabilities, or lack of experience and knowledge, unless
they have been given supervision or instruction concerning
use of the appliance by a person responsible for their
safety.
� Do not use an extension cord.
� If power supply cord is damaged, it must be replaced by the
manufacturer, its service agent, or a similarly qualified
person in order to avoid a hazard.
� Connect to potable water supply only.
� This appliance is intended to be used in household and
similar applications such as: staff kitchen areas in shops,
offices, and other working environments; farm houses and
by clients in hotels, motels, and other residential-type
environments; bed and breakfast-type environments; and
catering and similar non-retail applications.
� Do not store explosive substances such as aerosol cans
with a flammable propellant in this appliance.
� Do not use replacement parts that have not been
recommended by the manufacturer (e.g., parts made at
home using a 3D printer).
� Keep ventilation openings, in the appliance enclosure or in
the built-in structure, clear of obstruction.
� Do not use mechanical devices or other means to
accelerate the defrosting process, other than those
recommended by the manufacturer.
� Do not damage the refrigerant circuit.
� Do not use electrical appliances inside the food storage
compartments of the appliance, unless they are of the type
recommended by the manufacturer.
SAVE THESE INSTRUCTIONS
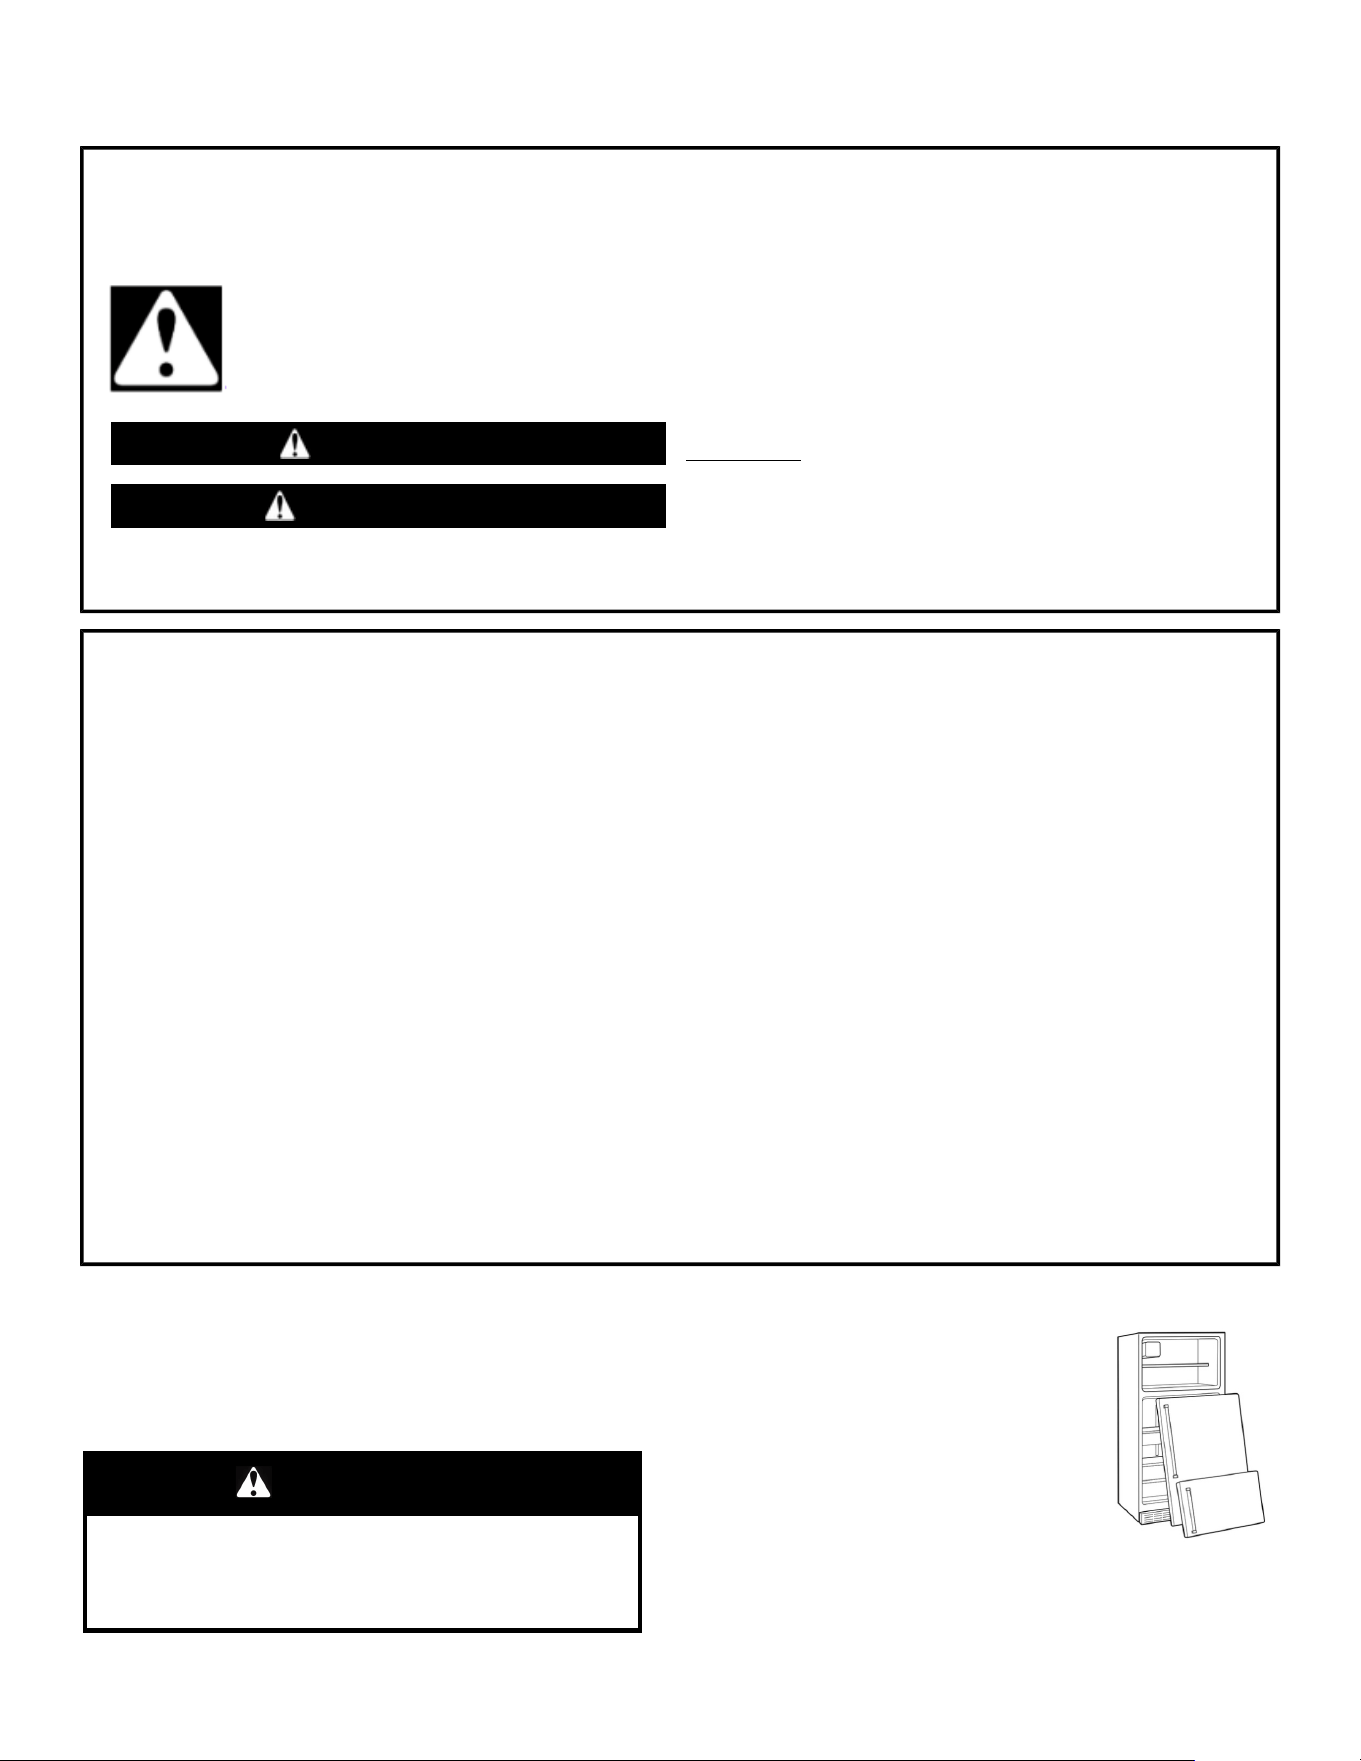
Proper Disposal of Your Old Refrigerator
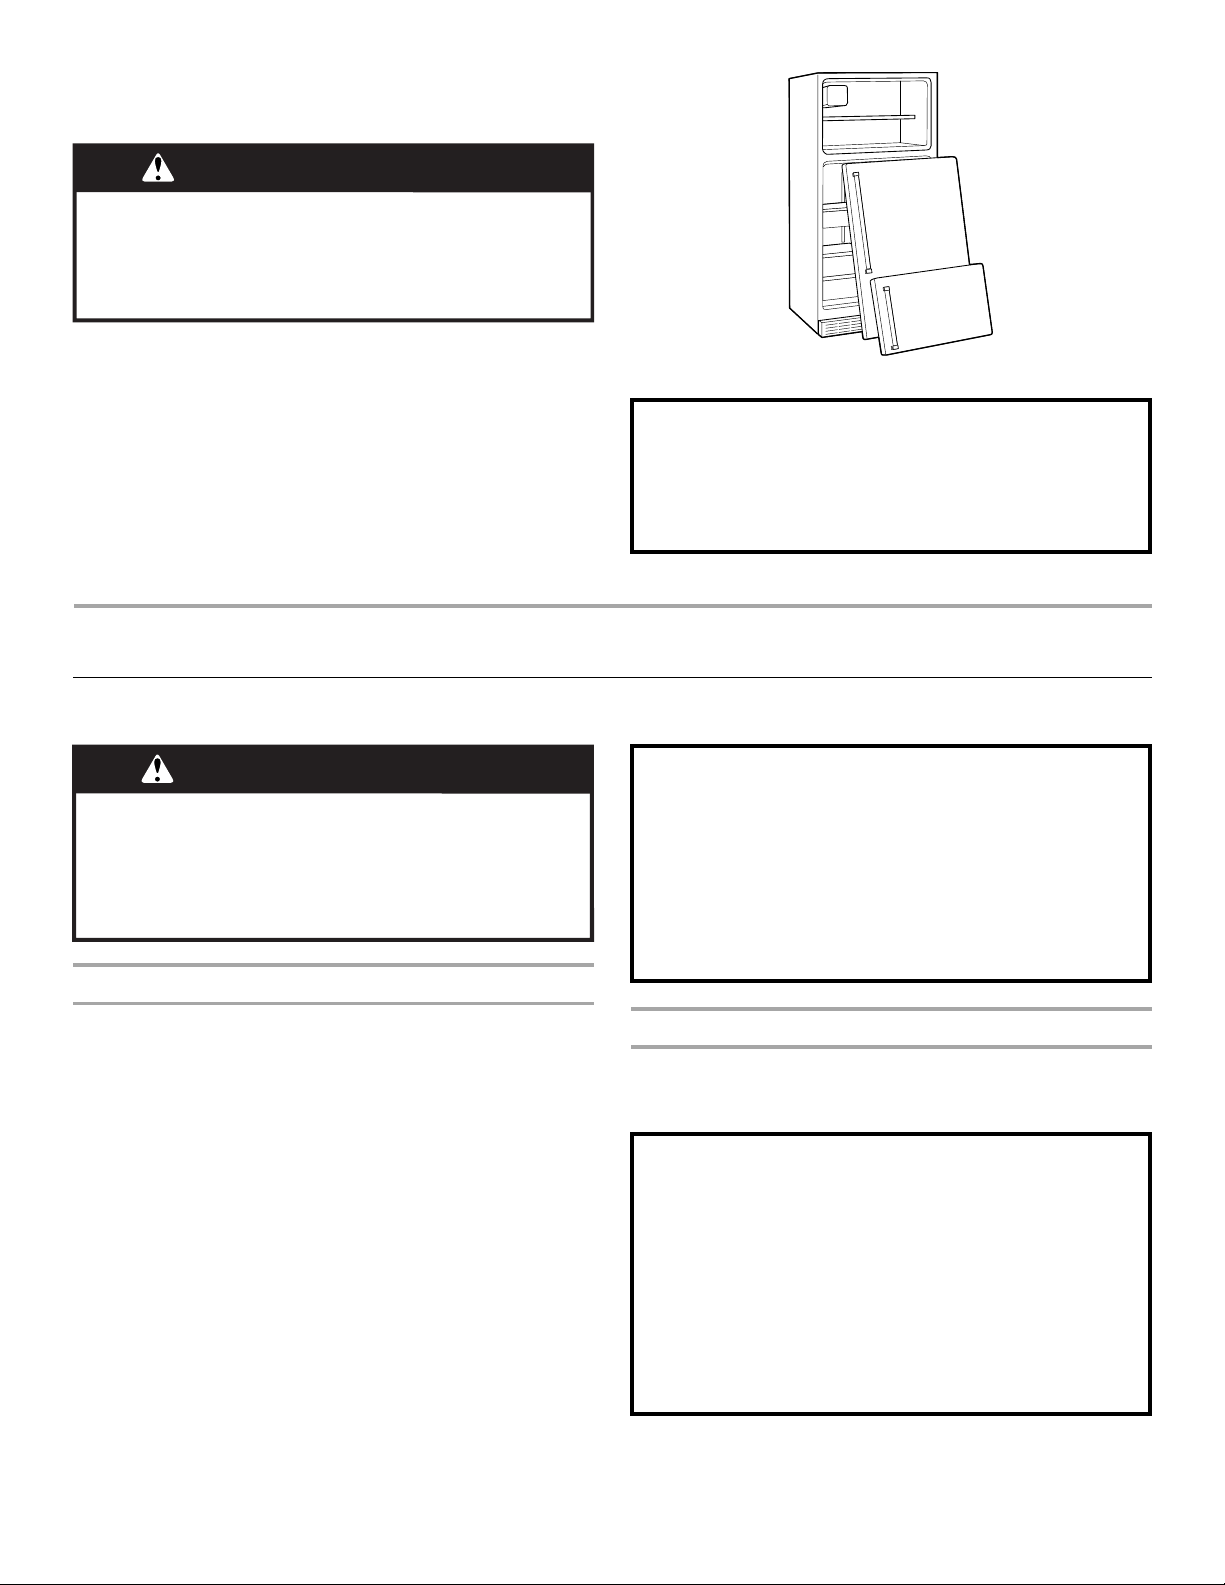
WARNING: Risk of child entrapment. Before you throw
away your old refrigerator or freezer:
� Take off the doors.
� Leave the shelves in place so that children may not easily
climb inside.
WARNING
Suffocation Hazard
Remove doors or lid from your old appliance.
Failure to do so can result in death or brain damage.
IMPORTANT: Child entrapment and suffocation
are not problems of the past. Junked or
abandoned refrigerators are still dangerous, even
if they will sit for “just a few days.” If you are getting
rid of your old refrigerator, please follow these
instructions to help prevent accidents.
Important information to know about disposal
of refrigerants:
Dispose of refrigerator in accordance with federal
and local regulations. Refrigerants must be
evacuated by a licensed, EPA-certified refrigerant
technician in accordance with established
procedures.
3
MAINTENANCE AND CARE
Cleaning
WARNING
Explosion Hazard
Risk of Fire or Explosion.
Flammable Refrigerant Used.
Do Not Use Mechanical Devices to Defrost Refrigerator.
Do Not Puncture Refrigerant Tubing.
Both the refrigerator and freezer sections defrost automatically.
However, clean both sections about once a month to avoid
buildup of odors. Wipe up spills immediately.
IMPORTANT:
� Because air circulates between both sections, any odors
formed in one section will transfer to the other. You must
thoroughly clean both sections to eliminate odors. To avoid
odor transfer and drying out of food, wrap or cover foods tightly
� For stainless steel models, stainless steel is corrosion
resistant and not corrosion-proof. To help avoid corrosion of
your stainless steel, keep your surfaces clean by using the
following cleaning instructions
To Clean Your Refrigerator:
NOTE: Do not use abrasive or harsh cleaners such as window
sprays, scouring cleansers, flammable fluids, muriatic acid,
cleaning waxes, concentrated detergents, bleaches or cleansers
containing petroleum products on exterior surfaces (doors and
cabinet), plastic parts, interior and door liners, or gaskets. Do not
use paper towels, scouring pads, or other harsh cleaning tools.
1. Unplug refrigerator or disconnect power.
2. Using a clean sponge or soft cloth and a mild detergent in
warm water, hand-wash, and rinse removable parts and
interior surfaces thoroughly. Dry thoroughly with a soft cloth.
3. Clean the exterior surfaces.
IMPORTANT:
� When cleaning stainless steel, always wipe in the direction
of the grain to avoid cross-grain scratching.
� To keep your stainless steel refrigerator looking like new
and to remove minor scuffs or marks, it is suggested that
you use the manufacture's approved Stainless Steel
Cleaner and Polish. To order, use the following parts:
Affresh
®®
Stainless Steel Cleaner: Part #W10355016
Affresh
®®
Stainless Steel Wipes: Part #W10355049
Affresh
®®
Kitchen & Appliance Cleaner: Part
#W10355010
� Stainless Steel Cleaner and Polish is for stainless steel
only. Do not allow the Stainless Steel Cleaner to come into
contact with any plastic parts such as the trim pieces,
dispenser covers or door gaskets. If unintentional contact
does occur, clean plastic part with a sponge and a mild
detergent in warm water. Dry thoroughly with a soft cloth.
4. There is no need for routine condenser cleaning in normal
home operating environments. If the environment is
particularly greasy or dusty, or there is a significant pet traffic
in the home, the condenser should be cleaned every 2 to 3
months to ensure maximum efficiency.
If you need to clean the condenser:
WARNING
Explosion Hazard
Risk of Fire or Explosion due to Puncture of Refrigerant
Tubing;
Follow Handling Instructions Carefully.
Flammable Refrigerant Used.
� Pull refrigerator out away from the wall. See “Unpack the
Refrigerator.”
� Remove the base grille.
� Vacuum coils when they are dusty or dirty.
� Replace the base grille when finished.
� Roll refrigerator back into place. Make sure to leave 1" (2.5
cm) between the cabinet back and the wall.
� Check to see that the refrigerator is level.
5. Plug in refrigerator or reconnect power.
Changing the Light Bulbs
IMPORTANT: The lights in both the refrigerator and freezer
compartments use LED technology that do not need to be
replaced. If the lights do not illuminate when the door or drawer is
opened, call for assistance or service. Refer to the Quick Start
Guide for contact information. The lighting system in this
appliance may consist of:
� Sealed LED modules
� LED Bulbs
� Incandescent Bulbs
� or a combination of the above.
NOTE: If your product has a sealed LED module, call for
assistance or service . Refer to the Quick Start Guide for contact
information.
IMPORTANT:
� Depending on your model, the light bulb in your new
refrigerator may use LED technology. If your model uses LED
lighting and the light does not illuminate when the refrigerator
door is opened, call for assistance or service.
� Some LED replacement bulbs are not recommended for wet/
damp environments. The refrigerator and freezer
compartments are considered to be wet/dam environments. If
using a brand of LED bulb other than the recommended LED
bulb listed below, before installation, read and follow all
instructions on the LED packaging.
� If an incandescent bulb is used to replace an LED bulb, use
only incandescent bulbs for household appliances with a
maximum of 40 W.
4
CHANGING THE LIGHT BULB
1. Unplug refrigerator or disconnect power.
2. The light bulb is located behind the Temperature control on
most models.
3. Remove the light shield (if applicable) as shown below.
4. Remove and replace the light bulb as shown below.
5. Replace the light shield (if applicable).
6. Plug in refrigerator or reconnect power.
REFRIGERATOR LIGHT STYLE 1
To Remove and Replace Light Bulb:
1. Reach behind the control panel and unscrew the bulb.
2. Replace the bulb with a 40 W max. appliance bulb.
REFRIGERATOR LIGHT STYLE 2
1. Remove the light shield by squeezing in on the sides and
pulling it straight down.
2. Remove the light bulb and replace it with an appliance bulb
of the same size and shape.
NOTE: To replace with an LED light bulb, order part number
W10565137 (3.6 W).
REFRIGERATOR LIGHT STYLE 3
1. Remove the light shield by squeezing in on the sides and
pulling it straight down.
2. Remove the light bulb and replace it with an appliance bulb
of the same size and shape.
NOTE: To replace with an LED light bulb, order part number
W10565137 (3.6 W).
FREEZER LIGHT
1. Slide the light shield toward the back of the compartment to
release it from the light assembly.
2. Remove the light bulb and replace it with an appliance bulb
of the same size and shape.
NOTE: To replace with an LED light bulb, order part number
W10574850 (2.0 W).
Vacations
If You Choose to Leave the Refrigerator On While You’re
Away :
1. Use up any perishables and freezer other items.
2. If your refrigerator has an automatic ice maker and is
connected to the household water supply, turn off the water
supply to the refrigerator. Property damage can occur if the
water supply is not turned off.
3. If you have an automatic ice maker, turn off the ice maker.
NOTE: Raise the wire shut-off arm to Off (up) position.
4. Empty the ice bin.
If You Choose to Turn Off the Refrigerator Before You Leave:
1. Remove all food from the refrigerator.
2. If your refrigerator has an automatic ice maker:
� Turn off the water supply to the ice maker at least one day
ahead of time.
� When the last load of ice drops, raise the wire shutoff arm
to the Off (up) position.
3. Turn off the Temperature control(s). See “Using the Controls”
in the Quick Start Guide.
4. Clean refrigerator, wipe it, and dry well.
5. Tape rubber or wood blocks to the tops of both doors to prop
them open far enough for air to get in. This stops odor ad mold
from building up.
Moving
When you are moving your refrigerator to a new home, follow
these steps to prepare it for the move.
1. If your refrigerator has an automatic ice maker:
� Turn off the water supply to the ice maker at least one day
ahead of time.
� Disconnect the water line from the back of the refrigerator.
� When the last load of ice drops, raise the wire shutoff arm
to the Off (up) position.
2. Remove all food from the refrigerator and pack all frozen food
in dry ice.
3. Empty the ice bin.
4. Turn off the Temperature control(s). See “Using the Controls”
in the Quick Start Guide.
5. Unplug refrigerator.
6. Clean refrigerator, wipe it, and dry well.
7. Take out all removable parts, wrap them well, and tape them
together so they don’t shift and rattle during the move.
8. Depending on the model, raise the front of the refrigerator so it
rolls more easily, or raise the leveling legs so they don't
scrape the floor. See “Adjust the Doors” or “Door Removal,
Leveling and Alignment” in the online Feature Guide.
5
9. Tape the doors closed and tape the power cord to the back of
the refrigerator.
When you get to your new home, put everything back and refer to
the “Installation Instructions” for preparation instructions. Also, if
your refrigerator has an automatic ice maker, remember to
reconnect the water supply to the refrigerator.
INSTALLATION INSTRUCTIONS
Unpack the Refrigerator
WARNING
Excessive Weight Hazard
Use two or more people to move and install or uninstall
appliance.
Failure to do so can result in back or other injury.
Remove the Packaging
IMPORTANT: Do not remove the white foam air return insert from
behind the control panel on the ceiling of the refrigerator. If the
insert is removed, ice may migrate down from the freezer and
cause icicles to form.
� Remove tape and glue residue from surfaces before turning on
the refrigerator. Rub a small amount of liquid dish soap over
the adhesive with your fingers. Rinse with warm water and dry
with a soft cloth.
NOTE: Do not use sharp instruments, rubbing alcohol,
flammable fluids, or abrasive cleaners to remove tape or glue.
These products can damage the surface of your refrigerator.
For more information see “Refrigerator Safety.”
� Dispose of/recycle all packaging materials.
When Moving Your Refrigerator:
Your refrigerator is heavy. When moving the refrigerator for
cleaning or service, be sure to cover the floor with cardboard or
hardboard to avoid floor damage. Always pull the refrigerator
straight out when moving it. Do not wiggle or “walk” the
refrigerator when trying to move it, as floor damage could occur.
Clean Before Using
After you remove all of the packaging materials, clean the inside
of your refrigerator before using it. See the cleaning instructions in
the “Maintenance and Care” section.
Important information to know about glass shelves and
covers:
Do not clean glass shelves or covers with warm water when they
are cold. Shelves and covers may break if exposed to sudden
temperature changes or impact, such as bumping. Tempered
glass is designed to shatter into many small, pebble-size pieces.
This is normal. Glass shelves and covers are heavy. Use both
hands when removing them to avoid dropping.
Location Requirements
WARNING
Explosion Hazard
Keep flammable materials and vapors, such as gasoline,
away from appliance.
Use nonflammable cleaner.
Failure to do so can result in death, explosion, or fire.
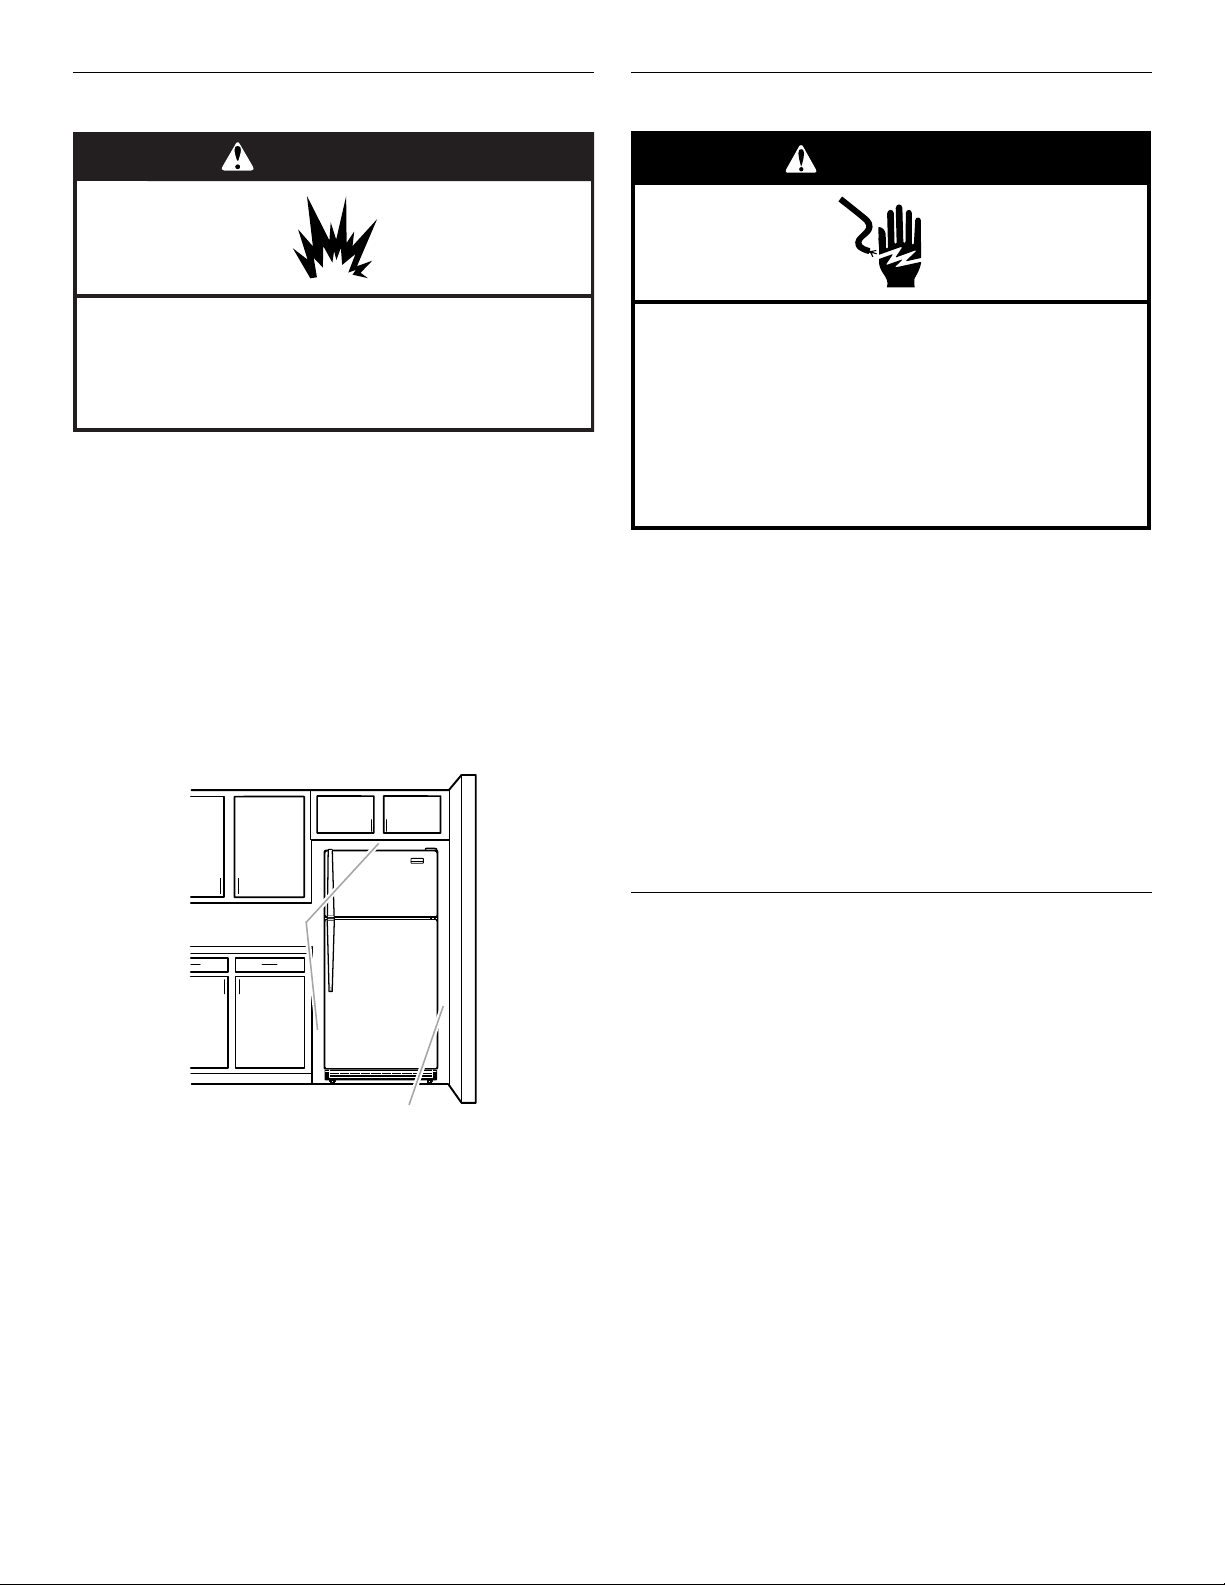
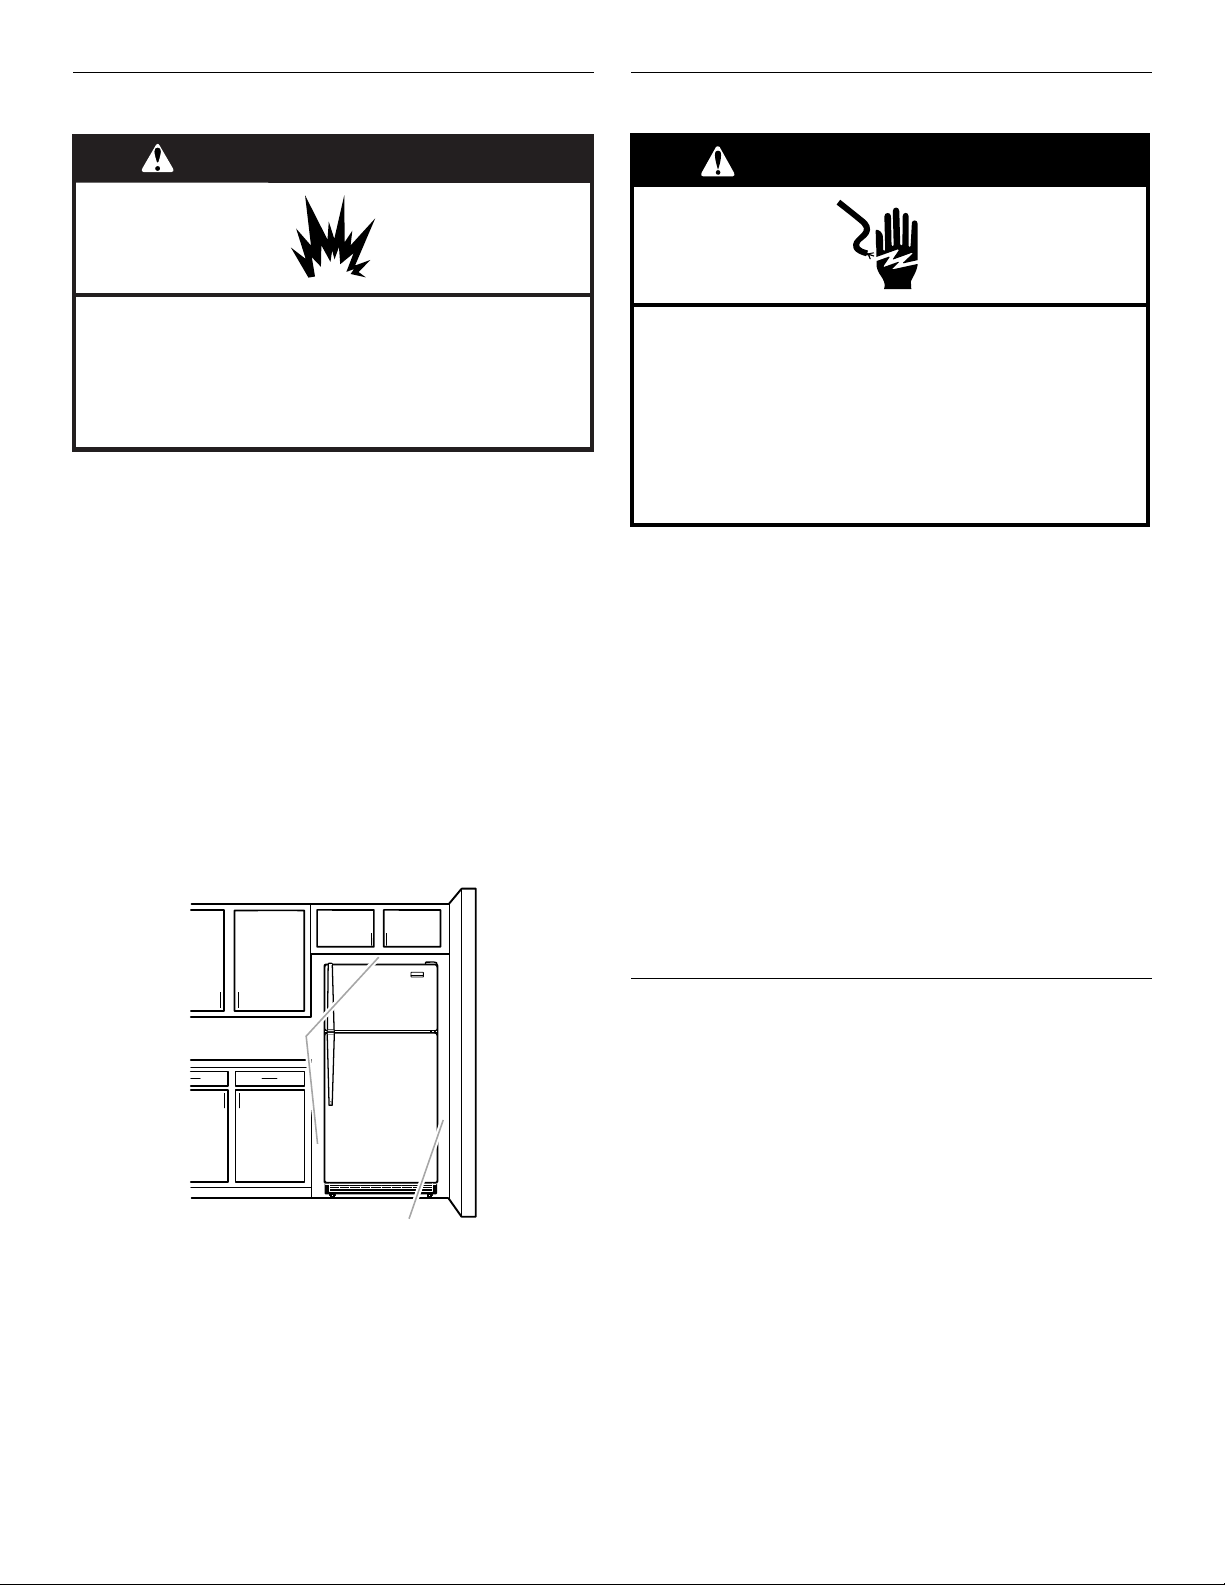
IMPORTANT: This refrigerator is designed for indoor, household
use only.
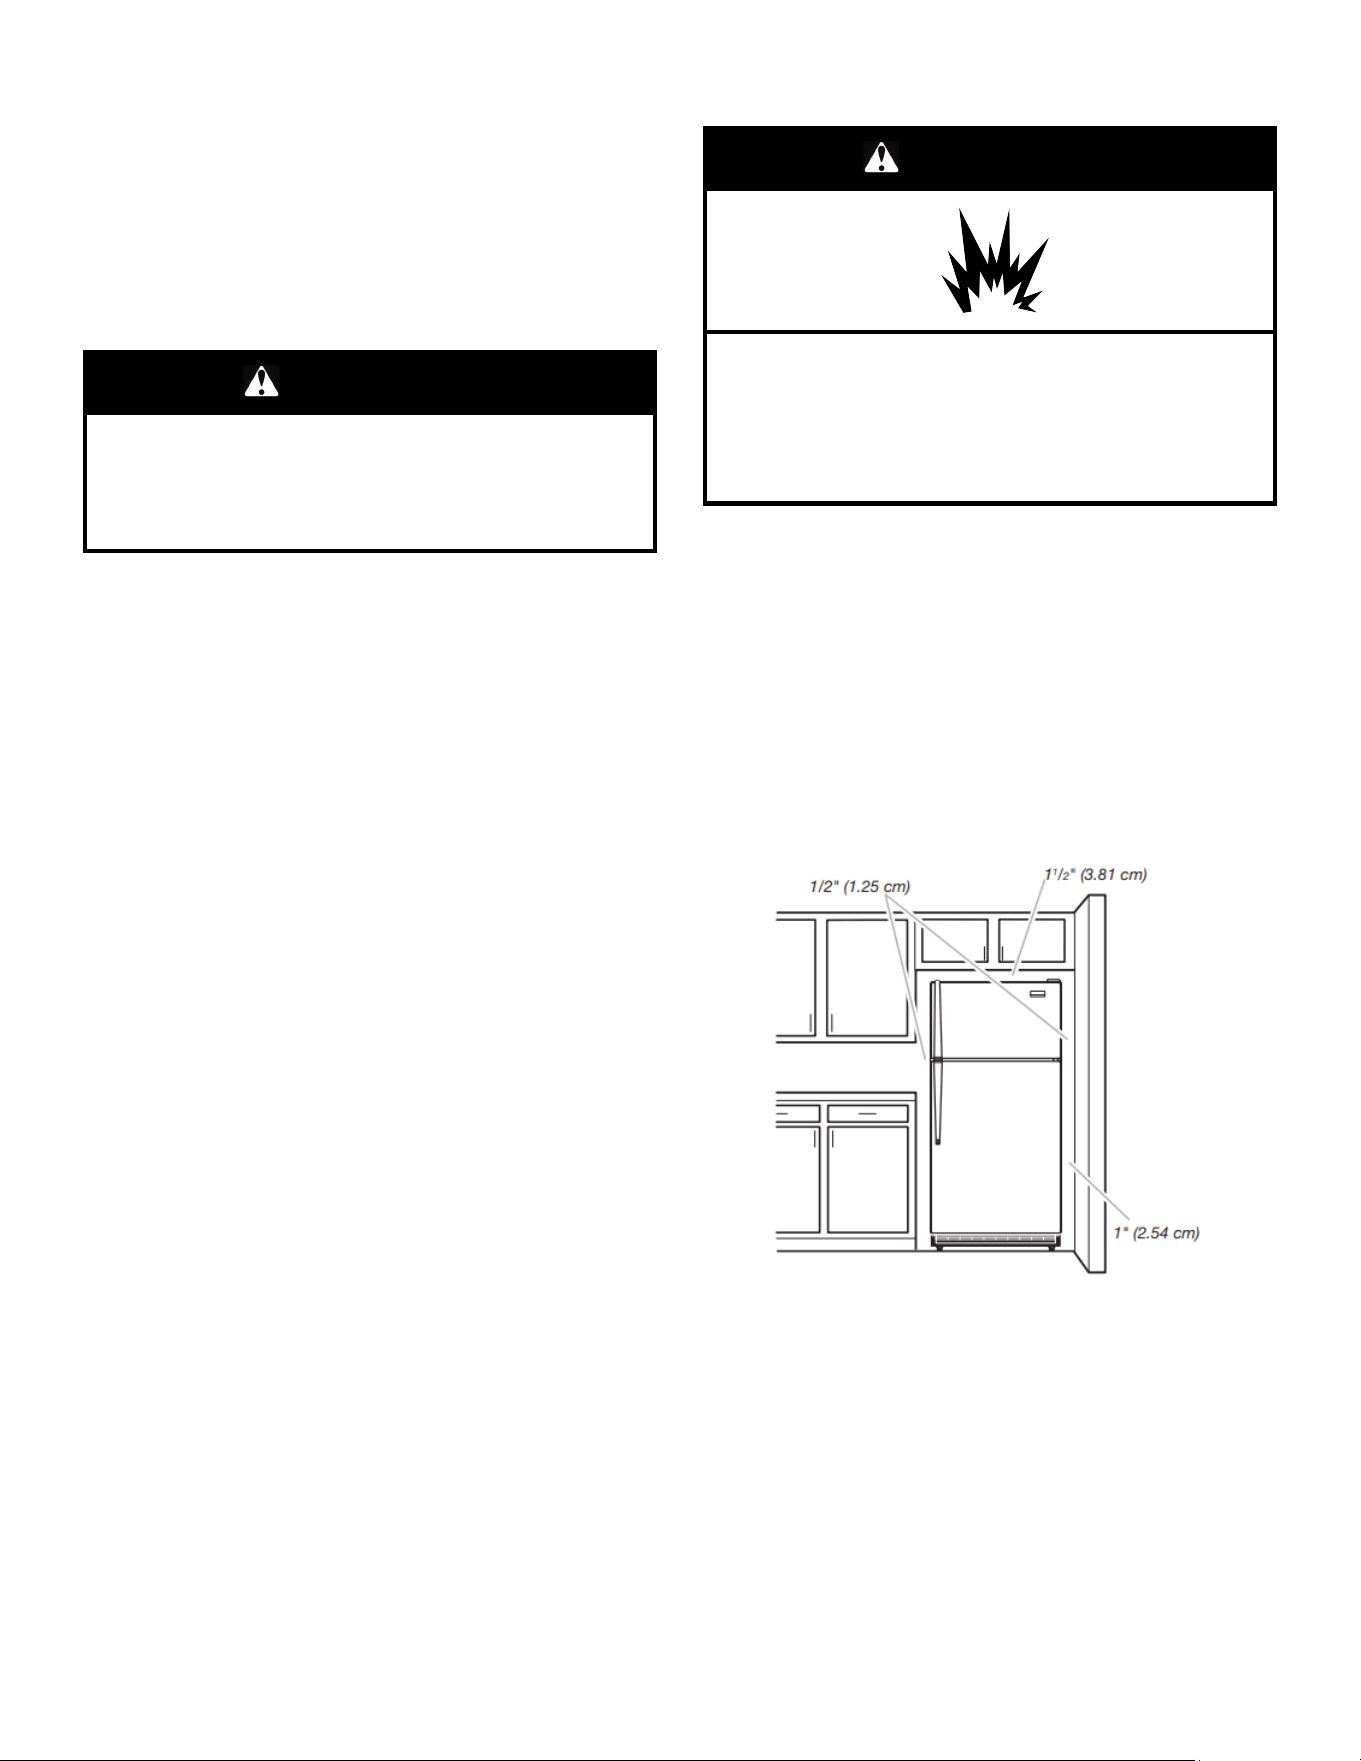
To ensure proper ventilation for your refrigerator, allow 1/2"
(1.25 cm) of space on each side. Allow 1 1/2" (3.81 cm) of space
between overhead cabinets and refrigerator top. Allow at least 1”
(2.54 cm) between back of cabinet and the wall. If your refrigerator
has an ice maker, allow extra space at the back for the water line
connections.
NOTE: This refrigerator is intended for use in a location where the
temperature ranges from a minimum of 55°F (13°C) to a
maximum of 110°F (43°C). The preferred room temperature range
for optimum performance, which reduces electricity usage and
provides superior cooling, is between 60°F (15°C) and 90°F
(32°C). It is recommended that you do not install the refrigerator
near a heat source, such as an oven or radiator.
6
Electrical Requirements
WARNING
Electrical Shock Hazard
Plug into a grounded 3 prong outlet.
Do not remove ground prong.
Do not use an adapter.
Do not use an extension cord.
Failure to follow these instructions can result in death,
fire, or electrical shock.
Before you move your refrigerator into its final location, it is
important to make sure you have the proper electrical connection.
If the supply cord is damaged, it must be replaced by the
manufacturer or its service agent or a similarly qualified person.
Do not use a cord that shows cracks or abrasion damage along its
length or at either the plug or connector end.
Recommended Grounding Method
A 115 V, 60 Hz, AC-only 15 A or 20 A fused, grounded electrical
supply is required. It is recommended that a separate circuit
serving only your refrigerator be provided. Use an outlet that
cannot be turned off by a switch. Do not use an extension cord.
NOTE: Before performing any type of installation, cleaning, or
removing a light bulb, turn the refrigerator to Off. Depending on
your model, turn the refrigerator control to the word Off, or press
the refrigerator down arrow touch pad until a dash (–) appears in
refrigerator displays. Disconnect the refrigerator from the electrical
source. When you are finished, reconnect the refrigerator to the
electrical source and reset the temperature controls to the desired
setting. See “Using the Controls” in the Quick Start Guide.
Water Supply Requirements
Read all directions before you begin.
IMPORTANT:
� Connect to potable water supply only.
Do not use with water that is microbiologically unsafe or of
unknown quality without adequate disinfection before or after
the system. Systems certified for cyst reduction may be used
on disinfected waters that may contain filterable cysts.
� If you turn the refrigerator on before the water line is
connected, turn off the ice maker.
� All installations must meet local plumbing code requirements.
� Use copper or PEX tubing and check for leaks. Install copper
or PEX tubing only in areas where the household temperatures
will remain above freezing.
TOOLS NEEDED: Flat-blade screwdriver, 7/16" and 1/2" open-
end wrenches or 2 adjustable wrenches, 1/4" nut driver and drill
bit, cordless drill. Gather the required tools and parts before
starting installation. Read and follow the instructions provided with
any tools listed.
NOTE: Your refrigerator dealer has a kit available with a 1/4" (6.35
mm) saddle-type shutoff valve, a union, and copper or PEX
tubing. Before purchasing, make sure a saddle-type valve
complies with your local plumbing codes. Do not use a piercing-
type or 3/16" (4.76 mm) saddle valve which reduces water flow
and clogs more easily.
Water Pressure
A cold water supply with water pressure of between 30 psi and 120
psi (207 kPa and 827 kPa) is required to operate the ice maker. If
you have questions about your water pressure, see
“Troubleshooting” online or call a licensed, qualified plumber.
Reverse Osmosis Water Supply
If a reverse osmosis water filtration system is connected to your
cold water supply, the water pressure to the reverse osmosis
system needs to be a minimum of 40 psi to 60 psi (276 kPa to
414 kPa). If the ice maker is still not operating properly:
� Check to see whether the sediment filter in the reverse
osmosis system is blocked. Replace the filter if necessary.
� Allow the storage tank on the reverse osmosis system to refill
after heavy usage.
If you have questions about your water pressure, see
“Troubleshooting” online or call a licensed, qualified plumber.
7
Connect the Water Supply
Read all directions before you begin.
IMPORTANT: If you turn on the refrigerator before the water line is
connected, turn off the ice maker to avoid excessive noise or
damage to the water valve.
Connect to Water Line
1. Unplug refrigerator or disconnect power.
2. Turn Off main water supply. Turn On nearest faucet long
enough to clear line of water.
3. Locate a 1/2" to 1 1/4" (1.27 cm to 3.18 cm) vertical cold water
pipe near the refrigerator.
IMPORTANT:
� Make sure it is a cold water pipe.
� Horizontal pipe will work, but drill on the top side of the
pipe, not the bottom. This will help keep water away from
the drill and normal sediment from collecting in the valve.
4. Determine the length of copper or PEX tubing you will need.
Measure from the connection on lower-left rear of refrigerator
to the water pipe. Add 7 ft. (2.1 m) to allow for cleaning. Use 1/
4" (6.35 mm) O.D. (outside diameter) copper or PEX tubing.
Be sure both ends of copper or PEX tubing are cut square.
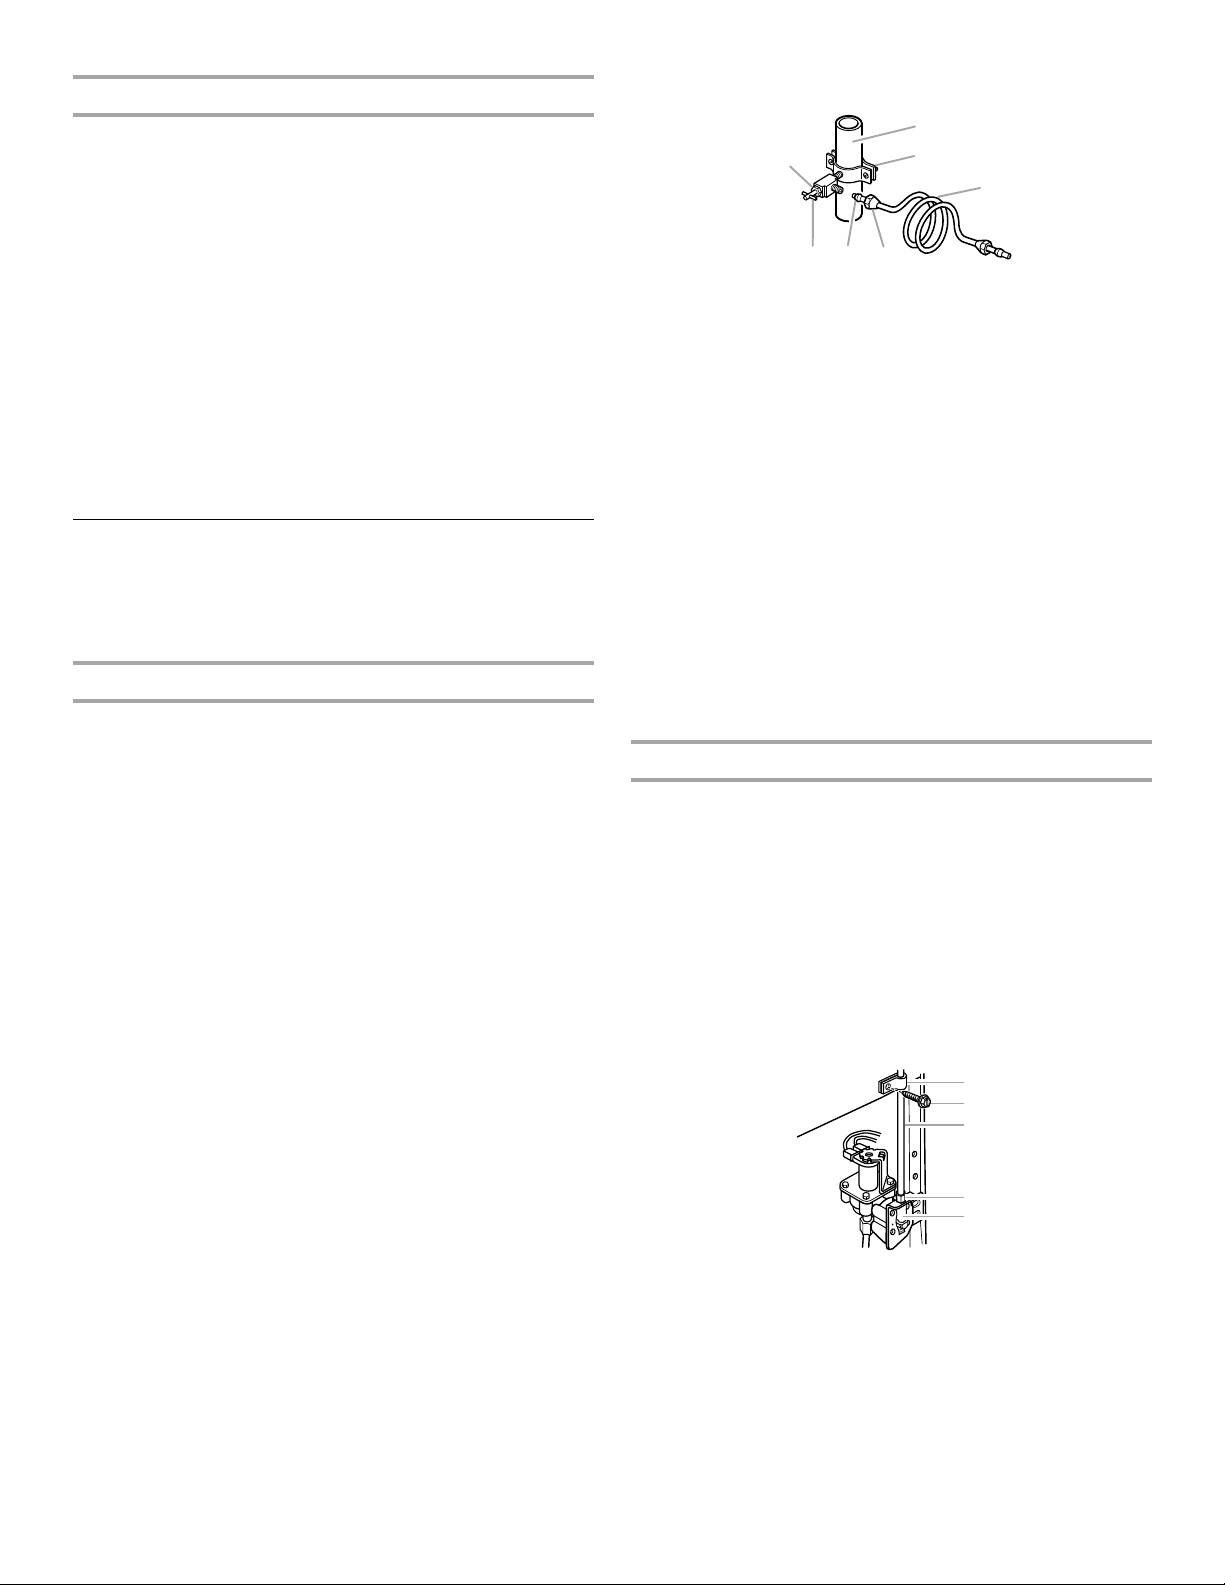
5. Using a cordless drill, drill a 1/4" hole in the cold water pipe
you have selected.
A. Cold water pipe
B. Pipe clamp
C. Copper or PEX
tubing
D. Compression nut
E. Compression sleeve
F. Shutoff valve
G. Packing nut
6. Fasten the shutoff valve to the cold water pipe with the pipe
clamp. Be sure the outlet end is solidly in the 1/4" (6.35 mm)
drilled hole in the water pipe and that the washer is under the
pipe clamp. Tighten the packing nut. Tighten the pipe clamp
screws slowly and evenly so washer makes a watertight seal.
Do not overtighten or you may crush the copper or PEX
tubing.
7. Slip the compression sleeve and compression nut on the
copper or PEX tubing as shown (PEX tubing has compression
sleeves and compression nuts preinstalled.) Insert the end of
the tubing into the outlet end squarely as far as it will go.
Screw compression nut onto outlet end with adjustable
wrench. Do not overtighten.
8. Place the free end of the tubing in a container or sink, and turn
On the main water supply. Flush the tubing until water is clear.
Turn Off the shutoff valve on the water pipe. Coil the copper or
PEX tubing.
Connect to Refrigerator
NOTE: On kit models, assemble water valve to refrigerator
according to kit instructions.
Style 1
1. Unplug refrigerator or disconnect power.
2. Attach the copper tube to the valve inlet using a compression
nut and sleeve as shown. Tighten the compression nut. Do not
overtighten.
3. Use the tube clamp on the back of the refrigerator to secure
the tubing to the refrigerator as shown. This will help avoid
damage to the tubing when the refrigerator is pushed back
against the wall.
4. Turn On shutoff valve.
5. Check for leaks. Tighten any connections (including
connections at the valve) or nuts that leak.
A. Tube clamp
B. Tube clamp screw
C. Copper or PEX
tubing
D. Compression nut
E. Valve inlet
6. The ice maker is equipped with a built-in water strainer. If your
water conditions require a second water strainer, install it in
the 1/4“ (6.35 mm) water line at either tube connection. Obtain
a water strainer from your nearest appliance dealer.
NOTE: On kit models, assemble water valve to refrigerator
according to kit instructions.
Style 2
1. Unplug refrigerator or disconnect power.
2. Disconnect the tube clamp on the back of the product and
insert the copper or PEX tubing through the clamp as shown.
3. Attach the copper or PEX tube to the valve inlet using a
compression nut and sleeve as shown.
4. Tighten the compression nut. Do not overtighten. Reattach the
tube clamp and tube to the back of the cabinet.
A. Tube clamp
B. Copper or PEX
tubing
C. Compression nut
5. Turn On shutoff valve. Check for leaks. Tighten any
connections (including connections at the valve) or nuts that
leak.
6. The ice maker is equipped with a built-in water strainer. If your
water conditions require a second water strainer, install it in
the 1/4" (6.35 mm) water line at either tube connection. Obtain
a water strainer from your nearest appliance dealer.
8
Complete the Installation
WARNING
Electrical Shock Hazard
Plug into a grounded 3 prong outlet.
Do not remove ground prong.
Do not use an adapter.
Do not use an extension cord.
Failure to follow these instructions can result in death,
fire, or electrical shock.
1. Plug into a grounded 3-prong outlet.
NOTE: Allow 24 hours to produce the first batch of ice. Discard
the first three batches of ice produced. Allow 3 days to completely
fill ice container.
Install Air Filter
On some models, your refrigerator's accessory packet includes an
air filter, which must be installed prior to use. On some models,
the air filter is already installed at the factory. To order a
replacement air filter, use part number W10311524.
The air filter reduces the buildup of odors. This helps to maintain a
cleaner environment inside the refrigerator.
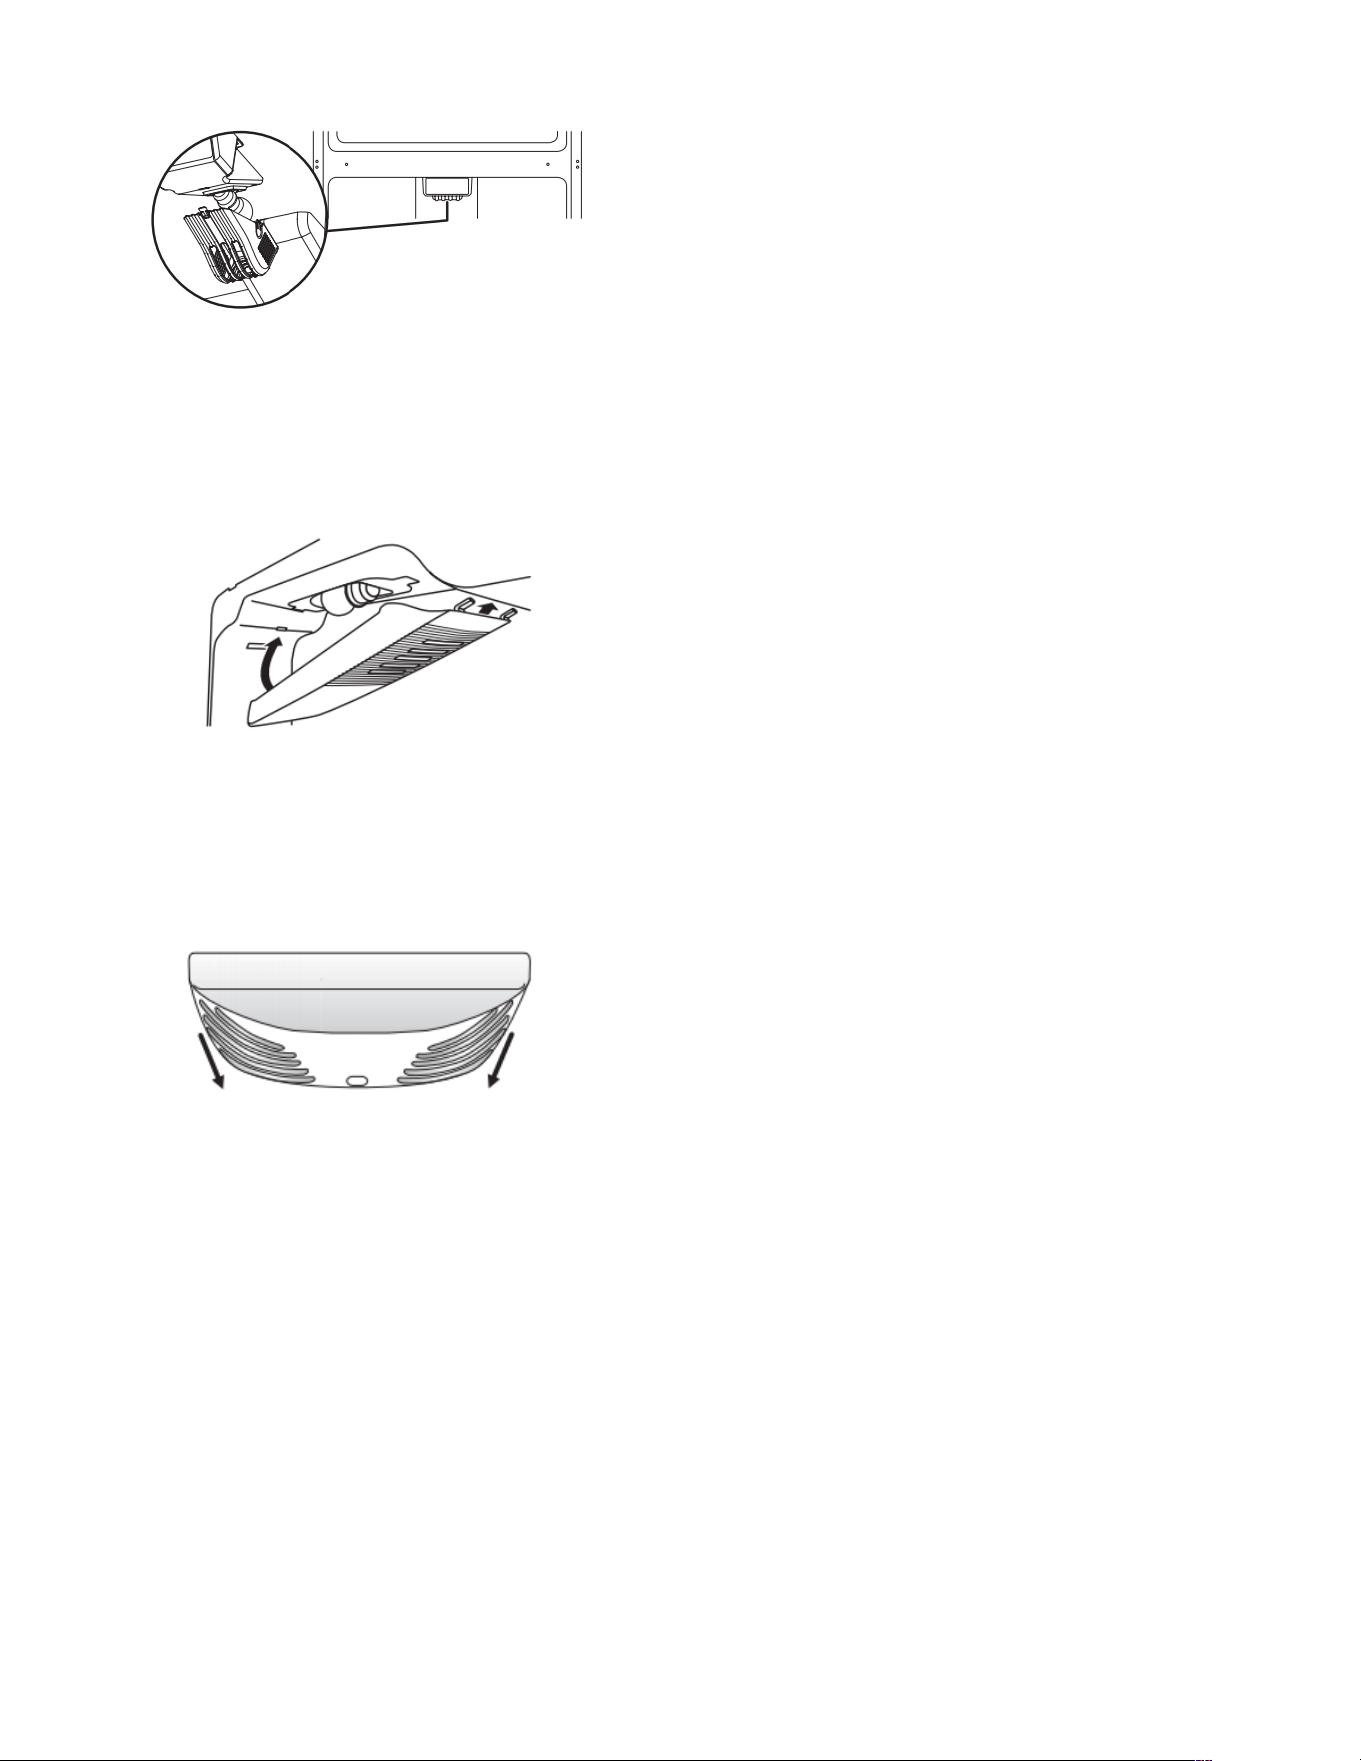
Installing the Air Filter
The filter should be installed behind the vented door, which is
located (depending on your model) along either the rear or left
interior wall near the top of the refrigerator compartment.
1. Remove the air filter from its packaging.
2. Lift open the vented door.
3. Snap the filter into place.
Air Filter Status Indicator
The filter comes with a status indicator, which should be activated
and installed at the same time the air filter is installed.
1. Place the indicator facedown on a firm, flat surface.
2. Apply pressure to the bubble on the back of the indicator, until
the bubble pops to activate the indicator.
3. Lift open the vented air filter door. On some models, there are
notches behind the door.
On models with notches:
� Slide the indicator down into the notches, facing outward.
NOTE: The indicator will not easily slide into the notches if the
rear bubble has not been popped.
� Close the air filter door, and check that the indicator is visible
through the rectangular hole in the door.
On models without notches:
� Store the indicator in a visible place you will easily remember
—either inside the refrigerator or elsewhere in your kitchen or
home.
Replacing the Air Filter
The disposable air filter should be replaced every 6 months, when
the status indicator has completely changed from white to red.
1. Remove the old air filter by squeezing in on the side tabs.
2. Remove the old status indicator.
3. Install the new air filter and status indicator using the
instructions in the previous sections.
REFRIGERATOR DOORS
Door and Handle Instructions
Depending on the width of your doorway, you may need to remove
the doors to move the refrigerator into your home. Also, the door
hinges are factory installed on the right-hand side. If you want the
door to open from the other direction, you must reverse the door
swing.
WARNING
Electrical Shock Hazard
Disconnect power before removing doors.
Failure to do so could result in death or electrical shock.
IMPORTANT:
� Before you begin, turn the refrigerator control off. Unplug
refrigerator or disconnect power. Remove food and any
adjustable door or utility bins from doors.
� If you are only removing and replacing the doors, see the
“Remove Doors and Hinges” and “Replace Doors and Hinges”
sections.
� If you choose to reverse the door swing, a Reversibility Kit,
which includes a new brand badge and hole plugs, is
available.
Tools Needed: 5/16" hex-head socket wrench, #2 Phillips
screwdriver, flat-blade screwdriver, 5/16" open-end wrench, flat 2"
putty knife
9
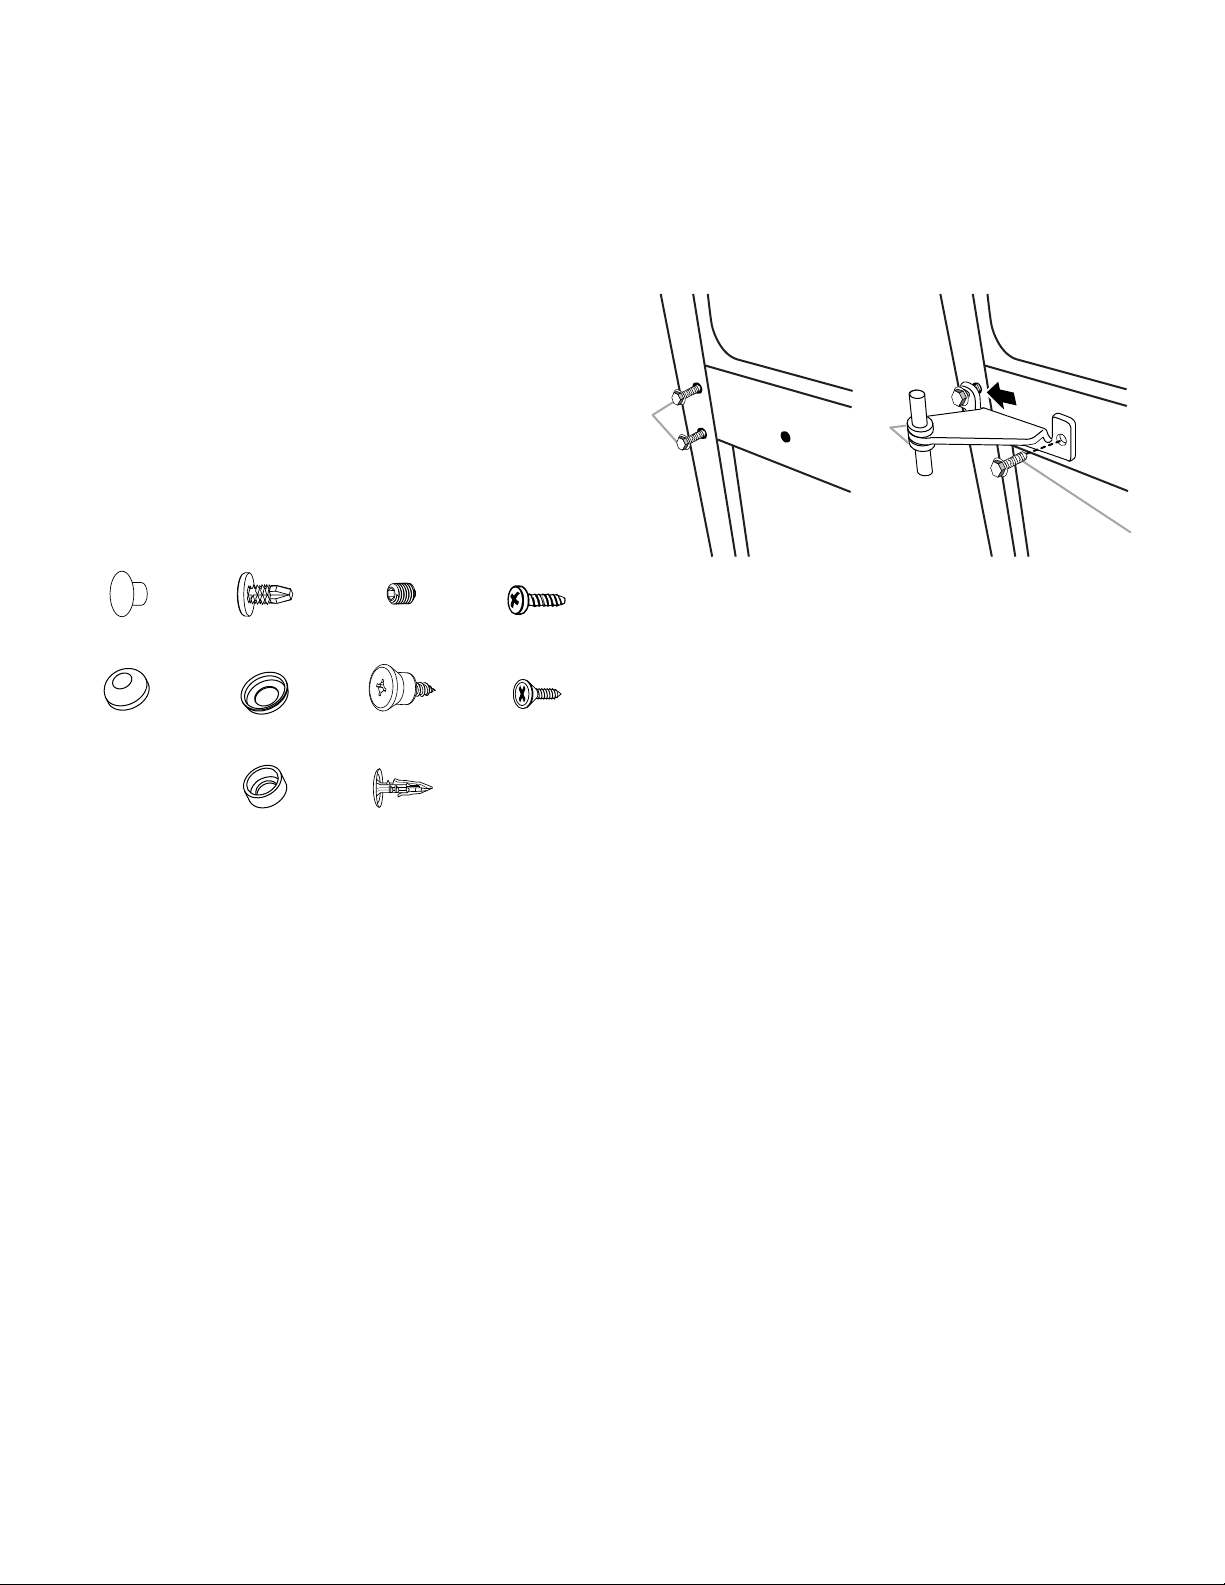
Remove Doors and Hinges
1. Unplug refrigerator or disconnect power.
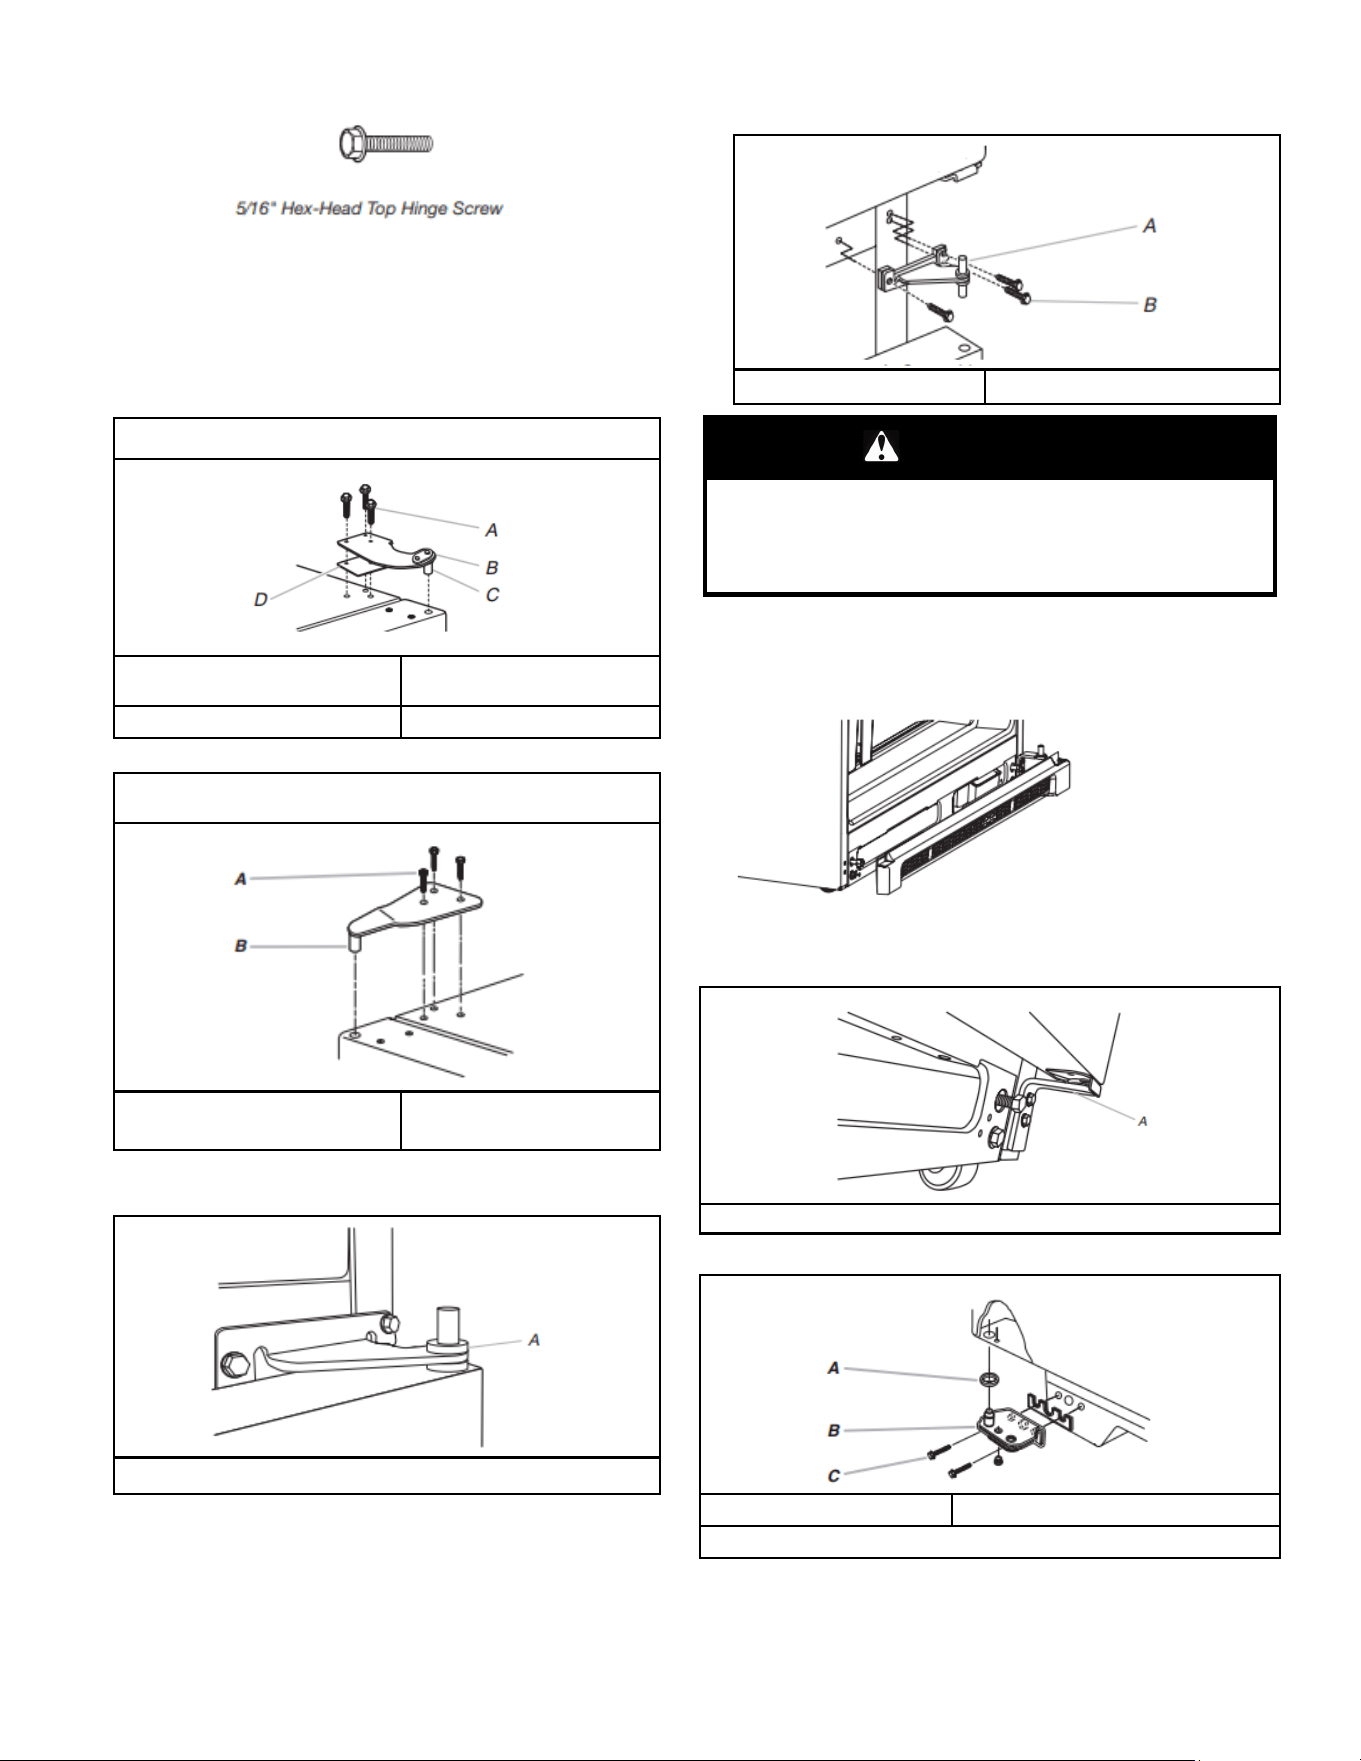
2. Using a hex-head socket wrench, remove the three 5/16" hex-
head hinge screws from the top hinge and lift up to remove the
hinge.
NOTE: Provide additional support for the door while the
hinges are being moved. Do not depend on the door magnets
to hold the door in place while you are working.
Top Hinge Style 1
A. 5/16" Hex-head hinge
screws
C. Hinge pin
B. Top hinge D. Spacer
Top Hinge Style 2
A. 5/16" Hex-head hinge
screws
B. Top hinge
3. Lift the freezer door off of the center hinge and set it aside
4. Remove the washer from the top of the Center Hinge pin.
A. Washer
5. Using a hex-head socket wrench, remove the three screws
from the center hinge and remove the hinge. Set aside.
A. Center hinge B. 5⁄16" hex-head hinge screws
WARNING
Excessive Weight Hazard
Use two or more people to lift the appliance door.
Failure to do so can result in back or other injury.
6. Lift the refrigerator door off of the bottom hinge and set it
aside.
7. Remove the base grille from the bottom front of the
refrigerator.
8. Remove the parts for the bottom hinge as shown in the
Bottom Hinge graphics.
Bottom Hinge Style 1
A. Bottom hinge
Bottom Hinge Style 2
A Spacer C. 5⁄16" hex-head hinge screws
B. Bottom Hinge

10
Reverse Doors and Hinges (optional)
IMPORTANT: If you want to reverse your doors so that they open
in the opposite direction, follow these steps. If you are not
reversing the doors, see “Replace Doors and Hinges.”
Style 1 - Standard Door Models
Graphics follow these instructions.
Door Stop
Screw
Dome Cap Cabinet Hinge
Hole Plug
Door Handle
Hole Plug
Door Handle
Sealing Screw
Flat-Head
Handle Screw
Dome Cap
Washer
Door Hinge
Hole Plug
Cabinet
1. Remove the three dome caps and the screws from handle
side and move them to opposite side.
A. Dome cap washers C. Dome Caps
B. Hex-head hinge screws
2. Remove cabinet hinge hole plugs from cabinet top and move
them to opposite side hinge holes as shown below..
A. Cabinet Hinge Hole Plugs
Freezer Door
1. Remove the screw cover.
2. Remove the freezer handle assembly as shown below. Keep
all parts together.
A. Screw Cover C. Freezer Handle
B. Handle Screw D. Flat-Head Handle Screw
3. Remove door hinge hole plug from freezer door. Move to
opposite side hinge hole as shown below.
A. Door Hinge Hole Plug
4. Remove the brand badge using the plastic tool (provided).
Replace it with the badge provided in the Reversibility Kit
located inside the crisper drawer. For proper placement, see
the Brand Badge Placement template (the last page of this
manual).
NOTEs:
� To avoid scratching the finish, do not use a sharp or
metallic object to pry the brand badge from the door.
� Rub a small amount of liquid dish soap over any adhesive
residue with your fingers. Rinse the door with warm water
and dry with a soft cloth.
5.
A. Door stop screw B. Door stop
6. Remove door stop. Move to opposite side of refrigerator door
as shown.
7. Refer to image in Step 2. Position freezer handle on opposite
side of the freezer door. First, drive the bottom two screws into
handle. Align upper portion of handle and drive top screw into
handle.
8. Tighten all screws. Set aside door until hinges and refrigerator
compartment door are in place.
9. Replace screw cover. Refer to image in Step 2.
Refrigerator Door
1. Remove the screw cover.
2. Remove refrigerator handle assembly as shown below. Keep
all parts together..
A. Flat-Head Handle Screw C. Handle Screw
B. Refrigerator Handle D. Screw Cover

11
3. Remove door hinge hole plug from refrigerator door. Move to
opposite side hinge hole as shown below.
A. Door Hinge Hole Plug
4. Remove door handle sealing screws. Move to opposite side of
refrigerator door as shown.
A. Door Handle Sealing Screws
5. Remove door handle hole plug and discard. Replace on
opposite side with the door handle hole plug provided in the
Reversibility Kit located in the crisper.
6. Remove door stop. Move to opposite side of refrigerator door
as shown below.
A. Door Stop Screw B. Door Stop
7. Refer to image in Step 2. Position refrigerator handle on
opposite side of the refrigerator door. First, drive top two
screws in handle first. Align lower portion of handle and drive
bottom screw into handle.
8. Tighten all screws. Set aside refrigerator door until bottom
hinge is installed on refrigerator.
9. Replace screw cover.
Style 2 - Contour Door Models
Graphics follow these instructions.
Door Hinge
Hole Plug
Cabinet
Hinge Hole
Plug
Setscrew Door Stop
Screw
Shoulder
Screw
Washer
Dome Cap Dome Cap
Washer
Shoulder
Screw
Flat-Head
Handle
Screw
Door
Handle
Hole Plug
Cabinet
1. Remove the three dome caps and the screws from handle
side and move them to opposite side.
2. Using the three 5/16" hex-head hinge screws, insert two
screws halfway into the holes, leaving space to insert the
Center Hinge.
3. Slide the center hinge, from the right, onto the screws, insert
the third screw, and tighten all screws completely.
NOTE: Make sure the washers are in place on both the top
and bottom pins of the center hinge.
A. 5/16" Hex-head hinge screws B. Washers
4. Remove cabinet hinge hole plugs from the cabinet top and
move them to opposite side hinge holes as shown below.
A. Cabinet Hinge Hole Plugs
12
Freezer Door
1. Remove the freezer door handle. Using a 1/8" hex key, loosen
the setscrew located on the side of the handle. Pull the handle
straight out from the door. Keep all parts together.
A. Shoulder screw C. Flat-head handle screws
B. Setscrew
2. Remove the brand badge using the plastic tool (provided).
Replace it with the badge provided in the Reversibility Kit
located inside the crisper. For proper placement, see the
Brand Badge Placement template (the last page of this
manual).
NOTES:
� To avoid scratching the finish, do not use a sharp or
metallic object to pry the brand badge from the door.
� Rub a small amount of liquid dish soap over any adhesive
residue with your fingers. Rinse the door with warm water
and dry with a soft cloth.
3. Remove door stop. Move to opposite side of freezer door as
shown.
A. Door Handle Sealing Screws
4. Refer to image in Step 1. Reinstall freezer handle on opposite
side of the freezer door.
5. Tighten all screws. Set aside door until hinges and refrigerator
compartment door are in place.
Refrigerator Door
1. Remove the refrigerator door handle. Using a 1/8" hex key,
loosen the setscrew located on the side of the handle. Pull the
handle straight out from the door. Keep all parts together.
A. Flat-Head Handle Screw B. Set Screw
2. Remove door hinge hole plug from refrigerator door. Move to
opposite side hinge hole as shown below.
A. Door Hinge Hole Plug
3. Remove door handle hole plug and discard. Replace on
opposite side with the door handle hole plug provided in the
Reversibility Kit located in the crisper.
4. Remove door stop. Move to opposite side of refrigerator door
as shown below.
A. Door Stop Screw B. Door Stop
5. Refer to image in Step 1. Reinstall refrigerator handle on
opposite side of the refrigerator door.
6. Tighten all screws. Set aside refrigerator door until bottom
hinge is installed on refrigerator.
13
Replace Doors and Hinges
NOTE: Graphic may be reversed if door swing is reversed.
1. Replace the parts for the bottom hinge as shown. Tighten
screws. Replace the refrigerator door.
NOTE: Provide additional support for the doors while the
hinges are being moved. Do not depend on the door magnets
to hold the doors in place while you are working.
2. Measure the distance from the bottom of the refrigerator door
to the floor. The distance should be approximately 3 1/2" (88
mm).
NOTE: If necessary, loosen the bottom hinge, without
removing the screws, adjust the door to the correct height and
fully tighten the screws.
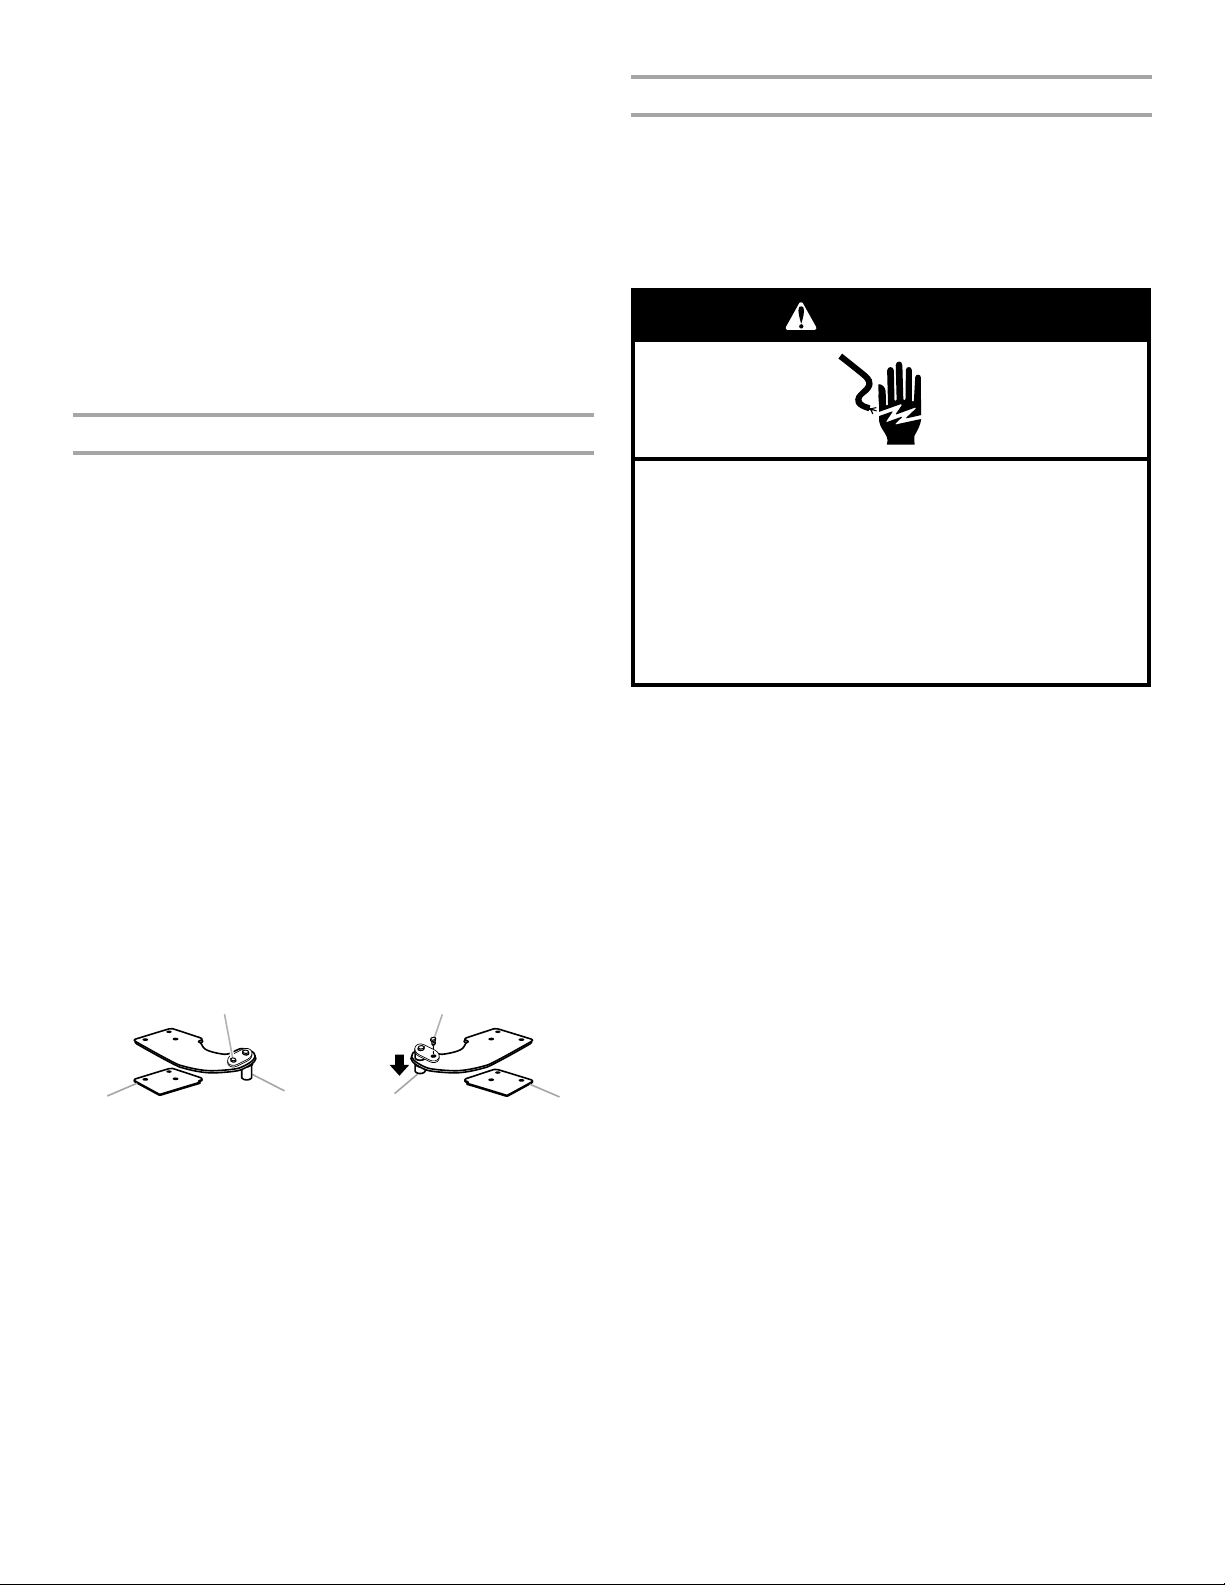
3. Assemble the parts for the center hinge as shown and tighten
all screws. See Center Hinge graphic. Replace the freezer
door.
4. Assemble the parts for the top hinge as shown. See Top Hinge
graphic. Do not tighten screws completely.
Contour Door Models Only:
� Remove the screw attaching the hinge pin to the hinge.
Turn the hinge over so that it is pointing in the opposite
direction.
� Place the plastic spacer beneath the hinge so that it will be
between the hinge and the cabinet, making sure the holes
are aligned.
� Fasten the Top Hinge to the opposite side of the cabinet,
inserting the screws only halfway, so you will be able to
replace and align the freezer door later.
5. Line up the doors so that the bottom of the freezer door aligns
evenly with the top of the refrigerator door. Tighten all screws.
NOTE: The distance between the doors should be
approximately 5/8" (16 mm).
Final Steps
WARNING
Electrical Shock Hazard
Plug into a grounded 3 prong outlet.
Do not remove ground prong.
Do not use an adapter.
Do not use an extension cord.
Failure to follow these instructions can result in death,
fire, or electrical shock.
1. Check all holes to make sure that hole plugs and screws are in
place. Reinstall top hinge cover. See Top Hinge graphic.
2. Remove the cover from the base grille. Move the cover to the
opposite side.
3. Align the clips on the base grille with the screws on the bottom
of the cabinet. Push the base grille toward the cabinet until it is
flush.
4. Plug into a grounded 3 prong outlet.
5. Reset the controls. See “Operating Instructions” in the Quick
Start Guide.
6. Return all removable door parts to doors and food to
refrigerator.
Reversibility Kit Instructions
If your model came with a Reversibility Kit or you purchased a kit
for your contour door refrigerator, please use the Brand Badge
Placement template and the following instructions to install the
Brand Badge on the opposite side of the freezer door.
Parts Included:
Brand badge removal tool, Brand badge template (on last page of
this manual), Door handle hole plug
Tools Needed:
Scissors and masking tape.
Freezer Door
1. Using the removal tool (provided), remove the brand badge
from the freezer door by lifting up the right-hand side and
peeling the badge away from the door from right to left
NOTE: Using the removal tool (provided), remove the brand
badge from the freezer door by lifting up the right-hand side
and peeling the badge away from the door from right to left
2. Rub a small amount of liquid dish soap over any adhesive
residue with your fingers. Rinse the door with warm water and
dry with a soft cloth.
3. Cut the template along the dotted lines that match the shape
of the brand badge.
14
4. Align the edges of the template with the side and top of the
freezer door and tape the template to the door
NOTE: When the template is correctly aligned, the hole in the
door, where the handle was, will be within the cutout of the
template, as shown.
5. Using the cutout as a guide, press the brand badge onto the
freezer door making sure that the hole is completely covered.
6. Slowly remove the template.
Adjust the Doors
WARNING
Excessive Weight Hazard
Use two or more people to lift the appliance door.
Failure to do so can result in back or other injury.
Your refrigerator has two adjustable levelers, one on each side, at
the base of the refrigerator. If your refrigerator seems unsteady or
if you want the doors to close more easily, adjust the level and tilt
of the refrigerator.
1. Turn the leveler to the left to raise that side of the refrigerator
or to the right to lower that side. It may take several turns to
adjust the tilt of the refrigerator.
NOTE: Having someone push against the top of the
refrigerator takes some weight off the levelers. This makes it
easier to turn the levelers.
2. Open both doors again to make sure that they close as easily
as you like. If not, tilt the refrigerator slightly more to the rear
by turning both levelers to the right. It may take several more
turns.
NOTE: To keep the refrigerator level, make the same
adjustment to each side.
3. Using a level, make sure the refrigerator is still level from side
to side. Readjust if necessary.
REFRIGERATOR AND FREEZER
FEATURES
Refrigerator Shelves
Important information to know about glass shelves and
covers:
Do not clean glass shelves or covers with warm water when they
are cold. Shelves and covers may break if exposed to sudden
temperature changes or impact, such as bumping. Tempered
glass is designed to shatter into many small, pebble-size pieces.
This is normal. Glass shelves and covers are heavy. Use both
hands when removing them to avoid dropping.
Refrigerator Shelves
The shelves in your refrigerator are adjustable to match your
individual storage needs.
Storing similar food items together in your refrigerator and
adjusting the shelves to fit different heights of items will make
finding the exact item you want easier. It will also reduce the
amount of time the refrigerator door is open, and save energy
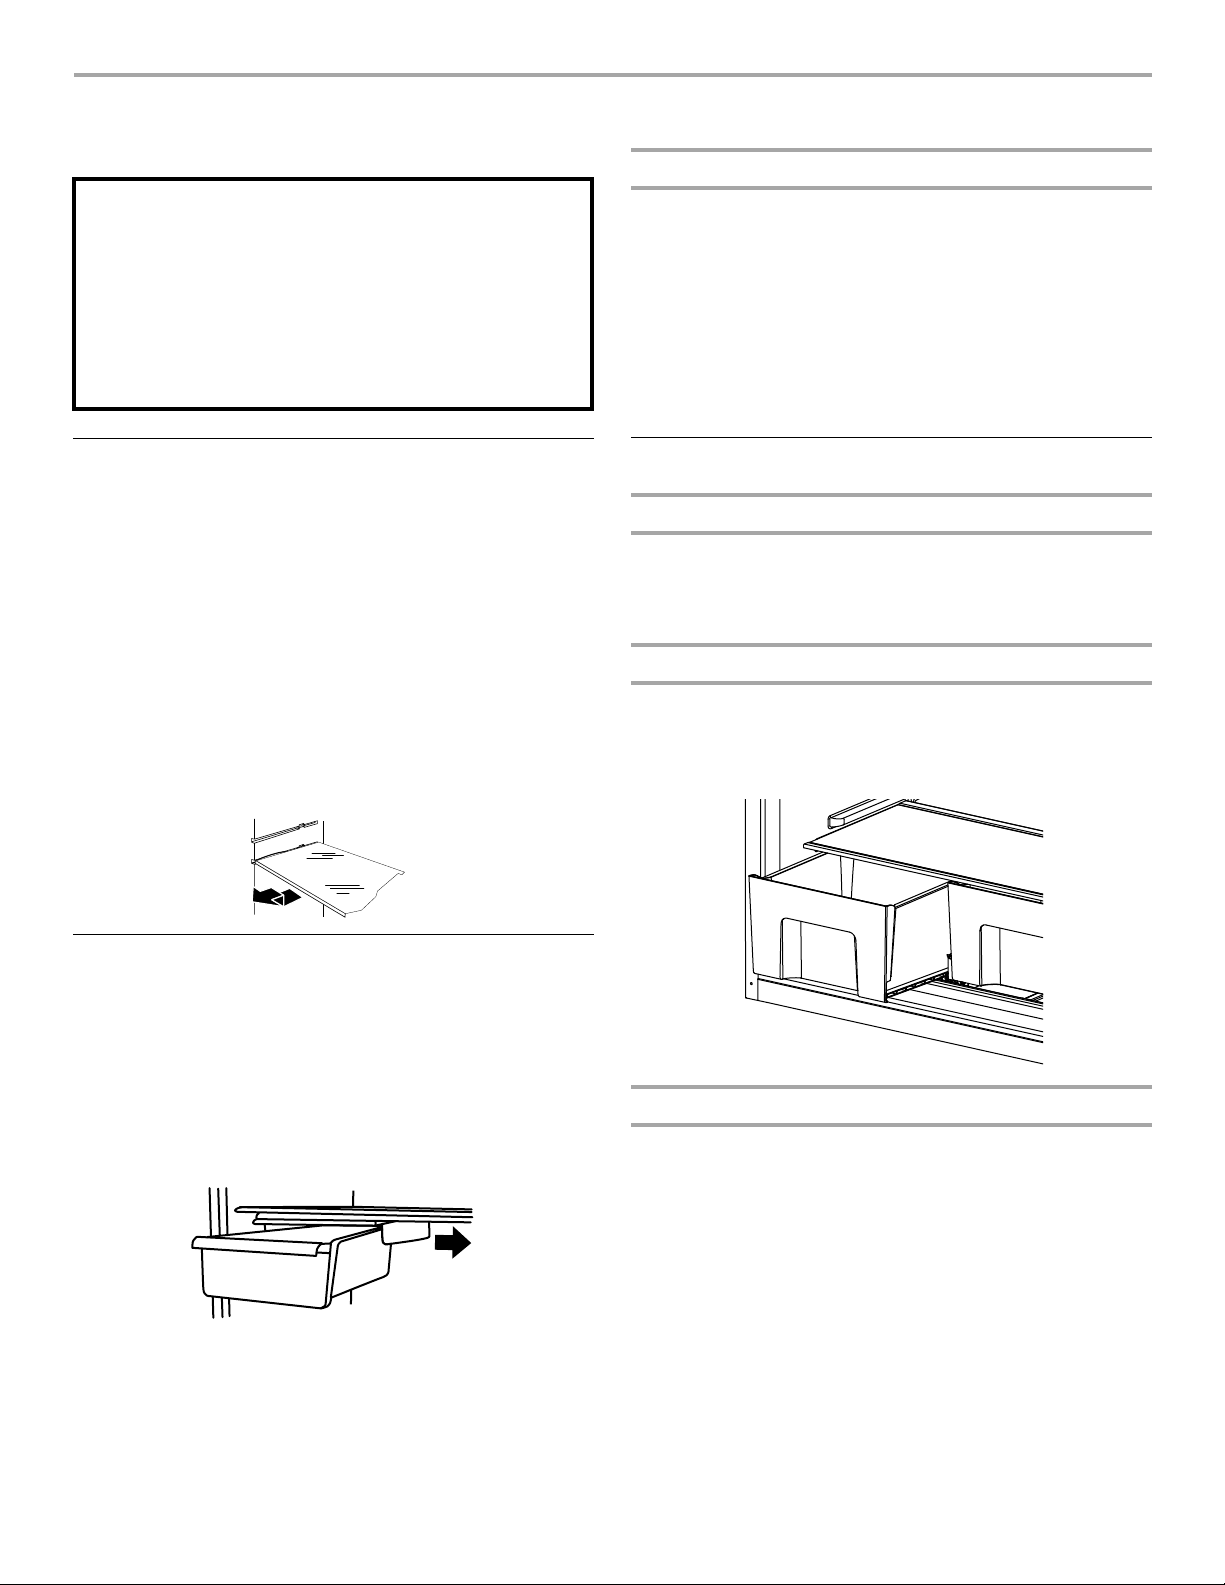
To remove and replace a shelf:
1. Remove items from the shelf.
2. Slide the shelf straight out to the stop.
3. Depending on your model, lift back or front of the shelf past
the stop. Slide shelf out the rest of the way.
4. Replace the shelf by sliding the back of the shelf into the track
in the wall of the cabinet.
5. Guide the front of the shelf into the shelf track. Be sure to slide
the shelf in all the way.
Freezer Shelf
Important information to know about glass shelves and
covers:
Do not clean glass shelves or covers with warm water when
they are cold. Shelves and covers may break if exposed to
sudden temperature changes or impact, such as bumping.
Tempered glass is designed to shatter into many small,
pebble-size pieces. This is normal. Glass shelves and covers
are heavy. Use both hands when removing them to avoid
dropping.

15
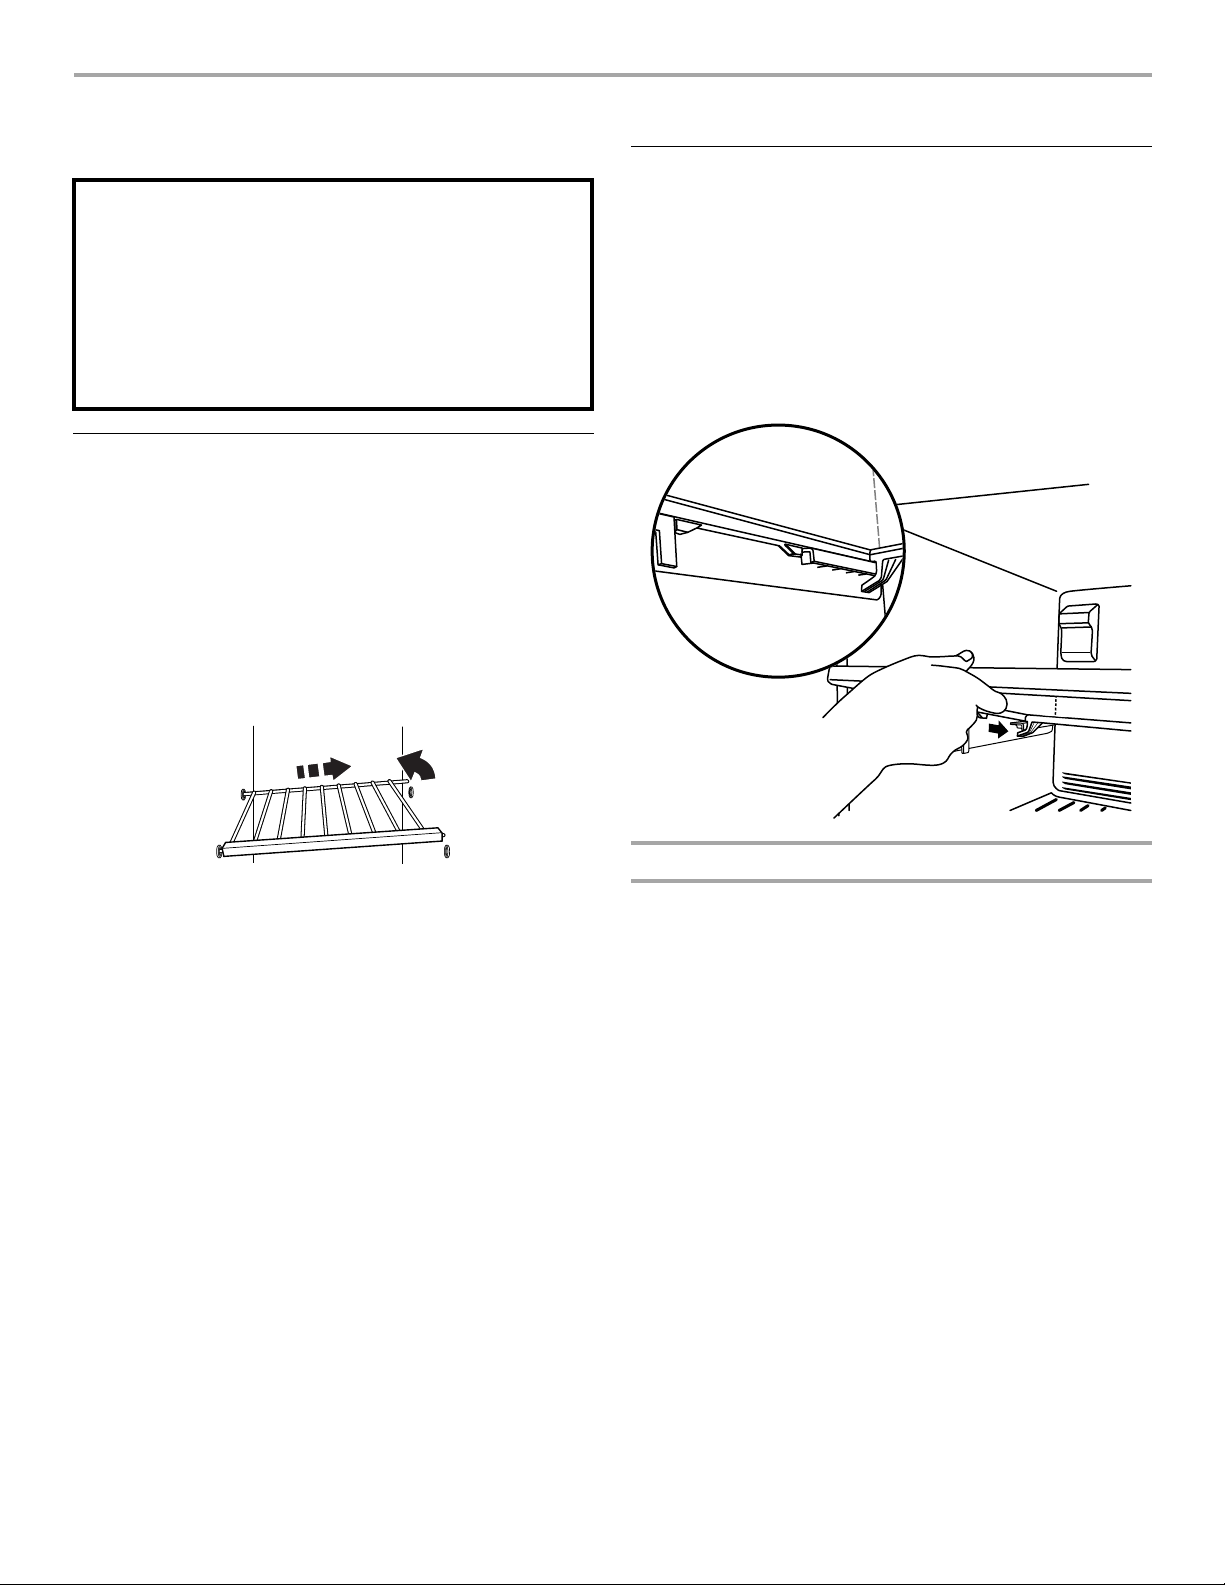
Full-Width Shelf (on some models)
Depending on your model, the shelf may be wire or glass.
To remove and replace the freezer shelf:
1. Remove items from the shelf.
2. Lift back of shelf over stop and slide shelf straight out
3. Replace the shelf by sliding the back of the shelf into the
tracks on walls of cabinet.
4. Be sure to slide the shelf in all the way
Half-Width Shelf (on some models)
IMPORTANT: The half–width shelf can only be installed in the left-
hand side of the freezer compartment.
1. Remove items from the shelf
2. Remove the shelf screw. Lift back of the shelf over the stop
and slide it out.
3. Replace the shelf by sliding the back of the shelf into the
tracks on the walls of the cabinet. Fasten the shelf screw.
Frozen Food Storage Guide
Storage times will vary according to the quality and type of food,
the type of packaging or wrap used (should be airtight and
moisture-proof), and the storage temperature. Seal the package
or container securely to avoid taste and odor transfer throughout
the product. Ice crystals inside a sealed package are normal. This
simply means that moisture in the food and air inside the package
have condensed, creating ice crystals.
Put no more unfrozen food into the freezer than will freeze within
24 hours (no more than 2 to 3 lbs of food per cubic foot [907 to
1,350 g per L] of freezer space). Leave enough space in the
freezer for air to circulate around packages. The freezer door
must close tightly.
NOTE: For more information on preparing food for freezing, check
a freezer guide or reliable cookbook.
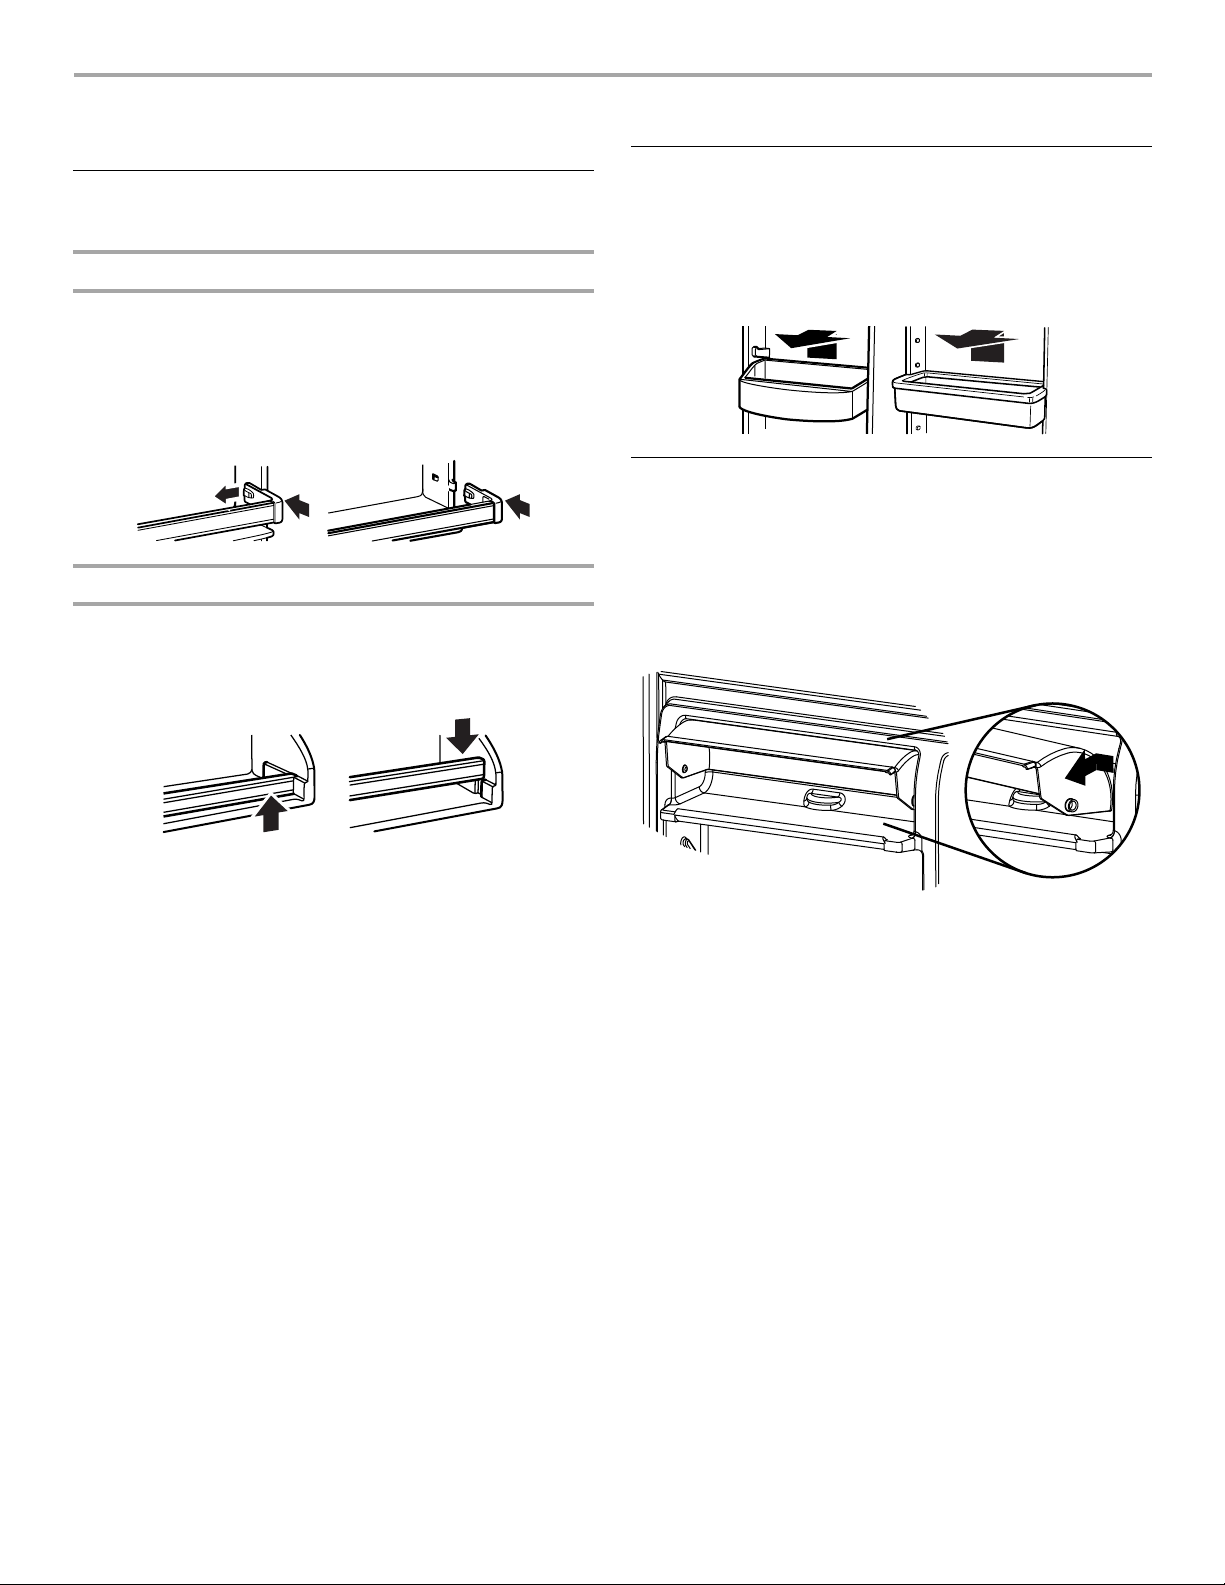
Door Rails or Trivets
SNAP ON DOOR RAILS OR TRIVETS
To remove and replace the rails or trivets:
1. Depending on your model, remove the rails or trivets by
pushing in slightly on the front of the bracket while pulling out
on the inside tab. Repeat these steps for the other end.
2. Replace the rails or trivets by aligning the ends of the brackets
with the buttons on the sides of the door liner. Firmly snap
bracket and assembly onto the tabs above the shelf as shown.
Style 1 -Door Rails
Style 2 - Trivets
DROP-IN DOOR RAILS
To remove and replace the rails:
1. Remove the rails by pulling straight up on each end of the rail.
2. Replace the rails by sliding the shelf rail into the slots on the
door
Can Racks and Bins (on some
models)
Can Racks and Door Bins
NOTE: Can racks may be purchased as an accessory for some
models.
To remove and replace the racks/bins:
1. Remove the rack/bin by lifting it and pulling it straight out.
2. Replace the rack/bin by sliding it in above the desired support
and pushing it down until it stops.
16
Egg or Utility Bins
Depending on your model, you may have a one, two, or three
piece bin. Eggs may be stored in the egg tray or loose in the bin.
NOTE: Store eggs in a covered container for long–term storage. If
your model does not have an egg storage bin, store eggs in their
original container on an interior shelf.
Deli or Meat Drawer
The deli drawer design allows flexible positioning.
Deli or Meat Drawer
1. Remove deli drawer.
2. Release cover and place it between the desired crossbars
3. Secure the rear clips onto the shelf.
4. Replace the drawer
To remove and replace the drawer:
1. Slide deli drawer out to the stop
2. Lift front of deli drawer with one hand while supporting bottom
of drawer with other hand. Slide drawer out the rest of the
way.
3. Replace the drawer by sliding it back in fully past the drawer
stop
DRAWER COVER
To remove and replace the drawer cover:
Style 1 - Wire Shelves
1. Remove the deli drawer
2. Push the cover back to release the rear clips from the shelf.
Tilt the cover up at the front, and then pull it forward.
3. Replace the deli drawer cover by fitting the notches and clips
on the cover over the rear and center crossbars on the shelf.
4. Replace the deli drawer
Style 2 - Glass Shelves
1. Remove the drawer
2. Remove items from the shelf.
3. Slide the shelf straight out to the stop.
4. Slide the cover to one side until free.
5. Insert the cover into the shelf tracks
6. Slide the shelf back into the refrigerator, and then replace the
deli drawer
NOTE: On some models the drawer slides sideways on the
shelf to allow for flexible positioning
Meat Storage Guide
Store most meat in original wrapping as long as it is airtight and
moisture-proof. Rewrap if necessary. See the following chart for
storage times. When storing meat longer than the times given,
freeze the meat.
Fresh fish or shellfish ....................... use same day as purchased
Chicken, ground beef, variety meats (liver) ................... 1-2 days
Cold cuts, steaks/roasts ................................................ 3-5 days
Cured meats ................................................................. 7-10 days
Leftovers - Cover leftovers with plastic wrap, aluminum foil, or
plastic containers with tight lids.
Crisper
Crisper Cover
Style 1 – Plastic Cover
To remove and replace the crisper cover:
1. Remove the crisper(s).
2. Lift the cover up and slide it out.
3. Replace the cover by fitting the cover tabs into the lowest
cabinet slots and pushing them in. Lower the front retainers
into place.
Style 2– Glass Cover
To remove and replace the crisper cover:
1. Remove the crisper(s).
2. Pull the glass straight out.
3. Replace the glass by pushing it straight in.
17
Crisper Humidity Control (On Some Models)
You can control the amount of humidity in the moisture-sealed
crisper. Adjust the control to any setting between Low and High.
Low(open) – lets moist air out of the crisper for best storage of
fruits and vegetables with skins.
� Fruit: Wash, let dry, and store in refrigerator in plastic bag or
crisper. Do not wash or hull berries until they are ready to use.
Sort and keep berries in original container in crisper or store in
a loosely closed paper bag on a refrigerator shelf.
� Vegetables with skins: Place in plastic bag or plastic container
and store in crisper
High (closed) – keeps moist air in the crisper for best storage
of fresh, leafy vegetables.
� Leafy vegetables: Wash in cold water, drain, and trim or tear
off bruised and discolored areas. Place in plastic bag or plastic
container and store in crisper.
Utility Compartment
The utility compartment may be removed for easier cleaning.
To remove and replace the utility compartment:
1. Remove the utility compartment by squeezing against one
side while raising the utility compartment up and pulling it
straight out.
2. Replace the utility compartment by positioning one side in the
lock and sliding in the opposite side until it stops.
Ice Maker
For models with a water filter, after connecting the refrigerator to a
water source or replacing the water filter, fill and discard three full
containers of ice to prepare the water filter for use.
For products without any parts of the ice dispensing circuit, ice
maker and internal water circuit parts must be installed by the
manufacturer or by its qualified service technician.
For Easy Connect (ice maker ready) products, ice maker can be
easily installed by the user, following instructions given with the
kit.
In order to know which type of ice maker fits in your product,
please refer to the serial tag inside the food compartment of
appliance for ice maker kit model information.
Refer to the Quick Start Guide for contact information.
Turning the Ice Maker On/Off
� To turn the ice maker On, simply lower the wire shutoff arm.
� To manually turn the ice maker off, lift the wire shutoff arm to
the off (arm up) position and listen for the click.
NOTE: Your ice maker has an automatic shutoff. As ice is made,
the ice cubes will fill the ice storage bin and the ice cubes will raise
the wire shutoff arm to the Off (arm up) position. Do not force the
wire shutoff arm up or down.
Ice Storage Bin
NOTE: Turn off the ice maker before removing the ice storage bin
to serve ice or to clean the bin. This will keep the ice cubes from
dropping out of the ice maker and into the freezer compartment.
After replacing the ice storage bin, turn on the ice maker.
1. Wash the ice storage bin with mild soap and warm water.
2. Slide the ice storage bin under the ice maker and push it
toward the back as far as it will go.
3. Lower the arm on the ice maker to the On position.
Ice Production Rate
� The ice maker should produce a complete batch of ice
approximately every 3 hours, approximately 8 to 12 batches of
ice in a 24 hour period.
� To increase ice production, lower the freezer and refrigerator
temperature. See “Using the Controls” in the Quick Start
Guide. Wait 24 hours between adjustments.
� Maximum ice production (on some models): If your refrigerator
has the maximum ice production feature, push the switch to
Max to produce approximately 16 to 20 batches of ice in a 24
hour period.
Remember:
NOTE: The dispenser will automatically turn off Measured Fill
after 1 minute of inactivity. When Measured Fill is turned off, any
changes you have made will be lost and all defaults will be
restored.
18
SÉCURITÉ DU RÉFRIGÉRATEUR
INSTRUCTIONS IMPORTANTES DE SÉCURITÉ
AVERTISSEMENT: Afin de réduire le risque d’incendie, de décharge électrique ou de blessures corporelles lors de l’utilisation
de cet appareil, observer certaines précautions fondamentales, notamment :
� Les enfants doivent être surveillés afin de s’assurer qu’ils
ne jouent pas avec l’appareil.
� Cet appareil ne convient pas à une utilisation par des
personnes (y compris des enfants) à capacités physiques,
sensorielles ou mentales réduites, ou possédant un
manque d’expérience et de connaissances, à moins
qu’elles ne soient placées sous supervision ou qu’elles
aient reçu des instructions concernant l’utilisation de
l’appareil par une personne responsable de leur sécurité.
� Ne pas utiliser de rallonge.
� Si le cordon d’alimentation est endommagé, il doit être
remplacé par le fabricant, son agent de réparation ou toute
autre personne qualifiée afin d’éviter tout danger.
� Brancher sur une alimentation en eau potable uniquement.
� Cet appareil est destiné à un usage domestique et à
d’autres usages similaires comme : coins cuisine réservés
au personnel des boutiques, des bureaux et d’autres
environnements professionnels; maisons d’hôtes, ainsi que
par les clients d’hôtel, de motels et d’autres installations
d’hébergement; gîtes touristiques; et banquets et autres
utilisations non commerciales semblables.
� Ne pas entreposer de substances explosives comme des
aérosols avec agent propulseur inflammable dans cet
appareil.
� Ne pas utiliser de pièces de remplacement qui n’ont pas
été recommandées par le fabricant (c.-à-d., pièces
fabriquées à la maison à l’aide d’une imprimante 3D).
� Garder les évents à l’intérieur de l’enceinte de l’appareil ou
de la structure encastrée exempte d’obstacles.
� Ne pas utiliser des appareils mécaniques ou autres
moyens pour accélérer le processus de dégivrage, autre
que ceux recommandés par le fabricant.
� Ne pas endommager le circuit réfrigérant.
� Ne pas utiliser des appareils électriques à l’intérieur des
compartiments d’aliments de l’appareil, à moins qu’ils
soient de type recommandé par le fabricant.
CONSERVER CES INSTRUCTIONS
Votre sécurité et celle des autres sont très importantes.
Nous donnons de nombreux messages de sécurité importants dans ce manuel et sur votre appareil. Assurez-vous de toujours lire
tous les messages de sécurité et de vous y conformer.
Voici le symbole d’alerte de sécurité.
Ce symbole d’alerte de sécurité vous signale les dangers potentiels de décès et de blessures graves.
Tous les messages de sécurité suivront le symbole d’alerte de sécurité et le mot « DANGER » ou
« AVERTISSEMENT ». Ces mots signifient :
DANGER
AVERTISSEMENT
Risque possible de décès ou de blessure grave si vous ne
suivez pas immédiatement les instructions.
Risque possible de décès ou de blessure grave si vous ne
suivez pas les instructions.
Tous les messages de sécurité vous diront quel est le danger potentiel, comment réduire le risque de blessure et ce qui peut se
produire en cas de non-respect des instructions.
19
Mise au rebut du vieux réfrigérateur
AVERTISSEMENT : Un enfant peut rester piégé. Avant de jeter
votre vieux réfrigérateur ou congélateur :
� Enlever les portes.
� Laisser les tablettes en place de sorte que les enfants ne
puissent pas y pénétrer facilement.
Risque de suffoquer
Enlever les portes ou le couvercle de votre vieil appareil.
Le non-respect de cette instruction peut causer un
décès ou des lésions cérébrales.
IMPORTANT : Le risque qu’un enfant puisse se retrouver coincé
et suffoquer n’est pas chose du passé. Les réfrigérateurs jetés ou
abandonnés restent dangereux, même s’ils ne restent à l’extérieur
que pour « quelques jours ». Si l’ancien réfrigérateur doit être mis
au rebut, suivre les instructions suivantes afin d’éviter les
accidents.
Informations importantes à connaître pour l’élimination du
liquide réfrigérant :
Jeter le réfrigérateur conformément aux règlements fédéraux et
locaux. Les liquides réfrigérants doivent être évacués par un
technicien en réfrigération accrédité EPA, conformément aux
procédures établies.
ENTRETIEN ET RÉPARATION
Nettoyage
AVERTISSEMENT
Risque d’explosion
Risque d’incendie ou d’explosion.
Fluide frigorigène inflammable utilisé.
Ne pas utiliser d’appareils mécaniques pour dégivrer le
réfrigérateur.
Ne pas perforer la tubulure de réfrigération.
Les sections de réfrigération et de congélation se dégivrent
automatiquement. Toutefois, nettoyer les deux compartiments
environ une fois par mois afin d’éviter une accumulation d’odeurs.
Essuyer les renversements immédiatement.
IMPORTANT :
� Comme l’air circule entre les deux sections, toutes les odeurs
formées dans une section seront transférées à l’autre. Les
deux sections doivent être nettoyées avec soin pour éliminer
les odeurs. Pour éviter le transfert d’odeurs et l’assèchement
des aliments, envelopper ou recouvrir hermétiquement les
aliments
� Pour les modèles en acier inoxydable, l’acier inoxydable est
résistant à la corrosion, mais non anticorrosion. Afin d’éviter
l’oxydation de l’acier inoxydable, veiller à ce que les surfaces
restent propres en suivant les instructions de nettoyage
suivantes
Nettoyage du réfrigérateur :
REMARQUE : Ne pas utiliser de nettoyants puissants ou abrasifs
tels que les nettoyants à vitre en atomiseurs, nettoyants à récurer,
liquides inflammables, acide chlorhydrique, cires nettoyantes,
détergents concentrés, agents de blanchiment ou nettoyants
contenant du pétrole sur les surfaces extérieures (portes et caisse
de l’appareil), pièces en plastique, les garnitures intérieures et
garnitures de portes ou sur les joints de portes. Ne pas utiliser
d’essuie-tout, de tampons à récurer ou un autre outil de nettoyage
abrasif.
1. Débrancher le réfrigérateur ou déconnecter la source de
courant électrique.
2. Utiliser une éponge propre ou un linge doux et un détergent
doux dans de l’eau tiède, laver à la main et rincer
soigneusement les pièces amovibles et les surfaces
intérieures. Sécher soigneusement avec un chiffon doux.
AVERTISSEMENT
20
3. Nettoyer les surfaces extérieures.
IMPORTANT :
� Lors du nettoyage de l’acier inoxydable, toujours frotter
dans le sens du grain afin d’éviter d’érafler la surface.
� Pour que votre réfrigérateur en acier inoxydable conserve
son aspect neuf et pour enlever les petites égratignures ou
marques, il est suggéré d’utiliser le nettoyant et poli pour
acier inoxydable approuvé par le fabricant. Pour
commander, utiliser les pièces suivantes :
Affresh
®®
Nettoyant pour acier inoxydable : Pièce
No W10355016
Affresh
®®
Lingettes pour acier inoxydable : Pièce
No W10355049
Affresh
®®
Nettoyant pour cuisine et appareils
ménagers : Pièce No W10355010
� Nettoyant et poli pour acier inoxydableseulement. Veiller à
ce que le nettoyant pour acier inoxydable n’entre pas en
contact avec les pièces de plastique comme les garnitures
couvercles de distributeurs ou joints de porte. En cas de
contact non intentionnel, nettoyer la pièce de plastique
avec une éponge et un détergent doux dans de l’eau tiède.
Sécher soigneusement avec un chiffon doux.
4. Le condensateur n’a pas besoin d’être nettoyé souvent dans
des conditions de fonctionnement domestique normales. Si
l’environnement est particulièrement graisseux, poussiéreux
ou s’il y a des animaux domestiques dans la maison, le
condenseur devrait être nettoyé tous les 2 ou 3 mois pour
assurer une efficacité maximum.
Si on doit nettoyer le condensateur :
AVERTISSEMENT
Risque d’explosion
Risque d’incendie ou d’explosion causé par la
perforation de la tubulure de réfrigération;
suivre avec attention les instructions de manipulation.
Fluide frigorigène inflammable utilisé.
� Éloigner le réfrigérateur du mur. Voir la
section « Déballage du réfrigérateur ».
� Retirer la grille de la base.
� Nettoyer à l’aspirateur les serpentins lorsqu’ils sont sales
ou poussiéreux.
� Replacer la grille de la base après avoir terminé.
� Rouler de nouveau le réfrigérateur en position. S’assurer
qu’il y a un espace d’au moins 1 po (2,5 cm) entre l’arrière
de la caisse et le mur.
� Vérifier l’aplomb du réfrigérateur.
5. Brancher le réfrigérateur ou reconnecter la source de courant
électrique.
Remplacement des ampoules
d’éclairage
IMPORTANT : Les lampes dans le réfrigérateur et le congélateur
utilisent la technologie à DEL et n’ont pas besoin d’être
remplacées. Si les lampes ne s’allument pas lorsqu’on ouvre la
porte, appeler les numéros fournis pour obtenir de l’aide ou un
dépannage. Consulter le Guide de démarrage rapide pour les
coordonnées. Le système d’éclairage pour cet appareil peut
comprendre :
� Modules à DEL scellés
� Ampoules à DEL
� Ampoules incandescentes
� ou combinaison des susmentionnées.
REMARQUE : Si le produit est muni d’un module à DEL scellé,
appeler pour obtenir de l’aide ou un entretien. Consulter le Guide
de démarrage rapide pour les coordonnées.
IMPORTANT :
� En fonction de votre modèle, les ampoules de votre nouveau
réfrigérateur peuvent être issues de la technologie DEL. Si
votre modèle utilise un éclairage à DEL et que les lumières ne
s’allument pas lorsqu’on ouvre la porte, appeler les numéros
fournis pour obtenir de l’aide ou un dépannage.
� Certaines ampoules DEL de rechange ne sont pas
recommandées pour des environnements humides/mouillés.
Les compartiments de réfrigération et de congélation sont
considérés comme des environnements humides/mouillés. Si
on utilise une marque d’ampoules DEL différente de celle
recommandée ci-dessous, lire et suivre toutes les instructions
de l’emballage des ampoules DEL avant de procéder à
l’installation.
� Si l’on utilise une ampoule à incandescence pour remplacer
l’ampoule DEL, utiliser uniquement des ampoules à
incandescence pour les appareils ménagers de 40 W
maximum.
REMPLACEMENT DES AMPOULES D’ÉCLAIRAGE
1. Débrancher le réfrigérateur ou déconnecter la source de
courant électrique.
2. L’ampoule se trouve derrière la commande de température
sur la majorité des modèles.
3. Retirer le protège-ampoule (si applicable) comme illustré ci-
dessous.
4. Retirer et replacer l’ampoule comme illustré ci-dessous.
5. Si applicable, replacer le protecteur d’ampoule.
6. Brancher le réfrigérateur ou reconnecter la source de courant
électrique.
ÉCLAIRAGE DU RÉFRIGÉRATEUR STYLE 1
Enlever et réinstaller une ampoule :
1. Passer la main derrière le tableau de commande et dévisser
l’ampoule.
2. Utiliser uniquement une ampoule de 40 W maximum pour
appareil électroménager.
21
ÉCLAIRAGE DU RÉFRIGÉRATEUR STYLE 2
1. Enlever le protège-ampoule en appuyant sur les côtés et en
le tirant vers le bas.
2. Retirer l’ampoule et la remplacer par une ampoule de même
taille et forme.
REMARQUE : Pour remplacer l’ampoule par une ampoule
DEL, commander la pièce numéro W10565137 (3,6 W).
ÉCLAIRAGE DU RÉFRIGÉRATEUR STYLE 3
1. Enlever le protège-ampoule en appuyant sur les côtés et en
le tirant vers le bas.
2. Retirer l’ampoule et la remplacer par une ampoule de même
taille et forme.
REMARQUE : Pour remplacer l’ampoule par une ampoule
DEL, commander la pièce numéro W10565137 (3,6 W).
ÉCLAIRAGE DU CONGÉLATEUR
1. Faire glisser le protège-ampoule vers l’arrière du
compartiment pour la libérer de l’ensemble d’éclairage.
2. Retirer l’ampoule et la remplacer par une ampoule de même
taille et forme.
REMARQUE : Pour remplacer l’ampoule par une ampoule
DEL, commander la pièce numéro W10574850 (2,0 W).
Vacances
Si le réfrigérateur est laissé en marche pendant une
absence :
1. Consommer toutes les denrées périssables et congeler les
autres articles.
2. Si le réfrigérateur comporte une machine à glaçons
automatique et qu’il est raccordé à la source
d’approvisionnement en eau du domicile, fermer la source
d’approvisionnement en eau du réfrigérateur. Des dommages
matériels peuvent subvenir si l’alimentation en eau n’est pas
coupée.
3. Si votre machine à glaçons est automatique, éteindre la
machine à glaçons.
REMARQUE : Fermer le bras de commande d’arrêt en
broche (vers le haut).
4. Vider le bac à glaçons.
Si l’utilisateur choisit d’arrêter le réfrigérateur avant son
absence :
1. Enlever tous les aliments du réfrigérateur.
2. Si le réfrigérateur est équipé d’une machine à glaçons
automatique :
� Fermer l’approvisionnement en eau de la machine à
glaçons au moins un jour à l’avance.
� Lorsque la dernière quantité de glaçons est déposée,
soulever le bras de commande en broche à la position Off
(élevée).
3. Éteindre la/les commande(s) de température. Voir la section
« Utilisation des commandes » du guide d’utilisation rapide.
4. Nettoyer le réfrigérateur, l’essuyer et bien le sécher.
5. À l’aide d’un ruban adhésif, placer des blocs de caoutchouc
ou de bois dans la partie supérieure de chaque porte de façon
à ce qu’elles soient suffisamment ouvertes pour permettre à
l’air d’entrer et d’éviter l’accumulation d’odeur ou de
moisissure.
Déménagement
En cas de déménagement et de déplacement du réfrigérateur
dans une nouvelle habitation, suivre ces étapes pour préparer le
déménagement.
1. Si le réfrigérateur est équipé d’une machine à glaçons
automatique :
� Fermer l’approvisionnement en eau de la machine à
glaçons au moins un jour à l’avance.
� Débrancher la canalisation d’eau de l’arrière du
réfrigérateur.
� Lorsque la dernière quantité de glaçons est déposée,
soulever le bras de commande en broche à la position Off
(élevée).
2. Retirer tous les aliments du réfrigérateur et placer tous les
aliments congelés dans de la neige carbonique.
3. Vider le bac à glaçons.
4. Éteindre la/les commande(s) de température. Voir la section
« Utilisation des commandes » du guide d’utilisation rapide.
5. Débrancher le réfrigérateur.
6. Nettoyer le réfrigérateur, l’essuyer et bien le sécher.
7. Retirer toutes les pièces amovibles, bien les envelopper et les
attacher ensemble avec du ruban adhésif pour qu’elles ne
bougent et ne s’entrechoquent pas durant le déménagement.
8. Selon le modèle, soulever le devant du réfrigérateur pour qu’il
roule plus facilement ou soulever les pieds de nivellement
pour qu’ils n’égratignent pas le plancher. Voir les sections
« Ajustement des portes » ou « Retrait, ajustement de
l’aplomb et alignement des portes » du guide de
caractéristiques en ligne.
9. Fermer les portes à l’aide de ruban adhésif et fixer le cordon
d’alimentation à la partie arrière du réfrigérateur.
Une fois arrivé à votre nouveau domicile, remettre tout en place et
consulter les instructions d’installation pour des instructions sur la
préparation de l’appareil. Aussi, si le réfrigérateur comporte une
machine à glaçons automatique, ne pas oublier de rebrancher
l’approvisionnement en eau au réfrigérateur.

22
INSTRUCTIONS D’INSTALLATION
Déballage du réfrigérateur
AVERTISSEMENT
Risque de poids excessif
Utiliser deux personnes ou plus pour déplacer et installer
l’appareil.
Le non-respect de cette instruction peut causer une
blessure au dos ou d’autres blessures.
Retrait des matériaux d’emballage
IMPORTANT : Ne pas enlever l’encart en mousse blanche du
retour d’air situé derrière le tableau de commande, au plafond du
réfrigérateur. Si l’encart est enlevé, de la glace peut se former en
provenance du congélateur et causer la formation de glaçons.
� Enlever tout résidu de ruban adhésif et de colle des surfaces
avant de mettre en marche votre tiroir de réfrigération. Frotter
une petite quantité de savon liquide à vaisselle sur l’adhésif
avec les doigts. Rincer à l’eau tiède et sécher avec un chiffon
doux.
REMARQUE: Ne pas utiliser d’instruments coupants, d’alcool
à friction, de liquides inflammables ou de nettoyants abrasifs
pour enlever le ruban adhésif ou la colle. Ces produits peuvent
endommager la surface du réfrigérateur. Pour plus de
renseignements, voir la section « Sécurité du réfrigérateur ».
� Éliminer/recycler tous les matériaux d’emballage.
Lors du déplacement du réfrigérateur :
Ce réfrigérateur est lourd. Lors du déplacement de ce
réfrigérateur pour un nettoyage ou un entretien, veiller à recouvrir
le plancher d’un carton ou panneau de fibre dur pour éviter de
l’endommager. Toujours tirer le réfrigérateur tout droit lors du
déplacement. Ne pas incliner le réfrigérateur d’un côté ou de
l’autre ni le « faire marcher » en essayant de le déplacer, car le sol
pourrait être endommagé.
Nettoyage avant utilisation
Après avoir enlevé tous les matériaux d’emballage, nettoyer
l’intérieur du réfrigérateur avant de l’utiliser. Voir les instructions
de nettoyage dans la section « Entretien et nettoyage ».
Informations importantes à propos des tablettes et des
couvercles en verre :
Ne pas nettoyer les tablettes ou les couvercles de verre avec de
l’eau tiède lorsqu’ils sont froids. Les tablettes et couvercles
peuvent se briser s’ils sont exposés à un changement de
températures ou impact soudain, tel qu’une chute. Le verre
trempé est conçu pour se briser en de multiples petits morceaux
de la taille de gravillons. Ceci est normal. Les tablettes en verre et
les couvercles sont lourds. Employer les deux mains lorsqu’on les
retire afin d’éviter de les faire tomber.
Exigences d’emplacement
AVERTISSEMENT
Risque d’explosion
Garder les matières et les vapeurs inflammables, telles
que l’essence, à l’écart de l’appareil.
Utiliser un produit de nettoyage ininflammable.
Le non-respect de ces instructions peut causer un
décès, une explosion ou un incendie.
IMPORTANT : Ce réfrigérateur est conçu pour un usage
domestique, à l’intérieur uniquement.
Pour obtenir une aération appropriée pour le réfrigérateur, laisser
un espace de 1/2 po (1,25 cm) de chaque côté. Laisser un espace
de 1 1/2 po (3,81 cm) entre le dessus du réfrigérateur et le
dessous des armoires. Laisser au moins 1 po (2,54 cm) entre
l’arrière de la caisse et le mur. Si le réfrigérateur comporte une
machine à glaçons, s’assurer qu’un espace additionnel est prévu
à l’arrière pour permettre les raccordements des conduits d’eau.
REMARQUE : Ce réfrigérateur est conçu pour être utilisé dans un
endroit où la température est comprise entre un minimum de
55 °F (13 °C) et un maximum de 110 °F (43 °C). La plage de
température ambiante idéale pour un rendement optimal est
comprise entre 60 °F (15 °C) et 90 °F (32 °C). Respecter cette
plage de température permet aussi de réduire la consommation
d’électricité et d’optimiser l’efficacité du refroidissement. Il est
recommandé de ne pas installer le réfrigérateur près d’une source
de chaleur comme un four ou un radiateur.
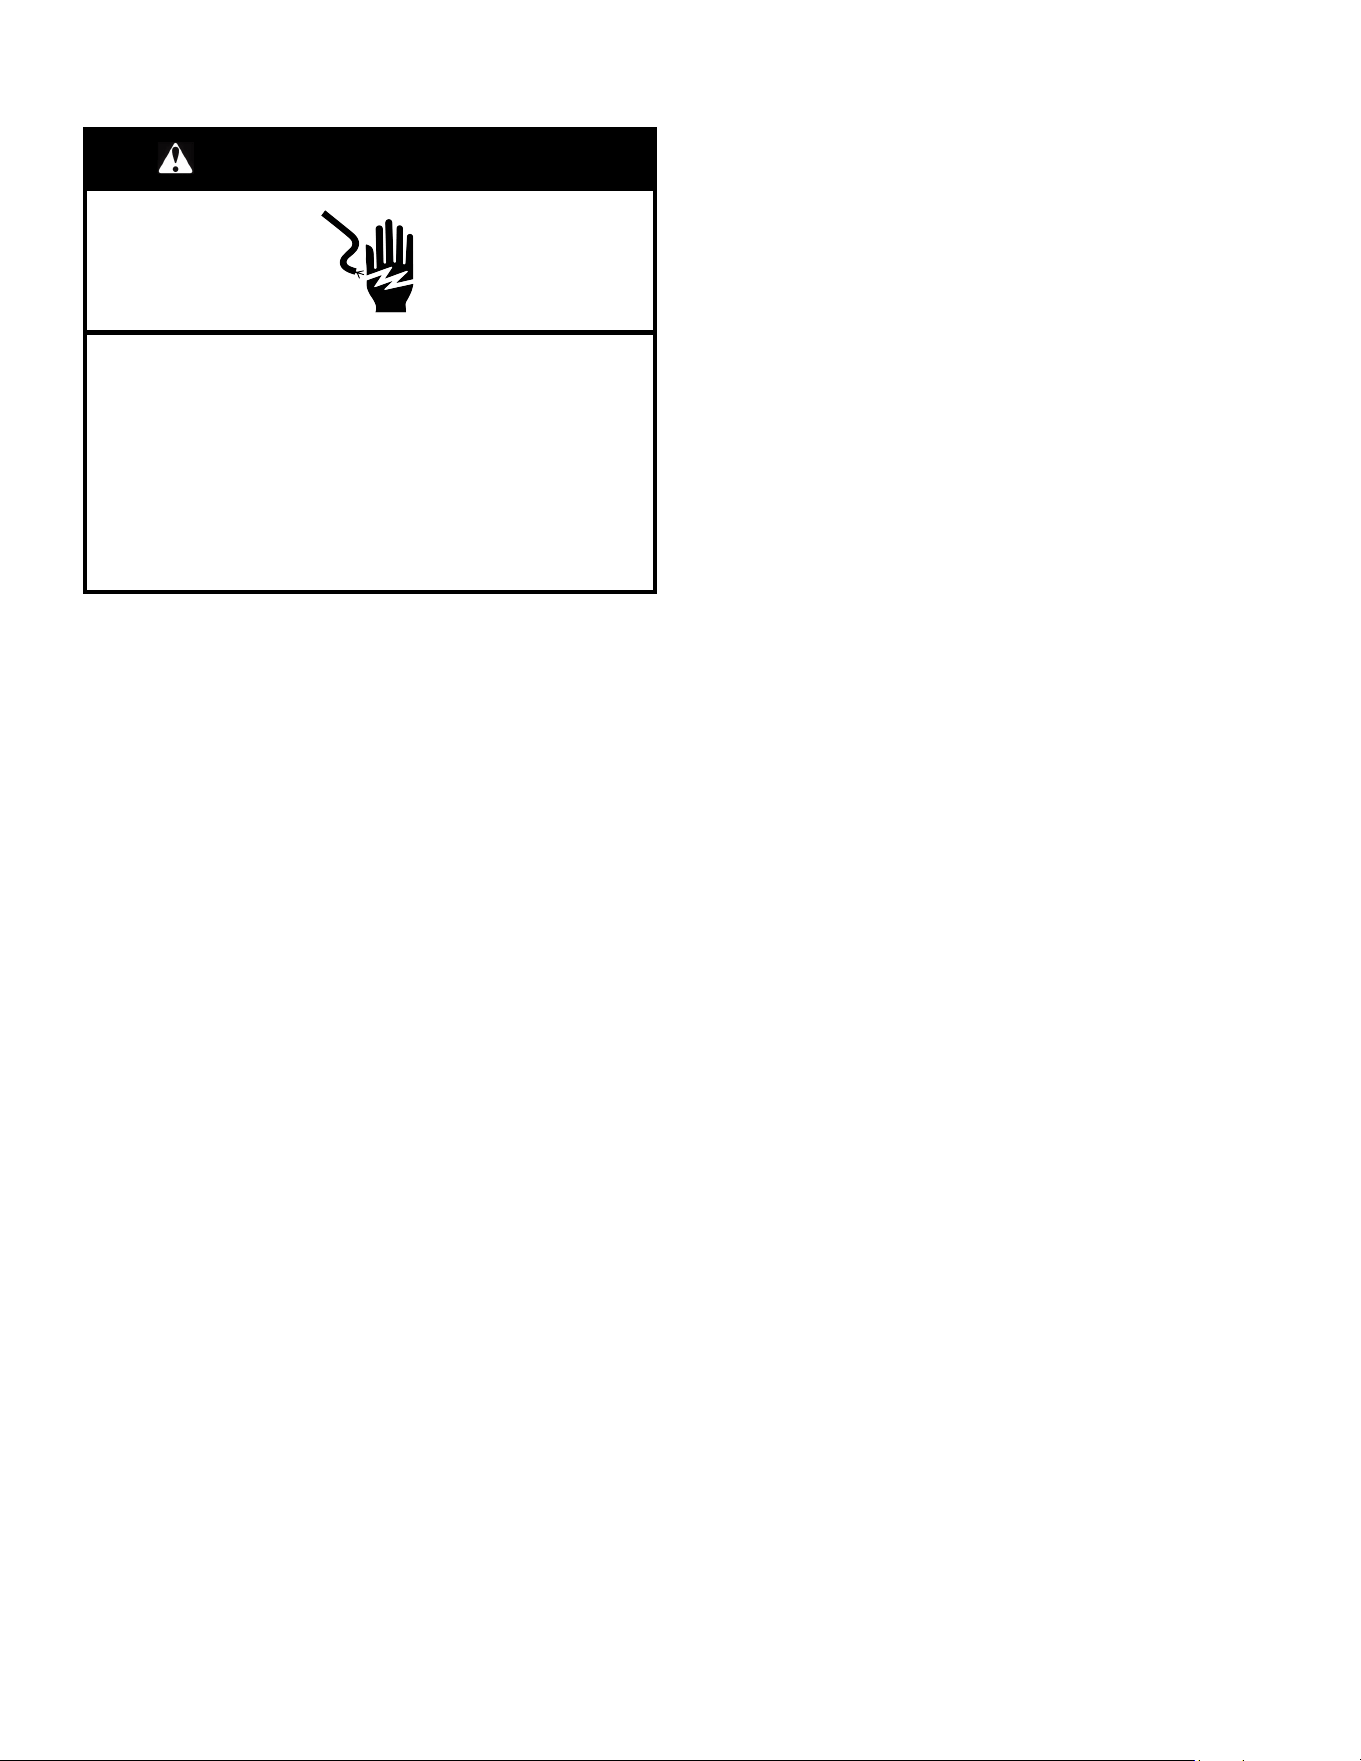
23
Spécifications électriques
AVERTISSEMENT
Risque de choc électrique
Brancher l’appareil sur une prise à 3 alvéoles reliée à la
terre.
Ne pas enlever la prise de liaison à la terre.
Ne pas utiliser d’adaptateur.
Ne pas utiliser de rallonge.
Le non-respect de ces instructions peut causer un
décès, un incendie ou un choc électrique.
Avant de placer le réfrigérateur à son emplacement final, il est
important de s’assurer d’avoir la connexion électrique appropriée.
Si le cordon d’alimentation est endommagé, il doit être remplacé
par le fabricant, son agent de service ou toute autre personne
également qualifiée. Ne pas utiliser un cordon craquelé ou qui
présente des dommages d’abrasion sur la gaine, la fiche ou le
connecteur.
Méthode recommandée de liaison à la terre
Un circuit de 115 V CA à 60 Hz relié à la terre et protégé par un
fusible de 15 A ou 20 A est requis. Il est recommandé d’utiliser un
circuit distinct pour alimenter le réfrigérateur uniquement. Utiliser
une prise de courant dont l’alimentation ne peut pas être
interrompue par un interrupteur. Ne pas utiliser de rallonge.
REMARQUE : Avant de procéder à tout type d’installation, de
nettoyage ou de changement d’ampoule, mettre le réfrigérateur à
l’arrêt. Selon le modèle, tourner la commande du réfrigérateur
vers Off (arrêt) ou appuyer sur la flèche vers le bas du
réfrigérateur jusqu’à ce qu’un tiret (–) apparaisse sur l’affichage
du réfrigérateur. Déconnecter le réfrigérateur de la source de
courant électrique. Une fois l’opération terminée, reconnecter le
réfrigérateur à la source de courant électrique et remettre la
commande de température au réglage désiré. Voir la section
« Utilisation des commandes » du guide d’utilisation rapide.
Spécifications de l’alimentation en
eau
Lire toutes les instructions avant de commencer.
IMPORTANT :
� Brancher sur une alimentation en eau potable uniquement.
Ne pas utiliser ce produit pour filtrer une eau
microbiologiquement polluée ou de qualité inconnue en
l’absence d’un dispositif de désinfection adéquat en amont ou
en aval du système. Les systèmes certifiés pour la réduction
des kystes peuvent être utilisés pour une eau désinfectée
susceptible de contenir des kystes filtrables.
� Si on doit mettre en marche le congélateur avant de raccorder
la canalisation d’eau, placer la machine à glaçons à Off (arrêt).
� Toutes les installations doivent être conformes aux exigences
des codes locaux de plomberie.
� Utiliser un tuyau en cuivre ou en polyéthylène réticulé et
vérifier qu’il n’y a pas de fuite. Installer seulement des tuyaux
en cuivre ou en polyéthylène réticulé là où les températures
resteront au-dessus du point de congélation.
OUTILS NÉCESSAIRES : Tournevis à lame plate, clés plates de
7/16 po et 1/2 po ou deux clés à molette, tourne-écrou de 1/4 po
et foret, une perceuse sans fil. Rassembler les outils et pièces
nécessaires avant d’entreprendre l’installation. Lire et observer
les instructions d’installation fournies avec chaque outil mentionné
dans la liste.
REMARQUE : Votre marchand de réfrigérateurs propose une
trousse avec un robinet d’arrêt à étrier de 1/4 po (6,35 mm), un
raccord et un tube en cuivre ou en polyéthylène réticulé. Avant
d’en faire l’achat, s’assurer que le robinet d’arrêt à étrier est
conforme aux codes locaux de plomberie. Ne pas employer de
robinet d’arrêt à étrier de 3/16 po (4,76 mm) ou de type à percer –
ils réduisent le débit d’eau et s’obstruent plus facilement.
Pression d’eau
Une alimentation en eau froide avec une pression entre 207 à
827 kPa (30 et 120 lb/po²) est nécessaire pour faire fonctionner la
machine à glaçons. Pour toute question au sujet de la pression de
l’eau, consulter la section « Dépannage » en ligne ou faire appel à
un plombier qualifié agréé.
Alimentation en eau par osmose inverse
Si un système de filtration de l’eau par osmose inverse est
raccordé à votre alimentation en eau froide, la pression de l’eau
au système doit être d’un minimum de 276 à 414 kPa (40 à 60 lb/
po²). Si la machine à glaçons ne fonctionne toujours pas
correctement :
� Vérifier que le filtre à sédiment dans le système à osmose
inverse n’est pas obstrué. Remplacer le filtre si nécessaire.
� Laisser le réservoir du système d’osmose inverse se remplir
après une utilisation intense.
Pour toute question au sujet de la pression de l’eau, consulter la
section « Dépannage » en ligne ou faire appel à un plombier
qualifié agréé.
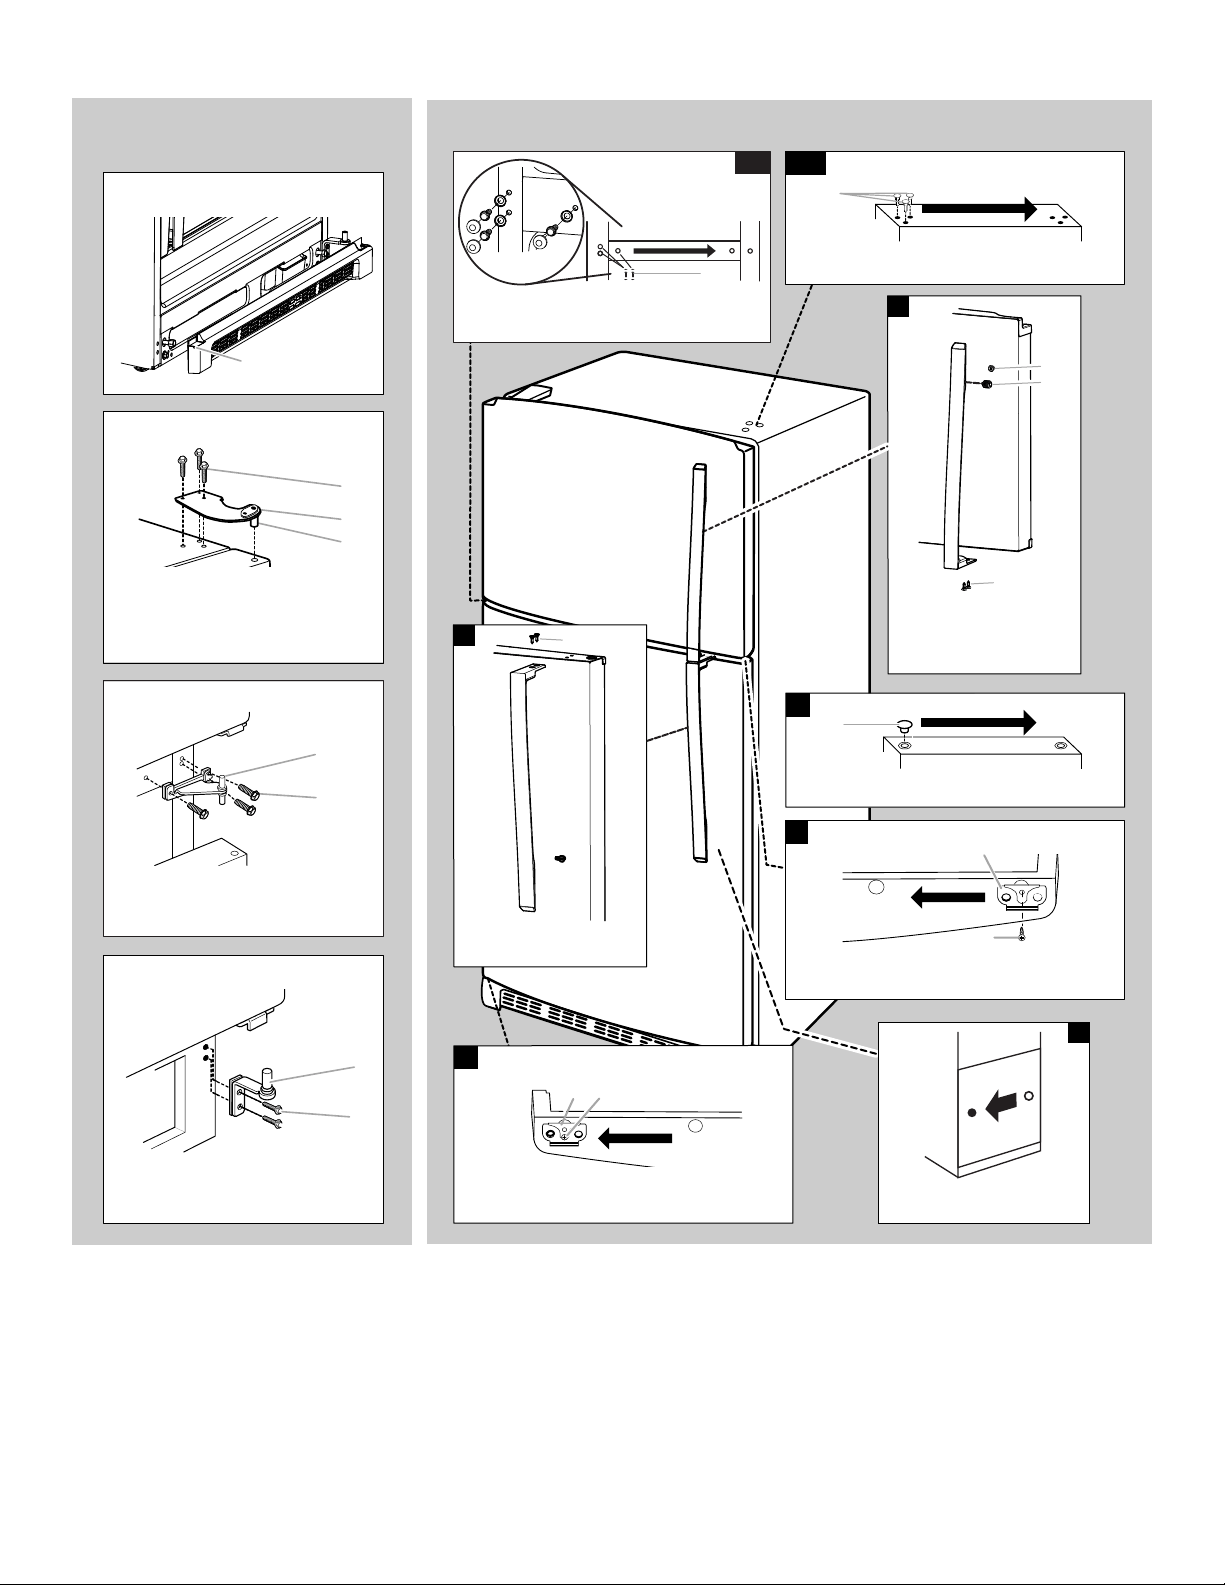
24
Raccordement à la canalisation
d’eau
Lire toutes les instructions avant de commencer.
IMPORTANT : Si on met en marche le réfrigérateur avant que la
canalisation d’eau ne soit raccordée, éteindre la machine à
glaçons pour éviter tout bruit excessif ou éviter d’endommager le
robinet d’eau.
Raccordement à la canalisation d’eau
1. Débrancher le réfrigérateur ou déconnecter la source de
courant électrique.
2. Couper l’alimentation principale en eau. Ouvrir le robinet le
plus proche assez longtemps pour vider l’eau du tuyau.
3. Trouver une canalisation d’eau froide verticale de 1/2 po à
1 1/ 4 po (1,27 cm à 3,18 cm) à proximité du réfrigérateur.
IMPORTANT:
� Vérifier qu’il s’agit d’une canalisation d’eau froide.
� On peut aussi utiliser une canalisation horizontale; dans ce
cas, on devra percer sur la face supérieure du tuyau et non
pas au-dessous. Ceci permet de tenir la perceuse à l’écart
de l’eau et d’empêcher les sédiments qu’on trouve
normalement dans l’eau de s’accumuler dans le robinet
d’arrêt.
4. Déterminer la longueur de la canalisation en cuivre ou en
polyéthylène réticulé à utiliser. Mesurer depuis le point de
connexion (côté inférieur arrière gauche du réfrigérateur) et la
canalisation d’eau. Ajouter 7 pi (2,1 m) pour permettre les
opérations de nettoyage. Utiliser une canalisation en cuivre ou
en polyéthylène réticulé de 1/4 po (6,35 mm) (diamètre
externe) . Veiller à ce que la canalisation en cuivre ou en
polyéthylène réticulé soit coupée d’équerre aux deux
extrémités.
5. À l’aide d’une perceuse sans fil, percer un trou de 1/4 po dans
la canalisation d’eau froide sélectionnée.
A. Canalisation
d’eau froide
B. Bride de tuyau
C. Tuyau en cuivre
ou en
polyéthylène
réticulé
D. Écrou de
compression
E. Virole de compression
F. Robinet d’arrêt
G. Écrou de presse-étoupe
6. Fixer le robinet d’arrêt sur la canalisation d’eau froide avec la
bride de tuyau. Veiller à bien insérer l’extrémité de sortie dans
le trou de 1/4 po (6,35 mm) de la canalisation d’eau; veiller à
placer correctement le joint sous la bride du tuyau. Serrer
l’écrou de serrage. Serrer lentement et uniformément les vis
fixant la bride de tuyau sur le tuyau afin d’assurer l’étanchéité
du joint. Ne pas serrer excessivement, car ceci pourrait
provoquer l’écrasement de la canalisation en cuivre ou en
polyéthylène réticulé.
7. Enfiler la bague et l’écrou de compression sur la canalisation
en cuivre ou en polyéthylène réticulé comme illustré (Le tuyau
en polyéthylène réticulé possède des viroles et écrous de
compression déjà installés.) Insérer l’extrémité de la
canalisation directement dans l’extrémité de sortie, aussi loin
que possible. Visser l’écrou de compression sur l’extrémité de
sortie du raccord à l’aide d’une clé à molette. Ne pas serrer
excessivement.
8. Placer le bout libre de la canalisation dans un contenant ou
évier et ouvrir le robinet principal d’alimentation en eau.
Laisser l’eau s’écouler par la canalisation jusqu’à ce qu’elle
soit limpide. Fermer le robinet d’arrêt de la canalisation d’eau.
Lover le tube de cuivre ou de polyéthylène réticulé.
Raccordement au réfrigérateur
REMARQUE: Pour les modèles en kit, installer la valve d’entrée
d’eau sur le réfrigérateur conformément aux instructions du kit.
Style 1
1. Débrancher le réfrigérateur ou déconnecter la source de
courant électrique.
2. Raccorder la canalisation en cuivre au robinet d’arrivée d’eau
à l’aide d’un écrou et d’une bague de compression, comme
illustré. Serrer l’écrou de compression. Ne pas serrer
excessivement.
3. Utiliser la bride du tube à l’arrière du réfrigérateur pour fixer le
tube au réfrigérateur comme illustré. Ceci aide à éviter
d’endommager le tube lorsque le réfrigérateur est poussé
contre le mur.
4. Ouvrir le robinet d’arrêt.
5. Vérifier qu’il n’y a pas de fuites. Serrer tous les raccords (y
compris les raccords du robinet) ou les écrous qui présentent
des fuites.
A. Bride de tuyau
B. Vis de bride de
tuyau
C. Tuyau en cuivre ou
en polyéthylène
réticulé
D. Écrou de compression
E. Orifice d’arrivée d’eau
6. La machine à glaçons comporte un filtre à eau incorporé. Si
les caractéristiques de l’eau requièrent un second filtre à eau,
installer celui-ci dans la canalisation d’eau de 1/4 po
(6,35 mm) à l’une ou l’autre des extrémités de la canalisation.
Se procurer un filtre à eau auprès de votre revendeur
d’appareils ménagers le plus proche.
REMARQUE: Pour les modèles en kit, installer la valve d’entrée
d’eau sur le réfrigérateur conformément aux instructions du kit.
Style 2
1. Débrancher le réfrigérateur ou déconnecter la source de
courant électrique.
2. Déconnecter la bride du tube à l’arrière du produit et introduire
le tube en cuivre ou en polyéthylène réticulé dans la bride,
comme indiqué.
3. Raccorder la canalisation en cuivre ou en polyéthylène
réticulé au robinet d’arrivée d’eau à l’aide d’un écrou et d’une
bague de compression, comme illustré.
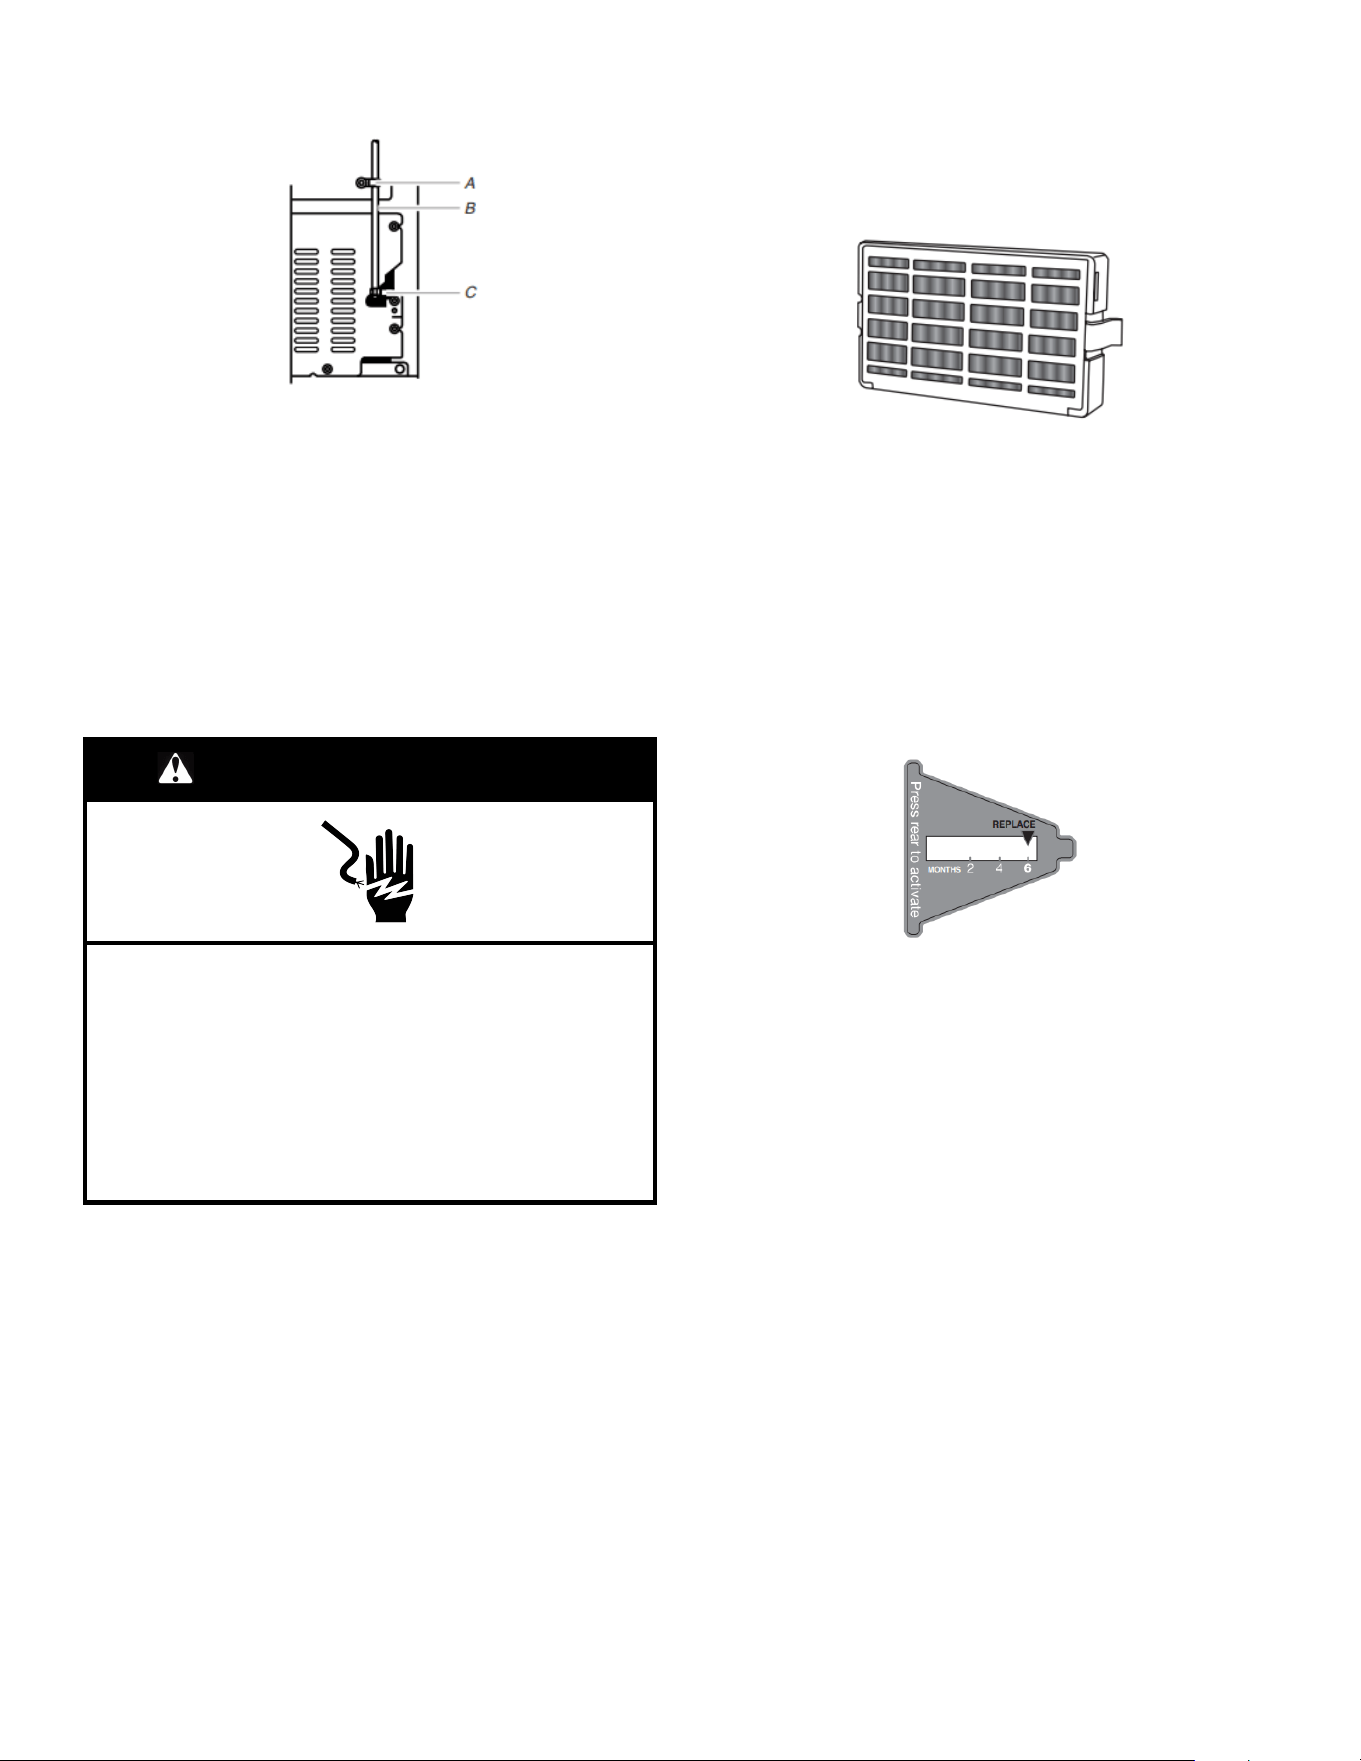
25
4. Serrer l’écrou de compression. Ne pas serrer excessivement.
Réattacher la bride du tube et le tube à l’arrière de la caisse.
A. Bride de tuyau
B. Tuyau en cuivre ou
en polyéthylène
réticulé
C. Écrou de compression
5. Ouvrir le robinet d’arrêt. Vérifier qu’il n’y a pas de fuites. Serrer
tous les raccords (y compris les raccords du robinet) ou les
écrous qui présentent des fuites.
6. La machine à glaçons comporte un filtre à eau incorporé. Si
les caractéristiques de l’eau requièrent un second filtre à eau,
installer celui-ci dans la canalisation d’eau de 1/4 po
(6,35 mm) à l’une ou l’autre des extrémités de la canalisation.
Se procurer un filtre à eau auprès de votre revendeur
d’appareils ménagers le plus proche.
Terminer l’installation
AVERTISSEMENT
Risque de choc électrique
Brancher l’appareil sur une prise à 3 alvéoles reliée à la
terre.
Ne pas enlever la prise de liaison à la terre.
Ne pas utiliser d’adaptateur.
Ne pas utiliser de rallonge.
Le non-respect de ces instructions peut causer un
décès, un incendie ou un choc électrique.
1. Brancher l’appareil dans une prise à 3 alvéoles reliée à la
terre.
REMARQUE: Prévoir un délai de 24 heures pour la production du
premier lot de glaçons. Jeter les trois premiers lots de glaçons
produits. Prévoir un délai de 3 jours pour le remplissage complet
du récipient à glaçons.
Installation du filtre à air
Sur certains modèles, le sachet d’accessoires du réfrigérateur
comprend un filtre à air qui doit être installé avant d’utiliser le
réfrigérateur. Sur certains modèles, le filtre à air est préinstallé à
l’usine. Pour commander un filtre à air de remplacement, utiliser le
numéro de pièce W10311524.
Ce filtre à air réduit l’accumulation d’odeurs. Ceci aide à maintenir
un environnement plus propre à l’intérieur du réfrigérateur.
Installation du filtre à air
Le filtre doit être installé derrière la porte à aérations, située (selon
le modèle) le long de la paroi intérieure gauche ou arrière, à
proximité du sommet du compartiment de réfrigération.
1. Retirer le filtre à air de son emballage.
2. Ouvrir la porte à aérations en la soulevant.
3. Emboîter le filtre pour le mettre en place.
Témoin d’état du filtre à air
Le filtre comporte un témoin d’état qui doit être activé et installé en
même temps que le filtre à air.
1. Placer le témoin orienté vers le bas sur une surface ferme et
plane.
2. Appliquer une pression sur la bulle située à l’arrière du témoin
jusqu’à ce que la bulle éclate – ceci active le témoin.
3. Ouvrir la porte du filtre à air à aérations en la soulevant. Sur
certains modèles, l’arrière de la porte comporte des
encoches.
Modèles avec encoches :
� Faire glisser le témoin vers le bas, dans les encoches, en
l’orientant vers l’extérieur.
REMARQUE : Le témoin ne glissera pas facilement dans les
encoches si la bulle arrière n’a pas éclaté.
� Fermer la porte du filtre à air et vérifier que le témoin est visible
à travers le trou rectangulaire de la porte.
Modèles sans encoches :
� Placer le témoin dans un endroit visible dont l’utilisateur se
souviendra facilement – soit à l’intérieur du réfrigérateur soit
dans un autre endroit de la cuisine ou du domicile.
Remplacer le filtre à air
Le filtre à air jetable doit être remplacé tous les 6 mois, lorsque le
témoin est entièrement passé du blanc au rouge.
1. Retirer l’ancien filtre à air en serrant les onglets latéraux.
2. Retirer l’ancien témoin.
3. Installer le filtre à air et le témoin neufs à l’aide des
instructions des sections précédentes.
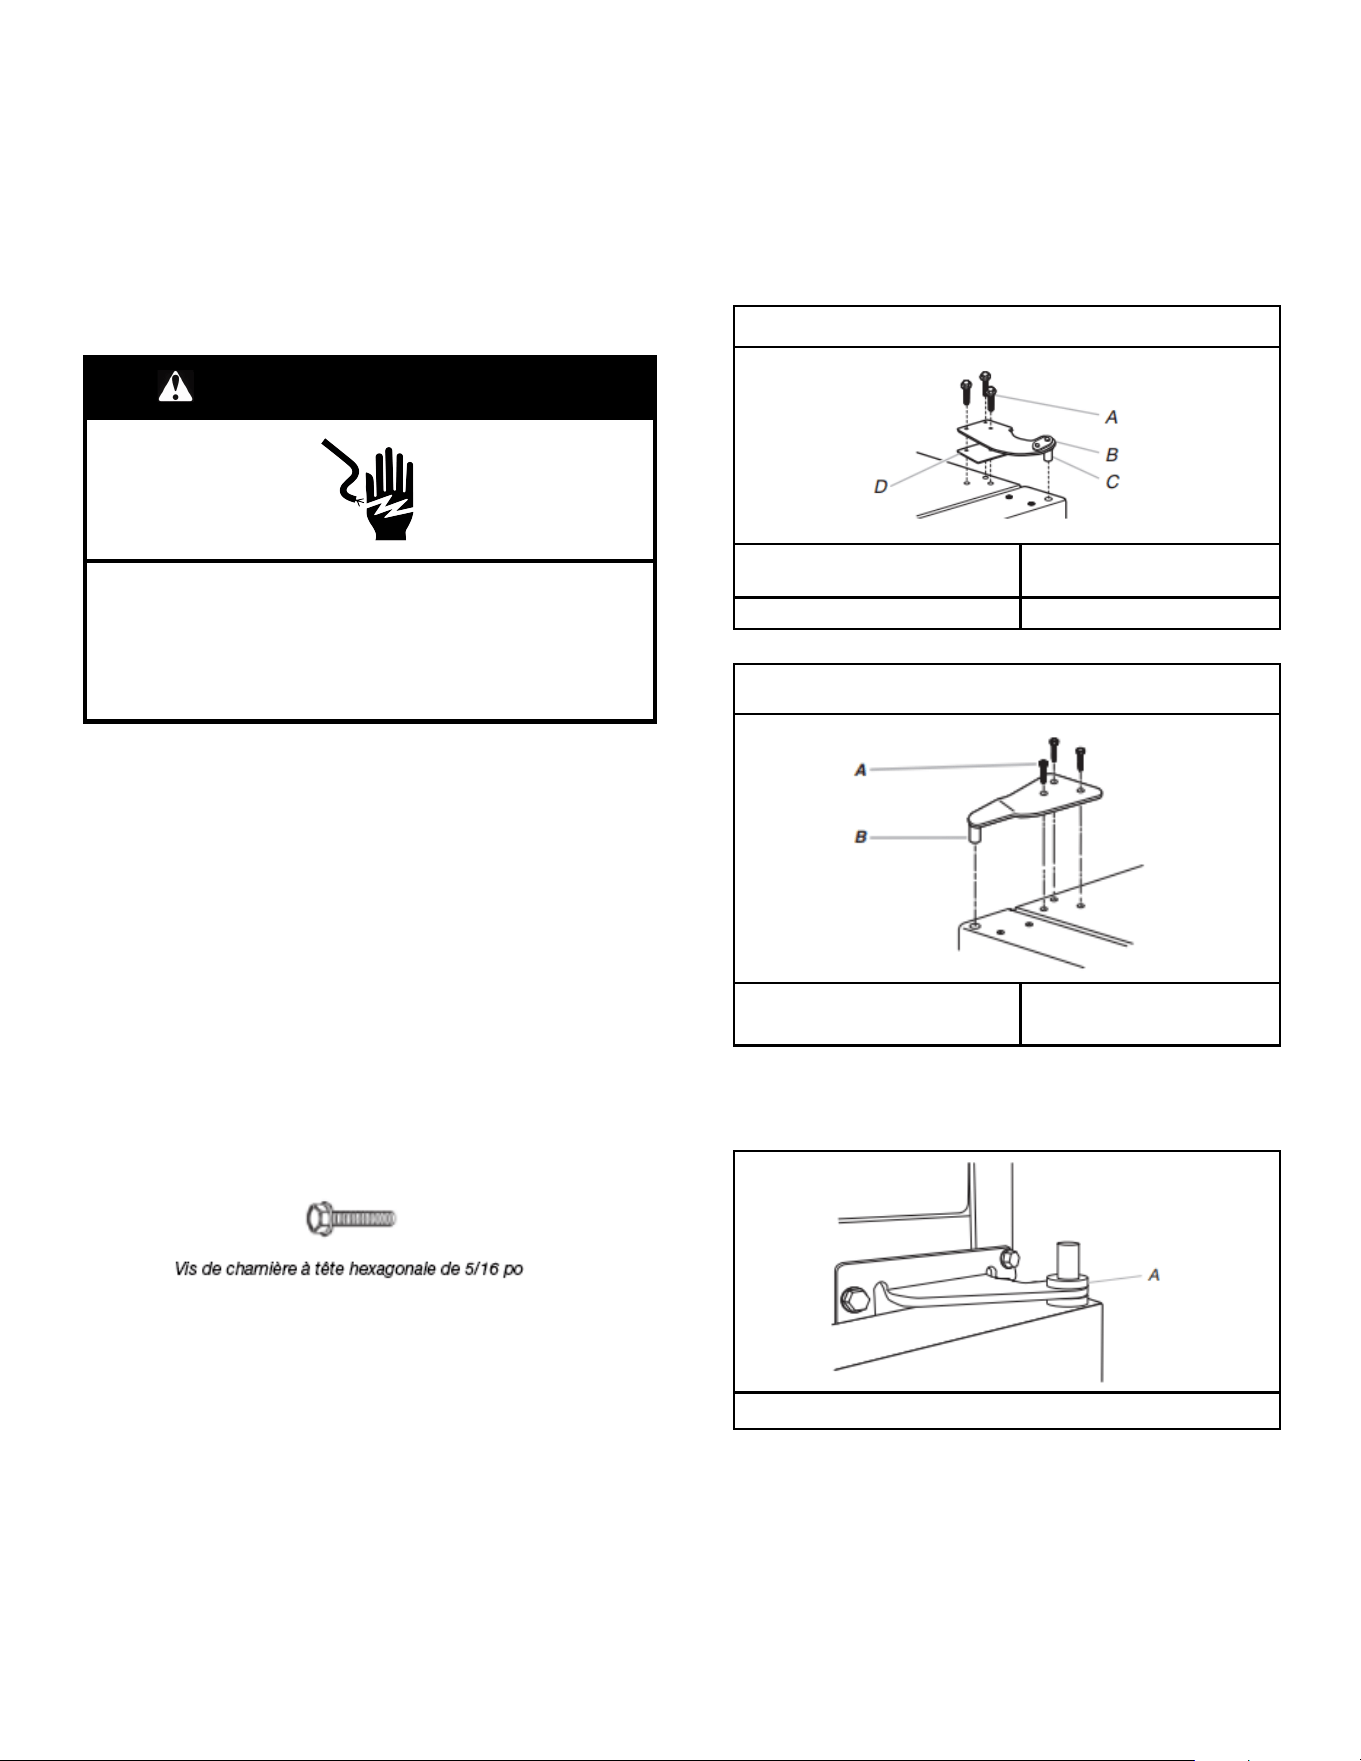
26
PORTES DU RÉFRIGÉRATEUR
Instructions pour la porte et la
poignée
En fonction de la largeur de l’ouverture de la porte, il faudra peut-
être retirer les portes pour pouvoir introduire le réfrigérateur dans
le domicile. Les charnières de portes ont été installées à l’usine
sur le côté droit de l’appareil. Si l’on souhaite que la porte puisse
s’ouvrir depuis le côté opposé, le sens d’ouverture de la porte doit
être inversé.
AVERTISSEMENT
Risque de décharge électrique
Déconnecter la source de courant électrique avant
d’enlever les portes.
Le non-respect de cette instruction peut causer un
décès ou une décharge électrique.
IMPORTANT :
� Avant de commencer, tourner la commande du réfrigérateur à
Off (arrêt). Débrancher le réfrigérateur ou déconnecter la
source de courant électrique. Retirer les aliments et tous les
balconnets de la porte du réfrigérateur.
� Si l’utilisateur souhaite uniquement enlever et réinstaller les
portes, voir les sections « Démontage des portes et des
charnières » et « Réinstallation des portes et des charnières ».
� Si l’on souhaite inverser le sens d’ouverture des portes, on
peut acheter un ensemble d’inversion du sens d’ouverture qui
comprend un nouvel insigne de la marque ainsi que des
bouchons d’obturation.
Outils requis : Clé à douille à tête hexagonale de 5/16 po,
tournevis cruciforme no 2, tournevis à lame plate, clé plate de 5/
16 po et couteau à mastic de 2 po
Démontage des portes et charnières
1. Débrancher le réfrigérateur ou déconnecter la source de
courant électrique.
2. Utiliser une clé à douille hexagonale, retirer les trois vis de
charnière à tête hexagonale de 5/16 po de la charnière
supérieure et les soulever pour retirer la charnière.
REMARQUE : Prévoir un support additionnel de la porte
pendant le changement de côté des charnières. La force
d’attraction des aimants de porte ne suffit pas à la maintenir
en place.
Charnière supérieure Style 1
A. Vis de charnière à tête
hexagonale de 5/16 po
C. Axe de charnière
B. Charnière supérieure D. Cale
Charnière supérieure Style 2
A. Vis de charnière à tête
hexagonale de 5/16 po
B. Charnière supérieure
3. Soulever la porte du congélateur pour la séparer de la
charnière centrale et la conserver à part
4. Retirer la rondelle du sommet de l’axe de la charnière
centrale.
A. Rondelle
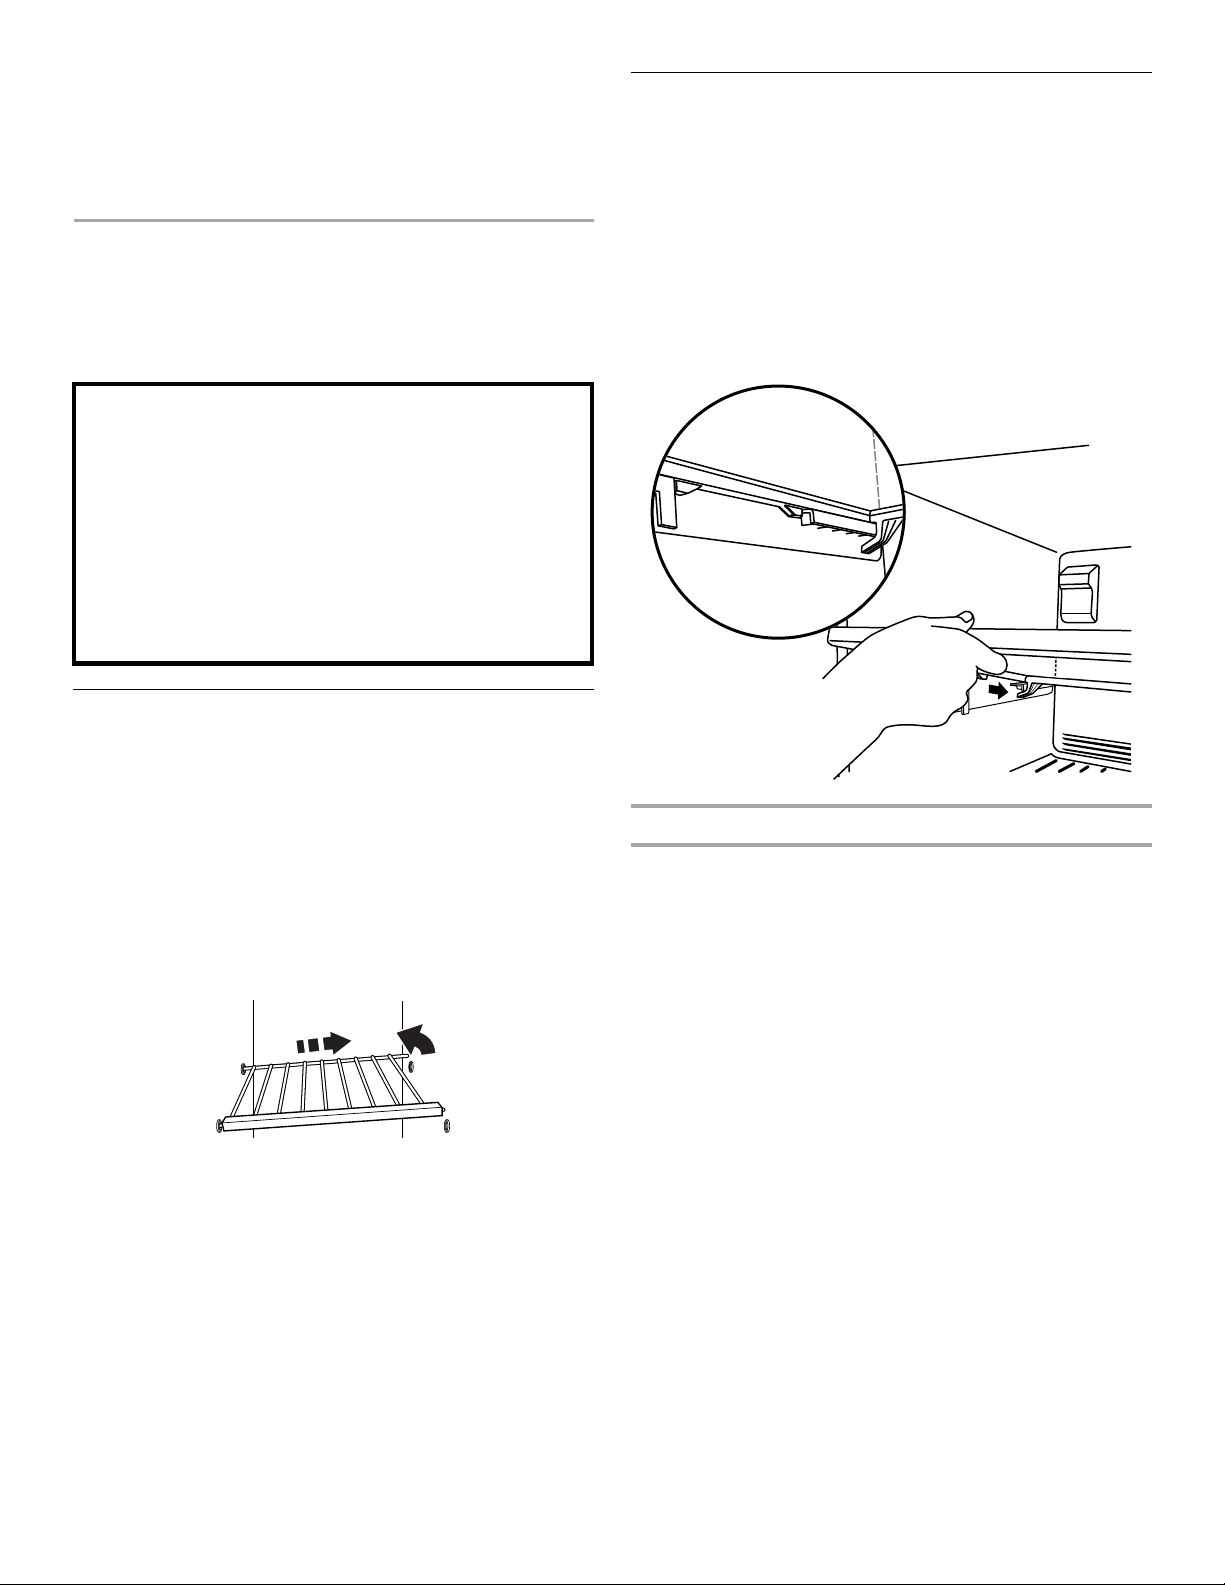
27
5. À l’aide d’une clé à douille hexagonale, retirer les trois vis de
la charnière centrale puis retirer la charnière. Mettre de côté.
A. Charnière centrale B. Vis de charnière à tête
hexagonale de 5/16 po
AVERTISSEMENT
Risque de poids excessif
Utiliser deux ou plus de personnes pour soulever la
porte de l'appareil.
Le non-respect de cette instruction peut causer une
blessure au dos ou d’autres blessures.
6. Soulever la porte du congélateur pour la séparer de la
charnière inférieure et la conserver à part.
7. Extraire doucement la grille de la base de la partie inférieure
avant du réfrigérateur.
8. Enlever les pièces de la charnière inférieure – voir l’illustration
de la charnière inférieure.
Charnière inférieure Style 1
A. Charnière inférieure
Charnière inférieure Style 2
A. Cale C. Vis de charnière à tête
hexagonale de 5/16 po
B. Charnière inférieure
Inversion du sens d’ouverture des
portes et d’installation des
charnières (facultatif)
IMPORTANT : Si on souhaite inverser la position des portes pour
pouvoir les ouvrir dans la direction opposée, procéder comme
suit. Si vous ne souhaitez pas inverser le sens d’ouverture des
portes, voir la section « Réinstallation des portes et des
charnières ».
Style 1 – Modèles avec porte standard
Les illustrations sont indiquées à la suite de ces instructions.
Vis de butée
de porte
Chapeau
bombé
Bouchon
obturateur du
trou de
charnière de la
caisse
Bouchon
d’obturation
pour poignée
de porte
Vis de
scellement de
poignée de
porte
Vis de poignée
à tête plate
Rondelle de
chapeau
bombé
Bouchon
obturateur du
trou de la
charnière de la
porte

28
Caisse
1. Enlever les trois chapeaux bombés et les vis du côté poignée
et les transférer du côté opposé.
A. Rondelles de chapeaux
bombés
C. Chapeaux bombés
B. Vis de charnière à tête hexagonale
2. Enlever les bouchons d’obturation des trous de la charnière
au sommet de la caisse; transférer ceux-ci dans les trous de
charnière du côté opposé comme illustré ci-dessous.
A. Bouchons de protection des trous de charnière de la
caisse
Porte du congélateur
1. Enlever le couvre-vis.
2. Enlever la poignée de porte du congélateur comme illustré ci-
dessous. Conserver toutes les pièces ensemble.
A. Cache-vis C. Poignée du congélateur
B. Vis de poignée D. Vis de poignée à tête
plate
3. Enlever le bouchon d’obturation du trou de charnière de la
porte du congélateur. Le transférer dans le trou de charnière
du côté opposé comme illustré ci-dessous.
A. Bouchon obturateur du trou de charnière de porte
4. Enlever l’insigne de la marque à l’aide de l’outil en plastique
(fourni). Le remplacer par l’insigne fourni dans l’ensemble
d’inversion situé dans le bac à légumes. Pour le placer
correctement, voir le gabarit de placement de l’insigne de la
marque (dernière page de ce manuel).
REMARQUEs :
� Afin d’éviter d’érafler la porte, ne pas utiliser d’objet pointu
ou métallique pour arracher l’insigne de la marque de la
porte.
� Frotter une petite quantité de savon liquide à vaisselle sur
les résidus d’adhésif avec les doigts. Rincer la porte à
l’eau tiède et sécher avec un chiffon doux.
5.
A. Vis de butée de porte B. Butée de porte
6. Enlever la butée de porte. La transférer du côté opposé du
réfrigérateur comme illustré.
7. Consulter l’image de l’étape 2. Positionner la poignée du
congélateur du côté opposé de la porte du congélateur.
Insérer d’abord les deux vis du bas dans la poignée. Aligner la
partie supérieure de la poignée et insérer la vis supérieure
dans la poignée.
8. Serrer toutes les vis. Conserver la porte à part jusqu’à la mise
en place des charnières et de la porte du compartiment de
réfrigération.
9. Réinstaller le couvre-vis. Consulter l’image de l’étape 2.
Porte du réfrigérateur
1. Enlever le couvre-vis.
2. Enlever la poignée du réfrigérateur comme illustré ci-dessous.
Conserver toutes les pièces ensemble.
A. Vis de poignée à tête
plate
C. Vis de poignée
B. Poignée du réfrigérateur D. Cache-vis
3. Enlever le bouchon d’obturation du trou de charnière de la
porte du réfrigérateur. Le transférer dans le trou de charnière
du côté opposé comme illustré ci-dessous.
A. Bouchon obturateur du trou de charnière de porte

29
4. Enlever les vis d’obturation de poignée de la porte. La
transférer du côté opposé du réfrigérateur comme illustré.
A. Vis de scellement de poignée de la porte
5. Enlever le bouchon d’obturation du trou de la poignée et le
jeter. Les remplacer du côté opposé par les bouchons
d’obturation de poignée de porte fournie dans l’ensemble
d’inversion situé dans le bac à légumes.
6. Enlever la butée de porte. La transférer du côté opposé du
réfrigérateur comme illustré ci-dessous.
A. Vis de butée de porte B. Butée de porte
7. Consulter l’image de l’étape 2. Positionner la poignée du
réfrigérateur du côté opposé de la porte du réfrigérateur.
Placer d’abord les deux vis supérieures de la poignée. Aligner
la partie inférieure de la poignée, puis visser la vis inférieure
dans la poignée.
8. Serrer toutes les vis. Conserver la porte du réfrigérateur à part
jusqu’à ce que la charnière inférieure soit installée sur le
réfrigérateur.
9. Réinstaller le couvre-vis.
Style 2 – Modèles avec porte contour
Les illustrations sont indiquées à la suite de ces instructions.
Bouchon
obturateur
du trou de
la
charnière
de la porte
Bouchon
obturateur
du trou de
charnière
de la
caisse
Vis de
serrage
Vis de
butée de
porte
Rondelle de
vis à
épaulement
Chapeau
bombé
Rondelle
de
chapeau
bombé
Vis à
épaule-
ment
Vis de
poignée à
tête plate
Bouchon
d’obturation
pour
poignée de
porte
Caisse
1. Enlever les trois chapeaux bombés et les vis du côté poignée
et les transférer du côté opposé.
2. À l’aide des trois vis de charnière à tête hexagonale de 5/16
po, insérer deux vis à moitié dans les trous en laissant
suffisamment d’espace pour insérer la charnière centrale.
3. Faire glisser la charnière centrale de droite à gauche sur les
vis, insérer la troisième vis et serrer complètement toutes les
vis.
REMARQUE : S’assurer que les rondelles sont bien installées
sur les axes supérieurs et inférieurs de la charnière centrale.
A. Vis de charnière à tête
hexagonale de 5/16 po
B. Rondelles
4. Enlever les bouchons d’obturation des trous de la charnière
au sommet de la caisse; transférer ceux-ci dans les trous de
charnière du côté opposé comme illustré ci-dessous.
A. Bouchons de protection des trous de charnière de la
caisse
Porte du congélateur
1. Retirer la poignée du congélateur. Desserrer la vis de blocage
située sur le côté de chaque poignée à l’aide d’une clé
hexagonale de 1/8 po. Tirer sur la poignée tout droit pour
l’extraire de la porte. Conserver toutes les pièces ensemble.
A. Vis à épaulement C. Vis de poignée à tête
plate
B. Vis de blocage
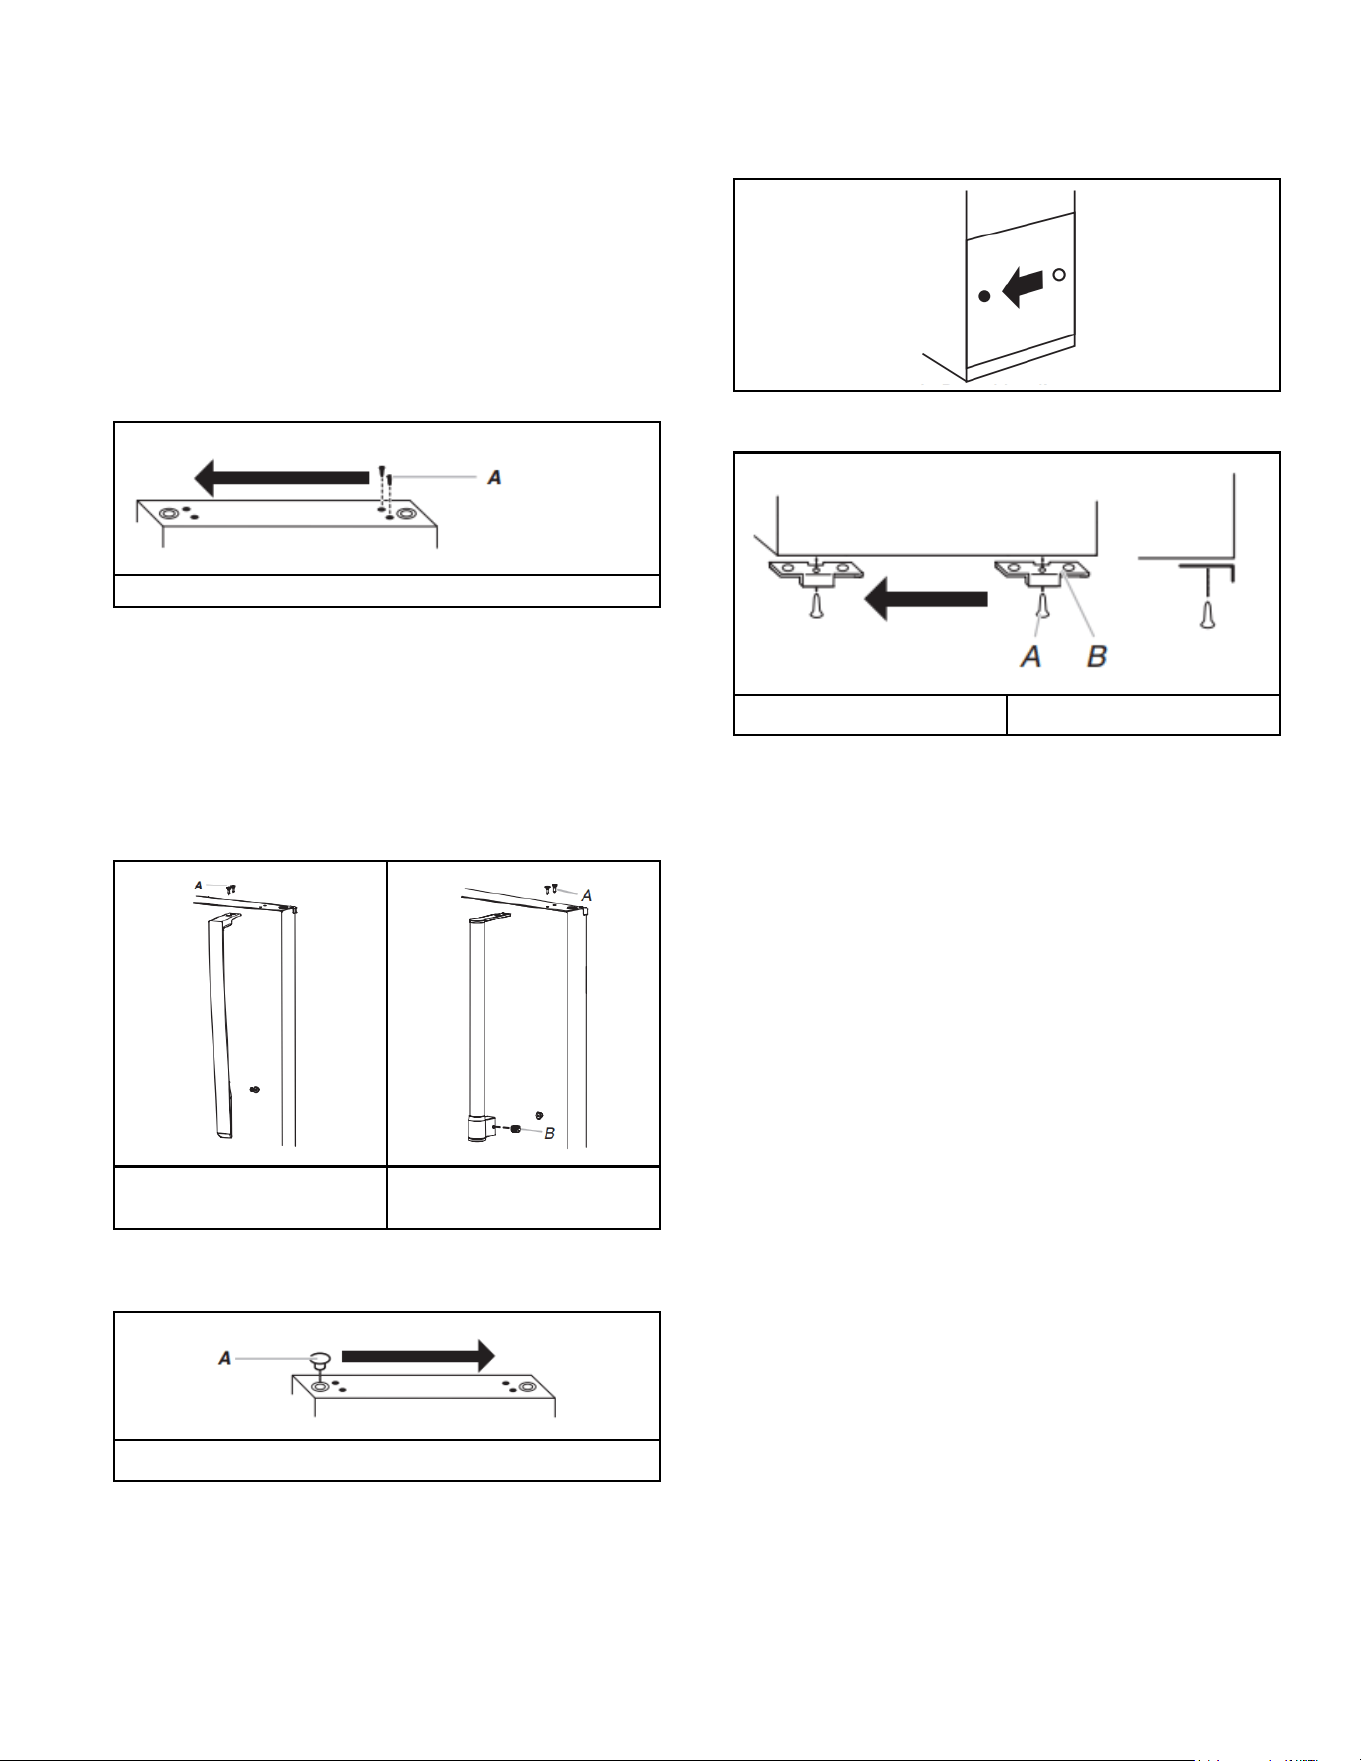
30
2. Enlever l’insigne de la marque à l’aide de l’outil en plastique
(fourni). Le remplacer par l’insigne fourni dans l’ensemble
d’inversion situé dans le bac à légumes. Pour le placer
correctement, voir le gabarit de placement de l’insigne de la
marque (dernière page de ce manuel).
REMARQUE S :
� Afin d’éviter d’érafler la porte, ne pas utiliser d’objet pointu
ou métallique pour arracher l’insigne de la marque de la
porte.
� Frotter une petite quantité de savon liquide à vaisselle sur
les résidus d’adhésif avec les doigts. Rincer la porte à
l’eau tiède et sécher avec un chiffon doux.
3. Enlever la butée de porte. La transférer du côté opposé du
congélateur comme illustré.
A. Vis de scellement de poignée de la porte
4. Consulter l’image de l’étape 1. Réinstaller la poignée du
congélateur du côté opposé de la porte du congélateur.
5. Serrer toutes les vis. Conserver la porte à part jusqu’à la mise
en place des charnières et de la porte du compartiment de
réfrigération.
Porte du réfrigérateur
1. Retirer la poignée de la porte du réfrigérateur. Desserrer la vis
de blocage située sur le côté de chaque poignée à l’aide d’une
clé hexagonale de 1/8 po. Tirer sur la poignée tout droit pour
l’extraire de la porte. Conserver toutes les pièces ensemble.
A. Vis de poignée à tête
plate
B. Vis de blocage
2. Enlever le bouchon d’obturation du trou de charnière de la
porte du réfrigérateur. Le transférer dans le trou de charnière
du côté opposé comme illustré ci-dessous.
A. Bouchon obturateur du trou de charnière de porte
3. Enlever le bouchon d’obturation du trou de la poignée et le
jeter. Les remplacer du côté opposé par les bouchons
d’obturation de poignée de porte fournie dans l’ensemble
d’inversion situé dans le bac à légumes.
4. Enlever la butée de porte. La transférer du côté opposé du
réfrigérateur comme illustré ci-dessous.
A. Vis de butée de porte B. Butée de porte
5. Consulter l’image de l’étape 1. Réinstaller la poignée du
réfrigérateur du côté opposé de la porte du réfrigérateur.
6. Serrer toutes les vis. Conserver la porte du réfrigérateur à part
jusqu’à ce que la charnière inférieure soit installée sur le
réfrigérateur.
Réinstallation des portes et
charnières
REMARQUE : Si on inverse le sens d’ouverture de la porte,
considérer l’image symétrique.
1. Replacer les pièces de la charnière inférieure comme illustré.
Serrer les vis. Replacer la porte du réfrigérateur.
REMARQUE : Prévoir un support additionnel des portes
pendant le déplacement des charnières. La force d’attraction
des aimants des portes ne suffit pas à les maintenir en place
pendant la manutention.
2. Mesurer la distance entre le bas de la porte du réfrigérateur et
le plancher. Cette distance doit être d’environ 3 1/2 po
(88 mm).
REMARQUE : Si nécessaire, desserrer la charnière inférieure
sans retirer les vis, ajuster la hauteur de la porte et serrer
complètement les vis.
3. Assembler les pièces de la charnière centrale comme illustré
et serrer les vis. Voir l’illustration de la charnière centrale.
Réinstaller la porte du congélateur.
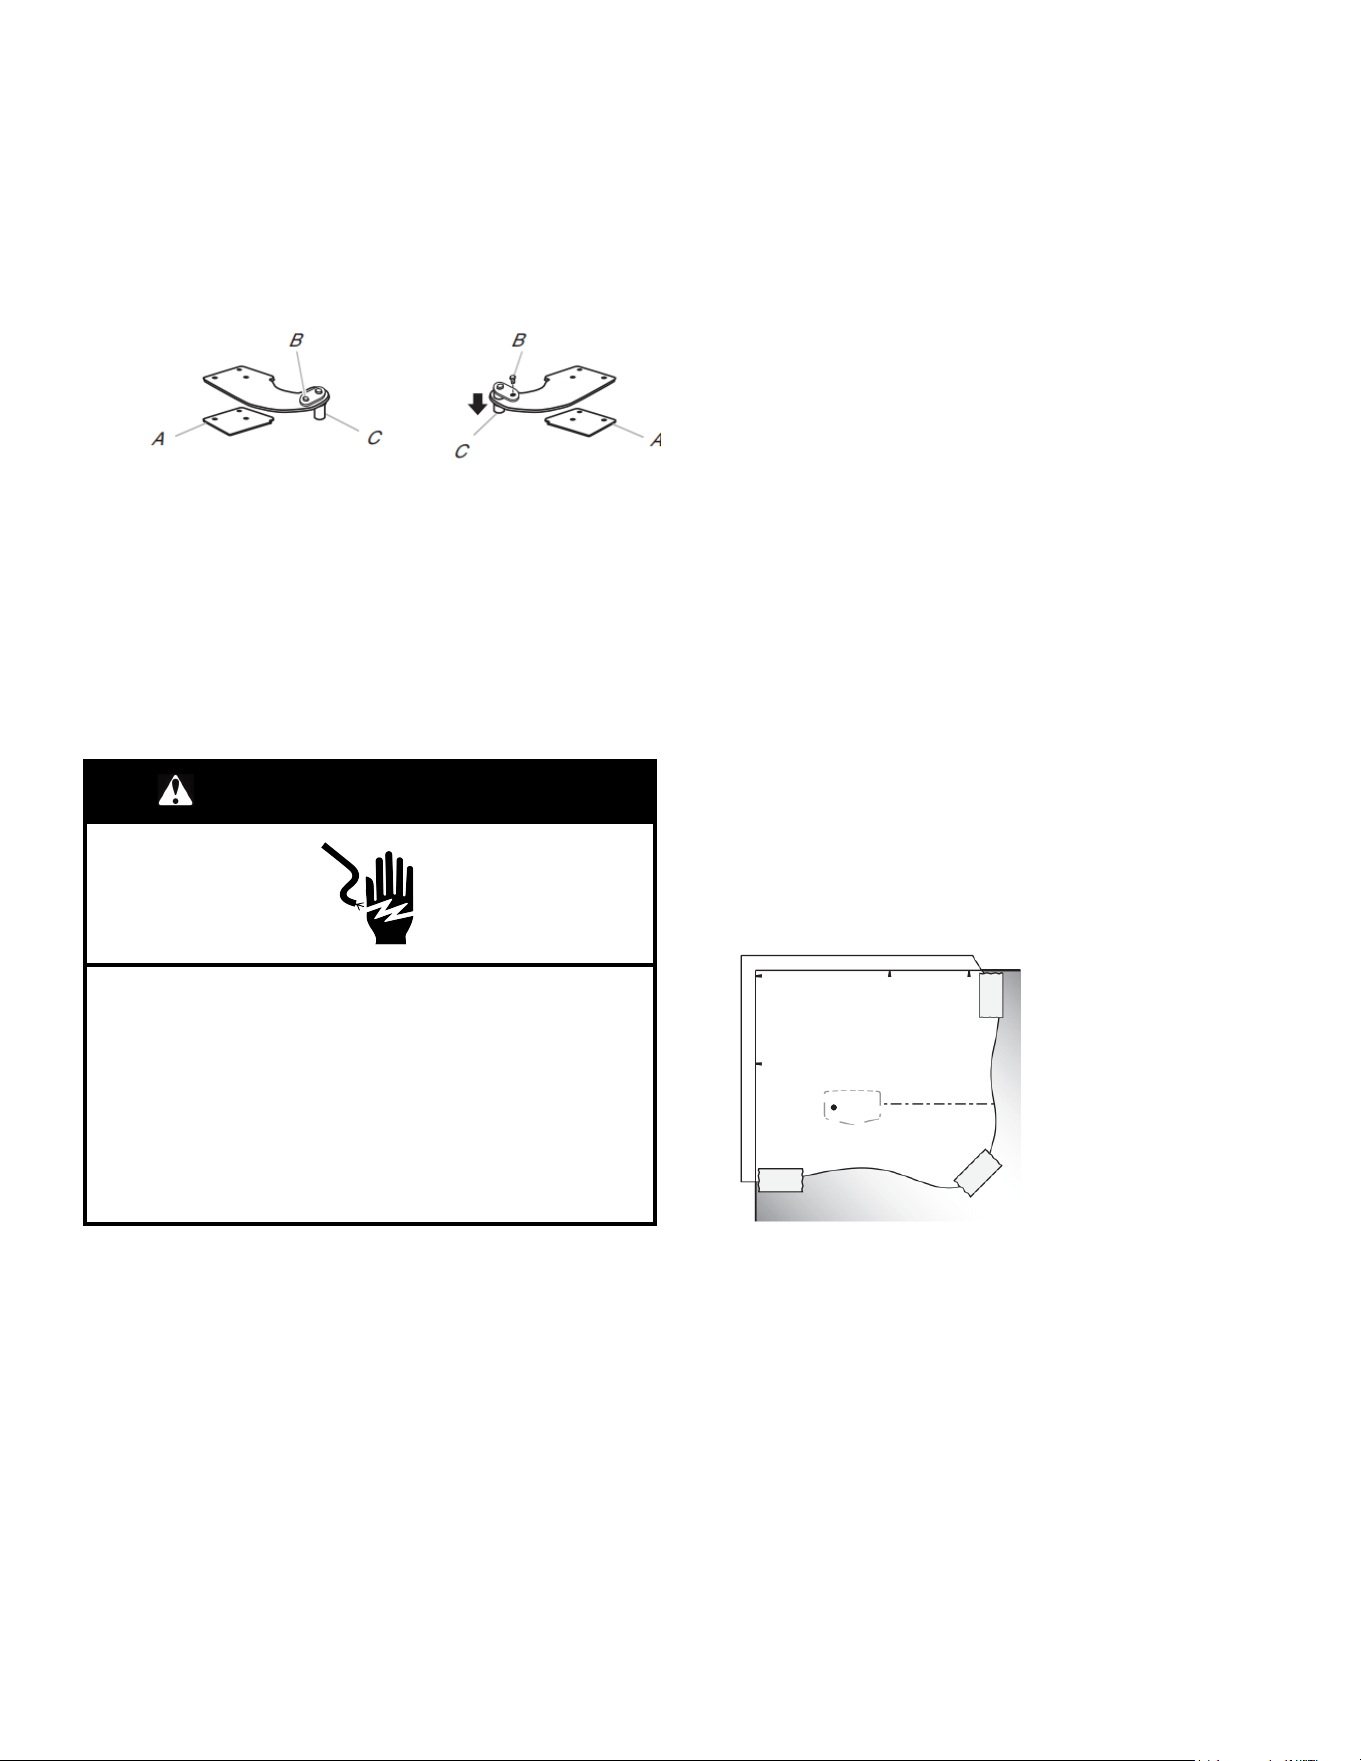
31
4. Réunir les pièces de la charnière supérieure comme illustré.
Voir l’illustration de la charnière supérieure. Ne pas
complètement serrer les vis.
Modèles avec porte contour uniquement :
� Ôter la vis fixant l’axe de charnière à la charnière.
Retourner la charnière de façon à ce qu’elle soit orientée
dans la direction opposée.
� Placer la cale en plastique sous la charnière de façon à ce
qu’elle se trouve entre la charnière et la caisse, tout en
s’assurant que les trous sont bien alignés.
� Fixer la charnière supérieure sur le côté opposé de la
caisse en insérant les vis jusqu’à la moitié seulement, de
façon à pouvoir réinstaller et aligner la porte du
congélateur plus tard.
5. Aligner correctement les portes au niveau du bas de la porte
du compartiment de congélation et du sommet de la porte du
réfrigérateur. Serrer toutes les vis.
REMARQUE : La distance entre les portes doit être d’environ
5/8 po (16 mm).
Étapes finales
AVERTISSEMENT
Risque de choc électrique
Brancher l’appareil sur une prise à 3 alvéoles reliée à la
terre.
Ne pas enlever la prise de liaison à la terre.
Ne pas utiliser d’adaptateur.
Ne pas utiliser de rallonge.
Le non-respect de ces instructions peut causer un
décès, un incendie ou un choc électrique.
1. Inspecter tous les trous. Vérifier que tous les bouchons
d’obturation et vis sont en place. Réinstaller le couvercle de la
charnière supérieure. Voir l’illustration de la charnière
supérieure.
2. Enlever le couvercle de la grille de la base. Transférer le
couvercle du côté opposé.
3. Aligner les attaches de la grille de la base avec les vis du bas
de la caisse. Pousser la grille de la base vers la caisse jusqu’à
ce qu’elle soit alignée avec celle-ci.
4. Brancher l’appareil sur une prise à 3 alvéoles reliée à la terre.
5. Réinitialiser les commandes. Voir la section « Instructions
d’utilisation » du guide de démarrage rapide.
6. Réinstaller l’ensemble des pièces de porte amovibles sur les
portes et remettre les aliments dans le réfrigérateur.
Instructions pour l’ensemble
d’inversion du sens d’ouverture
Si votre modèle est accompagné d’un ensemble d’inversion du
sens d’ouverture ou si vous avez acheté un ensemble pour un
réfrigérateur à porte-contour, utiliser le gabarit de positionnement
de l’insigne de la marque et les instructions suivantes pour
installer l’insigne de la marque du côté opposé de la porte du
congélateur.
Pièces fournies :
Outil de retrait de l’insigne de la marque, gabarit de l’insigne de la
marque (à la dernière page de ce manuel), bouchon d’obturation
pour poignée de porte
Outils requis :
Ciseaux et ruban adhésif de marquage.
Porte du congélateur
1. À l’aide de l’outil de retrait (fourni), retirer l’insigne de la
marque de la porte du congélateur en soulevant le côté droit
et en décollant l’insigne de la porte, de droite à gauche
REMARQUE: À l’aide de l’outil de retrait (fourni), retirer
l’insigne de la marque de la porte du congélateur en soulevant
le côté droit et en décollant l’insigne de la porte, de droite à
gauche
2. Frotter une petite quantité de savon liquide à vaisselle sur les
résidus d’adhésif avec les doigts. Rincer la porte à l’eau tiède
et sécher avec un chiffon doux.
3. Couper le gabarit le long des pointillés qui correspondent à la
forme de l’insigne de la marque.
4. Aligner les bords du gabarit avec les parties latérale et
supérieure de la porte du congélateur et fixer le gabarit sur la
porte à l’aide de ruban adhésif
REMARQUE: Une fois le gabarit correctement aligné, le trou
dans la porte, à l’emplacement de la poignée, se trouvera
dans l’ouverture découpée du gabarit, comme illustré.
5. En utilisant cette ouverture comme guide, appuyer l’insigne de
la marque sur la porte du congélateur, en veillant à ce que le
trou soit entièrement recouvert.
6. Retirer lentement le gabarit.
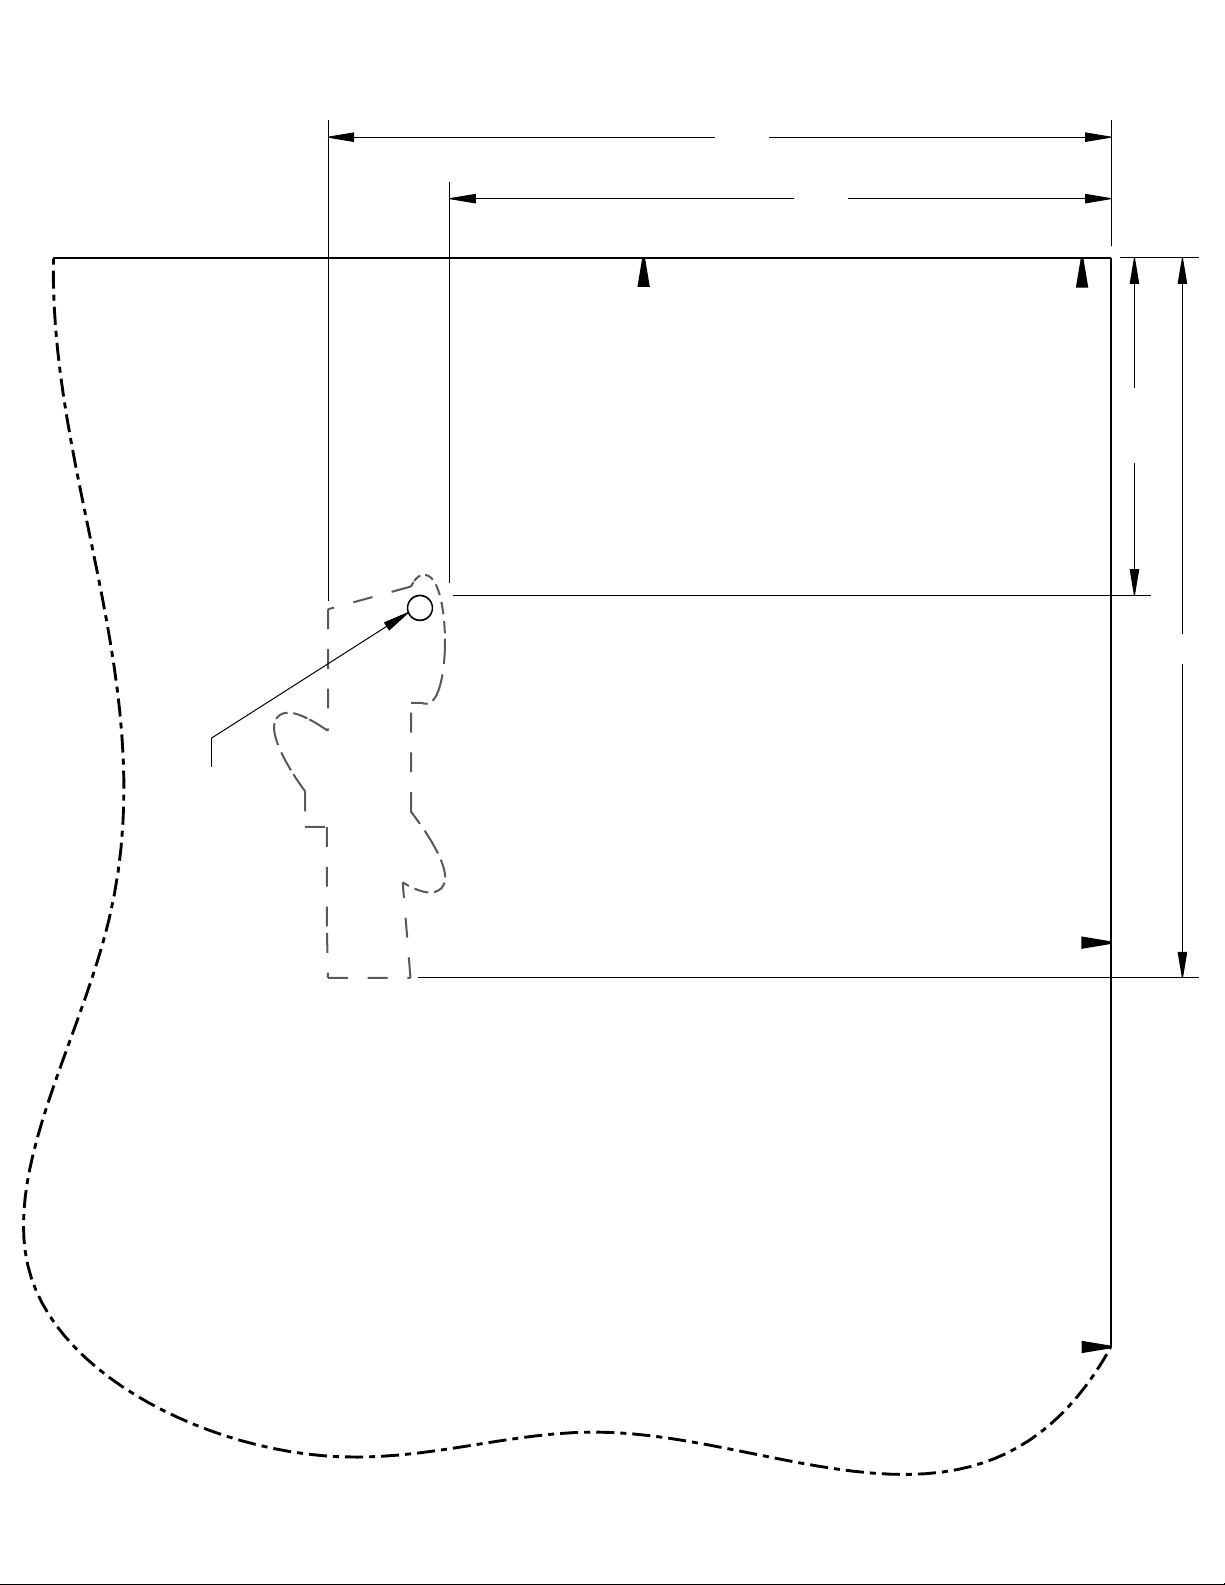
32
Ajustement des portes
AVERTISSEMENT
Risque de poids excessif
Utiliser deux ou plus de personnes pour soulever la
porte de l'appareil.
Le non-respect de cette instruction peut causer une
blessure au dos ou d’autres blessures.
Le réfrigérateur comporte deux pieds de nivellement réglables qui
se trouvent de chaque côté de la base du réfrigérateur. Si le
réfrigérateur semble instable ou si l’on désire que les portes se
ferment plus facilement, régler les pieds de nivellement et ajuster
l’inclinaison du réfrigérateur.
1. Tourner le pied de nivellement vers la gauche pour soulever
ce côté du réfrigérateur ou vers la droite pour abaisser ce
côté. Plusieurs tours peuvent être nécessaires pour ajuster
l’inclinaison du réfrigérateur.
REMARQUE: Si une autre personne pousse le haut du
réfrigérateur, le poids devient moins lourd sur les pieds de
nivellement. Ceci facilite le réglage des pieds de nivellement.
2. Ouvrir à nouveau les deux portes et vérifier que leur fermeture
est aussi aisée que l’on souhaite. Si ce n’est pas le cas,
incliner le réfrigérateur un peu plus vers l’arrière en tournant
les deux pieds de nivellement vers la droite. Cela peut
nécessiter plusieurs tours supplémentaires.
REMARQUE: Pour que le réfrigérateur reste d’aplomb,
effectuer le même réglage sur l’autre côté.
3. À l’aide d’un niveau, s’assurer que le réfrigérateur est encore
d’aplomb dans le sens transversal. Le réajuster au besoin.
CARACTÉRISTIQUES DU
RÉFRIGÉRATEUR ET DU
CONGÉLATEUR
Tablettes du réfrigérateur
Informations importantes à propos des tablettes et des
couvercles en verre :
Ne pas nettoyer les tablettes ou les couvercles de verre avec de
l’eau tiède lorsqu’ils sont froids. Les tablettes et couvercles
peuvent se briser s’ils sont exposés à un changement de
températures ou impact soudain, tel qu’une chute. Le verre
trempé est conçu pour se briser en de multiples petits morceaux
de la taille de gravillons. Ceci est normal. Les tablettes en verre et
les couvercles sont lourds. Employer les deux mains lorsqu’on les
retire afin d’éviter de les faire tomber.
Tablettes du réfrigérateur
Les tablettes de réfrigérateur sont réglables pour s’adapter aux
besoins de rangement de l’utilisateur.
Afin de pouvoir trouver plus facilement l’article recherché, on peut
remiser ensemble des aliments semblables dans le réfrigérateur
et ajuster les tablettes pour les adapter aux différentes tailles
d’articles. Ceci réduira également la durée d’ouverture de la porte
du réfrigérateur et permettra d’économiser de l’énergie
Pour enlever et réinstaller une tablette :
1. Retirer les articles de la tablette.
2. Retirer la tablette en la faisant glisser tout droit jusqu’à la
butée.
3. Selon le modèle, soulever l’arrière ou l’avant de la tablette et
la retirer au-delà de la butée. Retirer complètement la tablette
en la faisant glisser entièrement hors des supports.
4. Réinstaller la tablette en la réinsérant de nouveau dans la
rainure de la paroi de la caisse.
5. Guider l’avant de la tablette dans la rainure de tablette.
S’assurer de faire glisser la tablette jusqu’au fond.
Tablette de congélateur
Informations importantes à propos des tablettes et des
couvercles en verre :
Ne pas nettoyer les tablettes ou les couvercles de verre avec
de l’eau tiède lorsqu’ils sont froids. Les tablettes et couvercles
peuvent se briser s’ils sont exposés à un changement de
températures ou impact soudain, tel qu’une chute. Le verre
trempé est conçu pour se briser en de multiples petits
morceaux de la taille de gravillons. Ceci est normal. Les
tablettes en verre et les couvercles sont lourds. Employer les
deux mains lorsqu’on les retire afin d’éviter de les faire tomber.
Tablette pleine largeur (sur certains modèles)
Selon le modèle, il peut s’agir d’une clayette ou d’une tablette en
verre.
Pour enlever et réinstaller la tablette du congélateur :
1. Retirer les articles de la tablette.
2. Soulever l’arrière de la tablette hors de la butée et la faire
glisser vers l’extérieur
3. Replacer la tablette en faisant glisser l’arrière de la tablette
dans les rails des parois de la caisse.
4. S’assurer de faire glisser la tablette jusqu’au fond
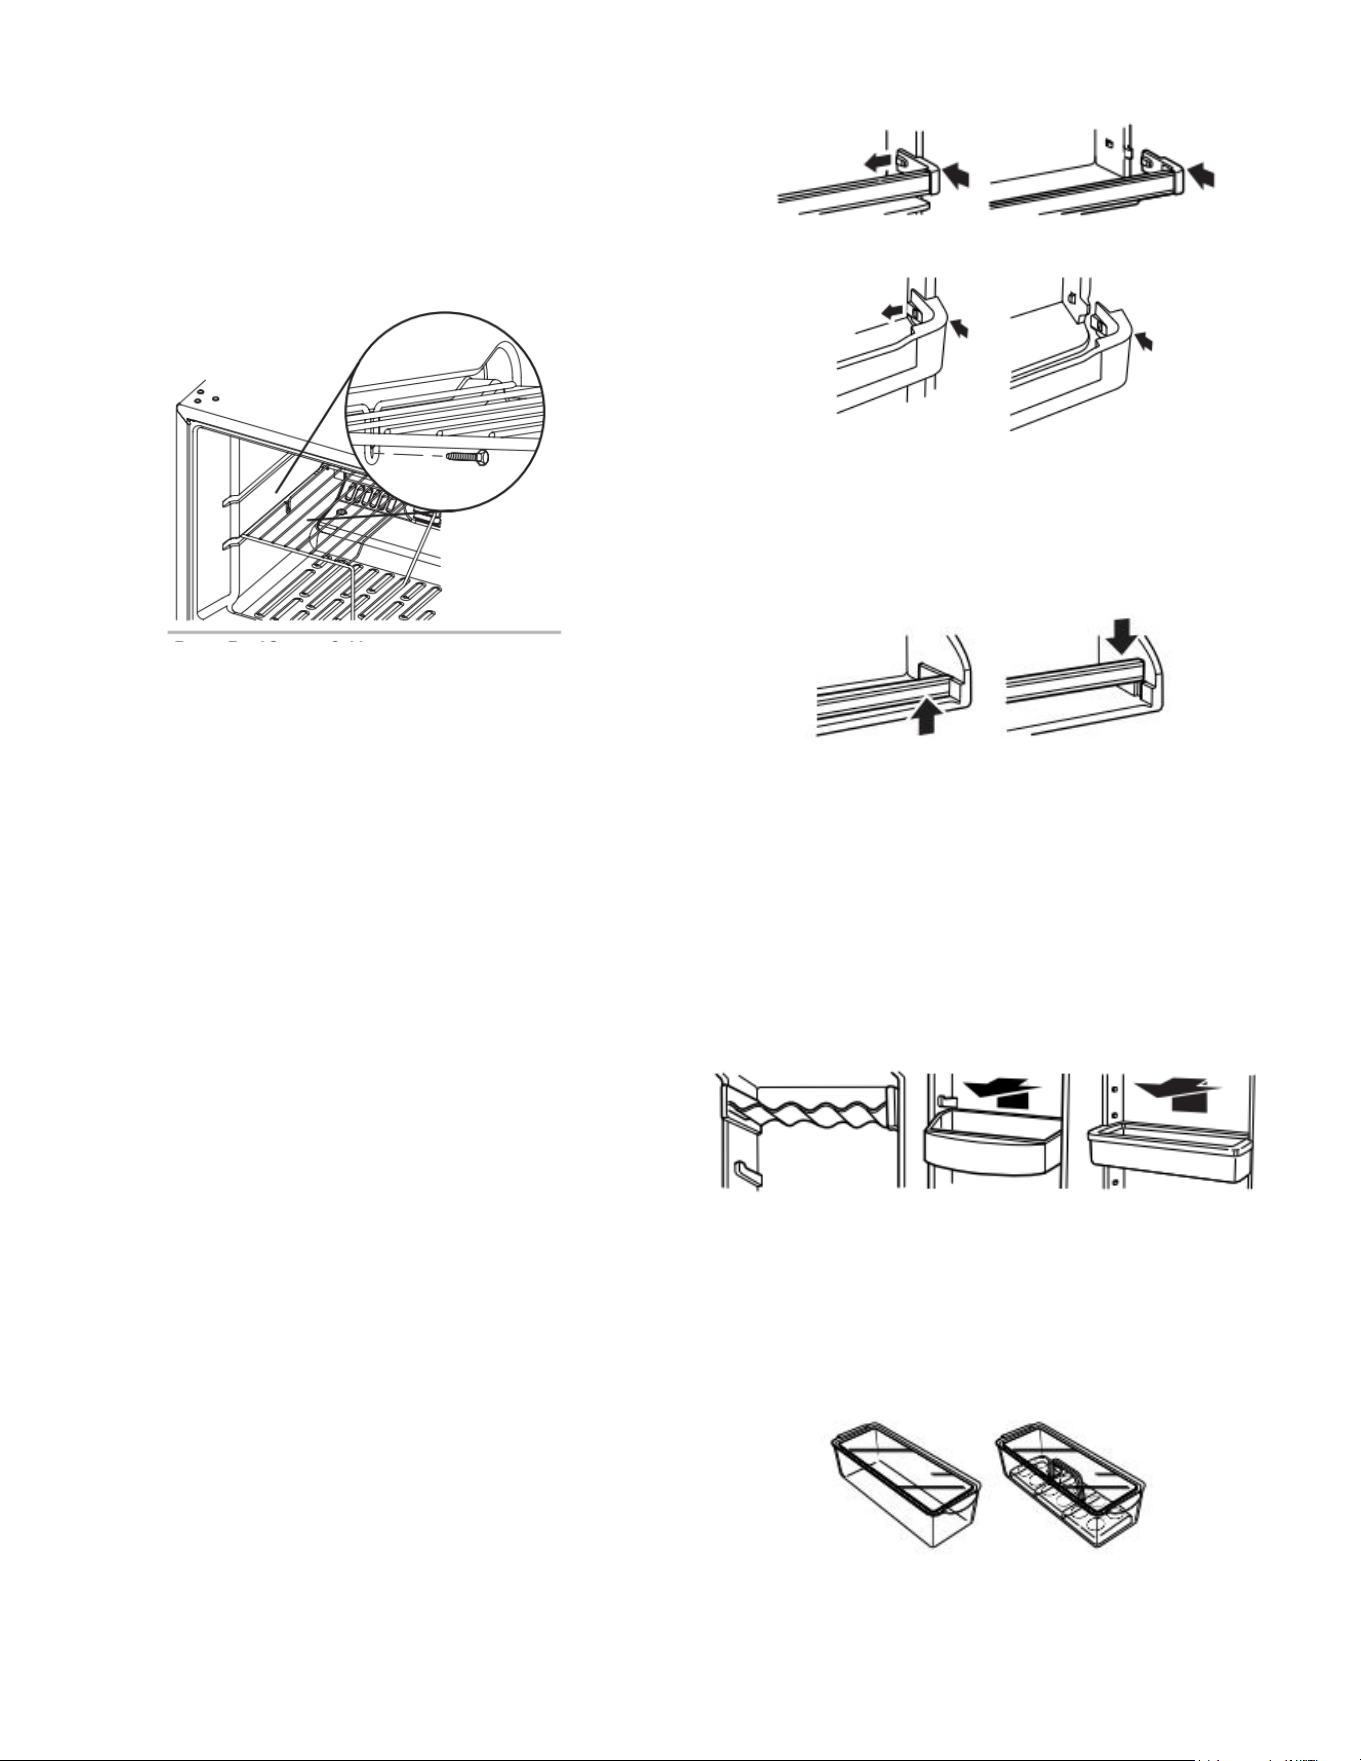
33
Guide de stockage des aliments surgelés
Les périodes de conservation varient selon la qualité et le type
d’aliment, le type d’emballage et de pellicule utilisés (doivent être
hermétiques et résistants à l’humidité) et la température de
remisage. Bien fermer le sachet ou le récipient pour empêcher le
transfert de goût et d’odeur dans le produit. Les cristaux de glace
à l’intérieur d’un emballage scellé sont normaux. La présence de
cristaux signifie simplement que l’humidité dans les aliments et
l’air à l’intérieur de l’emballage se sont condensés.
Ne pas placer plus d’aliments non congelés dans le congélateur
que la quantité qui congèlera dans l’intervalle de 24 heures (pas
plus de 2 à 3 lb d’aliments par pied cube d’espace [907 à 1 350 g
par L] dans le congélateur). Laisser assez d’espace dans le
congélateur pour permettre la circulation d’air entre les
emballages. S’assurer que la porte du congélateur est bien
fermée.
REMARQUE : Pour plus de renseignements au sujet de la
préparation des aliments pour la congélation, consulter un guide
pour congélateur ou un livre de recettes fiable.
Tringles de la porte ou balconnets
TRINGLES OU BALCONNETS À ENCLENCHER DANS LA
PORTE
Pour retirer et réinstaller les tringles ou les balconnets :
1. Selon le modèle, retirer les tringles ou balconnets en
appuyant légèrement sur l’avant du support tout en tirant sur
la languette intérieure. Répéter ces étapes pour l’autre
extrémité.
2. Réinstaller les tringles ou balconnets en alignant les
extrémités des supports avec les attaches de chaque côté de
la paroi de la porte. Enclencher fermement le support et
l’ensemble sur les pattes situées au-dessus de la tablette
comme indiqué.
Style 1 – Rainures de porte
Style 2 – Porte-bouteilles/cannettes
TRINGLES DÉPOSÉES DANS LA PORTE
Retirer et réinstaller les tringles :
1. Retirer les tringles en les soulevant à partir de chaque
extrémité de la tringle.
2. Réinstaller les tringles en faisant glisser la tringle de la tablette
dans les fentes sur la porte
Cannettes et balconnets de porte
(sur certains modèles)
Porte-cannettes et balconnets
REMARQUE : Les porte-cannettes peuvent être achetés comme
accessoires sur certains modèles.
Pour retirer et réinstaller les porte-cannettes/balconnets :
1. Retirer le porte-cannettes/balconnet en le soulevant et le tirant
tout droit.
2. Réinstaller le balconnet en le faisant glisser au-dessus du
support désiré et en l’enfonçant jusqu’à la butée.
Œufrier ou balconnet
Le réfrigérateur peut être livré avec un, deux ou trois casiers,
selon le modèle. Les œufs peuvent être rangés dans l’œufrier ou
en vrac dans le casier.
REMARQUE : Conserver les œufs dans un contenant couvert
pour un stockage à long terme. Si le modèle ne comporte pas un
casier à œufs, ranger les œufs dans leur contenant original ou sur
une tablette intérieure.
Tablette de demi-largeur (sur certains modèles)
IMPORTANT : La tablette de demi-largeur peut uniquement être
installée du côté gauche du compartiment de congélation.
1. Retirer les articles de la tablette
2. Retirer la vis de la tablette. Soulever l’arrière de la tablette
hors de la butée et la faire glisser vers l’extérieur.
3. Réinstaller la tablette en la réinsérant de nouveau dans les
rainures des parois de la caisse. Serrer la vis de la tablette.
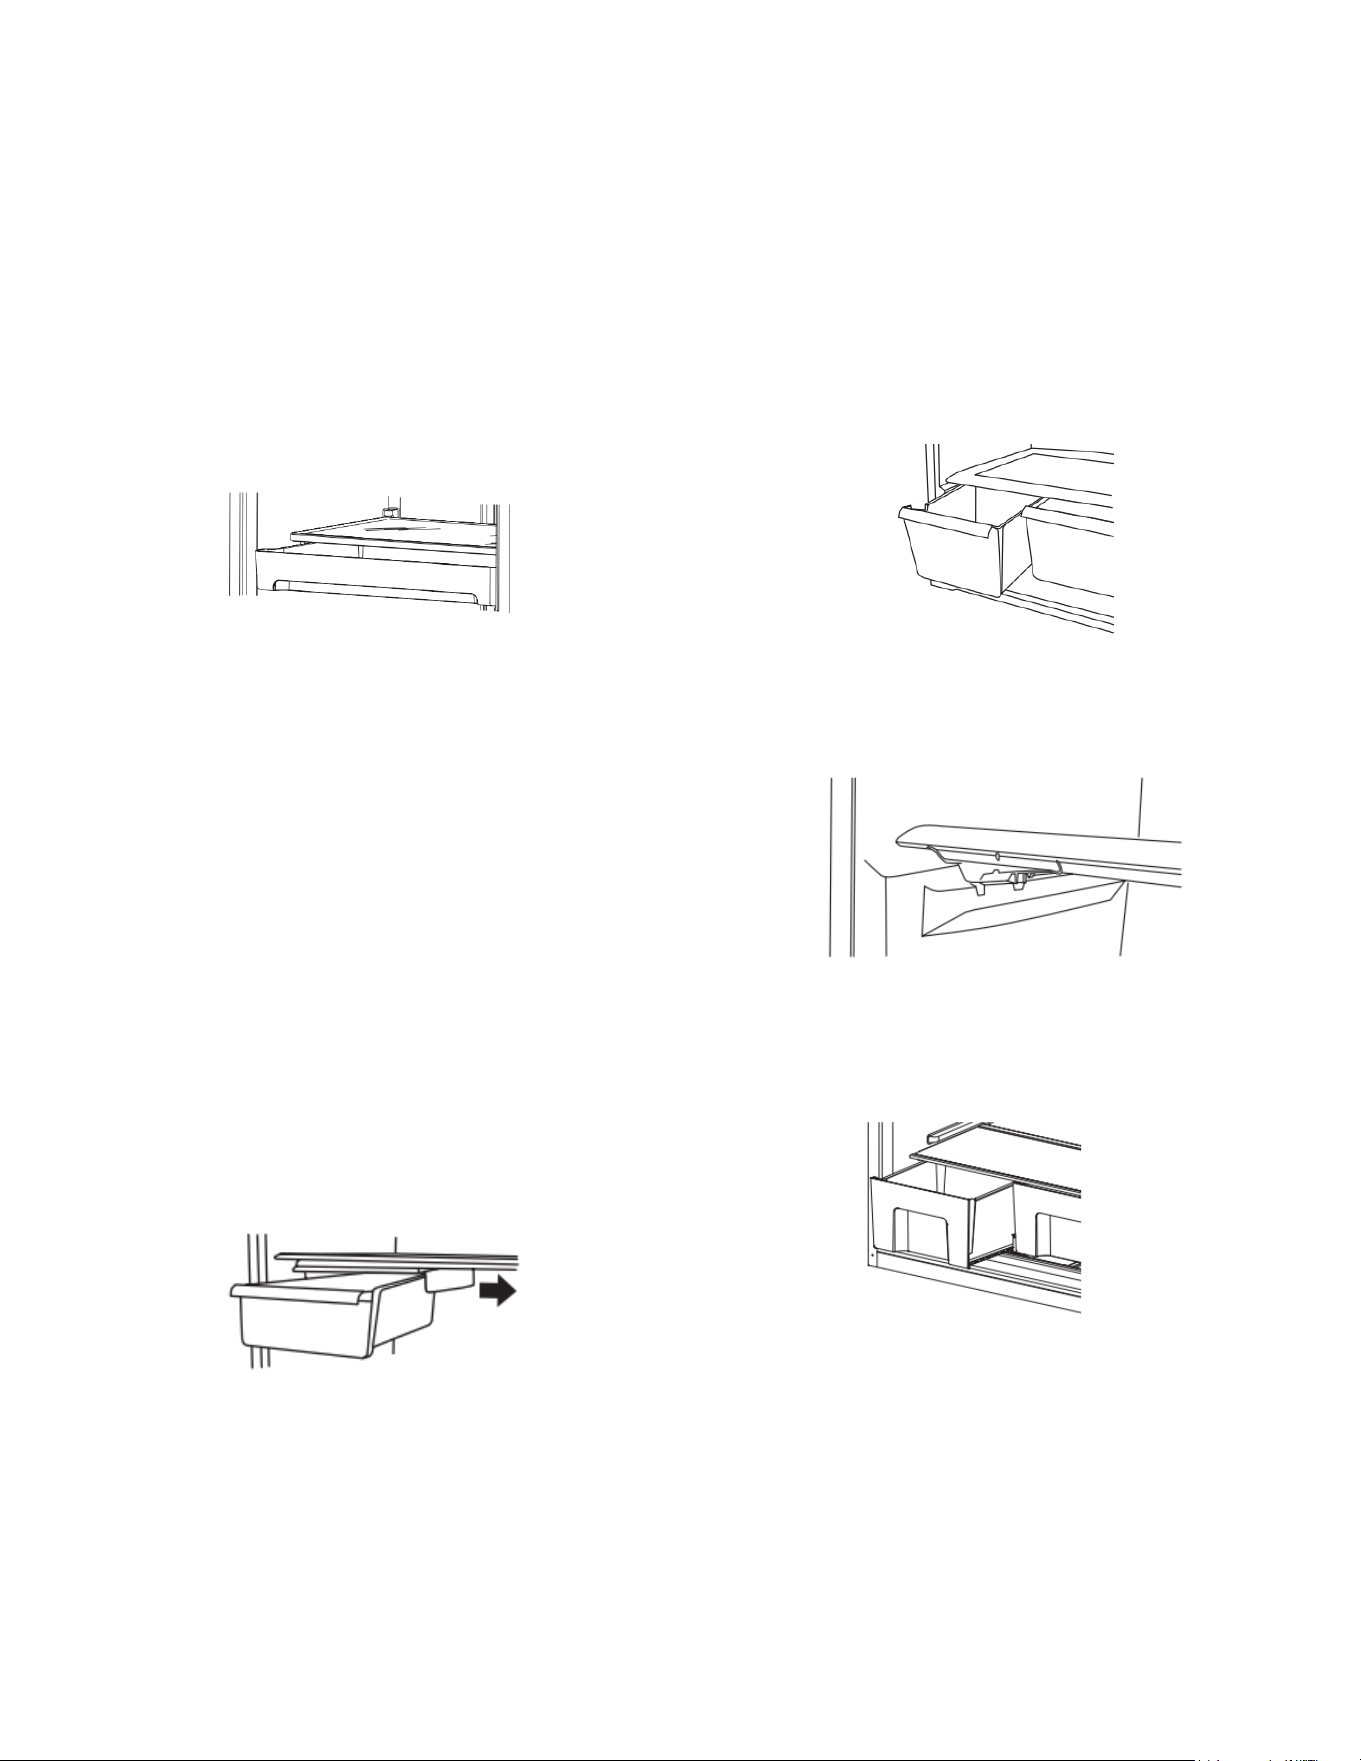
34
Tiroir à viande ou à charcuterie
La conception du tiroir pour spécialités alimentaires permet d’en
changer facilement la position.
Tiroir à viande ou à charcuterie
1. Retirer le tiroir pour spécialités alimentaires.
2. Retirer le couvercle et le placer entre les croisillons désirés
3. Fixer les pattes de fixation arrière sur la tablette.
4. Réinstaller le tiroir
Retrait et réinstallation du tiroir :
1. Retirer le tiroir pour spécialités alimentaires en le faisant
glisser vers l’extérieur jusqu’à la butée
2. Soulever l’avant du tiroir à charcuterie d’une main tout en
soutenant la partie inférieure du tiroir de l’autre main. Faire
glisser le tiroir complètement vers l’extérieur.
3. Réinstaller le tiroir en le réinsérant complètement au-delà de
la butée
COUVERCLE DE TIROIR
Retrait et réinstallation du couvercle du tiroir :
Style 1 – Clayettes
1. Retirer le tiroir pour charcuteries
2. Repousser le couvercle vers l’arrière pour libérer les pattes de
fixation arrière de la clayette. Soulever l’avant du couvercle et
le tirer vers l’avant.
3. Réinstaller le couvercle du tiroir pour charcuteries en plaçant
les encoches et les attaches du couvercle sur les croisillons
centraux et arrière de la clayette.
4. Réinstaller le tiroir pour charcuteries
Style 2 – Tablettes en verre
1. Retirer le tiroir
2. Retirer les articles de la tablette.
3. Retirer la tablette en la faisant glisser tout droit jusqu’à la
butée.
4. Faire glisser le couvercle du tiroir d’un côté jusqu’à ce qu’il se
dégage.
5. Insérer le couvercle dans les rainures de tablette
6. Repositionner la tablette dans le réfrigérateur puis réinstaller
le tiroir à charcuterie
REMARQUE : Sur certains modèles, le tiroir peut être
déplacé latéralement sur la tablette pour pouvoir en changer
facilement la position
Guide d’entreposage des viandes
Garder la plus grande partie des viandes dans leur emballage
d’origine pourvu qu’il soit hermétique et à l’épreuve de l’humidité.
Emballer de nouveau si nécessaire. Voir le tableau suivant pour
les durées d’entreposage. Lorsque la viande doit être entreposée
plus longtemps que les durées indiquées, congeler la viande.
Poisson frais ou crustacés......................... à consommer le jour
même de l’achat
Poulet, bœuf haché, abats comestibles (foie)................... 1 à 2
jours
Charcuteries, steaks/rôtis................................................ 3 à 5
jours
Viandes salaisonnées................................................................. 7
à 10 jours
Restes – Couvrir les restes avec une pellicule en plastique ou du
papier d’aluminium ou utiliser des contenants en plastique avec
couvercles hermétiques.
Bac à légumes
Couvercle du bac à légumes
Style 1 – Couvercle de plastique
Retrait et réinstallation du couvercle du bac à légumes :
1. Retirer le/les bac(s) à légumes.
2. Soulever le couvercle et le glisser vers l’extérieur.
3. Réinstaller le couvercle en plaçant les pattes du couvercle
dans les encoches inférieures de la caisse et en les
enfonçant. Abaisser les pattes de fixation avant pour les
mettre en place.
Style 2 – Couvercle en verre
Retrait et réinstallation du couvercle du bac à légumes :
1. Retirer le/les bac(s) à légumes.
2. Tirer sur le couvercle en verre tout droit vers l’extérieur.
3. Réinstaller le couvercle en verre en le réinsérant.
Commande d’humidité dans le bac à légumes (sur certains
modèles)
Le degré d’humidité dans le bac à légumes étanche peut être
contrôlé. La commande peut être placée à n’importe quel réglage
entre Low (faible) et High (élevée).
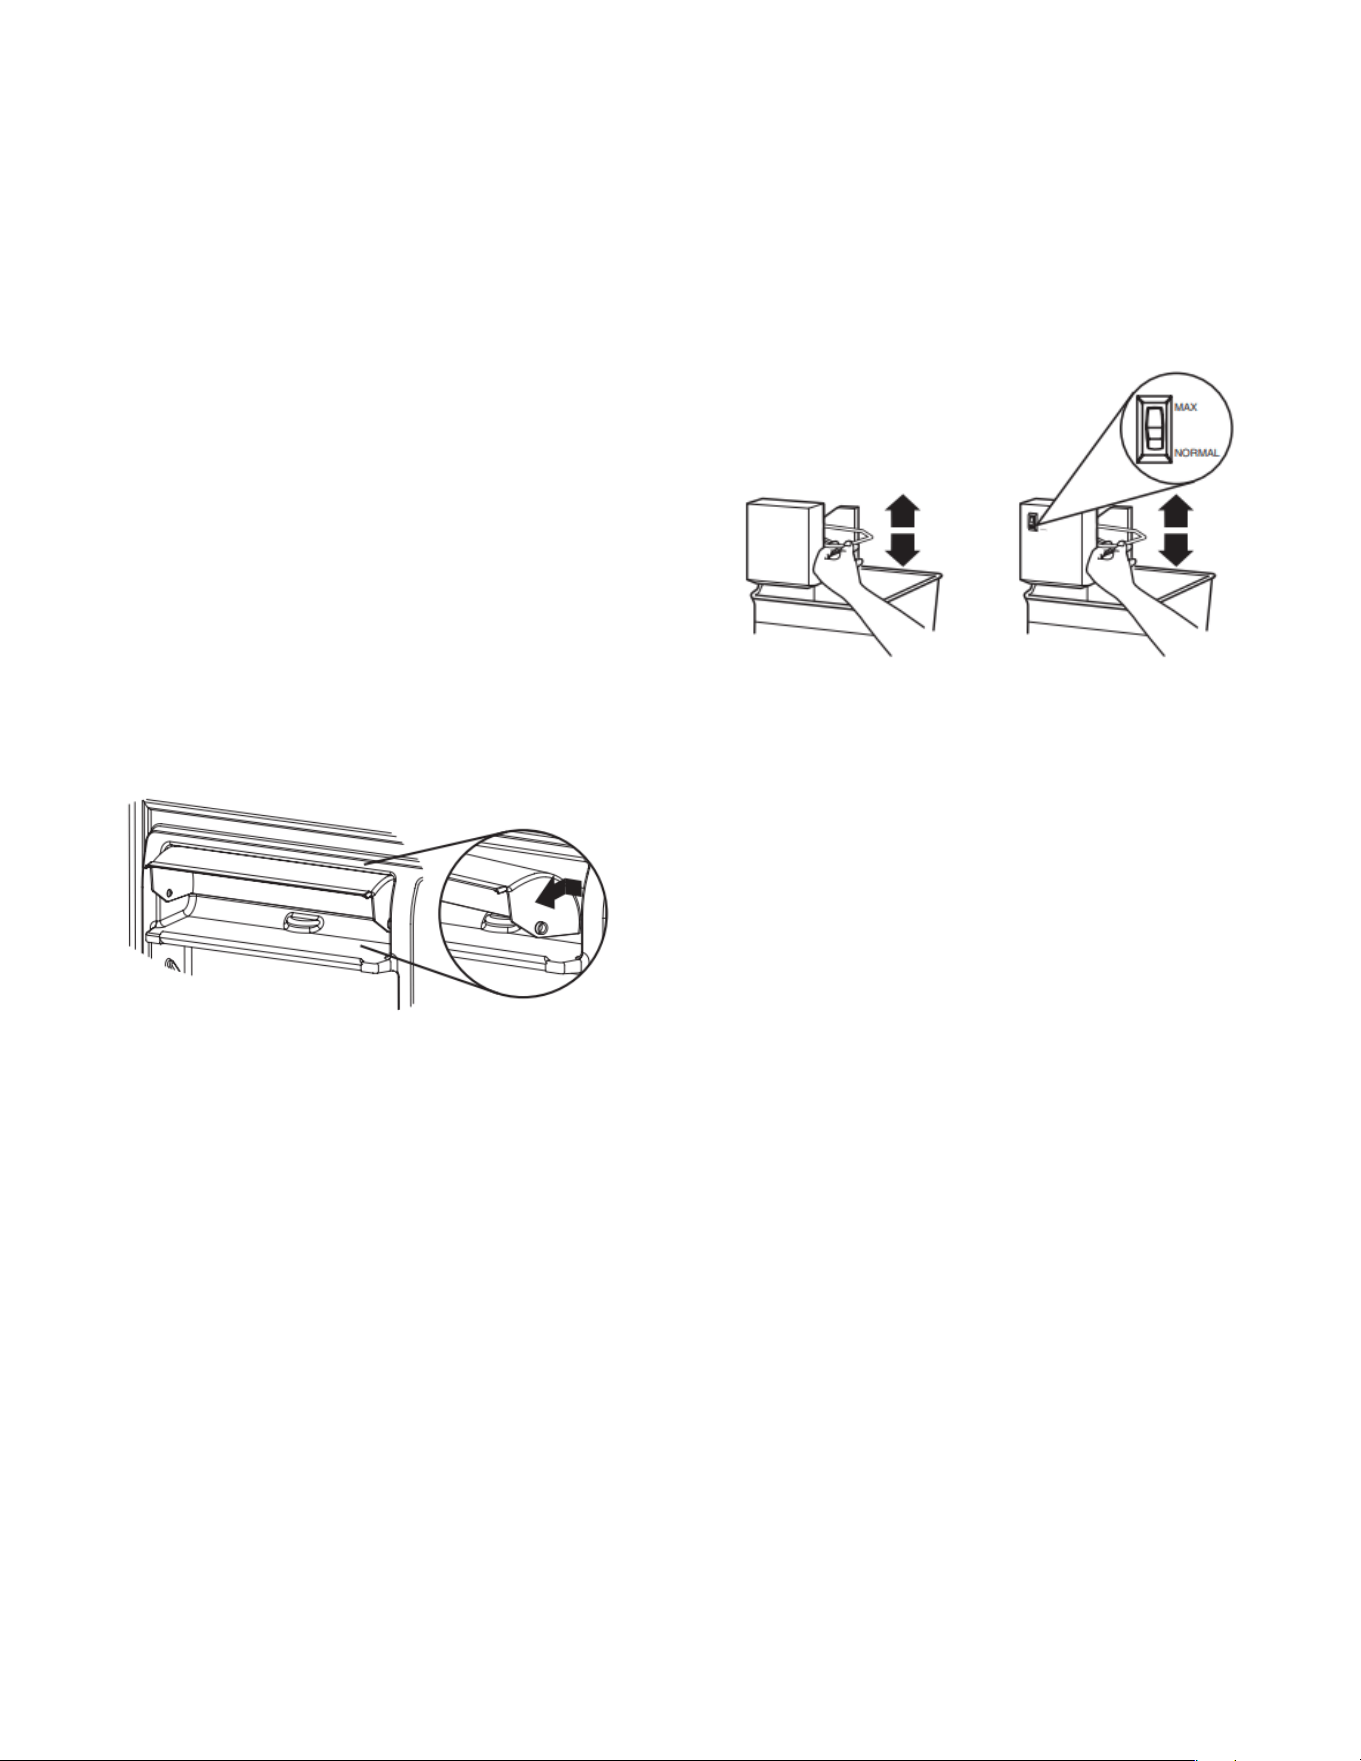
W11507956A
En position Low (faible) (ouvert), le réglage laisse échapper l’air
humide du bac à légumes pour mieux conserver les fruits et
légumes à pelures.
� Fruits : Laver, laisser sécher et garder au réfrigérateur dans un
sac en plastique ou dans le bac à légumes. Ne pas laver ni
équeuter les baies avant le moment de leur utilisation. Répartir
et garder les baies dans leur contenant original dans le bac à
légumes ou les conserver sur une tablette du réfrigérateur
dans un sac en papier fermé sans être serré.
� Légumes à pelure : Placer dans des sacs ou un contenant en
plastique et ranger dans le bac à légumes
En position High (élevée) (fermé), le réglage permet de retenir
l’humidité à l’intérieur du bac pour mieux conserver les
légumes à feuilles frais.
� Légumes à feuilles : Laver à l’eau froide, égoutter et couper ou
éliminer les sections endommagées et décolorées. Placer
dans des sacs ou un contenant en plastique et ranger dans le
bac à légumes.
Compartiment utilitaire
Le compartiment utilitaire peut être enlevé pour faciliter le
nettoyage.
Retrait et réinstallation du compartiment utilitaire :
1. Retirer le compartiment utilitaire en pressant l’un des côtés
tout en soulevant le compartiment utilitaire et en le tirant tout
droit pour le dégager.
2. Réinstaller le compartiment utilitaire en plaçant un côté dans
le mécanisme de verrouillage et en faisant coulisser l’autre
côté en place jusqu’à la butée.
Machine à glaçons
Pour les modèles comportant un filtre à eau, après avoir raccordé
le réfrigérateur à l’alimentation en eau ou avoir remplacé le filtre à
eau, remplir et jeter trois récipients entiers de glaçons afin que le
filtre à eau soit prêt pour utilisation.
Pour les produits sans pièces du circuit de distribution de glaçons,
la machine à glaçons et les pièces du circuit d’eau ne doivent être
installées que par le fabricant ou un de ses agents de service.
Pour les produits à connexion facile (machine à glaçons prête), la
machine à glaçons peut facilement être installée par l’utilisateur
en suivant les instructions fournies avec la trousse.
Pour savoir quel type de machine à glaçons convient pour votre
produit, consulter la plaque signalétique située à l’intérieur du
compartiment pour les aliments de l’appareil. Les informations du
modèle d’ensemble de machine à glaçons y sont inscrites.
Consulter le Guide de démarrage rapide pour les coordonnées.
Mise en marche/arrêt de la machine à glaçons
� Pour mettre la machine à glaçons en marche, il suffit
d’abaisser le bras de commande d’arrêt métallique.
� Pour éteindre manuellement la machine à glaçons, soulever le
bras de commande à d’arrêt métallique à la position Off (arrêt/
position haute) et attendre l’émission d’un clic.
REMARQUE : La machine à glaçons comporte un système
d’arrêt automatique. Au fur et à mesure de la production, les
glaçons remplissent le bac d’entreposage. Les glaçons soulèvent
le bras de commande métallique jusqu’à ce qu’il atteigne la
position Off (arrêt/position haute). Ne pas forcer le bras de
commande à broche métallique vers le haut ou vers le bas.
Bac à glaçons
REMARQUE : Éteindre la machine à glaçons avant de retirer le
bac d’entreposage pour servir des glaçons ou pour nettoyer le
bac. Ceci empêchera les glaçons de tomber de la machine à
glaçons et dans le compartiment de congélation. Après avoir
remplacé le bac d’entreposage, mettre en marche la machine à
glaçons.
1. Nettoyer le bac à glaçons au savon doux et à l’eau tiède.
2. Insérer le bac à glaçons sous la machine à glaçons et le
pousser aussi loin que possible.
3. Abaisser le levier de commande de la machine à glaçons et le
placer en position de marche.
Taux de production des glaçons
� La machine à glaçons devrait produire un lot complet de
glaçons approximativement toutes les 3 heures, soit environ 8
à 12 lots de glaçons au cours d’une période de 24 heures.
� Pour augmenter la production de glaçons, diminuer la
température du congélateur et du réfrigérateur. Voir la section
« Utilisation des commandes » du guide d’utilisation rapide.
Attendre 24 heures entre les réglages.
� Production maximale de glaçons (sur certains modèles) : Si
votre réfrigérateur est doté de la caractéristique de production
maximale de glaçons, pousser le commutateur à Max pour
produire environ 16 à 20 lots de glaçons sur une période de 24
heures.
Ne pas oublier :
REMARQUE : Le distributeur désactive automatiquement la
fonction de remplissage mesuré après 1 minute d’inactivité.
Lorsque la fonction Measured Fill (remplissage mesuré) est
désactivée, toute modification effectuée est perdue et les
réglages par défauts sont réactivés.
®/™©2021 All rights reserved. Used under license in Canada.
Tous droits réservés. Utilisé sous licence au Canada.
02/21