Loading ...
Loading ...
Loading ...
Version 07/11- Page 7
3. Before mounting the CANOPY SECTION, tighten the two
leveling screws located near the CANOPY SECTION mounting
points as indicated in FIGURE 6.
4. Hook the body on to the MOUNTING SCREWS (D in FIGURE
6) and fully tighten the MOUNTING SCREWS.
5. Adjust the leveling screws to level the CANOPY SECTION.
INSTALL THE RANGEHOOD
1. Remove the unit from the carton and place on a at surface
for assembly. Cover the surface to prevent accidental damage.
Remove all parts including the mounting hardware before discard-
ing the carton. Remove the Protective covering from the chimneys
and rangehood canopy section (A, B, C in FIGURE 1).
2. Remove the grease lters from the unit and set aside. The
grease lters are removed by pressing the handle in front of
the lter (FIGURE 10 next page). When replacing, make sure
that the lters are properly positioned with the handles in front
and visible.
6. Remove the cover from the Field Wiring Compartment with
a phillips screwdriver. Feed the Power Supply Cable through
the electrical knockout. Connect the Power Supply Cable to the
rangehood cable. Attach the White lead of the power supply to the
White lead of the rangehood with a twist-on type wire connector.
Attach the Black lead of the power supply to the Black lead of the
rangehood with a twiston type wire connector. Attach the Power
Supply Cable grounding lead to the green screw provided. Using
the 4 holes provided screw the Field Wiring Compartment to the
wall as dictated by your Power Supply Cable location (screws
not provided). Replace the cover.
7. For ducted installations, the damper must be attached to the
exhaust opening on the top of the canopy. Connect the ductwork
and seal all connections with duct tape. If installing the hood
ductless, go to "FOR DUCTLESS INSTALLATIONS".
8. See FIGURE 1 for reference, The Upper chimney cover
can be installed with the side vent holes on the top towards the
ceiling, or ip the chimney and hide the holes under the lower
chimney. Install the UPPER CHIMNEY COVER (B in FIGURE
1) by slightly widening the two sides and hooking them behind
the CHIMNEY MOUNTING BRACKETS (E). Secure the sides
to the CHIMNEY MOUNTING BRACKETS with the 4 CHIMNEY
SCREWS (G). Install the LOWER CHIMNEY COVER (C)
by slightly widening the two sides of the LOWER CHIMNEY
COVER and hooking them between the UPPER CHIMNEY
COVER and the wall making sure that it ts snugly. Secure the
LOWER CHIMNEY COVER to the CANOPY SECTION (A) with
2 CHIMNEY SCREWS (G).
CONTINUE TO ALL INSTALLATIONS ON THE NEXT PAGE
FOR DUCTLESS INSTALLATIONS
The UPPER CHIMNEY COVER must be installed rst, before
the LOWER CHIMNEY.
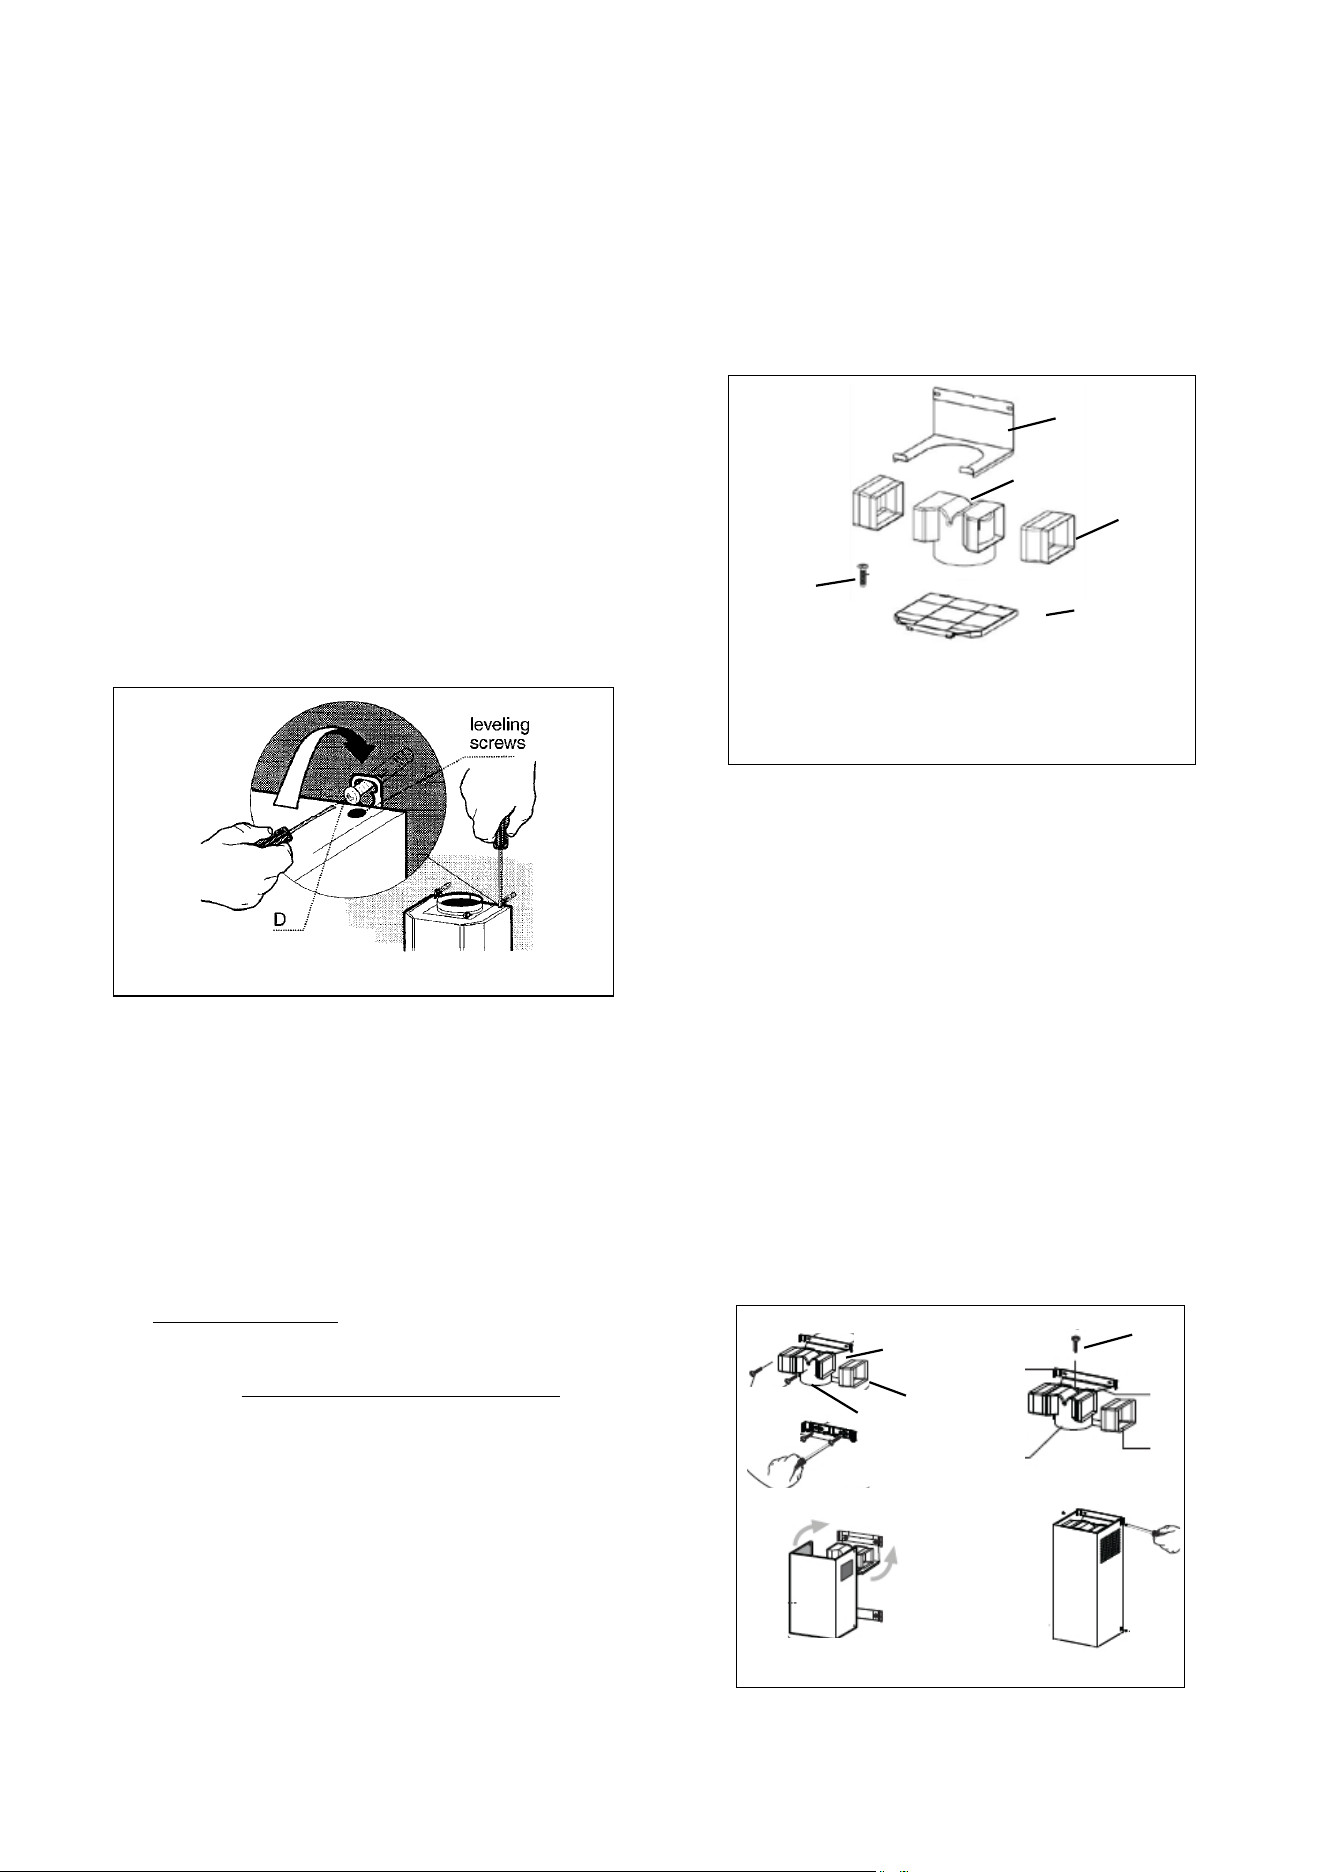
Ductless installations require a Ductless Conversion Kit,
purchased seperately (FIGURE 7). This kit consists of
a CHARCOAL FILTER (A in FIGURE 7 ) ,a DUCTLESS
DIVERTER (B) and EXTENSION PIECES (C), DIVERTER
WALL SUPPORT (D), and SCREW (E).
FIGURE 7
1) See (FIGURE 8), Step 1 - connect B (Diverter) and C (2 -
Diverter extension) pieces together, one on each end. Hold
the (D) Diverter wall support on the wall 1/8" from the ceiling
using the center line as a middle reference point. Using 2
screws, attach the chimney bracket on top of (D) the diverter
wall support together into the wall. Step 2 - Attach the diverter
and extension pieces (B, C) to the diverter wall support with
a screw (E).
2) Use a small amount of 6 inch round metal ducting (purchased
seperately), to connect the duct exit on top of the canopy to
the ductless diverter near the ceiling. Tape the duct at the top
and bottom to seal.
3) Step 3, Attach the upper chimney to the top and bottom
chimney brackets, by wrapping the chimney behind the wall
brackets, and Step 4 use the chimney screws to secure the
chimney to the brackets. Wrap the lower chimney cover over
the upper cover, and screw the lower chimney to the canopy
at the bottom.
FIGURE 8
FIGURE 6
A
B
C
D
E
C
D
B
E
STEP 1
STEP 2
STEP 3
STEP 4
CONTINUE DUCTLESS INSTALL ON THE NEXT PAGE
Loading ...
Loading ...
Loading ...