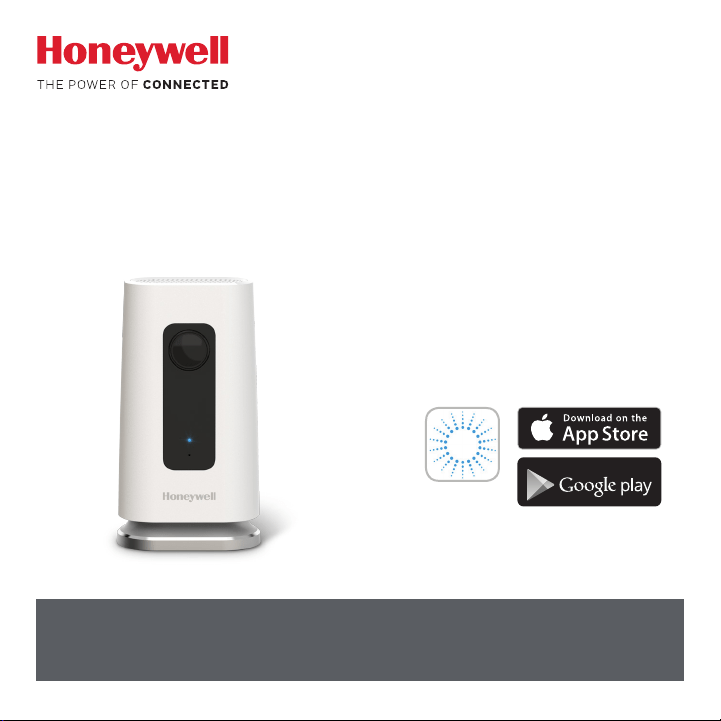
Lyric™ C1 Wi-Fi Security Camera
USER MANUAL
Before you begin
Read these instructions carefully. Failure to follow these instructions may damage
the product.
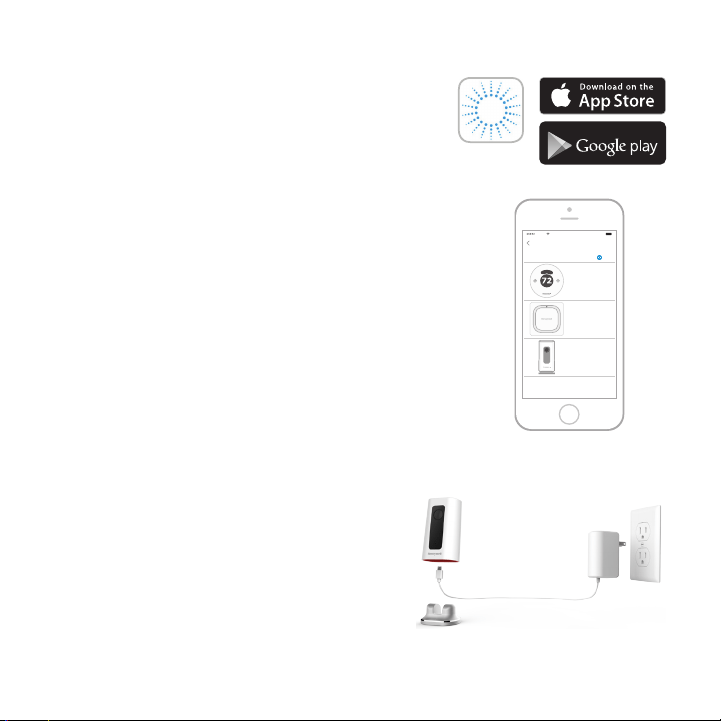
Download the Lyric app
To setup and use your new security
camera, search for Honeywell Lyric
in the App Store or Google Play.
GET IT ON
Lyric

ii
Need help?
If you need help at any point during the installation and setup of the
Wi-Fi Security Camera, please contact Honeywell Lyric Support:
Web: YourHome.Honeywell.com
Email: MyLyric@honeywell.com
Phone: 1-800-633-3991

iii
Contents
Welcome • 1
Camera overview • 2
Placement • 3
With stand • 3
Without stand • 3
Installation • 4
Download the Honeywell Lyric app • 4
Launch the Lyric app • 4
Connect the power cord • 4
Connect • 5
Connect to mobile device • 5
Connect to Wi-Fi • 5
Status LEDs • 6
Operation • 7
Remove/replace the stand • 7
Lyric app experience • 7
Reset • 7
SD card • 7

iv
App overview • 8
Livestreaming • 9
Configure alerts • 10
Select alert notification type • 10
Select alert recipients • 11
Review clips • 11
Camera settings • 12
Turn the LED on and o • 14
Turn the microphone on and o • 14
Motion detection • 15
Sound detection • 16
Smoke or carbon monoxide alarm detection • 17
Delete a camera • 18

v
Set up detection zones • 20
Geofencing setup • 19
App settings and account info • 22
Manage messages • 23
Frequently Asked Questions • 24
Specifications • 27
FCC Regulations • 28
Warranty • 29

vi

1
Welcome
Congratulations on your purchase of Honeywell’s Lyric™ C1 Wi-Fi
Security Camera. You can monitor visitors, pets, and family
yourself—anytime, anywhere.
What’s in the box?
You should find:
• Honeywell Lyric C1 Wi-Fi Security Camera
• Optional mounting screws
• Power cord
• 8 GB microSD Card
Download the app
To setup and use your new camera, search for Honeywell Lyric in the
App Store or Google Play.
After downloading, follow the
instructions in the app.
GET IT ON
Lyric
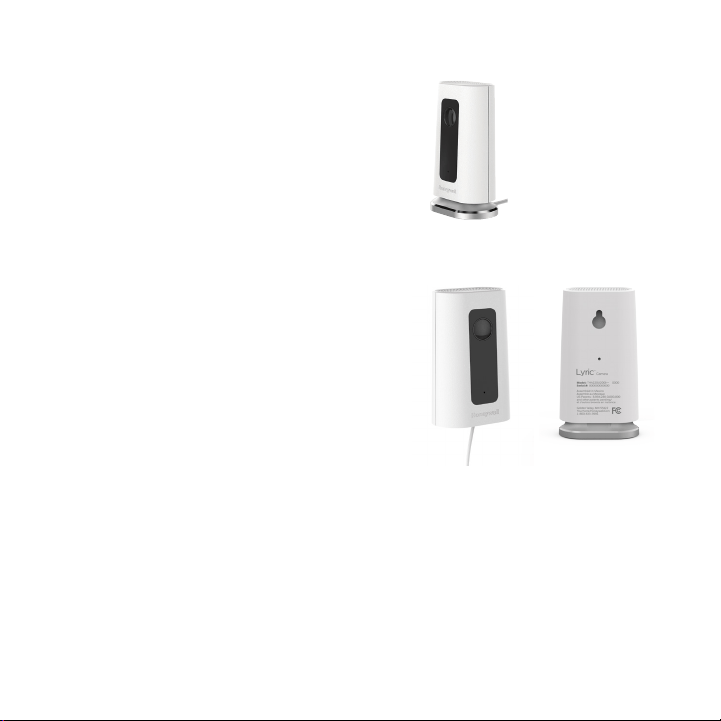
2
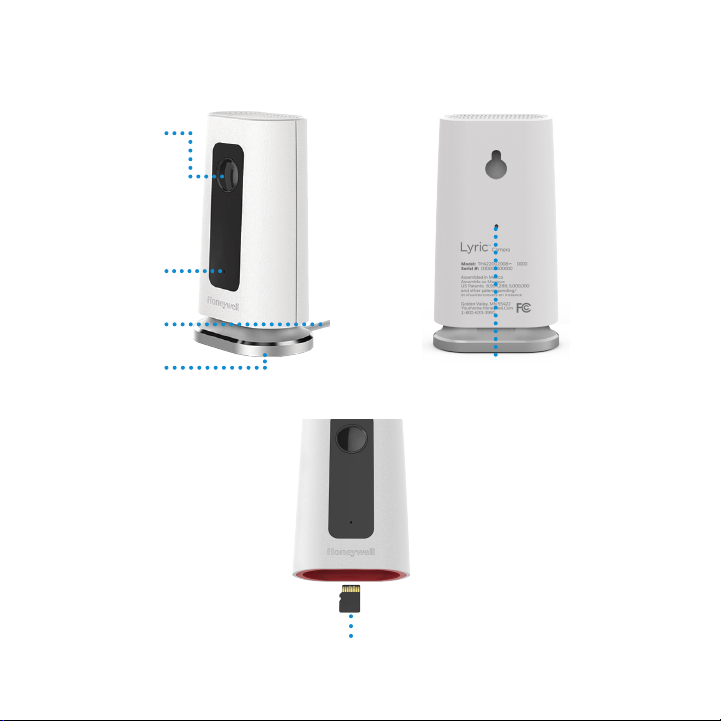
Camera overview
Camera lens
LED indicator
Power cord
Stand
Reset hole
SD card and slot
3
Placement
With stand
Place the camera in a desired location for
viewing and recording.
Without stand
You can also mount the camera directly to
the wall without the stand.
4
Installation
Launch the Lyric app
4
Launch the Lyric app.
5
Select the Lyric C1 Wi-Fi Camera to install, then create an
account (if necessary), or sign in to your Lyric account.
6
Follow the instructions in the Lyric app to name the
camera and its location.
Download the Honeywell Lyric app
Note: Have your Wi-Fi password available and confirm
your router communicates at 2.4 GHz before installation.
1
Make sure bluetooth is enabled on your mobile device.
2
Search for Honeywell Lyric in the App Store or Google
Play.
3
Download the Honeywell Lyric app.
Connect the power cord
7
Remove the camera base and plug the power
cord’s USB end into the camera.
8
Reinsert the camera base and plug the camera
into a power outlet.
9
Wait until the LED on the camera blinks blue
(about 1 minute), then tap NEXT.
Note: If the LED turns solid red, it means the
connection mode timed out. Unplug the camera and
plug it back in.
GET IT ON
Lyric
Select a device to installl
Carrier 100%8:08 AM
Add New Device
Lyric C1 Wi-Fi Camera
Lyric Round
Lyric Water Leak &
Freeze Detector

5
Connect
Connect to Wi-Fi
Be sure you are on the same Wi-Fi network you
wish to connect your camera to.
1
Choose your Wi-Fi network from the list.
Press NEXT.
2
Enter your Wi-Fi password, if necessary.
Press DONE.
Note: The camera will beep during some steps in
this process.
Connect to mobile device
1
Enable bluetooth on your mobile device.
2
The app will look for the camera.
• For one camera, it will connect
automatically.
• For more than one camera, the app will
prompt you to select one camera at a time.
Each camera has a unique MAC ID printed
on the back. Use that ID to select the
camera you want to connect.
3
A QR code will display in the app. To connect
your camera to the app, hold the QR code
approximately 3-8 inches (7-20cm) from the
camera lens.
4
The camera LED turns purple and the camera
beeps.
Scan code to connect camera
Carrier 100%8:08 AM
NEXT
Connect
2.7-7.9 in

6
Status LEDs
During Wi-Fi connection and camera operation, the LED shows the status of
the camera.
LED Camera state
During installation
Blinking Blue Powered up. Ready to begin setup.
If the LED blinks blue during setup, it has lost
bluetooth connection. Unplug it and plug it back in
again. See “Connect the power cord” on page 4
for instructions.
Solid Blue Connected to App. Ready to complete setup.
Solid Red (for
2seconds)
Setup timed out, or connection failed. The LED will
then turn solid purple. Unplug camera, plug it back
in, and restart the process.
Solid Purple QR Code scan complete.
See “Connect to Wi-Fi” on page 5.
Blinking Green Connecting to Wi-Fi network.
Solid Green Connected to Wi-Fi network.
During operation
Blinking Green Connecting to Wi-Fi network.
Solid Green Connected to Wi-Fi and operating.
Blinking Red Not connected to Wi-Fi.
7
Operation
Remove/replace the stand
The C1 Camera stand is connected to the camera by a magnet. If you want
to remove the stand to hang the camera on the wall or replace the SD card,
simply pull the stand o of the camera. To replace, just snap it back on the
camera.
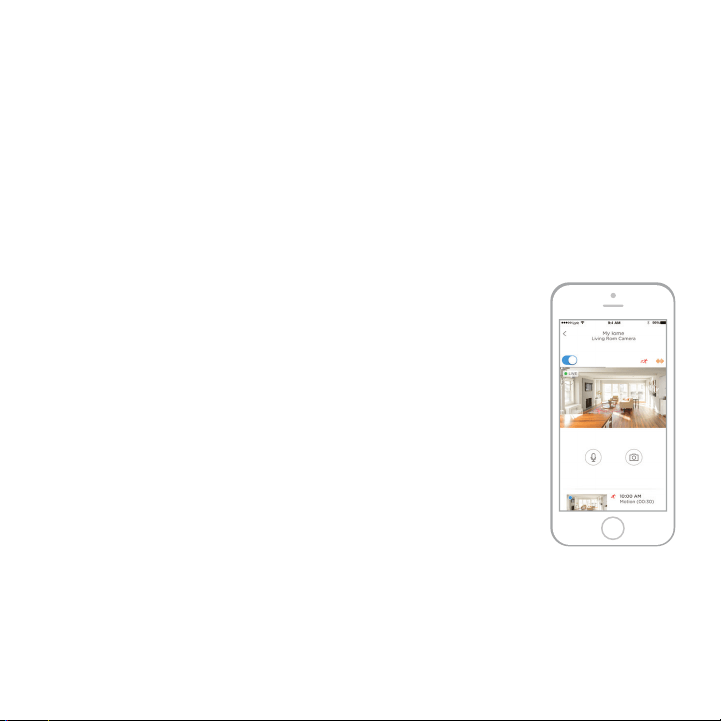
Lyric app experience
When you launch the application, live video from your
camera is displayed.
If you have multiple cameras, a list of them is displayed.
Select a camera from the list to view live video from that
camera.
Reset
If your Wi-Fi connection fails or you need to connect to a
dierent Wi-Fi network, insert one end of a paperclip into
the reset hole. Press and hold it for 10seconds until you
hear a chirp.
SD card
The camera comes with an encrypted 8GB SD card installed. It stores images
if the camera’s connection to the cloud is lost. You can replace it with any
compatible SDcard, up to 64GB.
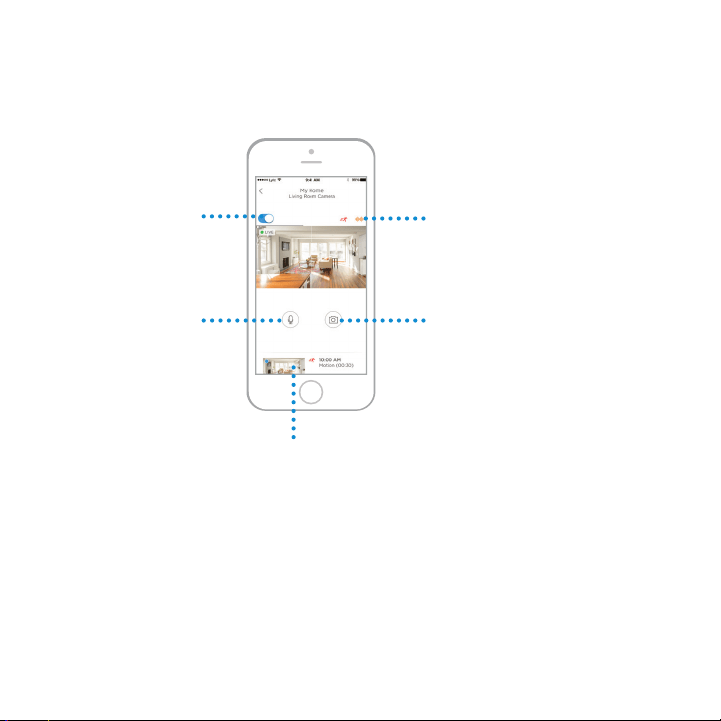
8
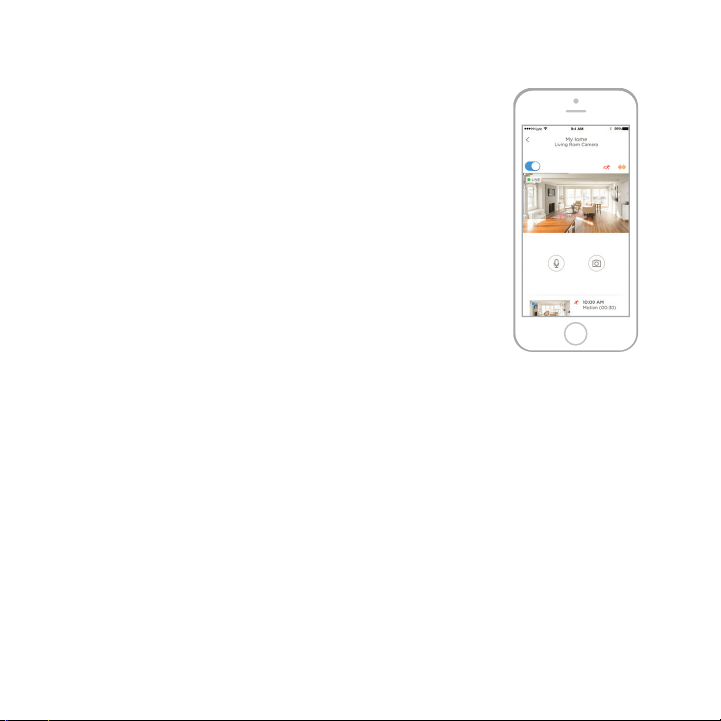
App overview
These are the controls available during livestream.
Camera on/o
Press to turn the
camera on or o.
Motion/sound detector
Press to turn the motion or
sound detection alerts on or
o during livestream.
Snapshot control
Press to take pictures during
livestream. Images are saved
to mobile device’s photos.
Video clips
When the camera detects motion or sound, it records
a clip. Those clips are listed in chronological order
here. Swipe up to see the list of clips, then swipe up or
down to see the full list. Press a clip to watch it.
Push to Talk
Press and hold
to speak out of
the camera.
Release to stop.
9
Livestreaming
You can use your security camera to get a live look-in wherever
you place the camera. Each livestream session lasts 90
seconds. When one livestream session ends, you can start a
new one if you like.
Use the Push to Talk button to talk to someone through the
camera.
Livestreams are not saved to the SD card, and are not
uploaded to your cloud storage.
By default, livestreams are in HD. If data limits are a concern,
change this setting to Auto or Low. See “Video quality” on
page 13.
10
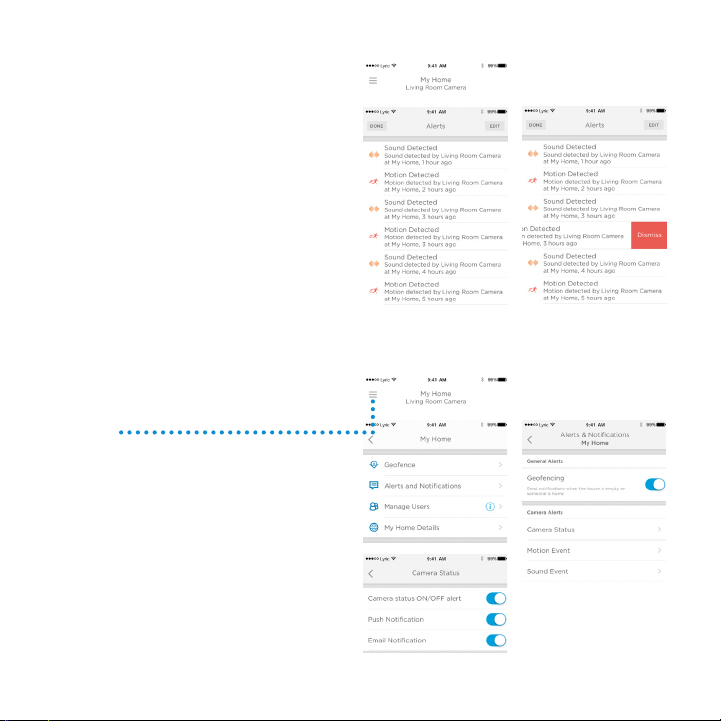
Configure alerts
When the camera detects a sound or
motion, it sends an alert to the app.
1
Press the Alerts icon when a red bubble
appears.
2
The Alerts are displayed with the Alert
type and the date/time stamp.
3
Press an alert to view the 30-second
video clip.
4
Swipe left, then press Dismiss to remove
the Alert.
5
To dismiss all Alerts, press Edit, then
press DISMISS ALL.
Select alert notification type
1
Press the side menu button on the home
screen.
2
Press Alerts and Notifications.
3
Select the notification type you want
to set (Camera Status, Motion Event, or
Sound Event).
4
Choose to turn on or o the following
types of notifications:
• Camera Status ON/OFF alert -
displayed in the Alerts list.
• Push Notification - displayed on your
mobile device.
• Email Notificaton - sent via email
11
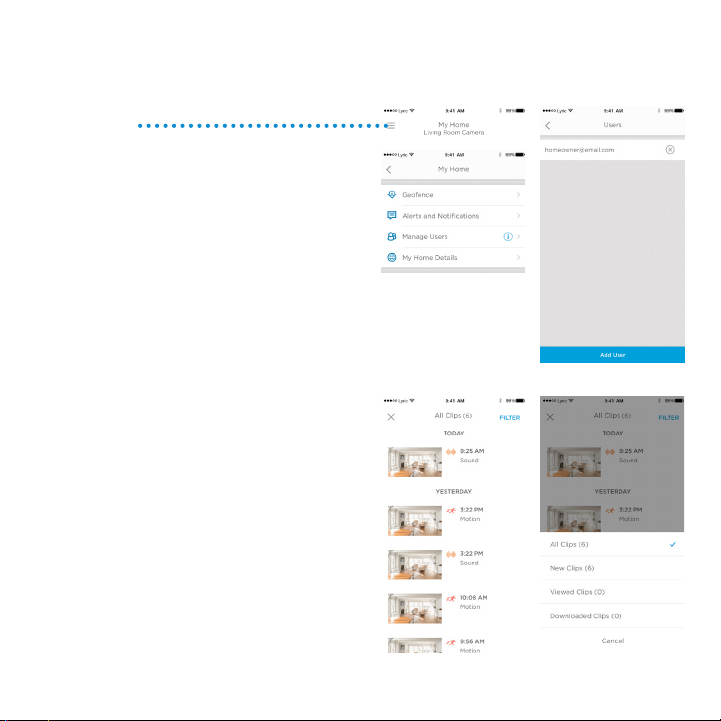
Select alert recipients
You can choose multiple people to have access to the camera and receive Alerts.
1
Press the side menu button on the home
screen.
2
Press Manage Users.
3
Press Add User at the bottom of the
app.
4
Enter the email address of the person
you want to add to the camera then
press SEND.
Review clips
1
Swipe up from the bottom of the home
screen to show clips.
2
Press a clip to watch it.
3
Press FILTER to sort the clips, then
select a filter type (All, New, Viewed,
Downloaded).

12
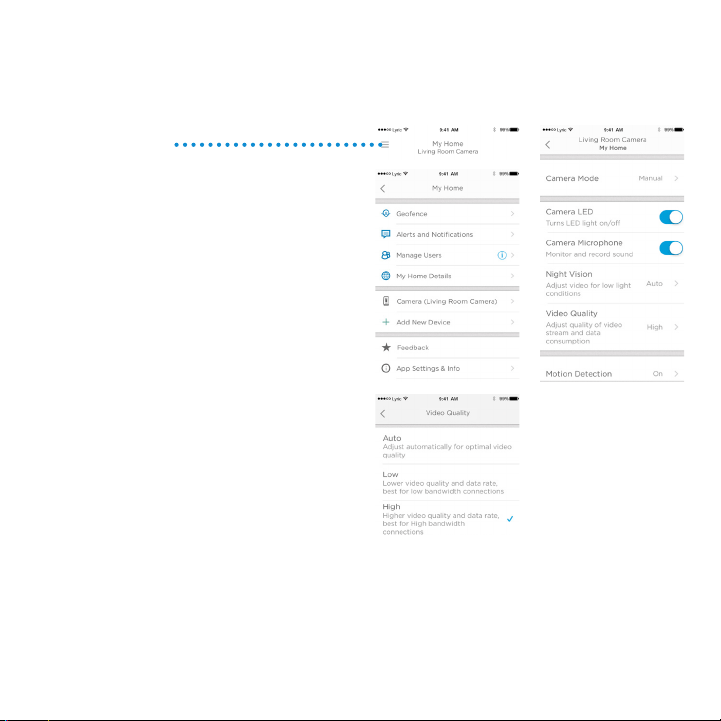
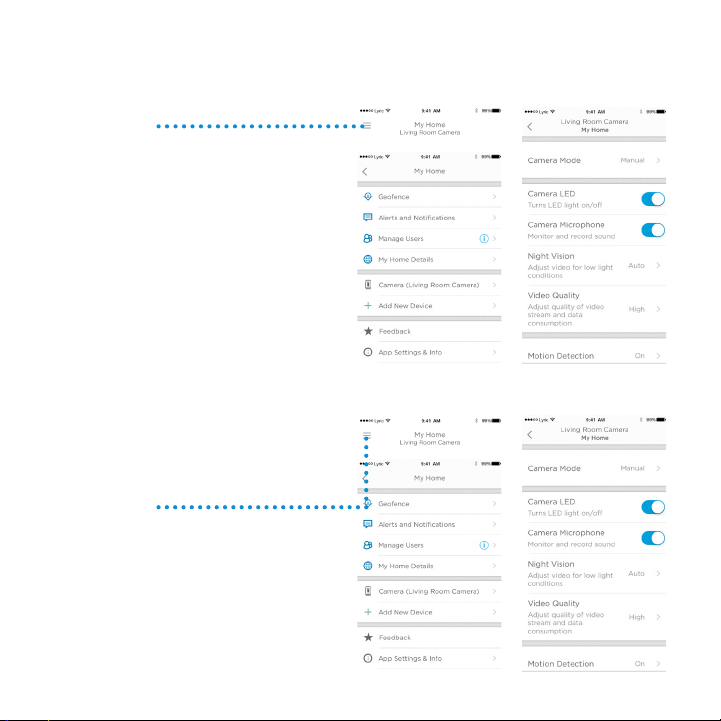
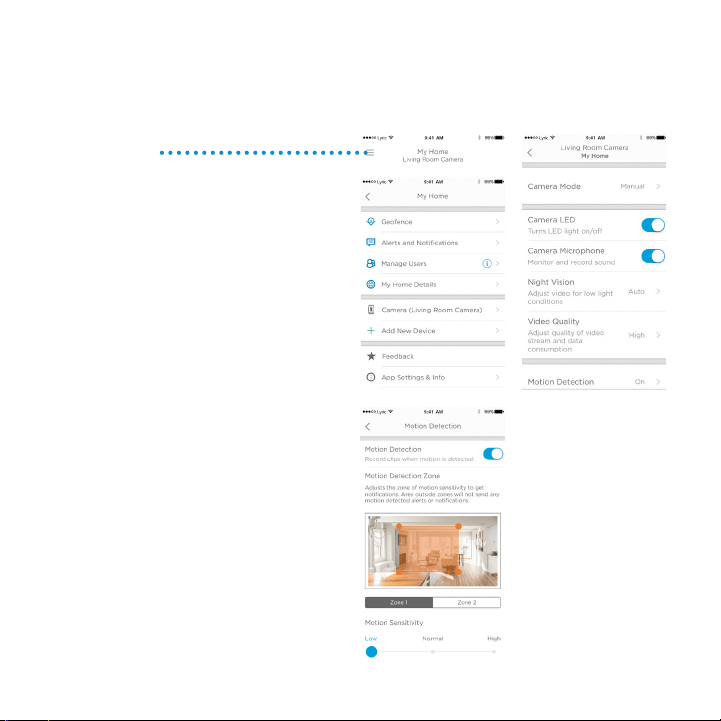
Camera settings
Camera settings can be controlled in the app. You can set up things like night mode, use
Lyric’s Geofencing capability, and turn on Motion or Sound Detection, and other settings.
1
Press the side menu button on the
home screen.
2
Press the camera you want to change
the settings on. Look for the name you
gave the camera when installed.
3
To change the camera mode, press
Camera Mode.
4
Press a setting for the camera mode:
• Manual - turn the camera on or o
using the app.
• Geofencing - the camera turns on
when you leave the area, and turns
o when you return.
5
To change the night vision settings,
press Night Vision.
6
Press a setting for night vision:
• Auto - the camera adjusts its
settings automatically.
• On - night vision is always on.
• O - night vision is always o.
13
Video quality
You can change the quality of your video stream. This will help limit data use on your
mobile device.
1
Press the side menu button on the
home screen.
2
Press the camera you want to change
the settings on. Look for the name you
gave the camera when installed.
3
Press Video Quality.
4
Press a setting for video quality:
• Auto - the camera adjusts its
settings automatically.
• Low - lower quality video that uses
less data or bandwidth (VGA).
• High - higher quality video that
uses more data or bandwidth
(720p HD).
14
Turn the LED on and o
If you want to turn the camera’s LED o (or back on), it is easy to do using the app.
1
Press the side menu button on the
home screen.
2
Press the camera you want to change
the settings on. Look for the name you
gave the camera when installed.
3
Use the Camera LED switch to turn the
LED on or o.
Turn the microphone on and o
If you want to turn the camera’s
microphone o (or back on), it is easy to
do using the app.
1
Press the side menu button on the
home screen.
2
Press the camera you want to change
the settings on. Look for the name you
gave the camera when installed.
3
Use the Camera Microphone switch to
turn the microphone on or o.
15
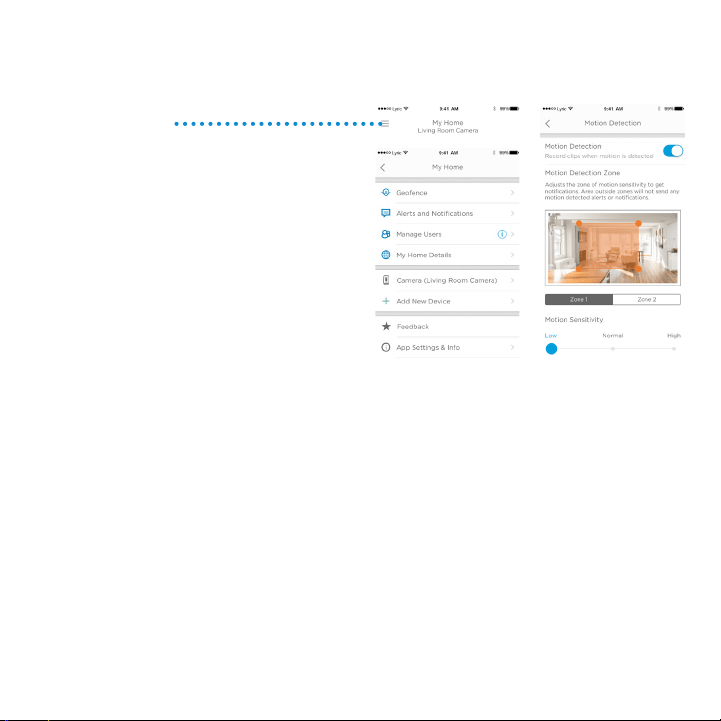
Motion detection
You can turn motion detection on or o, as well as adjust the sensitivity.
1
Press the side menu button on the
home screen.
2
Press the camera you want to change
the settings on. Look for the name you
gave the camera when installed.
3
Press Motion Detection.
4
Use the Motion Detection switch to turn
motion detection on or o.
5
Adjust how big a movement triggers
a Motion Event by selecting O, Low,
Medium, or High.
• O - ignores all movement.
• Low - detects only big movement.
• Medium - detects general movement and changes in environment.
• High - detects all movement and changes in environment.
To set up separate zones, see “Set up detection zones” on page 20.

16
Sound detection
You can turn sound detection on or o, as well as adjust the sensitivity.
1
Press the side menu button on the
home screen.
2
Press the camera you want to change
the settings on. Look for the name you
gave the camera when installed.
3
Press Sound Detection.
4
Use the Sound Detection switch to turn
sound detection on or o.
5
Adjust the volume of sound that
triggers a Sound Event by selecting
Low, Normal, or High.
• Low – detects only loud sounds,
such as a motorcycle or food
processor, around 80–100 decibels.
• Normal – detects general sounds
like a refrigerator, air conditioner
or conversation, around 50–100
decibels.
• High – detects even the quietest
sounds like a pin drop or whispers,
around 10–100 decibels.

17
Smoke or carbon monoxide alarm detection
If your smoke or carbon monoxide alarm goes o and your camera is on, it will send you
an alert that a smoke or CO alarm has been detected.
To test this feature, press and hold the Test button on your smoke/CO detector for at least
5 seconds or 3 cycles of the detector’s alarm. A shorter test might not trigger a sound
event.
18
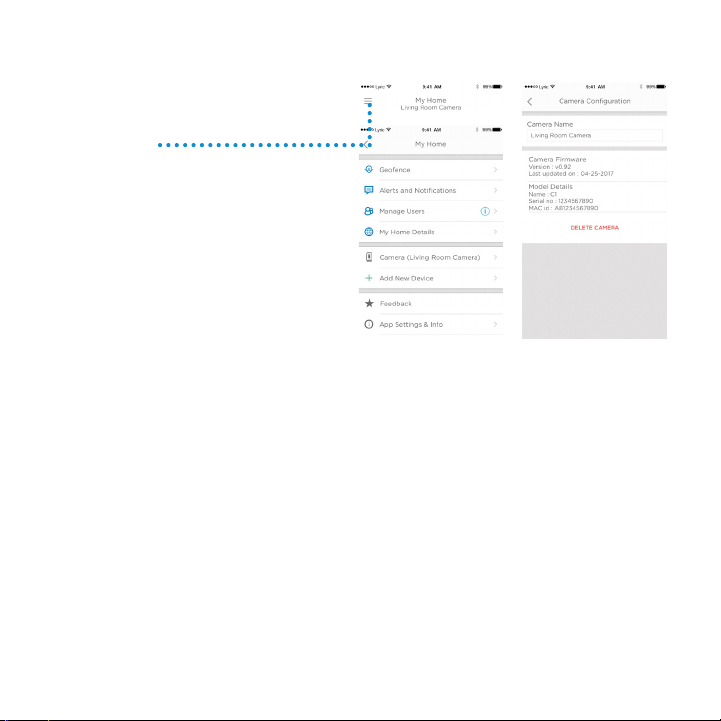
Delete a camera
If you need to remove a camera from your
account, it is easy to do using the app.
1
Press the side menu button on the
home screen.
2
Press the camera you want to delete.
Look for the name you gave the
camera when installed.
3
Press Camera Configuration.
4
Press DELETE CAMERA.
Note: Deleting the camera from the app
will result in losing all stored video clips
that have not been saved to another
device.
5
To re-install the camera, follow the steps in “Launch the Lyric app” on page 4.
19
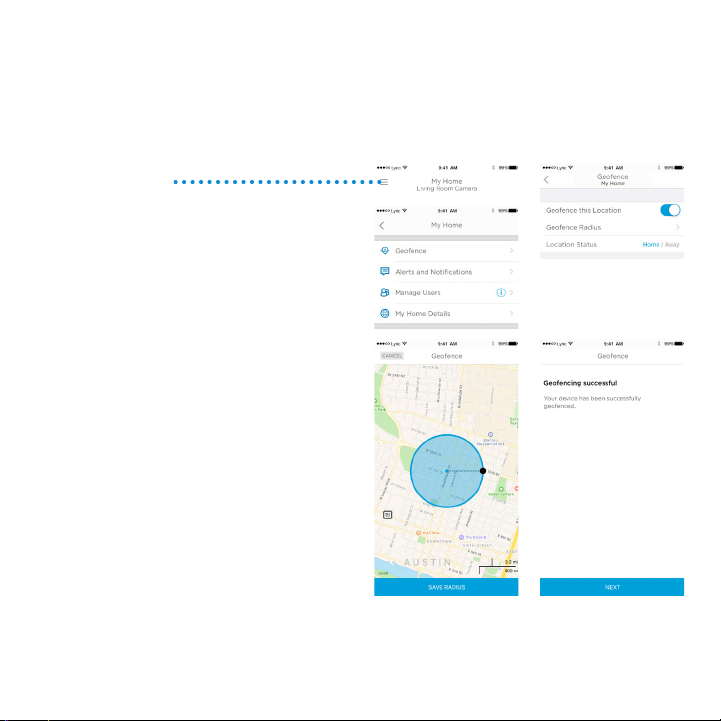
Geofencing setup
If you set up the camera to use geofencing to turn itself on and o, the camera will sense
where you are through the location of your mobile device.
Note: Turn geofencing on in the camera settings. See “Camera settings” on page 12.
1
Press the side menu button on the
home screen.
2
Press Geofence.
3
Use the Geofence this Location switch
to turn geofencing on or o.
4
When geofencing is on, the Location
Status will indicate whether you are
Home or Away.
5
Press Geofence Radius to change how
close your smartphone is to the camera
for it to turn on (when Away) or o
(when Home).
6
Press the black dot and drag the
geofence radius to the size you want.
7
Press NEXT.
8
When the geofencing is set, press
NEXT.
20
Set up detection zones
Draw your own alert zones for extra sensitivity or to ignore background motion such as a
ceiling fan.
1
Press the side menu button on the
home screen.
2
Press the camera you want to change
the settings on. Look for the name you
gave the camera when installed.
3
Press Motion Detection.
Note: The app will need access to the
camera so you can set up detection zones.
4
The default area for Zone 1 is the entire
snapshot. To re-size, drag the rectangle
from any corner or edge. Drag from the
center to re-locate.
5
Set the desired sensitivity for Zone 1 by
selecting O, Low, Medium, or High.
• O - no motion detection in this
zone.
• Low - detects only big movement.
• Medium - detects general movement
and changes in environment.
• High - detects all movement and
changes in environment.
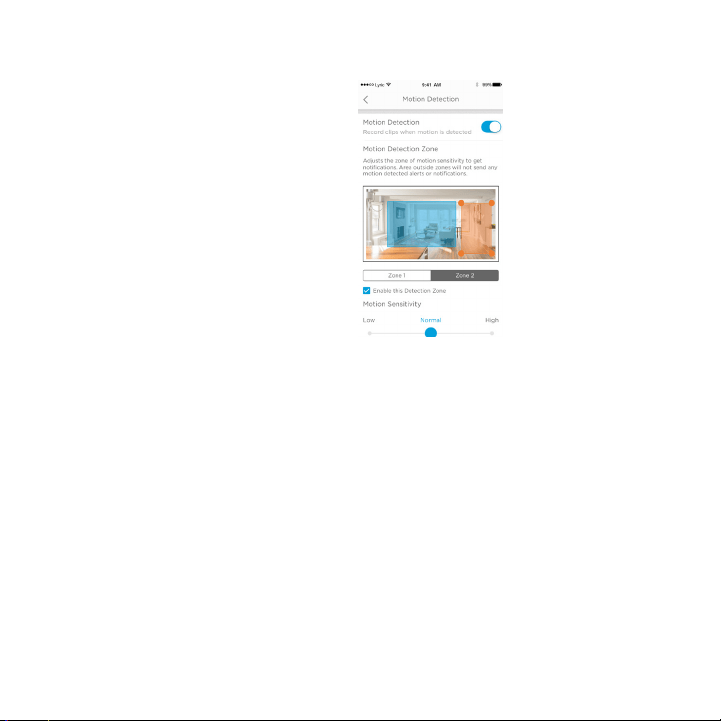
21
Set up detection zones
6
Press Zone 2.
7
Press Enable this Detection Zone.
8
Re-size or re-locate Zone 2 the same
way you did Zone 1.
Note: Zones can not overlap.
22
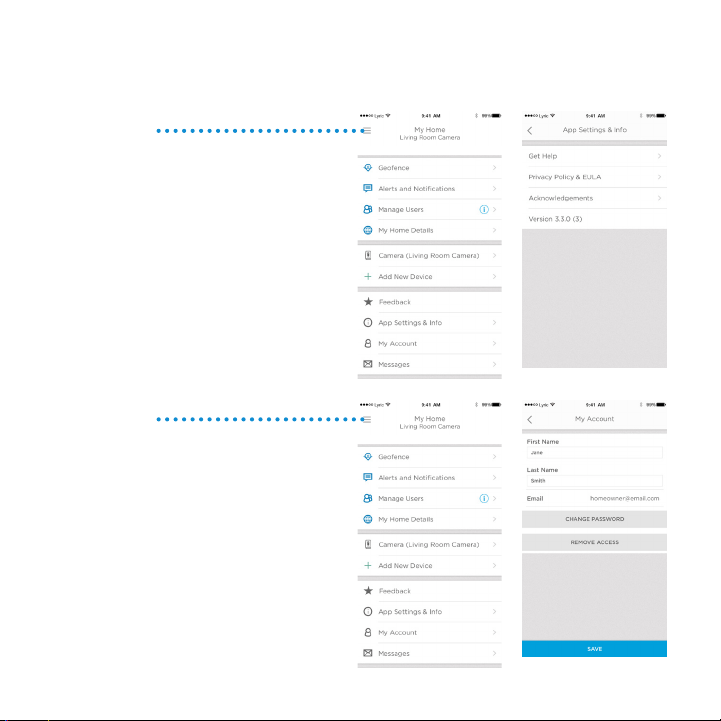
App settings and account info
Follow these steps to see app settings such as version info, help, etc.
1
Press the side menu button on the
home screen.
2
Press App Settings & Info.
3
Select any of the menu options for
more information.
Follow these steps to see your account
information, such as name, email address,
password reset, etc.
1
Press the side menu button on the
home screen.
2
Press My Account.
3
Change your name, email address,
password, or access. Follow the steps in
the app to complete.
23
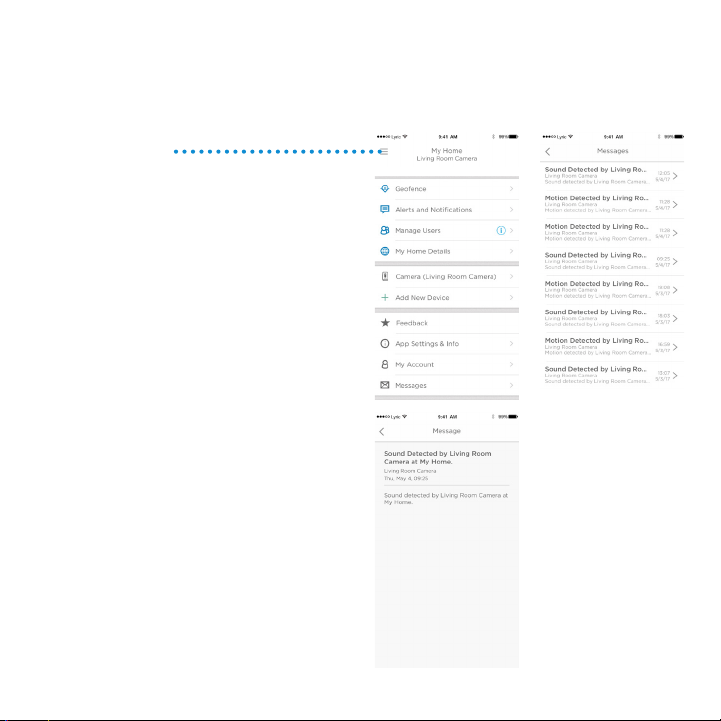
Manage messages
Use the app to view and manage messages about motion or sound detected by your
camera.
1
Press the side menu button on the
home screen.
2
Press Messages.
3
The messages are displayed.
4
Press a message to read it.
5
Press the back arrow to go back to the
list of messages.

24
Frequently Asked Questions
What kind of maintenance does my security camera need?
Your camera requires no maintenance.
What should I do if I get a message that the security camera is unavailable?
1. Check that the security camera is connected to power.
2. Check for any notification from Honeywell sent via email about scheduled maintenance.
3. Check that your home Wi-Fi network is working, and the camera LED is solid green.
4. If the camera LED is not green, unplug the camera from wall outlet, wait 10 seconds,
and plug it back in. If you can livestream from the camera, it is now available.
5. There are other networks and servers involved in the data transfer process, and one of
them could be down temporarily. Wait a bit and try again.
6. If none of these steps solves the problem, contact Honeywell Lyric Support at
1-800-633-3991.
Does the security camera record continuously?
No. To conserve bandwidth, the security camera only records to the cloud when it detects
a sound or motion.
When does the camera record?
When the security camera detects sound or motion, it records a clip that includes
5seconds before the sound or motion and 25seconds after, then uploads the 30second
clip to cloud storage and sends you a notification of the event. If the cloud is unavailable
or the security camera is not connected to the internet, clips are stored on the SD card,
and uploaded to the cloud when the connection is restored.
How many clips can be stored on the SD card?
SD card storage is synced with the numbers of clips saved to the cloud and based on the
storage tier you selected.
Plan 1-day storage (default) 7-day storage 30-day storage
Clips stored 50 350 1500

25
Can I modify the frames per second for smaller file sizes?
No. The camera adjusts this automatically. The default rate is 30 frames per second.
Can I connect the security camera to a computer to download recorded clips?
No. Clips are accessible only through the app. Clips can be downloaded and saved to your
mobile device, but you need to do so before the clips are deleted based on your storage
tier of 1, 7, or 30 days.
How long can I livestream from the camera?
You have unlimited livestream sessions with your camera to look in on what’s happening
at any given moment. Each livestream session is 90seconds long to conserve bandwidth.
You can start a new livestream session immediately after one expires.
Can I use the security camera outdoors?
No. The security camera is intended for indoor use only.
What can I do if the night video is too dark?
Check that you have set Night Vision to automatic and not manual. See “Camera settings”
on page 12.
Why can’t I hear anything in the clips?
Check that you have the security camera microphone turned on. See “Turn the
microphone on and o” on page 14.
Can I use geofencing for more than one mobile device?
Yes. Every mobile device linked in the Lyric account is tracked, so the security camera
doesn’t turn on until the last mobile device leaves the geofence radius, and turns o again
when the first one enters the geofence radius.

26
What if I get too many motion or audio event notifications?
Try setting up detection zones, and create exclusion zones by setting sensitivity as O
or Low. See “Set up detection zones” on page 20. You can also change the motion
or sound sensitivity settings to O or Low (see “Motion detection” on page 15 and
“Sound detection” on page 16)
How close must the security camera be to my internet router?
The range of distance of the Wi-Fi signal is determined by your router. We recommend
keeping the security camera within 30 feet (10 meters) of your router. This distance can
vary depending on obstacles such as concrete or stucco walls, metallic barriers, or other
interference.
Will the security camera work without Wi-Fi?
No. The security camera requires Wi-Fi to work fully with the app.
What if I can’t find my Wi-Fi network in the app to connect my camera?
1. The camera could be too far from the router, or there might be too many routers near
the camera. Press the Refresh button in the app and try again.
2. Check the Wi-Fi connection status in the Wi-Fi settings menu of your mobile device. If
your mobile device is connected, you should be able to connect the security camera. If
your mobile device is not connected, your Wi-Fi network is probably down.
What if I need to change the Wi-Fi network the security camera connects to?
Perform a reset on the security camera (see “Reset” on page 7). Then re-install it
without deleting the camera from the app (see “Installation” on page 4), using the
same name for the camera as you used before.
Where is the MAC ID on the security camera?
Each security camera has a unique MAC ID printed on the back.
If you need further assistance, please Honeywell Lyric Support for help:
Web: YourHome.Honeywell.com
Email: MyLyric@honeywell.com
Phone: 1-800-633-3991

27
Specifications
Dimensions (W x H x D): 2.5 x 4.4 x 1.8 in. (6.3 x 11.2 x 4.6 cm)
Weight Camera & Base: 4 oz. (113 g)
Weight Camera Alone: 3oz. (85 g)
Video Resolution: 720p HD @ 30 fps
Video Resolution: 1 MP JPEG
Video Compression: MPEG-4 (H.264)
Field of View: 135° / 5x Digital Zoom
Wi-Fi Connectivity: IEEE 802.11 b, g, n; Single Band 2.4 GHz
Minimum Bandwidth: 1.333 Mbps
Power Supply: 5V / 2A AC
Operating Temp.: 32°–104°F (0°–40°C)
microSD Card (capacity): Up to 64 GB SDXC; recommend class 10 microSD
Card (8 GB card included)
Night Vision: Up to 16.5 ft (5 m)

28
FCC Regulations
§ 15.19 (a)(3)
This device complies with part 15 of the FCC Rules. Operation is subject to the
following two conditions: (1) This device may not cause harmful interference,
and (2) this device must accept any interference received, including
interference that may cause undesired operation.
§ 15.21
Changes or modifications not expressly approved by the party responsible for
compliance could void the user‘s authority to operate the equipment.
§ 15.105(b)
This equipment has been tested and found to comply with the limits for a Class
B digital device, pursuant to part 15 of the FCC Rules. These limits are designed
to provide reasonable protection against harmful interference in a residential
installation. This equipment generates, uses and can radiate radio frequency
energy and, if not installed and used in accordance with the instructions, may
cause harmful interference to radio communications. However, there is no
guarantee that interference will not occur in a particular installation. If this
equipment does cause harmful interference to radio or television reception,
which can be determined by turning the equipment o and on, the user is
encouraged to try to correct the interference by one or more of the following
measures:
• Reorient or relocate the receiving antenna.
• Increase the separation between the equipment and receiver.
• Connect the equipment into an outlet on a circuit different from that to
which the receiver is connected.
• Consult the dealer or an experienced radio/TV technician for help.

29
FCC Radiation Exposure Statement:
This equipment complies with FCC radiation exposure limits set forth for an
uncontrolled environment. This equipment should be installed and operated
with minimum distance 20cm between the radiator and your body.
This device and its antenna(s) must not be co-located or operating in
conjunction with any other antenna or transmitter.
IC Regulations
This device complies with Industry Canada license-exempt RSSs. Operation is
subject to the following two conditions:
(1)this device may not cause interference, and
(2)this device must accept any interference, including interference that may
cause undesired operation of the device.
IC Radiation Exposure Statement:
This equipment complies with IC RSS-102 radiation exposure limits set forth for
an uncontrolled environment. This equipment should be installed and operated
with minimum distance 20cm between the radiator and your body.
Warranty
For warranty information, go to yourhome.honeywell.com
Home and Building Technologies
Honeywell
1985 Douglas Drive North
Golden Valley, MN 55422
YourHome.Honeywell.com
® U.S. Registered Trademark
© 2017 Honeywell International Inc.
33-00267—01 M.S. 05-17
Printed in U.S.A.
Lyric™ C1 Wi-Fi Security Camera
33-00267-01