created by: Impala Services Ltd.Page size: 139.7 x 107.95 mm
B0725QSF1K
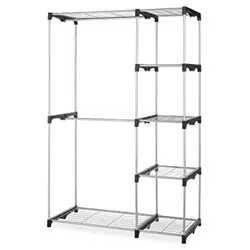
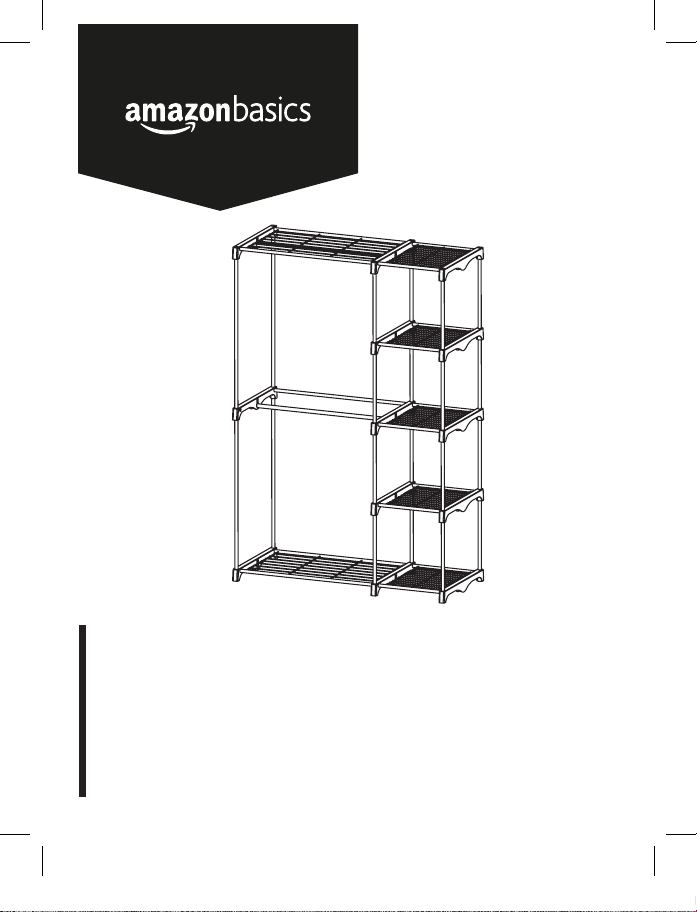
Double Rod Freestanding Closet
Armoire Autonome à Deux Portants
Doppelt Verstrebter Freistehender Schrank
Armadio a Giorno, Doppio
Armario Ropero Independiente Con Doble Vara
ハンガーラッククローゼット、ダブルロッド
双杆独立式衣柜
B0725QSF1K-AmazonBasics-Free standing closet-IM-V02 (EU).indb 1 8/8/17 1:44 PM
English ..................................... 3
Français ................................. 13
Deutsch .................................. 23
Italiano ................................... 33
Español .................................. 43
日本語 ..................................... 53
中文 ........................................ 63
B0725QSF1K-AmazonBasics-Free standing closet-IM-V02 (EU).indb 2 8/8/17 1:44 PM
3
Welcome Guide
•
English
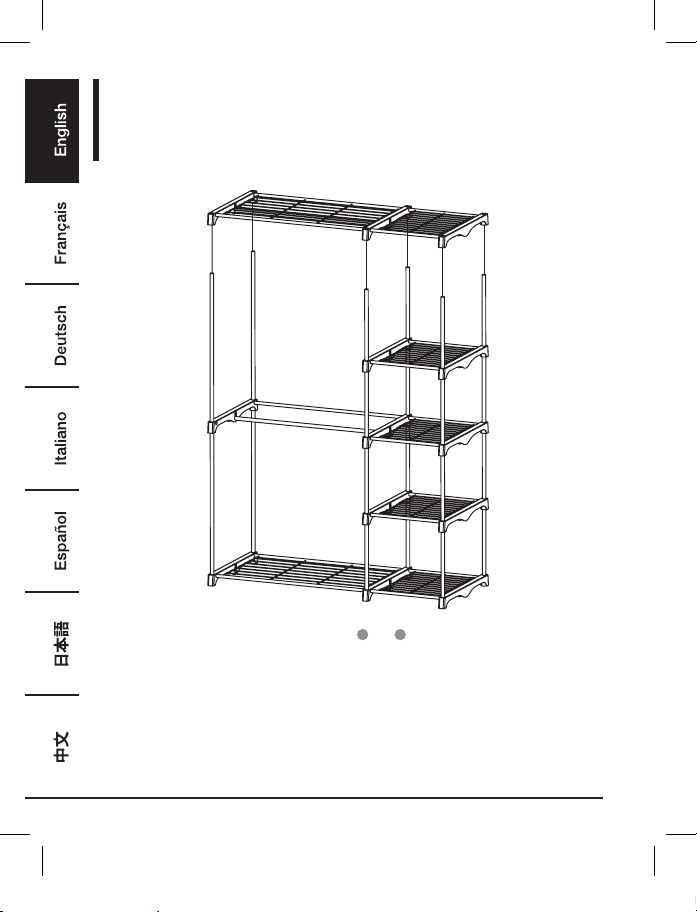
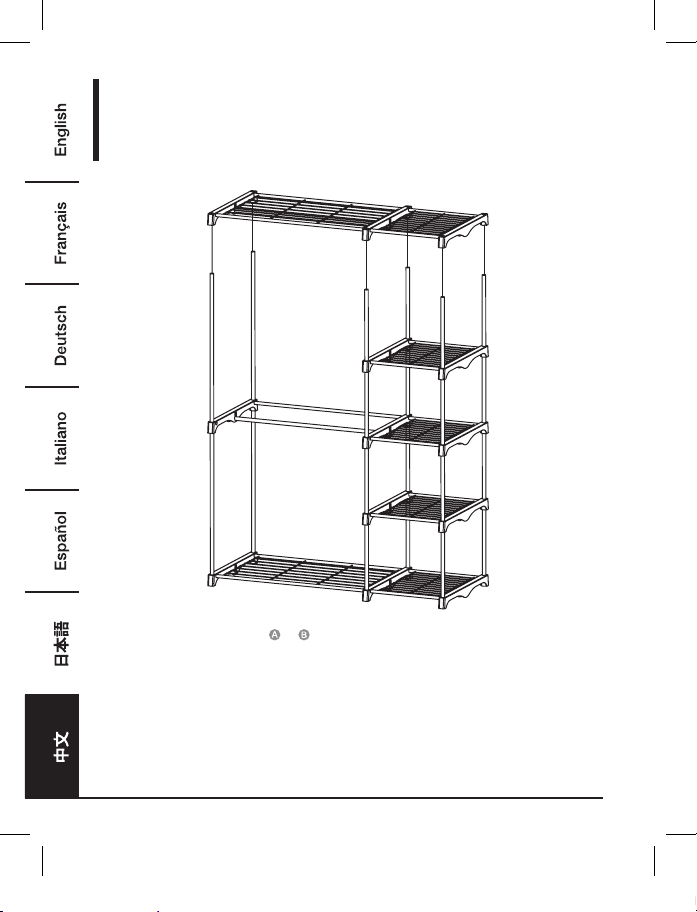
Double Rod Freestanding Closet
Contents:
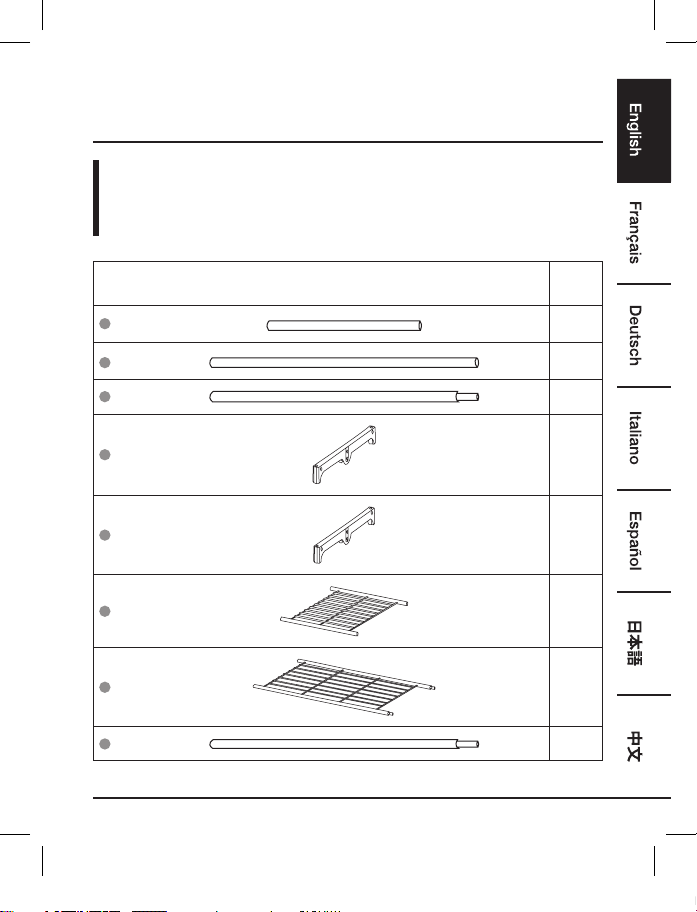
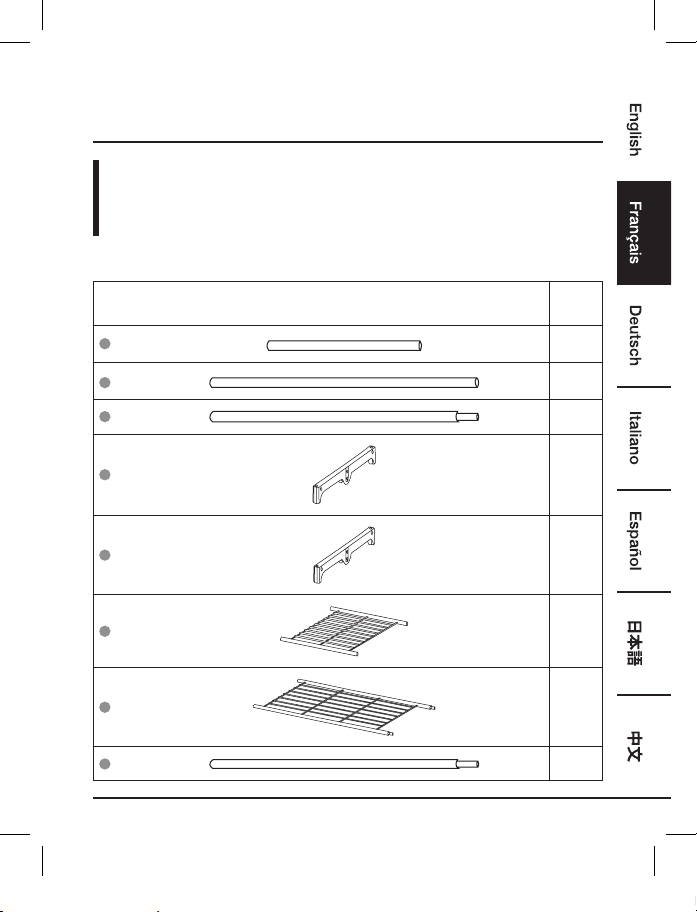
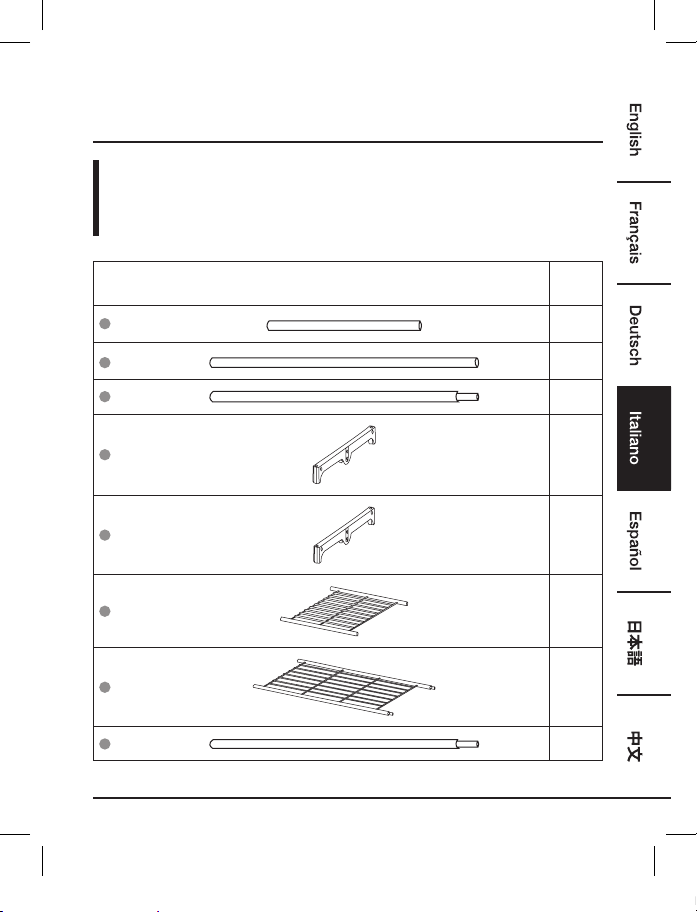
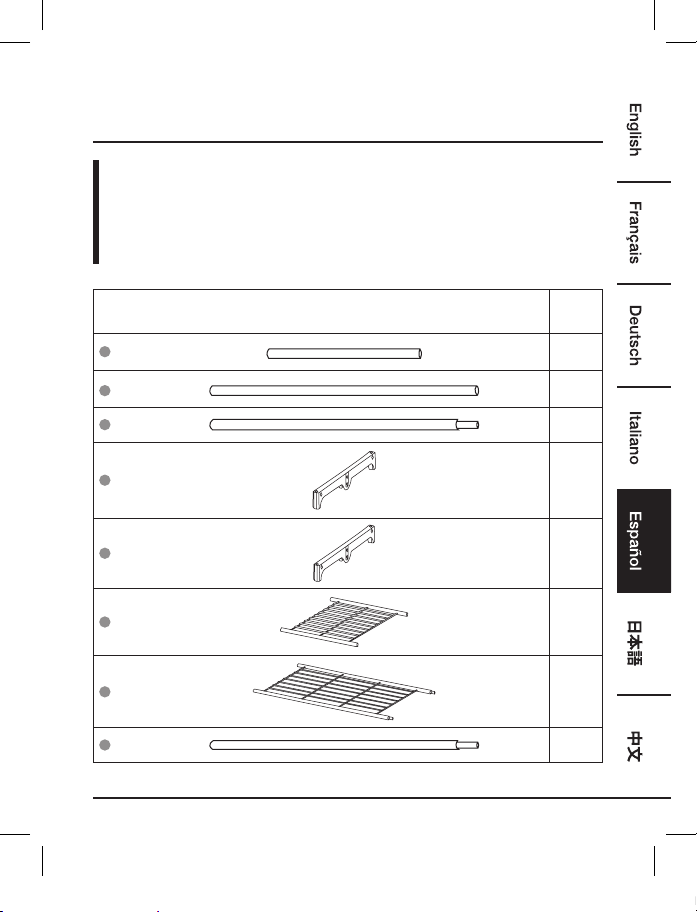
Before getting started, ensure the package contains the following components:
Part Qty
A
16
B
4
C
2
D
10
E
3
F
5
G
2
H
1
B0725QSF1K-AmazonBasics-Free standing closet-IM-V02 (EU).indb 3 8/8/17 1:44 PM
4
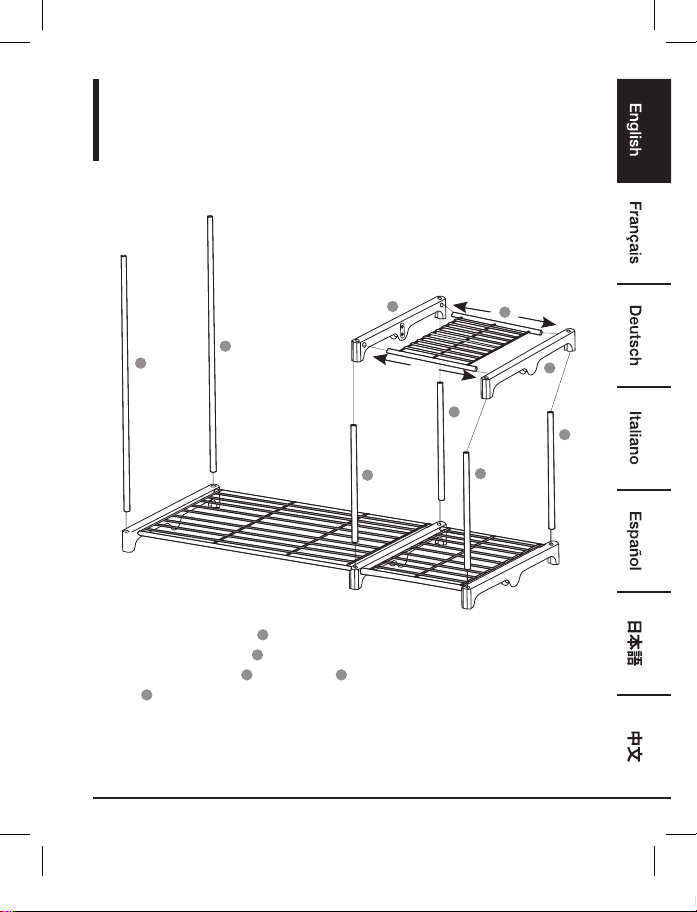
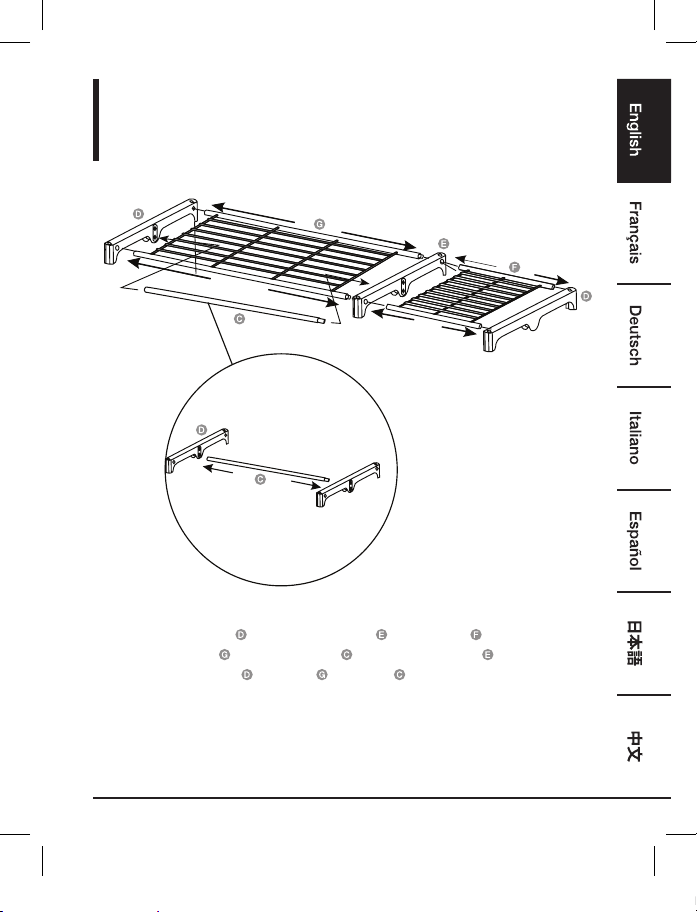
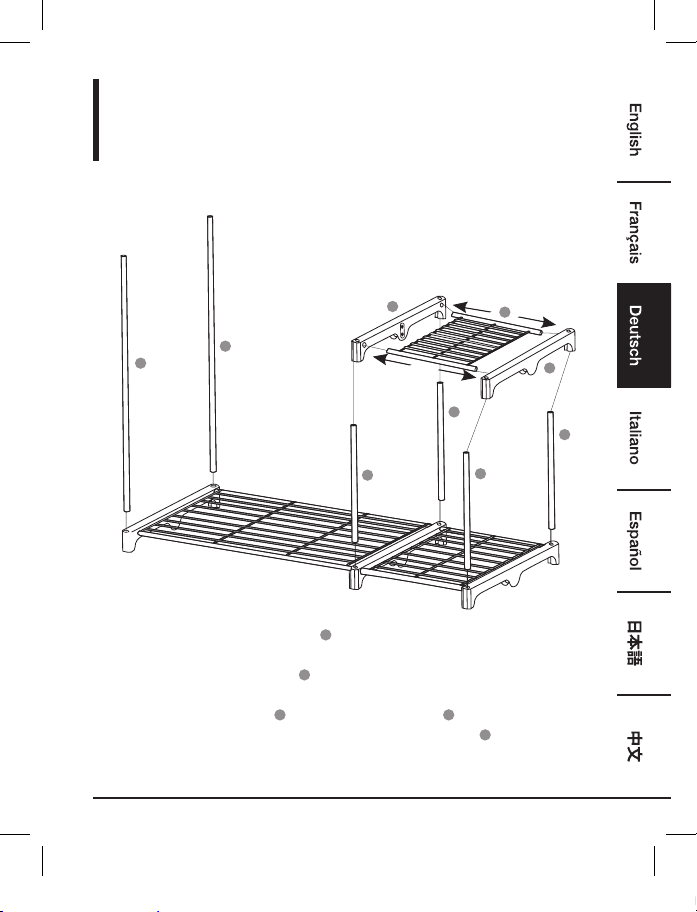
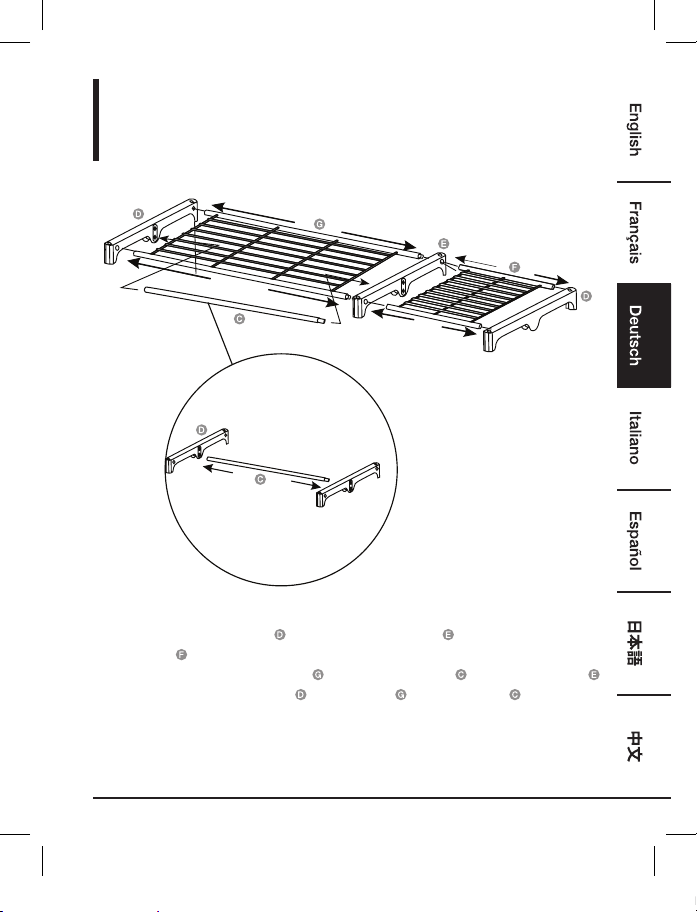
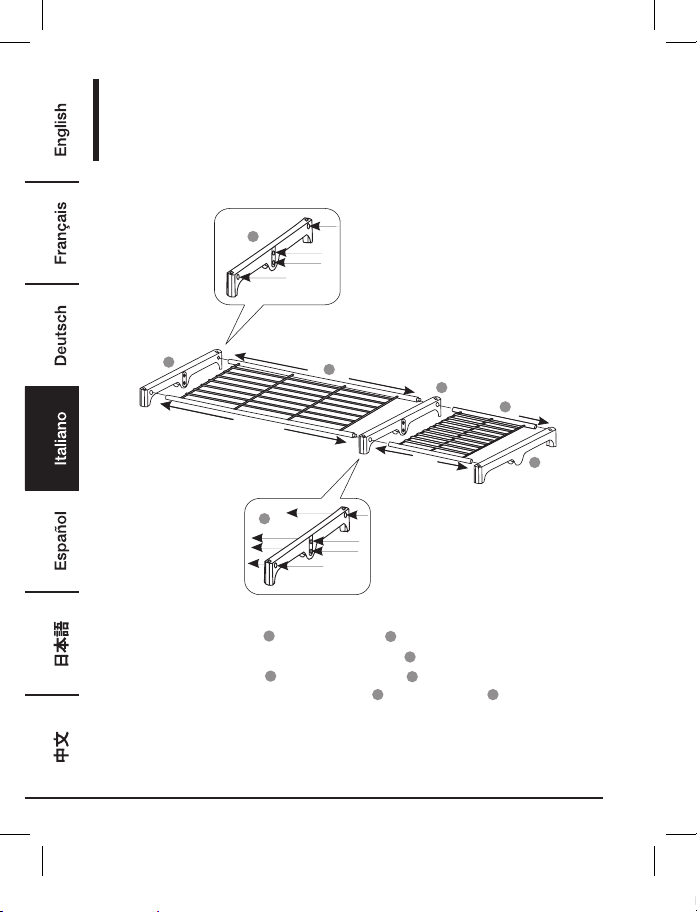
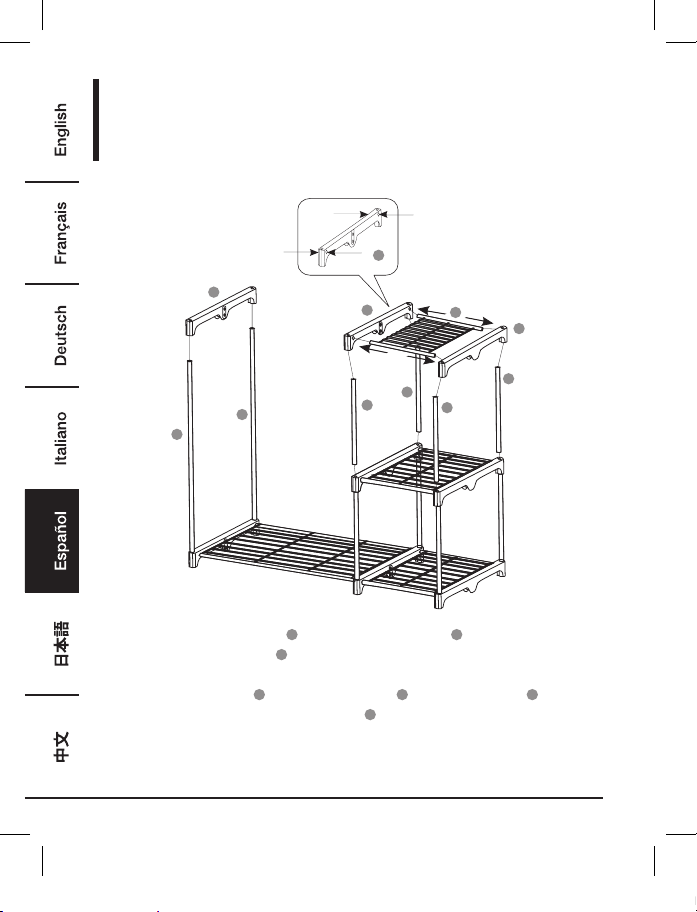
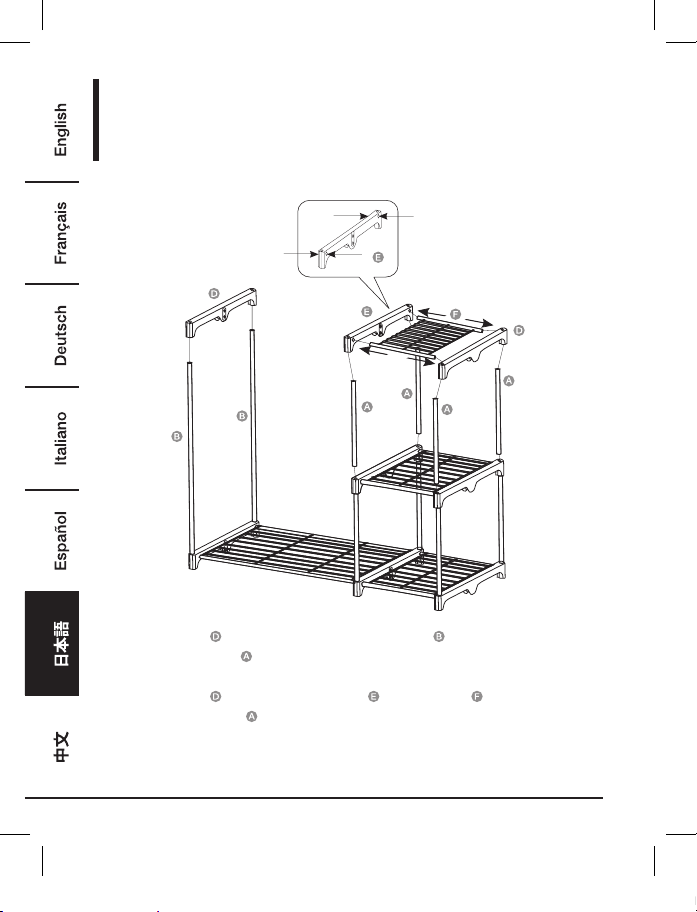
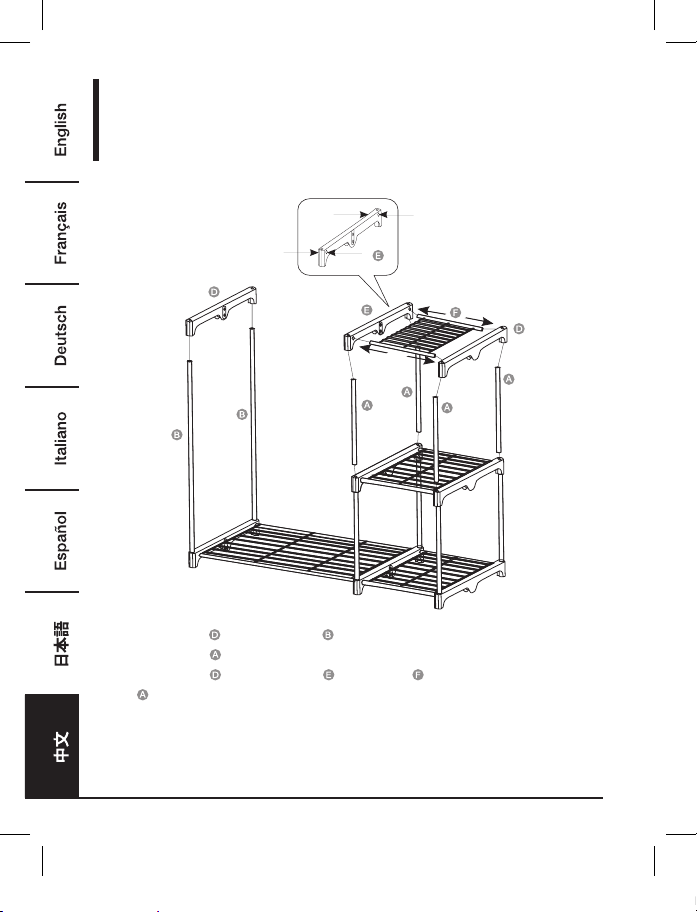
Assembly
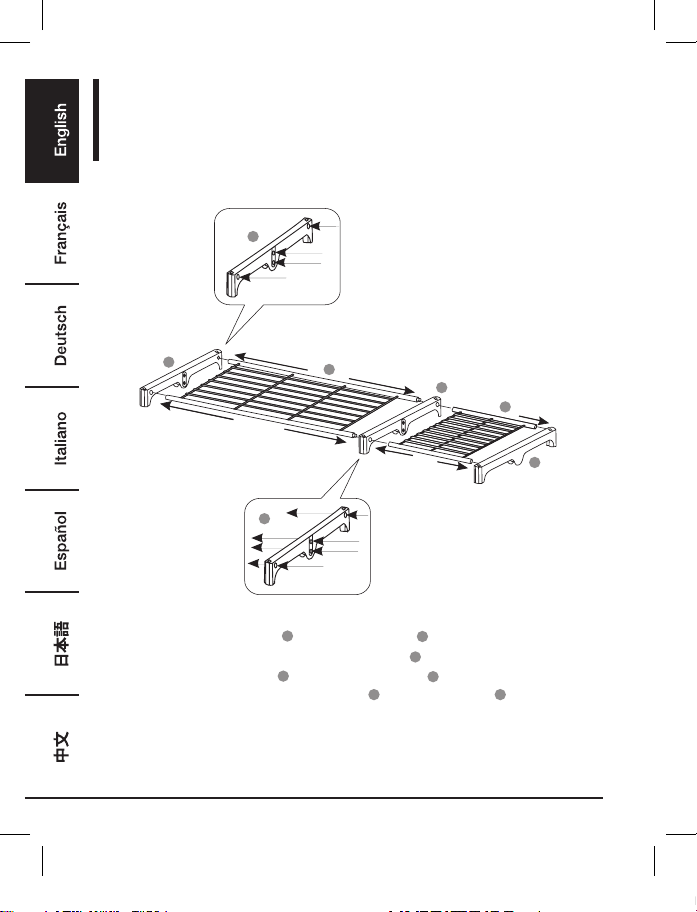
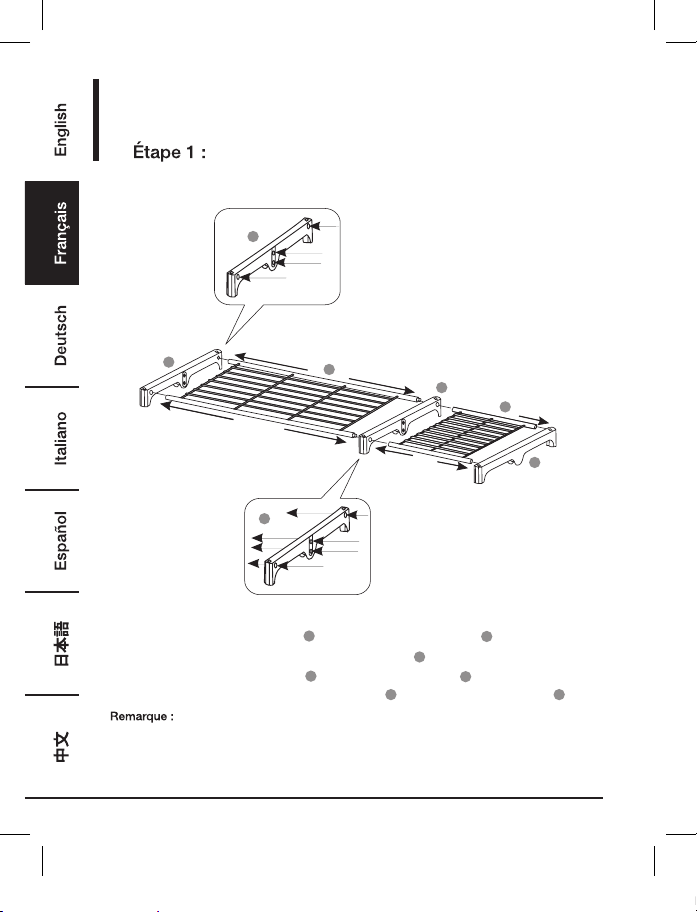
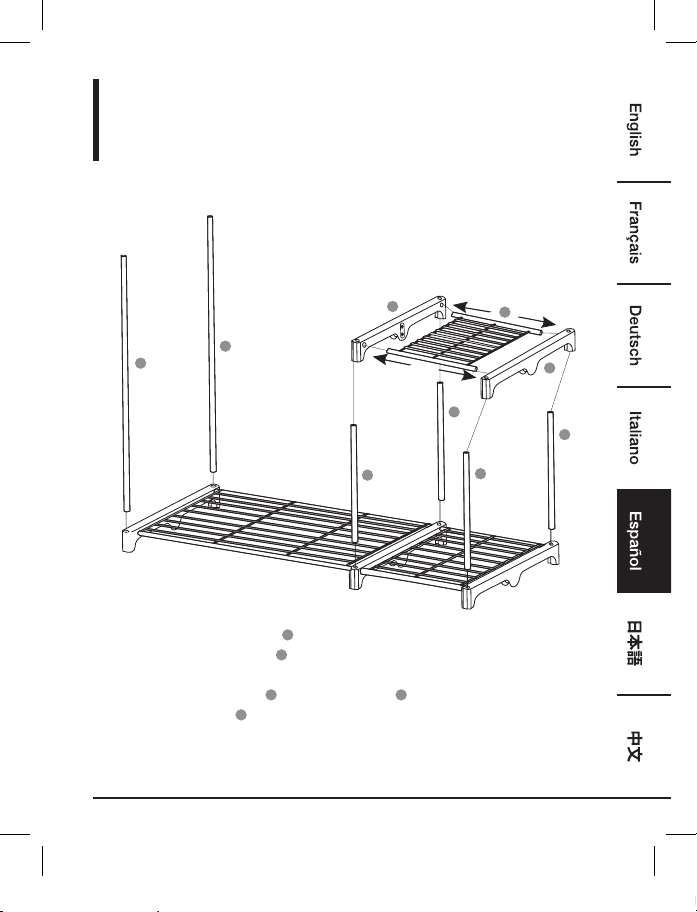
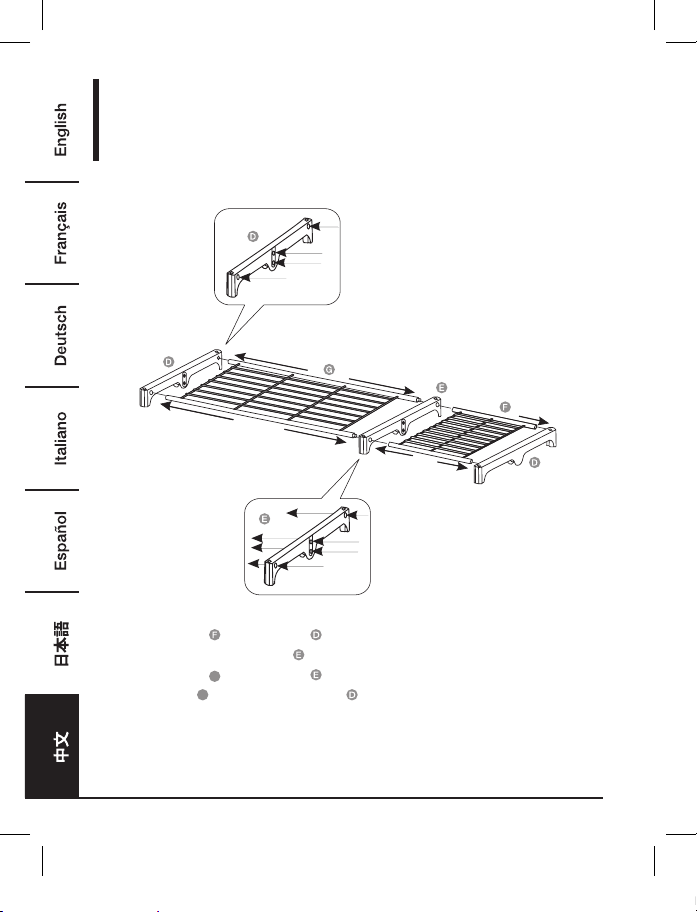
Step 1:
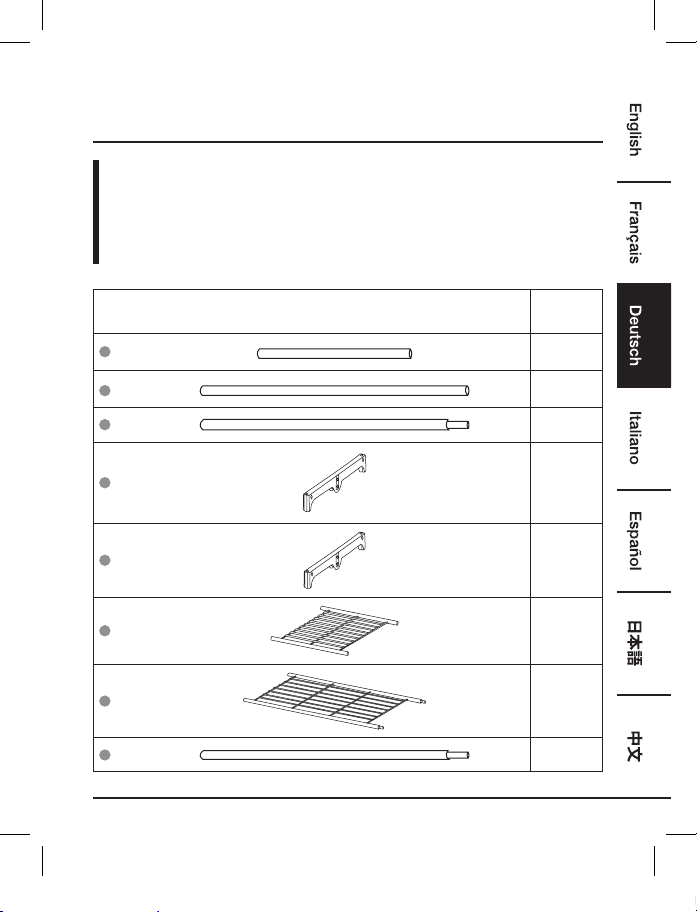
Setting Up the Product
D
D
D
E
E
F
G
• Insert the poles of the short shelf
F
into the end connector
D
.
• Attach the other end of the poles to the middle connector
E
.
• Insert the poles of the long shelf
G
into the middle connector
E
.
• Attach the other end of the poles of the long shelf
G
to the end connector
D
.
• Note: make sure that all poles are fully and securely inserted into the connectors.
B0725QSF1K-AmazonBasics-Free standing closet-IM-V02 (EU).indb 4 8/8/17 1:44 PM
5
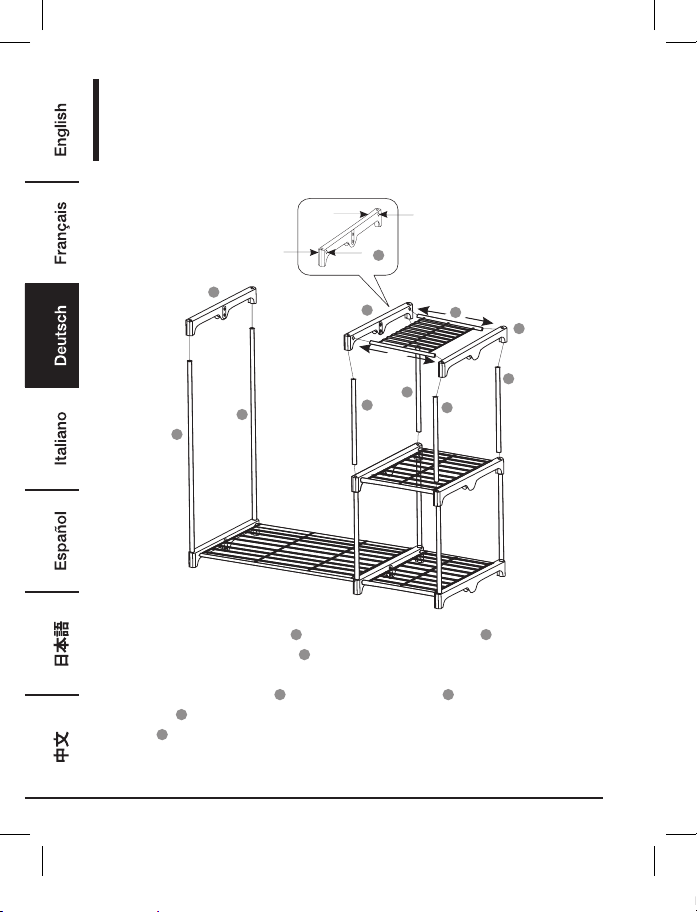
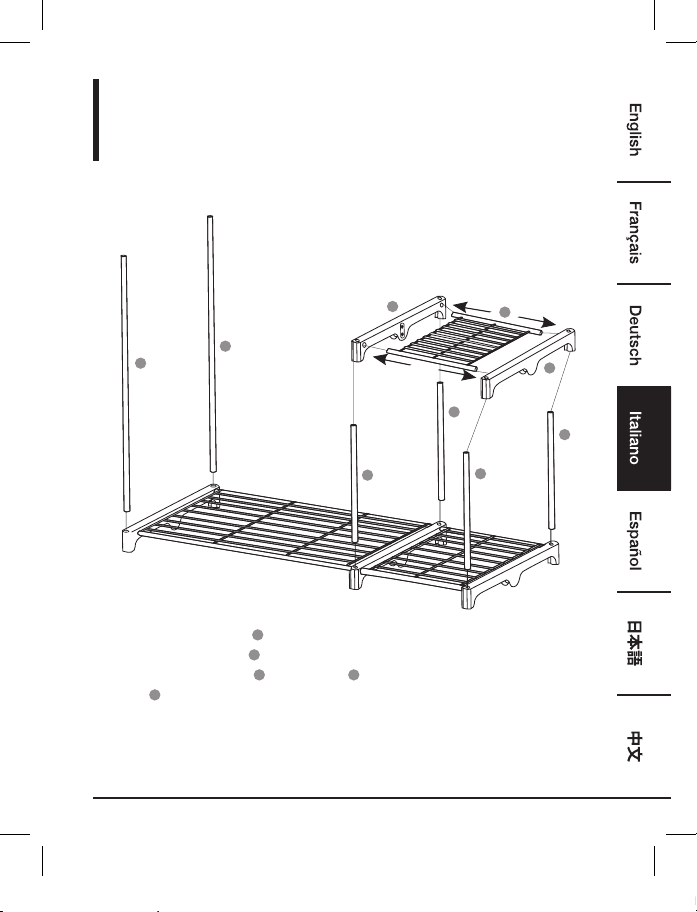
Assembly
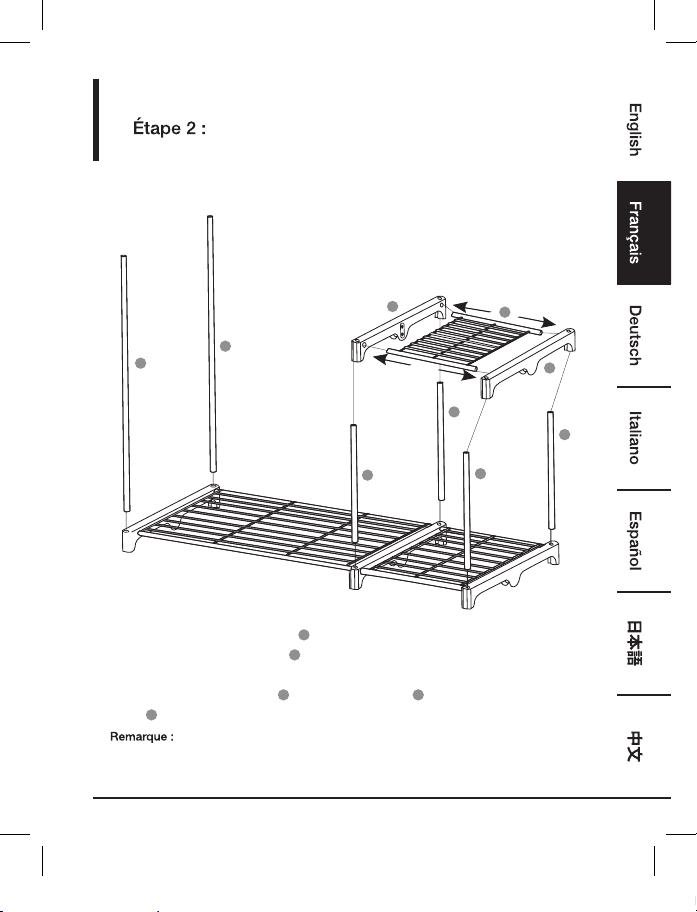
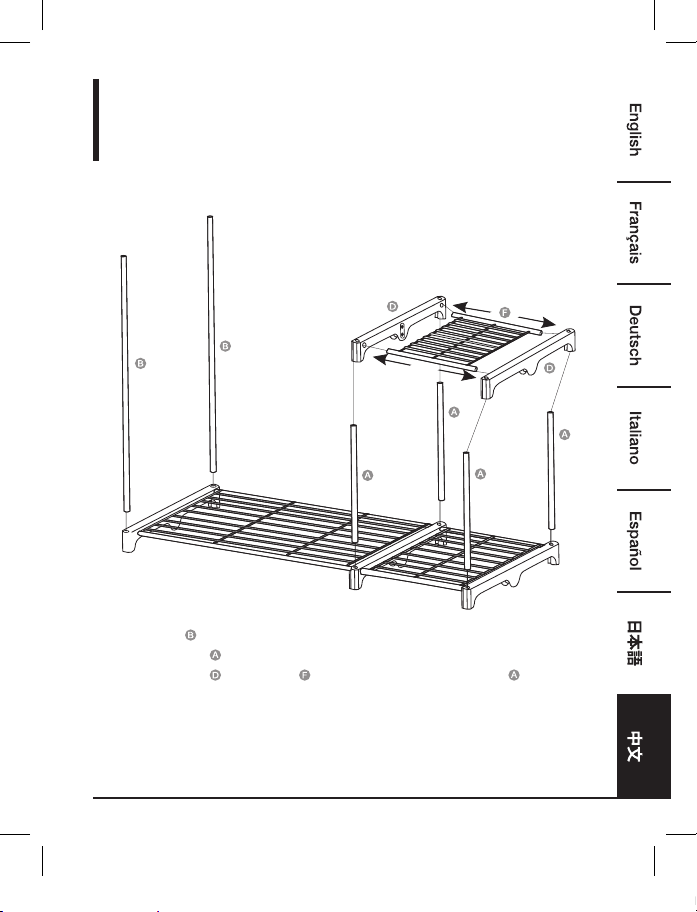
Step 2:
A
A
A
A
B
B
D
D
F
• Insert the long upright poles
B
into the end connector attached to the long shelf.
• Insert 4 short upright poles
A
into the middle and end connectors attached to the short shelf.
• Attach 2 end connectors
D
to a short shelf
F
. Lower the shelf inserting the connectors onto
poles
A
.
• Note: make sure that all poles are fully and securely inserted into the connectors.
B0725QSF1K-AmazonBasics-Free standing closet-IM-V02 (EU).indb 5 8/8/17 1:44 PM
6
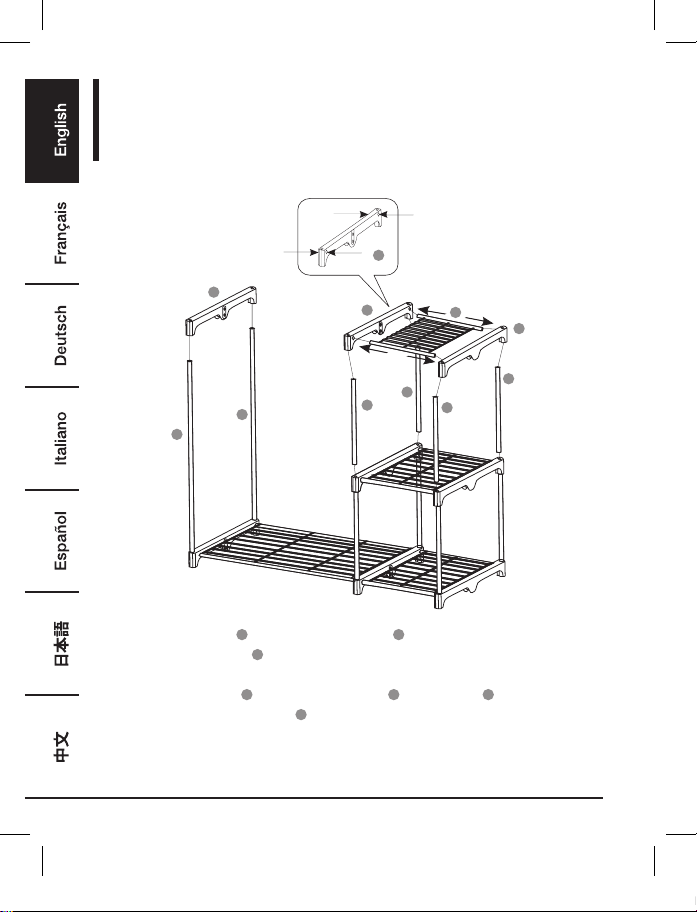
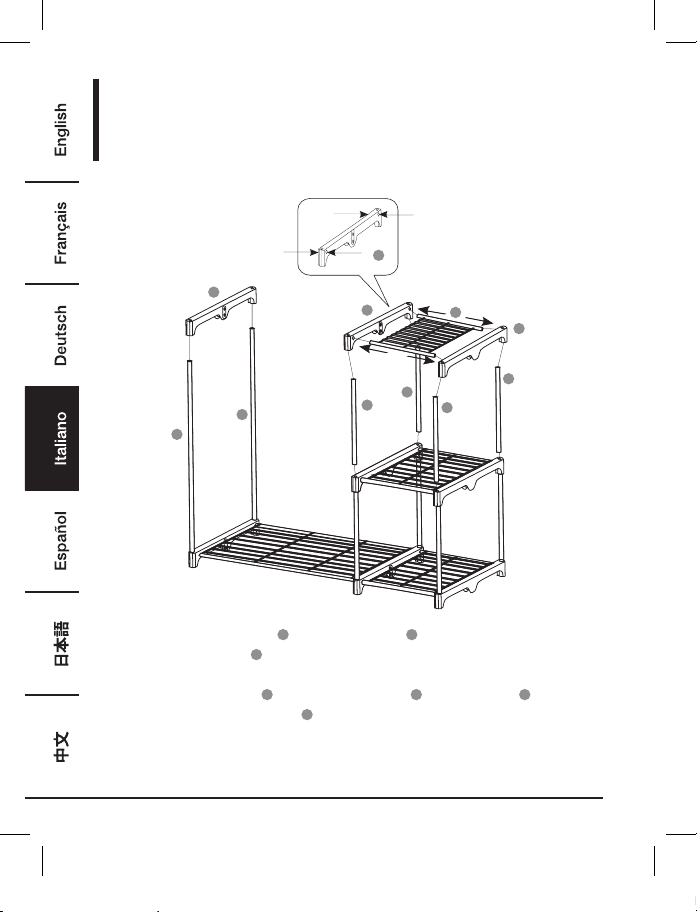
Assembly
Step 3:
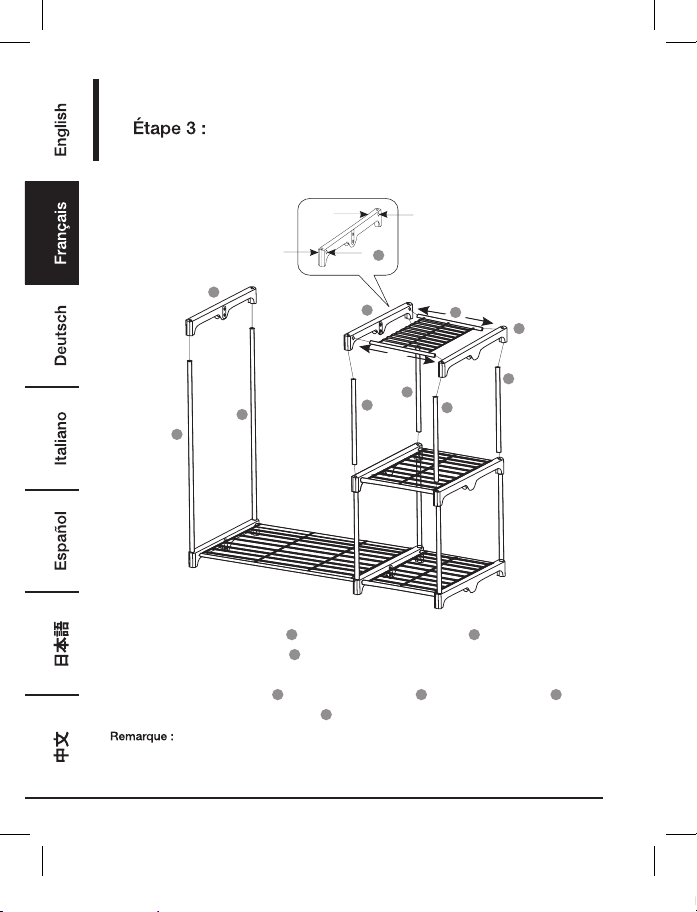
A
A
A
A
D
D
E
E
F
B
B
• Place an end connector
D
onto the long upright poles
B
.
• Insert 4 short upright poles
A
into the middle and end connectors attached to the short shelf
(second level).
• Attach 1 end connectors
D
and an middle connector
E
to a short shelf
F
. Lower the shelf
inserting the connectors onto poles
A
.
• Note: make sure that all poles are fully and securely inserted into the connectors.
B0725QSF1K-AmazonBasics-Free standing closet-IM-V02 (EU).indb 6 8/8/17 1:44 PM
7
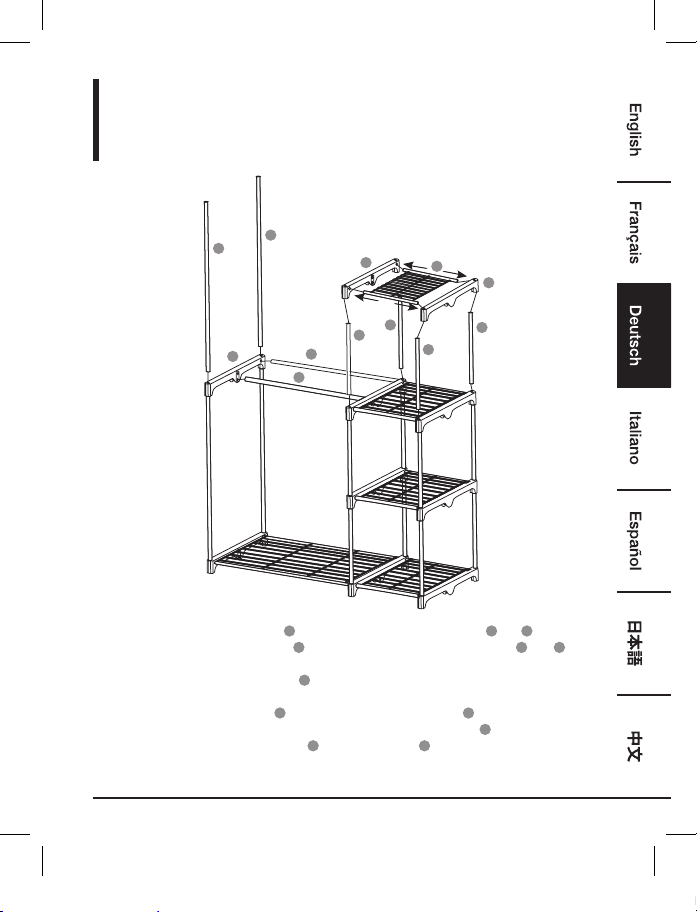
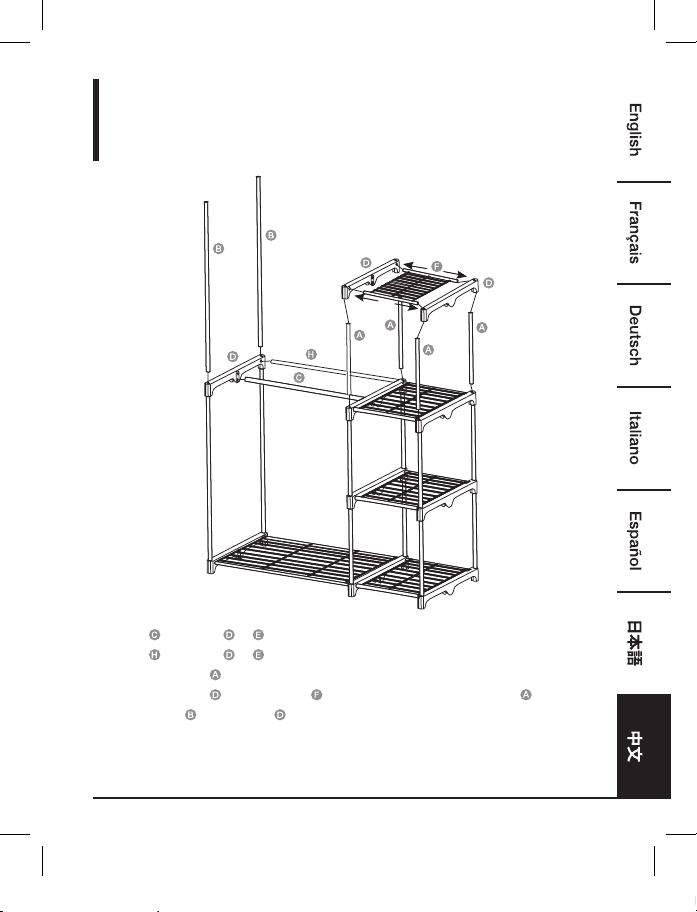
Assembly
Step 4:
A
A
A
A
B
B
C
D
D
F
H
D
• Attach the hanging rod
C
to the bottom holes of connectors
D
and
E
(third level).
• Attach the hanging rod
H
to the side holes of connectors
D
and
E
(third level).
• Insert 4 short upright poles
A
into the middle and end connectors attached to the short shelf
(third level)
• Attach 2 end connector
D
to the next short shelf
F
. Lower the shelf inserting the connectors
onto poles
A
.
• Attach long upright poles
B
to end connector
D
.
• Note: make sure that all poles are fully and securely inserted into the connectors.
B0725QSF1K-AmazonBasics-Free standing closet-IM-V02 (EU).indb 7 8/8/17 1:44 PM
8
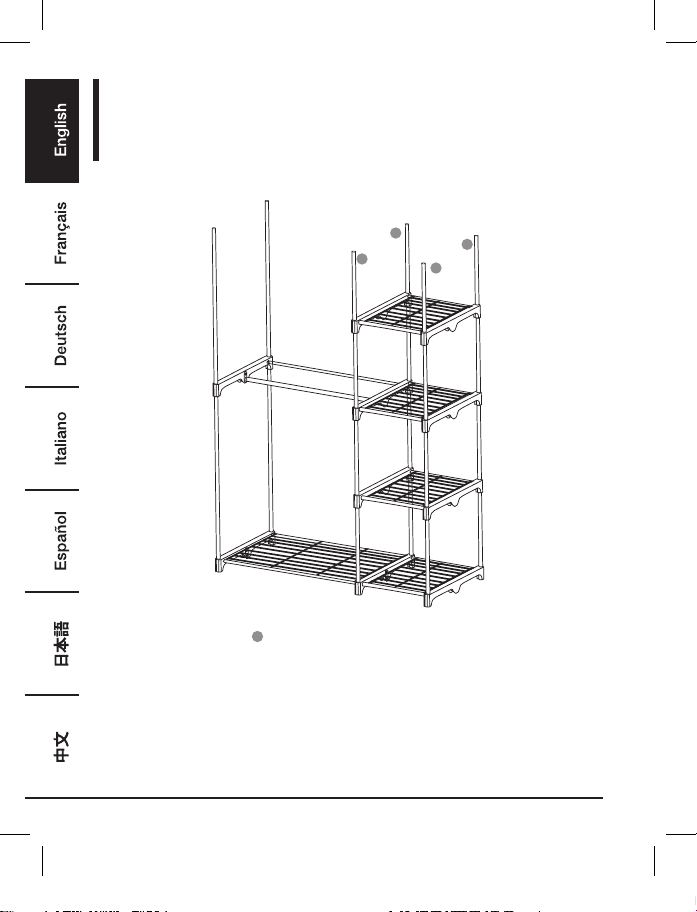
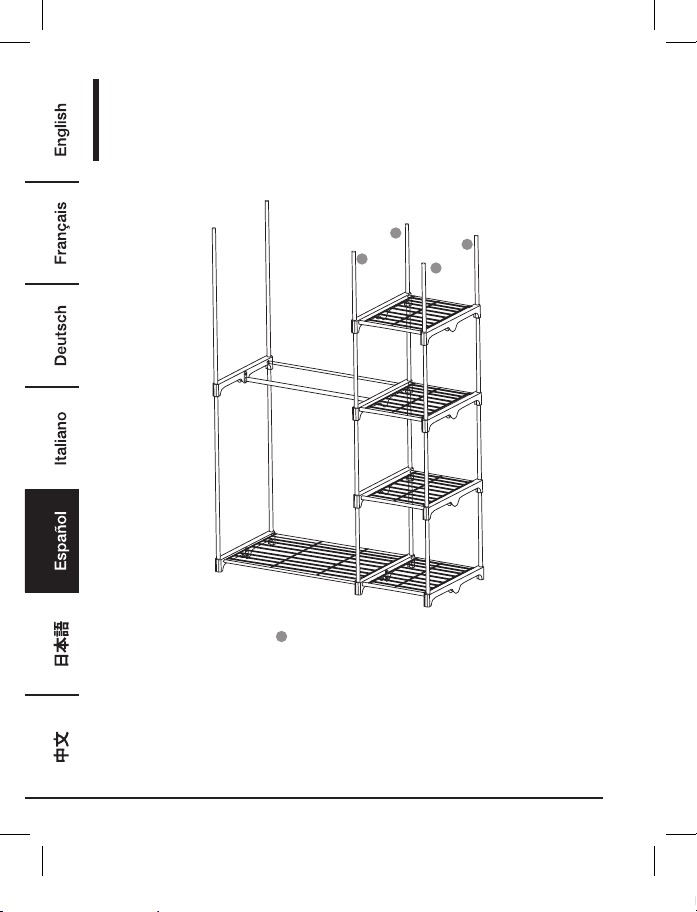
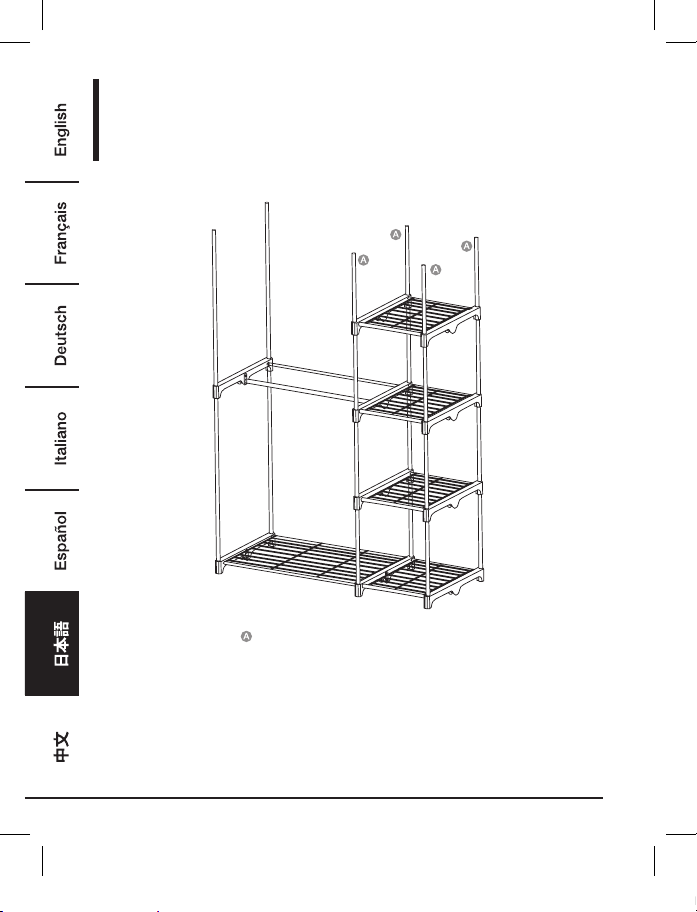
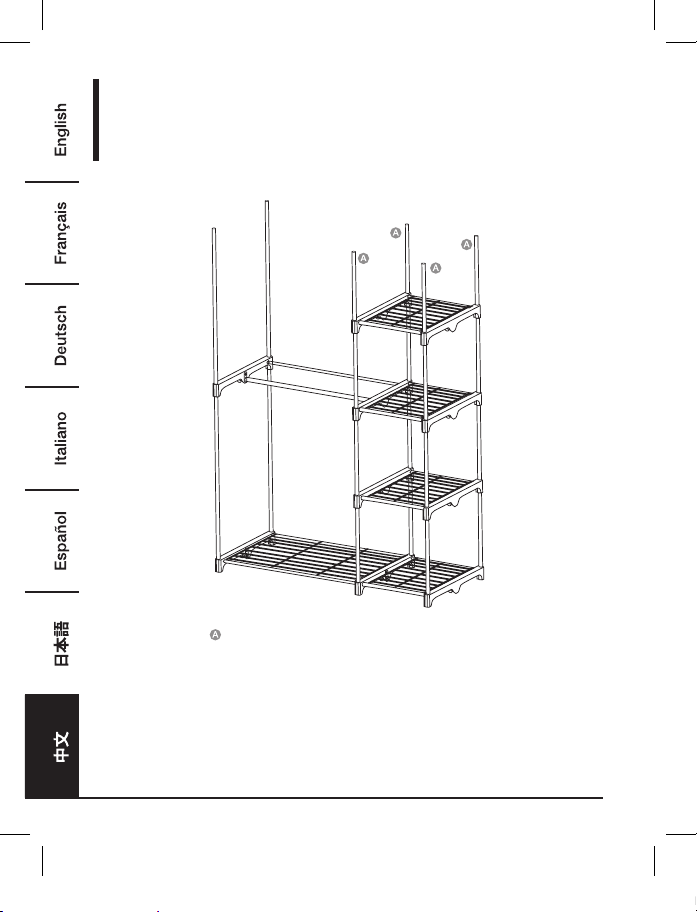
Assembly
Step 5:
A
A
A
A
• Insert 4 short upright poles
A
into the middle and end connectors attached to the short shelf
(fourth level).
• Note: make sure that all poles are fully and securely inserted into the connectors.
B0725QSF1K-AmazonBasics-Free standing closet-IM-V02 (EU).indb 8 8/8/17 1:44 PM
9
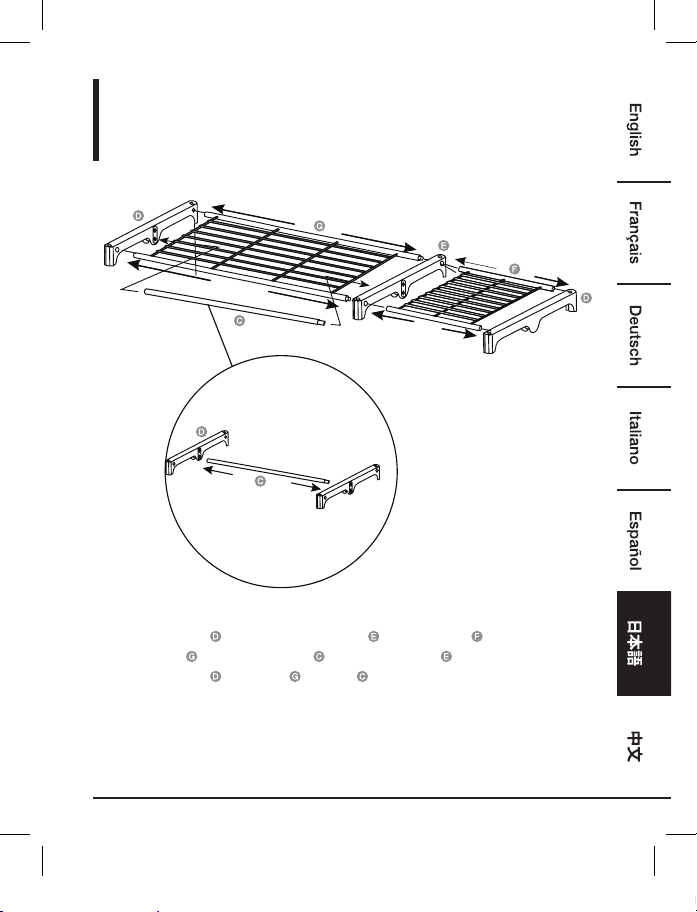
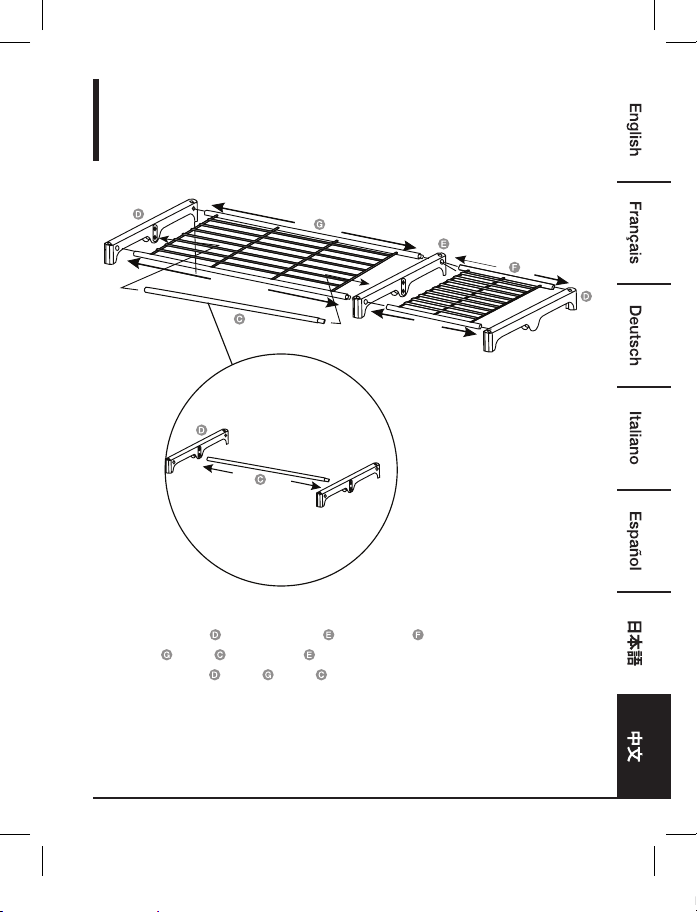
Assembly
Step 6:
• Attach 1 end connector and a middle connector to a short shelf .
• Attach the long shelf
and the hanging rod to the middle connector .
• Attach an end connector
to the shelf and the rod .
• Note: the hanging rod should be inserted in the bottom holes of the connectors.
B0725QSF1K-AmazonBasics-Free standing closet-IM-V02 (EU).indb 9 8/8/17 1:44 PM
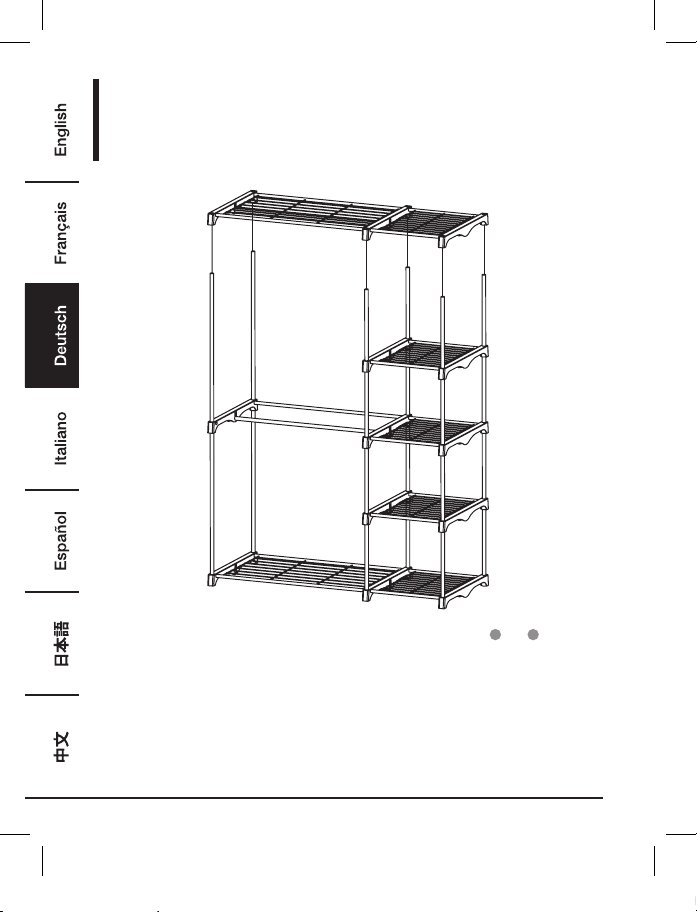
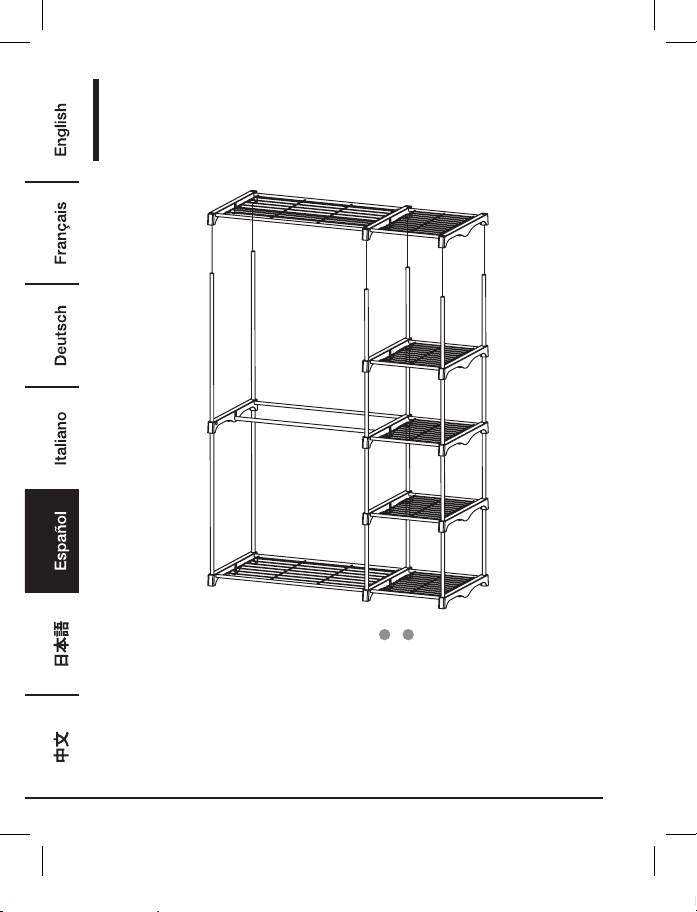
10
Assembly
Step 7:
• Lower the shelves/rod assembly onto the poles
A
and
B
.
• Note: make sure that all poles are fully and securely inserted into the connectors.
B0725QSF1K-AmazonBasics-Free standing closet-IM-V02 (EU).indb 10 8/8/17 1:44 PM
11
Cleaning and Maintenance
• Wipe with a dry cloth as needed to remove dust and dirt.
• Avoid contact with corrosive substances like acids, alkaline or similar substances.
Safety and Compliance
• Warning: Do not let children climb on or play with the product.
• Handle with care.
• To avoid scratching the floor, assemble the closet on a soft surface such as a carpet.
• Warning: Do not place heavy items on the rack, this product in only suitable for towels, clothes
and accessories.
Specications
Maximum Load US Standard Metric
Hanging Rod 15 lbs 6.8 kg
Big Shelf 30 lbs 13.6 kg
Small Shelf 15 lbs 6.8 kg
Warranty Information
To obtain a copy of the warranty for this product:
Visit amazon.com/AmazonBasics/Warranty
— or —
Contact Customer Service at 1-866-216-1072
B0725QSF1K-AmazonBasics-Free standing closet-IM-V02 (EU).indb 11 8/8/17 1:44 PM
12
Feedback
Love it? Hate it?
Let us know with a customer review.
AmazonBasics is committed to delivering customer-driven products that live up to your high
standards. We encourage you to write a review sharing your experiences with the product.
Please visit: amazon.com/review/review-your-purchases#
For further services:
Visit amazon.com/gp/help/customer/contact-us
— or —
Contact Customer Service at 1-866-216-1072
B0725QSF1K-AmazonBasics-Free standing closet-IM-V02 (EU).indb 12 8/8/17 1:44 PM
13
Guide de Bienvenue
•
Français
Armoire Autonome à Deux Portants
Contenu:
Avant de commencer, veuillez vous assurer que l’emballage contient les composants
suivants:
Composant Qté
A
16
B
4
C
2
D
10
E
3
F
5
G
2
H
1
B0725QSF1K-AmazonBasics-Free standing closet-IM-V02 (EU).indb 13 8/8/17 1:44 PM
14
Montage
Installation Du Produit
D
D
D
E
E
F
G
• Insérez les barres de l’étagère courte
F
dans le connecteur d’extrémité
D
.
• Fixez l’autre extrémité des barres sur le connecteur central
E
.
• Insérez les barres de l’étagère longue
G
dans le connecteur central
E
.
• Fixez l’autre extrémité des barres de l’étagère longue
G
sur le connecteur d’extrémité
D
.
•
assurez-vous que toutes les barres sont complètement et solidement insérées
dans les connecteurs.
B0725QSF1K-AmazonBasics-Free standing closet-IM-V02 (EU).indb 14 8/8/17 1:44 PM
15
Montage
A
A
A
A
B
B
D
D
F
• Insérez les barres verticales longues
B
dans le connecteur d’extrémité fixé sur l’étagère longue.
• Insérez 4 barres verticales courtes
A
dans le connecteur central et dans le connecteur
d’extrémité fixés sur l’étagère courte.
• Fixez 2 connecteurs d’extrémité
D
sur une étagère courte
F
. Abaissez l’étagère en insérant les
barres
A
dans les connecteurs.
•
assurez-vous que toutes les barres sont complètement et solidement insérées
dans les connecteurs.
B0725QSF1K-AmazonBasics-Free standing closet-IM-V02 (EU).indb 15 8/8/17 1:44 PM
16
Montage
A
A
A
A
D
D
E
E
F
B
B
• Placez un connecteur d’extrémité
D
sur les barres verticales longues
B
.
• Insérez 4 barres verticales courtes
A
dans le connecteur central et dans le connecteur
d’extrémité fixés sur l’étagère courte (deuxième niveau).
• Fixez 1 connecteur d’extrémité
D
et un connecteur central
E
sur une étagère courte
F
.
Abaissez l’étagère en insérant les barres
A
dans les connecteurs.
•
assurez-vous que toutes les barres sont complètement et solidement insérées
dans les connecteurs.
B0725QSF1K-AmazonBasics-Free standing closet-IM-V02 (EU).indb 16 8/8/17 1:44 PM
17
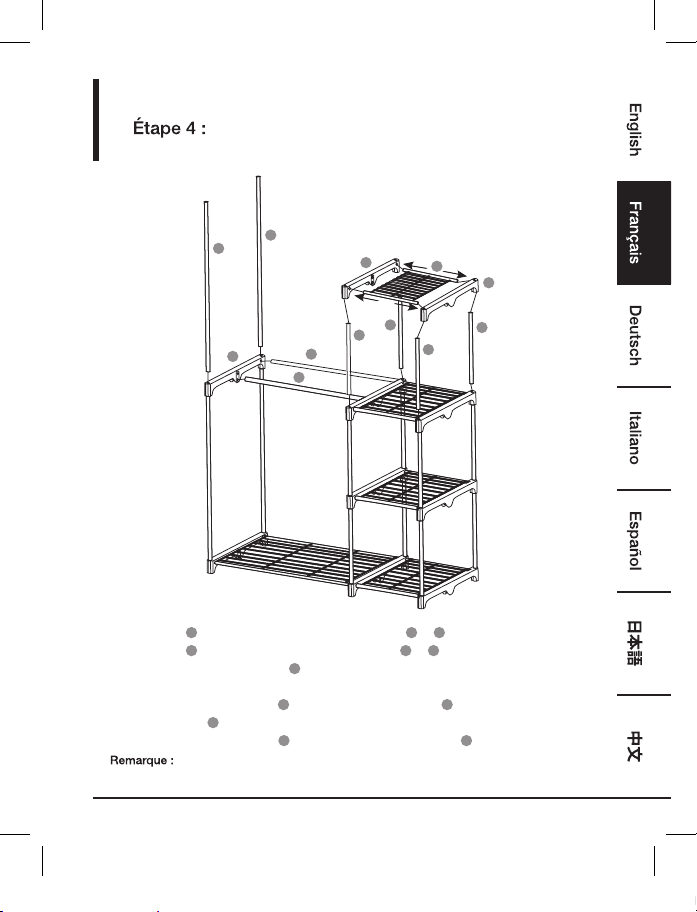
Montage
A
A
A
A
B
B
C
D
D
F
H
D
• Fixez la tringle
C
sur les trous inférieurs des connecteurs
D
et
E
(troisième niveau).
• Fixez la tringle
H
sur les trous latéraux des connecteurs
D
et
E
(troisième niveau).
• Insérez 4 barres verticales courtes
A
dans le connecteur central et dans le connecteur
d’extrémité fixés sur l’étagère courte (troisième niveau).
• Fixez 2 connecteurs d’extrémité
D
sur l’étagère courte suivante
F
. Abaissez l’étagère en
insérant les barres
A
dans les connecteurs.
• Fixez un connecteur d’extrémité
D
sur les barres verticales longues
B
.
• assurez-vous que toutes les barres sont complètement et solidement insérées
dans les connecteurs.
B0725QSF1K-AmazonBasics-Free standing closet-IM-V02 (EU).indb 17 8/8/17 1:44 PM
18
Montage
A
A
A
A
• Insérez 4 barres verticales courtes
A
dans le connecteur central et dans le connecteur
d’extrémité fixés sur l’étagère courte (quatrième niveau).
•
assurez-vous que toutes les barres sont complètement et solidement insérées
dans les connecteurs.
B0725QSF1K-AmazonBasics-Free standing closet-IM-V02 (EU).indb 18 8/8/17 1:44 PM
19
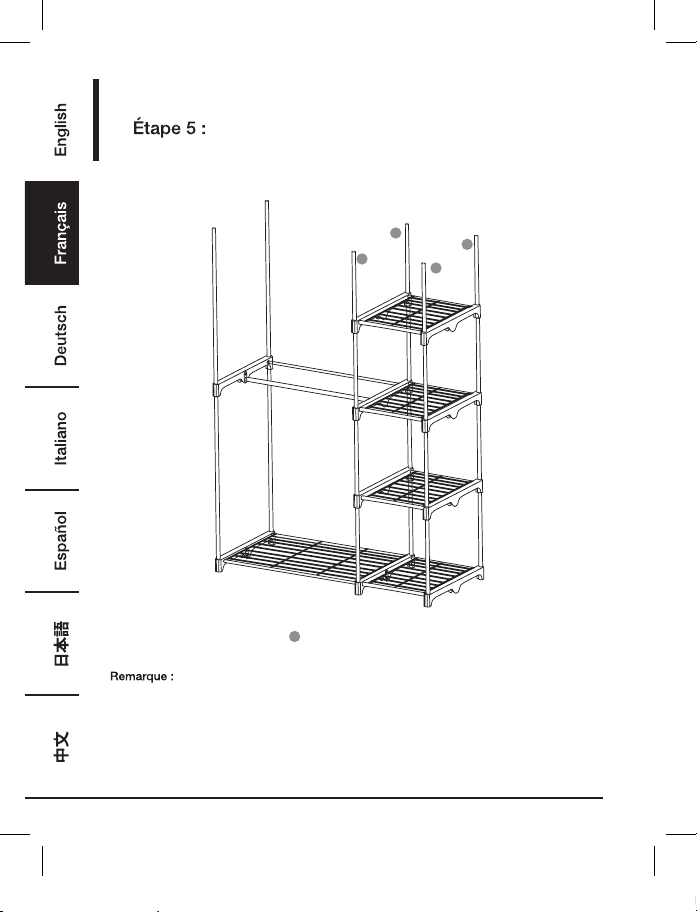
Montage
• Fixez 1 connecteur d’extrémité et un connecteur central sur une étagère courte .
• Fixez l’étagère longue
et la tringle sur le connecteur central .
• Fixez un connecteur d’extrémité
sur l’étagère et sur la tringle .
•
la tringle doit être insérée dans les trous inférieurs des connecteurs.
B0725QSF1K-AmazonBasics-Free standing closet-IM-V02 (EU).indb 19 8/8/17 1:44 PM
20
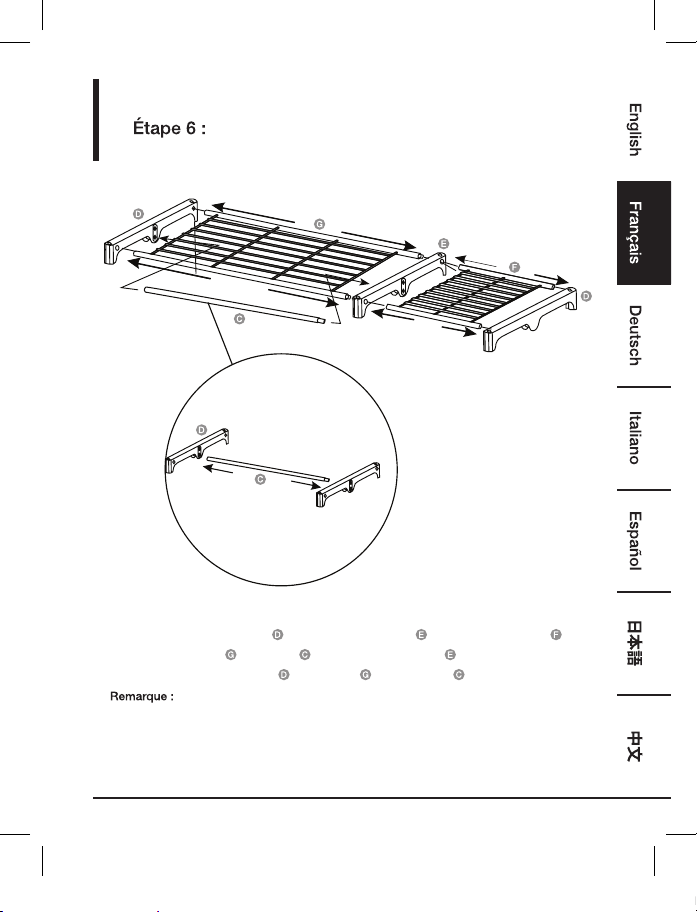
Montage
• Abaissez l’ensemble étagères/tringle sur les barres
A
et
B
.
•
assurez-vous que toutes les barres sont complètement et solidement insérées
dans les connecteurs.
B0725QSF1K-AmazonBasics-Free standing closet-IM-V02 (EU).indb 20 8/8/17 1:44 PM
21
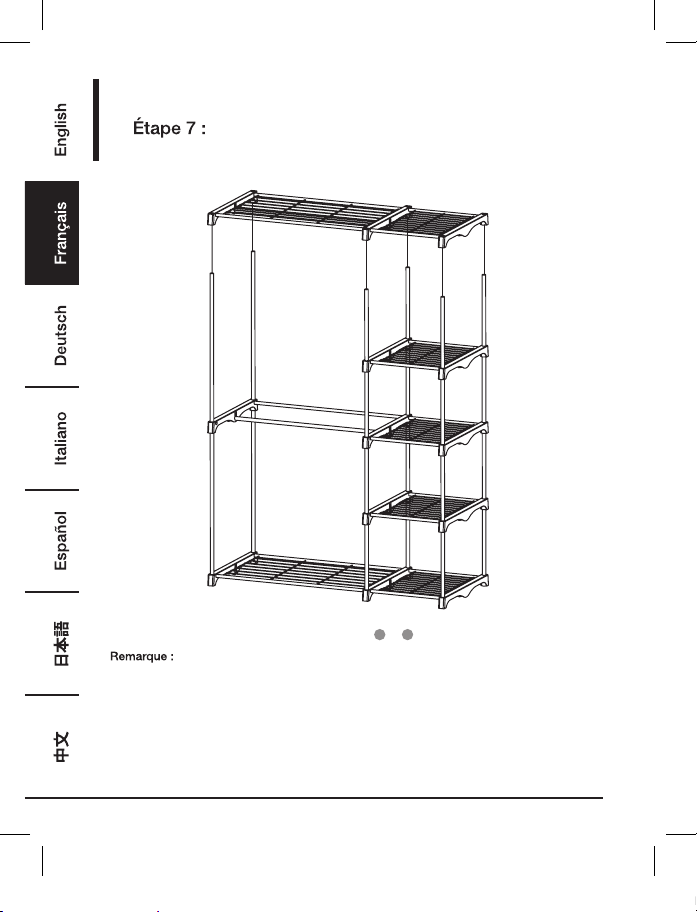
Nettoyage Et Entretien
• Essuyez le produit à l'aide d'un chiffon sec, au besoin, pour en éliminer toute poussière et saleté.
•
Évitez tout contact avec des substances corrosives, notamment acides, alcaline ou toutes
substances similaires.
Sécurité Et Conformité
• Avertissement: Ne laissez pas des enfants escalader le produit ou jouer avec celui-ci.
• Manipulez-le avec précaution.
• Afin d’éviter de rayer le sol, montez l’armoire sur une surface molle telle qu’un tapis.
• Avertissement: Ne placez pas d’objets lourds sur les étagères. Ce produit convient
exclusivement au rangement des serviettes, des vêtements et des accessoires.
Caractéristiques
Charge Maximale Standard Américain Métriques
Tringle 15lb 6,8 kg
Étagère longue 30lb 13,6 kg
Étagère courte 15lb 6,8 kg
Informations Sur La Garantie
Pour obtenir une copie de la garantie portant sur ce produit:
Veuillez visiter amazon.fr/AmazonBasics/Warranty
— ou —
Contactez le service clients au 08 00 94 77 15
B0725QSF1K-AmazonBasics-Free standing closet-IM-V02 (EU).indb 21 8/8/17 1:44 PM
22
Vos Avis
Vous l’adorez? Vous le détestez?
Faites-le nous savoir en laissant un commentaire.
AmazonBasics s’engage à vous offrir des produits axés sur les besoins de la clientèle et répondant
à vos normes élevées. Nous vous encourageons à rédiger un commentaire visant à partager vos
expériences sur le produit.
Veuillez visiter : amazon.fr/review/review-your-purchases#
Pour obtenir d’autres services:
Veuillez visiter amazon.fr/gp/help/customer/contact-us
— ou —
Contactez le service clients au 08 00 94 77 15
B0725QSF1K-AmazonBasics-Free standing closet-IM-V02 (EU).indb 22 8/8/17 1:44 PM
23
Bedienungsanleitung
•
Deutsch
Doppelt Verstrebter Freistehender
Schrank
Inhalt:
Bevor Sie beginnen, prüfen Sie, ob die Verpackung die folgenden Teile enthält:
Teil Anzahl
A
16
B
4
C
2
D
10
E
3
F
5
G
2
H
1
B0725QSF1K-AmazonBasics-Free standing closet-IM-V02 (EU).indb 23 8/8/17 1:44 PM
24
Montage
Schritt 1:
Montage des Produkts
D
D
D
E
E
F
G
• Führen Sie die Stangen des kurzen Regalbodens
F
in den End-Verbinder
D
ein.
• Befestigen Sie das andere Ende der Stangen am mittleren Verbinder
E
.
• Führen Sie die Stangen des langen Regalbodens
G
in den mittleren Verbinder
E
ein.
• Befestigen Sie das andere Ende der Stangen des langen Regalbodens
G
am End-Verbinder
D
.
• Hinweis: Achten Sie darauf, dass alle Stangen vollständig und sicher in den Verbindern
eingesetzt sind.
B0725QSF1K-AmazonBasics-Free standing closet-IM-V02 (EU).indb 24 8/8/17 1:44 PM
25
Montage
Schritt 2:
A
A
A
A
B
B
D
D
F
• Führen Sie die langen, geraden Stangen
B
in den End-Verbinder ein, der am langen
Regalboden befestigt ist.
• Führen Sie 4 kurze, gerade Stangen
A
in die mittleren Verbinder und End-Verbinder ein, die am
kurzen Regalboden befestigt sind.
• Befestigen Sie 2 End-Verbinder
D
an einem kurzen Regalboden
F
. Senken Sie den
Regalboden ab und befestigen Sie dabei die Verbinder an den Stangen
A
.
• Hinweis: Achten Sie darauf, dass alle Stangen vollständig und sicher in den Verbindern
eingesetzt sind.
B0725QSF1K-AmazonBasics-Free standing closet-IM-V02 (EU).indb 25 8/8/17 1:44 PM
26
Montage
Schritt 3:
A
A
A
A
D
D
E
E
F
B
B
• Platzieren Sie einen End-Verbinder
D
auf den langen, geraden Stangen
B
.
• Führen Sie 4 kurze, gerade Stangen
A
in die mittleren Verbinder und End-Verbinder ein, die am
kurzen Regalboden befestigt sind (zweite Ebene).
• Befestigen Sie 1 End-Verbinder
D
und einen mittleren Verbinder
E
an einem kurzen
Regalboden
F
. Senken Sie den Regalboden ab und befestigen Sie dabei die Verbinder an den
Stangen
A
.
• Hinweis: Achten Sie darauf, dass alle Stangen vollständig und sicher in den Verbindern
eingesetzt sind.
B0725QSF1K-AmazonBasics-Free standing closet-IM-V02 (EU).indb 26 8/8/17 1:44 PM
27
Montage
Schritt 4:
A
A
A
A
B
B
C
D
D
F
H
D
•
Befestigen Sie die Aufhängestange
C
an den unteren Löchern der Verbinder
D
und
E
(dritte Ebene).
• Befestigen Sie die Aufhängestange
H
an den seitlichen Löchern der Verbinder
D
und
E
(dritte
Ebene).
• Führen Sie 4 kurze, gerade Stangen
A
in die mittleren Verbinder und End-Verbinder ein, die am
kurzen Regalboden befestigt sind (dritte Ebene).
• Befestigen Sie 2 End-Verbinder
D
am nächsten kurzen Regalboden
F
. Senken Sie den
Regalboden ab und befestigen Sie dabei die Verbinder an den Stangen
A
.
• Befestigen Sie lange, gerade Stangen
B
am End-Verbinder
D
.
• Hinweis: Achten Sie darauf, dass alle Stangen vollständig und sicher in den Verbindern
eingesetzt sind.
B0725QSF1K-AmazonBasics-Free standing closet-IM-V02 (EU).indb 27 8/8/17 1:44 PM
28
Montage
Schritt 5:
A
A
A
A
• Führen Sie 4 kurze, gerade Stangen
A
in die mittleren Verbinder und End-Verbinder ein, die am
kurzen Regalboden befestigt sind (vierte Ebene).
• Hinweis: Achten Sie darauf, dass alle Stangen vollständig und sicher in den Verbindern
eingesetzt sind.
B0725QSF1K-AmazonBasics-Free standing closet-IM-V02 (EU).indb 28 8/8/17 1:44 PM
29
Montage
Schritt 6:
• Befestigen Sie 1 End-Verbinder und einen mittleren Verbinder an einem kurzen
Regalboden
.
• Befestigen Sie den langen Regalboden
und die Aufhängestange am mittleren Verbinder .
• Befestigen Sie einen End-Verbinder
am Regalboden und an der Stange .
• Hinweis: Die Aufhängestange sollte in den unteren Löchern der Verbinder eingesetzt werden.
B0725QSF1K-AmazonBasics-Free standing closet-IM-V02 (EU).indb 29 8/8/17 1:44 PM
30
Montage
Schritt 7:
• Senken Sie die zusammengebauten Regalböden/Stange auf die Stangen
A
und
B
ab.
• Hinweis: Achten Sie darauf, dass alle Stangen vollständig und sicher in den Verbindern
eingesetzt sind.
B0725QSF1K-AmazonBasics-Free standing closet-IM-V02 (EU).indb 30 8/8/17 1:44 PM
31
Reinigung und Pege
• Wischen Sie bei Bedarf Staub und Schmutz mit einem trockenen Tuch ab.
•
Vermeiden Sie den Kontakt mit ätzenden Substanzen, wie Säuren, Laugen oder ähnlichen
Materialien.
Sicherheit und Konformität
• Warnung: Lassen Sie niemals Kinder auf das Produkt klettern oder mit dem Produkt spielen.
• Vorsichtig damit umgehen.
• Um Kratzer am Boden zu vermeiden, montieren Sie den Schrank auf einem weichen
Untergrund wie einem Teppich.
• Warnung: Legen Sie keine schweren Gegenstände auf das Regal, dieses Produkt ist nur für
Handtücher, Bekleidung und Accessoires vorgesehen.
Technische Daten
Maximale Belastung US-Norm Metrisch
Aufhängestange 15 lbs 6,8 kg
Großer Regalboden 30 lbs 13,6 kg
Kleiner Regalboden 15 lbs 6,8 kg
Gewährleistung
Eine Kopie der Gewährleistung für dieses Produkt erhalten Sie unter
Besuchen Sie amazon.de/AmazonBasics/Warranty
— oder —
Wenden Sie sich an den Kundendienst unter 08 00-3 63 84 69
B0725QSF1K-AmazonBasics-Free standing closet-IM-V02 (EU).indb 31 8/8/17 1:44 PM
32
Feedback
Gefällt es Ihnen? Gefällt es Ihnen nicht?
Dann bewerten Sie das Produkt auf unserer Webseite!
AmazonBasics setzt sich für die Bereitstellung kundenorientierter Produkte ein, um Ihre hohen
Qualitätsstandards zu erfüllen. Bitte schreiben Sie eine Rezension, in der Sie Ihre Erfahrungen mit
dem Produkt teilen.
Bitte besuchen Sie: amazon.de/review/review-your-purchases#
Möchten Sie mehr wissen?
Besuchen Sie amazon.de/gp/help/customer/contact-us
— oder —
Wenden Sie sich an den Kundendienst unter 08 00-3 63 84 69
B0725QSF1K-AmazonBasics-Free standing closet-IM-V02 (EU).indb 32 8/8/17 1:44 PM
33
Guida di Benvenuto
•
Italiano
Armadio a Giorno, Doppio
Contenuto:
Prima di iniziare, assicurarsi che la confezione contenga i seguenti componenti:
Pezzo Qtà
A
16
B
4
C
2
D
10
E
3
F
5
G
2
H
1
B0725QSF1K-AmazonBasics-Free standing closet-IM-V02 (EU).indb 33 8/8/17 1:44 PM
34
Montaggio
Passo 1:
Installazione Del Prodotto
D
D
D
E
E
F
G
• Inserire i pali del ripiano corto
F
nel connettore finale
D
.
• Attaccare l’altra estremità dei pali al connettore di mezzo
E
.
• Inserire i pali del ripiano lungo
G
nel connettore di mezzo
E
.
• Attaccare l’altra estremità dei pali del ripiano lungo
G
al connettore finale
D
.
• Nota: assicurarsi che tutti i pali siano inseriti completamente e in modo sicuro nei connettori.
B0725QSF1K-AmazonBasics-Free standing closet-IM-V02 (EU).indb 34 8/8/17 1:44 PM
35
Montaggio
Passo 2:
A
A
A
A
B
B
D
D
F
• Inserire i lunghi pali verticali
B
nel connettore finale attaccato al ripiano lungo.
• Inserire 4 pali verticali corti
A
nei connettori di mezzo e finale attaccati al ripiano corto.
• Attaccare 2 connettori finali
D
al ripiano corto
F
. Abbassare il ripiano inserendo i connettori
nei pali
A
.
• Nota: assicurarsi che tutti i pali siano inseriti completamente e in modo sicuro nei connettori.
B0725QSF1K-AmazonBasics-Free standing closet-IM-V02 (EU).indb 35 8/8/17 1:44 PM
36
Montaggio
Passo 3:
A
A
A
A
D
D
E
E
F
B
B
• Posizionare un connettore finale
D
sui lunghi pali verticali
B
.
• Inserirei 4 pali verticali corti
A
nei connettori di mezzo e finale attaccati al ripiano corto (secondo
livello).
• Attaccare 1 connettore finale
D
e un connettore di mezzo
E
a un ripiano corto
F
. Abbassare il
ripiano inserendo i connettori nei pali
A
.
• Nota: assicurarsi che tutti i pali siano inseriti completamente e in modo sicuro nei connettori.
B0725QSF1K-AmazonBasics-Free standing closet-IM-V02 (EU).indb 36 8/8/17 1:44 PM
37
Montaggio
Passo 4:
A
A
A
A
B
B
C
D
D
F
H
D
• Fissare la barra
C
nei fori inferiori dei connettori
D
e
E
(terzo livello).
• Fissare la barra
H
ai fori laterali dei connettori
D
e
E
(terzo livello).
•
Inserire 4 pali verticali corti
A
nei connettori di mezzo e finali attaccati al ripiano corto (terzo livello).
• Attaccare 2 connettori finali
D
al prossimo ripiano corto
F
. Abbassare il ripiano inserendo i
connettori nei pali
A
.
• Attaccare i lunghi pali verticali
B
al connettore finale
D
.
• Nota: assicurarsi che tutti i pali siano inseriti completamente e in modo sicuro nei connettori.
B0725QSF1K-AmazonBasics-Free standing closet-IM-V02 (EU).indb 37 8/8/17 1:44 PM
38
Montaggio
Passo 5:
A
A
A
A
• Inserire 4 pali verticali corti
A
nei connettori di mezzo e finali attaccati al ripiano corto (quarto
livello).
• Nota: assicurarsi che tutti i pali siano inseriti completamente e in modo sicuro nei connettori.
B0725QSF1K-AmazonBasics-Free standing closet-IM-V02 (EU).indb 38 8/8/17 1:44 PM
39
Montaggio
Passo 6:
• Attaccare 1 connettore finale e un connettore di mezzo a un ripiano corto .
• Attaccare il ripiano lungo
e la barra al connettore di mezzo .
• Attaccare un connettore finale
al ripiano e l’asta .
• Nota: la barra dovrebbe essere inserita nei fori inferiori dei connettori.
B0725QSF1K-AmazonBasics-Free standing closet-IM-V02 (EU).indb 39 8/8/17 1:44 PM
40
Montaggio
Passo 7:
• Abbassare il ripiano superiore preassemblato al passo precedente sui pali
A
e
B
.
• Nota: assicurarsi che tutti i pali siano inseriti completamente e in modo sicuro nei connettori.
B0725QSF1K-AmazonBasics-Free standing closet-IM-V02 (EU).indb 40 8/8/17 1:44 PM
41
Pulizia e Manutenzione
• Pulire con un panno asciutto, secondo necessità, per rimuovere la polvere e lo sporco.
• Evitare contatto con sostanze corrosive come acidi, sostanze alcaline o simili.
Sicurezza e Conformità
• Avvertenza: non lasciare che i bambini si arrampichino sopra o giochino con il prodotto.
• Maneggiare con cura.
• Per evitare di graffiare il pavimento, assemblare il mobile su una superficie morbida come ad
esempio un tappeto.
• Attenzione: Non collocare oggetti pesanti sul mobile, questo prodotto è adatto solo per
asciugamani, vestiti e accessori.
Speciche
Carico massimo Standard USA Sistema metrico
Barra 15 libbre 6,8 kg
Grande Ripiano 30 libbre 13,6 kg
Piccolo Ripiano 15 libbre 6,8 kg
Informazioni Di Garanzia
Per ottenere una copia della garanzia del prodotto:
Visita amazon.it/AmazonBasics/Warranty
— o —
Contattare il Servizio Clienti al
800 62 88 05
B0725QSF1K-AmazonBasics-Free standing closet-IM-V02 (EU).indb 41 8/8/17 1:44 PM
42
Feedback
Ti piace? Oppure no?
Faccelo sapere scrivendo la tua recensione.
AmazonBasics si impegna a distribuire prodotti orientati al cliente che siano all’altezza degli
standard più elevati. Pertanto, invitiamo i clienti a scrivere una recensione per condividere le proprie
esperienze con il prodotto.
Visitare:
amazon.it/review/review-your-purchases
Per ulteriori servizi:
Visita amazon.it/gp/help/customer/contact-us
— o —
Contattare il Servizio Clienti al
800 62 88 05
B0725QSF1K-AmazonBasics-Free standing closet-IM-V02 (EU).indb 42 8/8/17 1:44 PM
43
Guía de Bienvenida
•
Español
Armario Ropero Independiente Con
Doble Vara
Contenido:
Antes de comenzar, compruebe que el embalaje incluye los siguientes componentes:
Componente Cant.
A
16
B
4
C
2
D
10
E
3
F
5
G
2
H
1
B0725QSF1K-AmazonBasics-Free standing closet-IM-V02 (EU).indb 43 8/8/17 1:44 PM

44
Montaje
Paso 1:
Montaje Del Producto
D
D
D
E
E
F
G
• Inserte las varas de la estantería corta
F
en el conector del extremo
D
.
• Fije el otro extremo de las varas en el conector del medio
E
.
• Inserte las varas de la estantería larga
G
en el conector del medio
E
.
• Fije el otro extremo de las varas de la estantería larga
G
en el conector del extremo
D
.
• Nota: compruebe que todas las varas se han insertado de forma segura y correcta en los
conectores.
B0725QSF1K-AmazonBasics-Free standing closet-IM-V02 (EU).indb 44 8/8/17 1:44 PM
45
Montaje
Paso 2:
A
A
A
A
B
B
D
D
F
• Inserte las varas verticales largas
B
en el conector del extremo fijado a la estantería larga.
• Inserte 4 varas verticales cortas
A
en los conectores del medio y del extremo fijados a la
estantería corta.
• Fije 2 conectores del extremo
D
a una estantería corta
F
. Baje la estantería insertando los
conectores en las varas
A
.
• Nota: compruebe que todas las varas se han insertado de forma segura y correcta en los
conectores.
B0725QSF1K-AmazonBasics-Free standing closet-IM-V02 (EU).indb 45 8/8/17 1:44 PM
46
Montaje
Paso 3:
A
A
A
A
D
D
E
E
F
B
B
• Coloque un conector del extremo
D
en las varas verticales largas
B
.
• Inserte 4 varas verticales cortas
A
en los conectores del medio y del extremo fijados a la
estantería corta (segundo nivel).
• Fije 1 conector del extremo
D
y un conector del medio
E
a una estantería corta
F
. Baje la
estantería insertando los conectores en las varas
A
.
• Nota: compruebe que todas las varas se han insertado de forma segura y correcta en los
conectores.
B0725QSF1K-AmazonBasics-Free standing closet-IM-V02 (EU).indb 46 8/8/17 1:44 PM
47
Montaje
Paso 4:
A
A
A
A
B
B
C
D
D
F
H
D
• Fije la barra de colgar
C
a los orificios inferiores de los conectores
D
y
E
(tercer nivel).
• Fije la barra de colgar
H
a los orificios laterales de los conectores
D
y
E
(tercer nivel).
• Inserte 4 varas verticales cortas
A
en los conectores del medio y del extremo fijados a la
estantería corta (tercer nivel).
• Fije 2 conectores del extremo
D
a la siguiente estantería corta
F
. Baje la estantería insertando
los conectores en las varas
A
.
• Fije las varas verticales largas
B
al conector del extremo
D
.
• Nota: compruebe que todas las varas se han insertado de forma segura y correcta en los
conectores.
B0725QSF1K-AmazonBasics-Free standing closet-IM-V02 (EU).indb 47 8/8/17 1:44 PM
48
Montaje
Paso 5:
A
A
A
A
• Inserte 4 varas verticales cortas
A
en los conectores del medio y del extremo fijados a la
estantería corta (cuarto nivel).
• Nota: compruebe que todas las varas se han insertado de forma segura y correcta en los
conectores.
B0725QSF1K-AmazonBasics-Free standing closet-IM-V02 (EU).indb 48 8/8/17 1:44 PM

49
Montaje
Paso 6:
• Fije 1 conector del extremo y un conector del medio a una estantería corta .
• Fije la estantería larga
y la barra de colgar al conector del medio .
• Fije un conector del extremo
a la estantería y a la barra .
• Nota: la barra de colgar debe insertarse en los orificios inferiores de los conectores.
B0725QSF1K-AmazonBasics-Free standing closet-IM-V02 (EU).indb 49 8/8/17 1:44 PM
50
Montaje
Paso 7:
• Inserte el conjunto de estanterías/barra en las varas
A
y
B
.
• Nota: compruebe que todas las varas se han insertado de forma segura y correcta en los
conectores.
B0725QSF1K-AmazonBasics-Free standing closet-IM-V02 (EU).indb 50 8/8/17 1:44 PM
51
Limpieza y Mantenimiento
• Limpie el producto con un paño seco con el fin de eliminar la suciedad y el polvo.
• Evite el contacto con sustancias corrosivas como ácidos, sustancias alcalinas o similares.
Seguridad y Cumplimiento
• Advertencia: no permita que los niños se suban o jueguen con el producto.
• Manipule con cuidado.
• Para evitar causar rasguños en el suelo, monte el armario en una superficie blanda, como una
alfombra.
• Advertencia: No coloque elementos pesados en la estantería; este producto solo es adecuado
para toallas, prendas de vestir y accesorios.
Especicaciones
Carga máxima Estándar Estadounidense Métrico
Barra de colgar 15 lbs 6,8 kg
Estantería grande 30 lbs 13,6 kg
Estantería pequeña 15 lbs 6,8 kg
Información Sobre La Garantía
Para obtener una copia de la garantía de este producto:
Visite amazon.es/AmazonBasics/Warranty
— o —
Póngase en contacto con Atención al cliente en el 0900 803 711
B0725QSF1K-AmazonBasics-Free standing closet-IM-V02 (EU).indb 51 8/8/17 1:44 PM
52
Comentarios
¿Le encanta? ¿No le gusta nada?
Escriba una opinión como cliente.
En AmazonBasics nos comprometemos a proveer productos pensados para satisfacer a nuestros
clientes y que estén a la altura de sus elevados estándares de calidad. Le animamos a que escriba
una opinión sobre su experiencia con el producto.
Por favor, visite: amazon.es/review/review-your-purchases#
Para otros servicios:
Visite amazon.es/gp/help/customer/contact-us
— o —
Póngase en contacto con Atención al cliente en el 0900 803 711
B0725QSF1K-AmazonBasics-Free standing closet-IM-V02 (EU).indb 52 8/8/17 1:44 PM
53
ウェルカムガイド
•
日本語
ハンガーラッククローゼット、ダブ
ルロッド
内容:
スタートする前に、パッケージに以下のものが含まれていることを必ず確認してください。
パーツ 数量
16
4
2
10
3
5
2
1
B0725QSF1K-AmazonBasics-Free standing closet-IM-V02 (EU).indb 53 8/8/17 1:44 PM
54
組み立て
ステップ1:
製品のセットアップ
• 短いシェルフ のポールをエンドコネクター に差し込みます。
• ポールのもう片方の端をミドルコネクター
に接続します。
• 長いシェルフ
G
のポールをミドルコネクター に差し込みます。
• 長いシェルフ
G
のポールのもう片方の端をエンドコネクター に接続します。
• 注:全てのポールがそれぞれのコネクターに、深くしっかり押し込まれていることを確認
してください。
B0725QSF1K-AmazonBasics-Free standing closet-IM-V02 (EU).indb 54 8/8/17 1:44 PM

55
組み立て
ステップ2:
• 長い縦のポール を、長いシェルフに取り付けてあるエンドコネクターに差し込みます。
• 4 つある短い縦のポール
を、短いシェルフに取り付けてあるミドルおよびエンドコネク
ターに差し込みます。
• 2つのエンドコネクター
を短いシェルフ に取り付けます。シェルフを下ろし、ポー
ル
がコネクターに差し込まれるようにします。
• 注:全てのポールがそれぞれのコネクターに、深くしっかり押し込まれていることを確認
してください。
B0725QSF1K-AmazonBasics-Free standing closet-IM-V02 (EU).indb 55 8/8/17 1:44 PM
56
組み立て
ステップ3:
• エンドコネクター 長い、縦のポールの上に位置させます 。
• 4つある短い縦のポール
を、短いシェルフ(2段目)に取り付けてあるミドルおよびエン
ドコネクターに差し込みます。
• エンドコネクター
の1つとミドルコネクター を短いシェルフ に取り付けます。シ
ェルフを下ろし、ポール
がコネクターに差し込まれるようにします。
• 注:全てのポールがそれぞれのコネクターに、深くしっかり押し込まれていることを確認
してください。
B0725QSF1K-AmazonBasics-Free standing closet-IM-V02 (EU).indb 56 8/8/17 1:44 PM
57
組み立て
ステップ4:
• 吊り下げ用のロッド コネクター および の下の穴に取り付けます(3段目)。
• 吊り下げ用のロッド コネクター および の横の穴に取り付けます(3段目)。
• 4つある短い縦のポール を、短いシェルフ(3段目)に取り付けてあるミドルおよびエン
ドコネクターに差し込みます。
• 2つのエンドコネクター を次の短いシェルフ に取り付けます。シェルフを下ろし、
ポール がコネクターに差し込まれるようにします。
• 長い縦のポール をエンドコネクター に取り付けます。
• 注:全てのポールがそれぞれのコネクターに、深くしっかり押し込まれていることを確認
してください。
B0725QSF1K-AmazonBasics-Free standing closet-IM-V02 (EU).indb 57 8/8/17 1:44 PM
58
組み立て
ステップ5:
• 4つある短い縦のポール を、短いシェルフ(4段目)に取り付けてあるミドルおよびエン
ドコネクターに差し込みます。
• 注:全てのポールがそれぞれのコネクターに、深くしっかり押し込まれていることを確認
してください。
B0725QSF1K-AmazonBasics-Free standing closet-IM-V02 (EU).indb 58 8/8/17 1:44 PM
59
組み立て
ステップ6:
• エンドコネクター の1つとミドルコネクター を短いシェルフ に取り付けます。
• 長いシェルフ
と吊り下用げロッド をミドルコネクター に取り付けます。
• エンドコネクター
をシェルフ とロット に取り付けます。
• 注:吊り下げ用ロッドはコネクターの下の穴に差し込んでください。
B0725QSF1K-AmazonBasics-Free standing closet-IM-V02 (EU).indb 59 8/8/17 1:44 PM

60
組み立て
ステップ7:
• それぞれのシェルフおよびロッドをポール と の上におろしてください。
• 注:全てのポールがそれぞれのコネクターに、深くしっかり押し込まれていることを確認
してください。
B0725QSF1K-AmazonBasics-Free standing closet-IM-V02 (EU).indb 60 8/8/17 1:44 PM
61
掃除およびメンテナンス
•• ほこりや汚れを取る必要がある場合は乾いた布で拭いてください。
•• 酸、アルカリその他そのような腐食性の物質に触れないようにしてください。
安全および守るべきこと
•• 警告:お子様が製品に上る、製品で遊ぶことがないようにしてください。
•• 取扱には十分注意を払ってください。
•• 床に傷がつくのを避けるため、本製品はカーペットの上など柔らかい面の上で組み立てて
ください。
•• 注意:重いものをラックに乗せないでください、この製品はタオル、服および付属品用で
す。
規格
最大耐荷重 米国基準 メートル法
吊り下げ用ロッド 15•ポンド
6.8 kg
シェルフ•大 30•ポンド
13.6 kg
シェルフ•小 15•ポンド
6.8 kg
保証について
この製品の保証書のコピーを入手するには:
ホームページ: amazon.jp/AmazonBasics/Warranty
-•または•-
カスタマーサービス 0120-899-276 にご連絡ください。
B0725QSF1K-AmazonBasics-Free standing closet-IM-V02 (EU).indb 61 8/8/17 1:44 PM
62
フィードバック
気に入っていただけましたか?お気に召しませんでしたか?
カスタマーレビューでお知らせください。
Amazonベーシック•は、皆様の高い水準に答えることのできるような消費者志向型の製品をお
届けするのを旨としています。この製品についてのレビューで製品についてのご意見をお聞か
せください。
レビューはこちらへ:•amazon.jp/review/review-your-purchases#
更なるサービスについては:
こちらのリンクへ•amazon.jp/gp/help/customer/contact-us
-•または•-
カスタマーサービス•0120-899-276•にご連絡ください。
B0725QSF1K-AmazonBasics-Free standing closet-IM-V02 (EU).indb 62 8/8/17 1:44 PM

63
欢迎指南
•
中文
双杆独立式衣柜
内装物:
在开始组装之前,确保包装内包含以下组件:
部件 数量
16
4
2
10
3
5
2
1
B0725QSF1K-AmazonBasics-Free standing closet-IM-V02 (EU).indb 63 8/8/17 1:44 PM
64
组装
步骤 1:
组装产品
• 将窄架板的支撑杆 插入侧端连接板 。
• 将支撑杆的另一端插入中间连接板
。
• 将宽架板的支撑杆
G
插入中间连接板 。
• 将宽架板支撑杆
G
的另一端插入侧端连接板 。
• 注意:确保所有支撑杆都完全紧固地插入到连接板。
B0725QSF1K-AmazonBasics-Free standing closet-IM-V02 (EU).indb 64 8/8/17 1:44 PM
65
组装
步骤 2:
• 将竖直长立杆 插入与宽架板组装的侧端连接板。
• 将 4 根竖直短立杆
插入中间连接板以及与窄架板组装的侧端连接板。
• 把 2 个侧端连接板
与一个窄架板 组装。放低架板,把连接板插入立杆 。
• 注意:确保所有支撑杆都完全紧固地插入到连接板。
B0725QSF1K-AmazonBasics-Free standing closet-IM-V02 (EU).indb 65 8/8/17 1:44 PM
66
组装
步骤 3:
• 将一块侧端连接板 放置到竖直长立杆 上。
• 将 4 根竖直短立杆
插入中间连接板以及与窄架板组装的侧端连接板(第二层)。
• 把 1 块侧端连接板
和一块中间连接板 与一块窄架板 连接。放低架板,把连接板插入
立杆
。
• 注意:确保所有支撑杆都完全紧固地插入到连接板。
B0725QSF1K-AmazonBasics-Free standing closet-IM-V02 (EU).indb 66 8/8/17 1:44 PM
67
组装
步骤 4:
• 把挂杆 与连接板( 和 )上的下方孔连接(第三层)。
• 把挂杆
与连接板( 和 )上的侧孔连接(第三层)。
• 将 4 根竖直短立杆
插入中间连接板以及与窄架板组装的侧端连接板(第三层)。
• 把 2 个侧端连接板
与下一个窄架板 组装。放低架板,把连接板插入立杆 。
• 将竖直长立杆
与侧端连接板 连接。
• 注意:确保所有支撑杆都完全紧固地插入到连接板。
B0725QSF1K-AmazonBasics-Free standing closet-IM-V02 (EU).indb 67 8/8/17 1:44 PM
68
组装
步骤 5:
• 将 4 根竖直短立杆 插入中间连接板以及与窄架板组装的侧端连接板(第四层)。
• 注意:确保所有支撑杆都完全紧固地插入到连接板。
B0725QSF1K-AmazonBasics-Free standing closet-IM-V02 (EU).indb 68 8/8/17 1:44 PM
69
组装
步骤 6:
• 把 1 块侧端连接板 和一块中间连接板 与一块窄架板 连接。
• 把宽架板
和挂杆 与中间连接板 连接。
• 把一块侧端连接板
与架板 和挂杆 连接。
• 注意:挂杆应被插入到连接板的下方孔里。
B0725QSF1K-AmazonBasics-Free standing closet-IM-V02 (EU).indb 69 8/8/17 1:44 PM
70
组装
步骤 7:
• 放低架板/挂杆,放置至立杆 和 上。
• 注意:确保所有支撑杆都完全紧固地插入到连接板。
B0725QSF1K-AmazonBasics-Free standing closet-IM-V02 (EU).indb 70 8/8/17 1:44 PM
71
清洁和保养
• 需要时用干布擦拭,拭去灰尘和污物。
• 避免与酸、碱或类似的腐蚀性物质接触。
安全和注意事项
• 警告:切勿让儿童攀爬或玩耍该产品。
• 小心搬运。
• 为避免划伤地板,请将本衣柜安装到柔软的表面上,例如地毯。
• 警告:不要在架体上放置重物,此产品仅适用于毛巾、衣服和配饰。
规格
最大承重 美国标准 公制
挂杆 15 磅 6.8 千克
大架板 30 磅 13.6 千克
小架板 15 磅 6.8 千克
保修信息
如需获得此产品的保修信息:
访问 amazon.cn/AmazonBasics/Warranty
— 或 —
拨打 400-810-5666 联系客服人员
B0725QSF1K-AmazonBasics-Free standing closet-IM-V02 (EU).indb 71 8/8/17 1:44 PM
72
反馈
喜欢这款产品?不喜欢这款产品?
让我们通过客户评论了解您的想法和意见。
亚马逊倍思以客户为导向,致力于供应满足客户高标准的产品。我们邀请您填写评论,分享您使
用产品的体验。
请访问:amazon.cn/review/review-your-purchases
如需更多服务:
访问 amazon.cn/gp/help/customer/contact-us
— 或 —
拨打 400-810-5666 联系客服人员
B0725QSF1K-AmazonBasics-Free standing closet-IM-V02 (EU).indb 72 8/8/17 1:44 PM

MADE IN CHINA
amazon.com/AmazonBasics
B0725QSF1K-AmazonBasics-Free standing closet-IM-V02 (EU).indb 73 8/8/17 1:44 PM