

PRODUCT WHITE PAPER
http://
www.
Elite Screens Inc. |E
lite
Elite S
creens Taiwan
SABLE FRAME
Section 1: Screen Desig
n
1.1 What is it for?
The Sable Frame 2 Series
uses Elite’s
velveteen coated frame. A new design feature for the
border that makes installation a lot easier and a lot less time consuming. As an added bonus,
a new installation kit with sliding wall brackets is included f
1.2 How does it work?
The Sable Frame 2 Series
is easy to assemble and installs in minutes.
facilitates lower shipping costs without sacrificing quality. Wall brackets allow the screen to
slide horizontally to ensure
properly centered installation.
Section 2: Product Features
2.1 Characteristics
Screen Material
Award Winning CineWhite™
1.1 Gain front projection material with black backing and full tension
uniformity
across entire viewing surface
Outstanding picture quality at any viewing angle with no compromise in resolution or brightness
Active 3D and 4K Ultra HD Ready
Elegant velvet covered frame absorbs projector overshoot and increases picture contrast
Assembles
in minutes and includes installation hardware
Design and Installation
2.4” width frame and is velvet coated
Split-
frame design facilitates lower shipping costs without sacrificing quality
Easy to assemble and install in minutes
Wall brackets allow screen
to slide horizontally for properly centered installation
Installation kit includes: Woods screws & anchors, Wall Brackets, Screwdriver, Mallet
PRODUCT WHITE PAPER
www.
elitescreens.com
lite
Screens Europe GmbH| Elite Screens India |Elite Screens China Ltd.
creens Taiwan
Corp |Elite Screens Japan |Elite Screens Australia
SABLE FRAME
2 SERIES
n
uses Elite’s
CineWhite™
tensioned 1.1 gain material
velveteen coated frame. A new design feature for the
CineWhite™
material is a rubber
border that makes installation a lot easier and a lot less time consuming. As an added bonus,
a new installation kit with sliding wall brackets is included f
ree of charge.
is easy to assemble and installs in minutes.
Its
split
facilitates lower shipping costs without sacrificing quality. Wall brackets allow the screen to
properly centered installation.
1.1 Gain front projection material with black backing and full tension
across entire viewing surface
Outstanding picture quality at any viewing angle with no compromise in resolution or brightness
Active 3D and 4K Ultra HD Ready
Elegant velvet covered frame absorbs projector overshoot and increases picture contrast
in minutes and includes installation hardware
2.4” width frame and is velvet coated
frame design facilitates lower shipping costs without sacrificing quality
Easy to assemble and install in minutes
to slide horizontally for properly centered installation
Installation kit includes: Woods screws & anchors, Wall Brackets, Screwdriver, Mallet
1
n
tensioned 1.1 gain material
within a
material is a rubber
-edge
border that makes installation a lot easier and a lot less time consuming. As an added bonus,
split
-frame design
facilitates lower shipping costs without sacrificing quality. Wall brackets allow the screen to
1.1 Gain front projection material with black backing and full tension
Outstanding picture quality at any viewing angle with no compromise in resolution or brightness
Elegant velvet covered frame absorbs projector overshoot and increases picture contrast
Installation kit includes: Woods screws & anchors, Wall Brackets, Screwdriver, Mallet
PRODUCT WHITE PAPER
http://
www.
Elite Screens Inc. |E
lite
Elite S
creens Taiwan
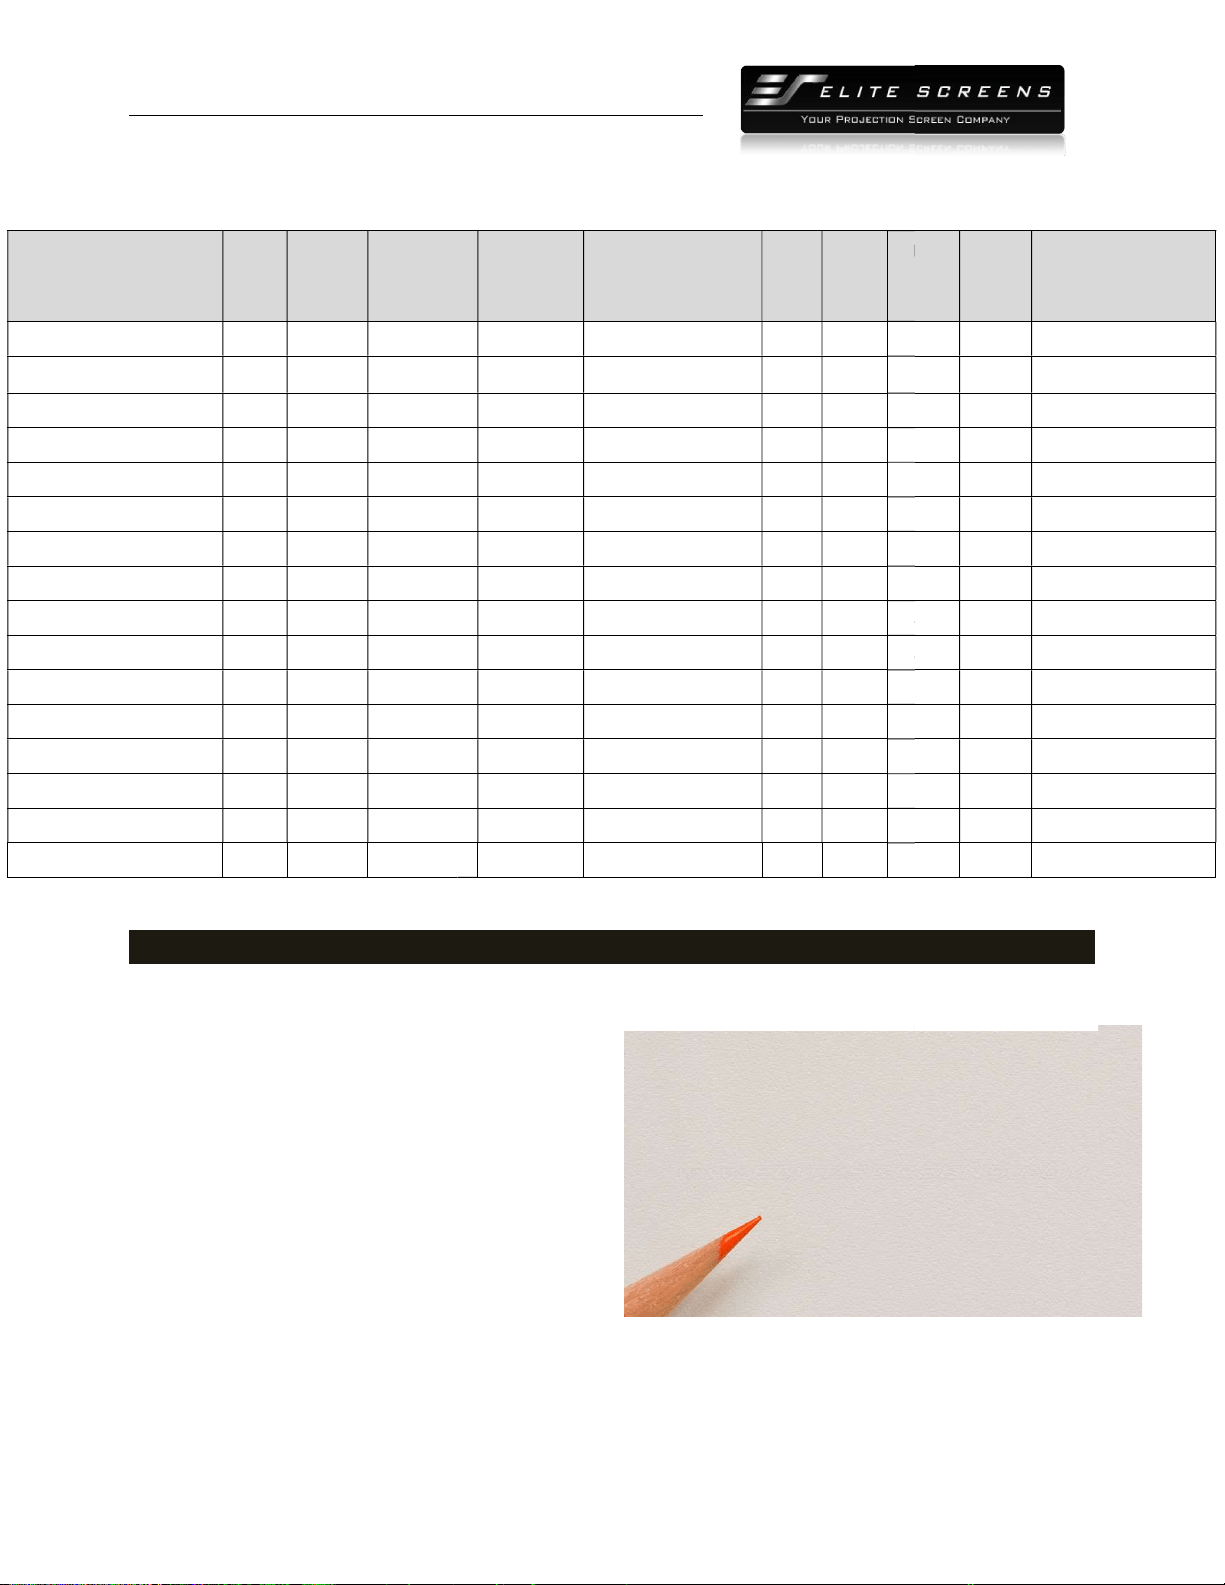
2.2 Model Numbers
Model Number
Diag.
Size
Aspect
Ratio
Viewing
Height (in)
ER92WH2 92" 16:9 45.1
ER100WH2 100"
16:9 49.0
ER106WH2 106"
16:9 52.0
ER110WH2 110"
16:9 53.9
ER120WH2 120"
16:9 58.8
ER135WH2 135"
16:9 66.1
ER150WH2 150"
16:9 73.6
ER165WH2 165"
16:9 80.9
ER180WH2 180"
16:9 88.2
ER200WH2 200"
16:9 98.0
ER109WX2 109"
16:10 57.5
ER114WX2 114"
16:10 60.0
ER115WH2-Wide 115"
2.35:1 45.0
ER125WH2-Wide 125"
2.35:1 48.9
ER138WH2-Wide 138"
2.35:1 54.0
ER158WH2-Wide 158"
2.35:1 61.9
Section
3: Screen Material Specifications
3.1 Characteristics
CineWhite™
(Tension Matte White) has broad light
dispersion through diffusion uniformity, black &
white contrast and true color rendition making it
the most versatile in Elite's tensions screen product
lines. This tension PVC surface
is the best choice
for today's high-
contrast ratio projectors in
commercial or resi
dential presentations.
The CineWhite™
material equals the performance
to our MaxWhite product, but improves the experience with the superior surface flatness.
diffusion surface has black-
backing to eliminate light penetration and is easily washable with mild soap
and water.
PRODUCT WHITE PAPER
www.
elitescreens.com
lite
Screens Europe GmbH| Elite Screens India |Elite Screens China Ltd.
creens Taiwan
Corp |Elite Screens Japan |Elite Screens Australia
Viewing
Height (in)
Viewing
Width (in)
Screen Material Gain
Case
Color
N.W.
(lbs)
80.2 CineWhite™
1.1 Black
23.0
87.2 CineWhite™
1.1 Black
22.4
92.4 CineWhite™
1.1 Black
25.9
95.9 CineWhite™
1.1 Black
25.9
104.6 CineWhite™
1.1 Black
28.2
117.7 CineWhite™
1.1 Black
31.5
130.7 CineWhite™
1.1 Black
33.4
143.8 CineWhite™
1.1 Black
39.6
156.9 CineWhite™
1.1 Black
43.1
174.4 CineWhite™
1.1 Black
48.5
92.0 CineWhite™
1.1 Black
24.4
96.0 CineWhite™
1.1 Black
27.1
105.8 CineWhite™
1.1 Black
25.4
115.0 CineWhite™
1.1 Black
27.8
127.0 CineWhite™
1.1 Black
31.5
145.4 CineWhite™
1.1 Black
34.2
3: Screen Material Specifications
(Tension Matte White) has broad light
dispersion through diffusion uniformity, black &
white contrast and true color rendition making it
the most versatile in Elite's tensions screen product
is the best choice
contrast ratio projectors in
dential presentations.
material equals the performance
to our MaxWhite product, but improves the experience with the superior surface flatness.
backing to eliminate light penetration and is easily washable with mild soap
2
N.W.
(lbs)
G.W.
(lbs)
Packaging
Dimensions (LxWxH)
23.0
30.9 56.7"x6.7"x11.8"
22.4
34.2 61.4"x6.7"x11.8"
25.9
35.0 63.5"x6.7"x11.8"
25.9
35.6 65.5"x6.7"x11.8"
28.2
38.3 69.7"x6.7"x11.8"
31.5
41.7 78.2"x5.7"x15.8"
33.4
45.8 85.6"x5.7"x15.8"
39.6
51.9 92.9"x5.7"x15.8"
43.1
57.8 100.2"x7.7"x15.8"
48.5
64.6 110"x7.5"x15.8"
24.4
35.9 69.4"x6.7"x11.8"
27.1
38.0 72.1"x6.7"x11.8"
25.4
34.8 62.2"x6.7"x11.8"
27.8
37.4 67.1"x5.5"x15.75"
31.5
40.9 73"x5.5"x15.75"
34.2
44.7 82.3"x5.7"x15.4"
to our MaxWhite product, but improves the experience with the superior surface flatness.
Uniform
backing to eliminate light penetration and is easily washable with mild soap
PRODUCT WHITE PAPER
http://
www.
Elite Screens Inc. |E
lite
Elite S
creens Taiwan
Features & Benefits
Multi-
layer PVC (Polyvinyl chloride) with texture and surface coating
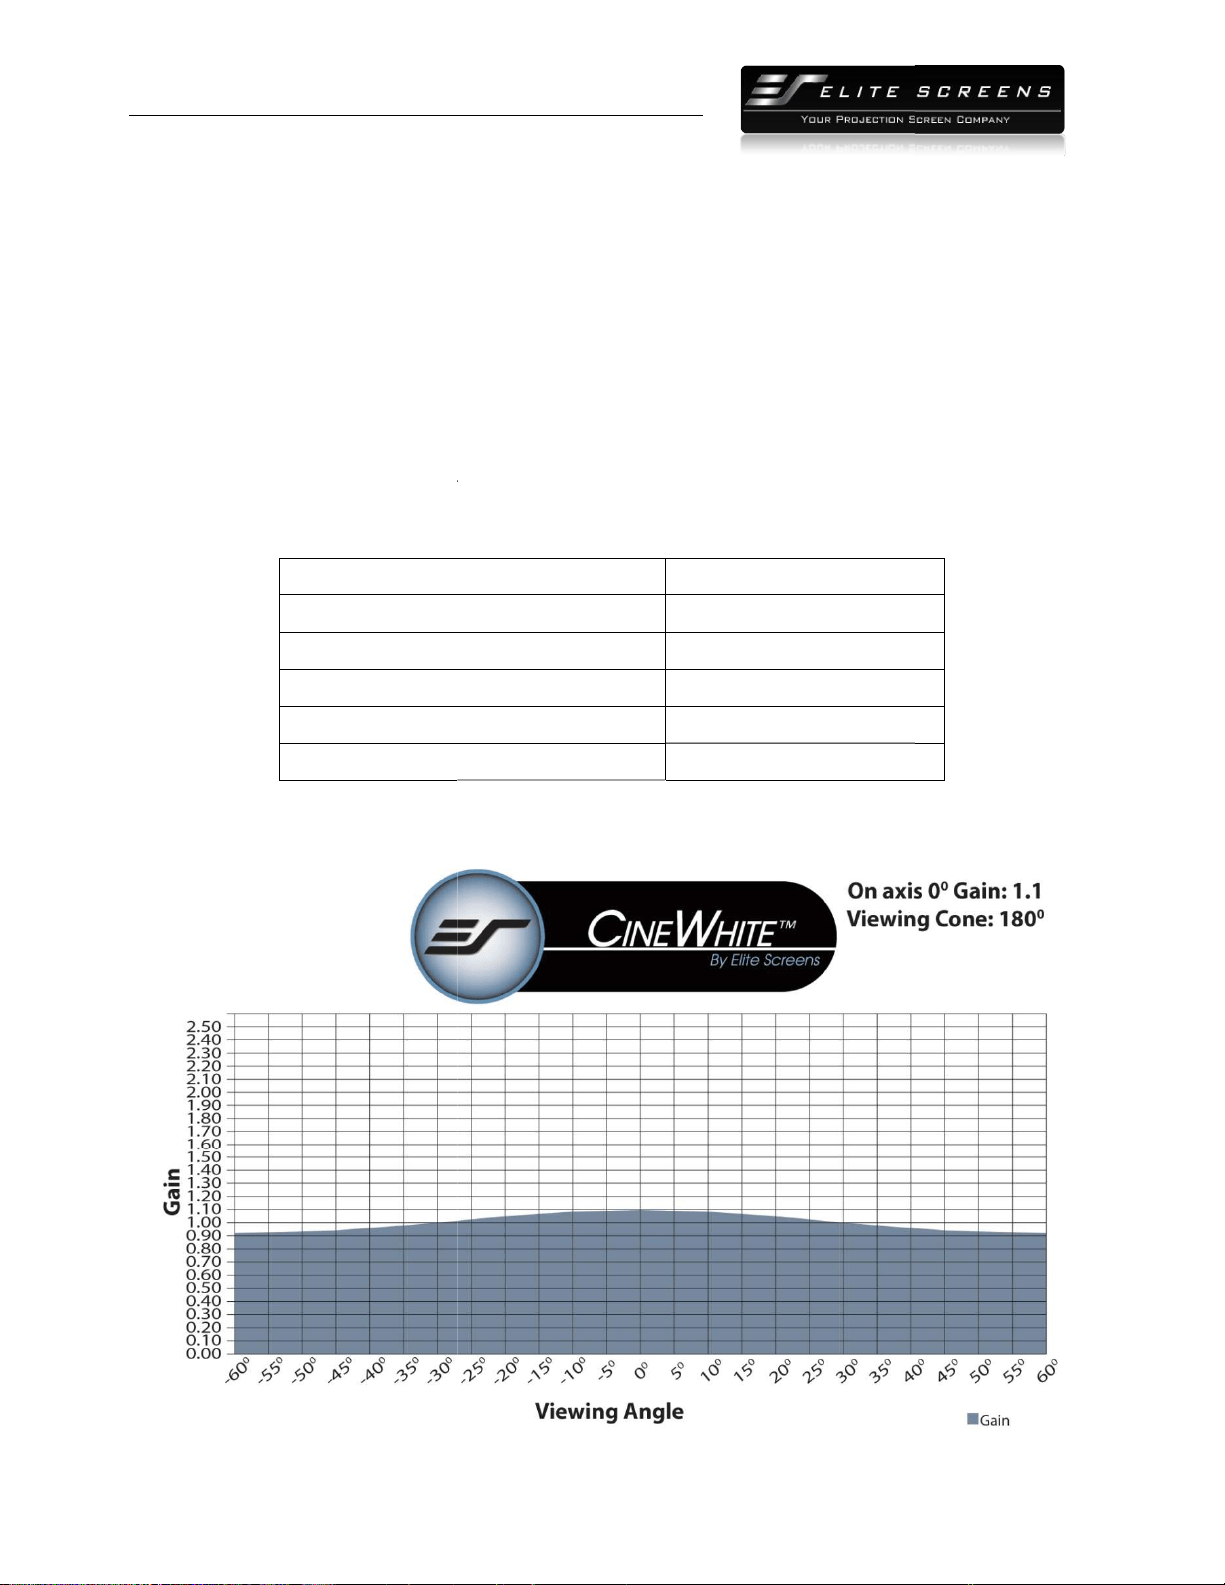
Gain: 1.1
View Angle: 180° (90° ±LR)
Full Lambertian Diffuser-
no half gain drop
Produces exceptional picture quality for any presentation
Mildew Resistant
Active 3D and 4K Ultra HD ready
Surface can be cleaned with (water) moist cotton cloth
3.2
Gain and Viewing Angle Chart
Specifications
Thickness
Weight
Maximum Height
On-axis Gain
Half-Gain Angle
PRODUCT WHITE PAPER
www.
elitescreens.com
lite
Screens Europe GmbH| Elite Screens India |Elite Screens China Ltd.
creens Taiwan
Corp |Elite Screens Japan |Elite Screens Australia
layer PVC (Polyvinyl chloride) with texture and surface coating
no half gain drop
Produces exceptional picture quality for any presentation
Active 3D and 4K Ultra HD ready
Surface can be cleaned with (water) moist cotton cloth
Gain and Viewing Angle Chart
0.27 mm
350 g/m2
Maximum Height
3.2 M (10 ft)
1.1
Does not reach half gain
3

PRODUCT WHITE PAPER
http://
www.
Elite Screens Inc. |E
lite
Elite S
creens Taiwan
Section 4: Execution
4.1 Care & Use Instructions
Dust, dirt and scratches on the projection surface will affect the picture quality, please take note of
the points below to prevent that from occurring:
1. Do not touch the
projection surface with your hands
2. Do not write or draw on the projection surface
3. Do not use fingers or sharp objects to point on the projection surface; this will damage the
screen material.
4. Use a soft-
damp cloth to clean the projection surface;
or alcohol.
5. Use clean water when dampening the cleaning cloth and do not rub against the material
to clean it.
4.2 Hardware Parts List
A. Frame Parts
x 6 pcs (4 top/bottom frame pcs + 2 side frame
pcs)
B. Screen Material
x 1 pc
C. Center joints
x 2 pcs
D. Elbow Joints
x4pcs
E. Wall brackets
x4pcs (depending on model/size)
F. Wood Screws x 8
pcs
G. Drywall anchors x 8
pcs
H. M5x15 screws
x 16 pcs
I. Center Support Bar
x 1
J. Support joiner
x 2
K. Fix Plates
x 60
L. Rubber hammer x 1
M. Screw driver x 1
Note
: Please make sure all parts are included in your package before proceeding to assemble your fixed
frame projection screen.
PRODUCT WHITE PAPER
www.
elitescreens.com
lite
Screens Europe GmbH| Elite Screens India |Elite Screens China Ltd.
creens Taiwan
Corp |Elite Screens Japan |Elite Screens Australia
Dust, dirt and scratches on the projection surface will affect the picture quality, please take note of
the points below to prevent that from occurring:
projection surface with your hands
2. Do not write or draw on the projection surface
3. Do not use fingers or sharp objects to point on the projection surface; this will damage the
damp cloth to clean the projection surface;
do not use chemical cleaning agents
5. Use clean water when dampening the cleaning cloth and do not rub against the material
x 6 pcs (4 top/bottom frame pcs + 2 side frame
pcs)
x 1 pc
x 2 pcs
x4pcs
x4pcs (depending on model/size)
pcs
pcs
x 16 pcs
x 1
- 2 pcs (depending on model/size)
x 2
- 4 pcs (depending on model/size)
x 60
- 180 pcs (depending on model/size)
pc
pc
: Please make sure all parts are included in your package before proceeding to assemble your fixed
4
Dust, dirt and scratches on the projection surface will affect the picture quality, please take note of
3. Do not use fingers or sharp objects to point on the projection surface; this will damage the
do not use chemical cleaning agents
5. Use clean water when dampening the cleaning cloth and do not rub against the material
: Please make sure all parts are included in your package before proceeding to assemble your fixed
PRODUCT WHITE PAPER
http://
www.
Elite Screens Inc. |E
lite
Elite S
creens Taiwan
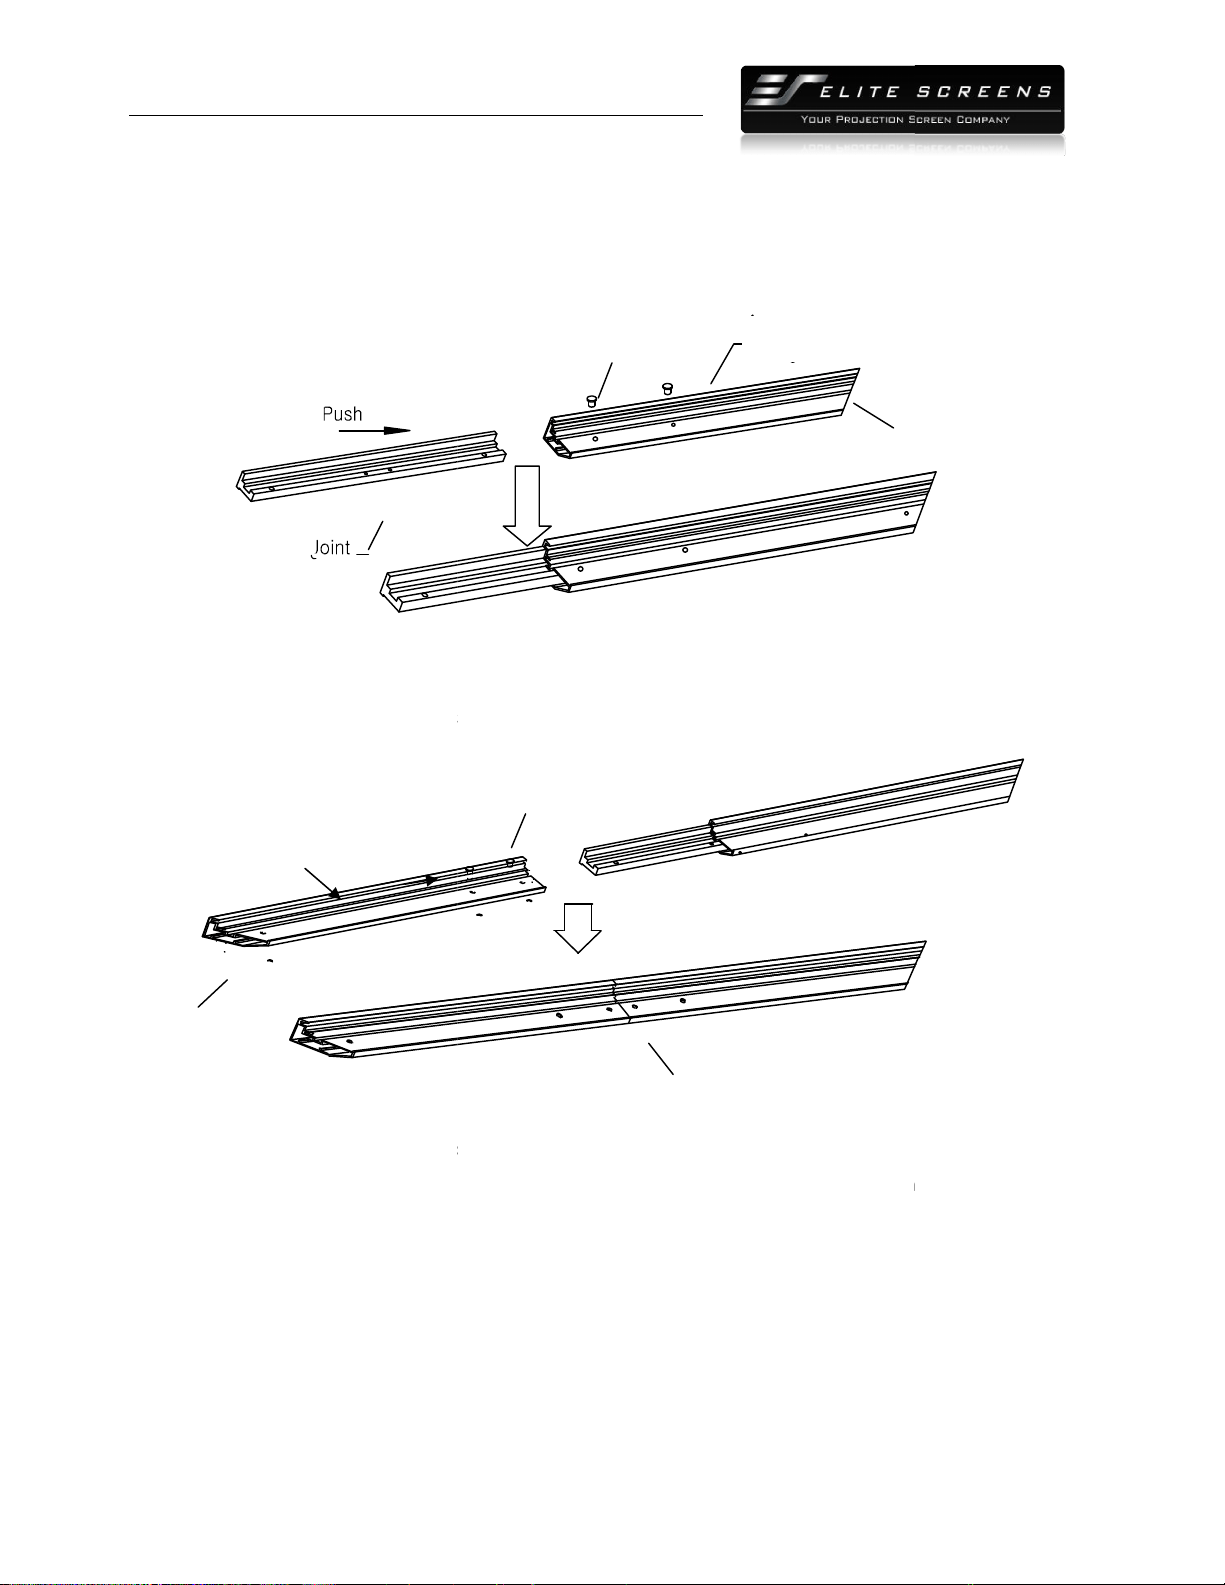
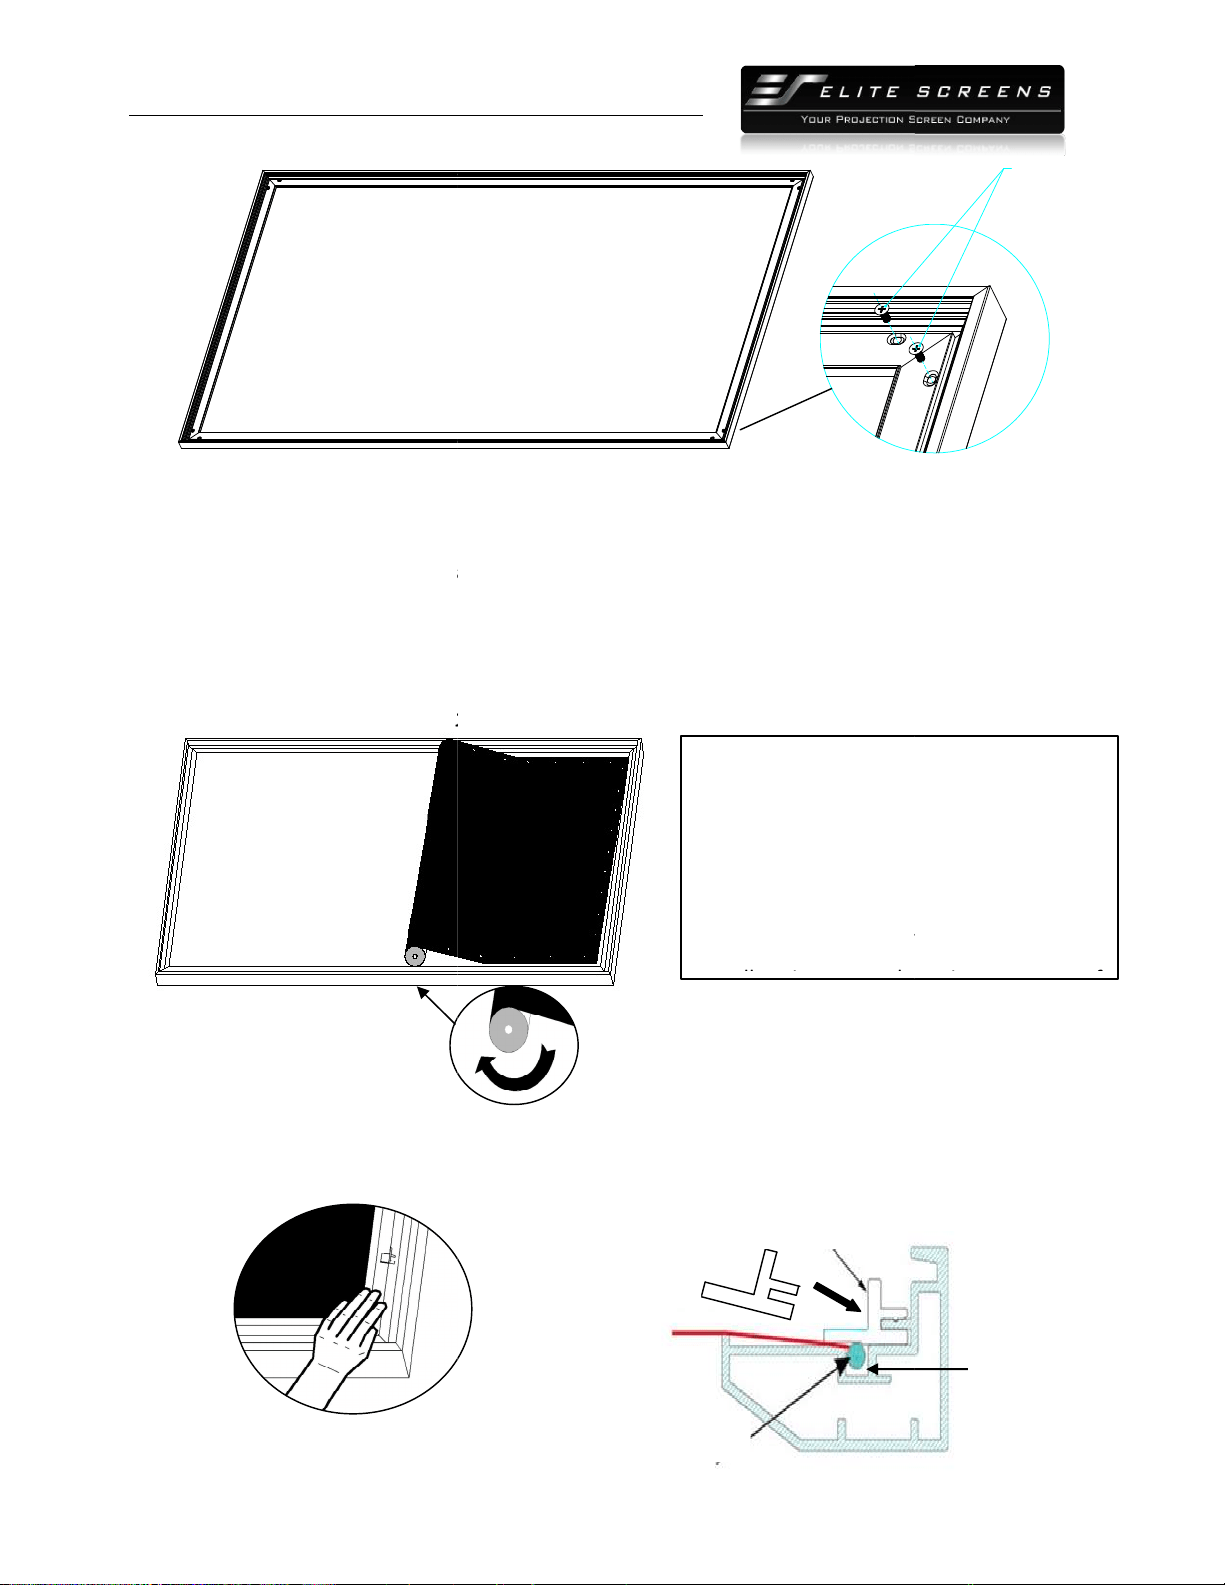
4.3 Frame Assembly
1. Insert the center joint (c)
connector to the ½ horizontal frame piece and fasten it with two
(h).
2.Insertthe other ½
horizontal frame piece to the
screws (h).
Repeat steps 1 and 2 for assembling the second horizontal frame.
Note: a. Two½ size horizontal frames
b. Do not tighten the screws completely until all frame pieces have been
3. Insert both elbow joint (d)
connectors into the long horizontal frame and
(h) seeFig.1. Then insert the vertical
short frames
them with M5x15 screws(fig.1.2).
Bevel
½ Long Frame
Pus
PRODUCT WHITE PAPER
www.
elitescreens.com
lite
Screens Europe GmbH| Elite Screens India |Elite Screens China Ltd.
creens Taiwan
Corp |Elite Screens Japan |Elite Screens Australia
connector to the ½ horizontal frame piece and fasten it with two
horizontal frame piece to the
center joint (c) connector and
fasten it with two
Repeat steps 1 and 2 for assembling the second horizontal frame.
Note: a. Two½ size horizontal frames
should be assembled for a screen.
b. Do not tighten the screws completely until all frame pieces have been
assembled correctly.
connectors into the long horizontal frame and
fasten it with two
short frames
into the exposed elbow joint (d)
connectors and fasten
M5x15
bevel
½ Long Frame
Horizontal Long
M5×15 Screw
5
connector to the ½ horizontal frame piece and fasten it with two
M5x15screws
fasten it with two
M5x15
assembled correctly.
fasten it with two
M5x15 screws
connectors and fasten
bevel
PRODUCT WHITE PAPER
http://
www.
Elite Screens Inc. |E
lite
Elite S
creens Taiwan
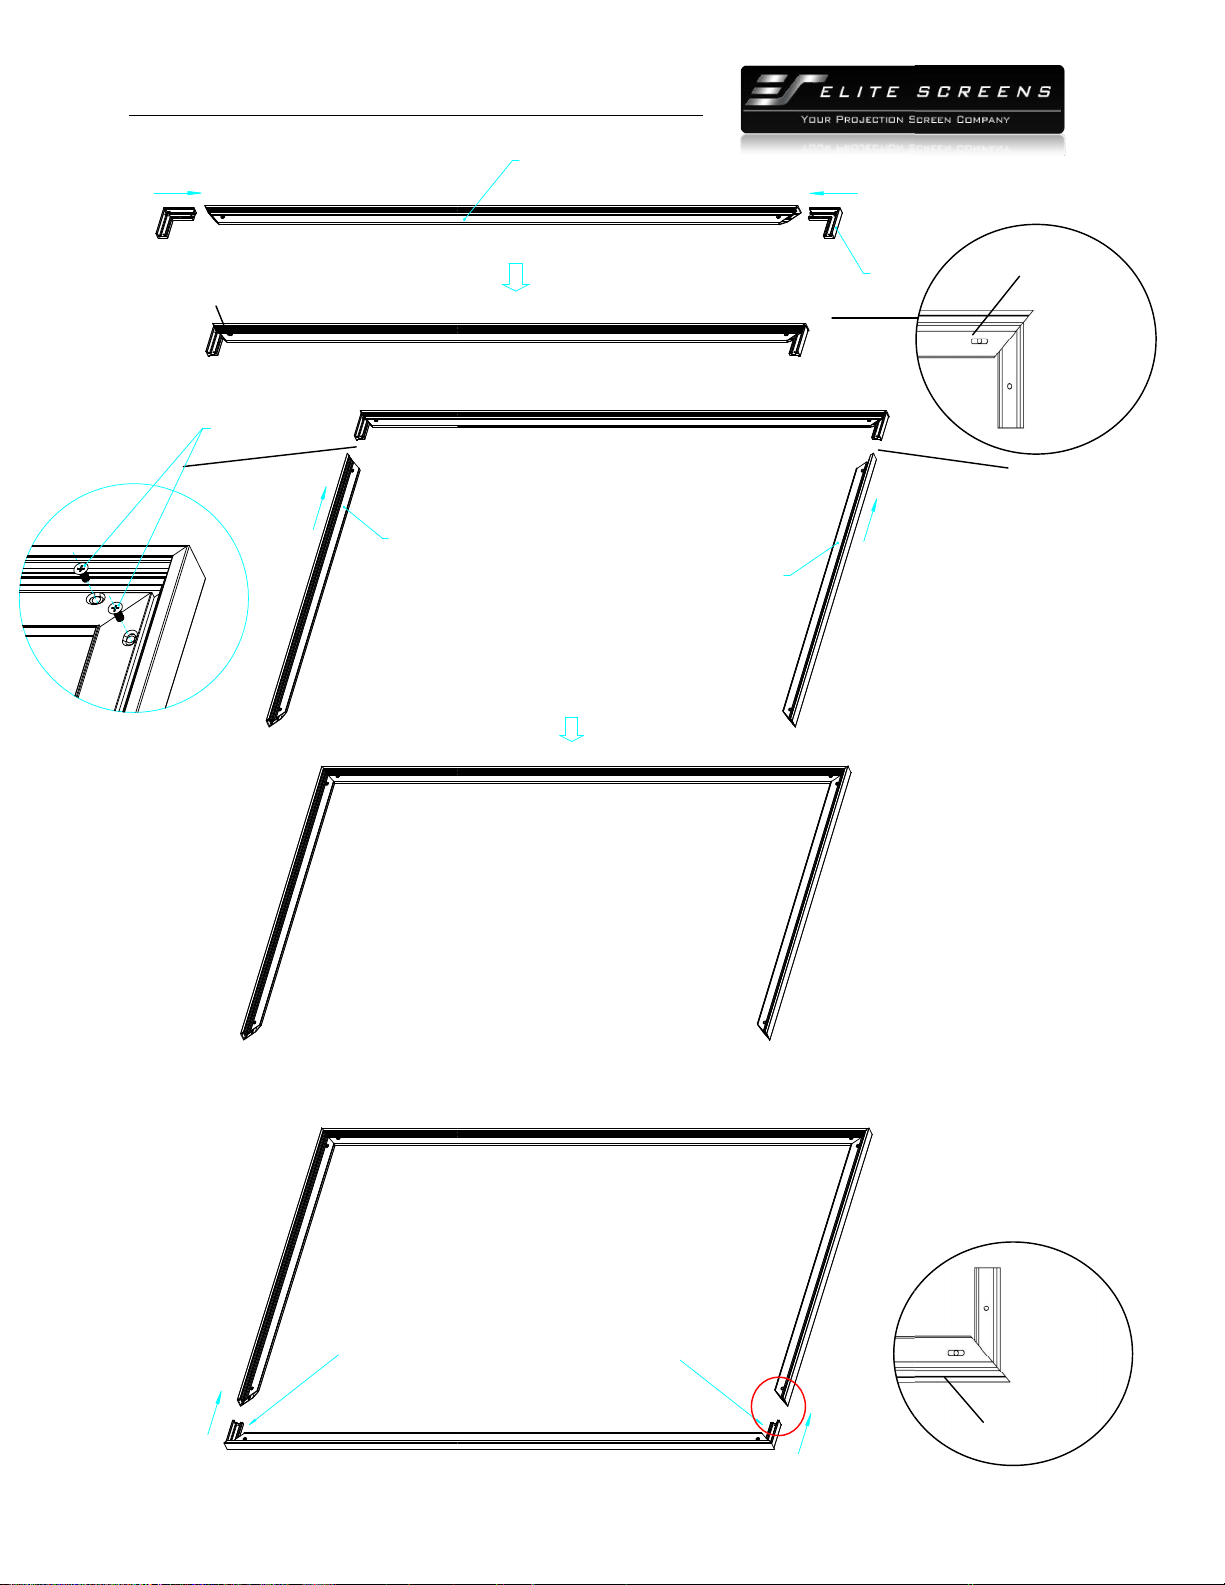
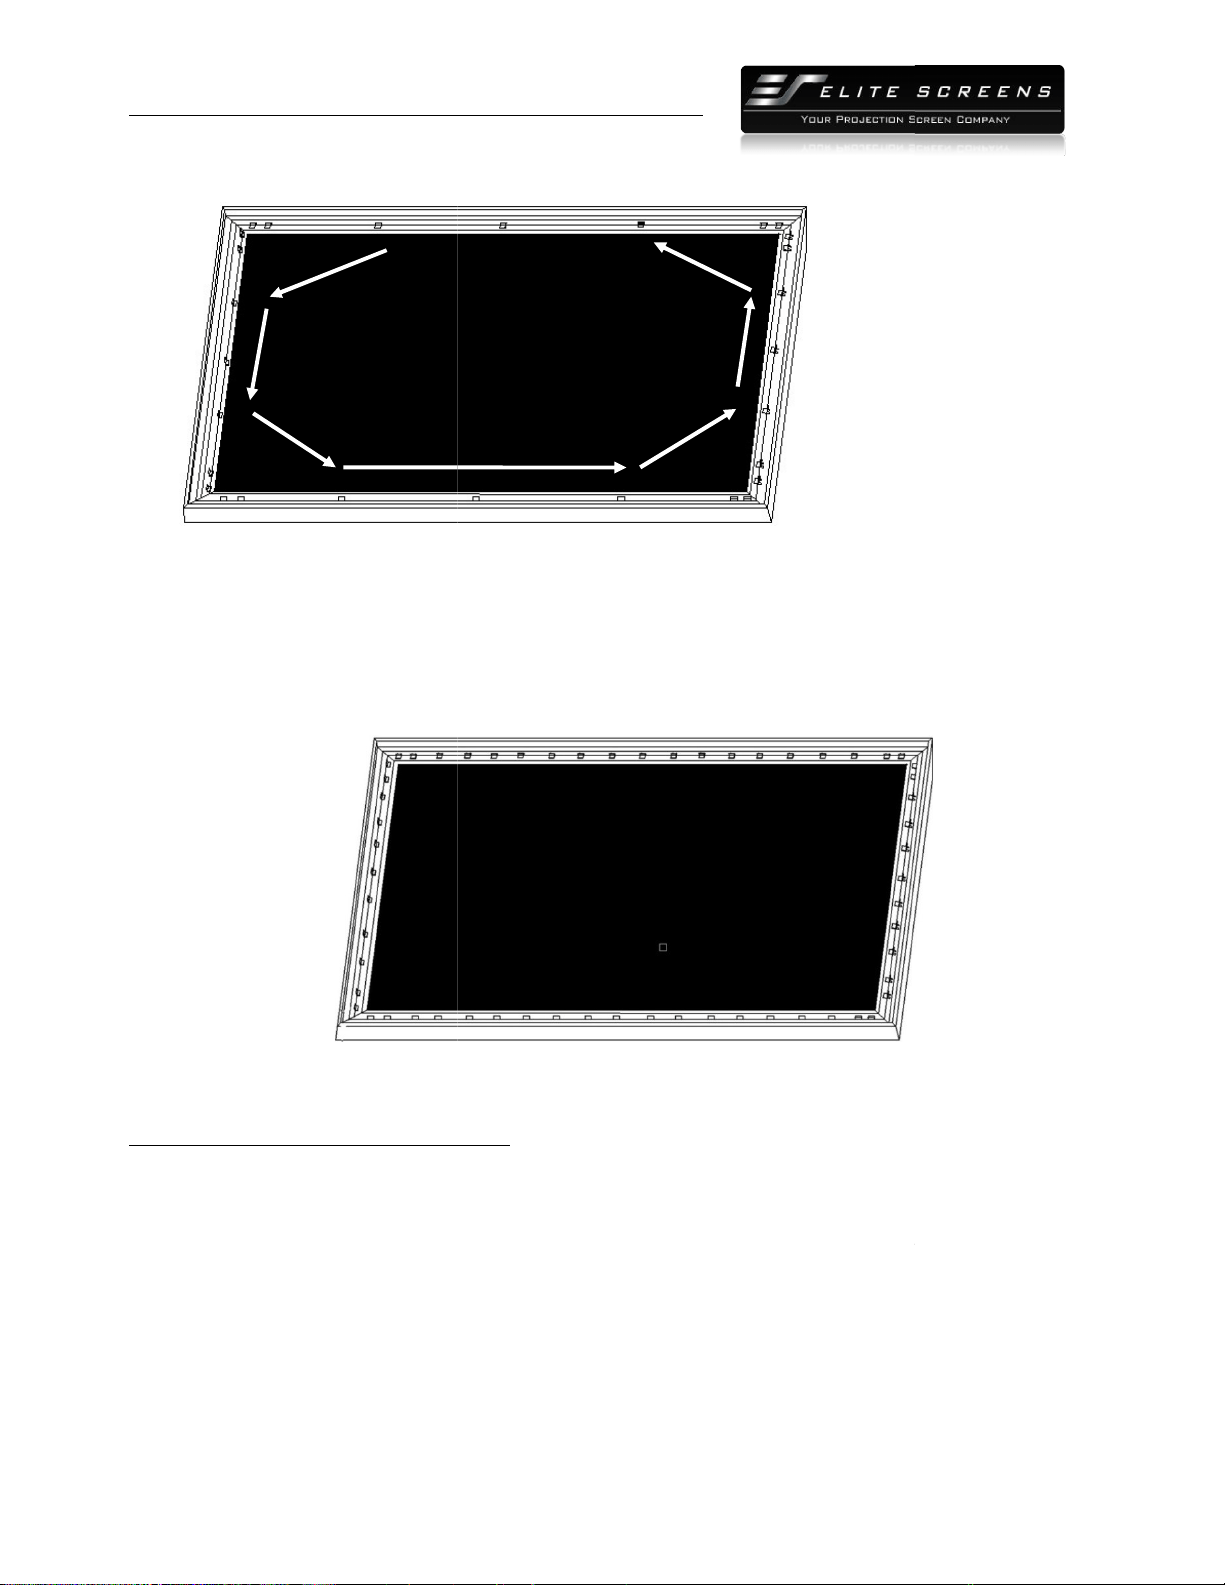
Push
Insert the exposed ends of the joint connectors
into the short (vertical) frame and align the four
corners so that they meet at perfect right angles
Push
Short frame
4.
Join all four frame parts together following the steps shown below.
Note: When assembled, please push simultaneously the
Push
M5x15 screws
Screw
PRODUCT WHITE PAPER
www.
elitescreens.com
lite
Screens Europe GmbH| Elite Screens India |Elite Screens China Ltd.
creens Taiwan
Corp |Elite Screens Japan |Elite Screens Australia
Push
Insert the exposed ends of the joint connectors
into the short (vertical) frame and align the four
corners so that they meet at perfect right angles
Push
Short frame
Short frame
Join all four frame parts together following the steps shown below.
(Fig.2)
Note: When assembled, please push simultaneously the
two ends of the long frames.
Push
Joint
Long frame
( fig.1)
(Fig.1.1)
(Fig.1.2)
6
M5x15 screws
M5x15Screws
M5×15 screws
PRODUCT WHITE PAPER
http://
www.
Elite Screens Inc. |E
lite
Elite S
creens Taiwan
( fig.2)
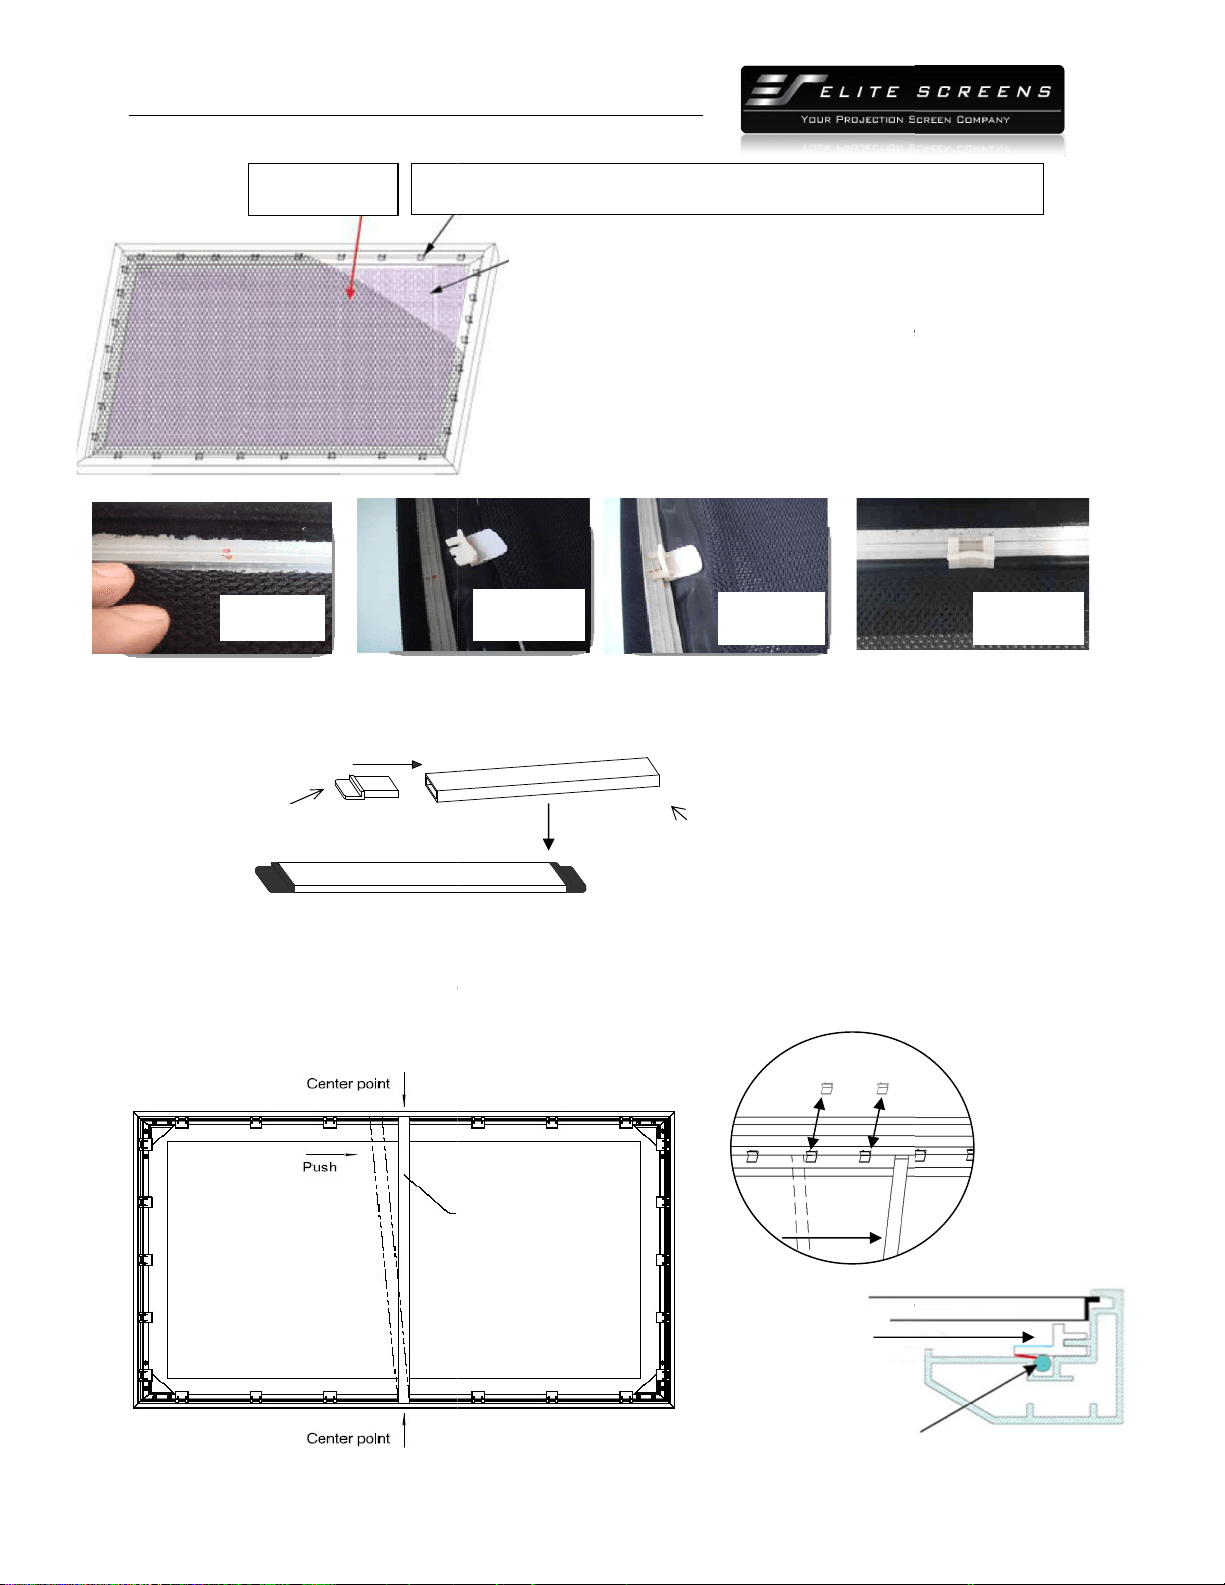
4.4 Attaching the screen material to the frame
1.
Make sure the screen material and frame are both lying face down on a clean, dry, and non
surface.
2. Carefully unroll the material
inside the frame. (
Please note the material will be noticeably smaller than the frame, as the material must be stretched to create a
sufficient amount of tension for perfect material flatness.
3. Attach the fix plates.
(1)
Stretch the material to the corner and insert the screen material’s edge in the groove of the frame.
While one hand holds the material in place the oth
(Fig.3)
PRODUCT WHITE PAPER
www.
elitescreens.com
lite
Screens Europe GmbH| Elite Screens India |Elite Screens China Ltd.
creens Taiwan
Corp |Elite Screens Japan |Elite Screens Australia
( fig.2)
4.4 Attaching the screen material to the frame
Make sure the screen material and frame are both lying face down on a clean, dry, and non
inside the frame. (
Fig.3)
Please note the material will be noticeably smaller than the frame, as the material must be stretched to create a
sufficient amount of tension for perfect material flatness.
Stretch the material to the corner and insert the screen material’s edge in the groove of the frame.
While one hand holds the material in place the oth
er hand snaps in the push plate
Notes:
Make note of the label to help
distinguish the back and front side.
Unroll the
screen material
Keep the screen material as close as
possible to the frame
allow
it to scratch against any part of
(Fig. 4)
Insert push plate in
Screen material edge
Plate
7
Make sure the screen material and frame are both lying face down on a clean, dry, and non
-abrasive
Please note the material will be noticeably smaller than the frame, as the material must be stretched to create a
Stretch the material to the corner and insert the screen material’s edge in the groove of the frame.
er hand snaps in the push plate
(Fig.4-Fig.5).
Screw
Make note of the label to help
distinguish the back and front side.
screen material
face down
Keep the screen material as close as
possible to the frame
and do not
it to scratch against any part of
(Fig. 5)
Schematic cross section
of the frame
Frame groove

PRODUCT WHITE PAPER
http://
www.
Elite Screens Inc. |E
lite
Elite S
creens Taiwan
(2)
Begin by securing the four corners in the following sequence A
(3)
Insert the fix the plates as shown on Fig. 5. Fix plate
corner. Fix plate ②
is about 5cm away. (Fig.7)
(4)
Place a fix plate in the center of each side in the following order
(5) Next, fasten a fix plate
on the center
→P as shown in Fig.10.
(
Fig.
B
C
H
Tip for attaching the last corner (D):
1. Position yourself left of location ①.
2. Pull the material to the corner of the frame with your hand while
hand snaps in the fix plate on location ①
(the third red
3. Then insert and snap in the fix plate on
location
4. Next, mo
veand position yourself on location
the frame and fasten plates on locations③
and
PRODUCT WHITE PAPER
www.
elitescreens.com
lite
Screens Europe GmbH| Elite Screens India |Elite Screens China Ltd.
creens Taiwan
Corp |Elite Screens Japan |Elite Screens Australia
Begin by securing the four corners in the following sequence A
→B→C→D (Fig.6)
Insert the fix the plates as shown on Fig. 5. Fix plate
①
is about 10cm away from the frame’s
is about 5cm away. (Fig.7)
Place a fix plate in the center of each side in the following order
E→F→G→H.(Fig.9)
on the center
of each frame side in the following order I→
J
Fig.
6)
A
D
E
G
F
(Fig.9)
2. Pull the material to the corner of the frame with your hand while
your left
(the third red
dot).
location
②.
veand position yourself on location
③,then pull the edge to
and
④.
①
②
Pull
8
→B→C→D (Fig.6)
.
is about 10cm away from the frame’s
J
→K→L→M→N→O
(
Fig.
7
)
G
(Fig.9)
②
③
⑤
④
(
Fig.
8
)
PRODUCT WHITE PAPER
http://
www.
Elite Screens Inc. |E
lite
Elite S
creens Taiwan
(6)
Fasten the remainder of the fix plates in the empty locations in the red markings to
complete attaching the screen material
Black backing for AcousticPro
models
This procedure only applies to AcousticPro models. Disregard this section if your Fixed Frame does not
include an acoustically transparent screen material. The purpose of the black backing material is to block
out any light penetration that may
reflect off of anything mounted behind the screen, which can cause
distortion to the projected image.
The black backing is held in place by the Velcro that is on the fix plates.
I
J
K
L
PRODUCT WHITE PAPER
www.
elitescreens.com
lite
Screens Europe GmbH| Elite Screens India |Elite Screens China Ltd.
creens Taiwan
Corp |Elite Screens Japan |Elite Screens Australia
Fasten the remainder of the fix plates in the empty locations in the red markings to
complete attaching the screen material
. (Fig.11)
models
This procedure only applies to AcousticPro models. Disregard this section if your Fixed Frame does not
include an acoustically transparent screen material. The purpose of the black backing material is to block
reflect off of anything mounted behind the screen, which can cause
The black backing is held in place by the Velcro that is on the fix plates.
M
N
O
P
(Fig.10)
9
Fasten the remainder of the fix plates in the empty locations in the red markings to
This procedure only applies to AcousticPro models. Disregard this section if your Fixed Frame does not
include an acoustically transparent screen material. The purpose of the black backing material is to block
reflect off of anything mounted behind the screen, which can cause
(Fig.11)
The black backing is held in place by the Velcro that is on the fix plates.
(Fig.10)
PRODUCT WHITE PAPER
http://
www.
Elite Screens Inc. |E
lite
Elite S
creens Taiwan
4.5 Center Support Bar
1. Insert the support joiner (j)
into each end of the
support joiner
2. Insert the Center Support Bar
into the upper top groove on the back of the frame
the fix plate inserts)
with the bottom end near the approximate center point of the frame
an angle so that both ends of the bar are in alignment with the groove
details).
Diagonal mode
ls 135” and below use 1 x Center Support Bar
Black backing
Fix plates
(
Fig.
12)
PRODUCT WHITE PAPER
www.
elitescreens.com
lite
Screens Europe GmbH| Elite Screens India |Elite Screens China Ltd.
creens Taiwan
Corp |Elite Screens Japan |Elite Screens Australia
into each end of the
center support bar (i).
Center support bar
into the upper top groove on the back of the frame
with the bottom end near the approximate center point of the frame
an angle so that both ends of the bar are in alignment with the groove
(see Fig. 16and
ls 135” and below use 1 x Center Support Bar
Fix plates
secure the Acoustic material and the black
backing behind it.
Interval markings reveal the best points for inserting the fix plates (Fig.
12). The prongs on the fix plates insert to the lip on the back of the
frame creating a friction hold that will firmly keep the material
black backing in place (Fig. 13-
14).After the material has been
the backing will lay
over the back of the white (Acoustic) material and
then be held in place by the Velcro on the fix plates(Fig 15).
(Fig. 14)
(Fig. 13)
Remove
push
Screen material
(Fig. 16)
Fixed plate groove
(do not insert here)
Center Support Bar
10
(not the one where
with the bottom end near the approximate center point of the frame
and rotate it in at
(see Fig. 16and
Fig. 17below for
backing behind it.
Interval markings reveal the best points for inserting the fix plates (Fig.
12). The prongs on the fix plates insert to the lip on the back of the
frame creating a friction hold that will firmly keep the material
and
14).After the material has been
installed,
over the back of the white (Acoustic) material and
then be held in place by the Velcro on the fix plates(Fig 15).
(Fig. 15)
Screen material
Center Support Bar
PRODUCT WHITE PAPER
http://
www.
Elite Screens Inc. |E
lite
Elite S
creens Taiwan
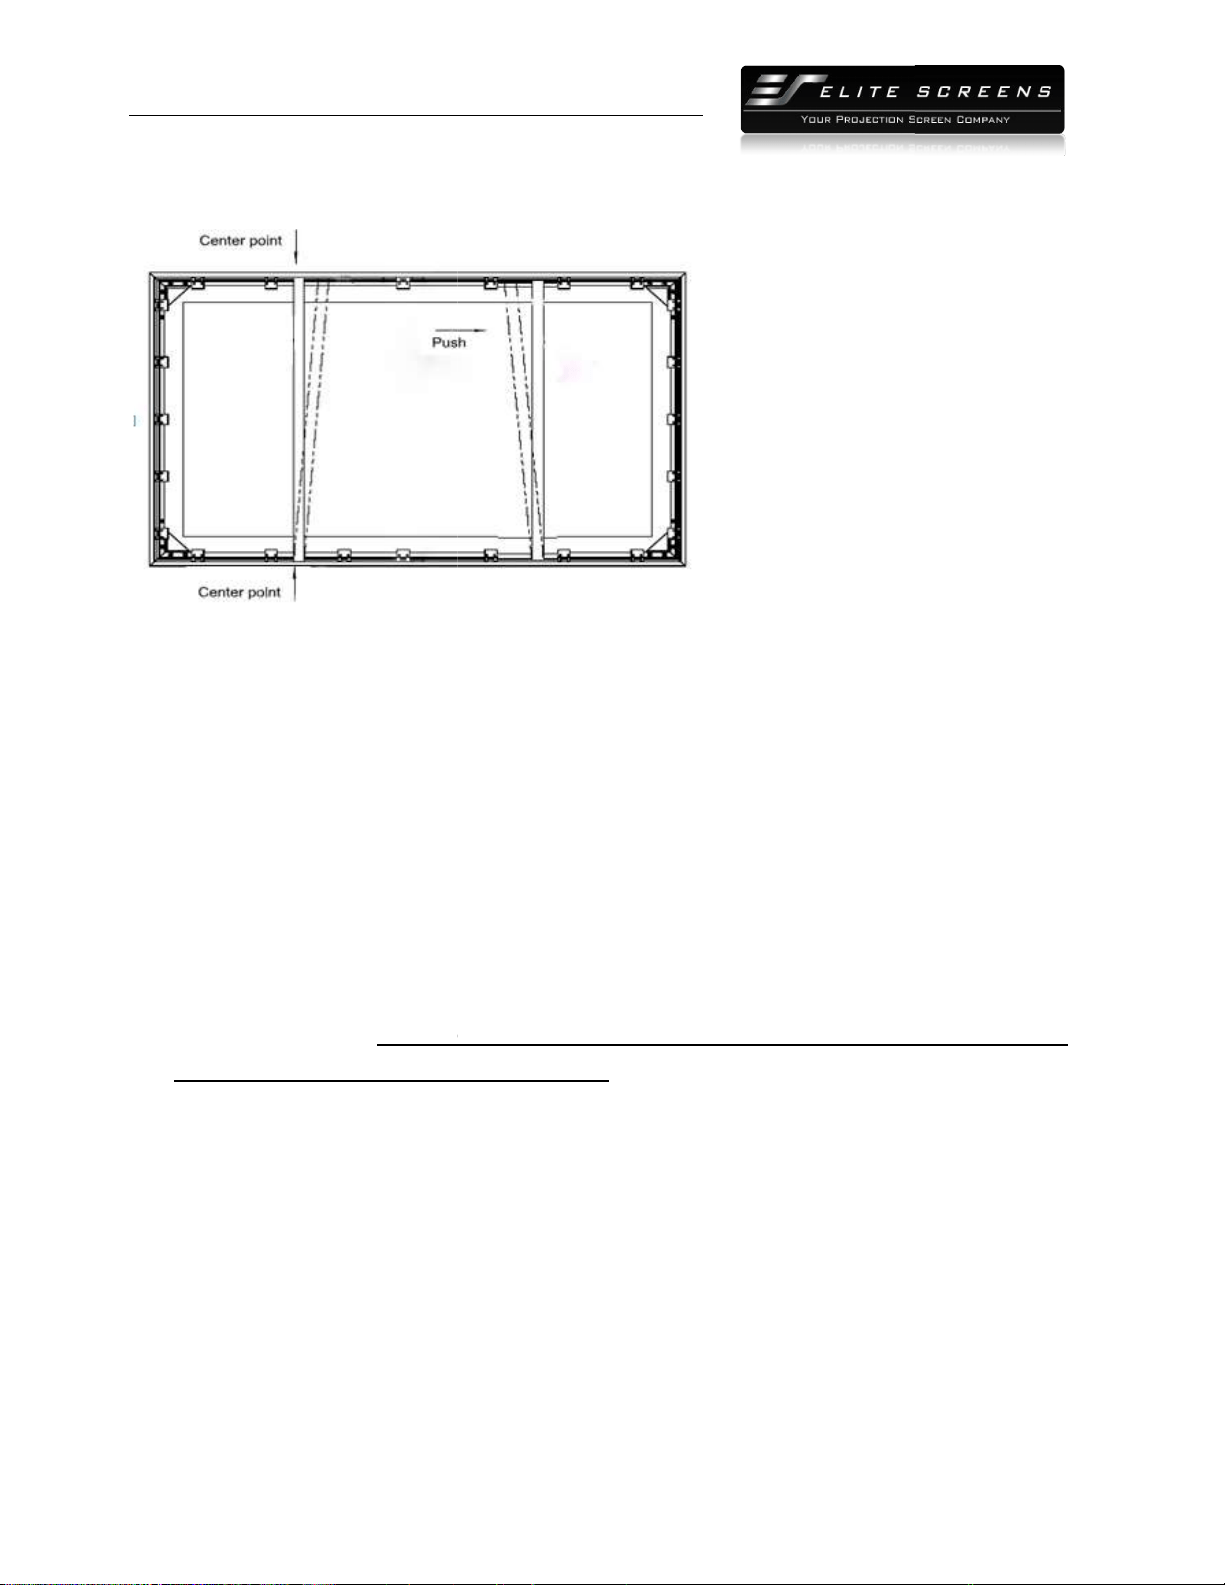
Diagonal models above 135” require 2x Center Support Bars
3. Slide the top
end of the bar into the top center point of the frame
installation.
This will provide added stability to your frame and added tension to the material.
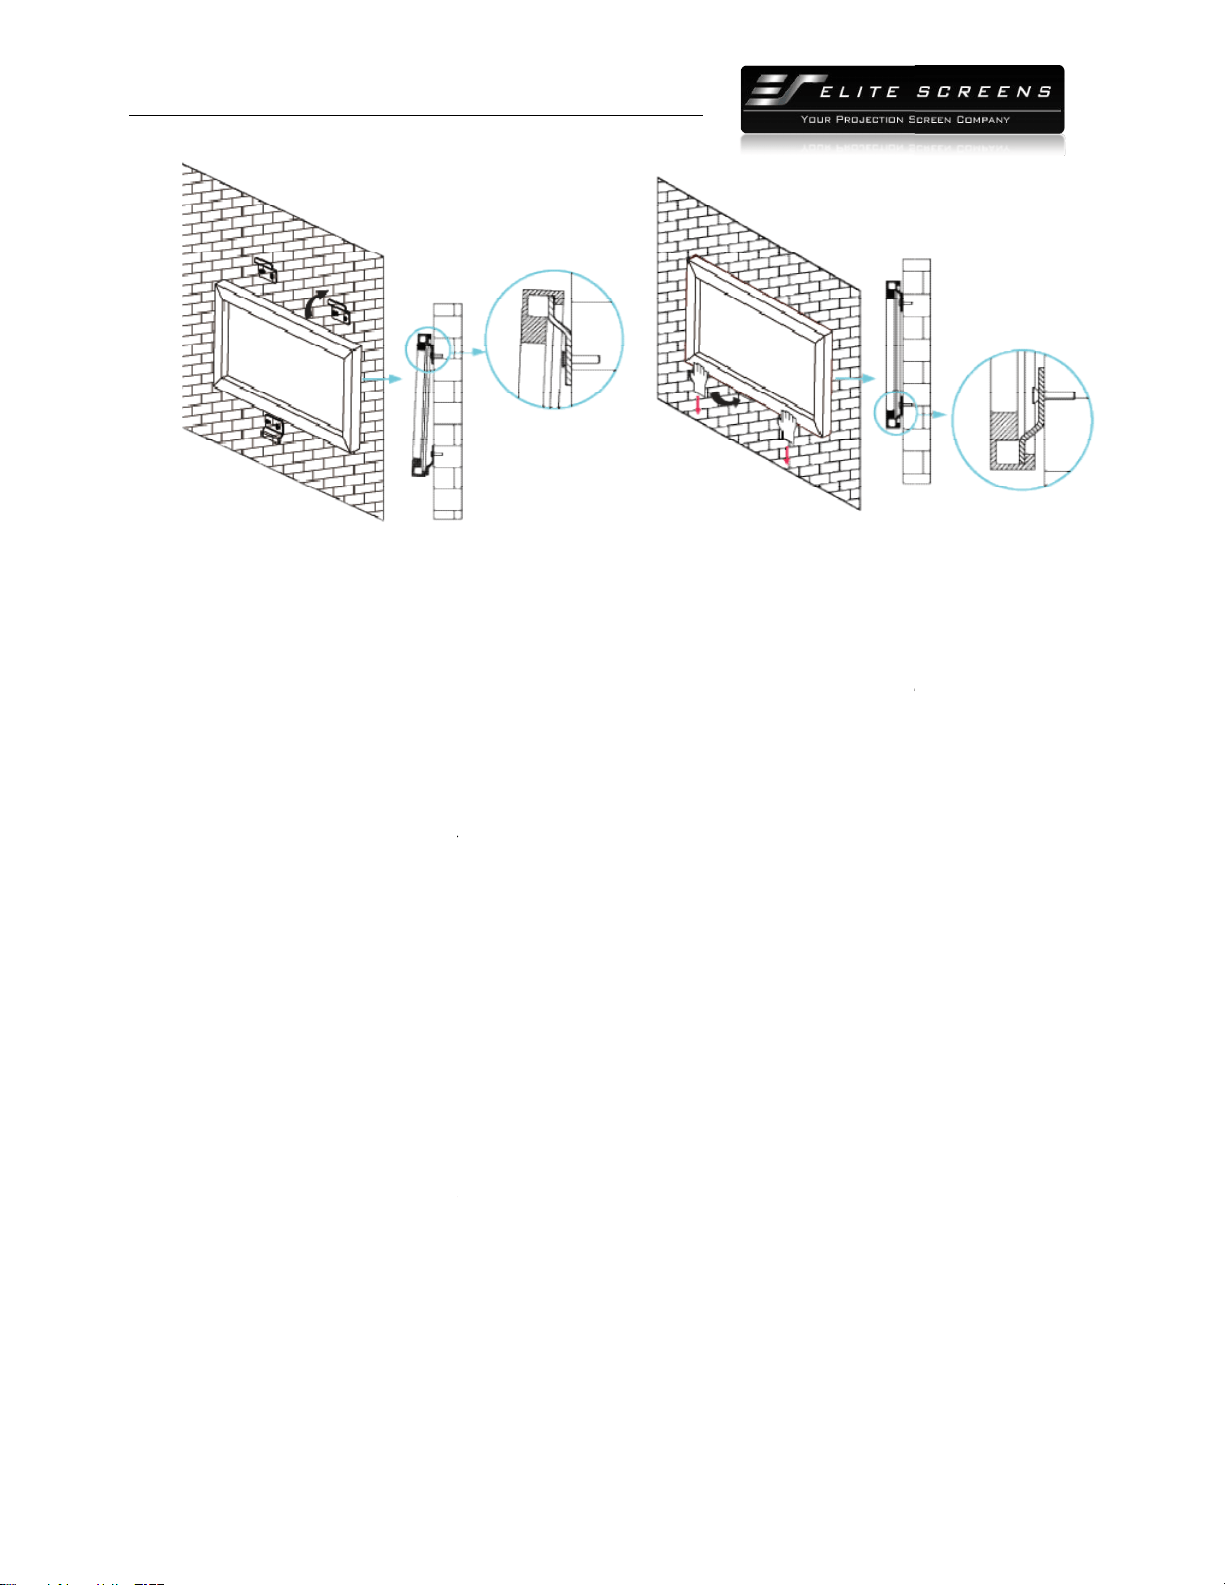
4.6 Installation
1.
Locate your desired installation location with a
area of where the screen is to be installed.
2.
Drill a hole with the proper bit size according to the wood screws included.
3.
Line up the wall brackets with the drilled holes on the installation location and screw them in using
a Phillips screwdriver.
Note: Use 2 top wall brackets on diagonal sizes below 135”, and use 3 top
wall brackets on diagonal sizes 135” and above.
4. Positio
n the fixed frame screen onto the top wall brackets as shown in
the center of the bottom frame to secure the installation.
5.
The design of the wall brackets allows the
importa
nt feature of the installation design as it allows your screen to be properly centered.
6.
Using both hands finish the installation by pushing the lower portion of the fixed frame screen into
the lower bracket as shown in Fig 19.
PRODUCT WHITE PAPER
www.
elitescreens.com
lite
Screens Europe GmbH| Elite Screens India |Elite Screens China Ltd.
creens Taiwan
Corp |Elite Screens Japan |Elite Screens Australia
Diagonal models above 135” require 2x Center Support Bars
end of the bar into the top center point of the frame
to complete the center support bar
This will provide added stability to your frame and added tension to the material.
Locate your desired installation location with a
stud finder (recommended) and mark the drill
area of where the screen is to be installed.
Drill a hole with the proper bit size according to the wood screws included.
Line up the wall brackets with the drilled holes on the installation location and screw them in using
Note: Use 2 top wall brackets on diagonal sizes below 135”, and use 3 top
wall brackets on diagonal sizes 135” and above.
n the fixed frame screen onto the top wall brackets as shown in
(Fig. 18)
and push down at
the center of the bottom frame to secure the installation.
The design of the wall brackets allows the
frame to slide over them through its sides. This is an
nt feature of the installation design as it allows your screen to be properly centered.
Using both hands finish the installation by pushing the lower portion of the fixed frame screen into
the lower bracket as shown in Fig 19.
(Fig. 17)
11
to complete the center support bar
This will provide added stability to your frame and added tension to the material.
stud finder (recommended) and mark the drill
-hole
Line up the wall brackets with the drilled holes on the installation location and screw them in using
Note: Use 2 top wall brackets on diagonal sizes below 135”, and use 3 top
and push down at
frame to slide over them through its sides. This is an
nt feature of the installation design as it allows your screen to be properly centered.
Using both hands finish the installation by pushing the lower portion of the fixed frame screen into
PRODUCT WHITE PAPER
http://
www.
Elite Screens Inc. |E
lite
Elite S
creens Taiwan
CAUTION
Please follow these instructions carefully to ensure proper maintenance and safety
1. When hanging the screen up, please make sure that no other objects such as power switches, outlets,
furniture, ladders, windows, etc. occupy the space designated for your Fixed
2. Regardless if the screen is hung on or installed into the
anchors are used and that the weight is supported appropriately by a strong and structurally sound
surface just as any large and heavy picture frame should.
(Please consult a home improvement specialist for the bes
3. Frame parts are made of high quality velour
4. When not in use, cover over the screen with a furniture sheet to protect it from dirt, grime, paint or
any other impurities.
5. When cleaning, use a damp soft cloth with warm water to remove any marks on the frame or screen
surface.
6. Never attempt to use any solutions, chemicals or abrasive cleaners on the screen surface.
7. In order to avoid damaging the screen, avoid touc
sharp or abrasive objects.
8. Spare Parts should be placed out of reach of small children in accordance with household safety
guidelines.
(Fig. 18)
PRODUCT WHITE PAPER
www.
elitescreens.com
lite
Screens Europe GmbH| Elite Screens India |Elite Screens China Ltd.
creens Taiwan
Corp |Elite Screens Japan |Elite Screens Australia
Please follow these instructions carefully to ensure proper maintenance and safety
of your Fixed Frame Screen.
1. When hanging the screen up, please make sure that no other objects such as power switches, outlets,
furniture, ladders, windows, etc. occupy the space designated for your Fixed
-
Frame screen.
2. Regardless if the screen is hung on or installed into the
wall, make sure that the proper mounting
anchors are used and that the weight is supported appropriately by a strong and structurally sound
surface just as any large and heavy picture frame should.
(Please consult a home improvement specialist for the bes
t advice on installation)
3. Frame parts are made of high quality velour
-
surfaced aluminum and should be handled with care.
4. When not in use, cover over the screen with a furniture sheet to protect it from dirt, grime, paint or
5. When cleaning, use a damp soft cloth with warm water to remove any marks on the frame or screen
6. Never attempt to use any solutions, chemicals or abrasive cleaners on the screen surface.
7. In order to avoid damaging the screen, avoid touc
hing it directly with your fingers, tools or any other
8. Spare Parts should be placed out of reach of small children in accordance with household safety
(Fig.19)
12
of your Fixed Frame Screen.
1. When hanging the screen up, please make sure that no other objects such as power switches, outlets,
Frame screen.
wall, make sure that the proper mounting
anchors are used and that the weight is supported appropriately by a strong and structurally sound
surfaced aluminum and should be handled with care.
4. When not in use, cover over the screen with a furniture sheet to protect it from dirt, grime, paint or
5. When cleaning, use a damp soft cloth with warm water to remove any marks on the frame or screen
6. Never attempt to use any solutions, chemicals or abrasive cleaners on the screen surface.
hing it directly with your fingers, tools or any other
8. Spare Parts should be placed out of reach of small children in accordance with household safety
PRODUCT WHITE PAPER
http://
www.
Elite Screens Inc. |E
lite
Elite S
creens Taiwan
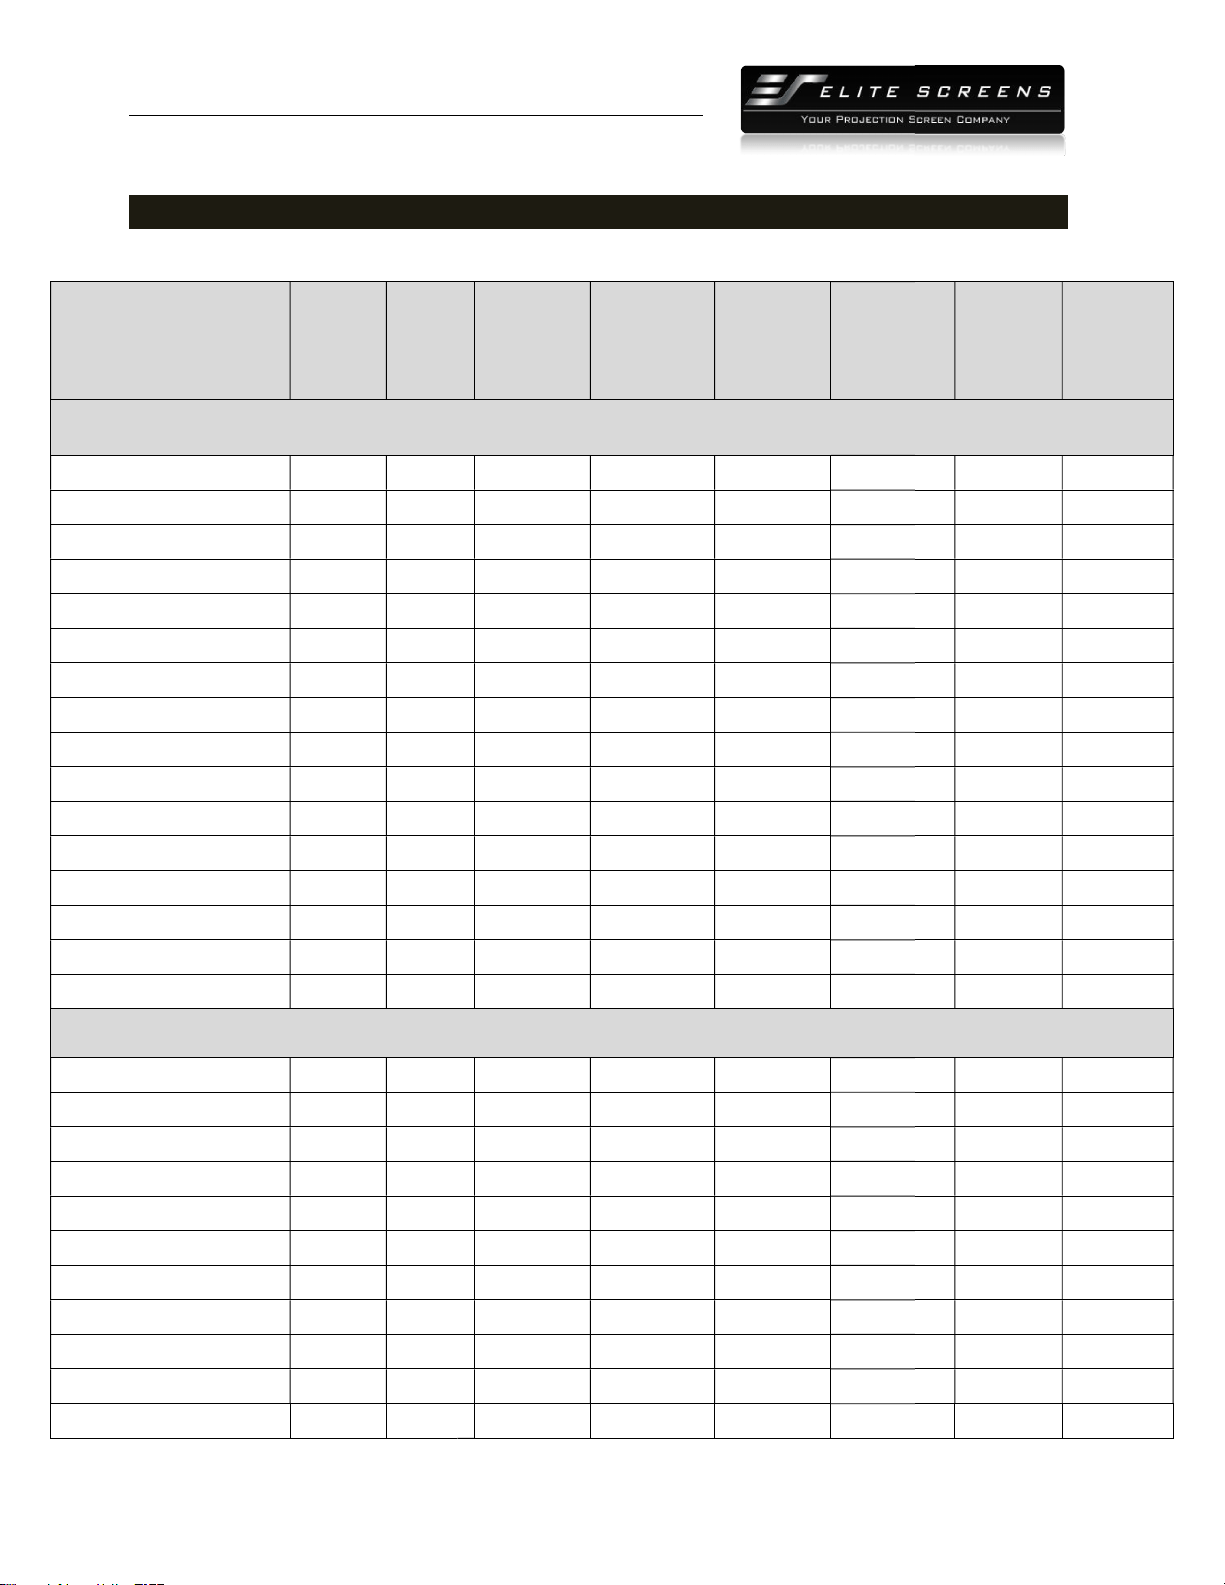
Section 5: Product Specifications
5.1 Dimensions
Model Number
Diag.
Size
Aspect
Ratio
ER92WH2 92" 16:9
ER100WH2 100" 16:9
ER106WH2 106" 16:9
ER110WH2 110" 16:9
ER120WH2 120" 16:9
ER135WH2 135" 16:9
ER150WH2 150" 16:9
ER165WH2 165" 16:9
ER180WH2 180" 16:9
ER200WH2 200" 16:9
ER109WX2 109" 16:10
ER114WX2 114" 16:10
ER115WH2-Wide 115"
2.35:1
ER125WH2-Wide 125"
2.35:1
ER138WH2-Wide 138"
2.35:1
ER158WH2-Wide 158"
2.35:1
ER92WH2 92" 16:9
ER100WH2 100" 16:9
ER106WH2 106" 16:9
ER110WH2 110" 16:9
ER120WH2 120" 16:9
ER135WH2 135" 16:9
ER150WH2 150" 16:9
ER165WH2 165" 16:9
ER180WH2 180" 16:9
ER200WH2 200" 16:9
ER109WX2 109" 16:10
PRODUCT WHITE PAPER
www.
elitescreens.com
lite
Screens Europe GmbH| Elite Screens India |Elite Screens China Ltd.
creens Taiwan
Corp |Elite Screens Japan |Elite Screens Australia
Section 5: Product Specifications
Aspect
Viewing
Width (A)
Overall
Width (A1)
Viewing
Height (B)
Overall
Height (B1)
Unit: Inches
80.2 84.9 45.1 49.8
87.2 91.9 49.0 53.7
92.4 97.1 52.0 56.7
95.9 100.6 53.9 58.7
104.6 109.3 58.8 63.5
117.7 122.4 66.1 70.9
130.7 135.4 73.6 78.3
143.8 148.5 80.9 85.6
156.9 161.6 88.2 92.9
174.4 179.1 98.0
102.8
92.0 96.7 57.5 62.2
96.0 100.7 60.0 64.7
2.35:1
105.8 110.6 45.0 49.8
2.35:1
115.0 119.7 48.9 53.7
2.35:1
127.0 131.7 54.0 58.7
2.35:1
145.4 150.1 61.9 66.6
Unit: mm
2037 2156 1146
1265
2215 2334 1245
1364
2347 2466 1321
1440
2436 2555 1369
1491
2657 2776 1494
1613
2990 3109 1679
1801
3320 3439 1869
1989
3653 3773 2055
2175
3985 4105 2240
2360
4430 4549 2489
2611
2337 2456 1461
1580
13
Overall
Height (B1)
Frame
Width
(C)
Frame
Depth(D)
2.4 1.6
2.4 1.6
2.4 1.6
2.4 1.6
2.4 1.6
2.4 1.6
2.4 1.6
2.4 1.6
2.4 1.6
102.8
2.4 1.6
2.4 1.6
2.4 1.6
2.4 1.6
2.4 1.6
2.4 1.6
2.4 1.6
61 41
61 41
61 41
61 41
61 41
61 41
61 41
60 40
61 41
61 41
61 41
PRODUCT WHITE PAPER
http://
www.
Elite Screens Inc. |E
lite
Elite S
creens Taiwan
Model Number
Diag.
Size
Aspect
Ratio
ER114WX2 114" 16:10
ER115WH2-Wide 115"
2.35:1
ER125WH2-Wide 125"
2.35:1
ER138WH2-Wide 138"
2.35:1
ER158WH2-Wide 158"
2.35:1
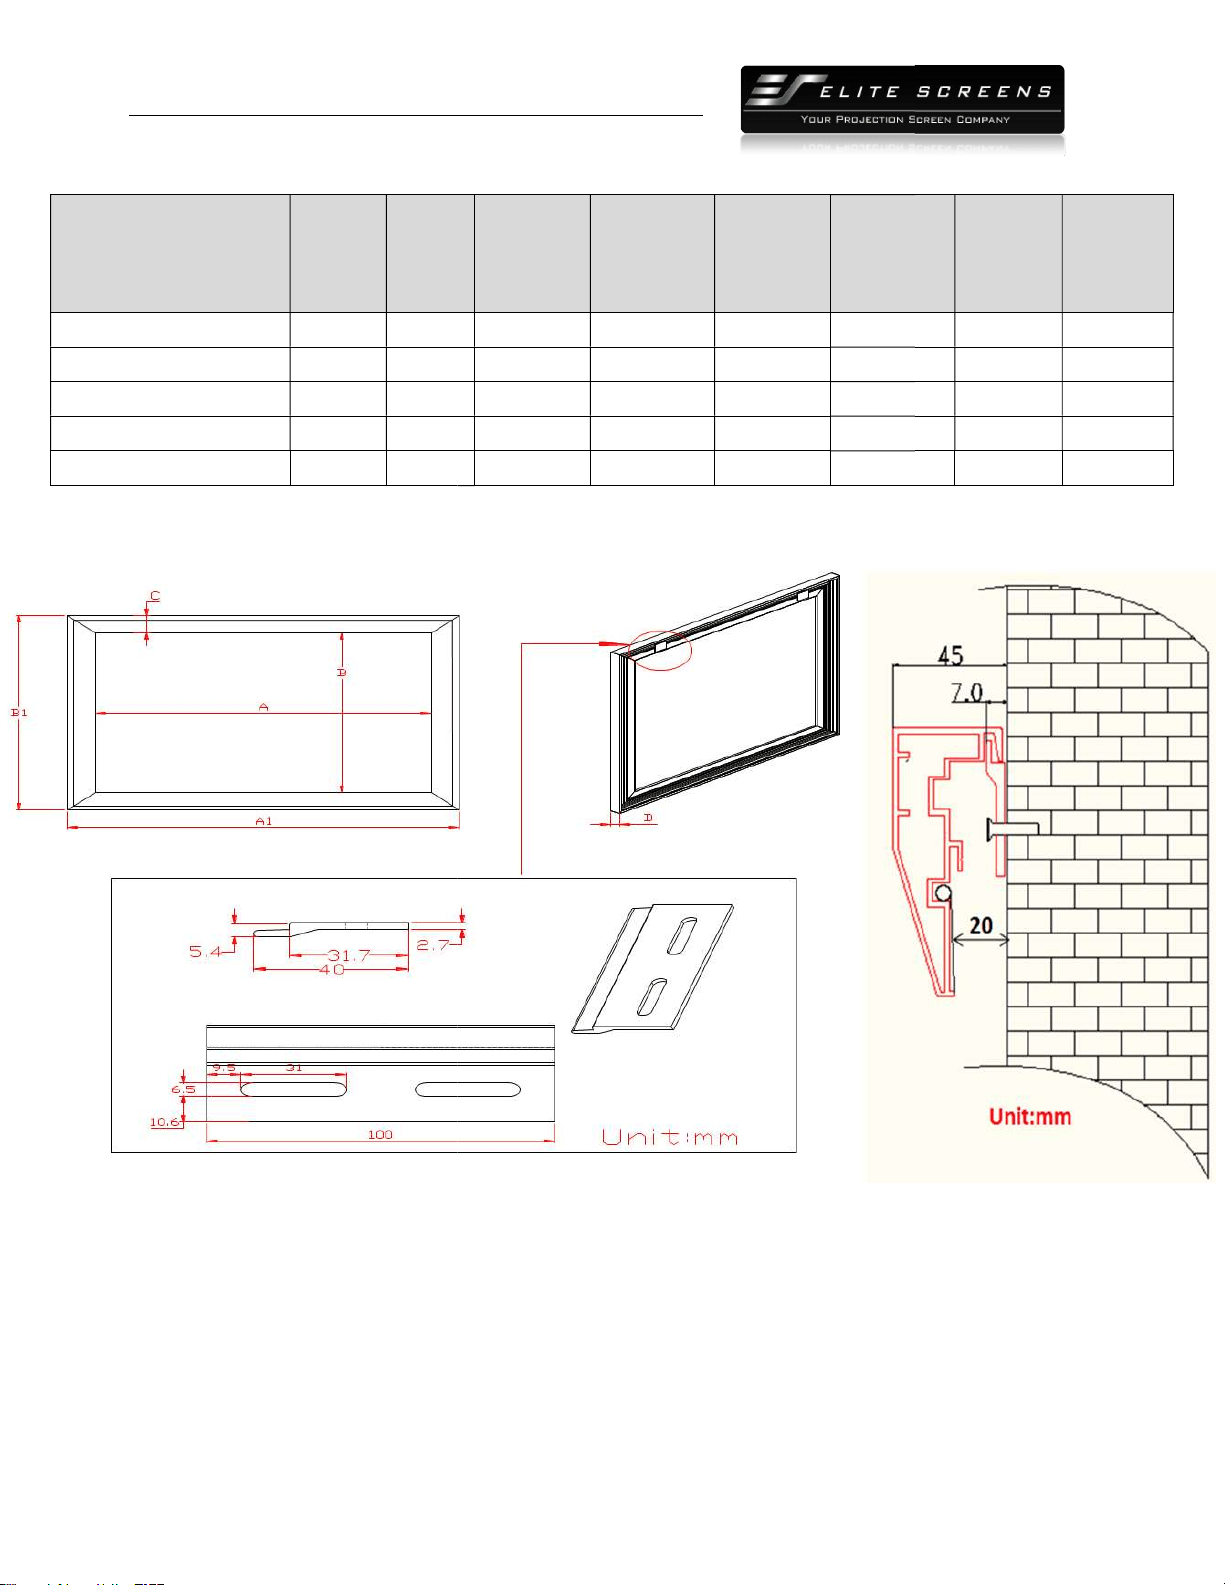
5.2 Drawings
PRODUCT WHITE PAPER
www.
elitescreens.com
lite
Screens Europe GmbH| Elite Screens India |Elite Screens China Ltd.
creens Taiwan
Corp |Elite Screens Japan |Elite Screens Australia
Aspect
Viewing
Width (A)
Overall
Width (A1)
Viewing
Height (B)
Overall
Height (B1)
2438 2558 1524
1643
2.35:1
2687 2809 1143
1265
2.35:1
2921 3040 1242
1364
2.35:1
3226 3345 1372
1491
2.35:1
3693 3813 1571
1691
14
Overall
Height (B1)
Frame
Width
(C)
Frame
Depth(D)
61 41
61 41
61 41
61 41
61 41
PRODUCT WHITE PAPER
http://
www.
Elite Screens Inc. |E
lite
Elite S
creens Taiwan
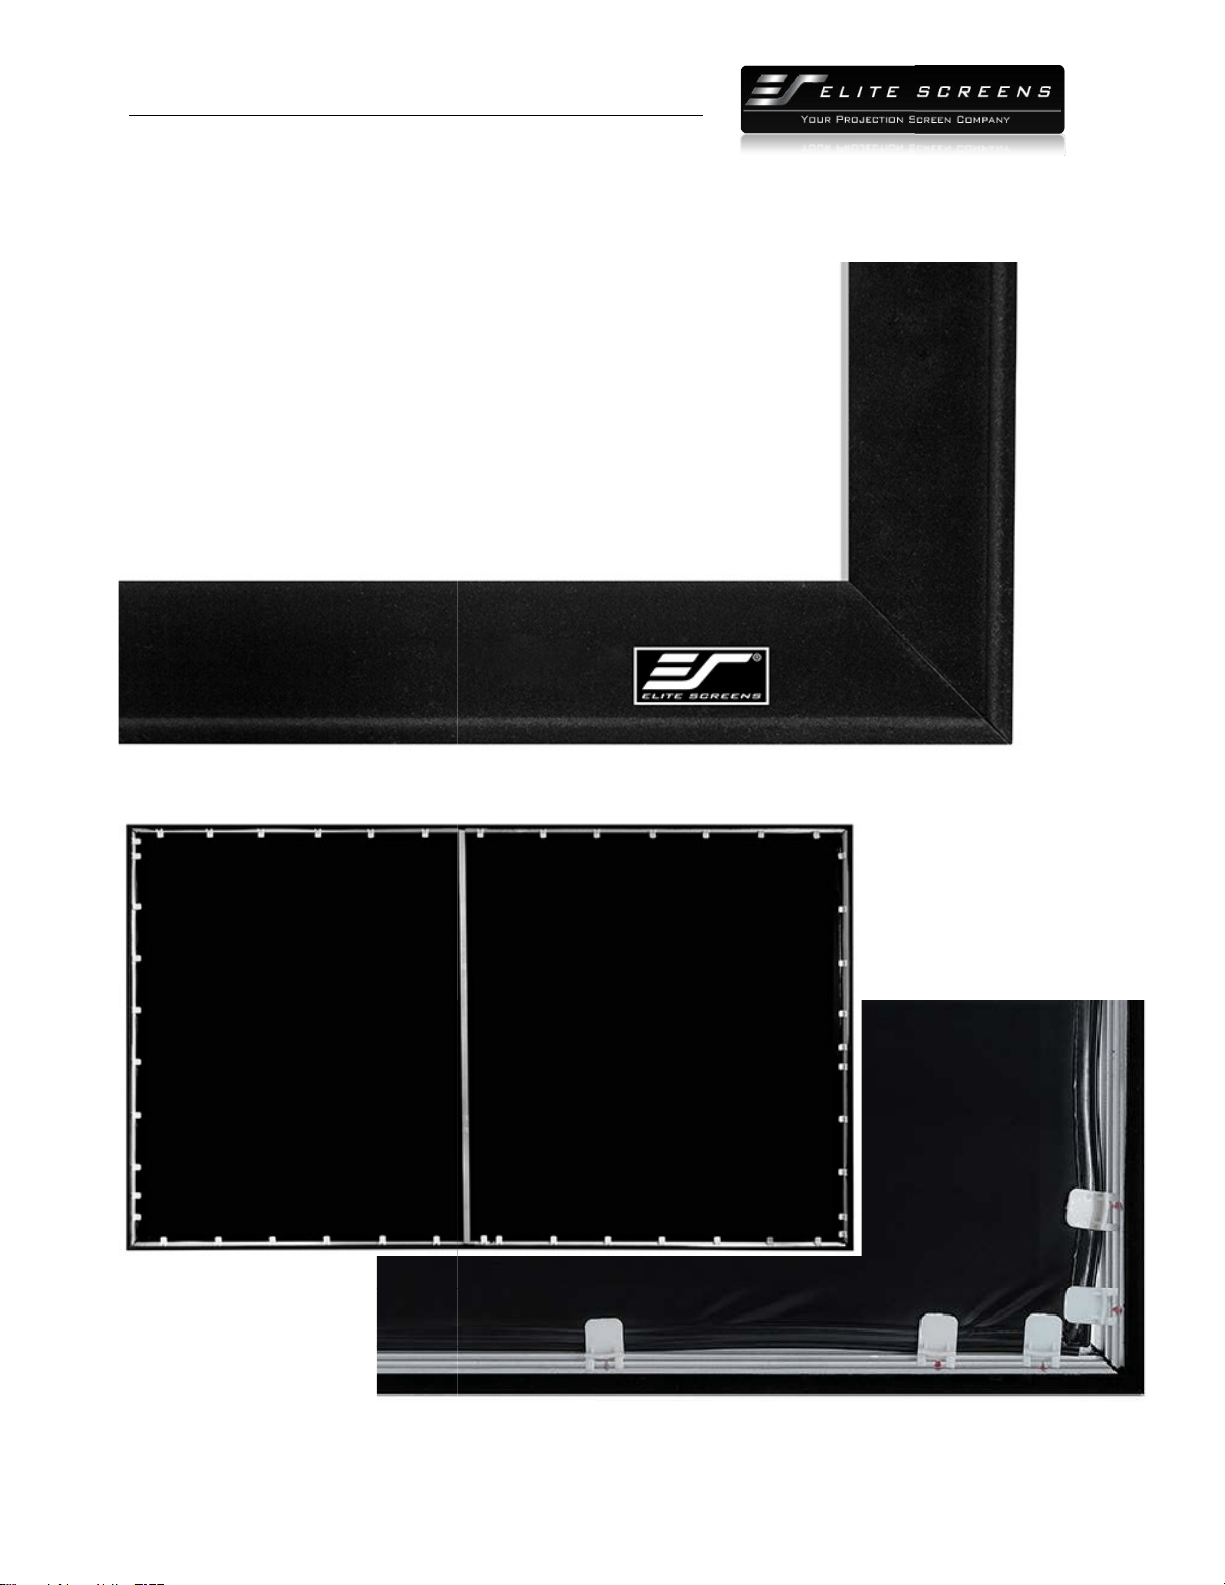
5.3 Pictures
Frame Detail
Back View and Detail
PRODUCT WHITE PAPER
www.
elitescreens.com
lite
Screens Europe GmbH| Elite Screens India |Elite Screens China Ltd.
creens Taiwan
Corp |Elite Screens Japan |Elite Screens Australia
15
PRODUCT WHITE PAPER
http://
www.
Elite Screens Inc. |E
lite
Elite S
creens Taiwan
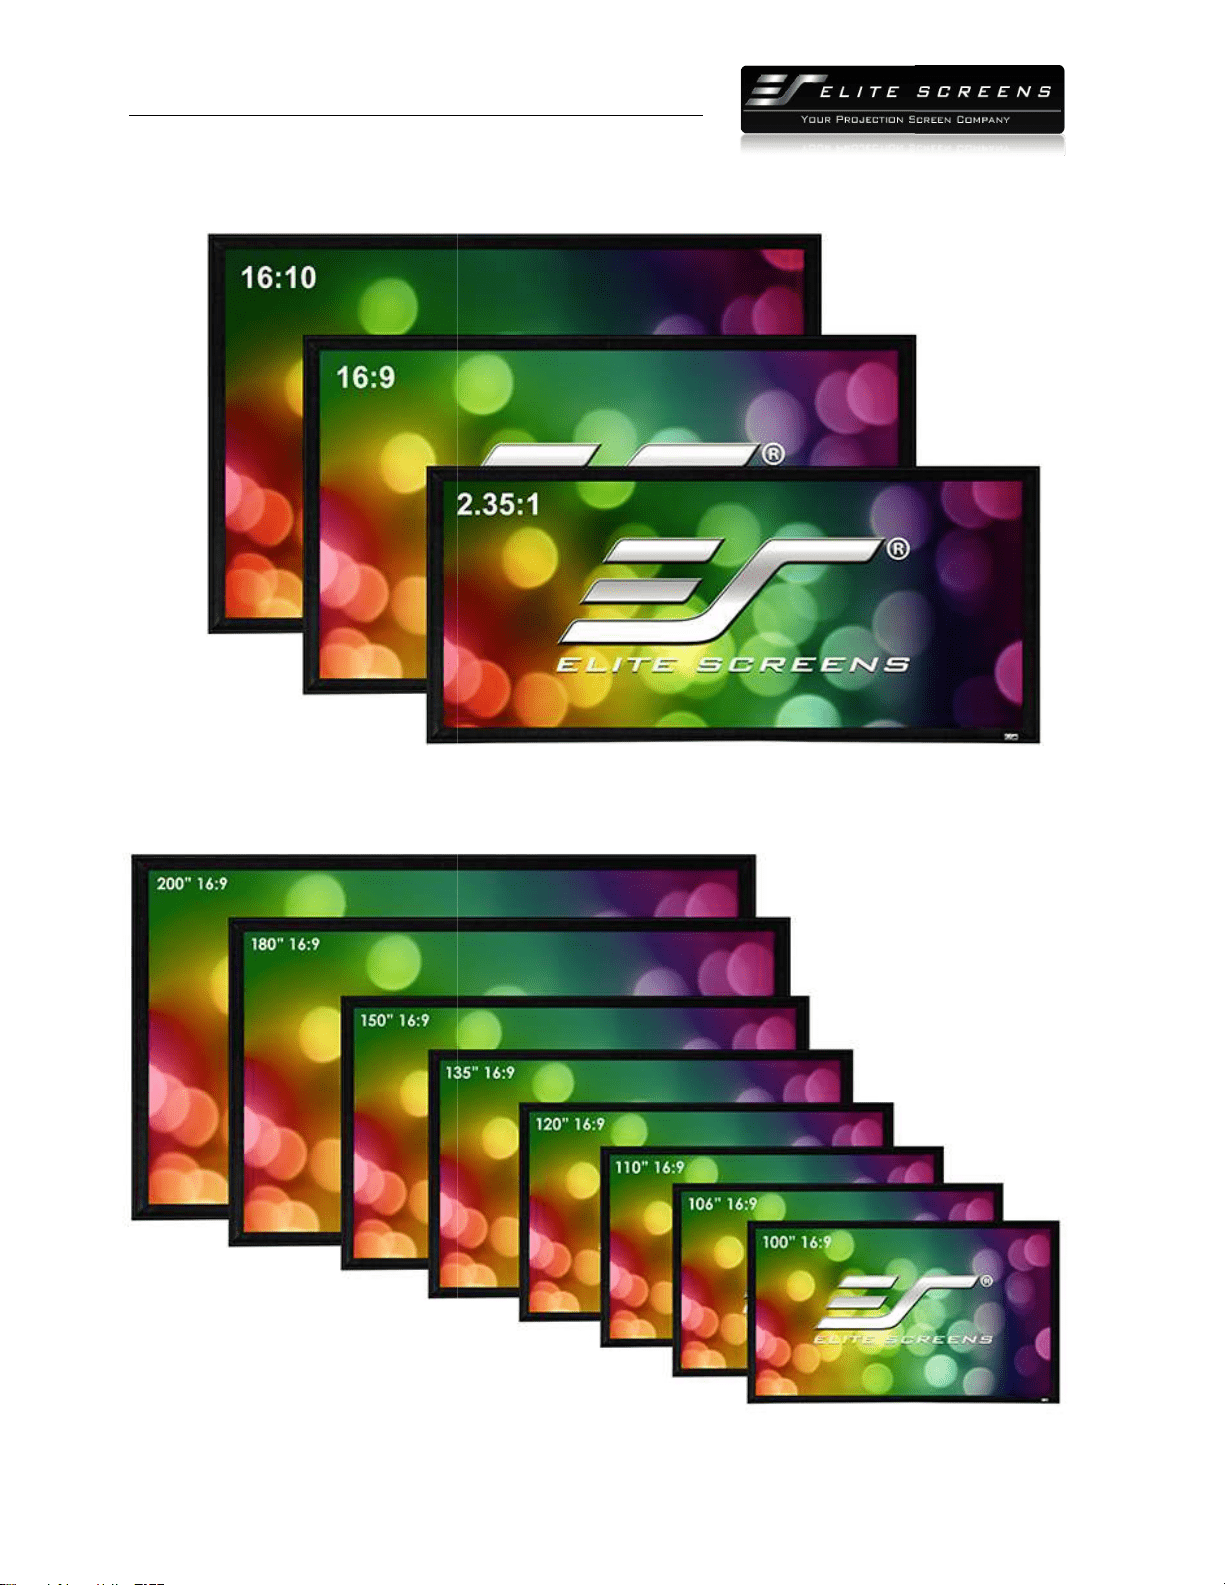
Sable Frame 2 Series
Aspect Ratios
Sizes in 16:9 Aspect Ratio
PRODUCT WHITE PAPER
www.
elitescreens.com
lite
Screens Europe GmbH| Elite Screens India |Elite Screens China Ltd.
creens Taiwan
Corp |Elite Screens Japan |Elite Screens Australia
Aspect Ratios
16
PRODUCT WHITE PAPER
http://
www.
Elite Screens Inc. |E
lite
Elite S
creens Taiwan
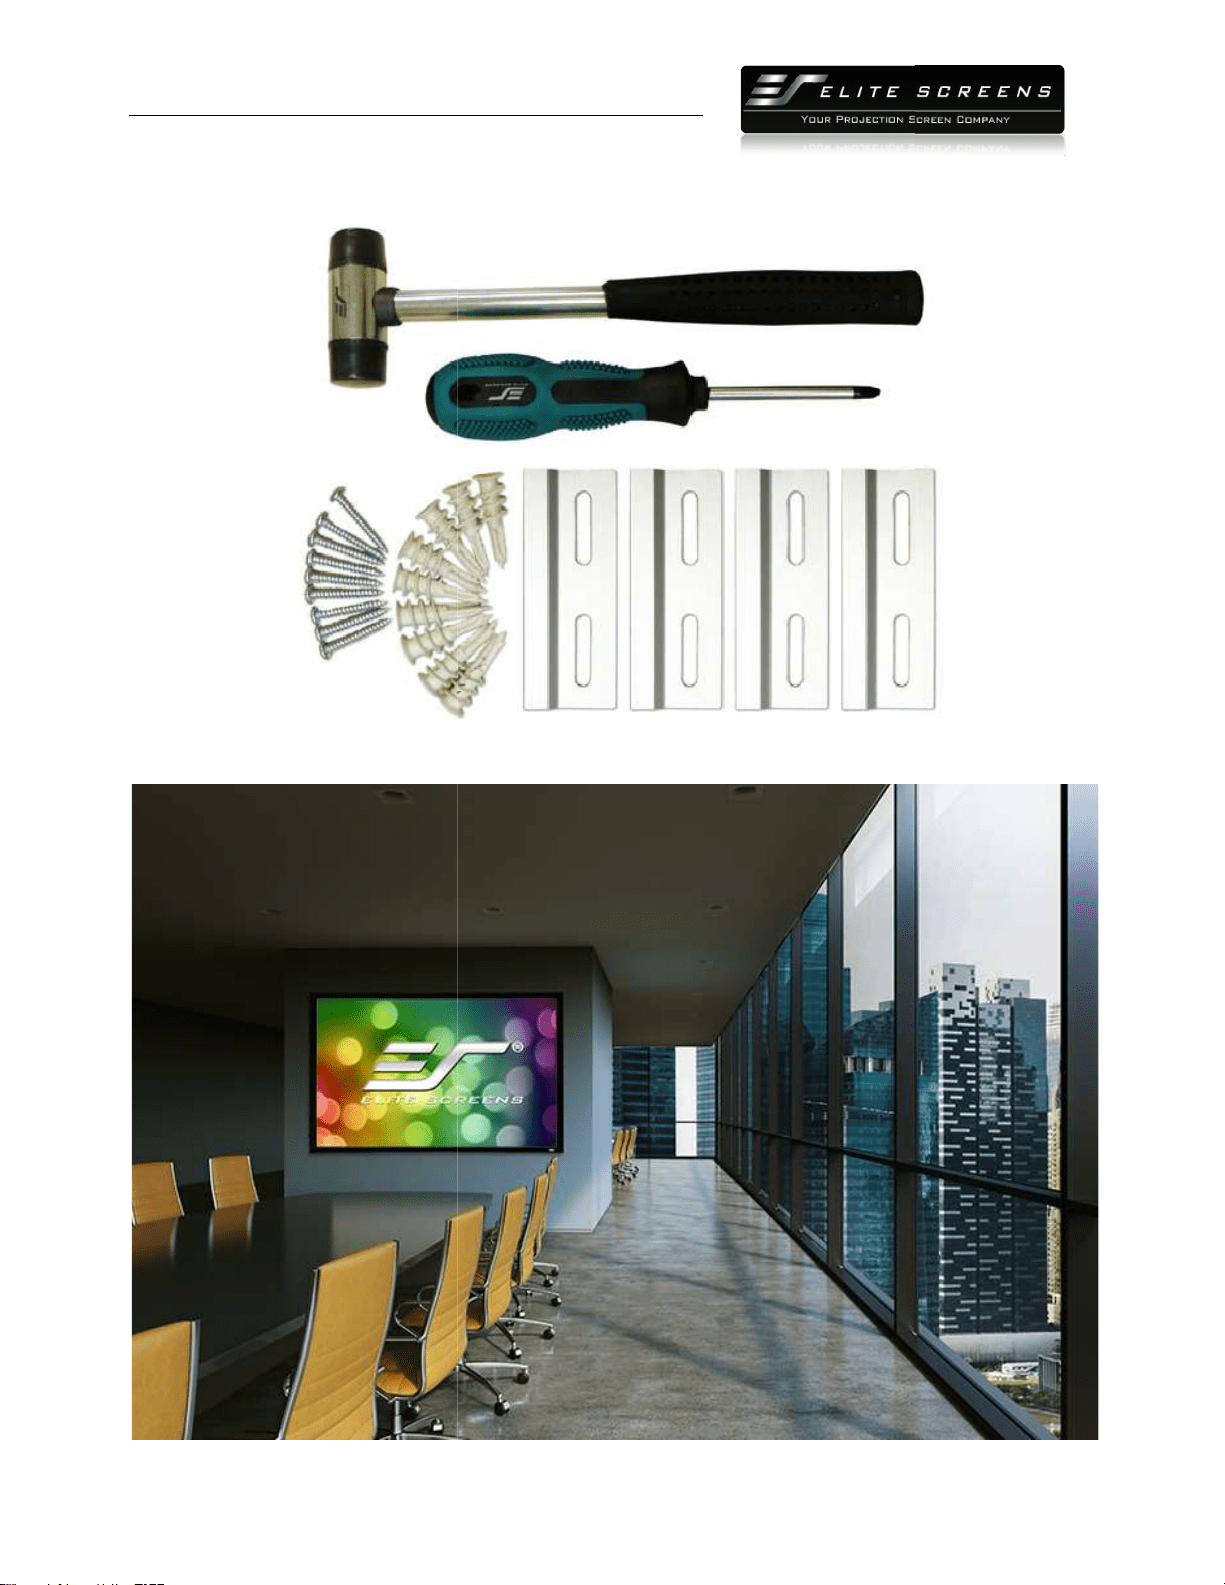
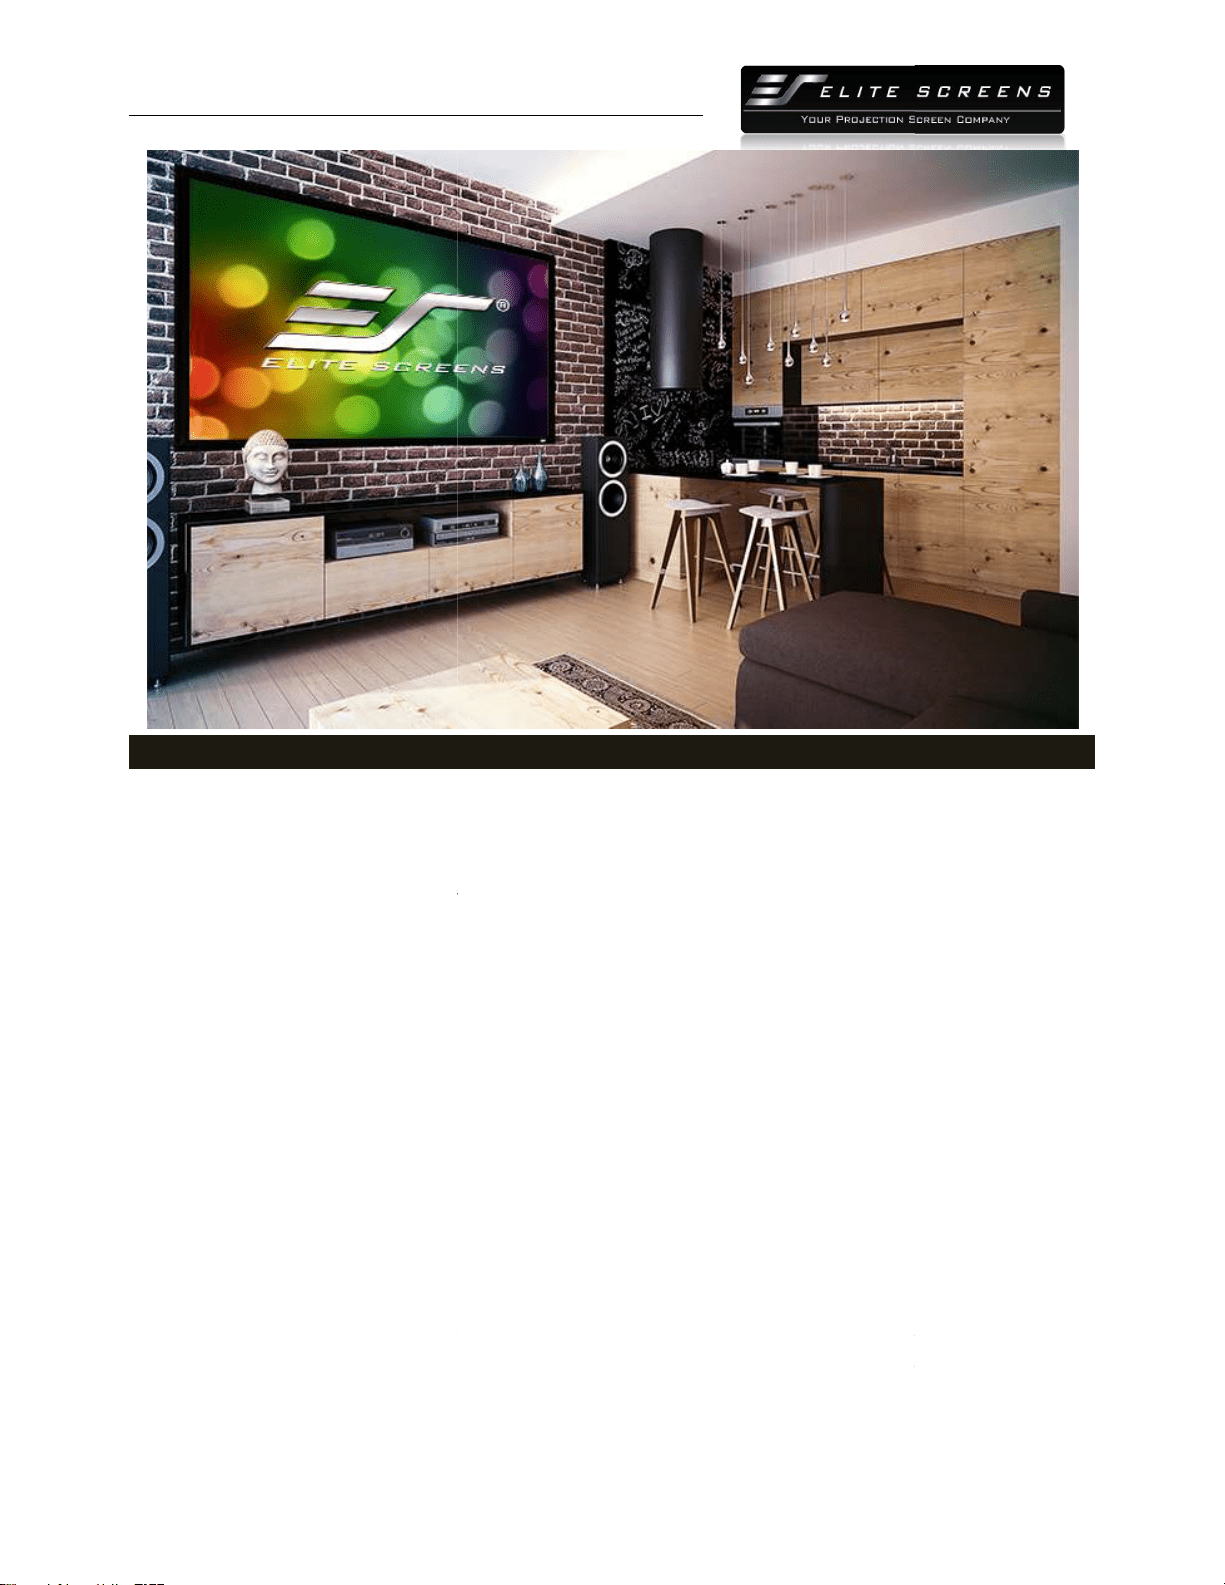
Installation Kit
Life Style
PRODUCT WHITE PAPER
www.
elitescreens.com
lite
Screens Europe GmbH| Elite Screens India |Elite Screens China Ltd.
creens Taiwan
Corp |Elite Screens Japan |Elite Screens Australia
17
PRODUCT WHITE PAPER
http://
www.
Elite Screens Inc. |E
lite
Elite S
creens Taiwan
Section 6: About Elite Screens
6.1 Company Description
Elite Screens Inc.
is a California based company that specializes in making quality commercial and
home-theater projection
screens for the retail and custom install sales channels. Our company
began as an innovative venture into the projection market by manufacturing veterans from the
AV/IT industry. Elite Screens quickly established itself as an entry level commercial and hom
theater screen manufacturer. This was accomplished by making a quality product cost effective
with a focus on mass-
producing screen material, sizes and aspect ratios that were most commonly
preferred by AV customers in general. We focused on uniformity w
mainstream demographic while including extra features that are not usually included by other
manufacturers.
In time, we progressed from just retail sales into the realm of custom
installer/integrator manufacture as our numerous rev
our product and are so certain of customer satisfaction with the quality of our product that we
offer a 2-
year manufacturer's warranty which is twice the industry standard.
devotion to excellenc
e in products and service, we are committed to implementing green practices
with our production. We have adopted manufacturing methods that promote conservative
regulation of our energy needs. Our simple product designs combined with the expertise of our
p
ermanent staff ensures that our entire line of products are made by experienced hands devoted
to the high standards of today’s audio
PRODUCT WHITE PAPER
www.
elitescreens.com
lite
Screens Europe GmbH| Elite Screens India |Elite Screens China Ltd.
creens Taiwan
Corp |Elite Screens Japan |Elite Screens Australia
Section 6: About Elite Screens
is a California based company that specializes in making quality commercial and
screens for the retail and custom install sales channels. Our company
began as an innovative venture into the projection market by manufacturing veterans from the
AV/IT industry. Elite Screens quickly established itself as an entry level commercial and hom
theater screen manufacturer. This was accomplished by making a quality product cost effective
producing screen material, sizes and aspect ratios that were most commonly
preferred by AV customers in general. We focused on uniformity w
ith what would match the
mainstream demographic while including extra features that are not usually included by other
In time, we progressed from just retail sales into the realm of custom
installer/integrator manufacture as our numerous rev
iews and awards will attest. We stand behind
our product and are so certain of customer satisfaction with the quality of our product that we
year manufacturer's warranty which is twice the industry standard.
In our continued
e in products and service, we are committed to implementing green practices
with our production. We have adopted manufacturing methods that promote conservative
regulation of our energy needs. Our simple product designs combined with the expertise of our
ermanent staff ensures that our entire line of products are made by experienced hands devoted
to the high standards of today’s audio
-video consumer.
###
18
Section 6: About Elite Screens
is a California based company that specializes in making quality commercial and
screens for the retail and custom install sales channels. Our company
began as an innovative venture into the projection market by manufacturing veterans from the
AV/IT industry. Elite Screens quickly established itself as an entry level commercial and hom
e
theater screen manufacturer. This was accomplished by making a quality product cost effective
producing screen material, sizes and aspect ratios that were most commonly
ith what would match the
mainstream demographic while including extra features that are not usually included by other
In time, we progressed from just retail sales into the realm of custom
iews and awards will attest. We stand behind
our product and are so certain of customer satisfaction with the quality of our product that we
In our continued
e in products and service, we are committed to implementing green practices
with our production. We have adopted manufacturing methods that promote conservative
regulation of our energy needs. Our simple product designs combined with the expertise of our
ermanent staff ensures that our entire line of products are made by experienced hands devoted