• Bucking - The process of cross cutting a felled tree or log into lengths.
• Motor Brake - A device used to stop the saw chain when the trigger is released.
• Chainsaw Powerhead - A chainsaw without the saw chain and guide bar.
• Drive Sprocket or Sprocket - The toothed part that drives the saw chain.
• Felling - The process of cutting down a tree.
• Felling Back Cut - The final cut in a tree felling operation made on the opposite side of the tree from the notching cut.
• Front Handle - The support handle located at or toward the front of the chainsaw.
• Front Hand Guard - A structural barrier between the front handle of a chainsaw and the guide bar, typically located close to the hand position on the front handle and sometimes employed as an activating lever for a chain brake.
• Guide Bar - A solid railed structure that supports and guides the saw chain.
• Guide Bar Scabbard - Enclosure fitted over guide bar to prevent tooth contact when saw is not in use.
• Kickback - The backward or upward motion, or both of the guide bar occurring when the saw chain near the nose of the top area of the guide bar contacts any object such as a log or branch, or when the wood closes in and pinches the saw chain in the cut.
• Kickback, Pinch - The rapid pushback of the saw which can occur when the wood closes in and pinches the moving saw chain in the cut along the top of the guide bar.
• Kickback, Rotational - The rapid upward and backward motion of the saw which can occur when the moving saw chain near the upper portion of the tip of the guide bar contacts an object, such as a log or branch.
• Limbing - Removing the branches from a fallen tree
• Low-Kickback Chain - A chain that complies with the kickback performance requirements of ANSI B175.1-1991 (when tested on a representative sample of chainsaws.)
• Normal Cutting Position - Those positions assumed in performing the bucking and felling cuts.
• Notching Undercut - A notch cut in a tree that directs the tree’s fall.
• Rear Handle - The support handle located at or toward the rear of the saw.
• Reduced Kickback Guide Bar - A guide bar which has been demonstrated to reduce kickback significantly.
• Replacement Saw Chain - A chain that complies with kickback performance requirements of ANSI B175.1-2000 when tested with specific chainsaws. It may not meet the ANSI performance requirements when used with other saws.
• Saw Chain - A loop of chain having cutting teeth, that cut the wood,and that is driven by the motor and is supported by the guide bar.
• Ribbed Bumper - The ribs used when felling or bucking to pivot the saw and maintain position while sawing.
• Switch - A device that when operated will complete or interrupt an electrical power circuit to the motor of the chainsaw.
• Switch Linkage - The mechanism that transmits motion from a trigger to the switch.
• Switch Lockout - A movable stop that prevents the unintentional operation of the switch until manually actuated.
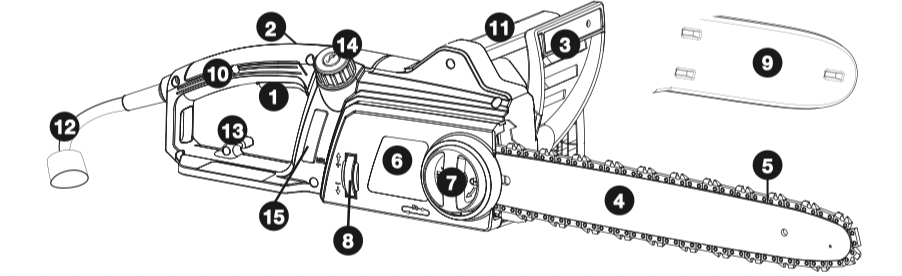
FUNCTIONAL DESCRIPTION
1. Trigger switch
2. Lock-off button (not shown)
3. Front hand guard
4. Guide bar
5. Saw chain
6. Sprocket cover
7. Bar adjust locking knob
8. Chain tensioning wheel
9. Guide bar scabbard
10. Rear handle
11. Front handle
12. Power cord
13. Extension cord retainer
14. Oil cap
15. Oil level indicator
PREPARING YOUR CHAINSAW FOR USE
WARNING: Read and understand all instructions. Failure to follow all instructions listed below may result in electric shock, fire and/or serious personal injury
ASSEMBLY
INSTALLING THE GUIDE BAR AND SAW CHAIN
CAUTION: Sharp chain. Always wear protective gloves when handling the chain. The chain is sharp and can cut you when it is not running.
WARNING: Sharp moving chain. To prevent accidental operation, ensure that tool is unplugged before performing the following operations. Failure to do this could result in serious personal injury.
The saw chain (5) and guide bar (4) are packed together in the carton. They need to be attached to the body of the saw.
• Place the saw on a firm surface.
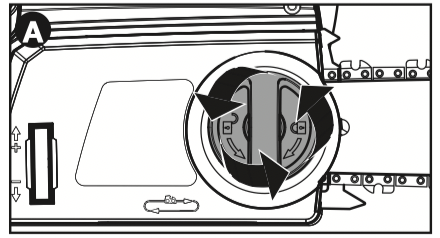
• Rotate the bar adjust locking knob (7) counterclockwise as shown in figure A to remove sprocket cover (6).
• Wearing protective gloves, grasp the saw chain (5) and wrap it around the guide bar (4), ensuring the teeth are facing the correct direction (see figure G)
• Ensure the chain is properly set in the slot around the entire guide bar.
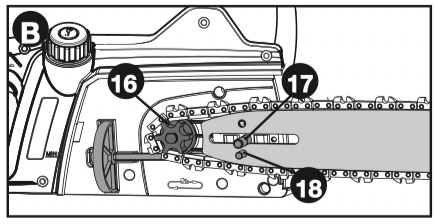
• Place the saw chain around the sprocket (16) while lining up the slot in the guide bar with the bolt (17) in the base of the tool and the chain tensioning pin (18) as shown in figure B.
NOTE: You may need to adjust the position of the chain tension pin (18) for it to properly engage the slot in the guide bar by rotating the chain tensioning wheel (8).
• Once in place, turn the chain tensioning wheel (8) by hand to preliminarily tighten the assembly and hold it in place.
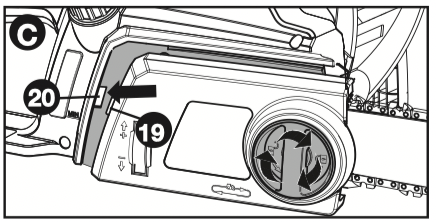
• While holding the bar still, replace the sprocket cover (6). Make sure the tab (19) on the cover lines up with the slot (20) in the main housing as shown in figure C. Rotate the bar adjust locking knob (7) clockwise until snug, then loosen knob (7) one full turn, so the saw chain can be properly tensioned.
• Follow instructions for “Adjusting Chain Tension” in the next section.
ADJUSTING CHAIN TENSION
CAUTION: Sharp chain. Always wear protective gloves when handling the chain. The chain is sharp and can cut you when it is not running.
WARNING: Sharp moving chain. To prevent accidental operation, ensure that the tool is unplugged before performing the following operations.
Failure to do this could result in serious personal injury.
• With the saw on a firm surface, check the saw chain (5) tension. The tension is correct when the chain snaps back after being pulled 1/8 inch (3mm) away from the guide bar (4) with light force from the middle finger and thumb as shown in figure D.
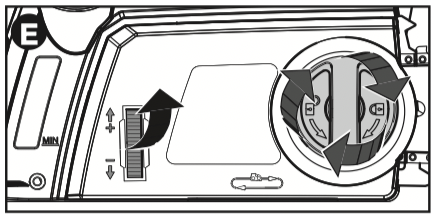
• To adjust saw chain tension, loosen bar adjust locking knob (7), rotate the chain tensioning wheel (8) towards the top of the saw to increase tension as shown in figure E. Tighten the bar adjust locking knob until snug after making sure the saw chain (5) is snug around the guide bar (4).
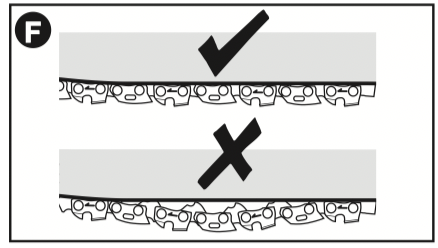
• There should be no “sag” between the guide bar and the chain on the underside as shown in figure F.
• Once chain tension is correct, tighten bar adjust locking knob.
• Do not over-tension the chain as this will lead to excessive wear and will reduce the life of the bar and chain.
• When the chain is new, check the tension frequently (after unplugging tool) during the first 2 hours of use as a new chain stretches slightly.
REPLACING THE SAW CHAIN
CAUTION: Sharp chain. Always wear protective gloves when handling the chain. The chain is sharp and can cut you when it is not running.
WARNING: Sharp moving chain. To prevent accidental operation, ensure that the tool is unplugged before performing the following operations. Failure to do this could result in serious personal injury
• Rotate the bar adjust locking knob (7) counterclockwise to lessen chain tension.
• Remove sprocket cover (6) as described in “Installing the Guide Bar and Saw Chain” section.
• Lift the worn saw chain (5) out of the groove in the guide bar (4).
• Place the new chain in the slot of the guide bar, making sure the saw teeth are facing the correct direction by matching the arrow on the chain with the graphic on the sprocket cover (6) shown in figure G.
• Follow instructions for “Adjusting Chain Tension” in the next section.
AUTO OILING SYSTEM
This chainsaw is equipped with an auto oiling system that keeps the saw chain and guide bar constantly lubricated. The oil level indicator (15) shows the level of the oil in the chainsaw. If the oil level is less than a quarter full, unplug the chainsaw and refill with the proper oil.
NOTE: Use a high quality bar and chain oil for proper chain and bar lubrication. As a temporary substitute, a non-detergent SAE30 weight motor oil can be used.The use of a vegetable based bar and chain oil is recommended when pruning trees. Mineral oil is not recommended because it may harm trees. Never use waste oil or very thick oil. These may damage your chainsaw.
FILLING THE OIL RESERVOIR
• Remove the oil cap (14) and fill the reservoir with the recommended chain oil until the oil level has reached the top of the oil level indicator (15).
• Refit the oil cap.
• Periodically switch the chainsaw off and check the oil level indicator to ensure the bar and chain are being properly oiled.
ATTACHING EXTENSION CORD
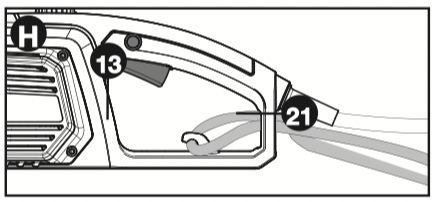
An extension cord retainer (13) is built into the switch handle. It prevents the Extension cord from coming unplugged.
• Double the extension cord and insert it into the slot (21) in the end of the handle area as shown in figure H. Hook the loop formed by doubling the cord over the cord retainer (13). Gently tug on the cord to ensure that it is firmly retained in the handle. Plug the receptacle end of the extension cord into the power cord (12) of the chainsaw.
TRANSPORTING SAW
• Always cover the guide bar (4) with the scabbard (9) (figure I) when transporting the saw.
OPERATING THE CHAINSAW
WARNING: Read and understand all instructions. Failure to follow all instructions listed below may result in electric shock, fire and/or serious personal injury.
• Guard Against Kickback which can result in severe injury or death. See Important Safety Instructions “Guard Against Kickback”, to avoid the risk of kickback.
• Do not overreach. Do not cut above chest height. Make sure your footing is firm. Keep feet apart. Divide your weight evenly on both feet.
• Use a firm grip with your left hand on the front handle (11) and your right hand on the rear handle (10) so that your body is to the left of the guide bar.
• Do not hold chainsaw by front hand guard (3). Keep elbow of left arm locked so that left arm is straight to withstand a kickback.
WARNING: Never use a crosshanded grip (left hand on the rear handle and right hand on the front handle).
WARNING: Never allow any part of your body to be in line with the guide bar (4) when operating the chainsaw.
• Never operate while in a tree, in any awkward position or on a ladder or other unstable surface. You may lose control of saw causing severe injury.
• Keep the chainsaw running at full speed the entire time you are cutting.
• Allow the chain to cut for you. Exert only light pressure. Do not put pressure on chainsaw at end of cut.
ON / OFF
Always be sure of your footing and grip the chainsaw firmly with both hands with the thumb and fingers encircling both handles.
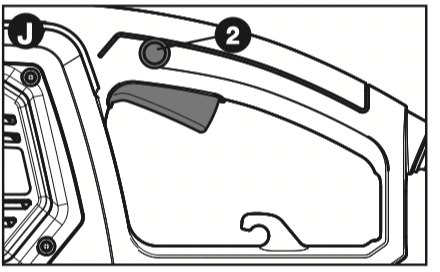
• To turn the tool ON, depress the lock off button (2) and squeeze the trigger switch (1) as shown in figure J. (Once the tool is running you can release the lock off button.)
• To turn the tool OFF, release the trigger switch.
COMMON CUTTING TECHNIQUES
FELLING
Felling is the process of cutting down a tree. Be sure battery is fully charged before felling a tree so you can finish on a single charge. Do not fell trees in high wind conditions.
WARNING: Felling can result in injury. It should only be performed by a trained person.
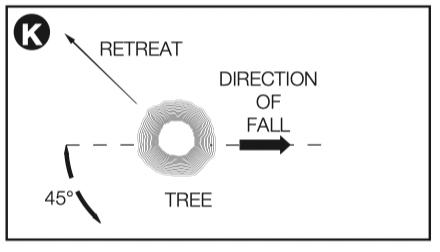
• (Figure K) A retreat path should be planned and cleared as necessary before cuts are started. The retreat path should extend back and diagonally to the rear of the expected line of fall.
• Before felling is started, consider the natural lean of the tree, the location of larger branches and the wind direction to judge which way the tree will fall. Have wedges (wood, plastic or aluminum) and a heavy mallet handy. Remove dirt, stones, loose bark, nails, staples, and wire from the tree where the felling cuts are to be made
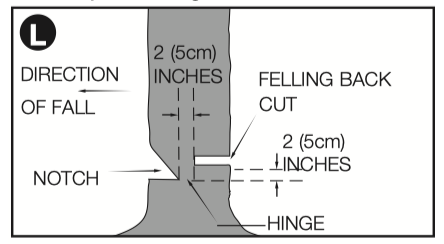
• (Figure L) Notching Undercut - Make the notch 1/3 of the diameter of the tree, perpendicular to the direction of the fall. Make the lower horizontal notching cut first. This will help to avoid pinching of either the saw chain or the guide bar when the second notch is being made.
• (Figure L) Felling Back Cut - Make the felling back cut at least 2 inches (51mm) higher than the horizontal notching cut. Keep the felling back cut parallel to the horizontal notching cut. Make the felling back cut so enough wood is left to act as a hinge. The hinge wood keeps the tree from twisting and falling in the wrong direction. Do not cut through the hinge.
• (Figure L) As the felling cut gets close to the hinge the tree should begin to fall. If there is any chance that the tree may not fall in the desired direction or it may rock back and bind the saw chain, stop cutting before the felling cut is complete and use wedges to open the cut and drop the tree along the desired line of fall. When the tree begins to fall remove the chainsaw from the cut, stop the motor, put the chainsaw down, then use the retreat path planned. Be alert for overhead limbs falling and watch your footing.
LIMBING
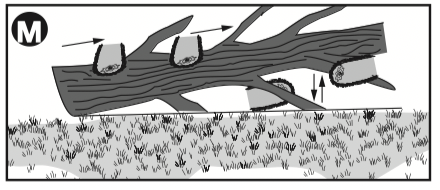
Limbing is removing the branches from a fallen tree. When limbing, leave larger lower limbs to support the log off the ground. Remove the small limbs in one cut. Branches under tension should be cut from the bottom up to avoid binding the chainsaw as shown in figure M. Trim limbs from opposite side keeping tree stem between you and saw. Never make cuts with saw between your legs or straddle the limb to be cut.
BUCKING
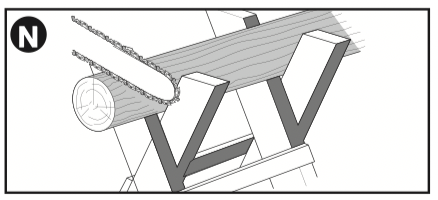
Bucking is cutting a felled tree or log into lengths. How you should cut depends on how the log is supported. Use a saw horse (figure N) whenever possible.
• (Figure N) When using a saw horse This is strongly recommended whenever possible. Position the log in a stable position. Always cut on the outside of the saw horse arms.
Always start a cut with the chain running at full speed.
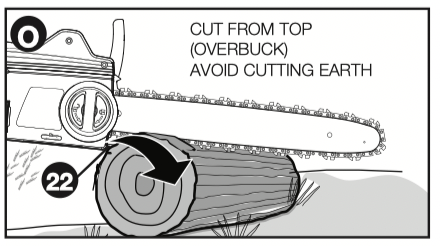
• Place the bottom spike (22) of the chainsaw behind the area of the initial cut as shown in figure O.
• Turn the chainsaw on then rotate the chain and bar down into the tree, using the spike as a hinge.
• Once the chainsaw gets to a 45 degree angle, level the chainsaw again and repeat steps until you cut fully through.
• When the tree is supported along its entire length, make a cut from the top (overbuck), but avoid cutting the earth as this will dull your saw chain quickly.
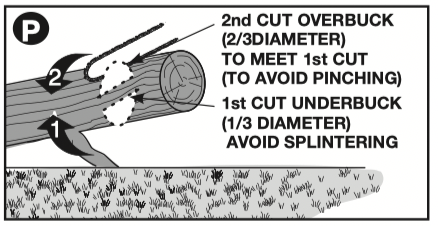
• (Figure P) When supported at one end First, cut 1/3 the diameter from the underside (underbuck). Then make the finished cut by overbucking to meet the first cut.
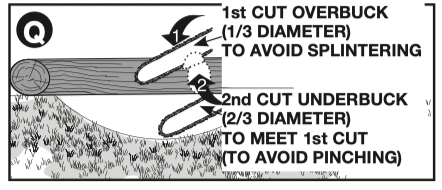
• (Figure Q) When supported at both ends First, cut 1/3 down from the top overbuck. Then make the finished cut by underbucking the lower 2/3 to meet the first cut.
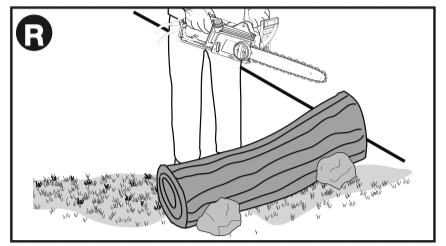
• (Figure R) When on a slope Always stand on the uphill side of the log. When “cutting through”, to maintain complete control release the cutting pressure near the end of the cut without relaxing your grip on the chainsaw handles. Don’t let the chain contact the ground. After completing the cut, wait for the saw chain to stop before you move the chainsaw. Always stop the motor before moving from cut to cut.
CARE AND MAINTENANCE
Use only mild soap and damp cloth to clean the tool. Do not use solvents to clean the plastic housing of the saw. Never let any liquid get inside the tool; never immerse any part of the tool into a liquid.
IMPORTANT: To assure product SAFETY and RELIABILITY, repairs, maintenance and adjustment should be performed by qualified service organizations, always using identical replacement parts. Regular maintenance ensures a long effective life for your chainsaw. We recommend you make the following checks on a regular basis:
CHAIN AND BAR
After every few hours of use, remove the guide bar and chain and clean thoroughly
SAW CHAIN SHARPENING
CAUTION: Sharp chain. Always wear protective gloves when handling the chain. The chain is sharp and can cut you when it is not running.
WARNING: Sharp moving chain. To prevent accidental operation, ensure that the tool is unplugged before performing the following operations.
Failure to do this could result in serious personal injury.
NOTE: The cutters will dull immediately if they touch the earth or a nail while cutting.
To get the best possible performance from your chainsaw it is important to keep the teeth of the chain sharp. Follow these helpful tips for proper saw chain sharpening:
1. For best results use a 4.5mm file and a file holder or filing guide to sharpen your chain. This will ensure you always get the correct sharpening angles.
2. Place the file holder flat on the top plate and depth gauge of the cutter.
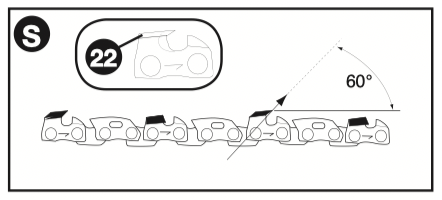
3. (Figure S) Keep the correct top plate (22) filing angle line of 30° on your file guide parallel with your chain (file at 60° from chain viewed from above).
4. Sharpen cutters on one side of the chain first. File from the inside of each cutter to the outside. Then turn your saw around and repeat the processes (2,3,4) for cutters on the other side of the chain.
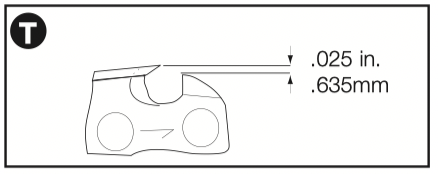
NOTE: Use a flat file to file the tops of the rakers (portion of chain link in front of the cutter) so they are about .025 inch (.635 mm) below the tips of the cutters as shown in Figure T.
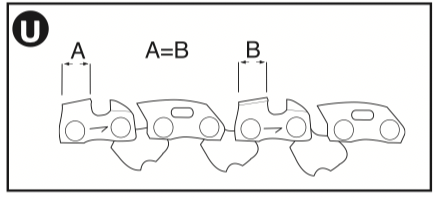
5. (Figure U) Keep all cutter lengths equal.
6. If damage is present on the chrome surface of the top plates or side plates, file back until such damage is removed.
CAUTION: After filing, the cutter will be sharp, use extra caution during this process.
NOTE: Each time the chain is sharpened, it loses some of the low kickback qualities and extra caution should be used. It is recommended that a chain be sharpened no more than four times.
ACCESSORIES
WARNING: The use of accessories not recommended in this manual may be hazardous. Accessories are available from your local retailer.
Accessories are available from your local retailer.
• Replace bar with a corresponding 16-inch low-kickback bar.
NOTE: Ensure the new bar is equipped with a tool-free tension assembly (16).
This Class B digital apparatus complies with Canadian ICES-003. This device complies with part 15 of the FCC rules. Operation is subject to the following two conditions:
(1) This device may not cause harmful interference, and
(2) this device must accept any interference received, including interference that may cause undesired operation.
This Class B digital apparatus complies with Canadian ICES-003.
This device complies with part 15 of the FCC rules. Operation is subject to the following two conditions: (1) This device may not cause harmful interference, and (2) this device must accept any interference received, including interference that may cause undesired operation.
NOTE: This equipment has been tested and found to comply with the limits for a Class B digital device, pursuant to Part of the FCC Rules. These limits are designed to provide reasonable protection against harmful interference in a residential installation. This equipment generates, uses and can radiate radio frequency energy and, if not installed and used in accordance with the instructions, may cause harmful interference to radio communications.
However, there is no guarantee that interference will not occur in a particular installation.
If this equipment does cause harmful interference to radio or television reception,which can be determined by turning the equipment off and on, the user is encouraged to try to correct the interference by one or more of the following measures:
• Reorient or relocate the receiving antenna.
• Increase the separation between the equipment and receiver.
• Connect the equipment into an outlet on a circuit different from that to which the receiver is connected.
• Consult the dealer or an experienced radio/ TV technician for help.
Changes or modifications to this unit not expressly approved by the party responsible for compliance could void the user’s authority to operate the equipment. This Class B digital apparatus complies with Canadian ICES-003.
TROUBLESHOOTING
Problem
Possible Cause
Possible Solution
• Chain saw will not start.
• Cord not plugged in.
• Circuit fuse is blown.
• Plug chain saw into a working outlet.
• Replace circuit fuse. (If the product repeatedly causes the circuit fuse to blow, discontinue use immediately and call the Craftsman help line at 888-331-4569.
• Circuit breaker is tripped.
• Reset circuit breaker. (If the product repeatedly causes the circuit breaker to trip, discontinue use immediately and call the Craftsman help line at 888-331-4569.
• Cord or switch is
• Call the Craftsman help line at 888-331-4569 to have cord or switch replaced.
• Lock-off button not actuated.
• Push lock off button and then depress the trigger switch.
Bar / chain overheated.
• Chain too tight.
• Refer to “adjusting chain tension” section.
• Lubrication needed.
• Refer to “filling the oil reservoir” section.
•Chain is loose.
• Chain tension set incorrectly.
• Refer to “adjusting chain tension” section.
•Poor cut quality.
• Chain tension set incorrectly
• Refer to “adjusting chain tension” section.
• Chain needs to be sharpened.
• Refer to “saw chain sharpening” section.
Note: Excessive tension leads to excessive wear and reduction in life of bar & chain. Ensure too is always adequately filled with proper oil.
Refer to “replacing the saw chain” section.
•Unit runs but does not cut.
• Chain installed backwards.
• Refer to sections for installing and removing chain.