USER MANUAL Cordless handstick vacuum cleaner
Familiarising yourself with your appliance
Familiarise yourself with the parts of your appliance.
Appliance
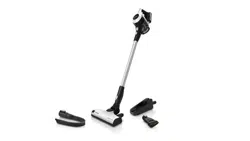
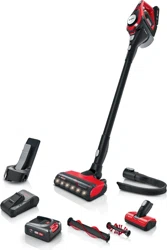
You can find an overview of the parts of your appliance here. → Fig. 2
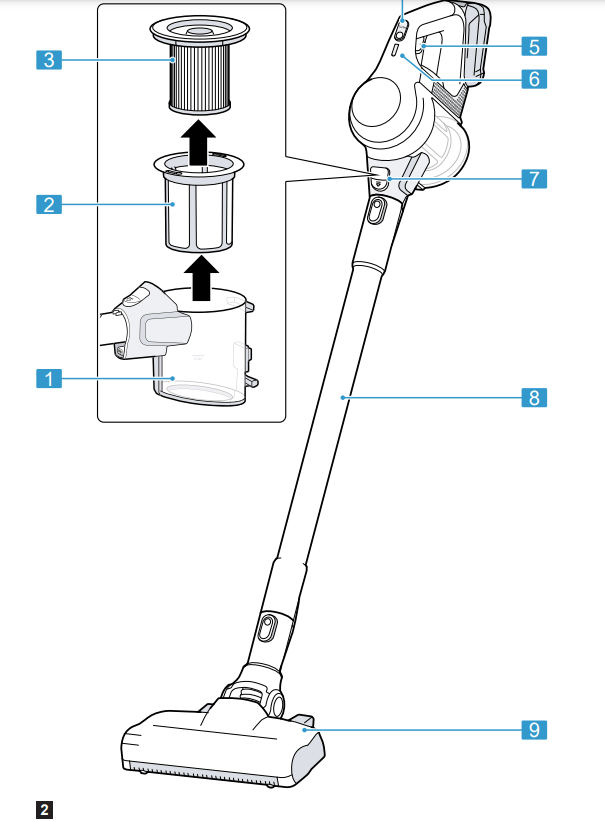
- Dust container
- Fluff filter
- Cartridge filter
- Turbo switch
- On/off switch
- Status display
- Dust container release button
- Suction pipe
- Floor nozzle with power brush
Controls
You can find an overview of the controls for your appliance here
Status display
The status display indicates the different operating statuses.
| Operating status |
Status display |
| Normal mode |
Display lights up white. |
| Turbo mode |
LED slowly flashes white. |
| Battery charge below 20% |
Display rapidly flashes red. |
| Battery empty |
Display goes out. |
| Charging process |
LED slowly flashes white. |
| Battery is fully charged |
Display lights up white and goes out after approx. two minutes |
| Over-/under-temperature protection |
Display lights up red and goes out after approx. 10 seconds. |
Before using for the first time
Prepare the appliance for use.
Installing the base station
WARNING: Risk of electric shock! Incorrect installation is dangerous.
- Check whether any household wiring could be damaged in the installation area.
- Do not install the base station horizontally or vertically above, below or next to a socket.
1. Remove the front panel towards the front. → Fig. 3

2. Wall-mount the base station . Install the base station close to a socket.
3. Insert the appliance plug for the charging cable1 into the recess in the base station . → Fig. 4
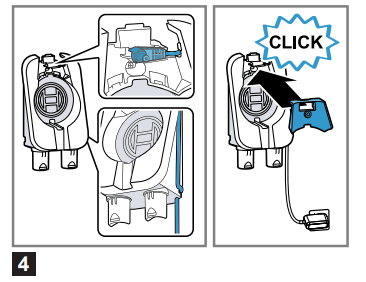
4. Guide the charging cable along the side of the base station1 and secure it in the recess.
5. Insert the front panel. The front panel secures the appliance plug into the base station .
6. Plug the charging cable's mains plug1 into the socket.
Inserting and charging the battery
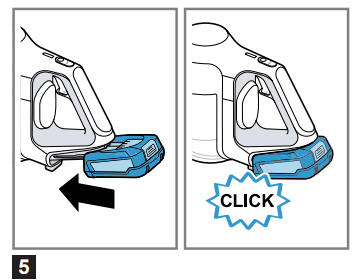
1. Use the guide rail to insert the battery into the vacuum cleaner. → Fig. 5
2. Fully charge the battery. → "Charging"
Basic operation
You can find out everything you need to know about operating your appliance here.
Charging
Depending on the appliance features, you can charge the battery in three different ways.
WARNING: Risk of fire! Improper use of the battery and the rapid charger is dangerous.
- Only charge the battery in chargers that are recommended by the manufacturer.
- Only use the battery in connection with the Bosch appliance.
- Charge the battery using the original charging cable 1 or the original quick charger .
- Only use batteries from the Power for ALL 18 V series.
Charging using the charging cable1
Note: The charging cable and the vacuum cleaner heat up while charging. This is normal and harmless. Requirement: The battery has been inserted. → "Inserting and charging the battery"
1. Place the vacuum cleaner close to the socket.
2. Plug the appliance plug into the vacuum cleaner. → Fig. 6
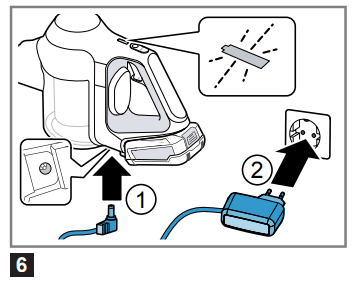
3. Insert the mains plug into the socket.
- The status display slowly flashes white while the battery is charging. Once the battery is fully charged, the status display lights up white for a few minutes.
Tip: To check that the battery has charged fully, briefly disconnect the vacuum cleaner from the mains. The status display then lights up white. You can charge the vacuum cleaner whenever it is not in use.
Battery charging times
You can find an overview of the battery charging times here.
Charging in the base station
WARNING: Risk of injury! An appliance that falls may endanger people.
- Ensure that children do not play with the appliance, even when it is in the base station.
Note: The charging cable and the vacuum cleaner heat up while charging. This is normal and harmless.
Requirement: The battery has been inserted.
- Insert the vacuum cleaner into the base station from the front. → Fig. 7
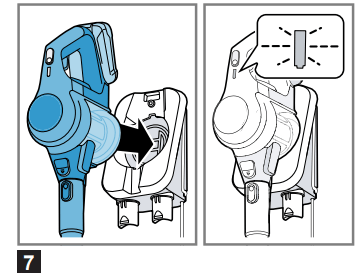
- The status display flashes white while the battery is charging. Once the battery is fully charged, the status display lights up white for a few minutes.
Tip: To check that the battery has charged fully, briefly disconnect the vacuum cleaner from the mains. Once the status display lights up white, the appliance is fully charged.
Charging using the quick charger
1. Press the release button and remove the battery to the rear. → Fig. 8
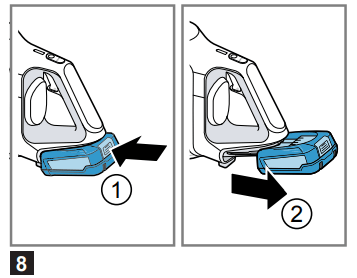
2. Observe the enclosed instructions.
Notes
- The specified charging times may vary depending on the battery charging status, the battery temperature and the age of the battery.
- You can find out which battery charging times are achieved with the quick charger1 in the instructions of for the quick charger
Tip: If the quick charger displays a battery charging status of approx. 80%, you can remove and use the battery.

Installing the appliance
1. Place the suction pipe onto the appliance's connection port and lock it in place. → Fig. 9
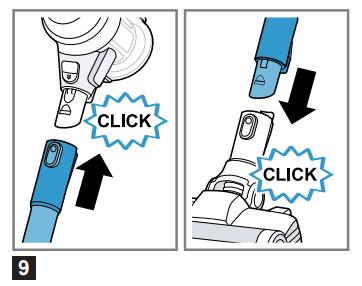
2. Insert the end of the suction pipe into the floor nozzle and lock it in place.
Dismantling the appliance
1. Press the release button and pull the suction pipe out of the floor nozzle. → Fig. 10
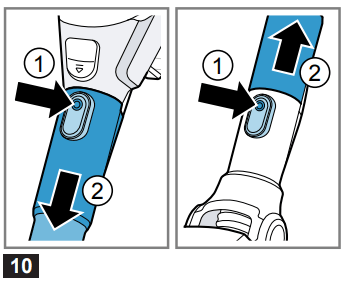
2. Press the release button and pull the suction pipe out of the appliance's connection port.
Switching on the appliance
- Press
 . → Fig. 11
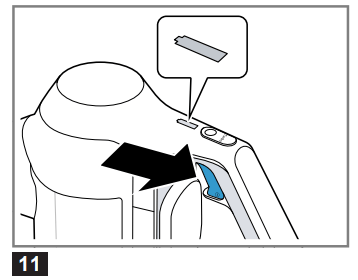
- The status display lights up white.
Switching off the appliance
- Press .
- The status display goes out.
Using turbo mode
Requirement: The appliance has been switched on. → "Switching on the appliance"
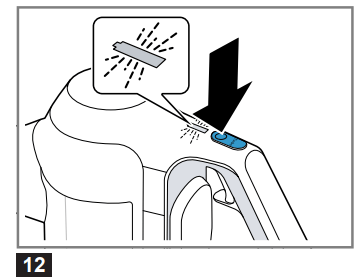
- The status display flashes white.
Vacuuming with accessories
1. Place the required accessory onto the suction pipe or the appliance's connection port. → Fig. 13
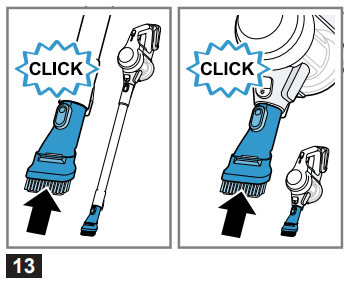
2. After use, insert the accessory into the base station . → Fig. 14

Cleaning and servicing
To keep your appliance working efficiently for a long time, it is important to clean and maintain it carefully.
Cleaning products
Only use suitable cleaning products.
ATTENTION! Using unsuitable cleaning products or incorrect cleaning may damage the appliance.
- Do not use harsh or abrasive detergents.
- Do not use cleaning products with a high alcohol content.
- Do not use hard scouring pads or cleaning sponges.
- Wash sponge cloths thoroughly before use.
Cleaning the appliance
Requirement: The appliance is switched off. → "Switching off the appliance"
1. Disconnect the appliance from the charging cable .
2. Clean the appliance and the accessory with a soft cloth and a commercially available plastic cleaner.
Emptying the dust container
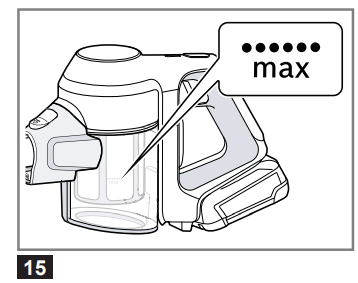
Empty the dust container at the latest when the fill level has reached the  mark. In order to achieve the best possible vacuuming results, empty the dust container after every use of the vacuum cleaner.
Requirement: The appliance is switched off. → "Switching off the appliance"
1. Check the fill level of the dust container. → Fig. 15
2. Check how dirty the filter unit is and clean it if necessary. → "Cleaning the filter unit"
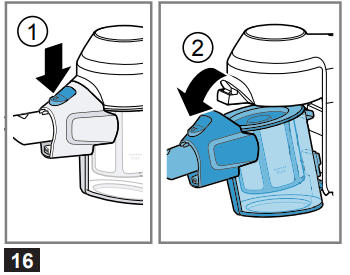
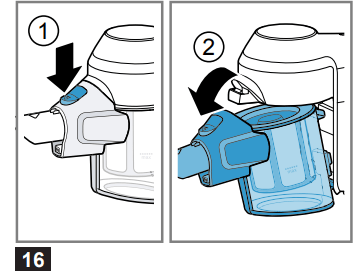
3. To remove the dust container, press the release button. → Fig. 16
4. Remove the filter unit from the dust container. → Fig. 17
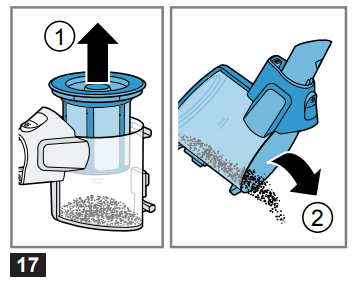
5. Empty the dust container.
6. If there is dirt underneath the ejection opening, remove the dirt.
7. Insert the filter unit into the dust container and check that it is seated correctly. → Fig. 18
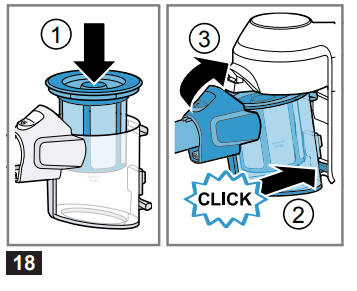
8. Insert the dust container.
- The dust container audibly clicks into position
Cleaning the filter unit
When you empty the dust container, also clean the filter. This gives you a good vacuuming result.
ATTENTION! Penetrating moisture may damage the filters.
- Never allow the filters to come into contact with liquids.
Requirement: The appliance is switched off. → "Switching off the appliance"
1. Remove the dust container. → Fig. 16
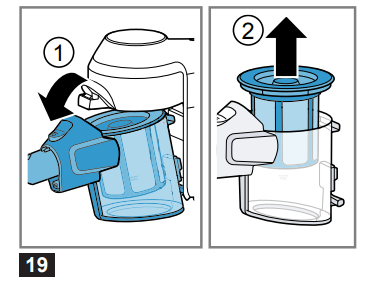
2. Remove the filter unit from the dust container. → Fig. 19
3. To unlock the cartridge filter, turn the filter unit in the direction. → Fig. 20

4. Remove the cartridge filter.
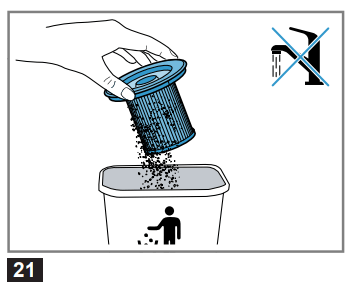
5. Tap out the cartridge filter over a bin. → Fig. 21
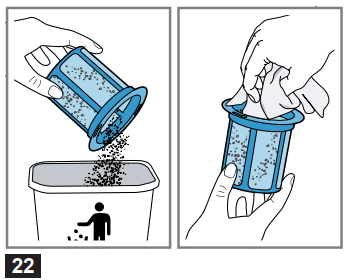
6. Lightly shake the fluff filter over a bin and lightly tap on it. → Fig. 22
7. Clean the fluff filter with a dry cloth.
8. Insert the cartridge filter into the fluff filter. → Fig. 23
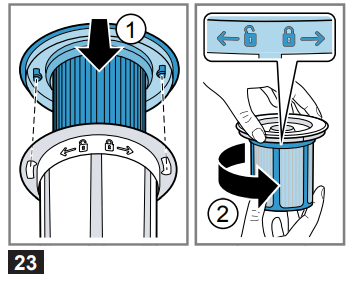
9. Lock the cartridge filter in the direction.
10.Insert the filter unit into the dust container. → Fig. 18
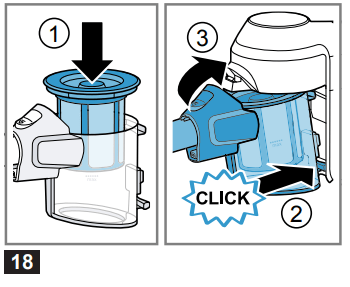
11.Insert the dust container.
- The dust container audibly clicks into position.
Cleaning the nozzles
Requirement: The appliance is switched off. → "Switching off the appliance"
1. Disconnect the nozzle from the appliance.
2. Release the brush roller. → Fig. 24
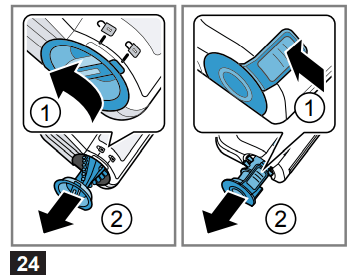
3. Remove the brush roller sideways from the nozzle.
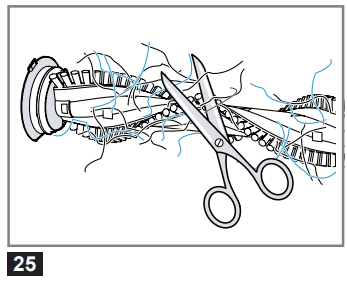
4. Use scissors to cut through threads and hairs wound round the brush and then remove them. → Fig. 25
5. Insert the brush roller sideways along the guide bar and into the nozzle. → Fig. 26
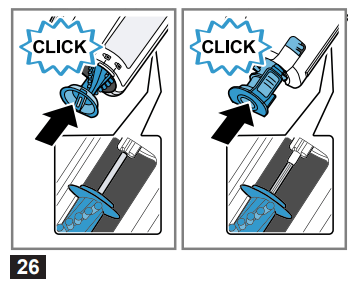
6. Lock the brush roller.
Troubleshooting
You can rectify minor faults on your appliance yourself. Read the troubleshooting information before contacting Customer Service. This will avoid unnecessary costs.
Malfunctions
| Errors |
Cause |
Troubleshooting |
|
The appliance is not working.
The battery status display does not show any status.
The red battery status display lights up for 10 seconds.
|
The battery has not been inserted correctly. |
▶ Insert the battery correctly. → "Inserting and charging the battery" |
| The battery has not been charged. |
▶ Charge the battery. → "Charging" |
| The battery has overheated or overcooled. |
1. Switch off the appliance and disconnect the appliance from the power supply.
2. Wait until battery has reached room temperature.
|
| The appliance has overheated or overcooled. |
1. Switch off the appliance and disconnect the appliance from the power supply.
2. Wait until the appliance has reached room temperature.
|
| The dust container cannot be inserted. |
The filter unit is not complete. |
▶ Check whether the filter unit is complete |
| The filter unit or dust container is not positioned correctly. |
▶ Check whether the filter unit and dust container are inserted correctly. |
| Suction is reduced. |
The filter is blocked. |
1. Switch off the appliance and disconnect the appliance from the power supply.
2. Clean the filter unit. → "Cleaning the filter unit"
|
| Suction is reduced. |
The nozzle is blocked. |
1. Switch off the appliance and disconnect the appliance from the power supply.
2. Check whether the air channel from the nozzle to the appliance is blocked.
3. Empty the dust container. → "Emptying the dust container"
4. Clean the filter unit. → "Cleaning the filter unit"
5. Once the appliance has cooled down, switch the appliance back on.
|