Before Operating Your Appliance for the first time
Setting the time
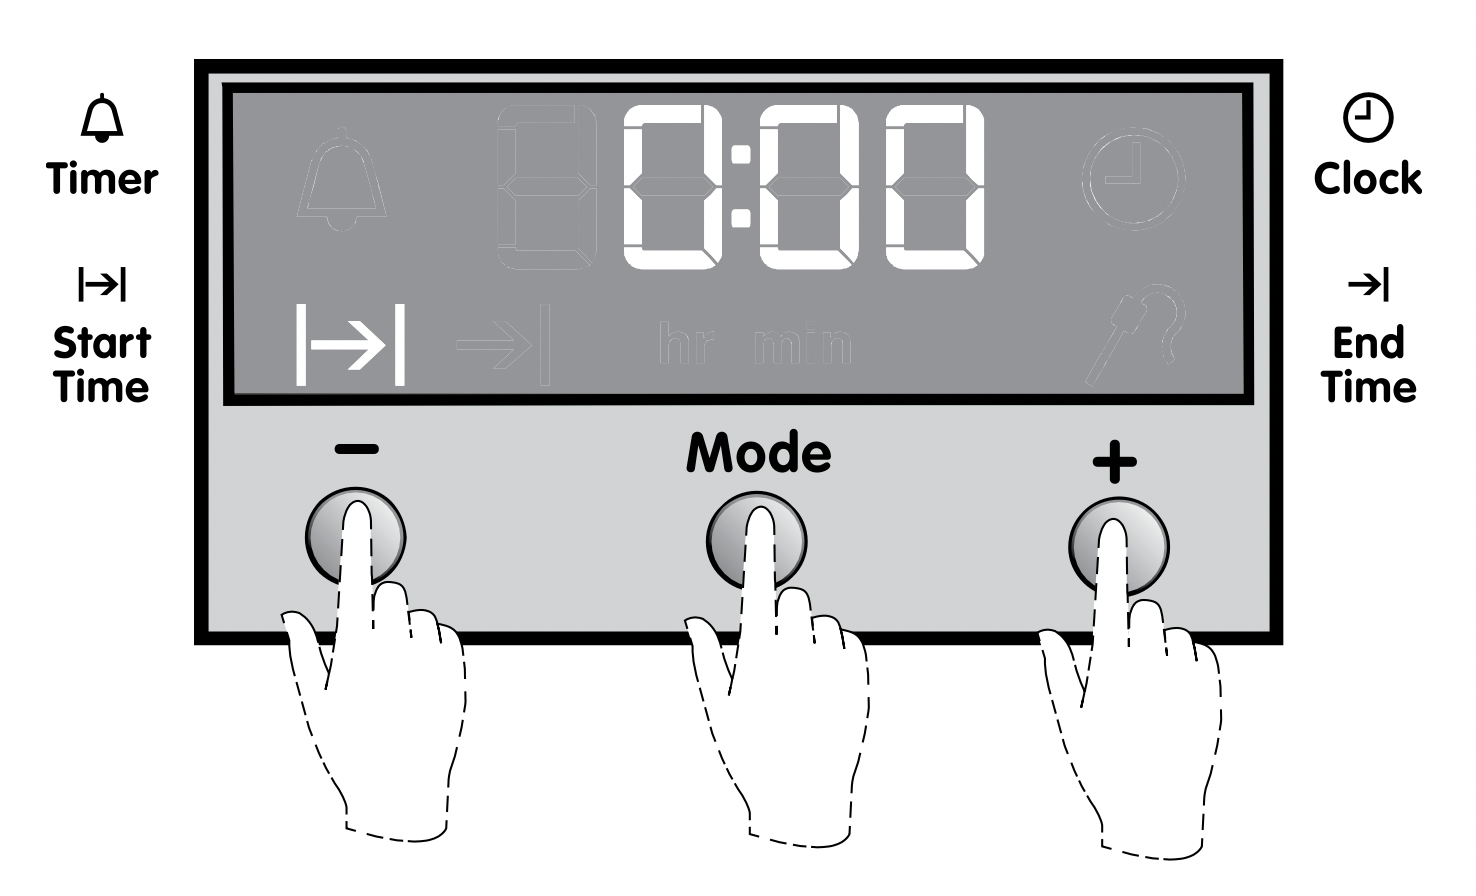
3 button programmable clock (where applicable) After electrically connecting the appliance, you must set the time of the day before you can operate your oven.
After the appliance has been electrically connected ‘12:00’ will be displayed and the clock ‘indicator’ will flash.
To set the time of day in hours and minutes press the - or + buttons.
5 seconds after the last change, clock ‘indicator’ will disappear, confirming the time has been set. Once the time has been entered, the clock advances minute by minute.
NOTE: The clock has a 24-hour display.
Operating your 120 minute timer (where applicable)
To set the timer, simply turn the knob clockwise to the required number of minutes.
NOTE: For any time below fifteen minutes turn the knob past the forty minute mark then turn back to the required number of minutes. When the timer returns to zero/off position, the timer gives a short ring/ding.
For appliances with a separate grill compartment, run grill on maximum for 15 minutes with grill door open.
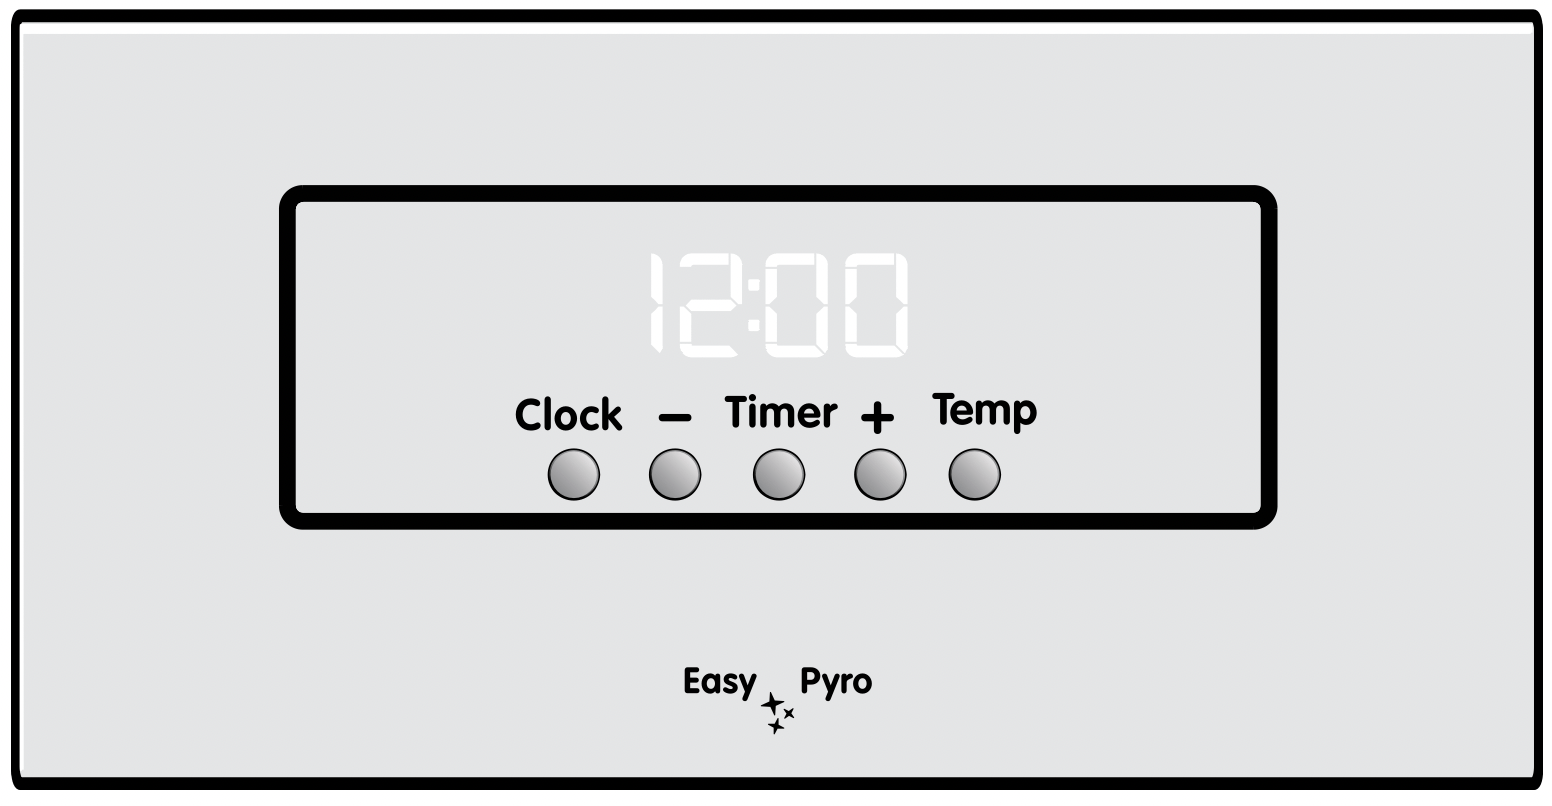
5 button programmable clock (where applicable)
After the appliance has been electrically connected, “12” and the “Set Clock” symbol “ “ will flash.
To set the time of day “Hours” press the - or + buttons.
Press the “Clock” button and the time of day “Minutes” will flash and can be set in the same manner.
After 5 seconds from the last change, the clock display will stop flashing, confirming the time is set.
NOTE: The clock has a 24-hour display.
Preparing your appliance for the first time
Please remove all boxes and bags from inside the oven before operation.
Please wipe out the oven interior prior to operation with warm soapy water and polish dry with a soft clean cloth. Do not close the oven door until the oven is completely dry.
New appliances can have an odour during first operation. It is recommended to ‘run in’ your oven before you cook for the first time. Run the oven at 180°C for 30 minutes and ensure that the room is well ventilated.
Installing your oven accessories
The type of oven accessories you receive is dependant on the model you have purchased.
1. Shelves and trays
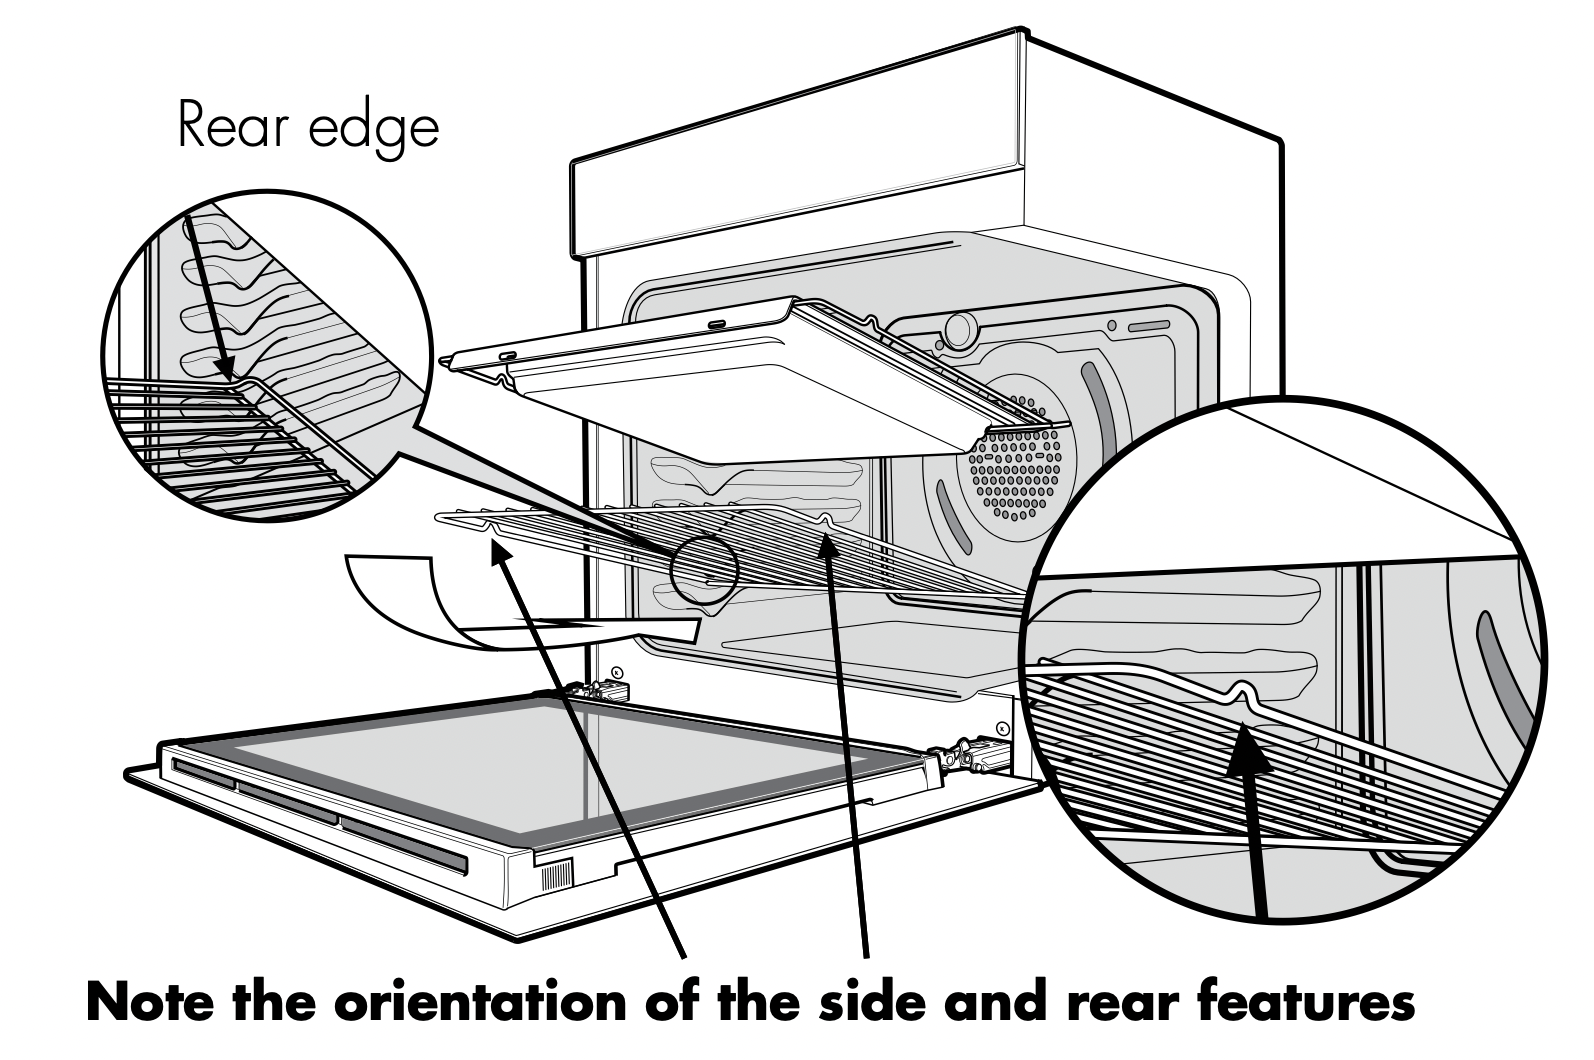
Caution: Ensure the shelves are inserted in the correct orientation, otherwise you may damage the appliance.
Your oven comes with formed “easy clean” shelf supports. The shelves are designed to travel freely on the shelf supports without being pulled out accidentally. Make sure you have the shelf in the correct orientation before you slide it in. Otherwise it could become jammed.
Locate the rear edge of the shelf in the recess between 2 formed shelf supports. See diagram below.
NOTE: The top ‘ledge’ is not a shelf position.
With the front edge raised, begin to slide the shelf into the oven. Lower the front edge as you push the shelf fully in.
The grill/baking tray for underbench oven models sits into a wire carrier that fits into the oven exactly like the shelves.
The grill/baking tray for separate grill wall oven models slides into the wire runners in a similar manner.
When fully inserted, the shelf/tray should not interfere with the closed oven door.
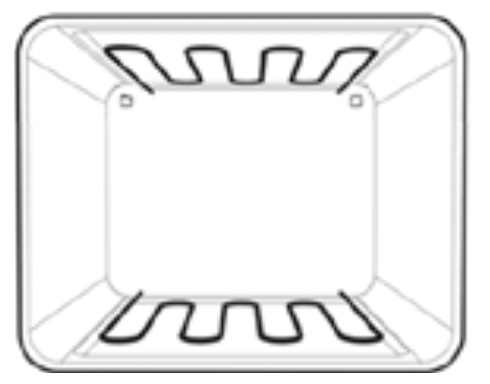
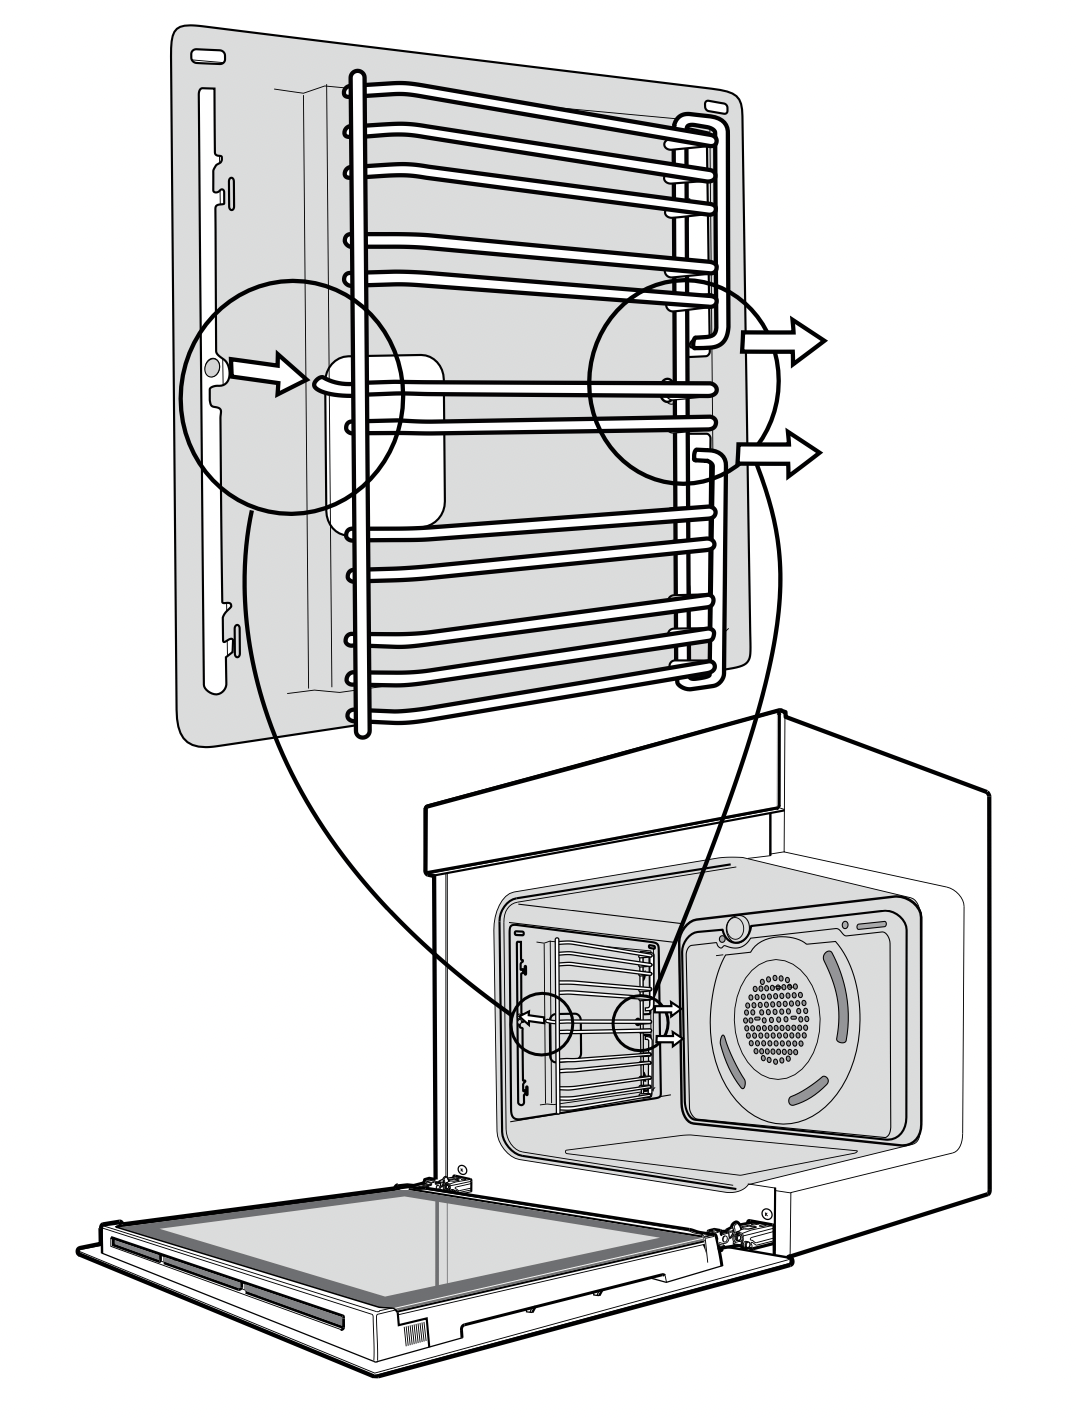
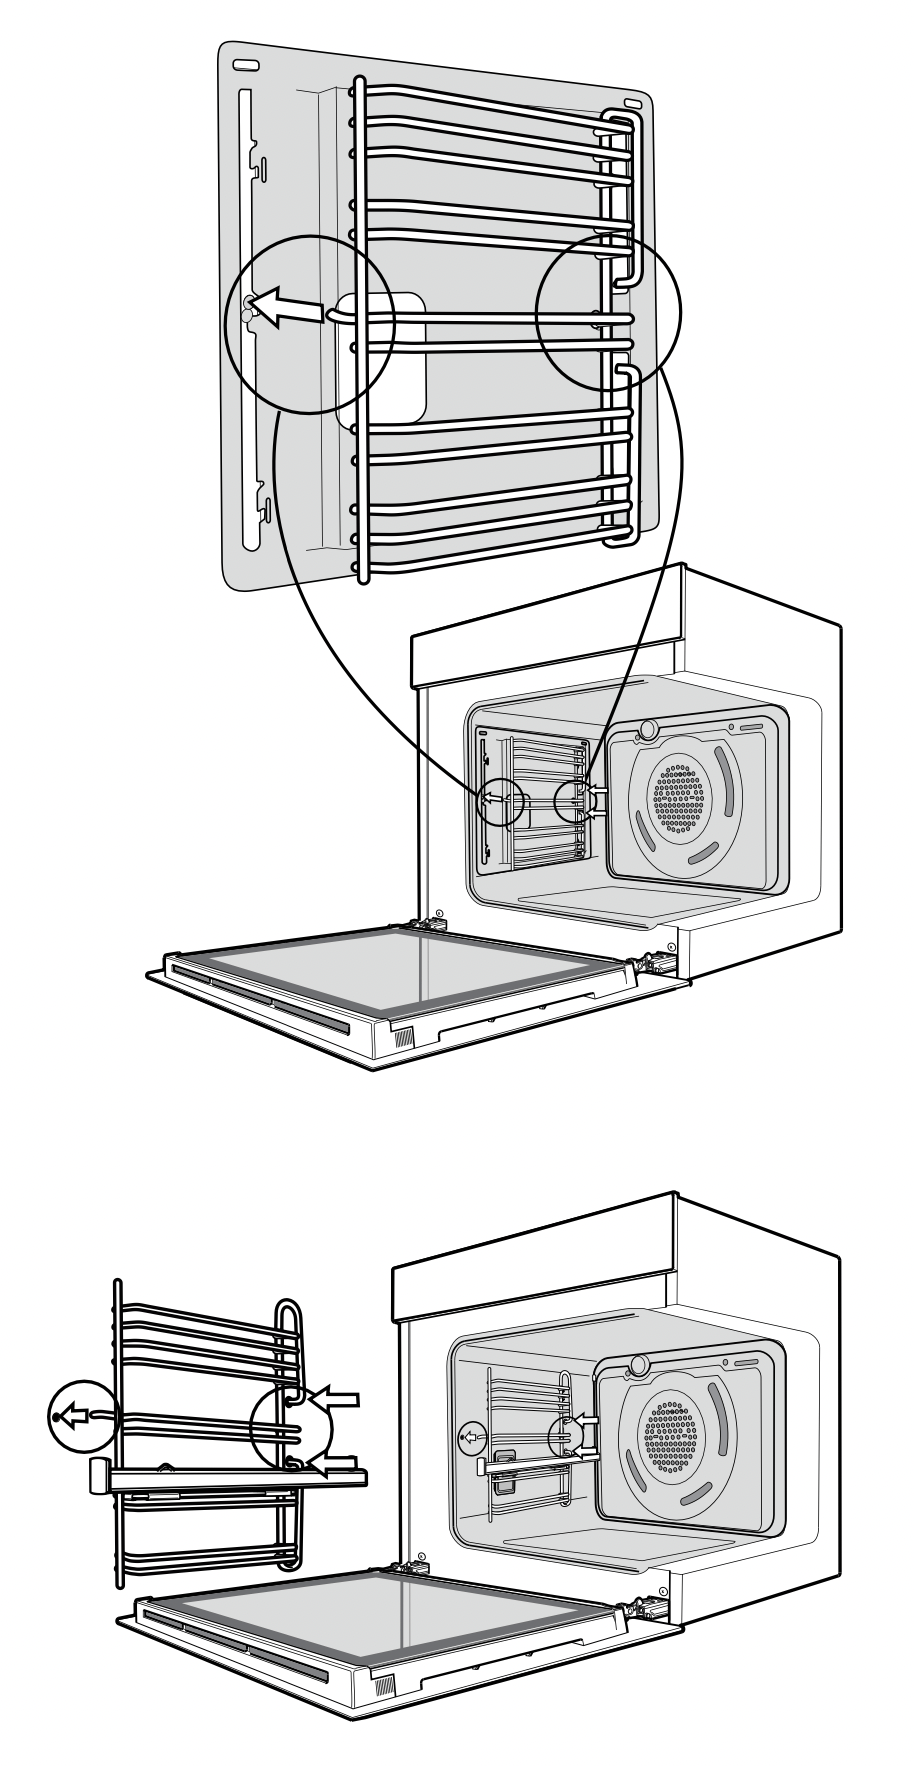
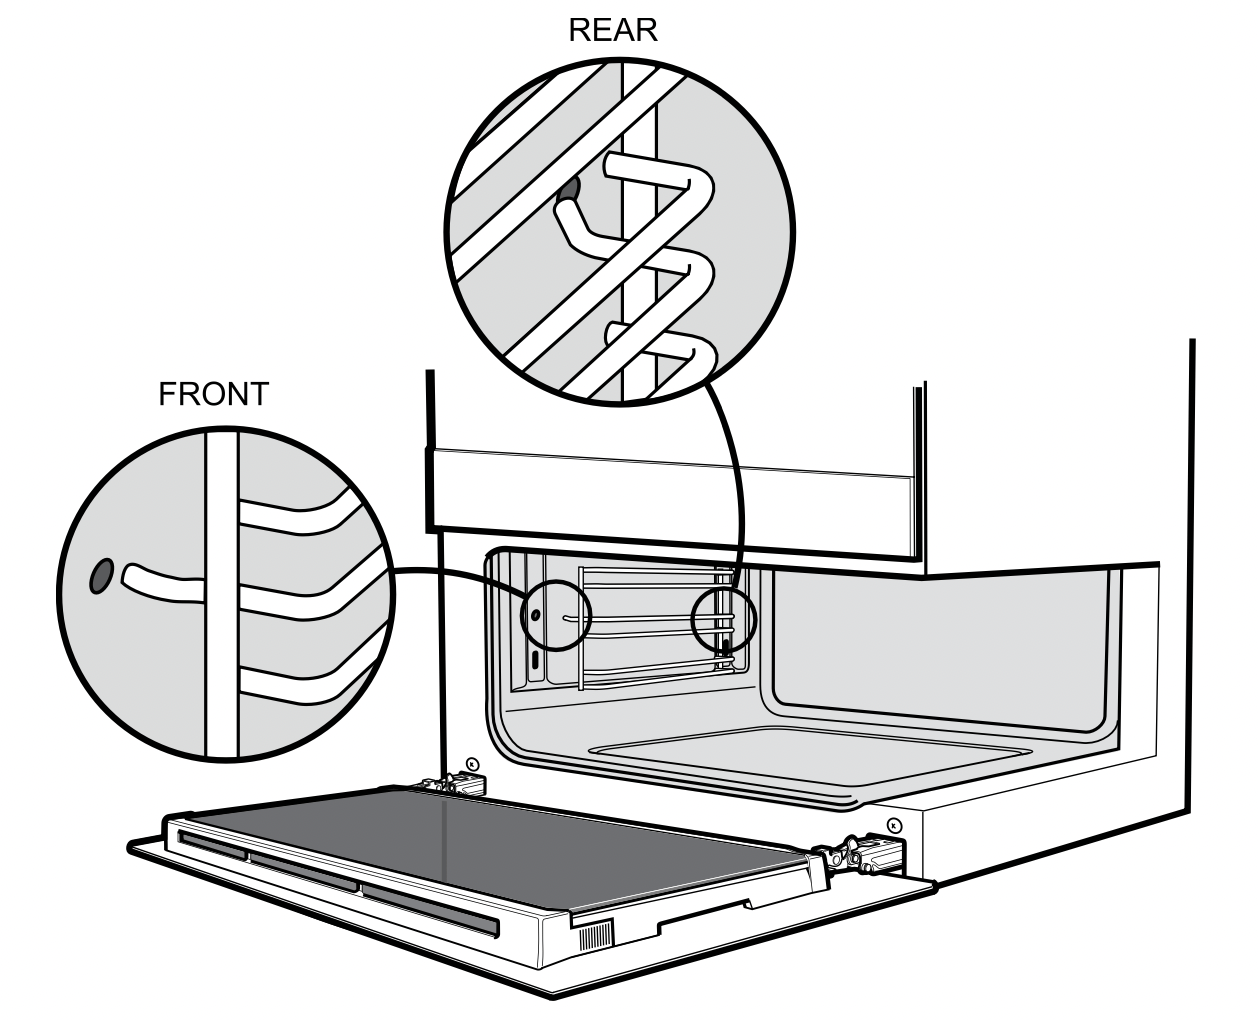
2. Main oven wire side racks (where applicable)
The side racks that come with your oven can be attached to either side of your oven.
Insert the twin pegged side into the rear access holes provided, ensuring that the pegs are fully inserted.
Then locate the front peg into the front access hole and push in firmly.
When locating the left side rack into the small oven or grill, ensure the pegs are inserted into the upper two access holes.
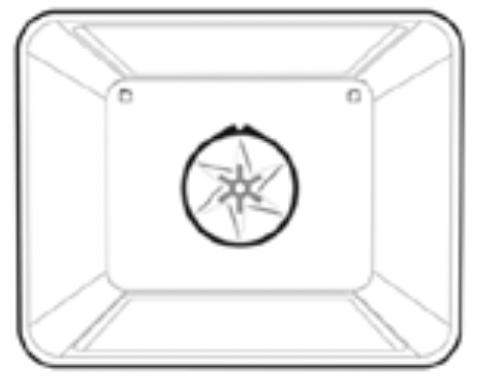
3. Separate grill side racks (where applicable)
Separate grill wall ovens come with side racks that are to be fitted to the smaller lower grill/oven.
These can be attached to either side in the following manner:
Insert the largest peg into rear access hole provided. See diagram above.
Then locate the front peg into the front access hole and push in firmly.
When locating the left side rack into the small oven or grill, ensure the pegs are inserted into the upper two access holes.
Operating the Programmable Clock
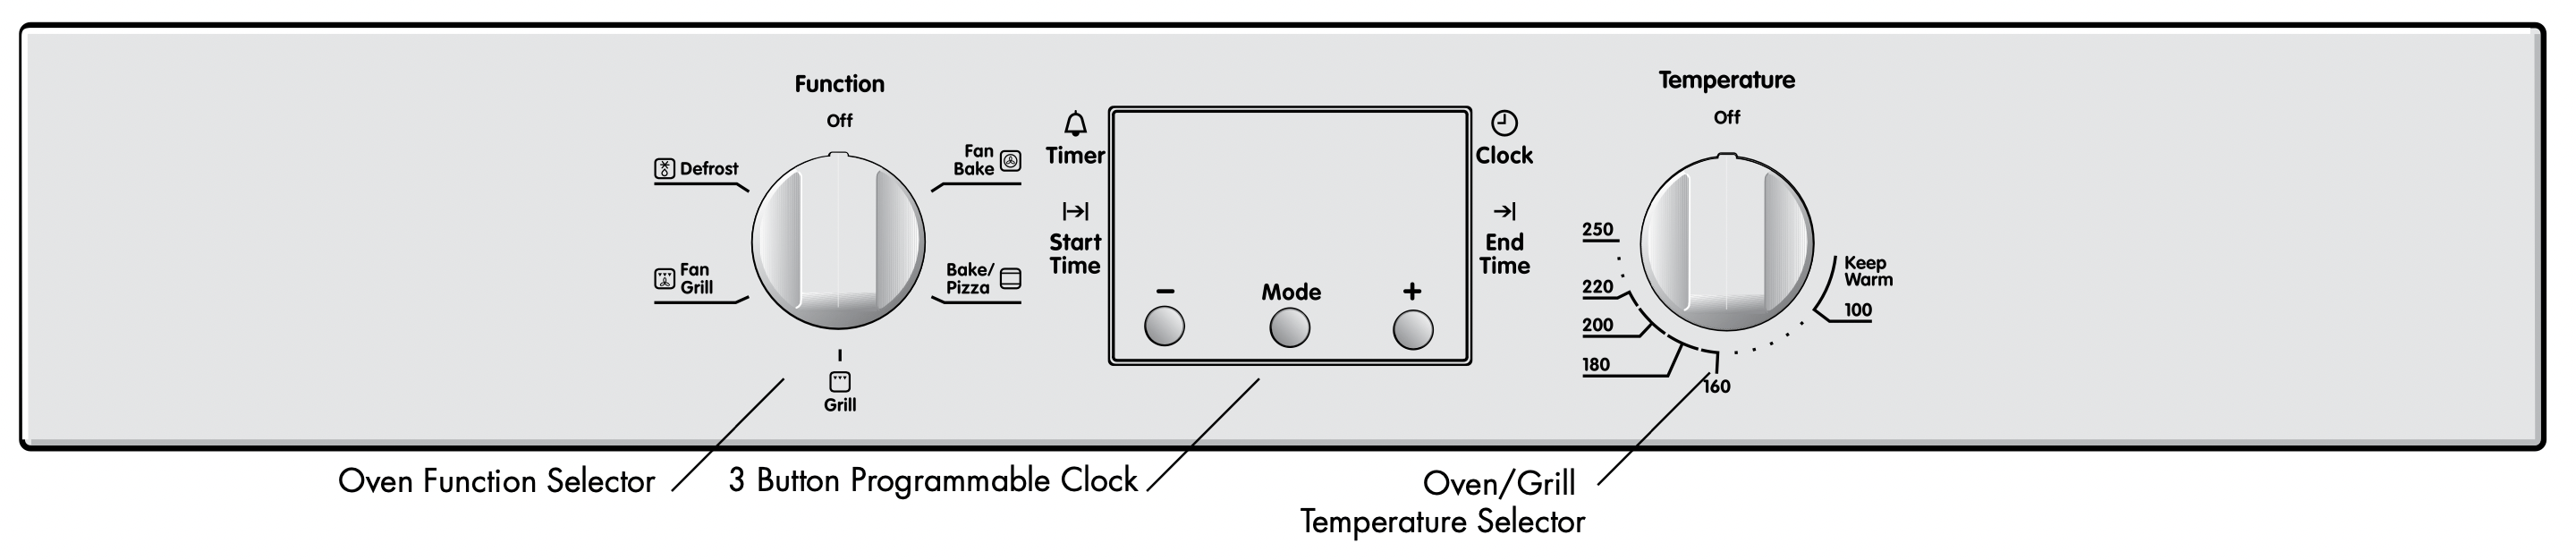
3 button programmable clock
Your oven is equipped with a 3 button timer that has the following features:
Timer - you can set a countdown time that will beep when the set time has elapsed.
Cook time - you can set cooking duration. A timer will count down the preset cooking time, beep when the time has elapsed and turn the appliance off.
End time - instead of setting a cooking duration you can set a cooking finish time. When the finish time has been reached the timer will beep and turn the appliance off.
Delayed start cooking time - you can combine the cooking time and end cooking time to switch oven on and off at a specific time during the day.
Selecting the timer
Press the MODE button until the timer ‘indicator’ begins flashing.
Set the countdown time you want by using the - and + buttons. 5 seconds after the last change the timer ‘indicator’ will stop flashing and the countdown will start in minutes.
To stop the beeper, press any button.
Maximum countdown time is 2hrs 30mins
Setting the cooking duration
Select the desired oven function and temperature.
The oven indicator light will glow and the heating source will come on.
Press the MODE button until the cook time ‘indicator’ begins flashing.
Set the cooking duration you want by using the - and + buttons. Five seconds after the last change the cook time ‘indicator’ will stop flashing, and the time of day will be displayed.
To stop beeper, press any button.
Note: Remember to add pre-heating time if necessary.
Setting the cooking end time
Check that the clock displays the correct time of day.
Select the desired oven function and temperature. The oven indicator light will glow and the heating source will come on.
Press MODE button until the end time ‘indicator’ begins flashing.
Enter the time of day you want to finish cooking by pressing - or + buttons. Five seconds after the last change, the end time ‘indicator’ will stop flashing and the current time of day will be displayed.
To stop beeper, press any button.
Setting the delayed start cooking time
Set the cook time and end time as described in the previous sections.
Once both the cook time and end time have been set, the cook time and the end time ‘indicators’ will stop flashing and the current time of day will be displayed.
To stop beeper, press any button.
To check or cancel settings
To check your settings, press the MODE button until the indicator you want is flashing.
To cancel “delayed start” press the mode button until “end time” symbol starts flashing. Press and hold the - button until the clock no longer reverses (you will hear a beep). If you have left the temperature and function knobs at a setting the oven will start once the “end time” indicator stops flashing.
To cancel “auto shut off” press the mode button until “cook time” indicator starts flashing. Press and hold the button until the clock no longer reverses (at 0:00 you will hear a beep). This automatically cancels “delayed start”. If you have left the temperature and function knobs at a setting, the oven will start once the “cook time” indicator stops flashing. Because you have cancelled “auto off” the oven will continue to heat until you manually turn it off.
On completion of cooking
The heat source will turn off, the timer will beep and the end time and/or cook time ‘indicators’ will flash.
Even though the heating element turns off, the oven will still retain substantial heat. This will continue to cook the food until it is removed or the oven cools down. If you do not plan on being present when the oven turns off, you should take this extra heating time into account.
Turn the function and temperature controls to the off position.
Press any button to stop the timer beeping.
Adjusting the clock
Press the MODE button until the clock ‘indicator’ begins flashing.
Press the - or + buttons to change the time of day. 5 seconds after the last change, the clock ‘indicator’ will disappear, confirming the time has been adjusted.
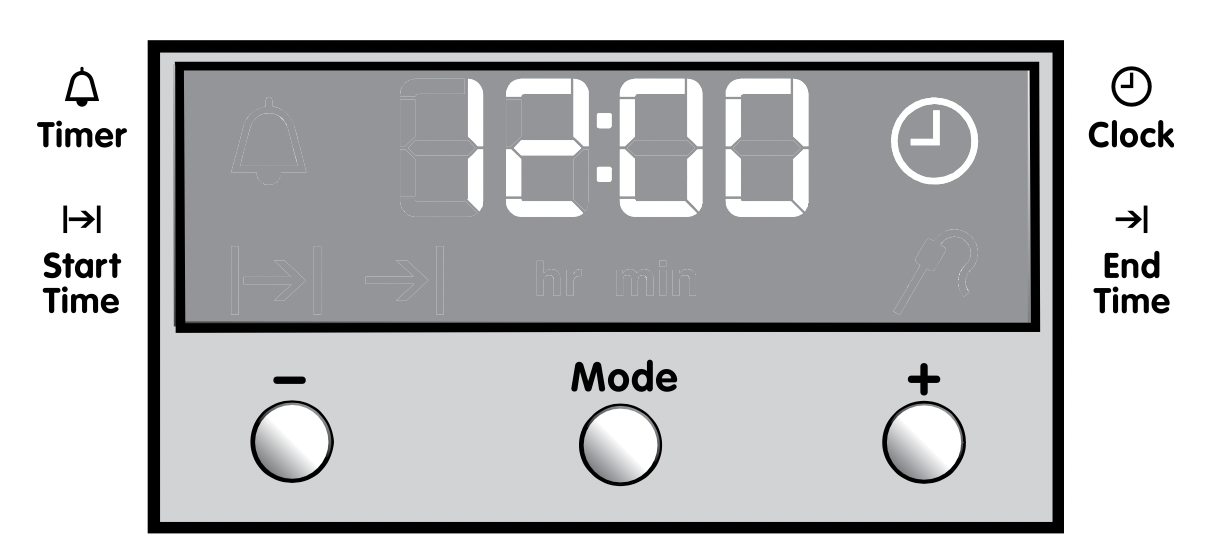
The oven is equipped with an electronic clock that can be used to turn the oven on and off automatically. The COOK TIME function automatically turns the oven off after a set amount of time. The END TIME function is used to set the time of day you want the cooking cycle to finish. A “Delayed start” is possible by combining the COOK TIME and END TIME features to switch the oven on and off at a specific time during the day.
Setting the time of day (after electrical connection):
After the appliance has been electrically connected, “12” and the “Set Clock” symbol will flash.
To set the time of day “Hours” press the - or + buttons while the “Set Clock” symbol is flashing.
Press the CLOCK button and the time of day “Minutes” will flash and can be set in the same manner.
After 5 seconds from the last change, the clock display will stop flashing, confirming the time is set.
NOTE: The clock has a 24-hour display.
Changing the time of day
Press CLOCK button until the “Set clock” symbol begins to flash on the clock display.
To set the time of day “Hours” press the - or + buttons while the “Set Clock” symbol is flashing.
Press the CLOCK button and the time of day “Minutes” will flash and can be set in the same manner.
After 5 seconds from the last change, the clock display will stop flashing, confirming the time is set.
NOTE: The clock has a 24-hour display.
Setting the oven function
Turn the oven FUNCTION selector clockwise to select the desired oven function. The default temperature for that function will be shown on the display.
After 5 seconds from the last change, the oven will begin heating and the “Elapsed time” commences on the display.
Changing the oven temperature
Toggle the TEMPERATURE selector left - or right + as required to set the desired cooking temperature. The temperature setting changes in increments of 5°C.
The set temperature is displayed for 5 seconds from the last change.
NOTE: The temperature can be adjusted at any time. Oven temperature cannot be changed for the Defrost or Pyro function.
Setting the cooking duration
Select the desired oven function and cooking temperature.
Press “Clock” button until the COOK TIME symbol appears flashing.
Set the desired cooking duration “Minutes” by using - or + buttons while the COOK TIME symbol is flashing.
Press the CLOCK button and the cooking duration “Hours” will flash and can be set in the same manner.
After 5 seconds from the last change, the COOK TIME symbol will stop flashing confirming the cooking duration is set.
A countdown of the “Cooking time remaining” will be shown on the display.
When the set time has elapsed, a signal will sound and the oven will turn off. To stop the signal, press any button on the clock and then turn the oven FUNCTION selector to “Off”.
NOTE: Do not forget to add pre-heating time if necessary. Cooking duration cannot be set for the Rapid Heat function. The cooking duration can be cancelled at any time by turning the “Function” selector to “Off”.
Checking the oven temperature
To check the actual temperature inside the oven, press any button on the controller to display the temperature.
Setting the cooking end time
Select the desired oven function and cooking temperature.
Press CLOCK button until the END TIME symbol appears flashing.
Set the desired time of day “Hours” to finish cooking by pressing - or + buttons while the END TIME symbol is flashing.
Press the CLOCK button and the time of day “Minutes” to finish cooking will flash and can be set in the same manner.
After 5 seconds from last change, the END TIME symbol will stop flashing confirming the cooking end time is set.
The “Cooking end time” will be shown on the display.
When the set time has elapsed, a signal will sound and the oven will turn off. To stop the signal, press any button on the clock and then turn the oven FUNCTION selector to “Off”.
NOTE: Cooking end time cannot be set for the Rapid Heat function. The cooking duration can be cancelled at any time by turning the “Function” selector to “Off”.
Setting the delayed start cooking time
Program the COOK TIME and END TIME as described in the relevant sections. Once both the COOK TIME and END TIME have been set, the COOK TIME and END TIME indicators will stop flashing and the “Set temperature” will be displayed.
NOTE: Do not forget to add pre-heating time if necessary. Delayed start cooking time cannot be set for the Rapid Heat function. The delayed start cooking time can be cancelled at any time by turning the “Function” selector to “Off”.
Setting the minute minder
Press the button and the “Minute minder” symbol begins to flash.
Set the countdown time “Seconds” by using - or + buttons while the minute minder symbol is flashing.
Press the button and the countdown time “Minutes” will flash and can be set in the same manner.
Press the button and set the countdown time “Hours” will flash and can be set in the same manner.
After 5 seconds from the last change, the “Minute minder” symbol will stop flashing confirming it has been set.
Once the set time has elapsed, a signal will sound for 1 minute. The time indication “0.00” and a flashing “Minute minder” symbol will appear on the display.
To stop the signal, press any button on the clock.
To cancel the minute minder, press the button and the display will flash. Then press and hold - or + buttons together until the minute minder is cleared.
NOTE: This feature has no effect on the oven operation. With the oven “Off” and minute minder operating, the time of day cannot be displayed.
Elapsed time
When an oven function is selected (other than pyrolytic clean), after 5 seconds the “Elapsed time” is displayed.
To reset the “Elapsed time”, press and hold both the - and + buttons until the timer is reset.
Displaying the oven centre and set temperature (other than pyrolytic clean function)
Press the TEMP. button when the oven is operating and the “Oven centre temperature” is displayed.
Press the TEMP. button again within 5 seconds and the “Oven set temperature” is displayed.
Alternatively, the TEMPERATURE selector can be toggled left - or + right for 1 second and the “Oven set temperature” is displayed.
Note: This temperature is displayed for 5 seconds.
Light operation
At any time, the oven lamp can be switched on or off by pressing and holding the button for 5 seconds.
Activating the child-proof lock
When the child lock is engaged, the oven cannot be operated and the door cannot be opened.
Switch the FUNCTION selector to “Off”.
Press and hold the CLOCK and + buttons at the same time until the word ‘SAFE’ is displayed and a double beep sounds. The word ‘SAFE’ will be replaced by a padlock symbol on the display after 5 seconds.
De-activating the child-proof lock
Press and hold the CLOCK and + buttons at the same time until a double beep sounds. This will commence to unlock the door and after 5 seconds the oven is ready for use.
Switching the clock display ON and OFF
When the oven is off, the clock display can be switched on and off.
Press together - and + symbols for 2 seconds to switch off the display.
Press together - and + symbols for 2 seconds to switch the clock display on again.
When the oven is off and the display is set to the ‘off’ state, pressing the - or + buttons will display the time of day for 5 seconds then turn off the display.
NOTE: If a timer mode is set or the oven is operating, then it is not possible to switch the display off.
Safety cut-out feature
The oven will automatically switch “Off” if the temperature is not adjusted or the appliance is left operating for a period of time. The oven switches itself off after:
12.5 hours when the temperature is set between 30°C and 120°C.
8.5 hours when the temperature is set between 120°C and 200°C.
5.5 hours when the temperature is set between 200°C and 250°C.
3.0 hours when the temperature is set at 250°C.
How to exit DEMO mode
The oven can be set to operate in a demonstration mode (e.g. in a retail store). The oven will not actually heat if it has been inadvertently supplied in this mode. The following instructions demonstrate how to exit this mode.
Ensure the oven is “Off”. Press and hold the + button until a beep sounds. The ‘Demo’ text on the display will flash.
While holding the + button, turn the FUNCTION selector to the first oven function until another beep is heard.
Then turn the FUNCTION selector to the ‘Off’ position.
Release the + button.
Toggle and hold the TEMPERATURE selector to the right + until 3 beeps sound. The ‘Demo’ text will no longer be displayed and the oven will function normally. If the ‘Demo’ text is still displayed repeat the above procedure.
Using Your Oven
Understanding your oven functions
Your oven will have a selection of the following functions. Refer to “Description of your appliance” to confirm what functions are available to you.
Fan Bake
Heat comes from the element surrounding the fan. This fan circulates the hot air around the oven cavity so that you can put your food in different places in the oven and still cook them at the same time.
You can use the “Fan Bake” function for multi-shelf cooking, reheating cooked foods, pastries and complete oven meals. It will cook at a lower temperature and be faster than baking. Please note that some variation in browning is normal.
Bake
Heat comes from the elements, one above and one below the food. The bottom element is a clean heat element and is below the floor of the oven. Both elements are controlled by the thermostat and will turn on and off to maintain the set temperature.
You can use the “Bake” function for single trays of biscuits, scones, muffins, cakes, slices, casseroles, baked puddings, roasts and delicate egg dishes.
Defrost
The “Defrost” function uses low temperature air that is circulated by the fan. You can defrost (thaw) your food before you cook it. You can also use “Defrost” to raise your yeast dough and to dry fruit, vegetables and herbs.
Fan Grill
“Fan grill” offers you the benefits of both “bake” and traditional “grill” functions. The grill element turns on and off to maintain the set temperature while the fan circulates the heated air. The oven door remains closed. You can use “Fan grill” for large cuts of meat. This gives you a result that is similar to “rotisserie” cooked meat. Put your food on a shelf in the second lowest shelf position. Put the grill dish on the lowest shelf position to catch any spills. When using “Fan grill” it is not necessary to turn the food over during the cooking cycle. Set temperature to 180°C.
Grill
The “Grill” directs radiant heat from the powerful upper element onto the food. You can use the “Grill” function for tender cuts of meat, steak, chops, sausages, fish, cheese toasties and other quick cooking foods. Grill with the oven door closed. Preheat your grill for 3 minutes to get the best results. This will help seal in the natural juices of steak, chops etc. for a better flavour. You can slide your grill dish into either of the 2 spaces within the upper pairs of support rails.
Maxi Grill
“Maxi grill” directs radiant heat from 2 powerful upper elements onto the food. You can use the “Maxi grill” function for tender cuts of meat, steak, chops, sausages, fish, cheese toasties and other quick cooking foods. Grill with the oven door closed.
“Maxi grill” allows you to take full advantage of the large grill dish area and will cook faster than normal “Grill”. For best results it is recommended to preheat your grill for 3 minutes. This will help seal in the natural juices of steak, chops etc. for a better flavour. You can slide your grill dish into either of the 2 spaces within the upper pairs of support rails.
Separate Grill (where applicable)
The “Grill” directs radiant heat from the powerful upper elements onto the food. You can use the “Grill” function for tender cuts of meat, steak, chops, sausages, fish, cheese toasties and other quick cooking foods. Grill with the oven door open. Preheat your grill for 3 minutes to get the best results. This will help seal in the natural juices of steak, chops etc. for a better flavour. The grill dish is to be positioned between the upper pair of support rails.
Pyro Clean (where applicable)
The “Pyrolytic cleaning” function is used for cleaning the main oven. It cleans by burning off the spatters and temperature. This process produces ash which can be wiped out of the oven cavity.
Pizza (where applicable)
Heat comes from two elements, one above and one below the food. The bottom element is a clean heat element and is below the floor of the oven. Both elements are controlled by the thermostat and will turn on and off to maintain the set temperature. You can use the “Pizza” function specifically for making pizza, using the pizza stone and rack. However, you can also use this function for a single tray of biscuits, scones, muffins, cakes, slices, casseroles, baked puddings, roasts and delicate egg dishes.
Cooling/Venting fan
Your built-in appliance is fitted with a cooling fan. It will operate whenever you are using your oven or grill and will blow warm air across the top of the oven door. In some appliances the cooling fan may continue to operate after the appliance is turned off. This is to cool the product.
Condensation
Excess condensation may fog the oven door. This may happen when you are cooking large quantities of food from a cold start. You can minimise condensation by:
Keeping the amount of water used whilst cooking to a minimum.
Making sure that the oven door is firmly closed.
Baking custard in a baking dish that is slightly smaller than the water container.
Cooking casseroles with the lid on.
NOTE: If you are using water in cooking, this will turn to steam and may condense outside your appliance. This is not a problem or fault with your oven.
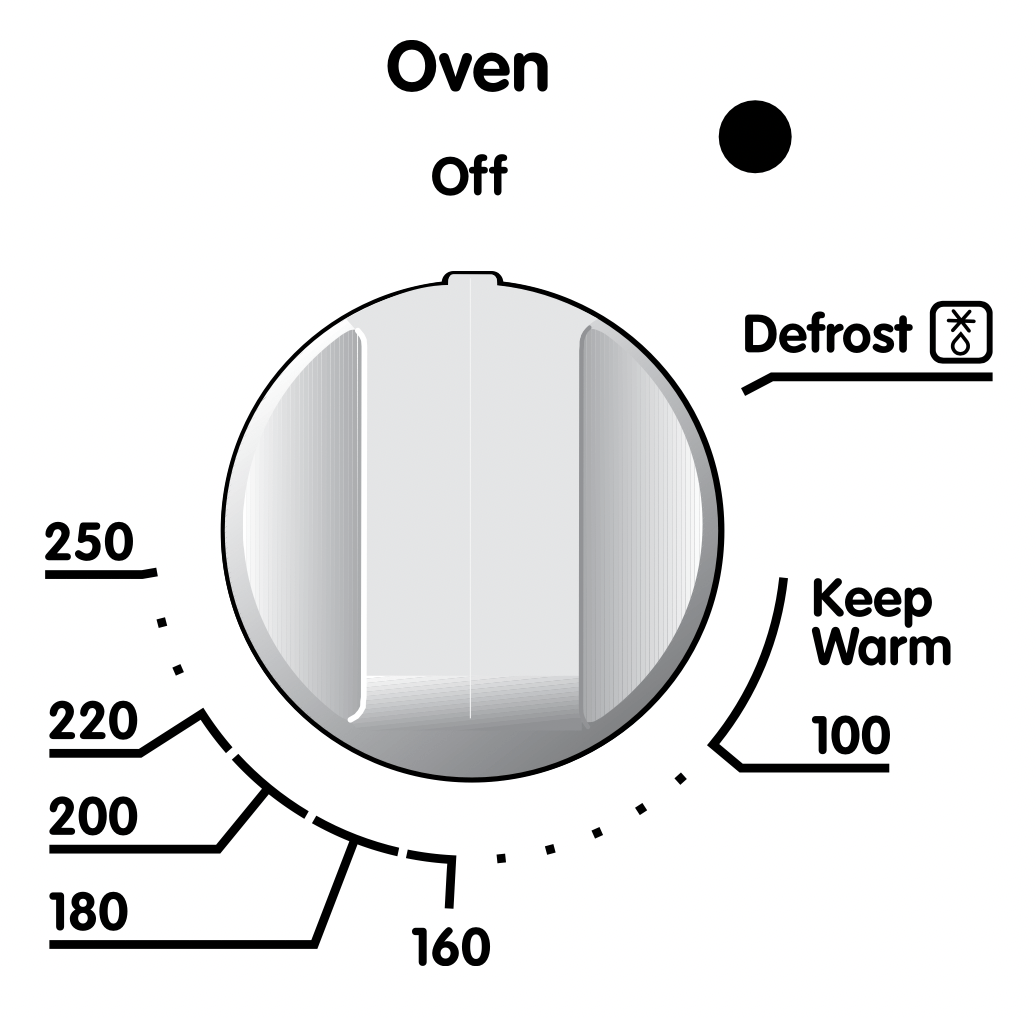
Operating your oven temperature selector
A thermostat controls the temperature in your appliance.
The temperature can be selected within the specified range. To set the temperature, turn the temperature selector in a clockwise direction to the desired setting. An indicator light above the temperature selector will come on. When the temperature is reached, the heating source switches itself off and the indicator light goes out. When the oven temperature falls below the desired setting, the heating source switches on and the indicator light comes on again. Once the food is cooked, turn the temperature selector back in an anticlockwise direction. Do not force it right round in a clockwise direction as this will result in damage to the thermostat.
NOTE: For multifunction ovens the desired cooking function must be selected before the oven will operate. Once the desired function has been selected, use the temperature selector to set the required temperature.
Pre-heating your appliance
Pre-heating your appliance is recommended in cooking and grilling functions. For best results when baking you must preheat your oven for 30 minutes.
With “Fan Bake”
It is recommended to preheat your appliance when cooking or baking.
Set the desired temperature, by rotating your oven temperature selector.
When the indicator light above the temperature selector goes out, the oven has reached the desired temperature, place your food into the oven, close the door and set the timer if you desire.
With “Grill”
Preheat the grill for at least 3 minutes to obtain best results. This will help to seal the natural juices of steak, chops and other meats for a better flavour.
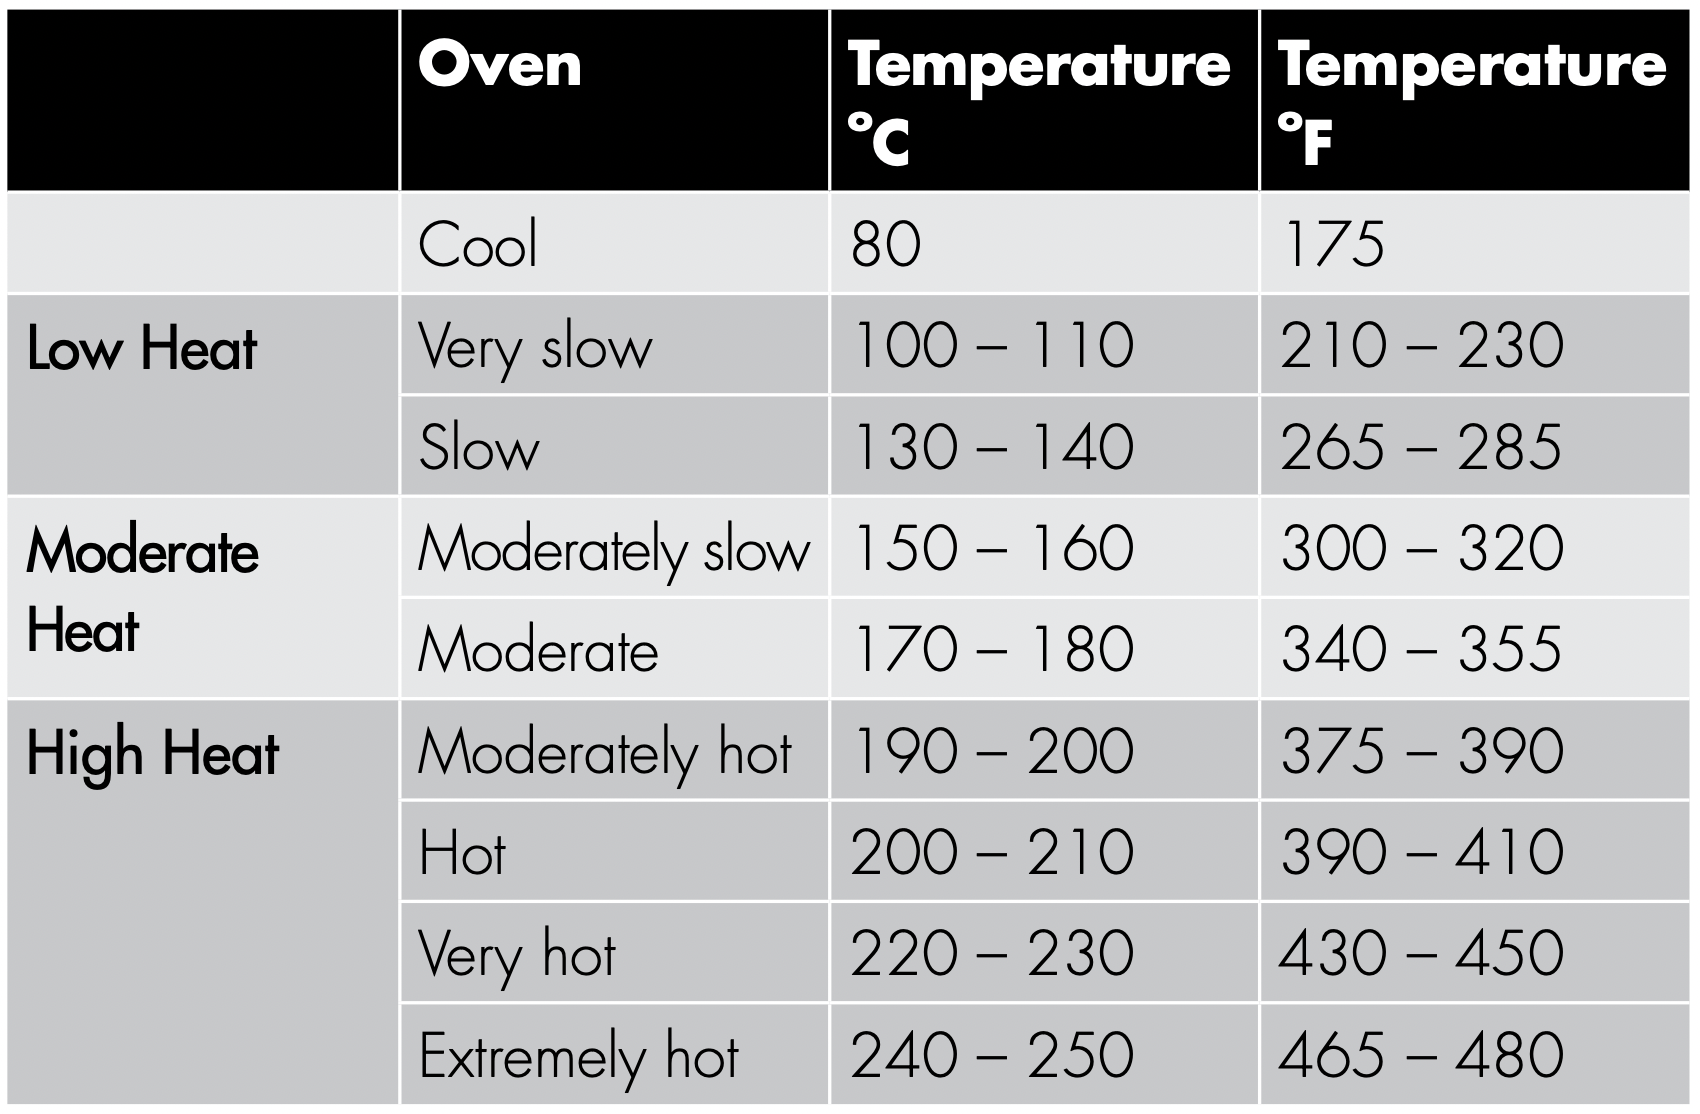
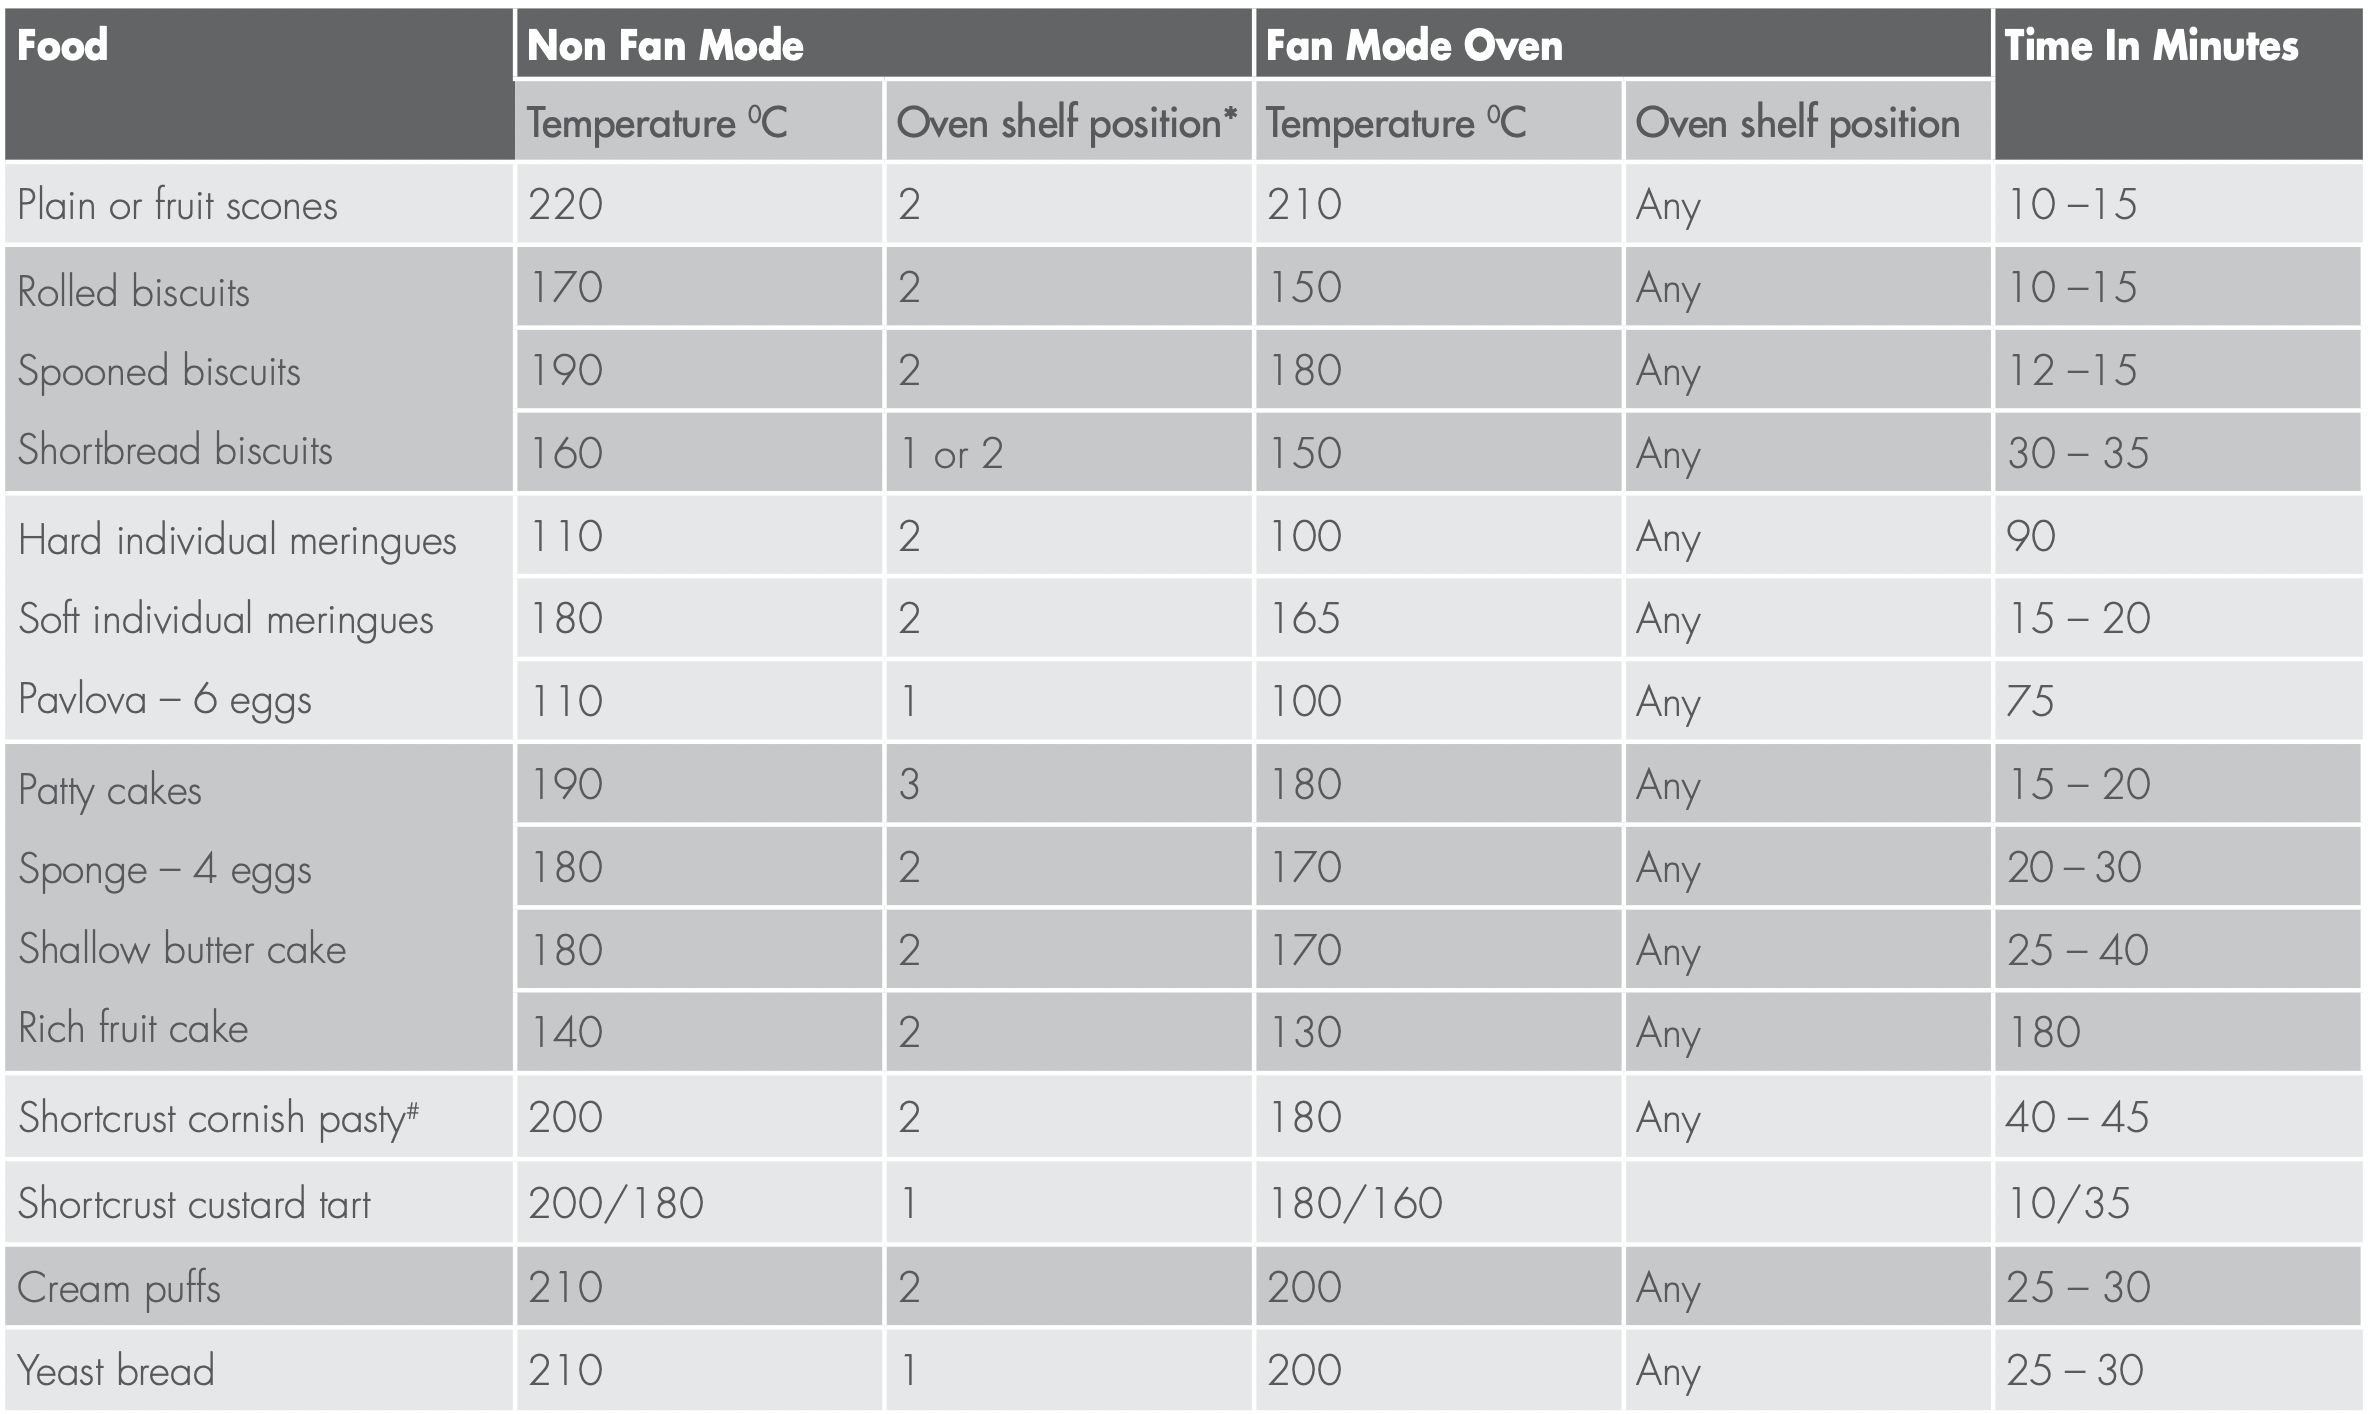
Setting temperatures
The following table displays the temperature settings for recipes which do not show actual temperatures.
Cooking Guide
On completion of cooking
Turn the function and temperature controls to the off position.
Press any button to stop the timer from beeping.
After the oven is turned off it retains the heat for some time. Use this heat to finish custards or to dry bread.
Cooking guide
Select the correct shelf location for food being cooked.
Make sure dishes will fit into the oven before you switch it on.
Keep edges of baking dishes at least 40mm from the side of the oven. This allows free circulation of heat and ensures even cooking.
Do not open the oven door more than necessary.
Do not place foods with a lot of liquid into the oven with other foods. This will cause food to steam and not brown.
Do not use a lot of cooking oil when roasting. This will prevent splattering oil on the sides of the oven and the oven door. Polyunsaturated fats can leave varnish like residue which is very difficult to remove.
For sponges and cakes use aluminium, bright finished or non-stick utensils.
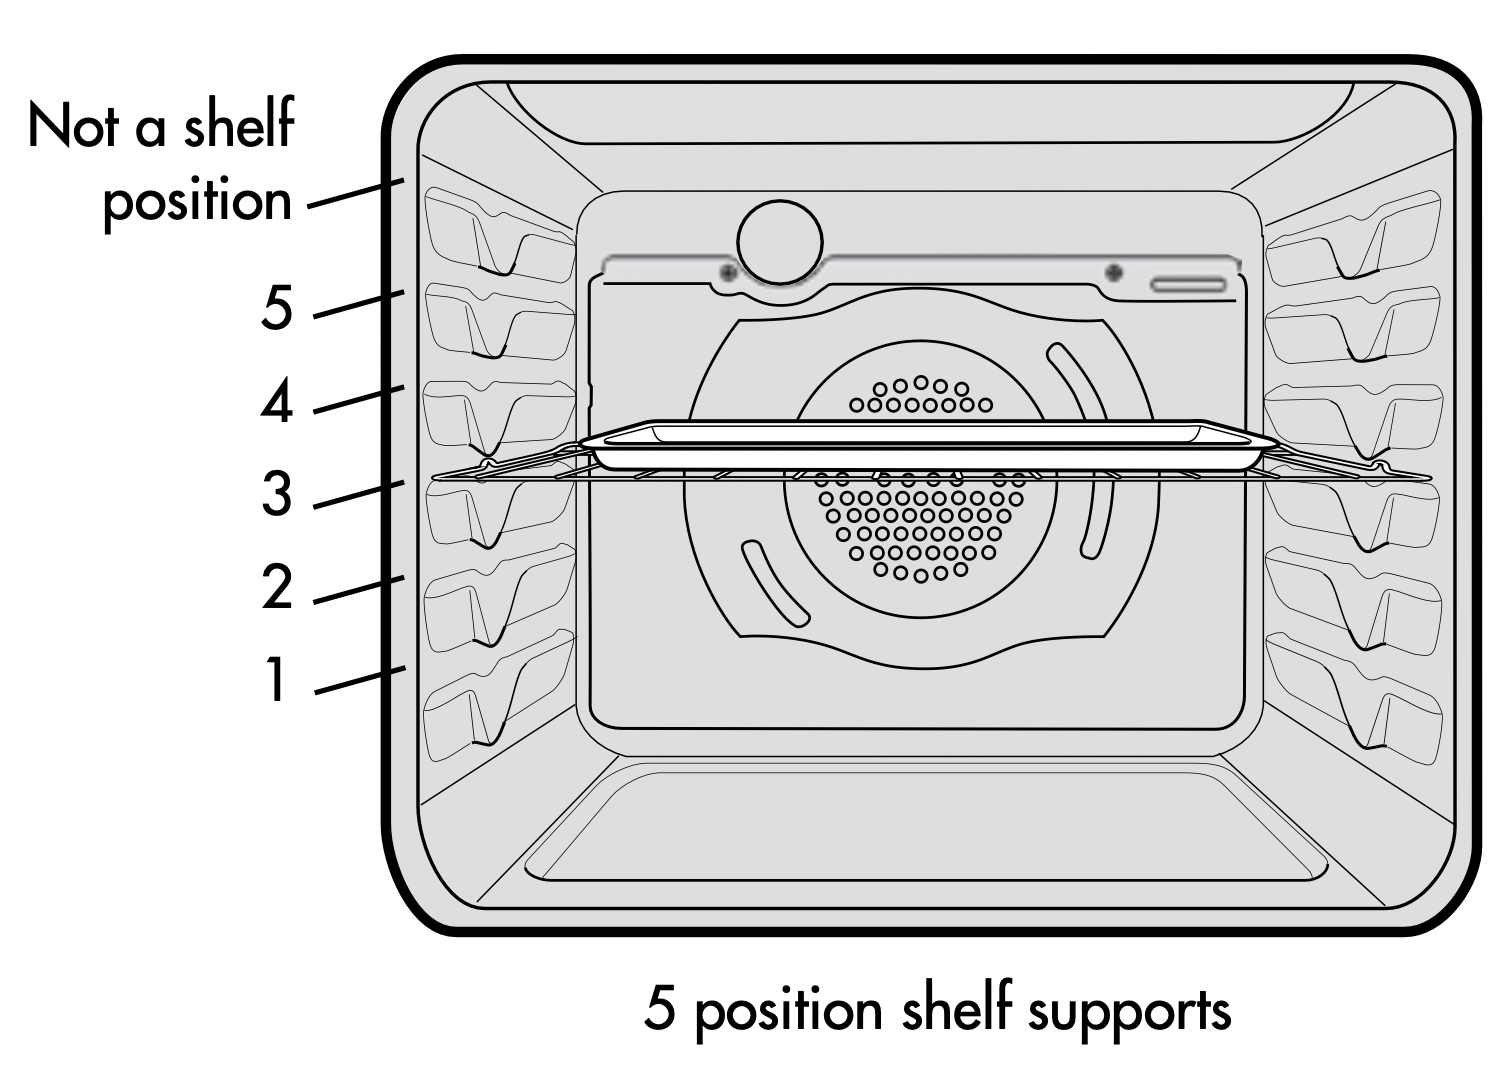
Oven shelf location
Your oven comes with formed “easy clean” shelf supports that allow five positions for shelves. These are numbered from 1 (the lowest shelf position) to 5 (the highest shelf position). See diagram.
In general:
When cooking with 1 shelf, use position 3.
When cooking with 2 shelves, use positions 2 and 4.
For more specific recommendations, refer to the table on the following page. Use the oven efficiently by cooking many trays of food at the same time. For example:
Cook 2 trays of scones, small cakes or sausage rolls.
Cook a roast dinner at the same time as you cook chips or vegetables.
Choosing the best oven settings
The following table is intended as a guide and experience may show some variation in cooking times necessary to meet individual requirements. For best baking results preheat the oven for 30 minutes.
*Shelf position is counted from the bottom up. Bottom shelf is 1. # Turn down temperatures and times shown.
Cooking with the pizza stone
WARNING:
Keep out of reach of children.
Always use oven gloves, the pizza stone will retain heat for a long time.
Always place a heat proof surface under the pizza stone to protect benchtops.
The stone may crack if dropped. Handle with care.
Do not use a damage or chipped stone.
Do not put a cold pizza stone into a hot oven. It may shatter the stone.
Pizza ovens cook at high temperatures. Do not leave this cooking process unattended. It must be supervised at all times.
Place the stone on the pizza rack as described in the“ Before operating your appliance for the first time” section.
Use the middle or lower position
TIPS:
Lightly flour the pizza stone to prevent the dough from sticking. Do not use grease or oils.
Close the lower door.
Turn the lower function knob clockwise to the “Pizza” function. Turn the lower oven knob clockwise until it points to “Pizza”. The lower over will now start heating the stone.
Heat the stone for 15 to 20 minutes.
Carefully place the uncooked pizza onto the hot stone. A pizza paddle may help with this (sold separately - contact the customer care team. Refer to the last page for contact details).
Your pizza should be ready between 5 to 8 minutes.
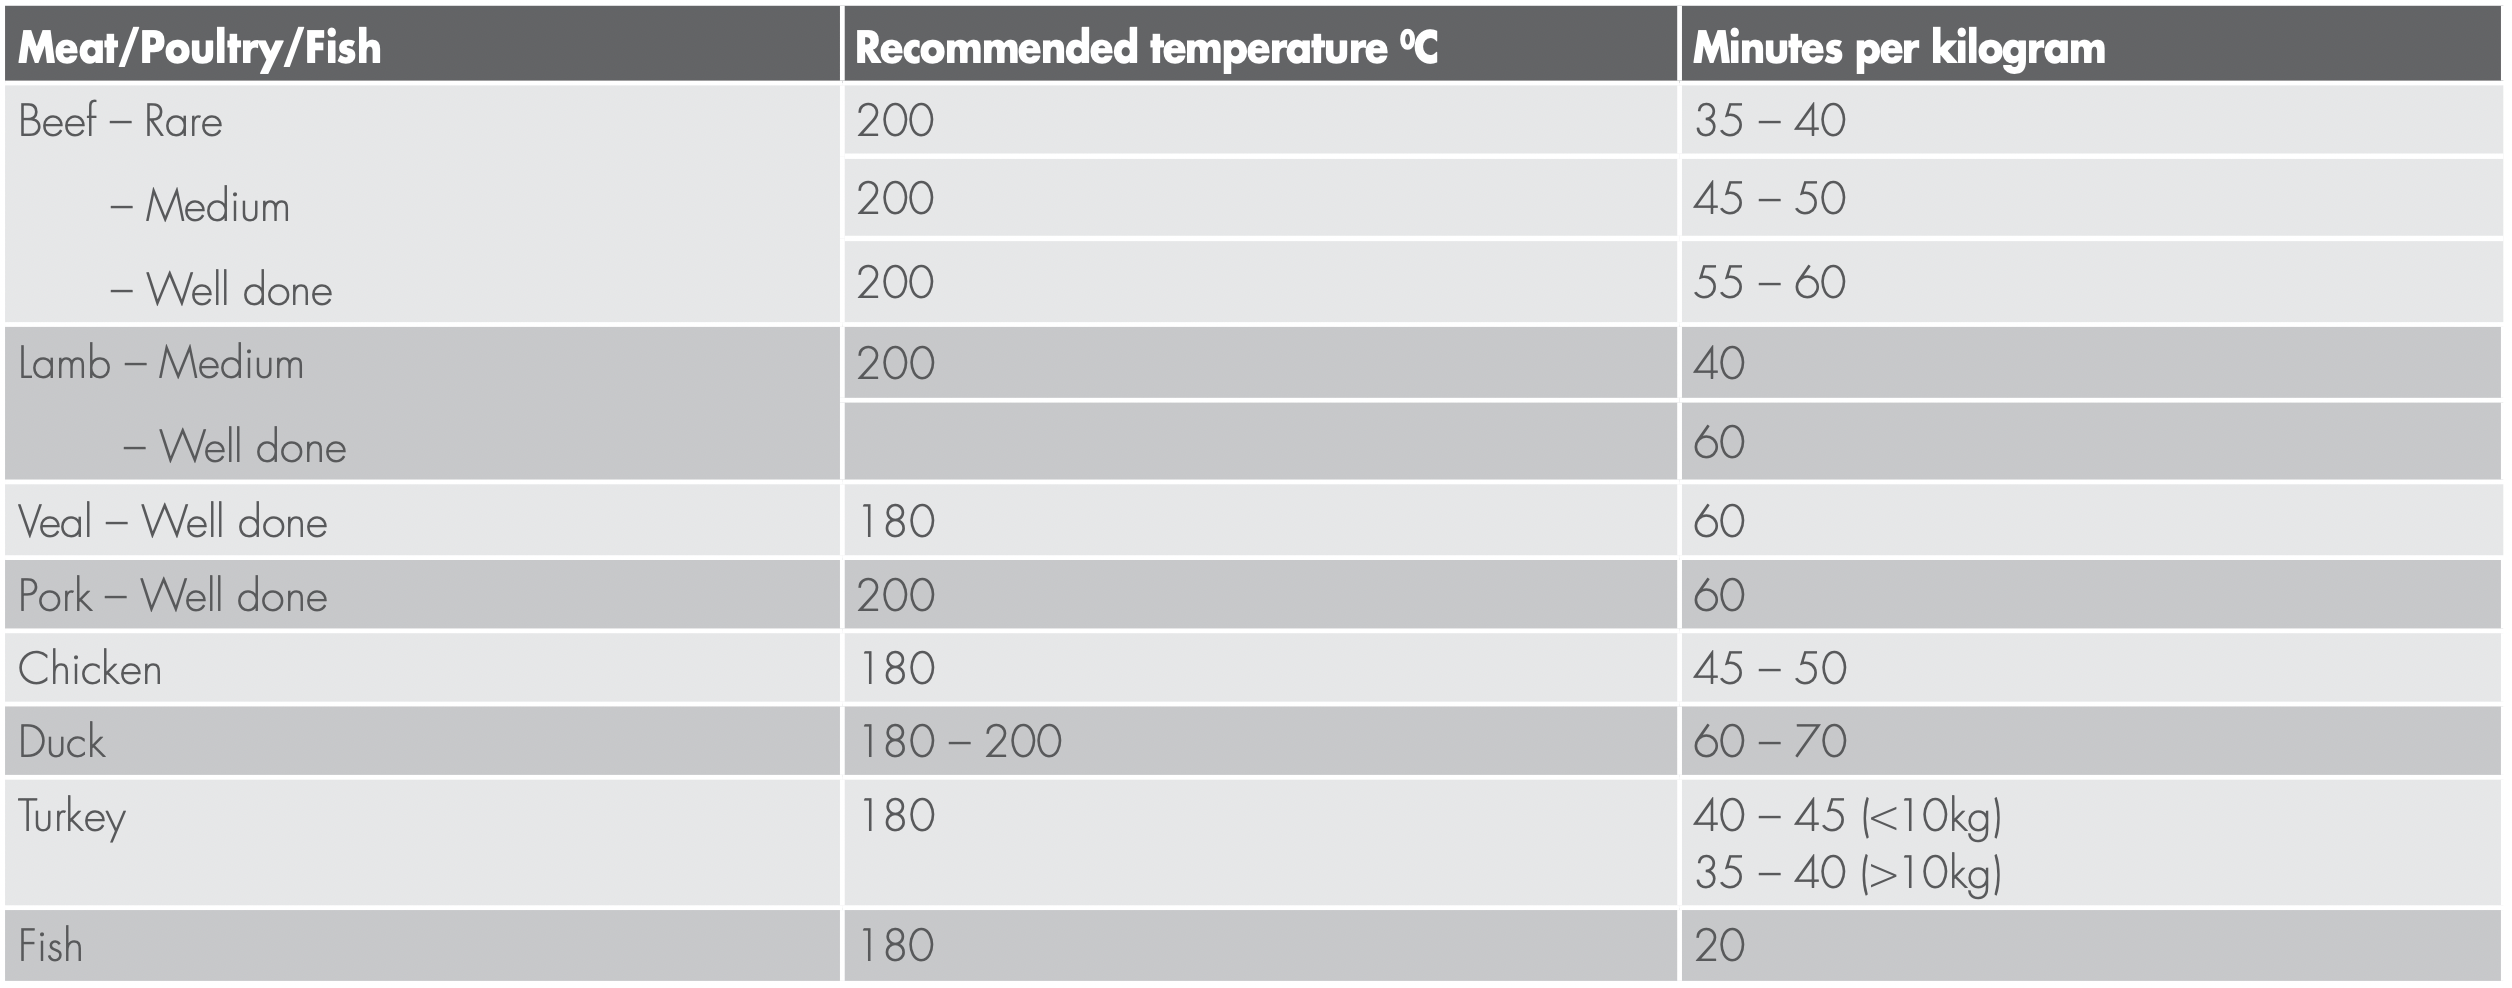
Roasting meat
Place the meat in the oven and set the temperature between 180°C and 200°C. (It is recommended to wrap your meats in an oven roasting bag or foil to prevent fats and oils from splattering, making it easier to clean your oven.)
Use the grill/oven dish and grill dish insert. Place the meat on the insert.
Do not pierce the meat as this will allow juices to escape.
When the meat is cooked, take the roast out of the oven, wrap in aluminum foil and leave to stand for about 10 minutes. This will help retain the juices when the meat is carved. The table shows temperatures and cooking times for different kinds of meat. These may vary depending on the thickness or bone content of the meat.
Roasting poultry and fish
Place the poultry or fish in an oven set at a moderate temperature of 180°C.
Place a layer of foil over the fish for about three quarters of the cooking time.
The table shows temperatures and cooking times for different kinds of fish and poultry. These may vary depending on the thickness or bone content of the meat.
Grilling Guide
Grilling hints
NOTE: Always clean the grill/oven dish after every use. Excessive fat build up may cause a fire.
Depending on your model of appliance, you will grill:
With the door open, if you are grilling in the separate grill compartment.
With the door open or closed, if you are grilling in the oven compartment.
As a method of cooking, grilling can be used to:
Enhance the flavours of vegetables, fish, poultry and meat.
Seal the surface of the food and retain the natural juices.
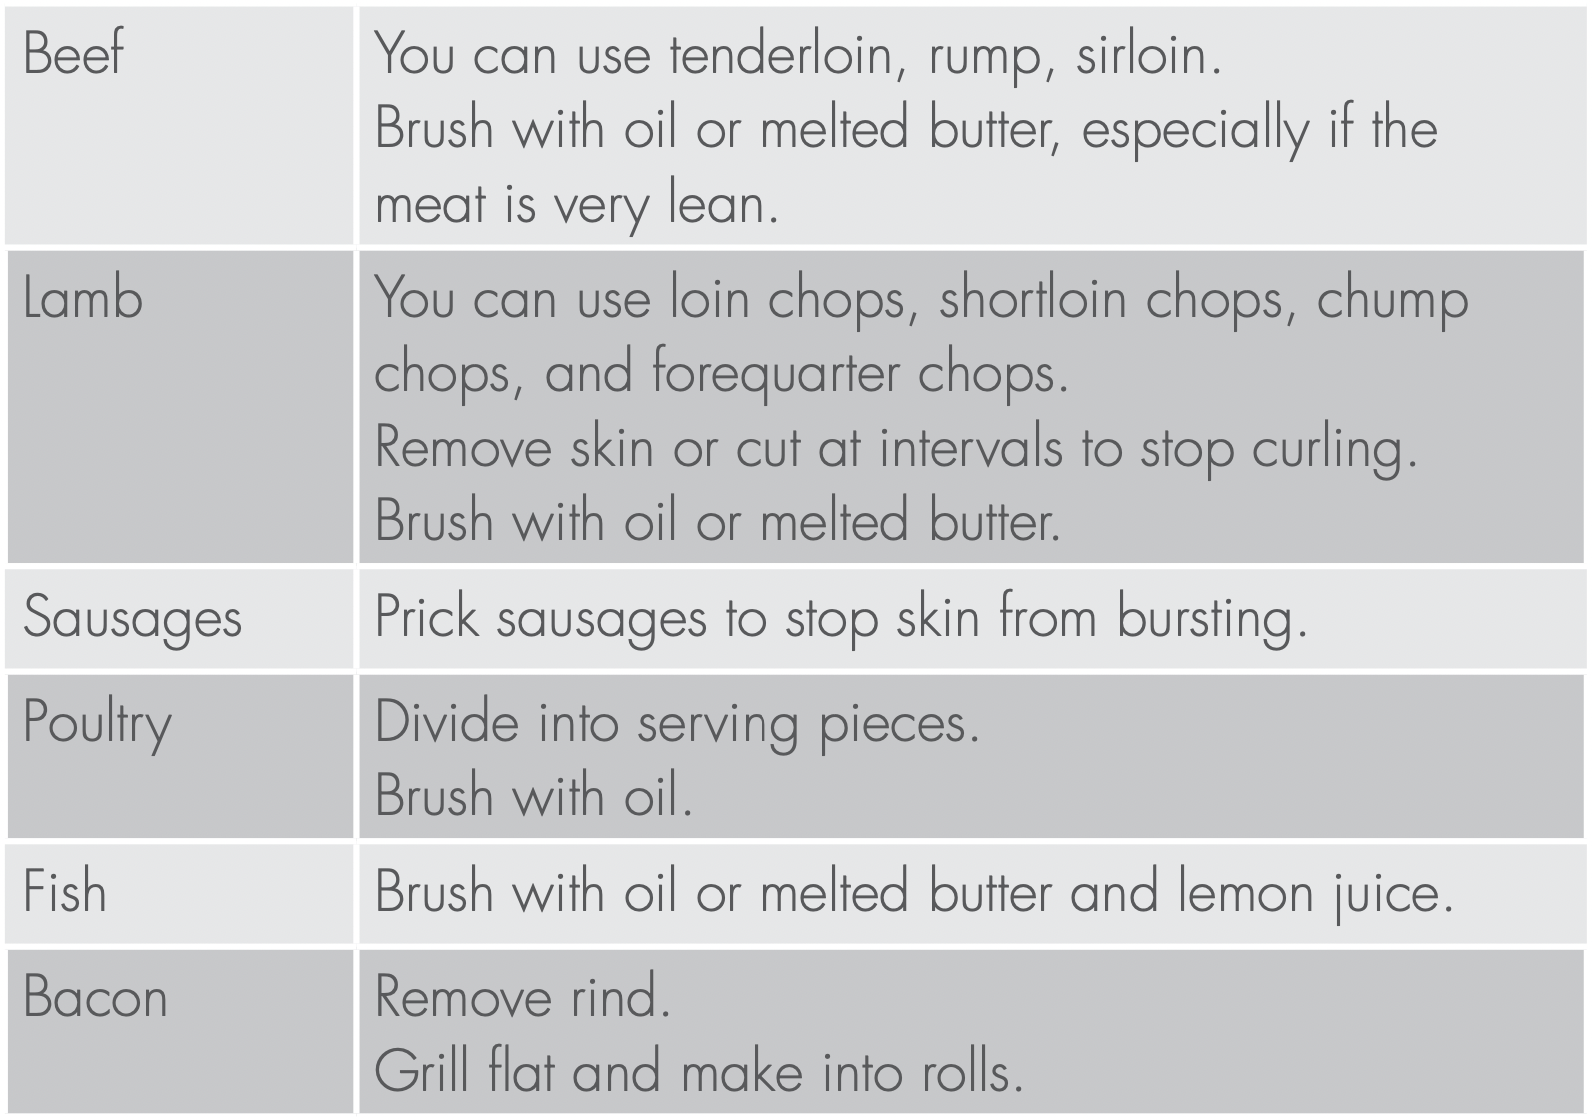
This table shows how to grill different types of meat:
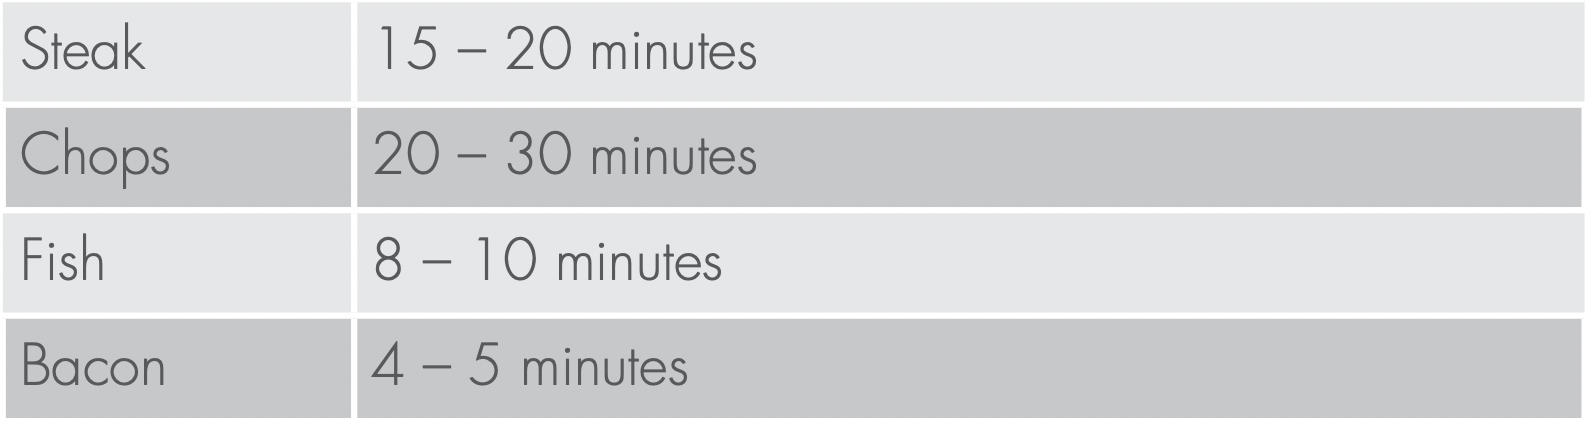
Guide to better grilling
No definite times can be given for grilling because this depends on your own tastes and the size of the food. These times should only be used as a guide and remember to turn the food over halfway through the cooking process.
For better grilling results, follow these easy instructions:
Remove oven/grill dish and grill dish insert and preheat the grill for about 3 minutes.
Choose only prime cuts of meat or fish. If the cut is less than 5mm thick it will dry out. If the cut is more than 40mm thick, the outside may burn whilst the inside remains raw.
Do not place aluminium foil under the food as this prevents fats and oils from draining away, which could result in a fire.
Baste the food during cooking with butter, olive oil or marinade. Grilled food is better if marinated before cooking.
Use tongs to turn food as a fork pierces the surface and will let juices escape.
Fan Grill (multifunction models only)
If your appliance has Fan Grill as a function, this will assist the grilling process by circulating the heat evenly around the food. The recommended temperature setting is 180°C for all fan grilling functions.
Use the grill dish insert and oven dish for all Turbo grilling.
Position the dish in the lower half of the oven, for best results.
Wipe off any oil or fat which spatters while the oven is still warm.
There is no need to turn the meat as both sides are cooked at the same time which means that the food is succulent.
Dealing With Cooking Problems
Problem
Causes
Remedy
Uneven cooking
Incorrect shelf position
Select shelf that puts food in centre of oven
Oven tray too large
Try other trays or dishes
Trays not in centre
Put trays in centre
Air flow in oven uneven
Rotate food during cooking
Grill tray affecting thermostat
Remove grill tray from oven on bake modes
Baked products too brown on top
Oven not preheated
Preheat the oven
Baking tins too large for recipe
Use correct size tins
Baking tins not evenly spaced
Stagger baking tins at least 3cm between tins and the oven walls
Products not evenly sized or spaced ontrays
Make into same size and shape and spread evenly over trays
Baked products too brown on bottom
Baking tins too large
Use correct size tins
Baking tins are dark metal or glass
Change to shiny, light coloured tins or lower the temperature by10°C
Food too low in oven
Cook one shelf higher
Oven door opened too frequently during baking
Don’t open the oven door until at least half the cooking time has passed
Baking temperature too high
Lower the temperature
Grill tray affecting thermostat
Remove grill tray from oven on bake modes
Cakes have a cracked thick crust
Baking temperature too high
Lower the temperature
Food too high in oven
Cook one shelf lower
Cake batter over mixed
Mix just long enough to combine the ingredients
Baking tin too deep
Check size of tin and use recommended size
Baking tins dark
Change to shiny light coloured tins
Baked products are pale, flat and under cooked
Baking temperature too low
Raise the temperature
Food too low in oven
Cook one shelf higher
Baking time too short
Increase cooking time
Incorrect baking tin size
Use correct size tin
Cakes fallen in centre
Baking temperature too low
Raise the temperature
Baking time too short
Increase cooking time
Proportions of ingredients incorrect for recipe
Check recipe
Opening door too early during baking
Do not open door until the last quarter of cooking time
Roast meat and potatoes not brown in fan oven
Poor hot air circulation
Elevate food onto a rack to allow air circulation
Grill tray affecting thermostat
Remove grill tray from oven on bake modes
Juices running out of meat
Do not pierce meat with fork, turn with tongs
Grilled meats overcooked on outside & raw in the centre
Grill at lower insert position
Grilled chops & steaks curling
Cut into fat every 2cm (3/4")
Pizza toppings burnt
Use lower shelf
Cleaning Your Appliance
Important:
Always make sure that the oven is electrically isolated before cleaning. This can be done via the functional switch located nearby. Do not use steam cleaners.
Do not line the bottom of the oven or grill with foil or cookware as trapped heat will crack and craze the floor of the oven.
Enamel inside oven and grill compartments
Rub persistent stains vigorously with a nylon scourer or creamed powder cleansers. NOTE: You can also use household oven enamel cleaners – follow the manufacturer’s instructions carefully.
Do not use harsh abrasive cleaners, powder cleaners, steel wool or wax polishes.
Oven
Always keep your appliance clean. Ensure that fats and oils do not accumulate around elements, burners or fans.
Always keep the oven dish, bake trays and grill dish insert clean, as any fat deposits may catch fire.
Always wrap your meats in foil or an oven roasting bag to minimise cleaning. Any polyunsaturated fats can leave a varnish-like residue which is very difficult to remove.
Grill
Always keep the grill dish insert clean, as any fat deposits may catch fire.
Stainless steel
All grades of stainless steel can stain, discolour or became greasy. You must clean these areas regularly by following the procedures below if you want your appliance to look its best, perform well and have a long life.
Care must be taken when wiping exposed stainless steel edges...they can be sharp!
Wash with warm soapy water and rinse with clean water.
If you want a better look, wipe your appliance with a suitable stainless steel cleaner then wipe with a soft lint free cloth.
Use a stainless steel cleaner only where the stainless steel is extremely dirty and/or discoloured. A suitable cleaner can be purchased from Electrolux Service or Spares. See back cover.
Glass
Glass surfaces on doors are best cleaned immediately after soiling.
A damp cloth may help remove baked on food deposits.
Oven cleaners can be used to remove stubborn marks and stains.
Control panel & door trim
Wash with soapy water and rinse with clean water. Wipe dry with a soft, lint free cloth.
Do not use harsh abrasive cleaners, powder cleaners, steel wool or wax polishes.
Oven accessories
Removing the grill dish and shelves from your appliance
Slide the shelves towards you until they reach the front stop.
Tilt them up at the front, taking care not to spill any contents.
Lift them clear.
Wash the grill dish, grill dish insert and the shelves in hot soapy water.
Reverse the above steps to put the grill dish and shelves back again.
Removing the wire side racks (where applicable)
Grasp the middle wire at the front.
Pull firmly inwards.
After cleaning in hot soapy water, reinstall the side racks by inserting the rear pins first.
Removing and replacing the oven back light and side light (where fitted)
Turn oven back light glass anticlockwise to remove it for globe replacement.
To remove side light, place a spoon under the light glass and lever off. Replace globe and snap glass cover back into position.
A special high temperature resistant globe should be used. This can be purchased from Electrolux Customer Care Centre. See last page.
WARNING: Make sure the appliance is turned off before you remove or replace parts, to avoid the possibility of electric shock.
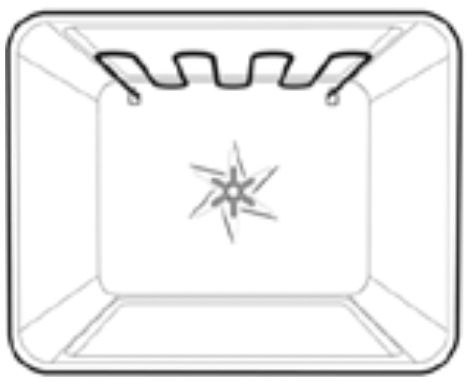
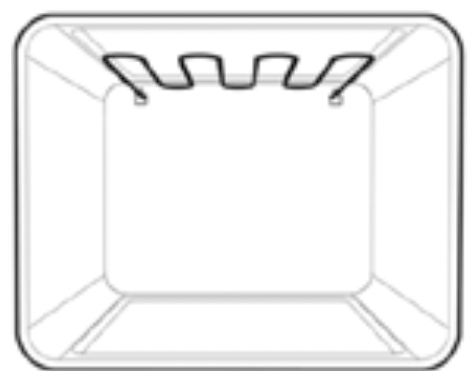
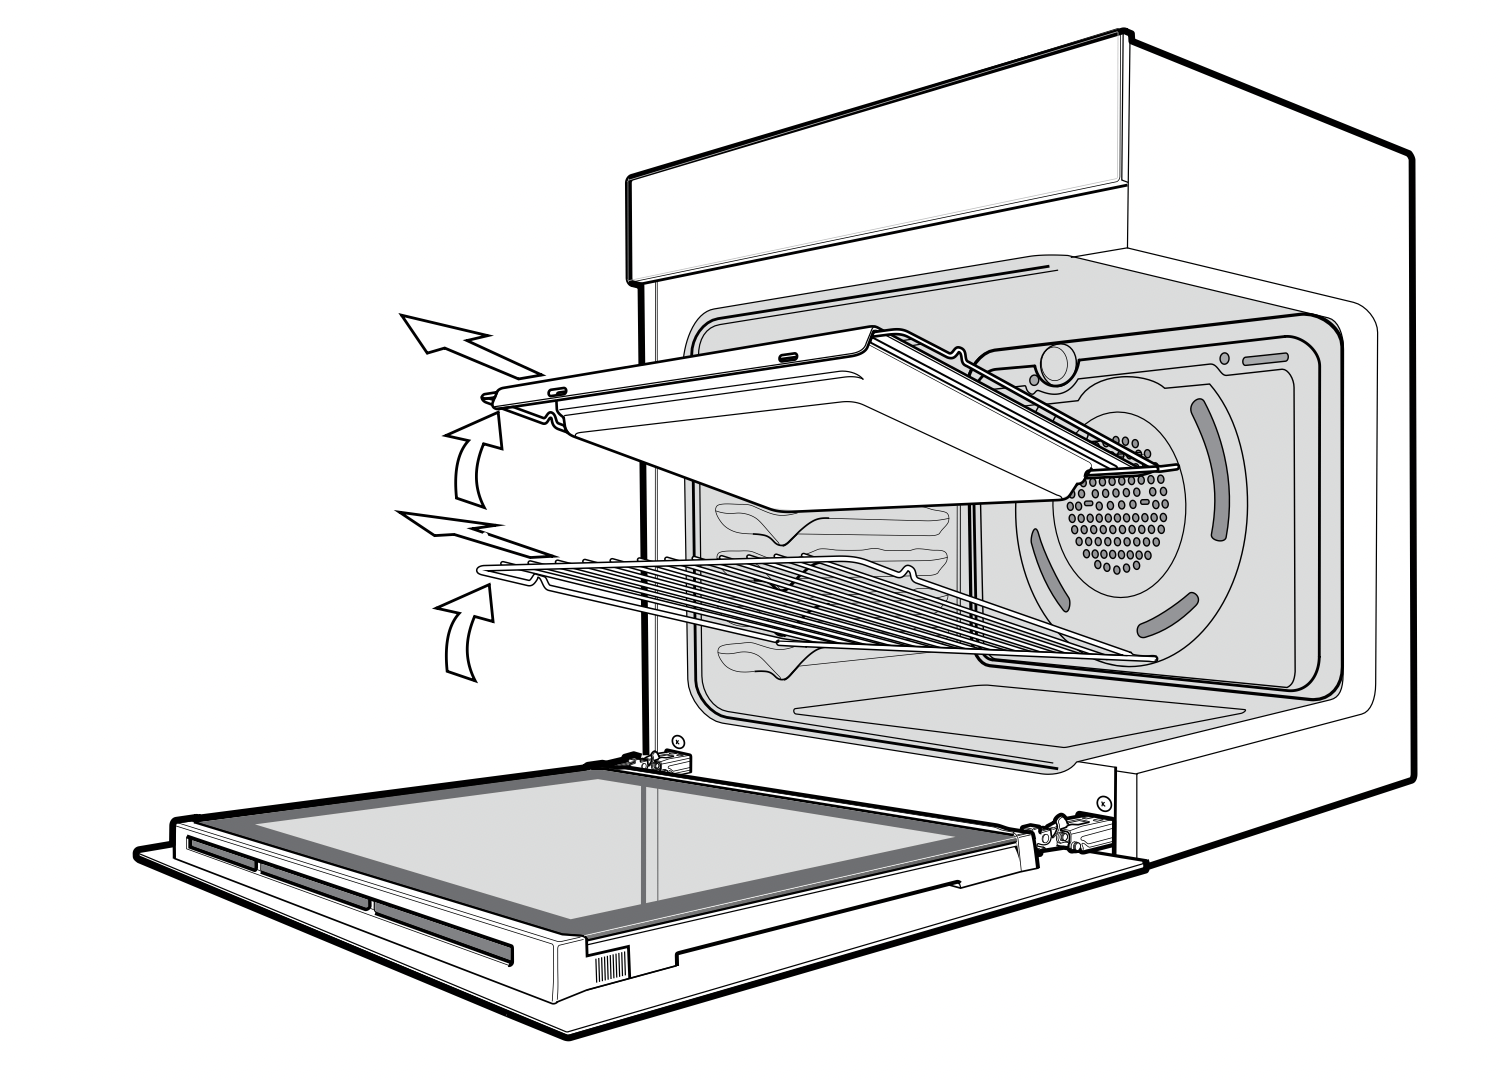
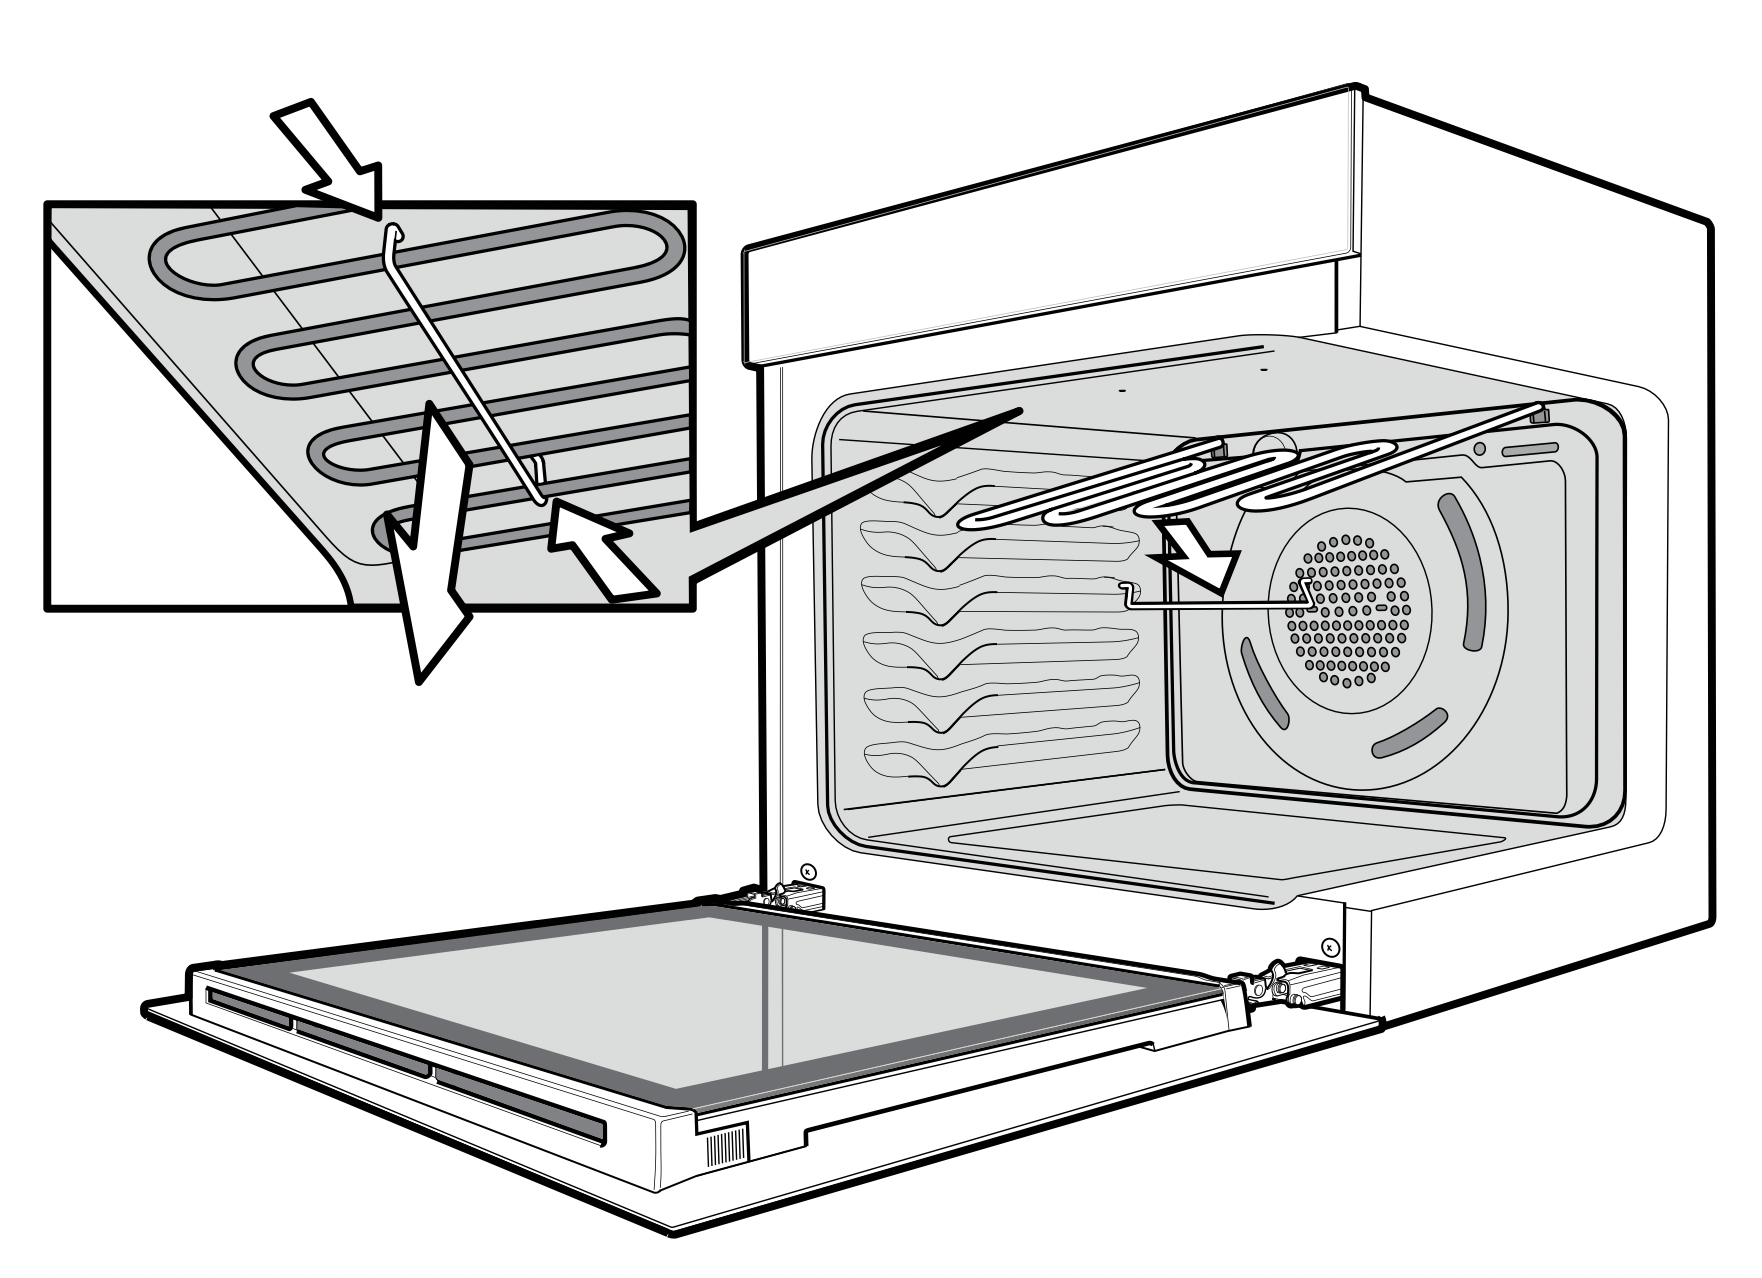
Releasing the grill element
Retaining wire models
We have designed the upper element with a hanger clip to help you reach your oven roof for cleaning.
Lift element up carefully.
Push the sides of the clip together. The element will drop down freely.
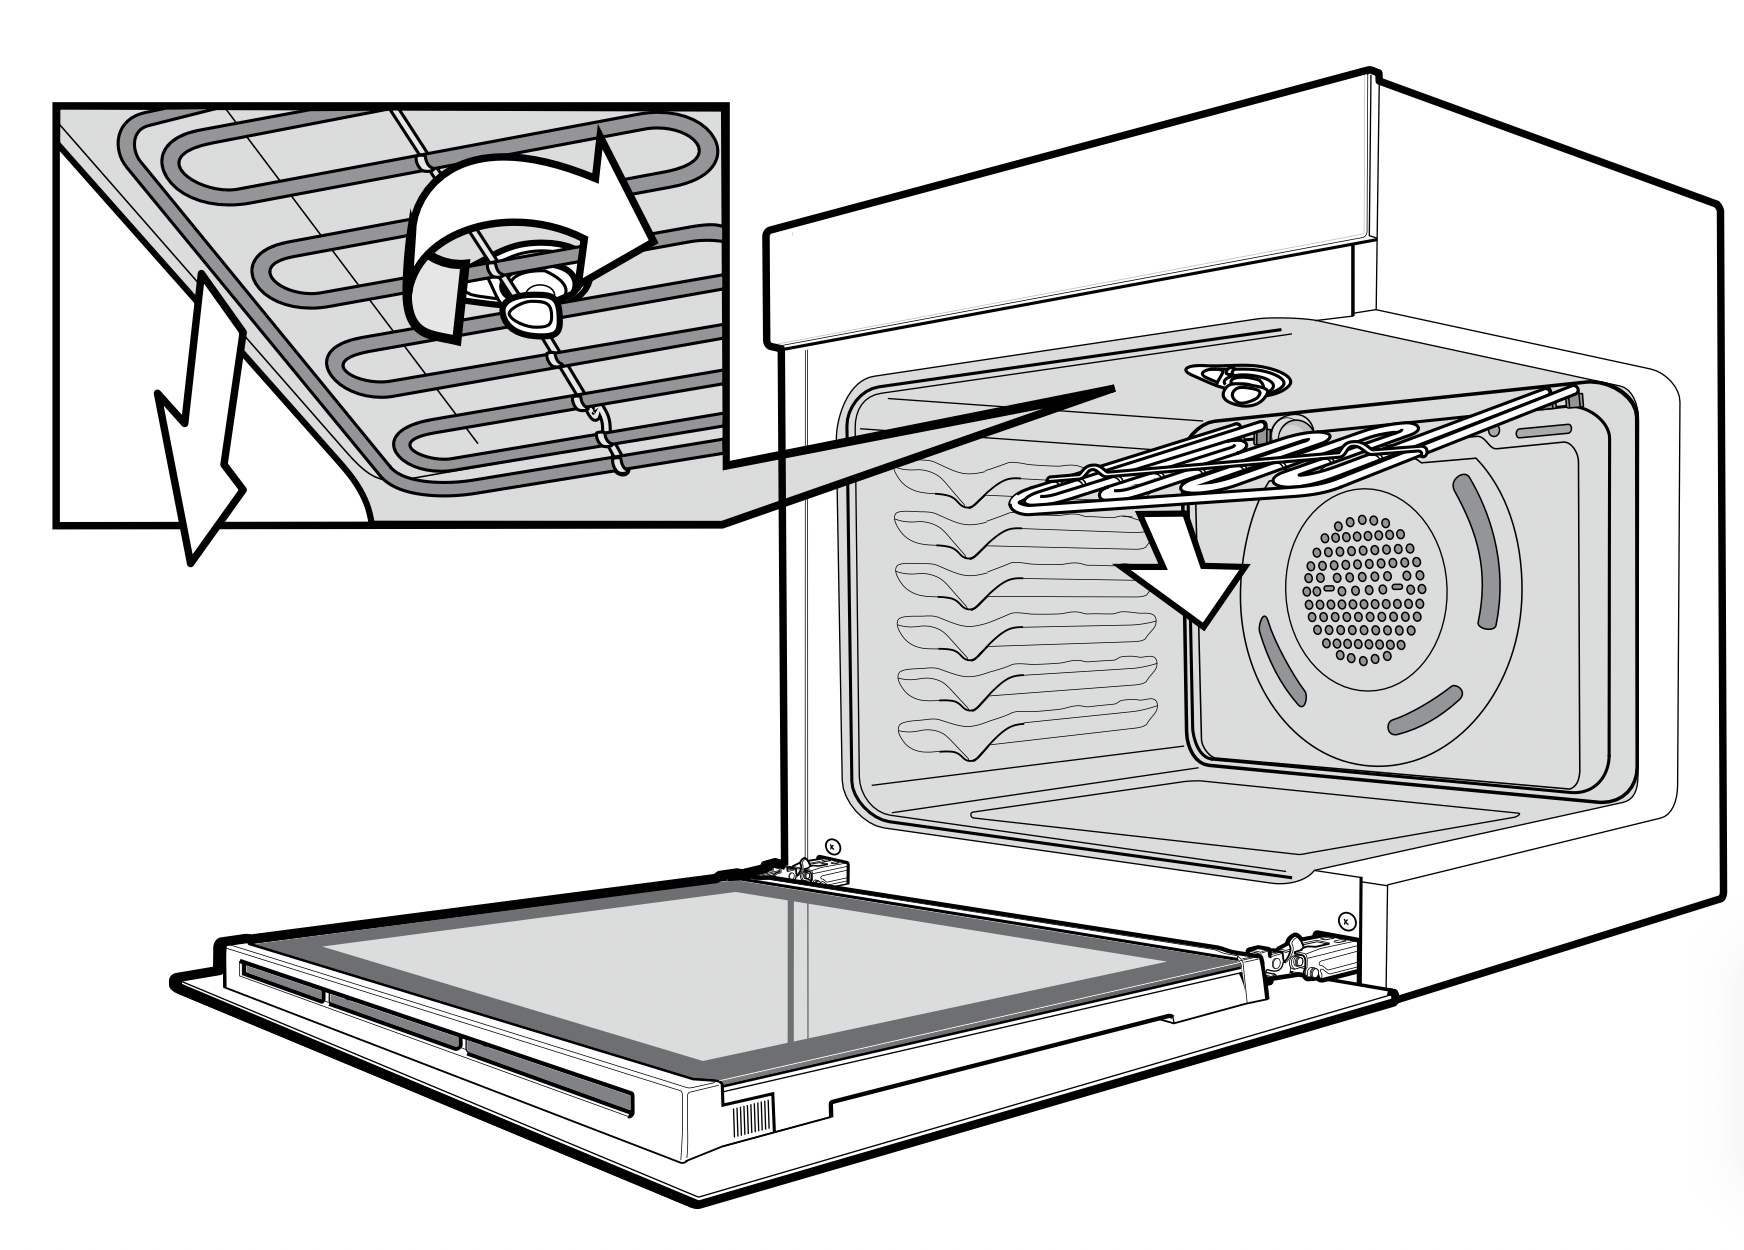
Rotating latch models
Rotate latch 180º.
The element will drop down freely.
Pizza stone
WARNING:
Always wait until the stone is cool before cleaning. The pizza stone will retain heat for a long time.
Never use soap or detergent to wash your pizza stone. Only use plain water Do not put a hot stone into water. It may cause the stone to crack. Allow the stone to cool down first.
Do not soak your pizza stone in water. Too much moisture may crack the pizza stone during the next use.
The best way to clean the pizza stone is to scrape off excess food build up with a metal spatula.
If you feel it is necessary to clean with water, use a clean sponge and wipe away the food or grime from the surface using plain water.
Store your pizza stone in a safe and dry place, to ensure it is fully dried before the next use.
Your pizza stone will gradually get darker and will also obtain some stains with use. This is normal. It will not affect the taste of the food on the stone, or impact performance, and it part of the natural seasoning of the stone.
Cleaning Your Oven Door
WARNING: Do not lift the door by the handle. Rough handling will cause glass to break.
Removing the oven door
Your oven is equipped with a door that can be disassembled in order to clean all the panes of glass. Remove the door before cleaning.
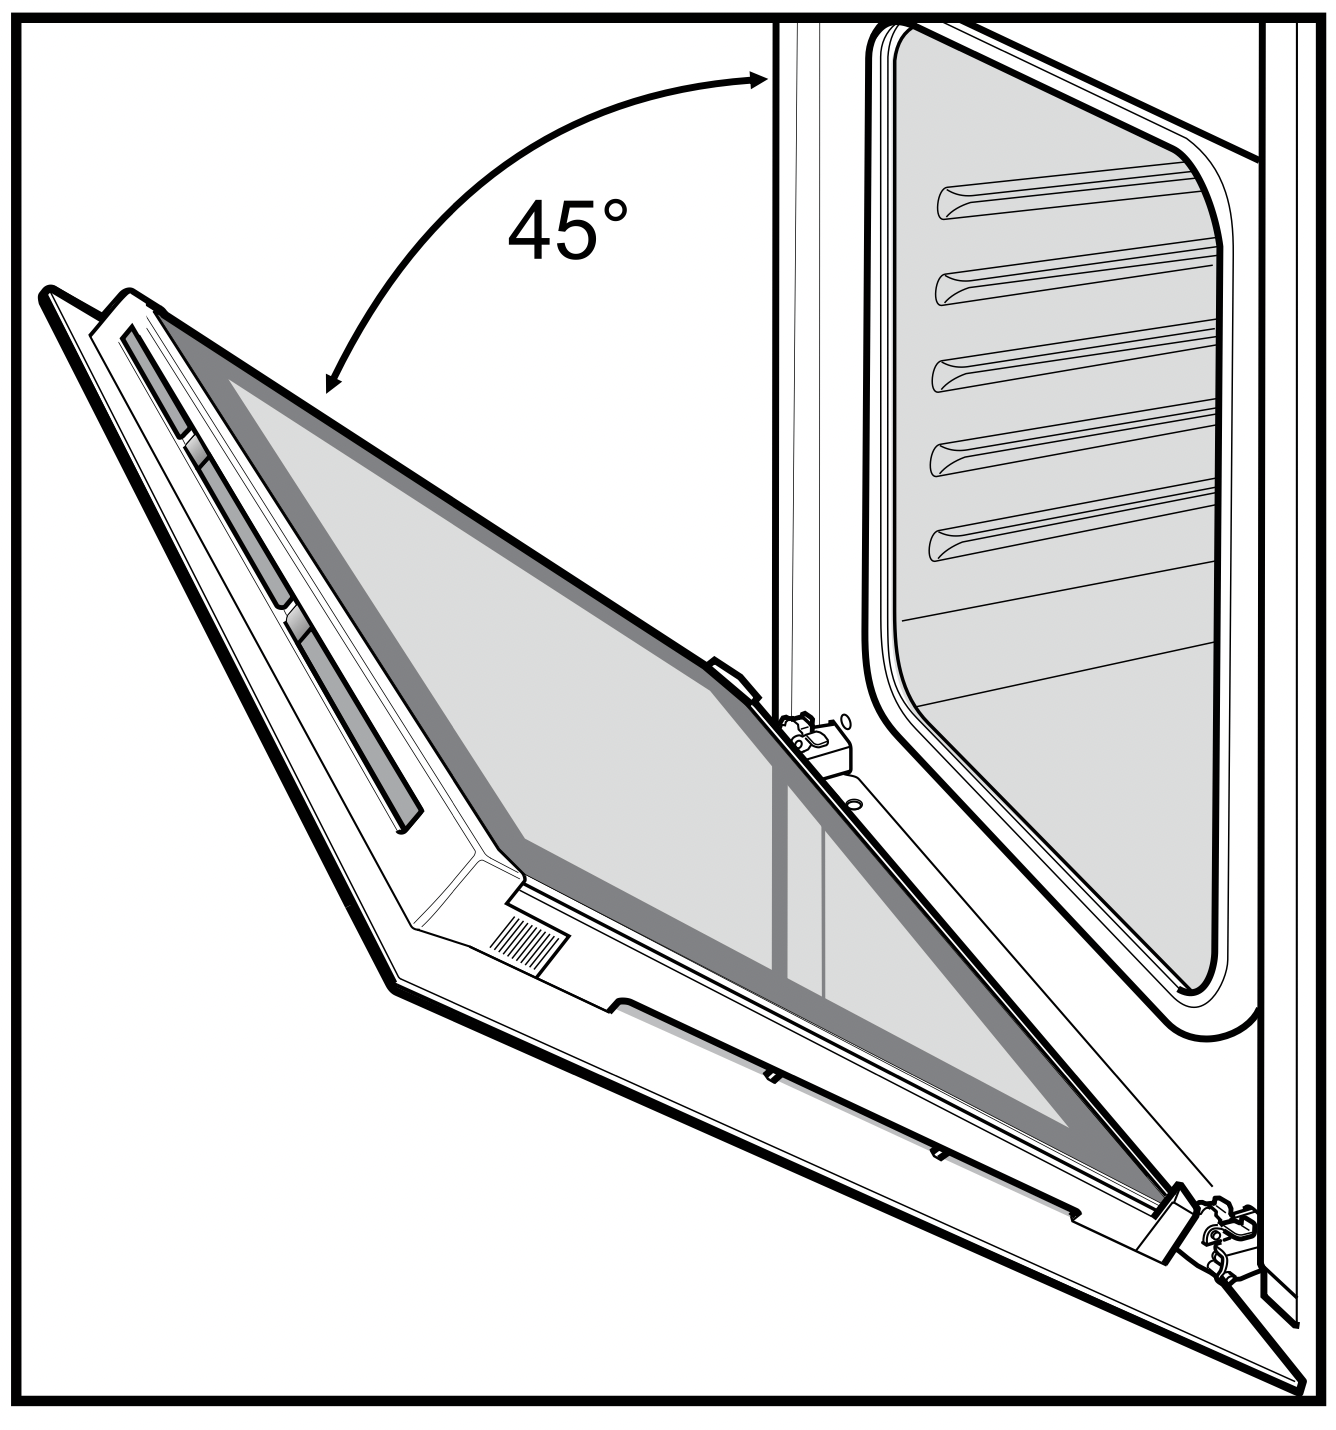
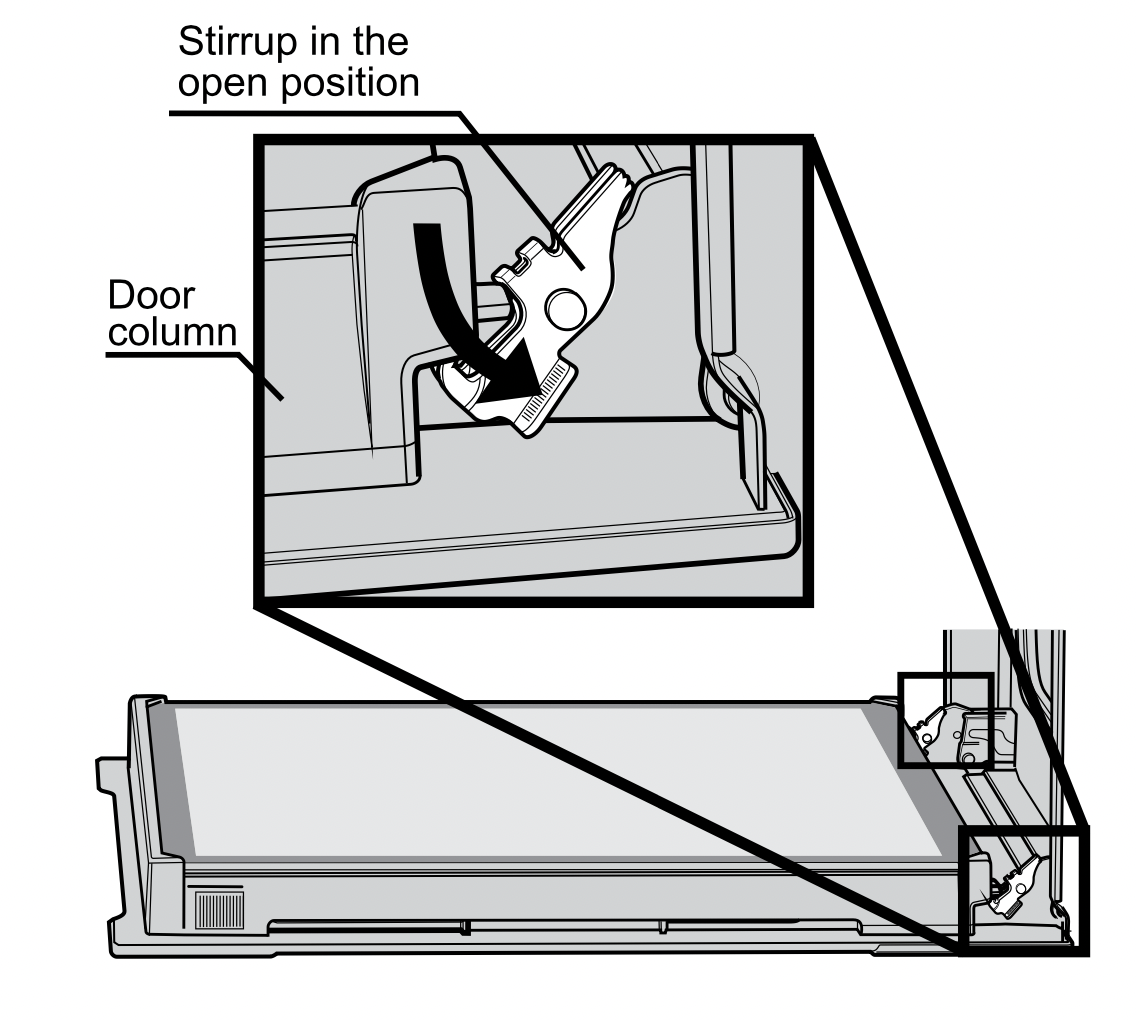
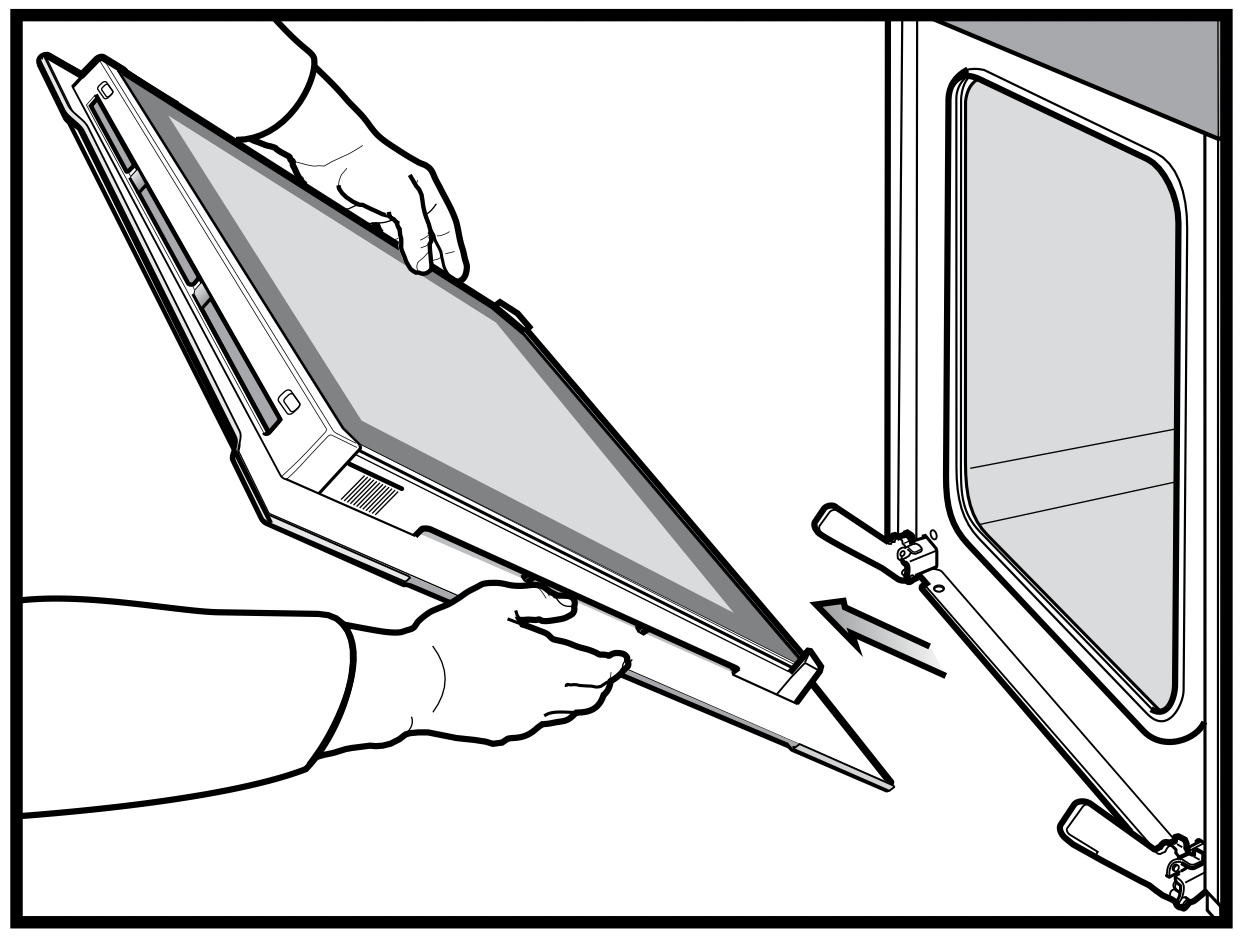
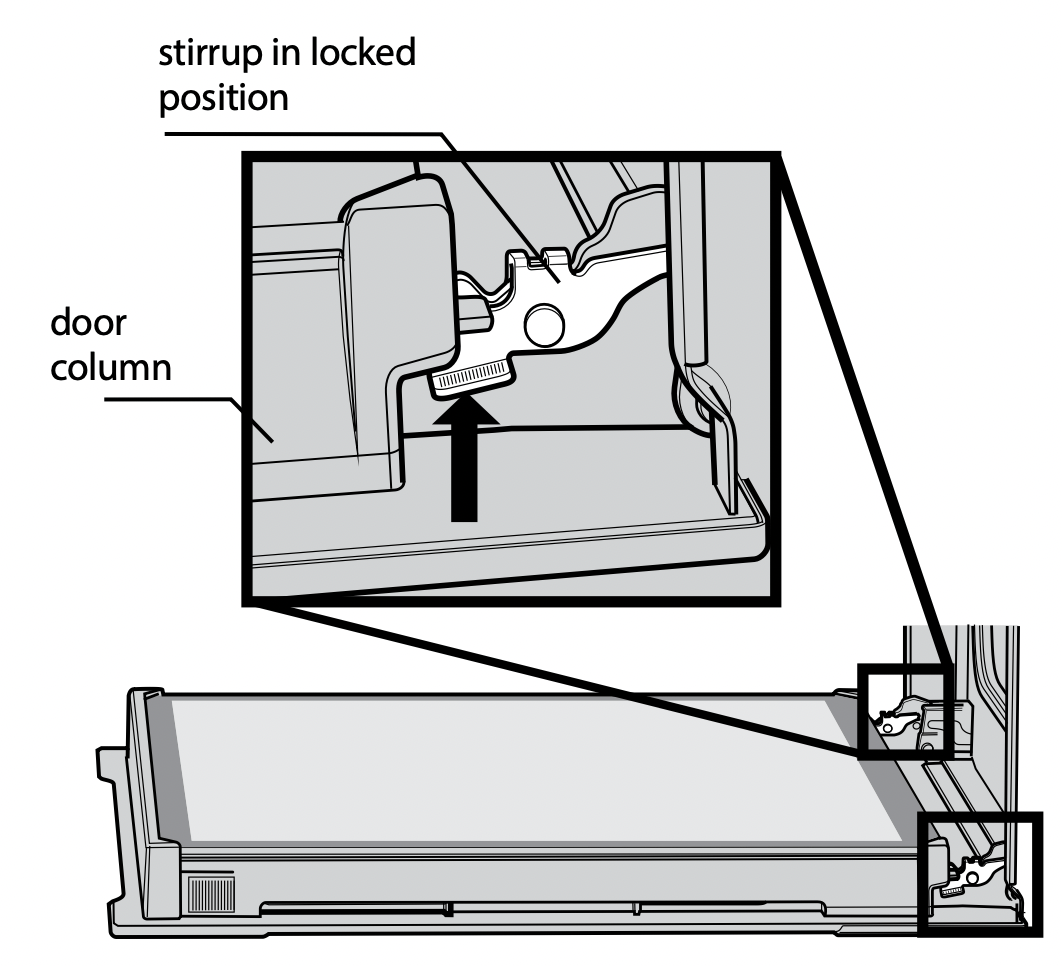
Open the door fully to access the hinges then rotate the ‘stirrups’ (highlighted in the image) on both hinges fully towards the oven.
Slowly close the oven door until it is stops against the ‘stirrups’ (about 45o).
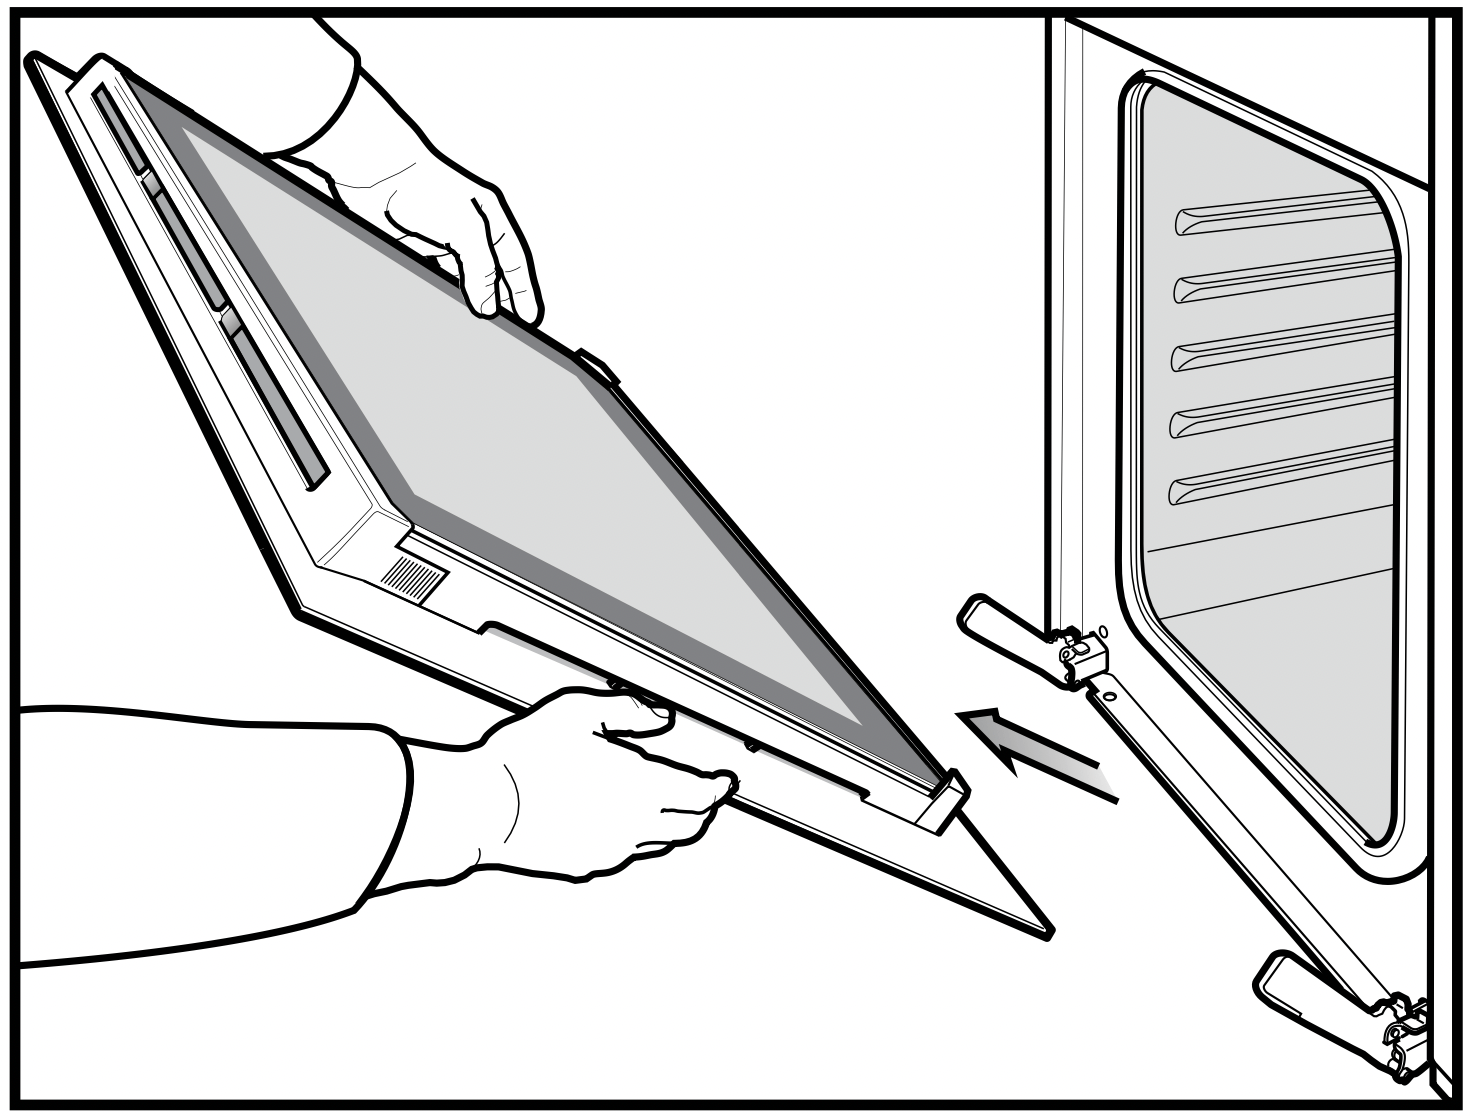
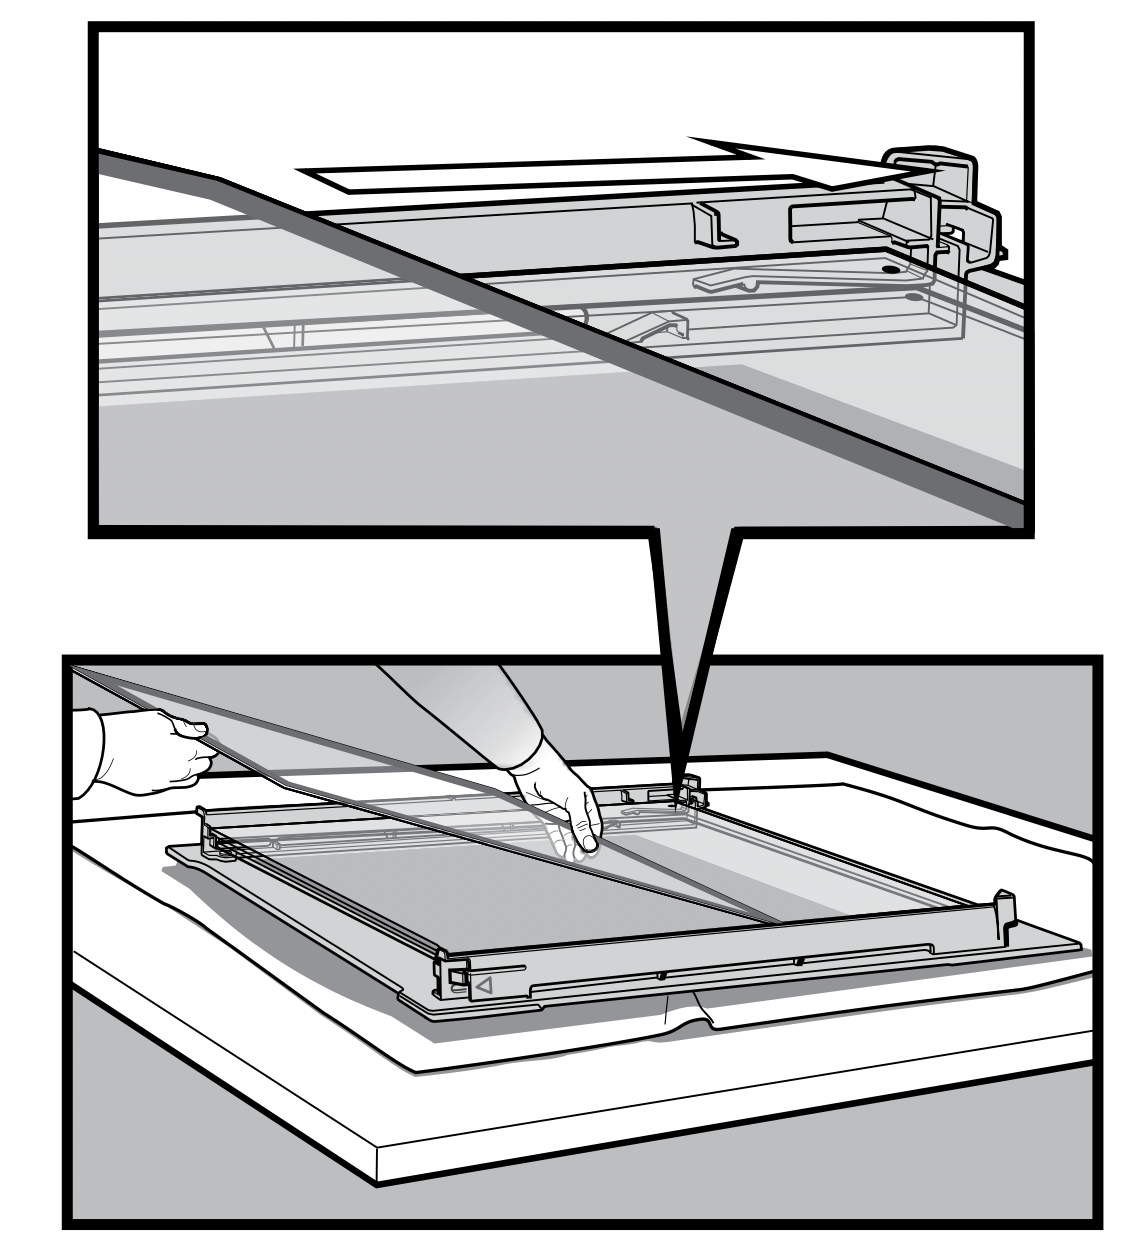
Grasp the oven door with a hand each side of the door and remove it from the oven by pulling it towards you.
Lay the oven door with the outer side facing downwards on something soft and flat (for example a blanket on a kitchen table) to prevent scratches.
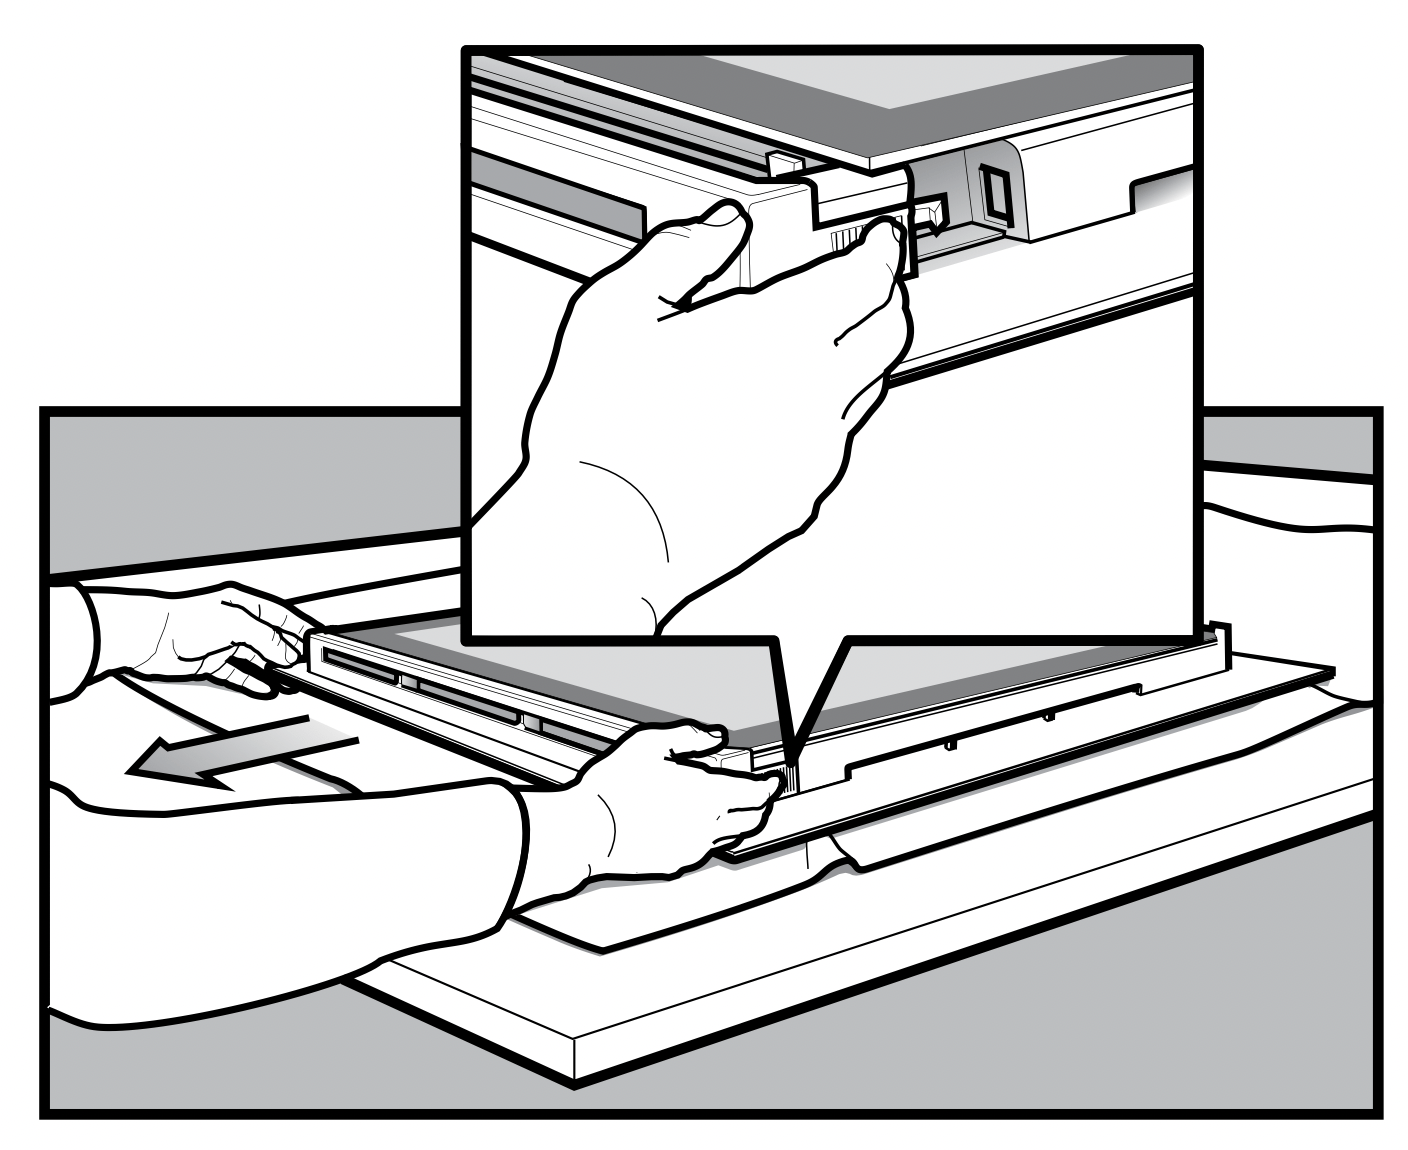
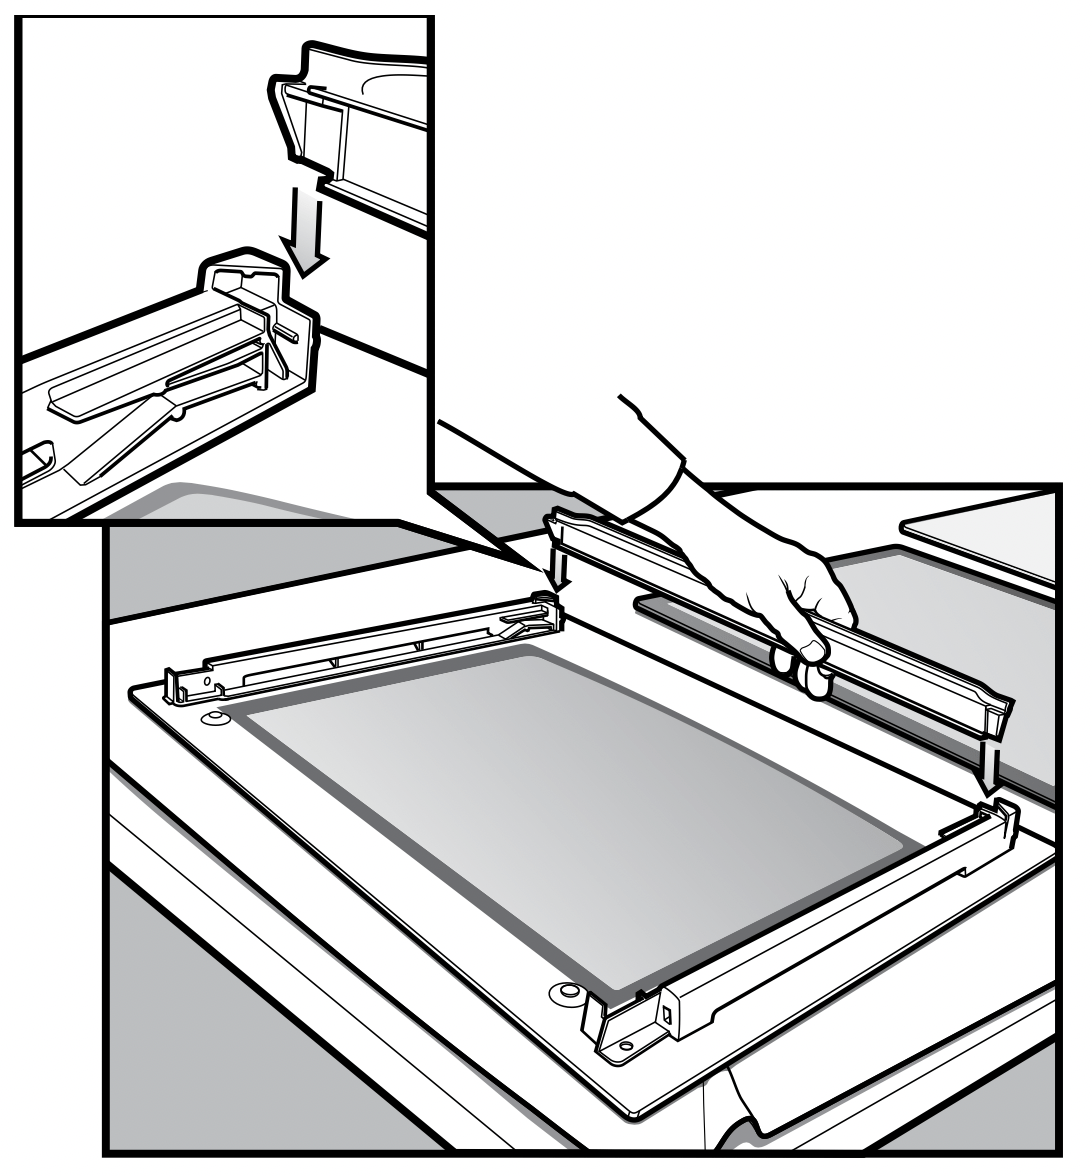
Removing oven door top trim
Take hold of the grid embossed sections of the door trim at each end and press inwards to release the clips. Remove the door trim by pulling it towards you.
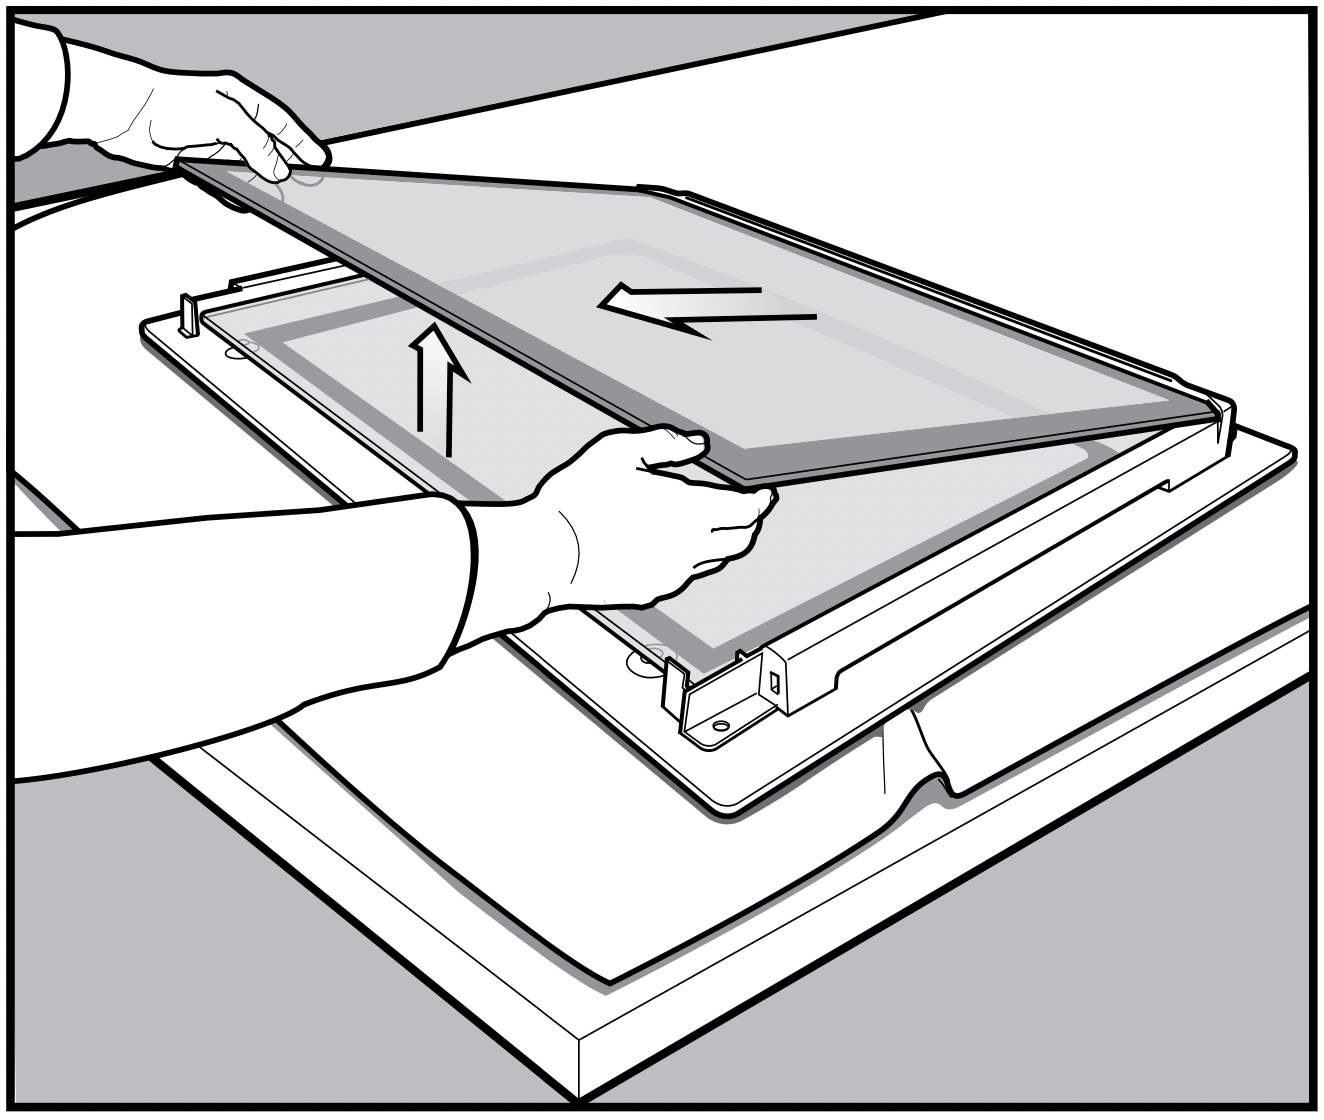
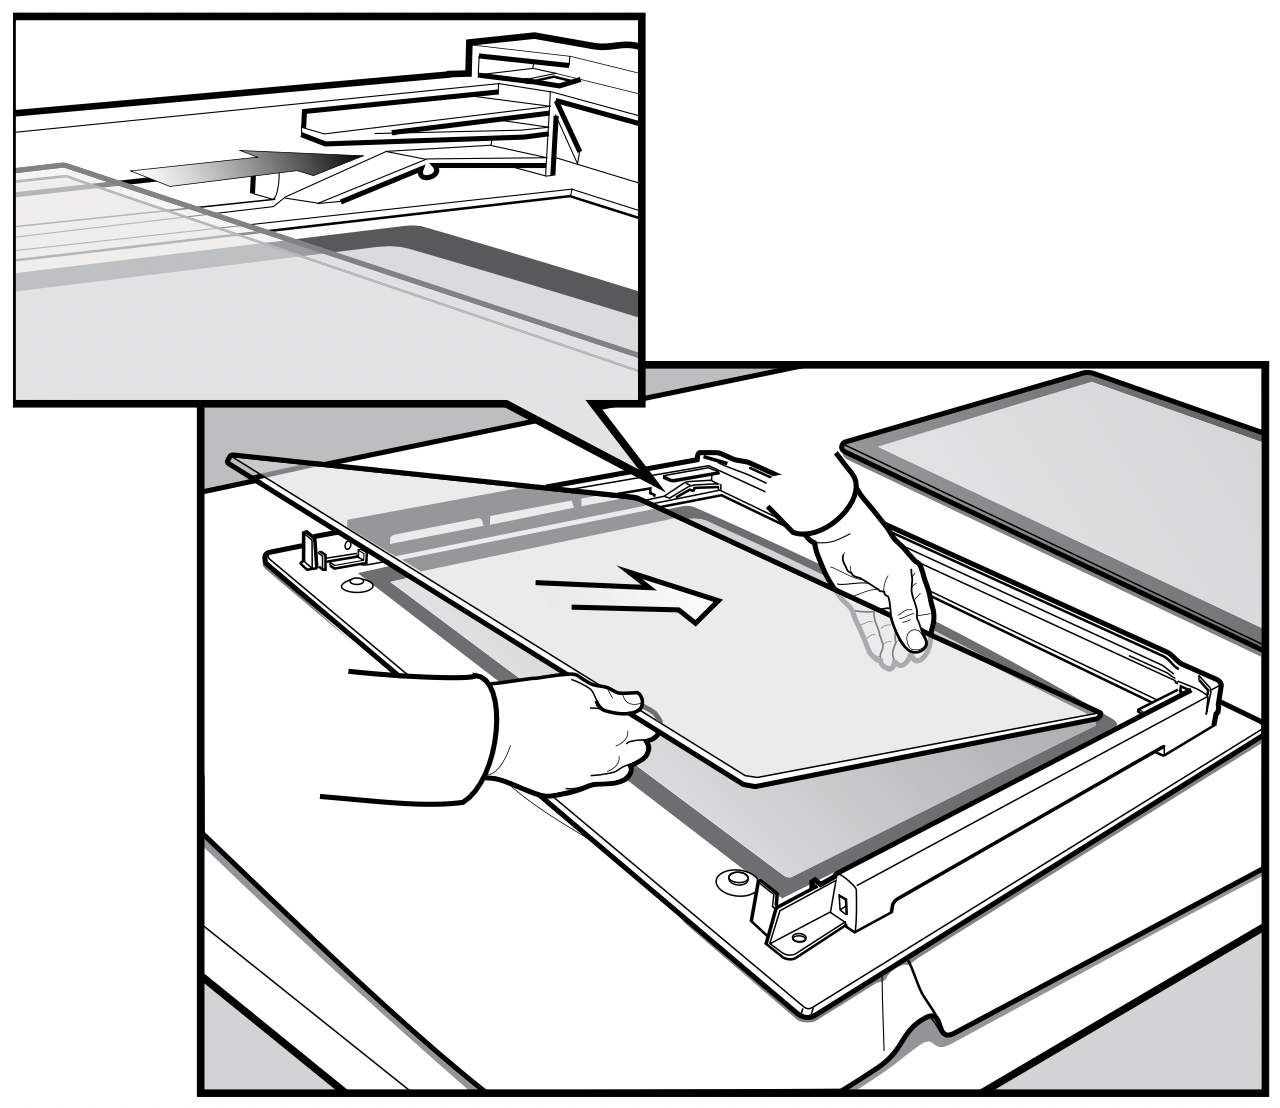
Removing door glass panels (2 layer and 3 layer doors)
WARNING: Rough handling, especially around the edges can cause the glass to break.
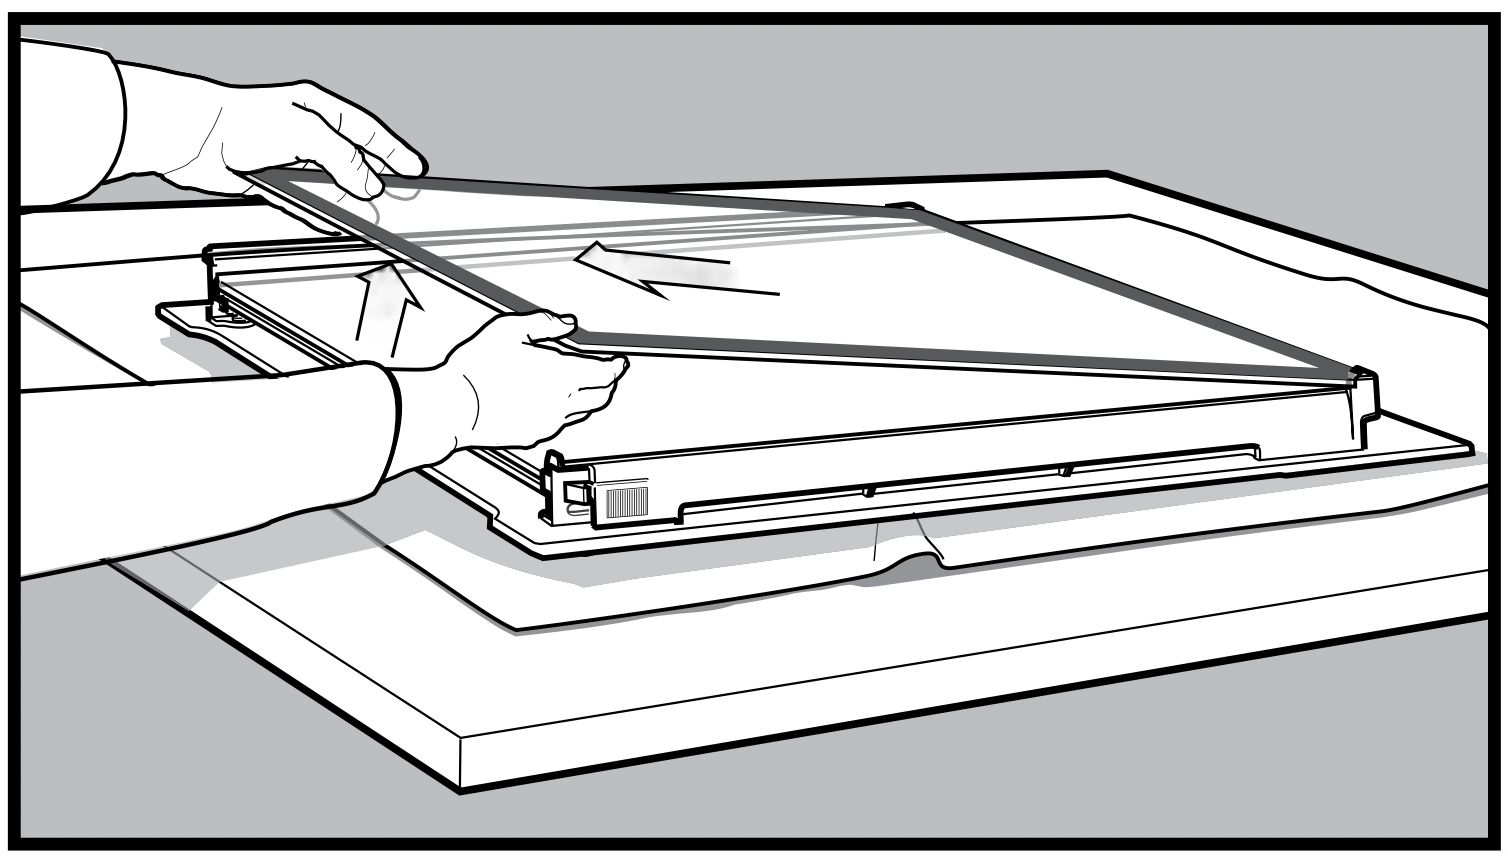
Lift the black bordered glass panel out of the guide.
Repeat this for the smaller clear glass panel (when fitted).
3 layer door shown
Cleaning door glass panels
WARNING: Do not to use harsh abrasives on the glass panes as the reflective surface plays a role in the function of the oven. Do not place glass in dishwasher. Hand wash only with a soft cloth and warm soapy water. When dry, polish with a soft cloth and ensure the glass is dry before reassembly.
Bottom trim (where applicable)
The bottom trim may be removed for cleaning by snapping out and lifting away from the glass.
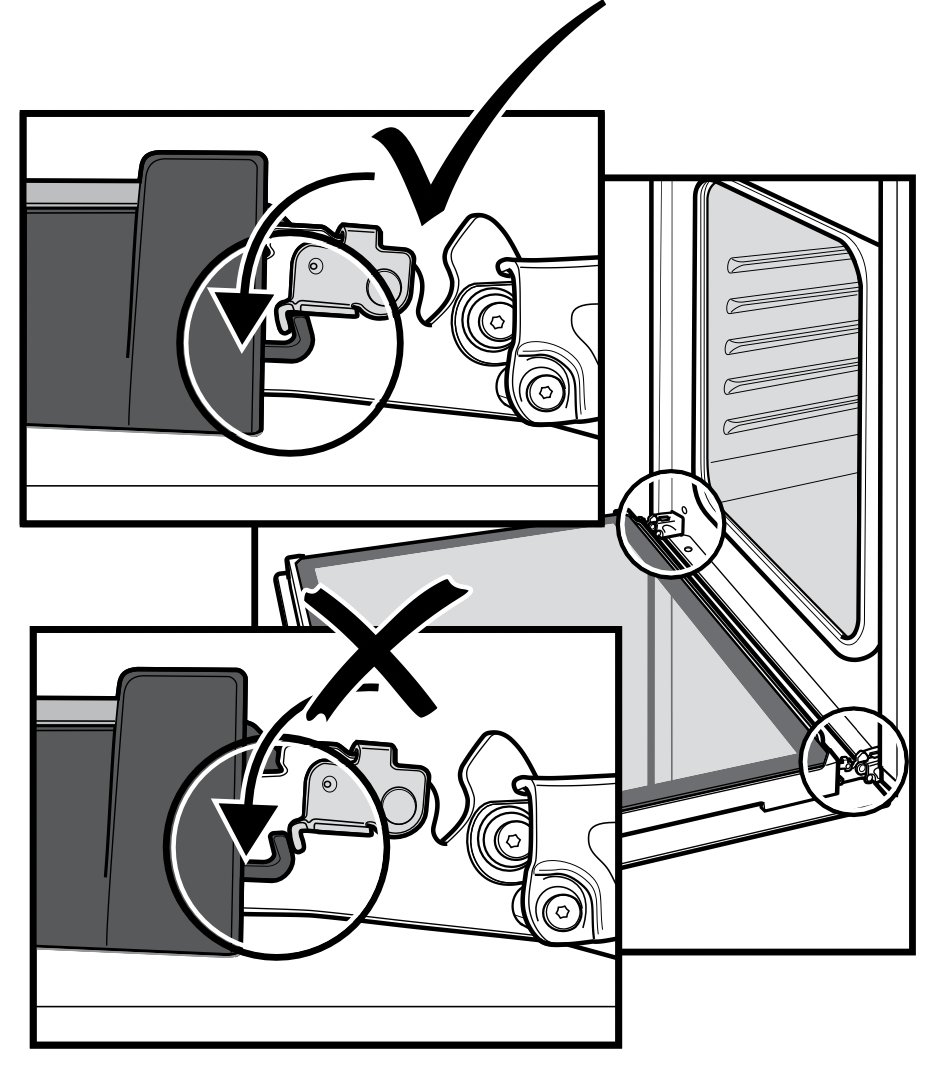
Re-assembling bottom trim
Push down to “snap” each side of bottom trim back into door columns.
Re-assembling door glass panels
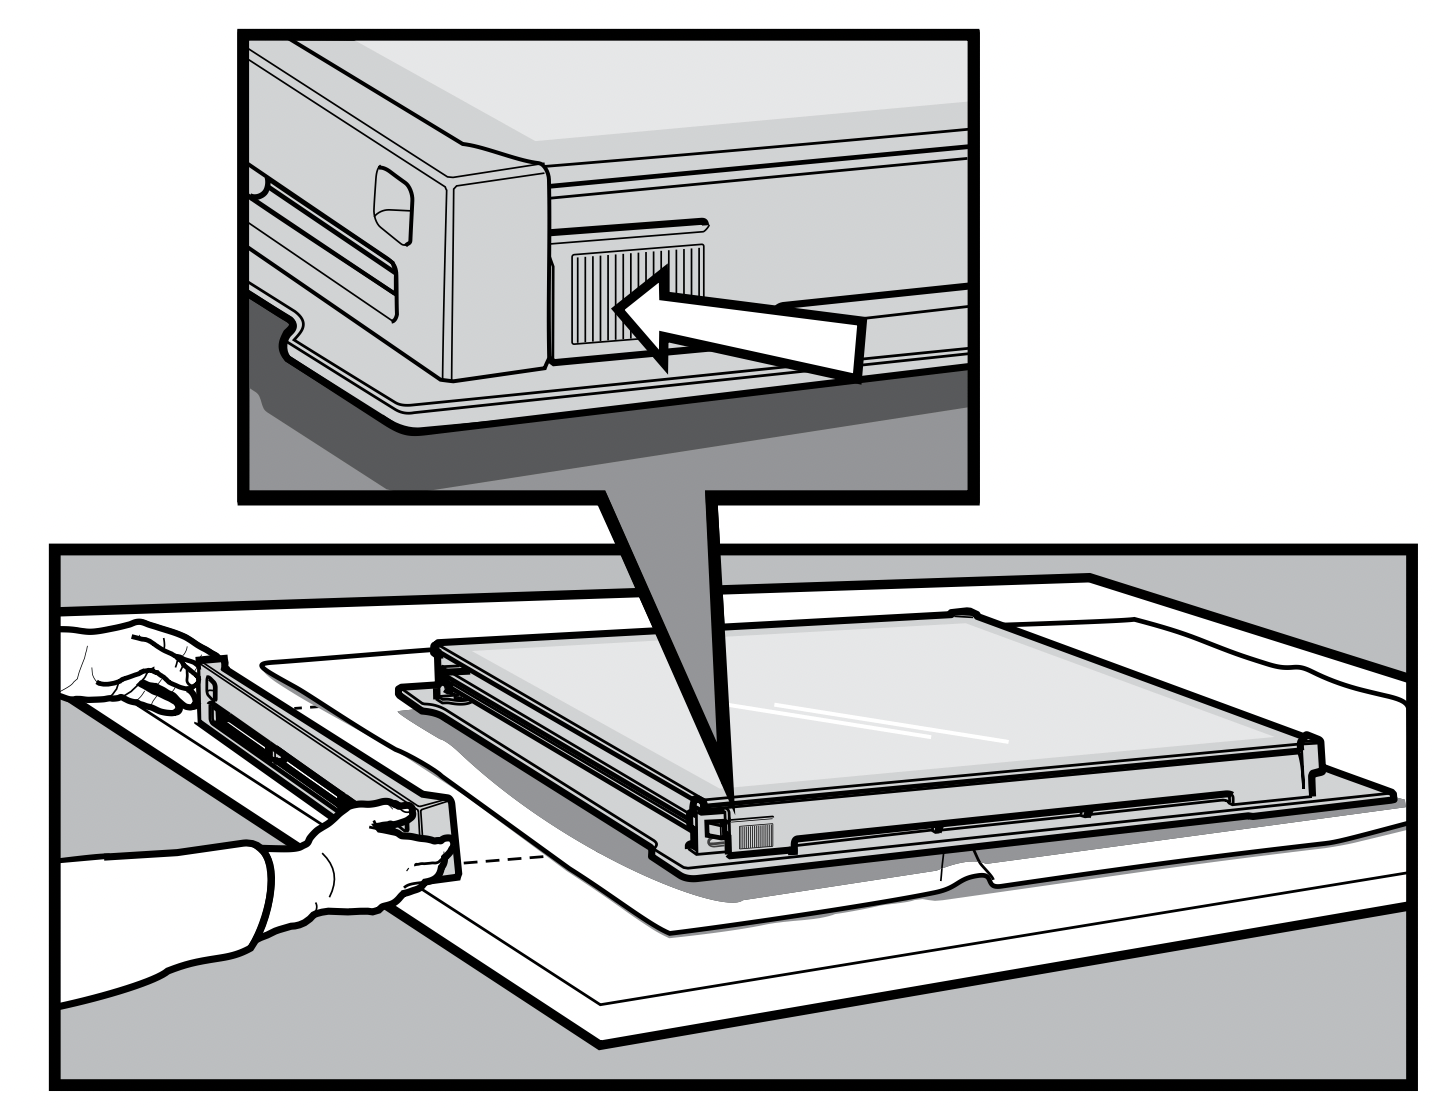
Insert the smaller clear glass panel (when fitted) first from above and at an angle to the profile of the door.
Repeat for the black bordered glass panel ensuring the painted surface is facing to the downside.
Re-assembling top door trim
Hold the top door trim at each side and position it to the inside edge of the glass.
Push the trim down with its top edge over glass panel until the clip snaps in on each side of the trim.
Push the middle of the trim down to ensure it is straight and firm against the glass panel.
Fitting the oven door
Take hold of the oven door with a hand on each side and with the door at an angle of 45º, position the recesses at the bottom of the door onto the hinge arms of the oven. Let the door slide down the hinge arms as far as it will go.
Open the door fully to access the hinges then rotate the ‘stirrups’ (highlighted in the image) on both hinges back to their original positions.
The oven door may now be closed.
Cleaning your oven door (pyrolytic models)
Cleaning the 4 layer door (Pyrolytic models)
WARNING: Do not lift the door by the handle. Rough handling will cause glass to break.
Removing the oven door
Important: Your oven is equipped with a door that can be disassembled in order to clean all the panes of glass. Remove the door before cleaning.
Open the door fully to access the hinges then rotate the ‘stirrups’ (highlighted in the image) on both hinges fully to open position.
Slowly close the oven door until it is stops against the ‘stirrups’ (about 30°).
Hold the oven door with a hand each side and remove it from the oven by pulling it towards you.
Lay the oven door with the outer side facing downwards on something soft and flat (for example a blanket on a kitchen table) to prevent scratches.
Removing oven door top trim
Hold the embossed sections of the door columns at each end and press inwards to release the clips. Remove the upper door trim by pulling it towards you.
Removing the door glass panels
Caution: Rough handling, especially around the edges can cause the glass to break.
Lift the black bordered glass panel out of the guide and place on something soft and flat to prevent scratches.
Repeat this for the smaller clear glass panels.
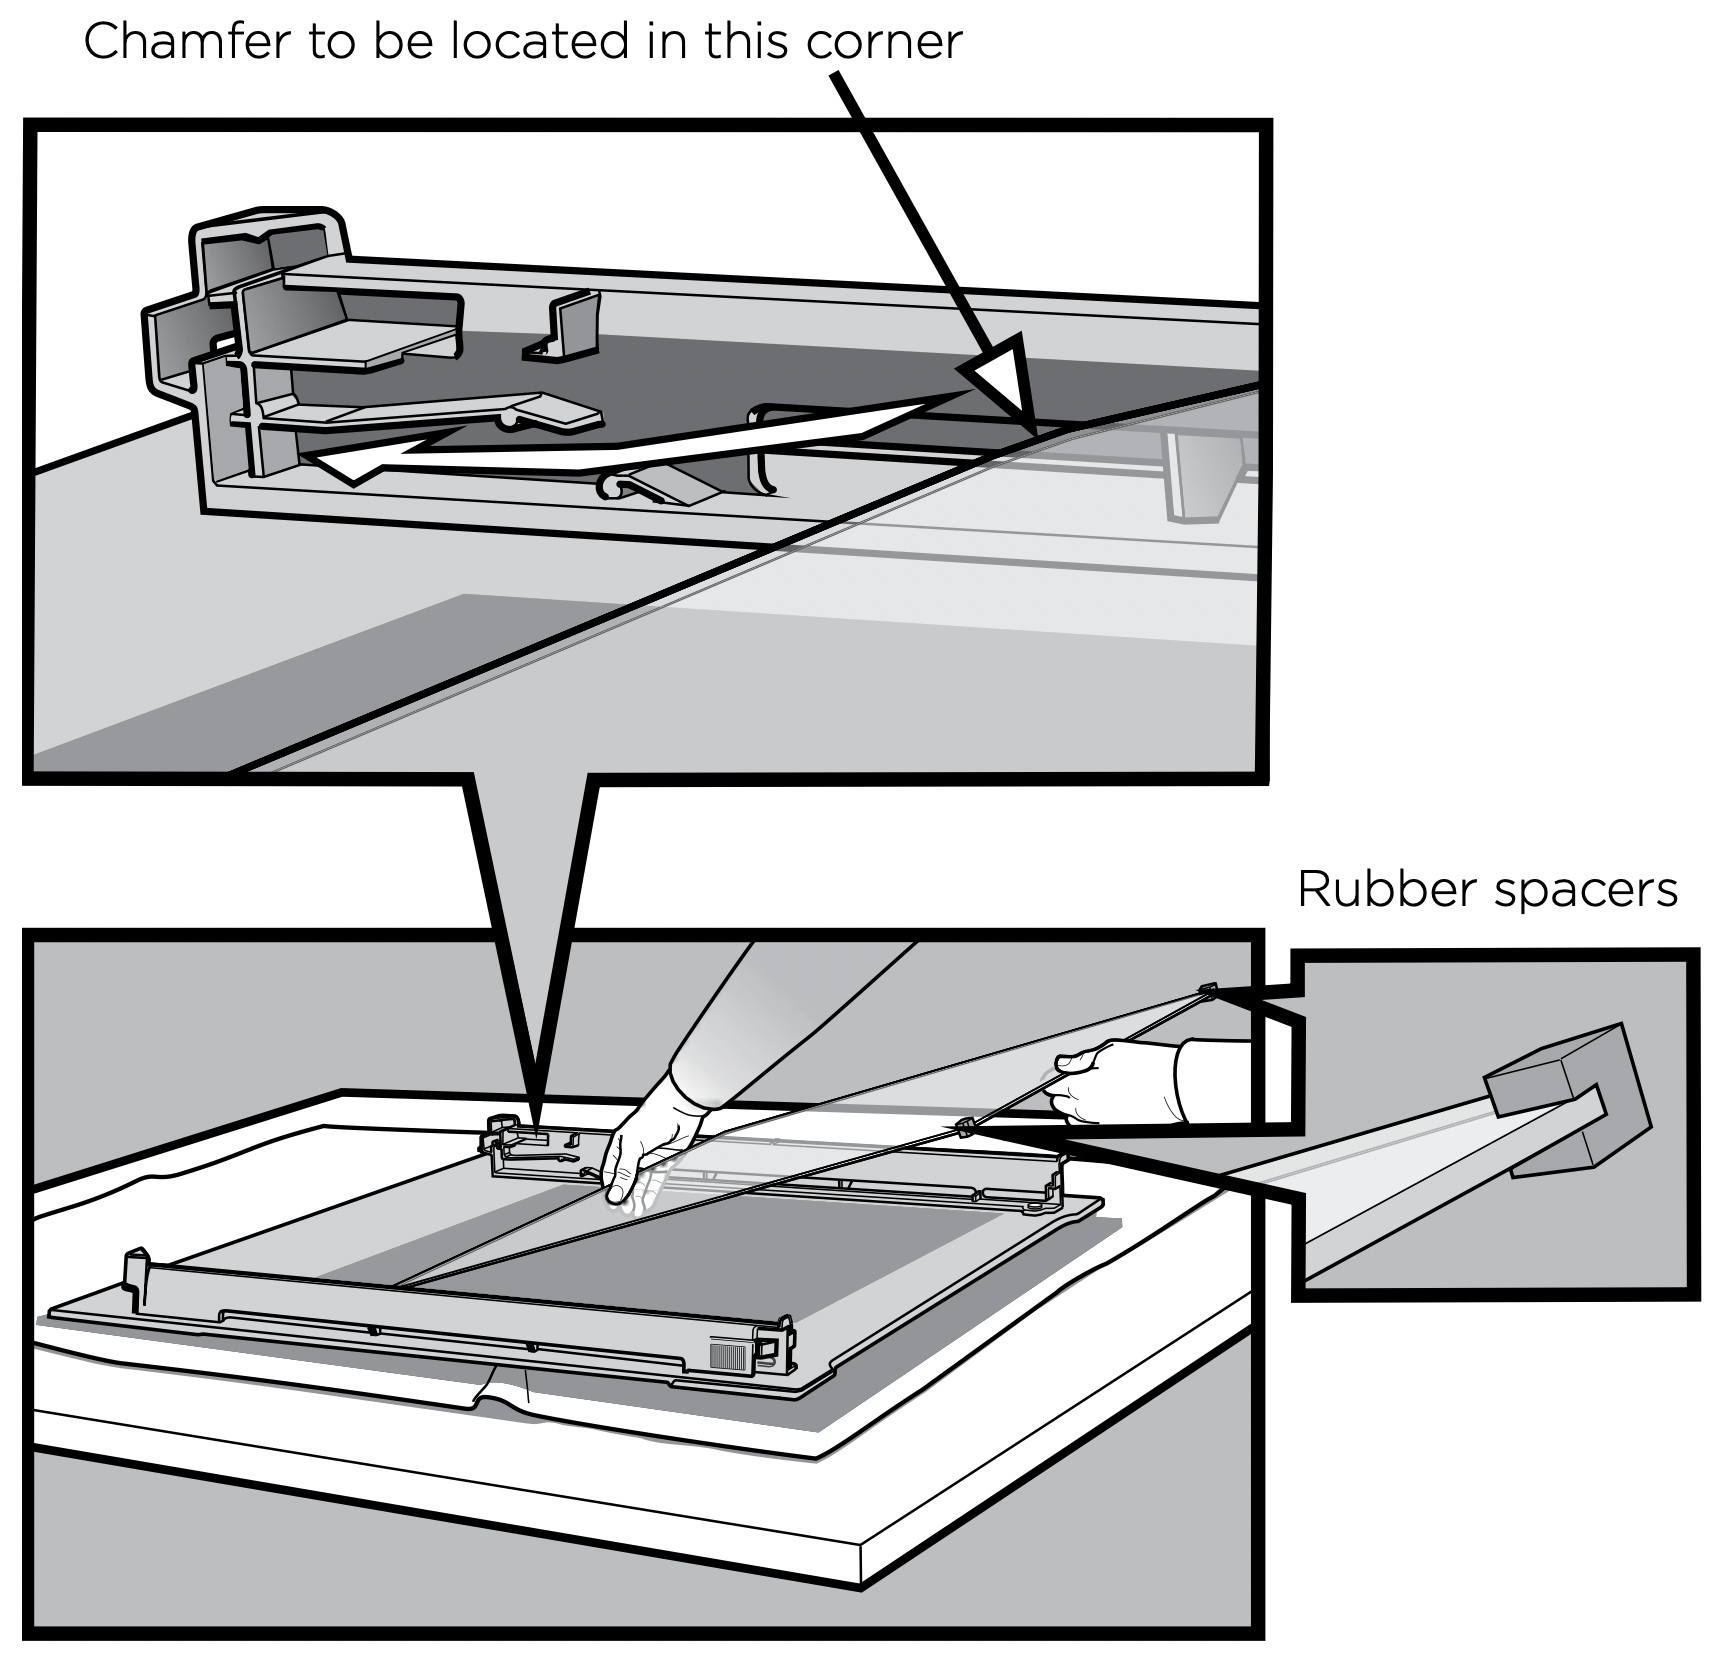
When removing panel 3, ensure that the two rubber spacers are removed before cleaning. Do not misplace them!
Cleaning the door glass panels
WARNING: Do not to use harsh abrasives on the glass panes as the reflective surface plays a role in the function of the oven. Do not place glass in dishwasher. Hand wash only with a soft cloth and warm soapy water. When dry polish with a soft cloth and ensure the glass is dry before reassembly.
Re-assembling the 4 layer oven door
Re-assembling the door glass panels
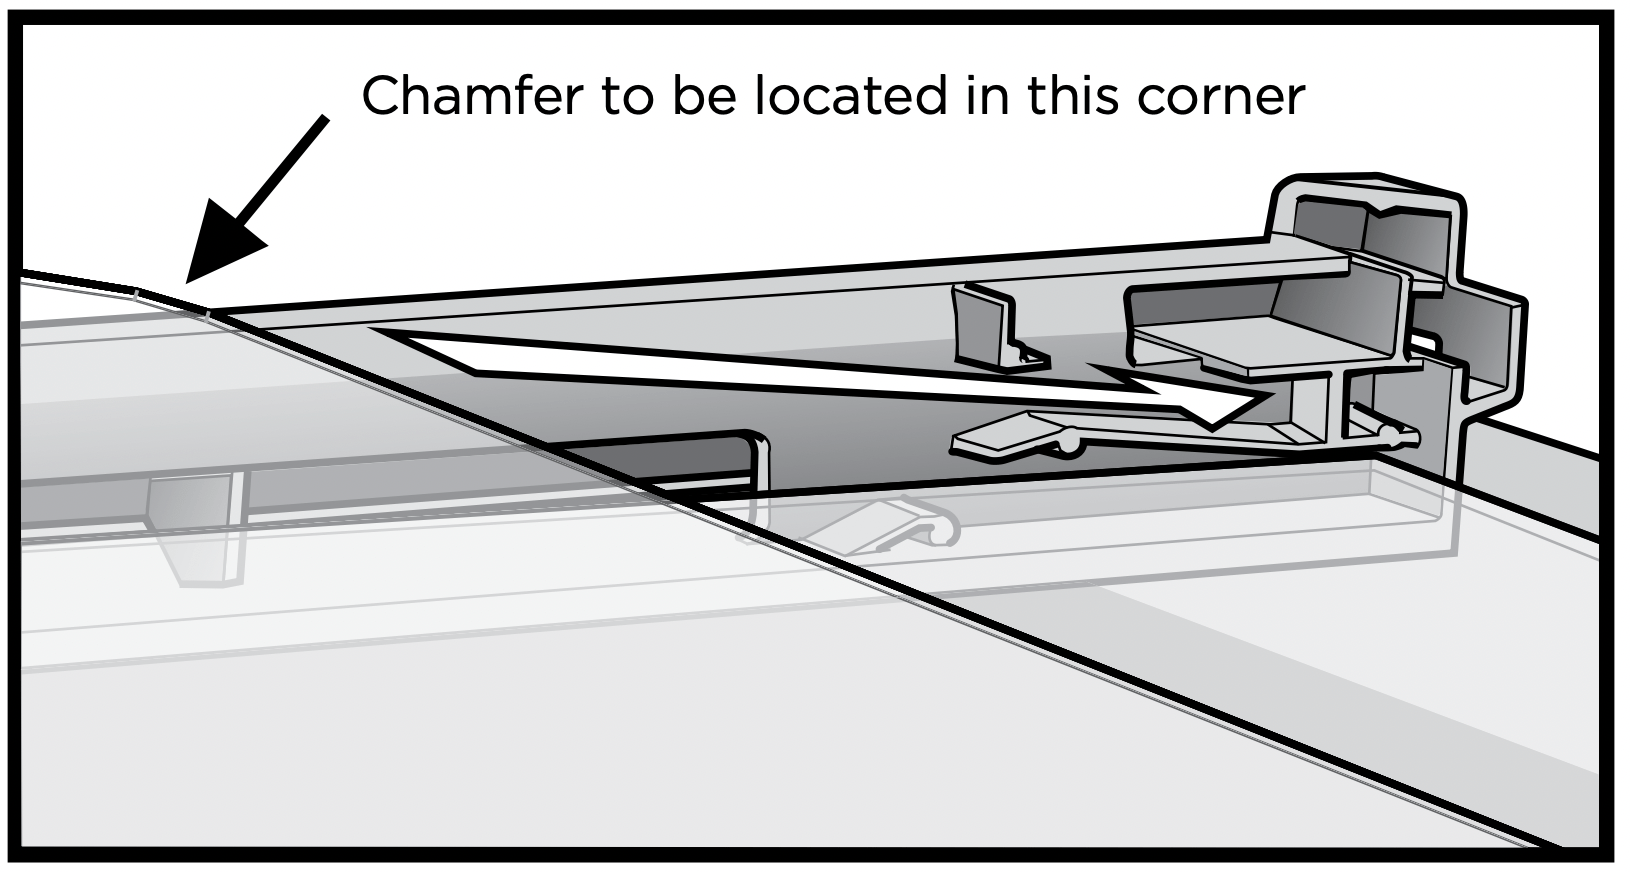
Assemble the rubber spacers to the upper corners of one of the clear glass panels. Position the panel into the lower position of the door, ensuring the chamfered corner of the panel is placed in the correct location as shown in the next diagram.
Insert the remaining smaller clear glass panel into the middle position, ensuring the chamfered corner of the panel is placed in the correct location as shown in the diagram below.
Insert the black bordered glass panel into the upper position, ensuring the painted surface is facing the downside as per the diagram below.
Replacing the top door trim
Hold the top door trim at each side and position it to the inside edge of the glass.
Push the trim down with its top edge over the glass panel until the clip snap in on each side of the trim.
Push the middle of the trim down to ensure it is straight and firm against the glass panel.
Fitting the oven door
Take hold of the oven door with a hand on each side and with the door at an angle of 30˚, position the recesses at the bottom of the door onto the hinge arms of the oven. Let the door slide down the hinge arms as far as it will go.
Open the door fully to access the hinges.
Rotate the ‘stirrups’ (see the image below) until they lock into the hook. The oven door may now be closed.
Pyrolytic Cleaning of the Oven Cavity (Pyrolytic models only)
The oven has a pyrolytic self-cleaning function. It cleans by burning off the spatters and accumulated dirt and grease from the oven liner, at high temperature. This process produces ash which can then be wiped out of the oven cavity. It is recommended you clean your oven regularly to keep the oven in its best condition.
Light clean - this is an energy saving cycle that can be used on a regular basis if the oven is lightly soiled. Possibly after every 2nd or 3rd roast.
Normal clean - use this as the regular cycle about once every 2-3 months.
Before carrying out the Pyrolytic cleaning function
WARNING
Clean large deposits, spills or grease from the oven cavity.
Please keep small children at a safe distance. The appliance becomes very hot.
Never clean non-stick baking trays and tins in the oven during the pyrolytic cycle. High temperatures damage the non-stick coating and poisonous gas is released.
Pyrolitic cleaning can release fumes that are not harmful to humans, including infants or persons with medical conditions, however you are strongly advised to provide good ventilation during and after each pyrolytic cleaning process.
Unlike humans, some birds and reptiles can be extremely sensitive to the potential fumes emitted during the pyrolytic cleaning process. It is strongly advised to remove any pets (especially birds) from the vicinity of the appliance during and after each pyrolytic cleaning process.
Small pets can also be highly sensitive to the localized temperature changes in the vicinity of all pyrolytic ovens when the pyrolytic self cleaning program is in operation.
Caution
All accessories must be removed from the oven, including shelves, trays and side racks.
During pyrolytic cleaning the air outlet vent above the door must be kept clear of any obstruction (e.g. tea towels).
Do not use your oven to clean miscellaneous items (e.g. cookware).
To prevent damage, do not use acids, sprays or similar cleaning agents.
Important: During the pyrolytic cleaning function, it is advisable not to use a cooktop if it is fitted above the oven. This could cause overheating and damage to both appliances. The cooling fan will operate at an increased speed for Pyrolytic cleaning and will continue to run until the oven has cooled down. It is recommended to use the Pyro clean function regularly to keep the oven in its best condition.
Starting the Pyrolytic cleaning function
Turn the oven “Function” selector clockwise to select the “Pyro” function.
Use the + or – buttons on the electronic clock to select between a pyrolytic cleaning time of 1:30 hours (light clean) or 2:30 hours (normal clean) for the appropriate level of cleaning required.
After 5 seconds from the last change, the oven will begin heating and the “Remaining time” will be displayed.
The pyrolytic cleaning function can be stopped at any time during the cycle by turning the function selector counter-clockwise to the “OFF” position.
During Pyrolytic cleaning
When the temperature in the oven approaches 300C the door will automatically lock and a padlock symbol will appear on the display.
After Pyrolytic cleaning
The door will only unlock when the oven has cooled to a safe temperature. Turning the function off will not unlock the door.
After cool-down, wipe the ash out of the oven with a soft damp cloth and warm water. To restore the enamel shine to more difficult areas, use a damp cloth with vinegar and detergent.
Note: The “Remaining time” does not include cool-down time for the oven.
Solving Problems
Faults
If there is a problem with the oven and/or grill, please:
Check the points listed below before calling for service. It may be possible to avoid a call by fixing the problem yourself – and so continue cooking.
For cooking problems refer to “Dealing with cooking problems” section.
NOTE: We may charge for service even in the warranty period if your problem is due to the causes listed below.
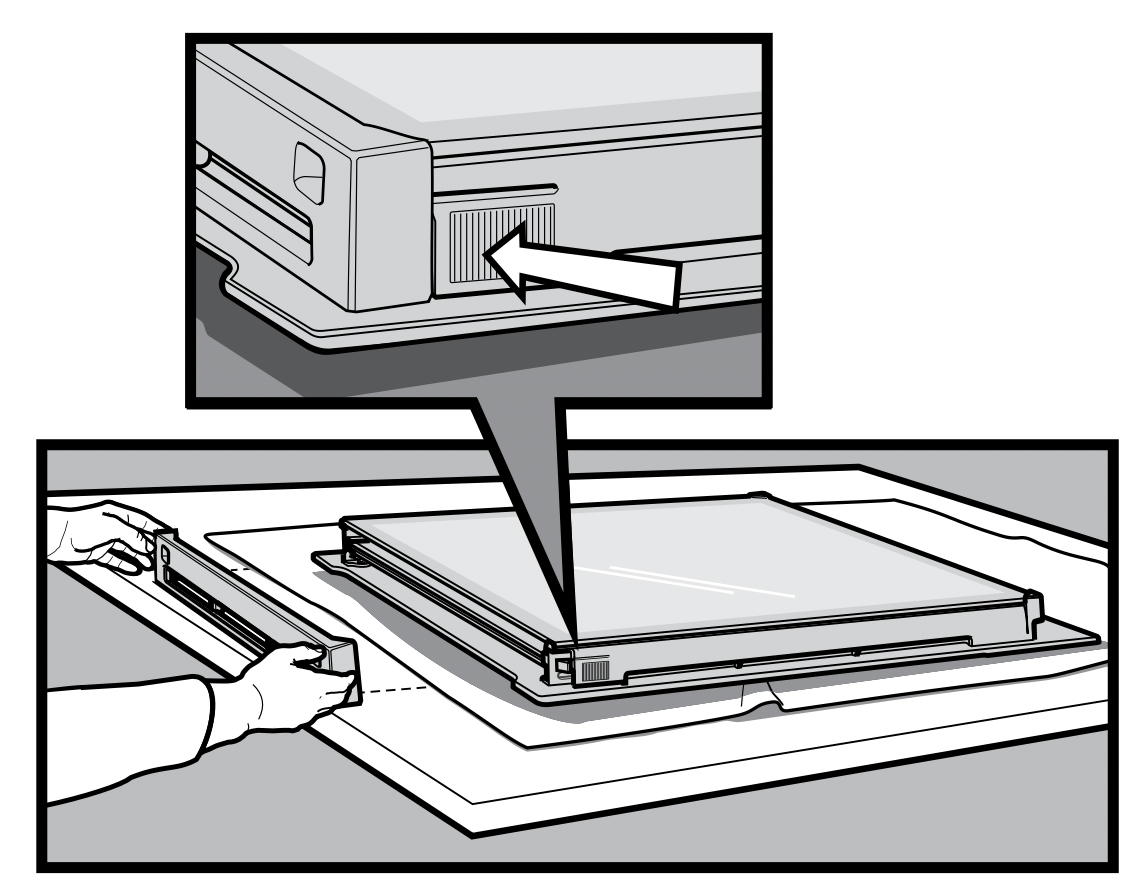
Data Plate
When you need information, service or replacement parts please:
Tell us the model number & serial number shown on the data plate.
The data plate is visible when the oven or grill door is open.
Problem
Possible Cause
Oven or grill not working
Time of day not set.
Power not turned on.
Controls are incorrectly set.
Household fuse has blown or power supply is off.
Child-proof oven lock activated. (Refer to operating instructions)
NOTE: If the household fuse continues to blow, call the Electrolux Customer Care Centre.
Oven light not working
Lamp blown or loose in socket.
Household fuse has blown.
NOTE: If the household fuse continues to blow, call the Electrolux Customer Care Centre.
Oven not heating enough
Foil or trays on bottom of oven.
Oven not working
Household fuse has blown.
NOTE: If the household fuse continues to blow, call the Electrolux Customer Care Centre.
Timer flashing on display
Power failure or interruption.
NOTE: Reset time of day and any cooking functions you were using. (Refer to clock operating instructions)
Unit smoking when first used
Protective oils being removed. This will eventually stop after some time.
Condensation building up
Reduce amount of water used in cooking. (Some condensation is normal)
Door cannot be replaced after removal
Stirrup not engaged properly.
Shelves tight in oven
Shelf not in correct orientation.
Functions and temperature appear on display but oven does not work
Oven is in “Demo” mode. Refer to “Operating the programmable clock” instructions.
When the door is open the fan stops (pyrolytic models only)
This is a feature of the oven to help reduce the blast of air when opening the door.
When a non fan mode is selected the fan starts
Most oven modes have a fast heat up function that uses the fan, oven fan element and grill elements. Auto fast heat up can be over ridden by selecting a temperature of 120°C or less, allowing the function to start, then increasing the temperature to the desired level.
The light stays on when the door is closed
An oven function has been selected.
The light has been turned on at the control panel.
The light does not turn on when the door is opened
We do have an installation company which covers certain areas nationally for us, this information about installation is available on the website once you place your postcode and suburb into the selector on the main page. So on the main page at the top " Your delivery location is:" place your postcode here, select your suburb. Once you have done this if you are located in their install area there will be a price for installation on the right hand side of the under " Choose your accessories and installation options." All their fees are Like for Like installation, which includes delivery, disconnection of the old oven, connection of the new oven and tested, removal of the old item and all packaging included. Their price does not include any infill panels if there is any gaps.
Always make sure that the oven is electrically isolated before cleaning. This can be done via the functional switch located nearby. Do not use steam cleaners. Do not line the bottom of the oven or grill with foil or cookware as trapped heat will crack and craze the floor of the oven. Always keep your appliance clean. Ensure that fats and oils do not accumulate around elements, burners or fans. Always keep the oven dish, bake trays and grill dish insert clean, as any fat deposits may catch fire. Always wrap your meats in foil or an oven roasting bag to minimise cleaning. Any polyunsaturated fats can leave a varnish-like residue which is very difficult to remove.
 ‘indicator’ will flash.
 - you can set a countdown time that will beep when the set time has elapsed.
 - you can set cooking duration. A timer will count down the preset cooking time, beep when the time has elapsed and turn the appliance off.
 - instead of setting a cooking duration you can set a cooking finish time. When the finish time has been reached the timer will beep and turn the appliance off.