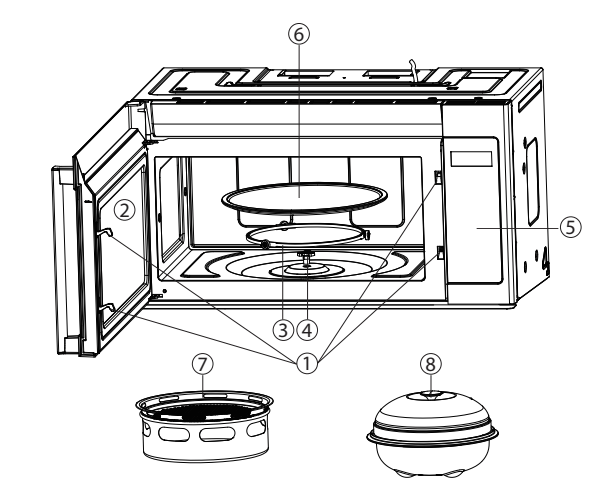
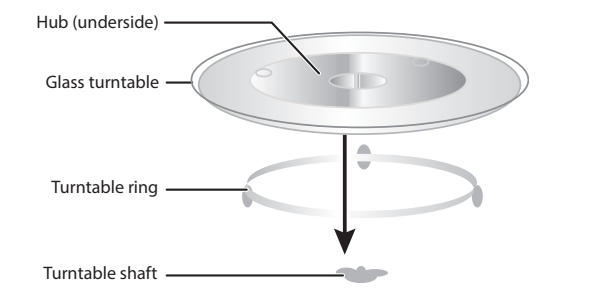
Place the turntable ring in the round depression in the bottom of the microwave oven so that it turns freely.
Place the glass turntable (flat side up) on the turntable ring so that the hub engages the turntable shaft in the bottom of the oven. The glass turntable should not turn freely when it is correctly installed.
Setting the Clock
This is a 12 or 24 hour clock. In standby mode, press CLOCK button once to choose 12 hour clock and if you want to choose 24 hour clock , press CLOCK button again.
Example 1: suppose you want to set the clock to 5:00 p.m. on 12 hour clock.
In standby mode, press CLOCK button once.
Press number pads 5,0,0, the display will show "5:00"
Press CLOCK button once. The display will show "SELECT 1-AM 2-PM" .
Press number pad “2”. “PM 5:00” will display.
Example 2: suppose you want to set the clock to 5:00 p.m. on 24 hour clock.
In standby mode, press CLOCK button twice.
Press number pads 1,7,0,0, the display will show "17:00"
Press CLOCK button to confirm.
Setting the Timer
In standby mode, press TIMER button once.
Use the number buttons to enter time.
Press START button
Express Cooking
In standby mode, press a number pad (1, 2, 3, 4, 5 or 6) once, the system starts the cooking program directly with the corresponding time (respectively 1 minute, 2 minutes, 3 minutes, 4 minutes, 5 minutes and 6 minutes). The microwave oven will start to cook at full power level.
Microwave Cooking
In standby mode, press MICRO button once.
Use the number pads to enter cooking time. The longest time is 99 minutes and 99 seconds
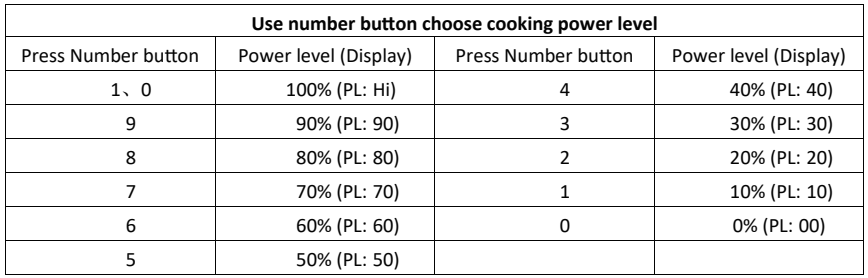
Press MICRO button once again, and then use the number pads to enter power level.
Press START button to confirm.
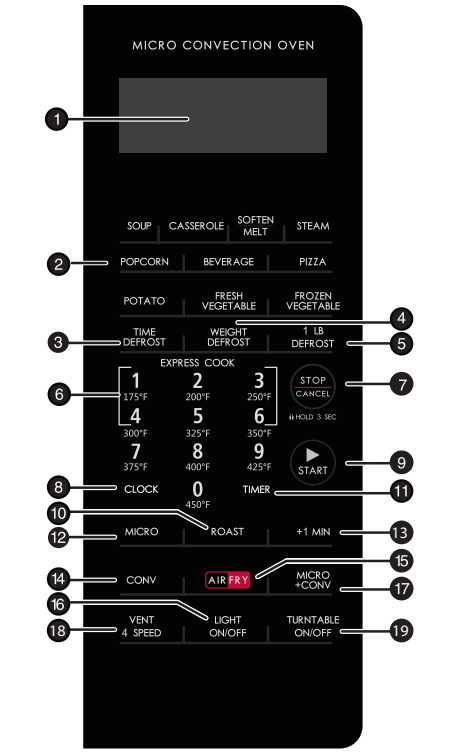
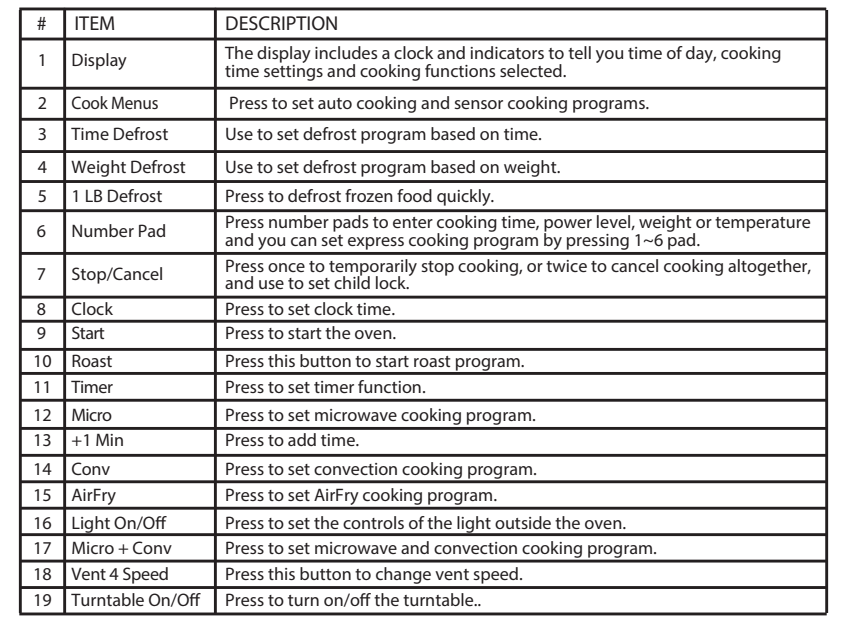
OPERATION INSTRUCTION
Roast Cook
In standby mode, press ROAST button repeatedly to choose the temperature.(450F→425F→400F →375F).
Use the number pads to enter cooking time. The longest time is 99 minutes and 99 seconds
Press START button to confirm.
Sensor Cook
The sensor features detect the increasing humidity released during cooking. The oven automatically adjusts the cooking time to various types and amounts of food.
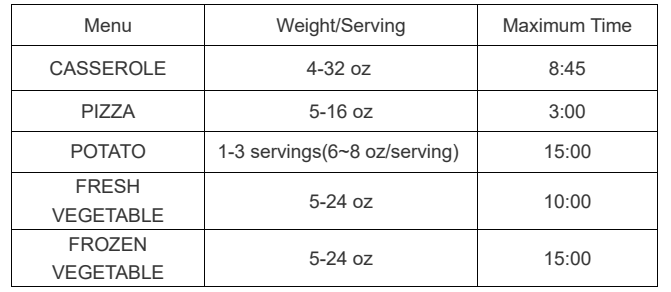
For Casserole, Pizza, Potato, Fresh Vegetable or Frozen Vegetable:
In standby mode, press CASSEROLE, PIZZA, POTATO, FRESH VEGETABLE or FROZEN VEGETABLE button once.
Press START button to start.
AirFry Cook
In standby mode, press AIR FRY button once, the display shows “ ENTER FOOD TYPE CODE 1 TO 7”.
Press number pad to choose food type, the display will show the food, and make you to choose the weight
After choosing the weight, the time will be showed, and press START button to start cooking, the display will show “PREHEAT”.
When meet the temperature, “PREHEAT DONE, PLACE FOOD IN OVEN” will display and beeps will sound to remind you place the food.
Open the door and place food in oven, “CLOSE THE DOOR AND PRESS START” will display.
Close the door and press START button to start cooking
Convection
With Preheat
In standby mode, press CONV button once, the display will show “ SELECT TEMPERATURE”.
Press number pad to choose the temperature, the display will show “PRESS START OR PRESS CONV”
Press START button to start preheat, the display will show “PREHEAT”.
When meet the temperature, “PREHEAT DONE, PLACE FOOD IN OVEN” will display and beeps will sound to remind you place the food.
Open the door and place food in oven, “CLOSE THE DOOR AND ENTER COOK TIME”.
Use the number pad to enter the cook time, press START button to start cooking.
Without Preheat
In standby mode, press CONV button once, the display will show “ SELECT TEMPERATURE”.
Press number pad to choose the temperature, the display will show “PRESS START OR PRESS CONV”
Press CONV button to confirm the temperature, and use the number pad to enter the cooking time.
Press START button to start cooking.
Microwave+Convection
In standby mode, press MICRO+CONV button repeatedly to choose the temperature. (”400F”→”350F”→”300F”→”250F”).
Use the number pad to enter the cooking time.
Press START button to start cooking.
Steam Cook
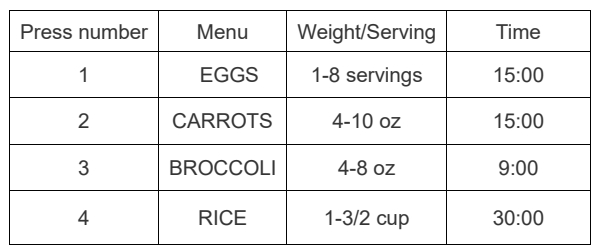
For Egg, Carrots, Broccoli or Rice:
In standby mode, press the STEAM button once, the display will shows “USE STEAM KIT” first, and shows “PRESS 1--EGGS 2--CARROTS 3--BROCCOLI 4--RICE”.
Press number pad “1,2,3,4” to choose food type, and the display will shows “ADD WATER TO STEAM KIT” , then shows the cooking time.
Press START button to start cooking.
Weight Defrost
The oven allows you to defrost food based on the weight entered by user. The defrosting time and power level are automatically set once the food weight is entered. The frozen food weight ranges is 1-96 oz.
In standby mode, press WEIGHT DEFROST button once. The display will shows “ENTER WEIGHT OZ”.
Press number button to enter food weight.
Press START button to confirm.
Time Defrost
Press TIME DEFROST. The display will shows “ENTER DEFROST TIME”.
Press number pad to enter the time. The time range must be between 00:01 and 99:99.
Press START to start defrosting. The remaining cooking time is displayed.
1LB Defrost
This feature allows you to defrost food quickly.
In standby mode, press 1LB DEFROST button once.
Press START button to confirm.
Child Lock
The child lock prevents unsupervised operation by children and this program only works in standby mode
To set: In standby mode, press and hold LOCK more than 3 seconds, then a beep will sound, "LOCK ON" appears on the display for 3 seconds and lock indication will light. In the lock state, all buttons are disabled.
To cancel: Press and hold LOCK for more than 3 seconds, then a beep will sound, "LOCK OFF" appears on the display and lock indication comes off.
CLEAN AND CARE
Cleaning the outside of your microwave
Exterior
The outside surface is precoated steel and plastic. Clean the outside with mild soap and water, then rinse and dry with a soft cloth. Do not use any type of household or abrasive cleaner.
Door
Wipe the window on both sides with a damp cloth to remove any spills or spatters. Metal parts will be easier to maintain if wiped frequently with a damp cloth. Avoid the use of spray and other harsh cleaners as they may stain, streak, or dull the door surface.
Control panel
If the control panel is dirty, open the microwave door before cleaning. Wipe the panel with a cloth dampened slightly with water only. Dry with a soft cloth. Do not scrub or use any sort of chemical cleaners. Close the door and press Stop to clear any buttons you may have pressed.
Cleaning the inside of your microwave
Interior
Wipe with a soft cloth and warm water. Do not use abrasive or harsh cleaners or scouring pads. For baked-on food, use baking soda or a mild soap, then rinse thoroughly with hot water.
Waveguide cover
The waveguide cover is located on the ceiling inside the microwave cavity. It is made from mica so requires special care. Keep the waveguide cover clean to assure good microwave performance. Carefully wipe with a damp cloth any food spatters from the surface of the cover immediately after they occur. Built-up splashes may overheat and cause smoke or possibly catch fire. DO NOT REMOVE THE WAVEGUIDE COVER.
Removing odors
Occasionally, a cooking odor may remain in the microwave. To remove, combine one cup water, grated peel and juice of one lemon, and several whole cloves in a two-cup glass measuring cup. Boil for several minutes using 100% power, then let it cool in the microwave. Wipe the interior with a soft cloth.
Turntable and turntable support
Remove the turntable and turntable support and wash them in mild, sudsy water. For stubborn stains, use a mild cleanser and non-abrasive scouring sponge. You can also wash them in the top rack of a dishwasher.
The turntable motor shaft is not sealed, so excess water or spills should be wiped up immediately
Cleaning and replacing the filters
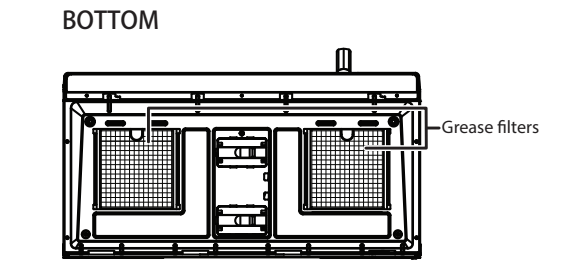
Cleaning the grease filters
Clean the filters at least once a month. Never use the fan or microwave without the filters in place.
Pull down slightly on the tab toward the front of the microwave to remove the filter. Repeat for the other filter.
Soak the filter in a sink or dish pan filled with hot water and detergent.
Agitate and scrub the filter with a brush to remove embedded dirt.
Rinse thoroughly and shake dry.
Replace by fitting the filter back into the opening.
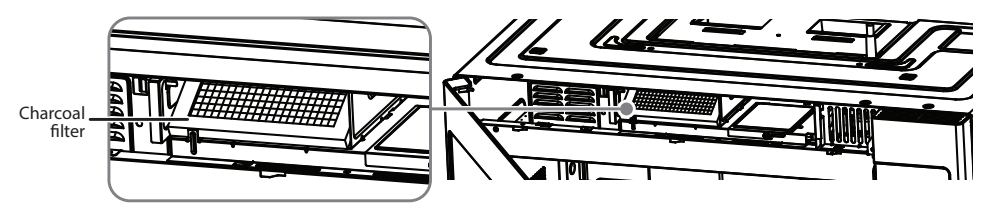
Replacing the charcoal filter
A charcoal filter is used for nonvented, recirculated installation. The filter should be changed every 6 to 12 months depending on use.
1.Disconnect power to the microwave at the circuit breaker or by unplugging it.
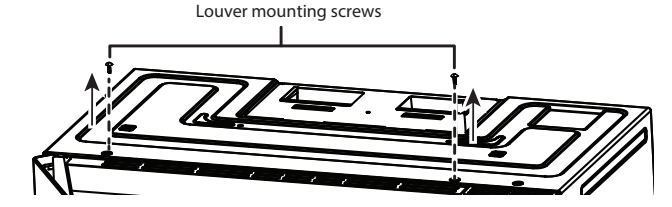
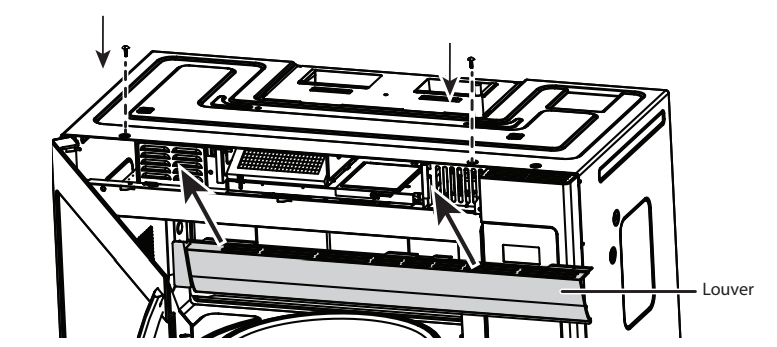
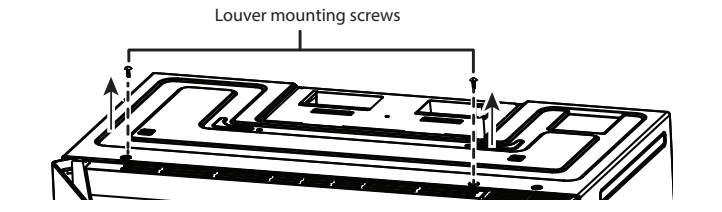
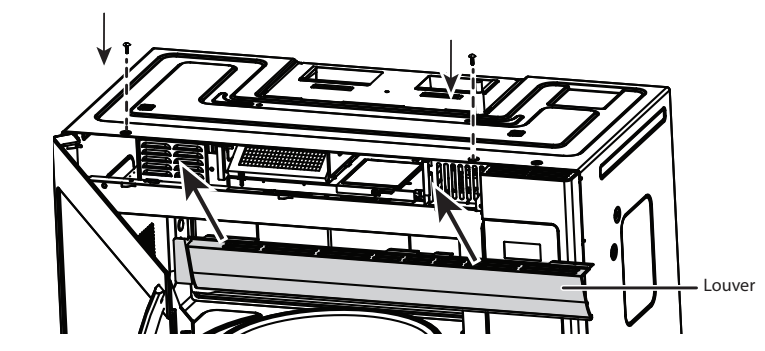
2. Remove the louver mounting screws from the top center of the louver, then push down on the tabs at each end of the louver to disengage it.
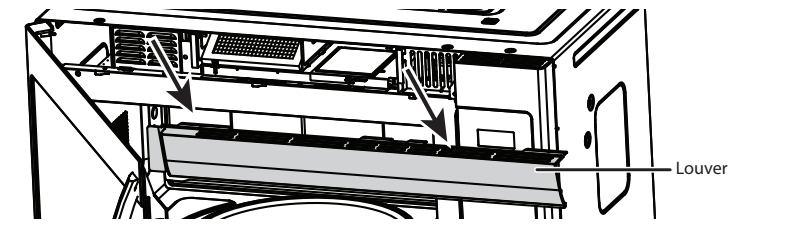
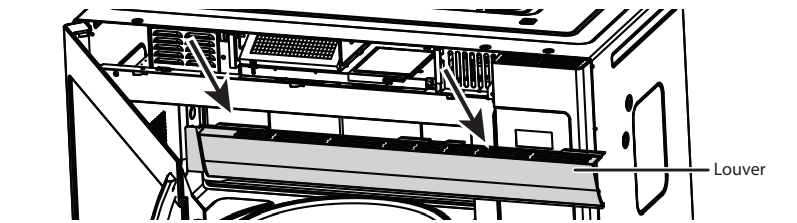
3. Pull the louver away from the unit.
4. Replace the charcoal filter. Make sure that the wire mesh is visible from the front.
5. Carefully push the louver back into place and replace the louver mounting screws.
Changing the light bulbs
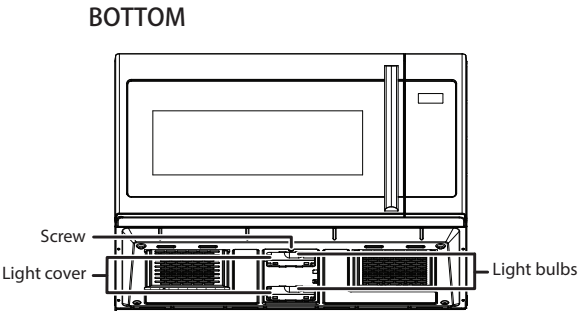
Countertop light (exterior)
Disconnect power to the microwave at the circuit breaker or by unplugging it.
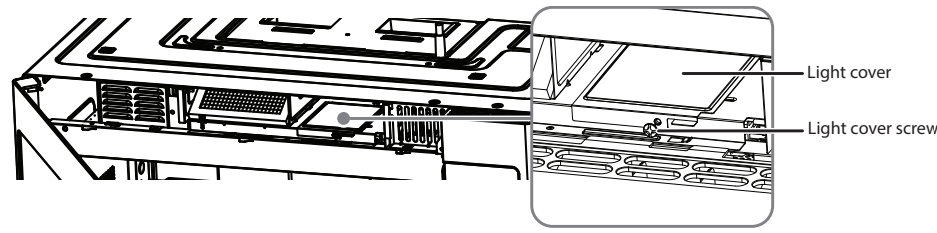
Remove the screw holding the light cover in place, then remove the light cover.
Remove the old light bulb, then replace with a new bulb.
Replace the light cover and secure it with the screw.
Microwave light (interior)
1.Disconnect power to the microwave at the circuit breaker or by unplugging it.
2. Remove the louver mounting screws from the top center of the louver, then push down on the tabs at each end of the louver to disengage it.
3. Pull the louver away from the unit.
4. Open the light cover located behind the filter by removing the light coverscrew, then carefully pulling up on the front edge.
5. Remove the old light bulb, then replace with a new bulb.
6. Replace the microwave light cover by carefully pushing it into place.
7. Push the louver back into place and replace the louver mounting screws.
TROUBLESHOOTING
If you have a problem with your microwave, review the following chart for a possible solution. If the microwave still does not work properly, contact the nearest authorized service center.
Error Code
Failure Mode
Action
(Customer Service # 1-800-562-0738)
E-21
Open circuit alarm of humidity sensor
Press STOP/CANCEL button twice to stop the cooking process
Unplug the oven, wait for 10 seconds, then plug it back in again.
If the error code does not immediately appear again, try to warm a cup of water for 30 seconds on microwave. If the error re-occurrs, contact customer service for assistance
E-22
Short circuit alarm of humidity sensor
E-23
Humidity sensor detection alarm (the sensor cook runs for the longest time
Check whether the type of food is selected correctly;
Check whether the food is in the correct weight/serving;
If the error re-occurrs, contact customer service for assistance.
E-24
Sensor cook alarm when the door is opened during cooking (the door is open for 3 seconds)
Please close the door and restart cooking
If the error re-occurrs, contact customer service for assistance.
E-25
Calibration error alarm
Please contact customer service at 1-800-562-0738 for assistance.
E-11
Open circuit alarm of temperature sensor
Press STOP/CANCEL button twice to stop the process.
Unplug the oven, wait for 10 seconds, then plug it back in again.
If the error code does not immediately appear again, try to warm a cup of water for 30 seconds on microwave.
If the error re-occurrs, contact customer service for assistance.
E-12
Short circuit alarm of temperature sensor
Press STOP/CANCEL button twice to stop the process.
Unplug the oven, wait for 10 seconds, then plug it back in again.
If the error code does not immediately appear again, try to warm a cup of water for 30 seconds on microwave.
If the error re-occurrs, contact customer service for assistance.
E-13
Ultra-high temperature protection. When the temperature in the oven is greater than 452°F (250°C)
Unplug the oven and allow it to cool. Recommend waiting at least 30 minutes. Plug the oven back in and listen for the cooling fan, if the error code does not immediately appear again, try to warm a cup of water for 30 seconds on microwave.
If the error re-occurrs, contact customer service for assistance.
E-15
Ultra-low temperature protection. After 10 minutes of continuous operation, the temperature in the oven is lower than 104°F( 40°C)
Press STOP/CANCEL button once.
Unplug the oven, wait for 10 seconds, then plug it back in again.
If the error code does not immediately appear again, try to warm a cup of water for 30 seconds on microwave. If the error re-occurrs, contact customer service for assistance.
E-d1
Membrane was held for too long
Press STOP/CANCEL button once
Unplug the oven, wait for 10 seconds, then plug it back in again.
If the error re-occurrs, contact customer service for assistance.