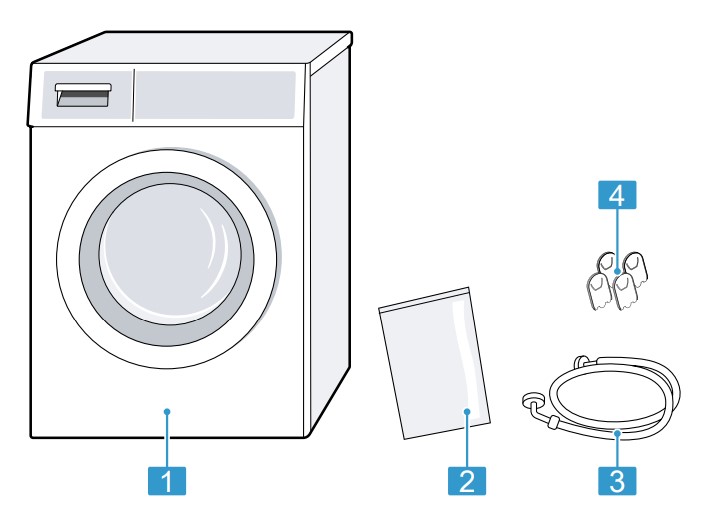
After unpacking all parts, check for any damage in transit and completeness of the delivery.
Washing machine
Accompanying documents
Water inlet hose
Cover caps
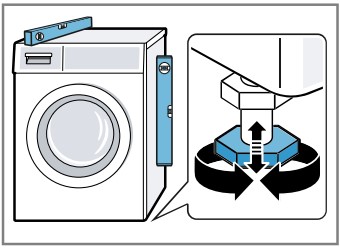
Aligning the appliance
In order to reduce noise and vibration and to prevent the appliance from moving, align the appliance correctly.
Note: Please read the information in the Safety → Page 4 and Preventing material damage → Page 10 sections to ensure that you use the appliance safely
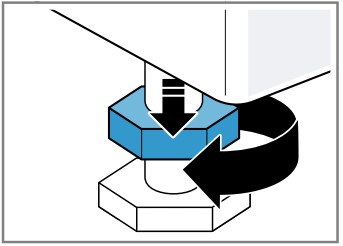
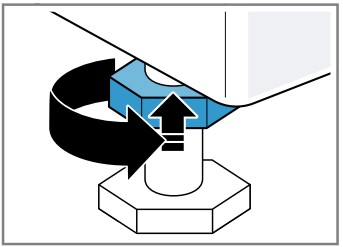
1. Loosen the lock nuts using a WAF 17 wrench by turning it in a clockwise direction.
2. To align the appliance, turn the appliance feet. Check that the appliance is level using a spirit level.
All appliance feet must stand firmly on the ground.
3. Screw the lock nuts tightly against the housing using a WAF 17 wrench.
In doing so, hold the foot tight and do not adjust its height.
Connecting the appliance to the electricity supply
Note: Please read the information in the Safety → Page 4 and Preventing material damage → Page 10 sections to ensure that you use the appliance safely.
1. Insert the mains plug of the appliance's power cable in a socket nearby.
The connection details of the appliance can be found under Technical data → Page 56.
2. Check the mains plug is inserted properly.
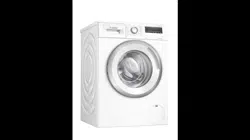
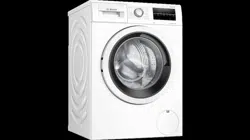
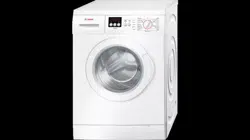
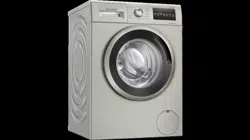
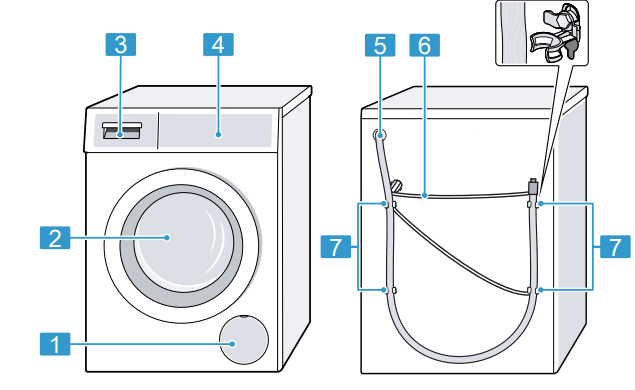
Familiarising yourself with your appliance
Appliance
You can find an overview of the parts of your appliance here.
On certain models, specific details such as the colour and shape may differ from those pictured
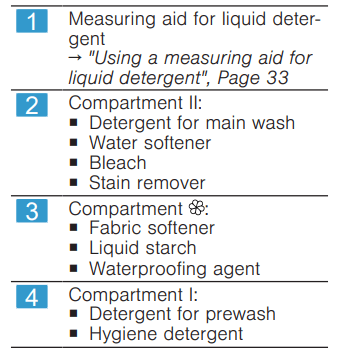
Detergent drawer
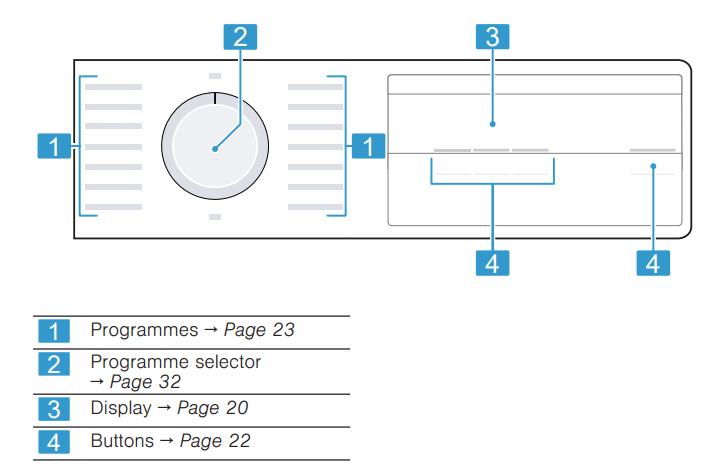
Controls
You can use the control panel to configure all functions of your appliance and to obtain information about the operating status.
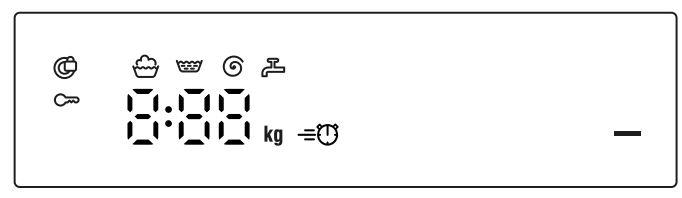
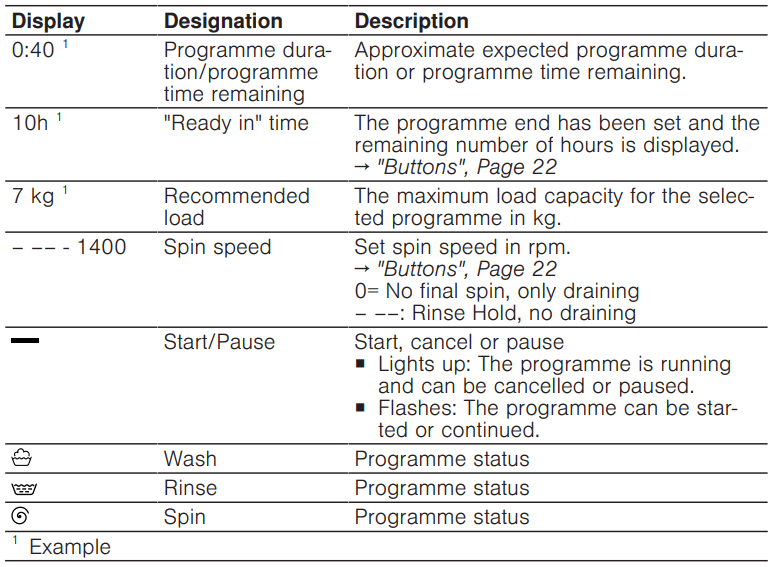
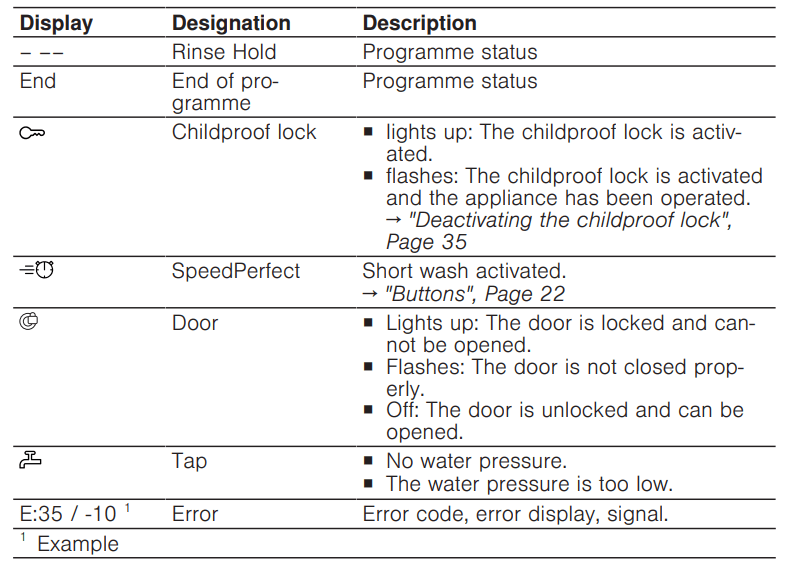
Display
The display shows the current settings, options or relevant information.
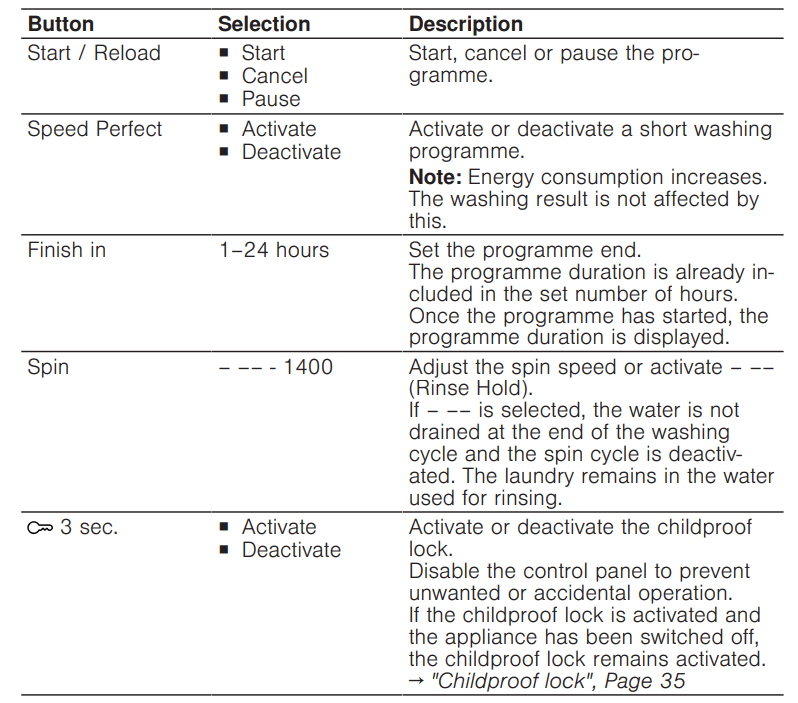
Buttons
Buttons The selection of programme settings depends on the programme that is set. You can see the selection options for each programme in the overview for → "Programmes", Page 23.
Basic operation
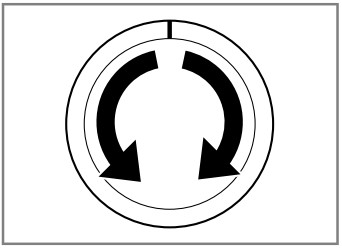
Switching on the appliance
Turn the programme selector to a programme.
Setting a programme
1. Set the programme selector to the required programme. → "Programmes", Page 23
2. If necessary, adjust the programme settings → Page 32.
Loading laundry
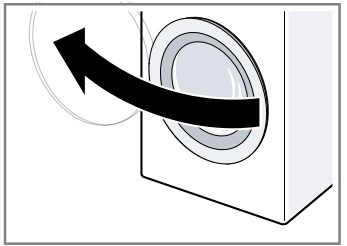
1. Open the door.
Make sure that the drum is empty.
2. Load the laundry unfolded into the drum.
3. Close the door. Ensure that there is no laundry trapped in the door.
Using a measuring aid for liquid detergent
If you order the measuring aid as an accessory, you must use the measuring aid.
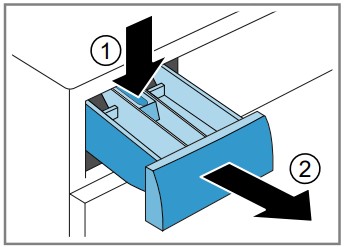
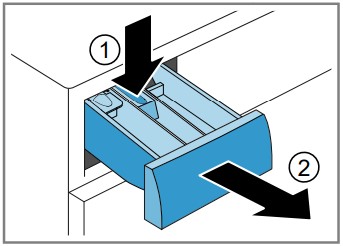
1. Press down on the insert and remove the detergent drawer.
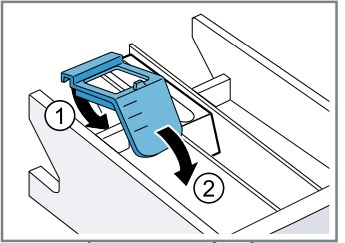
2. Insert the measuring aid.
3. Insert the detergent drawer.
Adding detergent and care product
Notes
Please read the information in the Safety and Preventing material damage sections to ensure that you use the appliance safely.
Do not use the measuring aid for liquid detergent for gel detergents, washing powder, or if Prewash or "Ready in" time are activated.
Requirement: Find out the optimum dosage for detergent and care product.
1. Pull out the detergent drawer.
2. Pour in detergent. → "Detergent drawer"
3. If required, add the care product.
4. Push in the detergent drawer.
Starting the programme
Note: If you want to change the time until the programme ends, set the "Ready in" time first.
Press Start / Reload.
The drum rotates and load detection takes place. This can take up to 2 minutes, after which water enters the drum.
The display shows either the programme duration or the "Ready in" time.
After the programme has ended, the display shows: "End".
Adjusting the "Ready in" time before the programme starts
You can readjust the selected "Ready in" time before the programme starts.
Press Start / Reload.
Press Finish in repeatedly until the display indicates the desired "Ready in" time.
Press Start / Reload.
Soaking laundry
Note: No additional detergent is required. The washing solution is then used for washing.
Start the programme.
To pause the programme, after approx. 10 minutes, press Start / Reload.
To resume the programme, after the desired soaking time, press Start / Reload.
Cleaning and servicing
To keep your appliance working efficiently for a long time, it is important to clean and maintain it carefully
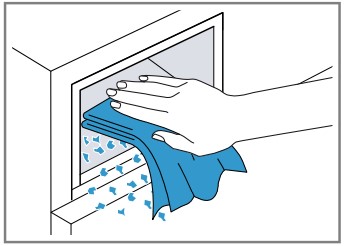
Tips on appliance care
Wipe down the housing and the control panel with nothing but water and a damp cloth.
This ensures the parts of the appliance will remain clean and hygienic.
Remove all detergent residue, spray residue or other residues immediately.
Fresh deposits are easier to remove without leaving any residue.
Keep the appliance door and detergent drawer open after use.
This allows the residual water to dry, reducing odours in the appliance.
Cleaning the drum
CAUTION Risk of injury!
Permanently washing at low temperatures and a lack of ventilation for the appliance may damage the drum and cause injury.
▶ Regularly run a programme for cleaning the drum or wash at temperatures of at least 60 °C.
▶ Leave the appliance to dry after every operation with the door open, and leave the detergent drawer to dry.
▶ Run the Cottons 90° programme without laundry. Add washing powder.
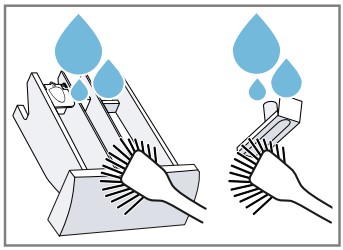
Cleaning the detergent drawer
1. Pull out the detergent drawer.
2. Press down on the insert and
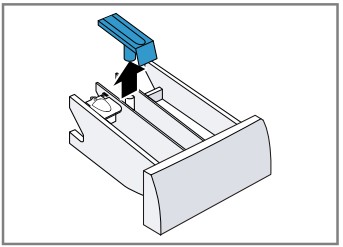
3. Press out the insert upwards from below.
4. Clean the detergent drawer and insert with water and a brush, and then dry them.
5. Fit the insert and lock it into place.
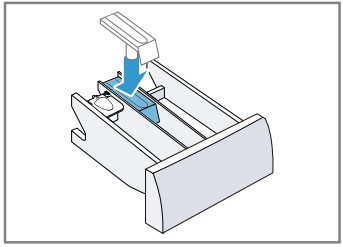
6. Cleaning the opening for the detergent drawer.
7. Push in the detergent drawer.
Descaling
ATTENTION! The use of unsuitable descaling agents, e.g. for coffee machines, may damage the appliance.
▶ For this appliance, only use descaling agents that are available from the manufacturer's website or our after-sales service.
Cleaning the drain pump
Clean the drain pump in the event of faults, e.g. blockages or rattling noises
Emptying the drain pump
Note: Please read the information in the Safety → Page 4 and Preventing material damage → Page 10 sections to ensure that you use the appliance safely.
1. Turn off the water tap.
2. Switch off the appliance.
3. Disconnect the appliance's mains plug from the power supply.
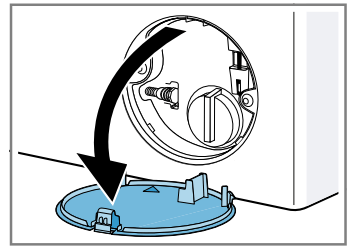
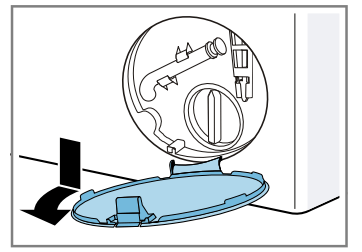
4. Open the maintenance flap
5. Remove the maintenance flap.
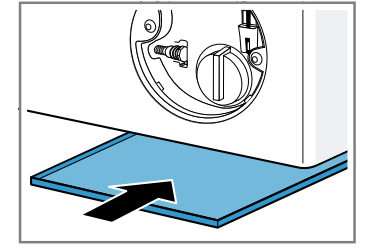
6. Slide a sufficiently large receptacle under the opening
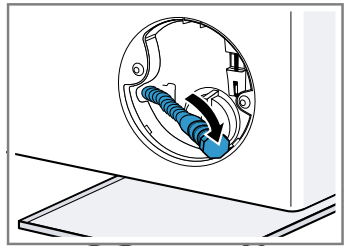
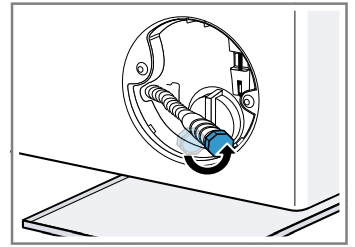
7. Take the drain hose out of the holder.
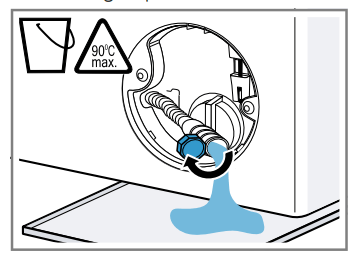
8. CAUTION - Risk of scalding! When you wash at high temperatures, the detergent solution gets hot.
▶ Do not touch the hot detergent solution.
To allow the detergent solution to flow out into the container, remove the sealing cap.
9. Firmly press on the sealing cap.
10.Insert the drain hose into the holder.
Cleaning the drain pump
Note: Please read the information in the Safety → Page 4 and Preventing material damage → Page 10 sections to ensure that you use the appliance safely.
Requirement: The drain pump is empty. → Page 39
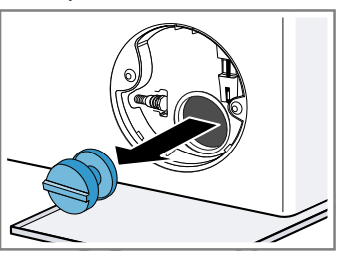
1. Since water may remain in the drain pump, remove the pump cap carefully.
2. Clean the interior, the thread on the pump cap and the pump housing.
3. Make sure that the impeller in the drain pump can be rotated.
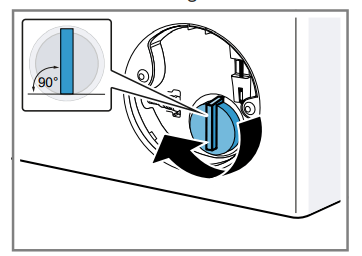
4. Insert the pump cap and screw it on as far as it will go.
The handle on the pump cap must be in a vertical position.
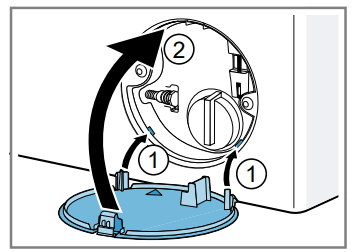
5. Insert the maintenance flap and lock it into place.
6. Close the maintenance flap.
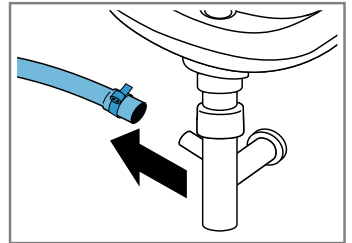
Cleaning the water outlet hose at the siphon
1. Switch off the appliance.
2. Disconnect the appliance's mains plug from the power supply.
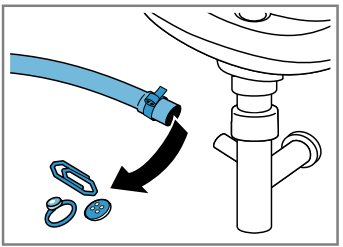
3. Loosen the hose clamp and carefully remove the water outlet hose.
Residual water may leak out.
4. Clean the water outlet hose and siphon connecting piece.
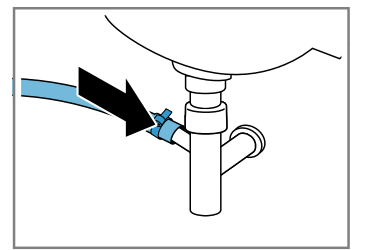
5. Reattach the water outlet hose and secure the connection point using the hose clamp.
Clean the water inlet filters.
Emptying the water inlet hose
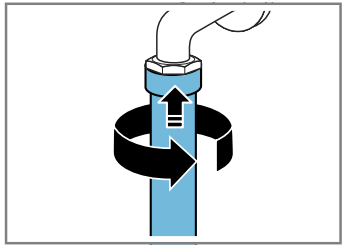
Turn off the tap.
Set a programme, except for Rinse, Spin or Drain.
Start the programme and leave it to run for approx. 40 seconds.
Switch off the appliance.
Disconnect the appliance's mains plug from the power supply.
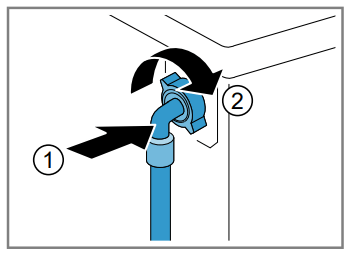
Cleaning the filter on the tap
Note: Please read the information in the Safety → Page 4 and Preventing material damage → Page 10 sections to ensure that you use the appliance safely.
Requirement: The water inlet hose is empty.
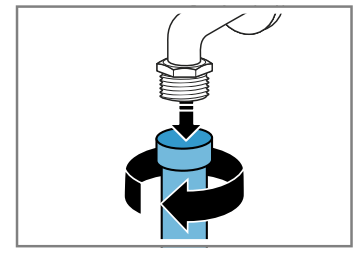
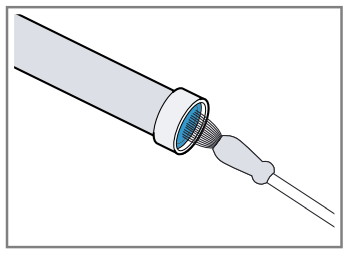
1. Remove the water inlet hose from the tap.
2. Clean the filter with a small brush.
3. Connect the water inlet hose and check for leaks.
Cleaning the filter on the appliance
Note: Please read the information in the Safety → Page 4 and Preventing material damage → Page 10 sections to ensure that you use the appliance safely.
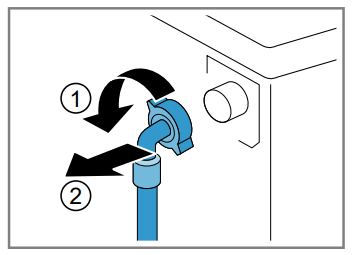
Requirement: The water inlet hose is empty. → "Emptying the water inlet hose", Page 41
1. Disconnect the hose from the rear of the appliance.
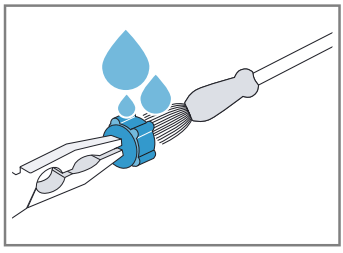
2. Use pliers to remove the filter.
3. Clean the filter with a small brush.
4. Reinsert the filter.
5. Connect the hose and check for leaks.
Troubleshooting
You can rectify minor faults on your appliance yourself. Read the troubleshooting information before contacting after-sales service. This will avoid unnecessary costs.
Fault
Cause and troubleshooting
The display goes out and Start / Reload flashes.
Energy-saving mode is active
Press any button.
The symbol lights up again.
"E:36 / -10"
Drain pipe or water outlet hose is blocked.
Clean the drain pipe and the water outlet hose.
Drain pipe or water drain hose is caught or jammed.
Ensure that the drain pipe and water drain hose are not kinked or trapped.
Drain pump is blocked.
→ "Cleaning the drain pump",
The water outlet hose is connected too high.
Install the water outlet hose at a maximum height of 1 metre.
Detergent dosage is too high.
Immediate measure: Mix one tablespoon of fabric softener with 0.5 litres of water and pour the mixture into the left-hand compartment (not for outdoor clothing, sportswear or items stuffed with down).
Reduce the amount of detergent for the next washing cycle with the same load.
Unapproved extension installed on the water drain hose.
Remove any unapproved extensions from the water hose. Connecting the appliance
"E:36 / -25 / -26"
Drain pump is blocked.
→ "Cleaning the drain pump",
The water pressure is low.
No remedial action possible.
The filters in the water inflow are blocked.
Clean the filters in the water inflow
The tap is turned off.
Turn on the tap.
The water inlet hose is kinked or jammed.
Ensure that the water inlet hose is not kinked or jammed.
lights up.
The temperature is too high.
Wait until the temperature has dropped.
→ "Cancelling the programme"
Water level is too high.
Start the Drain programme.
Laundry is caught in the door.
Open the door again.
Remove any trapped laundry.
Close the door.
Press Start / Reload to start the programme.
flashes
Door is not closed.
Close the door.
Press Start / Reload to start the programme.
All other error codes.
Malfunction
Call the after-sales service. → "Customer Service"
The appliance is not working.
The mains plug of the power cord is not plugged in.
Connect the appliance to the power supply.
The circuit breaker is faulty.
Check the circuit breaker in the fuse box.
There has been a power cut.
Check whether the lighting in your kitchen or other appliances are working.
The programme does not start.
You have not pressed Start / Reload.
Press Start / Reload.
Door is not closed.
Close the door.
Press Start / Reload to start the programme.
Childproof lock is activated.
→ "Deactivating the childproof lock"
Finish in is activated.
Check whether Finish in is activated. → "Buttons"
Laundry is caught in the door.
Open the door again.
Remove any trapped laundry
Close the door.
Press Start / Reload to start the programme.
The door cannot be opened.
– –– is activated.
Continue the programme by selecting Spin or Drain and pressing Start / Reload. → "Resuming the programme when the programme status is Rinse Hold",
The temperature is too high.
Wait until the temperature has dropped.
→ "Cancelling the programme"
Water level is too high.
Start the Drain programme
Power failure.
Open the door using the emergency release. → "Emergency release"
The water is not draining.
Drain pipe or water outlet hose is blocked.
Clean the drain pipe and the water outlet hose.
Drain pipe or water drain hose is caught or jammed.
Ensure that the drain pipe and water drain hose are not kinked or trapped.
Drain pump is blocked.
→ "Cleaning the drain pump"
– –– is activated.
Continue the programme by selecting Spin or Drain and pressing Start / Reload. → "Resuming the programme when the programme status is Rinse Hold"
The water outlet hose is connected too high.
Install the water outlet hose at a maximum height of 1 metre.
Detergent dosage is too high.
Immediate measure: Mix one tablespoon of fabric softener with 0.5 litres of water and pour the mixture into the left-hand compartment (not for outdoor clothing, sportswear or items stuffed with down).
Reduce the amount of detergent for the next washing cycle with the same load.
Unapproved extension installed on the water drain hose.
Remove any unapproved extensions from the water hose. Connecting the appliance
Water is not flowing in. Detergent is not being dispensed.
You have not pressed Start / Reload.
Press Start / Reload.
The filters in the water inflow are blocked.
Clean the filters in the water inflow
The tap is turned off.
Turn on the tap.
The water inlet hose is kinked or jammed.
Ensure that the water inlet hose is not kinked or jammed.
The spin cycle runs several times.
The unbalanced load detection system eliminates an imbalance by repeatedly redistributing the laundry.
Not a fault – no action required.
Note: When loading, where possible, place large and small items of laundry together in the drum. Different sized items of laundry distribute themselves better during the spin cycle.
The programme duration changes during the wash cycle.
The programme operation is optimised electronically. This may change the programme duration.
Not a fault – no action required.
The unbalanced load detection system eliminates an imbalance by repeatedly redistributing the laundry.
Not a fault – no action required.
Note: When loading, where possible, place large and small items of laundry together in the drum. Different sized items of laundry distribute themselves better during the spin cycle.
Foam detection system switches on a rinse cycle if foam build-up is too high.
Not a fault – no action required.
No water is visible in the drum.
Water is below the visible area.
Not a fault – no action required.
Do not add any extra water to the appliance while it is operating.
Drum jerks after the programme starts.
This is caused by an internal motor test.
Not a fault – no action required.
Residual water is present in the compartment .
Insert in compartment is blocked.
→ "Cleaning the detergent drawer",
Vibrations and movement of the appliance whilst spinning.
Appliance is not correctly aligned.
Aligning the appliance
The appliance feet are not fixed.
Secure the appliance feet. Aligning the appliance
Transit bolts have not been removed.
Removing the transit bolts
Drum does not turn, water does not flow in.
Load detection is active.
Not a fault – no action required.
Note: The load detection can take up to two minutes.
Heavy foam build-up
Detergent dosage is too high.
Immediate measure: Mix one tablespoon of fabric softener with 0.5 litres of water and pour the mixture into the left-hand compartment (not for outdoor clothing, sportswear or items stuffed with down).
Reduce the amount of detergent for the next washing cycle with the same load.
High spin speed not reached.
A low spin speed is selected.
The next time you run a wash cycle, set a higher spin speed.
Unbalance load detection system is using a reduced spin speed to eliminate an unbalance.
Redistribute the laundry in the drum.
Note: Where possible, mix large and small items in the drum. Different sized items of laundry distribute themselves better during the spin cycle.
Start the Spin programme.
The spin programme does not start.
Drain pipe or water outlet hose is blocked.
Clean the drain pipe and the water outlet hose.
Drain pipe or water drain hose is caught or jammed.
Ensure that the drain pipe and water drain hose are not kinked or trapped.
The unbalanced load detection system has interrupted the spin cycle because the laundry is unevenly distributed.
Redistribute the laundry in the drum.
Note: Where possible, mix large and small items in the drum. Different sized items of laundry distribute themselves better during the spin cycle.
Start the Spin programme.
Rushing, hissing noise.
Water is flushed under pressure into the detergent drawer.
Not a fault – normal operating noise.
Loud noises during the spin cycle.
Appliance is not correctly aligned.
Aligning the appliance
The appliance feet are not fixed.
Secure the appliance feet. Aligning the appliance
Transit bolts have not been removed.
Removing the transit bolts
Banging noises, rattling in the drain pump.
Foreign bodies have got into the drain pump.
→ "Cleaning the drain pump"
Slurping, rhythmical suction noise.
The drain pump is active, the detergent solution is pumped out.
Not a fault – normal operating noise.
Creasing.
The spin speed is too high.
The next time you run a wash cycle, set a lower spin speed.
The load is too large.
The next time you run a wash cycle, reduce the amount of laundry being loaded.
The wrong programme is selected for the type of fabric.
Select the programmes that are suitable for the type of fabric. → "Programmes"
Detergent or fabric softener drips off the seal and collects on the door or in the seal fold.
Too much detergent/fabric softener in the detergent drawer.
When dosing liquid detergent and fabric softener, observe the marking in the detergent drawer and do not dose above this.
The spin result is not satisfactory. The laundry is too wet/too damp.
A low spin speed is selected.
The next time you run a wash cycle, set a higher spin speed.
Start the Spin programme.
Drain pipe or water outlet hose is blocked.
Clean the drain pipe and the water outlet hose.
Drain pipe or water drain hose is caught or jammed.
Ensure that the drain pipe and water drain hose are not kinked or trapped.
The unbalanced load detection system has interrupted the spin cycle because the laundry is unevenly distributed.
Redistribute the laundry in the drum.
Note: Where possible, mix large and small items in the drum. Different sized items of laundry distribute themselves better during the spin cycle.
Start the Spin programme.
Unbalance load detection system is using a reduced spin speed to eliminate an unbalance.
Redistribute the laundry in the drum.
Note: Where possible, mix large and small items in the drum. Different sized items of laundry distribute themselves better during the spin cycle.
Start the Spin programme.
Detergent residue on the damp washing.
Detergents may contain water-insoluble substances that deposit on the laundry.
Start the Rinse programme.
Detergent residue on the dry laundry.
Detergents may contain water-insoluble substances that deposit on the laundry.
Brush out the laundry after washing and drying.
Water is leaking out at the water inlet hose.
Water inlet hose is not correctly/securely connected.
Connect the water supply hose correctly. Connecting the water inlet hose
Tighten the screw connection.
Water is leaking out at the water outlet hose.
The water outlet hose is damaged.
Replace the damaged water outlet hose.
Water outlet hose is not connected correctly.
Connect the water outlet hose correctly. Water outlet connection types
Odours have formed in the appliance.
Humidity and detergent residue may promote the formation of bacteria.
→ "Cleaning the drum", Page 37
If you are not using the appliance, leave the door and detergent drawer open so that residual water can evaporate.
#1 The water is not draining, did I make any faults in Installation steps?
Immediate measure: Mix one tablespoon of fabric softener with 0.5 litres of water and pour the mix- ture into the left-hand compartment (not for outdoor clothing, sportswear or items stuffed with down). Reduce the amount of detergent for the next wash- ing cycle with the same load. Unapproved extension installed on the water drain hose. Remove any unapproved extensions from the water hose. Connecting the appliance


 lights up.
 .
.