Owners' Guide Televisons
Setting Up
Wall Mounting
Your TV is also prepared for a VESA-compliant wall mount bracket (sold separately). Use the following VESA code when purchasing the wall mount . . .
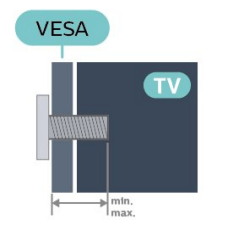
- 50PUS9006
VESA MIS-F 200x300, M6 (min.: 10mm, max.:16mm)
- 58PUS9006
VESA MIS-F 200x300, M6 (min.: 10mm, max.:16mm)
- 70PUS9006
VESA MIS-F 300x300, M8 (min.: 12mm, max.:25mm)
Preparation
Make sure that the metal screws, to mount the TV to the VESA-compliant bracket, go about 10mm deep inside the threaded bushes of the TV.
Caution
Wall mounting the TV requires special skills and should only be performed by qualified personnel. The TV wall mounting should meet safety standards according to the TVs weight. Also read the safety precautions before positioning the TV. TP Vision Europe B.V. bears no responsibility for improper mounting or any mounting that results in accident or injury.
Tips on Placement
- Position the TV where light does not shine directly on the screen.
- Dim lighting conditions in the room for best Ambilight effect.
- The ideal distance to watch TV is 2 to 5 times its diagonal screen size. When seated, your eyes should be level with the centre of the screen.
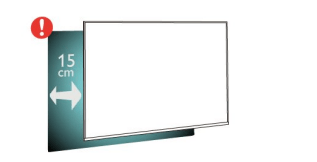
- When wall mounted, position the TV up to 15 cm away from the wall.
Note: Please keep the TV away from dust-producing sources such as stoves. It is suggested to clean the dust regularly to avoid getting dust into the TV.
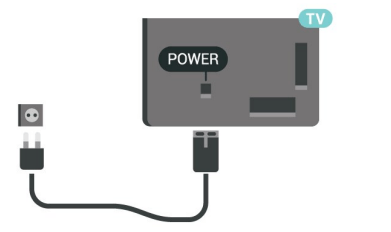
Power Cable
- Insert the power cable into the POWER connector on the back of the TV.
- Make sure the power cable is securely inserted in the connector.
- Make sure that the power plug, in the wall socket, is accessible at all times.
- When you unplug the power cable, always pull the plug, never pull the cable.
Although this TV has a very low standby power consumption, unplug the power cable to save energy if you do not use the TV for a long period of time. For more information, in Help, press the colour key  Keywords and look up Switching On for more information on switching the TV on or off.
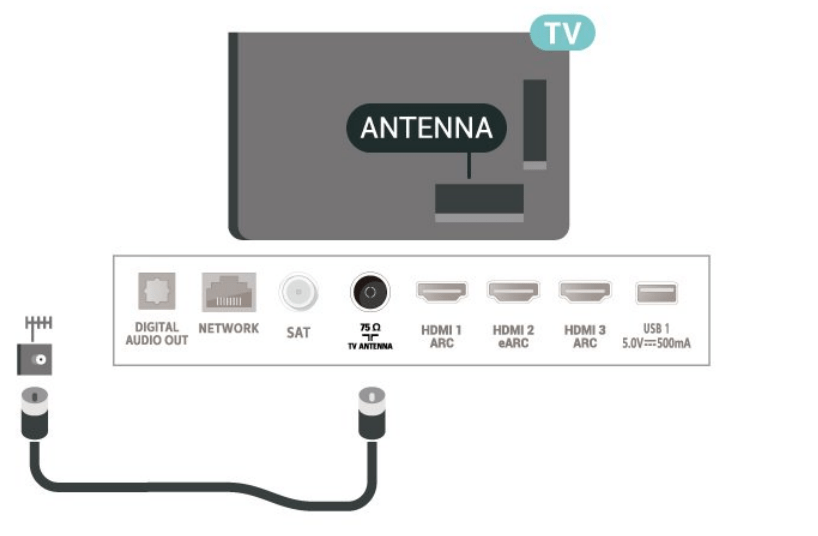
Antenna Cable
Insert the antenna plug firmly into the Antenna socket at the back of the TV.
You can connect your own antenna or an antenna signal from an antenna distribution system. Use an IEC Coax 75 Ohm RF antenna connector.
Use this antenna connection for DVB-T and DVB-C input signals.
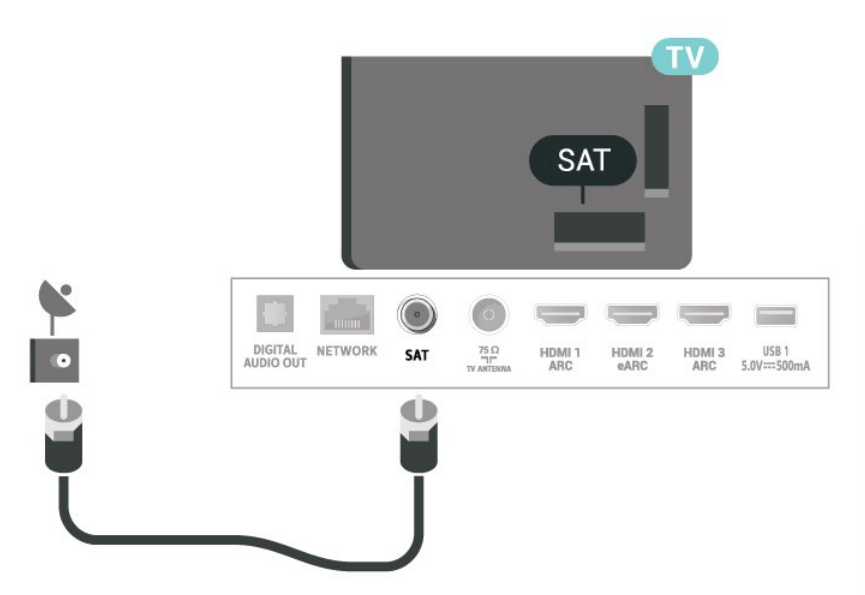
Satellite Dish
Attach the satellite F-type connector to the satellite connection SAT at the back of the TV.
Remote Control
Key Overview
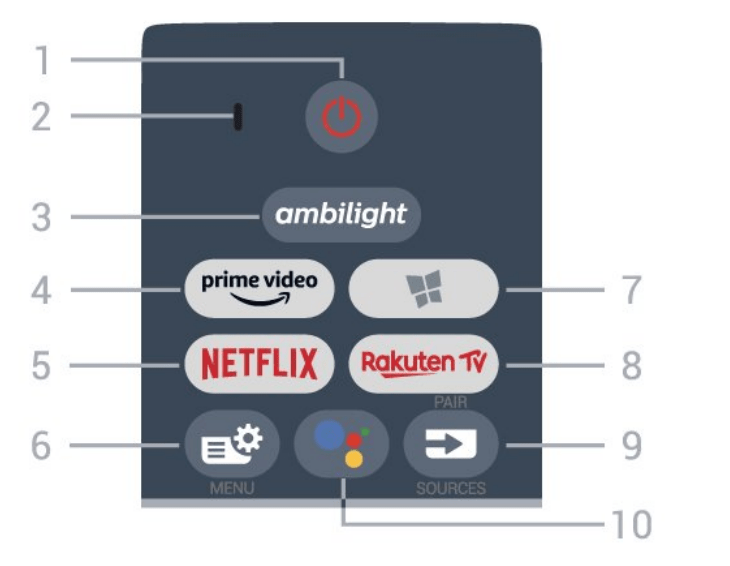
Top
-
 Standby / On
To switch the TV on or back to Standby.
- VOICE microphone

To select one of the Ambilight style.
To launch the Amazon prime video App.
To open the Netflix App directly. With the TV switched on or from standby.
• If you have a Netflix membership subscription, you can enjoy Netflix on this TV. Your TV must be connected to the Internet.
• To open Netflix, press  to open the Netflix App. You can open Netflix immediately from a TV in standby.
 Quick Menu
To open the Quick Menu with typical TV functions. Philips TV Collection
To launch Philips TV Collection App.
To launch the Rakuten TV App. SOURCES / PAIR
• To open or close the Sources menu.
• To pair the remote control to the TV. Google Assistant™
To launch the Google Assistant™.
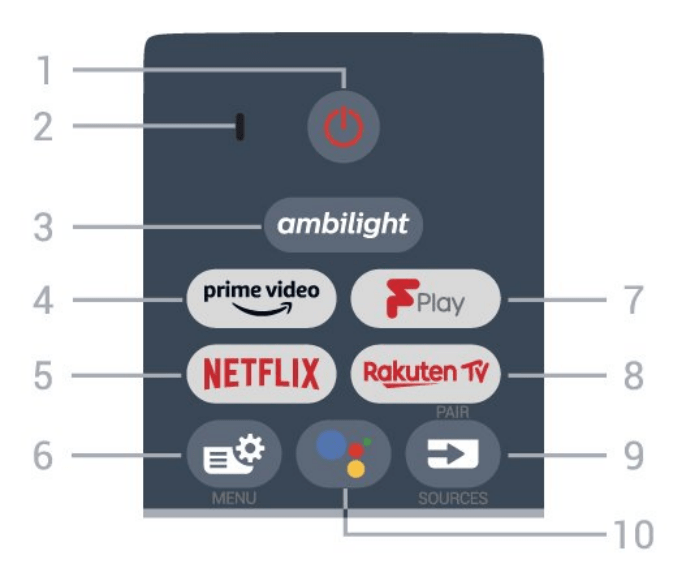
Top (for UK models)
-
 Standby / On
To switch the TV on or back to Standby.
- VOICE microphone

To select one of the Ambilight style.
To launch the Amazon prime video App.
To open the Netflix App directly. With the TV switched on or from standby.
• If you have a Netflix membership subscription, you can enjoy Netflix on this TV. Your TV must be connected to the Internet.
• To open Netflix, press  to open the Netflix App. You can open Netflix immediately from a TV in standby.
 Quick Menu
To open the Quick Menu with typical TV functions.- Freeview Play
To launch Freeview Play.

To launch the Rakuten TV App. SOURCES / PAIR
• To open or close the Sources menu.
• To pair the remote control to the TV. Google Assistant™
To launch the Google Assistant™.
Middle
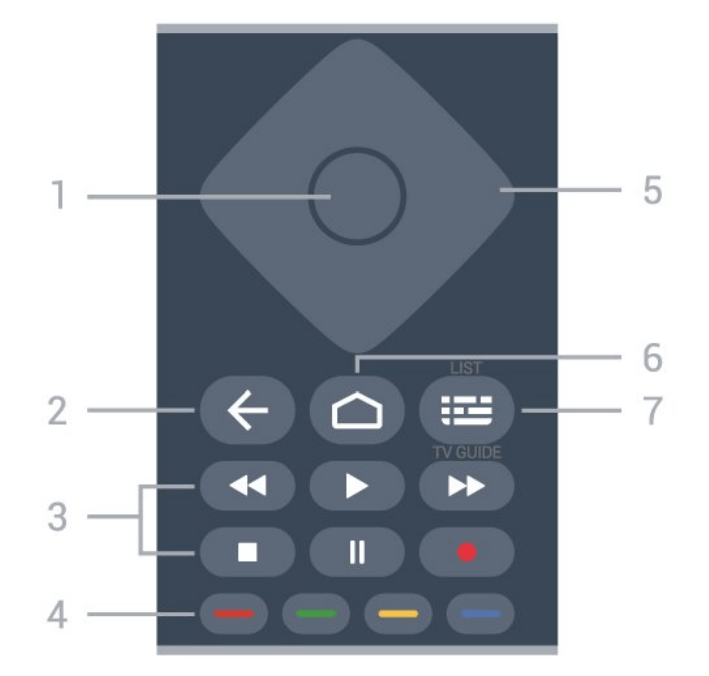
- OK key
To confirm a selection or setting. To open the channel list while watching TV.
 Back
Back
To switch back to the previous channel you selected. To return to previous menu. To go back to the previous App/Internet page.- Playback and Record
• Play  , to playback.
• Pause  , to pause playback
• Stop  , to stop playback
• Rewind  , to rewind
• Fast forward  , to go fast forward
• Record  , to start recording
 Colour keys
Direct selection of options. Blue key  , opens Help.
- Arrow / navigation keys
To navigate up, down, left or right.
 HOME
HOME
To open the Home menu. TV Guide / Channel list
To open or close the TV Guide. Long press to open the channel list.
Middle (for UK models)
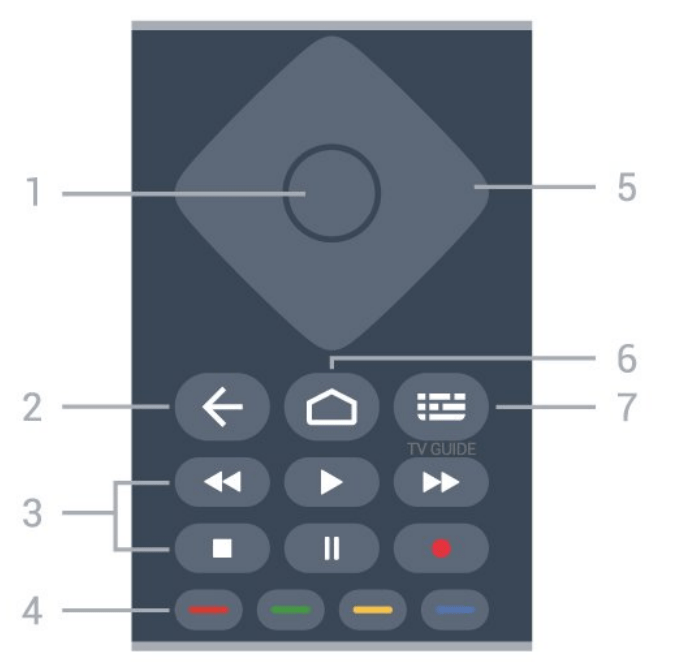
- OK key
To confirm a selection or setting. To open the channel list while watching TV.
 Back
Back
To switch back to the previous channel you selected. To return to previous menu. To go back to the previous App/Internet page.- Playback and Record
• Play  , to playback.
• Pause  , to pause playback
• Stop  , to stop playback
• Rewind  , to rewind
• Fast forward  , to go fast forward
• Record  , to start recording
 Colour keys
Direct selection of options. Blue key  , opens Help.
- Arrow / navigation keys
To navigate up, down, left or right.
 HOME
HOME
To open the Home menu. TV Guide / Channel list
To open or close the TV Guide.
Bottom
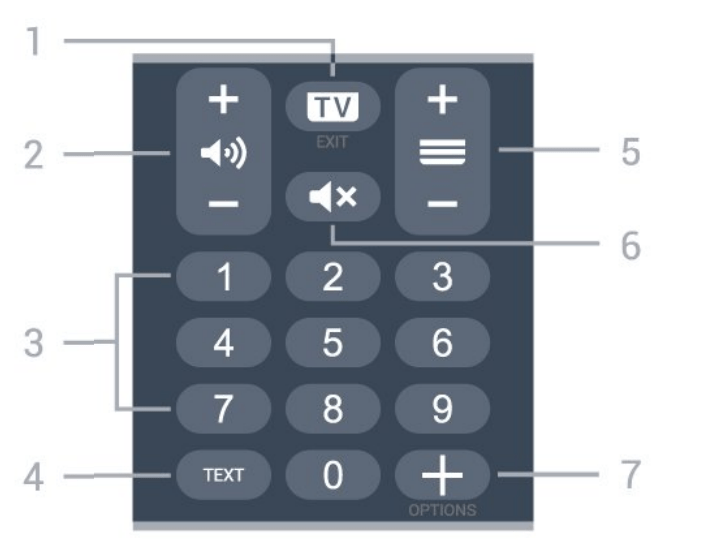
 EXIT
EXIT
To switch back to watch TV or to stop an interactive TV application. Volume
Prese + or - to adjust the volume level.- Number keys
To select a channel directly.
- TEXT
To open or close Text/Teletext.
 Channel
Prese + or - to switch to the next or previous channel in the channel list. To open the next or previous page in Text/Teletext. Mute
Mute
To mute the sound or to restore it. OPTIONS
To open or close the options menu.
Bottom (for UK models)
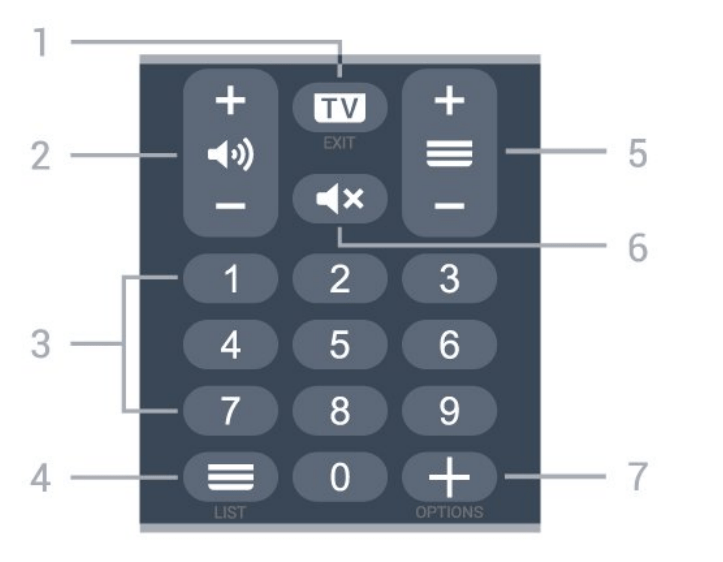
 EXIT
EXIT
To switch back to watch TV or to stop an interactive TV application. Volume
Prese + or - to adjust the volume level.- Number keys
To select a channel directly.
 Channel list
To open the channel list. Channel
Prese + or - to switch to the next or previous channel in the channel list. To open the next or previous page in Text/Teletext. Mute
Mute
To mute the sound or to restore it. OPTIONS
To open or close the options menu.
Pair Your Remote Control to TV
This remote control uses both Bluetooth and IR (infrared) to send its commands to the TV.
- You can use this remote control via IR (infrared) for most operations.
- To use advanced operation like voice search and remote control keyboard, you need to pair (link) the TV with the remote control.
When you start the initial TV installation, the TV invites you to long press the PAIR key, and by doing so, the pairing will be done.
Note:
- Once the remote control has entered pairing mode successfully, the blue LED indicator ring around the microphone on the front side of the remote control starts blinking.
- The remote control must be kept close to the TV (within 1m distance) during pairing in order to ensure success.
- If the TV does not launch the voice control field when press
 , pairing was unsuccessful.
- It is advisable to wait until the set has fully started up and launched all background processes before pairing mode is entered as the toast message containing further instructions may appear too late, thereby negatively impacting the pairing procedure.
Pairing or pairing again
If the pairing with the remote control was lost, you can pair the TV with the remote control again.
You can simply long press the PAIR key (approximate for 3 seconds) for pairing.
Alternatively, go  Settings > Wireless and networks > Remote control > Pair remote control, then follow the on-screen instructions.
A message appears when the pairing is successful.
Remote Control Software
 Settings > Wireless and networks > Remote control > Remote control info Once the remote control is paired, you can check the current remote control software version.
 Settings > Wireless and networks > Remote control > Update remote control software
Check available remote control software for updates.
Voice Search
You can search for videos, music or anything else on the Internet by simply using your voice. You can speak into the microphone on the remote control.
You need to pair the remote control to the TV before use voice search.
To use Voice...
- Press
 on remote control, the blue light on the remote control lights up and the search field opens, the microphone is active.
- Speak out what you are looking for with clear pronunciation. You can speak for 10 seconds before the microphone switches off. It might take some time for the results to appear.
- In the list of search results, you can select the item you want.
IR Sensor
The TV can receive commands from a remote control that uses IR (infrared) to send commands. If you use such a remote control, always make sure you point the remote control at the infrared sensor on the front of the TV.
Warning
Do not put any objects in front of IR sensor of the TV, it may block the IR signal.
Batteries
If the TV does not react on a key press on the remote control, the batteries might be empty.
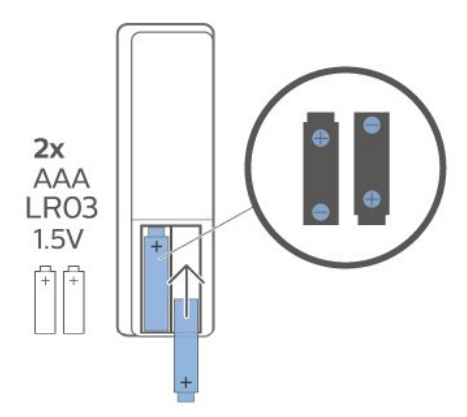
To replace the batteries, open the battery compartment on the back-bottom of the remote control.
- Slide the battery door in the direction shown by the arrow.
- Replace the old batteries with 2 Alkaline, type AAA-LR03-1.5V batteries. Make sure the + and the - ends of the batteries line up correctly.
- Reposition the battery door and slide it back until it clicks.
Remove the batteries if you are not using the remote control for a long time. Safely dispose of your old batteries according to the end of use directions.
For more information, in Help, select Keywords and look up End of use.
Cleaning
Your remote control is treated with a scratch-resistant coating.
To clean the remote control, use a soft damp cloth. Never use substances such as alcohol, chemicals or household cleaners on the remote control.
Switching On and Off
On or Standby
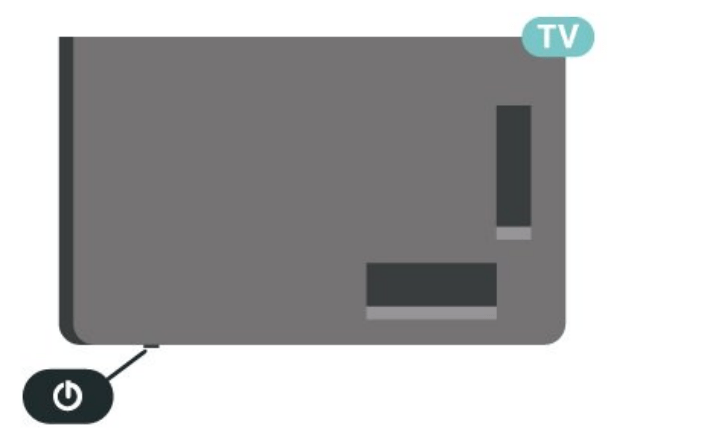
Make sure the TV is connected to the mains AC power. Connect the supplied power cord to the AC in connector at the back of the TV. The indicator light at the bottom of the TV lights up.
Switch on
Press  on the remote control to switch the TV on. Alternatively, press
  HOME. You can also press the small joystick key on the bottom of the TV to switch the TV on in case you can't find the remote control or its batteries are empty.
Switch to standby
To switch the TV to standby, press  on the remote control. You can also press the small joystick key on the bottom of the TV.
In standby mode, the TV is still connected to the mains power but consumes very little energy.
To switch off the TV completely, disconnect the power plug.
When disconnecting the power plug, always pull the power plug, never the cord. Ensure that you have full access to the power plug, power cord and outlet socket at all times.
Keys on TV
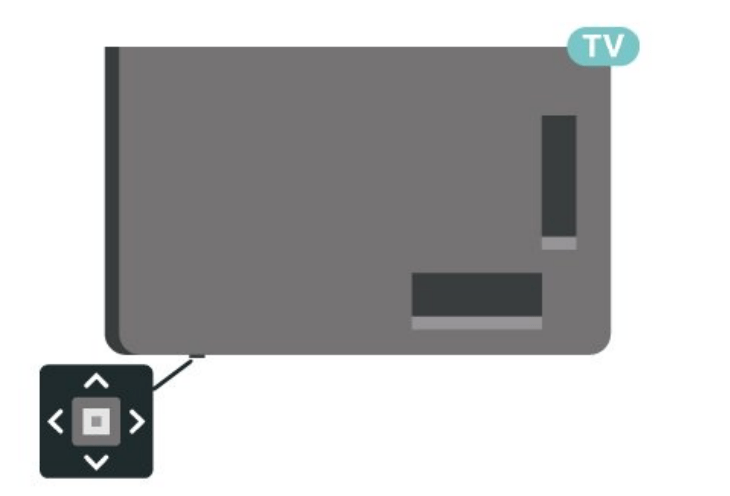
If you lost the remote control or its batteries are empty, you can still do some basic TV operations.
To open the basic menu…
- With the TV switched on, press the joystick key on the bottom of the TV to bring up the basic menu.
- Press left or right to select
 Volume,
  Channel or
  Sources. Select
  Demo, to start a demo movie.
- Press up or down to adjust the volume or tune to the next or previous channel. Press up or down to go through the list of sources, including the tuner selection. Press the joystick key to start the demo movie.
- The menu will disappear automatically. To switch the TV on standby, select
 and press the joystick key.
You can use the Quick Menu as your Home menu. In the Quick Menu, you will find a quick way to access TV functions.
To open Quick Menu and open an item…
- Press
 to open Quick Menu.
- Select an item and press OK to open or start it.
- Press
 Back to close Quick Menu without starting anything.
Settings
Picture
Picture Settings
Picture Style
Select a style
 Quick Menu > Frequent Settings > Picture > Picture style.
For easy picture adjustment, you can select a preset picture style.
- Personal - The picture preferences you set during the first start up.
- Vivid - Ideal for daylight viewing
- Natural - Natural picture settings
 Standard - Most energy conscious setting - Factory setting
- Movie - Ideal for watching movies with original studio effect
- Game* - Ideal for playing games
- Monitor** - Ideal for PC display
 Day - For ISF Calibration, you can press the colour key
  APPLY ALL to copy the calibrated settings to all sources.
 Night - For ISF Calibration, you can press the colour key
  APPLY ALL to copy the calibrated settings to all sources.
- Expert - Restore the PQ settings linked to the picture style Expert
* Picture style - Game is only available in HDMI video source.
** Picture style - Monitor is only available when HDMI source video is applicable for PC application. HDR is not supported in Monitor mode. The TV is able to play HDR video in Monitor mode but no HDR processing will be applied.
When TV receives HDR signal (Hybrid Log Gamma, HDR10 and HDR10+), select a picture style below:
- HDR Personal
- HDR Vivid
- HDR Natural
- HDR Movie
- HDR Game
 Day - For ISF Calibration
 Night - For ISF Calibration
- HDR Expert
When TV receives Dolby Vision HDR signal, select a picture style below:
- HDR Personal
- HDR Vivid
- Dolby Vision Bright
- Dolby Vision Dark
- Dolby Vision Game
Restore a Style
- Select the picture style you want to restore.
- Press the colour key
 Restore style, and press OK. The style is restored.
Customise a Style
Any picture setting you adjust, like Colour or Contrast, is stored in the currently selected Picture Style. It allows you to customise each style. Only the style Personal can save its settings for each source in the Sources menu.
Colour, Contrast, Sharpness, Brightness
Adjust the picture colour
 Settings > Picture > Colour.
Press the arrows  (up) or
  (down) to adjust the colour saturation value of the picture.
Adjust the picture contrast
 Settings > Picture > Backlight contrast or OLED contrast.
Press the arrows  (up) or
  (down) to adjust the contrast value of the picture.
You can decrease contrast value to reduce power consumption.
Adjust the picture sharpness
 Settings > Picture > Sharpness.
Press the arrows  (up) or
  (down) to adjust the sharpness value of the picture.
Adjust brightness
 Settings > Picture > Brightness.
Press the arrows  (up) or
  (down) to set the level of brightness of the picture signal.
Note: Setting of brightness much away from reference value (50) may result lower contrast.
Advanced Picture Settings
Picture Clean
Noise reduction
 Settings > Picture > Advanced > Picture clean > Noise reduction.
Select Maximum, Medium, or Minimum to set the level for removing the noise in video content. Noise is mostly visible as small moving dots in onscreen picture.
MPEG Artefact Reduction
 Settings > Picture > Advanced > Picture clean > MPEG Artefact Reduction.
Select Maximum, Medium, or Minimum to have different degress of smoothing the artefects in digital video content. MPEG artefacts are mostly visible as small blocks or jagged edges in on-screen images.
Advanced Sharpness Settings
Ultra Resolution
 Settings > Picture > Advanced > Sharpness > Ultra Resolution.
Select On to have a superior sharpness in line edges and details.
Colour Settings
Advanced Colour Settings
 Settings > Picture > Advanced > Colour.
Adjust the colour enhancement
 Settings > All settings > Picture > Advanced > Colour > Colour enhancement.
Select Maximum, Medium, or Minimum to set the level of the colour intensity and the details in bright colours.
Note: Not available when Dolby Vision signal is detected.
Adjust the colour gamut
 Settings > All settings > Picture > Advanced > Colour > Colour gamut.
Select Normal or Wide to set the type of colour gamut.
Note: Not available when wide colour gamut signal is detected.
Select the preset colour temperature
 Settings > Picture > Advanced > Colour > Co lour temperature.
Select Normal, Warm, or Cool to set the colour temperature for your preference.
Whitepoint alignment
 Settings > Picture > Advanced > Colour > Whitepoint alignment.
Customise the whitepoint alignment based on the selected colour temperature of the picture. Press the arrows  (up) or
  (down) to adjust the value.
Colour control (Hue and Saturation)
 Settings > Picture > Advanced > Colour > Colour control.
Press the arrows  (up) or
  (down) to adjust the value of Hue and Saturation for the colour Red, Yellow, Green, Cyan, Blue and Magenta. Press the colour key
  Reset to rest the picture style. If you want to reset all value to default, select Reset all.
Note: Available only when picture style is ISF Day or ISF Night.
RGB only mode
 Settings > Picture > Advanced > Colour > RGB only mode.
Select Red, Green or Blue to switch picture as selected colour only, or select Off to turn off RGB mode.
Note: Available only when picture style is ISF Day or ISF Night.
Advanced Contrast Settings
Contrast Modes
 Settings > Picture > Advanced > Contrast > Contrast mode.
Select Normal, Optimized for picture, or Optimized for energy savings to set the TV automatically reduces the contrast, for best power consumption or for best picture experience, or select Off to switch off the adjustment.
HDR Settings
If you are watching HDR programmes - programmes recorded in HDR - there is no need to upscale to HDR and the HDR Upscaling Control is unavailable. The TV will automatically switched to HDR mode with indication.
TV supports following HDR formats: Hybrid Log Gamma, HDR10, HDR10+, and Dolby Vision but it is subject to the availability of such HDR format in content providers.
HDR Upscaling
 Settings > Picture > Advanced > Contrast > HDR Upscaling.
Select On to boost the brightness and contrast of the picture. The picture is much brighter and has a higher level of contrast between lighter and darker parts. HDR upscaling keeps colours rich and saturated. Not available when video content is supported HDR.
HDR Plus
 Settings > Picture > Advanced > Contrast > HDR Plus.
Select HDR Plus for superior contrast and brightness effect.
Note: Available when HDR (High-Dynamic Range) signal is detected.
Dynamic Contrast
 Settings > Picture > Advanced > Contrast > Dynamic contrast. Select Maximum, Medium, or Minimum to set the level at which the TV automatically enhances the details in the dark, middle and light areas of the picture.
Note: Not available when HDR signal is detected. Not available in Monitor mode.
Video Contrast, Gamma
Video contrast
 Settings > Picture > Advanced > Contrast > Video contrast.
Press the arrows  (up) or
  (down) to adjust the video contrast level.
Gamma
 Settings > Picture > Advanced > Contrast > Gamma.
Press the arrows  (up) or
  (down) to set a nonlinear setting for picture luminance and contrast.
Light Sensor
 Settings > Picture > Advanced > Contrast > Light sensor.
Select On to adjust the picture settings automatically to the lighting conditions of the room. Motion Settings Motion Styles
Motion Styles
 Settings > Picture > Advanced > Motion > Motion styles.
Motion styles provides optimised motion setting modes for different video content.
Select one of the motion styles to have different viewing experience on motion video. (Off, Pure Cinema, Movie, Standard, Smooth, Personal)
Not available for below cases:
 Settings > Picture > Picture style > Monitor
 Settings > Picture > Picture style > Game
Natural Motion
 Settings > Picture > Advanced > Motion > Natural Motion.
Natural Motion makes any movement smooth and fluent.
Select from 0 to 10 to have different degress for reducing the motion judder, visible in movies on TV. Select 0 when noise appears in playing moving picture on-screen.
Note: Only available when Motion styles set to Personal.
Picture Format
If the picture is not filling the whole screen, if black bars are showing on the top or bottom or at both sides, you can adjust the picture to fill the screen completely.
To select one of the basic settings to fill the screen…
- While watching a TV channel, select
 Settings > Picture Format > Fill Screen, Fit to Screen, Wide Screen and Original, and press OK.
- Press
 (left) repeatedly if necessary, to close the menu.
- Fill Screen – automatically enlarges the picture to fill the screen. Picture distortion is minimal, subtitles remain visible. Not suitable for PC input. Some extreme picture content can still show black bars. Picture content aspect ratio may change.
- Fit to Screen – automatically zooms in the picture to fill the screen without distortion. Black bars may be visible. Not suitable for PC input.
- Wide Screen – automatically zooms in the picture to 16:9 full screen. Picture content aspect ratio may change.
- Original – automatically zooms in the picture to fit the screen with original aspect ratio. No content lost visible.
To format the picture manually…
- While watching a TV channel, select
 Settings > Picture Format > Advanced and press OK.
- Use Shift, Zoom, and Stretch to adjust the picture.
- Or select Undo to return to the setting the picture had when you opened Picture Format.
- Shift – Select on the arrows to shift the picture. You can only shift the picture when it is zoomed in.
- Zoom – Select on the arrows to zoom in
- Stretch – Select on the arrows to stretch the picture vertically or horizontally.
- Undo – Select to return to the picture format you started with.
Dolby Vision Notification
 Settings > Picture > Dolby Vision notification.
Switch On or Off the Dolby Vision notification when Dolby Vision content begins to play on your TV.
Quick Picture Setting
During the first installation, you did some picture settings in a few easy steps. You can redo these steps with Quick Picture Setting.
To set the picture in a few easy steps…
- Select
 Settings > Picture and press
  (right) to enter the menu.
- Select Quick Picture Setting, and press OK.
- Use the navigation keys to select your preferable brightness, contrast, colour and sharpness settings.
- Select Finish or press
 (left) repeatedly if necessary, to close the menu.
Sound
Sound Style
Select a style
 Settings > Sound > Sound style.
For easy sound adjustment, you can select a preset setting with sound style.
- AI mode - There are ideal styles for watching movies, listening to music or playing a game. Select AI mode for intelligent switching of sound style base on audio content.
- Original - Most neutral sound setting
- Movie - Ideal for watching movies
- Music - Ideal for listening to music
- Game - Ideal for gaming
- Dialogue - Ideal for speech
- Personal mode - Access to a more in depth sound settings.
Restore Personal mode
- Set the sound style to Personal mode.
- Press the colour key
 Restore Style, and press OK. The style is restored.
Customise Personal mode
- Set the sound style to Personal mode.
- Press the colour key
 Customise, and press OK to change
Personal mode settings.
Speaker virtualizer
 Settings > Sound > Personal mode settings > Speaker virtualizer.
Select On or Auto (Dolby Atmos) to enable Dolby Atmos which can add height dimension in sound. With height dimension, sound can be precisely placed and moved in three-dimensional space.
Clear dialogue
 Settings > Sound > Personal mode settings > Clear dialogue > On.
Select On to get an improved sound quality for speech programme.
AI Equalizer
 Settings > Sound > Personal mode settings > AI Equalizer.
Select On to enable intelligent equalizer adjustment based on audio content and custom settings.
Custom AI Equalizer
 Settings > Sound > Personal mode settings > Custom AI Equalizer.
Press the arrows  (up) or
  (down) to adjust the level of AI Equalizer.
TV placement
 Settings > Sound > TV placement.
Select On a TV stand or On the wall to have best sound reproduction according to the setting. DTS Play-Fi
DTS Play-Fi
 Settings > Sound > DTS Play-Fi.
With DTS Play-Fi on your Philips TV, you can connect to compatible speakers to stream audio wirelessly to other rooms in your house.
Note: Settings for Multiroom TV Audio are not available when connected to the DTS Play-Fi Headphones app or playing music from the DTS PlayFi app.
To stream audio wirelessly to speakers, you will need...
- Philips Android Smart TV that supports DTS Play-Fi
- DTS Play-Fi compatible device
- DTS Play-Fi app on your Philips TV
- Mobile device such as your phone or tablet
- DTS Play-Fi app or DTS Play-Fi Headphones app installed on your phone or tablet
- Wi-Fi network
Setup to connect DTS Play-Fi compatible device
- Download DTS Play-Fi app or DTS Play-Fi Headphones app and install the App on your phone or tablet.
- Use DTS Play-Fi app or DTS Play-Fi Headphones app to search and setup DTS Play-Fi compatible device. Make sure the DTS Play-Fi device is connected with same Wi-Fi network of your TV.
- On your Philips TV, open the pre-installed DTS Play-Fi app and select Connect Speakers to search DTS Play-Fi compatible devices.
- When the DTS Play-Fi devices is successfully connected with your TV, you can select the devices from device list and adjust the volume.
- Now you can start to stream audio from your TV to multiple DTS Play-Fi devices.
Advanced Sound Settings
Volume Control
Auto volume
 Settings > Sound > Advanced > Auto volume.
Select On or Off to switch on or off the auto volume adjustment.
Select Night Mode for a more comfortable quiet listening experience.
Delta volume
 Settings > Sound > Advanced > Delta volume.
The Delta volume setting can be used to adjust to balance the sound level difference between the TV channel and the HDMI source input. Press the arrows  (up) or
  (down) to adjust the delta value for TV speaker volume.
Note: Delta volume is available when the input source is set to HDMI or Analogue sources and the Audio out is set to TV speakers or HDMI sound system.
Audio Out Settings
Audio out
 Settings > Sound > Advanced > Audio out.
Set the TV to play the sound on TV or on the connected audio system.
You can select where you want to hear the TV sound and how you want to control it.
- If you select TV speakers off, you permanently switch off the TV speakers.
- If you select TV speakers, the TV speakers are always on. With an audio device connected with HDMI CEC, select HDMI sound system. The TV will switch off the TV speakers when the device is playing the sound.
eARC
 Settings > Sound > Advanced > eARC. Set eARC mode to Auto or Off.
Digital Output Settings
Digital output settings are available for optical and HDMI ARC sound signals.
Digital out format
 Settings > Sound > Advanced > Digital out format.
Set the audio out signal of the TV to fit the sound capabilities of the connected Home Theatre System.
- Stereo (uncompressed): If your audio playback devices have no multichannel sound processing, select to only output stereo content to your audio playback devices.
- Multichannel: Select to output multichannel audio content (compressed multichannel sound signal) or stereo audio content to your audio playback devices.
- Multichannel (bypass): Select to output Dolby Digital Plus or DTS content to your audio playback devices or Home theatre system.
- Make sure your audio playback devices support Dolby Atmos feature.
- SPDIF output (DIGITAL AUDIO OUT) will be disabled when streaming Dolby Digital Plus content.
Digital out levelling
 Settings > Sound > Advanced > Digital out levelling.
Adjust the loudness level from device which is connected to digital audio output (SPDIF) or HDMI.
- Select More to have louder volume.
- Select Less to have softer volume.
Digital out delay
 Settings > Sound > Advanced > Digital out delay.
For some Home Theatre Systems you might need to adjust the audio sync delay to synchronise the audio to the video. Select Off if a sound delay is set on your Home Theatre System.
Digital out offset (Only available when Digital out delay set to On)
 Settings > Sound > Advanced > Digital out offset.
If you cannot set a delay on the Home Theatre System, you can set the TV to sync the sound. You can set an offset that compensates for the time necessary for the Home Theatre System to process the sound of the TV picture. You can set the value in steps of 5ms. Maximum setting is 60ms.
Dolby Atmos Notification
 Settings > Sound > Dolby Atmos notification.
Switch On or Off the Dolby Atmos notification when Dolby Atmos content begins to play on your TV.
Ambilight Settings
Turn Ambilight On or Off Turn off Ambilight
Press  and select Off, or you can turn Off by pressing
  Settings > Ambilight > Ambilight style > Off.
Ambilight Style
You can select the way Ambilight follows.
 Settings > Ambilight > Ambilight style.
Follow video
 Settings > Ambilight > Ambilight style > Follow video.
Select one of the styles that follow the dynamics of the picture on your TV screen.
- Standard - Ideal for day to day TV watching
- Natural - Follows the picture or sound as truthful as possible
- Sports - Ideal for sports programme
- Vivid - Ideal for daylight conditions
- Game - Ideal for gaming
Follow audio
 Settings > Ambilight > Ambilight style > Follow audio.
Select one of the styles that follow the dynamics of the sound.
- Lumina - Mixes audio dynamics with video colours
- Retro - Based on audio dynamics
- Rhytm - Based on audio dynamics
Lounge light
 Settings > Ambilight > Ambilight style > Lounge light.
Select one of the preset colour styles.
- Hot lava - Red colour variations
- Deep water - Blue colour variations
- Fresh nature - Green colour variations
 Warm white / ISF - Static colour
- Custom colour - Static colour of your choice. To set the colour for Ambilight static light, go to
 Settings > Ambilight > Custom colour and pick a colour you like.
Follow flag
 Settings > Ambilight > Ambilight style > Follow flag.
Let Ambilight follow the country flag you select.
Follow app
 Settings > Ambilight > Ambilight style > Follow app.
This function is available when you control Ambilight with an app.
Custom Colour
 Settings > Ambilight > Custom colour.
To set the colour for Ambilight static light of your choice. You can pick a colour you like from the colour palette.
Advanced Ambilight Settings
Brightness
 Settings > Ambilight > Advanced > Brightness. Press the arrows (up) or (down) to set the level of Ambilight brightness.
Saturation
 Settings > Ambilight > Advanced > Saturation. Press the arrows (up) or (down) to set the level of Ambilight saturation.
Ambilight bottom side
 Settings > Ambilight > Advanced > Ambilight bottom side. Switch Ambilight bottom side on or off.
Brightness bottom side
 Settings > Ambilight > Advanced > Brightness bottom side.
If Ambilight bottom side is turned on, press the arrows (up) or (down) to adjust the level of brightness of Ambilight bottom side.
Neutralise the influence of a coloured wall on the Ambilight colours
 Settings > Ambilight > Advanced > Wall colour.
Select the colour of the wall behind the TV and the TV will modify the Ambilight colours to appear as they are intended.
Set Ambilight to switch off immediately or slowly fade out when you switch off the TV
 Settings > Ambilight > Advanced > TV switch off > Fade out to off / Immediate switch off.
 ISF Tuning
 Settings > Ambilight > Advanced >
  ISF tuning.
The ISF Calibration expert tunes and locks your preferred colour for Ambilight. When the ISF Calibration is done, select  Settings > Ambilight > Ambilight style > Follow colour >
  Warm white / ISF to use ISF tuning for Ambilight.
Eco Settings
Set screen off to save energy consumption
 Settings > Eco settings > Screen off.
Select Screen off, the TV screen is switched off, to switch the TV screen back on, press any key on the remote control.
Switch on built-in ambient light sensor
 Settings > Eco settings > Light sensor. Select Light sensor, the built-in ambient light sensor lowers the brightness of the TV screen when the surrounding light darkens. The built-in light sensor automatically adjusts the picture, to the lighting conditions of the room.
Set TV switch off timer
 Settings > Eco settings > Switch off timer.
Press the arrows  (up) or
  (down) to adjust the value. The value 0 (Off) deactivates the automatic switch off.
Select Switch off timer, the TV switches off automatically to save energy.
* TV switches off if receiving a TV signal but you don't press a key on the remote control during a 4 hour period.
* TV switches off if not receiving a TV signal nor a remote control command for 10 minutes.
* If you use the TV as a monitor or use a digital receiver to watch TV (a Set-Top Box - STB) and you do not use the remote control of the TV, you should deactivate this automatic switch off, to set the value to 0.
General Settings
USB Hard Drive
You need to set up and format a USB Hard Drive before you record a channel.
 Settings > General settings > USB Hard Drive.
Before you can pause or record a broadcast, or store apps, you must connect and format a USB Hard Drive. Formatting removes all files from the USB Hard Drive.
Warning
The USB Hard Drive is formatted exclusively for this TV, you cannot use the stored recordings on another TV or PC. Do not copy or change recording files on the USB Hard Drive with any PC application. This will corrupt your recordings. When you format another USB Hard Drive, the content on the former will be lost. A USB Hard Drive installed on your TV will need reformatting for use with a computer.
* Connect the USB Hard Drive with size less than 2TB.
To format a USB Hard Drive…
- Connect the USB Hard Drive to one of the USB connections on the TV. Do not connect another USB device to the other USB ports when formatting.
- Switch on the USB Hard Drive and the TV.
- Select Recordings if you want to perform Pause TV and Recordings, otherwise, select Apps to store apps. Follow the instructions on screen.
- All files and data will be removed after formatting.
- When the USB Hard Drive is formatted, leave it connected permanently.
USB Keyboard Settings
Set the keyboard layout for installed USB keyboard
 Settings > General settings > USB keyboard settings.
Connect the USB keyboard to one of the USB connections on this TV. When the TV detects the keyboard for the first time, you can select your keyboard lay-out and test your selection.
Home or Shop
Select the location of your TV
 Settings > General settings > Location. Select Shop, the picture style is switched back to Vivid, and can adjust shop settings. Shop mode is for in-store promotion.
Shop Setup
Adjust shop settings
 Settings > General settings > Shop setup.
If the TV is set to Shop, you can set the availablility of a specific demo for in store use.
Adjust Picture and audio
 Settings > General settings > Shop setup > Picture and audio.
Select Optimized for shop or custom for picture and audio settings.
Set Logos and banner
 Settings > General settings > Shop setup > Logos and banner.
Set to display Feature logos and Promotional banner.
Demo Me autostart and Ambilight Demo autostart
 Settings > General settings > Shop setup > Demo Me autostart / Ambilight Demo autostart.
Turn On/Off the Demo Me or Ambilight Demo autostart
EasyLink - HDMI CEC
Connect HDMI CEC-compatible devices to your TV, you can operate them with the TV remote control.
EasyLink HDMI CEC must be switched on on the TV and the connected device.
Switch on EasyLink
 Settings > General settings > EasyLink > EasyLink > On.
Operate HDMI CEC-compatible devices with TV remote control '
 Settings > General settings > EasyLink > EasyLink remote control > On.
Note:
- EasyLink might not work with devices from other brands.
- The HDMI CEC functionality has different names on different brands. Some examples are: Anynet, Aquos Link, Bravia Theatre Sync, Kuro Link, Simplink and Viera Link. Not all brands are fully compatible with EasyLink. Example HDMI CEC branding names are property of their respective owners.
HDMI Ultra HD
This TV can display Ultra HD signals. Some devices - connected with HDMI - do not recognise a TV with Ultra HD and might not work correctly or show distorted picture or sound.
To avoid the malfunctioning of such a device, you can adjust HDMI Ultra HD setting when TV is in the HDMI source. Recommended setting for legacy device is Standard.
Set the signal quality for each HDMI connectors
 Settings > General settings > HDMI Ultra HD > HDMI (port) > Standard, Optimal, or Optimal (Auto Game).
To change the settings, switch to the HDMI source first. Select Optimal to enable the highest quality HDMI signal for 4K Ultra HD and HDR content (4K60 4:4:4, 4K60 10 or 12-bit HDR).
- The setting Optimal allows maximum up to Ultra HD (50 Hz or 60Hz) RGB 4:4:4 or YCbCr 4:4:4/4:2:2/4:2:0 signals.
- The setting Standard allows maximum up to Ultra HD (50 Hz or 60Hz) YCbCr 4:2:0 signals.
Maximum supported video timing format for HDMI Ultra HD options:
- Resolution: 3840 x 2160
- Frame rate (Hz): 50Hz, 59.94Hz, 60Hz
- Video data sub-sampling (bit-depth)
- 8 bit: YCbCr 4:2:0, YCbCr 4:2:2*, YCbCr 4:4:4*, RGB 4:4:4*
- 10 bit: YCbCr 4:2:0*, YCbCr 4:2:2*
- 12 bit: YCbCr 4:2:0*, YCbCr 4:2:2*
* Supported only when HDMI Ultra HD is set to Optimal.
Select Standard if the picture or sound are distorted.
- Set Optimal (Auto Game) to enable TV to support the HDMI Variable Refresh Rate* video (on some models only and the Picture style setting is not Monitor). TV will automatically set Picture/Sound style to Game whenever it is informed by the HDMI device connected to TV.
* With HDMI Variable Refresh Rate supported, the TV changes its refresh rate in real time according to the frame rate signal to synchronize with every picture. It is applied to reduce the lag, judder and frame tearing for better gaming experience.
Note: To watch HDR10+ or Dolby Vision content from HDMI source, you may need to power off your player and power on again when the player connected to TV playing such content for the first time. HDR10+ or Dolby Vision content is supported only when HDMI Ultra HD is set to Optimal or Optimal (Auto Game).
Auto Movie Mode
Set the Auto movie mode
 Settings > General settings > Auto movie mode.
Set Auto movie mode to On, if you want TV to automatically set Picture style to Movie when movie contents is detected.
Advanced
HbbTV Settings - Hybrid Broadcast Broadband TV
Switch on HbbTV
 Settings > General settings > Advanced > HbbTV settings > HbbTV > On.
Switch off HbbTV History Tracking
 Settings > General settings > Advanced > HbbTV settings > HbbTV tracking > Off.
Remove HbbTV Cookies
 Settings > General settings > Advanced > HbbTV settings > HbbTV cookies > On.
Clear approved app listing
 Settings > General settings > Advanced > HbbTV settings > Clear approved app listing.
To clear all User's approved HbbTV applications.
HbbTV Device ID reset
 Settings > General settings > Advanced > HbbTV settings > HbbTV Device ID reset.
You can reset your TV unique device identifier. A new identifier will be created. This will replace your Device ID with a new identifier.
CAM Profile Name and CAM Priority
Set profile name for installed CI+/CAM
 Settings > General settings > CAM profile name.
Select the type of CI+/CAM
 Settings > General settings > CAM priority.
Select USB to enable the USB CAM, then the PCMCIA CAM will be disabled. Select PCMCIA to enable the PCMCIA CAM, then the USB CAM will be disabled.
Reset TV Settings and Reinstall TV
Reset all settings value to original TV settings
 Settings > General settings > Factory settings.
Redo full TV installation , and set TV status back to the first time you switch on
 Settings > General settings > Reinstall TV.
Enter PIN code and select Yes, the TV will reinstall completely.
All settings will be reset and installed channels will be replaced.
The installation can take a few minute
Clock, Region, and Language Settings
Language
 Settings > Region and language > Language.
Change the language of the TV menu and messages
 Settings > Region and language > Language > Menu language.
Set audio preference language
 Settings > Region and language > Language > Primary audio, Secondary audio.
Digital TV channels can broadcast audio with several spoken languages for a programme. You can set a preferred primary and secondary audio language. If audio in one of these languages is available, the TV will switch to this audio.
Set subtitle preference language
 Settings > Region and language > Language > Primary subtitle, Secondary subtitle.
Digital channels can offer several subtitle languages for a programme. You can set a preferred primary and secondary subtitle language. If subtitles in one of these languages are available, the TV will show the subtitles you selected.
Set teletex preference language
 Settings > Region and language > Language > Primary text, Secondary text.
Some digital TV broadcasters have several Text languages available.
Clock
 Settings > Region and language > Clock.
Correct clock automatically
 Settings > Region and language > Clock > Auto clock mode.
- The standard setting for the TV clock is Automatic. The time information comes from the broadcasted UTC - Coordinated Universal Time information.
- If the clock is not correct, you can set the TV clock to Country dependent.
Correct clock manually
 Settings > Region and language > Clock > Auto clock mode > Manual.
 Settings > Region and language > Clock > Date, Time.
Go to previous menu, and select Date and Time to adjust the value.
Note:
- If none of the automatic settings display the time correctly, you can set the time manually.
- If you schedule recordings from the TV Guide, we recommend not to change the time and date manually.
Set time zone or set a time offset for your region (Only available for certain countries)
 Settings > Region and language > Clock > Time zone.
Time zone setting is only available when Auto clock mode is set to Automatic or Country dependant.
Set the TV to switch to Standby automatically after a preset time
 Settings > Region and language > Clock > Sleep timer.
Android Settings
 Settings > Android settings.
View the list of installed Apps, check out the free space to download more or uninstall an App.
Universal Access Settings
 Settings > Universal access.
With Universal Access switched on, the TV is prepared for use for the deaf, hard of hearing, blind or partially sighted people.
Switch on universal access settings
 Settings > Universal access > Universal access > On.
Universal access for hearing impaired people
 Settings > Universal access > Hearing impaired > On.
- Some digital TV channels broadcast special audio and subtitles adapted for the hard of hearing or deaf people.
- Switched on, the TV automatically switches to the adapted audio and subtitles, if available.
Universal access for blind or partially sighted people
 Settings > Universal access > Audio description > Audio description > On.
Digital TV channels can broadcast special audio commentary describing what is happening on screen.
 Settings > Universal access > Audio description > Mixed volume, Audio effects, Speech.
- Select Mixed volume, you can mix the volume of the normal audio with the audio commentary. Press the arrows
 (up) or
  (down) to adjust the value.
- Set Audio effect to On for extra audio effects in the commentary audio, like stereo or fading sound.
- Select Speech to set speech preference, Descriptive or Subtitles.
Dialogue enhancement
 Settings > Universal access > Dialogue enhancement.
Increase the intelligibility of dialogue and commentary, if available. Only available when sound setting Clear dialogue is On and audio stream is AC-4.
Lock Settings
Set Code and Change Code
Set a new code or reset the change code
 Settings > Child lock > Set code / Change code. The child lock code is used to lock or unlock channels or programmes.
Note: If you forgot your PIN code, you can override the current one by using the code 8888 and entering a new one.
Lock for Programme
Set a minumum age to watch rated programmes
 Settings > Child lock > Parental rating.
Lock for App
Set lock on Philips apps
 Settings > Child lock > App lock.
You can lock apps unsuited for children. You can lock 18+ rated apps from the Philips apps or set up a restricted profile in the Home menu.
18+
The 18+ app lock will ask for a PIN code when you try to start an 18+ rated app. This lock is only valid for 18+ rated apps from the Philips apps.
Restricted profile
You can set up a restructed profile for the Home menu where only the apps you allow are available. You need to enter a PIN code to set up and switch on the restricted profile.
Google Play Store - Maturity
In the Google Play Store, you can hide apps according to users/buyers maturity. You need to enter a PIN code to select or change the level of maturity. The level of maturity will determine which apps are available for installation.
Lock for CAM
Set CAM PIN for recording
 Settings > Child lock > CAM PIN.
TV Guide
What You Need
With the TV Guide you can view a list of the current and scheduled TV programmes of your channels. Depending on where the TV guide information (data) is coming from, analogue and digital channels or only digital channels are shown. Not all channels offer TV Guide information.
The TV can collect TV Guide information for the channels that are installed on the TV. The TV cannot collect the TV Guide information for channels viewed from a digital receiver or decoder
TV Guide Data
The TV Guide receives information (data) from broadcasters. In some regions and for some channels, TV Guide information might not be available. The TV can collect TV Guide information for the channels that are installed on the TV. The TV cannot collect the TV Guide information from channels viewed from a digital receiver or decoder.
Using the TV Guide
Open the TV Guide
To open the TV Guide, press TV GUIDE. The TV Guide shows the channels of the selected tuner.
Press  TV GUIDE again to close.
The first time you open the TV Guide, the TV scans all TV channels for programme information. This may take several minutes. TV Guide data is stored on TV.
Tune to a Programme
From the TV Guide, you can tune to a current programme.
To switch to the programme (channel), select the programme and press OK.
View programme details
To call up the details of the selected programme…
- Press + OPTIONS, select Programme Info and press OK.
- Press
 Back to close.
Change Day
The TV Guide can show the scheduled programmes for the upcoming days (maximum up to 8 days).
Press the colour key  Day and select the day you need.
Set a Reminder
You can set a reminder for a programme. A message will alert you at the start of the programme. You can tune to this channel immediately.
In the TV Guide a programme with a reminder is marked with a  (clock).
To set a reminder…
- Press
 TV GUIDE and select an upcoming programme.
- Press + OPTIONS and select Set remider or press the colour key
 Set reminder .
- Press
 Back to close the menu.
To clear a reminder…
- Press
 TV GUIDE and select a programme with the reminder.
- Press + OPTIONS and select Clear remider or press the colour key
 Clear reminder .
- Press
 Back to close the menu.
Search by Genre
If the information is available, you can look up scheduled programmes by genre like movies, sports, etc.
To search for programmes by genre…
- Press
 TV GUIDE.
- Press + OPTIONS.
- Select Search by genre and press OK.
- Select the genre you want and press OK. A list with the found programmes appears.
- You can set reminders or schedule a recording on a selected programme.
- Press
 Back to close the menu.
For more information on Recording, press the colour key  Keywords and look up Recording.
* Note: The Search by genre function is only available for certain countries.
List of Reminders
You can view a list of the reminders you have set.
List of Reminders
To open the list of reminders…
- Press
 TV GUIDE.
- Press the colour key
 Scheduled .
- At the top of the screen, select
 scheduled and press OK.
- In the list of scheduled recordings and reminders, select the tab Reminders and press OK to view the reminders only.
- Press the colour key
 Remove to remove the selected reminder. Press the colour key
  Record to record the selected programme.
- Press
 Back to close the menu.
Set a Recording
You can set a recording in the TV Guide*.
To see the recording list, press  Recordings , a programme set to be recorded is marked with a
  (red dot) on the front of the programme name.
To record a programme…
- Press
 TV GUIDE and select a future or ongoing programme.
- Press the colour key
 Record .
- Press
 Back to close the menu.
To cancel a recording…
- Press
 TV GUIDE and select the programme set for recording.
- Press the colour key
 Clear Recording .
- Press
 Back to close the menu.
To record a TV programme you need…
- a connected USB Hard Drive formatted on this TV
- digital TV channels installed on this TV
- to receive channel information for the on screen TV Guide
- a reliable TV clock setting. If you reset the TV clock manually, recordings may fail.
Smartphones and Tablets
Philips TV Remote App
The new Philips TV Remote App on your smartphone or tablet is your new TV buddy.
With the TV Remote App, you master your media around you. Send photos, music or videos to your big TV screen. Look up what you want to watch on the TV Guide and watch it on your TV. With the TV Remote App you can use your phone as a remote control, TV can be switched on or off via your phone.
Download the Philips TV Remote App from your favourite app store today.
The Philips TV Remote App is available for iOS and Android and is free of charge.
Google Cast
What You Need
If an app on your mobile device has Google Cast, you can cast your app on this TV. On the mobile app, look for the Google Cast icon. You can use your mobile device to control what's on TV. Google Cast works on Android and iOS.
Your mobile device must be connected to the same Wi-Fi home network as your TV.
Apps with Google Cast
New Google Cast apps come available every day. You can already try it with YouTube, Chrome, Netflix, Photowall … or Big Web Quiz for Chromecast.
Cast to Your TV
To cast an app to the TV screen…
- On your smartphone or tablet, open an app that supports Google Cast.
- Tab the Google Cast icon.
- Select the TV you would like to cast to.
- Press play on your smartphone or tablet. What you selected should start playing on TV.
Troubleshooting
Switch On and Remote Control
The TV does not switch on
- Disconnect the power cable from the power outlet. Wait for one minute then reconnect it.
- Make sure that the power cable is securely connected.
Creaking sound at startup or switch off
When you are switching the TV on, off or to standby, you hear a creaking sound from the TV chassis. The creaking sound is due to the normal expansion and contraction of the TV as it cools and warms up. This does not affect performance.
TV does not respond to the remote control
The TV requires some time to start up. During this time, the TV does not respond to the remote control or TV controls. This is normal behaviour.
If the TV continues to be unresponsive to the remote control, you can check if the remote control is working by means of a mobile phone camera. Put the phone in camera mode and point the remote control to the camera lens. If you press any key on the remote control and you notice the infra red LED flicker through the camera, the remote control is working. The TV needs to be checked.
If you do not notice the flickering, the remote control might be broken or its batteries are low. This method of checking the remote control is not possible with remote controls which are wirelessly paired with the TV.
The TV goes back to standby after showing the Philips startup screen
When the TV is in standby, a Philips startup screen is displayed, then the TV returns to standby mode. This is normal behaviour. When the TV is disconnected and reconnected to the power supply, the startup screen is displayed at the next startup. To switch on the TV from standby, press  on the remote control or on the TV.
The standby light keeps on blinking
Disconnect the power cable from the power outlet. Wait 5 minutes before you reconnect the power cable. If the blinking reoccurs, contact Philips TV Consumer Care.
Channels
No digital channels found during the installation
See the technical specifications to make sure that your TV supports DVB-T or DVB-C in your country. Make sure that all cables are properly connected and that the correct network is selected.
Previously installed channels are not in the channel list
Make sure that the correct channel list is selected.
Picture
No picture / distorted picture
- Make sure that the antenna is properly connected to the TV.
- Make sure that the correct device is selected as the display source.
- Make sure that the external device or source is properly connected.
Sound but no picture
- Change to other video sources and then change back to current source, then do picture style restore in Picture settings or do Factory reset in General settings option.
Poor antenna reception
- Make sure that the antenna is properly connected to the TV.
- Loud speakers, unearthed audio devices, neon lights, high buildings and other large objects can influence reception quality. If possible, try to improve the reception quality by changing the antenna direction or moving devices away from the TV.
- If reception on only one channel is poor, fine-tune this channel with Manual Installation.
Poor picture from a device
- Make sure that the device is connected properly. Make sure the device's output video setting is the highest possible resolution if applicable.
- Restore picture style or change to other picture styles.
Picture settings change after a while
Make sure that Location is set to Home . You can change and save settings in this mode.
A commercial banner appears
Make sure that Location is set to Home.
Picture does not fit the screen
- Change to a different picture format.
- Change Picture format to Original.
Picture position is incorrect
- Picture signals from some devices may not fit the screen correctly. Check the signal output of the connected device.
- Change Picture format to Original.
Computer picture is not stable
- Make sure that your PC uses the supported resolution and refresh rate.
- Make sure HDMI video source is not supported HDR content.
Sound
No sound or poor sound quality
If no audio signal is detected, the TV automatically switches the audio output off — this does not indicate malfunction.
- Make sure that the sound settings are correctly set.
- Make sure that all cables are properly connected.
- Make sure that the volume is not muted or set to zero.
- Make sure that the TV audio output is connected to the audio input on the Home Theatre System. Sound should be heard from the HTS speakers.
- Some devices may require you to manually enable HDMI audio output. If HDMI audio is already enabled, but you still do not hear audio, try changing the digital audio format of the device to PCM (Pulse Code Modulation). Refer to the documentation accompanying your device for instructions.
HDMI and USB
HDMI
- Note that HDCP (High-bandwidth Digital Content Protection) support can delay the time taken for a TV to display content from an HDMI device.
- If the TV does not recognise the HDMI device and no picture is displayed, switch the source from one device to another and back again.
- If the picture and sound of a device connected to HDMI is distorted, connect the device to another HDMI port on TV and power reboot your source device.
- If the picture and sound of a device connected with HDMI is distorted, check if a different HDMI Ultra HD setting can solve this problem. In Help, press the colour key
 Keywords and look up HDMI Ultra HD.
- If there are intermittent sound disruptions, make sure that output settings from the HDMI device are correct.
- If you use an HDMI-to-DVI adapter or HDMI-to-DVI cable, make sure that an additional audio cable is connected to AUDIO IN (mini-jack only), if available.
HDMI EasyLink does not work
- Make sure that your HDMI devices are HDMI-CEC compatible. EasyLink features only work with devices that are HDMI-CEC compatible.
No volume icon shown
- When an HDMI-CEC audio device is connected and you use the TV Remote Control to adjust the volume level from the device, this behaviour is normal.
- Photos, videos and music from a USB device do not show
- Make sure that the USB storage device is set to Mass Storage Class compliant, as described in the storage device's documentation.
- Make sure that the USB storage device is compatible with the TV.
- Make sure that the audio and picture file formats are supported by the TV. Choppy playback of USB files
- The transfer performance of the USB storage device may limit the data transfer rate to the TV which causes poor playback.
Network
Wi-Fi network not found or distorted
- Microwave ovens, DECT phones or other Wi-Fi 802.11b/g/n/ac devices in your proximity might disturb the wireless network.
- Make sure that the firewalls in your network allow access to the TV's wireless connection.
- If the wireless network does not work properly in your home, try the wired network installation. Internet does not work
- If the connection to the router is OK, check the router connection to the Internet.
The PC and Internet connection are slow
- Look in your wireless router's user manual for information on indoor range, transfer rate and other factors of signal quality.
- Use a high-speed (broadband) Internet connection for your router.
DHCP
- If the connection fails, you can check the DHCP (Dynamic Host Configuration Protocol) setting of the router. DHCP should be switched on.
Bluetooth
Unable to pair
- Make sure the device is in pairing mode. Read the user manual of the device.
- Keep the wireless speaker as close to the TV as possible.
- Trying to pair several devices with the TV at the same time, may not work.
Bluetooth lost connection
- Always position the wireless speaker within a range of 5 meters from the TV.
Bluetooth Audio and Video syncronisation
- Before you purchase a wireless Bluetooth speaker, inform yourself about its quality of Audio to Video syncronisation, commonly called 'lip sync'. Not all Bluetooth devices perform correctly. Ask your dealer for advice.
Wrong Menu Language
Wrong menu language
Change the language back to your language.
- Press
 HOME to go to Home screen .
- Select the
 icon (Settings) from System bar on the top of Home screen and press OK.
- Press 5 times
 (down).
- Press 3 times
 (right), select your language and press OK.
- Press
 Back to close the menu.
Safety and Care
Safety
Important
Read and understand all safety instructions before you use the TV. If damage is caused by failure to follow instructions, the warranty does not apply.
Risk of Electric Shock or Fire
- Never expose the TV to rain or water. Never place liquid containers, such as vases, near the TV. If liquids are spilt on or into the TV, disconnect the TV from the power outlet immediately. Contact Philips TV Consumer Care to have the TV checked before use.
- Never expose the TV, remote control or batteries to excessive heat. Never place them near burning candles, naked flames or other heat sources, including direct sunlight.
- Never insert objects into the ventilation slots or other openings on the TV.
- Never place heavy objects on the power cord.
- Avoid force coming onto power plugs. Loose power plugs can cause arcing or fire. Ensure that no strain is exerted on the power cord when you swivel the TV screen.
- To disconnect the TV from the mains power, the power plug of the TV must be disconnected. When disconnecting the power, always pull the power plug, never the cord. Ensure that you have full access to the power plug, power cord and outlet socket at all times.
Risk of Injury or Damage to the TV
- Two people are required to lift and carry a TV that weighs more than 25 kg or 55 lbs.
- If you mount the TV on a stand, only use the supplied stand. Secure the stand to the TV tightly. Place the TV on a flat, level surface that can support the weight of the TV and the stand.
- When wall mounted, ensure that the wall mount can safely bear the weight of the TV set. TP Vision bears no responsibility for improper wall mounting that results in accident, injury or damage.
- Parts of this product are made of glass. Handle with care to avoid injury or damage.
Risk of damage to the TV !
Before you connect the TV to the power outlet, ensure that the power voltage matches the value printed on the back of the TV. Never connect the TV to the power outlet if the voltage is different.
Stability Hazards
A television set may fall, causing serious personal injury or death. Many injuries, particularly to children, can be avoided by taking simple precautions such as:
- ALWAYS ensure the television set is not overhanging the edge of the supporting furniture.
- ALWAYS use cabinets or stands or mounting methods recommended by the manufacturer of the television set.
- ALWAYS use furniture that can safely support the television set.
- ALWAYS educate children about the dangers of climbing on furniture to reach the television set or its controls.
- ALWAYS route cords and cables connected to your television so they cannot be tripped over, pulled or grabbed.
- NEVER place a television set in an unstable location.
- NEVER place the television set on tall furniture (for example, cupboards or bookcases) without anchoring both the furniture and the television set to a suitable support.
- NEVER place the television set on cloth or other materials that may be located between the television set and supporting furniture.
- NEVER place items that might tempt children to climb, such as toys and remote controls, on the top of the television or furniture on which the television is placed.
If the existing television set is going to be retained and relocated, the same considerations as above should be applied.
Risk of Batteries
- Do not ingest the battery. Chemical burn hazard.
- The remote control may contains a coin/button cell battery. If the coin/button cell battery is swallowed, it can cause severe internal burns in just 2 hours and can lead to death.
- Keep new and used batteries away from children.
- If the battery compartment does not close securely, stop using the product and keep it away from children.
- If you think batteries might have been swallowed or placed inside any part of the body, seek immediate medical attention.
- Risk of fire or explosion if the battery is replaced by an incorrect type.
- Replacement of a battery with an incorrect type that can defeat a safeguard (for example, in the case of some lithium battery types).
- Disposal of a battery into fire or a hot oven, or mechanically crushing or cutting of a battery, that can result in an explosion.
- Leaving a battery in an extremely high temperature surrounding environment that can result in an explosion or the leakage of flammable liquid or gas.
- A battery subjected to extremely low air pressure that may result in an explosion or the leakage of flammable liquid or gas.
Risk of Overheating
Never install the TV in a confined space. Always leave a space of at least 10 cm or 4 inches around the TV for ventilation. Ensure curtains or other objects never cover the ventilation slots on the TV.
Lightning Storms
Disconnect the TV from the power outlet and antenna before lightning storms. During lightning storms, never touch any part of the TV, power cord or antenna cable.
Risk of Hearing Damage
Avoid using earphones or headphones at high volumes or for prolonged periods of time.
Low Temperatures
If the TV is transported in temperatures below 5°C or 41°F, unpack the TV and wait until the TV temperature reaches room temperature before connecting the TV to the power outlet.
Humidity
In rare occasions, depending on temperature and humidity, minor condensation can occur on the inside of the TV glass front (on some models). To prevent this, do not expose the TV to direct sunlight, heat or extreme humidity. If condensation occurs, it will disappear spontaneously while the TV is playing for a few hours.
The condensation moisture will not harm the TV or cause malfunction.
Screen Care
- Never touch, push, rub or strike the screen with any object.
- Unplug the TV before cleaning.
- Clean the TV and frame with a soft damp cloth and wipe gently. Avoid touching the Ambilight* LEDs on the backside of the TV. Never use substances such as alcohol, chemicals or household cleaners on the TV.
- To avoid deformations and colour fading, wipe off water drops as quickly as possible.
- Avoid stationary images as much as possible. Stationary images are images that remain onscreen for extended periods of time. Stationary images include onscreen menus, black bars, time displays, etc. If you must use stationary images, reduce screen contrast and brightness to avoid screen damage.
* Ambilight LED is only for models which support Ambilight function.