
NOTE: This manual may be subject to updates or changes. Up to date manuals are available through our website at www.lifespanfitness.com.au
Product may vary slightly from the item pictured due to model upgrades
Read all instructions carefully before using this product. Retain this owner’s manual for future
reference.
SS2 SINGLE STATION
OWNER’S MANUAL

2
SS2 SINGLE STATION
TABLE OF CONTENTS
1. IMPORTANT SAFETY INSTRUCTIONS 3
2. PARTS LIST 4
3. ASSEMBLY INSTRUCTIONS 5
4. WARRANTY 14

3
SS2 SINGLE STATION
1. IMPORTANT SAFETY INSTRUCTIONS
WARNING - Read all instructions before using this machine.
• Assemble the product on a flat level surface
• Place your unit on a solid, level surface when in use
• Never allow children on or near the machine.
• Keep hands away from all moving parts.
• Never drop or insert any object into any openings.
• Care must be taken when lifting or moving the equipment so as not to injure your back. Always use
proper lifting techniques and/or seek assistance if necessary.
• Keep children and pets away from the machine at all times. DO NOT leave children unattended in the
same room with the machine.
• Only 1 person at a time should use the machine.
• If the user experiences dizziness, nausea, chest pain, or any other abnormal symptoms, STOP the
workout at once. CONSULT A PHYSICIAN IMMEDIATELY
• Do not use the machine near water or outdoors.
• Keep hands away from all moving parts.
• Always wear appropriate workout clothing when exercising. DO NOT wear robes or other clothing that
could become caught in the machine. Running or aerobic shoes are also required when using the
machine.
• Use the machine only for its intended use as described in this manual. DO NOT use attachments not
recommended by the manufacturer.
• Do not place any sharp objects around the machine.
• Users with disabilities should not use the machine without a qualified person or physician in attendance.
• Never operate the machine if the machine is not functioning properly.
• A spotter is recommended during exercise.

4
SS2 SINGLE STATION
2. PARTS LIST
#
Description
Specification
Qty.
#
Description
Specification
Qty.
1
Ground piece
1
47
Tube set
50x70
2
2
Ground piece
1
48
Swing arm
1
3
Guide rods
2
49
Plug
Φ50
1
4
Frame piece
1
50
Shaft
1
5
Vertical beam
1
51
Cushion pad
Φ45x35
1
6
Reinforcing pipe
1
52
Pan head screw
M10x20mm
4
7
Seat cushion frame
1
53
Pipe
2
8
Rubber cushion
1
54
Foam
4
9
Pan head screw
M6x16mm
2
55
Plug
4
10
Pipe set
8
56
Pedal
1
11
Tube set
50x70mm
4
57
Cushion
1
12
Frame piece
1
58
Pan head screw
M8x85mm
2
13
Pipe set
50x25mm
4
59
Cushion pad
Φ61xΦ58
2
14
Long axis
1
60
Weights
12
15
Plug
2
61
Shaft lever
1
16
Rubber paste
1
62
Counter Weight
1
17
Washer
Φ10
64
63
Pan head screw
M10x45mm
16
18
Left fly arms
1
64
Foot tube
1
19
Right fly arms
1
65
Pipe plug
1
20
Block
2
66
Pan head screw
M10x16mm
2
21
Lock-nut
M6mm
2
67
Pulley
18
22
Allen screw
M6x35mm
2
68
Pulley frame
1
23
Lock-nut
M10mm
34
69
Pulley block
2
24
Allen screw
M10x175mm
1
70
Pulley sleeve
2
25
Plate
4
71
Pan head screw
M10x65mm
3
26
Handles
2
72
Pulley support
1
27
Pipe plug
Φ25
3
73
Pan head screw
M10x110mm
1
28
Sleeves
2
74
Swinging frame
2
29
Cover
2
75
Cable set
4040mm
1
30
Arc gasket
10-R12.5
2
76
Cable set
3450mm
1
31
Pan head screw
M10x85mm
2
77
Cable set
3020mm
4
32
Side splint
1
78
C shape
5
33
Pan head screw
M10x25mm
4
79
Cable set
1
34
Screw carriage
M10x90mm
6
80
6 Ring chains
1
35
Screw carriage
M10x70mm
4
81
Row bar
1
36
Pan head screw
M10x70mm
1
82
Bushing
2
37
Spring pull pin
2
83
15 Ring chains
1
38
Plug
50x45
2
84
Handle
1
39
Chest foam
2
85
Bushing
2
40
Seat frame
1
86
Handle pipe
1
41
Seat cushion
1
87
Handle cover
2
42
Washer
Φ8
6
88
Foot set
1
43
Pan head screw
M8x40mm
2
89
L-pin
1
44
Arm frame
1
90
Shield
2
45
Arm pad
1
46
Pan head screw
M8x20mm
2
5
SS2 SINGLE STATION
3. ASSEMBLY INSTRUCTIONS
Note: It is strongly recommended that this machine is assembled by 2 or more adults to avoid injury.
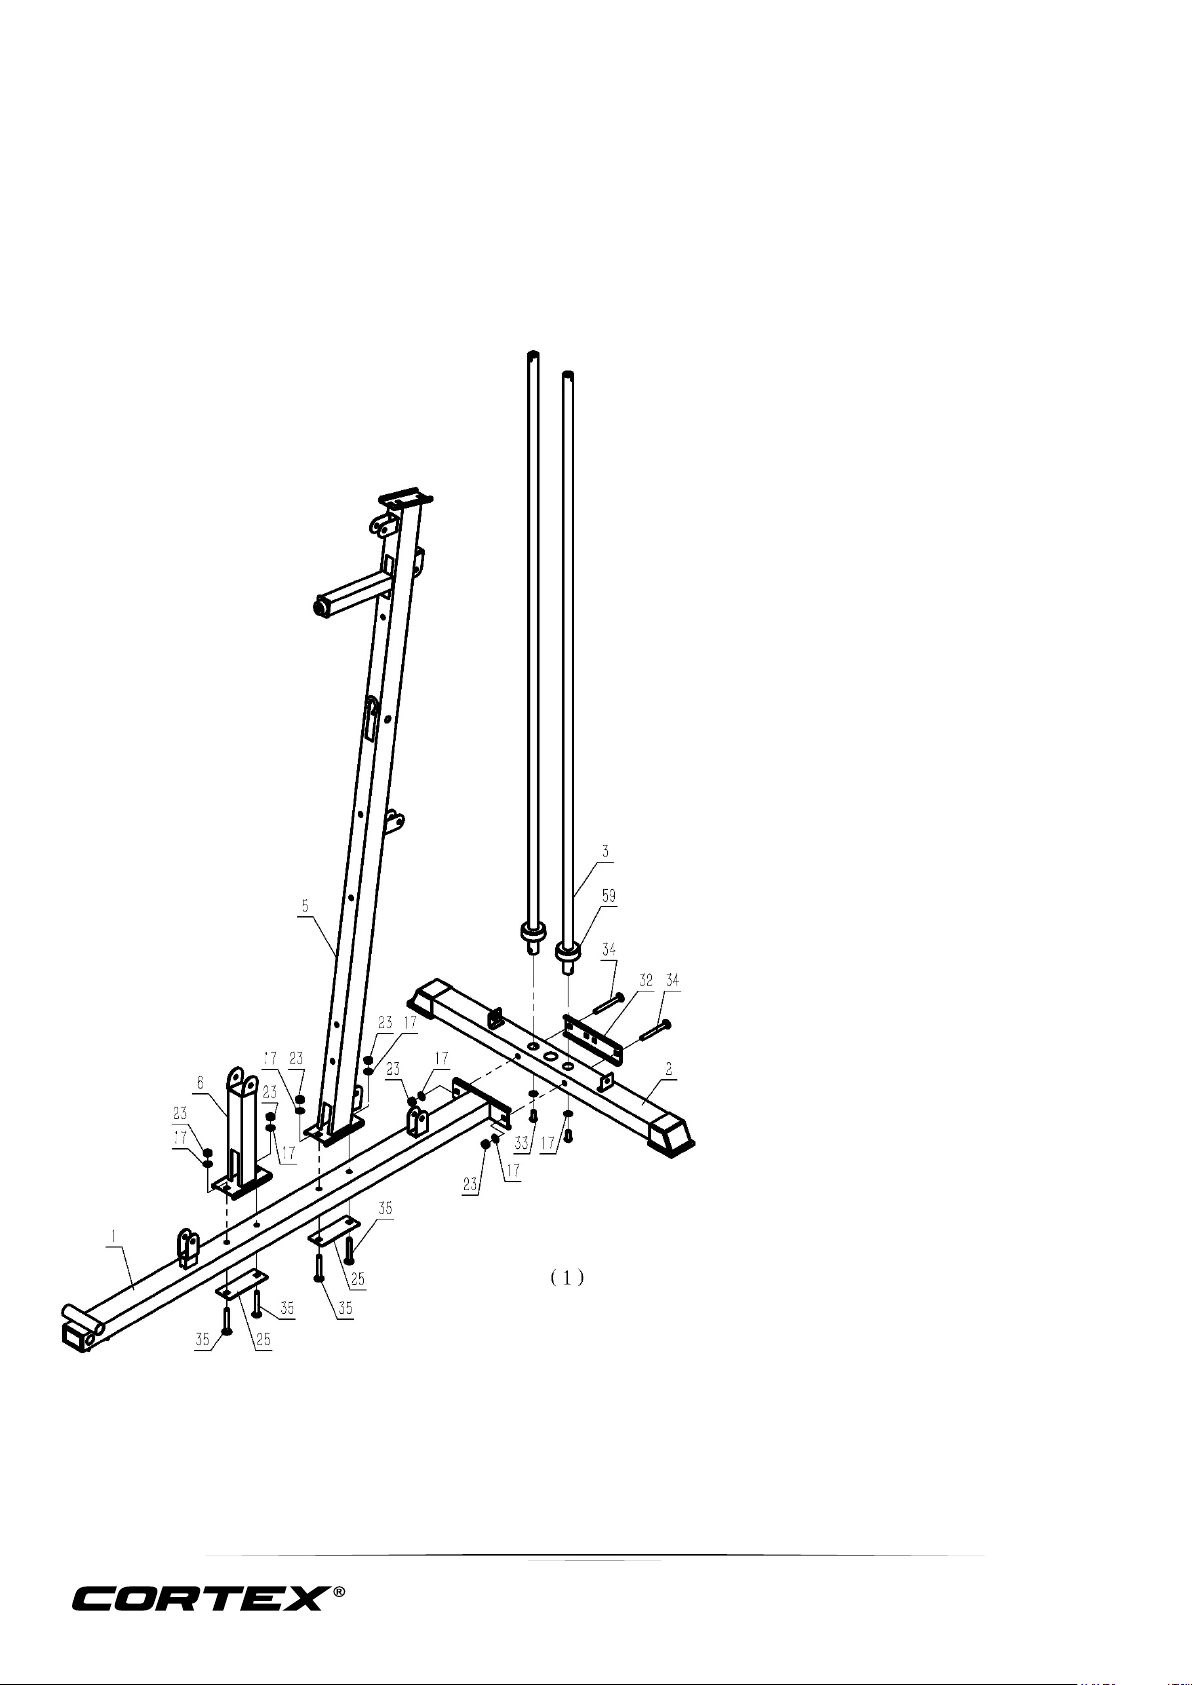
STEP 1
1. Slide the 2x cushions (59#) onto the
guide rods (3#).
2. Insert the guide rods (3#) into the 2x
holes on ground piece (2#).
a. Use 2x pan head screws
M10x25mm (33#) and 2x Φ10
washers (17#) to attach the guide
rod (3#) to ground piece (2#).
3. Connect ground piece (32#) and
ground piece (2#) to ground piece
(1#).
a. Use 2x screw carriage
M10x70mm (34#), 2x Φ10
washers (17#) and 2x M10mm
lock -nut (23#).
4. Connect the vertical beam (5#) and
fixed plate (#25) to ground piece (#1)
from the bottom.
a. Use 2x screw carriage
M10x70mm (35#), 2x Φ10
washers (17#) and 2x M10mm
lock-nut (23#).
5. Connect mat reinforcement pipe (6#),
fixed plate (25#) to ground piece (1#)
from the bottom.
a. Use 2x screw carriage
M10x70mm (35#), 2x Φ10
washers (17#) and 2x M10mm
lock-nut (23#).
6
SS2 SINGLE STATION
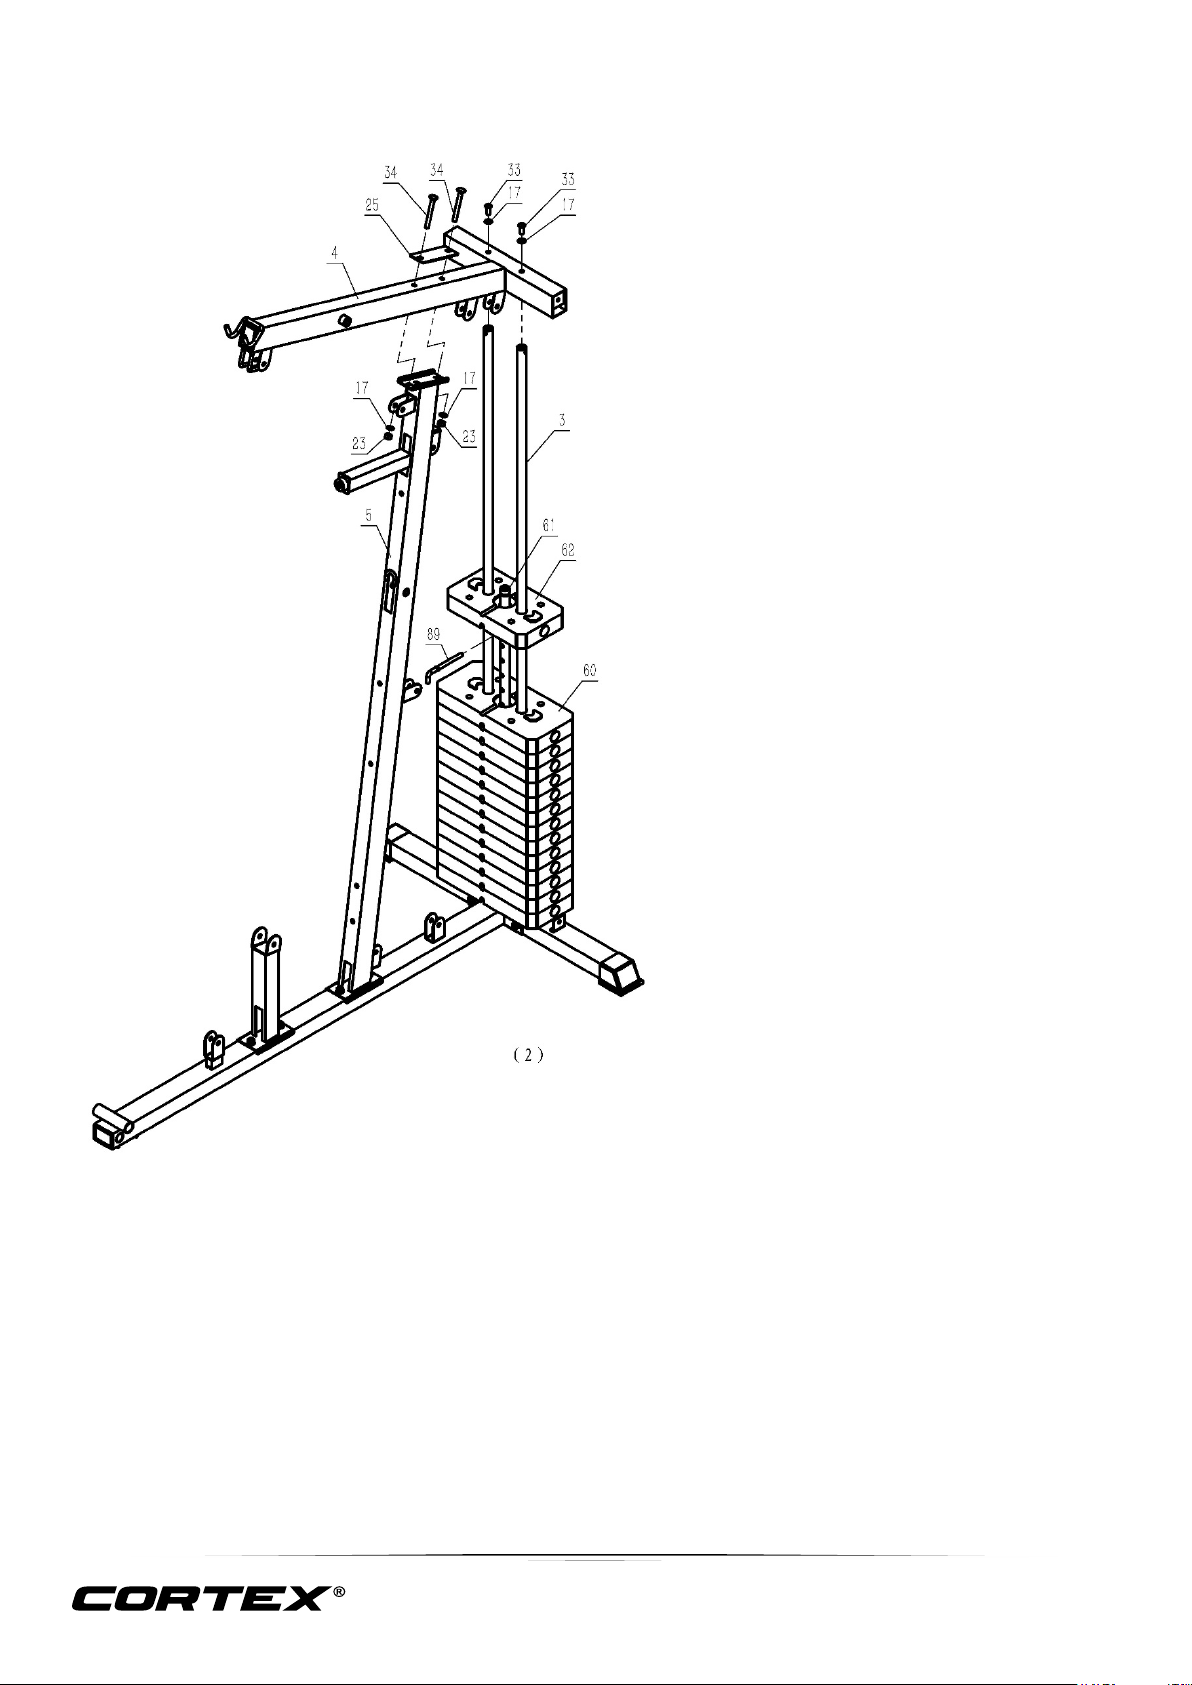
STEP 2
1. Slide 12x weights (60#) into the
guide rods (3#) in order. Insert the
shaft lever (61#) into the middle
hole, then place the counter weight
(#62) on top.
2. Select a choice piece (60#) with L
pin (89#).
3. Connect frame piece (4#) to the
upper guide rods (3#).
a. Use 2x pan head screws
M10x25mm (33#), 2x Φ10 gaskets
(#17).
4. Connect vertical beam (5#) and plate
(25#) to frame piece (4#).
a. Use 2x screw carriage
M10x90mm (34#), 2x Φ10
washers (17#) and 2x lock-nut
M10mm (23#).

7
SS2 SINGLE STATION
STEP 3
1. Connect frame piece (12#) to frame piece (4#).
a. Use the long axis (14#), 2x Φ10 washers (17#) and 2x (23#) M10mm lock-nuts.
2. Connect the left and right fly arms (18#, 19#) to frame piece (12#).
a. Use 2x cylinder head screws M6x35mm (22#), 2x blocks (20#) and 2x M6mm lock-nuts (21#).
b. Place 2x foams (39#) onto the fly arms (18#, 19#).
3. Connect 2x handles (26#) to the fly arms (18#, 19#).
a. Use 2x pan head screws M10x85mm (31#).
4. Connect pad (57#) to beam (5#).
a. Use 2x head screw M8x85mm (58#) and 2x Φ8 washer (42#).
5. Connect the pulley bracket (72#) with vertical beam (5#).
a. Use 1x pan head screw M10x110mm (73#), 2x Φ10 washers (17#) and 1x M10mm lock-nut
(23#).
6. Connect the block (74#) to the pulley bracket (72#).
a. Use 2x pan head bolt M10x65mm (71#), 4x Φ10 washer (17#) and 2x M10mm lock-nut (23#).
8
SS2 SINGLE STATION
STEP 4
1. Connect the seat cushion frame (7#) with plate (11#) through the vertical beam (5#).
a. Use 2x screw carriage M10x90mm (34#), 2x Φ10 washers (17#), plate (25#) and 2x M10mm
lock-nut (23#).
2. Connect the seat cushion frame (7#) to reinforcing pipe (6#).
a. Use 1x pan head screw M10x70mm (36#), 2x Φ10 washers (17#) and 1x M10mm lock-nut
(23#).
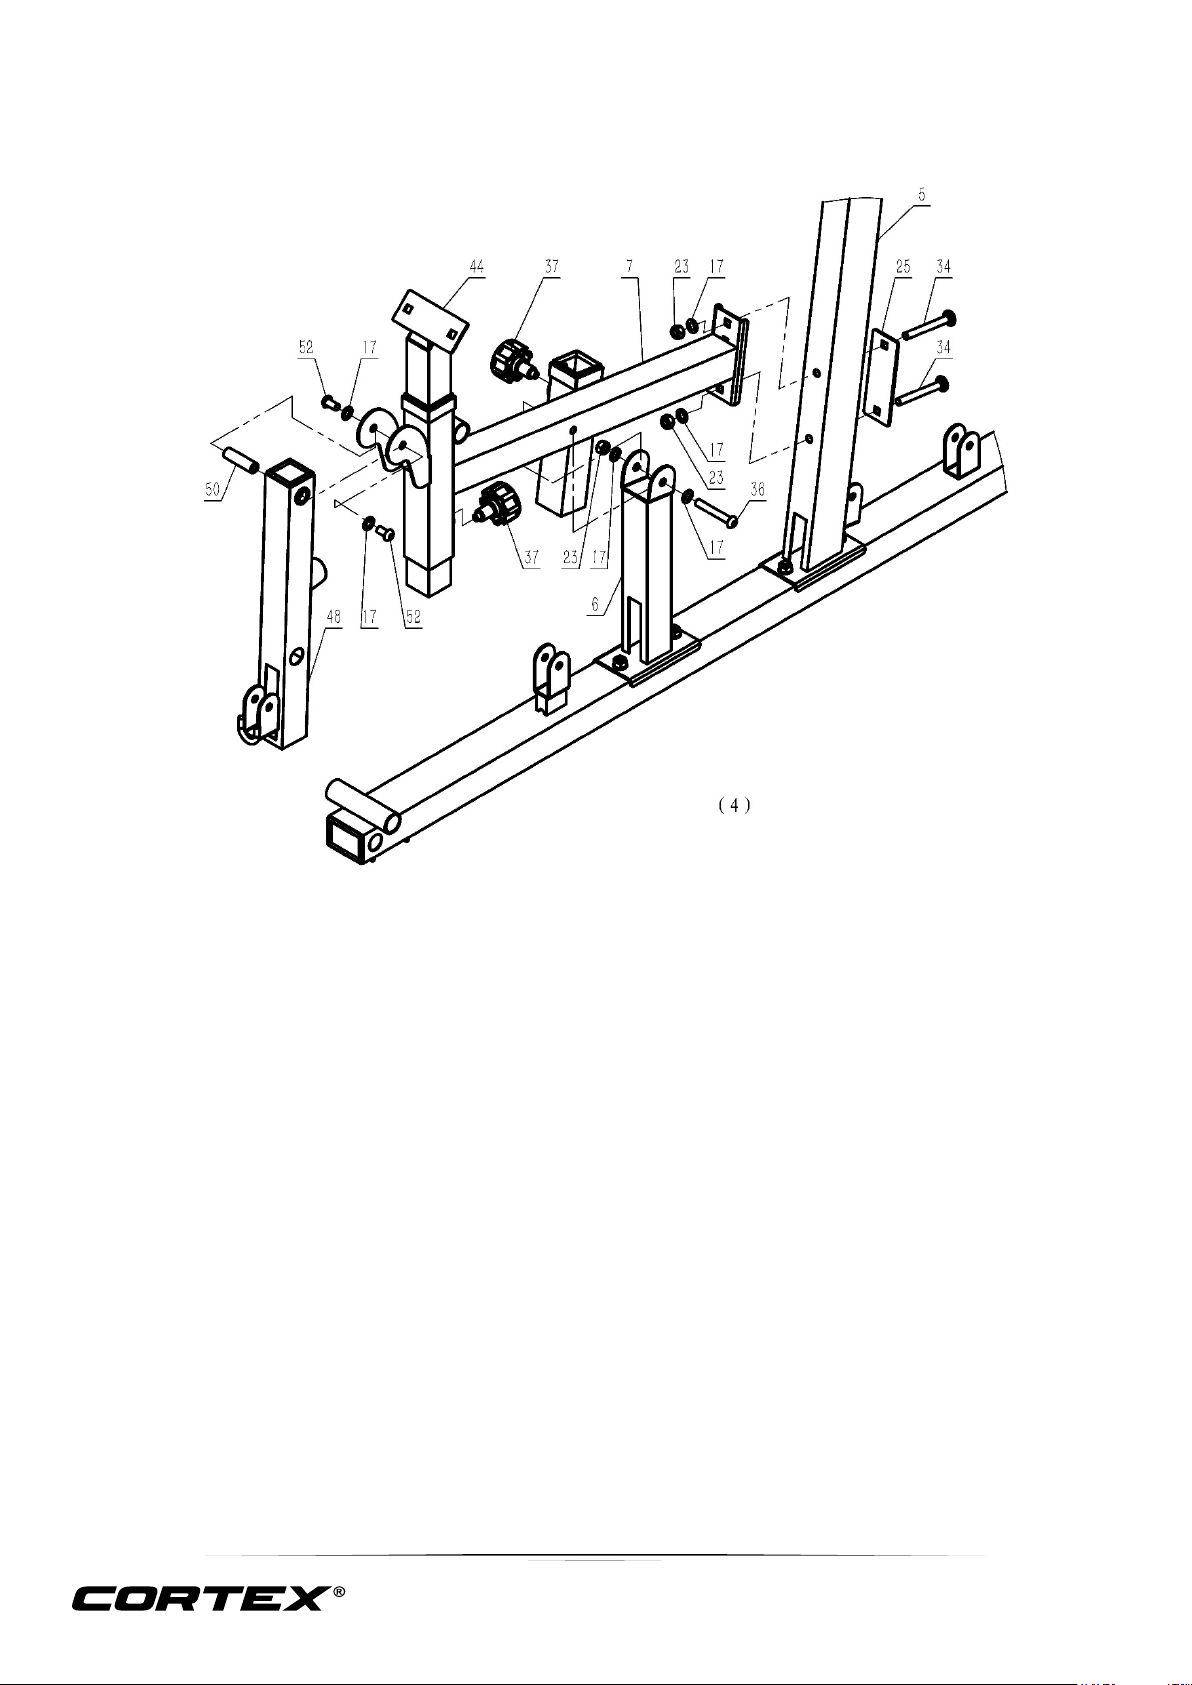
3. Connect the swing arm (48#) and axis (50#) to seat cushion frame (7#).
a. Use 2x pan head screws M10x16mm (52#), 2x Φ10 washer (17#).
4. Connect arm frame (44#) to the cushion frame (7#) with spring pull pin (37#).
9
SS2 SINGLE STATION
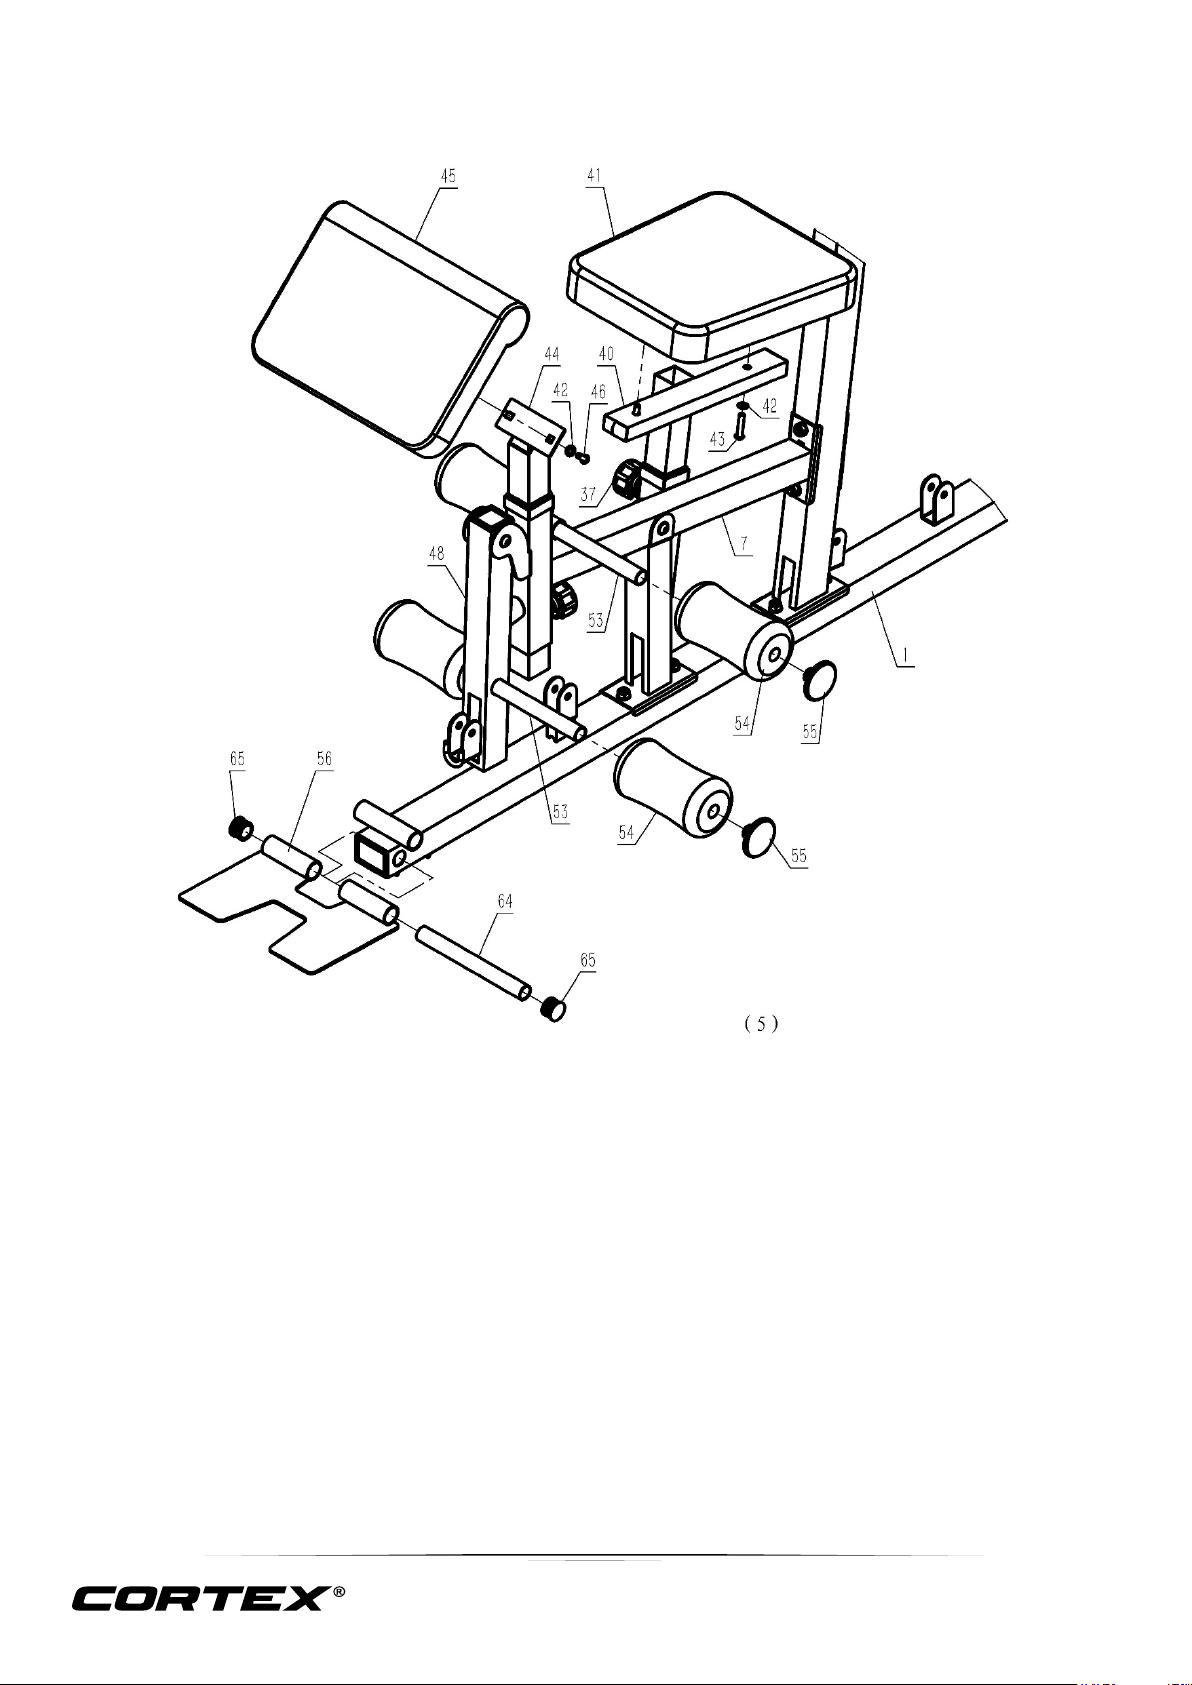
STEP 5
1. Connect the seat cushion (41#) to the seat cushion frame (40#), and put the frame (40#) into the
seat cushion frame (7#) secured with spring pull pin (37#).
a. Use 2x pan head screws M8x40mm (43#) and 2x Φ8 washer (42#).
2. Connect arm pad (45#) to arm frame (44#).
a. Use 2x pan head screws M8x20mm (46#) and 2x Φ8 washer (42#).
3. Insert 2x foam tube (53#) through the sleeves located on the seat cushion frame (7#) and swing
arm (48#).
a. Secure with 4x foam roll (54#), and 4x foam pipe plug (55#).
4. Connect the foot pedals (56#) to ground piece (1#).
a. Use one foot tube (64#), and insert the two plugs (65#).
10
SS2 SINGLE STATION
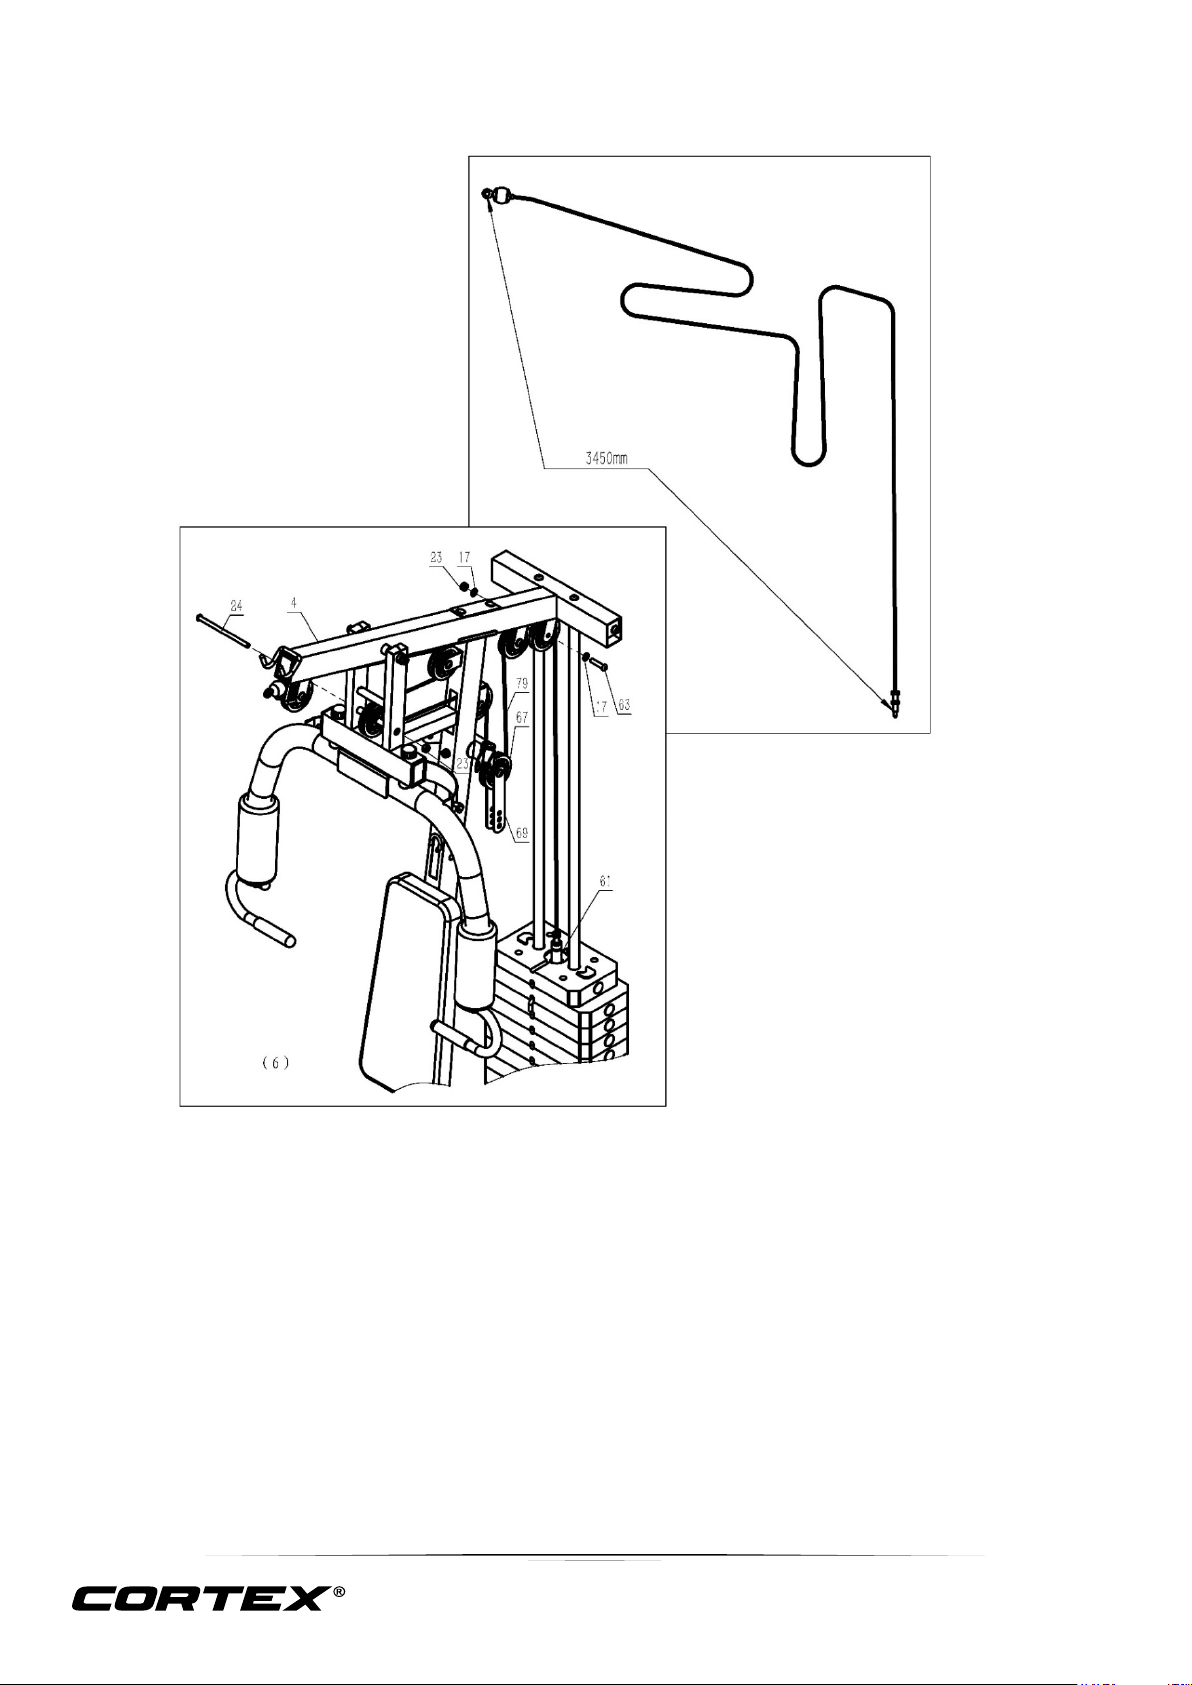
STEP 6
Refer to diagram.
1. Pull the 3450mm cable (76#) connection, screw head with 1x end connected to shaft lever (61#)
through the machine, in accordance with the cable diagram.
a. Use 7x pulley (67#), 6 Allen pan head screw M10x45mm (63#), 1x Allen pan head screw
M10x175mm (24#), 10x Φ10 washer (17#), 7x M10mm lock-nut 1 (23#), 1x wheel rack (69#).
11
SS2 SINGLE STATION
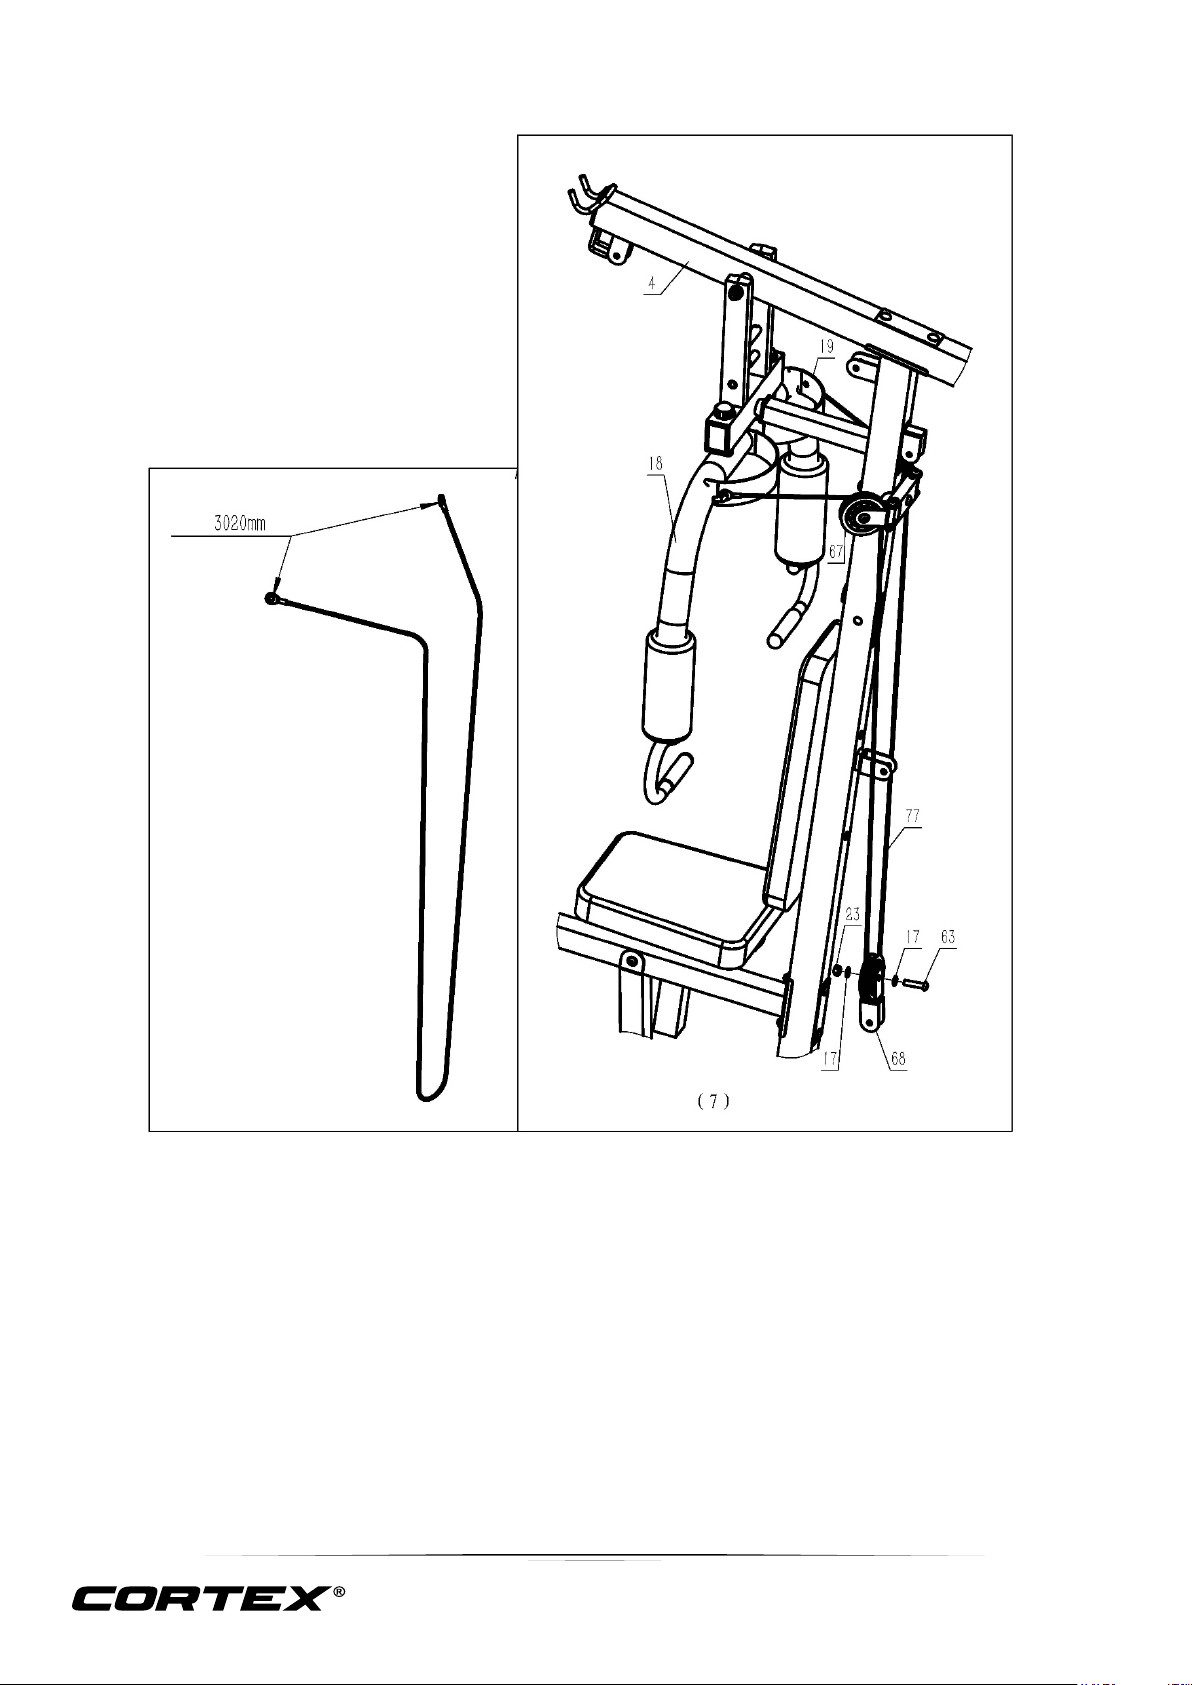
STEP 7
Refer to diagram.
1. Hook the 3020mm cable (77#) to both ends of the cable on the left and right of fly arms (18#,
19#).
2. Set up the 3020mm cable (77#) with the rest of the frame.
a. Use cross roller frame (68#), 3x pulleys (67#), 3x socket head pan head screw M10x45mm.
3. (63#), 6x Φ10 washer (17#) and 3x M10mm lock-nut (23#).
12
SS2 SINGLE STATION
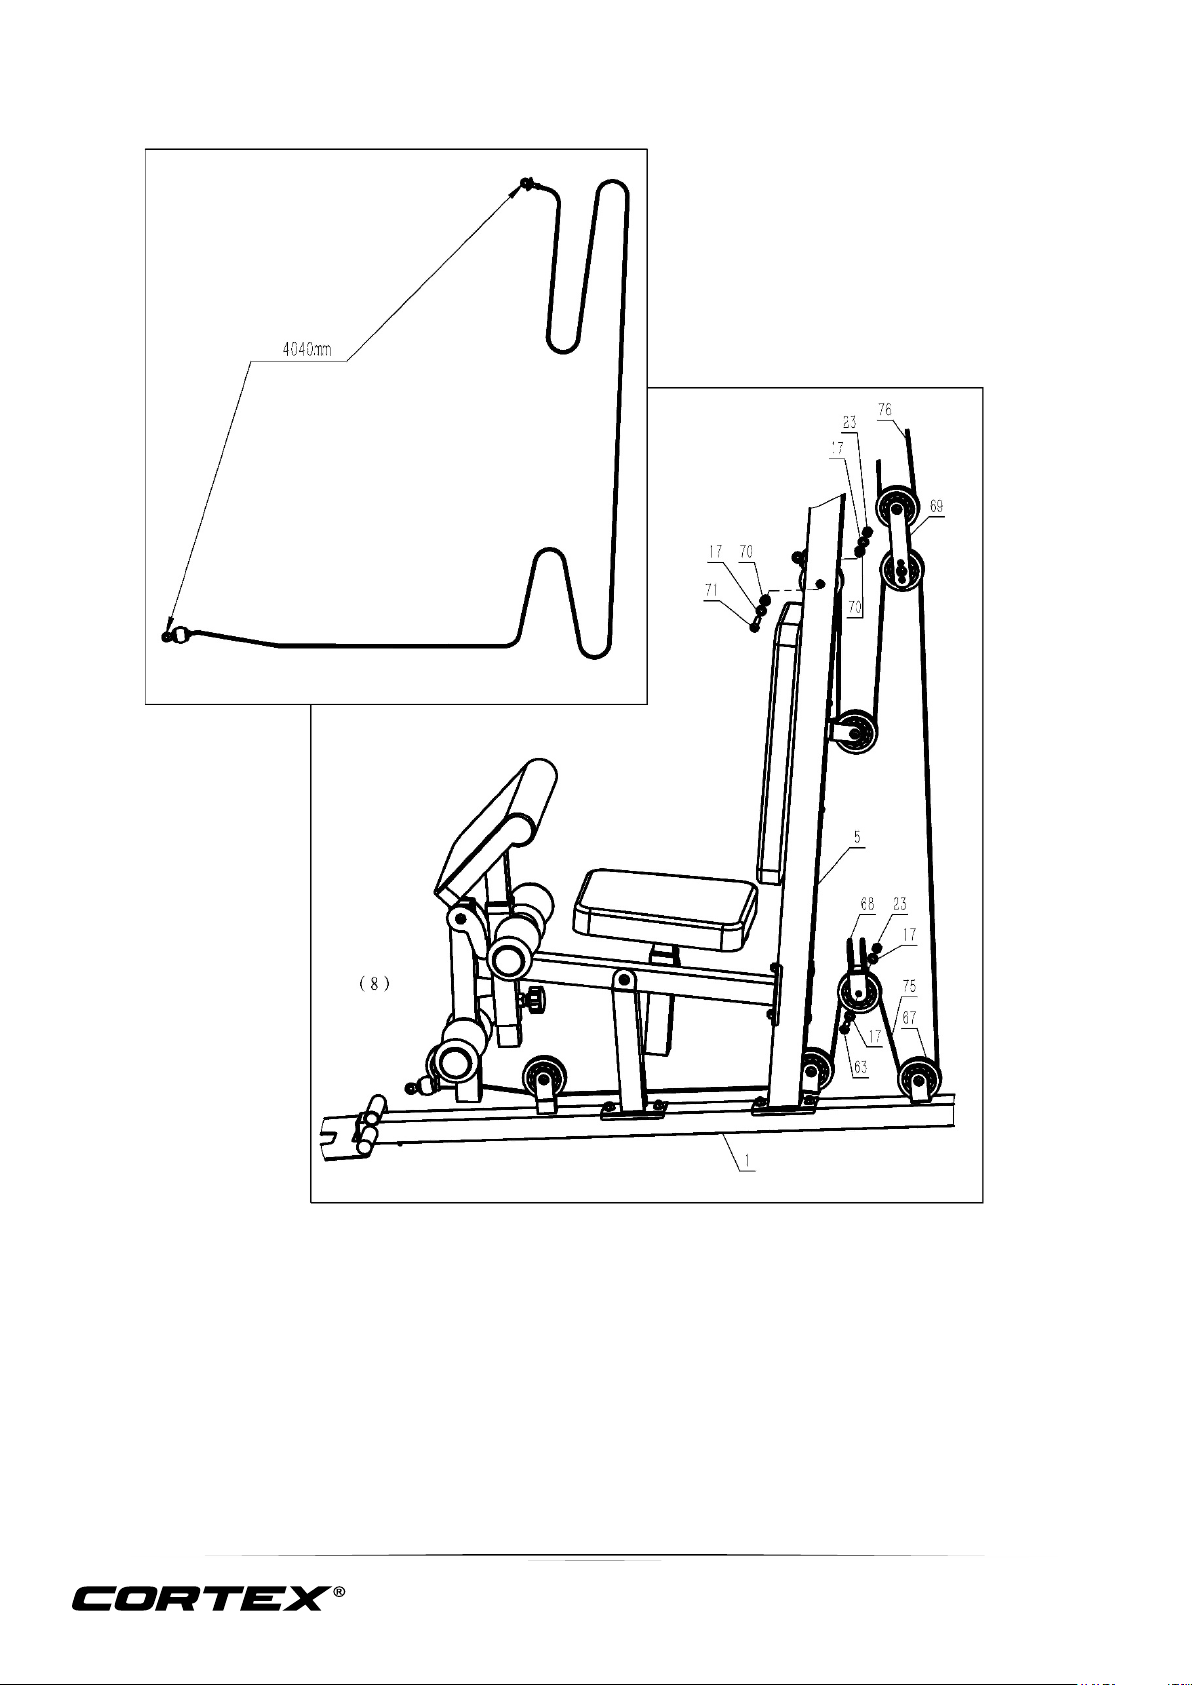
STEP 8
Refer to diagram.
1. Attach the 4040mm cable (75#).
a. Use 8x pulleys (67#), 7x Allen pan head screw M10x45mm (63#), 1x Allen pan head screw
M10x65mm (71#), 16x Φ10 washer (#17), 8x M10mm lock-nut (#23), 2x pulley sleeves (70#).
13
SS2 SINGLE STATION
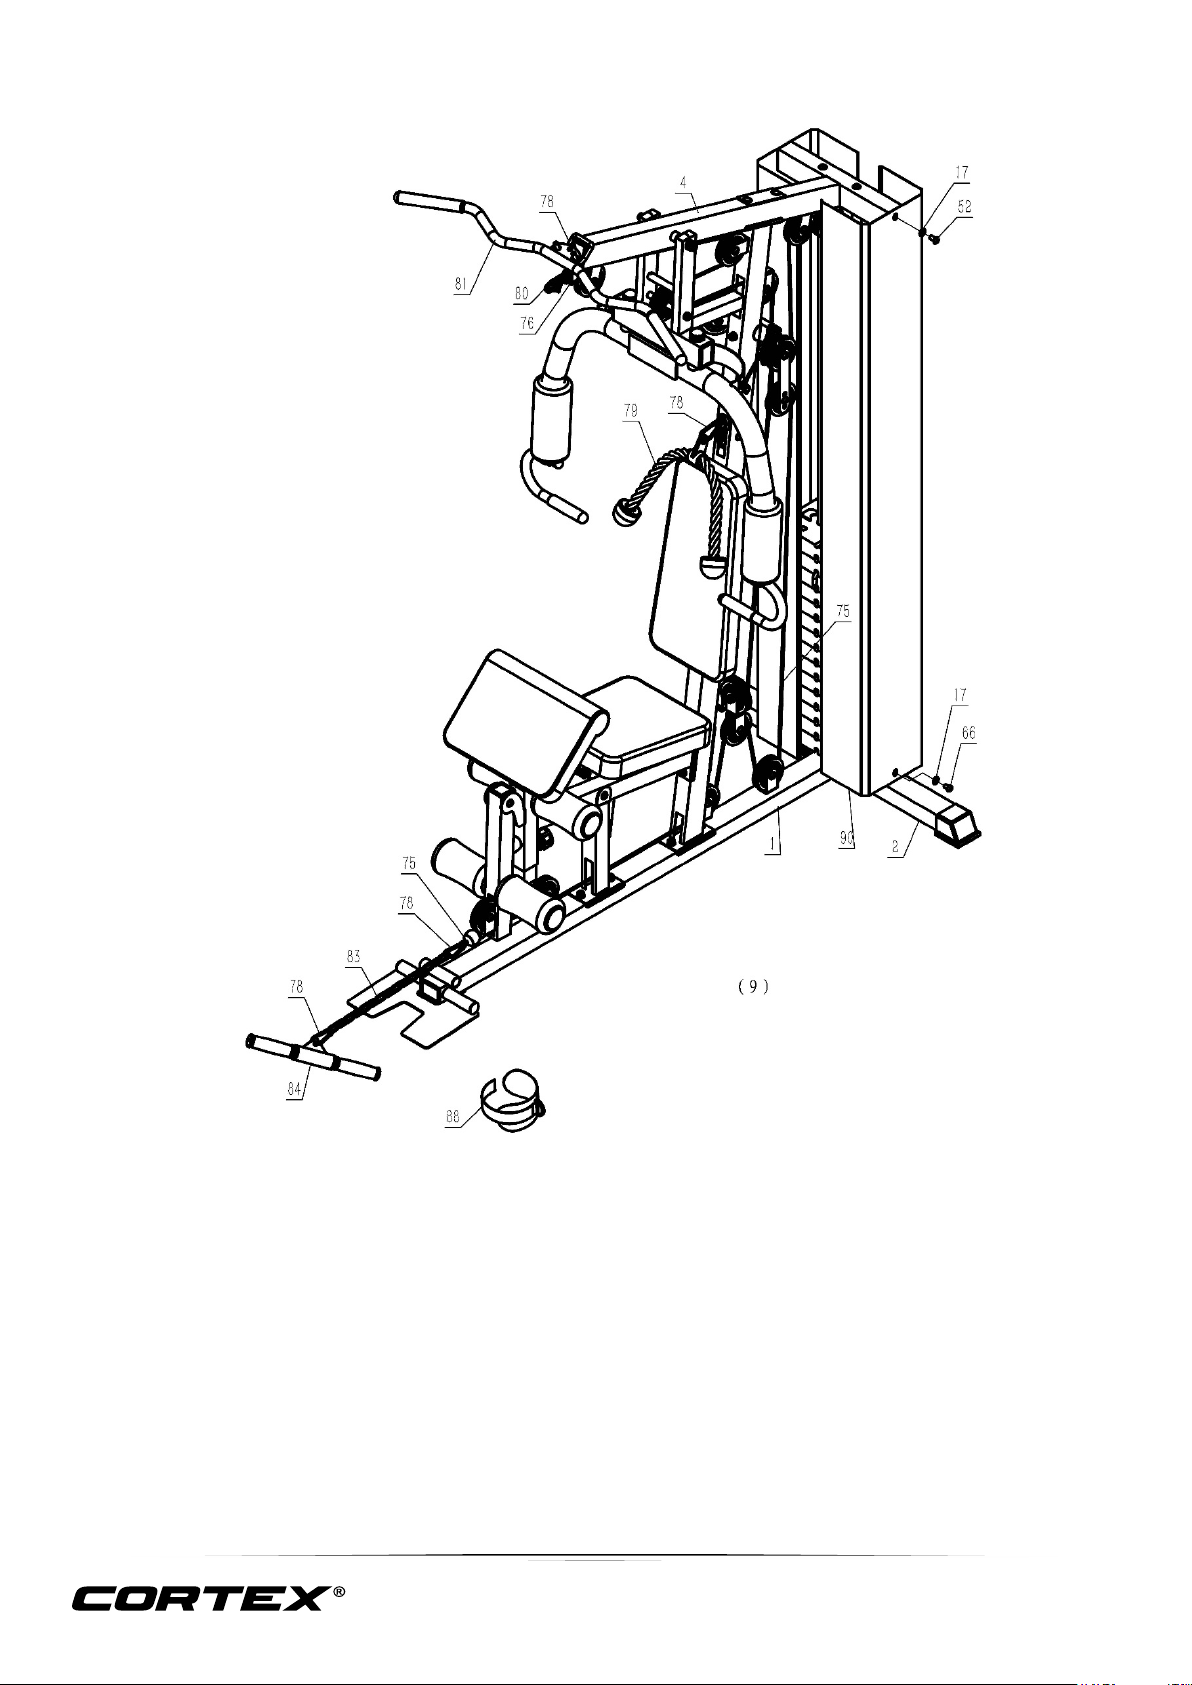
STEP 9
1. Connect the two shields (90#).
a. Use 2x bolt M10x20mm (52#), 2x bolt M10x16mm (66#), 4x flat gasket Φ10 (17#).
2. Connect the 3450mm cable (76#) with lat pull down bar (81#).
a. Use 2x C shape buckles (78#) and 1x 6 ring chain (80#).
3. Connect 4040mm cable (75#) with row bar (84#).
a. Use 2x C shape buckles (78#) and 1x 15 ring chain (83#).
4. Connect the Cable set (79#) with 4040mm cable (75#).
a. Use 1x shape buckle (78#).

14
SS2 SINGLE STATION
4. WARRANTY
AUSTRALIAN CONSUMER LAW
Many of our products come with a guarantee or warranty from the manufacturer. In addition, they come with
guarantees that cannot be excluded under the Australian Consumer Law. You are entitled to a replacement or
refund for a major failure and compensation for any other reasonably foreseeable loss or damage.
You are entitled to have the goods repaired or replaced if the goods fail to be of acceptable quality and the failure
does not amount to a major failure. Full details of your consumer rights may be found at www.consumerlaw.gov.au
Please visit our website to view our full warranty terms and conditions:
http://www.lifespanfitness.com.au/warranty-repairs
Warranty and Support:
Please email us at support@lifespanfitness.com.au
for all warranty or support issues.
For all warranty or support related enquiries an email must be sent to lodge a support case in our system.