Loading ...
Loading ...
Loading ...
11
CAUTION: HOOD MAY HAVE VERY SHARP EDGES; PLEASE WEAR
PROTECTIVE GLOVES WHENEVER IT IS NECESSARY TO REMOVE ANY
PARTS FOR INSTALLING, CLEANING OR SERVICING.
INSTALLATION PROCEDURES
Wall Mount Installation Method
12
1.
A. Find the 4 mounting holes in the back of the
range hood. Mark their locations at the installation
location with a pencil or marker.
B. Drill 5/16 (8mm) hole at each of the marked
locations.
C. Insert anchors along with screws into each drilled
hole. Firmly tighten the screw into place.
D. Hang your Range Hood into place by aligning the
screws with the 4 mounting holes in the back of the
range hood. Lock into place by sliding down the
36" Model
A= 27.375"
30" Model
A= 26.5"
CAUTION: HOOD MAY HAVE VERY SHARP EDGES; PLEASE WEAR
PROTECTIVE GLOVES WHENEVER IT IS NECESSARY TO REMOVE ANY
PARTS FOR INSTALLING, CLEANING OR SERVICING.
INSTALLATION PROCEDURES
Wall Mount Installation Method
12
1.
A. Find the 4 mounting holes in the back of the
range hood. Mark their locations at the installation
location with a pencil or marker.
B. Drill 5/16 (8mm) hole at each of the marked
locations.
C. Insert anchors along with screws into each drilled
hole. Firmly tighten the screw into place.
D. Hang your Range Hood into place by aligning the
screws with the 4 mounting holes in the back of the
range hood. Lock into place by sliding down the
range hood.
36" Model
A= 27.375"
30" Model
A= 26.5"
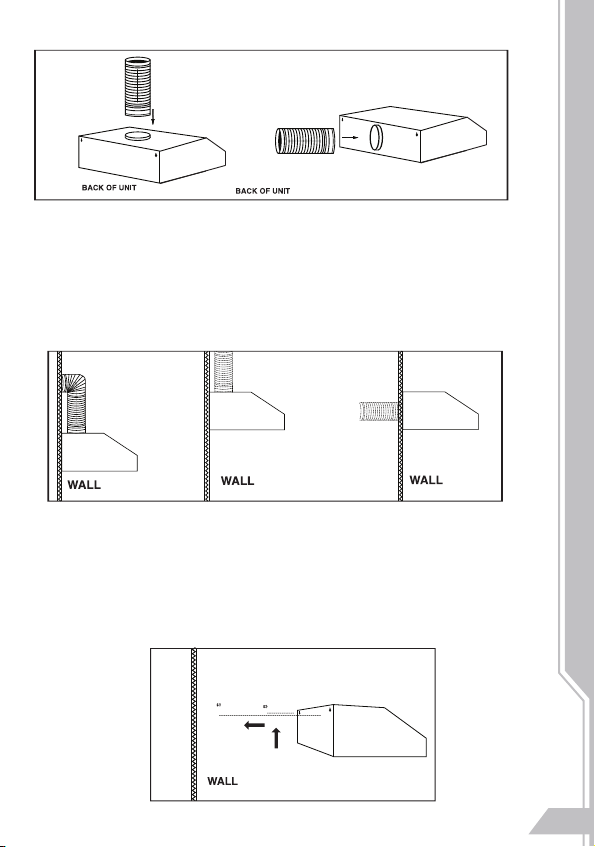
4. Take the hood unit along with the 5” Round Aluminum duct. Secure the round aluminum
duct to the damper at the top or rear of the hood unit using HVAC Aluminum foil tape.
(Skip this step for recirculating mode)
5.
5a. If mounting to the wall only, drill a 5.25” round hole on the back wall above the hood, OR
into the ceiling directly above the hood, or on the back wall centered with the rear vent hole of the
hood. (Skip this step for recirculating mode)
5b. Lift the hood and hang the hood unit on the back wall using the screws drilled in Step 3.
Once the hood is securely hung on the wall, tighten the screws from the interior of the hood
after removing the aluminum filters.
5c. Pull round aluminum duct through the newly drilled hole in the wall. Plug unit into power
outlet. (Skip this step for recirculating mode)
Step 4
Step 5
OR
OR
OR
Step 5b.
If mounting to a cabinet, skip step 5.
Loading ...
Loading ...
Loading ...