
Operating Instructions
VRD-MC1
2-661-941-02 (1)
masterpage:Cover
© 2005 Sony Corporation
2-661-941-02 (1)
7819901257B
IT
JP
FR
DE
ES
IT
CS
Video Recordable
DVD Drive
G:\#sagyou\Sony\01 TV\836599S VRD-MC1\0119 VRD-MC1i\0119 VRD-MC1 kai nou-
hin\2661941011\2661941011\2661941011 VRD-MC1\GB00COV.FM
VRD-MC1
GB01COV1.book Page 1 Thursday, January 19, 2006 7:25 PM
2
masterpage:Left
VRD-MC1
2
-
661
-
941
-
02
(1)
G:\#sagyou\Sony\01 TV\836599S VRD-MC1\0119 VRD-MC1i\0119 VRD-MC1 kai nou-
hin\2661941011\2661941011\2661941011 VRD-MC1\GB01REG.fm
Safety
Regulations
WARNING
You are cautioned that any changes or
modifications not expressly approved in this
manual could void your authority to operate
this equipment.
To reduce the risk of fire or electric shock, do
not expose this apparatus to rain or moisture.
To avoid electrical shock, do not open the
cabinet. Refer servicing to qualified personnel
only.
CAUTION:
As the laser beam in the VRD-MC1 is harmful
to the eyes, do not attempt to disassemble the
cabinet. Refer servicing to qualified personnel
only.
The use of optical instruments with this
product will increase eye hazard.
The use of controls or adjustments or
performance of procedures other than those
specified herein may result in hazardous
radiation exposure.
The VRD-MC1 is classified as a CLASS 1
LASER PRODUCT.
The CLASS 1 LASER PRODUCT notice is
located on the enclosure.
FCC Compliance:
This equipment has been tested and found to
comply with the limits for a Class B digital
device, pursuant to Part 15 of the FCC Rules.
These limits are designed to provide reasonable
protection against harmful interference in a
residential installation. This equipment
generates, uses, and can radiate radio
frequency energy and, if not installed and used
in accordance with the instructions, may cause
harmful interference to radio communications.
However, there is no guarantee that
interference will not occur in a particular
installation. If this equipment does cause
harmful interference to radio or television
reception, which can be determined by turning
the equipment off and on, the user is
encouraged to try to correct the interference by
one or more of the following measures:
• Reorient or relocate the receiving antenna.
• Increase the separation between the
equipment and receiver.
• Connect the equipment into an outlet on a
circuit different from that to which the
receiver is connected.
• Consult the dealer or an experienced radio/
TV technician for help.
The shielded interface cable recommended in
this manual must be used with this equipment
in order to comply with the limits for a digital
device pursuant to Subpart B of Part 15 of FCC
Rules.
Notes:
If you have any questions about this product,
you may call the telephone number listed on
the “Support Overview” on page 54. The
telephone number below is not for customer
service but only for official purposes.
CAUTION:
The mains plug on this equipment must be used
to disconnect mains power.
Please ensure that the socket outlet is installed
near the equipment and shall be easily
accessible.
CLASS 1
LASER PRODUCT
LASER KLASSE 1
PRODUKT
Declaration of Conformity
Trade Name: SONY
Model No.: VRD-MC1
Responsible Party: Sony Electronics Inc.
Address: 16530 Via Esprillo,
San Diego, CA 92127
U.S.A.
Telephone No.: 858-942-2230
This device complies with Part 15 of the FCC
Rules. Operation is subject to the following two
conditions:
(1) This device may not cause harmful
interference, and
(2) This device must accept any interference
received, including interference that may
cause undesired operation.
GB01COV1.book Page 2 Thursday, January 19, 2006 7:25 PM

VRD-MC1
2-661-941-02
(
1
)
masterpage:Right
3
G:\#sagyou\Sony\01 TV\836599S VRD-MC1\0119 VRD-MC1i\0119 VRD-MC1 kai nou-
hin\2661941011\2661941011\2661941011 VRD-MC1\GB02COV1TOC.fm
Table of Contents
Safety Regulations ........................2
Features .........................................6
Package Contents ..........................7
Parts and Controls ........................8
About Auto Setup and the Main
Menu ............................................11
To display the main menu .......11
Creating a Video DVD ...............12
One touch recording and video
recording .................................12
Writable discs that can be
used .........................................12
Video Recording .........................13
One Touch Recording
(DV Full Dubbing) ......................17
Previewing a Video DVD ...........20
Creating a Photo DVD ...............22
Photo DVD to be created ........22
Writable discs that can be
used .........................................22
Storage location of photos in the
photo DVD ..............................23
Photo Recording .........................24
Viewing and Printing Photos .....28
Using the Setup Menu ................32
DV Full Dubbing ....................33
Rec Quality .............................33
Auto Stop Timer .....................33
Auto Chaptering ......................34
Slide show BGM .....................35
Color system ...........................35
Finalize disc ............................ 36
Erase disc ................................ 39
System .................................... 40
System Requirements ................. 41
Setting Up the Computer ........... 42
Installing the software ............ 42
Connecting DVDirect to a
computer ................................. 43
Disconnection ......................... 44
Using Memory Card slots ....... 44
Using the Bundled Software ...... 45
Launching
“Nero StartSmart” .................. 45
Notes on using other software
with DVDirect ........................ 45
Maximizing Performance .......... 46
Reaching the highest possible data
transfer rate ............................. 46
Updating the system
software .................................. 46
Using 48x read/write speed for
CDs ......................................... 46
About Discs ................................. 47
Compatible writable discs ...... 47
Recommended writable
discs ........................................ 48
Writable discs and
compatibility ........................... 48
Precautions on writing/playing
discs ........................................ 49
About Memory Cards ................ 51
About “Memory Stick” ........... 51
Introducing DVDirect
Using DVDirect without a
Computer
Using DVDirect with a
Computer
Additional Information
GB01COV1.book Page 3 Thursday, January 19, 2006 7:25 PM

4
VRD-MC1
2-661-941-02 (1)
masterpage:Left
G:\#sagyou\Sony\01 TV\836599S VRD-MC1\0119 VRD-MC1i\0119 VRD-MC1 kai nou-
hin\2661941011\2661941011\2661941011 VRD-MC1\GB02COV1TOC.fm
About the CompactFlash/SD/
xD-Picture Cards ..................... 52
Precautions .................................. 53
Support Overview ....................... 54
User support web site .............. 54
Update the system software .... 54
Technical support .................... 54
Specifications ............................... 55
GB01COV1.book Page 4 Thursday, January 19, 2006 7:25 PM

VRD-MC1
2-661-941-02
(
1
)
masterpage:Right
5
G:\#sagyou\Sony\01 TV\836599S VRD-MC1\0119 VRD-MC1i\0119 VRD-MC1 kai nou-
hin\2661941011\2661941011\2661941011 VRD-MC1\GB03REG.fm
• Pentium is a registered trademark of Intel Corporation.
• Microsoft and Windows are registered trademarks of Microsoft Corporation.
• Other system and product names used herein are registered trademarks or trademarks of their
respective manufacturers, although the ™ and ® marks are not used in the text.
• Manufactured under license from Dolby Laboratories.
Dolby and the double-D symbol are trademarks of Dolby Laboratories.
• Memory Stick and the memory stick logo are trademarks, or registered trademarks of Sony
Corporation.
Please Record Responsibly
Before copying anything onto a disc, please be sure that you are not violating copyright
laws. Most software companies allow you to make a backup or archive copy of software.
Check your software’s license agreement for details.
Copyrights
• Television programs, films, video tapes, discs, and other materials may be copyrighted.
Unauthorized recording of such material may be contrary to the provisions of the
copyright laws. Also, use of this product with cable television transmission may require
authorization from the cable television transmitter and/or program owner.
• This product incorporates copyright protection technology that is protected by U.S.
patents and other intellectual property rights. Use of this copyright protection
technology must be authorized by Macrovision, and is intended for home and other
limited viewing uses only unless otherwise authorized by Macrovision. Reverse
engineering or disassembly is prohibited.
❑ Our product warranty is valid only when the supplied accessories (including software)
are used in the specified or recommended system environment, in accordance with the
documentation, and applies only to this DVDirect. Our customer service and user
support apply only under these product warranty conditions.
❑ Please note that we cannot accept responsibility for failure of the computer or other
devices, incompatibility with special hardware, operating problems caused by improper
installation of software, loss of data, discs or other accidental or incidental damage that
might occur when using this product.
❑ The guarantee and user support for this product are valid only within the countries or
sales regions specified on the warranty card.
❑ Copyright laws prohibit the copying in part or in full of the supplied software and
documentation, or loaning the software, without obtaining permission of the copyright
holder.
❑ We cannot accept responsibility for any direct or indirect financial damage or loss of
profit that might occur when using the supplied software.
❑ The supplied software can only be used with this product.
❑ Specifications of the supplied software may be changed without notice in the interest of
product improvement.
GB01COV1.book Page 5 Thursday, January 19, 2006 7:25 PM
6
VRD-MC1
2-661-941-02 (1)
masterpage:Leftmasterpage:Left
G:\#sagyou\Sony\01 TV\836599S VRD-MC1\0119 VRD-MC1i\0119 VRD-MC1 kai nou-
hin\2661941011\2661941011\2661941011 VRD-MC1\GB04STA.fm
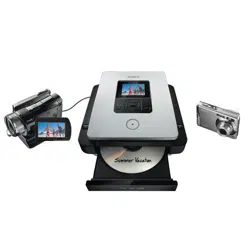
Features
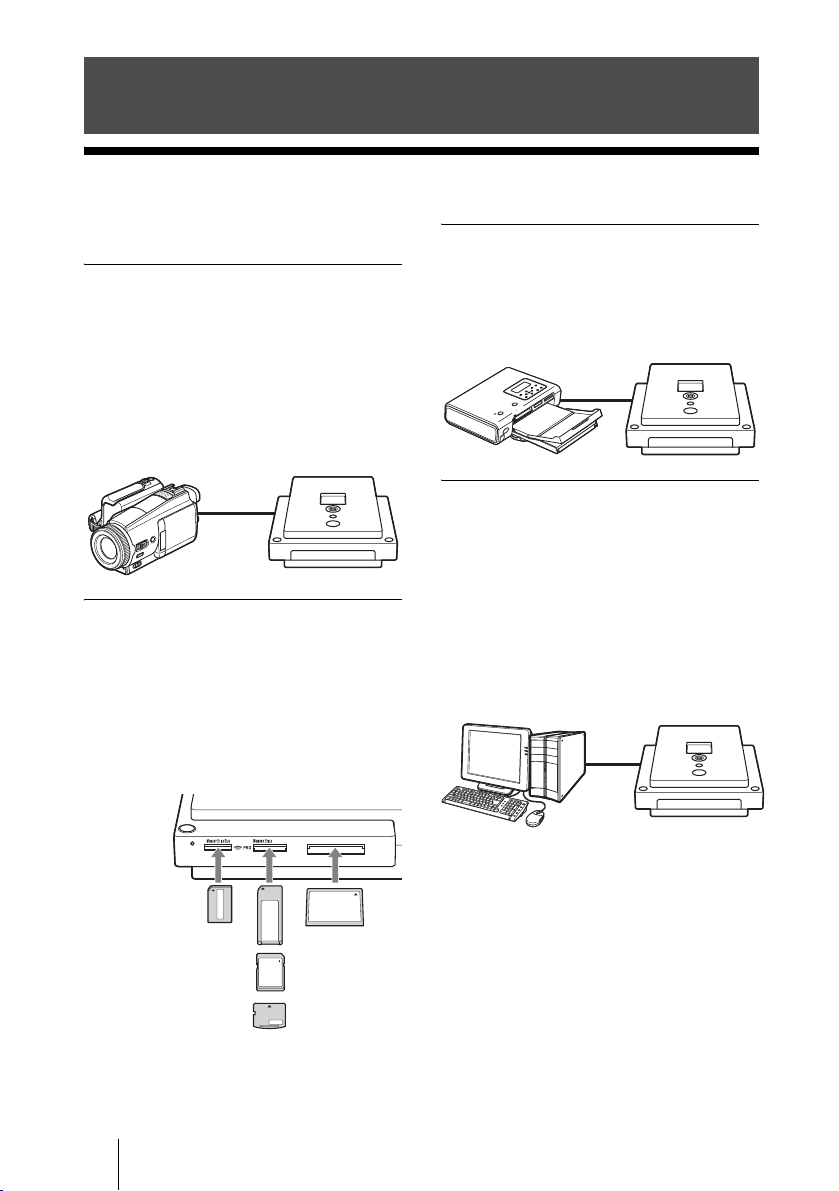
This DVDirect offers the following features.
Burning video DVDs
❑ You can burn videos on DVDs directly
from connected video cameras and AV
devices without using a computer.
❑ You can burn the entire contents of your
digital video camera on DVDs with one-
touch of the record button when using
the i.LINK connection.
Burning photo DVDs
❑ You can archive photos on DVDs
directly from memory cards without
using a computer.
❑ You can record photos as a slide show
on DVDs playable on most DVD
players.
Direct printing operation
You can print out photos burned on DVDs or
in a memory card directly by connecting this
DVDirect to a PictBridge-compatible printer
with the supplied USB cable.
Computer-controlled operation
❑ This DVDirect can be used as a high
speed DVD/CD drive with Hi-Speed
USB (USB 2.0-compatible) interface
when connected to a computer by a USB
cable.
❑ This DVDirect supports high speed
recording to the latest format discs such
as DVD+R double layer disc or DVD-R
dual layer disc.
Introducing DVDirect
CFSD xD
GB01COV1.book Page 6 Thursday, January 19, 2006 7:25 PM
VRD-MC1
2-661-941-02
(
1
)
masterpage:Right
7
Introducing DVDirect
G:\#sagyou\Sony\01 TV\836599S VRD-MC1\0119 VRD-MC1i\0119 VRD-MC1 kai nou-
hin\2661941011\2661941011\2661941011 VRD-MC1\GB05SET.fm
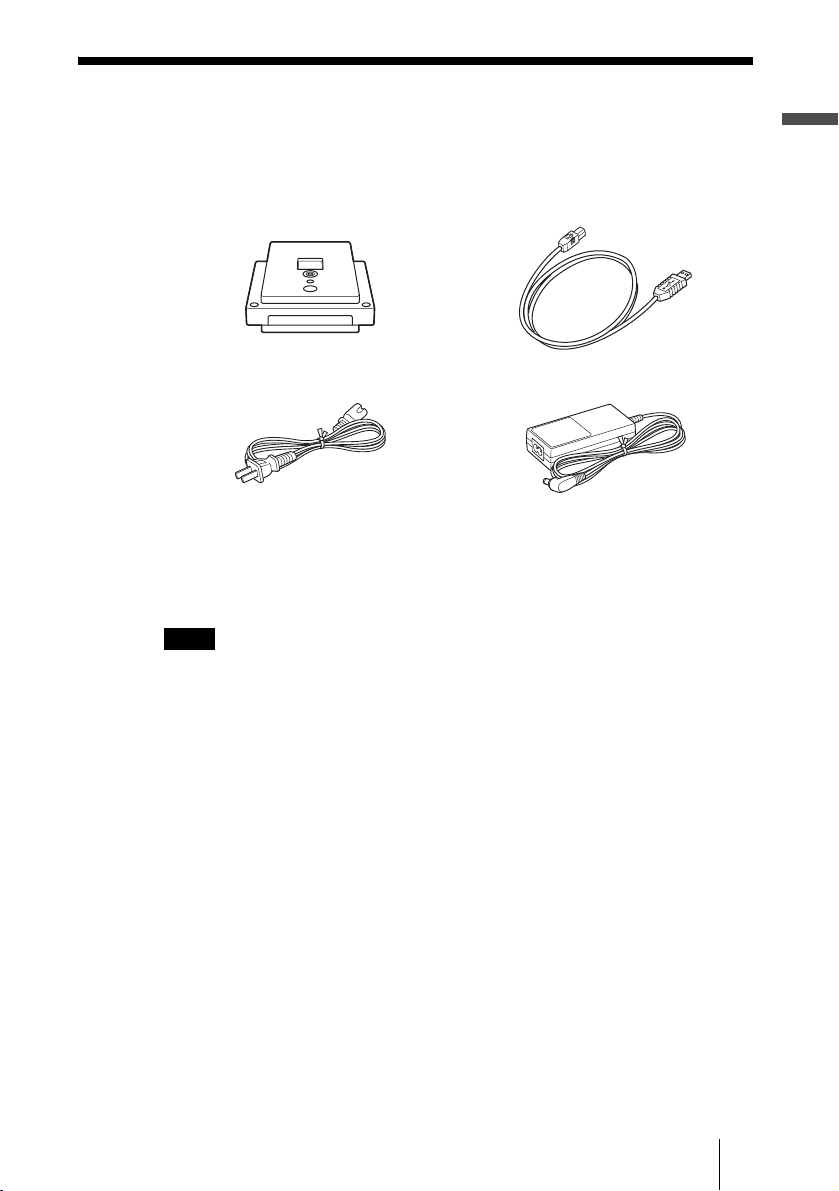
Package Contents
Please confirm that the package contains the following items. If any of these
items are missing and/or damaged, please contact your dealer.
• Quick Start Guide
• Operating Instructions (this document)
• Software disc
• Warranty card
Note
Make sure that you back up the supplied software disc on another disc as the software disc is
not sold separately.
• DVDirect • Hi-Speed USB cable
• Power cord • AC adaptor (MPA-AC1)
GB01COV1.book Page 7 Thursday, January 19, 2006 7:25 PM
8
VRD-MC1
2-661-941-02 (1)
masterpage:Leftmasterpage:Left
G:\#sagyou\Sony\01 TV\836599S VRD-MC1\0119 VRD-MC1i\0119 VRD-MC1 kai nou-
hin\2661941011\2661941011\2661941011 VRD-MC1\GB05SET.fm
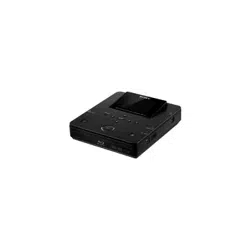
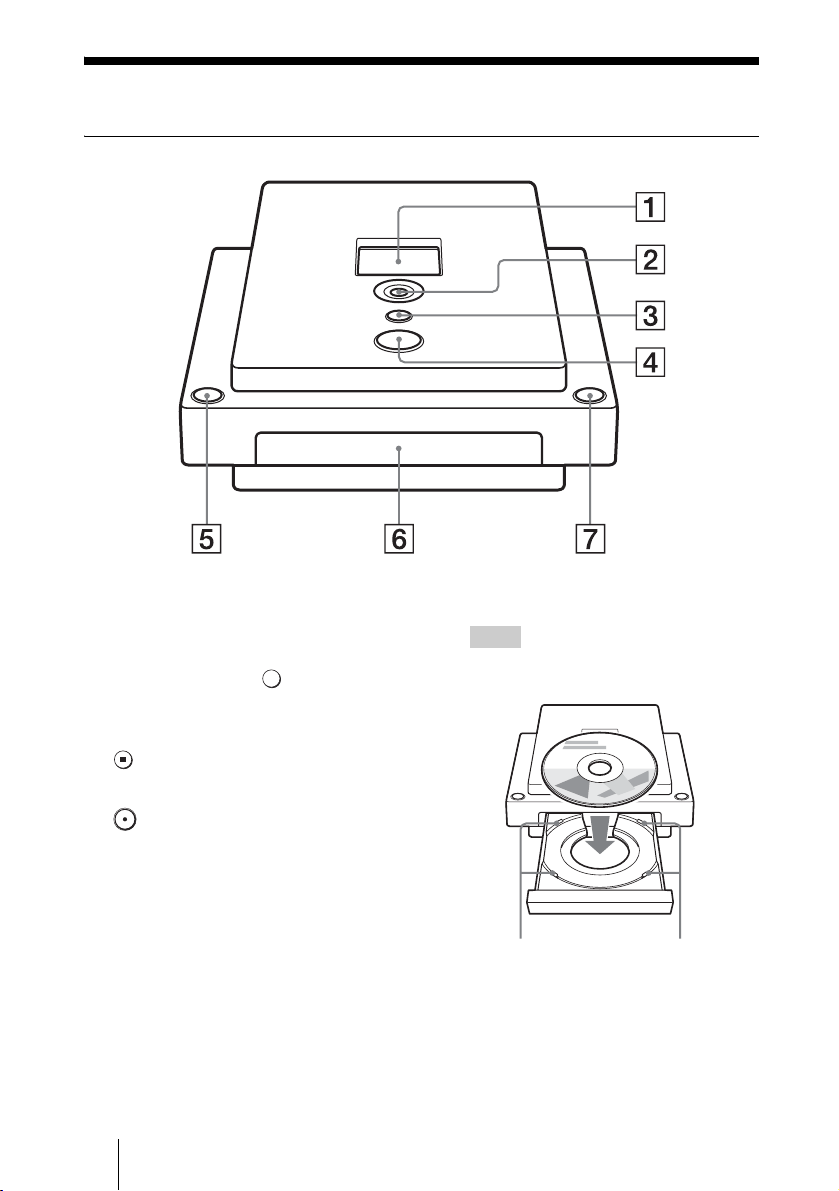
Parts and Controls
Front and top panels
A Display window
Displays a menu screen, images from a
playback device or photos from a
memory card.
B Mm<, Cursor/ Select
button
Selects a function.
C Stop button
Stops recording.
D Record button
Starts recording.
Lights in red when recording.
E Power button
Turns DVDirect on or off.
F Disc tray
Insert a disc here, label side up.
Hint
When you insert a disc into DVDirect, make
sure it rests flat under the four tabs.
G Eject button
Opens and closes the disc tray.
Tabs Tabs
GB01COV1.book Page 8 Thursday, January 19, 2006 7:25 PM

VRD-MC1
2-661-941-02
(
1
)
masterpage:Right
9
Introducing DVDirect
G:\#sagyou\Sony\01 TV\836599S VRD-MC1\0119 VRD-MC1i\0119 VRD-MC1 kai nou-
hin\2661941011\2661941011\2661941011 VRD-MC1\GB05SET.fm
Left side panel
A DC IN jack
Connect the supplied AC power adaptor.
Note
• Be sure to use the supplied power cord.
• Do not use damaged cables, such as cables with
deformed connectors.
B Mode switch
Switch to [PC/PRINT] when connecting
a printer or computer.
C USB connector
Connect the supplied USB cable when
connecting DVDirect to a computer or
printer.
D AUDIO IN L/R connectors
Connect the audio plugs of an AV cable
(not supplied) when connecting
DVDirect to a video device, such as a
video camera or VCR.
E VIDEO IN connector
Connect the video plug of an AV cable
(not supplied) when connecting
DVDirect to a video device, such as a
video camera or VCR.
F S VIDEO IN connector
Connect an S VIDEO cable (not
supplied) when connecting DVDirect to
a video device with an S VIDEO jack,
such as a video camera or VCR.
G DV IN connector (4-pin)
Connect a DV (i.LINK) cable (not
supplied) when connecting DVDirect to
a digital video camera*.
* For DV/Digital8 camcorder input only.
DC 12V IN
STANDALONE PC/PRINT
R AUDIO IN VIDEO IN S VIDEO IN
DV IN
L
1
DC 12V IN
Power
cord
AC adaptor
GB01COV1.book Page 9 Thursday, January 19, 2006 7:25 PM
10
VRD-MC1
2-661-941-02 (1)
masterpage:Leftmasterpage:Left
G:\#sagyou\Sony\01 TV\836599S VRD-MC1\0119 VRD-MC1i\0119 VRD-MC1 kai nou-
hin\2661941011\2661941011\2661941011 VRD-MC1\GB05SET.fm
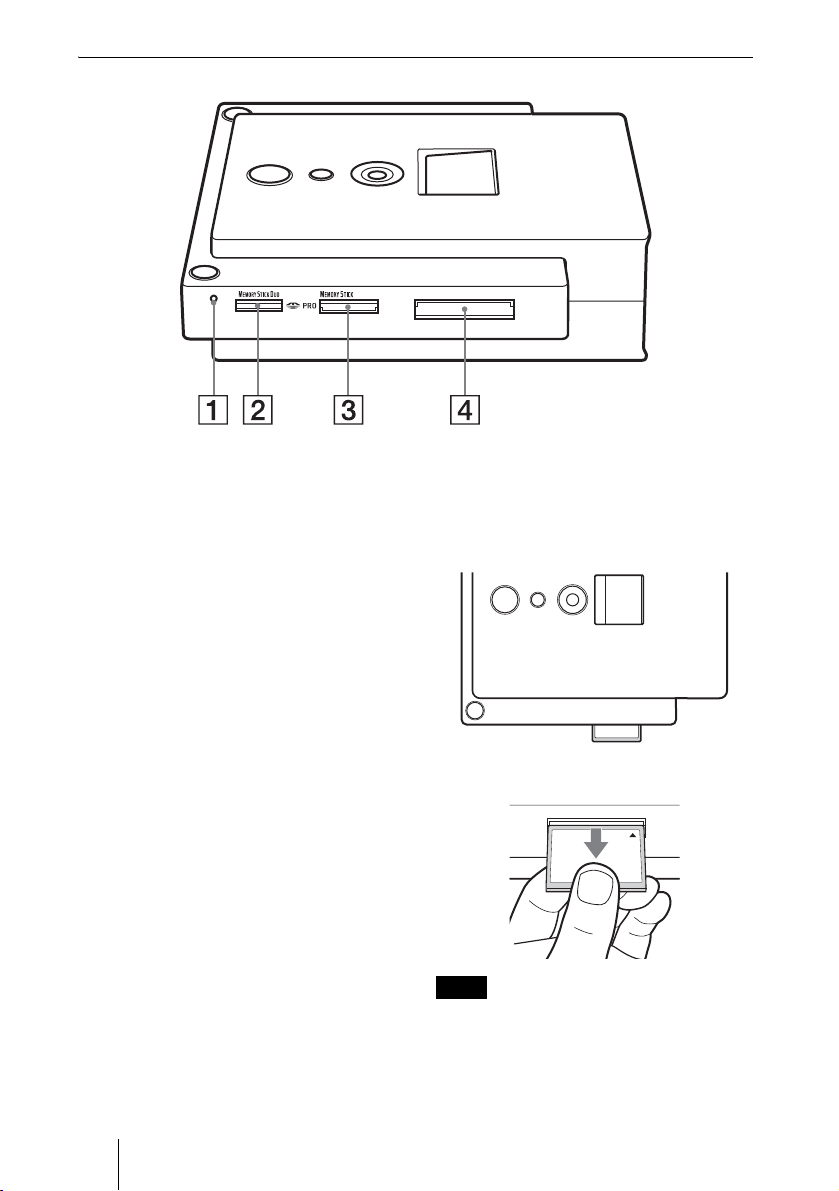
Right side panel
A Memory card LED
Lights in amber when accessing the
memory card.
Never remove the memory card while
the LED is lit.
Otherwise data in the memory card may
be damaged.
B Memory Stick Duo slot
Insert a “Memory Stick Duo.”
Push the “Memory Stick Duo” into the
Memory Stick Duo slot until you hear a
click.
To remove, push the “Memory Stick
Duo” and pull out.
C Multi memory card slot
Insert a “Memory Stick,” SD Card or
xD-Picture Card.
Push each card into the multi memory
card slot until you hear a click.
To remove, push the card and pull out.
D CompactFlash Card slot
Insert a CompactFlash.
Push the CompactFlash into the
CompactFlash slot.
The CompactFlash stays half inserted.
To remove, pull out the CompactFlash.
Note
You can use the memory card slot for both stand-
alone or computer operation.
CFSD xD
CF
GB01COV1.book Page 10 Thursday, January 19, 2006 7:25 PM
VRD-MC1
2-661-941-02 (1)
masterpage:Right
11
G:\#sagyou\Sony\01 TV\836599S VRD-MC1\0119 VRD-MC1i\0119 VRD-MC1 kai nou-
hin\2661941011\2661941011\2661941011 VRD-MC1\GB05OPE1.fm
Using DVDirect without a Computer
2111
About Auto Setup and the Main Menu
DVDirect automatically detects input signals from video connection, memory
card and DVD disc right after turning on the power, and displays the
appropriate message for preparation of recording in the display window. By
following the message, you can automatically move to the recording procedure
you intended without the complicated button operation (auto setup function).
You can also perform the recording procedure manually by selecting the
option from the main menu. You can move to the setup screen (setup menu)
for various setting from the main menu.
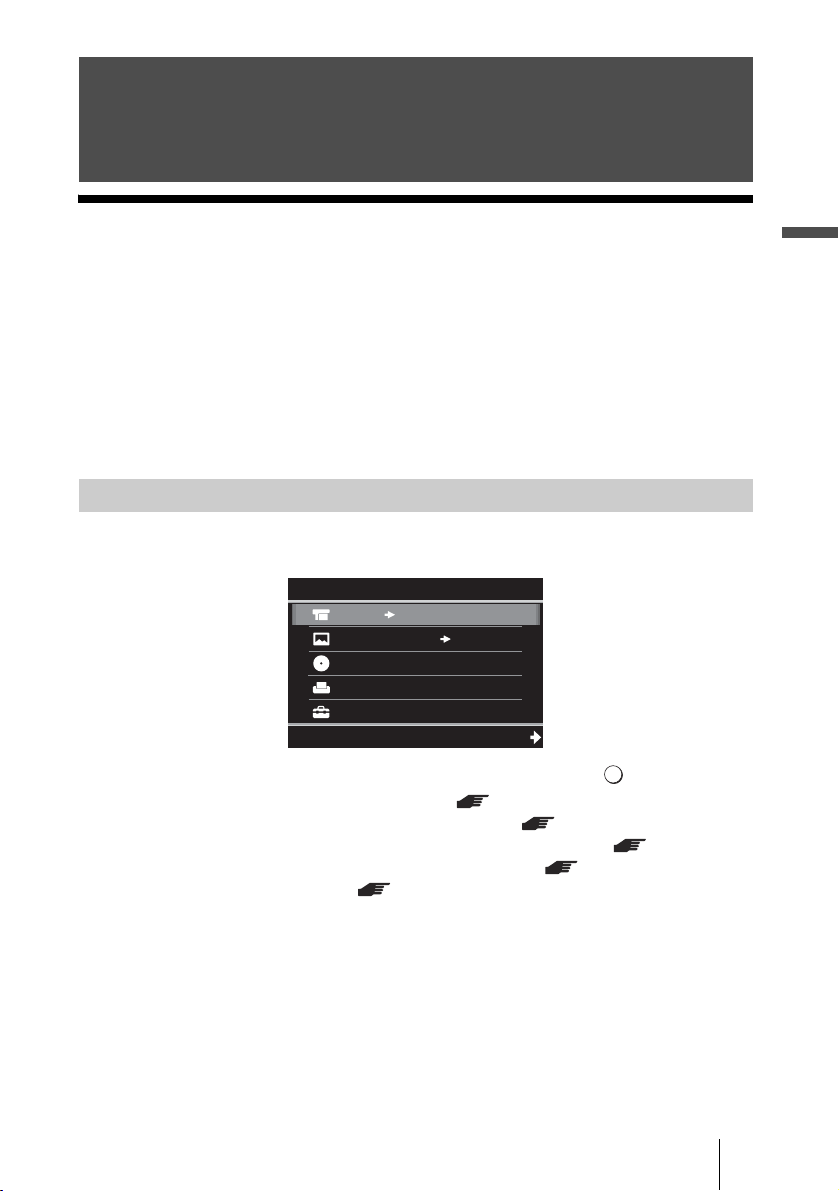
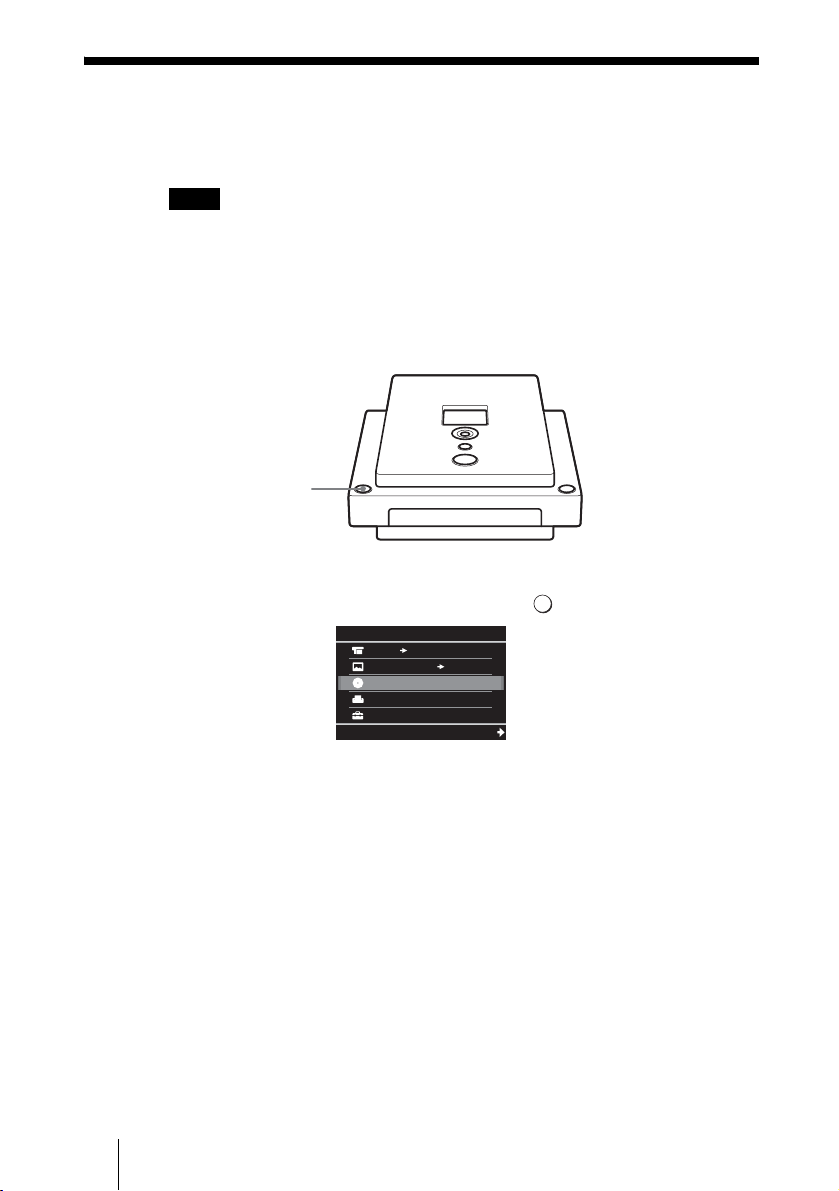
Press
< when [< Menu] is displayed in the bottom left of the display
window to move to the main menu.
Press
Mm to select the desired operation, and press , or (Select).
Video
, DVD: Create video DVD ( page 12)
MemoryCard
, DVD: Create photo DVD ( page 22)
DVD Video Preview: Playback the created video DVD ( page 20)
Photo View/Print: Display or print out photos ( page 28)
Setup: Various setting ( page 32)
Using DVDirect without a
Computer
To display the main menu
MemoryCard DVD
Video
Menu
DVD
DVD Video Preview
Photo View/Print
Setup
Select
GB01COV1.book Page 11 Thursday, January 19, 2006 7:25 PM
12
VRD-MC1
2-661-941-02 (1)
masterpage:Left
G:\#sagyou\Sony\01 TV\836599S VRD-MC1\0119 VRD-MC1i\0119 VRD-MC1 kai nou-
hin\2661941011\2661941011\2661941011 VRD-MC1\GB05OPE1.fm
Creating a Video DVD
You can use this DVDirect as a stand-alone DVD recorder to burn videos on
DVDs directly from a connected video camera or video device such as VCR/
DVR/PVR.
You can play the created video DVD with other DVD devices, or the DVD
drives of computers.
Two types of recording are available to create video DVD; one touch recording
and video recording.
Video recording ( page 13)
Record video DVD by operating DVDirect and the connected video devices
with buttons such as (Record) and (Stop) of DVDirect, or the play,
pause and stop buttons of the video device. Any video devices with video
output jack will be recordable.
One touch recording (DV Full Dubbing feature) ( page 17)
When connecting your digital video camera* with a DV jack to DVDirect
using a DV (i.LINK) cable, you can burn the entire contents of a tape recorded
by your digital video camera on a DVD with one touch of (Record).
DVDirect controls the digital video camera for the whole process, and
completes creation of the video DVD.
* DV or Digital8 camcorder only. MICROMV camcorder is not supported.
To create a video DVD, you can use DVD+R, DVD+R DL (double layer disc),
DVD-R, DVD+RW, or DVD-RW disc.
See “Compatible writable discs” for details. ( page 47)
Notes on creating a video DVD
• You cannot record videos with copy protected signals (commercial DVD, VHS software,
some programs from satellite receiver or CATV receiver, etc.).
• You cannot make incremental recordings on discs that have been created using a computer
or other DVD recorder.
One touch recording and video recording
Writable discs that can be used
GB01COV1.book Page 12 Thursday, January 19, 2006 7:25 PM
VRD-MC1
2-661-941-02 (1)
masterpage:Right
13
G:\#sagyou\Sony\01 TV\836599S VRD-MC1\0119 VRD-MC1i\0119 VRD-MC1 kai nou-
hin\2661941011\2661941011\2661941011 VRD-MC1\GB05OPE1.fm
Using DVDirect without a Computer
Video Recording
1 Connect the supplied power cord and AC adaptor to DVDirect.
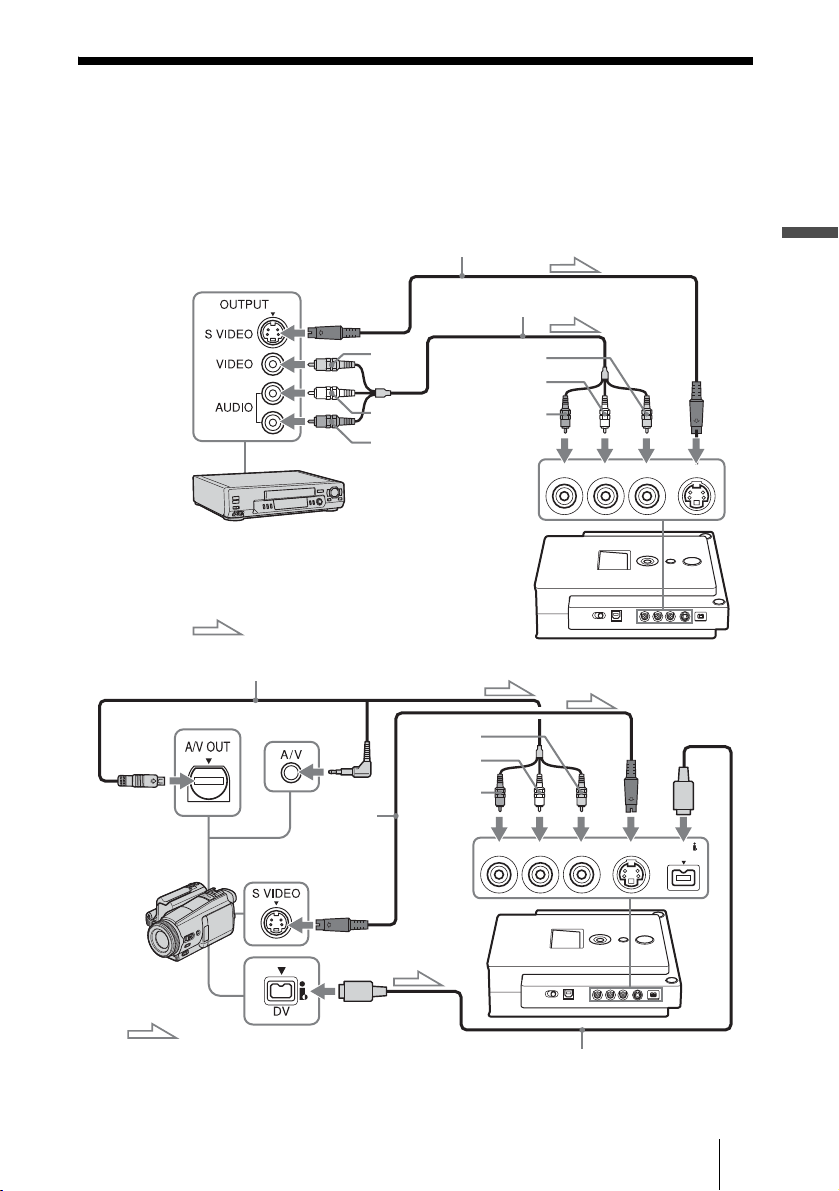
2 Connect your video device to DVDirect with an AV, S-VIDEO or
DV (i.LINK) cable (not supplied).
R AUDIO IN VIDEO IN S VIDEO INL
Signal flow
Yellow
White
Red
Yellow
White
Red
S video cable*
AV cable
To LINE OUT or OUTPUT
on VCR, DVR, etc.
R AUDIO IN VIDEO IN S VIDEO INL
or
DV IN
Signal flow
Yellow
White
Red
S video
cable*
AV
ca
bl
e
DV (i.LINK) cable**
To analog or
digital video
camera, etc.
. Continued
GB01COV1.book Page 13 Thursday, January 19, 2006 7:25 PM
14
VRD-MC1
2-661-941-02 (1)
masterpage:Left
G:\#sagyou\Sony\01 TV\836599S VRD-MC1\0119 VRD-MC1i\0119 VRD-MC1 kai nou-
hin\2661941011\2661941011\2661941011 VRD-MC1\GB05OPE1.fm
3 Turn on the video device and ready it for playback.
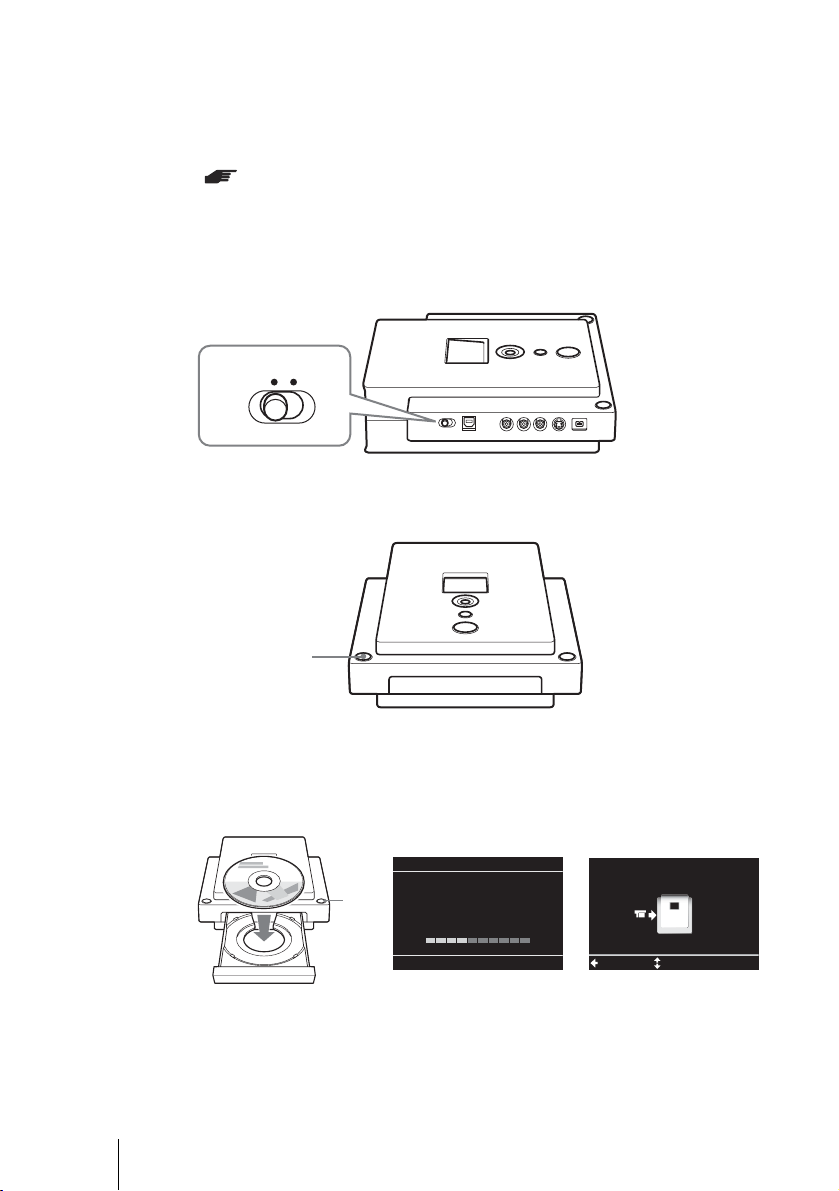
4 Set the mode switch on the left side of DVDirect to
[STANDALONE].
5 Turn on DVDirect.
The display window turns on.
6 Press the eject button, and insert a disc.
A new blank disc will be formatted automatically. Wait until [Formatting the
disc.] in the display window disappears, and DVDirect becomes ready for
recording.
*
I
f
t
h
e v
id
eo camera or V
C
R
h
as an
S
VIDE
O
j
ac
k
, use an
S
VIDE
O
ca
bl
e
(
not supp
li
e
d)
for improved picture quality (compared to a video cable). You also need to connect audio
cables for sound.
** If the digital video camera has a DV (i.LINK) jack, use a DV (i.LINK) cable (not
supplied) for improved picture quality (compared to a video or S VIDEO cable). If you
use a DV (i.LINK) cable, you can perform one touch recording (DV Full Dubbing feature)
( page 17).
STANDALONE PC/PRINT
Power
button
Formatting the disc.
This may take some time.
Please wait.
Menu
Check video cable
Select
Eject
button
t
GB01COV1.book Page 14 Thursday, January 19, 2006 7:25 PM
VRD-MC1
2-661-941-02 (1)
masterpage:Right
15
G:\#sagyou\Sony\01 TV\836599S VRD-MC1\0119 VRD-MC1i\0119 VRD-MC1 kai nou-
hin\2661941011\2661941011\2661941011 VRD-MC1\GB05OPE1.fm
Using DVDirect without a Computer
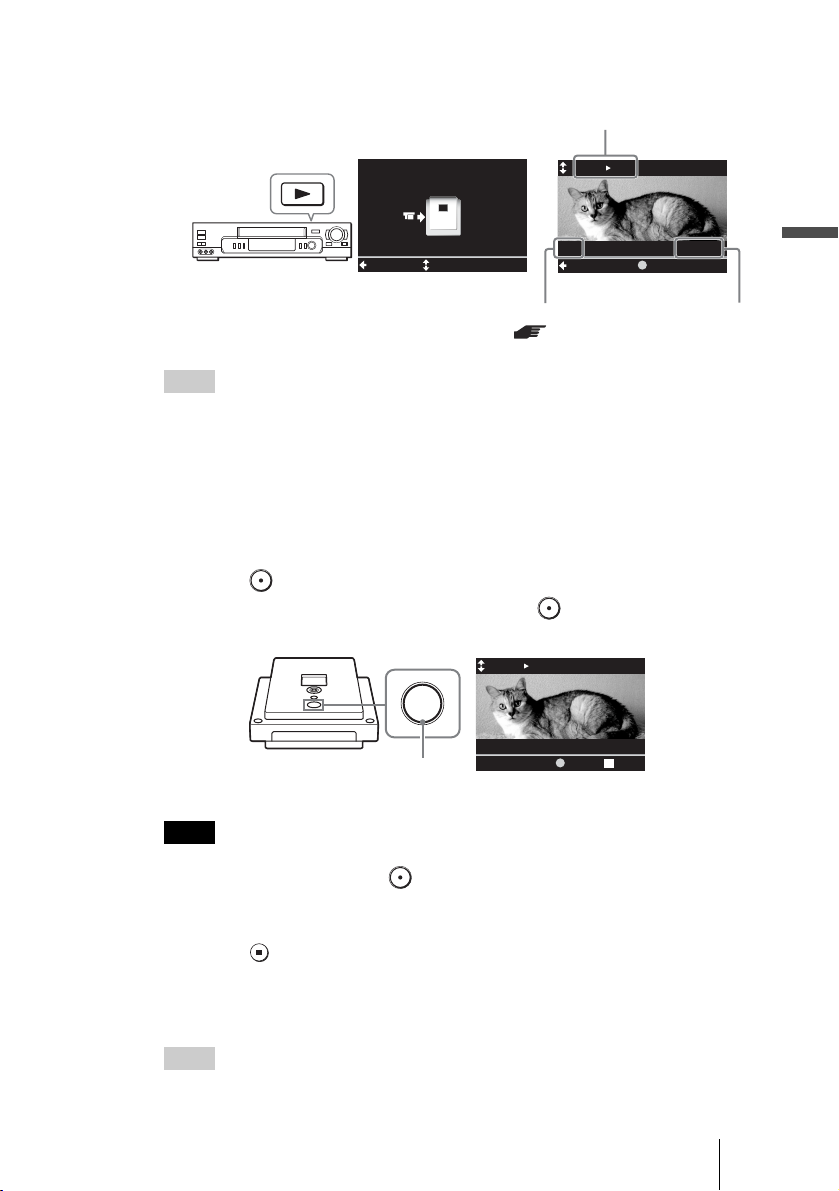
7 Start playback on the video device.
The image from the connected video device appears in the display window.
Hint
DVDirect detects a video input automatically when you play back video on the connected
video device. You can check video playback in the display window.
The selected input is displayed in the top left.
DV
B DVD : DV IN is selected.
Video
B DVD : VIDEO IN is selected.
S-Video
B DVD : S VIDEO IN is selected.
If a video input is not detected correctly (or if the video playback is not displayed), press
Mm
to select the correct input.
8 Press (Record) on DVDirect.
[Recording] appears in the display window and (Record) lights up during
recording.
Note
If you stop playback on the video device during recording, (i.e. the video signal is
interrupted), DVDirect pauses and (Record) blinks.
To resume recording, restart playback on the video device. If no video signals are detected
for 2 minutes, it stops.
9 Press (Stop) to stop recording.
Wait a moment until the display window changes.
10
Press the eject button to eject the disc.
Hint
Repeat steps 7 to 9 to continue recording.
Menu
Check video cable
Select
Video DVD
HQ
01:00:00
Menu
Remaining
REC
Recording mode
( page 33)
Remaining
time
Selected input
t
z
Video DVD
HQ
00:00:03
Recording
PAUSE STOP
Record
. Continued
GB01COV1.book Page 15 Thursday, January 19, 2006 7:25 PM
16
VRD-MC1
2-661-941-02 (1)
masterpage:Left
G:\#sagyou\Sony\01 TV\836599S VRD-MC1\0119 VRD-MC1i\0119 VRD-MC1 kai nou-
hin\2661941011\2661941011\2661941011 VRD-MC1\GB05OPE1.fm
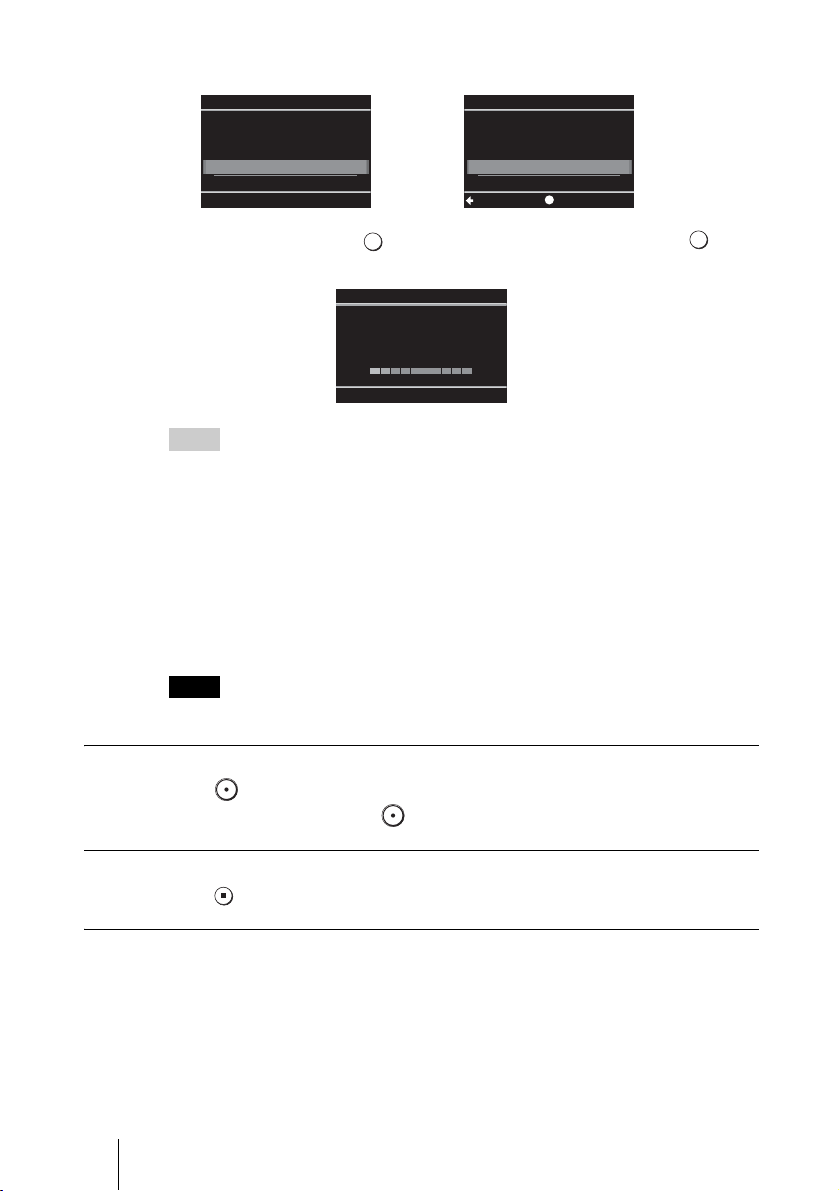
11
The following message appears.
Select [Yes] and press (Select), and again select [OK] and press
(Select). DVDirect starts finalizing the disc.
Hints
• If you select [No], the disc is ejected without finalizing. This disc is not completed yet and
cannot be played with other DVD players or DVD drives of computers. See page 38 for
details on finalizing.
• When using a DVD+RW, this message will not appear. (The DVD+RW disc is
automatically finalized and ejected.)
12
When finalizing is completed, the disc is automatically ejected.
The video DVD is completed.
You can play the video DVD with other DVD players or DVD drive of
computers.
Note
It may take a few minutes to finalize.
To pause recording
Press (Record).
To resume recording, press (Record) again.
To stop recording
Press (Stop).
To further record videos
If you eject a disc without finalizing or DVD+RW disc after recording videos,
you can add videos on the same disc later.
Insert the disc to add videos, and then repeat steps 7 to 9.
Eject
Ye s
No
Do you want to
finalize the disc?
Disc will be playable,
but not recordable.
Finalize disc
OK
Cancel
SelectSetup
t
Finalizing...
GB01COV1.book Page 16 Thursday, January 19, 2006 7:25 PM
VRD-MC1
2-661-941-02 (1)
masterpage:Right
17
G:\#sagyou\Sony\01 TV\836599S VRD-MC1\0119 VRD-MC1i\0119 VRD-MC1 kai nou-
hin\2661941011\2661941011\2661941011 VRD-MC1\GB05OPE1.fm
Using DVDirect without a Computer
One Touch Recording (DV Full Dubbing)
Note
Before you start recording, change the [DV Full Dubbing setting] to [ON] in the Setup menu.
( page 33)
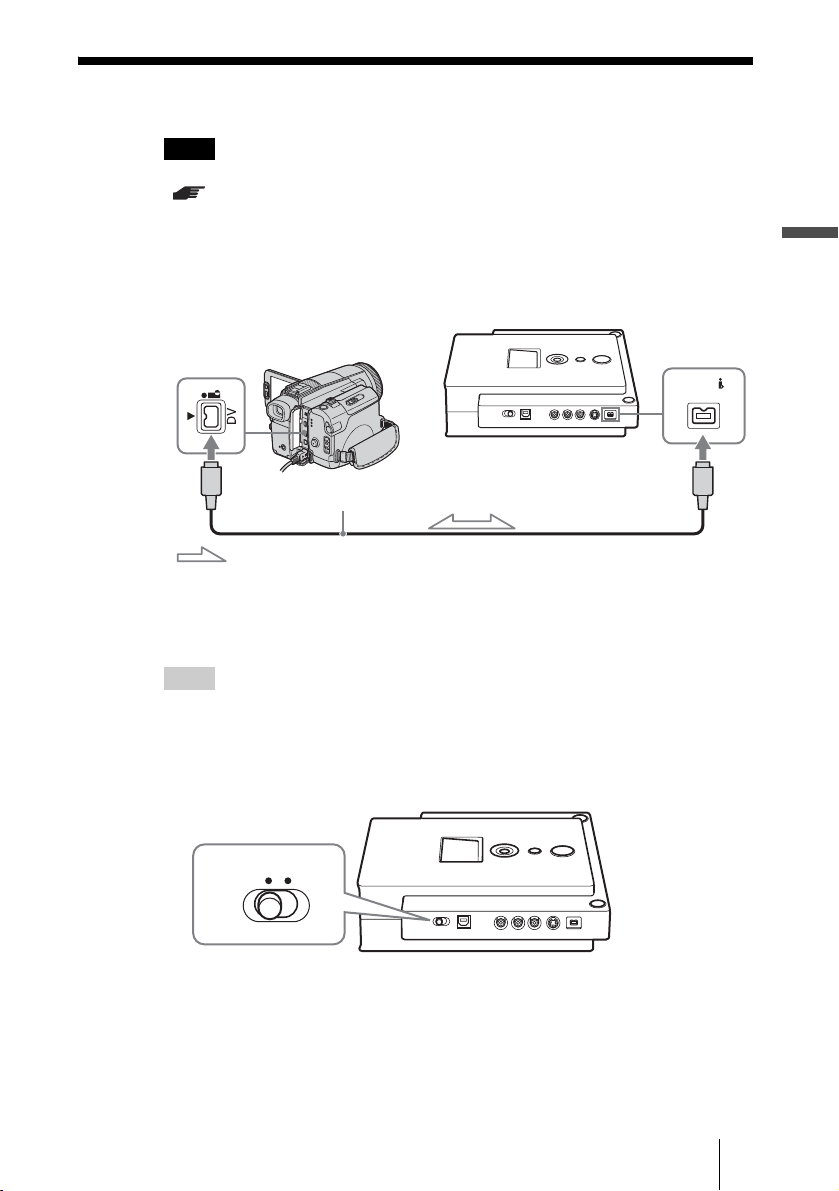
1 Connect the supplied power cord and AC adaptor to DVDirect.
2 Connect your digital video camera* to DVDirect with a DV
(i.LINK) cable (not supplied).
* DV or Digital8 camcorder only. MICROMV camcorder is not supported.
3 Turn on the digital video camera and ready it for playback.
Hint
For most digital video cameras, switch the power/mode button to the playback or “VTR”
mode to play the tape or perform dubbing.
4 Set the mode switch on the left side of DVDirect to
[STANDALONE].
DV IN
DV (i.LINK) cable
Signal flow
STANDALONE PC/PRINT
. Continued
GB01COV1.book Page 17 Thursday, January 19, 2006 7:25 PM
18
VRD-MC1
2-661-941-02 (1)
masterpage:Left
G:\#sagyou\Sony\01 TV\836599S VRD-MC1\0119 VRD-MC1i\0119 VRD-MC1 kai nou-
hin\2661941011\2661941011\2661941011 VRD-MC1\GB05OPE1.fm
5 Turn on DVDirect.
The display window turns on.
6 Press the eject button, and insert a disc.
A new blank disc will be formatted automatically. Wait until [Formatting the
disc.] in the display window disappears and the display window changes.
7 Press (Record) to start recording.
DVDirect starts recording at the same time the video camera starts playback.
If the video tape is not at the beginning, it is winded back to the start and played
back automatically, and DVDirect starts recording.
[Recording] appears in the display window, and (Record) lights up during
recording.
(Record) turns off and recording is completed.
Recording stops automatically when playback of the digital video camera ends.
Press the eject button to eject the disc, and follow step 11 on page 16.
Power
button
Formatting the disc.
This may take some time.
Please wait.
DV DVD
HQ
01:00:00
Menu
Remaining
REC
Eject
button
t
z
DV DVD
HQ
00:00:03
Recording
PAUSE STOP
Record
DV DVD
HQ
00:12:34
Menu
Remaining
REC
GB01COV1.book Page 18 Thursday, January 19, 2006 7:25 PM

VRD-MC1
2-661-941-02 (1)
masterpage:Right
19
G:\#sagyou\Sony\01 TV\836599S VRD-MC1\0119 VRD-MC1i\0119 VRD-MC1 kai nou-
hin\2661941011\2661941011\2661941011 VRD-MC1\GB05OPE1.fm
Using DVDirect without a Computer
To pause recording
Press (Record).
To resume recording, press (Record) again.
To stop recording
Press (Stop).
Note
If the DV (i.LINK) cable is disconnected during the recording procedure, DVDirect can no longer detect
signals from the video camera depending on the model. In this case, turn on the digital video camera and
DVDirect again.
GB01COV1.book Page 19 Thursday, January 19, 2006 7:25 PM
20
VRD-MC1
2-661-941-02 (1)
masterpage:Left
G:\#sagyou\Sony\01 TV\836599S VRD-MC1\0119 VRD-MC1i\0119 VRD-MC1 kai nou-
hin\2661941011\2661941011\2661941011 VRD-MC1\GB05OPE1.fm
Previewing a Video DVD
You can play and check the video DVD burned by this DVDirect in the display
window on the top of DVDirect.
Notes
• Sound will not be heard when previewing the disc in this DVDirect.
• You cannot output video images to external devices such as TV.
• You cannot play back a disc recorded on a device other than DVDirect or commercial DVD
software.
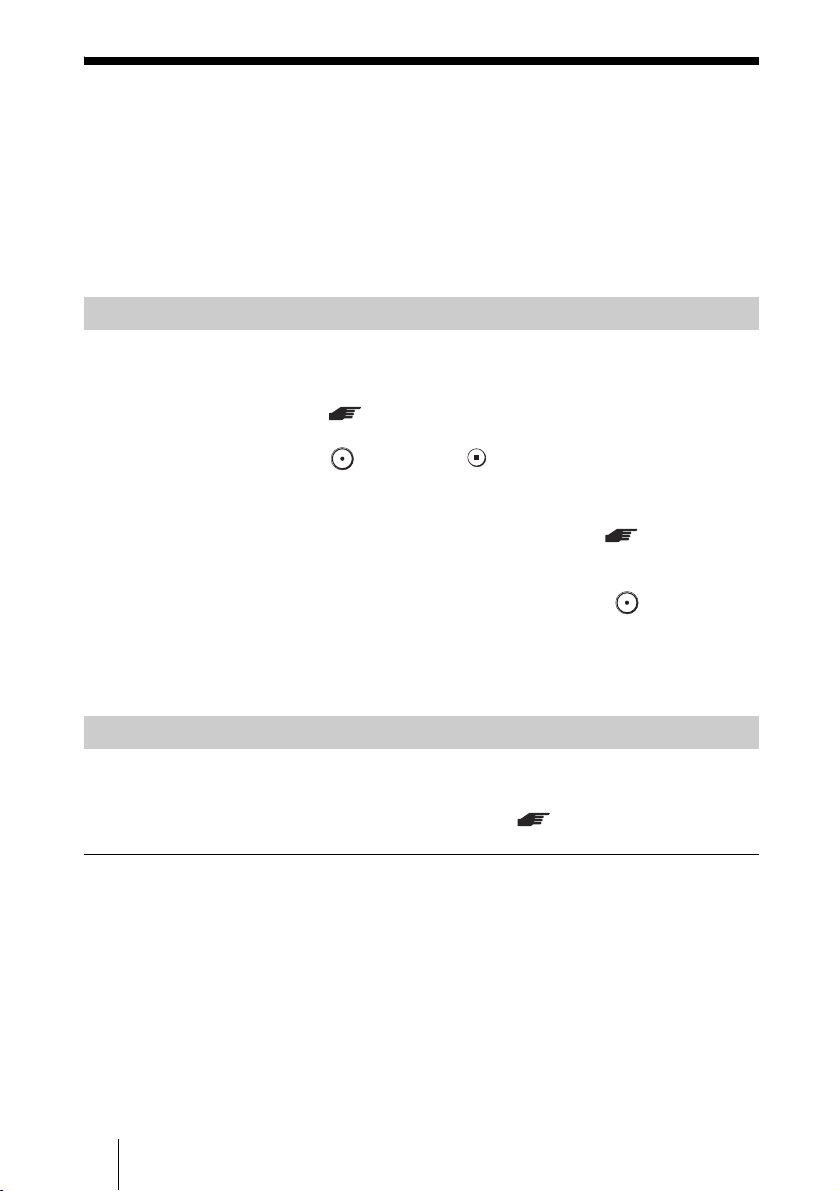
1 Turn on DVDirect.
The display window turns on.
2 Press < to display the main menu, and press Mm to select [DVD
Video Preview], and then press
, or (Select).
Power
button
MemoryCard DVD
Video
Menu
DVD
DVD Video Preview
Photo View/Print
Setup
Select
GB01COV1.book Page 20 Thursday, January 19, 2006 7:25 PM
VRD-MC1
2-661-941-02 (1)
masterpage:Right
21
G:\#sagyou\Sony\01 TV\836599S VRD-MC1\0119 VRD-MC1i\0119 VRD-MC1 kai nou-
hin\2661941011\2661941011\2661941011 VRD-MC1\GB05OPE1.fm
Using DVDirect without a Computer
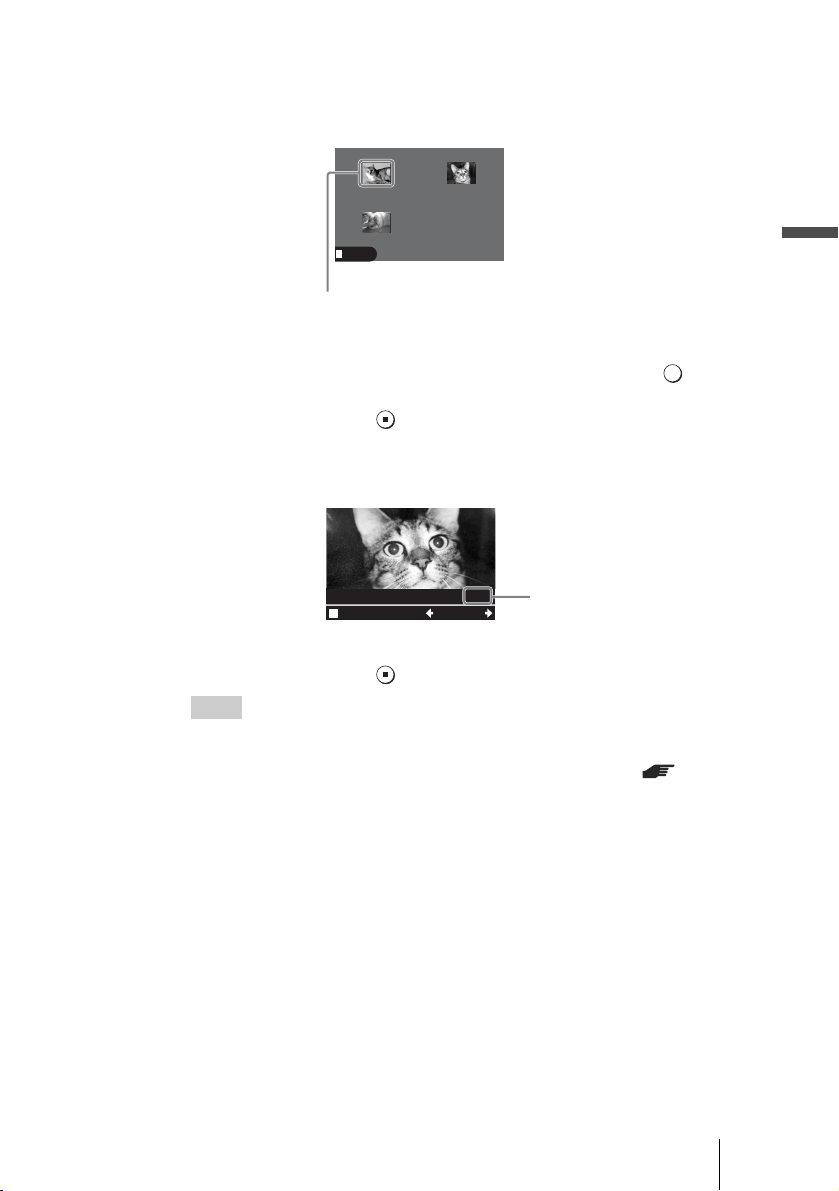
3 Press the eject button, and insert a video recorded disc.
For a finalized disc
The video titles recorded on the disc appear in the display window.
Press
Mm < , to select the title you want to view, and press (Select).
The selected title starts to play.
To stop playback, press (Stop).
For an unfinalized disc
The last title on the disc starts to play automatically.
Press
< , to select the title you want to view.
To stop playback, press (Stop).
98% free
HQ: 64 minutes
Menu
01/01
Title 3
00:00:16 HQ
Title 1
00:00:24 HQ
Title 2
00:00:31 HQ
Selected title
(highlighted in yellow)
2/2
Prev Next
Menu
Current title number/
total title number
Hints
• For a DVD+RW disc, the video titles appear in the display window, as in the case of
a finalized disc.
• If you insert a formatted video DVD first, the Auto Setup function ( page 11)
activates and the video titles will be played automatically.
• For details on titles, see “About title and chapter on a disc” on page 34.
GB01COV1.book Page 21 Thursday, January 19, 2006 7:25 PM

22
VRD-MC1
2-661-941-02 (1)
masterpage:Left
G:\#sagyou\Sony\01 TV\836599S VRD-MC1\0119 VRD-MC1i\0119 VRD-MC1 kai nou-
hin\2661941011\2661941011\2661941011 VRD-MC1\GB05OPE1.fm
Creating a Photo DVD
You can easily record photos taken by your digital camera on DVDs from a
memory card. You can also create a slide show DVD.
The following types of photo DVD can be created with DVDirect. You can
decide which you intend to create according to a message appeared when
ejecting the disc.
Photo backup DVD ( pages 24, 36)
DVD stored the photos (JPEG file) taken by a digital camera. You can preview
the photo backup DVD created by DVDirect with the display window of
DVDirect or computer DVD drives.
Slide show DVD ( pages 24, 36)
DVD with a photo slide show stored the photos (JPEG file) taken by a digital
camera and can be compatible with common DVD video discs. You can play
the slide show DVD with commercial DVD players and preview photos as a
slide show with a back ground music.
To create a photo DVD, use DVD-R and DVD-RW discs. See “Compatible
writable discs” for details. ( page 47)
Notes
• It takes more time to create a slide show DVD than a photo backup DVD.
• Up to 2,000 photos can be recorded on one disc.
Photo DVD to be created
Writable discs that can be used
GB01COV1.book Page 22 Thursday, January 19, 2006 7:25 PM
VRD-MC1
2-661-941-02 (1)
masterpage:Right
23
G:\#sagyou\Sony\01 TV\836599S VRD-MC1\0119 VRD-MC1i\0119 VRD-MC1 kai nou-
hin\2661941011\2661941011\2661941011 VRD-MC1\GB05OPE1.fm
Using DVDirect without a Computer
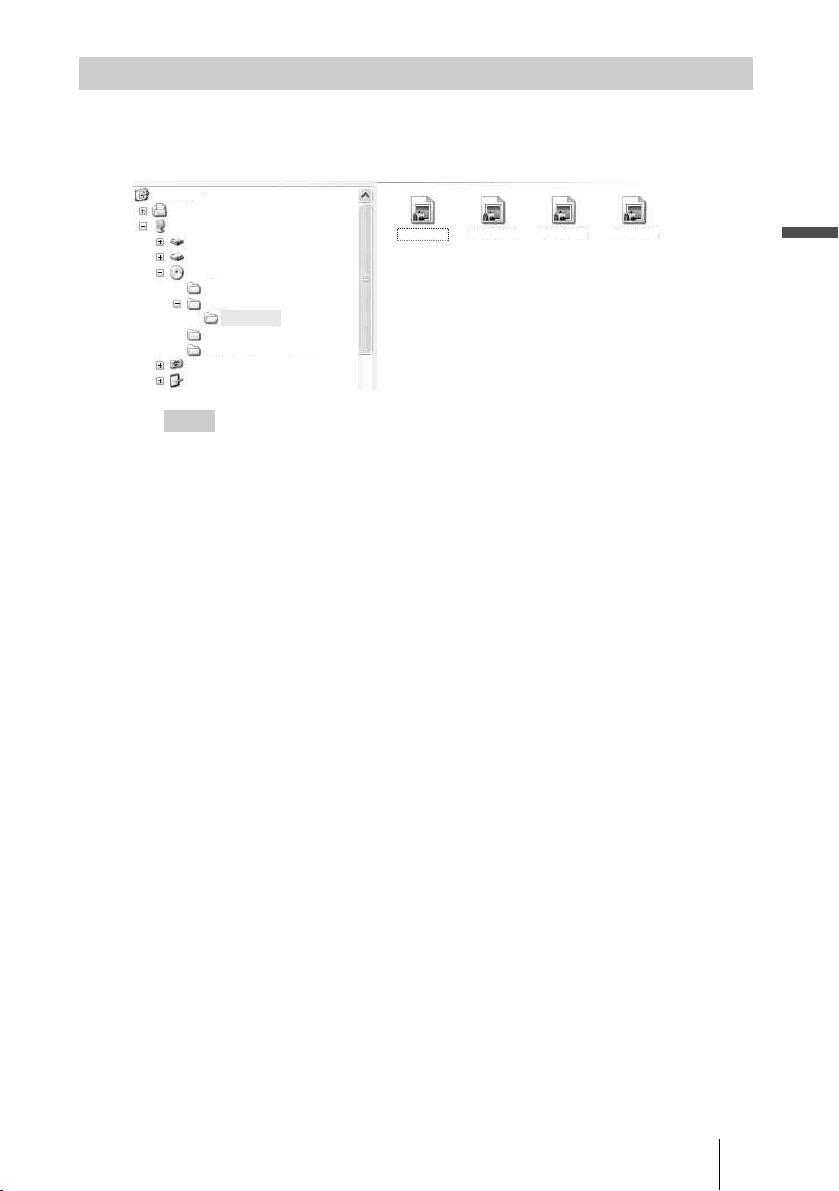
The following shows the folders and files of photos in the photo DVD on the
computer screen.
All photos are stored in the folder 100VRDMC.
Hints
• File names are automatically created when the photo DVD is created.
Storage location of photos in the photo DVD
DSC00001
Desktop
My Documents
My Computer
WinXP-J(C:)
WinXP-E(D:)
VRD_MC1(E:)
AUDIO_TS
DCIM
100VRDMC
VIDEO_RM
VIDEO_TS
Sony MemoryStick - MG(G:)
Control Panel
DSC00002 DSC00003 DSC00004
GB01COV1.book Page 23 Thursday, January 19, 2006 7:25 PM
24
VRD-MC1
2-661-941-02 (1)
masterpage:Left
G:\#sagyou\Sony\01 TV\836599S VRD-MC1\0119 VRD-MC1i\0119 VRD-MC1 kai nou-
hin\2661941011\2661941011\2661941011 VRD-MC1\GB05OPE1.fm
Photo Recording
1 Connect the supplied power cord and AC adaptor to DVDirect.
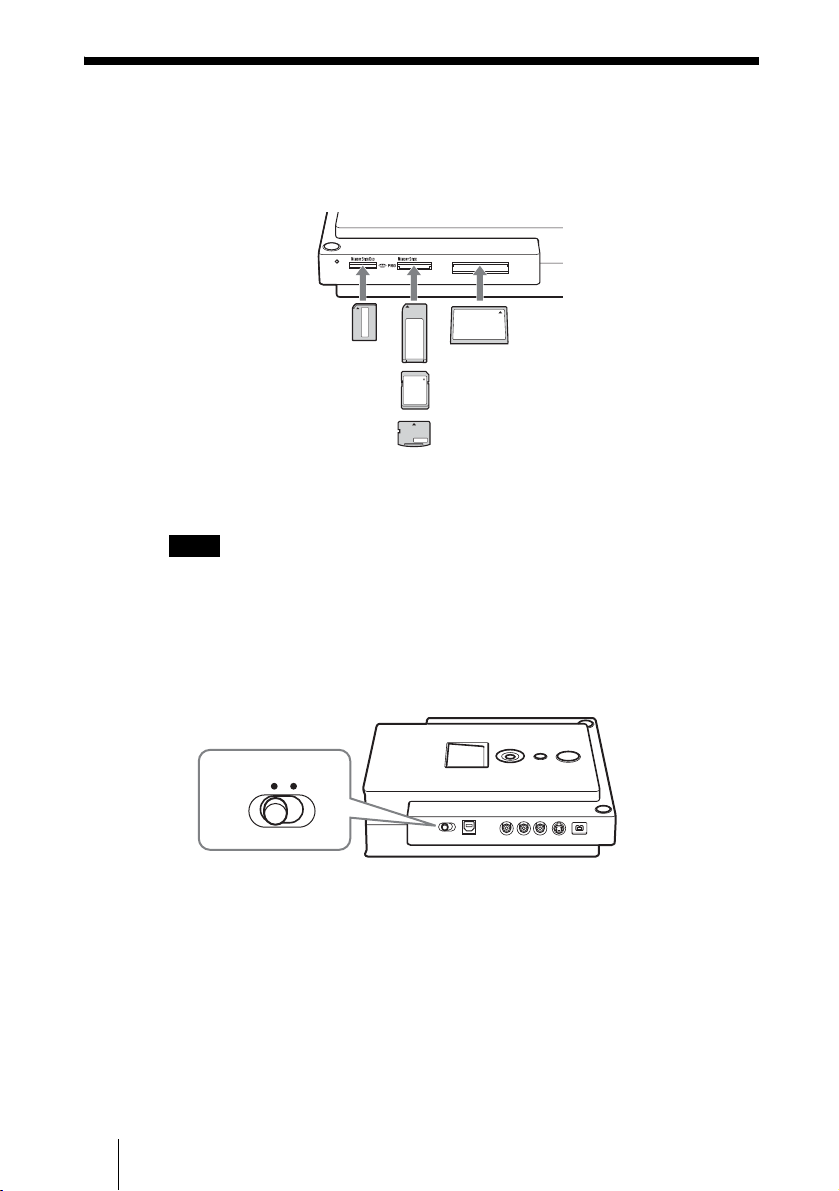
2 Insert the memory card into its corresponding memory card slot.
Notes
• Insert only one memory card into a memory card slot. Furthermore you cannot use more
than one memory card slot at a time.
• Do not insert a “Memory Stick Duo” with a Memory Stick Duo adaptor into the multi
memory card slot.
3 Set the mode switch on the left side of DVDirect to
[STANDALONE].
CFSD xD
Memory
Stick Duo
CompactFlash
Memory Stick
SD Card
xD-Picture Card
STANDALONE PC/PRINT
GB01COV1.book Page 24 Thursday, January 19, 2006 7:25 PM
VRD-MC1
2-661-941-02 (1)
masterpage:Right
25
G:\#sagyou\Sony\01 TV\836599S VRD-MC1\0119 VRD-MC1i\0119 VRD-MC1 kai nou-
hin\2661941011\2661941011\2661941011 VRD-MC1\GB05OPE1.fm
Using DVDirect without a Computer
4 Turn on DVDirect.
The display window turns on.
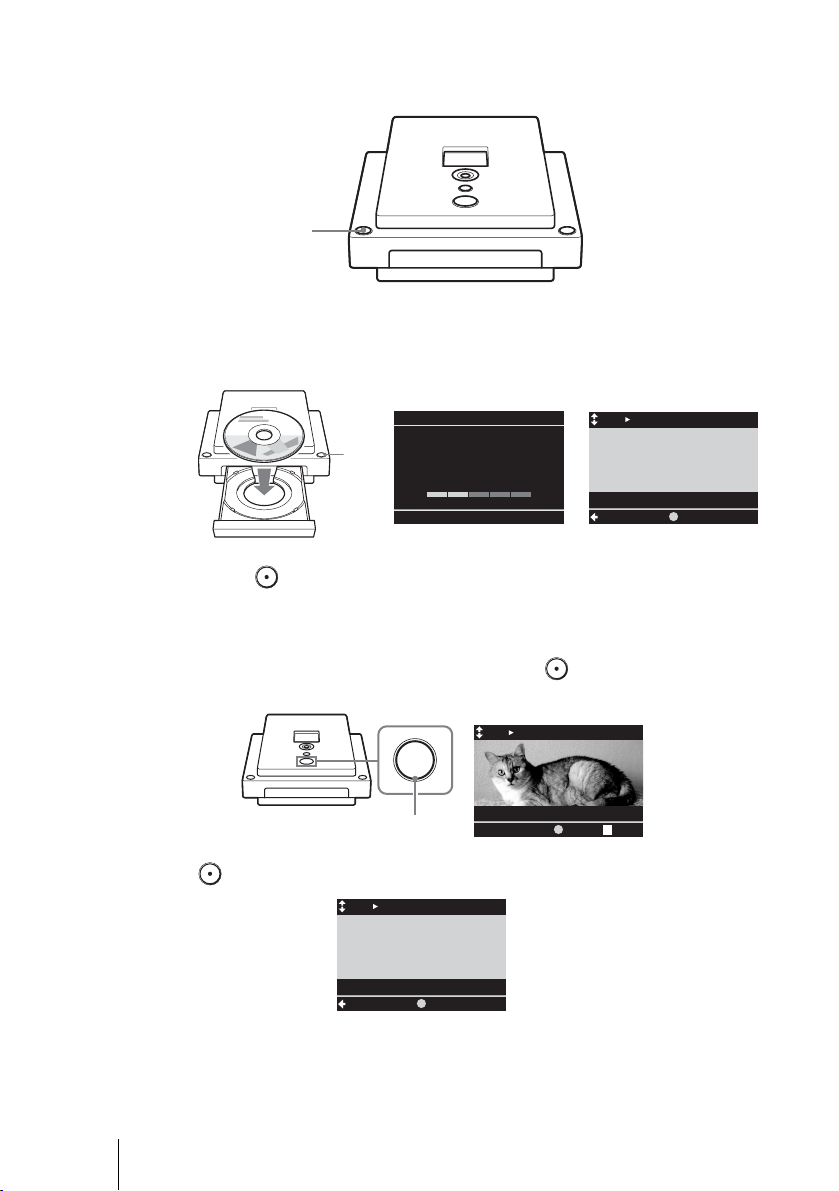
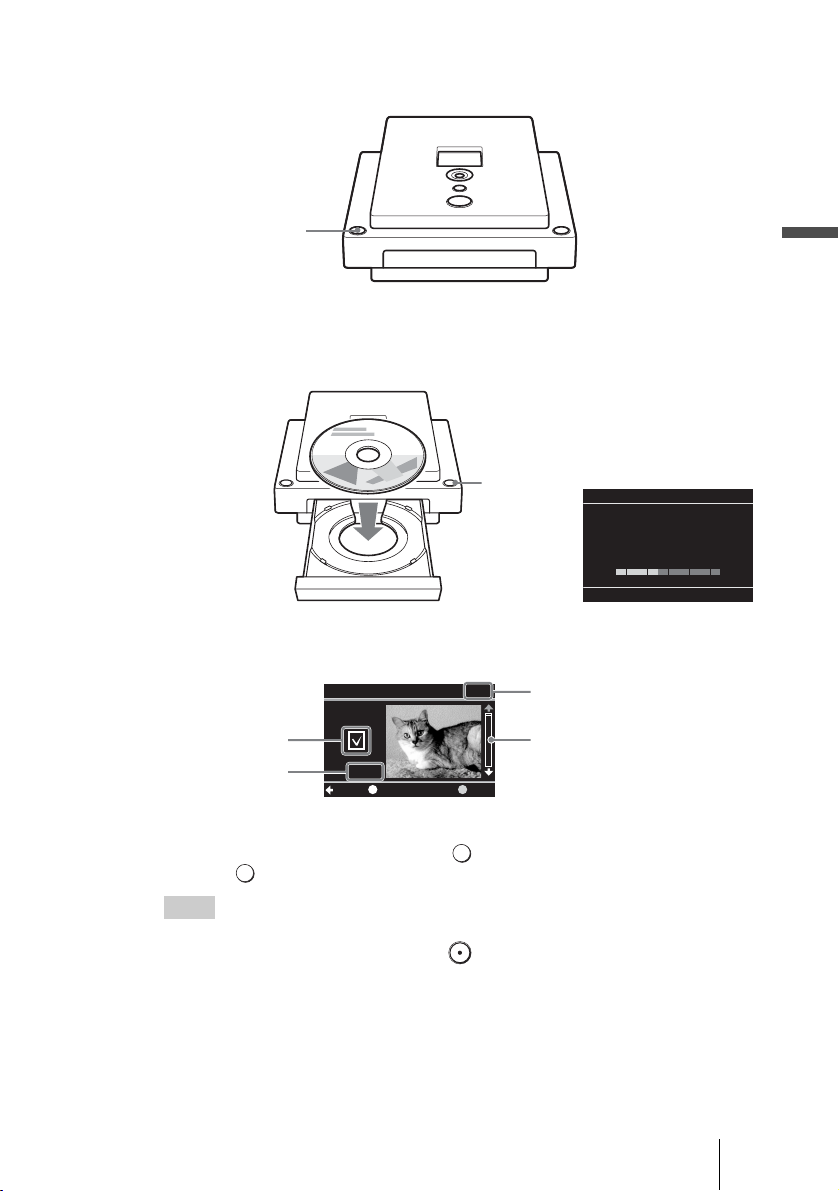
5 Press the eject button, and insert a disc.
A new blank disc is formatted automatically. Wait until [Formatting the disc.]
in the display window disappears and the display window changes.
6 Photos in the memory card appears in the display window.
Press Mm to scroll the photos.
Display a photo to record and press (Select) to release the tick mark.
Press (Select) again to put a tick mark.
Hint
Tick marks are applied for all photos when inserting a memory card and displaying photos.
If you intend to record all photos, just press (Record) to start recording.
Power
button
Formatting the disc.
This may take some time.
Please wait.
Eject button
1/123
REC
M.S.
Mark/UnmarkMenu
Scroll bar
Tick mark
Current photo number/ total
number of photos
Selected memory card
. Continued
GB01COV1.book Page 25 Thursday, January 19, 2006 7:25 PM
26
VRD-MC1
2-661-941-02 (1)
masterpage:Left
G:\#sagyou\Sony\01 TV\836599S VRD-MC1\0119 VRD-MC1i\0119 VRD-MC1 kai nou-
hin\2661941011\2661941011\2661941011 VRD-MC1\GB05OPE1.fm
7 Press (Record) to start recording.
[Writing photos to disc.] appears in the display window and (Record) lights
up during recording.
(Record) turns off and recording is completed.
Recording stops automatically when the photos are recorded.
Hint
You can continuously add photos from another memory card on the same disc. In this case,
change the memory card, and if you press (Record) after the new photo is displayed in
the display window, recording will start.
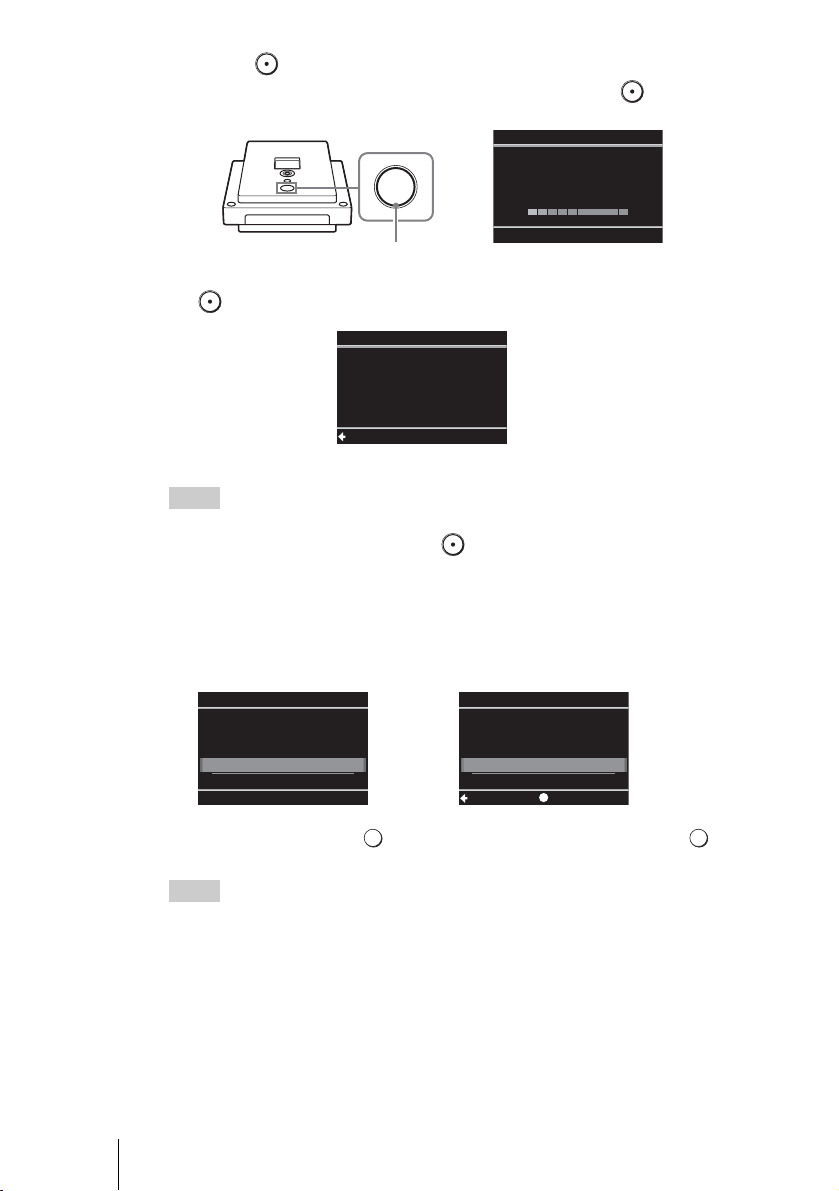
8 Press < to display the main menu, and then press the eject
button to eject the disc.
9 The following message appears.
Select [Yes] and press (Select), and again select [OK] and press
(Select).
Hint
If you select [No], the disc is ejected without finalizing. This disc is not completed yet and
cannot be played with other DVD players or DVD drives of computers. See page 38 for
details on finalizing.
z
Writing photos to disc.
HINT: Slide show created
when disc is ejected.
1/123
Record
Complete
Menu
Eject
Ye s
No
Do you want to
finalize the disc?
Disc will be playable,
but not recordable.
Finalize disc
OK
Cancel
SelectSetup
t
GB01COV1.book Page 26 Thursday, January 19, 2006 7:25 PM

VRD-MC1
2-661-941-02 (1)
masterpage:Right
27
G:\#sagyou\Sony\01 TV\836599S VRD-MC1\0119 VRD-MC1i\0119 VRD-MC1 kai nou-
hin\2661941011\2661941011\2661941011 VRD-MC1\GB05OPE1.fm
Using DVDirect without a Computer
10
The following message appears.
To complete the disc as a photo backup DVD, select [No].
To complete the disc as a slide show DVD, select [Yes].
Notes
• For a photo backup DVD, it takes a few minutes to complete finalizing.
• For a slide show DVD, it takes more time to complete the disc according to the number and
size of photos. (E.g. It may take about 10 to 15 minutes to record 100 photo files on DVD.)
11
DVDirect starts finalizing, or a slide show is created and
finalizing starts.
12
When finalizing is completed, the disc is automatically ejected.
The photo DVD is completed.
To further record photos
If you eject a disc without finalizing after recording photos, you can add photos
on the same disc later. Insert the disc to add photos or photos stored on a
memory card to DVDirect, and then repeat steps 6 to 7.
Create a slide show?
(This may require time.)
Ye s
No
Slide show
Finalizing...
GB01COV1.book Page 27 Thursday, January 19, 2006 7:25 PM

28
VRD-MC1
2-661-941-02 (1)
masterpage:Left
G:\#sagyou\Sony\01 TV\836599S VRD-MC1\0119 VRD-MC1i\0119 VRD-MC1 kai nou-
hin\2661941011\2661941011\2661941011 VRD-MC1\GB05OPE1.fm
Viewing and Printing Photos
You can view and check the photos recorded on DVD or photos stored in a
memory card in the display window on the top of DVDirect.
You can also print out photos in a photo DVD or memory card by connecting
this DVDirect to a PictBridge-compatible printer.
Note
You cannot output the photo images to external devices, such as TV.
1 Turn on DVDirect.
The display window turns on.
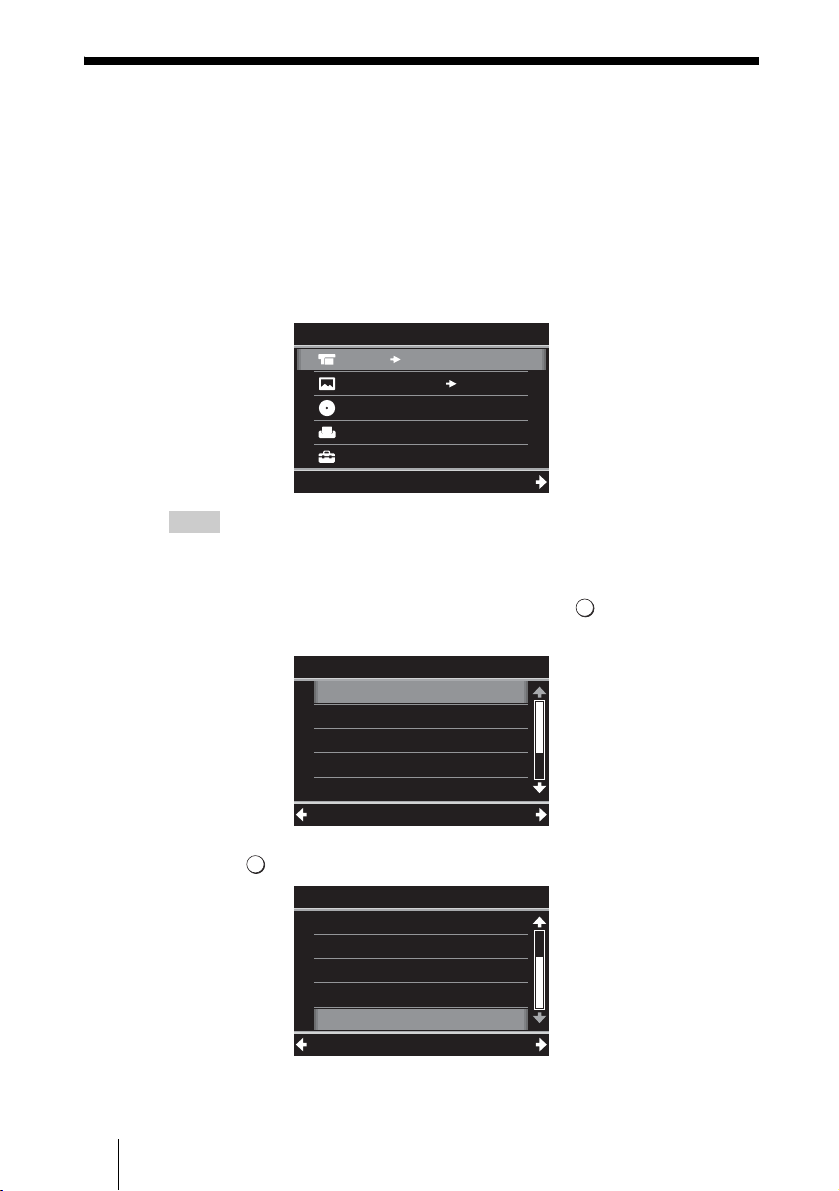
2 Press < to display the main menu, and press Mm to select
[Photo View/Print], and then press
, or (Select).
3 Press Mm to select [DVD] to view the photo DVD, or select
[Memory Card] to view the memory card, and then press
, or
(Select).
Power button
MemoryCard DVD
Video
Menu
DVD
DVD Video Preview
Photo View/Print
Setup
Select
Memory Card
DVD
Select Media
Select
Menu
GB01COV1.book Page 28 Thursday, January 19, 2006 7:25 PM

VRD-MC1
2-661-941-02 (1)
masterpage:Right
29
G:\#sagyou\Sony\01 TV\836599S VRD-MC1\0119 VRD-MC1i\0119 VRD-MC1 kai nou-
hin\2661941011\2661941011\2661941011 VRD-MC1\GB05OPE1.fm
Using DVDirect without a Computer
4 Press the eject button and insert a photo recorded disc, or insert
a memory card.
5 Press Mm to scroll and view the photos, or display a photo to
print.
One photo is displayed in the display window at a time.
Hint
If you insert the formatted photo DVD first, the Auto Setup function ( page 11)
activates and the photo on the disc will be displayed automatically.
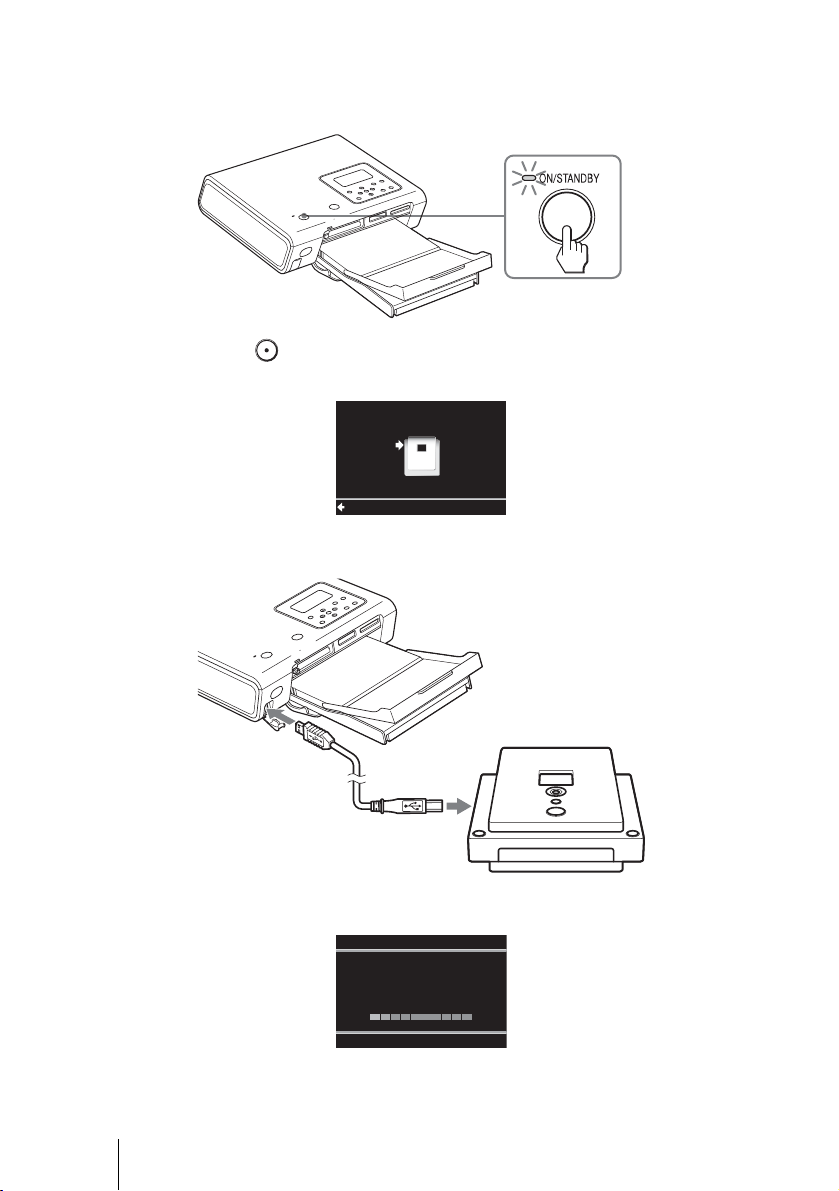
6 Set the mode switch on the left side of DVDirect to [PC/PRINT].
Eject button
1/123
Print
DVD
Menu
The selected disc
or memory card is displayed.
STANDALONE PC/PRINT
. Continued
GB01COV1.book Page 29 Thursday, January 19, 2006 7:25 PM
30
VRD-MC1
2-661-941-02 (1)
masterpage:Left
G:\#sagyou\Sony\01 TV\836599S VRD-MC1\0119 VRD-MC1i\0119 VRD-MC1 kai nou-
hin\2661941011\2661941011\2661941011 VRD-MC1\GB05OPE1.fm
7 Turn on the printer and set up for printing.
Refer to the operating instructions of your printer for setup details.
(See connection with a PictBridge-compatible device.)
8 Press (Record).
The following message appears.
9 Connect your printer to DVDirect with the supplied USB cable.
10
The printer starts printing.
The message [Printing] will disappear when printing is completed.
Select
Menu
Connect printer and
check switch on left of unit.
Printing...
GB01COV1.book Page 30 Thursday, January 19, 2006 7:25 PM

VRD-MC1
2-661-941-02 (1)
masterpage:Right
31
G:\#sagyou\Sony\01 TV\836599S VRD-MC1\0119 VRD-MC1i\0119 VRD-MC1 kai nou-
hin\2661941011\2661941011\2661941011 VRD-MC1\GB05OPE1.fm
Using DVDirect without a Computer
Hint
To continue printing other photos, press
Mm to scroll and display the desired photo to print,
and then press (Record).
Notes on viewing or printing photos
• You cannot view or print photos from a photo DVD created by a device other than
DVDirect, i.e., a computer created disc.
• With DVDirect, you can view and print photos complied with the JPEG format taken by a
digital still camera. Any other photo files (e.g. JPEG files created, edited or finished on a
computer) may not be guaranteed to view or print.
GB01COV1.book Page 31 Thursday, January 19, 2006 7:25 PM
32
VRD-MC1
2-661-941-02 (1)
masterpage:Left
G:\#sagyou\Sony\01 TV\836599S VRD-MC1\0119 VRD-MC1i\0119 VRD-MC1 kai nou-
hin\2661941011\2661941011\2661941011 VRD-MC1\GB05OPE1.fm
Using the Setup Menu
You can change the various setting to create a disc in the Setup menu screen.
The following shows the procedure to display the Setup menu.
1 Turn on DVDirect.
The display window turns on.
2 Press <.
The main menu appears.
Hint
Whenever [
< Menu] is displayed in the bottom left during operating DVDirect, the main
menu appears if you press
<.
3 Press m to select [Setup], and press , or (Select).
The Setup menu appears.
Move the cursor by pressing Mm to select items or options to change, and press
, or (Select) to confirm.
MemoryCard DVD
Video
Menu
DVD
DVD Video Preview
Photo View/Print
Setup
Select
Rec Quality
DV Full Dubbing
Auto Stop Timer
Auto Chaptering
Slide show BGM
HQ
OFF
OFF
5min
ON
Setup
Select
Menu
Finalize disc
Erase disc
System
Setup
Select
Menu
Slide showBGM
Color system
ON
NTSC
GB01COV1.book Page 32 Thursday, January 19, 2006 7:25 PM
VRD-MC1
2-661-941-02 (1)
masterpage:Right
33
G:\#sagyou\Sony\01 TV\836599S VRD-MC1\0119 VRD-MC1i\0119 VRD-MC1 kai nou-
hin\2661941011\2661941011\2661941011 VRD-MC1\GB05OPE1.fm
Using DVDirect without a Computer
Set [ON/OFF] for the one touch recording feature ( page 17).
To create video DVD, you can select the recording quality.
To create video DVD, you can select the preset time to stop recording
automatically.
Note
The [Auto Stop Timer] setting is cancelled when the recording is completed,
press (Stop) during recording, or the power is turned off.
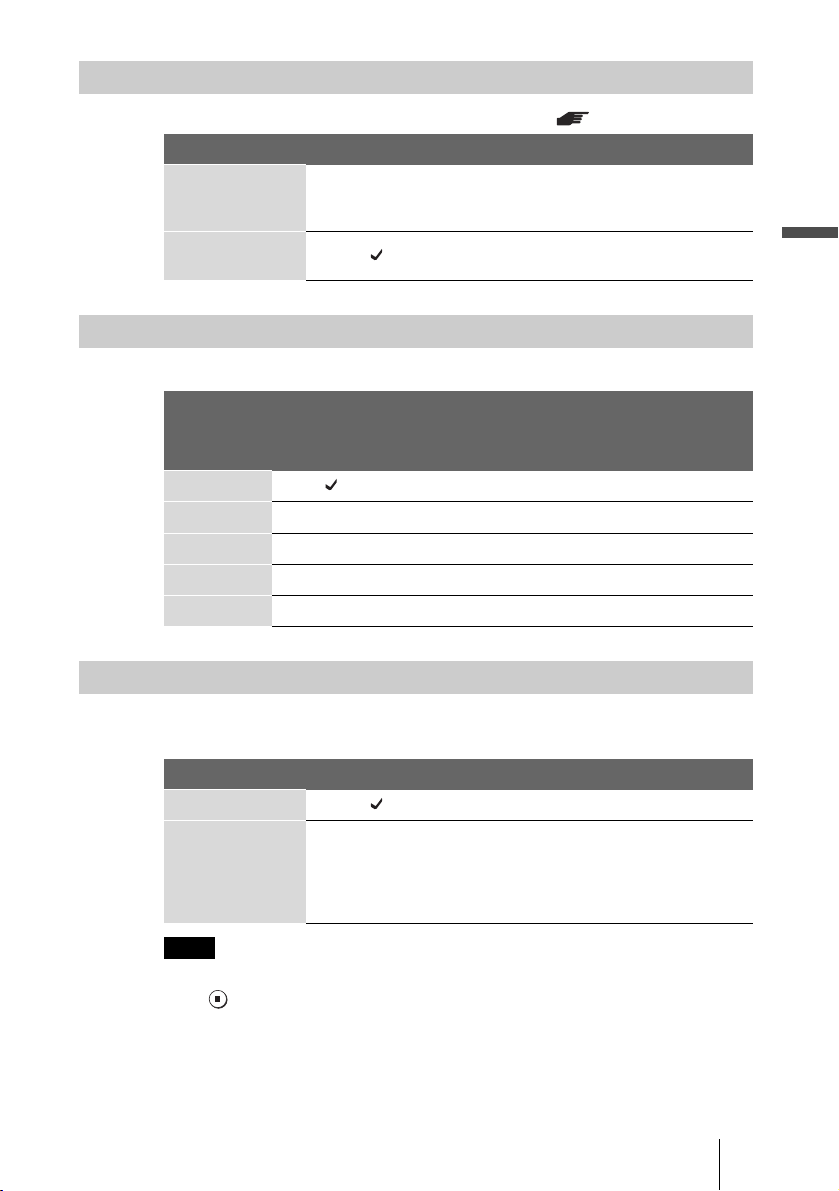
DV Full Dubbing
Setting Default setting Feature
ON Rewinds the tape in the digital video
camera automatically, and then start
recording from the beginning of the tape.
OFF Starts recording from the point the tape in
the digital video camera has been stopped.
Rec Quality
Rec Quality
Default
setting
Picture
quality
Recording time (approx.)
Single layer
disc
Double layer
disc
HQ High 1 hour 2 hours
HSP
R
1.5 hours 3 hours
SP Standard 2 hours 4 hours
LP R 4 hours 8 hours
SLP Low 6 hours 12 hours
Auto Stop Timer
Setting Default setting Feature
OFF —
30min to 8h Recording automatically stops when the
preset time has passed after starting
recording.
30 min, 60 min, 90 min, 2h, 3h, 4h, 6h, 8h
are available.
GB01COV1.book Page 33 Thursday, January 19, 2006 7:25 PM
34
VRD-MC1
2-661-941-02 (1)
masterpage:Left
G:\#sagyou\Sony\01 TV\836599S VRD-MC1\0119 VRD-MC1i\0119 VRD-MC1 kai nou-
hin\2661941011\2661941011\2661941011 VRD-MC1\GB05OPE1.fm
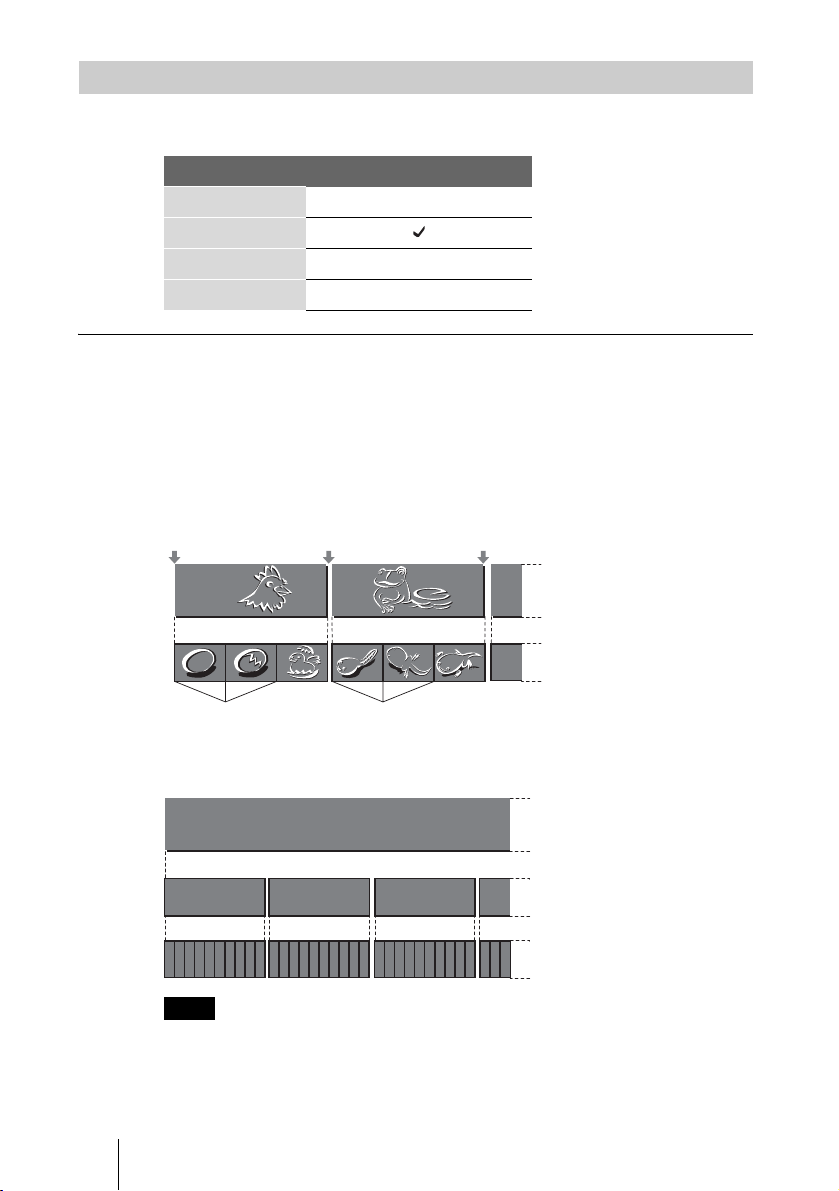
To create video DVD, you can specify a time to create chapter marks
automatically in the disc.
About title and chapter on a disc
DVD contents consist of sections, called titles, and smaller sub-sections, called
chapters. When you create a video DVD with DVDirect, a title is created
between the points where you start and stop a recording.
When you create a photo DVD (slide show DVD) with DVDirect, a chapter is
created for 10 photos.
Video DVD
Photo DVD
Note
Up to 49 titles/a disc and 99 chapters/a title can be created. Depending on the condition of the
videos or photos, the number decreases.
Auto Chaptering
Setting Default setting
OFF
5min
10min
15min
Title 1
Chapters
Title 2
Start Rec. Stop/Start
Chapters
Chapter marks
Chapter marks
Stop Rec.
Title 1
Chapter 1
10 Photos
43215678910
Chapter 2 Chapter 3
10 Photos
43215678910
10 Photos
43215678910321
GB01COV1.book Page 34 Thursday, January 19, 2006 7:25 PM

VRD-MC1
2-661-941-02 (1)
masterpage:Right
35
G:\#sagyou\Sony\01 TV\836599S VRD-MC1\0119 VRD-MC1i\0119 VRD-MC1 kai nou-
hin\2661941011\2661941011\2661941011 VRD-MC1\GB05OPE1.fm
Using DVDirect without a Computer
To create photo DVD (slide show DVD), you can select if you record a
background music on the disc.
Note
Only one background music is pre-installed in DVDirect and cannot be changed.
Select the color system of the disc.
The disc cannot be played if the color system is different between the created
disc and the DVD player.
Note
The default setting of the color system is set appropriately in advance
according to the shipping destination. Keep this setting.
Slide show BGM
Setting Default setting
ON
OFF
Color system
Setting Feature
NTSC Record DVD with NTSC color
system.
PAL Record DVD with PAL color
system.
. Continued
GB01COV1.book Page 35 Thursday, January 19, 2006 7:25 PM
36
VRD-MC1
2-661-941-02 (1)
masterpage:Left
G:\#sagyou\Sony\01 TV\836599S VRD-MC1\0119 VRD-MC1i\0119 VRD-MC1 kai nou-
hin\2661941011\2661941011\2661941011 VRD-MC1\GB05OPE1.fm
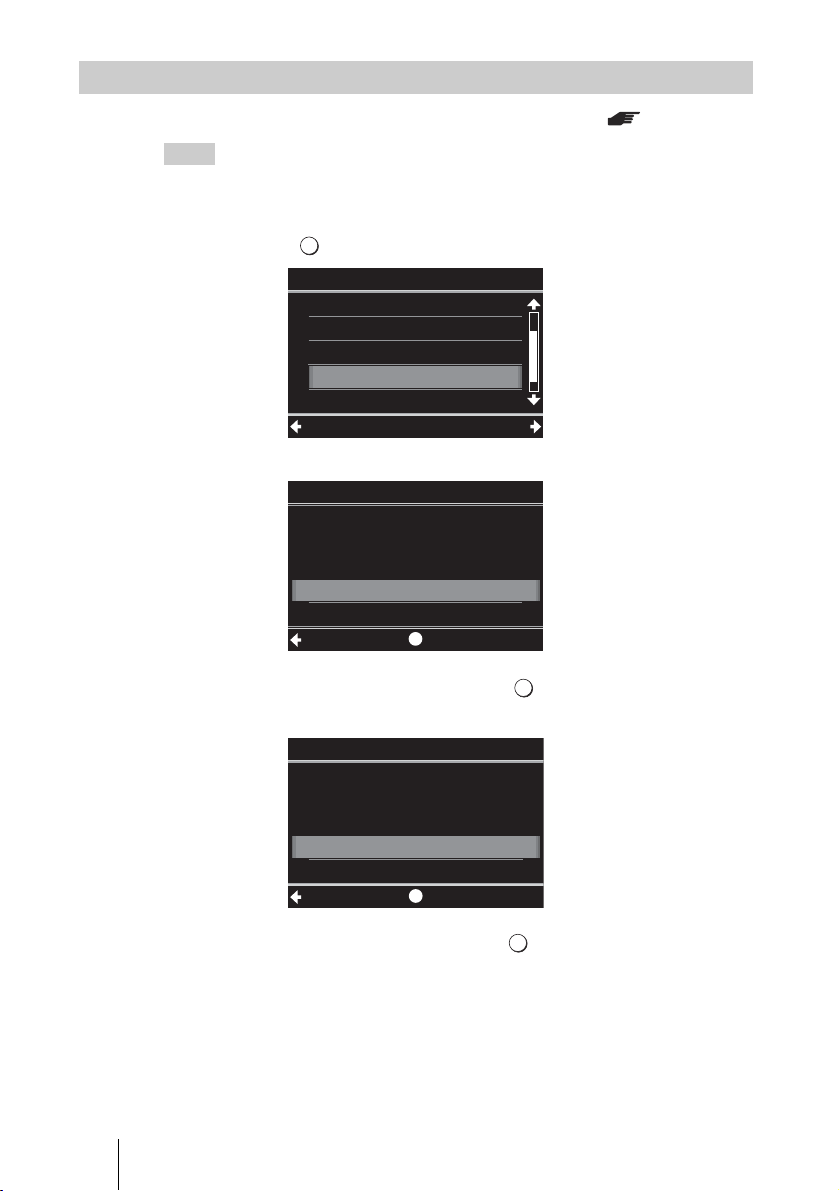
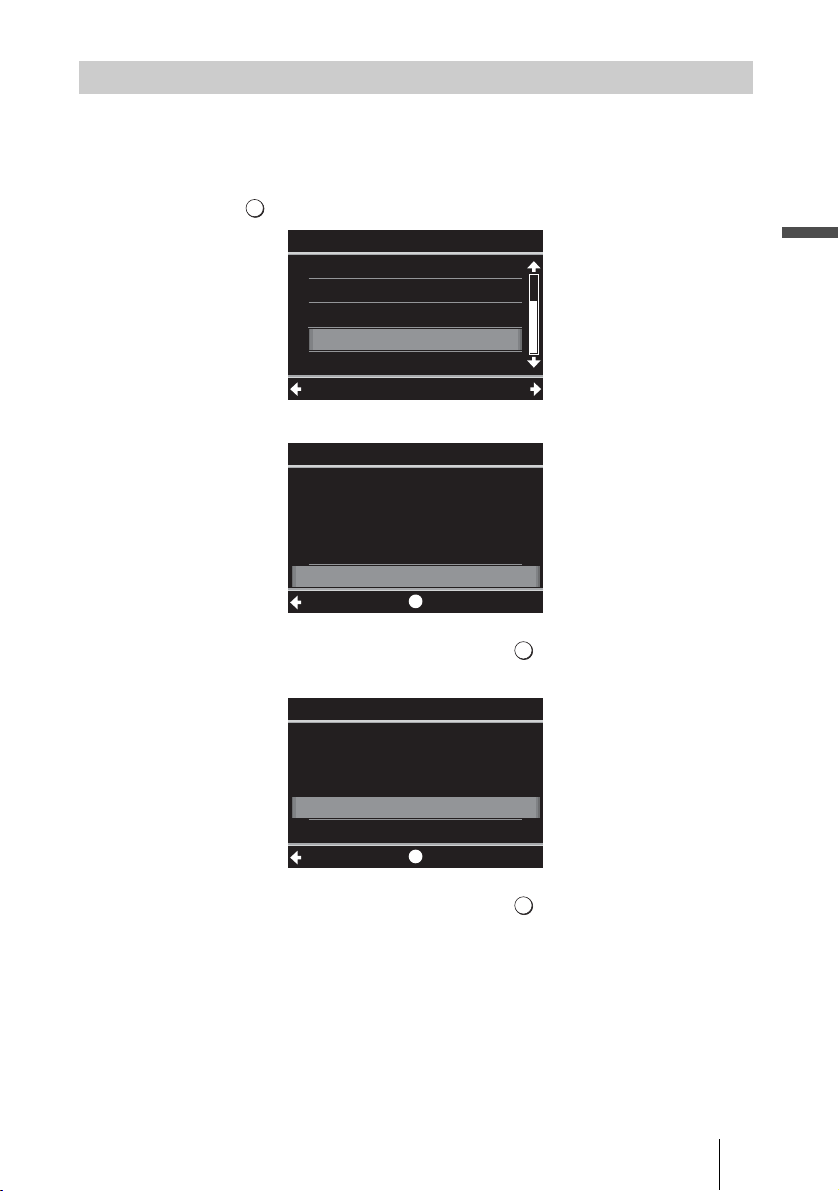
Finalize a disc that has not been finalized when ejecting. ( page 38)
Hint
When you use a DVD+RW disc, you do not need to finalize it.
1 Insert a disc to finalize, press m to select [Finalize disc], and
press
, or (Select).
The following message appears.
2 Press Mm to select [Yes], and press (Select).
The following message appears.
3 Press Mm to select [OK], and press (Select).
Finalize disc
Erase disc
Setup
Select
Menu
AutoChaptering
Slide showBGM
Color system
Finalize disc
5min
ON
NTSC
Are you sure you want
Finalize disc
to finalize the disc?
Ye s
No
SelectSetup
Disc will be playable,
but not recordable.
Finalize disc
OK
Cancel
SelectSetup
GB01COV1.book Page 36 Thursday, January 19, 2006 7:25 PM

VRD-MC1
2-661-941-02 (1)
masterpage:Right
37
G:\#sagyou\Sony\01 TV\836599S VRD-MC1\0119 VRD-MC1i\0119 VRD-MC1 kai nou-
hin\2661941011\2661941011\2661941011 VRD-MC1\GB05OPE1.fm
Using DVDirect without a Computer
4 DVDirect starts finalizing.
For video DVD
The following message appears.
For photo DVD
The following message appears.
To complete the disc as a photo backup DVD, select [No].
To complete the disc as a slide show DVD, select [Yes].
Notes
• For a video DVD or photo backup DVD, it takes a few minutes to complete finalizing.
• For a slide show DVD, it takes more time to complete the disc according to the number and
size of photos. (E.g. It may take about 10 to 15 minutes to record 100 photo files on DVD.)
5 Finalizing is completed.
Finalizing...
Create a slide show?
(This may require time.)
Ye s
No
Slide show
Finalization successful.
Menu
. Continued
GB01COV1.book Page 37 Thursday, January 19, 2006 7:25 PM
38
VRD-MC1
2-661-941-02 (1)
masterpage:Left
G:\#sagyou\Sony\01 TV\836599S VRD-MC1\0119 VRD-MC1i\0119 VRD-MC1 kai nou-
hin\2661941011\2661941011\2661941011 VRD-MC1\GB05OPE1.fm
What is “Finalize disc”?
To finalize the disc means to make the created disc playable on other DVD
devices.
When ejecting a disc immediately after recording, DVDirect gives a message
to ask if you wish to finalize the disc or not ( page 16).
You can select to finalize the disc or not according to the purpose.
(You can finalize the disc from the Setup menu ( page 36)).
Generally complete the disc by finalizing.
The finalized disc can be used like DVD-Video or DVD-ROM discs on a DVD
device.
See the following to check if finalizing is necessary according to your
purposes.
Discs require finalizing
• To play the created disc on the general DVD players
• To read the created disc on the general DVD drives of computers
• To distribute the created disc
• To complete the disc 100% (no plan to add videos or photos on the same
disc)
Discs not require finalizing
• To add videos on the same disc later by DVDirect
• To add photos on the same disc later by DVDirect
• In the middle of creating the disc (not playable on the other DVD devices
yet)
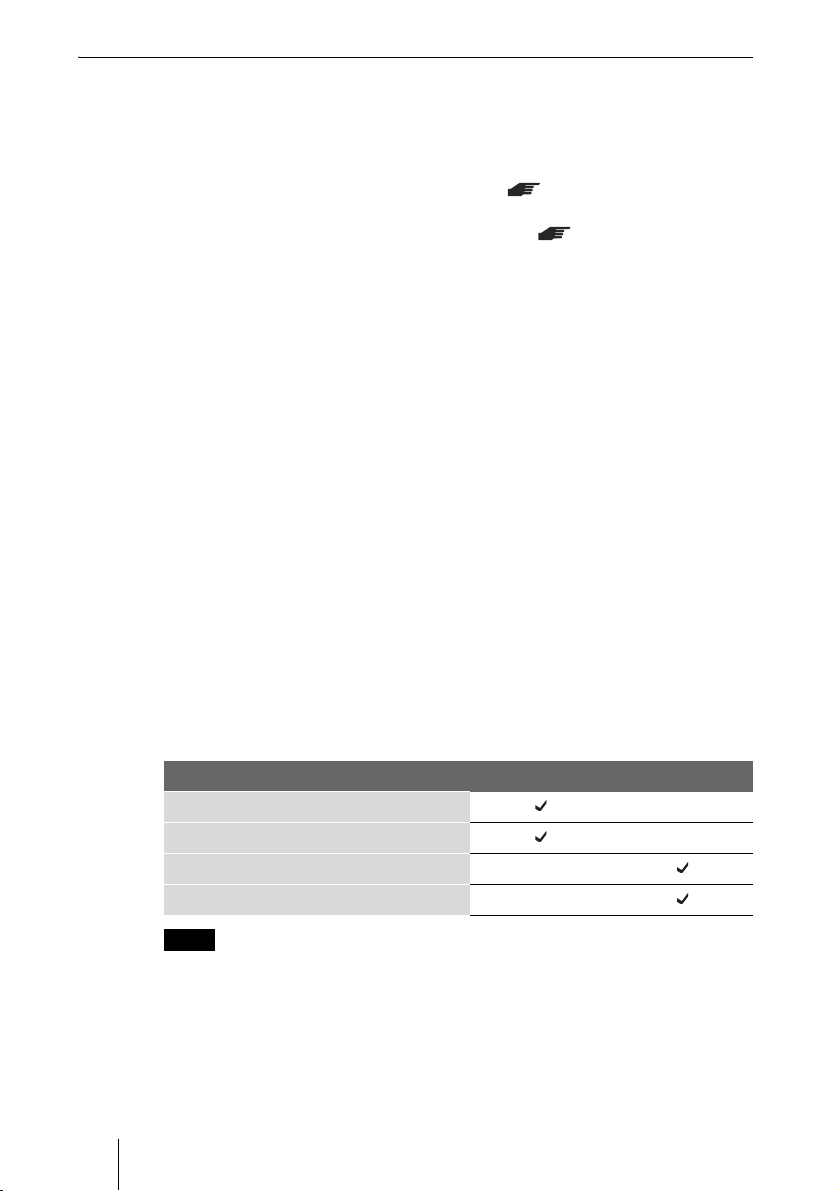
The following shows the difference between a finalized disc and an unfinalized
disc.
Note
To use a DVD+RW disc, finalizing is unnecessary; no message to finalize appears when
ejecting the disc, and there is no need to finalize from the Setup menu.
DVDirect can always add videos on the DVD+RW, and the disc can always be played with
a DVD player or the DVD drive of a computer.
Finalized disc Unfinalized disc
Playing on general DVD players
Reading on DVD drives of computers
Adding videos on the same disc later
Adding photos on the same disc later
GB01COV1.book Page 38 Thursday, January 19, 2006 7:25 PM
VRD-MC1
2-661-941-02 (1)
masterpage:Right
39
G:\#sagyou\Sony\01 TV\836599S VRD-MC1\0119 VRD-MC1i\0119 VRD-MC1 kai nou-
hin\2661941011\2661941011\2661941011 VRD-MC1\GB05OPE1.fm
Using DVDirect without a Computer
Erase all data recorded in DVD+RW or DVD-RW. The erased disc is reusable
as a blank disc.
1 Insert a disc to erase, press m to select [Erase disc], and press
, or (Select).
The following message appears.
2 Press Mm to select [Yes], and press (Select).
The following message appears.
3 Press Mm to select [Yes], and press (Select).
Erase disc
Color system
Slide showBGM
Finalize disc
Erase disc
System
NTSC
ON
Setup
Select
Menu
Do you want to
Erase disc
Erase
the disc?
Ye s
No
SelectSetup
Are you sure you want
Erase disc
to erase the disc?
Ye s
No
SelectSetup
. Continued
GB01COV1.book Page 39 Thursday, January 19, 2006 7:25 PM

40
VRD-MC1
2-661-941-02 (1)
masterpage:Left
G:\#sagyou\Sony\01 TV\836599S VRD-MC1\0119 VRD-MC1i\0119 VRD-MC1 kai nou-
hin\2661941011\2661941011\2661941011 VRD-MC1\GB05OPE1.fm
4 DVDirect erasing starts.
Notes
• Be aware that this operation erases all data.
• You cannot erase individual titles or chapters.
5 After erasing is completed, the disc can be ejected.
You can check the system software version of DVDirect.
Press
m to select [System], and press , or (Select) to display the version
in the display window.
Hint
The system software is the built-in software that makes DVDirect work.
System
Erasing...
Successfully erased.
Menu
GB01COV1.book Page 40 Thursday, January 19, 2006 7:25 PM

VRD-MC1
2-661-941-02 (1)
masterpage:Right
41
Using DVDirect with a Computer
G:\#sagyou\Sony\01 TV\836599S VRD-MC1\0119 VRD-MC1i\0119 VRD-MC1 kai nou-
hin\2661941011\2661941011\2661941011 VRD-MC1\GB06OPE2.fm
System Requirements
When using DVDirect with your computer (Drive Mode), the computer
system should meet the following requirements
1)
.
❑ CPU: Pentium III, 800 MHz or higher (with NeroVision Express: Pentium 4,
1.6 GHz recommended)
❑ RAM: 256 MB or higher
❑ 10 GB free hard disk space or more recommended
❑ Operating system:
Windows 2000 Professional (referred to as Windows 2000),
Windows XP Home Edition or Windows XP Professional (referred to as
Windows XP)
❑ Hi-Speed USB (USB2.0) port
1)
The above requirements are the minimum necessary requirements to write to disc
normally. Under actual operating conditions, the requirements imposed by your software
must also be met. For details, refer to your software documentation.
Using DVDirect with a
Computer
GB01COV1.book Page 41 Thursday, January 19, 2006 7:25 PM
42
VRD-MC1
2-661-941-02 (1)
masterpage:Left
G:\#sagyou\Sony\01 TV\836599S VRD-MC1\0119 VRD-MC1i\0119 VRD-MC1 kai nou-
hin\2661941011\2661941011\2661941011 VRD-MC1\GB06OPE2.fm
Setting Up the Computer
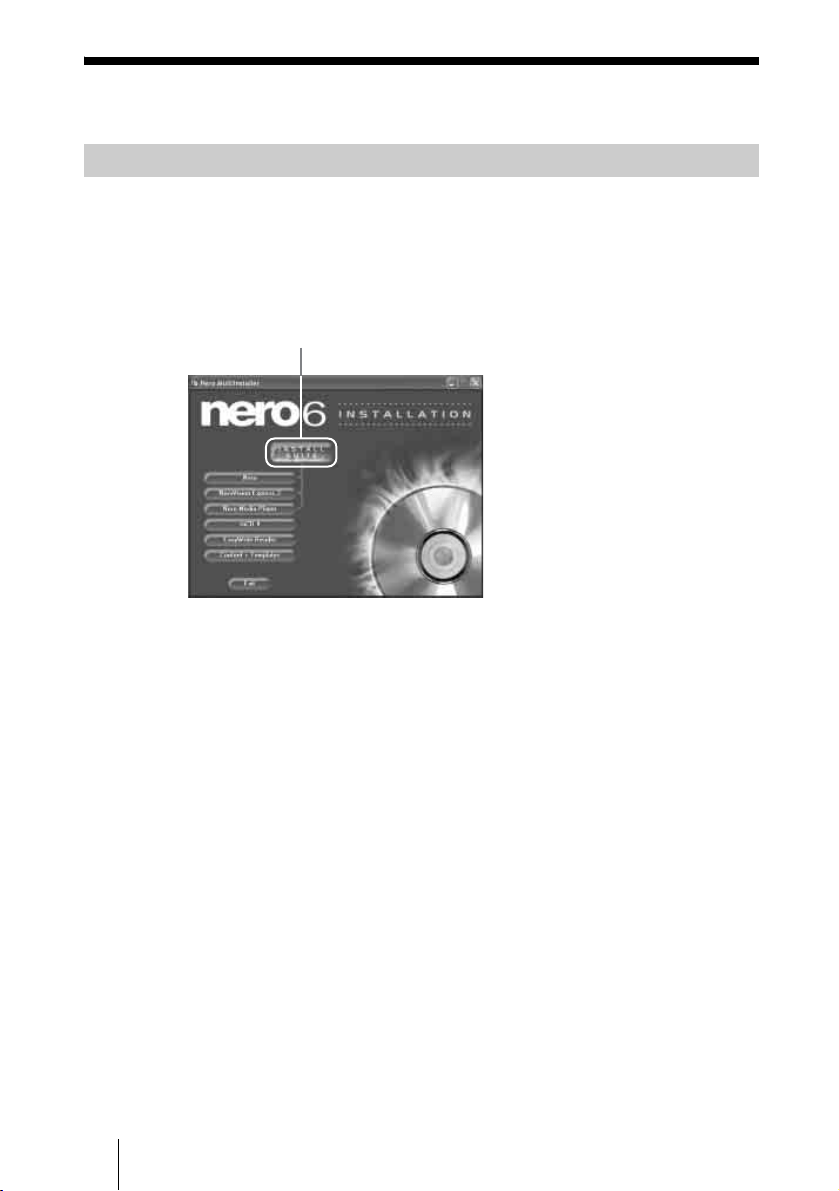
1 Insert the supplied software disc into a drive on the computer.
The installer will start automatically.
2 Click [INSTALL SUITE] button to install the software.
3 After installation is completed, continue to install other options or
click [EXIT] to finish installation.
Installing the software
Click [INSTALL SUITE].
GB01COV1.book Page 42 Thursday, January 19, 2006 7:25 PM
VRD-MC1
2-661-941-02 (1)
masterpage:Right
43
Using DVDirect with a Computer
G:\#sagyou\Sony\01 TV\836599S VRD-MC1\0119 VRD-MC1i\0119 VRD-MC1 kai nou-
hin\2661941011\2661941011\2661941011 VRD-MC1\GB06OPE2.fm
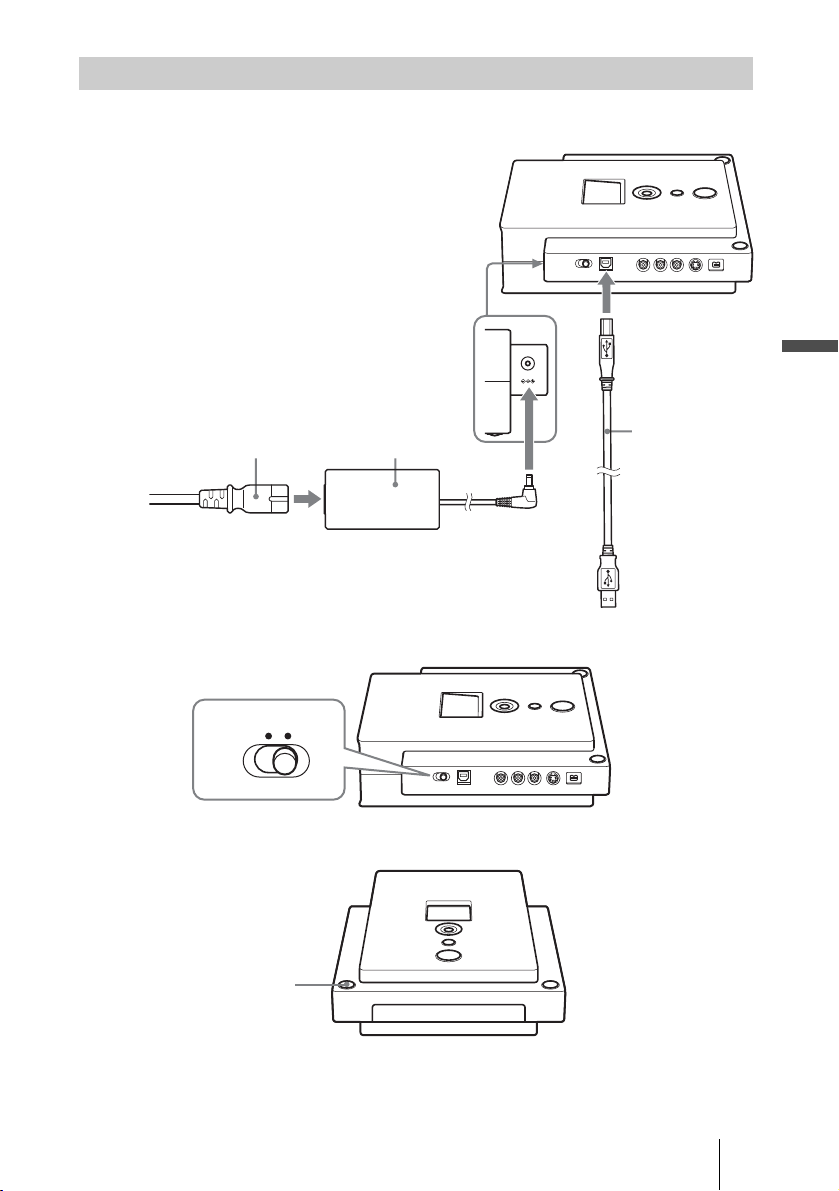
1 Connect the supplied USB cable, the power cord, and the AC
adaptor to DVDirect.
2 Set the mode switch on the left side of DVDirect to [PC/PRINT].
3 Turn on DVDirect.
4 Turn on your computer.
Connecting DVDirect to a computer
DC 12V IN
USB Cable
AC adaptorPower cord
STANDALONE PC/PRINT
Power button
. Continued
GB01COV1.book Page 43 Thursday, January 19, 2006 7:25 PM

44
VRD-MC1
2-661-941-02 (1)
masterpage:Left
G:\#sagyou\Sony\01 TV\836599S VRD-MC1\0119 VRD-MC1i\0119 VRD-MC1 kai nou-
hin\2661941011\2661941011\2661941011 VRD-MC1\GB06OPE2.fm
5 Connect the other end of the USB cable to your computer.
[Drive Mode] appears in the display window.
Note
Please connect DVDirect directly to a USB connector on the computer.
Click [MY computer] and make sure the icon of this DVDirect is added.
You can now use DVDirect with your computer.
The disconnection procedure varies depending on your OS.
When your computer detects DVDirect successfully, appears on the
Windows task bar. If you want to disconnect DVDirect, you must first stop it
by clicking this icon.
1 Click on the task bar, and click DVDirect to be disconnected
on the shortcut menu.
2 Operate following the message displayed, if any.
3 Disconnect the USB cable.
Note
If you disconnect the USB cable without performing the procedure above, your computer
may operate erratically or data may be damaged. Be sure to perform the procedure above
before disconnecting the USB cable.
If you insert a memory card into the memory card slot of DVDirect when you
use DVDirect as an external DVD drive, you can use the memory card as a
removable disc for the computer. The memory card is displayed as a
“removable disk” icon in the “My Computer” folder on the Windows display.
Notes
• Insert only one memory card into the memory card slot. Furthermore you cannot use more
than one memory card slot at a time.
• Do not connect DVDirect and a USB memory card adapter to the computer at the same
time, as DVDirect may not work properly.
Disconnection
Using Memory Card slots
Computer
GB01COV1.book Page 44 Thursday, January 19, 2006 7:25 PM
VRD-MC1
2-661-941-02 (1)
masterpage:Right
45
Using DVDirect with a Computer
G:\#sagyou\Sony\01 TV\836599S VRD-MC1\0119 VRD-MC1i\0119 VRD-MC1 kai nou-
hin\2661941011\2661941011\2661941011 VRD-MC1\GB06OPE2.fm
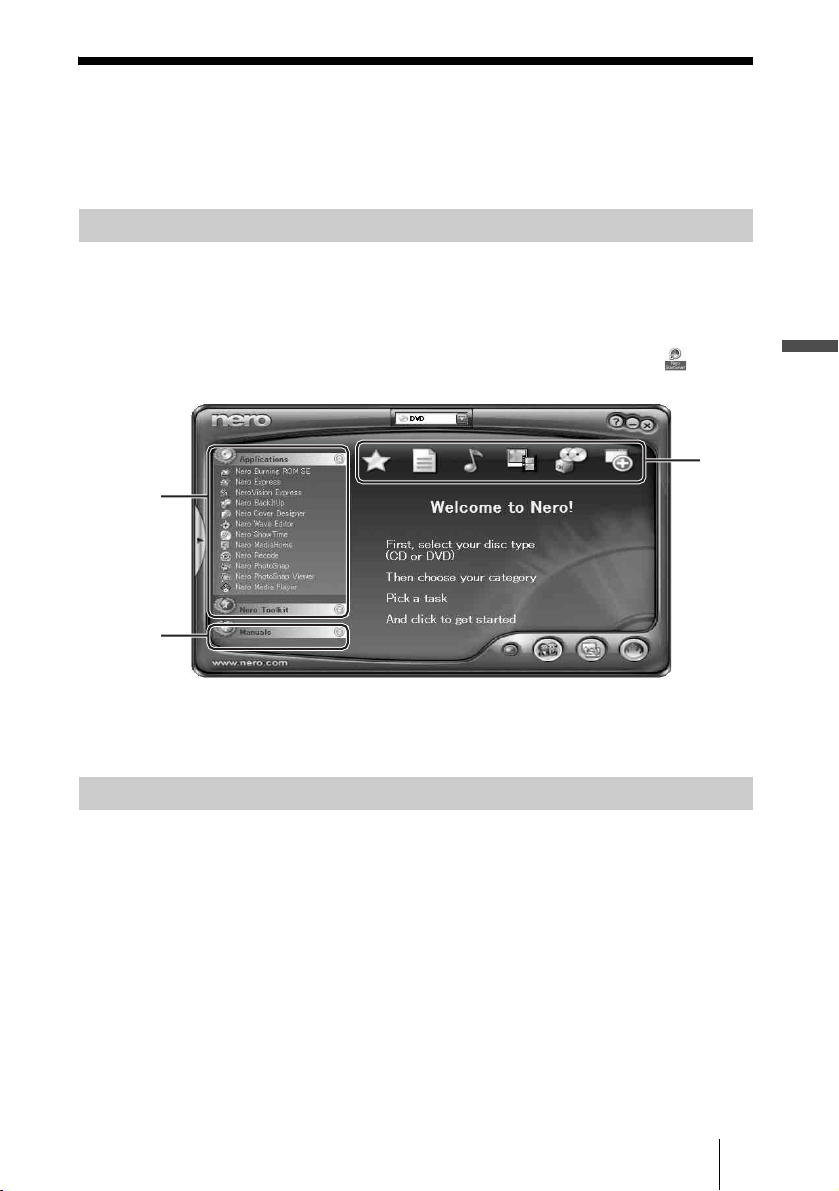
Using the Bundled Software
Use the bundled software to create or play back CDs and DVDs on your
computer with DVDirect.
Using “Nero StartSmart”, your central starting point for all your audio, video,
data, backup and recording tasks, you can choose a task from several
categories, launch Nero applications, tools, and view manuals. (Refer to the
manuals or online help of each application for details about their operation.)
To launch “Nero StartSmart”, double-click the “Nero StartSmart” icon, or
start [Nero StartSmart] in the program menu.
Put a cursor on each icon or application to display the summary in a pop-up
window. Click what you intend to use.
• Using software other than the bundled software (such as commercially
available software, shareware, or freeware) to write data to disc with this
DVDirect is not under warranty and Sony provides no customer service.
• Make sure that the bundled writing software and other writing software do
not coexist on your computer. Especially if other packet writing software
*
exists in your computer, the software and/or computer may operate
erratically.
*
Such as Drag-to-Disc (ROXIO), Direct CD (ROXIO), B’s CLIP (BHA), and DLA (Sonic).
Launching “Nero StartSmart”
Notes on using other software with DVDirect
Applications
and tools
Manuals
Task
icons
GB01COV1.book Page 45 Thursday, January 19, 2006 7:25 PM

46
VRD-MC1
2-661-941-02 (1)
masterpage:Left
G:\#sagyou\Sony\01 TV\836599S VRD-MC1\0119 VRD-MC1i\0119 VRD-MC1 kai nou-
hin\2661941011\2661941011\2661941011 VRD-MC1\GB06OPE2.fm
Maximizing Performance
Make sure that you use high-speed certified discs for which this operation has
been guaranteed by Sony. For the latest information about these discs, visit the
user support web site. When using discs other than those mentioned above,
DVDirect may limit writing speed to preserve a good reading quality.
We recommend using DVDirect with the latest system software (or referred as
firmware) as some problems encountered when using DVDirect can be solved
simply by updating the system software. The system software updates are
available on the user support web site. See page 54 for details.
Hint
The system software is the built-in software that makes DVDirect work.
The default read/write speed for CDs of this DVDirect is 40× speed. With a
single touch, you can make the read/write speed 48× speed.
Notes
• On rare occasions, some discs may not be able to tolerate 48× speed, causing them to break.
We recommend that you do not use deeply scratched, brittle, or other discs that may break
at 48× speed.
• This function does not guarantee a 48× write speed. Depending on the condition of the disc
you are using, the speed may be lower.
• This function does not increase read/write speed with CD-RW discs.
1 Insert a disc into DVDirect.
The read/write speed when you insert a disc is normally 40× speed.
2 Press the eject button for five seconds.
A few seconds later the read/write speed switches to 48× speed.
Hint
When you open the disc tray, the read/write speed reverts to its default of 40× speed.
Reaching the highest possible data transfer rate
Updating the system software
Using 48x read/write speed for CDs
GB01COV1.book Page 46 Thursday, January 19, 2006 7:25 PM
VRD-MC1
2-661-941-02 (1)
masterpage:Right
47
Additional Information
G:\#sagyou\Sony\01 TV\836599S VRD-MC1\0119 VRD-MC1i\0119 VRD-MC1 kai nou-
hin\2661941011\2661941011\2661941011 VRD-MC1\GB07DISC.fm
About Discs
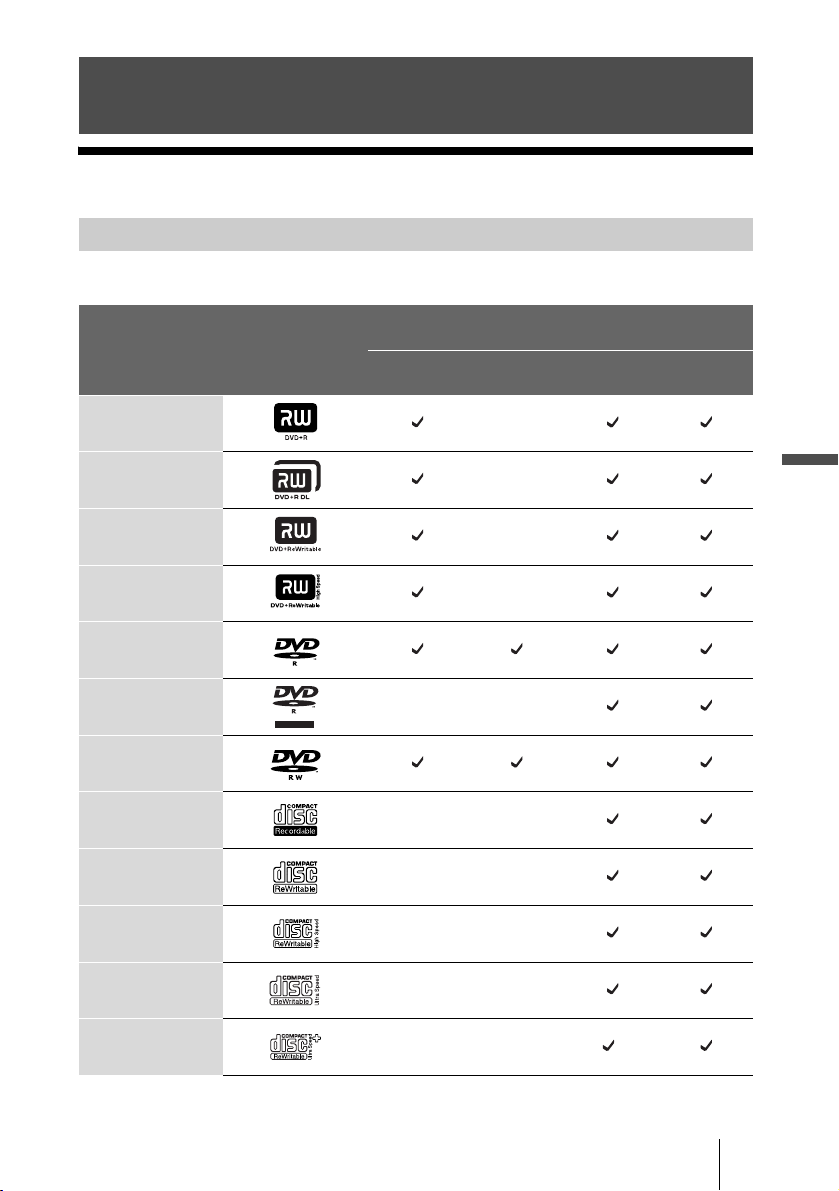
The following writable discs are compatible with DVDirect.
Additional Information
Compatible writable discs
Disc type Logo
Using without
computer
Using with computer
Video DVD
creation
Photo DVD
creation
Write Read/
Playback
DVD+R
DVD+R DL
(Double layer)
DVD+RW
DVD+RW
High speed
DVD-R
DVD-R DL
(Dual layer)
DVD-RW
CD-R
CD-RW
CD-RW
High speed
CD-RW
ultra speed
CD-RW
ultra speed plus
*
R DL
R DL
. Continued
* maximum x16 speed
GB01COV1.book Page 47 Thursday, January 19, 2006 7:25 PM

48
VRD-MC1
2-661-941-02 (1)
masterpage:Left
G:\#sagyou\Sony\01 TV\836599S VRD-MC1\0119 VRD-MC1i\0119 VRD-MC1 kai nou-
hin\2661941011\2661941011\2661941011 VRD-MC1\GB07DISC.fm
Note
Only round discs should be used with this DVDirect. Never use odd-shaped discs (stars,
hearts, card shape, etc.), otherwise DVDirect may be damaged.
We strongly recommend that you only use discs for which operation has been
guaranteed. You can obtain the latest list of writable discs for which operation
with this DVDirect has been guaranteed at the user support web site (see
page 54 for details).
Note
You can safely use most disc formats that comply with the appropriate standards with this
DVDirect. However, bear in mind that some commercially available discs do not comply
with the quality or performance standards that are necessary to use with this DVDirect. If you
use such discs, DVDirect may automatically adjust the writing speed, or may not be able to
write at all, etc. Even if discs are successfully written, they may cause errors at the time of
reading.
CD-R discs
Data can be written to this type of disc only once, and once it has been written,
it cannot be erased. Music CDs created on CD-R disc media can be played on
standard CD players.
CD-RW discs
Data can be written to and erased from this type of disc repeatedly. Typically,
a new CD-RW disc can be rewritten about 1,000 times.
Music CDs created on CD-RW disc media cannot be played on a CD player
unless it is designed to be CD-RW compatible.
DVD+R, DVD-R, DVD+R DL and DVD-R DL discs
Data can be written to this type of disc only once, and once it has been written,
it cannot be erased.
DVD+R DL (double layer) and DVD-R DL (dual layer) discs have two layers
on one side and have a double capacity compared to the conventional one-layer
disc.
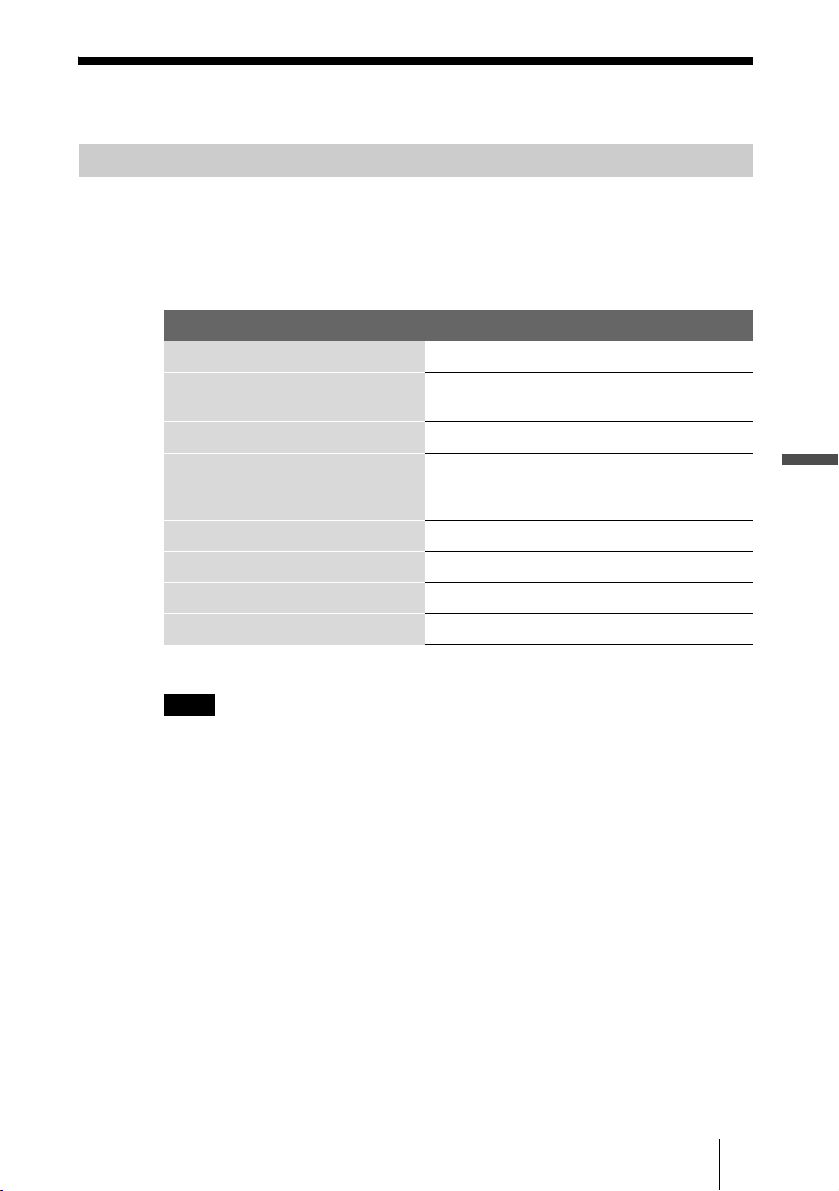
Disc diameters Read Write
DVD
12 cm
8 cm —
CD
12 cm
8 cm
Recommended writable discs
Writable discs and compatibility
GB01COV1.book Page 48 Thursday, January 19, 2006 7:25 PM

VRD-MC1
2-661-941-02 (1)
masterpage:Right
49
Additional Information
G:\#sagyou\Sony\01 TV\836599S VRD-MC1\0119 VRD-MC1i\0119 VRD-MC1 kai nou-
hin\2661941011\2661941011\2661941011 VRD-MC1\GB07DISC.fm
DVD+RW and DVD-RW discs
Data can be written to or erased from this type of disc repeatedly. Typically, a
new DVD+RW or DVD-RW disc can be rewritten about 1,000 times.
About playback/reading compatibility
CD-R and CD-RW discs created with DVDirect can be read on most CD-ROM
drives. However, some older CD-ROM drives cannot read CD-RW discs.
In addition, CD-R music discs created and finalized with DVDirect can be
played on most CD players, however, there are some CD players and
automobile CD players that do not guarantee or support playback of CD-R
discs.
Further, because of the differences in quality and characteristics between
various CD-ROM drive, CD player, CD-R disc, and CD-RW disc
manufacturers, playback may not be possible depending on the combination.*
DVD-Video discs created and finalized with the DVDirect can be played back
on many standard DVD players. Also, DVD-ROM discs created and finalized
with the DVDirect can be played back on almost all DVD drives.
However depending on the combination of the type of your player/drive and
the disc, playback/reading may not be supported or may not be possible. In
addition, some drives do not support multi-session/multi-border DVD-ROM
discs. In these cases, the drive may only read the first session/border of the
disc.
Further, because of the differences in quality and characteristics between
various DVD drives, DVD players, and disc manufacturers, playback/reading
may not be possible depending on the combination.
*Playback compatibility is not under warranty.
Write speed and compatible discs
• When writing data to disc at high speeds, you must use the appropriate type
of disc.
• Set the writing speed on your writing software. For details about the setting
procedures, refer to your writing software documentation.
• Writing speed may be adjusted automatically according to the quality of the
disc used. Also, writing speed may be limited by the transfer rate of the
computer.
DVD region codes
The playback of DVD-Video (DVD discs) is protected and controlled by a
region code setting. For using DVDirect to play back DVD-Video on your
computer, the region code on the DVD disc, DVDirect and the DVD-Video
play back software must be identical.
Precautions on writing/playing discs
. Continued
GB01COV1.book Page 49 Thursday, January 19, 2006 7:25 PM
50
VRD-MC1
2-661-941-02 (1)
masterpage:Left
G:\#sagyou\Sony\01 TV\836599S VRD-MC1\0119 VRD-MC1i\0119 VRD-MC1 kai nou-
hin\2661941011\2661941011\2661941011 VRD-MC1\GB07DISC.fm
With this DVDirect, the region code can be set up to five times, including the
initial assignment (RPC phase 2
1)
standard). After setting the region code five
times, the setting becomes permanent and can no longer be changed. From this
point on, you are only able to play back DVD-Video whose region code
matches the one set at the fifth time.
Do not attempt to make unauthorized changes to the region code. Any
problems resulting from doing so are not covered by the warranty.
Hint
• You can change the region code of DVDirect on it's properties dialog box that is accessible
from the Device Manager.
• The DVDs created in stand-alone operation have the region code “All”.
1) Region Playback Control (RPC) standard.
Playing back DVD-Video
DVD-Video disc playback conditions are sometimes determined by software
manufacturers. Because the drive plays back discs as determined by software
manufacturers, some drive functions may not always perform as expected.
When playing back DVD-Video, refer to the documentation accompanying
each disc.
About copy protected DVDs
Most DVD-Video discs on the market are protected against unauthorized
copy. Attempting to copy protected discs violates copyright laws.
About copy controlled CDs
This product is designed to play back discs conforming to the Compact Disc
(CD) standard. Audio CDs encoded with copyright protection technology are
now marketed by various record companies. Be aware that some of these discs
do not conform to the CD standard and you may not be able to play them back
with DVDirect. When using DVDirect as an audio CD player, only use audio
CDs with the following mark. Some of these discs are encoded in such a way
as to prevent sampling and/or copy, while others can only be played back
under certain conditions. For details, refer to the documentation of your audio
CD.
Note on DualDiscs
A DualDisc is a two sided disc product which mates DVD recorded material
on one side with digital audio material on the other side.
However, since the audio material side does not conform to the Compact Disc
(CD) standard, playback on this product is not guaranteed.
GB01COV1.book Page 50 Thursday, January 19, 2006 7:25 PM
VRD-MC1
2-661-941-02 (1)
masterpage:Right
51
Additional Information
G:\#sagyou\Sony\01 TV\836599S VRD-MC1\0119 VRD-MC1i\0119 VRD-MC1 kai nou-
hin\2661941011\2661941011\2661941011 VRD-MC1\GB07DISC.fm
About Memory Cards
A “Memory Stick” is a compact, portable IC recording medium.
The types of “Memory Stick” that can be used with DVDirect are listed in the
table below. However, proper operation cannot be guaranteed for all “Memory
Stick” functions.
*
1
Read/write of data that requires MagicGate functions cannot be performed with DVDirect.
Note
When formatting a “Memory Stick,” use the format function of your digital camera. You can
also use “Memory Stick Formatter” in the supplied software disc. To install the “Memory
Stick Formatter” into your computer, start the installer “MSfmtInst240.exe” located in the
folder “\MSfmt” on the software disc. To launch the installed “Memory Stick Formatter,”
access “Memory Stick Utility” folder in the program menu of Windows.
However, a “Memory Stick” formatted by a computer may not be usable depending on the
digital camera. In this case, the “Memory Stick” needs to be formatted again by the digital
camera.
About “Memory Stick”
“Memory Stick” type Read/Write
Memory Stick
a
Memory Stick (MagicGate/High-
speed data transfer compatible)
a
*1
Memory Stick Duo
a
Memory Stick Duo (MagicGate/
High-speed data transfer
compatible)
a
*1
MagicGate Memory Stick a
*1
MagicGate Memory Stick Duo a
*1
Memory Stick PRO a
*1
Memory Stick PRO Duo a
*1
. Continued
GB01COV1.book Page 51 Thursday, January 19, 2006 7:25 PM
52
VRD-MC1
2-661-941-02 (1)
masterpage:Left
G:\#sagyou\Sony\01 TV\836599S VRD-MC1\0119 VRD-MC1i\0119 VRD-MC1 kai nou-
hin\2661941011\2661941011\2661941011 VRD-MC1\GB07DISC.fm
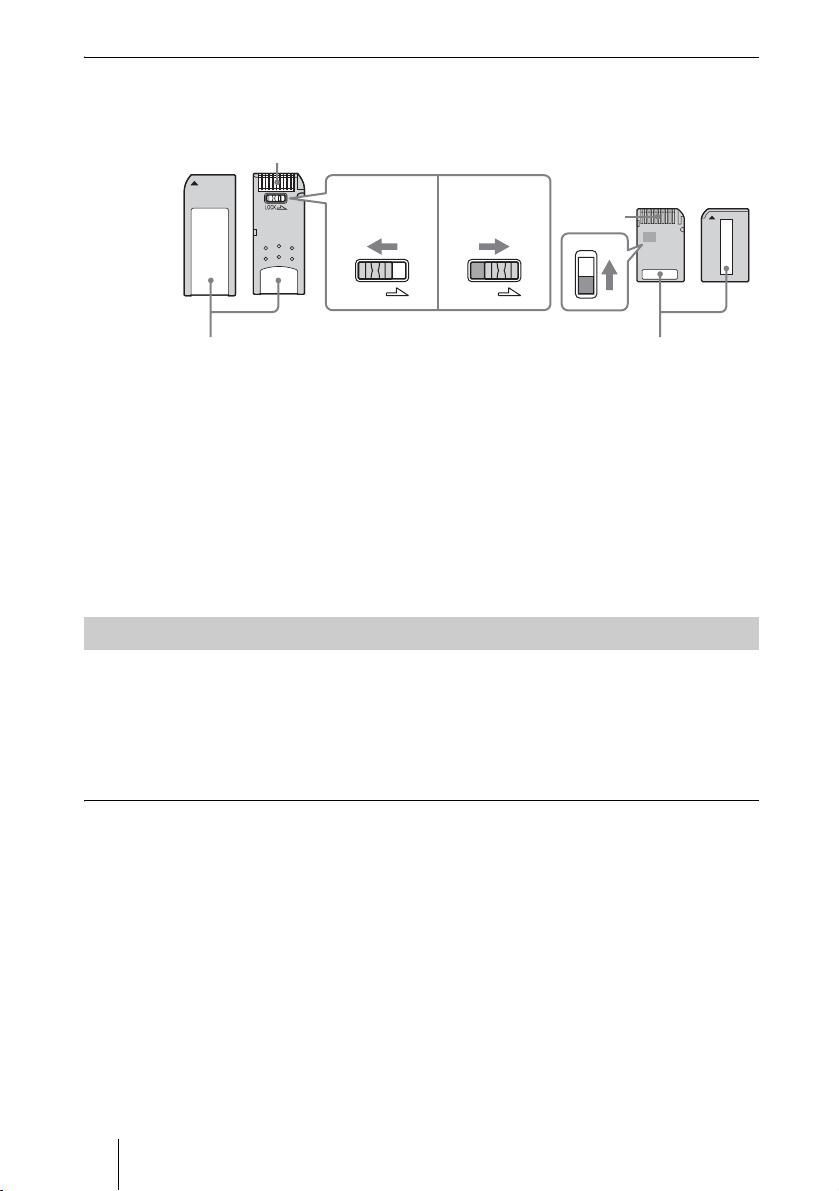
Notes on using “Memory Stick”
• You cannot record, edit or delete images if you slide the write-protect switch
to LOCK with a fine-tipped object.
The position and/or the shape of the write-protect switch may differ depending
on the “Memory Stick” you use.
• Do not remove the “Memory Stick” while reading or writing data.
• Data may be corrupted in the following cases:
- When the “Memory Stick” is removed or DVDirect is turned off during a
read operation
- When the “Memory Stick” is used in locations subject to static electricity
or electrical noise
With the multi memory card slot of DVDirect, you can use “Memory Stick,”
SD Card and xD-Picture Card. With the CompactFlash Card slot of DVDirect,
you can use CompactFlash Storage Card (Type I/Type II) and CF+Card (Type
I/Type II)-compatible CompactFlash Storage Card. Not all the memory card
operations are supported.
Notes on use
• You cannot use CompactFlash Cards with a power specification of 3V (3.3V
or less) only. Do not insert other types of CompactFlash Card into the
DVDirect’s insertion slot. DVDirect may be damaged.
• When using the ComapctFlash Card adaptor, the write-protected card may
not work properly.
• You cannot read the data of the SD Card subject to the copyright protection.
About the CompactFlash/SD/xD-Picture Cards
LOCK LOCK
Terminal
Memo area
Write
enable
position
Write
protect
position
Terminal
Memo area
“Memory Stick” “Memory Stick Duo”
GB01COV1.book Page 52 Thursday, January 19, 2006 7:25 PM
VRD-MC1
2-661-941-02 (1)
masterpage:Right
53
G:\#sagyou\Sony\01 TV\836599S VRD-MC1\0119 VRD-MC1i\0119 VRD-MC1 kai nou-
hin\2661941011\2661941011\2661941011 VRD-MC1\GB08ADD.fm
Additional Information
Precautions
Operation and storage conditions
Avoid using or storing DVDirect in a hot or
humid location, or where it might be subject
to severe vibration or direct sunlight.
Transportation
• Please repack DVDirect in its original
carton when shipping by itself.
• If DVDirect is to be shipped while
installed in a computer, remove any disc
beforehand.
Moisture condensation
Do not expose DVDirect to sudden
temperature changes. Do not use DVDirect
immediately after moving it from a cold to a
warm location, or raising the room
temperature suddenly, as condensation may
form within DVDirect. If the temperature
changes suddenly while using DVDirect,
stop using it, but keep the power on for at
least an hour.
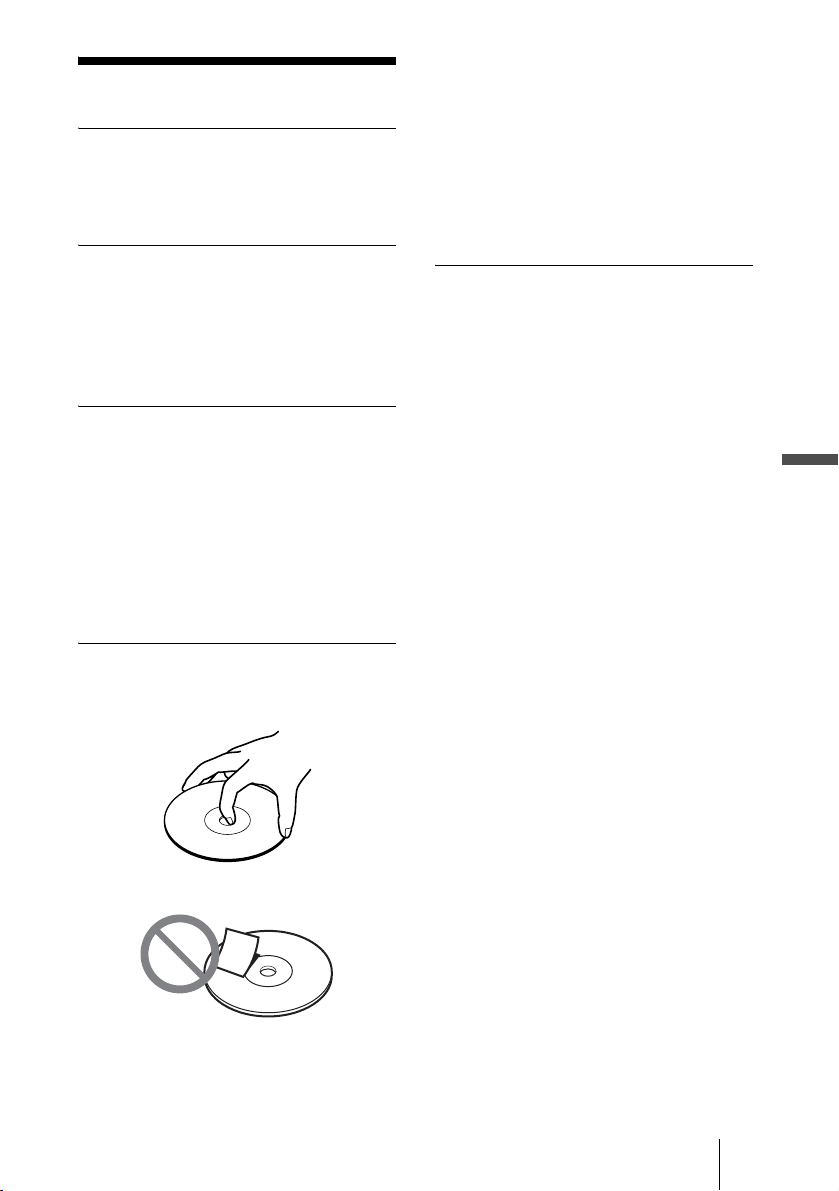
Handling discs
• Handle discs only by the edges. Never
touch the recording surface.
• Do not affix labels on discs.
• Do not store discs in dusty, dirty or humid
locations, in direct sunlight, or near heat-
generating devices.
• To protect important data, always keep
discs in their cases.
• Do not wipe writable discs using a disc
cleaner before recording data. Instead, use
a blower to remove any dust.
• Data may not be recorded properly if there
are scratches or dust on the unrecorded
area of writable discs. Handle discs very
carefully.
Handling memory cards
• Do not drop, bend, or submit the memory
cards to external shock.
• Do not disassemble or modify the memory
cards.
• Avoid touching the terminal of a memory
card or contacting it with a metal object.
• Avoid getting liquids on a memory card or
using them in areas subject to high
humidity.
• Avoid using or storing a memory card in a
location subject to:
- extremely high temperature, such as the
hot interior of a car, outdoors exposed to
direct sunlight, or a place near a heater.
- direct sunlight
- high humidity
- corrosive substances
- excessive dust
- electrostatic or electronic noises
- magnetic fields
• When storing or carrying a memory card,
keep it in its original case to ensure
protection of important data.
• Avoid removing a memory card from its
slot or turning off the power button while
DVDirect is accessing it, as data may be
rendered unreadable.
GB01COV1.book Page 53 Thursday, January 19, 2006 7:25 PM

54
VRD-MC1
2-661-941-02 (1)
masterpage:Left
G:\#sagyou\Sony\01 TV\836599S VRD-MC1\0119 VRD-MC1i\0119 VRD-MC1 kai nou-
hin\2661941011\2661941011\2661941011 VRD-MC1\GB08ADD.fm
Support Overview
You can find the following information on
this web site. The information is periodically
updated, so we recommend that you visit
regularly.
• Information about DVDirect
• Information about the software supplied
with DVDirect
• Latest system software (firmware)
• Frequently asked questions
• Troubleshooting guide
• Guaranteed compatible computers
• Guaranteed compatible discs
• Operating instructions
•Others
Accessing the user support web
site
Sony Storage Support web sites
(As of March, 2005)
http://sony.storagesupport.com/
About the Bundled Software
Detailed information about the supplied
software is available on the web sites of the
software manufacturer.
http://www.nero.com
Some problems encountered when using
DVDirect can be solved simply by updating
the system software (or referred to as
firmware). The system software updates are
available on the user support web site.
Access the site, make sure that there is an
update for your DVDirect, and follow the
instructions on the screen to proceed with
download and installation.
Please visit the above web sites that provide
technical support and other information on
DVDirect and the supplied software. When
asking questions using telephone or e-mail,
please have the following information
available:
• Model number: VRD-MC1
• Serial number
• Date and place of purchase
• Computer maker and model number
• Computer specifications (CPU speed,
memory size, OS version, etc.)
• Writing software used (version, etc.)
Local technical support is only
available in the specified sales
regions. The customers in these
regions should be provided with a
warranty card for this product. For
contact information, refer to the
warranty card.
Note that technical support
conditions may vary according to
the locality, and that charges and/
or limited service may apply in
some regions.
User support web site
Update the system software
Technical support
GB01COV1.book Page 54 Thursday, January 19, 2006 7:25 PM

VRD-MC1
2-661-941-02 (1)
masterpage:Right
55
G:\#sagyou\Sony\01 TV\836599S VRD-MC1\0119 VRD-MC1i\0119 VRD-MC1 kai nou-
hin\2661941011\2661941011\2661941011 VRD-MC1\GB08ADD.fm
Additional Information
Specifications
Stand-alone operation
Color system
NTSC/PAL
Recordable discs
DVD+R (video DVD)
DVD+R DL (video DVD)
DVD+RW (video DVD)
DVD-R (video DVD, photo DVD)
DVD-RW (video DVD, photo DVD)
Video encoding
MPEG-2
Audio encoding
Dolby Digital (2ch)
Supported photo file (photo backup)
JPEG, DCF2.0 compliant
Printing
PictBridge compliant, printer
connection via USB port
DVD/CD rewritable drive
Maximum write speed* / Recordable
discs
DVD+R DL 8x, DVD+R 16x,
DVD+RW 8x, DVD-R DL 4x, DVD-R
16x, DVD-RW 6x, CD-R 48x, CD-RW
24x
Maximum read speed
DVD-ROM 16x, DVD-Video 6x, CD-
ROM 48x, CD-DA 10x
Buffer capacity
2 MB
* Use discs appropriate to each writing speed.
Interface
DV IN
1)
4-pin i.LINK (IEEE1394), S100,
DVC-SD input
VIDEO input
1 Vp-p/75 ohms
S VIDEO input
Y: 1 Vp-p/75 ohms
C: 0.286 Vp-p/75 ohms
AUDIO input
2 Vrms, Impedance more than
47 kilohms
Memory Card slot
Memory Stick Duo, Memory Stick
2)
, SD
Memory Card
2)
, xD-Picture Card
2)
,
CompactFlash
USB port
Hi-Speed USB (USB 2.0 compliant)
LCD monitor
2 inch color LCD
1)
For DV input from DV/Digital8 camcorder
only.
You cannot record video from MICROMV or
HDV camcorder (HDV format) and other
digital video devices having the i.LINK
connector. You cannot use the DVDirect by
connecting it to a computer with an i.LINK
connector.
2)
Multi card slot
General
Power
DC 12 V (supplied from the DC IN jack)
Consumption
Max. 3.0 A
AC adaptor
AC 100 - 240 V
Use a power cord appropriate to the
region or country of use.
Size
Approx. 204 × 65 × 222 mm (W×H×D)
Weight
Approx. 1.75 kg
Operating temperature
5 to 35 ºC
Design and specifications are subject to
change without notice.
Screen displays in this manual may not be
the same as those of the product.
GB01COV1.book Page 55 Thursday, January 19, 2006 7:25 PM

Sony Corporation Printed in China
VRD-MC1
2-661-941-02 (1)
G:\#sagyou\Sony\01 TV\836599S VRD-MC1\0119 VRD-MC1i\0119 VRD-MC1 kai nou-
hin\2661941011\2661941011\2661941011 VRD-MC1\GB09BCO.fm
GB01COV1.book Page 56 Thursday, January 19, 2006 7:25 PM