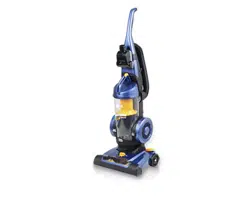
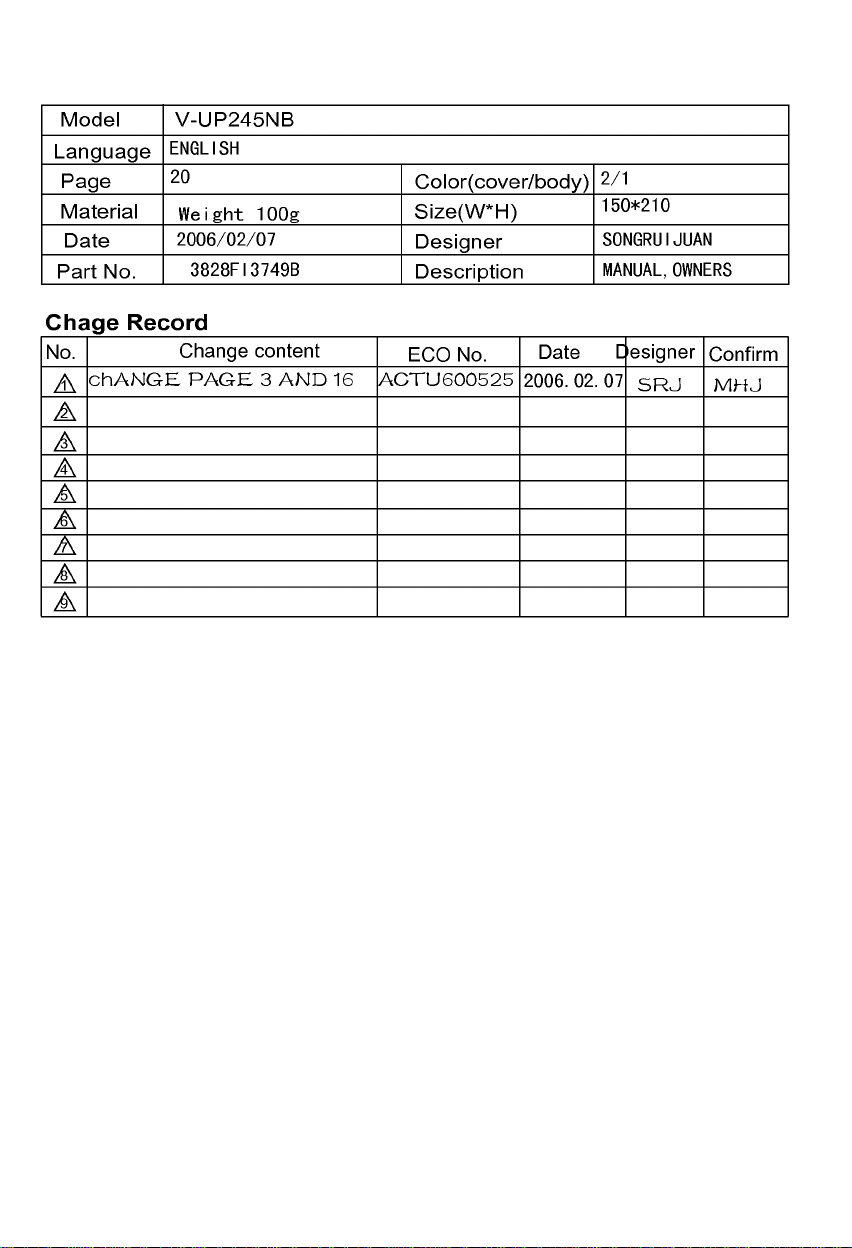
Model
V-UP245NB
Language
Page
Material
Size(W*H)
Designer
Designer
Confirm
Color(cover/body)
Part
No.
Description
Date
No.
Date
Chage
Record
Change
content
ECO
No.
せどねにぬへ
onnに
1
2
3
4
5
6
7
8
9
ぉげかぐきしが
pn
pmo
osnhpon
pnntmnpmnu
qvpvおきqurwう
しこげかざすきぎすぅげ
けぅげすぅぐjこせげぉざし
でぬぅげかぉ
ごぅかぉ
q
ぅげえ
ot
ぅぇじすtnnsps
しざぎ
けがぎ
pnntlnplnu

Upright
Vacuum
Cleaner
Owner's
Manual
MODEL:
V-UP245NB
PLEASE
READ
THIS
MANUAL
THOROUGHLY
AND
CAREFULLY
BEFORE
OPERATING
THE
CLEANER
P/No.:3828FI3749B
Website
http://www.LGEservice.com
E-mail
http://www.LGEservice.com/techsup.html
2
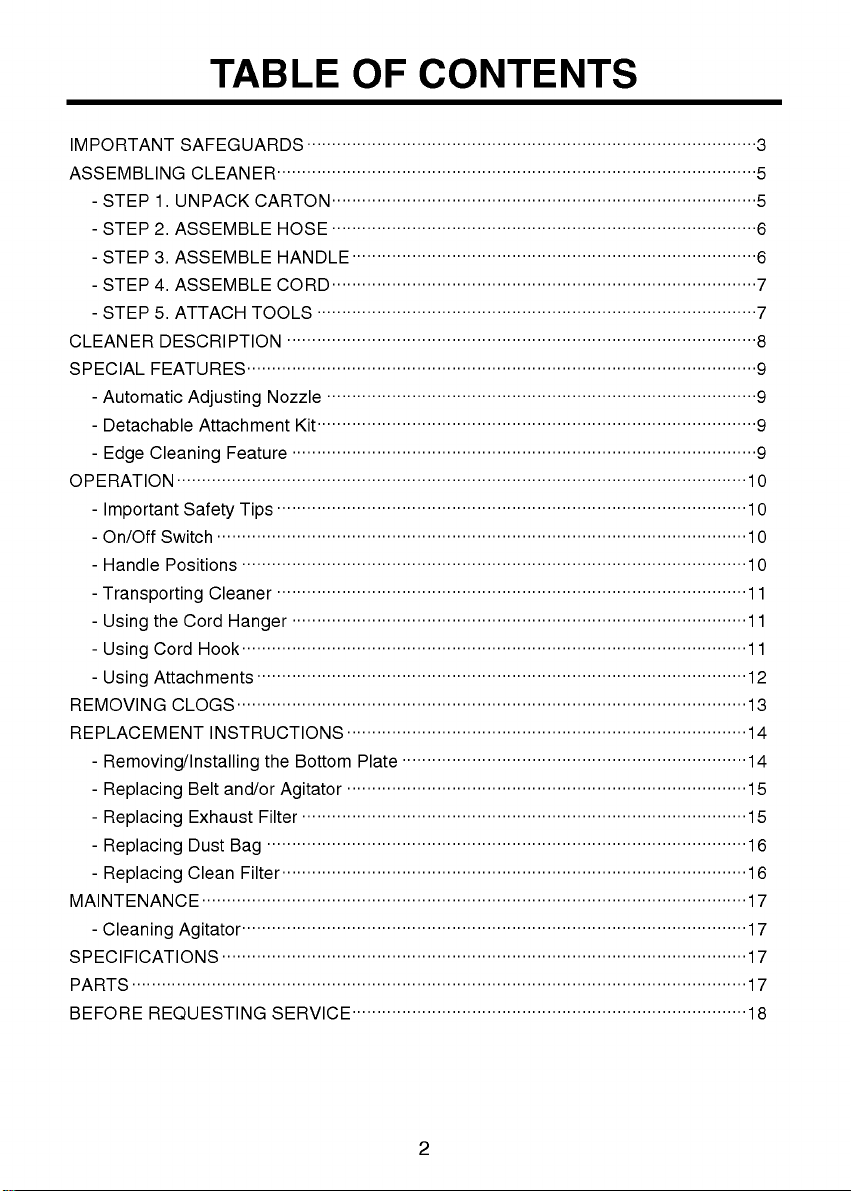
TABLE
OF
CONTENTS
IMPORTANT
SAFEGUARDS
..........................................................................................
3
ASSEMBLING
CLEANER
................................................................................................
5
-
STEP
1.
UNPACK
CARTON
.....................................................................................
5
-
STEP
2.
ASSEMBLE
HOSE
.....................................................................................
6
-
STEP
3.
ASSEMBLE
HANDLE
.................................................................................
6
-
STEP
4.
ASSEMBLE
CORD
.....................................................................................
7
-
STEP
5.
ATTACH
TOOLS
........................................................................................
7
CLEANER
DESCRIPTION
..............................................................................................
8
SPECIAL
FEATURES
......................................................................................................
9
-
Automatic
Adjusting
Nozzle
......................................................................................
9
-
Detachable
Attachment
Kit
........................................................................................
9
-
Edge
Cleaning
Feature
.............................................................................................
9
OPERATION
..................................................................................................................
10
-
Important
Safety
Tips
..............................................................................................
10
-
On/Off
Switch
..........................................................................................................
10
-
Handle
Positions
.....................................................................................................
10
-
Transporting
Cleaner
..............................................................................................
11
-
Using
the
Cord
Hanger
...........................................................................................
11
-
Using
Cord
Hook
.....................................................................................................
11
-
Using
Attachments
..................................................................................................
12
REMOVING
CLOGS
......................................................................................................
13
REPLACEMENT
INSTRUCTIONS
................................................................................
14
-
Removing/Installing
the
Bottom
Plate
.....................................................................
14
-
Replacing
Belt
and/or
Agitator
................................................................................
15
-
Replacing
Exhaust
Filter
.........................................................................................
15
-
Replacing
Dust
Bag
................................................................................................
16
-
Replacing
Clean
Filter
.............................................................................................
16
MAINTENANCE
.............................................................................................................
17
-
Cleaning
Agitator
.....................................................................................................
17
SPECIFICATIONS
.........................................................................................................
17
PARTS
...........................................................................................................................
17
BEFORE
REQUESTING
SERVICE
...............................................................................
18
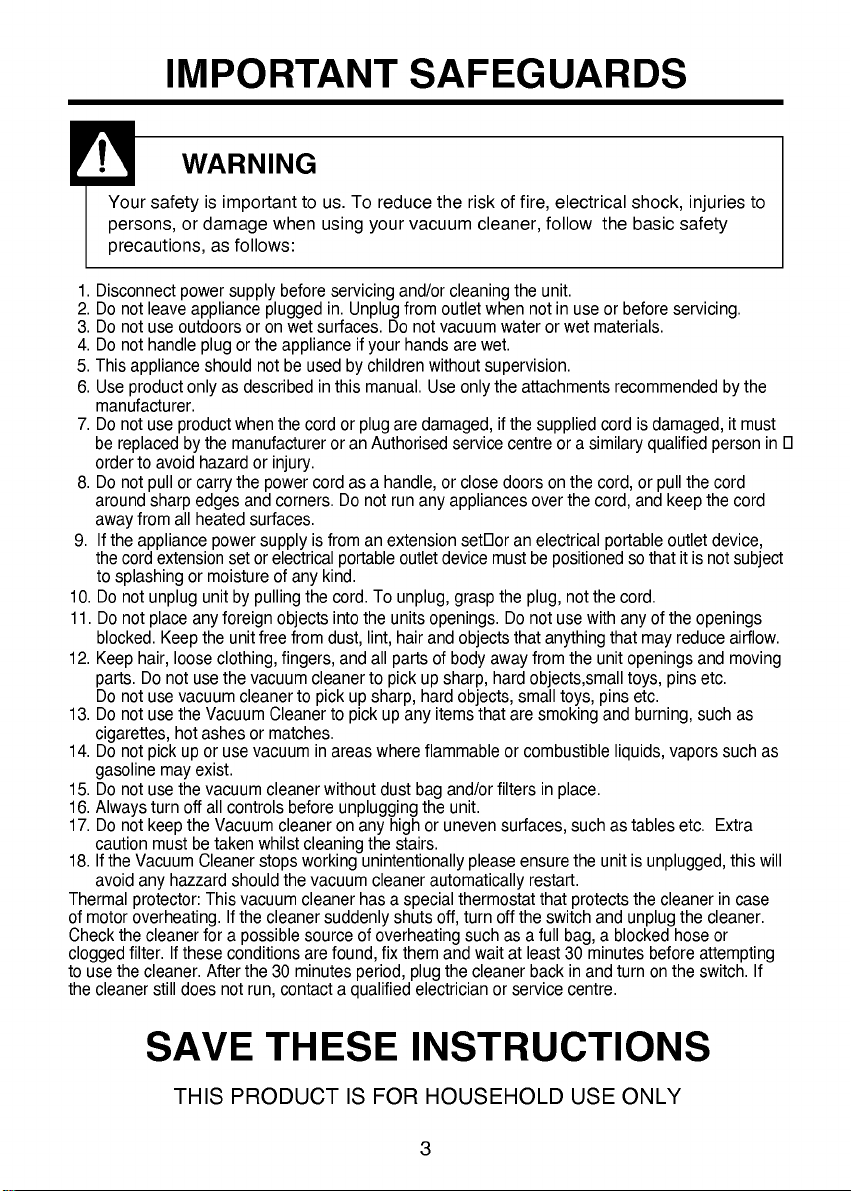
1.
Disconnect
power
supply
before
servicing
and/or
cleaning
the
unit.
2.
Do
not
leave
appliance
plugged
in.
Unplug
from
outlet
when
not
in
use
or
before
servicing.
3.
Do
not
use
outdoors
or
on
wet
surfaces.
Do
not
vacuum
water
or
wet
materials.
4.
Do
not
handle
plug
or
the
appliance
if
your
hands
are
wet.
6.
Use
product
only
as
described
in
this
manual.
Use
only
the
attachments
recommended
by
the
manufacturer.
7.
Do
not
use
product
when
the
cord
or
plug
are
damaged,
if
the
supplied
cord
is
damaged,
it
must
be
replaced
by
the
manufacturer
or
an
Authorised
service
centre
or
a
similary
qualified
person
in
order
to
avoid
hazard
or
injury.
8.
Do
not
pull
or
carry
the
power
cord
as a
handle,
or
close
doors
on
the
cord,
or
pull
the
cord
around
sharp
edges
and
corners.
Do
not
run
any
appliances
over
the
cord,
and
keep
the
cord
away
from
all
heated
surfaces.
10.
Do
not
unplug
unit
by
pulling
the
cord.
To
unplug,
grasp
the
plug,
not
the
cord.
11.
Do
not
place
any
foreign
objects
into
the
units
openings.
Do
not
use
with
any
of
the
openings
blocked.
Keep
the
unit
free
from
dust,
lint,
hair
and
objects
that
anything
that
may
reduce
airflow.
12.
Keep
hair,
loose
clothing,
fingers,
and
all
parts
of
body
away
from
the
unit
openings
and
moving
parts.
Do
not
use
the
vacuum
cleaner
to
pick
up
sharp,
hard
objects,small
toys,
pins
etc.
Do
not
use
vacuum
cleaner
to
pick
up
sharp,
hard
objects,
small
toys,
pins
etc.
13.
Do
not
use
the
Vacuum
Cleaner
to
pick
up
any
items
that
are
smoking
and
burning,
such
as
cigarettes,
hot
ashes
or
matches.
14.
Do
not
pick
up
or
use
vacuum
in
areas
where
flammable
or
combustible
liquids,
vapors
such
as
gasoline
may
exist.
15.
Do
not
use
the
vacuum
cleaner
without
dust
bag
and/or
filters
in
place.
16.
Always
turn
off
all
controls
before
unplugging
the
unit.
17.
Do
not
keep
the
Vacuum
cleaner
on
any
high
or
uneven
surfaces,
such
as
tables
etc.
Extra
caution
must
be
taken
whilst
cleaning
the
stairs.
18.
If
the
Vacuum
Cleaner
stops
working
unintentionally
please
ensure
the
unit
is
unplugged,
this
will
avoid
any
hazzard
should
the
vacuum
cleaner
automatically
restart.
Thermal
protector:
This
vacuum
cleaner
has
a
special
thermostat
that
protects
the
cleaner
in
case
of
motor
overheating.
If
the
cleaner
suddenly
shuts
off,
turn
off
the
switch
and
unplug
the
cleaner.
Check
the
cleaner
for
a
possible
source
of
overheating
such
as
a
full
bag,
a
blocked
hose
or
clogged
filter.
If
these
conditions
are
found,
fix
them
and
wait
at
least
30
minutes
before
attempting
to
use
the
cleaner.
After
the
30
minutes
period,
plug
the
cleaner
back
in
and
turn
on
the
switch.
If
the
cleaner
still
does
not
run,
contact
a
qualified
electrician
or
service
centre.
SAVE
THESE
INSTRUCTIONS
THIS
PRODUCT
IS
FOR
HOUSEHOLD
USE
ONLY
3
IMPORTANT
SAFEGUARDS
WARNING
Your
safety
is
important
to
us.
To
reduce
the
risk
of
fire,
electrical
shock,
injuries
to
persons,
or
damage
when
using
your
vacuum
cleaner,
follow
the
basic
safety
precautions,
as
follows:
5.
This
appliance
should
not
be
used
by
children
without
supervision.
9.
If
the
appliance
power
supply
is
from
an
extension
set
or
an
electrical
portable
outlet
device,
the
cord
extension
set
or
electrical
portable
outlet
device
must
be
positioned
so
that
it
is
not
subject
to
splashing
or
moisture
of
any
kind.
4
IMPORTANT
SAFEGUARDS
Important
for
users
in
the
Australia
The
wires
in
the
mains
lead
of
this
appliance
are
coloured
in
accordance
with
the
following
code:
BLUE
-
neutral
BROWN
-
live
As
the
colours
of
the
wires
in
the
mains
lead
of
this
appliance
may
not
correspond
with
the
coloured
markings
identifying
the
terminals
in
your
plug.
PROCEED
AS
FOLLOWS:
The
wire
which
is
coloured
BROWN
must
be connected
to
the
terminal
which
is
marked
L
or
coloured
RED.
The
wire
which
is
coloured
BLUE
must
be
connected
to
the
terminal
which
is
marked
N
or
coloured
BLACK!
WARNING!
Should
it
become
necessary
to
replace
the
moulded
on
plug
then
the
detective
plug
should
be
destroyed
to
avoid
any
possible
shock
hazard
that
could
occur
should
such
a
plug
be
inserted
into
a
13
amp
socket
elsewhere
in
the
house.


12
Using
Attachments
Remove
the
lower
end
of
stretch
hose
from
the
vacuum
by
pulling
out
the
hose
collar.
(Fig
A)
Remove
the
telescopic
wand
from
its
storage
position.
(Fig.
B)
Remove
the
crevice
tool
from
the
extension
wand.
(Fig.
C)
Turn
the
lower
extension
wand
to
the
UNLOCK
position.
(Fig.
D)
Extend
the
wand
to
its
full
length.
Turn
the
lower
wand
to
LOCK
position.
(Fig.
D)
Attach
the
extension
wand
onto
the
hose
collar.
(Fig.
E)
Attach
crevice
tool
or
dusting
brush
onto
the
end
of
extension
wand.
Crevice
tool
and
dusting
brush
will
also
fit
on
the
hose
collar.
The
dusting
brush
has
two
options.
When
the
front
brush
is
removed,
the
remaining
part
can
be
used
as
an
upholstery
nozzle.
(Fig.
F)
OPERATION
Unlock
Lock
Crevice
Tool
Extension
Wand
Dusting
Brush
Upholstery
Nozzle
WARNING
Personal
Injury
and
Product
Damage
Hazard
?
DO
NOT
plug
in
if
switch
is
in
the
ON
position.
Personal
injury
or
damage
could
occur.
?
DO
NOT
use
outlets
above
counters.
Damage
to
items
in
surrounding
area
could
occur.
CAUTION
When
using
attachments,
be
careful
not
to
overextend
the
hose. This
could
cause
the
cleaner
to
tip
over.
A
A
B
B
C
C
D
D
E
E
F
F


14
Removing/Installing
the
Bottom
Plate
Before
replacing
any
parts,
disconnect
the
vacuum
from
the
electrical
outlet.
To
remove
the
bottom
plate,
unscrew
and
slide
latch
off
as
shown
in
the
figure.
(Fig.
A)
Pushing
the
locking
tabs
toward
the
center
of
the
vacuum,
pull
the
bottom
plate
away
from
the
nozzle
housing.
(Fig.
B)
To
install
the
bottom
plate,
hook
the
front
end
of
bottom
plate
into
the
slots
on
the
front
of
nozzle.
(Fig.
C)
Press
the
bottom
plate
until
the
locking
tabs
snap
into
place
then
slide
the
latch
and
tighten
the
screw.
REPLACEMENT
INSTRUCTIONS
WARNING
Electrical
Shock
or
Personal
Injury
Hazard
Disconnect
electrical
supply
before
servicing
or
cleaning
the
unit.
Failure
to
do
so
could
result
in
electrical
shock
or
personal
injury
from
cleaner
suddenly
starting.
Tabs
Agitator
Bottom
Plate
Tabs
Latch
A
A
B
B
C
C

15
Replacing
Belt
and/or
Agitator
Check
the
belt
and
agitator
frequently.
If
they
are
broken
or
worn
out,
replace
them.
Turn
the
unit
over
and
remove
the
bottom
plate
as
described
in
Removing/Installing
the
Bottom
Plate
section.
To
remove
the
belt
or
agitator,
grasp
the
both
ends
of
agitator
and
lift
it
slowly.
Remove
the
belt
from
agitator
pulley
and
motor
shaft.
If
the
belt
was
broken,
be
sure
all
pieces
are
removed.
Loop
the
new
belt
around
the
motor
shaft
and
agitator
pulley.
Reinsert
the
agitator
making
sure
that
both
ends
of
the
agitator
fit
in
the
groove
of
the
nozzle
head.
After
installing
the
agitator,
turn
it
by
hand
making
sure
that
the
belt
is
not
twisted
or
pinched
and
all
parts
turn
freely.
Replace
the
bottom
plate
as
described
in
the
Removing/Installing
the
Bottom
Plate
section.
Replacing
Exhaust
Filter
This
exhaust
filter
must
be
replaced
when
dirty.
Pull
outward
on
the
dust
cover
grip
to
remove
dust
cover.
(Fig.
A)
Replace
exhaust
filter
and
close
the
dust
cover.
(Fig.
B)
REPLACEMENT
INSTRUCTIONS
Motor
Shaft
Motor
Shaft
Belt
Agitator
Agitator
WARNING
Electrical
Shock
or
Personal
Injury
Hazard
Disconnect
electrical
supply
before
servicing
or
cleaning
the
unit.
Failure
to
do
so
could
result
in
electrical
shock
or
personal
injury
from
cleaner
suddenly
starting.
WARNING
Personal
Injury
Hazard
Be
careful
when
removing
the
agitator
as
the
belt
tension
is
high.
Failure
to
do
so
could
result
in
personal
injury
from
the
agitator
releasing
quickly
and
snapping
away.
The
motor
shaft
may
be
very
hot!
Exhaust
Filter
B
B
A
A


18
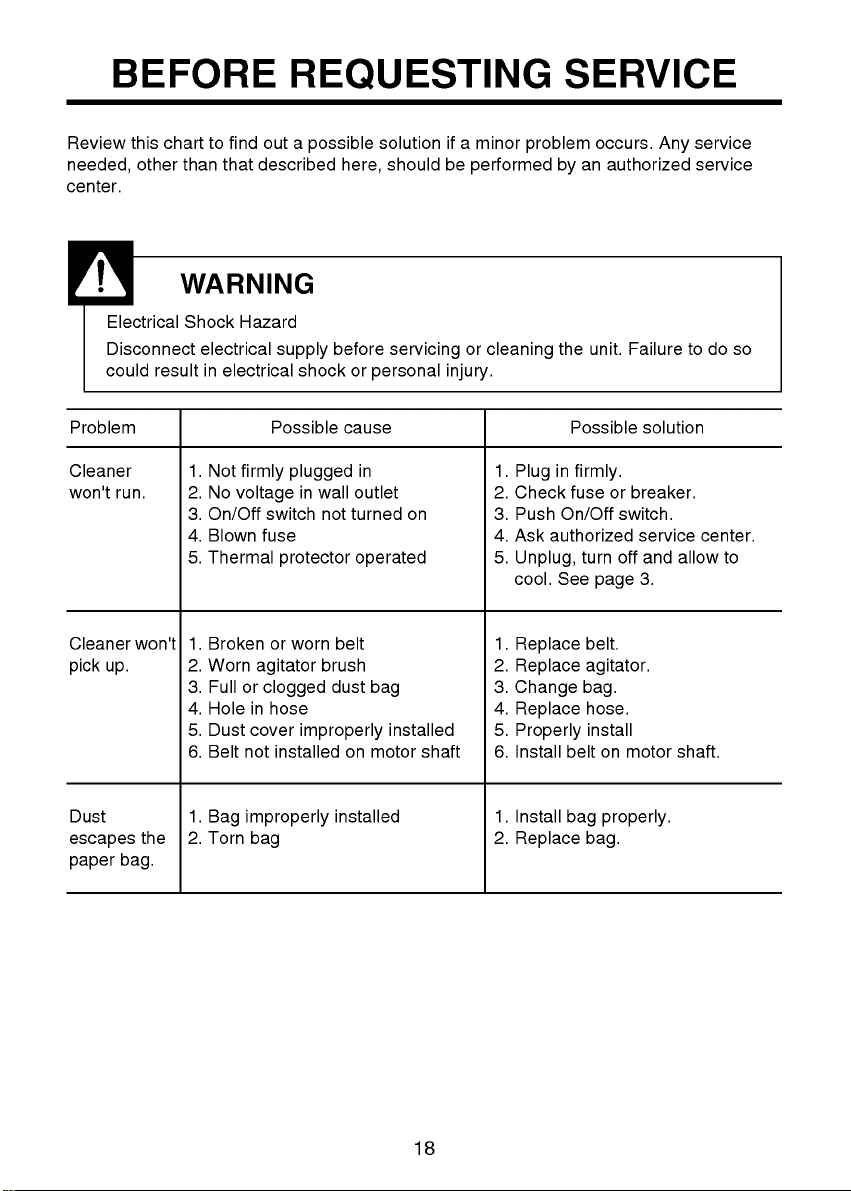
Review
this
chart
to
find
out
a
possible
solution
if
a
minor
problem
occurs.
Any
service
needed,
other
than
that
described
here,
should
be
performed
by
an
authorized
service
center.
BEFORE
REQUESTING
SERVICE
Problem
Cleaner
won't
run.
Cleaner
won't
pick
up.
Dust
escapes
the
paper
bag.
Possible
cause
1.
Not
firmly
plugged
in
2.
No
voltage
in
wall
outlet
3.
On/Off
switch
not
turned
on
4.
Blown
fuse
5.
Thermal
protector
operated
1.
Broken
or
worn
belt
2.
Worn
agitator
brush
3. Full
or
clogged
dust
bag
4.
Hole
in
hose
5.
Dust
cover
improperly
installed
6.
Belt
not
installed
on
motor
shaft
1.
Bag
improperly
installed
2.
Torn
bag
Possible
solution
1.
Plug
in
firmly.
2.
Check
fuse
or
breaker.
3.
Push
On/Off
switch.
4.
Ask
authorized
service
center.
5.
Unplug,
turn
off
and
allow
to
cool.
See
page
3.
1.
Replace
belt.
2.
Replace
agitator.
3.
Change
bag.
4.
Replace
hose.
5.
Properly
install
6.
Install
belt
on
motor
shaft.
1.
Install
bag
properly.
2.
Replace
bag.
WARNING
Electrical
Shock
Hazard
Disconnect
electrical
supply
before
servicing
or
cleaning
the
unit.
Failure
to
do
so
could
result
in
electrical
shock
or
personal
injury.

19
MEMO

20
MEMO