
Hisense
Refrigerator Use & Care Guide
Model:
HRTl 80N6ABD
HRT180N6AWD
HRTl 80N6AVD
For questions about features, operation/performance, parts or service, call:
1-877-465-3566

Table of Contents
Im
p
o
ant
S
afet
y
I
nstructions
.......................................................................................... 3
Re
fri
g
erator Overview ..... ..... ... .... .... ..... .... .... .... ..... .... .... ..... .... .... .... ..... .... .... .... ..... .... .... ...... 6
I
nsta
llin
g
Your New A
pp
liance ....................................................................................... i
Dis
p
la
y
Contro
ls, ...................................................................................................................
11
Usin
g
Your A
pp
liance....................................................................................................... 12
Cleanin
g
an
d
Care.........................................................................................................
1
3
H
e
l
p
ful
H
ints an
d
T
i
p
s
..........................................................................................................
1
4
T
ro
b
l
es
h
ootin
g
...................................................................................................................
1
5
Dis
p
osa
l
of t
h
e a
pp
liance
................................................................................................
1
7

3
Read and follow all safety messages. Save these instructions.
A
This safety alert symbol will help you understand situations and hazards that may
cause injury or death.
A
WARNING
�DANGER
The WARNING alert means a potentially hazardous situation. Serious
injury or death may occur if not avoided.
The DANGER alert means an imminently hazardous situation. Serious
injury or death may occur if not avoided.
A
CAUTION
The CAUTION alert means a potentially hazardous situation. Moderate
or minor injury may occur if not avoided.
AwARNING
l . Please ensure that everyone using this
appliance is familiar with its operations and
safety features. This appliance is not intended
for use by persons (including children) with
reduced physical, sensory or mental capabilities,
unless supervised or properly instructed.
2. This appliance is intended to be used in
residential households and similar applications.
3. Keep explosive and flammable substances
away
from unit. Do not store these materials in
the refrigerator.
4. Disconnect power before servicing or installing
an Ice Maker.
5. Use nonflammable cleaner.
6. Use 2 or more people to remove old unit
and install this unit.
7. Connect to potable water supply only.
8. Do not use mechanical devices or other
means to accelerate the defrosting process,
other than those recommended by the
manufacturer.
9. Do not damage the refrigerant circuit.
l 0. Do not use electrical appliances inside the
food storage compartments of the appliance,
unless they are of the type recommended by
the manufacturer.
11 . The instructions include the following
wording regarding the use of extension cords:
Do not use an extension cord or
ungrounded (two prong) adapters.
If the supply cord is damaged, it must be
replaced by the manufacturer, its service
agent or similarly qualified persons in order to
avoid a hazard.
12. Keep ventilation openings, in the
appliance enclosure or in the built-in structure,
clear of obstruction.
A DANGER
To avoid the risks that are always present
when using an electric appliance, we
recommend that you pay attention to the
instructions about electricity below.
l . The appliance requires single phase
l 15V/60Hz power supply. It has a power cord
that has a 3-prong grounding plug that
minimizes the possibility of electrical shock. This
appliance must be grounded. Do not remove
the
grounding prong or modify the power plug.
2. The unit should be plugged into a dedicated
electrical outlet that meets all current standards
and requirements. Do not plug anything else
into the same outlet and ensure the appliance is
the only thing plugged into the entire circuit. It
should have its own dedicated breaker.
Otherwise, this may overload the circuit and
cause a fire.
3. Do not modify the power plug. The power
plug must be accessible when the appliance is
installed.
4. The appliance should not be turned off with a
switch or other device.
5. Make sure that the plug is not squashed or
damaged. Otherwise, it may cause short circuit,
electric shock or overheat and even cause a fire.
6. Do not insert the power plug if the socket is
loose, there is a risk of electric shock or fire.
7. Switch off the appliance and disconnect it
from the main power before you clean or
move it.
8. Never unplug the appliance by pulling on the
electrical cord. Always grip the plug
firmly and pull straight out from the socket to
prevent damaging the power cord.
9. Do not operate the appliance without the
cover over the interior lighting.
l O. Any electrical component must be
replaced or repaired by a qualified electrician
or authorized service engineer. Only genuine
replacement parts should be used.
11. To avoid eye injury, do not look direct into
the LED light located in the refrigerator
compartment. If it is not functioning correctly,
consult a qualified, registered electrician or
replace it in accordance with the Cleaning
and Care chapter.
12. The refrigerant isobutene (R600a) is
contained within the refrigerant circuit of the
appliance. During transportation and
installation of the appliance, ensure that none
of the components of the refrigerant circuit
become damaged. The refrigerant (R600a) is
flammable.
13. Risk of child entrapment. Before you throw
away your old appliance:
Take off the doors
Leave the shelves in place so that children
may not easily climb inside.
A CAUTION
l . Don't store products which contain
flammable propellants (e.g. spray cans) or
explosive substances in the appliances.
2. Avoid open flames (candles, lamps etc.)
and other sources of ignition.
3. Thoroughly ventilate the room in which the
appliance is situated.
4. Unpack and check through the appliance.
Should any damage be evident, dont plug in
the appliance but contact the shop immedi
ately from which you purchased it. Keep all
packing materials in this case.
5. We recommend that you wait for 4 hours
before connecting the appliance to allow the
refrigerant to flow back into the compressor.
4

5
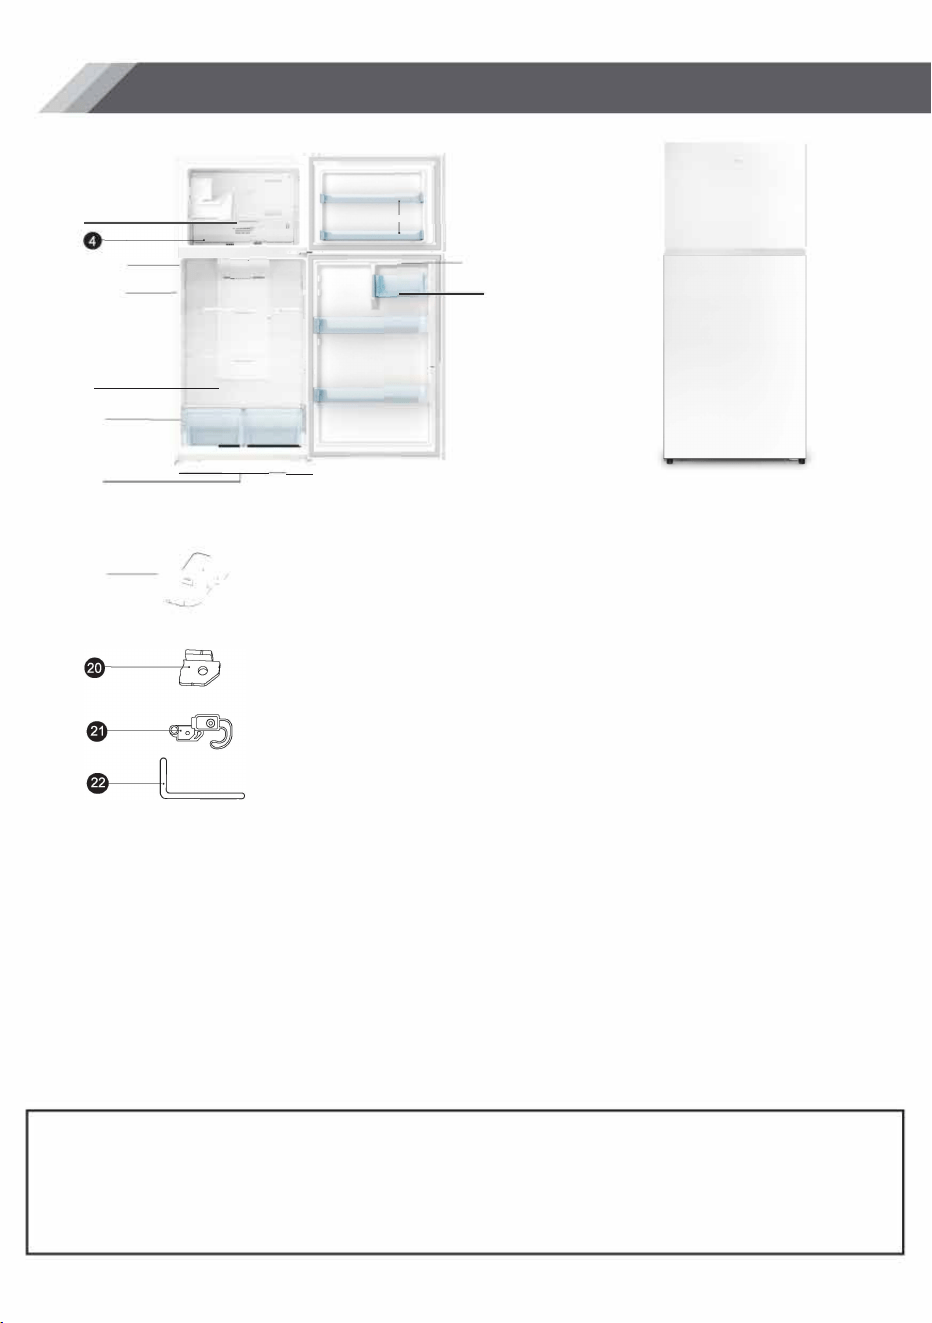
Refrigerator Overview
-----�
�
=
=
-��
__ ,
--=
9----
]/�
�
��b
e
c
l
•
�-
-,
--. '
··,.u
•
·
c:·::�f
A NOTE
I
r
I
•
-
�
f
O Automatic lcemaker (Optional)
8 Ice Container (Optional)
8 Glass Shelf
0 Freezer Air Duct
8 LED Light
8 Fridge Air Duct
8 Wire shelves
8 Crisper Cover
8 Crisper Drawers
Ajustable bottom feet
Package Contents
Left hinge cover
Stopper block (x2)
L
Freezer Door Gasket
Freezer Door
Freezer Door Bins
Dairy Bin Cover
Dairy Bin
Gallon Door Bins
Fridge Door Gasket
e Fridge Door
Spare parts for reversing
the door
9 Door stopper (x2)
$ Allen wrench
• Due to unceasing modification of our products, your refrigerator may be slightly different from
this instruction manual, but its functions and using methods remain the same.
• To get the best energy efficiency of this product, please place all shelves, drawers and baskets
on their original position as the illustration above.
6

7
r Installing Your New Appliance
Before using the appliance for the first time, you
should be informed of the following tips.
A
Warning!
For proper installation, this refrigerator must be
placed on a level surface of hard material that
is the same height as the rest of the flooring. This
surface should be strong enough to support a
fully loaded refrigerator.
The rollers, which are not castors, should be only
used for forward or backward movement.
Moving the refrigerator sideways may damage
your floor and the rollers.
0
�
A
Ventilating the Appliance
In order to improve efficiency of the
cooling system and save energy, it is necessary
to maintain good ventilation around the
appliance for the dissipation of heat. For this
reason, sufficient clear space should be
available around the refrigerator.
Suggestion
It is advisable for there to be at least 3 inches
(75mm) of clearance from the back of the
fridge to the wall, at least 3.9 inches (100mm)
of clearance from its top, at least 3.9 inches
(100mm) from its side to the wall and a clear
space in front to allow the doors to open
125
°
.
As shown in following diagrams.
A
58.l n(l476mm )
B
30.7 n(779mm )
C
29. 5 n (750mm)
D
47. 3 n(l 201 mm)
A
3
,
0
5mm)
,3.9'(100mm)
'•�.
3.9 • ( i
)
C
B
D
Note:
E
E
0
'
• This appliance performs well with ambient
temperature between 55
(
12. a·c) to
1
10
(
4
3
.
3
"C
)I,
The appliance may not
work
properly if left at a temperature above or
below the indicated range.
•Stand your appliance in a dry place to
avoid high moisture.
•
Keep the appliance out of direct sunlight,
rain or frost. Stand the appliance away from
heat sources such as stoves, fires or heaters.
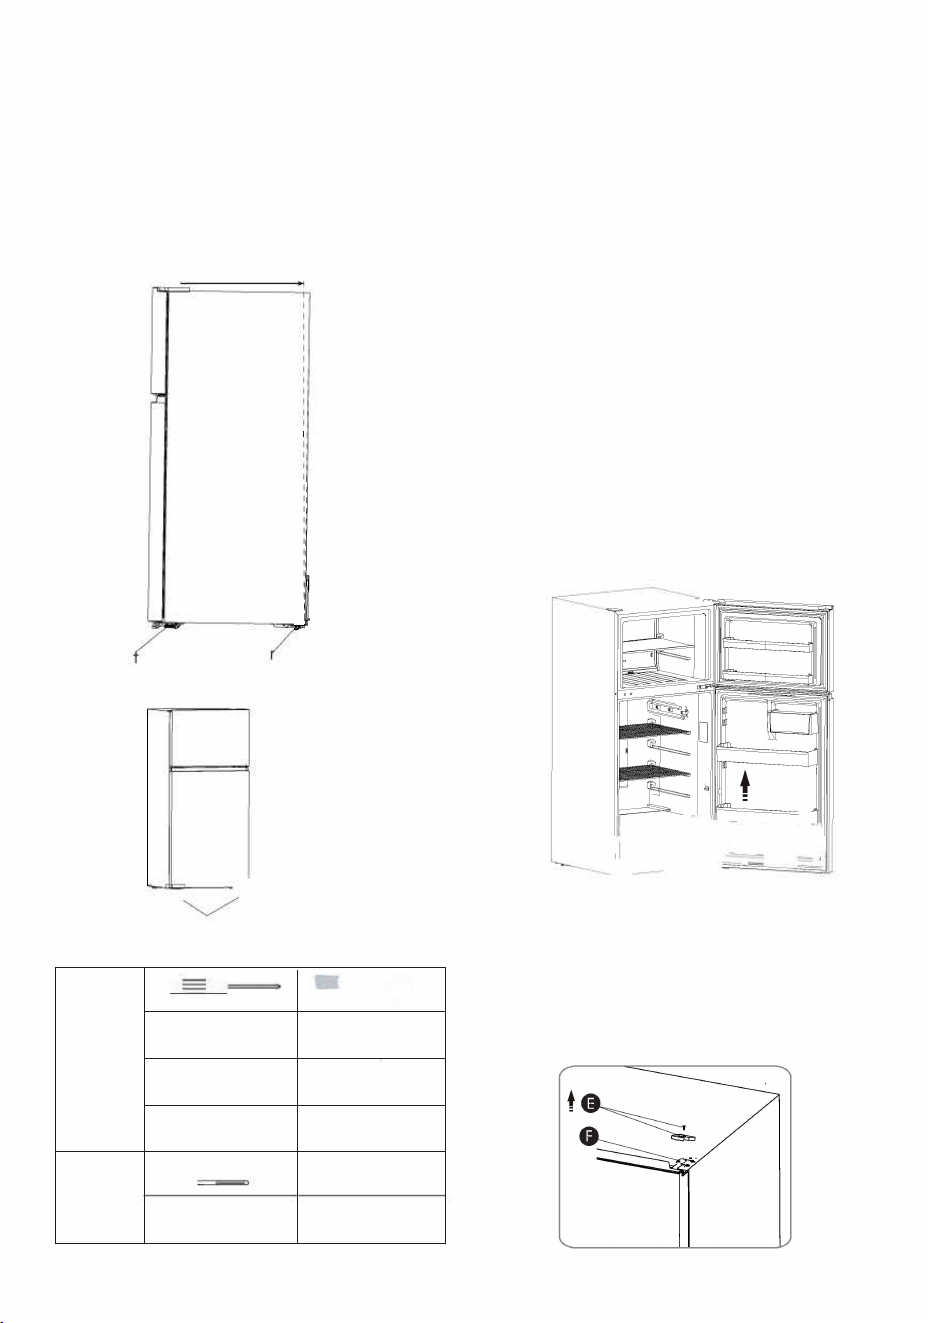
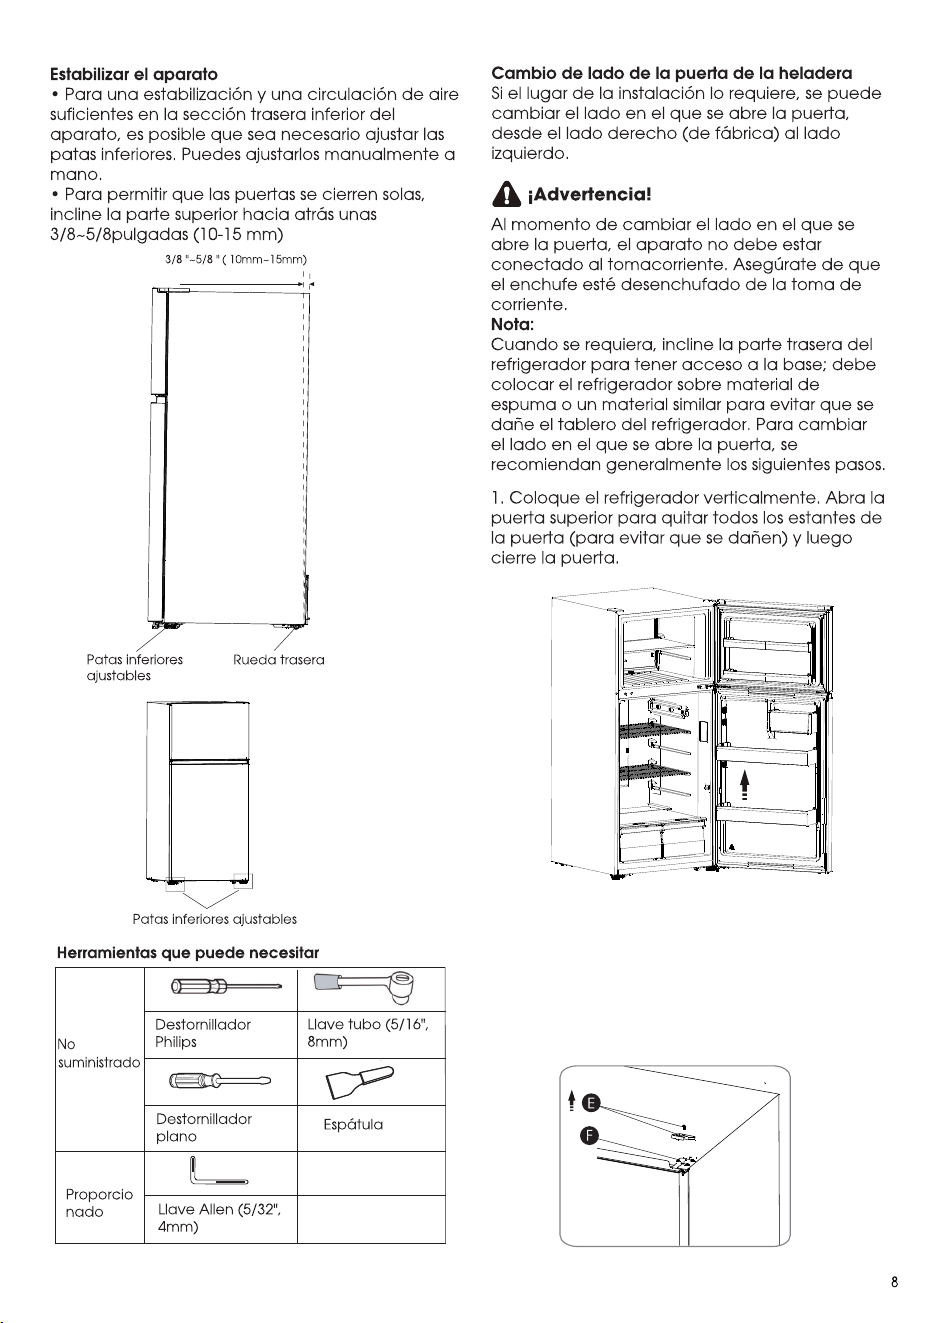
Leveling the Appliance
• For sufficient leveling and air circulating in
the lower rear section of the appliance.the
bottom feet may need to be adjusted. You
can adjust them manually by hand.
• To allow the doors to self-close, tilt the top
backwards by 3/8-5/8 inches (l O-l 5mm).
3/8 "-5/8 " ( l0mm- l 5mm)
,
,
a
Adjus able
boom feet
Rea roller
=
Adjustable bottom feet
Tools you may need
�
Philips
Socket Wrench
Not
Screwdriver
(5/16", 8mm)
provided
Sloed
Pu Knife
Screwdriver
�
Provided
Allen Wrench
(5/32", 4mm)
Reversing the Fridge Door
The side at which the door opens can be
changed, from the right side (as supplied)
to the left side, if the installation site
requires.
A warning!
When reversing the door, the appliance must
not be connected to the mains. Ensure that
the plug is removed from the power socket.
Note:
When required, tilt the refrigerator back in
order to gain access to the base, you
should rest the appliance on soft foam
packaging or similar material to avoid
damaging the backboard of the
refrigerator. To reverse the door, the
following steps are generally
recommended.
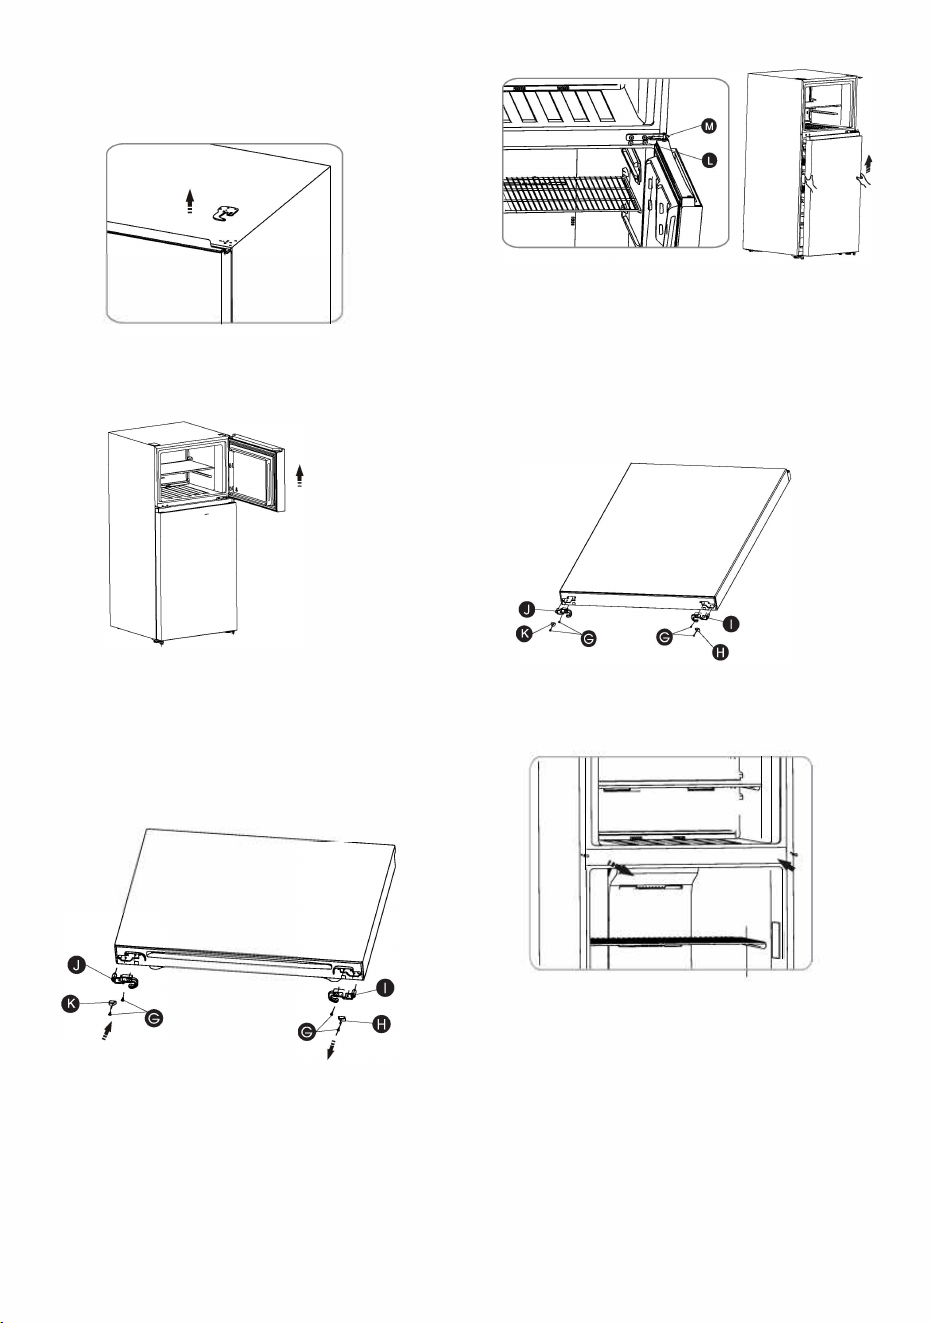
l . Stand the refrigerator upright. Open the
upper door to take out all door racks (to avoid
damaged racks)
and then close the
door.
11�;1.�-�-���-J.Ji1
J�
2. With the door closed, remove screws (you
can pry it up with a Philips Screwdriver) and the
upper
hinge
cover (you can pry it up with a
Slotted Screw driver) (E) on the top right side
of appliance and remove 3 special flange
screws (F) with a Socket Wrench. Keep the
upper hinge cover for future reference.
8
9
3. Remove the upper hinge (Please hold
upper door by hand when installing). Keep it
for future use.
4. Use both hands to open the door more
than 90
°
. Lift it up and take it off.
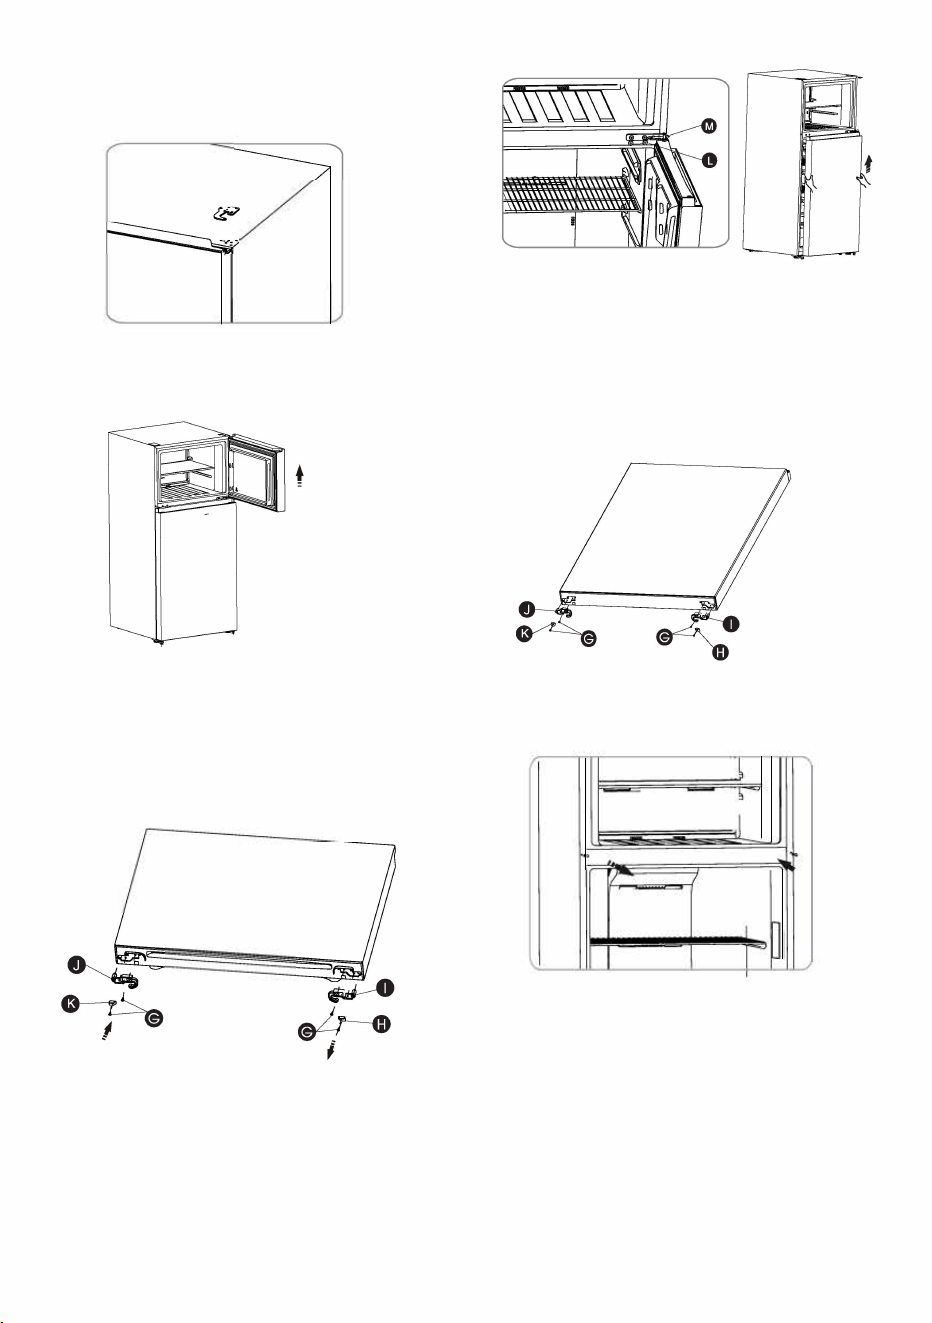
5. Loosen the two screws (G) on the right
bottom of the freezer door, then take
out the right stopper block (H) and the
right door stopper (I). Then install the left
stopper block (K) and the left door
stopper (J) (provided in the plastic bag).
6. Open the fridge door, then loosen 2
screws ( with a 4mm Allen Wrench (provided
in plastic) and remove middle hinge (. Keep
the middle hinge (M) for future use. Remove
the fridge door from the lower hinge.
7. Place the fridge door on a smooth
surface with its panel upward. Loosen the
two screws (G) on the right bottom of the
fridge door, then take out the right
stopper block (H) and the right door
stopper block (I) . Then install the left
stopper block (K) and the left door
stopper (J).
8. Change the screw hole covers and the
screws on the middle cover plate from left
to right.
II,
=
·It�
"0
0 0
b
,,
�
9. Lay the refrigerator on soft foam
packaging or similar material.
Remove both adjustable bottom feet
parts, and the lower hinge part by
unscrewing the special flange self
tapping screws. Loosen the lower
hinge axis then install it on the
reverse hole site.
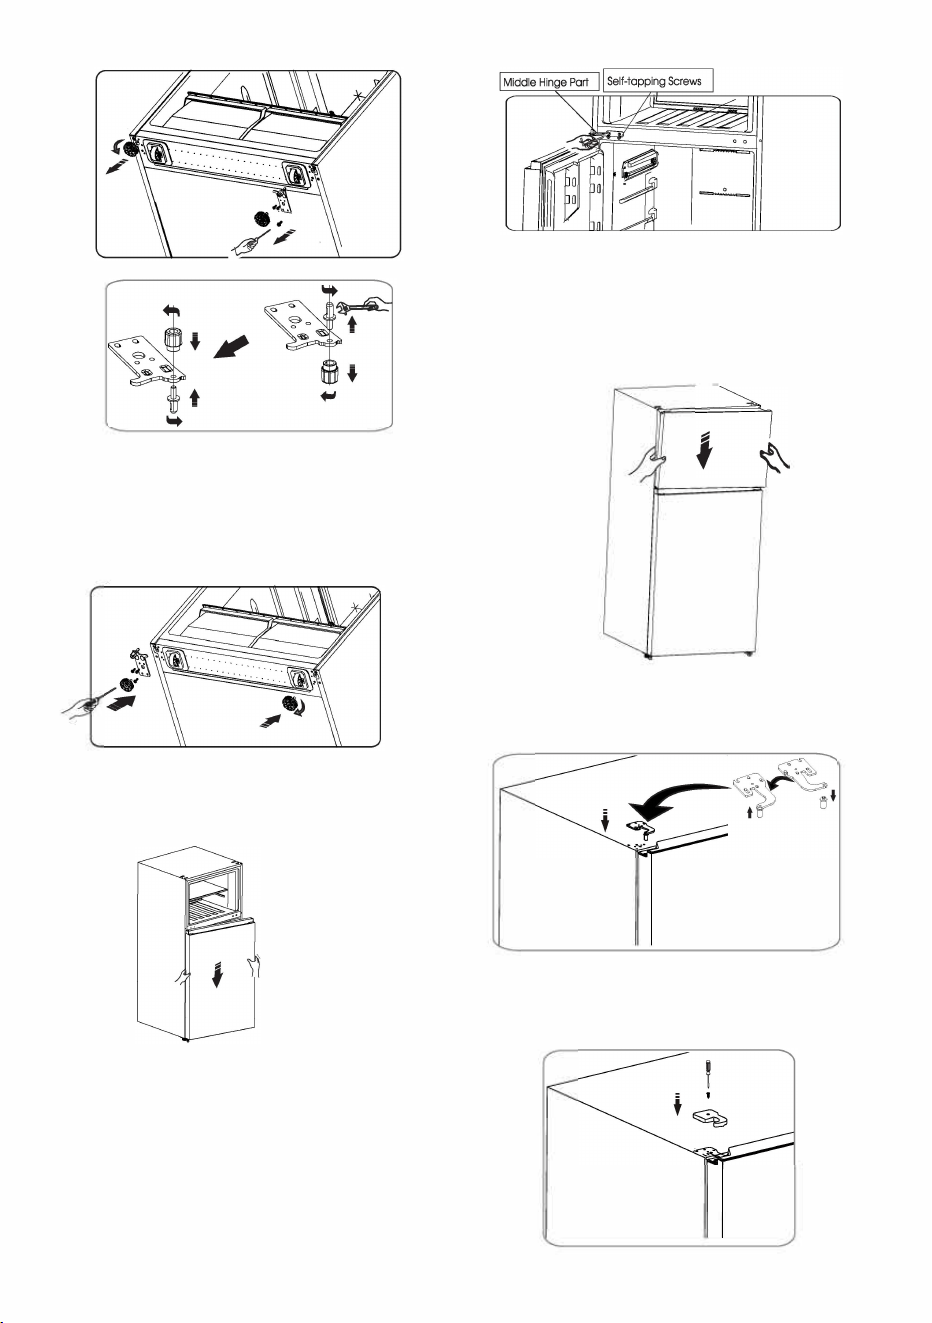
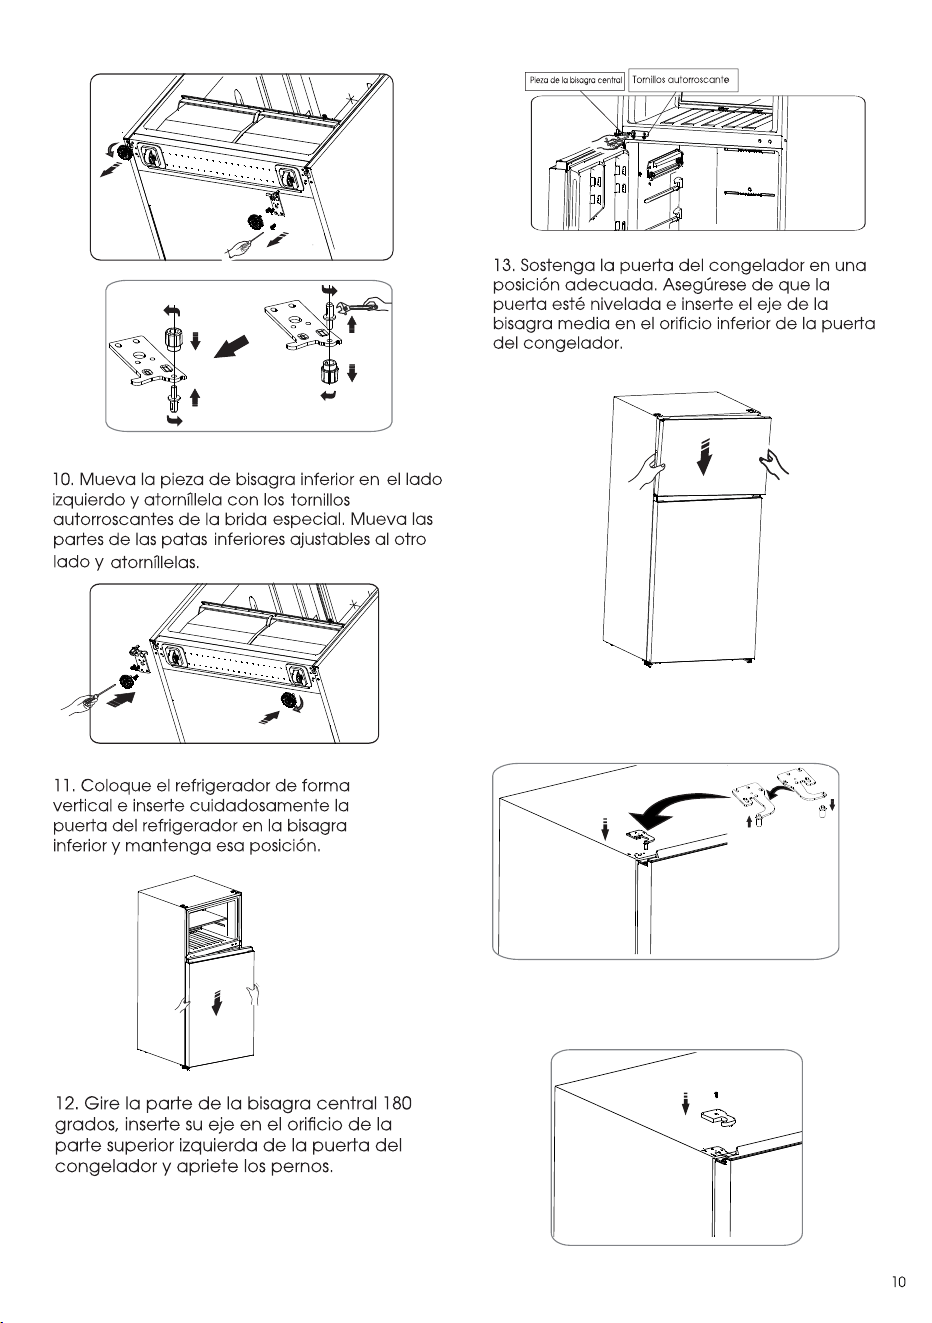
l 0. Move the lower hinge part to the left
side and screw it on with the special flange
self-tapping screws. Move the adjustable
bottom feet
parts to the other side
and
screw them.
11 . Stand the refrigerator upright and
carefully slot the fridge door onto the lower
hinge pin and hold it in position.
12. Turn the middle hinge part 180
degrees, insert the middle hinge axis
into the hole in the upper left side of the
fridge door and tighten the bolts.
13. Hold the freezer door in the
appropriate position. Make sure the door
is level and insert the middle hinge axis
into the into the lower hole of the freezer
door.
14. Screws out
the
upper hinge axis ,
turn
the upper hinge over and f ix axis on it .
Then attach it on the top left side.
15. Remove the upper hinge cover from
the plastic bag provided, and install it
and fix it with screws
.
10
11
Controlling the Temperature
We recommend that when you sta your
refrigerator for the first time, the temperature for
the refrigerator is set to "3" and the freezer is set to
the middle position. If you want to change the
temperature, follow the instructions below.
Caution!
When you set a temperature, you set an
average temperature for the whole refrigerator
cabinet. Temperatures inside each
compartment may vary from the temperature
displayed on the panel, depending on how
much food you store and where you place
them. Ambient temperature may also aect
the actual temperature inside the appliance.
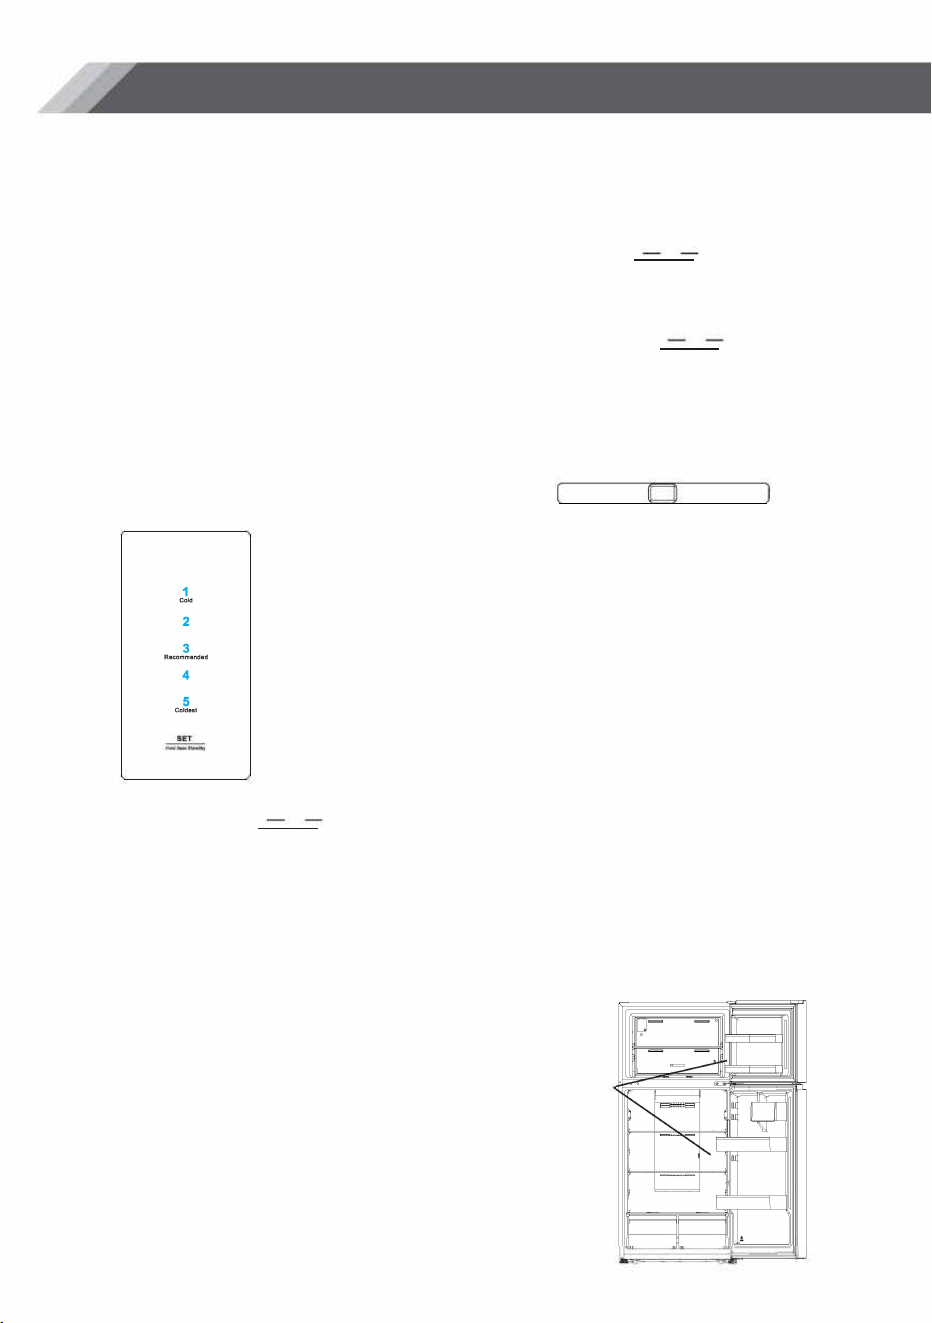
1. Fridge
TEMP. CONTROL
2
eoco1,.,.
4
You can press the "�,!
;
,
,
. " buon to
select a temperature setting. When you
press the buon continuously, the
temperature will be set in the following
sequence.
Important!
C
4
-
5
,
3-2-1�
High ambient temperatures (e.g. on hot
summer days) and a colder setting on the
temperature regulator can cause the
compressor to run continuously or even
non-stop!
We do not advise the user set the
temperature at "5"or "l "in normal.
Demo mode
Demo mode is for store display, and it
prevents the refrigerator from generating
cool air. In this of Cooling O Mode, the
refrigerator may seem like it is working but
it will not make cool air. Press the
"
,,,,�""' "
button for 3 seconds, and the refrigerator
will be set into demo mode. Then all of the
figures on the control panel will lighten. To
cancel this mode, press
"
,,!
;
;, ••
" for 3
seconds and the refrigerator begins
cooling again.
2. Freezer
COLD----=--- ■ COLDER
FREEZER TEMP. CONTROL
When using the refrigerator in normal
conditions, please set the temperature
regulator at the middle position.
Impoant!
We do not advise the user set the
temperature control knob at
"
COLDER
"
for too long. Doing so the temperature
drops fastest in the freezer, and the
temperature in refrigerator will rise. If there
is food in the refrigerator, don't keep it in
this mode for too long.
If the user set the temperature controller
at "COLD" position, the temperature in
the freezer is higher than that in normal
mode. This mode is only recommended
when there is no food in the freezer.
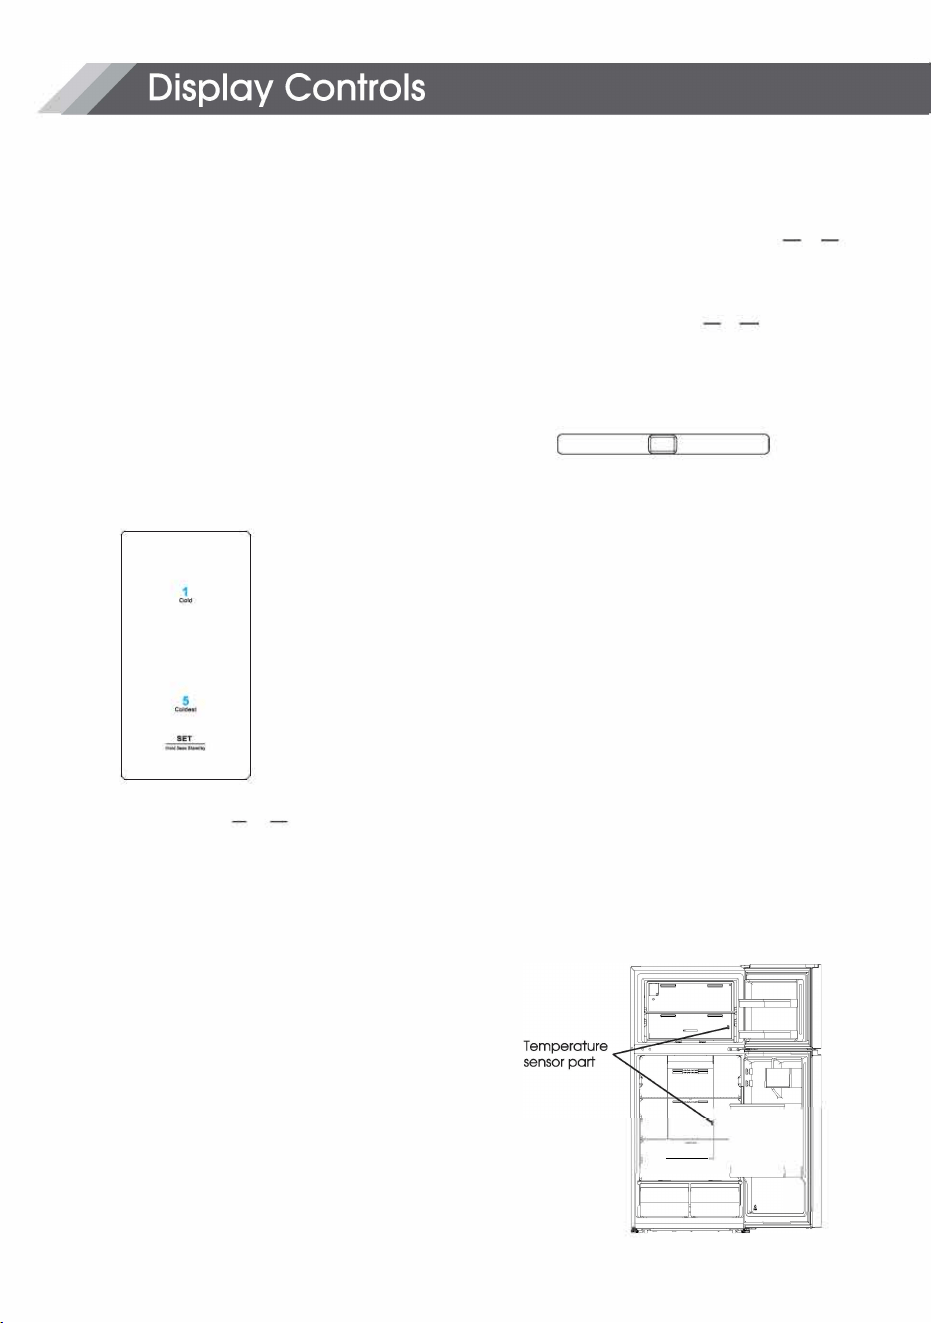
Impoant!
Don't place too much food directly
against the air outlet of the temperature
sensor part in the air channel cover of the
refrigerator compartment, as it will affect
the proper operation of the appliance.
�
1
-
-
�
,
Using your Appliance
This section tells you how to use most of the
useful features. We recommend that you
read through them carefuly before using the
appliance.
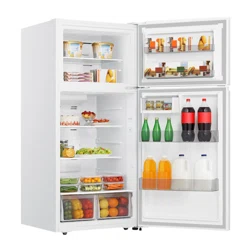
1. Using your Refrigerator Compament
The refrigerator compartment is suitable for
storage of vegetables and fruit. Food inside
should be packed to store in order to avoid losing
moisture or flavor permeating into other foods.
A
CAUTION
Never close the refrigerator door while the
shelves, crisper and/or telescopic slides are
extended. It may damage both them and the
refrigerator.
Wire shelves and door bins
The refrigerator compartment is provided
with shelf parts and door bins, which are
suitable for the storage of eggs, canned
liquid, bottled drinks and packed food.
They can be placed at different heights
according to your needs. However, do not
place too many heavy things in the bins.
Before you li up the door bin vertically,
please take the food out.
f
t
-
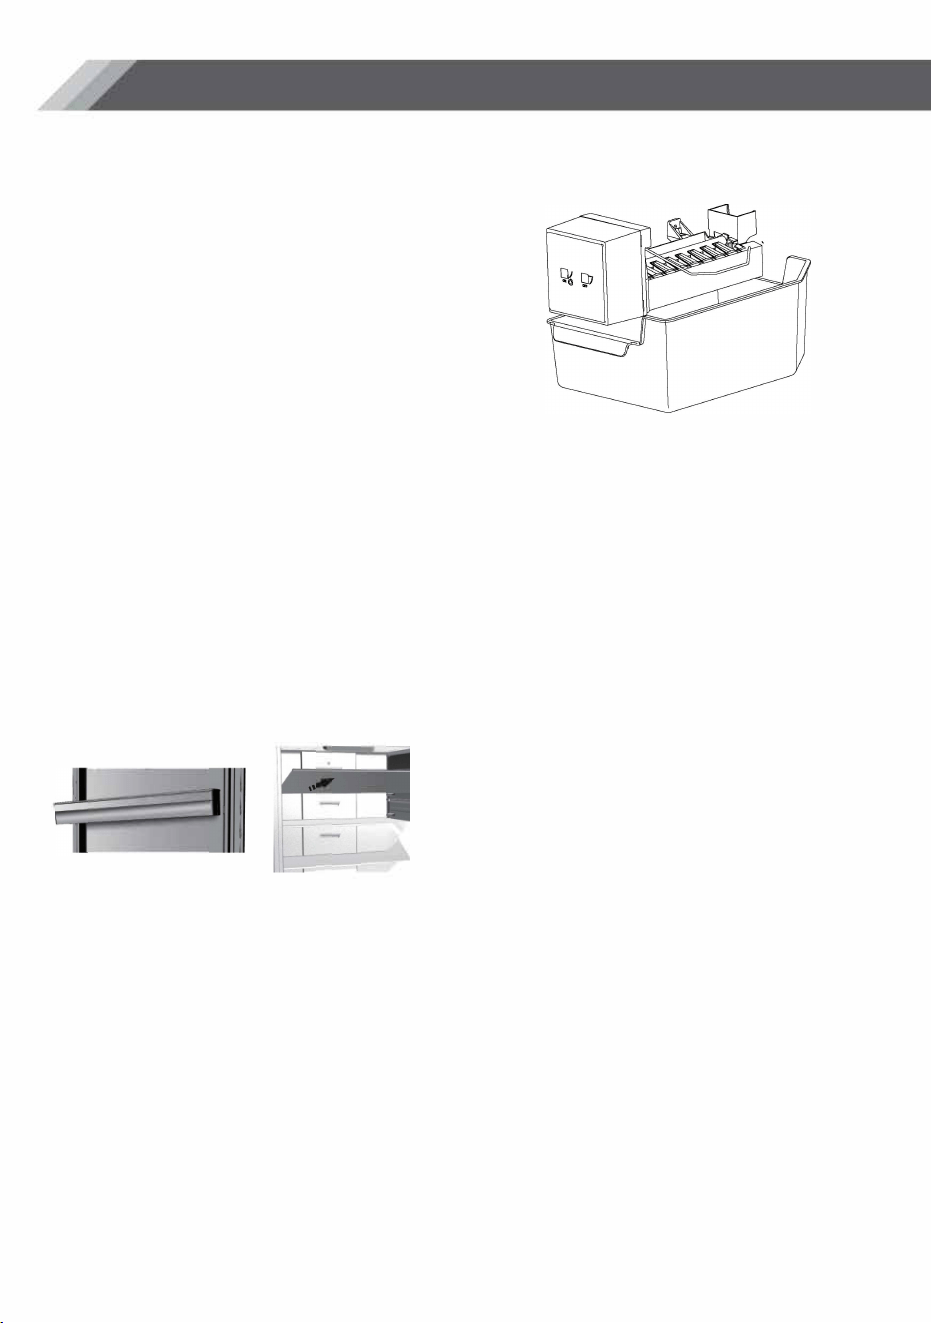
Crisper Drawer
This is suitable for storage of fruits and vegetables.
It can be removed for cleaning. To remove
open the door fully. Then pull out the drawer
and tilt up the front of the crisper after
moving slightly.
Using the Freezer Compament
The freezer compartment is provided with a
glass shelf.
3. Automatic ice-maker (If you have
installed a HIMT30G01 icemaker kit).
Note:
•
When the ice maker dumps ice into
the ice box, any sounds are part of
normal operation.
• If ice is not dispensed for a long
period of time, it may clump in the Ice
bin. If this occurs, please remove all the
ice and empty the bin.
• In case of prolonged absence and no
ice maker use, close the water valve
to prevent leaks.
It is recommended that the first
several ice charges be discarded to
ensure the highest quality of ice.
Do not store cans or containers that will
burst when frozen.
A
CAUTION
Do not allow your children to touch the ice
maker. This could cause injury.
12

For hygienic reasons the appliance (including
exterior and interior accessories) should be
cleaned at least every two months.
A
CAUTION
The appliance must not be connected to the
wall outlet during cleaning. Danger of
electrical shock! Before cleaning, switch the
appliance o and remove the plug from the
wall outlet socket.
Exterior Cleaning
To maintain good appearance of your
appliance, you should clean it regularly.
Spray water onto a cleaning cloth instead
of spraying directly on the surface of the
appliance. This helps ensure an even distribu
tion of moisture to the surface.
Clean the doors, handles and cabinet
surfaces with a mild detergent and then wipe
dry with a soft cloth.
A
CAUTION
Don't use sharp objects to clean as
they are likely to scratch the surface.
Don't use thinner, Car detergent, bleach,
ethereal oil, abrasive cleansers or organic
solvent such as Benzene for cleaning. They
may damage the surface of the appliance
and may cause fire.
Interior Cleaning
You should clean the appliance interior
regularly. It will be easier to clean when food
stocks are low. Wipe the inside of the fridge
and freezer with a weak solution of baking
soda and water, and then rinse with warm
water using a wrung-out sponge or cloth.
Wipe completely dry before replacing the
shelves and baskets. Thoroughly dry all
surfaces and removable parts before
putting them back into place. Although
this appliance automatically defrosts.
13
a layer of frost may occur on the freezer
compartments interior walls if the freezer door
is opened frequently or kept open too long. If
the frost is too thick, choose a time when the
freezer is nearly empty and proceed as
follows:
l . Remove existing food and accessory
baskets, unplug the appliance from the main
power and leave the doors open. Ventilate
the room thoroughly to accelerate the
process.
2. When defrosting is completed, clean your
freezer as described above.
A
wARNING
Do not use sharp objects to remove frost from
the freezer compartment. Only after the
interior is completely dry should the appliance
be switched back on and plugged back into
the main socket.
Door Gasket Cleaning
Take care to keep the door gasket clean.
Sticky food and drinks can cause the
gasket to stick to the cabinet and tear
when you open the door. Wash gasket with
a mild detergent and warm water. Rinse
and dry the gasket thoroughly after
cleaning.
A
CAUTION
Only after the door seals are completely dry
should the appliance be powered on.
Replacing the LED Light
Warning: The LED light must be replaced by a
competent person. If the LED light is
damage
d,
follow the steps below:
l. Unplug your appliance.
2. Remove the light cover by lifting up and
puling out the LED light.
3. Hold the LED light with one hand and pull it
with the other hand while pressing the
connector latch.
4. Replace the LED light and snap it
correctly in place and reattach the light
cover.

Energy Saving Tips
We recommend that you follow the tips below
to save energy.
Try to avoid keeping the door open for long
periods in order to conserve energy. Ensure
the appliance is away from any sources of
heat (direct sunlight, electric oven or cooker
etc.)
Don't
set the temperature colder than
necessary.
Don't store warm food or evaporating liquid
in the appliance.
Place the appliance in a well ventilated,
humidity free room. Please refer to
the
Installing your New Appliance chapter.
If the diagram shows the correct combination
for the drawers, crisper and shelves, do not
adjust the combination as this is designed to be
the most energy efficient configuration.
Tips for Fresh Food Refrigeration
Do not place hot food directly into the
refrigerator or freezer, the internal temperature
will increase resulting in the compressor having
to work harder, and consume more energy.
Do cover or wrap the food, particularly if it has
a strong flavor.
Place food properly so that air can circulate
freely around it.
Tips for Refrigeration
For Meat: (all types) wrap in cling wrap and
place on the glass shelf above the vegetable
drawer. Always follow food storage times and
use by dates suggested by manufacturers.
Cooked food, cold dishes, etc.:
These should be covered and placed on any
shelf.
Fruit and vegetables:
These should be stored in the special drawer provided.
Butter and cheese:
Should be wrapped in airtight foil or plastic film
wrap.
Milk bottles:
Should have a lid and be stored in the door
bins.
Tips for Freezing
When first starting-up or aer a period of no use,
let the appliance run at least 2 hours on the
higher settings before putting food in the
compartment.
Prepare food in small portions to enable it to
be rapidly and completely frozen and to make it
possible to subsequently thaw only the
quantity required.
Wrap up the food in aluminum foil or cling
wraps which are airtight.
Do not allow fresh, unfrozen food to touch the
food which is already frozen to avoid
temperature rise of the latter.
Iced products, (ice cubes, popsicles):
If consumed immediately after removal from the
freezer compartment, will probably cause
frost burns to the skin.
It is recommended to label and date each
frozen package in order to keep track of the
storage time.
Hints for the Storage of Frozen Food
Ensure that frozen food has been stored
correctly by the food retailer.
Once defrosted, food will deteriorate rapidly
and should not be re-frozen. Do not exceed
the storage period indicated by the food
manufacturer.
Switching o your Appliance
If the appliance needs to be switched off for
an extended period, the following steps should
be
taken
to
prevent mold on the appliance.
l. Remove all food.
2. Remove the power plug from the main socket.
socket.
3. Clean and dry the interior thoroughly.
4. Ensure that all the doors are wedged open
slightly to allow air to circulate.
14
If you experience a problem with your appliance or are concerned that the appliance is not
functioning correctly, you can carry out some easy checks before calling for service, please see
below.
AwARNING
l. Don't try to repair the appliance yourself. If the problem persists after you have made the checks
mentioned below, contact a qualified electrician, authorized service engineer or the shop where
you purchased the product.
15
2. A child entrapment warning statement is included in either the operating instructions or in a use
and care manual provided with each refrigerator.
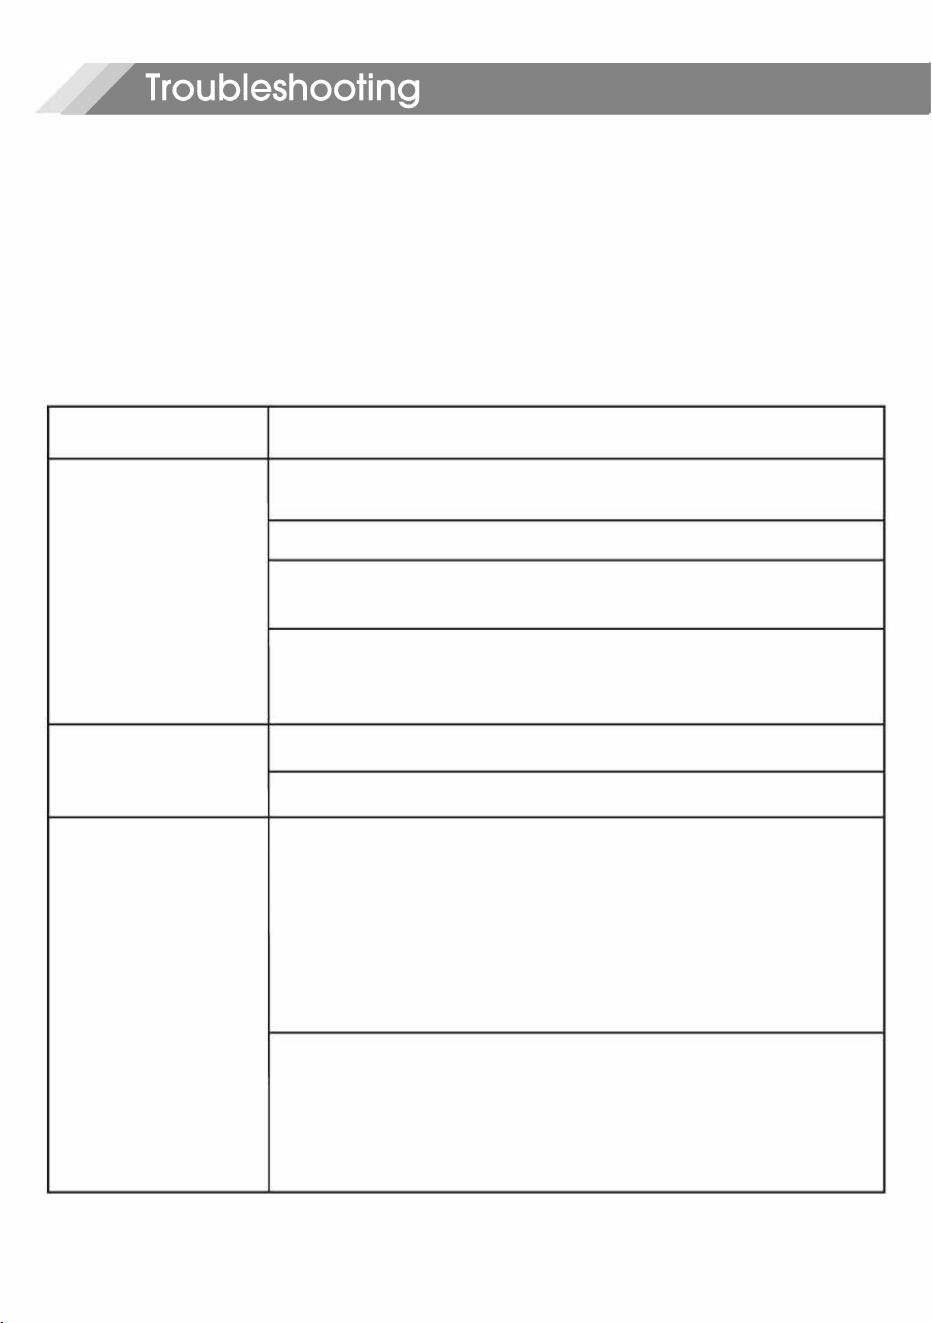
Problem
Possible Cause & Solution
Check whether the power cord is plugged into the power outlet
properly.
Check the fuse or circuit of your power supply, replace if necessary.
Appliance is not
The ambient temperature is too low. Try setting the chamber
working correctly
temperature to a colder level to solve this problem.
It is normal that the freezer does not operate during the defrost cycle,
or for a short time after the appliance is switched on to protect the
compressor.
Odors from the
The interior may need to be cleaned
compaments
Some food, containers or wrapping cause odors.
The sounds below are quite normal:
Compressor making noises.
Air movement noise from the small fan motor in the freezer
compartment or other compartments.
Gurgling sound similar to water boiling.
Noise from the
Popping noise during automatic defrosting.
appliance
Clicking noise before the compressor starts.
Clicking noise when you get the water.
The motor running noises when you get ice.
Other unusual noises are due to the reasons below and may need
you to check and take action:
The cabinet is not level.
The back of appliance is touching the wall.
Bottles or containers have fallen or are rolling.
It is normal to frequently hear the sound of the motor, it will need to
run more under the following circumstances:
Temperature setting is set colder than necessary.
The motor runs continuously
Large quantity of warm food has recently been stored within
the appliance.
The temperature outside the appliance is high.
Doors are kept open too long or too often.
Aer installing the appliance or it has been switched off for a long time.
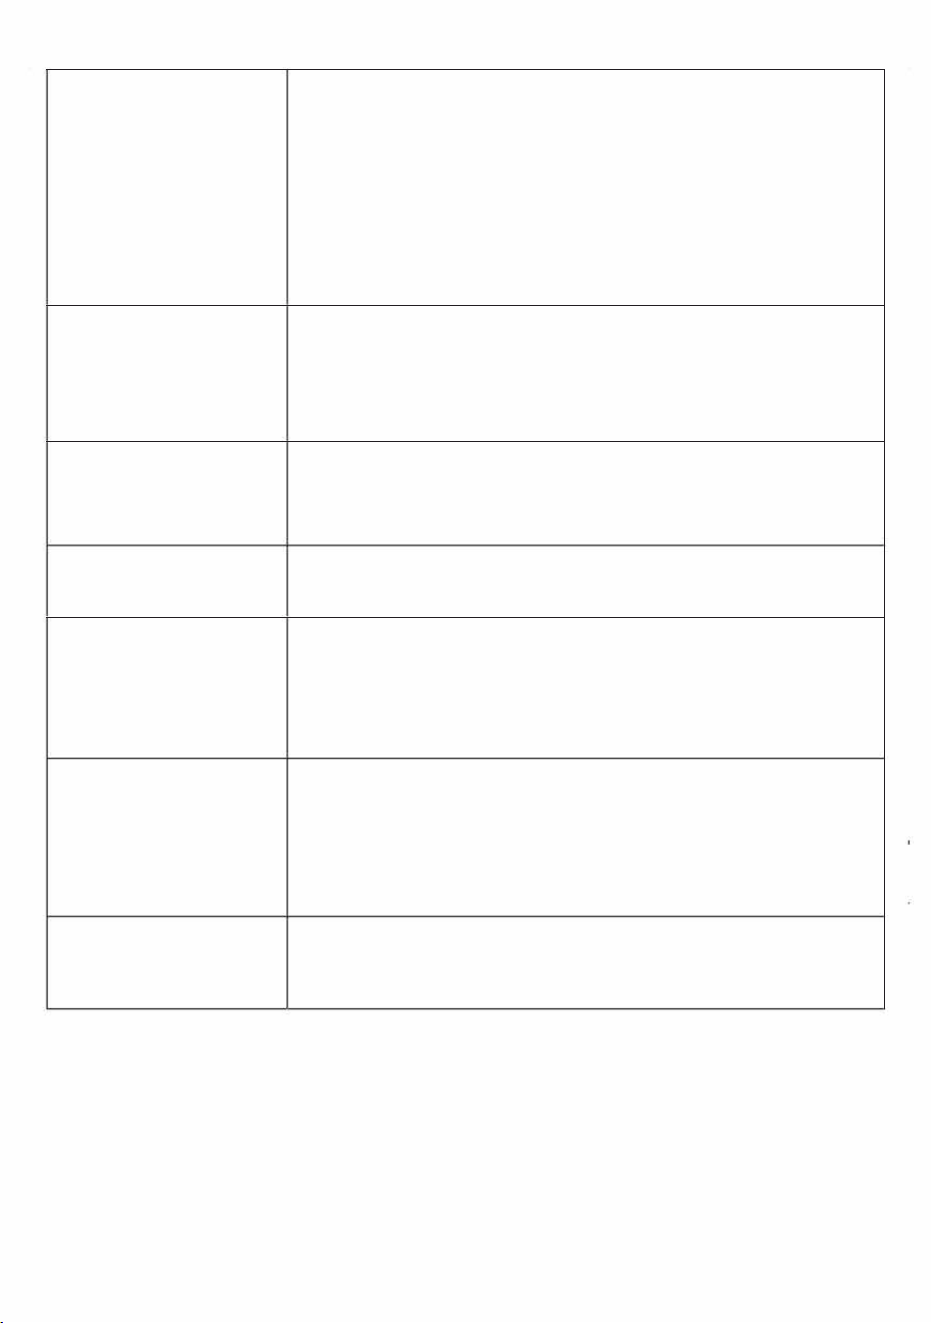
Check that the air outlets are not blocked by food and ensure food
A layer of frost occurs in the
is placed within the appliance to allow sufficient ventilation. Ensure
compament
that the door is fully closed. To remove the frost, please refer to the
Cleaning and Care chapter.
Temperature inside is
You may have left the doors open too long or too frequently; or the
too warm
doors are kept open by some obstacle; or the appliance is located
with insufficient clearance at the sides, back and top,
Temperature inside is
Increase the temperature by following the Display Controls chapter.
too cold
Doors can't be closed
Check whether the top of the refrigerator is tilted back by l O-l 5mm
to allow the doors to self-close, or if something inside is preventing
easily
the doors from closing.
The LED light may be damaged. Refer to replace LED lights in
The light is not working
Cleaning and Care chapter.
The control system has disabled the lights due to the door being
kept open too long. Close and reopen the door to reactivate the lights.
Hear water bubbling in the
This is normal. The bubbling comes from the refrigerant coolant liquid
refrigerator
circulating through the refrigerator.
16
A DANGER
It is prohibited to dispose of this appliance as household waste.
Packaging Materials
Packaging materials with the recycle symbol are recyclable. Dispose of the packaging into a
suitable waste collection container to recycle it.
Before Disposal of the Appliance
l . Pull out the main plug from the main socket.
2. Cut o the power cord and discard with the main plug.
17
AwARNING
Potential Suffocation Hazard! Potential death or brain damage could occur. Remove doors to
prevent potential suffocation.
1. To prevent potential suocation hazard, remove your old refrigerators doors completely
,
immediately. Leave shelves installed to help block children from climbing on or getting inside.
2. When disposing of the appliance do so only at an authorized waste disposal center. Do not
expose to flame.
Refrigerators contain refrigerant and gases in the insulation. Refrigerant and gases must be
disposed of professionally as they may cause eye injuries or ignition. Ensure that tubing of the
refrigerant circuit is not damaged prior to proper disposal .
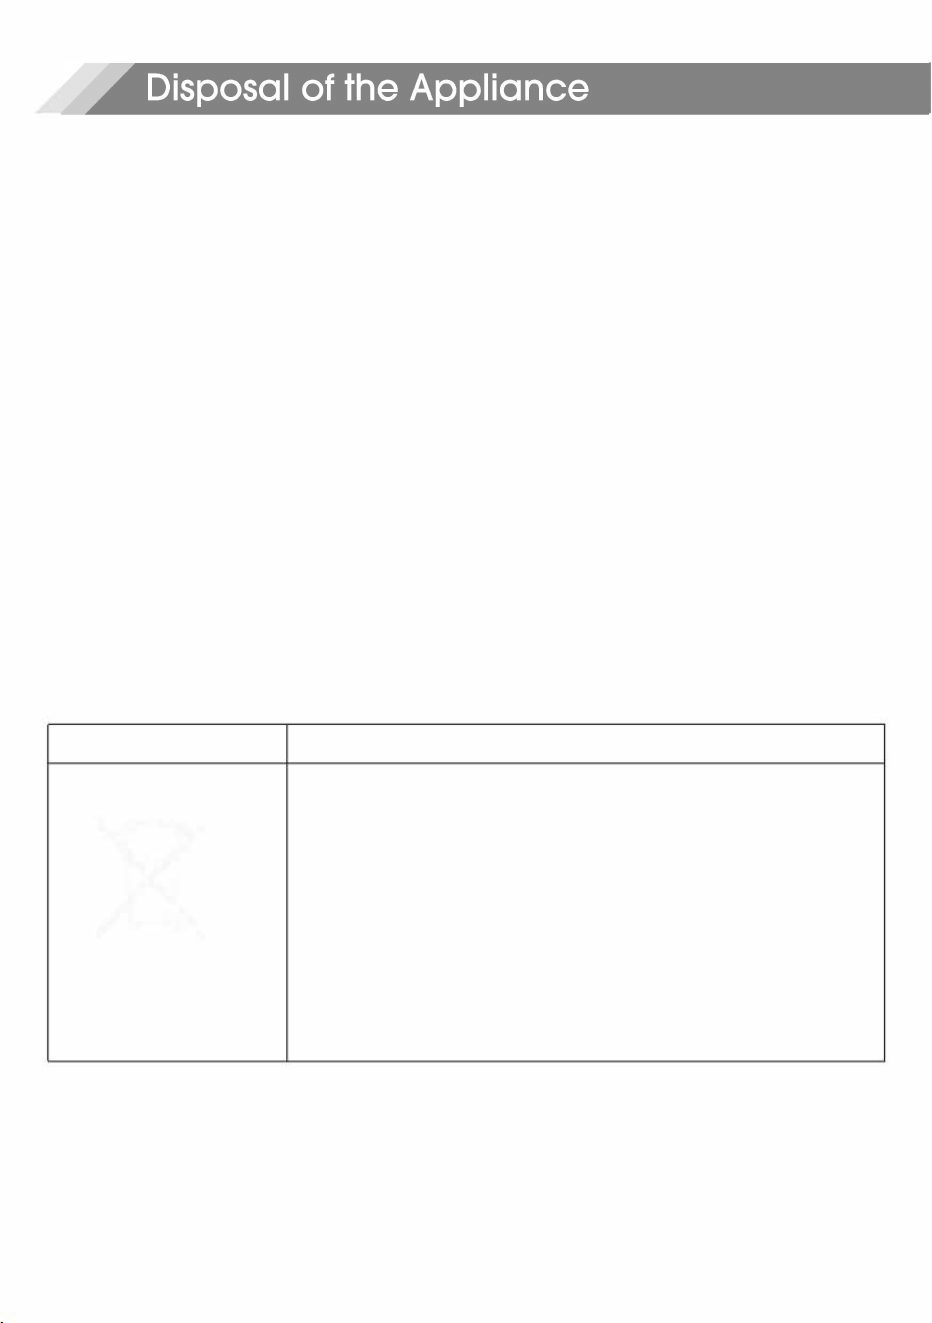
Correct Disposal of this product
This symbol on the product or in its packing indicates that this
R
product may not be treated as household waste. Instead, it should
be taken to the appropriate waste collection point for the recycling
of electrical and electronic equipment. By ensuring this product is
disposed of correctly, you will help prevent potential negative
consequences for the environment and human health, which could
otherwise be caused by the inappropriate waste handling of this
product. For more detailed information about the recycling of this
-
product, please contact your local council, your household waste
disposal service, or the shop where you purchased the product.

Hisense
Gu de uso y cuidado del refrigerador
Modelo:
HRTl 80N6ABD
HRT180N6AWD
HRT180N6AVD
Para consultas sobre las caracterticas, funcionamiento/rendimiento, piezas o
servicio, llame al:
1-877-465-3566

Tabla de contenidos
l
ns
tr
ucci
o
nes im
porta
n
te
s
d
e
se
g
u
r
i
dad
.......................................................
..........................
.... 3
D
e
sc
r
i
p
ci6n
del re
f
r
i
gerador
..... .............................................................................................. 6
l
ns
talar el aparato
nu
e
v
o
...................................
............................................... 7
Co
n
trole
s
d
e la pa
n
talla ................................................................................................................
11
U
so
del aparato ................................................................................................... 12
Lim
p
i
e
z
a
y m
a
n
te
nimi
e
n
to
......................................................................................................
1
3
Su
gere
nci
a
s y c
o
n
se
j
os
u
t
i
les
......................................................................................................
1
4
R
esol
uci6n
d
e pro
b
le
m
a
s ...............................................................................................................
1
5
E
l
imin
a
ci6n
del aparato
............................................................................................
1
7
3
Lea y siga todos los mensajes de seguridad. Guarde estas instrucciones.
A
Este sfmbolo de alerta de seguridad lo ayudara a comprender las situaciones y los
peligros que puedan causar lesiones o la muerte.
A ADVERTENCI
�PELIGRO
El aviso de ADVERTENCIA significa una posible situaci6n peligrosa.
Pueden ocurrir lesiones graves o la muerte si no se evitan.
PELIGRO significa una situaci6n peligrosa inminente. Pueden ocurrir
lesiones graves o la muerte si no se evitan.
A PRECAUCl6N
El aviso de PRECAUCION significa una posible situaci6n peligrosa.
Pueden ocurrir lesiones menores o leves si no se evitan.
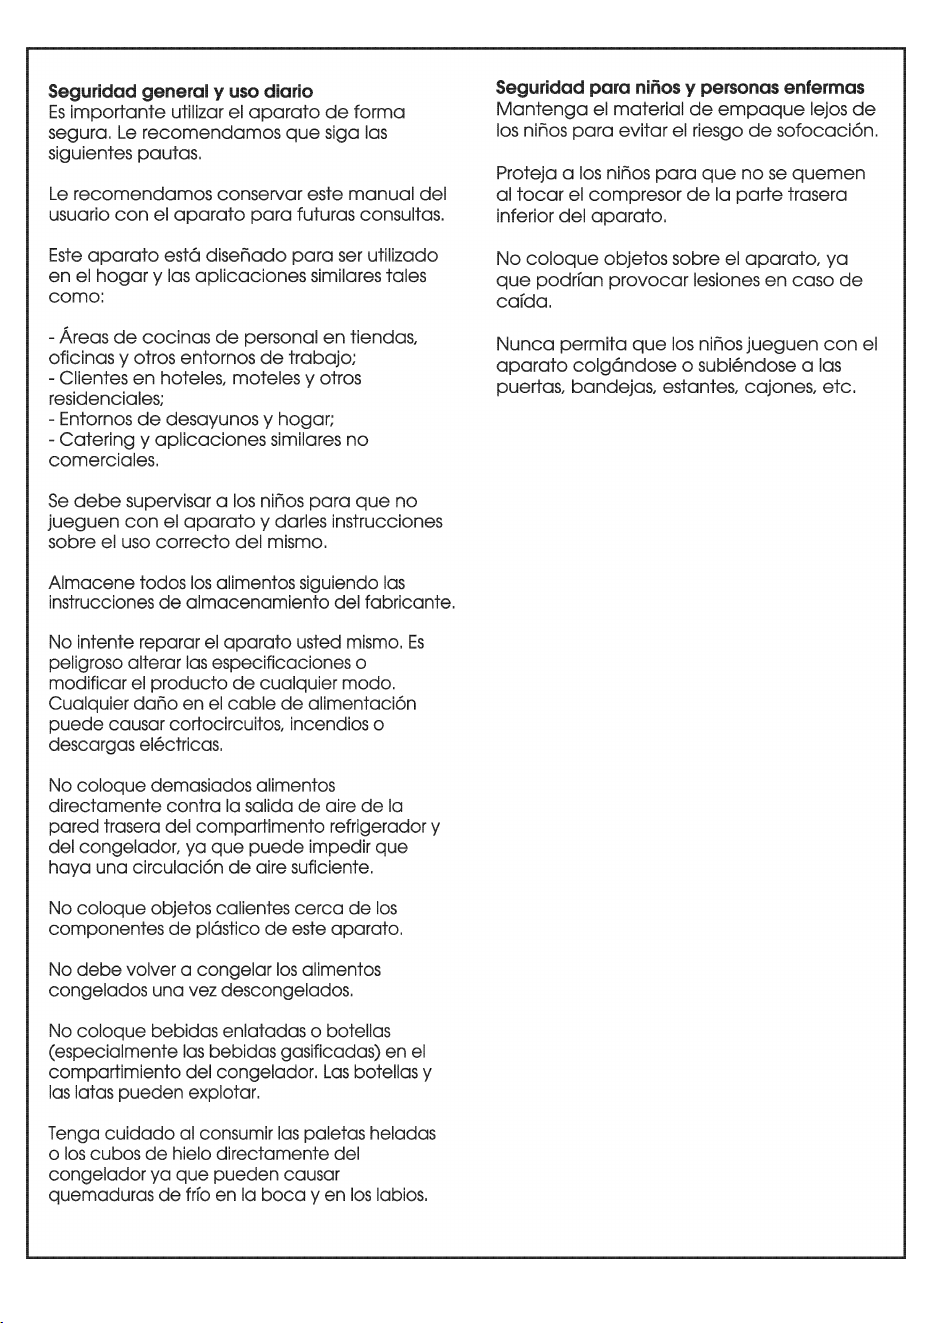
A ADVERTENCIA
l . Asegurese de que todas las personas que
utilizan este aparato esten familiarizadas con
su funcionamiento y sus funciones de
seguridad. Este aparato no esta destinado
para ser utilizado por personas (incluso ninos)
con capacidades ffsicas sensoriales o
mentales reducidas a menos que hayan sido
supervisados o instruidos correctamente.
2. Este aparato esta destinado para ser
utilizado en el hogar y lugares similares.
3. Mantenga las sustancias explosivas e
inflamables lejos de la unidad. No almacene
estos materiales en el refrigerador.
4. Desconecte la energfa antes de realizar el
mantenimiento o la instalaci6n de la maquina
de hielo.
5. Utilice limpiadores no inflamables.
6. Se necesitan 2 o mas personas para quitar
la unidad vieja e instalar esta unidad.
7. S61o conectelo a un suministro de agua
potable.
8. No utilice los dispositivos mecanicos u otros
medios para acelerar el proceso de
descongelaci6n, con excepci6n de los
recomendados por el fabricante.
9. No done el circuito del refrigerante.
l 0. No utilice aparatos electricos dentro de
los compartimentos de almacenamiento de
alimentos del aparato, a menos que sean
del tipo recomendado por el fabricante.
11 . Las instrucciones incluyen las siguientes
indicaciones acerca del uso de cables
alargadores:
No utilice un cable alargador.
Si el cable de alimentaci6n esta danado,
debera ser reemplazado por el fabricante,
su agente de o las personas similarmente
cualificadas con el fin de evitar un peligro.
12. Mantenga las aperturas de ventilaci6n
en la carcasa del aparato o en la estructura
construida libres de obstaculos.

A PELIGRO
Para evitar los riesgos que est6n siempre
presentes cuando se utiliza un aparato
electrico, le recomendamos que preste
atenci6n a las siguientes instrucciones sabre
la electricidad.
l . El aparato requiere una fuente de
alimentaci6n de 115 V/60 Hz de una fase.
Tiene un cable electrico con un enchufe de
3 clavijas y conexi6n a tierra que minimiza la
posibilidad de descargas electricas. Este
aparato debe tener conexi6n a tierra. No
quite la terminal a tierra ni modifique el
conector.
2. La unidad debe enchufarse a una toma
electrica dedicada que cumpla todas las
normas y requisitos de corriente. No enchufe
otros aparatos en la misma toma y
asegurese de que el aparato sea el unico
dispositivo enchufado en todo el circuito.
Debe cantor con un interruptor propio. De lo
contrario, el circuito podr sobrecargarse y
provocar un incendio.
3. No modifique el enchufe electrico. El
enchufe electrico debe ser accesible
cuando el aparato este instalado.
4. El aparato no debe apagarse con un
interruptor u otro dispositivo.
5. Compruebe que el enchufe electrico no
este aplastado ni danado. De lo contrario,
podrfa provocar un cortocircuito, una
descarga electrica o sobrecalentamiento e
incluso originar un incendio.
6. No inserte el enchufe electrico si la toma
est6 suelta, existe riesgo de descarga
electrica o incendio.
7. Apague el aparato y desconectelo del
interruptor principal antes de realizar la
limpieza o moverlo.
8. Nunca desenchufe el aparato estirando
del cable electrico. Agarre siempre el
enchufe con firmeza y extr6igalo de la toma
para evitar donor el cable electrico.
9. No opere el electrodomestico sin el
cobertor de la luz interior.
l 0. La sustituci6n o reparaci6n de los
componentes electricos las debe realizar un
electricista cualificado o un ingeniero de
servicio autorizado. Solo deben utilizarse
piezas de sustituci6n originales.
11 . Para evitar lesiones oculares, no mire
directamente a la luz LED del
compartimento refrigerador. Si no funciona
correctamente, consulte con un electricista
cualificado y certificado o sustituyala en
conformidad con el capftulo Limpieza y
mantenimiento.
12. El refrigerante isobutano (R600a) se
encuentra dentro del circuito refrigerante
del aparato. Durante el transporte y la
instalaci6n del aparato, asegurese de que
ninguno de los componentes del circuito
refrigerante se done. El refrigerante (R600a)
es inflamable.
13. Riesgo de atrapamiento para ninos.
Antes de deshacerse del viejo aparato:
Quite las puertas
Deje los estantes en el lugar para que los
ninos no puedan meterse dentro
f6cilmente.
A PRECAUCION
l . No almacene productos que contengan
propelentes inflamables (ej.: Iotas de
aerosol) ni sustancias explosivas en el
aparato.
2. Evite llamas (velas, 16mparas, etc.) y otras
fuentes de ignici6n.
3. Ventile bien la solo en la que este situado
el aparato.
4. Desempaquete y compruebe
detenidamente el aparato. Cualquier dano
deberfa ser evidente; no conecte el
aparato y contacte inmediatamente a la
tienda donde lo compr6. En este caso,
conserve todos los materiales de empaque.
5. Se recomienda esperar al menos 4 horas
antes de conectar el aparato para permitir
que el refrigerante regrese al compresor.
4
5
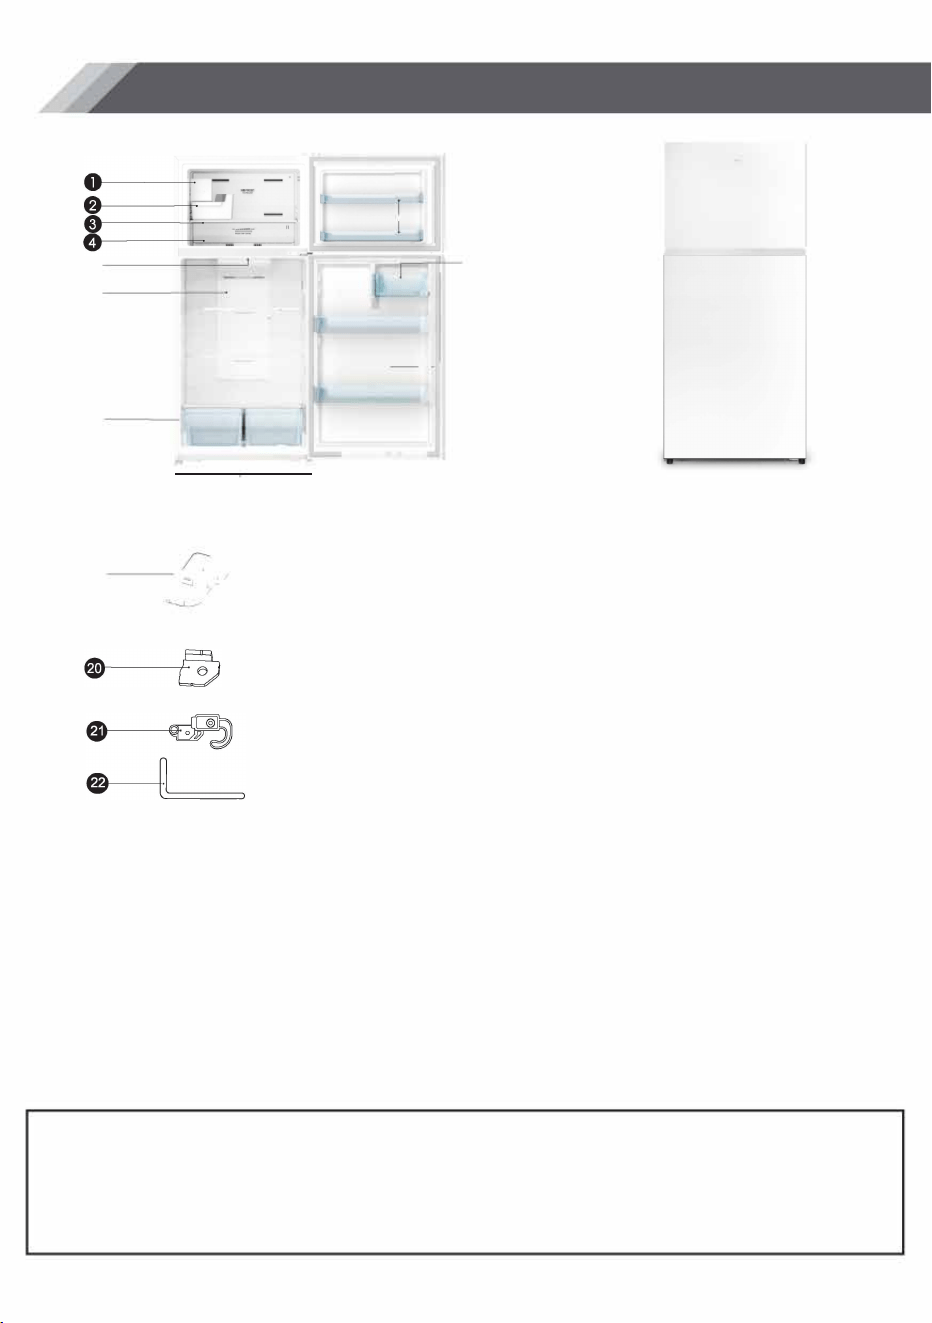
Descripcion del refrigerador
�----�
�
o
I
9
J�
�
:
-r1 �
1
_, • ==I=:b
'
?
·
-
�
r
---�
-,
---+ '
··,.u
•
·
c:·::�f
A NOTA
O M6quina de hielo autom6tica
(Opcional)
8 Recipiente de hielo (Opcional)
Estante de vidrio
0 Conducto de aire del congelador
8 Luz LED
8 Conducto de aire de la nevera
O Estantes de cable
8 Cubierta del caj6n Crisper
O Cajon para verduras
Patas inferiores ajustables
Contenido del paquete
Cobertor de la bisagra izquierda
Tap6n (x2)
L
Junta de la puerta del congelador
e Puerta del congelador
Recipiente chico de la puerta del
congelador
Cubierta de recipiente de 16cteos
Recipiente de 16cteos
�
Recipiente de puerto de gal6n
Junta de la puerta de la heladera
Puerta del refrigerador
Piezas de repuesto para inversar la
puerta
Tap6n de la puerta (x2)
LlaveAllen
• Debido a las modificaciones incesantes de nuestros productos su refrigerador puede diferir un poco
del de este manual de instrucciones pero sus funciones y metodos de uso son los mismos.
• Para obtener la mejor eficiencia energetica de este producto, coloque todos los estantes, cajones y
recipientes en su posici6n original como se muestra en la imagen de arriba.
6
7
r lnstalar el aparato nuevo
Antes de utilizar el aparato por primera vez,
debe leer los siguientes consejos.
A
i
Adveencia!
Para realizar una instalaci6n adecuada, se debe
colocar la nevera sabre una superficie nivelada
de material duro que este a la misma altura que
el resto del suelo. Esta superficie debe ser lo
suficientemente fuerte para soportar una nevera
completamente cargada.
Los rodillos, que no son ruedas, solo se deben
usar para moverla hacia delante o hacia atras.
Mover la nevera hacia los lados podr donor el
suelo y los rodillos.
0
�
A
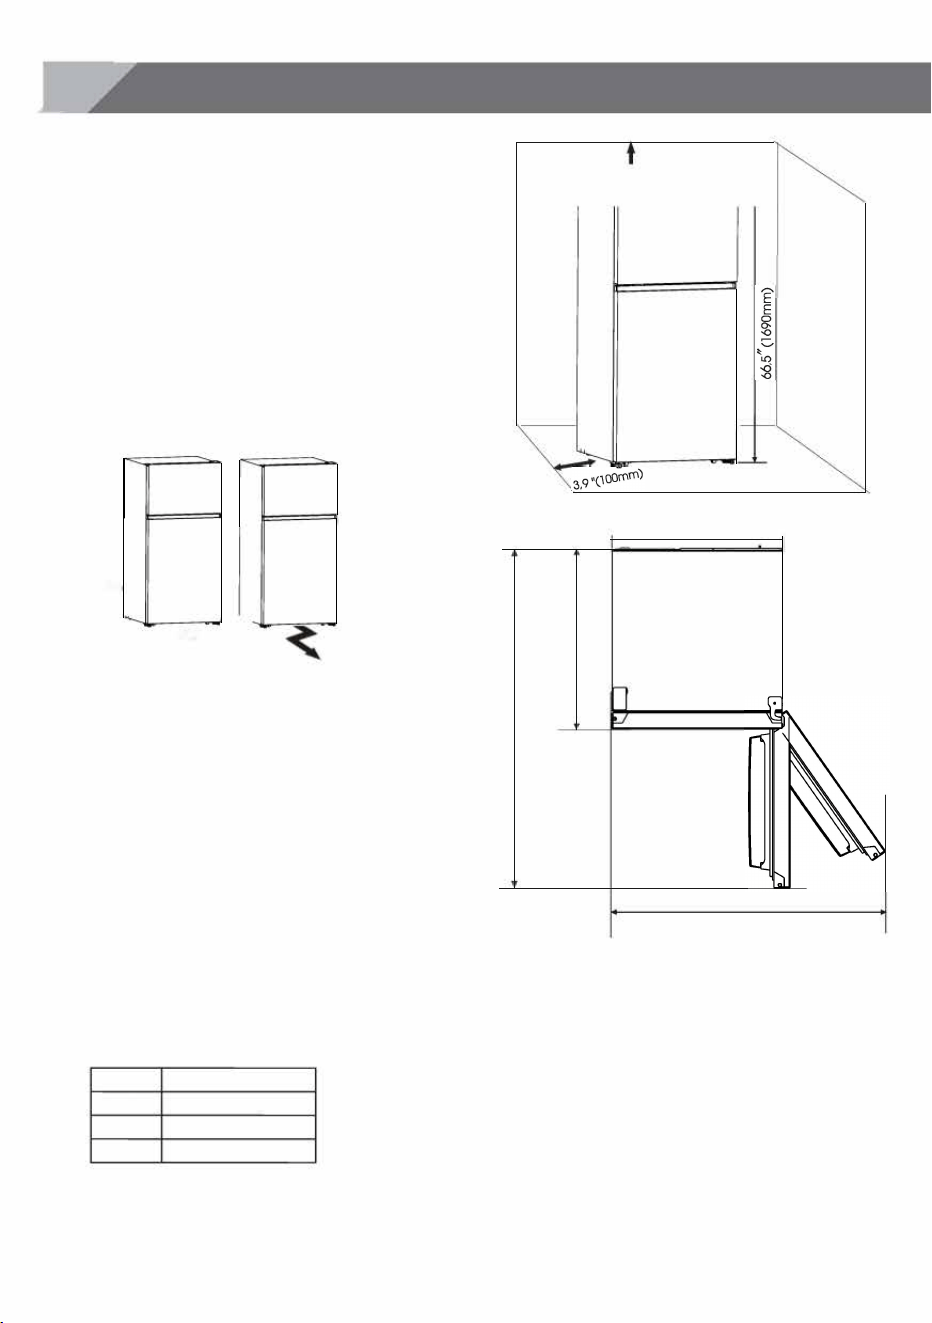
Ventilar el aparato
Para mejorar la eficacia del sistema refrigerante
y ahorrar energfa, es necesario mantener una
buena ventilaci6n alrededor del aparato para
disipar el color. Por esta raz6n, se debe dejar
suficiente espacio libre alrededor del
refrigerador.
Sugerencia
Se recomienda dejar un espacio de al menos 3
pulgadas (75mm) entre la parte trasera del
frigorffico y la pared, al menos 3, 9 pulgadas
(l 00mm) de espacio en la parte superior, al
menos 3,9 pulgadas (100mm) entre el lateral y la
pared, y dejar libre de obstaculos el frente para
que las puertas puedan abrirse 125
°
, coma
muestra el siguiente diagrama.
A
58, l "(l 476mm)
B
30,7 "(779mm)
C
29,5 "(750mm)
D
47,3 "(1201 mm)
3 • (75mm)
J
3,9 "(lOOmm)
'•�.
C
B
A
D
Noto:
• El aparato funciona bien dentro de la
temperatura ambiente entre 55
°
F (12,8
°
C) y
110
°
F (43,3
°
C). El aparato puede no funcionar
correctamente si se deja a una temperatura
superior o inferior del rango indicado.
• Coloque el aparato en un lugar seco para
evitar la alto humedad.
• Mantenga el aparato lejos de la luz solar, la
lluvia o la escarcha. Coloque el aparato
alejado de fuentes de color, coma estufas,
fuegos o calentadores.
2. Con la puerta cerrada, quite los tornillos (puede
intentar con un destornillador Philips) y la cubierta
de la bisagra superior (puede intentar con un
destornillador plano) (E) en el lado derecho superior
del aparato y quite las 3 tornillos especiales de brida
(F) con una llave de tubo. Guarde la cubierta de la
bisagra superior para futuras referencias.
9
3. Quite la bisagra superior (sostenga la
puerta superior con la mono mientras la
instala). Gu6rdelo para el uso futuro.
t
4. Utilice ambas monos para abrir la puerta a
m6s de 90
°
. Lev6ntela y quela.
5. Afloje los dos tornillos (G) en la parte inferior
derecha de la puerta del congelador, luego
saque el bloque de tope derecho (H) y el
tope derecho de la puerta (I). A
continuaci6n, instale el bloque de tope
izquierdo ( y el tope izquierdo de la puerta
(J) (suministrados en la balsa de pl6stico).
6. Abra la puerta del heladera, luego, afloje
los 2 tornillos (L) con la llave Allen de 4 mm (se
suministra una de pl6stico) y quite la bisagra
central (M). Guarde la bisagra media (M)
para su uso futuro. Retire la puerta del nevera
de la bisagra inferior.
7. Coloque la puerta de nevera sabre una
superficie suave con los paneles hacia arriba.
Afloje los dos tornillos (G) en la parte inferior
derecha de la puerta de la nevera, luego
saque el bloque de tope derecho (H) y el
bloque de tope derecho de la puerta (I). A
continuaci6n, instale el bloque de tope
izquierdo (K) y el tope izquierdo de la puerta (J).
8. Cambie las cubiertas de los orificios de los
tornillos de la parte central de la placa de
cubierta de izquierda a derecha .
II,
=
·II�
"0
0 0
b
,,
�
"
9. Incline el refrigerador sabre el envoltorio de
espuma suave o sabre un material similar. Retire
las piezas de las patas inferiores ajustables y la
pieza de bisagra inferior desatornillando los
tornillos autorroscantes de la brida especial.
Afloje el eje de la bisagra inferior y luego
inst61elo en el lugar del orificio inverso.
14. Desatornille el eje de la bisagra superior, gire la
bisagra superior y fije el eje en ella. Luego
colóquela en la parte superior izquierda.
15. Retire la cubierta de la bisagra superior de la
bolsa de plástico suministrada, instálela, y fíjela
con tornillos.
11
Controles de la pantalla
Control de la temperature
Se recomienda que, cuando empiece a utilizar la
refrigerador por primera vez, ajuste la temperatura
de la nevera en "3" y la del congelador en la
posici6n media. Si desea cambiar la temperatura,
siga estas instrucciones.
jPrecauc
i
6n!
Al ajustar una temperatura, se ajusta la
temperatura media de todo el armario de la
nevera. La temperatura dentro de coda
compartimiento puede variar de la temperatura
que se muestra en el panel dependiendo de
cuanta comida haya almacenada y d6nde este
ubicada. Las temperaturas ambientales tambien
podrfan afectar a la temperatura real del interior
del aparato.
1. Heladera
TEMP. CONTROL
Puede presionar el bot6n "
_
,,
,�
" para
seleccionar un ajuste de temperatura. Cuando
pulse continuamente el bot6n, la temperatura se
ajustara en la secuencia siguiente.
C
4
-
5
,
3-2-1�
i
lmpoante!
La temperatura ambiente alto (ej.: en dfas de
color de verano) y una configuraci6n mas frfa en
el regulador de temperatura puede hacer que el
compresor funcione de manera continua, o
i
que
no pare!
No recomendamos al usuario que establezca la
temperatura en "5" o "l" en condiciones normales.
Modo demo
El modo demo es para su exhibici6n en la
tienda y evita que el refrigerador genere aire
frfo. En este modo, el refrigerador parece estar
funcionando pero no generara aire frfo.
Presione el bot6n "
_
,,
,�
" durante 3 segundos
y el refrigerador se configurara en modo de
demostraci6n. Entonces, todas las cifras del
panel de control se iluminaran. Para cancelar
este modo, presione "
,,""' " durante 3
segundos y el refrigerador comenzara a
enfriarse nuevamente.
2. Congelador
INTERMEDIO
FRiO
-------- ■ MFRfO
CONL DE TEMPERA DEL CONGEDOR
Cuando utilice el refrigerador en condiciones
normales, coloque el regulador de temperatura
en la posici6n media.
jlmportante!
No recomendamos al usuario que ajuste la
perilla de control de temperatura en "MAS FRIO"
durante mucho tiempo. Al hacerlo, la
temperatura en el congelador desciende mas
rapidamente y la en el refrigerador aumentara.
Si hay alimentos en el frigorico, no los
mantengas en este modo durante mucho
tiempo.
Si el usuario configura el regulador de
temperatura en la posici6n "FRIO", la
temperatura en el congelador es mas alto que
en el modo normal. Solo se recomienda este
modo cuando no hay alimentos en el
congelador.
jlmportante!
No coloque demasiados alimentos en la salida
de aire del sensor de temperatura en la
cubierta del canal de aire del refrigerador ya
que afecta a la operaci6n correcta del aparato.
Partedel
sensor de
temperatura
Uso del aparato
Esta secci6n explica c6mo utilizar la mayorfa
de funciones utiles. Se recomienda leerla
detenidamente antes de utilizar el aparato.
1. Uso del compaimento de nevera
El compartimento de refrigerador es apto para
almacenar carnes, verduras y fruta. La fruta que
meta debe estar envasada para evitar que
pierda humedad o sabor que se impregne en
otros alimentos.
A PRECAUCION
Nunca cierre la puea de la nevera con las
estanterfas, el caj6n para verduras y/o gufas
telesc6picas extendidas. Podrn danarse, asf
como a la nevera.
Estantes de cable y recipientes en las puertas
El compartimento del refrigerador dispone de
paes de estantes y recipientes en las pueas,
que son ideales para almacenar huevos,
lfquidos en Iota, bebidas embotelladas y
alimentos envasados. Se pueden colocar a
distintas alturas segCm sus necesidades. Sin
embargo, no coloque demasiados objetos
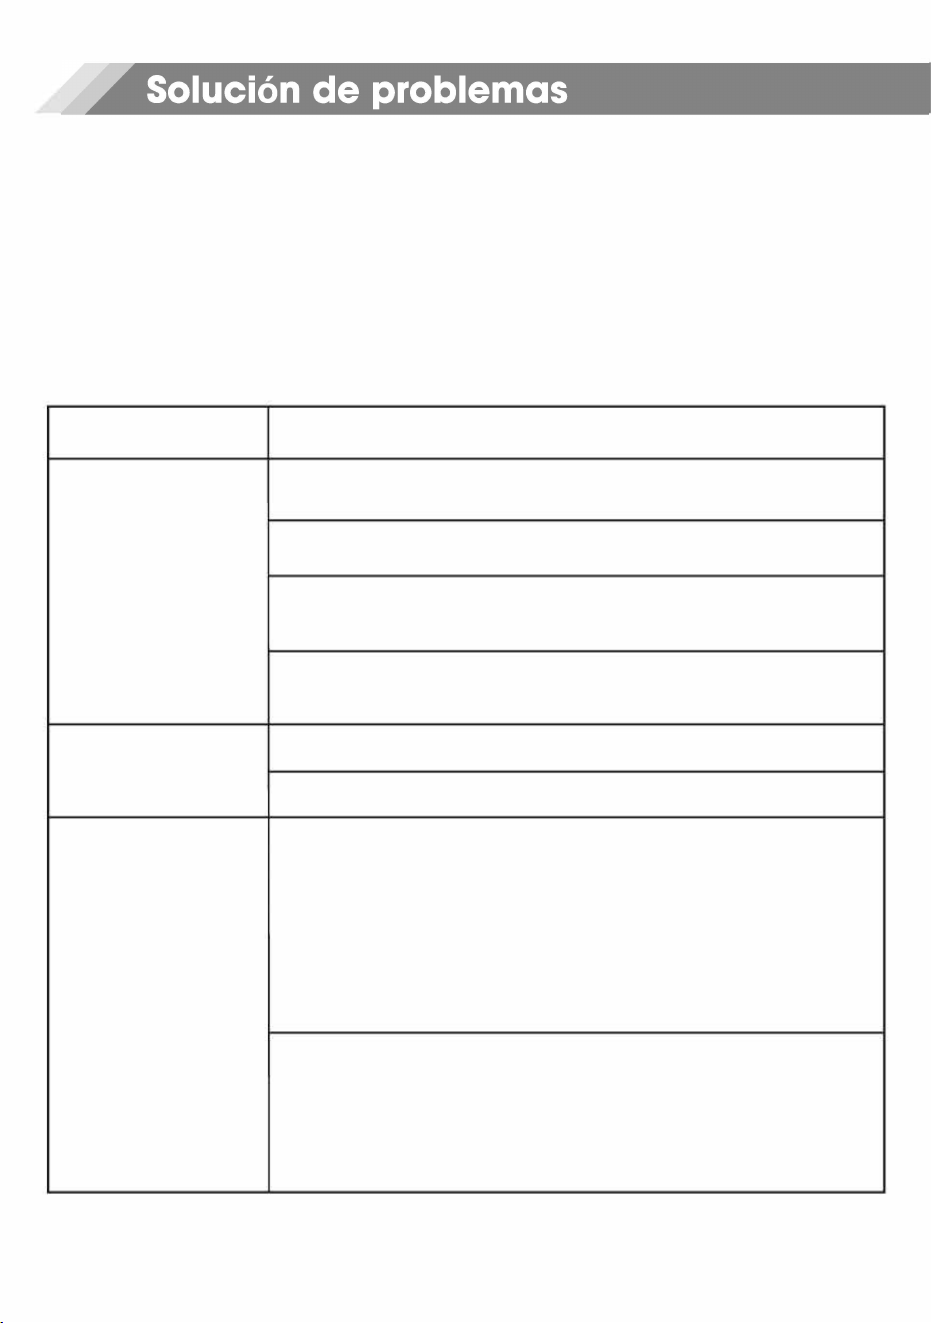
pesados en los recipientes. Antes de levantar
verticalmente el estante de la puea, retire los
alimentos.
t
-
Cajon para verdures
Es ideal para almacenar frutas y verduras. Se
puede retirar para su limpieza. Para retirarlos,
abra la puerta completamente. A continuaci6n,
retire el caj6n e incline la parte frontal del caj6n
para verduras despues de moverlo ligeramente.
Uso del compaimiento del congelador
El compartimiento del congelador tambien
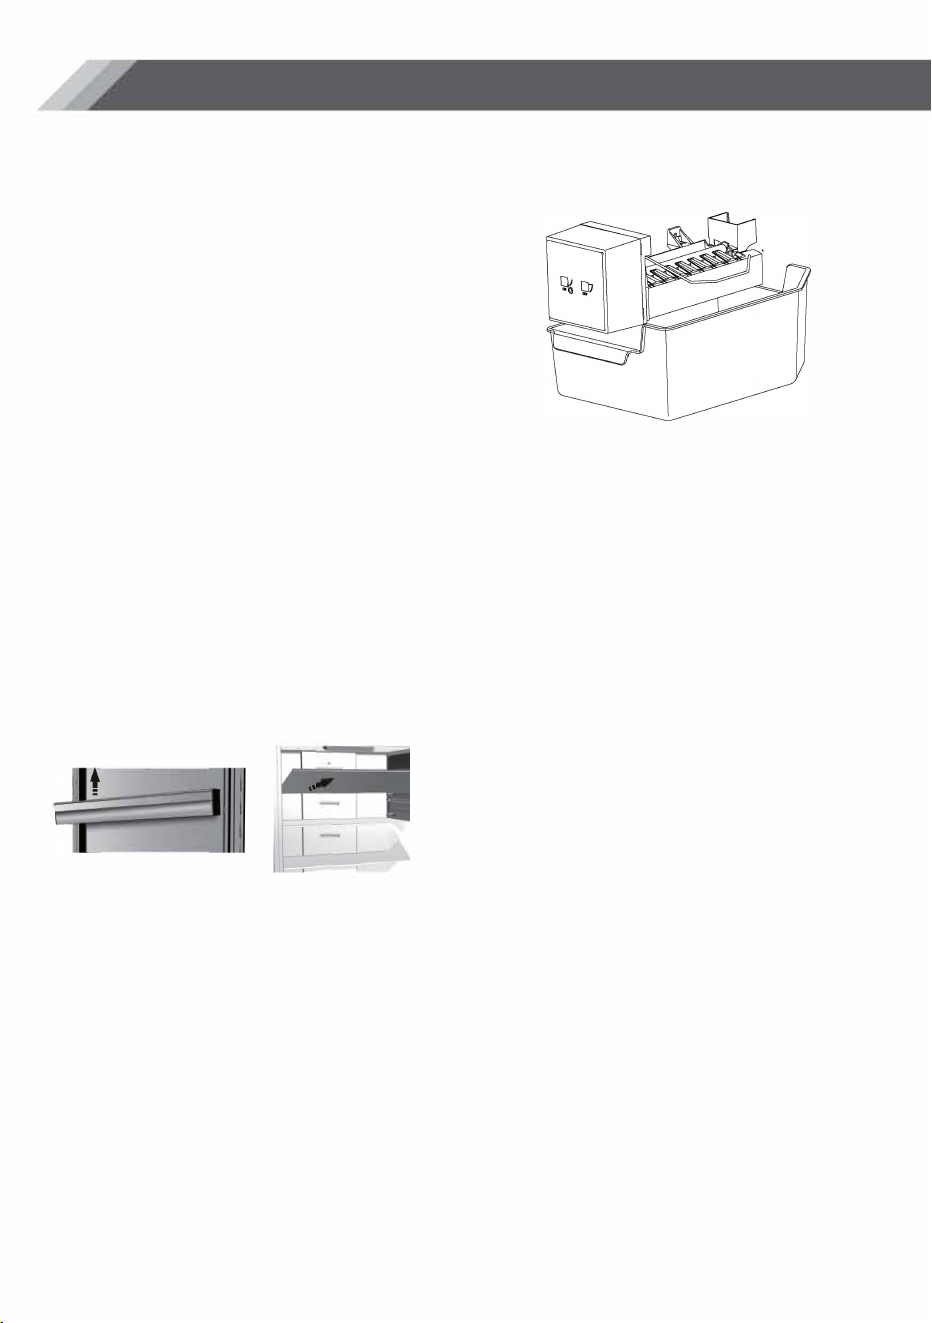
cuenta con un estante de vidrio.
3. Maquina de hielo automatica (si ha
instalado un kit
de maquina de hielo
HIMT30GOl).
Nota:
• Cuando la maquina de hielo arroja los
hielos en el recipiente, cualquier ruido es
parte del funcionamiento normal.
•
Si no dispensa hielos por largos periodos de
tiempo, el hielo puede acumularse en el
recipiente. Si esto sucediera, retire todo el
hielo y vacfe el recipiente.
•
En caso de no utilizar la maquina de forma
prolongada, cierre la valvula de agua para
evitar fugas.
Se recomienda descartar los primeros cubos
de hielo para garantizar la mejor calidad del
hielo.
No almacene Iotas ni contenedores que
explotan cuando se congelan.
A PRECAUCl6N
No permita que sus hijos se cuelguen del
dispensador ni toquen la maquina de hielo.
Podr provocarles lesiones.
12

Por motivos de higiene, se debe limpiar
peri6dicamente al menos coda dos meses el
aparato (incluyendo las accesorios exteriores
e interiores).
A PRECAUCION
No se debe conectar el electrodomestico al
toma de la pared durante la limpieza.
i
Existe
peligro de descarga electrical Antes de
realizar la limpieza, desconecte el
electrodomestico y quite el conector del
toma de la pared.
Limpieza exterior
Para mantener la buena apariencia del
aparato, debe limpiarlo regularmente.
Rode agua en el pano de limpieza en lugar
de rociarla directamente sabre la superficie
del aparato. Esto ayuda a garantizar una
distribuci6n uniforme de la humedad par la
superficie.
Limpie las puertas, las asas y las superficies del
armario con detergente suave y sequelas
con un pano suave.
A PRECAUCION
No utilice objetos afilados para la limpieza ya
que podrfan manor la superficie.
No utilice disolvente, detergente para
vehfculos, Clorox, aceite etereo, limpiadores
abrasivos ni disolventes org6nicos, coma
benceno, para limpiarlo. Podrfan donor la
superficie del aparato y provocar un
incendio.
Limpieza interior
Debe limpiar peri6dicamente el interior del
aparato. Le resultar6 mas f6cil limpiarlo
cuando tenga poca cantidad de comida.
Limpie el interior del frigorico y del
congelador con una soluci6n suave de
bicarbonato de sodio y agua, y acl6relo todo
con agua tibia y una esponja o trapo bien
escurridos. Seque par completo antes de
volver a colocar las bandejas y las estantes.
Seque bien todas las superficies y las partes
desmontables antes de volver a colocarlas
en su lugar. Aunque esta unidad se
descongela autom6ticamente,
puede producirse una capo de escarcha en
13
las paredes interiores del congelador si la
puerta del congelador se abre con frecuencia
o se mantiene abierta durante demasiado
tiempo. Si la escarcha es demasiado gruesa,
elija un momenta en el que las existencias de
alimentos sean bajas y siga estos pasos:
l . Retire las alimentos y las cestas de
accesorios, desenchufe el aparato de la
corriente y deje las puertas abiertas. Ventile
bien la habitaci6n para acelerar el proceso
de descongelaci6n.
2. Cuando se haya descongela
completamente, limpie el congelador
siguiendo el proceso antes descrito.
A ADVERTENCIA
No utilice objetos afilados para retirar la
escarcha del compartimento congelador.
Solo cuando el interior este completamente
seco, se puede volver a encender el aparato
y volver a enchufarlo en la toma electrica.
Limpieza de las juntas de la puerta Mantenga
las juntas de las puertas limpias. Los alimentos
pegajosos y las bebidas pueden adherirse a
las juntas y pegarse al gabinete causando
rupturas cuando abre le puerta. Lave las
juntas con detergente neutro y agua tibia.
Aclare y seque bien la junta despues de la
limpieza.
A
PRECAUCION
S61o debe encender el aparato despues de que
los sellos de la puea esten completamente
secos.
Reemplazo de la luz LED
Advertencia: Una persona capacitada debe
reemplazar la luz LED. Si la luz LED esta danada,
siga los pasos que se indican a continuaci6n
1. Desenchufe el aparat.
2. Retire la cubierta de la luz levantando y
sacando la luz LED.
3. Sostenga la cubierta del LED con una mono y
estire con la otra mientras presiona enganche del
conector.
4. Reemplace la luz LED y presi6nela
correctamente en el lugar y vuelva a colocar la
cubiea de la luz.

Consejos de ahorro de energ
Se recomienda seguir estos consejos para
ahorrar energ.
Procure evitar mantener la puerta abierta
durante mucho rato para ahorrar energfa.
Asegurese de que el aparato este alejado de
fuentes de color (luz solar directa, horno
electrico o estufa, etc).
No configure la temperatura mas frio de lo
necesario.
No almacene alimentos calientes o lfquidos
que se evaporan en la unidad.
Coloque el aparato en una solo bien
ventilada y libre de humedad. Consulte el
capulo lnstalar el nuevo aparato .
Si el diagrama muestra la combinaci6n
correcta de los cajones, el caj6n para
verduras y los estantes, no la ajuste ya que
esta disenado para ofrecer la mejor
configuraci6n de eficiencia energetica.
Consejos para refrigerar alimentos frescos
No coloque alimentos calientes directamente
en el frigorico o el congelador, ya que la
temperatura interna aumentara haciendo
que el compresor necesite mas potencia y
consuma mas energfa.
Cubra o envuelva los alimentos, en especial si
tienen un olor fuerte.
Coloque los alimentos cuidadosamente para
que el aire pueda circular libremente en torno
a ellos.
Consejos para la refrigeraci6n
Para carnes: (todos los tipos) envueltas y
colocadas en el estante de vidrio sobre el
caj6n de verduras. Siga el periodo de
almacenamiento de los alimentos y utilice las
fechas sugeridas por los fabricantes.
Alimentos cocinados, platos frs, etc.:
Se deben cubrir y se pueden colocar en
cualquier estante.
Frutos y verduras:
Se deben guardar en el caj6n especial
provisto.
Mantequilla y queso:
Se deben envolver con plastico hermetico o
pelfcula plastica.
Botellas de leche:
Deben tener una tapa y se pueden almacenar
en los recipientes de la puerta.
Consejos de congelaci6n
Cuando lo encienda por primera vez o no lo
utilice durante un periodo largo, deje que el
aparato funcione al menos 2 horas con los
ajustes mas altos antes de colocar alimentos
en el compartimento.
Prepare los alimentos en porciones pequenas
para que se congelen del todo rapidamente y
para que sea posible despues descongelar
solo la cantidad necesaria.
Envuelva los alimentos en papel aluminio o film
hermetico.
No permita que los alimentos frescos no
congelados toquen los alimentos que ya estan
congelados para evitar el aumento de la
temperatura de estos ultimos.
Productos helados,(cubos de hielo, paletas
heladas):
Si se consume alimentos congelados
directamente despues de sacarlos del
congelador, probablemente provoquen
quemaduras por congelaci6n en la piel.
Se recomienda etiquetar y colocar la fecha de
coda paquete congelado para mantener un
seguimiento del tiempo de almacenamiento.
Consejos para almacenar alimentos
congelados
Revise que los alimentos congelados se hayan
almacenado correctamente por el vendedor
de alimentos.
Una vez descongelados, los alimentos se
deterioraran rapidamente y no deben volverse
a congelar. No supere el periodo de
almacenamiento indicado por el fabricante de
los alimentos.
Apagar el aparato
Si tiene que desenchufar el electrodomestico
durante un largo periodo de tiempo, debe
seguir los siguientes pasos para evitar que le
salga moho.
l . Retire todos los alimentos.
2. Desconecte el enchufe de la toma de
corriente principal.
3. Limpie y seque completamente el interior.
4. Asegurese de que todas las puertas queden
abiertas ligeramente para permitir que circule
el aire.
14
Si experimenta problemas con el aparato o le preocupa que no funcione correctamente, puede
realizar algunas comprobaciones sencillas antes de llamar al servicio de mantenimiento, consulte a
continuaci6n.
A ADVERTENCIA
15
l . No intente reparar el aparato usted mismo. Si el problema persiste despues de realizar las
comprobaciones mencionadas a continuaci6n, p6ngase en contacto con un electricista
cualificado, un ingeniero de servicio autorizado o la tienda donde compr6 el producto.
2. Las instrucciones de funcionamiento o el manual de uso y mantenimiento de los
refrigeradores contienen una advertencia de aprisionamiento infantil.
Problema
Cause posible y soluci6n
Compruebe si el cable electrico est6 enchufado correctamente en la
toma electrica.
Compruebe el fusible o el circuito del suminsitro electrico y sustitOyalos si
fuera necesario.
El aparato no funciona
La temperatura ambiental es demasiado baja. lntente establecer la
correctamente
temperatura de la c6mara en un nivel mas frio para solucionar este
problema.
Es normal que el congelador no funcione durante el ciclo de
descongelaci6n, o durante un breve tiempo despues de encender el
aparato para proteger el compresor.
Salen olores de los
Es posible que sea necesario limpiar el interior.
compartimentos
Algunos alimentos, recipientes o envoltorios provocan olores.
Los sonidos descritos a continuaci6n son bastante normales:
Ruidos de funcionamiento del compresor.
Ruido de circulaci6n de aire del motor del ventilador pequeno ubicado
en el compartimento del congelador o en otros compartimentos.
Sonido de gorgoteo similar al de agua hirviendo.
Sale ruido del aparato
Sonido de golpeteo durante la descongelaci6n autom6tica.
Sonido de chasquido antes de que arranque el compresor.
Sonido de chasquido cuando consigues el agua.
El motor en marcha hace ruido cuando hay hielo.
Otros ruidos inusuales pueden ser debidos a los motivos descritos a
continuaci6n y es posible que deba comprobarlos y tomar medidas:
El armario no est6 nivelado.
La parte trasera del aparato toca la pared.
Botellas o recipientes caos o rodando.

Es normal escuchar con frecuencia el sonido del motor, debera
funcionar con mas potencia en las circunstancias siguientes:
El ajuste de temperatura es mas fr de lo necesario.
El motor funciona
Se ha almacenado recientemente una gran cantidad de comida
continuamente
caliente dentro del aparato.
La temperatura exterior del aparato es demasiado elevada.
Las puertas hon estado abiertas demasiado rato o con mucha
frecuencia.
Despues de instalar el aparato o cuando ha estado apagado
durante mucho tiempo.
Compruebe que las salidas de aire no esten bloqueadas con
Hay una capa de
alimentos y asegurese de que la comida este bien colocada en el
escarcha en el
aparato para permitir una ventilaci6n suficiente. Asegurese de que la
compartimenfo
puerta este cerrada completamente. Para ver c6mo eliminar la
escarcha consulte el capulo Limpieza y mantenimiento.
La temperature interna es
Es posible que haya dejado las puertas abiertas demasiado rato o que
demasiado calida
las haya abierto con demasiada frecuencia, que algun obstaculo las
haya mantenido abiertas; o que el aparato tenga poco espacio a los
lados, por detras y por encima.
La temperature interior es
Suba la temperatura siguiendo las instrucciones del capulo Controles
demasiado frfa
de la pantalla.
Compruebe si la parte superior de la nevera esta inclinada hacia atras
Las puertas no se pueden
l 0-15 mm para permitir que las puertas se cierren automaticamente, o
cerrar facilmente
si dentro hay algo que evite que las puertas se cierren.
La luz LED podr estar danada. Consulte c6mo sustituir las luces LED en
La luz no funciona
el capulo Limpieza y mantenimiento.
El sistema de control ha desactivado las luces porque la puerta ha
estado abierta demasiado rato. Cierre y vuelva a abrir la puerta para
reactivar las luces.
Se escuchan burbujas de
Esto es normal. El burbujeo proviene del lfquido refrigerante que circula
agua en el refrigerador
por el refrigerador.
16
A
PELIGRO
Esta prohibido eliminar este aparato con los residuos domesticos.
Materiales de embalaje
Los materiales de embalaje con el sfmbolo de reciclaje son reciclables. Arroje el embalaje a un
contenedor de recogida de residuos adecuado para reciclarlo.
Antes de desechar el aparato
l . Retire el enchufe electrico de la toma electrica.
2. Corte el cable electrico y elimfnelo con el enchufe.
A
ADVEENCIA
i
Peligro potencial de sofocaci6n! Puede ocasionar la muerte o dano cerebral. Retire las puertas
para evitar una posible asfixia.
l . Para evitar un peligro potencial de asfixia, retire completamente las puertas de su
refrigerador viejo de inmediato. Deje los estantes instalados para ayudar a impedir que los ninos
se suban o entren.
17
2. Para desechar el aparato, llevelo a un centro autorizado de eliminaci6n de residuos. No lo
expongan a llamas.
Las neveras contienen refrigerante y gases dentro del aislamiento. Se debe desechar el
refrigerante y los gases de forma profesional, ya que podrn provocar lesiones oculares o
ignici6n. Asegurese de que la tuber del circuito de refrigerante no este danada antes de su
desecho adecuado.
Eliminaci6n correcta del producto
Este sfmbolo en el producto o en el material de empaque indica
que este producto no se puede tratar como desperdicios
R
domestico. En su lugar, se debe llevar al punto de recogida de
residuos adecuados para reciclar el equipo electrico y
electr6nico. Al asegurarse de que este producto se elimina
correctamente, ayudara a prevenir las consecuencias negativas
potenciales para el entorno y la salud humana, que de lo
contrario podrfan ser causadas por la manipulaci6n inadecuada
de los residuos de este producto. Para mas informaci6n detallada
-
acerca del reciclaje de este producto, p6ngase en contacto
con el servicio de eliminaci6n de residuos domesticos de su
ayuntamiento o con la tienda donde compr6 el producto.