
Operating instructions
Cordless stick vacuum cleaner
AUS, NZ
M.-Nr. 11 579 120
HS19

Contents
2
Warning and Safety instructions ..................................................................... 4
Caring for the environment .............................................................................. 11
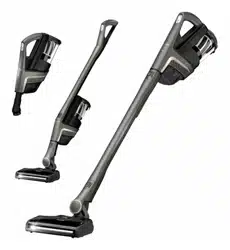
Guide to the appliance...................................................................................... 12
Installation and connection .............................................................................. 14
Assembling the vacuum cleaner ......................................................................... 14
Connecting the Comfort handle .......................................................................... 14
Connecting the PowerUnit and the suction tube ................................................ 15
Inserting the battery ............................................................................................ 16
Connecting the Electrobrush............................................................................... 17
General battery information................................................................................. 17
Charging the battery (without wall mounting)...................................................... 18
Charging the battery (with wall mounting)........................................................... 18
Wall mounting...................................................................................................... 19
Attaching the mounting plate .............................................................................. 20
Attaching the charging cable to the wall bracket ................................................ 20
Connecting the accessories holder (if required).................................................. 21
Connecting the wall bracket................................................................................ 21
Battery charging state indicator (while charging) ................................................ 22
Battery charging state indicator (while in use)..................................................... 22
Using the accessories supplied ....................................................................... 23
ElectrobrushMultiFloorXXL (SEB 430 or SEB 435)........................................... 23
ElectroCompact handheld brush (SEB 23)......................................................... 24
Additional AP01 battery and LS03 charger cradle .............................................. 24
Use...................................................................................................................... 25
Switching on and off ........................................................................................... 25
Regulating the suction power ............................................................................. 25
Illuminating the work area ................................................................................... 25
Self-standing function for short pauses in vacuuming........................................ 25
Maintenance ...................................................................................................... 26
Emptying the dust container ............................................................................... 26
Cleaning the fine dust filter.................................................................................. 28
Cleaning the pre-filter.......................................................................................... 28
Cleaning the dust container ................................................................................ 30
Cleaning the Electrobrush/handheld brush......................................................... 30
Replacing the rechargeable battery .................................................................... 31
Problem solving guide ...................................................................................... 32
Error messages ................................................................................................. 34

Contents
3
Cleaning and care ............................................................................................. 35
Service................................................................................................................ 35
Contact in case of malfunction ........................................................................... 35
Warranty .............................................................................................................. 35
Optional accessories ........................................................................................ 36
Electrical connection ........................................................................................ 37
Warning and Safety instructions
4
It is essential to read these instructions.
This vacuum cleaner conforms to current safety requirements. In-
appropriate use can lead to personal injury and damage to prop-
erty.
Please read the operating instructions before using the vacuum
cleaner and charging the battery for the first time. They contain im-
portant information on the safety, use and maintenance of the va-
cuum cleaner. This will prevent both personal injury and damage to
the appliance.
In accordance with standard IEC60335-1, Miele expressly and
strongly advises that you read and follow the instructions in the
“Installation and connection” chapter as well as the safety instruc-
tions and warnings.
Miele cannot be held liable for injury or damage caused by non-
compliance with these instructions.
Keep these operating instructions in a safe place and pass them
on to any future owner.
Always disconnect the vacuum cleaner from the power supply
when you have finished using it, before changing any accessories,
as well as for maintenance work, cleaning and troubleshooting.
Use the On/Off switch on the Comfort handle to do this.
Correct application
This vacuum cleaner is intended for cleaning flooring in domestic
households and similar residential environments. This vacuum
cleaner is not suitable for use on construction sites.
This vacuum cleaner is not intended for outdoor use.

Warning and Safety instructions
5
This vacuum cleaner can be used for all normal cleaning of car-
pets, rugs and robust hard flooring.
This vacuum cleaner is intended for use at altitudes of up to
4000m above sea level.
The vacuum cleaner must only be used to vacuum dry floor sur-
faces. Do not vacuum people or animals. Any other types of use,
modifications or alterations are not permitted.
This vacuum cleaner can only be used by people with reduced
physical, sensory or mental capabilities, or lack of experience or
knowledge, if they are supervised whilst using it or have been shown
how to use it in a safe way and understand and recognise the con-
sequences of incorrect operation.
The packaging material protects the vacuum cleaner from trans-
port damage. We recommend you keep the packaging for transport
purposes.
Safety with children
Young children must be kept away from the vacuum cleaner un-
less they are constantly supervised.
Older children may only use the vacuum cleaner without supervi-
sion if they have been shown how to use it in a safe manner. Chil-
dren must be able to understand and recognise the possible dangers
caused by incorrect operation.
Children must not be allowed to clean or maintain the vacuum
cleaner unsupervised.
Please supervise children in the vicinity of the vacuum cleaner and
do not let them play with it.
Danger of suffocation. Packaging, e.g. plastic wrappings, must be
kept out of the reach of babies and children. Whilst playing, children
could become entangled in packaging or pull it over their head and
suffocate.

Warning and Safety instructions
6
Technical safety
The vacuum cleaner operates at 25.2V.
It is classified as a class III appliance.
This appliance is supplied by a safety extra-low voltage (SELV)
power source where the voltage is low enough to protect users from
the risk of electrical shock. A Class II charger is used for supplying
power to charge the vacuum cleaner.
Compare the connection data on the data plate of the charger
(voltage and frequency) with that of the mains electricity supply. This
data must match exactly. Without modifications, the charger is suit-
able for 50Hz and 60Hz.
The mains electrical outlet must be fitted with an appropriate cir-
cuit breaker.
Before using the vacuum cleaner and its accessories, check for
any visible signs of damage. Do not use a damaged appliance.
The MieleMultiFloorXXLElectrobrush and the MieleElec-
troCompacthandheldbrush (varies according to the model) are ad-
ditional motor-driven devices designed specially for this Miele va-
cuum cleaner. For safety reasons, the vacuum cleaner must not be
used with a different MieleElectrobrush/handheld brush or an Elec-
trobrush/handheld brush produced by another manufacturer.
Store the vacuum cleaner at an ambient temperature between
0°C and 45°C.
Repairs should only be undertaken by a Miele authorised service
technician. Otherwise the warranty will be invalidated.
Repairs and other work by unqualified persons can cause consid-
erable danger to users.
Miele can only guarantee the safety of the appliance when genu-
ine Miele replacement parts are used. Faulty components must only
be replaced with genuine Miele replacement parts.

Warning and Safety instructions
7
If the vacuum cleaner is to be stored unused for a long period, the
battery should be removed.
The supply terminals must not be short-circuited.
Cleaning
Do not immerse the vacuum cleaner or any accessories supplied
with it in water.
The Electrobrush/handheld brush (depending on the model), the
PowerUnit, the suction tube, the body and the Comfort handle con-
tain electrical wires. The plug connectors must not come into con-
tact with water. Danger of electric shock. They should only be
cleaned with a dry cloth.
Clean the vacuum cleaner and accessories only with a dry or
slightly damp cloth when disconnected from the power supply. Ex-
ception:
- Dust container: empty the dust container and remove the pre-fil-
ter. Clean the dust container using water and mild washing-up li-
quid only. Then dry the dust container carefully. Replace the pre-
filter in the dust container.
Correct use
Do not use the vacuum cleaner without the dust container, pre-fil-
ter, fine dust filter and motor protection filter fitted.
Do not vacuum up anything which has been burning or is still
glowing e.g. cigarettes, ashes or coal, whether glowing or apparently
extinguished.
Do not use the vacuum cleaner to vacuum up any water, liquid or
damp dirt. Wait until any freshly cleaned or shampooed rugs or car-
pets are completely dry before attempting to vacuum.
Do not use the vacuum cleaner to vacuum toner dust. Toner, such
as that used in printers and photocopiers, can conduct electricity.

Warning and Safety instructions
8
Do not vacuum up any inflammable or combustible liquids or
gases and do not vacuum in areas where such substances are
stored.
Never touch the Electrobrush/handheld brush (varies according to
the model) while it is rotating.
Do not use the Electrobrush/handheld brush (varies according to
the model) at head height.
Do not vacuum at head height and do not let the suction get any-
where near a person's head.
Accessories
Only use genuine accessories with the “ORIGINAL Miele” logo on
the packaging. The manufacturer cannot otherwise guarantee the
safety of the product.
Safety instructions and warnings for AP01 battery, LG01
charger, LS03 charger cradle (depending on the model)
Safety with children
People (including children) with reduced physical, sensory or men-
tal capabilities, or lack of experience or knowledge, who are unable
to use the LG01 charger/LS03 charger cradle safely may only use
this vacuum cleaner if they are supervised whilst using it or have
been shown how to use it in a safe way and understand and recog-
nise the consequences of incorrect operation.
Keep the AP01 battery out of the reach of children.
Children must be kept away from the LG01 charger/LS03 charger
cradle unless they are constantly supervised.
Do not let children play with the chargers.
Warning and Safety instructions
9
Technical safety
The AP01 battery, the LG01 charger and the LS03 charger cradle
are designed for use with the Miele HS19 vacuum cleaner. For safety
reasons, the vacuum cleaner must not be used with a battery, char-
ger or charger cradle produced by another manufacturer.
Only the LG01/xx charger or the LS03/xx charger cradle supplied
with the vacuum cleaner can be used to charge the AP01 battery.
Do not use the LG01/xx charger or LS03/xx charger cradle to charge
any other batteries.
xx stands for 01, 02, 03, 04, 05, 06, 07 or 08; these numbers identify
the country version of your LG01 charger and your LS03 charger
cradle:
XX
01 AT, BE, BG, CH, CL, CZ, DE, DK, EE, ES, FI, FR, GR, HR, HU, IT, KZ, LT,
LU, LV, NL, NO, PL, PT, RO, RS, RU, SE, SI, SK, TR, UA, ZA
02 AE, GB, HK, IE, MY, SG
03 CA, MX, US
04 AU, NZ
05 CN
06 KR
07 JP
08 IN
If you are using a mains plug adapter, make sure that it is ap-
proved for continuous operation.
Reliable and safe operation of this vacuum cleaner can only be
assured if the LG01 charger/LS03 charger cradle has been connec-
ted to the mains electricity supply.
Charge the vacuum cleaner at an ambient temperature between
0°C and 45°C. During charging, the AP01 battery must be placed in
a well ventilated area.

Warning and Safety instructions
10
Stop using the AP01battery immediately if you notice an unusual
smell from it, if liquid is leaking from it, if it is significantly overheating
or if it is discoloured or deformed. Dispose of the AP01battery im-
mediately (see safety notice “Disposing of the AP01battery” at the
end of this chapter as well as “Caring for the environment” – “Dis-
posing of old batteries”).
Batteries will deplete over time. They can then leak corrosive flu-
ids. Avoid contact with the eyes and skin. In the event of contact,
rinse thoroughly with water and seek medical advice.
To deal with leaking batteries, refer to the Safety Data Sheet (con-
tact Miele to request a copy).
Correct use
Do not drop or throw the AP01battery. For safety reasons, do not
continue to use an AP01battery which has been damaged.
Keep the AP01 battery away from naked flames or other heat
sources. Do not heat the AP01 battery. Do not expose the re-
chargeable battery to direct sunlight.
Do not dismantle the AP01 battery.
Do not cause a short circuit by bridging the contacts of the AP01
battery, either unintentionally or deliberately.
Do not allow the AP01battery to come into contact with liquids.
Disposing of the AP01 battery: remove the AP01 battery from the
vacuum cleaner. Insulate the metal contacts with adhesive tape to
prevent short circuits. Dispose of the AP01 battery in a municipal re-
cycling facility. Do not dispose of the AP01 battery with your house-
hold waste.
The rechargeable battery must be removed before the appliance
is scrapped.
Caring for the environment
11
Disposal of the packing mater-
ial
The packaging is designed to protect
the appliance from damage during
transportation. The packaging materials
used are selected from materials which
are environmentally friendly for disposal
and should be recycled.
Recycling the packaging reduces the
use of raw materials in the manufactur-
ing process and also reduces the
amount of waste in landfill sites.
Disposing of your old appli-
ance
Before disposing of your old vacuum
cleaner, remove the fine dust filter and
dispose of it with your household
waste.
Electronic and electrical appliances
contain many valuable materials. They
also contain certain materials, com-
pounds and components which were
essential for their correct functioning
and safety. These could be hazardous
to your health and to the environment if
disposed of with general waste or if
handled incorrectly. Please do not,
therefore, dispose of your old vacuum
cleaner with your household waste.
Instead, please make use of officially
designated collection and disposal
points to dispose of and recycle elec-
trical and electronic appliances in your
local community, with your dealer or
with Miele. Ensure that it presents no
danger to children while being stored
for disposal.
Disposing of old batteries
In many cases, electrical and electronic
appliances contain batteries which
must not be disposed of with house-
hold waste after use. You are legally ob-
liged (depending on country) to remove
any old batteries which are not securely
enclosed by the vacuum cleaner and to
take them to a suitable collection point
(e.g. retailer) where they can be handed
in free of charge. Insulate the metal
contacts with adhesive tape to prevent
short circuits. Batteries may contain
substances which can be hazardous to
human health and the environment.
The labelling on the battery will provide
further information. The bin symbol with
a cross through it means that the bat-
teries must not be disposed of in
household waste. A bin with a cross
through it which also has one or more
chemical symbols on it indicates that
the battery contains lead (Pb), cadmium
(Cd) and/or mercury (Hg).
3E&G+J
Old batteries contain valuable raw ma-
terials which can be recycled. Dispos-
ing of batteries separately makes them
easier to handle and recycle.

Guide to the appliance
12

Guide to the appliance
13
a
Comfort handle
b
Release catch for Comfort handle (on the back)
c
Dust container handle
d
Dust container with pre-filter, fine dust filter and motor protection filter
e
PowerUnit with battery connection and connections for Comfort handle, suc-
tion tube, Electrobrush and dust container
f
Release catches for battery (on both sides of the battery)
g
Charging socket (at the bottom of the battery)
h
AP01 lithium-ion battery
i
Connector
j
MultiFloorXXLElectrobrush (some models feature BrilliantLight lighting)
k
Removable roller brush
l
Flap
m
Release catch for removing the roller brush
n
Release catches
o
Battery charging state indicator
p
Suction tube
q
On/Off switch with suction power selector
14
Installation and connection
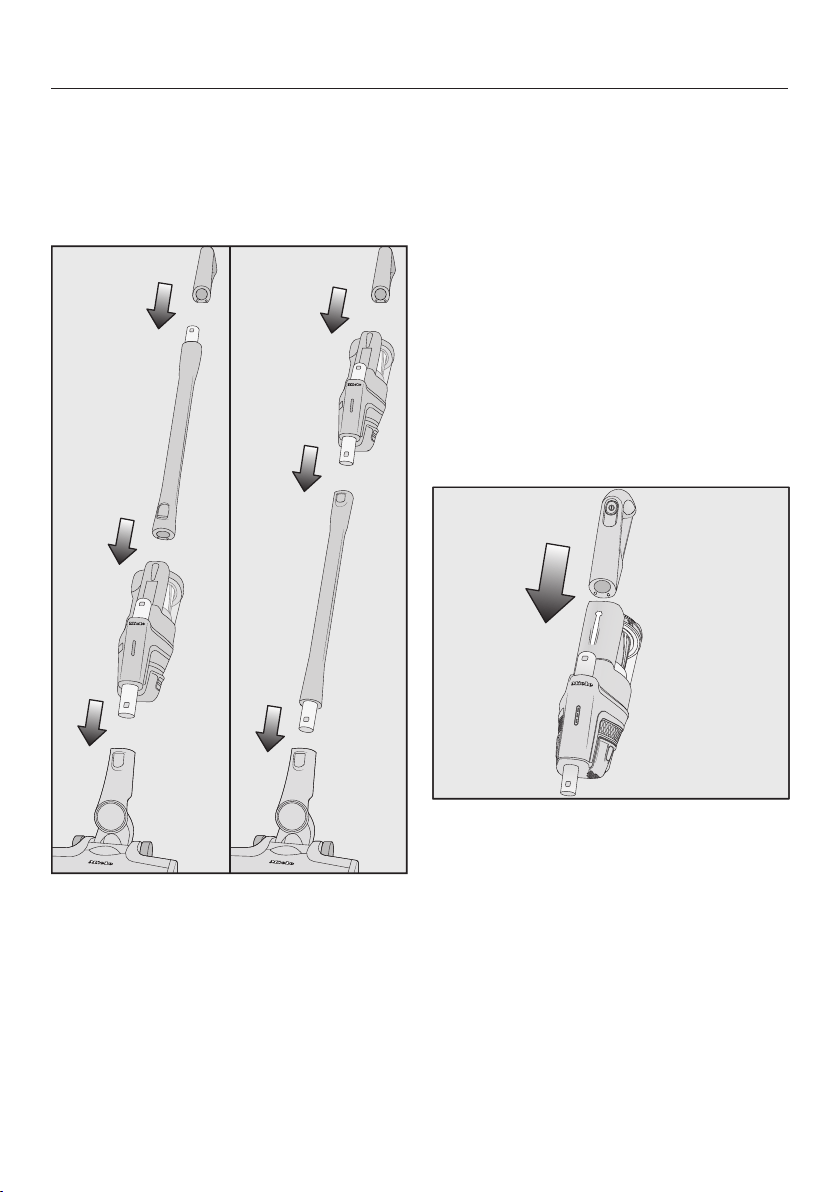
Assembling the vacuum cleaner
You can assemble the vacuum cleaner
in 2different ways.
You can place the suction tube either
above or below the PowerUnit.
The advantages of placing the
PowerUnit at the bottom of the va-
cuum cleaner are as follows:
- secure self-standing function possible
(see “Use” – “Self-standing function for
short pauses in vacuuming”)
- ergonomic (reduced strain on the
wrist)
- convenient cleaning of large surfaces
The advantages of placing the
PowerUnit at the top of the vacuum
cleaner are as follows:
- convenient cleaning underneath fur-
niture
- PowerUnit can be removed quickly
PowerUnit solo
The PowerUnit can be used on its own
without the suction tube and Electro-
brush as a quick way of vacuuming up
crumbs and lint in specific areas.
Tip: This configuration is particularly
suitable when using the three-piece ac-
cessory set (see “Using the accessories
supplied”).
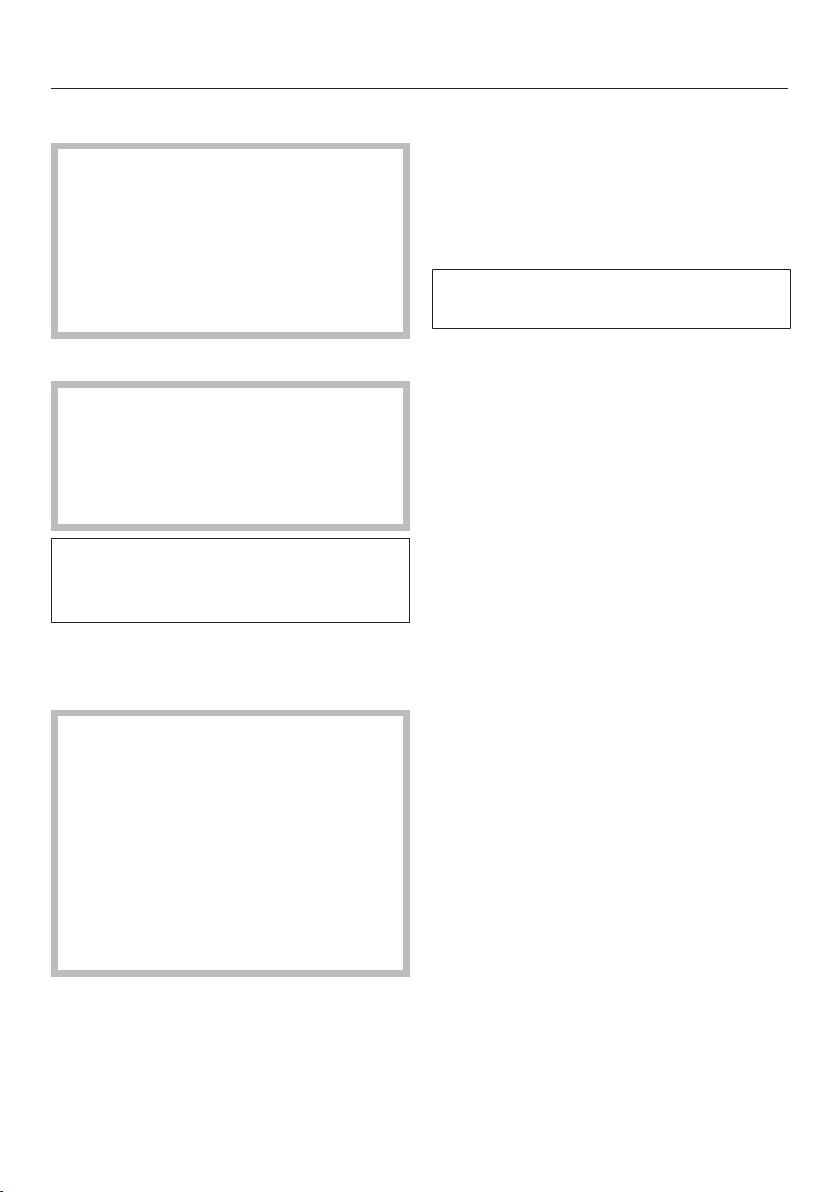
Connecting the Comfort handle
Depending on how your vacuum
cleaner is configured, you can connect
the Comfort handle to either the suction
tube or the PowerUnit.
15
Push the Comfort handle down on to
the suction tube connector from
above until it audibly clicks into place
(left image detail).
Slide the Comfort handle along the
guide line on the dust container
handle and down on to the PowerUnit
connector from above until it audibly
clicks into place (right image detail).
Switch off the vacuum cleaner using
the On/Off switch on the front of the
Comfort handle before separating the
sections.
Press the release catch and remove
the Comfort handle by pulling up-
wards.
Connecting the PowerUnit and the
suction tube
Depending on how your vacuum
cleaner is configured, the suction tube
is located either above or below the
PowerUnit.
Slide the suction tube along the guide
line on the dust container handle and
down on to the PowerUnit connector
from above until it audibly clicks into
place (left image detail).
Push the PowerUnit connector down
on to the suction tube from above un-
til it audibly clicks into place (right im-
age detail).
16
Press the release catch to separate
the individual sections from each
other.
Inserting the battery
Remove the protective sticker from
the battery.
Push the battery along the guide lines
until it audibly clicks into place in the
PowerUnit.
If you want to separate the sections
again, press both release catches at
the side of the battery to remove the
battery.
17
Connecting the Electrobrush
Depending on how your vacuum
cleaner is configured, you can connect
either the PowerUnit connector or the
suction tube connector to the Electro-
brush.
Insert the connector down into the
Electrobrush from above until it aud-
ibly clicks into place.
To separate the individual sections
from each other, press the release
catch on the Electrobrush and pull
the connector out of the Electro-
brush.
General battery information
The rechargeable battery is supplied
not fully charged.
Charge the battery completely before
using it for the first time. Allow approx-
imately 4hours for this.
It is essential to charge the battery for
the first time in the PowerUnit in order
to activate maximum power in the bat-
tery.
Once the battery is fully charged, the
battery charging state indicator
switches off after 10minutes to con-
serve energy.
You can use the vacuum cleaner for up
to 14minutes if you are using it in its
fully assembled state at the maximum
power level.
If, however, you are using the
PowerUnit on its own and select the
lowest power level, you can vacuum for
up to 60minutes.
Keep batteries out of the reach
of children.
A swallowed battery can cause injury
and even death. Even flat batteries
can still be dangerous. If you suspect
a child has swallowed a battery, seek
medical advice immediately*. Exam-
ine devices and make sure the bat-
tery compartment is correctly se-
cured, e.g. that the screw or other
mechanical fastener is tightened. Do
not use if compartment is not secure.
* Australia: Poisons Information
Centre, Tel. 13 11 26;
NZ: National Poisons Centre,
Tel. 0800 764 766
18
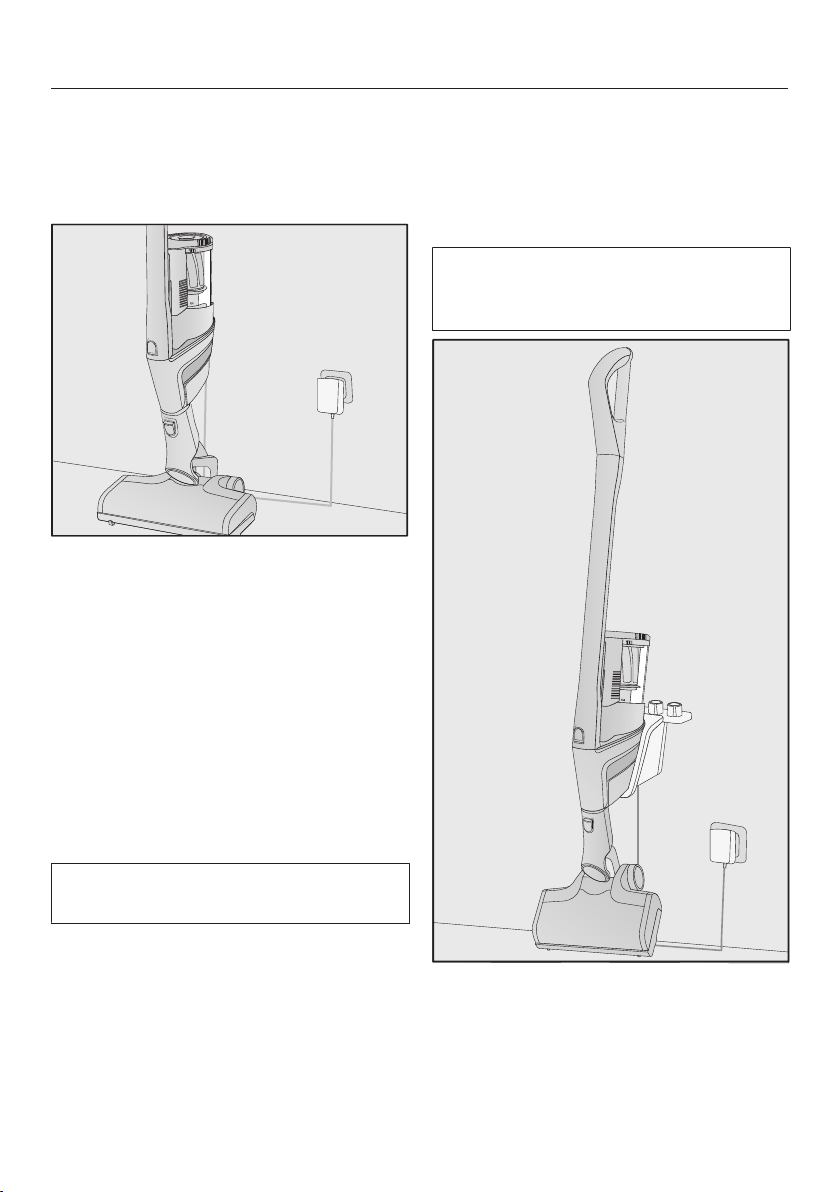
Charging the battery (without wall
mounting)
You can store the vacuum cleaner up-
right and charge the battery directly.
Connect the PowerUnit to the Elec-
trobrush to provide a secure base for
the vacuum cleaner.
Swing the vacuum cleaner forwards
until the Electrobrush connector aud-
ibly clicks into place.
Plug the supplied charging cable into
the charging socket on the bottom of
the battery.
Plug the charger into a power socket.
The charging process will start.
You can read more about this in “Bat-
tery charging state indicator”.
Charging the battery (with wall
mounting)
There are 2ways to store and charge
the vacuum cleaner in the supplied wall
bracket.
You will need a suitable location near
a free power socket for mounting the
appliance on the wall.
19
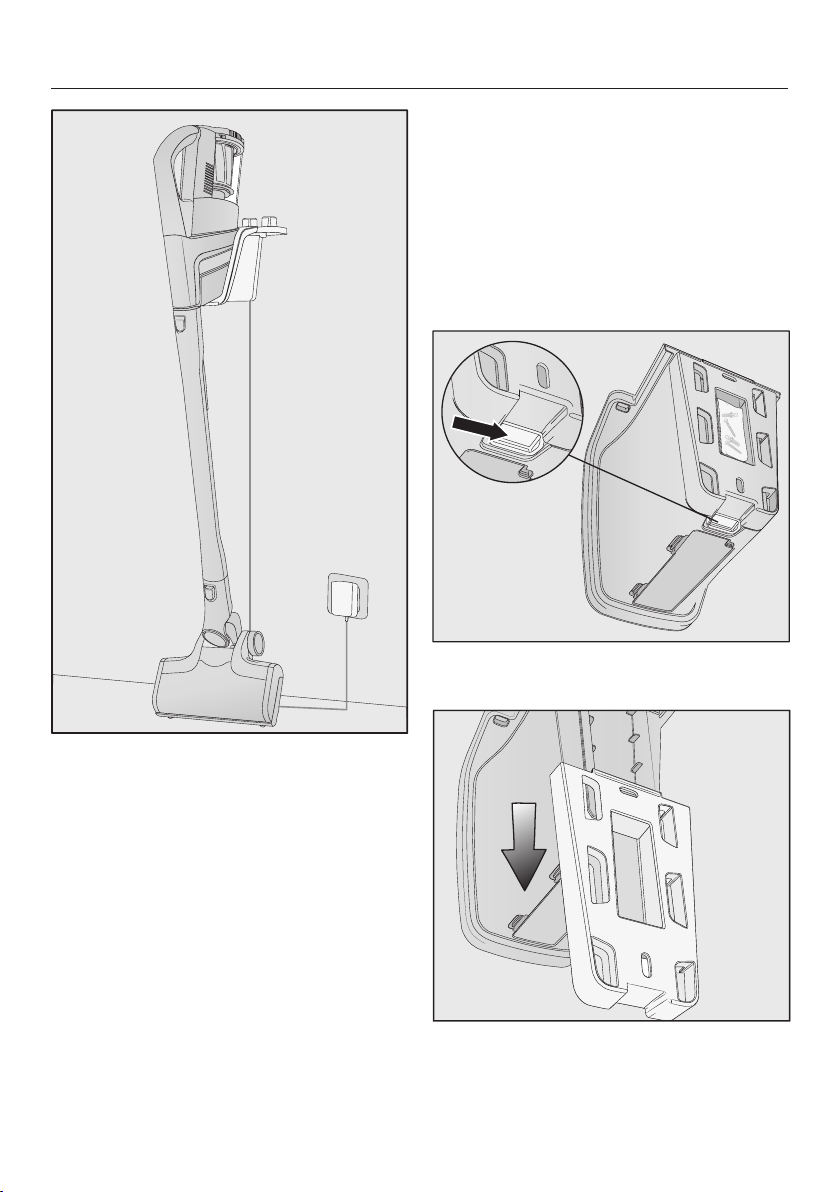
Wall mounting
The supplied wall bracket has a mount-
ing plate with a bag of screws attached
to the back.
Attach the mounting plate to the point
on the wall where you want the wall
mounting to be.
Remove the bag of screws.
Press the release catch at the bottom
of the wall bracket.
Remove the mounting plate from the
wall bracket by sliding it downwards.
20
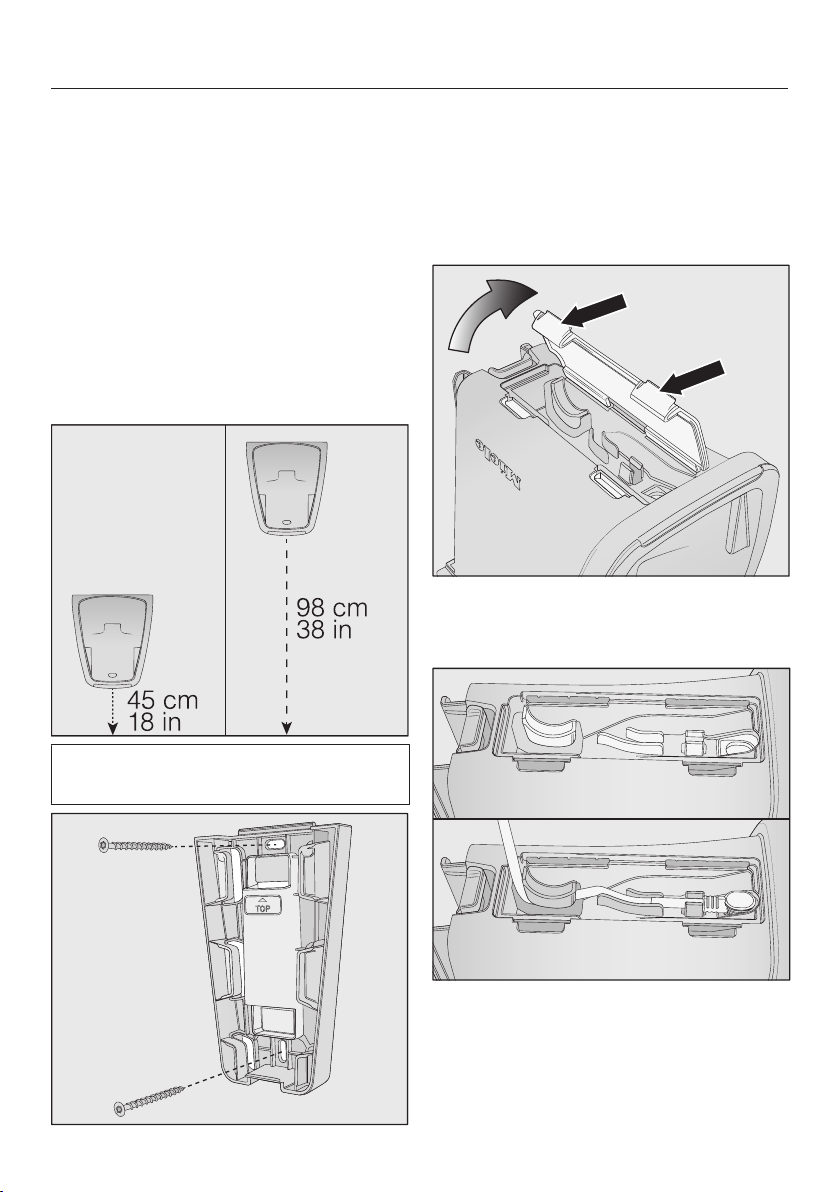
Attaching the mounting plate
2plugs and 2T20 TORX screws are
supplied for attaching the mounting
plate to the wall.
You will also need a battery-operated
screwdriver or a drill (with a drilling dia-
meter of 6mm).
Depending on how your vacuum
cleaner is configured, select a distance
of 45cm or 98cm between the bottom
edge of the mounting plate and the
floor.
Be careful not to damage any cables
laid in the wall.
Attach the mounting plate to the wall.
Attaching the charging cable to the
wall bracket
A cable compartment is located on the
underside of the wall bracket.
Press both release catches on the un-
derside of the wall bracket and re-
move the cable compartment cover.
Insert the supplied charging cable
into the opening from above.
Lay the charging cable in its guide.
21
Refit the cover and close the cable
compartment.
Then turn over the wall bracket.
Connecting the accessories holder
(if required)
An accessories holder is supplied for
storing the three-piece accessory set
(see “Using the accessories supplied”).
Push the accessories holder on to the
wall bracket as far as it will go.
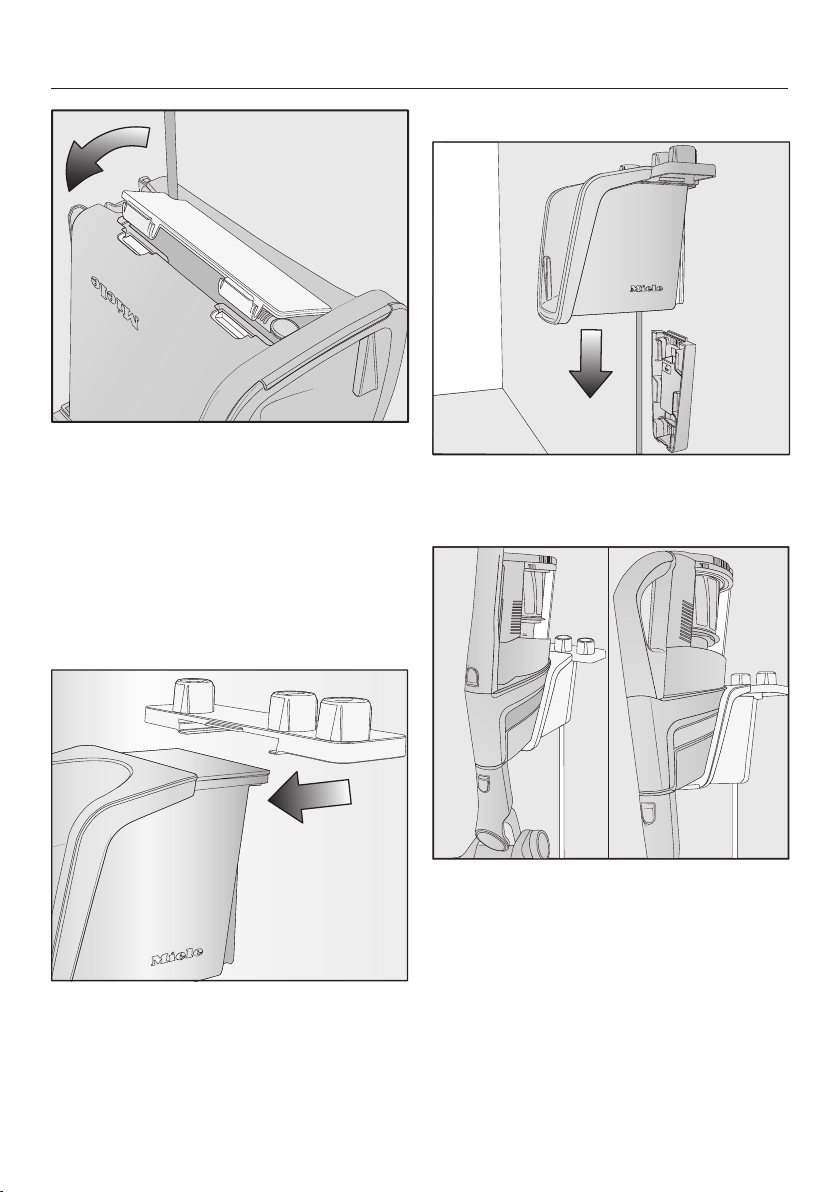
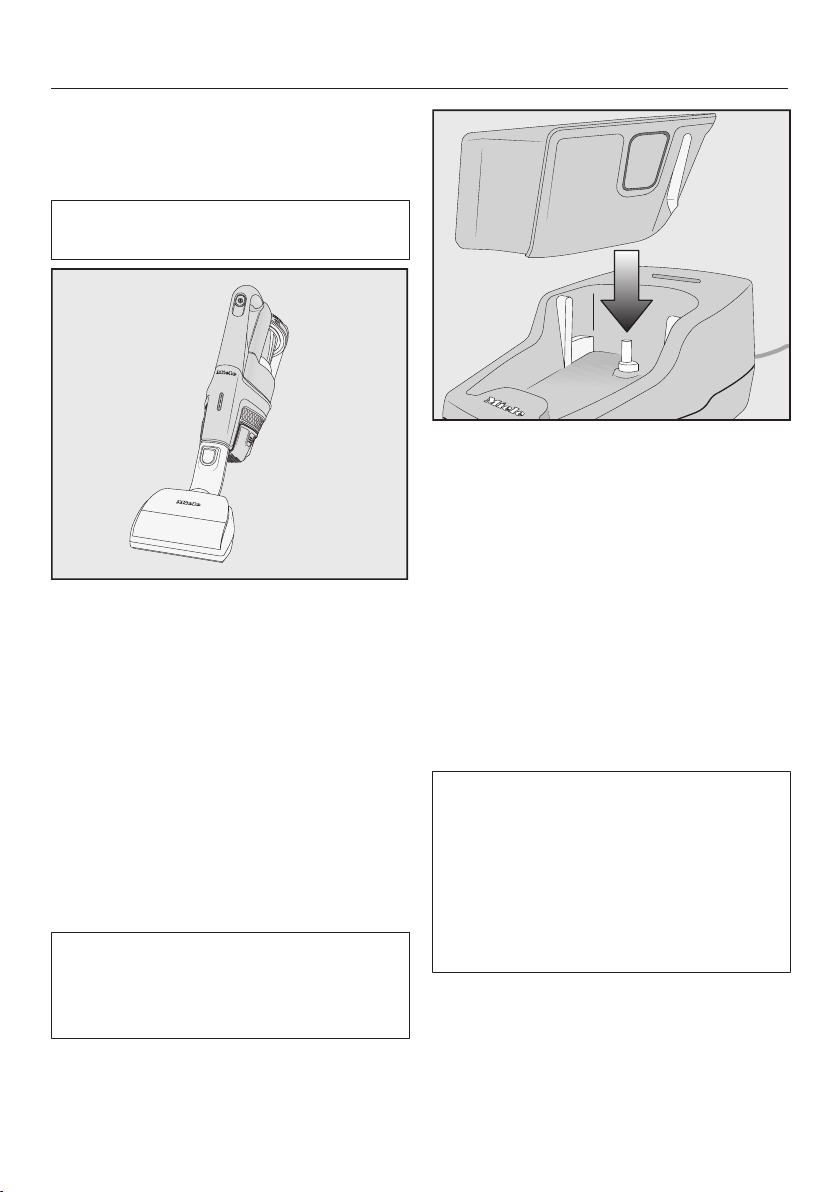
Connecting the wall bracket
Slide the wall bracket down into the
mounting plate from above until it
audibly clicks into place.
Slide the PowerUnit of the fully as-
sembled vacuum cleaner, with the
battery inserted, down into the wall
bracket from above.
Plug the charger into the power
socket.
The charging process will start.
22
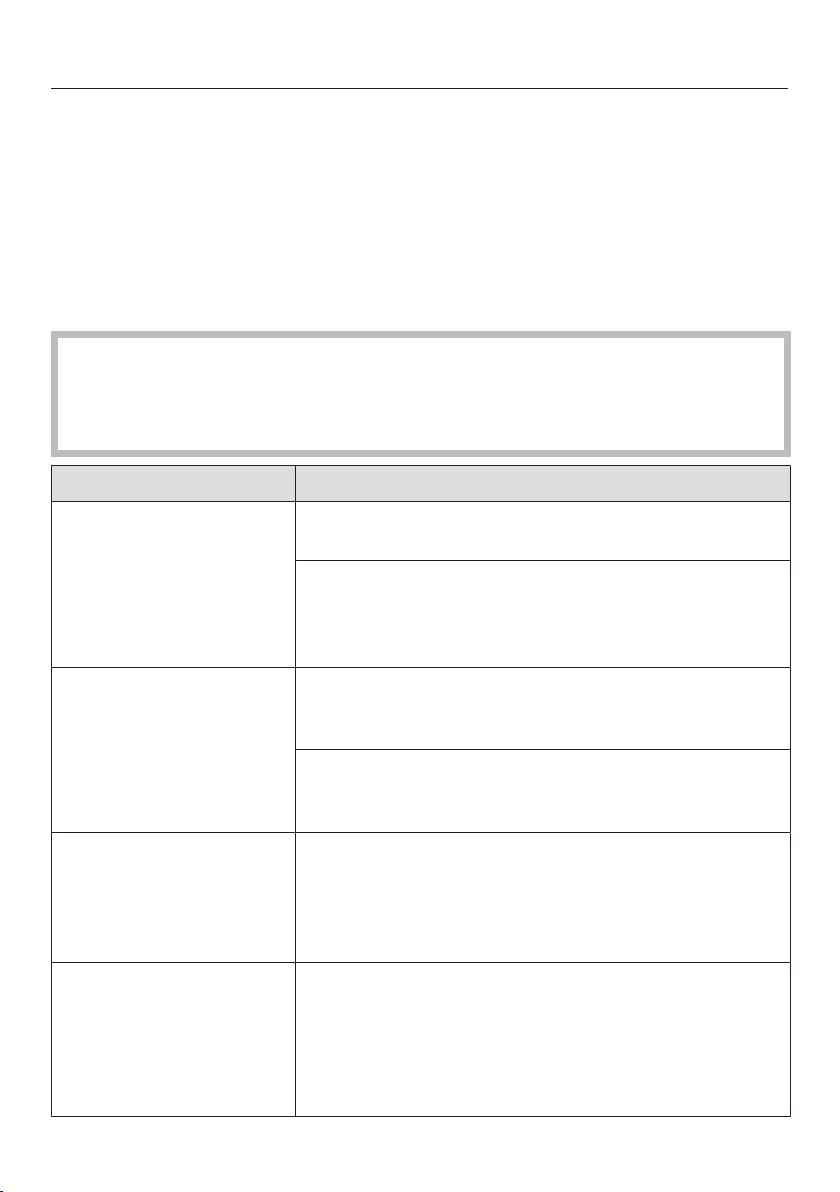
Battery charging state indicator
(while charging)
The battery charging state is displayed
on the PowerUnit.
Charging capa-
city
Display
Approx.0–34% Bottom light
flashes slowly
Approx.35–69% Bottom light is lit
up; middle light
flashes slowly
Approx.70–90% Bottom and
middle lights are
lit up;
top light flashes
slowly
Approx.91–
100%
Bottom, middle
and top lights are
lit up
Once the battery is fully charged, the
battery charging state indicator
switches off after 10minutes to con-
serve energy.
You can display the charging state for
4seconds at any time by pressing the
On/Off switch on the Comfort handle.
If the battery has not been used for a
long time and has run down, it will go
into a safe mode. As a result, the bat-
tery charging state indicator will only
respond after approximately 30–
60minutes when charging in the
PowerUnit.
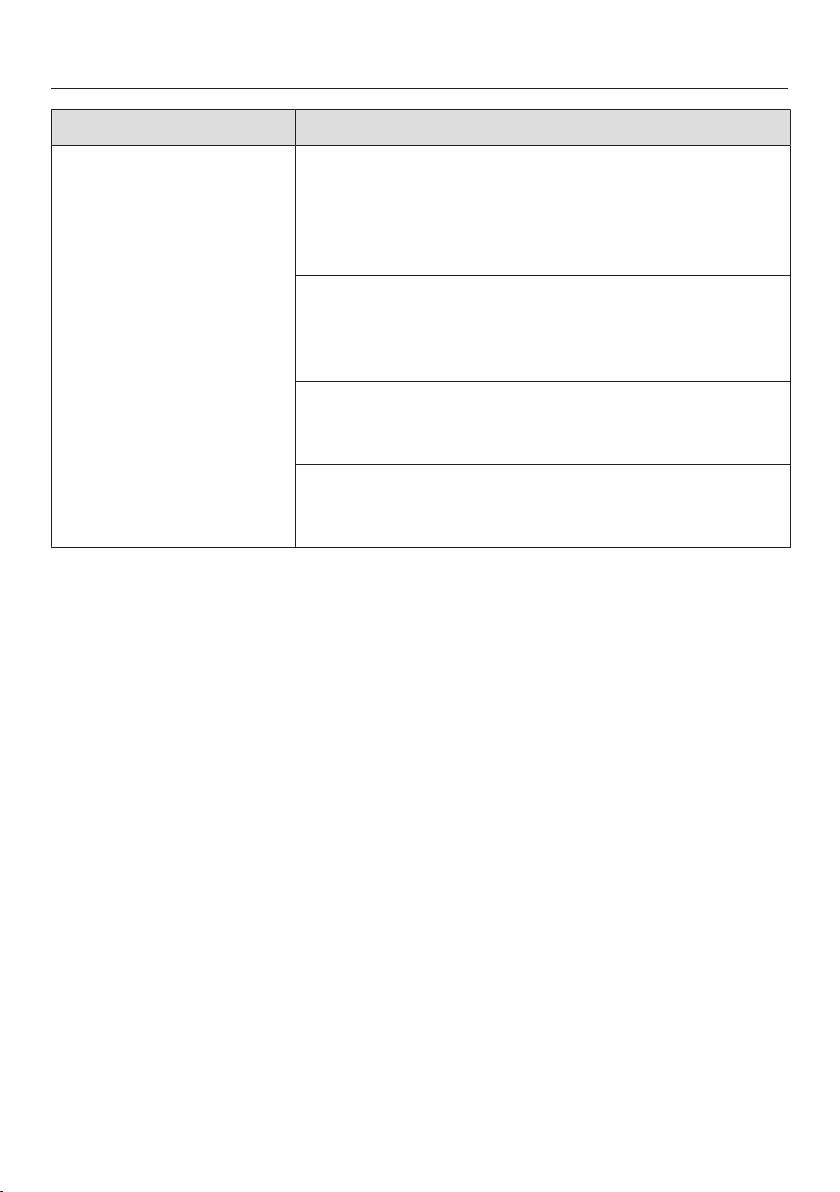
Battery charging state indicator
(while in use)
The battery charging state is displayed
on the PowerUnit.
Charging capa-
city
Display
Approx.100–
70%
Top, middle and
bottom lights are
lit up
Approx.69–35% Middle and bot-
tom lights are lit
up
Approx.34–11% Bottom light is lit
up
Approx.10–0% Bottom light
flashes slowly
23
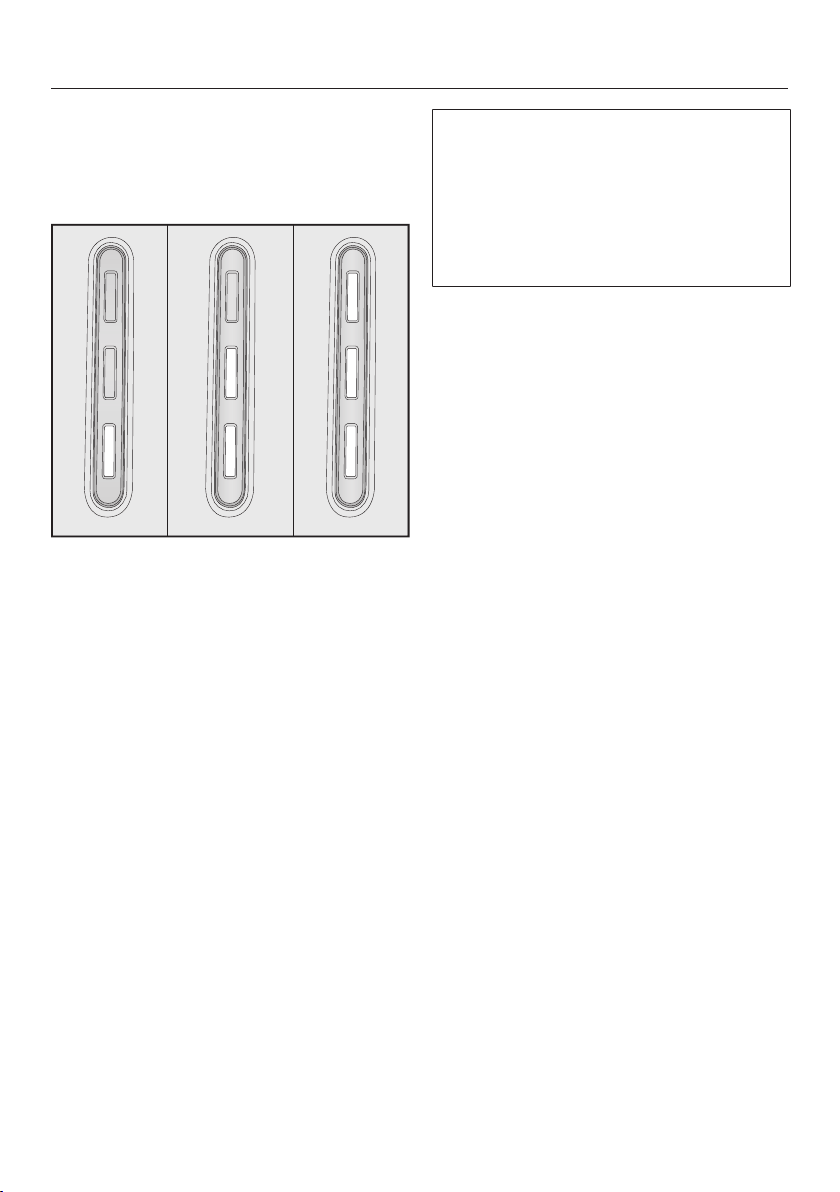
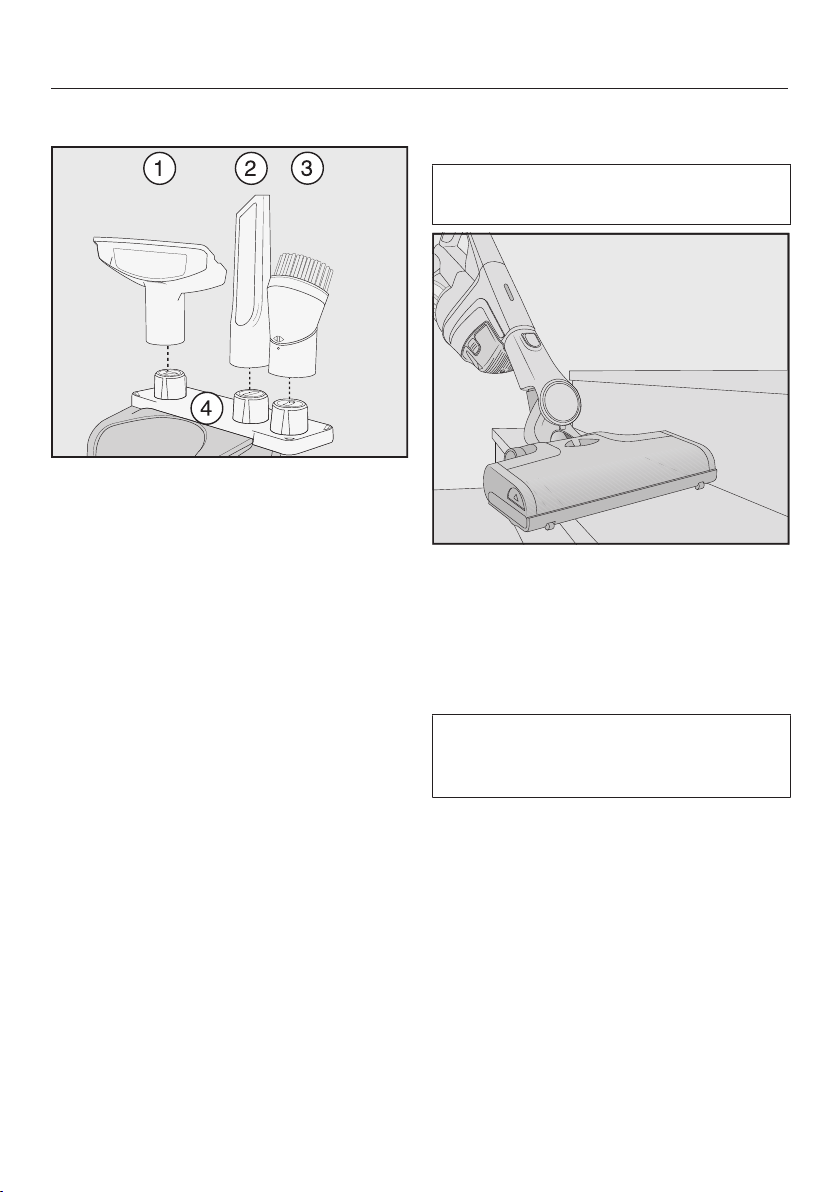
Using the accessories supplied
Upholstery nozzle
Accessory for cleaning upholstery,
mattresses and cushions.
Crevice nozzle
Accessory for cleaning in folds,
crevices or corners.
Dusting brush
Accessory for vacuuming skirting
boards, carved furniture or orna-
ments.
The head can be swivelled to ad-
just the angle.
d Accessories holder
For storing the three-piece ac-
cessory set.
Symbols on the holder show where to
attach the different accessories.
You can fit the accessories holder to the
wall bracket (see “Installation and con-
nection” – “Connecting the accessories
holder”).
ElectrobrushMultiFloorXXL (SEB
430 or SEB 435)
Follow the flooring manufacturer’s
cleaning and care instructions.
The Electrobrush can be used for all
normal cleaning of carpets, rugs and
hard flooring which is not susceptible to
scratching.
Tip: The suction tube is not a conveni-
ent option for cleaning carpeted stairs.
Miele offers a range of suitable ac-
cessories for many special applica-
tions (see “Optional accessories”).
24
ElectroCompact handheld brush
(SEB 23)
(depending on model)
Follow the flooring manufacturer’s
cleaning and care instructions.
The handheld brush is particularly suit-
able for intensive cleaning of upholstery
and car seats.
Tip: The suction tube is not a conveni-
ent option for cleaning upholstery or car
seats.
Additional AP01 battery and LS03
charger cradle
(depending on model)
Using the additional battery doubles the
amount of time the vacuum cleaner can
be used for.
Before charging for the first time,
please note the information in “Install-
ation and connection” – “General bat-
tery information”.
After the battery has been fully
charged once in the PowerUnit, the
charger cradle can be used to charge
it. Push the battery into the charger
cradle until it audibly clicks into place.
Insert the plug into a power socket.
The charging process will start. The
battery charging state indicator flashes
on the left.
You can find out more about the battery
charging state indicator in “Installation
and connection” – “Battery charging
state indicator”.
If you place the run-down battery in
the charger cradle straight after use, it
will only start charging once the bat-
tery has cooled down.
The cooling process can take up to
60minutes. The battery charging state
indicator on the charger cradle will not
respond during this time.
25
Use
Switching on and off
Pull the charger out of the charging
socket on the battery if you have
charged the battery directly.
If you have charged the battery in the
wall bracket, take the vacuum cleaner
out of the wall bracket.
Press the On/Off switch on the Com-
fort handle.
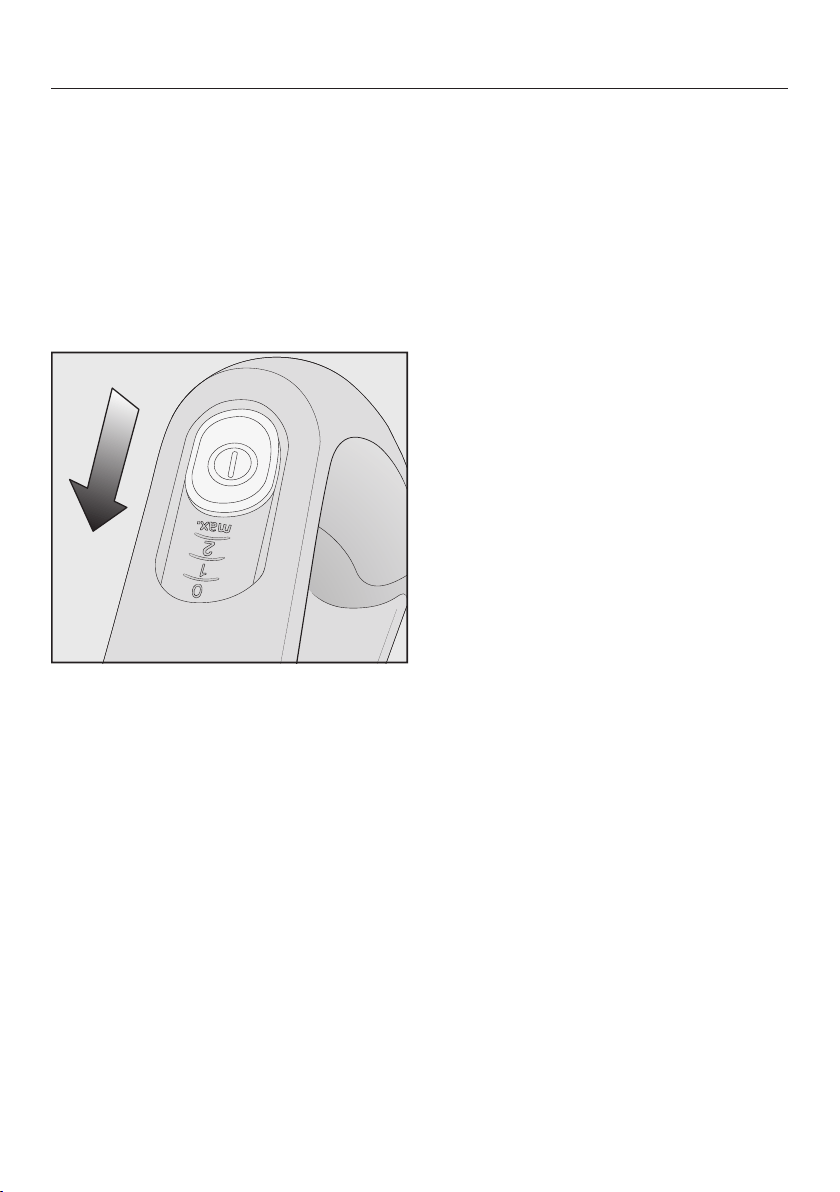
Regulating the suction power
The suction power can be regulated to
suit the type of flooring being cleaned.
Reducing the suction power reduces
the amount of effort required to man-
oeuvre the Electrobrush.
There are 3power levels to choose from
on the Comfort handle:
1 Lowest power level
for light soiling
2 Medium power level
for normal soiling
Max. Highest power level
for heavy soiling
The floor covering detection function is
activated in the medium and highest
power levels.
The Electrobrush power output is auto-
matically set to the optimum level
based on the type of flooring – this can
lead to a change in the operating noise.
Illuminating the work area
(depending on model)
The Electrobrush on your vacuum
cleaner is equipped with BrilliantLight to
illuminate the work area.
Self-standing function for short
pauses in vacuuming
(For safety reasons, this function can
only be used when the PowerUnit is fit-
ted at the bottom of the vacuum
cleaner)
If you are vacuuming with the
PowerUnit fitted at the bottom of the
vacuum cleaner, you can easily inter-
rupt operation while the appliance is
switched on.
Swing the vacuum cleaner forwards
until the Electrobrush connector aud-
ibly clicks into place.
The vacuum cleaner stays securely up-
right, the Electrobrush switches itself off
and the battery is conserved.
If you then unlock the connector on the
Electrobrush, the Electrobrush will
switch on again.
26
Maintenance
Risk of injury caused by rotating
roller brush.
You can injure yourself on the rotat-
ing roller brush.
Switch the vacuum cleaner off before
doing any maintenance work. Use
the On/Off switch on the Comfort
handle to do this.
We recommend using only genuine
Miele accessories bearing the “ORI-
GINAL Miele” logo on the packaging.
Only these will guarantee the optimum
performance of your vacuum cleaner
and the best possible cleaning results.
Please note that faults and damage
caused by use of accessories which
do not bear the “ORIGINAL Miele”
logo on the packaging are not covered
by the vacuum cleaner warranty.
Purchasing accessories
Original Miele accessories are available
from the Miele Webshop, Miele and
your Miele supplier.
Original Miele accessories are identified
by the “ORIGINAL Miele” logo on the
packaging.
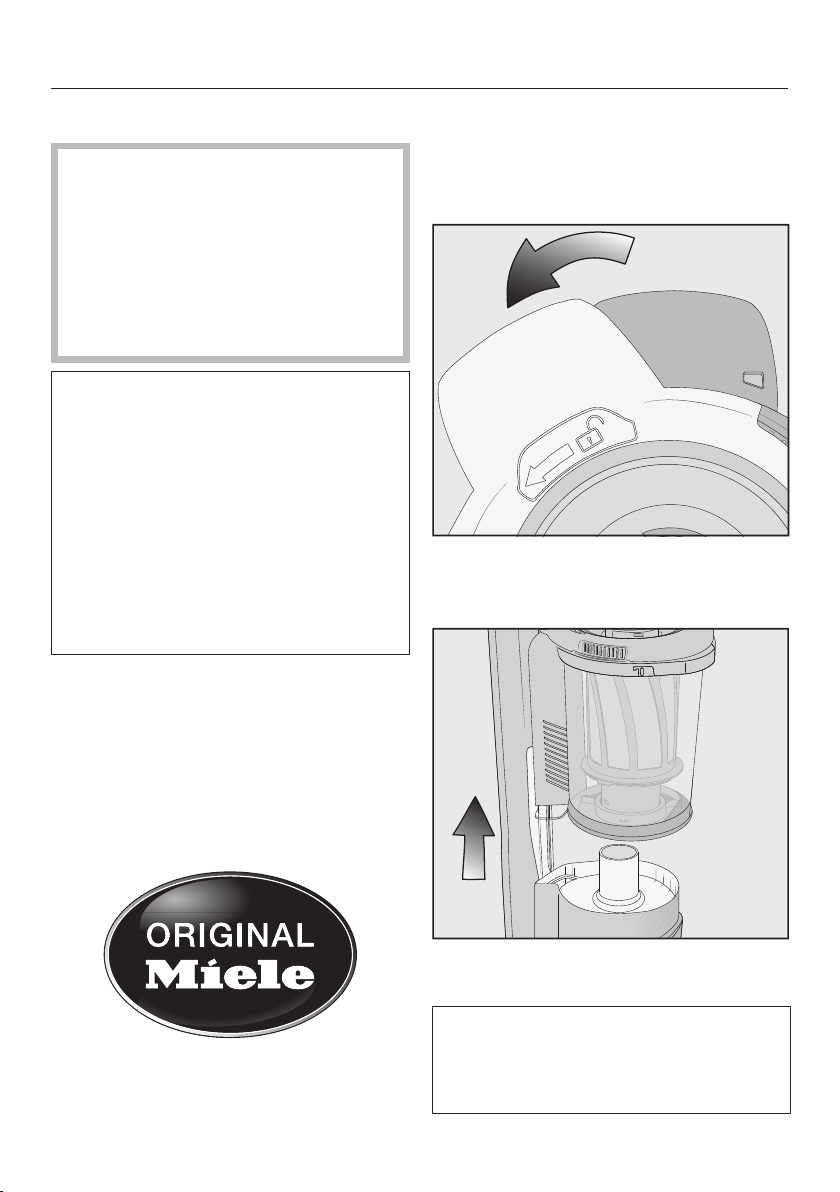
Emptying the dust container
Empty the dust container before the
dust has reached the max marking on
the dust container.
Turn the lid of the dust container in
the direction of the arrow as far as
the first stop.
Lift the dust container upwards to re-
move it.
The contents of the container can be
disposed of with normal domestic
waste, providing they consist of gen-
eral household dust only.
27
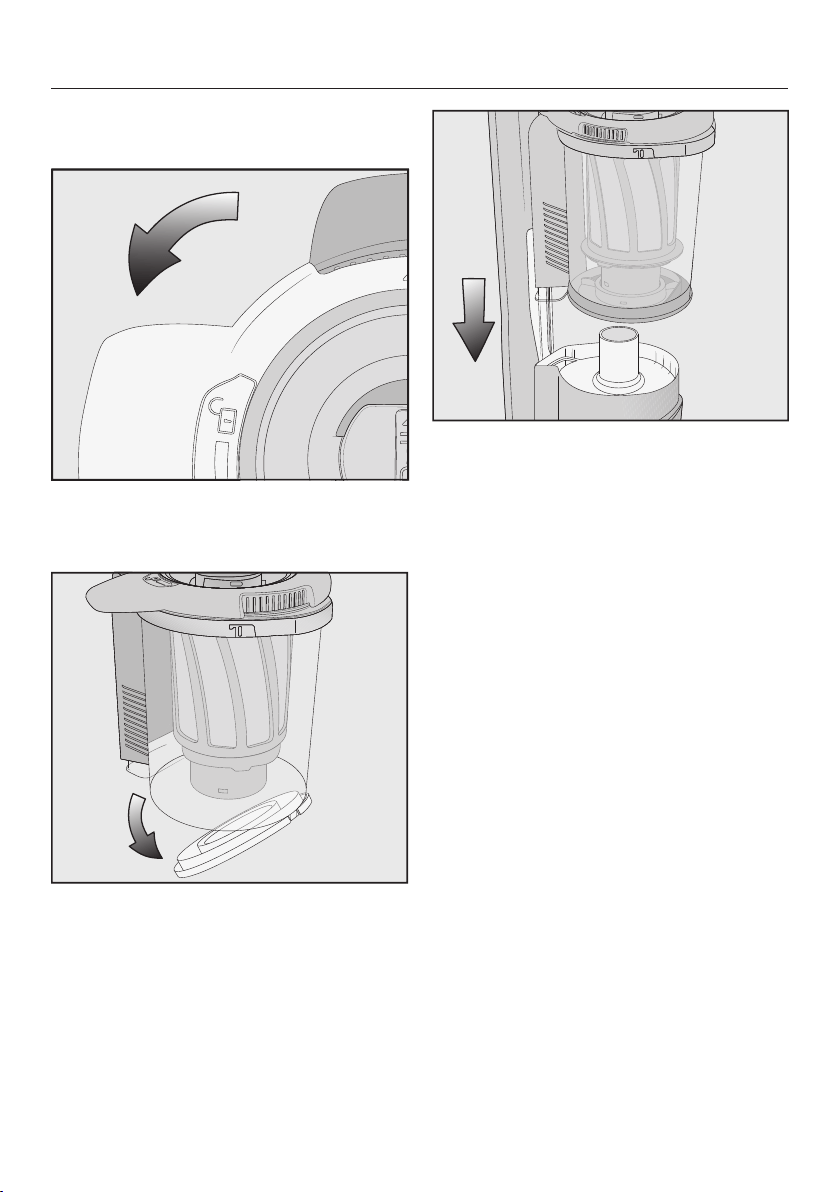
Hold the dust container close to the
bin to prevent dust from billowing out.
Turn the lid of the dust container in
the direction of the arrow as far as
the next stop.
The cover at the bottom of the dust
container will open and the dust will fall
out.
Turn the lid of the dust container back
to its original position.
Close the cover making sure it clicks
into place.
Slide the dust container handle along
the guide line and down on to the
PowerUnit connector from above until
it audibly clicks into place.
28
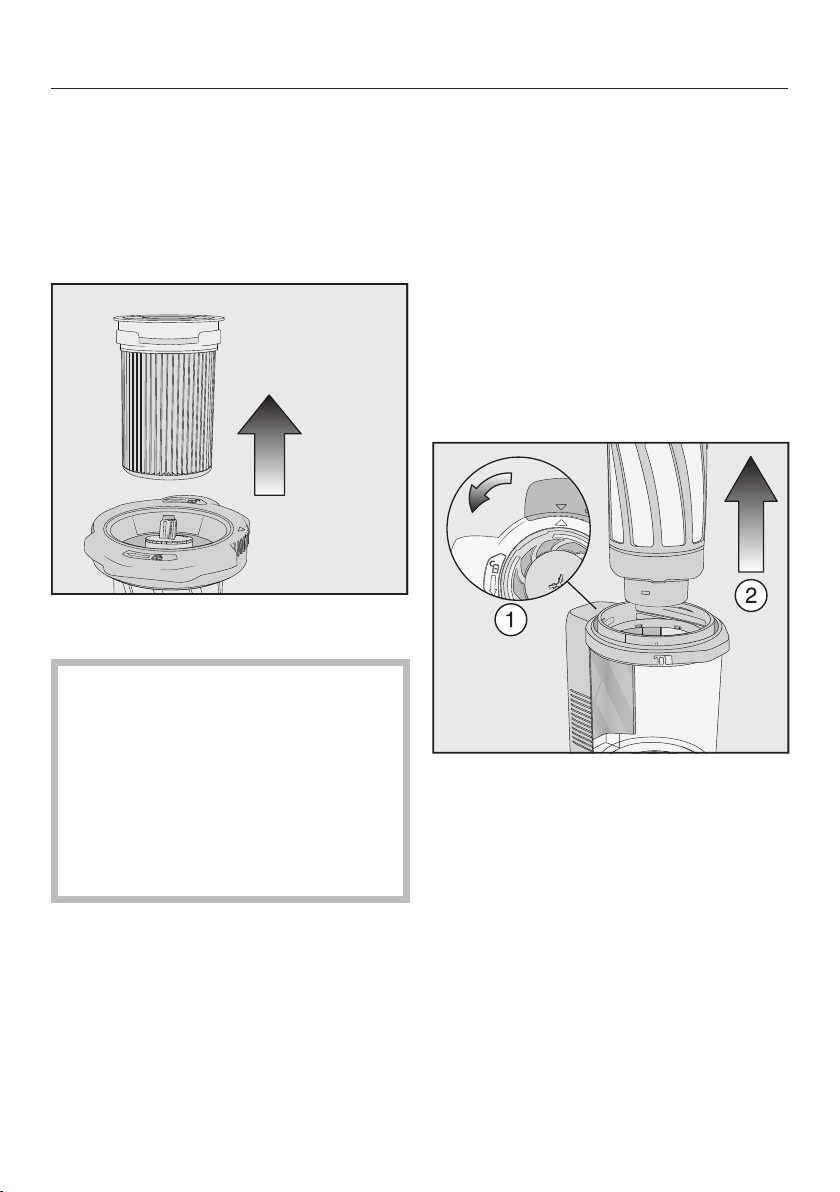
Cleaning the fine dust filter
The fine dust filter is located in the dust
container.
Clean the fine dust filter at least once a
month.
Remove the dust container.
Lift the fine dust filter upwards to re-
move it.
Risk of damage caused by incor-
rect cleaning.
The fine dust filter can become dam-
aged and be less effective as a res-
ult.
Do not clean the inside of the fine
dust filter. Do not use pointed or
sharp-edged objects to clean the fil-
ter. Do not brush the fine dust filter.
Hold the fine dust filter over a bin.
Carefully knock the rubberised lower
edge of the fine dust filter.
Turn the fine dust filter slightly while
you do this to free the dirt from all of
the crevices.
Once it is clean, replace the fine dust
filter in its position in the dust con-
tainer.
Replace the dust container on the
PowerUnit connector.
Cleaning the pre-filter
The pre-filter is located in the dust con-
tainer.
Clean the pre-filter when required.
Remove the dust container.
Remove the fine dust filter.
Empty the dust container over a bin
and lift the pre-filter upwards to re-
move it.

29
Unlock the motor protection filter by
turning it anti-clockwise and lift it up-
wards to remove it.
Risk of damage caused by incor-
rect cleaning.
The pre-filter can become damaged
and be less effective as a result.
Do not use pointed or sharp-edged
objects to clean the filter.
Carefully knock the dust out of the
pre-filter over a bin.
Tip: Use a tool like a fine cleaning brush
to clean the inside of the pre-filter thor-
oughly.
You do not need to clean the motor pro-
tection filter. It can be removed so that
the inside of the pre-filter is easier to
reach.
After cleaning the pre-filter, place the
motor protection filter back into the
pre-filter securely, making sure it is
properly positioned.
Lock the motor protection filter by
turning it clockwise as far as it will go.
Replace the pre-filter in the dust con-
tainer.
To do this, line up the guide lines on
the two sections and turn the dust
container lid back to its original posi-
tion.
Close the cover at the bottom of the
dust container, making sure it clicks
into place.
Replace the fine dust filter.
Replace the dust container on the
PowerUnit connector.
30
Cleaning the dust container
Clean the dust container as required.
Remove the dust container.
Empty the dust container over a bin
and lift the pre-filter upwards to re-
move it.
Clean the dust container using water
and mild washing-up liquid.
Dry the dust container thoroughly.
Replace the pre-filter in the dust con-
tainer.
Replace the dust container on the
PowerUnit connector.
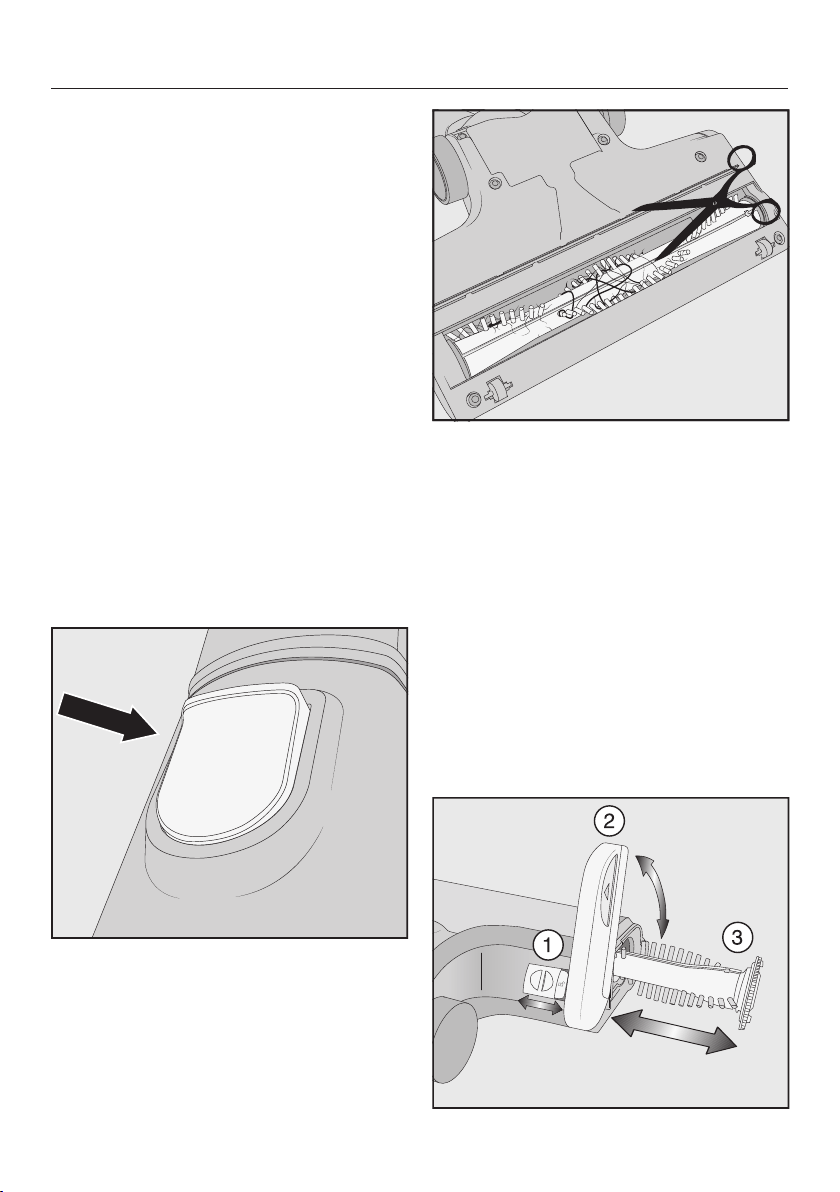
Cleaning the Electrobrush/handheld
brush
(The availability of the handheld brush
depends on the model)
Separate the Electrobrush/handheld
brush from the vacuum cleaner con-
nector.
Removing threads and hairs
Place the Electrobrush/handheld
brush upside down on a level, clean
surface.
Cut any threads or hairs that have
wound themselves around the roller
brush with a pair of scissors. To guide
the scissors, move along the guide
track on the roller brush.
Then run the vacuum cleaner to va-
cuum up the cut threads and hairs.
Removing the roller brush
(Not possible with the handheld brush)
You can take the roller brush out of the
Electrobrush in order to remove stub-
born soiling and clean the inside of the
Electrobrush.

31
Unlock the cover on the side of the
Electrobrush so that the symbol
becomes visible.
Lift the cover up as far as it will go.
Remove the roller brush.
Clean the roller brush and remove
any stubborn dirt inside the Electro-
brush.
Reassemble the Electrobrush in re-
verse order.
Replacing the rechargeable battery
An original Miele AP01 lithium-ion re-
chargeable battery (HXLA) is required.
Follow the instructions regarding the
handling and disposal of rechargeable
batteries found in the following sec-
tions: “Warning and safety”, “Caring
for the environment” and “Installation
and connection” (“General battery in-
formation”).
32
Problem solving guide
With the help of the following guide, minor faults in the performance of the appli-
ance, some of which may result from incorrect operation, can be remedied without
contacting Miele. This will save you time and money because you won't need a
service call.
Please note that a call-out charge will be applied to unnecessary service visits
where the problem could have been rectified as described in these operating in-
structions.
Risk of injury caused by rotating roller brush.
You can injure yourself on the rotating roller brush.
Switch the vacuum cleaner off before dealing with any problems. Use the On/
Off switch on the Comfort handle to do this.
Problem Cause and remedy
The cleaning perform-
ance is poor.
The dust container is full.
Empty and clean the dust container.
The Electrobrush is dirty/blocked.
Clean the roller brush and the inside of the Electro-
brush (see “Maintenance” – “Cleaning the Electro-
brush”).
Cleaning performance
is reduced.
The fine dust filter is dirty.
Clean the fine dust filter (see “Maintenance” –
“Cleaning the fine dust filter”).
The pre-filter is dirty.
Clean the pre-filter (see “Maintenance” – “Cleaning
the pre-filter”).
The Electrobrush
switches itself off.
The Electrobrush is overloaded – this can happen on
surfaces like deep-pile carpet.
Switch the vacuum cleaner off and switch it on
again at a reduced suction power level. Use the
On/Off switch on the Comfort handle to do this.
The operating noise is
changing during vacu-
uming.
The floor covering detection function is activated in
the medium and highest power levels. The Electro-
brush power output is automatically set to the op-
timum level based on the type of flooring.
The noise is not unusual – the vacuum cleaner is
functioning normally.
33
Problem Cause and remedy
The vacuum cleaner
does not start when it is
switched on.
There is no battery inserted or the battery is inserted
incorrectly.
Insert the battery or check how the battery is posi-
tioned (see “Installation and connection” – “Insert-
ing the battery”).
The rechargeable battery is not sufficiently charged.
Charge the battery exactly as described in these
operating instructions (see “Installation and con-
nection” – “Charging the battery”).
An original Miele battery has not been inserted.
Insert an original Miele AP01 lithium-ion re-
chargeable battery (HXLA).
The charger is still plugged in.
Pull the plug out of the charging socket on the bat-
tery.
34
Error messages
Risk of injury caused by rotating roller brush.
You can injure yourself on the rotating roller brush.
Switch the vacuum cleaner off before dealing with any problems. Use the On/
Off switch on the Comfort handle to do this.
Error messages are displayed with a quick flashing light on the battery charging
state indicator on the PowerUnit.
Problem Cause and remedy
Bottom light flashes
quickly
Internal system error
Remove the battery, wait for 10seconds, reinsert
it and charge it.
Bottom and middle
lights flash quickly
“Battery overheating” error
Wait for approximately 30minutes before switch-
ing the vacuum cleaner back on again.
Middle and top lights
flash quickly
“Battery not recognised” error
Insert an original Miele AP01 lithium-ion re-
chargeable battery (HXLA).
Top light flashes quickly “Comfort handle not recognised” error
Remove the Comfort handle and reconnect it (see
“Installation and connection” – “Connecting the
Comfort handle”).
Remove the battery, wait for 10seconds and rein-
sert it.
35
Cleaning and care
Risk of injury caused by rotating
roller brush.
You can injure yourself on the rotat-
ing roller brush.
Switch the vacuum cleaner off before
cleaning it. Use the On/Off switch on
the Comfort handle to do this.
Vacuum cleaner and accessories
Risk of electric shock from mains
voltage.
If moisture gets into the charger,
there is a risk of electric shock.
Do not let the charger get wet.
Follow the special cleaning instruc-
tions for the dust container in the
“Maintenance” section.
The vacuum cleaner and all plastic ac-
cessories can be cleaned with a propri-
etary cleaner suitable for plastic.
Damage due to unsuitable clean-
ing agents.
All surfaces are susceptible to
scratching. Contact with unsuitable
cleaning agents can alter or discol-
our the external surfaces.
Do not use abrasive cleaning agents,
glass cleaning agents, all-purpose
cleaners or oil-based conditioning
agents.
Service
Contact in case of malfunction
In the event of any faults which you
cannot remedy yourself, please contact
Miele.
Contact information for Miele can be
found at the end of this document.
Please note that telephone calls may be
monitored and recorded for training
purposes and that a call-out charge will
be applied to service visits where the
problem could have been resolved as
described in this booklet.
Warranty
The manufacturer's warranty for this ap-
pliance is 2 years.
For more information about country
specific warranty terms and conditions,
please contact Miele.

36
Optional accessories
Follow the flooring manufacturer’s
cleaning and care instructions.
We recommend using only genuine
Miele accessories bearing the “ORI-
GINAL Miele” logo on the packaging.
Only these will guarantee the optimum
performance of your vacuum cleaner
and the best possible cleaning results.
Please note that faults and damage
caused by use of accessories which
do not bear the “ORIGINAL Miele”
logo are not covered by the vacuum
cleaner warranty.
Purchasing accessories
Original Miele accessories are available
from the Miele webshop, the Miele Cus-
tomer Service Department and from
your Miele dealer.
Original Miele accessories are identified
by the “ORIGINAL Miele” logo on the
packaging.
Certain models are supplied as stand-
ard with one or more of the following
accessories.
SEB 23 ElectroCompact handheld
brush (HXSEB)
For intensive cleaning of upholstery and
car seats.
Radiator brush (SHB 30)
For dusting radiators, narrow shelves
and crevices.
Mattress nozzle (SMD 10)
For vacuuming upholstery, mattresses,
cushions, curtains, covers etc.
Crevice nozzle, 300mm (SFD 10)
Extra long crevice nozzle for cleaning in
folds, crevices and corners.
Crevice nozzle, 560mm (SFD 20)
Flexible crevice nozzle for vacuuming
hard to reach places.
Additional AP01 battery (HXLA)
For doubling the amount of time the va-
cuum cleaner can be used for.
LS03 charger cradle (HX LS)
For charging the additional battery inde-
pendently of the appliance, i.e. while
the appliance is in use.

37
Electrical connection
All work should be carried out by a suit-
ably qualified and competent person in
strict accordance with national and
local safety regulations. The voltage
and rated load are given on the data
plate located underneath the vacuum
cleaner. Please ensure that these match
the household mains supply. The char-
ger is supplied with a cable and moul-
ded plug ready for connection to a
230V/50Hz AC single phase supply.
Test Marks Electrical safety
RCM Mark
Electrically sup-
pressed
according to
CISPR 14.1


Miele Experience Centre and
Head Office Melbourne:
1 Gilbert Park Drive
Knoxfield, VIC 3180
Miele Experience Centre South Melbourne:
206-210 Coventry Street
South Melbourne, VIC 3205
Miele Experience Centre and Office Sydney:
3 Skyline Place
Frenchs Forest, NSW 2086
Miele Experience Centre and Office Brisbane:
Tenancy 4C, 63 Skyring Terrace
Newstead, QLD 4006
Miele Experience Centre and Office Perth:
83-85 Sir Donald Bradman Drive
Hilton, SA 5033
Miele Experience Centre and Office Adelaide:
Miele Australia Pty. Ltd. Miele New Zealand Limited
Level 2, 10 College Hill
Freemans Bay, Auckland 1011
Miele Experience Centre
Auckland:
8 College Hill
Freemans Bay, Auckland 1011
Miele Global Headquarters
Germany
Miele & Cie. KG
Carl-Miele-Straße 29
33332 Gütersloh
Federal Republic of Germany
Head Office:
IRD 98 463 631
ACN 005 635 398
ABN 96 005 635 398
Miele Experience Centre Gold Coast:
131 Ferry Road
Southport, QLD 4215
Miele Experience Centre
Wellington:
183 Featherston Street
Wellington 6011
0800 464 353 (0800 4 MIELE)
www.miele.co.nz
205-207 Stirling Highway
Claremont, WA 6010
1300 464 353 (1300 4 MIELE)
www.miele.com.au
SMxxx - 1020 M.-Nr. 11 579 120 / 00