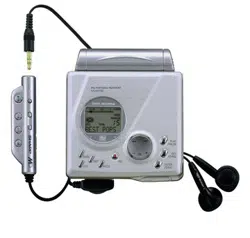
PORTABLE MINIDISC
RECORDER
Thank you for purchasing this SHARP product.
For the best performance, read this manual carefully.
It will guide you in operating your SHARP product.
MODEL
MD
-
MT877
OPERATION MANUAL
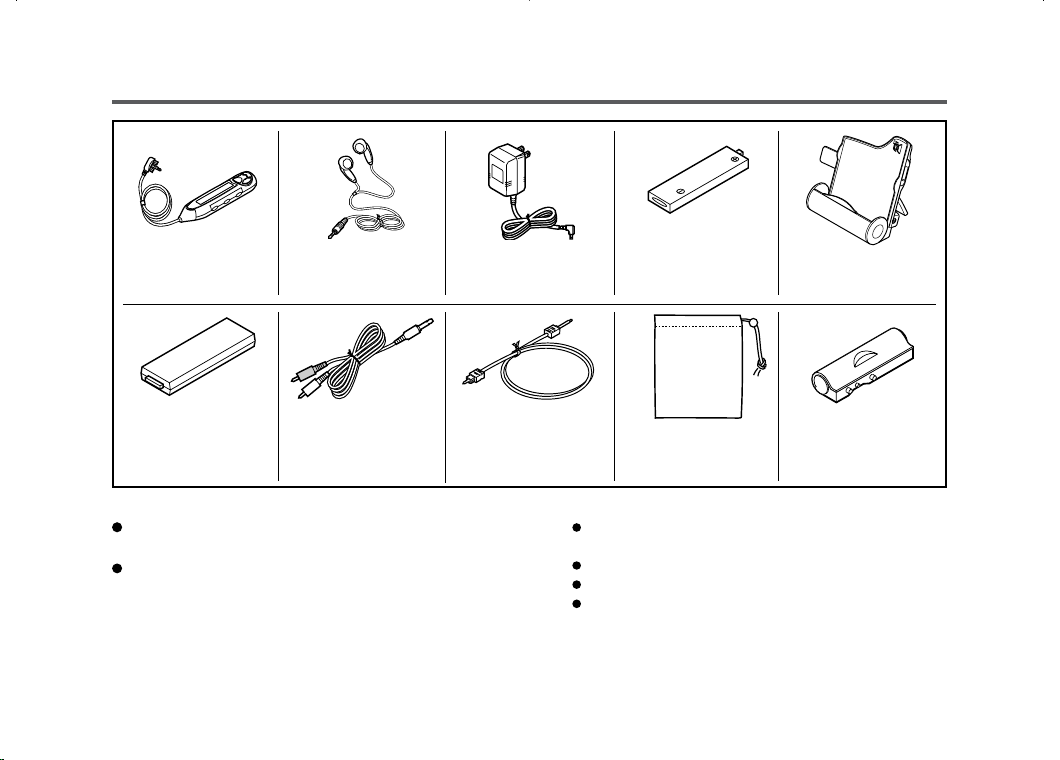
Accessories
Notes:
Parts and equipment mentioned in this operation manual
other than those detailed above are not included.
The AC adaptor may be different from the one in the
drawing.
Rechargeable Nickel
-Metal Hydride Battery
Remote Control x 1 Earphones x 1 AC Adaptor
x 1
(AD-N55BT) x 1
Battery Charger x 1
(RRMCW0011AWSA) (RPHOH0176AFSA)
(RADPA3048AWZZ)
(UBATM0006AWSA)
(RUNTZ0032AWM1)
Connection Cable Connection Cable
Battery Carrying (for analog (for digital Carrying Bag x 1 Battery Case x 1
Case x 1 recording) x 1 recording) x 1
(UBAGC0006AWSA)
(GCASZ0002AWSA)
(UBAGC0005AWZZ) (QCNWG0029AWZZ)
(QCNWG0422AFZZ)
2
Optional accessories
Rechargeable Nickel-Metal Hydride Battery
(AD-N55BT)
Car adaptor (AD-CA55X)
Cassette adaptor (AD-CT14)
Plug adaptor (AD-M66PA)
For optional accessories, contact your local dealer, call
the Sharp Accessories and Supply Center at 1-800-
642-2122, or visit SHARP’s web site (http://
www.sharp-usa.com).

Contents
Important Introduction
Special Notes ................................................ 4-5
Precautions .......................................................6
Names of Controls and Indicators .............. 7-9
Battery Charger ......................................... 10-11
Power Source
Using with the Rechargeable Battery ..... 12-13
Using with the AC Adaptor ............................ 14
Using with the Alkaline Battery ..................... 15
Preparation
Hold Function .................................................16
Inserting a MiniDisc ....................................... 17
Connections .............................................. 18-19
Basic Operation
Recording .................................................. 20-23
Playback .................................................... 24-26
3
Useful Features
Advanced Playback .................................. 27-29
Advanced Recording ............................... 30-35
Recording from a Microphone ................ 36-38
Checking Displays ................................... 39-40
Changing Default Settings ...................... 41-42
Advanced Features
Titling a MiniDisc ...................................... 43-47
Editing a Recorded MiniDisc ................... 48-50
Listening to a MiniDisc Through a Stereo
System or a Car Stereo ................................ 51
References
Other Features and Caution ..........................52
MiniDisc System Limitations .........................53
Error Messages ........................................ 54-55
Troubleshooting ....................................... 56-57
Maintenance .................................................... 57
Specifications ........................................... 58-59
CONSUMER LIMITED WARRANTY ...... Back cover
4
Important Introduction
– Special Notes –
Special Notes
It is the intent of Sharp that this product be used in full
compliance with the copyright laws of the United States
and that prior permission be obtained from copyright
owners whenever necessary.
Caution - use of controls or adjustments or per-
formance of procedures other than those speci-
fied herein may result in hazardous radiation ex-
posure.
“BATTERY DISPOSAL”
CONTAINS NICKEL-METAL HYDRIDE BATTERY.
MUST BE DISPOSED OF PROPERLY. CONTACT
LOCAL AGENCIES FOR INFORMATION ON RECY-
CLING AND DISPOSAL PLANS IN YOUR AREA.
US and foreign patents licensed from Dolby Laborato-
ries.
The letters in brackets contained in the model number
indicate the color of the product only. Operation and
specifications are unaffected.
FOR YOUR RECORDS
For your assistance in reporting this unit in case of
loss or theft, please record below the model number
and serial number which are located on the bottom of
the unit.
Please retain this information.
Model number
Serial number
Date of purchase
Place of purchase

DEUTSCH
FRANÇAIS
ESPAÑOL
SVENSKA
ITALIANO
NEDERLANDS
ENGLISH
5
Special Notes
Special Notes : continued
Important Introduction
– Special Notes
–
Note:
This equipment has been tested and found to comply with
the limits for a Class B digital device, pursuant to Part 15
of the FCC Rules.
These limits are designed to provide reasonable protec-
tion against harmful interference in a residential installa-
tion.
This equipment generates, uses, and can radiate radio fre-
quency energy and, if not installed and used in accordance
with the instructions, may cause harmful interference to
radio communications.
However, there is no guarantee that interference will not
occur in a particular installation.
If this equipment does cause harmful interference to radio
or television reception, which can be determined by turn-
ing the equipment off and on, the user is encouraged to try
to correct the interference by one or more of the following
measures:
Reorient or relocate the receiving antenna.
Increase the separation between the equipment and
receiver.
Connect the equipment into an outlet on a circuit differ-
ent from that to which the receiver is connected.
Consult the dealer or an experienced radio/TV techni-
cian for help.
WARNING
FCC Regulations state that any unauthorized changes or
modifications to this equipment not expressly approved by
the manufacturer could void the user’s authority to operate
this equipment.
6
Important Introduction
– Precautions –
Precautions
Important
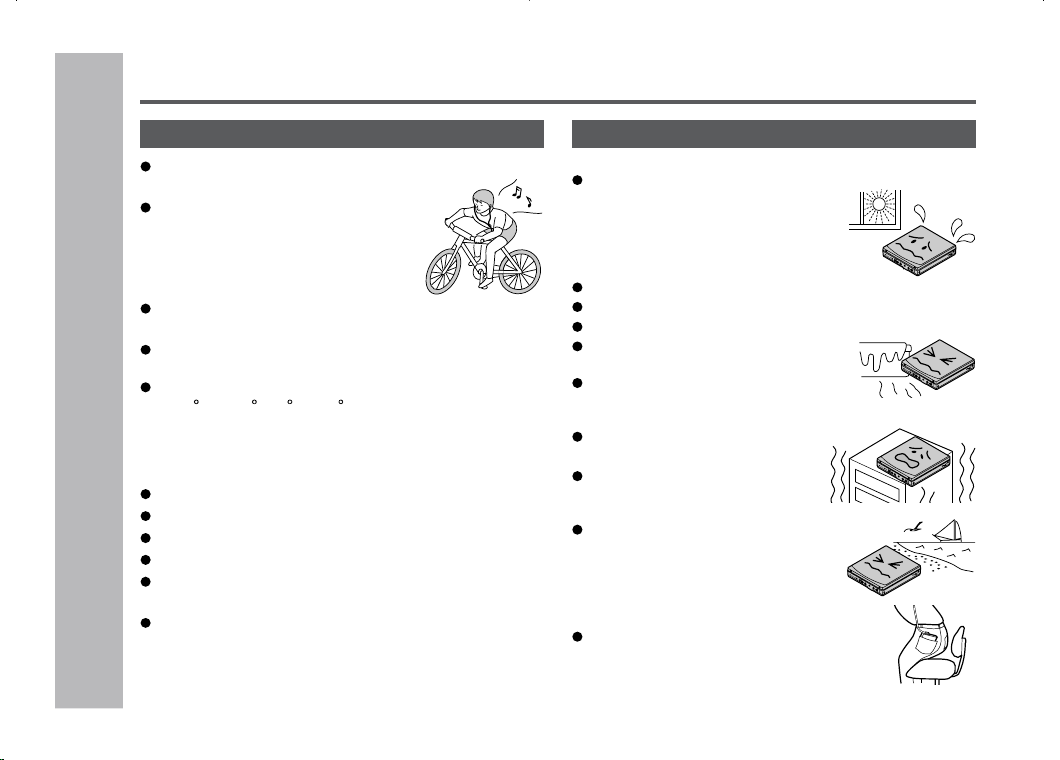
Do not wear your earphones when you are crossing
streets or near traffic.
Do not use your earphones while driv-
ing a motor vehicle, it may create a traf-
fic hazard and may be illegal.
Remember to obey all of the safety rules
in your area.
Do not play the unit at a high volume. Hearing experts
advise against extended listening at high volume levels.
If you experience ringing in your ears, reduce the vol-
ume or discontinue use.
This portable MD should only be used within the range
of 32 F - 104 F (0 C - 40 C).
To avoid accidental electric shock or other possible
problems, observe the precautions listed below.
Do not disassemble or modify the unit.
Do not drop or subject the unit to shock.
Do not use the unit near open flames.
Do not spill liquid on the unit.
Do not use an external power supply, other than the 5V
DC supplied with this unit, as it may damage it.
SHARP is not responsible for damage due to improper use.
Refer all servicing to a SHARP authorized service center.
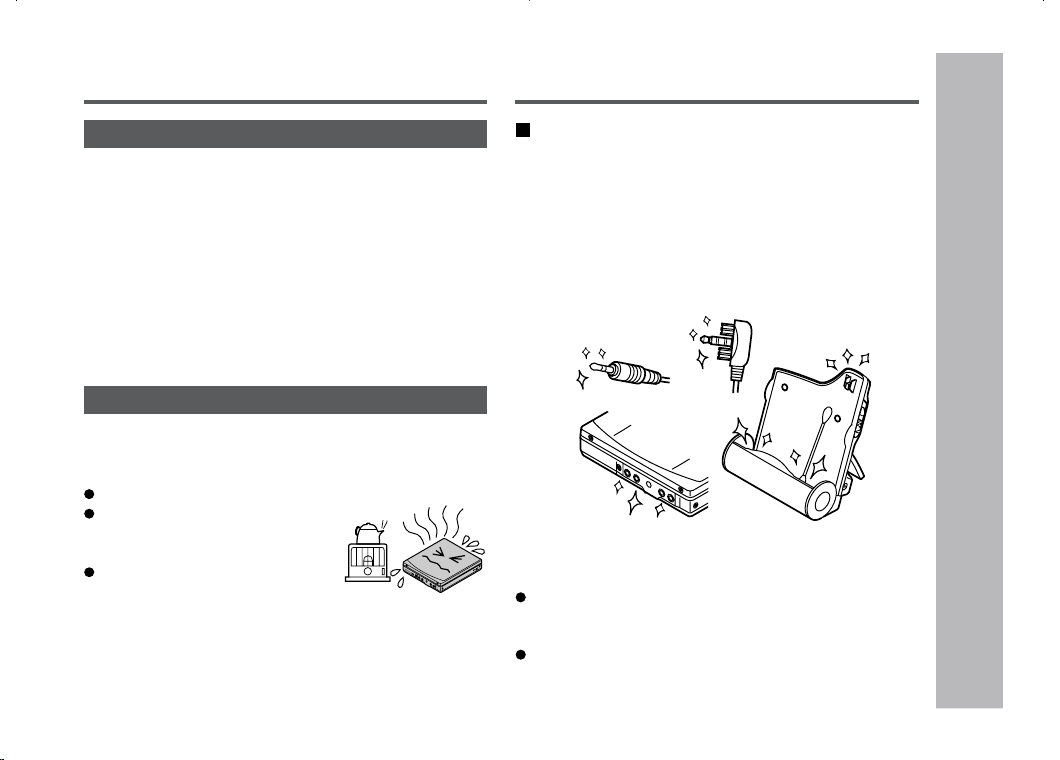
Storing the unit
Avoid using or leaving the unit in the following places.
Places exposed to direct sunlight
for many hours (especially in cars
with the doors and windows
closed) or near heaters.
(The cabinet may deform, change
color or the unit may malfunction.)
Places exposed to water.
Places exposed to excessive dust.
Places where temperatures are excessively high or low.
Places (bathrooms) where the hu-
midity is extremely high.
Pla c e s w i t h stron g ma g n e t i c
fields such as TVs or loudspeak-
ers.
Places exposed to vibration.
Places where sand can easily en-
ter the inside of the unit (beaches
etc.).
If the unit is used near radio tuners
or TVs, noise and/or picture inter-
ference may result. If you experi-
ence these problems, move the unit
away from such devices.
It is not recommendable to put the
MiniDisc into a rear pocket, as this may
damage the product when sitting.
DEUTSCH
FRANÇAIS
ESPAÑOL
SVENSKA
ITALIANO
NEDERLANDS
ENGLISH
7
Important Introduction
– Names of Controls and Indicators
–
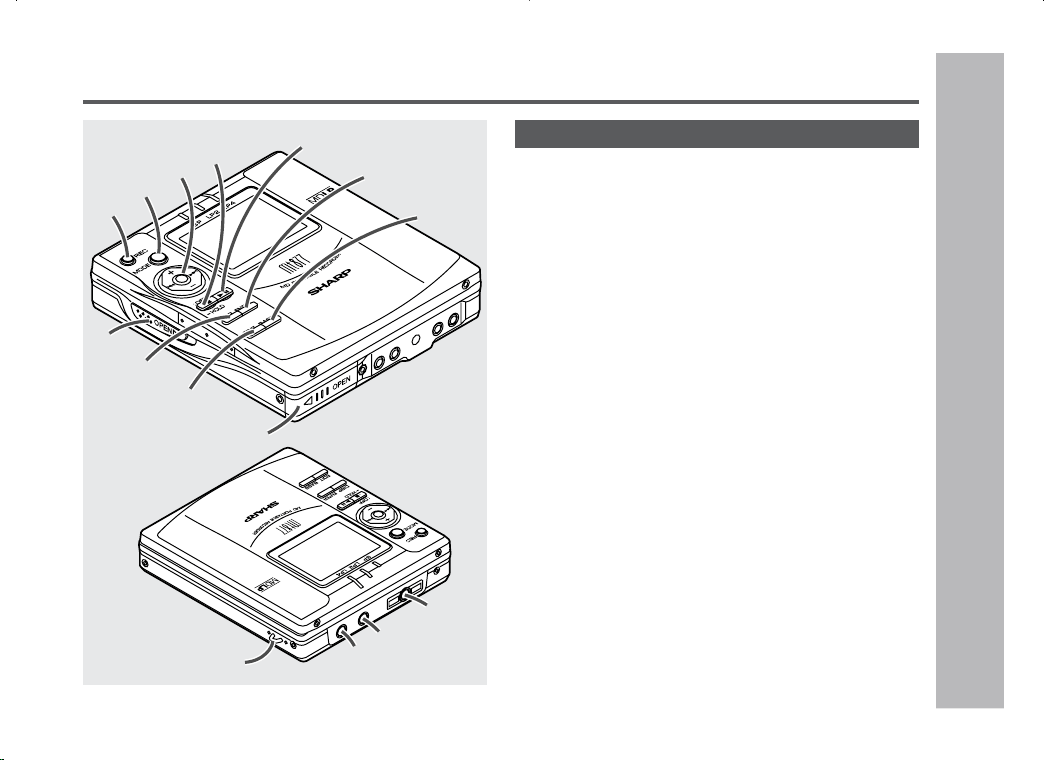
Names of Controls and Indicators
Main unit
13
14
15
12
2
1
3
4
5
6
7
8
9
10
11
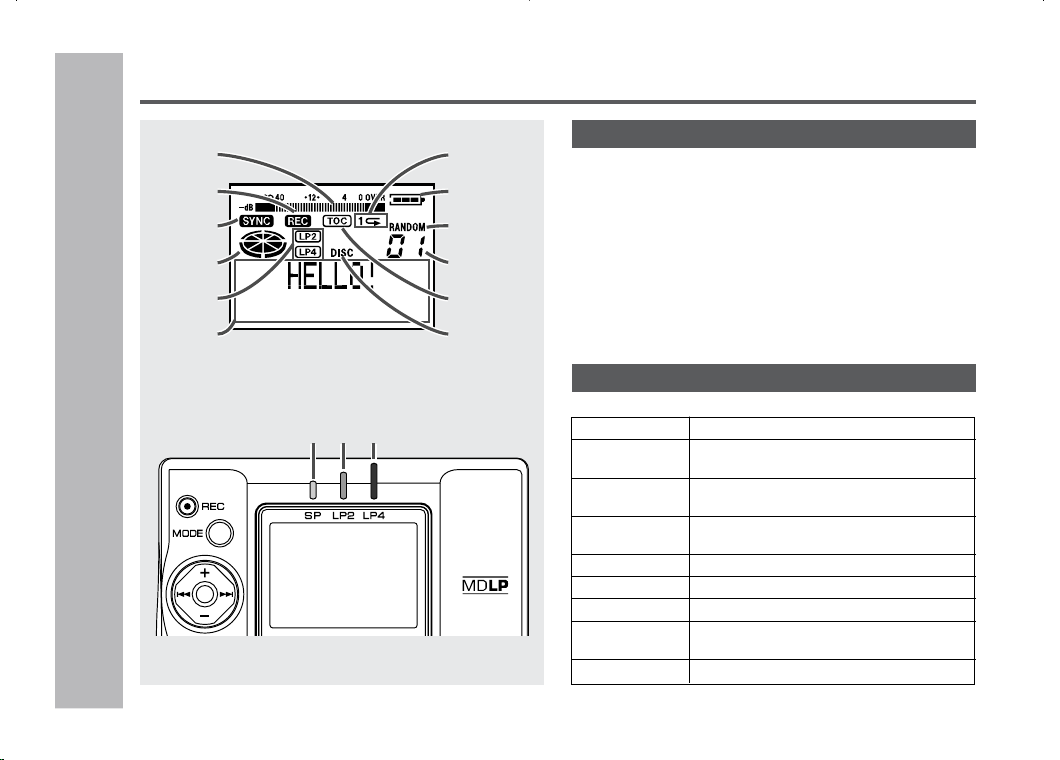
1. Record/Track Mark Button (20, 34)
2. Mode Button (20, 29, 32, 41)
3. Volume/Cursor/Fast Forward/Fast Reverse/
Recording Level/Name Select Button
(20, 26, 27, 30, 41-45)
4. Stop/Power Off/Hold Button (16, 22, 25, 41)
5. Open Lever (17)
6. Display/Character Select Button (39, 40, 43)
7. Edit/Auto Mark/Time Mark Button (34, 38, 43-50)
8. Play/Pause Button (20, 24)
9. Enter/Fast Play/Synchro Button (29, 43-50)
10. Bass/Delete Button (26, 44)
11. Rechargeable Battery Cover (12)
12. Handstrap Holder
13. Optical/Line Input Jack (18, 19)
14. Microphone Input Jack (36)
15.
Remote Control/Earphones/Line Output Jack (24)
8
Important Introduction
– Names of Controls and Indicators
–
01. Level Meter
02. Record Indicator
03. Synchro Recording Indicator
04. Operation Indicator
05. Long-play/Recording Mode Indicator
6. Character/Time Information Indicator
7. Repeat Indicator
8. Battery Indicator
9. Random Indicator
10. Track Number Indicator
11. TOC Indicator
12. Disc Name Indicator
Names of Controls and Indicators (continued)
1
2
3
4
5
6
7
8
9
10
11
12
Main unit display panel
3-color LED
Various modes are indicated with three colors of lights.
Charging Light
ing starting with yellow-green light.
Refresh Extinguishing starting with orange light
after all the lights are lit.
Playback Flashing the color of the activated play-
back mode.
Recording Flashing the color of the activated re-
cording mode.
Fast Forward
Flashing starting with yellow-green light.
Fast Reverse Flashing starting with orange light.
Volume (+) Lighting starting with yellow-green light.
Volume (–) Extinguishing instantly starting with or-
ange light after all the lights are lit.
TOC Reading: flashing at random.
Blue
Yellow-
green
Orange
DEUTSCH
FRANÇAIS
ESPAÑOL
SVENSKA
ITALIANO
NEDERLANDS
ENGLISH
9
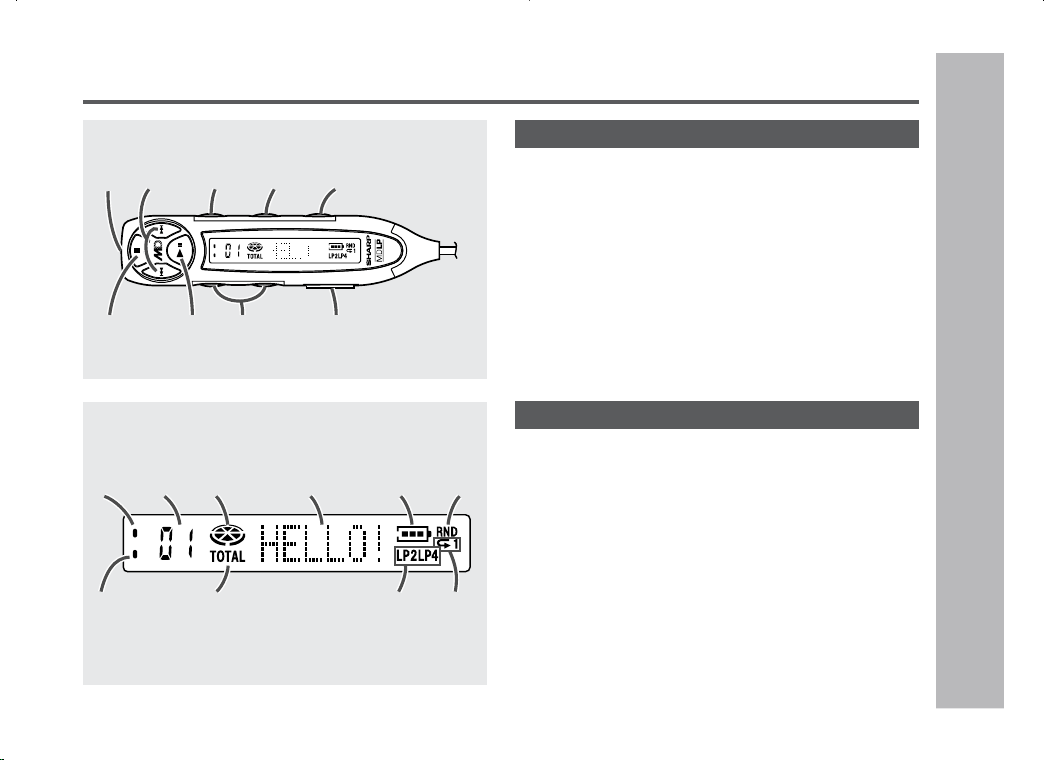
01. Record Indicator
02. Track Number Indicator
03. Operation Indicator
04. Character/Time Information Indicator
05. Battery Indicator
06. Random Indicator
07. Synchro Recording Indicator
08. Total Track Number Indicator
09. Long-play/Recording Mode Indicator
10. Repeat Indicator
Names of Controls and Indicators : continued
Important Introduction
– Names of Controls and Indicators
–
Remote control display panel
1
86
7 9
2 3 4 5
Remote control unit
1. Earphones Jack (24)
2. Fast Forward/Fast Reverse Button
3. Display Button
4. Play Mode Button (29)
5. Sound/Track Mark Button (26, 34)
6. Stop/Power Off Button (22, 25)
7. Play/Pause Button
8. Volume Button
9. Hold Switch (16)
1 2 3
4
5 6
7
8
9
10
10
Important Introduction
– Battery Charger –
Battery Charger
There are two different ways to use the battery charger one is to use it as a normal battery charger, the
other is to use it with an AC adaptor by attaching the portable MD to the battery charger.
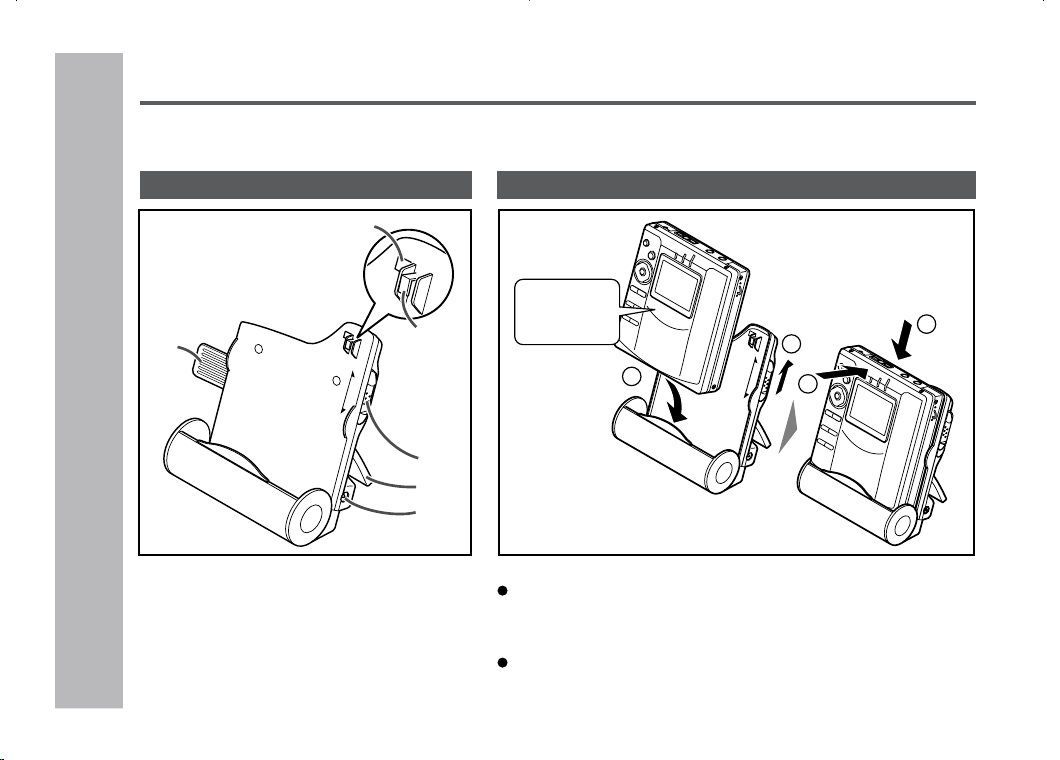
1. Remote Control Holder (11)
(You can hang the remote control on it.)
2. Lock Detector
3. Hook For Fixing The Main Unit
4. Charge/Operation Switch (11)
5. Stand
6. AC Adaptor Connecting Jack (18, 19)
Names Setting
C
H
AR
G
E
OPE
R
AT
I
ON
1
2
3
4
Before setting the portable MD to the battery charger, make
sure the battery charger is in the charge mode (CHARGE). If
you insert the portable MD by force while in the operation mode
(OPERATION), the hook for fixing the portable MD may break.
Operating while in the charge mode, “CHARGEmode” will appear
and no operation is possible.
Face the top
toward you.
Caution:
Charge
mode
1
4
5
6
3
2
C
H
A
R
G
E
OPE
R
A
T
I
O
N
DEUTSCH
FRANÇAIS
ESPAÑOL
SVENSKA
ITALIANO
NEDERLANDS
ENGLISH
11
Important Introduction
– Battery Charger
–
About the Battery Charger : continued
2
1
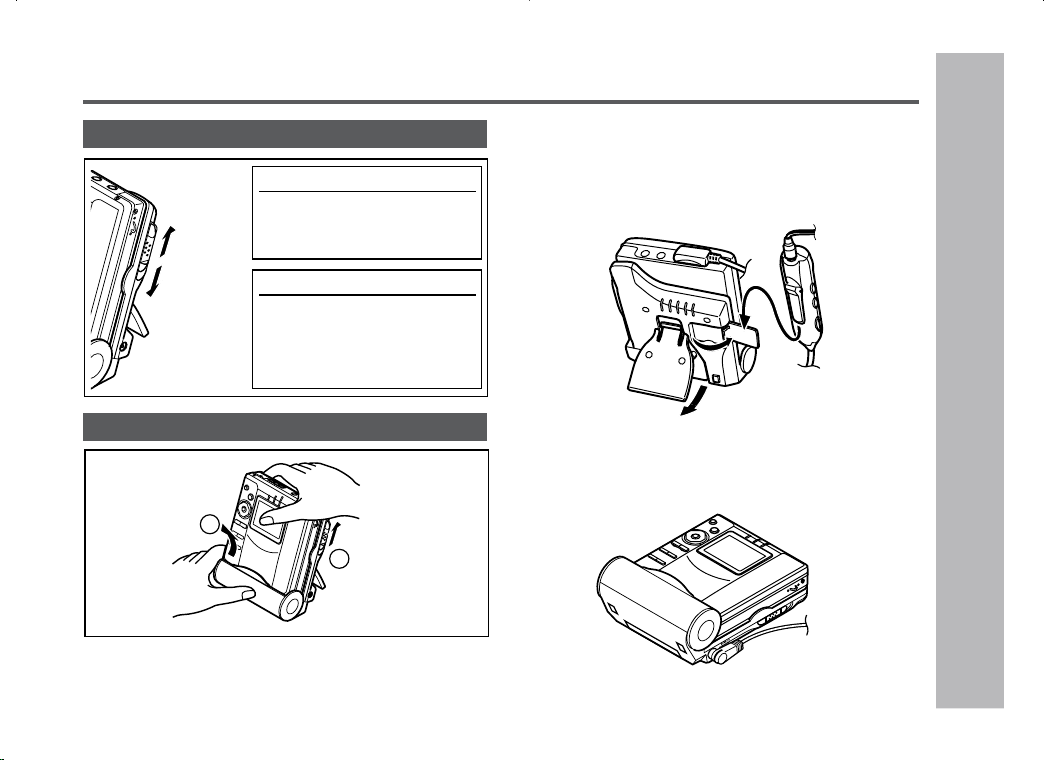
How to use the Charge / Operation switch
Removing
Charge
mode
(RELEASE)
Operation
mode
(LOCK)
For charging
Move it to the charge mode
(see “Using with the Re-
chargeable Battery” page 12).
For operations
Move it to the operation
mode when playing back or
recording (see “Using with
the AC Adaptor” page 14).
Move the Charge / Operation switch to the charge mode.
Charge
mode
(RELEASE)
Setting the battery charger and hanging the
remote control
When the remote control is not used, hang it on the holder
for your convenience.
For use with the AC adaptor
When using the unit with AC adaptor, use it horizontally.
Do not stand the unit.
12
Power Source
– Using with the Rechargeable Battery –
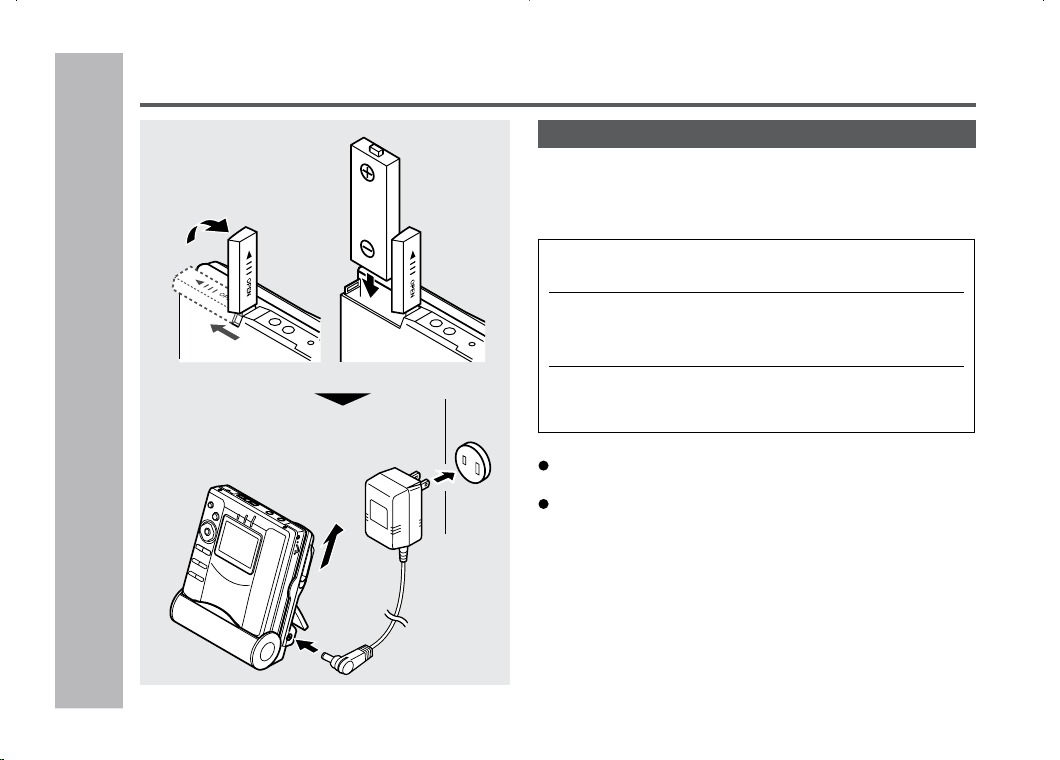
Using with the Rechargeable Battery
Charging
When the rechargeable battery is used for the first time
or when you want to use it after a long period of disuse,
be sure to charge it fully.
After the rechargeable battery is charged or used, it will get
slightly warm. This is normal.
When the portable MD is turned on or operating, the battery
will not be charged.
To the DC IN
5V jack
AC 120V,
60Hz
Charge
mode
Do not force the
battery cover
open too far.
1
Insert the rechargeable battery.
2
Move the Charge/Operation switch to the
charge mode.
3
Place the portable MD into the battery charger
and connect the AC adaptor.

DEUTSCH
FRANÇAIS
ESPAÑOL
SVENSKA
ITALIANO
NEDERLANDS
ENGLISH
13
Caution:
Use the specified battery AD-N55BT only. Do not charge
a battery (nickel-cadmium, alkaline, etc.) other than that
specified.
Do not remove the outer cover of the re-
chargeable battery. It may cause heat gen-
eration, fire, or explosion.
Do not dip the battery in water, do not dis-
pose of it in a fire, and do not take it apart.
If the rechargeable battery terminal is dirty, charging may
not start. In such a case, wipe off the dirt with a dry cloth.
Do not disassemble the battery.
About Power Source : continued
About the liquid crystal display (LCD)
The condition of the portable MD will be shown on the LCD
when inserting it into the battery charger.
Display Conditions
Scrolling
Charging.
Turns off
The charging is complete.
When the portable MD is not in-
serted correctly to the battery
charger, or
Rechargeable terminal is dirty, it may
not be possible to charge the bat-
tery. (Wipe the terminal by cotton
swab.)
Refreshing.
The unit checks and, if necessary,
discharge the rechargeable battery
to recharge it automatically. (At this
time battery indicator is flashing.)
About charging time
After about 3.5 hours have passed, “ ” will go out.
The battery is charged up to 95% if it is completely
discharged.
Notes:
Charge the battery within the range of 41 F - 95 F (5 C
- 35 C).
The unit can be left in the charging state after it is com-
pleted.
If the MiniDisc unit is not to be used for some time,
remove the battery. (The battery drains gradually even
when the power is turned off.)
Carry the battery in the supplied case.
Power Source
– Using with the Rechargeable Battery
–
14
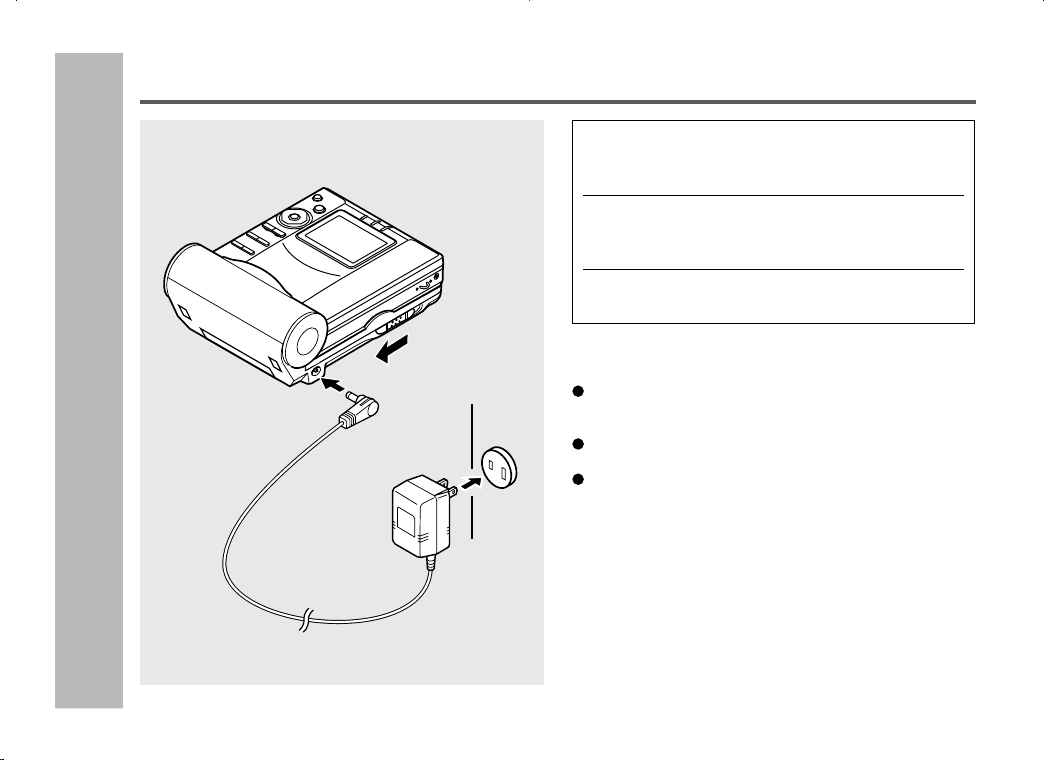
Using with the AC Adaptor
1
Place the portable MD to the battery
charger.
2
Move the Charge/Operation switch to
the operation mode.
3
Plug the AC adaptor.
Caution:
If the Charge/Operation switch is not set to the opera-
tion mode, no operation is possible.
(See “How to use the Charge/Operation switch”, page 11)
When the unit is not in use for extended periods, re-
move the AC adaptor from the AC outlet.
Insert the plugs firmly.
Note:
When power failure occurs while playing back using the
AC adaptor, disconnect the adaptor from the AC outlet.
Otherwise, playback may start automatically when the
power returns.
To the DC IN
5V jack
AC 120V,
60Hz
Operation mode
Power Source
– Using with the AC Adaptor
–
DEUTSCH
FRANÇAIS
ESPAÑOL
SVENSKA
ITALIANO
NEDERLANDS
ENGLISH
15
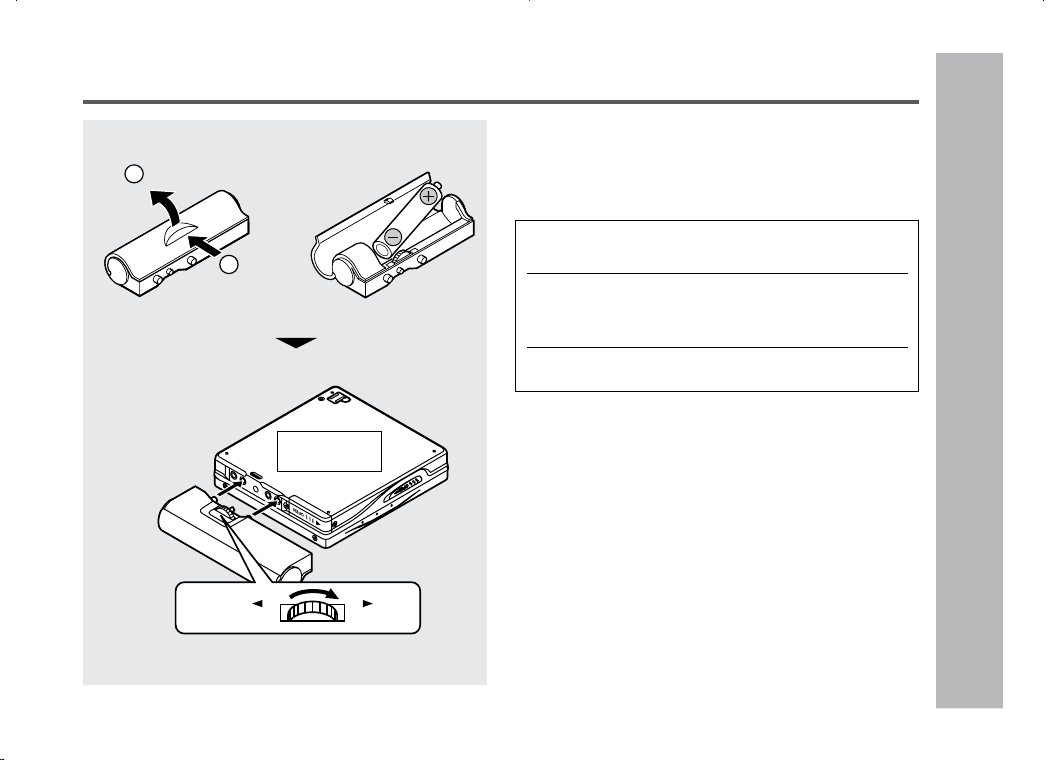
Use one commercially available alkaline battery (LR6, “AA”
size).
When using the alkaline batteries, make sure the recharge-
able battery is inserted.
Caution:
Do not use rechargeable batteries (nickel-cadmium bat-
tery etc.) in the battery case.
Power Source
– Using with the Alkaline Battery
–
Using with the Alkaline Battery
1
Open the case cover.
2
Insert an alkaline battery into the battery
case.
3
Attach the battery case to the portable MD.
1
2
Press
Open
Back of the
portable MD
RELEASE LOCK
16
Preparation
– Hold Function –
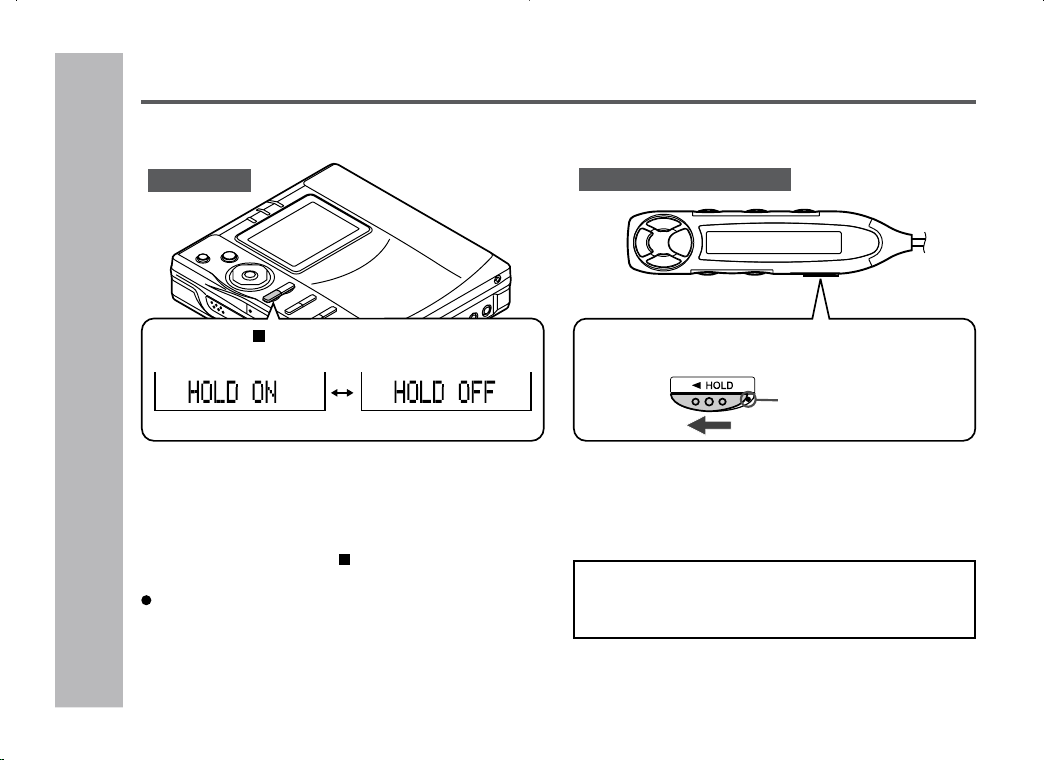
Hold Function
The present operation condition can be kept even if other buttons are accidentally pressed in a place such
as a crowded train.
To cancel the hold mode
Move the HOLD switch away from the safety posi-
tion (the opposite direction of the arrow).
If the hold function is active while the power is
turned off, the power cannot be turned on by mis-
take and the battery will not be drained.
If the battery is inserted or the AC adaptor is connected,
you can set this function even when the power is turned
off.
To cancel the hold mode
Press and hold down the • / –HOLD button for 2 sec-
onds or more while the unit is in the hold mode.
“HOLD OFF” will be shown.
Hold Release
Press the • / –HOLD button for 2 seconds
or more.
Move the HOLD switch to the safety position
(direction indicated by the arrow).
Orange mark
Remote control unit
Main unit
Hold

17
Inserting a MiniDisc
1
Slide the OPEN lever to release the com-
partment door.
2
Lift it up.
3
Insert a MiniDisc as shown.
4
Close the compartment door.
Notes:
Do not place the MiniDisc under the holder.
If any resistance is felt, do not force the MiniDisc into the
unit, as it may cause damage to the unit. If resistance is
felt, remove the MiniDisc and reload it.
The lid cannot be opened if “TOC” is displayed refer to
the instruction on page 22.
3
4
1
2
Preparation
– Inserting a MiniDisc
–
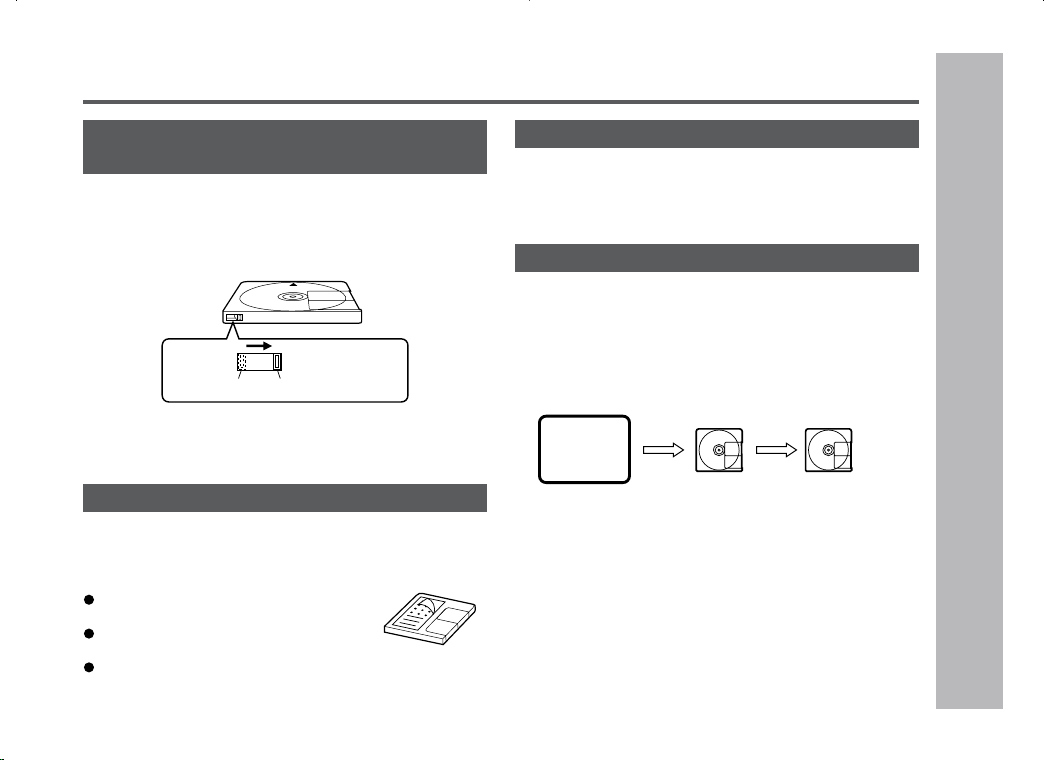
Recordable Recording
prevented
When you record on a
MiniDisc, check that the
erase prevention tab is
set to the “recordable”
position.
18
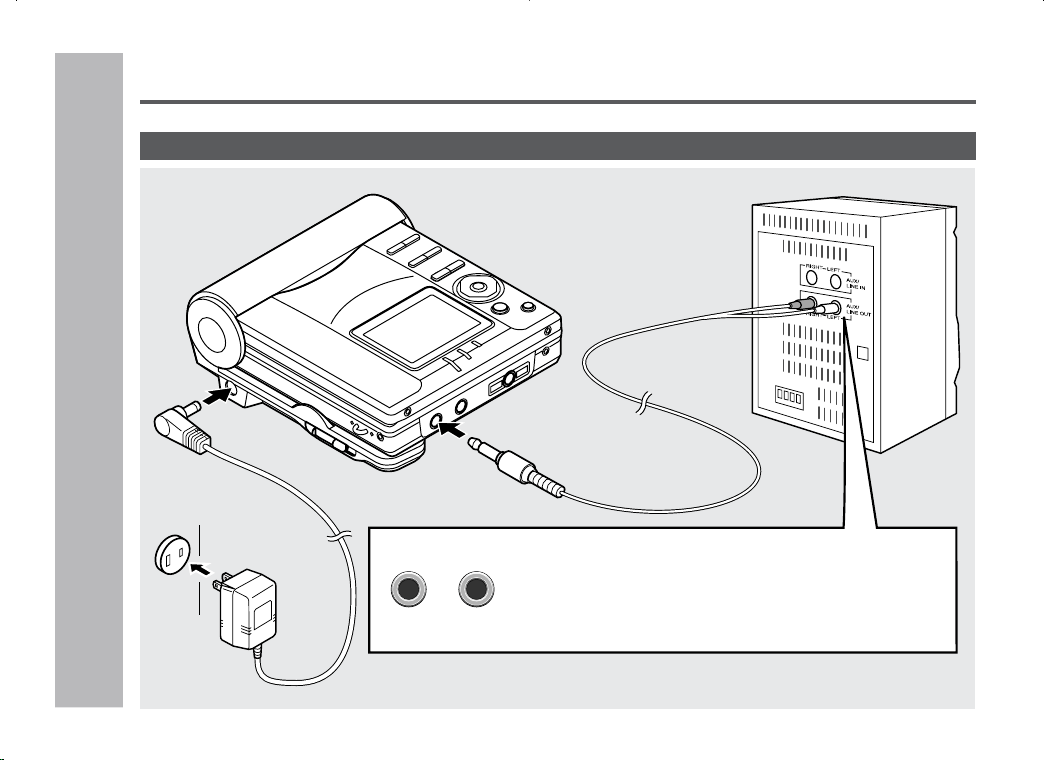
LINE OUT
RIGHT LEFT
Connections
To an AC
outlet
To the
DC IN 5V jack
Red : To Right
White : To Left
To the OPTICAL/
LINE IN jack
To a stereo system with “LINE OUT” or “AUDIO OUT”
jacks (See left, Analog connection.)
Note:
If the audio system has only one pair of jacks, they are usu-
ally for input only and recording via this connection is not
possible.
AC 120V,
60Hz
To connect to a stereo system with “LINE OUT” or “AUDIO OUT” jacks
You can record your favorite CDs or tapes to an MD.
Preparation
– Connections –
19
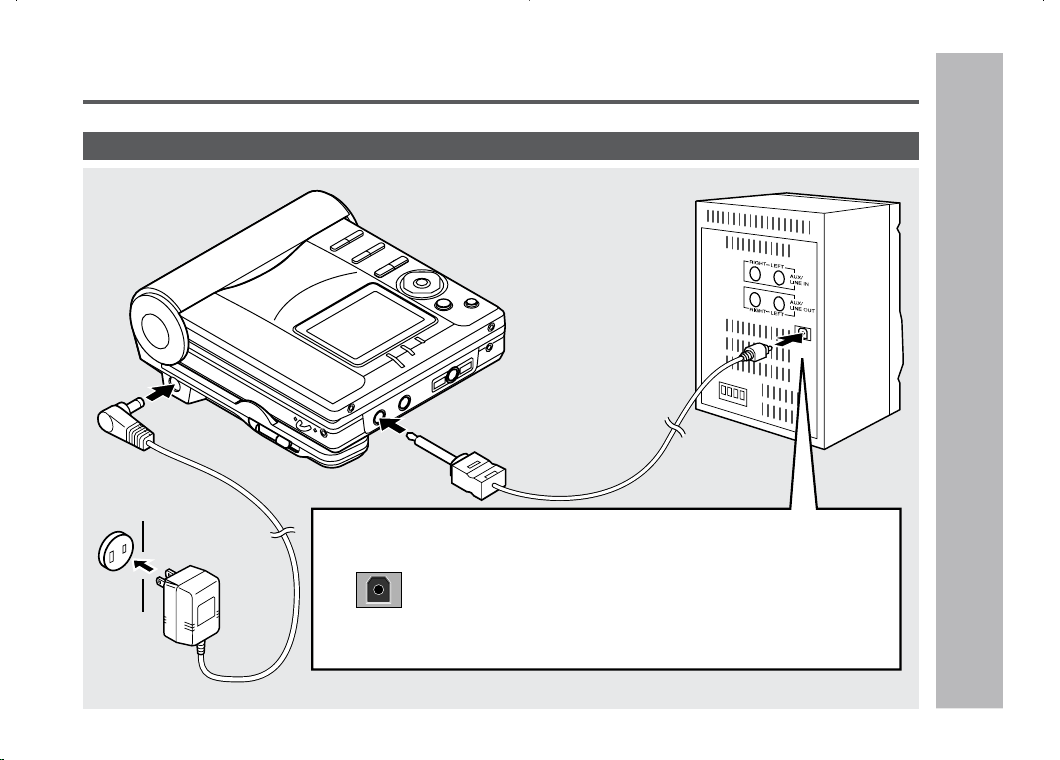
DIGITAL OUT
Preparation
– Connections –
Connections : continued
To connect to a stereo system with a “DIGITAL OUT” or “OPTICAL OUT” jack
To a stereo system with a “DIGITAL OUT” jack
(See left, Digital connection.)
Compared to analog connection recording, it allows a
high-quality recording.
Note:
Some audio systems do not have a DIGITAL OUT jack.
Check before connecting.
To the OPTICAL/
LINE IN jack
AC 120V,
60Hz
To an AC
outlet
To the
DC IN 5V jack
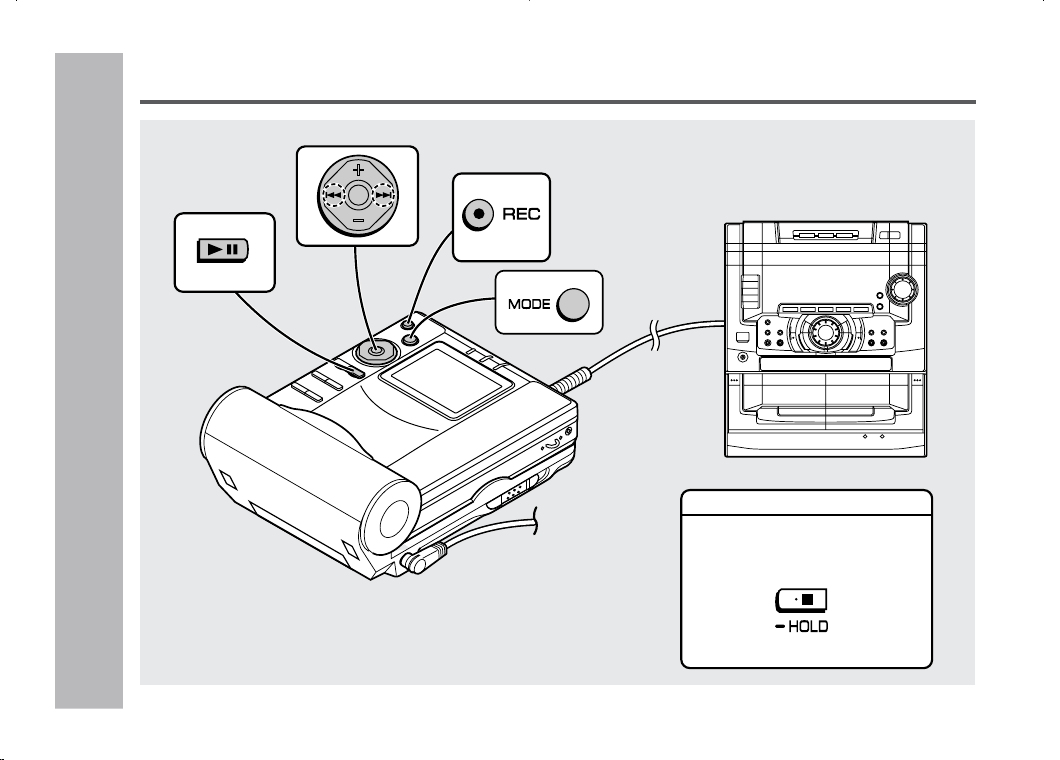
20
Recording
Basic Operation
– Recording –
As for the details, see page 16.
Before Recording
Cancel the hold mode.
The portable MD does not work
while in the hold mode.
21
Basic Operation
– Recording
–
Recording : continued
Notes:
When recording, it is recommended to use the AC adap-
tor and also install the charged battery. Should the power
failure occur, the power source would be automatically
switched to the rechargeable battery.
Changing the volume level while recording does not af-
fect the recording.
You cannot adjust the bass level while recording.
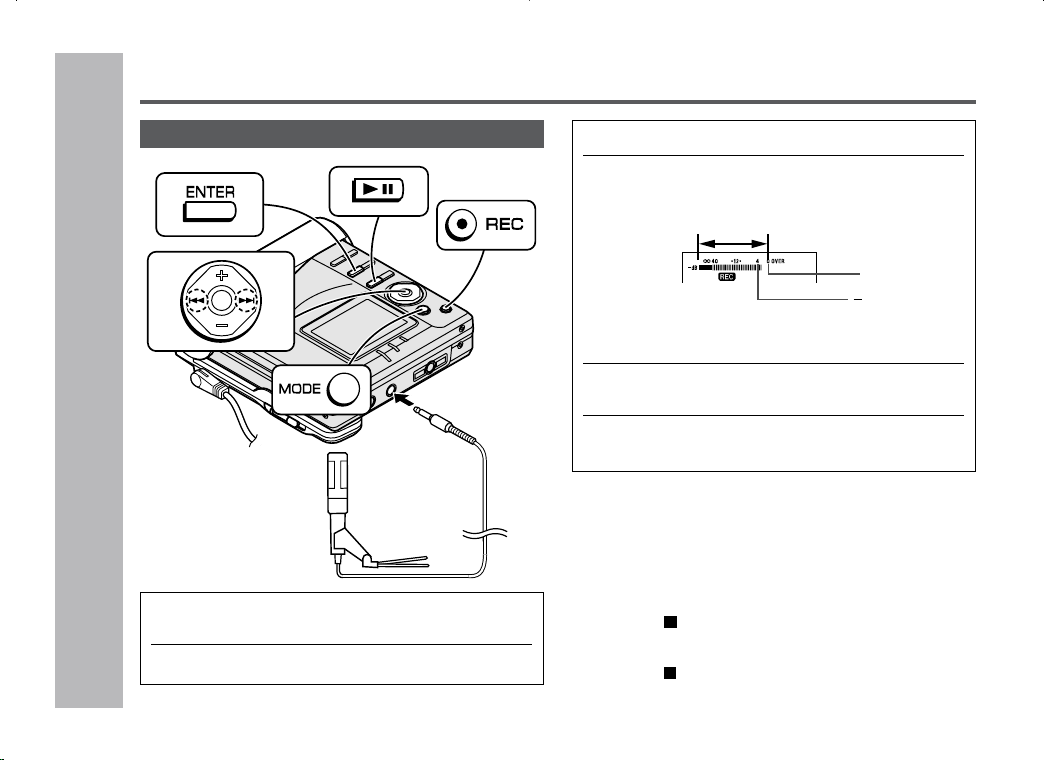
1
Press the REC button.
The record pause mode is entered.
2
Begin playback on the stereo system con-
nected to this portable MD.
To enable the record level to be set.
3
Press the
55
55
5
or
44
44
4
button to adjust the
recording level.
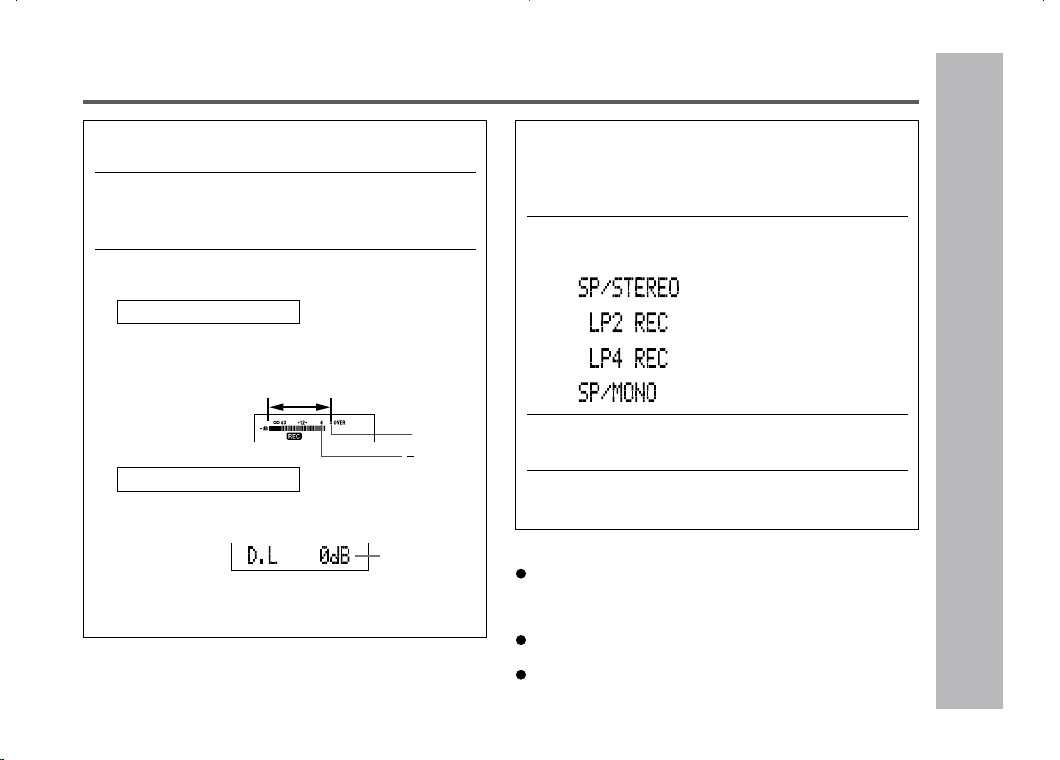
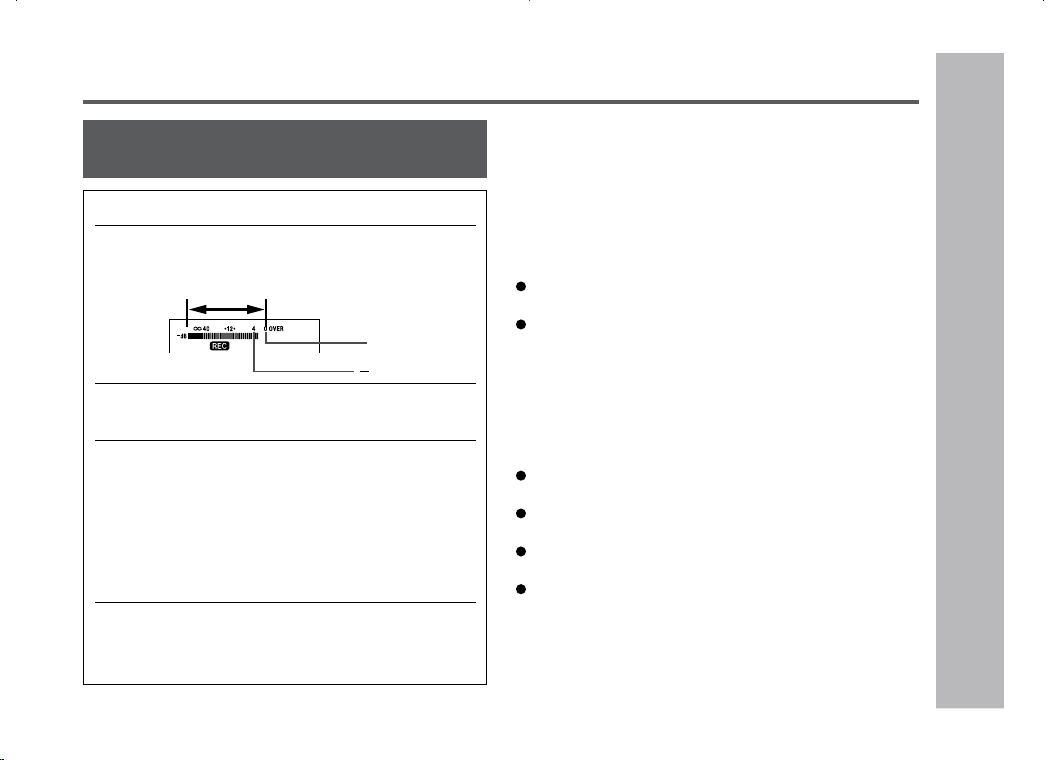
Analog recording
Adjust the recording level so that the maximum
sound volume from the source makes the reading
swing somewhere between –4 dB and 0 dB.
0dB
4dB
Digital recording
You can adjust the level in 1 dB increments within
the range of +12 - –12dB.
Once you adjust the digital recording level, the set-
ting remains even after the recording stops. (For
cancellation instructions, see page 41.)
4
Press the PAUSE button on the stereo sys-
tem to enter the playback pause mode at
the point you wish to start recording.
Here you can select the track to be recorded.
5
Press the MODE button repeatedly to se-
lect the recording mode (page 32).
(Stereo recoding)
(2 times long recording)
(4 times long recording)
(Monaural recording)
6
Press the
0606
0606
06
button to start the MiniDisc
unit recording.
7
Begin playback on the stereo system, the
output will be recorded.
Level meter indicator
+12 - –12dB
22
Basic Operation
– Recording –
Recording (continued)
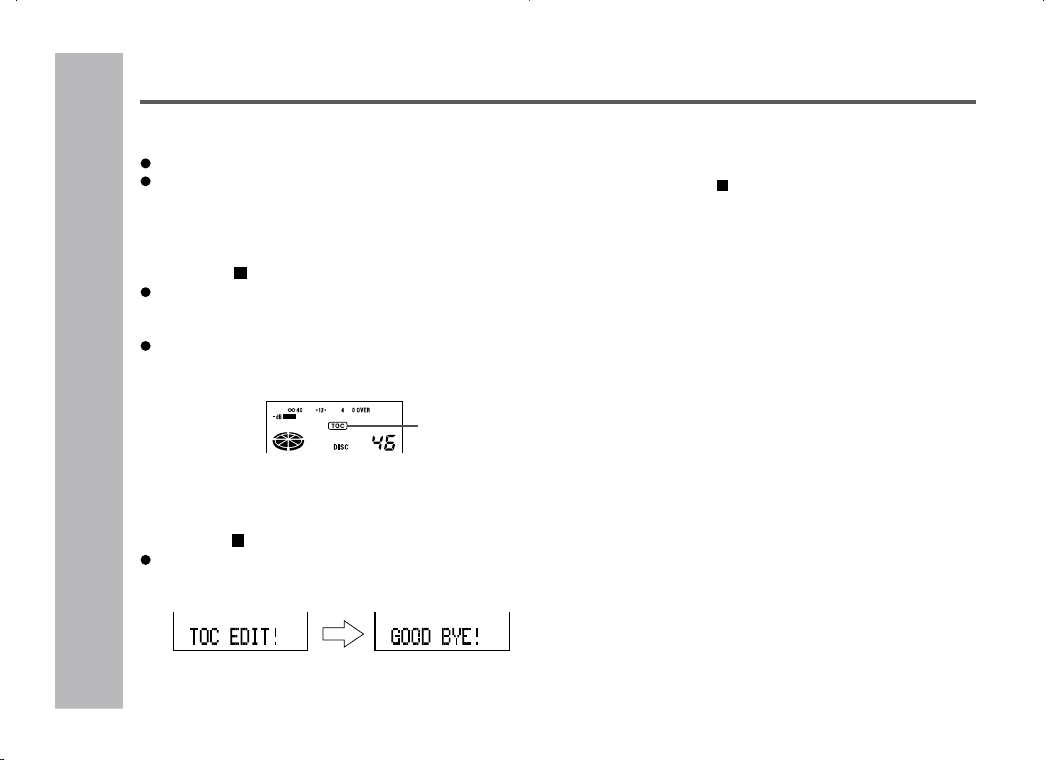
TOC display
About the TOC
After any recording or editing function “TOC” (Table Of
Contents) is displayed. To finalize the recording or editing
function, press the •
/ :OFF button. During this process
“TOC” will flash and “TOC EDIT!” will be displayed.
During any recording or editing function the MiniDisc unit
lid is locked, the MiniDisc cannot be removed until the pro-
cess is finalized.
Warning:
If the power is removed (Battery/AC adaptor) while “TOC”
is displayed, the MiniDisc unit lid will remain locked until
the battery/main power is restored and the unit is turned
on. Your new recordings or edited changes will be lost and
your MiniDisc may become unusable.
Caution:
While “TOC” or “TOC EDIT!” is displayed, follow the in-
structions below.
– Do not jerk or bump the unit.
– Do not unplug the AC adaptor.
– Do not remove the rechargeable battery or an alkaline
battery.
– Do not subject the unit to shock.
Otherwise, tracks may not be recorded properly.
To interrupt recording
Press the
06
button.
To resume recording, press the
06
button again.
The track number will be increased by one each time
the recording is interrupted.
To stop recording
Press the • / :OFF button.
When recording stops, “TOC” appears (Table Of Con-
tents). While “TOC” appears the MiniDisc recorded
contents have not yet been updated.
To prevent the new recording from being lost it is not
possible to remove the MiniDisc while “TOC” is dis-
played.
To update the recorded contents of the MiniDisc
Press the •
/ :OFF button while in the stop mode.
The power turns off after recorded contents have been
updated on the MiniDisc.
23
Basic Operation
– Recording
–
Recording
Helpful tip when attaching a label
When attaching a label to a MiniDisc cartridge, be sure to
note the following. If the label is not attached properly, the
MiniDisc may jam inside the unit and it may not be pos-
sible to remove it.
If the label peels off or partially lifts
away, replace it with a new one.
Do not put a new label on top of an
existing one.
Attach the label only in the specified location.
To prevent recorded MiniDiscs from be-
ing erased accidentally
Slide the accidental erase prevention tab, located
on the side of the MiniDisc, in the direction indicated
by the arrow.
The MiniDisc will then be protected against accidental era-
sure.
To add a recording to such a MiniDisc, slide the ac-
cidental erase prevention tab back to its original po-
sition.
Recording preventedRecordable
About sampling rate converter
This portable MD incorporates a sampling rate converter
meaning it can record from digital radios or DAT tape re-
corders.
Note for digital recording
You cannot copy a MiniDisc that you recorded from digital
inputs to another MiniDisc or DAT. It is prevented by the
SCMS (Serial Copy Management System). Recording from
analog inputs is not affected.
CD player,
MiniDisc
player,
etc.
Digital signals
Digitally recorded
MiniDisc
Cannot record
Digital
connection
Digital
connection
24
Basic Operation
– Playback –
Playback
To the jack
Main unit
Remote control unit
Release
As for the details, see page 16.
Before Playing back
Cancel the hold mode.
The portable MD does not work while in the hold mode.
Left
channel
Right
channel
25
Basic Operation
– Playback
–
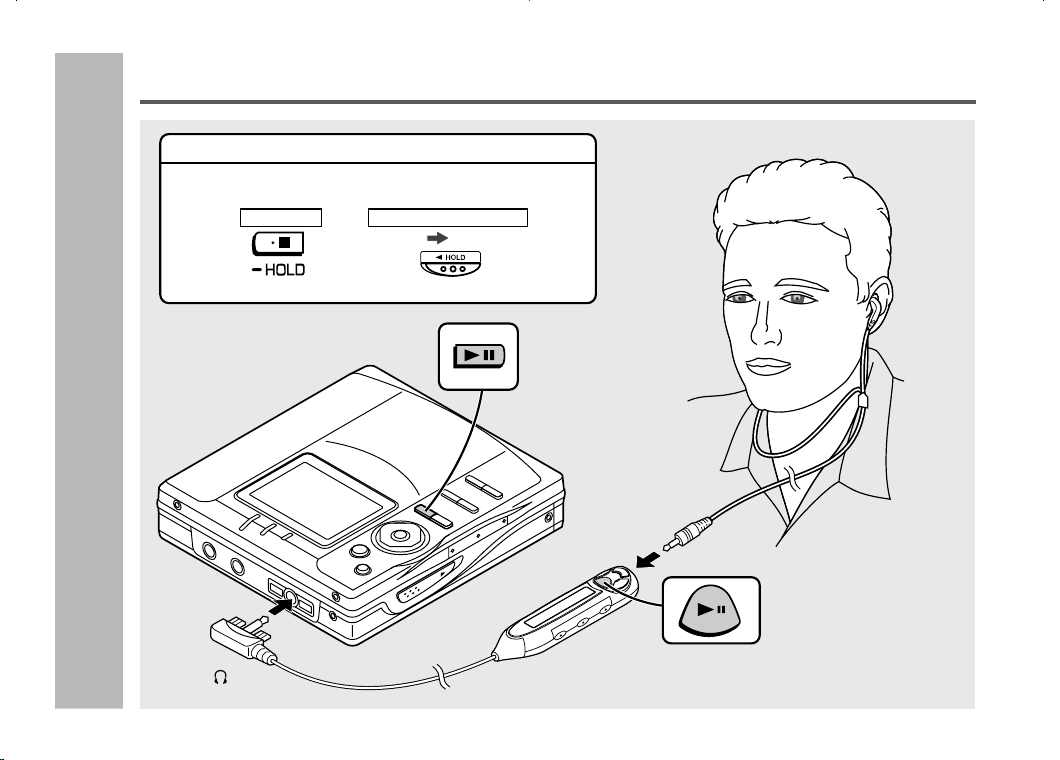
1
Insert the earphones plug firmly into the
earphones jack on the remote control unit.
2
Plug the remote control into the jack on
the unit.
3
Insert a MiniDisc (page 17).
4
Press the
06 06
06 06
06
button.
Playback starts automatically with a playback only
MiniDisc or a MiniDisc which is protected against
accidental erasure (Auto-play function).
To interrupt playback
Press the
06
button.
To resume playback, press the
06
button again.
To stop playback
Press the • / :OFF button.
If the unit is not operated for at least 2 minutes while in
the stop mode, the power will shut off automatically.
To turn off the power
Press the • / :OFF button while in the stop mode.
Playback : continued
26
Basic Operation
– Playback –
Playback (continued)
Notes:
If power failure occurs while playing a disc using the AC
adaptor, disconnect it from the AC outlet. Otherwise, play-
back may start automatically when electricity resumes.
If you connect the AC adaptor without installing the re-
chargeable battery, playback may start automatically.
Be sure to turn off the power.
Reduce the volume before starting to play. MiniDiscs, com-
pared to ordinary cassette tapes, have very little noise.
If the volume is adjusted according to your usual expec-
tations of noise, high volume may damage your hearing.
The sound escaping from your earphones may annoy
people around you.
In particularly crowded places (such as on trains or
buses), reduce the volume.
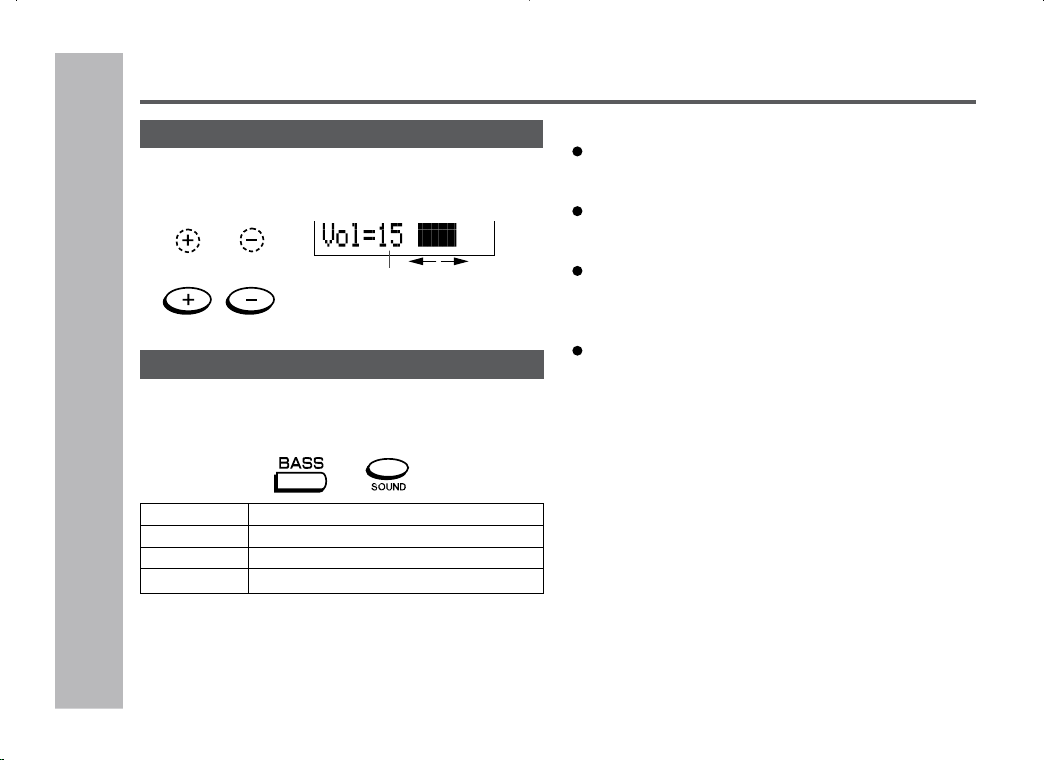
Volume control
Press the VOL+ button to increase the volume and
the press the VOL– button to decrease the volume.
Bass control
Each time the BASS button is pressed (Remote con-
trol: the SOUND button is pressed), the tone will be
switched as follows.
BASS 1 Emphasized slightly
BASS 2 Emphasized more
BASS 3 Emphasized fully
BASS OFF Canceled
Volume (0 - 30)
Main unit
Remote control unit
27
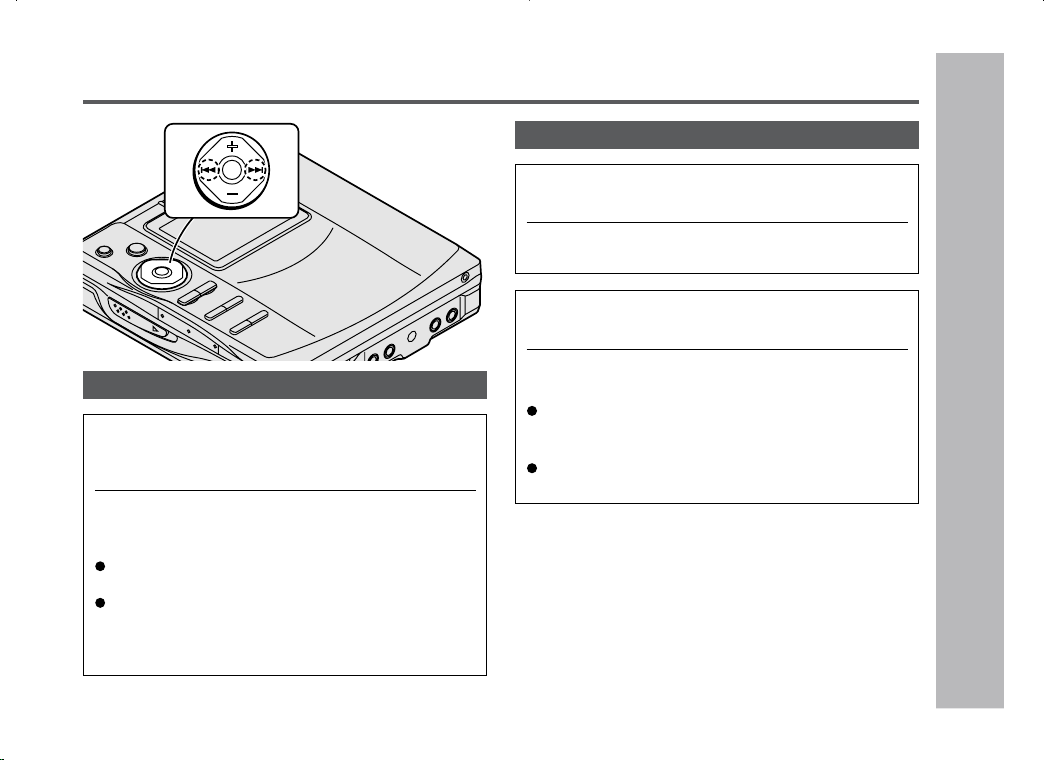
To locate the next track:
Press the
4
button while the unit is stopped.
To locate the previous track:
Press the
5
button while the unit is stopped.
To skip a number of tracks at one time, press the
55
55
5
or
4 4
4 4
4
button repeatedly until the desired track num-
ber is shown.
When you press the
06
button, playback starts from
the beginning of the track.
To locate the desired portion
For audible fast forward:
Press and hold down the
4
button during play-
back.
For audible fast reverse:
Press and hold down the
5
button during play-
back.
Normal playback will resume when the
5
or
4
button is released.
When the end of the last track is reached during fast
forward, the unit will enter the pause mode. When
the beginning of the first track is reached during fast
reverse, the unit will enter the playback mode.
To locate the beginning of a track
To move to the beginning of the next track:
Press the
4
button during playback.
To restart the track being played:
Press the
5
button during playback.
Advanced Playback
Useful Features
– Advanced Playback –

28
Advanced playback (continued)
Useful Features
– Advanced Playback –
Intro play
You can listen to each track for approximately 5 sec-
onds.
When stopped or paused, press the
06
button
for 2 seconds or more.
When the playback mode is set as random playback,
random repeat playback, or one-track repeat playback,
the intro scan is not possible.
In this case, the playback is started in the normal mode.
The duration that “INTRO PLAY” is displayed is not fixed.
To return to normal playback
Press the
0606
0606
06
button.
29
Useful Features
– Advanced Playback
–
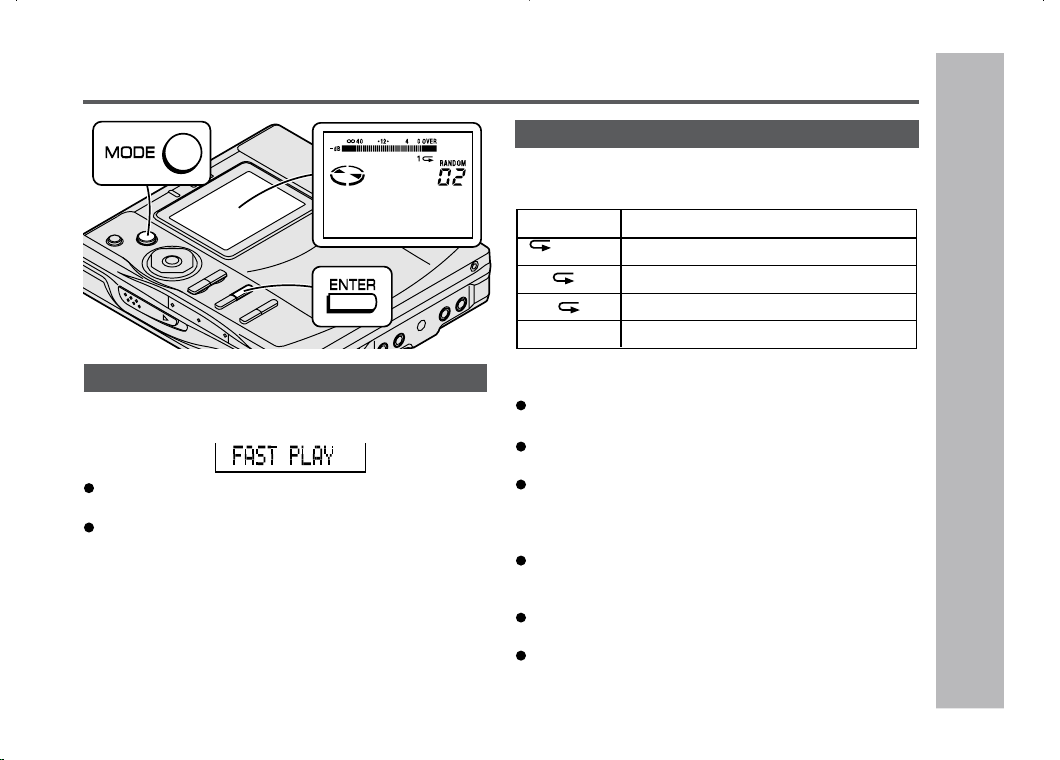
Random play or repeat play
During playback, press the MODE button repeat-
edly to select the playback mode.
Notes:
If the playback mode is selected while stopped, press
the
06
button to start playback.
When “TOC” is displayed, random play or repeat play
is impossible.
In random play the unit will select and play tracks auto-
matically. (You cannot select the order of the tracks.)
After all of the tracks have been played once each in
random order, the unit will stop automatically.
During random, random repeat, or single track repeat
play, you can forward or reverse the MiniDisc only within
the track being played.
During random play, the unit cannot find the beginning
of any track which has been played.
Repeat play lasts until you stop the unit.
To play at double speed
(Mono recording only)
Press the ENTER button while a MiniDisc recorded
in the monaural long-play mode is being played.
If a track recorded in the stereo mode is reached during
fast playback, the fast playback mode will be canceled.
Depending on the contents recorded on a MiniDisc, it
may be difficult to hear them.
To interrupt fast playback
Press the
0606
0606
06
button during playback.
When the
0606
0606
06
button is pressed again, the unit will resume
fast playback.
To return to normal playback
Press the ENTER button.
RANDOM
1
RANDOM
Random play
Repeat play of tracks in random order
Repeat play of all of the tracks
Repeat play of a single track
Normal playback
No display
Advanced playback : continued
30
Advanced Recording
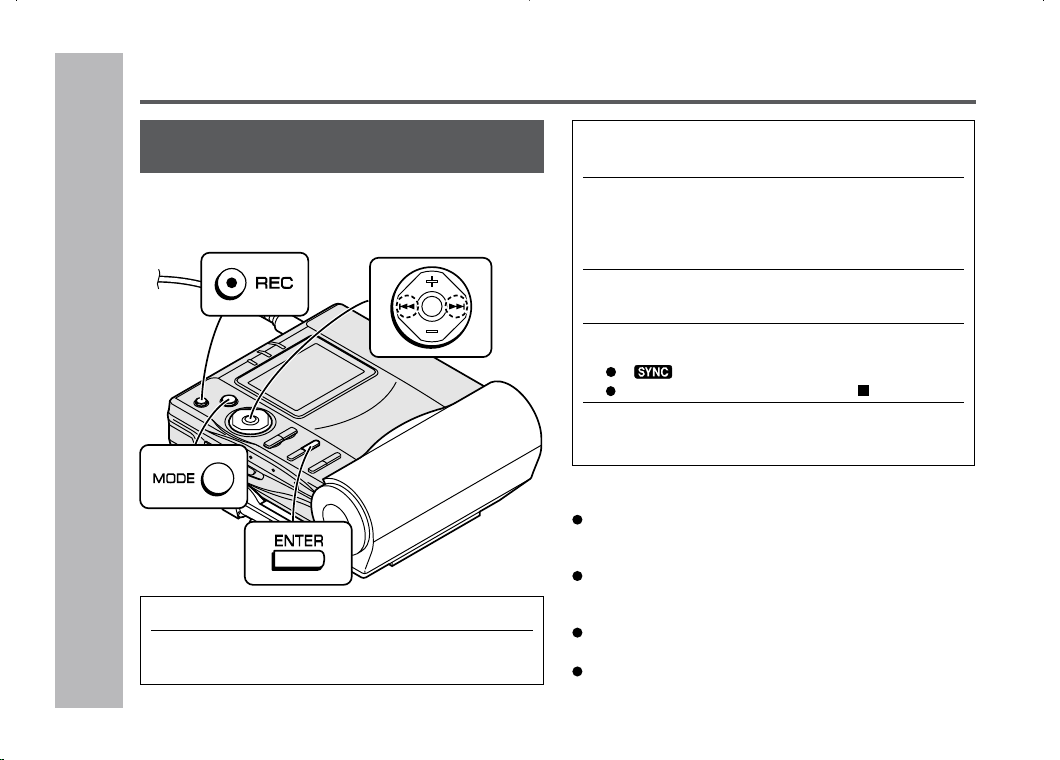
1
Press the REC button.
2
Begin playback on the stereo system con-
nected to this portable MD.
Playback sound-actuated recording
(Synchronized recording)
Recording automatically starts or pauses by detect-
ing sound from the stereo system (Synchronized
recording).
To interrupt recording
When the stereo system is stopped, the unit will enter
the synchro recording pause mode. When playback is
resumed, the recording will be resumed.
If a silence lasts for 3 seconds or more, the recording
will be paused (pause function does not work for
approximately 10 seconds after a recording starts).
When the unit receives sound again, recording automati-
cally starts.
A new track number is created when the recording resumes.
Useful Features
– Advanced Recording –
3
Press the
55
55
5
or
4 4
4 4
4
button to adjust the
recording level.
4
Press the PAUSE button on the stereo sys-
tem to enter the playback pause mode.
Select the starting point for your recording and press
the PAUSE button.
5
Press the MODE button repeatedly to se-
lect the recording mode (page 32).
6
Press the ENTER button (Synchro Button).
“ ” will be displayed.
To cancel the operation, press the • / :OFF button.
7
Begin playback on the stereo system.
Recording will begin automatically.
31
Useful Features
– Advanced Recording
–
Note:
To keep a track after the point you want to make a new
recording, move the track and then make recording after
that point.
(See “Editing a Recorded MiniDisc”, page 50.)
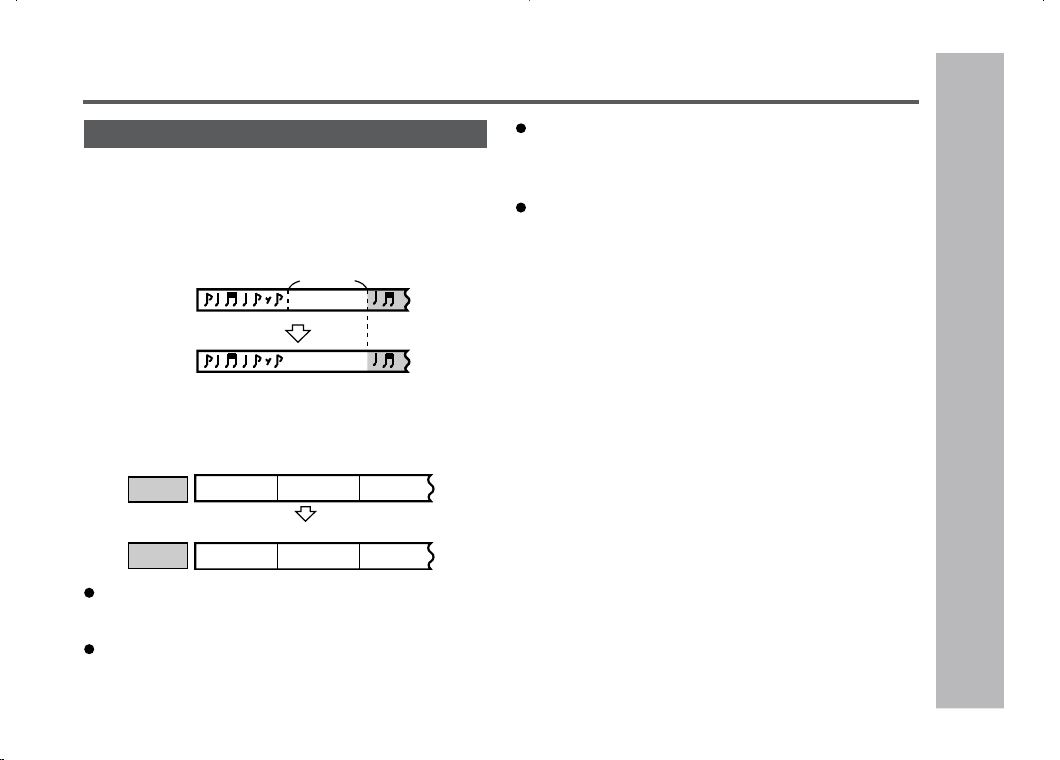
1
During playback, press the
0606
0606
06
button at the
point where you want to begin recording.
2
Press the REC button.
To cancel the operation, press the • / :OFF button.
3
Press the ENTER button.
All of the tracks and track names will be erased,
following the point where the playback is paused.
4
Press the MODE button repeatedly to se-
lect the recording mode (page 32).
5
Press the
0606
0606
06
button.
Recording will start.
To start recording from the middle of a track
You can erase a portion of a track and make a new
recording.
All of the tracks that follow the newly recorded track will be
erased.
Advanced Recording (continued)
32
Useful Features
– Advanced Recording –
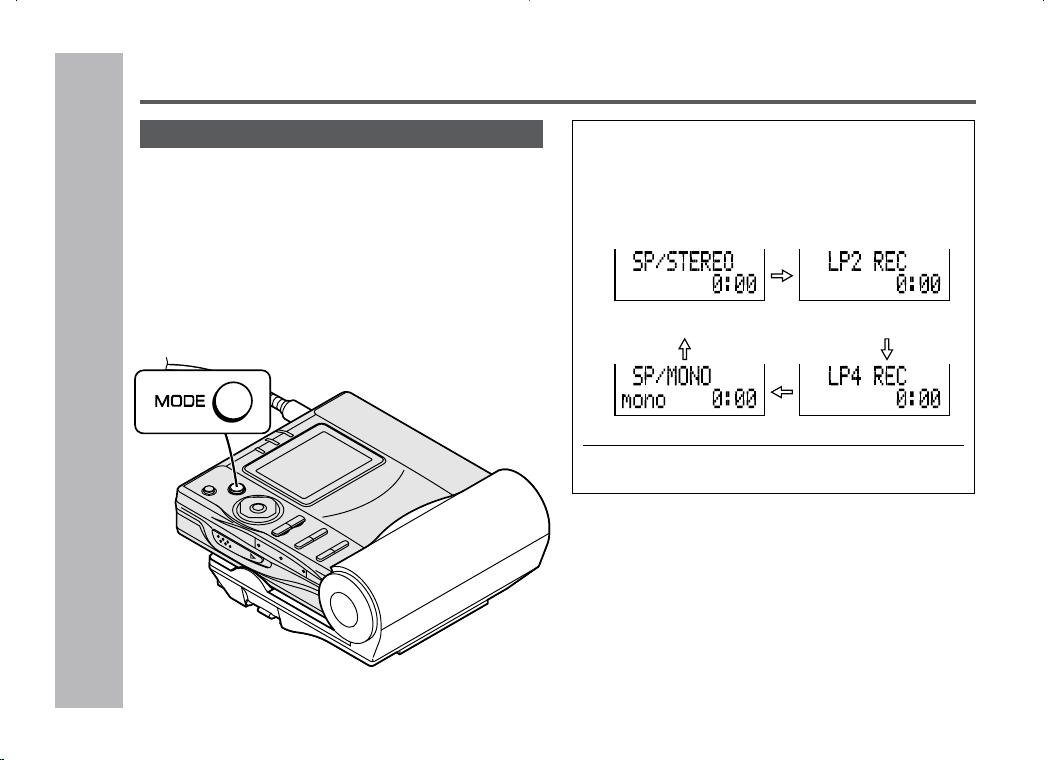
Advanced Recording (continued)
1
When a recording is paused, press the
MODE button repeatedly to select the re-
cording mode.
Each time the button is pressed, the display will
change as follows:
2
Start recording.
Long-play recording
Stereo recoding
Monaural recording
2 times and 4 times long recording
Double or quadruple time of stereo recording is
possible.
Monaural recording
In monaural, you can record twice as long as the
stereo recording (SP/STEREO).
A track recorded in monaural can be played back in
double speed, see page 29.
2 times long recording
4 times long recording
The recording mode remains unchanged until it is changed.

33
Useful Features
– Advanced Recording
–
Notes:
Tracks can be recorded in the stereo recording mode, 2
times long recording mode, and 4 times long recording
mode on one MiniDisc.
In monaural recording, the sound on the right and left
channels is mixed even if the input source is in stereo.
Although you can hear the stereo sound from the ear-
phones, the recorded sound is monaural.
Tracks recorded in the 2 times long recording and the 4
times long recording modes cannot be played with the
unit that does not support these modes. On such a unit,
“LP” is displayed at the beginning of the track and no
sound is heard. (The operation and the display may vary
depending on the unit.)
Tracks recorded in monaural cannot be played if equip-
ment does not support the monaural playback.
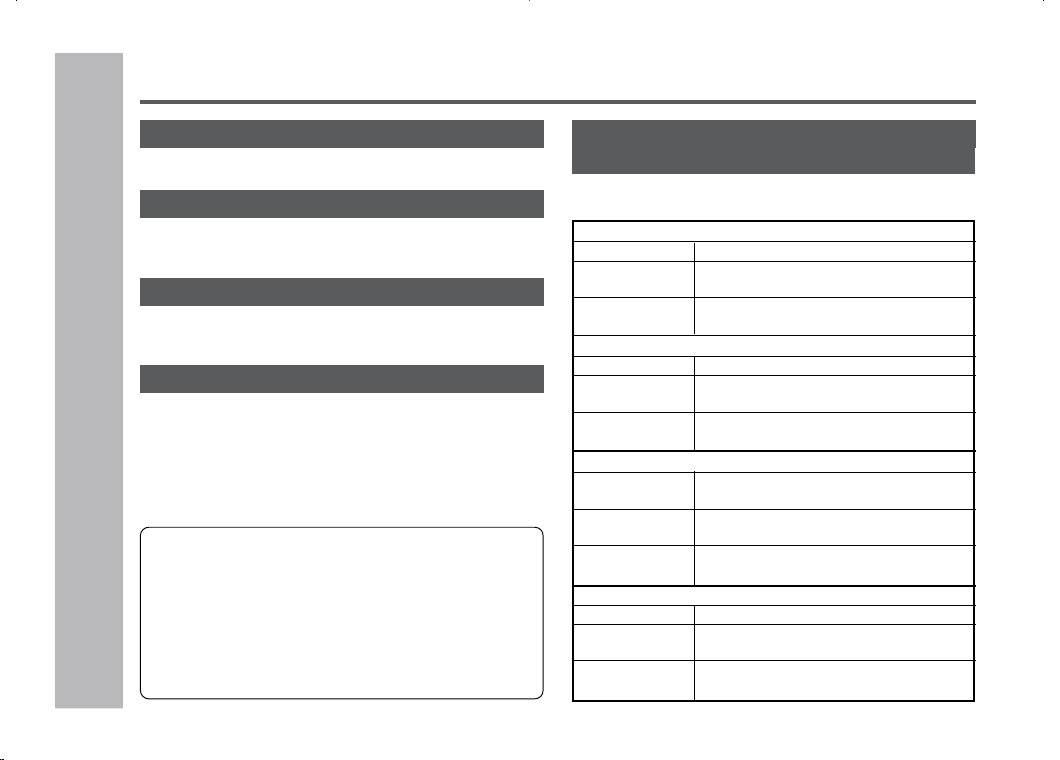
About the recording mode
You can select the recording mode from stereo recording,
2 times long recording, 4 times long recording, and mon-
aural recording. Recordable time varies depending on the
recording mode.
If the tracks are recorded on an 80-minute MiniDisc, you
can record them in the following 4 modes:
Caution for 4 times long recording (LP4)
Special compressing method allows the 4 times long re-
cording to realize long-time stereo recording. Therefore,
some noise is recorded occasionally.
If sound quality is the main requirement, stereo recording
or 2 times long recording is recommended.
About ATRAC
The ATRAC (Adaptive TRansform Acoustic Coding) sys-
tem compresses the sound data into 1/5 by cutting out the
inaudible sound. Since the sound is selected based on
psychoacoustics masking, the sound quality is not impaired.
This unit is equipped with the ATRAC3 compressing sys-
tem that can reduce the sound data to 1/10 or 1/20 of its
original size.
By employing this system, 2 times and 4 times long re-
cording is enabled in the stereo mode.
Indication Recording mode Recording time
SP/STEREO Stereo Max. 80 min.
LP2 REC 2 times long (stereo) Max. 160 min.
LP4 REC 4 times long (stereo) Max. 320 min.
SP/MONO Monaural Max. 160 min.
Advanced Recording : continued
34
To create your own track numbers
You can create your own track numbers at any point.
While recording, press the REC button at the
point where you want to create track numbers.
The track number will be increased by one.
One track number will be created every time the REC
button is pressed.
The SOUND button on the remote control can also be
used to create track numbers.
Numbering restriction
If you try to number more than 10 tracks in certain amount
of time, “SORRY” will be displayed and the operation will
be disabled.
In that case, wait until the next operation can be resumed.
In stereo recording Within 40 seconds
In 2 times long recording Within 80 seconds
In 4 times long recording Within 160 seconds
In monaural recording Within 80 seconds
Advanced Recording (continued)
Useful Features
– Advanced Recording –
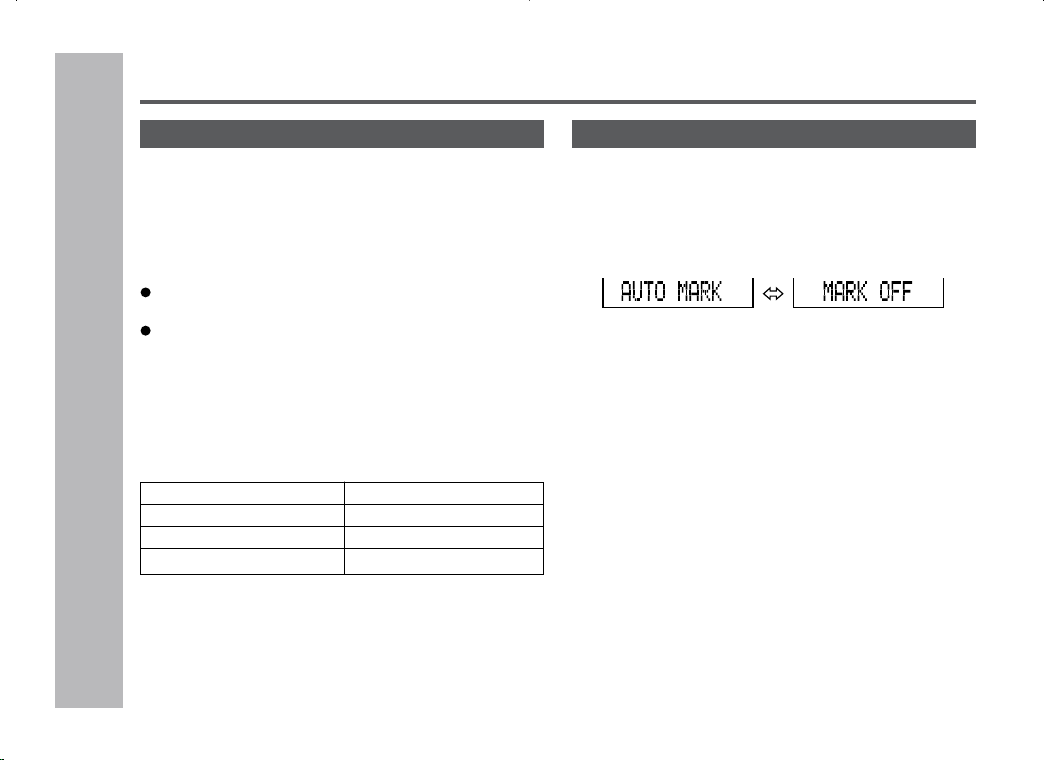
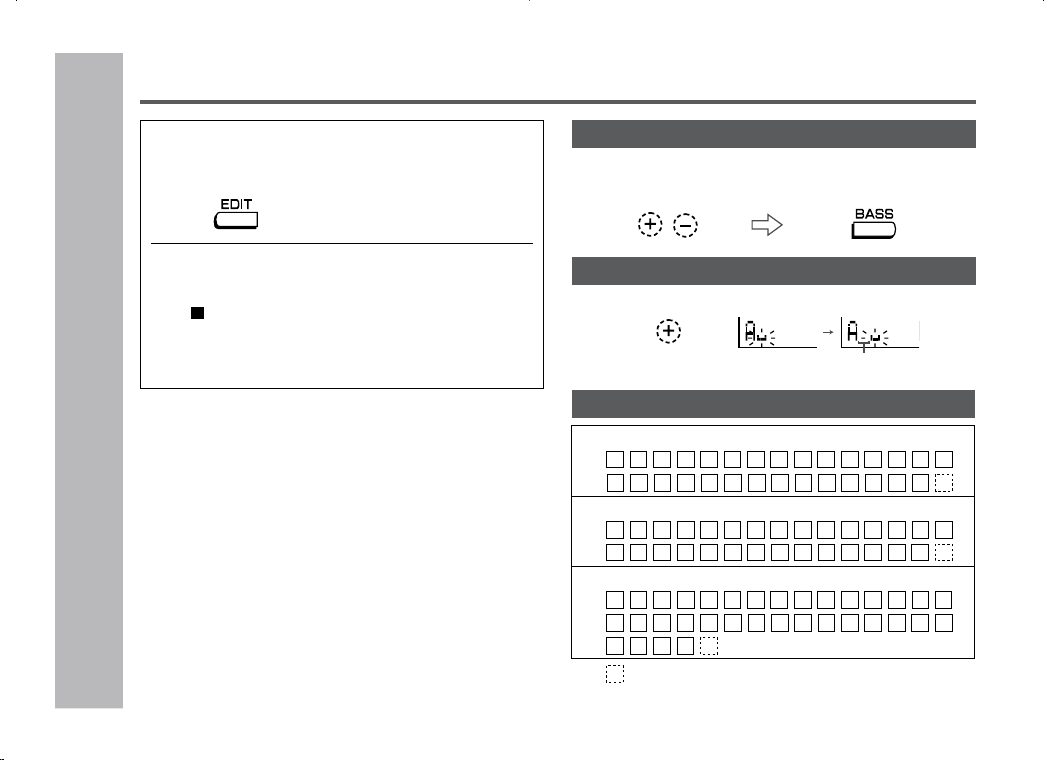
Recording tracks as a single track
You can record several pieces of music as a single
track by disabling the auto marker function.
When a recording is paused or while recording…
Press the EDIT button.
Note:
When making digital recordings using a CD player or an
MiniDisc player, track numbers will be created automati-
cally regardless of the setting of the auto marker function.
35
Useful Features
– Advanced Recording
–
Advanced Recording (continued)
About track numbers
1. Track numbers are created automatically during re-
cording via the analog connection when a silence of
1 second or more is detected (Auto marker function).
A series of tracks can be recorded as one by dis-
abling the auto marker function, see page 34.
2. When recording from a CD or a MiniDisc using the
digital connection, track numbers will be created at
the same points as on the CD or MiniDisc (Synchro
marker function).
Track numbers may not be created in proper places,
depending on the source to be recorded from, such as
signals with noise.
The track numbers on the playback side may not match
the track numbers recorded on the MiniDisc.
When recording, if a programmed playback is performed
by the source or playback is performed by selecting
tracks manually, the MiniDisc track numbers may not be
the same as on the source.
Track numbers may not be created properly, depending
on the connected stereo system.
Playback
side
Recording
side
First track Second track Third track
Track A Track B Track C
First track Second track Third track
Track A Track B Track C
Silence
Second
track
About 1
second
First
track
36
Useful Features
– Recording from a Microphone
–
To record from a microphone
1
Connect a stereo microphone to the MIC
IN jack.
2
Insert a recordable MiniDisc (page 17).
To interrupt a recording
Press the
06
button while recording.
To resume recording, press the
06
button again.
The track number will be increased by one each time you
interrupt a recording.
To stop recording
Press the • / :OFF button.
To write recorded contents on the MiniDisc
Press the •
/ :OFF button while in the stop mode.
Recording from a Microphone
To the MIC IN
jack
Stereo microphone
(commercially available)
0dB
4dB
Level meter
Adjust the recording level so that the maximum
sound volume from the source makes the reading
swing somewhere between –4 dB and 0 dB.
5
Press the MODE button repeatedly to se-
lect the recording mode (page 32).
6
Press the
06 06
06 06
06
button.
Recording will start.
3
Press the REC button.
4
Press the
55
55
5
or
4 4
4 4
4
button to adjust the
recording level.
37
Useful Features
– Recording from a Microphone
–
Notes:
While making a mic recording, do not connect anything
to the OPTICAL/LINE IN jack on the portable MD.
To use a microphone, be sure it is a plug-in-power type
microphone.
•
When a plug-in-power type microphone is plugged
in, the portable MD will provide power for the
microphone’s operation.
•
If a different type of microphone is plugged in, it may
not operate properly or it may cause the unit to mal-
function.
Insert the plug firmly. If you don’t, the recording will not
be made properly.
Use a microphone with a 1/8" (3.5 mm) diameter stereo
mini plug.
If the unit starts recording too often from low unwanted
noises, set the microphone input to “MIC SYNC L”.
Recording sensitivity can be changed while recording.
1
Press the REC button.
2
Press the
55
55
5
or
4 4
4 4
4
button to adjust the
recording level.
3
Press the MODE button repeatedly to se-
lect the recording mode (page 32).
4
Press the ENTER button to select the re-
cording sensitivity.
MIC SYNC H : Recording starts when the unit
detects –24 dB or more
(The unit can start recording from
quiet sounds).
MIC SYNC L : Recording starts when the unit
detects –12 dB or more.
5
When a sound, such as person speaking,
is picked up by the microphone, recording
will begin automatically.
About pause function
The unit automatically pauses when the microphone does
not pick up any sound for 3 seconds or more. (Pause func-
tion does not work for approximately 10 seconds after a
recording starts.) When the microphone picks up sound
again, recording starts automatically.
Recording from a Microphone (continued)
0dB
4dB
Level meter indicator
Sound-actuated recording
(Mic Synchronized recording)
38
Useful Features
– Recording from a Microphone
–
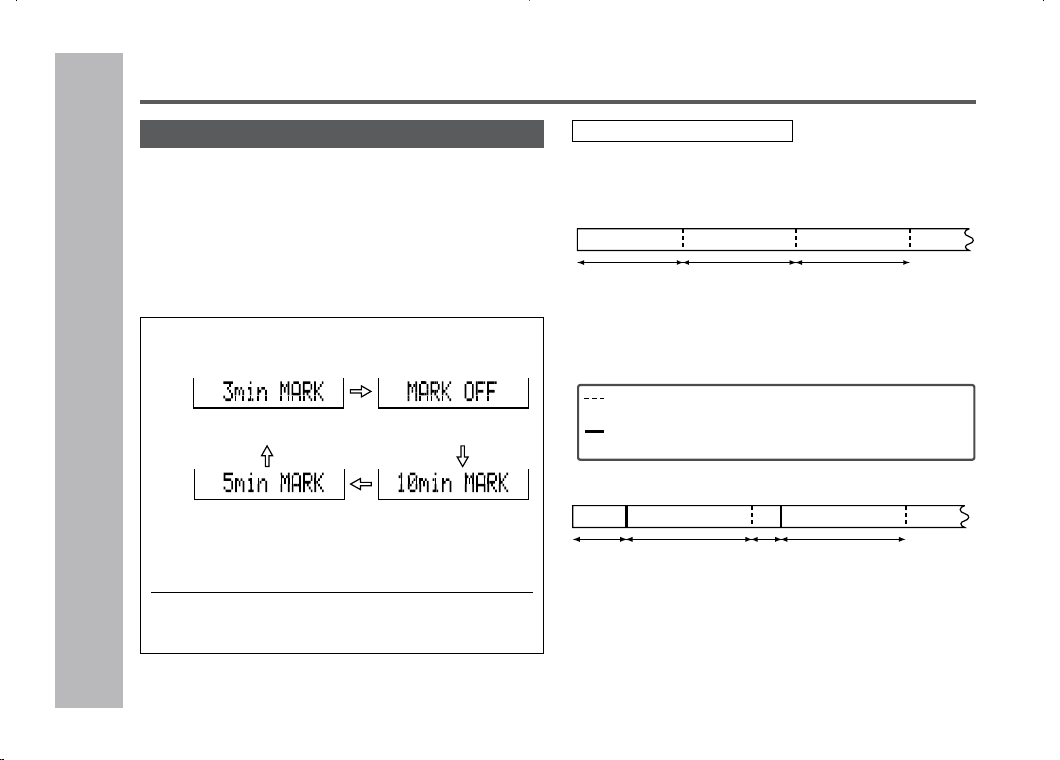
Track intervals
When recording from the microphone, track num-
bers will be created automatically at regular inter-
vals (default setting: approximately every 5 minutes).
During a mic synchro recording, the unit pauses
when a silence lasts for 3 seconds or more, and cre-
ates a track number.
Changing intervals between tracks
1
When a recording is paused or while re-
cording, press the EDIT button repeatedly.
The interval between marks may vary slightly com-
pared with the actual recording time.
2
Track numbers will be created automati-
cally at regular intervals.
Recording from a Microphone (continued)
Example: Set to “5 minutes”.
During a mic manual recording
Timed auto marks will be created every 5 minutes.
(A new track number is
created every 10 minutes.)
(A new track number is
created every 3 minutes.)
Creating track numbers manually
Press the REC button while recording.
During a mic synchro recording
If a silence lasts for 3 seconds or more, a timed auto mark
will be created 5 minutes after the previous mark is created.
:Track number which is created by the timed auto mark
function.
:Track number which is created when a silence lasts for 3
seconds or more during synchro recording.
2 minutes 5 minutes 1 minute 5 minutes
5 minutes 5 minutes 5 minutes
Track
number 1
Track
number 2
Track
number 3
Track
number 4
Track
number 1
Track
number 2
Track
number 3
Track
number 4
Track
number 5
(No automatic track
numbers are created.)
(A new track number is
created every 5 minutes.)
39
Useful Features
– Checking Displays –
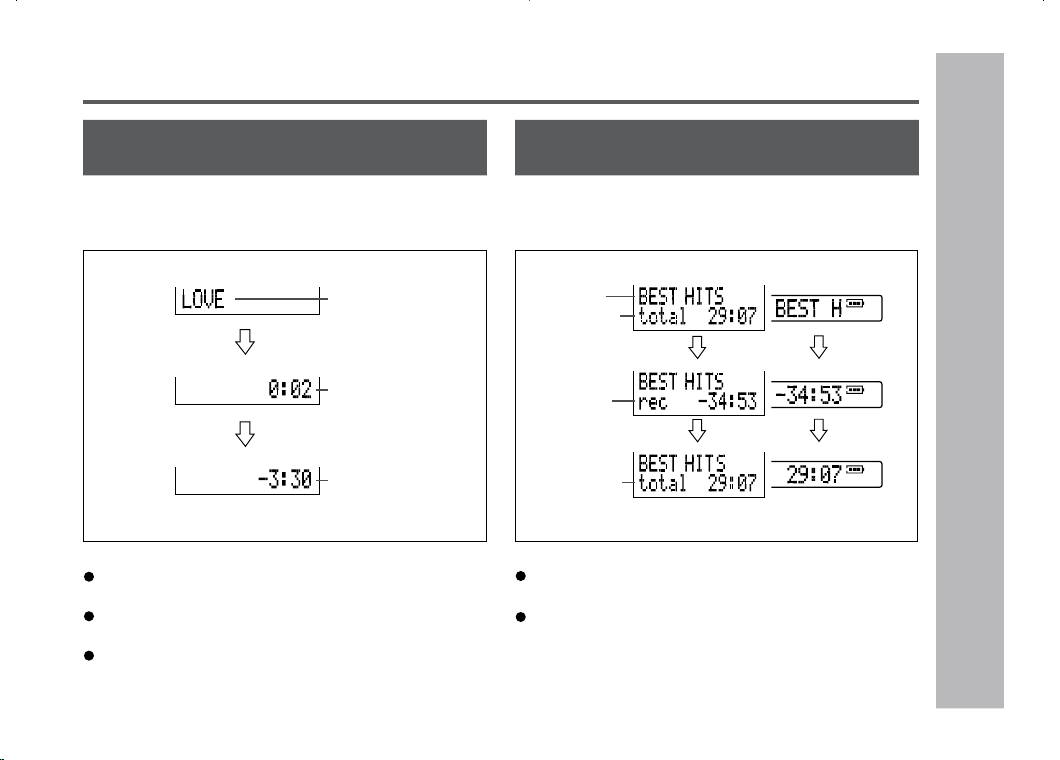
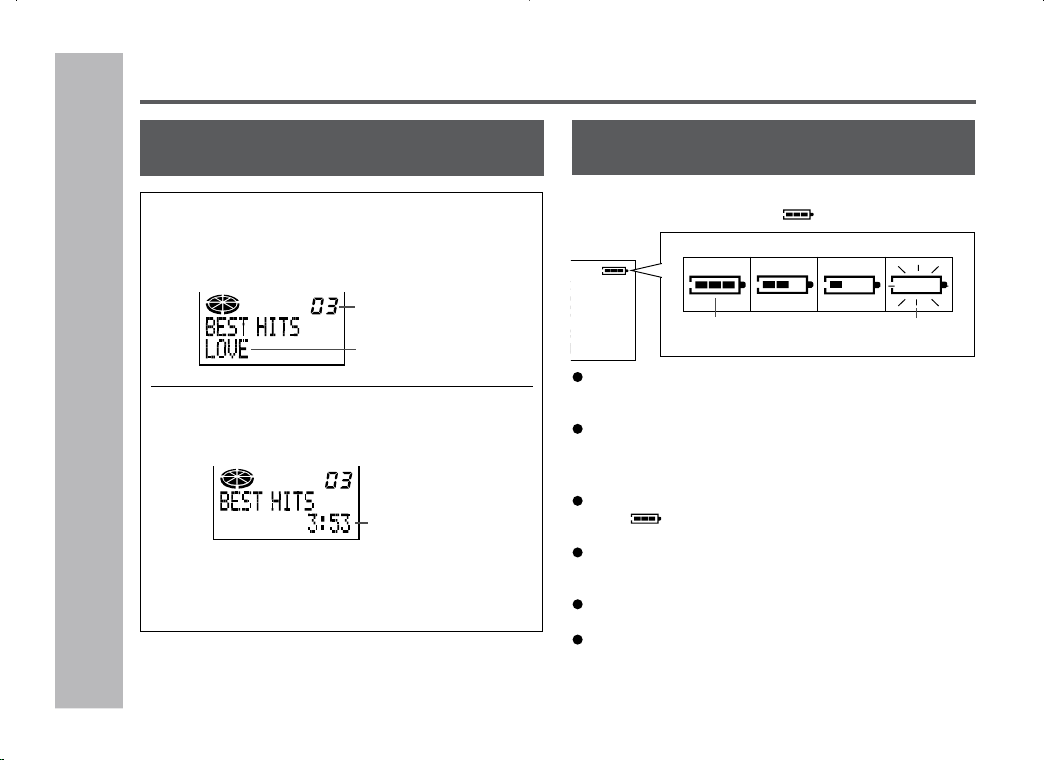
Checking Displays
To check the remaining recording time
and the total playing time
While in the stop mode, press the DISP button.
Each time the button is pressed, the display will change as
follows:
Disc name
Total playing
time
Remaining
recording time
Total playing
time
Notes:
If the disc name or the track name was not originally
recorded on the MiniDisc, “NO NAME” will be displayed.
Remaining recording time will not be displayed with a
playback-only MiniDisc.
Elapsed playback time and remaining playback time may
be different from the actual time.
To check the elapsed time and remaining
time of the track
During playback, press the DISP button.
Each time the button is pressed, the display will change as
follows:
Elapsed playback
time
Remaining
playback time
Track name
Remaining time of recording varies depending on the
set recording mode.
If the remaining time of recording is over 100 minutes,
the last digit of the seconds is not displayed on the re-
mote control.
< Main unit display > < Remote control
display >
40
Useful Features
– Checking Displays –
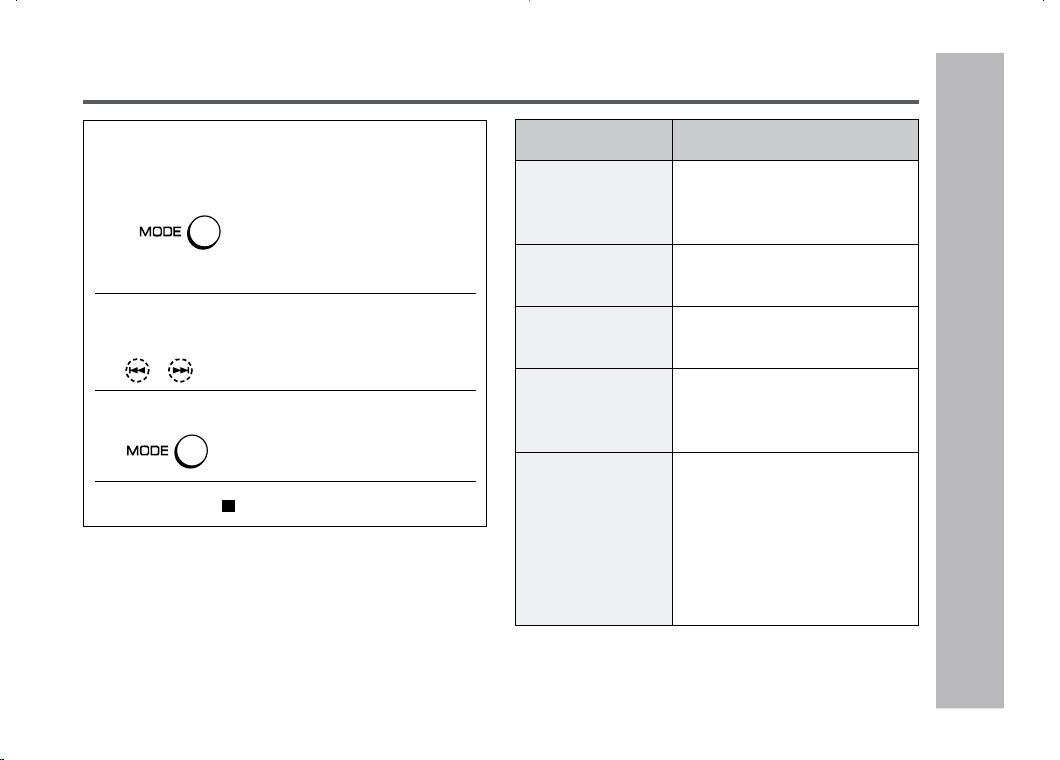
To display the playing time of an indi-
vidual track
1
While in the stop mode, press the
55
55
5
or
44
44
4
button to display the track number and
track name.
2
Press the DISP button to display the play-
ing time for that track.
Each time the
5
or
4
button is pressed, the
playing time of the previous or next track will be
displayed.
Checking the remaining amount of
battery level
The remaining amount of battery level is shown
by the battery indicator ( ) during operation.
When the battery is completely discharged, the battery
indicator will flash. Recharge the battery or replace the
alkaline battery with a new one.
When the battery has run completely out, “BATT EMPTY
(LoBATT)” will appear. Then, the power will be discon-
nected automatically.
Notes:
If you use the battery which you stopped charging half-
way, “ ” may appear. It does not mean that the bat-
tery is completely charged.
The battery indicator will not correctly display the remain-
ing capacity for approximately 20 seconds after the power
has been turned on.
When the AC adaptor or a separately available car adap-
tor is used, the battery indicator will not be shown.
The number of bars shown in the battery indicator may
increase or decrease, depending on the operation be-
ing performed. This is normal.
Track name
Track number
Playing time
Checking Displays (continued)
When the battery
level is high
When the battery
level is very low
How to read the battery indicator
41
Useful Features
– Changing Default Settings
–
Changing Default Settings
1
With a MiniDisc inserted, press the MODE
button for 2 seconds or more. “SET UP”
will appear.
When you release the button, “BEEP ON”
or “BEEP
OFF” will appear.
2
Press the
55
55
5
or
44
44
4
button to display the
menu.
3
Press the MODE button to switch items.
4
Press the •
/ :OFF button.
While in the stop mode ...
(*) indicates default setting.
MENU
BEEP ON
Confirmation
sound
A-PLAY ON
Auto play
AUTO Psave
Auto power save
D.L MODE 1
Digital recording
level
LIGHT NORM
3-color LED illu-
mination
Backlight on the
remote control
Display on the
remote control
SETTING ITEM
BEEP ON* Beep
BEEP OFF Silent
A-PLAY ON* Setting
A-PLAY OFF Canceled
AUTO Psave* Setting
Psave OFF Canceled
D.L MODE 1*
Setting keep
D.L MODE 2 Canceled
LIGHT NORM* See next
LIGHT ALL page.
LIGHT OPER
LIGHT OFF
42
Useful Features
– Changing Default Settings
–
Changing Default Settings (continued)
Beep sound
You can eliminate the confirmation sound that beeps
when you press a button.
Auto play
You can make the unit not play automatically when
you insert a playback-only MiniDisc or an accidental
erasure protected MiniDisc.
Auto power save
When the unit is used in a place exposed to much vibra-
tion, sound skipping can be decreased by canceling the
auto power save function. (Battery will drain faster.)
Digital recording level
“D.L MODE 1”
The digital recording level you set will be kept even
after canceling recording.
“D.L MODE 2”
Every time you cancel recording, the level will re-
turn to [ D.L 0dB ].
What is auto power save function?
During playback, maximum 40 seconds (in stereo) of
musical information is stored. Auto power save function
automatically adjusts the storage time between 5 and
40 seconds to reduce the power consumption. If this func-
tion is canceled, the storage time cannot be adjusted. (It
cannot be adjusted even if it is operated on the battery
charger.) The storage time varies depending on the play-
back mode.
Operation indicator, backlight on the remote
control and display on the remote control
The illuminating pattern of the 3-color LED and the
remote control can be changed.
LIGHT NORM
3-color LED Indication lamp is flashing.
Backlight on the
Lit for approx. 10 seconds when operated.
remote control
Display on the Indicated.
remote control
LIGHT ALL
3-color LED Indication lamp is lit.
Backlight on the
Lit for approx. 10 seconds when operated.
remote control
(Lit when operated on the battery charger.)
Display on the Indicated.
remote control
LIGHT OPER
3-color LED Lit for approx. 10 seconds when operated
during playback or recording.
Backlight on the
Lit for approx. 10 seconds when operated.
remote control
Display on the Indicated for approx. 10 seconds when
remote control operated.
LIGHT OFF
3-color LED The light is not turned on.
Backlight on the The light is not turned on.
remote control
Display on the Indicated for approx. 10 seconds when
remote control operated.
43
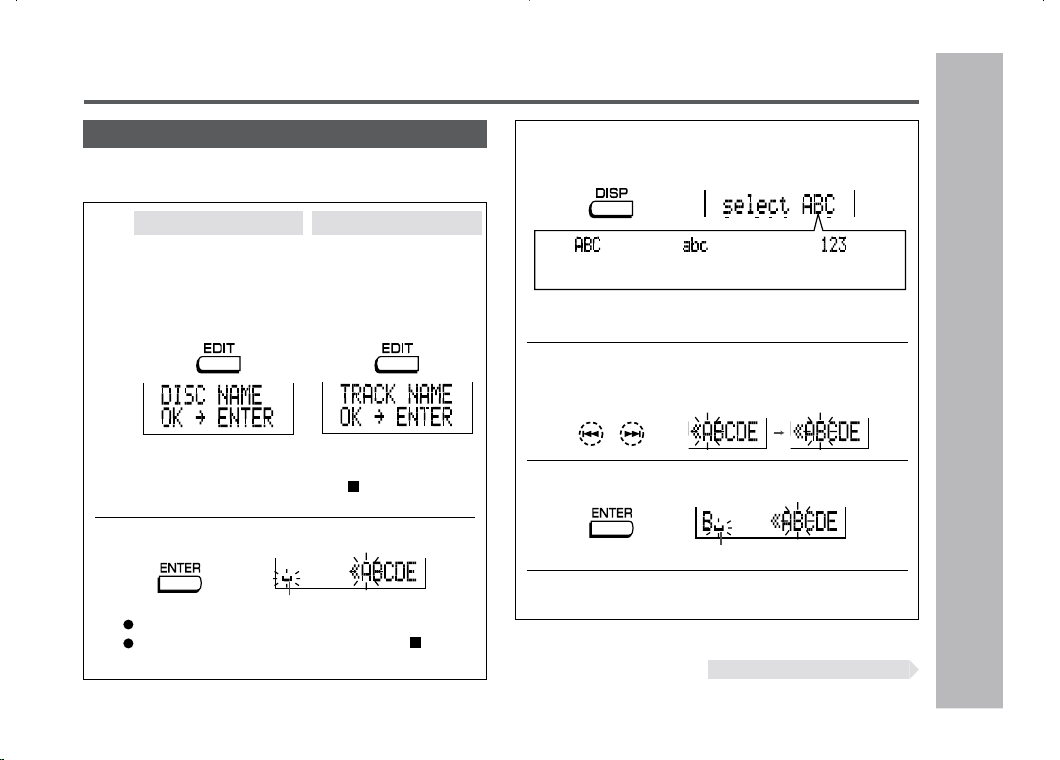
3
Press the DISP button repeatedly to select
the type of characters.
The first 3 characters in the group of the selected
characters will be displayed for about 1 second.
4
Press the
55
55
5
or
44
44
4
button repeatedly to
select the letter.
5
Press the ENTER button to enter it.
Position where the next letter will be entered
6
To enter more letters, repeat steps 3 - 5.
Advanced Features
– Titling a MiniDisc –
Titling a MiniDisc
Creating disc and track names
Load a MiniDisc to be named. A playback-only or record-
ing-prevented MiniDisc cannot be edited.
1
While in the pause
mode with “DISC” dis-
played, press the EDIT
button repeatedly to
select “DISC NAME”.
While in the pause
mode, press the EDIT
button repeatedly to
select “TRACK NAME”.
Disc name Track name
(Capital letters) (Lower-case letters) (Numbers and symbols)
Continued to the next page
2
Press the ENTER button.
Cursor
The unit will enter the character input mode.
To cancel the operation, press the • / :OFF
button.
If “DISC” is not displayed, you cannot select “DISC
NAME.”
“DISC” is displayed when the • /:OFF is pressed
once.
44
Advanced Features
– Titling a MiniDisc –
Characters (symbols)
To erase a character
Press the VOL + or VOL – button to move the cursor to the
character you want to erase, and then press the BASS
button.
To enter a space
Press the VOL + button to move the cursor to the right.
Space
A C D E F G HB
1 3 4 5 6 7 82
a c d e f g hb
I J K L M
S U V W X Y ZTR
N
QP
. ,
/
/.,
! " #
–
:
(
+
$
*
9 0
&
'
<; =
O
i j k l m
s u v w x y ztr
n o
qp
. ,
/
%
_
`
@
>
?
)
Capital letters
Lower-case letters
Numbers and symbols
: indicates a space.
Titling a MiniDisc (continued)
Note:
One disc name and up to 255 track names can be created
per disc. (A maximum of 100 characters for the disc and
each track name and a total of 1,700 characters can be
entered. However, if any tracks are recorded in the 2 times
or 4 times long recording mode, the number of characters
to be entered is decreased, since the information of the
recording mode is stored by the track.)
7
When the name has been completely en-
tered, press the EDIT button.
8
“TOC” will be displayed. To write the up-
dated contents to the MiniDisc, press the
• / :OFF button.
You cannot remove the MiniDisc while “TOC” is dis-
played. “TOC” will not disappear until the recorded
contents have been updated.
45
Advanced Features
– Titling a MiniDisc
–
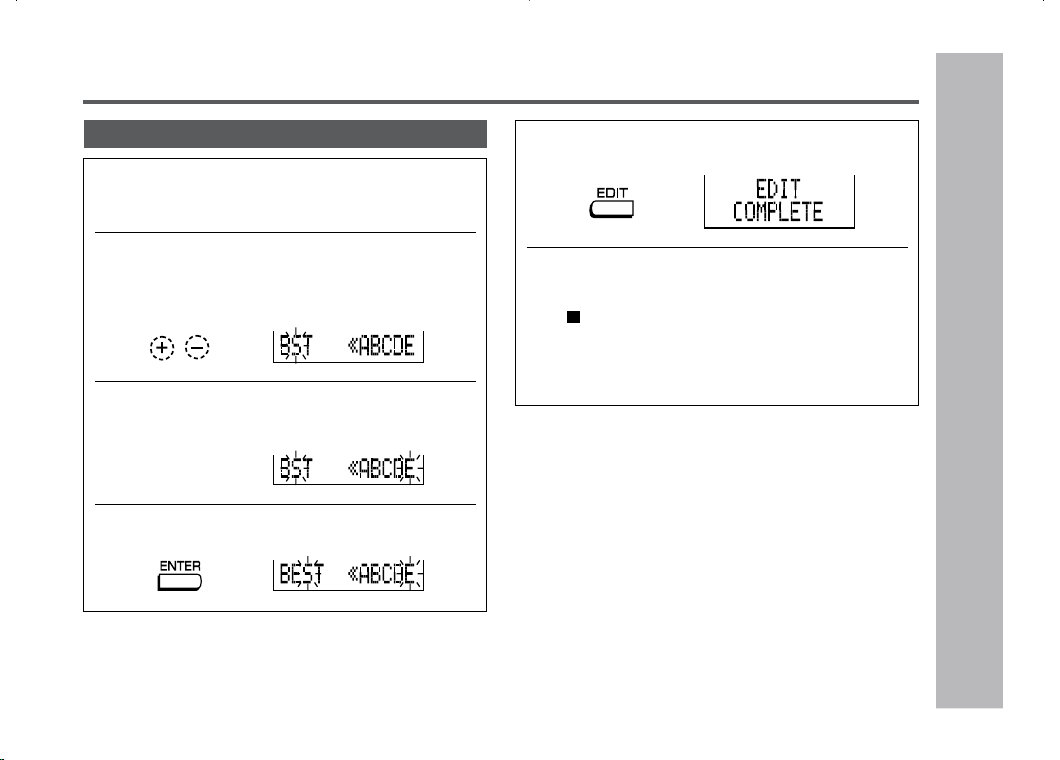
To add characters
1
Put the unit in the character input mode.
(Perform steps 1 - 2 on page 43.)
2
Press the VOL + or VOL – button to move the
cursor to the right of the character, where you
want to add a new character.
3
Select the character to add.
(Perform steps 3 - 4 on page 43.)
4
Press the ENTER button.
Titling a MiniDisc : continued
5
Press the EDIT button.
6
“TOC” will be displayed. To write the up-
dated contents to the MiniDisc, press the
• / :OFF button.
You cannot remove the MiniDisc while TOC is dis-
played. TOC will not disappear until the recorded
contents have been updated.

46
1
Insert a Master MiniDisc.
Do not mistake the Master MiniDisc for the target one.
2
While in the stop mode, press the EDIT but-
ton repeatedly to select “NAME STAMP”.
3
Press the ENTER button.
To cancel the operation, press the • / :OFF button.
Stamping titles from another MiniDisc
Before stamping
When there are 2 MiniDiscs on which the same tracks
are recorded, you can transfer the character information
(disc and track names) of the Master MiniDisc to another
MiniDisc (for stamping).
Titling a MiniDisc (continued)
1. What is a master MiniDisc?
A recordable MiniDisc that contains tracks and char-
acter information.
(You cannot transfer the information from a play-
back-only MiniDisc.)
2. What is a MiniDisc for stamping?
A MiniDisc that contains the same tracks in the same
order as the master MiniDisc.
(Make sure that the total number of tracks of the
master MiniDisc and the one for stamping are the
same.)
Master MiniDisc operation
Advanced Features
– Titling a MiniDisc –
47
Advanced Features
– Titling a MiniDisc
–
Titling a MiniDisc : continued
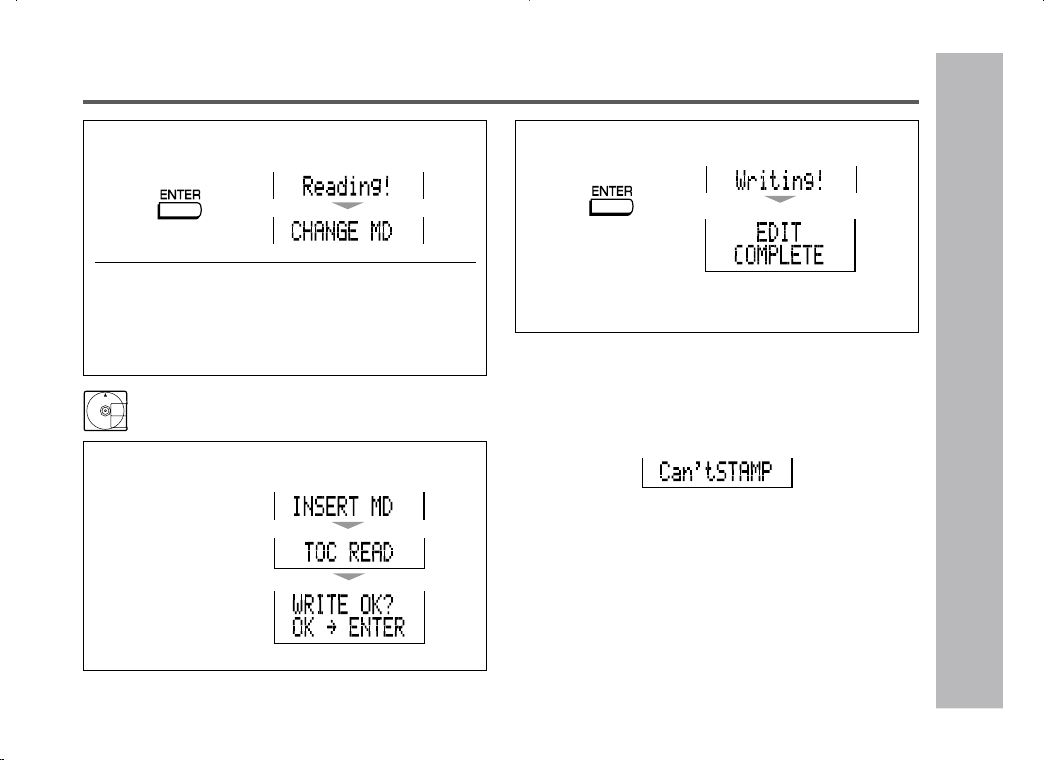
Note:
If the total number of tracks on the master MiniDisc does
not match that on the MiniDisc for stamping, the unit will
display “Can't STAMP” and turn off the power.
If this happens, adjust the total number of tracks on the
newly recorded MiniDisc using the edit operation.
4
Press the ENTER button.
5
When the unit displays “CHANGE MD”,
remove the master MiniDisc.
Remove it without turning off the power. Or, the op-
eration will be canceled.
6
Load a MiniDisc for stamping.
Operation of the MiniDisc for stamping
7
Press the ENTER button.
The unit will finish recording the character informa-
tion and enter the stop mode.
48
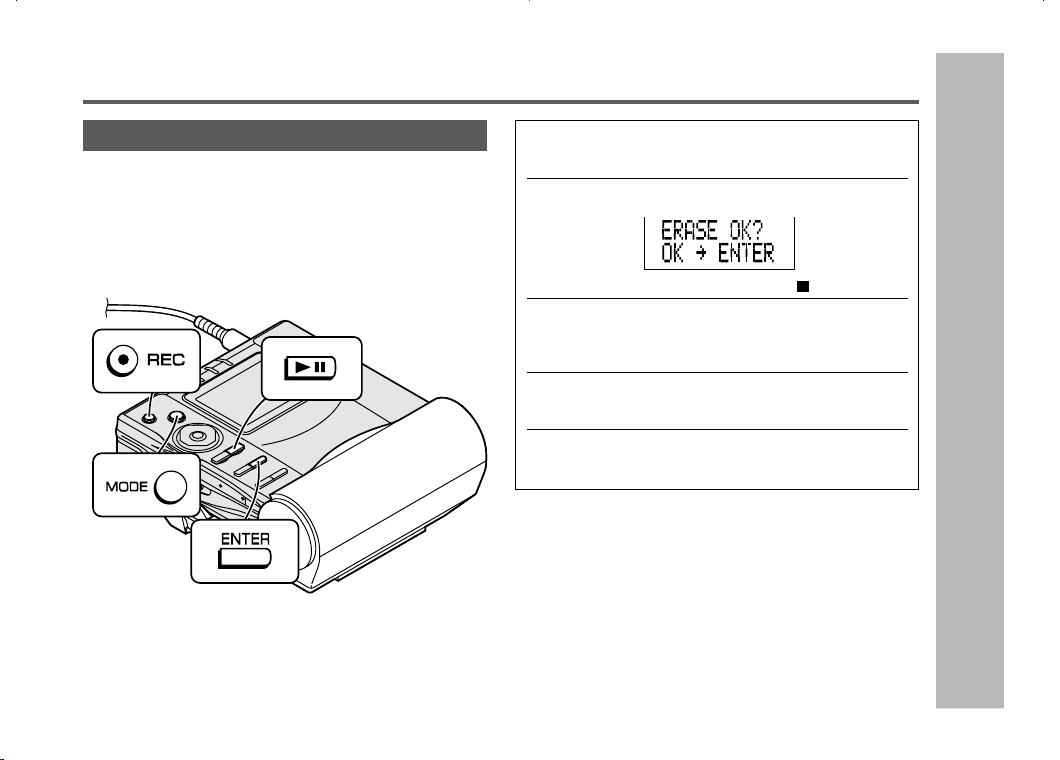
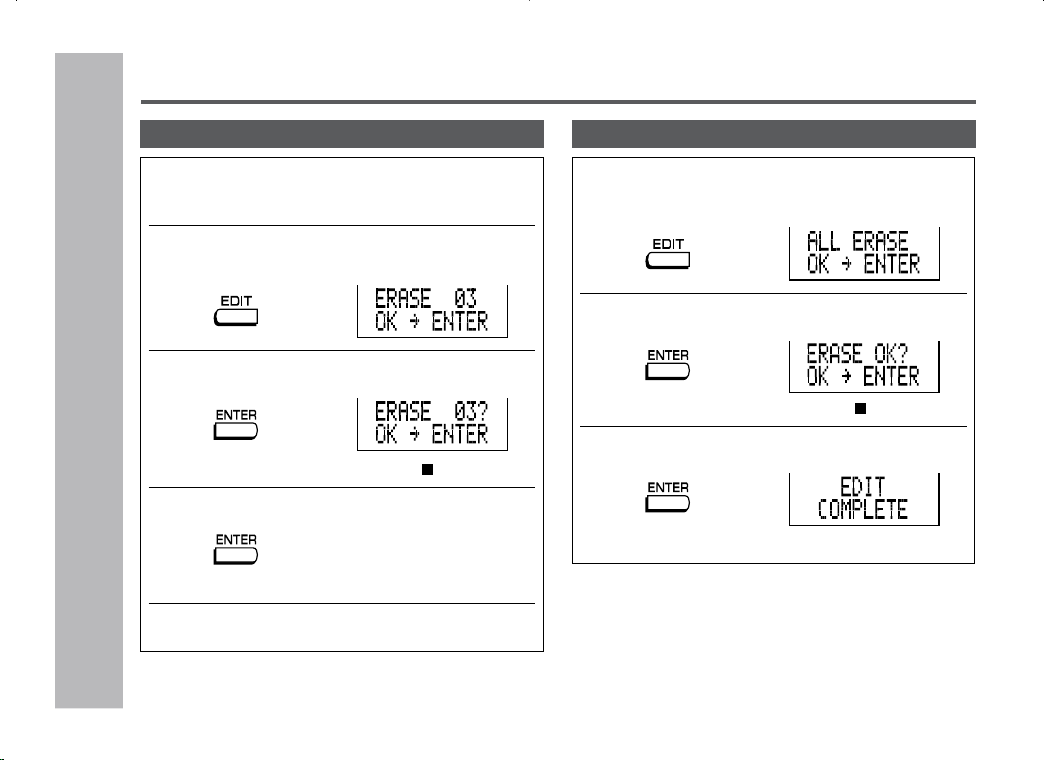
Editing a Recorded MiniDisc
1
Start playing the track to be erased, and
press the
06 06
06 06
06
button.
2
Press the EDIT button repeatedly to select
“ERASE”.
3
Press the ENTER button.
To cancel the operation, press the • / :OFF button.
4
Press the ENTER button again.
The track will be erased.
5
To erase other tracks, repeat steps 1 - 4.
1
While in the stop mode, press the EDIT but-
ton repeatedly to select “ALL ERASE”.
2
Press the ENTER button.
To cancel the operation, press the •
/ :OFF button.
3
Press the ENTER button again.
All of the tracks will be erased.
Caution:
Once a track has been erased, it cannot be recovered.
Check the track number before erasing it.
To erase tracks one at a time To erase all of the tracks at once
Advanced Features
– Editing a Recorded MiniDisc
–
49
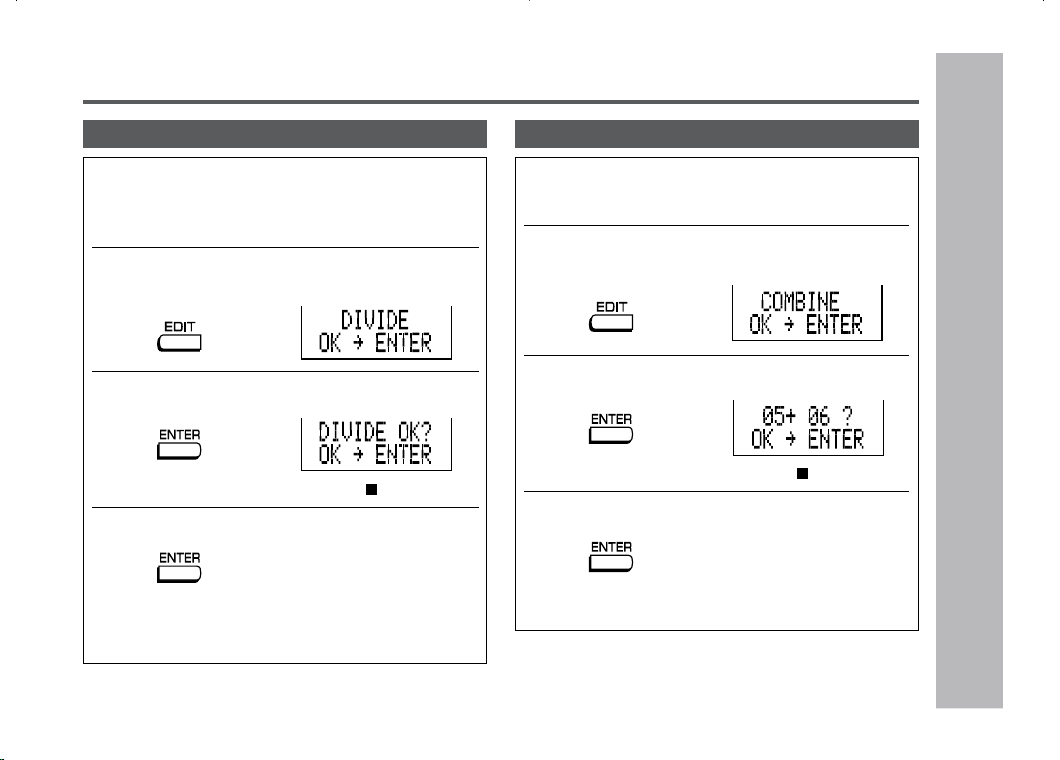
To divide a track
1
Start playing the track to be divided into
two. Press the
0606
0606
06
button at the point where
you want to divide the track.
2
Press the EDIT button repeatedly to select
“DIVIDE”.
3
Press the ENTER button.
To cancel the operation, press the •
/ :OFF button.
4
Press the ENTER button again.
The track will be divided into two tracks, and the unit
will pause at the beginning of the second of the two
new tracks.
Editing a recorded MiniDisc : continued
Advanced Features
– Editing a Recorded MiniDisc
–
To combine tracks
1
Start playing the last of the two tracks to
be combined, and press the
06 06
06 06
06
button.
2
Press the EDIT button repeatedly to select
“COMBINE”.
3
Press the ENTER button.
To cancel the operation, press the •
/ :OFF button.
4
Press the ENTER button again.
The two tracks will be combined, and the unit will be
paused at the beginning of the combined track.
50
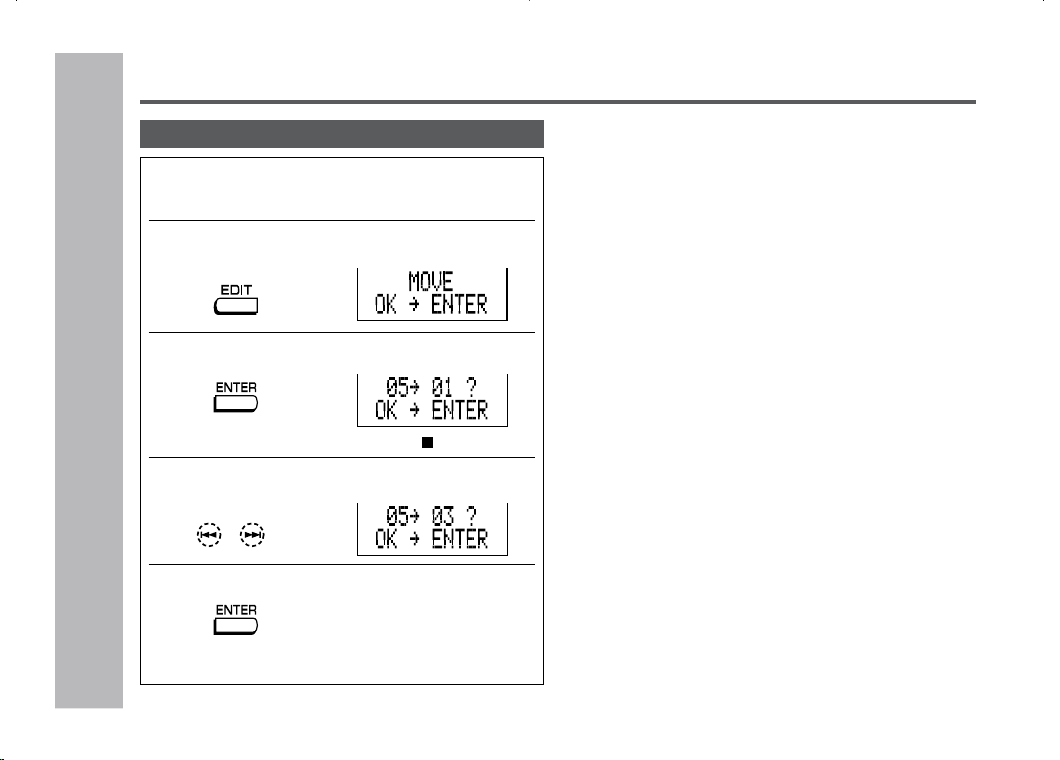
To move a track
1
Play the track to be moved, and press the
0606
0606
06
button.
2
Press the EDIT button repeatedly to select
“MOVE”.
3
Press the ENTER button.
To cancel the operation, press the •
/ :OFF button.
4
Press the
55
55
5
or
44
44
4
button to select the
direction.
5
Press the ENTER button again.
The track will be moved, and the unit will be paused
at the beginning of the track.
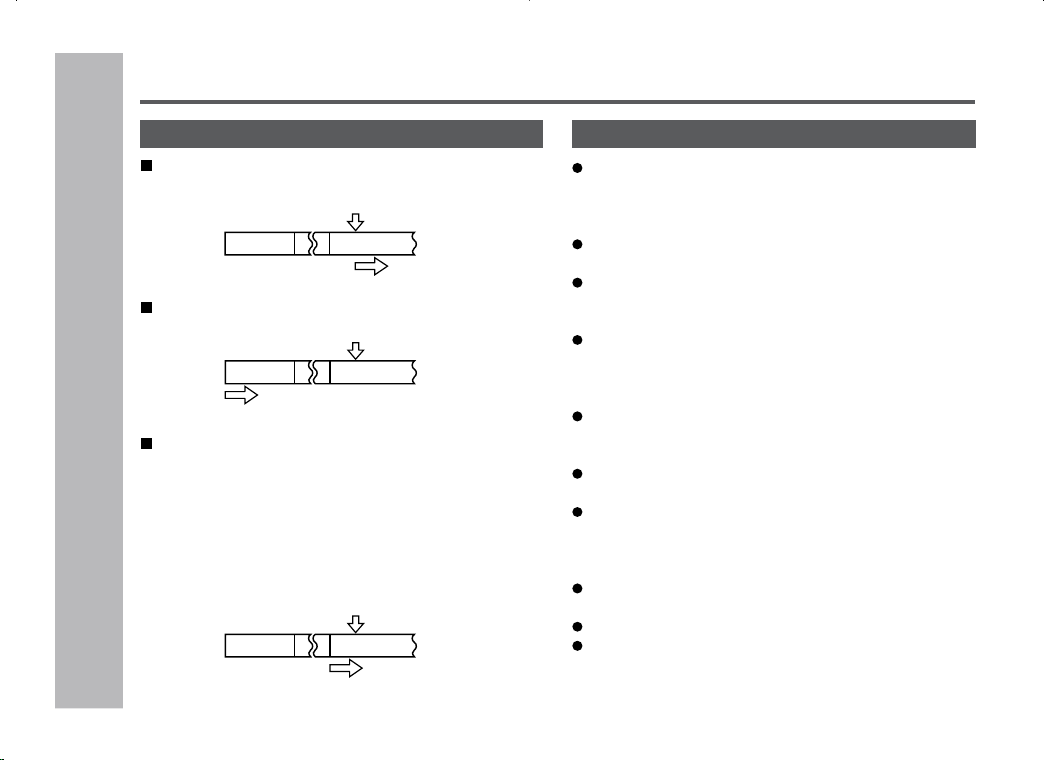
When a track has a name before dividing:
The two new tracks will have the same name. However, in
the TOC FULL condition, the second track may not be
named.
Total number of tracks that can be divided:
Each disc can hold up to 255 tracks. However, even if the
number of assigned tracks has not reached 254, it might
not be possible to make any further divisions of tracks.
To combine two non-adjacent tracks:
First, put the two tracks next to each other in the order you
want using the MOVE function. Then combine them using
the COMBINE function.
When one or both tracks to be combined have a name:
The first track name will be used. However, when the first
track does not have a name, the second track name will be
used.
In the following cases, tracks may not be combined:
Tracks recorded by different inputs cannot be combined.
Example:
- Digital recorded track and analog recorded track.
- Different recording modes (stereo recording, 2 times long
recording, 4 times long recording, monaural recording).
Tracks whose recording time is less than 12 seconds.
Editing a Recorded MiniDisc (continued)
Advanced Features
– Editing a Recorded MiniDisc
–
51
Advanced Features
– Listening to a MiniDisc Through a Stereo System or a Car Stereo –
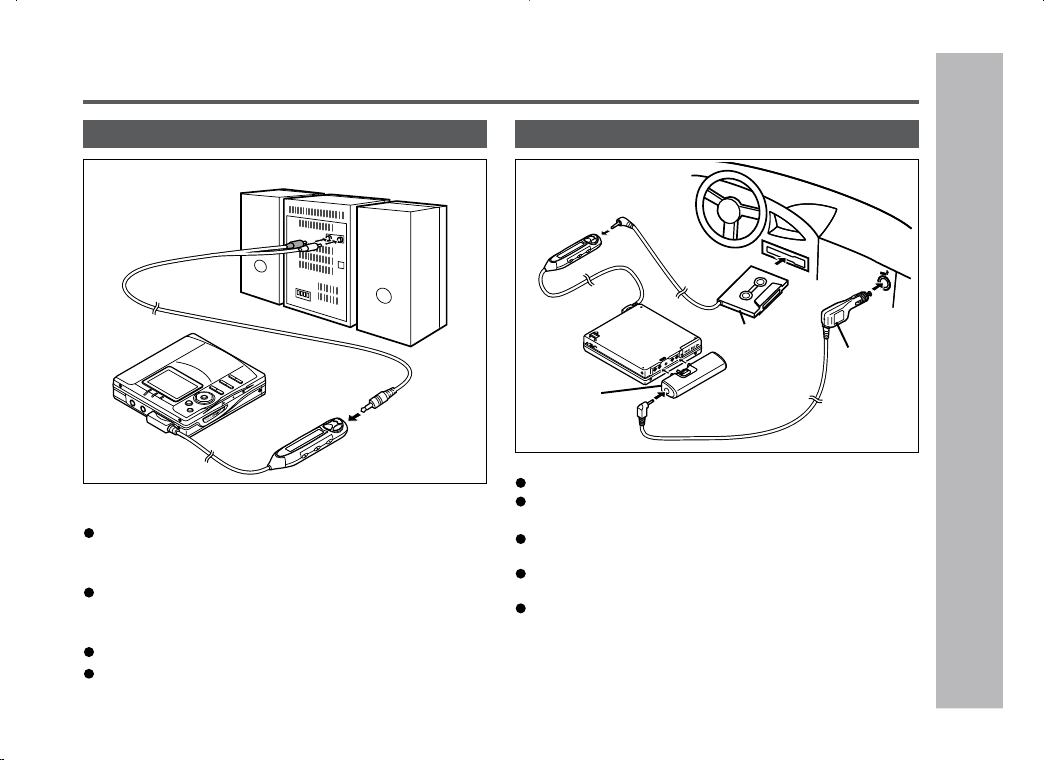
Listening to a MiniDisc Through a Stereo System or a Car Stereo
Notes:
It is recommended that the volume level of the MiniDisc
unit be set to maximum when listening through a stereo
system.
When recording with stereo system, eliminate the con-
firmation sound (page 41).
Otherwise, it will also be recorded.
The recording will be made in the analog mode.
Character information will not be recorded.
Listening through a stereo system
Notes:
Adjust the volume of both this portable MD and a car stereo.
Do not operate this portable MD while you drive a car.
It may distract your attention and cause a traffic accident.
Do not use any car adaptor except for the separately
available AD-CA55X.
Remove the battery when you power the unit from the
car battery.
Do not leave the unit in the place of high temperature
such as in a car.
If the unit gets hot, the LCD display will be darkened and
hard to read. It will return to normal when the tempera-
ture cools down.
Listening through a car stereo
Separately
available
cassette
adaptor
(AD-CT14)
Separately
available
car adaptor
(AD-CA55X)
Separately
available
plug adaptor
(AD-M66PA)
White:
To the left
Red:
To the right
Connection cable
To the LINE INPUT jacks
52
References
– Other Features and Caution –
Resuming auto play
When you stop playback and replay the MiniDisc
without removing it, playback starts from the point
you stopped it.
Once you remove the MiniDisc, playback starts from
the first track.
The unit provides the following functions when you
use it with the separately available car adaptor (AD-
CA55X) (when the rechargeable or alkaline battery
is removed):
1.
When you turn off the engine, the power of this port-
able MD also turns off. (It may not work with some
types of cars.)
2. When you restart the engine, playback starts from
the beginning of the stopped track.
First track
Stopping
Playing
Stopped track
Stopping
Playing
First track
Stopped track
Stopping
Playing
First track
Stopped track
Other Features and Caution
A rechargeable nickel-metal hydride battery is the only
kind that can be used. Even if the battery is not used,
you should charge it at least once every three months
because of the special quality of this battery.
The rechargeable battery can be charged approximately
300 times.
When the operating time is reduced to about half the
normal amount of time, even after a full charge is per-
formed, replace the battery with a new one (AD-N55BT).
When the battery is charged for the first time or is charged
after not being used for a long period, the operating time
may be shorter than normal. The battery life will recover
with normal use i.e. charging and discharging.
To avoid shortening the service life of the battery, only
recharge the battery after it has been completely dis-
charged.
If the rechargeable battery is used in a cold environment,
the operating time will be reduced.
Do not carry the battery in your pocket or a bag together
with metal objects (keys, coins, jewelry, etc.). The bat-
tery may short out and generate significant amounts of
heat.
Do not short-circuit the terminals as they will become
very hot and will damage the battery.
Do not drop or subject the battery to shock.
Do not insert objects (metal etc.) into the battery com-
partment of this product or into the rechargeable battery.
Rechargeable battery

53
The unit may have the following symptoms while recording or editing. The unit is not out of order.
MiniDisc System Limitations
References
– MiniDisc System Limitations
–
SYMPTOM
“DISC FULL” or “TOC FULL” appears
even though the MiniDisc still has re-
cording time left.
The remaining recording time does not
increase even though you erased tracks.
The total of the recorded time and the
remaining time does not match the maxi-
mum recordable time.
Combine function does not work.
Sound skips in fast reverse/forward.
A track number is created in the middle
of a track.
LIMITATIONS
More than 255 tracks (maximum) cannot be recorded regardless of the re-
cording time.
If the MiniDisc is recorded or edited repeatedly or if it has scratches (record-
ing skips scratched parts), you may not be able to record the maximum
tracks above.
The unit does not count non-recorded portions that last 12 or fewer seconds
to display the remaining recording time. The time may not increase even if
you erase short tracks.
One cluster (approximately 2 seconds) is the minimum unit for recording.
For example, a 3-second track uses 2 clusters (approximately 4 seconds).
Therefore, the actual recordable time may be shorter than the displayed
time.
A MiniDisc on which recording and editing are repeated may not allow the
combine function.
One track is divided and recorded in separate places on a repeatedly re-
corded or edited MiniDisc.
Sound may skip.
A track number may be created if there are scratches or dust on the MiniDisc.
54
References
– Error Messages –
Error Messages
ERROR MESSAGES
BATT EMPTY
(LoBATT)
BLANK MD
(BLANK)
Can’t COPY
(Can’tC)
Can’t EDIT
(Can’tE)
Can’t READ *
(Can’tS)
(Can’tT)
(Can’tU)
Can’t REC
(Can’tR)
Can’t STAMP
Can’t WRITE
(Can’tW)
CHARGEmode
DEFECT
(DEFECT)
DISC FULL
Er-MD **
(ErMD*)
HOLD
(HOLD)
LOCKED
(Can’tLOCK)
MEANING
The battery is run down.
Nothing is recorded.
You tried to record from a copy prohibited
MiniDisc.
A track cannot be edited.
The disc data cannot be read because the disc
is damaged.
Recording cannot be performed correctly due to
vibration or shock.
Stamp function does not work.
Cannot save the TOC information correctly to a
MiniDisc. (A large portion of the disc has been
damaged.)
The Charge/Operation switch is not set to the
operation mode when using this unit with the AC
adaptor.
The disc is scratched.
The disc is out of recording space.
The microprocessor has reported a system fault
and the unit is out of order.
The unit is in the hold mode.
You removed a MiniDisc while recording or
editing.
REMEDY
Charge the rechargeable battery or replace the alka-
line battery (or use the AC adaptor for power).
Replace the disc with a recorded disc.
Record using the analog cable.
Change the stop position of the track and then edit it.
Reload the disc.
Replace it with another recorded disc.
Re-record or replace it with another recordable disc.
Check the number of tracks.
Replace the disc with another recordable disc.
Set the Charge/Operation switch to the operation mode.
If the sound you hear is not right, record again.
Replace the disc with another recordable disc.
Replace it with another recordable disc.
To have it repaired, go to the distributor where you pur-
chased the unit.
Return the HOLD switch to its original position.
Turn off the power and remove the MiniDisc.

55
References
– Error Messages –
Error Messages : continued
ERROR MESSAGES
NO DISC
NO SIGNAL
(noSIG.)
PLAY MD
(PLAYmd)
POWER ?
PROTECTED
SORRY
(Sorry)
TEMP OVER
(TEMP!)
TOC FORM **
(Tform**)
TOC FULL
Tr. Protect
? DISC
(? DISC)
MEANING
A disc has not been loaded.
Poor connection of the digital cable.
No output signal comes out from the connected
unit to playback.
The input signal has improper sampling fre-
quency.
You recorded on a playback-only disc.
The battery charger is defective.
The write protection tab of a MiniDisc is set to
the protected position.
You tried to record on a playback-only disc.
Since a track number is currently being located
or updated, the unit cannot accept your com-
mand.
The temperature is too high.
There is an error in the recording signal.
There is no space left for recording character
information (track names, disc names, etc.).
The track has been protected from being erased.
A disc which contains data other than music was
played.
There is an error in the signal recorded on the
disc.
Stamping is not possible.
REMEDY
Load a disc.
Connect the digital cable securely.
If the portable CD player has a function to prevent sound
skips, deactivate it.
Playback with the connected unit.
Replace it with a recordable disc.
To have it repaired, go to the distributor where you
purchased the unit.
Move the write protection tab back to its original position.
Replace it with a recordable MiniDisc.
Wait for a while and try the operation again.
Turn off the power, and wait for a while.
Erase all of the tracks, and then record again.
Replace it with another recordable disc.
Edit the track with the device on which it was recorded.
A disc which contains non-music data cannot be played.
Replace it with another recorded disc.
Retry.
( ) : Error messages seen on the remote control.
Number or symbol appears in * position.
56
Troubleshooting
References
– Troubleshooting –
Many potential “problems” can be resolved by the owner without calling a service technician.
If something seems to be wrong with this product, check the following before calling your authorized SHARP dealer or
service center.
The unit does not
turn on.
No sound is
heard from the
earphones.
When the opera-
tion buttons are
pressed, the unit
does not respond.
Some sounds
are skipped.
Is the AC adaptor disconnected?
Is the battery exhausted?
Is the unit in the hold mode?
Has condensation formed inside the
unit?
Is the unit being influenced by me-
chanical shock or by static electric-
ity?
Is the volume set too low?
Is the remote control unit or the ear-
phones plugged in?
Are you trying to play a MiniDisc with
data on it instead of a MiniDisc contain-
ing music?
Is the unit in the hold mode?
Is the battery exhausted?
Is the remote control unit plug or the
earphones plug inserted firmly?
Is the battery exhausted?
Is the unit being subjected to exces-
sive vibration?
Has the track number or character
information been updated on the
disc yet?
Is the unit in the recording or edit-
ing mode?
Is the MiniDisc protected against
accidental erasure?
Is the unit connected properly to the
other equipment?
Is the AC adaptor unplugged or did a
power failure occur while recording or
editing?
Is the unit in the hold mode?
Is an optical signal being output from
the stereo system?
Read the operation manual for the
stereo system.
Is the select switch for charging/
operation set on the charging side?
Is the jack clean?
Is the remote control display set to
“LIGHT OFF”?
The MiniDisc can-
not be ejected.
Recording and
editing are im-
possible.
The battery cannot
be charged.
Nothing appears
on the remote
control display.
PROBLEM CAUSE PROBLEM CAUSE
57
References
– Maintenance
–
Troubleshooting : continued
If trouble occurs
When this product is subjected to strong external in-
terference (mechanical shock, excessive static elec-
tricity, abnormal supply voltage due to lightning, etc.)
or if it is operated incorrectly, it may malfunction.
If such a problem occurs, do the following:
1. Unplug the AC adaptor from the AC outlet.
2. Remove the battery.
3. Leave the unit completely unpowered for approximately
30 seconds.
4. Plug the AC adaptor back into the AC outlet and re-
operate the unit.
Caution:
Do not use chemicals for cleaning (gasoline, paint thin-
ner, etc.).
It may damage the cabinet finish.
Do not apply oil to the inside of the unit.
It may cause malfunctions.
Cleaning
When the unit becomes dirty
Clean it with a soft cloth.
When the unit is excessively dirty, use a soft cloth damp-
ened in water (external surfaces only).
Clean the plugs and the connecting jack.
If the plugs or jacks are dirty, noise may be heard.
Cleaning will prevent noise.
Maintenance
Moisture condensation
When the unit has condensation inside, the disc signals
cannot be read, and the unit may not function properly.
In the following cases, condensation may form inside the unit.
Shortly after turning on a heater.
When the unit is placed in a room
where there is excessive steam
or moisture.
When the unit is moved from a
cool place to a warm place.
To remove condensation:
Remove the MiniDisc and leave the unit for approximately
1 hour. The condensation should evaporate and the unit
will work properly.
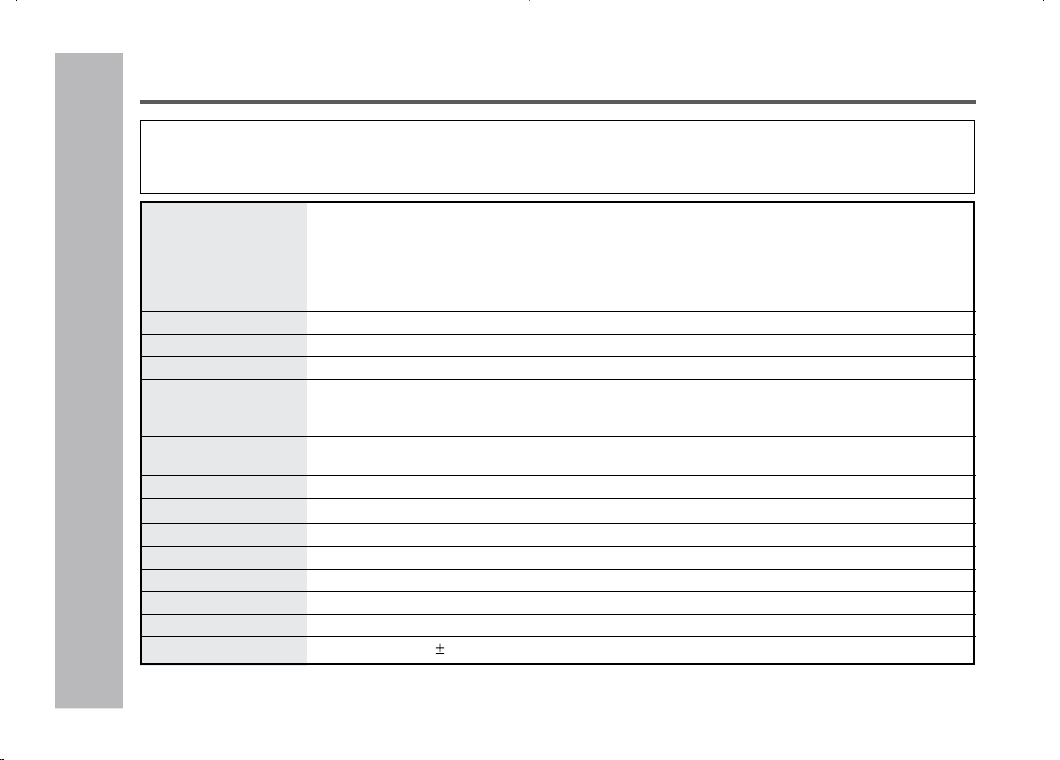
58
References
– Specifications –
Specifications
As a part of our policy of continuous improvement, SHARP reserves the right to make design and specification
changes for product improvement without prior notice.
The performance specification figures indicated are nominal values of production units. There may be some devia-
tions from these values in individual units.
Power source DC 1.2V: Rechargeable Nickel-Metal Hydride battery (AD-N55BT) x 1
DC 5V: AC adaptor (AC 120V, 60 Hz)
DC 1.5V: Commercially available, “AA” size (LR6), alkaline battery x 1
DC 1.5V: Separately available car adaptor, AD-CA55X (for cars with a 12-24V DC nega-
tive ground electrical system) (Used with separately available plug adaptor
(AD-M66PA))
Power consumption 7 W (AC adaptor)
Output power RMS; 10 mW (5 mW + 5 mW) (0.2% T.H.D.)
Charging time Approx. 3.5 hours
Input sensitivity MIC H: reference input level 0.25 mV input impedance 10 k ohms
MIC L: reference input level 2.5 mV input impedance 10 k ohms
LINE: reference input level 100 mV input impedance 20 k ohms
Output level Earphones
:
maximum output level 5 mW + 5 mW load impedance 32 ohms
LINE: specified output 250 mV (-12 dB) load impedance 10 k ohms
Dimensions Width: 2-27/32” (71.9 mm) Height: 11/16” (16.8 mm) Depth: 3-1/8” (78.7 mm)
Weight 0.29 lbs. (131 g) with rechargeable battery
Input jack Line/optical digital, microphone (powered by the main unit)
Output jack Earphones (impedance: 32 ohms)/remote control unit
Type Portable MiniDisc recorder
Signal readout Non-contact, 3-beam semiconductor laser pickup
Audio channels Stereo 2 channels/monaural (long-play mode) 1 channel
Frequency response
20 – 20,000 Hz ( 3 dB)

59
References
– Specifications
–
Specifications
Rotation speed Approx. 400 – 1,350 rpm
Error correction ACIRC (Advanced Cross Interleave Reed-Solomon Code)
Coding ATRAC/ATRAC3 (Adaptive TRansform Acoustic Coding), 24-bit computed type
Recording method Magnetic modulation overwrite method
Sampling frequency
44.1 kHz (32 kHz and 48 kHz signals are converted to 44.1 kHz, and then recorded.)
Wow and flutter Unmeasurable (less than 0.001% W. peak)
When using the rechargeable battery
(fully charged) included with the unit
When using one, commercially avail-
able, high capacity, “AA” size (LR6), al-
kaline battery (The rechargeable bat-
tery is in the unit, discharged.)
When using one, commercially avail-
able, high capacity, “AA” size (LR6), al-
kaline battery with the rechargeable bat-
tery (fully charged)
Stereo 2 times long 4 times long
Continuous Continuous Continuous Continuous Continuous Continuous
recording: play: recording: play: recording: play:
Approx. Approx. Approx. Approx. Approx. Approx.
6.5 hours 12 hours 9 hours 13.5 hours 11.5 hours 15 hours
Continuous Continuous Continuous Continuous Continuous Continuous
recording: play: recording: play: recording: play:
Approx. Approx. Approx. Approx. Approx. Approx.
6 hours 16 hours 10 hours 19.5 hours 13 hours 22 hours
Continuous Continuous Continuous Continuous Continuous Continuous
recording: play: recording: play: recording: play:
Approx. Approx. Approx. Approx. Approx. Approx.
15 hours 29 hours 22 hours 33 hours 30 hours 40 hours
Battery life
The above values are the standard values when the unit is
operated horizontally and charged at an ambient tempera-
ture of 77 F (25 C). (The operable duration with the recharge-
able battery will be shorter when the unit is carried around.)
The volume level is set at “VOL 15”.
The LED is set at “LIGHT OFF” (see page 41).
Operable duration with a commercially available battery var-
ies depending on its maker, type, and conditions of use.
“Fully charged” means that the charging is complete after
approximately 3.5 hours since the remaining amount of the
battery is reduced to “ ” (1 bar).
Printed in Malaysia
A0101.TOTINSZ0639AWZZ
SHARP ELECTRONICS CORPORATION
Sharp Plaza, Mahwah, New Jersey 07430-2135
SHARP CORPORATION
9906
CONSUMER LIMITED WARRANTY
SHARP ELECTRONICS CORPORATION warrants to the first consumer purchaser that this Sharp brand product (the “Product”), when shipped in its original container,
will be free from defective workmanship and materials, and agrees that it will, at its option, either repair the defect or replace the defective Product or part thereof with
a new or remanufactured equivalent at no charge to the purchaser for parts or labor for the period(s) set forth below.
This warranty does not apply to any appearance items of the Product nor to the additional excluded item(s) set forth below nor to any Product the exterior of which has
been damaged or defaced, which has been subjected to improper voltage or other misuse, abnormal service or handling, or which has been altered or modified in
design or construction.
In order to enforce the rights under this limited warranty, the purchaser should follow the steps set forth below and provide proof of purchase to the servicer.
The limited warranty described herein is in addition to whatever implied warranties may be granted to purchasers by law. ALL IMPLIED WARRANTIES INCLUDING
THE WARRANTIES OF MERCHANTABILITY AND FITNESS FOR USE ARE LIMITED TO THE PERIOD(S) FROM THE DATE OF PURCHASE SET FORTH BELOW.
Some states do not allow limitations on how long an implied warranty lasts, so the above limitation may not apply to you.
Neither the sales personnel of the seller nor any other person is authorized to make any warranties other than those described herein, or to extend the duration of any
warranties beyond the time period described herein on behalf of Sharp.
The warranties described herein shall be the sole and exclusive warranties granted by Sharp and shall be the sole and exclusive remedy available to the purchaser.
Correction of defects, in the manner and for the period of time described herein, shall constitute complete fulfillment of all liabilities and responsibilities of Sharp to the
purchaser with respect to the Product, and shall constitute full satisfaction of all claims, whether based on contract, negligence, strict liability or otherwise. In no event
shall Sharp be liable, or in any way responsible, for any damages or defects in the Product which were caused by repairs or attempted repairs performed by anyone
other than an authorized servicer. Nor shall Sharp be liable or in any way responsible for any incidental or consequential economic or property damage. Some states
do not allow the exclusion of incidental or consequential damages, so the above exclusion may not apply to you.
THIS WARRANTY GIVES YOU SPECIFIC LEGAL RIGHTS. YOU MAY ALSO HAVE OTHER RIGHTS WHICH VARY FROM STATE TO STATE.
Model Specific Section
Your Product Model Number & Description:
(Be sure to have this information available when you need service for your Product.)
Warranty Period for this Product: One (1) year parts and ninety (90) days labor.
Additional Item(s) Excluded from Warranty Coverage (if any): Non-functional accessories, supplies, and consumable items.
Where to Obtain Service: At a Sharp Authorized Servicer located in the United States.
To find a location of the nearest Sharp Authorized Servicer, call Sharp toll free at 1-800-BE-SHARP.
What to do to Obtain Service: Ship prepaid or carry in your Product to a Sharp Authorized Servicer.
Be sure to have Proof of Purchase available. If you ship the Product, be sure it is insured and packaged securely.
TO OBTAIN SUPPLY, ACCESSORY OR PRODUCT INFORMATION, CALL 1-800-BE-SHARP.
0101
MD-MT877 Portable MiniDisc Recorder