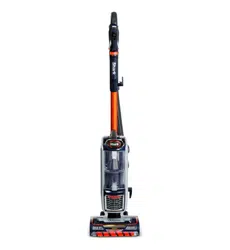
DuoClean
®
PowerFins
Powered Lift-Away
®
with Self-Cleaning Brushroll
Upright Vacuum
Aspirateur vertical DuoClean
®
PowerFins
Powered Lift-Away
®
avec brosse rotative autonettoyante
Aspiradora vertical con cepillo
giratorio de autolimpieza
Estabilizadores De Potencia
DuoClean® y Powered Lift-Away
AZ2000 Series • Séries • Serie
OWNER’S GUIDE
GUIDE DE L’UTILISATEUR
GUÍA DEL USUARIO
POWERFINS

sharkclean.comsharkclean.com
SAVE THESE INSTRUCTIONS
READ ALL INSTRUCTIONS BEFORE USE
IMPORTANT SAFETY INSTRUCTIONS
HOUSEHOLD USE ONLY
To reduce the risk of electric shock, this vacuum cleaner has a polarized
plug (one blade is wider than the other). As a safety feature, this plug will
fit into a polarized outlet only one way. If the plug does not fit fully into the
outlet, reverse the plug. If it still does not fit, contact a qualified electrician.
DO NOT force into outlet or try to modify to fit.
WARNING
TO REDUCE THE RISK OF FIRE, ELECTRIC SHOCK OR INJURY:
GENERAL WARNINGS
When using an electrical appliance,
basic precautions should always be
followed, including the following:
1. Your vacuum cleaner may consist
of a motorized nozzle, wand, hose,
and/or vacuum pod. This device
contains electrical connections,
electrical wiring, and moving
parts that potentially present risk
to the user.
2. Use only identical replacement parts.
3. Carefully observe and follow
the instructions provided below
to avoid improper use of the
appliance. DO NOT use the vacuum
for any purpose other than those
described in this manual.
4. Before use, carefully inspect all
parts for any damage. DO NOT
use if any parts are damaged.
5. The use of an extension cord is
NOT recommended.
6. This vacuum cleaner contains
no serviceable parts.
USE WARNINGS
7. This appliance can be used by
persons with reduced physical,
sensory or mental capabilities or
lack of experience and knowledge
if they have been given supervision
or instruction concerning use of
the appliance in a safe way and
understand the hazards involved.
Cleaning and user maintenance shall
not be made by children. Keep the
appliance and its cord out of reach of
children. DO NOT allow the appliance
to be used by children. DO NOT allow
to be used as a toy. Close supervision
is necessary when used near children.
8. Always turn off the vacuum cleaner
before connecting or disconnecting
any motorized nozzles or other
accessories.
9. DO NOT handle plug or vacuum
cleaner with wet hands.
10. DO NOT use without filters in place.
11. Only use Shark® branded filters
and accessories.
12. DO NOT damage the power cord:
a) DO NOT pull or carry vacuum
cleaner by the cord or use the
cord as a handle.
b) DO NOT unplug by pulling
on cord. Grasp the plug, not
the cord.
c) DO NOT run the vacuum cleaner
over the power cord, close a
door on the cord, pull the cord
around sharp corners, or leave
the cord near heated surfaces.
13. DO NOT put any objects into nozzle
or accessory openings. DO NOT use
with any opening blocked; keep free
of dust, lint, hair, and anything that
may reduce airflow.
14. DO NOT use if nozzle or accessory
airflow is restricted. If the air
paths or the motorized floor
nozzle become blocked, turn the
vacuum cleaner off and unplug
from electrical outlet. Remove all
obstructions before you plug in
and turn on the unit again.
15. Keep nozzle and all vacuum
openings away from hair, face,
fingers, uncovered feet, or
loose clothing.
16. DO NOT use if vacuum cleaner is
not working as it should, or has
been dropped, damaged, left
outdoors, or dropped into water.
17. Use extra care when cleaning
on stairs.
18. DO NOT leave the vacuum cleaner
unattended while plugged in.
19. When powered on, keep the
vacuum cleaner moving over the
carpet surface at all times to avoid
damaging the carpet fibers.
20. DO NOT place vacuum cleaner
on unstable surfaces such as chairs
or tables.
21. Your Shark® vacuum may not
be designed to stand up on its own.
When taking a break from cleaning,
you may need to lean it against
furniture or a wall, or lay it flat
on the floor. Using the vacuum
for an application where the unit
lacks stability may result in
personal injury.
22. DO NOT use to pick up:
a) Liquids
b) Large objects
c) Hard or sharp objects
(glass, nails, screws, or coins)
d) Large quantities of dust (drywall
dust, fireplace ash, or embers).
DO NOT use as an attachment to
power tools for dust collection.
e) Smoking or burning objects
(hot coals, cigarette butts,
or matches)
f) Flammable or combustible
materials (lighter fluid, gasoline,
or kerosene)
g) Toxic materials (chlorine bleach,
ammonia, or drain cleaner)
23. DO NOT use in the following areas:
a) Poorly lit areas
b) Wet or damp surfaces
c) Outdoor areas
d) Spaces that are enclosed and
may contain explosive or toxic
fumes or vapors (lighter fluid,
gasoline, kerosene, paint,
paint thinners, mothproofing
substances, or flammable dust)
24. Turn off all controls before plugging
in or unplugging the vacuum.
25. Unplug from electrical outlet
when not in use and before
any maintenance or cleaning.
26. Hand wash with water only.
Washing with cleaning chemicals
could damage the unit.
27. During cleaning or routine
maintenance, DO NOT cut anything
other than hair, fibers, or string
wrapped around the brushroll.
28. Allow all filters to air-dry completely
before replacing in the vacuum to
prevent liquid from being drawn
into electric parts.
29. Make sure the dust cup and all
filters are in place after routine
maintenance.
30. If provided, secure the power
cord around the two cord hooks
during storage.

sharkclean.comsharkclean.com
ASSEMBLY
1. Place motorized Nozzle on floor and insert Wand, pressing it in until it clicks
securely into place.
2. Place Pod onto wand and slide down to connect.
3. Insert Handle into wand, pressing it in until it clicks securely into place.
4. Connect Hose to back of pod, pressing it in until it clicks securely into place.
5. Store included accessories on the Accessory Posts on the pod.
IMPORTANT: For proper operation, ensure all connections are securely clicked into place.
ASSEMBLY
(Click)
1
(Click)
2
(Click)
3
(Click)
4
(Click)
5

sharkclean.comsharkclean.com
NOTE: All accessories are compatible with both the wand and the handle.
WHOLE-HOME CLEANING
CLEANING MODES
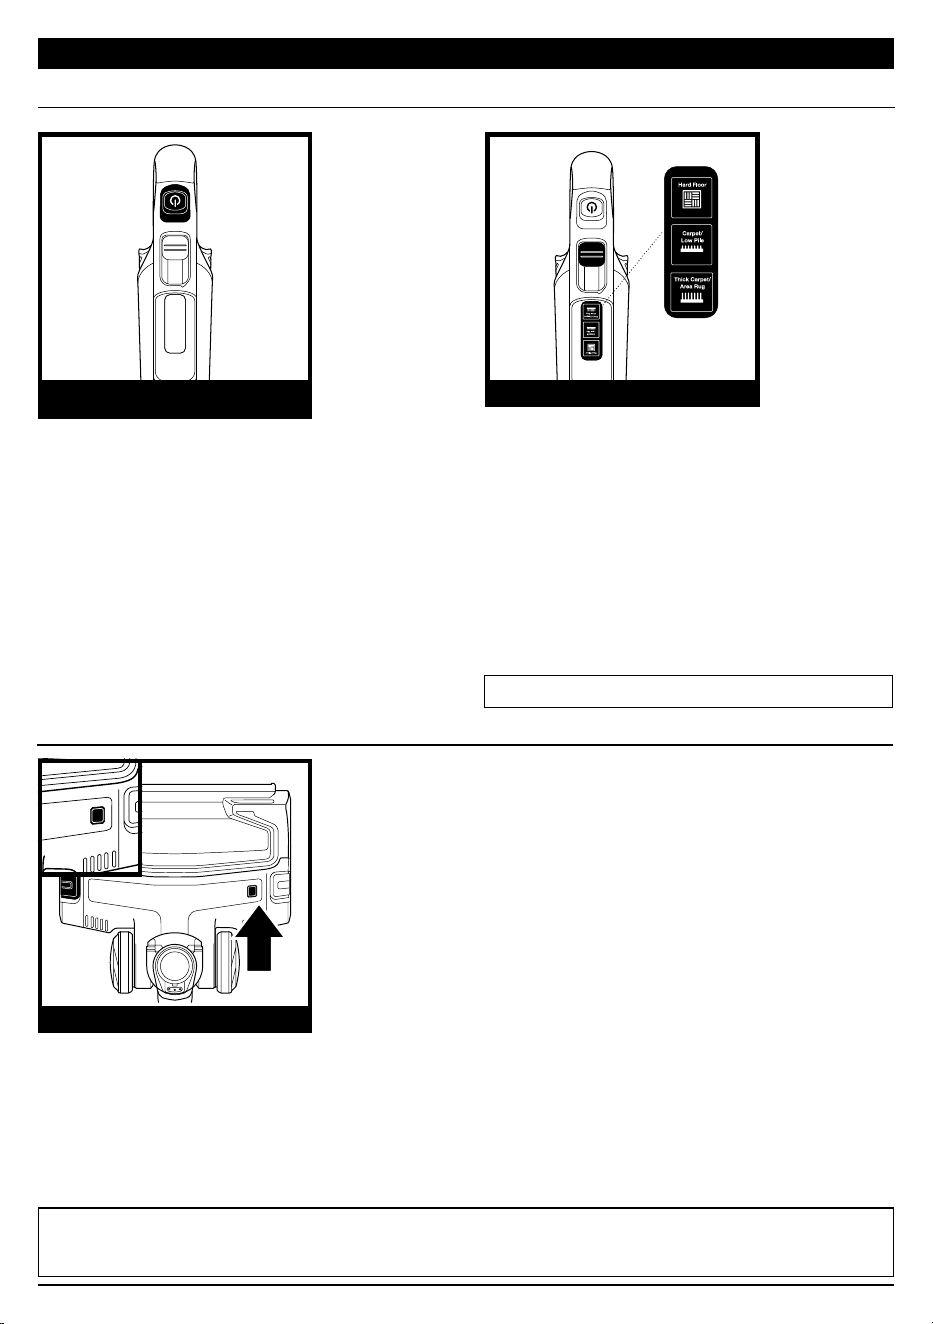
To engage brushrolls, step on floor nozzle
and tilt handle back.
Press power button to turn on vacuum.
Please note the brushrolls will not spin
unless the wand is reclined.
WHAT DOES THE BRUSHROLL INDICATOR LIGHT MEAN?
Solid Green: The brushrolls are spinning and working as they should.
Solid Red: There is a jam in the brushroll area. Turn o the vacuum and unplug it, then remove
any blockages in the nozzle.
Flashing Red: The motorized floor nozzle is overheating. Turn o the vacuum, unplug it, and
remove any blockages. Let the vacuum cool down for at least 60 minutes before restarting.
See Troubleshooting section for more information.
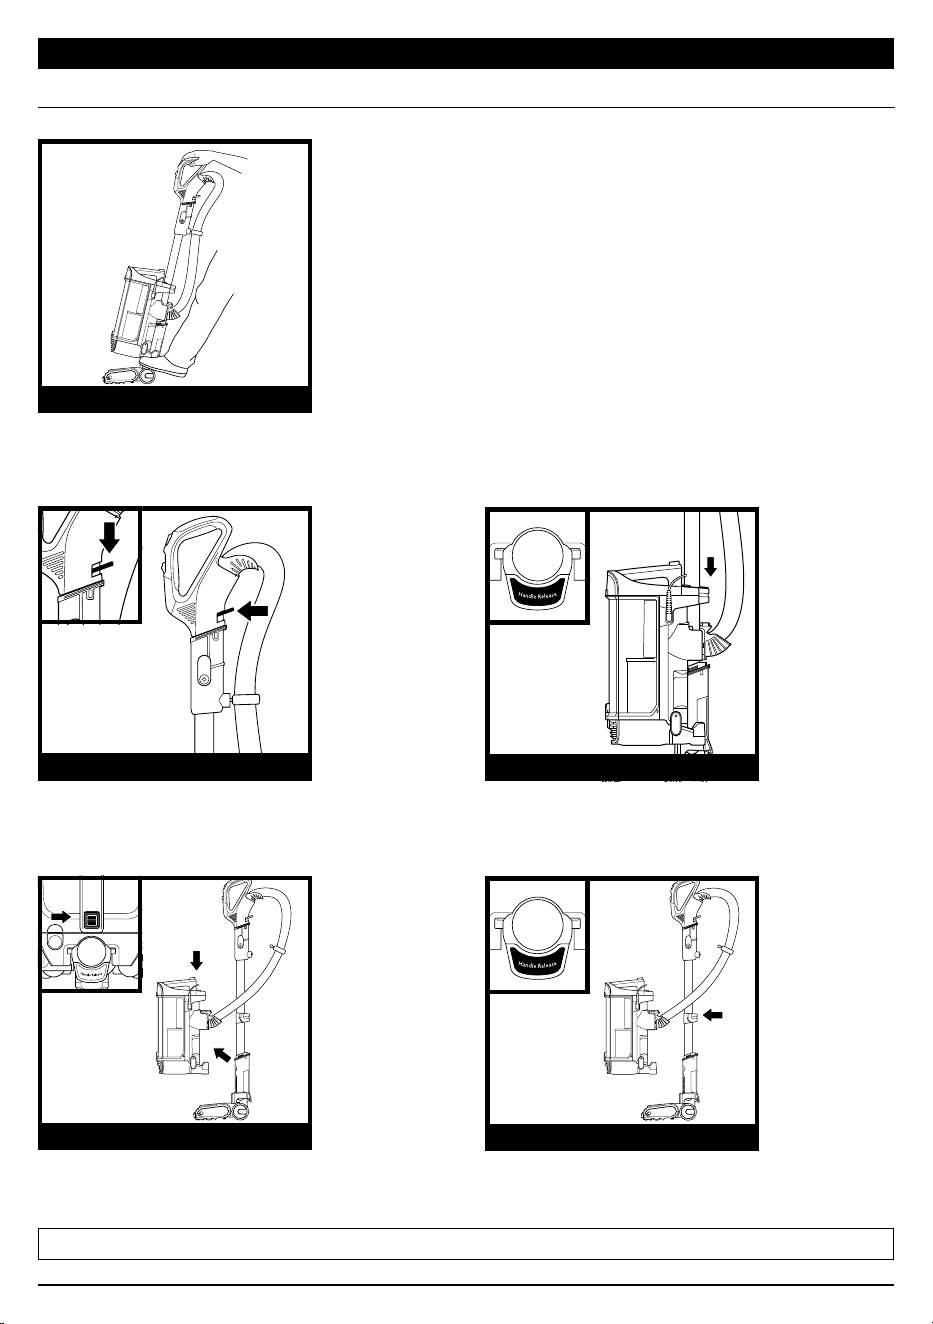
Press the Wand Release button to detach the
wand from the pod.
Thick Carpet & Area Rug Cleaning
Slide the surface switch to the top position
to select Thick Carpet/Area Rug.
Carpet & Low Pile Cleaning
Slide the surface switch to the middle position
to select Carpet/Low Pile to increase the
speed of the brushrolls and to help remove
stuck-on dust and debris.
Hard Floor Cleaning
Slide the surface switch to the bottom
position to select Hard Floor.
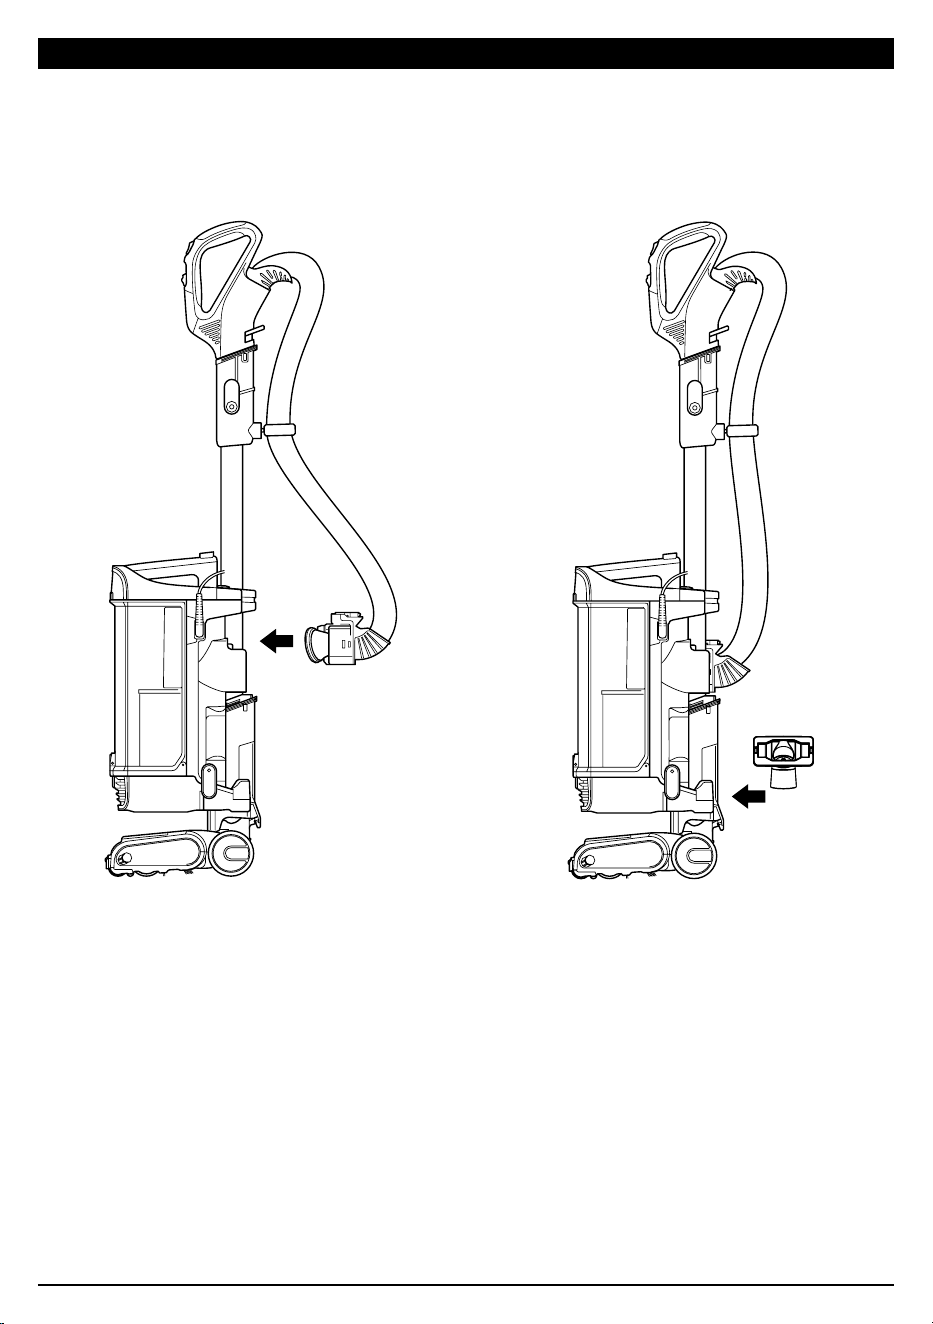
With pod removed, press the Wand Release
button to detach the wand from the floor
nozzle.
Press the Handle Release latch to detach the
handle from the wand.
Press the Lift-Away button to detach the pod
from the floor nozzle.
UPRIGHT
POWER SWITCH
INDICATOR LIGHT
ABOVE-FLOOR—HANDLE
POWERED LIFT-AWAY®
ABOVE-FLOOR—WAND
SURFACE SELECTOR
LIFT-AWAY®
WHOLE-HOME CLEANING
SETTINGS
BRUSHROLL INDICATOR LIGHT
NOTE: For deep cleaning per ASTM F 608 (embedded dirt in carpets) please set to Carpet/Low Pile.
NOTE: For maximum suction for above-floor cleaning per ASTM F558, set to Hard Floor mode.
NOTE: Try using Hard Floor mode for low pile area rugs.

sharkclean.comsharkclean.com
NOTE: All accessories are compatible with both the wand and the handle.
WHOLE-HOME CLEANING
CLEANING MODES
To engage brushrolls, step on floor nozzle
and tilt handle back.
Press power button to turn on vacuum.
Please note the brushrolls will not spin
unless the wand is reclined.
WHAT DOES THE BRUSHROLL INDICATOR LIGHT MEAN?
Solid Green: The brushrolls are spinning and working as they should.
Solid Red: There is a jam in the brushroll area. Turn o the vacuum and unplug it, then remove
any blockages in the nozzle.
Flashing Red: The motorized floor nozzle is overheating. Turn o the vacuum, unplug it, and
remove any blockages. Let the vacuum cool down for at least 60 minutes before restarting.
See Troubleshooting section for more information.
Press the Wand Release button to detach the
wand from the pod.
Thick Carpet & Area Rug Cleaning
Slide the surface switch to the top position
to select Thick Carpet/Area Rug.
Carpet & Low Pile Cleaning
Slide the surface switch to the middle position
to select Carpet/Low Pile to increase the
speed of the brushrolls and to help remove
stuck-on dust and debris.
Hard Floor Cleaning
Slide the surface switch to the bottom
position to select Hard Floor.
With pod removed, press the Wand Release
button to detach the wand from the floor
nozzle.
Press the Handle Release latch to detach the
handle from the wand.
Press the Lift-Away button to detach the pod
from the floor nozzle.
UPRIGHT
POWER SWITCH
INDICATOR LIGHT
ABOVE-FLOOR—HANDLE
POWERED LIFT-AWAY®
ABOVE-FLOOR—WAND
SURFACE SELECTOR
LIFT-AWAY®
WHOLE-HOME CLEANING
SETTINGS
BRUSHROLL INDICATOR LIGHT
NOTE: For deep cleaning per ASTM F 608 (embedded dirt in carpets) please set to Carpet/Low Pile.
NOTE: For maximum suction for above-floor cleaning per ASTM F558, set to Hard Floor mode.
NOTE: Try using Hard Floor mode for low pile area rugs.
sharkclean.comsharkclean.com
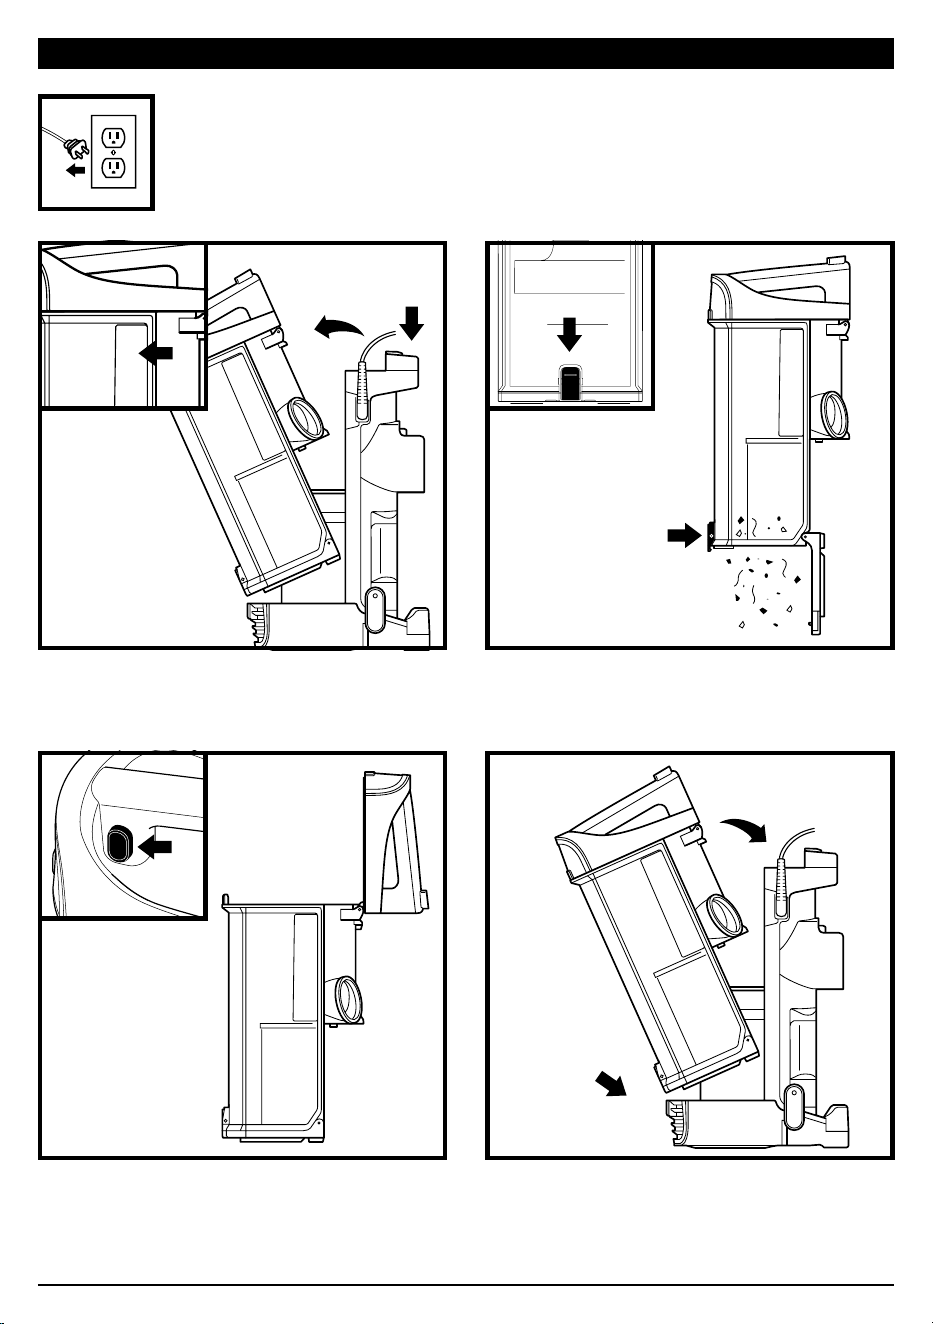
EMPTYING THE DUST CUP
To remove Dust Cup, press release button on
top of the pod. Tilt dust cup away from wand,
then lift to remove.
To reinstall, place bottom of dust cup into
pod and then tilt until it clicks into place.
To empty debris into trash, press lower release
button and bottom of dust cup will drop open.
To remove collected debris from Lint Screen,
press top release button and lift handle to
access screen.
CLEAN HEPA FILTER EVERY YEAR
With the dust cup removed, press button on Filter Door. Pull forward and slide out to remove,
then take out HEPA Filter.
To reinstall, insert HEPA filter into unit and replace filter door.
CLEAN PRE-MOTOR FILTERS
EVERY MONTH
Remove Dust Cup, then lift out Filters.
Regularly rinse and replace the filters to
maintain your vacuum’s suction power.
To prevent damage from cleaning chemicals,
rinse filters with cold water only. Allow all
filters to air-dry for at least 24 hours before
reinstalling them to prevent liquid from being
drawn into electric parts.
CLEANING AND REPLACING THE FILTERS
CLEANING FILTERS
IMPORTANT: DO NOT use soap when
cleaning the filters.
IMPORTANT: Unplug the power cord before performing any maintenance.
Filter
Door
Release
NOTE: The pre-motor filters should be replaced every 2.5 years. The post-motor filter should be replaced every 3 years.
Filter
Filter Door

sharkclean.comsharkclean.com
EMPTYING THE DUST CUP
To remove Dust Cup, press release button on
top of the pod. Tilt dust cup away from wand,
then lift to remove.
To reinstall, place bottom of dust cup into
pod and then tilt until it clicks into place.
To empty debris into trash, press lower release
button and bottom of dust cup will drop open.
To remove collected debris from Lint Screen,
press top release button and lift handle to
access screen.
CLEAN HEPA FILTER EVERY YEAR
With the dust cup removed, press button on Filter Door. Pull forward and slide out to remove,
then take out HEPA Filter.
To reinstall, insert HEPA filter into unit and replace filter door.
CLEAN PRE-MOTOR FILTERS
EVERY MONTH
Remove Dust Cup, then lift out Filters.
Regularly rinse and replace the filters to
maintain your vacuum’s suction power.
To prevent damage from cleaning chemicals,
rinse filters with cold water only. Allow all
filters to air-dry for at least 24 hours before
reinstalling them to prevent liquid from being
drawn into electric parts.
CLEANING AND REPLACING THE FILTERS
CLEANING FILTERS
IMPORTANT: DO NOT use soap when
cleaning the filters.
IMPORTANT: Unplug the power cord before performing any maintenance.
Filter
Door
Release
NOTE: The pre-motor filters should be replaced every 2.5 years. The post-motor filter should be replaced every 3 years.
Filter
Filter Door
sharkclean.comsharkclean.com
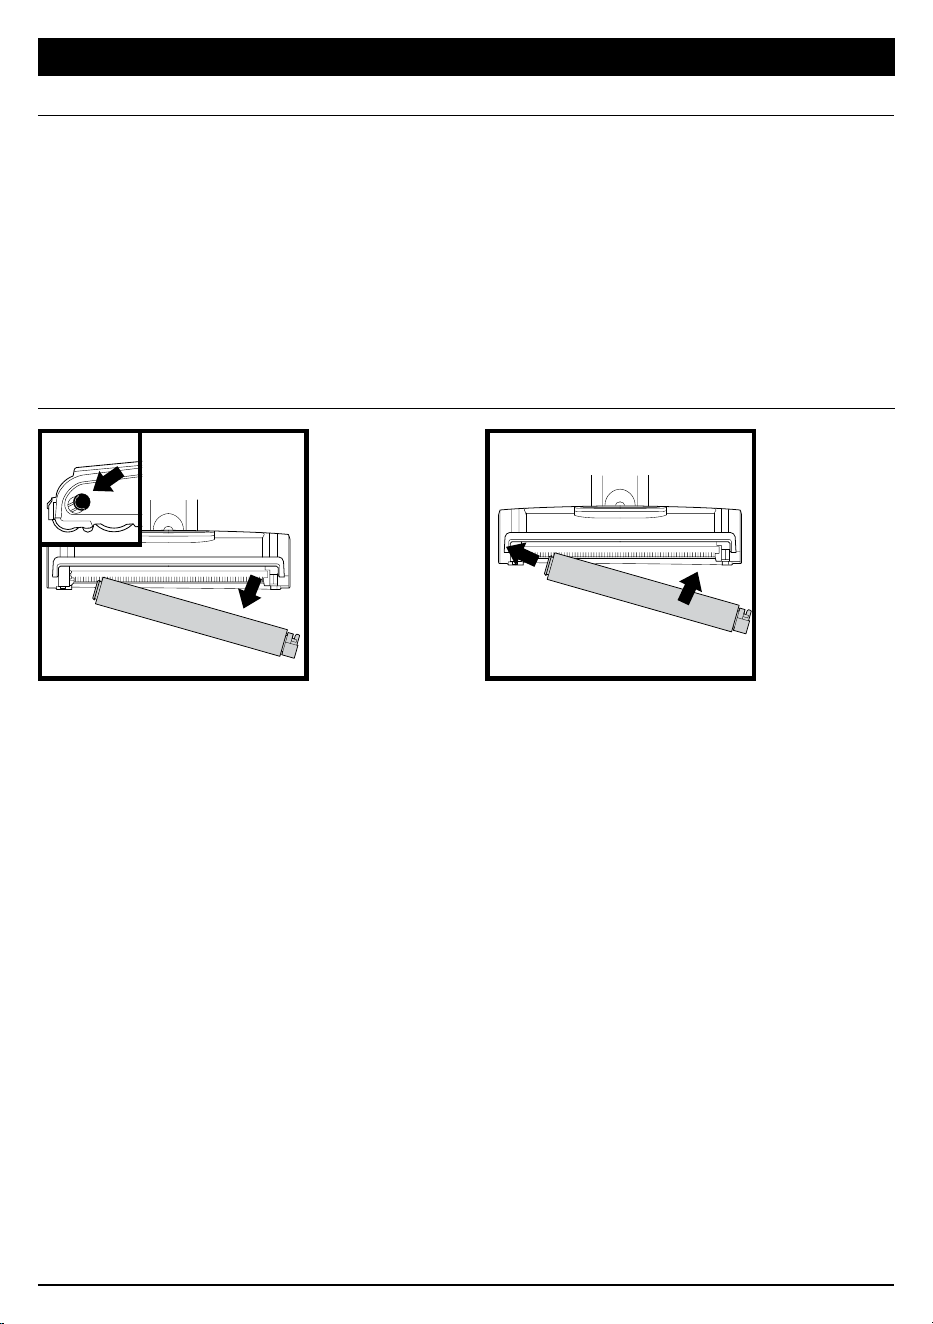
Slide the Soft Roller access button forward to
release the Soft Roller.
Hand wash the Soft Roller as needed. Use only
water, and allow it to air-dry completely for at
least 24 hours. Reinsert the Soft Roller in the
front of the nozzle until it clicks into place.
CLEANING THE SOFT ROLLER
MAINTENANCE
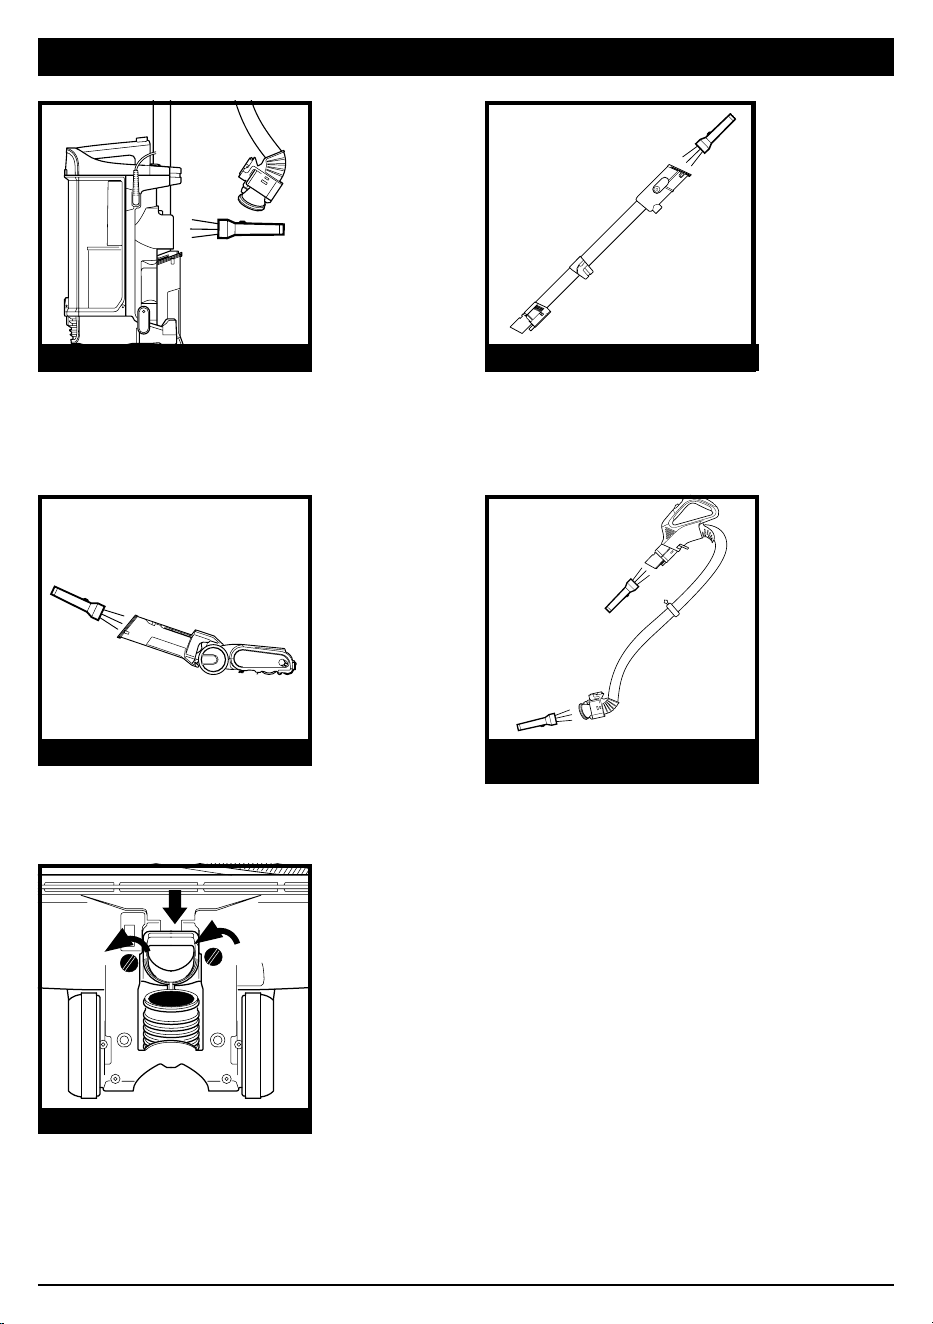
CHECKING FOR BLOCKAGES
Detach hose from vacuum pod, and check
hose and opening on back of pod for
blockages.
Detach wand from floor nozzle and handle,
and check both ends for blockages.
Detach wand from floor nozzle, tilt nozzle
neck back, and check opening for blockages.
To access the nozzle hose, open the locks
on the bottom of the nozzle. With a coin,
turn the locks counterclockwise, then lift the
cover and clear any blockages.
Detach handle from wand and hose from
the vacuum pod, and check openings for
blockages.
SELF-CLEANING BRUSHROLL
If any hair is wrapped around the brushroll, continue vacuuming, using Carpet/Low Pile mode
on a bare floor surface, a low-pile carpet, or a small area rug. This will allow the self-cleaning
brushroll to remove the hair wrap and send it to the dust cup.
If you run over a hard or sharp object or notice a noise change while vacuuming, check for
blockages or objects caught in the brushroll.
If some fibers remain wrapped around the brushroll after continued use, clear them from the
brushroll.
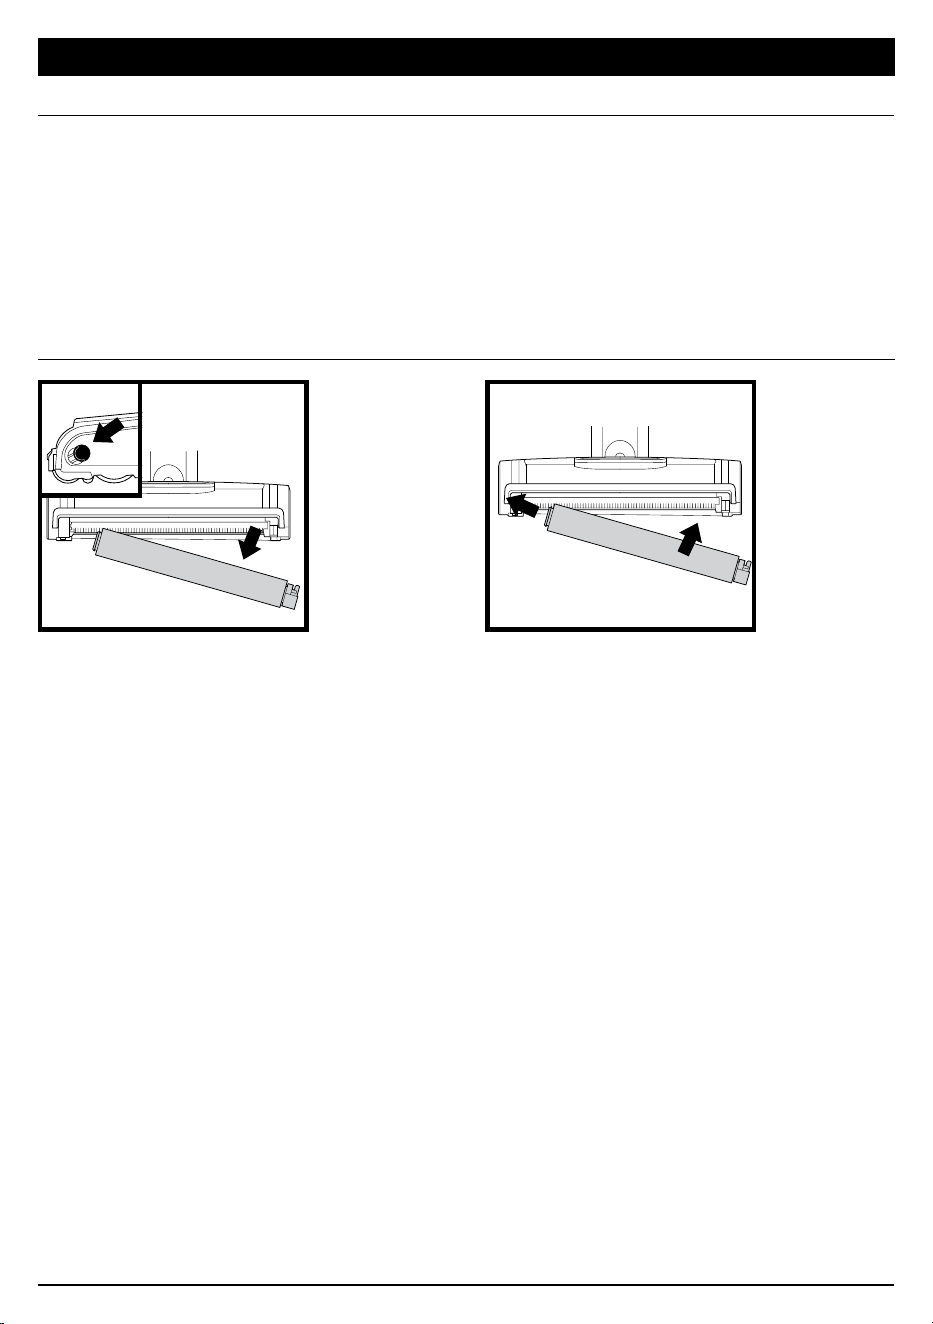
NOZZLE MAINTENANCE
HOSE BLOCKAGE WAND BLOCKAGE
POD BLOCKAGE
HANDLE/HOSE BLOCKAGE
NOZZLE HOSE BLOCKAGE

sharkclean.comsharkclean.com
Slide the Soft Roller access button forward to
release the Soft Roller.
Hand wash the Soft Roller as needed. Use only
water, and allow it to air-dry completely for at
least 24 hours. Reinsert the Soft Roller in the
front of the nozzle until it clicks into place.
CLEANING THE SOFT ROLLER
MAINTENANCE
CHECKING FOR BLOCKAGES
Detach hose from vacuum pod, and check
hose and opening on back of pod for
blockages.
Detach wand from floor nozzle and handle,
and check both ends for blockages.
Detach wand from floor nozzle, tilt nozzle
neck back, and check opening for blockages.
To access the nozzle hose, open the locks
on the bottom of the nozzle. With a coin,
turn the locks counterclockwise, then lift the
cover and clear any blockages.
Detach handle from wand and hose from
the vacuum pod, and check openings for
blockages.
SELF-CLEANING BRUSHROLL
If any hair is wrapped around the brushroll, continue vacuuming, using Carpet/Low Pile mode
on a bare floor surface, a low-pile carpet, or a small area rug. This will allow the self-cleaning
brushroll to remove the hair wrap and send it to the dust cup.
If you run over a hard or sharp object or notice a noise change while vacuuming, check for
blockages or objects caught in the brushroll.
If some fibers remain wrapped around the brushroll after continued use, clear them from the
brushroll.
NOZZLE MAINTENANCE
HOSE BLOCKAGE WAND BLOCKAGE
POD BLOCKAGE
HANDLE/HOSE BLOCKAGE
NOZZLE HOSE BLOCKAGE

sharkclean.comsharkclean.com
AVAILABLE ACCESSORIES TROUBLESHOOTING
Vacuum is not picking up debris. No suction or light suction.
• Check filters to see if they need cleaning. Follow instructions for rinsing and air-drying the
filters before reinstalling them.
• Dust cup may be full; empty dust cup.
• Check hose, hose connections, nozzle, wand, pod, and accessories for blockages. Clear any
blockages found. See Checking for Blockages section for more information.
• If any hair, string, or carpet fibers are wrapped around the brushroll, extend cleaning time
to allow the self-cleaning brushroll to remove them. If some hair or fibers remain wrapped
around brushroll after continued use, carefully remove them. See Cleaning the Brushroll
section for more information.
Vacuum lifts area rugs.
• Make sure Surface Selector switch is set to Thick Carpet & Area Rug Cleaning.
• Suction is powerful. Take care when vacuuming area rugs or rugs with delicately sewn edges.
Brushrolls do not spin.
• If the Brushroll Indicator Light turns red, immediately turn o and unplug the vacuum.
Remove pod and wand from floor nozzle and clear any blockages. Reconnect nozzle, plug in
vacuum, and turn on power.
• With the power on, recline the handle, which will automatically turn on the brushrolls.
Vacuum turns o on its own or indicator light flashes red.
If your vacuum overheats, the thermostat will automatically turn o the motor. Perform the
following steps to restart:
1. Turn vacuum o and unplug it.
2. Empty dust cup and clean filters. See Emptying the Dust Cup and Cleaning the Filters
section for more information.
3. Check for blockages in hose, wand, floor nozzle, accessories, and inlet openings.
4. Allow unit to cool for a minimum of 60 minutes.
5. Plug in vacuum and turn it on.
For all other issues, please call Customer Service 1-800-798-7398.
D
F
G
I
E
C
B
A
Crevice Tool
This slender tool oers extended reach to
access corners, baseboards, tight spaces,
and ceilings.
B
Upholstery Tool
Picks up hair, dust, and large debris from
mattresses, couches, curtains, lampshades,
and other delicate upholstered fabrics.
C
Pet Multi-Tool
A single convertible tool for cleaning tough
pet messes two ways: use the sti bristle
brush to clean stuck-on debris, or take o
the bristles to reveal an upholstery tool
perfect for removing stubborn pet hair and
large piles of debris.
D
Duster Crevice Tool
Two cleaning tools in one. The crevice tool
gives you extended reach to clean in tight
spaces, while the soft brush is ideal for
dusting delicate surfaces.
E
Pet Power Brush
The turbine brush loosens and removes
pet hair and debris from carpets, and
powerfully deep-cleans dander out of
upholstery and other surfaces.
F
Under-Appliance Wand
Clean under and behind hard-to-move
appliances and furniture with this adjustable
36” tool. Flip the extension piece over to
clean the underside of appliances.
G
Anti-Allergen Dust Brush
This brush features nylon fiber bristles
specifically designed for removing fine
dust and allergen particles from the most
delicate surfaces.
H
Self-Cleaning Pet Power Brush
Tackles pet hair and ground-in dirt from
above-floor areas like carpeted stairs and
upholstery, while actively removing hair
wrap as it cleans.
I
Home & Car Detail Kit
Deep-clean your car like a professional
detailer, or clean hard-to-reach areas in
your home. Micro-sized tools let you clean
around delicate objects and access the
tightest spaces like car vents and computer
keyboards.
J
Accessory Bag
This convenient accessory storage bag
measures 32 cm x 70 cm and fits the Under-
Appliance Wand. Smaller size available at
sharkaccessories.com.
A
J
H
NOTE: Not all accessories come with all units. For a list of the accessories included with this model, see the top inside flap
of the box. To order additional accessories, visit sharkaccessories.com.

sharkclean.comsharkclean.com
TECHNICAL SPECIFICATIONS
Voltage: 120V~, 60Hz
Watts: 1400W
Amps: 11.8A
TIP: You can find the model and serial
numbers on the QR code label on the
bottom of the back of the vacuum pod.
Benefits of registering your product and
creating an account:
• Get easier, faster product support and
access to warranty information
• Access troubleshooting and product care
instructions
• Be among the first to know about
exclusive product promotions
RECORD THIS INFORMATION
Model Number:
����������������������������������������������������������������������������������������������������
Serial Number:
������������������������������������������������������������������������������������������������������
Date of Purchase:
��������������������������������������������������������������������������������������������
(Keep receipt)
Store of Purchase:
������������������������������������������������������������������������������������������
REGISTER YOUR PURCHASE
registeryourshark.com
Scan QR code using
mobile device
FIVE (5) YEAR LIMITED WARRANTY
The Five (5) Year Limited Warranty applies to purchases made from authorized retailers of SharkNinja
Operating LLC. Warranty coverage applies to the original owner and to the original product only and is
not transferable.
SharkNinja warrants that the unit shall be free from defects in material and workmanship for a period
of five (5) years from the date of purchase when it is used under normal household conditions and
maintained according to the requirements outlined in the Owner’s Guide, subject to the following
conditions and exclusions:
What is covered by this warranty?
1. The original unit and/or non-wearable parts deemed defective, in SharkNinja’s sole discretion, will be
repaired or replaced up to five (5) years from the original purchase date.
2. In the event a replacement unit is issued, the warranty coverage ends six (6) months following the
receipt date of the replacement unit or the remainder of the existing warranty, whichever is later.
SharkNinja reserves the right to replace the unit with one of equal or greater value.
What is not covered by this warranty?
1. Normal wear and tear of wearable parts (such as foam filters, HEPA filters, pads, etc.), which require
regular maintenance and/or replacement to ensure the proper functioning of your unit, are not covered
by this warranty. Replacement parts are available for purchase at sharkaccessories.com.
2. Any unit that has been tampered with or used for commercial purposes.
3. Damage caused by misuse (e.g., vacuuming up water or other liquids), abuse, negligent handling,
failure to perform required maintenance (e.g., not cleaning the filters), or damage due to mishandling
in transit.
4. Consequential and incidental damages.
5. Defects caused by repair persons not authorized by SharkNinja. These defects include damages caused
in the process of shipping, altering, or repairing the SharkNinja product (or any of its parts) when the
repair is performed by a repair person not authorized by SharkNinja.
6. Products purchased, used, or operated outside North America.
How to get service
If your appliance fails to operate properly while in use under normal household conditions within the warranty
period, visit sharkclean.com/support for product care and maintenance self-help. Our Customer Service
Specialists are also available at 1-800-798-7398 to assist with product support and warranty service options,
including the possibility of upgrading to our VIP warranty service options for select product categories. So
we may better assist you, please register your product online at registeryourshark.com and have the product
on hand when you call.
SharkNinja will cover the cost for the customer to send in the unit to us for repair or replacement. A fee of
$24.95 (subject to change) will be charged when SharkNinja ships the repaired or replacement unit.
How to initiate a warranty claim
You must call 1-800-798-7398 to initiate a warranty claim. You will need the receipt as proof of purchase.
We also ask that you register your product online at registeryourshark.com and have the product on hand
when you call, so we may better assist you. A Customer Service Specialist will provide you with return and
packing instruction information.
How state law applies
This warranty gives you specific legal rights, and you also may have other rights that vary from state to
state. Some states do not permit the exclusion or limitation of incidental or consequential damages, so the
above may not apply to you.

sharkclean.com
CONSERVEZ CES INSTRUCTIONS
LISEZ TOUTES LES INSTRUCTIONS AVANT L’UTILISATION
CONSIGNES DE SÉCURITÉ IMPORTANTES
USAGE DOMESTIQUE SEULEMENT
Pour réduire le risque de décharges électriques, cet aspirateur est muni d’une
fiche polarisée (une lame est plus large que l’autre). Comme précaution, cette
fiche s’insère dans une prise polarisée dans un seul sens. Si la fiche d’alimentation
ne s’insère pas à fond dans la prise de courant, inversez alors le sens de la fiche.
Si elle ne s’insère toujours pas, communiquez avec un électricien qualifié.
NE FORCEZ PAS pour insérer la fiche dans la prise et ne tentez pas de la modifier.
AVERTISSEMENT
AFIN DE RÉDUIRE LES RISQUES D’INCENDIE, D’ÉLECTROCUTION OU DE BLESSURE:
AVERTISSEMENTS GÉNÉRAUX
Lors de l’utilisation d’un appareil
électrique, des précautions de base
doivent toujours être suivies, y compris les
suivantes:
1. Votre aspirateur pourrait être composé
d’une buse motorisée, d’un tube,
d’un tuyau ou d’un réceptacle. Cet
appareil comporte des raccordements
électriques, du filage électrique et des
pièces amovibles pouvant exposer
l’utilisateur à certains risques.
2. Utilisez uniquement des pièces de
rechange identiques.
3. Respectez et suivez attentivement les
instructions ci-dessous afin d’éviter
tout usage inadéquat de l’appareil.
N’UTILISEZ PAS l’aspirateur pour un
usage autre que ceux décrits dans le
présent manuel.
4. Avant d’utiliser l’appareil, inspectez
soigneusement toutes les pièces afin de
déceler tout dommage. NE L’UTILISEZ
PAS s’il est endommagé.
5. L’utilisation d’une rallonge électrique
N’EST PAS recommandée.
6. Cet aspirateur ne contient aucune pièce
pouvant être réparée par l’utilisateur.
AVERTISSEMENTS CONCERNANT
L’UTILISATION
7. Cet appareil peut être utilisé par des
personnes dont les capacités physiques,
sensorielles ou mentales sont réduites
ou qui manquent d’expérience et de
connaissances seulement si elles ont été
supervisées ou instruites par rapport à
l’utilisation sécuritaire de l’appareil et si
elles comprennent les dangers possibles.
Les enfants ne peuvent pas nettoyer ni
entretenir l’appareil. Gardez l’appareil et
son câble hors de la portée des enfants.
NE LAISSEZ PAS les enfants se servir
de l’appareil. NE PERMETTEZ PAS de
l’utiliser comme un jouet. Une surveillance
étroite est nécessaire lorsque l’appareil
est utilisé en présence d’enfants.
8. Mettez toujours l’aspirateur hors tension
avant d’attacher ou de détacher la buse
motorisée ou un autre accessoire.
9. NE MANIPULEZ PAS la fiche ou
l’aspirateur avec les mains mouillées.
10. N’UTILISEZ PAS l’appareil si les filtres ne
sont pas en place.
11. Utilisez uniquement des filtres et des
accessoires de marque Shark®.
12. N’ENDOMMAGEZ PAS le cordon
d’alimentation :
a) N’UTILISEZ PAS le cordon
d’alimentation comme poignée pour
transporter ou pour tirer l’aspirateur.
b) NE DÉBRANCHEZ PAS l’appareil en
tirant sur le cordon d’alimentation.
Agrippez la fiche et non le cordon
d’alimentation.
c) NE PASSEZ PAS l’aspirateur sur le
cordon d’alimentation, ne fermez
pas de porte sur le cordon, ne
tendez pas le cordon sur des coins
pointus et ne laissez pas le cordon
près de surfaces chaudes.
13. ÉVITEZ d’insérer des objets dans les
ouvertures de la buse ou de tout autre
accessoire. N’UTILISEZ PAS l’appareil
si une ouverture est obstruée. Veillez
à ce que les ouvertures ne soient pas
bloquées par de la poussière, de la
peluche, des cheveux ou tout autre
élément qui pourrait gêner la circulation
de l’air.
14. N’UTILISEZ PAS l’appareil si le flux
d’air de la buse ou de l’accessoire
est obstrué. Si la buse de plancher
motorisée ou les conduits d’air
deviennent obstrués, éteignez
l’aspirateur et débranchez-le de la prise
de courant. Retirez toute obstruction
avant de remettre l’appareil en marche.
15. Tenez la buse et tous les orifices de
l’aspirateur éloignés des cheveux,
du visage, des doigts, des pieds
déchaussés ou de vêtements amples.
16. N’UTILISEZ PAS l’aspirateur s’il ne
fonctionne pas comme prévu, ou s’il a
été échappé sur le sol, endommagé,
laissé à l’extérieur ou immergé.
17. Soyez extrêmement prudent lorsque
vous nettoyez les escaliers.
18. NE LAISSEZ PAS l’aspirateur sans
surveillance lorsqu’il est branché.
19. Lorsqu’il est en marche, gardez
l’aspirateur en mouvement sur le
tapis en tout temps, afin d’éviter
d’endommager les fibres du tapis.
20. NE PLACEZ PAS l’aspirateur sur des
surfaces instables comme des chaises ou
des tables.
21. Votre aspirateur Shark® pourrait ne pas
avoir été conçu pour se maintenir de
lui-même en position verticale. Lorsque
vous prenez une pause, vous devrez
peut-être l’appuyer contre un meuble
ou un mur, ou le placer sur le plancher.
Toute utilisation où l’aspirateur serait
dans une position instable pourrait
entraîner des blessures corporelles.
22. N’UTILISEZ PAS l’appareil pour aspirer :
a) Des liquides
b) Des objets de grande taille
c) Des objets durs ou tranchants (verre,
clous, vis ou pièces de monnaie)
d) De grandes quantités de poussière
(poussière de cloison sèche, cendres
ou braises de foyer). N’UTILISEZ
PAS l’aspirateur comme accessoire
pour un outil électrique pour
l’aspiration de la poussière.
e) Des objets fumants ou brûlants
(charbons ardents, mégots de
cigarettes ou allumettes)
f) Des matériaux inflammables ou
combustibles (essence à briquet,
essence ou kérosène)
g) Des matières toxiques (eau de
Javel, ammoniaque ou produit
débouchant)
23. N’UTILISEZ PAS l’appareil dans les
endroits suivants:
a) Les endroits faiblement éclairés
b) Les surfaces humides ou mouillées
c) À l’extérieur
d) Endroits fermés pouvant contenir
des matières explosives ou
des fumées ou des vapeurs
toxiques (essence à briquet,
essence, kérosène, peinture,
diluants à peinture, produits de
traitement antimite ou poussières
inflammables)
24. Fermez toutes les commandes avant de
brancher ou de débrancher l’aspirateur.
25. Débranchez l’appareil de la prise murale
lorsqu’il n’est pas en usage, et avant
d’en faire l’entretien ou de le nettoyer.
26. Lavez à la main avec de l’eau
seulement. L’utilisation de produits
chimiques de nettoyage pourrait
endommager l’appareil.
27. Pendant le nettoyage ou l’entretien, NE
COUPEZ AUCUNE matière autre que
des cheveux, des fibres ou de la ficelle
enroulés autour de la brosse rotative.
28. Laissez tous les filtres sécher
complètement avant de les remettre
dans l’aspirateur pour éviter que
du liquide ne soit aspiré dans les
composants électriques.
29. Après avoir effectué l’entretien de
routine, assurez-vous que le récipient
à poussière et tous les filtres sont en
place.
30. Le cas échéant, fixez le cordon
d’alimentation autour des deux crochets
avant de ranger l’appareil.

sharkclean.comsharkclean.com
ASSEMBLAGE
1. Placez la buse motorisée sur le sol et insérez le tube à l’intérieur, de manière à entendre un
déclic indiquant qu’il est bien en place.
2. Faites glisser le réceptacle sur le tube afin de les raccorder.
3. Insérez la poignée dans le tube de manière à entendre un déclic indiquant qu’elle est bien en place.
4. Fixez le tuyau à l’arrière du réceptacle de manière à entendre un déclic indiquant qu’il est bien
en place.
5. Rangez les accessoires inclus sur les supports d’accessoires sur le réceptacle.
IMPORTANT: Afin que l’appareil fonctionne correctement, assurez-vous que tous les branchements
sont maintenus fermement en place.
ASSEMBLAGE
(Clic)
1
(Clic)
2
(Clic)
3
(Clic)
4
(Clic)
5
sharkclean.comsharkclean.com
REMARQUE: Tous les accessoires sont compatibles avec le tube et la poignée.
NETTOYAGE DOMESTIQUE COMPLET
MODES DE NETTOYAGE
Pour activer les brosses rotatives, appuyez sur
la buse de plancher et inclinez la poignée vers
l’arrière.
Appuyez sur l’interrupteur d’alimentation pour
mettre l’aspirateur en marche. Veuillez noter
que la brosse rotative est activée uniquement
lorsque l’aspirateur est incliné vers l’arrière.
QU’INDIQUENT LES VOYANTS INDICATEURS DE LA BROSSE ROTATIVE?
Vert uni: Les brosses rotatives tournent et fonctionnent adéquatement.
Rouge uni: Une obstruction a été détectée dans la zone de la brosse rotative. Éteignez
l’aspirateur, débranchez-le et retirez tout élément causant l’obstruction dans la buse.
Rouge clignotant: La buse de plancher motorisée surchaue. Éteignez l’aspirateur, débranchez-le et
retirez tout élément causant l’obstruction. Laissez l’aspirateur refroidir pendant au moins 60minutes
avant de le remettre en marche. Consultez la section de dépannage pour obtenir plus de renseignements.
Appuyez sur le bouton Wand Release
(dégagement du tube) afin de détacher le tube
du réceptacle.
Nettoyage de tapis épais et décoratifs
Réglez le sélecteur de surface à la position du
haut pour sélectionner Thick Carpet/Area Rug
(tapis épais/tapis décoratifs).
Nettoyage des carpettes et des tapis à poils courts
Réglez le sélecteur de surface à la position
du milieu pour sélectionner Carpet/Low Pile
(carpettes/tapis à poils courts) afin d’accélérer la
vitesse des brosses rotatives et d’aider à enlever la
poussière et les débris collés.
Nettoyage du plancher
Réglez le sélecteur de surface à la position du
bas pour sélectionner Hard Floor (plancher).
Une fois le réceptacle retiré, appuyez sur le
bouton Wand Release (dégagement du tube)
afin de détacher le tube de la buse de plancher.
Appuyez sur le loquet Handle Release
(dégagement de la poignée) afin de détacher la
poignée du tube.
Appuyez sur le bouton Lift-Away
(déverrouillage) afin de détacher le réceptacle de
la buse de plancher.
VERTICAL
INTERRUPTEUR
D’ALIMENTATION
VOYANT INDICATEUR
AU-DESSUS DU SOL – POIGNÉE
POWERED LIFT-AWAY®
AU-DESSUS DU SOL – TUBE
SÉLECTEUR DE SURFACE
LIFT-AWAY®
NETTOYAGE DOMESTIQUE COMPLET
RÉGLAGES
VOYANT INDICATEUR DE LA BROSSE ROTATIVE
REMARQUE: Pour un nettoyage en profondeur selon la norme ASTMF608 (élimination des saletés incrustées dans les tapis),
sélectionnez le réglage Carpet/Low Pile (carpettes/tapis à poils courts).
REMARQUE: Pour une aspiration maximale selon la norme ASTM F558 lors du nettoyage au-dessus du plancher, réglez
l’appareil en mode Hard Floor (plancher).
REMARQUE: Essayez d’utiliser le mode Hard Floor
(plancher) pour les carpettes à poil court.

sharkclean.comsharkclean.com
VIDANGE DU RÉCIPIENT À POUSSIÈRE
Pour retirer le récipient à poussière, appuyez sur le
bouton de dégagement au-dessus du réceptacle.
Inclinez le récipient à poussière en direction
opposée du tube, puis soulevez-le afin de le retirer.
Afin de réinstaller le récipient à poussière,
placez son dessous sur le réceptacle, puis
inclinez le récipient à poussière jusqu’à ce que
vous entendiez un déclic.
Pour jeter les débris aux ordures, appuyez sur
le bouton de dégagement inférieur et le bas du
récipient à poussière s’ouvrira.
Afin de retirer les débris ramassés dans le
filtre à charpie, appuyez sur le bouton de
dégagement du dessus et tirez la poignée
pour accéder au filtre.
NETTOYEZ LE FILTRE HEPA CHAQUE ANNÉE
Lorsque le récipient à poussière est retiré, appuyez sur le bouton qui se trouve sur la porte du
filtre. Tirez et faites glisser l’accessoire vers l’extérieur pour le retirer, puis sortez le filtre HEPA.
Pour le réinstaller, insérez le filtre HEPA dans l’appareil et replacez la porte du filtre.
NETTOYEZ LES FILTRES PRÉ-MOTEUR
À CHAQUE MOIS
Retirez le récipient à poussière, puis soulevez
les filtres.
Rincez régulièrement et remplacez les filtres
afin de maintenir la puissance d’aspiration de
votre aspirateur.
Rincez les filtres avec de l’eau froide seulement
afin d’éviter les dégâts résultant de l’utilisation
de produits chimiques. Laissez tous les filtres
sécher entièrement au moins 24heures avant
de les remettre dans l’aspirateur pour éviter
que l’eau ne soit aspirée dans les composants
électriques.
NETTOYAGE ET REMPLACEMENT DES FILTRES
NETTOYAGE DES FILTRES
IMPORTANT: N’UTILISEZ PAS de savon pour
nettoyer les filtres.
IMPORTANT: Débranchez le cordon d’alimentation avant d’eectuer tout entretien.
Bouton de
dégagement
de la porte
du filtre
REMARQUE: Les filtres pré-moteur devraient être remplacés tous les 2ans et demi. Le filtre post-moteur devrait être remplacé tous les 3ans.
Filtre
Porte du filtre
sharkclean.comsharkclean.com
Pour enlever le rouleau doux, faites glisser le
bouton d’accès de ce dernier vers l’avant.
Lavez le rouleau doux à la main au besoin.
Utilisez uniquement de l’eau et laissez-le sécher
entièrement à l’air libre pendant au moins
24heures. Réinsérez le rouleau doux à l’avant de
la buse jusqu’à ce qu’un clic se fasse entendre.
NETTOYAGE DU ROULEAU DOUX
ENTRETIEN
VÉRIFICATION DE LA PRÉSENCE D’OBSTRUCTIONS
Détachez le tuyau du réceptacle de
l’aspirateur et vérifiez le tuyau et l’ouverture
du réceptacle pour voir s’il y a des
obstructions.
Détachez le tube de la buse de plancher et de
la poignée et vérifiez s’il y a des obstructions
des deux côtés.
Détachez le tube de la buse de plancher,
inclinez la buse vers l’arrière, et vérifiez s’il y a
des obstructions dans l’ouverture.
Pour accéder à la buse du tuyau, ouvrez les
verrous au fond de la buse. Avec une pièce
de monnaie, tournez les verrous dans le sens
antihoraire, puis soulevez le couvercle et
dégagez toute obstruction.
Détachez la poignée du tube et le tuyau du
réceptacle de l’aspirateur afin de vérifier s’il y
a des obstructions aux extrémités.
BROSSE ROTATIVE AUTONETTOYANTE
S’il y a des cheveux enroulés autour de la brosse rotative, continuez à passer l’aspirateur en
utilisant le mode Carpet/Low Pile (carpettes/tapis à poils courts) sur les planchers, les tapis à
poils courts ou les carpettes. Ainsi, la brosse rotative autonettoyante pourra enlever les cheveux
enroulés et les envoyer dans le récipient à poussière.
Si vous passez l’aspirateur sur un objet dur ou tranchant ou que vous remarquez un changement
de bruit pendant que vous passez l’aspirateur, vérifiez la présence d’obstructions ou d’objets
coincés dans la brosse rotative.
Si certaines fibres restent enroulées autour de la brosse rotative après une utilisation continue,
retirez-les de la brosse.
ENTRETIEN DE LA BUSE
OBSTRUCTION DU TUYAU OBSTRUCTION DU TUBE
OBSTRUCTION DU RÉCEPTACLE
OBSTRUCTION DE LA
POIGNÉE/TUYAU
BLOCAGE DE LA BUSE DU TUYAU

sharkclean.comsharkclean.com
ACCESSOIRES DISPONIBLES DÉPANNAGE
L’aspirateur ne ramasse pas la poussière. Aucune aspiration ou aspiration faible.
• Vérifiez les filtres pour voir s’ils doivent être nettoyés. Suivez les instructions de rinçage et de
séchage des filtres avant de les réinsérer.
• Le récipient à poussière pourrait être plein; videz-le, le cas échéant.
• Vérifiez le tuyau, les raccords du tuyau, la buse, le tube, le réceptacle et les accessoires pour
déterminer s’ils sont obstrués. Éliminez toute obstruction, le cas échéant. Consultez la section
Vérification des obstructions pour plus d’informations.
• Si des poils, une ficelle ou des fibres de tapis sont enroulés autour de la brosse rotative,
prolongez la durée de nettoyage pour permettre à la brosse rotative autonettoyante de
les retirer pour vous. Si des cheveux ou certaines fibres restent enroulées autour de la
brosse rotative après une utilisation continue, enlevez-les soigneusement. Vérifiez la section
Nettoyage de la brosse rotative pour plus d’informations.
L’aspirateur soulève les carpettes.
• Assurez-vous que le sélecteur de surface est réglé sur Nettoyage de tapis épais et de tapis.
• La succion est puissante. Faites attention lorsque vous passez l’aspirateur sur les carpettes et sur
les tapis à bordure cousue délicate.
Les brosses rotatives ne tournent pas.
• Si le voyant indicateur de la brosse rotative devient rouge, éteignez et débranchez
immédiatement l’aspirateur. Retirez le réceptacle et le tube de la buse de plancher et éliminez
toutes les obstructions. Refixez la buse, branchez l’aspirateur et mettez-le en marche.
• Lorsque l’aspirateur est en marche, inclinez la poignée; cela activera automatiquement les
brosses rotatives.
L’aspirateur s’éteint tout seul ou le voyant indicateur clignote en rouge.
En cas de surchaue de l’aspirateur, le thermostat éteint automatiquement le moteur de
l’appareil. Suivez les étapes ci-dessous pour réinitialiser l’appareil:
1. Éteignez l’aspirateur et débranchez-le.
2. Videz le récipient à poussière et nettoyez les filtres. Reportez-vous aux sections Vidange du
récipient à poussière et Nettoyage des filtres pour plus de renseignements.
3. Vérifiez s’il y a des obstructions dans le tuyau, le tube, la buse de plancher, les accessoires et
les orifices d’entrée.
4. Laissez refroidir l’appareil pendant au moins 60minutes.
5. Branchez l’aspirateur et mettez-le en marche.
Si vous rencontrez toute autre diculté, veuillez contacter notre service à la clientèle au
1800798-7398.
D
F
G
I
E
C
B
A
Suceur plat
Cet accessoire elé permet d’accéder aux coins,
aux plinthes et aux endroits exigus et d’atteindre
les plafonds.
B
Outil à meubles
Enlève les cheveux, la poussière et les gros débris
des matelas, des canapés, des rideaux, des abat-
jours et des autres tissus rembourrés délicats.
C
Accessoire polyvalent pour les poils d’animaux de
compagnie
Un seul outil convertible pour nettoyer les dégâts
des animaux de compagnie de deux manières:
utilisez la brosse aux soies rigides pour nettoyer
les débris tenaces, ou retirez la brosse à poils pour
révéler un outil à meubles parfait pour nettoyer les
poils d’animaux tenaces et les gros amas de débris.
D
Outil suceur plat avec brosse à épousseter
Deux accessoires de nettoyage en un. Le suceur
plat vous permet de mieux atteindre des espaces
restreints à nettoyer, tandis que la brosse douce à
épousseter est parfaite pour nettoyer des surfaces
délicates.
E
Brosse motorisée pour les poils d’animaux
La brosse à turbine détache et élimine les poils
d’animaux et les débris des tapis, et nettoie en
profondeur et avec puissance les squames des
tissus d’ameublement et d’autres surfaces.
F
Tube d’extension pour l’espace sous les meubles
Utilisez cet outil réglable de 91cm pour nettoyer en
dessous et à l’arrière des meubles et des appareils
électroménagers diciles à déplacer. Retournez
l’accessoire de rallonge pour nettoyer en dessous
des appareils électroménagers.
G
Brosse à épousseter anti-allergène
Cette brosse est dotée de poils en fibre de nylon
spécialement conçus pour enlever la poussière fine
et les particules allergènes des surfaces les plus
délicates.
H
Labrosse motorisée pour les poils d’animaux
autonettoyante
s’attaque aux poils d’animaux domestiques et à la
saleté incrustée dans les zones surélevées, comme
les marches recouvertes de tapis et les meubles en
tissu, tout en retirant activement l’enroulement de
poils et de cheveux pendant qu’elle nettoie.
I
Ensemble pour maison et voiture
Nettoyez votre voiture en profondeur, comme un
détaillant professionnel, ou nettoyez les zones
diciles à atteindre de votre maison. Des micro-
outils vous permettent de nettoyer autour d’objets
délicats et d’accéder aux espaces les plus exigus,
comme les bouches d’aération de voiture et les
claviers d’ordinateur.
J
Sac d’accessoires
Ce sac de rangement pratique pour accessoires de
32cm x 70cm peut contenir le tube d’extension
pour l’espace sous les meubles. Version en format
réduit proposée sur sharkaccessories.com.
A
J
H
REMARQUE: Tous les accessoires ne sont pas fournis avec tous les appareils. Pour une liste des accessoires inclus avec ce modèle,
consultez le rabat intérieur supérieur de la boîte. Pour acheter des accessoires supplémentaires, consultez le site sharkaccessories.com.

sharkclean.comsharkclean.com
CARACTÉRISTIQUES TECHNIQUES
Tension: 120V~, 60Hz
Puissance: 1 400W
Ampères: 11,8A
CONSEIL: Le numéro de modèle et le
numéro de série sont indiqués sur l’étiquette
de code QR située en bas, à l’arrière du
réceptacle de l’aspirateur.
Avantages d’enregistrer votre produit et de
créer un compte:
• Obtenez un service après-vente plus facile
et plus rapide, et accédez aux informations
de garantie
• Accédez au dépannage et aux instructions
d'entretien du produit
• Soyez parmi les premiers à connaître les
promotions exclusives de produits
NOTEZ LES RENSEIGNEMENTS CI-DESSOUS
Numéro de modèle:
�����������������������������������������������������������������������������������
Numéro de série:
��������������������������������������������������������������������������������������������
Date d’achat:
���������������������������������������������������������������������������������������������������������
(Conservez la facture)
Magasin où l’appareil
a été acheté:
����������������������������������������������������������������������������������������������������������
ENREGISTREZ VOTRE ACHAT
registeryourshark.com
Numérisez le code QR
avec votre appareil mobile
GARANTIE LIMITÉE DE CINQ(5)ANS
La garantie limitée de cinq(5)ans s’applique aux achats eectués auprès de détaillants autorisés de
SharkNinjaOperatingLLC. La garantie s’applique uniquement au premier propriétaire et au produit original et
n’est pas transférable.
SharkNinja garantit ce produit contre toute défectuosité de matériau ou de main-d’œuvre pour une période
de cinq(5)ans à compter de la date d’achat, dans le cadre d’un usage domestique normal et si le produit
est entretenu conformément aux exigences décrites dans le guide de l’utilisateur, sujet aux conditions et aux
exclusions ci-dessous:
Qu’est-ce qui est couvert par cette garantie?
1. L’appareil d’origine ou les pièces inusables considérés comme défectueux, à la seule discrétion de
SharkNinja, seront réparés ou remplacés jusqu’à cinq(5)ans à compter de la date d’achat initiale.
2. Dans le cas d’un remplacement de l’appareil, la garantie prendra fin six(6)mois après la date de réception
de l’appareil de remplacement ou pendant le reste de la période de garantie existante, selon la période
la plus longue. SharkNinja se réserve le droit de remplacer l’appareil par un autre de valeur égale ou
supérieure.
Qu’est-ce qui n’est pas couvert par cette garantie?
1. L’usure normale des pièces (comme les filtres en mousse, les filtres HEPA, les tampons, etc.) qui
nécessitent un entretien et/ou un remplacement réguliers afin d’assurer le bon fonctionnement de votre
appareil n’est pas couverte par cette garantie. Vous pouvez faire l’achat de pièces de rechange par
l’entremise du site sharkaccessories.com.
2. La garantie ne s’applique pas aux appareils ayant été altérés ou utilisés à des fins commerciales.
3. Les dommages causés par une mauvaise utilisation (comme aspirer de l’eau ou d’autres liquides), un abus,
une négligence lors de la manipulation, un manquement à l’entretien nécessaire (comme ne pas nettoyer
les filtres), ou un dommage dû à une mauvaise manipulation pendant le transport.
4. Les dommages indirects et accidentels.
5. Les défaillances causées par des réparateurs non autorisés par SharkNinja. Ces défectuosités incluent les
dommages causés lors du processus d’expédition, de modification ou de réparation du produit SharkNinja
(ou de l’une de ses pièces) lorsque la réparation est eectuée par un réparateur non autorisé par
SharkNinja.
6. Les produits achetés, utilisés ou mis en fonction à l’extérieur de l’Amérique du Nord.
Comment obtenir du service
Si votre appareil ne fonctionne pas comme il le devrait lors d’un usage domestique normal pendant la période
de garantie, consultez le site sharkclean.com/support pour obtenir des renseignements au sujet des soins et de
l’entretien du produit. Nos spécialistes du service à la clientèle sont aussi disponibles au 1800798-7398 pour
de l’assistance sur les produits et les options de garantie de service oertes, y compris la possibilité de profiter
de nos options de garantie VIP pour certaines catégories de produits. Afin que nous puissions mieux vous aider,
veuillez enregistrer votre produit en ligne au registeryourshark.com et ayez le produit à portée de main lorsque
vous appelez.
SharkNinja assumera les frais de retour de l’appareil à nos sites par le consommateur en vue de la réparation ou
du remplacement de l’appareil. Un montant de 24,95$ (sujet à changement) sera facturé lorsque SharkNinja
expédiera l’appareil réparé ou remplacé.
Comment présenter une demande de service sous garantie
Vous devez téléphoner au 1800798-7398 pour soumettre une réclamation au titre de la garantie. Vous aurez
besoin du reçu comme preuve d’achat. Nous vous demandons également d’enregistrer votre produit en ligne
au registeryourshark.com et d’avoir le produit à portée de main lorsque vous appelez afin que nous puissions
mieux vous aider. Un spécialiste du service à la clientèle vous fournira les directives d’emballage et de retour.
Manière dont les lois provinciales ou étatiques s’appliquent
Cette garantie vous accorde des droits spécifiques légaux et vous pouvez aussi bénéficier d’autres droits qui
varient d’une province ou d’un État à l’autre. Certains États américains ou certaines provinces canadiennes
n’acceptent pas l’exclusion ou la limitation de dommages accessoires ou indirects, de sorte que les dispositions
ci-dessus peuvent ne pas s’appliquer à votre cas.

sharkclean.comsharkclean.com
GUARDE ESTAS INSTRUCCIONES.
LEA TODAS LAS INSTRUCCIONES ANTES DE USARLA.
INSTRUCCIONES IMPORTANTES DE SEGURIDAD
SOLO PARA USO DOMÉSTICO
Para reducir el riesgo de descarga eléctrica, esta aspiradora tiene un enchufe
polarizado (una patilla es más ancha que la otra). Como función de seguridad,
este enchufe cabe en la toma de corriente polarizada de una sola forma. Si el
enchufe no cabe en la toma de corriente completamente, invierta el enchufe.
Si de todas formas no encaja, comuníquese con un electricista calificado.
NO lo fuerce en la toma de corriente ni intente modificarlo para que se adapte.
ADVERTENCIA
PARA REDUCIR EL RIESGO DE INCENDIO, DESCARGA ELÉCTRICA O LESIONES:
ADVERTENCIAS GENERALES
Al utilizar un electrodoméstico, siempre
se deben seguir precauciones básicas,
que incluyen las siguientes:
1. La aspiradora puede contener
una boquilla de piso motorizada,
un vástago, una manguera y un
receptáculo de aspiradora. Esta
unidad contiene conexiones eléctricas,
cableado eléctrico y piezas móviles
que pueden representar un riesgo para
el usuario.
2. Use únicamente piezas de repuesto
idénticas.
3. Observe y siga las siguientes
instrucciones detenidamente
para evitar el uso incorrecto del
electrodoméstico. NO use la aspiradora
para otro fin que no sea el que se
describe en este manual.
4. Antes de usarla, inspeccione todas las
piezas para verificar que no tengan
daños. NO use ninguna pieza que esté
dañada.
5. El uso de un cable de extensión NO se
recomienda.
6. Esta aspiradora contiene piezas que no
se reparan.
ADVERTENCIAS PARA EL USO
7. Este electrodoméstico lo pueden utilizar
personas con capacidades físicas,
sensoriales o mentales disminuidas o que
carecen de experiencia y conocimientos
si han recibido la supervisión o
instrucciones relacionadas con el uso
del electrodoméstico de forma segura,
y si comprenden los peligros. Los
niños no deben realizar la limpieza y el
mantenimiento del aparato. Mantenga
este electrodoméstico y su cable fuera
del alcance de los niños. NO permita
que los niños usen el electrodoméstico.
NO permita que los niños usen el
electrodoméstico como un juguete. Es
necesaria una supervisión minuciosa
cuando se utiliza cerca de los niños.
8. Siempre apague la aspiradora antes
de conectar o desconectar cualquier
boquilla de piso motorizada u otros
accesorios.
9. NO manipule el enchufe o la aspiradora
con las manos mojadas.
10. NO la use sin los filtros colocados en su
lugar.
11. Solo use filtros y accesorios de la
marca Shark®.
12. NO dañe el cable de alimentación:
a) NO tire del cable ni cargue la
aspiradora del cable ni use el cable
como un mango.
b) NO desenchufe tirando del cable.
Sujete el enchufe, no el cable.
c) NO pase la aspiradora sobre el
cable de alimentación, ni cierre
una puerta sobre el cable, ni tire
del cable alrededor de esquinas
afiladas, tampoco deje el cable
cerca de superficies calientes.
13. NO coloque ningún objeto dentro
de la boquilla de piso o los orificios
de accesorios. NO la use con un
orificio obstruido; mantenga el
electrodoméstico libre de polvo,
pelusas, pelo y cualquier otra cosa que
pueda reducir el flujo de aire.
14. NO la use si el flujo de aire de la
boquilla de piso o del accesorio está
restringido. Si los pasajes de aire o
la boquilla de piso motorizada se
bloquean, apague la aspiradora y
desenchúfela de la toma de corriente
eléctrica. Quite todas las obstrucciones
antes de volver a enchufar y encender
la unidad.
15. Mantenga la boquilla de piso y todos
los orificios de la aspiradora alejados
del pelo, rostro, dedos, pies descalzos
o ropa suelta.
16. NO use la aspiradora si no funciona
como debe ser o si se le cayó, dañó,
se dejó en los exteriores o se cayó en
agua.
17. Tenga mucho cuidado al limpiar
escaleras.
18. NO deje la aspiradora sin supervisión
mientras esté enchufada.
19. Cuando esté encendida, mantenga
la aspiradora en movimiento sobre
la superficie de la alfombra en todo
momento para evitar dañar las fibras
de la alfombra.
20. NO coloque la aspiradora en superficies
poco estables, como sillas o mesas.
21. La aspiradora Shark® no está diseñada
para sostenerse por sí sola. Cuando
haga una pausa en la limpieza, es
posible que deba apoyarla contra un
mueble o la pared o acostarla en el
piso. El uso de la aspiradora en una
aplicación en la que la unidad no tiene
estabilidad puede provocar lesiones
personales.
22. NO la use para recoger lo siguiente:
a) Líquidos
b) Objetos grandes
c) Objetos duros o afilados (vidrio,
clavos, tornillos o monedas)
d) Grandes cantidades de polvo
(polvo de placas de yeso, cenizas
de chimenea o brasas). NO la use
como accesorio para recolección de
polvo de herramientas eléctricas.
e) Objetos humeantes o
incandescentes (carbón caliente,
colillas de cigarrillo o fósforos)
f) Materiales inflamables o
combustibles (líquido de
encendedor, gasolina o queroseno)
g) Materiales tóxicos (blanqueador
con cloro, amoniaco o limpiador
alcalino para drenajes)
23. NO la use en las siguientes áreas:
a) Áreas poco iluminadas
b) Superficies húmedas o mojadas
c) Áreas exteriores
d) Espacios cerrados y que contengan
gases o vapores explosivos o
tóxicos (líquido de encendedor,
gasolina, queroseno, pintura,
diluyente de pintura, sustancias
antipolillas o polvo inflamable)
24. Apague todos los controles antes de
enchufar o desenchufar la aspiradora.
25. Desenchúfela de la toma de corriente
eléctrica cuando no la use y antes de
cualquier mantenimiento o limpieza.
26. Limpie a mano solo con agua. Limpiar
la unidad con productos químicos de
limpieza podría dañarla.
27. Durante la limpieza o mantenimiento
de rutina, NO corte nada más que
los mechones de pelo, fibras o hilos
enredados en el cepillo giratorio.
28. Permita que todos los filtros se sequen
al aire libre completamente antes de
volver a colocarlos en la aspiradora
para impedir que ingrese líquido a las
piezas eléctricas.
29. Asegúrese de que el recipiente para
el polvo y todos los filtros estén en su
lugar después del mantenimiento de
rutina.
30. Si se proporcionaron, asegure el cable
de alimentación alrededor de los
dos ganchos para cable durante el
almacenamiento.
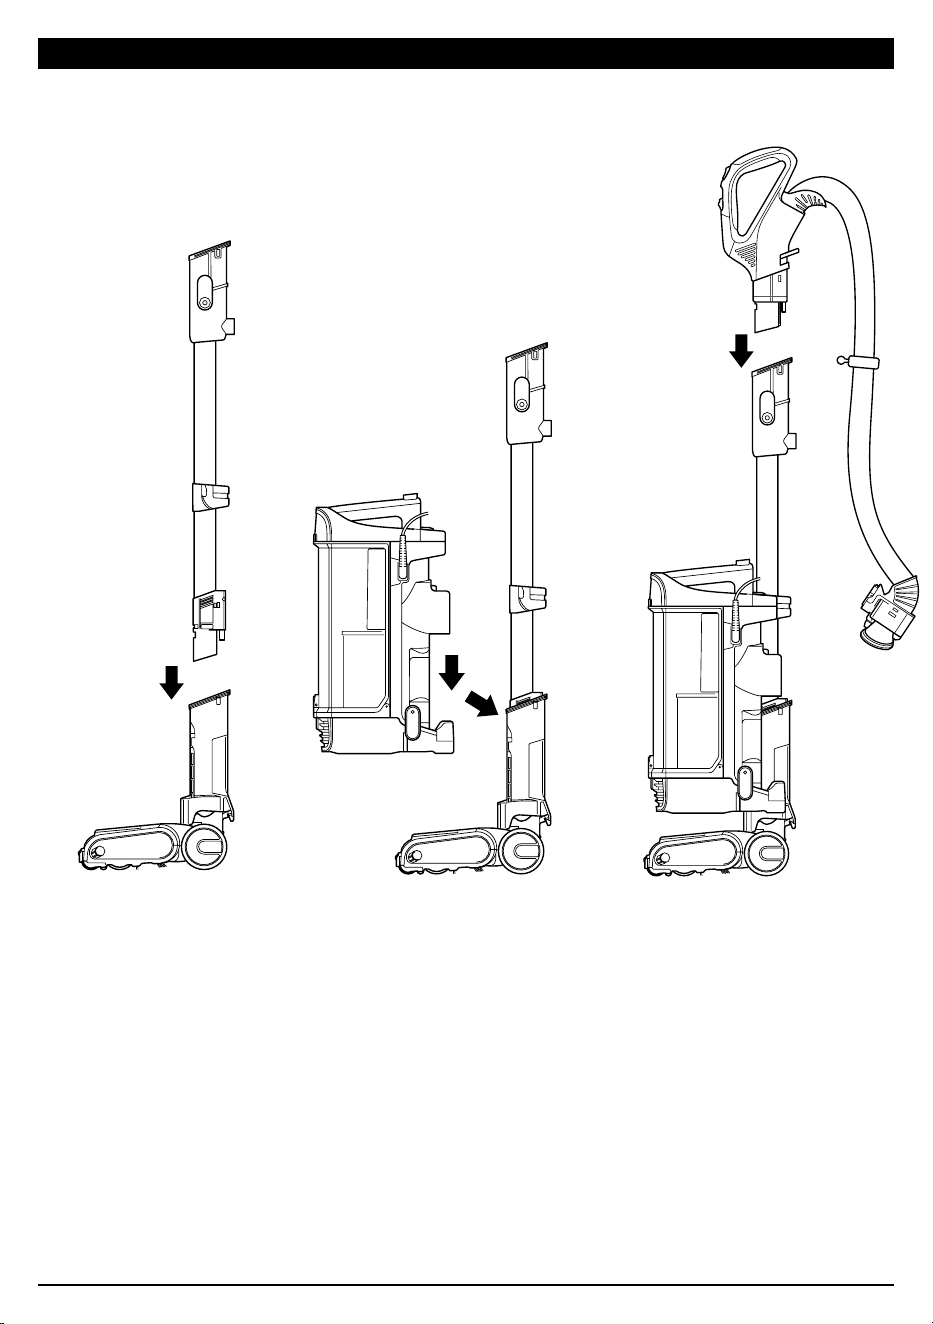
sharkclean.comsharkclean.com
ENSAMBLADO
1. Coloque la boquilla de piso motorizada sobre el piso e inserte el vástago presionándolo hacia
dentro hasta que enganche firmemente en su sitio.
2. Coloque el receptáculo en el vástago y deslícelo hacia abajo para conectarlo.
3. Inserte el mango en el vástago presionándolo hacia dentro hasta que enganche firmemente
en su sitio.
4. Conecte la manguera en la parte trasera del receptáculo presionándola hacia dentro hasta
que enganche firmemente en su sitio.
5. Guarde los accesorios incluidos en los postes para accesorios del receptáculo.
IMPORTANTE: Para un funcionamiento correcto, asegúrese de que todas las conexiones hayan
encajado firmemente en su lugar.
ENSAMBLADO
(Clic)
1
(Clic)
2
(Clic)
3
(Clic)
4
(Clic)
5
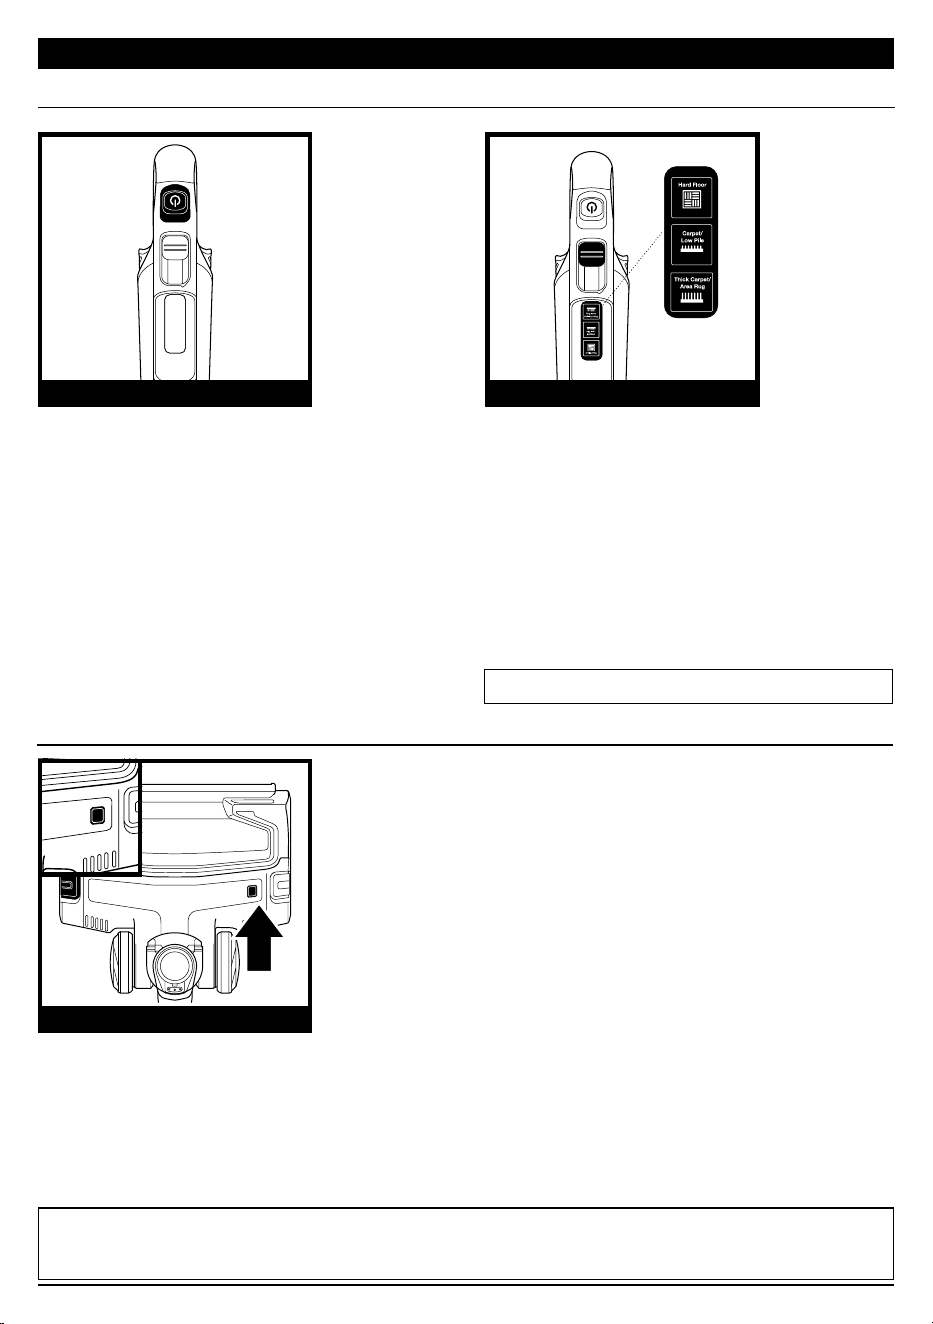
sharkclean.comsharkclean.com
NOTA: Todos los accesorios son compatibles con el vástago y con el mango.
LIMPIEZA DE TODO EL HOGAR
MODOS DE LIMPIEZA
Para enganchar los cepillos giratorios, pise la
boquilla de piso e incline el mango hacia atrás.
Presione el botón de encendido para prender
la aspiradora. Tenga presente que los cepillos
giratorios no girarán si el vástago no está
inclinado.
¿QUÉ SIGNIFICA LA LUZ INDICADORA DEL CEPILLO GIRATORIO?
Verde continuo: Los cepillos giratorios están girando y funcionando correctamente.
Rojo continuo: Hay una obstrucción en el área del cepillo giratorio. Apague y desconecte la aspiradora y
quite cualquier obstrucción en la boquilla de piso.
Rojo parpadeante: La boquilla de piso motorizada se está sobrecalentando. Apague y desconecte la
aspiradora y quite cualquier obstrucción. Deje que la aspiradora se enfríe durante al menos 60 minutos
antes de volver a encenderla. Consulte la sección Solución de problemas para obtener más información.
Presione el botón Wand Release (liberar
vástago) para separar el vástago del
receptáculo.
Limpieza de alfombras y tapetes gruesos
Deslice el interruptor de superficie hacia la posición
superior para seleccionar Thick Carpet/Area Rug
(alfombra/tapetes gruesos).
Limpieza de alfombras de fibras cortas:
Deslice el interruptor de superficie hacia la posición media
para seleccionar Carpet/Low Pile (alfombra/fibra corta)
para aumentar la velocidad de los cepillos giratorios y
facilitar la eliminación de polvo y suciedad pegados.
Limpieza de piso duro
Deslice el interruptor de superficie hacia la posición
inferior para seleccionar Hard Floor (piso duro).
Con el receptáculo desmontado, presione el
botón Wand Release (liberar vástago) para
separar el vástago de la boquilla de piso.
Presione el mecanismo Handle Release
(liberar mango) para separar el mango del
vástago.
Presione el botón Lift-Away (separar) para
separar el receptáculo de la boquilla de piso.
VERTICAL
INTERRUPTOR DE ENCENDIDO
LUZ INDICADORA
POR ENCIMA DEL PISO - MANGO
PROPULSIÓN LIFT-AWAY®
POR ENCIMA DEL PISO -
VÁSTAGO
SELECTOR DE SUPERFICIE
LIFT-AWAY®
LIMPIEZA DE TODO EL HOGAR
AJUSTES
LUZ INDICADORA DEL CEPILLO GIRATORIO
NOTA: Para una limpieza profunda según ASTM F 608 (suciedad incrustada en alfombras), ajuste el interruptor a Carpet/Low
Pile (alfombra/fibra corta).
NOTA: Para lograr una succión máxima cuando limpie pisos descubiertos según ASTM F558, coloque el interruptor en modo
Hard Floor (piso duro).
NOTA: Intente usar el modo Hard Floor (piso duro) en
alfombras de fibras cortas.
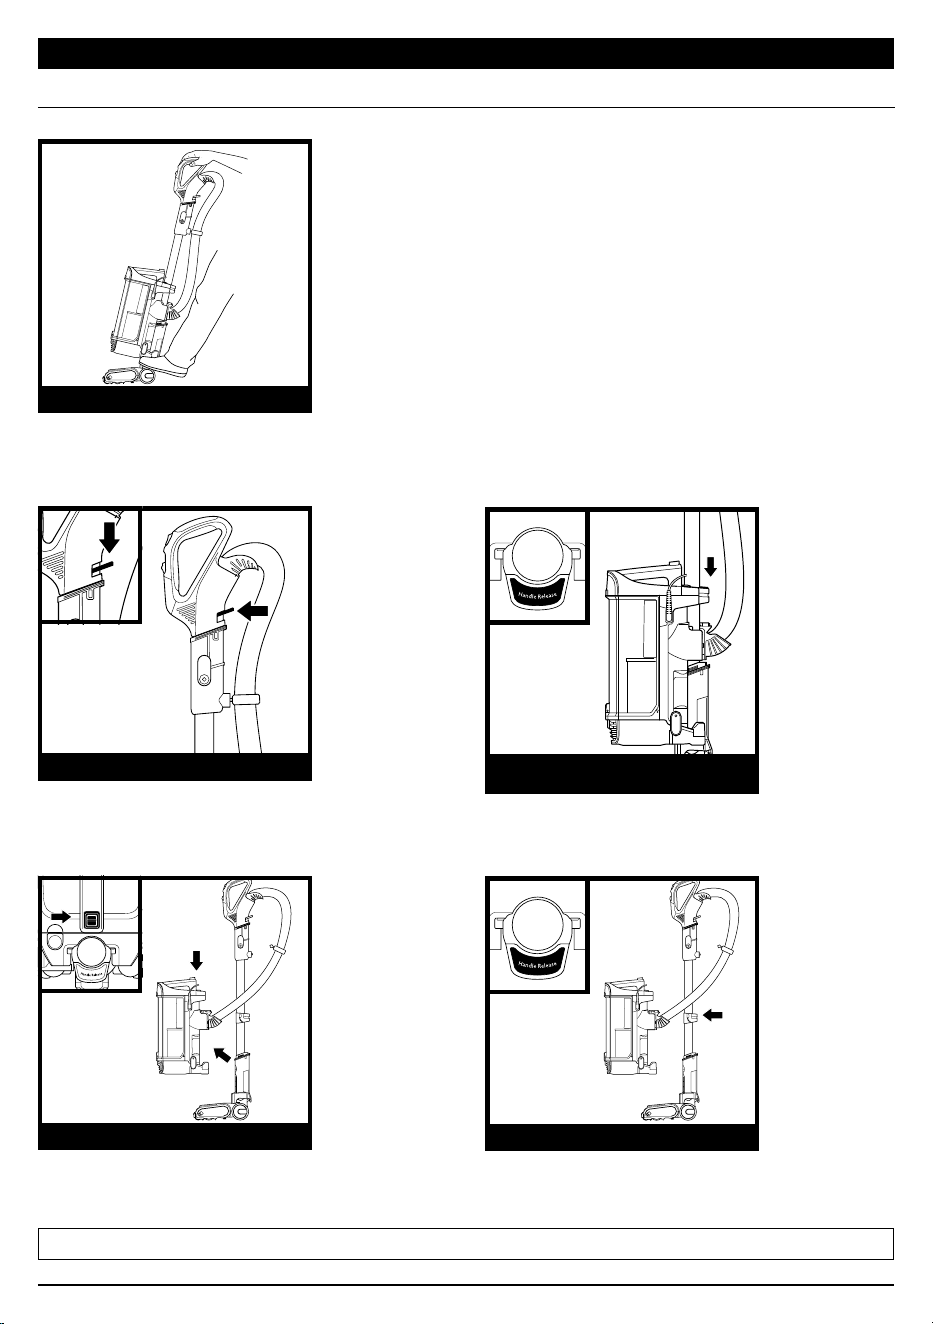

sharkclean.comsharkclean.com
CÓMO VACIAR EL RECIPIENTE PARA EL POLVO
Para quitar el recipiente para el polvo, presione
el botón de liberación en la parte superior del
receptáculo. Incline el recipiente para el polvo
alejándolo del vástago y levántelo para quitarlo.
Para reinstalar, coloque la parte inferior del
recipiente para el polvo en el receptáculo y
luego inclínelo hasta que encaje en su lugar.
Para vaciar los escombros en la basura, presione
el botón de liberación inferior y el recipiente
para el polvo se abrirá.
Para eliminar los desechos acumulados en
la rejilla para pelusa, presione el botón de
liberación superior y levante el mango para
acceder a la rejilla.
LIMPIE EL FILTRO HEPA CADA AÑO
Una vez que haya quitado el recipiente para el polvo, presione el botón ubicado en Filter Door (tapa
del filtro). Tire hacia adelante y deslice hacia afuera para quitarlo, después saque el filtro HEPA.
Para reinstalar, inserte el filtro HEPA en la unidad y vuelva a colocar la tapa del filtro.
LIMPIE LOS FILTROS DELANTEROS DEL
MOTOR CADA MES
Quite el recipiente para el polvo, luego levante
los filtros.
Enjuague y remplace los filtros con
regularidad para mantener el poder de
succión de la aspiradora.
Para evitar daños producidos por productos
químicos de limpieza, enjuague los filtros
únicamente con agua fría. Permita que los
filtros se sequen al aire por lo menos durante
24 horas antes de volver a colocarlos para
evitar que ingrese líquido a las piezas eléctricas.
CÓMO LIMPIAR Y REEMPLAZAR LOS FILTROS
LIMPIEZA DE LOS FILTROS
IMPORTANTE: NO use jabón cuando limpie
los filtros.
IMPORTANTE: Desenchufe el cable de alimentación antes de cualquier tarea de
mantenimiento.
Liberación
de la tapa
del filtro
NOTA: Los filtros delanteros del motor deben reemplazarse cada 2.5 años. El filtro trasero del motor debe reemplazarse cada 3 años.
Filtro
Tapa del filtro
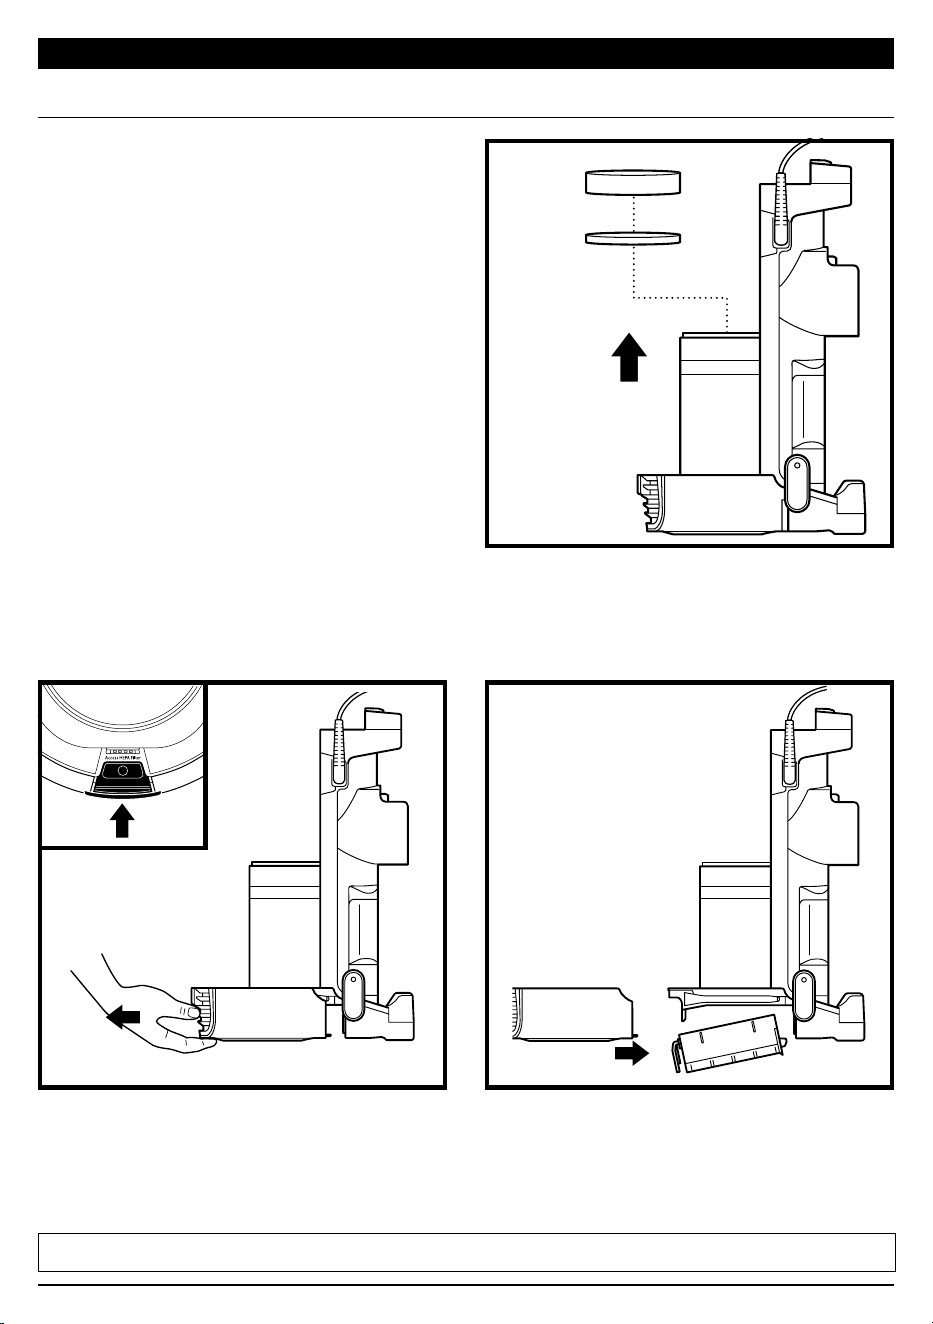
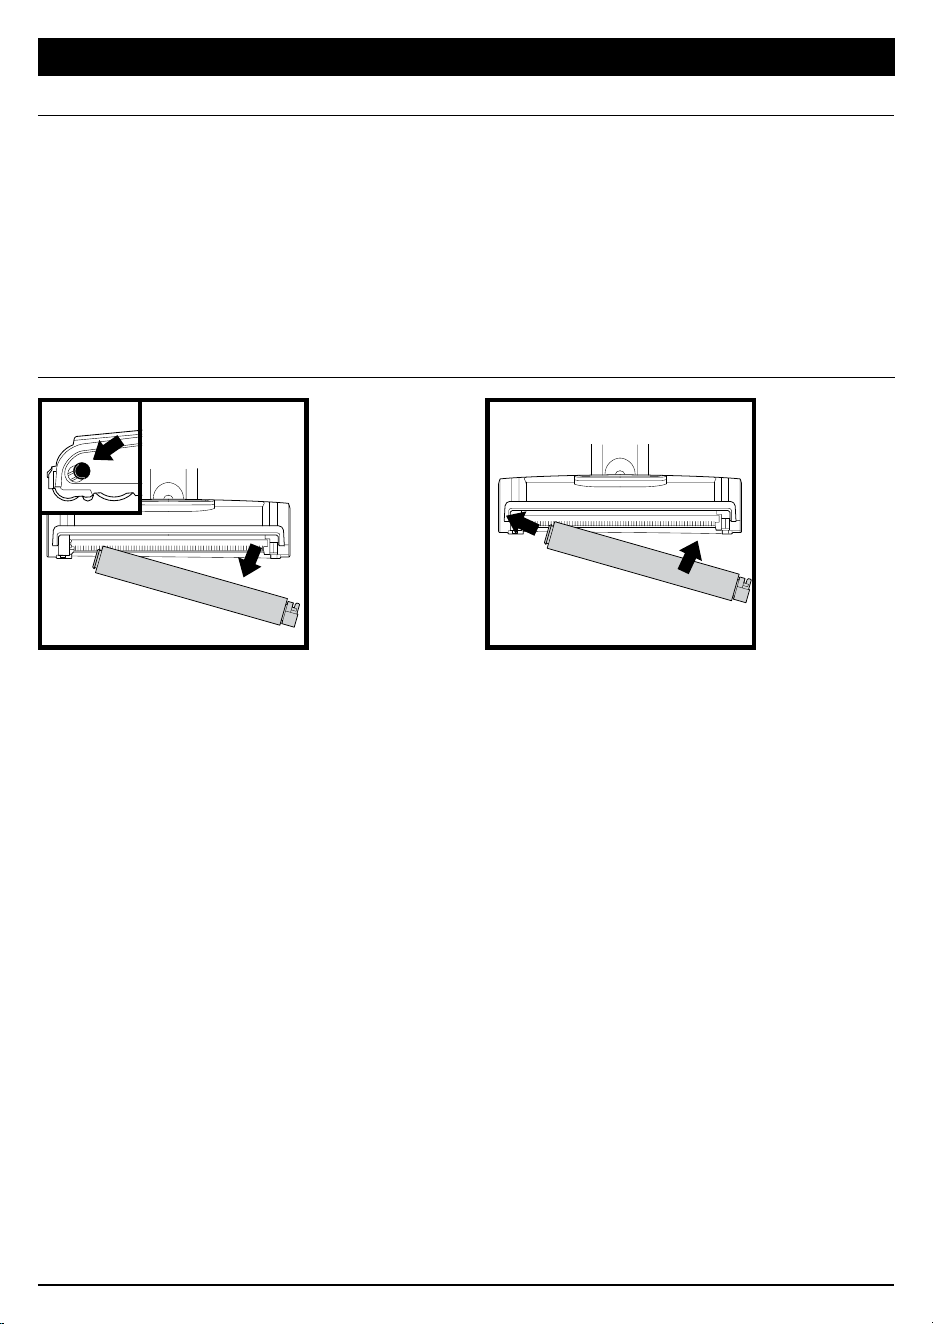
sharkclean.comsharkclean.com
Deslice hacia adelante el botón de acceso al
rodillo suave para liberar el rodillo.
Lave el rodillo suave a mano si es necesario.
Use solamente agua y permita que seque por
completo al aire por lo menos durante 24 horas.
Vuelva a insertar el rodillo suave en el frente de
la boquilla de piso hasta que encaje firmemente
en su sitio.
LIMPIEZA DEL RODILLO SUAVE
MANTENIMIENTO
CÓMO VERIFICAR SI HAY OBSTRUCCIONES
Desacople la manguera del receptáculo de la
aspiradora y verifique si hay obstrucciones en
la manguera y en el orificio en la parte trasera
del receptáculo.
Desacople el vástago de la boquilla de piso y
el mango, y verifique los dos extremos para
ver si hay obstrucciones.
Desacople el vástago de la boquilla de piso,
incline la parte trasera de la boquilla de piso y
verifique si hay obstrucciones en el orificio.
Para acceder a la manguera de la boquilla,
abra los seguros que se encuentran en la
parte inferior de la boquilla. Con una moneda,
gire las trabas en sentido antihorario,
luego levante la tapa y elimine cualquier
obstrucción.
Desacople el mango del vástago y la
manguera del receptáculo de la aspiradora, y
verifique si hay obstrucciones en los orificios.
CEPILLO GIRATORIO DE AUTO-LIMPIEZA
Si hay cabello enredado en el cepillo giratorio, siga aspirando en el modo de Carpet/Low Pile
(alfombra/fibra corta) sobre una superficie de piso descubierta, una alfombra de fibra corta o un
tapete pequeño. Esto permitirá que el cepillo giratorio de autolimpieza quite el enredo de pelos
y lo envíe al recipiente para el polvo.
Si aspira un objeto duro o afilado o se da cuenta de un cambio en el ruido mientras aspira,
verifique si hay obstrucciones u objetos atrapados en el cepillo giratorio.
Si aún quedan fibras enredadas en el cepillo giratorio después del uso constante, quítelas del
cepillo giratorio.
MANTENIMIENTO DE LA BOQUILLA DE PISO
OBSTRUCCIÓN DE LA
MANGUERA
OBSTRUCCIÓN DEL VÁSTAGO
OBSTRUCCIÓN DEL
RECEPTÁCULO
OBSTRUCCIÓN DEL MANGO O
LA MANGUERA
OBSTRUCCIÓN DE LA MANGUERA
DE LA BOQUILLA DE PISO
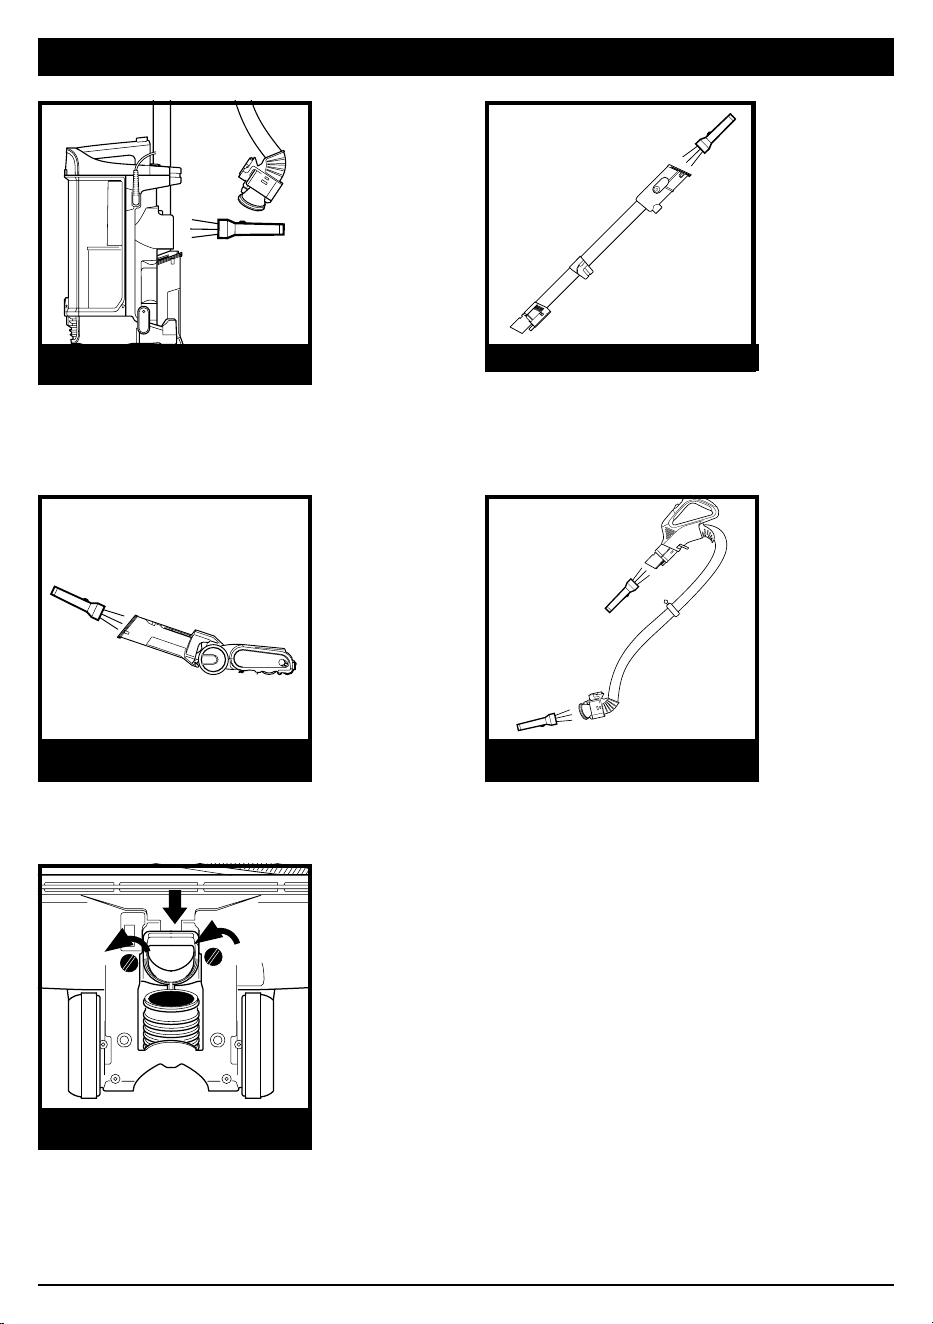
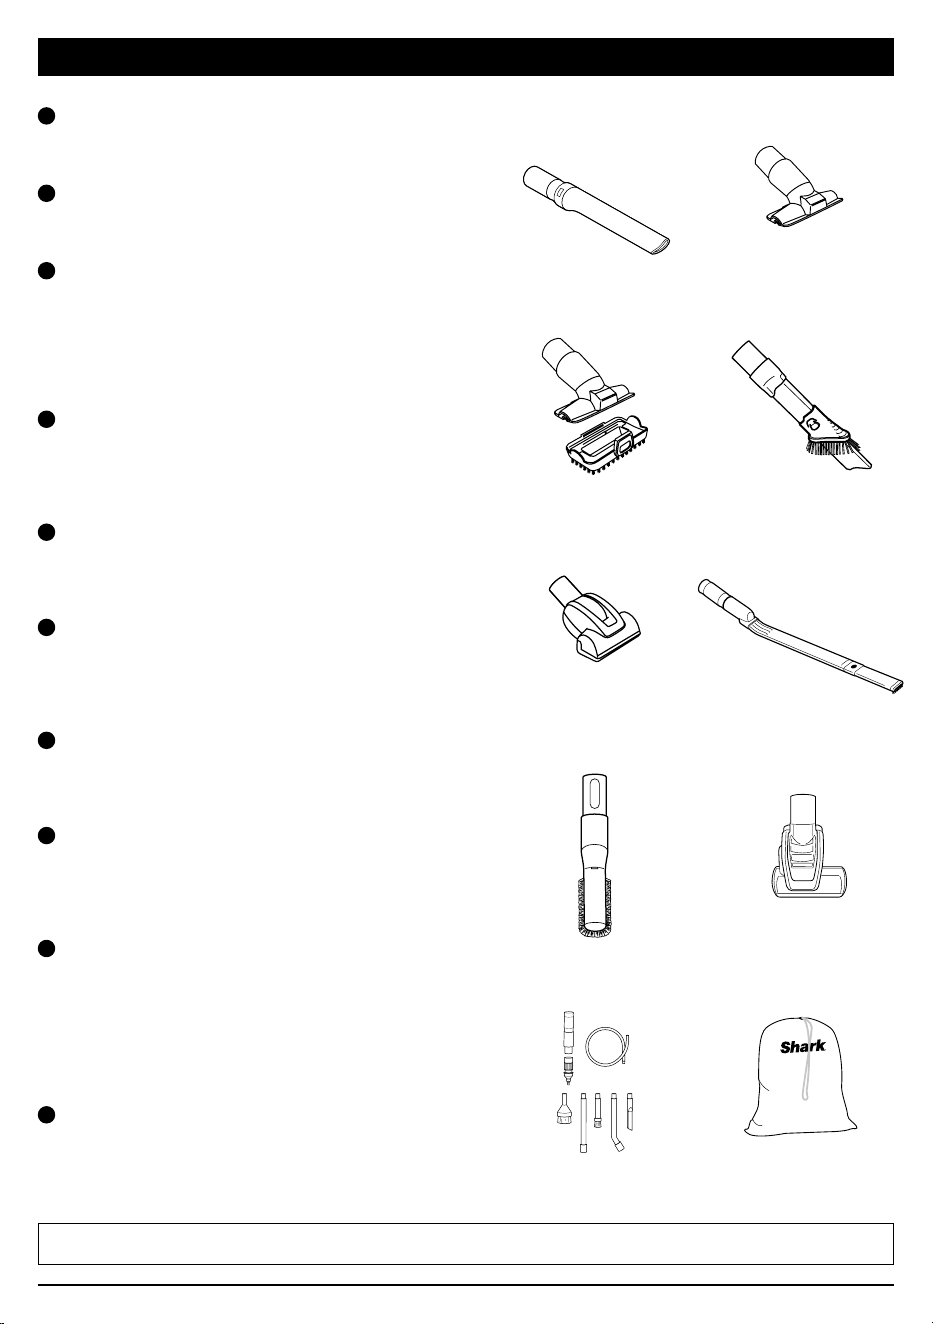
sharkclean.comsharkclean.com
ACCESORIOS DISPONIBLES SOLUCIÓN DE PROBLEMAS
La aspiradora no recolecta escombros. No hay succión o hay poca succión.
• Revise los filtros para determinar si necesitan limpieza. Siga las instrucciones para enjuagar y
secar los filtros al aire antes de volver a instalarlos.
• El recipiente para el polvo puede estar lleno; vacíe el recipiente para el polvo.
• Revise la manguera, las conexiones de la manguera, la boquilla de piso, el vástago y
receptáculo, así como los accesorios, para ver si hay obstrucciones. Limpie cualquier
obstrucción que encuentre. Consulte la sección “Cómo verificar si hay obstrucciones” para
obtener más información.
• Si hay mechones de pelo, hilos o fibras de alfombra enredados en el cepillo giratorio, extienda
el tiempo de limpieza para permitir que el cepillo giratorio de autolimpieza los quite. Si
aún quedan pelos o fibras enredados en el cepillo giratorio después del uso constante,
retírelos con cuidado. Consulte la sección Cómo limpiar el cepillo giratorio para obtener más
información.
La aspiradora levanta los tapetes.
• Asegúrese de que el interruptor selector de superficie esté configurado en Limpieza de
alfombras gruesas y alfombras de área.
• La succión es potente. Tenga cuidado cuando aspire tapetes con bordes cosidos y delicados.
Los cepillos giratorios no giran.
• Si se enciende en rojo la luz indicadora del cepillo giratorio, apague la aspiradora de inmediato
y desenchúfela. Retire el receptáculo y el vástago de la boquilla del piso y elimine cualquier
obstrucción. Vuelva a conectar la boquilla, conecte la aspiradora y encienda la alimentación.
• Con la aspiradora encendida, recline el mango para encender automáticamente los cepillos
giratorios.
La aspiradora se apaga por sí sola o la luz indicadora parpadea en rojo.
Si la aspiradora se sobrecalienta, el termostato apagará el motor automáticamente. Siga estos
pasos para reiniciar:
1. Apague y desenchufe la aspiradora.
2. Vacíe el recipiente para el polvo y limpie los filtros. Consulte las secciones Cómo vaciar el
recipiente para el polvo y Limpieza de los filtros para obtener más información.
3. Verifique si hay obstrucciones en la manguera, el vástago, la boquilla de piso, los accesorios o
los orificios de entrada.
4. Permita que la unidad se enfríe durante un mínimo de 60 minutos.
5. Enchufe la aspiradora y enciéndala.
Para todos los demás problemas, llame al Servicio al Cliente al 1-800-798-7398.
D
F
G
I
E
C
B
A
Herramienta para grietas
Esta herramienta delgada ofrece mayor alcance
para acceder a esquinas, zócalos, espacios
estrechos y techo.
B
Herramienta para tapicería
Recolecta pelo, polvo y desechos grandes de
colchones, sofás, cortinas, pantallas de lámparas y
otras superficies delicadas y tapizadas.
C
Herramienta múltiple para mascotas
Una sola herramienta convertible para limpiar la
suciedad difícil de mascotas de dos maneras: use
el cepillo de cerda dura para limpiar la suciedad
pegada o retire las cerdas para encontrar una
herramienta perfecta para tapicería que elimina el
pelo adherido de mascotas y grandes cantidades
de escombros.
D
Herramienta para grietas quitapolvo
Dos herramientas de limpieza en una. La
herramienta para grietas ofrece alcance extendido
para limpiar espacios reducidos, mientras que
el cepillo suave es ideal para eliminar polvo de
superficies delicadas.
E
Cepillo para mascotas
El cepillo de turbina desprende y elimina pelos y
escombros de mascotas de alfombras, y limpia
profundamente la caspa de origen animal de
muebles tapizados y otras superficies.
F
Vástago para usar debajo de electrodomésticos
Limpie debajo y detrás de los electrodomésticos
y muebles que son difíciles de mover con esta
herramienta ajustable de 91 cm (36 pulg.). Voltee la
pieza de extensión para limpiar la parte inferior de
los electrodomésticos.
G
Cepillo quitapolvo antialérgeno
Este cepillo tiene cerdas de fibra de nailon
específicamente diseñadas para eliminar polvo
fino y partículas de alérgenos de la mayoría de las
superficies delicadas.
H
Cepillo motorizado de autolimpieza para
mascotas
Recoge pelo de mascotas y suciedad de áreas por
encima del piso, como escaleras alfombradas y
tapicería, a la vez que elimina el pelo enredado en
forma activa mientras limpia.
I
Kit para limpieza del hogar y el automóvil
Limpie de forma profunda su automóvil tal como
lo hace un servicio de lavado de autos profesional,
o limpie los rincones de difícil acceso de su
hogar. Las herramientas diminutas le permiten
limpiar alrededor de objetos delicados y llegar
a los lugares más reducidos, como las salidas de
ventilación del automóvil y los teclados de las
computadoras.
J
Bolsa para accesorios
Esta práctica bolsa para guardar accesorios mide
32cm x 70cm y se adapta al tubo de extensión.
Hay un tamaño más pequeño disponible en
sharkaccessories.com.
A
J
H
NOTA: No se incluyen todos los accesorios en todas las unidades. Para ver la lista de accesorios incluidos con este modelo,
consulte la solapa interior superior de la caja. Para solicitar accesorios adicionales, visite sharkaccessories.com.

sharkclean.comsharkclean.com
ESPECIFICACIONES TÉCNICAS
Voltaje: 120V~, 60Hz
Vatios: 1400W
Amperios: 11.8 A
SUGERENCIA: Puede encontrar los números
de modelo y de serie en la etiqueta del
código QR en la base de la parte posterior
del receptáculo de la aspiradora.
Beneficios de registrar su producto y crear
una cuenta:
• Obtenga asistencia con el producto
con más facilidad y rapidez, y acceda a
información de la garantía.
• Acceda a solución de problemas e
instrucciones de cuidado del producto.
• Sea uno de los primeros en recibir
promociones exclusivas de productos.
REGISTRE ESTA INFORMACIÓN
Número de modelo:
�������������������������������������������������������������������������������������
Número de serie:
����������������������������������������������������������������������������������������������
Fecha de compra:
�������������������������������������������������������������������������������������������
(Conserve el recibo)
Tienda donde la adquirió:
�������������������������������������������������������������������
REGISTRE SU COMPRA
registeryourshark.com
Escanee el código QR
con un dispositivo móvil.
GARANTÍA LIMITADA DE CINCO (5) AÑOS
La garantía limitada de cinco (5) años se aplica a las compras realizadas en tiendas autorizadas de SharkNinja
Operating LLC. La cobertura de la garantía se aplica solo al propietario original y al producto original y no es
transferible.
SharkNinja garantiza que la unidad estará libre de defectos en materiales y mano de obra por un período de
cinco (5) años a partir de la fecha de compra, cuando se usa bajo las condiciones normales del hogar y se
mantiene de acuerdo con los requisitos descritos en la guía del usuario, sujeto a las siguientes condiciones y
exclusiones:
¿Qué cubre esta garantía?
1. La unidad original o las piezas que no sean de desgaste que se consideren defectuosas, a discreción
exclusiva de SharkNinja, serán reparadas o reemplazadas hasta cinco (5) años a partir de la fecha de
compra original.
2. En el caso de que se emita una unidad de reemplazo, la cobertura de la garantía finaliza seis (6) meses
después de la fecha de recepción de la unidad de reemplazo o el resto de la garantía existente, la que sea
más tardía. SharkNinja se reserva el derecho de reemplazar la unidad con una de igual o mayor valor.
¿Qué es lo que no cubre la garantía?
1. El desgaste normal de las piezas consumibles (como filtros de espuma, filtros HEPA, almohadillas, etc.),
que requieren un mantenimiento regular o un reemplazo para garantizar el correcto funcionamiento de su
unidad, no está cubierto por esta garantía. Las piezas de repuesto están disponibles para su compra en
sharkaccessories.com.
2. Cualquier unidad que haya sido manipulada o utilizada con fines comerciales.
3. Daños causados por el mal uso (por ejemplo, aspirar agua u otros líquidos), abuso, manejo negligente,
no realizar el mantenimiento requerido (p. ej., no limpiar los filtros) o daños debido a un mal manejo en
tránsito.
4. Daños consecuenciales e incidentales.
5. Defectos causados por personas que hacen reparaciones que no están autorizadas por SharkNinja. Estos
defectos incluyen los daños causados en el proceso de envío, modificación o reparación del producto
SharkNinja (o cualquiera de sus partes) cuando la reparación es realizada por una persona que hace
reparaciones y que no está autorizada por SharkNinja.
6. Productos comprados, usados u operados fuera de América del Norte.
Cómo obtener servicio
Si su electrodoméstico no funciona correctamente mientras está en uso bajo las condiciones normales del hogar
dentro del período de garantía, visite sharkclean.com/support para obtener autoayuda de mantenimiento y
cuidado del producto. Nuestros especialistas en servicio al cliente también están disponibles en el 1-800-798-7398
para ayudarlo con el soporte de productos y las opciones de servicio de garantía, incluyendo la posibilidad
de actualizar nuestras opciones de servicio de garantía VIP para categorías de productos selectas. Para que
podamos asistirlo de una manera más eficiente, registre su producto en línea en registeryourshark.com y tenga el
producto a la mano cuando llame.
SharkNinja cubrirá el costo para que el cliente nos envíe la unidad para su reparación o reemplazo. Se cobrará
una tarifa de $24.95 (sujeta a cambio) cuando SharkNinja envíe la unidad reparada o de reemplazo.
Cómo iniciar un reclamo de garantía
Debe llamar al 1-800-798-7398 para iniciar un reclamo de garantía. Necesitará el recibo como comprobante
de compra. También le pedimos que registre su producto en línea en registeryourshark.com y que tenga el
producto a mano cuando llame, para que podamos asistirlo mejor. Un especialista en servicio al cliente le
proporcionará información sobre instrucciones de devolución y embalaje.
Cómo se aplica la ley estatal
Esta garantía le otorga derechos legales específicos, y usted también puede tener otros derechos que
varían de un estado a otro. Algunos estados no permiten la exclusión o limitación de daños incidentales o
consecuentes, por lo que es posible que lo anterior no aplique a usted.

sharkclean.comsharkclean.com
NOTES REMARQUES
�����������������������������������������������������������������������
�����������������������������������������������������������������������
�����������������������������������������������������������������������
�����������������������������������������������������������������������
�����������������������������������������������������������������������
�����������������������������������������������������������������������
�����������������������������������������������������������������������
�����������������������������������������������������������������������
�����������������������������������������������������������������������
�����������������������������������������������������������������������
�����������������������������������������������������������������������
�����������������������������������������������������������������������
�����������������������������������������������������������������������
�����������������������������������������������������������������������
�����������������������������������������������������������������������
�����������������������������������������������������������������������
�����������������������������������������������������������������������
�����������������������������������������������������������������������
�����������������������������������������������������������������������
�����������������������������������������������������������������������
�����������������������������������������������������������������������
�����������������������������������������������������������������������
�����������������������������������������������������������������������
�����������������������������������������������������������������������
�����������������������������������������������������������������������
�����������������������������������������������������������������������
�����������������������������������������������������������������������
�����������������������������������������������������������������������
�����������������������������������������������������������������������
�����������������������������������������������������������������������
�����������������������������������������������������������������������
�����������������������������������������������������������������������
�����������������������������������������������������������������������
�����������������������������������������������������������������������
�����������������������������������������������������������������������
�����������������������������������������������������������������������
�����������������������������������������������������������������������
�����������������������������������������������������������������������
�����������������������������������������������������������������������
�����������������������������������������������������������������������

sharkclean.comsharkclean.com
NOTES NOTAS
�����������������������������������������������������������������������
�����������������������������������������������������������������������
�����������������������������������������������������������������������
�����������������������������������������������������������������������
�����������������������������������������������������������������������
�����������������������������������������������������������������������
�����������������������������������������������������������������������
�����������������������������������������������������������������������
�����������������������������������������������������������������������
�����������������������������������������������������������������������
�����������������������������������������������������������������������
�����������������������������������������������������������������������
�����������������������������������������������������������������������
�����������������������������������������������������������������������
�����������������������������������������������������������������������
�����������������������������������������������������������������������
�����������������������������������������������������������������������
�����������������������������������������������������������������������
�����������������������������������������������������������������������
�����������������������������������������������������������������������
�����������������������������������������������������������������������
�����������������������������������������������������������������������
�����������������������������������������������������������������������
�����������������������������������������������������������������������
�����������������������������������������������������������������������
�����������������������������������������������������������������������
�����������������������������������������������������������������������
�����������������������������������������������������������������������
�����������������������������������������������������������������������
�����������������������������������������������������������������������
�����������������������������������������������������������������������
�����������������������������������������������������������������������
�����������������������������������������������������������������������
�����������������������������������������������������������������������
�����������������������������������������������������������������������
�����������������������������������������������������������������������
�����������������������������������������������������������������������
�����������������������������������������������������������������������
�����������������������������������������������������������������������
�����������������������������������������������������������������������

© 2020 SharkNinja Operating LLC. DUOCLEAN, LIFT-AWAY, POWERED LIFT-AWAY, and SHARK are registered
trademarks of SharkNinja Operating LLC. VERTEX is a trademark of SharkNinja Operating, LLC.
© SharkNinja Operating LLC, 2020. DUOCLEAN, LIFT-AWAY, POWERED LIFT-AWAY, et SHARK sont des marques de
commerce déposées de SharkNinja Operating LLC. VERTEX est une marque de commerce de SharkNinja Operating, LLC.
© 2020 SharkNinja Operating LLC. DUOCLEAN, LIFT-AWAY, POWERED LIFT-AWAY, y SHARK son marcas comerciales
registradas de SharkNinja Operating LLC. VERTEX es una marca comercial de SharkNinja Operating, LLC.
AZ2000BBB�Series�IB�E�F�S�MP�Mv4
PRINTED IN CHINA / IMPRIMÉ EN CHINE / IMPRESO EN CHINA
PLEASE READ CAREFULLY AND KEEP FOR FUTURE REFERENCE.
This Owner’s Guide is designed to help you get a complete understanding of your new Shark®
Vertex™ DuoClean® POWERFINS Powered Lift-Away® with Self-Cleaning Brushroll Upright Vacuum.
SharkNinja Operating LLC
US: Needham, MA 02494
CAN: Ville St-Laurent, QC H4S 1A7
1-800-798-7398
sharkclean.com
Illustrations may dier from actual product. We are constantly striving to improve our products;
therefore the specifications contained herein are subject to change without notice.
For SharkNinja U.S. Patent information, visit sharkninja.com/uspatents
LEA ATENTAMENTE Y GUARDE COMO REFERENCIA PARA EL FUTURO.
Esta guía de usuario está diseñada para ayudarle a entender completamente su nueva aspiradora
vertical con cepillo giratorio de autolimpieza Shark® Vertex™ Estabilizadores de potencia DuoClean®
POWERED Lift-Away®.
SharkNinja Operating LLC
EE.UU.: Needham, MA 02494
CAN: Ville St-Laurent, QC H4S 1A7
1-800-798-7398
sharkclean.com
Las ilustraciones pueden diferir del producto real. Nos esforzamos constantemente para mejorar
nuestros productos, por lo tanto, las especificaciones contenidas en este documento están sujetas a
cambios sin previo aviso.
Para obtener información sobre la patente de SharkNinja en EE.UU., visite sharkninja.com/uspatents.
VEUILLEZ LIRE ATTENTIVEMENT LE PRÉSENT MODE D’EMPLOI ET LE CONSERVER À TITRE
INFORMATIF.
Ce guide de l’utilisateur a été conçu pour vous aider à acquérir une compréhension approfondie
de votre nouvel aspirateur vertical Shark® Vertex™ DuoClean® POWERFINS Powered Lift-Away® avec
brosse rotative autonettoyante.
SharkNinja Operating LLC
États-Unis: Needham, MA 02494
Canada: Saint-Laurent (Québec) H4S1A7
1800798-7398
sharkclean.com
Les illustrations peuvent diérer du produit réel. Nous tentons constamment d’améliorer nos produits;
par conséquent, les caractéristiques indiquées dans le présent guide peuvent être modifiées sans préavis.
Pour obtenir de l’information au sujet des brevets de SharkNinja aux États-Unis, consultez le site
suivant:www.sharkninja.com/uspatents