
All products are trademarks of Nostalgia Products LLC.
Worldwide design & utility patented or patents pending.
© 2022 Nostalgia Products LLC.
www.nostalgiaproducts.com
(rev. 11/14/22 WL)
CBD5BS
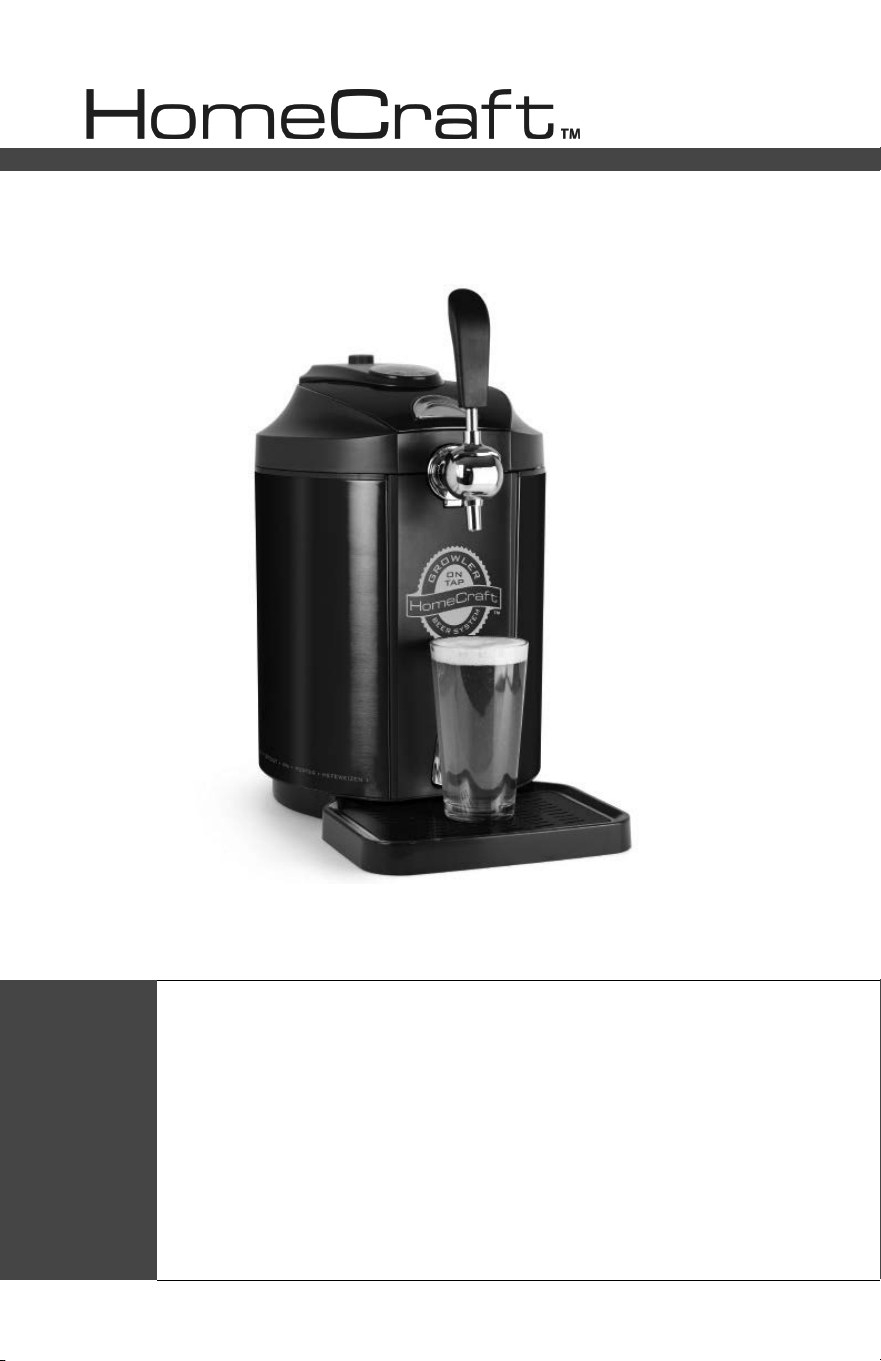
HomeCraft™ On-Tap Beer Growler System
Sistema de barril de cerveza tirada artesanal
Système de bière en fût
Instructions
Instrucciones
Instructions

ENGLISH
2
Make every day a party!
Visit www.nostalgiaproducts.com for more fun products.
CONTENTS
SAFETY . . . . . . . . . . . . . . . . . . . . . . . . . . . . . . . . . . . . . . . . . 2
IMPORTANT SAFEGUARDS . . . . . . . . . . . . . . . . . . . . . . . . . . . . . 3
ADDITIONAL IMPORTANT SAFEGUARDS . . . . . . . . . . . . . . . . . . . . 3
INTRODUCTION . . . . . . . . . . . . . . . . . . . . . . . . . . . . . . . . . . . . 5
PARTS & ASSEMBLY . . . . . . . . . . . . . . . . . . . . . . . . . . . . . . . . . . 6
HOW TO OPERATE . . . . . . . . . . . . . . . . . . . . . . . . . . . . . . . . . . 11
HELPFUL TIPS . . . . . . . . . . . . . . . . . . . . . . . . . . . . . . . . . . . . . 14
CLEANING & MAINTENANCE . . . . . . . . . . . . . . . . . . . . . . . . . . . . 15
RETURNS & WARRANTY . . . . . . . . . . . . . . . . . . . . . . . . . . . . . . . 16
SAFETY
Appliance Specications:
120 Volts, 60 Hz
65 Watts
THIS PRODUCT IS FOR USE IN 120V AC OUTLET ONLY.
Refer to www.nostalgiaproducts.com/user-manuals/ for the most updated manual.
Your safety and the safety of others is very important.
We have provided many important safety messages in this manual and
on your appliance. Always read and obey all safety messages.
This is the safety alert symbol.
This symbol alerts you to potential hazards that can
cause serious injury to you and others.
All safety messages will follow the safety alert symbol.
All safety messages will tell you what the potential hazard is, tell you how to reduce the
chance of injury, and tell you what can happen if the instructions are not followed.

ENGLISH
3
IMPORTANT SAFEGUARDS
A person who has not read and understood all operating and safety instructions
is not qualied to operate this appliance. All users of this appliance must read and
understand this Instruction Manual before operating or cleaning this appliance.
When using electrical appliances, basic safety precautions
should always be followed, including:
1. Read all instructions before operating this appliance.
2. DO NOT TOUCH the hot surfaces. Use handles or knobs.
3. This appliance is NOT A TOY.
4. Keep out of reach of children.
5. Unsupervised young children and cognitively challenged
individuals should never operate this appliance.
6. Close supervision is necessary when any appliance is used by or near children.
7. To protect against electrical shock do not immerse cord, plug
or any part of this unit in water or other liquids.
8. Do not operate this appliance when parts are missing or broken.
9. Unplug from outlet when not in use, before removing parts and before cleaning.
Allow to cool before putting on or taking o any parts, and before cleaning.
10. DO NOT operate any appliance with a damaged cord or plug, or after the appliance
malfunctions, or if the appliance has been damaged in any manner. Return the
appliance to the nearest repair shop for examination, repair or adjustment.
11. The manufacturer does not recommend the use of accessory attachments other than
what is provided by the manufacturer. Use of attachments may cause injuries.
12. DO NOT use the appliance for other than its intended use.
13. DO NOT use outdoors. FOR HOUSEHOLD USE ONLY.
14. DO NOT place on or near a hot gas or electric burner, or in a heated oven.
15. DO NOT put any parts of this appliance in dishwasher.
16. DO NOT let cord hang over edge of table or counter, or touch not surfaces.
17. NEVER leave unit unattended while in use or when plugged into an outlet.
18. To disconnect, turn any control to "o," then remove plug from wall outlet.
ADDITIONAL IMPORTANT SAFEGUARDS
Operating Safety Precautions
1. This appliance is designed for use by responsible adults of legal drinking age.
2. Never place the appliance under direct sunlight, and avoid any other heat source.
3. To ensure proper ventilation, this appliance should not be recessed or built
into an enclosed cabinet. It is designed for freestanding assembly only.
4. Do not insert any object into the ventilation spaces.
5. Do not operate your appliance in the presence of explosive fumes.
6. Kegs pre-charged with CO2 do not require the use of the external CO2
system regulator, so there is no need to install a CO2 cartridge. The knob
on the Top Cover will not work when using a pre-charged keg.

ENGLISH
4
Instructions for the Electrical Cord and Plug
1. This appliance has a polarized plug (one blade is wider than the other). To reduce the
risk of electrical shock, this plug is intended to t into a polarized outlet only one way.
If the plug does not t fully into the outlet, reverse the plug. If it still does not t,
contact a qualied electrician. Do not attempt to modify the plug in any way.
2. A short power supply cord is provided to reduce the risk resulting
from becoming entangled or tripping over a long cord.
3. If a long detachable power-supply cord or extension cord is used:
• Extension cords can be used if care is exercised in their use.
• The marked electrical rating of the cord or extension cord should
be at least as great as the electrical rating of the appliance.
• When using a longer cord or extension cord, make sure that
the cord does not drape over a countertop or tabletop where
it can be pulled on or tripped over unintentionally.
4. The manufacturer does not recommend using this machine in countries that do not
support 120V AC even if a voltage adapter, transformer, or converter is in use.
CO
2
(Carbon Dioxide) Gas
1. DO NOT remove the CO2 cartridge from unit until CO2 cartridge is completely empty.
2. Always keep CO
2
cartridges away from heat. Store extra
cartridges in a cool, dry place (preferably 70°F/20°C).
3. DO NOT use the CO2 cartridge if the room temperature is over 120°F
(49°C). Failure to do so can result in explosion or injury. Escaping CO2
gas can cause frostbite if allowed to come in contact with skin.
4. CO
2
gas can be dangerous! CO
2
cartridges contain high-pressure compressed
gas, which can be hazardous if not handled properly. Make sure you read and
understand all the procedures for the CO
2
cartridge before installation.
5. Never connect the CO
2
cartridge directly to the beer keg.
6. Always follow the correct procedures when changing the CO
2
cartridge.
7. ALWAYS ventilate and leave the area immediately if CO
2
leakage has occurred.
8. Never drop or throw a CO
2
cartridge.
9. Never attempt to rell a CO
2
cartridge.
SAVE THESE INSTRUCTIONS!
ENGLISH
5
INTRODUCTION
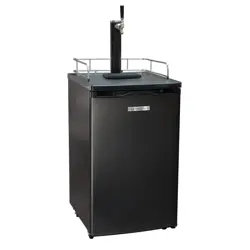
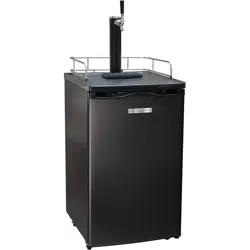
Congratulations! You are now the proud owner of your very own HOMECRAFT ON-
TAP BEER GROWLER SYSTEM! Perfect for the kitchen or bar countertop, use the
included reusable growler or any standard 5-liter growler keg to dispense your
favorite craft brews at home. Equipped with a CO2 cartridge pressure system,
this unit will keep your beer fresh for up to 30 thirst-quenching days.
Proper Location
To ensure that your ON-TAP BEER GROWLER SYSTEM works to the maximum eciency
for which it was designed, keep it in a location where there is proper air circulation and
electrical outlets.
Choose a location where the unit will be away from heat
and will not be exposed to direct sunlight.
• Indoor use only. It should not be used outdoors.
• Unit requires the use of a standard threaded CO2 cartridge.
• Each CO2 cartridge should be able to dispense up to one (5L) growler kegs.
• Capacity: 0.32 cu. ft.
• Unit dimensions: L 15.5" x W 10.5" x H 17"
• Designed to be freestanding and should not be placed in a built-in or recessed area.
• Recommended dimensions for clearances around the ON-TAP BEER GROWLER SYSTEM:
Sides …………………… 2 ½” (64 mm)
Back ……………………. 4” (102 mm)
• Unit weight: 15 lbs.
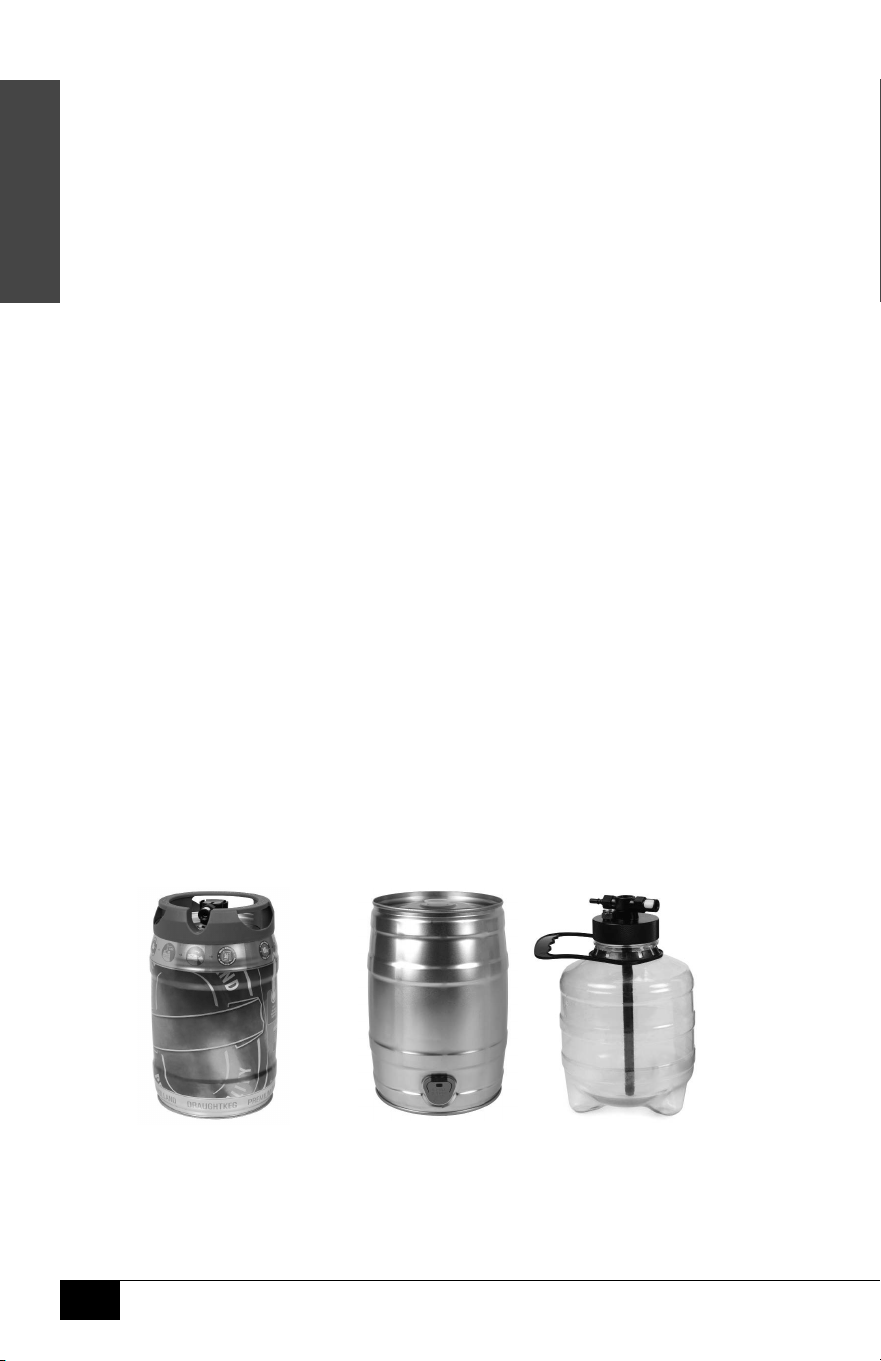
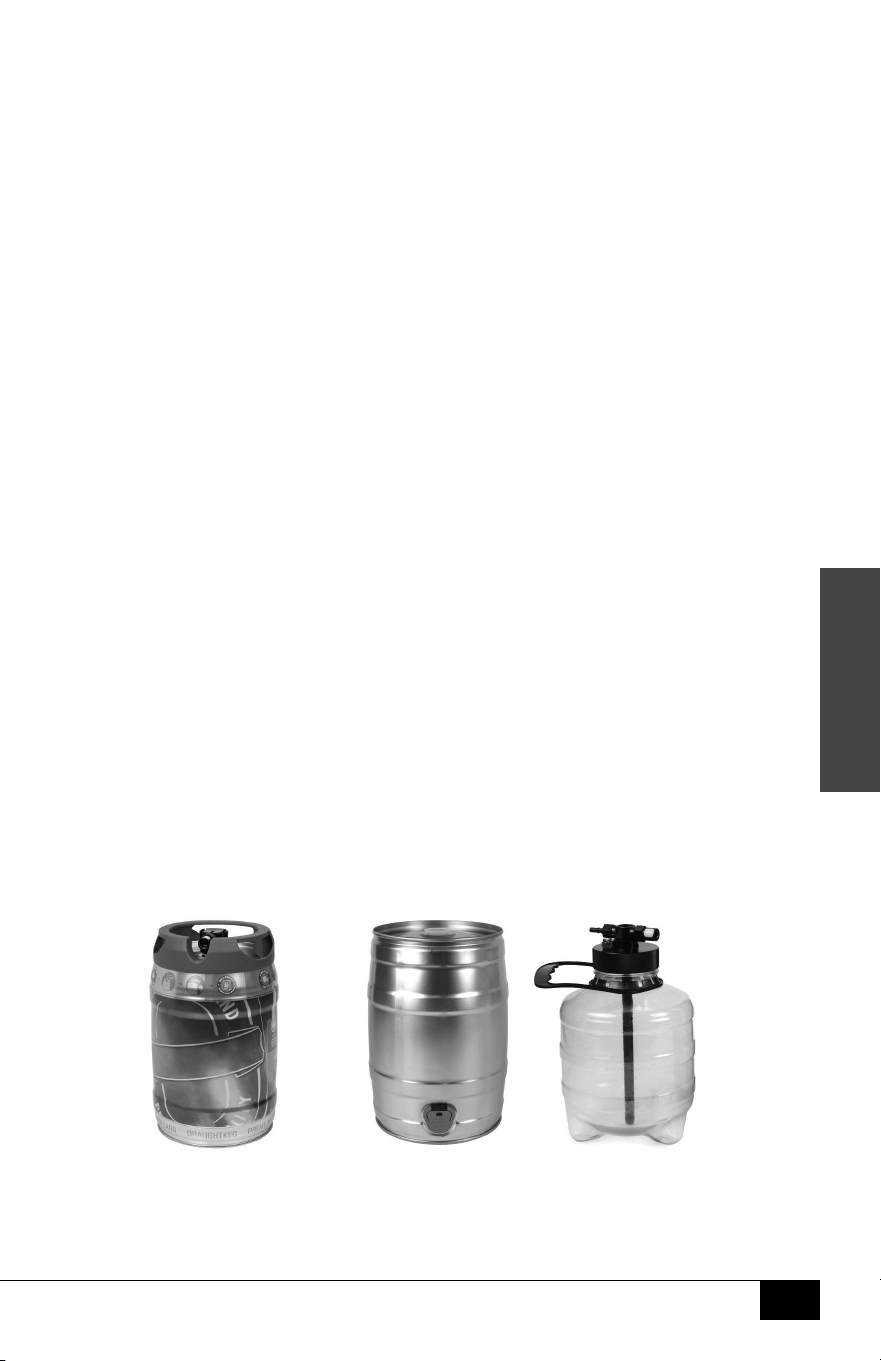
Selecting A Keg
The ON-TAP BEER GROWLER SYSTEM includes a Reusable 5L Growler Keg. Simply
bring the reusable keg to your favorite brewery to be lled with your favorite
craft beer, then bring it home so it can be enjoyed within the next 30 days.
This unit is also compatible with all standard 5L growler kegs, both pressurized
and non-pressurized. Unit DOES NOT t non-standard 5L growler keg sizes.
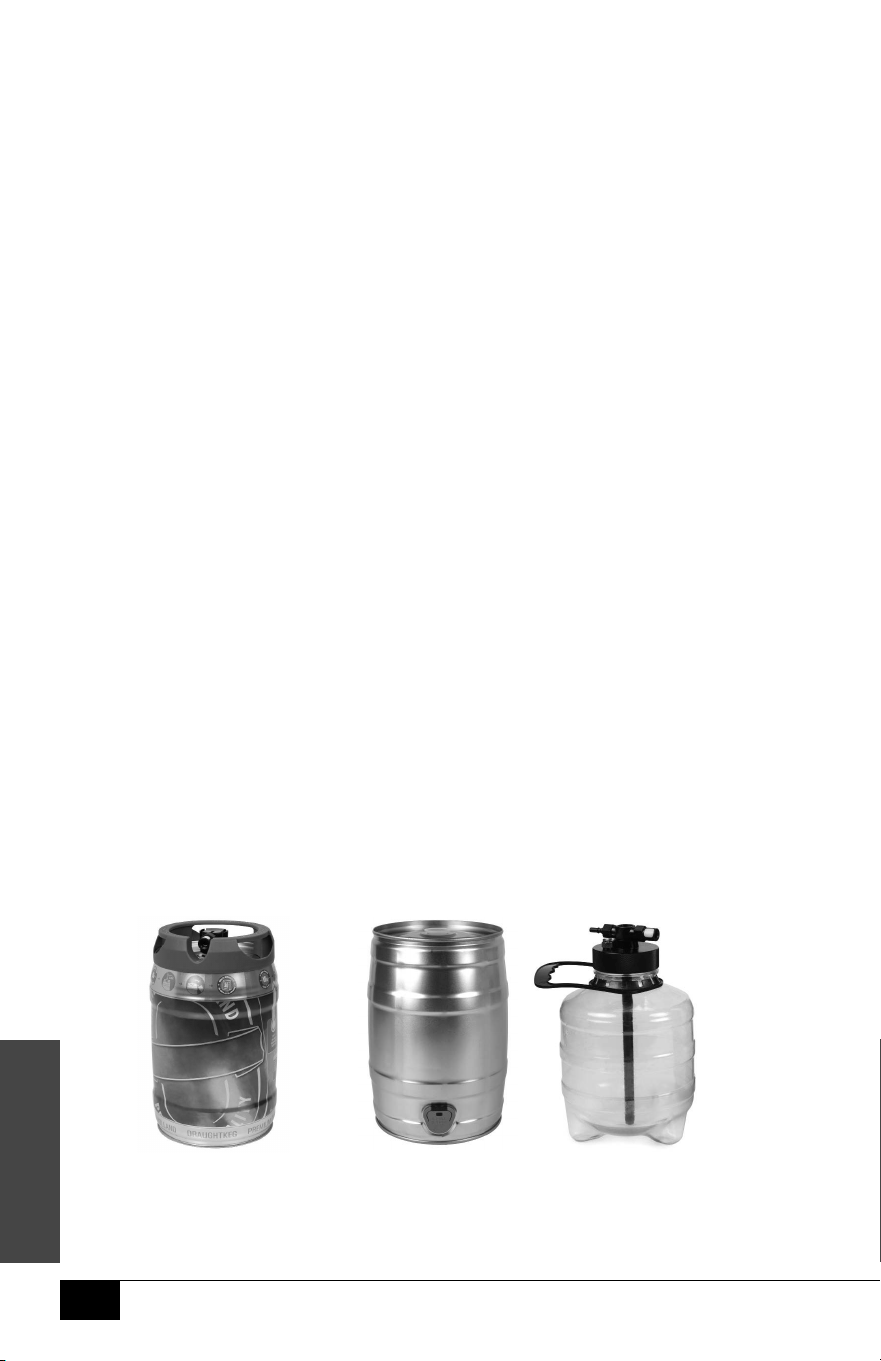
PRESSURIZED
Pressurized Kegs
include a built-in tapping
system that connects
to the top of the keg.
NON-PRESSURIZED
Non-Pressurized Kegs (Gravity Kegs) have a
venting plug on the top, and in some cases, have
a pouring spout on the side towards the bottom.
ENGLISH
6
PARTS & ASSEMBLY
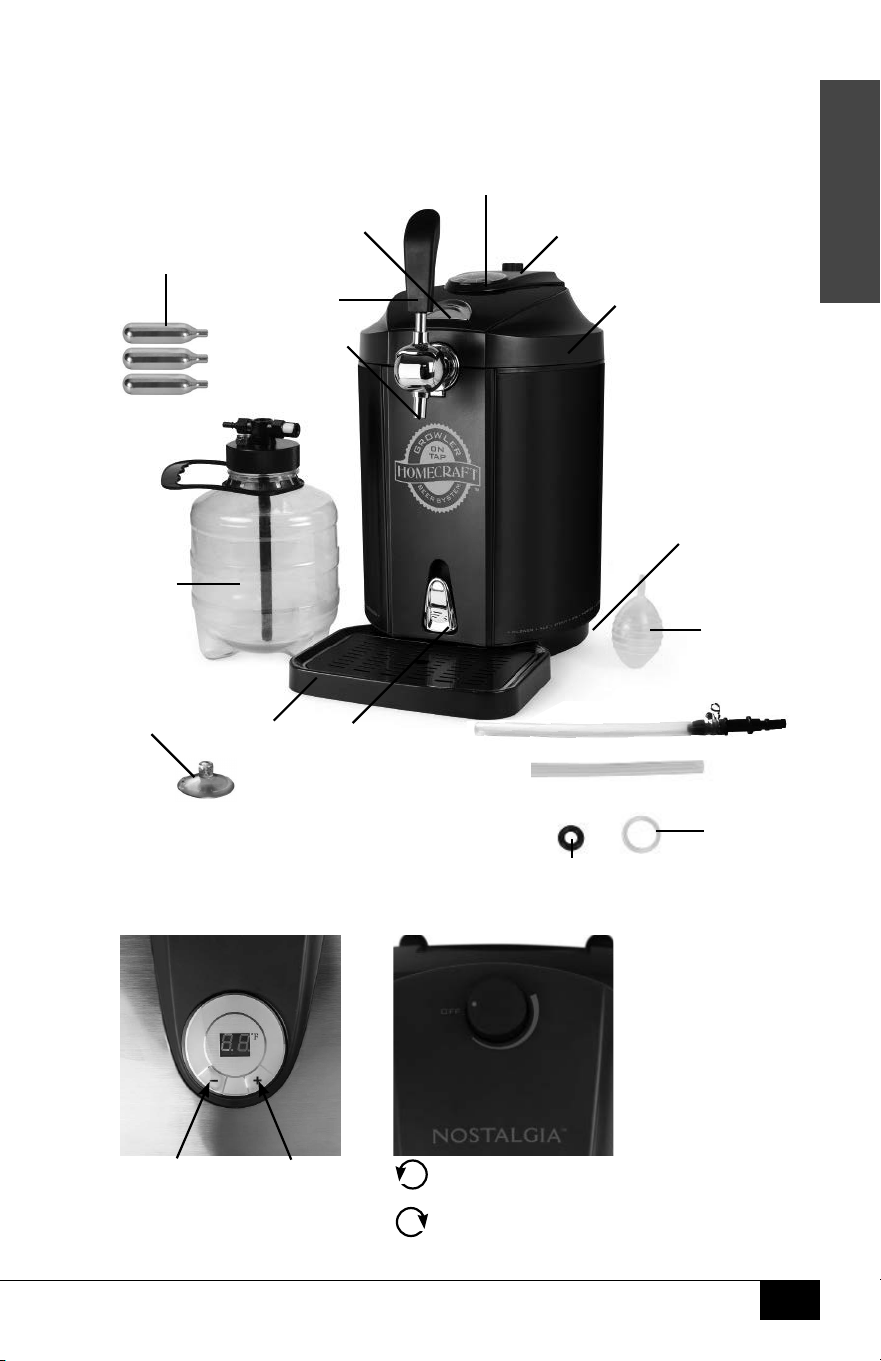
PARTS
CO2 Regulator Knob
"-" Decrease
Temperature
"+" Increase
Temperature
LED Temperature Display
Turn counterclockwise to
increase CO2 pressure.
Turn clockwise to
decrease CO2 pressure.
Beer Line (extra)
Dip Tube
Washer
(extra)
CO2 Cartridge
Washer (extra)
Top
Cover
Tap
Handle
Tap
Faucet
Reusable 5L
Growler Keg
Drain
Tab
CO2
Regulator
Knob
LED
Temperature
Display
Door
Release
Button
Drip
Tray
Power
Switch
Suction
Cup
Cleaning
Bottle
Beer Line (with connector)
Threaded
16g CO2
Cartridges (3)
ENGLISH
7
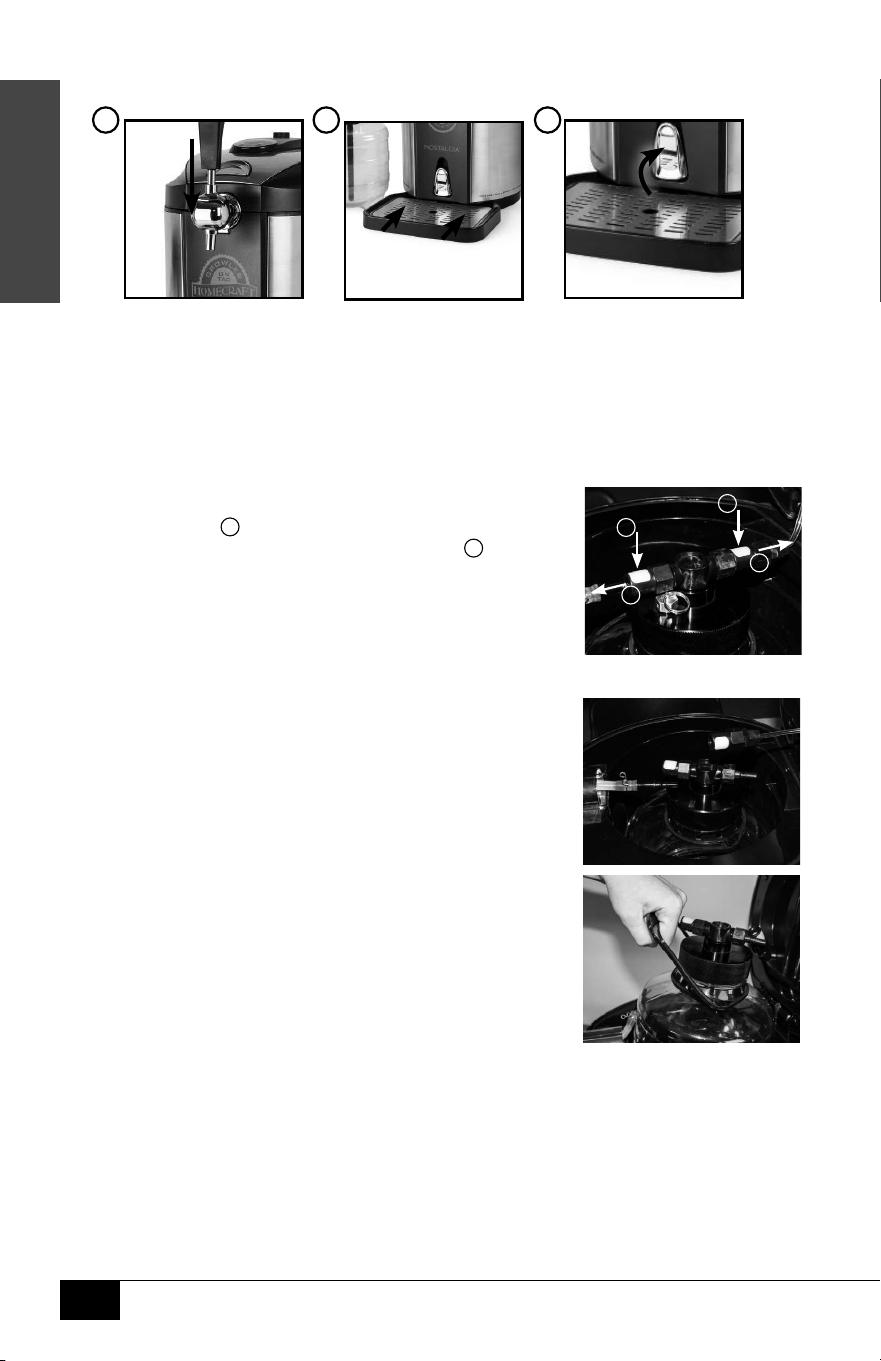
BASIC ASSEMBLY
REMOVING THE INCLUDED 5L GROWLER
1. For both the CO2 line and beer line, squeeze the
white button
1
as shown in the image below, while
simultaneously pulling the corresponding line
2
to release
from the Growler.
2. When the CO2 and beer lines have been released, it will
look like this.
3. Use the Growler handle to lift the Growler
out of the Cooling Cavity.
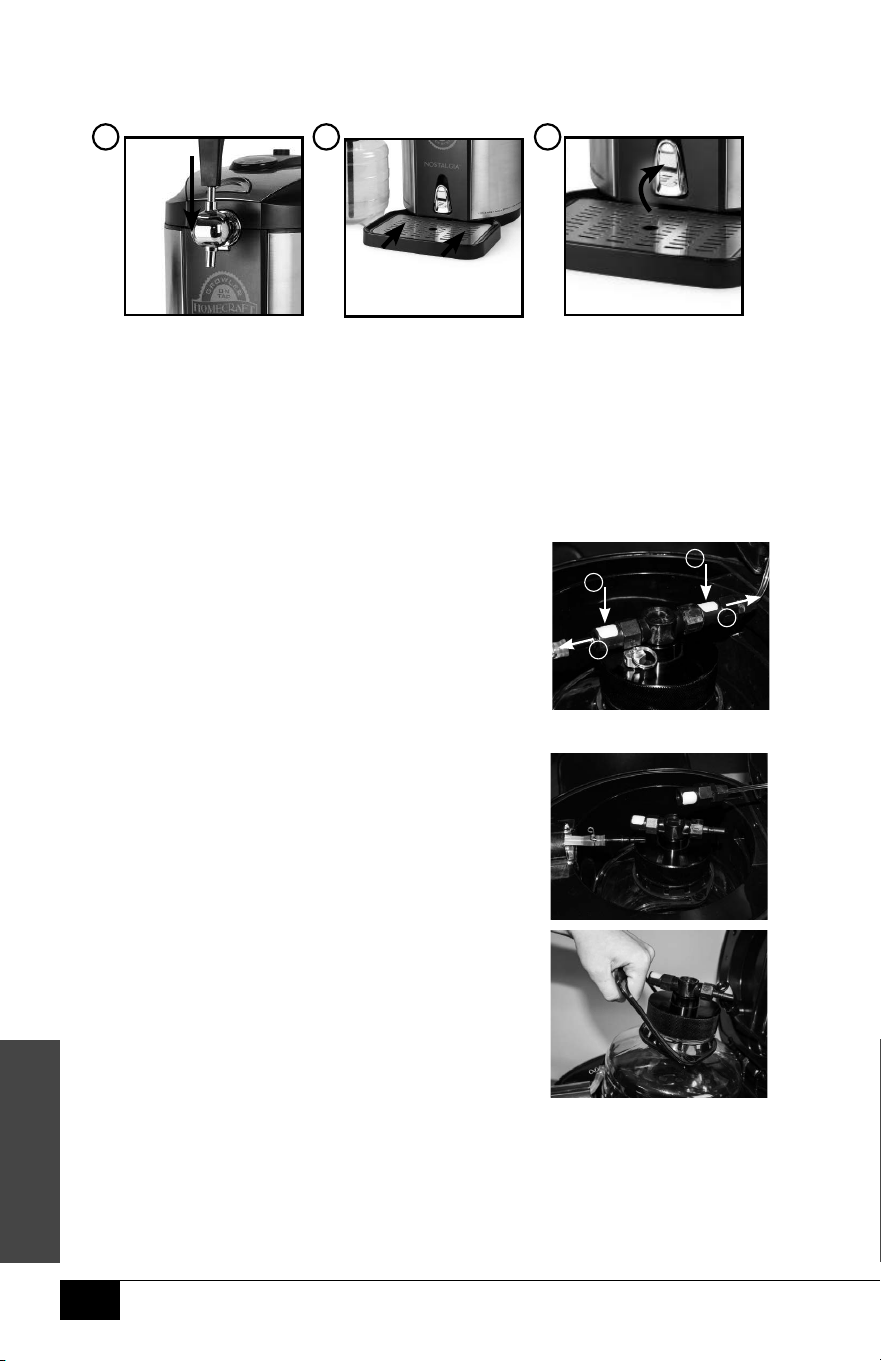
Fit the Tap Handle
onto the Tap Faucet.
1
Slide the notches on
the Drip Tray into the
tabs located at the
bottom of the main unit
2
Make sure the Drain Tab
is in the closed position,
like shown above.
3
1
2
1
2
ENGLISH
8
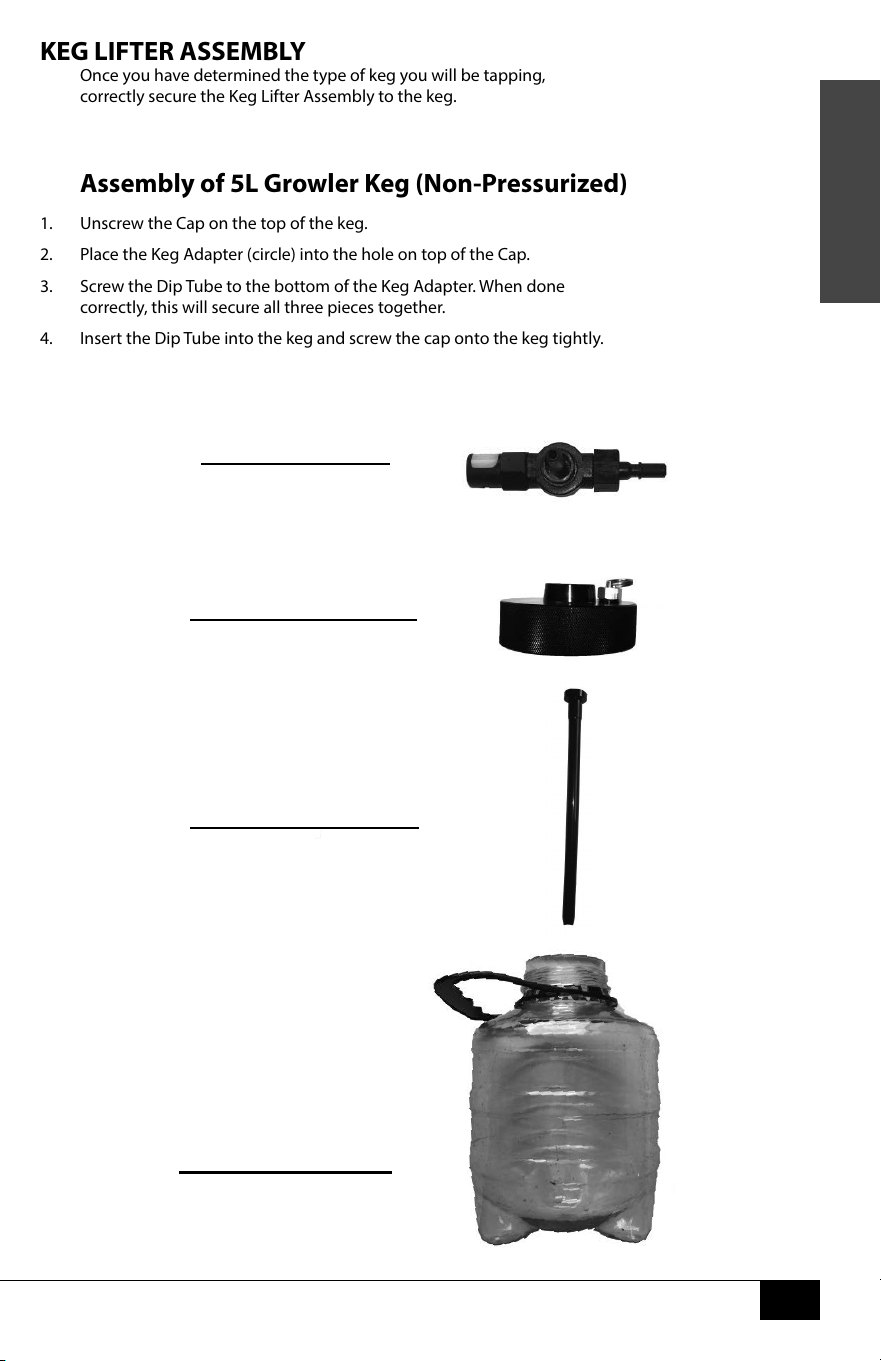
KEG LIFTER ASSEMBLY
Once you have determined the type of keg you will be tapping,
correctly secure the Keg Lifter Assembly to the keg.
Assembly of 5L Growler Keg (Non-Pressurized)
1. Unscrew the Cap on the top of the keg.
2. Place the Keg Adapter (circle) into the hole on top of the Cap.
3. Screw the Dip Tube to the bottom of the Keg Adapter. When done
correctly, this will secure all three pieces together.
4. Insert the Dip Tube into the keg and screw the cap onto the keg tightly.
Keg Adapter
(circle)
Dip Tube
Cap
Growler Keg

ENGLISH
9
Keg Adapter (square)
Keg Lifter
Dip Tube
Keg Bung
Keg
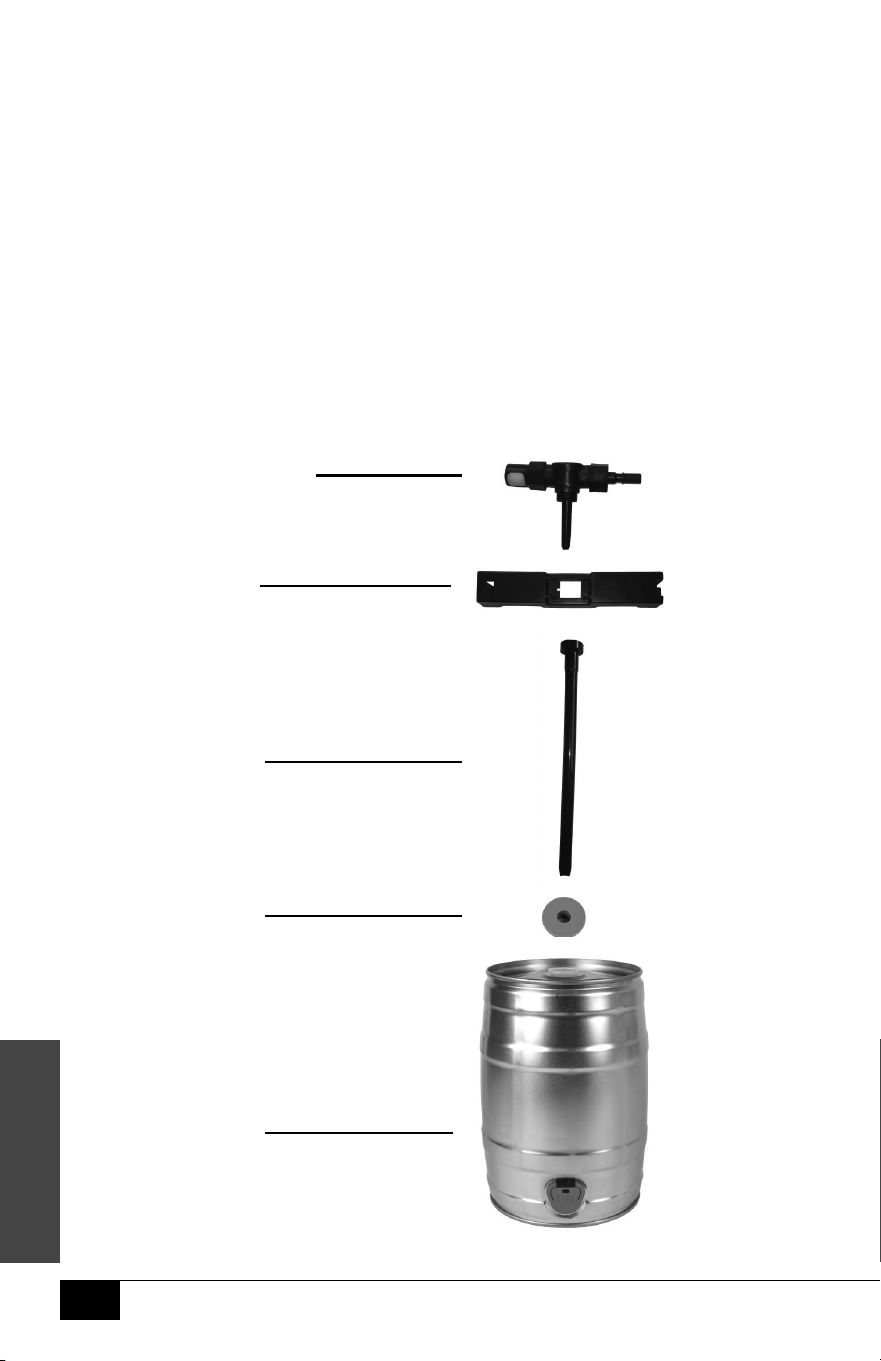
Assembly of 5L Standard Non-Pressurized Kegs
1. Follow any required instructions marked on the keg to eliminate excess gas, and to
ensure the keg has rested long enough to avoid foam coming out of the Tap Faucet.
2. Place the Keg Adapter (square) into the top opening of the Keg Lifter,
then screw the Dip Tube into the bottom of the Beer Line Connector.
When done correctly, this will secure all three pieces together.
3. Pierce the seal on the top of the keg and place the Keg Bung into the opening.
4. Insert the Dip Tube into the Keg Bung and fully into the keg.
5. Secure the ends of the Keg Lifter onto the lip of the keg.

ENGLISH
10
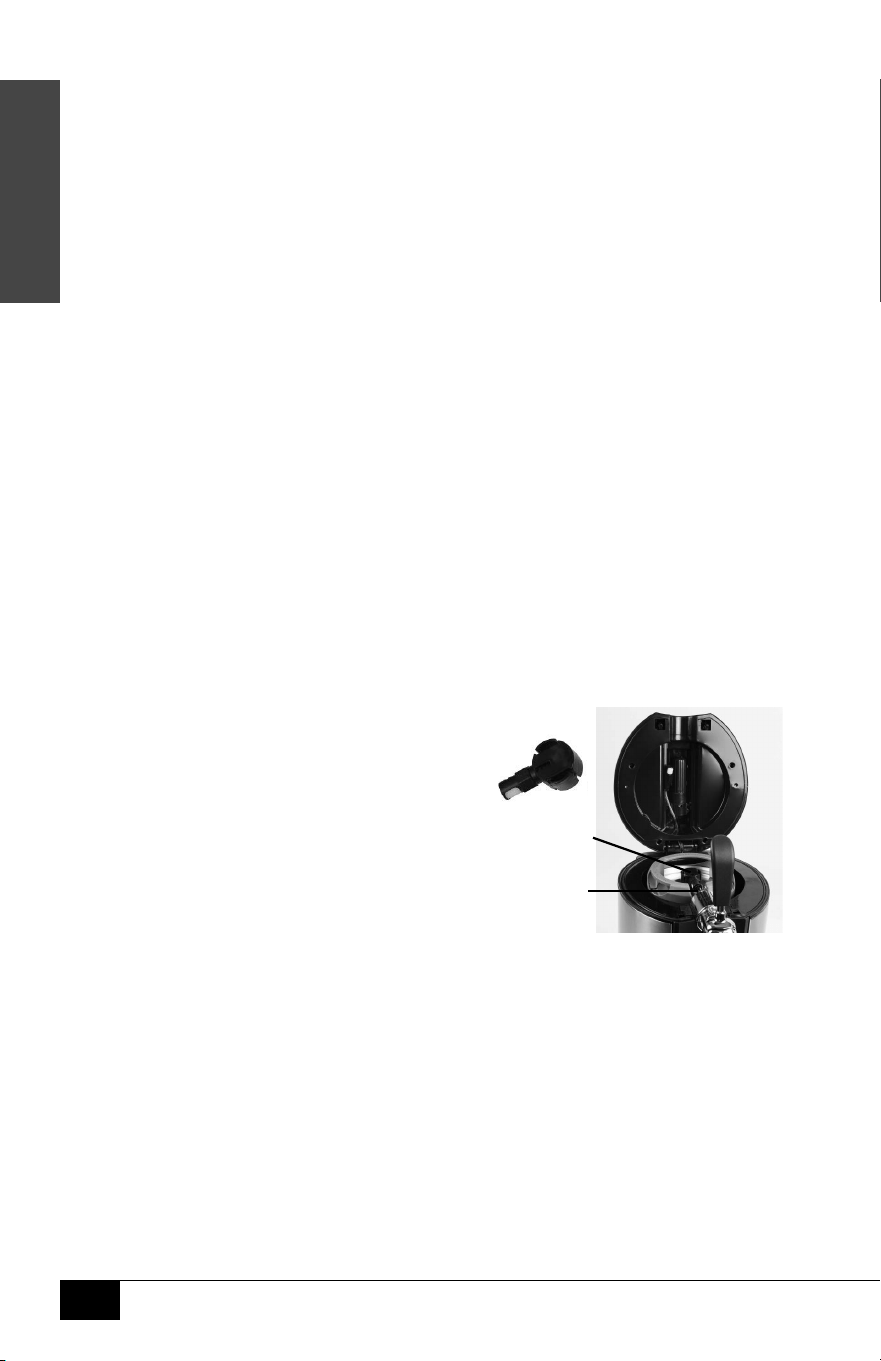
5L Pressurized Kegs (Heineken™)
1. Follow any required instructions marked on the keg to eliminate excess gas, and to
ensure the keg has rested long enough to avoid foam coming out of the Tap Faucet.
2. Carefully place the Pressurized Keg into the Cooling Cavity.
3. Use a at head screwdriver to remove the plastic plug from the top of the keg.
4. Connect the Pressurized Keg Adapter to the Tap Beer Line.
5. Insert the Pressurized Keg Adapter into the top of the Pressurized Keg.
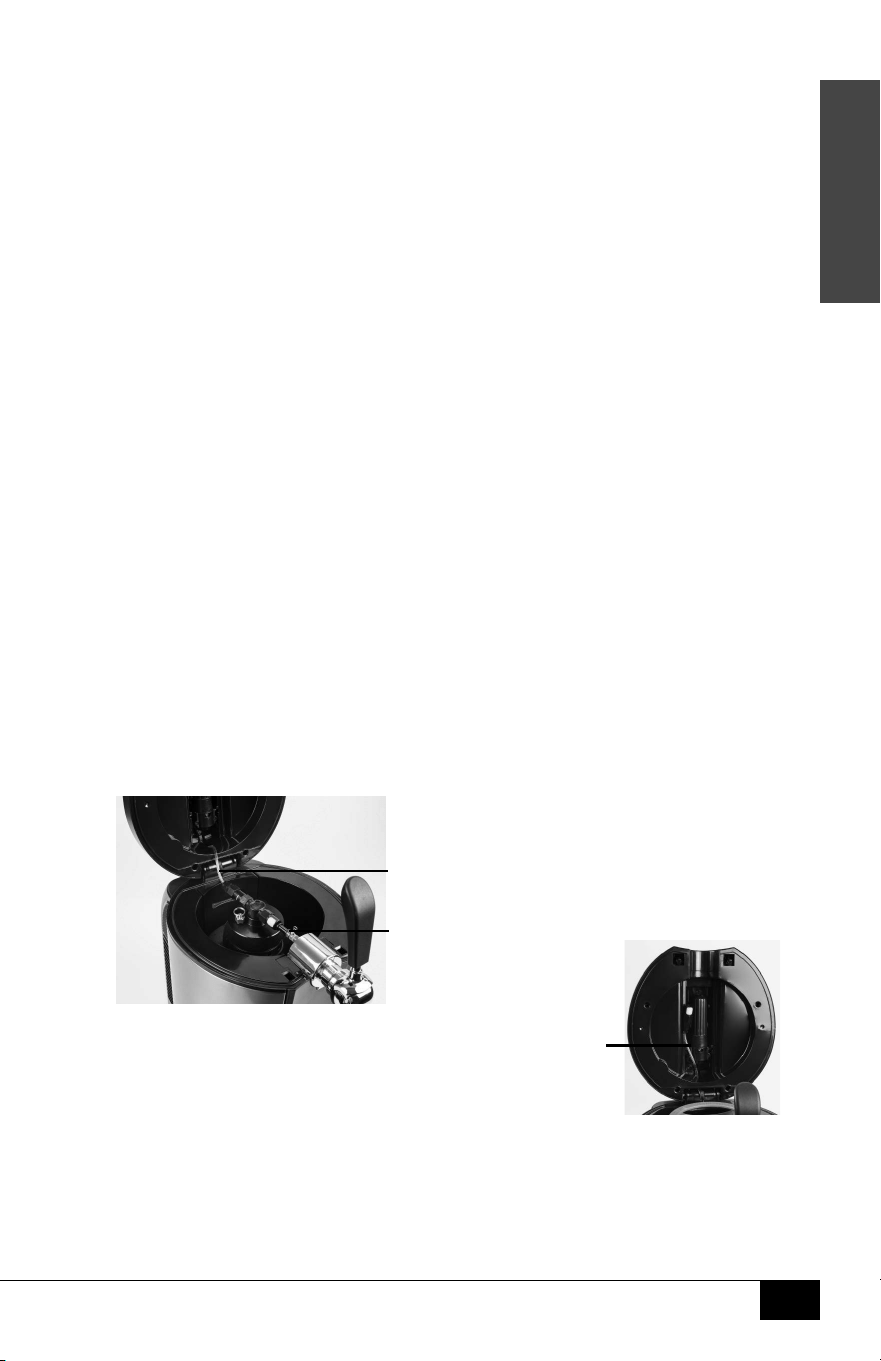
Installing the CO2 Cartridge
1. Place the CO2 Cartridge into the CO2 Sheath, making
sure the pointed tip of the cartridge is situated
towards the large threaded end of the sheath.
2. Tilt the CO2 Cartridge Holder out from the Top Cover, then
quickly screw the CO2 Cartridge and Sheath onto the CO2
Cartridge Holder.
NOTE: When the CO2 Cartridge has been pierced, you
should hear a short burst of CO2 escape from the cartridge.
3. Tilt the CO2 Cartridge Holder back into the Top Cover.
Cooling Cavity
Pressurized Keg Adapter
Tap Beer Line
ENGLISH
11
HOW TO OPERATE
Before you begin, determine whether you are tapping a pressurized keg,
non-pressurized keg, or the included 5L Growler Keg.
Follow the steps below for each type of keg.
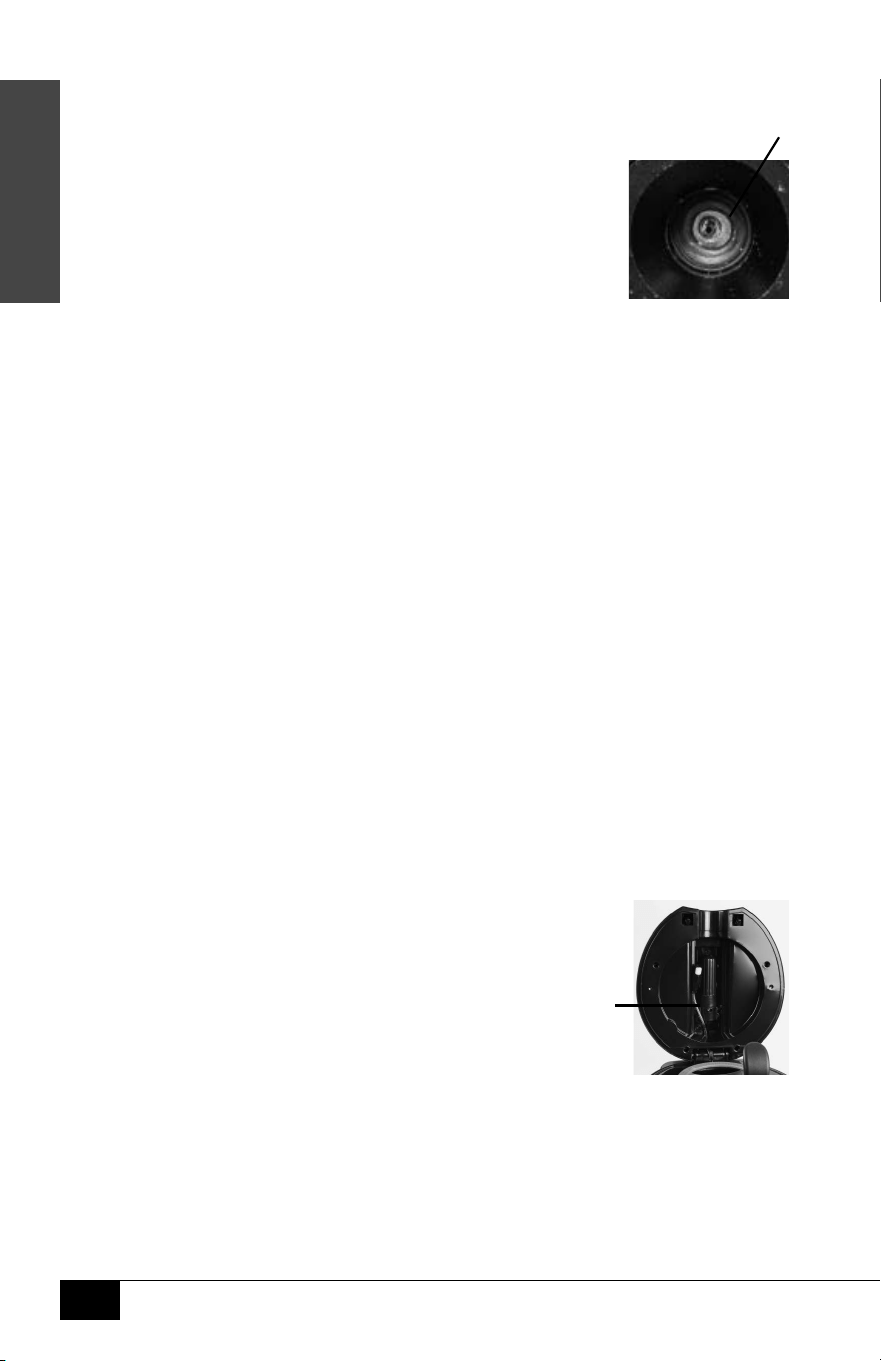
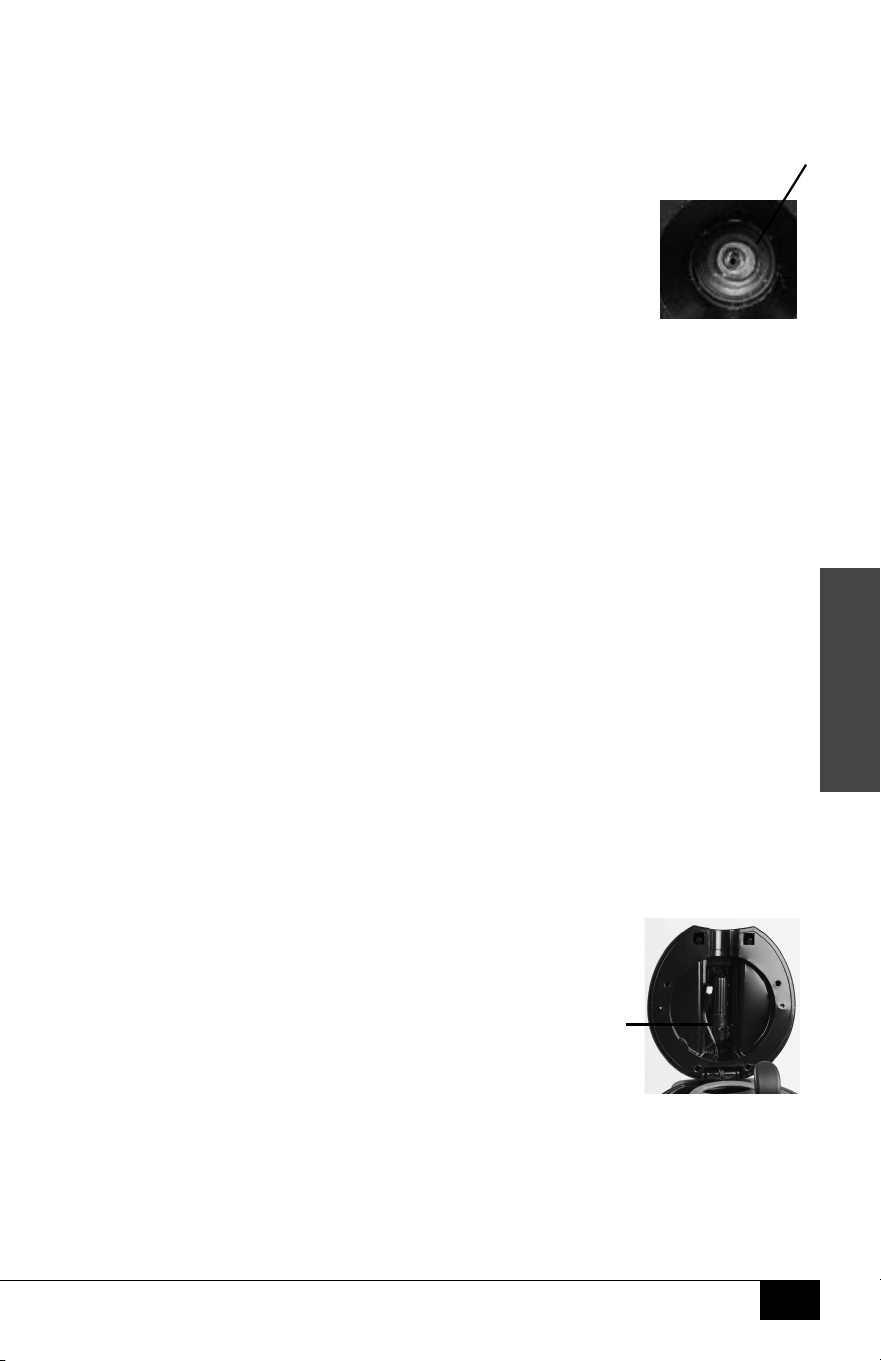
To replace the CO2 O-Ring (pictured), take a small screwdriver
or tweezers and dig underneath the ring and lift upward
to pop it out. When putting in the new O-Ring, the ring will
need to be pushed into the space and adjusted to t.
DISPENSING FROM 5L STANDARD NON-PRESSURIZED KEGS
1. Chill the keg for 10-12 hours in the refrigerator, or for 4-6 hours in an ice bath.
2. Find a stable, waterproof surface near an electrical outlet to set the unit. Make sure the cord
is away from any water source.
NOTE: When moving the keg, take care not to shake or jostle the keg
as it may cause your beer to pour with too much foam.
3. Check that the Drain Tab is in the closed position (up position),
and there are no extra objects in the Cooling Cavity.
4. Add 3 cups (800 ml) of water into the Cooling Cavity. Be sure water levels do not exceed
the MAX line found inside the Cooling Cavity. The water works to keep the keg cool.
5. Set the LED Temperature Display to your desired temperature by pressing the "-" and "+"
buttons.
NOTE: It may take several hours to reach your desired temperature.
This is why it is important to chill your keg beforehand.
6. Turn the Power Switch to ON (I).
7. Follow the steps under KEG LIFTER ASSEMBLY for STANDARD NON-
PRESSURIZED KEGS, and secure the Keg Lifter Assembly to your keg.
8. Turn the CO2 Regulator Knob to the OFF position (turn dial all the way clockwise).
9. Making sure the keg is upright, carefully place your keg into the Cooling Cavity.
NOTE: Make sure the Suction Cup is securely fashioned to the bottom of
the Cooling Cavity. The Suction Cup ensures the keg will not oat.
10. Connect the Keg Adapter to the CO2 Line and Beer Line.
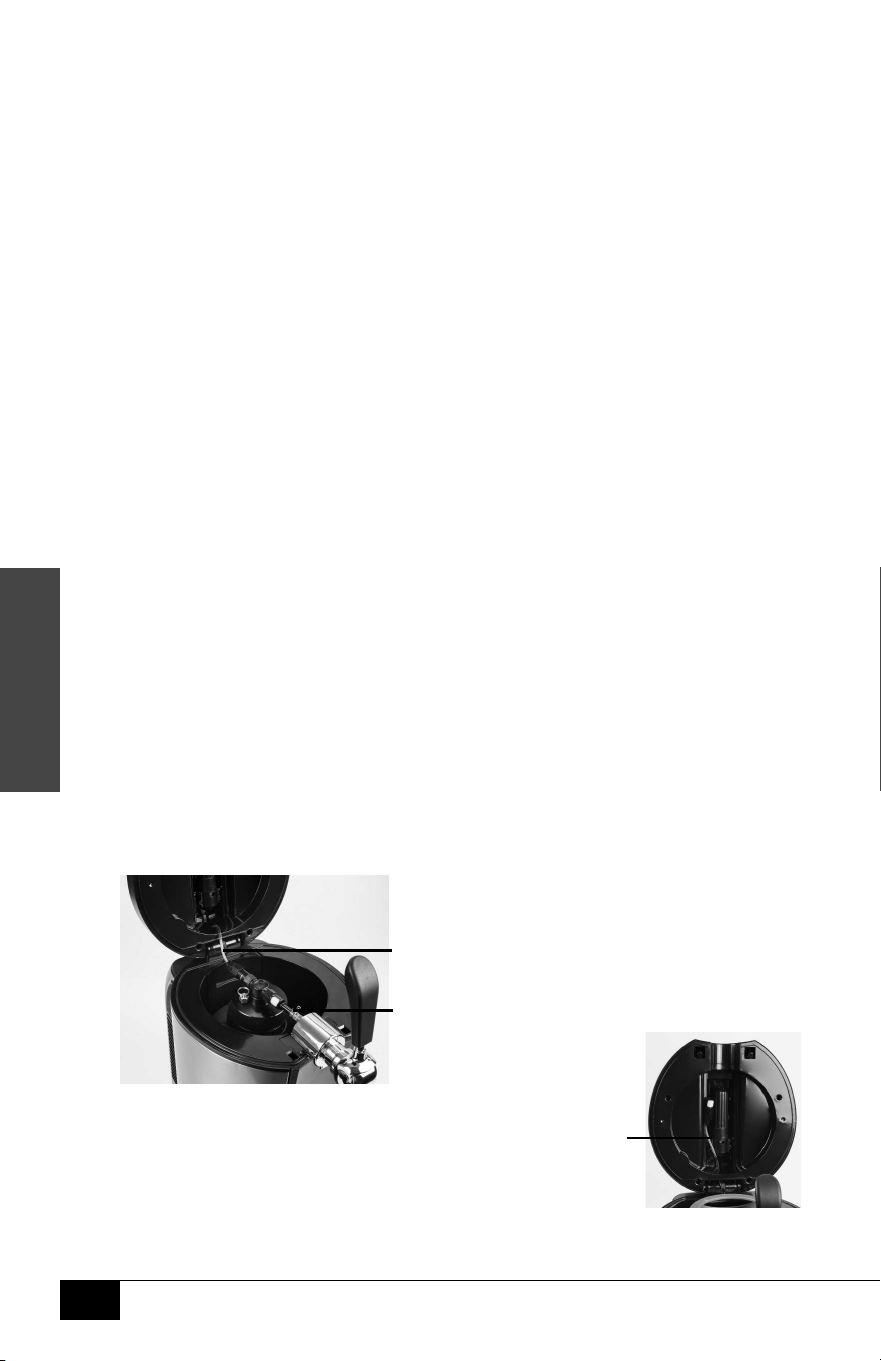
11. Tilt the CO2 Holder out from the Top Cover and
unscrew the CO2 Sheath. Screw in the CO2
cartridge into the CO2 holder and then screw the
CO2 Sheath back on, covering the CO2 cartridge.
NOTE: When the CO2 cartridge has been
pierced, you should hear a short burst
of CO2 escape from the cartridge.
12. To pour a beer, slowly turn the
Regulator Dial counterclockwise
to increase the CO2 pressure within the keg. When you hear the CO2
begin to ow, you may want to pause to try pouring a beer.
• If the beer does not have enough foam for your liking, slowly increase the CO2
pressure. DO NOT increase the CO2 pressure too quickly or your beer may dispense too
quickly and with too much foam.
PRO TIP:
When the regulator is open, CO2 will continue owing into the keg. This may
CO2 Cartridge
Holder
CO2 O-Ring
ENGLISH
12
result in a surplus of pressure owing into the keg, and may be a cause of foamy beer.
If you experience foamy beer, simply ll the keg with CO2, then turn the Regulator
Knob to the OFF position. As more beer is dispensed, add small amounts of CO2 into
the keg to displace the dispensed beer, then turn the Regulator Knob back to OFF.
DISPENSING FROM 5L GROWLER KEG (NON-PRESSURIZED)
1. Chill the keg for 10-12 hours in the refrigerator, or for 4-6 hours in an ice bath.
2. Find a stable, waterproof surface near an electrical outlet to set the unit. Make sure the cord
is away from any water source.
NOTE: When moving the keg, take care not to shake or jostle the keg
as it may cause your beer to pour with too much foam.
3. Check that the Drain Tab is in the closed position (up position),
and there are no extra objects in the Cooling Cavity.
4. Add 3 cups (800 ml) of water into the Cooling Cavity. Be sure water levels do not exceed
the MAX line found inside the Cooling Cavity. The water works to keep the keg cool
5. Set the LED Temperature Display to your desired temperature by pressing the "-" and "+"
buttons. Recommended temperature is 37°F.
NOTE: It may take several hours to reach your desired temperature.
This is why it is important to chill your keg beforehand.
6. Turn the Power Switch to ON (I).
7. Follow the steps under KEG LIFTER ASSEMBLY for STANDARD NON-
PRESSURIZED KEGS, and secure the Keg Lifter Assembly to your keg.
8. Turn the CO2 Regulator Knob to the OFF position (turn dial all the way clockwise).
9. Making sure the keg is upright, carefully place your keg into the Cooling Cavity.
NOTE: Make sure the Suction Cup is securely fashioned to the bottom of
the Cooling Cavity. The Suction Cup ensures the keg will not oat.
10. Connect the Keg Adapter to the CO2 Line and Beer Line.
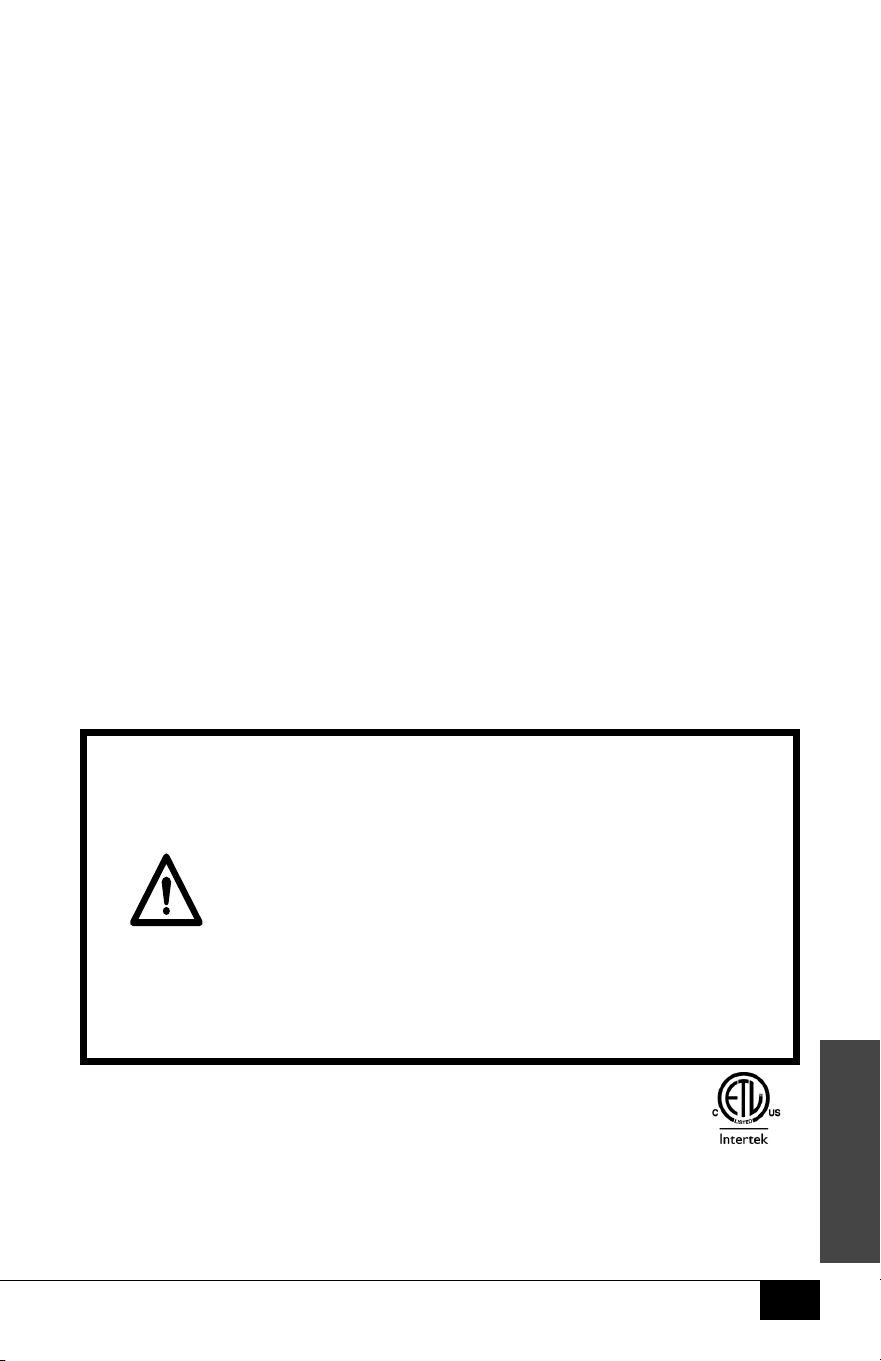
11. Tilt the CO2 Holder out from the
Top Cover and unscrew the CO2
Sheath. Screw in the CO2 cartridge
into the CO2 holder and then screw the
CO2 Sheath back on, covering the CO2
cartridge. NOTE: When the CO2 cartridge
has been pierced, you should hear a short burst of CO2 escape from the cartridge.
12. Slowly turn the Regulator Dial counterclockwise to increase the CO2 pressure within the
keg. When you hear the CO2 begin to ow, you may want to pause to try pouring a beer.
CO2 Line
Beer Line
CO2 Cartridge
Holder
CO2 O-Ring
ENGLISH
13
• If the beer does not have enough foam for your liking, slowly increase
the CO2 pressure. DO NOT increase the CO2 pressure too quickly or
your beer may dispense too quickly and with too much foam.
• If the beer has too much foam, turn the Regulator Knob to the OFF position,
pull the Pressure Relief Valve on the 5L Growler Keg, then slowly turn the
Regulator Dial counterclockwise to increase the CO2 pressure within the keg.
• PRO TIP:
When the regulator is open, CO2 will continue owing into the keg. This may
result in a surplus of pressure owing into the keg, and may be a cause of foamy beer.
If you experience foamy beer, simply ll the keg with CO2, then turn the Regulator
Knob to the OFF position. As more beer is dispensed, add small amounts of CO2 into
the keg to displace the dispensed beer, then turn the Regulator Knob back to OFF.
DISPENSING FROM 5L PRESSURIZED KEGS (HEINEKEN™)
1. Chill the keg for 10-12 hours in the refrigerator, or for 4-6 hours in an ice bath.
2. Find a stable, waterproof surface near an electrical outlet to set the
unit. Make sure the cord is away from any water source.
3. Check that the Drain Tab is in the closed position (up position),
and there are no extra objects in the Cooling Cavity.
4. Add 3 cups (800 ml) of water into the Cooling Cavity. Be sure water levels do not exceed
the MAX line found inside the Cooling Cavity. The water helps to keep the keg cool.
5. Set the LED Temperature Display to your desired temperature by pressing the "-" and "+"
buttons.
NOTE: It may take several hours to reach your desired temperature.
This is why it is important to chill your keg beforehand.
6. Turn the Power Switch to ON (I).
7. Carefully place the Pressurized Keg into the
Cooling Cavity.
NOTE: When moving the keg, take care not to
shake or jostle the keg as it may cause your beer to
pour with too much foam.
NOTE: Make sure the Suction Cup is securely
fashioned to the bottom of the Cooling Cavity.
The Suction Cup ensures the keg will not oat.
8. Use a at head screwdriver to remove the
plastic plug from the top of the keg.
9. Connect the Pressurized Keg Adapter to the Beer Line.
10. Insert the Pressurized Keg Adapter into the top of the Pressurized Keg.
11. Pour yourself a beer!
NOTE: Pressurized kegs come pre-charged with CO2. These kegs do not require
the use of this unit's external CO2 system, so there is no need to install a CO2
cartridge. The Regulator Knob on the Top Cover does not work with these kegs.
12. When the keg is empty, remove the Pressurized Keg Adapter from
the keg by pressing inward on both sides of the adapter.
Beer Line
Pressurized
Keg Adapter

ENGLISH
14
HELPFUL TIPS
Pouring Draft Beer
1. Start with a clean glass.
2. Hold the glass at a 45° angle about 1 inch below the Tap Faucet.
3. Pull the Tap Handle forward to completely open the ow of beer.
4. Continue holding the glass at 45° and allow the beer to ow
down the side of the glass until the glass is half full.
5. Once glass is half full, continue pouring while you gently tilt the
glass upright and pour down the center of the glass. Ideally, this
will create about a 1" head of foam as you nish the pour.
6. Quickly put the Tap Handle back into the original upright position.
NOTE: If a beer pour foams more than expected, let the beer rest until the
head calms down, and then nish your pour. This prevents beer waste.
Prevent Foamy Beer
• Chill the beer. Warm beer is more likely to cause foamy beer. It is
recommened to buy beer the day before and allow it to chill in the
refrigerator for 10-12 hours. The recommended temperature is 37°F
• Pour into a clean glass. Reside in an unclean glass can disrupt the pour and taste
of your beer. Follow the directions on Pouring Draft Beer to perfect your pour.
• Conrm the beer lines are not kinked and are clean.
• Adjust down your CO2 pressure.
• Do not shake or jostle the keg. Too much agitation of the keg can create foamy pours. If the
keg has been shaken or jostled, allow the keg to rest and settle for 2-3 hours before pouring.
• Foamy beer may also be caused by a faulty seal or connection between the keg and the
main unit. Make sure all connections are secure, well tightened and correctly placed.
Pressurized Kegs
• Pressurized kegs come pre-charged with CO2 and do not require the
use of this unit's external CO2 system regulator. The Regulator Knob on
the Top Cover does not work when using a pressurized keg.
• If you experience a less than satisfactory pour of beer, such as foamy
beer, please contact the manufacturer or seller of the keg.
CO2 Regulator Knob
• When the regulator is open, CO2 will continue owing into the keg. This may result in
a surplus of pressure owing into the keg, and may be a cause of foamy beer. If you
experience foamy beer, simply ll the keg with CO2, then turn the Regulator Knob
to the OFF position. As more beer is dispensed, add small amounts of CO2 into the
keg to displace the dispensed beer, then turn the Regulator Knob back to OFF.

ENGLISH
15
CLEANING & MAINTENANCE
1. After using your ON-TAP BEER GROWLER SYSTEM,
disconnect the unit from the electrical outlet.
2. Detach the Keg Lifter Assembly from the keg, then remove the keg from the Cooling Cavity.
3. Clean the Cooling Cavity.
a. Make sure there are no foreign objects in the Cooling Cavity.
b. Drain the water in the Cooling Cavity by placing the unit near the edge of a
table or countertop so that a bowl can be placed below the Drain Tab.
c. Place a bowl beneath the Drain Tab, then pull down on the Drain Tab to
allow the water in the Cooling Cavity to drain into the empty bowl.
d. Wipe the Cooling Cavity dry with a soft, non-abrasive cloth.
4. Clean the beer line using the included Cleaning Bottle.
a. Place an empty bowl beneath the Tap Faucet.
b. Load the Cleaning Bottle with warm, soapy water.
c. Insert the tip of the Cleaning Bottle into the open end of
the Dip Tube (part of the Keg Lifter Assembly).
d. Pull down on the Tap Handle, then squeeze the Cleaning Bottle to allow the
soapy water to ow through the beer line and into the empty bowl.
e. Repeat this process with just warm water as many times as necessary until
the beer lines are clean and all soap is cleared from the beer line.
f. If the Beer Line needs to be replaced, lift up on the Beer Line and chrome
plate covering the line. Pull down on the Tap Handle, then pull on the old
Beer Line to remove. The new Beer Line can be put back into place by again
pulling down on the Tap Handle, then inserting the Beer Line into the tap.
Releasing the Tap Handle will pinch the new Beer Line, securing it.
5. Wash the remaining removable parts in warm, soapy
water. Dry with a soft, non-abrasive cloth.
6. As needed, wipe down the exterior of the unit with a damp, non-abrasive cloth.

ENGLISH
16
RETURNS & WARRANTY
SHOULD YOUR UNIT NOT WORK OR IF DAMAGED WHEN YOU FIRST TAKE IT OUT OF
THE BOX, PLEASE RETURN IT TO THE PLACE OF PURCHASE IMMEDIATELY.
HOMECRAFT ON-TAP BEER GROWLER DISPENSER / CBD5BS
Should you have any questions, please contact us via email or at the customer service number listed
below between the hours of 9:00 AM and 4:00 PM, Monday through Friday, Central Standard Time.
Distributed by:
Nostalgia Products LLC
1471 Partnership Dr.
Green Bay, WI 54304-5685
Customer Service
Phone: (920) 347-9122
Web: www.nostalgiaproducts.com
Customer Service Inquiry
To submit a Customer Service inquiry, go to www.nostalgiaproducts.com and ll
out the Customer Service Inquiry form and click the Submit button.
A representative will contact you as soon as possible.
Product Warranty Terms
Nostalgia Products LLC (the “Company”) hereby warrants that for a period of one (1) year from the
date of original purchase, this product will be free of defects in material and workmanship under
normal home use, provided that the product is operated and maintained in accordance with the
operating instructions. As the sole and exclusive remedy under this warranty, the Company will
at its discretion either repair or replace the product found to be defective, or issue a refund on the
product during the warranty period. This warranty is only available to the original retail purchaser of
the product from the date of initial retail purchase, and is only valid with the original sales receipt, as
proof of purchase date is required to obtain warranty benets. All warranty claims must be brought
to the attention of the Company within the warranty period and no later than 30 days of the failure
to perform. This warranty does not cover normal wear or damage caused by shipping, mishandling,
misuse, accident, alteration, improper replacement parts, or other than ordinary household use.
You may be required to return the product (with shipping prepaid by you) for inspection and
evaluation. Return shipping costs are not refundable. The Company is not responsible for returns
damaged or lost in transit. Unless otherwise specically permitted by the operating instructions, this
warranty applies to indoor household use only. In order to obtain service under this warranty, please
contact the Company at the telephone number listed above or by lling out the Customer Service
Inquiry Form located at www.nostalgiaproducts.com. Warranty valid only in USA and Canada.
This warranty is in lieu of all other warranties, expressed or implied, including warranties of
merchantability and tness for a particular purpose, which are hereby excluded to the extent
permitted by law. In no event shall the Company be liable for any indirect, incidental, consequential,
or special damages arising out of or in connection with this product or the use thereof. Some
states, provinces or jurisdictions do not permit the exclusion or limitation of incidental or
consequential damages, so the foregoing exclusion or limitation may not apply to you.
This warranty does not apply to re-manufactured merchandise.
Please read the operating instructions carefully. Failure to comply
with the operating instructions will void this warranty.
For more information, visit us online at www.nostalgiaproducts.com.
Like us on Facebook at www.facebook.com/NostalgiaElectrics.
Follow our boards on Pinterest at www.pinterest.com/nostalgiaelctrx.
Tweet along with us on Twitter at www.twitter.com/NostalgiaElctrx.

17
ESPAÑOL
17
¡Haga de cada día una esta!
Visite www.nostalgiaproducts.com para
ver más productos divertidos.
CONTENIDO
SEGURIDAD . . . . . . . . . . . . . . . . . . . . . . . . . . . . . . . . . . . . . . 17
PROTECCIONES IMPORTANTES . . . . . . . . . . . . . . . . . . . . . . . . . . 18
PROTECCIONES IMPORTANTES ADICIONALES . . . . . . . . . . . . . . . . . 18
INTRODUCCIÓN . . . . . . . . . . . . . . . . . . . . . . . . . . . . . . . . . . . . 20
PIEZAS Y ENSAMBLAJE . . . . . . . . . . . . . . . . . . . . . . . . . . . . . . . 21
CÓMO FUNCIONA . . . . . . . . . . . . . . . . . . . . . . . . . . . . . . . . . . 26
CONSEJOS ÚTILES . . . . . . . . . . . . . . . . . . . . . . . . . . . . . . . . . . 29
LIMPIEZA Y MANTENIMIENTO . . . . . . . . . . . . . . . . . . . . . . . . . . . 30
DEVOLUCIONES Y GARANTÍA . . . . . . . . . . . . . . . . . . . . . . . . . . . 31
SEGURIDAD
Especicaciones del electrodoméstico:
120 Voltios, 60 Hz
65 Watts
ESTE PRODUCTO ES PARA USAR SOLAMENTE EN UN TOMACORRIENTE DE 120 VCA
Visite www.nostalgiaproducts.com/user-manuals/ para ver el manual más actualizado.
Su seguridad y la de otras personas es muy importante.
Hemos dado muchos mensajes de seguridad importantes en este manual y
en el aparato. Siempre lea y obedezca todos los mensajes de seguridad.
Este es el símbolo de alerta de seguridad.
Este símbolo le avisa de los peligros potenciales que
pueden provocar serias lesiones a usted y a otros.
Todos los mensajes de seguridad estarán antecedidos por el símbolo de alerta.
Todos los mensajes de seguridad le indicarán cuál es el peligro potencial, cómo
reducir la posibilidad de lesiones, y qué puede suceder si no sigue las instrucciones.
18
ESPAÑOL
18
PROTECCIONES IMPORTANTES
Una persona que no haya leído y comprendido todas las instrucciones
de uso y seguridad no está calicada para utilizar este aparato. Todos
los usuarios de este dispositivo deben leer y comprender este Manual
de instrucciones antes de utilizar o limpiar este aparato.
Cuando utiliza aparatos eléctricos, siempre se deben seguir algunas
medidas básicas de seguridad que incluyen las siguientes:
1. Lea todas las instrucciones antes de utilizar este aparato.
2. NO TOQUE las supercies calientes. Use agarraderas o mangos.
3. Este aparato NO ES UN JUGUETE.
4. Manténgalo fuera del alcance de los niños.
5. Sin supervisión los niños y las personas con discapacidad
intelectualnunca deben usar este aparato.
6. Es necesaria una supervisión estricta cuando los niños utilicen
el aparato o cuando se encuentren a su alrededor.
7. Como medida de protección contra el riesgo de descarga eléctrica, no sumerja el
cable, los enchufes ni ninguna otra parte de la unidad en agua ni en otros líquidos.
8. No haga funcionar el aparato si están faltando piezas o si están rotas.
9. Desenchufe el aparato de la red cuando no lo esté utilizando, antes
de retirar piezas y antes de su limpieza. Déjelo enfriar antes de colocar
o retirar cualquiera de las piezas, y antes de la limpieza.
10. NO utilice ningún aparato con el cable o el enchufe dañados, ni si el aparato
tiene desperfectos o SI se ha dañado de cualquier manera. Devolver el
aparato al taller de reparación más cercano para su reparación o ajuste.
11. El fabricante no recomienda el uso de otros aditamentos o accesorios diferentes a los
proporcionados por el fabricante. El uso de accesorios puede provocar lesiones.
12. NO utilice el aparato para otro uso que no sea el cual para el que está destinado.
13. NO lo utilice en exteriores. ÚNICAMENTE PARA USO INTERIOR
14. NO coloque el aparato sobre o cerca de un fogón de gas
o eléctrico o dentro de un horno caliente.
15. NO coloque ninguna pieza de este aparato en un lavavajillas.
16. NO permita que el cable cuelgue sobre el borde de la mesa o
del mostrador, ni que toque supercies calientes.
17. NUNCA deje la unidad desatendida mientras esté en uso o
cuando esté enchufada a una toma de corriente.
18. Para desconectar, mueva todos los controles a “o” y
luego retire el enchufe del tomacorriente.
PROTECCIONES IMPORTANTES ADICIONALES
Precauciones de seguridad operativa
1. Este aparato está destinado a ser usado por adultos responsables
con edad legal para el consumo de alcohol.
2. Nunca coloque el aparato bajo la luz directa del sol, y evite toda otra fuente de calor.
3. Para asegurar una ventilación apropiada, este aparato no debe empotrarse o integrarse

19
ESPAÑOL
19
en un gabinete cerrado. Sólo está diseñado para un montaje independiente.
4. No inserte ningún objeto en los espacios de ventilación.
5. NO utilice el aparato en presencia de vapores explosivos.
6. Los barriles precargados no CO2 no requieren el uso de un regulador de sistema
externo de CO2, por lo que no hay necesidad de instalar un cartucho de CO2.
La perilla en la cubierta superior no funciona al usar un barril precargado.
Instrucciones para el cable eléctrico y el enchufe
1. El aparato tiene un enchufe polarizado (una patita más ancha). Se diseñó para
reducir el riesgo de descarga eléctrica, dado que entra en un tomacorriente
polarizado solo en una posición. Si el enchufe no entra bien en la toma
de corriente, déle la vuelta. Si aún así no entra,comuníquese con un
electricista calicado. No modique el enchufe de ninguna manera.
2. Se provee un cable de alimentación corto para reducir el riesgo
resultantede enredarse o tropezar con un cable largo.
3. Si se utiliza un cable alargador o un cable de alimentación más largo:
• Unos cables de extensión se pueden utilizar si se tiene cuidado con su uso.
• Las características nominales del grupo de cables o del cable de
extensión deben ser al menos iguales a las del aparato.
• Cuando se utiliza un cable largo o cable de extensión, asegúrese de
que el cable no sobresalga de la encimera ni una mesa ya que se
puede halar o tropezarse con el cable involuntariamente.
4. El fabricante no recomienda el uso de esta máquina en países que no admiten 120V
CA incluso si se está usando un adaptador, transformador o convertidor de voltaje.
Gas CO2 (dióxido de carbono)
1. NO retire el cartucho de CO2 de la unidad hasta que el
cartucho de CO2 esté completamente vacío.
2. Siempre mantenga los cartuchos de CO2 lejos del calor. Almacene los cartuchos
adicionales en un lugar fresco y seco (preferiblemente a 70°F/20°C).
3. NO use el cartucho de CO2 si la temperatura de la sala es superior a 120°F (49°C).
No hacerlo puede resultar en una explosión o causar lesiones. El gas CO2 que
se escapa puede causar congelamiento si entra en contacto con la piel.
4. ¡El gas de CO2 puede ser peligroso! Los cartuchos de CO2 contienen gas comprimido de
alta presión, que pueden ser peligrosos si no se manejan adecuadamente. Asegúrese de
leer y comprender todos los procedimientos del cilindro de CO2 antes de la instalación.
5. Nunca debe conectar el cartucho de CO2 directamente al barril de cerveza.
6. Siempre siga los procedimientos correctos al cambiar el cilindro de CO2.
7. SIEMPRE ventile y abandone la zona inmediatamente si se ha producido una fuga de CO2.
8. Nunca deje caer o tire el cartucho de CO2.
9. Nunca intente recargar un cartucho de CO2.
¡GUARDE ESTAS INSTRUCCIONES!
20
ESPAÑOL
20
INTRODUCCIÓN
¡Felicitaciones! Usted es ahora el orgulloso propietario de su propio SISTEMA DE BARRIL DE
CERVEZA TIRADA ARTESANAL! Ideal para la cocina o para la mesada de un bar, use el barril
reusable incluido o cualquier barril de gravedad estándar de 5 litros para dispensar sus
cervezas artesanales favoritas en su hogar. Equipada con un sistema de presión con cartucho
de CO2, esta unidad mantendrá su cerveza fresca por hasta 30 días para calmar la sed.
Ubicación apropiada
Para garantizar que el SISTEMA DE BARRIL DE CERVEZA TIRADA funcione
con máxima eciencia para el que fue diseñado, manténgalo en un lugar
donde haya una adecuada circulación de aire y de tomas de corriente.
Escoja una ubicación donde la unidad esté lejos del calor
ni esté expuesto a la luz solar directa.
• Solo pra uso en interiores. No debe utilizarse en exteriores.
• La unidad requiere el uso de un cartucho de CO2 estándar con hilo.
• Cada cartucho de CO2 debe poder dispensar hasta uno barril de gravedad (5L).
• Capacidad: 0,32 pies cúbicos
• Dimensiones de la unidad: Largo 15,5" x Ancho 10,5" x Alto 17"
• Diseñado para ser autosuciente y no debe colocarse en una zona integrada o empotrada.
• Dimensiones recomendadas para espacios alrededor del SISTEMA DE BARRIL DE CERVEZA
TIRADA:
Lados …………………… 2 ½” (64 mm)
Atrás ……………………. 4” (102 mm)
• Peso de la unidad: 15 lbs.
Selección de un barril
El SISTEMA DE BARRIL DE CERVEZA TIRADA incluye un barril reusable de gravedad de 5L.
Simplemente lleve el barril reusable a su cervecería favorita para llenarlo con su cerveza
artesanal favorita, luego llévelo al hogar para disfrutarlo durante los próximos 30 días.
Esta unidad también es compatible con todos los barriles de gravedad
estándar de 5L, presurizados y no presurizados. La unidad NO es
compatible con tamaños de barril de gravedad no estándar de 5L.
PRESURIZADO
Los barriles presurizados
incluyen un sistema incluido
de llave que se conecta a la
parte superior del barril.
NO PRESURIZADO
Los barriles no presurizados (barriles de
gravedad) tienen un tapón de ventilación en
la parte superior y, en algunos casos, tienen un
pico en un lado, que apunta hacia abajo.

21
ESPAÑOL
21
PIEZAS Y ENSAMBLAJE
PIEZAS
Cubierta
superior
Mango de
la llave
Grifo de
la llave
Reusable de
5L Barril de
gravedad
Drenaje
Lengüeta
Perilla reguladora
de CO2
Indicador
LED de
temperatura
Botón de
liberación
de la puerta
Bandeja
de goteo
Interruptor de
encendido
16 g de
cartuchos de
CO2 con hilo
(3)
Botella de
limpieza
Perilla reguladora de CO2
"-" Reducir
Temperatura
"+" Aumentar
Temperatura
Indicador LED de
temperatura
Gire en sentido antihorario para
aumentar la presión de CO2.
Gire en sentido horario para
reducir la presión de CO2.
Ventosa
Línea de cerveza (con conector)
Línea de cerveza (adicional)
Lavadora
del tubo de
inmersión
(adicional)
Lavadora del cartucho
de CO2 (adicional)
22
ESPAÑOL
22
ENSAMBLAJE BÁSICO
1
2
1
2
Coloque el mango
de la llave en el
grifo de la llave.
1
Deslice las muescas en
la bandeja de goteo en
las pestañas ubicadas
en la parte inferior de
la unidad principal.
2
Asegúrese de que la
pestaña de drenaje
esté en la posición
cerrada, como se
muestra más arriba.
3
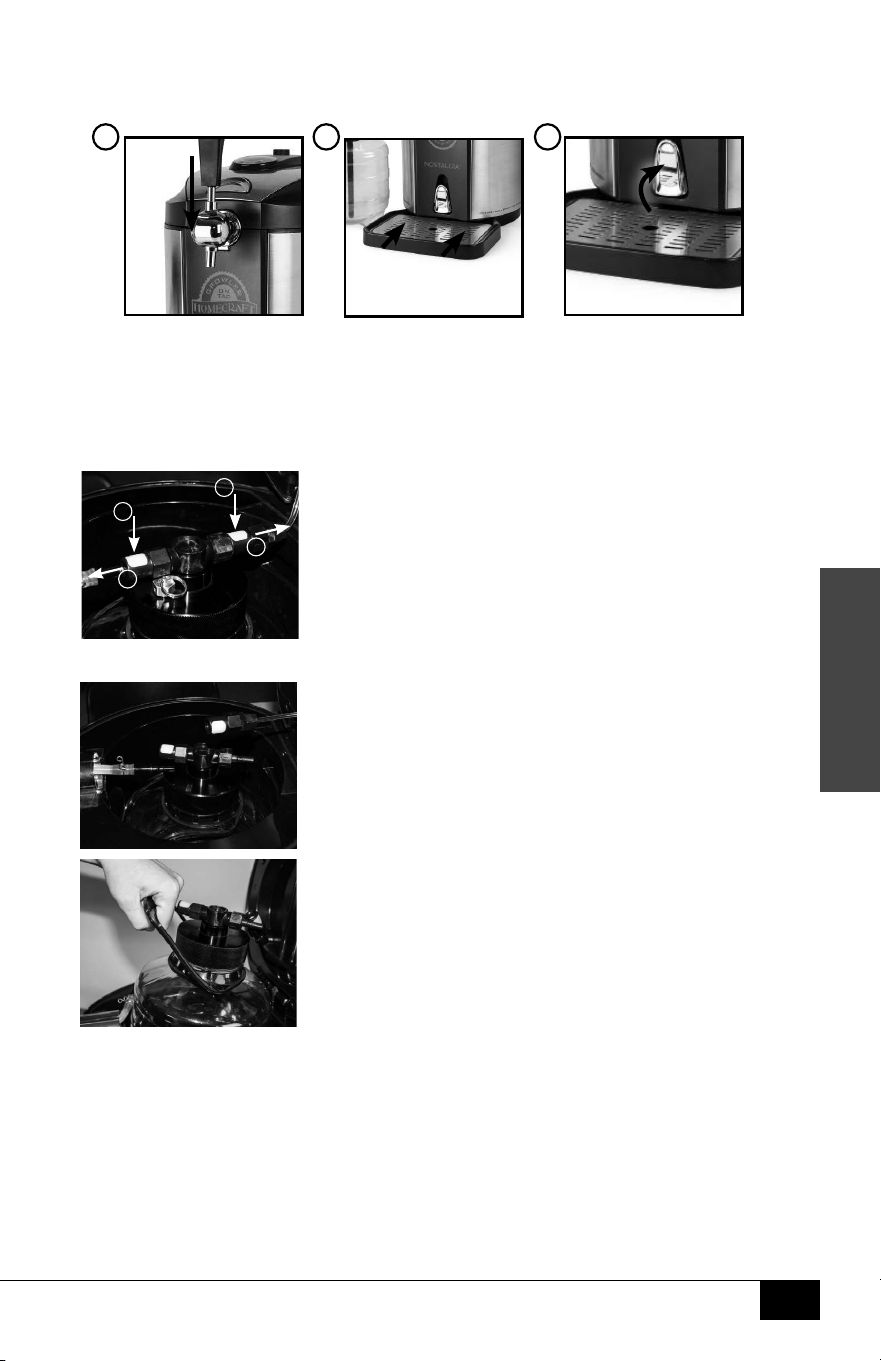
DESMONTAJE DEL GROWLER DE 5L INCLUIDO
1. Tanto para la línea de CO2 como para la línea de cerveza,
presione el botón blanco como se muestra en la imagen
a continuación, mientras tira simultáneamente de la
línea correspondiente para liberarlo del Growler.
2. Cuando se hayan liberado las líneas de CO2 y cerveza, se
verá así.
3. Use la manija Growler para levantar el Growler
fuera de la cavidad de enfriamiento.
23
ESPAÑOL
23
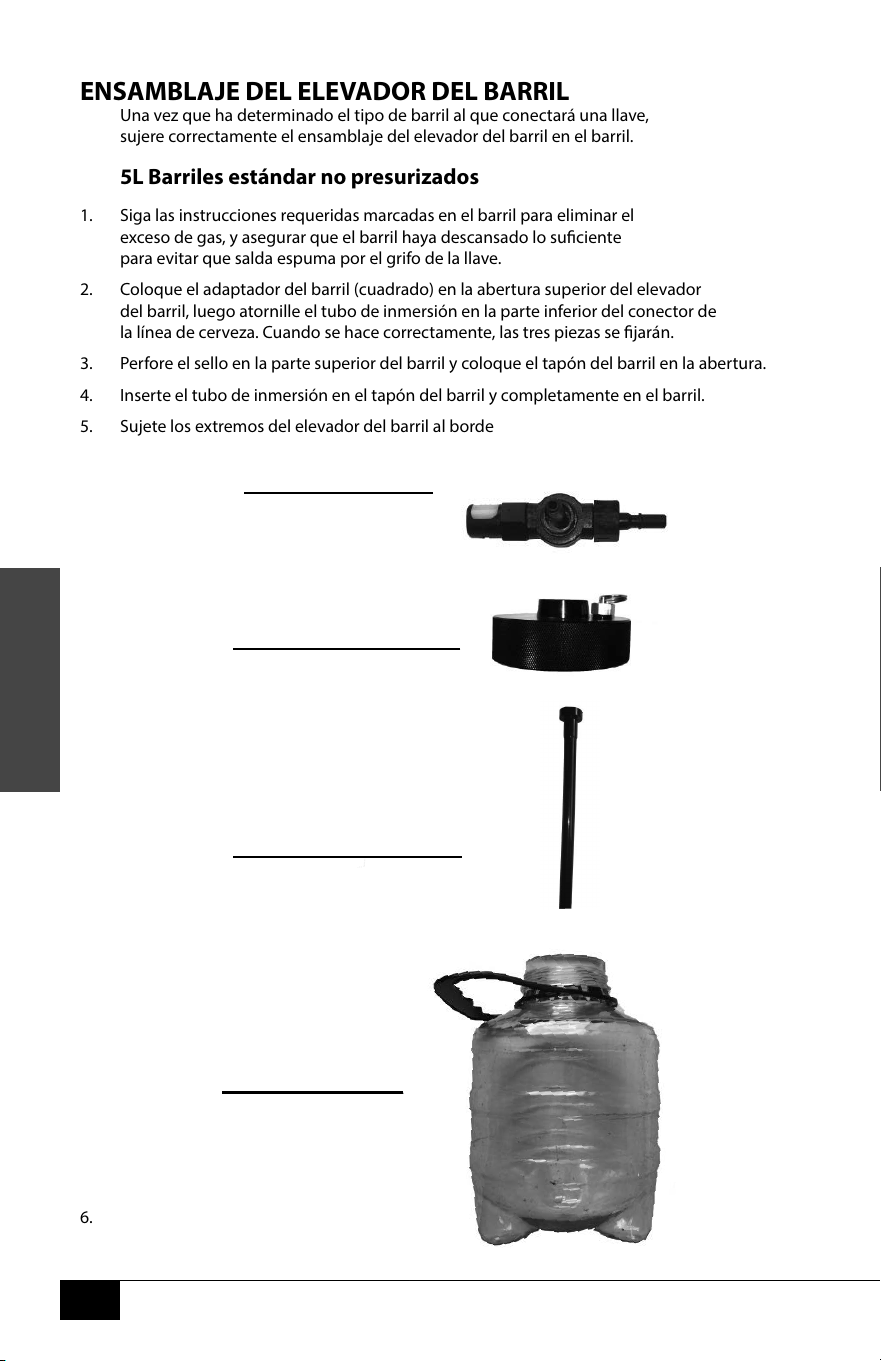
ENSAMBLAJE DEL ELEVADOR DEL BARRIL
Una vez que ha determinado el tipo de barril al que conectará una llave,
sujere correctamente el ensamblaje del elevador del barril en el barril.
5L Barriles estándar no presurizados
1. Siga las instrucciones requeridas marcadas en el barril para eliminar el
exceso de gas, y asegurar que el barril haya descansado lo suciente
para evitar que salda espuma por el grifo de la llave.
2. Coloque el adaptador del barril (cuadrado) en la abertura superior del elevador
del barril, luego atornille el tubo de inmersión en la parte inferior del conector de
la línea de cerveza. Cuando se hace correctamente, las tres piezas se jarán.
3. Perfore el sello en la parte superior del barril y coloque el tapón del barril en la abertura.
4. Inserte el tubo de inmersión en el tapón del barril y completamente en el barril.
5. Sujete los extremos del elevador del barril al borde
6.
Adaptador de barril
(circulo)
Tubo de inmersion
Gorra
Barril de gruñido
24
ESPAÑOL
24
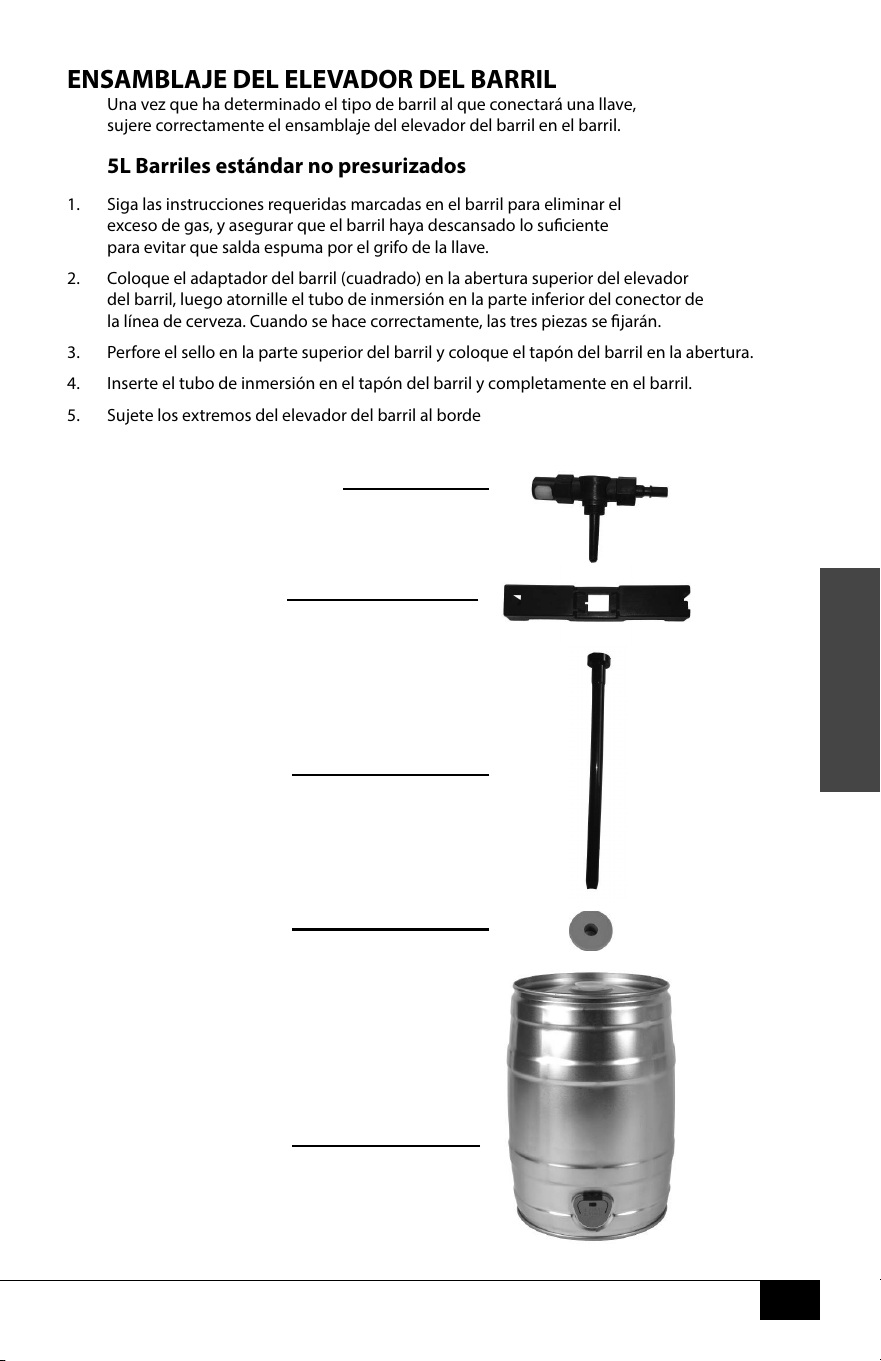
ENSAMBLAJE DEL ELEVADOR DEL BARRIL
Una vez que ha determinado el tipo de barril al que conectará una llave,
sujere correctamente el ensamblaje del elevador del barril en el barril.
5L Barriles estándar no presurizados
1. Siga las instrucciones requeridas marcadas en el barril para eliminar el
exceso de gas, y asegurar que el barril haya descansado lo suciente
para evitar que salda espuma por el grifo de la llave.
2. Coloque el adaptador del barril (cuadrado) en la abertura superior del elevador
del barril, luego atornille el tubo de inmersión en la parte inferior del conector de
la línea de cerveza. Cuando se hace correctamente, las tres piezas se jarán.
3. Perfore el sello en la parte superior del barril y coloque el tapón del barril en la abertura.
4. Inserte el tubo de inmersión en el tapón del barril y completamente en el barril.
5. Sujete los extremos del elevador del barril al borde
Adaptador de barril
(cuadrado)
Keg Lifter
Tubo de inmersion
Keg Bung
Barrilete
25
ESPAÑOL
25
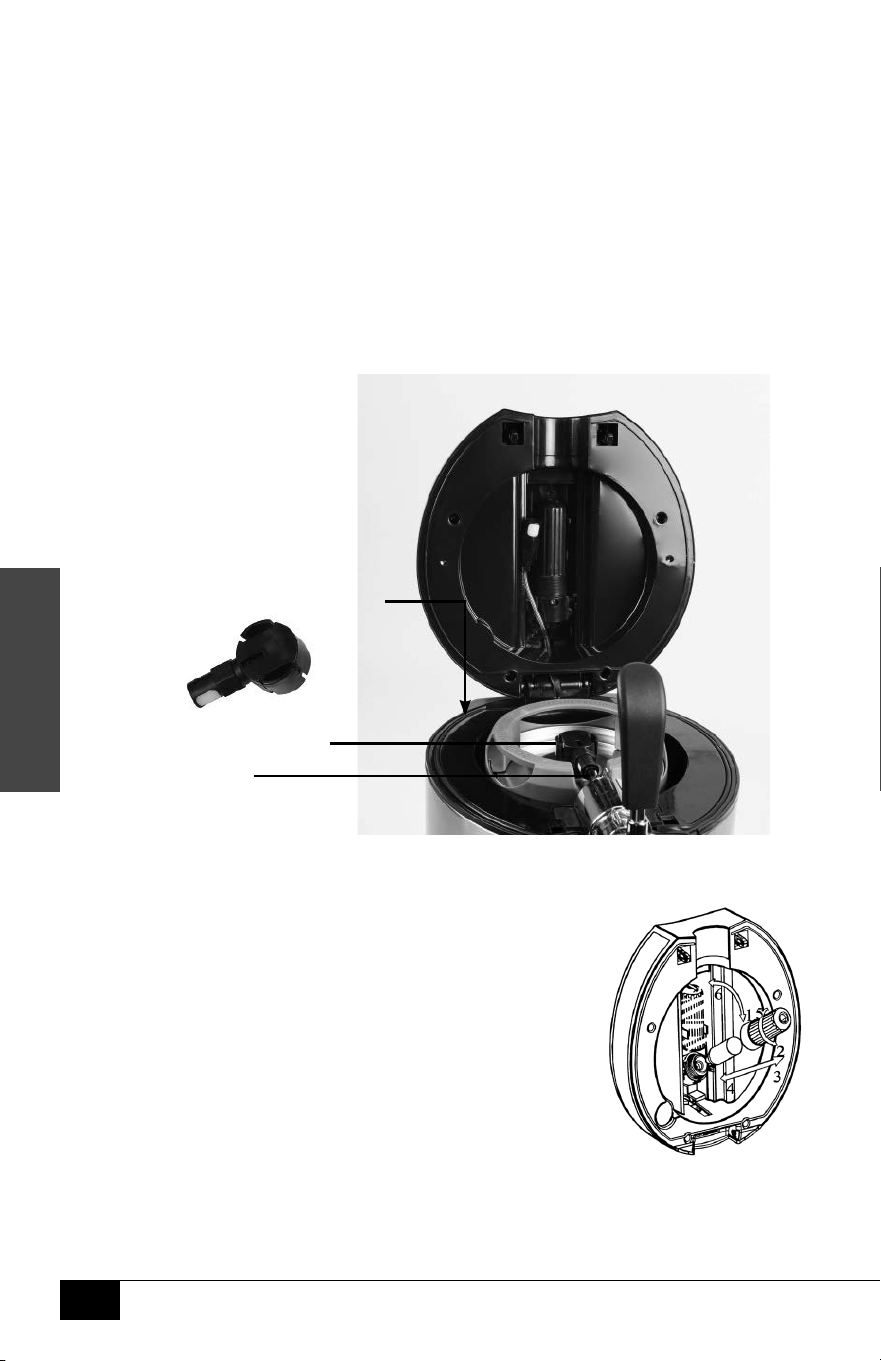
5L Los barriles presurizados (Heineken™)
1. Siga las instrucciones requeridas marcadas en el barril para eliminar el
exceso de gas, y asegurar que el barril haya descansado lo suciente
para evitar que salda espuma por el grifo de la llave.
2. Coloque con cuidado el barril presurizado en la cavidad de enfriamiento.
3. Use un destornillador de cabeza plana para quitar el tapón
de plástico de la parte superior del barril.
4. Conecte el adaptador de la tapa presurizada a la línea de cerveza de la llave.
5. Inserte el adaptador del barril presurizado en la parte superior del barril presurizado.
Instalación del cartucho de CO2
1. Coloque el cartucho de CO2 en la funda de CO2,
asegurándose de que la punta puntiaguda del cartucho
esté situada hacia el extremo roscado grande de la funda.
2. Incline el soporte del cartucho de CO2 hacia afuera de la
cubierta superior, luego atornille rápidamente el cartucho
de CO2 y la funda en el soporte del cartucho de CO2.NOTA:
Cuando el cartucho de CO2 ha sido perforado, debería escuchar
una breve explosión de CO2 escapando del cartucho.
3. Incline el soporte del cartucho de CO2
nuevamente dentro de la cubierta superior.
Cavidad de
enfriamiento
Adaptador de barril
presurizado
Tap Beer Line
26
ESPAÑOL
26
CÓMO FUNCIONA
Antes de comenzar, determine su utiliza un barril presurizado o no presurizado, o el barril
de gravedad de 5 L incluido. Siga los pasos a continuación para cada tipo de barril.
Para reemplazar la junta tórica de CO2 (en la foto), tome un
destornillador pequeño o pinzas y excave debajo del anillo y
levántelo para sacarlo. Al colocar la nueva junta tórica, el anillo
deberá empujarse hacia el espacio y ajustarse para que encaje.
5L BARRILES ESTÁNDAR NO PRESURIZADOS
1. Enfríe el barril por 10-12 horas en el refrigerador, o por 4-6 horas en un baño de hielo.
2. Encuentre una supercie estable e impermeable cerca de un tomacorriente eléctrico para
instalar la unidad. Asegúrese de que el cable esté alejado de cualquier fuente de agua.
NOTA: Al mover, tenga cuidado de no agitar o empujar el barril ya que
puede causar que salga espuma con demasiada espuma.
3. Compruebe que la pestaña de drenaje se encuentre cerrada (hacia arriba),
y que no haya objetos adicionales en la cavidad de enfriamiento.
4. Agregue 3 tazas (800 ml) de agua en la cavidad de enfriamiento.
Asegúrese de que los niveles de agua no excedan la línea MAX dentro
de la cavidad de enfriamiento. El agua mantiene frío el barril.
5. Ajuste la pantalla de temperatura LED a su temperatura deseada presionando los botones
"-" y "+".
NOTA: Puede tomar varias horas alcanzar su temperatura deseada.
Es por eso que es importante enfriar antes el barril.
6. Mueva el interruptor a encendido (I).
7. Siga los pasos en ENSAMBLAJE DEL ELEVADOR DEL BARRIL para BARRILES ESTÁNDAR
NO PRESURIZADOS, t sujete el ensamblaje del elevador del barril a su barril.
8. Gire la perilla del regulador de CO2 a la posición de apagado
(gire el indicador en sentido horario).
9. Asegurándose de que el barril esté vertical, coloque con cuidado su barril en la cavidad de
enfriamiento.
NOTA: Asegúrese de que la taza de succión se sujete rmemente a la parte inferior
de la cavidad de enfriamiento. La taza de succión asegura que el barril no ote.
10. Conecte el adaptador del barril a la línea de CO2 y la línea de cerveza.
11. Incline el soporte de CO2 hacia afuera de la cubierta
superior y desenrosque la funda de CO2. Atornille el
cartucho de CO2 en el soporte de CO2 y luego atornille
nuevamente la funda de CO2, cubriendo el cartucho de
CO2.
NOTA: Cuando se ha perforado el cartucho
de CO2, escuchará una breve explosión
por el escape de CO2 del cartucho.
12. Para servir cerveza, gire lentamente el indicador
del regulador en sentido antihorario para aumentar la presión de CO2 dentro del
barril. Al escuchar que el CO2 comienza a uir, puede dejar de servir cerveza.
• Si la cerveza no tiene suciente espuma de su agrado, aumente lentamente la presión
de CO2. NO aumente la presión de CO2 demasiado rápido o su cerveza puede
dispensarse demasiado rápido y con demasiada espuma.
SUGERENCIA PROFESIONAL:
Cuando el regulador está abierto, el CO2 continuará
uyendo en el barril. Esto puede resultar en un excesoi de presión que uye hacia
CO2 Cartridge
Holder
Anillo de CO2
27
ESPAÑOL
27
el barril, y puede causar cerveza con mucha espuma. Si experimenta cerveza
con mucha espuma, simplemente llene el barril con CO2, luego gire la perilla
reguladora a la posición de apagado. A medida que se dispensa más cerveza,
agregue peqeuñas cantidades de CO2 en el barril para desplazar la cerveza
dispensada, luego gire la perilla reguladora nuevamente a APAGADO.
BARRIL DE GRAVEDAD DE 5 L (NO PRESURIZADO)
1. Encuentre una supercie estable. Si la cerveza tiene demasiada espuma, reduzca la
presión de CO2. Simplemente gire el indicador del regulador a la posición de APAGADO.
2. Enfríe el barril por 10-12 horas en el refrigerador, o por 4-6 horas en un baño de hielo.
3. Encuentre una supercie estable e impermeable cerca de un tomacorriente eléctrico para
instalar la unidad. Asegúrese de que el cable esté alejado de cualquier fuente de agua.
NOTA: Al mover, tenga cuidado de no agitar o empujar el barril ya que
puede causar que salga espuma con demasiada espuma.
4. Asegúrese de que la pestaña de drenaje esté en la posición cerrada (hacia
arriba), y que no haya objetos adicionales en la cavidad de enfriamiento.
5. Agregue 3 tazas (800 ml) de agua en la cavidad de enfriamiento.
Asegúrese de que los niveles de agua no excedan la línea MAX dentro
de la cavidad de enfriamiento. El agua mantiene frío el barril.
6. Ajuste la pantalla de temperatura LED a su temperatura deseada presionando los botones
"-" y "+". La temperatura recomendada es de 37 °F.
NOTA: Puede tomar varias horas alcanzar su temperatura deseada.
Es por eso que es importante enfriar antes el barril.
7. Mueva el interruptor a encendido (I).
8. Siga los pasos en ENSAMBLAJE DEL ELEVADOR DEL BARRIL para BARRILES ESTÁNDAR
NO PRESURIZADOS, t sujete el ensamblaje del elevador del barril a su barril.
9. Gire la perilla del regulador de CO2 a la posición de apagado
(gire el indicador en sentido horario).
10. Asegurándose de que el barril esté vertical, coloque con cuidado su barril en la cavidad de
enfriamiento.
NOTE: Make sure the Suction Cup is securely fashioned to the bottom of
the Cooling Cavity. The Suction Cup ensures the keg will not oat.
11. Conecte el adaptador del barril a la línea de CO2 y la línea de cerveza.
12. Incline el soporte de CO2 hacia afuera de la cubierta
superior y desenrosque la funda de CO2. Atornille
el cartucho de CO2 en el soporte de CO2 y luego
atornille nuevamente la funda de CO2, cubriendo el
cartucho de CO2.
NOTA: Cuando se ha perforado el cartucho
de CO2, escuchará una breve explosión por el escape de CO2 del cartucho.
Línea de CO2
Línea de
cerveza
Soporte de
cartucho de CO2

28
ESPAÑOL
28
13. Gire lentamente el indicador del regulador en sentido antihorario
para aumentar la presión de CO2 dentro del barril. Al escuchar que
el CO2 comienza a uir, puede dejar de servir cerveza.
• Si la cerveza no tiene suciente espuma de su agrado, aumente lentamente
la presión de CO2. NO aumente la presión de CO2 demasiado rápido o su
cerveza puede dispensarse demasiado rápido y con demasiada espuma.
• Si la cerveza tiene demasiada espuma, gire la perilla reguladora a la
posición de APAGADO, tire de la válvula de escape de presión en el barril de
gravedad de 5L, luego gire lentamente el indicador regulador en sentido
antihorario para aumentar la presión de CO2 dentro del barril.
• SUGERENCIA PROFESIONAL:
Cuando el regulador está abierto, el CO2 continuará
uyendo en el barril. Esto puede resultar en un excesoi de presión que uye hacia
el barril, y puede causar cerveza con mucha espuma. Si experimenta cerveza
con mucha espuma, simplemente llene el barril con CO2, luego gire la perilla
reguladora a la posición de APAGADO. A medida que se dispensa más cerveza,
agregue peqeuñas cantidades de CO2 en el barril para desplazar la cerveza
dispensada, luego gire la perilla reguladora nuevamente a APAGADO.
5L BARRILES PRESURIZADOS (HEINEKEN™)
1. Enfríe el barril por 10-12 horas en el refrigerador, o por 4-6 horas en un baño de hielo.
2. Encuentre una supercie estable e impermeable cerca de un tomacorriente eléctrico para
instalar la unidad. Asegúrese de que el cable esté alejado de cualquier fuente de agua.
3. Compruebe que la pestaña de drenaje se encuentre cerrada (hacia arriba),
y que no haya objetos adicionales en la cavidad de enfriamiento.
4. Agregue 3 tazas (800 ml) de agua en la cavidad de enfriamiento. Asegúrese
de que los niveles de agua no excedan la línea MAX dentro de la cavidad
de enfriamiento. El agua ayuda a mantener frío el barril.
5. Ajuste la pantalla de temperatura LED a su temperatura deseada presionando los botones
"-" y "+".
NOTA: Puede tomar varias horas alcanzar su temperatura deseada.
6. Es por eso que es importante enfriar antes el barril.
7. Mueva el interruptor a encendido (I).
8. Coloque con cuidado el barril presurizado en la cavidad de enfriamiento.
NOTA: Al mover, tenga cuidado de no agitar o empujar el barril ya que puede causar que
salga espuma con demasiada espuma.
NOTA: Asegúrese de que la taza de succión se sujete rmemente a la parte inferior
de la cavidad de enfriamiento. La taza de succión asegura que el barril no ote.
9. Use un destornillador de cabeza plana para quitar el tapón de plástico
de la parte superior del barril.
10. Conecte el adaptador de la tapa presurizada a la línea de cerveza.
11. Inserte el adaptador del barril presurizado en
la parte superior del barril presurizado.
12. ¡Sírvase una cerveza!
NOTA: Los barriles presurizados vienen precargados con CO2.
Estos barriles precargados no CO2 no requieren el uso de un
sistema de CO2 externo a la unidad, por lo que no hay necesidad de instalar un cartucho
de CO2. La perilla reguladora en la cubierta superior no funciona con estos barriles.
13. Cuando el barril esté vacío, retire el adaptador del barril presurizado del
barril presionando hacia adentro en los dos lados del adaptador.
Línea de
cerveza
Adaptador
de la tapa
presurizada

29
ESPAÑOL
29
CONSEJOS ÚTILES
Cómo servir cerveza artesanal
1. Comience con un vaso limpio.
2. Sostenga el vaso en un ángulo de 45° a 1 pulgada por debajo del grifo de la llave.
3. Mueva el mango de la llave hacia adelante para abrir por completo el ujo de cerveza.
4. Continúe sosteniendo el vaso a 45° y permita que la cerveza uya
por el lado dle vaso hasta que el vaso esté medio lleno.
5. Una vez que el vaso está medio lleno, continúe sirviendo mientras inclina
suavemente el vaso verticalmente y sirve en el centro del vaso. Idealmente,
esto creará una supercie de 1" de espuma al terminar de servir.
6. Mueva rápidamente el mango de la llave nuevamente a la posición vertical original.
NOTA: Si la cerveza forma más espuma de la esperada, deje asentar la cerveza hasta
que la espuma baje, y luego termine de servir. Esto impide el desperdicio de cerveza.
Prevenga la cerveza espumosa
• Enfríe la cerveza. La cerveza caliente tiene una mayor probabilidad de formar
espuma. Se recomienda comprar la cerveza el día antes y dejarla enfriar en el
refrigerador por 10-12 horas. La temperatura recomendada es de 37 °F.
• Sirva con un vaso limpio. Los residuos en un vaso sucio pueden
interferir con el servido y el sabor de su cerveza. Siga las direcciones
para Servir cerveza artesanal para perfeccionar su bebida.
• Conrme que las líneas de cerveza no estén dobladas y que están limpias.
• Reduzca la presión de CO2.
• No agite ni empuje el barril. Demasiada agitación del barril puede crear cerveza espumosa.
Si el barril se agita o empuja, deje reposar y asentar por 2-3 horas antes de servir.
• La cerveza espumosa también puede ser ocasionada por un sello o una conexión
defectuosa entre el barril y la unidad principal. Asegúrese de que todas las
conexiones estén rmes, bien ajustadas y colocadas correctamente.
Barriles presurizados
• Los barriles presurizados vienen precargados con CO2 y no requieren el uso
de un regulador del sistema de CO2 externo a la unidad. La perilla reguladora
en la cubierta superior no funciona al usar un barril presurizado.
• Si experimenta una cerveza no satisfactoria, como con espuma,
contacte al fabricante o vendedor del barril.
Perilla reguladora de CO2
• Cuando el regulador está abierto, el CO2 continuará uyendo en el barril. Esto puede
resultar en un excesoi de presión que uye hacia el barril, y puede causar cerveza con
mucha espuma. Si experimenta cerveza con mucha espuma, simplemente llene el barril
con CO2, luego gire la perilla reguladora a la posición de apagado. A medida que se
dispensa más cerveza, agregue peqeuñas cantidades de CO2 en el barril para desplazar
la cerveza dispensada, luego gire la perilla reguladora nuevamente a APAGADO.

30
ESPAÑOL
30
LIMPIEZA Y MANTENIMIENTO
1. Después de usar su SISTEMA DE BARRIL DE CERVEZA TIRADA,
desconecte la unidad de la toma eléctrica.
2. Separe el ensamblaje del elevador del barril del barril, luego
quite el barril de la cavidad de enfriamiento.
3. Limpie la cavidad de enfriamiento.
a. Asegúrese de que no haya objetos extraños en la cavidad de enfriamiento.
b. Drene el agua en la cavidad de enfriamiento colocando la unidad cerca del borde de
una mesa o mesada para poder colocar un recipiente debajo de la pestaña de drenaje.
c. Coloque un recipiente debajo de la pestaña de drenaje, luego tire
de la pestaña de drenaje hacia abajo para permitir que el agua
en la cavidad de enfriamiento drene al recipiente vacío.
d. Seque la cavidad de enfriamiento con un paño suave, no abrasivo.
4. Limpie la línea de cerveza usando la botella de limpieza incluida.
a. Coloque un recipiente vacío debajo del grifo de la llave.
b. Cargue la botella de limpieza con agua caliente jabonosa.
c. Inserte la punta de la botella de limpieza en el extremo abierto del
tubo de inmersión (parte del ensamblaje del elevador del barril).
d. Tire hacia abajo del mango de la llave, luego presione la botella de limpieza para
permitir que el agua jabonosa uya por la línea de cerveza y en el recipiente vacío.
e. Repita este proceso con solo agua caliente la cantidad de veces
que sea necesairo hasta que las líneas de cerveza esten limpias
y todo el jabón se haya limpiado de la línea de cerveza.
f. Si la línea de cerveza debe reemplazarse, levante la línea de cerveza y la placa cromada
que cubre la línea. Tire hacia abajo del mango de la llave, luego tire de la línea de
cerveza usada para removerla. La nueva línea de cerveza puede colocarse en su lugar
tirando hacia abajo del mango de la llave, luego inserte la línea de cerveza en la llave.
Al liberar el mango de la llave se presionará la nueva línea de cerveza, armándola.
1. Lave el resto de las piezas removibles con agua caliente
jabonosa. Seque con un paño suave, no abrasivo.
2. Según sea necesario, limpie el exterior de la unidad con un paño húmedo, no abrasivo.

31
ESPAÑOL
31
DEVOLUCIONES Y GARANTÍA
SI LA UNIDAD NO FUNCIONA O ESTÁ DAÑADA AL SACARLA POR PRIMERA VEZ
DE LA CAJA, DEVUÉLVALA AL LUGAR DE COMPRA INMEDIATAMENTE.
DISPENSADOR CON BARRIL DE CERVEZA TIRADA ARTESANAL / CBD5BS
Si tiene preguntas, contacte con nosotros por correo electrónico o por el número
telefónico de servicio al cliente que aparece a continuación en el horario de
9:00 AM a 4:00 PM, de lunes a viernes, Hora Estándar del Este.
Distribuida por:
Nostalgia Products LLC
1471 Partnership Dr.
Green Bay, WI 54304-5685
Servicio al cliente
Teléfono: (920) 347-9122
Web: www.nostalgiaproducts.com
Solicitud de servicio al cliente
Para enviar una solicitud al Servicio al Cliente, vaya a www.nostalgiaproducts.com, llene
el formulario de Solicitud de Servicio al Cliente y haga clic en el botón Enviar.
Un representante le contactará tan pronto como sea posible.
Términos de garantía del producto
Po este medio, Nostalgia Products LLC (la “Compañía”) garantiza que por un período de un (1) año a
partir de la fecha de compra original, este producto estará sin defectos en cuanto a materiales y mano
de obra en uso normal en casa, siempre que el producto se maneje y mantenga de acuerdo con las
instrucciones de manejo. Como único y exclusivo remedio en virtud de esta garantía, la Compañía, a
su discreción, podrá optar por reparar o sustituir el producto que se encuentre defectuoso, o emitir un
reembolso por el producto durante el período de garantía. Esta garantía sólo está disponible para el
comprador original minorista del producto a partir de la fecha inicial de compra al por menor, y sólo es
válida con el recibo de compra original, y como prueba de la fecha de compra, es necesario obtener los
benecios de la garantía. Todos los reclamos de garantía deben hacerse a la atención de la Compañía
dentro del período de garantía y no más tarde que 30 días desde la imposibilidad de realizarlo. Esta
garantía no cubre el desgaste normal o daños ocasionados por el embarque, malos manejos, mal uso,
accidentes, alteración, piezas de cambio incorrectas, o algo distinto al uso doméstico normal. Es posible
que deba devolver el producto (con los gastos de envío pagados por usted) para inspección y evaluación.
Los costos de envío no son reembolsables. La empresa no se hace responsable por devoluciones
dañadas o perdidas en tránsito. A menos que se indique lo contrario especícamente permitido por
las instrucciones de manejo, esta garantía sólo se aplica al uso en interiores de las viviendas. Para
realizar una reparación bajo esta garantía, comuníquese con la Compañía mediante el número de
teléfono indicado anteriormente o al llenar el formulario de consulta para el servicio de Atención al
Cliente en www.nostalgiaproduct s.com. El período de garantía sólo es válido en EE.UU. y Canadá.
Esta garantía está en lugar de cualquier otra garantía, expresa o implícita, incluso las garantías de
comerciabilidad y conveniencia para un propósito en particular, que quedan excluidas en la medida
permitida por la ley. En ningún caso la compañía será responsable de cualquier daño indirecto, incidental,
consecuente, especial o daños que surjan o estén relacionados con este producto o la utilización del
mismo. Algunos estados, provincias o corregimientos no permiten la exclusión o la limitación de daños
incidentales o consecuentes, por lo que la exclusión o la limitación anterior quizás no se aplique a usted.
Esta garantía no se aplica a mercancía reelaborada.
Lea las instrucciones de manejo cuidadosamente. El incumplimiento
de las instrucciones de manejo anulará esta garantía.
Para obtener más información, visítenos en línea en www.nostalgiaproducts.com.
Me Gusta en Facebook en www.facebook.com / NostalgiaElectrics.
Siga nuestros consejos sobre Pinterest en www.pinterest.com / nostalgiaelctrx.
Tweet con nosotros en Twitter en www.twitter.com / NostalgiaElctrx.
32
FRANÇAIS
32
Faites que chaque jour soit une fête !
Visiter le site Web www.nostalgiaproducts.com
pour d’autres produits agréables.
SOMMAIRE
SÉCURITÉ . . . . . . . . . . . . . . . . . . . . . . . . . . . . . . . . . . . . . . . .32
PRÉCAUTIONS IMPORTANTES . . . . . . . . . . . . . . . . . . . . . . . . . . .33
PRÉCAUTIONS IMPORTANTES ADDITIONNELLES . . . . . . . . . . . . . . . 33
INTRODUCTION . . . . . . . . . . . . . . . . . . . . . . . . . . . . . . . . . . . . 35
PIÈCES ET ASSEMBLAGE . . . . . . . . . . . . . . . . . . . . . . . . . . . . . . . 36
COMMENT OPÉRER . . . . . . . . . . . . . . . . . . . . . . . . . . . . . . . . . . 41
CONSEILS UTILES . . . . . . . . . . . . . . . . . . . . . . . . . . . . . . . . . . .44
NETTOYAGE ET ENTRETIEN . . . . . . . . . . . . . . . . . . . . . . . . . . . . .45
RETOURS ET GARANTIE . . . . . . . . . . . . . . . . . . . . . . . . . . . . . . .46
SÉCURITÉ
Spécications de l'appareil :
120 Volts, 60 Hz
65 Watts
CE PRODUIT EST POUR UTILISATION DANS UNE PRISE DE 120V AC UNIQUEMENT.
Se reporter au site www.nostalgiaproducts.com/user-
manuals/ pour la version la plus récente.
Votre sécurité est très importante, ainsi que celle des autres.
Nous avons fourni de nombreux importants messages de sécurité dans ce manuel
et pour votre appareil. Toujours lire et respecter les consignes de sécurité.
Ceci est le symbole d'alerte de sécurité.
Ce symbole vous signale les dangers potentiels qui peuvent
causer des blessures graves pour vous et les autres.
Tous les messages de sécurité suivront le symbole d'alerte de sécurité.
Tous les messages de sécurité vous diront quel est le danger potentiel,
vous diront comment réduire le risque de blessure et vous diront
ce qui peut arriver si les instructions ne sont pas suivies.
33
FRANÇAIS
33
PRÉCAUTIONS IMPORTANTES
Une personne n'ayant pas lu et compris toutes les instructions de
fonctionnement et de sécurité n'est pas qualiée pour faire fonctionner cet
appareil. Tous les utilisateurs de cet appareil doivent lire et comprendre
ce mode d'emploi avant d'utiliser ou de nettoyer cet appareil.
Lorsque l'on utilise un appareil électrique, il faut toujours
respecter des précautions de base, y compris celles-ci :
1. Lisez toutes les instructions avant d'utiliser cet appareil.
2. NE PAS TOUCHER les surfaces chaudes. Utiliser les poignées ou les boutons.
3. Cet appareil n'est PAS UN JOUET.
4. Les jeunes enfants non supervisés et les individus ayant une décience
cognitive ne devraient jamais faire fonctionner cet appareil.
5. Une surveillance étroite est nécessaire lorsqu’un appareil
est utilisé par ou à proximité d’enfants.
6. Pour protéger contre les chocs électriques ne pas submerger le cordon, la
che ou aucune pièce de cet appareil dans l'eau ou d'autres liquides.
7. Débranchez l'appareil lorsqu'il ne sert pas, avant de retirer des pièces et avant le nettoyage.
Laisser refroidir avant de mettre ou d'enlever des pièces et avant le nettoyage.
8. NE PAS utiliser un appareil avec un cordon ou une che électrique
endommagés ou après un mauvais fonctionnement de l'appareil ou s'il a
été endommagé d'une manière quelconque. Retournez l'appareil à l'atelier
de réparation le plus proche pour un examen, réparation ou réglage.
9. Le fabricant ne recommande pas l'utilisation d'accessoires autres que ce qui est
prévu par le fabricant. L'utilisation d'accessoires peut causer des blessures.
10. NE PAS utiliser cet appareil pour toute autre utilisation pour laquelle il n’a pas été conçu.
11. N'utilisez PAS l'appareil à l'extérieur. POUR UN USAGE DOMESTIQUE UNIQUEMENT.
12. NE PAS placer sur ou près d'un brûleur à gaz ou électrique ou dans
un four chaué. 1. NE PAS mettre en lave-vaisselle.
13. NE laissez PAS le cordon pendre sur le bord de la table ou
du comptoir, ni toucher les surfaces chaudes.
14. NE laissez JAMAIS l'unité sans surveillance lorsqu'il est en
service ou une fois branché à une prise électrique.
15. Une extrême prudence doit être utilisée pour déplacer
un appareil contenant des liquides chauds.
16. Toujours brancher l'appareil en premier, puis brancher le cordon dans
la prise murale. Pour débrancher l’appareil, mettre tous les boutons à la
position « arrêt », puis débrancher la che de la prise murale.
PRÉCAUTIONS IMPORTANTES ADDITIONNEL
Instructions et précautions de sécurité
1. Cet appareil est conçu pour être utilisé par des adultes responsables et
en âge légal minimum d'achat de boissons contenant de l'alcool.
2. Ne jamais placer l’appareil en plein soleil et éviter toutes autres sources de chaleur.
3. Pour assurer une bonne aération, cet appareil ne doit être encastré ou construit
dans un meuble fermé. Il est conçu pour montage autoporteur seulement.
4. N’insérez pas de n’importe quel objet dans les espaces d'aération.

34
FRANÇAIS
34
5. N’utilisez pas votre appareil en présence de vapeurs explosives.
6. Les barils pré-chargés avec du CO2 n'exigent pas l'utilisation du régulateur externe du
système de CO2, donc il n'y a aucun besoin d'installer une cartouche de CO2. Le cadran situé
sur le dessus du couvercle ne fonctionnera pas si vous l'utilisez avec un baril pré-chargé.
Instructions pour le cordon électrique et la prise
1. Cet appareil a une che polarisée (une lame est plus large que l'autre). Pour réduire le
risque de choc électrique, cette che est conçue pour s’insérer dans une prise polarisée
d’une seule façon. Si la che ne s'insère pas complètement dans la prise électrique,
veuillez la l'insérer dans l'autre direction. Si elle ne s’enfonce toujours pas, contactez
un électricien qualié. Ne pas tenter de modier la che d'aucune façon que ce soit.
2. Un court cordon d'alimentation est fourni pour réduire les risques
d'enchevêtrement ou risques de trébucher sur un cordon plus long.
3. Si un cordon d'alimentation amovible ou une rallonge est utilisé :
• Les rallonges électriques peuvent être utilisées avec soin.
• Les caractéristiques électriques du câble ou de la rallonge doivent être
au moins aussi grandes que la puissance nominale de l’appareil.
• Lorsque vous utilisez un cordon plus long ou une rallonge électrique,
assurez-vous que celui-ci ne pende pas hors du comptoir ou
d'une table où il pourrait faire trébucher ou être tiré.
4. Le fabricant ne recommande pas l’utilisation de cet appareil dans les pays
qui ne supportent pas les tensions de 120V AC, même si un adaptateur
de tension, un transformateur ou un convertisseur est utilisé.
CO2 (dioxyde de carbone) gaz
1. NE PAS retirer la cartouche de CO2 de l'appareil jusqu'à ce la
cartouche de CO2 ne soit complètement vide.
2. Gardez toujours les cartouches de CO2 loin des sources de chaleur. Entreposez les
cartouches supplémentaires dans un endroit frais et sec (de préférence à 70° F / 20° C).
3. NE PAS utiliser la cartouche CO2 si la température ambiante est supérieure à 120° F (49°
C). Faute de quoi cela pourrait entraîner des blessures voire une explosion. Les gaz CO2
s'échappant peuvent causer des engelures si ceux-ci entrent en contact avec la peau.
4. Les gaz CO2 peuvent être dangereux ! Les cartouches de CO2 peuvent contenir des
gaz sous haute-pression suite à une mauvaise manipulation. Assurez-vous de bien
comprendre toutes les procédures des cartouches de CO2 avant l'installation.
5. Ne jamais brancher la cartouche de CO2 directement dans le baril de bière.
6. Toujours suivre les procédures correctement pour changer les cartouches de CO2.
7. Advenant une fuite de gaz CO2 TOUJOURS aérer et quitter la zone immédiatement.
8. Ne jamais échapper ni lancer les cartouches de CO2.
9. Ne jamais essayer de recharger une cartouche de CO2.
CONSERVEZ CES INSTRUCTIONS !
35
FRANÇAIS
35
INTRODUCTION
Félicitations ! Vous êtes maintenant l’heureux propriétaire de votre propre SYSTÈME
DE BIÈRES EN FÛT ! Parfait pour la cuisine ou le bar maison. Utilisez le cruchon
réutilisable inclus ou n'importe quel autre baril de 5 litres standard pour verser vos
bières maisons favorites chez-vous. Équipé d'un système sous pression à cartouches
de CO2, cet appareil conservera vos bières fraîches jusqu'à 30 jours désaltérant.
Endroit approprié
Pour vous assurer que votre SYSTÈME DE BIÈRES EN FÛT fonctionne
ecacement selon sa conception, veuillez le garder dans un endroit
adéquatement aéré et muni de prises électriques.
Choisissez un endroit où l'appareil sera loin des sources de
chaleur et ne sera pas exposé directement au soleil.
• Utilisation à l'intérieur uniquement. Il ne doit pas être utilisé à l’extérieur.
• L'appareil fonctionne avec des cartouches de CO2 letées standard.
• Chaque cartouche de CO2 devrait déverser un baril complet de 5 litres.
• Capacité : 0,32 pi. cu.
• Dimensions de l’appareil : L 15,5 po x La 10,5 po x H 17 po
• Conçu pour être debout et ne doit pas être placé dans une zone encastrée.
• Les dimensions des espaces recommandés autour du système de bières ON-TAP BEER
GROWLER sont :
Côtés …………………… 2 ½ po (64 mm)
Derrière ……………………. 4 po (102 mm)
• Poids de l'appareil : 15 lbs.
Choisir un baril
Le SYSTÈME DE BIÈRES EN FÛT inclut un baril réutilisable de 5 litres. Simplement mettre le
baril réutilisable à votre brasserie préférée an de le remplir de votre bière préférée faite
maison, puis ramenez-le à la maison an d'en apprécier le goût dans les 30 prochains jours.
Cet appareil est également compatible avec tous barils standards
de 5 litres, sous-pression ou non. L'appareil N'EST PAS compatible
avec les dimensions non-standards des barils de 5 litres.
SOUS-PRESSION
Les barils sous-pression
incluent une méthode de
saignée intégrée laquelle se
connecte au dessus du baril.
SANS PRESSION
Les barils sans pression (Barils gravité)
possèdent un vanne d'aération située sur le
dessus et dans quelques cas, possèdent un
bec-verseur situé sur le côté orienté vers le bas

36
FRANÇAIS
36
PIÈCES ET ASSEMBLAGE
PIÈCES
Couvercle
supérieur
Poignée
en fût
Robinet
en fût
Baril gravité
de 5 litres
réutilisable
Vidange
Onglet
Cadran régulateur
de CO2
Achage
DEL de la
température
Bouton de
relâchement
de la porte
Ramasse-
gouttes
Interrupteur
d'alimentation
Cartouches
(3) de 16 g de
CO2 leté
Bouteille de
nettoyage
Cadran régulateur de CO2
Diminution « - »
Température
"+" Augmenter
la température
Achage DEL de
la température
Tournez le cadran dans le sens
antihoraire pour augmenter
la pression de CO2.
Tournez le cadran dans le sens horaire
pour diminuer la pression de CO2.
Ventouse
Ligne de bière (avec connecteur)
Ligne de bière (extra)
Rondelle
du tube
plongeur
(extra)
Rondelle de la cartouche
de CO2 (extra)
37
FRANÇAIS
37
ASSEMBLAGE DE BASE
Insérer la poignée en
fût sur le robinet.
1
Glissez les encoches sur
le plateau ramasse-
gouttes dans les
onglets situés en bas
de l’appareil principal.
2
Assurez-vous que
l’onglet de la Vidange
est en position
fermée, comme
indiqué ci-dessu.
3
1
2
1
2
RETRAIT DU GROUPE DE 5L INCLUS
1. Pour la conduite de CO2 et la conduite de bière,
appuyez sur le bouton blanc, comme indiqué dans
l'image ci-dessous, tout en tirant simultanément sur la
conduite correspondante pour la libérer du Growler.
2. Lorsque les lignes de CO2 et de bière seront libérées,
cela ressemblera à ceci.
3. Utilisez la poignée du Growler pour le
sortir de la cavité de refroidissement.
38
FRANÇAIS
38
ASSEMBLAGE DU SOULÈVE-BARIL
Une fois déterminé quel type de baril vous mettrez en fût, xez
solidement l'assemblage du soulève-baril au baril-même.
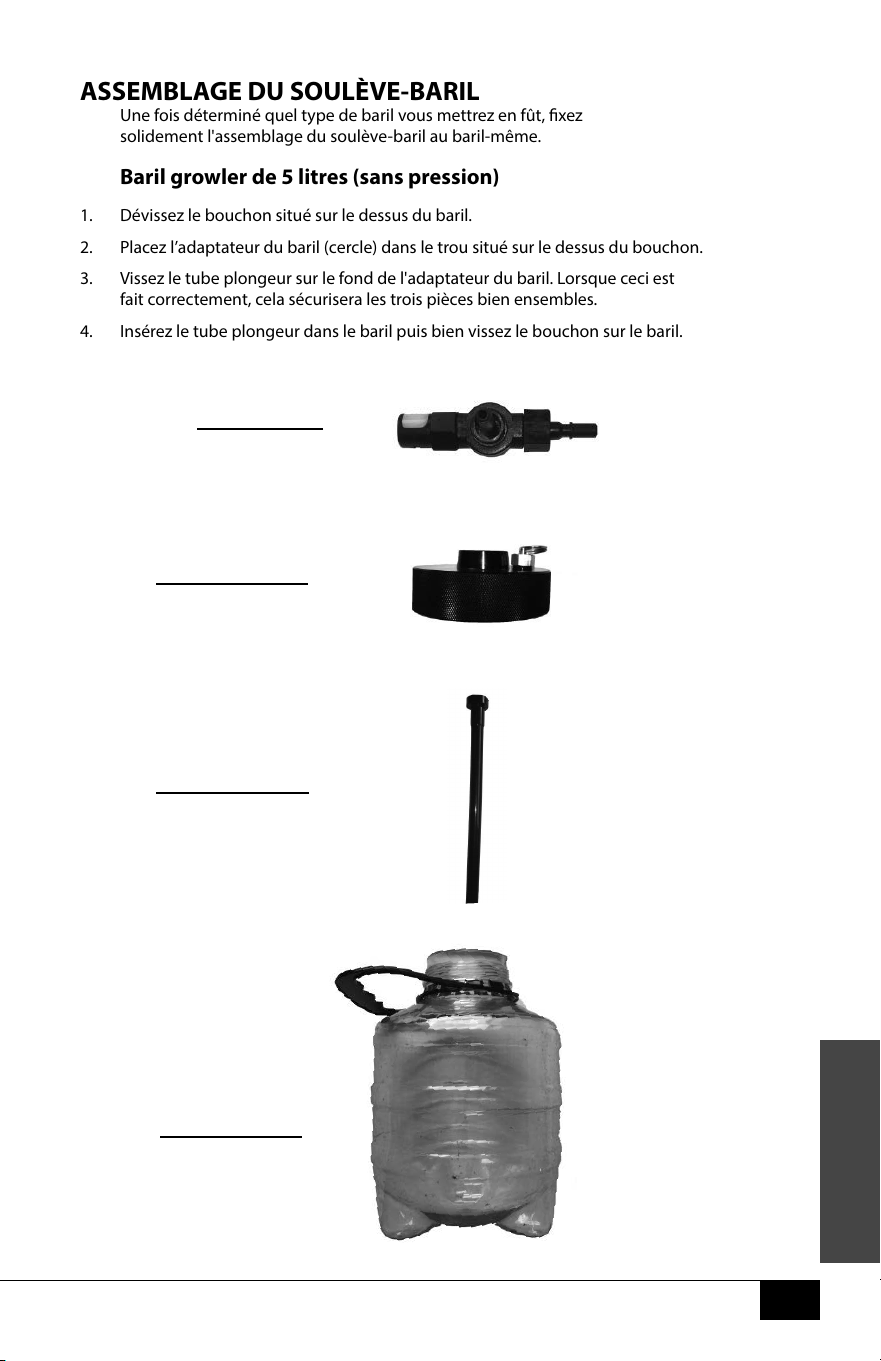
Baril growler de 5 litres (sans pression)
1. Dévissez le bouchon situé sur le dessus du baril.
2. Placez l’adaptateur du baril (cercle) dans le trou situé sur le dessus du bouchon.
3. Vissez le tube plongeur sur le fond de l'adaptateur du baril. Lorsque ceci est
fait correctement, cela sécurisera les trois pièces bien ensembles.
4. Insérez le tube plongeur dans le baril puis bien vissez le bouchon sur le baril.
Keg Adaptor
(cercle)
Tube plongeur
Casquette
Growler Keg
39
FRANÇAIS
39
5L Barils standards sans pression
1. Suivez toutes les instructions requises indiquées sur le baril an d'éliminer
le gaz excessif et assurer que le baril soit au repos assez longtemps
pour éviter que la mousse ne sorte par le robinet en fût.
2. Placez l'adaptateur du baril (carré) dans l'ouverture supérieure du soulève-baril, puis
vissez le tube plongeur dans le fond du connecteur de la ligne de bière. Lorsque
ceci est fait correctement, cela sécurisera les trois pièces bien ensembles.
3. Percez le sceau d'étanchéité sur le dessus du baril puis
placez le bondon du baril dans l'ouverture.
4. Insérez le tube plongeur dans le bondon du baril, lesquels
vous devrez insérer complètement dans le baril.
5. Fixez les extrémités du soulève-baril sur la lèvre du baril.
Adaptateur de fût (carré)
Kif Lifter
Tube plongeur
Keg Bung
Tonnelet
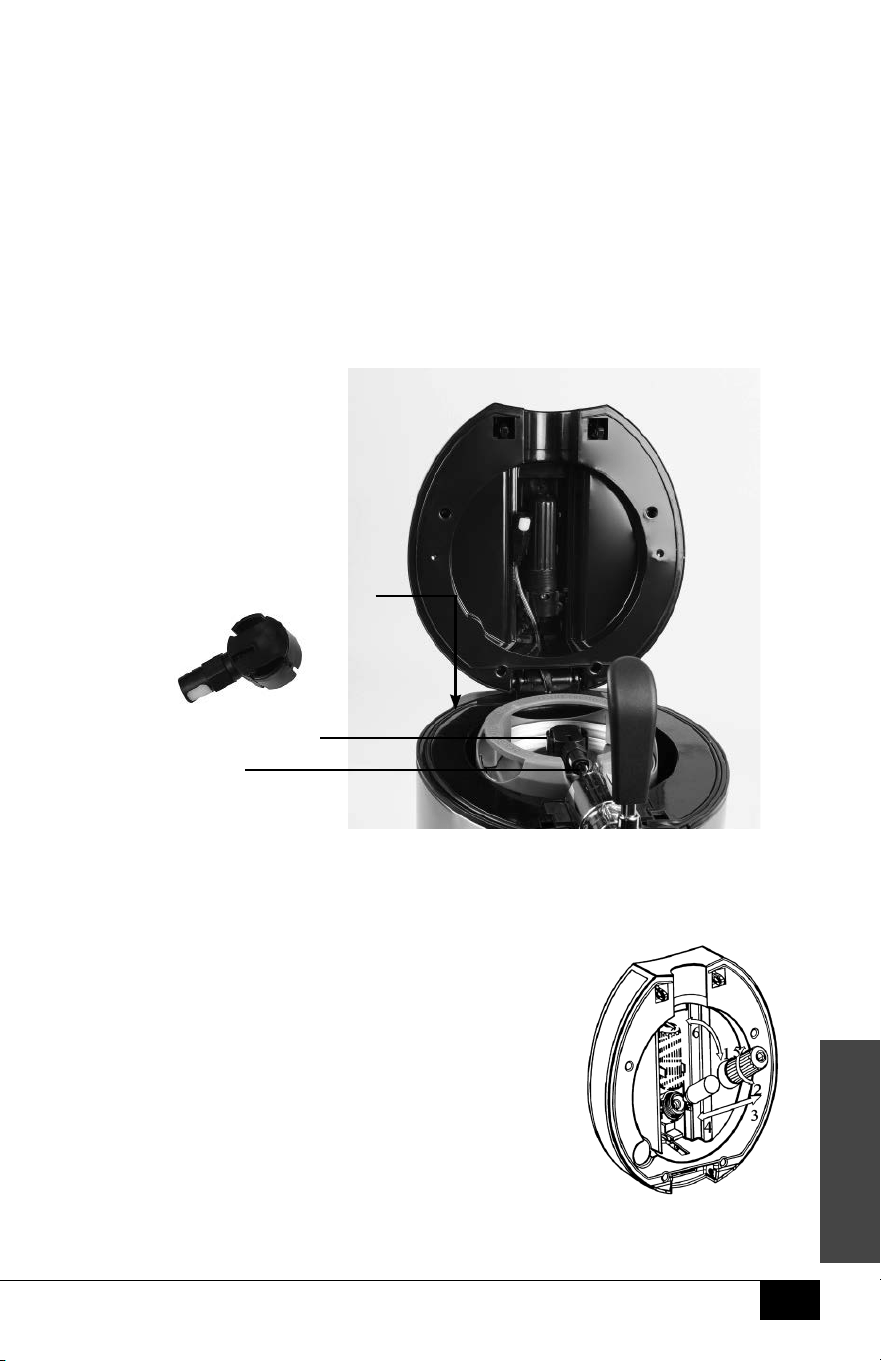
40
FRANÇAIS
40
5L Barils sous-pression (Heineken™)
1. Suivez toutes les instructions requises indiquées sur le baril an d'éliminer
le gaz excessif et assurer que le baril soit au repos assez longtemps
pour éviter que la mousse ne sorte par le robinet en fût.
2. Placez soigneusement le baril sous-pression dans la cavité de refroidissement.
3. Utilisez un tournevis plat pour retirer le bouchon en
plastique de la partie supérieure du baril.
4. Branchez l'adaptateur du baril sous-pression sur la ligne de bière en fût.
5. Insérez l’adaptateur du baril sous-pression dans la partie supérieure du baril sous-pression.
Instalación del cartucho de CO2
1. Placez la cartouche de CO2 dans le manchon CO2,
en veillant à ce que le bout pointu de la cartouche
soit placé du côté de la grande extrémité letée du manchon.
2. Inclinez le porte-cartouche de CO2 hors du capot supérieur,
puis vissez rapidement la cartouche de CO2 et le manchon
dans le porte-cartouche de CO2. REMARQUE: Une fois la
cartouche de CO2 perforée, vous devriez entendre une
brève explosion de CO2 s'échapper de la cartouche.
3. Inclinez le porte-cartouche de CO2 dans le capot supérieur.
Cavité de
refroidissement
Adaptateur de
baril pressurisé
Tap Beer Line
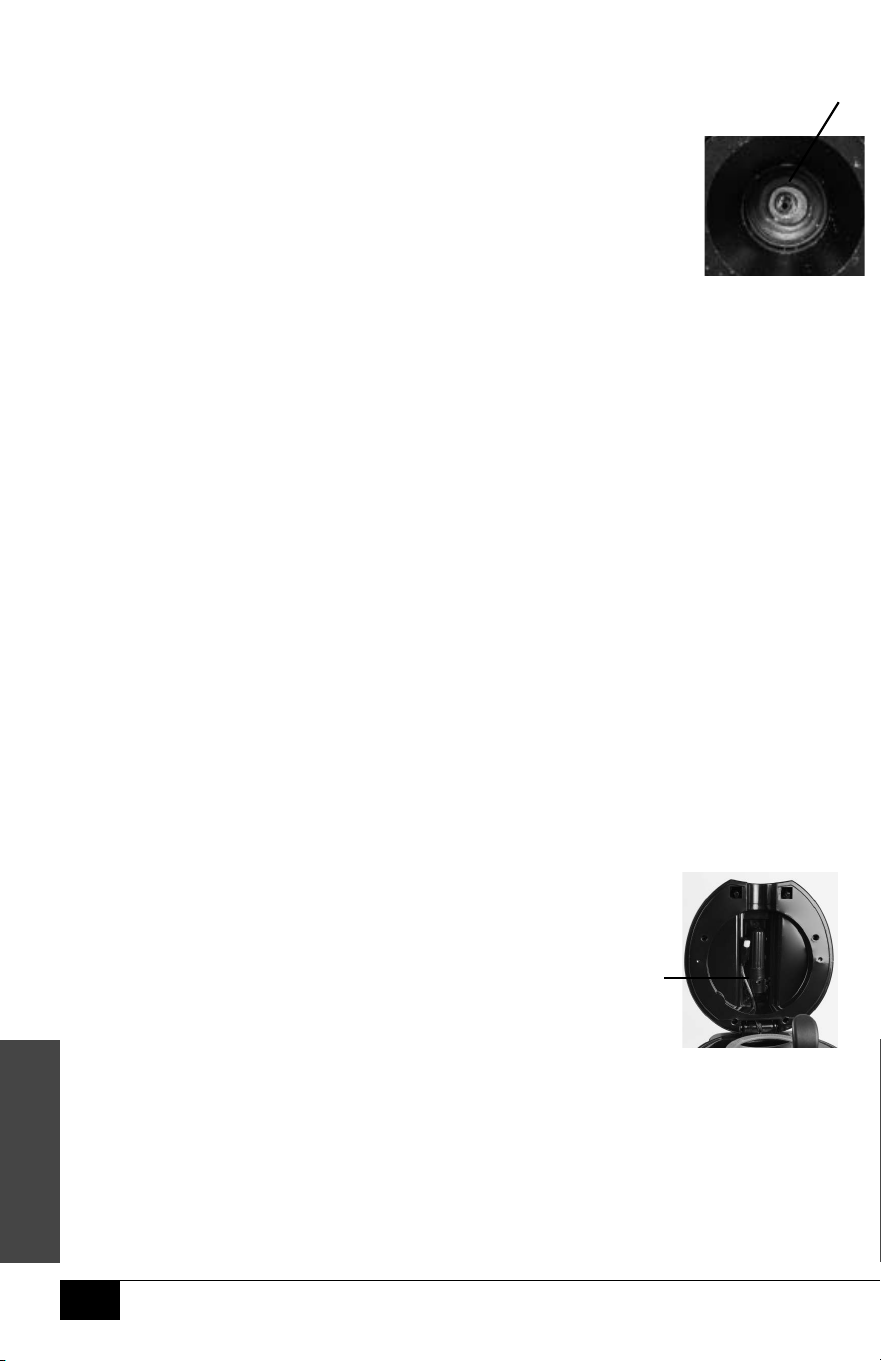
41
FRANÇAIS
41
COMMENT FAIRE FONCTIONNER
Avant de commencer, déterminez si vous mettez en fût un baril
sous-pression, sans pression ou le baril gravité de 5 litres inclus.
Suivez les étapes ci-dessous pour chaque type de baril.
Pour remplacer le joint torique CO2 (illustré), prenez un petit tournevis
ou une pince à épiler, creusez sous l'anneau et soulevez-le pour le
faire ressortir. Lors de l'installation du nouveau joint torique, l'anneau
devra être poussé dans l'espace et ajusté pour s'adapter.
5L BARILS STANDARDS SANS PRESSION
1. Faites refroidir le baril de 10 à 12 heures au réfrigérateur
ou de 4 à 6 heures dans un bain de glaces.
2. Trouvez une surface stable, hydrofuge et près d'une prise électrique pour y mettre l'appareil.
Assurez-vous que le cordon est loin de toutes sources d'eau.
REMARQUE : Lorsque vous déplacez le baril, prenez soin de ne pas brasser ni bousculer
le baril, car ceci pourrait causer que la bière ne s'écoule avec trop de mousse.
3. Vériez que l'onglet de la vidange soit dans la position fermée (position vers le
haut) et qu'aucun objet étranger ne soit dans la cavité de refroidissement.
4. Ajoutez 3 tasses (800 ml) d’eau dans la cavité de refroidissement. Assurez-vous
que le niveau d’eau du Réservoir d’eau ne dépasse pas la ligne MAX indiquée à
l'intérieur de la cavité de refroidissement. L'eau sert à garder le baril froid.
5. Programmez l’acheur DEL de la température à la température que vous désirez en
appuyant sur les boutons « - » et « + ».
REMARQUE : Il peut prendre plusieurs heures pour atteindre la température
désirée. C’est pourquoi il est important de refroidir votre baril au préalable.
6. Tournez l'interrupteur d'alimentation à ALLUMÉ (I).
7. Suivez les étapes sous ASSEMBLAGE DU SOULÈVE-BARIL pour les BARILS
STANDARDS SANS PRESSION, puis sécurisez l'assemblage du soulève-baril.
8. Tournez le bouton du régulateur de CO2 à la position ÉTEINTE
(tournez le cadran complètement dans le sens horaire).
9. En vous assurant que le baril soit positionné debout, placez soigneusement votre baril dans
la cavité de refroidissement.
REMARQUE: Assurez-vous que la ventouse soit xée de façon sécuritaire au fond de la cavité
de refroidissement. La ventouse empêche le baril de otter.
10. Branchez l’adaptateur du baril à la ligne
de CO2 et la ligne de bière.
11. Inclinez le support de CO2 hors du capot supérieur et
dévissez la gaine de CO2. Vissez la cartouche de CO2 dans
le porte-CO2, puis revissez la gaine de CO2 en recouvrant la
cartouche de CO2.
REMARQUE: Lorsque la cartouche de
CO2 a été percée, vous devriez entendre
une courte fuite de gaz CO2 s'échapper de la cartouche.
12. Pour verser une bière, tournez lentement le cadra du régulateur dans le sens antihoraire
pour augmenter la pression de CO2 à l'intérieur du baril. Lorsque vous entendez le
CO2 commencer à couler, faites une pause an d'essayer de verser une bière.
• Si la bière n'a pas assez de mousse selon vos préférences, augmentez légèrement la
pression de CO2. N'augmentez PAS la pression de CO2 trop rapidement car votre bière
pourrait se verser trop rapidement et avec trop de mousse.
CONSEIL DE PRO : Quand le régulateur est ouvert, le CO2 continuera de couler
Support pour
cartouche
de CO2
Anneau de CO2
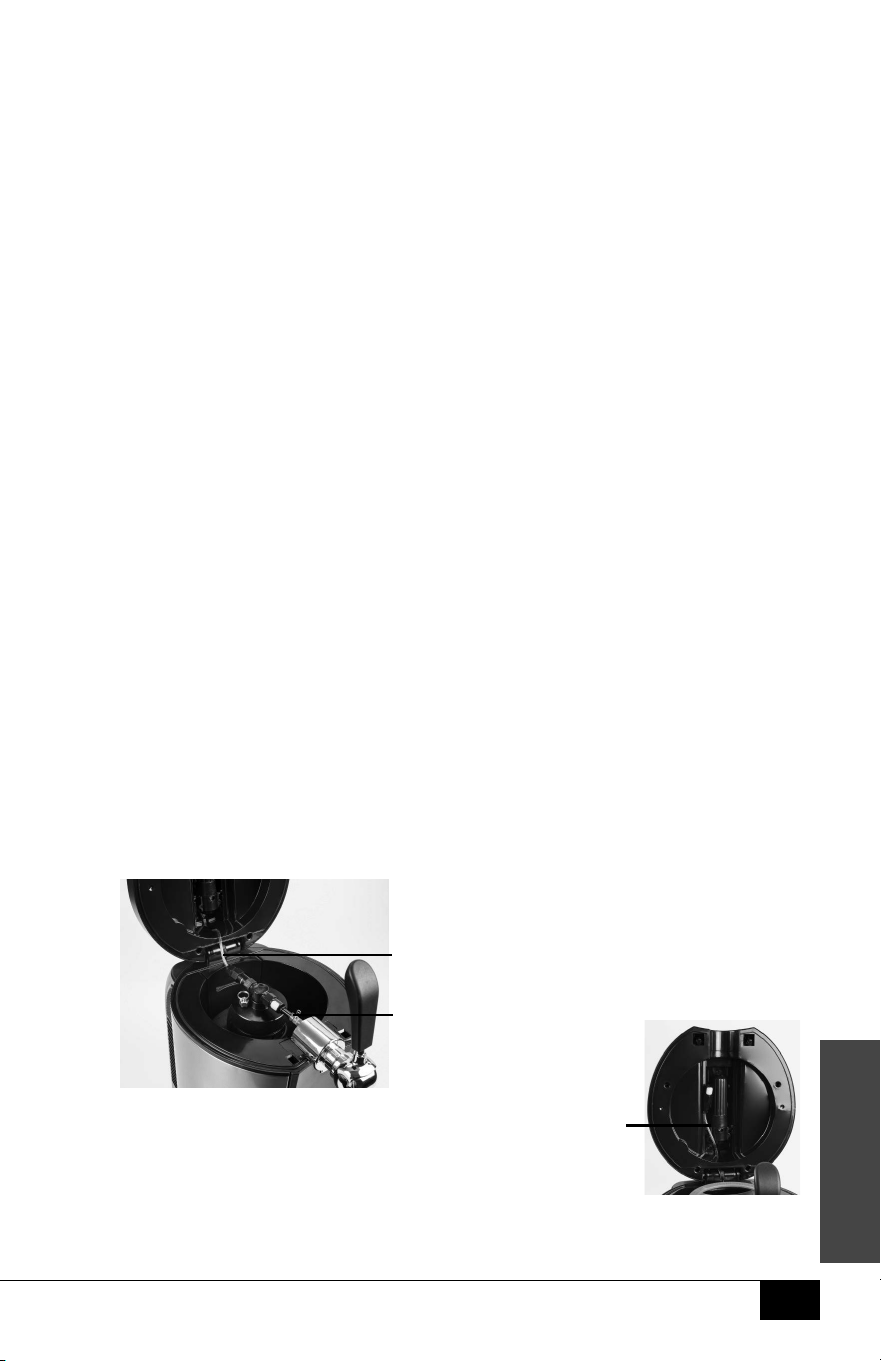
42
FRANÇAIS
42
dans le baril. Ceci pourrait occasionner un surplus de pression s'écoulant dans
le baril et pourrait causer un surplus de mousse dans la bière. Si vous éprouvez
une bière trop mousseuse, remplissez simplement baril de CO2, puis tournez
le cadran du régulateur à la position ÉTEINTE. Comme plus de bière est versé,
ajoutez de petites quantités de CO2 dans le baril pour déplacer la bière déversée,
puis tournez le cadran du régulateur à la position ÉTEINTE à nouveau.
BARIL GRAVITÉ DE 5 LITRES (SANS PRESSION)
1. Trouvez un endroit stable. Si la bière à trop de mousse, ajustez la pression de CO2
à la baisse. Il sut de tourner le cadran du régulateur à la position ÉTEINTE.
2. Faites refroidir le baril de 10 à 12 heures au réfrigérateur
ou de 4 à 6 heures dans un bain de glaces.
3. Trouvez une surface stable, hydrofuge et près d'une prise électrique pour y mettre l'appareil.
Assurez-vous que le cordon est loin de toutes sources d'eau.
REMARQUE : Lorsque vous déplacez le baril, prenez soin de ne pas brasser ni bousculer
le baril, car ceci pourrait causer que la bière ne s'écoule avec trop de mousse.
4. Vériez que l'onglet de la Vidange soit dans la position fermée (la position vers
le haut), et qu'aucun objet ne se trouve dans la cavité de refroidissement.
5. Ajoutez 3 tasses (800 ml) d’eau dans la cavité de refroidissement. Assurez-vous
que le niveau d’eau du Réservoir d’eau ne dépasse pas la ligne MAX indiquée à
l'intérieur de la cavité de refroidissement. L'eau sert à garder le baril froid.
6. Programmez l’acheur DEL de la température à la température que vous désirez en
appuyant sur les boutons « - » et « + ». La température recommandée est de 37° F.
REMARQUE: Il peut prendre plusieurs heures pour atteindre la température
désirée. C’est pourquoi il est important de refroidir votre baril au préalable.
7. Tournez l'interrupteur d'alimentation à ALLUMÉ (I).
8. Suivez les étapes sous ASSEMBLAGE DU SOULÈVE-BARIL pour les BARILS
STANDARDS SANS PRESSION, puis sécurisez l'assemblage du soulève-baril.
9. Tournez le bouton du régulateur de CO2 à la position ÉTEINTE
(tournez le cadran complètement dans le sens horaire).
10. En vous assurant que le baril soit positionné debout, placez soigneusement votre baril dans
la cavité de refroidissement.
REMARQUE: Assurez-vous que la ventouse soit xée de façon sécuritaire au fond
de la cavité de refroidissement. La ventouse empêche le baril de otter.
11. Branchez l’adaptateur du baril à la ligne de CO2 et la ligne de bière.
12. Inclinez le support de CO2 hors du capot supérieur et
dévissez la gaine de CO2. Vissez la cartouche de CO2
dans le porte-CO2, puis revissez la gaine de CO2 en
recouvrant la cartouche de CO2.
REMARQUE: Lorsque la cartouche de CO2 a été
percée, vous devriez entendre une courte fuite de gaz CO2 s'échapper de la cartouche.
Ligne de CO2
Ligne de bière
Support pour
cartouche
de CO2
Anneau de CO2

43
FRANÇAIS
43
13. Pour verser une bière, tournez lentement le cadra du régulateur dans le sens antihoraire
pour augmenter la pression de CO2 à l'intérieur du baril. Lorsque vous entendez le
CO2 commencer à couler, faites une pause an d'essayer de verser une bière.
• Si la bière n'a pas assez de mousse selon vos préférences, augmentez légèrement
la pression de CO2. N'augmentez PAS la pression de CO2 trop rapidement car
votre bière pourrait se verser trop rapidement et avec trop de mousse.
• Si la bière a trop de mousse, tourner le bouton de réglage sur la
position ÉTEINTE, retirez la vanne de relâchement située sur le baril
gravité de 5 litres, puis tournez lentement le cadran régulateur vers
la gauche pour augmenter la pression de CO2 dans le baril.
• CONSEIL DE PRO :
Lorsque le régulateur est ouvert, le CO2 continuera de couler
dans le baril. Ceci pourrait occasionner un surplus de pression s'écoulant dans
le baril et pourrait causer un surplus de mousse dans la bière. Si vous éprouvez
une bière trop mousseuse, remplissez simplement baril de CO2, puis tournez
le cadran du régulateur à la position ÉTEINTE. Comme plus de bière est versé,
ajoutez de petites quantités de CO2 dans le baril pour déplacer la bière déversée,
puis tournez le cadran du régulateur à la position ÉTEINTE à nouveau.
5L BARILS SOUS PRESSION (HEINEKEN™)
1. Faites refroidir le baril de 10 à 12 heures au réfrigérateur
ou de 4 à 6 heures dans un bain de glaces.
2. Trouvez une surface stable, hydrofuge et près d'une prise électrique pour y mettre
l'appareil. Assurez-vous que le cordon est loin de toutes sources d'eau.
3. Vériez que l'onglet de la vidange soit dans la position fermée (position vers le
haut) et qu'aucun objet étranger ne soit dans la cavité de refroidissement.
4. Ajoutez 3 tasses (800 ml) d’eau dans la cavité de refroidissement. Assurez-vous
que le niveau d’eau du Réservoir d’eau ne dépasse pas la ligne MAX indiquée à
l'intérieur de la cavité de refroidissement. L'eau sert à garder le baril froid.
5. Programmez l’acheur DEL de la température à la température que vous désirez en
appuyant sur les boutons « - » et « + ».
REMARQUE : Il peut prendre plusieurs heures pour atteindre la température
désirée. C’est pourquoi il est important de refroidir votre baril au préalable.
6. Tournez l'interrupteur d'alimentation à ALLUMÉ (on) (I).
7. Placez soigneusement le baril sous-pression dans la cavité de refroidissement.
REMARQUE : Lorsque vous déplacez le baril, prenez soin de ne pas brasser ni bousculer le
baril, car ceci pourrait causer que la bière ne s'écoule avec trop de mousse.
REMARQUE : Assurez-vous que la ventouse soit xée de façon sécuritaire au fond
de la cavité de refroidissement. La ventouse empêche le baril de otter.
8. Utilisez un tournevis plat pour retirer le bouchon
en plastique de la partie supérieure du baril.
9. Branchez l'adaptateur du baril sous-
pression sur la ligne de bière en fût.
10. Insérez l’adaptateur du baril sous-pression dans
la partie supérieure du baril sous-pression.
11. Versez-vous une bière !
REMARQUE: Les barils sous pression viennent déjà
chargés de CO2. Ces barils pré-chargés avec du CO2
n'exigent pas l'utilisation du système externe du
régulateur de CO2, donc il n'y a aucun besoin d'installer une cartouche de CO2. Le
cadran du régulateur situé sur le couvercle ne fonctionne pas avec ces barils.
12. Lorsque le baril est vide, enlevez l'adaptateur du baril sous pression du baril-
même en appuyant sur les côtés de l'adaptateur vers l'intérieur.
Ligne de
bière
Sous-pression
Adaptateur
du baril

44
FRANÇAIS
44
CONSEILS UTILES
Verser la bière en fût
1. Commencez avec un verre propre.
2. Tenir le verre à un angle de 45°environ 1 pouce sous le robinet de la bière en fût.
3. Tirez sur la poignée en fût pour ouvrir complètement le débit de bière.
4. Maintenez toujours le verre à 45° et laissez la bière s’écouler sur la paroi
du côté du verre jusqu'à ce que celui-ci soit à moitié plein.
5. Une fois que le verre est à moitié plein, continuez de verser doucement la bière
tout en diminuant l'inclinaison du verre à une position debout puis verser
le reste dans le centre du verre. Idéalement, cela créera environ 1 pouce de
tête de mousse lorsque vous aurez terminé de verser la bière en fût.
6. Remettez rapidement la poignée du fût dans sa position initiale debout.
REMARQUE : Si vous cumulez plus de mousse dans la bière que prévu, laissez
la bière reposer quelques instants jusqu'à ce que la mousse soit inerte puis
nissez de verser la bière dans le verre. Cela empêche les déchets de bière.
Éviter une bière trop mousseuse
• Refroidir la bière. Une bière chaude ou tablette est plus susceptible de causer une bière
mousseuse. Il est fortement recommandé d'acheter la bière le jour précédent et la
refroidir au réfrigérateur de 10 à 12 heures. La température recommandée est de 37° F
• Versez dans un verre propre. Les résidus d'un verre malpropre pourraient
aecter le débit et le goût de votre bière. Suivez les indications sur Comment
verser de la bière en fût an de perfectionner votre déversement.
• Assurez-vous que les lignes de bière sont propres et non tordues.
• Ajustez votre pression de CO2 à la baisse.
• Évitez de brasser ou agiter le baril. Trop d'agitation du baril pourrait
faire verser trop de mousse. Si le baril a été brassé ou agité, laissez
le baril se reposer pour 2 à 3 heures avant de le verser.
• Une bière mousseuse peut également faire suite à des sceaux défectueux
entre le baril et l'appareil principal. Assurez-vous que toutes les
connexions soient sécurisées, bien serrés et bien placées.
Barils sous-pression
• Les barils sous-pression viennent pré-chargés de CO2 et n'ont pas besoin d'utiliser le
système externe du régulateur de CO2 de cet appareil. Le cadran situé sur le dessus
du couvercle ne fonctionnera pas si vous l'utilisez avec un baril pré-chargé.
• Si votre expérience est moins que satisfaisante de verser de la bière, qu'elle est
mousseuse ou autre, veuillez contacter le fabricant ou le détaillant du baril.
Cadran régulateur de CO2
• Lorsque le régulateur est ouvert, le CO2 continuera de couler dans le baril. Ceci pourrait
occasionner un surplus de pression s'écoulant dans le baril et pourrait causer un surplus de
mousse dans la bière. Si vous éprouvez une bière trop mousseuse, remplissez simplement
baril de CO2, puis tournez le cadran du régulateur à la position ÉTEINTE. Comme plus
de bière est versé, ajoutez de petites quantités de CO2 dans le baril pour déplacer la
bière déversée, puis tournez le cadran du régulateur à la position ÉTEINTE à nouveau.

45
FRANÇAIS
45
NETTOYAGE ET ENTRETIEN
1. Après avoir utilisé le SYSTÈME DE BIÈRES EN FÛT, débranchez l'appareil de la prise électrique.
2. Détachez l’assemblage du soulève-baril du baril-même, puis
enlevez le baril de la cavité de refroidissement.
3. Nettoyez la cavité de refroidissement.
a. Assurez-vous qu'il n'y a aucun objet étranger présent dans la cavité de refroidissement.
b. Videz l'eau de la cavité de refroidissement en la plaçant l'appareil sous le bord d'une
table ou d'un comptoir an que le bol puisse être placé sous l'onglet de la vidange.
c. Placez un bol sous l’onglet de vidange, puis tirez l'onglet Vidange vers le bas
an que l'eau puisse se vider de la cavité de refroidissement dans le bol vide.
d. Essuyez la cavité de refroidissement avec un linge doux et non abrasif.
4. Nettoyez la ligne de bière avec la bouteille de nettoyage incluse.
a. Placez un bol vide sous le robinet du fût.
b. Remplissez la bouteille de nettoyage avec de l'eau chaude savonneuse.
c. Insérez la bouteille de nettoyage dans l'embout ouvert du tube
plongeur (qui fait parti de l'assemblage du soulève-baril).
d. Tirez pour abaisser la poignée du fût, puis pressez la bouteille de nettoyage an
que l'eau chaude savonneuse s'inltre dans la ligne de bière jusqu'au bol vide.
e. Répétez ce processus avec de l'eau chaude uniquement autant de
fois que besoin, jusqu'à ce que les lignes de bière soient propres et
qu'aucune trace de savon ne soit détectable dans la ligne de bière.
f. Si la ligne de bière doit être remplacée, soulevez la ligne de bière et le couvercle
chromé de la ligne. Baissez la poignée du fût, puis tirez sur la vieille ligne de
bière pour l'enlever. La nouvelle ligne de bière peut être remise en place à
nouveau en baissant la poignée, puis en insérant la ligne de bière dans le fût.
Relâchez la poignée du fût pincera la nouvelle ligne de bière en la sécurisant.
5. Lavez les pièces amovibles restantes avec l'eau chaude savonneuse.
Asséchez complètement avec un linge doux et non-abrasif.
6. Au besoin, nettoyez l’extérieur de l’appareil avec un chion humide non abrasif.

46
FRANÇAIS
46
RETOURS ET GARANTIE
SI VOTRE APPAREIL NE FONCTIONNE PAS OU S'IL EST ENDOMMAGÉ QUAND VOUS LE RETIREZ
DE LA BOÎTE, VEUILLEZ LE RETOURNER IMMÉDIATEMENT À L'ENDROIT OÙ IL A ÉTÉ ACHETÉ.
SYSTÈME DE BIÈRE EN FÛT / CBD5BS
Pour toute question, communiquer par courriel ou au numéro de téléphone du service à
la clientèle, entre 09 h 00 et 16 h 00, du lundi au vendredi, heure normale du Centre.
Distribué par :
Nostalgia Products LLC
1471 Partnership Dr.
Green Bay, WI 54304-5685
Service à la clientèle
Téléphone : (920) 347-9122
Site Web : www.nostalgiaproducts.com
Demande pour le service à la clientèle
Pour soumettre une demande au service à la clientèle, rendez vous au www.nostalgiaproducts.com puis
remplissez le formulaire de demande au service à la clientèle puis cliquez sur le bouton Soumettre.
Un représentant vous contactera dès que possible.
Conditions de garantie du produit
Le groupe Nostalgia Products LLC (référé tel « l’Entreprise ») garantit que pour une période d’un
(1) an en date d’achat, ce produit est sans défaut de matériel et de fabrication selon une utilisation
normale à domicile, seulement si le fonctionnement et l’entretien du produit sont conforment aux
directives fournies. À titre de réparation exclusive et entière sous cette garantie, l’Entreprise pourra
à sa discrétion, réparer ou remplacer le produit défectueux, voire émettre un remboursement du
produit durant la période couverte sous garantie. Cette garantie n’est disponible seulement qu’à
l’acheteur d’origine du produit, en date d’achat au détail dudit produit et sera valide uniquement
avec le reçu de caisse d’origine, à titre de preuve d’achat, lequel est requis pour obtenir les bienfaits
reliés à cette garantie. Toute réclamation doit être rapportée à l’attention de l’Entreprise dans la
fenêtre de la période de la garantie, sans dépasser 30 jours à défaut de performance. Cette garantie
ne couvre pas l’usure normale ou dommage cause par l'expédition, la mauvaise manipulation, la
mauvaise utilisation, les accidents, les modications, les mauvaises pièces de remplacement, voire
toute autre utilisation anormale du produit à domicile. Il est possible que vous ayez à retourner le
produit (avec les frais de retour prépayés par vous) pour une inspection et une évaluation. Les frais
des coûts de retour ne sont pas remboursables. L'Entreprise n’est aucunement responsable pour les
retours endommagés ou perdus en transit. Autrement que spéciquement permit selon les directives
de fonctionnement, cette garantie s’applique à une utilisation à domicile à d'intérieur seulement.
An d'obtenir un service couvert sous cette garantie, veuillez contacter l'Entreprise au numéro de
téléphone inclut ci-haut ou en remplissant le formulaire de demande au service à la clientele, sur le
site www.nostalgiaproducts.com. La garantie est valide seulement aux États-Unis et au Canada.
Cette garantie prévaut toute autre garantie, expresse ou implicite incluant les garanties de qualité
marchande ou ayant une aptitude pour une intention en particulier, lesquelles sont exclues selon la
loi. Sous aucun prétexte l’Entreprise ne pourra être tenue responsable pour tout dommage indirect,
accidentel, conséquentiel ou spécial provenant de ou en relativité avec ce produit ou son utilisation.
Certains états, provinces ou juridictions n'allouent pas l'exclusion ou la limitation de tels dommages
accidentels ou conséquentiels, donc l'exclusion ou limitation suscitée peut ne pas s'appliquer à vous.
Cette garantie ne s’applique pas à la merchandise de renaissance.
Veuillez lire les directives de fonctionnement attentivement. Ne pas se
conformer aux directives de fonctionnement annulera cette garantie.
Pour plus d’informations, visitez notre site Web à www.nostalgiaproducts.com.
Aimez-nous sur Facebook à l’adresse www.facebook.com / NostalgiaElectrics.
Suivez nos conseils sur Pinterest à www.pinterest.com / nostalgiaelctrx.
Tweet avec nous sur Twitter à l’adresse www.twitter.com / NostalgiaElctrx.