Smart Keg Quickstart Guide
(The CO
2
cartridge is not included).
MiniBrew Smart Keg
Safety Instructions
Product Overview
Getting Started
Cleaning & Maintenance
MiniBrew Fass
Sicherheitshinweise
Produkt Übersicht
Erste Schritte
Reinigung Instandhaltung
4
6
7
9
9
10
12
13
15
15
5
4
3
2
1
1
2
3
4
5
English
Deutsch
3

MiniBrew Smart Keg
1
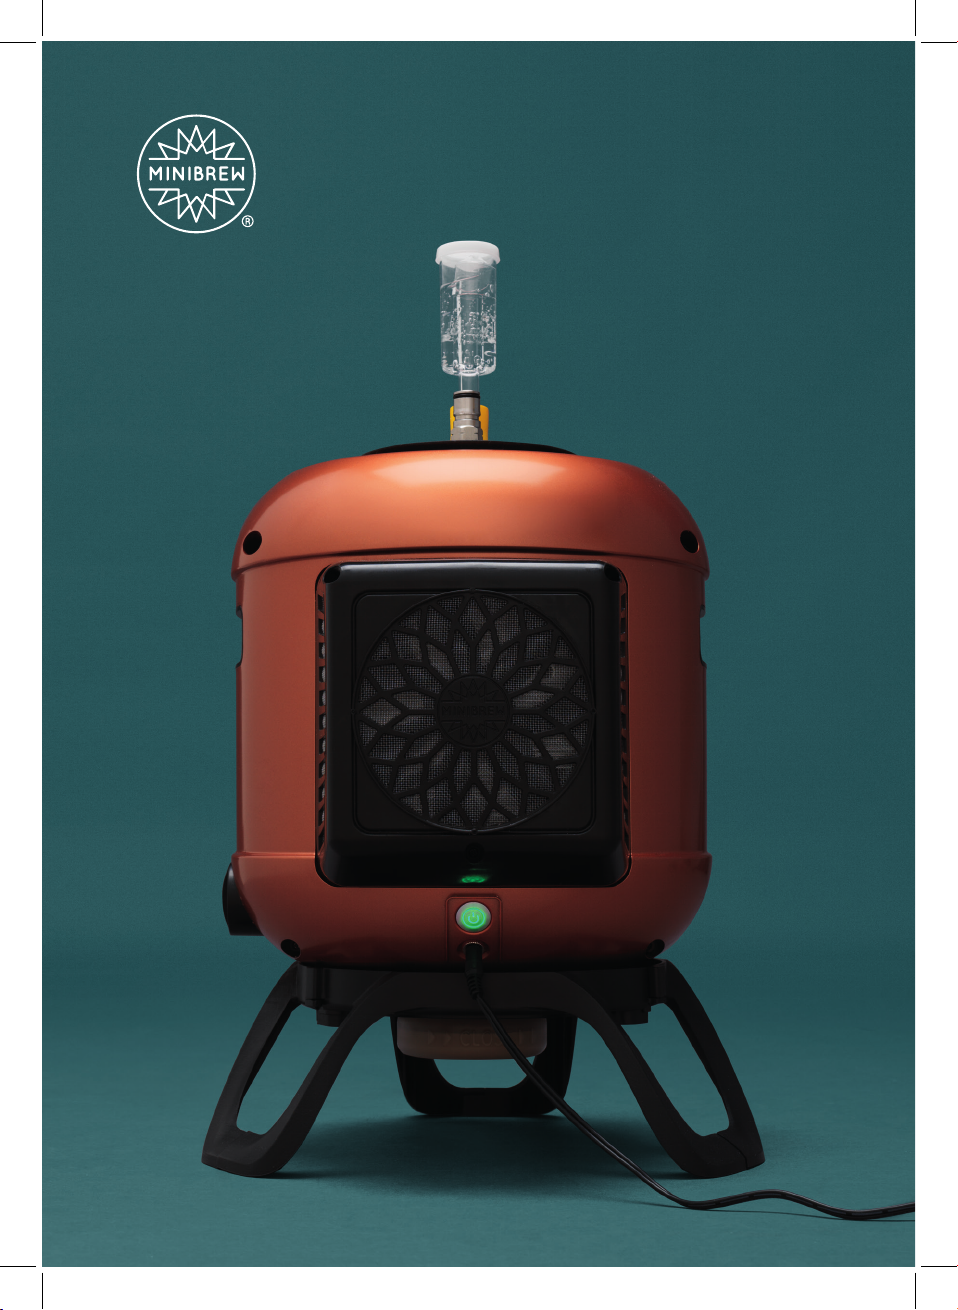
The MiniBrew Smart Keg is mandatory for the proper use of
your MiniBrew Base Station. It has multiple functionalities
such as temperature controlled brewing, automated
fermentation, and the portable cooling and serving of your
beers. With a MiniBrew Smart Keg you can take the party
anywhere.
4
Safety Instructions
2
Please read these instructions before operating the appliance, and retain for future use.
6
• This appliance is intended solely for
household use.
• Before cleaning, allow the appliance to cool
down.
• Attention! Avoid touching hot surfaces.
• Before plugging into a socket, check
whether the voltage in your home
corresponds with the voltage printed on the
bottom of the fan cover of the appliance.
• If the power cord is damaged, it must be
replaced by the manufacturer, its service
agent, or a similarly qualified person to
avoid hazard.
• Never unplug it from the socket by pulling
the cable.
• Always ensure that your hands are dry
before removing the plug.
• When positioning the appliance, ensure the
supply cord is not trapped or damaged.
• Do not position multiple portable socket-
outlets or portable power supplies at the
rear of the appliance.
• This appliance may be used by people
over the age of 18. It should not be used
by people with reduced physical, sensory,
or mental capabilities, or by those who
lack experience, unless they are properly
supervised or instructed via software for
the safe usage of the appliance and the
hazards associated with its use.
• Children should not play with the appliance.
• Children aged from 3 to 8 years are allowed
to load and unload refrigerating appliances.
• Unplug the appliance as soon as you have
finished using it and when you are cleaning
it.
• For your own safety, only use the original
parts from the manufacturer.
• The warranty/safety is not guaranteed after
using 3rd party parts.
• Never use the appliance if it is not working
properly, or if it has been damaged.
Any intervention (other than normal
maintenance activities performed by the
user) must be carried out by an approved
service center.
• It is absolutely necessary to keep the
appliance clean at all times, because it
comes into direct contact with bacteria.
• If the Smart Keg appliance is left empty for
long periods, switch off, defrost, clean, dry,
and leave the Keg lid open to prevent mold
developing within the appliance.
• If the appliance is used for other purposes
than intended, or if it is not handled in
accordance with the Quick Start Guide or
user manual in the app; MiniBrew is not
liable for any damage which may occure by
use of the machine.
• This product contains batteries. In the
context of the sale of rechargeable and
disposable batteries, or in the context
of the delivery of equipment containing
rechargeable or disposable batteries,
we are obliged to draw your attention
to the Battery Ordinance, which states
that batteries may not be disposed of as
ordinary household waste. As the end user,
you are obliged to return used batteries.
You can return batteries free of charge after
use to a retail outlet, municipal collection
points, or shops. You can also return
batteries to the seller by post.
• The frequency band is 2400-2483.5 MHz,
13.56 MHz. The maximum RF Output Power
is 15.3 dBm.
• Avoid spillage on the electrical plug.
Product Overview
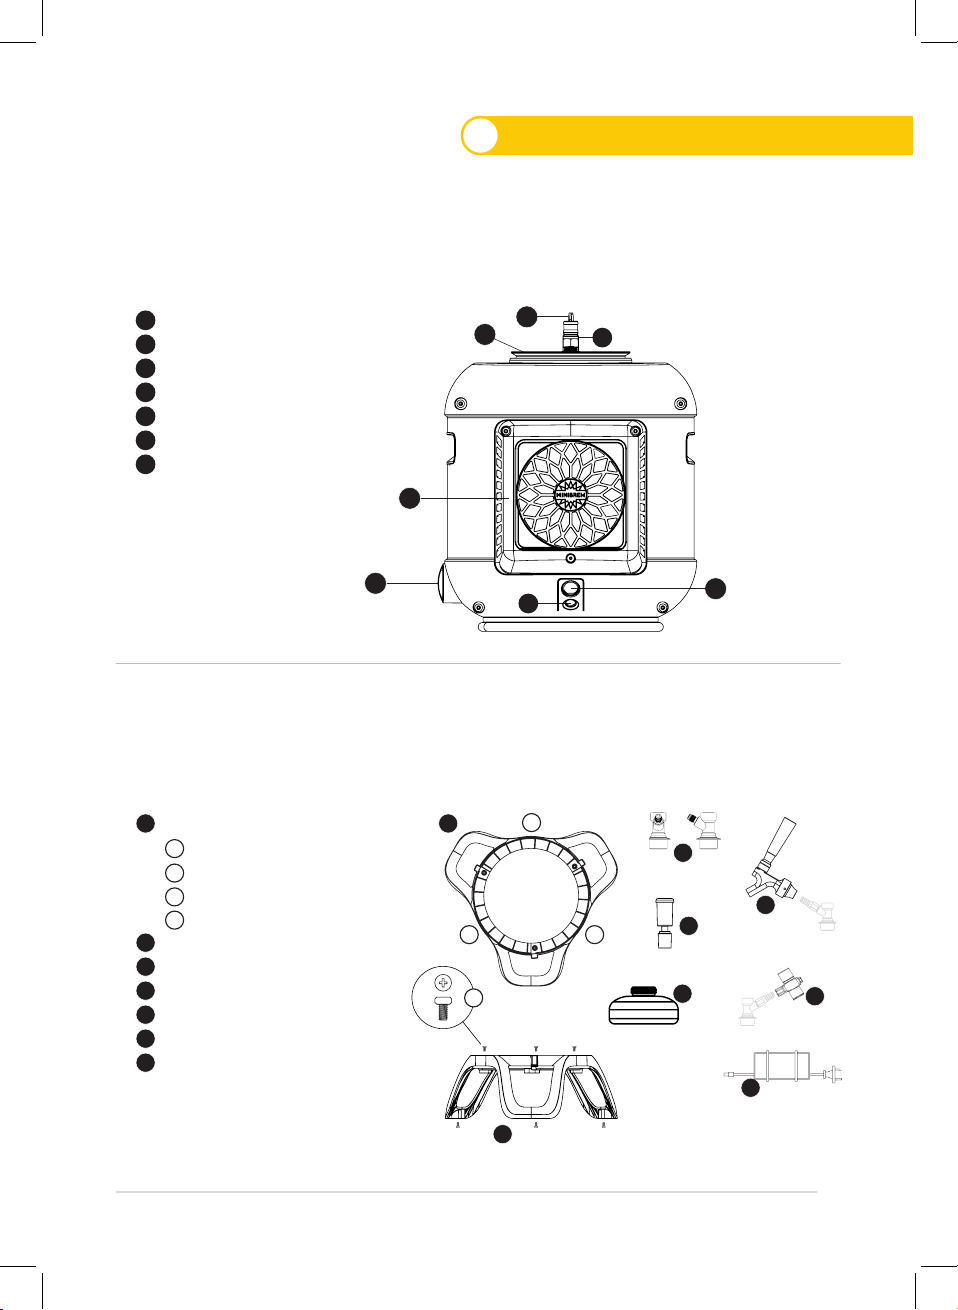
MiniBrew Smart Keg
MiniBrew Smart Keg Parts
7
3
A
A
C
C
D
D
F
F
FF
GG
EE
DD
CC
BB
AA
GG
BB
Keg Valve (open/close)
Keg Posts
Pressure Relief Valve
Keg Lid and Tube
Keg Cooler
WiFi Connect Button
Power Adapter Socket
Keg Stand (needs to be assembled)
Stand part 1
Stand part 2
Stand part 3
6 Stand Screws
2x Ball Lock Connectors
Airlock + Sleeve
Trub Container
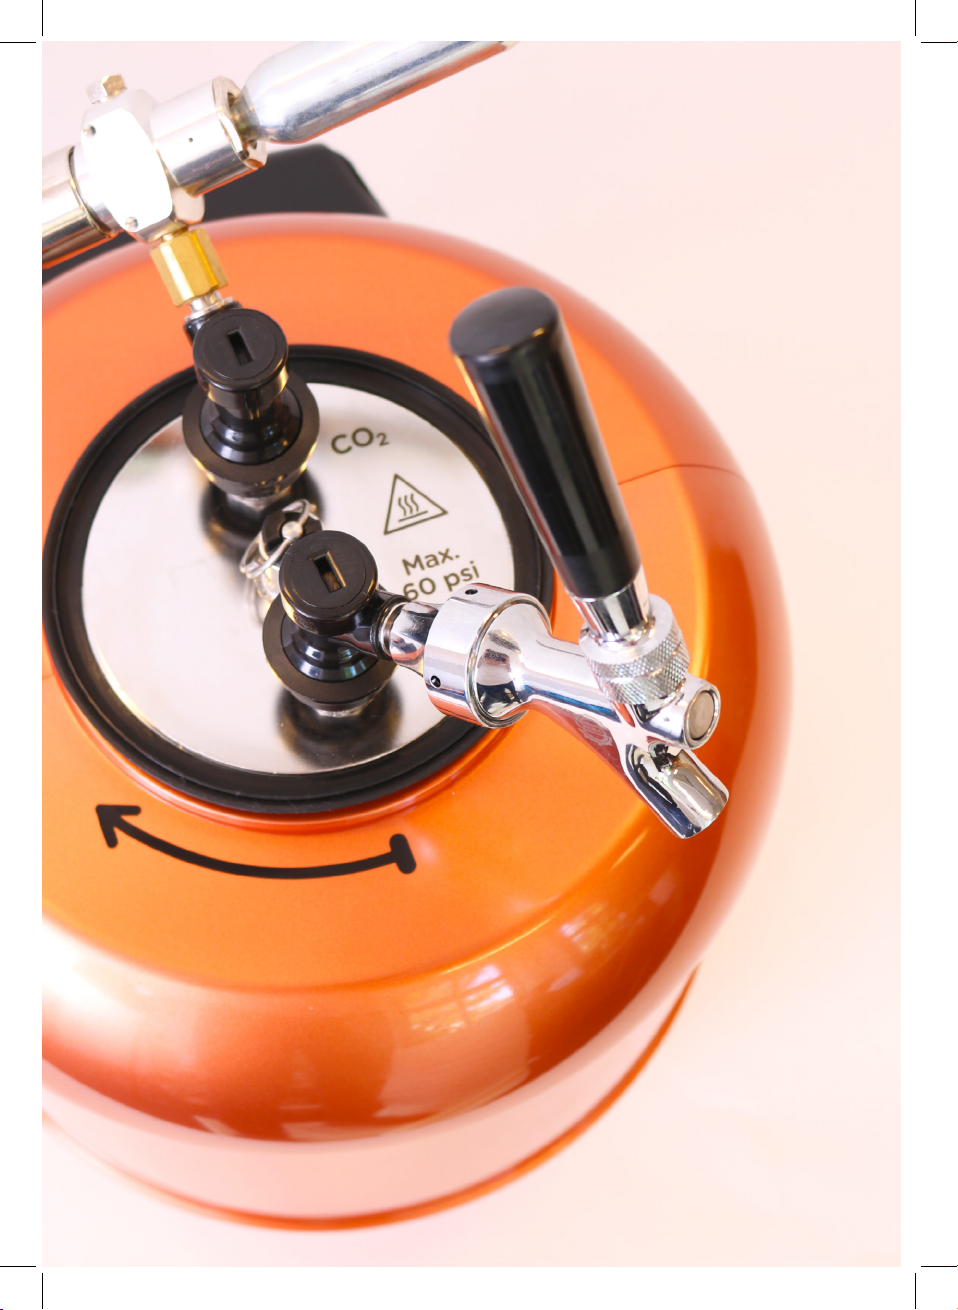
Tap Handle
CO
2
Regulator
Power Adapter + Cord (12Volt)
This product overview shows a complete summary of the MiniBrew Smart Keg and its standard parts. The Smart Keg
works with the MiniBrew Base Station and its parts, which are delivered in a separate box.
Remove all Smart Keg parts from the box that you need for fermentation and tapping. Check all parts for defects before
using with the MiniBrew Smart Keg. The box contains the following parts:
1 1
3
4
3
5
4
6
5
7
6
2
1.1
1.1
1.2
1.3
1.4
1.2 1.3
1
2
7
E
E
1.4
6x

(MiniBrew glasses and CO
2
cartridge are not included).

Follow 10 steps to successfully
start brewing.
1. Remove all components and place them aside. These
parts will be used later in the ferment or serving process.
2. Remove the stickers, foil or plastic from the appliance.
3. Keep these materials (plastic bags and cardboard) out
of reach of children.
4. Check the MiniBrew Smart Keg after unpacking for
any damage caused during transport.
5. Open and close the Keg Valve a few times. Knob on
the side
6. At first the Keg Valve might feel stiff, but after a few
goes, it should turn more easily.
7. Attention! When the Smart Keg is in the Base Station
and the keg Valve is open, it’s locked to the machine.
8. Before lifting the Smart Keg off the machine, turn the
keg Valve to the CLOSED (horizontal) position.
9. Only connect your Smart Keg to power when
instructed to do so by the app or desktop version, or after
moving the keg
• Wipe the Minibrew Smart Keg with a soft cloth when beer or wort spills on it.
• Dilute the sanitizer solution properly as strong sanitizer solution can cause damage to the outside of the Smart Keg.
• Never immerse the MiniBrew Smart Keg in water as the Smart Keg contains electronic devices.
• Please follow the Clean In Place (CIP) instruction in the MiniBrew app or on our website.
• Do not use dishwasher tablets containing glass cleaners or rinse aids.
• After completing serving, clean or rinse the Smart Keg with a brush as residue remains in the keg after draining.
• The ideal conditions for the Smart Keg to operate include an ambient temperature of between 5°C and 22 °C.
• Do not store explosive substances, such as aerosol cans with a flammable propellant in this appliance.
to a different location.
10. For further instructions regarding brewing,
fermentation and tapping please take a look at the App
or dekstop version*. The instructions shall contain details
on the use of the appliance to ensure safe preservation
of food stuff.
*These instructions are also available in an alternative
format on www.minibrew.io/faq
Cleaning & Maintenance
Getting Started
4
5
9

MiniBrew Fass
1
Das MiniBrew Fass (SmartKeg) ist obligatorisch für die kor-
rekte Anwendung des MiniBrew Apparats (Basisstation). Es hat
mehrere Funktionen von der Temperaturkontrolle währen des
Brauens und automatisierten Gärens, bis hin zur Kühlung und
Servieren der Biere. Mit dem MiniBrew Smartkeg können Sie
Ihre Party überall mit hinnehmen.
10

Sicherheitshinweise
2
Lesen Sie diese Gebrauchsanweisung sorgfältig durch, bevor Sie das Gerät in Betrieb
nehmen und heben Sie diese für den späteren Gebrauch auf.
12
• Dieses Gerät ist nur dazu bestimmt im
Haushalt verwendet zu werden.
• Lassen Sie das Fass vor der Reinigung
vollständig abkühlen.
• Achtung! Vermeiden Sie unbedingt,heiße
Oberflächen zu berühren.
• Die Spannung der Stromquelle muss mit den
Angaben auf dem Typenschild, auf der
Rückseite des Fasses, übereinstimmen.
• Wenn das Netzkabel des Fasses beschädigt
wurde, muss es durch den Hersteller, seinen
Kundendienst oder eine ähnlich qualifizierte
Person ersetzt werden, um Gefahren zu
vermeiden.
• Ziehen Sie den Netzstecker niemals am Kabel
aus dem Fass.
• Vergewissern Sie sich, den Netzstecker
immer mit trockenen und niemals mit nassen
Händen aus der Steckdose zu ziehen.
• Stellen Sie sicher, dass beim Aufrechtsellen
des Geräts dass das Netzkabel nicht
eingeklemmt oder beschädigt ist.
• Vermeiden Sie bitte mehrfache
Steckdosenleisten oder Netzteile auf der
Rückseite des Geräts.
• Das Fass darf nicht von Personen unter 18
Jahren benutzt werden. Er sollte nicht von
Menschen benutzt werden mit eingeschränk
ter physischer, sensorischer oder mentalen
Fähigkeiten, ebenso nicht von Menschen die
keine Erfahrung haben, außer dem Fall wenn
sie ordentlich angewiesen werden oder per
Software angewiesen werden, wie der sichere
Umgang mit dem Gerät funktioniert und
welche möglichen Gefahren vorkommen
können.
• Kinder sollten nicht mit dem Gerät spielen.
• Kinder im Alter von 3 bis 8 Jahren dürfen
Kühlgeräte be- und entladen
• Wenn das Fass nicht benutzt oder
gereinigt wird, schalten Sie das Fass
aus und ziehen Sie den Stecker aus der
Steckdose.
• Verwenden Sie zu Ihrer eigenen Sicherheit nur
die Originalteile- und Zubehörteile des
Herstellers, die ausschließlich für das Fass
geeignet sind.
• Die Garantie / Sicherheit ist nicht mehr
gewährleistet, nachdem Teile von Drittanbietern
verwendet wurden.
• Bewahren Sie das Fass in einer aufrechten
Position auf.
• Wenn das Smart Keg-Gerät längere Zeit leer
bleibt, schalten Sie es aus, enteisen Sie es,
reinigen Sie es, trocknen Sie es und lassen
Sie den “Growler head” stehen, damit sich
kein Schimmel im Gerät bildet.
• Verwenden Sie das Fass niemals, wenn es
nicht richtig funktioniert oder wenn es
beschädigt wurde. Jeglicher Eingriff außer
der Verwendung des Fasses und der
normalen Wartung durch den Kunden muss
von einem zugelassenen Servicecenter
durchgeführt werden.
• Es ist unbedingt notwendig, das Fass
stets sauber zu halten, da es in direkten
Kontakt mit Bakterien kommt.
• Wenn das Fass für andere als die
vorgesehenen Zwecke verwendet wird oder
es nicht gemäß der Kurzanleitung und dem
Benutzerhandbuch in der App gehandhabt
wird, liegt die volle Verantwortung für
eventuelle Folgen beim Kunden.
• Dieser Apparat enthält Batterien. Das
Fass darf am Ende seiner Lebensdauer nicht
im Hausmüll entsorgt werden, sondern muss
an einer zentralen Stelle für das Recycling
von elektrischen und elektronischen
Haushaltsgeräten angeboten werden.
• Wenn die Batterien mit den chemischen
Symbolen Hg, Cd oder Pb gekennzeichnet
ist, liegt der Quecksilber-, Cadmium- oder
Blei-Gehalt der Batterien über den in der
EG-Richtlinie 2006/66 festgelegten Referen
zwerten.
• Das Frequenzband beträgt 2400-2483,5 MHz,
13,56 MHz. Die maximale HF-Ausgangsleistung
beträgt 15,3 dBm.
• Vermeiden Sie unbedingt Wasserverschüttung
auf den elektrischen Kabeln und Anschlüssen.
Produkt Übersicht
13
3
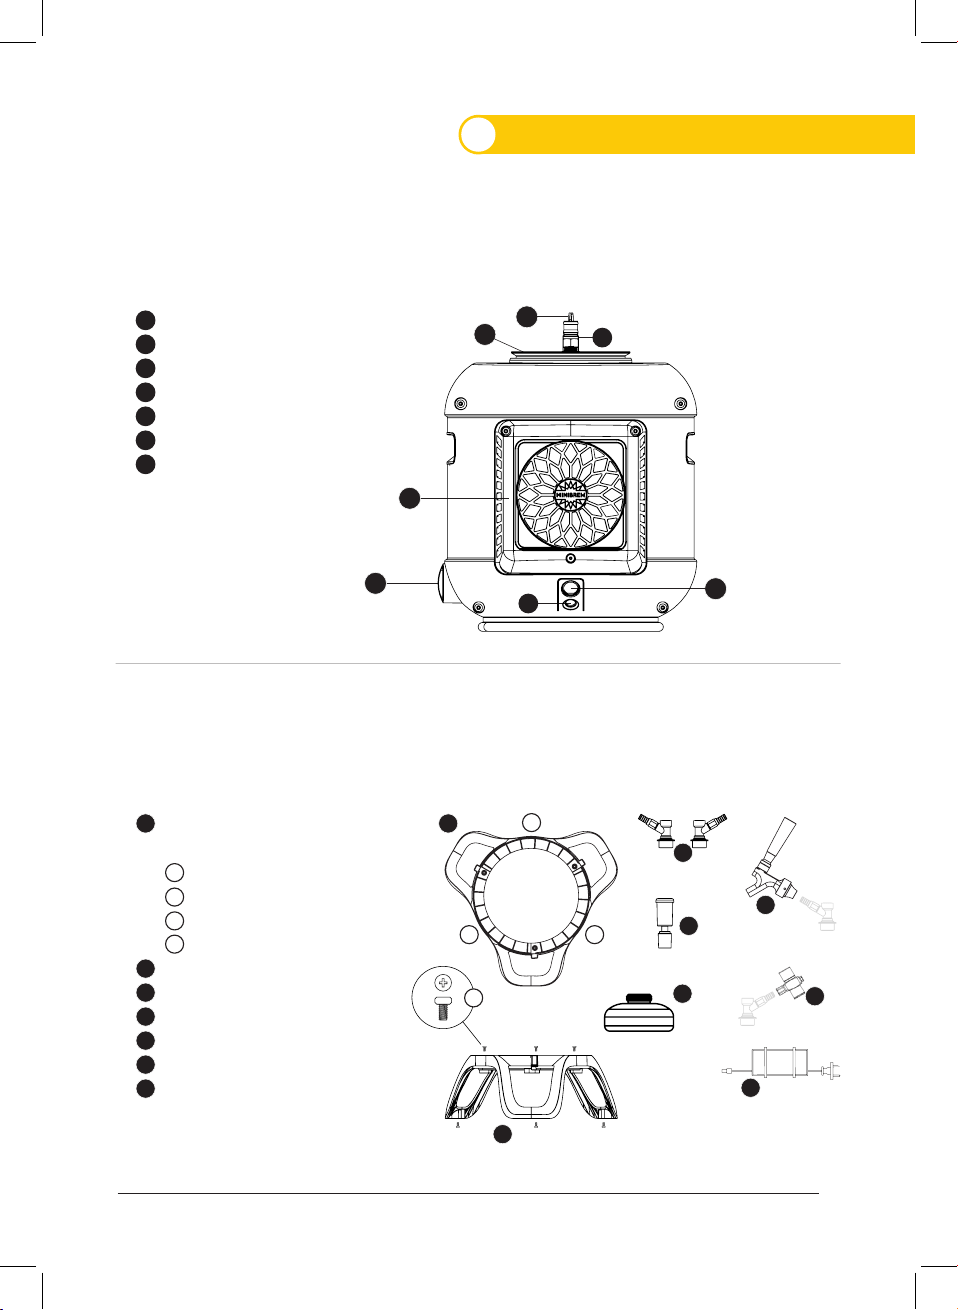
MiniBrew Fass (Smart Keg)
MiniBrew Keg Einzelteile
A
A
C
C
D
D
F
F
FF
GG
EE
DD
CC
BB
AA
GG
BB
Keg Ventil (offen/geschlossen)
NC Ventil
Überdruckventil
Kegdeckel + Schlauch
Keg Kühler
WiFi Verbindungstaste
Stromanschlusskabel Eingang
Keg Ständer(muss
zusammenge-baut werden)
Fass Ständerteil 1
Fass Ständerteil 2
Fass Ständerteil 3
6 Fassständer Schrauben
2 NC Ventilkupplungen
Gärspund
Hefe Behälter
Zapfhahn
CO2 regulator
Stromadapter + Kabel (12Volt)
Diese Produktübersicht zeigt ein komplettes MiniBrew Keg mit dem mitgelieferten Standardzubehör. Das MiniBrew Keg
funktioniert nur mit der MiniBrew Basisstation.*
Entfernen Sie alle MiniBrew Einzelteile , die zum Brauen benötigt werden, aus der Box. Überprüfen Sie vor der
Verwendung alle Teile auf Mängel. Die Box enthält die folgenden Einzelteile.
1 1
3
4
3
5
4
6
5
7
6
2
1.1
1.1
1.2
1.3
1.4
1.2 1.3
1
2
7
E
E
1.4
6x

(MiniBrew Gläser und CO
2
Kartuschen sind nicht enthalten).

Folgen Sie 10 einfachen Schritten um
mit dem Brauen beginnen zu
können
1. Nehmen Sie das Einzelteile aus der Verpackung und
legen Sie es beiseite. Diese Einzelteile werden nachher
bei dem Prozeß der Fermentierung oder beim Servieren
benötigt.
2. Entfernen Sie die Sticker, Schutzfolie oder andere
Plastik-Teile von dem Gerät.
3. Stellen Sie sicher, dass das Verpackungsmaterial
(Plastiktüten und Kartonagen) außer Reichweite von
Kindern sind.
4. Prüfen Sie das Keg nach dem Auspacken, dass
während des Transports kein Schaden am Keg entstanden
ist.
5. Öffnen und Schließen Sie das Keg Ventil (offen/
geschlossen) einige Male.
6. Anfangs wird das Ventil sich schwer öffnen lassen,
welches nach einigem Auf- und Zudrehen sich wesentlich
leichter gestalten sollte.
7. VORSICHT! Wenn das Keg (SmartKeg) sich in der
Basisstation befindet und das Fass-Ventil offen ist, ist das
Fass fest an die Basisstation angeschlossen.
• Wischen Sie das Keg ab, wenn Bier oder Würze darauf kommt.
• Tauchen Sie das Keg niemals in Wasser, das Gehäuse beinhaltet elektronische Vorrichtungen.
• Bitte befolgen Sie das Reinigungsssprogramm (CIP = Clean In Place) wie in der App oder auf unserer Webseite erläutert
• Benutzen Sie niemals Geschirrspül-Tabs mit Zusätzen von Glasreiniger oder Klarspüler.
•.Nach dem Servieren, reinigen Sie und und spülen Sie das Keg mit deiner Bürste, um rückständige Reste nach
dem Entleeren zu beseitigen.
• Der Betriebszustand des Keg liegt bei einer Ideal Umgebungstemperatur zwischen 5°C und 22°C.
• Lagern Sie keine explosiven Gegenstände wie Spraydosen it entzündlichen Treibmitteln in diesem Gerät.
8. Bevor Sie Keg aus der Basisstation entnehmen, stellen
Sie bitte sicher, dass sich das Ventil in geschlossenen
Zustand befindet.
9. Bitte schließen Sie das Fass nur dann an den Strom
an, wenn Sie von der App / Desktop so instruiert wurden
oder nachdem Sie das Fass an einen anderen Ort gebracht
haben.
10. Für weitere Instruktionen bezüglich des Brauens,
Gärens oder Anzapfens, und Gewährleistung einer sicheren
Aufbewahrung schauen Sie bitte in der App* / desktop
nach. Die Gebrauchsanweisung muss Angaben zur Ver-
wendung des Geräts enthalten, um die sichere Aufbe-
wahrung von Lebensmitteln zu gewährleisten.
*Diese Anleitungen sind auch in anderen Formaten
verfügbar auf www.minibrew.io/faq
Erste Schritte
Reinigung & Instandhaltung
4
5
15

Discover. Brew. Share
WWW.MINIBREW.IO