
Atom
User Manual V1.0

i
Contents
Unboxing your Phone .................................................................................. 6
Getting to know your phone
......................................................................................................... 6
Inserting a SIM card
.................................................................................................................... 6
Charging your phone
................................................................................................................... 7
Turning your phone on and off
..................................................................................................... 8
About Network
............................................................................................................................ 8
About Waterproof
........................................................................................................................ 9
About Battery
.............................................................................................................................. 9
Transferring Data to the new phone ........................................................... 9
Transferring data between your phone and a computer
............................................................... 10
Copying contacts from an old phone to a new phone
................................................................... 10
First Use and Initial Setup ......................................................................... 11
Initial setup
............................................................................................................................... 11
Dual SIM settings
...................................................................................................................... 11
Connecting to the Internet
.......................................................................................................... 12
Installing Applications ............................................................................... 14
Sharing applications using storage
............................................................................................. 14
Installing an application from Play Store
..................................................................................... 14
Uninstalling an application
......................................................................................................... 15
Getting Started ........................................................................................... 16
Locking and unlocking the screen
.............................................................................................. 16
Touchscreen gestures
............................................................................................................... 16
Status and notification icons
...................................................................................................... 18
Home screen
............................................................................................................................ 18
Taking a screenshot
.................................................................................................................. 22
Notifications
.............................................................................................................................. 22
Accessing applications
.............................................................................................................. 24
Personalizing your phone
.......................................................................................................... 26
Entering text
............................................................................................................................. 27
Tips and Tricks ........................................................................................... 29
High volume mode
.................................................................................................................... 29
Finding applications quickly
....................................................................................................... 29
Searching for settings
................................................................................................................ 29
Quickly sign in a Google account
............................................................................................... 29
Quickly returning a call
.............................................................................................................. 30

ii
Quickly enter an application
....................................................................................................... 30
Taking photos while recording video
........................................................................................... 30
Adjusting the system volume rapidly
........................................................................................... 31
Calls and Contacts ..................................................................................... 32
Making calls
............................................................................................................................. 32
Answering or rejecting a call
...................................................................................................... 33
Functions available during a call
................................................................................................ 34
Answering a third-party call
........................................................................................................ 35
Making a conference call
........................................................................................................... 35
TTY Operation
.......................................................................................................................... 36
Viewing the call log
................................................................................................................... 36
Call settings
.............................................................................................................................. 37
Adding a contact to your favorites
.............................................................................................. 38
Creating a contact
..................................................................................................................... 39
Set photo for phone contact
....................................................................................................... 39
Set ringtone for phone contact
................................................................................................... 40
Importing or exporting contacts
.................................................................................................. 41
Managing contacts
.................................................................................................................... 42
Finding a contact
...................................................................................................................... 43
Viewing contacts from different accounts
.................................................................................... 43
Contact label
............................................................................................................................ 44
Messaging and Email ................................................................................. 46
Sending a message
.................................................................................................................. 46
Replying to a message
.............................................................................................................. 46
Searching for messages
............................................................................................................ 46
Deleting threads
........................................................................................................................ 47
Managing conversations
............................................................................................................ 47
Managing messages
................................................................................................................. 48
More functions
.......................................................................................................................... 48
Adding an email account
........................................................................................................... 48
Sending an email
...................................................................................................................... 49
Checking your emails
................................................................................................................ 50
Account settings
....................................................................................................................... 50
Camera ........................................................................................................ 52
Accessing the viewfinder
........................................................................................................... 52
Taking a photo
.......................................................................................................................... 52
Shooting modes
........................................................................................................................ 52
Burst shooting
.......................................................................................................................... 53
HDR mode
............................................................................................................................... 53
Super Night mode
..................................................................................................................... 53

iii
Panoramic shots
....................................................................................................................... 54
Shooting a video
....................................................................................................................... 55
Camera and video settings
........................................................................................................ 55
Photos and Videos ..................................................................................... 56
Viewing photos and videos
........................................................................................................ 56
Playing a video
......................................................................................................................... 57
Deleting images or videos
.......................................................................................................... 57
Sharing images or videos
.......................................................................................................... 58
Editing an image
....................................................................................................................... 58
More functions
.......................................................................................................................... 58
Music ........................................................................................................... 60
Adding songs to your phone
...................................................................................................... 60
Searching for local music
........................................................................................................... 60
Listening to music
..................................................................................................................... 60
Controlling playback using a smart headset
................................................................................ 60
Creating a playlist
..................................................................................................................... 61
Playing a playlist
....................................................................................................................... 62
Setting a song as the ringtone
.................................................................................................... 62
Accessing the Internet ............................................................................... 63
Connecting to the Internet using mobile data
............................................................................... 63
Connecting to the Internet using Wi-Fi
........................................................................................ 63
Sharing your mobile Internet with other devices
........................................................................... 64
Data sharing and transmission ................................................................. 66
Transferring data using PC
........................................................................................................ 66
Transferring data using USB OTG
.............................................................................................. 67
Transferring data using Bluetooth
............................................................................................... 67
Transferring data using NFC
...................................................................................................... 68
File Management ........................................................................................ 70
Viewing files
............................................................................................................................. 70
Sharing files
............................................................................................................................. 70
Creating folders
........................................................................................................................ 70
Renaming files
.......................................................................................................................... 71
Copying, moving, or deleting files
............................................................................................... 71
Power Management ................................................................................... 72
Viewing battery usage statistics
................................................................................................. 72
DuraSpeed
............................................................................................................................... 72
Power save manager
................................................................................................................ 72
Battery saving mode
................................................................................................................. 73

iv
Configuring display and sound settings
....................................................................................... 73
Tools ............................................................................................................ 74
Pedometer
............................................................................................................................... 74
Calendar
.................................................................................................................................. 75
Clock
....................................................................................................................................... 77
Calculator
................................................................................................................................. 79
Sound recorder
......................................................................................................................... 79
Toolbox
.................................................................................................................................... 79
Track Back
............................................................................................................................... 80
SOS
......................................................................................................................................... 82
Zello
......................................................................................................................................... 84
Settings ....................................................................................................... 87
Configuring the Access Point Names
.......................................................................................... 87
Enabling location access
........................................................................................................... 87
Increasing indoor positioning accuracy
....................................................................................... 88
Configuring the display settings
.................................................................................................. 88
Sound settings
.......................................................................................................................... 89
Changing the screen unlock method
........................................................................................... 90
Airplane mode
.......................................................................................................................... 92
Setting your SIM card PIN
......................................................................................................... 92
Setting up an account
................................................................................................................ 93
Smart Assistant
........................................................................................................................ 94
Setting the date and time
........................................................................................................... 95
Changing the system language
.................................................................................................. 95
Viewing your phone's specifications
........................................................................................... 96
Viewing the available storage space
........................................................................................... 96
Restoring factory settings
.......................................................................................................... 96
Updating your phone ................................................................................. 96
Accessibility Features ............................................................................... 98
TalkBack
.................................................................................................................................. 98
Captions
................................................................................................................................. 100
Volume key shortcut
................................................................................................................ 100
Magnification gestures
............................................................................................................ 100
Using the power button to end a call
......................................................................................... 102
Auto-rotate screen
.................................................................................................................. 102
Adjusting the screen response time
.......................................................................................... 102
Color correction
...................................................................................................................... 102
Appendix ................................................................................................... 103
Obtaining help
........................................................................................................................ 103

Transferring Data to the new phone
6
Unboxing your Phone
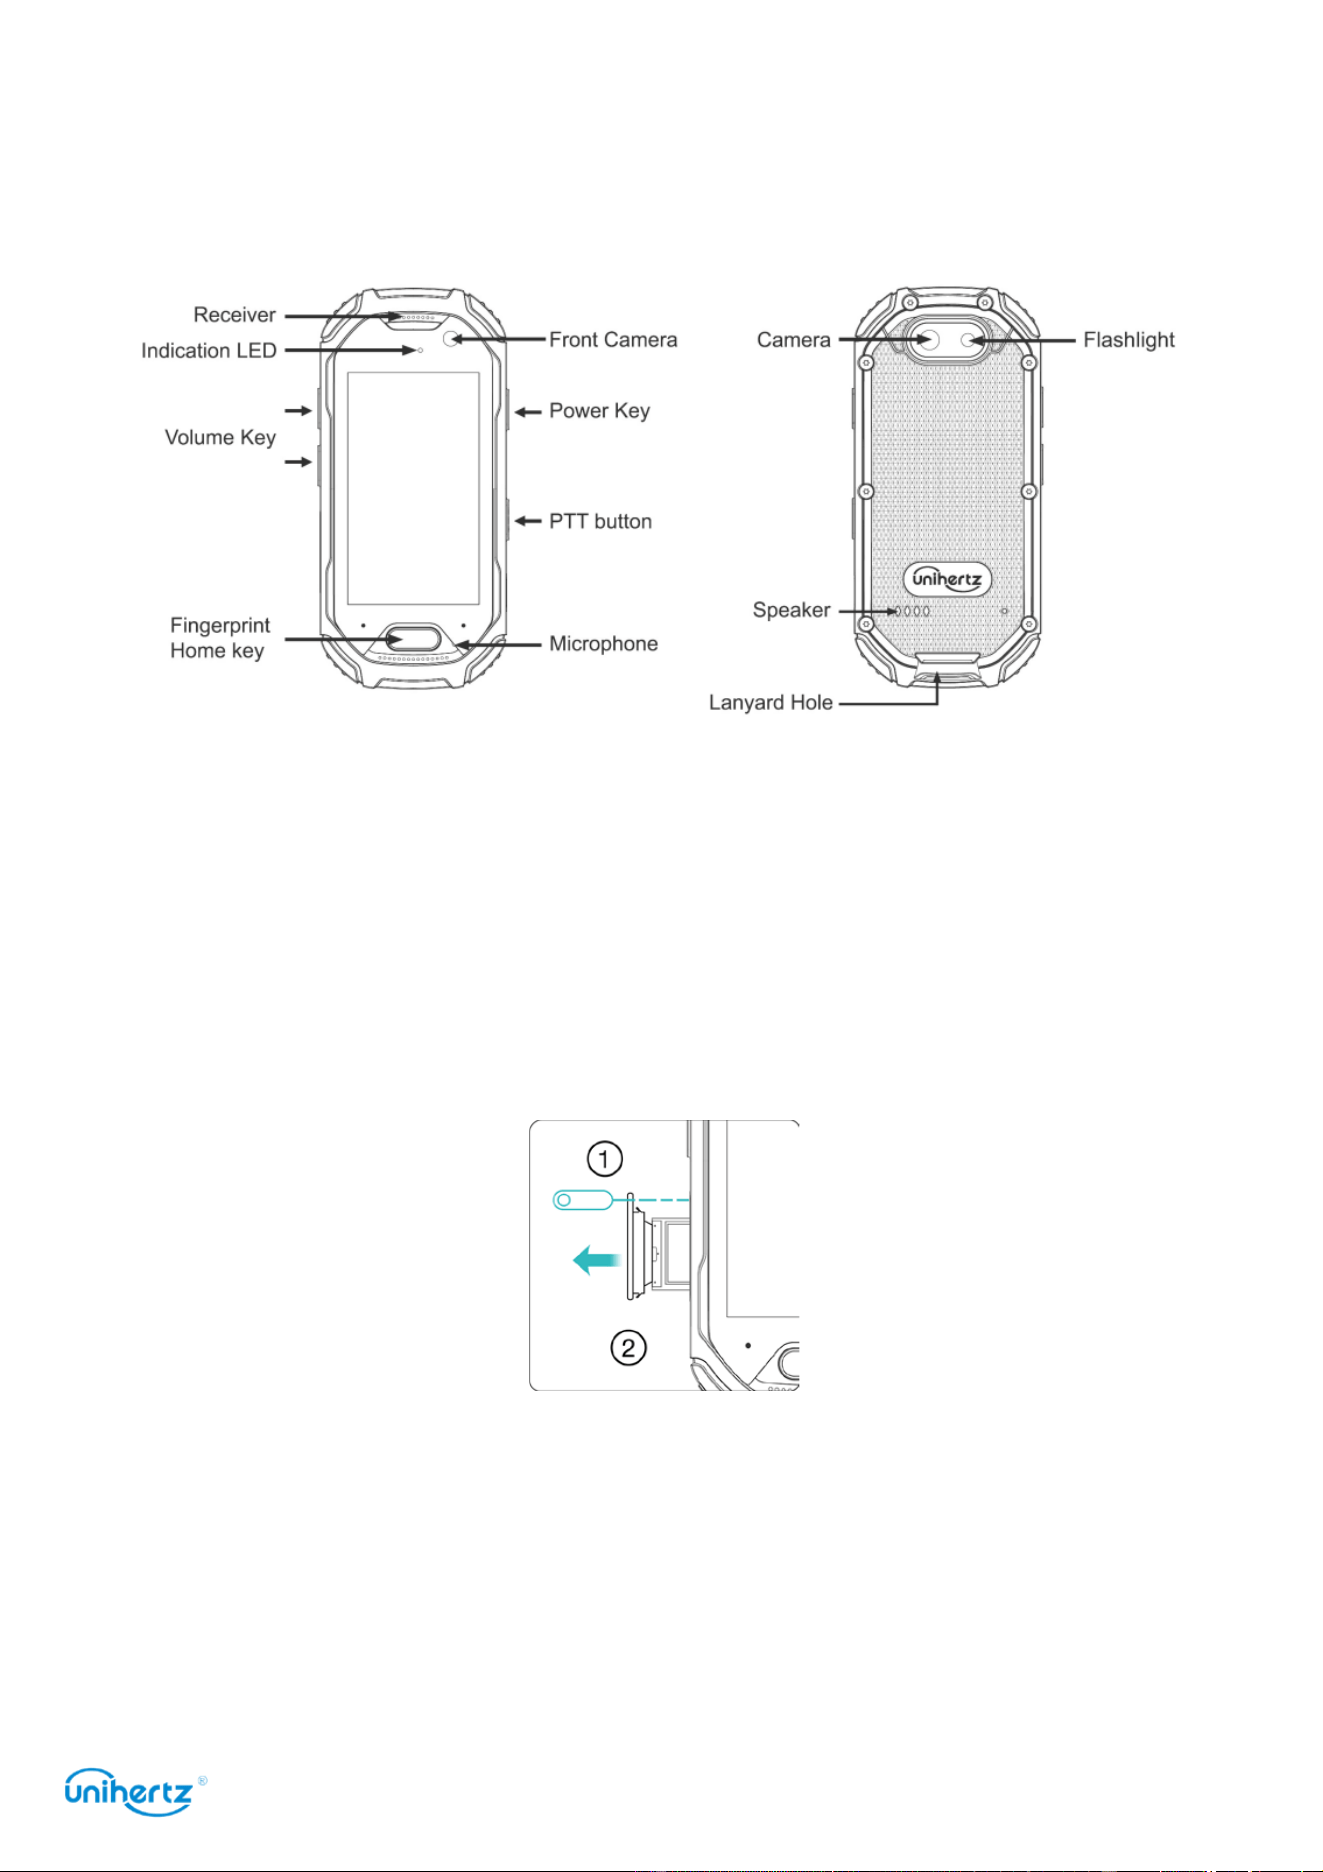
Getting to know your phone
Inserting a SIM card
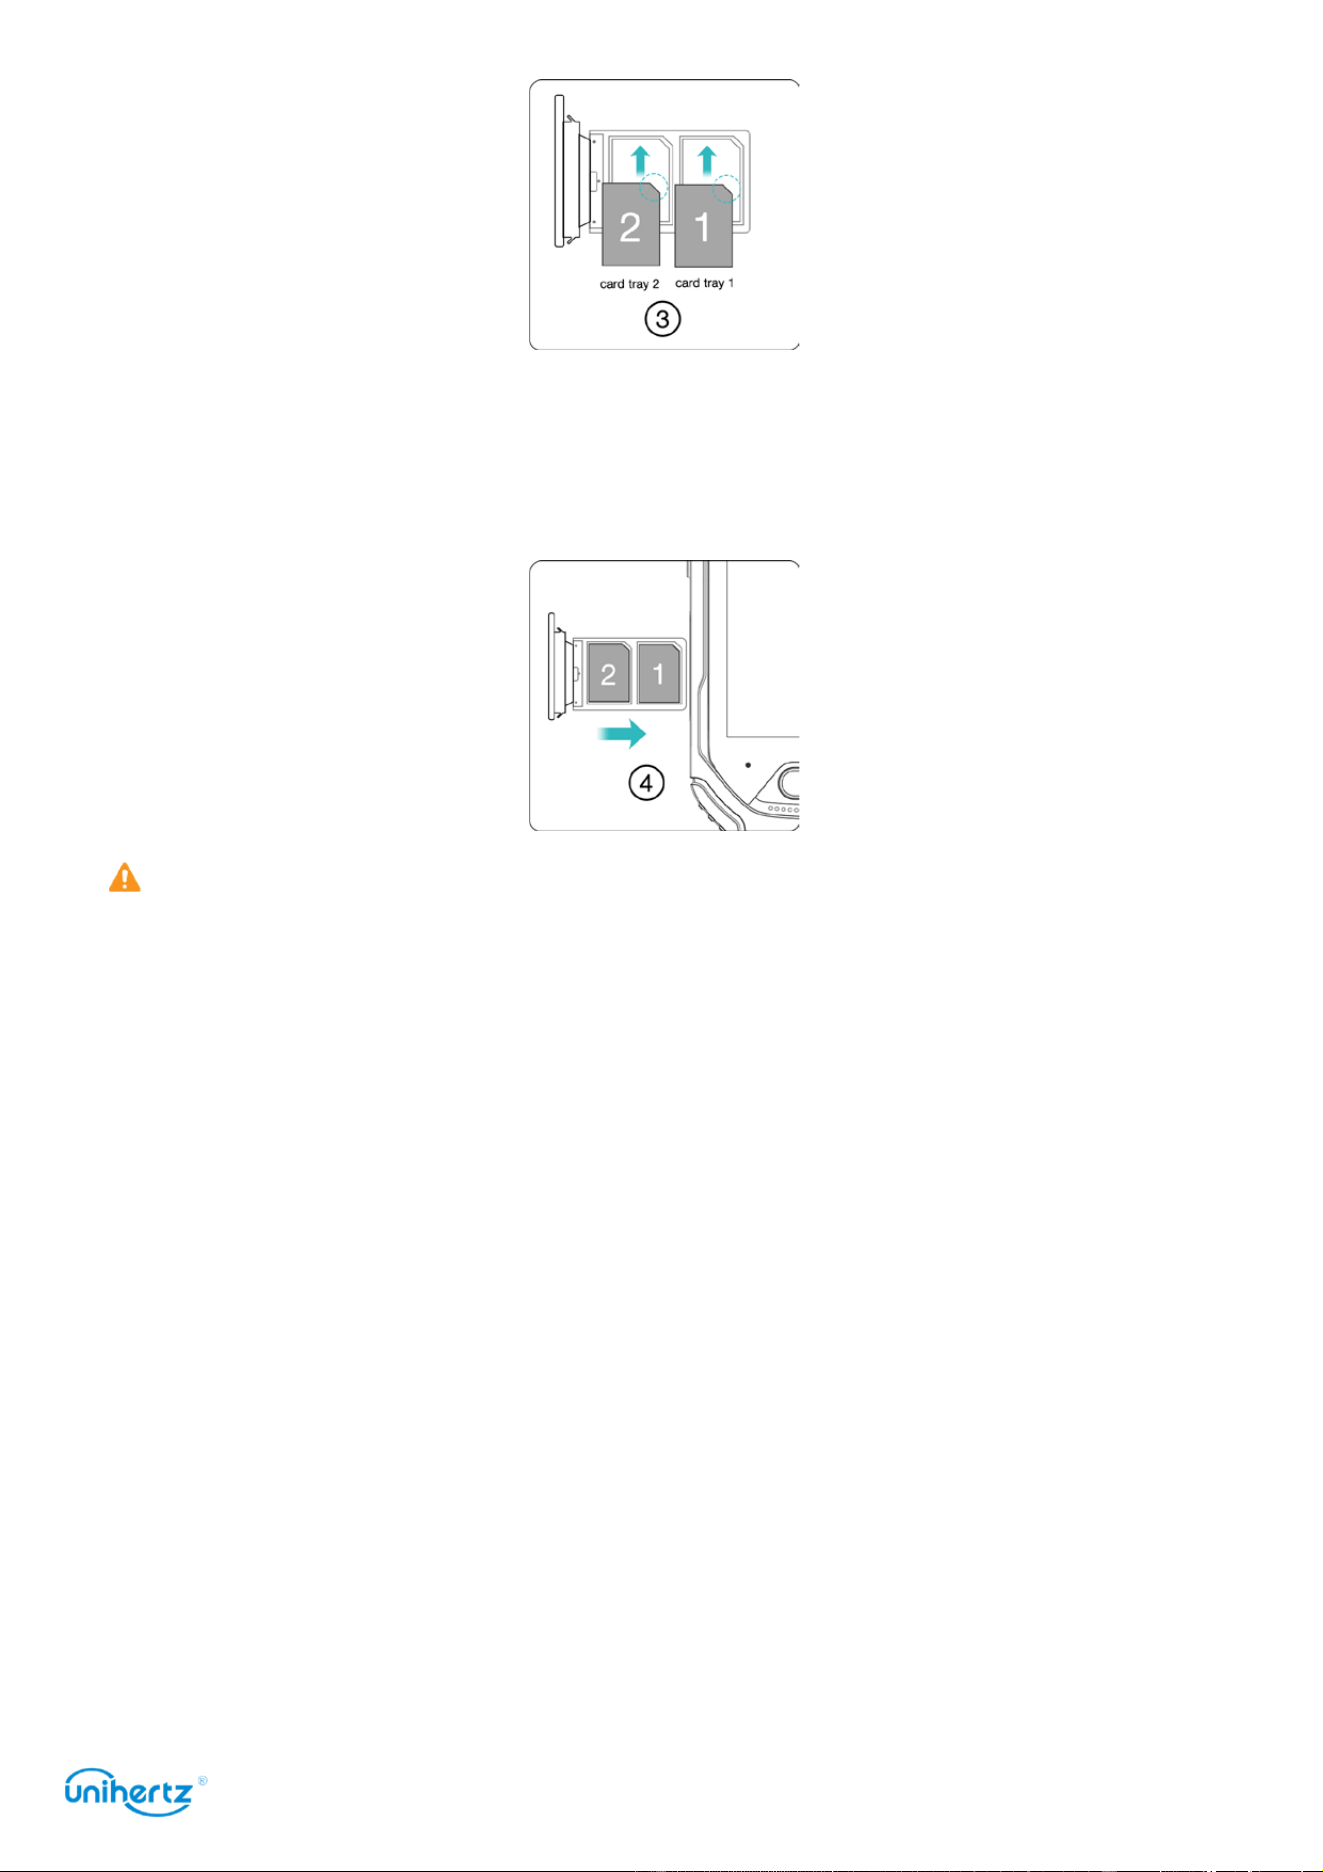
This phone supports dual Nano cards, and support card 1 / card 2 hot plug. In the
boot state, when you insert card 1 / card 2, the phone can automatically recognize.
1 The touch screen of the mobile phone is facing up, and the ejector pin is inserted
into the side thimble hole to press inward, and the card tray is ejected.
2 Take out the card tray.
3 Place the metal side of the Nano card face down, at an oblique angle to the bevel
of the card, and place it in the card slot as indicated by the arrow in the illustration.
Transferring Data to the new phone
7
4 The touch screen of the mobile phone is facing up, and the card tray with the card
1/card 2 installed is loaded into the mobile phone in the direction indicated by the
arrow.
1 Please put the card 1/card 2 into the card tray first, then load the card tray into
the phone. It is forbidden to directly insert the card 1 / card 2 into the mobile phone.
2 Cutting the card yourself may damage the card 1/card 2 and severely damage the
phone. If the size of the card 1 / card 2 is not suitable, please go to the operator's
business office for professional help.
3 Do not disassemble the back cover of the phone to avoid damage to the machine.
Charging your phone
This section outlines how to care for your battery in order to maximize its lifespan.
Using your battery
● You can recharge your battery many times, but all batteries have a limited lifespan.
● Your phone may become warm after prolonged use or when exposed to high
ambient temperatures. This is entirely normal. If your phone becomes hot to the
touch, stop charging it and disable unnecessary features. Place your phone in a cool
location and allow it to cool down to room temperature. Avoid prolonged contact with
the surface of your phone if it becomes hot.
● When charging your phone, only use genuine Unihertz batteries, chargers, and
USB cables.
Transferring Data to the new phone
8
Third-party accessories are a potential safety hazard and may impair your phone's
performance. Avoid using your phone when it is charging. Do not cover your phone
or the power adapter.
● Charging times may vary depending on the ambient temperature and the remaining
battery level.
● A low
battery warning
will
be displayed when
the
battery level is
low.
●
Your phone
will
switch
off
automatically when
the
battery is nearly
empty.
Battery status indicator
The battery status is indicated by your phone's indicator light and the battery icon in
the status bar.
● If the status indicator blinks red and the battery icon changes to the battery level
is below 4%.
● The status indicator and the battery icon indicate the battery status during
charging. A red status indicator and a battery icon indicate that the battery level is
below 90%. A green status indicator and a battery icon indicate that the battery
level is between 90% and 100%. A green status indicator and a battery icon indicate
that the battery is fully charged and you can unplug the charging cable from your
phone.
If your phone does not respond when you press the power button, this indicates
that the battery is empty. Charge your battery for at least 10 minutes using a
genuine Unihertz charger, and then turn on your phone.
Turning your phone on and off
● To turn on your phone, press and hold the power button until your phone vibrates
and the screen turns on.
● To turn off your phone, press and hold the power button, and then touch .
If your phone does not respond after holding down the power button for 15
seconds, the battery may be empty. If so, connect your phone to a charger to charge
the battery.
About Network
Bands supported by Atom:
GSM: Band 2/3/5/8
WCDMA: Band 1/2/4/5/8

Transferring Data to the new phone
9
TDSCDMA: Band 34/39
FDD-LTE: Band 1/2/3/4/5/7/8/12/13/17/18/19/20/25/26/28A/28B
TDD-LTE: Band 34/38/39/40/41
CDMA2000: BC0/BC1
Due to different carrier's policy regarding to unlocked phones, LTE wireless
service may not be available even if listed bands are supported by your carrier.
Please contact your carrier for more details.
About Waterproof
Atom is splash, water, and dust resistant and was tested under controlled laboratory
conditions with a rating of IP68 under IEC standard 60529. Splash, water, and dust
resistance are not permanent conditions and resistance might decrease as a result
of normal wear. Do not attempt to charge a wet Atom; refer to the user guide for
cleaning and drying instructions.
Liquid damage not covered under warranty.
What should I do if my Atom gets wet?
If liquid splashes on your phone, wipe it off with a soft, lint-free cloth—for example, a
lens cloth.
After use at the seaside or underwater, soak the unit in fresh water pooled in a
shallow container for 10 minutes or less.
Make sure that your phone is dry before opening the SIM tray.
To dry your phone, tap it gently against your hand with the USB
connector/headphone jack facing down and remove excess liquid. Leave your phone
in a dry area with some airflow. Placing your phone in front of a fan blowing cool air
directly into the USB connector/headphone jack might help the drying process.
Don't dry your phone using an external heat source or insert a foreign object, such
as a cotton swab or a paper towel, into the USB connector/headphone jack.
Make sure that your phone is dry before plug in the USB cable/headphone.
About Battery
Don’t attempt to replace the Atom battery yourself—you may damage the battery,
which could cause overheating, fire, and injury. Dispose of batteries according
to your local environmental laws and guidelines.
Transferring Data to the new phone

Transferring Data to the new phone
10
Transferring data between your phone and a computer
Transfer the data on your old phone to your computer, and then transfer it to your
new phone.
Connect your phone to a computer using a USB cable. Select
Photos
or
Files
. Your
computer will automatically install any necessary drivers. Once installed, double-
click on the new disk drive to manage files. The drive name should be your phone's
model number.
●
Photos
: View photos that are stored on your phone.
●
F
iles
: Transfer files between your phone and a computer.
● If no connection type is specified, your phone will remain in charging mode.
Copying contacts from an old phone to a new phone
Use any of the following methods to copy contacts from your old phone to your new
phone.
SIM card
Use the SIM import feature to copy SIM card contacts to your
new phone. For more information, see Importing contacts
from a SIM card.
Bluetooth
Enable Bluetooth on both your old and new phones, and
import your contacts using Bluetooth. For more information,
see Transferring data using Bluetooth.
NFC
Enable NFC on both your old and new phones, and import
your contacts using Bluetooth. For more information, see
Transferring data using NFC.
Computer
Sync contacts on your old phone to a computer, and then
sync these to a new phone using a phone management
application.
Other methods
● Install social networking applications and synchronize your
contacts.
● Login to your Google account and synchronize your
contacts.
First Use and Initial Setup
11
First Use and Initial Setup
Initial setup
Ensure that the SIM card is inserted correctly before using your phone for the first
time. Read the Quick Start Guide for more information on how to set up your phone.
Press and hold the power button to turn on your phone, and then follow the onscreen
instructions to complete the initial setup.
1 Select your language and region, and then touch
Next
.
2 Proceed to the
Wi-Fi settings
screen. Your phone will automatically list available
Wi-Fi networks. Select the network you want to connect to, and then enter the
password to access the Internet.
3 Proceed to the
Terms and Conditions
screen. Read the content carefully, accept
the user terms and Google Privacy Policy, and then touch
Next
.
4 Follow the onscreen instructions to add your screen lock if you want to protect
your phone.
5 On the
Configuration
successful
screen, touch
Got it
to complete the settings. You
can now start using your phone.
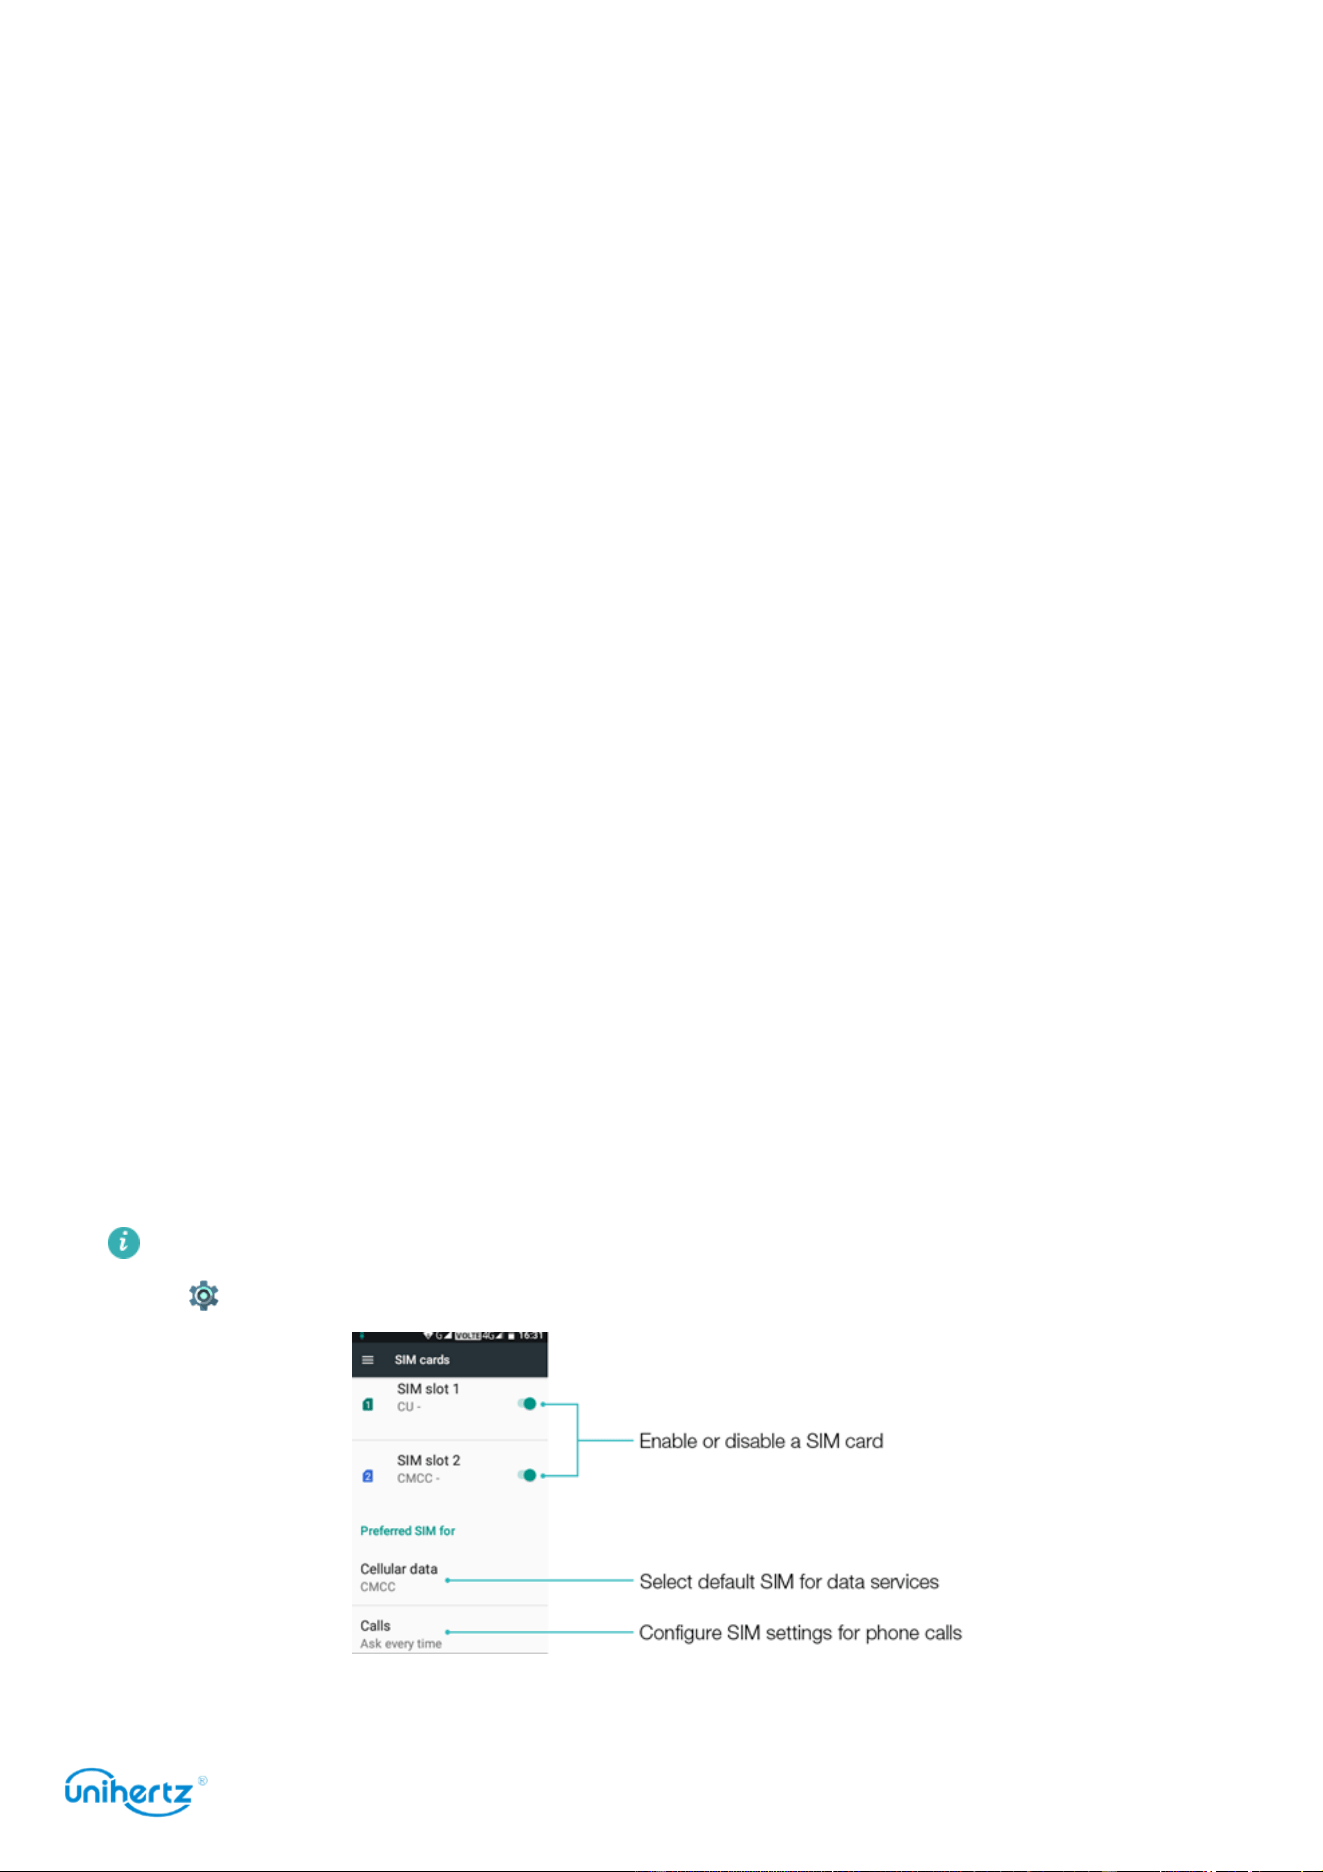
Dual SIM settings
When two SIM cards are inserted, only one SIM card can be set as the 4G/3G/2G
SIM. You can also configure the default card for mobile data and phone calls
according to your monthly plan.
This feature is only available on dual SIM phones.
Open
Settings
and touch
SIM cards
. You can configure both SIM cards as desired.
● If you disable a SIM card, you will be unable to use it to make calls, send
First Use and Initial Setup
12
messages, or access the Internet.
● Select
Calls
. You can configure whether you want to select a SIM card manually or
use the default SIM card each time you make a call. If you choose to use the default
SIM card, your phone will use that SIM card for all outgoing calls.
● Select
SMS messages
. You can configure whether you want to select a SIM card
manually or use the default SIM card each time you send a message. If you choose
to use the default SIM card, your phone will use that SIM card for all outgoing
messages.
Connecting to the Internet
Connect to the Internet using Wi-Fi or mobile data to surf the web, play games, and
use instant messaging applications.
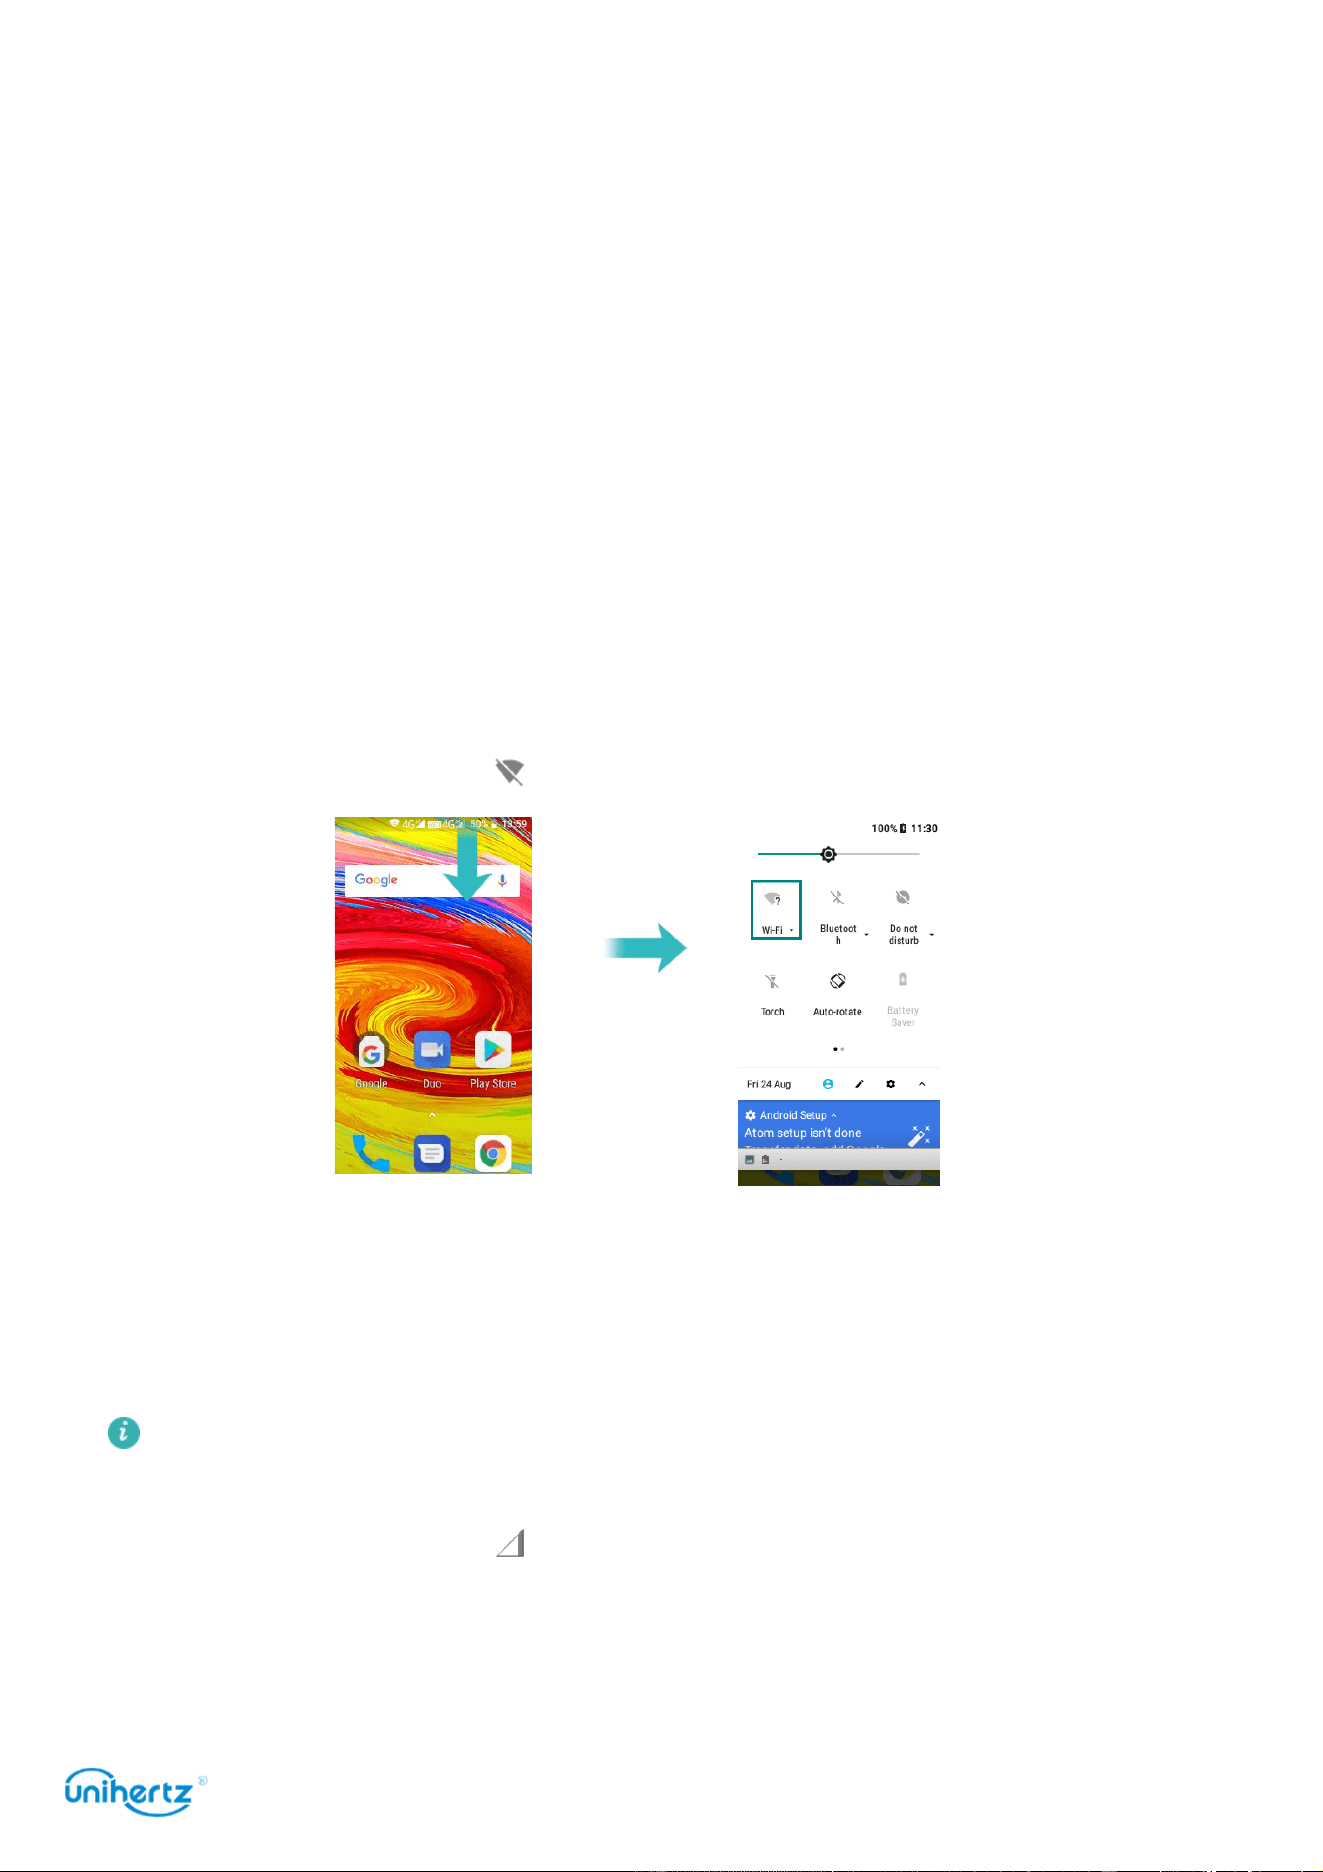
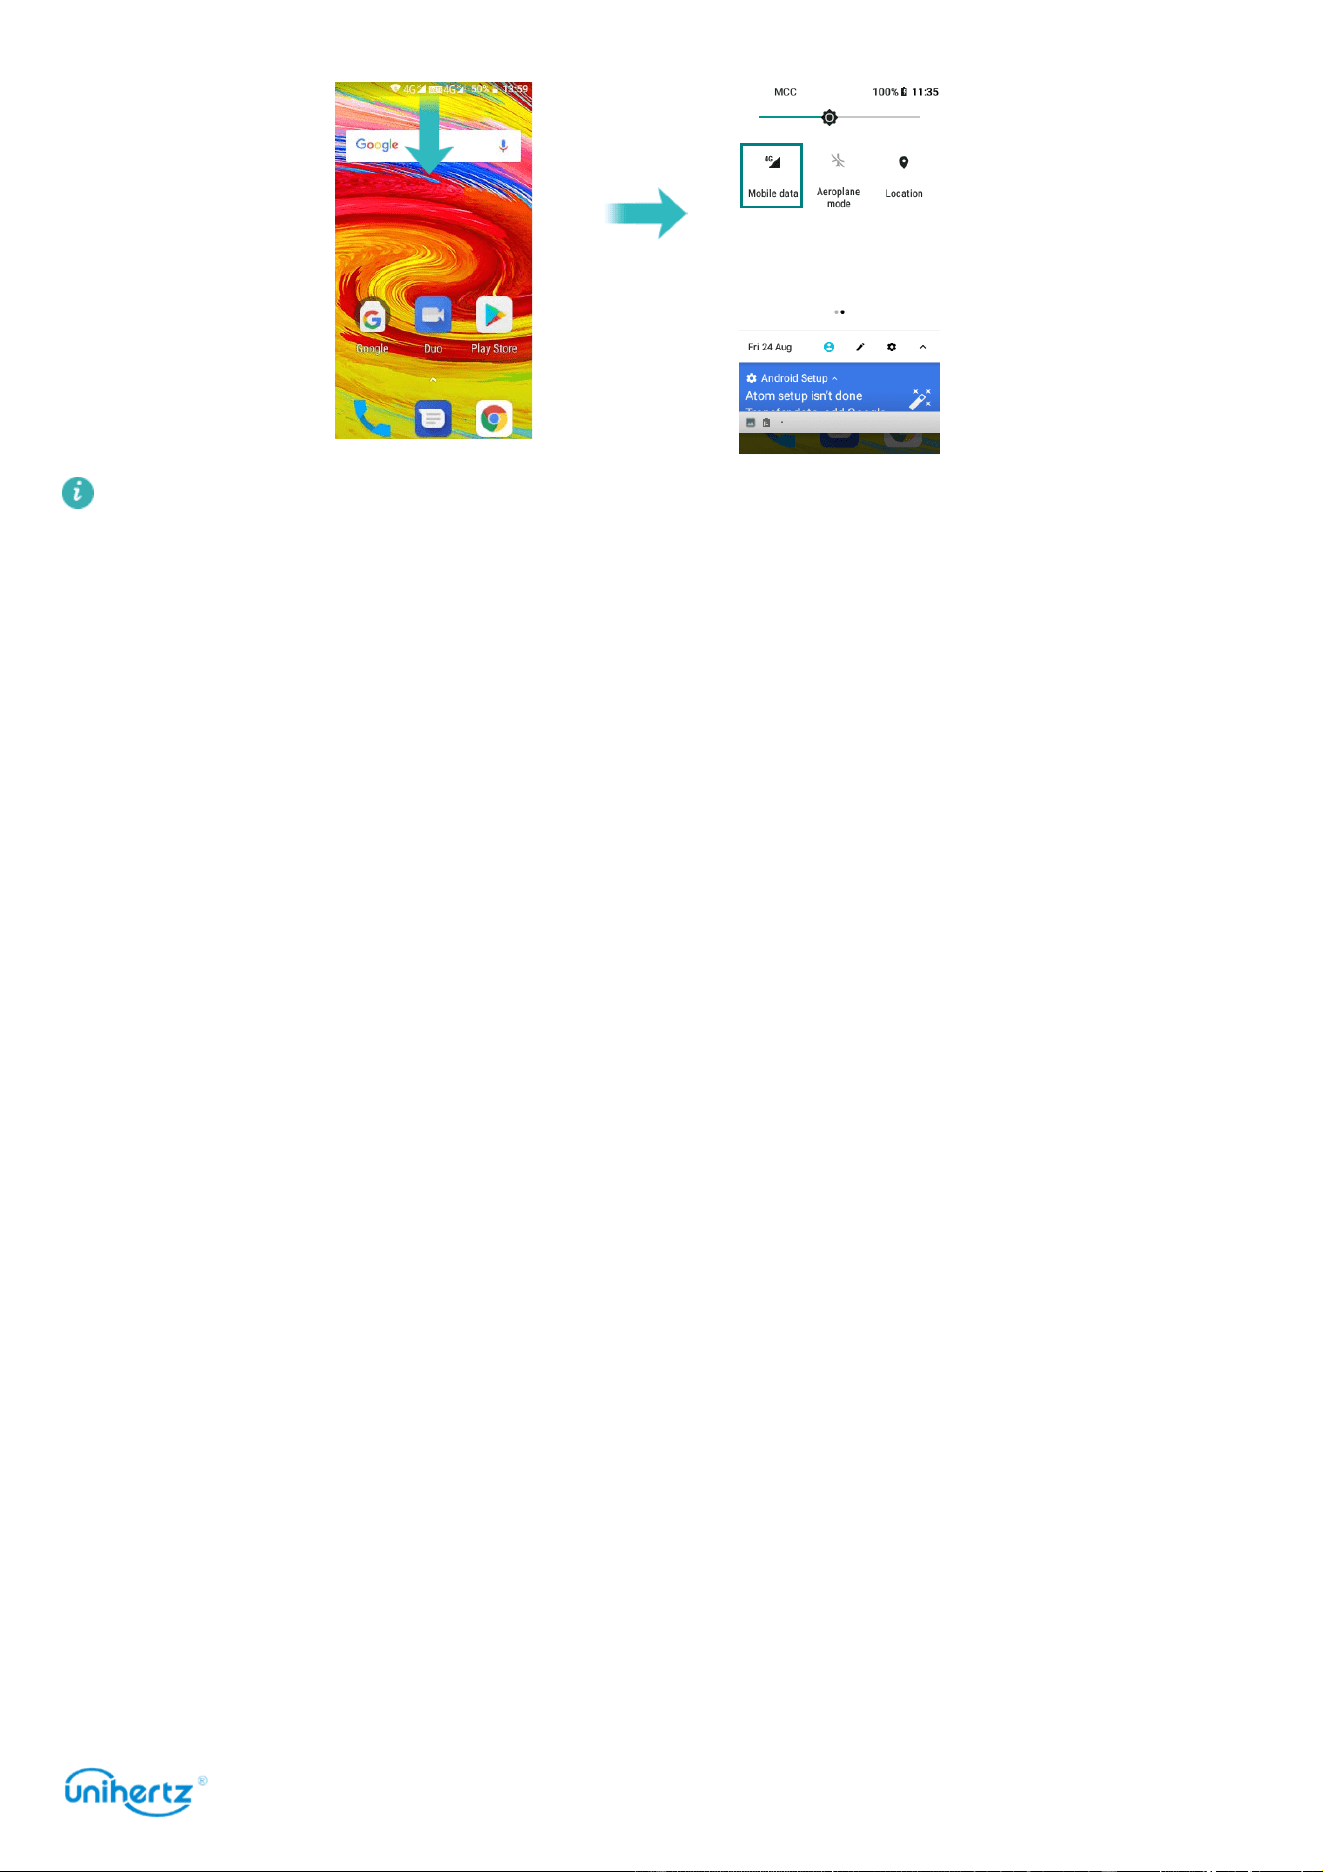
Connecting to a Wi-Fi network
1 Swipe down from the status bar to open the notification panel.
2 In the
Shortcuts
tab, touch to open the Wi-Fi settings screen
3 Turn on the Wi-Fi switch. Your phone will list available Wi-Fi networks.
4 Select the Wi-Fi network you want to connect to. If the Wi-Fi network is encrypted,
enter the password when prompted.
Using mobile data
Before using mobile data, ensure that you have a data plan with your carrier.
1 Swipe down from the status bar to open the notification panel.
2 In the
Shortcuts
tab, touch to enable mobile data
First Use and Initial Setup
13
Disable mobile data when not required in order to save battery power and reduce
data usage.
Installing Applications
14
Installing Applications
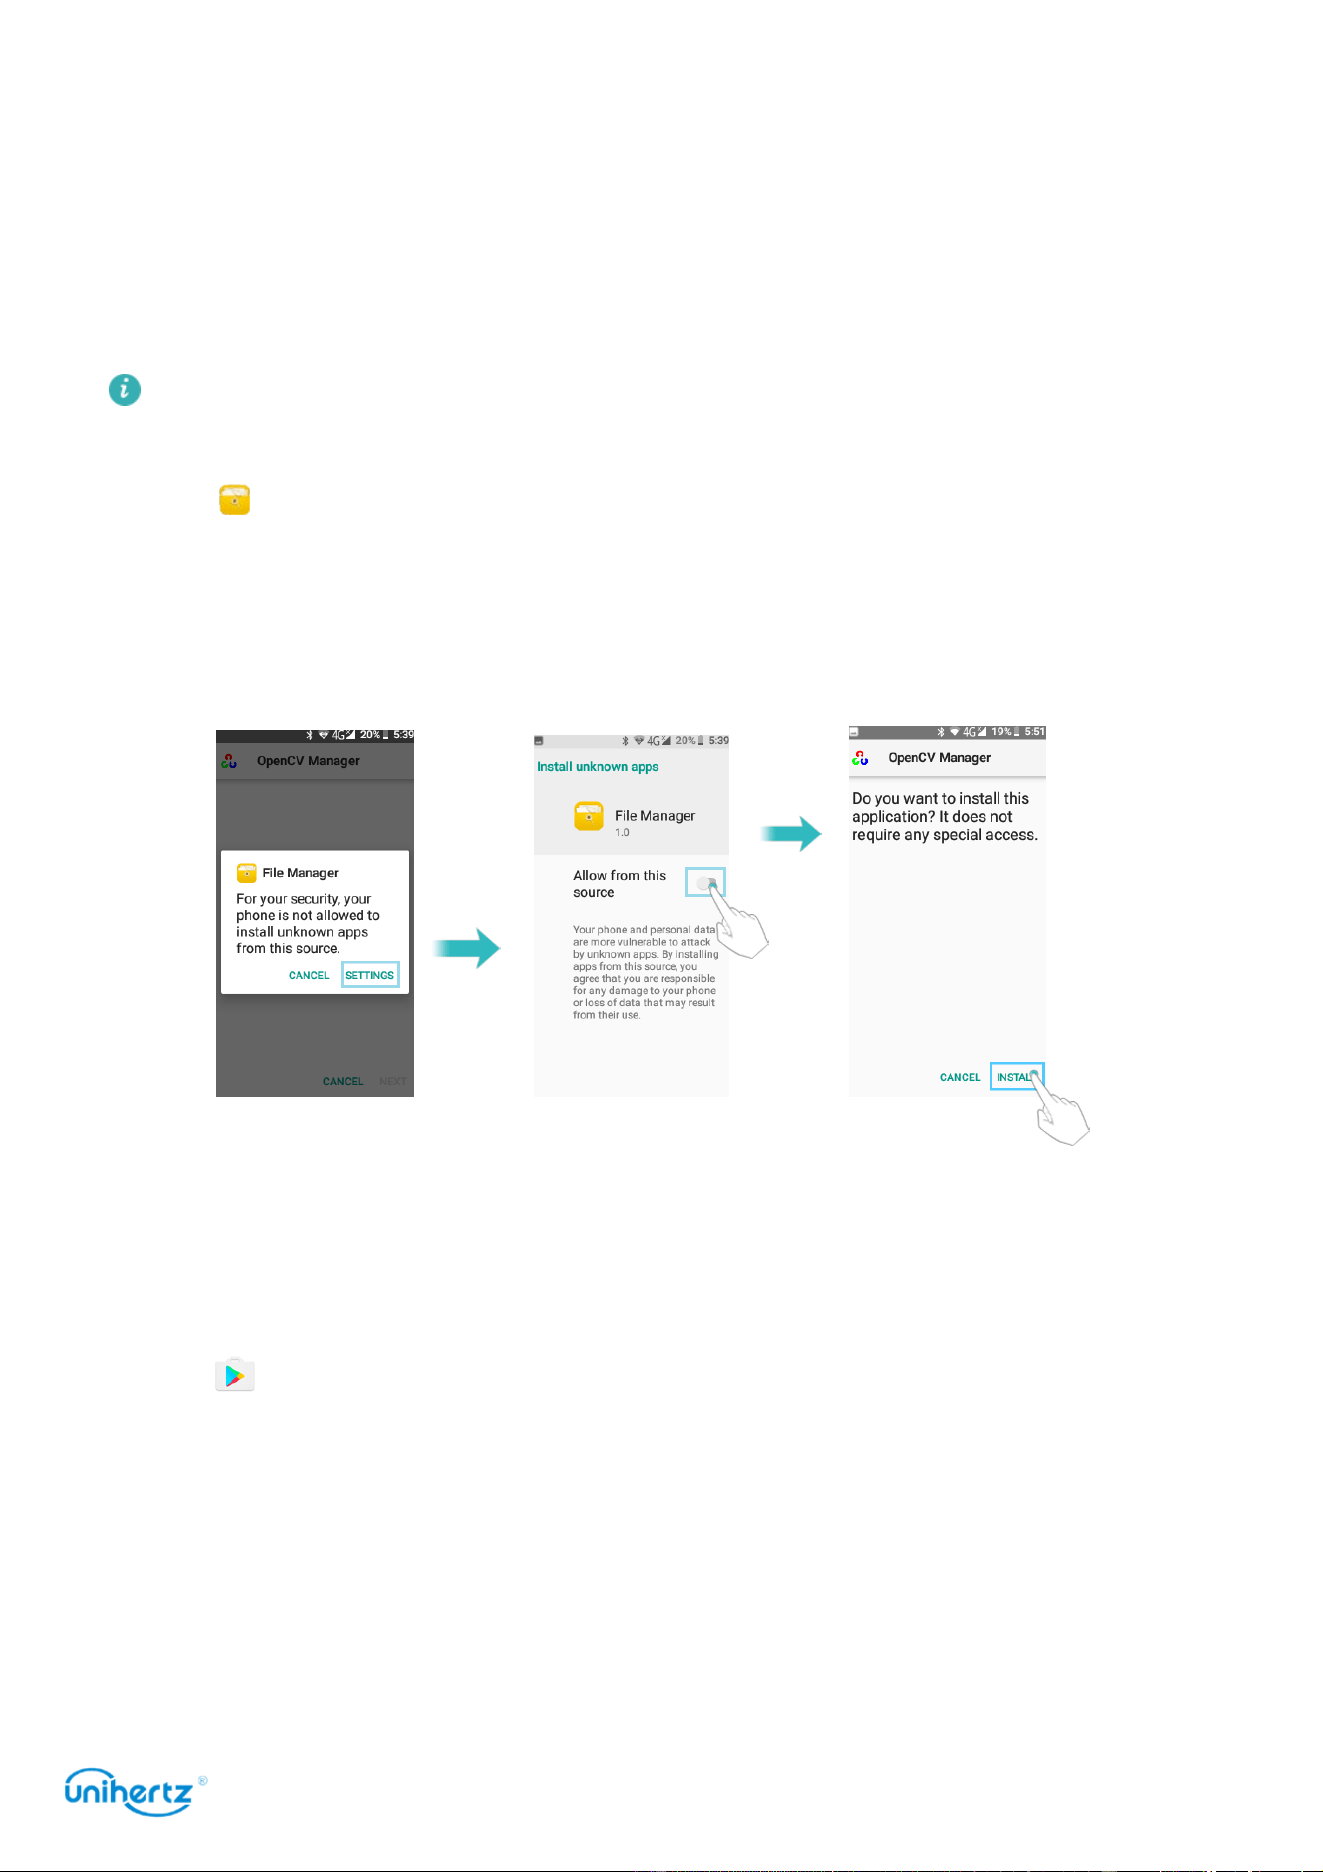
Sharing applications using storage
Save installation packages to phone storage to share them with other phones.
Only install applications from trusted sources.
1 Copy the installation package into your phone.
2 Open
Files
, locate the installation package, and then touch to install. A
warning message may be displayed during the installation process. Always read
these messages carefully. If you wish to proceed with the installation, please open
the permissions set switch to allow your phone to install third-party applications.
After installation, the application will be visible on your home screen.
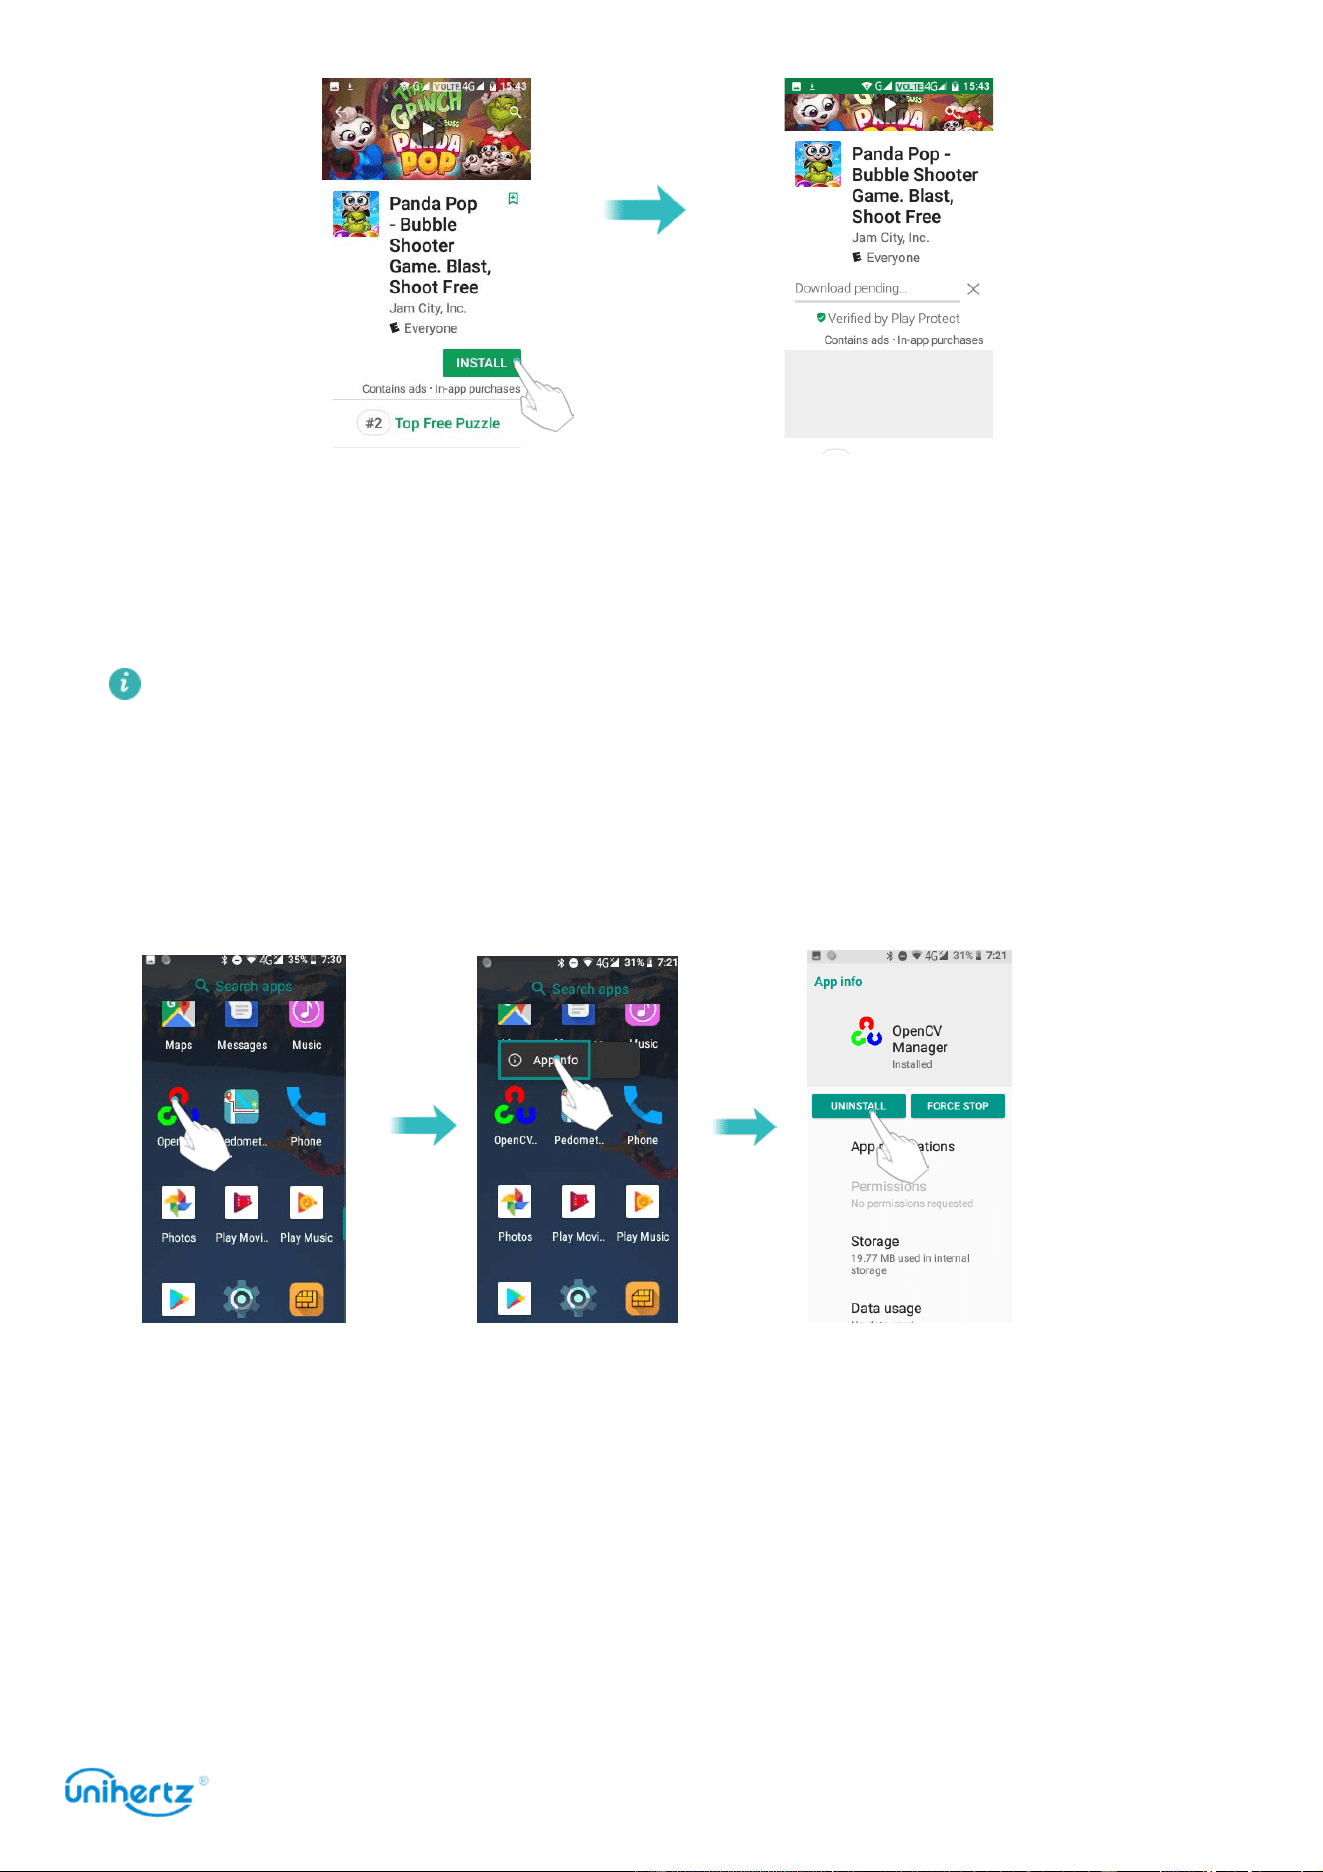
Installing an application from Play Store
Installation packages from third-party sources may contain viruses or malicious
software and should be installed with caution. You can download and install Apps
from Play Store.
1 Open
Play Store
.
2 Select the desired application, Download and Install it.
Installing Applications
15
Uninstalling an application
Free up space on your phone and boost performance by removing unused
applications.
Some pre-installed system applications cannot be removed.
● On the home screen, touch and hold the application you want to uninstall, and
then touch App info, touch
Uninstall
.
● Touch
Settings
>
Apps
, select the application you want to uninstall, and then
touch
Uninstall
.
Getting Started
16
Getting Started
Locking and unlocking the screen
Locking the screen
● Press the power button to manually lock the screen.
● The screen will lock automatically and enter sleep mode after it has been idle for
a certain period to reduce power consumption and prevent unintended operations.
To change the screen sleep time, open
Settings
, touch
Display
>
Sleep
, and
then select a time.
Your phone will continue to receive messages, notifications, and incoming calls
when the screen is locked. The status indicator will flash when you receive new
notifications. When you receive an incoming call, the screen will turn on and
display the caller information.
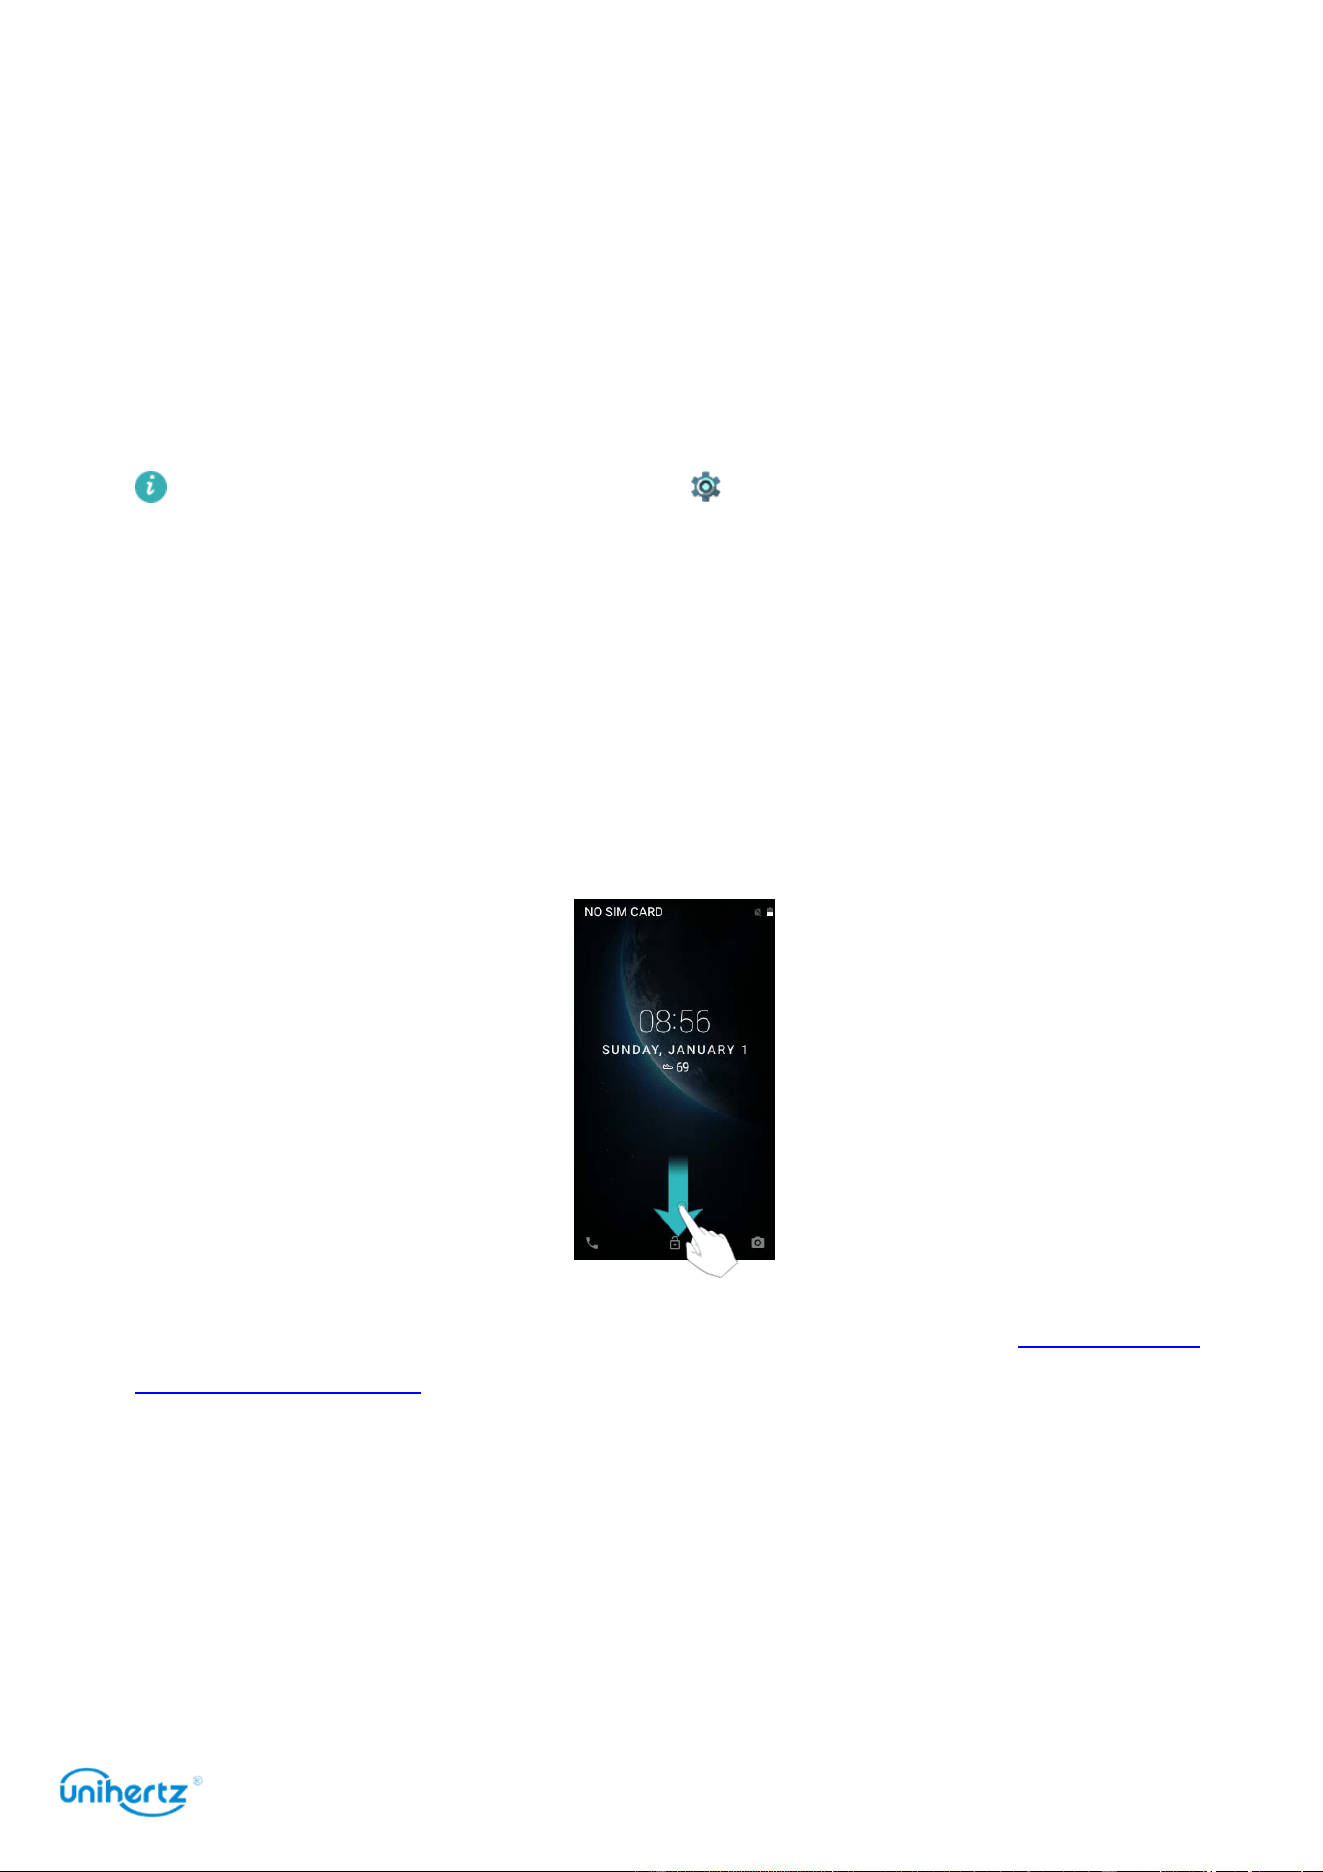
Unlocking the screen
When the screen is off, press the power button to wake the screen. Slide your
finger from the bottom to unlock the screen.
This phone supports a variety of unlocking methods, such as Pattern, PIN,
Password, Fingerprint, Face Unlock, etc. For more information, see Changing the
screen unlock method.
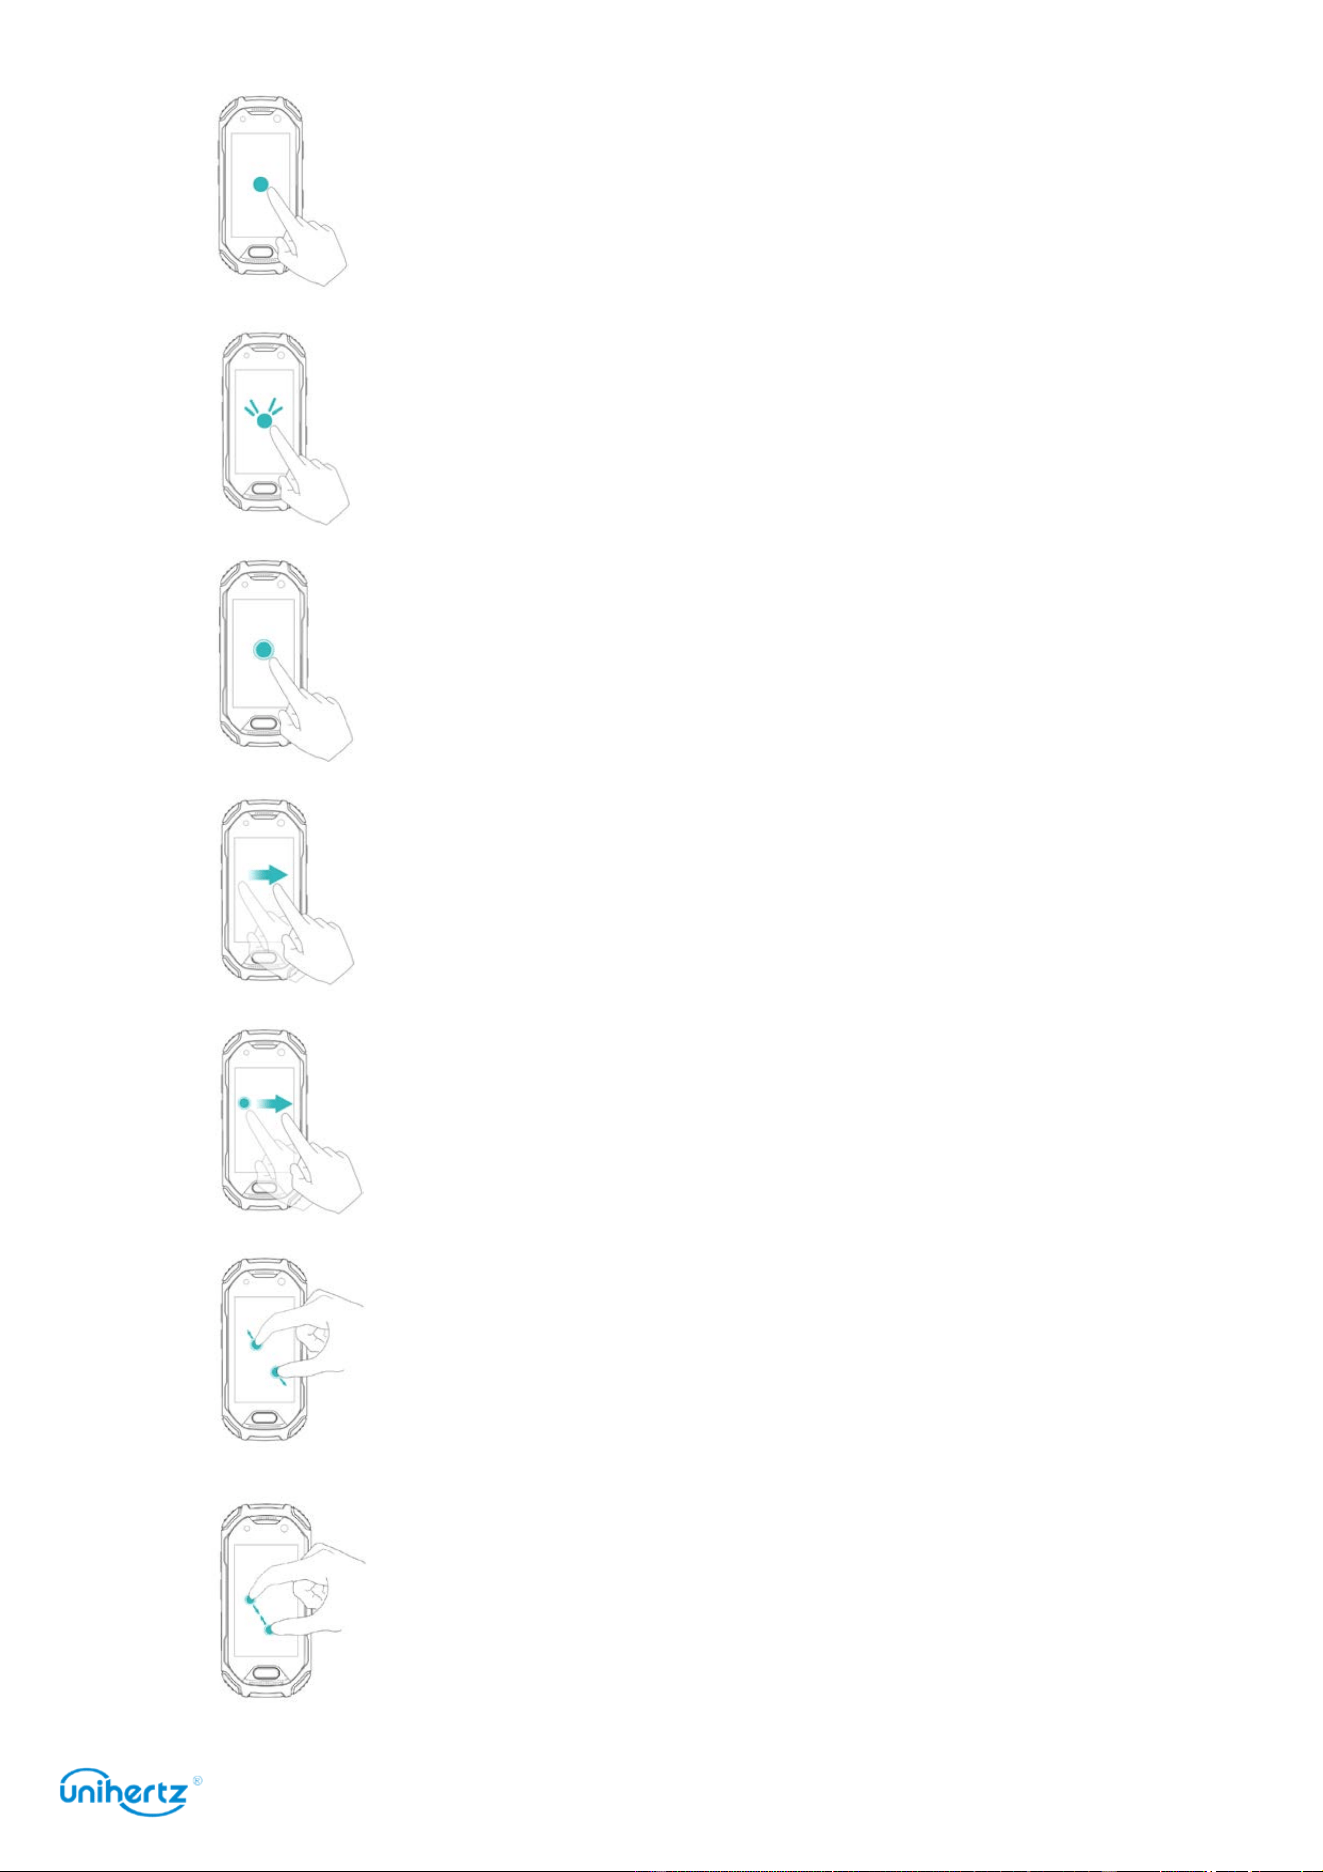
Touchscreen gestures
Use simple touch screen gestures to perform a variety of tasks, such as open
applications, scroll through lists, and zoom images.
Getting Started
17
Touch
: Touch an item once. For example, touch
to select an option or open an application.
Double touch
: Touch the target area of the
screen twice in quick succession. For example,
double touch an image in full screen mode to
zoom in or out.
Touch and hold
: Touch and hold the target area
of the screen for at least 2 seconds. For
example, touch and hold a blank area on the
home screen to access the home screen editor
Swipe
: Swipe your fingers on the screen. For
example, in the Notifications tab, swipe left or
right on a notification to dismiss it. Swipe
vertically or horizontally to go to other home
screens, scroll through a document, and more.
Drag
: Touch and hold an item, and then move it
to another position. For example, use this
gesture to rearrange applications and widgets on
the home screen
Spread fingers apart
: Spread two fingers apart on
the screen. For example, spread two fingers
apart to zoom in on a picture or web page
Pinch fingers together
: Pinch two fingers
together on the screen. For example, pinch two
fingers together to zoom out on an image
Getting Started
18
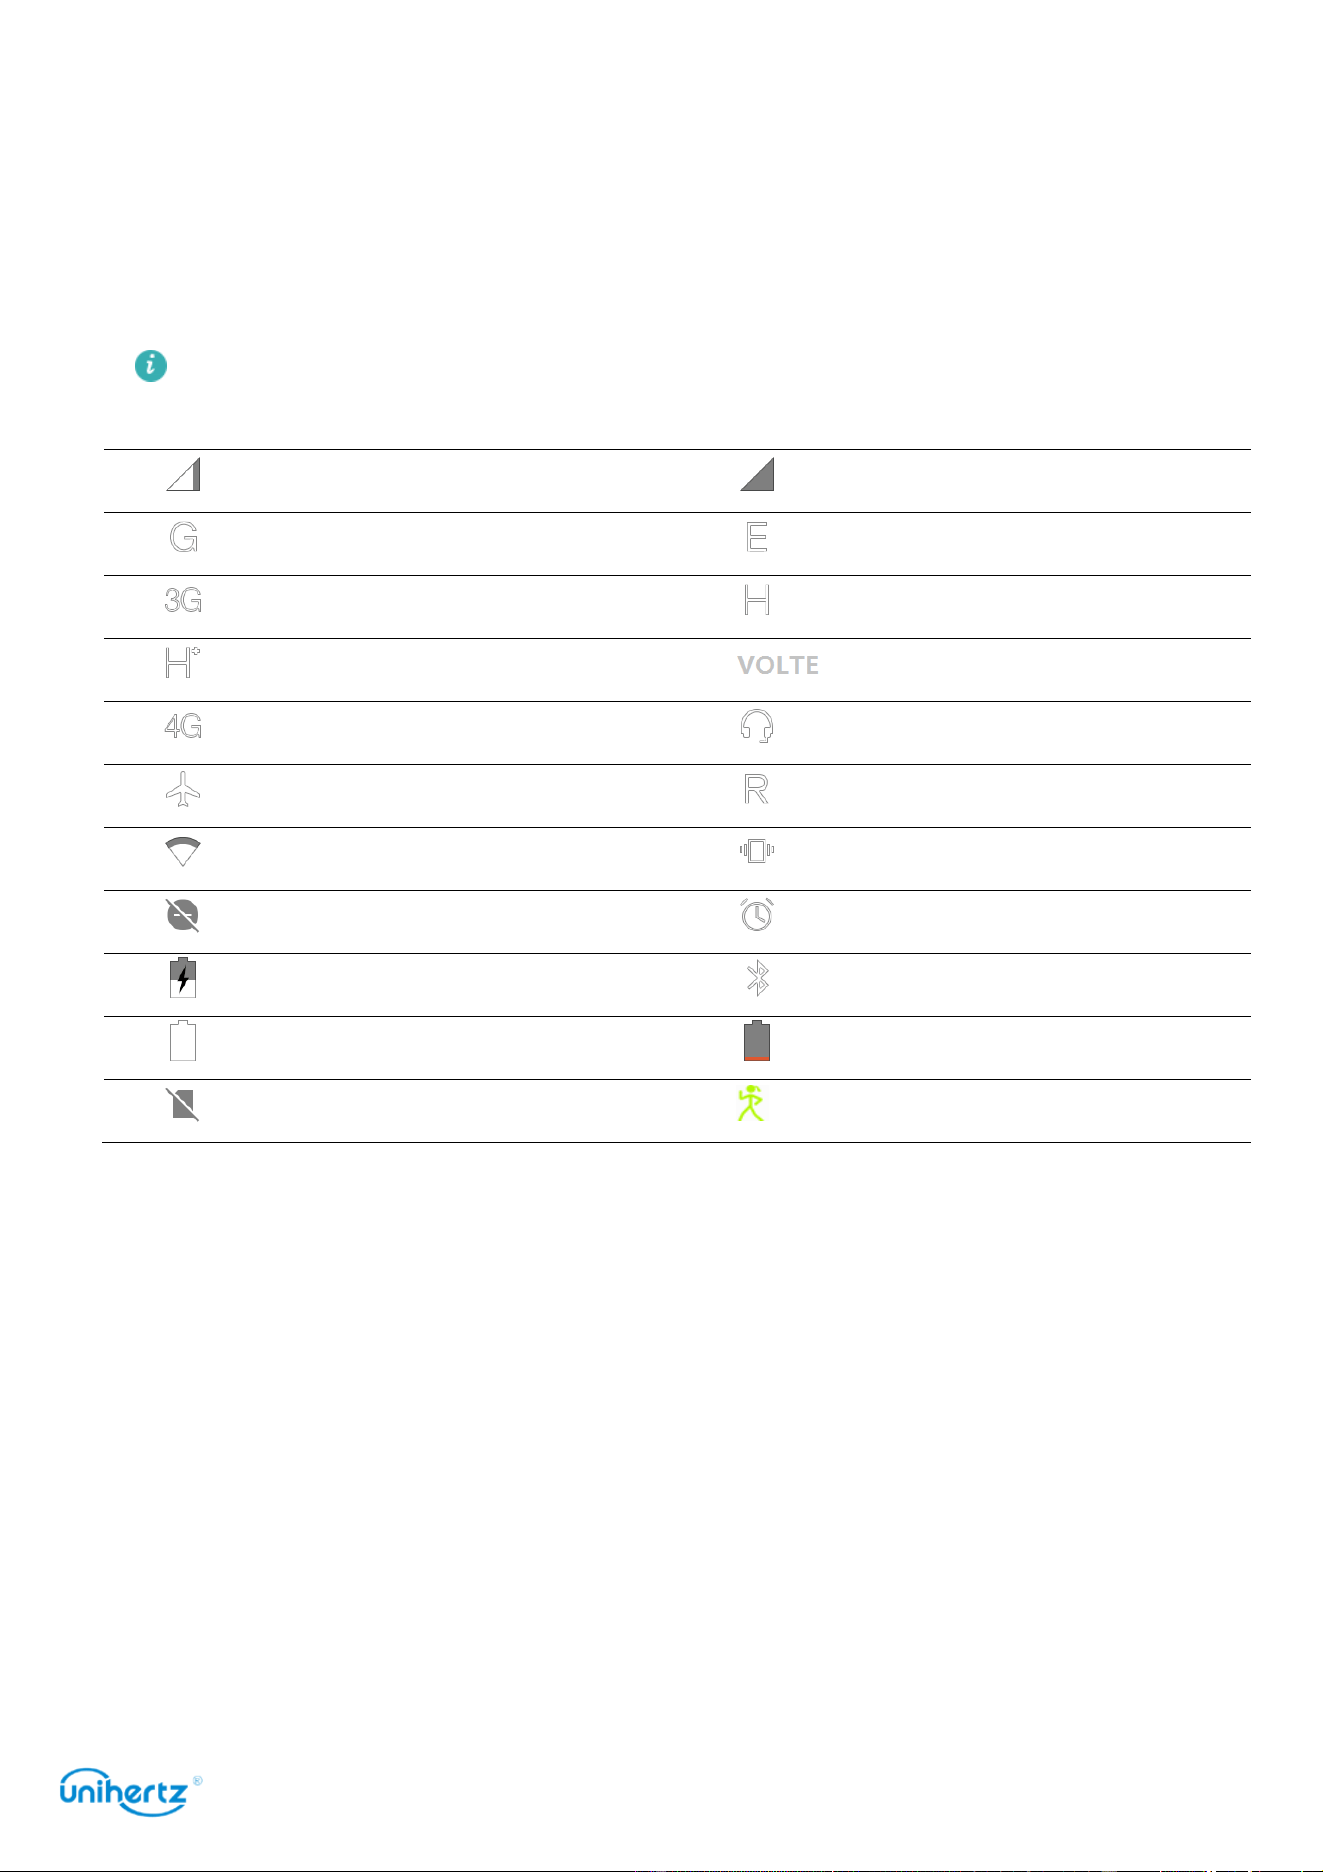
Status and notification icons
Status icons
Status icons are displayed on the right-hand side of the status bar. Status icons
display information about your phone's status, such as network connection
information, signal strength, battery level, and time.
Status icons may vary according to your region or carrier.
Signal
strength
No
si
gnal
Connected over GPRS
Connected over EDGE
Connected over
3G
Connected over
HSPA
Connected over HSPA+
Connected over VOLTE
Connected over LTE
Headset
inserted
Airplane mode enabled
Roaming
Connected over Wi-Fi
Vibration mode
Silent mode enabled
Alarm enabled
Charging
Bluetooth enabled
Battery full
Battery low
No
SIM card
found
Movement track recording
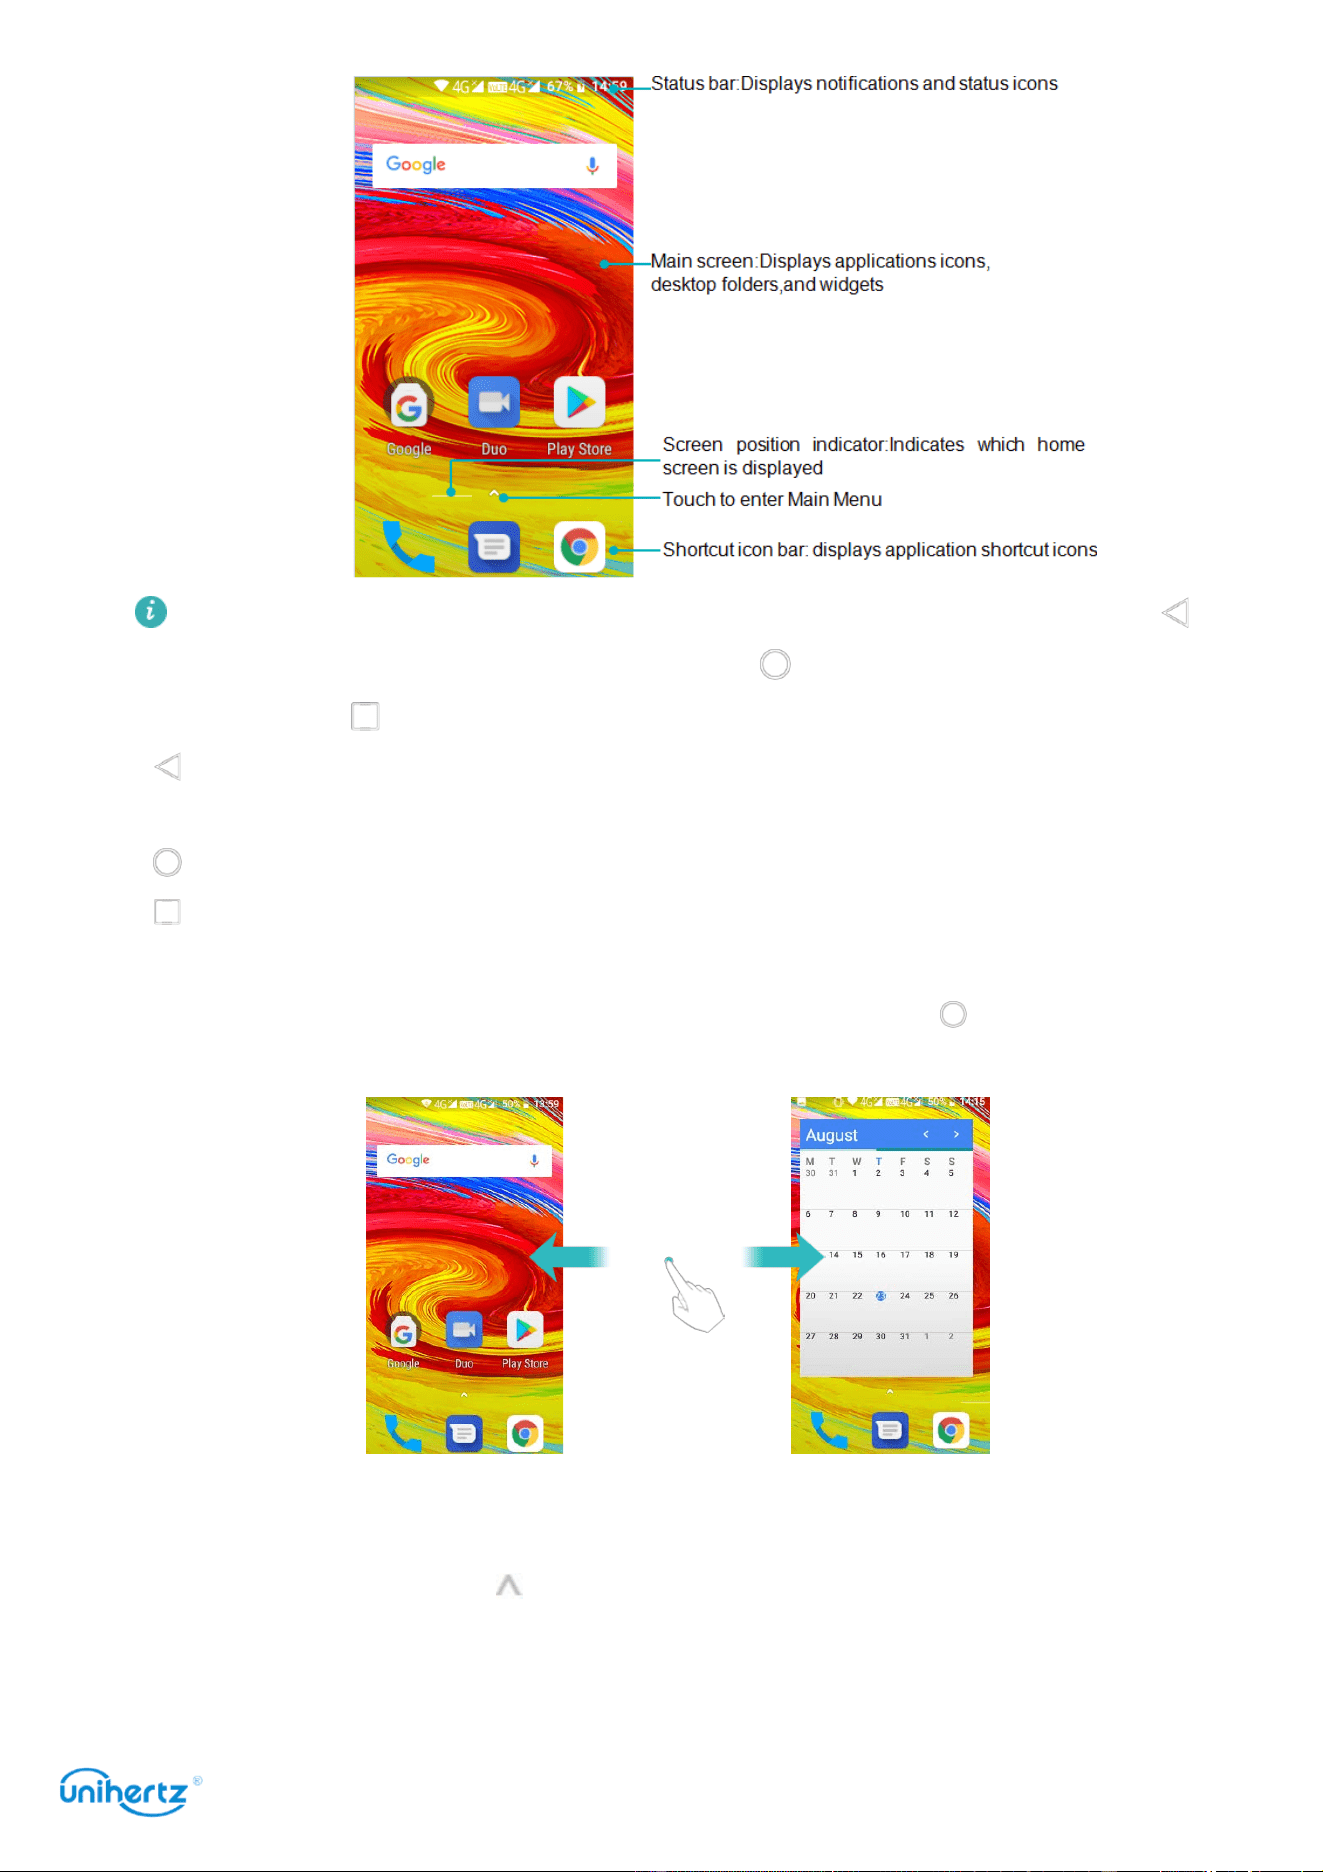
Home screen
Getting to know your home screen
Your home screens are where you can find your favorite widgets and your favorite
applications. The application list has been removed to give you a more convenient
and direct path to your applications.
Getting Started
19
For an explanation of TP button, The left button is the Back button, show as .
The middle button is the Home button, show as . The right button is the Recent
button, show as .
●
Back
: Touch to return to the previous screen or close an application. When
entering text, touch to close the onscreen keyboard.
●
Home
: Touch to return to the home screen.
●
Recent
: Touch to access the list of recently used applications.
Switching between home screens
Swipe left or right to view the extended home screens. Touch
Home
to return to
the default home screen.
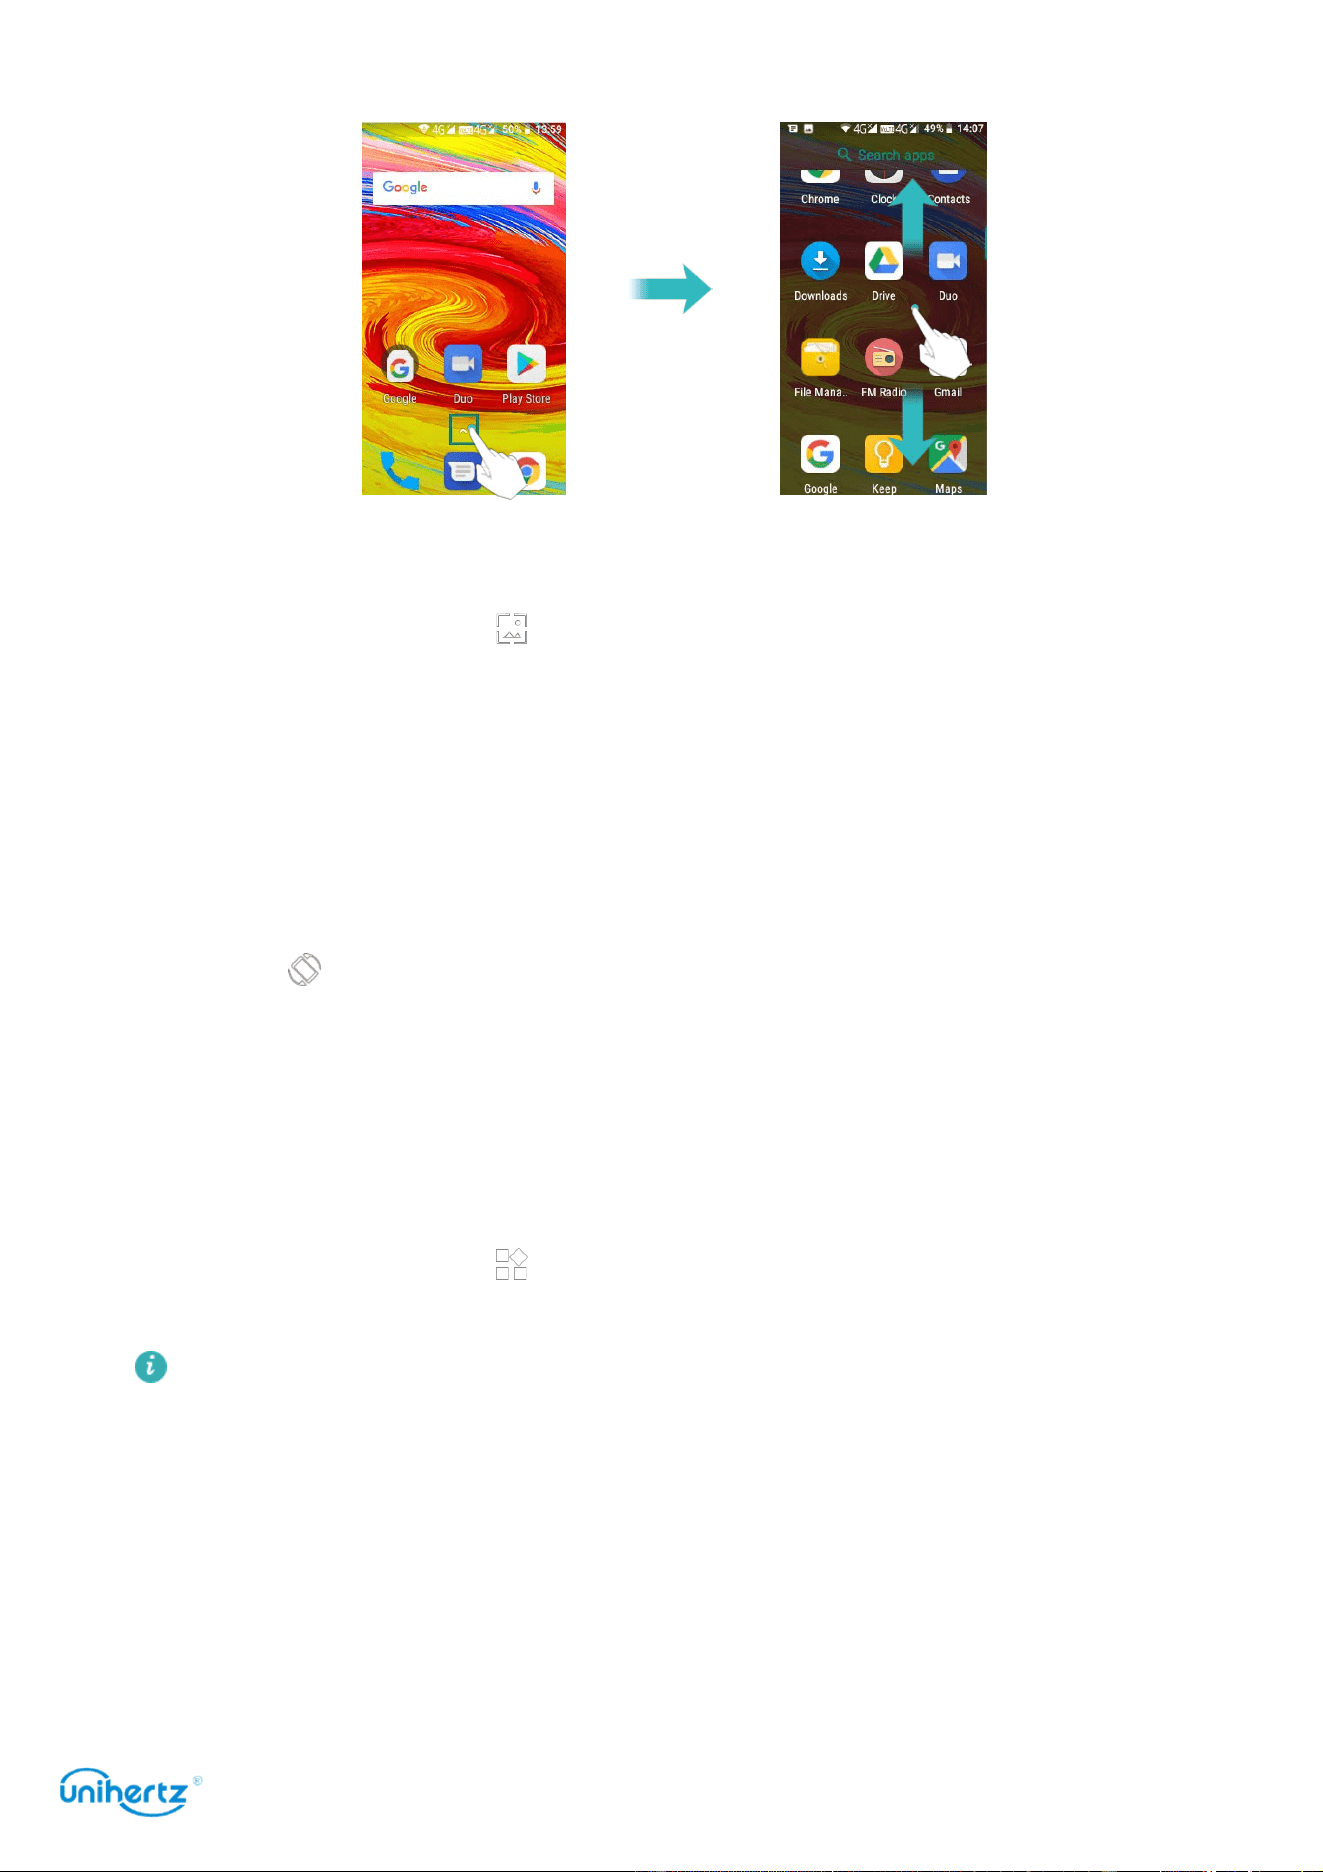
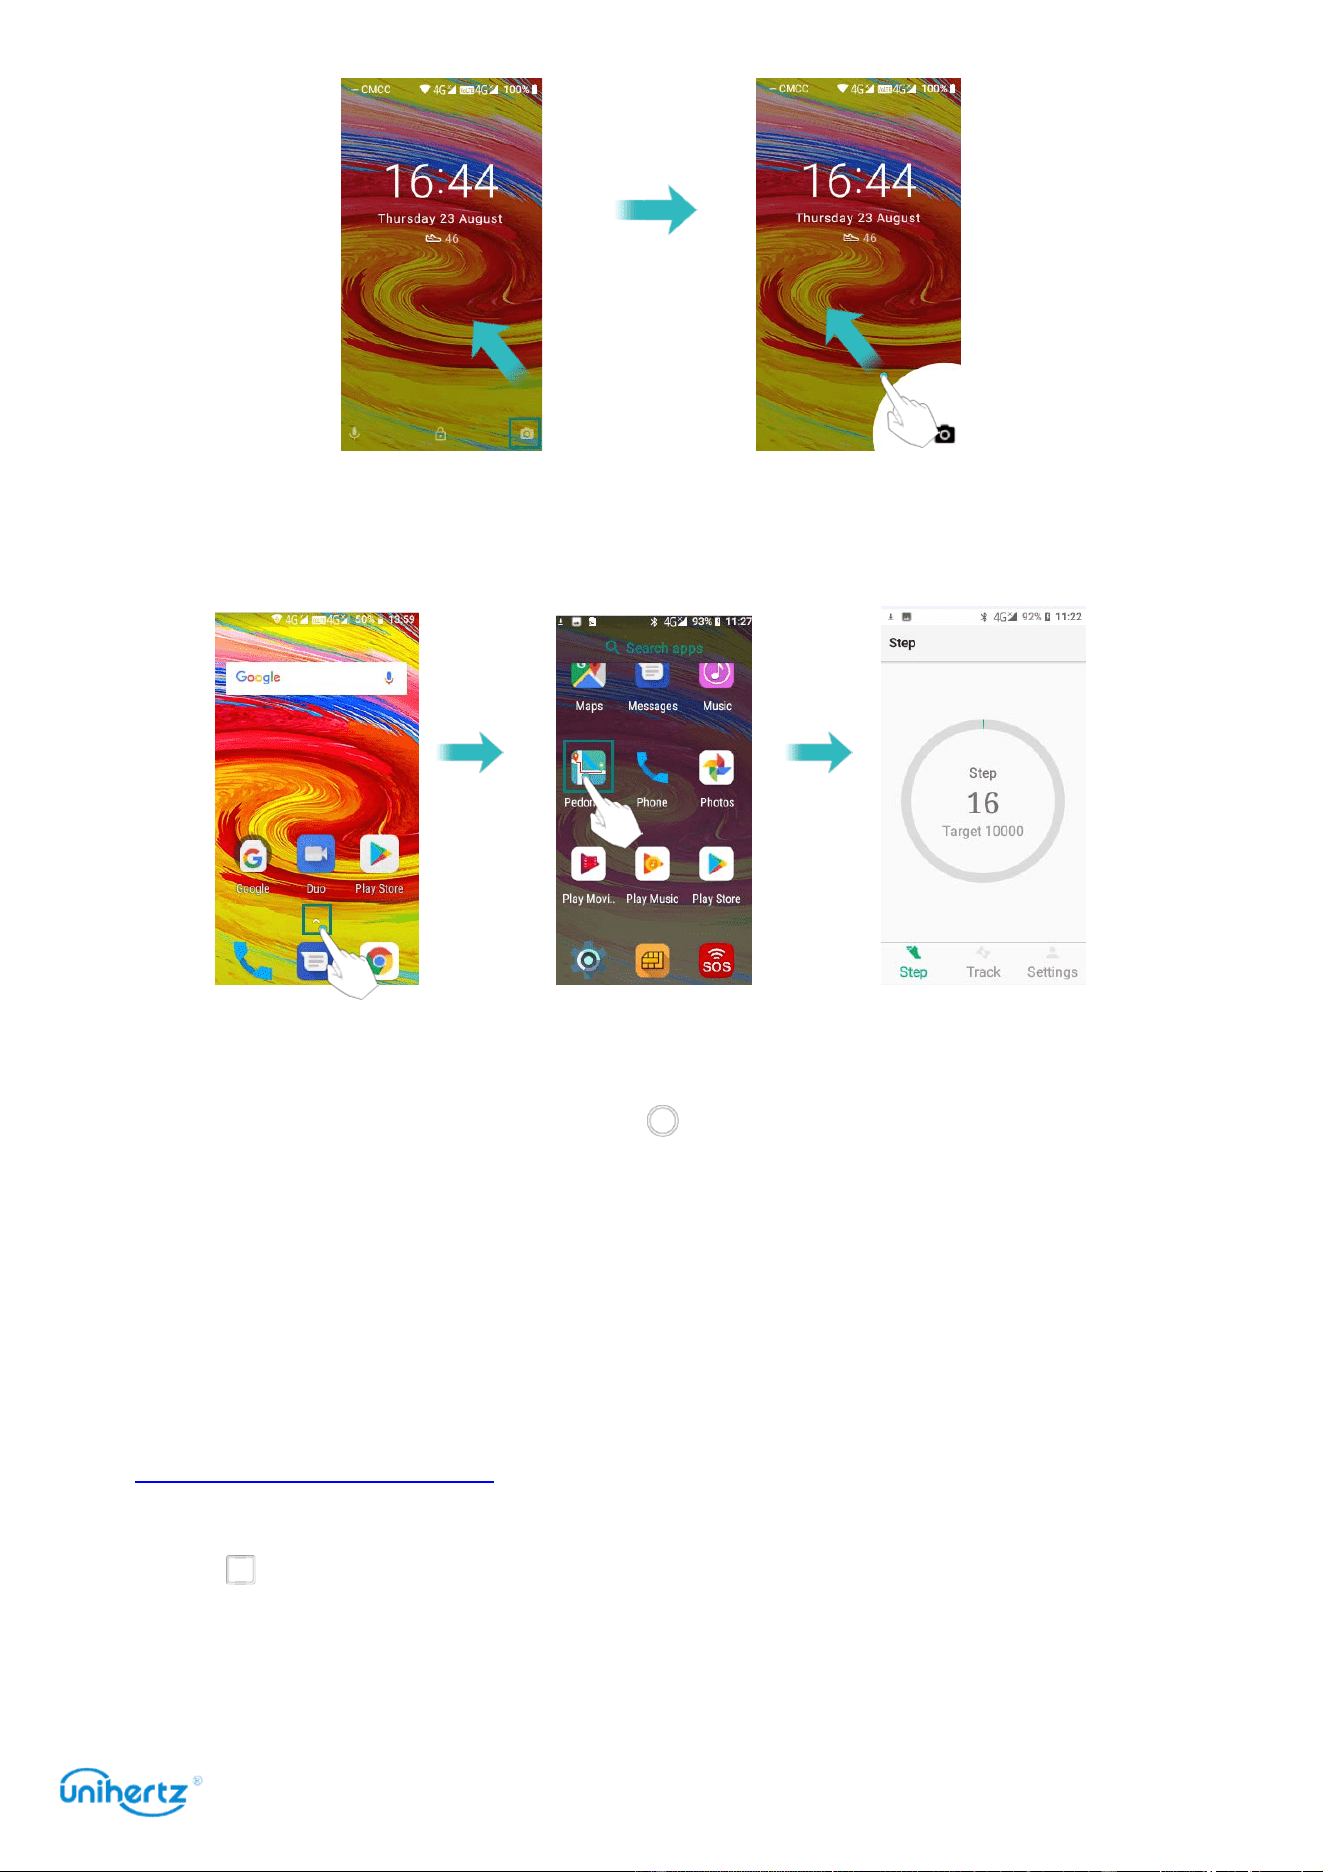
Enter Main Menu
On the home screen, touch to enter the main menu interface, slide the screen
up and down to preview the system presets and installed apps, select an APP icon
to enter the program
Getting Started
20
Change the wallpaper
On the home screen, touch and hold a blank area on the screen to access the
home screen editor. Touch
, in the
My photos
or
Wallpapers
tab, select an
image, and then follow the onscreen instructions to set it as the wallpaper.
Automatic screen rotation
When you rotate your phone, some applications will automatically adjust the
screen orientation to make them easier to use. This feature also lets you use tilt-
controlled applications.
Swipe down from the status bar to open the notification panel, and then touch
Auto-rotate
in the
Shortcuts
tab to enable or disable automatic screen rotation.
Organizing applications and widgets on the home screen
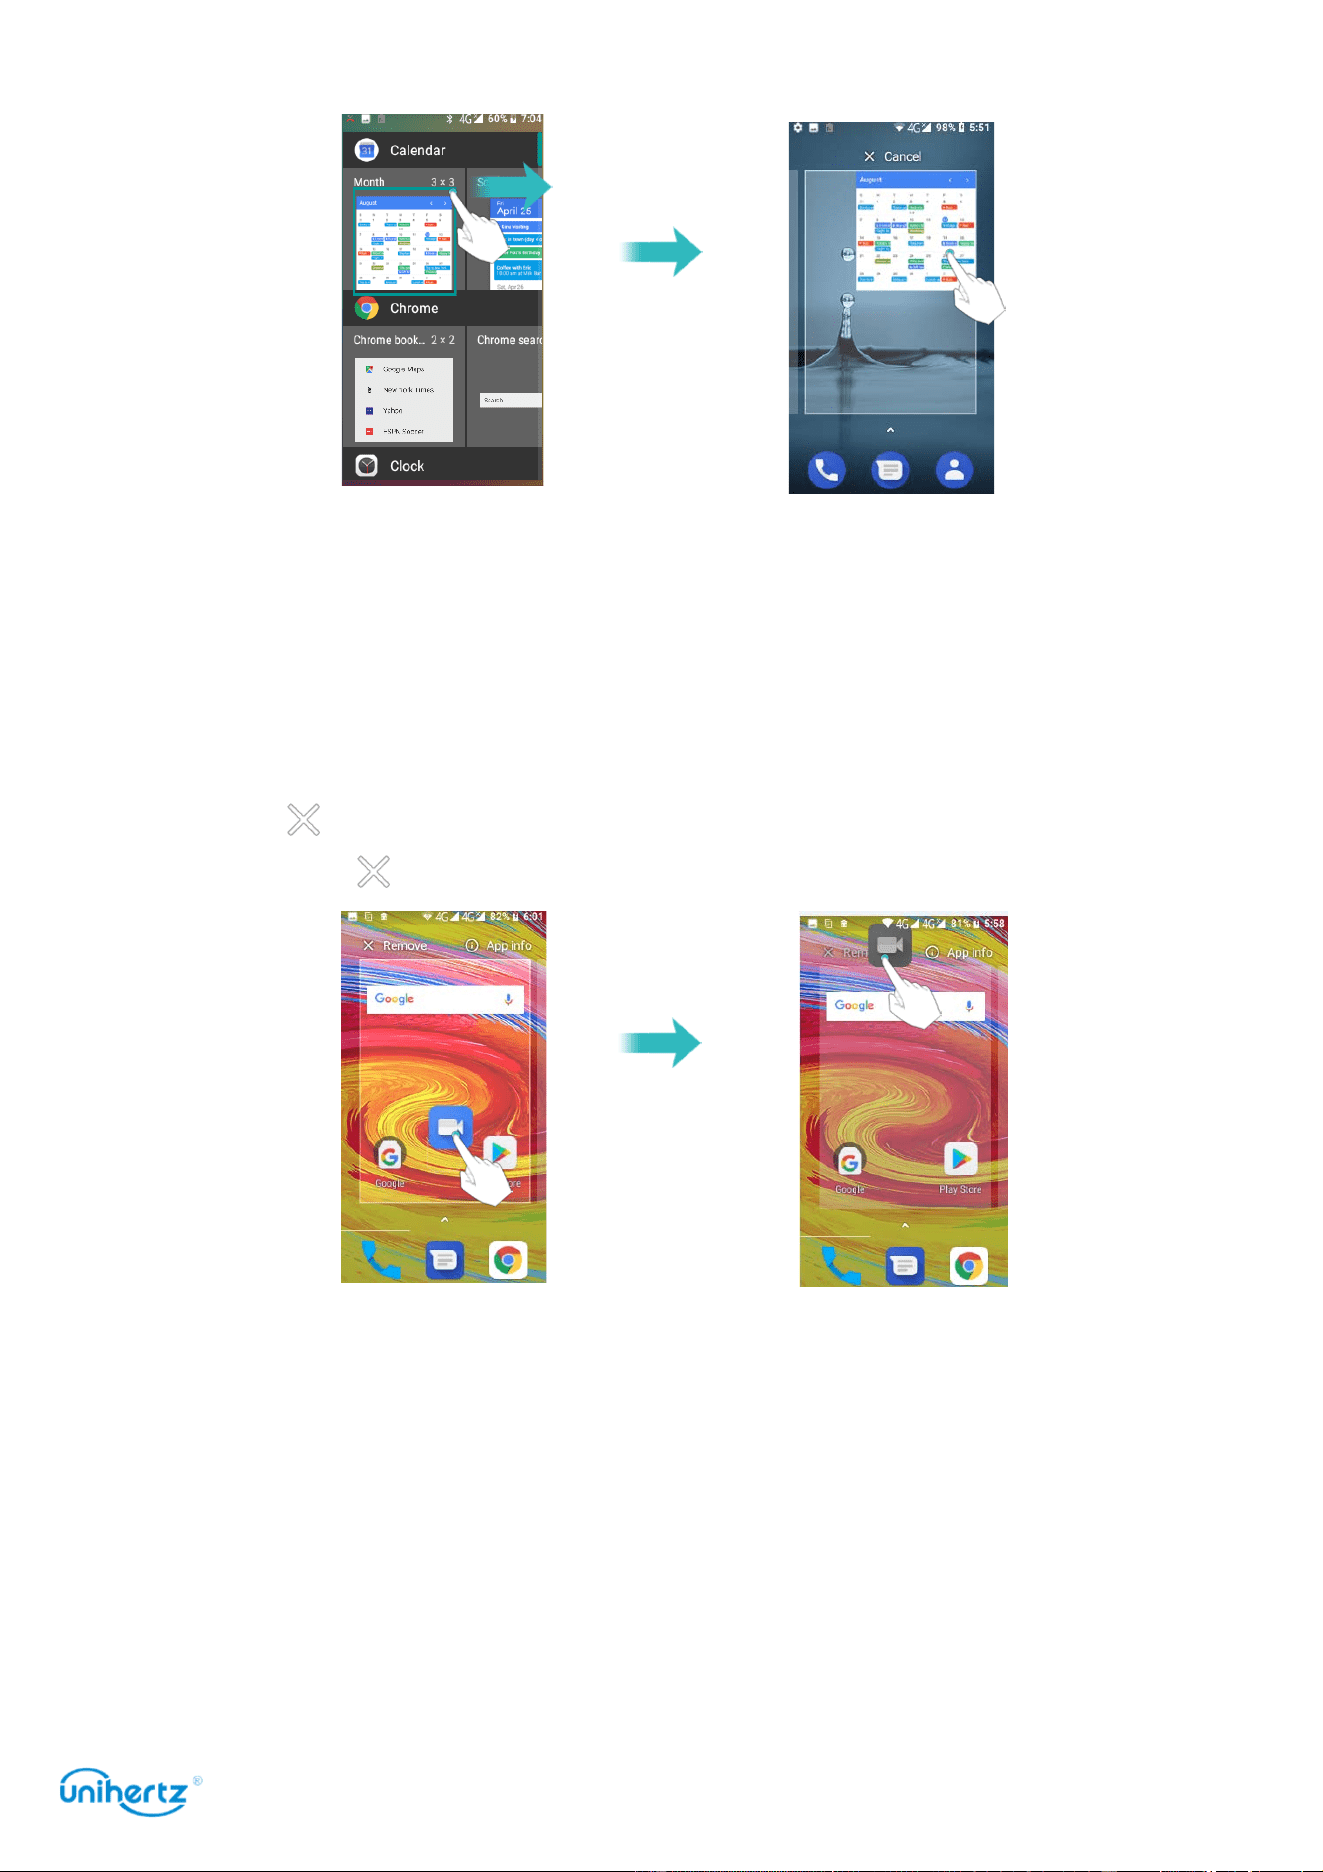
Adding a widget to the home screen
Add frequently used widgets to the home screen for quick access.
On the home screen, touch and hold a blank area on the screen to access the
home screen editor. Touch
Widgets
and select a widget. Touch and hold the
widget and drag it to a blank area on the home screen.
You must have enough space on the home screen to add widgets. If there is
not enough space, add another home screen or free up some space.
Getting Started
21
Moving a widget or icon
On the home screen, touch and hold an application icon or widget until your phone
vibrates. You can then drag the application icon or widget to the desired location.
Deleting a widget or icon
On the home screen, touch and hold the application icon or widget you want to
delete until is displayed at the top of the screen. Drag the unwanted application
icon or widget to .
Creating a folder
Create home screen folders to organize your applications by type. For example,
you can create a Games folder that contains all of your game applications.
On the home screen, drag an icon on top of another icon to create a folder
containing both applications. To rename the folder, open the folder, and then touch
the folder name.

Getting Started
22
Taking a screenshot
Your phone comes with a range of screenshot options. Capture the entire screen
or draw a shape on the screen to take a partial screenshot.
Using the power and volume down buttons
Press the power and volume down buttons at the same time to take a full
screenshot.
By default, screenshots are saved to the
Pictures
>
Screenshots
folder in
storage
.
Notifications
Status indicator
The status indicator changes color and flashes to indicate the following:
● Steady red (not charging): The battery level is critically low and the phone will
turn off automatically.
● Steady red (when charging): The battery level is critically low.
● Steady green (when charging): The battery is almost full or already full. Unplug
Getting Started
23
the charger when the battery level reaches 100%.
● Flashing green or other color (not charging): You have unread messages,
notifications, or missed calls.
Notification badges
Notification badges appear in the top right corner of application icons.
The badge number indicates the number of new notifications. Open the
corresponding application to view more details about the notifications.
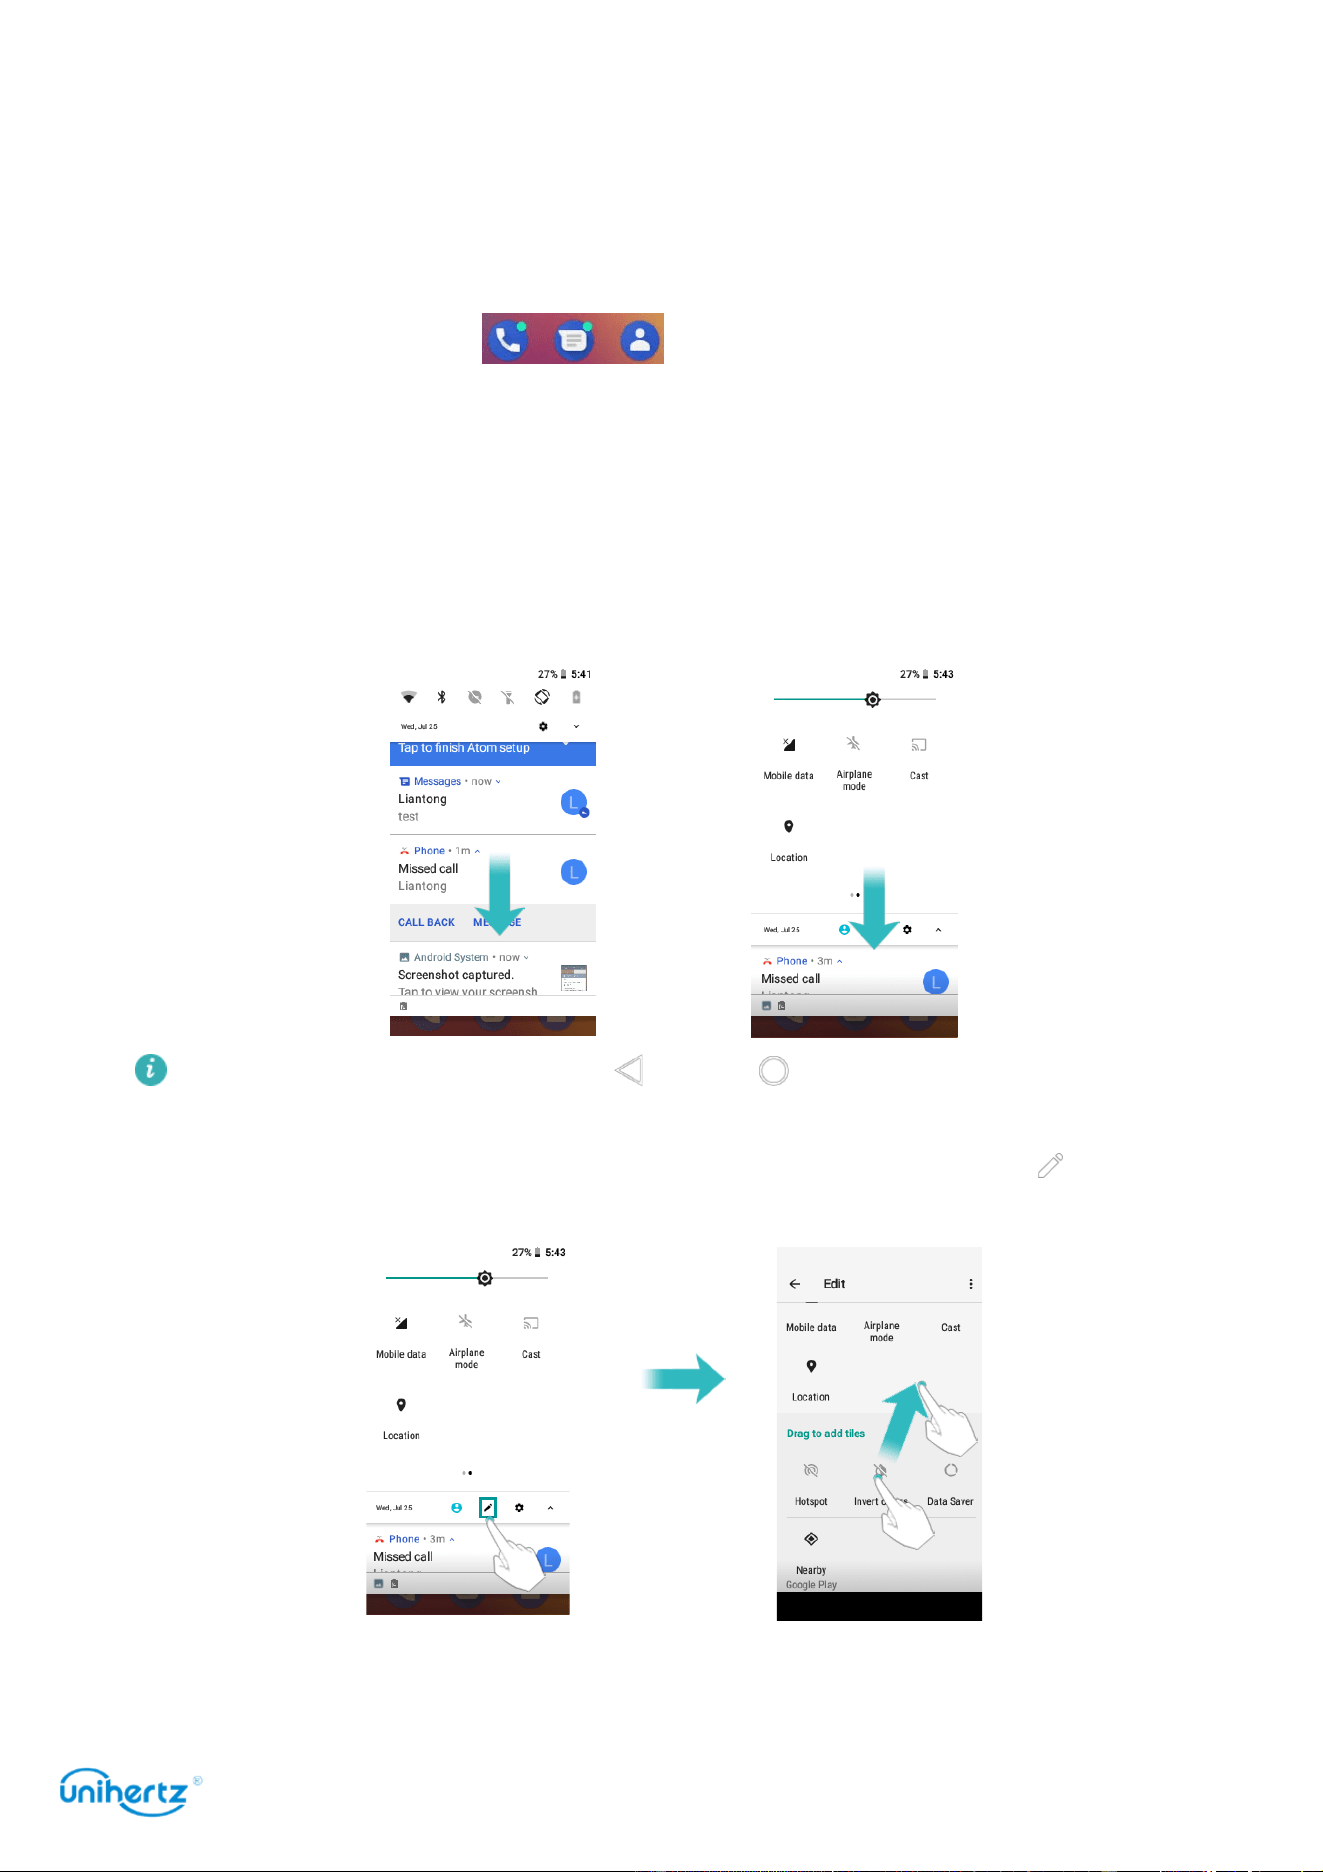
Notification panel
Swipe down from the status bar and open the notification panel to view
notifications. Swipe down continue on the notification panel to go to the shortcuts
panel.
Swipe up on the screen, or touch
Back
or
Home
to close the notification
panel.
Customize shortcut switches: On the shortcuts panel, and then touch . Drag the
shortcut switch to the desired location for easier access.
Viewing notifications on the lock screen
New notifications (such as missed calls and messages) are displayed on the lock

Getting Started
24
screen.
Swipe right on the lock screen notification to view its details.
By default, your phone will only display lock screen notifications for certain
applications.
Managing notification permissions
Disable notifications for an application to prevent unnecessary disturbances.
1 Open
Settings
2 Touch Apps&
Notifications
, and then select the desired application.
3 Enable or disable notification settings as desired.
Display notifications in do not disturb mode
: Select the desired application in
Notification
, and then turn on the Override
Do Not Disturb
switch. Notifications will
still be displayed when
Allow only priority interruptions
is enabled in do not disturb
mode.
You cannot access the notification panel from the lock screen if you have set a
screen lock password.
Accessing applications
Opening and switching between applications
Opening applications from the lock screen
Touch and swipe up on the lock screen to launch the camera application. You
can also touch a shortcut icon and swipe up from the bottom of the screen to
quickly launch the corresponding application.
Getting Started
25
Opening an application from the home screen
On the home screen, touch an icon to open the corresponding application.
Switching between applications
To switch to another application, touch
Home
to return to the home screen, and
then touch the icon of the application you want to open.
Searching for applications
Finding applications
Touch the search bar, and then enter the name of an application. The search
results will be displayed underneath the search bar. For more information, see
Finding applications quickly.
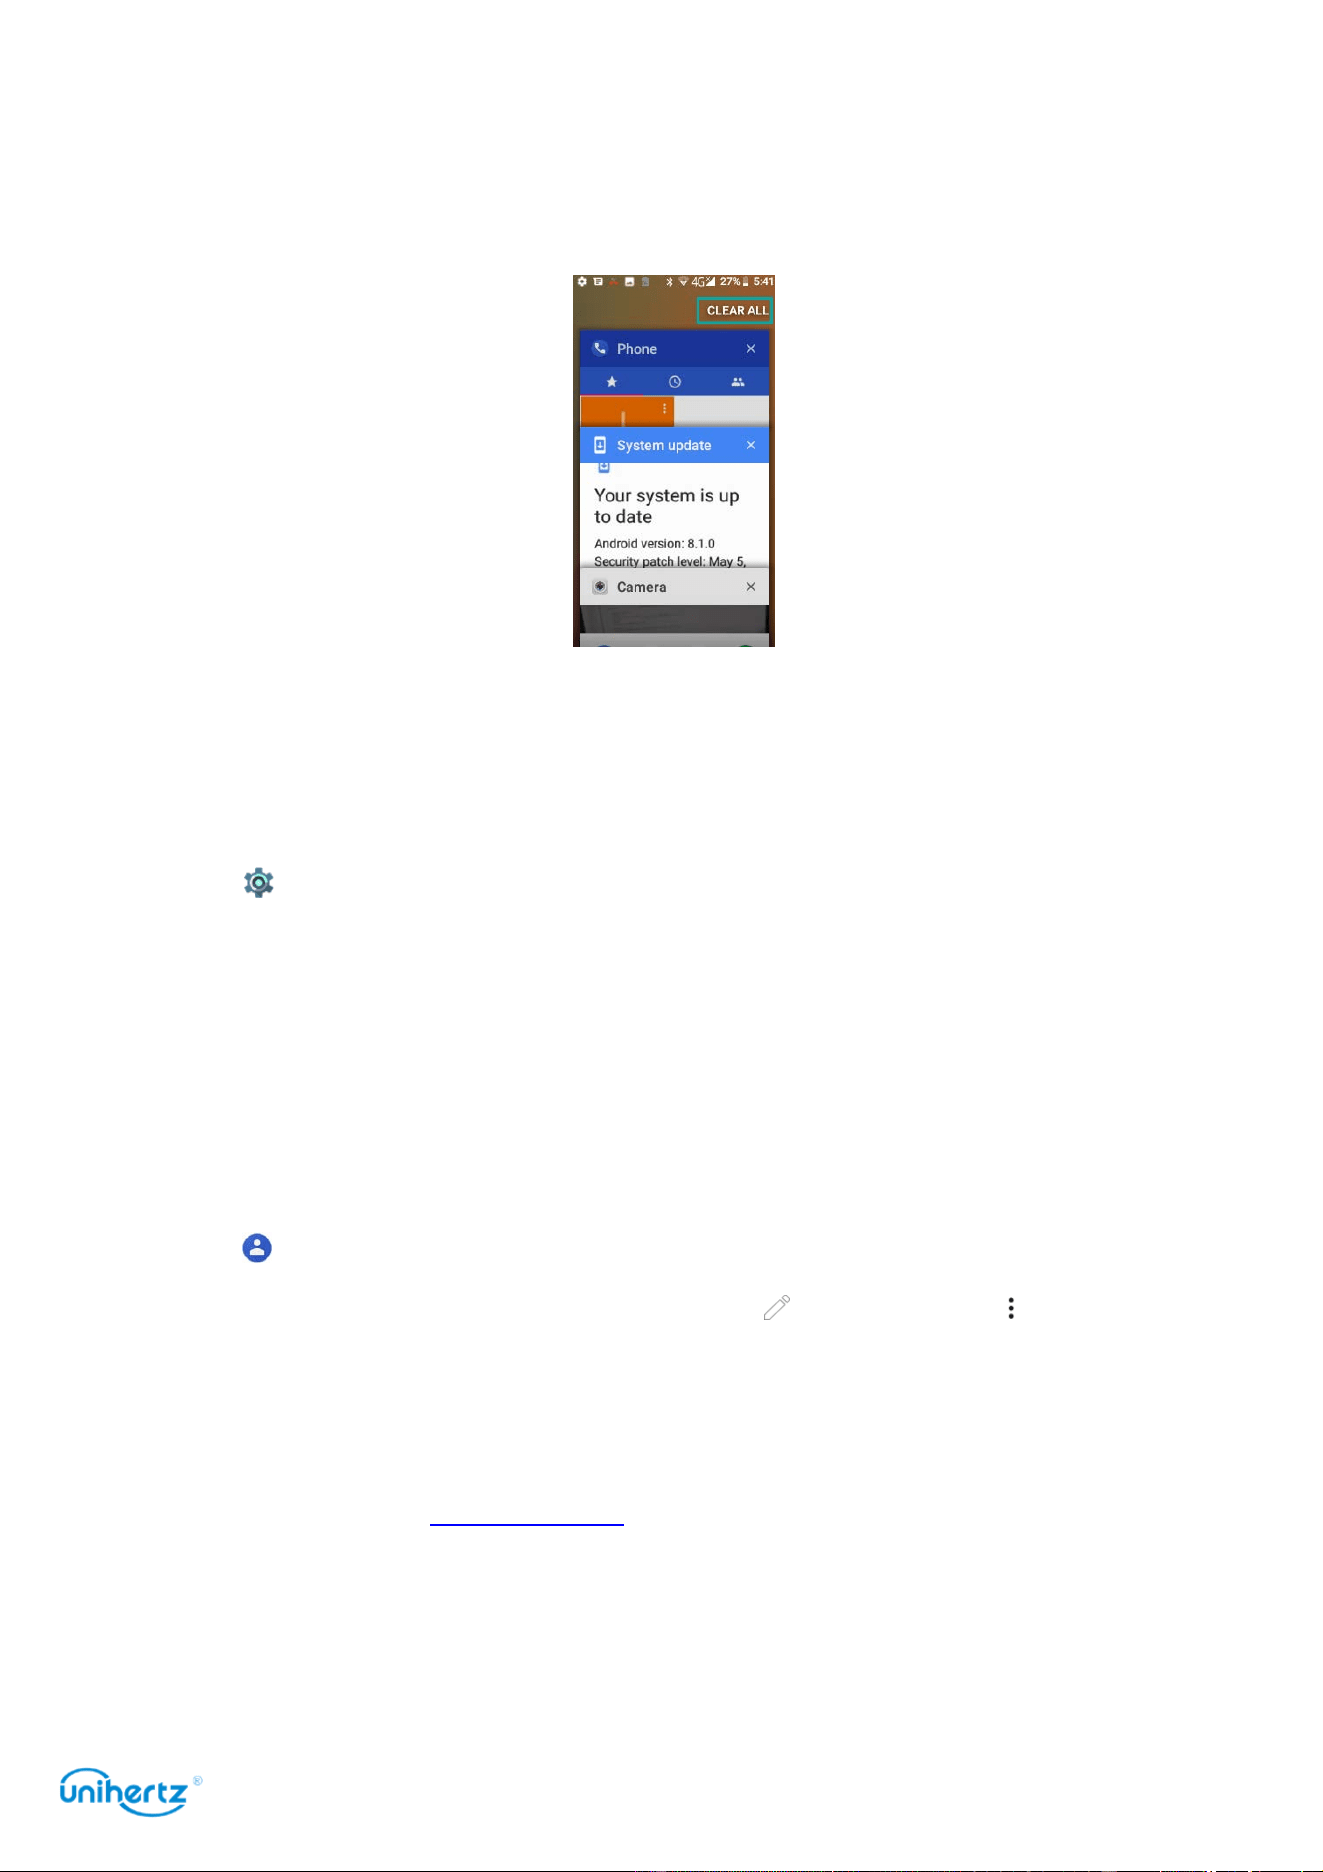
Viewing recently used applications
Touch
Recent
to display the list of recently used applications.
●
View more applications
: Swipe up or down on the screen to view more recently
used applications.
●
Open an application
: Touch a thumbnail to open the corresponding application.
Getting Started
26
●
Close an application
: Swipe left or right on a thumbnail to close the
corresponding application
●
Close all applicatio
n: Swipe to the toppest of the screen, touch
Clear all
to
close all applications.
Personalizing your phone
Changing the wallpaper
Set your favorite images or photos as your phone's wallpaper.
1 Open
Settings
and select
Display
.
2 Touch
Wallpaper
, select an image from
Photos
/
Wallpapers
.
3 Follow the onscreen instructions to set it as the wallpaper.
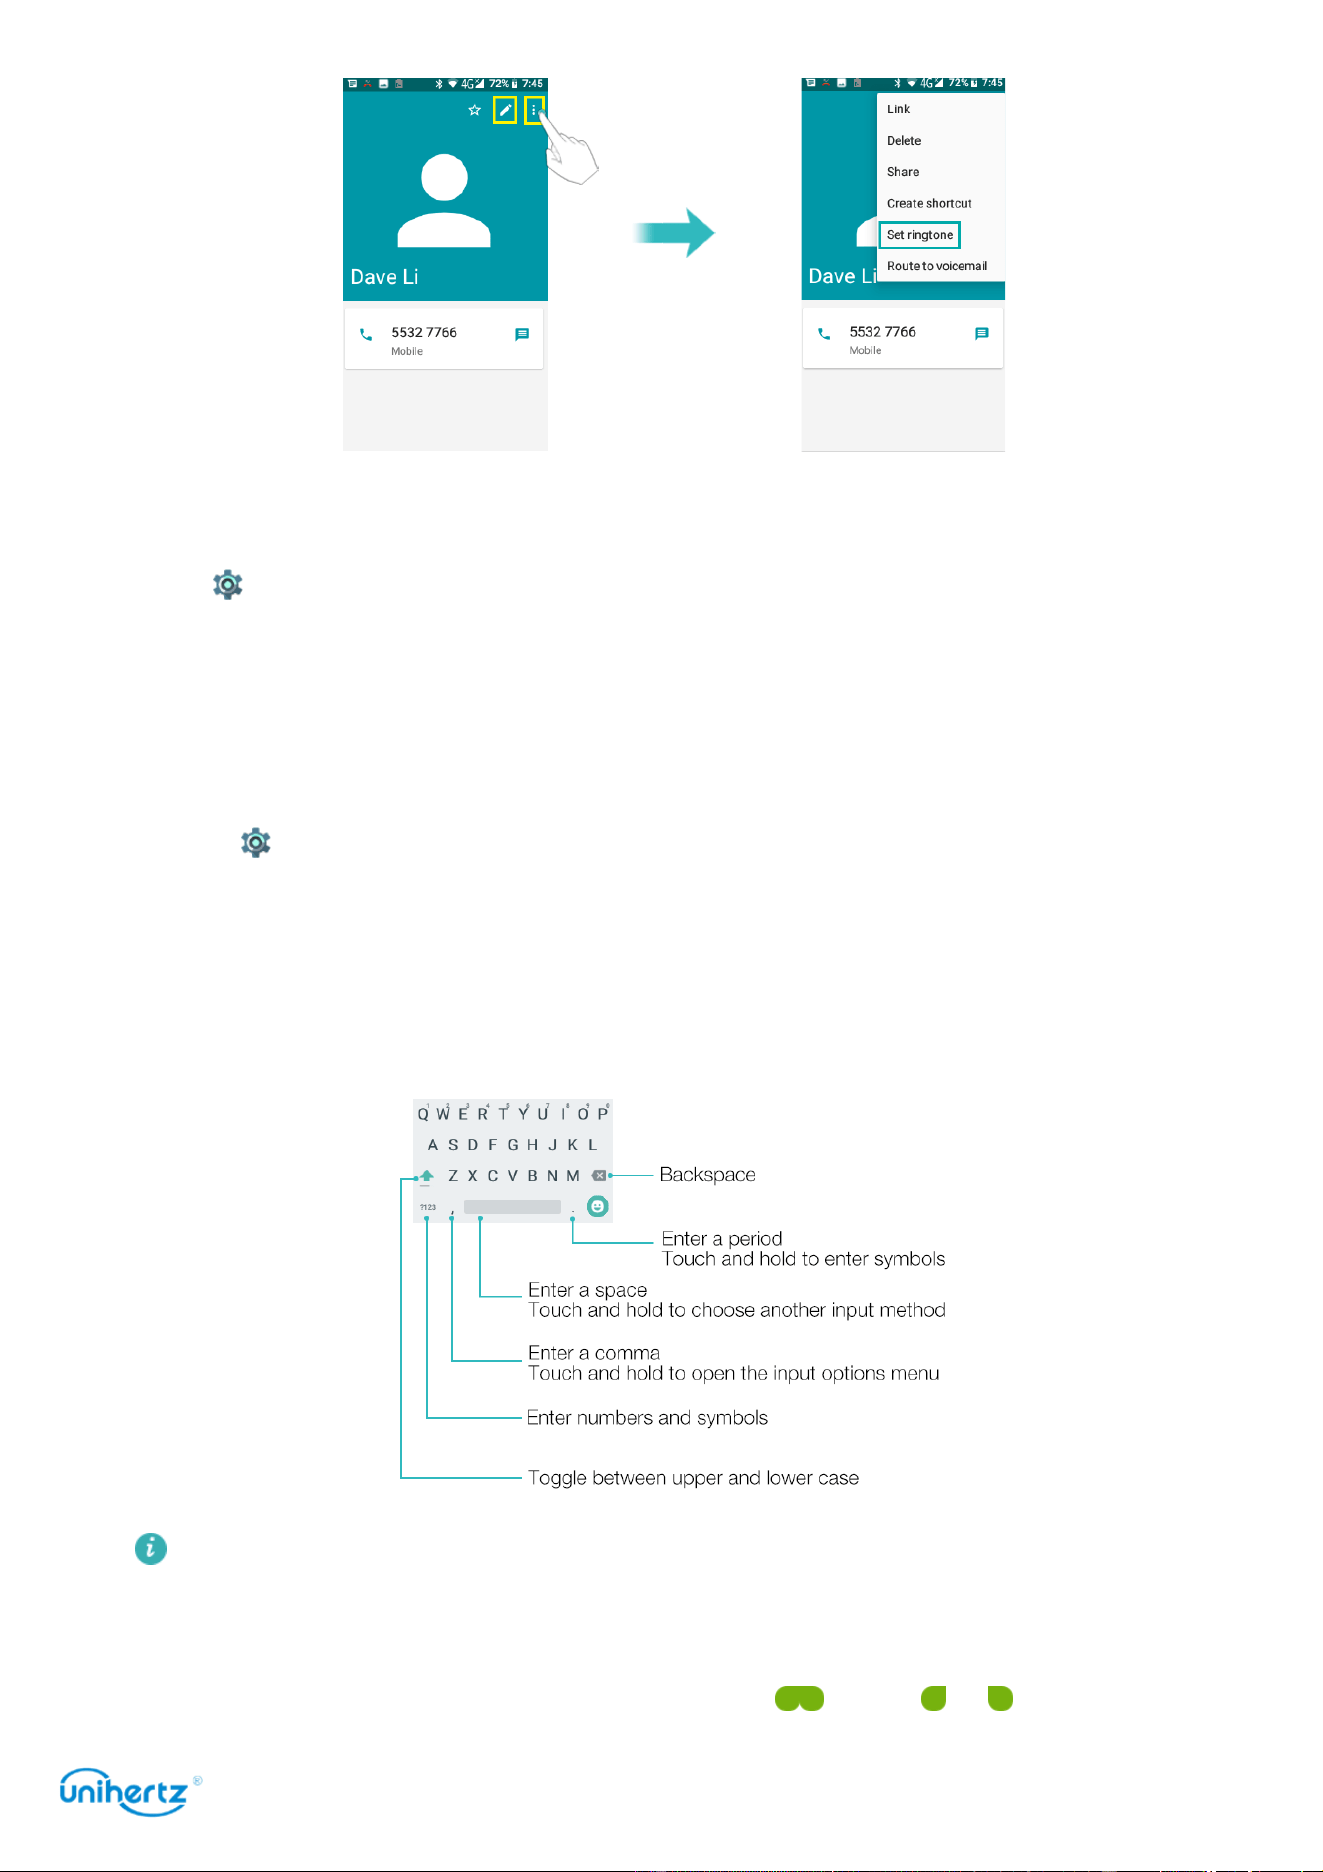
Assigning a ringtone to a contact
Assign a unique ringtone to each contact so that you can easily tell who is
contacting you.
1 Open
Contacts
.
2 Select the existence of native contacts, touch and then touch ,
Phone
ringtone
.
3 Select
Set ringtone
and then choose the desired ringtone or music file.
For more information on how to configure call and message ringtones and
vibration settings, see Sound settings.
Getting Started
27
Changing the font size
The phone's font size can be increased to make words easier to read.
Open
Settings
, and then touch
Display
>
Font size
to set the system font size.
Entering text
Switching text input methods
Switch between text input methods as desired.
1 Open
Settings
, Touch
Language & input
>
Virtual keyboard
>
Manage
keyboards
.
2 Turn on the switch next to the corresponding input method.
3 Choose the desired input method.
Gboard input method
The Gboard input method supports a wide range of languages.
Editing text
You can select, cut, copy, and paste text on your phone.
●
Select text
: Touch and hold the text to bring up . Drag or to select more

Getting Started
28
or less text, or touch
Select all
to select all text.
●
Copy text
: Select text and touch
Copy
.
●
Cut text
: Select text and touch
Cut
.
●
Paste text
: Touch and hold where you want to insert the text, and then touch
Paste
.
●
Share text
: Select text, and then touch
Share
to select a sharing method.
Tips and Ticks
29
Tips and Tricks
High volume mode
Press the volume up button repeatedly during a call to increase the call volume
above the usual maximum.
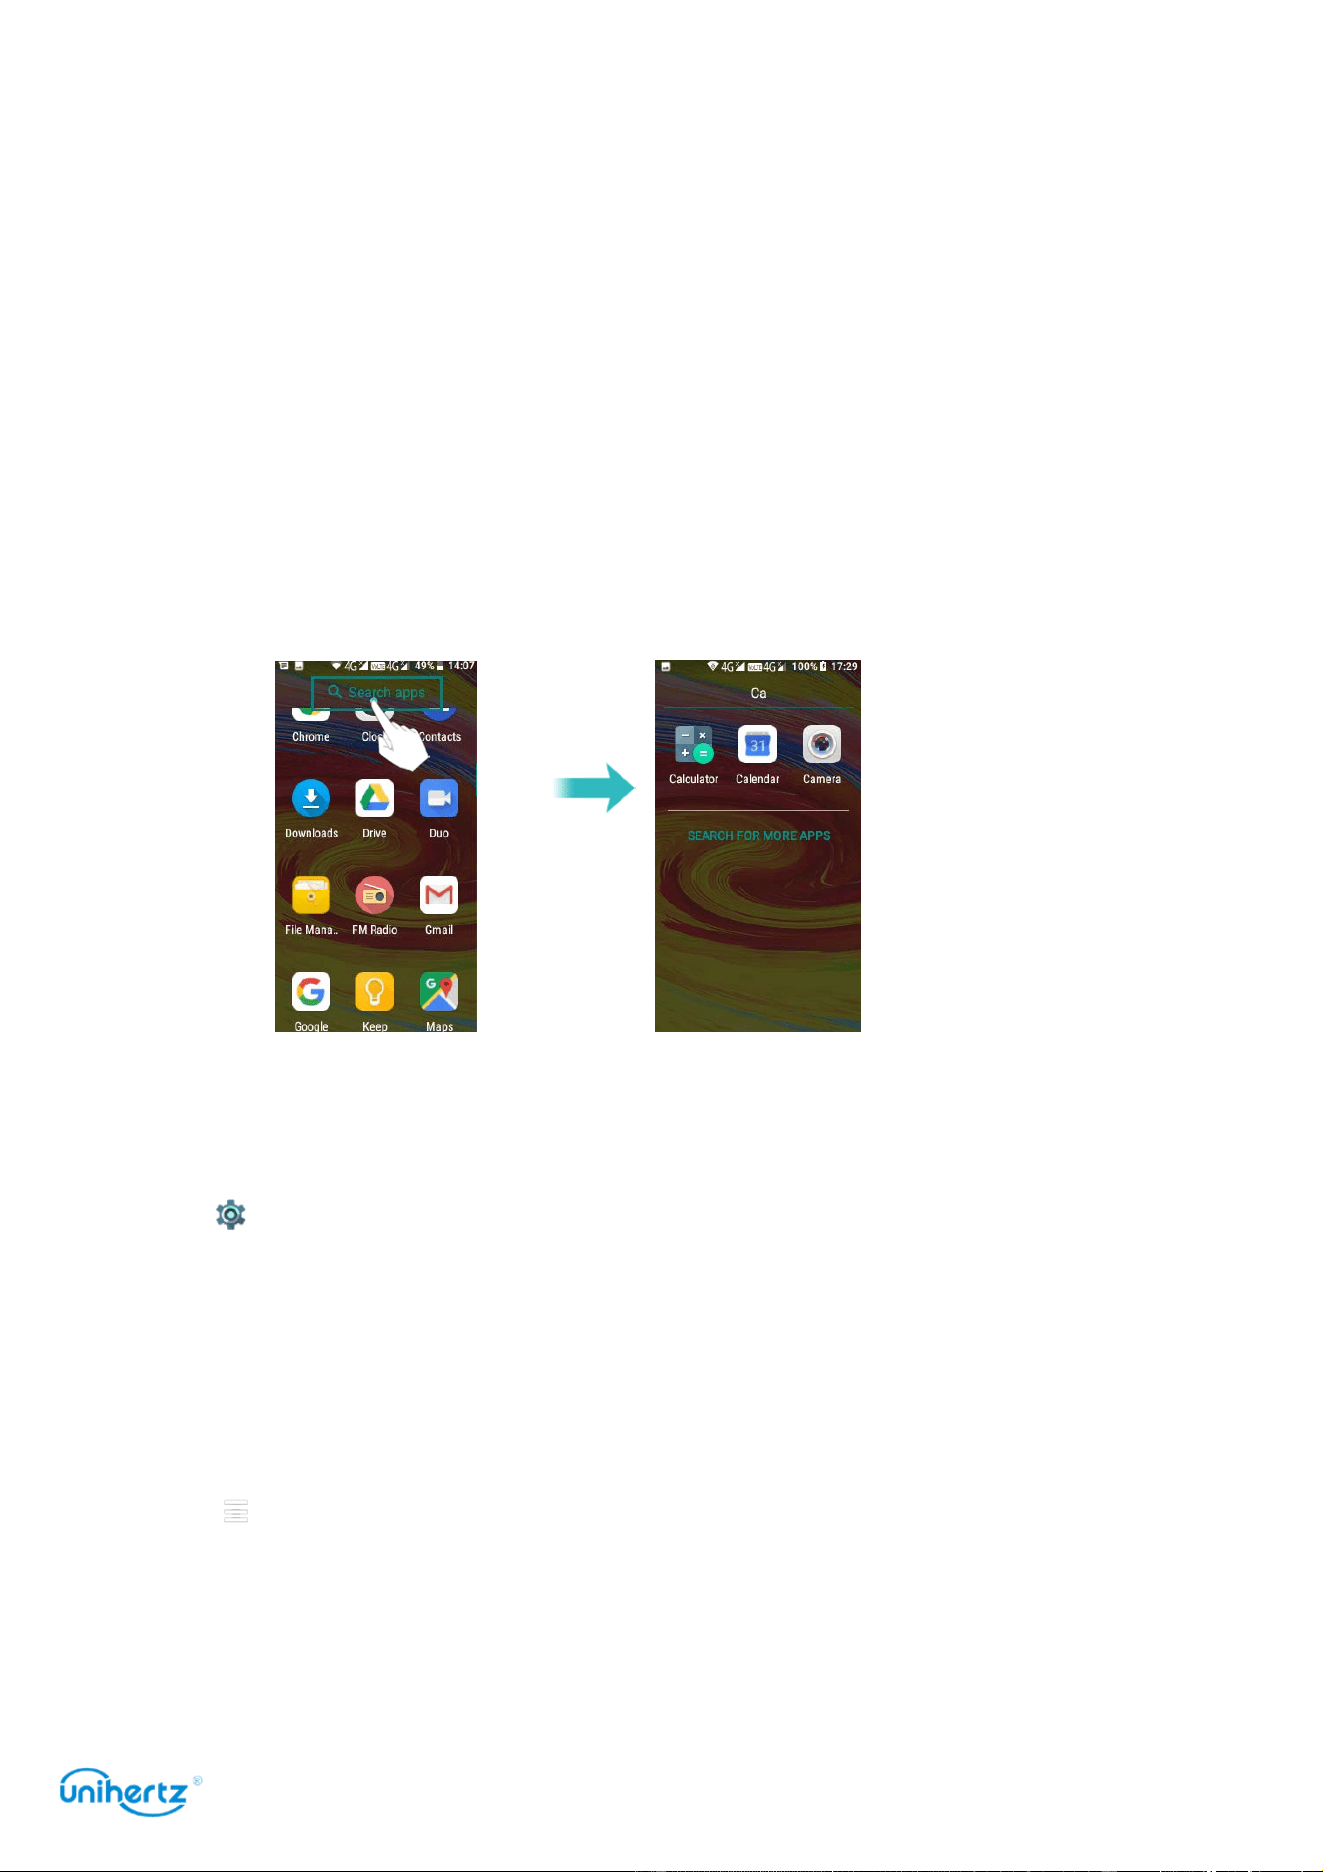
Finding applications quickly
Use the search feature to quickly find an application.
Touch the search bar, and then enter the name of an application and then enter
the name of the application that you are looking for. The search results will be
displayed underneath the search bar.
Searching for settings
Use the search feature in Settings to search for menu options.
Open
Settings
, and then touch the search box at the top of the screen and
enter a search term (such as Sound). Your phone will display the search results;
touch an option to access the corresponding setting.
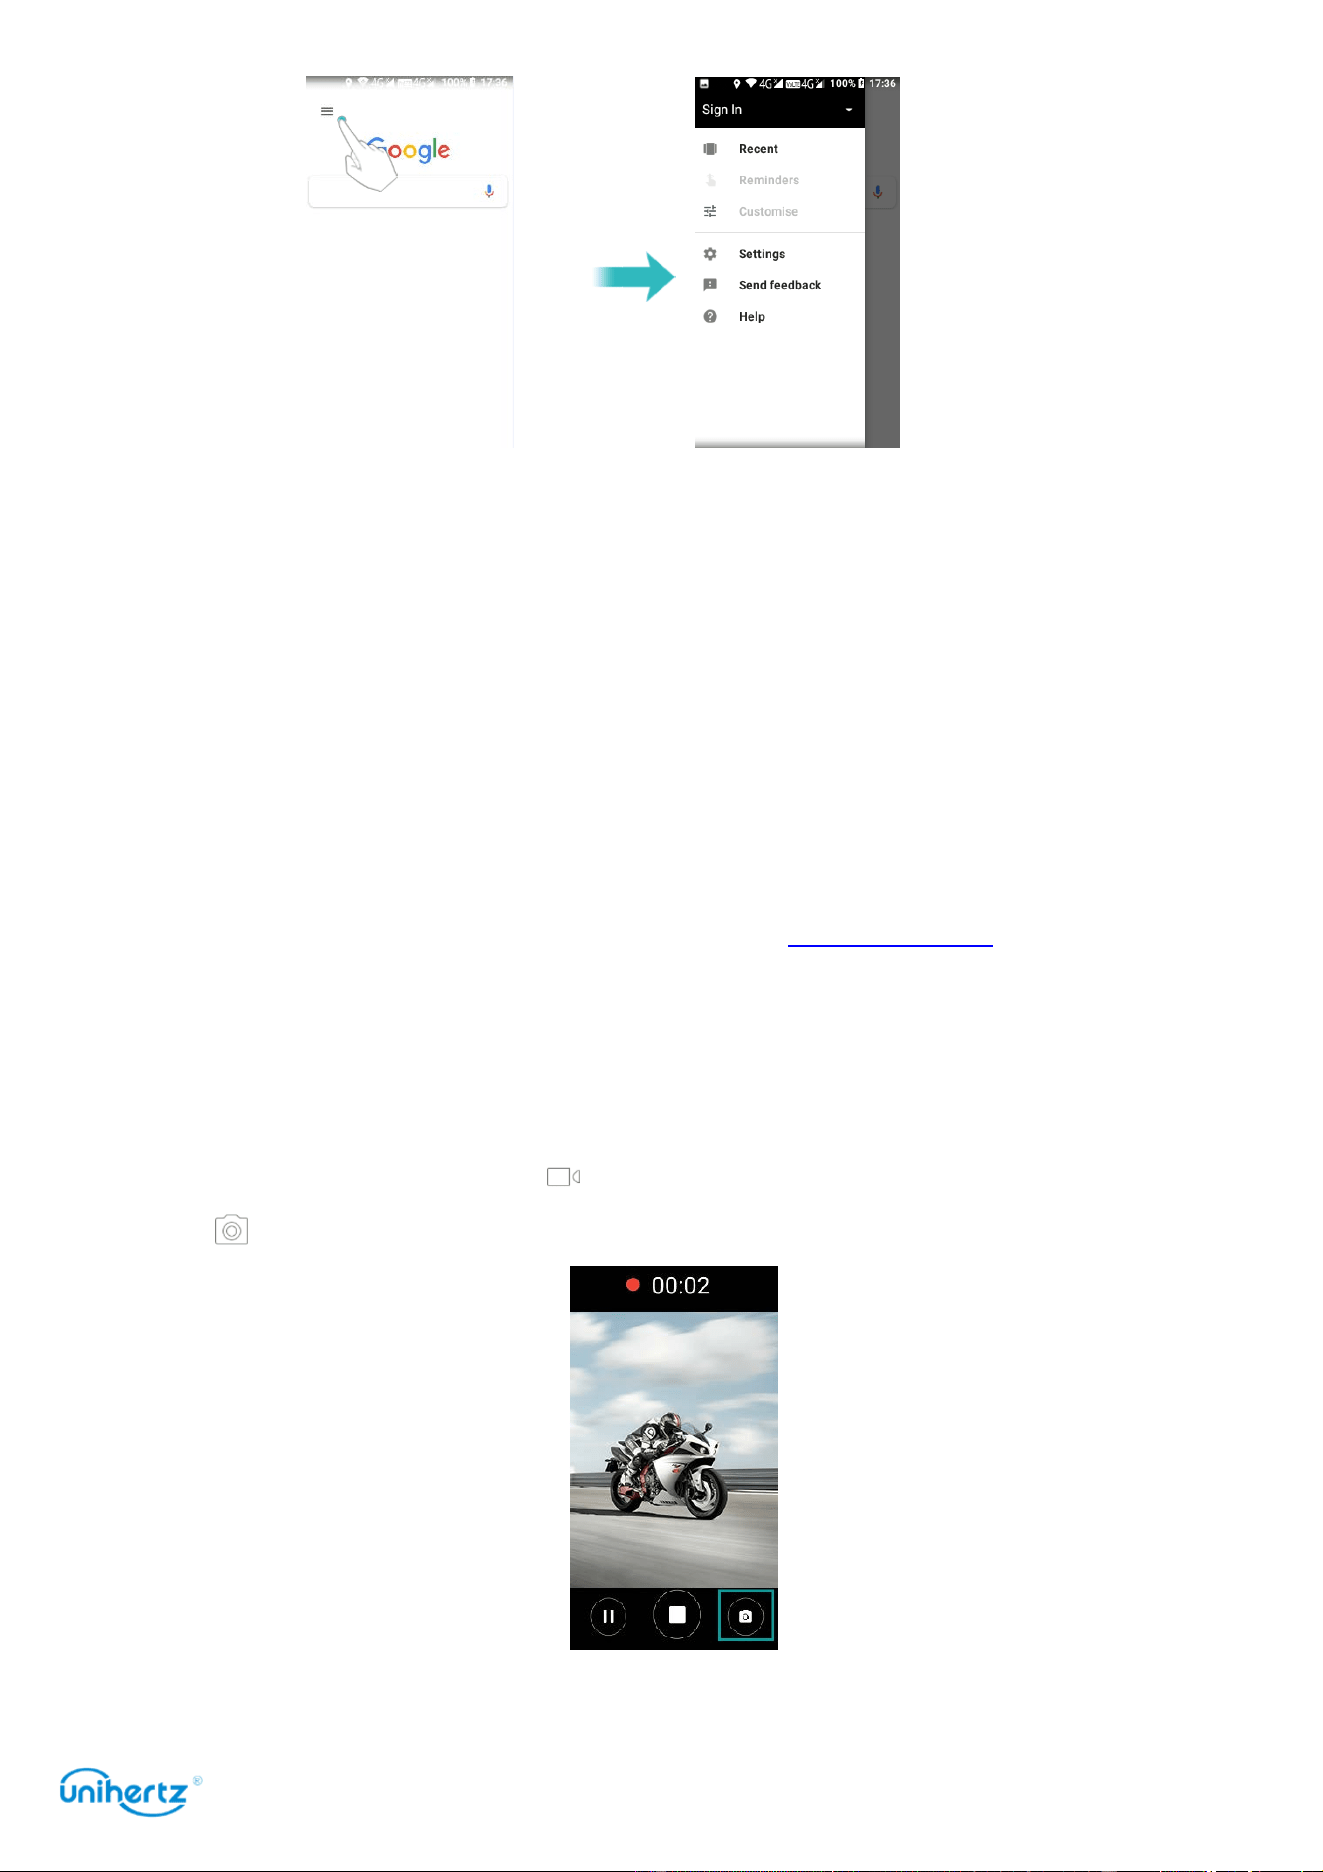
Quickly sign in a Google account
On the home screen, swipe the screen to the right to quickly access
Google search
,
Touch , quickly login to Google account, and personalize your account.
Tips and Ticks
30
Quickly returning a call
On the lock screen, double touch on a missed call notification and unlock the
screen. The dialer screen will be displayed; touch the corresponding number to
return the call.
Quickly enter an application
You can customize the PTT button function on the right side of the phone, turn on
the switch, select an app in the list, press this button in any interface to quickly
enter the selected app. For more information, see Smart Assistant >Shortcut
button.
Taking photos while recording video
Ever wanted to take a photo during a video recording?
On the camera interface, touch to start a video recording. While recording video,
touch to take a photo.
Tips and Ticks
31
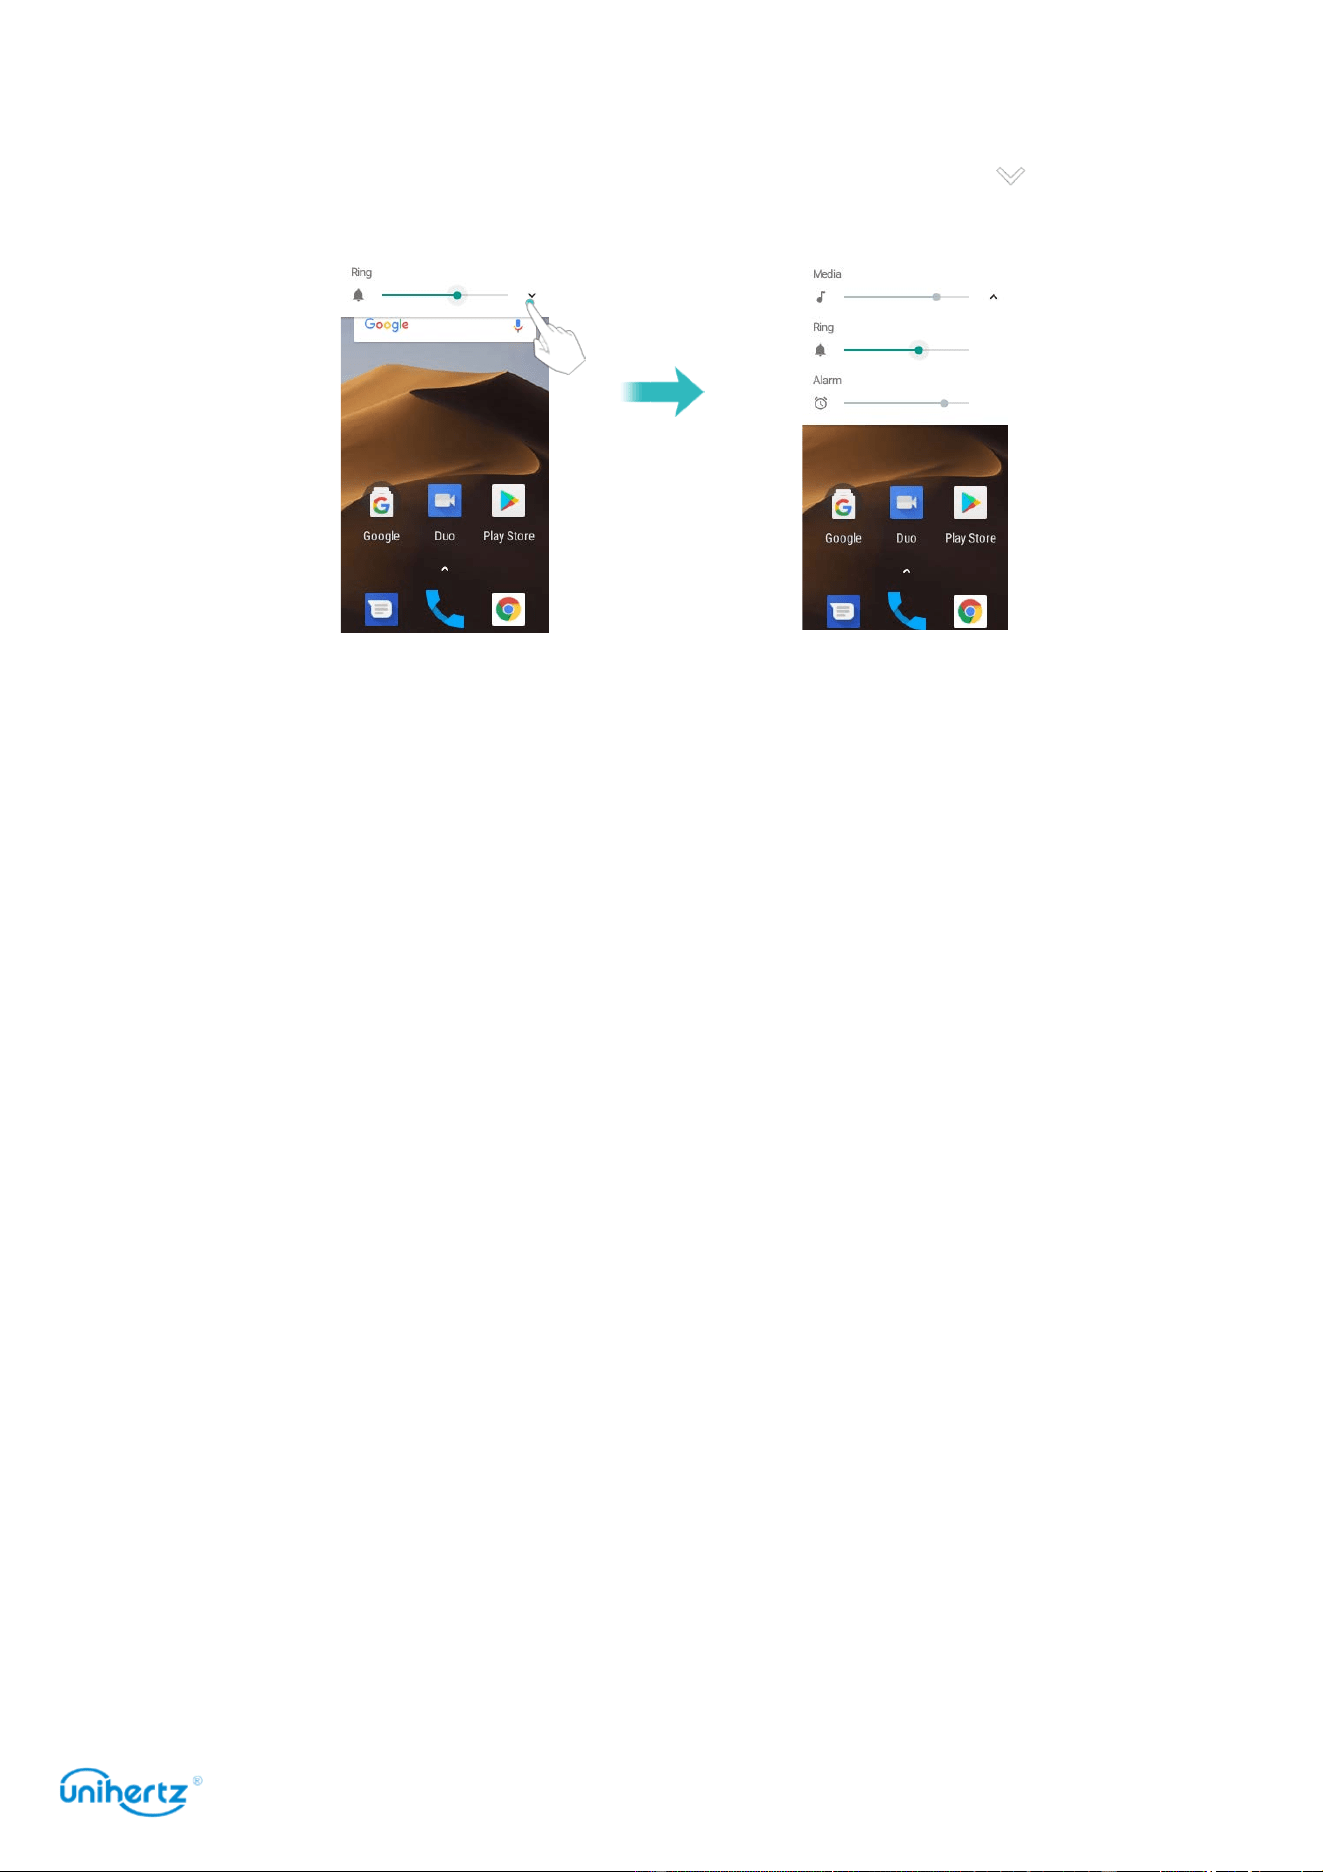
Adjusting the system volume rapidly
Press the volume button on the side of the phone, and then touch to adjust the
ringtone, multimedia, alarm, and call volume.
Calls and Contacts
32
Calls and Contacts
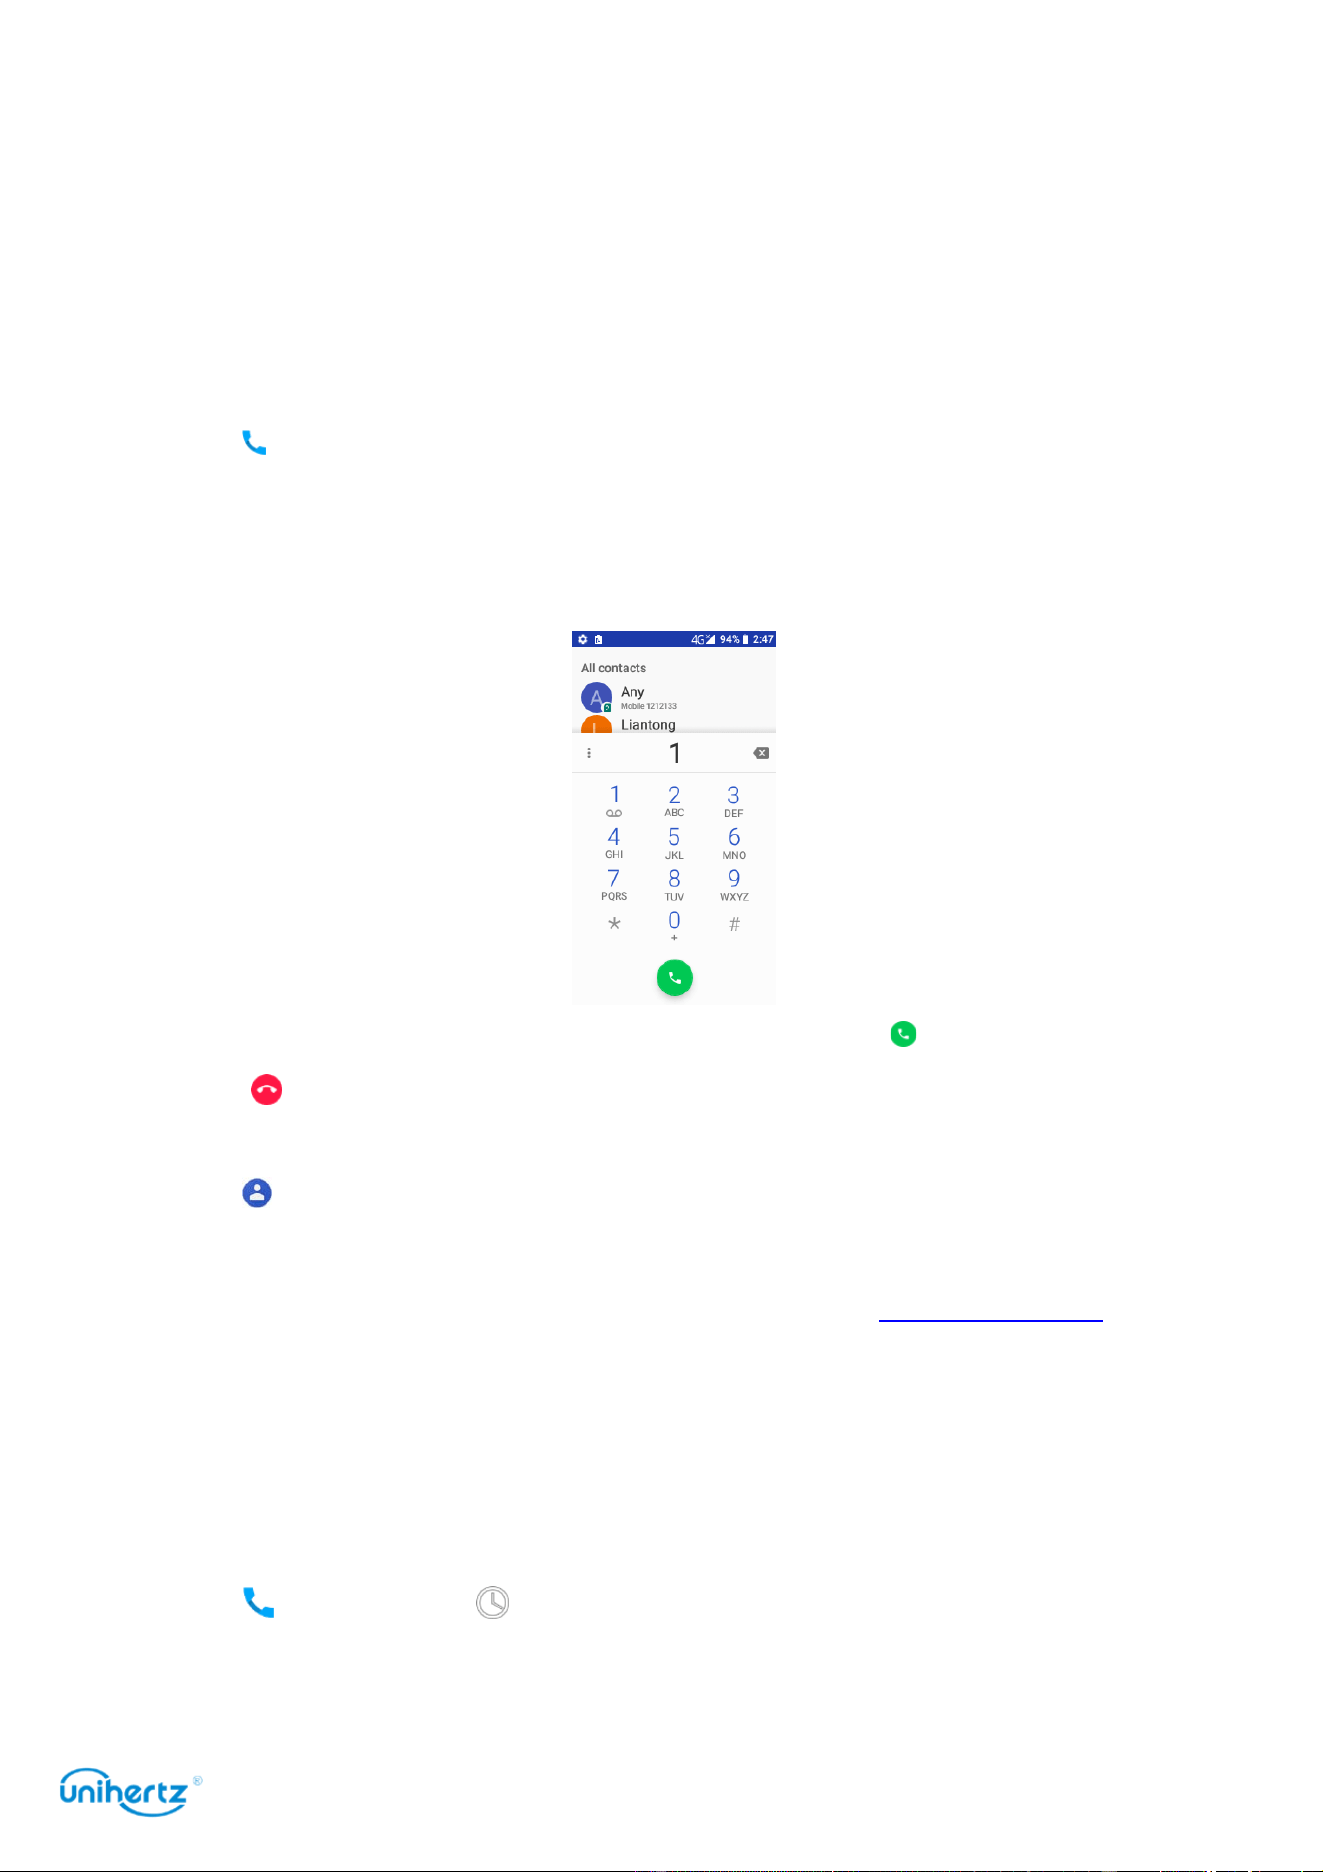
Making calls
Smart dialing
Enter the name, initials, or number of a contact in the dialer. Your phone will
display matching contacts.
1 Open
Phone
.
2 Enter the name or initials of a contact in the dialer (for example, Howard Smith
or HS). Your phone will search your contacts and call log and list the results above
the dialer.
3 From the list, select the contact you want to call. Touch to make a call.
4 Touch to end the call.
Making a call from Contacts
1 Open
Contacts
.
2 Touch the search bar and enter the name or initials of the person you want to
call. For more information on searching for contacts, see Finding a contact.
3 Touch the contact number. If your phone has dual SIM support, touch the
contact's phone number, and select a sim or use the default sim to initiate the call.
Making a call from the call log
View incoming and outgoing calls in the call log and dial the corresponding
numbers.
1 Open
Phone
> touch .
2 Slide the list up and down to view all calls. Touch the name or number of the
person that you want to call. If your phone has dual SIM support, select a sim or
Calls and Contacts
33
use the default sim to make a call.
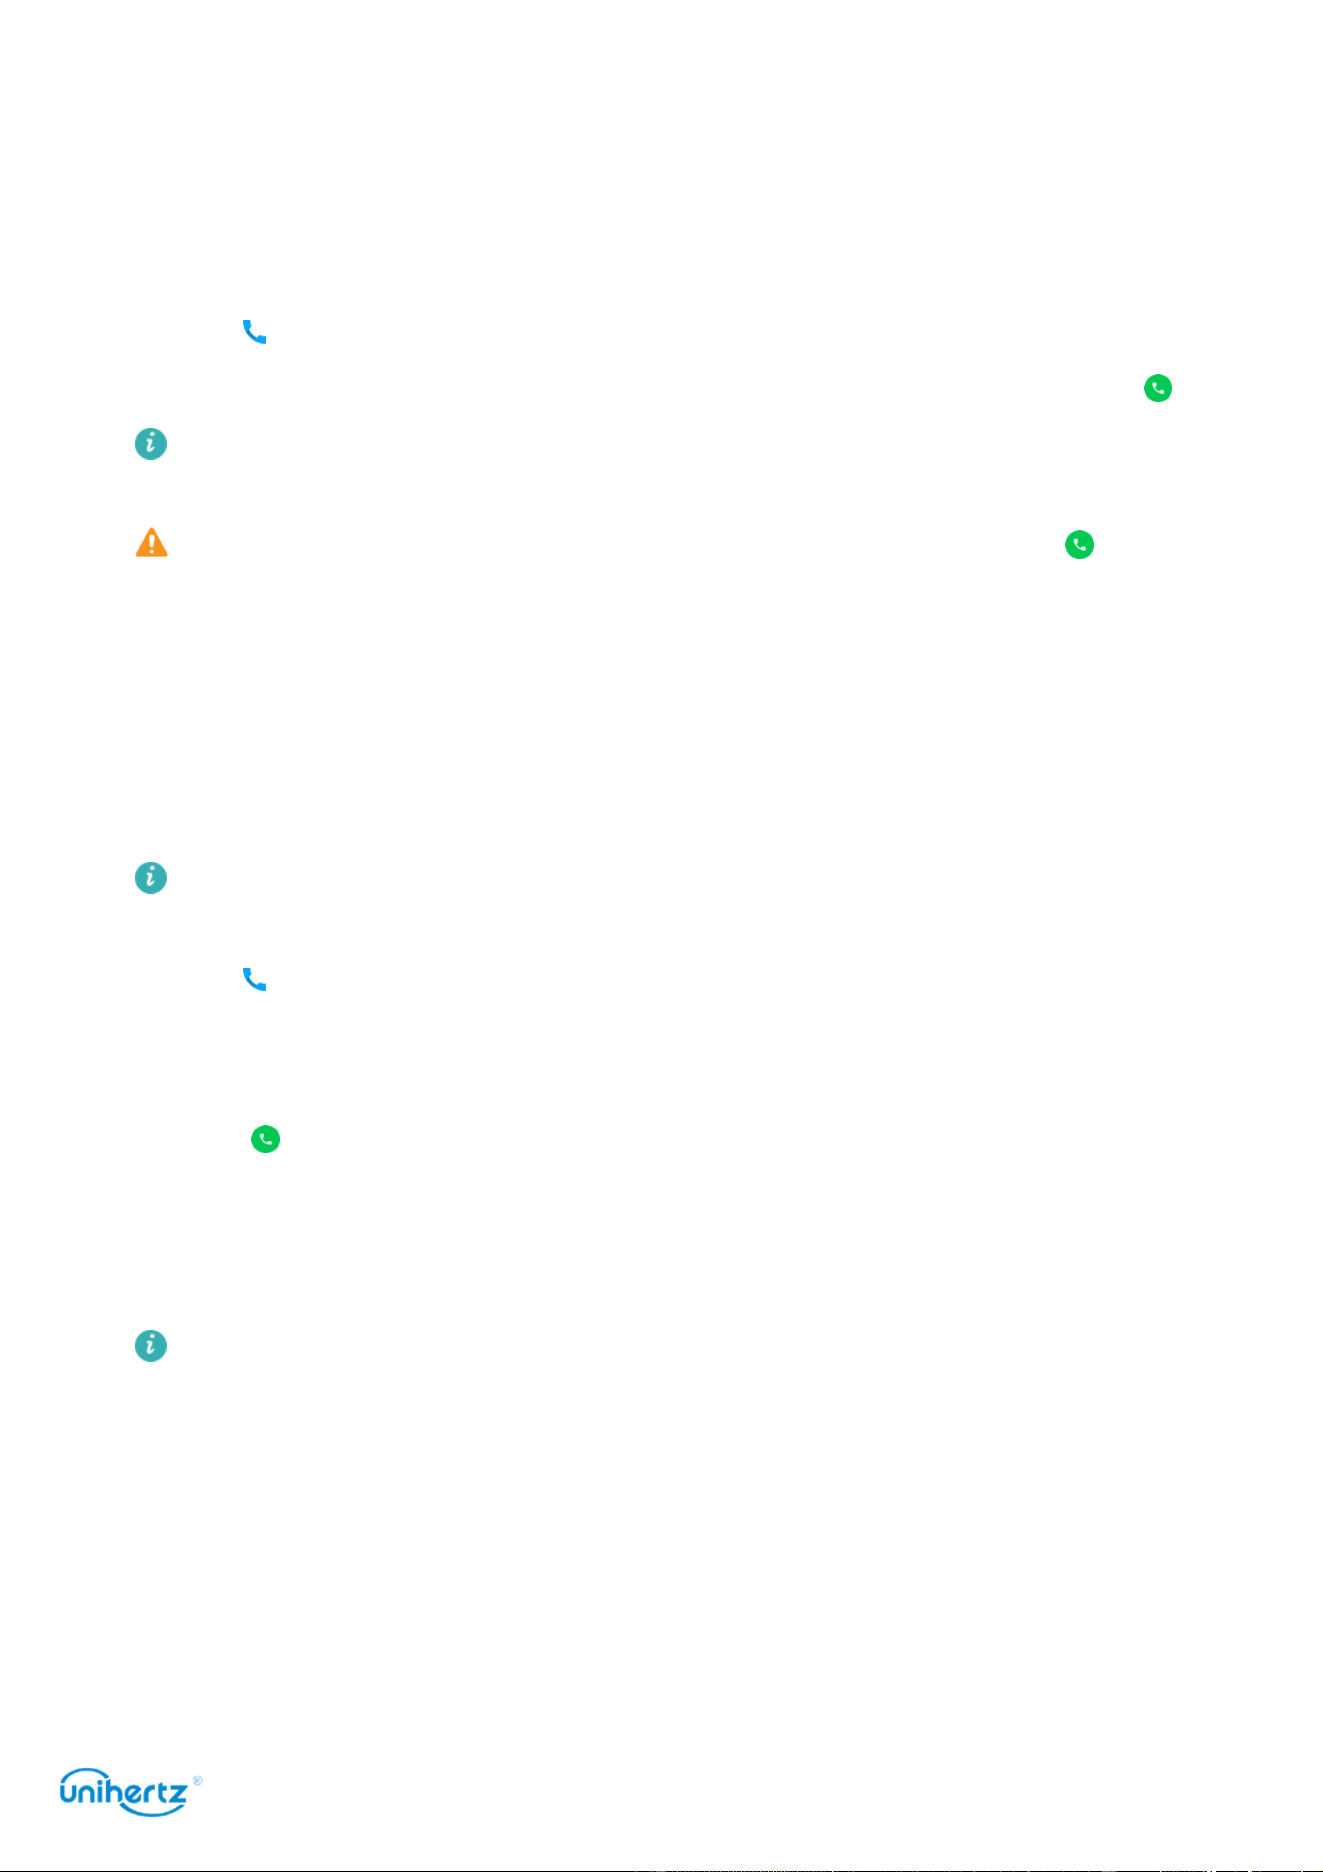
Making an emergency call
In the event of an emergency, you can make emergency calls from your phone,
even without a
SIM card. However, you must be in an area with cellular coverage.
1 Open
Phone
.
2 Enter the emergency number for your location in the dialer, and then touch .
You can dial an emergency number even when the screen is locked. On the
lock screen, touch
Emergency call
, enter your local emergency number, and then touch .
The ability to make emergency calls can depend on local regulations and carriers
in your area. Poor network reception or environmental interference may prevent
your call from being.
connected. Never rely solely on your phone for essential communication during
emergencies.
Making an international call
Before making a long-distance call, contact your carrier to activate an
international calling or roaming service.
1 Open
Phone
.
2 On the dialer screen, touch and hold the 0 key to enter a + symbol, and then
enter the country code, area code, and phone number.
3 Touch . If your phone has dual SIM support, select a sim or use the default
sim to make a call.
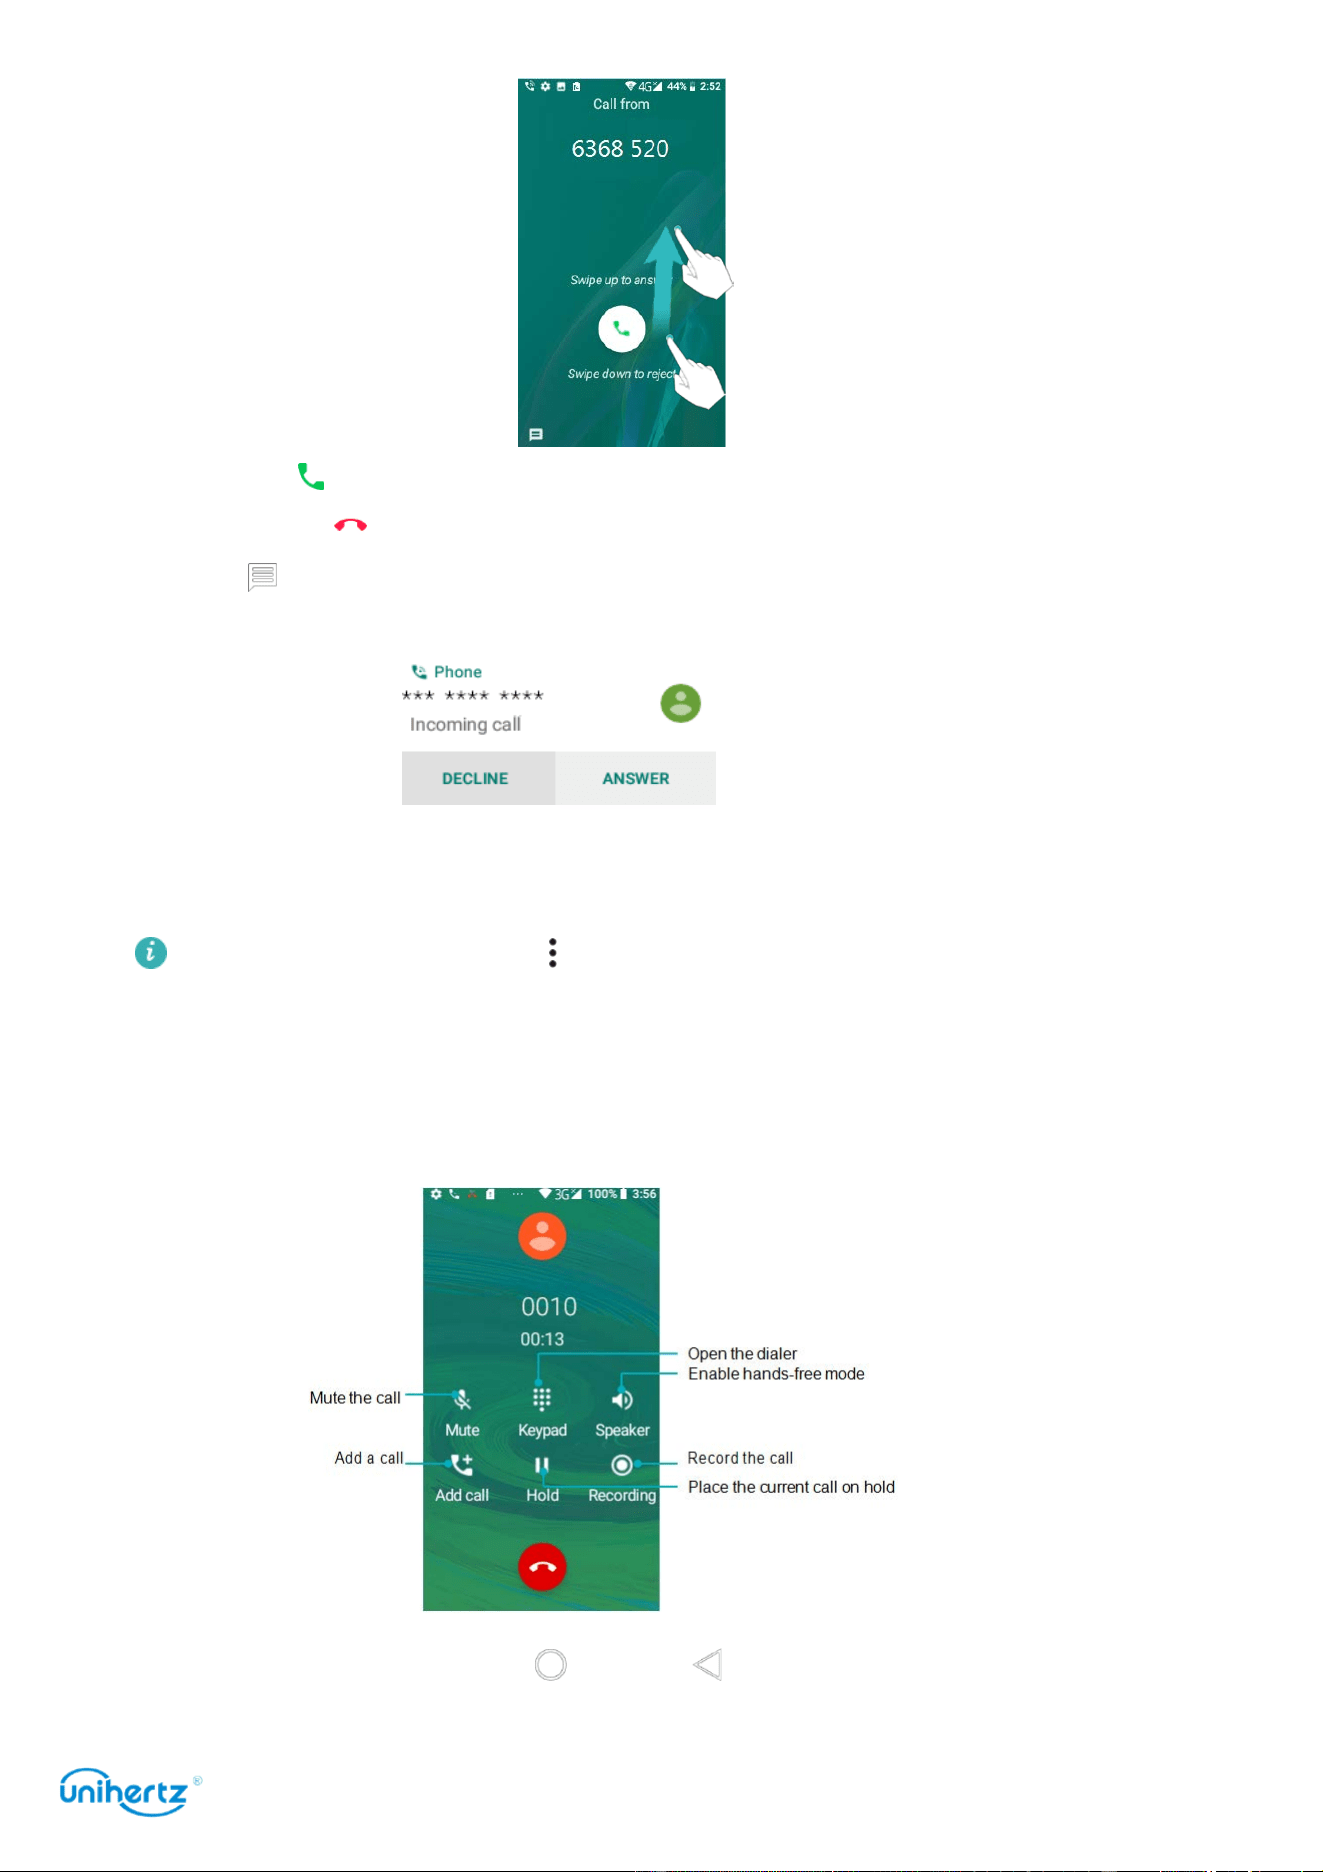
Answering or rejecting a call
When a call comes in, you can press the volume button to mute the ringtone.
While the screen is locked or on the home screen:
Calls and Contacts
34
● Swipe up to answer the call.
● Swipe down to reject the call.
● Swipe to reject the call and send an SMS.
While the screen is in the application interface:
● Touch
ANSWER
to answer the call.
● Touch
DECLINE
to reject the call.
On the dialer screen, touch >
Settings
>
Quick responses
to edit the
predefined text messages.
Functions available during a call
During a call, your phone will display an in-call menu.
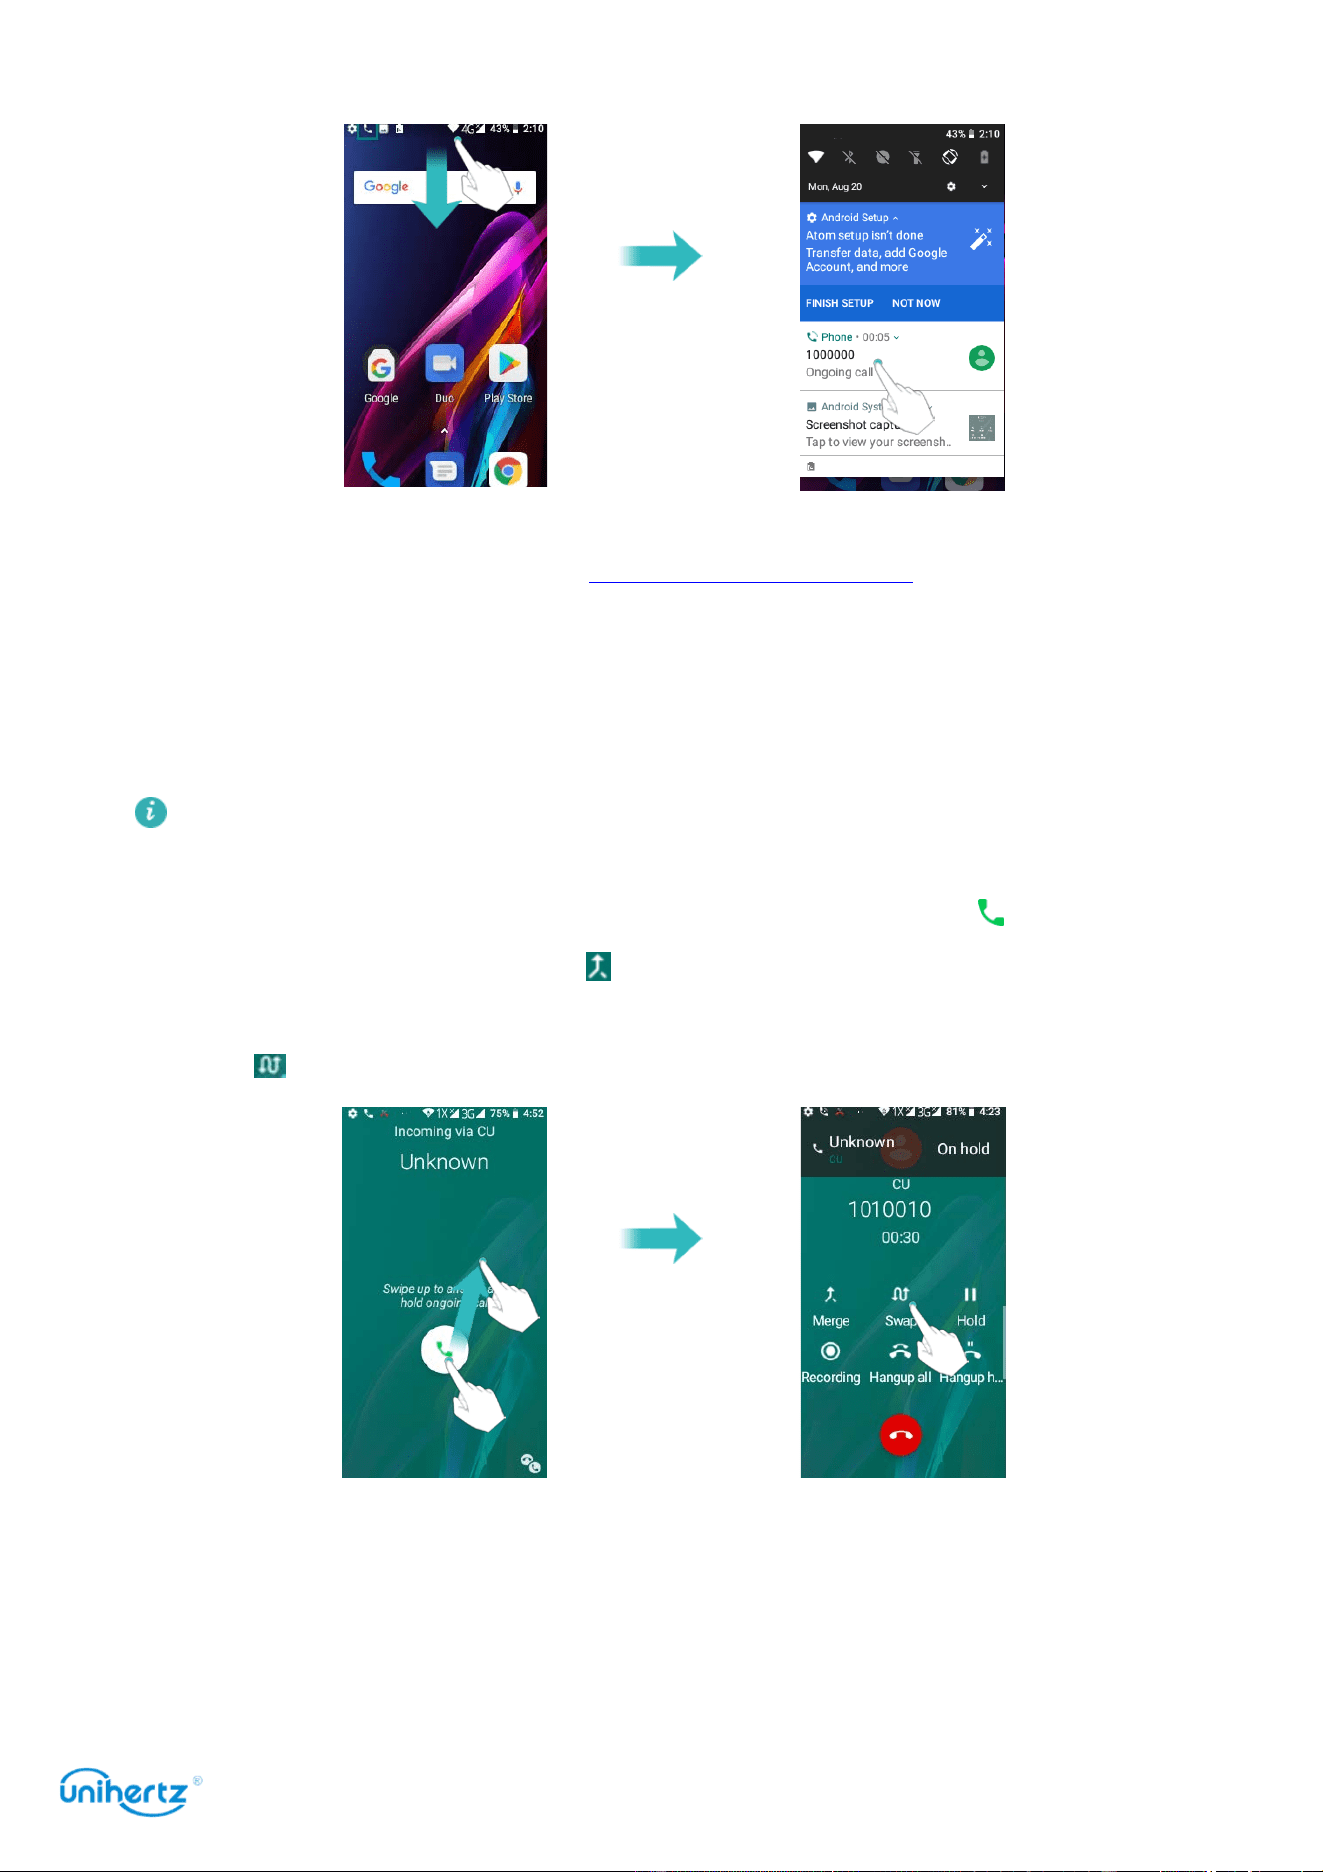
●
Hide the in-call menu
: Touch
Home
or
Return
. To return to the in-call menu,
swipe down from the status bar to open the notification panel, touch the
Calls and Contacts
35
notification of call.
●
Start a three-way call
: Please contact your carrier to find out how to use this
feature. For more information, see Making a conference call.
●
Adjust the volume
: Press the volume up button to increase the volume, or the
volume down button to decrease the volume.
Answering a third-party call
Before using this feature, check that you have subscribed to a call hold service
and enabled call waiting on your phone. For details, contact your carrier.
1 If you receive an incoming call when in another call, swipe up to answer the
call and hold the other line. Touch to merge the incoming call and the accepted
call.
2 Touch to swap the two calls.
Making a conference call
You can set up a conference call using the multi-party call feature on your phone.
Call one number (or receive a call), and then call another number to add it to the
conference call.

Calls and Contacts
36
Conference calling requires network support. Please ensure you have activated
this service. For details, contact your carrier.
1 Call the first participant.
2 Once the call is connected, touch to
add a call
. The first participant will be
placed on hold.
3 When the second call is connected, touch to start a conference call.
4 To add more people to the call, repeat steps 2 and 3.
5 Touch to end the call.
TTY Operation
This feature is only available on FRD-L04 and FRD-L14 models.
Using the TTY Device
The Teletypewriter (TTY) is a typewriting device. By connecting the phone to the
TTY device, you can use the TTY functions to send/receive messages. When you
use the TTY function, do as follows:
1 Connect the TTY device to the headset jack of the phone and set the phone to
the TTY mode.
2 Make or answer calls as normal.
3 When the call is put through, use the TTY device to send or receive the letters.
4 Press the to end the call.
Setting the TTY Mode
1 Open
Phone
and touch >
Settings
>
Accessibility
>
TTY mode
.
2 Select one TTY mode.
●
TTY Off
: The standard voice speaking mode and the listening mode.
●
TTY
Full: Transmit and receive the TTY characters.
●
TTY
HCO
: Transmit TTY characters but receive by listening to the earpiece.
●
TTY
VCO
: Receive TTY characters but transmit by speaking into the microphone.
Viewing the call log
The call log is displayed while the dial keyboard is hide. Missed calls are displayed
in red.
Adding a number from the call log
Calls and Contacts
37
Select a number from the call log and save it to your contacts.
1 Open
Phone
> touch . If the dial keyboard is exist, press back key to hide
it, then you can see .
2 In the call log, touch the number you want to add and do the following:
● Touch to create a new contact. For more information, see Creating a contact.
● Touch to add the number to an existing contact.
●
Touch ,You won’t receive calls from this number.
● Touch to see Call details.
Clearing the call log
Open
Phone
> touch > touch > select
Call History
. You can:
●
Delete one entry
: touch > select Delete.
●
Delete multiple entries
: Touch >
Clear call history
.
Call settings
Enabling call forwarding
If you are unavailable to take a call, you can configure your phone to forward calls
to another number.
1 Open
Phone
.
2 Touch >
Settings
>
Calling accounts
.
3 Touch the desired SIM, then touch
Call forwarding
.
4 Select a forwarding method, enter the destination number, and then touch Turn
on.
When call forwarding is enabled, your phone will forward certain calls (such as
unanswered calls) to the number you specified.
Enabling call waiting
Call waiting allows you to take an incoming call when you are already in a call and
switch between the two conversations.
1 Open
Phone
.
2 Touch >
Settings
>
Calling accounts
.
3 Touch the desired SIM, then touch
Additional settings
and turn on the
Call
waiting
switch. When you receive an incoming call while already in a call, swipe up
to answer the new call, and touch to switch between the two calls.

Calls and Contacts
38
Enabling do not disturb mode
Do not disturb mode allows you to work or relax in peace and quiet. Your phone
will only notify you about important calls or messages.
1 Open
Settings
>
Sound
.
2 Touch
Do not disturb
.
3 Touch
Priority only allows
, turn on the switches will allow ring or vibrate.
When do
not
disturb mode is enabled, your phone will only ring or vibrate when
chosen contacts call or message you. Your phone will mute ringtones or vibrations
for any other calls or messages. Notifications for these can be viewed in the
notification panel.
Configuring
the
harassment
filter
The harassment filter automatically blocks calls and messages from unknown or
blacklisted sources. The blacklist is constantly updated, ensuring that you are
never disturbed.
Open Phone and then touch >
Settings
>
Call
blocking
>
Add
a Number
,you
won’t receive calls or texts from blocked numbers.
Configuring voicemail
Divert calls to your voicemail when your phone is switched off or unavailable.
Callers can leave a voice message which you can listen to later.
Voicemail must be supported by your carrier. Please ensure that you have
subscribed to this service. Contact your carrier for information about their
voicemail service.
1 Open
Phone
.
2 Touch >
Settings
>
Calling accounts
.
3 Touch the desired SIM, then touch
Voicemail
and then enter your voicemail
number.
When you receive a voicemail message, the icon is displayed in the status bar.
Dial the voicemail number to retrieve the message.
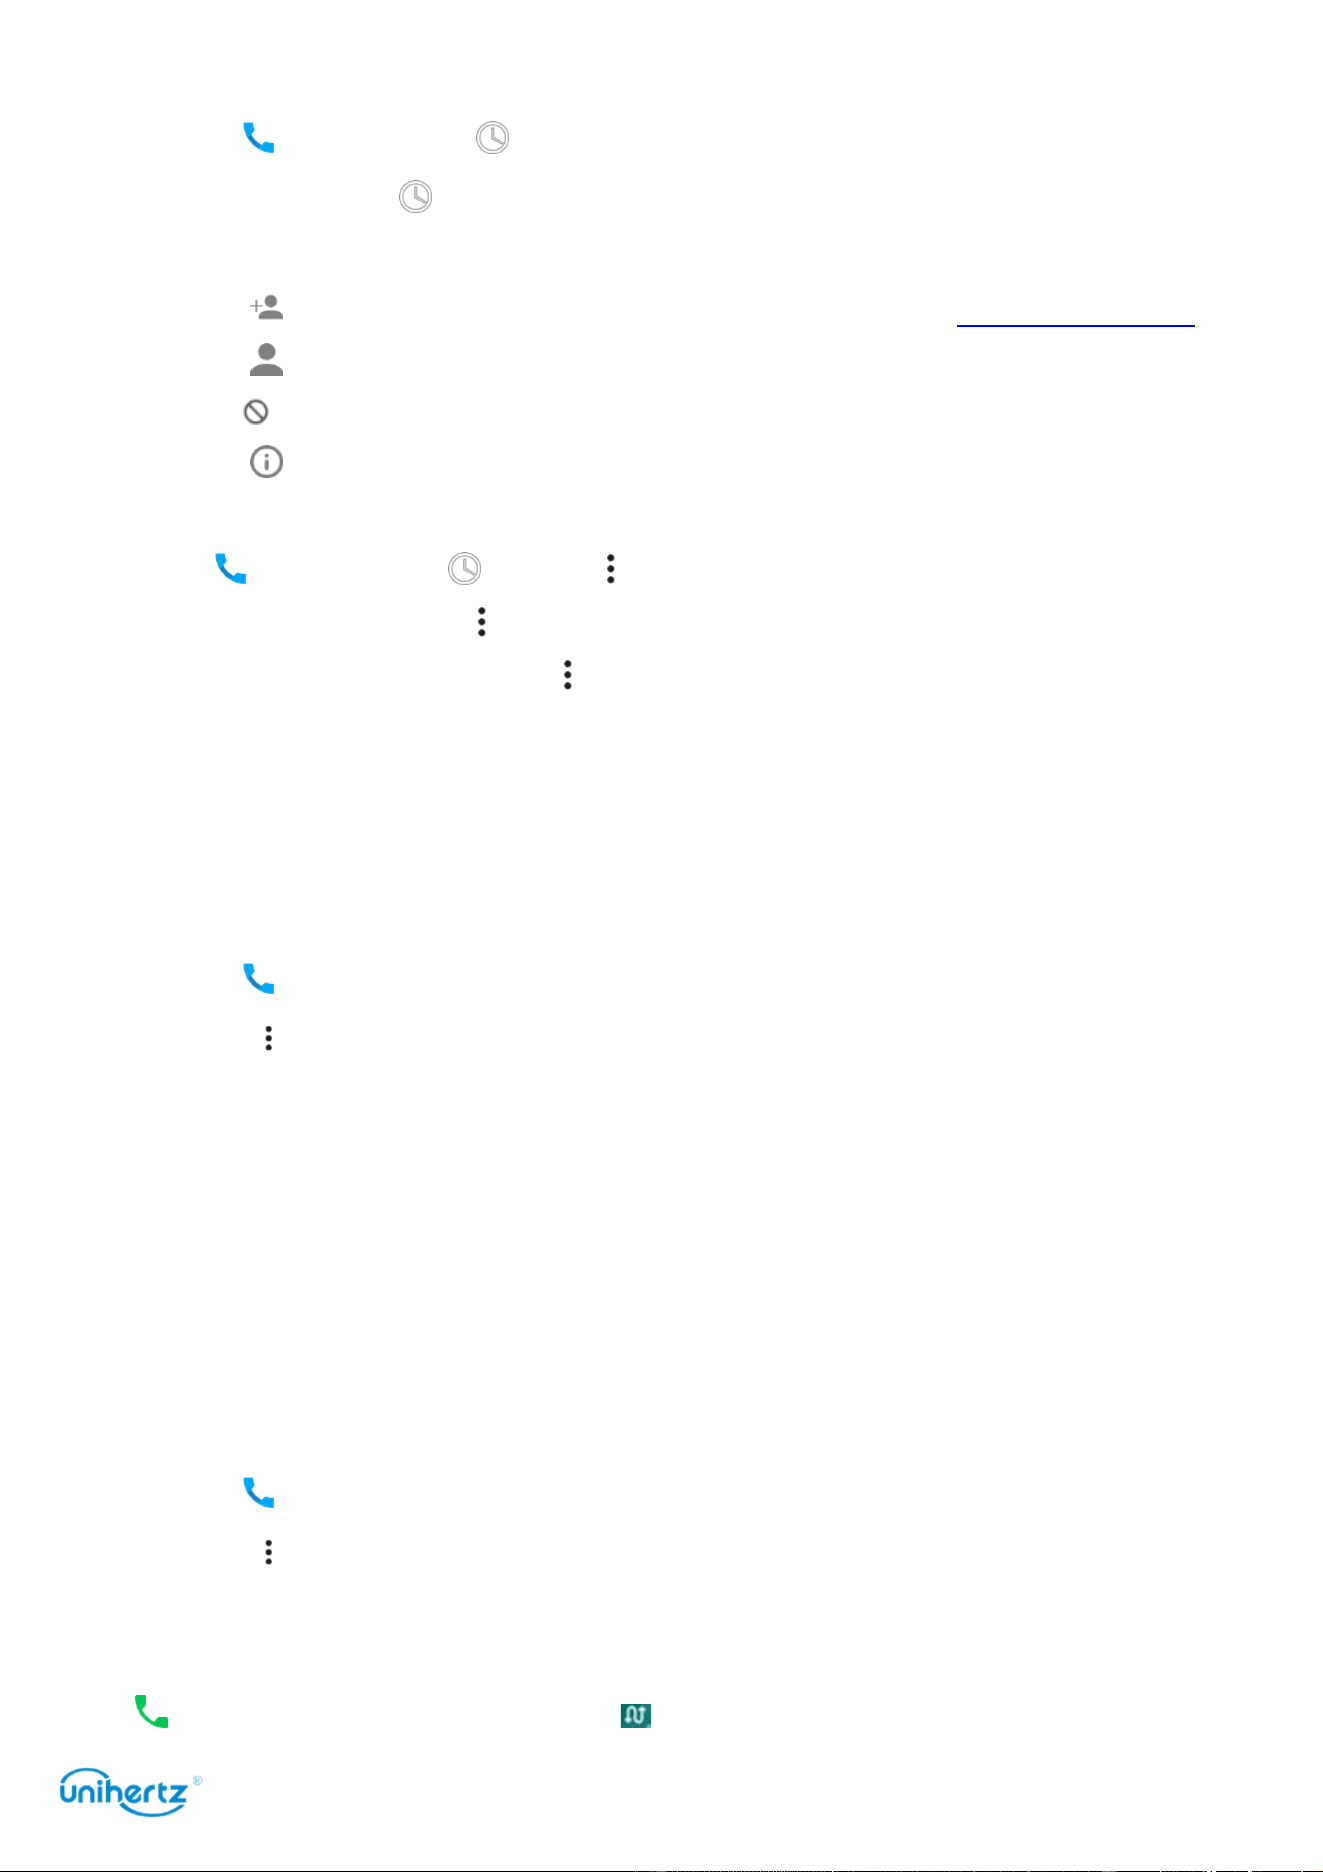
Adding a contact to your favorites
You can add frequently-contacted people to your favorites to make them easier to
find.
1 Open
Contacts
.
Calls and Contacts
39
2 Touch the existence of native contacts you want to add to your favorites, and
then touch to add the contact to
Favorites
.
Remove contacts from your favorites
: Open
Contacts,
select the contacts that
you wish to remove from your favorites, and then touch to remove it.
Creating a contact
The number of contacts you can store on your phone depends on the size of
your phone's internal storage. The maximum number of SIM card contacts may
vary depending on your SIM card's storage capacity.
1 Open
Contacts
.
2 Touch select a location to save the contact from the options menu.
3 Enter the contact's name, phone number and other information, and then touch
SAVE .
If you want to save a number from your call log, touch the number next to the icon
you want to save, and then select or . You can also save phone numbers
or email addresses in
Messaging
or
Email
to your contacts.
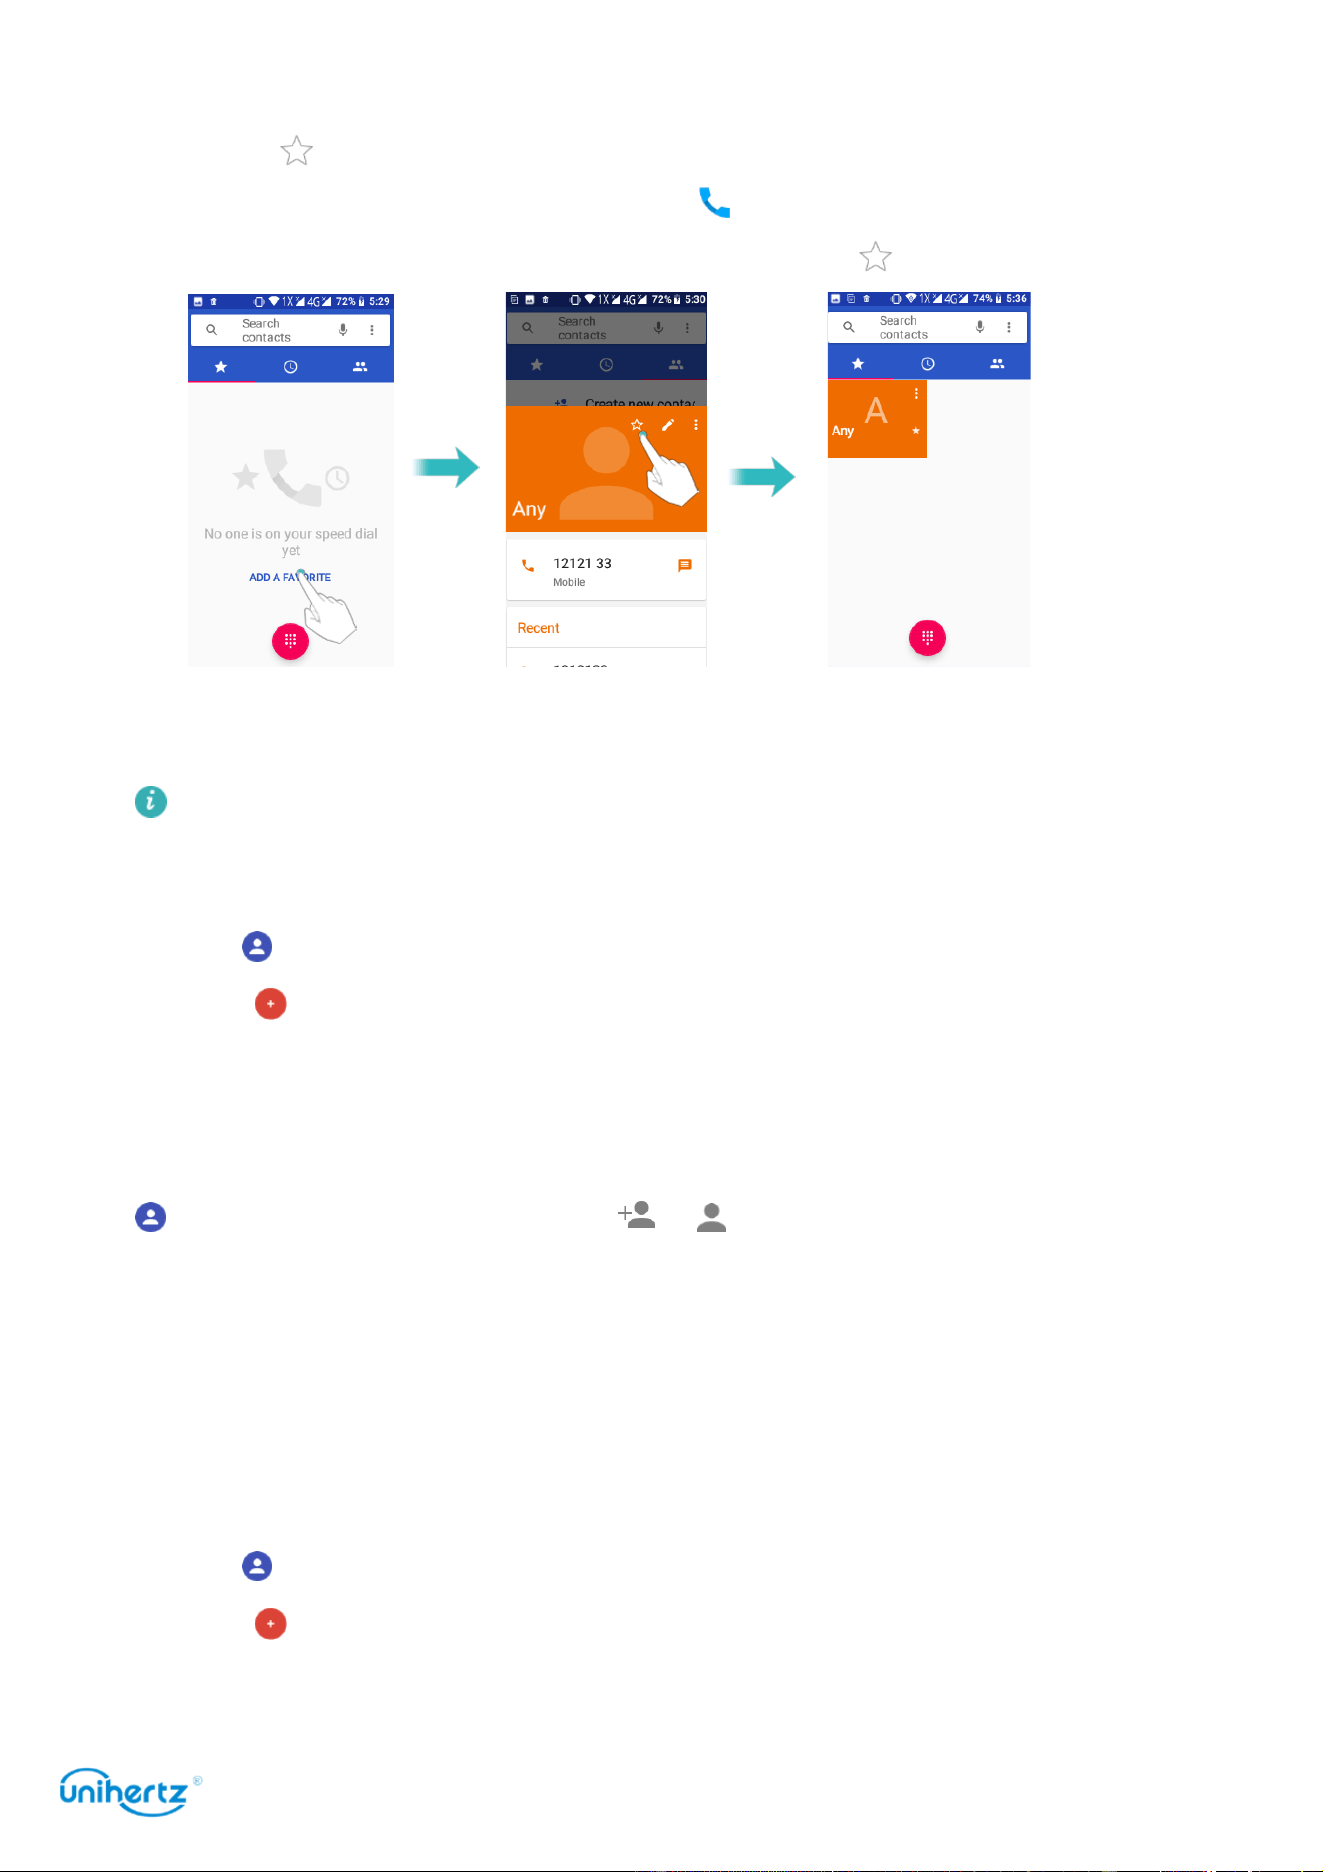
Set photo for phone contact
You can set the photo for the contact saved locally on the phone. After the setting
is successful, the photo will be displayed in the contact list, the outgoing interface.
Add photo for new contact
1 Open
Contacts
.
2 Touch , select a location to save the contact, choose Phone contact.
3 Enter the contact's name, phone number and other information.
Calls and Contacts
40
4 Touch ,take photo or choose a photo from the phone.
5 Touch SAVE.
Add photo for the existing contact
1 Open
Contacts
.
2 Select a
Phone contact
.
3 Touch to edit the contact.
4 Touch ,take photo or choose a photo from the phone.
5 Touch SAVE.
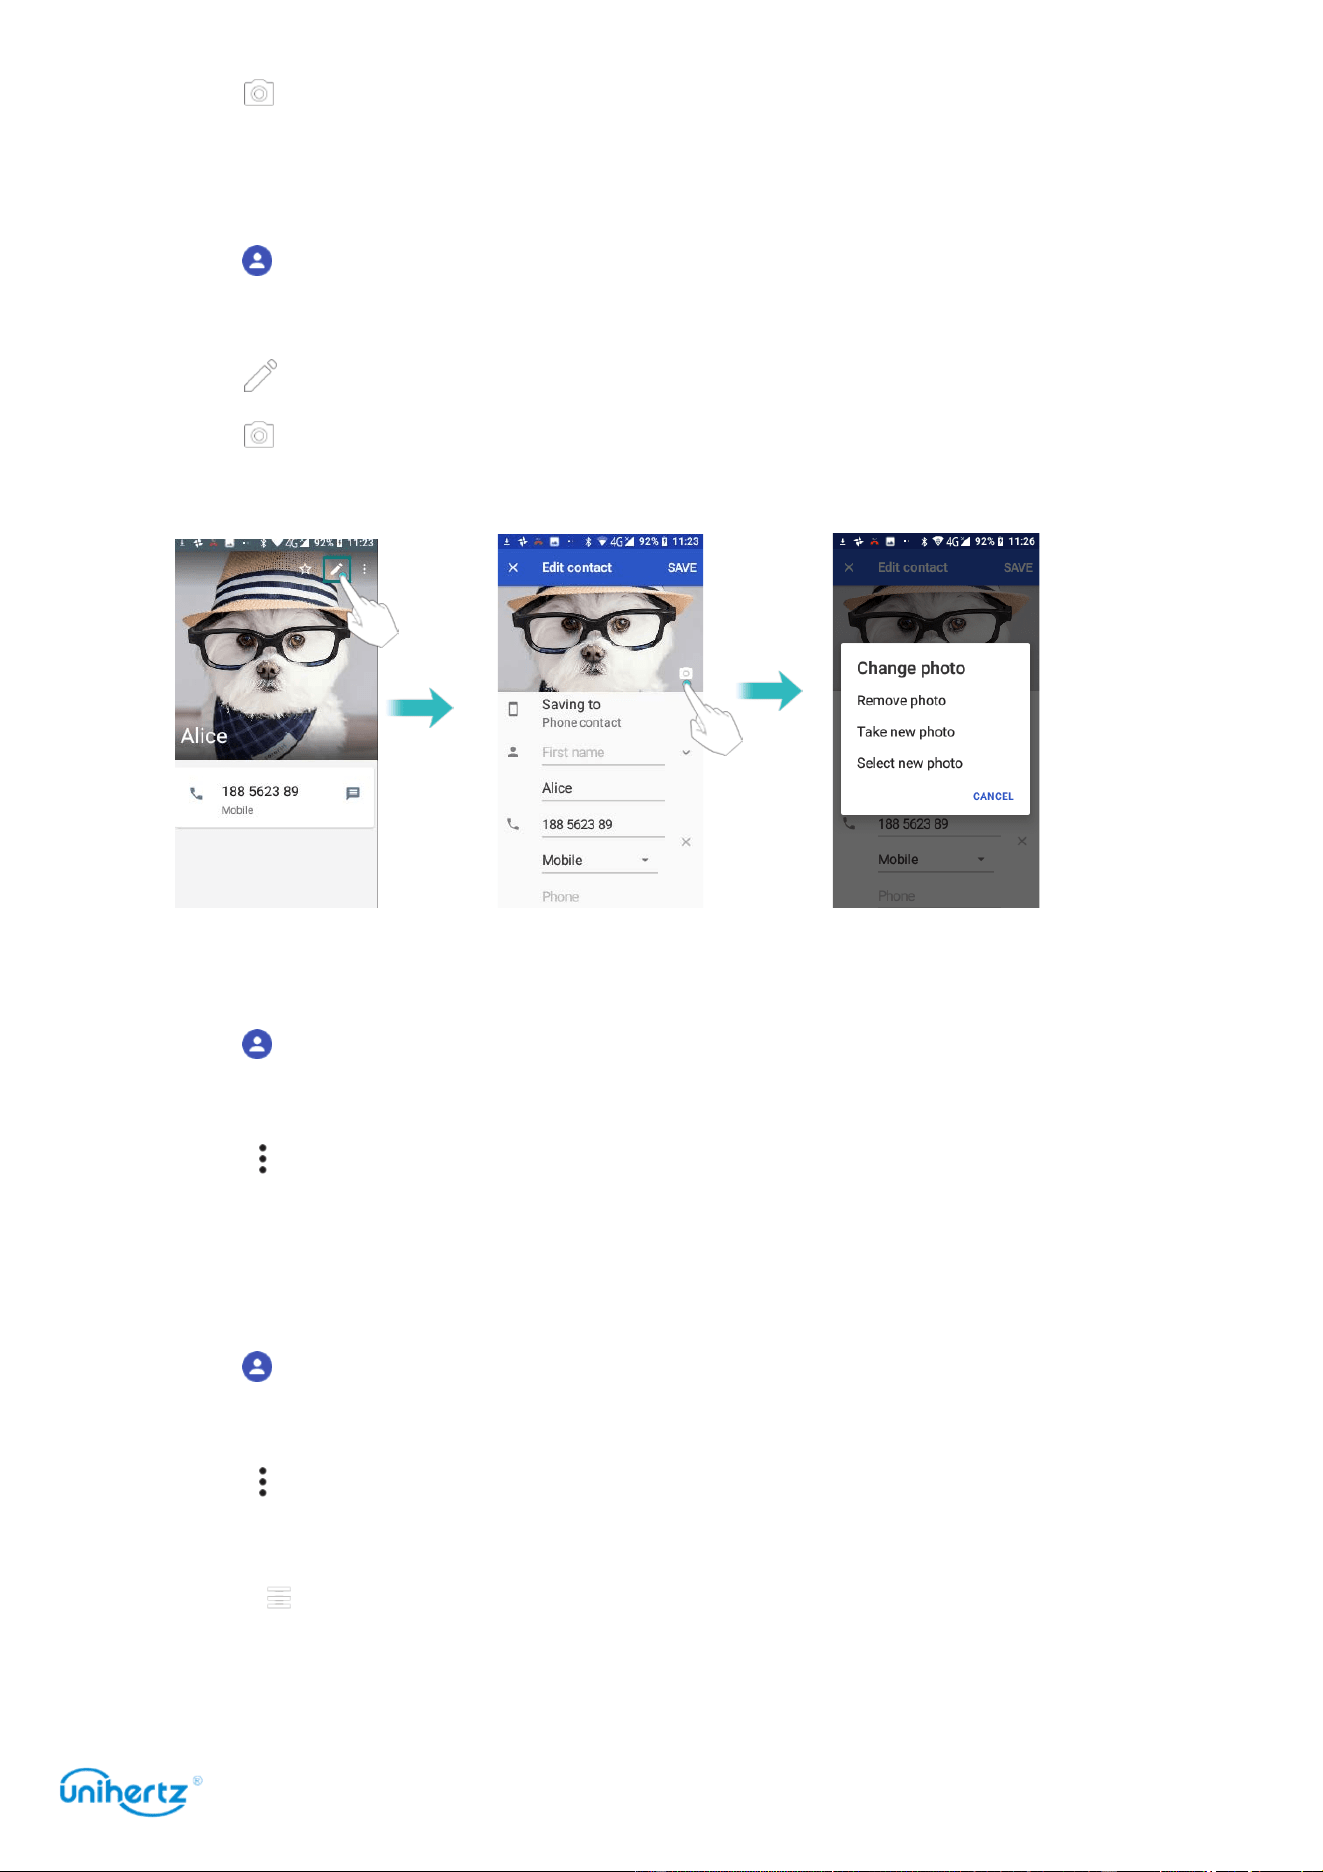
Set ringtone for phone contact
1 Open
Contacts
.
2 Select a
Phone contact
.
3 Touch > Set ringtone.
4 Choose a ringtone and then touch
OK
.
Set the ringtone to be a non-system preset personalized ringtone, such as mp3,
recording etc.
1 Open
Contacts
.
2 Select a
Phone contact
.
3 Touch > Set ringtone.
4 Ringtones list then slide to the bottom > Add ringtone.
5 Touch , select a personalized ringtone.
6 Touch OK > Ringtones list > select the personalized ringtone > touch
OK
.
Calls and Contacts
41
Importing or exporting contacts
Your phone supports .
vcf
contact files.
VCF
is a standard file format for storing
contact information, including names, addresses, and phone numbers.
Importing contacts from a storage device
1 Open
Contacts
.
2 Touch >
Settings
>
Import
> copy contacts from
Internal shared storage
>
copy contacts to Phone contact
.
3 Select one or more .
vcf
files, and then touch
OK
.
Importing contacts from a SIM card
1 Open
Contacts
.
2 Touch >
Settings
>
Import
> copy contacts from
SIM car
d >
copy contacts to
Phone contact
.
3 Select the contacts you want to import, and then touch
OK
.
4 Your phone will automatically import the contacts.
Exporting contacts to a storage device
1 Open
Contacts
.
2 Touch >
Settings
>
Export
> copy contacts from
Phone contact
>
copy
contacts to Internal shared storage
.
3 Touch
Next
.
4 Select the contacts you want to export, and then touch
OK
.
The exported .
vcf
file is saved to the root directory of your phone's internal storage
by default. Open
Files
to view the exported file.
Exporting contacts to a SIM card

Calls and Contacts
42
1 Open
Contacts
.
2 Touch >
Settings
>
Export
> copy contacts from
Phone
contact
> copy
contacts to
SIM1
or
SIM2
.
3 Touch
N
ext.
4 Select the contacts you want to export, and then touch
OK
.
Sharing contacts
1 Open
Contacts
.
2 Select the contacts you want to share.
3 Touch >
Share
.
4 Choose your sharing method, and then follow the onscreen instructions.
Managing contacts
Editing a contact
After creating a contact, you can edit their contact information at any time. This
includes adding or deleting default information such as phone numbers or email
addresses. You can also choose a custom ringtone and add a birthday, nickname,
or photo.
1 Open
Contacts
.
2 Touch the contact you want to edit, and then touch
Edit
.
3 Touch the contact's photo, and then select
Take photo
or
Choose photo
.
Alternatively, enter the contact's new information, and then touch SAVE.
The contact's photo will be displayed when the contact calls you. Other contact
information such as company name and job title will also be displayed.
Merging duplicate contacts
When you add contacts to your phone from different sources, you may end up with
duplicate entries. These duplicate entries can be merged into one to help keep
your contacts organized.
Only the existence of native contacts support to merge.
1 Open
Contacts
.
2 Touch the existence of native contacts you want to merge, and then touch
Edit
.
Calls and Contacts
43
3 Touch >
Link
.
4 Select the contacts you want to merge .
Deleting contacts
1 Open
Contacts
.
2 Touch the contact you want to delete.
3 Touch >
Delete
.
4 Touch
Delete
.
You can also touch and hold a contact you want to delete. Then you can select
more contacts. Touch to delete all the selected contacts.
Finding a contact
Search contacts stored on the phone, SIM card, or linked to an online account.
1 Open
Contacts
.
For more complete search results, ensure that Contacts is configured to display
all of your contacts. On the contacts screen, touch >
Settings
>
Contact
t
o
Display
and then select
All contacts
.
2 On the contact list, use one of the following methods to find a contact:
● Swipe the contact list up or down.
● Slide your finger up or down the index on the left-hand side of the screen to
scroll through your contacts.
● Touch ,and then enter the contact's name, initials, phone number, email
address, or other contact information in the search bar at the top of the contact list.
Search results will be displayed underneath.
3 Select a contact. You can then choose to call them, send them a text message,
or edit their contact information.
Viewing contacts from different accounts
You can select which contacts to display on your phone.
1 Open
Contacts
.
2 Touch >
Settings
>
Contact to Display
.
3 Select the account you want to display or customize the accounts to display.
Calls and Contacts
44
Contact label
Organize friends and family into different groups. You can send text messages or
emails to everyone in a label.
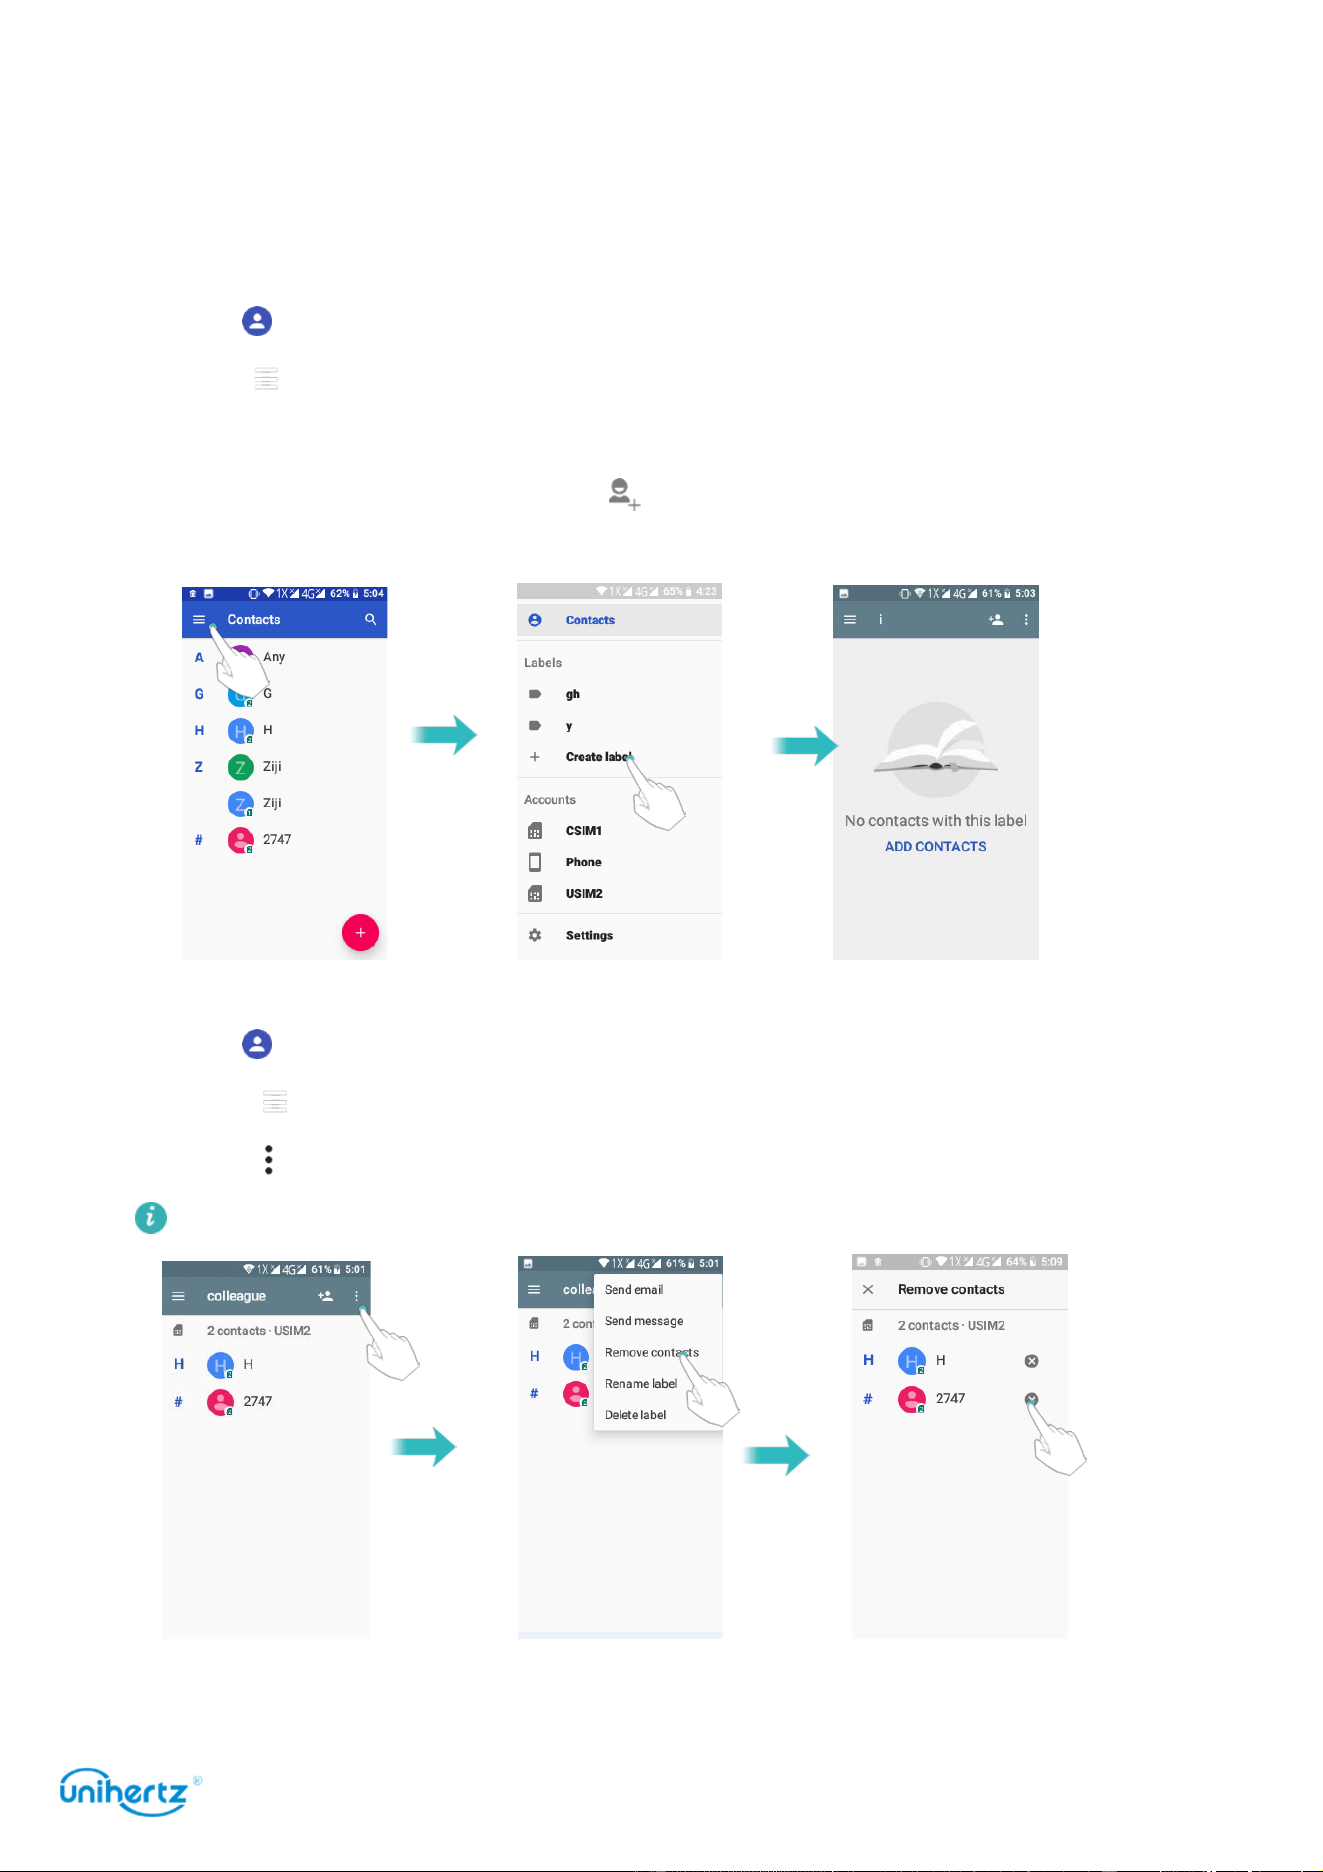
Creating a label
1 Open
Contacts
.
2 Touch >
Settings
>
Create label
.
3 Touch >
Choose account
.
4 Input Label name, and then touch . Select the contacts you want to add to the
label.
Deleting a label
1 Open
Contacts
.
2 Touch >
Settings
and select the label you want to delete.
3 Touch >
Delete label
.
Deleting a label will not remove the contacts in the label.
Remove contacts in a label
Calls and Contacts
45
1 Open
Contacts
.
2 Touch >
Settings
and select the label you want to edit.
3 Touch >
Remove contacts
, select the contact you want to delete and then
touch to remove contact from the label.
Rename a label
1 Open
Contacts
.
2 Touch >
Settings
and select the label you want to edit.
3 Touch >
Rename label
to edit the label name.
Sending messages or emails to a label
1 Open
Contacts
.
2 Touch >
Settings
and select the label you want to send messages or emails.
3 Touch
Send message
to send a message, or touch
Send email
to send an email.
Messaging and Email
46
Messaging and Email
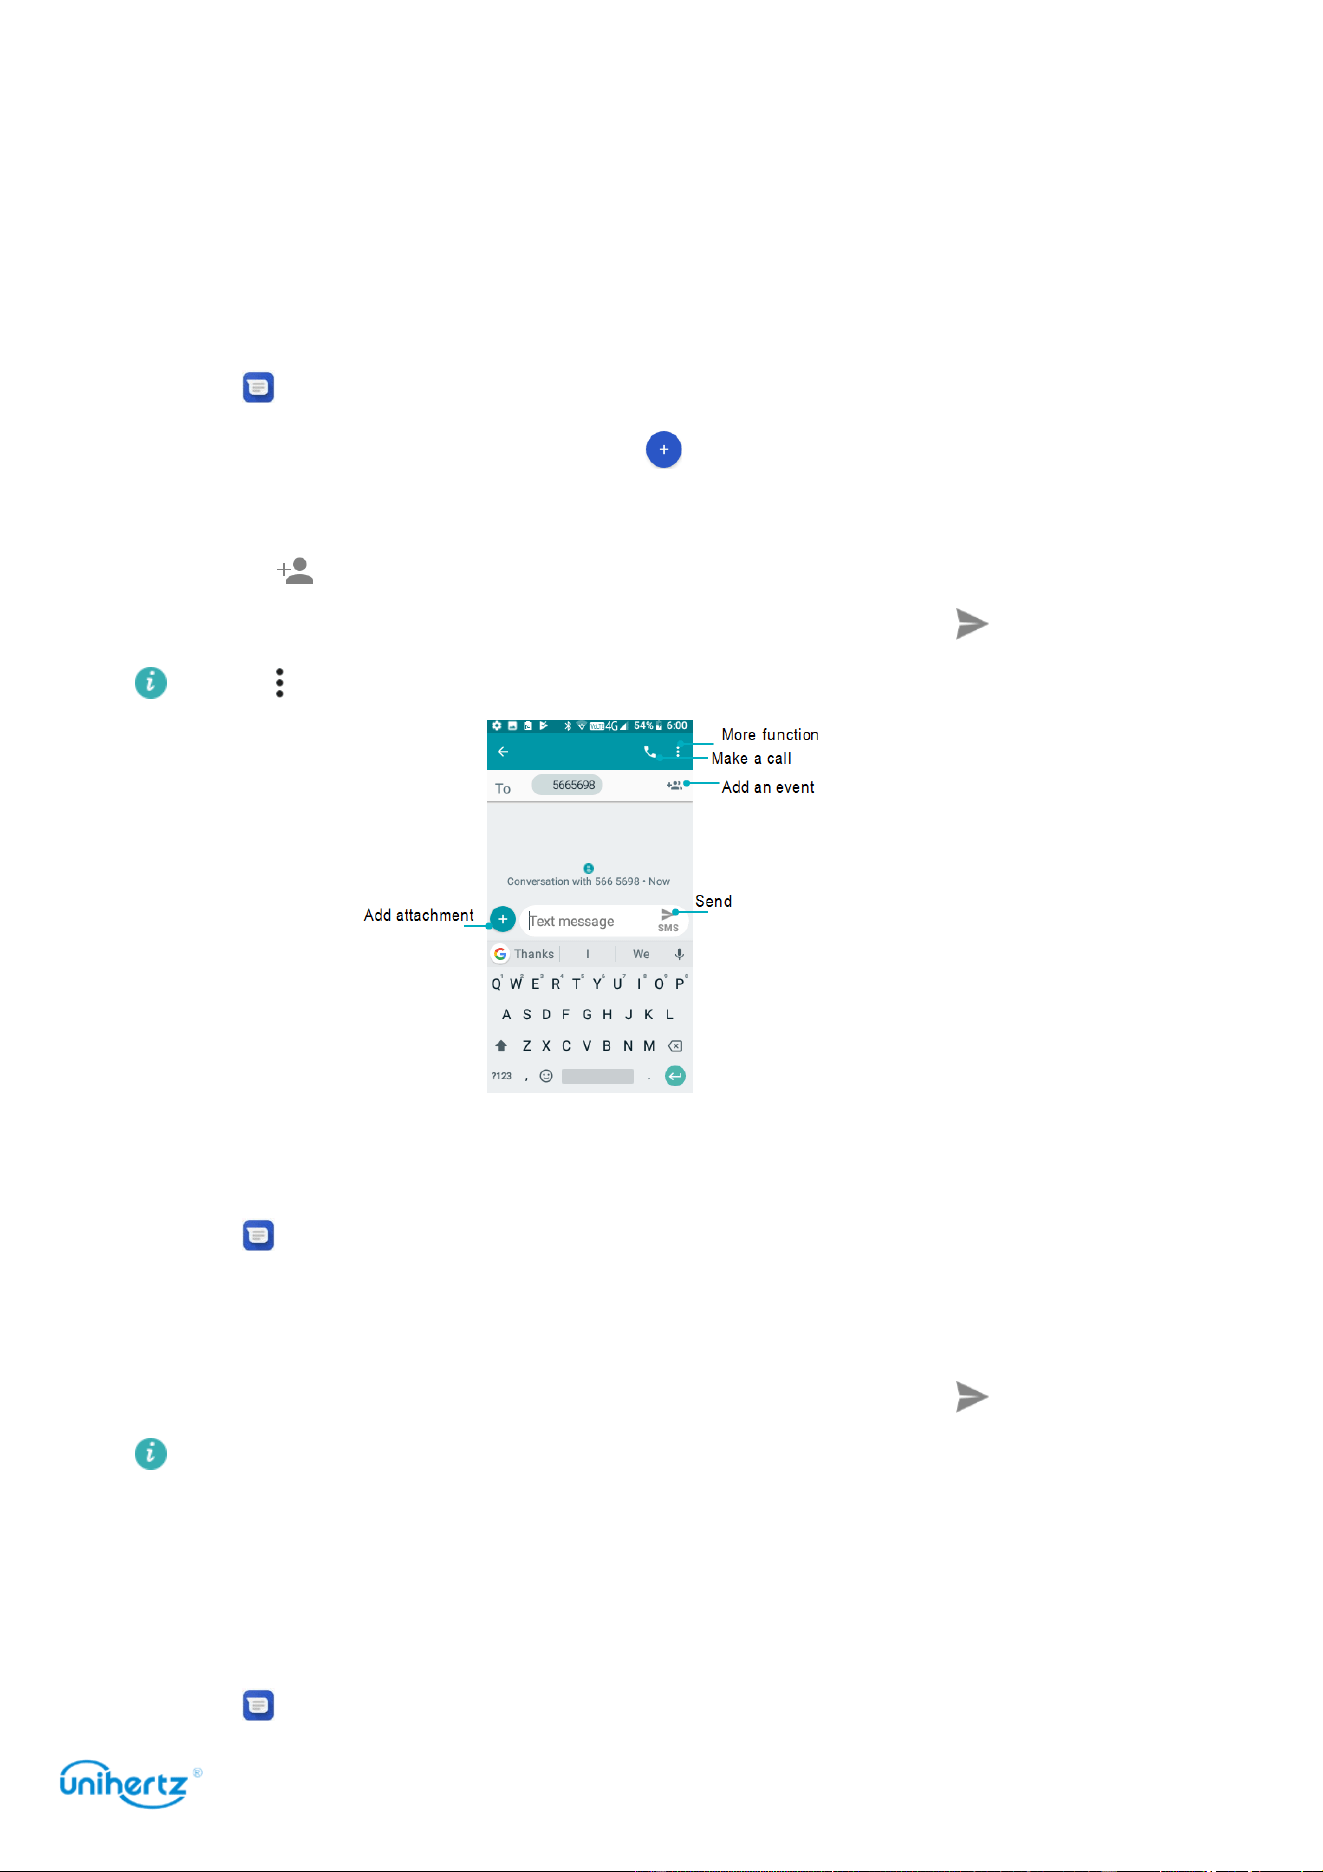
Sending a message
Spice up your messages by adding emoticons, images, videos, music, recordings,
and more.
1 Open
Messaging
.
2 In the list of message threads, touch .
3 Select the recipient box and enter the contact name or phone number. You can
also touch to open your contact list and choose a contact or contact group.
4 Select the text field and enter your message, and then touch .
Touch >
Attach
to add an attachment to your message.
Replying to a message
1 Open
Messaging
.
2 In the list of message threads, touch a contact name or phone number to view
your conversations.
3 Select the text field and enter your message, and then touch .
Reply to a message from the notification bar
: New messages will be displayed in
the notification bar. Touch the message to compose a reply.
Searching for messages
Use the message search feature to find messages quickly.
1 Open
Messaging
.
Messaging and Email
47
2 Touch > Search to bring up the search bar.
3 Enter one or more keywords. The search results will be displayed underneath
the search bar.
Deleting threads
Delete unwanted or old threads to tidy up your message list.
Deleted threads cannot be retrieved, so please proceed with caution.
1 Open
Messaging
.
2 In the list of message threads, touch and hold a thread.
3 Select the threads you want to delete, and then touch >
Delete
.
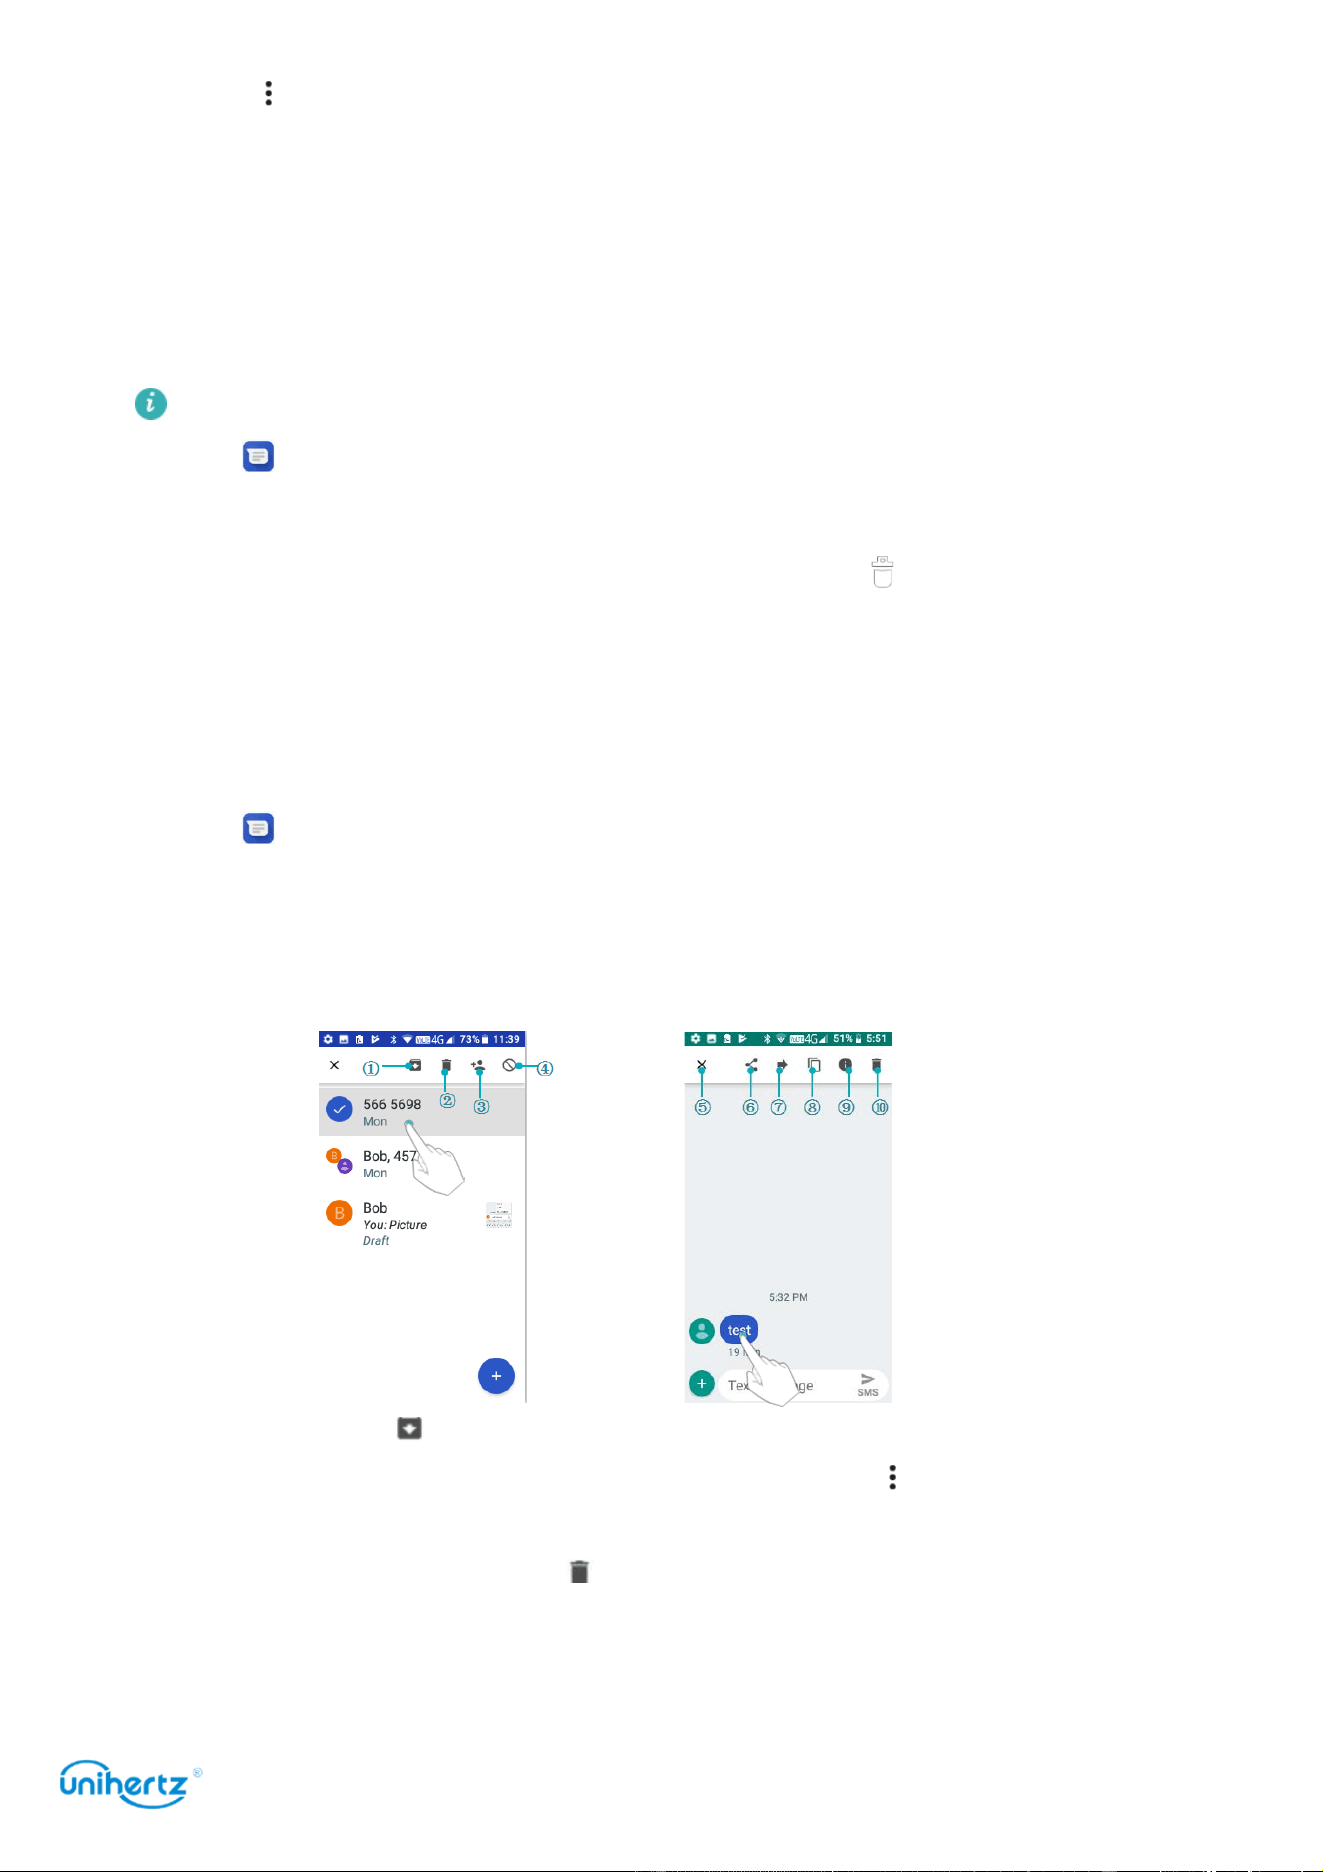
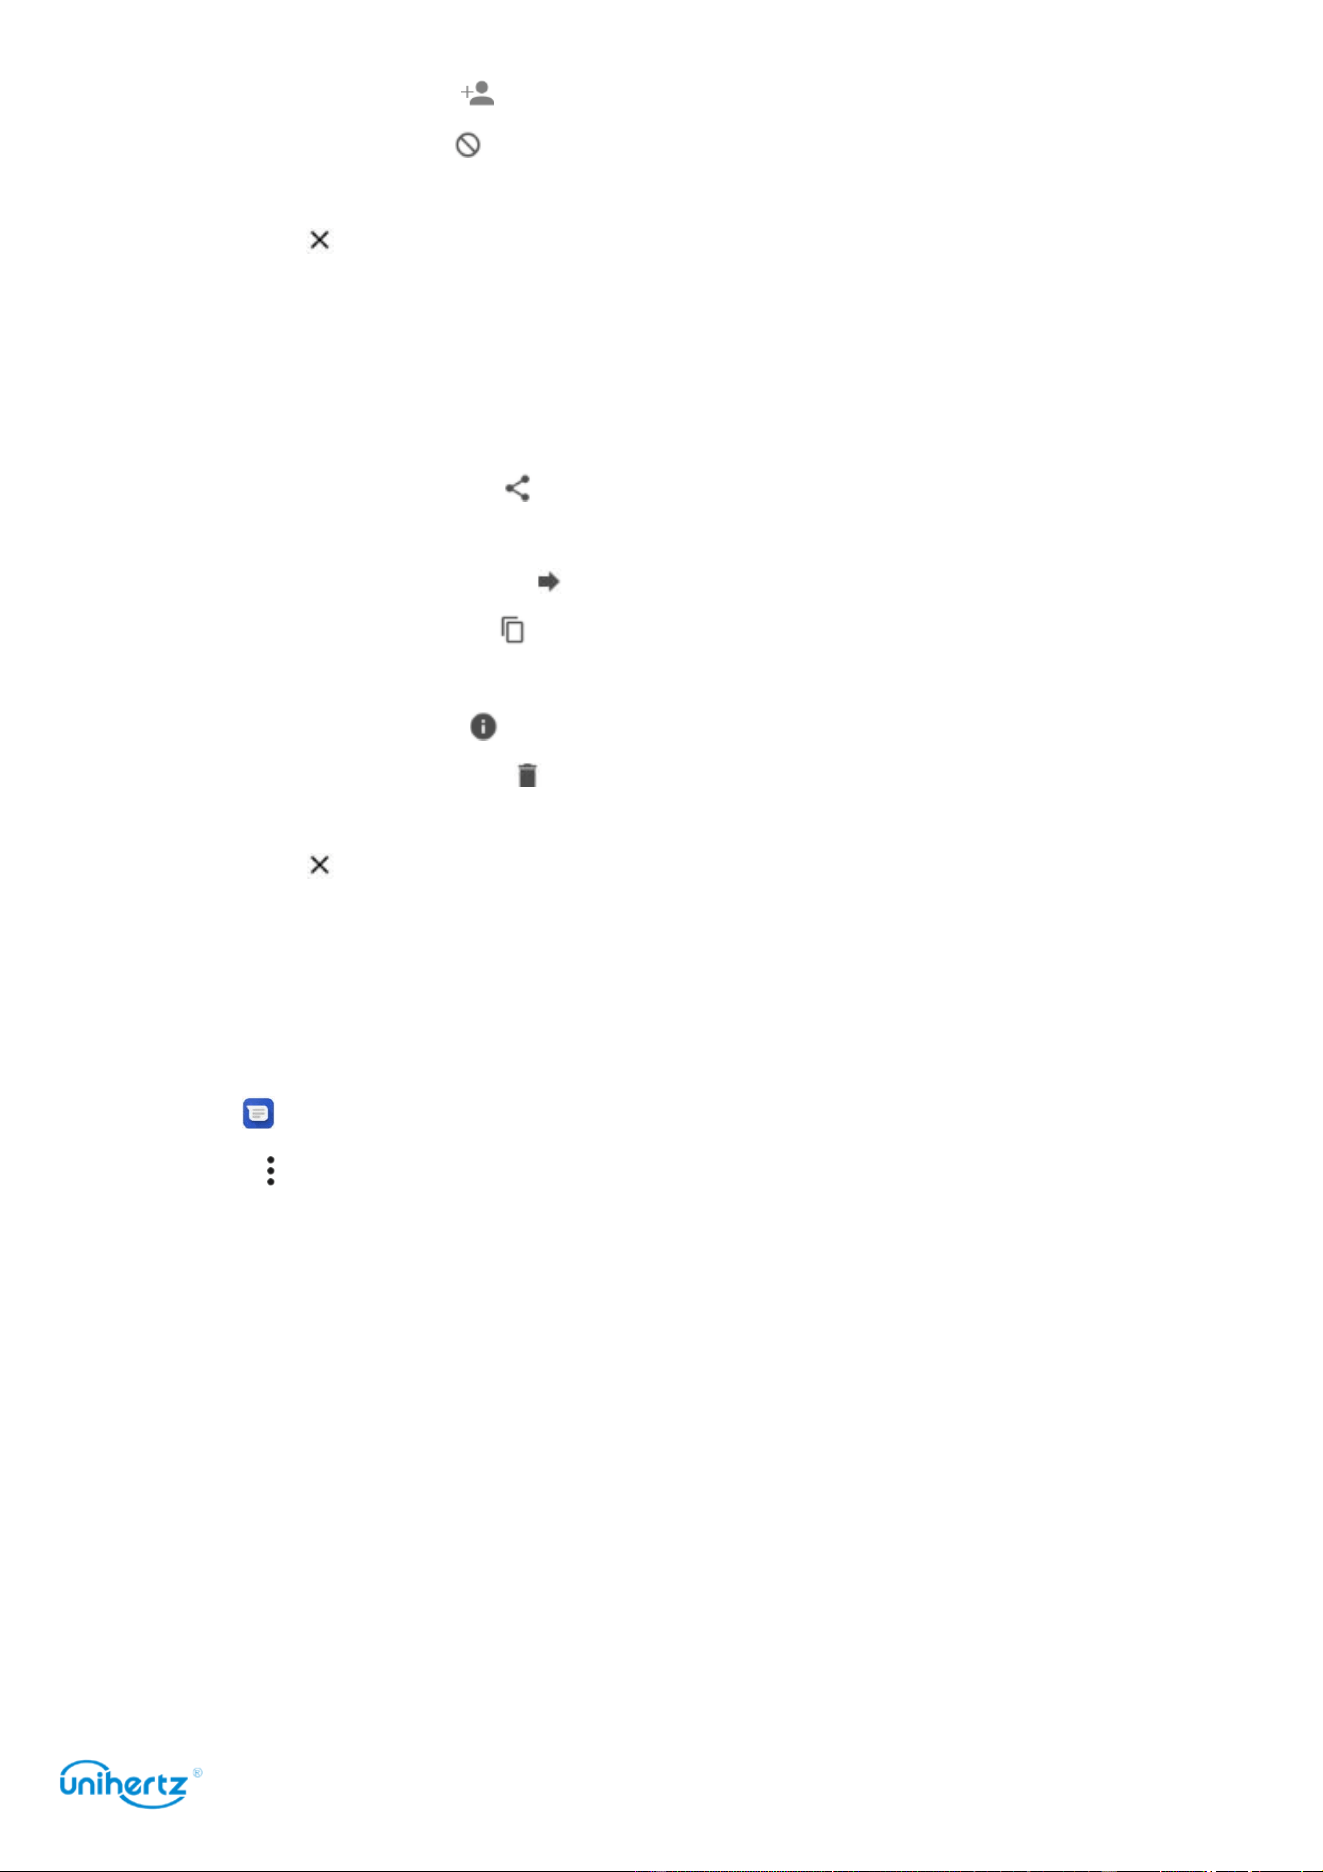
Managing conversations
Delete unwanted conversation, save the number to contacts, archived the
conversation and set the blacklist.
1 Open
Messaging
.
2 In the list of message threads, touch a contact name or phone number to view
your conversations.
3 Touch and hold a conversation. You can:
● Archived: Touch icon, the session will be archived and will not appear in the
conversation list. In the conversation list interface Touch > Archived, select the
session to unarchive and the session will reappear in the list.
●
Delete the conversation
: Touch to delete the conversation. Deleted
conversations cannot be retrieved.
Messaging and Email
48
●
Add to Contacts
: Touch
to add the number to the Contacts.
●
Do Not Disturb
:
Touch ,You won’t receive calls or texts from this number. This
conversation will be archived.
●
Exit
:
T
ouch to exit.
Managing messages
Delete unwanted messages, forward messages to other contacts, copy message
content, share message, and to view the details of the message.
●
share the message
: Touch , share information to other devices by message,
Bluetooth, Gmail, Android Beam, Keep, etc.
●
Forward the message
: Touch to forward the message to another contact.
●
Copy the message
: Touch to copy the message to the clipboard and paste it
elsewhere.
●
Message details
: Touch to view the details of the message.
●
Delete the message
: Touch to delete the message. Deleted messages cannot
be retrieved.
●
Exit
:
T
ouch to exit.
More functions
Personalize the details of Messaging, where you can view archived conversations
and manage blacklists.
1 Open
Messaging
.
2 Touch , You can:
●
Archived
: View archived conversations.
●
Blocked contacts
: View a list of blocked numbers and manage them for deletion
and addition.
●
Settings
: You can view and manage the SMS messages in the SIM card, view
the local number, and personalize the sound, vibration, display, etc. of the
message notification.
Adding an email account
Adding a personal email account
When adding an account, consult your email service provider if you are unsure
about the account settings.
Messaging and Email
49
1 Open
Gmail
.
2 Enter your email address and password, and then touch
Next
to configure an
email.
3 Follow the onscreen instructions to configure your account. The system will
automatically connect to the server and check the server settings.
Once the account has been set up, your
Inbox
will be displayed.
After adding an email account, touch >
Settings
>
Add account
in your
Inbox
to continue adding other accounts.
Adding an Exchange account
Exchange is an email system developed by Microsoft for businesses. Some email
service providers also provide Exchange accounts for individuals and families.
When adding an account, consult your email service provider if you are unsure
about the account settings.
1 Open
Gmail
.
2 Touch
Exchange and office365
.
3 Enter your email address, user name, and password. Touch
Next
.
4 Follow the onscreen instructions to configure your account. The system will
automatically connect to the server and check the server settings.
Once the account has been set up, your
Inbox
will be displayed.
Sending an email
1 Open
Email
.
2 Touch .
3
From
: select the email account you want to use.
4 Enter one or more recipients.

Messaging and Email
50
To
Cc
or
Bcc
the email to multiple recipients, touch
Cc
/
Bcc
:.
5 Enter your email subject and main body. Touch >
Attach
file
to add an
attachment.
6 Touch to
send
.
Your email service provider may place a limit on the size of email attachments.
If your attachments exceed the limit, send the attachments in separate emails.
Touch >
Save draft
to save your email as a draft.
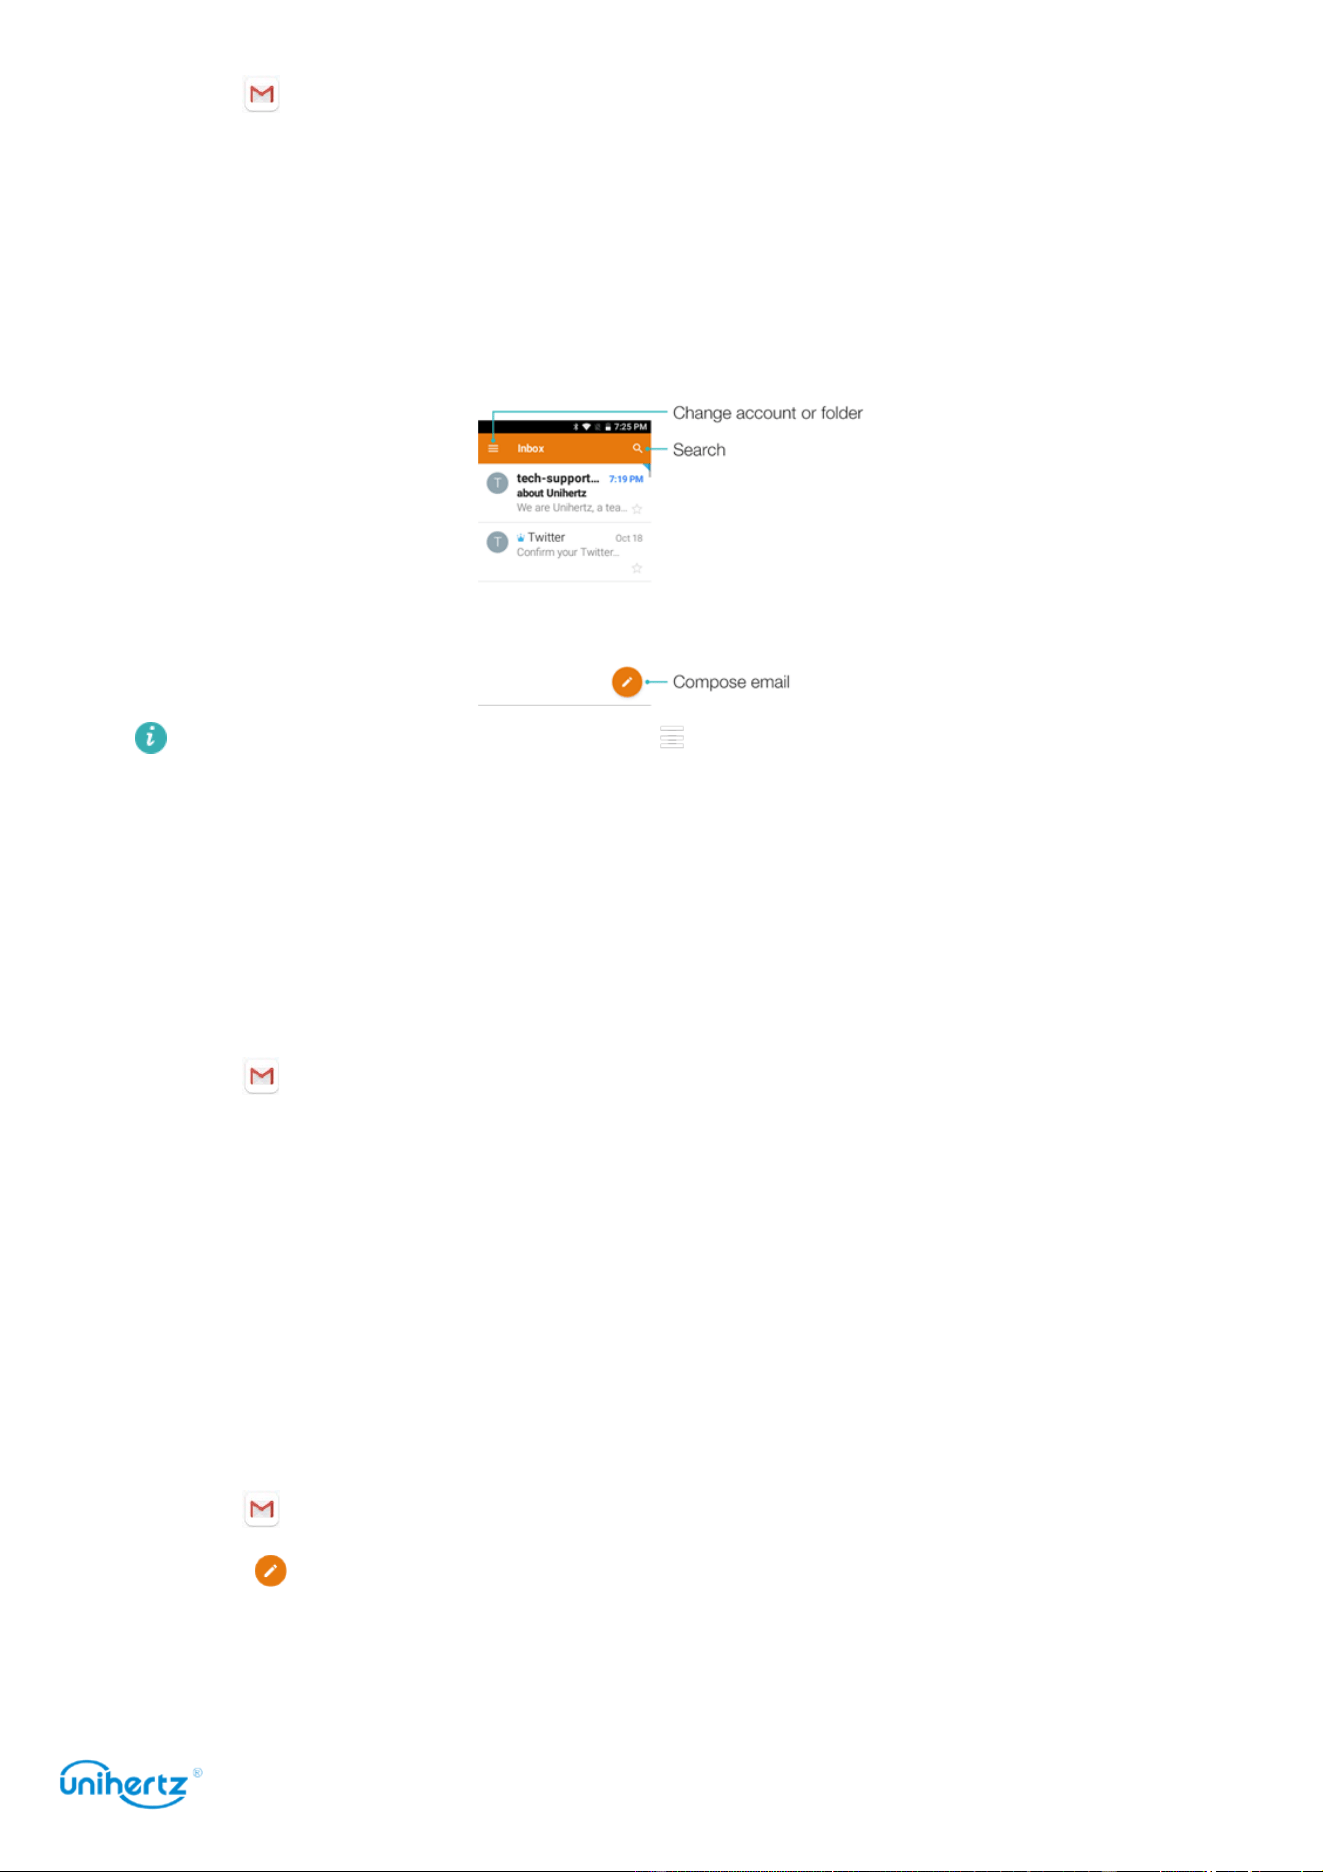
Checking your emails
Open
Gmail
and then swipe down in your Inbox to refresh the list of emails.
1 Open
Gmail
.
2 In your Inbox, touch in the upper left corner to select an account.
3 Touch the email you want to read. You can:
● Touch to
Starred
for future reference.
● Swipe left or right to the email.
Account settings
Changing email accounts
If you have added multiple email accounts on your phone, ensure you switch to the
right account before viewing or sending emails.
1 Open
Gmail
.
2 In your
Inbox
, touch in the upper left corner to open the account list.
3 Select the desired email account.
Removing an email account
1 Open
Settings
> >
Manage accounts
.
2 Select the account you want to remove.
3 Touch
Remove account
>
OK
.
After you remove an email account, you will no longer be able to send or receive
emails using that account.
Personalizing
your email account
Display contact pictures, choose what to display after deleting an email, change

Messaging and Email
51
your signature, set inbox update frequency, and change email notification tones.
1 Open
Gmail
.
2 In your
Inbox
, touch >
Settings
>
General settings
.
3 In your
Inbox
, touch >
Settings
and then choose the desired account.
Camera and Gallery
52
Camera
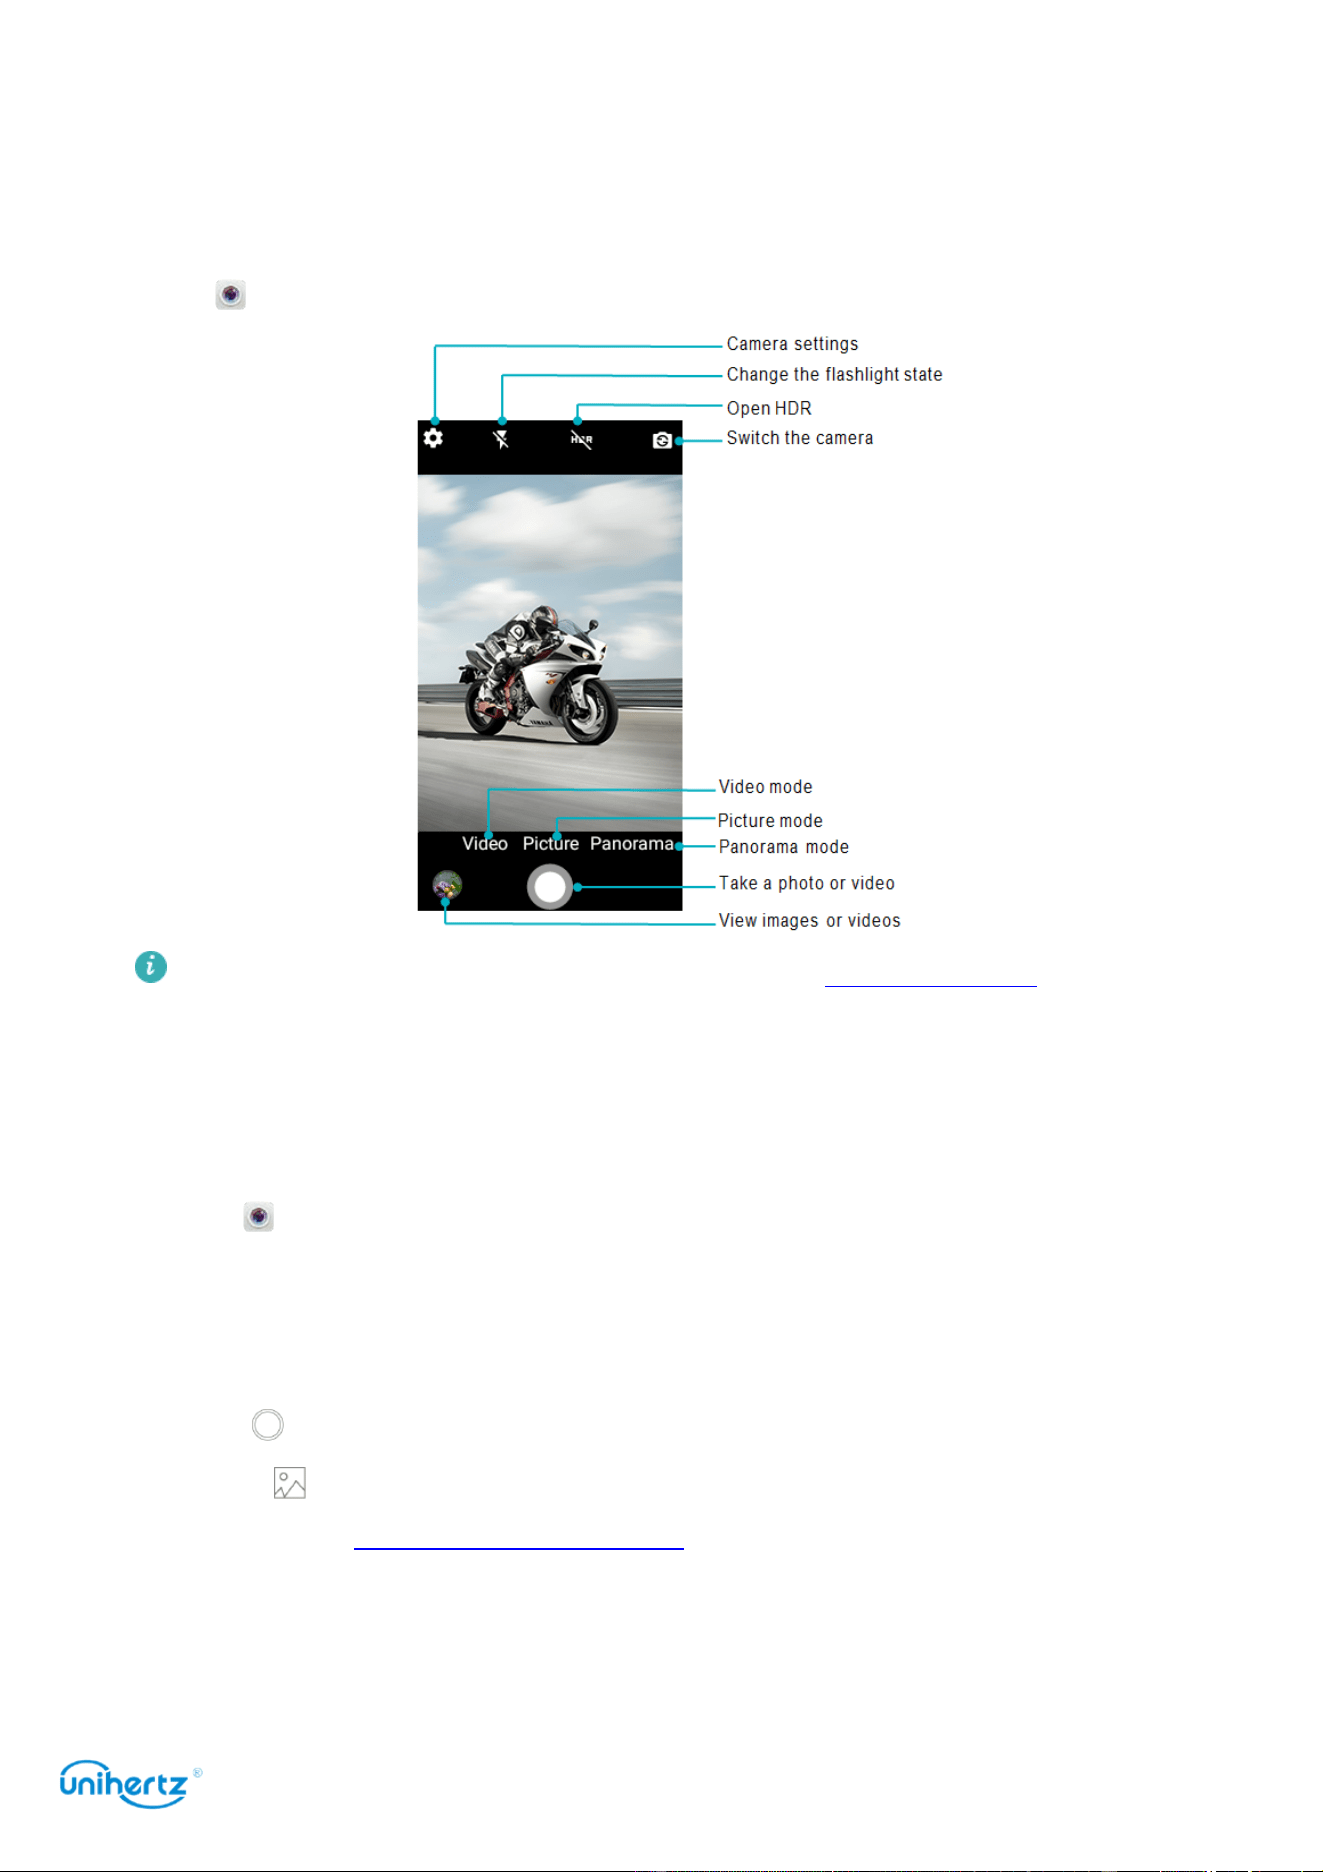
Accessing the viewfinder
Open
Camera
to access the viewfinder.
For more information on the camera settings, see Camera settings.
Taking a photo
Your phone comes with a feature-packed camera that you can use to capture life's
unforgettable moments.
1 Open
Camera
.
2 Frame the scene you want to capture, the camera will focus automatically.
Touch any part of the viewfinder to focus on the corresponding area. To adjust the
Zoom size, pinch two fingers together or spread them apart on the viewfinder.
3 Touch .
Touch the thumbnail to view a photo and share it with friends. For more
information, see Sharing images or videos.
Shooting modes
Your phone features a variety of different camera modes for different shooting

Camera and Gallery
53
scenarios.
Availability of different shooting modes varies by model. Touch the icon on the
bottom of viewfinder to change the capture mode.
●
Panorama mode
: Use this mode to take wide-angle shots. For more information,
see Taking a panoramic photo.
●
Normal mode
>
HDR
: Enhance a photo taken under insufficient or excessive light
conditions. For more information, see HDR mode.
Burst shooting
Use burst shooting when you want to take a photo of a moving subject, such as
during a football match. The camera will capture several images in quick
succession so that you don't miss out on the action.
Not all camera modes support this feature.
1 Open
Camera
.
2 Focus on the subject, and then press and hold to start the burst sequence.
Release your finger to stop shooting.
3 To view and select images, touch the image thumbnail .
HDR mode
Use HDR mode for scenes with a large contrast to prevent under- or overexposure
and ensure clarity in every shot.
HDR mode is not available for the front camera.
1 Open
Camera
, and then touch >
HDR
.
2 Hold your phone steady, frame the scene, and then touch .
Super Night mode
Super Night mode improves the quality of images taken at night and in low-light
conditions by accentuating the detail of darker areas to produce brighter, more
colorful images.
Use a tripod to minimize camera shake.
1 Open
Camera
, and then touch >
Scene mode
>
Night
.
2 Hold your phone steady, frame the scene, and then touch . The camera will
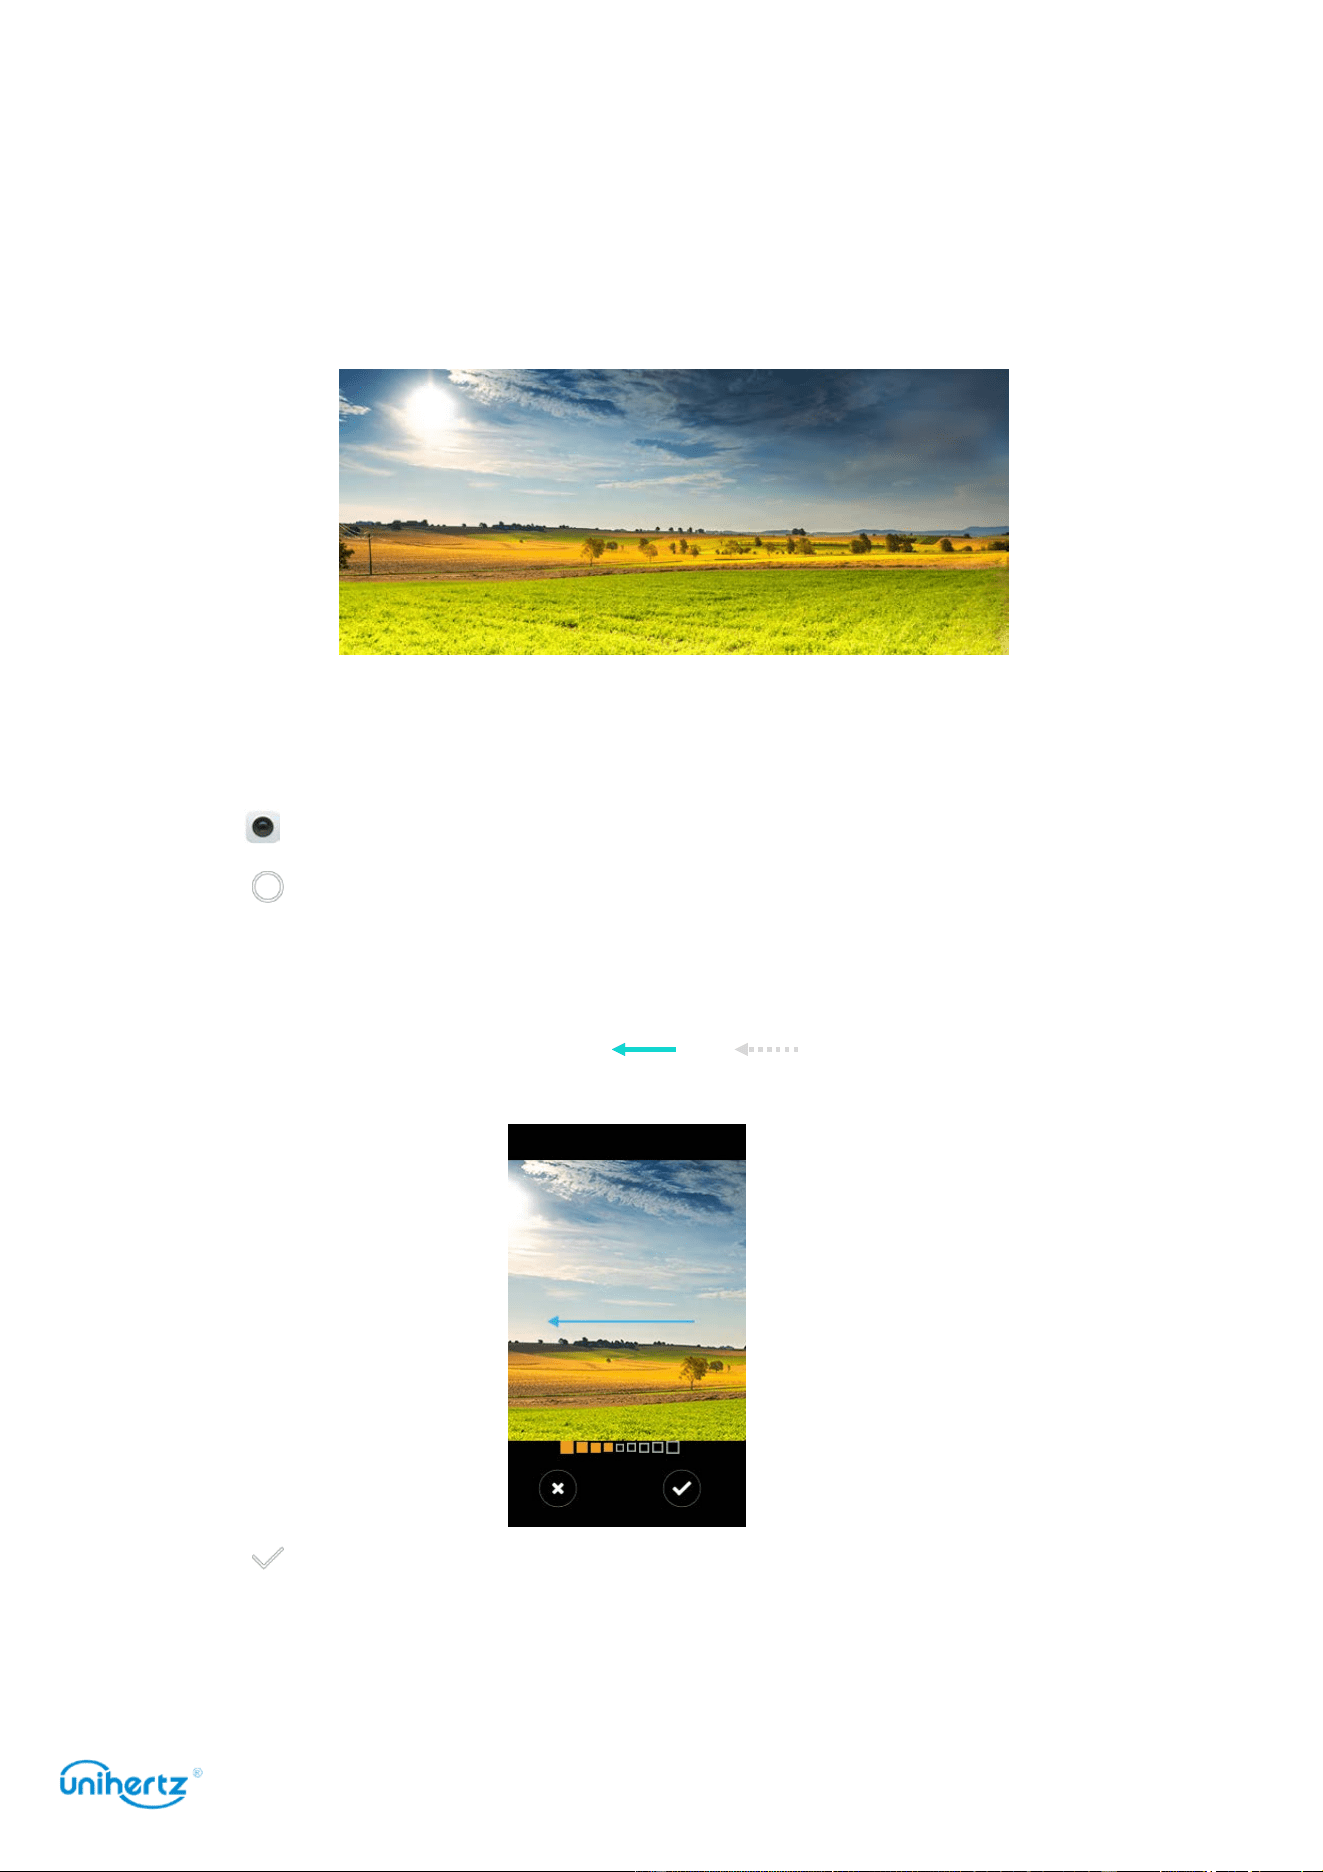
Camera and Gallery
54
automatically take several images and merge them into one photo.
Panoramic shots
Taking a panoramic photo
Select Panorama mode to take wide-angle shots.
1 Select a suitable location and hold your phone steady. Shoot the image in a
wide, open space and avoid monochromatic backgrounds.
2 Open
Camera
, swipe right on the screen, and then touch
Panorama
.
3 Touch to start shooting.
4 Follow the onscreen instructions to take the photo. Slowly move your camera
from left to right, ensuring that the arrow stays level with the center line. To take a
panoramic shot in portrait mode, Let and overlap and then slowly move
your camera upwards.
5 Touch to stop shooting. The camera automatically stitches the photos
together to create one panoramic photograph.
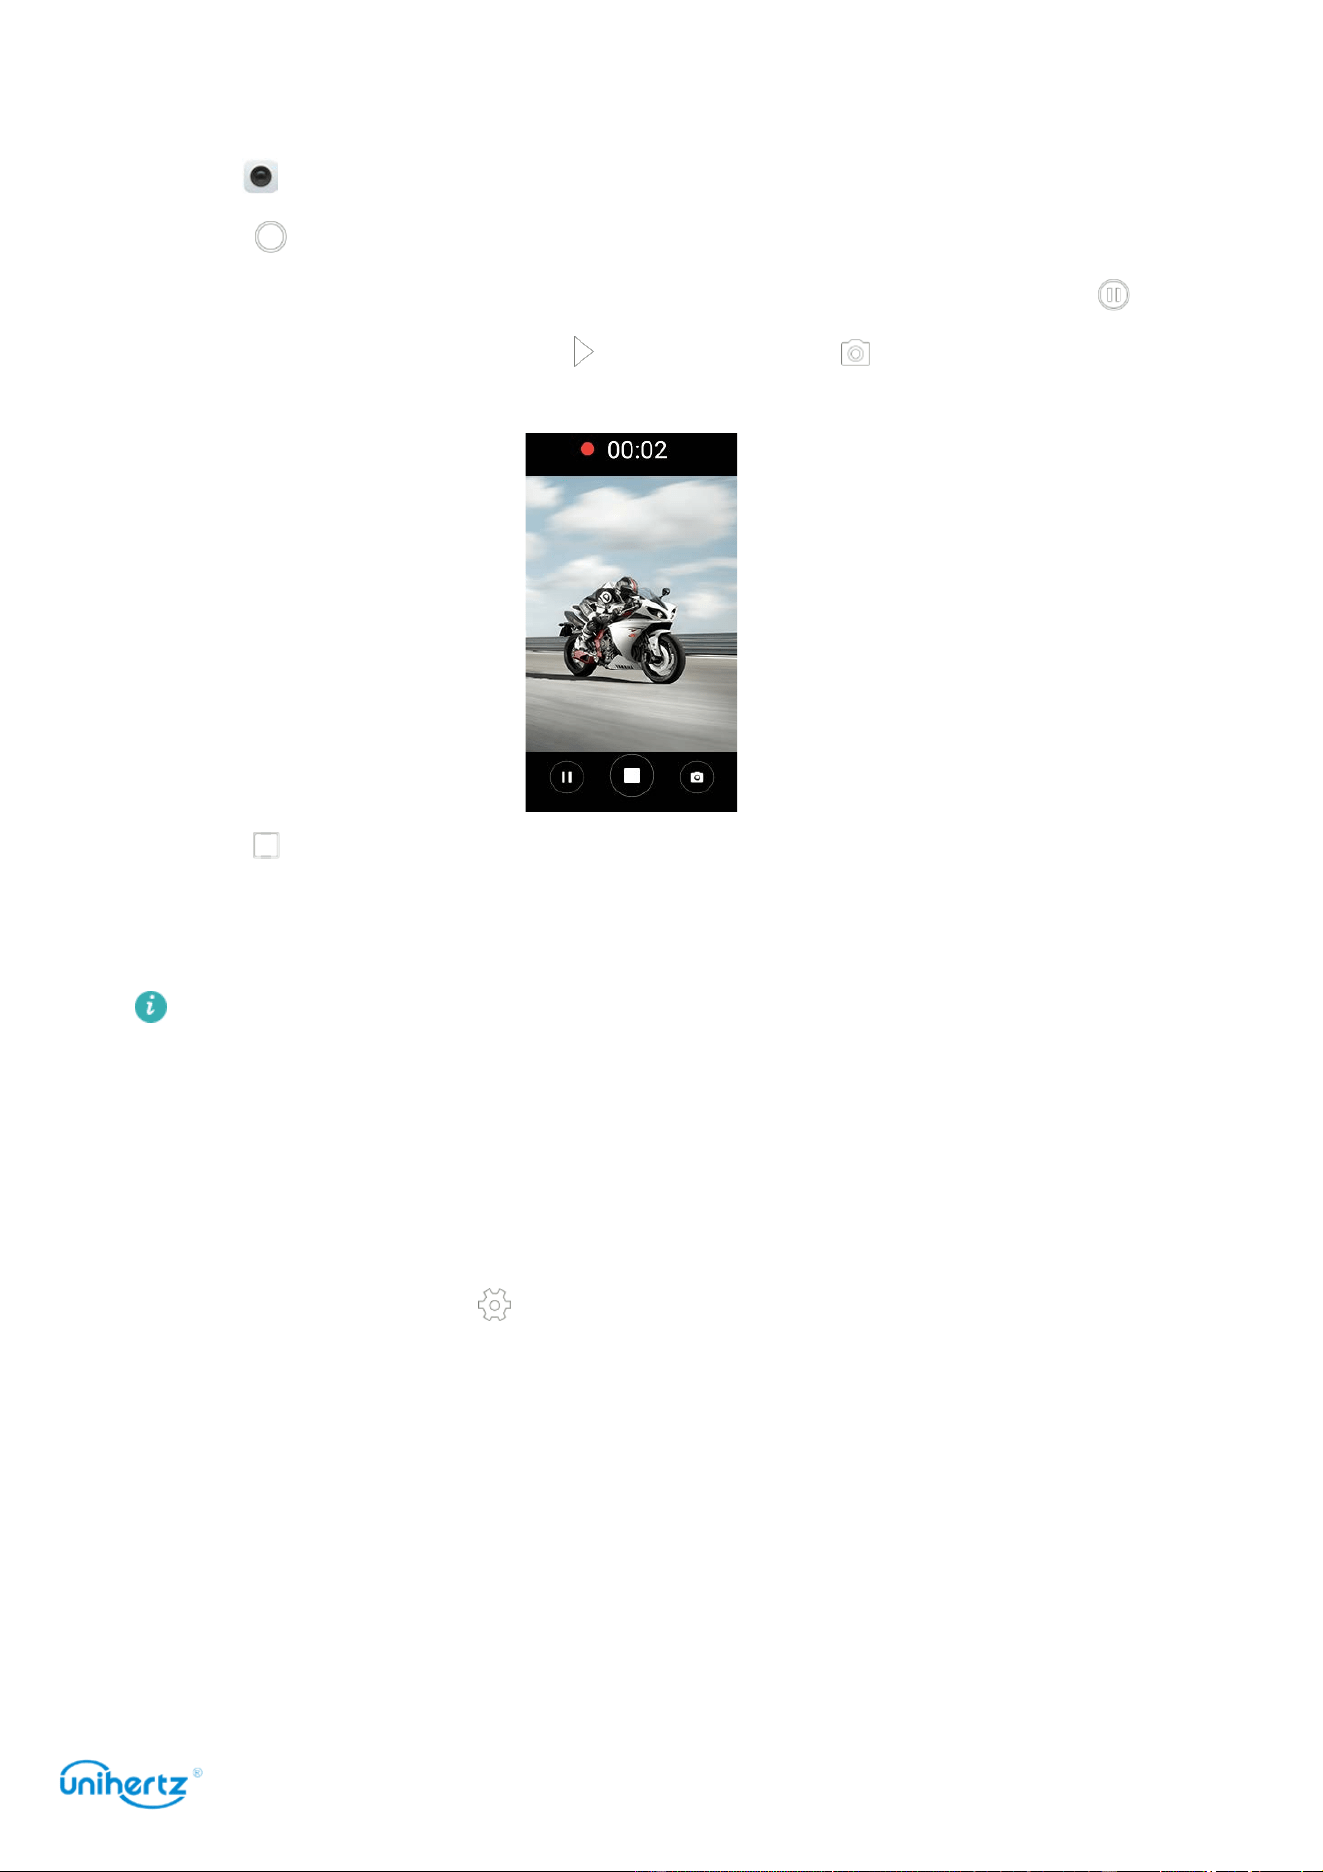
Camera and Gallery
55
Shooting a video
1 Open
Camera
.
2 Touch to start a video recording.
3 Touch the screen to focus on an object or area during recording. Touch to
pause recording, and then touch to resume. Touch to save the current scene
as a photo.
4 Touch icon to end the recording.
Camera and video settings
Some shooting modes may not support all settings.
Setting the photo and video resolutions
Increase the resolution for higher quality images and videos. However, larger
resolution images take up more space on your phone. Changing the resolution will
also change the image dimensions.
Video settings
In the Video mode, Touch to configure the following settings:
●
Scene mode
: Choose a viewfinder mode that suits your current environment,
such as:Night, Sunset, Sorts, Steady photo, Landscape, Portrait etc.
●
Microphone
: Silent recording or sound recording.
●
White balance
: Manually switch the white balance mode to other mode which
matches the current environment, such as:Daylight, Cloudy, Twilight,
incandescent, etc.
●
Anti flicker
: If the camera preview interface flickers in some scenes, you can manually
switch the frequency to improve.

Camera and Gallery
56
●
Image properties
: Set the properties of the image according to the actual scene and
personal preferences such as brightness, contrast, Hue, saturation, sharpness etc.
●
Video Format
: Set the recording format 3GP or MP4.
Camera settings
In the Picture mode, Touch to configure the following settings:
●
Self timer
: Enable this feature to set a self-timer.
●
Picture size
:
Changing the resolution to change the image dimensions.
●
ZSD
: Turn on this switch and expose the image when the shutter is pressed. It is
suitable for quick capture of dynamic scenes.
●
Capture Sound
:
Turn off the switch, turn off the sound during capture.
Photos and Videos
Viewing photos and videos
You can view the following photos and videos in Photos:
● Photos and videos shot with the camera.
● Photos and videos that your friends shared with you.
● Photos and videos synced from your computer.
● Photos and videos saved from messages, emails, or websites, as well as
screenshots.
Viewing photos by album
Open Photos , and then select
Albums
. Photos and videos are automatically
added to the default folders. For example, photos that you shot using the camera
are automatically added to the
Camera
folder, and
screenshots
are added to the
Screenshot folder.
Viewing photos as a slideshow
Select any folder and touch >
Slideshow
.
Viewing photos in full-screen mode
Open Photos and then touch an image to view it in full-screen mode. Touch the
screen to display or hide the screen menu.
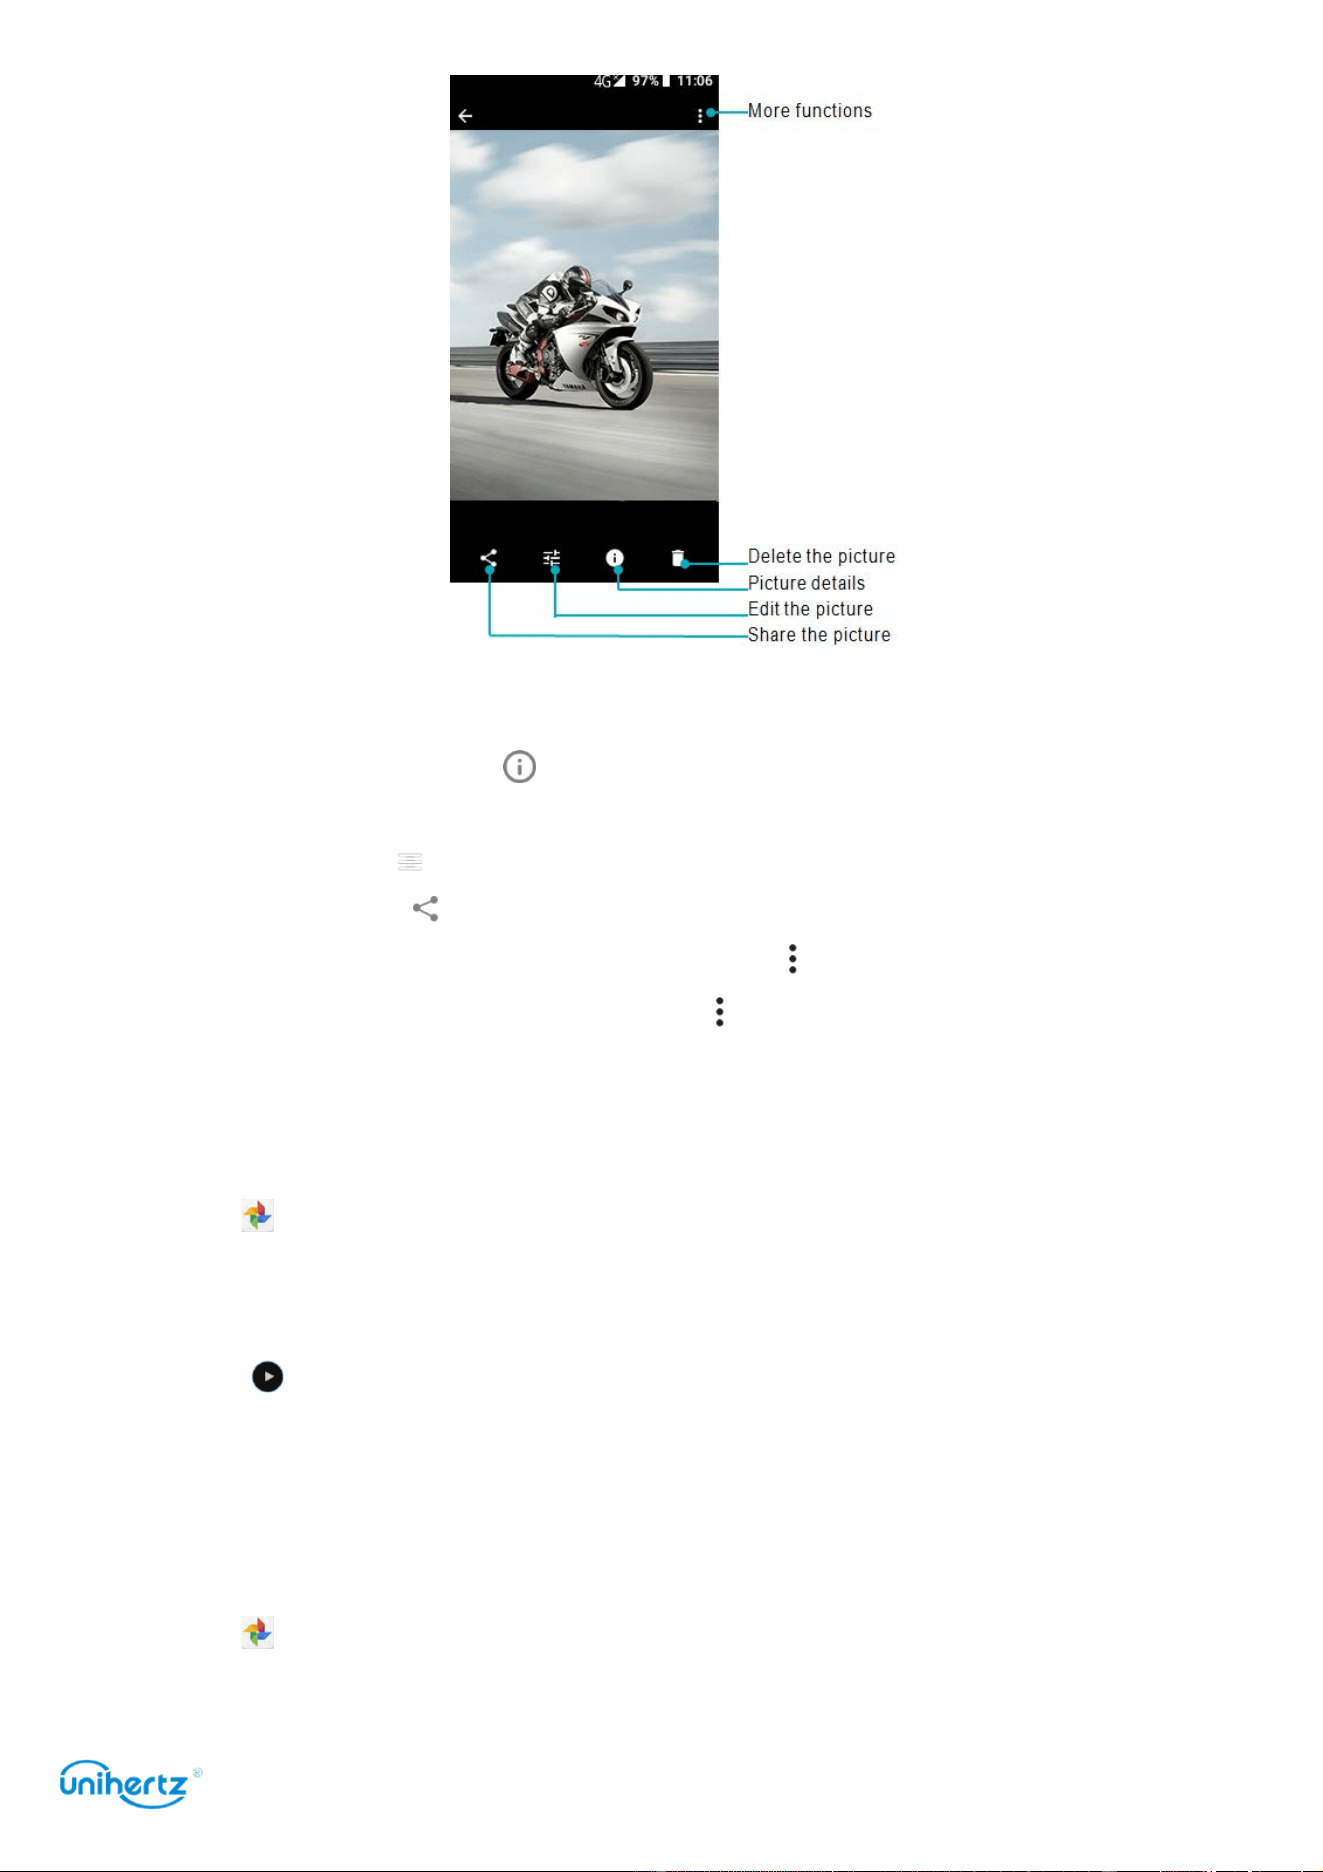
Camera and Gallery
57
●
Zoom or in out
: Spread two fingers apart to zoom in or pinch two fingers together
to zoom out.
●
View image details
: Touch to view the image details, such as the ISO, photo
shooting time, storage location, etc.
●
Edit photo
: Touch to edit rename a photo .
●
Share photo:
Touch
and then choose a sharing method to share the photo.
●
Set photo as wallpaper or Contact photo
: Touch >
Use as
>
Wallpaper
to set a
photo as the home screen wallpaper, touch >
Use as
>
Contact
photo
to set a
photo as one of the contact.
Playing a video
1 Open
Videos
.
2 Touch the video you want to play. Touch the screen to display or hide the
screen menu.
3 Touch to pause the video playback.
Deleting images or videos
If you're running out of storage space, delete unwanted photos and videos from
Photos.
1 Open Photos.
2 Touch and hold an image or video to select the files that you want to delete.

Camera and Gallery
58
3 Touch >
Delete
to delete the selected files.
Sharing images or videos
1 Open Photos.
2 Touch and hold an image or video thumbnail, and then select the files that you
want to share.
3 Touch , choose a sharing method, and follow the onscreen instructions to
share your files.
Editing an image
The Photos application comes with powerful image editing tools that you can use
to bring your photos to life. For example, you can draw graffiti, or apply a variety of
filters.
1 Open
Photos
.
2 Touch an image to view it in full-screen mode. Touch to edit the image.
3 Select an image editing tool. You can:
●
Select scene
: Touch and select the desired scene.
●
Edit an image
: Adjust the color of the photo, Touch > , Make detailed
adjustments to the light and color of the photo.
●
Crop an image
: Touch > to select the crop ratio (for example, 16:9). Drag
the dotted edges to crop the image to the desired size.
●
Rotate an image
: Touch > and swipe the screen to adjust the angle of
rotation.
More functions
More features can be see after logging into Google account, and the browsing
interface will also display more function menus.
1 Open
Photos
2 Touch in the upper left corner to sign in an account, you can:
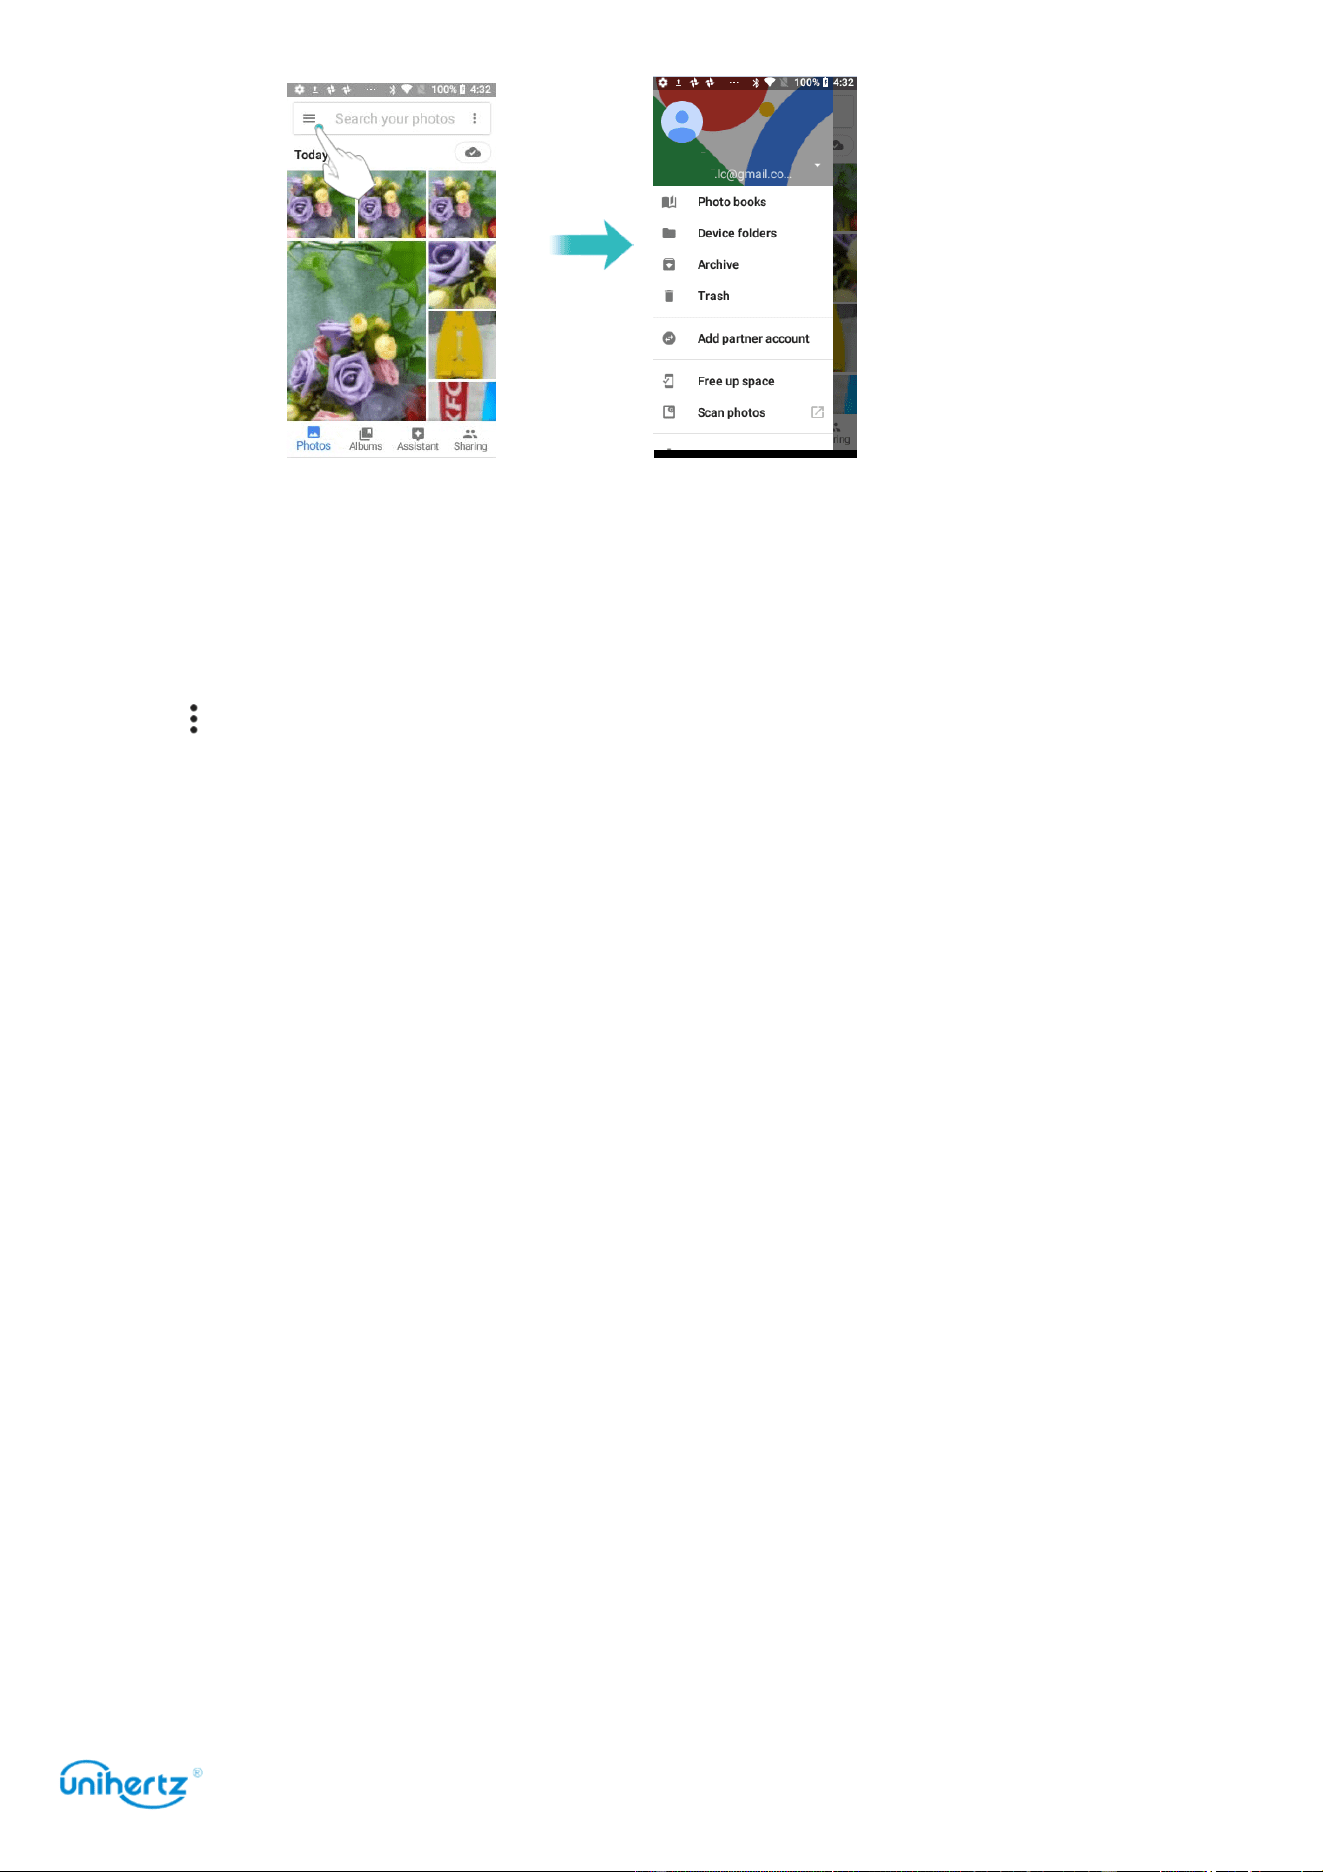
Camera and Gallery
59
● Photos
: Go to the Photos to view photos or videos
● Device folders
: Show all classified folders in the Photos
● Archive
:
Archived photos or videos will appear here
● Trash
:
Deleted photos or videos will be saved here,
Touch RESTORE, the file can be
restored to the original folder, otherwise it will be permanently deleted after 60 days.
Touch >Empty trash, can manually delete all files in Trash.
● Free up space
:
Remove items from the device to free up the space.
● Settings
: Personalize account synchronization, notifications, share files, location
information, and etc.

Music
and
Video
60
Music
Adding songs to your phone
Before you can listen to your music, you need to copy your songs onto your phone.
To add songs to your phone:
● Copy songs from your computer using the USB cable.
● Download songs from the Internet.
● Copy songs with Bluetooth.
Searching for local music
Sort your music by category or search with a keyword to find your music files
quickly.
1 Open
Music
.
2 You can choose to organize your music by song name, artist, album name, or
folder. To search for a specific song, touch and then enter the song name,
artist, or album in the search bar.
Listening to music
1 Open
Music
.
2 Touch the song you want to play.
Using your phone during music playback
● When a song is playing, touch
Home
to exit the music playback screen
without stopping the song. To return to the music playback screen, open the
notification panel and touch the song icon that is playing.
● Touch will close the music player, touch will change to pre song in songs
list, touch will switch to the next song.
Controlling playback using a smart headset
You can use the buttons on a headset to control playback without turning on
the screen.
● Not all headsets are compatible with your phone. You are advised to purchase
an official headset.
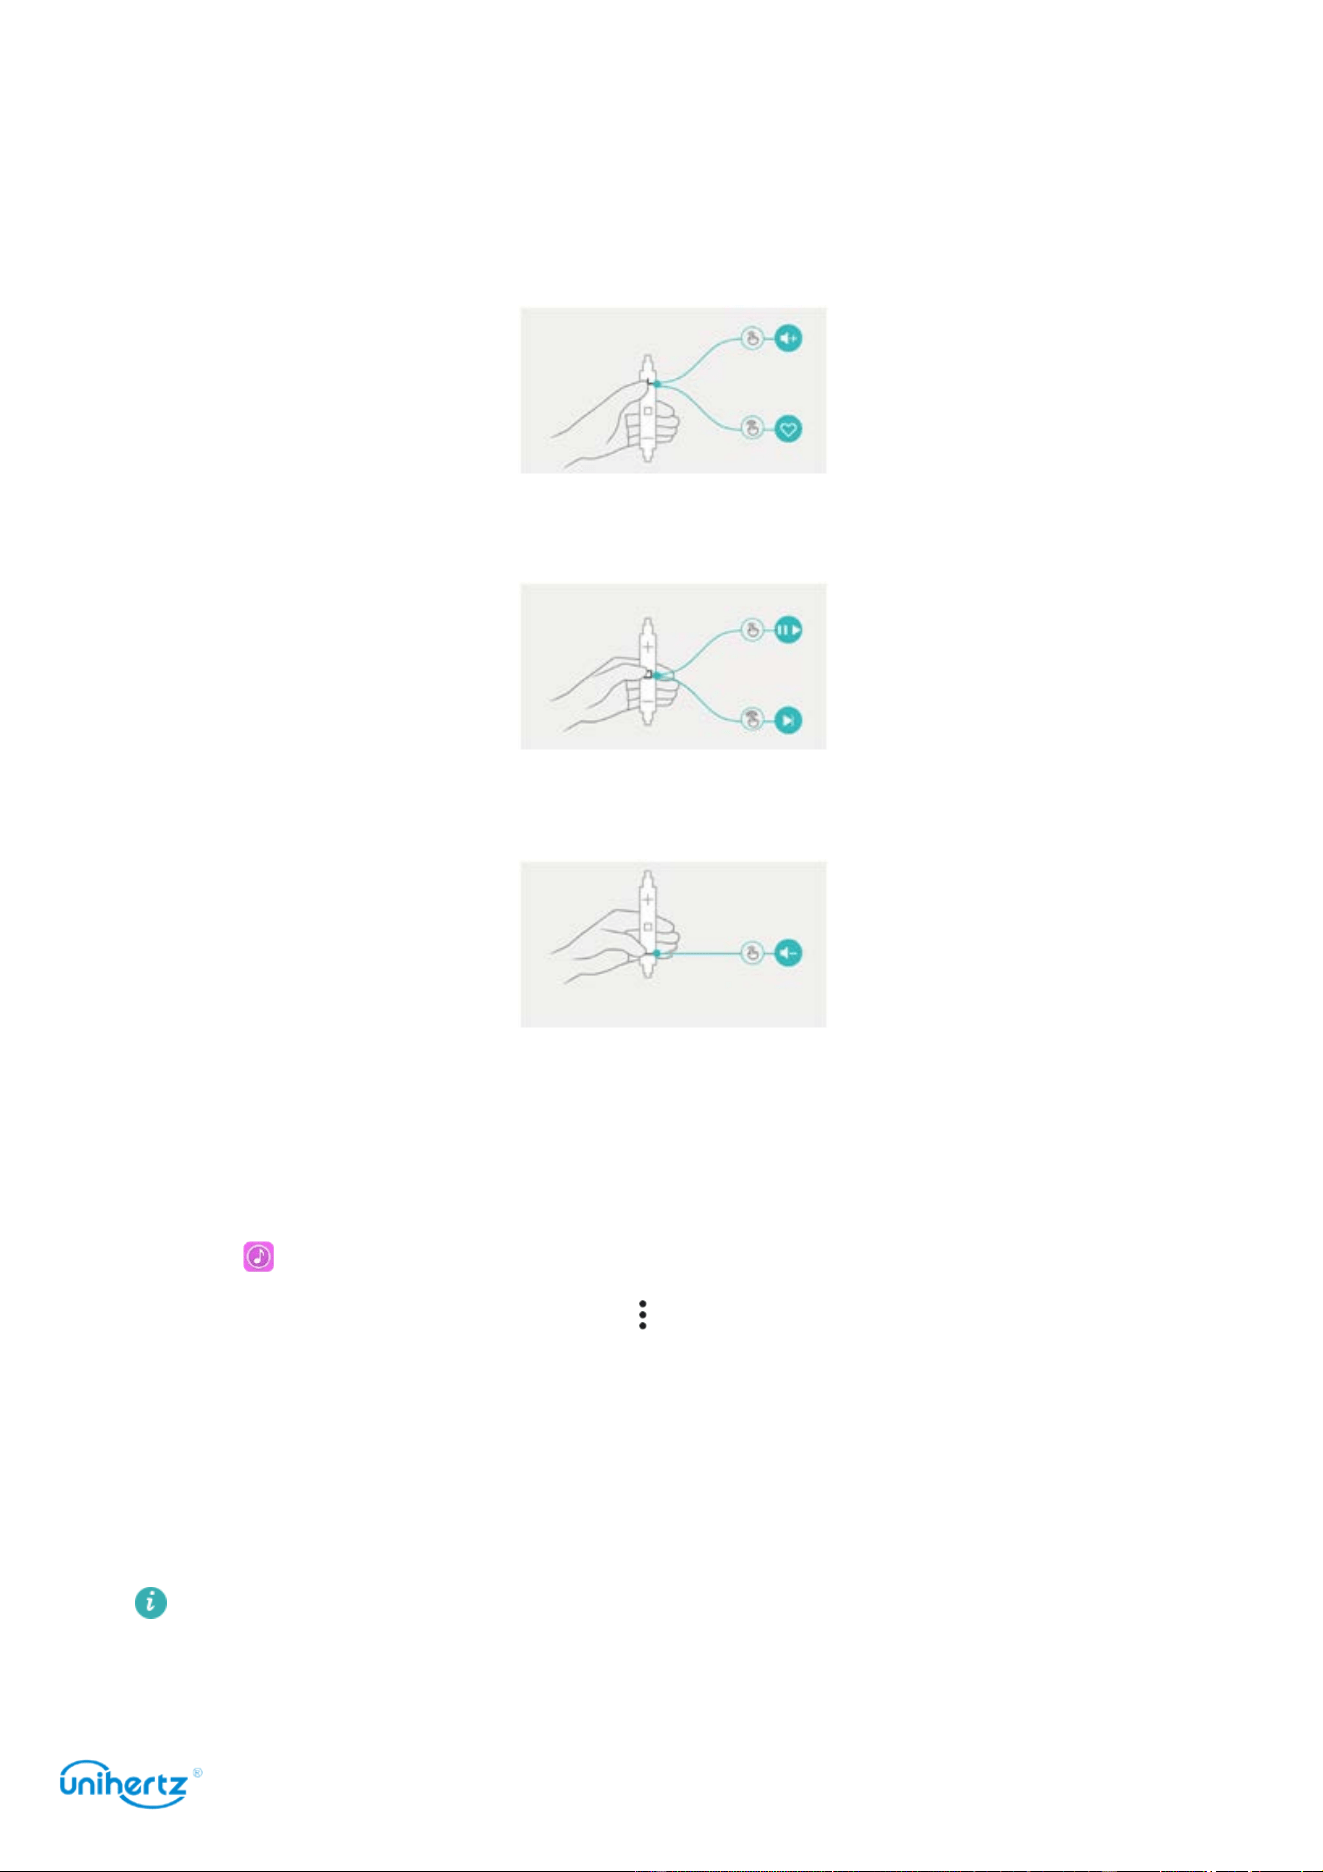
Music
and
Video
61
● You can also use a headset to control video playback (this feature is not
supported by all video players).
Use the following buttons to control playback:
●
Volume up button
: Press once to increase the volume, or twice to add the current
song to your favorites.
●
Pause button
: Press once to pause or resume playback, twice to skip to the next
song.
●
Volume down button
: Press once to decrease the volume, or twice to change the
playback mode.
Creating a playlist
Organize your music by creating customized playlists that contain your favorite
songs.
1 Open
Music
.
2 Touch
Playlists
>
Recently added
> >
Save as playlist
.
3 Name the playlist and touch
Save
.
4 The songs will auto add to the playlist.
5 Select one of the playlist and then touch and hold the songs.
6 From the pop menu, add the song to playlist or remove the song from playlist.
Touch and hold the playlist to
Play
,
Delete
or
Rename
the playlist

Music
and
Video
62
Playing a playlist
1 Open
Music
.
2 Touch
Playlists
.
3 Touch and hold the playlist you want to play.
Setting a song as the ringtone
Set your favorite song as the call, notification, or alarm ringtone.
1 Open
Music
.
2 Touch
Local songs
.
3 Touch >
Use as ringtone
.

Accessing
the
Internet
63
Accessing the Internet
Connecting to the Internet using mobile data
Data charges may apply when using mobile data to access the Internet.
Before using mobile data, ensure that you have a data plan with your carrier.
1 Open
Settings
.
2 Touch
More
>
Mobile network
.
3 Turn on the Mobile data switch to enable mobile data.
Disable mobile data when not required in order to save battery power and
reduce data usage. If you cannot use mobile date to connect to the internet, see
Configuring the Access Point Names.
Connecting to the Internet using Wi-Fi
You can connect to the Internet using a Wi-Fi access point or hotspot.
Your personal data and financial information may be at risk if you connect to
insecure public
Wi-Fi networks.
Connecting to a Wi-Fi network
1 Open
Settings
.
2 Touch Network & Internet >
Wi-Fi
and then turn on the
Wi-Fi
switch. Your phone
will list available Wi-Fi networks.
Add a Wi-Fi network that is not shown in the list
: Touch
Add network…
. Follow the
onscreen instructions to configure the Wi-Fi settings and password.
3 Select the Wi-Fi network you want to connect to:
● If the Wi-Fi network does not require a password, your phone will connect
automatically.
● If the network is protected, enter the password when prompted, and then touch
Connect.
Once your phone is connected to a Wi-Fi network, it will display the icon in the
status bar. Your phone will remember Wi-Fi networks that you have used before
and reconnect to them automatically.
Connecting to a Wi-Fi network using WPS

Accessing
the
Internet
64
Connect your phone to a WPS-enabled router without having to enter the network
key.
1 Open
Settings
.
2 Touch Network & Internet
>
Wi-Fi
and then turn on the
Wi-Fi
switch.
3 Touch WiFi preferences >
Advanced
, and then choose one of the following
methods:
● Touch
WPS Push
Button and then press the Wi-Fi router's WPS button.
● Touch
WPS Pin Entry
to generate a PIN, and then enter this PIN on the Wi-Fi
router.
Once your phone is connected to a Wi-Fi network, it will display the icon in the
status bar. Your phone will remember Wi-Fi networks that you have used before
and reconnect to them automatically.
Sharing your mobile Internet with other devices
You can share your phone's mobile Internet with other devices (such as phones,
tablets, or computers). The following Internet sharing methods can be used:
●
Wi-Fi hotspot
: Create a portable Wi-Fi hotspot to share your mobile Internet with
other devices.
●
Bluetooth tethering
: Share your mobile Internet with other devices using
Bluetooth.
●
USB tethering
: Use a USB cable to share your mobile Internet with a computer.
Using a Wi-Fi hotspot to share your mobile Internet
Set up a Wi-Fi hotspot to share your phone's mobile Internet with other devices.
Compared with Bluetooth tethering, the portable Wi-Fi hotspot feature offers
quicker, longer- range connections, but power consumption is higher.
● Your device can't access the Internet using Wi-Fi when your
Wi-Fi hotspot
is
switched on.
● To enable mobile data, see Connecting to the Internet using mobile data.
1 Open
Settings
.
2 Touch
Network &Internet
>
Hotspot & Tethering
3 Touch
Wi-Fi hotspot
and then turn on the Wi-Fi hotspot switch.
After enabling your personal Wi-Fi hotspot, your phone will display the icon in
the status bar.

Accessing
the
Internet
65
4 Touch
Set up Wi-Fi hotspot
to view or modify the hotspot name, security settings,
and password, and then touch
Save
.
●
Change the hotspot name
: The
Network SSID
is the hotspot's name. By default,
this is the name of your phone model. You can manually change the name to
something that is easier to remember.
●
Change the hotspot security settings
: Touch
Security type
to configure the
hotspot security settings. Your phone uses
WPA2 PSK
encryption by default. Other
devices will require a password to connect to the hotspot. If you choose
None
,
devices will not require a password to connect to the hotspot.
●
Configure a password that is easy to remember
: The hotspot password is
generated randomly by your phone. For security reasons, choose a password that
is not easy to guess and change it regularly.
●
Configure the maximum number of connections
: Touch
Maximum connections
and
change the maximum number of connections. By default, your phone will allow
eight devices to connect to the hotspot concurrently.
You will need to remember the hotspot name and password to connect to it using
other devices.
Using USB tethering to share mobile Internet with a computer
Use a USB cable to share your phone's mobile Internet with a computer. This is
useful if your computer's Internet connection stops working.
●
USB tethering
can be used to share your Wi-Fi and mobile Internet connection.
To enable mobile data, see Connecting to the Internet using mobile data.
● Depending on your computer's operating system, you may need to install phone
drivers on the computer or establish a network connection in order to use USB
tethering. Please read the instructions for your operating system.
1 Use a USB cable to connect your phone to the computer.
2 Open
Settings
.
3 Touch
Network &Internet
>
Hotspot & Tethering
4 Turn on the
USB tethering
switch to share your mobile Internet.
After enabling USB tethering, your phone will display the icon in the status bar.
You can then use the computer to access the Internet.
You cannot use the mass storage feature when your phone is in USB tethering
mode.
Using Bluetooth tethering to share your mobile Internet

Accessing
the
Internet
66
Use Bluetooth tethering to turn your phone into a wireless router and share your
mobile Internet with other devices. Compared with a Wi-Fi hotspot, Bluetooth
tethering offers a slower Internet connection, but consumes less power.
Bluetooth tethering
can be used to share your Wi-Fi and mobile Internet
connection. To enable mobile data, see Connecting to the Internet using mobile
data.
1 Establish a Bluetooth connection between two devices and check that they are
paired.
2 Open
Settings
.
3 Touch
Network &Internet
>
Hotspot & Tethering
4 Turn on the
Bluetooth tethering
switch to share your mobile Internet.
5 On the
Bluetooth
screen, touch next to the name of the paired device, and
then turn on the
Internet access
switch to establish an Internet connection.
Send an Internet access request to your phone from the device that requires an
Internet connection.
After enabling Bluetooth tethering, your phone will display the icon in the status
bar. Other devices can now connect and use your mobile Internet.
Data sharing and transmission
Transferring data using PC
View photos stored on your phone by computer or transfer audio, video and other
files between your phone and computer
In the boot state, connect the mobile phone to the computer through the USB data
cable, click Android System in the mobile phone notification bar, select “Transfer
files”, double-click the newly appeared “Atom” drive in the computer to copy,
delete and other related operations.
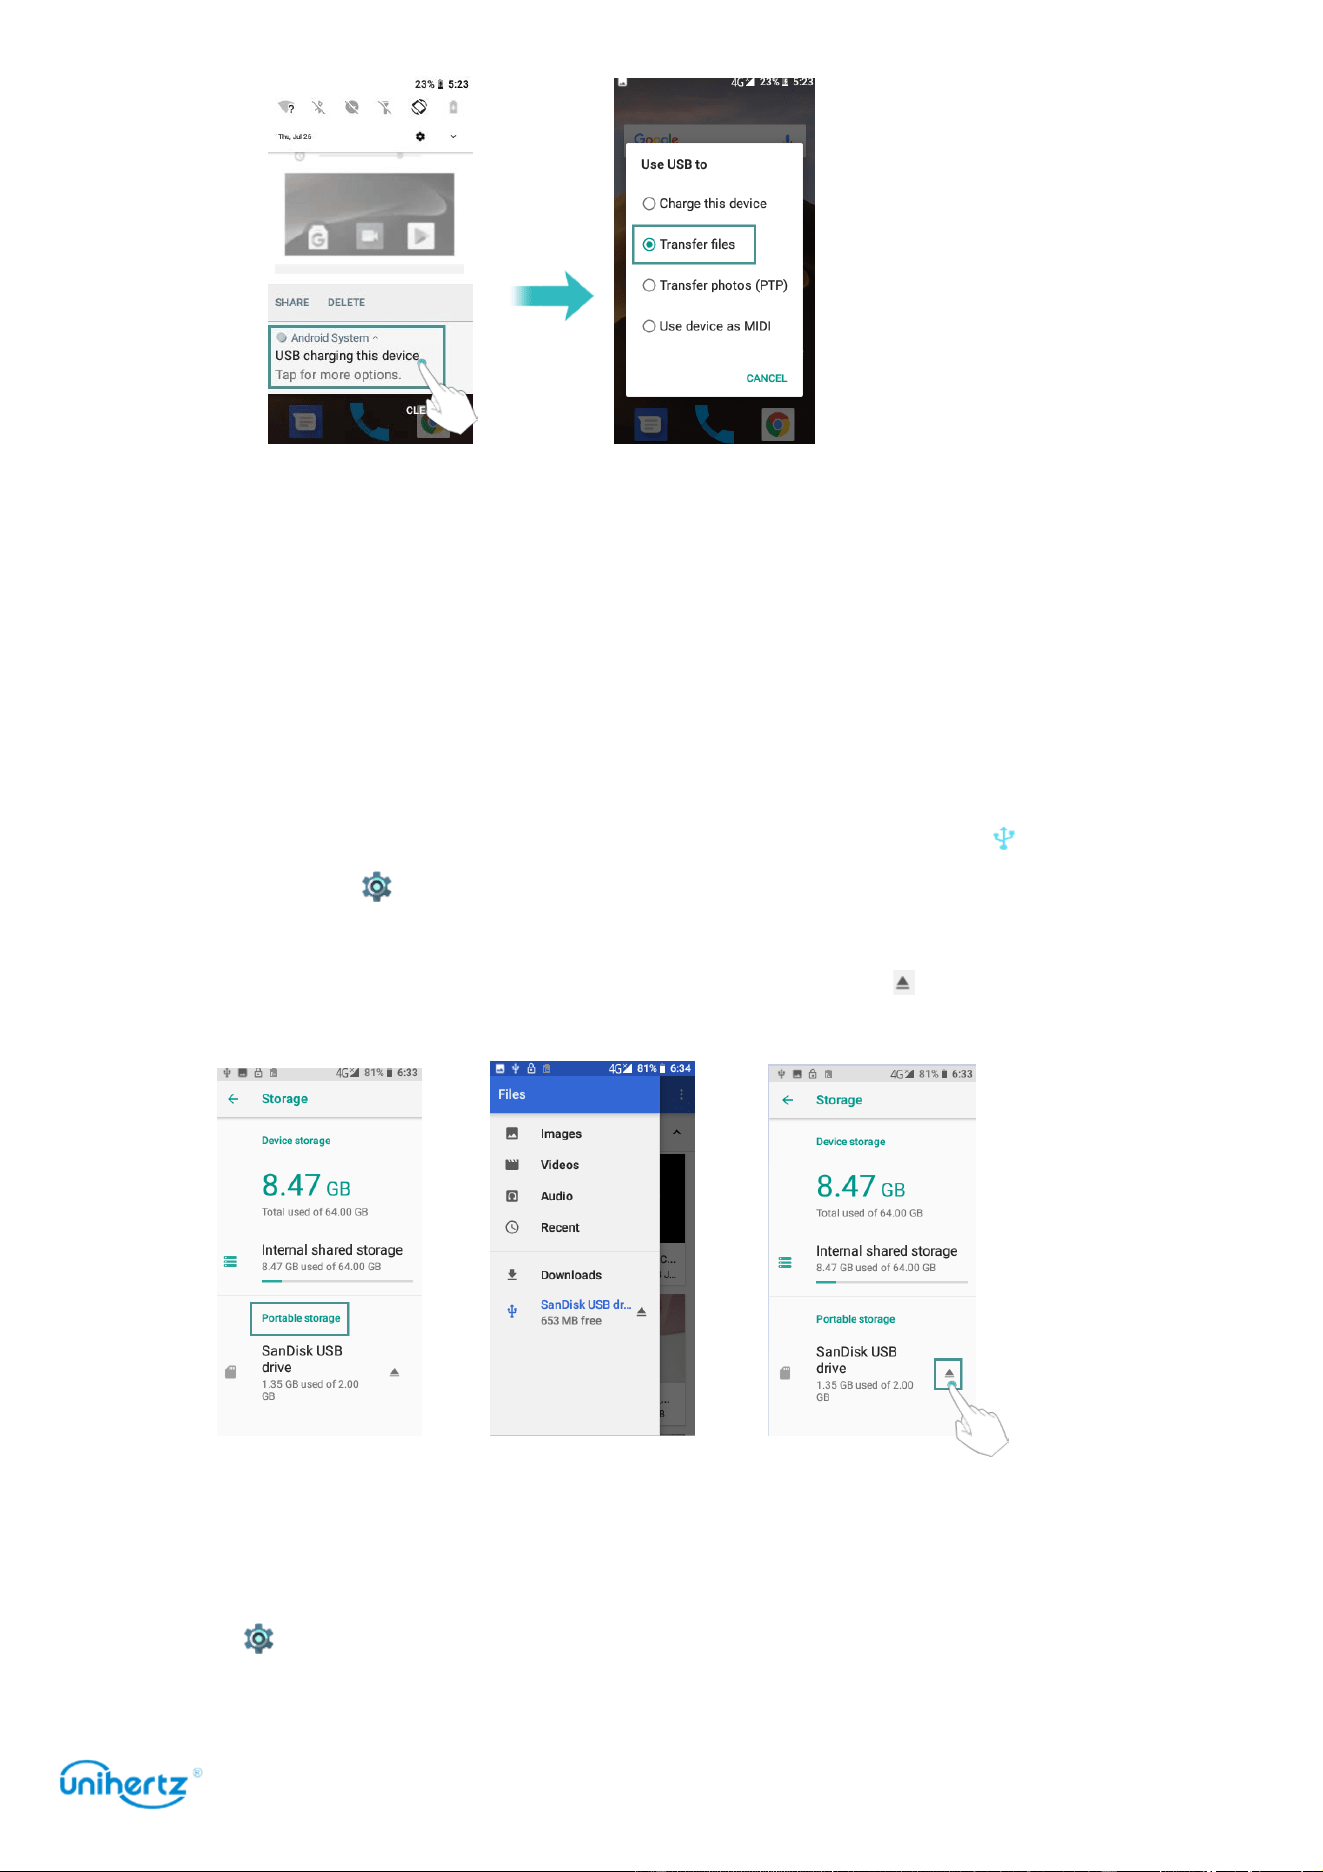
Accessing
the
Internet
67
Transferring data using USB OTG
This phone adopts the standard OTG protocol, supports OTG adapter U disk, USB
mouse, USB keyboard, USB microphone and other USB devices. Please use the
OTG data cable of the standard protocol USB-C interface.
The USB OTG data cable can be connected directly to the USB storage device for
file transfer without PC. USB storage devices supported by mobile phones include:
USB disk, card reader, and mobile phones with micro SD cards inserted.
Connect the USB storage device to the phone via the OTG cable, will appear in
status bar. Open
Settings
>
Storage
>
Portable Storage
, Browse the data on the
USB drive, select the data you want to copy, and copy it to the destination folder.
After reading, click
Settings
>
Storage
>
USB Disk
> Press to pop up
Transferring data using Bluetooth
Enabling Bluetooth and pairing your phone with another device
1 Open
Settings
.
2 Touch Connected devices >Bluetooth

Accessing
the
Internet
68
3 Turn on the
Bluetooth
switch.
4 Touch Pair new device and then select the device you want to pair with and
follow the onscreen instructions.
Sending and receiving files using Bluetooth
Check that both devices are paired before attempting to transfer files.
●
Send files
: Touch and hold the file you want to send and touch >
Bluetooth
.
Your device will automatically search for nearby devices. Select the receiving
device.
●
Receive files
: When another device tries to send you files using
Bluetooth
, select
Accept
from the dialog box that appears. Open the notification panel to view file
transfer progress.
By default, received files are saved to the
Bluetooth
folder on your device's
internal storage.
Unpairing Bluetooth devices
1 Open
Settings
.
2 Touch Connected devices >Bluetooth
3 Turn on the
Bluetooth
switch.
4 Touch the icon next to the name of the paired device, and then touch
Forget
.
Renaming your phone
By default, your phone's model number is used as the device name when you
enable Bluetooth. You can change the name to something more recognizable.
1 Open
Settings
.
2 Touch Connected devices >Bluetooth
3 Turn on the
Bluetooth
switch.
4 Touch Device name to Rename the phone.
Transferring data using NFC
Enabling NFC and transferring data
1 Open
Settings
.
2 Touch Connected devices >NFC
3 Turn on the
NFC
switch.
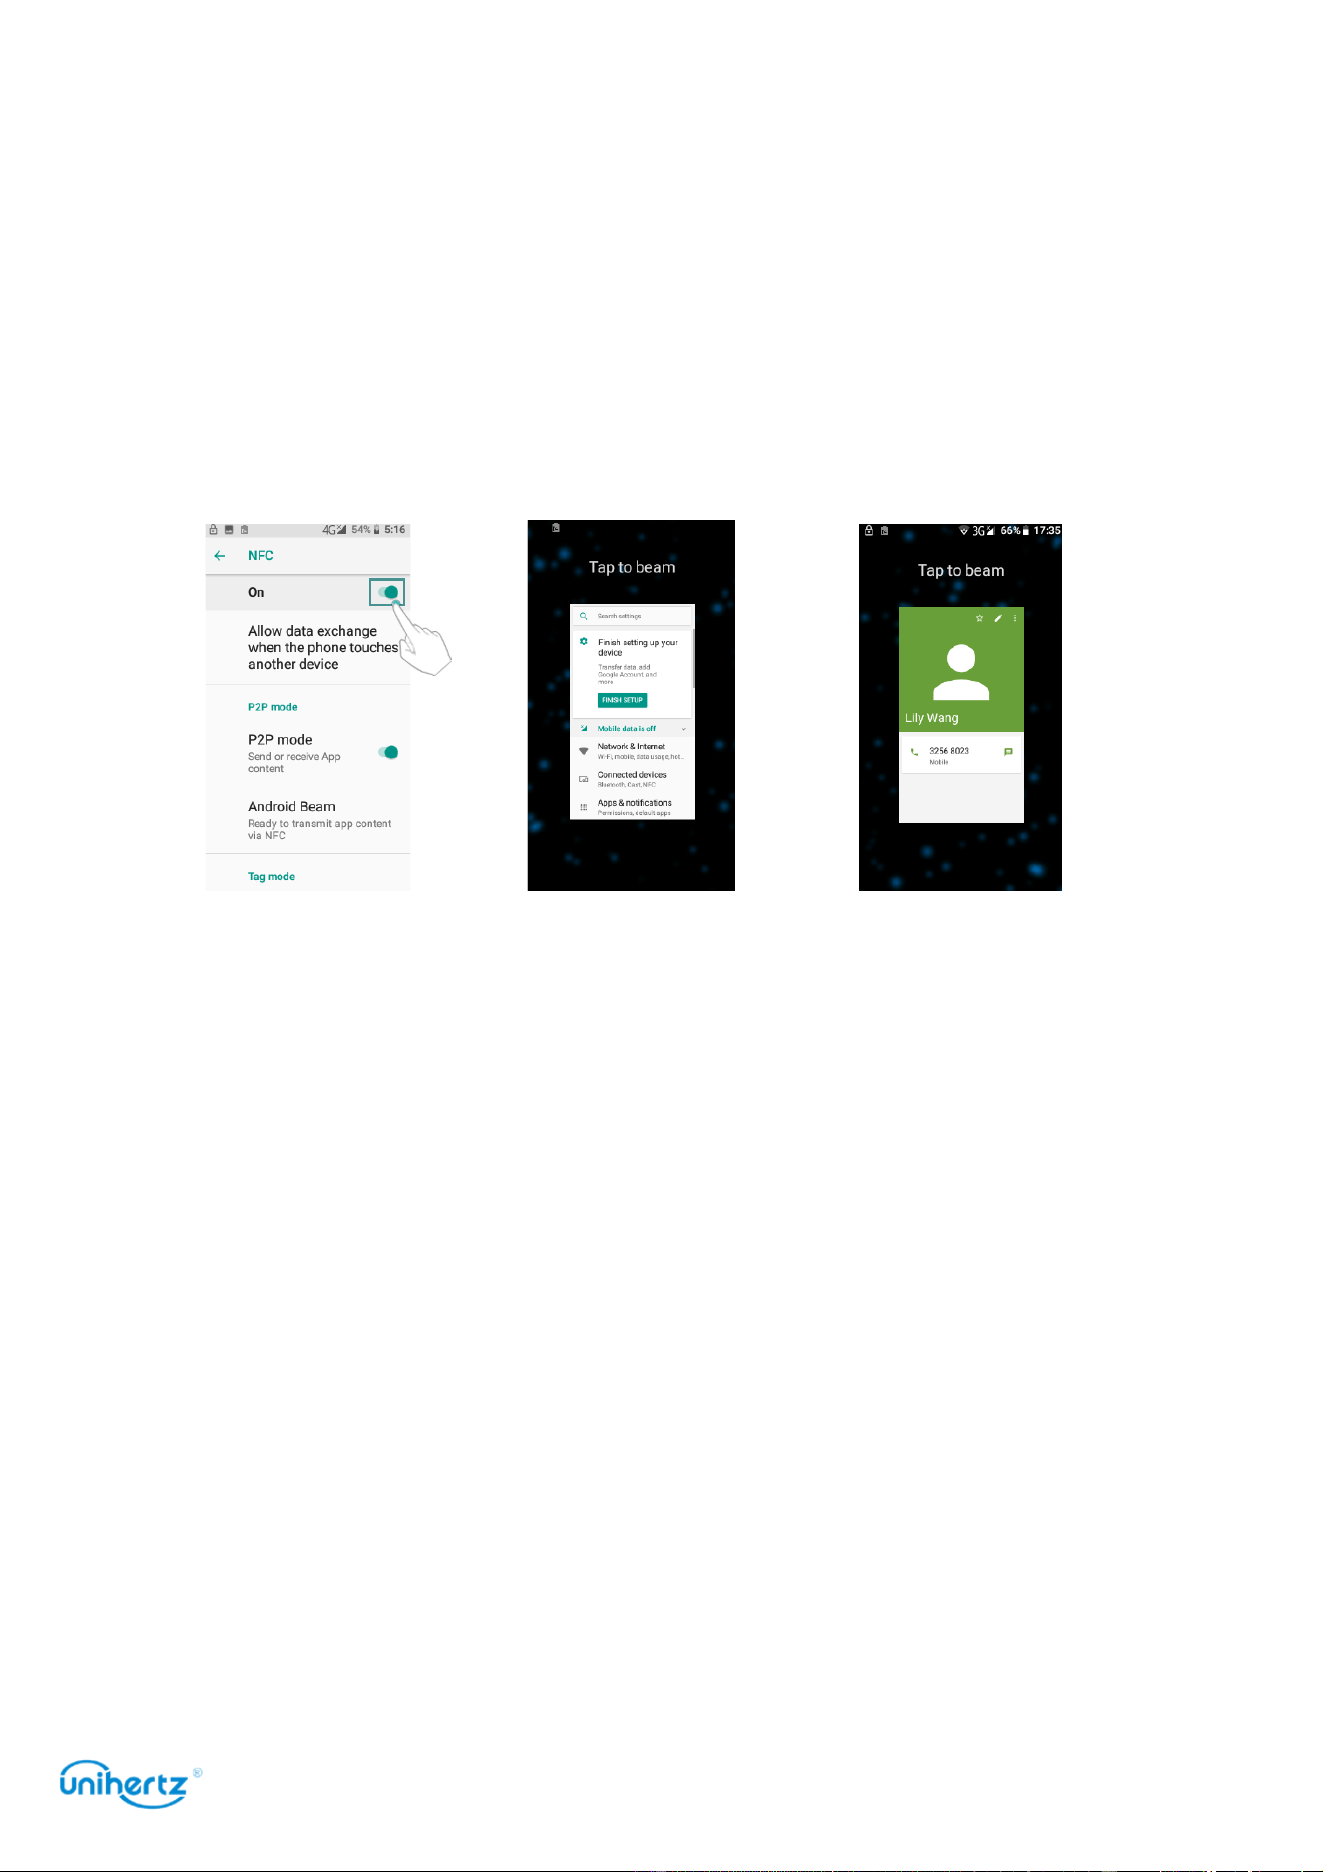
Accessing
the
Internet
69
4 Checked and the two devices must be in non-lock-screen interface.
5 Open the interface you want to share, such as an app or a single contact, and put two
phones with NFC antenna together, and they will send the buzz of voices, then touch the
screen, two phone will display the same content ,such as the music, pictures, individual
contacts, settings interface, a single application, web pages of the current phone
supporting to be shared.
NFC with other devices and Internet
NFC is also widely used in access control, bank payment, brush bus card and other
practical life. Some features may require third-party support.
File Management
70
File Management
Viewing files
Viewing files by folder
Your files are automatically sorted into different folders.
Finding files quickly
Use the search feature to quickly find what you are looking for.
1 Open
File Manager
.
2 Touch
Internal shared storage
.
3 Touch and then enter the file name or keywords. Search results will be
displayed below the search bar.
Sorting your files
Use the sort feature to arrange your files by Type, Name, Size, or Time.
1 Open
File Manager
.
2 Touch
Internal shared storage
.
3 Touch >
Sort
to sort files by Type, Name, Size, or Time as desired.
Sharing files
Use
Files
to
share photos
or
videos
on
social media,
or with friends.
1 Open
File Manager
.
2 Touch
Internal shared storage
.
3 Select the files you want to share, and then touch to
Share
.
4 Choose a sharing method and follow the onscreen instructions to share your
files.
Creating folders
Create folders and place files inside them to keep your phone organized.
1 Open
File Manager
.
2 Touch
Internal shared storage
.
3 Touch , enter the name of the new folder, and then touch
OK
.

File Management
71
Renaming files
Give your files distinctive names so that you can find them more quickly.
1 Open
File Manager
.
2 Touch
Internal shared storage
.
3 Touch and hold the file or folder you want to rename, and then touch >
Rename
.
4 Enter a new name, and then touch
Done
.
Copying, moving, or deleting files
1 Open
File Manager
.
2 Touch
Internal shared storage
.
3 Select the files you want to copy, move, or delete. You can:
●
Copy files to a destination folder
: Touch , select a destination folder, and then
touch .
●
Move files to a destination folder
: Touch >
Cut
, select a destination folder, and
then touch .
●
Delete files
: Touch >
Delete
.

Power
Management
72
Power Management
Viewing battery usage statistics
Open
Settings
and then touch
Battery
. You can:
● Turn on the
Standby intelligent power saving
. Your phone will check for power
consumption problems and automatically optimize performance.
● Turn on the
Battery save
. To help improve battery life, battery saver reduces
your device’s performance and limits vibration, location services and most
background data. Email, messaging and other apps that rely on syncing may not
update unless you open them.
●
Battery optimization
, touch >
Battery optimization
,
Optimizing battery use for
all the app. Select
Optimize
will recommend for better battery life. Email,
messaging and other apps that rely on syncing may not update unless you open
them. Select
Don’t optimize
may drain your battery more quickly.
● Touch the battery diagram. Your phone will show the History details of battery
since last full charge.
DuraSpeed
Use
DuraSpeed
to optimize performance and reduce power consumption.
DuraSpeed
helps boost the foreground APP by restricting background APPs, some
notifications may be postponed or not received.
DuraSpeed
does not restrict
background activities of APPs switched on in the list.
Open
Settings
and then touch
DuraSpeed
. You can:
●
Restrict applications
: Turn off the switch next to the applications that you do not
want to run in the background when the screen is locked. Turn on the switch next
to the applications will allow the application running in background.
●
Quick a ions
: Touch > Turn all on or Turn all off.
It will appear in the notification panel if DuraSpeed is running in the background.
Power save manager
Reduce power consumption by closing background applications when the screen is
locked.
Open
Settings
>Smart Assist>Power save manager. You can:

Power
Management
73
● Turn on the Power save manager switch for non-essential applications to
prevent them from running while the screen is locked. Press the power button to
lock the screen.
●
White list
: If you want an application to continue running after the screen is
locked (such as the Backup application), turn on the switch for that application.
Press the power button to lock the screen. Your phone will close all background
applications except those that are in White list or the top app.
Battery saving mode
Open
Settings
>Smart Assist>Battery saving mode.
●
Battery profiles
: Turn this mode on to optimize system settings and extend
standby time. It has two modes.
Sleep
: In this mode, the system enters flight mode, the call, sms and all networks
are turned off, only the preset alarm clock is reserved.
My profile
: This mode is your daily use status that is automatically saved according
to your usage habits. Click to customize the options such as network and location.
●
Schedule for profile switch
: Automatic power saving by time period, can be
customized for the power saving time period, the mode used during the power
saving period.
Configuring display and sound settings
Reduce power consumption by optimizing the display and sound settings on your
phone.
See Configuring the display settings to learn how to save power by disabling
Screen saver, turning off the indicator light, and reducing the screen brightness
and screen-off time.
See Smart Assistant> LED Notification to learn how to turning off the indicator
light.
See Sound settings to learn how to save power by disabling unnecessary sound or
vibration alerts.

Tools
74
Tools
Pedometer
Using a pedometer or step counter is an easy and fun way to track how active you
are. It adds up all the steps you take during the day.
Using a pedometer can remind you to walk more. A quick check may show that
you need more steps for the day.
Using a pedometer can help you set goals to take more steps in a day. You may
need to find creative ways to add more steps, but walking more will help you get
more exercise, feel better, and stay healthy.
Settings
Please enter your personal information about height, weight before using the
pedometer to get more accurate pedometer data. Set up a Target steps and, then,
focus on it consistently and keep check in every day. Day after day, time after time,
and finally turn the goals into a habit.
1 Open
Pedometer
.
2 Touch
Settings
.
3 Custom your personal profile: You can input your
Height
,
Weight
,
Target
steps or
choose
Maps
.
4 Touch
History
to view
Track statist
: You can view by
Week
,
Month
,
Year
or
Total
.
5 Select the desired account, and then login to your Exchange account to sync the
calendar.
Step Count
The default step counting algorithm uses the accelerometer data of your phone to
calculate steps. You can see the step data when screen is locked.
1 Open
Pedometer
.
2 Touch
Step
.
3 You can view your steps today and Target steps.
4 Touch : You can view the
Step
,
Distance
and
Calorie
record in weeks or
months.
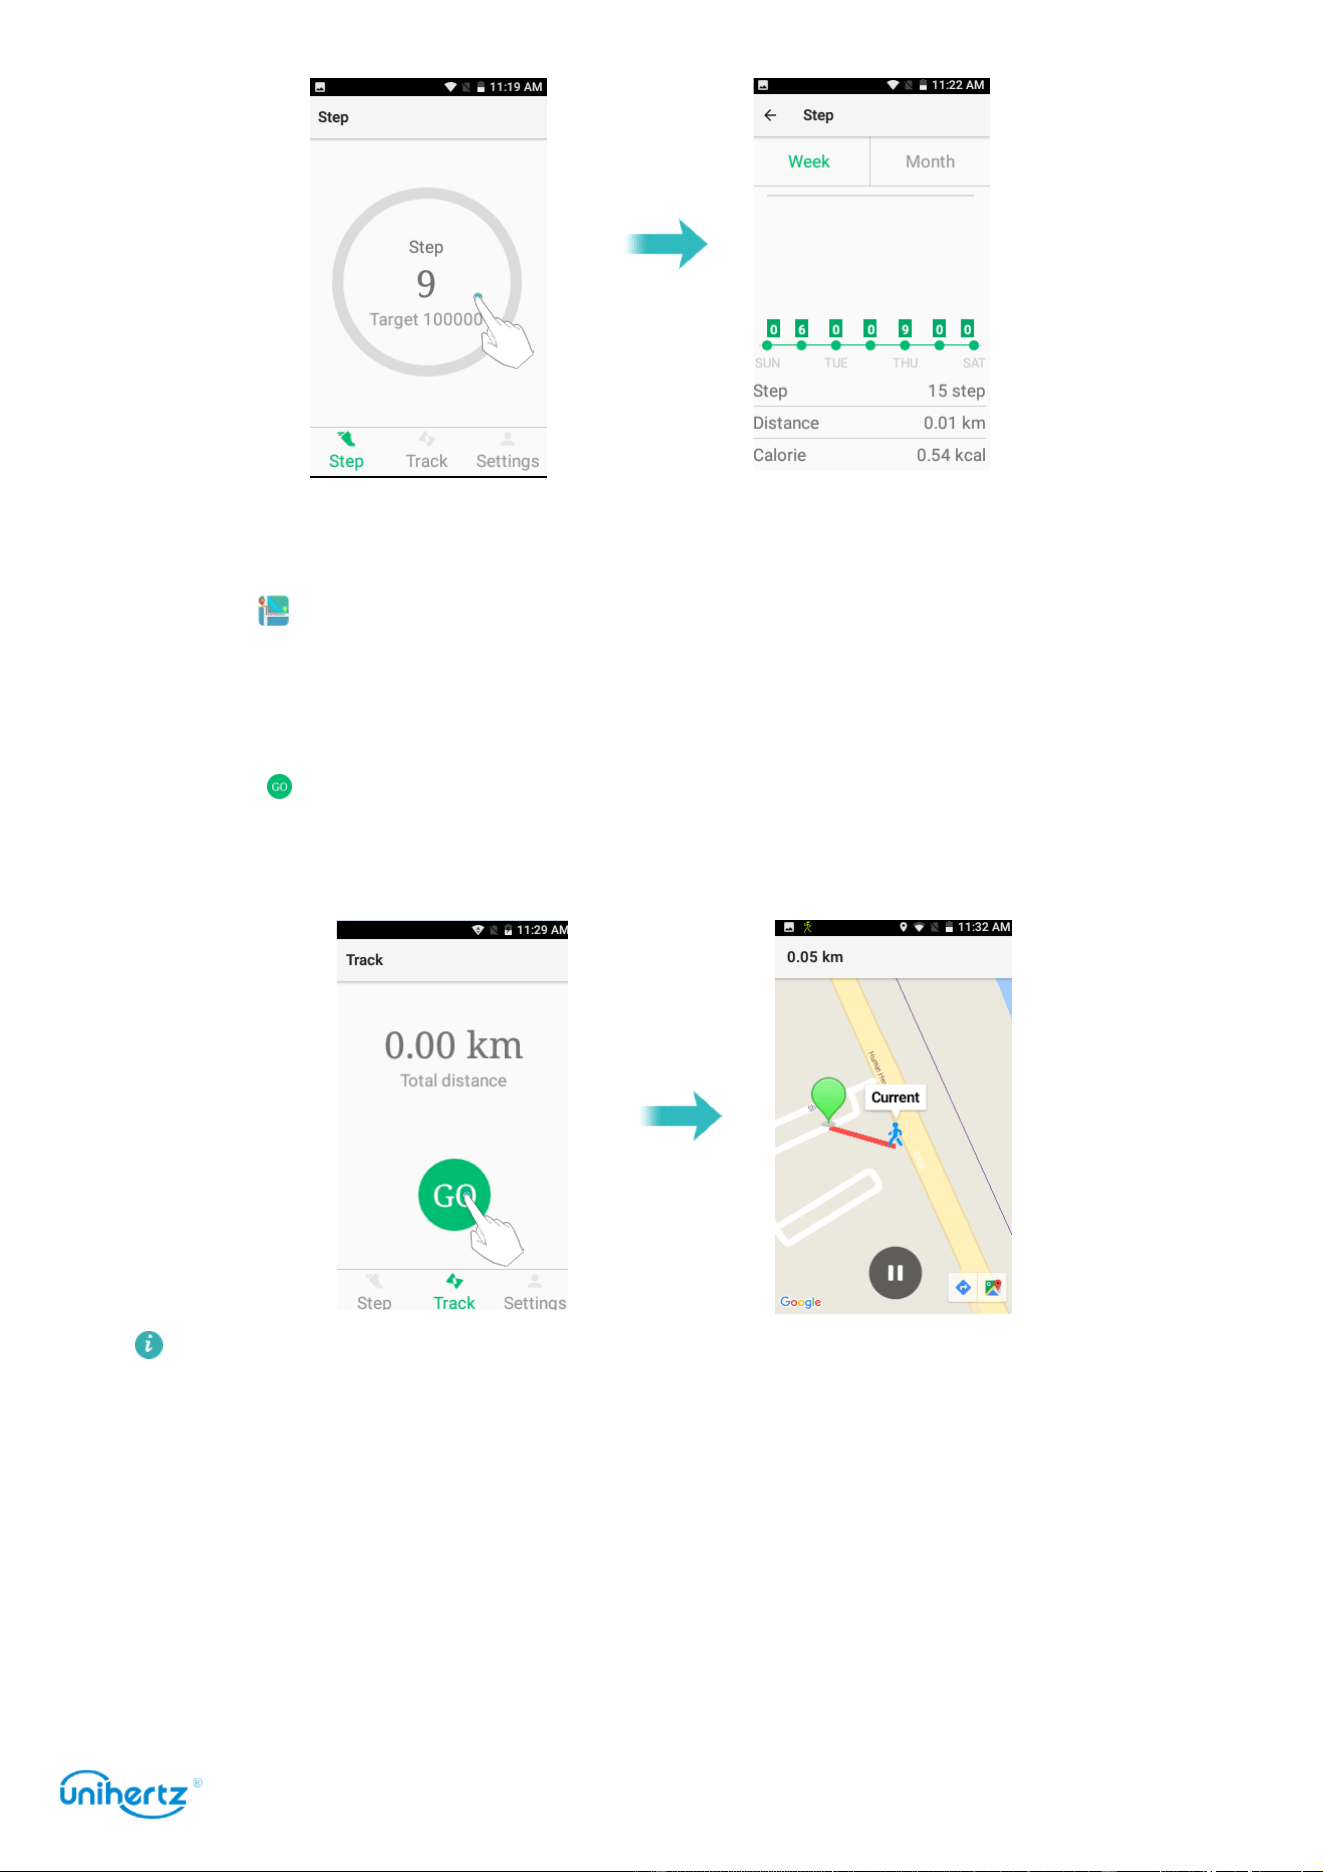
Tools
75
Track
Sync your calendar with your account for easy access wherever you are.
1 Open
Pedometer
.
2 Touch
Track
.
3 You can view your
Total distance
.
4 Touch : It counts the duration taken by you, the distance traveled and the
track that is followed. It is linked with GPS and Internet that help you plan out your
running routine in a better and more efficient way.
In case of indoors and absence of network, please pay attention to close the
track function, so as not to affect your battery life.
Calendar
Calendar
helps you to plan your daily schedule. For example, it helps you to plan
ahead. If you have saved your contacts' birthdays, Calendar will automatically
create birthday reminders.
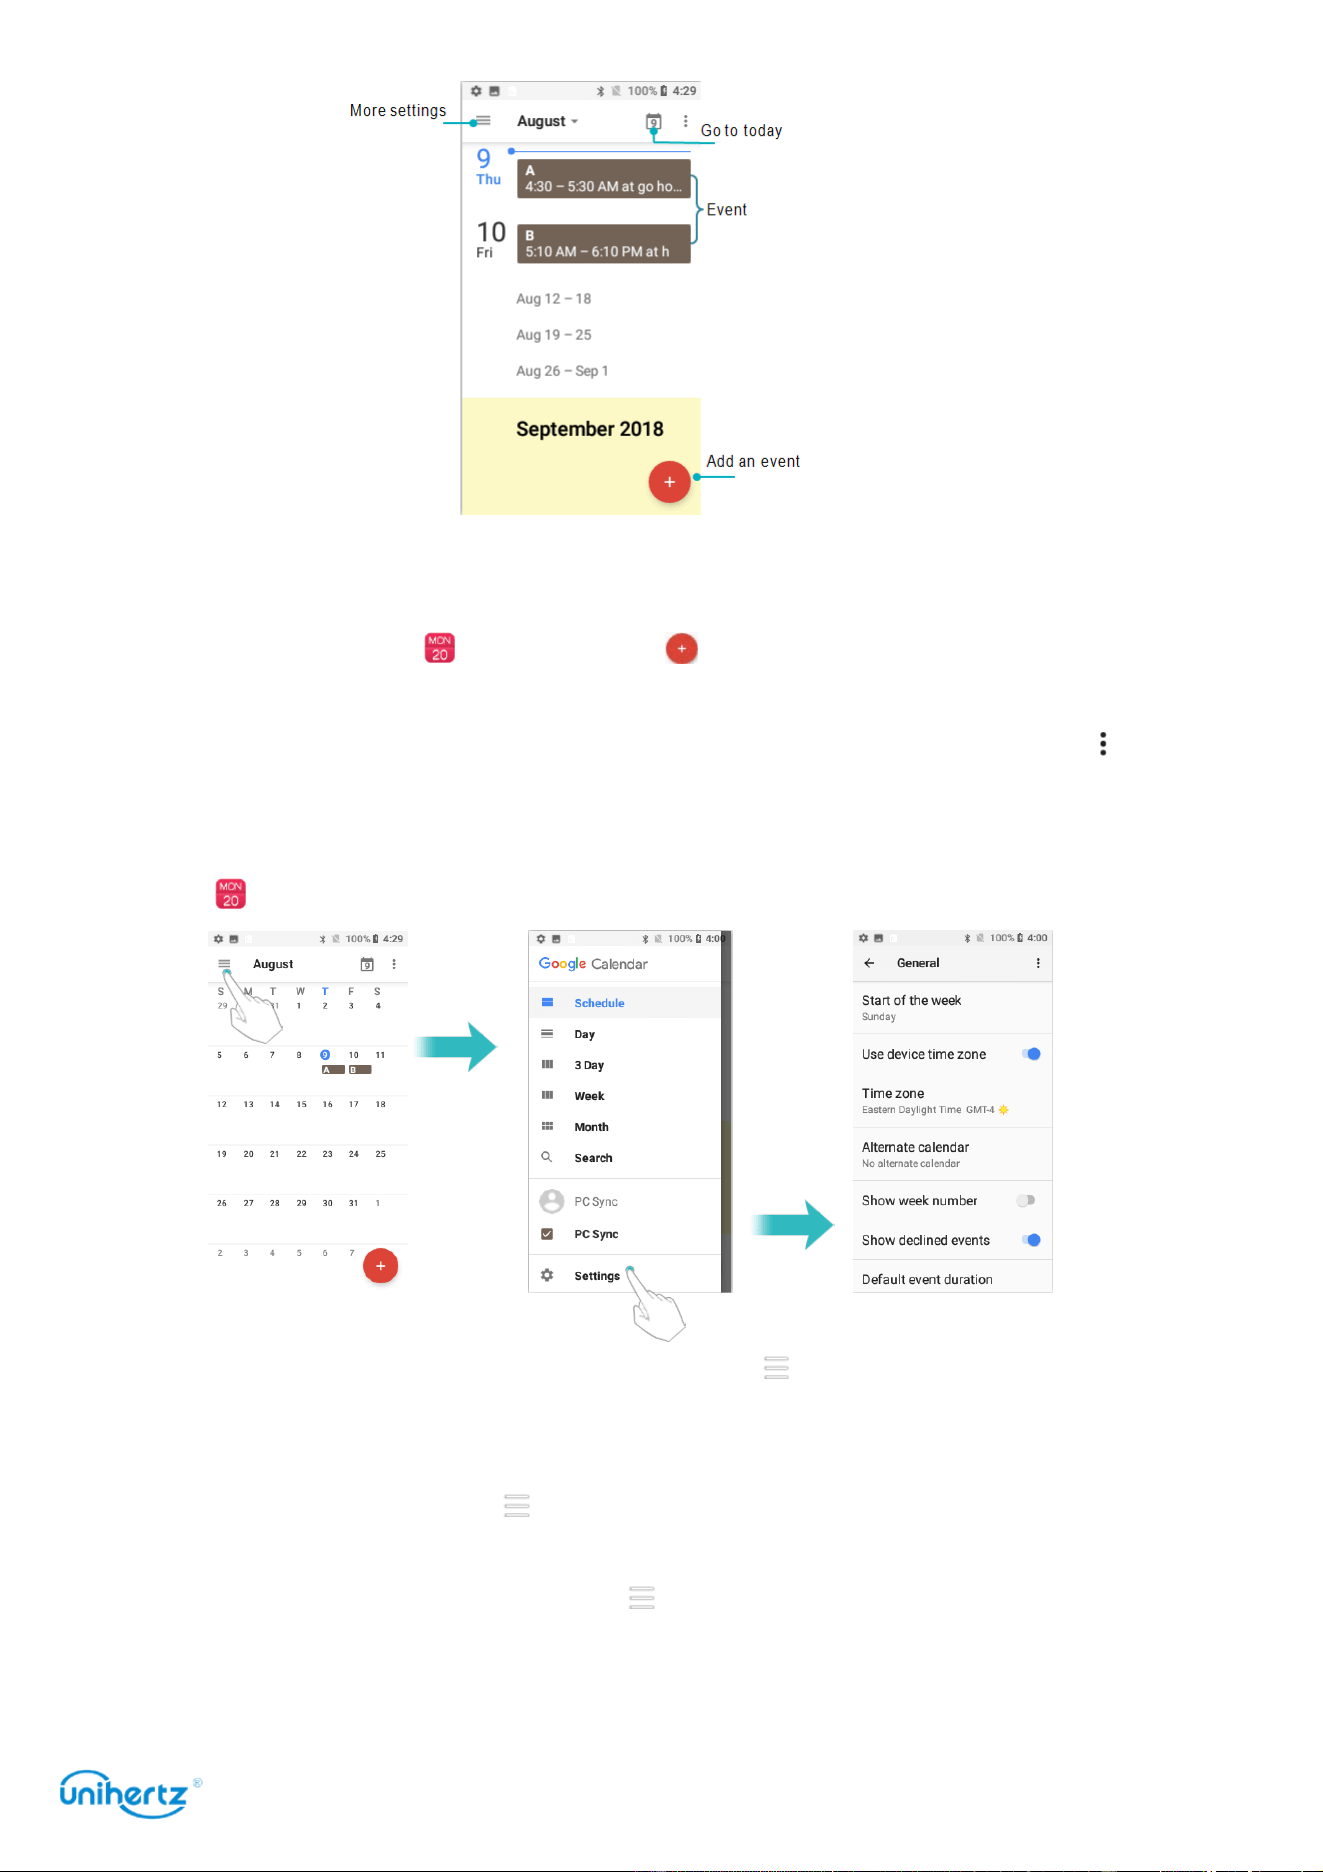
Tools
76
Adding and deleting events
Add events and set reminders to help you plan ahead.
●
Add an event
: Open
Calendar
, touch , and then enter the name, start and
end time, and location of the event. Touch SAVE to save the event.
●
Delete an event
: Go to the event that you want to delete, and then touch >
Delete
.
Viewing the calendar
Open
Calendar
. You can:
● Switch to month, week,3day, day view: Touch ,When in month, week, 3day or
day view, swipe left or right to change the month, week, or day that is displayed.
Touch the event to see more detail, you can also edit, duplicate or delete it.
●
View week number
: Touch >
Settings
>
General
, and then turn on the Show
week number switch to display the week number on the left of the calendar.
●
Change first day of the week
: Touch >
Settings
>
General
> Starts of the week,
and then select a day
●
Alternate calendar
: Make sure that you are connected to the Internet, and then
Tools
77
touch >
Settings
>
General
>
Alternate calendar
, touch Local calendar and select
the desired calendar.
Synchronizing a calendar
Sync your calendar with your account for easy access wherever you are.
1 Open
Calendar
.
2 Touch
> PC Sync.
3 Select the account whose calendar you want to display.
4 Touch
Calendars to sync
.
5 Select the desired account, and then login to your Exchange account to sync the
calendar.
Clock
In the Clock application, you can add alarms, view world times, and use the
stopwatch and timer features.
Managing alarms
Open
Clock
. In the Alarm tab, you can:
●
Add an alarm
: Touch and set the alarm time, ringtone, repetitions, and more.
●
Enable or disable an alarm
: Touch the switch next to an alarm.
●
Configure the alarm setting
s: Touch >
Settings
to configure the snooze
duration, silent mode settings, and volume button behavior.
●
Delete an alarm
: Touch the alarm you want to delete, and then touch .
●
Turn off an alarm
: Swipe down from the status bar to open the notification panel
and touch
Dismiss now
to turn off an alarm.
●
Snooze or Dismiss an alarm
: Touch >
Settings
>
Volume buttons
, select
Snooze
or
Dismiss
to snooze or dismiss an alarm when the alarm is coming by
press the volume button.
●
Snooze for 10 minutes
: The alarm will go off again after 10 minutes.
Swipe down on the screen to open the notification panel and touch the alarm
notification to turn off the alarm.
World clock
Add multiple clocks to view the time in various cities around the world.
Open
Clock
. In the
World clock
tab, you can:
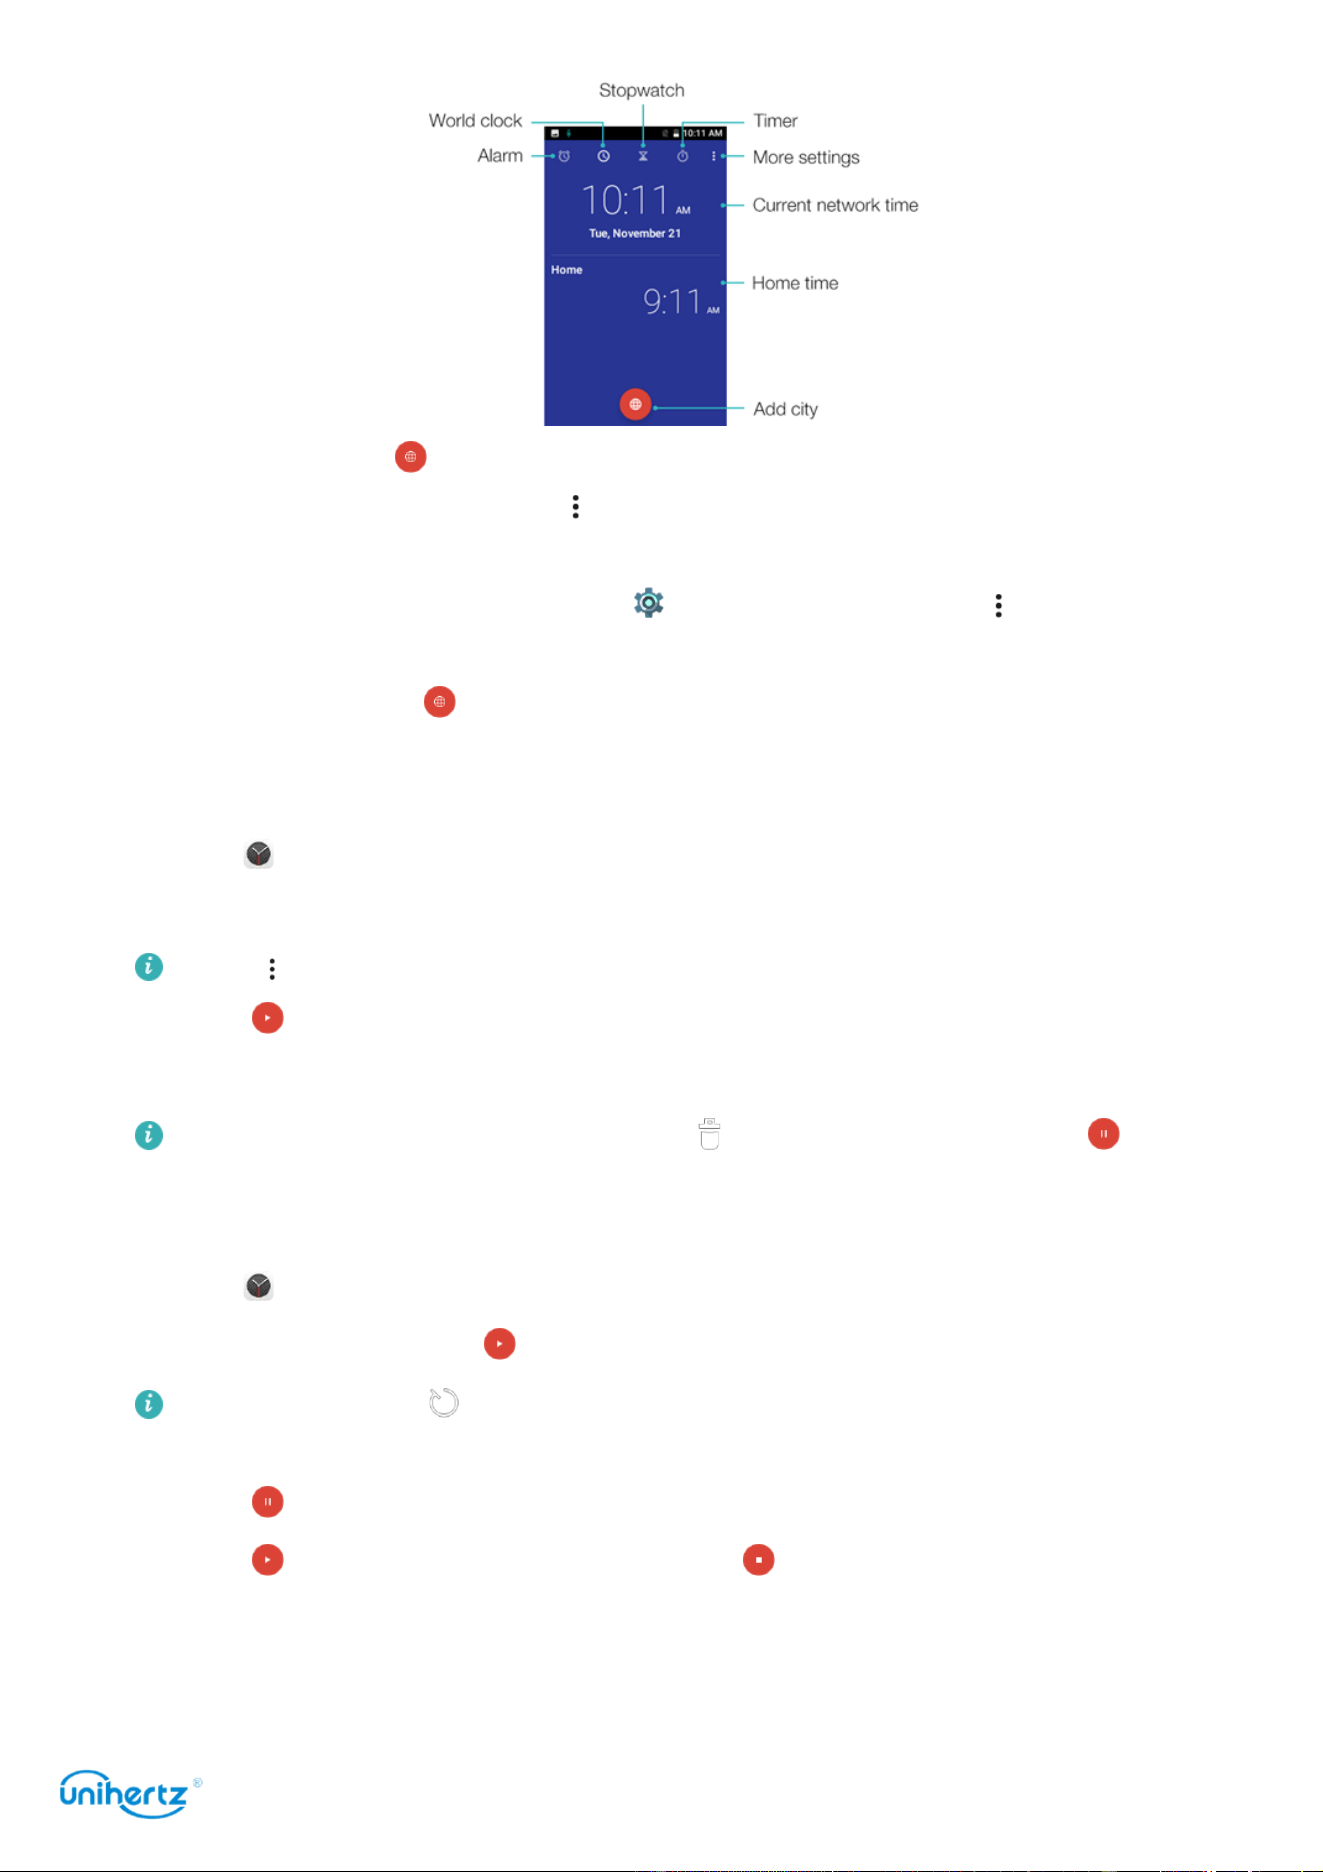
Tools
78
●
Add a city
: Touch Enter a city name or select a city from the list.
●
Set the home time zone
: Touch >
Settings
, turn on the Automatic home clock
switch, and then touch Home time zone.
●
Set the system date and time
: Touch >
Date & time
, or Touch >
Settings
>
Change
Date & time
.
●
Delete a city
: Touch , and then touch unselect the desired city from Selected
Cities.
Timer
1 Open
Clock
.
2 Under Timer, input the countdown time.
Touch >
Settings
>
Timer
sound to set a ringtone for the timer.
3 Touch to start the timer.
4 When the timer goes off, touch
Stop
to silence the ringtone.
When the timer is counting down, touch to reset the timer, or touch to
pause the countdown.
Stopwatch
1 Open
Clock
.
2 Under
Stopwatch
, touch to start timing.
While timing, touch to count laps. Swipe up on the timer in the middle of the
screen to view your lap data.
3 Touch to pause the
stopwatch
.
4 Touch to resume the
stopwatch
, or touch to clear the stopwatch records.
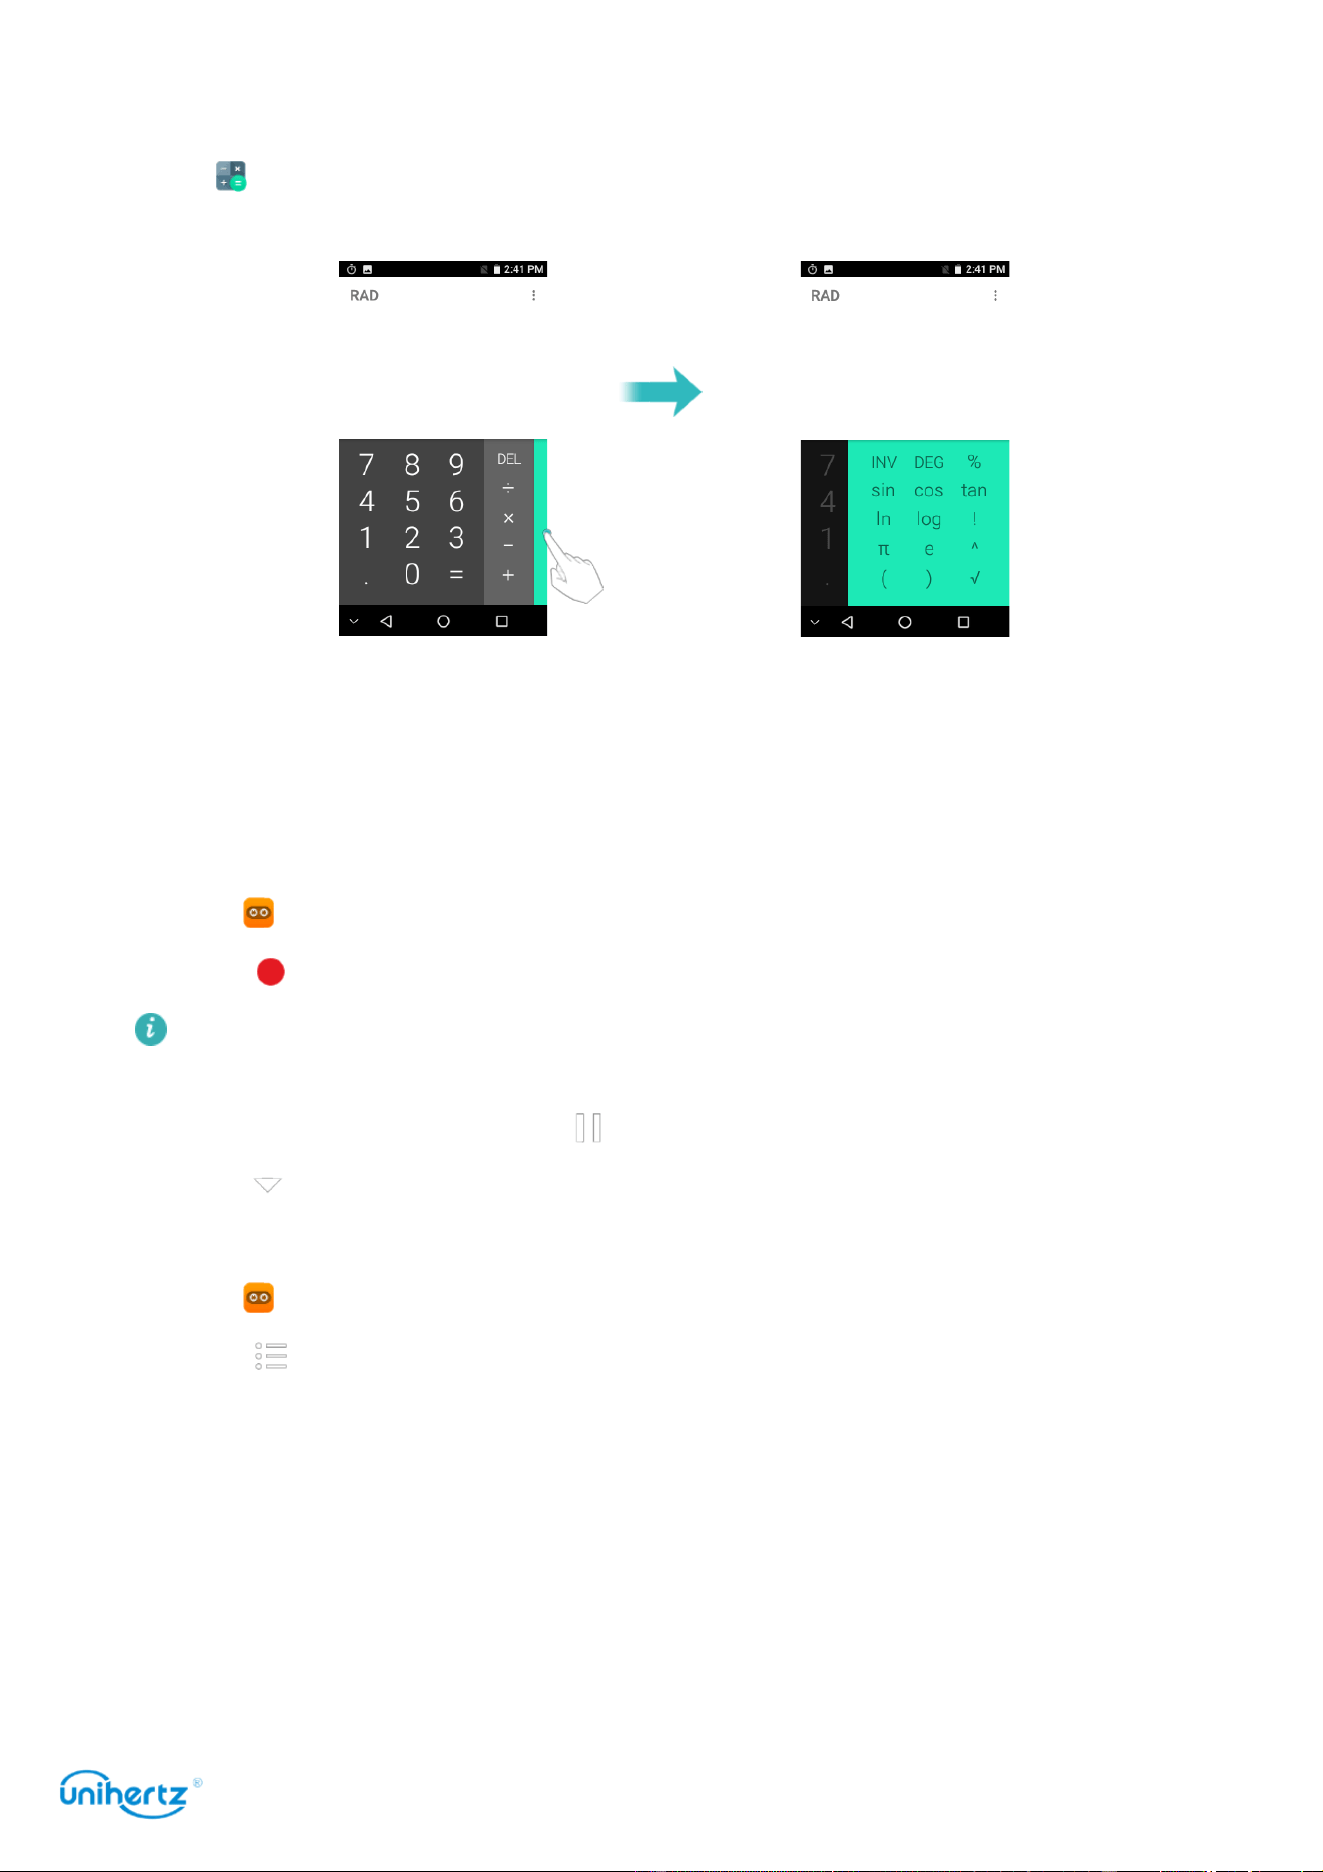
Tools
79
Calculator
Open
Calculator
. Swipe right or left on the keypad screen orientation to switch
between the standard and scientific calculators.
Sound recorder
You can use the Recorder application to record sound in a variety of different
scenarios, such as meetings, lecture, or your own voice.
Recording sound
1 Open
Sound Recorder
.
2 Touch to start recording.
In order to ensure optimum recording quality, place your phone on a flat surface
and do not cover the microphone.
3 When you are recording, touch to pause.
4 Touch to play the record file, or touch
Discard
or
Save
.
Playing a recording
1 Open
Sound Recorder
.
2 Touch .
3 Select the recording file you wish to play, or touch and hold the recording file to
delete it.
Toolbox
Contains multiple programs with different functions, convenient and practical.
●
Sound Meter
: Automatically start measuring the db value and level of the
surrounding environment.

Tools
80
●
Compass
: View the latitude and longitude of the direction and environment.
Please touch to calibrate the compass as prompted of the screen before
making the measurement accurate!
●
Flashlight
: Turn the flashlight on or off.
●
Bubble Level
: A measuring tool for measuring small angles, which can be used
to measure the tilt angle with respect to the horizontal position, the horizontal
position and vertical position of the equipment installation, etc.
●
Picture Hanging
: A gauge that measures horizontal and vertical angles,
horizontal and vertical position measurement of equipment installations, etc.
●
Heart Rate
: A tool that can test and record heart rate in real time. Enter the app
and follow the on-screen prompts to place your finger on the camera position on
the back of the phone, then touch the START button to start the test. There will be
a test details record below the test.
●
Height Measure
: According to the screen prompts to estimate the height and
distance of the target object.
●
Magnifier
: drag left and right to adjust the magnification. Touch icon to
switch back and forth, Touch icon to turn on the flashlight.
●
Alarm
: Contains the flashlight, alarm, the screen-flash three tools, Touch the
icon above them can realize the corresponding function.
●
Plumb Bob
: Measuring whether the object is vertical.
●
Protractor
: Drag the blue pointer to measure the exact angle value.
Track Back
The Track Back uses GPS to record your trajectory. When you go out, it can not
only locate, but also map the current trajectory of your current travel on the map,
and automatically and in real time calculate the distance you are currently moving.
You can also use the recorded trajectory for the original return. Navigation.
Please ensure that the GPS performance of the mobile phone is good and the
GPS is turned on before use.
●
Recording track
: Click to start recording. If the positioning is successful, a blue
dot will appear on the map to represent your current location. As you move, the
blue dot moves in real time and draws the trace you are moving on the map. After
the current destination is reached, click to stop the track record.
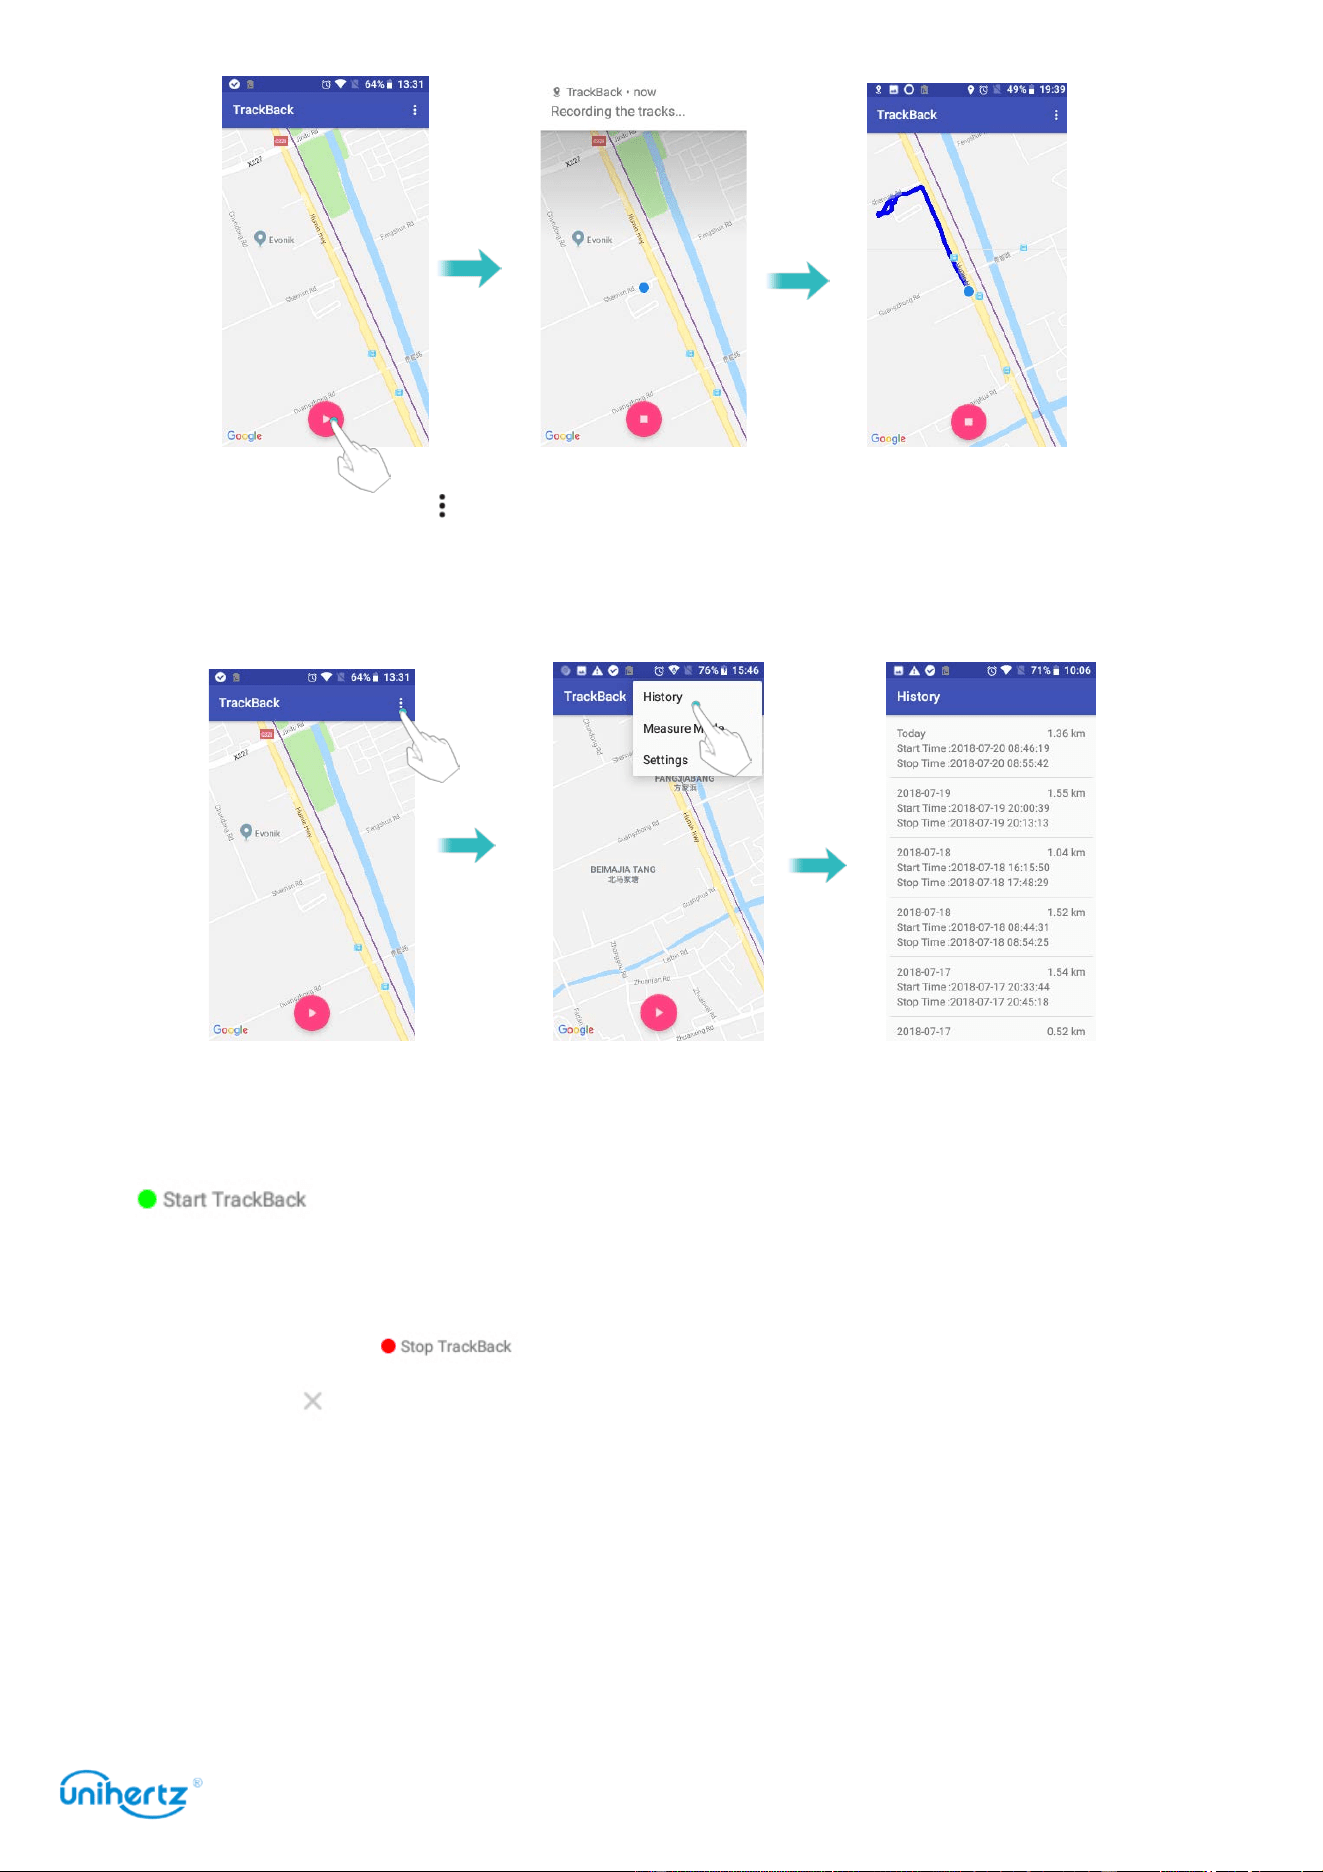
Tools
81
●
History record
: Click and select History. You can see all the track routes you
have saved in chronological order, and the start/end time of each route and the
distance moved.
●
TrackBack
: Click on the record in the history that you want to return to, you can
see your original start/end position and the path of the move (where green dot
represents the starting position and red dot represents the end position). Click
, it will first locate your current location. After the positioning is
successful, a blue dot with a triangular arrow will appear, and the direction of the
arrow represents the direction of your current head. As you move, the blue dots
move with it. Click to stop returning. To exit the original track return,
please click .
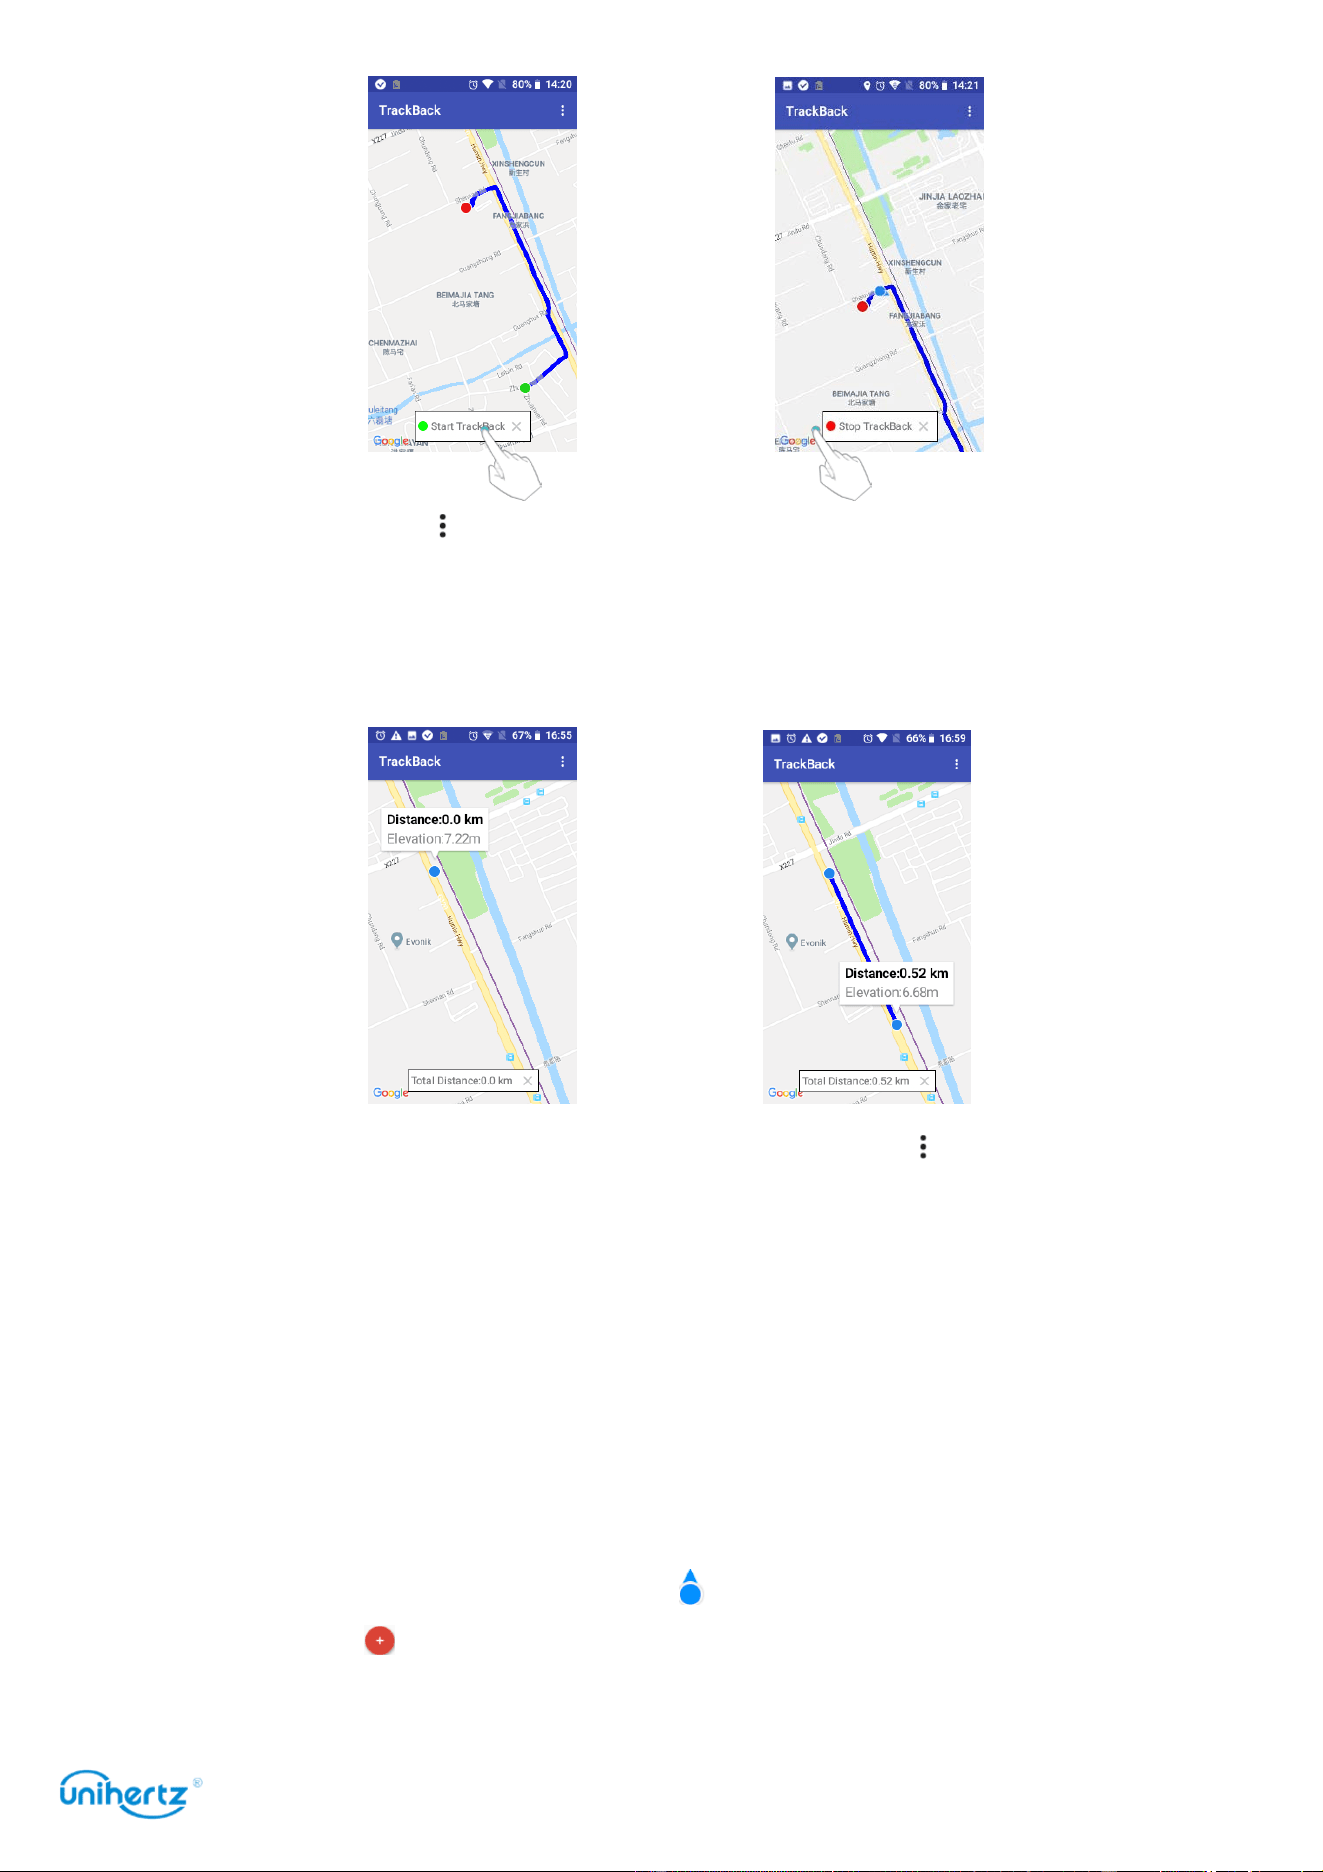
Tools
82
●
Measure Mode
: Click and select
Measure Mode
. You can measure the distance
between two locations and the altitude at which the two locations are located by
clicking on the two locations you want to measure directly on the map.
●
Compass
:
●
Switch maps
: The app uses Google Maps by default. Click and select
Setting
.
After switch the map, re-enter the map after exiting the application.
SOS
SOS is a software application that can notify emergency contacts in a dangerous
situation, reduce the power consumption of mobile phones, and extend standby
time in order to wait for effective rescue.
●
Positioning
: Connect the network to the application positioning interface. If you
want to send the location information to the emergency contact, you must first
locate it successfully (make sure the icon appears on the map).
●
Contact
: Click to add an emergency contact. In case of emergency, you can
directly call the emergency contact or send a message to an emergency contact

Tools
83
for help. Added contacts, swipe left to delete
。
●
First aid
:
CALL
: Swipe the icon to the right in an emergency to call all your emergency
contacts for help. Shake your phone and hang up to cancel dialing
SMS
: Swipe the icon to the right in an emergency, you can send a distress
message to all emergency contacts, and your location information will be included
in the distress message. (Make sure the phone positioned successfully)
SOS
: Slide the icon to the right in an emergency to enter the distress mode for
longer duration. The phone sends a help message to the emergency contact every
10 minutes in the help mode. Press and hold the power button to exit this mode
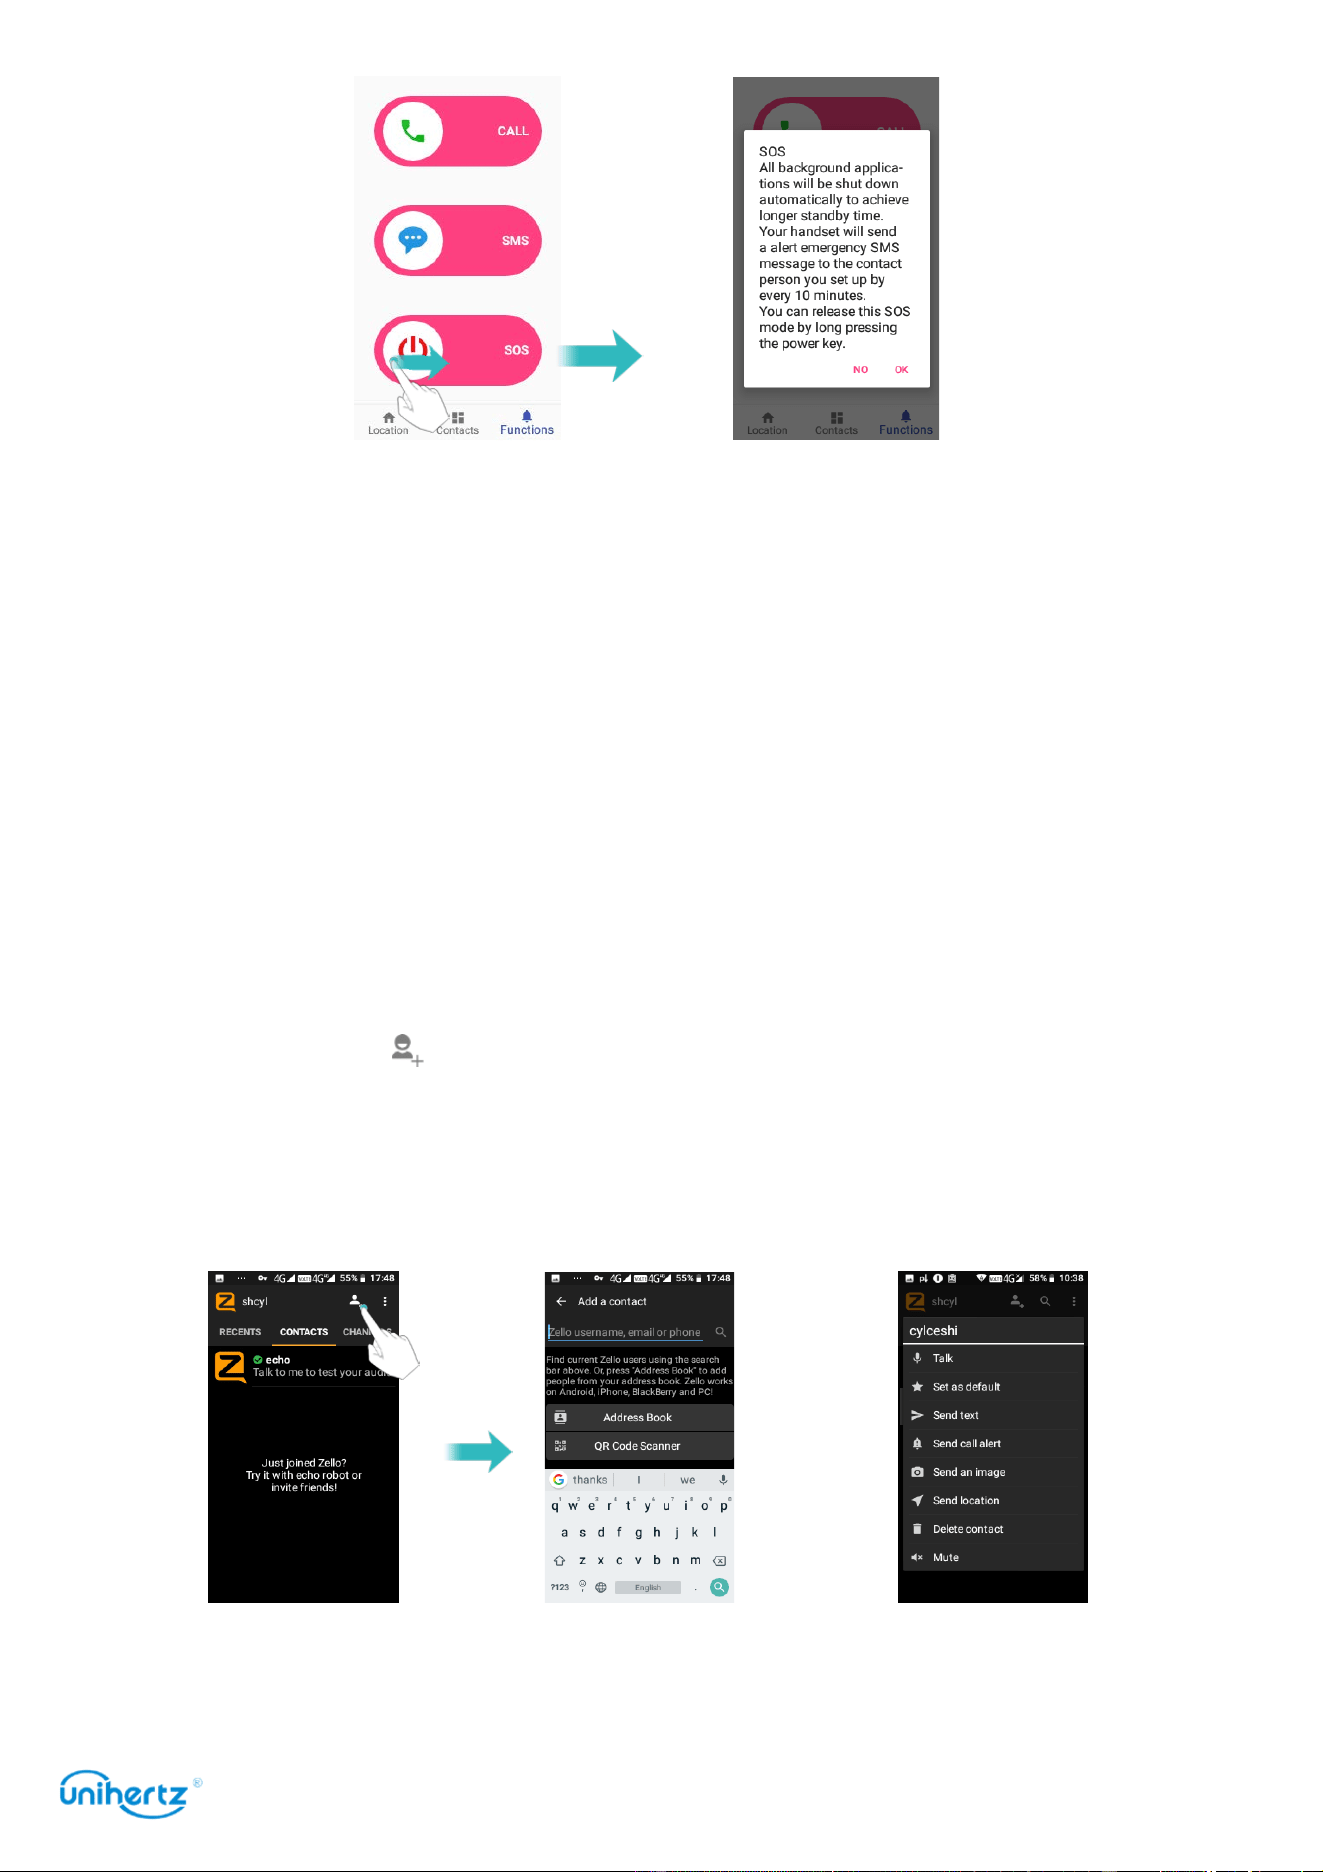
Tools
84
● Shortcut button: Touch Settings > Smart Assistant > Shortcut button >
SOS.
Any interface can quickly enter the SOS by pressing the shortcut key (PTT).
Zello
Zello is an instant intercom application between mobile phones or between a
mobile phone and a PC. It can communicate across platforms and can be used for
private or group chat.
You need to register a Zello account before using it, and then login to Zello to use
it.
●
RECENTS
: View the communication information between the nearest contacts,
and share, delete, play, etc. the messages. Click to select a contact for a new
conversation.
●
CONTACTS
: Click to add a contact by looking for a zello account, phone
number, email address, and more. The added contacts are stored in the contact
list, which can be selected directly by clicking on the contact or by clicking the
search icon. Long press the contact to Talk, Set as default, Send text, Delete
contact, etc.
Click the contact to enter the intercom interface, press and hold the intercom icon
for instant intercom, or send information, photos, location information, etc. You
can also customize the volume, answering method, contact name, and so on.
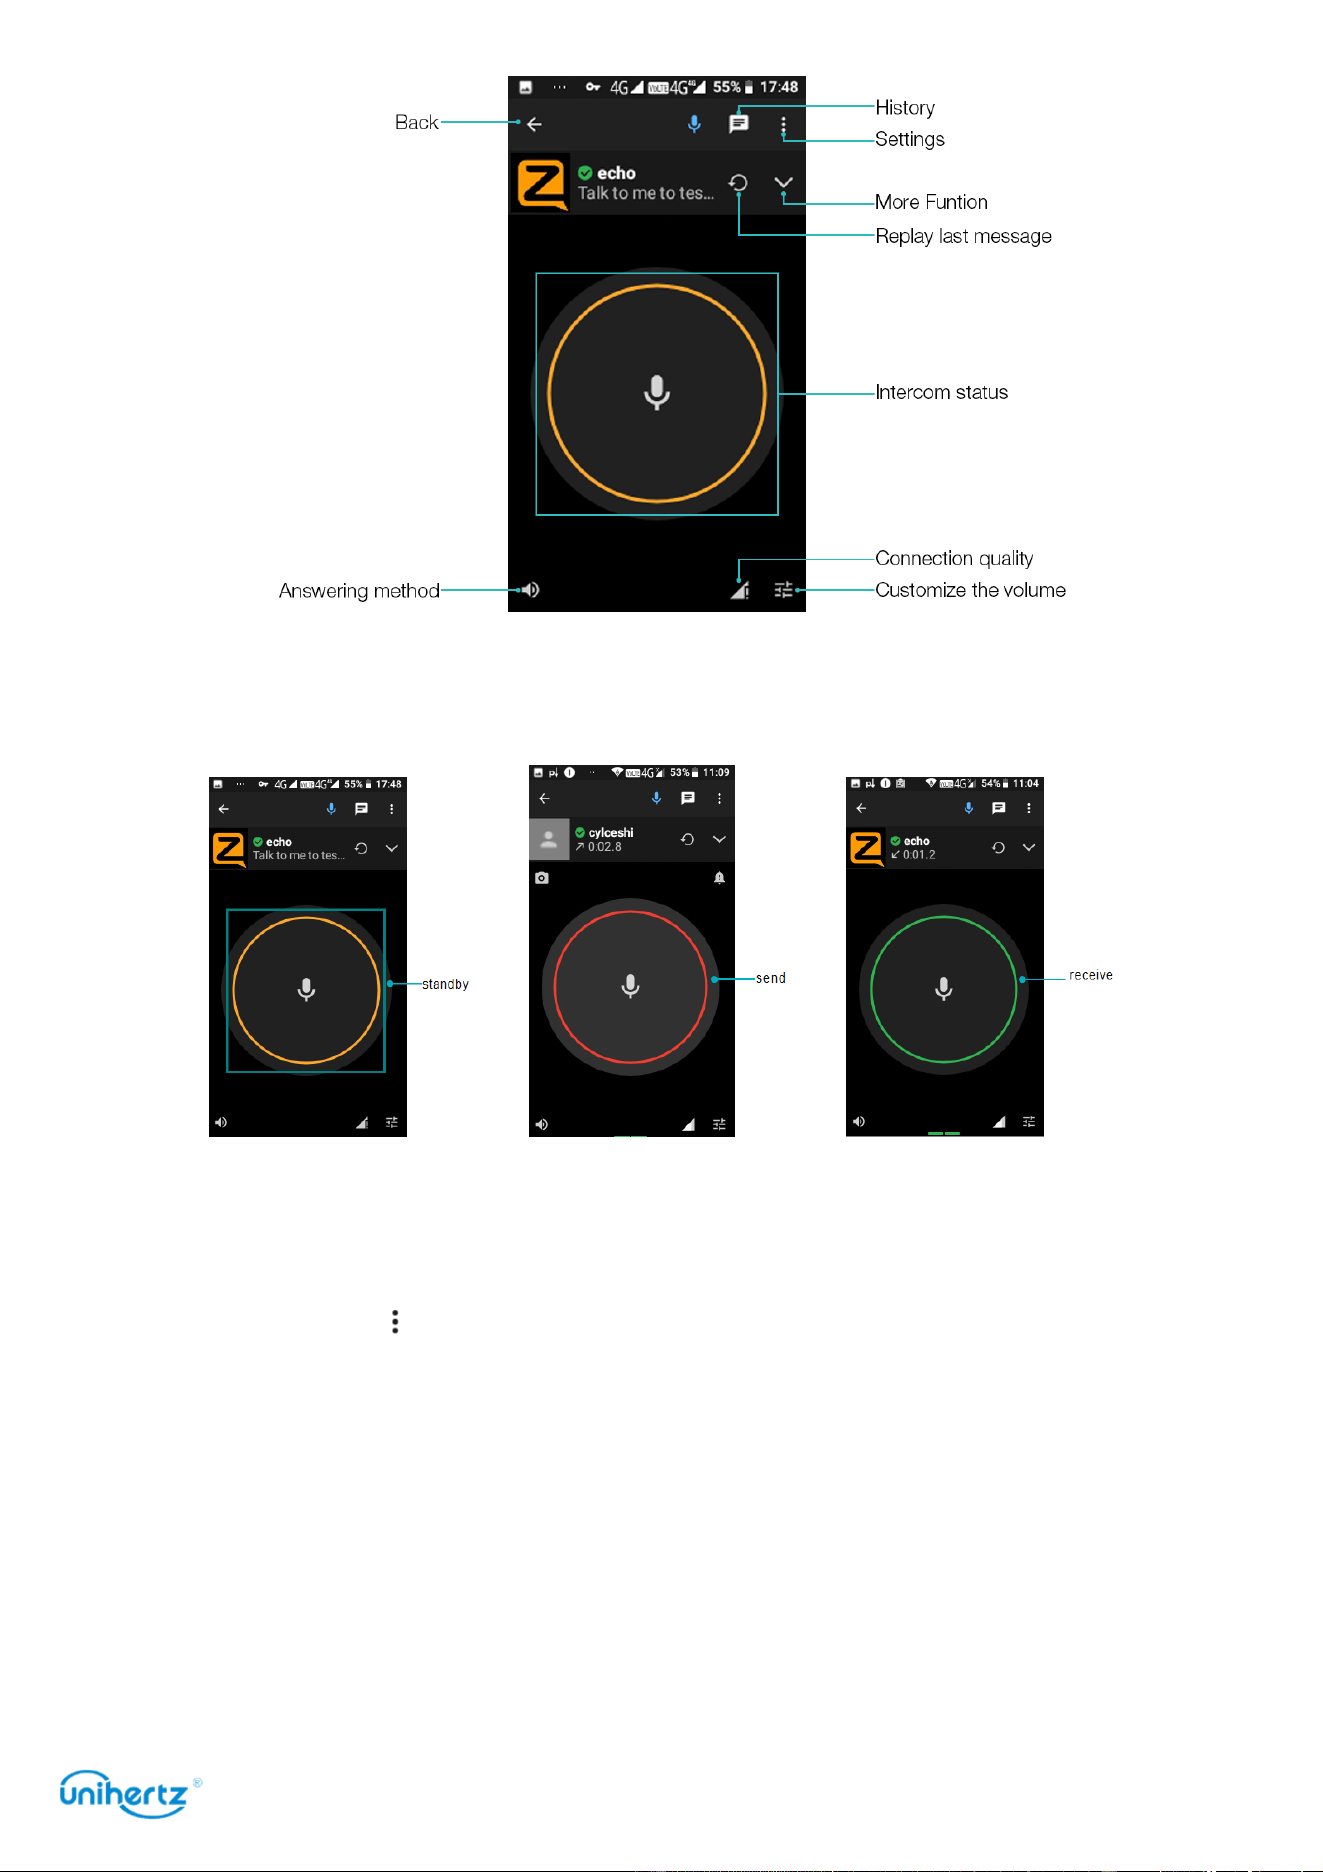
Tools
85
The intercom status icon is shown in the figure below: the yellow icon is standby,
the red is for sending the intercom status, and the green is for receiving the
intercom status.
●
CHANNEALS
: Look for specific channels of interest, view channels that match
your language or the most active channel, scan QR code to connect channels,
create your own channel and invite friends, and set a password for your channel.
●
Options
: Touch
Status
: Set different states.
Options
: Customize settings based on personal usage habits.
Sign out
: Log out your account.
Exit
: Exit the app.
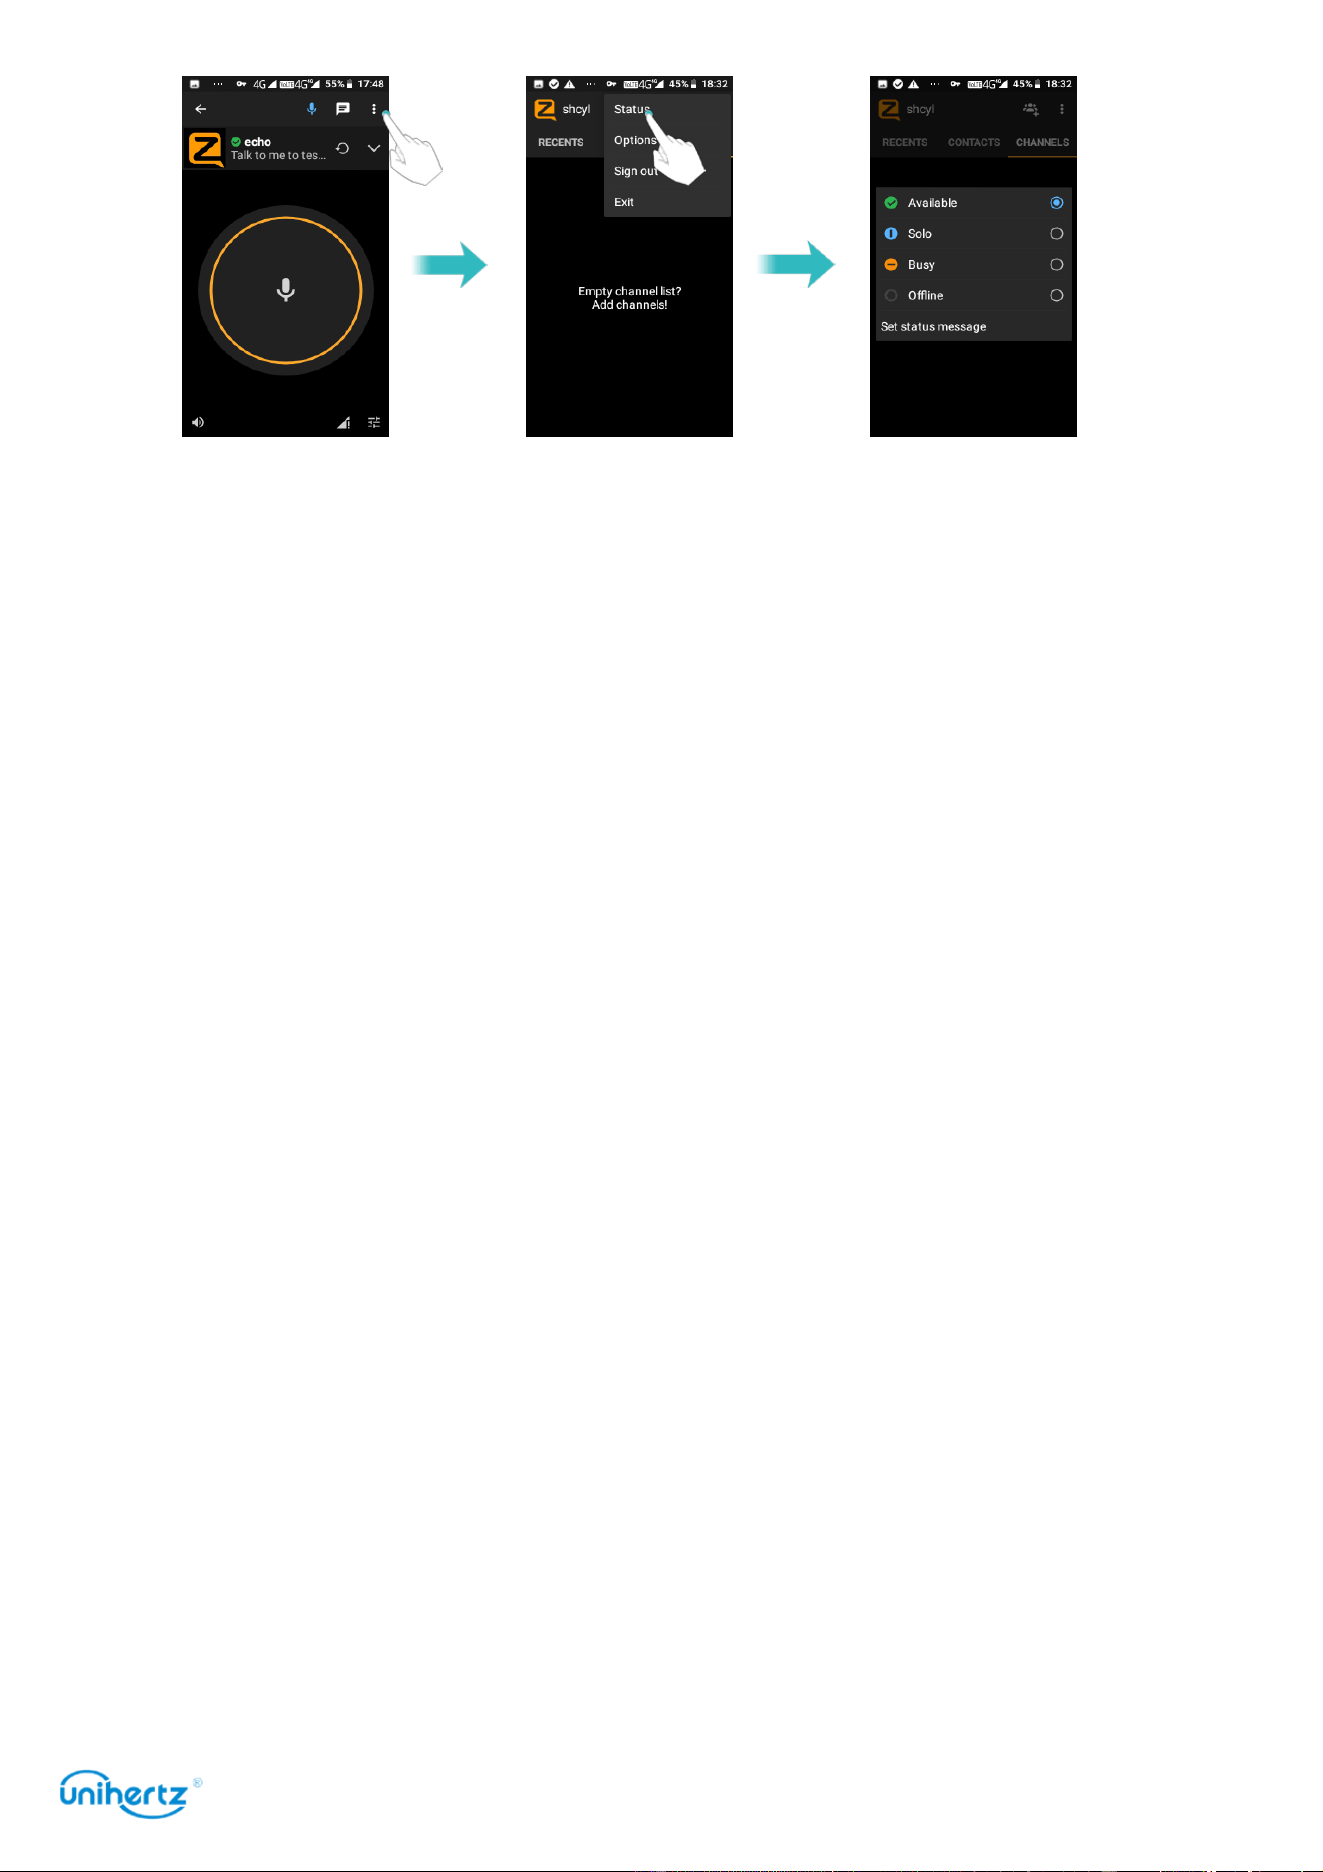
Tools
86
●
Shortcut
:
Pull down the notification bar and click on the
Zello
notification to quickly enter the
Zello
application.
Touch
Settings
>
Smart Assistant
>
Shortcut button
>
Zello
. Any interface can
quickly enter the
Zello
by pressing the shortcut key (PTT). The intercom interface
can also be intercomed by pressing the
PTT
button.
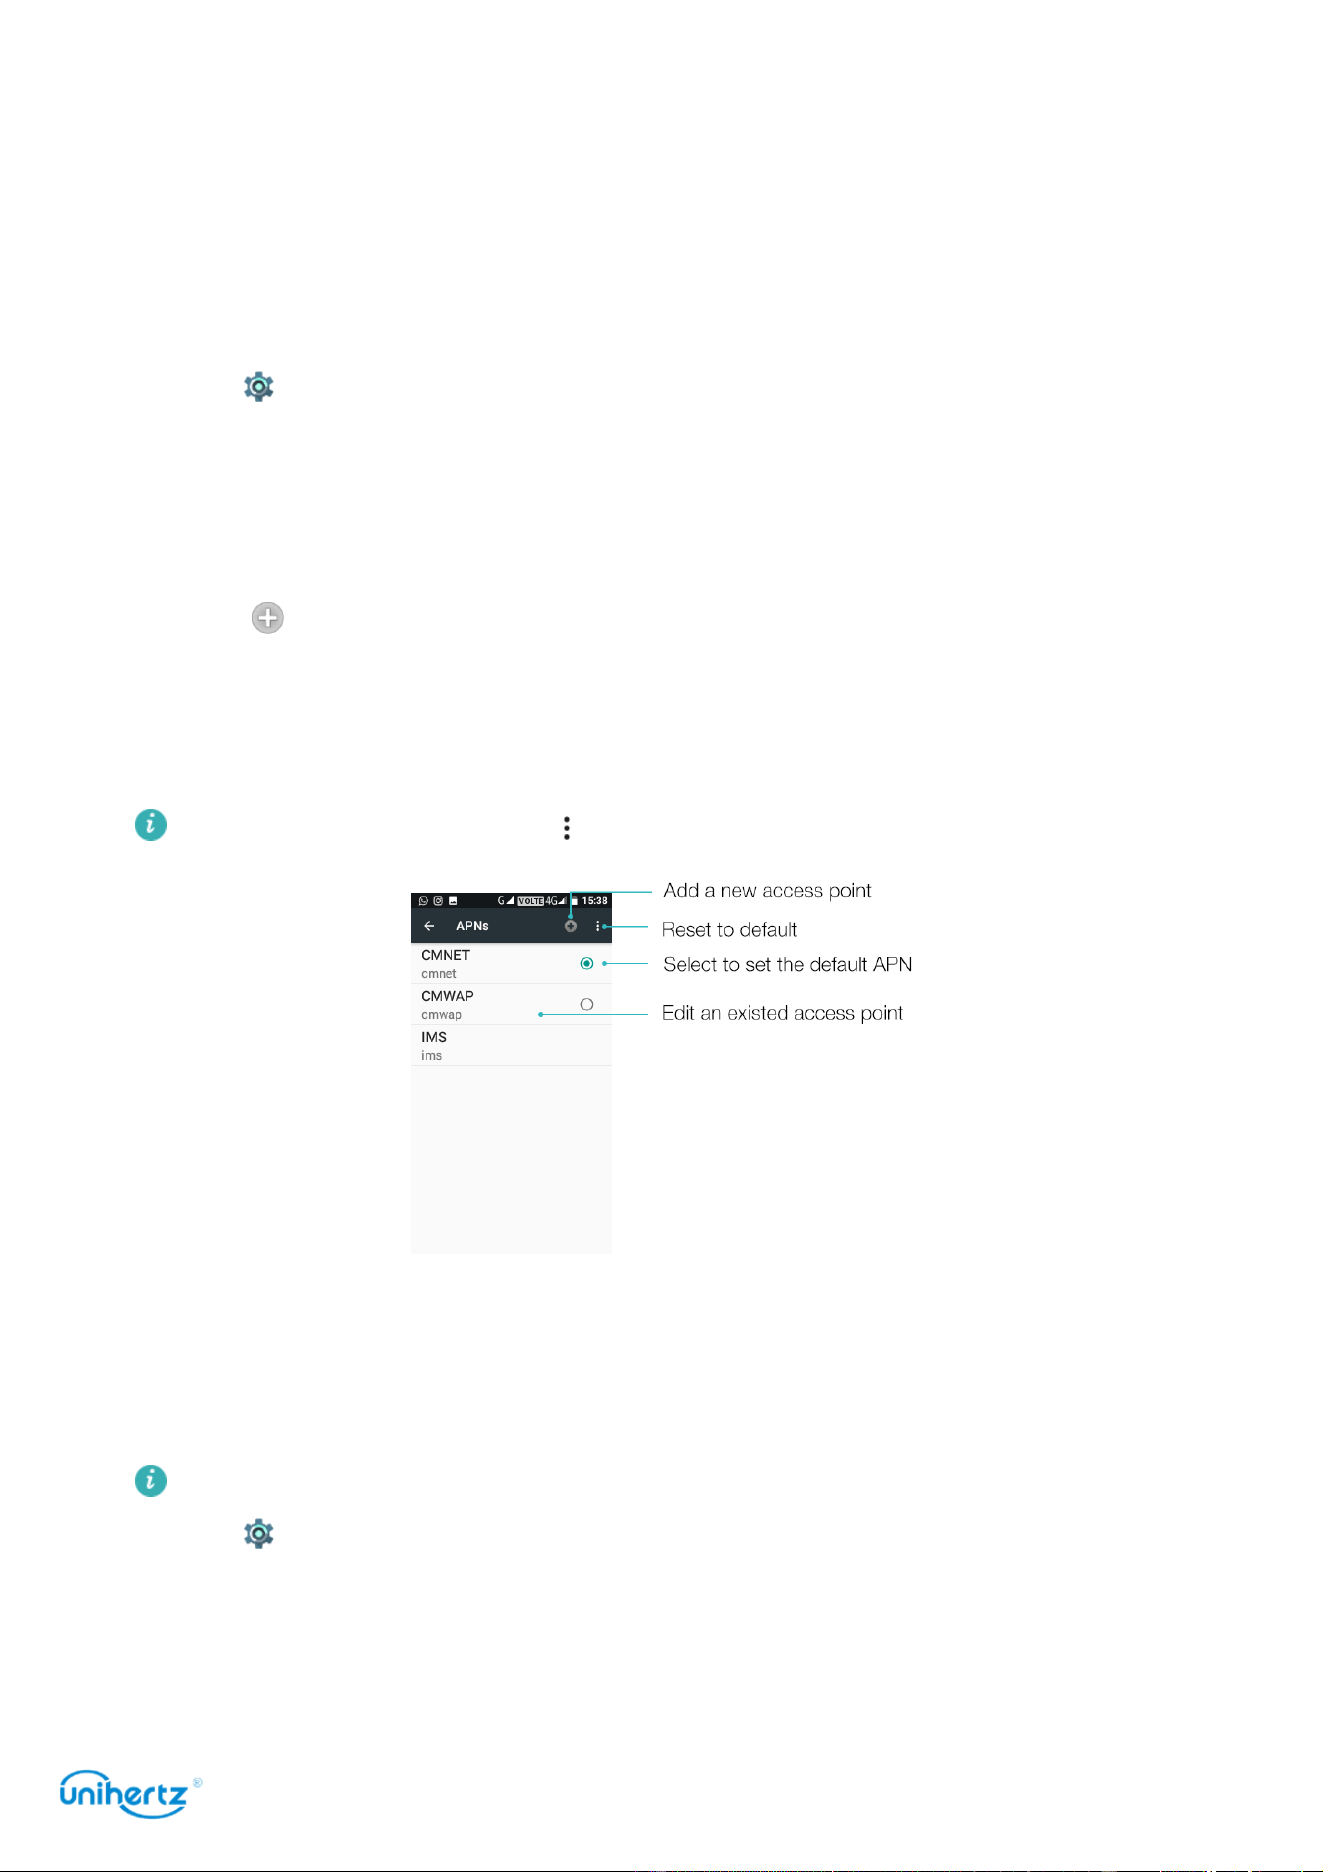
Settings
87
Settings
Configuring the Access Point Names
Configure the Access Point Names when you cannot use mobile date to connect to
the internet.
1 Open
Settings
.
2 Touch
Network &Internet
>
Mobile network
.
3 Select the SIM card you use to connect to the internet.
4 Touch
Access Point Names
>
APNs
.
5 Touch to add a new
access point
. You can also select an existed
access point
and edit it.
6 Check all the access point values like
Name
,
APN
,
Proxy
by comparing other
phones that can use mobile date to connect to the internet.
Touch
Access Point Names
> >
Reset to default
.
Enabling location access
Enable location-based services to ensure that map, navigation, and other
applications can access your location information.
Features may vary depending on your carrier.
1 Open
Settings
.
2 Touch Security &
Location
>Location and then turn on the location switch.
3 Three options are available under Location mode:
●
High accuracy
: Use GPS, Wi-Fi, Bluetooth or cellular networks to determine
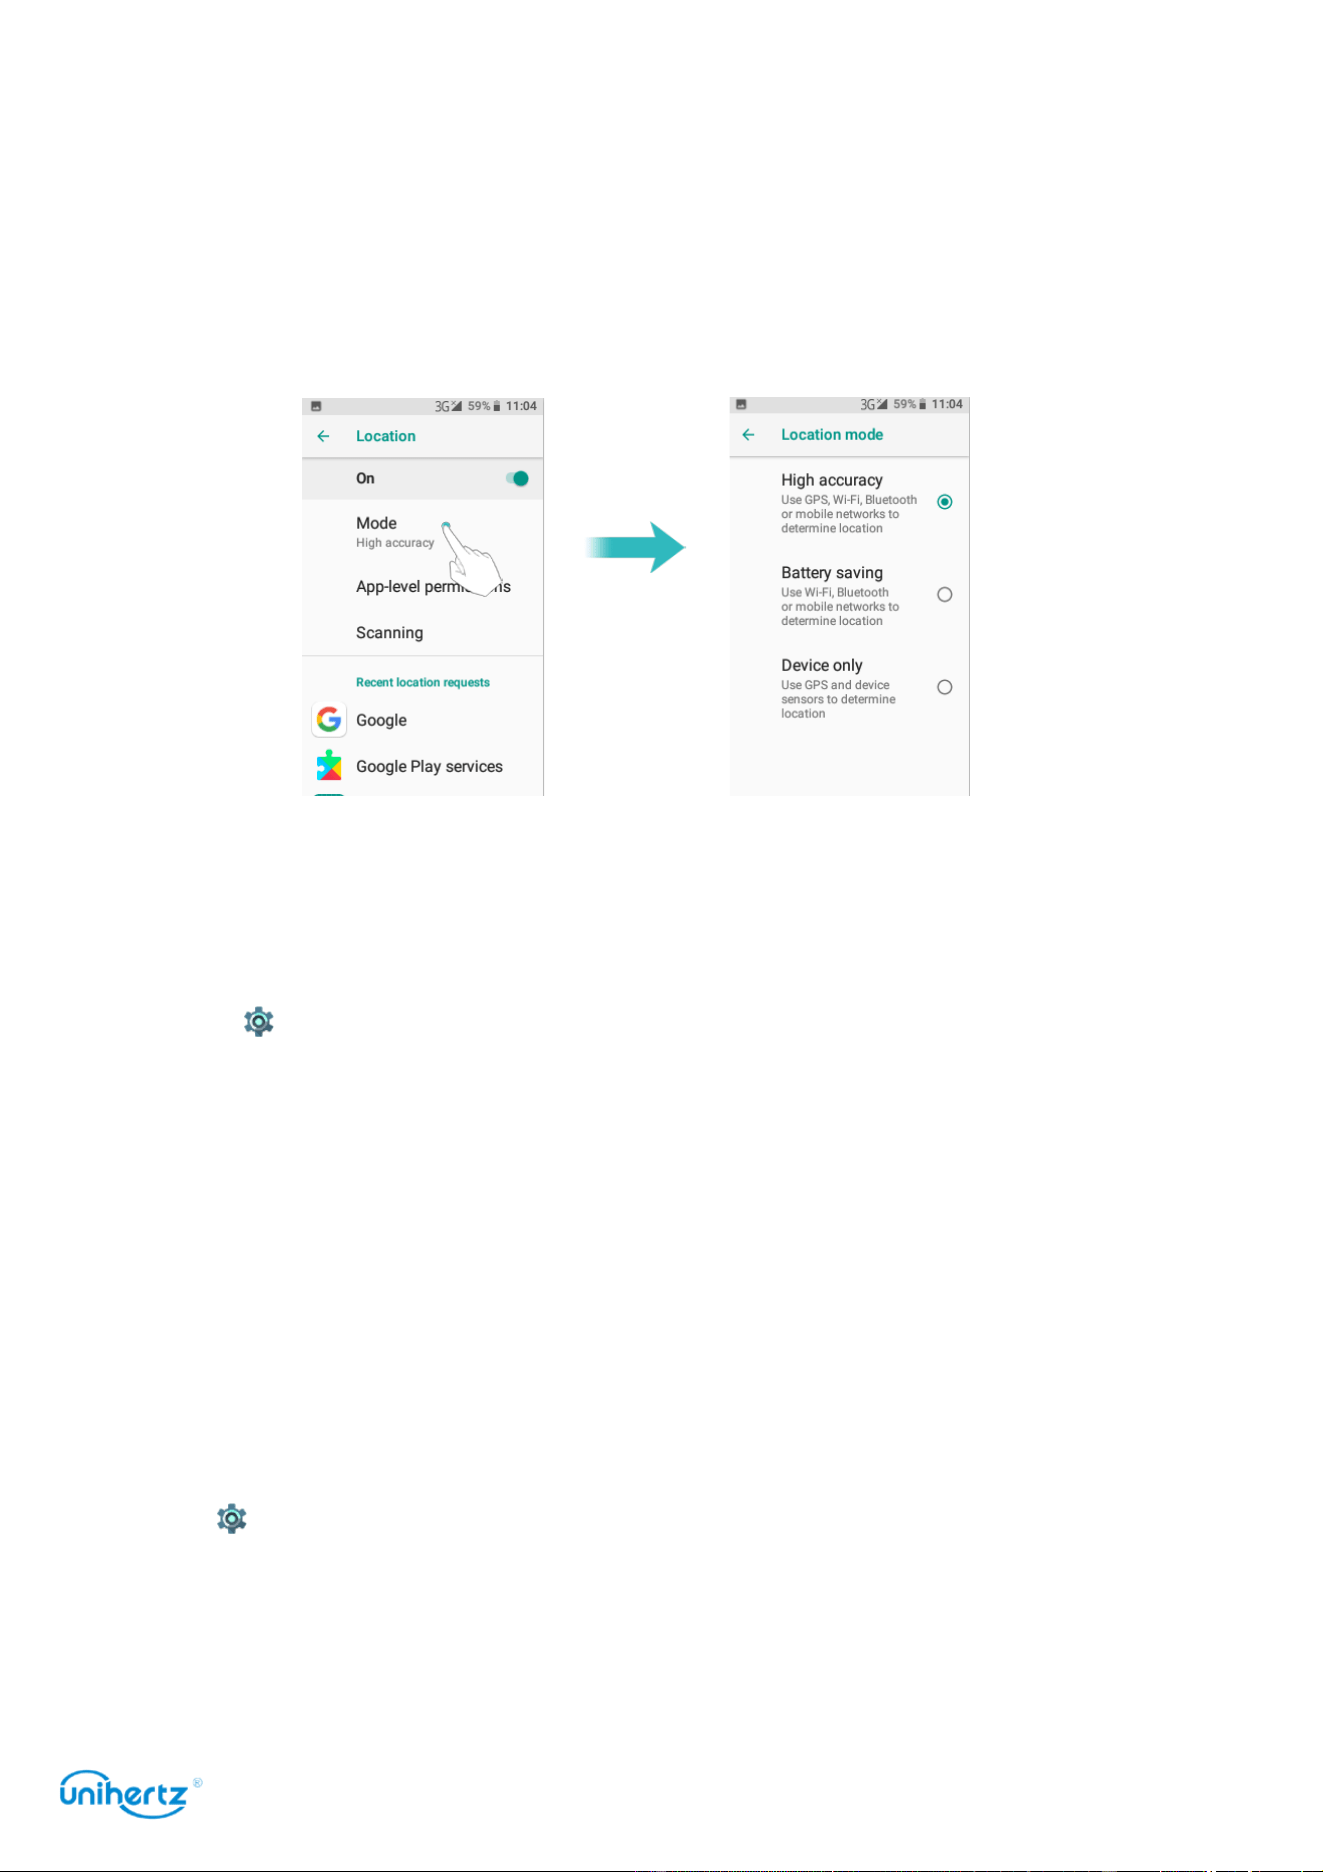
Settings
88
location. Uses GPS and your phone's Internet connection. Enable this option for
highly accurate positioning.
●
Battery saving
: Use GPS, Bluetooth or cellular networks to determine location.
Only uses your phone's Internet connection. Enable this option for reduced power
consumption and longer standby times.
●
Device only
: Does not require an Internet connection. Enable this option to
reduce mobile data usage.
Increasing indoor positioning accuracy
Your phone uses Wi-Fi and Bluetooth for more accurate positioning when you are
indoors.
1 Open
Settings
.
2 Touch Security &
Location
>Location >
Scanning
.
● Turn on the
Wi-Fi scanning
switch. Location applications and services will
continually scan for Wi-Fi networks for more accurate positioning.
● Turn on the
Bluetooth scanning
switch. Location applications and services will
search for Bluetooth devices for more accurate positioning.
Configuring the display settings
Configure the display settings to personalize your phone. For example, you can
change the wallpaper, font size, and screen-off time.
Go to
Settings
and then touch Display. You can configure the following settings:
●
Brightness level
: You can manually adjust the brightness.
● Adaptive
brightness
: Auto adjust the brightness level for available light.
●
Wallpaper
: Set the lock screen and home screen wallpapers.
●
Sleep
: The screen will lock automatically after a period of inactivity to reduce
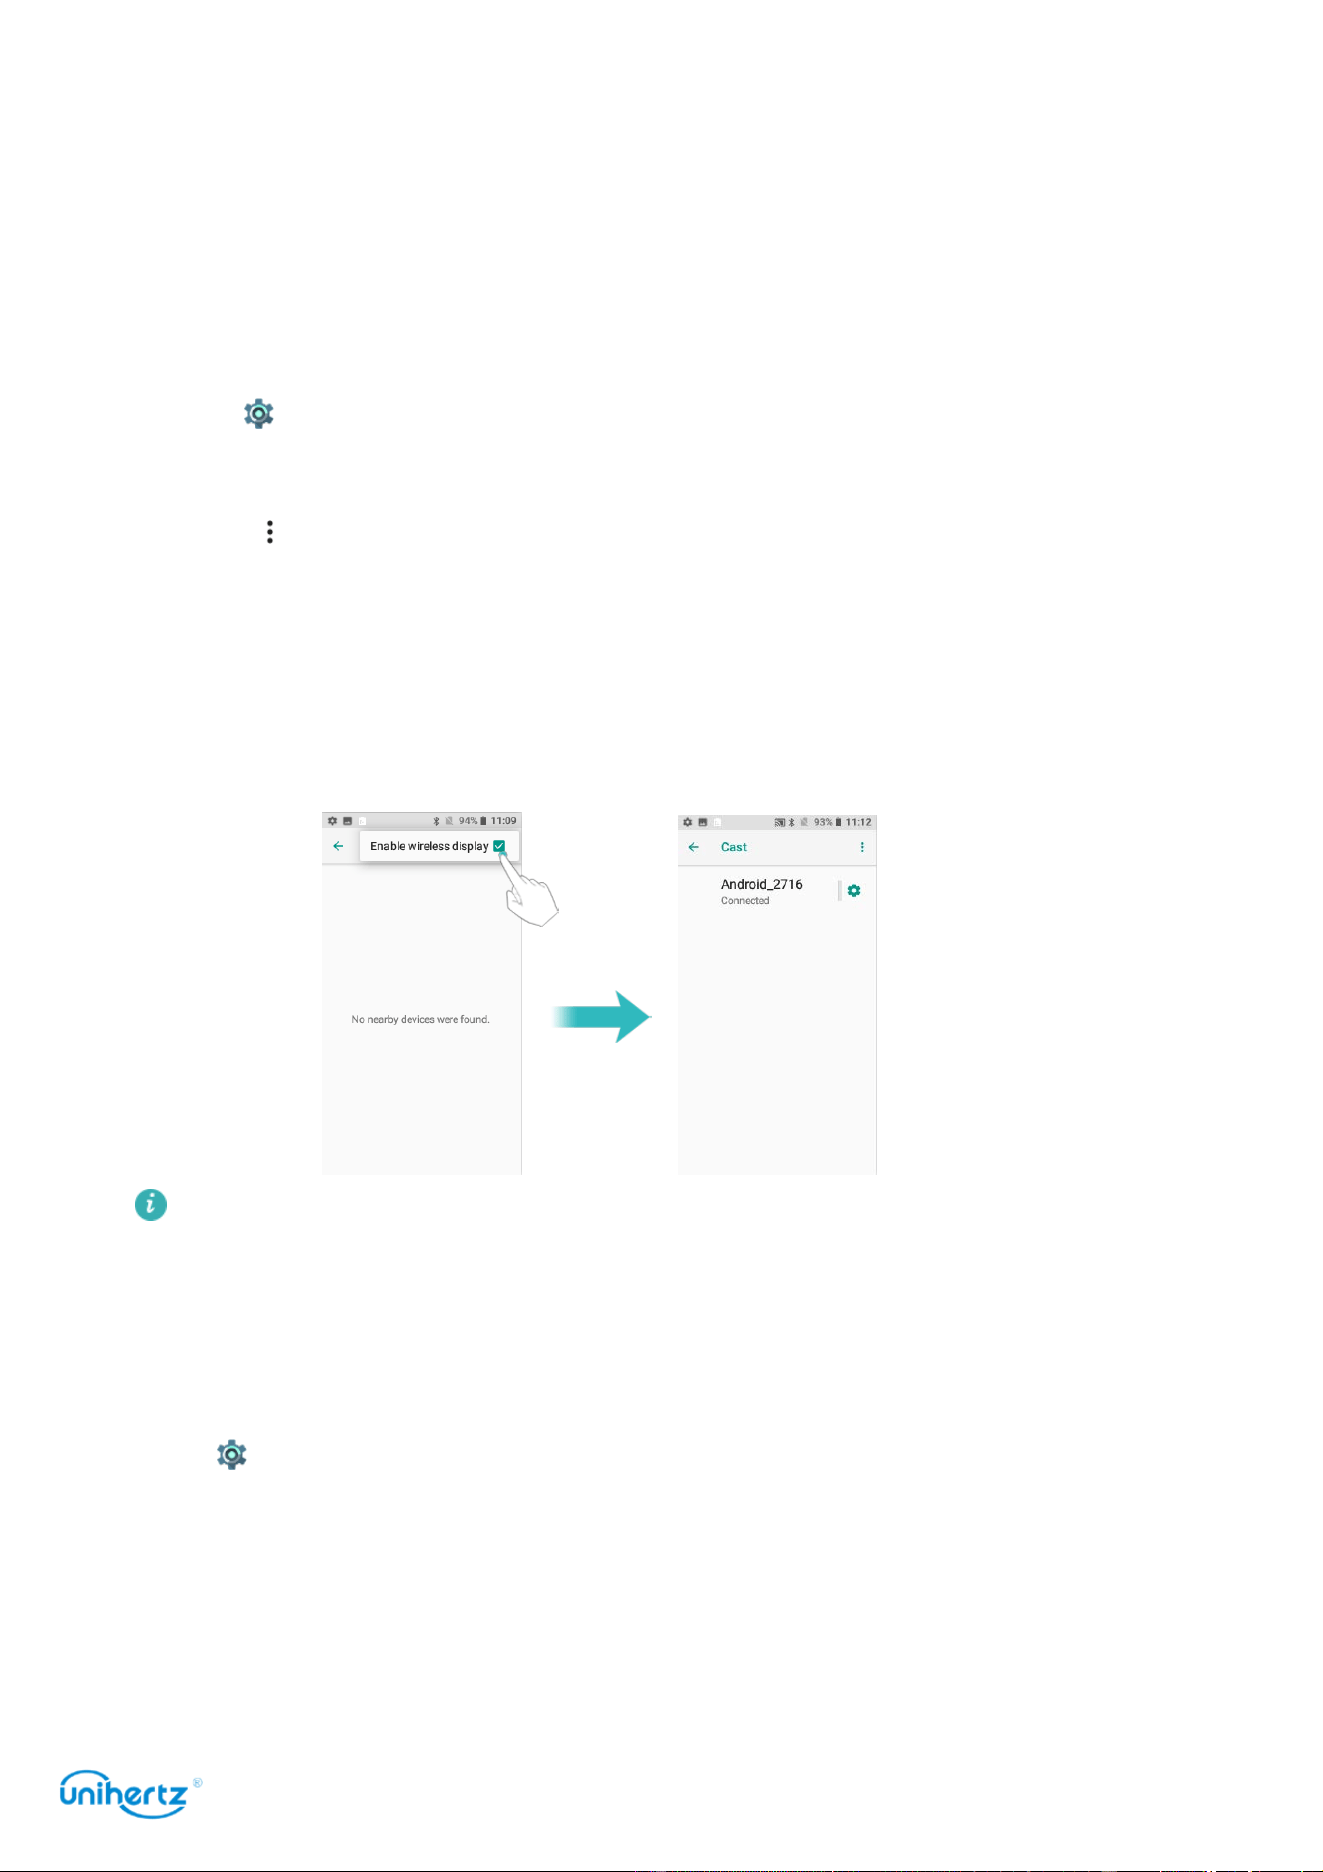
Settings
89
power consumption. Select Sleep to adjust the screen-off time.
●
Font size
: Set the font size.
●
Auto-rotate screen
: If this option is enabled, your screen's orientation will switch
automatically depending on how you hold your phone when performing certain
operations, such as browsing a web page, viewing a picture, or writing a message.
●
Cast
: It can be used to transfer the screen of the phone to other display devices
such as TVs and projectors which support WLAN Display by WLAN network.
1 Open
Settings
.
2 Touch Connected devices >Cast
3 Touch , tick the Enable wireless display
4 When the display device is turned on, the phone automatically searches for
other display device and then initiates a connection notification. After the device is
connected, the screen content on the phone will be displayed on other device
simultaneously the audio of the phone will be turned off, and the sound will be
output from the connected device.
The above options may not be available on all phone models.
Sound settings
Change the incoming call and message ringtones or set the system alert sound
and vibration effects.
Go to
Settings
and then touch
Sound
. You can configure the following settings:
●
Volume
: Adjust the ringtone, media, and alarm volume.
●
Silent mode
: Once enabled, your phone will not ring when you receive an
incoming call or message, but the screen will still turn on. Even you have enabled
Vibrate in silent mode, your phone will not vibrate to alert you of incoming calls or
messages.

Settings
90
● Select a
ringtone
under Phone ringtone to change the ringtone. You can choose
from preset ringtones or a local music file. Turn on
Also vibrate for calls
switch to
enable vibrations when your phone rings.
● Default
notification ringtone
: Choose a preset ringtone or a local music file as
the notification tone for messages, emails, and other notifications.
● Touch the switches under
Other sounds
to enable or disable dial pad tones,
touch sounds, screen locking sounds, charging sounds, and Vibrate on tap.
The above options may not be available on all phone models.
Changing the screen unlock method
Set a screen lock password to prevent unauthorized access to your phone.
Unlocking the screen with pattern
1 Open
Settings
.
2 Touch Security &
Location
>
Screen lock
.
3 You can choose to set
pattern
. Connect at least four dots to create a screen
unlock pattern, and then release your finger. Draw your screen unlock pattern
again to confirm.
Unlocking the screen with password
1 Open
Settings
.
2 Touch Security &
Location
>
Screen lock
.
3 You can choose to set a
PIN
or
password
:
● Touch
PIN
, and then enter a PIN containing at least four digits and select
Done
.
● Touch
Password
, and then enter a password containing at least four characters
and select
Done
.
Unlocking the screen with Fingerprint
1 Open
Settings
.
2 Touch Security &
Location
>
Fingerprint
3 Follow the prompt to select an alternate screen lock, touch the fingerprint sensor
according to the prompt to start registering the fingerprint, the local fingerprint
sensor is located on the phone
HOME
button. This machine can register a total of 5
fingerprints
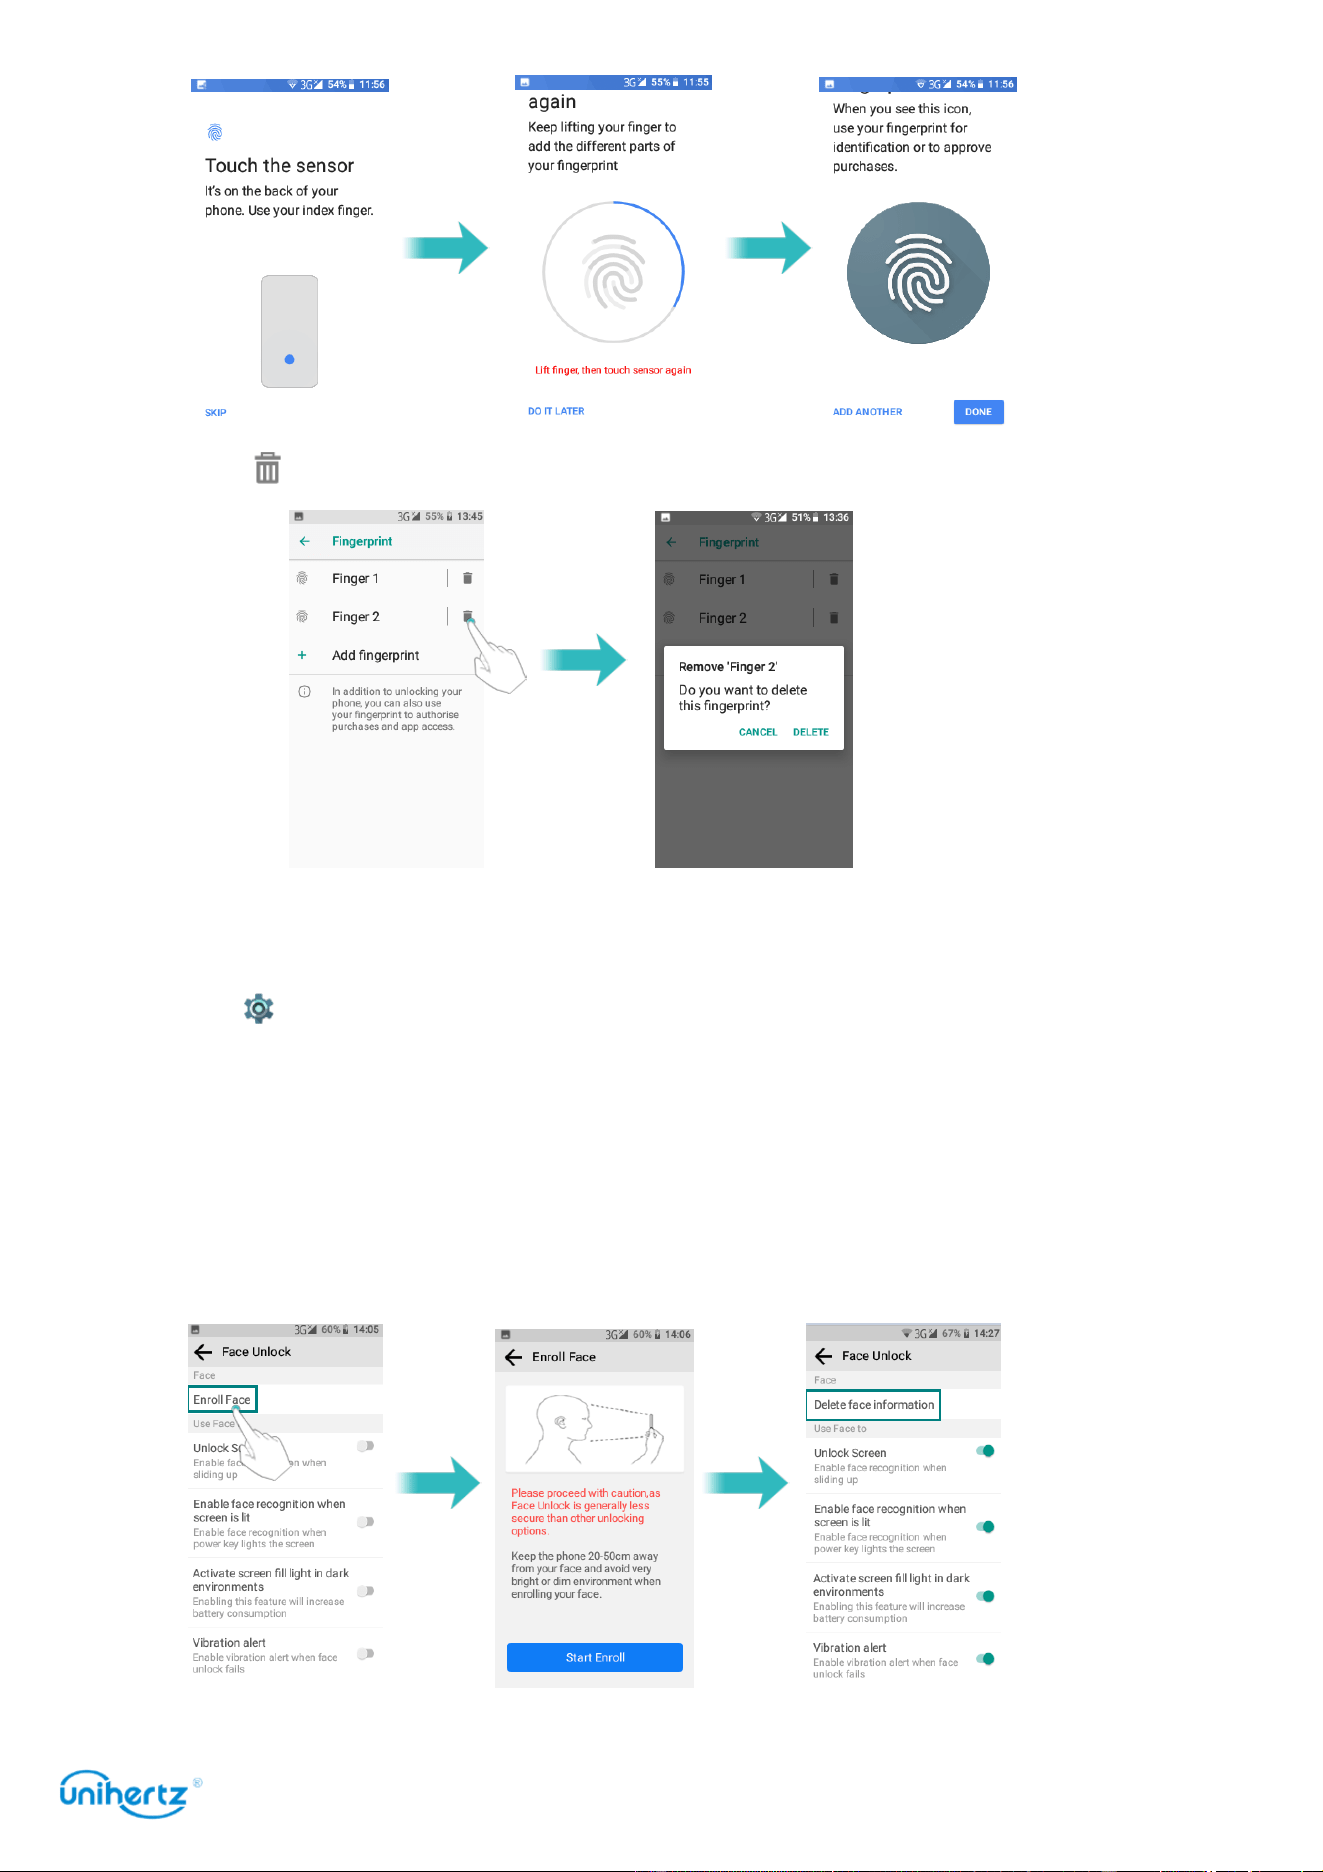
Settings
91
4 Touch to remove the corresponding fingerprint.
Unlocking the screen with Face Unlock
1 Open
Settings
.
2 Touch Security &
Location
>
Face Unlock
.
3 Touch
Enroll Face
, select an alternate screen lock, enter the face according to
the prompts, and open the
Unlock Screen
switch.
4 Touch
Delete face information
to replace or remove the face information.
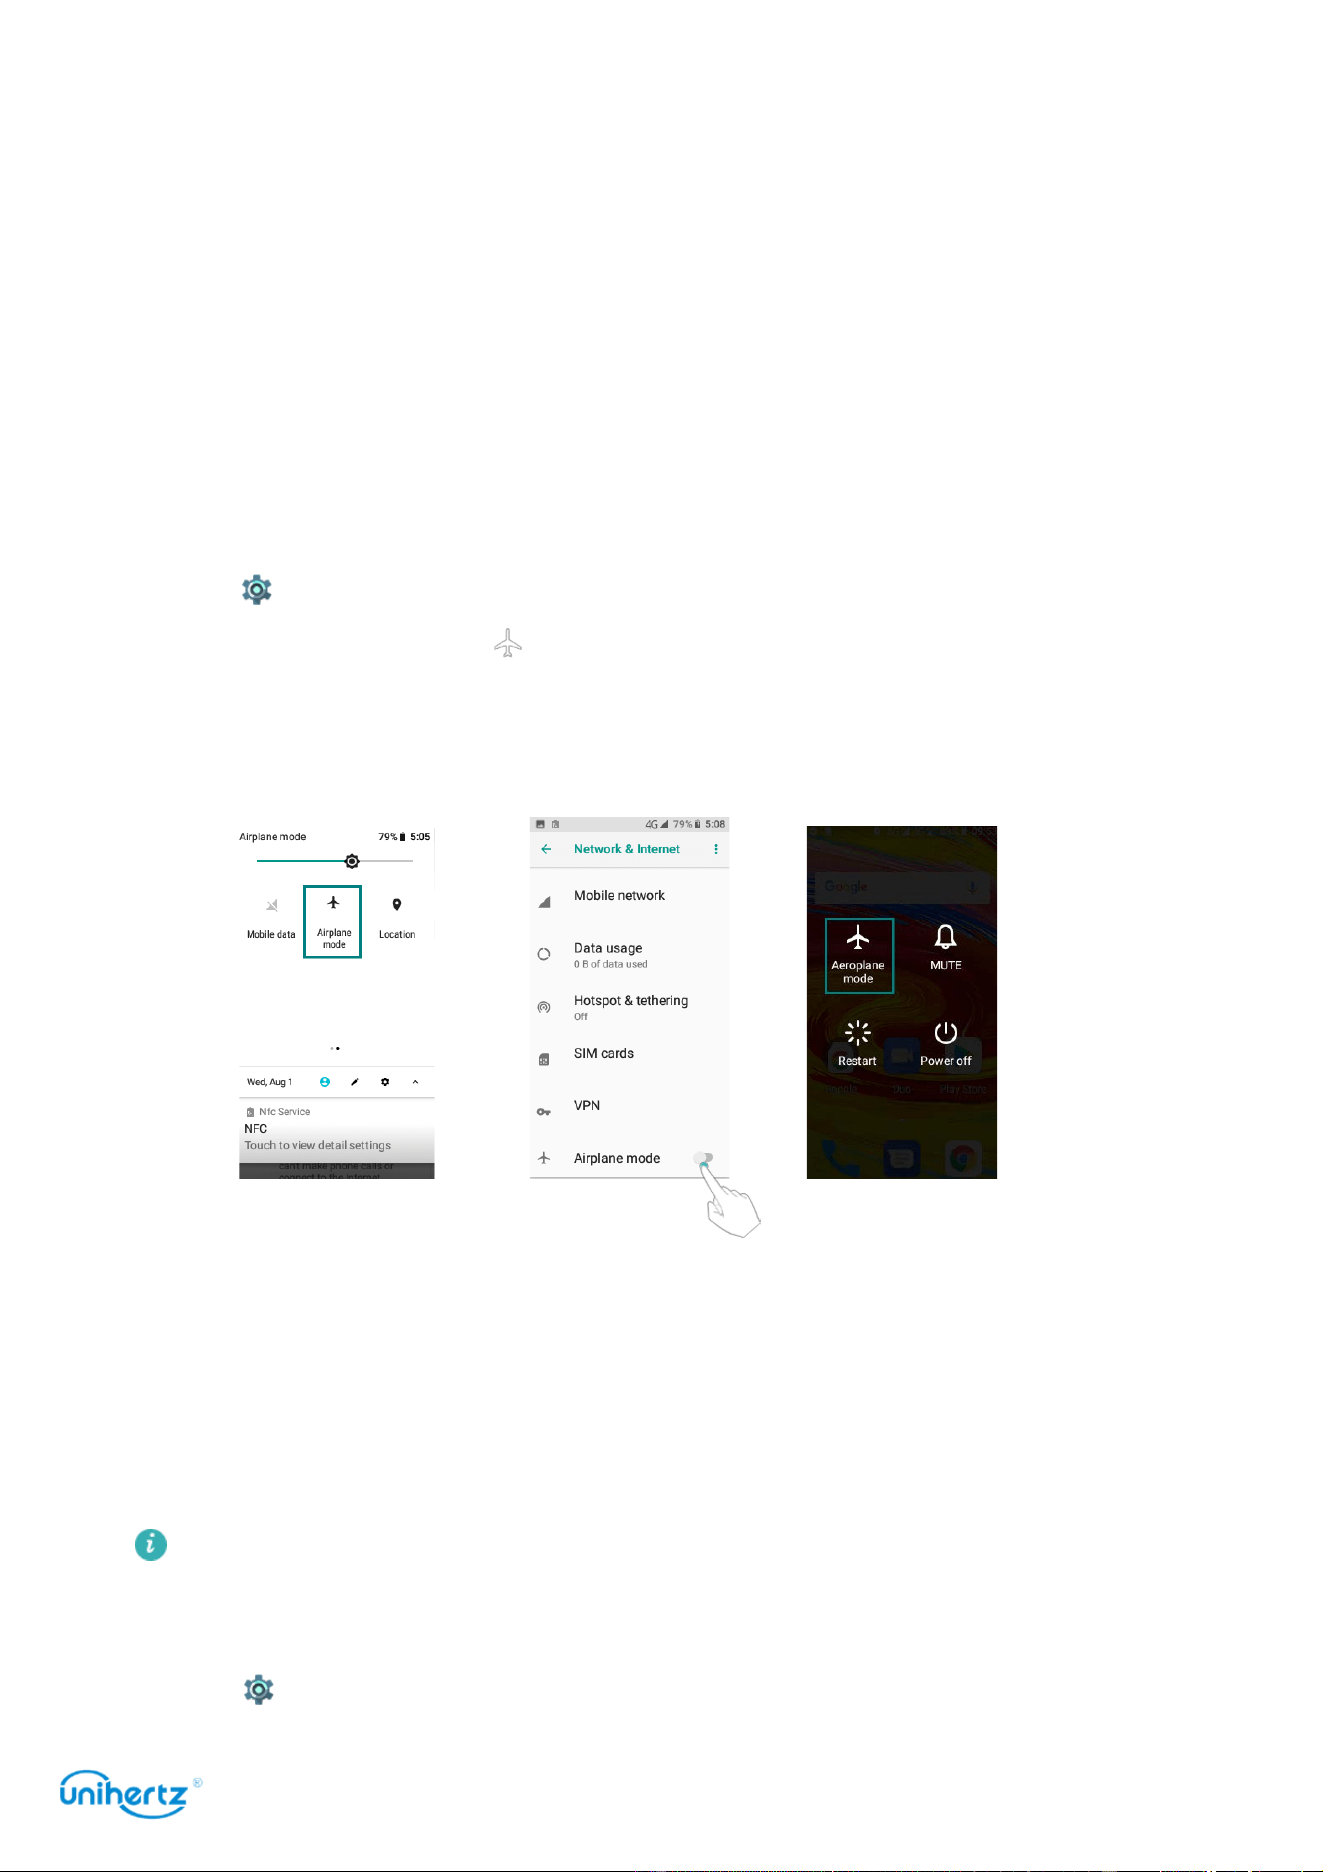
Settings
92
Airplane mode
Wireless devices may interfere with an airplane's flight system. Power off your
phone or switch to airplane mode when you are on a flight.
After you enable airplane mode, all of your phone's network features will be
disabled. You will not be able to make or receive calls, or use mobile data,
Bluetooth or Wi-Fi. However, you will still be able to play music, watch videos, and
use applications that do not require an Internet connection.
Use one of the following methods to enable or disable airplane mode:
● Swipe down from the status bar to open the notification panel. In the Shortcuts
tab, turn on the
Airplane mode
switch.
● Open
Settings
>
Network &Internet
, and then turn on the
Airplane mode
switch.
When airplane mode is on, is displayed in the status bar.
● Press and hold the power button, and then touch
Airplane mode
.
Setting your SIM card PIN
A personal identification number (PIN) is delivered with your SIM card to protect
your phone data. If you have enabled PIN protection for your SIM card, you will
need to enter the PIN each time you turn on your phone or insert the SIM card into
another phone.
Features may vary depending on your network carrier.
Before you perform the following operations, make sure you have received a SIM
card PIN from your carrier.
1 Open
Settings
.

Settings
93
2 Touch Security &
Location
>
SIM card lock
, and then touch
Set up SIM card lock
to configure the SIM lock settings.
3 Turn on the
Lock SIM card
switch.
4 Enter your PIN, and then touch
OK
. To change your PIN, touch
Change SIM PIN
.
● You will need to enter the PUK code if you exceed the maximum number of
incorrect PIN attempts. The SIM card will be permanently locked if the PUK code
is entered incorrectly too many times.
● Contact your carrier for details about these limits.
Setting up an account
Adding an account
Many applications and online services require you to create an account in order to
access the full range of features.
1 Open
Settings
.
2 Touch
Users &accounts
>
Add account
.
3 Select an account type, and then follow the onscreen instructions to enter your
account information.
● You must install the corresponding application before you can add an account
for a third-party application.
●To add an email account, see Adding an email account.
Deleting an account
1 Open
Settings
.
2 Touch
Accounts
, and then select the account type.
3 Select the account that you want to delete, and then follow the onscreen
instructions to delete it.
Syncing data with your phone
Enable the sync feature to keep all of your phone's data up-to-date and prevent
data loss. You can sync emails, contacts, and other data from your old phone or
computer.
The type of data that can be synced depends on the account type. Some
applications may not support syncing for all data types.
The example below illustrates how to sync data for an email account.
1 Open
Settings
.

Settings
94
2 Touch
Accounts
, and then select
Auto-sync data
. Follow the onscreen
instructions, and then touch OK to turn on the sync data switch.
3 On the Accounts screen, select an account type, and then select the account
that you want to sync with your phone.
4 Touch to sync your emails.
Smart Assistant
Physical key switch
1 Open
Settings
.
2 Touch
Smart Assistant
>
Physical key switch
Turn on the switch,
Back
Key and
Recent
Key will exchange function. Touch the
switch off to restore the default state.
Gradually in-crease incoming ring volume
1 Open
Settings
.
2 Touch
Smart Assistant
>
Gradually in-crease incoming ring volume
Turn on the switch, the ringer volume will gradually increase from small to large
when you call. Touch the switch off to restore the default state.
Power save manager
Reduce power consumption by closing background applications when the screen is
off. For more information, see Power Management > Power save manager.
Battery saving mode
This mode assists in optimizing system settings and extending standby time. For
more information, see Power Management> Battery saving mode.
Shortcut button
The PTT button located on the right side of the phone is defaults set as the
intercom button. Pressing this button on any interface will enter the Zello app.
After selecting the contact in the Zello, press PTT button to send the intercom.
You can customize the PTT key function, open the switch, select an application in
the list, press the PTT button on any interface will quickly enter the selected
application.
1 Open
Settings
.
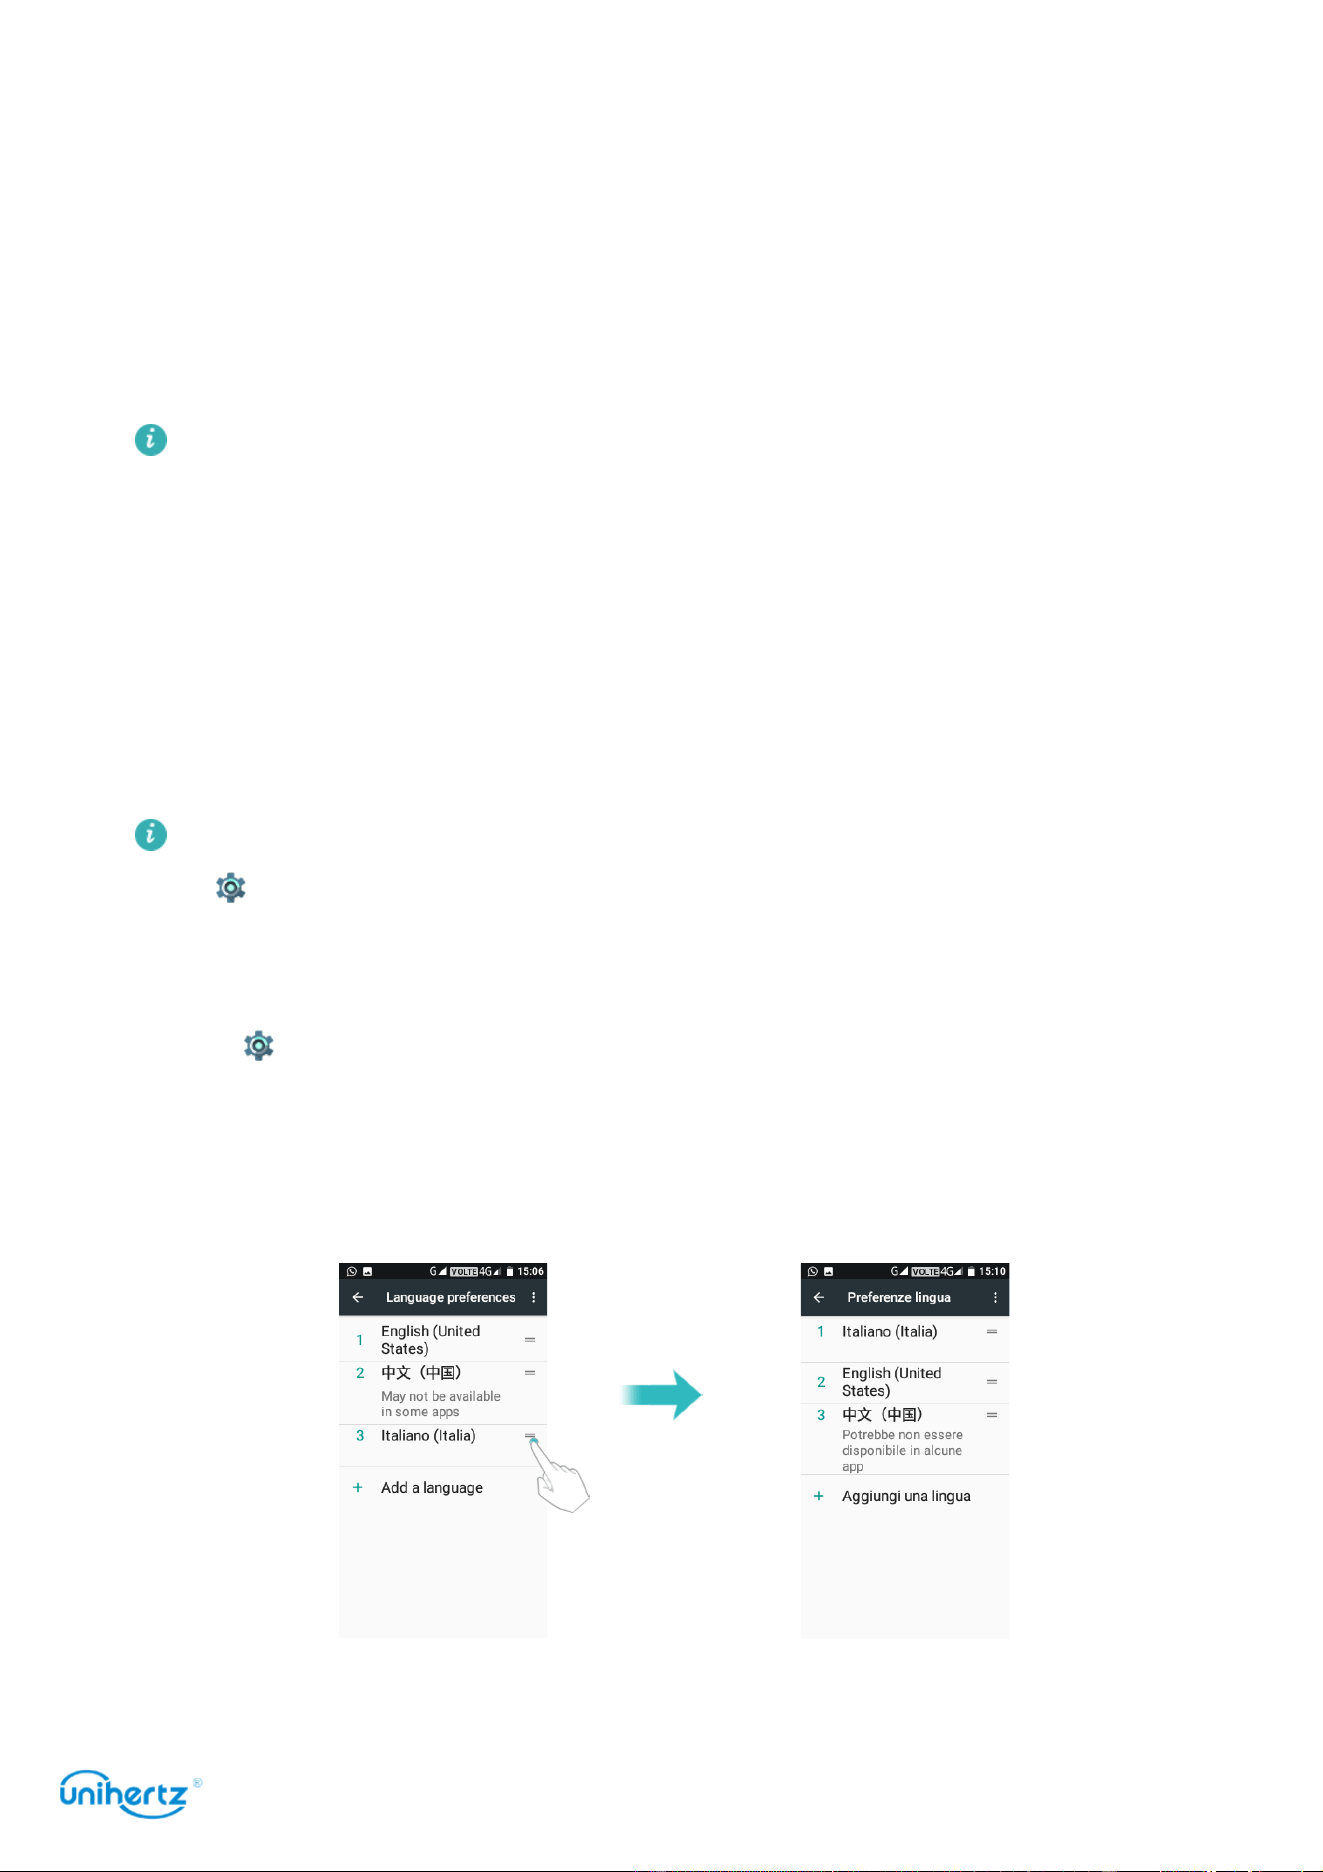
Settings
95
2 Touch
Smart Assistant
>
shortcut button
.
3 Turn on the switch.
4 Select the desired application.
LED Notification
The status indicator will blink when you receive incoming calls, messages, or other
notifications.
LED notifications give more timely reminders, but batteries consume more
power.
Flip to mute
Turn on the switch, you can turn over the phone to mute the incoming call, mute
the alarm clock, or stop the music.
Setting the date and time
Features may vary depending on your carrier.
Open
Settings
. Touch System>
Date & time
to configure the settings.
Changing the system language
1 Open
Settings
.
2 Touch System>
Languages & input
.
3 Touch
Languages
>
Add a language
, and then select the desired language.
4 Touch and hold the desired language to the first row.
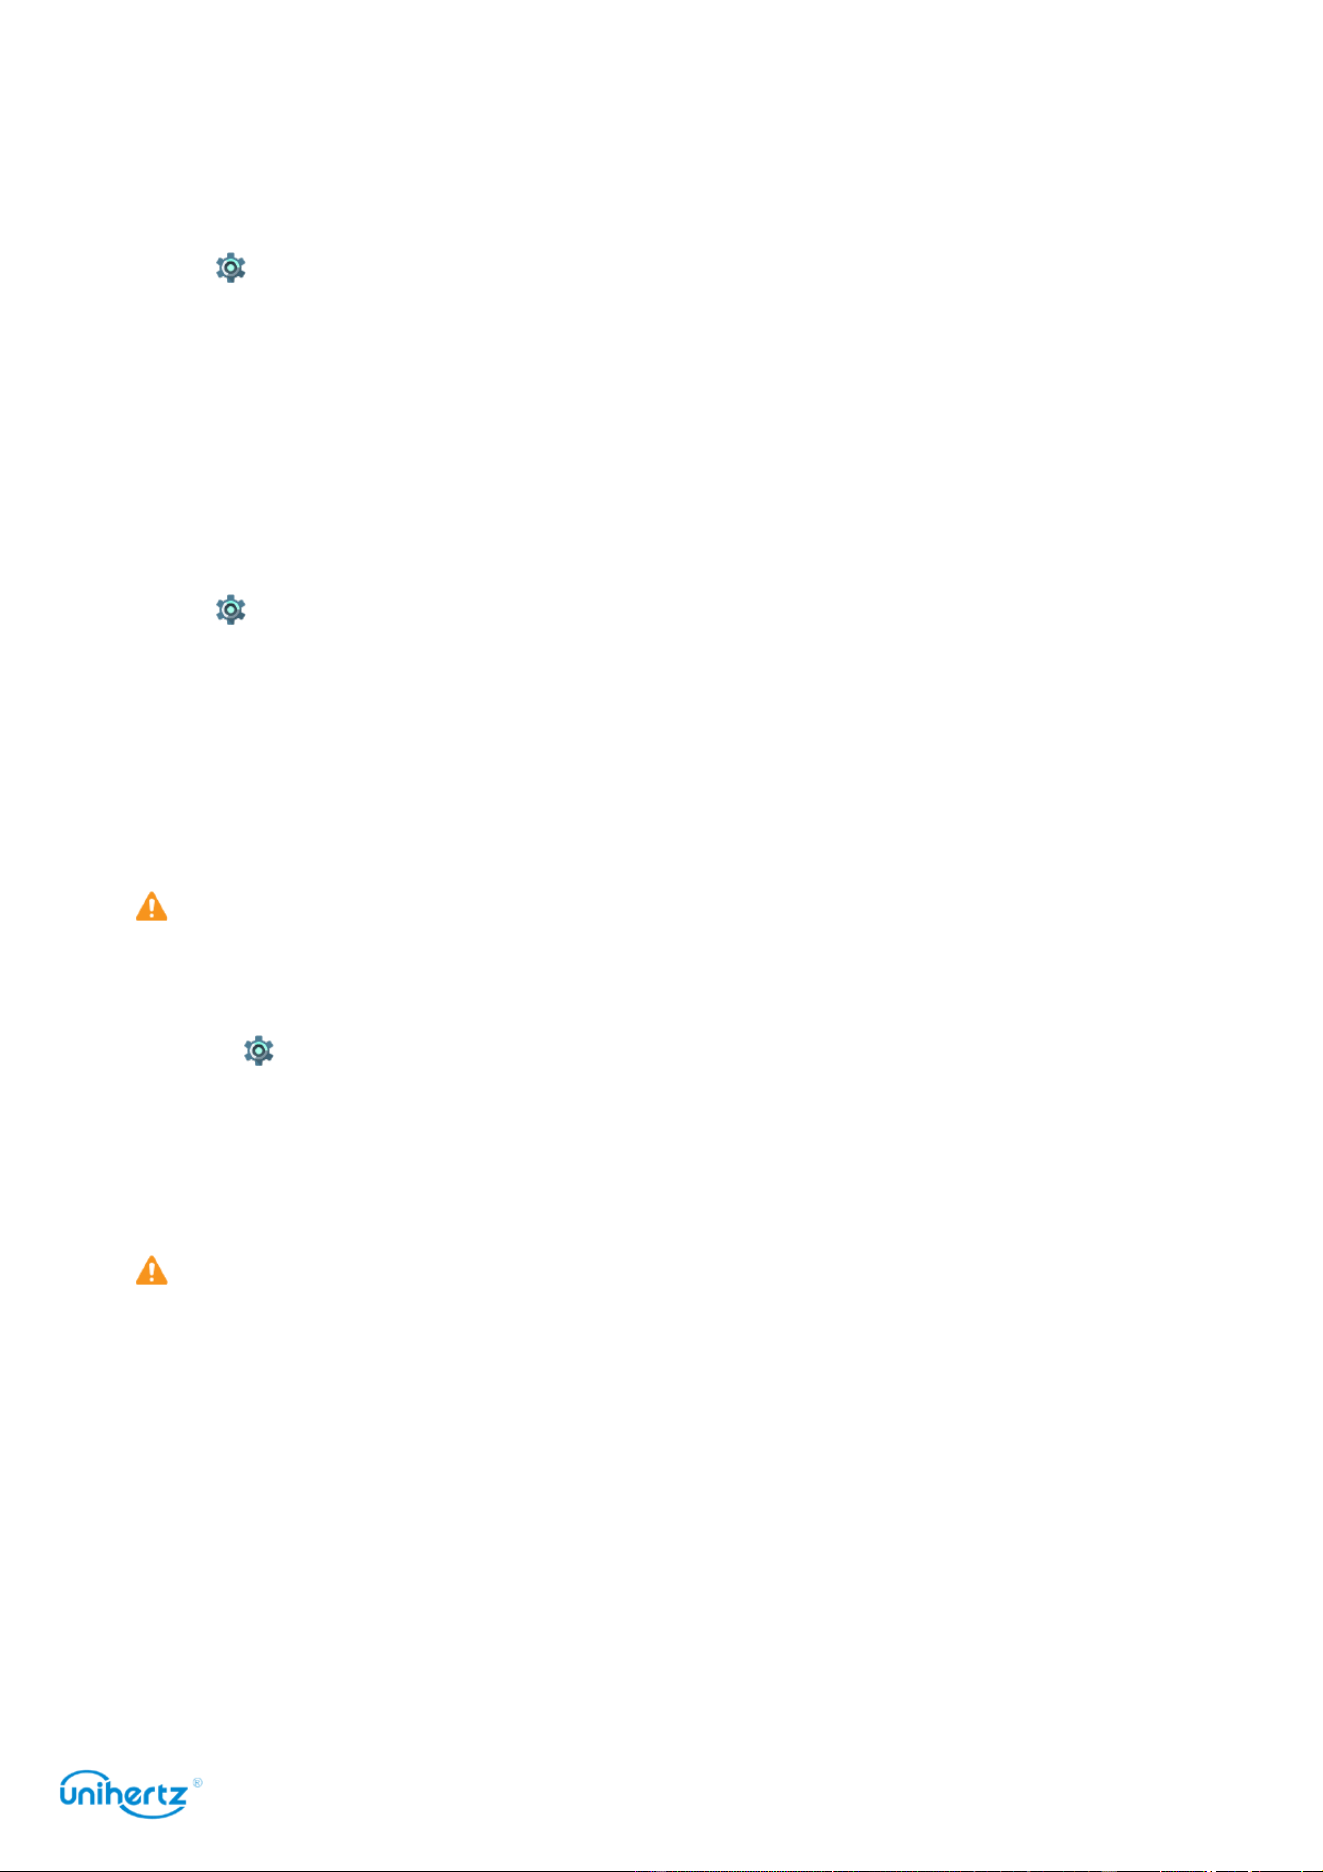
Settings
96
Viewing your phone's specifications
View your phone's specifications in a few simple steps. You can view information
about your processor, memory, and more.
Open
Settings
and touch System>
About phone
. Swipe up or down on the
screen to view information about the processor, RAM, internal storage, SIM status ,
IMEI, and more.
Viewing the available storage space
Check that there is enough space on your phone's internal storage before
downloading update packages or large files.
Open
Settings
and touch
Storage
to view storage information.
Touch
Default write disk
to set the default storage location to
Internal shared
storage
.
Restoring factory settings
Restore your phone to its factory settings if it crashes or is slow to respond.
Back up important data on your phone before restoring factory settings.
Restoring factory settings will erase all personal data from your phone, including
account information, downloaded applications, and application settings.
1 Open
Settings
.
2 Touch System>
Reset options
> Erase all data>
Factory reset
.
3 Touch
Reset phone
>
ERASE EVERYTHING
to restore your phone to its factory
settings. Your phone will restart automatically when the process is complete.
It will delete all files on your internal storage, such as music and images.
Proceed with caution.
Updating your phone
Update your phone's system to the latest version to enhance performance.
● Using unauthorized third-party software to update your phone may render your
phone unusable or put your personal information at risk. Always update through
your phone's online update feature.
● Your personal data may be erased during a system update. Ensure that you

Settings
97
back up important data before updating your phone.
● When updating, ensure that your phone has at least 50% battery power
remaining.
● After updating, you may find that some third-party applications are incompatible
with your system, such as Internet banking applications and games. This is
because it takes a while for third-party application developers to release updates
for new Android releases. Please wait until a new version of the application is
released.
Touch
Settings
>
About phone
>
Build number
to view your phone's version.
OTA updates
When a new system update is released, you will be prompted to download and
install the latest version. Select OTA update for quick and secure updates.
Ensure that your phone is connected to the Internet before updating. Connect to
a Wi-Fi network before updating to avoid incurring data charges. In addition,
ensure that your phone has sufficient battery power remaining.
1 Open
Settings
>System>
About phone
.
2 Touch
Wireless Updater
. Your phone will automatically check for updates.
3 Your phone will automatically download the update package.
4 Once the download is complete, touch
Install now
. The update process may take
a while to complete. Do not use your phone before it has finished updating. Your
phone will restart automatically when it has finished updating.

Accessibility
Features
98
Accessibility Features
Accessibility features make it easier for users with impaired vision or hearing to
use their phone.
TalkBack
Enabling or disabling TalkBack
TalkBack is an accessibility feature designed for visually impaired users. It
provides audible prompts to help you operate your phone. Once it is enabled, your
phone will issue audible prompts for all content that you touch, select, or enable.
Please enable with caution.
TalkBack's audible prompts are not available for all languages.
1 Open
Settings
.
2 Touch
Accessibility
>
TalkBack
.
3 Turn on the
TalkBack
switch, and then touch
OK
to enable
TalkBack
. The audible
tutorial will be started automatically when you enable
TalkBack
for the first time. If
you need to play the tutorial again, touch
Settings
to access the settings, and then
select Launcher
Talkback tutorial
.
4 Touch
Settings
, and then select
Explore by touch
. Your phone will not issue
audible prompts for the content that you touch unless you turn on
Explore by touch
.
Using TalkBack to control your phone
After you have enabled
TalkBack
, use gestures to:
Browse the screen
: Use two fingers to swipe the screen (instead of one). Swipe up
or down with two fingers to scroll through menu lists. Swipe left or right to move
between screens.
Select an item
: Touch an item with one finger to select it (it will not open). The
phone will read out the content of the selected item.
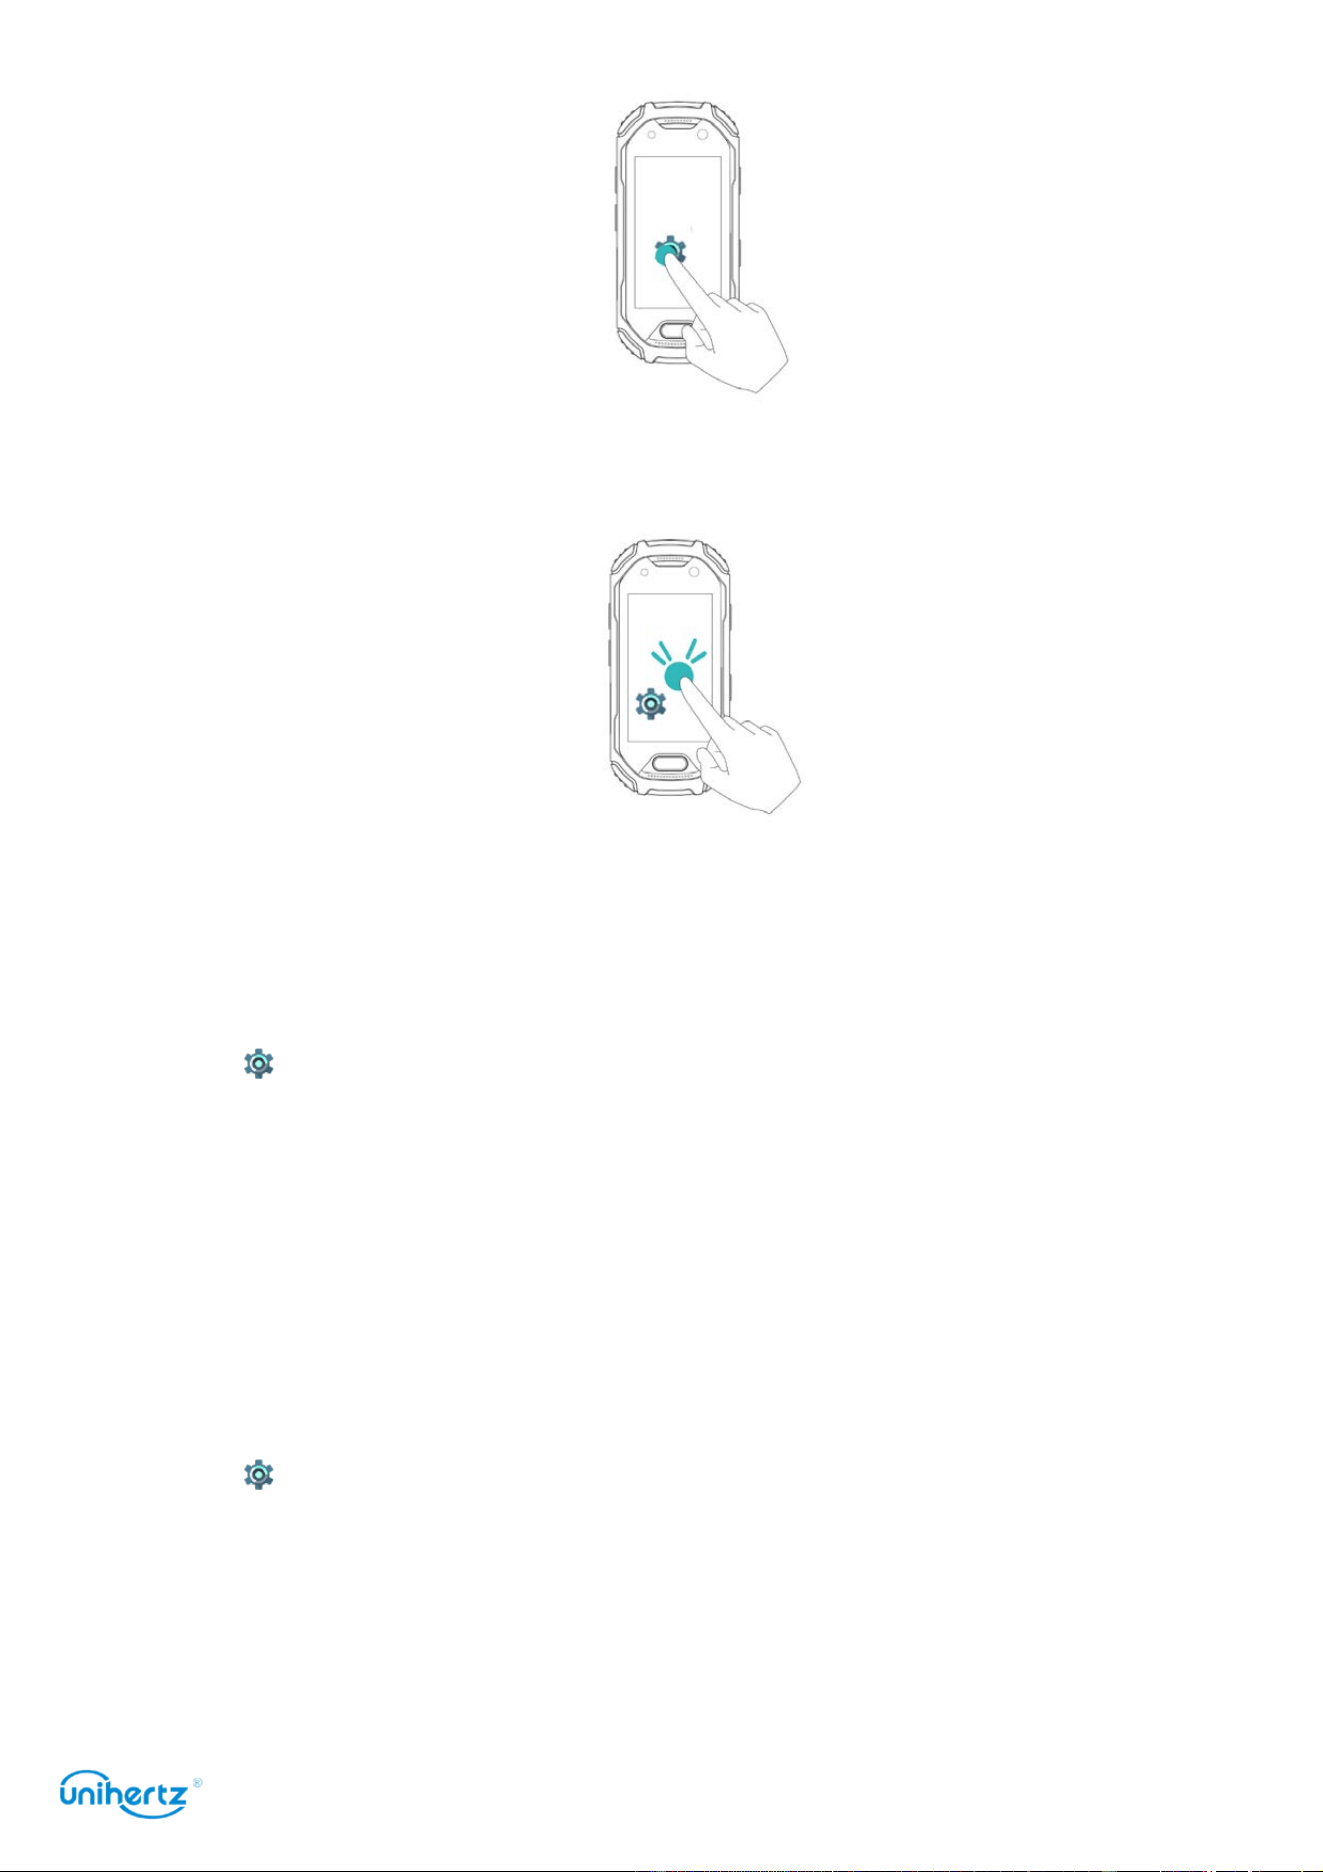
Accessibility
Features
99
Open an item
: Double touch any part of the screen using one finger to confirm your
selection from the previous step.
For example, if you want to open
Settings
, two steps are required: Touch the
Settings
icon once using one finger, and then touch twice on any part of the screen.
Configuring the TalkBack settings
TalkBack settings can be customized to suit your individual needs.
1 Open
Settings
.
2 Touch
Accessibility
>
TalkBack
>
Settings
.
3 You can adjust the feedback volume, audible feedback settings, control gestures,
and more.
Audible password prompts
This feature provides audible feedback for visually impaired users. When you enter
a password, your phone will read out the letters as you type. This feature requires
TalkBack to be enabled.
1 Open
Settings
.
2 Touch
Accessibility
and then turn on the
Speak passwords
switch.
Text To Speech (TTS) output
This feature converts text into speech for visually impaired users. This feature
requires
TalkBack
to be enabled.

Accessibility
Features
100
1 Open
Settings
.
2 Touch
Accessibility
>
Text-to-speech output
.
3 Select the desired speech synthesis engine and voice speed.
Captions
In addition to providing audible prompts, TalkBack also displays captions for
hearing-impaired users. This feature requires TalkBack to be enabled.
1 Open
Settings
.
2 Touch
Accessibility
>
Captions
.
3 Turn on the
Captions
switch, and then configure the language, font size, and
caption style.
Volume key shortcut
When the shortcut is on, you can press both volume keys for 3 seconds to start an
accessibility feature.
1 Open
Settings
.
2 Touch
Accessibility
>
volume key shortcut
.
3 Turn on the
On
switch, and then long press the volume keys for 3 seconds to
open
TalkBack
.
Magnification gestures
Use magnification gestures to zoom in on a specific area.
1 Open
Settings
.
2 Touch
Accessibility
>
Magnification
.
3 Turn on the
Magnification gestures
switch.
●
Zoom in
: Touch the screen three times in quick succession to zoom in. Touch the
screen three times again to zoom back out.
Magnification gestures
will still be
enabled when you touch the screen three times. Turn off the
Magnification
gestures
switch to disable magnification gestures.
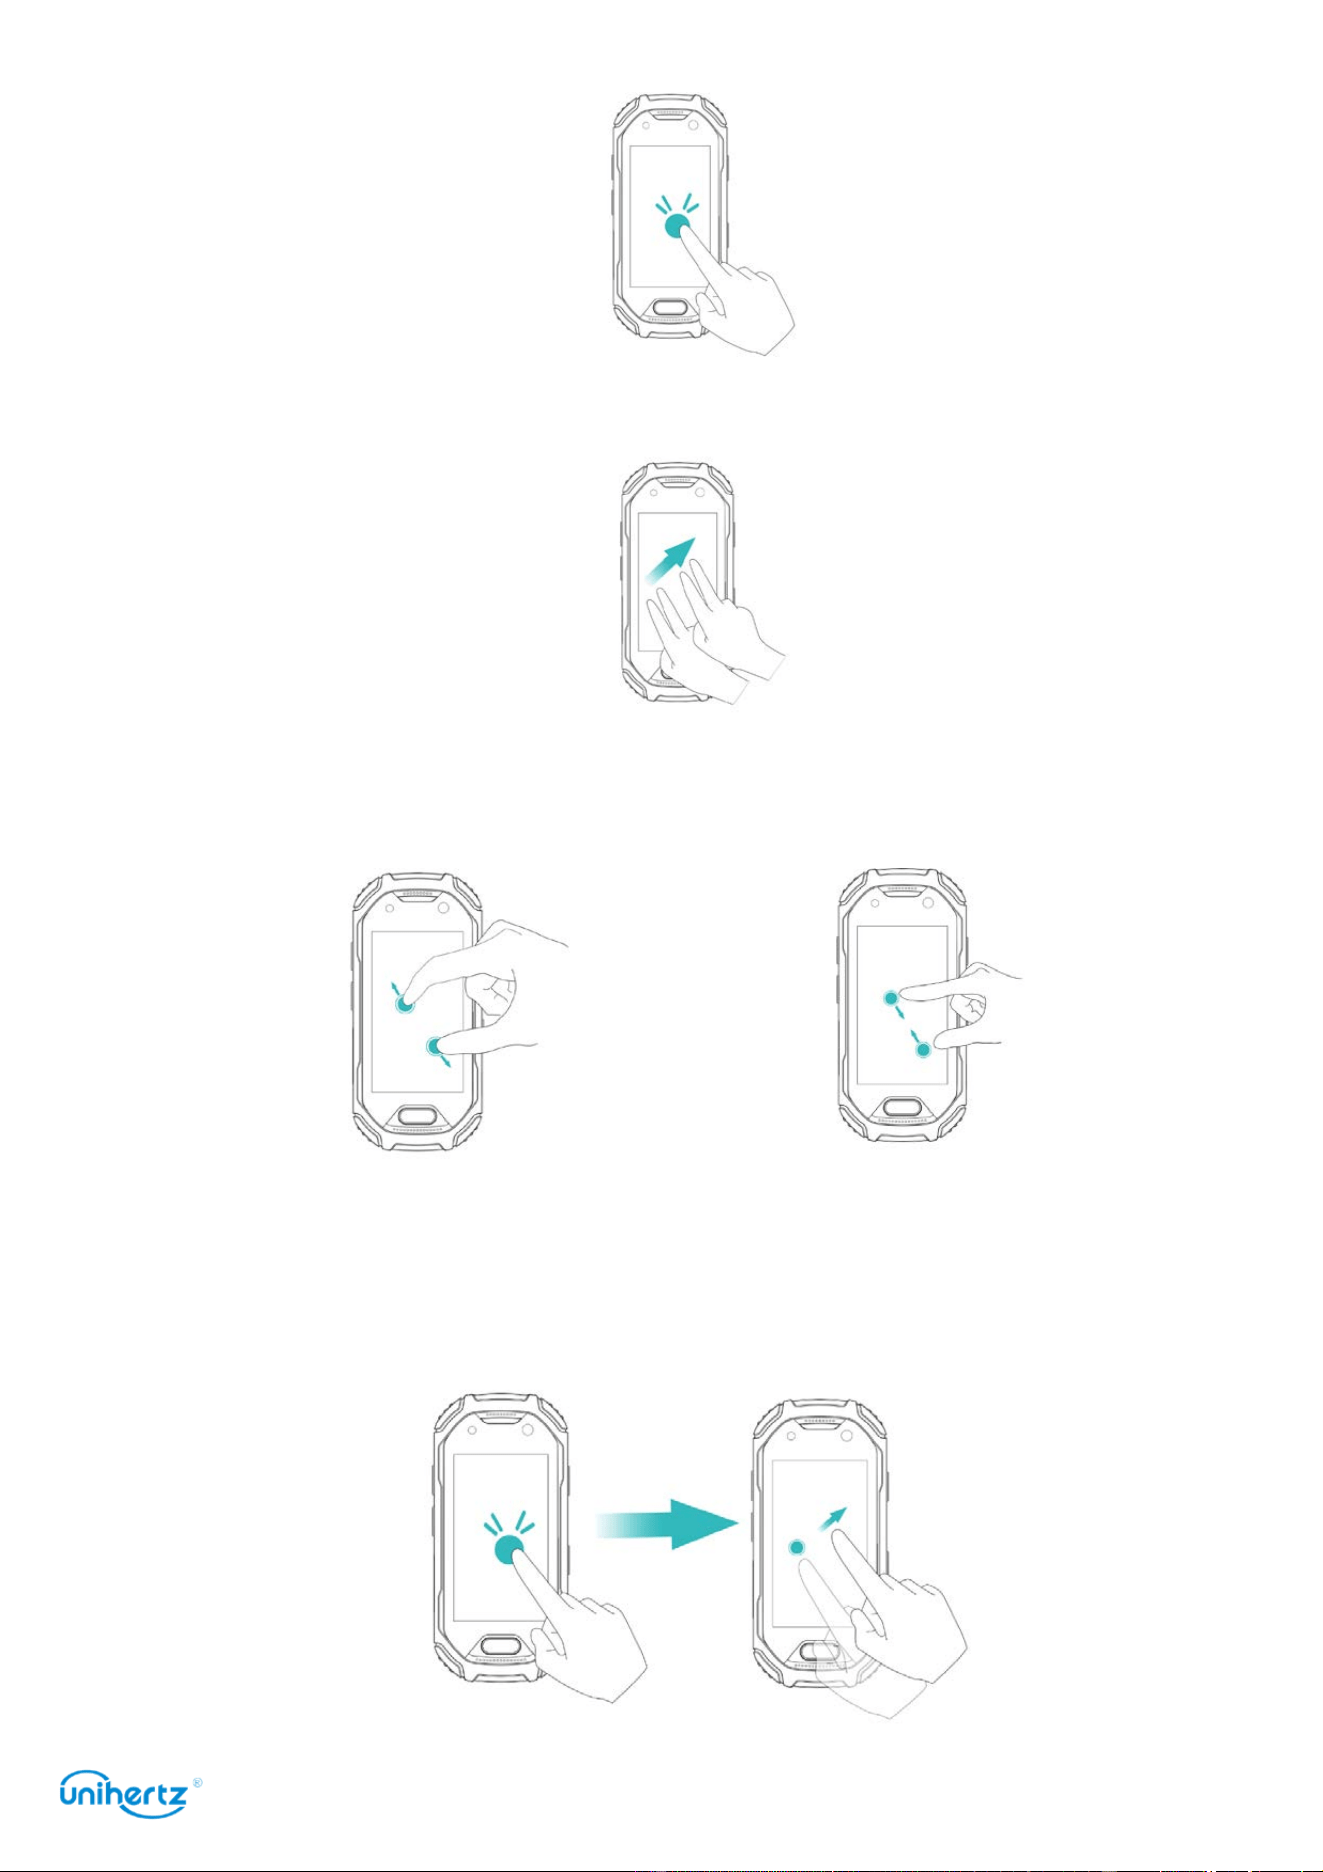
Accessibility
Features
101
●
Browse a magnified area
: Swipe the screen using two or more fingers.
●
Adjust the zoom
: Pinch two or more fingers together or spread them apart. To
zoom in, spread your fingers apart. Pinch your fingers together to zoom back out.
●
Zoom in temporarily
: Touch the screen three times in quick succession, and then
hold your finger on the screen. Keep your finger on the screen and swipe to
browse a magnified area. Release your finger to zoom back out.

Accessibility
Features
102
Using the power button to end a call
1 Open
Settings
.
2 Touch
Accessibility
and then turn on the Power button ends call switch.
Once you have enabled this feature, press the power button to end a call.
Auto-rotate screen
If this option is enabled, your screen's orientation will switch
automatically depending on how you hold your phone when performing certain
operations, such as browsing a web page, viewing a picture, or writing a message.
1 Open
Settings
.
2 Turn
Accessibility
>
Auto-rotate screen
switch on.
Adjusting the screen response time
You can adjust the time that it takes for your phone to respond to gestures, such
as touch and hold.
1 Open
Settings
.
2 Touch
Accessibility
>
Touch & hold delay
.
3 Select the desired delay time:
Short
,
Medium
or
Long
.
Color correction
Color correction mode adjusts colors to make it easier for color vision impaired
users to distinguish between different parts of the screen.
Enable this mode with caution, as it may affect your phone's battery.
1 Open
Settings
.
2 Touch
Accessibility
and then turn on the
Color correction
switch.
3 Touch
Correction mode
and then select a correction mode.

Appendix
103
Appendix
Obtaining help
Touch
Settings
>
About phone
>
Legal information
to read the legal information.
Visit
http://www.unihertz.com
for more information.
About this guide
All pictures and illustrations in this document are for your reference only and may
differ from the final product.
Features in this guide are for your reference only. Some features may not be
supported by all phones or carriers.
This guide is for reference purposes only and does not constitute any form of
guarantee.
Personal Information and Data Security
The use of some functions or third-party applications on your device could result
in your personal information and data being lost or becoming accessible to others.
Several measures are recommended to help you protect personal and confidential
information.
● Place your device in a safe area to prevent it from unauthorized use.
● Set your device screen to lock and create a password or unlock pattern to open
it.
● Periodically back up personal information kept on your SIM card, memory card,
or stored in your device memory. If you change to a different device, be sure to
move or delete any personal information on your old device.
● If you are worried about viruses when you receive messages or emails from a
stranger, you can delete them without opening them.
● If you use your device to browse the Internet, avoid websites that might pose a
security risk to avoid theft of your personal information.
● Be sure to obtain third-party applications from a legitimate source. Downloaded
third-party applications should be scanned for viruses.
● Some applications require and transmit location information. As a result, a third-
party may be able to share your location information.
● Your device may provide detection and diagnostic information to third-party
application providers. Third party vendors use this information to improve their

Appendix
104
products and services.
● If you have concerns about the security of your personal information and data,
please contact tech-support@unihertz.com.
Legal Notice
Copyright © Unihertz E-Commerce Co., Ltd. All rights reserved.
No part of this manual may be reproduced or transmitted in any form or by any
means without prior written consent of Unihertz E-Commerce Co., Ltd. and its
affiliates ("Unihertz ").
The product described in this manual may include copyrighted software of
Unihertz and possible licensors. Customers shall not in any manner reproduce,
distribute, modify, decompile, disassemble, decrypt, extract, reverse engineer,
lease, assign, or sublicense the said software, unless such restrictions are
prohibited by applicable laws or such actions are approved by respective
copyright holders.
Trademarks and Permissions
Atom, , Unihertz are trademarks or registered trademarks of Unihertz
E-Commerce Co., Ltd.
Android™ is a trademark of Google LLC.
LTE is a trademark of ETSI.
The Bluetooth® word mark and logos are registered trademarks owned by
Bluetooth SIG, Inc. and any use of such marks by Unihertz E-Commerce Co., Ltd.
is under license.
Other trademarks, product, service and company names mentioned may be the
property of their respective owners.
Notice
Some features of the product and its accessories described herein rely on the
software installed, capacities and settings of local network, and therefore may not
be activated or may be limited by local network operators or network service
providers.
Thus, the descriptions herein may not exactly match the product or its accessories
which you purchase.
Unihertz reserves the right to change or modify any information or specifications
contained in this manual without prior notice and without any liability.
Third-Party Software Statement

Appendix
105
Unihertz does not own the intellectual property of the third-party software and
applications that are delivered with this product. Therefore, Unihertz will not
provide any warranty of any kind for third party software and applications. Neither
will Unihertz provide support to customers who use third-party software and
applications, nor be responsible or liable for the functions or performance of third-
party software and applications.
Third-party software and applications services may be interrupted or terminated at
any time, and Unihertz does not guarantee the availability of any content or
service. Third-party service providers provide content and services through
network or transmission tools outside of the control of Unihertz. To the greatest
extent permitted by applicable law, it is explicitly stated that Unihertz shall not
compensate or be liable for services provided by third-party service providers, or
the interruption or termination of third-party contents or services.
Unihertz shall not be responsible for the legality, quality, or any other aspects of
any software installed on this product, or for any uploaded or downloaded third-
party works in any form, including but not limited to texts, images, videos, or
software etc. Customers shall bear the risk for any and all effects, including
incompatibility between the software and this product, which result from installing
software or uploading or downloading the third-party works.
This product is based on the open-source Android™ platform. Unihertz has made
necessary changes to the platform. Therefore, this product may not support all the
functions that are supported by the standard Android platform or may be
incompatible with third-party software. Unihertz does not provide any warranty or
representation in connect with any such compatibility and expressly excludes all
liability in connection with such matters.
DISCLAIMER
ALL CONTENTS OF THIS MANUAL ARE PROVIDED "AS IS". EXCEPT AS
REQUIRED BY APPLICABLE LAWS, NO WARRANTIES OF ANY KIND, EITHER
EXPRESS OR IMPLIED, INCLUDING BUT NOT LIMITED TO, THE IMPLIED
WARRANTIES OF MERCHANTABILITY AND FITNESS FOR A PARTICULAR
PURPOSE, ARE MADE IN RELATION TO THE ACCURACY, RELIABILITY OR
CONTENTS OF THIS MANUAL.
TO THE MAXIMUM EXTENT PERMITTED BY APPLICABLE LAW, IN NO EVENT
SHALL UNIHERTZ BE LIABLE FOR ANY SPECIAL, INCIDENTAL, INDIRECT, OR
CONSEQUENTIAL DAMAGES, OR LOSS OF PROFITS, BUSINESS, REVENUE,
DATA, GOODWILL SAVINGS OR ANTICIPATED SAVINGS REGARDLESS OF

Appendix
106
WHETHER SUCH LOSSES ARE FORSEEABLE OR NOT.
THE MAXIMUM LIABILITY (THIS LIMITATION SHALL NOT APPLY TO LIABILITY
FOR PERSONAL INJURY TO THE EXTENT APPLICABLE LAW PROHIBITS
SUCH A LIMITATION) OF UNIHERTZ ARISING FROM THE USE OF THE
PRODUCT DESCRIBED IN THIS MANUAL SHALL BE LIMITED TO THE AMOUNT
PAID BY CUSTOMERS FOR THE PURCHASE OF THIS PRODUCT.
Import and Export Regulations
Customers shall comply with all applicable export or import laws and regulations
and be responsible to obtain all necessary governmental permits and licenses in
order to export, re- export or import the product mentioned in this manual
including the software and technical data therein.
Privacy Policy
To better understand how we protect your personal information, please see the
privacy
policy at http://www.unihertz.com/about.html/.

107
This guide is for reference only. The actual product, including but not limited to
the color, size, and screen layout, may vary. All statements, information, and
recommendations in this guide do not constitute a warranty of any kind, express
or implied.
Please visit http://www.unihertz.com/about.html to contact us.