www.philips.com/support
For support call 0870 900 9070
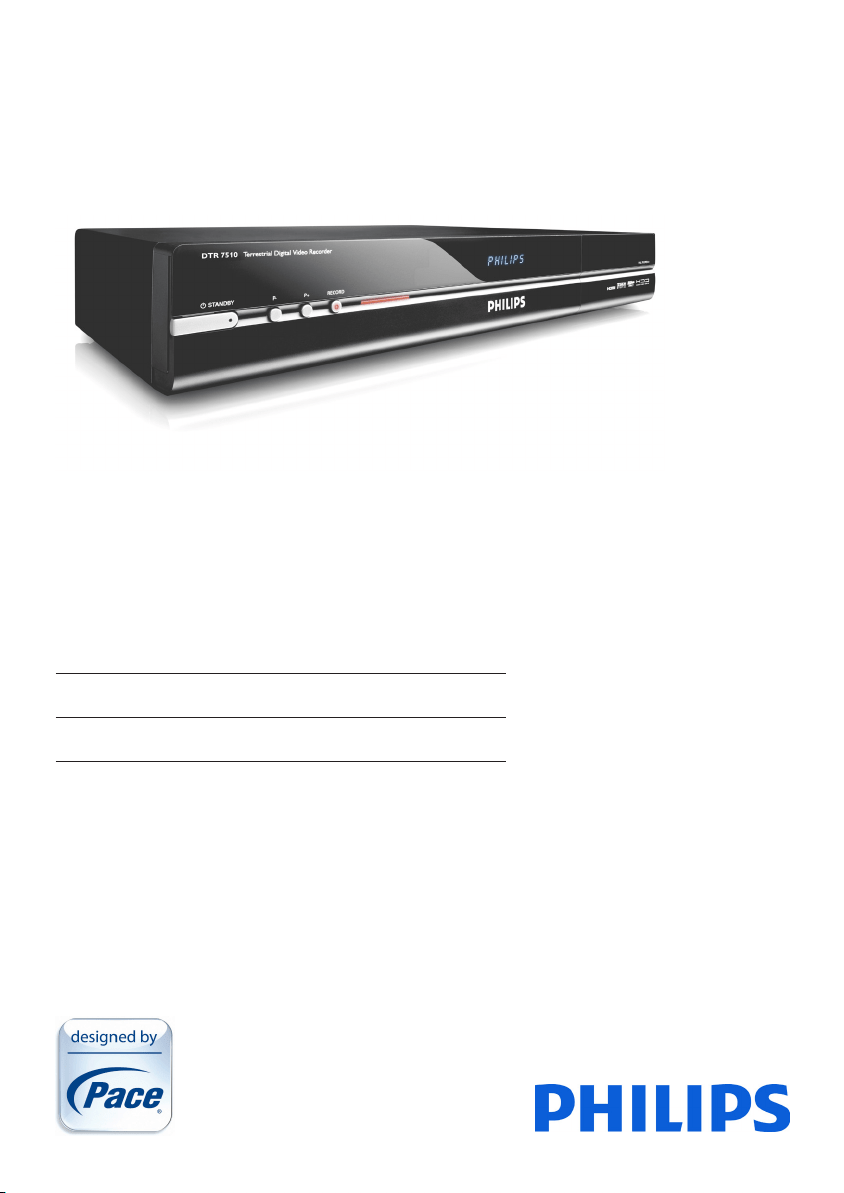
EN Digital Terrestrial Receiver
DTR 7510
DTR 7510 200910.indd 1 16/10/2009 17:40:43

2
DTR 7510 200910.indd 2 16/10/2009 17:40:43

3
ENGLISH
Table of contents
1 Important 4
2 Your Digital Terrestrial Receiver 6
2.1 What’s in the box? 6
2.2 What you also need (not supplied) 7
2.3 Digital Terrestrial Receiver overview 7
2.4 Main menu overview 8
2.5 How to read this manual 8
3 Getting started 9
3.1 Prepare 9
3.2 Connect 10
3.3 Install 10
3.4 RETUNE procedure: 11
4 Using your Digital Terrestrial
Receiver 13
4.1 Watching live TV 13
4.2 Controlling Live TV 16
4.3 Recording 18
4.4 HDD library 21
4.5 PlaylesfromanUSBdevice 21
5 Use more of your Digital Terrestrial
Receiver 22
5.1 DigitalTerrestrialReceiverfull
overview 22
5.2 DigitalTerrestrialReceiverdisplayfull
overview 23
5.3 Remotecontrolfulloverview 25
5.4 Menufulloverview 26
5.5 TV guide 26
5.6 Channel manager 30
5.7 HDD Library 32
5.8 USB 32
5.9 Settings 33
6 Maintenance 39
6.1 Cleaning 39
6.2 Replacement 39
6.3 Disposal 39
7 Accessories and connections 40
7.1 Connecting a DVD player / external
recorder 40
7.2 Connecting your audio equipment 40
7.3 Universal remote control 41
8 Guarantee and service 47
9 Technical data 47
10 Frequently asked questions 49
11 Glossary 51
12 Index 53
13 Remote control brand code list 54
13.1 SetupCodeForAllTVs 54
13.2 SetupCodeForAllVCRs 55
13.3 SetupCodeforAllDigitalVideoDisks 56
13.4 SetupCodeforAllAudioAMP/Tuners 57
13.5 SetupCodeforAllAudio
Ampliers(A) 58
Contact information 59
Trademarks and partner logos 59
DTR 7510 200910.indd 3 16/10/2009 17:40:44
Important4
1 Important
TaketimetoreadthisUserManualbeforeusingtheDigitalTerrestrialReceiver.
Itcontainsimportantinformationandnotesregardinghowtooperateit.
Disposalofyouroldproduct
Yourproductisdesignedandmanufacturedwithhighqualitymaterials
and components, which can be recycled and reused.
When this crossed-out wheeled bin symbol is attached to a product or
itspackaging,itmeanstheproductiscoveredbyEuropeanDirective
2002/96/EC.
Pleaseinformyourselfaboutthelocalseparatecollectionprocessfor
electrical and electronic products.
Pleaseactaccordingtoyourlocalrulesanddonotdisposeofyourold
productswithyournormalhouseholdwaste.Thecorrectdisposalof
youroldproductwillhelppreventpotentialnegativeconsequencesfor
the environment and human health.
The“Materialrecyclabilitysymbol”afxedonpackagecardboardand
user manual means these parts are recyclable.
Sodonotdisposeofthemwithyournormalhouseholdwaste.
The“Materialrecyclabilitysymbol”afxedonplasticpackagingparts
means these parts are recyclable.
Sodonotdisposeofthemwithyournormalhouseholdwaste.
The“GreenDot”afxedoncardboardmeansPHILIPSpaysanancial
dutytothe“AvoidanceandRecoveryofPackagingWaste”organization.
DTR 7510 200910.indd 4 16/10/2009 17:40:44

5Important
ENGLISH
YourreceiverispoweredusinganACpowercord.TheDigitalTerrestrialReceiverhasbeen
manufacturedtomeettheappropriatesafetystandards,buttheinstructionsbelowmustbefollowed
tooperateitsafely.Theseinstructionsmustbekeptforfuturereference.
Danger
• The Digital Terrestrial Receiver does not contain any user-serviceable parts. Do not attempt to
openthem.Allmaintenanceworkmustbecarriedoutbyqualiedservicescentres.
• Thesuppliedmainsplugmaybeanon-rewireabletypeorarewireabletype.Bothtypescontain
anapproved3Afuse.Ifyouneedtoreplacethefuse,useanASTA-orBSI-approvedBS1362fuse,
ratedat3Aandmarkedwitheitherofthesesymbols.
• Non-rewireableplugshavethefusebeneathafusecoverontheplugface.Useascrewdriverto
leveroffthefusecover,replacethefusewithanewoneandretitscover.Neveruseaplugifits
fusecoverismissing.
• Rewireableplugshavethefuseinside.Useascrewdrivertoremovetheplug’sbackcover,then
leveroutthefuseandreplaceitwithanewone.Replacetheplug’sbackcover.Ifthesupplied
mainsplugisnotsuitableforyourmainssocket-outlet,removeitsfuseandthencuttheplugoff
thelead.Destroytheseveredplugimmediatelytoavoidtheshockhazardwhichwouldexistifthis
weretobepluggedintoamainssocket.Donotattempttorepairormodifythemainsleador
plug.Fitanappropriatemainsplugonthelead.Ifthisplugcontainsafuse,itshouldbeasdescribed
above.Ifyouareusinganon-fusedplug,anexternalfusemustnotexceed5A.
• Makesurethatchildrendonotplaceanyforeignobjectsinanyoftheopenings.
Warnings
• BeforeconnectingtheACpowercordtothemains,checkthatthemainssupplyvoltage
correspondstothevoltageprintedonit.Ifthemainsvoltageisdifferent,consultyourdealer.
• TheACpowercordhasbeendesignedforindooruseonly.
• ItisrecommendedtounplugtheACpowercordfromthemainsduringlightningstorms.
• Periodically inspect the ACpowercordfordamage.Donotuseifdamageisfound.Alwaysreferto
qualiedservicescentres.
• Topreventreorshockhazard,donotexposetheDigitalTerrestrialReceivertorainormoisture.
• TheDigitalTerrestrialReceivershouldbeplacedonarmsurface,andtheventilationopenings
must not be covered with items, such as newspapers, table clothes, curtains, etc.
• Do not install the Digital Terrestrial Receiver near heat sources such as radiators, stoves or other
apparatusthatproduceheat.Protectitfromdirectsunlight.
• WheninstallingtheDigitalTerrestrialReceiver,ensurethereisagapofapproximately5cm
aroundtheDigitalTerrestrialReceivertoenableairtocirculatefreelyandpreventoverheating.
• LeaveaccessibletheACpowercordincaseemergencyshutdownisrequired.
• DonotplaceanycombustibleobjectsontheDigitalTerrestrialReceiver(candles,etc.).
• Noobjectslledwithliquids,suchasvases,shallbeplacedontheunit.TheDigitalTerrestrial
Receivershallnotbeexposedtodrippingorsplashing.Shouldthishappen,disconnecttheAC
powercordfromthemainsandconsultqualiedservicescentres.
• Donotmovetheproductorturnthepoweroffsuddentlywhiletheharddiskdriveisrunning.
Thecompanyshallnotbeliableforanycorruptionofdataontheharddiskdrivecausedbythe
carelessnessormisuseofusers.
Referalsotothecautionsthroughoutthismanual.
DTR 7510 200910.indd 5 16/10/2009 17:40:44
Your Digital Terrestrial Receiver6
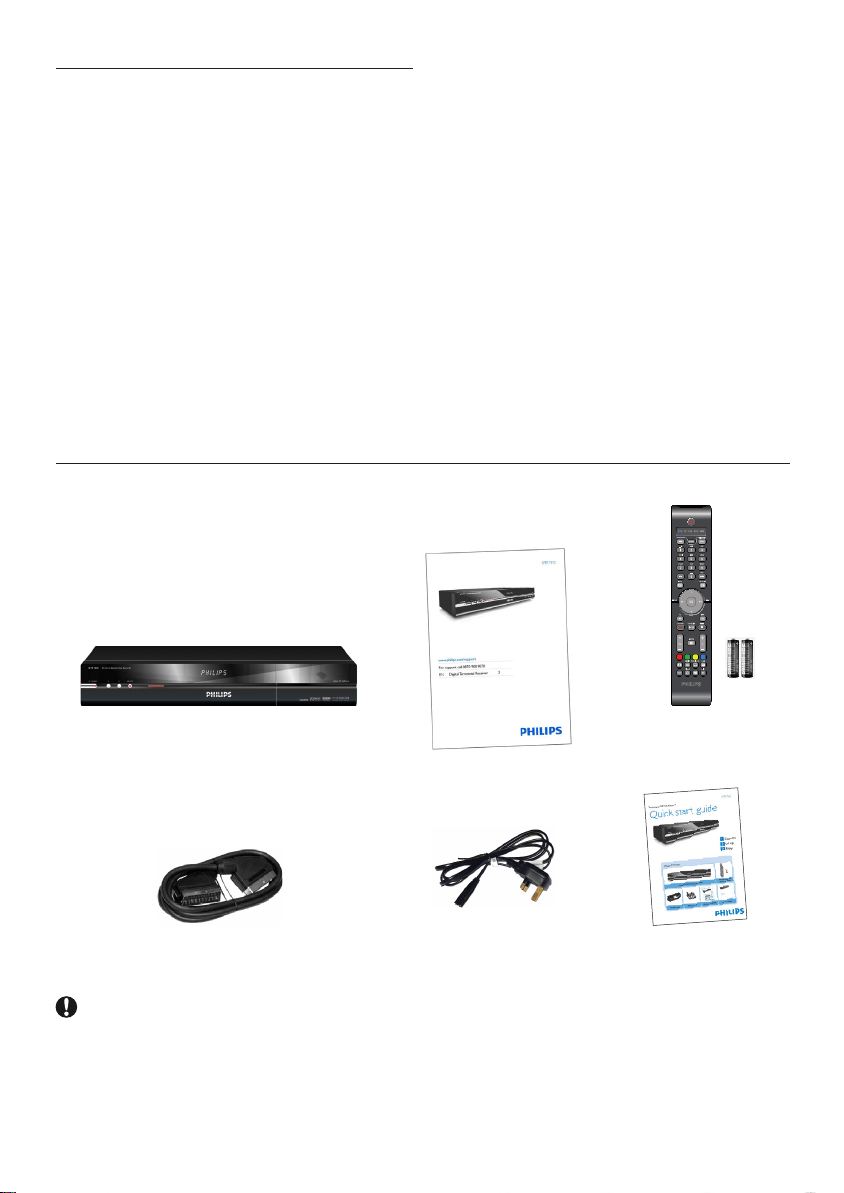
2.1 What’s in the box?
Digital Terrestrial Receiver User manual
Remote control and
2 batteries
SCARTcable ACPowercord QuickStartGuide
Caution
Plastic bags can be dangerous.
Toavoidsuffocationkeepthebagawayfrombabiesandchildren.
2 Your Digital Terrestrial
Receiver
Congratulations on your purchase and welcome
to Philips!
TofullybenetfromthesupportthatPhilips
offers,registeryourproductat
www.philips.com/welcome.
With this Digital Terrestrial Receiver, you never
needtoscheduleyourlifearoundyourfavourite
TVprogrammes.Thankstothebuiltinharddisk
drive (HDD) that records programmes as you
watch them, you can pause live TV, or repeat a
scene you missed. Want to record a programme
so that you can watch it later? Just press the
record button.
Onceyoubegintorecord,youarefreetowatch
other recorded programmes. You can even watch
theprogrammethatyouarerecordingfromthe
start without disruption to the recording, or
record two channels at the same time.
Needtoschedulearecordinginadvance?Simply
access the Electronic programme guide, which
liststheTVprogrammescheduleforthenext
eight days.
Andyoucandomuchmorethanjustrecordon
this recorder
DTR 7510 200910.indd 6 16/10/2009 17:40:45
7Your Digital Terrestrial Receiver
ENGLISH
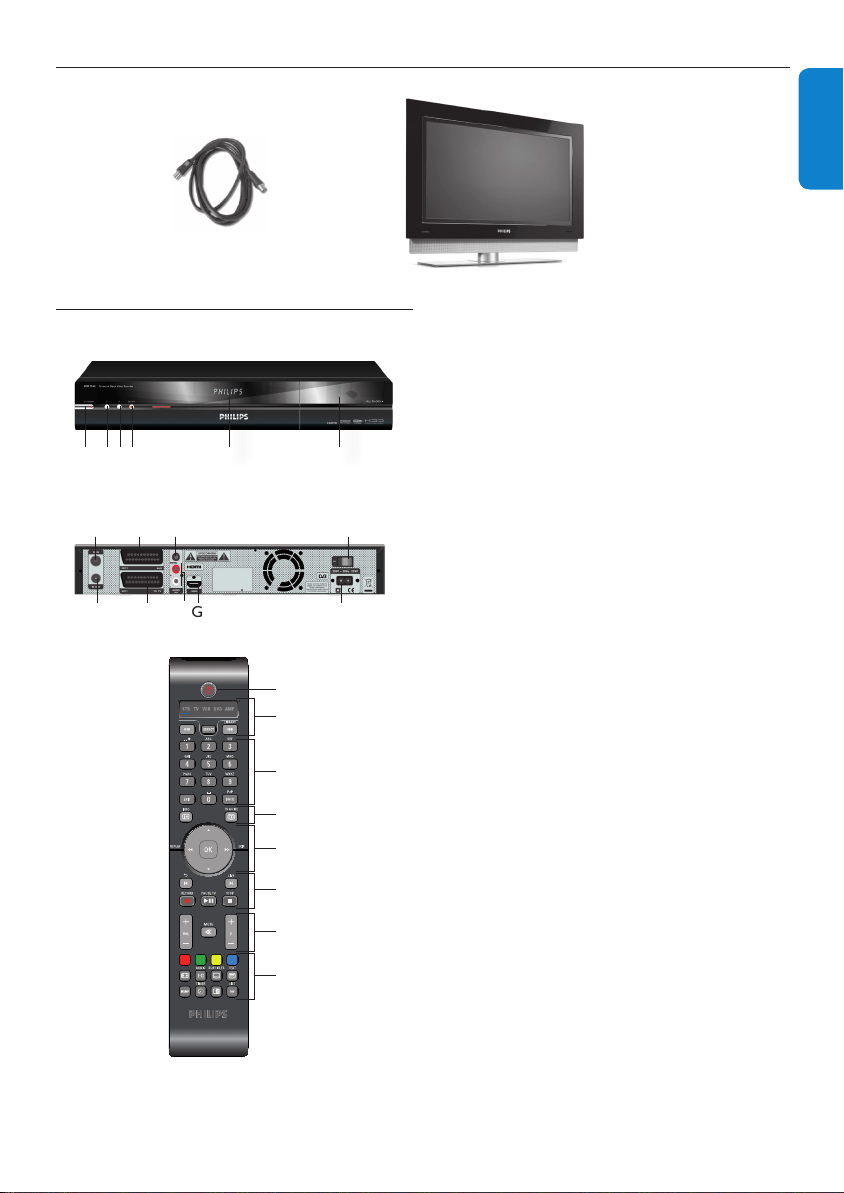
2.2 What you also need (not supplied)
RF Cable TVSet
Front Panel
A Standby
B Programme-
C Programme +
D Record
E Display
F Front panel door
Rear Panel
A RFIN
*
B RFOUT
*
C AUXscart
*
D TV scart
*
E SPDIFaudioout(digital)
*
F L/R audio out
*
(analogue)
G HDMI
*
H Power
**
I ON/OFFSwitch
**
*
Safetyextralowvoltage
**
Hazardousvoltage
Remote control unit
A Standby
B Sourceselection
C Alphanumerickeypad,Exit,Back
D Programmeinformation
E Up/Down
Left/Right
OKkeys
F Recorderfunctions
G Volume control
Programme+/Programme-
H SystemkeysMenuFavlist,
2.3 Digital Terrestrial Receiver
overview
Front Panel
Rear Panel
Remote control unit
A B C D
E F
A
B
C
D
E ICA
B D G HF
E
F
G
H
DTR 7510 200910.indd 7 16/10/2009 17:40:48
Your Digital Terrestrial Receiver8
2.4 Main menu overview
Press MENU on the remote control to
access the main menu.
Use the / / / arrowkeysto
navigatethroughthedifferentoptions.
The visible option is automically validated.
Usealsothesekeystonavigatethrough
differentlevelofmenus.
Press OKtovalidateyourchoiceinalistof
items.
Note
Formoreinformation,seechapter5.4 Menu full
overview.
2.5 How to read this manual
Danger
Describessituationsininjuryorlossoflife.
Warning
Describes actions that may cause damage to the
product.
Caution
Describes the actions required to avoid
dangerous or illegal situations.
Note
Additionalinformation.
Tip
Informationthatisusefultoknowbutnot
essentialtothetask.Forexample,information
about alternative use.
DTR 7510 200910.indd 8 16/10/2009 17:40:48
9Getting started
ENGLISH
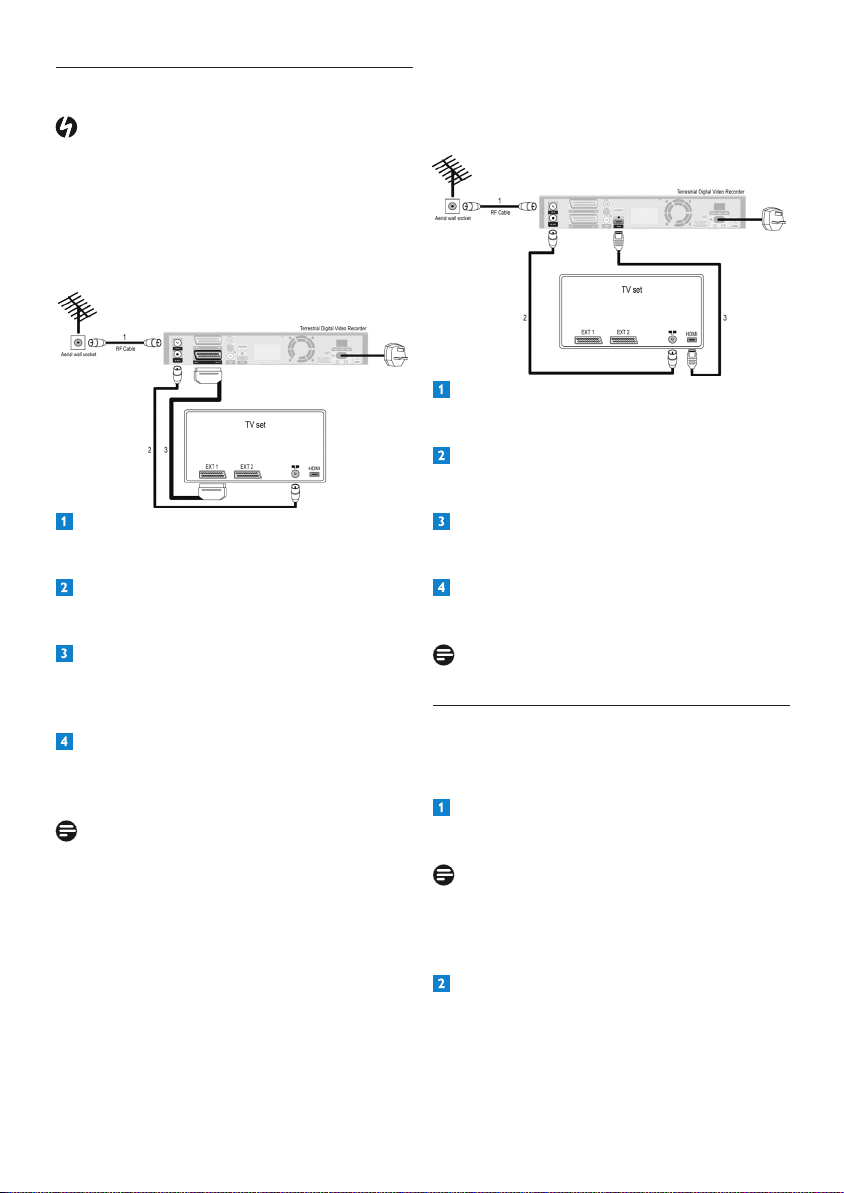
Prepare the smart card
To be able to receive scrambled digital channels
frompay-TVproviders,youneedasmartcard
(notsupplied)fromtheproviderbroadcasting
those channels.
Warning
Insertthesmartcardwiththechipfacingdown.
Notes
•Youcanaccesstheinformationstoredon
the smart card by selecting MENU, and
then the Menu/Settings/Smart Card
submenu.
•Formoreinformationaboutsmartcardsor
operators, consult your installer or dealer.
3 Getting started
The basic steps to get you started are described
in this chapter.
3.1 Prepare
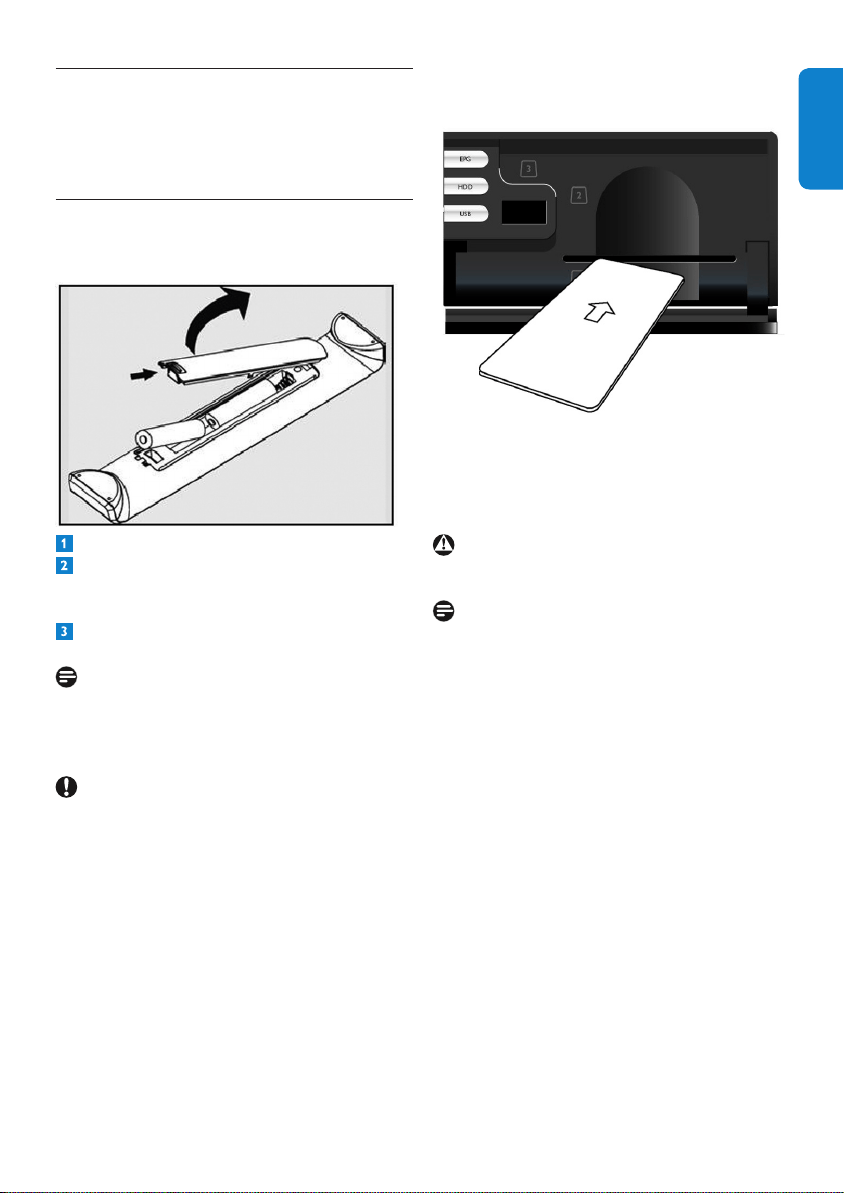
Prepare the remote control
Open the battery compartment.
Insert the two batteries supplied according
to the indications (+/-) inside the
compartment.
Close the battery compartment.
Note
Point the remote control directly at the remote
sensoronthefrontpanelandselectthedesired
function.
Caution
Donotmixbatteriesorkeepthemintheremote
controlforlongperiodsoftimewithoutuse.
Batteriesmustnotbedisposedofwithyour
household waste but to a local separate battery
collection system.
Donotdisposeofbatteriesinare.
DTR 7510 200910.indd 9 16/10/2009 17:40:48
Getting started10
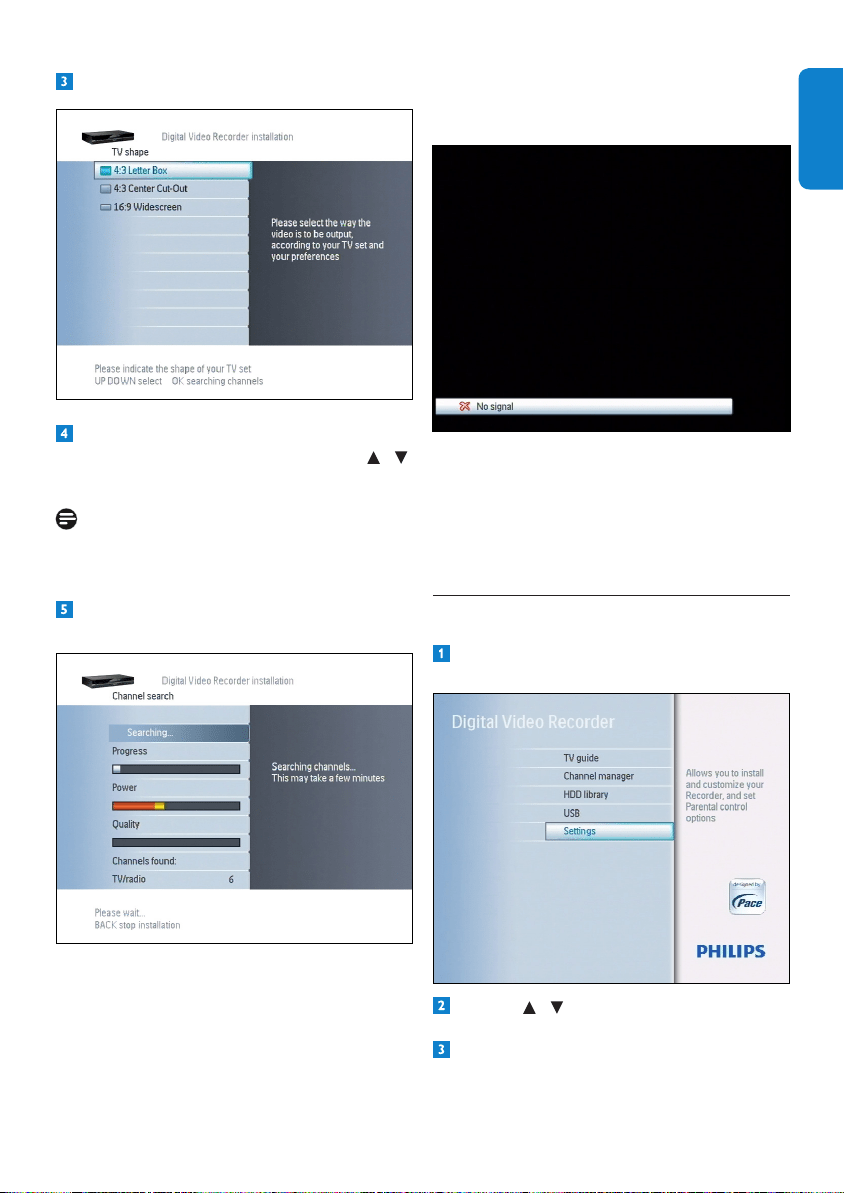
3.2 Connect
Danger
Riskofelectricshock!
Makesureallthedevicesaredisconnectedfrom
themainsbeforemakinganyconnections.
SCART connection
UsethisconnectionifyourTVsetisnottted
with a HDMI input.
Connecttheaerialcablefromthewall
sockettotheRF IN socketattherearof
the Digital Terrestrial Receiver.
Connect the RF OUT socketattherear
oftheDigitalTerrestrialReceivertotheRF
inputofyourTVsetusingaRFcable.
Connect the supplied scart cable to the
scartinputoftheTVsetandtothe TV scart
socketattherearoftheDigitalTerrestrial
Receiver.
Plug your TV set to the mains. Do not plug
your Digital Terrestrial Receiver yet!
Note
The fan extracts hot air from the device:
Check that there is enough place and
fresh air around the device to avoid
overheating.
HDMI connection
UsethisconnectionifyourTVsetisttedwith
a HDMI input.
Connecttheaerialcablefromthewall
sockettotheRF IN socketattherearof
the Digital Terrestrial Receiver.
Connect the RF OUTsocketattherear
oftheDigitalTerrestrialReceivertotheRF
inputofyourTVsetusingaRFcable.
Connect a HDMI cable to the HDMI input
oftheTVsetandHDMIsocketattherear
oftheDigitalTerrestrialReceiver.
Plug your TV set to the mains. Do not plug
your Digital Terrestrial Receiver yet!
Note
The HDMI cable is not supplied
3.3 Install
Beforeyoustartinstallation,makesureyouhave
made all the required connections.
SwitchonyourTVsetandselectthecorrect
source(refertotheusermanualofyourTVset).
Note
ThedisplayformatbeingmanagedbytheDigital
TerrestrialReceiver,setyourTVto“fullscreen”
or to the similar equivalent setting.
Plug the power cord into the mains and
settheswitchattherearoftheDigital
Terrestrial Receiver to position ON.
DTR 7510 200910.indd 10 16/10/2009 17:40:49
11Getting started
ENGLISH
Search failure
Incaseofchannelsearchfailure,ablackscreen
with a No signal message is displayed.
Beforestartinganewsearch,checktheRFcable
connection to your Digital Terrestrial Receiver
as described in chapter 3.2 Connect.
Onceyouhavecheckedallthosepoints,apply
the Retune procedure:
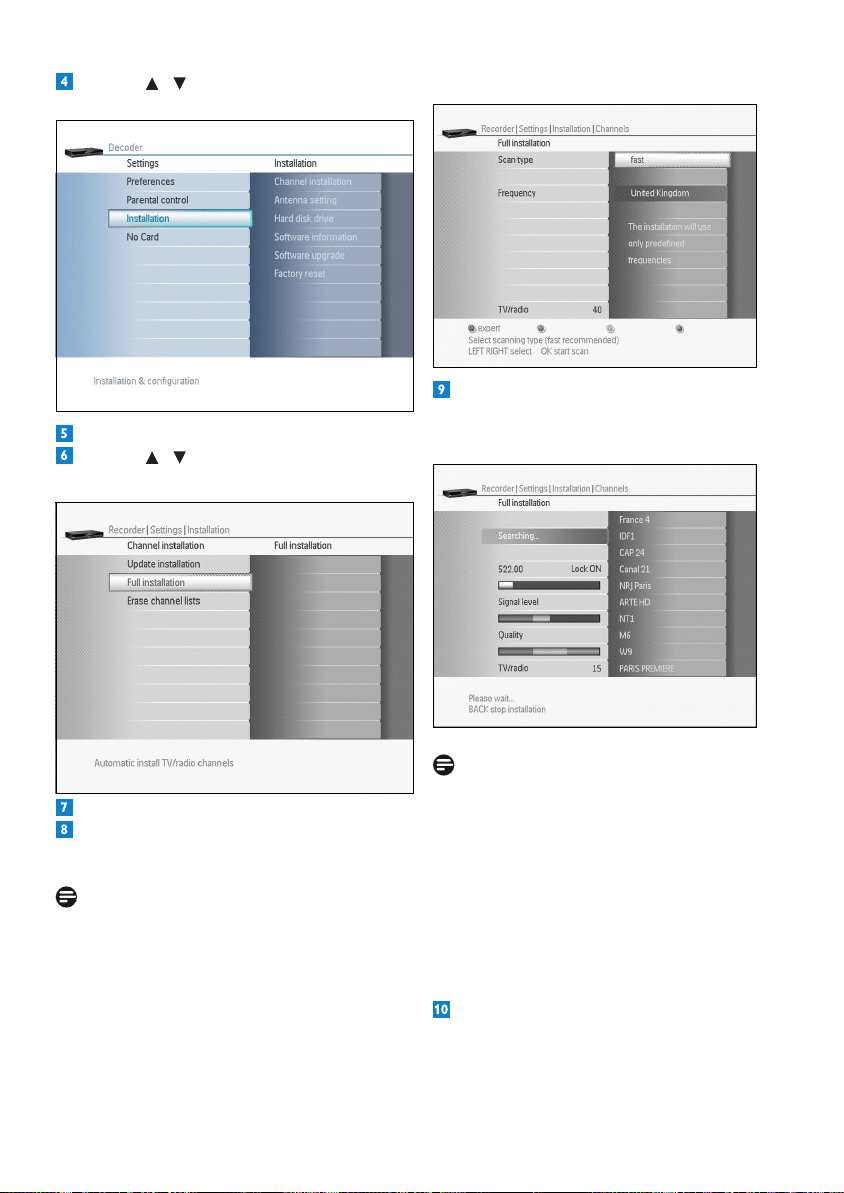
3.4 RETUNE procedure:
Press MENU on the remote control to
access the main menu.
Use the / arrowkeystohighlight
Settings.
Press OK.
The TV shape screen appears.
Depending on your TV set, select the
appropriate TV shape setting using the /
arrowkeysoftheremotecontrol.
Note
FormoreinformationaboutTVshapes,see
chapterSettings.
Press OK. The Channel search screen
appears.
DTR 7510 200910.indd 11 16/10/2009 17:40:50
Getting started12
Use the / arrowkeystohighlight
Installation.
Press OK.
Use the / arrowkeystohighlight
Full installation.
Press OK.
OnscreenScanmodeselection,select
Scan type fast.
Note
IfthenumberofTV/Radiostaysat0value,
refertochapter10 Frequently asked questions.
Youcouldtryagainfromthisstep,choosing
Scantypeautomatic, or advanced but it
couldtakemorethan30minutes.
Iftheproblemremains,contactyourdealer.
ScreenScanmodeselection:
Press OK.
Thescanprocessdisplayschannelsfoundwith
signallevelandquality.ofallsourcesanalysed
Note
Ifsignallevelstayslowandred,duringthefull
scanoperation,checkthecables.
IfPowerseemsokbutQualityindicatorstays
lowandred,checktheavailabilityofdigital
signalsinyourarea.Ifyouaresupposedto
haveaccesstodigitalsignal,checkyouraerial
installation.
Ifsomelocalvariantexist,theseextrachannels
will start with number 800.
Whenthescanisnished,yourDigital
Terrestrial Receiver display again the screen
ofscanmodeselection.PressExit
Enjoy your Digital Terrestrial Receiver.
DTR 7510 200910.indd 12 16/10/2009 17:40:51
13Using your Digital Terrestrial Receiver
ENGLISH
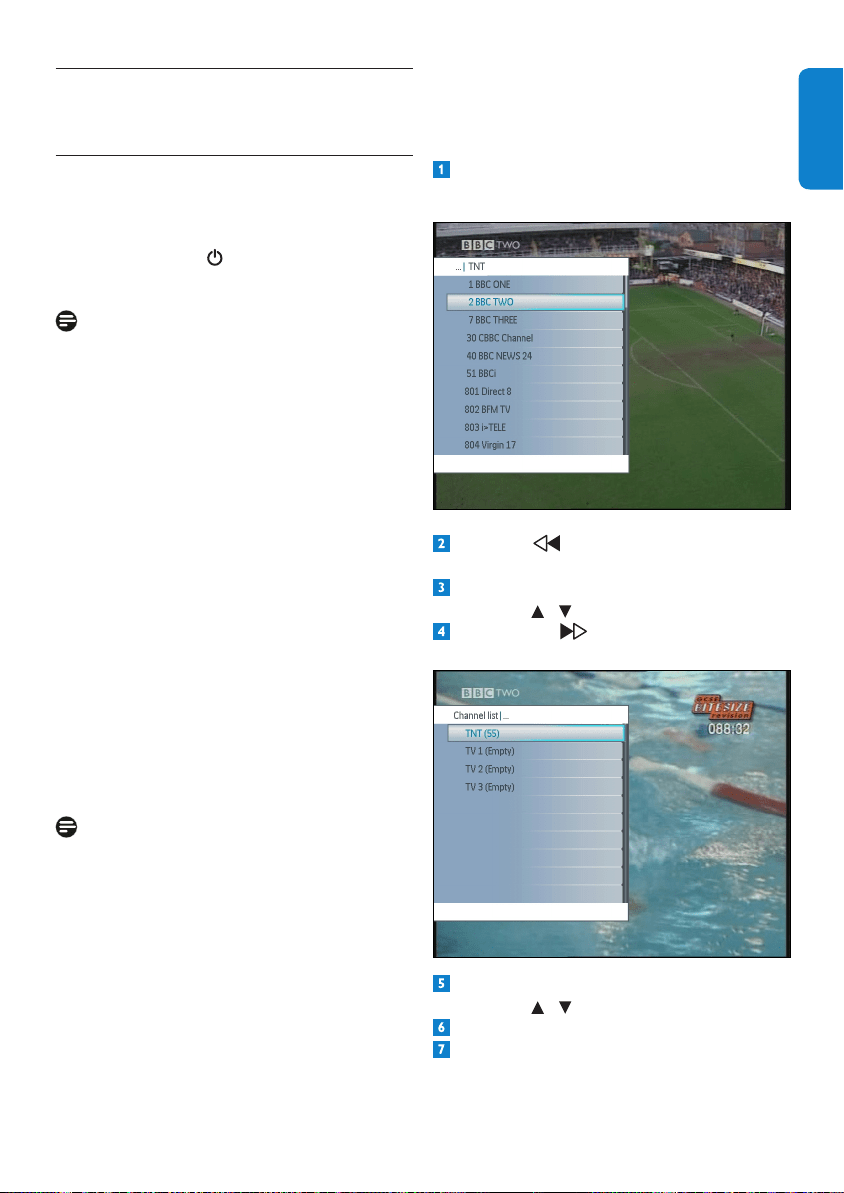
Channel lists
While watching digital TV, you can access existing
channellists.Seecreationofachannellistin
chapter channel manager..
Press FAVtodisplaythechannelsofthe
current list.
Press the arrowkeytogotothe
Channel lists menu.
Scrollupordowntothedesiredchannellist
using the / arrowkeys.
Press OK or arrowkeytodisplaythe
channelsoftheselectedlist.
Scrollupordowntothedesiredchannel
using the / arrowkeys.
Press OK to select the channel, or EXIT.
Press OK again or FAV or EXIT to close
the channel list.
4 Using your Digital
Terrestrial Receiver
4.1 Watching live TV
Digital Terrestrial Receiver wake-up
TowakeupyourDigitalTerrestrialReceiver
fromstandby,press: STANDBYonthefront
panel or remote control
Note
In order to reduce power consumption, switch
your Digital Terrestrial Receiver to standby
mode whenever you are not using it.
For maximum energy saving we recommend
youtoswitchofftheDigitalTerrestrialReceiver
usingtheswitchatthebackoftheDigital
TerrestrialReceiverifyouarenotusingitfora
long time.
Channel selection
To change channels, use P+/P- or the numerical
keysoftheremotecontroloronthefront
panel.
Press BACK to move to the previous channel
you watched.
AquickerwayistouseFAV to use a Channel
lists. OK will present the channel, OK again
hides the Channel list. You could create your
own channel list, see §5.6 Channel manager.
Anotherquickwaytoselectachannelisusing
the channel banner, see on next page.
Note
When two records are ongoing at the same
timeontwodifferentfrequencies,zappingisonly
allowedonthosetwofrequencies.Unavailable
channels are in grey in the Favorite list menu.
Recordingfromthetimeshiftbufferwill
recordthefullprogrammeevenifyoustart
therecordingaftertheprogrammehasalready
begun.Attheendofthisoperation,theplayback
will start again automatically at the point
where you started the recording. The recorded
programme will be indicated in red in the Time
Shiftbar(Refertopage19).
DTR 7510 200910.indd 13 16/10/2009 17:40:52
Using your Digital Terrestrial Receiver14
Press againtodisplaymoreinformation
on the current programme.
Press a third time or EXIT to close the
channel banner.
Volume control
To increase or decrease the volume, use the
VOL+/-key.
To mute the sound, press .
Note
Thevolumelevelisalsocontrolledfromyour
TV set. It can also be controlled using your TV
remote control.
Incaseofexternalamplicator,thevolumelevel
is only managed by the external device.
Achangeofvolumeisshownon-screenusing
a bar graph, while the iconinthetopleft
cornerofthescreenindicatesaudiomute.
Icon Description
Dolby Digital
available
Alternateaudio
available
Subtitlesavailable
Teletext available
Notes
•Youcanonlyzapthroughthechannelsof
the current list.
•Tomanageyourfavouritelists,seechapter
5.6 Channel manager.
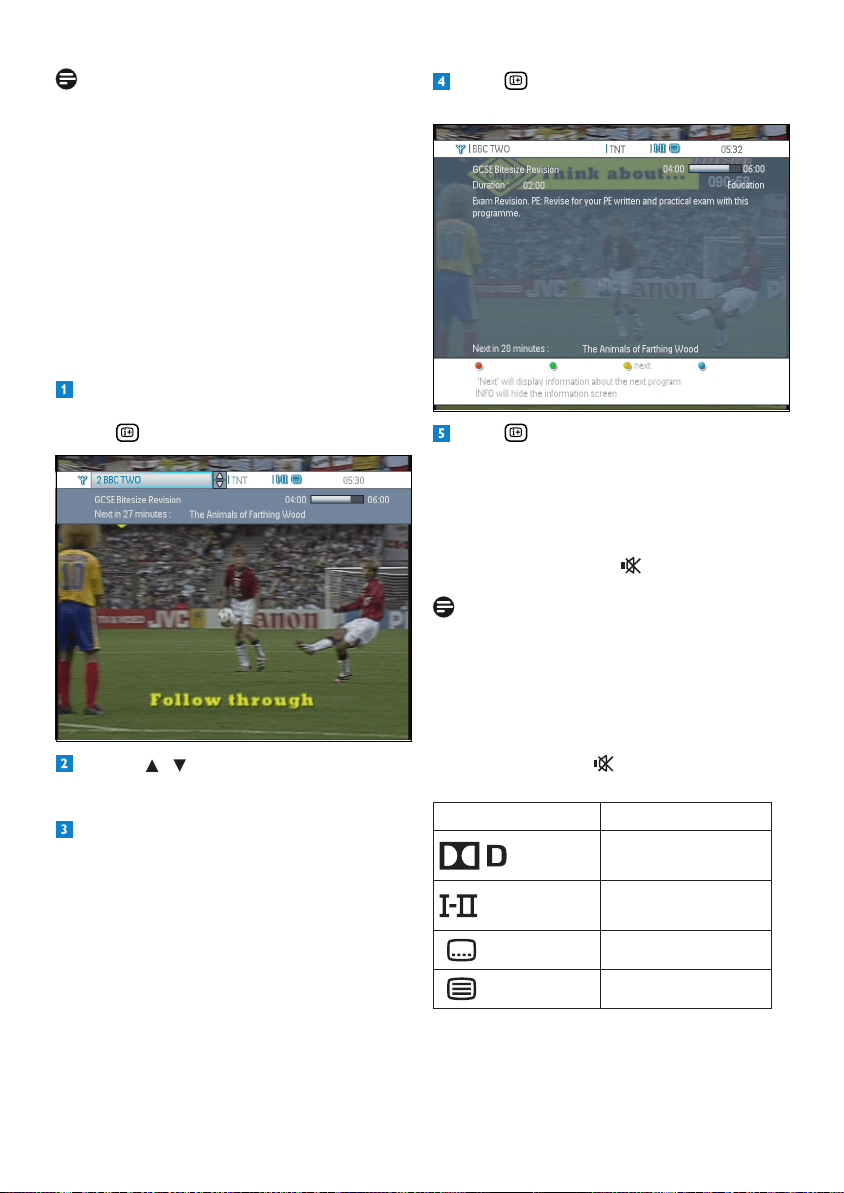
Channel banner
Every time you tune to a channel, the channel
bannerappears,displayinginformationonthis
channel,includinginformationonthecurrent
programme.
Thechannelbannerisdisplayedfor4secondsas
perdefault.
While watching a channel, you can display
the channel banner at anytime by pressing
info button.
Use the / arrowkeystodisplaythe
titlesofthecurrentandnextprogrammes
broadcast on other channels.
Press OK to select the channel
or EXIT to remove the Channel banner and
stay tuned to the current channel.
DTR 7510 200910.indd 14 16/10/2009 17:40:52
15Using your Digital Terrestrial Receiver
ENGLISH
Pause live TV
Atanytime,youcanpausetheprogrammethat
is being watched. The broadcast programme is
temporarilyrecordedinthetime-shiftbufferto
allowlaterresumeoftheplayback.
Simplypress to pause any live TV
programme.TheTimeshiftbarappears.
Resumeplaybackbypressing again.
To return to the live TV programme,
press .
Press EXIT or OK toclosethetimeshift
bar.
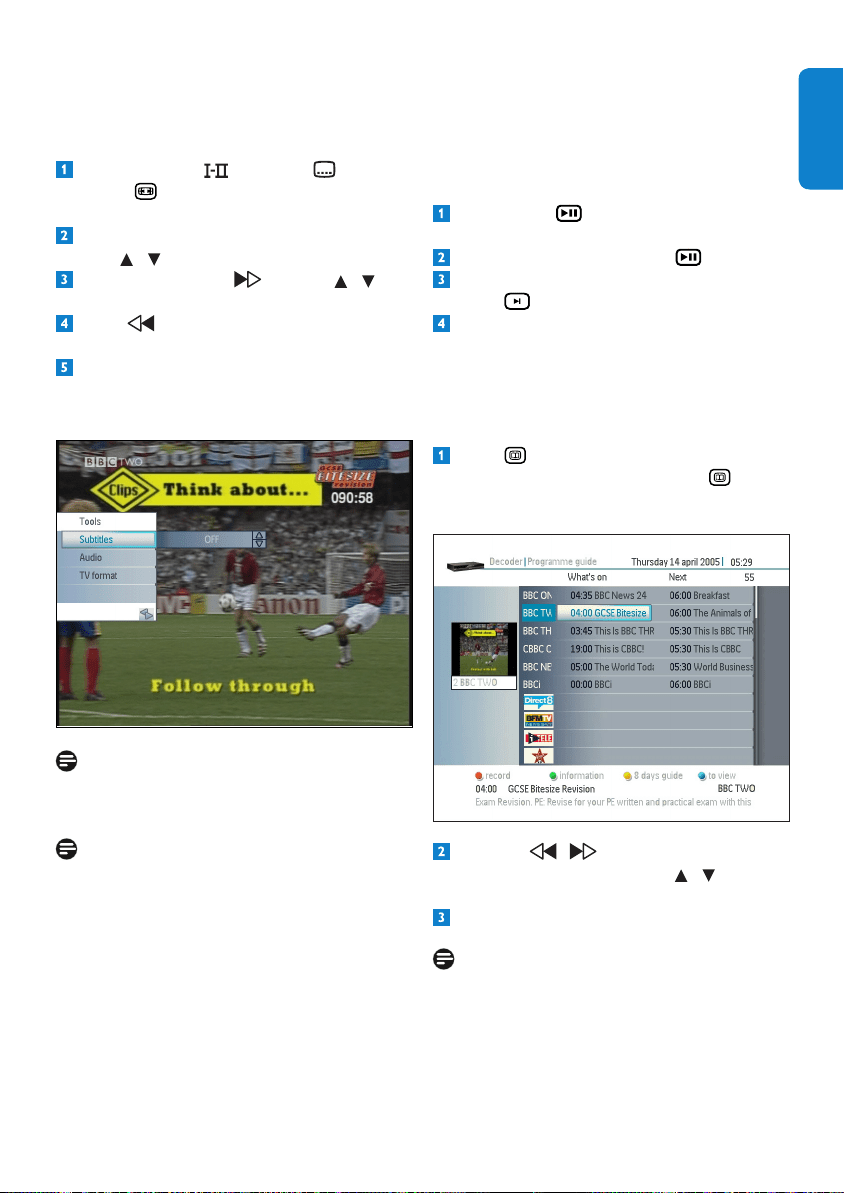
TV Guide
TheTVGuidegivesanoverviewofthe
scheduled programmes.
Press on your remote control to view
the scheduled programmes. Press again
to display the 8 days TV Guide (EPG).
Press the / arrowkeystonavigate
between programmes and the / arrow
keysto navigate through channels.
Press EXIT to close the TV guide.
Note
NotallchannelsofferanextensiveTVguide.
Somechannelsprovidethecurrentday
programmebutdonotofferdetailed
descriptions.
Options control
You can change the subtitles, audio language or
TVformatforaparticularprogramme.
Press either the key,orthe key
or the key.NowtheTools menu is
displayedforthisprogramme.
Choose the relevant item using the arrow
keys / .
Pressthearrowkey and then / to
modifytheselecteditem.
Press or OK to validate the
modication.
Press the EXITkeytoclosetheTools
menu.
Note
Availablelanguagesdependonthetransmitted
content.
Note
TVformatisalsointerpretedbyyourTVset.
WithananalogconnectiontoaatTV,theTV
setcouldchangetheformatautomaticallyto
propose a better view.
0nHDMItheTVsetreceivesinformationabout
theformatofbroadcast.IfTVsetisinautomatic
mode,theformatchosenbyTVsetcouldupdate
automatically.
DTR 7510 200910.indd 15 16/10/2009 17:40:53

Using your Digital Terrestrial Receiver16
4.2 Controlling Live TV
When you begin to watch live TV, your Digital
Terrestrial Receiver begins to store whatever
youwatchintothetimeshiftbuffer,whichgives
you control over live TV.
Each time you change channels, the watched
programme is stored in a new title into the time
shiftbuffer.
Once you have stored programmes into the
timeshiftbuffer,youcanwatchitagainbyusing
afreenavigationthroughthetimeshiftbar,by
doing an Instant Replay or by accessing previous
programmes.
Note
Thetimeshiftbufferstoresupto3hoursof
liveTV.After3hours,theoldestpartofthe
recording is overwritten.
Thetimeshiftbufferisemptiedwhenyouturn
your Digital Terrestrial Receiver to standby.
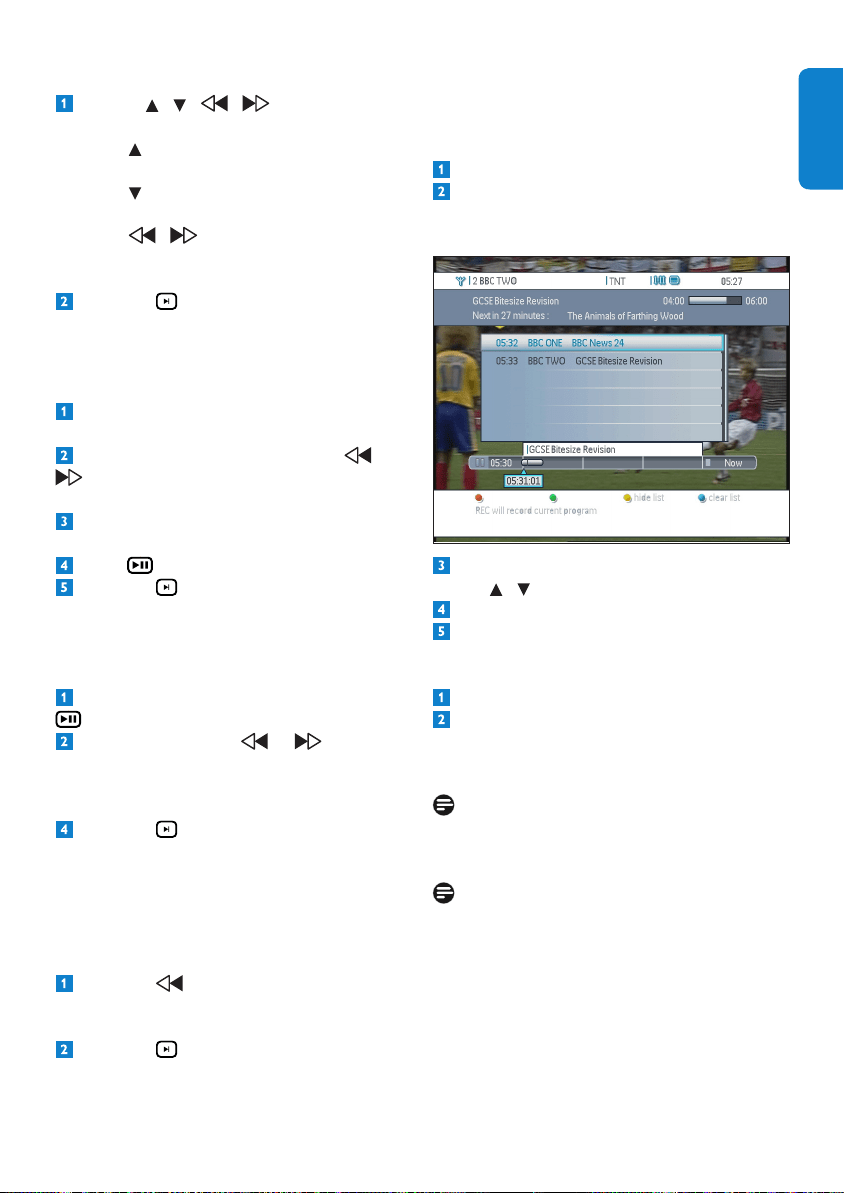
Time shift bar
Thetimeshiftbarisabar-graphrepresentingthe
contentsofthetimeshiftbuffer,lledfromthe
rightleftwards.
Press OKtodisplaythetimeshiftbar.
Atanytime,PressOK or EXIT to hide the
timeshiftbar.
AllTimeshiftbarcommandsareavailabeon
live or recorded content.
Watching 2 channels at the same time
While watching digital TV:
Press once to display the current
programme in an inset window (Picture in
Picture, or PiP).
Press a second time to view both
programmes side by side on the screen
(PaP). You can press the P+/-keytochange
thechanneldisplayedontheleftpicture.
Press a third time to return to normal
viewing.
Note
Whenarecordingisinprogress,oneofthetwo
channel has to be the recorded channel.
AccessingtoMHEG5interactivity(redbutton)
is not possible when you are using Pip or Pap:
this is signalled by “data service” message.
DTR 7510 200910.indd 16 16/10/2009 17:40:54
17Using your Digital Terrestrial Receiver
ENGLISH
Access previous programmes
Youcandisplayalistofpreviouslywatched
programmestomakeyournavigationeasier.
Press OKtodisplaythetimeshiftbar
Press the yellow-colouredkeytodisplay
the previous programmes stored on the
timeshiftbuffer.
Move to the desired programme by using
the / arrowkeys.
Press OK to select the programme.
Press EXITtoclosethetimeshiftbar.
Clearing the Time Shift buffer
Press OKtodisplaythetimeshiftbar.
Presstheblue-colouredkey.Thetime-shift
bufferisimmediatelyemptied.
Changingchannelformorethan3second
createanewcontentonthetimeshiftbarlistof
events.
Seealsochapter5.9 Settings about the
Recorder Settings menu. to change duration
ofchapter.
Moving within the programe:
Use the / / / arrowkeysto
navigatethroughthetimeshiftbar:
•The arrowkeysletyoumovefromone
title to the previous title
•The arrowkeysletyoumovefromone
title to the next title
•The / arrowkeysallowyouto
moveaccordingtothechaptersize
(5minutesbydefault).
Press the keytoreturntoliveTV
programme, and then OKtoexitthetimeshift
bar.
High speed playback:
Can only be activated when watching live or
recorded content (not paused, or slow motion)
Press longtime (1 or 2 seconds) on or
todisplaytheTimeshiftbarandstartthe
rewindorfastforwardwithdoublespeed(x2).
Anotherpressincreasesthespeedupto
x32.Availablespeedsarex2,x4,x8,x16andx32.
Press togobacktonormalspeed.
Press the keytoreturntoliveTV
programme, and then OKtoexitthetimeshift
bar.
Low speed playback:
Whentheplaybackispaused(bypressing
)
Ashortpressonthe or arrow
keysletsyourewindorforwardinslowmotion.
Availablespeedsinthismodearex1/2,x1/4and
x1/8.
Press the keytoreturntoliveTV
programme,andthenOKtoexitthetimeshift
bar.
Instant Replay
Thisfeatureallowsyoutoreplaywhatyouhaveseen
during the last 30 seconds.
Press the arrowkey.Thetimeshiftbar
is displayed and you watch the previous 30’ TV
content.
Press the keytoreturntoliveTV
programme,andthenOKtoexitthetimeshift
bar.
DTR 7510 200910.indd 17 16/10/2009 17:40:54
Using your Digital Terrestrial Receiver18
4.3 Recording
Your Digital Terrestrial Receiver is compatible
withfollowingFreeview+requirements,itis
limited to two recording at the same time.
Accurate recording
Recordings start and stop at the times sent by
thebroadcasters.Ifaprogrammestartsearlyor
runs late the record time will automatically be
adjustedtorecordthewholeprogramme.So
youaresuretogetyourprogramrecordedfrom
its very beginning to its last second.
Thisfeaturecouldcreateaconictbetween
two recordings that seems to have no overlap
atthetimeofprogramming..Durationofsuch
recordings cannot be changed.
Series Link
Ifaprogrammeyouwishtorecordisina
series,youcanrecordthewholeseries.Ifthe
programmechangestoadifferentdayortime
theDigitalTerrestrialReceiverwilltrackthese
changes and still record the programme
Using series recording intensively could
createalotofrecordings.YourDigital
Terrestrial Receiver may also have to cancel
somerecordingsifmorethantwooccur
simultaneously(recordingconicts).
Usethisfeaturewithmesure.
Split recordings
Ifaprogrammehastwoormorepartssplit
byanotherentryintheTVGuide(e.g.alm
divided into two parts by a News programme)
you will be given the option to record all parts
automatically.
Alternate instances
Ifascheduledrecording(s)overlapwithother
programmes set to record, you will be given
theoptiontorecordoneoftheprogrammes
laterthatdayorweek,onthesamechannelora
differentchannel.
by pressing Timer button youcouldcheck
andcorrectdecisionstakentoresolveconicts.
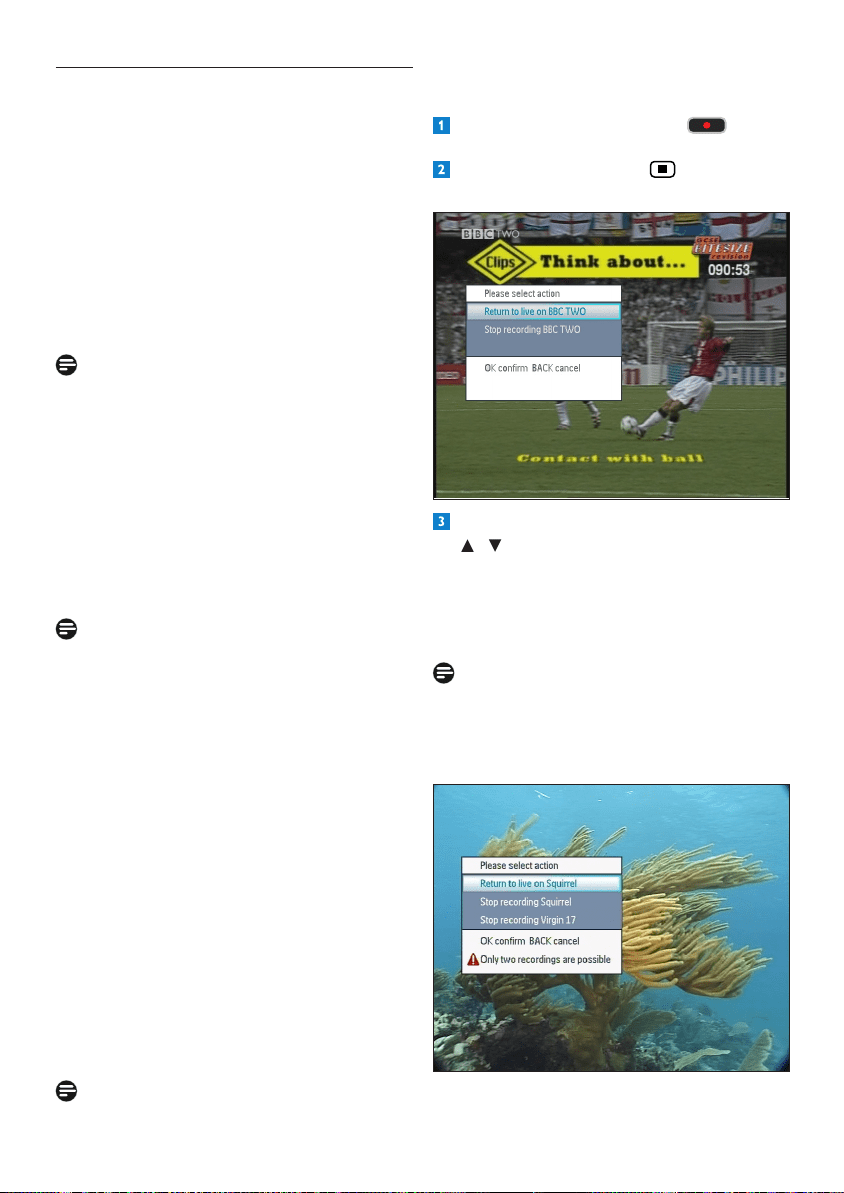
Recording a TV programme that is
currently playing
While you watch live TV, press .
The record begins immediatly.
To stop a record: Press to display the
Please select action menu.
SelectStop recording by using the
/ arrowkeystostoprecordingthe
corresponding channel.
To ajust the duration of this record:
Press INFO button, then press red button.
Note
It is impossible to record more than two
channelsatthesametime.Ifyoutrytorecord
more than two channels, the Please select action
menu displays a warning message:
DTR 7510 200910.indd 18 16/10/2009 17:40:55

19Using your Digital Terrestrial Receiver
ENGLISH
Recording a TV programme that you have
been watching
While you watch live TV, press OK.
Thetimeshiftbarappears.
Press the the arrowkey.tondthe
chapter where you want to start to record..
Press to start the record.
Recording a TV programme through the
Time Shift Bar
While you watch live TV, press OK.
Thetimeshiftbarappears.
Presstheyellow-colouredkeytodisplaythe
previous programmes.
Move to the desired programme by using
the / arrowkeys.
Press OK to select the programme.
Press . to start the record.
Note
Recordingfromthetimeshiftbufferwillrecord
thefullprogrammefrombeginningtotheend,
evenifyoustarttherecordingafterthe
programmehasalreadybegun.Asthisisa
relatively complex operation, the box does not
displaytheimagewhilethebufferistransferring
thestartoftheprogramme(totheharddisk).
Attheendofthisoperation,theplaybackwill
start again automatically at the point where you
started the recording. The recorded programme
willbeindicatedinredintheTimeShiftbar.
Recording by setting a timer through the
TV guide
Press on the remote control to go to the
TV Guide.
Scrolltotheprogrammeyouwantto
record.
Press on the remote control.
Press EXIT several times to close the
menus.
Recording with a series link
Press on the remote control to go to the
TV Guide.
Press again to go to the 8 days TV Guide.
Use the / / / arrowkeystoscroll
to the programme you want to record.
Pressthered-colouredkey.
Iftheprogrammeisinaseries,theDigital
TerrestrialReceiverdisplaysthefollowing
screen:
Selecttheactiontoperform:
•Pressthered-colouredkeytorecordthe
current episode only.
•Pressthegreen-colouredkeytorecordthe
whole series (see notes about limitations
andconicts).
Onceyouhavepressedoneofthosetwo
keys,therecordisset.
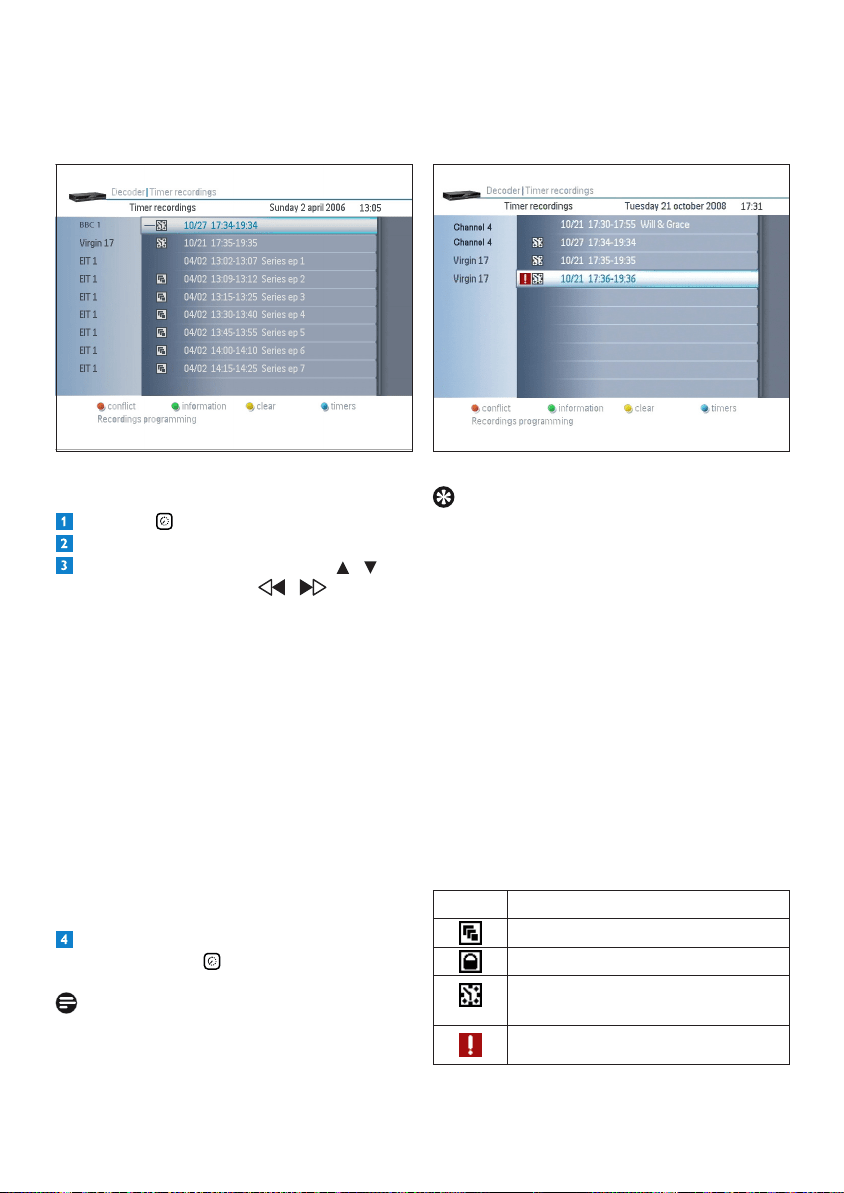
Note: all record programming are called
Timers recording. Bypressing Timer button
youcouldaccesstothelist,checkandcorrect
decisionstakentoresolveconicts.
DTR 7510 200910.indd 19 16/10/2009 17:40:56
Using your Digital Terrestrial Receiver20
You can see in the Timers recording menu
the episodes that are planned to record with a
speciciconnexttotheirtitles:
Recording by setting a timer through the
timer key
Press the key.
Presstheblue-colouredkey.
Setthetimeroptionsbyusingthe /
arrowkeysandusethe / arrowkeys
tomodifytheoptionsvalues:
•Status:toenableordisablethetimer
•Repetition:once,daily,orweekly
•Action:usedtodescribetheactiontaken
atthedeneddateandtime:recording,
recording(locked)
•Dayofweek:availableonlyifRepetitionis
settoonceorweekly
•Date:optionavailableonlyifRepetitionis
set to once
•Begintime
•End time
•Channel: press OKtodisplaythelistof
channels and press OKagaintomakea
selection
Press EXIT several times to close the
menus, or press again to close the menu.
Note
•Settimersarereprensentedbyaclock
icon.
•It is impossible to record more than two
channels at the same time.
•Ifyoutrytorecordmorethantwo
channels using a timer, the third record will
have a red symbol next to it.
Tips
•You can start watching the programme
you are recording while recording is still in
progress.
•You can record any programme you have
watched within the past 3 hours.
•You can watch other channels while you
record.Selectanotherusingtheremote
control.
•When two records are ongoing at the
sametimeontwodifferentfrequencies,
zappingisonlyallowedonthosetwo
frequencies.Unavailablechannelsarein
grey in the Favorite list menu.
List of icons in timer recordings
Icon Description
Seriesrecording
Protected content
Programmescheduledfor
recording
Conict
DTR 7510 200910.indd 20 16/10/2009 17:40:56
21Using your Digital Terrestrial Receiver
ENGLISH
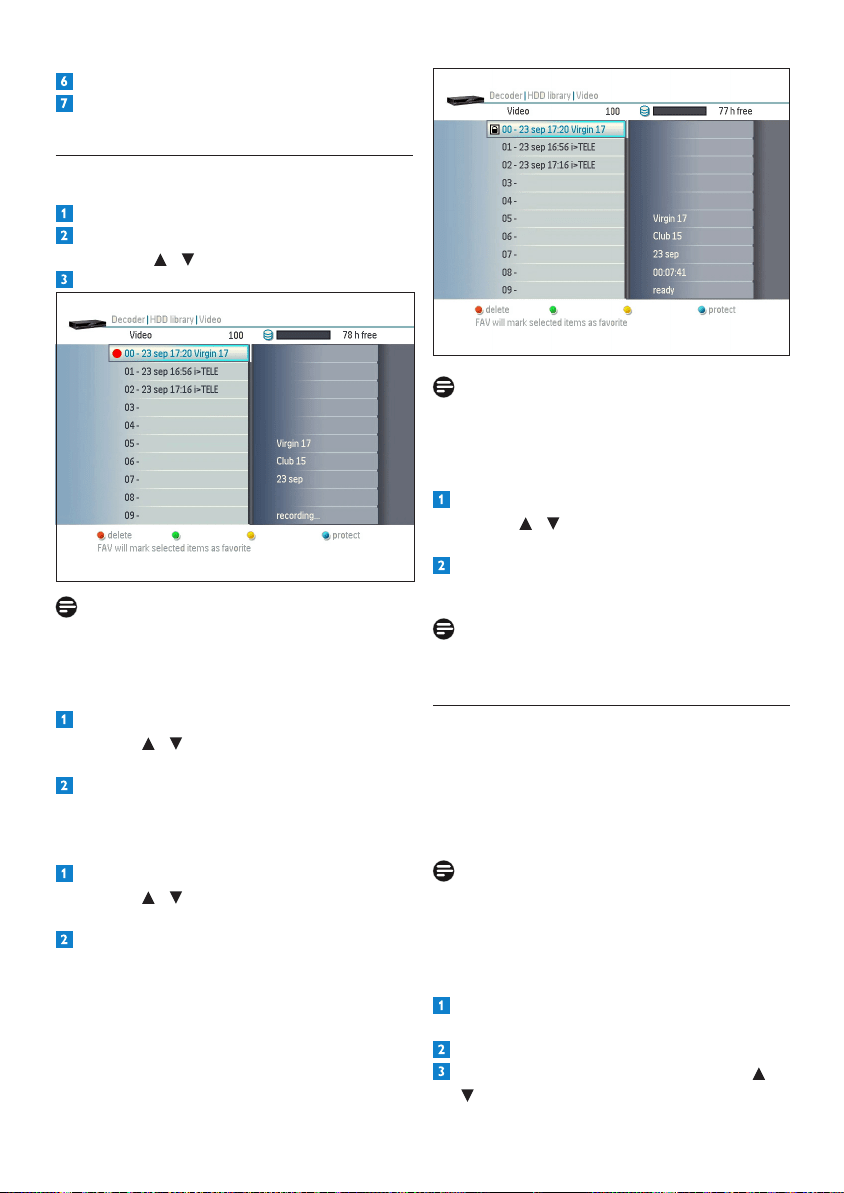
4.4 HDD library
Youcanstoreupto78hoursofvideo.
Playback of Records
Press HDD on the remote control.
Scrolltothedesireditemusingthe /
arrowkeys.
Press OK. to start viewing, “HDD” text and
disqueiconisdispayedonthefrontdisplay.
Incaseofprotectedprogramme,enteryour
PIN code.
Tocontroltheplayback,youhavetousethe
TimeShiftBar:Allthecommandsandmodeof
theTimeshiftbarareavailable.Seepage16.
Press OKtodisplaythetimeshiftbar.
Atanytime,PressOK or EXIT to hide the
timeshiftbar.
High speed playback:
When you are viewing a content with the
normal speed.,
Alongpressureon or will display
theTimeshiftbarandstarttherewindorfast
forwardwithdoublespeed(x2)..
Anotherpressureincreasethespeedupto
x32.Availablespeedsarex2,x4,x8,x16andx32.
Press togobacktonormalspeed.
Press the keytoreturntoliveTV
programme, and then OKtoexitthetimeshift
bar.
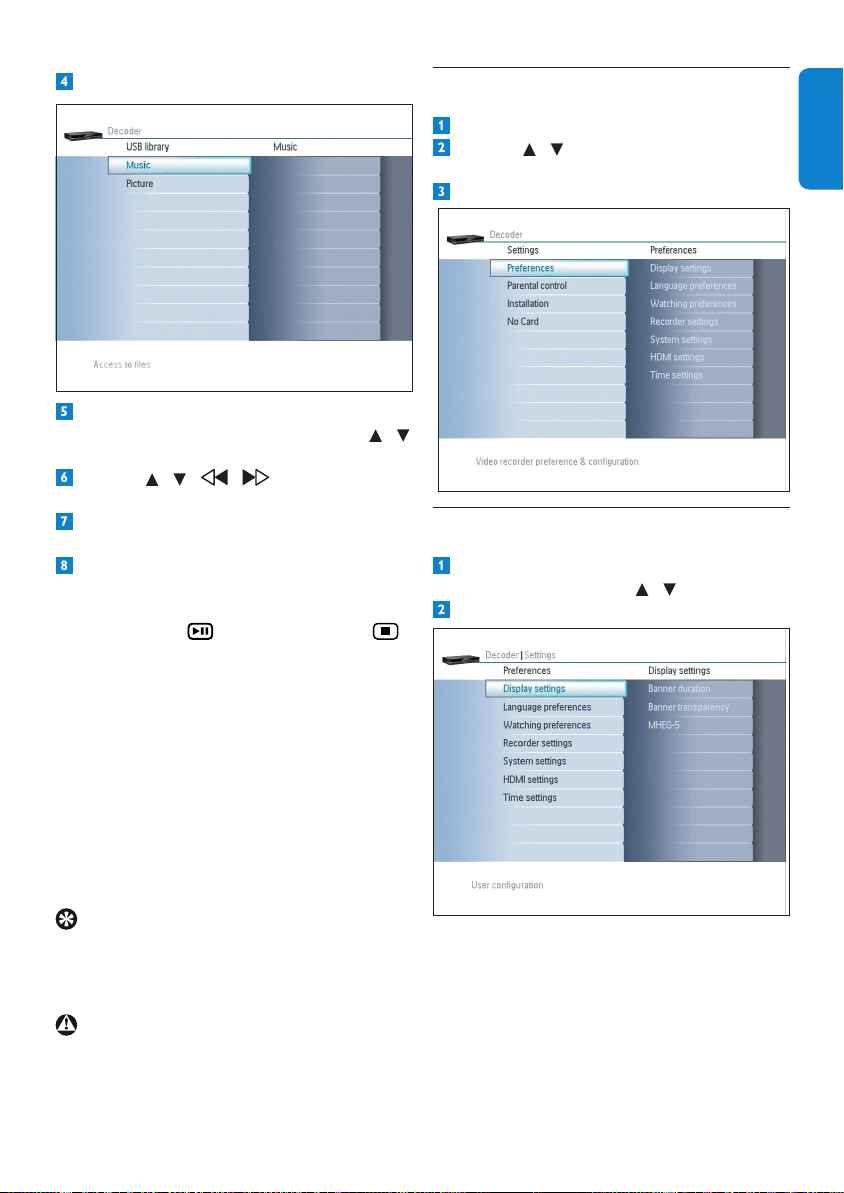
4.5 Play les from an USB device
TheintegratedUSBportallowsyoutoreadthe
followingles:
•Music:MP3les
•Images:JPEGles
InserttheUSBdeviceintotheUSBport.
Press USB on your remote control or the
USBbuttononthefrontpanel.
Scrolltothedesiredtypeofleusingthe
or arrowkeys.
Press OK
Scrolltothedesiredleorfolderusingthe
or arrowkeys.
Press OK to start playing.
Warning
Your Digital Terrestrial Receiver can only read
lesrecordedwithaFAT16orFAT32-compliant
leformat.andUSB2.0devicesonly.
DTR 7510 200910.indd 21 16/10/2009 17:40:57
UsemoreofyourDigitalTerrestrialReceiver22
5 Use more of your Digital
Terrestrial Receiver
This chapter gives a complete description the
functionalitiesofyourDigitalTerrestrialReceiver.
5.1 Digital Terrestrial Receiver full
overview
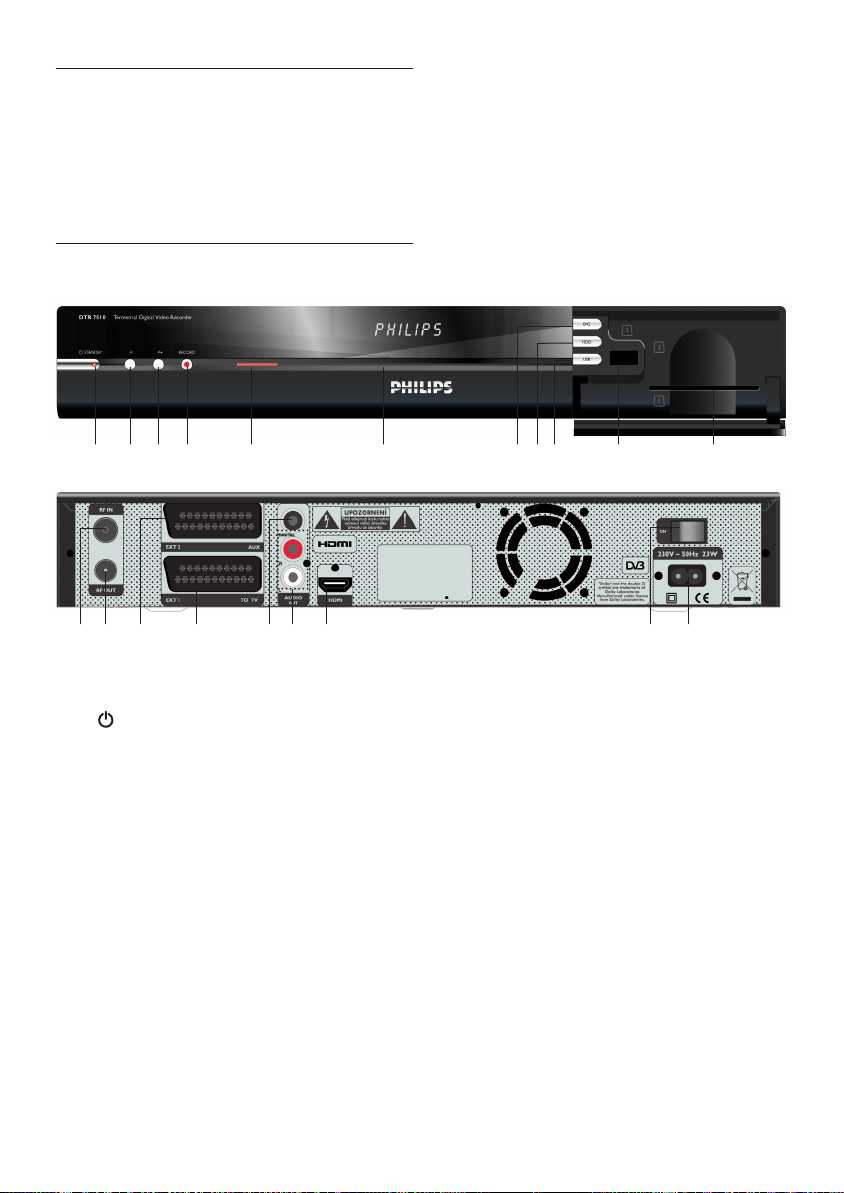
Front Panel
Rear Panel
Front Panel
1 STANDBYbuttonwithindicator,switch
tostandby/wakeup
Green LED: watching mode
Red LED: standby mode
Orange LED: initialisation mode
2 P-, previous programme
3 P+, next programme
4 RECORD, instant recording
5 Recording LED, indicates recording
6 Display panel
7 EPG, open/close EPG
8 HDD, open/close HDD library
9 USB,accessUSBcontents
10 USBconnector*
11 Smartcardreader
Rear Panel
1 RF IN*, input to connect your aerial cable
fromthewallsocket
2 RF OUT*, output to connect your
recorder to a VCR/TV set/another
receiver
3 AUXscart*outputtoconnectyour
external recorder or DVD player
4 TV scart*, output to connect your TV set
5 SPDIF*,digitalaudiooutput
6 L/Raudio*,Left/Rightanalogueaudio
outputs
7 HDMI*, output to connect your TV set
with HDMI input
8 ON/OFFswitch**,turnon/offyourDigital
Terrestrial Receiver
9 Power**, output to connect the mains
cord
*Safetyextralowvoltage
**Hazardousvoltage
1 2 3 4 5 6 7 98
1 2 3 4 5 6 7 8 9 10 11
DTR 7510 200910.indd 22 16/10/2009 17:40:59

23UsemoreofyourDigitalTerrestrialReceiver
ENGLISH
5.2 Digital Terrestrial Receiver display
full overview
Interpretation of front display pictograms
Lit when playing HDD contents
LitwhenplayingUSBcontents
DIRECT
Lit when watching live TV
DTR 7510 200910.indd 23 16/10/2009 17:40:59
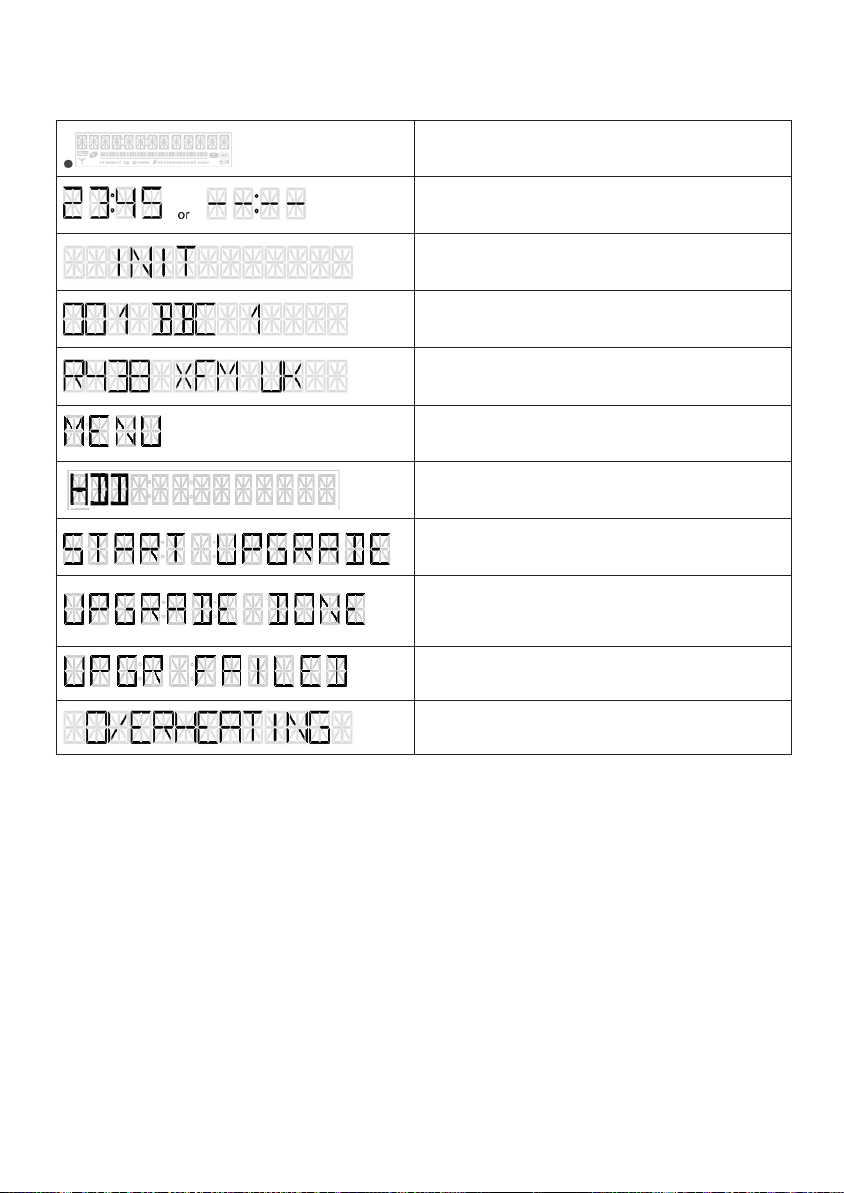
UsemoreofyourDigitalTerrestrialReceiver24
Interpretation of front display messages
Digital Terrestrial Receiver connected to mains
and in standby
Digital Terrestrial Receiver in standby
Initiating Digital Terrestrial Receiver
Digital Terrestrial Receiver tuned on a digital TV
channel
Digital Terrestrial Receiver tuned on a digital
radio channel
Menu
PlaybackfromHDDlibraryorUSBdevice
Softwareupgradestarting
Successfulsoftwareupgrade
Softwareupgradefailure
Digital Terrestrial Receiver overheating
DTR 7510 200910.indd 24 16/10/2009 17:40:59

25UsemoreofyourDigitalTerrestrialReceiver
ENGLISH
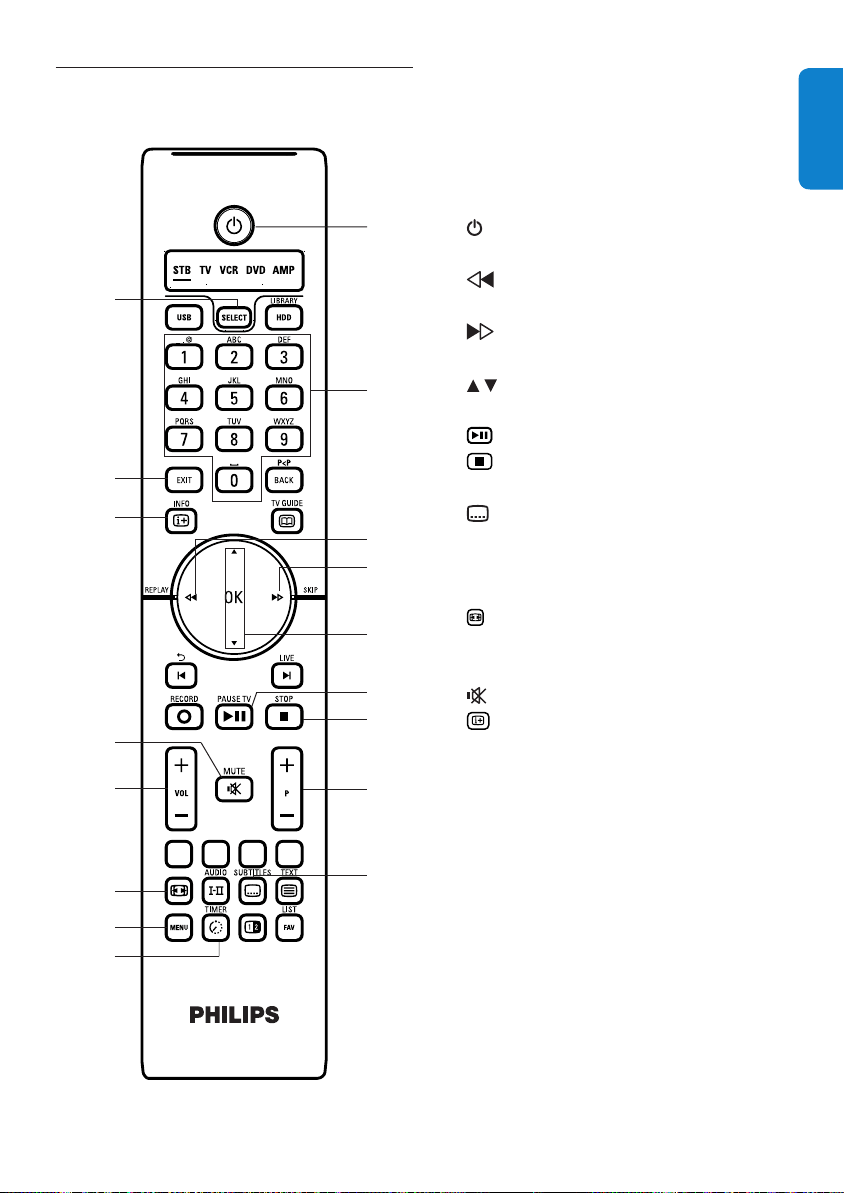
5.3 Remote control full overview
1 Switchtostandby/wakeup
2 HDD Open/close HDD library
3 Alphanumerickeypad
4 BACK Switchtopreviouschannel
or previous section
5 Open/close TV GUIDE
6 Replay/Left,
7 Skip/Right,Submenuaccess.
8 Move up/down within lists
OK Conrmselection.Timeshift
bar.
9 Return to live TV
10 Pause live TV
11 Stoprecording/playback
12 P+/- Selectnext/previous
channel
13 Colourkeys Contextualkeys
14 Selectsubtitles
15 Display / hide teletext
16 FAV Channelselection,Favourite
lists
17 Pip Pap selection
18 Accesstoallrecorded
programmes.
19 MENU Open / close menu
20 Open/closeTVformat
menu
21 Open / Close Tools menu
22 VOL +/- Turn the volume up/down
23 Mute / Restore sound
24 Instant recording
25 Instant replay
26 Informationbanner
27 EXIT CloseMenu/InfoBanner/
Timeshiftbar
28 USB AccessUSBcontents
29 SELECT Modeselection:STBmustbe
highligtedbyrstpress
1
5
7
9
4
3
6
8
10
11
12
13
14
15
16
17
18
19
20
22
21
23
24
25
26
27
28
2
29
DTR 7510 200910.indd 25 16/10/2009 17:41:00
UsemoreofyourDigitalTerrestrialReceiver26
5.5 TV guide
In this menu you can access the programme
guideandalsocheckthetimerrecordings.
Press MENU to display the main menu
Use the / arrowkeystohighlightTV
Guide.
Press OK. The TV Guide menu is displayed.
Thefollowingoptionsareavailablefromthis
screen:
•Programme guide
•Timer recordings
•Sleep&wake-uptimers
Note that Timer recordings list contains
the recordings based on timer but also the
recordings that are programmed through EPG
including serial recording and alternate events.
Itistheplacewhereyoushouldcheckthe
conictsthatcouldbedetected(notlinked
torecordingsmovingintimetofollowthe
accuraccy requirement).
5.4 Menu full overview
While watching digital TV:
Press MENU to display the main menu.
To scroll to the appropriate menu item,
press the / arrowkeys.
To display the corresponding sub-items,
press OK or .
Note
Toopenalockedmenuitem,youmustenter
your PIN Code.
Onceyouhavehighlightedanadjustableitem,
youcanviewthelistofavailablesettingsor
corresponding numerical values on the right-
handsideofthescreen.
•Settheappropriatesettingusingthearrow
keys.
•Usethenumericalkeystoentervaluesif
necessary.
•Usethecolouredkeystoperform
contextual actions. The actions that can be
performedaredescribedatthebottomof
the screen.
•Press BACK or the arrowkeytosave
your changes and return to the previous
screen.
•Press MENU to exit the menu system.
DTR 7510 200910.indd 26 16/10/2009 17:41:00
27UsemoreofyourDigitalTerrestrialReceiver
ENGLISH
5.5.1 TV Guide
TheTVGuideoffersyouanoverviewofthe
programmes that will be broadcast during the
next 8 days.
Once you are in the TV Guide menu,
use the / arrowkeystohighlight
Programme guide.
Press OK. The Programme guide menu is
displayed.
Note
When you are watching TV, you can directly
access the Programme guide menu by
pressing the key(What’sonandNext
information).
Formoreinformationonaprogramme,
highlight it by using the / / / arrow
keys.
Presstheappropriatecontextualkeys:
•Press OK to preview the programme.
•Pressthered-colouredkeytorecordthe
highlighted programme.
•Pressthegreen-colouredkeytodisplay
informationsabouttheprogramme.
•Presstheyellow-colouredkeytodisplay
the 8-days guide.
•Presstheblue-colouredkeytowatchthe
highlighted channel.
Close the guide by pressing the EXITkey.
8 days TV guide (EPG)
Once you are in the Programme guide
menu,presstheyellow-colouredkeyto
display the 8-days TV guide (EPG).
Presstheappropriatecontextualkeys:
•Press OK to preview the programme.
•Pressthered-colouredkeytorecordthe
highlighted programme.
•Pressthegreen-colouredkeytodisplaythe
guideofthepreviousday.
•Presstheyellow-colouredkeytodisplay
the next day guide.
•Presstheblue-colouredkeytowatchthe
highlighted channel.
Close the guide by pressing the EXITkey.
IfyouwanttogobacktotheProgramme
guide menu, press BACK.
Notes
•When you are watching TV, you can
directly access the 8 days TV Guide by
pressing the keytwice.
•Pressing Info willdisplaysignicanceof
colors.
•Whenyoujustactivateyourrecorder,it
takeupto20minutesfortheEPGtobe
fullycomplete.
•Programmes already over will not appear
will not appear in EPG.
DTR 7510 200910.indd 27 16/10/2009 17:41:01
UsemoreofyourDigitalTerrestrialReceiver28
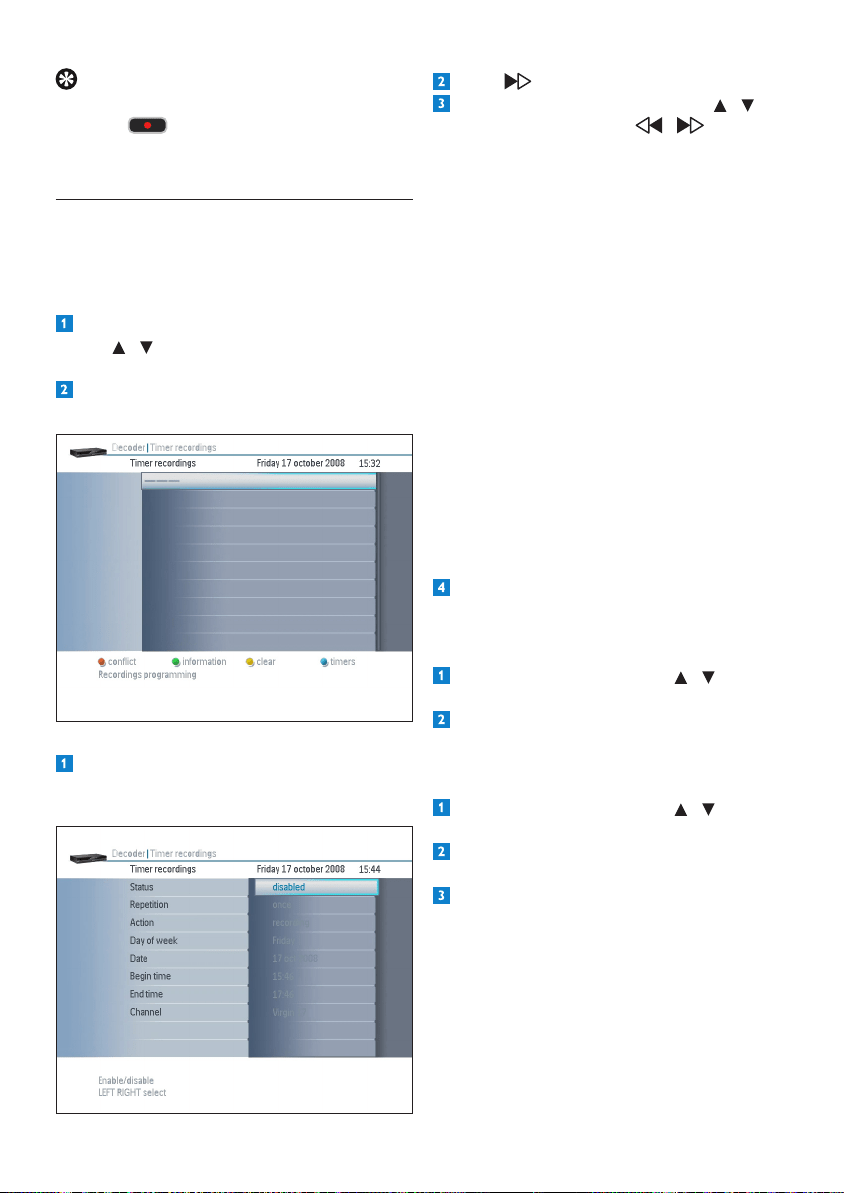
Press to enable the timer.
Setthetimeroptionsbyusingthe /
arrowkeysandusethe / arrowkeys
tomodifytheoptionsvalues.
•Status:toenableordisablethetimer
•Repetition:once,daily,orweekly
•Action:usedtodescribetheactiontaken
atthedeneddateandtime:recording,
recording(locked)
•Dayofweek:setthedaywhenyouwant
torecord.Thisoptionisavailableonlyif
Repetitionissettoonceorweekly
•Date: set the date when you want to
record.Thisoptionisavailableonlyif
Repetition is set to once
•Begintime
•End time
•Channel: select the channel you wish to
record. Press OKtodisplaythelistof
channels and press OKagaintomakea
selection
Once all the options are set, press EXIT.
Your timer is set.
Clear timer
Selectthetimerbyusingthe / arrow
keys.
Presstheyellow-colouredkey.
The timer is immediately cleared.
Modify a timer
Selectthetimerbyusingthe / arrow
keys.
Pressthegreen-colouredkey.
Youcannowmodifythetimersettings.
Onceyouhavemodiedalltheoptionsyou
needed to, press EXIT to save the changes.
Tip Ifyouwanttorecordascheduled
programme, move to this programme and
press the key,.Whenyoumovethefocus
(white color) the event will be colored in red
(recording or recording programmed)
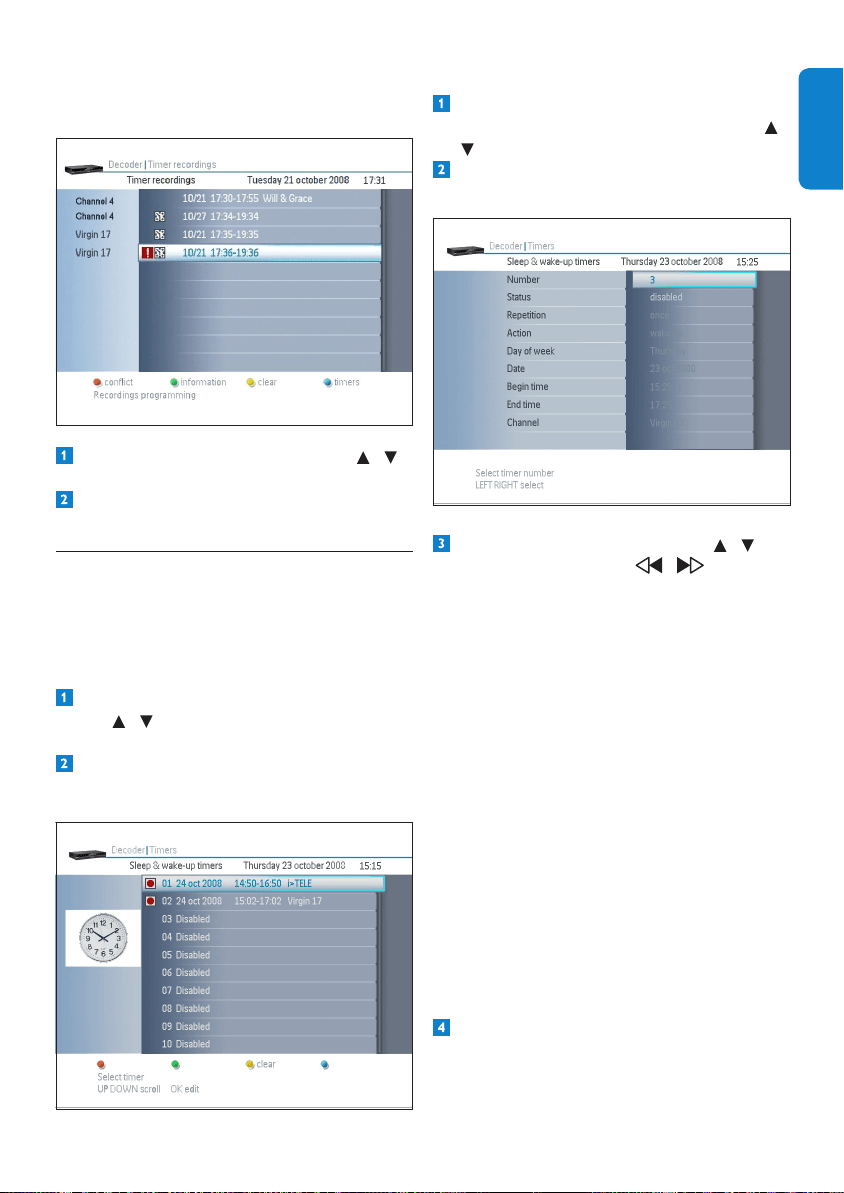
5.5.2 Timer recordings
The Timer recordings menu lists all the
current recordings that are programmed.
Once you are in the TV Guide menu, use
the / arrowkeystohighlightTimer
recordings.
Press OK.
The Timer recordings menu is displayed.
Set a timer
Once you are in the Timer recordings
menu,presstheblue-colouredkey.
Thefollowingscreenisdisplayed:
DTR 7510 200910.indd 28 16/10/2009 17:41:01
29UsemoreofyourDigitalTerrestrialReceiver
ENGLISH
Conict
Youmayhaveconictsbetweentwotimers.
Conictsarerepresentedbyredmarks:
In that case:
Selectthemarkedtimerbyusingthe /
arrowkeys.
Pressthered-colouredkeytosolvethe
conict.
5.5.3 Sleep & wake-up timers
The Sleep & wake-up timers can put the
DigitalTerrestrialReceivertostandby/wake-up
mode,likeanalarmclock.
Once you are in the TV Guide menu, use
the / arrowkeystohighlightSleep &
wake-up timers.
Press OK.
The Sleep & wake-up timers menu is
displayed.
Set a timer
Once you are in the Sleep & wake-up
timers menu, select a timer by using the /
arrowkeys.
Press OK.
Thefollowingscreenisdisplayed:
Setthetimeroptionsbyusingthe /
arrowkeysandusethe / arrowkeys
tomodifytheoptionsvalues.
•Status:toenableordisablethetimer
•Repetition:once,daily,orweekly
•Action:usedtodescribetheactiontaken
atthedeneddateandtime:recording,
recording(locked)
•Dayofweek:setthedaywhenyouwant
torecord.Thisoptionisavailableonlyif
Repetitionissettoonceorweekly
•Date: set the date when you want to
record.Thisoptionisavailableonlyif
Repetition is set to once
•Begintime
•End time
•Channel: select the channel you wish to
record. Press OKtodisplaythelistof
channels and press OKagaintomakea
selection
Once all the options are set, press EXIT.
Your timer is set.
DTR 7510 200910.indd 29 16/10/2009 17:41:02

UsemoreofyourDigitalTerrestrialReceiver30
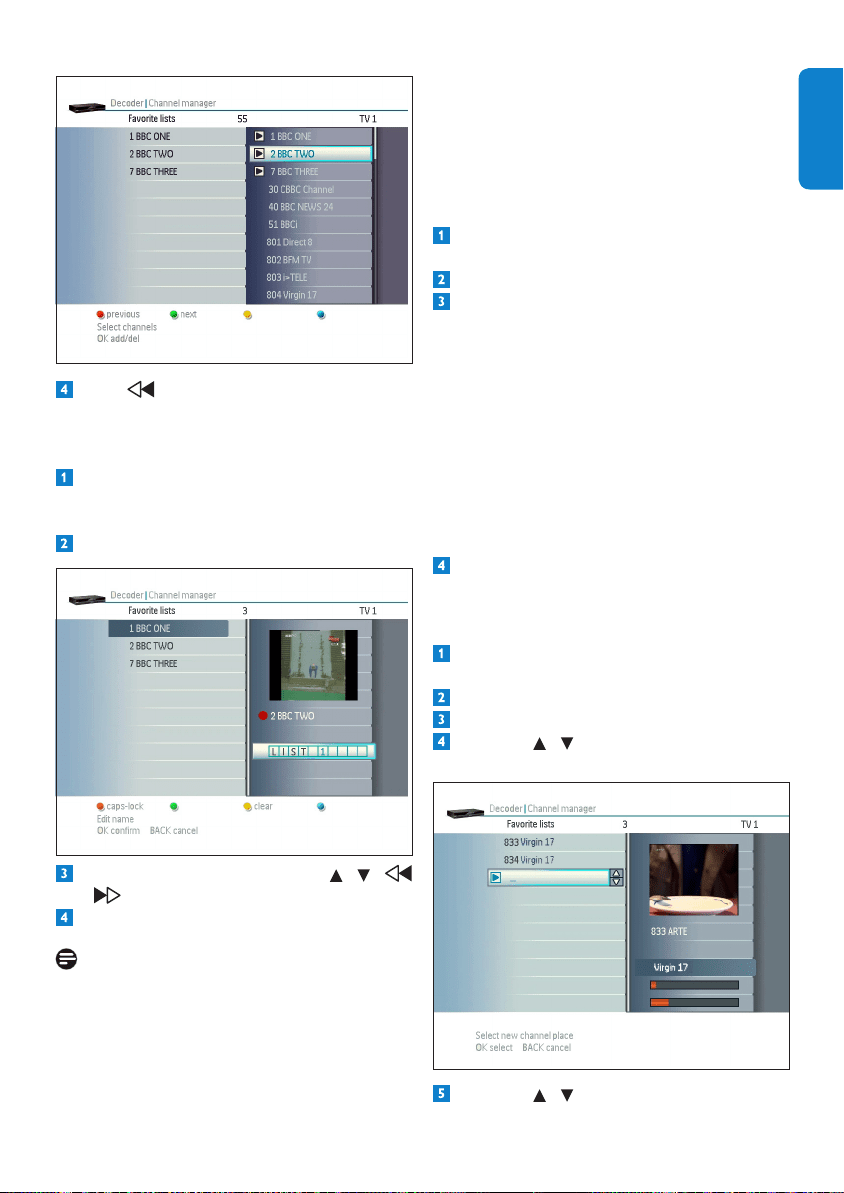
5.6 Channel manager
Atinstallation,allthechannelsfoundareadded
to the All channels list. From this list, you
maycreate,delete,andrenamefavouritelists
accordingtoyourpreferences.
Press MENU to display the main menu.
ScrolltotheChannel manager menu item
using the / arrowkeys,andthenpress
OK.
Thefollowingoptionsareavailablefromthis
screen:
•Allchannels
•Favorite lists
Select Favorite lists using the / arrow
keys.
Press OK.
Add/remove channels from a favourite list
Threelistsarecreatedbydefault:TV1 to TV3.
Press OK again.
Press FAV to select the current list. The
nameofthelistisdisplayedontopright
corner.
Press thered-colouredkey.
Scrolltothechannelsyouwanttoaddor
remove to the current list, and select them
individually by pressing OK.
Selectedchannelsaremarkedwithanarrow.
Clear a timer
Selectthetimerbyusingthe / arrow
keys.
Presstheyellow-colouredkey.
The timer is immediately cleared.
Tips
•You can start watching the programme
you are recording while recording is still in
progress.
•You can record any programme you have
watched within the past 3 hours.
•You can watch other channels while you
record.SelectanotherusingtheTVremote
control.
DTR 7510 200910.indd 30 16/10/2009 17:41:02
31UsemoreofyourDigitalTerrestrialReceiver
ENGLISH
Press toreturntothefavouritelists.The
new list is now displayed.
Rename a favourite list
Once you are in the Favourite lists menu,
scroll to the list you want to rename using
FAV.
Press theblue-colouredkey.
Enter the desired name using the / /
/ arrowkeys.
Press OK to validate or BACK to cancel.
Notes
•Whenyouactivateoneofthefavourite
lists by pressing FAV while watching
digital TV, the Digital Terrestrial Receiver
onlyzapsthroughyourfavouritechannels.
Press FAV again to toggle between your
favouritelistsandtheAll channels list.
•The Favourites lists menu is also used
toeditindividualfavouritelists.Toedita
givenfavouritelist,selectthislistonthe
righthandsideofthescreen.Youcanthen
accessvariouseditionfeatures.
Sort the selected list automatically:
Once you are in the Favourite lists menu,
scroll to the list you want to sort using FAV.
Press theyellow-colouredkey.
Presstheappropriatecolourkeydepending
onthetypeofsortingyouwanttoperform:
•Press thered-colouredkey to sort all
channels according to their name.
•Press thegreen-colouredkey to sort all
channels according to their type.
•Press theyellow-colouredkey to sort all
channelsaccordingtotheirfrequency.
•Press theblue-colouredkey to sort all
channels according to their number.
Press EXIT several times to exit the
Favorite lists menu.
Sort the selected list manually
Once you are in the Favourite lists menu,
scroll to the list you want to sort using FAV.
Press theyellow-colouredkey.
Press FAV
Press the / arrowkeystohighlightthe
channel you want to move and press OK.
Press the / arrowkeystomovethe
selected channel.
DTR 7510 200910.indd 31 16/10/2009 17:41:03
UsemoreofyourDigitalTerrestrialReceiver32
Note
Protectedprogrammesaremarkedwitha
padlocknexttoit
Delete recorded content
Once you are in the HDD Library menu,
use the / arrowkeystohighlightthe
programme you want to watch.
Pressthered-colouredkey.Theprogramme
is immediately deleted.
Note
Ifthecontentisprotected,yourPIN-Codewill
beaskedbeforedeletion.
5.8 USB
TheintegratedUSBportallowsyoutoreadthe
followingles:
•Music:MP3les
•Images:JPEGles
Note
OnlyUSBkeysarerecognizedbytheDigital
TerrestrialReceiver.ExternalHardDiskDrives,
digitalmusicplayersmaynotworkwiththe
Digital Terrestrial Receiver.
PluganUSBkeyintotheUSBportinthe
frontpanel,behindthedoor.
Press MENU to display the main menu.
ScrolltotheUSB menu item using the /
arrowkeys.
Press OK.
Press EXIT several times to exit the
Favorite lists menu.
5.7 HDD Library
Press MENU to display the main menu.
ScrolltotheHDD Library menu item
using the / arrowkeys.
Press OK.
Note
Contentthatarecurrentlyrecordingaremarked
with a red circle next to it.
Watch recorded content
Once you are in the HDD Library menu,
use the / arrowkeystohighlightthe
programme you want to watch.
Press OK.
The programme is displayed.
Protect recorded content
Once you are in the HDD Library menu,
use the / arrowkeystohighlightthe
programme you want to watch.
Presstheblue-colouredkey.Theprogramme
is now protected.
DTR 7510 200910.indd 32 16/10/2009 17:41:03
33UsemoreofyourDigitalTerrestrialReceiver
ENGLISH
Press OK.
Choose between Music and Picture the
typeoflesyouwanttoplayusingthe /
arrowkeys,andthenpressOK.
Use the / / / arrowkeysto
selectthedesiredle.
Oncethedesiredleishighlighted,press
OK to start playing.
Youcanperformthefollowingactions,
dependingofthetypeofleyouareplaying:
•Music: Press toplaythele.Press
tostopplayingthele.Pressthered-
colouredkeytodeletethele.Pressthe
yellow-colouredkeytotogglebetween
playing modes (you can choose between
Single song, All songs and Shufe).
Finally,presstheblue-colouredkeyto
enable or disable the loop.
•Picture:Usethered-colouredkeyto
dezoomandthegreen-colouredkeyto
zoom.Presstheyellow-colouredkeyto
rotate the displayed picture.
Tip
YoucanaccessdirectlytoyourUSBkeyby
pressing USB on the remote control, or by
usingtheUSBbuttononthefrontpanel.
Warning
OnlylesrecordedwithaFAT16orFAT32-
compliantleformatcanberead.
5.9 Settings
Press MENU to display the main menu.
Use the / arrowkeystohighlightthe
Settings menu item.
Press OK.
5.9.1 Preferences
Once you are in the Settings menu, select
Preferences using the / arrowkeys.
Press OK.
Preferencesisusedtosetthefollowingoptions:
•Display settings
•Languagepreferences
•Watchingpreferences
•Recorder settings
•Systemsettings
•HDMI settings
•Time settings
DTR 7510 200910.indd 33 16/10/2009 17:41:04
UsemoreofyourDigitalTerrestrialReceiver34
Display settings
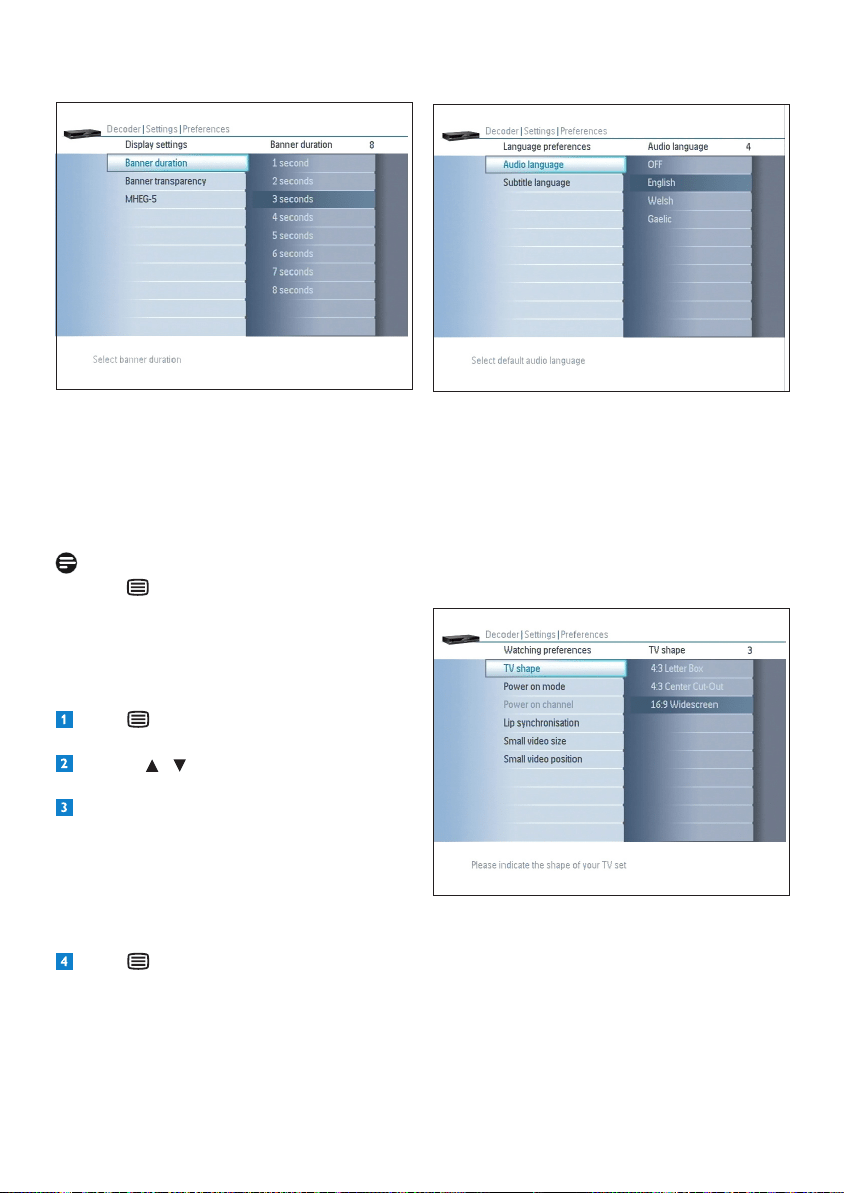
Setappropriatevaluesfor:
•Bannerduration:bannerdisplayduration
from1to8seconds
•Bannertransparency:from0to100%in
stepsof25%
•MHEG-5: choose between ON and OFF.
Note
With the keyyoumayaccessadditionaltext
and multimedia contents. MHEG (Multimedia
and Hypermedia Expert Group) is a standard
thatoffersyouinformationaboutvarious
contentslikelifestyle,shoppingorsportsevents
and results.
Press orthered-colouredkeytobring
upthetextmenuforthecurrentchannel.
Use the / arrowkeystonavigate
through the menu.
Use OK to select an item.
Additionallythefourcolouredkeys(Red,
Green,YellowandBlue)helpyoutonavigate
throughthecontentofapage.Theiruse
variesfordifferentstations.Functionis
commonlyexplainedatthebottomofthe
display.
Press again to leave the MHEG, or press
EXIT.
Language preferences
Selectyourpreferredlanguageforthefollowing:
•Audiolanguage
•Subtitlelanguage
You can also set the Audio language and/or
Subtitle language options to OFF to disable
them.
Watching preferences
Setappropriatevaluesforthefollowing:
•TVshape:denesthewaythevideo
formatisadapted:4:3LetterBox,4:3
Center Cut-Out or 16:9 Widescreen
•Power on mode: last viewed channel or
denedchannel
•Poweronchannel:ifyouhavesetPower
on mode to dened channel, choose the
channel to be tuned at power on
DTR 7510 200910.indd 34 16/10/2009 17:41:05
35UsemoreofyourDigitalTerrestrialReceiver
ENGLISH
•Lipsynchronisation:Settoonbydefault.
Other choices are progressive and off
•Smallvideosize:sizeoftheinsetwindow
in PiP mode, choose between small,
standard and large
•Smallvideoposition:selectthecornerin
which the inset windwo in PiP mode shall
be displayed
Note
The TV shape is managed by the Digital
TerrestrialReceiver.ButTVsetmanagedalsothe
adaptationofinputformattoshapeandsiae.Set
yourTVtothesimilarequivalentsetting(refer
totheusermanualofyourTVset).
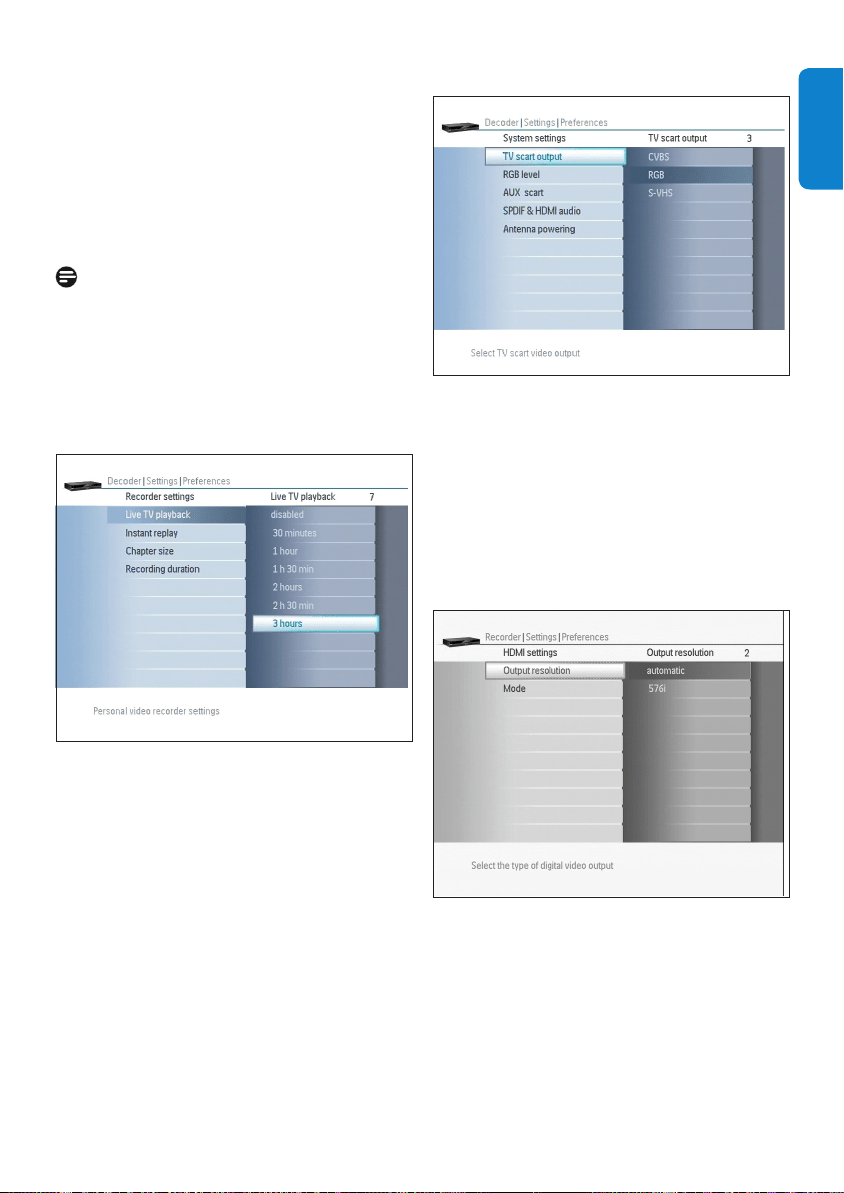
Recorder settings
•LiveTVplayback:setthemaximum
durationofliveTVplayback,from30
minutes to 3 hours, or disable it
•Instantreplay:setthetimeofinstantreplay,
from10secondsto1minute
•Chaptersize:settheTimeshiftbuffer’s
defaultstoragesizefrom1minuteto15
minutes
•Recordingduration:Settherecording
defaultduration,from30minuteto3
hours.
System settings
•TV scart output
•RGBlevel
•AUXscart
•SPDIF&HDMIaudio:Setthevalueto
PCM forstereoandDolby Digitalfor
multi-surround sound output on audio
amplier
•Antennapowering
HDMI settings
•Output resolution: only two choices are
possible to set HDMI output resolution:
“automatic”mode(bydefault)or“576i”
mode.
•Mode:selectHDMIifyourTVsetistted
withanHDMIinputorselectDVIifyour
TVsetisonlyttedwithaDVIinput.Inthe
latter case, you need an HDMI-DVI cable
or a HDMI-DVI adapter.
DTR 7510 200910.indd 35 16/10/2009 17:41:05
UsemoreofyourDigitalTerrestrialReceiver36
Note
•AllTVdonotsupport576ioutput.
•Incaseofblackscreenafterselectingan
HDMIoutput,pleaseconnectaSCART
cable to your TV set to change the output
HDMI resolution.
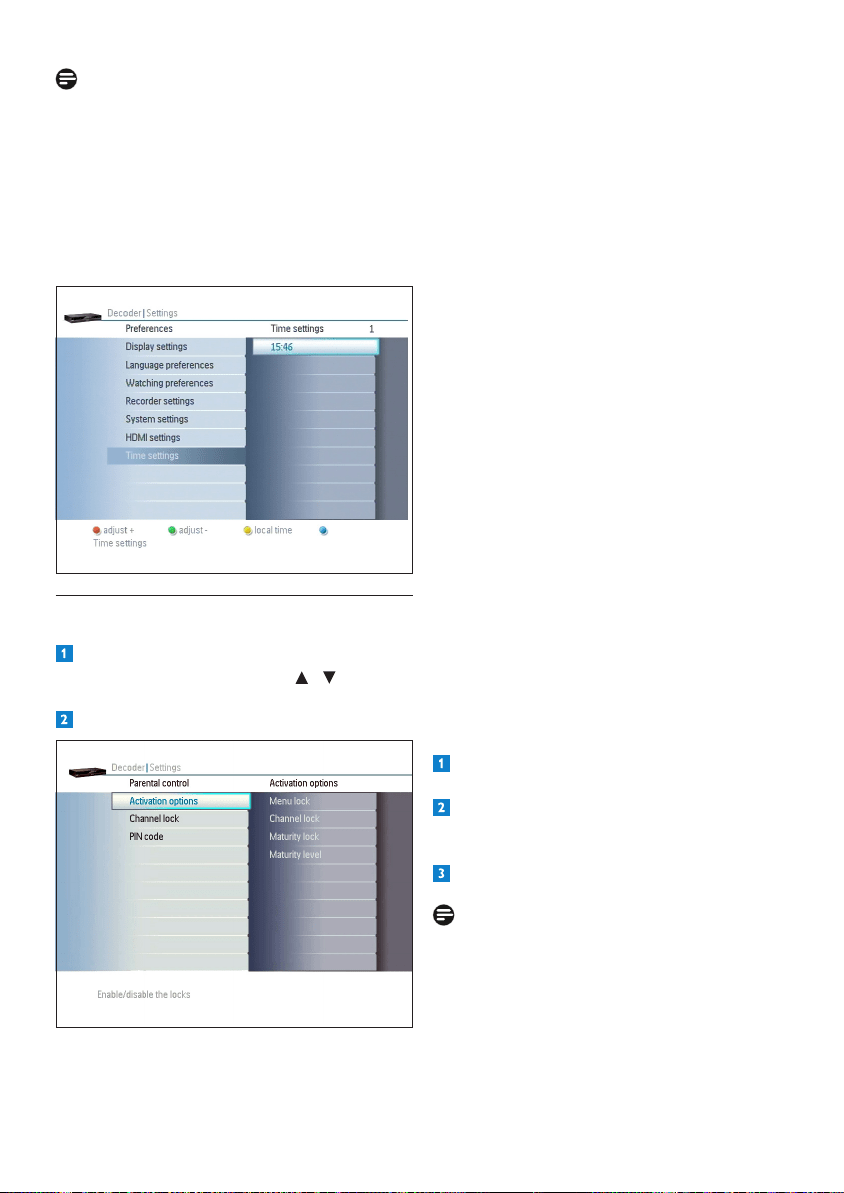
Time settings
Settheappropriatetimeusingthecolouredkeys.
5.9.2 Parental control
Once you are in the Settings menu, select
Parental control using the / arrow
keys.
Press OK.
ParentalControlisusedtoactivatelocking
options.APINCodeisusedtopreventaccess
tolockeditems.
Lockingoptionsinclude:
•Lockingaccesstothemenu
•Lockingaccesstoindividualchannels
•Lockingaccesstoprogrammesaccording
to their maturity rating.
Parental Control is also used to change the PIN
CodeoftheDigitalTerrestrialReceiver.
Activation options
Enableordisablethefollowing:
•Menulock
•Channellock
•Maturitylock
IfyouenableMaturitylock,selectaMaturity
level. Maturity level is used to set PIN Code
protection on programmes according to their
maturity rating.
Thisfeatureisbasedonbroadcastratings.Very
fewchannelsarebroadcastingratings.
Setamaturitylevelfromage2to18toprevent
undesiredaccesstoprogrammesforwhich
maturity rating is higher. For instance, to prevent
yourchildfromwatchingaprogrammenon-
suitable to children below 10, set the maturity
rating to 10.
To access this programme, you will be prompted
to enter your PIN Code.
Channel lock
Tolockorunlockchannels:
Scrolltothechannelyouwanttolockor
unlock.
Pressthegreen-colouredkeytolockor
unlockthechannel.Lockedchannelsare
markedwithapadlock.
Press OK to exit the channel list
Note
•Channellockiseffectiveonlyifyouhave
enabledthechannellockoption.
•Alockedchannelislockedinallthelistsit
belongs to.
DTR 7510 200910.indd 36 16/10/2009 17:41:06
37UsemoreofyourDigitalTerrestrialReceiver
ENGLISH
PIN Code
To change your PIN Code:
Enter your PIN Code.
Enter your new PIN Code.
Enter your new PIN Code again.
Note
OnceyouhavechangedyourPINCode,keep
itsecrettopreventothersfromusingit.Ifyou
forgetorloseyourPINCode,refertochapter
Frequentlyaskedquestions.
Note
ThePINCodedefaultvalueis0000.
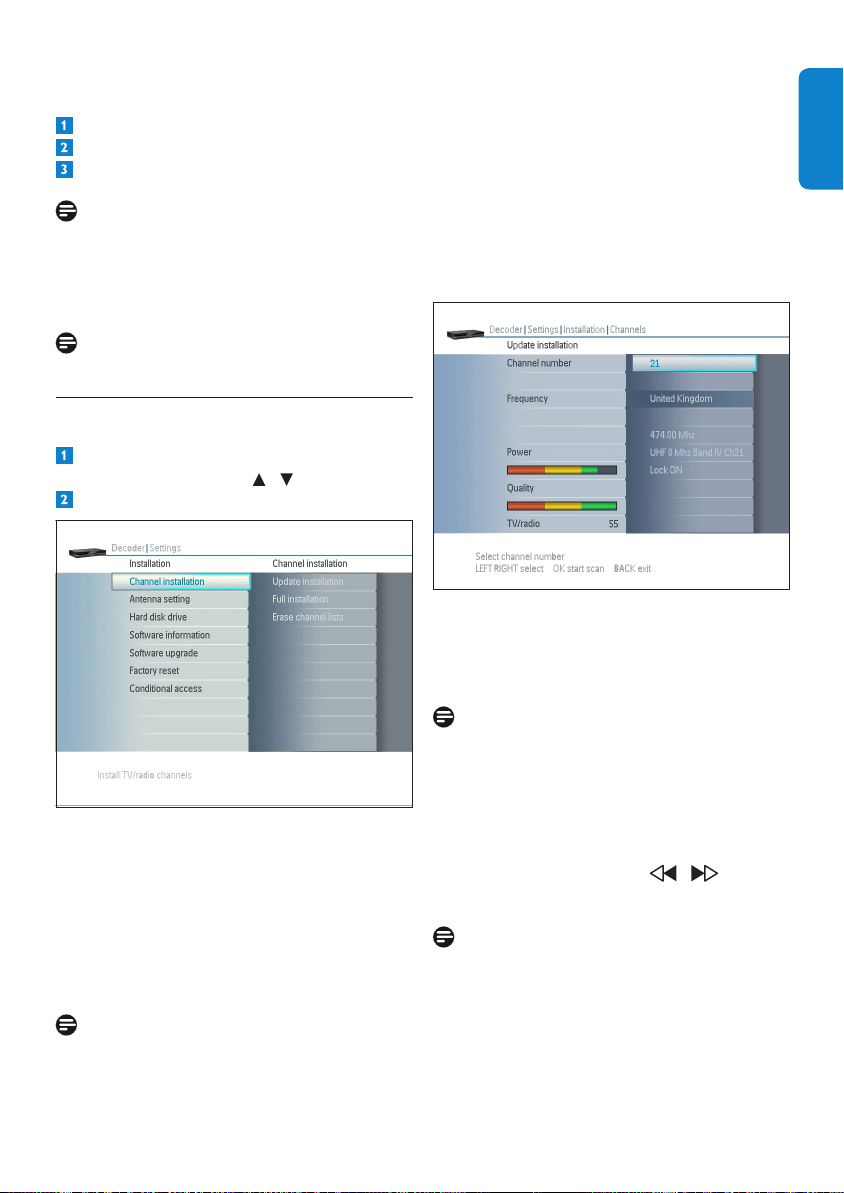
5.9.3 Installation
Once you are in the Settings menu, select
Installation using the / arrowkeys.
Press OK.
This menu is used to:
•Manage channel installation
•Position your antenna - Test signal level and
quality
•ManagetheHardDiskDrive
•Checksoftwareupgradesandinformation
•Restore the Digital Terrestrial Receiver
factorysettings.
Disabling Hard drive is a way to reduce Fan
noise.HDDisasourceofheatandnotusingit
reducestheneedforusingtheinternalfan.
Channel installation
This sub-menu is used to manage channel
installation and update TV/Radio services in the
main list
•Update installation: manual update
•Full installation: choose between fast,
(recommanded) automatic and
advanced. (long) see Retune page 11
•Erase channel lists: Use this option to
deleteallchannelsandfavoritelists.
Antenna setting
Thissub-menuisusedtocheckthesignallevel
andquality.Ifthesignalpowerandqualityisnot
adequate,adjustyourantenna.
Note
ForinformationontheUHFchannelsavailablein
yourarearefertoyourlocaldealer.
Hard disk drive
•Recordles:pressOK to delete all
•Formatdisk:pressOKtoformatdisk
•Harddiskdrive:usethe / arrow
keystoenableordisableHardDiskDrive.
Note
•DisablingtheHardDiskDrivealsodisables
alltherecordingfunctionsandTimeShift
Bufferfunctions.Youwon’tbeableto
access the recorded programmes.
•InformationontheHDDreferenceand
capacity is displayed in the bottom right
corner.
DTR 7510 200910.indd 37 16/10/2009 17:41:06
UsemoreofyourDigitalTerrestrialReceiver38
Software information
ThismenugivesyouinformationontheDigital
Terrestrial Receiver, including the model type
andcurrentsoftwareversion.
Software upgrade
Softwareupgradeisusedtodisplaythecurrent
softwareversion.
Inordertomaintainadvantagesofsoftware
improvementswearecarryingout,pleasecheck
regularly on the DTG web site, (http://www.dtg.
org.uk/industry/download_schedule.php)inthe
“Freeviewdownloads”tables,fortheavailability
ofanewsoftwareversionforthePhilips
DTR7510/05 digital terrestrial recorder.
Ifthereisanewsoftwareversionbroadcast,
pleasefollowtheinstructions:
Pressredcoloredbuttontocheckifan
updateisavailable.Itwilltakefewminutes.
Ifanewversionisfound,pressOK to install
it. Press OK toconrm.
Whenupdateisnished,itwillrebootthebox.
Factory reset
Factory Reset is used to restart the Digital
Terrestrial Receiver in its initial state: it is
protectedbycode(default0000)
Reset&restart:youlosealldataandinformation
previouslystored,andyouhavetorestartrst
installation.
Allrecordingsonharddrivearedeleted!!
Conditional access
The Conditional access sub-menu is used
togiveinformationontheNagra-Mediagard
conditionnalaccessembeddedinthesoftware
versionofyourdigitalterrestrailrecorder.
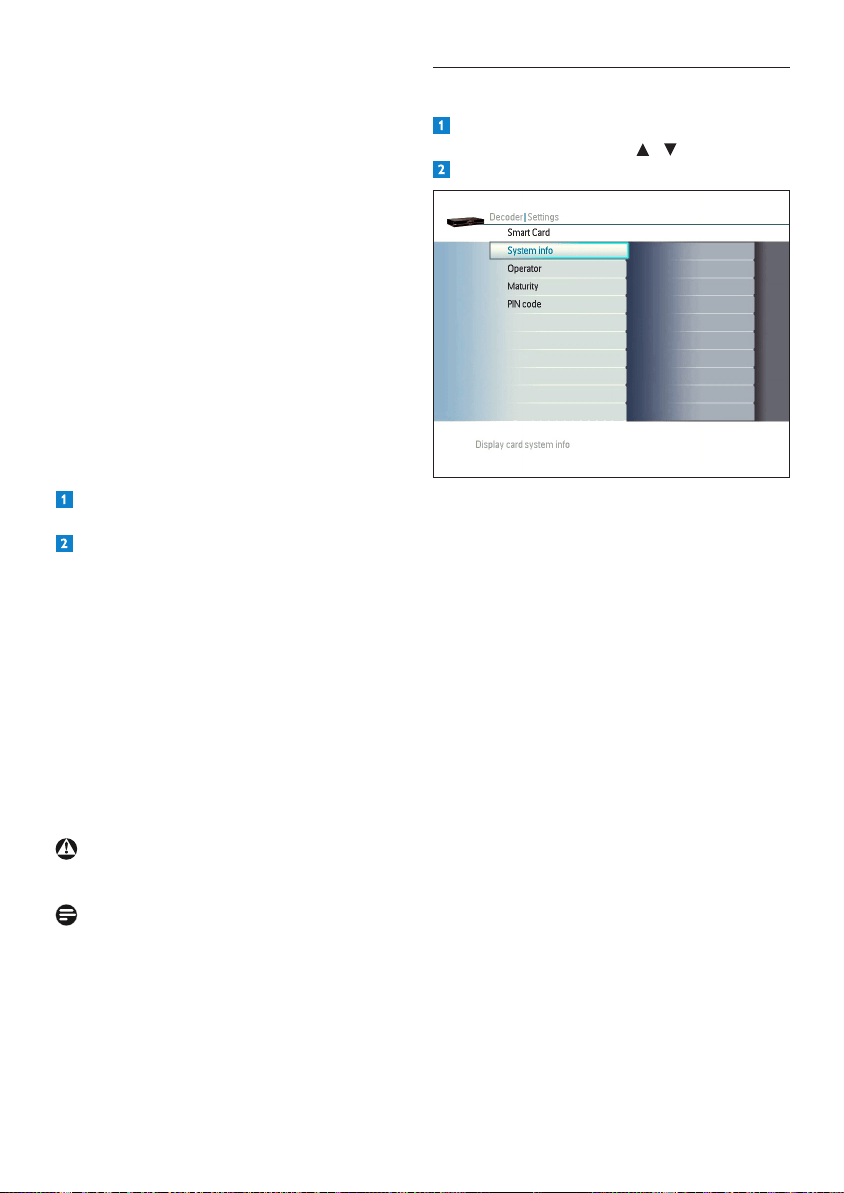
5.9.4 Smart Card
Once you are in the Settings menu, select
Smart Card using the / arrowkeys.
Press OK.
Thismenuprovidesyouaccesstothefollowing
options:
•Systeminfo
•Operator
•Maturity
•PIN code
System info:displayscardsysteminfo
Operator:displayscardoperatorsinfo
Maturity:providesinformationaboutmaturity
level
PIN code: use it to change the card PIN code
DTR 7510 200910.indd 38 16/10/2009 17:41:07

39Maintenance
ENGLISH
6 Maintenance
6.1 Cleaning
Forcleaning,useasoft,damp(notwet)cloth.
Never use any abrasive cloth and aerosol
cleaners
6.2 Replacement
The Digital Terrestrial Receiver does not contain
any user-serviceable parts. Do not attempt to
openit.Allmaintenanceworkmustbecarried
outbyqualiedservicecentres.
6.3 Disposal
Yourproductisdesignedandmanufacturedwith
high quality materials and components, which
can be recycled and reused.
Pleaseinformyourselfaboutthelocalseparate
collectionprocessforelectricalandelectronic
products.
Please act according to your local rules and
donotdisposeofyouroldproductswithyour
normal household waste. The correct disposal
ofyouroldproductwillhelppreventpotential
negativeconsequencesfortheenvironmentand
human health.
DTR 7510 200910.indd 39 16/10/2009 17:41:07
Accessoriesandconnections40
7 Accessories and
connections
7.1 Connecting a DVD player /
external recorder
Connecttheterrestrialantennacablefrom
thewallsocketorfromatable-topantenna
tothe“RFIN”socketattherearofthe
Digital Terrestrial Receiver
Connectthe“RFOUT”socketattherear
oftheDigitalTerrestrialReceivertothe
RFinputofyourDVDplayer/external
recorder using a RF cable
ConnecttheRFoutputattherearofyour
recordertotheRFinputofyourTVset
using a RF cable
ConnecttheSCARTcabletotheSCART
inputoftheTVsetandtothe“EXT1TO
TV”SCARTsocketattherearoftheDigital
Terrestrial Receiver. Your recorder does
notincludeanyrecordingfeaturefromScart
input.
You could also connect an HDMI cable to
theHDMIinputoftheTVsetandtothe
“HDMI”socketattherearoftheDigital
Terrestrial Receiver
To connect the Digital Terrestrial Receiver to
themains,refertochapterGettingstarted
7.2 Connecting your audio equipment
Option A – Analogue connection
Connect the L/R audio outputs to the relevant
inputsofyouraudioequipmentusingadouble
CINCH cable (not supplied).
Consulttheusermanualofyouraudio
equipment to choose the proper analogue audio
inputs.
Option B – Digital connection
Youraudioequipmentisttedwithadigital
audio input:
ConnecttheDIGITALaudiooutputofthe
Digital Terrestrial Receiver to the relevant audio
inputofyouraudioequipmentusingasingle
CINCH cable (not supplied).
Consulttheusermanualofyouraudio
equipment to choose the proper digital audio
input.
Notes
With digital connection, Mute and Volume
operations are managed by your audio
equipment and not any more by your recorder.
DTR 7510 200910.indd 40 16/10/2009 17:41:07

41Accessoriesandconnections
ENGLISH
7.3 Universal remote control
Prior to using your universal remote control,
checkorsetthefollowing:
•Device you want to control (Mode
selection)
•Volume and mute control assignment
•BrandsettingforyourTV,VCR,DVDand
Amplier
7.3.1 Mode selection (selecting the
device you want to control)
Your 5-in-1 remote control can be used to
controlmostofyouraudio/videoequipment
through various modes:
• STBmodeforthecontrolofyourDigital
Receiver
• TVmodeforthecontrolofyourTVset
• VCRmodeforthecontrolofyourVCR
• DVDmodeforthecontrolofyourDVD
or DVD Recorder
• AMPmodeforthecontrolofyouraudio
tuner/amplier.
Press SELECToncetocheckwhichmode
is active.To change the mode, press SELECT
repeatedly until the desired mode is signalled by
the corresponding indicator.
The mode sequence is:
STB-->TV-->VCR-->DVD-->AMP.
7.3.2 Volume and mute control
assignment
Default volume and mute control
assignment
Foreachmode,youcanselectthedeviceof
your audio/video set-up to which volume and
mute control is assigned.
WheninSTBmode,thevolumefunctions
(VOL+/- and keys)canbecontrolled
throughyourTVset,amplier,ordigitalreceiver.
Bydefault,volumecontrolisperformedthrough
a Philips brand TV set.
When in TV, VCR or DVD mode, the volume
functions(VOL+/- and keys)canbe
controlledthroughyourTVsetoramplier.By
default,volumecontrolisperformedthrougha
Philips brand TV set.
WheninAMPmode,thevolumefunctions
(VOL+/- and keys)canbecontrolled
throughaPhilipsbrandamplieronly.
Changing the volume and mute control
assignment
Theproceduresbelowassumeyoustartfrom
defaultsettings.
YourDigitalReceiver(STB),TV,VCRorDVD
audio outputs are “all” connected to your
amplier.Weadviseyoutoassignvolumecontrol
toyouramplierforallmodes(STB,TV,VCR,
and DVD).
To do so:
Press SELECT repeatedly to select the
AMPmode.
Simultaneouslypresskeys1 and 3 until the
AMPindicatorturnsonthenreleasethese
keys.
Enter code 993.The indicator surrounding
thekeyblinksonceaftereachentry.
Press the VOL-/+key.Theindicator
surroundingthekeyblinkstwice.
From then on, whatever mode you are in, the
AMPindicatorturnsoneachtimeyoupressone
ofthe(VOL+/- and keys).
Whencontrollingthevolume,makesurethe
sourceselectorofyouramplierisproperlyset
(refertoyouramplierusermanualforsource
selection).
Note
IfyourTVsetisonlyttedwithSCART
connectors (no HDMI, no DVI and no YPbPr),
we advise you to assign volume control to your
digitalreceiverfortheSTBmode.
DTR 7510 200910.indd 41 16/10/2009 17:41:08

Accessoriesandconnections42
Chooseonebrandcode,madeupof4digits,
fromthecodelistattheendofthismanual.
(Ifseveralcodesarepossible,gothroughthis
procedurewiththerstcodeandtryyour
remotecontrol.Ifyouarenotsuccessful,
repeat the procedure with the second code,
and so on).
Press the SELECTkeyrepeatedlyto
choose the mode corresponding to the type
ofdeviceyouwanttosetup(TV,VCR,DVD
orAmp/Tuner).
Simultaneouslypressdigits1and3untilthe
indicatorsurroundingthekeyblinkstwice
thenreleasethesekeys.
Enter the 4 digit code corresponding to the
device brand you have chosen.The indicator
surroundingthekeyblinksonceaftereach
oneoftherstthreeentries.Theindicator
surroundingthekeyblinkstwiceafterthe
fourthentry.
Ifaninvalidcodehasbeenentered,theindicator
surroundingthekeyblinksonceonly.Restart
fromstep1.
Notes
•Ifthebatterychangetakesmorethan1
minute the remote control may return to
thePhilipsdefaultsettings.Thereforeyou
havetoproceedwithanewsettingofyour
remotecontrolwiththehelpofthetable
aboveforyournon-Philipsbrandeddevices.
•Allmanufacturersareconcernedabout
theconstantimprovementoftheir
products.Althoughyourremotecontrolis
compatiblewithmostoftheequipmentof
thefollowinglist,Philipscannotguarantee
itsoperationwiththecompleterangeof
productsonthemarket
To do so:
Press SELECTrepeatedlytoselecttheSTB
mode.
Simultaneouslypresskeys1and3untilthe
STBindicatorturnsonthenreleasethekeys.
Enter code 993.The indicator surrounding
thekeyblinksonceaftereachdigitentry.
Press the VOL-/+ key.Theindicator
surroundingthekeyblinkstwice.
You have made several setting changes and you
wanttorestorethedefaultvolumecontrol
assignment settings
(see table in next paragraph)
Defaultvolumecontrolassignmentmeans:
•inTVmode,volumecontrolisperformed
through a Philips brand TV set
•inVCRmode,volumecontrolisperformed
through a Philips brand TV set
•in DVD mode, volume control is
performedthroughaPhilipsbrandTVset
•inAMPmode,volumecontrolisperformed
throughaPhilipsbrandamplieronly.
Torestoredefaultsettings:
Simultaneouslypresskeys1and3untilthe
indicatorsurroundingthekeyblinkstwice
thenreleasethesekeys.
Enter code 981.The indicator surrounding
thekeyblinkstwice.
7.3.3 Changing the brand setting of your
remote control for your TV, VCR,
DVD or Amplier
Bydefaultatrstpoweruporatrst
installation, your universal remote control is pre-
set to control your Digital Receiver as well
as most Philips brand audio/video devices.
Ifyouhaveotherbrandsofdevices,orifthe
presets do not enable you to control your
Philipsdevice,pleasefollowtheprocedure
below.
DTR 7510 200910.indd 42 16/10/2009 17:41:08
43Accessoriesandconnections
ENGLISH
7.3.4 Using the universal remote control
with your TV
1 Standby
2 0-9 Channel selection
3 BACK Lastchannelrecall
4 Changevalueofmenuitem
option
5 Changevalueofmenuitem
option
6 Item selection in menu /
OK Acknowledgeofselection
7 P+/- Channel Up/Down
8 Colourkeys Contextualkeysinteletext
9 MENU Open/Close menu
10 Movie Expand /
TVdisplayformat
11 Audiotrackselection
12 VOL+/- Volume Up/Down
13 SoundMute
14 Open/closeOnScreen
Display
15 EXIT Exit,menuoff
16 SELECT RemotecontrolMode
selection
Seep25forDigitalRecorderMode(STB)
1
5
3
2
4
6
7
8
9
10
12
11
13
14
15
16
DTR 7510 200910.indd 43 16/10/2009 17:41:08
Accessoriesandconnections44
7.3.5 Using the universal remote control
with your VCR (VCR mode)
1 Standby
2 0-9 Channel selection
3 Play/pause
4 Stop
5 P+/- Channel Up/Down
6 TIMER Recording (Press TIMER +
OK to start recording)
7 Movie Expand
8 VOL+/- Volume Up/Down
9 SoundMute
10 Record
11 SELECT RemotecontrolMode
selection
Seep25forDigitalRecorderMode(STB)
1
2
3
4
5
6
7
8
9
10
11
DTR 7510 200910.indd 44 16/10/2009 17:41:08
45Accessoriesandconnections
ENGLISH
7.3.6 Using the universal remote control
with your DVD player (DVD mode)
1 Standby
2 0-9 Channel selection
3 Changevalueofmenuitem
option
4 Changevalueofmenuitem
option
5 Item selection in menu /
OK Acknowledgeofselection
6 Play/pause
7 Stop
8 P+/- Channel Up/Down
9 Subtitleselection
10 TIMER Recording (Press TIMER +
OK to start recording)
11 MENU Open/Close menu
12 Movie Expand /
TVdisplayformat
13 VOL+/- Volume Up/Down
14 SoundMute
15 Open/closeOnScreen
Display
16 EXIT Exit,menuoff
17 SELECT RemotecontrolMode
selection
Seep25forDigitalRecorderMode(STB)
1
4
2
3
5
6
7
8
9
10
11
12
13
14
15
16
17
DTR 7510 200910.indd 45 16/10/2009 17:41:09
Accessoriesandconnections46
7.3.7 Using the universal remote control
with your tuner/amplier (AMP
mode)
1 Standby
2 0-9 Channel selection
3 Tuning Down
4 Tuning Up
5 Preset Up/Down
6 P+/- Channel Up/Down
7 Colourkeys Red:SelectSATinput
Green:SelectTVinput
Yellow:SelectDVDinput
Blue:Selecttuner/amplier
input
8 VOL+/- Volume Up/Down
9 SoundMute
10 SELECT RemotecontrolMode
selection
Seep25forDigitalRecorderMode(STB)
1
4
2
3
5
6
7
8
9
10
DTR 7510 200910.indd 46 16/10/2009 17:41:09

47Guarantee and service
ENGLISH
8 Guarantee and service
For the Philips warranty applicable to this
product,wereferyoutothePhilipswebsite
www.philips.com/guarantee. In the event you
do not have an Internet connection, please
contact your local Philips Consumer Care
Centre. Contact details are given in the Contact
informationchapterofthismanual.
9 Technical data
ThisproductisinconformitywithEuropean
95/47/EC and 2002/21/EC directives.
Theproductcomplieswiththefollowing
European council Directives: 2006/95/EEC and
89/336/EEC.
Tuner/Reception/Transmission
• DVB:Terrestrial
• Demodulation type: COFDM 2K/8K, MPEG-2
DVBcompliant,Network:MFN/SFN,QAM,
QPSK
• Inputfrequencyrange:474-862MHz
• NumberofTVtuners:2
Video Recording
• Recording enhancements: One Touch Record
(OTR), split event, series recording, accuracy
Storage Media
• HardDiskCapacity:160GB
• HDD video recording capacity: 78 hrs
• HDD recording enhancements: Instant Replay,
PauseLiveTV,TimeShiftBuffer,HardDisk
SpaceUsed,HardDiskSpaceFree
• ExtraHardDiskTechnology:Simultaneous
Record&Playback
• HDD Type: 3.5” HDD
Connectivity
• Terrestrialantennainterface:RFin,IEC169-2,
RF out, (bypass) IEC 169-2
• Video Output - Digital: HDMI
• TVscartout:AudioL/R,CVBS,RGB
• VCRscartout:AudioL/R,CVBS
• AudioOutput-Analog:AudioL/R(cinch)
• AudioOutput-Digital:Coaxial(cinch)
• USB:USB2.0
DTR 7510 200910.indd 47 16/10/2009 17:41:09

Technical data48
Convenience
• ChildProtection:ChildLock+ParentalControl
• Convenience Enhancements: Electronic
ProgrammingGuide,AutomaticOverheat
Warning, On-screen Display
• EaseofInstallation:Autoinstall
• Events timer/reminder: 20
• Favorite list radio programs: 4
• Favorite list TV programs: 4
• Parentalcontrol:LockwithPINcode,Child
timer
• Programmable Events: 32
• Recording:Recordfailurealarm,Record
header message
• Signalstrengthindication
• UserInterface:8daysElectronicprogram
Guide,Automaticprogramlistupdate,Multiple
subtitlessupported,Now&NextESG,On
ScreenDisplayonTV,Softwareupgradeover
the air, TV and Radio mode
Still Picture Playback
• Picturecompressionformat:JPEG
• PlaybackMedia:USBashdrive
Video Decoding
• Compression Format: MPEG-2 MP@HL (high
denition),MPEG-2MP@ML(stddenition)
• Conditional access system: Mediaguard (card
not supplied)
• De-scrambling:SmartCardreader
• Resolution: up to 1920 x 1080 interlaced
• AspectRatio:16:9,4:3Letterbox,4:3PanScan
• Video bitrate: Up to 15 Mbit/s
Audio Decoding
• Compressionformat:DolbyDigital,MPEG
layer I/II, MP3
• Soundsystem:DolbyDigital,DolbyDigital
downmixedtostereo,Stereo
System Specications
• CPUspeed:240MHz
• Flashmemorysize:16MB
• Ramsize:64MB
Power
• Mains power: 230 V
• Power consumption: < 23 W
• Standbypowerconsumption:<12W
Dimensions
• Carton dimensions (WxDxH):
320x245x65mm
• Product dimensions (WxHxD):
240x44x145mm
• Temperature (storage): -20° to 60° Celsius
• Weight:0.98kg
• Weightincl.packaging:1780kg
• Temperature (operation) 5° to 35° Celsius
Accessories
• IncludedAccessories:ACpowercord,SCART
cable,RemoteControl,UserManual,Quick
start guide
• Batteries:2xAA
Due to continued improvements, this
informationissubjecttochangewithoutnotice.
DTR 7510 200910.indd 48 16/10/2009 17:41:09

49Frequentlyaskedquestions
ENGLISH
10 Frequently asked
questions
Connection
On-screen display working but there is no
reception
Checktheinstallationandseeretunepage11.
Intermittent reception
Checkallconnectionsandcables
Aerialcouldalsobetherootcauseofissues.
The picture is not sharp and on-screen
text is difcult to read
•Change the TV scart output setting to
RGBfromtheSystemsettingsscreen
•RefertoyourTVusermanual
•UsetheSCARTcablesuppliedwiththe
Digital Terrestrial Receiver
What is HDMI?
High-DenitionMultimediaInterface(HDMI)is
ahigh-speeddigitalinterfacethatcantransmit
uncompressedhighdenitionvideoanddigital
multichannelaudio.Itdeliversperfectpicture
andsoundquality,completelyfreefromnoise.
HDMIisfullybackwardcompatiblewithDVI
Why does it take so long to display the
contents of my USB device?
• Thiscouldbeduetothelargenumberof
les(>500les/folders)orsizeoftheles
(>1MB)
• Therecouldbeothernon-supportedlesin
the device that the system is trying to read/
display
• FilesystemmustbeFAT16orFAT32
• DevicemustbeUSB2.0
No sound Nor picture but the front panel
LED is lit in red
Press onthefrontpanel.
Set-up
The LED on the front panel does not light
up after 5 secondes.
• Checkthatthepowercordiscorrectly
connected. Disconnect this cord and
reconnect it to ensure it is in place
• Checkthatpowerisavailableatthewall
socket
No sound or picture but the front panel
LED is blinking green
Pressthered-colouredkey,andthenenteryour
PIN Code to disable protection.
The remote control does not operate the
Digital Terrestrial Receiver
• Pressstopbuttontoverifyifyouarenotin
playback
• MakesuretheDigitalTerrestrialReceiveris
onSTB:pressSelectbutton,theSTBmust
behighlightedonthesmallscreenofthe
remote.Ifnotargetishighlightedcheckthe
batteries,pressSelectagaintohighlightSTB.
• Makesureyouarepointingyourremote
controlatthefrontpaneloftheDigital
Terrestrial Receiver
You cannot nd all the channels you think
should be available.
Try re-tuning the Digital Terrestrial Receiver,
followingtherelevantstepsinchapterInstall.
Checkinthe800range.
Ifyouarestillmissingchannels,callyour
customer service adviser.
Even if you use the numerical keys, you
cannot access a particular channel.
Enter your PIN Code to access the channel or
unlockit.ThedefaultPINCodeis0000.
You set a recording but did not record
what you wanted.
Makesurethatyourrecorderdidnotgetmore
than two records to do at the same time.
DTR 7510 200910.indd 49 16/10/2009 17:41:10
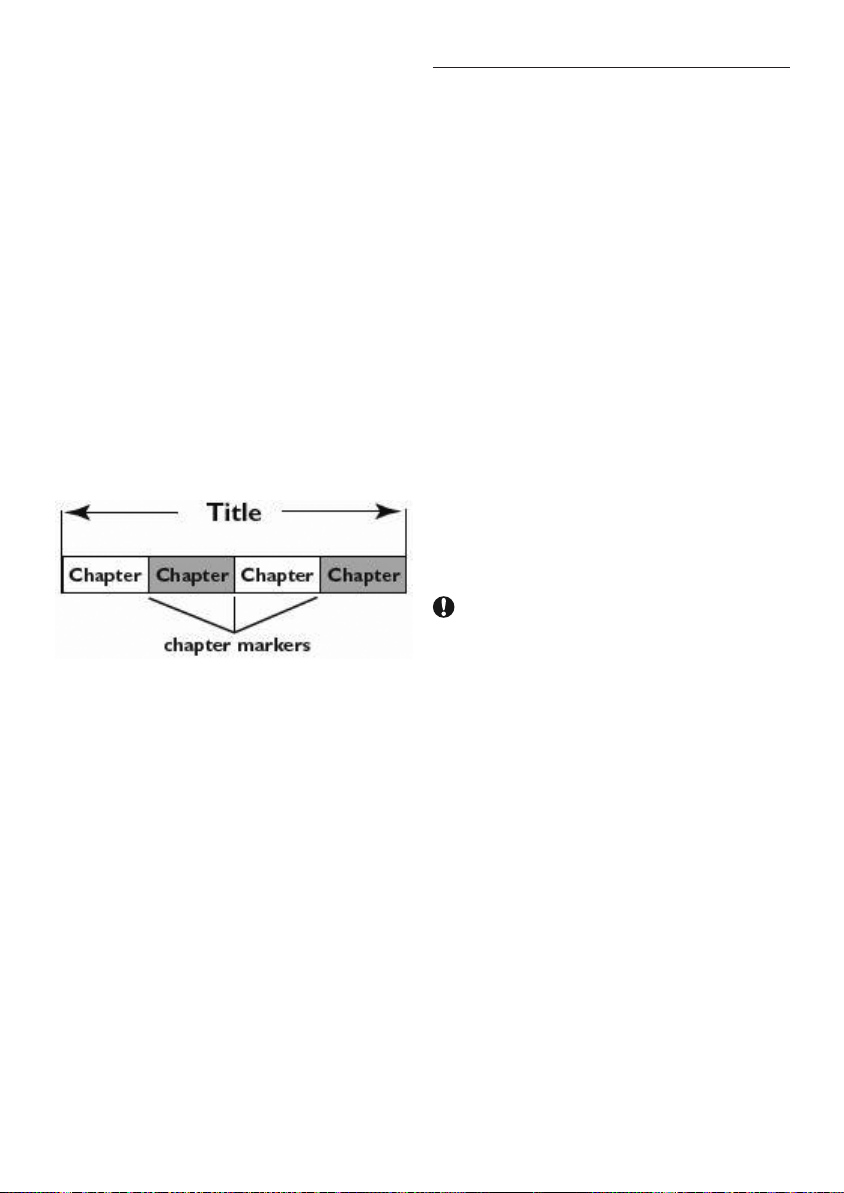
Frequentlyaskedquestions50
You set a recording but did not record
what you wanted.
PressTimertocheckifanalternateinstancewas
selectedbecauseofconicts.
You have forgotten your PIN Code
WhenpromptedforyourPINCode,enterthe
Master PIN Code. This will allow you to proceed
as well as reset the current PIN Code to its
defaultvalue(defaultis0000).TheMasterPIN
Code is 3001. Keep this code secret to prevent
othersfromusingit.
What are Titles and Chapters?
Arecordedmoviecontainstitlesandchapters,
whicharesimilartothetitlesandchaptersofa
book.Atitleisoftenacompletemovieandissplit
intochapters,orindividualscenesfromthemovies.
Programmes are recorded as a single title. They
mayconsistofonechapterorafewchapters
within a title, depending on the recording
settings.
How do I set up titles and chapters?
The Digital Terrestrial Receiver will automatically
create a new title every time you start a new
recording.
The HDD doesn’t respond but the power
is on
CheckifHDDisenabled.
Unplugtherecorderfromthemains.waitfor10
minutes, power on again.
Iftheproblempersist,callyourretailer.
Installation
No sound or picture but the front panel
LED is lit in green
• Checktheconnectionsatthewallsocket
and Digital Terrestrial Receiver
• ChecktheEXT1TOTVSCARTconnection,
or the HDMI connection
The picture on some channels seems to
have been stretched or squashed.
ChecktheDigitalTerrestrialReceiverTVshape
setting,followingtheinformationinparagraph
Watchingpreferences.Ifyouhaveawidescreen
TV,youmayalsoneedtocheckthesettingson
yourTV.Thedisplayformatbeingmanagedby
the Digital Terrestrial Receiver, set your TV to
“fullscreen”ortothesimilarequivalentsetting
(refertotheusermanualofyourTVset).
The order of the channels has changed.
RefertoparagraphSorttheselectedlist:to
change the order again.
Ifyouhavetriedalloftheactionssuggested
above and could not solve the problem, contact
your customer service adviser.
The message Overheating is displayed on
the front panel
• UnplugtheDigitalTerrestrialReceiverfrom
the mains to cool it down.
• Makesurethatitisplacedonarmsurface,
with the ventilation openings not covered
with items such as newspapers, table clothes,
curtains, etc.
• Makesurethattheheatcouldbeevacuated:
the receiver must not be included in a close
cabinet
• Iftheproblempersists,contactyourlocal
Philips Consumer Care Centre
DTR 7510 200910.indd 50 16/10/2009 17:41:10

51Glossary
ENGLISH
11 Glossary
Analogue audio
Soundthathasnotbeenturnedintonumbers.
AnaloguesoundisavailablefromtheLEFT/
RIGHTAUDIOoutputs.Theredandwhite
socketssendaudiothroughtwochannels,the
leftandright.
Aspect ratio
Aspectratioreferstothelengthtoheightratio
ofTVscreens.TheratioofastandardTVis4:3,
whiletheratioofahigh-denitionorwideTVis
16:9.Theletterboxformatallowsyoutoenjoya
picture with a wider perspective on a standard
4:3 screen.
Delay
Thetimedifferencebetweenasoniceventand
its perception at the listening position. Use the
LipSynchronizationfeaturetocancelthedelay.
De-scrambling/scrambled
Many TV channels are scrambled. To de-scramble
themyouneedspecicsmartcardsprovidedby
differentpay-TVproviders.
Digital audio
Soundsignalthathasbeenconvertedinto
numerical values. Digital sound is available
whenyouusetheDIGITALAUDIOOUT
COAXIAL.Thesesocketssendaudiothrough
multiplechannels,insteadofjusttwochannelsas
analogue does., Volume and mute are managed
by audio equipment.
Dolby Digital
AsurroundsoundsystemdevelopedbyDolby
Laboratoriescontaininguptosixchannelsof
digitalaudio(frontleftandright,surroundleft
andright,centreandsubwoofer),Volumeand
mute are managed by audio equipment.
DVB
DigitalVideoBroadcasting
EPG
Electronic Programme Guide
HDD
HardDiskDrive
HDMI
HDMIisastandardforvideointerfacing;itcan
conveyamassiveamountofdigitaldata.Itmeans
it can easily support all HDTV standards.
HDTV
High-DenitionTelevision
JPEG
Averycommondigitalstillpictureformat.A
still-picture data compression system proposed
by the Joint Photographic Expert Group, which
featuressmalldecreaseinimagequalityin
spiteofitshighcompressionratio.Filesare
recognizedbytheirleextension“JPG”or
“JPEG”.
Lip Synchronization
Settingusedtosynchronizesoundandpictures
incaseadelayisexperienced,inparticularifthe
soundofspeechdoesnotmatchlipmovements.
MP3
Aleformatwithasounddatacompressionsystem.
“MP3”istheabbreviationofMotionPictureExperts
Group1(orMPEG-1)AudioLayer3.Byusingthe
MP3format,oneCD-RorCD-RWcancontain
about 10 times more data than a regular CD. Files
arerecognizedbytheirleextension“.mp3”.
DTR 7510 200910.indd 51 16/10/2009 17:41:10

Glossary52
MPEG
MotionPictureExpertsGroup.Acollectionof
compressionsystemsfordigitalaudioandvideo.
PaP
Picture and Picture
PiP
Picture in Picture
PIN Code
4-digit code used to prevent access to
inappropriate programmes (parental control).
SCART Loop-through
Functionallowingautomaticsignalby-passfor
playbackfromaVCRorDVDplayer/recorder
connectedtoSCARTEXT2.
SDTV
StandardDenitionTelevision.
Smart Card
CardtobeinsertedintotheCommonInterface.
It is provided by the pay-TV provider whom you
tookoutasubscription.
Surround
Asystemforcreatingthreedimensionsound
eldsfullofrealismbyarrangingmultiple
speakersaroundthelistener.
USB key
Smallsizestoragedevice.Itisusedtostore
alltypesofcomputerles.AUSBkeycanbe
connectedtotheUSBportlocatedonthefront
paneloftheDigitalTerrestrialReceiver.
DTR 7510 200910.indd 52 16/10/2009 17:41:10

53Index
ENGLISH
12 Index
Connect
basic connection, 10
Consult the TV Guide, 15
Control Live TV, 16
Control Volume, 14
Favorite lists
Renameafavoritelist,27
Sortafavoritelist,28
Front display
Interpretfrontdisplaymessages,22
Interpretfrontdisplaypictograms,21
HDD titles
PlaybackfromHDDlibrary,19
Install
First installation, 10
Searchfailure,11
Pause live TV, 15
Playback
PlaybackfromHDDlibrary,19
PlaybackfromUSB,19
Record, 17
Remote control
Use the remote control, 23
Retune 11
Selectachannel,13
Setprogrammeoptions,14
Use channel lists, 13
Usethetimeshiftbar,16
Viewchannel/programinfo,14
Wake-uptheDigitalVideoRecorder,13
Watch 2 channels at the same time, 15
Watch previously broadcast programs, 17
DTR 7510 200910.indd 53 16/10/2009 17:41:10

Remote control brand code list54
13 Remote control brand
code list
13.1 Setup Code For All TVs
Akai 0036,0062,0087,0099,0190,
0205, 0235, 0243, 0244, 0245,
0291, 0388, 0398, 0404, 0439,
0460, 0500, 0507, 0543, 0575,
0583, 0608, 0629, 0633, 0658,
0675, 0741, 0742, 0772, 0839,
1564
Bang&Olufsen 0114,0592
Beko 0222,0319,0397,0445,0513,
0633, 0741, 0742, 0835, 1064
BenQ 1783
Daewoo 0036, 0063, 0135, 0136, 0197,
0205, 0244, 0245, 0291, 0401,
0478, 0526, 0583, 0661, 0688,
0892, 0907, 1782, 1783, 1936
Dell 1481
Emerson 0039, 0063, 0071, 0072, 0097,
0100, 0114, 0129, 0197, 0204,
0205, 0221, 0222, 0274, 0309,
0347, 0388, 0397, 0398, 0478,
0513, 0695, 0741, 1936
Ferguson 0100, 0136, 0220, 0222, 0265,
0314, 0362, 0470, 0575, 0587,
0652, 1064
Firstline 0036, 0099, 0235, 0243, 0244,
0262, 0265, 0274, 0348, 0388,
0401, 0438, 0558, 0571, 0583,
0695, 0741, 0835, 1064
Funai 0291, 0695
Goodmans 0036, 0038, 0062, 0063, 0099,
0243, 0244, 0245, 0262, 0265,
0291, 0362, 0398, 0401, 0507,
0514, 0526, 0543, 0583, 0587,
0606, 0614, 0657, 0661, 0688,
0695, 0741, 0835, 0907, 1064,
1190, 1927, 1936
Grundig 0036, 0063, 0097, 0190, 0222,
0470, 0514, 0562, 0583, 0614,
0657, 0710, 0733
Hitachi 0036, 0062, 0063, 0071, 0099,
0129, 0132, 0135, 0136, 0184,
0190, 0205, 0221, 0244, 0309,
0383, 0390, 0500, 0507, 0508,
0519, 0526, 0535, 0543, 0575,
0605, 0656, 0661, 0746, 0751,
0771, 0911, 1064, 1072, 1164,
1197, 1252, 1508, 1603
Hoher 0741, 0892
InFocus 0779
JVC 0063, 0097, 0120, 0220, 0245,
0398, 0445, 0535, 0633, 0677,
0680, 0710
LG 0087, 0135, 0205, 0583, 0671,
0741, 0742, 1175, 1664
Loewe 0114, 0319, 0539, 0543, 0660,
0682
Logik 0036,0038,0087,0099,0220,
0398, 0907
Magnavox 0062, 0063, 0087, 0309, 0462,
0733, 1481, 1782
Matsui 0036, 0038, 0062, 0063, 0099,
0190, 0204, 0222, 0235, 0243
0244, 0262, 0362, 0379, 0382,
0383, 0390, 0398, 0460, 0470,
0482, 0514, 0543, 0571, 0583,
0606, 0656, 0741, 1064
Metronic 0652
NEC 0036, 0038, 0063, 0197, 0205,
0244, 0272, 0291, 0347, 0401,
0439, 0482, 0526, 0535, 0614
0688, 0731, 0732, 1197, 1297,
1731
Nokia 0190,0235,0347,0366,0373
0388, 0401, 0500, 0507, 0575
0633, 0637, 0658
Orion 0038, 0204, 0205, 0262, 0291
0347, 0348, 0382, 0439, 0470
0543, 0558, 0571, 0583, 0682
0741, 0907, 1935, 1943
Panasonic 0062, 0099, 0135, 0190, 0220
0235, 0253, 0388, 0394, 0450
0535, 0543, 0575, 0677, 0880
1337, 1677
DTR 7510 200910.indd 54 16/10/2009 17:41:10

55Remote control brand code list
ENGLISH
Philips 0036, 0039, 0072, 0114, 0135
0205, 0220, 0265, 0388, 0401
0450, 0539, 0583, 0632, 0799
1481, 1783
Pioneer 0038, 0136, 0190, 0193, 0197
0314, 0388, 0450, 0513, 0539
0787
Proline 0099, 0100, 0348, 0438, 0648
0652, 0657, 0661, 1064
Sagem 0482,0637,0645
Samsung 0036,0062,0063,0072,0087
0099, 0120, 0190, 0205, 0235
0243, 0244, 0253, 0291, 0317
0389, 0397, 0398, 0509, 0583
0614, 0645, 0671, 0709, 0745
0839
Sanyo 0038,0063,0072,0099,0131
0132, 0135, 0184, 0197, 0235
0243, 0244, 0291, 0366, 0397
0439, 0535, 0571, 0582, 0731
1782
Schneider 0039,0097,0190,0244,0245
0274, 0286, 0379, 0388, 0398
0421, 0571, 0583, 0675, 0695
0741, 1064, 1164
Sharp 0036,0063,0120,0184,0220
0283, 0518, 0543, 0677, 0695
0845, 1190, 1220
Siemens 0184,0220,0222,0562
Sony 0038,0063,0120,0129,0184
0197, 0220, 0380, 0390, 0677
0861, 1532, 1678
TCL 0439, 0733, 1564
Technics 0253, 0583, 0677
Telefunken 0100,0136,0314,0362,0373
0513, 0525, 0587, 0614, 0652
0741
Thomson 0136, 0314, 0362, 0587, 0652
Toshiba 0036, 0038, 0062, 0063, 0072
0087, 0097, 0120, 0129, 0136
0193, 0222, 0244, 0291, 0439
0450, 0535, 0645, 0671, 0677
0741, 0745, 1190, 1535, 1731
Vestel 0244, 0583, 0695, 1064, 1190
Viewsonic 0751, 1782
13.2 Setup Code For All VCRs
Aiwa 0027,0059,0064,0334,0375
0379, 0769, 1164
Akai 0047,0064,0068,0133,0267
0342, 0375, 0379, 0669
Alba 0027,0047,0099,0108,0305
0342, 0375, 0379
Aristona 0108,0173
Daewoo 0047, 0064, 0072, 0131, 0305
0379, 0664, 0669, 0871, 1164
Denon 0069, 0108
Emerson 0027, 0064, 0070, 0072, 0099
0267, 0305, 0375, 0620, 0664
Ferguson 0027, 0068, 0193, 0305, 0347
0348
Firstline 0064, 0070, 0072, 0099, 0305
0375, 0507, 1164
Funai 0027, 0064, 0099, 0305, 0620
Goldstar 0027, 0064, 0065, 0253, 0305
0507, 1164
Grundig 0061, 0099, 0108, 0253, 0347
0374, 0375, 0376, 0379, 0769
Hitachi 0027, 0064, 0068, 0069, 0072
0108, 0193, 0267, 0620
JVC 0068, 0072, 0094, 0108, 0411
Kenwood 0065, 0068, 0094, 0411
LG 0064, 0065, 0069, 0072, 0267
0507, 1164
Loewe 0064, 0108, 1589
Magnavox 0027, 0064, 0075, 0108, 0253,
0267, 0620, 0669
Matsui 0064, 0267, 0305, 0375, 0376
0379, 0769
Metronic 0108,
NEC 0064, 0065, 0068, 0075, 0094
0131, 0305, 1164
Nokia 0068,0069,0075,0108,0131
0133, 0267, 0305, 0342, 0579
Panasonic 0027, 0047, 0253, 0863, 0864
1589
Philips 0027, 0061, 0072, 0075, 0108
0173, 0253, 0411, 0620, 1296
Pioneer 0069, 0094, 0108, 1830
Proline 0027, 0305, 0347, 0669
DTR 7510 200910.indd 55 16/10/2009 17:41:10

Remote control brand code list56
Pye 0027, 0108
Radiola 0108
Samsung 0027,0065,0072,0267,0459
0647
Sanyo 0027,0074,0075,0094,0131
0267, 0375, 1164
Schneider 0027,0064,0069,0099,0108
0173, 0267, 0305, 0375, 0379
0669, 0924, 1164
Sharp 0027,0059,0064,0074,0075
0596
Siemens 0064,0108,0131,0173,0347
0374
Sony 0027,0059,0061,0074,0075
0094, 0133, 0253, 1059
Technics 0027, 0064, 0108, 0253
Telefunken 0068,0305,0347,0348,0411
0521, 0620, 0669
Thomson 0068, 0094, 0305, 0347, 0348
0411, 0521, 0749
Toshiba 0027, 0068, 0069, 0070, 0072
0094, 0108, 0267, 0379, 0411
0459, 0769
13.3 Setup Code for All Digital Video
Disks
Aiwa 0560,0668,1163,1270
Alba 0566,0699,0722,0726,0740
0744, 0757, 0810, 1078, 1167
1722
Bang&Olufsen 1052
BenQ 1263
Daewoo 0732, 0741, 0797, 0811, 0859
0860, 0896, 0897, 0899, 1196
1933, 1945
Denon 0517, 0661, 1661
Emerson 0618, 0702, 0732
Ferguson 0678, 0722, 0925, 1722, 1757
Firstline 0678, 0740, 0826, 0870, 0896
Funai 0702, 0722
Goodmans 0678, 0717, 0740, 0750, 0757
0810, 0817, 0860, 0906, 1031
1167, 1248, 1281, 1757, 1950
2034, 2041
Grundig 0566, 0578, 0678, 0697, 0713
0722, 0728, 0732, 0740, 0802
0817, 1031, 1063, 1722,1757
1947, 2073
Hitachi 0600, 0691, 0692, 0722, 0740
0884, 1946, 1947, 2021
Hoher 0678, 0740, 0853, 0858, 1031
1251
Humax 0673
JVC 0530, 0566, 0650, 0894, 1191
1928, 1967
Kenwood 0517, 0561, 0764, 1090
Kiss 0692, 0868, 2030
LG 0618, 0768, 0774, 0817, 0896
1933, 2010, 2029
LiteOn 1085, 1185, 1188
Loewe 0566, 0768, 0912
Magnavox 0530, 0566, 0673, 0702, 0740
0912, 1167
Marantz 0530,0566,0702
Matsui 0678, 0699, 0722, 0740, 1031
1722, 1757
Metronic 0717
Mustek 0757,1757,1944
Nakamichi 1226,1249
DTR 7510 200910.indd 56 16/10/2009 17:41:10

57Remote control brand code list
ENGLISH
Onkyo 0530,0654,1639,2012
PackardBell 0858
Panasonic 0517, 0530, 0598, 1037, 1932
1935
Philips 0530, 0566, 0673, 0702, 0912
1185, 1839, 1840, 1938
Pioneer 0517, 0552, 0598, 0658, 1838
1927, 1992
Proline 0678, 0699, 0713, 0737, 0860
1031, 1942
Pye 0673
Samsung 0517,0600,0771,0847,1102
1955, 1959, 2035
Schneider 0566,0678,0732,0740,0806
0810, 0815, 0817, 0858, 0896
1128, 1180
Sharp 0657,0702,0740,0779,2042
Sony 0560,0600,0799,0891,1097
1122, 1160, 1560, 1660, 1930
1960, 2008
Teac 0543, 0598, 0719, 0722, 0744
0768, 0786, 0795, 0817, 0860
1033, 1224, 1254, 1956, 1957
1962, 2011
Technics 0517, 1932
Telefunken 0816,0817,0860,1110,1255
Thomson 0549, 0578
Toshiba 0530, 0566, 0600, 0722, 1072
2033
Yamaha 0517, 0566, 0673
Yukai 0757,1757,1944
13.4 Setup Code for All Audio AMP/
Tuners
Bang&Olufsen 0826
Bose 1382
CambridgeAudio 1674
Denon 0148, 1131, 1387, 1487
Harmon Kardon 1316, 1331, 1337
Hoher 1284
JBL 1317
JVC 0101, 0491, 1226, 1227, 1401
1522
Kenwood 0213, 0739, 1054, 1308, 1340
1596, 1597
Koss 0771
LG 1320, 1551
Magnavox 1296
Marantz 0771,1296,1316
Matsui 0771, 0774, 0824
NAD 0347,0636
Nakamichi 1340
Onkyo 1325,1347,1558
Panasonic 1315, 1335, 1545, 1790
Philips 1296, 1316, 1742
Pioneer 0213, 0316, 1050, 1211, 1311
1486, 1683
Samsung 1226,1308,1322,1331,1451
Sony 0820,1185,1285,1468,1481
1585, 1685, 1785, 1786, 1885
Teac 0490, 0636, 0680, 0771, 0774
0781, 0824, 1205, 1226, 1253
1298, 1306, 1308, 1417, 1452
1490, 1506, 1555
Technics 0235, 1335, 1336, 1545,1790
Telefunken 1417
Thomson 1181, 1381
Toshiba 1599
Yamaha 0203, 0213, 0739, 1050, 1303
1358
DTR 7510 200910.indd 57 16/10/2009 17:41:10

Remote control brand code list58
13.5 Setup Code for All Audio
Ampliers (A)
Pioneer 0327
Sony 0716
Teac 1301
Telefunken 1357
Thomson 1156
Yamaha 0381
DTR 7510 200910.indd 58 16/10/2009 17:41:10
59Contactinformation
ENGLISH
Contact information
DTR 7510
Serialnumber:
UNITED KINGDOM
Philips CE, The Philips Centre,
Surrey
Phone: 0870 900 9070 (ps tn)
Trademarks and partner logos
ThePhilipswordmarkandthePhilipsshield
areregisteredtrademarksofKoninklijkePhilips
Electronics N.V. and are used by Pace plc under
licensefromKoninklijkePhilipsElectronicsN.V.
ManufacturedunderlicensefromDolby
Laboratories.
“Dolby” and the double-D symbol are
trademarksofDolbyLaboratories.
HDMI,andHDMIlogoandHigh-Denition
MultimediaInterfacearetrademarksor
registeredtrademarksofHDMIlicensingLLC.
TrademarkoftheDVBDigitalVideo
BroadcastingProject(1991to1996)
100%recycledpaper
100%papierrecyclé
DTR 7510 200910.indd 59 16/10/2009 17:41:12

©2009KoninklijkePhilipsElectronicsN.V.
Allrightsreserved.
Document order number: 3111 176 53842
DTR 7510 200910.indd 60 16/10/2009 17:41:12