www.philips.com/support
For support call 0800 331 60 15
EN High-DenitionDigitalTerrestrialReceiver
DTR 5520

2

3
ENGLISH
Table of contents
1 Important 4
1.1 Safetyinformation 5
1.2 Reducingpowerconsumption 6
2 Your HD receiver 7
2.1 What’sinthebox? 7
2.2 Whatyoualsoneed(notsupplied)? 8
2.3 Overview 8
2.4 Howtoreadthismanual? 9
2.5 Howtousethemenus? 9
3 Getting started 9
3.1 Preparingyourremotecontrol 9
3.2 ConnectingyourHDTV 10
3.3 InstallingyourHDreceiver 10
3.4 Whatifnochannelsarefound? 12
4 Using your HD receiver 13
4.1 Standby/wakeup 13
4.2 Switchingonandoff 13
4.3 Changingchannels 13
4.4 Adjustingvolume 13
4.5 Usingthechannelbanner 13
4.6 Usingchannellists 15
4.7 UsingtheTVguide 15
4.8 Scheduling/stoppingrecordings 16
4.9 UsingtheToolsmenu 17
5 Using more of your
HD receiver 18
5.1 HDreceiver 18
5.2 Remotecontrol 19
5.3 Front-paneldisplaymessages 20
5.4 UsingtheMainmenu 21
6 Maintenance 27
6.1 Cleaning 27
6.2 Replacing 27
6.3 Disposing 27
7 Accessories and connections 28
7.1 Connectingyouraudioequipment 28
7.2 Connectingyourrecordingequipment 28
7.3 Connectingyour
standard-denitionTV 29
8 Guarantee and service 30
9 Technical data 30
10 Frequently asked questions 32
11 Glossary 35
12 Index 36
Contact information 37
Trademarks and partner logos 38

Important4
1 Important
ThankyouforpurchasingaPhilipsproduct.Taketimetoreadthisusermanualbeforeusingyour
HDreceiver.Itprovidesimportantinformationontheinstallation,operationandsafetyofyourHD
receiver.KeepthismanualnexttoyourHDreceiverforfuturereference.
Disposalofyouroldproduct
Yourproductisdesignedandmanufacturedwithhighqualitymaterials
andcomponents,whichcanberecycledandreused.
Whenthis“crossed-outwheeledbin”symbolisattachedtoaproduct
oritspackaging,itmeansthattheproductiscoveredbytheEuropean
Directive2002/96/EC.
Pleaseinformyourselfaboutthelocalseparatecollectionprocessfor
electricalandelectronicproducts.
Pleaseactaccordingtoyourlocalrulesanddonotdisposeofyourold
productswithyournormalhouseholdwaste.Thecorrectdisposalof
youroldproductwillhelppreventpotentialnegativeconsequencesfor
theenvironmentandhumanhealth.
The“Materialrecyclability”symbolafxedonthepackagecardboardand
usermanualmeansthatthesepartsarerecyclable.
Sodonotdisposeofthemwithyournormalhouseholdwaste.
The“Materialrecyclability”symbolafxedonplasticpackagingparts
meansthatthesepartsarerecyclable.
Sodonotdisposeofthemwithyournormalhouseholdwaste.
The“GreenDot”symbolafxedonthecardboardmeansthat
themanufactureroftheproducthasnanciallycontributedtothe
“AvoidanceandRecoveryofPackagingWaste”organization.

5Important
ENGLISH
1.1 Safety information
YourHDreceiverispoweredusinga12Vpowersupplyunit.YourHDreceiverhasbeen
manufacturedtomeettheappropriatesafetystandards,butyoumustfollowthebelowinstructions
tooperateitsafely.Keeptheseinstructionsforfuturereference.
Warnings
• YourHDreceiverdoesnotcontainanyuser-serviceableparts.Donotattempttoopenit.All
maintenanceworkmustbecarriedoutbyqualiedservicescentres.
• Beforeconnectingthe12Vpowersupplyunittothemains,checkthatthemainssupplyvoltage
correspondstothevoltageprintedonit.Ifthemainsvoltageisdifferent,consultyourlocaldealer.
• The12Vpowersupplyunithasbeendesignedforindooruseonly.
• Useonlytheoriginal12Vpowersupplyunit.
• Topreventreorshockhazard,donotexposeyourHDreceivertorainormoisture.
• PlaceyourHDreceiveronarmsurface,anddonotcovertheventilationopeningswithitems
suchasnewspapers,tableclothes,curtains,etc.
• DonotinstallyourHDreceivernearheatsourcessuchasradiators,stovesorotherequipment
thatproduceheat.Protectitfromdirectsunlight.
• InordertoensureafreeowofairaroundyourHDreceiver,allowatleast5cmofspaceabove
andaroundit.ThispreventsoverheatingofyourHDreceiver.
• Donotplaceanycombustibleobjectssuchascandles,etc.,onyourHDreceiver.
• Neverstandobjectslledwithliquids,suchasvases,ontopofyourHDreceiver.Donotplace
anythingonyourHDreceiverthatmightdriporspillintoit.Ifthishappens,disconnectthe
12VpowersupplyunitfromthewallsocketandhaveyourHDreceivercheckedatany
authorizedservicecentre.
• Thebatteriesinstalledintheremotecontrolshouldnotbeexposedtoexcessiveheatsuchas
sunshine,reorthelike.
Pleasealsopayattentiontoallthewarningsandcautionslistedthroughoutthismanual.

Important6
1.2 Reducing power consumption
YourHDreceiverisdesignedtoreduceitsimpactontheenvironmentandcomplieswiththe
EuropeanDirective2009/125/EC.ThisispartofPhilips’ongoingcommitmenttoleadthewayin
environmentalresponsibility.
Ithasastandbymodeofoperationthatneedsverylittlepower.Seethetablebelowandpleasenote
that:
•
WhenyourHDreceiverisinthestandbymode,yousaveenergy(andthereforemoney)and
reducecarbondioxideemissionsthatdamagetheenvironment.
• YouusethestandbybuttononyourHDreceiverorremotecontroltoswitchbetweenonand
standbymodes.Inaddition,ifyourHDreceiverison,butyoudonotpressanybuttononitor
yourremotecontrolfor3hours(congurable-see‘Automaticecomode’onpage24),yourHD
receiverwillautomaticallygetintothestandbymode.
• YouusetheON/OFFswitchontherearpanelofyourHDreceivertoturnoffyourHDreceiver.
• IfyouarenotgoingtouseyourHDreceiverforseveraldays,youcancutitsenergyconsumption
tozerobyunpluggingitfromthemainswallsocket.
• Intheoffandstandbymodes,yourHDreceivercannotreceiveupdatesfromthenetwork.
However,atreceiverwake-up,youwillbepromptedbyamessageifanupdatenoticationhas
beenreceived.
Mode Front-panel standby
indicator and display
Typical power
consumption (W)
Typical annual
energy use (kWh)
Power
adaptor
unplugged
Not lit up 0 0
Standby
Standbyindicatoris
red
0.86
15
*
Active
Standby
Standbyindicatoris
orange
5.00
On
Achannelnumberis
shownonthedisplay
5.80
*
BasedonyourHDreceiverbeingOnfor4hoursdailyandbeinginstandbyfor20hours
.
7YourHDreceiver
ENGLISH
2 Your HD receiver
CongratulationsonyourpurchaseandwelcometoPhilips!
TofullybenetfromthesupportthatPhilipsoffers,registeryourproductat
www.philips.com/welcome.
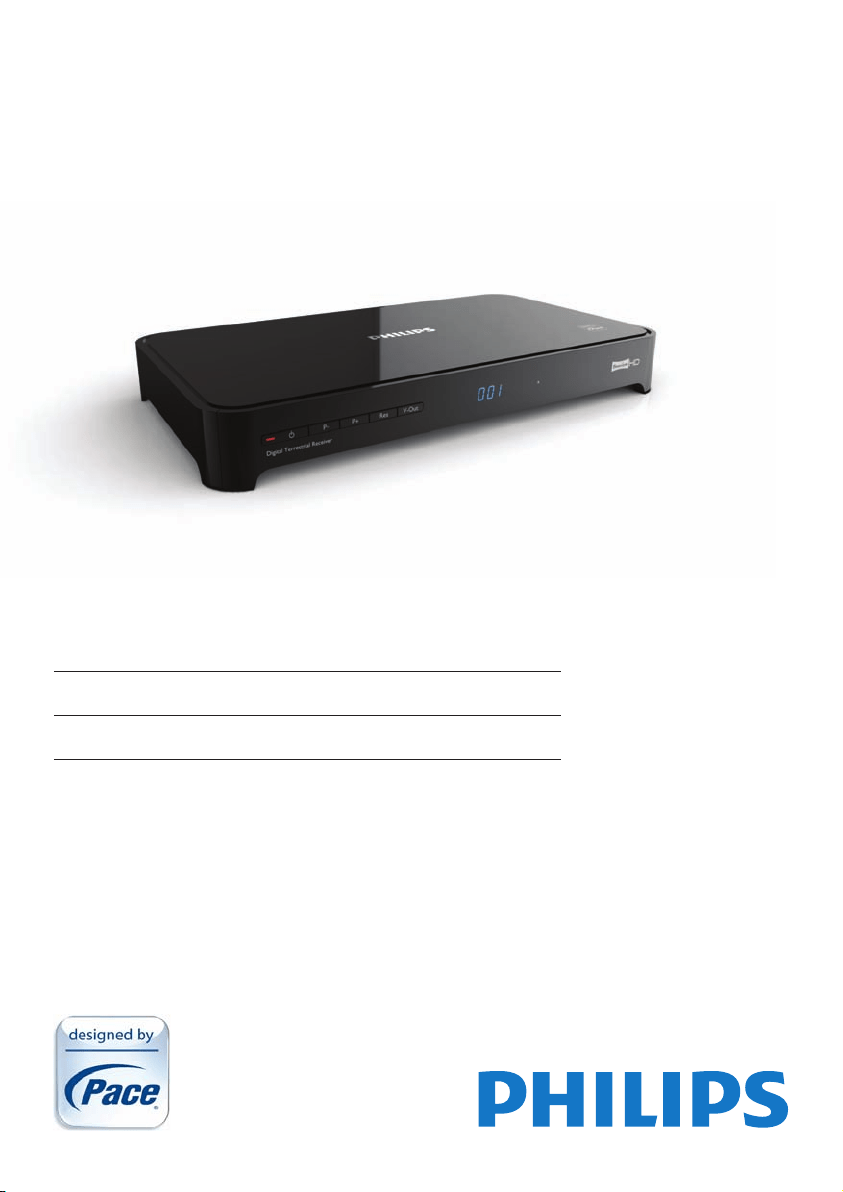
2.1 What’s in the box?
GUIDE
OPTIONS
INFO
DIGITAL RECEIVER
TEXT RADIO EXIT
AD
HDreceiver
Remotecontroland
2xAAAbatteries
12Vpower
supplyunit
HDMIcable
RFcable
Retuneyer
Freeviewyer
Quickstart
guide
Usermanual
Caution
Plasticbagscanbedangerous.
Toavoidsuffocation,keepthebagawayfrombabiesandchildren.
YourHDreceiver8
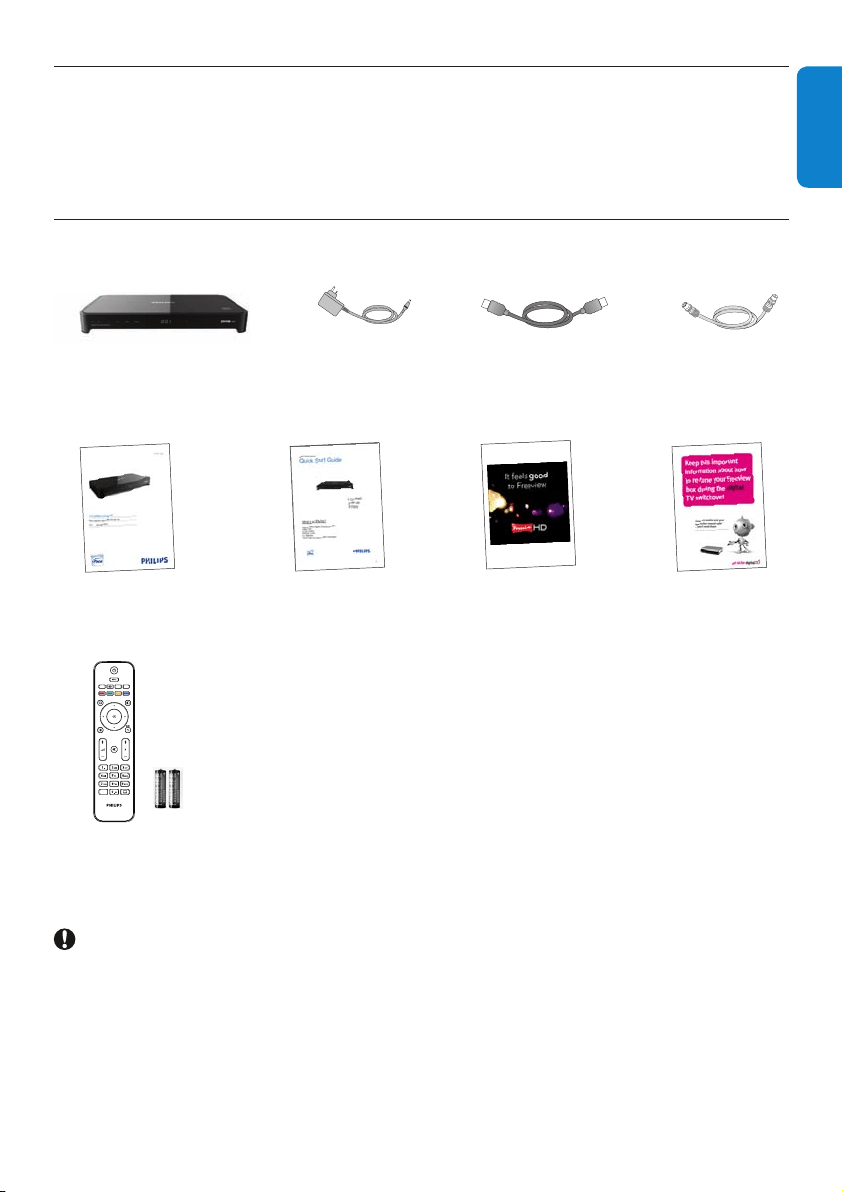
2.2 What you also need (not supplied)?
TV
2.3 Overview
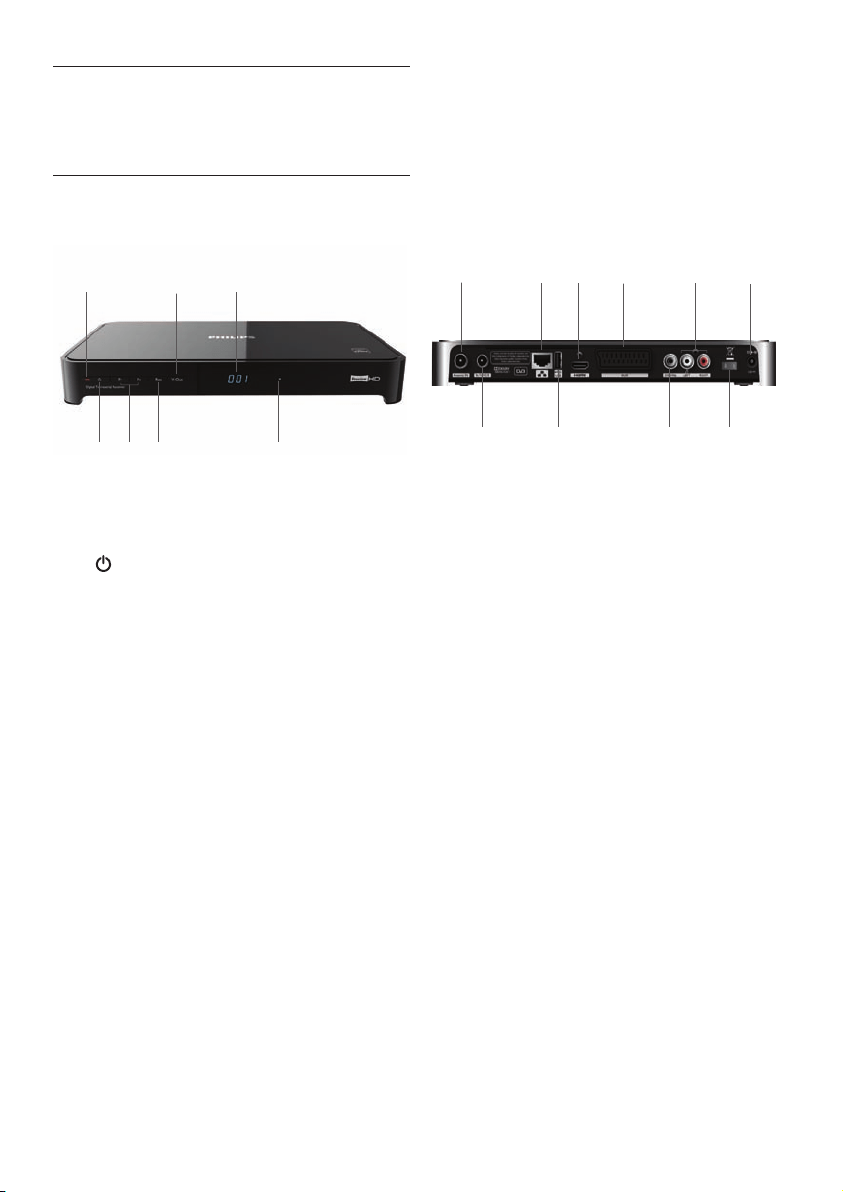
Front panel
4
2
3
7
5
1 6
Rear panel
8
1
2
3
4
5
6
7
10
9
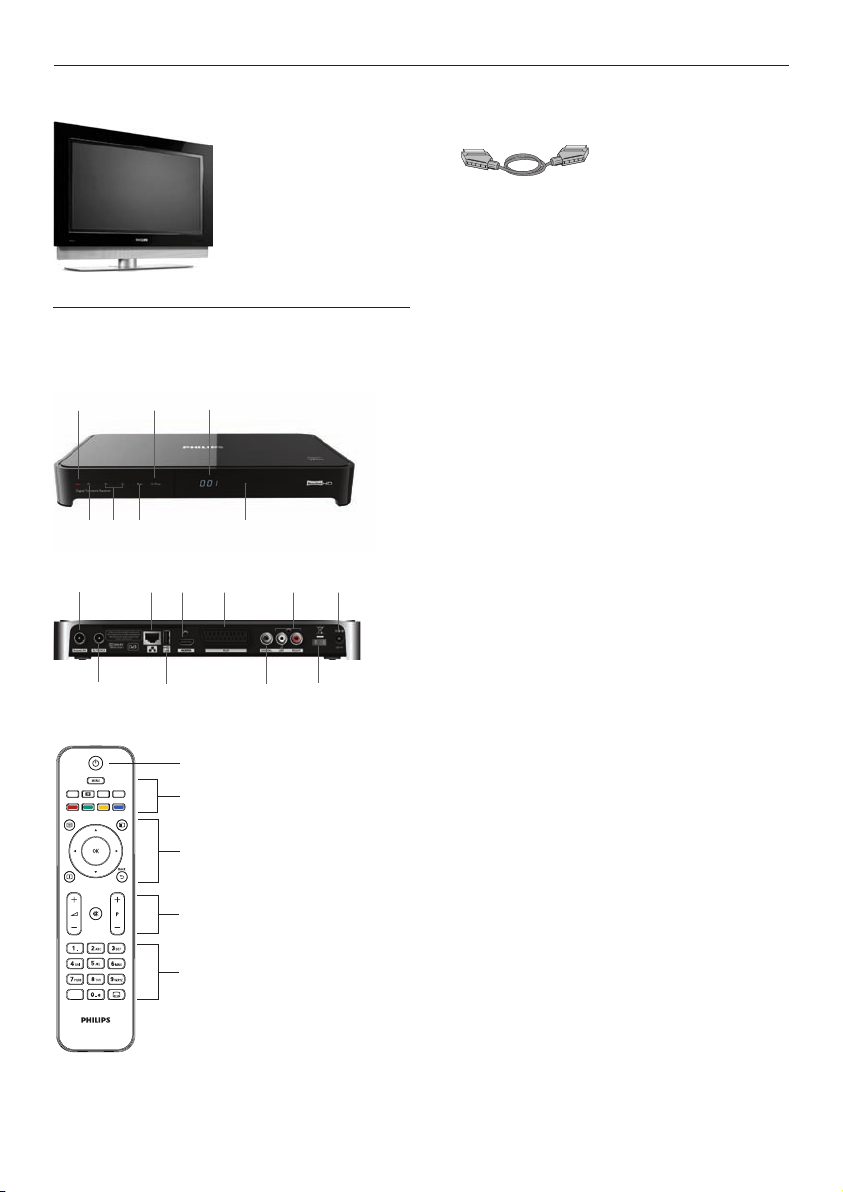
Remote control
GUIDE
OPTIONS
INFO
DIGITAL RECEIVER
TEXT RADIO EXIT
AD
1
2
4
5
3
Front Panel
1 Standbyindicator
2 Standbybutton
3 Programme+/-buttons
4 Resolutionbutton
5 V-Outbutton
6 Display
7 HDindicator
Rear Panel
1 AntennaIN
*
2 AntennaoutputtoTV/VCR(antennasignal)
*
3 RJ45Ethernetconnector
*
4 USB2.0connector
*
5 HDMI™connector
*
6 AUXSCARTconnector
*
7 DIGITALaudioout(digital)
*
8 L/Raudioout(analogue)
*
9 ON/OFFswitch
10 12Vpowerconnector
*
*
Safeextralowvoltage
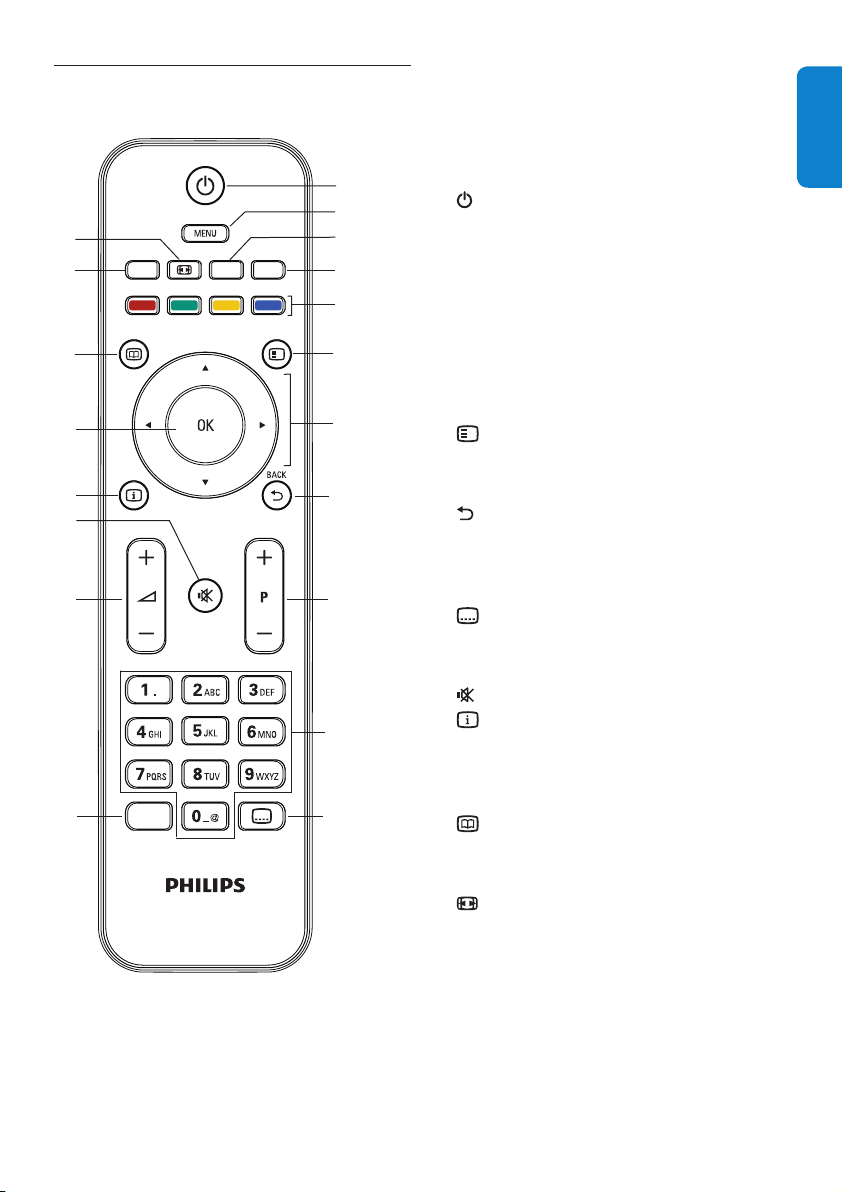
Remote control
1 Standby
2 Menu,Text,Pictureformat,Radio,Exit
3 Guide,Options,Up/Down,Left/Right,OK,
Info,Back
4 Volumecontrol,Programme+/-,Mute
5 Alphanumerickeypad,Audiodescription,
Subtitles
SCARTcable(requiredonlyifyouhavea
standard-denitionTVorifyouwanttorecord
aprogrammetoanexternalrecordingdevice
suchasaVideoorDVD-Rrecorder)
9Gettingstarted
ENGLISH
2.4 How to read this manual?
Danger
Describessituationsofinjuryorlossoflife.
Warning
Describesactionsthatmaycausedamageto
theproduct.
Caution
Describesactionsthatarerequiredtoavoid
dangerousorillegalsituations.
Note
Additionalinformation.
Tip
Informationthatisusefultoknowbut
notessentialtothetask.Forexample,
informationaboutalternativeuse.
2.5 How to use the menus?
Press MENU,GUIDE,OPTIONS or
INFO
onyourremotecontroltodisplay
the Mainmenu,TV guide, Toolsmenuor
channelbannerrespectively.
Use / / / tonavigatethroughthe
menusandchangeanysetting.
Press or OKtoconrmyourchoice.
Press EXITtoremovethemenu.
Formoreinformation,seepages13to27.
3 Getting started
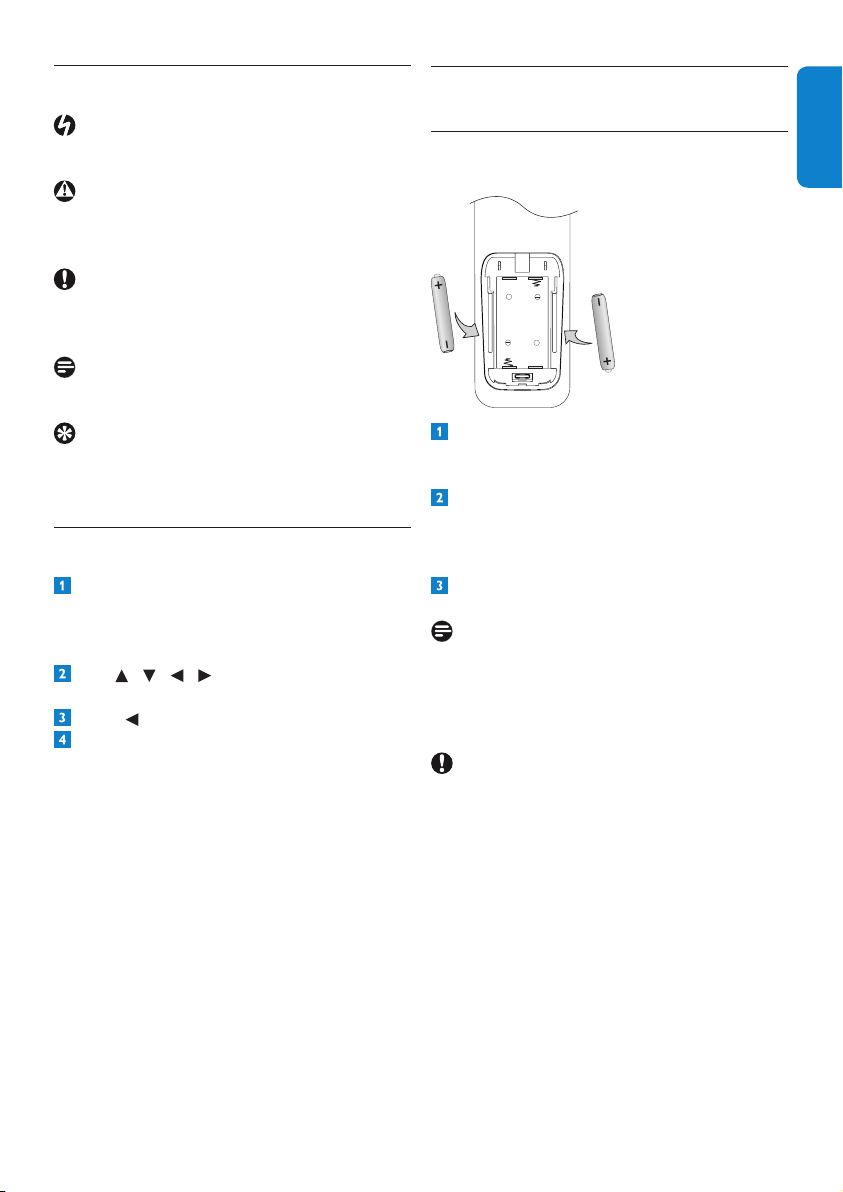
3.1 Preparing your remote control
+
+
Removethebatterycoverbygentlypressing
downinthesmallcircleonthecoverand
slidingitdownwards.
InsertthetwoAAAbatteriesasshown.Be
suretomatchthe+and-marksonthe
batteriestotheirrespectivemarksinsidethe
batterycompartment.
Replacethebatterycover.
Note
Forbetterreception,pointyourremotecontrol
directlyatthefrontpanelofyourHDreceiver
whilepressinganybutton.
Caution
Donotleavebatteriesinyourremotecontrolfor
longperiodsoftimewithoutuse.Replaceboth
batteriesatthesametime.Donotdisposeof
usedbatterieswithyourdomesticwaste.Used
batteriesshouldberecycledattheendoftheir
usefullife.Donotdisposeofbatteriesinare.
Gettingstarted10
3.3 Installing your HD receiver
Beforeyoustarttheinstallation,makesureyou
havemadealltherequiredconnections.
Connectthe12Vpowersupplyunittothe
12Vinputconnectorontherearpanelof
yourHDreceiver.
Connectthemainsplugtothemainswallsocket.
EnsurethattheON/OFF switchonthe
rearpanelofyourHDreceiverisswitched
on(isinthe‘1’position).
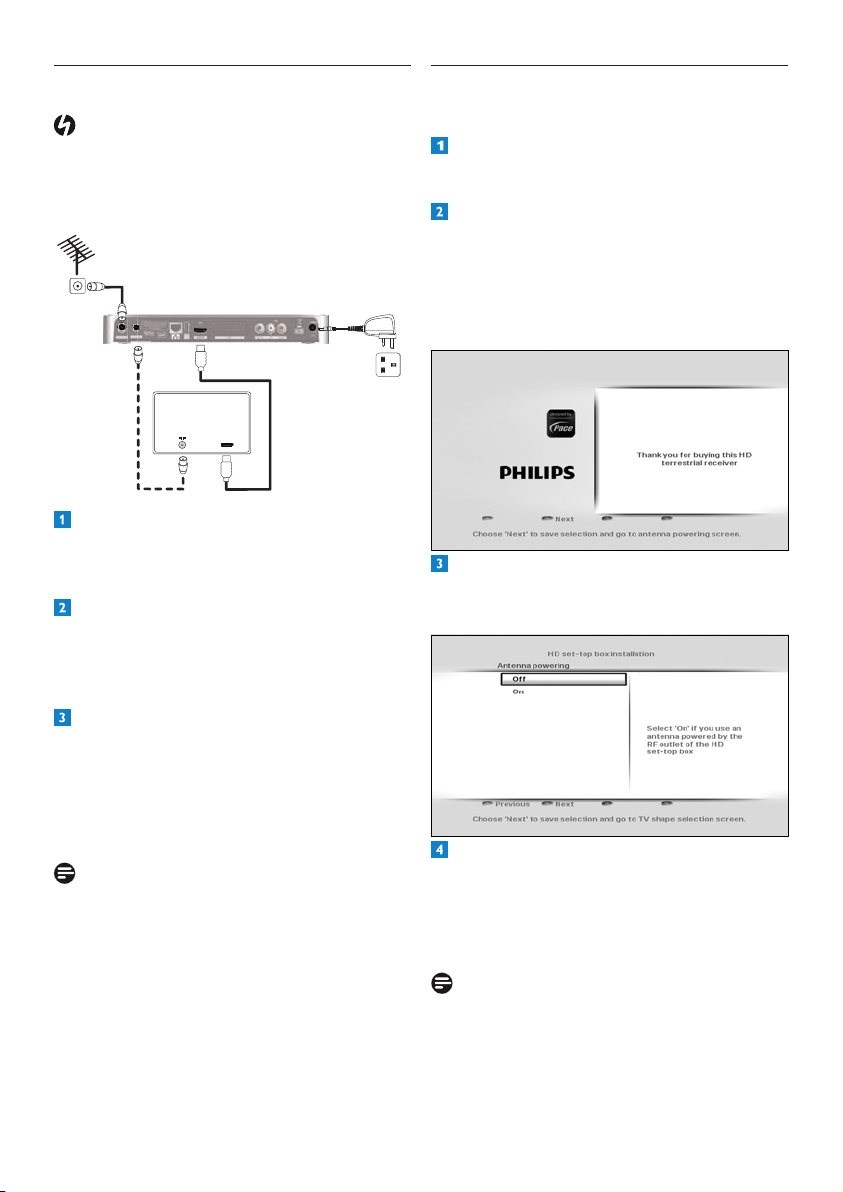
YourHDreceiverdisplaysawelcome
messageafterafewseconds.
Press the greenbuttontostartthe
installation.
TheAntenna poweringmenuappears.
LettheAntenna poweringsettingbeOff
unlessyouuseanindoorantennathatcan
bepoweredbythecoaxialcableconnected
to the Antenna INsocketofyourHD
receiver(seenote).
Note
YourHDreceivercanonlydeliver50mA
currentunder5V,sorefertoyourindoor
antenna’susermanualtocheckifitspower
requirementtsthecapabilityofyourHD
receiver.
3.2 Connecting your HDTV
Danger
Riskofelectricshock!
Beforemakinganyconnections,ensurethatyour
equipmentisdisconnectedfromthemains.
HD receiver
Aerial wall
socket
1
2
TV
HDMI
Mains wall
socket
Connecttheaerialcable(notsupplied)from
theaerialwallsockettotheAntenna IN
connectorontherearpanelofyourHD
receiver.
UsethesuppliedHDMIcabletoconnectthe
HDMIconnectorontherearpanelofyour
HDreceivertotheHDMIinputconnectorof
yourTV.Forthenextstep,notethechosen
HDMIinputofyourTV(e.g.‘HDMI1’).
ConnectyourTVtothemainsandselectthe
correctA/VsourceonyourTV.Thisshould
correspondtotheHDMIinputconnector
towhichyourHDreceiverisconnected.If
necessary,refertoyourTV’susermanualfor
instructions.
Notes
•
Optionally,youcanalsousethesupplied
RFcabletoconnecttheRFoutput
connector (labelledTo TV/VCR) of your
HDreceivertotheRFinputconnectorof
yourTV.
•ToconnectyourHDreceivertoyour
standard-denitionTV,seepage29.
11Gettingstarted
ENGLISH
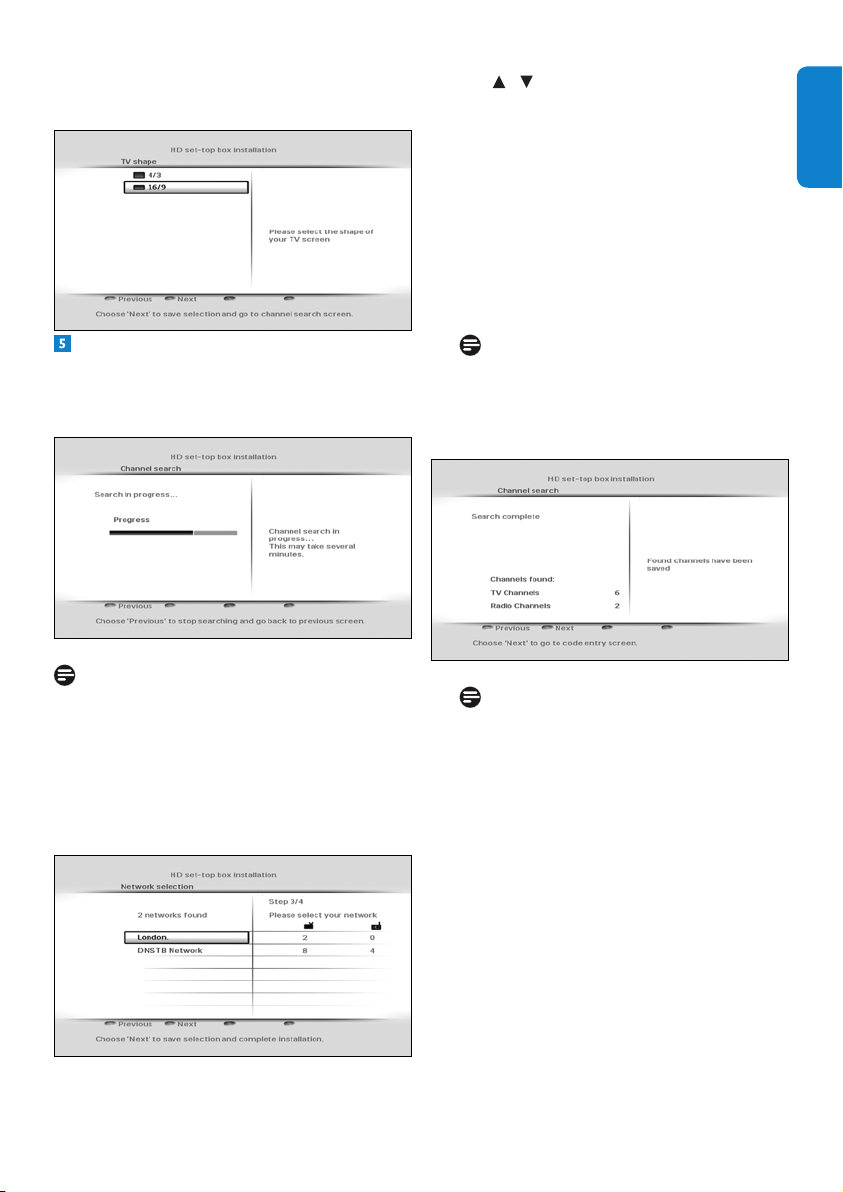
Press the greenbuttontoconrm.
TheTV shapemenuappears.
LettheTV shapesettingbe16:9 if you use
anHDMIconnectiontoyourTV.Press the
green
buttontoconrmandstartscanning
fortheavailablechannels.
Note
Ifyouareinanareathatreceivessignals
frommorethanonenetworkandpossibly
variantofthesamechannel(e.g.BBC1,
BBC1Scotland),thenyourHDreceiver
willpromptyoutoselectthenetworkand
channelvariantthatyouwantintheAll TV
andAll Radio lists.
Use / tohighlightthenetworkthatyou
wanttoinstallandpressthegreenbutton.
Aprogressscreendisplaystoconrmthat
thesearchistakingplace.
Whenthesearchiscomplete,ascreen
displaysthenumberofTVandradio
channelsthatyourHDreceiverhasfound.
YourHDreceiverautomaticallysavesthese
channels.Press the greenbuttontogoto
thenextstep.
Note
IncaseyourHDreceiverdoesnotndany
channels,seethe‘Whatifnochannelsare
found?’sectiononpage12.
Note
Digitalterrestrialbroadcastingisprogressing
throughouttheUK.Pleasenotethatthe
receptionofdigitalsignalsmayneedtobe
veriedasitcanbeadverselyaffectedby
physicalelements,suchasmountainous
areas,highbuildings,etc.Whenanalogue
broadcastinginyourregionisswitchedoff,
thereshouldbeaqualityimprovementin
digitalbroadcasting.Asdigitalswitchover
happens,thenumberofdigitalchannels
availableineachregionmayalsoincrease.
Pleasevisitthiswebsitetondoutwhenthe
digitalswitchoverisscheduledforyourarea:
www.digitaluk.co.uk
Gettingstarted12
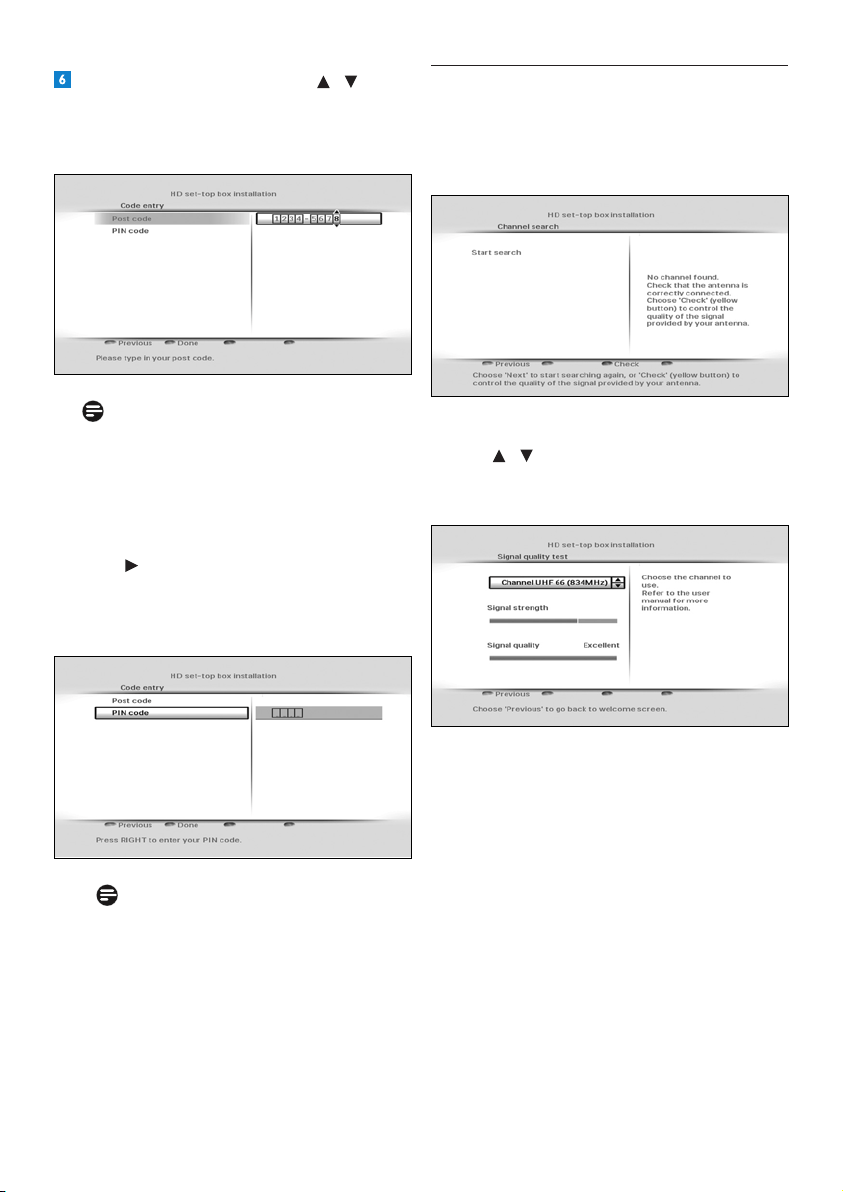
3.4 What if no channels are found?
IncaseyourHDreceiverdoesnotndany
channels,checkyourconnections(seepages
10and29)andpressthered buttontostart
therstinstallationsetupagain.
IfyourHDreceiverisstillnotabletond
anychannels,presstheyellowbutton.
Use / tomanuallycheckthequality
andstrengthofthesignalsreceivedbyyour
antennainvariouschannelfrequencies.
If the Signal strengthbarisgreen,then
yourantennaandHDreceiverareproperly
connected.Ifitisred,thenyouneedtorst
checkyourconnection.IftheSignal quality
barisgreen,thenyoucanbesurethatyou
arereceivingdigitalbroadcastsignals.If
yourreceptionisnotoptimal(fewchannels
or“blocky”image),youmustcheckyour
antennainstallationasitmayneedtobe
realignedorxed.
OntheCode entry menu,use / or the
number
buttonstoenteryourarea’spostal
code,andthenpressOK to highlight PIN
code.
Note
Enteringyourpostalcodeismandatory.
Youwillnotbeabletocompletetherst
installationsetupwithoutenteringyour
postalcode.
TochangethedefaultPINcode(0000),
press andusethenumberbuttonsto
enteryounewPINcode.Youwillthenbe
promptedtore-enteryourPINcodeto
conrm.
Note
YournewPINcodecanbeany4-digit
numberotherthanthedefaultPINcode
(0000).
Press the greenbuttontoconrmyour
choiceandcompletetheinstallation.
YoucannowstartusingyourHDreceiver.
13UsingyourHDreceiver
ENGLISH
4 Using your HD receiver
4.1 Standby/wake up
ToputyourHDreceiverintostandby,press
onyourHDreceiver’sfrontpanelorremote
control.TotakeyourHDreceiveroutofstandby,
press again.YoucanalsopressBACK ,
P+/P- or anynumberbuttononyourremote
controltowakeupyourHDreceiver.
Seepage6formoreinformation.
4.2 Switching on and off
Use the ON/OFF
switchontherearpanelof
yourHDreceivertoswitchyourHDreceiver
on/off.Seepage6formoreinformation.
4.3 Changing channels
Tochangechannels,usetheP+/P-onyour
remotecontroloryourHDreceiver’sfront
panel.Youcanalsousethenumberbuttonson
yourremotecontrol.
Press BACK toswitchtothelastchannel
youwerewatching.
Youcanalsousetheon-screenchannellistsor
channelbannertochangechannels(seesections
4.5and4.6).
Note
Initially,HDprogrammesareavailableonlyon
channels50and51.Switchtothesechannelsto
watch HD programmes.
4.4 Adjusting volume
Toincreaseordecreasethevolume,press
VOL+/VOL-.Thevolumelevelisshownbriey
onyourTV.
Tomuteorrestorethesound,press .When
youmuteyoursound,the iconisshown
inthetoprightcornerofyourTV.Thisicon
disappearsafterafewseconds.
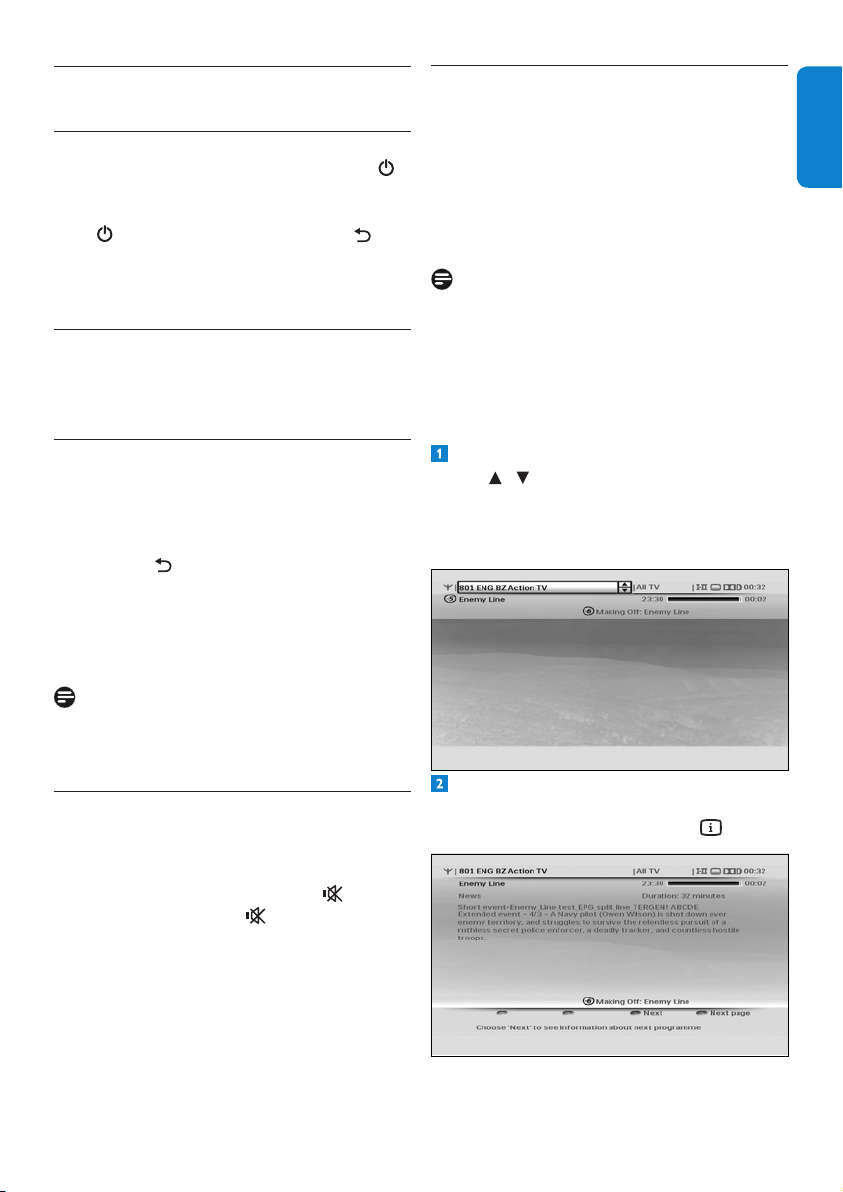
4.5 Using the channel banner
Channel information
Whenyouchangeachannel,thechannelbanner
appearsbrieytoshowinformationaboutthe
currentprogramme.Bydefault,itappearsfor
5seconds.Tosetthelengthoftimethatthe
channelbannerremainson-screen,seepage23.
Note
Whilerecordingaprogrammetoanexternal
recordingdevicesuchasaVCR,thechannel
banneroverlaywillnotberecorded.
Changing channel
Tochangethechannel,displaythechannel
bannerbypressingINFO.
Whenthechannelbannerison-screen,
use / to see what programmes are
currentlyshowingonotherchannels.Ifyou
seeaprogrammeyouwanttowatch,
press OK.
Todisplaymoreinformationaboutthe
currentprogrammeonthechannellistedin
thechannelbanner,pressINFO again.
UsingyourHDreceiver14
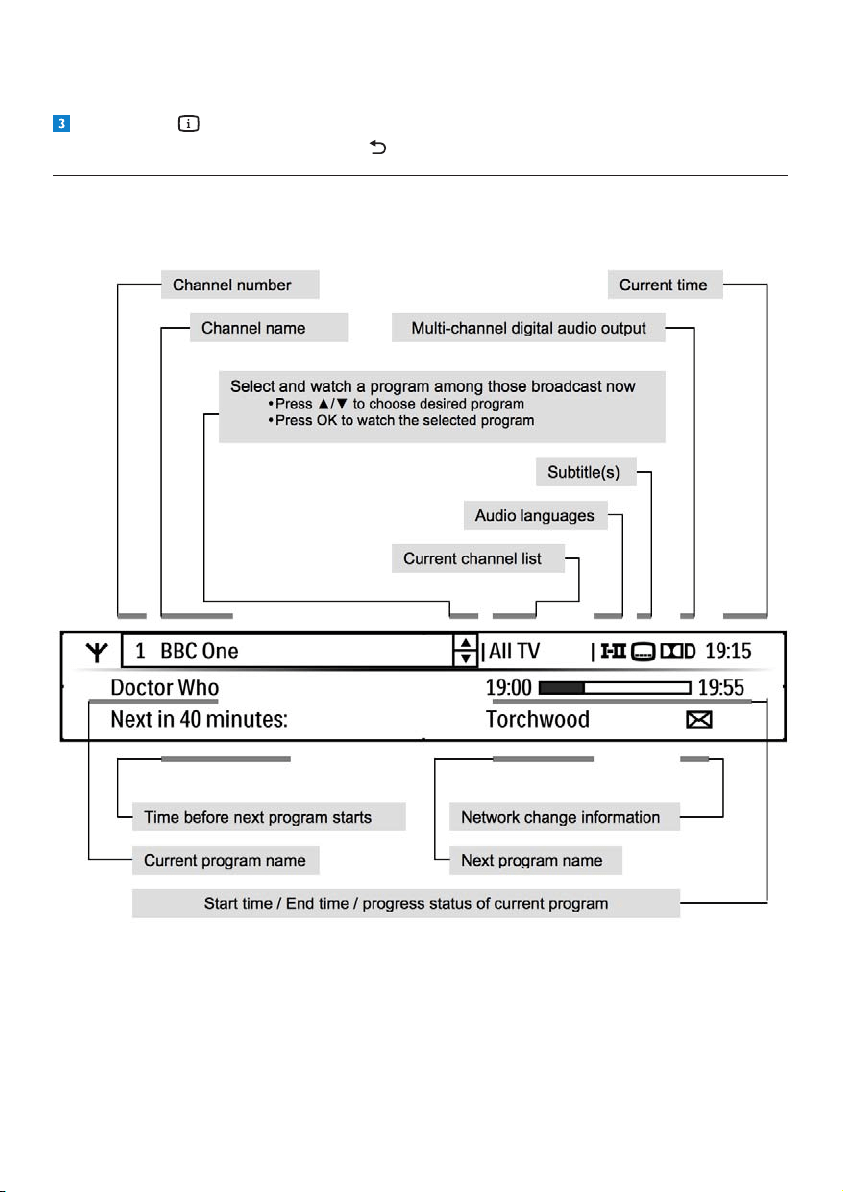
Todisplaywhatprogrammeisonnext(onthechannellistedinthechannelbanner),pressthe
yellowbutton.
Press INFO athirdtime,orpressEXITtoremovethechannelbannerwithoutchanging
thechannel.Alternatively,pressBACK toreturntothechannelbanner.
4.5.1 More about the channel banner content

15UsingyourHDreceiver
ENGLISH
4.7 Using the TV guide
TheTV guideprovidesyouwithalistingof
allprogrammesavailableonallchannelsfor
uptoeightdays,makingiteasytondthe
programmesyouwanttowatch.
Press GUIDE todisplaytheTV guide.
Use / toseewhatprogrammesareon
atdifferenttimesonachannel.
Use / tomovethroughthelistof
channels.
Use the green(+1day)andred(-1day)
buttonstomoveforwardandbackwardsby
adaythroughthelistings.
Use the bluebuttontoseewhat
programmesareonfrom18:00hours
onwards.
Use the yellowbuttontojumpdirectlyto
theprogrammelistforanyofthe
next7days.
Press GUIDE ,BACK or EXIT to
removetheTV guide.
Notes
•
Youcanalsoschedulearecordingusingthe
TV guide(seepage16).
•Somechannelsmaynotofferanextensive
TV guide.
4.6 Using channel lists
Youusethechannellistmenutoswitchtoany
TVorradiochannelfromtheAll TV or
All Radio
channellist,oryourfavouritelists.
Changing channel
Press OK todisplaythecurrentchannellist.
Use / toselectthechannelyouwantto
watch.
Press OKtopreviewthechannel;pressOK
againtowatchit.
Changing current channel list
Press OK todisplayallthechannelsofthe
currentchannellist.
Press todisplayalltheavailablechannel
andfavouritelists.Tocreatenewfavourite
lists,seepage21.
Use / tohighlightthelistyouwantto
use.
Press OKtoconrmanddisplayallthe
channelsoftheselectedlist.
Use / tohighlightachannelandpress
OK topreviewit.PressOKagaintowatch
thechannelorpressEXITtoremovethe
channellistmenuwithoutchangingthe
channel.
UsingyourHDreceiver16
HOW TO STOP A RECORDING?
Whenaprogrammeisbeingrecorded,you
cannotswitchtoanyotherchanneloruseany
oftheotherfeaturesofyourHDreceiver.TO
STOP/CANCELARUNNINGRECORDING
andreturntonormalliveTV,pressEXIT rst
thenOK immediatelyafter.
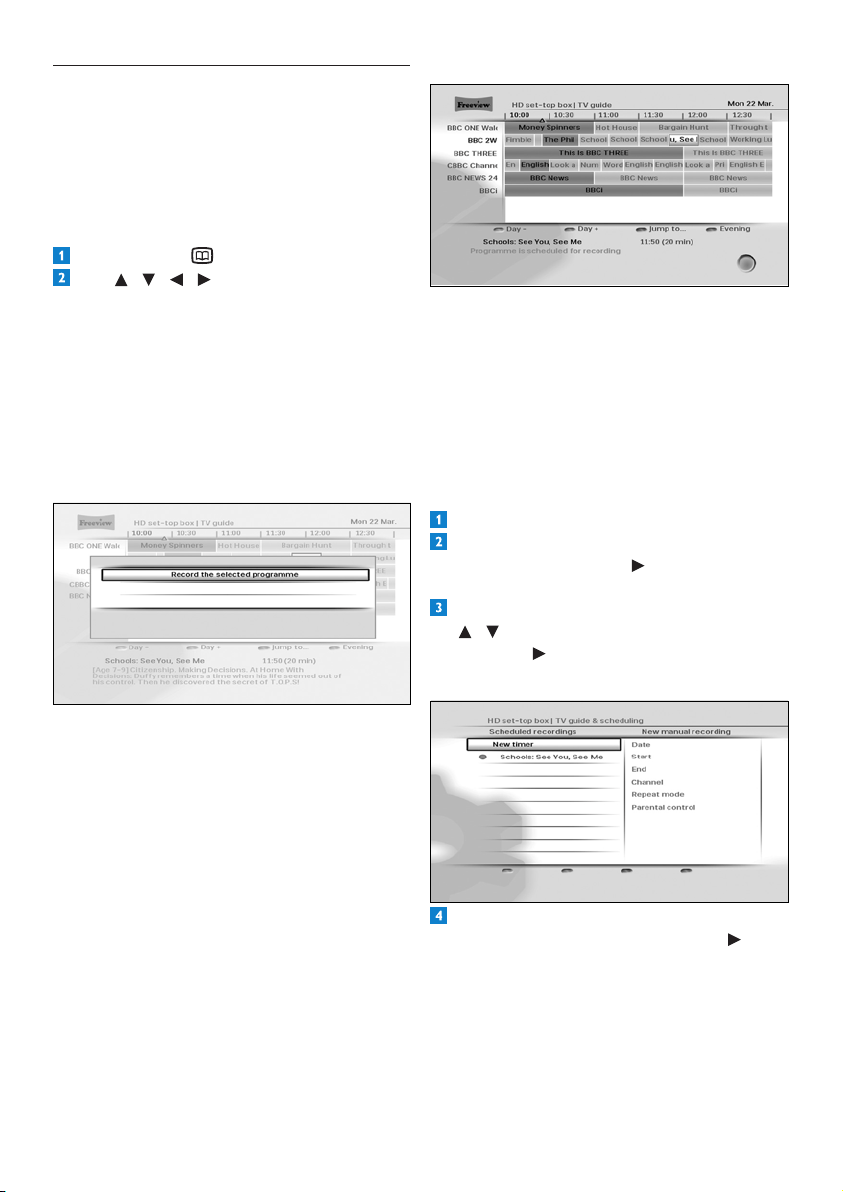
Using recording timers
Press MENU.todisplaytheMainmenu.
MakesurethatTV guide & scheduling
is
highlightedandpress or OK. The TV
guide & scheduling
menuappears.
Inthe TV guide & schedulingmenu,use
/ to highlight Scheduled recordings
andpress or OK.
TheScheduled recordingsmenuappears.
Toscheduleanewrecording,makesure
New timerishighlightedandpress or
OK
.TheNew manual recordingmenu
appears.
4.8 Scheduling/stopping recordings
Torecordaprogramme,youmustrstconnect
yourHDreceivertoyourVCRoranyrecording
deviceusingaSCARTcable(seepage28),and
thenschedulearecordingusingtheTV guide
orbysettingarecordingtimer.
Using TV guide
Press GUIDE todisplaytheTV guide.
Use / / / to highlight the
programmeyouwanttorecordandpress
OK.Inthemenuthatpopsup,pressoneof
thefollowing:
•OKagaintoconrmtheschedulingofthe
recording.
•EXIT
toreturntotheTVchannelthatyou
werewatchingpriortodisplayingtheTV
Guide.
•BACK
toreturntotheTV Guide.
IMPORTANT NOTE:
Iftheschedulingismadeona‘Now’
programme(highlightedinblue),yourHD
receiversstartsrecordinginstantlyand
islockedontheprogrammetosecure
itsrecording.Anyattempttocontrolthe
receiverdisplaysrEConyourHDreceiver’s
frontpanel.YoumustSTOPtherecordingto
recoverthecontrolofyourreceiver.
Iftheschedulingismadeonalater
programme,yourHDreceiverwillrecord
itatthesetdateandtime.Theprogramis
highlightedinredintheTV Guide.
17UsingyourHDreceiver
ENGLISH
Note
Ifparentalcontrolisonwhilescheduling
arecordingonalockedchannel,we
recommendyoutogototheParental
control
menuandenteryourPINcode
(thenreportedas“Typedin”).Inthatcase,
therecordingwillstartautomatically.
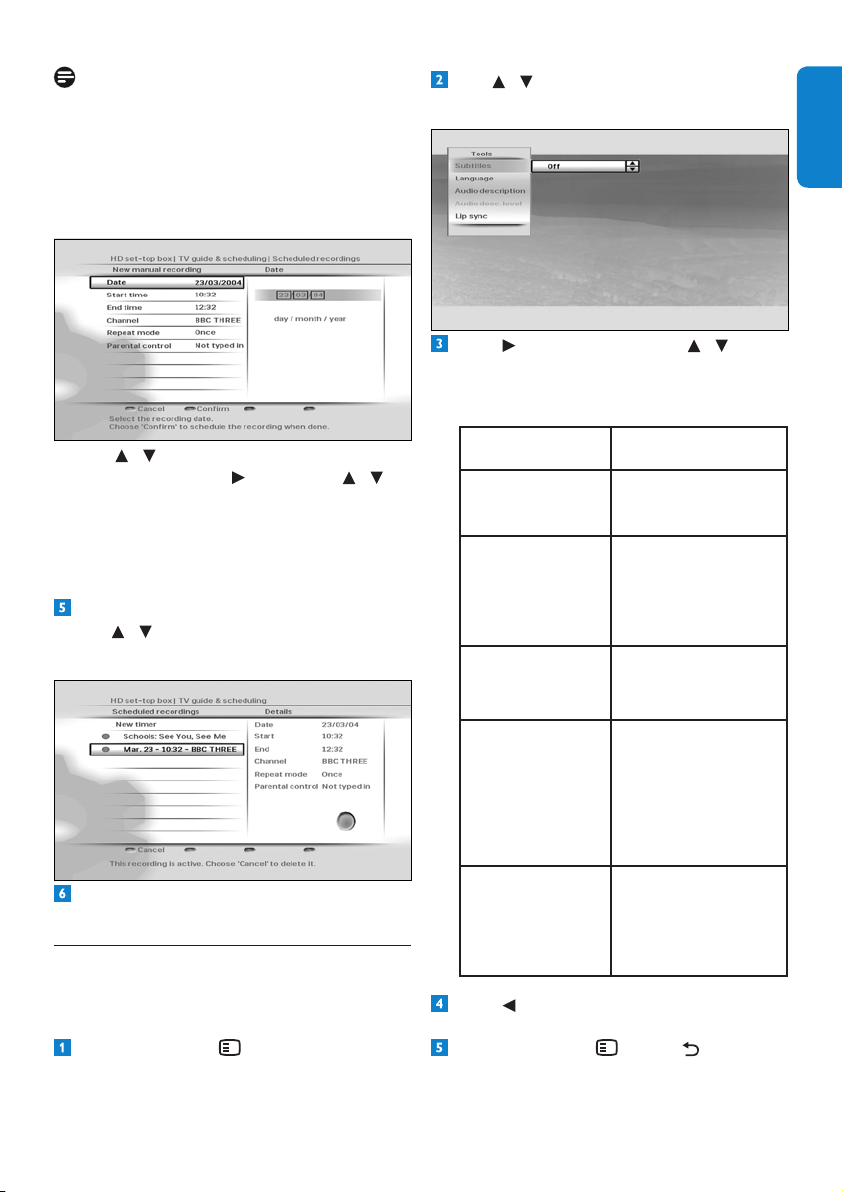
Use / tohighlightthesettingyouwant
tochangeandpress or OK. Use /
tochangeitandpressthegreenbuttonto
conrmtherecordingtimer.
Press the red
buttontocanceltherecording
timerandreturntotheScheduled
recordings
menu.
Todeleteanalreadyscheduledrecording,
use / tohighlightitandpressthered
button.
Press EXITtoreturntowatchingliveTVor
press MenutoreturntotheMainmenu.
4.9 Using the Tools menu
You use the Tools
menutodisplaysubtitles,
changetheaudiolanguage,controlaudio
descriptionandsynchroniseaudiowithvideo.
Press OPTIONS todisplaytheTools
menu.
Use / tohighlightthesettingyouwant
tochange.
Press or OK andthenpress / to
selectanoptionfromthelistthatappears
ontheright.Youcanchangethesesettings
usingtheToolsmenu:
Settings Options
Subtitles On
Off(default)
Audiolanguage Availablelanguages
dependonthe
broadcast
programme.
Audiodescription On
Off(default)
Audiodesc.level Settheaudio
descriptionvolume.
(Availableif
‘Audiodescription’
isturnedonand
broadcast.)
Lipsync Set the DIGITAL
audiooutputdelayto
synchroniseaudio
withvideo.
Press tosaveyourchangesandreturnto
thetoolsmenu.
Press OPTIONS ,BACK or EXIT
toremovethetoolsmenu.
UsingmoreofyourHDreceiver18
Rear panel
2
4
7 9
1 3 6
5
108
1 Antenna IN
*
:Toconnectyouraerial
cablefromthewallsocket
2 To TV/VCR
*
: AntennaoutputtoTV/VCR
(antennasignal)
3 Ethernet
*
: ToconnectyourHDreceiver
toanInternetaccesspoint
4 USB 2.0
*
:UniversalSerialBusport
5 HDMI
*
:ToconnecttotheHDMIinput
connectoronyourhigh-denitionTV
6 AUX SCART
*
: Toconnecttothe
SCARTconnectoronyourstandard-
denitionTVoranyrecordingdevice
suchasaVCR.
7 DIGITAL audio out
*
: Toconnectan
hi-amplier
8 AUDIO L + R
*
: Toanhi-amplier
9 ON/OFF switch: Toswitchon/offyour
HDreceiver
10 Power*:Toconnectthe12Vpowersupply
unit
*Safeextralowvoltage
5 Using more of your
HD receiver
5.1 HD receiver
Front panel
4
2
3
7
1
5
6
1 Standby indicator:
Red:initialisationmodeandstandby
mode
Orange:active-standbymode
2 standby button: Switches your HD
receiverintooroutofstandby
3 P+ & P- buttons:Tochangechannelup
ordown
4 Res button:TochangetheHDMIoutput
resolutiontoAuto(default),576i,
576p,1080i or 1080p
5 V-Out button:Tochangetheactivevideo
output to HDMI(default)orSCART
6 Display: 4-digitdisplay
7 HD indicator:Lightsupwhen
youarewatchinganHDchannel
19UsingmoreofyourHDreceiver
ENGLISH
5.2 Remote control
GUIDE
OPTIONS
INFO
DIGITAL RECEIVER
TEXT RADIO EXIT
AD
1
7
8
9
10
5
4
6
12
15
17
3
19
2
14
13
18
16
11
1 Switchtostandbyorwake
upfromstandby
2 MENU Open/close‘Main’menu
3 RADIO Switchbetweenradioand
TVchannels
4 EXIT Removemenus,channel
bannerandchannellists
5 Colourbuttons Usedincontextualmenus
andMHEGapplications
6 Open/close‘Tools’menu
7 U,D,L, R Moveup/down/left/right
withinlistsormenus
8 Returntotheprevious
channelormenuscreen
9 P+/- Changechannelup/down
10 Numberbuttons Alphanumerickeypad
11 Turnsubtitleson/off
12 AD TurnAudioDescriptionon/off
13 VOL+/- Turnvolumeup/down
14 Mute/restoresound
15 Open/closechannelbanner
16 OK Conrmselectionor
schedulearecordinginthe
‘TVguide’
17 Open/close‘TVguide’
18 TEXT Open/closeMHEG
applications
19
Changepictureformat
setting
UsingmoreofyourHDreceiver20
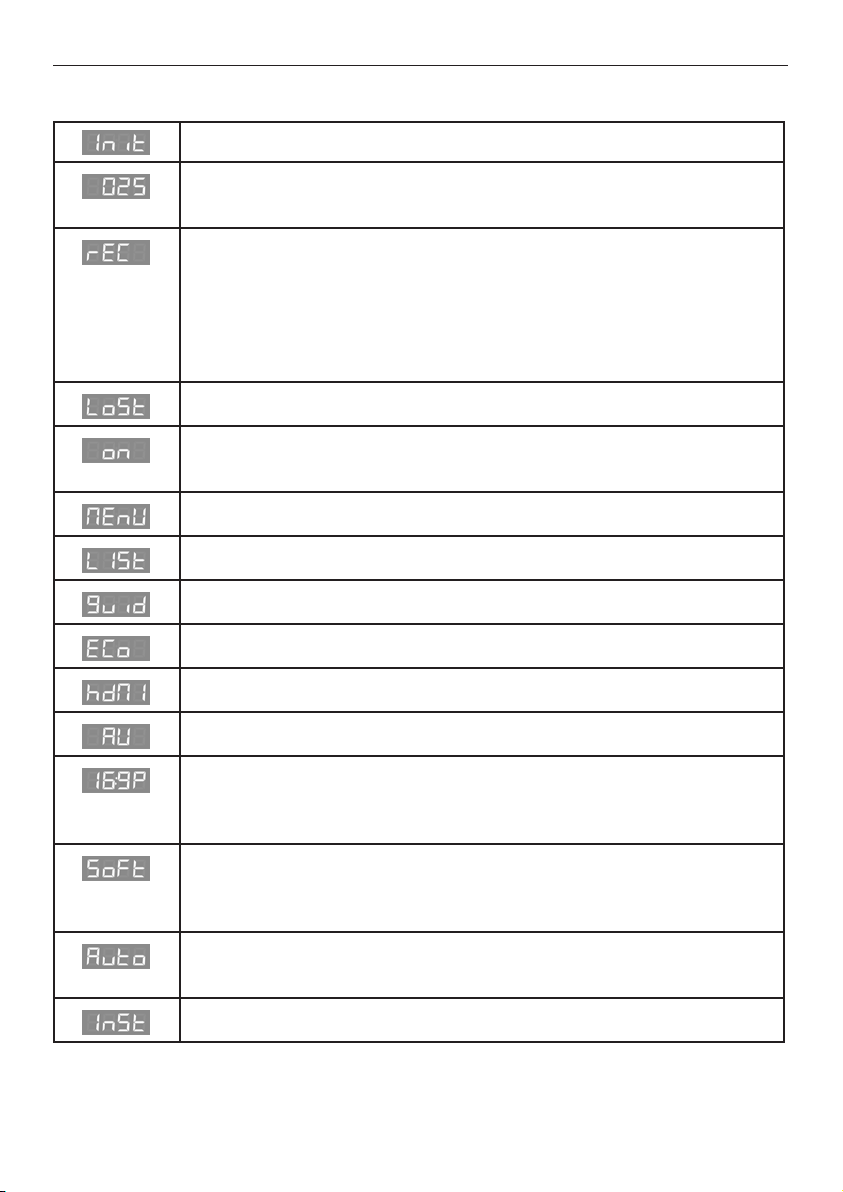
5.3 Front-panel display messages
YourHDreceiverisstartingup
YourHDreceiveristunedtoTVchannel25.
YourHDreceiverdisplaysr025 whenitistunedtoradiochannel25.
- rECisdisplayedeachtimeyoupressabuttononyourremotecontrolto
indicatethat:
•Arecordingisinprogress
•YourHDreceiverislockedontotheprogrammebeingrecorded
- TounlockyourHDreceiver,youmuststoptherecordingbypressingEXIT
andthenOK.
Antennasignalisnotavailable
Subtitleon.
oFFindicatesthatsubtitlesareturnedoff.
Mainmenuisopen
Channellistisopen
TVguideisopen
YourHDreceiverisswitchingtostandbymode
HDMIistheactiveA/Voutput(recommended)ofyourHDreceiver
AUXSCARTistheactiveA/VoutputofyourHDreceiver
Pictureformatis4:3withblackbars–16:9Eindicatesthatthepictureformat
is4:3stretchedto16:9–16:9oindicatesthatthepictureformatis4:3
zoomedintothescreenwidth.
Softwareupdateisstarting–L0 to L100indicatethatthesoftwareisbeing
loaded–S0 to S100indicatethatthesoftwareisbeingloaded–Endindicates
asuccessfulupdate–FAiLindicatesafailedupdate.
Automaticresolutionadjustment(recommended)–otherpossiblesettingsare
indicatedas576i,576P,720P,180i(for1080i)and180P(for1080p).
YourHDreceiverisintherstinstallationsetup
21UsingmoreofyourHDreceiver
ENGLISH
5.4 Using the Main menu
Press MENUtodisplaytheMainmenu.
Use / tohighlightasetting.
Press or OKtoconrmyourchoice.
Press BACK toreturntotheMain
menu.PressBACK again,MENU or
EXIT
toremovetheMainmenu.
Note
Use the colour
buttonstoperformcontextual
actions,whicharedescribedatthebottomof
thescreen.
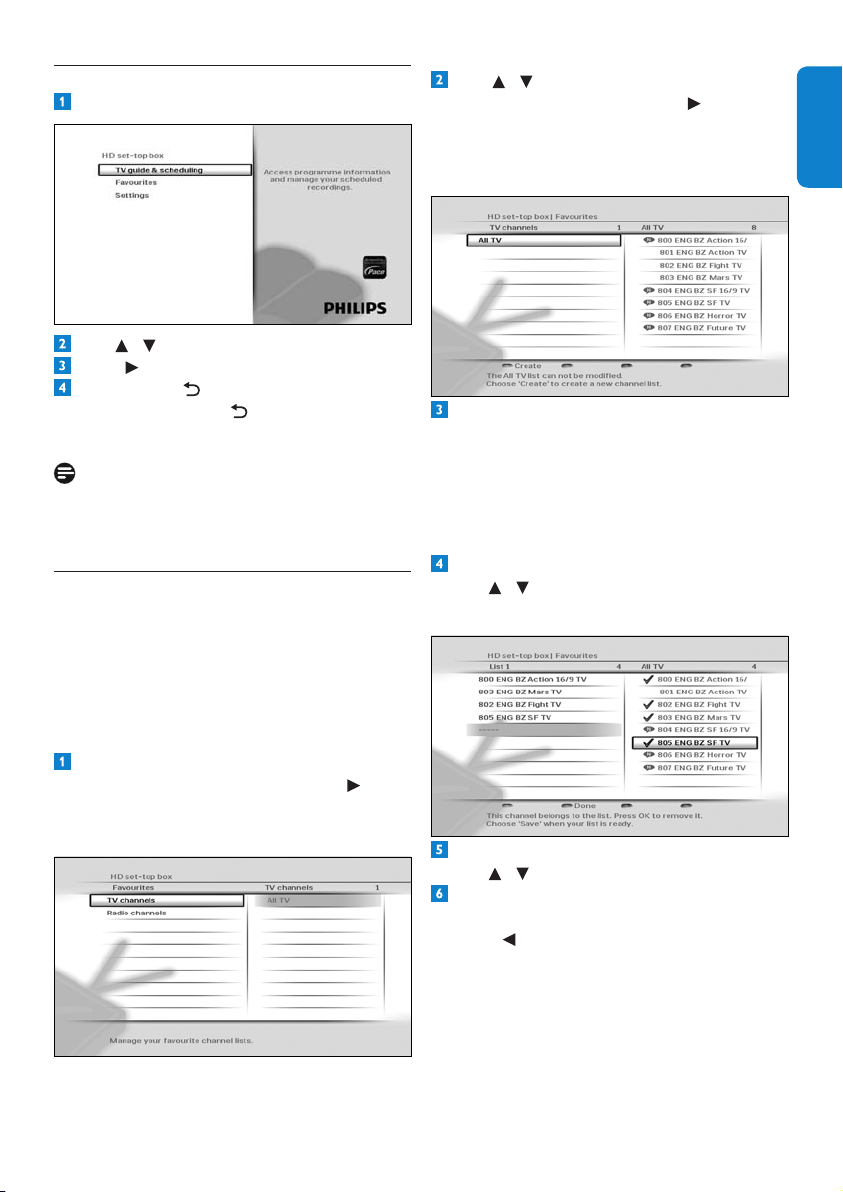
5.4.1 Managing favourite lists
YourHDreceiverallowsyoutocreatefavourite
liststhatincludethechannelsyouwatch
themost.Thisletsyouaccessyourfavourite
channelsquicklyinsteadofscrollingthroughthe
entirelist.
Creating a favourite list
OntheMainmenu,makesurethat
Favouritesishighlightedandpress or
OK.
TheFavouritesmenuappears.
Use / to highlight either TV channels
or Radio channels
,andpress or OK.
Themenunowdisplaystheselectedfull
channellist(All TV or All Radio)andthe
existingfavouritelists.
Press the redbuttontocreateanew
favouritelist.YourHDreceiver,bydefault,
namesthenewfavouritelistasList1(forTV
channels)orRLst1(forradiochannels).You
cancreateuptofourseparateTVandradio
favouritelists.Torenametheselists,see
page 22.
Toaddachanneltoyourfavouritelist,
use / tohighlightachanneland
press OK.
Toremoveachannelfromyourfavouritelist,
use / tohighlightitandpressOK.
Whenyouarenishedaddingallyour
channels,pressthegreenbutton.
Press toreturntotheFavouritesmenu.
UsingmoreofyourHDreceiver22
Toaddachannel,presstheredbutton.
Thenuse / tohighlightthechannelyou
wanttoaddandpressOK. Press the green
buttontosaveyourchanges.
Toremoveachannel,use / to highlight
itandpressthegreenbutton.
Toreorderthechannelsinyourfavourite
list,use / tohighlightachannelyouwant
tomoveandpressthebluebutton.
Use / tomovethechannelupordown
andpressOK.
Press toreturntotheFavouritesmenu.
Deleting favourite lists
From the Favouritesmenu,use / to
highlight either TV channels or Radio
channels
andpress or OK.Themenu
nowdisplaysthedefaultchannellist(All TV
or All Radio
)andanyexistingfavouritelists.
Use / tohighlightthefavouritelistthat
youwanttodelete,andpressthegreen
button.
Press or BACK toreturntothe
Favouritesmenu.
5.4.2 Using the Settings menu
You use the Settings
menutocustomiseyour
HDreceiver.Forexample,youcanlockcertain
channels,changedisplaysettings,etc.
Accessing the Settings menu
From the Mainmenu,use / to highlight
Settings
andpress or OK.
TheSettingsmenuappears.
Press or BACK toreturntothe
Mainmenu.
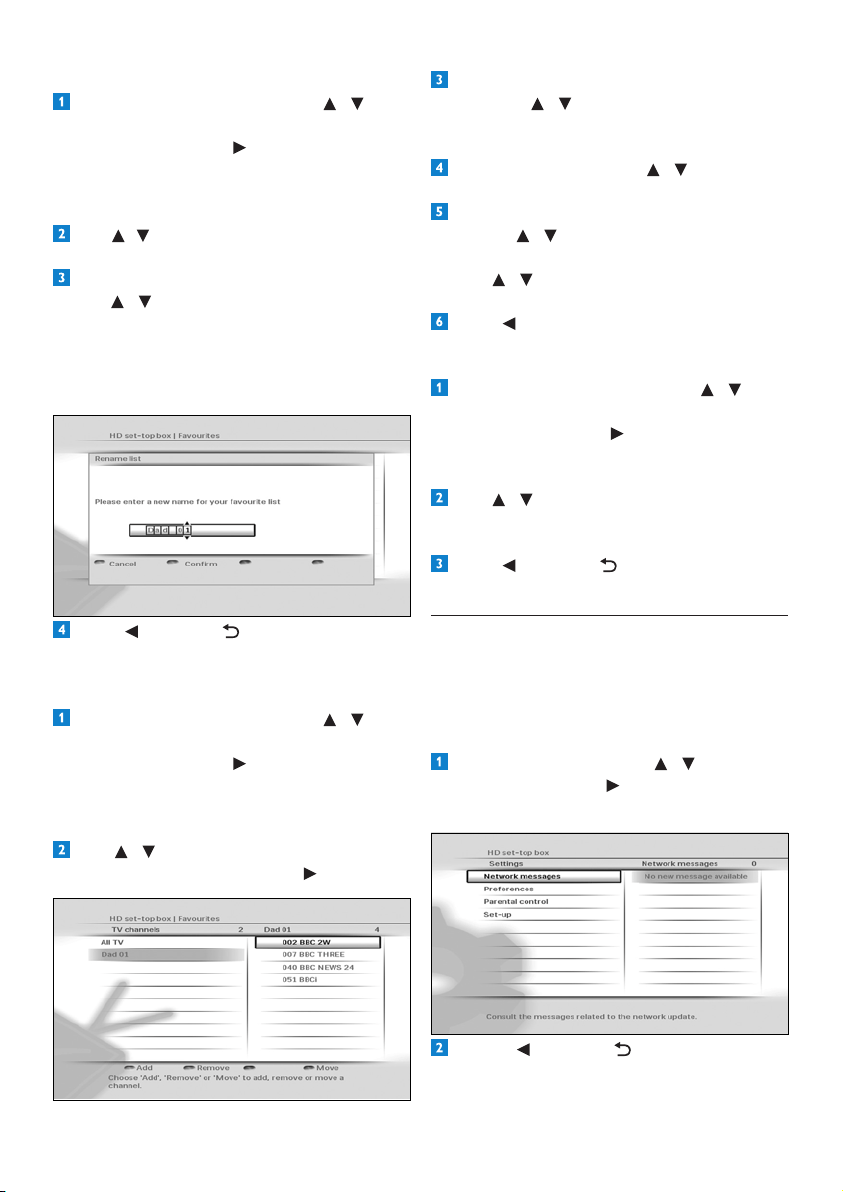
Renaming favourite lists
From the Favouritesmenu,use / to
highlight either TV channels or Radio
channels
andpress or OK.
Themenunowdisplaysthedefaultchannel
list(All TV or All Radio)andanyexisting
favouritelists.
Use / tohighlightthefavouritelistthatyou
wanttorename,andpressthebluebutton.
IntheRename listmenuthatpopsup,
use / or the numberbuttonsto
renameyourfavouritelist.Pressthegreen
buttontoconrmorpresstheredbutton
toreturntothepreviousmenuwithout
savinganychanges.
Press or BACK toreturntothe
Favouritesmenu.
Modifying/Editing favourite lists
From the Favouritesmenu,use / to
highlight either TV channels or Radio
channels
andpress or OK.
Themenunowdisplaysthedefaultchannel
list(All TV or All Radio)andanyexisting
favouritelists.
Use / tohighlightthefavouritelistthat
youwanttomodify,andpress or OK.
23UsingmoreofyourHDreceiver
ENGLISH
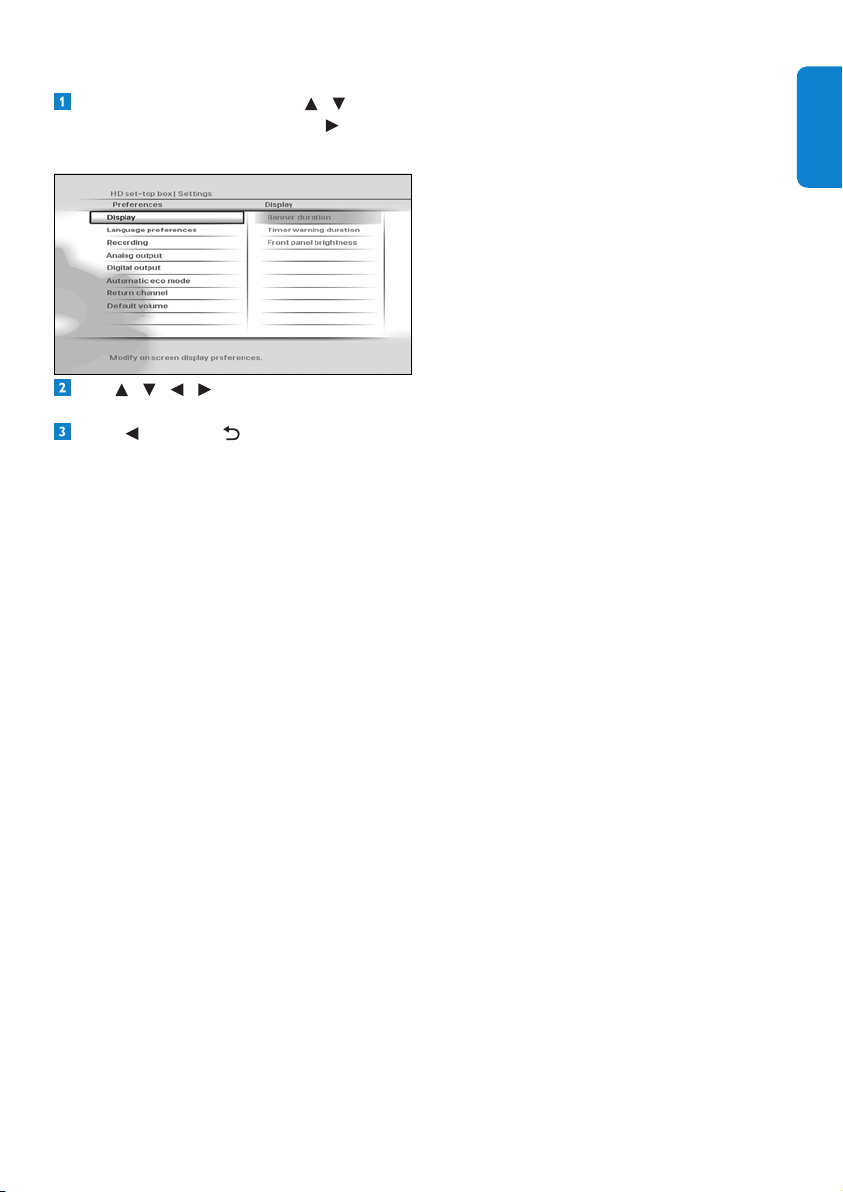
Setting your preferences
From the Settingsmenu,use / to
highlight Preferences
andpress or OK.
ThePreferencesmenuappears.
Use / / / / OK tonavigatethrough
thesettingsandoptions,andmakechanges.
Press or BACK tosaveyourchanges
andreturntothepreviousmenu.
You use the Preferencesmenutochange
thesesettings:
Display
•Banner duration - Use this to set the
lengthoftime(3to10seconds)thatthe
channelbannerremainson-screenwhen
youchangechannel.Bydefault,itissetto
5 seconds.
•Timer warning duration - Use this
tosethowsoonbeforethestartofa
programshouldtherecord-timeralert
you.Theavailableoptionsare30 seconds
before
,1 minute before (default),2
minutes before or 5 minutes before.
•Front panel brightness - Use this to set the
brightnessofthefront-paneldisplay.Youcan
set this to Low,Medium (default)orHigh.
Language preferences
•Information language - Use this to
setyourpreferredlanguagefordisplaying
programmeinformationtoEnglish
(default),Gaelic,Welsh or Irish.
•Audio language - Use this to set your
preferredaudiolanguagetoEnglish
(default),Gaelic,Welsh or Irish.
•Default subtitles mode - Use this to set
howyouprefertodisplaysubtitles.
YoucansetthistoActivated,Not
activated
,Auto when no correct
audio
(default),Auto when audio is
muted or For hearing-impaired.
•Subtitles language - Use this to set your
preferredlanguageforsubtitlestoEnglish
(default),Gaelic,Welsh or Irish.
Recording
•Record Link-Usethissettingtoenable
ordisablethecontrol,byyourHDreceiver,
ofthestart-stoprecordingfunctionofyour
VideoorDVD-Rrecorder(seethenote
onpage29).
Analog output
•Video on AUX Scart - Use this to set
thetypeofanaloguevideosignalsthatare
outputontheAUX SCART connectorof
yourHDreceiver.YoucansetthistoRGB
(defaultwhenV-OutissettoAV)orCVBS
(defaultwhenV-OutissettoHDMI).
•Audio on AUX Scart -Thissetting
applieswhenyourHDreceiveris
connectedviaaSCARTCabletoa
standard-denitionTV.Usethistosetthe
typeofanalogueaudiosignalsthatare
outputontheAUX SCART connector
ofyourHDreceiver.Youcansetthisto
Mono or Stereo (default).
•TV format - Use this to set the format
oftheanaloguevideothatisoutputon
the AUX SCART connectorofyourHD
receiver.Youcansetthisto4/3 Letter Box,
4/3 Centre Cut Out or 16/9(default).
Theoptionsdeterminehowwidescreen
(16:9)programmesshowonastandard-
denitionTVwithaspectratioof4:3.
Digital output
•HDMI output resolution - Use this to
settheHDMIvideoresolutionto576i,
576p, 720p, 1080i, 1080p,Auto (default)
or Original.Notethatyoucanalso
changethissettingusingtheRESbutton
onthefrontpanelofyourHDreceiver.
UsingmoreofyourHDreceiver24
Default volume
Usethistosetthedefaultvolumeatwake-
upofyourHDreceiver.
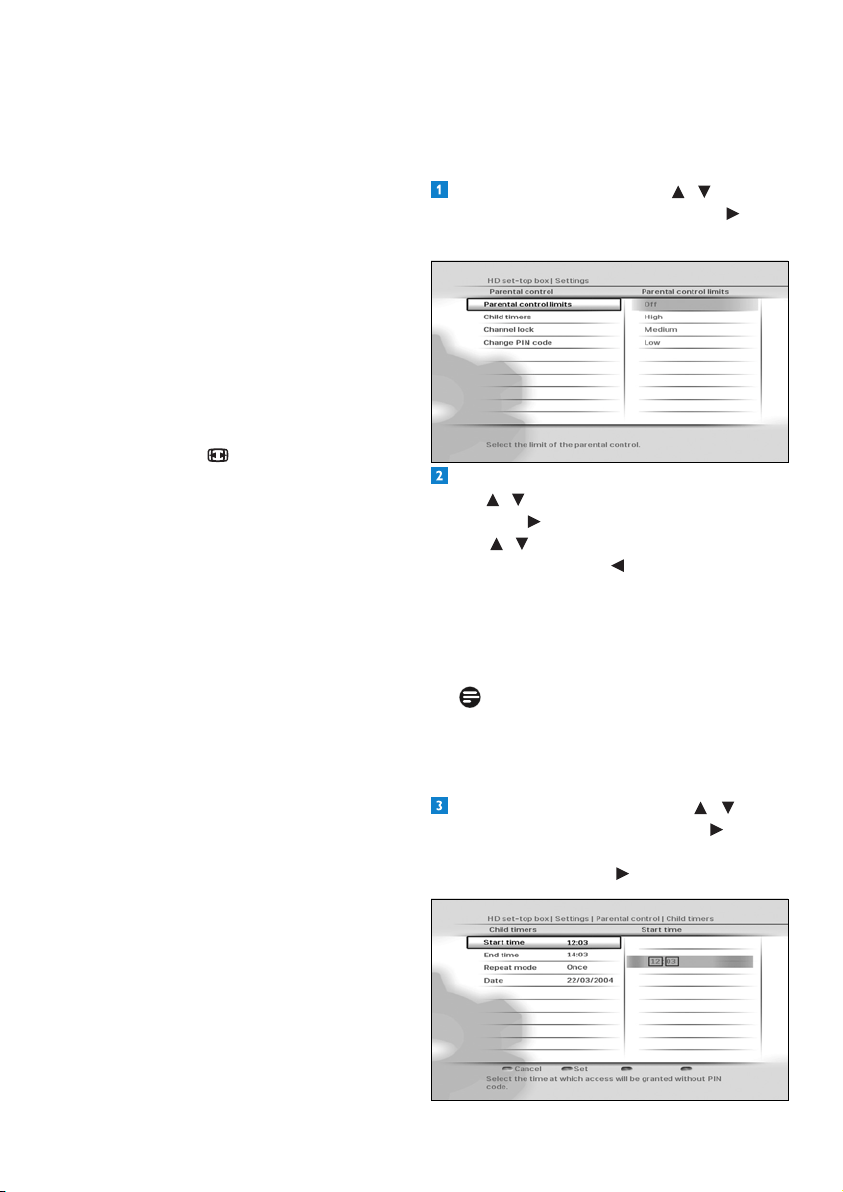
Changing parental control settings
From the Settingsmenu,use / to
highlight Parental control
andpress or
OK
.TheParental controlmenuappears.
Tochangetheparentalcontrolseveritysettings,
use / to highlight Parental control limits,
andpress or OK.
Use
/ tohighlighttheseveritylevelyou
wanttoset,andpress or OK tosaveyour
changesandreturntothepreviousmenu.Note
that if you set the Parental control limits to
Off
,thechildtimersandchannellocksettings
(seebelow)willnothaveanyeffect.
Note
WhenParental control limits is set to
ON
,menuitemslikeParental controland
Set-upwillbeprotectedbythePINcode.
Tocreateanewchildtimer,use / to
highlight Child timers
,andpress or OK.
MakesurethatDenechildtimer is
highlightedandpress or OK.
•Audio capabilities on HDMI - Use this
tosettheHDMIaudioformattoPCM
(default)orAuto*.
•Audio capabilities on S/PDIF - Use this
tosettheS/PDIFaudioformattoPCM
(default)orDolby Digital*.Youcanalso
set this to Not connected.
•Easy Link mode - For future use.
•TV format - Use this to set the format
ofthehigh-denitionvideothatisoutput
ontheHDMI connectorofyourHD
receiver.Youcansetthisto16/9 Pillar Box
(default), 16/9 Full Screen or 16/9 Zoom.
Theseoptionsdeterminehowstandard
(4:3)programmesshowonaTVwithaspect
ratioof16:9.Notethatyoucandirectly
changethissettingusingthepicture
format
button onyourremotecontrol.
*TheAutoandDolby Digitalsettingson
HDMIorS/PDIFarenotrecommendeduntil
yourHDreceiverhasbeenupdatedwiththe
appropriate software.
Visitwww.philips.com/supportregularlyto
checkiftherelevantsoftwareupdateisavailable.
Automatic eco mode
Use this to set the time after which your
inactiveHDreceiverautomaticallyenters
intotheactivestandbymode.Youcanset
this to off, 3 hours (default),4 hours,
5 hours, 6 hours
,7 hours or 8 hours.
Return channel
UsethistocongureyourHDreceiverto
connecttotheinternet,whichthenservesas
areturnchanneltoyourDigitalTVservice
provider.Thereturnchannelisnecessarytouse
anyinteractiveapplicationsthatyourDigitalTV
serviceprovidermayoffer.Beforeconguring
thereturnchannel,besuretoconnectyour
HDreceivertoyournetworkrouterusingan
Ethernetcable.ThenchooseeitherDHCP
tosetupyourconnectionautomaticallyor
manuallyenteralltheparameterslikeIP
address
,Network mask,Gatewayand
DNSsettingstomatchyourrouter’ssettings.
25UsingmoreofyourHDreceiver
ENGLISH
Use / / / tosetthetimeperiod
duringwhichyouwillbeabletowatchany
unlockedchannelwithouthavingtoenter
yourPINcode.Pressthegreen buttonto
conrm.
Todeletethechildtimer,makesureModify
child timer
ishighlightedand press the red
button.
Tomodifythechildtimer,makesureModify
child timer
ishighlightedand press or
OK
.Maketherequiredchangesandpress
the green buttontoconrm.
Tolockachannel,use / to highlight
Channel lock
,andpress or OK.
Use
/ tohighlightthechannelyouwant
tolock,andpressOK. Press or BACK
toreturntothepreviousmenu.
TochangeyourPINcode,use / to highlight
Change PIN code
,andpress or OK.
Use the number
buttonstorstenter
yourcurrentPINcodeandthenenter
yournewPINcode.Usethenumber
buttonstoenteryournewPINcodeagain,
forconrmation.Ifyoucorrectlyentered
thePINcodes,yourHDreceiverbriey
displaysamessageconrmingthatyourPIN
hasbeenchanged,andthenreturnstothe
Parental Controlmenu.
Note
YournewPINcodecanbeany4-digit
numberotherthanthedefaultPINcode
(0000).
Press or BACK toreturntothe
Settingsmenu.
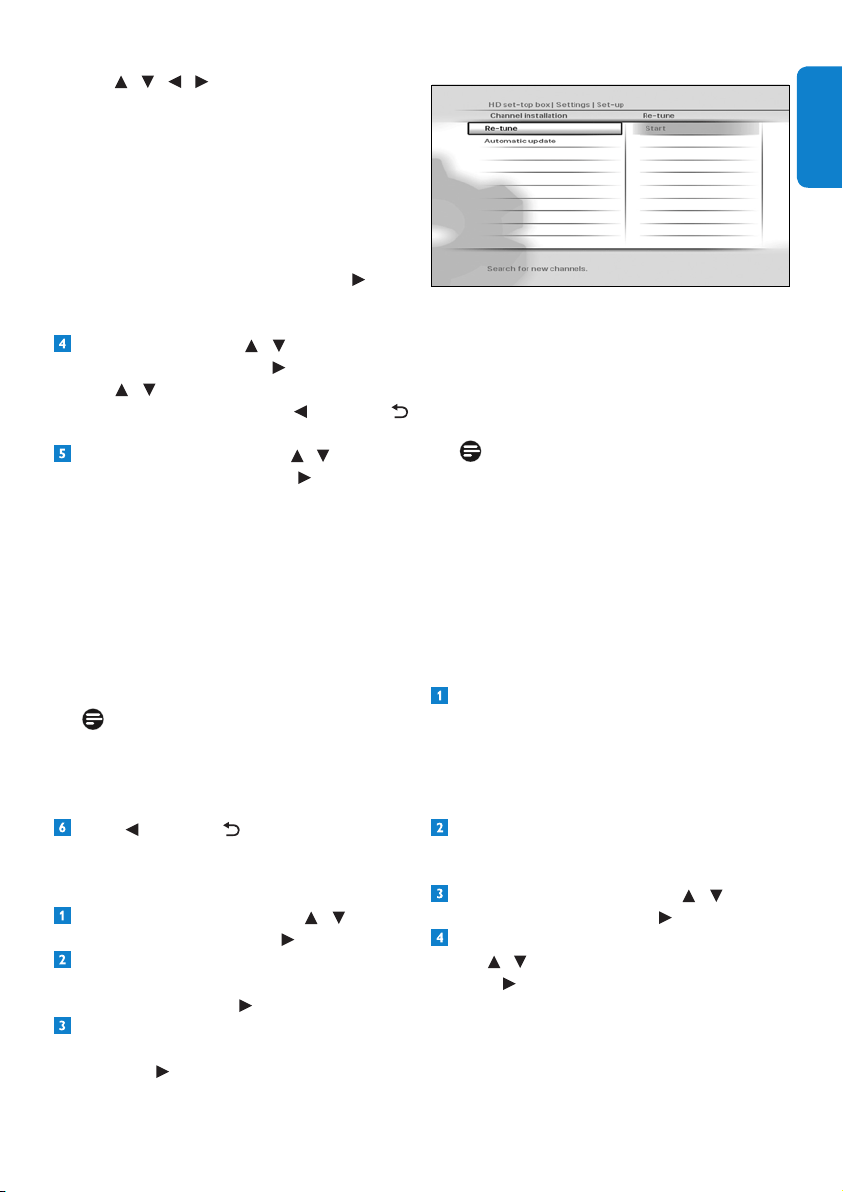
Retuning your HD receiver
From the Settingsmenu,use / to
highlight Set-up
andpress or OK.
IntheSet-upmenuthatappears,
makesure Channel installation is
highlightedandpress or OK.
IntheChannel Installationmenuthat
appears,makesureRe-tuneishighlighted
andpress or OK.
Aprogressscreendisplaystoconrmthatthe
searchistakingplace.
Press the greenbuttontosaveanynew
channelsandreturntotheSet-upmenu.
Press the redbuttontocancelthesearchand
returntotheSet-upmenu.
Note
TheNetwork messagesmenu(underthe
Settingsmenu)alertsyouofanychanges
toyournetworksuchasrecentlyadded
channels,services,etc.Tosavetime,check
thismenubeforeretuningyourHDreceiver.
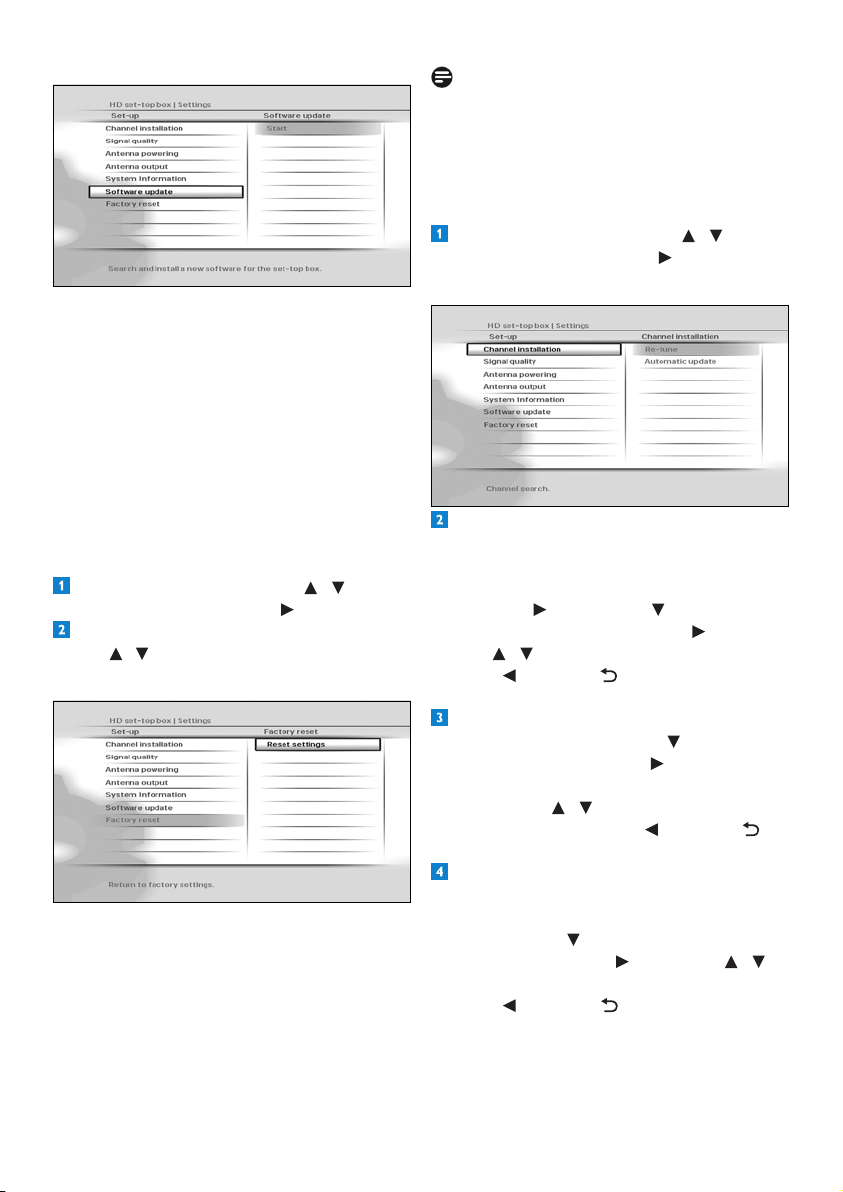
Updating your HD receiver’s software
manually
YoucanmanuallyupdateyourHDreceiver
softwareusingaUSBmemorystick.
Downloadthelatestsoftwarelefromthe
Philipswebsite(www.philips.com/support),
unzipitandtransferittoaUSBmemory
stick.Besuretoplacethedownloadedle
inthetop-levelfolderofyourUSBmemory
stick.
ConnectyourUSBmemorysticktotheUSB
connectorontherearpanelofyourHD
receiver.
From the Settingsmenu,use / to
highlight Set-up
andpress or OK.
IntheSet-upmenuthatappears,
use / to highlight Software updateand
press or OK.
UsingmoreofyourHDreceiver26
Note
ResettingyourHDreceivertothefactory
defaultsettingserasesallofyourpreferences
andsettings.Forexample,allofyourfavourite
listsandrecordingtimerswillbeerased.
Changing other system settings
From the Settingsmenu,use / to
highlight Set-up
andpress or OK.
TheSet-upmenuappears.
Toturnonoroffthechannelupdates
thatautomaticallyhappenwhenyourHD
receiverisintheactive-standbymode,make
sure Channel installationishighlighted
andpress or OK. Press to highlight
Automatic update
andpress or OK.
Use
/ to highlight On or Off.
Press
or BACK tosaveyourchanges
andreturntothepreviousmenu.
Tocheckthesignalqualityofanychannel
thatyouarereceiving,press to highlight
Signal quality
andpress or OK.
IntheSignal quality testmenuthat
appears,use / toselectachannelthat
youwanttocheck.Press or BACK to
returntothepreviousmenu.
Toturnonoroffpoweringyouractive-
indoor
antennausingtheAntenna IN
connectorontherearpanelofyourHD
receiver,press to highlight Antenna
powering
andpress or OK. Use / to
highlight Off or On.
Press
or BACK tosaveyourchanges
andreturntothepreviousmenu.
YourHDreceiverlocatesthesoftware
availableonyourUSBmemorystickand
displaysaconrmationmessage.Press
the greenbuttontoinstallthesoftware
immediately.Presstheredbuttontocancel
andreturntothepreviousmenu.Ifyou
press the greenbutton,yourHDreceiver
updatesthesoftwareandrestarts.Youmay,
dependingontheupdate,thenberequired
tocompletetherstinstallationsetup(see
page10).
Restoring factory default settings
From the Settingsmenu,use / to
highlight Set-up
andpress or OK.
IntheSet-upmenuthatappears,
use / to highlight Factory resetand
press OK twice.
Amessageappearsaskingyoutoconrm.
Ifyouaresure,pressthegreenbutton,or
press the redbuttontocancelandreturn
tothepreviousmenu.Ifyoupressthe
greenbutton,yourHDreceiverrestores
thefactorydefaultsettingsandrestarts.You
willthenberequiredtocompletetherst
installationsetup(seepage10).
27Maintenance
ENGLISH
Note
Set Antenna powering to Ononlyifyou
needtopoweranactive-indoorantennathat
requiresa5Vpowersupplynotexceeding
50mAcurrentconsumption.Besuretoread
yourindoorantenna’susermanualbefore
turningthissettingon.
Tocontrolantennaoutput,press to
highlight Antenna output
andpress or
OK. Use
/ to highlight Inactive in eco
mode or Always active.
Press
or BACK tosaveyourchanges
andreturntothepreviousmenu.
Note
If Antenna output is set to Inactive in
eco
modewhileAntenna powering is
set to On
,thedevice(s)connectedtothe
To TV/VCR outputwillnotreceivethe
antennasignal.
ToseeinformationaboutyourHDreceiver,
press andhighlightSystem information.
Detailssuchassoftwareversion,model
number,serialnumber,etc.,aredisplayedon
the right.
Press or BACK toreturntothe
Settingsmenu.
6 Maintenance
6.1 Cleaning
Forcleaning,useasoft,damp(notwet)cloth.
Neveruseanyabrasiveclothandaerosol
cleaners
6.2 Replacing
YourHDreceiverdoesnotcontainanyuser-
serviceableparts.Donotattempttoopenit.
Allmaintenanceworkmustbecarriedoutby
qualiedservicecentres.
6.3 Disposing
YourHDreceiverisdesignedandmanufactured
withhigh-qualitymaterialsandcomponents,
whichcanberecycledandreused.
Pleaseinformyourselfaboutthelocalseparate
collectionprocessforelectricalandelectronic
products.
Pleaseactaccordingtoyourlocalrulesand
donotdisposeofyouroldproductswithyour
normalhouseholdwaste.Thecorrectdisposal
ofyouroldproductwillhelppreventpotential
negativeconsequencesfortheenvironmentand
humanhealth.
Accessoriesandconnections28
Recommended connection
•
ConnecttheHDMIoutputofyourHD
receivertoanHDMIsourceinputofyour
amplier.
•
ConnecttheHDMIoutputofyour
ampliertoanHDMIinputofyourTV.
System settings
•
ForyourHDreceiver,settheAudio
capabilities on HDMI
setting(under
Menu > Settings > Preferences >
Digital output
)toAUTO.
•
SelectthecorrectA/VsourceonyourTV.
•SelectthecorrectA/Vsourceonyour
amplier.
•
VolumecontrolsandnecessaryLipsync
adjustmentsareperformedbyyour
amplier.Refertoyouramplier’suser
manual.
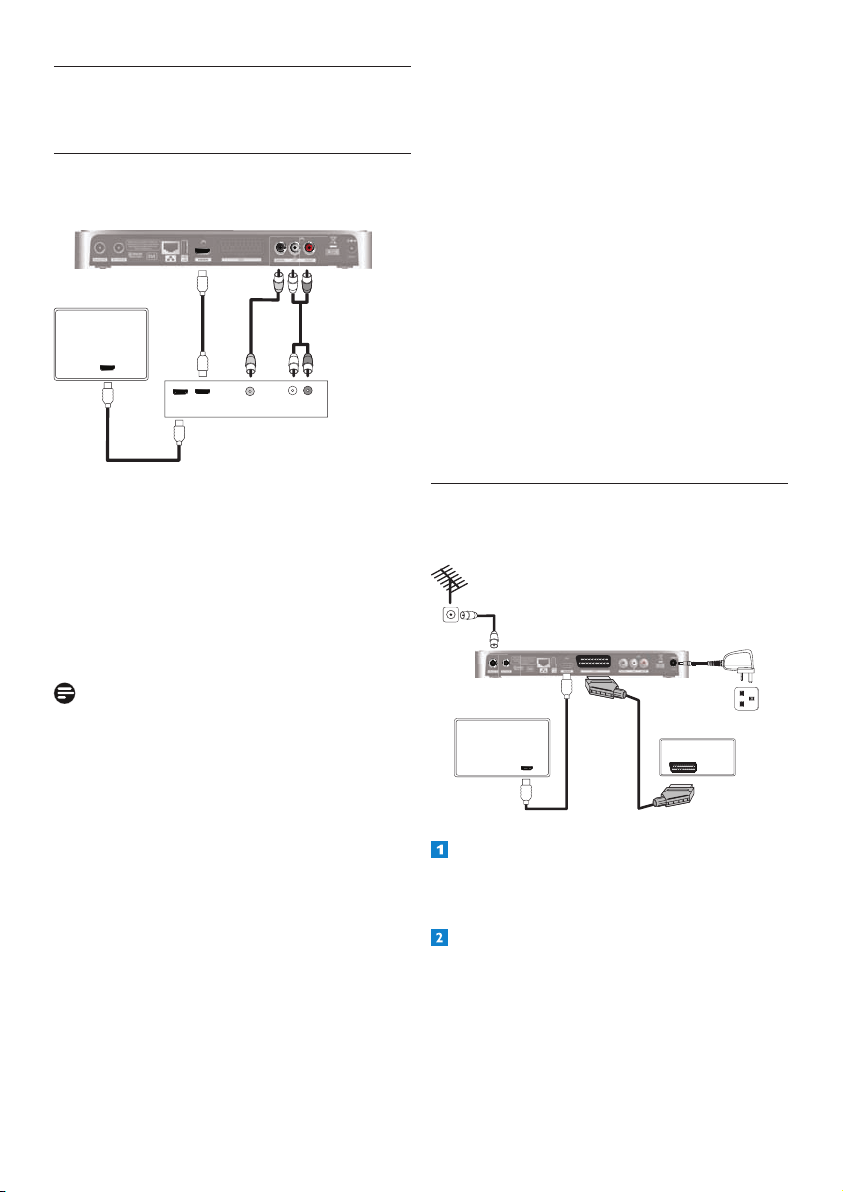
7.2 Connecting your recording
equipment
HD receiver
Aerial wall
socket
1
32
4
TV
HDMI
VCR
SCART
Mains wall
socket
Connecttheaerialcable(notsupplied)from
theaerialwallsockettotheAntenna IN
connectorontherearpanelofyourHD
receiver.
UsethesuppliedHDMIcabletoconnectthe
HDMI connectorontherearpanelofyour
HDreceivertotheHDMIinputconnector
ofyourTV.
7 Accessories and
connections
7.1 Connecting your audio equipment
Audio Equipment
L R
Digital
Analogue
A
C
B
HDMI
HDMI
TV
HDMI
C
HD receiver
Option A – Electrical S/PDIF connection
(Digital)
ConnecttheDIGITALaudiooutputofyour
HDreceivertotherelevantaudioinputofyour
audioequipmentusinganelectricalS/PDIFcable
(notsupplied).
Refertotheusermanualofyouraudio
equipmenttochoosetheproperdigitalaudio
input.
Note
WithadigitalconnectionviatheDIGITAL
outputofyourHDreceiver,muteandvolume
operationsaremanagedbyyouraudio
equipmentandnotbyyourHDreceiver.
Option B – Analogue connection
ConnecttheL/Raudiooutputstotherelevant
audioinputsofyouraudioequipmentusinga
doubleCINCHcable(notsupplied).
Refertotheusermanualofyouraudio
equipmenttochoosetheproperanalogueaudio
inputs.
Option C - HDMI connection
Recentampliersarettedwithoneormore
HDMIsourceinput(s)andoneHDMIoutput.

29Accessoriesandconnections
ENGLISH
UseaSCARTcable(notsupplied)toconnect
the AUX connectorontherearpanelofyour
HDreceivertotheSCARTinputconnectorof
yourVCRorotherrecordingequipment.
ConnectyourHDreceiverandother
equipmenttothemains.
Notes
Double Scheduling
Tosucceedmakingrecording,donot
forgettosettimersonyourvideoorDVD
recorderaccordingtoyourHDreceiver’s
recordingschedulings.
How to avoid double scheduling?
Yourrecorderisttedwithafeature
allowingitsstart-stopcontrolcompatible*
withyourHDreceiver.
*Therecorderfunctionisactivatedbythe
videosignalatitsSCARTinput.Oncethe
functionisactive,therecordingstartswhen
videoisonandstopswhenvideoisoff.
IfyourVideoorDVD-Rrecordersupports
theabovefunction,thesimpleschedulingof
yourHDreceiverwillautomaticallycontrol
yourrecorder.
Necessary system installation
•
Enable‘RecorderControl’onyourVideo
orDVD-Rrecorder.Refertotheuser
manualofyourrecorder.
•Set the Recording linksettingofyour
HDreceiver(underMenu > Settings >
Preferences > Recording
)toON.
7.3 Connecting your standard-
denitionTV
HD receiver
Aerial wall
socket
1
2
4
TV
SCART
Mains wall
socket
Connecttheaerialcable(notsupplied)from
theaerialwallsockettotheAntenna IN
connectorontherearpanelofyourHD
receiver.
UseaSCARTcable(notsupplied)toconnect
the AUX connectorontherearpanelofyour
HDreceivertotheSCARTinputconnectorof
yourstandard-denitionTV.
ConnectyourTVtothemains.UseyourTV’s
remotecontroltoselecttheSCARTinput
connector,whichisconnectedtoyourHD
receiver,asthetheA/Vsource.Ifnecessary,
refertoyourTV’susermanual.
ConnectyourHDreceivertothemainsand
waituntilyourHDreceiverwakesup(‘InSt’
appearsonthefront-paneldisplay).
Press the V-Out
buttononthefrontpanel
twice.‘AU’nowappearsonthefront-panel
displayandthe‘Welcome’screenappears
onyourTV.Seesection3.3,Installingyour
HDreceiver,onpage10forinstructionson
completingtherstinstallationsetupfrom
step 3.
Note
Optionally,youcanalsousethesuppliedRF
cabletoconnecttheRFoutputconnector
(labelledTo TV/VCR) ofyourHDreceiverto
theRFinputconnectorofyourTV.

Guaranteeandservice30
9 Technical data
ThisproductisinconformitywithEuropean
95/47/ECand2002/21/ECdirectives.
Theproductcomplieswiththefollowing
EuropeancouncilDirectives:2006/95/EECand
2004/108/EC.
Video decoding
Standarddenition
• MPEG2MP@ML
• MPEG4AVCMP@L3
• Videobitrate 15Mbit/s
• Resolution:576imax
720x576pixelsinterlaced
• Pictureformat4:3et16:9
Highdenition
• MPEG2MP@HL
• MPEG4AVCHP@L4
• Videobitrate 20Mbit/s
• Resolutionofbroadcast:720p,1080i
• Upscale up to: up to 1080p50
•
Contentprotection:HDCPonHDMI
Audio Decoding
•
MPEGIlayerI,II
• DolbyDigital
• HE-AACstereo/Multichannel
• DolbyDigital/HEAACtostereodown-mixing
• DolbyDigitalPlustoDolbyDigital
transcoding
•
HE-AACtoDolbyDigitaltranscoding*
*Featuresubjecttofutureproductsoftware
upgrade
Convenience
•
Automaticinstallation
• HDreceptionindicator
• Automaticchannelupdate
• TVandRadiomodes
• 4xfavoriteTVchannellists
• 4xfavoriteRadiochannellists
• Programlistediting:Add,Move,Delete
• Parentalcontrol–Childlock
• 8daysElectronicProgramGuide
8 Guarantee and service
ForthePhilipswarrantyapplicabletoyourHD
receiver,pleasevisitthePhilipswebsite:
www.philips.com/guarantee.
IncaseyoudonothaveanInternetconnection,
pleasecontactyourlocalPhilipsConsumerCare
Centre(seepage37).

31Technicaldata
ENGLISH
• Eventtimer8
• EventprogrammingviaEPG
• DVBsubtitling
• DigitalTXT/MHEGwithInteractionchannel
• VideoscalingonHDMIoutput:Auto,Original
576i,576p,720p,1080i,1080p50
• DolbyDigital5.1audiooutput
• ECOpowermanagement
• IPaddressassignment:ManualorDHCP
• Softwareupdate:
UpdateviaOTAdownload
LocalupdateviaUSB
Application system resources
•
ProcessorSTi7105
Reception - Demodulation
•
ReceptionofDVB-Tbroadcast(EN300744)
• ReceptionofDVB-T2broadcast(acc.D-Book6.1)
• Demodulationtype:COFDMFFT
• Inputfrequencyrange:UHFIV/V
470–862MHz
• ActiveRFLoop-through:
Bandwidth47-862MHz
Switchtopassiveloop-throughin
standbymode
• Channelbandwidth(BW):8MHz
• Network:MFN/SFN
Antenna control for indoor aerial
•
ViaRFINconnector
• DCpowering:5Volts/50mA
• Switchableviamenu:On/Off
Front-panel display / buttons
•
4x7segmentLEDdisplay
• 1xbi-colorLED
• 1xblueLED
• 5xButtons:Standby,P-,P+,Res,V-Out
Rear panel connections
•
RFin:typeIEC169-2female
• RFout:typeIEC169-2male
• HDMIoutput
• AUXSCARTcongurablebymenu
-SCARTVCRconguration(forrecorder)
Outputs:CVBS*,xedlevelL/Raudio
-SCARTTVconguration(foraTV)
Outputs:CVBS*orRGB/FB,xedlevel
L/Raudio,Slowblanking
• L/RanalogueAudiooutput
• Digitalaudiooutput:
CinchelectricalSPDIF
• DCpowerinlet
• RJ45
•
USB2.0(Master)
*Videostandard:PAL
Accessories
•
Remotecontrol
Protocol:RC6
• Batteries:2x1.5VtypeAAA/R03
• Usermanual
• QSG
•
Freeviewyer
• Retuneyer
• HDMIcable
• CoaxialRFcable
• AC/DCpoweradaptorincl.mainscord
Miscellaneous
•
Temperaturerange(°C)
Operating+5to+45°C
Storage-25to+70°C
• Mains:AC230V+/-10%,50Hz
• Powerconsumption:<6W
Standby:<1W
Offmode:<0.3W
• Weight:1.4kg
Includingpackaging:2.3kg
• Dimensions:
Product(mm)290x160x37
Packaging(mm)370x235x70
Duetocontinuedproductimprovement,this
specicationmaychangewithoutnotice.

Frequentlyaskedquestions32
Your HD receiver seems to be switching
off automatically after some time.
Ifyourreceiverautomaticallygoesintostandby
mode(standbyindicatoronthefrontpanellights
up),thisisduetotheEcomode.TheEcomode
issetto3hours,bydefault(environmentally
friendlyproduct).Tomodifyit,gotoMenu >
Settings > Preferences > Automatic Eco
mode
,andchooseadifferentvalue.Seepage24.
Your remote control is not working.
•
Makesurethatyoupointyourremote
controldirectlyatyourHDreceiverand
thatnothingisbetweenitandyourHD
receiver.ThestandbyindicatoronyourHD
receiver’sfrontpanelshouldasheachtime
youpressaremotecontrolbutton.
• Checkthebatteriesandreplacethem,if
necessary.
• If rEC
isdisplayed(onthefront-panel
display)everytimeyoupressabuttonon
yourremotecontrol,seebelow.
Your HD receiver displays “rEC” on the
front-panel display each time you press a
button on your remote control and your
HD receiver is locked.
Arecordingisrunning,whichlocksyourHD
receiver.TounlockyourHDreceiver,youmust
STOPTHERECORDINGbypressingEXITand
thenOK.
The picture is not displayed on your
HDTV and an HDCP authentication error
is displayed.
YourHDTVdoesnotsupportHDCP,which
allowsyourHDreceivertotransmitfull-
resolutionvideotoyourHDTV.Asaresult,the
HDMIoutputdisplaysamessagemaskingthe
video,whichasksyouforchangingtheresolution
downto576p(seepage18-Resbutton).
10 Frequently asked
questions
Connection
Your HD receiver does not display any
digital TV channels on your TV. You may
also see the on-screen message “Signal
lost”.
•
Checkthattheaerialcablefromtheaerial
wallsocketiscorrectlyconnectedtoyour
HDreceiver(seepage10).
• Theremaybeatemporaryproblemwith
thereception,caused,forexample,bybad
weather;tryagainlater.
• Checkifthereisanynetworkmessage
relatedtothissignalloss.Youcanaccessthe
Network messages menufromMenu >
Settings > Network messages.
Setup
Your HD receiver does not seem to be
working and there are no lights on the
front panel.
•
Checkthatthe12Vpowersupplyunit is
correctlyconnectedtoyourHDreceiver.
• EnsurethattheON/OFFswitchonthe
rearpanelofyourHDreceiverisswitched
on(isinthe‘1’position).
Your HD receiver does not seem to be
working and a channel number is shown
on the front-panel display.
•
Checkthatallconnectionsareproperly
made(seepage10).
• CheckthatyourTVispluggedintothemains
andthatitisswitchedon.
• Checkthatyouhaveselectedthecorrect
A/Vchannel/sourceonyourTVdepending
onhowyourHDreceiverisconnectedto
it(thatis,usingHDMIorSCART).Referto
yourTV’susermanualforinstructions.

33Frequentlyaskedquestions
ENGLISH
Your HD receiver seems to lock up or get
stuck while retuning it to search for new
channels.
InpartsofthecountrywheretheanalogueTV
serviceshavealreadybeenswitchedoff,thetime
takentoretunecanincrease.Thisisbecause
yourHDreceiverscansforallthetransmitters
inyourarea,whichcantakeupto15minutes.
Pleasewaitfortheretunetocomplete.Thisis
notafault.
Youcannotndallthechannelsyouthink
should be available even after retuning
your HD receiver.
•
Themissingchannelsmaynotbeavailable
inyourarea.Checkyourcoverageonthe
Freeviewwebsite:www.freeview.co.uk.
• Yourantennamayneedtobeupgraded
(signalpower,position,orientationor
cabling).
• Asignalboostermaybettedonyour
antenna.Considerhavingthisremovedas
ampliersarenormallynotrequiredafter
thedigitalswitchover.Toohighasignallevel
cancauseyourHDreceivertoskipsome
channels.
•
Someearlydigitalreceiversmanufactured
priorto2004supportonlythe2Kmode
ofdigitaltransmissions.Aspartofthe
digitalswitchover,theUKFreeviewTV
platformwillbeupgradedtoamorerobust
transmissionstandard.Thechangein
transmissionstandardhasbeenauthorised
byOFCOMandthenewstandardis
supportedbyproductsthathavethe“Digital
Tick”.
•
IfyouhaveaSKYbox,switchittostandby
modeandthenretunetheterrestrial
receiver.Ifitthenreceivesallexpected
Freeviewchannels,thenthemodulator
needsadjustingonyourSkybox.Contact
Skytondouthowtoadjustthemodulator.
The picture seems to be stretched or
squashed.
ChecktheTV formatsettingunderDigital
output or Analog output
(Main > Settings
> Preferences
).Alternatively,pressthepicture
format
button onyourremotecontrolto
scrollthroughthedifferentsettings.Alsoreferto
yourTV’susermanual.
Your HD receiver displays ‘err’ on the
front-panel display when you plug in a
USB memory stick.
ReformatyourUSBmemorystickusinga
computer.EnsurethatthelesystemisFAT16or
FAT32.
Youcannotndallthechannelsyouthink
should be available.
RetuneyourHDreceiver(seepage25).
Alternatively,resetyourHDreceivertoits
factorydefaultsettings(seepage26)and
proceedwiththerstinstallationsetup.
Note
Duringtherstinstallation,yourchoiceofthe
networkmayaffectthenumberofinstalled
channels.
YoudonotndanyHDchannels.
Initially,HDprogrammesareavailableonlyon
channels50and51.Switchtothesechannels.
NotethattheHDindicatoronthefrontpanel
ofyourHDreceiverlightsupwhilewatchingan
HDchannel.
Digitalterrestrialbroadcastingisprogressing
intheUK.Asdigitalswitchoverhappens,the
numberofdigitalchannelsavailableineach
regionmayalsoincrease.Pleasevisitoneofthe
followingwebsitestondoutwhenthedigital
switchoverisscheduledforyourarea:
www.digitaluk.co.uk
www.freeview.co.uk/availability(coverage
checkerforHD)

Frequentlyaskedquestions34
You get a picture or a freezed picture,
a program number on the front display
and your receiver seems blocked while
not responding to the remote control
commands.
YourHDreceiverhashungup.Youhavetoreset
yourHDreceiver.Pressthestandbybuttonon
thefrontpaneluntilInit isshownonthefront-
paneldisplay.
Ifyouhavetriedalloftheactionssuggested
aboveandstillarenotabletoresolvethe
problem,contactyourlocalPhilipsConsumer
CareCentre(seepage37).
Your HD receiver found all the expected
channels after you retuned it. However,
when you turned on your HD receiver the
next day, the picture was breaking up and
some channels were missing.
YourHDreceiverhasanautomaticretuning
feature;thisallowsittokeepuptodatewith
minorservicechanges.However,whenthesignal
levelofnearbyrelaytransmittersarehighor
iftheantennasignalisbeingamplied,these
problemscanoccur.
Tosolvethisproblem:
• Turnofftheautomaticchannelupdates
featureofyourHDreceiver(seepage26).
• Removeanysignalampliersorboosters
thatarettedonyourantenna.Theseare
notrequiredafterthedigitalswitchover.
• Checkthatyourantennaisalignedproperly
andisamodeladaptedfordigitalsignal
receptioninyourarea.Ifyouarenotsure,
pleaseusetheservicesofarecognisedCAI
antennainstallationcompany.
Although you set Audio capabilities to
“Auto” for HDMI or “Dolby Digital” for
S/PDIF, your HD receiver does not deliver
Dolby Digital 5.1 multi-channel audio
output.
•
YourHDreceiverneedsasoftwareupgrade.
• Visitwww.philips.com/supportregularly
tocheckiftheappropriatesoftwarefor
ugradingyourHDreceiverviaUSBis
available.
• Set the Audio capabilities
settingtoPCM
untiltheupgradeofyourHDreceiveris
done.

35Glossary
ENGLISH
11 Glossary
Analogue audio
AnaloguesoundisoutputfromtheLEFT/RIGHT
audioconnectorsontherearpanelofyourHD
receiver.Theredandwhitesocketssendaudio
throughtwochannels,theleftandright.
Aspect ratio
Aspectratioreferstothelength-to-heightratio
ofTVscreens.Theaspectratioofastandard
TVis4:3,whiletheratioofahigh-denition
orwidescreenTVis16:9.Theletterboxformat
allowsyoutowatchavideowithawideraspect
ratioonastandard4:3TV.
DHCP
DynamicHostCongurationProtocol(DHCP)
isanetworkprotocolthatenablesarouteror
servertoautomaticallyassignIPaddressesto
devicesthatarepartofitsnetwork.
Digital audio
Digitalsoundisavailablewhenyouusethe
DIGITALaudioconnector(coaxialS/PDIF)
ontherearpanelofyourHDreceiver.These
socketssendaudiothroughmultiplechannels,
insteadofjusttwochannelsasanaloguedoes.,
Dolby Digital
AsurroundsoundsystemdevelopedbyDolby
Laboratoriescontaininguptosixchannelsof
digitalaudio(frontleftandright,surroundleft
andright,centreandsubwoofer).
DVB
DigitalVideoBroadcasting
EPG
ElectronicProgrammeGuide
EasyLink
ThePhilipsEasyLink™technologyenablesyou
tocontrolmultipledevices,whichareconnected
throughstandardHDMIcables,usingasingle
remote.
HDCP
High-bandwidthDigitalContentProtection
(HDCP)isatypeofdigitalcopyprotection
system.Whenyourset-topisattachedviaan
HDMIcabletoanHDCP-compliantHDTV,
theHDTVandset-topnegotiateasecure
link,whichallowsyourset-toptotransmitfull
resolutionvideotoyourHDTV.
HDMI
High-DenitionMultimediaInterface(HDMI)is
ahigh-speeddigitalinterfacethatcantransmit
uncompressedhigh-denitionvideoanddigital
multi-channelaudio.Itdeliversperfectpicture
andsoundquality,completelyfreefromnoise.
HDMIisfullybackwardcompatiblewithDVI.
HDTV
High-DenitionTelevision
Lip Synchronisation
Settingusedtosynchroniseaudiowithvideo
incaseadelayisexperienced,inparticular,if
speechdoesnotmatchlipmovements.
MPEG
MotionPictureExpertsGroup.Acollectionof
compressionsystemsfordigitalaudioandvideo.
PIN Code
A4-digitcodeusedtopreventaccessto
inappropriateprogrammes(parentalcontrol).

Index36
SDTV
Standard-DenitionTelevision.
Surround
Asystemforcreatingthreedimensionsound
eldsfullofrealismbyarrangingmultiple
speakersaroundthelistener.
USB memory stick
Asmallsizestoragedevice,whichisusedto
updateyourHDreceiver’ssoftware(see
page25).ConnectittotheUSB 2.0
connnectorontherearpanelofyourHD
receiver.
12 Index
Changechannel,13-15
Channelbanner,13,14
Connect
HDMI,10
SCART,29
Controlvolume,13
Favouritelists
Create,21
Delete,22
Modify,22
Rename,22
Frontpanel,18
Indoorantenna
Setting,26
Powering,10,27
Install
Firstinstallation,10
Rearpanel,18
Record
Programmes,16
Stop,16,32
Remotecontrol,19
Restorefactorysettings,26
Retune,25
Returnchannel,24
Softwareupdate,25
Systemsettings,26
Switchonandoff,13
TVguide,15
Wake-upyourHDreceiver,13

37Contactinformation
ENGLISH
Contact information
DTR 5520/05
Serialnumber:
UNITED KINGDOM
Phone:08003316015

Trademarksandpartnerlogos38
Trademarks and partner logos
ThePhilipswordmarkandthePhilipsshieldareregisteredtrademarksofKoninklijkePhilips
ElectronicsN.V.andareusedbyPaceplcunderlicensefromKoninklijkePhilipsElectronicsN.V.
ManufacturedunderlicensefromDolbyLaboratories.
“Dolby”andthedouble-DsymbolaretrademarksofDolbyLaboratories.
HDMI,theHDMIlogo,andHigh-DenitionMultimediaInterfacearetrademarksorregistered
trademarksofHDMIlicensingLLCintheUnitedStatesandothercountries.
TrademarkoftheDVBDigitalVideoBroadcastingProject(1991to1996)
TheFREEVIEWserviceissubjecttocoverage.TheFREEVIEW,FREEVIEW+,FREEVIEWHDand
FREEVIEW+HDwordsandlogosaretrademarksofDTVServicesLTD.©DTVServicesLtd2010.
The“HDTV”LogoisatrademarkofEICTA.
100%recycledpaper
Paceand aretrademarksand/orregisteredtrademarksofPaceplc.

39Trademarksandpartnerlogos
ENGLISH

©2010KoninklijkePhilipsElectronicsN.V.
Allrightsreserved.
Documentordernumber:502-1040510