使用说明书
电磁炉
Instructions for use
Induction hob
HI1995G / HI9ETA04
HI1975G / SIVK9DTA
HI1655G / SIVK6ETA
HI1655M / SIVK6ETA
HI1355G / HI3DTA03
ZHS 手册 ZHS 3 - ZHS 35
EN Manual EN 3 - EN 30
使用的图示 - Pictograms used
重要信息 - Important information
提示 - Tip
ZHS 3
目录
电磁炉
介绍 4
控制面板 5
描述 6
安全须知
温度安全 7
烹饪限时器 7
使用
使用触摸式控制器 8
电磁炉 8
电磁炉如何工作 9
电磁噪音 9
平底锅 10
操作
打开电磁炉,设置功率 12
余热指示灯 12
快速加热 13
一前一后两个烹饪区 13
如何桥接Vario感应区 14
关闭 15
待机模式 15
经济待机模式 15
童锁 16
暂停 17
模式确认 17
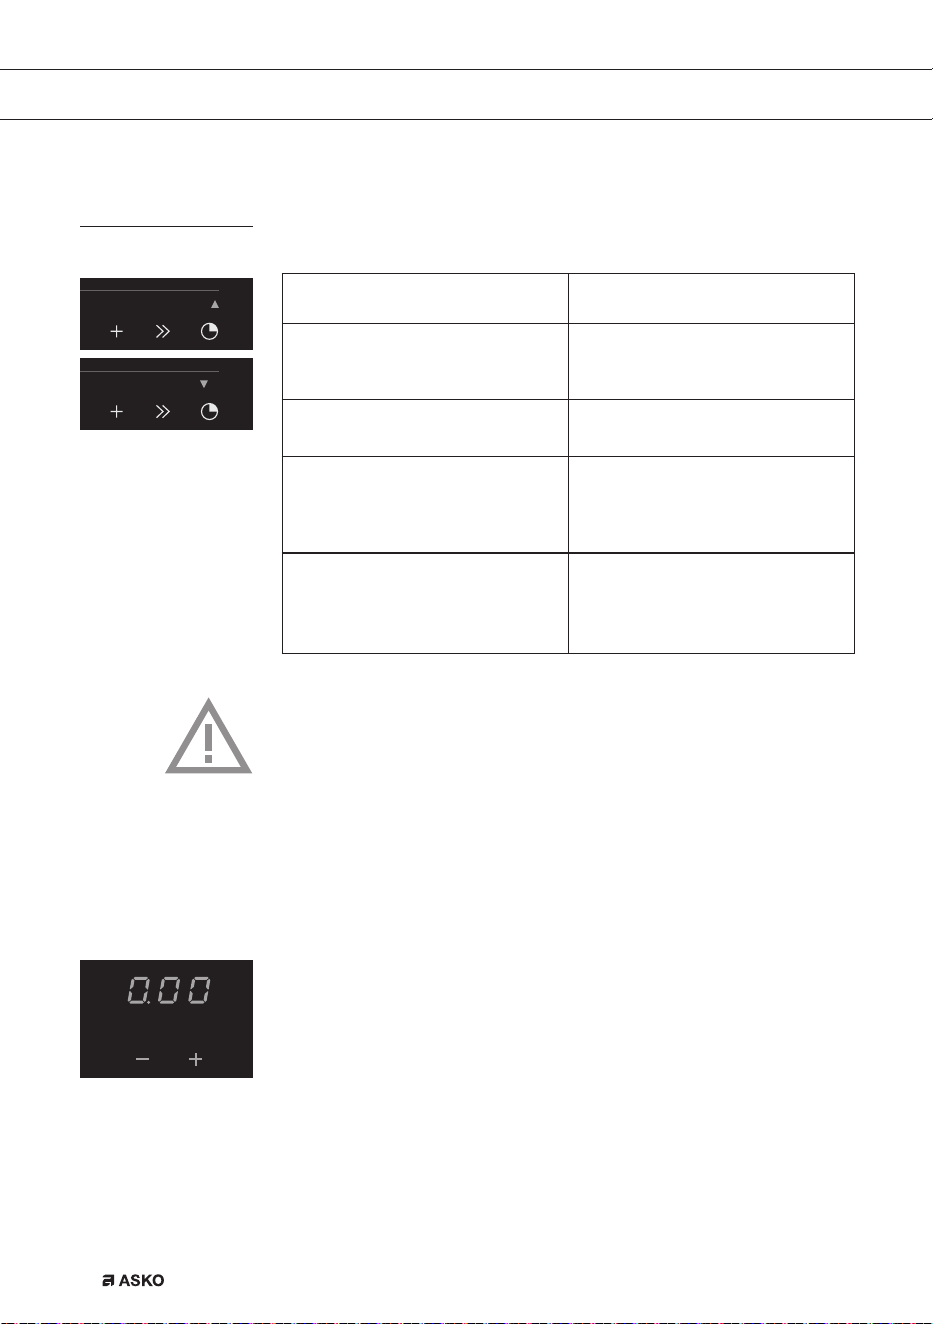
计时器/厨房计时器 18
报警器开关 20
平底锅自动检测 20
自动烹饪程序 21
厨师功能(HI1995G) 21
健康烹饪 26
烹饪设置 27
保养
清洁 29
故障
概述 30
故障排除表 30
环境因素
包装与电器的处理 32
产品中有害物质的名称及含量
3 4

ZHS 4
介绍
本款电磁炉专门为真正的烹饪爱好者而设计。
利用电磁炉烹饪具有很多优点。电磁炉烹饪比较容易,因为电磁炉反应
迅速,还可以设置成非常低的功率水平。此外,电磁炉还可以设置较高
功率水平,从而可以很快煮好菜肴。烹饪区之间空间充足,让人享受舒
适烹饪。
利用电磁炉烹饪不同于利用传统电器烹饪。电磁炉烹饪是利用磁场产生热
量。这意味着并不是所有平底锅都能在电磁炉上使用。
有关这方面,平底锅章节会详细阐述。
为了在最大程度上确保安全,电磁炉配有数个温度保护装置和一个余热指
示灯,可以显示哪些区域还仍然发热。
本手册描述了用户如何才可以充分利用电磁炉。除操作信息外,您还可以
了解一些背景信息,这些信息将有助于您使用本产品。本手册还包含有一
些烹饪表格与保养提示。
使用本电器之前,请通读本手册,并将本手册放置于安全位置,
以供后续查阅。
本手册还可作为检修技术人员的参考资料。因此,请在本手册背面规定位
置贴上设备标识卡。
设备标识卡含有检修技术人员适当地响应您的需要或问题所必需的所有
信息。
请享受烹饪吧!
电磁炉

ZHS 5
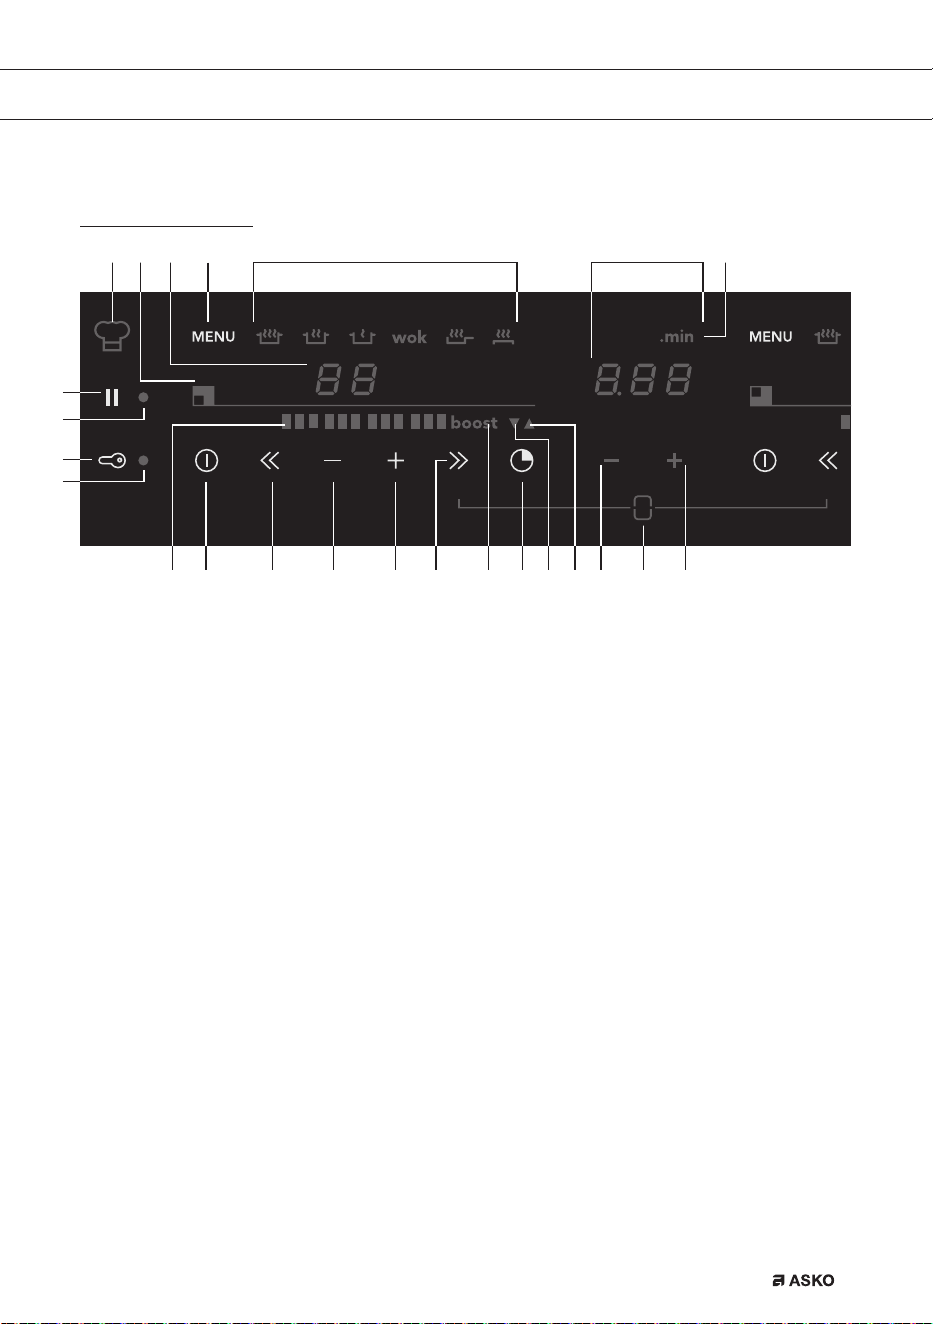
控制面板
1. 暂停键
2. 暂停指示灯
3. 童锁/经济待机键
4. 童锁指示灯/经济待机指示灯
5. 方块电平指示器
6. 开/关键
7. 快速降低功率
8. 降低功率
9. 增加功率
10. 快速增加功率
11. 快速加热
12. 计时器/闹钟键
13. 闹钟指示灯
14. 烹饪时间指示灯
15. “缩短时间”键
16. 桥接功能(两个烹饪区连接起来,形成一个“大”区。一次滑动控
制2个烹饪区)。
17. “增加时间”键
18. “小数点之后分钟数”指示灯
19. 计时器/闹钟
20. 菜单功能
21. 菜单键
22. 电平指示器
23. 烹饪区指示灯
24. 厨师功能
电磁炉
F00002557 - LED Screen ATAG TC (700002940000)
08-06-11 IH
2124 18
20
192223
6 7 8 9 12 13 14 15 1711 16105
1
2
4
3

ZHS 6
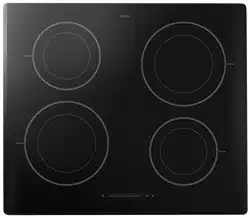
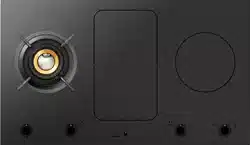
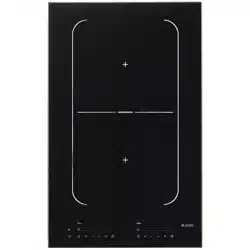
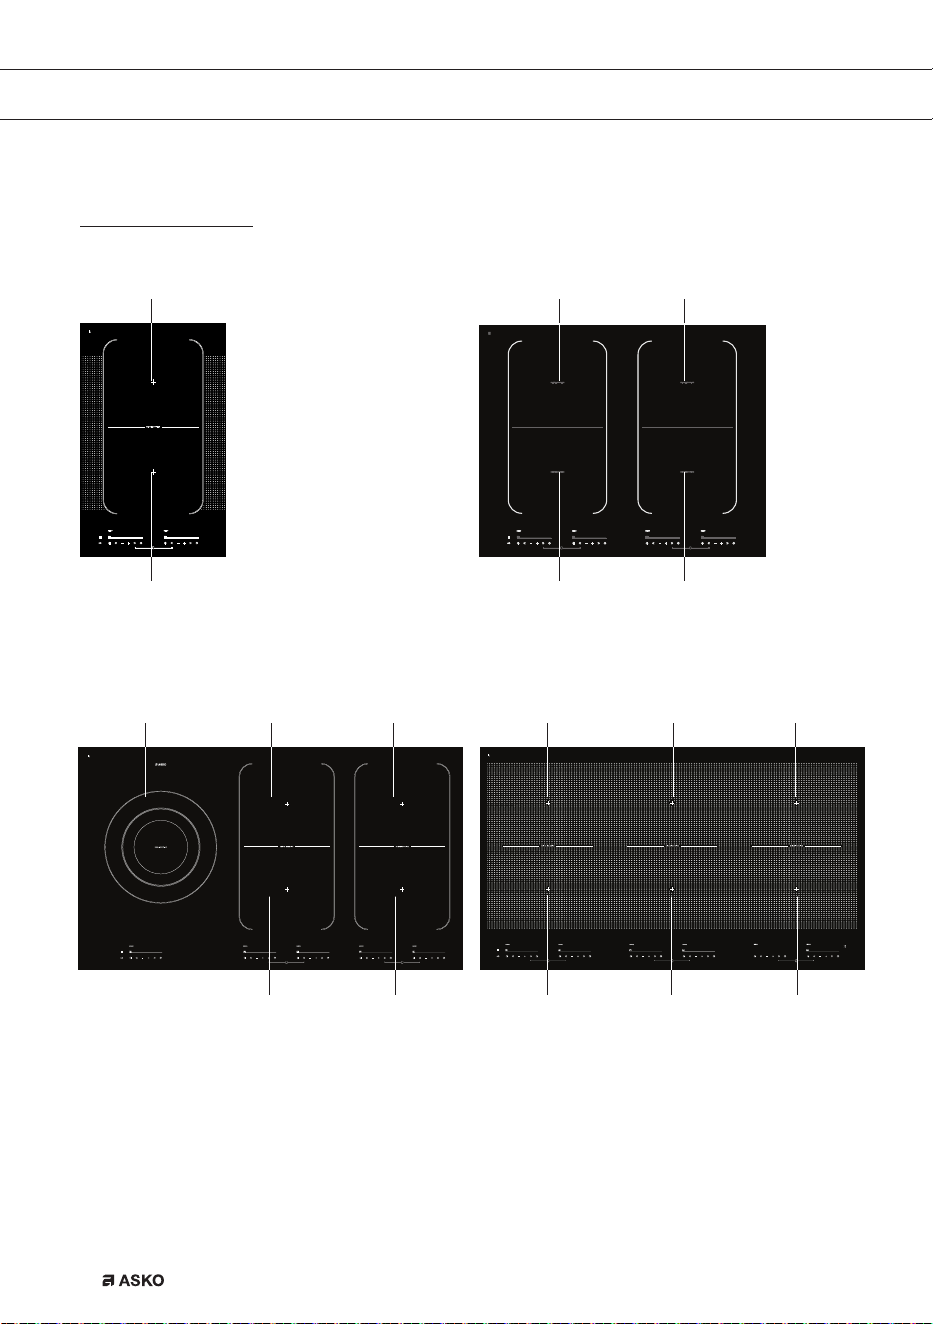
描述
HI1355G HI1655G/HI1655M
HI1975G HI1995G
电磁炉
1.适应区180x220毫米,3.7千瓦(可连接的区域)
2.烹饪区直径260毫米,5.5千瓦(双环)
11 1
11 1
1 1
12 1
1 1 1
1 1 1
ZHS 7
使用本装置之前,敬请阅读单独的安全须知!
温度安全
• 传感器持续测量电磁炉特定零部件的温度。每个烹饪区均配有传感
器,传感器负责测量平底锅底部温度,避免平底锅烧干后过热引起危
险。如果温度上升过高,电磁炉会自动降低功率或者自动关闭。
烹饪限时器
• 烹饪限时器是此烹饪电器的一种安全设施。当您忘记关闭电磁炉时,
该限制器便会工作。
• 烹饪时间限制如下,取决于您所选择的设置:
设置 以下时间之后,烹饪区自动关闭:
1和2 9小时
3、4和5 5小时
6、7和8 4小时
9 3小时
10 2小时
11和12 1小时
厨师功能 9小时
表中时间结束后,烹饪限时器会切断烹饪区电源。
设置 以下时间之后,烹饪区自动切换至
设置12:
快速加热 10分钟
安全
ZHS 8
使用
使用触摸式控制器
如果您之前一直使用的是其它(旋转式)控制器,那么可能需要一段时
间适应触摸式控制器。将指尖平放在控制器上效果最好。不需要施加任
何压力。
只需要指尖轻轻一按,触摸式传感器即可做出反应。不要使用其他物体操
纵控制器。宠物在电磁炉上行走是不会导致电磁炉开机的。
电磁烹饪
电磁烹饪速度快
• 一开始,您肯定会为电磁烹饪的速度感到惊讶。特别是高温设置时,
食物和液体很快就沸腾。平底锅最好不要离开人照看,以免过度沸腾
或烧干。
会调整功率
• 电磁烹饪时,仅使用烹饪区内平底锅所在部分。如果您在较大区域上
使用小锅,那么会根据锅径来调整功率。因此,功率会减小,平底锅
内的食物需要更长时间才能煮沸。
注意
• 沙粒可能会导致出现刮痕,这种刮痕是无法消除的。平底锅放置到烹
饪表面之前,底部必须清洁干净,而且始终是拿起平底锅来移动。
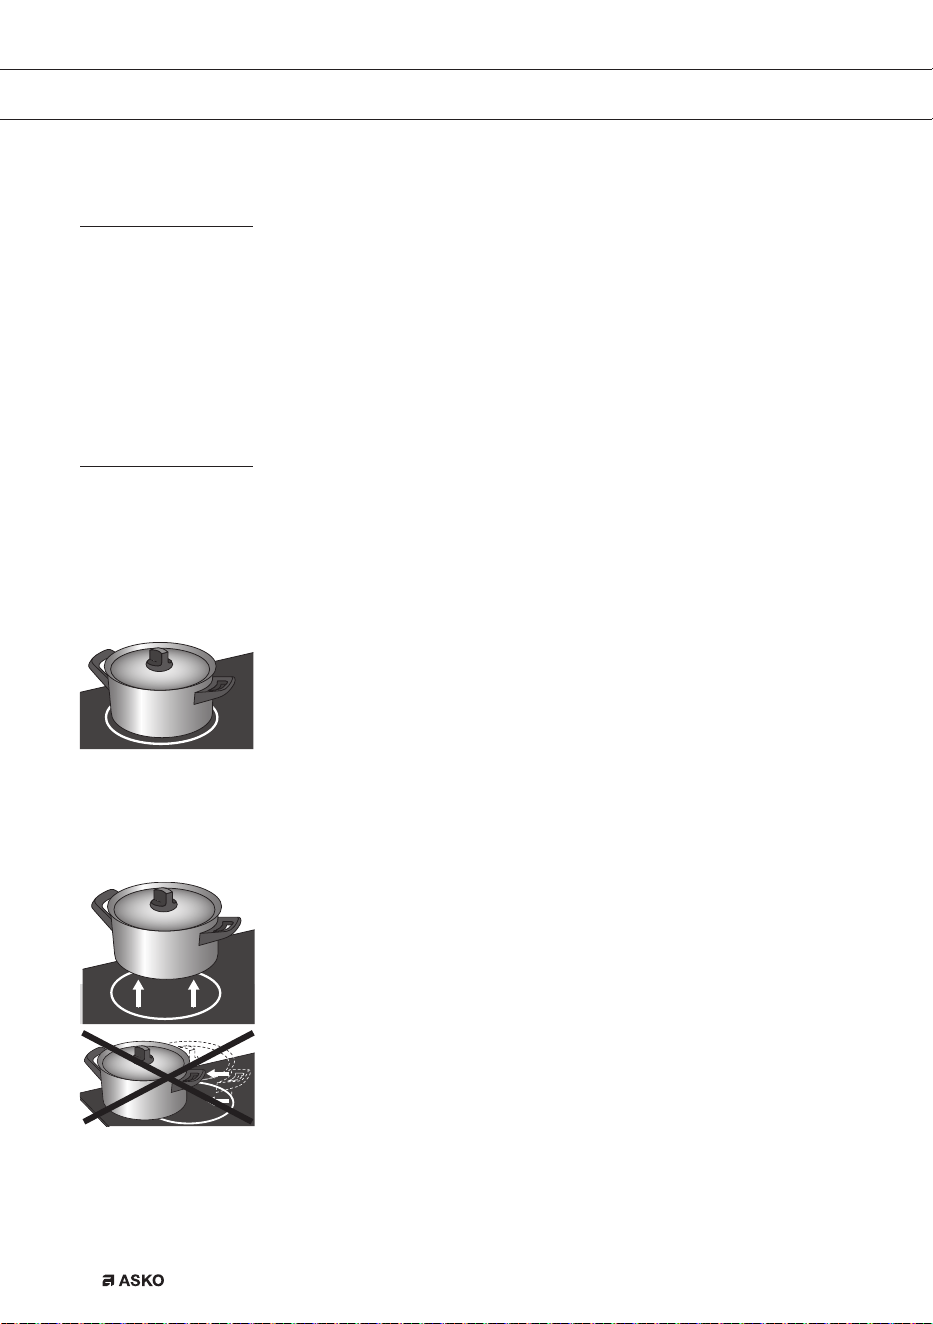
• 切勿将电磁炉作为工作台面使用。
• 烹饪期间,始终盖上锅盖,以免热量损失。
不会损失热量,手柄不会
发烫,实现电磁烹饪。
ZHS 9
使用
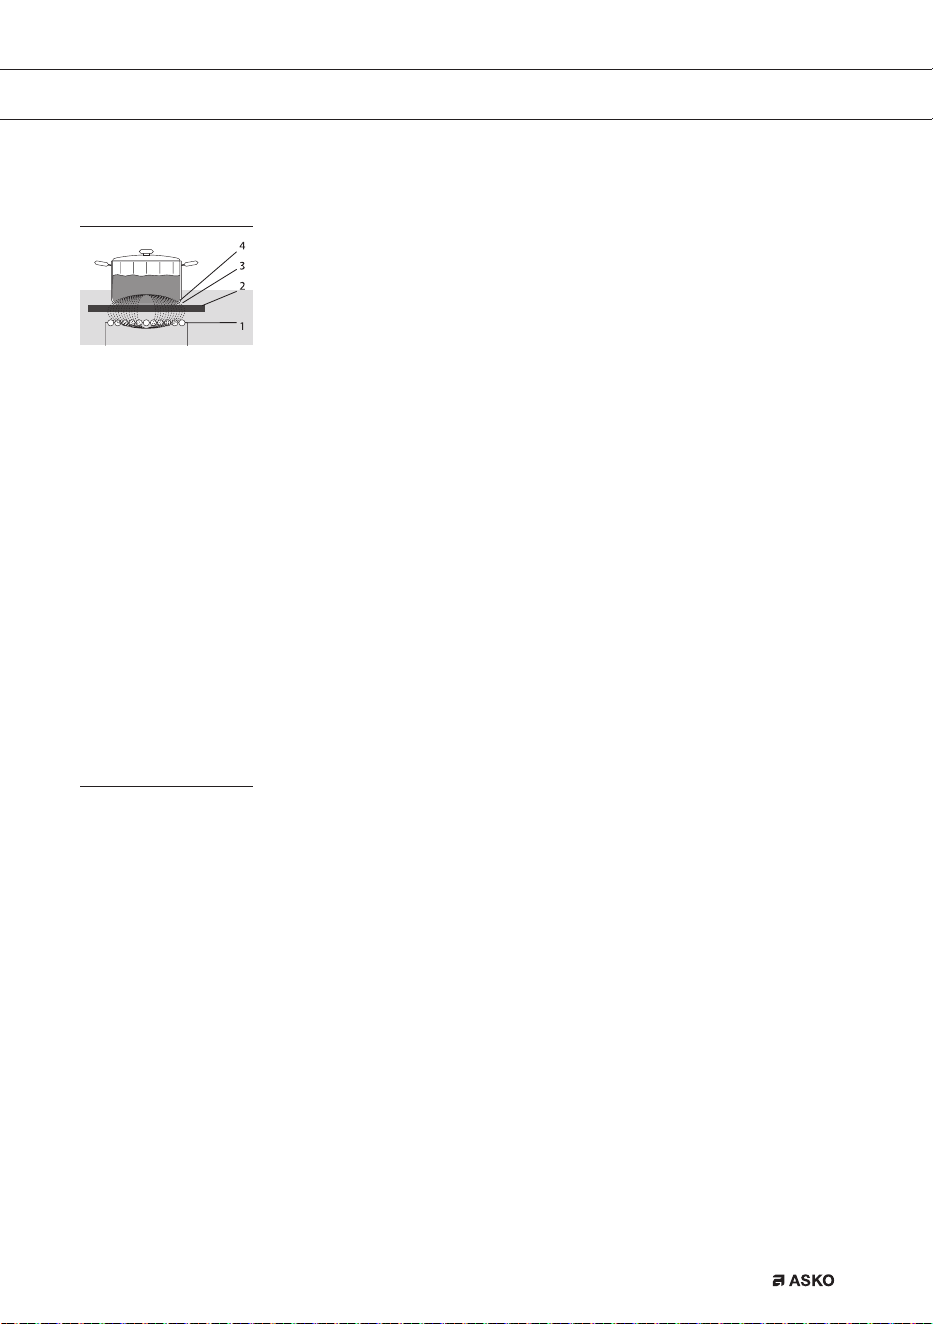
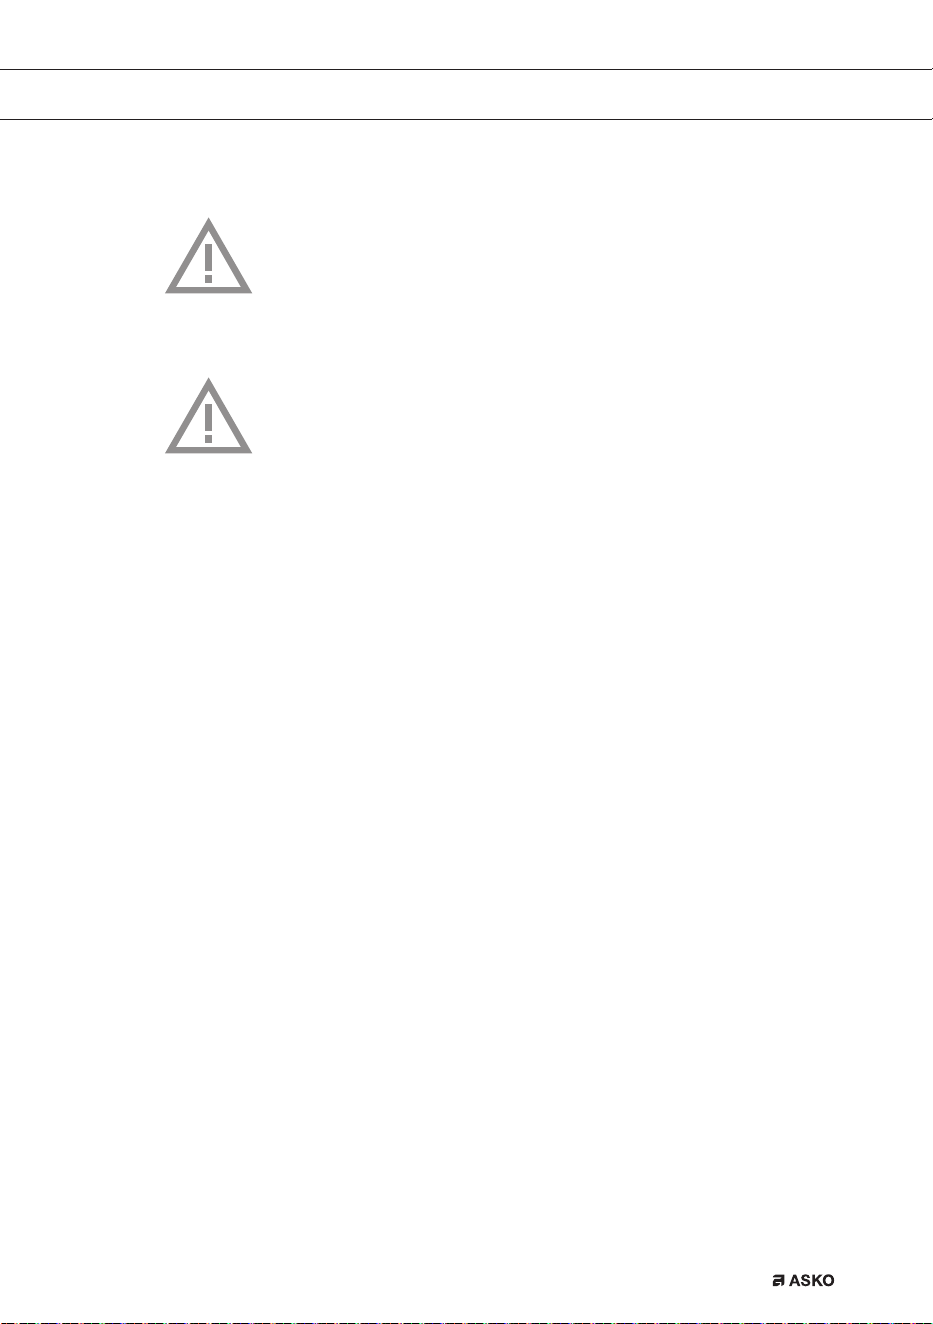
电磁炉如何工作
电磁炉内产生磁场。将铁底锅
放到烹饪区上,锅底即感应产生电流。这种感应电流在锅底产生热量。
简单
电子控制器精确、易于设置。在最低设置时,您可以直接在锅内熔化巧克
力等,或者烹煮一般需要水煮的材料。
快速
由于电磁炉功率水平较高,食物很快便煮沸。利用电磁炉烹饪食物所需的
时间和其它类型烹饪一样。
干净
电磁炉易于清洁。由于烹饪区的热量不会超过平底锅自身,因此,溢出的
食物不会起燃。
安全
热量是在锅内产生。玻璃台面的发热程度要弱于锅自身。这意味着,同陶
瓷炉或燃气炉相比,电磁炉烹饪区的温度要低很多。一旦将锅拿走,烹饪
区便会迅速冷却。
电磁噪音
滴答声
该声音是由前后区的容量限制器产生的。低温设置时,也可能会产生滴
答声。
平底锅产生噪音
烹饪过程中,平底锅可能会产生部分噪音。这是由于能量从电磁炉流向有
柄锅所产生的。高温设置下,这种声音对部分平底锅而言十分正常。它不
会损坏平底锅或电磁炉。
电磁炉(2)中的线圈(1)
产生磁场(3)。
将铁底锅(4)放到线圈上,
锅底即感应产生电流。
ZHS 10
风扇产生噪音
为延长电子产品的寿命,本机器配有风扇。如果您使用电磁炉比较频繁,
那么启动风扇即可给电磁炉降温,此时您便会听到嗡嗡声。电磁炉关闭
后,风扇还会运行几分钟。
自动接通电源功能
启动自动接通电源功能(APD)时,您会听到滴答声,即使没有在使用烹
饪区。
平底锅
电磁烹饪用锅
电磁烹饪必须使用特定质量的锅。
注意
• 如果已经在燃气炉上使用过,则此锅便不再适用于电磁炉。
• 只能使用适合于电磁烹饪的锅,应具有以下特征:
▷ 厚底(至少2.25毫米);
▷ 平底。
• 最好采用具有“电磁炉级别”质量标识的锅。
提示
您可以使用磁铁来自行检查您的锅是否合适。如果锅底吸附磁铁,则合适。
适用 不适用
特种不锈钢平底锅 陶器
电磁级 不锈钢
耐磨搪瓷平底锅 瓷器
搪瓷铸铁平底锅 铜制
塑料制
铝制
建议使用ASKO推荐的适合自动烹饪程序的锅。
使用
ZHS 11
使用
注意
对于搪瓷不锈钢锅,应注意:
• 平底锅(过于)烧干之后,如果电磁炉切换至高温设置,则搪瓷可能
会碎裂(搪瓷与钢之间出现松动);
• 锅底可能会发生翘曲--例如,由于过热或者使用功率水平过高。
注意
锅底已经变形的,切勿使用。锅底空心或磨圆的,可能会影响过热保护工作,
导致电磁炉过热。这样可能导致玻璃面开裂,锅底熔化。使用不适当的平底锅
或因烧干而导致损坏的,均不在质保范围内。
最小锅径
锅底直径必须至少达到12厘米。锅底直径与烹饪区相同的话,效果最佳。
如果锅太小,那么烹饪区便无法工作。
对于变化区所用的鱼锅(椭圆锅),其长度必须至少为22厘米。
压力煲
电磁烹饪非常适合使用压力煲烹煮。
烹饪区的反应非常快,因此压力煲很快便会完成增压。烹饪区一旦关闭,
烹饪过程便会立即停止。
ZHS 12
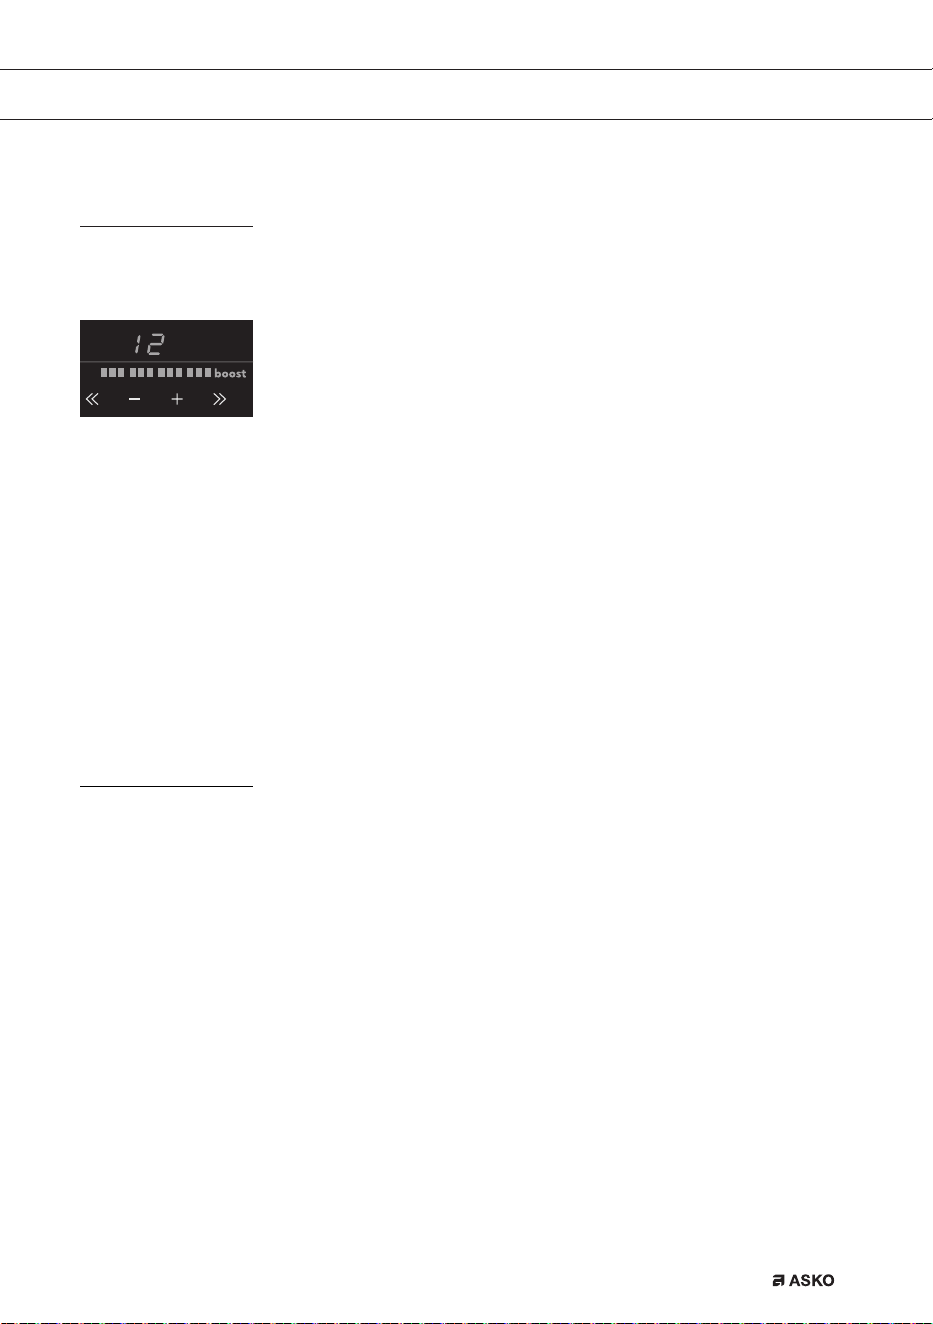
打开电磁炉,设置功率
烹饪区共有12种级别。此外,还有一个“快速加热”级。
1. 将锅放到烹饪区中间。
2. 按下童锁键。
您会听到哔的一声。
3. 按下对应烹饪区的开/关按钮。
显示器出现“-”闪烁,您会听到哔的一声。如果不采取其它动作,
则几秒后烹饪区便会自动关闭。
4. 按下+或-键,或者<<或>>键,选择预想设置。烹饪区自动在
所设置的级别启动(检测到有平底锅后)。
▷ 如果您首先按下+或-键,则出现级别6。
▷ 如果您首先按下>>键,则显示器中出现级别12+“快速加热”。
这就是“快速加热”功率水平,如果您希望快速煮熟菜肴,则可以使
用该设置(参见第14页)。
▷ 如果您首先按下<<键,则出现级别1。
提示
• 您可以使用+或-键逐步增加或减少功率设置值。您可以按下
<<或>>键快速增加或减少功率设置值。
• 按住<<、-、+或>>键可更加快速地设置预想功率水平。
锅检
烹饪功率设置完成之后,如果电磁炉未能检测到(铁)锅,则显示器会闪烁,
电磁炉继续保持冷态。如果未能在1分钟内将(铁)锅放置到烹饪区上,则
烹饪区会自动关闭(同样参见第11页和第12页“平底锅”)。
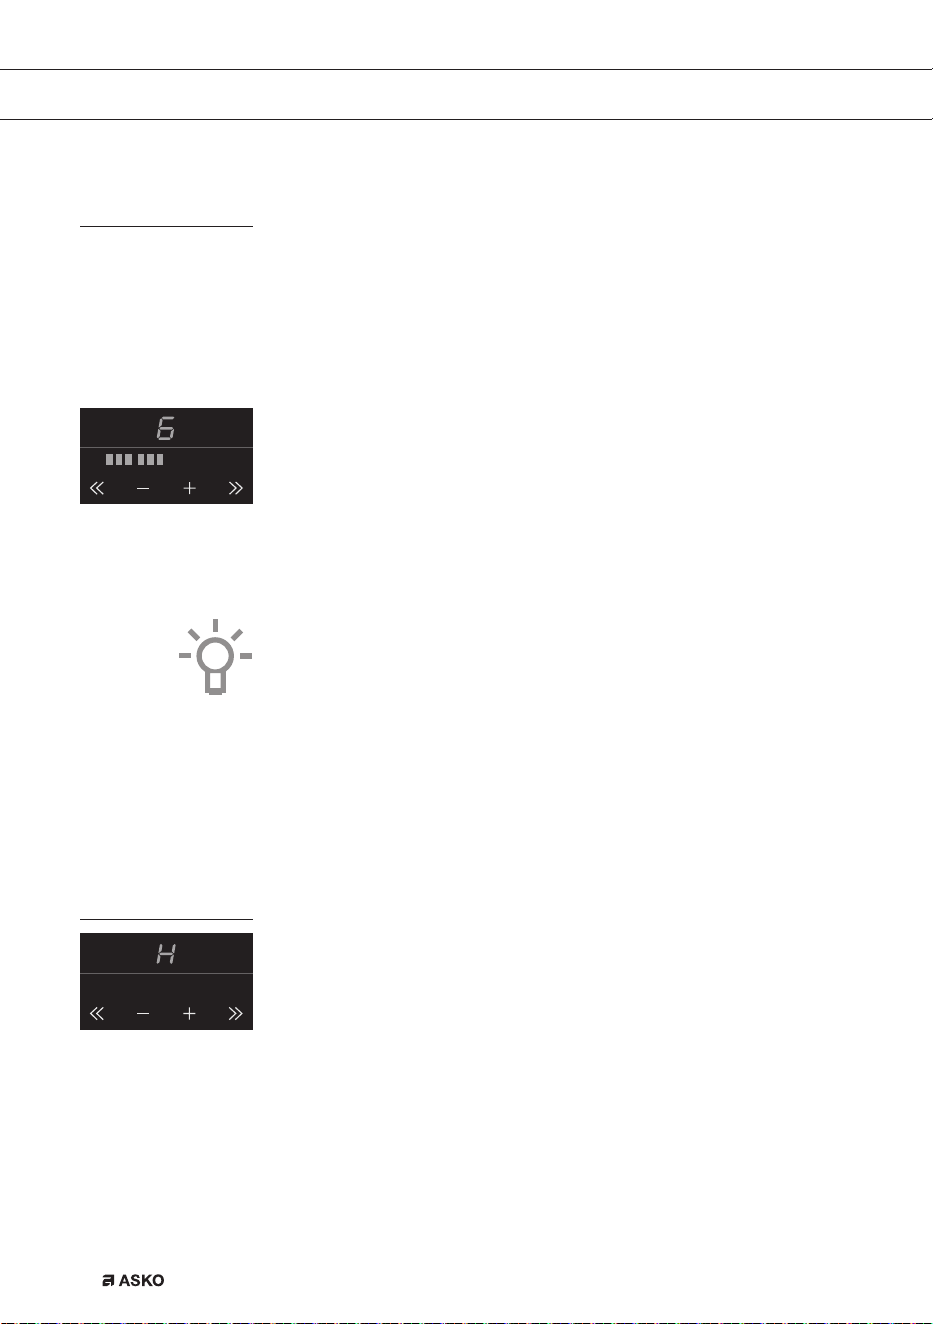
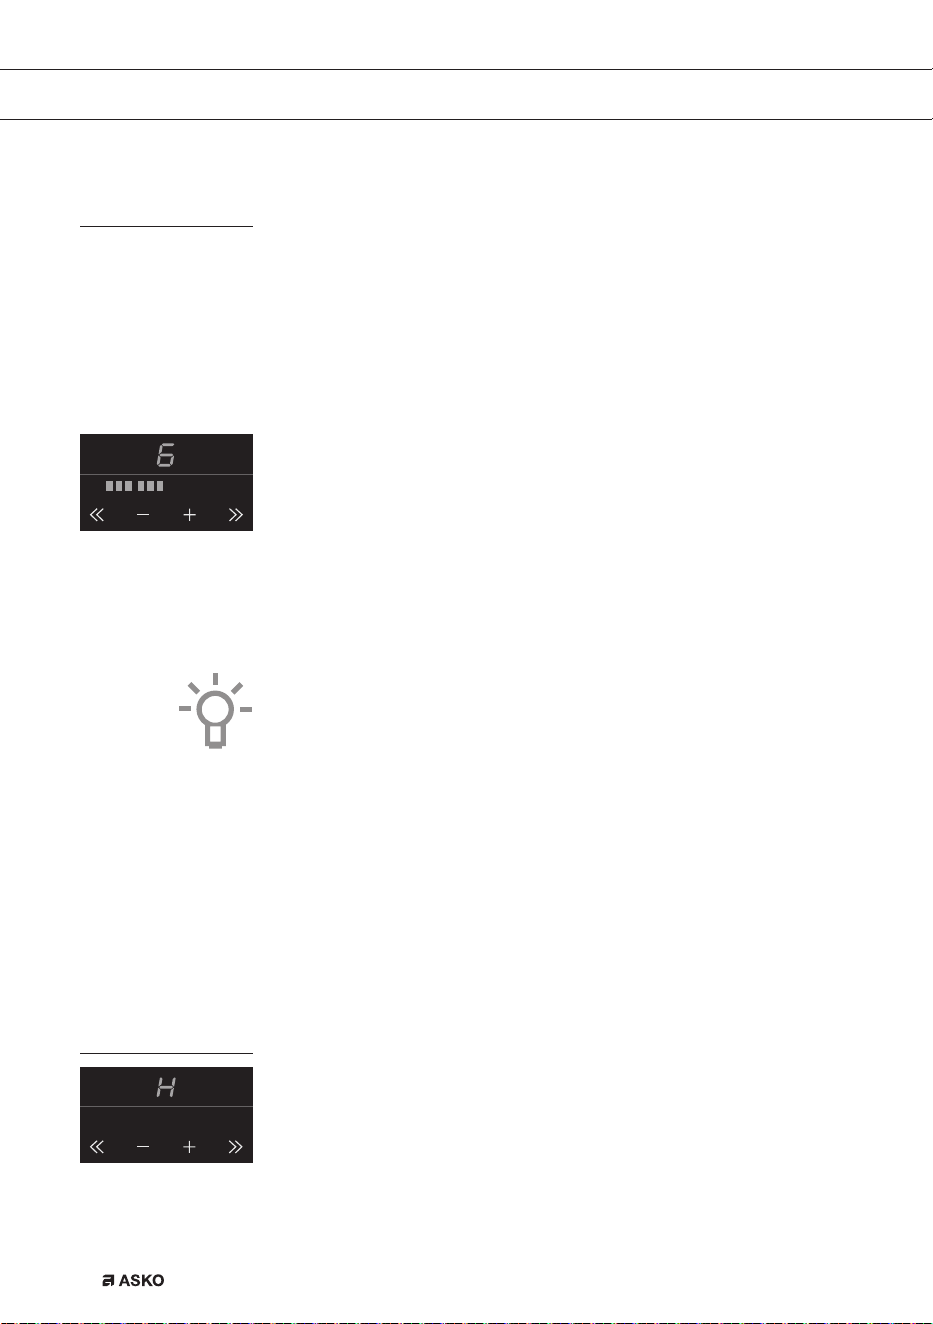
余热指示灯
电磁炉关闭之后,对于已集中使用的烹饪区,数分钟内仍然发烫。只要烹
饪区是发热的,显示器中便会出现“H”。
F00002557 - LED Screen ATAG TC (700002940000)
24-08-09 IH
F00002557 - LED Screen ATAG TC (700002940000)
24-08-09 IH
操作
ZHS 13
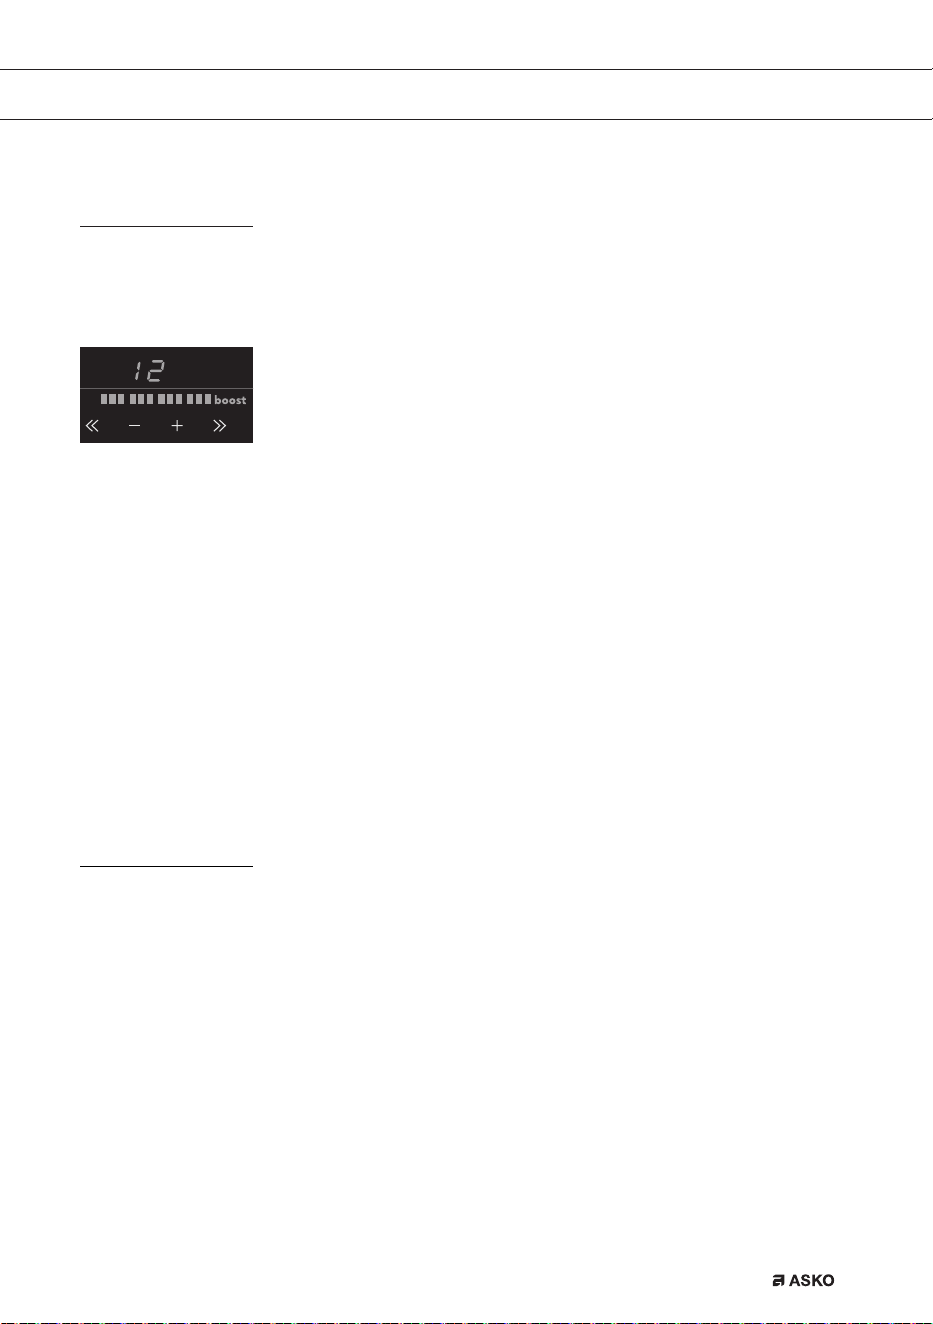
快速加热
可以使用“快速加热”功能,设置最高功率水平,短时间内完成烹饪
(最长10分钟)。最长的快速加热时间之后,功率会降至设置12。
启动“快速加热”
1. 将锅放置在烹饪区上。
2. 烹饪区启动之后,立即按下>>键。
显示器中出现级别12和“快速加热”。
• 如果烹饪区已经设置成某一功率水平,且您希望使用“快速加热”,
则应多次按下相关烹饪区的>>键或+键。
关闭“快速加热”
“快速加热”已经启动,显示器中显示级别12和“快速加热”。
1. 按下<<键或-键。
您在显示器中会看到更低级别。
或者:
2. 按下您准备关闭的烹饪区的开/关按钮。
您会听到哔的一声,显示器中所显示的级别会消失。
烹饪区已经完全关闭。
两个烹饪区,一前一后。
• 两个烹饪区,一前一后,相互影响。当同时启动这两个烹饪区时,自
动共享功率。首先设置的烹饪区会始终处于所设定的设置功率。无论
是前面的烹饪区或后面的烹饪区,添加时间靠后的,其最大设置值取
决于第一个烹饪区的设置值。达到最多烹饪设置组合数量之后,最后
设定的设置值开始闪烁,自动降至可能的最高设置值。
• 两个烹饪区分处相互的侧边,不会相互影响。您可以将两个烹饪区均
设置成高温。
• 如果变化区完成桥接,则便不能设置成快速加热,菜单功能无法使用。
F00002557 - LED Screen ATAG TC (700002940000)
24-08-09 IH
操作
ZHS 14
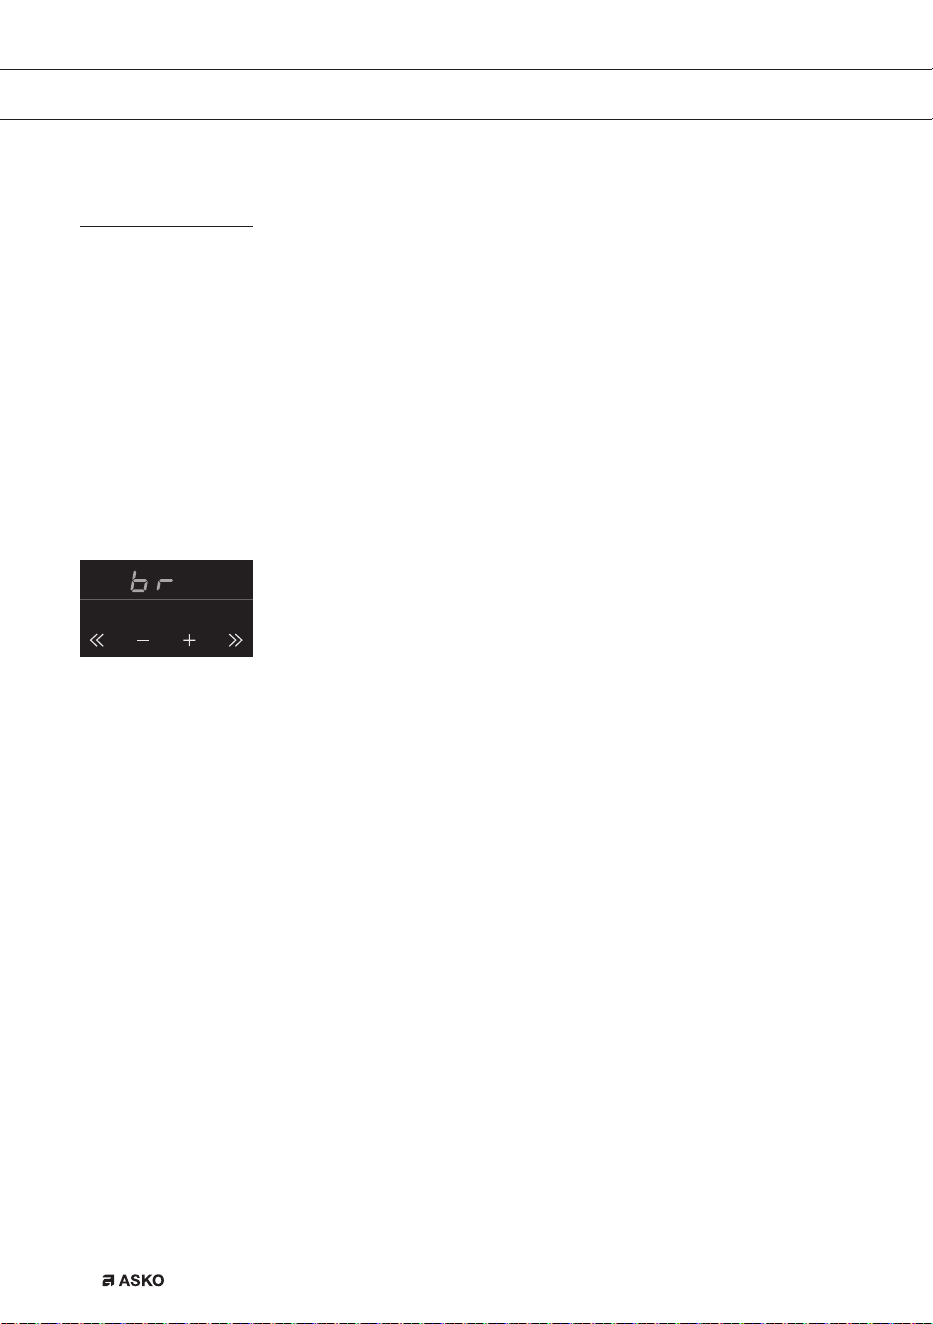
操作
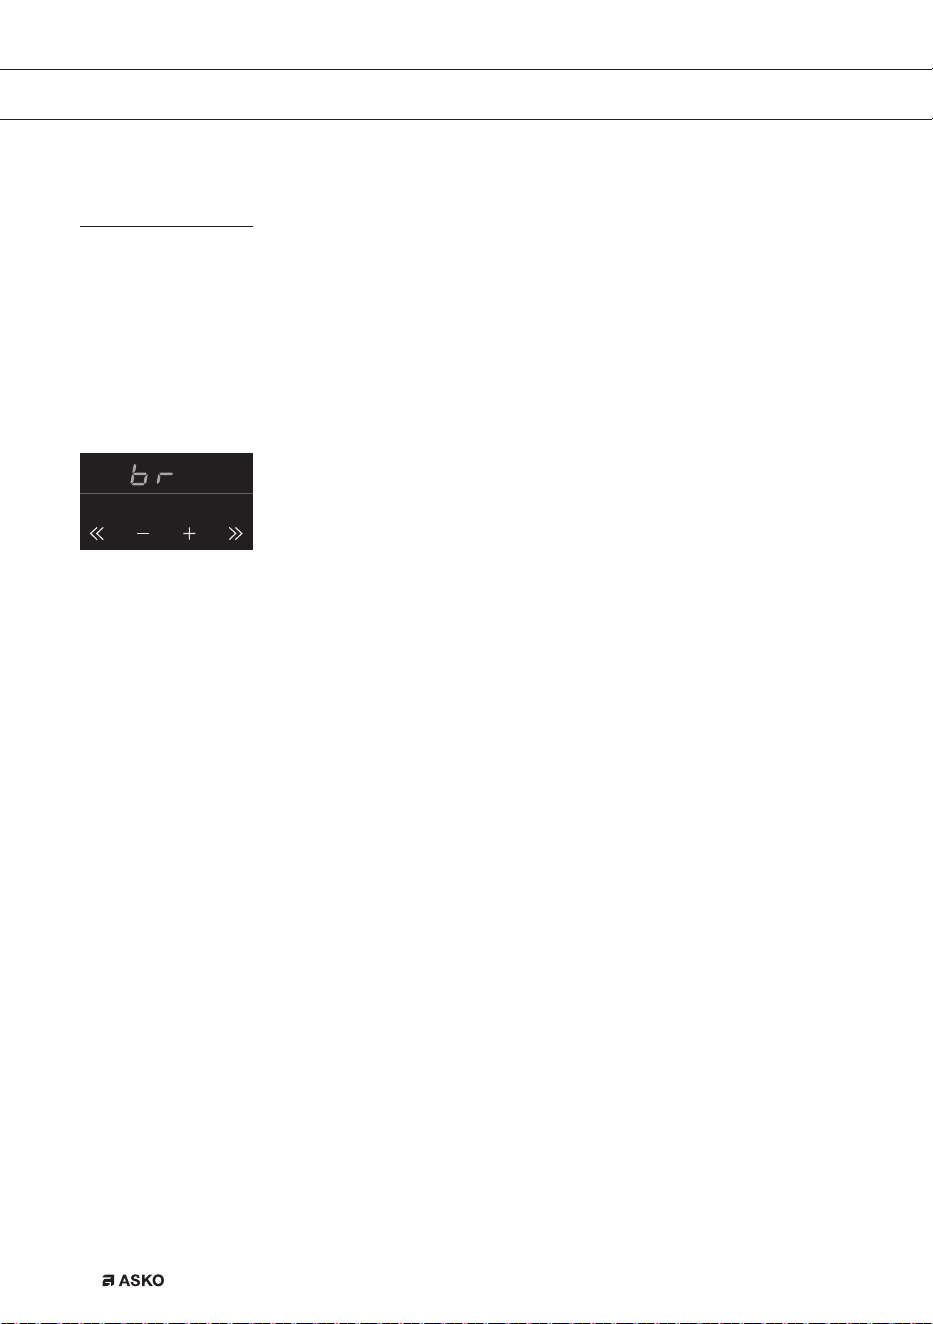
如何桥接Vario感应区
Vario感应区可以相互桥接(连接)。这样便形成了1个较大的感应区,
可供较大的鱼锅或大的炒锅使用。
• 如果变化区完成桥接,则便不能设置成快速加热,菜单功能无法使用。
使用(鱼)平底锅时,变化区至少有一个中心/中间位置被盖住。
启动桥接模式
1. 在两个烹饪区上放置一口较大的平底锅,将两个烹饪区全部盖住。
2. 启动前面的烹饪区。
3. 同时按住两个键(几秒钟):后桥接区的<<按钮和前桥接区的>>按
钮。
后区的显示器出现“BR”。然后,通过前变化区的控制器设置两个区
的烹饪级别。
4. 按下前区的+或-键,或者<<或>>键,设置预想烹饪级别。
两区均按照所设定的级别加热。
退出桥接模式
1. 同时按前变化区的>>键和后变化区的<<键,这样即可关闭“桥接”
级别。
在所设定的水平上,前区桥接功能时间更长。
或者:
2. 按下您准备关闭的烹饪区的开/关按钮。
您会听到哔的一声,显示器中所显示的级别会消失。
烹饪区已经完全关闭。
F00002557 - LED Screen ATAG TC (700002940000)
24-08-09 IH
ZHS 15
关闭
关闭一个烹饪区
按下您准备关闭的烹饪区的开/关按钮。
您会听到哔的一声,显示器中所显示的级别会消失。
• 如果按照上述方式关闭所有烹饪区,则电磁炉自动进入待机模式
(也可参见“待机模式”)。
关闭所有烹饪区
按下童锁键即可同时关闭所有烹饪区。
您会听到哔的一声。童锁按键旁边的红色童锁指示灯会非常缓慢地闪烁。
• 至此,电磁炉进入经济待机模式
(也可参见“经济待机模式”)。
待机模式
进入待机模式后,电磁炉关机。可以从经济待机模式切换至待机模式,或
者关闭所有烹饪区。
进入待机模式后,您可以按下预想烹饪区的开/关键,直接开始烹饪。
电磁炉由经济待机模式切换至待机模式
童锁按键旁边的红灯会持续缓慢地亮起和熄灭。
• 短暂按住童锁键,即可切换至
待机模式。
您会听到哔的一声。电磁炉上的所有指示灯都熄灭。
经济待机模式
进入经济待机模式后,电磁炉关机,最大程度上减少能源消耗。
电磁炉还可以从待机模式切换至经济待机模式,此时所有烹饪区均启动。
您是否知道
在经济待机模式下,电磁炉功耗不足0.5瓦。这种功耗甚至比电磁炉处
于待机模式还要少。
F00002557 - LED Screen ATAG TC (700002940000)
24-08-09 IH
操作
ZHS 16
电磁炉切换至经济待机模式
• 按下童锁键。
您会听到哔的一声。经济待机模式启动,童锁按键旁边的红灯会非常
缓慢地亮起、熄灭。
进入经济待机模式之后,无法立即开始烹饪。如果要烹饪,首先必须将电
磁炉切换至待机模式。
您是否知道
进入待机模式30分钟之后,电磁炉自动切换至经济待机模式,防止不
必要的能耗。
童锁
电磁炉配有童锁,可用来锁住电磁炉。防止意外开启。
启动童锁
1.
按下童锁键两秒钟时间。
您会听到两次哔的声音。至此,除童锁键之外,所有按键均无效。电
磁炉首先切换至经济待机模式,然后再切换至童锁模式。红灯常亮。
2. 再次按下此键2秒钟时间,即可解除童锁。
您会听到哔的一声。至此,电磁炉进入待机模式。童锁按键旁边的红
灯熄灭。
提示
清洁电磁炉之前,首先必须将电磁炉设置成童锁模式,防止意外启动。
您是否知道
进入童锁模式后,电磁炉所消耗的能源和经济待机模式下的一样少。
F00002557 - LED Screen ATAG TC (700002940000)
24-08-09 IH
F00002557 - LED Screen ATAG TC (700002940000)
24-08-09 IH
操作
ZHS 17
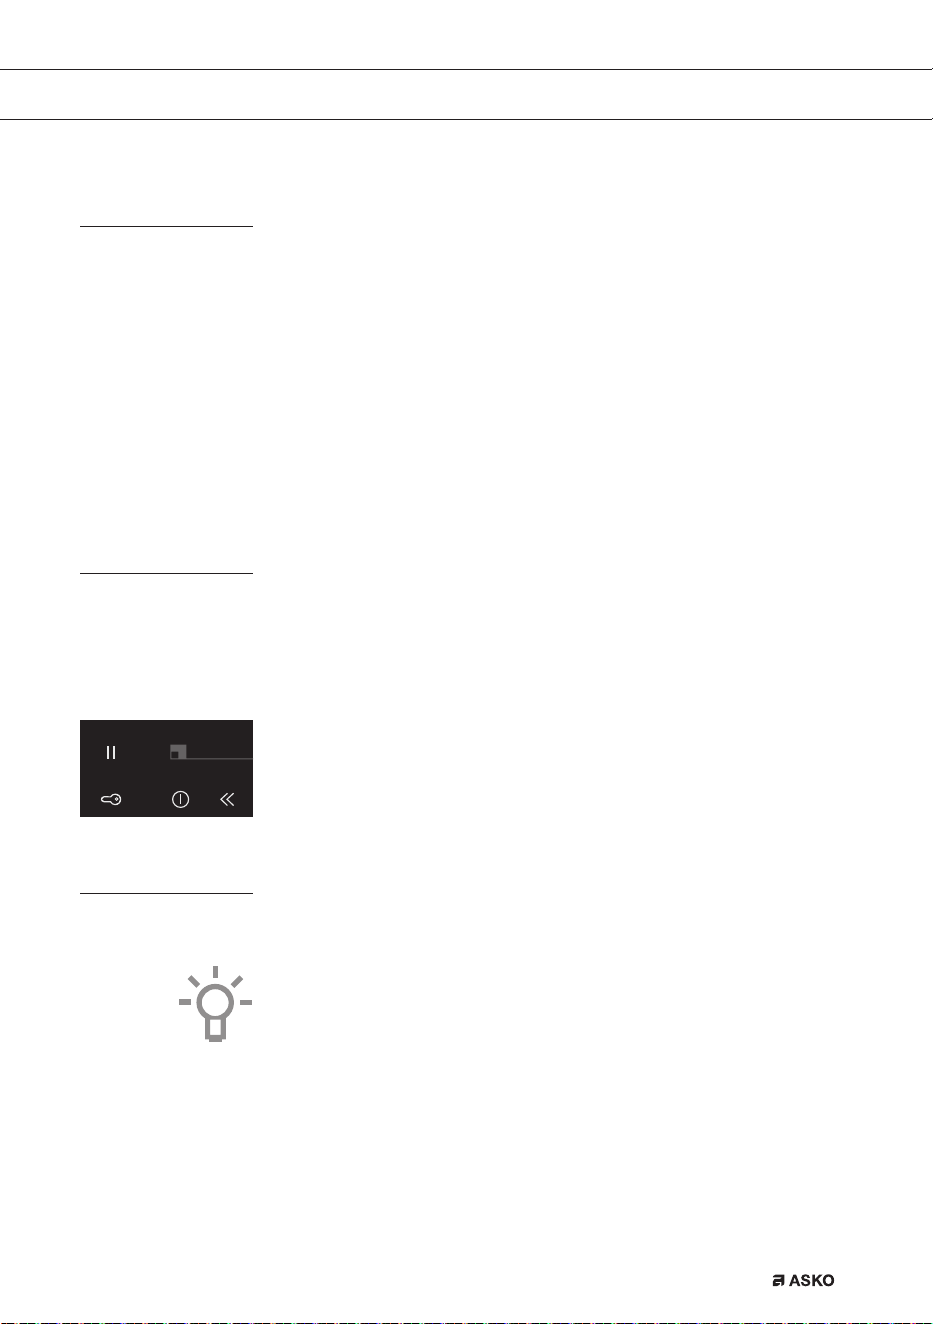
暂停
使用暂停功能,您可以在烹饪过程中,将整个电磁炉设置“暂停”
5分钟。这样一来,您即可短时间内安全清洁电磁炉或离开,而不会丢失
原来的设置。
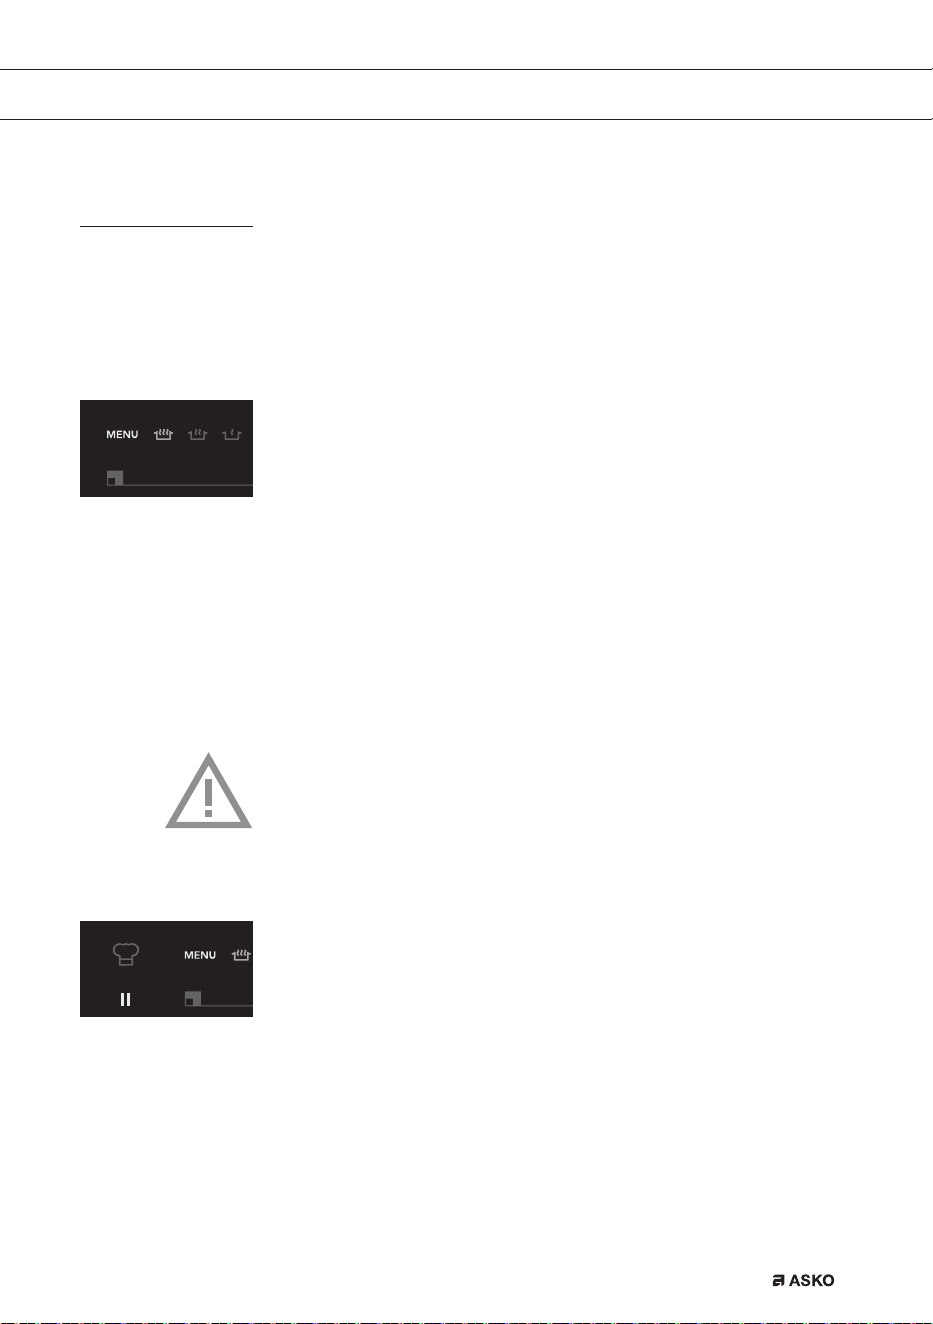
电磁炉切换至暂停模式
• 按下一次暂停键。
您会听到两次哔的声音,设置变成低温设置,暂停键旁边的红灯闪烁。
▷ 任何设置的计时器/厨房计时器停止。所有烹饪区均自动切换至低
温设置。
▷ 至此,除童锁键和暂停键之外,所有按键均无效。
▷ 各个烹饪区的开/关键仍然有效,但是会延迟两秒反应。
• 如果在5分钟内再次按下暂停键,则被暂停的烹饪过程便会恢复。
您会听到两次哔的声音,电磁炉恢复暂停之前的设置。
• 如果5分钟之内没有采取其它动作,则:
所有启动的烹饪区均会自动关闭。然后,暂停键会闪烁25分钟,表
示暂停模式已经结束烹饪过程。25分钟后,电磁炉自动由暂停模式切
换至经济待机模式。
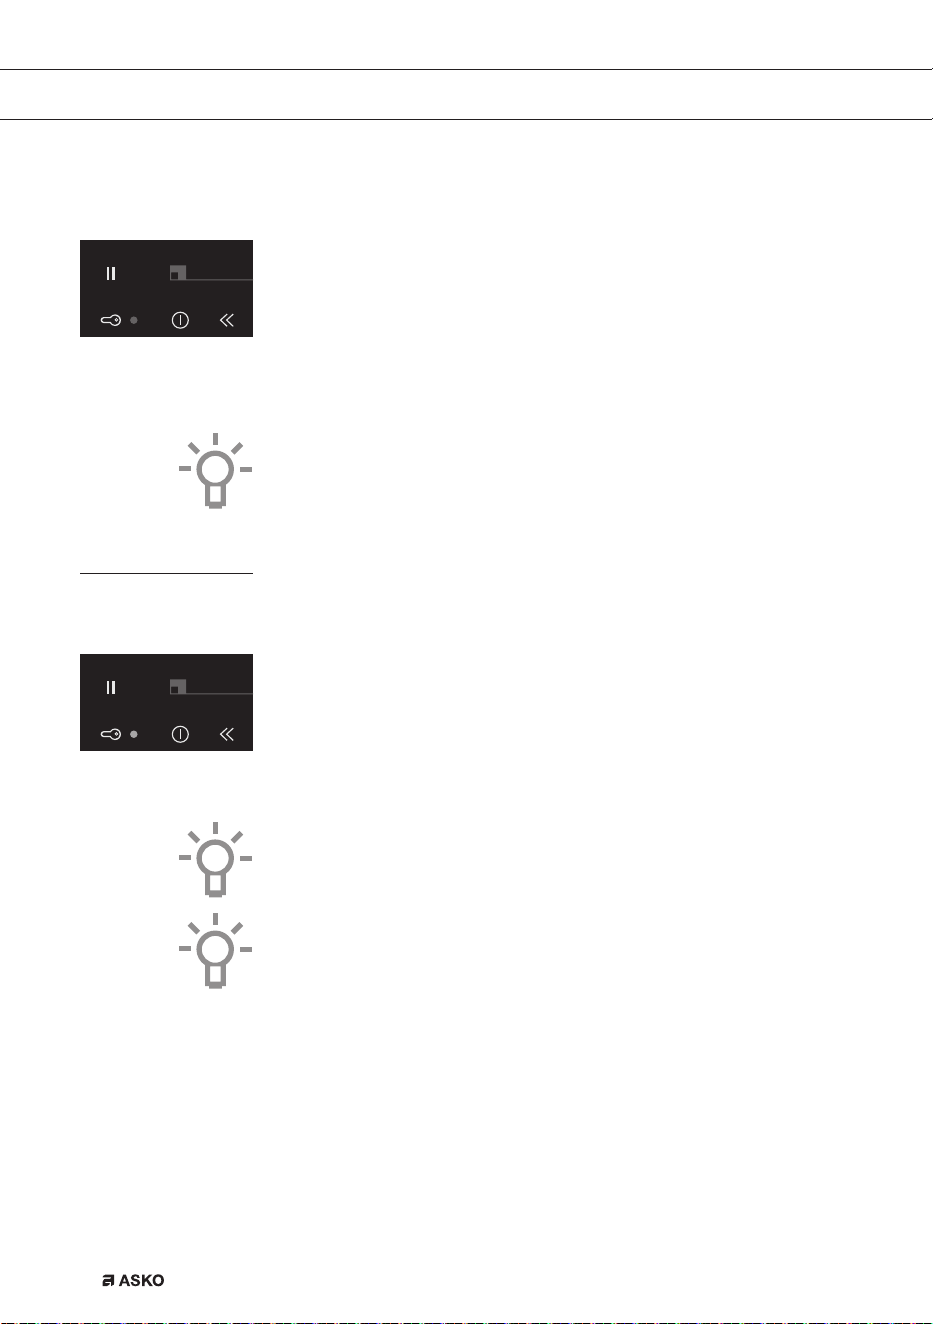
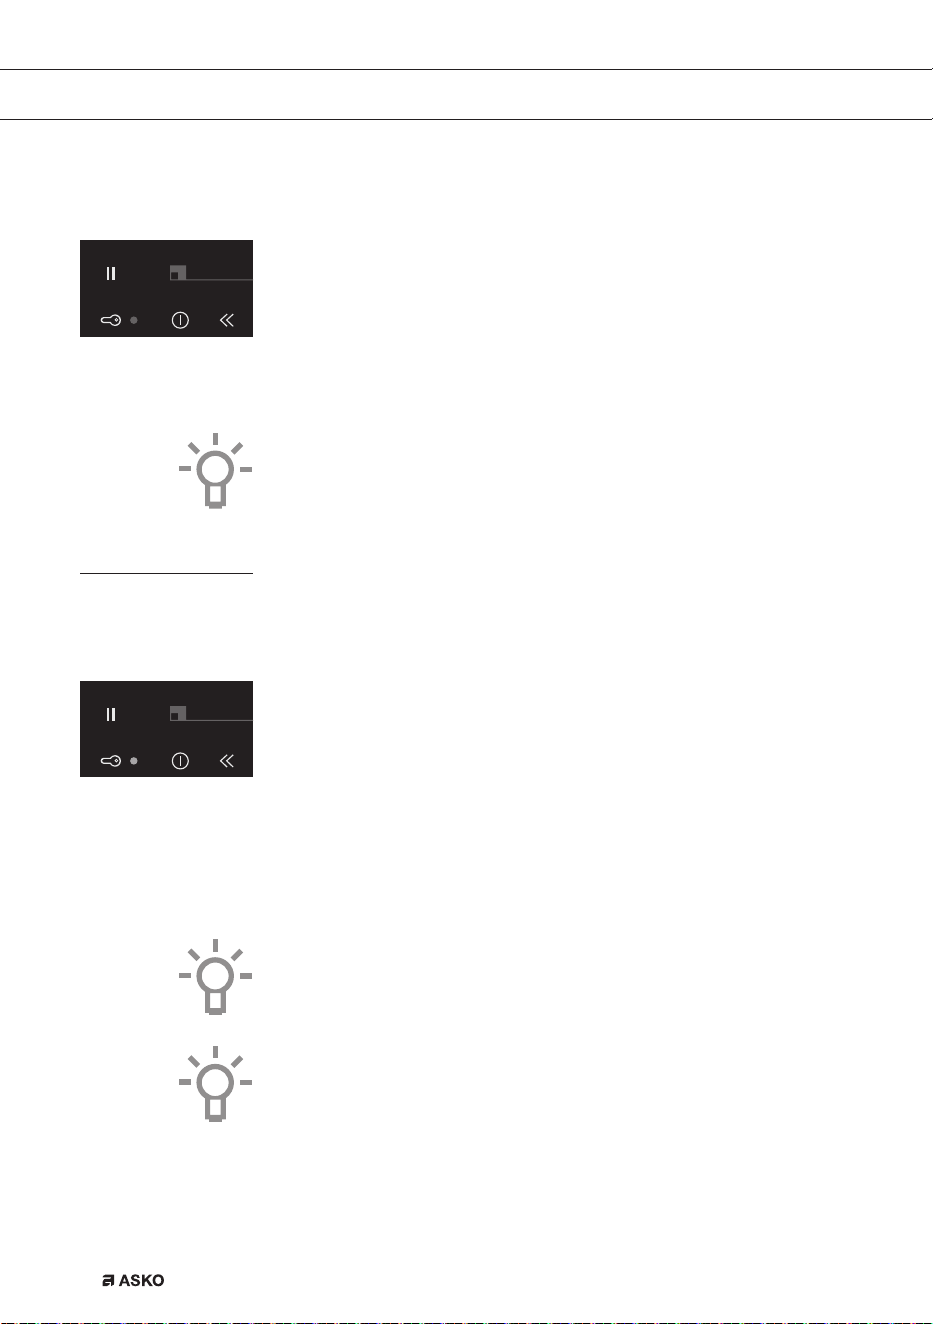
确认模式
待机模式 没有任何指示灯亮起。
经济待机模式
童锁按键旁边的红灯会持续缓慢地亮起和
熄灭。
童锁模式 童锁按键旁边的红灯常亮。
暂停模式
暂停按键旁边的红灯闪烁。
F00002557 - LED Screen ATAG TC (700002940000)
24-08-09 IH
操作
ZHS 18
操作
计时器/厨房计时器
每个烹饪区的计时器/闹钟键均具有两个功能:
计时器功能 厨房计时器功能
此功能可通过红色朝上小箭头来
确认。
此功能可通过红色朝下小箭头来
确认。
计时器功能增加时间。 厨房计时器功能减少时间。
计时器无法连接至烹饪区。 厨房计时器可以连接至烹饪区。这
意味着,如果设定时间结束,那么
烹饪区便会关闭。
按下计时器按键,如果您没有任何
操作,计时器功能自动在3秒钟
后启动。
按下红色+键或红色-键即可
从计时器功能切换至厨房计时器
功能。
注意
• 每两个烹饪区(前后)设一个计时器/厨房计时器。第5个烹饪区设
独立计时器/厨房计时器。
• 计时器/厨房计时器只能连接两个烹饪区中的其中一个(每组两个烹
饪区)。
• 此外,无需启动附属烹饪区即可使用计时器/厨房计时器功能。
启动计时器
1. 按下一次烹饪区计时器/闹钟键。
计时器显示器亮起,您会看到三个烹饪区闪烁。在其下出现+与-。
• 如果您未能使用+或-键设置时间,则计时器会在3秒后自动开
始运行。计时器可以工作9小时59分钟。
红色朝上箭头亮起,时间增加。
2. 再次按下烹饪区的计时器/闹钟键即可将其关闭。
F00002557 - LED Screen ATAG TC (700002940000)
24-08-09 IH
F00002557 - LED Screen ATAG TC (700002940000)
24-08-09 IH
F00002557 - LED Screen ATAG TC (700002940000)
24-08-09 IH
ZHS 19
启动厨房计时器
1. 按下烹饪区的计时器/闹钟键。
2. 按下+或-键,从计时器功能切换至厨房计时器功能。然后,您可
以使用+键设置预想的烹饪时间。然后,您可以使用-键改变所设
定的时间。
红色朝下小箭头亮起。时间采用倒计时方式。
3. 再次按下烹饪区的计时器/闹钟键即可将其关闭。
注意
•
如果附属烹饪区启动,则厨房计时器连接至烹饪区。一旦拿走平底锅,
厨房计时器便会停止工作,重新放回平底锅之后,便会恢复工作。
• 如果厨房计时器连接至其中一个烹饪区,则在设定时间结束后,该烹
饪区便会关闭。
厨房闹钟会响起,并持续一刻钟时间,而随着时间的推移,闹钟声音
会逐渐减小,当达到“0.00”时,朝下箭头闪烁。再次按下烹饪区的
计时器/闹钟键,即可将厨房计时器闹钟关闭。再次按下烹饪区计时
器/闹钟键,红色朝下箭头闪烁,或者将平底锅从烹饪区拿走,即可再
次关闭计时器。
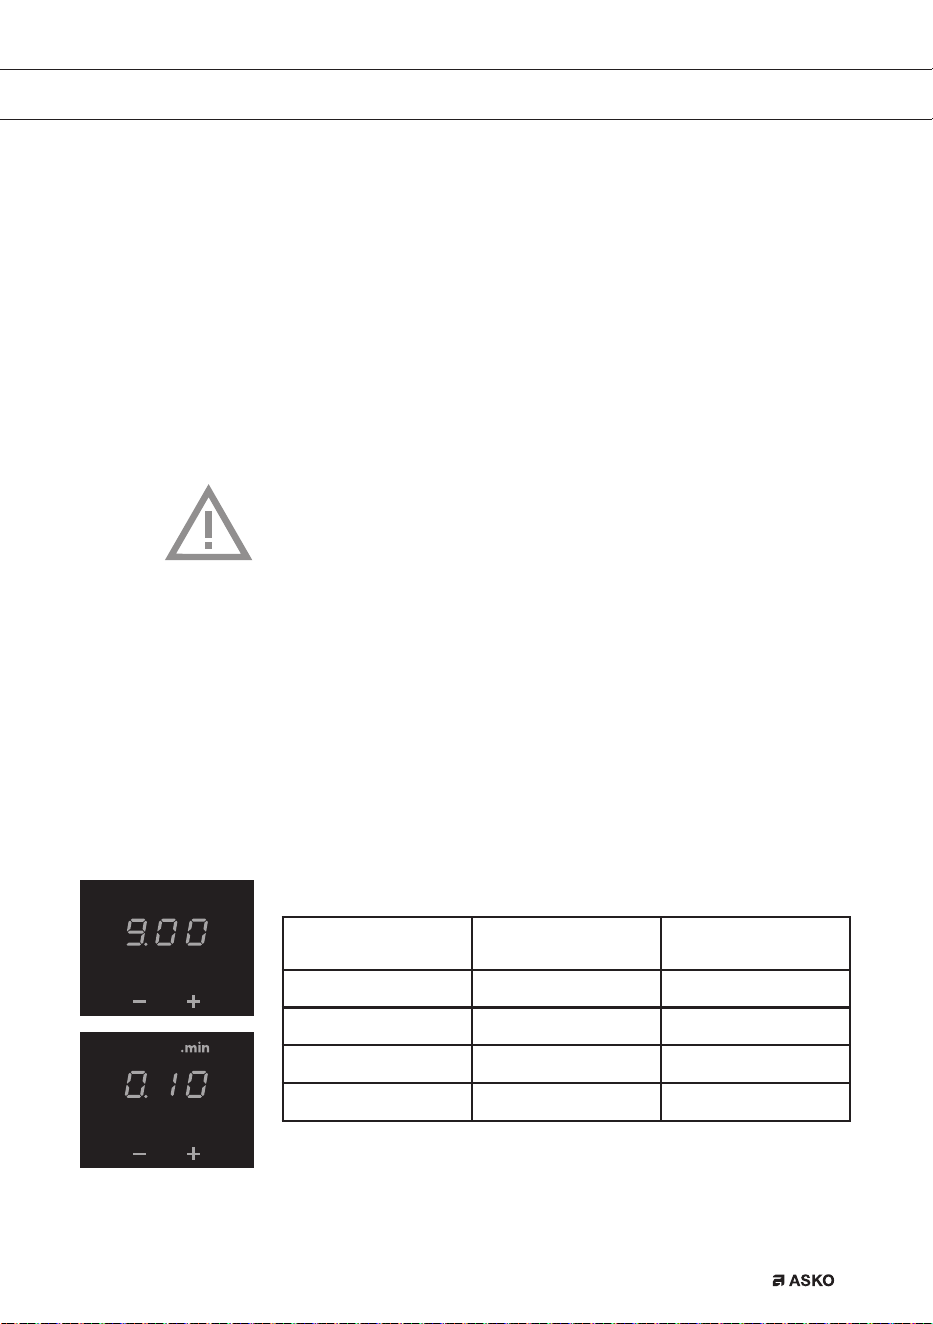
设置烹饪时间
• 启动厨房计时器。
按键 X步阶/按键触点 时间
+ x=1分钟 0.00至...
- x=10秒 5.00-0.00
- x=30秒 9.00-5.00
- x=1分钟 ...至9.00
9分钟0秒之后(“9.00”),显示器上方出现“.min”字样,分钟数
会添加在小数点之后。
F00002557 - LED Screen ATAG TC (700002940000)
24-08-09 IH
F00002557 - LED Screen ATAG TC (700002940000)
24-08-09 IH
操作

ZHS 20
提示
按住-或+键即可更加快速地设置预想烹饪时间。
报警器开关
1. 按下最左边的开/关按钮两次。
2. 同时按住<<键与+键,直至听到哔的一声。
至此,除暂停键和童锁键之外,报警器对任何按键操作均无反应。
注:厨房计时器闹钟与错误信息报警器不可以关闭。
3. 使用相同的按键组合再次启动报警器。
启动/关闭平底锅自动检测
电磁炉开机之后,如果将平底锅置于不活动的烹饪区,则相应的操作控制
器会亮起,可以立即使用(无需操纵开/关开关)。
如果烹饪区在10秒钟内未能启动,则灯会熄灭。可以通过将锅拿走,
然后重新放上去或者使用开/关开关来重新启动烹饪区。
此功能默认启动,但也可以关闭。这可以通过关闭电磁炉,然后操纵左
侧控制面板上的“菜单”(6)以及“开/关键”(21)5秒钟时间来实
现。显示器中出现“APdOFF”。重复上述过程,即可重新启动该功能,
显示器中出现“APdOn”。
操作
ZHS 21
操作
自动烹饪程序
您的电磁炉安装有6种自动烹饪程序。您可以借助于厨房计时器功能设
定自动烹饪程序的结束时间(参见第18页)。烹饪程序基于规范数量。
表格仅供参考,因为您可以根据自己的想法改变菜肴。
设置自动程序时
启动烹饪区。
• 按下菜单键。
连续6个图标亮起(HI1995G上有7个图标),其中一个图标比其
它图标更亮。
• 再次按下菜单键,或者按住菜单键进入下一个菜单功能。
所选烹饪程序在3秒钟后自动开始。显示器中出现“自动”“A”字样。
自动烹饪程序启动之后,可以使用下列按键返回至人工烹饪程序:
<<、+、-、>>。
注意
对于“Vario”装置,如果烹饪区被桥接或者启动厨师功能,则烹饪程序
与快速加热功能不会工作。
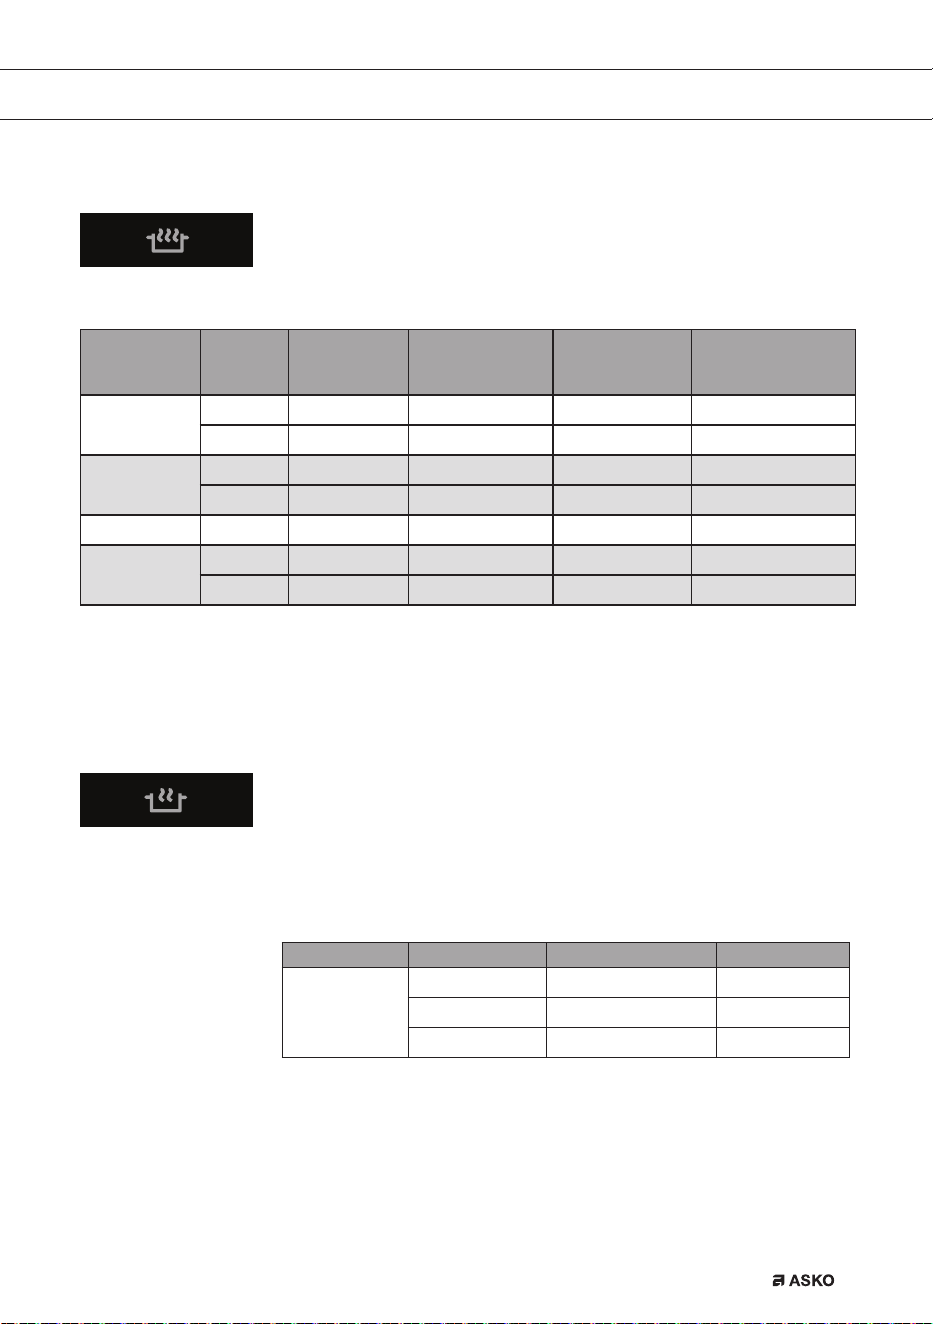
厨师功能
“厨师功能”启动之后,所有烹饪区均会启动。设置1中的右侧区、7
中的中间区以及12中的左侧区。后区的显示器出现“Ch”。然后,您
可以使用前区控制器为两个烹饪区配置不同的烹饪设置。
此功能可让您无需使用电动控制器即可完成烹饪,只需要将平底锅从一个
烹饪区移到另一个即可。
F00002557 - LED Screen ATAG TC (700002940000)
24-08-09 IH
F00002557 - LED Screen ATAG TC (700002940000)
24-08-09 IH

ZHS 22
操作
此功能只有在电磁炉未被使用的时候才可以启动。如要启动此功能,则首
先必须将所有烹饪区全部关闭。
按下最左侧的菜单按键,在厨师指示灯(24)亮起之后,释放该菜单按
键,即可选择该功能。
关闭厨师功能(HI1995G)
1. 按下经济锁定按键(3),即可将整个电磁炉全部关闭。
2. 按下开/关键(6):这样便可以关闭厨师功能;所有烹饪区均关闭。
启动APD之后,有平底锅的烹饪区,其显示器会亮起。
3. 操作厨师指示灯旁边最左侧的菜单键(21),终止厨师功能,但活动
区和计时器继续保持工作。未被使用的烹饪区关闭。
4. 如果电磁炉连续10分钟没有锅放在上面,则厨师功能自动关闭。
厨师功能过程中,只有升序计时器可用。
ZHS 23
煮沸功能*/**
此功能可将锅里面的食物煮沸(100°C),并保持煮沸状态。锅中食物烹
煮过程中,或者添加食物时,会听到哔的一声。此功能只有在没有盖上锅
盖的时候才有效。
菜肴 人数 数量 平底锅 烹饪区 最多可用锅数:
(开始烹煮)
煮土豆
6-8 1000-1400克
高锅(Ø200) Ø210/Vario
2.5l包括土豆
9-15 1500-2200克
大锅(Ø240) Ø260双层
3.5l包括土豆
解冻(急冻)
蔬菜
4-6 500-750克
高锅(Ø200) 180x220
2.5l包括蔬菜
6-8 750-900克
大锅(Ø240) Ø260双层
3.5l包括蔬菜
大米 4-5 400-500克
高锅(Ø240) 180x220
2.0l只有水
1)
面食
2-3 200-300克
高锅(Ø200) 180x220
2.0l只有水
1)
4-6 400-600克
大锅(Ø240) Ø260双层
3.5l只有水
1)
1)听到哔的一声后,即可添加大米或面食。
*此功能最好使用ASKO推荐的锅。
**上述菜单功能如果能在烹饪开始时便启动,则效果最好。
煨炖功能*
菜肴的温度持续接近沸点(90°C-95°C)。使用煨炖设置时,最好盖上
锅盖。对于菜肴汤浓的情况,必须每隔15分钟搅动一次。煨炖最长时间
是8小时,除非利用计时器设置更短时间。
菜肴 数量+/- 平底锅 烹饪区
酱汁或汤汁
1l
浅锅(Ø200) 180x220
1.5l
高锅(Ø200) 180x220
2.5l
大锅(Ø240) Ø260双层
操作
ZHS 24
保温功能*
菜肴温度自动保持在70°C-75°C之间的恒温。使用保温设置时,最
好盖上锅盖。菜肴量大、汤浓时,必须不时搅动。保温最长时间是8小
时,除非利用计时器设置更短时间。
菜肴 人数 数量+/- 平底锅 烹饪区
所有菜肴
4 2000克
高锅(Ø200) 180x220
8 4000克
大锅(Ø240) Ø260双层
*此功能最好使用ASKO推荐的锅。
操作
ZHS 25
工作功能*/**
此功能可以提供最佳工作温度,无论是油温还是炒锅。听到哔的一声后,
表明锅达到了温度,可将油倒入锅内,然后再倒入菜。
菜肴 人数 肉类/鱼类/蔬菜类
最大数量
平底锅 烹饪区
肉类、鱼类、
蔬菜类
3-4 600克/600克 炒锅
180x220
1-2 300克/300克 炒锅
Ø260双层
煎封功能*/**
煎封设置可提供最佳煎封温度。
听到哔的一声后,表明锅达到了温度。可将油或黄油倒入锅内,然后再
倒入菜。
菜肴 人数 数量 平底锅 烹饪区
肉类、鱼类
4-5 400-500克 油炸锅
180x220
5-6 500-600克 油炸锅
Ø260双层
*此功能最好使用ASKO推荐的锅。
**上述菜单功能如果能在烹饪开始时便启动,则效果最好。
操作
ZHS 26
烤制功能*/**
烤制设置可提供最佳烤制温度。听到哔的一声后,表明锅达到了温度。
菜肴 人数 数量 平底锅 烹饪区
肉类、鱼类、
蔬菜类
3-4 300-400克 烤锅/烤板
180x220
4-6 400-600克 烤锅/烤板
Ø260双层
健康烹饪
不同种类油品的起燃点
为最大程度上确保食物健康煎炸,ASKO建议根据煎炸温度选择油的种
类。每种油的起燃点均不相同,如果超过起燃点,便会释放有毒气体。
下表显示了各种类型油所对应的起燃点。
油品
发烟点°C
特级初榨橄榄油
160°C
黄油
177°C
椰子油
177°C
芥花籽油
204°C
初榨橄榄油
216°C
葵花籽油
227°C
玉米油
232°C
花生油
232°C
米糠油
255°C
橄榄油
242°C
*此功能最好使用ASKO推荐的锅。
**上述菜单功能如果能在烹饪开始时便启动,则效果最好。
操作

ZHS 27
烹煮设置
由于设置取决于锅内食物的数量和成分,因此
此表仅作指导之用。
使用“快速加热”设置与设置11和12,用途:
• 快速煮沸食物或液体;
• “收缩”蔬菜;
• 加热油脂;
• 让压力煲增压;
• 炒锅
使用设置9和10,用途:
• 烙肉;
• 烹煮鱼类;
• 煎蛋饼;
• 煎炸土豆;
• 油炸食物。
使用设置7和8,用途:
• 煎炸厚松饼;
• 煎炸香酥肉块;
• 煎炸培根肉(脂肪);
• 烹煮生土豆;
• 制作法式吐司;
• 煎炸香酥鱼肉;
• 烹煮面食;
• 煎炸香酥薄肉块;
• 煎炸香酥薄肉片;
使用设置4-6,用途:
• 烹煮大量食物;
• 解冻急冻蔬菜;
• 煎炸香酥厚肉块。
操作

ZHS 28
使用设置1-3,用途:
• 煨炖肉羹;
• 煨肉;
• 炖蔬菜;
• 熔化巧克力;
• 水煮;
• 保温;
• 熔化芝士。
操作
ZHS 29
清洁
提示
清洁电磁炉之前,设置童锁。
每日清洁
• 虽然溢出的食物不会在玻璃上燃烧,但是我们仍然建议您使用之后立
即清洁。
• 每日清洁时,最好用湿布和温和的清洁剂清洁。
• 用厨房用纸或干茶布擦干。
顽固污渍
• 还可以使用清洗液等温和清洁剂来清除顽固污渍。
• 用醋清除水迹和水垢。
• 金属痕迹(滑动平底锅所导致)难以清除。可使用专门的清洁剂。
• 使用玻璃用刮刀清除溢出的食物。对于融化的塑料和糖,最好使用玻
璃用刮刀清除。
切勿使用
• 切勿使用研磨料。研磨料会留下刮痕,容易藏污纳垢。
• 切勿使用钢丝绒或钢丝棉等锐利物。
保养
ZHS 30
概述
如果您注意到玻璃面开裂(但很小),则请立即关闭电磁炉,拔下插头,
关闭电表箱里面的(自动)保险丝开关,或者,对于永久性连接的,将电
源线中的开关设置为零。联系服务部门。
故障排除表
本电器无法正常工作时,并非都意味着本电磁炉存在故障。您可以自己先
尝试处理这一问题,检查下述几项。
现象 可能的原因 解决方案
电磁炉第一次启动后,显示器
亮起。
这是标准的设置程序。 正常操作。
电磁炉关闭后,风扇还会运行
几分钟。
电磁炉正在冷却。 正常操作。
电磁炉前几次使用时会有轻微
的味道。
新电磁炉正在暖机。 这是正常现象,使用几次之后
便会消失。厨房通风。
听到电磁炉发出滴答声。 该声音是由前后区的容量限制
器产生的。低温设置时,也可
能会产生滴答声。
正常操作。
烹饪过程中,平底锅会发出
声音。
这是由于能量从电磁炉流向有
柄锅所产生的。
高温设置下,这种声音对部分
平底锅而言十分正常。它不会
损坏平底锅或电磁炉。
已经打开一个烹饪区,但是显
示器还继续闪烁。
您所用的平底锅不适合电磁烹
饪,或者直径小于12厘米。
请使用合适的平底锅,参见第
10页和第11页。
烹饪区突然停止工作,听到信
号声。
预设时间已结束。 按下计时器+或-键关闭报
警器。
电磁炉未工作,显示器未显示
任何内容。
电源线故障或接线出错,导致
不通电。
检查保险丝或电气开关
(若无插头)。
电磁炉开机后,保险丝便熔断。
电磁炉连接错误。 检查电气接线。
显示器中出现“br”,触摸式
控制器未工作。
启动桥接功能。 取消桥接功能
(参见第14页)。
错误代码F00
控制面板变脏或者上面有水。 清洁控制面板。
错误代码F0包括F6
与FC。
发电机故障。 联系服务部门。
错误代码F7。
环境温度不好。 关闭烹饪板附近的所有热源。
故障排除
ZHS 31
现象 可能的原因 解决方案
错误代码F8与F08。
电器过热。 本电器因过热而关机。让电器
冷却,调至低温设置,重新
开机。
错误代码F9和/或连续报警。
本电器接线出错和/或电源电
压过高。
更改接线。
错误代码F99。
同时按下两个或更多按键。 切勿同时操纵多个按键。
错误代码FA。
电源电压过低。 联系供电局。
错误代码FAN。
空气循环不好。 确定烹饪板下方的通风孔是打
开的。
其它错误代码。
发电机故障。 联系服务部门。
故障排除

ZHS 32
环境因素
包装与电器的处理
本电器采用耐用材料制造。本电器使用寿命结束后,一定要采用负责任的
方式处置。欲想了解更多信息,请咨询相关机构。
本电器的包装可以回收利用。可能使用以下包装材料:
• 纸板;
• 聚乙烯薄膜(PE);
• 不含CFC的聚苯乙烯(PS硬泡沫)。
这些材料均应采用负责任的方式,按照政府规定处置。
为了提醒用户单独处置家用电器,本产品标注有打叉的带轮垃圾桶标志。
这意味着电器使用寿命结束后,不可作为城市垃圾处理。必须交由当地政
府机构运营的专门的垃圾收集中心,或者交由提供该项服务的商家。
单独处置家用电器,可以避免因处置不当而对环境和健康造成负面后果,
可以将制造材料加以回收,大量节约能源和资源。
一致性声明
我们声明,我们的产品符合相关欧洲指令、决策、规定以及所引用标准
的要求。

ZHS 33
ZHS 34
产品中有害物质的名称及含量
Name and content of hazardous substances in products
部件名称
Component name
有害物质
Hazardous substance
铅
Lead (Pb)
汞
Mercury (Hg)
镉
Cadmium (Cd)
外壳件
Enclosure material
O O O
印刷电路板
Printed circuit board
assembly
X O O
保温材料
Thermal issulation
material
O O O
电机
Motor
O O O
电源线及连接器
Plug, cable and
connector
O O O
包装印刷组件
Package and printing
material
O O O
本表格依据SJ/T11364的规定编制
O: 表示该有害物质在该部件所有均质材料中的含量均在GB/T26572规定的限量要求以下。
X: 表示该有害物质至少在该部件的某一均质材料中的含量超出GB/T26572规定的限量要求。
This table is prepared in accordance with the provisions of SJ/T 11364.
O: Indicates that said hazardous substance contained in all of the homogeneous materials for
this part is below the limit requirement of GB/T 26572.
X: Indicates that said hazardous substance contained in at least one of the homogeneous
materials used for this part is above the limit requirement of GB/T 26572.
产品中有害物质的名称及含量
ZHS 35
产品中有害物质的名称及含量
Name and content of hazardous substances in products
部件名称
Component name
有害物质
Hazardous substance
六价铬
Hexavalent
Chromium (Cr (VI))
多溴联苯
Polybrominated
biphenyls (PBB)
多溴二苯醚
Polybrominated
diphenyl ethers
(PBDE)
外壳件
Enclosure material
O O O
印刷电路板
Printed circuit board
assembly
O O O
保温材料
Thermal issulation
material
O O O
电机
Motor
O O O
电源线及连接器
Plug, cable and
connector
O O O
包装印刷组件
Package and printing
material
O O O
本表格依据SJ/T11364的规定编制
O: 表示该有害物质在该部件所有均质材料中的含量均在GB/T26572规定的限量要求以下。
X: 表示该有害物质至少在该部件的某一均质材料中的含量超出GB/T26572规定的限量要求。
This table is prepared in accordance with the provisions of SJ/T 11364.
O: Indicates that said hazardous substance contained in all of the homogeneous materials for
this part is below the limit requirement of GB/T 26572.
X: Indicates that said hazardous substance contained in at least one of the homogeneous
materials used for this part is above the limit requirement of GB/T 26572.
产品中有害物质的名称及含量

ZHS 36

EN 3
CONTENTS
Your induction hob
Introduction 4
Control panel 5
Description 6
Safety instructions
Temperature safety 7
Cooking-time limiter 7
Use
Using the touch controls 8
Induction cooking 8
How does induction work 9
Induction noises 9
Pans 10
Operation
Switching on the hob and setting the power 12
Residual heat indicator 12
Boost 13
Two cooking zones behind each other 13
How to bridge the Vario induction zones 14
Switching off 15
Stand-by modus 15
Eco stand-by modus 15
Child lock 16
Pause 17
Recognizing a mode 17
Timer / Kitchen timer 18
Switching on and off the beep 20
Automatic pan detection 20
Automatic cooking programs 21
Chef function (HI1995G) 21
Healthy cooking 26
Cooking settings 27
Maintenance
Cleaning 29
Faults
General 30
Troubleshooting table 30
Environmental aspects
Disposal of packaging and appliance 32

EN 4
Introduction
This hob has been designed for the real lover of cooking.
Cooking on an induction hob has a number of advantages. It is easy,
because the hob reacts quickly and can also be set to a very low power
level. Because, moreover, it can also be set to a high power level, it
can bring dishes to the boil very quickly. The ample space between the
cooking zones makes cooking comfortable.
Cooking on an induction hob is different from cooking on a traditional
appliance. Induction cooking makes use of a magnetic field to generate
heat. This means that you cannot use just any pan on it.
The pans section gives more information about this.
For optimum safety the induction hob is equipped with several
temperature protections and a residual heat indicator, which
shows which cooking zones are still hot.
This manual describes how you can make the best possible use of the
induction hob. In addition to information about operation, you will also
find background information that can assist you in using this product.
You will also find cooking tables and maintenance tips.
Read the manual thorougly before using the appliance, and
store these instructions in a safe place for future reference.
The manual also serves as reference material for service technicians.
Please, therefore, stick the appliance identification card in the
space provided, at the back of the manual.
The appliance identification card contains all the information that the
service technician will need in order to respond appropriately to your
needs and questions.
Enjoy your cooking!
YOUR INDUCTION HOB
EN 5
Control panel
1. Pause button
2. Pause indicator
3. Childproof lock/Eco stand-by button
4. Childproof lock indicator/Eco stand-by indicator
5. Level indicator in cubes
6. On/off button
7. Reduce the power quickly
8. Reduce the power
9. Raise the power
10. Raise the power quickly
11. Boost
12. Timer/alarmclock button
13. Alarm clock indicator
14. Cooking time indicator
15. ‘Reduce the time’ button
16. Bridge function (Two zones are connected; this creates one ‘big’
zone. Control 2 zones with one slider).
17. ‘Raise the time’ button
18. ‘Minutes after dot’ indicator
19. Timer/alarmclock
20. Menu functions
21. Menu button
22. Level indicator
23. Cooking zone indicator
24. Chef function
YOUR INDUCTION HOB
F00002557 - LED Screen ATAG TC (700002940000)
08-06-11 IH
2124 18
20
192223
6 7 8 9 12 13 14 15 1711 16105
1
2
4
3
EN 6
Description
HI1355G HI1655G/HI1655M
HI1975G HI1995G
YOUR INDUCTION HOB
1. Adaptive zone 180 x 220 mm 3,7kW (zones that can be connected)
2. Cooking zone Ø 260 5,5 kW (double ring)
11 1
11 1
1 1
12 1
1 1 1
1 1 1
EN 7
Before use, read the separate safety
instructions first!
Temperature safety
• A sensor continuously measures the temperature of certain parts
of the hob. Every cooking zone is equipped with a sensor that
measures the temperature of the bottom of the pan to avoid any
risk of overheating when a pan boils dry. In case of temperatures
rising too high, the power is reduced automatically or the hob
switches off automatically.
Cooking-time limiter
• The cooking-time limiter is a safety function of your cooking
appliance. It will operate if you forget to switch off your hob.
• Depending on the setting you have chosen, the cooking time will be
limited as follows:
Setting The cooking zone switches
automatically off after:
1 and 2 9 hours
3, 4 and 5 5 hours
6, 7 and 8 4 hours
9 3 hours
10 2 hours
11 and 12 1 hour
Chef function 9 hours
The cooking-time limiter switches the cooking zones off if the time in
the table has elapsed.
Setting The cooking zone switches
automatically to setting 12 after:
boost 10 minutes
SAFETY
EN 8
USE
Using the touch controls
The touch controls may take some getting used to if you are used to
other (rotary) controls. Place the tip of your finger flat on the control to
achieve the best results. You do not have to apply any pressure.
The touch sensors only react to the light pressure of a fingertip. Do not
operate the controls with any other objects. The hob will not switch on
when your pet walks over it.
Induction cooking
Induction cooking is fast
• To start you will be surprised by the speed of induction cooking.
Especially at higher settings, foods and liquids will boil very rapidly.
It is best not to leave pans unattended to avoid them boiling over or
boiling dry.
The power will be adjusted
• In the case of induction cooking, it is only the part of the zone on
which the pan stands that is used. If you use a small pan on a large
zone, the power will be adjusted to the diameter of the pan. The
power will thus be lower and it will take longer before the food in
the pan comes to the boil.
Attention
• Grains of sand may cause scratches which cannot be removed.
Only put pans with a clean base on the cooking surface and always
pick pans up to move them.
• Do not use the hob as a worktop.
• Always keep the lid on the pan when cooking, in order to avoid
energy loss.
No heat loss and cold
handles with induction
cooking.

EN 9
USE
How does induction work
A magnetic field is generated in the appliance. By placing a
pan with an iron base on a cooking zone, a current is induced in the
pan base. This induced current generates heat in the base of the pan.
Easy
The electronic controls are accurate and easy to set. On the lowest
setting, you can melt chocolate directly in the pan, for example, or cook
ingredients that you would normally heat in a bain-marie.
Fast
Thanks to the induction hob’s high power levels, bringing food to the
boil is very quick. Cooking food through takes just as long as for other
types of cooking.
Clean
The hob is easy to clean. Because the cooking zones do not get any
hotter than the pans themselves, food spills cannot burn on.
Safe
The heat is generated in the pan itself. The glass top does not get any
warmer than the pan. This means that the cooking zone is considerable
cooler compared to that from a Ceramic hob or a gasburner. Once a
pan has been taken away, the cooking zone cools down quickly.
Induction noises
A ticking sound
This is caused by the capacity limiter on the front and back zones.
Ticking can also occur at lower settings.
Pans are making noise
Pans can make some noise during cooking. This is caused by the
energy flowing from the hob to the saucepan. At high settings this is
perfectly normal for some pans. It will not damage either the pans or
the hob.
The coil (1) in the hob (2)
generates a magnetic field
(3). By placing a pan with
an iron base (4) on the coil,
a current is induced in the
base of the pan.

EN 10
The fan is making noise
To enlarge the lifespan of the electronics, the appliance is equiped with
a fan. If you use the appliance intense, the fan is activated to cool down
the appliance and you will hear a buzzing sound. The fan runs on for
several minutes after the hob has been switched off.
Automatic power-on function
When the automatic power-on function (APD) is active, you will hear a
ticking noise, even if the zone is not being used.
Pans
Pans for induction cooking
Induction cooking requires a particular quality of pan.
Attention
• Pans that have already been used for cooking on a gas hob are no
longer suitable for use on an induction hob.
• Only use pans that are suitable for electric and induction cooking
with:
▷ a thick base (minimum 2.25 mm);
▷ a flat base.
• The best are pans with the ‘Class Induction’ quality mark.
Tip
You can check for yourself whether your pans are suitable using a magnet.
A pan is suitable if the base of the pan is attracted by the magnet.
Suitable Unsuitable
Special stainless steel pans Earthenware
Class Induction Stainless steel
Hard-wearing enamelled pans Porcelain
Enamelled cast-iron pans Copper
Plastic
Aluminium
One is advised to use the pans recommended by ASKO for the
automatic cooking programs.
USE
EN 11
USE
Attention
Be careful with enamelled sheet-steel pans:
• the enamel may chip (the enamel comes loose from the steel), if
you switch the hob on at a high setting when the pan is (too) dry;
• the base of the pan may warp - due, for example, to overheating or
to the use of too high a power level.
Attention
Never use pans with a misshapen base. A hollow or rounded base can
interfere with the operation of the overheating protection, so that the
appliance becomes too hot. This may lead to the glass top cracking
and the pan base melting. Damage arising from the use of unsuitable
pans or from boiling dry is excluded from the guarantee.
Minimum pan diameter
The diameter of the bottom of the pan must be at least 12 cm. You will
achieve the best results by using a pan with the same diameter as the
zone. If a pan is too small the zone will not work.
The lenght of a fish-pan (oval pan), used on the vario zone, must be at
least 22 cm.
Pressure cookers
Induction cooking is very suitable for cooking in pressure cookers.
The cooking zone reacts very quickly, and so the pressure cooker is
quickly up to pressure. As soon as you switch a cooking zone off, the
cooking process stops immediately.
EN 12
Switching on the hob and setting the power
The cooking zones have 12 levels. Beside it there is a level ‘boost’.
1. Place a pan in the middle of a cooking zone.
2. Press the child lock button.
You will hear a single beep.
3. Press the on/off button of the cooking zone concerned.
A flashing ‘-’ appears in the display and you will hear a single beep.
If no further action is taken, the cooking zone will automatically
switch off after a few seconds.
4. Press the + or - button, or the << or >> button to select the desired
setting. The cooking zone starts automatically in the level that has
been set (when a pan is detected).
▷ If you press the + or - button first, level 6 appears.
▷ If you press the >> button first, level 12 + ‘boost’ appear in the
display. This is power level ‘boost’ and you can use this setting if
you want to bring dishes to the boil quickly (see page 14).
▷ If you press the << button first, level 1 will appear.
Tips
• With the + or - button you can raise or reduce the power setting
step by step. By pressing the << or >> button, you can raise or
reduce the power setting quick.
• Press and hold the << , - , + or >> button to set the desired power
level more quickly.
Pandetection
If the hob does not detect a (ferrous) pan after the cooking power has
been set, the display will blink and the hob will remain cold. If a (ferrous)
pan is not placed on the cooking zone within 1 minute, the cooking
zone will automatically switch off (see also page 11 and 12 ‘Pans’).
Residual heat indicator
A cooking zone that has been used intensively will retain heat for
several minutes after it has been switched off. An ‘H’ appears in the
display as long as the cooking zone is hot.
F00002557 - LED Screen ATAG TC (700002940000)
24-08-09 IH
F00002557 - LED Screen ATAG TC (700002940000)
24-08-09 IH
OPERATION
EN 13
Boost
You can use the ‘boost’ function to cook at the highest power level
during a short period of time (max.10 minutes). After the maximum
boost time the power will be reduced to setting 12.
Switching on ‘boost’
1. Put a pan on a cooking zone.
2. Press the >> button immediately after you have switched on the
zone.
Level 12 and ‘boost’ appear in the display.
• If a cooking zone has already been set to a power level and you
want to use ‘boost’, press several times the >> button or the
+ button of the cooking zone concerned.
Switching off ‘boost’
‘Boost’ has been switched on, the display shows level 12 and ‘boost’.
1. Press the << button or the - button.
In the display you will see a lower level.
Or:
2. Press the on/off button of the cooking zone you want to switch off.
You will hear a beep and the level in the display disappears.
The cooking zone has been switched off completely.
Two cooking zones one in front of the other
• Two cooking zones one in front of the other affect each other. When
both of these cooking zones are switched on at the same time, the
power is automatically shared between them. The first set cooking
zone will remain at the set setting at all times. The maximum set
setting for the cooking zones to the front or back that is added later,
depends on the setting of the first cooking zone. When you have
reached the maximum amount of cooking setting combinations, the
last set setting will start to flash and is automatically lowered to the
highest possible setting.
• Two cooking zones alongside each other have no effect on each
other. You can set both cooking zones on a high setting.
• If the vario zones are bridged, they cannot be set to boost and the
menu functions cannot be used.
F00002557 - LED Screen ATAG TC (700002940000)
24-08-09 IH
OPERATION
EN 14
OPERATION
How to bridge the Vario induction zones
The Vario induction zones can be bridged (linked) to each other. This
creates 1 large zone that can be used for example for a large fish pan
or one large cooking pan.
• If the vario zones are bridged, they cannot be set to boost and the
menu functions cannot be used.
Use a (fish) pan where at least one of the centre/middle positions of the
vario zones is covered.
Activating the bridge mode
1. Place the large pan on both cooking zones so that these are both
well covered.
2. Switch the front cooking zone on.
3. Hold two keys down at the same time (for a few seconds): the
<< button on the rear bridge zone and the >> button on the front
bridge zone.
‘BR’ will appear in the display on the rear zone. Then use the front
zone control to set a cooking level for both zones.
4. Set the desired cooking level using the + or - button, or the << or
>> button of the front zone. Both zones are heated in the level set.
Deactivating the bridge mode
1. Press simultaneously on the >> button on the front vario zone and
the << button on the very back vario zone to switch off the ‘bridge’
level.
The front zone goes further on the level set in bridge function.
Or:
2. Press the on/off button of the cooking zone you want to switch off.
You will hear a beep and the level in the display disappears.
The cooking zone has been switched off completely.
F00002557 - LED Screen ATAG TC (700002940000)
24-08-09 IH
EN 15
Switching off
Switching off one cooking zone
Press the on/off button of the cooking zone you want to switch off.
You will hear a beep and the level in the display disappears.
• If all cooking zones have been switched off in this way, the hob will
automatically be in the stand-by mode (also refer to
‘stand-by mode’).
Switching off all cooking zones
Press the child lock button to switch off all the cooking zones at the
same time.
You will hear a beep. The red childproof lock indicator next to the child
lock button will blink very slowly.
• The induction hob is now in eco stand-by modus
(see also ‘eco stand-by modus’).
Stand-by mode
In stand-by mode the induction hob is switched off. You can switch to
the stand-by mode from the eco stand-by mode, or by switching off all
cooking zones.
From the stand-by mode you can directly start cooking by pressing the
on/off button of the desired cooking zone.
Switching the hob from the eco stand-by mode to the standy-by
mode
The red light next to the child lock button keeps slowly going on and off.
• Press the child lock button for a short while to switch to the
stand-by mode.
A single beep will be heard. All lights on the hob are out.
Eco stand-by mode
In the eco stand-by mode the hob is switched off and it uses as little
energy as possible.
The hob can also be switched to the eco stand-by mode from the
stand-by mode and when cooking zones are still active.
Did you know that
The hob uses less than 0,5 Watt in the eco- stand-by mode. That is
even less than in the stand-by mode of the hob.
F00002557 - LED Screen ATAG TC (700002940000)
24-08-09 IH
OPERATION
EN 16
Switching the hob to the eco stand-by mode
• Press the child lock button.
A single beep will be heard. The eco stand-by mode is active, the
red light next to the child lock button keeps slowly going on and off.
From the eco stand-by mode you can’t immediately start cooking. To
be able to, the hob first needs to be switched to the stand-by mode.
Did you know that
After 30 minutes in the stand-by mode the hob will automatically switch
to the eco stand-by mode to prevent unnecessary energy consumption.
Child lock
Your induction hob is equipped with a childproof lock that lets you lock
the appliance. It prevents unintended switching on.
Switching on the child lock
1. Press the child lock button for two seconds.
You will hear a double beep. All buttons are inactive now, except
for the child lock button. The hob first switches to the eco
stand-by mode and then to the childproof lock mode. The red
light is constantly on.
2. Press the button again for 2 seconds to get the hob of the
childproof lock.
A single beep will be heard. The hob is now in the stand-by mode.
The red light next to the child lock button is out.
Tip
Set the hob to the child lock mode before cleaning the hob to prevent it
from accidentally switching on.
Did you know that
When the hob is set to the child lock, is uses just as little energy as
when it is in the eco stand-by mode.
F00002557 - LED Screen ATAG TC (700002940000)
24-08-09 IH
F00002557 - LED Screen ATAG TC (700002940000)
24-08-09 IH
OPERATION
EN 17
Pause
With this pause function, you can set the entire hob to ‘pause’ for
5 minutes during cooking. In this way you can leave or clean the hob in
a safe way during a short period of time, without losing settings.
Switching the hob to the pause mode
• Press the pause button once.
You will hear a double beep, the settings change into a lower setting
and the red light next to the pause button flashes.
▷ Any set timers/kitchen timers stop. All cooking zones are
automatically changed to a lower setting.
▷ All buttons are inactive except for the child lock button and the
pause button.
▷ The on/off button of the individual cooking zones also remain
active, they do however react with a delay of two seconds.
• If you press the pause button again within 5 minutes, the paused
cooking process will be resumed.
You will hear a double beep, the hob resumes the settings as they
were set before the pause.
• If you do not undertake any further action within 5 minutes:
All active cooking zones will be switched off automatically. After that
the pause button will keep flashing for 25 minutes to indicate the
cooking processes have been ended by the pause mode. The hob
automatically switches from the pause mode to the eco stand-by
mode after 25 minutes.
Recognizing a mode
The stand-by mode
Not a single light is lit.
The eco stand-by mode
The red light next to the child lock button
button keeps slowly going on and off.
The child lock mode
The red light next to the child lock button
is constantly on.
The pause mode
The red light next to the pause button
flashes.
F00002557 - LED Screen ATAG TC (700002940000)
24-08-09 IH
OPERATION
EN 18
OPERATION
Timer / Kitchen timer
The timer/alarmclock button of each cooking zone has two functions:
The timer function The kitchen timer function
This function can be recognized
by the red small arrow pointing
up.
This function can be recognized
by the red small arrow pointing
down.
The time increases in the timer
function.
The time decreases in the kitchen
timer function.
The timer cannot be linked to a
cooking zone.
The kitchen timer can be linked to
a cooking zone. This means the
cooking zone switches off if the
set time has passed.
When the timer button is pressed,
the timer function automatically
switches on after 3 seconds if you
do nothing.
The kitchen timer function can be
reached from the timer function
by pressing the red + button or
red - button.
Attention
• Per set of two cooking zones (front and back) one timer/kitchen
timer is available. The 5th cooking zone has its own timer/kitchen
timer.
• The timer/kitchen timer can only be linked to one of both cooking
zones per set of two cooking zones.
• The timer-/kitchen timer function can also be used without
activating an accompanying cooking zone.
Switching on the timer
1. Press the timer/alarmclock button of the cooking zone once.
The display of the timer lights up and you’ll see three zeroes
flashing. Under that appears a + and -.
• If you do not set a time with the + or - button, the timer will start
running automatically after 3 seconds. The timer can go as far as
9 hours and 59 minutes.
The red arrow pointing up lights up and the time increases.
2. Press the timer/alarmclock button of the cooking zone again, to
switch it off.
F00002557 - LED Screen ATAG TC (700002940000)
24-08-09 IH
F00002557 - LED Screen ATAG TC (700002940000)
24-08-09 IH
F00002557 - LED Screen ATAG TC (700002940000)
24-08-09 IH
EN 19
Switching on the kitchen timer
1. Press the timer/alarmclock button of the cooking zone once.
2. Press the + or - button to switch from the timer function to the
kitchen timer function. After that you can set the desired cooking
time with the + button. Then you can change the set time with the
- button.
The red small arrow pointing down lights up. Time is counting down.
3. Press the timer/alarmclock button of the cooking zone again, to
switch it off.
Attention
• The kitchen timer is linked to the cooking zone if the accompanying
cooking zone is switched on. The kitchen timer stops as soon as
the pan is removed and resumes when the pan is put back.
• If the kitchen timer is linked to a cooking zone, the cooking zone
will switch off after the set time has passed.
The kitchen timer alarm beeps for a quarter of an hour while
decreasing as the time passes, while ‘0.00’ and the arrow pointing
down keeps flashing. Press the timer/alarm clock button of the
cooking zone again, to switch off the kitchen timer alarm. Press the
timer/alarm clock button again for the cooking zone where the red
arrow pointing down is flashing, or remove the pan from the zone to
switch off the timer again.
Setting the cooking time
• Switch the kitchen timer on.
Button Steps of x per
button contact
Time
+ x = 1 minute 0.00 to ...
- x = 10 seconds 5.00 - 0.00
- x = 30 seconds 9.00 - 5.00
- x = 1 minute ... to 9.00
After 9 minutes and 0 seconds (‘9.00’) the word ‘.min’ appears above
the display and the minutes will be added behind the dot.
F00002557 - LED Screen ATAG TC (700002940000)
24-08-09 IH
F00002557 - LED Screen ATAG TC (700002940000)
24-08-09 IH
OPERATION

EN 20
Tip
You can press and hold the + or - button to set the desired cooking
time quicker.
Switching on and off the beep
1. Press the on/off button on the far left twice.
2. Press and hold the << button and the + button simultaneously until
you hear a beep.
The beep is now switched off for all button operations, except for
the pause button and the child lock button. Note: the kitchen timer
alarm and the beep for error messages cannot be switched off.
3. Use the same button combination to switch the sound back on.
Switching on/off the automatic pan detection
If, after the hob has been turned on, a pan is placed in an inactive
cooking zone, the corresponding operating controls light up and this
can be used immediately (without operating the on/off switch).
If the cooking zone is not activated within 10 seconds, the light will go
out. It can be re-activated by removing the pan and then replacing it or
by using the on/off switch.
This function is active by default, but can also be switched off. This is
done by switching the hob off and operating the ‘menu’ (6) and ‘on/off
button’ (21) on the left-hand control panel for 5 seconds. ‘APd OFF’ will
appear on the display. By repeating this process, the function can be
reactivated and the ‘APd On’ will appear on the display.
OPERATION
EN 21
OPERATION
Automatic cooking programs
Your hob is fitted with 6 automatic cooking programs. You can set any
end time of an automatic cooking program with the aid of the kitchen
timer function (refer to page 18). The cooking programs are based on
regular quantities. The tables are meant as a guideline, because of the
large margins you can alter the dish according to your wishes.
To set an automatic program
The cooking zone is switched on.
• Press the menu button.
A series of 6 icons will light up (7 icons on the HI1995G), one of
which will be brighter than the others..
• Again press the menu button, or press and hold down the menu
button to go to the next menu functions.
The selected cooking programme automatically starts after 3
seconds. An ‘A’ for ‘automatic’ appears in the display.
If an automatic cooking program is active, you can use the following
buttons to go back to the manual cooking process:
<< , + , - , >> .
Attention
For ‘Vario’ appliances, the cooking programs and boost function
will not work if the zones are bridged or the chef function is active.
Chef function
The ‘Chef function’ will activate all zones when switched on. The right-
hand zones in setting 1, the middle ones in 7 and the left-hand zones
in 12. ‘Ch’ will appear on the display for the rear zones. Afterwards
you can configure a different cooking setting for both zones using the
controls for the front zone.
This function enables you too cook without making use of the power
controls, but by moving the pans from zone to zone.
F00002557 - LED Screen ATAG TC (700002940000)
24-08-09 IH
F00002557 - LED Screen ATAG TC (700002940000)
24-08-09 IH

EN 22
OPERATION
This function can only be switched on if the hob is not being used. To
switch on this function, all zones first need to be switched off.
With the far left-hand menu button, the function can be selected by
releasing the menu button when the chef indicator (24) lights up.
Switching off the chef function (HI1995G)
1. By means of the eco-lock button (3), the whole hob can be
switched off.
2. Using the on/off buttons (6): This switches off the chef function; all
zones are deactivated. The displays light up for the zones where
there is a pan, if the APD is activated.
3. By operating the far left-hand menu button (21) next to the chef
indicator, the chef function is terminated, active zones and timers
remain active. Zones not in use will be switched off.
4. The chef function is switched off automatically if there has been no
pan on the hob for 10 minutes.
During the chef function, only the ascending timer is available.
EN 23
Boiling function*/**
This function brings the content of the pan to a boil (100 °C) and keeps
it boiling. A beep can be heard when the content is cooking or if the
food has to be added. This function works only without the lid on the pan.
Dish Number
of people
Quantity Pan Zone Fill the pan up to:
(start the cooking
process)
Cooked
potatoes
6 - 8 1000 - 1400 g High pan (Ø 200) 180 x 220 2,5 l incl. potatoes
9 - 15 1500 - 2200 g Large pan (Ø 240) Ø 260 double 3,5 l incl. potatoes
Cooked (hard)
vegetables
4 - 6 500 - 750 g High pan (Ø 200) 180 x 220 2,5 l incl. vegetables
6 - 8 750 - 900 g Large pan (Ø 240) Ø 260 double 3,5 l incl. vegetables
Rice 4 - 5 400 - 500 g High pan (Ø 240) 180 x 220 2,0 l only water
1)
Pasta
2 - 3 200 - 300 g High pan (Ø 200) 180 x 220 2,0 l only water
1)
4 - 6 400 - 600 g Large pan (Ø 240) Ø 260 double 3,5 l only water
1)
1) After the beep the rice or pasta can be added.
* This function works best with pans recommended by ASKO.
** These menu functions work best if they are started at the beginning of the cooking process.
Simmering fucntion*
The temperature of the dish is constantly kept near the boiling point
(90 °C - 95 °C). The simmer setting works best with a lid on the pan.
Thicker dishes have to be stirred every 15 minutes. The maximum
simmering time is 8 hours, unless a shorter time has been set with
the aid of a timer.
Dish Quantity +/- Pan Zone
Sauce or soup
1 l Low pan (Ø 200) 180 x 220
1,5 l High pan (Ø 200) 180 x 220
2.5 l Large pan (Ø 240) Ø 260 double
OPERATION
EN 24
Function for keeping warm*
The temperature of a dish is automatically kept at a constant tempera-
ture of 70 °C - 75 °C. The setting for keeping warm works best with a
lid on the pan. Larger quantities and thicker dishes need to be stirred
ocassionally. The maximum time for keeping warm is 8 hours, unless
a shorter time has been set with the aid of a timer.
Dish Number
of people
Quantity +/- Pan Zone
All dishes
4 2000 g High pan (Ø 200) 180 x 220
8 4000 g Large pan (Ø 240) Ø 260 double
* This function works best with pans recommended by ASKO.
OPERATION
EN 25
Wok function*/**
The wok setting provides an optimal wok temperature, for both the oil
and the wok. After the beep the pan has reached its temperature, the
oil can be put in the pan and then the dish.
Dish Number
of people
Maximum amount
of meat or fish /
vegetables
Pan Zone
Meat, fish,
vegetables
3 - 4 600 g / 600 g Wokpan 180 x 220
1 - 2 300 g / 300 g Wokpan Ø 260 double
Searing function*/**
The searing setting provides the optimal searing temperature.
After the beep the pan has reached its temperature. The oil or butter
can be put into the pan and then the dish.
Dish Number
of people
Quantity Pan Zone
Meat, fish
4 - 5 400 - 500 g Frying pan 180 x 220
5 - 6 500 - 600 g Frying pan Ø 260 double
* This function works best with pans recommended by ASKO.
** These menu functions work best if they are started at the beginning
of the cooking process.
OPERATION
EN 26
Grill function*/**
The grill setting provides the optimal grilling temperature. A beep can
be heard when the pan has reached its temperature.
Dish Number
of people
Quantity Pan Zone
Meat, fish,
vegetables
3 - 4 300 - 400 g Grill pan / plate 180 x 220
4 - 6 400 - 600 g Grill pan / plate Ø 260 double
Healthy cooking
Burning point of different types of oil
To ensure your food is fried as healthily as possible, Asko recommends
choosing the type of oil according to the frying temperature. Each oil
has a different burning point at which toxic gasses are released. The
below table shows the burning points for various types of oil.
Oil Smoke point °C
Extra virgin olive oil 160 °C
Butter 177 °C
Coconut oil 177 °C
Canola oil 204 °C
Virgin olive oil 216 °C
Sunflower oil 227 °C
Corn oil 232 °C
Peanut oil 232 °C
Rice oil 255 °C
Olive oil 242 °C
* This function works best with pans recommended by ASKO.
** These menu functions work best if they are started at the beginning
of the cooking process.
OPERATION

EN 27
Cooking settings
Because the settings depend on the quantity and composition of the
contents of the pan, the table below is intended as a guideline only.
Use setting ‘boost’ and setting 11 and 12 to:
• bring the food or liquid to the boil quickly;
• ‘shrink’ greens;
• heat oil and fat;
• bring a pressure cooker up to pressure;
• wok
Use setting 9 and 10 to:
• sear meats;
• cook fish;
• cook omelettes;
• fry boiled potatoes;
• deep fry foods.
Use setting 7 and 8 to:
• fry thick pancakes;
• fry thick slices of breaded meat;
• fry bacon (fat);
• cook raw potatoes;
• make French toast;
• fry breaded fish;
• cook through pasta;
• fry thin slices of breaded meat;
• fry thin slices of meat;
Use setting 4-6 to:
• complete the cooking of large quantities;
• defrost hard vegetables;
• fry thick slices of breaded meat.
OPERATION

EN 28
Use settings 1-3 to:
• simmer bouillon;
• stew meats;
• simmer vegetables;
• melt chocolate;
• poach;
• keep warm;
• melt cheese.
OPERATION
EN 29
Cleaning
Tip
Set the child lock before you start cleaning the hob.
Daily cleaning
• Although food spills cannot burn into the glass, we nevertheless
recommend you to clean the hob immediately after use.
• Best for daily cleaning is a damp cloth with a mild cleaning agent.
• Dry with kitchen paper or a dry teacloth.
Stubborn stains
• Stubborn stains can also be removed with a mild cleaning agent
such as washing-up liquid.
• Remove water marks and lime scale with vinegar.
• Metal marks (caused by sliding pans) can be difficult to remove.
Special agents are available.
• Use a glass scraper to remove food spills. Melted plastic and sugar
is also best removed with a glass scraper.
Never use
• Never use abrasives. They leave scratches in which dirt and lime
scale can accumulate.
• Never use anything sharp such as steel wool or scourers.
MAINTENANCE
EN 30
General
If you notice a crack in the glass top (however small), switch the hob
off immediately, unplug the hob, turn off the (automatic) fuse switch(es)
in the meter cupboard or, in the event of a permanent connection,
set the switch in the power supply lead to zero.) Contact the service
department.
Troubleshooting table
If the appliance does not work properly, this does not always mean that
it is defective. Try to deal with the problem yourself first by checking the
points mentioned below.
Symptom Possible cause Solution
The display lights up when
the hob is activated for the
first time.
This is the standard set-up
routine.
Normal operation.
The fan runs on for several
minutes after the hob has
been switched off.
The hob is cooling. Normal operation.
A slight smell is noticeable
the first few times the hob is
used.
The new appliance is heating
up.
This is normal and will
disappear once it has been
used a few times. Ventilate
the kitchen.
You can hear a ticking sound
in your hob.
This is caused by the
capacity limiter on the front
and back zones. Ticking can
also occur at lower settings.
Normal operation.
The pans make a noise while
cooking.
This is caused by the energy
flowing from the hob to the
saucepan.
At high settings this is
perfectly normal for some
pans. It will not damage either
the pans or the hob.
You have switched on a
cooking zone, but the display
keeps flashing.
The pan you are using is
not suitable for induction
cooking. or has a diameter of
less than 12 cm.
Use a suitable pan, see page
10 and 11.
A cooking zone suddenly
stops working and you hear
a signal.
The preset time has ended. Switch the bleep off by
pressing the + or - button of
the timer.
TROUBLESHOOTING
EN 31
Symptom Possible cause Solution
The hob is not working
and nothing appears in the
display.
There is no power supply
due to a defective cable or a
faulty connection.
Check the fuses or the
electric switch (if there is no
plug).
A fuse blows as soon as the
hob is switched on.
The hob has been wrongly
connected.
Check the electrical
connections.
‘br’ appears in the display
and the touch controls are
not working.
The bridge function is
activated.
Deactivate the bridge function
(see pagina 14).
Error code F00.
The control panel is dirty or
has water lying on it.
Clean the control panel.
Error code F0 up to and
including F6 and FC.
Defective generator. Contact the service
department.
Error code F7.
The ambient temperature is
not good.
Switch off all heat sources in
the vicinity of the cooking plate.
Error code F8 and F08.
Appliance over heated. The appliance has been
switched off because of over
heating. Let the appliance
cool down and start again on
a lower setting.
Error code F9 and/or
continuous beep.
The appliance has been
connected incorrectly and/or
the mains voltage is too high.
Let your connection be
changed.
Error code F99.
You have pressed two or more
buttons at the same time.
Do not operate more than one
button at the same time.
Error code FA.
Mains voltage is too low. Contact your energy supplier.
Error code FAN.
Air circulation not good. Make sure the venting holes
under the cooking plate are
open.
Other error codes.
Defective generator. Contact the service
department.
TROUBLESHOOTING

EN 32
ENVIRONMENTAL ASPECTS
Disposal of packaging and appliance
In the manufacturing of this appliance durable materials were used.
Make sure to dispose of this equipment responsibly at the end of its
lifecycle. Ask the authorities for more information regarding this.
The appliance packaging is recyclable. The following may have been
used:
• cardboard;
• polythene film (PE);
• CFC-free polystyrene (PS hard foam).
Dispose of these materials in a responsible manner and in accordance
with government regulations.
As a reminder of the need to dispose of household appliances
separately, the product is marked with the symbol of a crossed-out
wheeled dustbin. This means that at the end of its working life, the
product must not be disposed of as urban waste. It must be taken to
a special local authority differentiated waste collection centre or to a
dealer providing this service.
Disposing of a household appliance separately avoids possible
negative consequences for the environment and health deriving from
inappropriate disposal and enables the constituent materials to be
recovered to obtain significant savings in energy and resources.
Declaration of conformity
We declare that our products meet the applicable European Directives,
Decisions and Regulations and the requirements listed in the standards
referenced.

EN 33

614171 / VER 1 / 25-11-2016
581 (07-19)