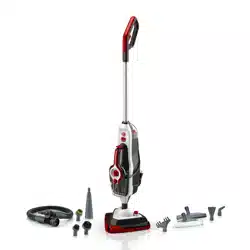
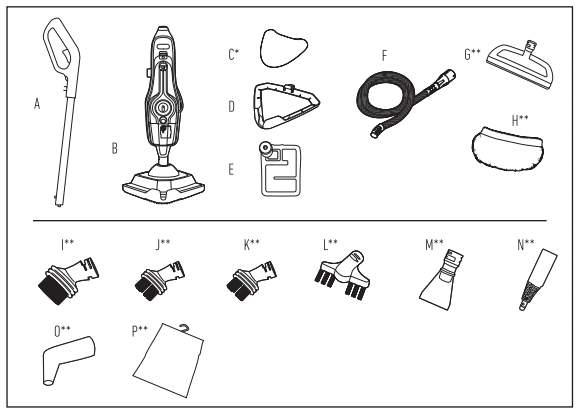
B. Steam Cleaner Body (Main Water Tank and Supplemental Water Tank attached)
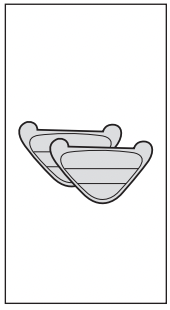
C. Multi-Surface Microfiber Pads (x2) "quantities vary per model
D. Carpet Glider
E. Water Filter (Pre-assembled in steam cleaner, remove main water tank to expose filter)
F. Hose
G. Squeegee Tool**
H. Upholstery Cloth Tool**
I. Large Plastic Brush**
J. Small Plastic Brush**
K. Metal Brush**
L. Grout Brush**
PM. Scraper Nozzle**
N. Concentration Nozzle**
O. Detail Nozzle**
P. Accessory Bag**
Remove all parts from carton and identify each item shown. Make sure all parts are located before disposing of packing materials.
**Select models only
Assembly
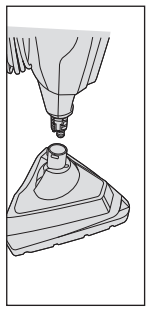
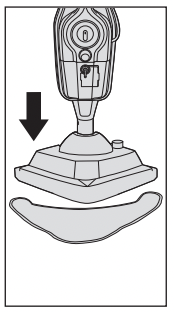
1. Insert the body into the floor head until it clicks into place.
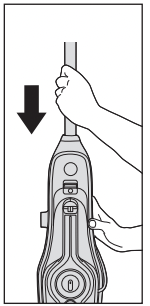
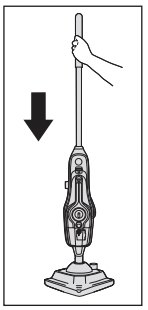
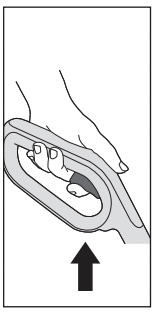
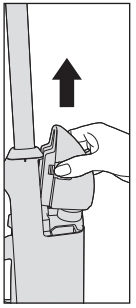
2. Insert the handle until it clicks into place.
3. To stand steam cleaner upright, push handle down until clicks into place.
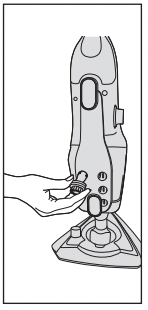
4. Insert tools into the hack of the steam cleaner.
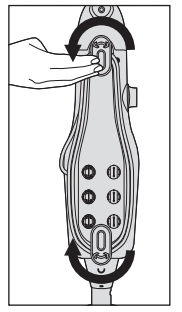
Cord storage
Wrap cord around release hooks for convenient storage. Attach the plug end to the cord.
Attach microfiber pad
WARNING: To reduce the risk of personal injury - Unplug the steam cleaner when assembling the accessories.
IMPORTANT: Never use the Steam Cleaner without the Microfiber Pad correctly attached to the Floor Head.
The "Multi-Surface Microfiber Pad" can be used on all sealed hard floor surfaces as well as carpet. When using on carpet the carpet glider attachment should be utilized as directed in the "Refreshing Carpet” section of this manual.
Place the cleaning pad on the floor white side facing up. Place steam cleaner on top of pad making sure the Floor Head covers the entire pad. Hook and loop feature on the bottom of the mop will hold the pad in place.
How to use
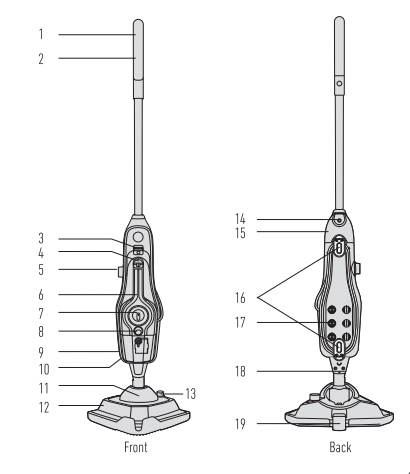
1. Handle 2. Steam Trigger (behind) 3. Handheld release button 4. Handheld Steam Trigger 5. Supplemental Water Tank Control Dial 6. Steam Ready Indicator 7. Steam Control Dial 8. On/Off Switch 9. Main Water Tank 10. Hard Water Filter (hidden) 11. Tile & Grout Scrub Brush (hidden) 12. Floorhead 13. SteamStream™ on/off button 14. Handle Release Button 15. Secondary Water Tank 16. Quick Cord Release Hook 17. Tool Storage 18. Floorhead Release Button 19. Carpet Glider
Before you begin cleaning
Filling the water tanks
WARNING ! To avoid the risk of personal injury - Turn off, unplug, and allow to cool before servicing or filling water tank. Do not use hot or boiling water to fill water tanks.
IMPORTANT: DO NOT ADD SOLUTION TO THE MAIN WATER TANK.
NOTE: When the tank is turned upright it may allow a few drops to drip from cap. This is normal.
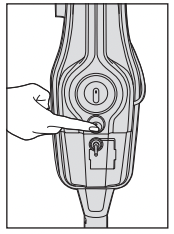
Press the Main Water Tank release buttons and pull the water tank to remove.
2. Pull the tab on the Main Water Tank cap to open.
3. Fill the Main Water Tank with water only to fill line, replace the cap and push firmly to close.
4. Slide the Main Water Tank back into the machine until it clicks into place.
5. To remove the Supplemental Water Tank press both release buttons and pull to release.
6. Twist the Supplemental Water Tank cap counter clockwise and lift to remove
7. Pour water to the water fill line. See tank fill line for reference.
8. Replace the Supplemental Water Tank cap and twist clockwise to close
9. Insert the Supplemental Water Tank back into the machine until it clicks into place.
Using your machine
• The steam cleaner and accessories get very hot during use, always allow them to cooldown before handling.
• Always unplug and switch off the steam cleaner when assembling.
• Always switch off the steam cleaner before emptying the water tanks or changing the cleaning pads/accessories.
• IMPORTANT: Please refer to floor manufacturer’s care recommendations before use and test the steam cleaner on a discrete area of flooring to begin with.
• When using steam cleaner, basic safety precautions should always be observed.
• Don’t aim the steam cleaner at people, animals, plants or electrical components such as interior of ovens or wires. Never touch the steam spray or floor head from a short distance. (There is a risk of scalding)
• The steam cleaner is equipped with a thermostat and a thermal cut out. If for any reason the steam cleaner overheats it will switch off. If this happens turn off and unplug the steam cleaner, allow to cool for a least 2 to 4 hours and re-start.
WARNING: Never leave the Steam Cleaner in one spot on any surface for an extended period of time with a damp or wet Microfiber pad attached as this may damage the floor surface. When cleaning hard floors, your Steam Cleaner should only be used on tiles, linoleum, sealed hardwood flooring, laminate, vinyl and sealed stone floors. If used on waxed flooring, you may experience loss of glossiness. To reduce the risk of personal injury, unplug the steam cleaner when assembling the accessories. Do not clean over floor electrical outlets. Do not use steam cleaner or press the Steam Trigger without water in the Main Water Tank.
IMPORTANT: Never use the Steam Cleaner without the Microfiber pad properly attached to the Floor Head.
WARNING: To reduce the risk of personal injury -Unplug the steam cleaner when assembling the accessories.
1. Place the microfiber pad on the ftoor white side facing up. Place floor head onto pad making sure the entire pad covers the floor head.
2. Plug into an outlet and Push On/Off switch to turn ON (l=0N). The blue light will illuminate to show power on. The green light will illuminate to show the steam mop is ready to use.
3. Adjust the steam dial to desired setting.
4. Utilize the Supplemental Water Tank by turning the dial to “LARGE AREA" when cleaning large spaces and turn the dial to “SMALL AREA" for quick cleaning.
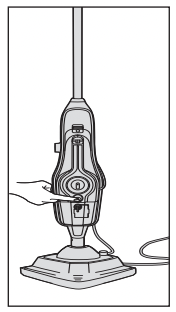
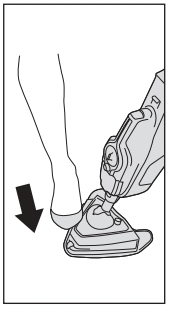
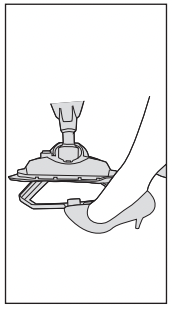
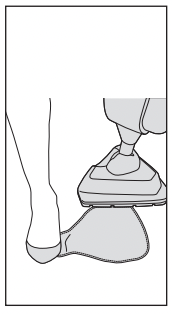
5. To recline the steam cleaner place foot here and pull handle backwards.
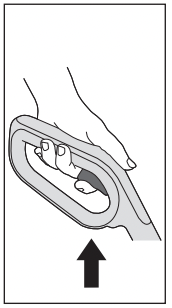
6. To produce steam squeeze the trigger in short bursts. Don't hold the trigger continuously to prevent over saturating floors.
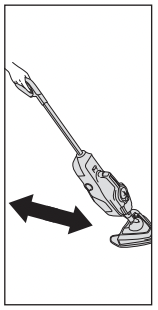
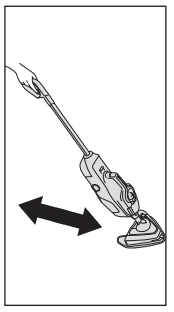
7. Move the steam cleaner slowly backwards and forwards across the floor. Squeeze and release trigger as required.
TO SANITIZE HARD SURFACES
Turn the steam control dial to "MAX" position. Connect the microfiber pad and run a minimum of 6 strokes at a medium pace (5-7 seconds per 32" stroke) across same area. Allow to dry.
Refreshing carpets
WARNING: To reduce the risk of personal injury - Unplug the steam cleaner when assembling the accessories.
WARNING: Do not clean over floor electrical outlets. Do not use steam cleaner or press the Steam Trigger without water in the Main Water Tank
IMPORTANT: When using on carpets,always ensure the multi-surface Microfiber Pad is properly attached to the Floor Head
1. Place the microfiber pad on the floor white side facing up. Place floor head onto pad making sure the entire pad covers the floor head.
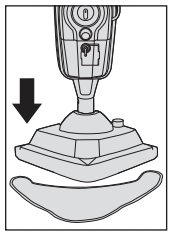
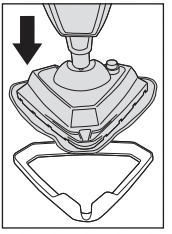
2. With microfiber pad attached, hook the steam cleaner into the front of the carpet glider and push to clip into place. Carpet glider should only be used when refreshing carpets.
3. Push On/Off button to power steam cleaner on and off.
4. To recline steam cleaner, place foot here and pull handle backwards.
5. To produce steam, squeeze the trigger. To prevent overly wetting the carpet, avoid holding the trigger continuously.
6. Move the steam cleaner slowly backwards and forwards across the carpet.
7. To release the carpet glider, place foot on clip and push down. Lift steam cleaner to unhook and remove.
Using tile and grout scrub brush and SteamStream™
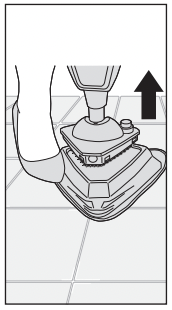
1. Place foot on outer floor head and gently pull away steam cleaner to release the tile and grout scrub brush.
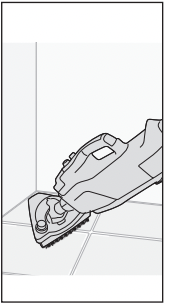
2. Move steam cleaner back and forth across the floor. getting into corners and awkward places.
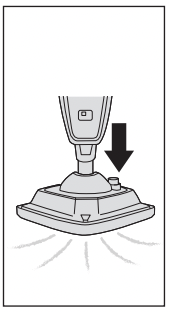
3. To engage SteamStream from the front nozzle. press the SteamStream button to activate. and squeeze the trigger to release steam. Press the SteamStream button to turn OFF (0=OFF).
WARNING: Do not clean over floor electrical outlets. Do not use steam cleaner or press the Steam Trigger without water in the Main Water Tank.
WARNING: Scrub brush bristles may damage wood floors.
IMPORTANT: Always switch off the steam cleaner before attaching or removing the floor head.
IMPORTANT: Scrub brush only recommended for tile and grout cleaning only.
Using the handheld steamer
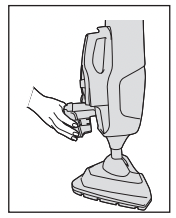
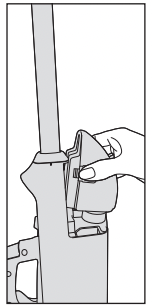
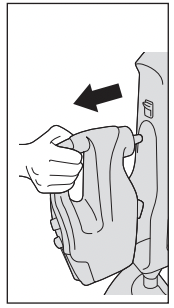
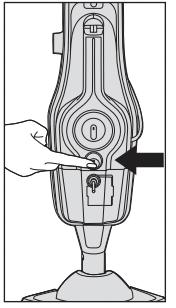
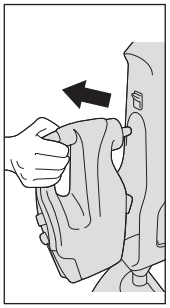
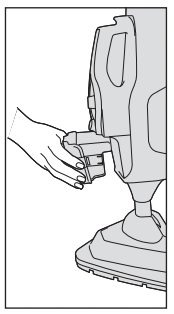
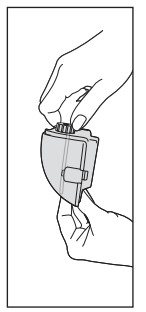
1. Lift the handheld release button and gently pull the handheld to release from the steam cleaner.
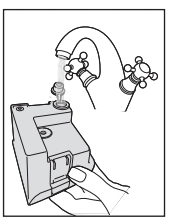
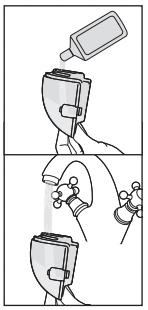
2. Remove Main Water Tank and refill before use.
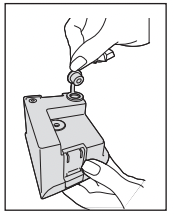
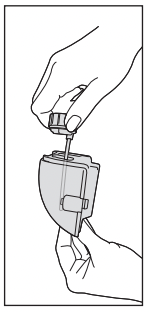
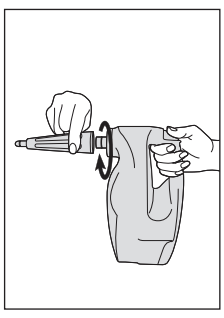
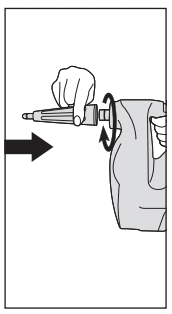
3. When using the handheld steamer always attach the concentration nozzle or hose. Push onto the handheld nozzle and twist clockwise to lock into position.
WARNING: Turn off, unplug and allow steam cleaner to cool before servicing or filling Main Water Tank.
CAUTION: Turn off, unplug and allow steam cleaner to cool before removing accessories. Always have the nozzle pointed away from you and others during installation.
4. Adjust the dial on the front of the handheld to desired steam setting.
WARNING ! To avoid burn injury, do not touch the steam cleaning nozzle or adjacent surfaces when steam cleaning or when the nozzle is heated.
5. To turn unit ON, push switch to ( I=ON)
6. To produce steam push the trigger with your thumb in short bursts. Don't hold the trigger continously to prevent over wetting.
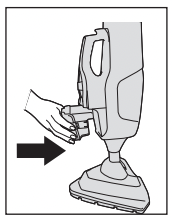
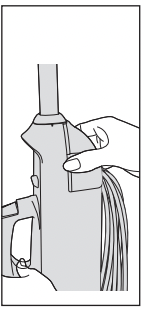
7. Insert the handheld back into the machine until it clicks into place.
Using small accessories
CAUTION: Turn off, unplug and allow steam cleaner to cool before removing accessories. Always have the nozzle pointed away from you and others during installation.
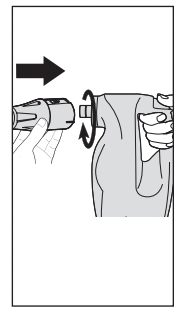
Small tools can be attached via oonoentration nozzle. Twist clockwise until locked into position and secure. To remove concentration nozzle, turn counter-clockwise.
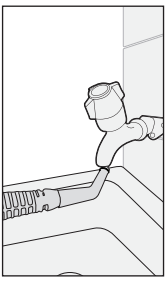
Using large accessories
Larger accessories can be attached using the concentration nozzle or hose. To attach the hose twist clockwise until locked into position and secure. To remove hose, turn counter-clockwise.
Using the tools
Concentration nozzle
1. Use to remove soap scum in baths and shower enctosures and to ctean heavily soiled areas in kitchens.
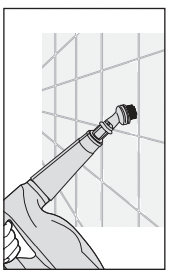
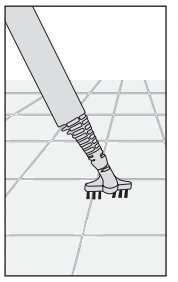
Brushes
2. Ideal for any surface from tiles, sinks, toilets and oven tops.
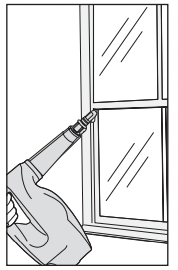
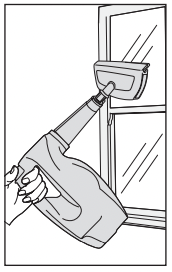
Squeegee tool*
3. Great for leaving your windows. tiles and mirrors gleaming. *Select models only
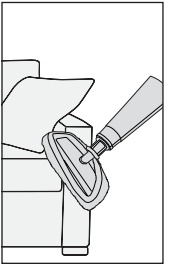
Upholstery/cloth tool*
4. Attach the cloth to the squeegee tool for use on upholstery and clothes.*Select models only
IMPORTANT: Faucets should be turned off when steaming around them. Don't steam clean ovens, oven surfaces or grills when hot. Allow to cool to room temperature.
Grout brush
5. Lifts embedded dirt from in between tiles.
Detail nozzle
6. For hard-to-reach areas e.g. around faucets.
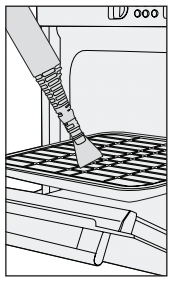
Scraper nozzle
7. Ideal for removing dried on residue from ovens. work surfaces and pans.
Maintenance
This steam cleaner contains no user serviceable parts. Do not try to repair it yourself. If steam cleaner is not working as it should, has been dropped, damaged, left outdoors, or dropped into water, call Customer Service at 1-800-944-9200 prior to continuing use.
IMPORTANT: Allow the steam cleaner to fully cool down before performing any maintenance or troubleshooting checks.
Emptying the Main Water Tank
1. Press the Main Water Tank release button and lift the water tank by the handle.
2. Pull the tab on the Main Water Tank to open.
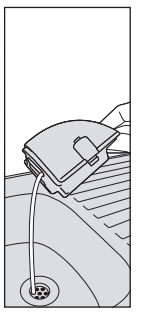
3. Empty any excess water over the sink.
Emptying the Supplemental Water Tank
4. Rinse Main Water Tank with water and push Main Water Tanktabfirmtyto close before replacing back onto the machine.
5. Push both Supplemental Water Tank release buttons then lift to remove.
6. Twist Supplemental Water Tank cap counterclockwise and lift to remove.
7. Empty any excess water over the sink.
8. Rinse Supplemental Water Tank with water and replace cap. turn clockwise to tighten before replacing back onto the machine.
Removing cleaning pads
WARNING: To reduce the risk of personal injury - Unplug Steam Cleaner before servicing and allow to cool.
IMPORTANT: Never use bleach or fabric softener when washing the pad.
1. Hold corner of pad down with foot and lift steam cleaner to peel away.
2. All cleaning pads are machine washable on WARM setting. For best results lay flat to dry. Allow to fully dry before use.
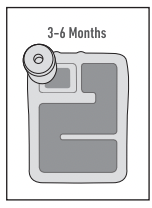
Replacing the hard water filter
WARNING: To reduce the risk of personal injury - Unplug Steam Cleaner before servicing and allow to cool.
IMPORTANT: The condition of the filter affects the performance of your machine. Check and change filter (depending on level of use and water conditions in your area). Do not operate Steam Cleaner without Water Filter in place.
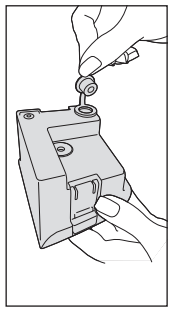
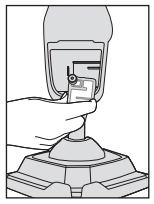
1. Remove the Main Water Tank to access the hard water filter.
2. Pull to remove the hard water filter.
3. New filter has a (beige/cream color).
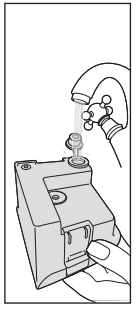
4. Ensure the hard water filter is properly snapped back in place when performing maintenance.
5. Hard water filter should be replaced every 6-8 months or when discolored.
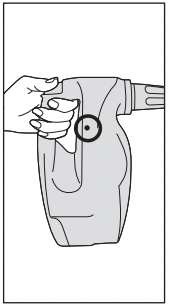
Clearing blockages
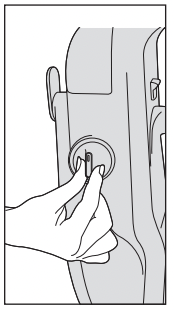
1. If there is an obstruction to the steam flow through the machine. steam may release through the bleed valve.
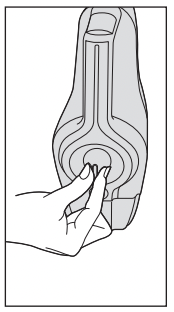
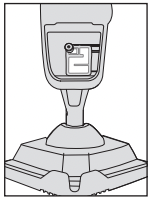
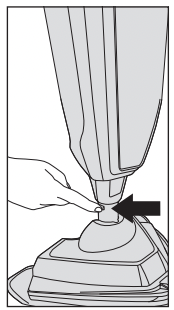
2. To remove the floor head from the body push the floor head release button and lift.
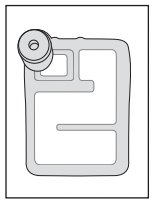
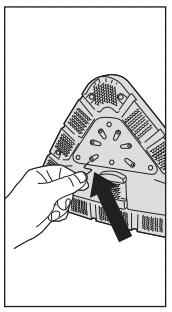
3. After the floor head is removed, use a thin object such as a paper-clip (in the area shown), to remove the blockage.
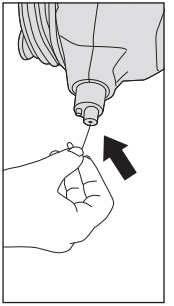
4. With the pad removed from the floor head, insert a small thin object such as a paper-clip in to the steam holes to remove a blockage.
WARNING ! To reduce the risk of personal injury -Unplug Steam Cleaner before servicing and allow to cool.
Storage
• Unplug the power cord.
• Allow time to coot.
• Empty the residual fluid from the the Main Water Tank and Supplemental Water Tank and clean the external surface with a dry cloth. Attow to dry.
• Re-instalt the Main Water Tank and Supplemental Water Tank.
Troubleshooting
This Steam Cleaner contains no user serviceable parts. Do not try to repair it yoursetf.
If steam cleaner is not working as it should, has been dropped, damaged, left outdoors, or dropped into water, call Customer Service at 1-800-944-9200 for further instruction prior to continuing use.
USE TROUBLESHOOTING GUIDE AS A FIRST STEP TO RESOLVE ANY PROBLEMS YOU MAY BE EXPERIENCING.
WARNING: To reduce the risk of personal injury - Unplug Steam Cleaner before servicing and allow to cool.
PROBLEM
POSSIBLE CAUSE
POSSIBLE SOLUTION
Steam Cleaner won’t run
1. No voltage in wall plug.
2. Blown fuse or tripped breaker
3. Steam cleaner may not be plugged into the electrical outlet correctly.
4. The electrical outlet may not be working properly, check the fuse or breaker, or consultan electrician.
5. The power cord may be damaged.
6. Does not turn on.
1. Check fuse or breaker in home.
2. Replace fuse or reset breaker in home.
3. Ensure the plug is pushed in securely.
4. Check fuse or breaker in home. Replace fuse/reset breaker inhome.
5. If cord is damaged, contact Customer Service at 1.800.944.9200.
6. Check the On/Off switch to make sure it is in the On position.
Steam Cleaner not producing steam
1. Main Water Tank may be empty.
2. The Main Water Tank may not be attached correctly.
3. Water Filter may be clogged and needs to be replaced.
4. Thermal protector may turn off pump if trying to operate steam cleanerbefore steam indicator is illuminated.
5. Steam path may be blocked.
6. Hard water filter not installed.
1. Please refer to the “Filling Tanks” section.
2. Please refer to the “Filling Tanks” section, and ensure tank is fully seated. Main Water Tank must have water in the tank to pull water from the Supplemental Water Tank.
3. Check Water Filter and clean or replace.
4. Unplug steam cleaner and allow to cool down.
5. Please refer to the “Clearing Blockages” section.
6. Ensure hard water filter is properly snapped back in place when replacing or performing maintenance. Refer to "Replacing the Hard Water Filter" section.
Microfiber pad doesn’t pick up dirt
1. The cleaning pad may already be saturated with dirt and needs washing.
1. Wash or replace with clean pad. Please refer to the “Removing CleaningPads” section.
This unit operates entirely on the natural cleaning power of steam. Steam is generated when water begins to boil. The steam coming from the unit is at or greater than 212 F (100 C) and care should be taken during use.