User manual Car
Introduction
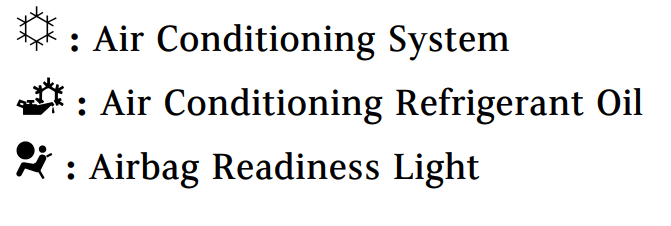
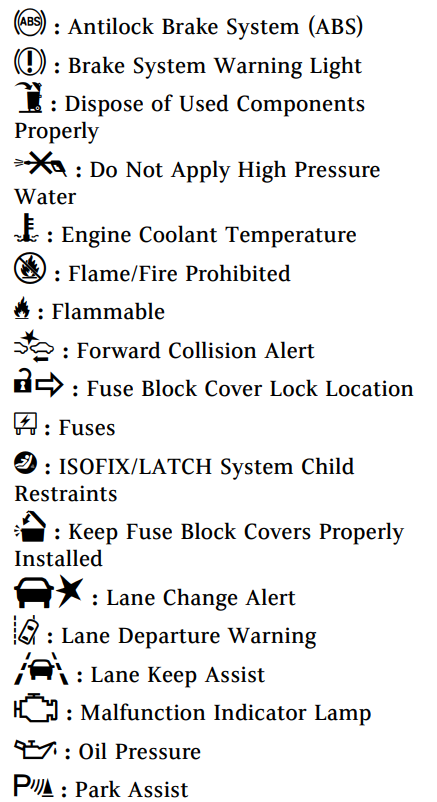
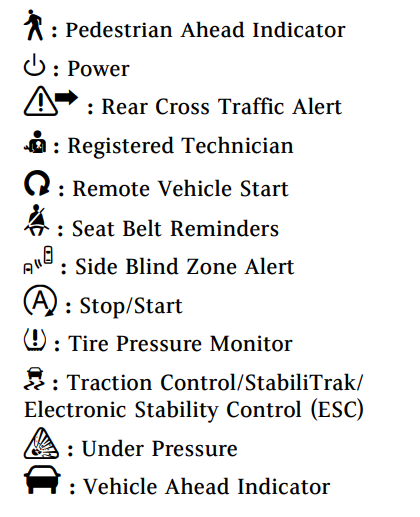
Symbols
Vehicle Symbol Chart
Here are some additional symbols that may be found on the vehicle and what they mean. See the features in this manual for information.
Instrument Panel Overview
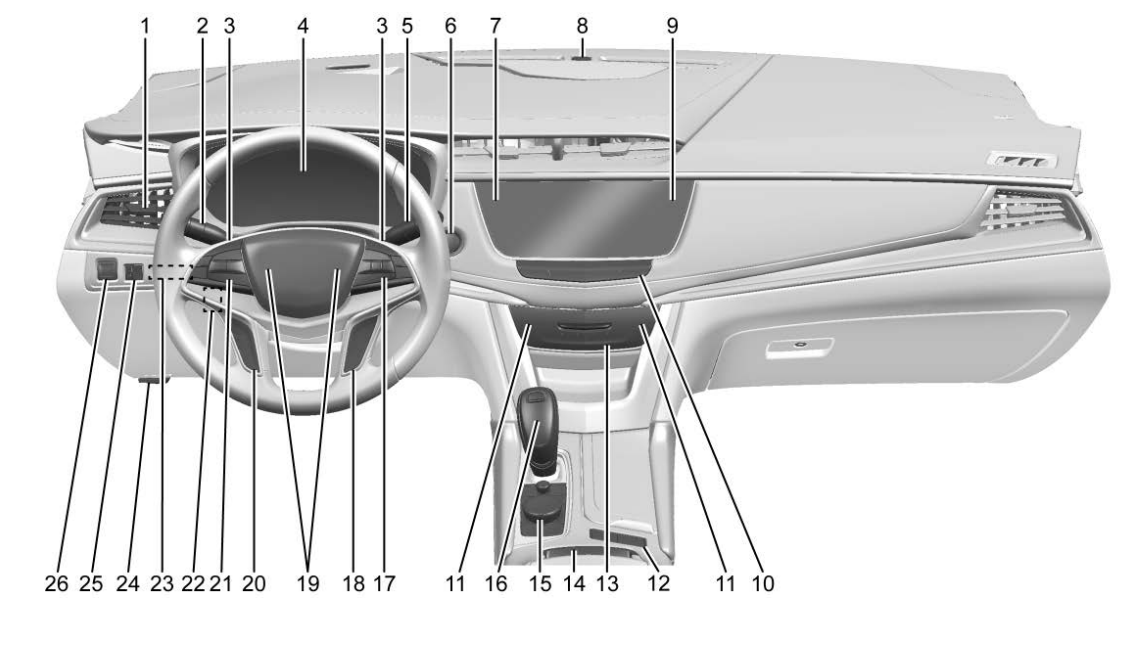
1. Air Vents.
2. Exterior Lamp Controls. Turn Signal Lever. See Turn and Lane-Change Signals. IntelliBeam System Button (If Equipped). See Exterior Lamp Controls.
3. Tap Shift Controls. See Manual Mode.
4. Instrument Cluster. Driver Information Center (DIC) Display. See Driver Information Center (DIC) 0 127.
5. Windshield Wiper/Washer. Rear Window Wiper/Washer.
6. ENGINE START/STOP Button. See Ignition Positions.
7. Park Assist Button. See Assistance Systems for Parking or Backing. Automatic Parking Assist (APA) Button. See Assistance Systems for Parking or Backing. Stop/Start System - Disable Button.
8. Light Sensor. See Automatic Headlamp System
9. Hazard Warning Flashers.
10. Infotainment.
11. Heated and Ventilated Front Seats (If Equipped).
12. MODE Switch. See Driver Mode Control. Traction Control/Electronic Stability Control. All-Wheel Drive (If Equipped).
13. Dual Automatic Climate Control System.
14. Wireless Charging (If Equipped).
15. Infotainment.
16. Shift Lever. See Automatic Transmission.
17. Steering Wheel Controls. Driver Information Center (DIC) Controls. See Driver Information Center (DIC).
18. Steering Wheel Controls.
19. Horn.
20. Forward Collision Alert (FCA) System (If Equipped). Lane Keep Assist (LKA) (If Equipped). Heated Steering Wheel (If Equipped).
21. Cruise Control. Adaptive Cruise Control (If Equipped). Phone Button. See Steering Wheel Controls.
22. Steering Wheel Adjustment (Out of View).
23. Head-Up Display (HUD) (If Equipped).
24. Hood Release. See Hood. Data Link Connector (DLC) (Out of View). See Malfunction Indicator Lamp (Check Engine Light).
25. Instrument Panel Illumination Control.
26. Electric Parking Brake.
INSTRUMENTS AND CONTROLS
Controls
Steering Wheel Adjustment
Power Tilt and Telescoping Steering Wheel
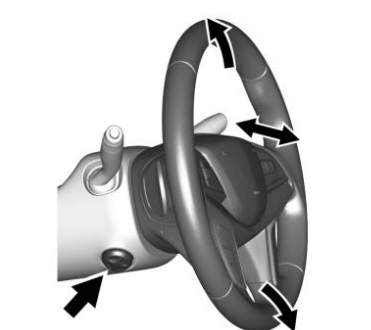
- Press the control to move the tilt and telescoping steering wheel up and down or forward and rearward.
- Do not adjust the steering wheel while driving.
Steering Wheel Controls
- The infotainment system can be operated by using the steering wheel controls. See "Steering Wheel Controls" in the infotainment manual.
Heated Steering Wheel

 : If equipped with a heated steering wheel, press to turn on or off. An indicator light next to the button is lit when the feature is turned on.
- The steering wheel takes about three minutes to start heating.
Automatic Heated Steering Wheel
- If equipped with a remote start, the heated steering wheel will turn on automatically during a remote start along with the heated seats when it is cold outside. The heated steering wheel indicator light may not come on
- If equipped with auto heated seats, the heated steering wheel will turn on when the auto heated seat is activated. The heated steering wheel indicator will display the state of the steering wheel heat.
- See Heated and Ventilated Front Seats
Horn
- Press
 on the steering wheel pad to sound the horn.
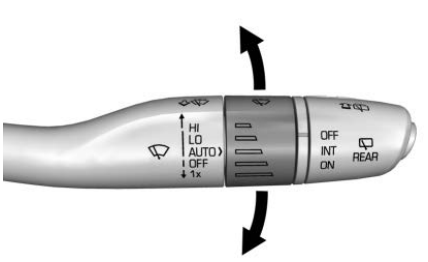
Windshield Wiper/Washer
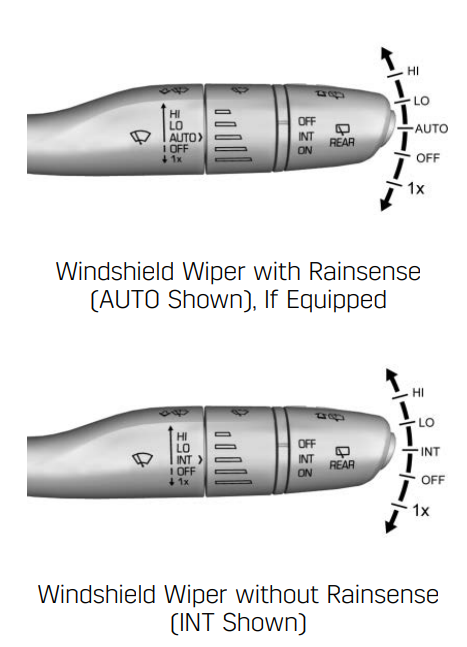
With the ignition on or in ACC/ ACCESSORY, move the windshield wiper lever to select the wiper speed.
- HI : Use for fast wipes.
- LO : Use for slow wipes.
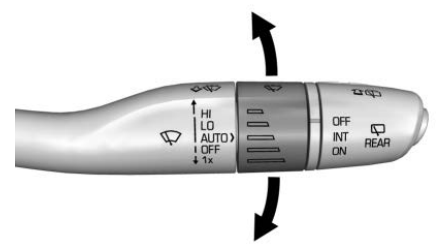
- AUTO : If equipped with Rainsense, use this setting for intermittent wipes when Rainsense is disabled, or Rainsense wipes when Rainsense is enabled. For intermittent wipes, move the windshield wiper lever to AUTO, then turn the band up for more frequent wipes or down for less frequent wipes. If Rainsense is turned on, see “Rainsense” later in this section.
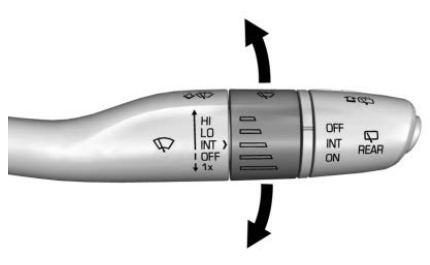
- INT : If equipped with intermittent wipers only, move the windshield wiper lever to INT. Turn the band up for more frequent wipes or down for less frequent wipes.
- OFF : Use to turn the wipers off.
- 1X : For a single wipe, briefly move the wiper lever down. For several wipes, hold the wiper lever down.
 : Pull the windshield wiper lever toward you to spray windshield washer fluid and activate the wipers. The wipers will continue until the lever is released or the maximum wash time is reached. When the windshield wiper lever is released, additional wipes may occur depending on how long the windshield washer has been activated. See Washer Fluid for information on filling the windshield washer fluid reservoir.
Warning: In freezing weather, do not use the washer until the windshield is warmed. Otherwise the washer fluid can form ice on the windshield, blocking your vision.
Warning: Before driving the vehicle, always clear snow and ice from the hood, windshield, roof, and rear of the vehicle, including all lamps and windows. Reduced visibility from snow and ice buildup could lead to a crash.
Clear snow and ice from the wiper blades and windshield before using them. If frozen to the windshield, carefully loosen or thaw them. Damaged blades should be replaced. See Wiper Blade Replacement.
Heavy snow or ice can overload the wiper motor. See Electrical System Overload
Wiper Parking
- If the ignition is turned off while the wipers are on LO, HI, or AUTO with Rainsense turned off, they will immediately stop.
- If the windshield wiper lever is then moved to OFF before the driver door is opened or within 10 minutes, the wipers will restart and move to the base of the windshield.
- If the ignition is turned off while the wipers are performing wipes due to windshield washing or Rainsense, the wipers continue to run until they reach the base of the windshield.
Rainsense
- If equipped with Rainsense and the feature is turned on, a sensor near the top center of the windshield detects the amount of water on the windshield and controls the frequency of the windshield wiper based on the current sensitivity setting.
- Keep this area of the windshield clear of debris to allow for best system performance.
- AUTO : Move the windshield wiper lever to AUTO. Turn the band on the wiper lever to adjust the sensitivity
- Turn the band up for more sensitivity to moisture.
- Turn the band down for less sensitivity to moisture.
- Move the windshield wiper lever out of the AUTO position to deactivate Rainsense. To turn the Rainsense feature on or off, see “Rain Sense Wipers” under Vehicle Personalization
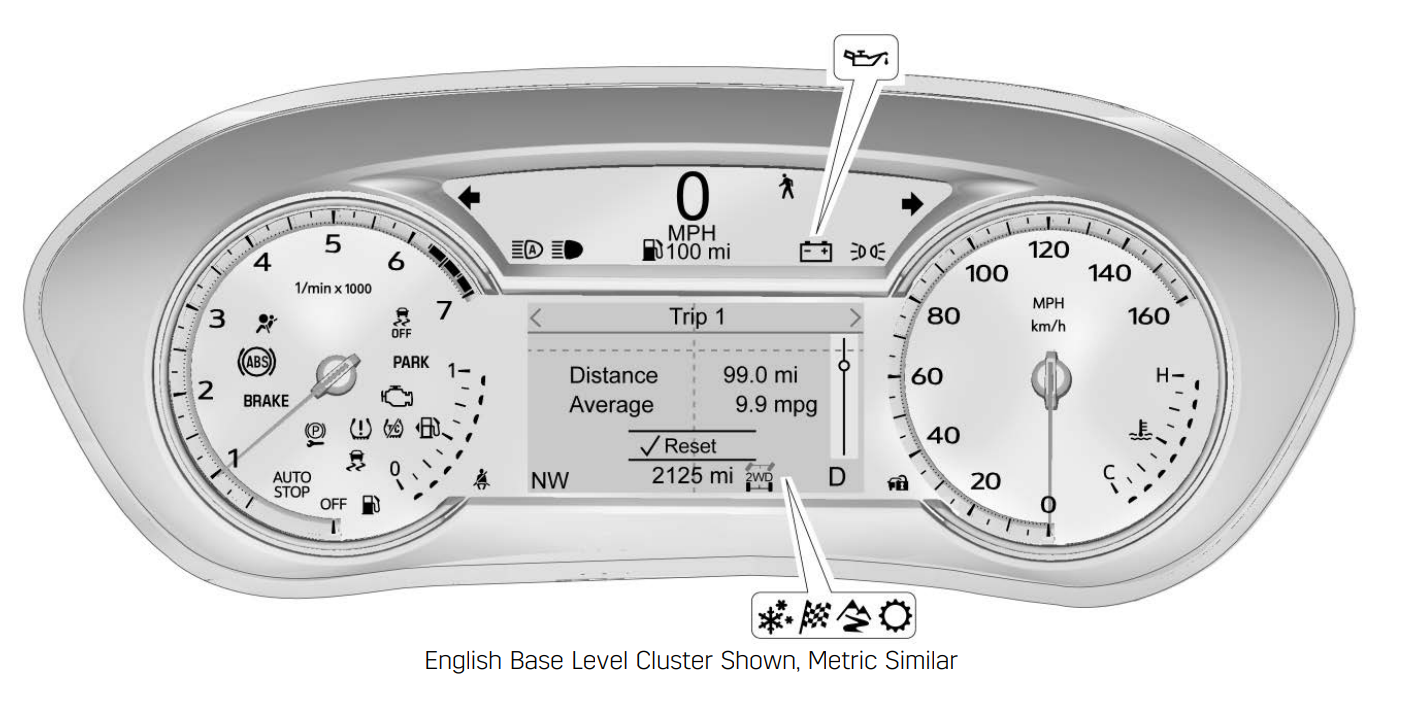
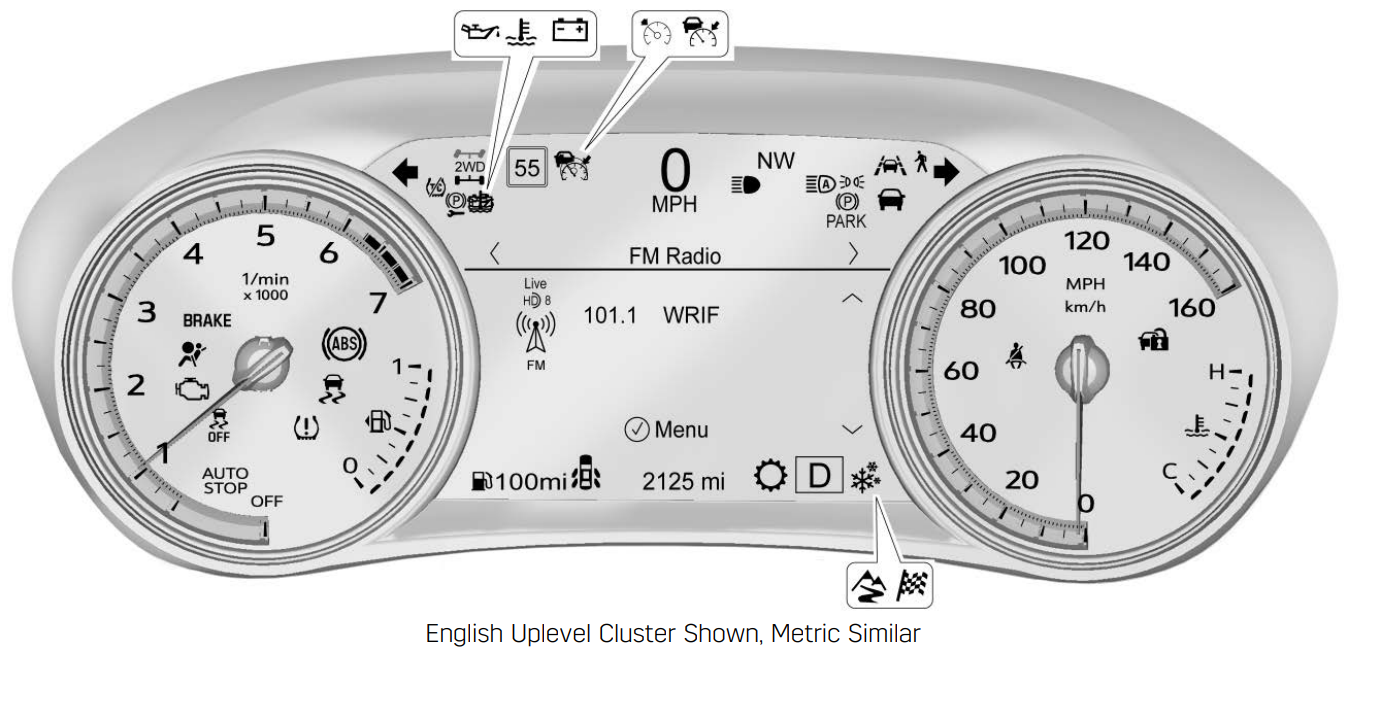
Instrument Cluster
VEHICLE CARE
Vehicle Checks
Doing Your Own Service Work
- Warning: It can be dangerous to work on your vehicle if you do not have the proper knowledge, service manual, tools, or parts. Always follow owner’s manual procedures and consult the service manual for your vehicle before doing any service work.
- If doing some of your own service work, use the proper service manual. It tells you much more about how to service the vehicle than this manual can. To order the proper service manual, see Publication Ordering Information
- This vehicle has an airbag system. Before attempting to do your own service work, see Servicing the Airbag-Equipped Vehicle
- If equipped with remote vehicle start, open the hood before performing any service work to prevent remote starting the vehicle accidentally. See Remote Vehicle Start
- Keep a record with all parts receipts and list the mileage and the date of any service work performed. See Maintenance Records
- Caution: Even small amounts of contamination can cause damage to vehicle systems. Do not allow contaminants to contact the fluids, reservoir caps, or dipsticks.
Hood
Warning: For vehicles with auto engine stop/ start, turn the vehicle off before opening the hood. If the vehicle is on, the engine will start when the hood is opened. You or others could be injured.
Warning: Components under the hood can get hot from running the engine. To help avoid the risk of burning unprotected skin, never touch these components until they have cooled, and always use a glove or towel to avoid direct skin contact.
Clear any snow from the hood before opening.
To open the hood:
- Pull the hood release handle with the
 symbol. It is on the lower left side of the instrument panel.
- Go to the front of the vehicle and locate the secondary release lever under the front center of the hood. Push the secondary hood release lever to the right to release.
- After you have partially lifted the hood, the gas strut system will automatically lift the hood and hold it in the fully open position.
To close the hood:
- Before closing the hood, be sure all filler caps are on properly, and all tools are removed.
- Pull the hood down until the strut system is no longer holding up the hood.
- Allow the hood to fall. Check to make sure the hood is latched completely. Repeat this process with additional force if necessary
Warning: Do not drive the vehicle if the hood is not latched completely. The hood could open fully, block your vision, and cause a crash. You or others could be injured. Always close the hood completely before driving.
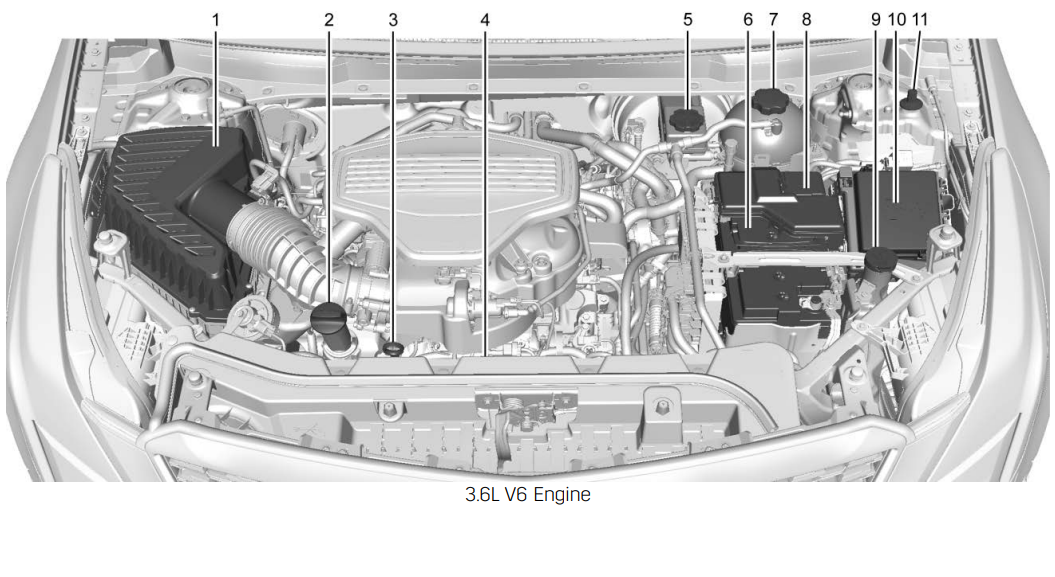
Engine Compartment Overview

- Engine Air Cleaner/Filter
- Engine Oil Fill Cap. See Engine Oil
- Engine Oil Dipstick. See Engine Oil
- Engine Cooling Fan (Out of View). See Cooling System
- Brake Fluid Reservoir. See Brake Fluid
- Battery - North America
- Engine Coolant Surge Tank and Pressure Cap. See Cooling System
- Positive (+) Battery Terminal (Under Cover). See Jump Starting - North America
- Windshield Washer Fluid Reservoir. See Washer Fluid
- Engine Compartment Fuse Block
- Remote Negative (-) Battery Terminal. See Jump Starting - North America
Engine Oil
To ensure proper engine performance and long life, careful attention must be paid to engine oil. Following these simple, but important steps will help protect your investment:
- Use engine oil approved to the proper specification and of the proper viscosity grade. See “Selecting the Right Engine Oil” in this section.
- Check the engine oil level regularly and maintain the proper oil level. See “Checking Engine Oil” and “When to Add Engine Oil” in this section.
- Change the engine oil at the appropriate time. See Engine Oil Life System
- Always dispose of engine oil properly. See “What to Do with Used Oil” in this section.
Checking Engine Oil
- Check the engine oil level regularly, every 650 km (400 mi), especially prior to a long trip. The engine oil dipstick handle is a loop. See Engine Compartment Overview for the location.
- Warning: The engine oil dipstick handle may be hot; it could burn you. Use a towel or glove to touch the dipstick handle.
- If a low oil Driver Information Center (DIC) message displays, check the oil level. Follow these guidelines:
- To get an accurate reading, park the vehicle on level ground. Check the engine oil level after the engine has been off for at least two hours. Checking the engine oil level on steep grades or too soon after engine shutoff can result in incorrect readings. Accuracy improves when checking a cold engine prior to starting. Remove the dipstick and check the level.
- If unable to wait two hours, the engine must be off for at least 15 minutes if the engine is warm, or at least 30 minutes if the engine is not warm. Pull out the dipstick, wipe it with a clean paper towel or cloth, then push it back in all the way. Remove it again, keeping the tip down, and check the level.
When to Add Engine Oil


- If the oil is below the cross-hatched area at the tip of the dipstick and the engine has been off for at least 15 minutes, add 1 L (1 qt) of the recommended oil and then recheck the level. See “Selecting the Right Engine Oil” later in this section for an explanation of what kind of oil to use. For engine oil crankcase capacity, see Capacities and Specifications
- Caution: Do not add too much oil. Oil levels above or below the acceptable operating range shown on the dipstick are harmful to the engine. If the oil level is above the operating range (i.e., the engine has so much oil that the oil level gets above the cross-hatched area that shows the proper operating range), the engine could be damaged. Drain the excess oil or limit driving of the vehicle, and seek a service professional to remove the excess oil.
- See Engine Compartment Overview for the location of the engine oil fill cap.
- Add enough oil to put the level somewhere in the proper operating range. Push the dipstick all the way back in when finished.
Selecting the Right Engine Oil
- Selecting the right engine oil depends on both the proper oil specification and viscosity grade. See Recommended Fluids and Lubricants
Specification
- Use full synthetic engine oils that meet the dexos1 specification. Engine oils that have been approved by GM as meeting the dexos1 specification are marked with the dexos1 approved logo. See www.gmdexos.com.

Engine Oil Life System
When to Change Engine Oil
- This vehicle has a computer system that indicates when to change the engine oil and filter. This is based on a combination of factors which include engine revolutions, engine temperature, and miles driven. Based on driving conditions, the mileage at which an oil change is indicated can vary considerably. For the oil life system to work properly, the system must be reset every time the oil is changed.
- When the system has calculated that oil life has been diminished, it indicates that an oil change is necessary. A CHANGE ENGINE OIL SOON message comes on. Change the oil as soon as possible within the next 1 000 km (600 mi). It is possible that, if driving under the best conditions, the oil life system might indicate that an oil change is not necessary for up to a year. The engine oil and filter must be changed at least once a year and at this time the system must be reset. Your dealer has trained service people who will perform this work and reset the system. It is also important to check the oil regularly over the course of an oil drain interval and keep it at the proper level.
- If the system is ever reset accidentally, the oil must be changed at 5 000 km (3,000 mi) since the last oil change. Remember to reset the oil life system whenever the oil is changed.
How to Reset the Engine Oil Life System
Reset the system whenever the engine oil is changed so that the system can calculate the next engine oil change. To reset the system:
- Using the DIC controls on the right side of the steering wheel, display REMAINING OIL LIFE on the DIC. See Driver Information Center (DIC) 0 127. When remaining oil life is low, the CHANGE ENGINE OIL SOON message will appear on the display.
- Press SEL on the DIC controls and hold SEL down for a few seconds to clear the CHANGE ENGINE OIL SOON message and reset the oil life at 100%. Be careful not to reset the oil life display accidentally at any time other than after the oil is changed. It cannot be reset accurately until the next oil change.
The oil life system can also be reset as follows:
- Display REMAINING OIL LIFE on the DIC. See Driver Information Center (DIC)
- Fully press and release the accelerator pedal three times within five seconds. If the CHANGE ENGINE OIL SOON message is not on, the system is reset.
The system is reset when the CHANGE ENGINE OIL SOON message is off.
If the CHANGE ENGINE OIL SOON message comes back on when the vehicle is started, the engine oil life system has not been reset. Repeat the procedure.
Automatic Transmission Fluid
- A transmission fluid leak is the only reason for fluid loss. If a leak occurs, take the vehicle to your dealer and have it repaired as soon as possible.
- Caution: Use of the incorrect automatic transmission fluid may damage the vehicle, and the damage may not be covered by the vehicle warranty. Always use the correct automatic transmission fluid. See Recommended Fluids and Lubricants
- See your dealer to have the fluid and filter changed at the intervals listed in the Maintenance Schedule
Engine Air Filter Life System
- If equipped, this feature provides the engine air filter’s remaining life and best timing for a change. The timing to change an engine air filter depends on driving and environmental conditions.
When to Change the Engine Air Filter
- When the Driver Information Center (DIC) displays a message to replace the engine air filter at the next oil change, follow this timing.
- When the DIC displays a message to replace the engine air filter soon, replace the engine air filter at the earliest convenience.
- The system must be reset after the engine air filter is changed.
- If the DIC displays a message to check the engine air filter system, see your dealer.
How to Reset the Engine Air Filter Life System
To reset:
- Place the vehicle in P (Park).
- Display the Air Filter Life on the DIC. See Driver Information Center (DIC)
- Press
 on the steering wheel to move to the Reset/Disable display area. Select Reset then press SEL.
- Press SEL to confirm the reset
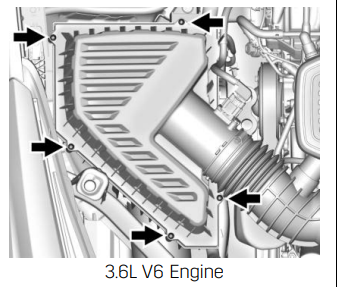
Engine Air Cleaner/Filter
The engine air cleaner/filter is in the engine compartment on the passenger side of the vehicle. See Engine Compartment Overview 0 255.
When to Inspect/Replace the Engine Air Cleaner/Filter
- If the vehicle is not equipped with the engine air filter life system, see Maintenance Schedule.
How to Inspect/Replace the Engine Air Cleaner/Filter
- Do not start the engine or have the engine running with the engine air cleaner/filter housing open. Before removing the engine air cleaner/filter, make sure that the engine air cleaner/ filter housing and nearby components are free of dirt and debris. Remove the engine air cleaner/filter. Do not clean the engine air cleaner/filter or components with water or compressed air.
- To inspect or replace the engine air cleaner/filter:
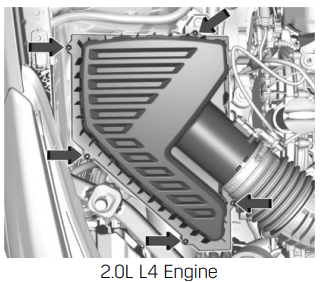
- Remove the five screws on top of the engine air cleaner/filter housing.
- Lift the air cleaner/filter cover housing away from the engine.
- Pull out the filter.
- Inspect or replace the engine air cleaner/filter.
- Reverse Steps 1–3 to reinstall the filter cover housing.
- If equipped, reset the engine air filter life system after replacing the engine air filter. See Engine Air Filter Life System
Warning: Operating the engine with the air cleaner/filter off can cause you or others to be burned. Use caution when working on the engine. Do not start the engine or drive the vehicle with the air cleaner/filter off, as flames may be present if the engine backfires.
Caution: If the air cleaner/filter is off, dirt can easily get into the engine, which could damage it. Always have the air cleaner/filter in place when driving.
Appearance Care
Exterior Care
Locks
- Locks are lubricated at the factory. Use a de-icing agent only when absolutely necessary, and have the locks greased after using. See Recommended Fluids and Lubricants
Washing the Vehicle
- To preserve the vehicle's finish, wash it often and out of direct sunlight.
- Caution: Do not use petroleum-based, acidic, or abrasive cleaning agents as they can damage the vehicle's paint, metal, or plastic parts. If damage occurs, it would not be covered by the vehicle warranty. Approved cleaning products can be obtained from your dealer. Follow all manufacturer directions regarding correct product usage, necessary safety precautions, and appropriate disposal of any vehicle care product.
- Caution: Avoid using high-pressure washes closer than 30 cm (12 in) to the surface of the vehicle. Use of power washers exceeding 8 274 kPa (1,200 psi) can result in damage or removal of paint and decals.
- Caution: Do not power wash any component under the hood that has this
 symbol. This could cause damage that would not be covered by the vehicle warranty
- If using an automatic car wash, follow the car wash instructions. The windshield wiper and rear window wiper, if equipped, must be off. Remove any accessories that may be damaged or interfere with the car wash equipment.
- Rinse the vehicle well, before washing and after, to remove all cleaning agents completely. If they are allowed to dry on the surface, they could stain.
- Dry the finish with a soft, clean chamois or an all-cotton towel to avoid surface scratches and water spotting.
Finish Care
- Application of aftermarket clearcoat sealant/wax materials is not recommended. If painted surfaces are damaged, see your dealer to have the damage assessed and repaired. Foreign materials such as calcium chloride and other salts, ice melting agents, road oil and tar, tree sap, bird droppings, chemicals from industrial chimneys, etc., can damage the vehicle's finish if they remain on painted surfaces. Wash the vehicle as soon as possible. If necessary, use non-abrasive cleaners that are marked safe for painted surfaces to remove foreign matter.
- Occasional hand waxing or mild polishing should be done to remove residue from the paint finish. See your dealer for approved cleaning products.
- Do not apply waxes or polishes to uncoated plastic, vinyl, rubber, decals, simulated wood, or flat paint as damage can occur.
- Caution: Machine compounding or aggressive polishing on a basecoat/ clearcoat paint finish may damage it. Use only non-abrasive waxes and polishes that are made for a basecoat/clearcoat paint finish on the vehicle.
- To keep the paint finish looking new, keep the vehicle garaged or covered whenever possible.
Protecting Exterior Bright Metal Moldings
Caution: Failure to clean and protect the bright metal moldings can result in a hazy white finish or pitting. This damage would not be covered by the vehicle warranty.
The bright metal moldings on the vehicle are aluminum, chrome, or stainless steel. To prevent damage always follow these cleaning instructions:
- Be sure the molding is cool to the touch before applying any cleaning solution.
- Use only approved cleaning solutions for aluminum, chrome, or stainless steel. Some cleaners are highly acidic or contain alkaline substances and can damage the moldings.
- Always dilute a concentrated cleaner according to the manufacturer’s instructions.
- Do not use cleaners that are not intended for automotive use.
- Use a nonabrasive wax on the vehicle after washing to protect and extend the molding finish.
Cleaning Exterior Lamps/Lenses, Emblems, Decals, and Stripes
Use only lukewarm or cold water, a soft cloth, and a car washing soap to clean exterior lamps, lenses, emblems, decals, and stripes. Follow instructions under "Washing the Vehicle" previously in this section.
Lamp covers are made of plastic, and some have a UV protective coating.
Do not clean or wipe them when dry. Do not use any of the following on lamp covers:
- Abrasive or caustic agents.
- Washer fluids and other cleaning agents in higher concentrations than suggested by the manufacturer.
- Solvents, alcohols, fuels, or other harsh cleaners.
- Ice scrapers or other hard items.
- Aftermarket appearance caps or covers while the lamps are illuminated, due to excessive heat generated
Caution: Failure to clean lamps properly can cause damage to the lamp cover that would not be covered by the vehicle warranty.
Caution: Using wax on low gloss black finish stripes can increase the gloss level and create a non-uniform finish. Clean low gloss stripes with soap and water only.
Air Intakes
- Clear debris from the air intakes, between the hood and windshield, when washing the vehicle.
Shutter System
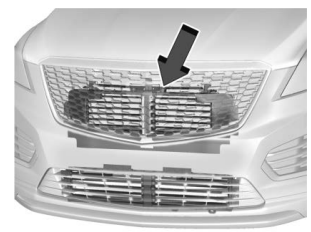
- The vehicle may have a shutter system designed to help increase fuel economy. Keep the shutter system clean for proper operation
Windshield and Wiper Blades
- Clean the outside of the windshield with glass cleaner.
- Clean rubber blades using a lint-free cloth or paper towel soaked with windshield washer fluid or a mild detergent. Wash the windshield thoroughly when cleaning the blades. Bugs, road grime, sap, and a buildup of vehicle wash/wax treatments may cause wiper streaking.
- Replace the wiper blades if they are worn or damaged. Damage can be caused by extreme dusty conditions, sand, salt, heat, sun, snow, and ice.
Weatherstrips
- Apply weatherstrip lubricant on weatherstrips to make them last longer, seal better, and not stick or squeak. Lubricate weatherstrips at least once a year. Hot, dry climates may require more frequent application. Black marks from rubber material on painted surfaces can be removed by rubbing with a clean cloth. See Recommended Fluids and Lubricants
Tires
- Use a stiff brush with tire cleaner to clean the tires.
- Caution: Using petroleum-based tire dressing products on the vehicle may damage the paint finish and/or tires. When applying a tire dressing, always wipe off any overspray from all painted surfaces on the vehicle
Wheels and Wheel Trim
- Use a soft, clean cloth with mild soap and water to clean the wheels. After rinsing thoroughly with clean water, dry with a soft, clean towel. A wax may then be applied.
- Caution: Chrome wheels and chrome wheel trim may be damaged if the vehicle is not washed after driving on roads that have been sprayed with magnesium chloride or calcium chloride. These are used on roads for conditions such as dust and ice. Always wash the chrome with soap and water after exposure.
- Caution: To avoid surface damage on wheels and wheel trim, do not use strong soaps, chemicals, abrasive polishes, cleaners, or brushes. Use only GM approved cleaners. Do not drive the vehicle through an automatic car wash that uses silicon carbide tire/ wheel cleaning brushes. Damage could occur and the repairs would not be covered by the vehicle warranty.
Interior Care
- To prevent dirt particle abrasions, regularly clean the vehicle's interior. Immediately remove any soils. Newspapers or dark garments can transfer color to the vehicle’s interior.
- Use a soft bristle brush to remove dust from knobs and crevices on the instrument cluster. Using a mild soap solution, immediately remove hand lotions, sunscreen, and insect repellent from all interior surfaces or permanent damage may result.
- Use cleaners specifically designed for the surfaces being cleaned to prevent permanent damage. Apply all cleaners directly to the cleaning cloth. Do not spray cleaners on any switches or controls. Remove cleaners quickly.
- Before using cleaners, read and follow all safety instructions on the label. While cleaning the interior, open the doors and windows to get proper ventilation.
- To prevent damage, do not clean the interior using the following cleaners or techniques:
- Never use a razor or any other sharp object to remove soil from any interior surface.
- Never use a brush with stiff bristles.
- Never rub any surface aggressively or with too much pressure.
- Do not use laundry detergents or dishwashing soaps with degreasers. For liquid cleaners, use approximately 20 drops per 3.8 L (1 gal) of water. A concentrated soap solution will create streaks and attract dirt. Do not use solutions that contain strong or caustic soap.
- Do not heavily saturate the upholstery when cleaning.
- Do not use solvents or cleaners containing solvents.
Interior Glass
- To clean, use a terry cloth fabric dampened with water. Wipe droplets left behind with a clean dry cloth. If necessary, use a commercial glass cleaner after cleaning with plain water.
- Caution: To prevent scratching, never use abrasive cleaners on automotive glass. Abrasive cleaners or aggressive cleaning may damage the rear window defogger.
- Cleaning the windshield with water during the first three to six months of ownership will reduce tendency to fog.
Speaker Covers
- Vacuum around a speaker cover gently, so that the speaker will not be damaged. Clean spots with water and mild soap
Coated Moldings Coated moldings should be cleaned.
- When lightly soiled, wipe with a sponge or soft, lint-free cloth dampened with water.
- When heavily soiled, use warm soapy water.
Fabric/Carpet/Suede
Start by vacuuming the surface using a soft brush attachment. If a rotating vacuum brush attachment is being used, only use it on the floor carpet. Before cleaning, gently remove as much of the soil as possible:
- Gently blot liquids with a paper towel. Continue blotting until no more soil can be removed.
- For solid soils, remove as much as possible prior to vacuuming.
To clean:
- Saturate a clean, lint-free colorfast cloth with water. Microfiber cloth is recommended to prevent lint transfer to the fabric or carpet.
- Remove excess moisture by gently wringing until water does not drip from the cleaning cloth.
- Start on the outside edge of the soil and gently rub toward the center. Fold the cleaning cloth to a clean area frequently to prevent forcing the soil in to the fabric.
- Continue gently rubbing the soiled area until there is no longer any color transfer from the soil to the cleaning cloth.
- If the soil is not completely removed, use a mild soap solution followed only by plain water.
If the soil is not completely removed, it may be necessary to use a commercial upholstery cleaner or spot lifter. Test a small hidden area for colorfastness before using a commercial upholstery cleaner or spot lifter. If ring formation occurs, clean the entire fabric or carpet.
After cleaning, use a paper towel to blot excess moisture.
Cleaning High Gloss Surfaces and Vehicle Information and Radio Displays
- Use a microfiber cloth on high gloss surfaces or vehicle displays. First, use a soft bristle brush to remove dirt that can scratch the surface. Then gently clean by rubbing with a microfiber cloth. Never use window cleaners or solvents. Periodically hand wash the microfiber cloth separately, using mild soap. Do not use bleach or fabric softener. Rinse thoroughly and air dry before next use.
- Caution: Do not attach a device with a suction cup to the display. This may cause damage and would not be covered by the vehicle warranty.
Instrument Panel, Leather, Vinyl, Other Plastic Surfaces, Low Gloss Paint Surfaces, and Natural Open Pore Wood Surfaces
- Use a soft microfiber cloth dampened with water to remove dust and loose dirt. For a more thorough cleaning, use a soft microfiber cloth dampened with a mild soap solution.
- Caution: Soaking or saturating leather, especially perforated leather, as well as other interior surfaces, may cause permanent damage. Wipe excess moisture from these surfaces after cleaning and allow them to dry naturally. Never use heat, steam, or spot removers. Do not use cleaners that contain silicone or wax-based products. Cleaners containing these solvents can permanently change the appearance and feel of leather or soft trim, and are not recommended. Do not use cleaners that increase gloss, especially on the instrument panel. Reflected glare can decrease visibility through the windshield under certain conditions.
- Caution: Use of air fresheners may cause permanent damage to plastics and painted surfaces. If an air freshener comes in contact with any plastic or painted surface in the vehicle, blot immediately and clean with a soft cloth dampened with a mild soap solution. Damage caused by air fresheners would not be covered by the vehicle warranty.
Cargo Cover and Convenience Net
- If equipped, wash with warm water and mild detergent. Do not use chlorine bleach. Rinse with cold water, and then dry completely.
Care of Seat Belts
- Keep belts clean and dry.
- Warning: Do not bleach or dye seat belt webbing. It may severely weaken the webbing. In a crash, they might not be able to provide adequate protection. Clean and rinse seat belt webbing only with mild soap and lukewarm water. Allow the webbing to dry
Floor Mats
- Warning If a floor mat is the wrong size or is not properly installed, it can interfere with the pedals. Interference with the pedals can cause unintended acceleration and/ or increased stopping distance which can cause a crash and injury. Make sure the floor mat does not interfere with the pedals.
- Use the following guidelines for proper floor mat usage.
- The original equipment floor mats were designed for your vehicle. If the floor mats need replacing, it is recommended that GM certified floor mats be purchased. Non-GM floor mats may not fit properly and may interfere with the pedals. Always check that the floor mats do not interfere with the pedals.
- Do not use a floor mat if the vehicle is not equipped with a floor mat retainer on the driver side floor.
- Use the floor mat with the correct side up. Do not turn it over.
- Do not place anything on top of the driver side floor mat. . Use only a single floor mat on the driver side.
- Do not place one floor mat on top of another.
Removing and Replacing the Floor Mats
The driver side floor mat is held in place by two button-type retainers.
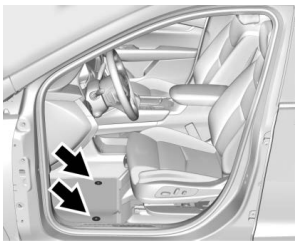
- Pull up on the rear of the driver side floor mat to unlock each retainer and remove.
- Reinstall by lining up the floor mat retainer openings over the carpet retainers and snapping into position.
- Make sure the floor mat is properly secured in place. Verify the floor mat does not interfere with the pedals.