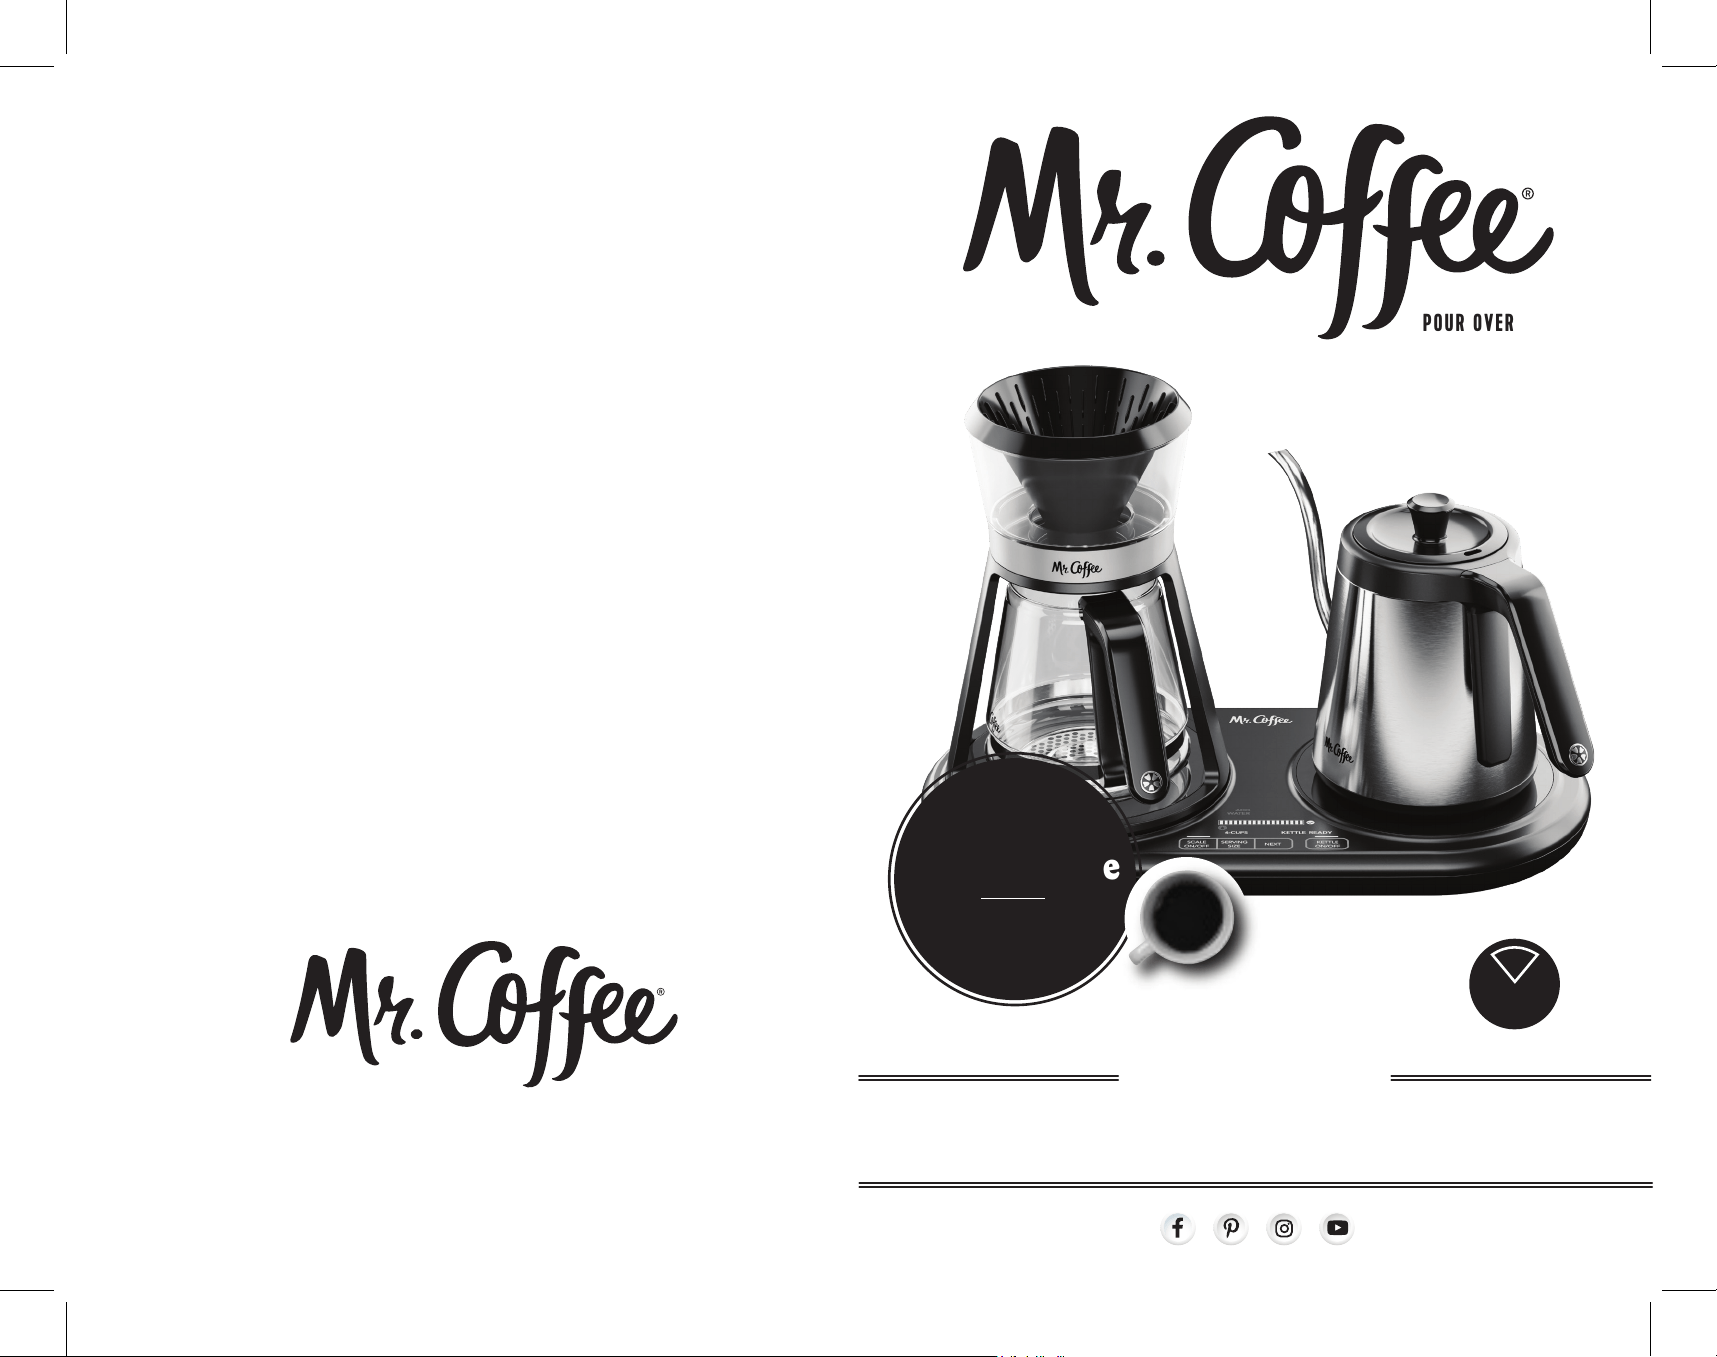
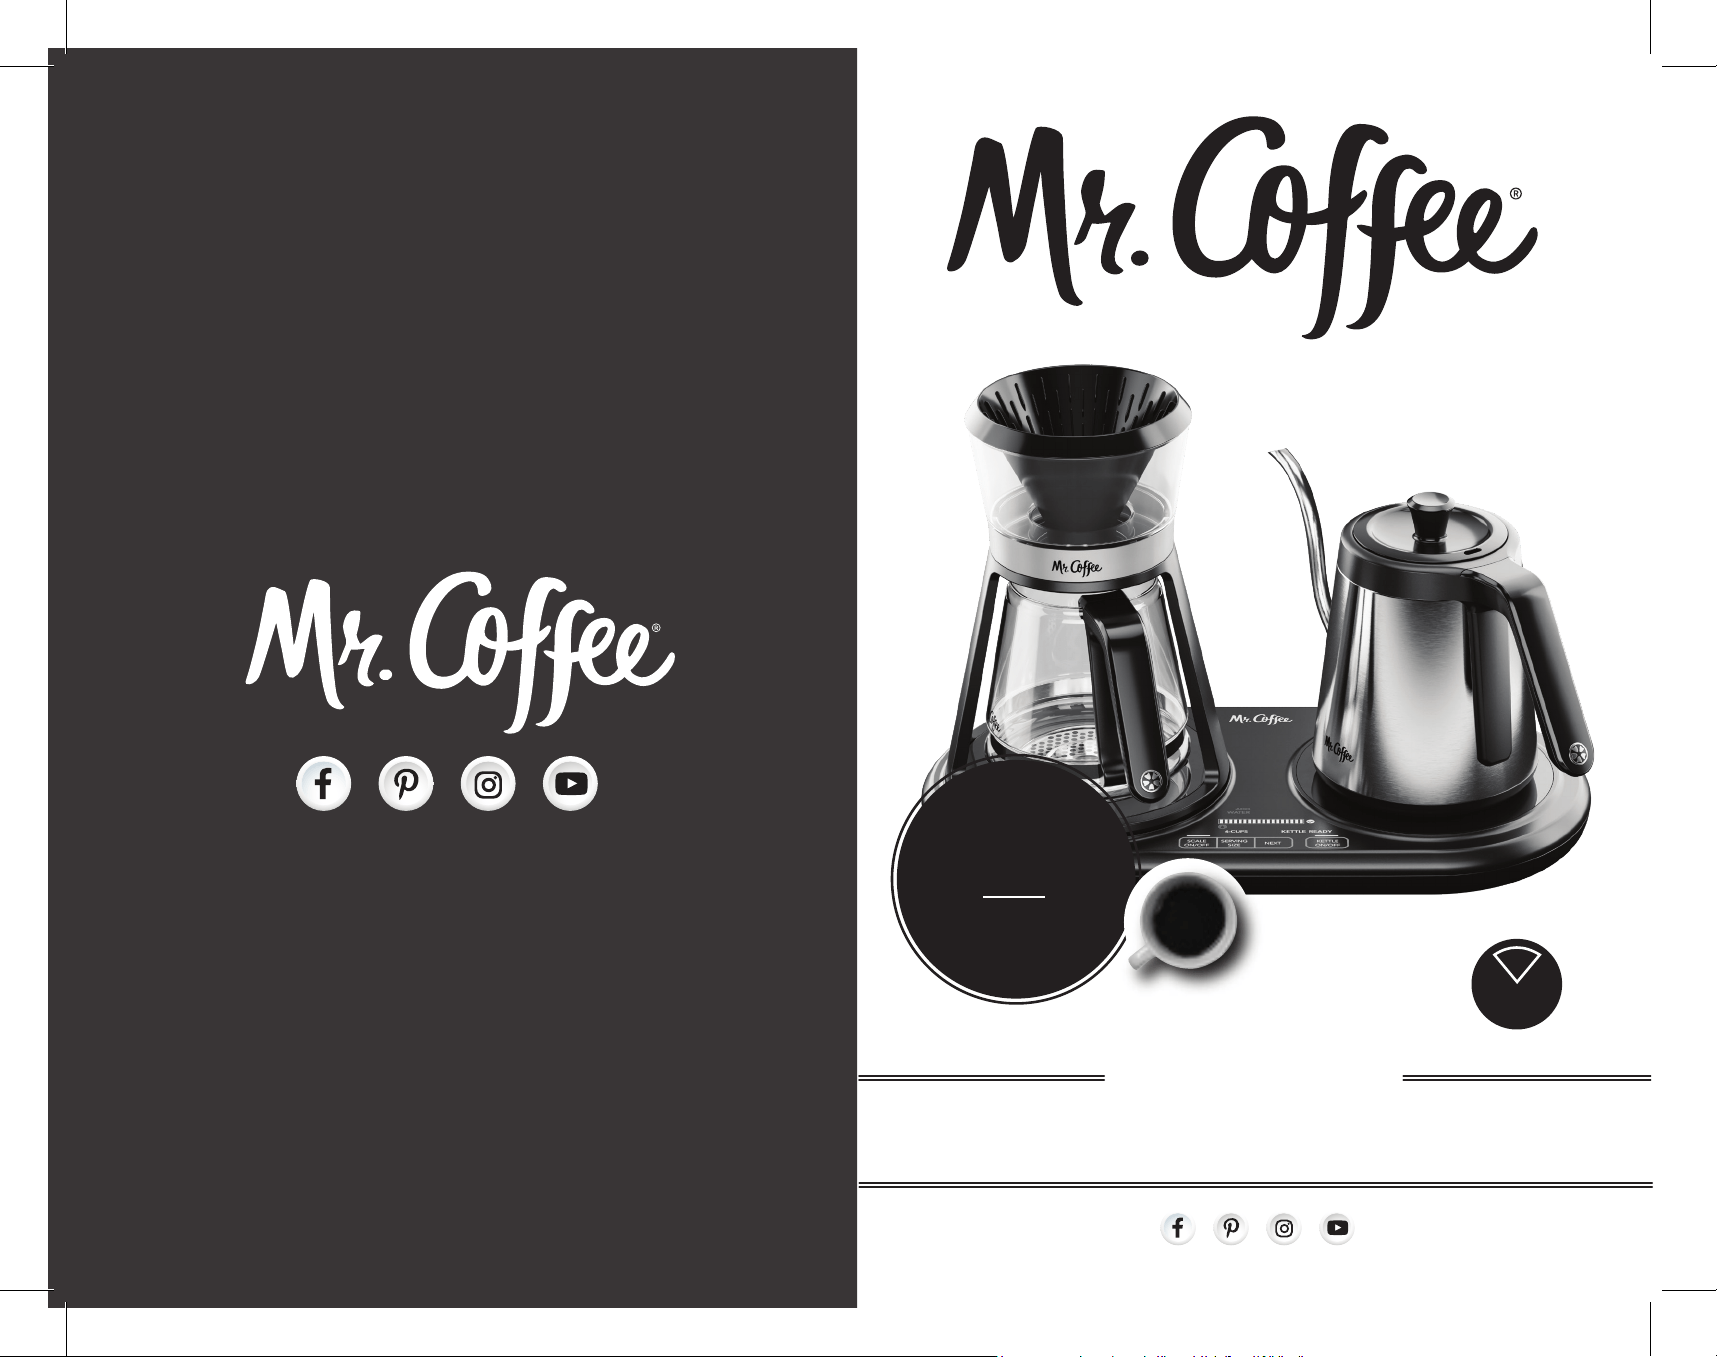
USER MANUAL
AT-HOME
POUR OVER
6 CUP POUR OVER BREWER & KETTLE
P.N. 198017 Rev A www.mrcoffee.com
© 2019 Sunbeam Products, Inc. All rights reserved. Distributed by Sunbeam Products, Inc.
Boca Raton, Florida 33431. Made in China. SPR-101818-389P
© 2019 Sunbeam Products, Inc. Todos los derechos reservados. Distribuido por Sunbeam
Products, Inc. Boca Ratón, Florida, 33431. Fabricado en China. SPR 101818-389P
made simple
POUR-OVER
FOR
BETTER
TASTING
COFFEE
with on screen
step by step guide
R
E
Q
U
I
R
E
S
2
CONE POINTED
FILTERS
#
N
O
T
I
N
C
L
U
D
E
D
IMPORTANT SAFEGUARDS
When using electrical appliances, basic safety precautions should
always be followed to reduce the risk of fire, electric shock, and/or
injury to persons including the following:
1. Read all instructions.
2. This appliance generates heat during use. Do not touch hot
surfaces. Use handles or knobs.
3. To protect against electric shock, do not place or immerse cord,
plugs, or appliance in water or other liquid.
4. This appliance is not to be used by children or by persons with
reduced physical, sensory or mental capabilities.
5. Close supervision is necessary when any appliance is used near
children. Children should not play with the appliance.
6. WARNING: The plug must be fully inserted into appliance
(models with detachable cord only). To ensure full insertion, verify
the marking on the plug is not visible. A loose contact may
cause overheating.
7. Unplug from outlet when not in use and before cleaning. Allow to
cool before putting on or taking off parts, and before cleaning
the appliance.
8. Do not operate any appliance with a damaged cord or plug or after
the appliance malfunctions, or has been damaged in any manner.
Return appliance to an Authorized Service Center for examination,
repair or adjustment. Do not attempt to replace or splice a
damaged cord.
9. The use of an accessory not recommended by the appliance
manufacturer for use with this appliance may result in fire, electric
shock or injury to persons.
10. Do not use outdoors or for commercial purposes.
11. Do not let cord hang over edge of table or counter, or touch hot
surfaces, including the stove.
12. Do not place on or near a hot gas or electric burner, or in a
heated oven.
13. Ensure that the kettle is properly located on the power base before
switching ON. Always attach plug to appliance first, then plug cord
into the wall outlet (for appliances with detachable cords). To
disconnect, turn any control to OFF, then remove plug from wall
outlet. Do not disconnect by pulling on cord.
14. Do not use appliance for other than intended use. Misuse can cause
injuries. Always use appliance on a dry, stable, level surface. Keep
the kettle away from the edge of the countertop.
15. WARNING: Do not remove the kettle lid while the water is boiling.
All lids should be closed during use.
16. Scalding may occur if the lid is removed during or immediately after
the heating cycle. Contents may be hot. Allow to cool before
opening the lid. Keep spout away from persons, as scalding can
result from steam.
INTRODUCTION
Welcome and congratulations on the purchase of your new
Mr. Coffee At-Home Pour Over System. Your new At-Home Pour
Over System is designed to give you a great tasting cup of pour
over– without the guesswork!
Our number one goal is to give you the best-tasting cup of coffee
every time, so if you have any questions about your new At-Home
Pour Over System, please contact us at 1-888-672-6333 or visit us
at www.mrcoffee.com.
1.
2.
IMPORTANT SAFEGUARDS
When using electrical appliances, basic safety precautions should
always be followed to reduce the risk of fire, electric shock, and/or
injury to persons including the following:
1. Read all instructions.
2. This appliance generates heat during use. Do not touch hot
surfaces. Use handles or knobs.
3. To protect against electric shock, do not place or immerse cord,
plugs, or appliance in water or other liquid.
4. This appliance is not to be used by children or by persons with
reduced physical, sensory or mental capabilities.
5. Close supervision is necessary when any appliance is used near
children. Children should not play with the appliance.
6. WARNING: The plug must be fully inserted into appliance
(models with detachable cord only). To ensure full insertion, verify
the marking on the plug is not visible. A loose contact may
cause overheating.
7. Unplug from outlet when not in use and before cleaning. Allow to
cool before putting on or taking off parts, and before cleaning
the appliance.
8. Do not operate any appliance with a damaged cord or plug or after
the appliance malfunctions, or has been damaged in any manner.
Return appliance to an Authorized Service Center for examination,
repair or adjustment. Do not attempt to replace or splice a
damaged cord.
9. The use of an accessory not recommended by the appliance
manufacturer for use with this appliance may result in fire, electric
shock or injury to persons.
10. Do not use outdoors or for commercial purposes.
11. Do not let cord hang over edge of table or counter, or touch hot
surfaces, including the stove.
12. Do not place on or near a hot gas or electric burner, or in a
heated oven.
13. Ensure that the kettle is properly located on the power base before
switching ON. Always attach plug to appliance first, then plug cord
into the wall outlet (for appliances with detachable cords). To
disconnect, turn any control to OFF, then remove plug from wall
outlet. Do not disconnect by pulling on cord.
14. Do not use appliance for other than intended use. Misuse can cause
injuries. Always use appliance on a dry, stable, level surface. Keep
the kettle away from the edge of the countertop.
15. WARNING: Do not remove the kettle lid while the water is boiling.
All lids should be closed during use.
16. Scalding may occur if the lid is removed during or immediately after
the heating cycle. Contents may be hot. Allow to cool before
opening the lid. Keep spout away from persons, as scalding can
result from steam.
POWER CORD INSTRUCTIONS
A short power supply cord (or detachable power-supply cord)
may be provided to reduce risks resulting from becoming
entangled in or tripping over a longer cord. Longer detachable
power-supply cords or extension cords are available and may be
used if care is exercised in their use. If a long detachable
power-supply cord or extension cord is used:
a. The marked electrical rating of the detachable power-supply
cord or extension cord should be at least as great as the
electrical rating of the appliance;
b. If the appliance is of the grounded type, the extension cord
should be a grounding type 3-wire cord; and
c. The longer cord should be arranged so that it will not drape
over the counter top or table where it can be pulled on by
children or tripped over unintentionally.
PRODUCT NOTICES
1. Place the appliance on a hard, flat, level surface to avoid
interruption of airflow underneath the electrical base.
2. Discard the coffee pot immediately if it is ever boiled dry.
3. Protect the coffee pot from sharp blows, scratches or rough
handling.
4. This kettle is intended for boiling water only. Do not heat any
other liquid or attempt to cook any food in this appliance.
5. Do not use under kitchen cabinets or areas where rising steam
can damage property.
4.3.
IMPORTANT SAFEGUARDS CONT.
17. Do not exceed the MAX water level mark when filling the kettle.
Overfilling could cause hot water to boil out of the spout, which can
cause burns.
18. The heating base and heating element is subject to residual heat
following a heating cycle. Do not touch heating base or heating
element immediately after a heating cycle. Allow to cool
before handling.
19. Remove the kettle from power base before filling or pouring. Do
not remove the kettle from the power base until it is switched OFF,
manually or automatically.
20. Use the kettle only with the power base provided.
21. Use extreme caution when handling, moving or pouring from the
kettle containing boiling water.
22. If your kettle comes with a grounded plug, connect to properly
grounded outlets only.
For appliances with glass containers:
23. The container is designed for use with this appliance. It must never
be used on a range top.
24. Do not set a hot container on a wet or cold surface.
25. Avoid sudden temperature changes, such as rinsing, washing,
filling, or immersing a hot container with cold liquids.
26. Do not use a cracked or chipped container or a container having a
loose or weakened handle.
27. Do not clean container with cleansers, steel wool pads, or other
abrasive material.
28. WARNING: Avoid spillage on the connector.
SAVE THESE INSTRUCTIONS
HOUSEHOLD USE ONLY
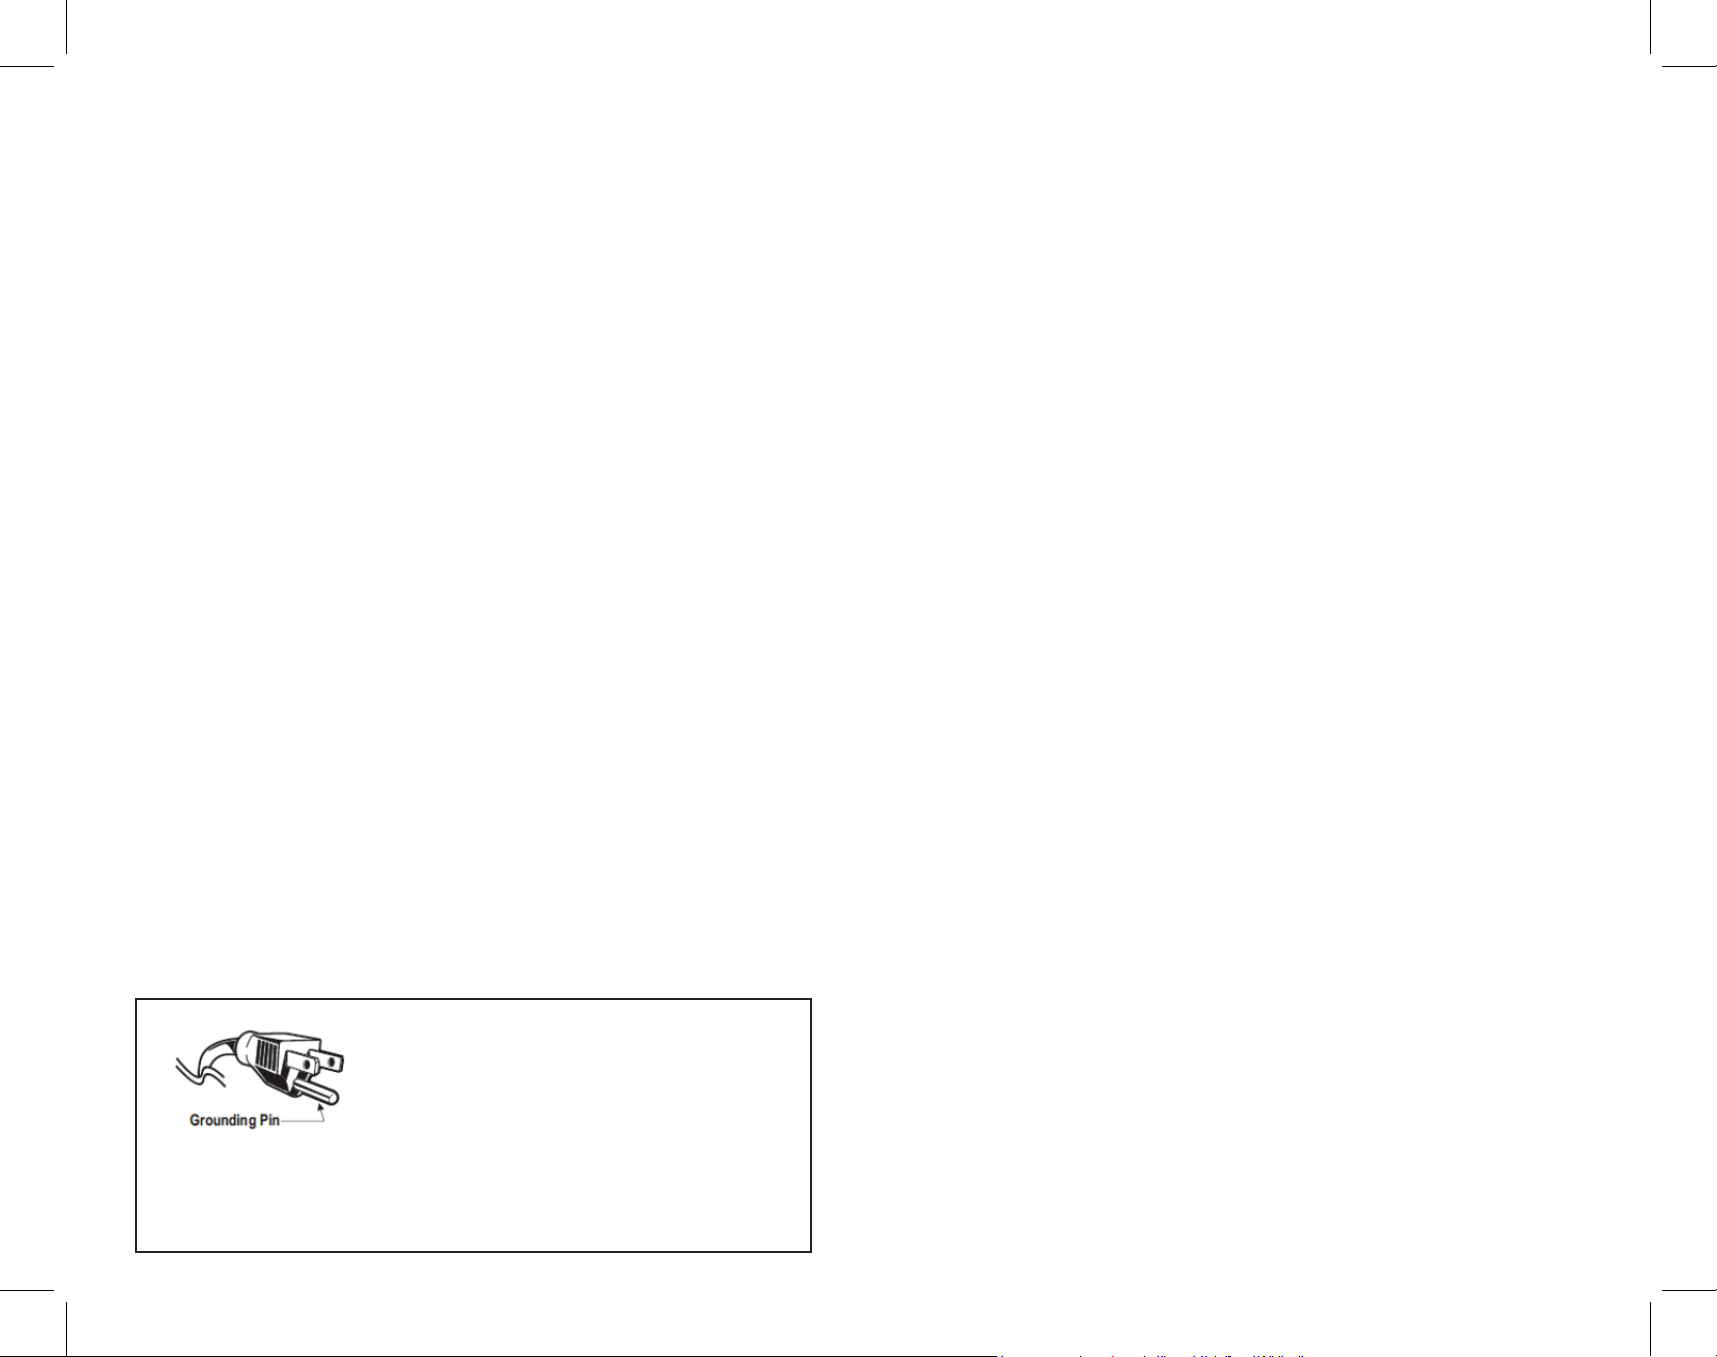
Grounded plug
To reduce the risk of electric shock, this
appliance has a grounded type cord and
plug that has a third grounding pin (3-prong
plug). The plug must be plugged into an
outlet that is properly installed and grounded
in accordance with all local codes and ordinances. If the plug does
not fit into the outlet or if in doubt as to whether the outlet is properly
grounded, contact a qualified electrician to install the proper outlet.
Do not alter the plug in any way.
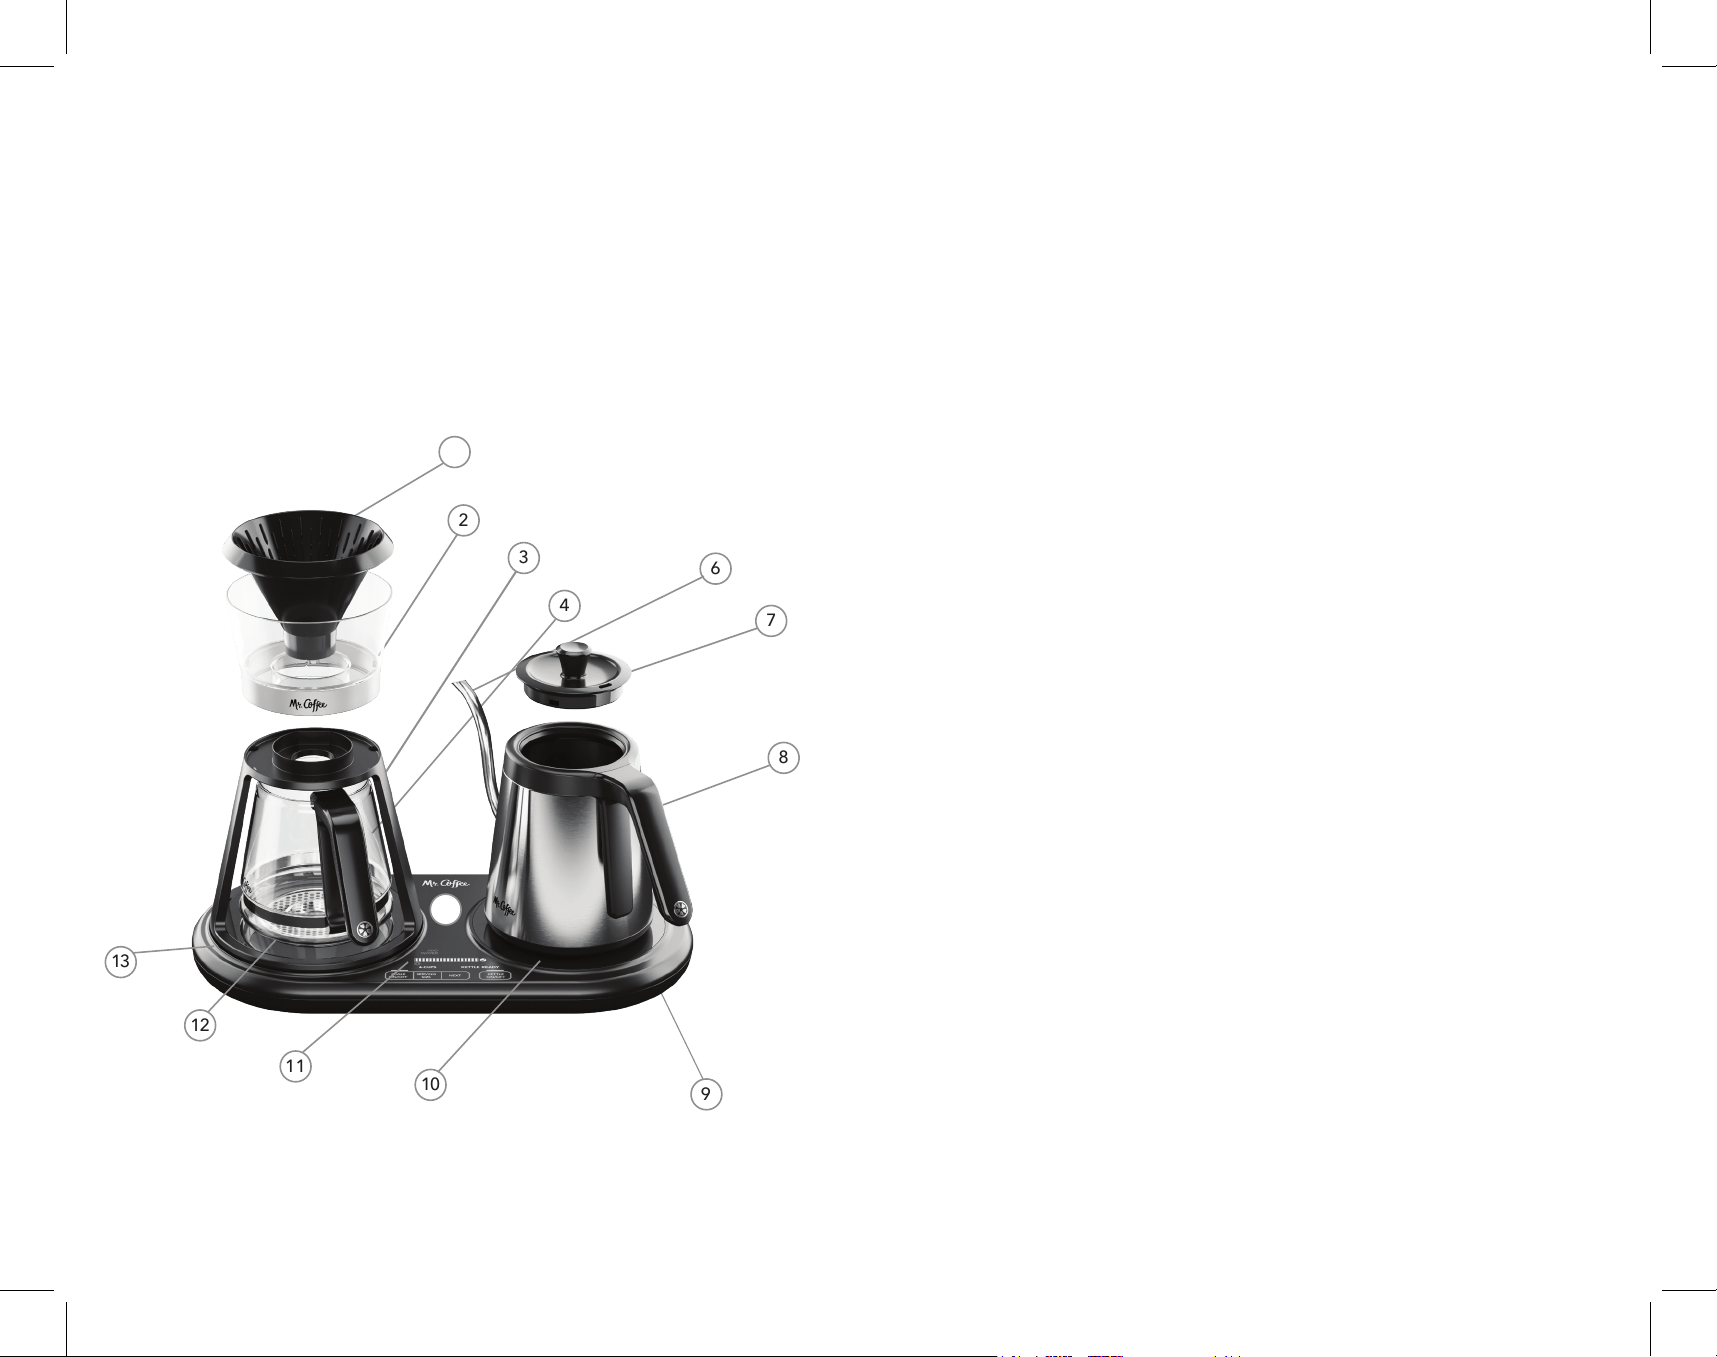
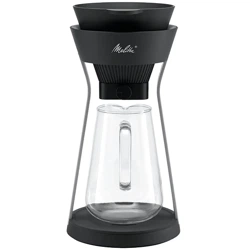
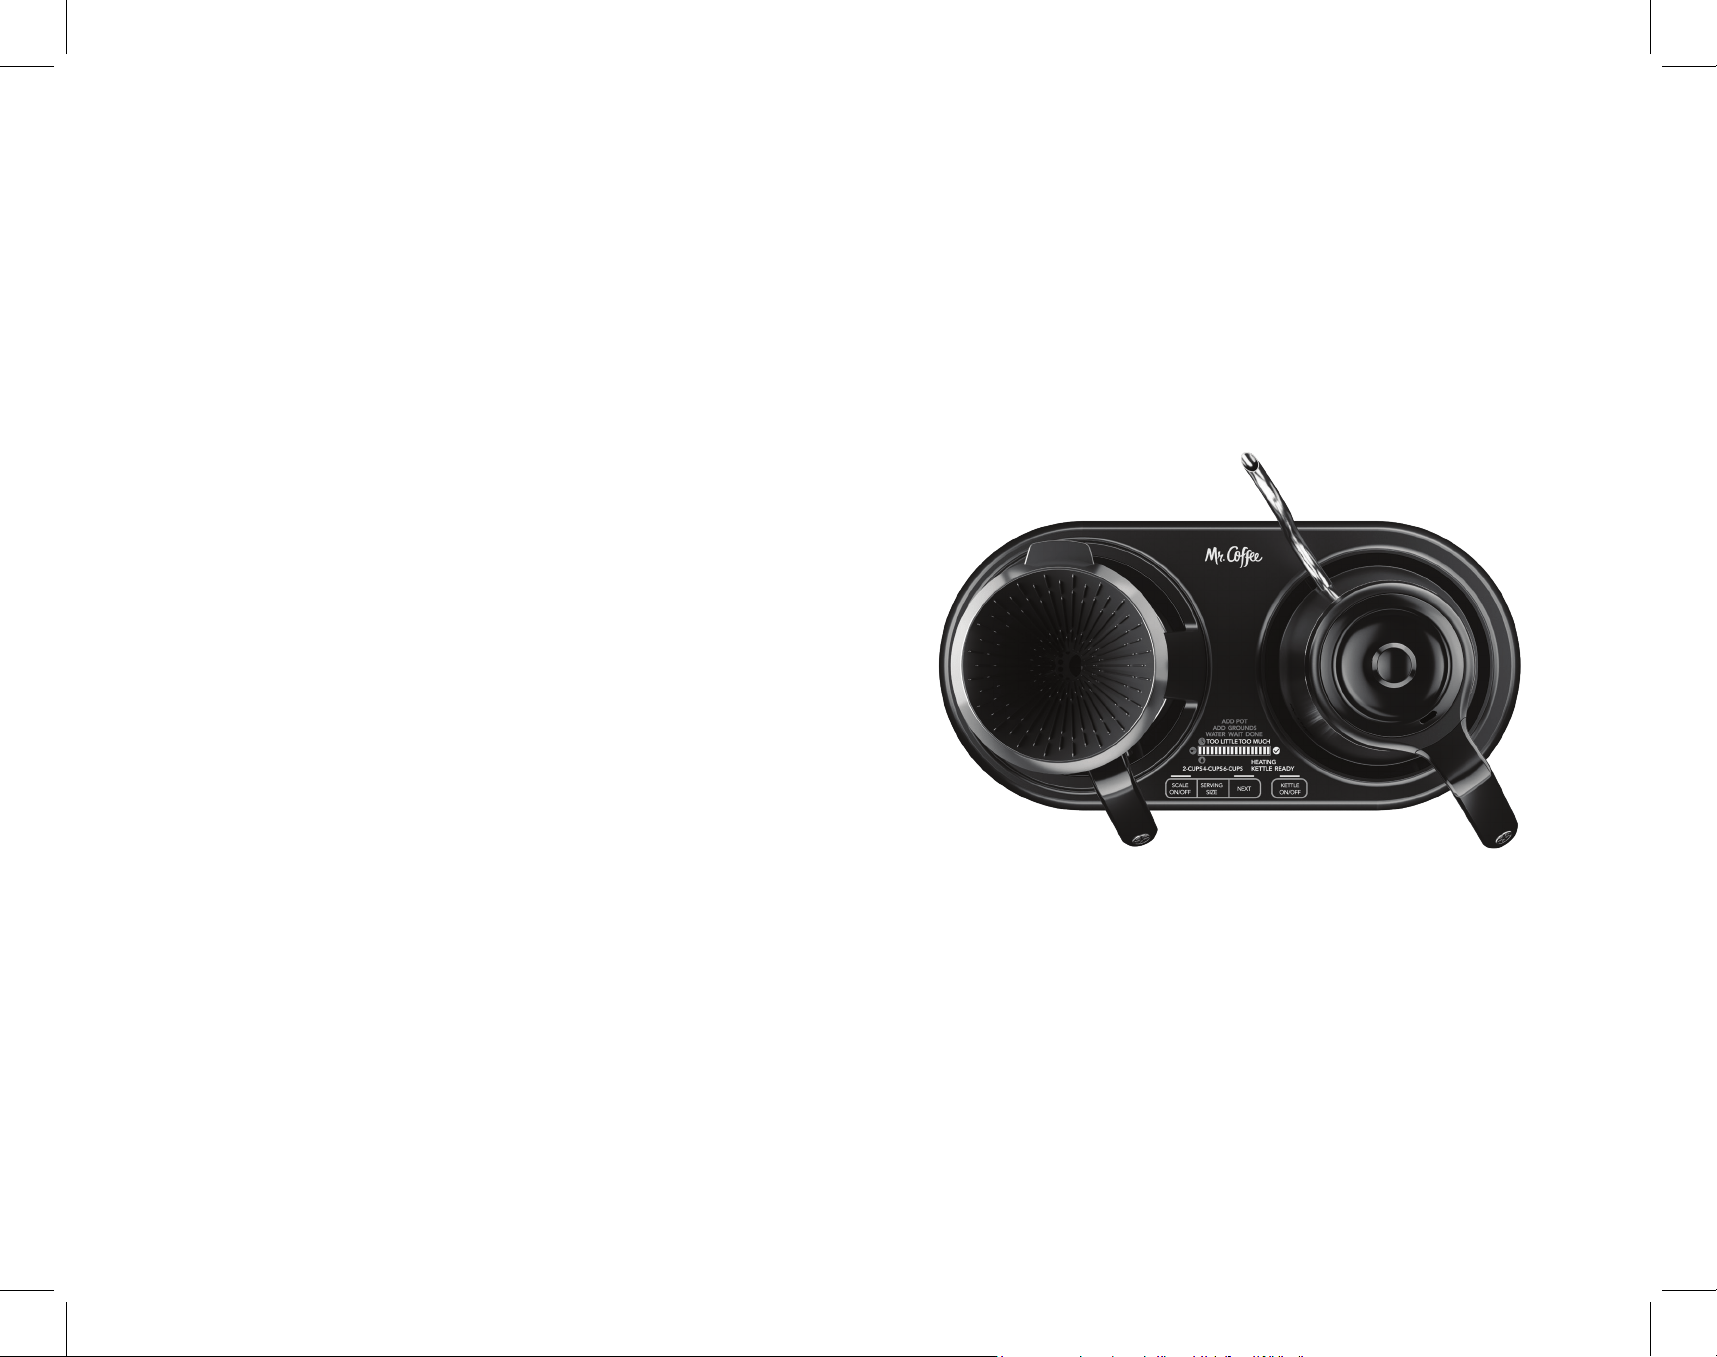
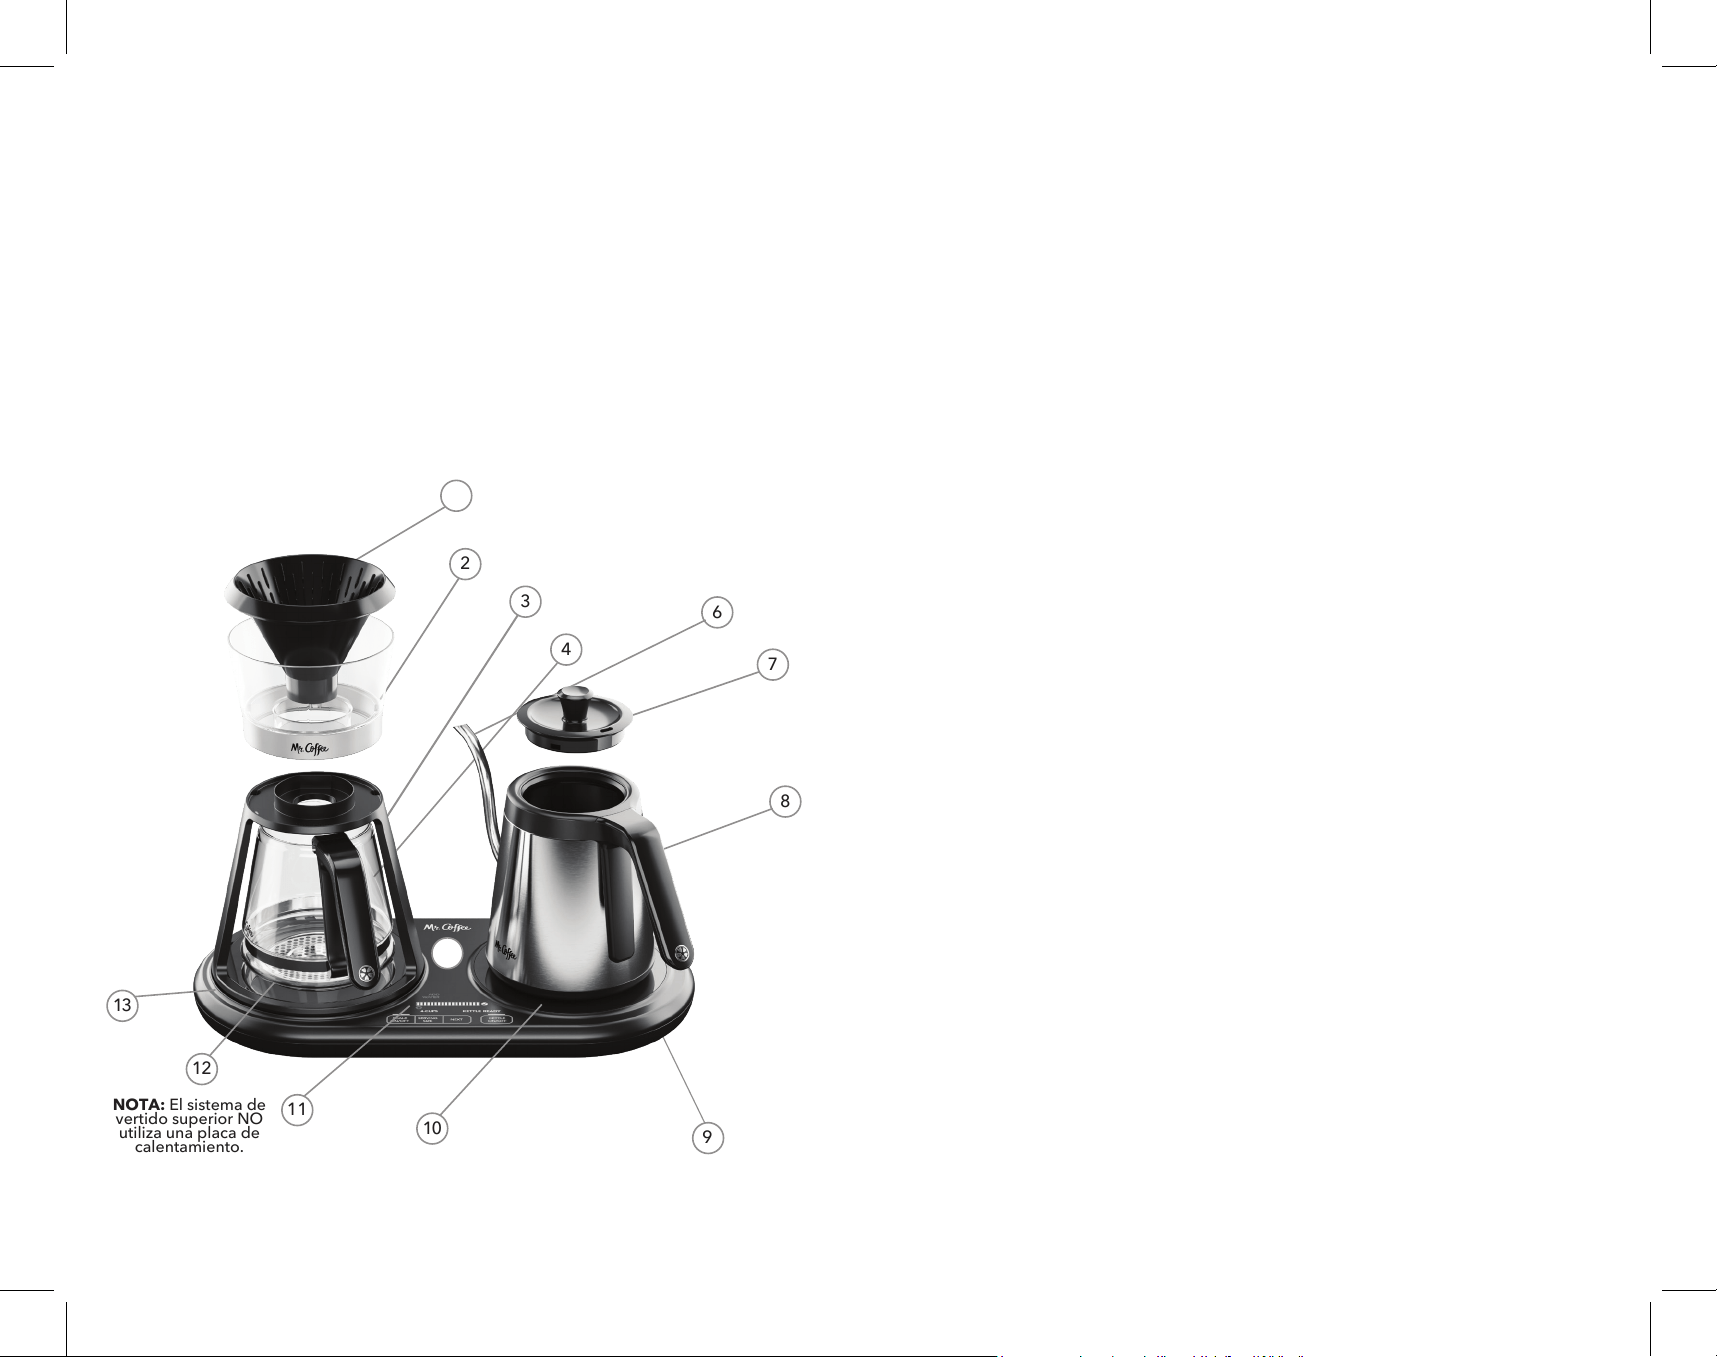
GET TO KNOW YOUR POUR OVER SYSTEM
GETTING STARTED
8. Electric Gooseneck Kettle
(Note: will get HOT)
9. Power cord storage
10. Electric Gooseneck
Kettle Power Base
11. Step-by-step on screen guide
12. Removable Drip Tray and Cover
(Dishwasher Safe)
13. Integrated Scale
1. Cone Dripper (Dishwasher Safe)
2. Outer Cone Dripper
3. Tower (Not Removable)
4. Coffee Pot (Dishwasher Safe)
5. Electric Base
6. Electric Gooseneck Kettle Spout
7. Electric Gooseneck Kettle Lid
(Dishwasher Safe)
Unpack your At-Home Pour Over System
1. Unpack your At-Home Pour Over System and remove plastic bags,
cartons and any tape on the unit.
IMPORTANT: KEEP PLASTIC BAGS AWAY FROM CHILDREN.
Clean your At-Home Pour Over System Before Use
Just follow these simple steps:
1. Wash the cone dripper, outer cone dripper, removable drip tray and
cover, and coffee pot in a mixture of mild detergent and water. Rinse
each thoroughly.
2. Wash the inside of the kettle and lid with mild detergent and water.
Let warm water run through the spout. Rinse thoroughly.
CAUTION: Do not immerse the kettle or electric base in water or any
other liquid.
3. Wipe down the electric base, and tower with a damp soft cloth.
4. Do not use scouring pads, steel wool or any forms of strong solvents
or abrasive cleaning agents to clean the appliance, as they can
damage the external surfaces of the appliance.
5. Allow the appliance to dry fully after cleaning before using.
CAUTION: The appliance must not be used if the electric base or the
underside of the appliance is wet.
6. Replace all parts and your system is ready for use!
CAUTION: Coffee pot, cone dripper, electric goosneck kettle lid, and
removable drip tray and cover are top rack dishwasher safe. Electric
gooseneck kettle, outer cone dripper,and electric base are NOT!
6.
5.
IMPORTANT SAFEGUARDS CONT.
17. Do not exceed the MAX water level mark when filling the kettle.
Overfilling could cause hot water to boil out of the spout, which can
cause burns.
18. The heating base and heating element is subject to residual heat
following a heating cycle. Do not touch heating base or heating
element immediately after a heating cycle. Allow to cool
before handling.
19. Remove the kettle from power base before filling or pouring. Do
not remove the kettle from the power base until it is switched OFF,
manually or automatically.
20. Use the kettle only with the power base provided.
21. Use extreme caution when handling, moving or pouring from the
kettle containing boiling water.
22. If your kettle comes with a grounded plug, connect to properly
grounded outlets only.
For appliances with glass containers:
23. The container is designed for use with this appliance. It must never
be used on a range top.
24. Do not set a hot container on a wet or cold surface.
25. Avoid sudden temperature changes, such as rinsing, washing,
filling, or immersing a hot container with cold liquids.
26. Do not use a cracked or chipped container or a container having a
loose or weakened handle.
27. Do not clean container with cleansers, steel wool pads, or other
abrasive material.
28. WARNING: Avoid spillage on the connector.
SAVE THESE INSTRUCTIONS
HOUSEHOLD USE ONLY
3
4
6
7
8
10
11
12
13
1
2
9
5
NOTE: Pour Over
does NOT use a
warming plate.
HOW TO MAKE YOUR FIRST
AT-HOME POUR OVER
Welcome to the World of Pour Over
The pour over process is the manual way of brewing coffee – resulting in
better tasting coffee due to the precise coffee to water ratio and optimal
water temperatures. Your on-screen guide walks you through this process
to create a consistently great cup of coffee with each use.
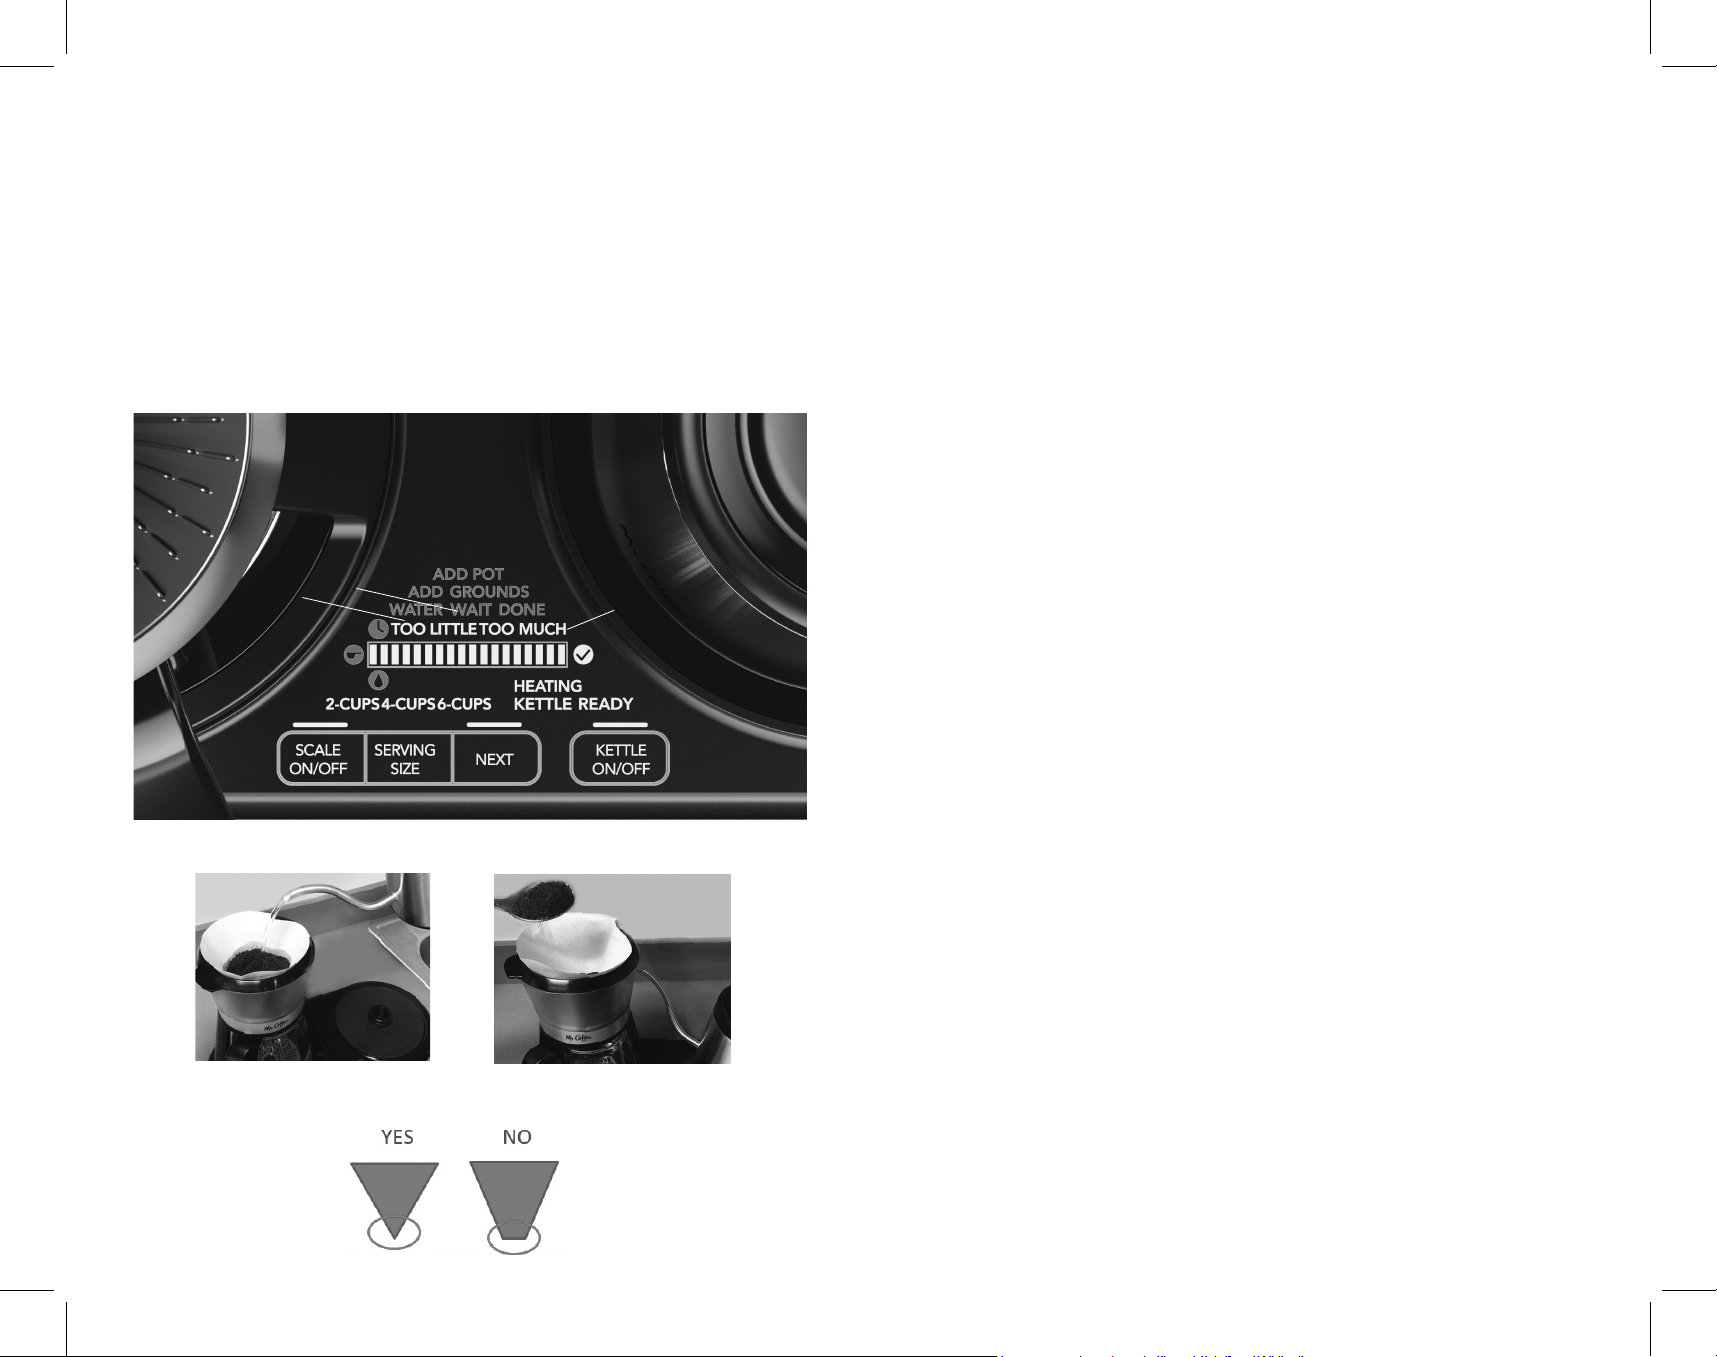
To operate your new Mr. Coffee At-Home Pour Over,
follow these steps:
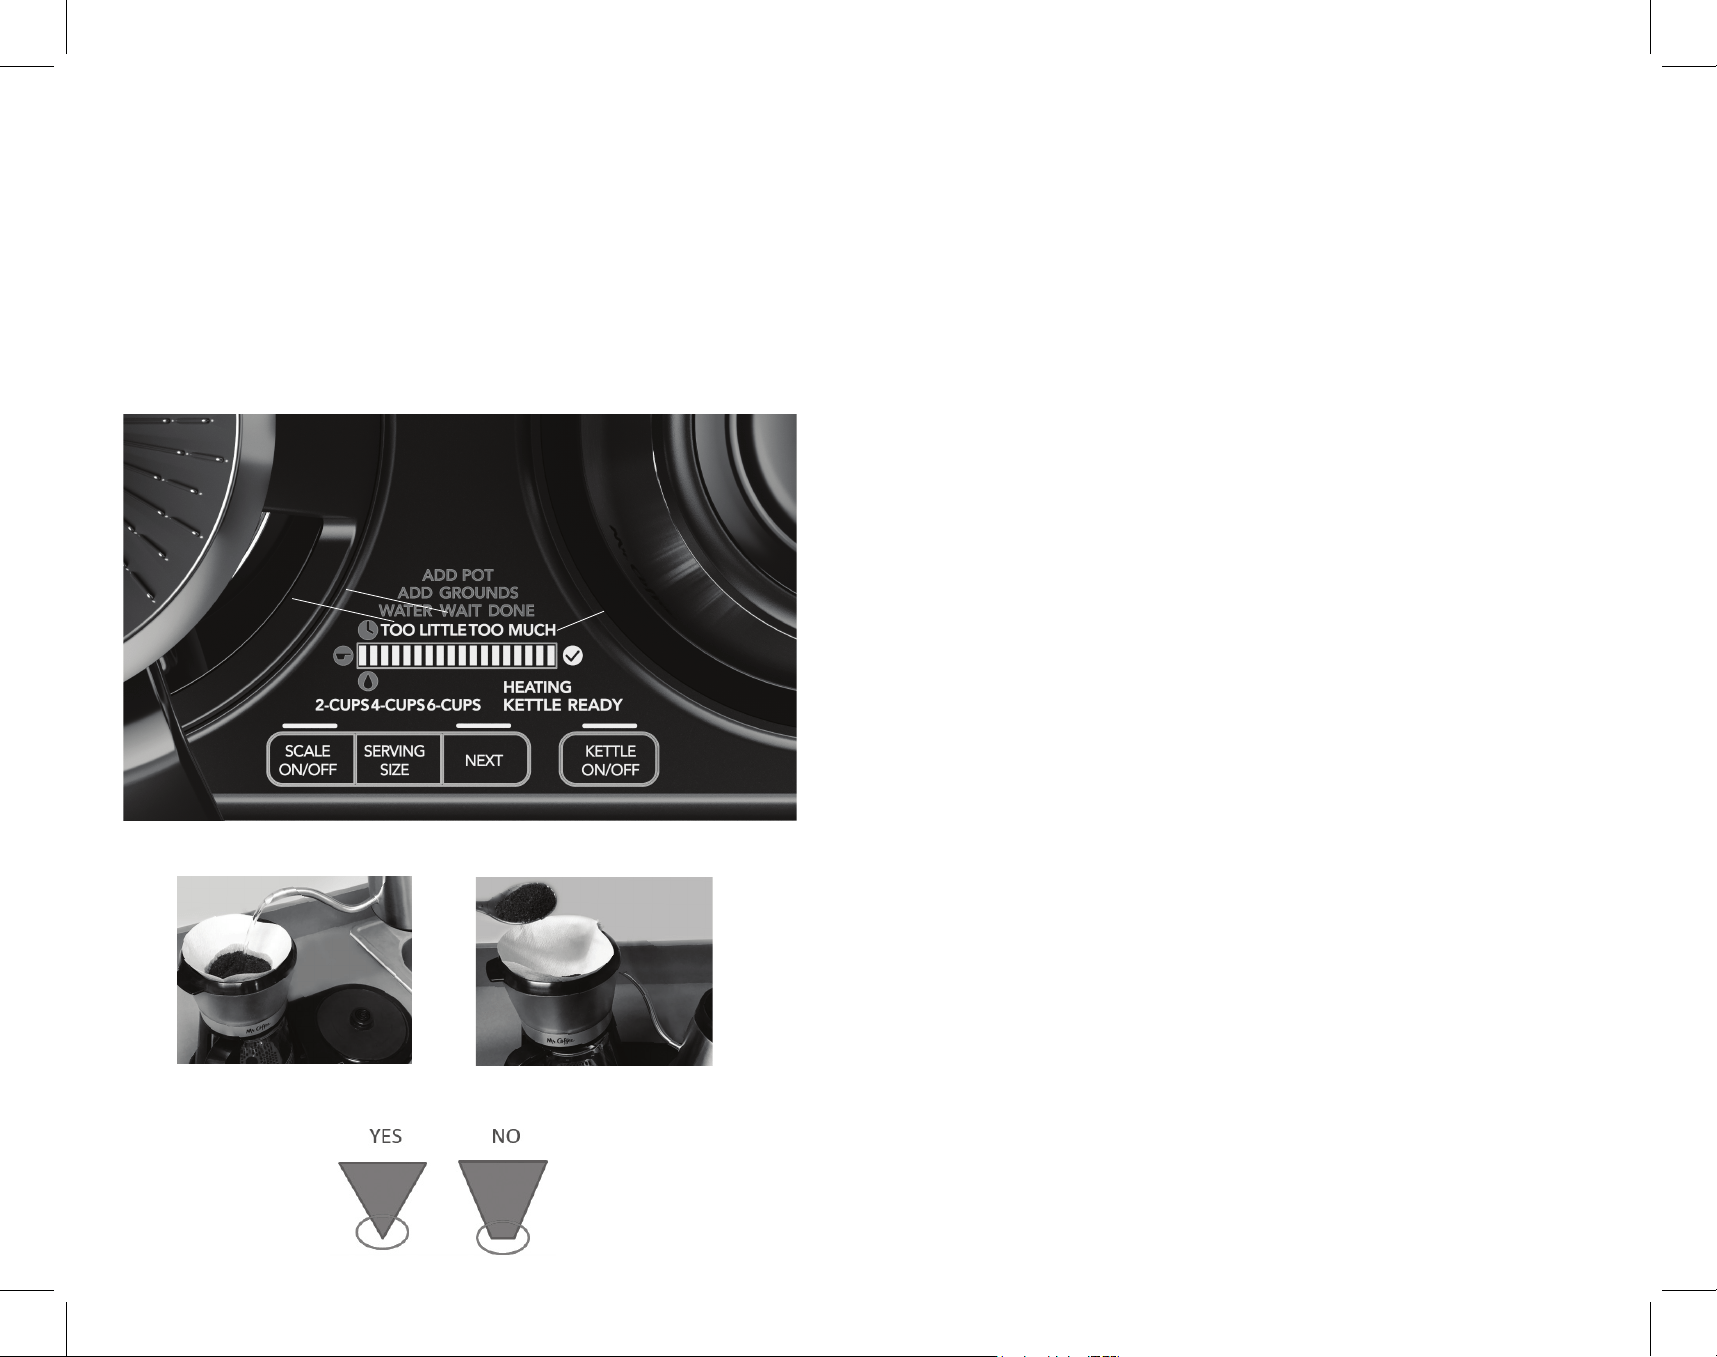
Refer to Image 1 when following steps
1. Add filtered water to the electric gooseneck kettle to the Max Fill Line
and place on its base. Select “Kettle On/Off” (O) to heat the water.
“Heating” (I) will light up on the screen while the water heats,
“Kettle Ready” (J) will light up, and beep will sound when water is
done heating.
NOTE: The kettle heats to 200°F for optimal coffee brewing. It does not
boil water. The kettle will keep warm for 5 minutes after heating, then
will be automatically shut off.
CAUTION: Do not exceed the "MAX" water level mark indicated on
the kettle. There are 3 level marks for 2, 4, or 6 cups (MAX) inside
the kettle.
CAUTION: Do not operate if electric base is not flat. If electric base is
not flat, remove kettle and coffee pot from electric base and repeat
cord placement instructions.
2. Select “Scale On/Off” (L)
3. “ADD POT” (A) will light up, add the coffee pot (or a personal mug)
under the tower and add a #2 paper cone filter into the cone dripper.
NOTE: Use a cone paper filter that has a point instead of a flat bottom.
This will allow for better coffee drainage.
4. Select “Next” (N) and then “Serving Size” (M) to select 2, 4, or 6 cups of
coffee (K).
5. Once your serving size is chosen, select “Next” (N) to continue and
“Add Grounds” (B) will light up.
6. Add grounds to the paper filter until the progress bar is full and the
check mark (H) appears and beep sounds. “Too Little” (F) will light up if
you need to add more coffee grounds. “Too Much” (G) will light up if
you need to remove coffee grounds.
7. Select “Next” (N) and “Add Water” (C) will light up. Slowly start pouring
water over the coffee grounds in a circular motion until the progress
bar is full, the beep sounds, and the “Wait” (D) screen lights up. Try to
fully soak all the grounds.
NOTE: If you do over pour, don’t worry, that extra water will count
towards the next step.
8. Wait until the progress bar is full and the check mark (H) appears. This
is the blooming stage, where the coffee grounds are pre-soaked for 30
seconds to extract the best flavor.
9. When “Add Water” (C) appears, continue pouring water in a
circular motion until the progress bar is full, the check mark (H)
appears, and the beep sounds. Pause while adding water if filter gets
too full.
NOTE: Do not pour water outside of the filter edge
10. Allow water to drip all the way through the filter and enjoy!
NOTE: To turn on/off the beeping sounds, hold down the “Serving
Size” (M) and “Next” (N) buttons until beeps sound.
11. For best results drink immediately. Since there is no warming plate,
the coffee will get cold if left out for a long period of time.
8.
7.
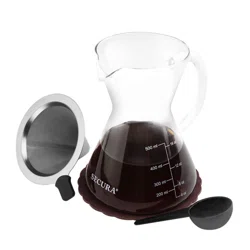
Image 1
Image 2 Image 3
B
A
C
D
E
F
G
H
L M N
O
I
J
K
Use #2 Cone Pointed Filters
HOW IT WORKS
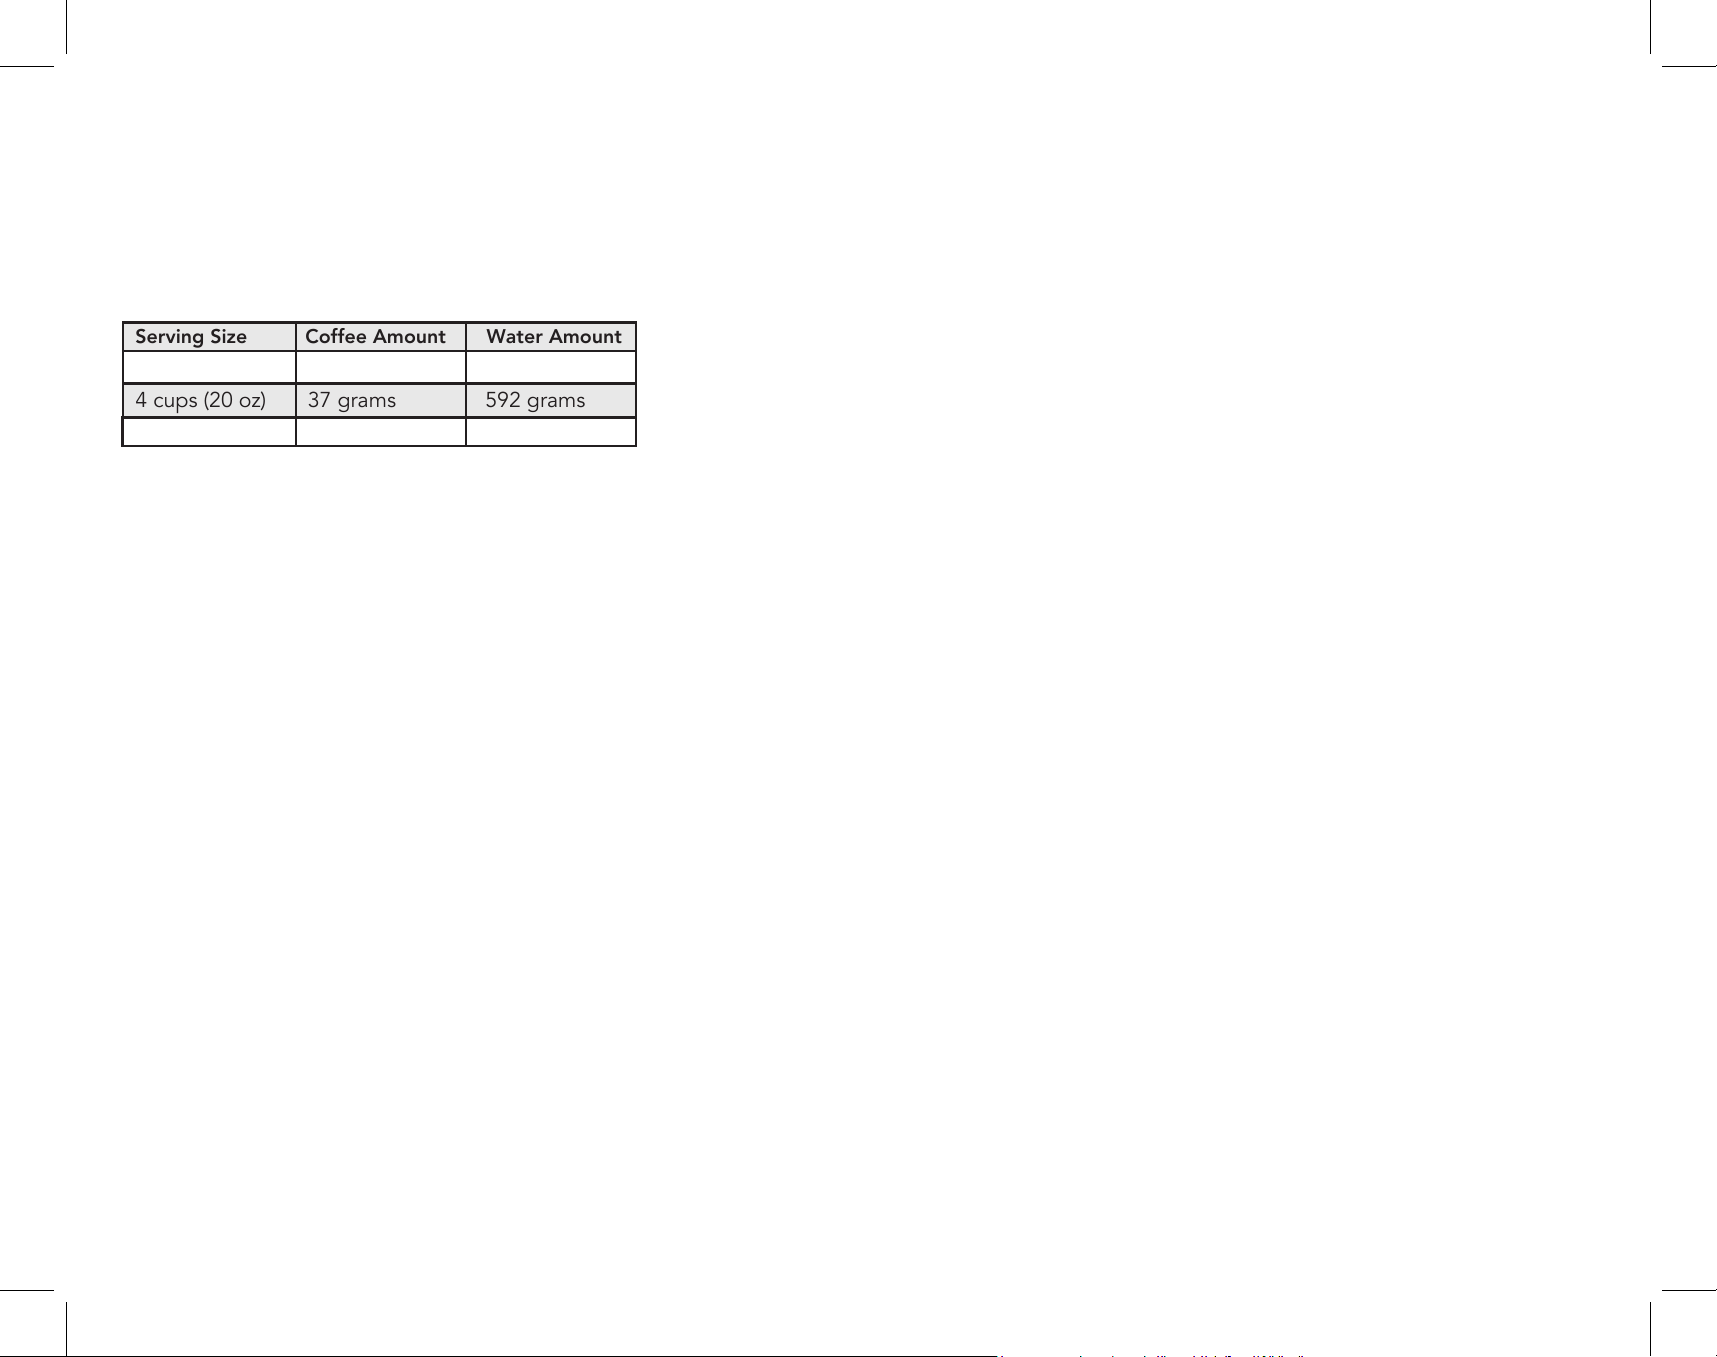
Behind the scenes, the At-Home Pour Over System scale calculates the
right coffee to water ratio for each serving size. For a great tasting pour
over, the integrated scales uses a 1:16 ratio of coffee to water. For every 1
gram of coffee, there will be 16 grams of water added. Reference chart
below for amounts integrated into the measuring system:
If you prefer a lighter tasting coffee, move forward in the "Add Grounds"
phase after the "Too Little" light has turned off, and before the progress bar
fills up to the check mark. If you prefer a stronger result, add more grounds
after the progress bar fills up to the check mark, before the "Too Much"
light has turned on.
HOW TO BREW THE PERFECT CUP
There are some extra steps you can take to ensure that your cup of
coffee tastes even better:
1. For best results, use freshly roasted coffee beans and grind them at a
medium grind setting just before brewing.
2. Pre-rinse your coffee filter. In the “Add Pot” phase, pour hot water over
the filter before adding coffee grounds and toss the water from the
coffee pot. This helps rinse any paper taste from the filter and heats up
your coffee pot (or mug) so the coffee stays hotter for a longer period
of time.
Hint: Using bleached cone paper filters will make sure there is less of a
paper taste in your coffee.
3. When pouring water, pour in a consistent circular motion, starting in the
center of the grounds, moving outwards towards the edge of the filter,
and then back to the center. Make sure to avoid pouring water on the
outer sides of the filter, this will cause the water to bypass the grounds.
4. There are many different pour over methods, and each coffee shop uses
their own technique. Some stir the grounds in the "blooming" phase,
some swirl the pot after the coffee has been brewed, and some use
different grind sizes. Get creative and try some of these techniques and
see what makes pour over the best experience for YOU!
Water
While it may not seem like an important ingredient, coffee is 98% water.
The type of water that you brew with greatly affects the final taste. Always
use clean, fresh water that is filtered and free of impurities – avoid hard
water or well water.
Cleanliness
A clean At-Home Pour Over System is essential to brewing great tasting
coffee each and every time. Please refer to the next section for steps on
routine cleaning.
ROUTINE CLEANING
Daily Cleaning
• Make sure the electric base is unplugged and the kettle has cooled
completely before cleaning.
• Remove the cone dripper, outer cone dripper, coffee pot, and drip tray
with cover and wash them in a solution of hot water and mild liquid soap.
Dry thoroughly. You can also place the cone dripper, coffee pot, and drip
tray with cover (NOT the outer cone dripper) in the dishwasher;
top-rack only.
CAUTION: Do not immerse the kettle or electric base in water or any
other liquid. NOT dishwasher safe.
Decalcifying your Kettle
Minerals (calcium/limestone) found in water will leave deposits in your
kettle and affect its performance. It’s recommended that you regularly
remove these deposits using vinegar.
1. To remove scale build up, fill the kettle with a solution of 2 cups white
vinegar and 2 cups water. Let sit overnight.
2. Empty the vinegar solution from the electric kettle. Remove any stain
remaining inside by rubbing with a damp cloth.
NOTE: Be careful of temperature sensor inside kettle base when
cleaning.
3. Fill the electric kettle with clean water. Place kettle on power base and
heat, then discard water. Repeat and the electric kettle will be ready
to use.
4. The outside of the electric kettle can be wiped down with a soft
damp cloth.
10.9.
Serving Size Coffee Amount Water Amount
2 cups (10 oz) 19 grams 296 grams
4 cups (20 oz) 37 grams 592 grams
6 cups (30 oz) 54 grams 868 grams
COFFEE POT USE AND CARE
Follow the instructions below to reduce or eliminate the chance of
breaking the glass coffee pot:
• Discard the coffee pot immediately if it is ever cracked.
• Protect the coffee pot from sharp blows, scratches or rough
handling. Do not use harsh abrasive cleaners that may scratch the
coffee pot. Scratches may cause the coffee pot to break.
USER MAINTENANCE
This appliance has no user serviceable parts. Any servicing beyond
that described in the Cleaning Section should be performed by an
Authorized Service Representative only.
SERVICE MAINTENANCE AND WARRANTY
Service Maintenance and Warranty can be found online at
www.mrcoffee.com or call us toll-free at the Consumer Service
Department,
1-800-MR COFFEE (1-800-672-6333).
11.
MANUAL DE USUARIO
CAFETERA DE
VERTIDO SUPERIOR
6 TAZAS VERTER SOBRE LA CAFETERA Y HERVIDOR
P.N. 198017 Rev A www.mrcoffee.com
sencillo
VERTIDO SUPERIOR
PARA
UN CAFÉ
DE MEJOR
SABOR
con guía paso
a paso en pantalla
R
E
Q
U
I
E
R
E
2
FILTROS
CÓNICOS
#
N
O
I
N
C
L
U
I
D
O
S

MEDIDAS DE SEGURIDAD IMPORTANTES
Al usar aparatos eléctricos, siempre se deben seguir las precauciones
básicas de seguridad para disminuir el riesgo de incendio, descarga
eléctrica o lesiones personales, incluidas las siguientes:
1. Lea todas las instrucciones.
2. Este aparato genera calor durante el uso. No toque las superficies
calientes. Utilice las asas o manijas.
3. Para protegerse contra las descargas eléctricas, no coloque ni
sumerja el cable, los enchufes ni el aparato en agua u otro líquido.
4. Los niños o personas con disminución de capacidades físicas,
sensoriales o mentales no deben utilizar este aparato.
5. Se requiere una estricta supervisión cuando el aparato se utiliza
cerca de los niños. Los niños no deben jugar con el aparato.
6. ADVERTENCIA: El enchufe debe insertarse por completo en el
aparato (solo para modelos con cable desmontable). Para asegurar
una inserción total, verifique que la marca que está en el enchufe no
esté visible. Un contacto flojo puede causar sobrecalentamiento.
7. Desenchufe el aparato del tomacorriente cuando no esté en uso y
antes de limpiarlo. Deje que el aparato se enfríe antes de poner o
quitar alguna parte, y antes de limpiarlo.
8. No haga funcionar ningún aparato con un cable o enchufe
dañado o después de algún fallo en el funcionamiento o daño de
cualquier tipo. Devuelva el aparato a un centro de servicio
autorizado para que lo examinen, reparen o ajusten. No intente
reemplazar o empalmar un cable dañado.
9. El uso de un accesorio no recomendado para este aparato por el
fabricante puede provocar incendios, descargas eléctricas o
lesiones personales.
10. No utilizar al aire libre o con fines comerciales.
11. No deje que el cable cuelgue del borde de la mesa o encimera, ni
que toque superficies calientes, incluida la estufa.
12. No colocar sobre un quemador a gas o eléctrico caliente, o cerca
del quemador, o en un horno caliente.
13. Asegúrese de que el hervidor esté ubicado correctamente en la
base eléctrica antes de encenderlo. Siempre conecte primero el
enchufe al aparato, luego enchufe el cable al tomacorriente de la
pared (para aparatos con cables desmontables). Para desconectar,
apague todos los controles poniéndolos en OFF y luego retire el
enchufe del tomacorriente de la pared. No desconecte tirando
del cable.
14. No utilice el aparato para otro uso que no sea el previsto. El mal
uso puede causar lesiones. Utilice siempre el aparato sobre una
superficie seca, estable y nivelada. Mantenga el hervidor alejado
del borde de la encimera.
15. ADVERTENCIA: No retire la tapa del hervidor mientras el agua esté
hirviendo. Todas las tapas deben estar cerradas durante el uso.
16. Se pueden sufrir quemaduras si se retira la tapa durante el ciclo de
calentamiento o inmediatamente después. El contenido puede
estar caliente. Deje enfriar antes de abrir la tapa. Mantenga el pico
alejado de las personas, ya que el vapor puede producir
quemaduras.
INTRODUCCIÓN
Felicitaciones por la compra de su nueva cafetera con sistema de
vertido superior Mr. Coffee. Su nueva cafetera con sistema de
vertido superior está diseñada para ofrecerle una taza de café de
sabor inigualable.
Nuestro objetivo número uno es ofrecerle siempre la taza de café
de mejor sabor, así que si tiene alguna pregunta sobre el nuevo
sistema de vertido superior, contáctenos al 1-888-672-6333 o
visítenos en www.mrcoffee.com.
1.
2.
MEDIDAS DE SEGURIDAD IMPORTANTES
Al usar aparatos eléctricos, siempre se deben seguir las precauciones
básicas de seguridad para disminuir el riesgo de incendio, descarga
eléctrica o lesiones personales, incluidas las siguientes:
1. Lea todas las instrucciones.
2. Este aparato genera calor durante el uso. No toque las superficies
calientes. Utilice las asas o manijas.
3. Para protegerse contra las descargas eléctricas, no coloque ni
sumerja el cable, los enchufes ni el aparato en agua u otro líquido.
4. Los niños o personas con disminución de capacidades físicas,
sensoriales o mentales no deben utilizar este aparato.
5. Se requiere una estricta supervisión cuando el aparato se utiliza
cerca de los niños. Los niños no deben jugar con el aparato.
6. ADVERTENCIA: El enchufe debe insertarse por completo en el
aparato (solo para modelos con cable desmontable). Para asegurar
una inserción total, verifique que la marca que está en el enchufe no
esté visible. Un contacto flojo puede causar sobrecalentamiento.
7. Desenchufe el aparato del tomacorriente cuando no esté en uso y
antes de limpiarlo. Deje que el aparato se enfríe antes de poner o
quitar alguna parte, y antes de limpiarlo.
8. No haga funcionar ningún aparato con un cable o enchufe
dañado o después de algún fallo en el funcionamiento o daño de
cualquier tipo. Devuelva el aparato a un centro de servicio
autorizado para que lo examinen, reparen o ajusten. No intente
reemplazar o empalmar un cable dañado.
9. El uso de un accesorio no recomendado para este aparato por el
fabricante puede provocar incendios, descargas eléctricas o
lesiones personales.
10. No utilizar al aire libre o con fines comerciales.
11. No deje que el cable cuelgue del borde de la mesa o encimera, ni
que toque superficies calientes, incluida la estufa.
12. No colocar sobre un quemador a gas o eléctrico caliente, o cerca
del quemador, o en un horno caliente.
13. Asegúrese de que el hervidor esté ubicado correctamente en la
base eléctrica antes de encenderlo. Siempre conecte primero el
enchufe al aparato, luego enchufe el cable al tomacorriente de la
pared (para aparatos con cables desmontables). Para desconectar,
apague todos los controles poniéndolos en OFF y luego retire el
enchufe del tomacorriente de la pared. No desconecte tirando
del cable.
14. No utilice el aparato para otro uso que no sea el previsto. El mal
uso puede causar lesiones. Utilice siempre el aparato sobre una
superficie seca, estable y nivelada. Mantenga el hervidor alejado
del borde de la encimera.
15. ADVERTENCIA: No retire la tapa del hervidor mientras el agua esté
hirviendo. Todas las tapas deben estar cerradas durante el uso.
16. Se pueden sufrir quemaduras si se retira la tapa durante el ciclo de
calentamiento o inmediatamente después. El contenido puede
estar caliente. Deje enfriar antes de abrir la tapa. Mantenga el pico
alejado de las personas, ya que el vapor puede producir
quemaduras.
INSTRUCCIONES SOBRE EL CABLE
DE ALIMENTACIÓN
Se puede proporcionar un cable de alimentación corto (o cable
de alimentación desmontable) para reducir los riesgos
ocasionados por el enredo o tropiezo con un cable más largo. Se
pueden utilizar los cables de alimentación desmontables más
largos o los cables de extensión que están disponibles, si se tiene
cuidado al utilizarlos. Si se utiliza un cable de alimentación
desmontable largo o de extensión:
a. La potencia eléctrica nominal marcada en el cable de
alimentación desmontable o del cable de extensión debe ser
al menos tan alta como la potencia eléctrica del aparato;
b. Si el aparato es del tipo con conexión a tierra, el cable de
extensión debe ser un cable de 3 hilos con conexión a tierra;
c. El cable más largo debe estar dispuesto de modo que no
cuelgue de la encimera o la mesa donde los niños puedan
tirar de él o tropezarse accidentalmente.
AVISOS SOBRE EL PRODUCTO
1. Coloque el aparato sobre una superficie dura, plana y
nivelada para evitar la interrupción del flujo de aire debajo de
la base eléctrica.
2. Deseche el café de inmediato si el contenido se evapora por
completo.
3. Proteja la cafetera de golpes fuertes, rayones o manipulación
brusca.
4. Este hervidor está previsto para hervir solo agua. No caliente
ningún otro líquido ni intente cocinar ningún alimento en este
aparato.
5. No lo use debajo de gabinetes de cocina o áreas donde el
aumento de vapor pueda dañar el electrodoméstico.
4.3.
MEDIDAS DE SEGURIDAD IMPORTANTES
(CONTINUACIÓN)
17. No supere la marca de nivel de agua MAX (MÁXIMO) cuando llene
el hervidor. El llenado excesivo puede hacer salir el agua caliente
por el pico, lo que puede causar quemaduras.
18. La base de calentamiento y el elemento de calentamiento están
expuestos al calor residual luego de un ciclo de calentamiento. No
toque la base ni el elemento de calentamiento inmediatamente
después de un ciclo de calentamiento. Deje que se enfríen antes de
tocarlos.
19. Retire el hervidor de la base eléctrica antes de llenar o verter. No
retire el hervidor de la base eléctrica hasta que esté apagada, de
forma manual o automática.
20. Use el hervidor solo con la base eléctrica provista.
21. Tenga mucho cuidado cuando manipule, mueva o vierta el
contenido del hervidor con agua caliente.
22. Si su hervidor está provisto de un enchufe con conexión a tierra,
conéctelo solo a tomacorrientes debidamente conectados a tierra.
Para aparatos con jarras de vidrio:
23. La jarra está diseñada para su uso con este aparato. Nunca debe
utilizarse sobre una estufa.
24. No coloque la jarra caliente sobre una superficie húmeda o fría.
25. Evite los cambios bruscos de temperatura, como enjuagar, lavar,
llenar o sumergir el recipiente caliente con líquidos fríos.
26. No utilice la jarra si está rota o astillada o tiene un mango suelto o
deteriorado.
27. No limpie la jarra con productos de limpieza, almohadillas de lana
de acero u otro material abrasivo.
28. ADVERTENCIA: Evite derramar sobre el conector.
CONSERVE ESTAS INSTRUCCIONES
SOLO PARA USO EN EL HOGAR
Enchufe con conexión a tierra
Para reducir el riesgo de descarga eléctrica, este
aparato tiene un cable y enchufe con conexión a
tierra que tiene una tercera clavija de conexión a
tierra (enchufe de 3 patas). El enchufe debe
enchufarse en un tomacorriente que esté
correctamente instalado y conectado a tierra de
acuerdo con todos los códigos y ordenanzas locales. Si el enchufe no encaja
en el tomacorriente o si tiene dudas sobre si el tomacorriente está
correctamente conectado a tierra, comuníquese con un electricista calificado
para instalar el tomacorriente adecuado. No modifique el enchufe de
ninguna manera.
CONOCE TU SISTEMA
DE VERTIDO SUPERIOR
GUÍA DE INICIO
8. Hervidor eléctrico
(Nota: se pondrá CALIENTE)
9. Almacenamiento del cable
de alimentación
10. Base eléctrica del
hervidor eléctrico
11. Guía paso a paso en pantalla
12. Tapa y bandeja de goteo
extraíbles (aptas
para lavavajillas)
13. Balanza integrada
1. Gotero cónico (apto para lavavajillas)
2. Gotero cónico exterior
3. Torre (no extraíble)
4. Cafetera (apta para lavavajillas)
5. Base eléctrica
6. Pico de hervidor eléctrico largo y curvo
7. Tapa de hervidor eléctrico
(apta para lavavajillas)
Desembale el sistema de vertido superior
1. Desembale el sistema de vertido superior completo y retire de la unidad
las bolsas de plástico, los cartones y cualquier cinta.
IMPORTANTE: MANTENGA LAS BOLSAS DE PLÁSTICO LEJOS DE LOS NIÑOS.
Limpie el sistema de vertido superior antes de usar
Solo siga estos pasos sencillos:
1. Lave el gotero cónico, el gotero cónico exterior, la tapa y bandeja de
goteo extraíbles, y la cafetera en una mezcla de detergente suave y agua.
Enjuáguelos bien.
2. Lave el interior del hervidor y la tapa con un detergente suave y agua.
Deje correr agua tibia por el pico. Enjuague bien.
PRECAUCIÓN: No sumerja el hervidor ni la base eléctrica en agua ni en
ningún otro liquido.
3. Limpie la base eléctrica y la torre con un paño suave y húmedo.
4. No utilice esponjas para restregar, lana de acero ni ningún tipo de
solvente fuerte o productos de limpieza abrasivos para limpiar el aparato,
ya que pueden dañar las superficies externas.
5. Antes de usar, deje que el aparato se seque por completo después de
limpiarlo.
PRECAUCIÓN: El aparato no debe utilizarse si la base eléctrica o el
lado inferior del aparato están mojados.
6. Vuelva a colocar todas las partes en su lugar y el sistema está listo
para usar.
PRECAUCIÓN: La cafetera, el gotero cónico, la tapa del hervidor
eléctrico y la tapa y bandeja de goteo extraíbles se pueden lavar en el
estante superior del lavavajillas. ¡NO lave en el lavavajillas el hervidor
eléctrico, el gotero cónico exterior ni la base eléctrica!
6.
5.
MEDIDAS DE SEGURIDAD IMPORTANTES
(CONTINUACIÓN)
17. No supere la marca de nivel de agua MAX (MÁXIMO) cuando llene
el hervidor. El llenado excesivo puede hacer salir el agua caliente
por el pico, lo que puede causar quemaduras.
18. La base de calentamiento y el elemento de calentamiento están
expuestos al calor residual luego de un ciclo de calentamiento. No
toque la base ni el elemento de calentamiento inmediatamente
después de un ciclo de calentamiento. Deje que se enfríen antes de
tocarlos.
19. Retire el hervidor de la base eléctrica antes de llenar o verter. No
retire el hervidor de la base eléctrica hasta que esté apagada, de
forma manual o automática.
20. Use el hervidor solo con la base eléctrica provista.
21. Tenga mucho cuidado cuando manipule, mueva o vierta el
contenido del hervidor con agua caliente.
22. Si su hervidor está provisto de un enchufe con conexión a tierra,
conéctelo solo a tomacorrientes debidamente conectados a tierra.
Para aparatos con jarras de vidrio:
23. La jarra está diseñada para su uso con este aparato. Nunca debe
utilizarse sobre una estufa.
24. No coloque la jarra caliente sobre una superficie húmeda o fría.
25. Evite los cambios bruscos de temperatura, como enjuagar, lavar,
llenar o sumergir el recipiente caliente con líquidos fríos.
26. No utilice la jarra si está rota o astillada o tiene un mango suelto o
deteriorado.
27. No limpie la jarra con productos de limpieza, almohadillas de lana
de acero u otro material abrasivo.
28. ADVERTENCIA: Evite derramar sobre el conector.
CONSERVE ESTAS INSTRUCCIONES
SOLO PARA USO EN EL HOGAR
NOTA: El sistema de
vertido superior NO
utiliza una placa de
calentamiento.
3
4
6
7
8
10
11
12
13
1
2
9
5
CÓMO HACER TU PRIMER CAFÉ CON LA
CAFETERA DE VERTIDO SUPERIOR
Bienvenidos al mundo del vertido superior
El proceso de vertido superior es la forma manual de preparar el café, que
da como resultado un café de mejor sabor debido a la proporción precisa
de café y de agua y las temperaturas óptimas del agua. Su guía en pantalla
lo asistirá en este proceso para crear siempre una excelente taza de café
con cada uso.
Para operar su nueva Mr. Coffee con vertido superior,
siga estos pasos:
Consulte la Imagen 1 cuando siga los pasos
1. Agregue agua filtrada al hervidor eléctrico hasta la línea de llenado
máximo y colóquelo en su base. Seleccione “Kettle On/Off” (O)
(“Hervidor encendido/apagado”) para calentar el agua. Se encenderá
“Heating” (I) (“Calentando”) en la pantalla mientras se calienta el agua;
se encenderá “Kettle Ready” (J) (“Hervidor listo”) y sonará un pitido
cuando el agua haya terminado de calentarse.
NOTA: El hervidor se calienta a 200 °F para una preparación óptima
del café. No hierve el agua. El hervidor se mantendrá caliente durante
5 minutos después de calentarse; luego se apagará automáticamente.
PRECAUCIÓN: No supere la marca de nivel de agua “MAX” indicada
en el hervidor. Hay 3 marcas de nivel para 2, 4 o 6 tazas (MÁX) dentro
del hervidor.
PRECAUCIÓN: No operar si la base eléctrica no está plana. Si la base
eléctrica no está plana, retire el hervidor y la cafetera de la base
eléctrica y repita las instrucciones de colocación del cable.
2. Seleccione “Scale On/Off” (L) (“Balanza encendida/apagada”).
3. Se encenderá “ADD POT” (A) (“AGREGAR RECIPIENTE”); agregue la
cafetera (o una taza personal) debajo de la torre y agregue un filtro de
cono de papel n.° 2 en el gotero cónico.
NOTA: se un filtro de papel cónico que tenga un punto en lugar de un
fondo plano. Esto permitirá un mejor drenaje del café.
4. Seleccione “Next” (N) (“Siguiente”) y luego “Serving Size” (M)
(“Tamaño de la porción”) para seleccionar 2, 4 o 6 tazas de café (K).
5. Una vez que haya elegido el tamaño de la porción, seleccione “Next”
(N) (“Siguiente”) para continuar y se iluminará “Add Grounds” (B)
(“Agregar granos de café”).
6. Agregue granos de café al filtro de papel hasta que la barra de
progreso esté llena y aparezca la marca de verificación (H) y suene un
pitido. Se encenderá “Too Little” (F) (“Muy poco”) si necesita agregar
más granos de café. Se encenderá “Too Much” (G) (“Demasiado”) si
necesita quitar granos de café.
7. Seleccione “Next” (N) (“Siguiente”) y se iluminará “Add Water” (C)
(“Agregar agua”). Comience a verter agua lentamente sobre los granos
de café con un movimiento circular hasta que la barra de progreso esté
llena; luego suena el pitido y se enciende “Wait” (D) (“Esperar”). Trate
de empapar todos los granos de café por completo.
NOTA: Si vierte de más, no se preocupe, esa agua adicional servirá
para el próximo paso.
8. Espere hasta que la barra de progreso esté llena y aparezca la marca
de verificación (H). Esta es la etapa de expansión, donde los granos de
café se remojan durante 30 segundos para extraer el mejor sabor.
9. Cuando aparezca “Add Water” (C) (“Agregar agua”), continúe
vertiendo agua con un movimiento circular hasta que la barra de
progreso esté llena, aparezca la marca de verificación (H) y se escuche
el pitido. Haga una pausa mientras agrega agua si el filtro se llena
demasiado.
NOTA: No vierta agua por fuera del borde del filtro.
10. Deje que el agua gotee a través del filtro y ¡disfrute!
NOTA: Para activar/desactivar los pitidos, mantenga presionados los
botones “Serving Size” (M) (“Tamaño de la porción”) y “Next” (N)
(“Siguiente”) hasta que suene un pitido.
11. Para un mejor resultado, beba la infusión de inmediato. Dado que no
hay placa de calentamiento, el café se enfriará si se deja afuera por un
largo período de tiempo.
8.
7.
Imagen 1
Imagen 2 Imagen 3
B
A
C
D
E
F
G
H
L M N O
I
J
K
B
A
C
D
E
F
G
H
L M N
O
I
J
K
Use filtros cónicos #2
CÓMO FUNCIONA
Detrás de escena, la balanza de la cafetera con sistema de vertido superior
calcula la proporción correcta de café y de agua para cada tamaño de
porción. Para un café de gran sabor, las balanzas integradas utilizan una
proporción de 1:16 entre el café y el agua. Por cada gramo de café, se
agregarán 16 gramos de agua. A continuación se muestra la tabla de
referencia para cantidades integradas en el sistema de medición:
Si prefiere un café de sabor más ligero, avance a la etapa “Add Grounds”
(“Agregar granos de café”) después de que la luz “Too Little” (“Muy poco”)
se haya apagado, y antes de que la barra de progreso se llene hasta la
marca de verificación. Si prefiere un café más fuerte, agregue más granos
de café después de que la barra de progreso se llene hasta la marca de
verificación, antes de que la luz “Too Much” (“Demasiado”) se haya
encendido.
CÓMO PREPARAR LA TAZA
DE CAFÉ PERFECTA
Hay algunos pasos adicionales que puede seguir para asegurarse de
que su taza de café tenga un mejor sabor:
1. Para obtener un mejor resultado, use granos de café recién tostados y
muélalos a un nivel medio de molienda justo antes de preparar el café.
2. Enjuague previamente el filtro de café. En la etapa “Add Pot” (“Agregar
recipiente”), vierta agua caliente sobre el filtro antes de agregar los
granos de café y agite el agua de la cafetera. Esto ayuda a limpiar
cualquier sabor a papel del filtro y calienta la cafetera (o taza) para que
el café se mantenga más caliente durante más tiempo.
Consejo: El uso de filtros de papel cónicos blanqueados asegurará que
haya menos sabor a papel en su café.
3. Cuando vierta agua, hágalo con un movimiento circular constante,
comenzando en el centro de los granos de café, luego hacia afuera,
hacia el borde del filtro, y finalmente regrese al centro. Asegúrese de
evitar verter agua en los lados exteriores del filtro, ya que esto hará que
el agua no pase por los granos de café.
4. Hay muchos métodos de vertido superior diferentes y cada cafetería
utiliza su propia técnica. Algunos revuelven los granos de café en la
etapa de “expansión”, otros agitan la cafetera después de preparar el
café, y otros usan diferentes tamaños de molienda. ¡Sea creativo y
pruebe algunas de estas técnicas y vea cómo el proceso de vertido
superior se convierte en la mejor experiencia para USTED!
Agua
Si bien puede parecer que no es un ingrediente importante, el café
contiene 98 % de agua. El tipo de agua con la que prepara el café afecta
enormemente el sabor final. Siempre use agua limpia y fresca que esté
filtrada y libre de impurezas; evite el agua dura o el agua de pozo.
Limpieza
Un sistema de vertido superior limpio es esencial para preparar siempre
un café de excelente sabor. Consulte la siguiente sección para conocer los
pasos para la limpieza de rutina.
LIMPIEZA DE RUTINA
Limpieza diaria
• Asegúrese de que la base eléctrica esté desenchufada y que el hervidor
se haya enfriado completamente antes de limpiar.
• Retire el gotero cónico, el gotero cónico exterior, la cafetera y la bandeja
de goteo con tapa y lávelos en una solución de agua caliente y jabón
líquido suave. Seque cuidadosamente. También puede colocar el gotero
cónico, la cafetera y la bandeja de goteo con tapa (NO el gotero cónico
exterior) en el lavavajillas (en el estante superior solamente).
PRECAUCIÓN: No sumerja el hervidor ni la base eléctrica en agua ni
en ningún otro líquido. NO apto para lavavajillas.
Cómo descalcificar el hervidor
Los minerales (calcio/piedra caliza) que se encuentran en el agua dejarán
depósitos en el hervidor y afectarán su rendimiento. Se recomienda
eliminar regularmente estos depósitos con vinagre.
1. Para eliminar la acumulación de incrustaciones, llene el hervidor con
una solución de 2 tazas de vinagre blanco y 2 tazas de agua. Deje
reposar durante la noche.
2. Vacíe la solución de vinagre del hervidor eléctrico. Elimine las manchas
que queden en el interior frotándolas con un paño húmedo.
NOTA: Tenga cuidado con el sensor de temperatura que está dentro de
la base del hervidor al limpiar.
3. Llene el hervidor eléctrico con agua limpia. Coloque el hervidor en la
base eléctrica y caliente, luego deseche el agua. Repita el
procedimiento y el hervidor eléctrico estará lista para usar.
4. El exterior del hervidor eléctrico se puede limpiar con un paño suave
húmedo.
10.9.
2 tazas (10 oz) 19 gramos 296 gramos
4 tazas (20 oz) 37 gramos 592 gramos
6 tazas (30 oz) 54 gramos 868 gramos
Tamaño de la porción
Cantidad de café
Cantidad de agua

USO Y CUIDADO DE LA CAFETERA
Siga las siguientes instrucciones para reducir o eliminar la posibilidad
de romper la cafetera de vidrio:
• Deseche la cafetera inmediatamente si está rajada.
• Proteja la cafetera de golpes fuertes, rayones o manipulación
brusca. No use productos de limpieza abrasivos fuertes que puedan
rayar la cafetera. Los rayones pueden hacer que la cafetera se
rompa.
MANTENIMIENTO DEL USUARIO
Este aparato no contiene partes que el usuario pueda reparar.
Cualquier servicio de mantenimiento que no sea lo descrito en la
“Sección de limpieza” deberá ser realizado únicamente por un
representante autorizado del servicio de mantenimiento.
SERVICIO DE MANTENIMIENTO Y GARANTÍA
El Servicio de Mantenimiento y Garantía se puede consultar en línea
en www.mrcoffee.com o llámenos sin cargo al Departamento de
Servicio al Consumidor, al 1-800-MR COFFEE (1-800-672-6333).
11.