PROPER INSTALLATION
This Whole Home Water Filtration System must be properly installed and located in accordance with the Installation Instructions before it is used.
- Check with your local public works department for plumbing codes. You must follow their guidelines as you install the Whole Home Water Filtration System.
- Use the Whole Home Water Filtration System on a potable. safe-to-drink. home COLD water supply only. The filter cartridge will not purify water or make unsafe water safe to drink.
- Protect the Whole Home Water Filtration System and piping from freezing. Water freezing in the housing will damage it.
- Your Whole Home Water Filtration System is rated up to 120 psi water pressure. If your house water supply pressure is higher than 80 psi during the day (it may reach higher levels at night). install a pressure-reducing valve before the housing is installed.
- Do not install on HOT WATER. The temperature of the water supply to the Whole Home Water Filtration Housing must be between the minimum of 40°F and the maximum of 100°F. See the Performance Data section.
- Do not install the Whole Home Water Filtration System using copper solder fittings. The heat from the soldering process will damage the unit.
- The sump should remain installed on the system at all times. except during the filter replacement process.

- Before starting installation. verify if the cold water pipe is being used to ground electrical outlets in the home.
- Refer to the Installing the Ground Wire’ section before cutting the cold water piping
- Discard all unused parts and packaging material after installation. Small parts remaining after installation could be a choke hazard
- Do not install the filter in an outside location or anywhere the filter will be exposed to freezing temperature or direct sunlight.
REQUIRED TOOLS AND ACCESSORIES FOR INSTALLATION
- Pipe cutter
- Ruler or tape measure
- Cordless drill
- Emery paper or file
- Screwdriver
- Additional installation parts may be required:
- UL-approved grounding clamps and 6-gauge copper grounding wire
Optional accessories are available (Visa. MasterCard Discover cards accepted) by visiting our Website at
GEAppliances.com or from Parts and Accessories. call 877.959.8688 (U.S.) or 800.661.1616 (Canada).
CONTENTS INCLUDED WITH PRODUCT
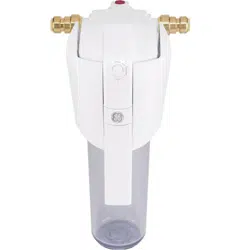
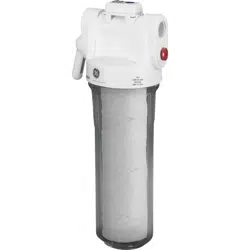
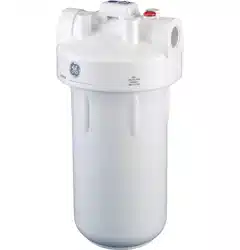
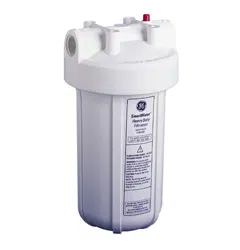
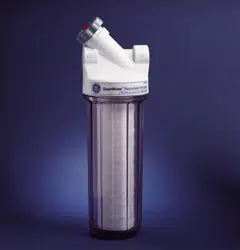
- Filter housing and head
- Product literature
- 2 quick connects
- Quick connect tool
- Mounting bracket
- 4 Hex-head screws and 4 Hex washer-head screws
- DC Power Cord (GXWH70M only)
SYSTEM SPECIFICATIONS
 Filter Cartridge Replacement
You should change your filter when the water flow is noticeably reduced or at least every 3 months.
Performance Data
 Turn off water to filter. To relieve the water pressure. turn the valve handle on the front of the unit to the “OFF” position and press the red pressure release button.
NOTE: GXWH70OM users should press and hold the white button down while turning to manually rotate the valve handle.
 Release the sump by pulling the filter holder handle up while holding on to the sump.
 Remove the filter by rotating 1/4 of a turn clockwise then discard used | filter. Wash the filter housing with mild soap and water. Do not use harsh cleaners or hot water.
 Inspect the filter housing O-ring. Make sure it is lightly lubricated with clean food-grade silicone grease (silicone grease is available through GEA Parts and Accessories: 877.959.8688 (Canada. 800.661.1616). part number (WS60S10005). Be sure the O-ring is seated in the groove (part number WS02X22023). It is recommended that you replace the O-ring if it is damaged.
 Place a new filter cartridge into the system. by rotating 1/4 turn counter clockwise.
 Reinstall the sump to the unit by placing the sump over the filter and aligning the sump pins with the system cap arms as you push the handle down into place.
 Rotate valve handle knob 180° to the “Filter” position. where it is aligned with the handle.
NOTE: GXWH/7OM users should press and hold the white button down while turning to manually rotate the valve handle.
 Press the red pressure-release button to remove trapped air.
 After installation, flush the cartridge for 10 minutes (40 gallons), wait one hour, then flush again for 10 minutes (40 gallons) before using the water.
STEP-BY-STEP INSTALLATION INSTRUCTIONS
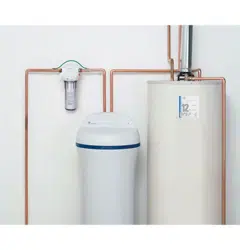
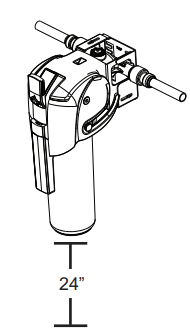
Installation Overview
NOTE: Be sure to allow a minimum space of 24” under the filter for removing the sump to change the cartridge.
Select Location
Select a location for the filter that is:
- protected from freezing.
- not exposed to direct sunlight.
It is recommended that a shut-off valve be placed on both sides of the filter.
It is recommended that a mounting bracket be used.
Cut Water Line
WARNING
A copper or galvanized cold water pipe may be used to ground electrical outlets in the home. Failure to maintain this ground path may result in an electric shock hazard. If the cold water pipe is used to ground electrical outlets. please refer to the Installing the Ground Wire section before cutting the pipe.
Turn off the water supply and open a nearby faucet to drain the water out of the pipes.
Select a secure location surface to install filter and mounting bracket. The location should align the filter system with inlet and outlet pipe and should not cause the pipes to bend or damage.
Using the template. mark the pipe where it will be cut relative to the mounting bracket location. Mark the distance “D” on the pipe, D is about 8 3/8
Note: It is recommended that the shut-off valve be placed before and after the filter.
Using a pipe cutter. cut pipe. Sand or file the cut ends of pipe to ensure that they are square and smooth.

Note: Have a bucket and towel available to collect excess water.
Install Mounting Bracket and Fittings
Instructions are for installing fittings onto %” copper or PEX plumbing. If the unit is to be installed on any other type of tubing (plastic. PVC. galvanized). consult a qualified plumber for additional hardware.
Use the supplied template to mark the holes on the wall for the mounting bracket.
Use the markings to drill 7/32” size pilot holes for provided wood screws.
Use 5/16” size screws for the mounting location (i.e. wood screws provided. or concrete screws) and loosely hand tighten the wall bracket into place.
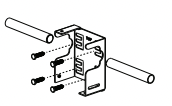
NOTE: Provided screws for use in wood only.
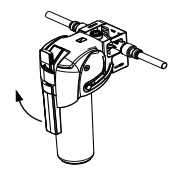
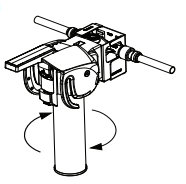
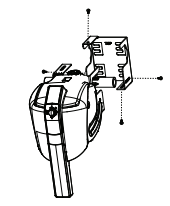
The inlet and outlet can be rotated to match your plumbing configuration(See picture)

Temporarily mount the POE system and adjust the wall bracket so the system inlet and outlet are aligned with the piping.
Attach 2 side brackets to the back of the system. (See picture)
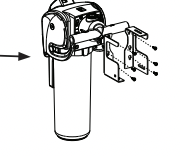
Remove the system and tighten screws holding mounting bracket securely to the wall.
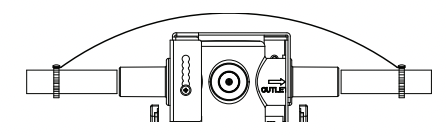
Attach Fittings to Water Line
Slide a quick connect fitting on each side of the pipe in the orientation shown.
Push the quick connects so the pipe is just showing outside the quick connect.
NOTE: Multiple installations and removals of the quick connect fittings could damage the pipes and lead to a leak.
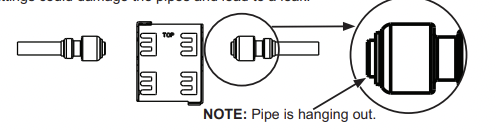
NOTE: Pipe is hahiging out.
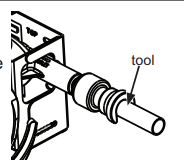
Installing the Unit
Mount POE system to wall bracket using provided screws.
NOTE: Multiple installations and removals of the quick connect fittings could damage the sysem and lead to a leak.
Using the quick connect tool. slide the quick connects fittings onto the system.
Installing the Ground Wire
NOTE: If your house plumbing is plastic. it would not be used as a grounding path. and this step should be skipped.

A copper or galvanized house cold water pipe is often used to ground electrical outlets in the home. Grounding protects you from electrical shock. The water filter housing may have broken this ground path. To restore connection. install an 18”-long. 6-gauge copper wire across the filter. tightly clamped using UL-approved 1/2’—1” bronze grounding clamps at both ends as shown. Zinc clamps should not be used on copper plumbing. Wire and clamps may be purchased separately from your local hardware store.
Clean copper pipe and ends of wire with emery paper. Bare wire is recommended. If insulated wire is used. it should be stripped 3/4” at each end before cleaning with emery paper.
Attach bronze clamps to pipe. Tighten screws.
Attach wire to clamps as shown. Tighten screws.
Final Check
Install filter. if not already done (see Filter Cartridge Replacement section).
Slowly turn on water supply.
Check entire system for leaks.
If leaking from fittings, shut off water and tighten or reseal fittings.
After installation, flush the cartridge for 10 minutes (40 gallons), wait one hour, then flush again for 10 minutes (40 gallons) before using the water.
APPLIANCE COMMUNICATION (for customers in the United States and its territories and Canada)
GE WiFi Connect
GE WiFi Connect Enabled*
If your water filter has a Connected Appliance information label located on the inside as shown. your water filter can be connected to your WiFi network. allowing it to communicate with your smart phone for remote monitoring. control and notifications. Depending on the water filter model you have. you either have a WiFi communication card built into the product. or a port for an external
WiFi ConnectPlus Module (sold separately). Please visit www.GEAppliances.com/connect to learn more about connected appliance features. and to learn what connected appliance apps will work with your Smart Phone.
WiFi Connectivity: For assistance with the appliance or the ConnectPlus network connectivity (for models that are WiFi enabled or WiFi optional). please call 1-800-220-6899.

Regulatory Information
FCC/IC Compliance Statement
This product complies with U.S. Federal Communications Commission (FCC) guidelines respecting safety levels of radio frequency (RF) exposure for Mobile devices.
FCC RF Radiation Exposure Statement:
This device complies with FCC RF radiation exposure limits set forth for an uncontrolled environment. This equipment should be installed and operated with a minimum of 20 cm between the radiator and your body. This transmitter must not be co-located or operating in conjunction with any other antenna or transmitter
FCC Part 15 Statement:
The wireless communication equipment installed on this device has been tested and found to comply with the limits for a Class B digital device. pursuant to part 15 of the FCC Rules. These limits are designed to:
(a) provide reasonable protection against harmful interference in a residential installation. This equipment generates. uses. and can radiate radio frequency energy and. if not installed and used in accordance with the instructions. may cause harmful interference to radio communications. However. there is no guarantee that interference will not occur in a particular installation. If this equipment does cause harmful interference to radio or television reception. which can be determined by turning the equipment off and on. the user is encouraged to try to correct the interference by one or more of the following measures:
+ Reorient or relocate the receiving antenna.
+ Increase the separation between the equipment and receiver.
+ Connect the equipment into an outlet on a circuit different from that to which the receiver is connected.
+ Consult the dealer or an experienced radio/TV technician for help.
(b) accept any interference received. including interference that may cause undesired operation of the device.
 Any changes or modifications not expressly approved by GE Appliance could void the user’s authority to operate the equipment.
LIMITED ONE-YEAR WARRANTY
- What does this warranty cover?
— Any defect in materials or workmanship in the manufactured product.
- What does this warranty not cover?
— Filter cartridge and batteries after 30 days from date of purchase.
— Service trips to your home to teach you how to use the product.
— Improper installation. delivery or maintenance.
— Failure of the product if it is abused. misused. altered. used commercially or used for other than the intended purpose.
— Use of this product where water is microbiologically unsafe or of unknown quality. without adequate disinfection before or after the system. Systems certified for cyst reduction may be used on disinfected water that may contain filterable cysts.
— Damage to the product caused by accident. fire. floods or acts of God.
— Incidental or con: ial dam: ible with this appliance. its installation or repair.
- For how long after the original purchase?
— One (1) year.
- How do | make a warranty claim?
— Retum to the retailer from which it was purchased. along with a copy of the “Proof of Purchase.” A new or reconditioned unit will be provided. This warranty excludes the cost of shipping the product to your home.
EXCLUSION OF IMPLIED WARRANTIES—Your sole and exclusive remedy is product exchange as provided in this Limited Warranty. Any implied warranties. including the implied warranties of merchantability or fitness for a particular purpose. are limited to one year or the shortest period allowed by law.
This warranty is extended to the original purchaser and any succeeding owner for products purchased for home or office use within the USA. In Alaska. the warranty excludes the cost of shipping or service to your home or office.
Some states do not allow the exclusion or limitation of incidental or consequential damages. This warranty gives you specific legal rights. and you may also have other rights. which vary from state to state. To know what your legal rights are. consult your local or state consumer affairs office or your state’s Attorney General.
Contact us at GEAppliances.com. or call toll-free at 800.646.2005 in the U.S.. or 877.994.5366 in Canada.