Loading ...
Loading ...
Loading ...
Follow these steps after the assembly STEPS to ensure proper function of your treadmill!
● If you are not comfortable performing these STEPS, please contact your local BODYCRAFT dealer or our
customer support department to arrange a qualified technician to come to your home or commercial location.
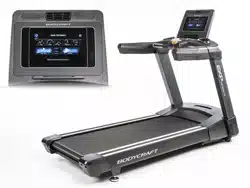
STEP 2: Next, adjust for Running Belt Tension. Stomp Test method: While straddling the Running Belt, with
your feet on the Side Rails, start the treadmill to 2.5 mph / 4 kmh, then while holding on to the handrails, use
your stronger foot only, stomp your foot down & forward to see if the Running Belt slips. If the belt does not slip,
continue to STEP 3. If the belt slips, the adjustment screws must be tightened evenly both right & left sides in
order to adjust the belt properly. The adjustment screws are located at the rear of the treadmill in the end caps
(see figure below).
v1.2
○ Both rear roller adjustment screws should be tightened in a
clockwise direction with a 6mm Hex Wrench.
○ After each adjustment check the running belt for slipping after
each adjustment. If the belt continues to slip, repeat this process until
the belt stops slipping. Make sure to ONLY turn both adjustment screws
1/2 turn each time until the slipping stops. This will ensure that you do not
over-tighten the rollers.
Over-tightening the rollers may cause serious damage to the treadmill
○ Once you have adjusted the tension, you need to do an Running Belt Alignment
procedure in STEP 3.
Product Setup - Running Belt Tension & Alignment
28
https://youtu.be/
73FGa3LrGVQ
Watch STEP 2
on YouTube
STEP 1: Level the treadmill. Refer to the “Leveling the treadmill”
procedure from earlier Product Setup pages for more details.
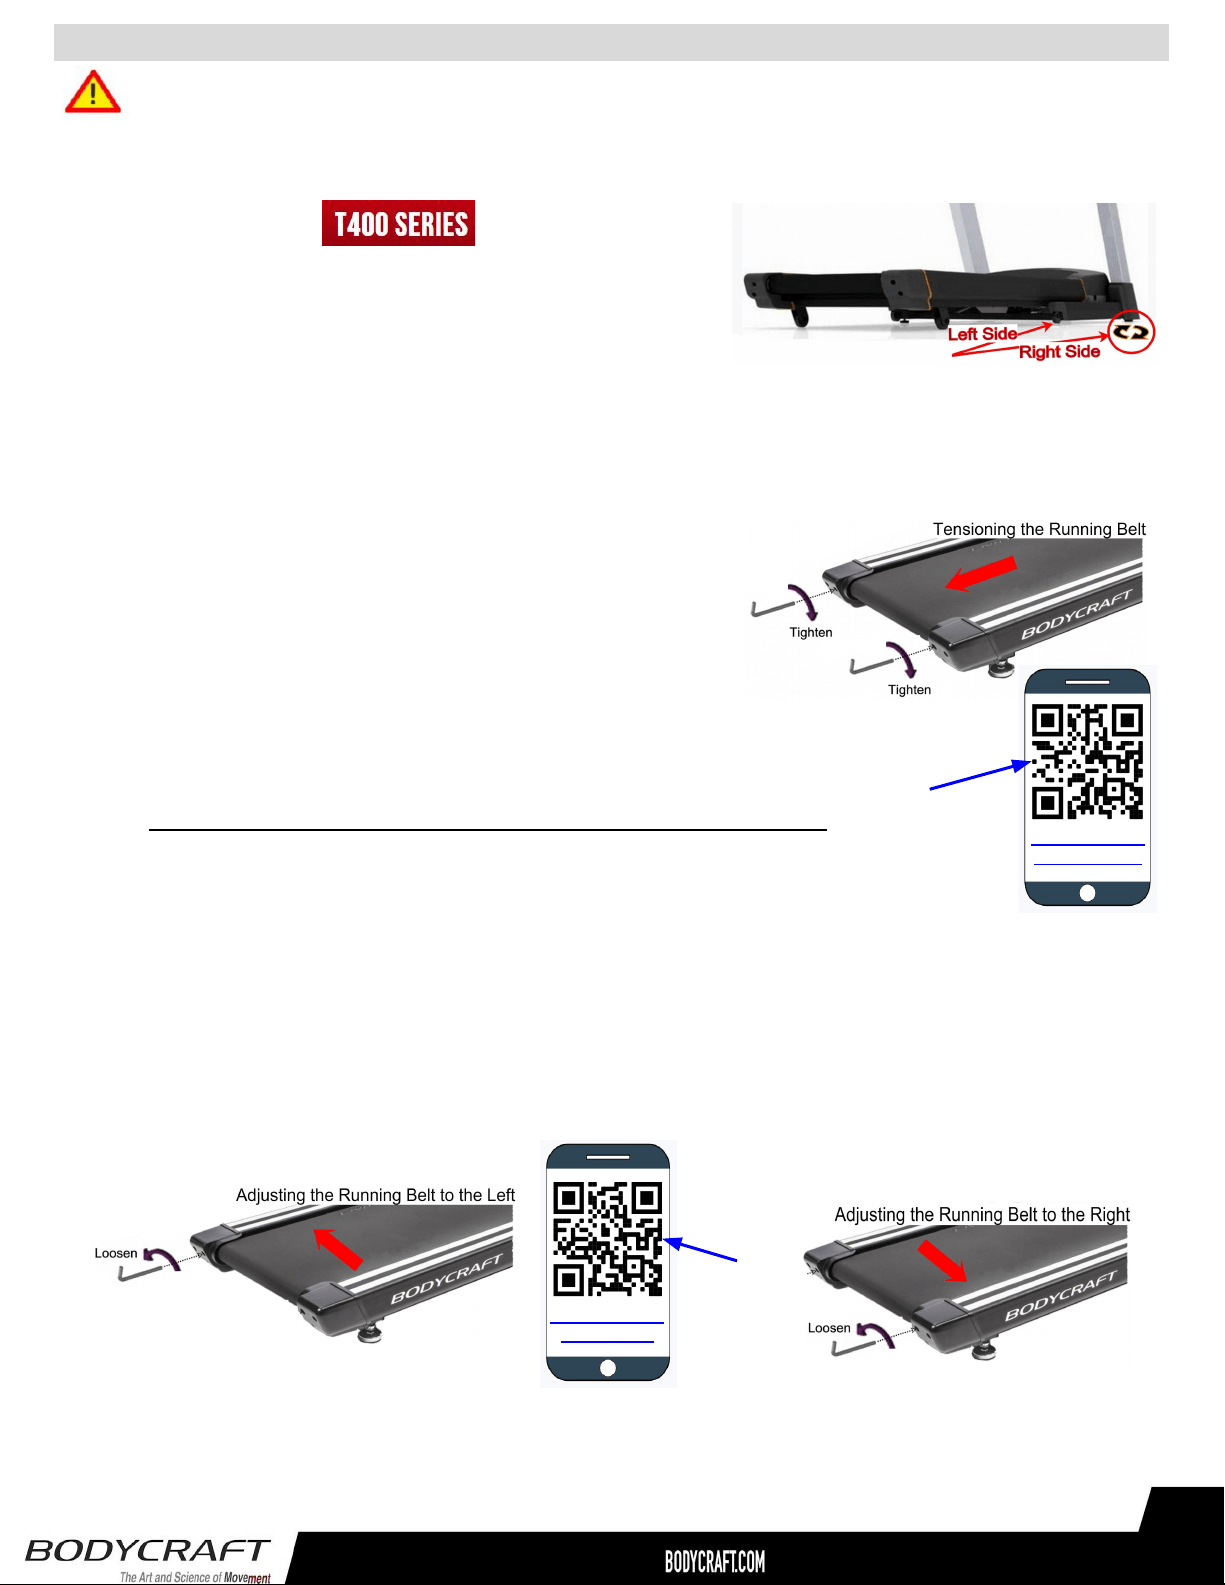
STEP 3: Next, adjust for Running Belt Alignment. The Running Belt needs to be centered between the Side
Rails with the same amount of space from both Left & Right edges of the Running Belt to each Side Rail.
STEP 4: Double confirm the Running Belt tension is still correct by simulating a Max Weight User. Simply start
walking on the treadmill at 3 mph. Then hold on the front handrails (with BOTH HANDS) and apply as much
downward and forward pressure with your feet while walking. Your feet should be moved back with the motion of
the Running Belt without any slipping. If there is any slipping, then go back to STEP 2.
○ Start the treadmill and run it at 5 mph / 8 km h for 1 to 2 minutes to insure the belt will stay in the center.
○ If the Running Belt is not centered, loosen the adjustment screw on the opposite side (where it has more
space), turning it counterclockwise 1/4 turn. Wait 1 min to confirm the Running Belt is now centered.
○ Repeat the procedure if necessary ONLY doing a 1/4 turn per adjustment.
https://youtu.be/
AMju1e25vI4
Watch STEP 3
on YouTube
Belt Tension and Alignment Adjustment
Proper belt adjustment is important for smooth and safe operation of the treadmill. If the belt is too
loose, you will feel a slight hesitation each time you take a step. The adjustment screws must be
tightened evenly in order to adjust the belt properly. The adjustment screws are located at the rear of
the treadmill in the end caps.
Both adjustment screws should be tightened 1/4 turn in a clockwise direction with a wrench and the
belt checked for slipping after each adjustment. If the belt continues to slip, repeat this process until
the belt stops slipping. Make sure to only turn the adjustment screws 1/4 turn each time until the
slipping stops. This will insure that you do not over-tighten the rollers. Over-tighten the rollers may
cause serious damage to the treadmill.
Belt Alignment
If the belt tracks too close to one side, loosen the adjustment screw on the opposite side, turning it
counterclockwise 1/4 turn. Restart the treadmill and run it at 5 mph / 8 kph for 1 to 2 minutes to insure
the belt will stay in the center. Repeat the procedure if necessary.
If noises develop or malfunctions occur, stop using treadmill and contact BODYCRAFT
Customer Support immediately.
RUNNING BELT TENSION AND ALIGNMENT ADJUSTMENT
28
Lubrication to the deck is very important to your treadmill.
Your treadmill is equipped with a pre-lubricated low friction, reversible deck, that reduces the frictional
forces working against the treadmill’s drive motor. Over time, belt and deck wear due to regular use can
increase friction forces and make your treadmill’s motor work harder. This is true for any motor driven
mechanical device. Keeping friction to a minimum helps extend component life. Additionally, nonuse of
the treadmill for an extended period can lead to a dry deck. If the treadmill belt slows down very quickly
after you have completed your workout, it may lack adequate silicone.
WHY LUBRICATE THE BELT/DECK AREA?
Loading ...
Loading ...
Loading ...