Accessories
6
Inserting the batteries
7
Operating range of the remote control unit
7
Features
8
High quality sound
8
High performance
9
Part names and functions
11
Front panel
11
Rear panel
13
Remote control unit
16
Connections
Connecting an amplifier
21
Connecting to a device with digital audio input connectors
22
Connecting to a device with digital audio output connectors
23
Connecting a PC or Mac
24
Connecting a USB memory device to the USB port
25
Connecting to a home network (LAN)
26
Wired LAN
26
Wireless LAN
27
Connecting an external control device
28
FLASHER IN jack
28
REMOTE CONTROL connectors
29
Connecting the power cord
30
Contents Connections Playback Settings Tips Appendix
2
Front panel Rear panel
Remote control
unit
Index
Playback
Basic operation
32
Turning the power on
32
Switching the power to standby
32
Selecting the input source
33
Listening to Internet Radio
34
Listening to Internet Radio
35
Playing back files stored on a PC or NAS
36
Playing back files stored on a PC or NAS
37
Playing a USB memory device
39
Playing files stored on USB memory devices
40
Listening to music on a Bluetooth device
42
Playing music from Bluetooth device
43
Pairing with other Bluetooth devices
44
Reconnecting to this unit from a Bluetooth device
45
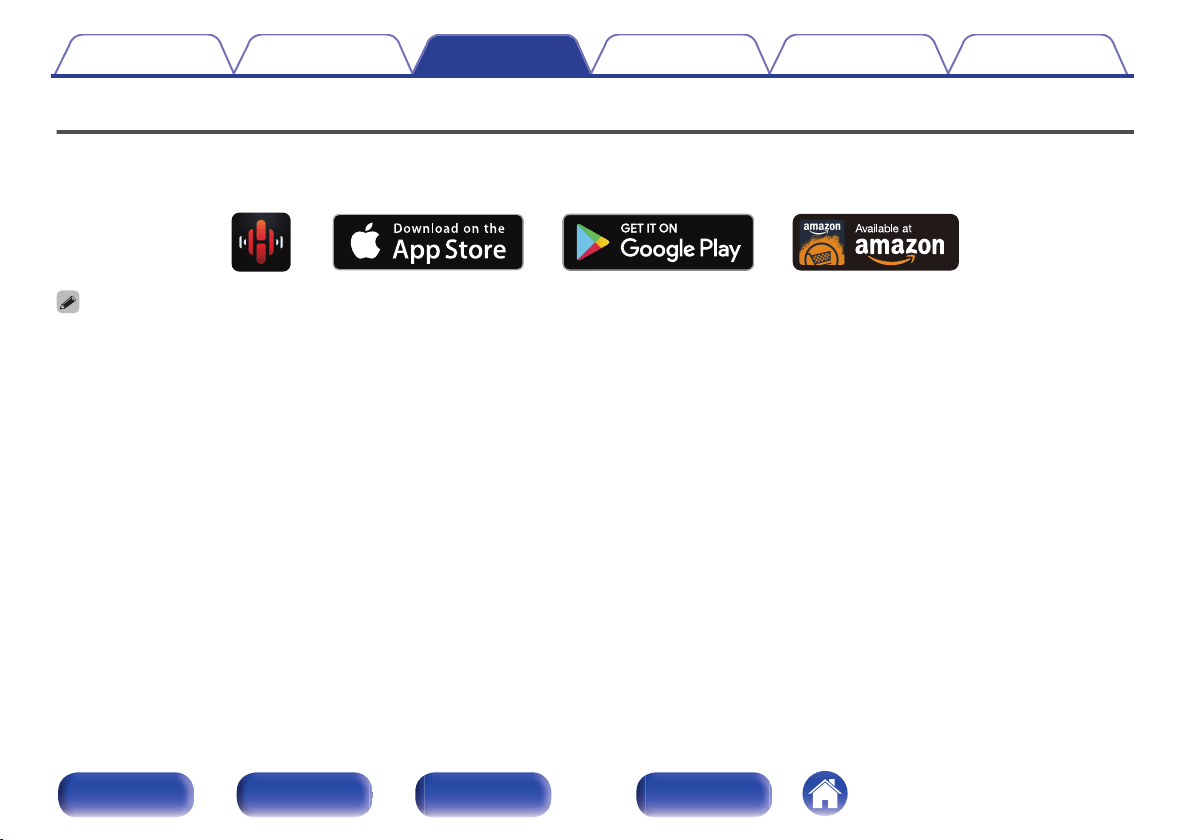
Getting the HEOS App
46
HEOS Account
47
Playing from streaming music services
48
Listening to the same music in multiple rooms
51
Playing CDs
55
Playing CDs
55
Playing tracks in a specific order (Program playback)
57
Playing DATA CDs
58
Playing files
59
Using as a D/A converter
61
Connecting and playing back from a computer (USB-DAC)
62
Connect and playback from a digital device (Coaxial/Optical 1/
Optical 2)
71
AirPlay function
72
Playing songs from your iPhone, iPod touch or iPad
73
Playing iTunes music with this unit
73
Perform iTunes playback operations with the remote control unit
of this unit
74
Spotify Connect function
75
Playing Spotify music with this unit
75
Convenience functions
76
Adding to HEOS Favorites
76
Playing back HEOS Favorites
77
Deleting a HEOS Favorites
77
Switching the display’s brightness
77
Using the sleep timer
78
Contents Connections Playback Settings Tips Appendix
3
Front panel Rear panel
Remote control
unit
Index
Settings
Menu map
79
Menu operation
84
Inputting characters
85
Using the number buttons
85
Using the cursor buttons
86
General
87
Language
87
Auto-Standby
87
Usage Data
88
Firmware
88
Information
91
Reset
91
Network
92
Network Information
92
Network & USB-A
92
Wi-Fi
92
Bluetooth
92
Network Control
93
Friendly Name
93
Connection
94
Settings
97
Diagnostics
98
HEOS Account
99
You have not signed in
99
You have already signed in
99
Audio
100
Filter
100
Lock Range
100
Variable Out
101
Volume Limit
101
Digital Out
101
Phones
101
H/P Amplifier Gain
102
Switching the function of the volume buttons on the remote
control
103
Setting the remote control operation mode to network CD player
operation mode
104
Setting the remote control operation mode to amplifier operation
mode
104
Contents Connections Playback Settings Tips Appendix
4
Front panel Rear panel
Remote control
unit
Index
Tips
Contents
105
Tips
106
Troubleshooting
108
Power does not turn on / Power is turned off
109
Operations cannot be performed through the remote control unit
110
Display on this unit shows nothing
110
No sound comes out
111
Sound is interrupted or noise occurs
112
Desired sound does not come out
114
AirPlay cannot be played back
114
USB memory devices cannot be played back
116
Bluetooth cannot be played back
117
The Internet radio cannot be played back
118
Music files on PC or NAS cannot be played back (Music server)
119
Various online services cannot be played
120
Cannot connect to a wireless LAN network
120
Cannot playback Discs
122
PC or Mac files cannot be played back (USB-DAC)
123
Audio from digital devices cannot be played back (Coaxial/
Optical)
124
Update/upgrade error messages
125
Resetting network settings
126
Appendix
Playing back Discs
127
Files
127
Playback order of music files
128
About discs and files
129
Playing back a USB memory devices
130
Cautions on using media
132
Inserting a disc
132
How to handle media
133
Cleaning discs
133
D/A converter
134
Playing back a Bluetooth device
134
Playing back files stored on a PC and NAS
135
Playing back Internet Radio
136
Explanation of terms
137
Trademark information
140
Specifications
142
Index
147
License
149
Contents Connections Playback Settings Tips Appendix
5
Front panel Rear panel
Remote control
unit
Index

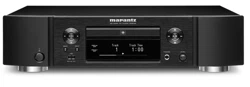
Thank you for purchasing this Marantz product.
To ensure proper operation, please read this owner’s manual carefully before using the product.
After reading this manual, be sure to keep it for future reference.
Accessories
Check that the following parts are supplied with the product.
.
Quick Start Guide
CD-ROM
(Owner’s Manual)
Safety Instructions
Notes on radio
Warranty
(for USA/for CANADA)
Power cord
Remote control unit (RC001PMND)
R03/AAA batteries
Audio cable Remote connector cable External antennas for
Bluetooth/wireless
connectivity
Contents Connections Playback Settings Tips Appendix
6
Front panel Rear panel
Remote control
unit
Index
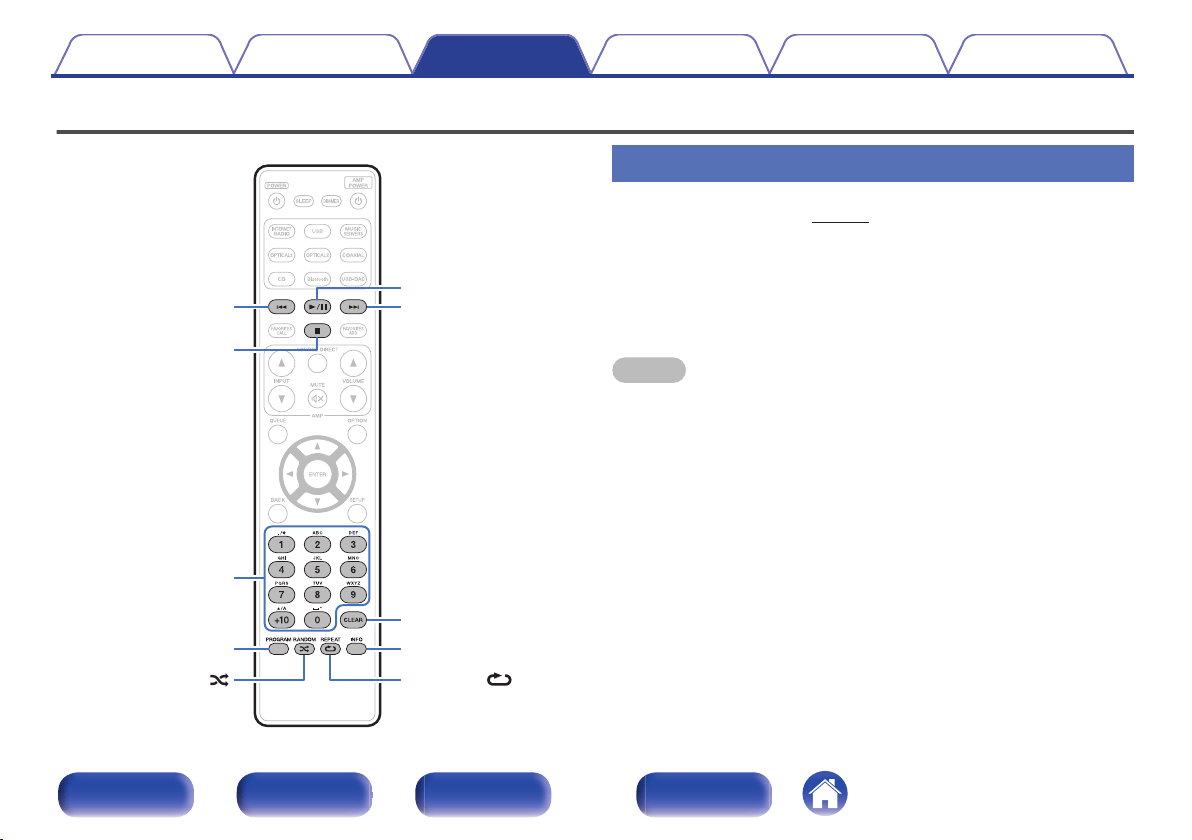
Inserting the batteries
1
Remove the rear lid in the direction of the arrow and
remove it.
.
2
Insert two batteries correctly into the battery
compartment as indicated.
.
Batteries
3
Put the rear cover back on.
NOTE
0
To prevent damage or leakage of battery fluid:
0
Do not use a new battery together with an old one.
0
Do not use two different types of batteries.
0
Remove the batteries from the remote control unit if it will not be in use for long
periods.
0
If the battery fluid should leak, carefully wipe the fluid off the inside of the battery
compartment and insert new batteries.
Operating range of the remote control
unit
Point the remote control unit at the remote sensor when operating it.
.
30°30°
Approx. 23 ft/7 m
Contents
Connections Playback Settings Tips Appendix
7
Front panel Rear panel
Remote control
unit
Index
Features
High quality sound
0
Toroidal transformer
This unit features a toroidal transformer that produces less vibration and
magnetic leakage flux compared to conventional power transformers.
The materials and manufacturing process of the ring-shaped core are
strictly controlled to reduce vibration, while the short-ring attached to the
perimeter of the transformer reduce magnetic leakage flux.
0
Large-capacitance block capacitor
A large capacitance 3,300 μF capacitor carefully selected for its
acoustic characteristics is incorporated into the power supply circuit.
0
High Sound Quality Parts Employed
The unit’s features the same audiophile-grade film capacitors,
electrolytic capacitors and MELF resistors specifically used in top-range
models.
0
Peripheral circuitry off function minimizes audio output signal
interference
This unit has functions to turn off the network, USB memory playback,
Wi-Fi, Bluetooth, headphones output circuit, variable audio output circuit
and digital output circuit and clear the display to prevent noise from
surrounding circuits from entering the audio signal output from the unit.
0
Low noise amp due differential input HDAM, and equipped with a
low distortion filter circuit due to high speed HDAM
®
SA2 delivery
amp
0
Double-layered chassis
0
High-grade machined Fixed analog audio output connectors
0
Marantz unique filtering technology (MMDF: Marantz Musical
Digital Filtering)
This unit is equipped with oversampling and digital filter functions using
an original algorithm created by Marantz. The unit supports PCM signal.
Toggle between the two types to suit your preferences.
0
High grade headphone circuit
The high-grade headphone circuit incorporates HDAM
®
SA2 amplifier to
enable headphone listening of high quality sound reproduction, late at
night or in other such situations.
0
Isolation design
To prevent audio quality from degrading due to noise from external
devices when this unit is connected to external devices such as
computers, the ground circuit for the Digital input interface device is
isolated from the audio circuit.
Contents
Connections Playback Settings Tips Appendix
8
Front panel Rear panel
Remote control
unit
Index
High performance
0
Equipped with a USB-DAC function to support playback of high-
resolution sound sources
This unit supports the playback of high resolution audio formats such as
DSD (2.8/5.6/11.2 MHz) and PCM files up to 384 kHz/32 bits. It
provides high quality playback of high resolution files into this unit from a
computer via USB-B connection.
0
Support for High Quality Audio playback via USB and networks
This unit supports the playback of high resolution audio formats such as
DSD (2.8/5.6 MHz) and WAV/FLAC/Apple Lossless Audio Codec
(ALAC) files up to 192 kHz/24 bits.
0
Can be used as a D/A convertor (Coaxial/Optical)
Digital audio signals input from an external device into this unit can be
converted and output as analog signals using this unit’s D/A converter.
0
The device is equipped with a AirPlay
®
function in addition to
network functions such as Internet radio etc.
You can enjoy a wide variety of content, including listening to Internet
Radio, playing audio files stored on your PC. This unit also supports
Apple AirPlay which lets you stream your music library from an iPhone
®
,
iPad
®
, iPod touch
®
or iTunes
®
.
0
Wireless connection with Bluetooth devices can be carried out
easily
You can enjoy music simply by connecting wirelessly with your
smartphone, tablet, PC, etc.
0
Support for Gapless playback
Playback with no gap between music files. (for WAV/FLAC/ALAC/DSD
only)
0
Compatible with the HEOS App
z
for performing basic operations
of the unit with an iPad, iPhone or Android™ devices (Google,
Amazon Kindle Fire)
z
Download the appropriate HEOS App for your iOS or Android devices. This unit
needs to be connected to the same LAN or Wi-Fi (wireless LAN) network that
the iPhone or iPod touch is connected to.
Contents
Connections Playback Settings Tips Appendix
9
Front panel Rear panel
Remote control
unit
Index
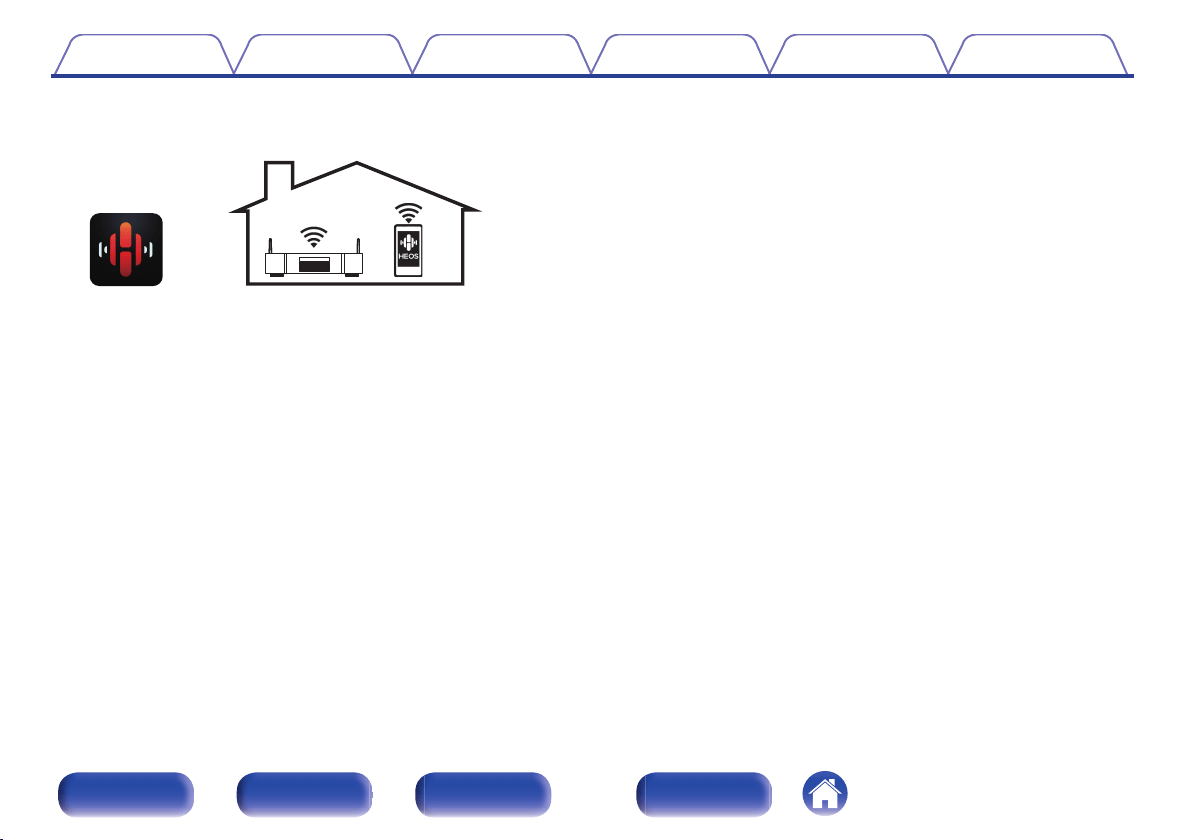
0
HEOS provides streaming music from your favorite online music
sources
.
HEOS wireless multi-room sound system that enables you to enjoy your
favorite music anywhere and everywhere around your home. By utilizing
your existing home network and the HEOS App (available for iOS,
Android and Amazon devices), you can explore, browse, and play
music from your own music library or from many online streaming music
services.
When multiple HEOS devices are connected to the same network,
HEOS devices can be grouped to play back the same music on all
devices simultaneously, or different music can be played on each
separate HEOS device.
0
Supports MP3 and WMA file CD playback
MP3 and WMA files that have been recorded onto CD-R or CD-RW
discs can be played back on this CD player.
0
Headphone Amplifier Gain selector function
This unit has a gain control function with three levels that can be
switched according to the characteristics of the connected headphones.
0
Equipped with analog audio output connectors (VARIABLE)
In addition to the normal analog audio output connectors (FIXED), this
unit is equipped with analog audio output connectors (VARIABLE) that
allow you to adjust the volume of the audio signal output from this unit.
These can be connected to the Power Amplifier to adjust the volume.
0
OLED (Organic Light Emitting Diode) display that can display 3
lines
0
Equipped with auto standby mode function that reduces power
consumption
Contents
Connections Playback Settings Tips Appendix
10
Front panel Rear panel
Remote control
unit
Index
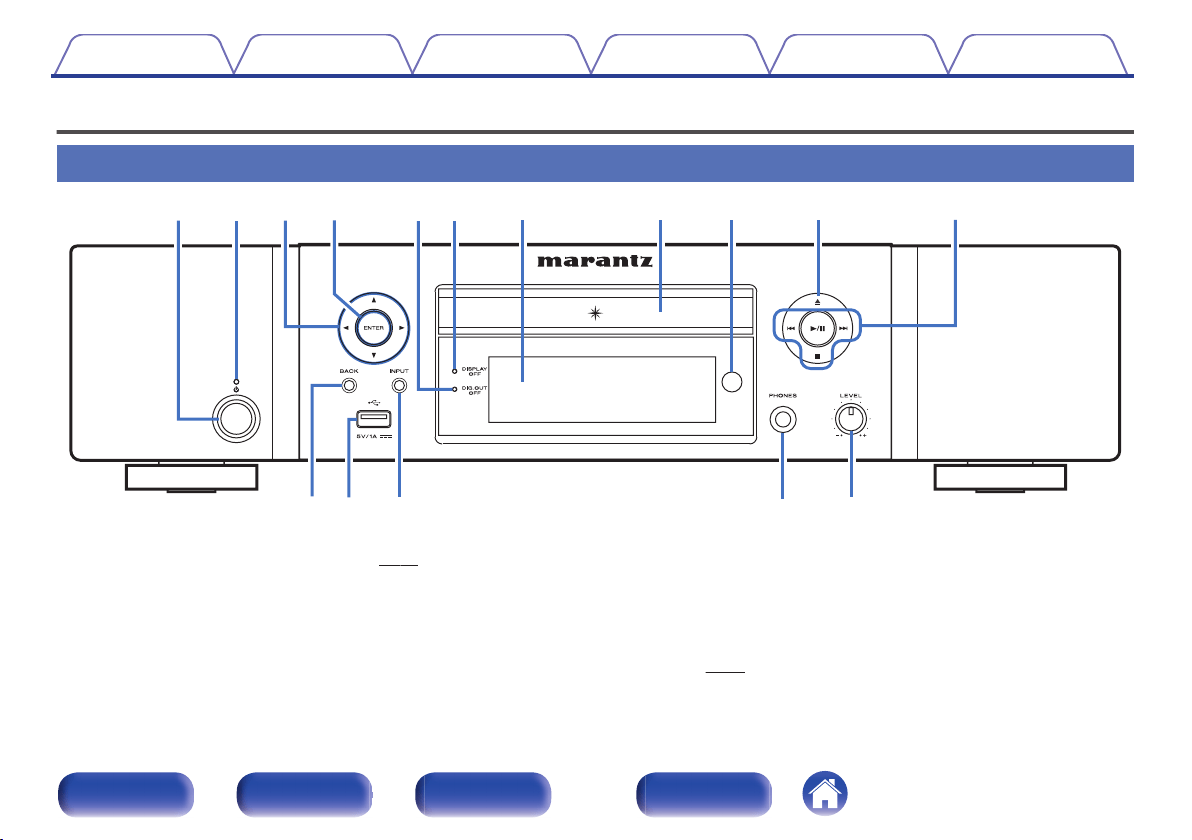
Part names and functions
Front panel
.
roi Q1Q0uytwq e
Q
3
Q
4
Q2
Q
5
Q
6
A
Power operation button (X)
This turns the power on/off (standby). (v p. 32)
B
Power indicator
This is lit as follows according to the power status:
0
Off: Power on
0
Red: Normal standby
0
Orange: Standby when the following settings are configured
0
When “Network Control” is set to “On”
(v
p. 93)
Contents Connections Playback Settings Tips Appendix
11
Front panel Rear panel
Remote control
unit
Index
.
oi Q1Q0uyt
Q
3
Q
4
Q
5
Q
6
Q2
r
e
C
Cursor buttons (uio p)
These select items.
D
ENTER button
This determines the selection.
E
Digital output off indicator (DIG. OUT OFF)
This indicator lights up when the “Digital Out” setting is set to “Off”.
(v p. 101)
F
DISPLAY OFF indicator
This indicator lights up when the display is off. (v
p. 77)
G
Display
Various information is displayed here.
H
Disc tray
Used to insert a disc. (v
p. 132)
I
Remote control sensor
This receives signals from the remote control unit. (v p. 7)
J
Disc tray open/close button (5)
Opens and closes the disc tray. (v p. 55)
K
System buttons
These perform playback related operations.
0
Play/pause button (1/3)
0
Skip buttons (8, 9)
0
Stop button (2)
L
BACK button
Returns to the previous item.
M
USB port (T)
This is used to connect USB storages (such as USB memory
devices). (v
p. 25)
N
INPUT button
These switch the input source. (v p. 33)
O
Headphones jack (PHONES)
Used to connect headphones.
NOTE
0
To prevent hearing loss, do not raise the volume level excessively when using
headphones.
P
Headphone volume control knob (LEVEL)
Adjusts the headphone volume.
Contents
Connections Playback Settings Tips Appendix
12
Front panel Rear panel
Remote control
unit
Index

.
wqertyq
A
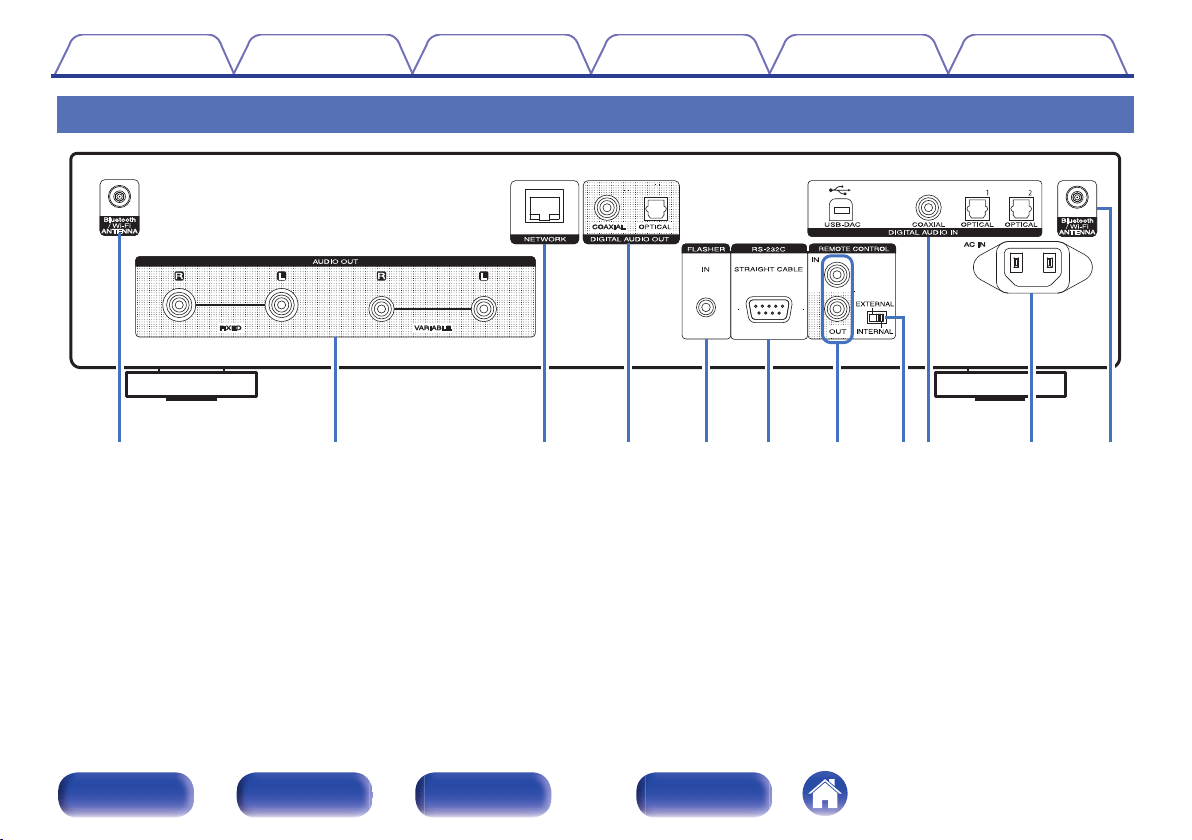
Bluetooth/wireless LAN antenna connectors
Used to connect the included external antennas for Bluetooth/wireless
connectivity when connecting to a network via wireless LAN, or when
connecting to a handheld device via Bluetooth. (v p. 27)
A
Place the external antennas for Bluetooth/wireless connectivity
evenly over the screw terminal of rear.
B
Turn clockwise until the antennas is fully connected.
C
Rotate the antenna upwards for best reception.
.
qwe
B
AUDIO OUT connectors
Used to connect devices equipped with analog audio inputs connectors
or an external power amplifier. (v p. 21)
C
NETWORK connector
Used to connect to a LAN cable when connecting to a wired LAN
network. (v p. 26)
D
DIGITAL AUDIO OUT connectors
Used to connect an AV receiver or D/A converter that has a digital input
connectors. (v p. 22)
E
FLASHER IN jack
Used to connect a control box, etc. (v
p. 28)
F
RS-232C connector
Used to connect home automation controller devices fitted with
RS-232C connectors. Consult the owner’s manual of the home
automation controller for more information about serial control of this
unit.
Perform the operation below beforehand.
A
Turn on the power of this unit.
B
Turn off the power of this unit from the external controller.
C
Check that the unit is in the standby mode.
Contents Connections Playback Settings Tips Appendix
14
Front panel Rear panel
Remote control
unit
Index
.
uoQ
0
i
G
REMOTE CONTROL connectors
Used to connect to a Marantz audio device that is compatible with the
remote control function. (v p. 29)
H
EXTERNAL/INTERNAL switch
Turn this switch to “EXTERNAL” to operate the unit by pointing the
remote control at the amplifier connected to this unit using the remote
control connection. (v p. 29)
I
DIGITAL AUDIO IN connectors
Used to connect a computer or devices equipped with digital audio
output connectors. (v
p. 23)
J
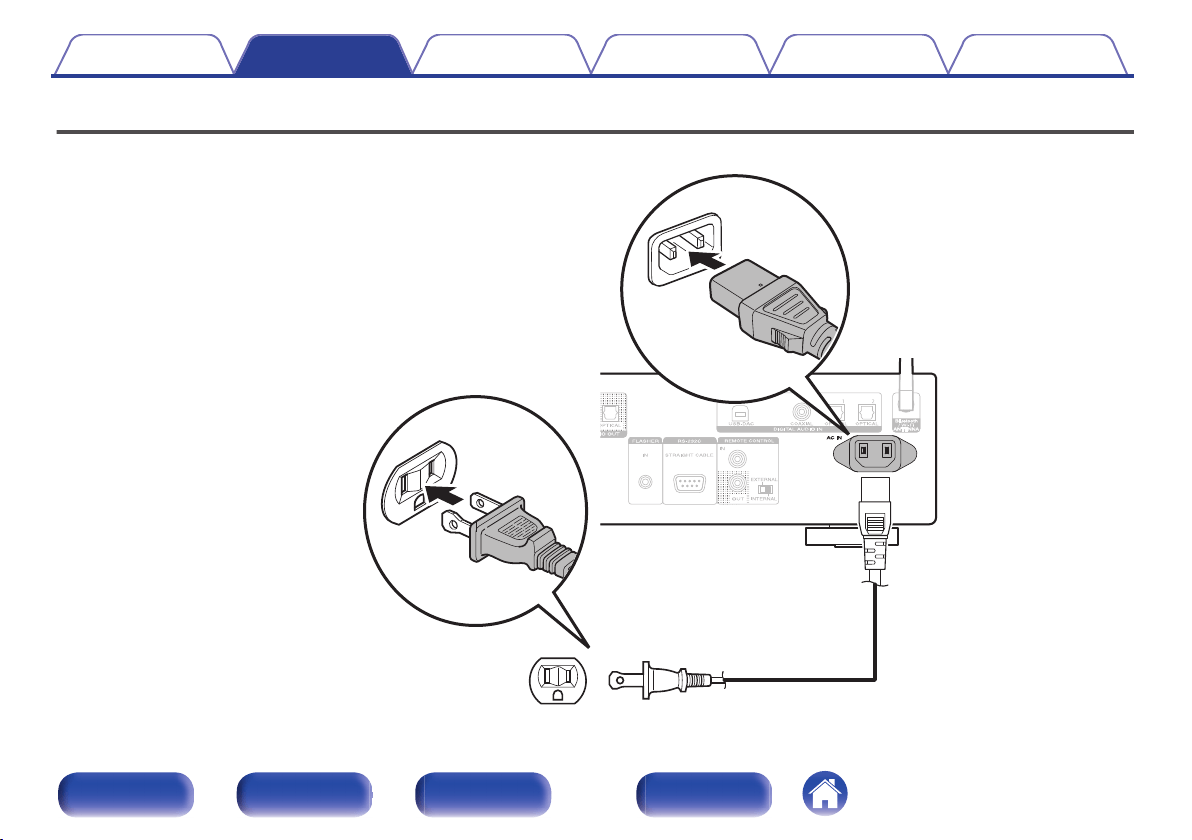
AC inlet (AC IN)
Used to connect the power cord. (v
p. 30)
Contents Connections Playback Settings Tips Appendix
15
Front panel Rear panel
Remote control
unit
Index
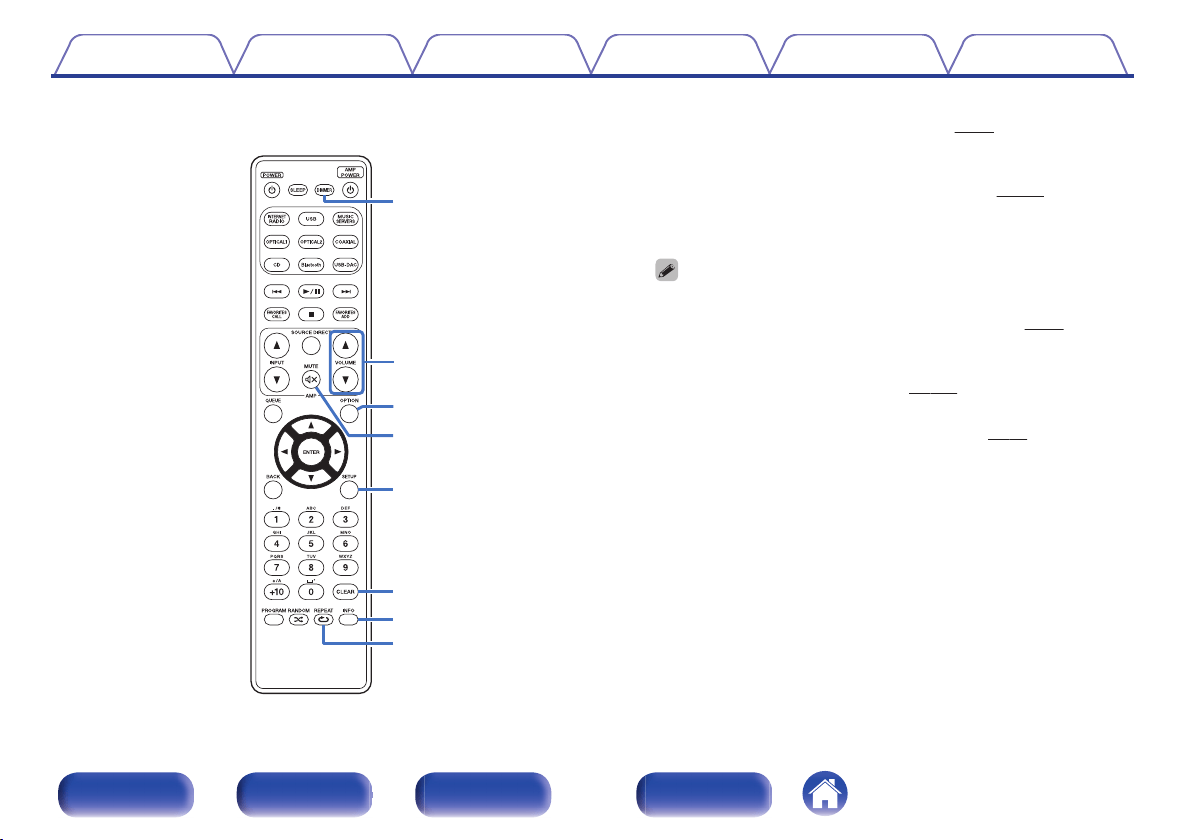
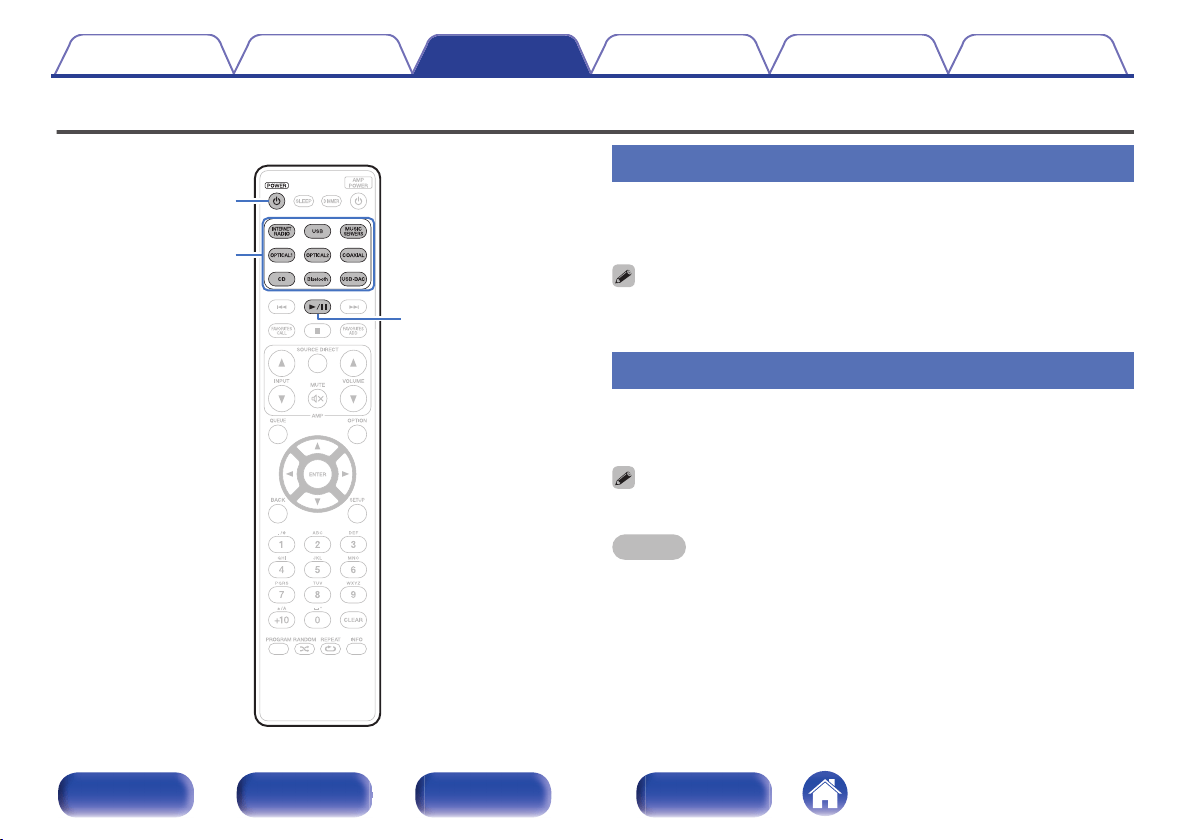
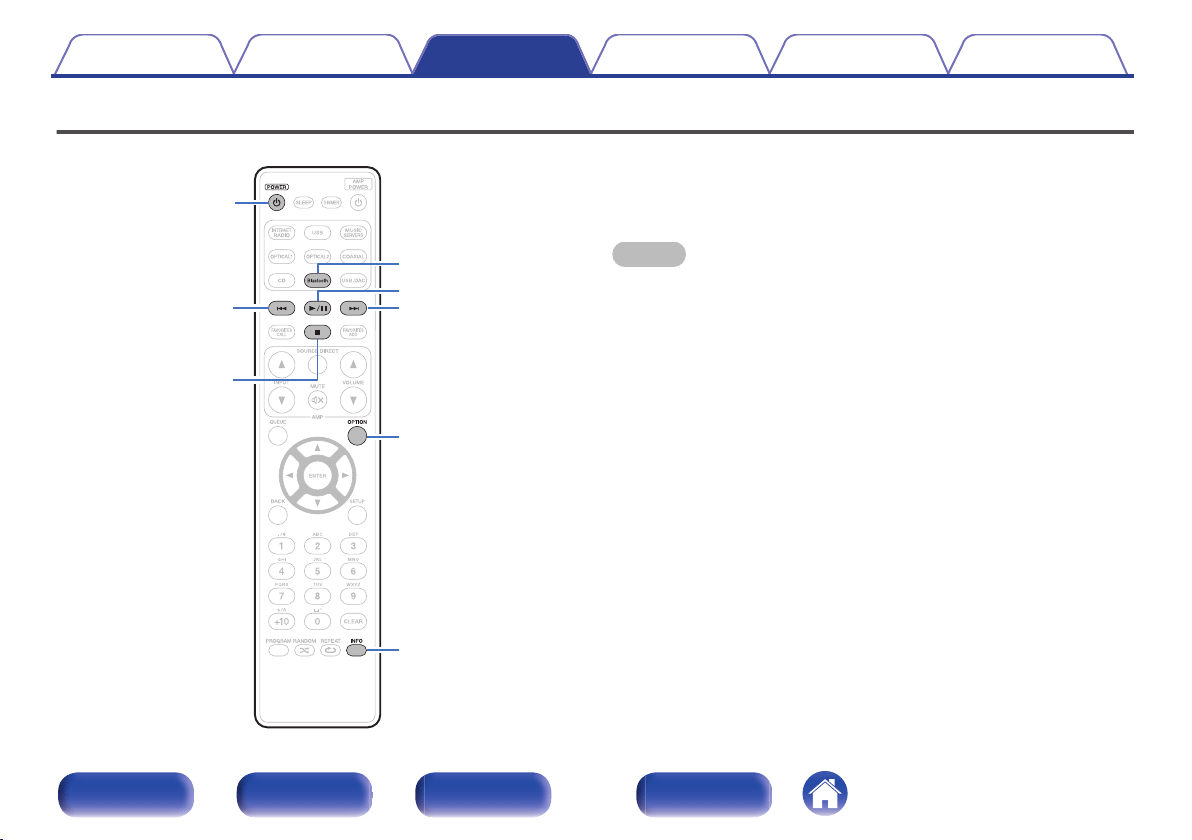
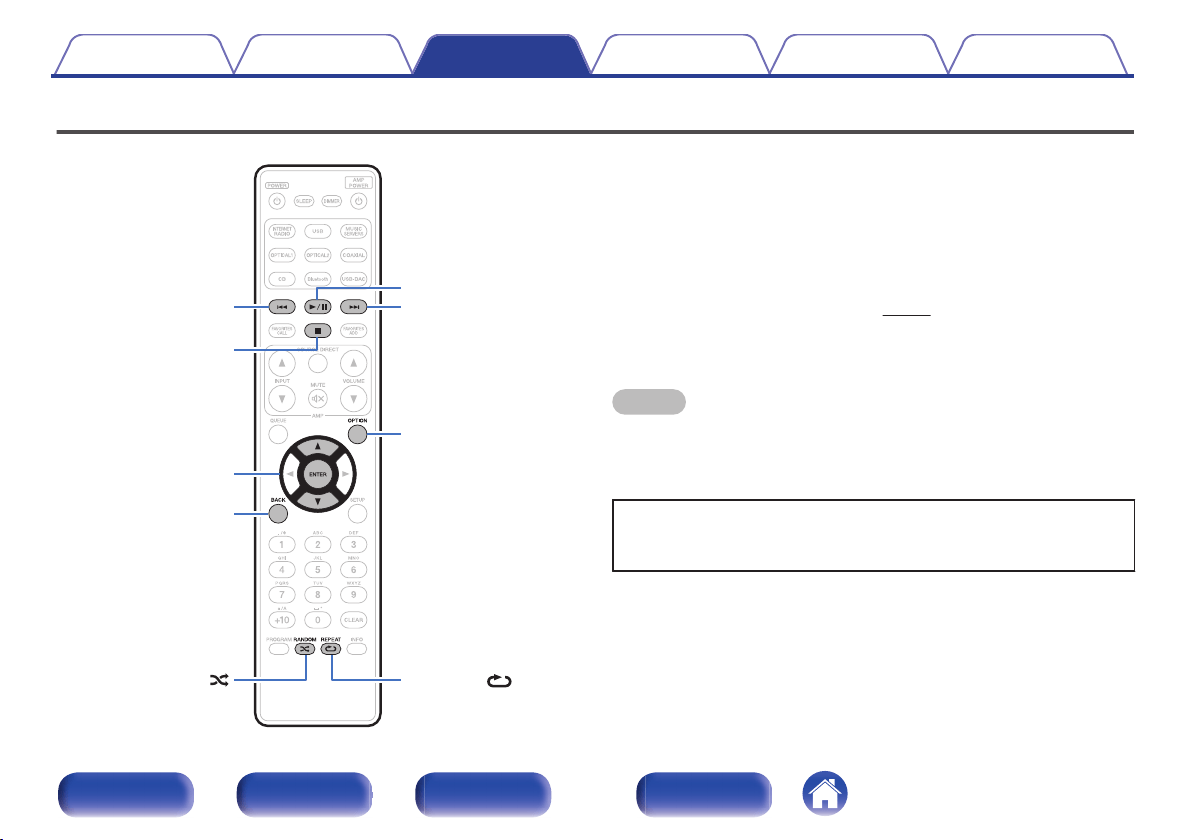
Remote control unit
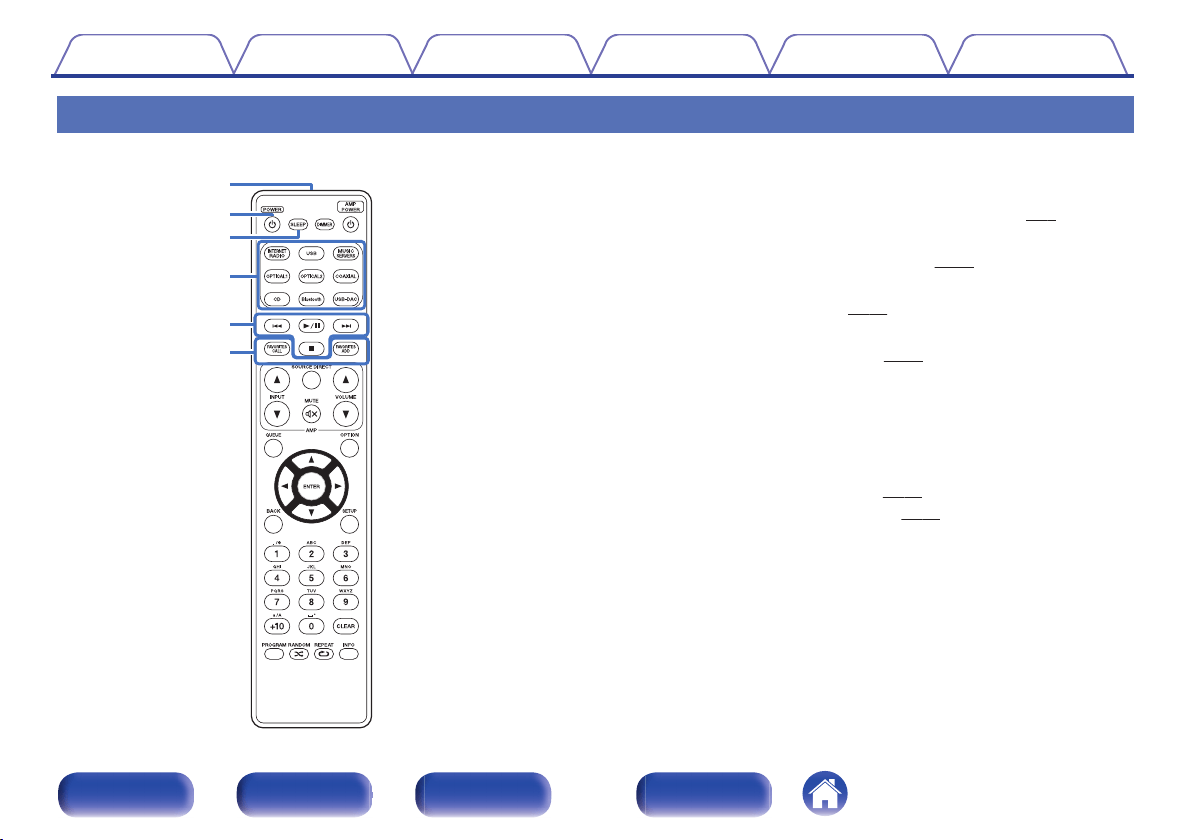
w
q
r
e
t
y
o
Operating this unit
A
Remote control signal transmitter
This transmits signals from the remote control unit. (v
p. 7)
B
Power operation button (POWER X)
This turns the power on/off (standby). (v p. 32)
C
SLEEP button
This sets the sleep timer. (v
p. 78)
D
Input source select buttons
These select the input source. (v
p. 33)
E
System buttons
These perform playback related operations.
F
FAVORITES CALL / ADD buttons
This allows you to register content to “HEOS Favorites” and call
registered content.
0
“Adding to HEOS Favorites” (v
p. 76)
0
“Playing backHEOS Favorites” (v
p. 77)
Contents
Connections Playback Settings Tips Appendix
16
Front panel Rear panel
Remote control
unit
Index
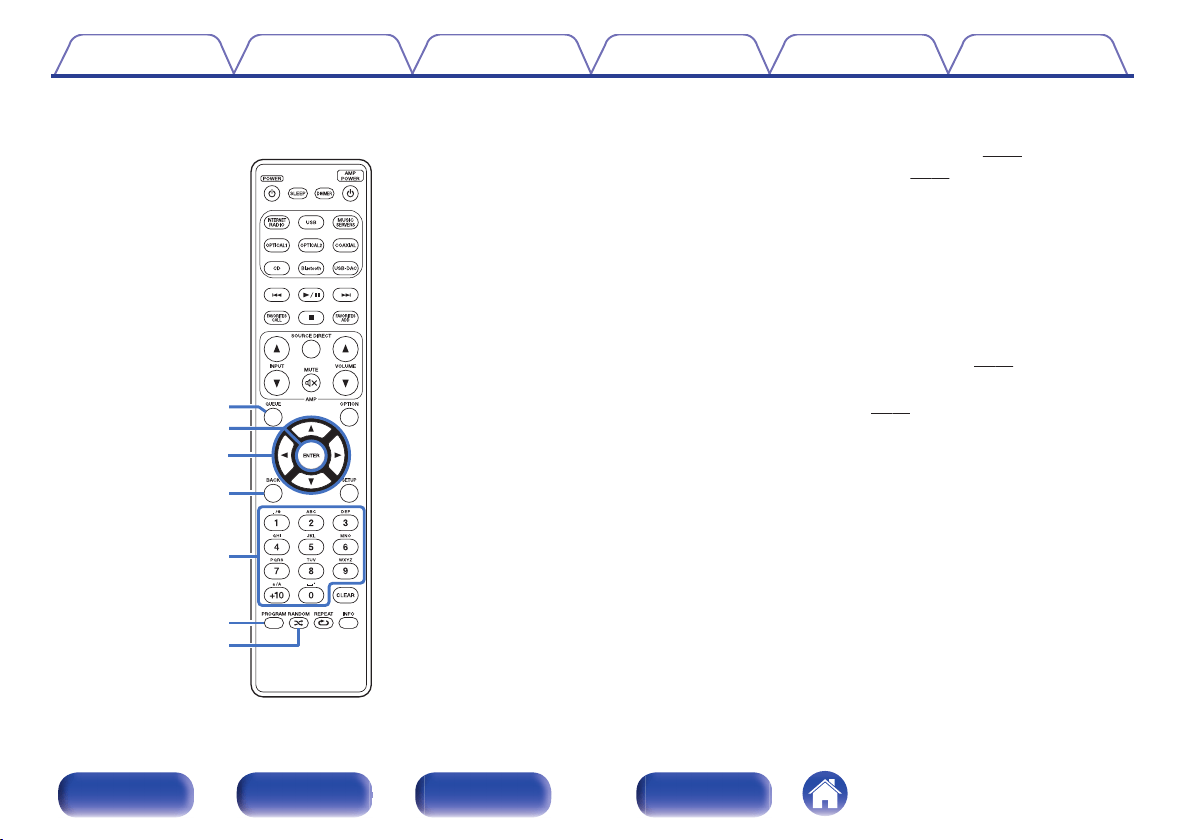
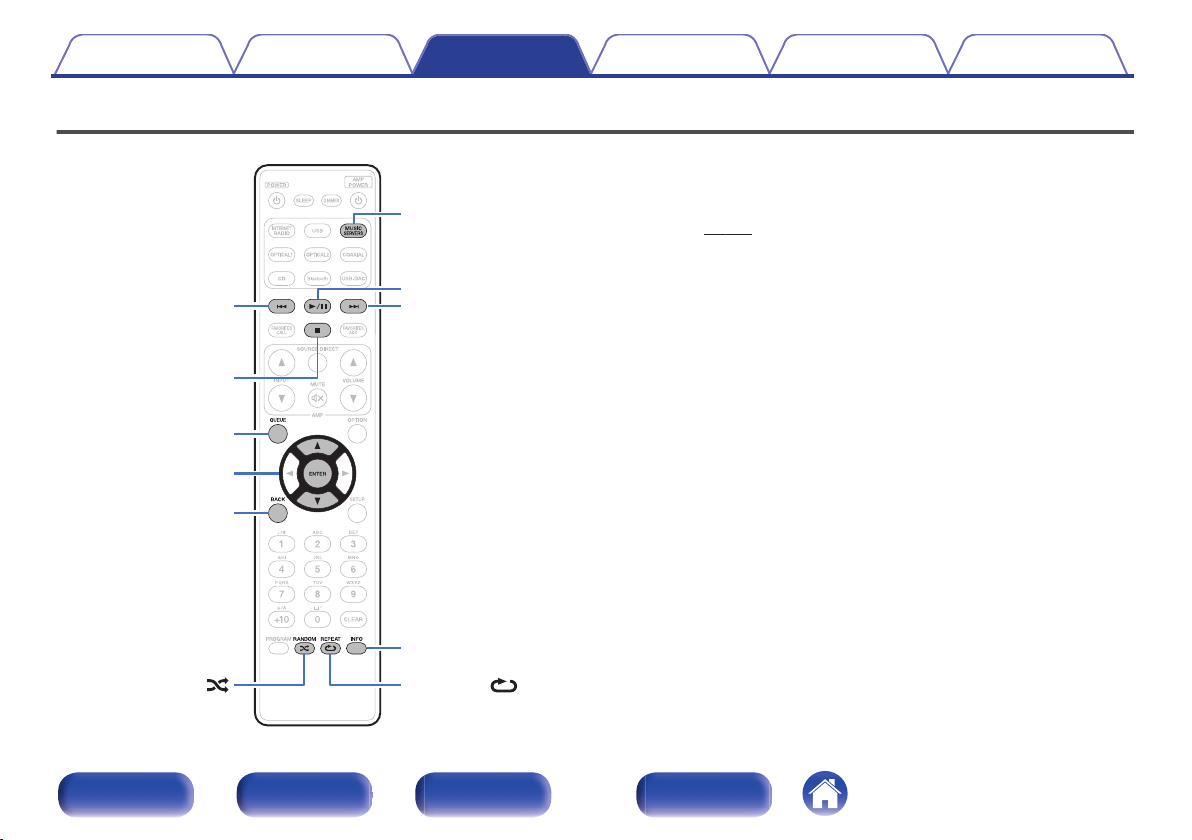
Q0
u
o
Q1
Q2
Q3
i
G
QUEUE button
This displays the queue.
0
“Playing back files stored on a PC or NAS” (v p. 36)
0
“Playing a USB memory device” (v p. 39)
H
ENTER button
This determines the selection.
I
Cursor buttons (uio p)
These select items.
J
BACK button
Returns to the previous item.
K
Number/letter buttons (0 – 9, +10)
These enter letters or numbers into the unit. (v
p. 85)
L
PROGRAM button
This sets program playback. (v p. 57)
M
RANDOM button (P)
Switches the random playback.
Contents
Connections Playback Settings Tips Appendix
17
Front panel Rear panel
Remote control
unit
Index
Q9
W0
Q6
Q7
Q4
W1
Q5
Q8
N
DIMMER button
Adjust the display brightness of this unit. (v
p. 77)
O
VOLUME buttons (df)
These adjust the volume of the audio signal output from the analog
audio output terminals (VARIABLE) of this unit. (v
p. 103)
P
OPTION button
0
This displays the option menu on the display.
0
An option menu is not displayed for some input sources.
0
This switches the playback range on a data CD. (v p. 60)
Q
MUTE button (:)
This mutes the audio signal output from the analog audio output
terminals (VARIABLE) of this unit. (v p. 103)
R
SETUP button
The setting menu is displayed on the display. (v
p. 84)
S
CLEAR button
This cancels the settings.
T
Information button (INFO)
This switches the track information shown in the display during
playback.
U
REPEAT button (L)
Switches to the repeat playback.
Contents
Connections Playback Settings Tips Appendix
18
Front panel Rear panel
Remote control
unit
Index
q
w
t
e
r
o
Amplifier operations
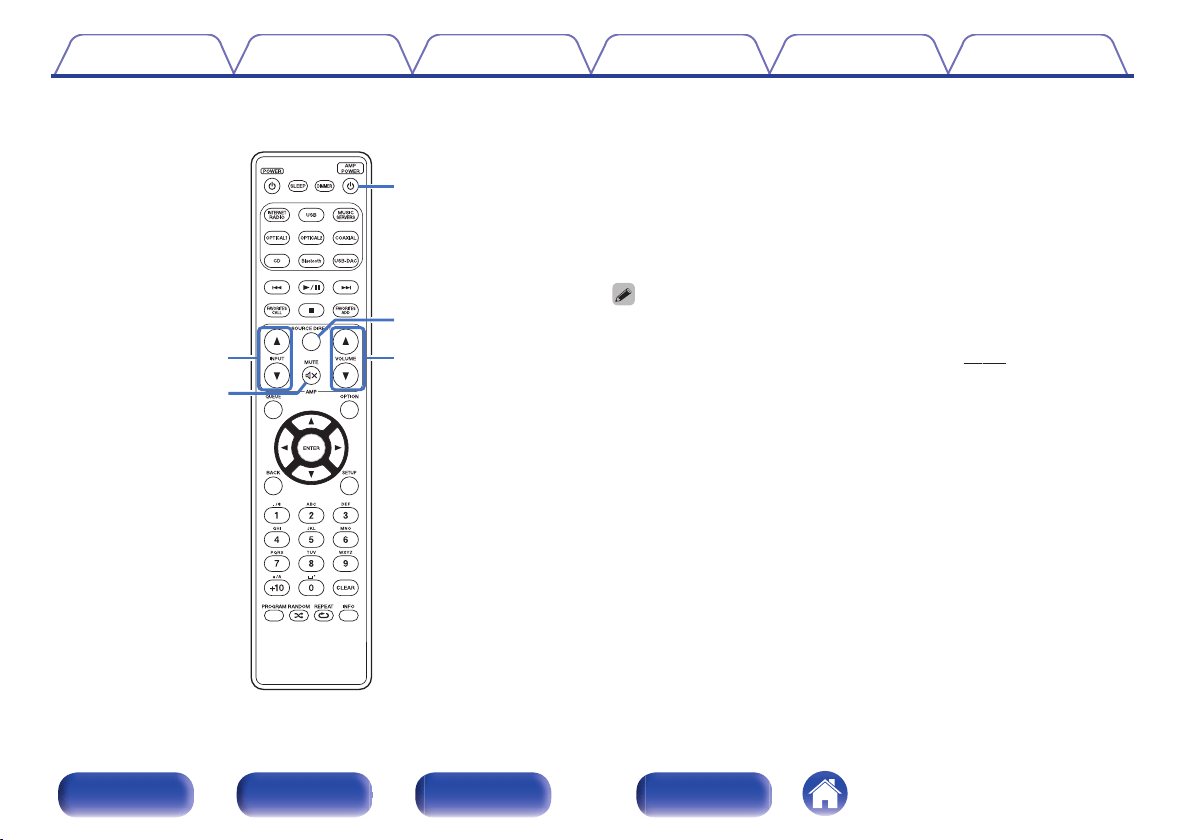
A Marantz amplifier can be operated.
A
Input source select buttons (INPUT df)
B
MUTE button (:)
C
Power operation button (AMP POWER X)
D
SOURCE DIRECT button
E
VOLUME buttons (df)
0
The remote control may not operate some products.
0
2 and 5 can be operated when the remote control operation mode is set to
amplifier operation mode (factory default setting). (v p. 103)
Contents
Connections Playback Settings Tips Appendix
19
Front panel Rear panel
Remote control
unit
Index
o
Contents
Connecting an amplifier 21
Connecting to a device with digital audio input connectors 22
Connecting to a device with digital audio output connectors 23
Connecting a PC or Mac 24
Connecting a USB memory device to the USB port 25
Connecting to a home network (LAN) 26
Connecting an external control device 28
Connecting the power cord 30
NOTE
0
Do not plug in the power cord until all connections have been completed.
0
Do not bundle power cords with connection cables. Doing so can result in
humming or noise.
o
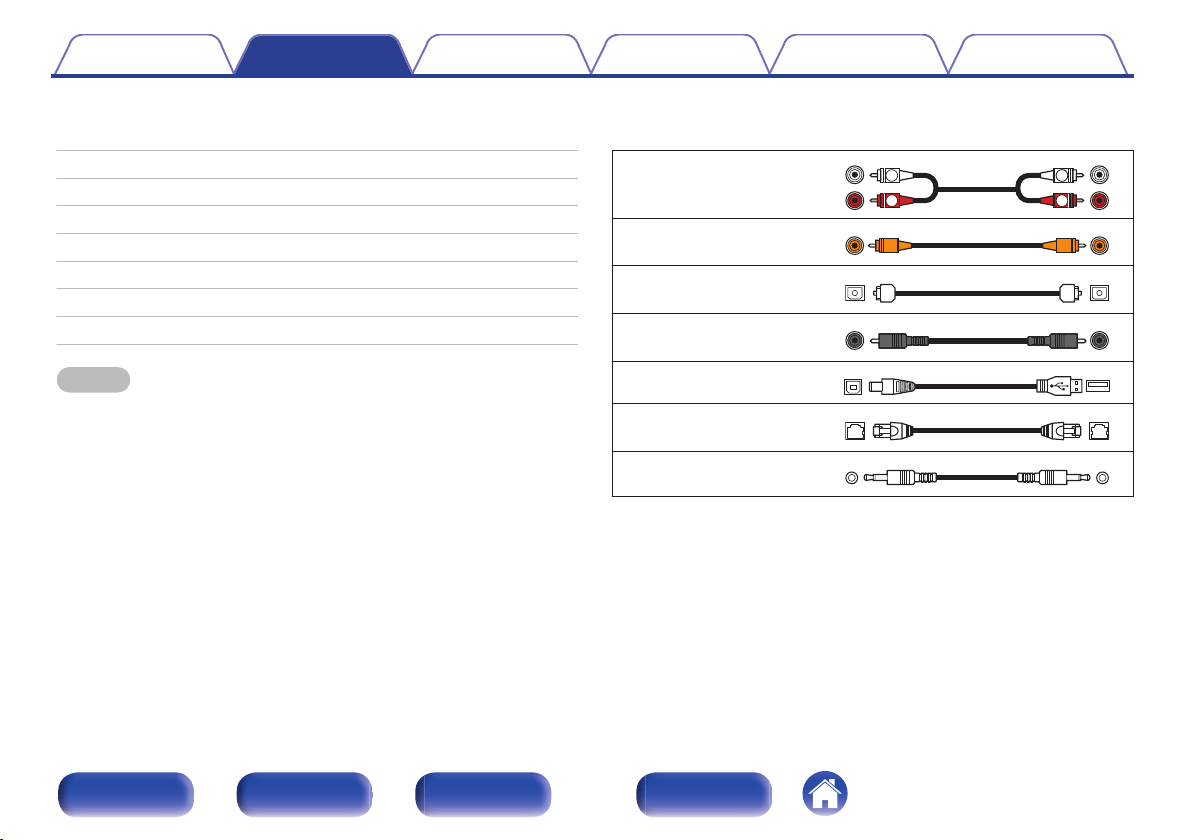
Cables used for connections
Provide necessary cables according to the devices you want to connect.
Audio cable (supplied)
.
R
L
R
L
Remote connector cable
(supplied)
.
Optical cable
(Sold separately)
.
Coaxial digital cable
(Sold separately)
.
USB cable (Sold separately)
.
LAN cable (Sold separately)
.
Monaural mini-plug cable
(Sold separately)
.
Contents Connections Playback Settings Tips Appendix
20
Front panel Rear panel
Remote control
unit
Index
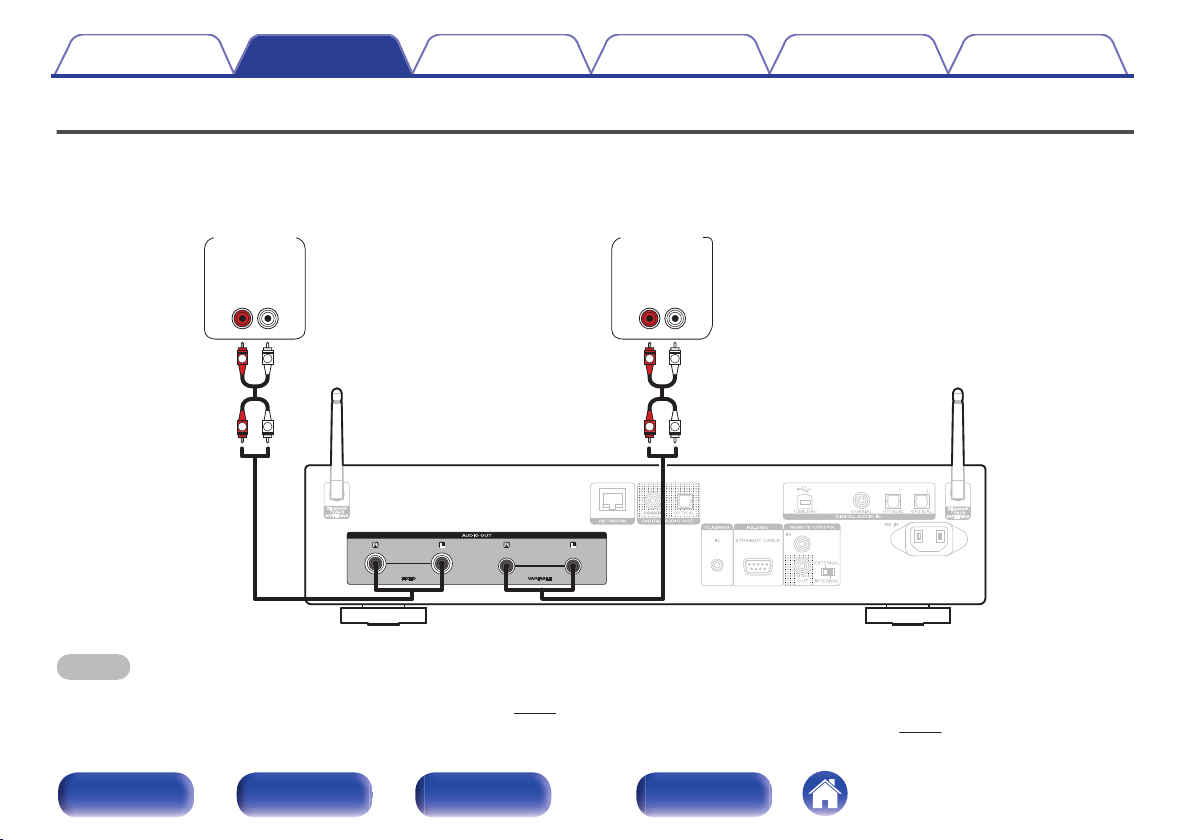
Connecting an amplifier
In addition to the normal analog audio output connectors (FIXED) this unit has analog audio output connectors (VARIABLE) that allow you to adjust the
volume of the audio signal output from this unit. Connect the power amplifier to the analog audio output connectors (VARIABLE) and press the VOLUME
df buttons on the remote control to adjust the volume of the audio signal output from this unit.
.
R
L
R
L
R
L
R
L
AUDIO
LR
IN
AUDIO
LR
IN
Pre
Amplifier
Power
Amplifier
NOTE
0
To adjust the volume of the audio signal output from the analog audio output connectors (VARIABLE) of this unit using the remote control, set the remote control operation
mode of the volume buttons to network CD player operation mode. (v p. 103)
0
An audio signal is not output from the analog audio output connectors (VARIABLE) when “Variable Out” is set to “Off” in the menu. (v p. 101)
0
Do not connect a power amplifier to the analog audio output connectors (FIXED). Connecting a power amplifier may cause damage to the speakers.
Contents Connections Playback Settings Tips Appendix
21
Front panel Rear panel
Remote control
unit
Index
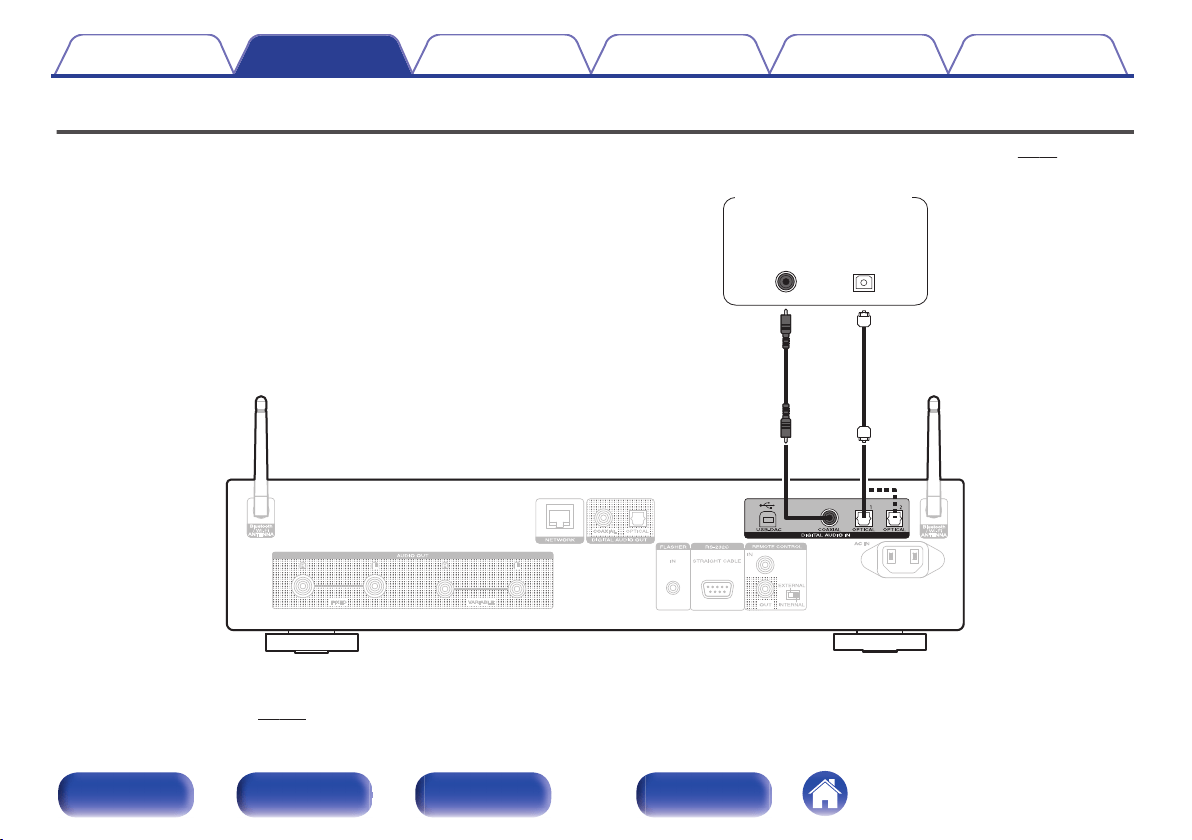
Connecting to a device with digital audio input connectors
You can enjoy digital audio playback by connecting an AV receiver or D/A converter that has a digital audio connector to this unit.
.
OPTICAL
IN
COAXIAL
IN
AV receiver /
D/A converter
NOTE
0
Digital audio output stops during playback of the DSD signals and linear PCM signals with a sampling frequency of 352.8/384 kHz using this unit’s USB-DAC.
0
Digital audio output stops during playback of the DSD files via USB and networks.
0
Digital audio output can be set on/off using “Digital Out” in the menu. (v p. 101)
Contents Connections Playback Settings Tips Appendix
22
Front panel Rear panel
Remote control
unit
Index
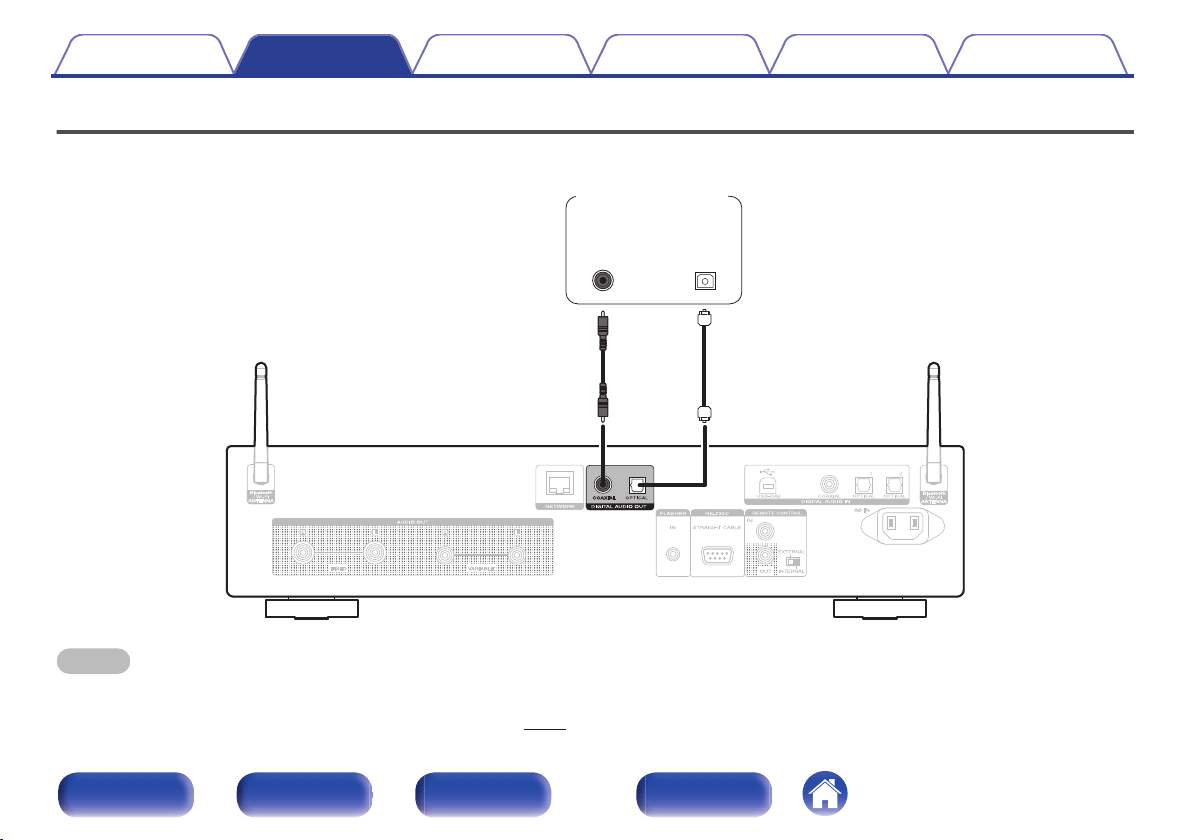
Connecting to a device with digital audio output connectors
Use this connection to input digital audio signals to this unit, and convert the signals for playback using the D/A converter of this unit. (v p. 61)
.
OPTICAL
OUT
COAXIAL
OUT
CD transport /
Digital device
o
Specifications of supported audio formats
See “D/A converter” (v p. 134).
Contents
Connections Playback Settings Tips Appendix
23
Front panel Rear panel
Remote control
unit
Index
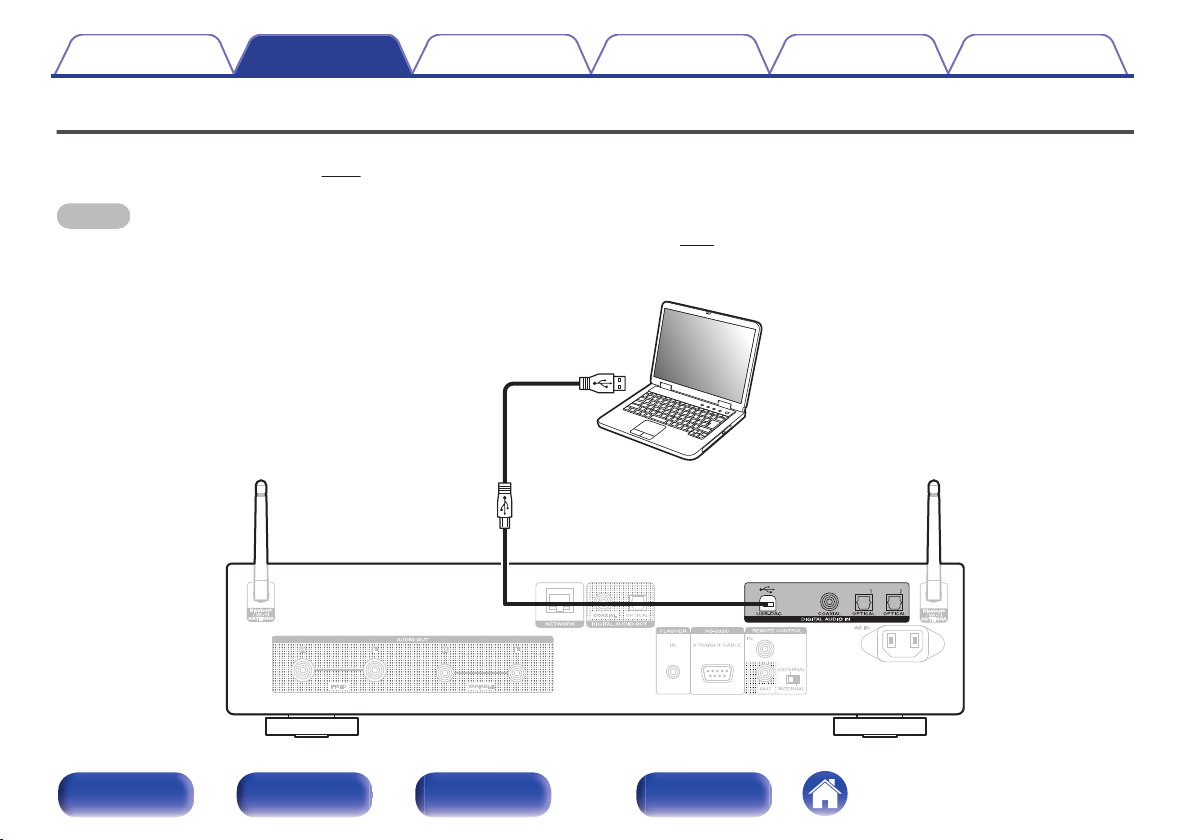
Connecting a PC or Mac
By connecting a computer to the USB port (USB-DAC) on the rear panel of this unit using a commercially available USB cable (Sold separately), this unit
can be used as a D/A converter. (v p. 61)
NOTE
0
Before USB connecting this unit to your computer, install the driver software in your computer. (v p. 62)
0
Download the driver software from the ND8006 page of the Marantz website.
0
Use a cable that is 10 ft (3 m) or less to connect to the computer.
.
Ty p e A
USB 2.0 cable
(Sold separately)
Ty p e B
Computer on which the driver software and
audio player software are installed
Contents
Connections Playback Settings Tips Appendix
24
Front panel Rear panel
Remote control
unit
Index
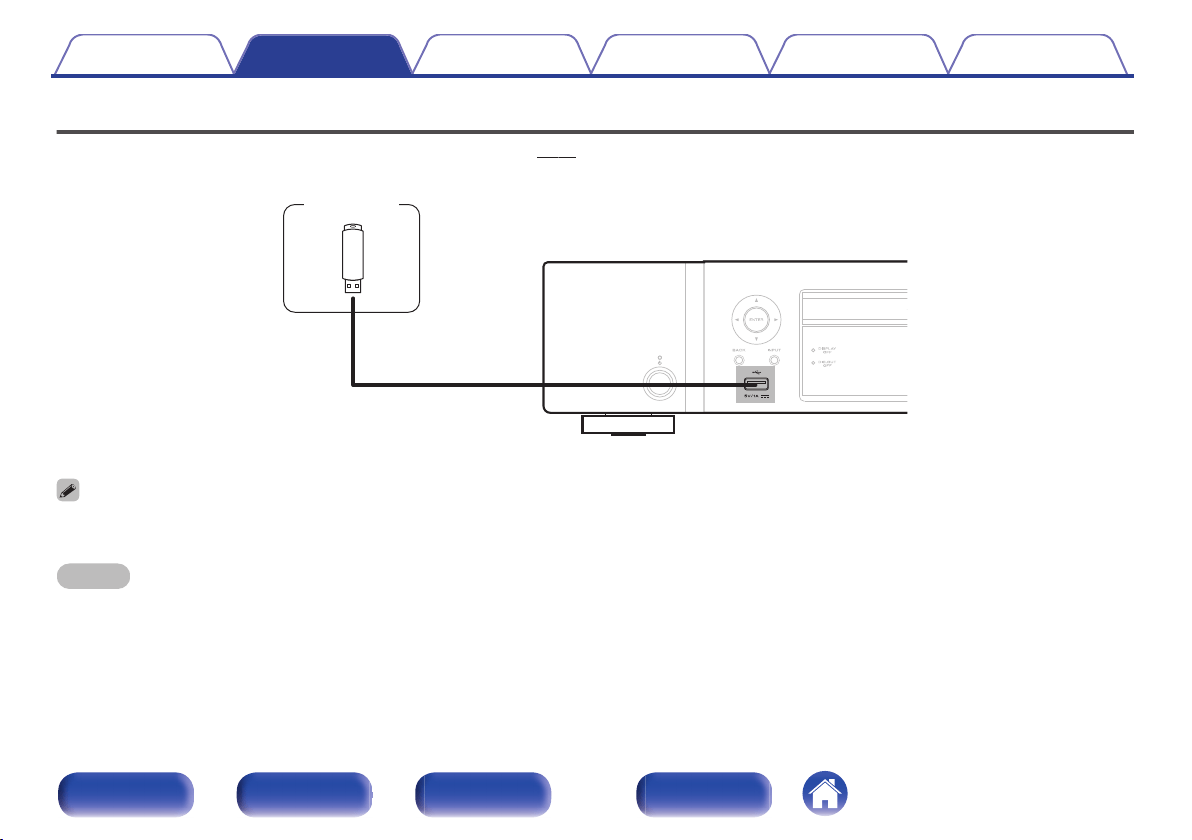
Connecting a USB memory device to the USB port
For operating instructions see “Playing a USB memory device”. (v p. 39)
.
USB memory
device
0
Marantz does not guarantee that all USB memory devices will operate or receive power. When using a portable USB hard disk drive (HDD) which came with an AC adapter,
use that device’s supplied AC adapter.
NOTE
0
USB memory devices will not work via a USB hub.
0
It is not possible to use this unit by connecting the front panel’s USB port to a computer via a USB cable. Connection to a computer is possible via the digital input USB-DAC
port (Type B) on the rear panel.
0
Do not use an extension cable when connecting a USB memory device. This may cause radio interference with other devices.
Contents Connections Playback Settings Tips Appendix
25
Front panel Rear panel
Remote control
unit
Index
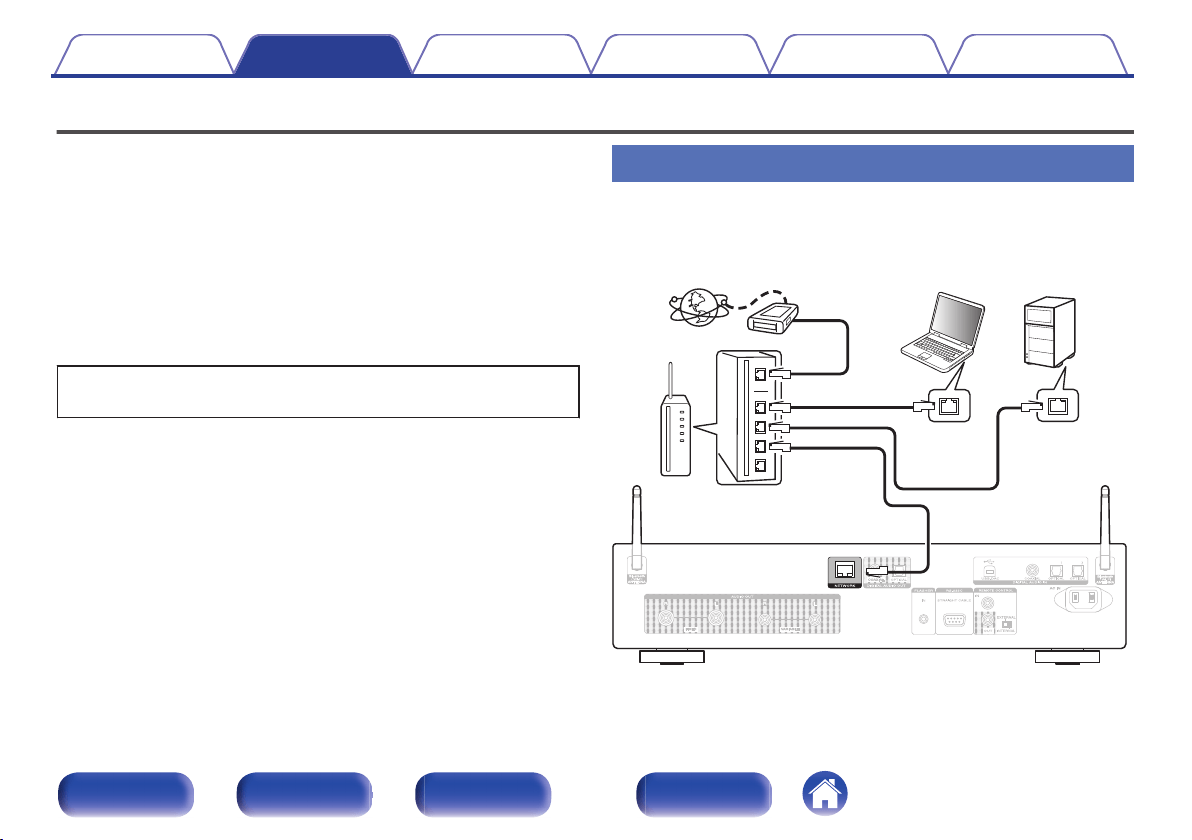
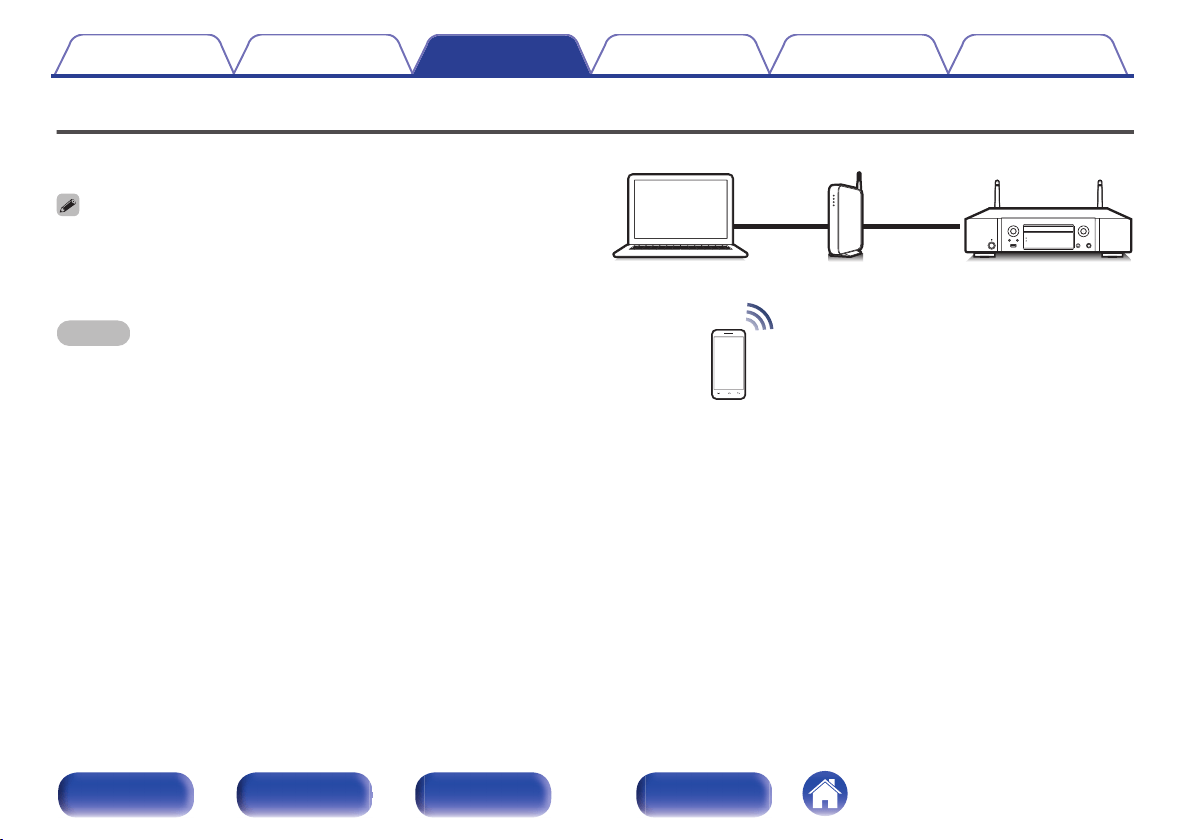
Connecting to a home network (LAN)
This unit can connect to a network using a wired LAN or wireless LAN.
You can connect this unit to your home network (LAN) to enable various
types of playback and operations as described below.
0
Playback of network audio such as Internet Radio and from your media
server(s)
0
Playback of streaming music services
0
Using the Apple AirPlay function
0
Operation on this unit via the network
0
Operation with the HEOS wireless multi-room sound system
0
Firmware Update
For connections to the Internet, contact an ISP (Internet Service
Provider) or a computer shop.
Wired LAN
To make connections via wired LAN, use a LAN cable to connect the
router to this unit as shown in the figure below.
.
Internet
Modem
PC
NAS
(Network Attached
Storage)
Router
To WAN side
To LAN port
To LAN port
LAN port/
Ethernet
connector
LAN port/
Ethernet
connector
Contents
Connections Playback Settings Tips Appendix
26
Front panel Rear panel
Remote control
unit
Index
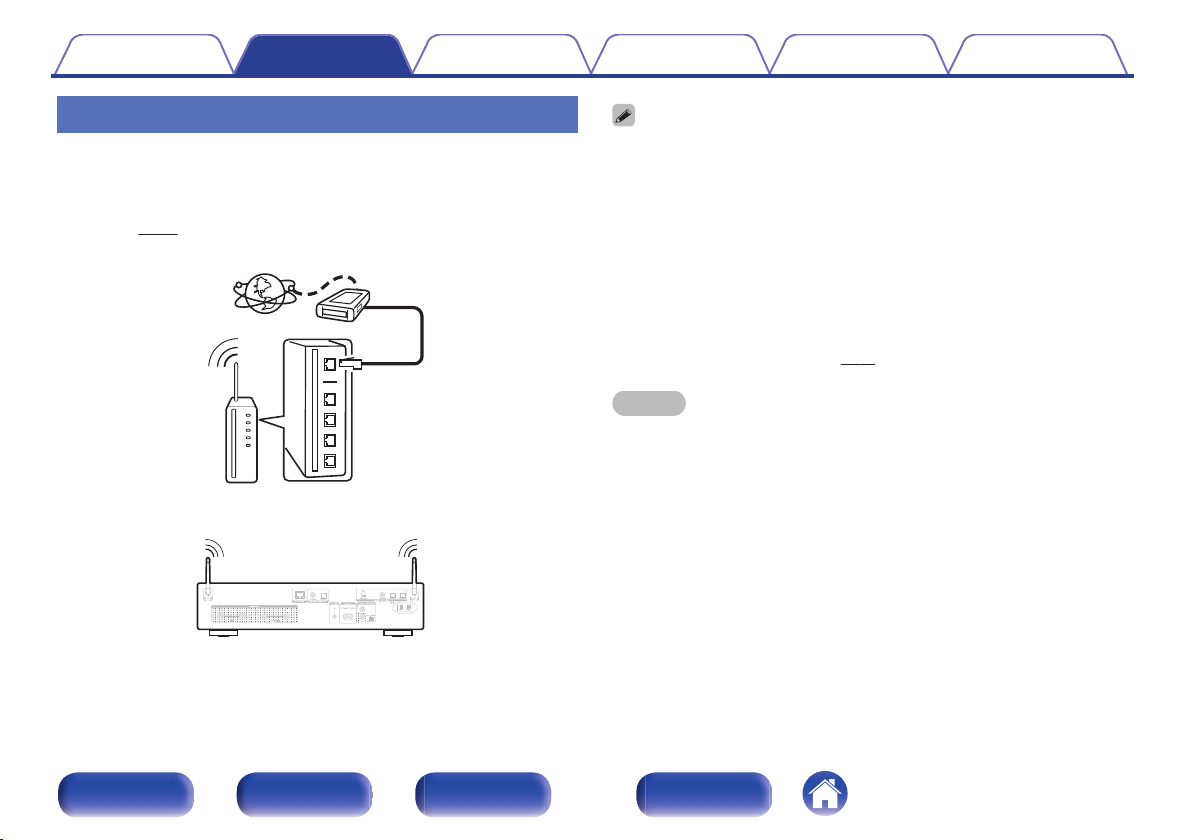
Wireless LAN
When connecting to the network via wireless LAN, connect the external
antennas for Bluetooth/wireless connectivity connection to the rear panel
and stand them upright.
See “Wi-Fi Setup” on how to connect to a wireless LAN
router. (v p. 94)
.
Internet
Modem
To WAN side
Router with access point
0
When using this unit, we recommend you use a router equipped with the following
functions:
0
Built-in DHCP server
This function automatically assigns IP addresses on the LAN.
0
Built-in 100BASE-TX switch
When connecting multiple devices, we recommend a switching hub with a
speed of 100 Mbps or greater.
0
Only use a shielded STP or ScTP LAN cable (readily available at electronics
stores). (CAT-5 or greater recommended)
0
The normal shielded-type LAN cable is recommended. If a flat-type cable or
unshielded-type cable is used, other devices could be affected by noise.
0
When using this unit connected to a network with no DHCP function, configure the
IP address, etc. in “Network”. (v p. 92)
NOTE
0
The types of routers that can be used depend on the ISP. Contact your ISP or a
computer shop for details.
0
This unit is not compatible with PPPoE. A PPPoE compatible router is required if
your contracted line is not set using PPPoE.
0
Do not connect a NETWORK connector directly to the LAN port/ Ethernet
connector on your computer.
0
Various online services may be discontinued without prior notice.
0
Do not carry this unit by the antenna.
Contents Connections Playback Settings Tips Appendix
27
Front panel Rear panel
Remote control
unit
Index

Connecting an external control device
FLASHER IN jack
This unit can be controlled by connecting a control box or other control device to this unit.
.
Control box
or
control device
GND
Signal
Monaural mini-plug cable
(Sold separately)
0
To use the FLASHER IN jack, set the EXTERNAL/INTERNAL switch to “INTERNAL”.
Contents Connections Playback Settings Tips Appendix
28
Front panel Rear panel
Remote control
unit
Index

REMOTE CONTROL connectors
If this unit is connected to a Marantz amp, the amp can be controlled via
this unit using the HEOS App. Also, remote control signals received by the
amp can be used to control this unit. Next, configure the “Connection” and
“Setting”.
o
Connection
Use the supplied remote connector cable to connect the REMOTE
CONTROL IN connector of this unit to REMOTE CONTROL OUT
connector of the amplifier.
o
Setting
Turn the EXTERNAL/INTERNAL switch on the unit to “EXTERNAL”.
0
This setting will disable remote sensor reception of this unit.
0
To operate the unit, point the remote control at the remote sensor of
the amplifier.
0
To use this unit by itself without connecting an amplifier, turn the switch to
“INTERNAL”.
This unit
Amplifier
Remote
connector cable
(supplied)
Set to
“EXTERNAL”.
Contents Connections Playback Settings Tips Appendix
29
Front panel Rear panel
Remote control
unit
Index
o
Contents
Basic operation
Turning the power on 32
Switching the power to standby 32
Selecting the input source 33
Playback network audio/service
Listening to Internet Radio 34
Playing back files stored on PC or NAS 36
Getting the HEOS App 46
AirPlay function 72
Spotify Connect function 75
Playback a device
Playing a USB memory device 39
Listening to music on a Bluetooth device 42
Playing CDs 55
Playing DATA CDs 58
Using as a D/A converter 61
Convenience functions
Adding to HEOS Favorites 76
Playing back HEOS Favorites 77
Deleting a HEOS Favorites 77
Switching the display’s brightness 77
Using the sleep timer 78
Contents Connections Playback Settings Tips Appendix
31
Front panel Rear panel
Remote control
unit
Index
Basic operation
.
POWER
X
1
/
3
Input source
select buttons
Turning the power on
1
Press POWER X to turn on power to the unit.
The power indicator turns off.
0
You can also press X on the main unit to turn on power from standby mode.
0
You can also press 1/3 to turn on power from standby mode.
Switching the power to standby
1
Press POWER X.
The unit switches to standby mode.
0
You can also switch the power to standby by pressing X on the main unit.
NOTE
0
Power continues to be supplied to some of the circuitry even when the power is in
the standby mode. When leaving home for long periods of time or when going on
vacation, unplug the power cord from the power outlet.
Contents Connections Playback Settings Tips Appendix
32
Front panel Rear panel
Remote control
unit
Index

Selecting the input source
1
Press the input source select button to be played back.
The selected input source appears on the display.
0
You can also select the input source by pressing INPUT on the main unit.
Contents Connections Playback Settings Tips Appendix
33
Front panel Rear panel
Remote control
unit
Index

Listening to Internet Radio
.
QUEUE
FAVORITES
CALL
INTERNET RADIO
FAVORITES
ADD
9
8
2
1
/
3
INFO
BACK
ui
ENTER
0
Internet Radio refers to radio broadcasts distributed over the Internet.
Internet Radio stations from around the world can be received.
0
The Internet Radio station list on this unit the database service provided
by TuneIn Radio service.
0
The audio format types and specifications supported by this unit for
playback are as follows.
See “Playing back Internet Radio” (v p. 136) for details.
0
WMA
0
MP3
0
MPEG-4 AAC
Contents Connections Playback Settings Tips Appendix
34
Front panel Rear panel
Remote control
unit
Index
Listening to Internet Radio
1
Press INTERNET RADIO.
2
Select the station you want to play.
Operation buttons Function
1/3
z
Playback / Pause
2
Stop
8 9
z
Skip to previous track / Skip to next track
u i
Select the item
ENTER Enter the selected item / Playback
BACK Moving up a level in the hierarchy
FAVORITES CALL
Call from the “HEOS Favorites” (v p. 77)
FAVORITES ADD
Add to the “HEOS Favorites” (v p. 76)
INFO
Switching the radio station name and file
format
QUEUE This displays the queue
z Enabled when playing Podcasts.
0
Any characters that cannot be displayed are replaced with “.” (period).
NOTE
0
The radio station database service may be suspended or be otherwise unavailable
without notice.
Contents Connections Playback Settings Tips Appendix
35
Front panel Rear panel
Remote control
unit
Index
Playing back files stored on a PC or NAS
.
9
8
2
MUSIC SERVERS
INFO
1
/
3
QUEUE
RANDOM
REPEAT
BACK
ui
ENTER
0
This unit can play back music files and playlists (m3u, wpl) from DLNA
compatible servers including PCs and NAS devices on your network.
0
Supported file formats:
For details, see “Playing back files stored on a PC and
NAS” (v p. 135).
0
WMA
0
MP3
0
WAV
0
MPEG-4 AAC
0
FLAC
0
Apple Lossless
0
DSD
Contents Connections Playback Settings Tips Appendix
36
Front panel Rear panel
Remote control
unit
Index

Playing back files stored on a PC or
NAS
Use this procedure to play music files or playlists stored on DLNA files
servers on your local network.
1
Press MUSIC SERVERS to switch the input source to
“Music Servers”.
2
Select the name of your networked PC or NAS
(Network Attached Storage) server.
3
Browse the music on your PC/NAS and select
something to play.
0
When you select something to play you will be asked how you want to
queue up your music.
Play Now:
Inserts the item into the queue after the
currently playing track and plays the
selected item immediately.
Play Now & Replace
Queue:
Clears the queue and plays the
selected item immediately.
Play Next:
Inserts the item into the queue after the
current song and plays it when the
current song ends.
Add to End of Queue: Adds the item to the end of the queue.
Contents Connections Playback Settings Tips Appendix
37
Front panel Rear panel
Remote control
unit
Index
4
Use ui to select the “Play Now” or “Play Now &
Replace Queue”, then press ENTER.
Playback starts.
Operation buttons Function
1/3
Playback / Pause
2
Stop
8 9
Skip to previous track / Skip to next track
u i
Select the item
ENTER Enter the selected item
BACK Moving up a level in the hierarchy
REPEAT L
Repeat playback
0
Switching between Single-track repeat
and All-track repeat.
RANDOM P
Random playback
INFO Switching the album name and file format.
QUEUE This displays the queue
NOTE
0
When playing back music files with your PC or NAS connected through wireless
LAN, audio may be interrupted depending on your wireless LAN environment. In
this case, connect using a wired LAN.
0
The order in which the tracks/files are displayed depends on the server
specifications. If the tracks/files are not displayed in alphabetical order due to the
server specifications, searching by the first letter may not work properly.
Contents Connections Playback Settings Tips Appendix
38
Front panel Rear panel
Remote control
unit
Index

Playing a USB memory device
.
USB
QUEUE
9
ui
ENTER
INFO
8
2
1
/
3
RANDOM
REPEAT
BACK
0
Playing back music files stored on a USB memory device.
0
Only USB memory devices conforming to mass storage class standards
can be played on this unit.
0
This unit is compatible with USB memory devices in “FAT16” or
“FAT32” format.
0
The audio format types and specifications supported by this unit for
playback are as follows.
See “Playing back a USB memory devices” (v p. 130) for details.
0
WMA
0
MP3
0
WAV
0
MPEG-4 AAC
0
FLAC
0
Apple Lossless
0
DSD
Contents
Connections Playback Settings Tips Appendix
39
Front panel Rear panel
Remote control
unit
Index
Playing files stored on USB memory
devices
1
Insert a USB memory device into the front panel’s USB
port.
2
Press USB to switch the input source to “USB Music”.
3
Select the name of this unit.
4
Browse the music on your USB memory device and
select something to play.
0
When you select something to play you will be asked how you want to
queue up your music.
Play Now:
Inserts the item into the queue after the
currently playing track and plays the
selected item immediately.
Play Now & Replace
Queue:
Clears the queue and plays the
selected item immediately.
Play Next:
Inserts the item into the queue after the
current song and plays it when the
current song ends.
Add to End of Queue: Adds the item to the end of the queue.
5
Use ui to select the “Play Now” or “Play Now &
Replace Queue”, then press ENTER.
Playback starts.
Contents
Connections Playback Settings Tips Appendix
40
Front panel Rear panel
Remote control
unit
Index
Operation buttons Function
1/3
Playback / Pause
2
Stop
8 9
Skip to previous track / Skip to next track
u i
Select the item
ENTER Enter the selected item / Playback
BACK Moving up a level in the hierarchy
REPEAT L
Repeat playback
0
Switching between Single-track repeat
and All-track repeat.
RANDOM P
Random playback
INFO Switching the album name and file format.
QUEUE This displays the queue
NOTE
0
Note that Marantz will accept no responsibility whatsoever for any problems
arising with the data on a USB memory device when using this unit in conjunction
with the USB memory device.
0
When a USB memory device is connected to this unit, the unit loads all of the files
on the USB memory device. Loading may take a while if the USB memory device
contains a large number of folders and/or files.
Contents Connections Playback Settings Tips Appendix
41
Front panel Rear panel
Remote control
unit
Index
Listening to music on a Bluetooth device
.
Bluetooth
9
8
2
INFO
OPTION
1
/
3
POWER
X
Music files stored on Bluetooth devices such as smartphones, digital
music players, etc. can be enjoyed on this unit by pairing and connecting
this unit with the Bluetooth device.
Communication is possible up to a range of about 98.4 ft/30 m.
NOTE
0
To play back music from a Bluetooth device, the Bluetooth device needs to
support the A2DP profile.
Contents Connections Playback Settings Tips Appendix
42
Front panel Rear panel
Remote control
unit
Index
Playing music from Bluetooth device
In order to enjoy music from a Bluetooth device on this unit, the Bluetooth
device must first be paired with this unit.
Once the Bluetooth device has been paired, it does not need to be paired
again.
1
Prepare for playback.
A
Connect the supplied external antennas for Bluetooth/wireless
connectivity to the Bluetooth/wireless LAN antenna connectors
on the rear panel. (v p. 14)
B
Press POWER X to turn on power to the unit.
2
Press Bluetooth.
When using for the first time, the unit will go into the pairing mode
automatically and “Bluetooth Pairing Mode” will appear on the
display of the unit.
3
Activate the Bluetooth settings on your mobile device.
4
Select this unit when its name appears in the list of
devices displayed on the screen of the Bluetooth
device.
Connect to the Bluetooth device while “Bluetooth Pairing Mode” is
being displayed on the display of the unit.
Perform the connection with the Bluetooth device close to the unit
(about 3.3 ft/1 m).
5
Play music using any app on your Bluetooth device.
0
The Bluetooth device can also be operated with the remote
control of this unit.
0
The next time the Bluetooth button is pressed on the remote
control unit, this unit automatically connects to the last Bluetooth
device that was connected.
Operation buttons
Function
1/3
Playback / Pause
2
Stop
8 9
Skip to previous track / Skip to next track
INFO
Switching the Bluetooth device name and
Album name.
Contents Connections Playback Settings Tips Appendix
43
Front panel Rear panel
Remote control
unit
Index
Pairing with other Bluetooth devices
Pair a Bluetooth device with this unit.
1
Activate the Bluetooth settings on your mobile device.
2
Press and hold Bluetooth on the remote control unit for
at least 3 seconds.
This unit will go into the pairing mode.
3
Select this unit when its name appears in the list of
devices displayed on the screen of the Bluetooth
device.
0
This unit can be paired with a maximum of 8 Bluetooth devices. When a 9th
Bluetooth device is paired, it will be registered in place of the oldest registered
device.
0
You can also enter pairing mode by pressing the OPTION button when the
Bluetooth playback screen is displayed and selecting “Pairing Mode” from the
displayed option menu.
NOTE
0
To operate the Bluetooth device with the remote control of this unit, the Bluetooth
device needs to support the AVRCP profile.
0
The remote control of this unit is not guaranteed to work with all Bluetooth devices.
0
For some Bluetooth devices, the volume set on the Bluetooth device is linked with
that of the audio signal output from the analog audio output terminals (VARIABLE)
of this unit.
Contents Connections Playback Settings Tips Appendix
44
Front panel Rear panel
Remote control
unit
Index

Reconnecting to this unit from a
Bluetooth device
After pairing is completed, the Bluetooth device can be connected without
performing any operations on this unit.
This operation also needs to be performed when switching the Bluetooth
device for playback.
1
If a Bluetooth device is currently connected, deactivate
the Bluetooth setting of that device to disconnect it.
2
Activate the Bluetooth setting of the Bluetooth device
to be connected.
3
Select this unit from the Bluetooth device list on your
Bluetooth device.
4
Play music using any app on your Bluetooth device.
0
When the power of this unit and the Bluetooth function of this unit are turned on,
the input source will be automatically switched to “Bluetooth” if a Bluetooth device
is connected.
0
When the “Network Control” setting of this unit is set to “On” and a Bluetooth
device is connected and is played with the unit in the standby state, the power of
the unit will be turned on automatically. (v p. 93)
Contents Connections Playback Settings Tips Appendix
45
Front panel Rear panel
Remote control
unit
Index
Getting the HEOS App
You can use many online music streaming services from the HEOS App. Depending upon your geographical location, there are several options to choose
from.
Download the HEOS App for iOS or Android by searching App Store, Google Play store or Amazon Appstore for “HEOS”.
.
0
Specifications of the HEOS App may be changed without prior notice for improvement purposes.
Contents Connections Playback Settings Tips Appendix
46
Front panel Rear panel
Remote control
unit
Index

HEOS Account
HEOS Accounts can be registered in “HEOS Account” (v p. 99) in the
menu of this unit or by tapping “Music” tab - “Settings” icon a in the
HEOS App.
o
What is a HEOS Account?
A HEOS Account is master account or “keychain” for managing all of
your HEOS music services with one single username and password.
o
Why do I need a HEOS Account?
With the HEOS Account you just have to enter your music services
login names and passwords one time. This allows you to easily and
quickly use multiple controller apps on different devices.
You just log into your HEOS Account on any device and you will have
access to all of your associated music services, play history and
custom playlists, even if you are at a friend’s house listening to music
on their HEOS system.
o
Signing up for a HEOS Account
You will be instructed to signup for a HEOS Account the first time you
try to access any music service from the main “Music” menu of the
HEOS App. Follow the instructions in the HEOS App to complete the
operation.
o
Changing your HEOS Account
1
Tap the “Music” tab.
2
Select the Settings icon a in the upper left corner of
the screen.
3
Select “HEOS Account”.
4
Change your location, change your password, delete
your account or sign out of your account.
Contents Connections Playback Settings Tips Appendix
47
Front panel Rear panel
Remote control
unit
Index
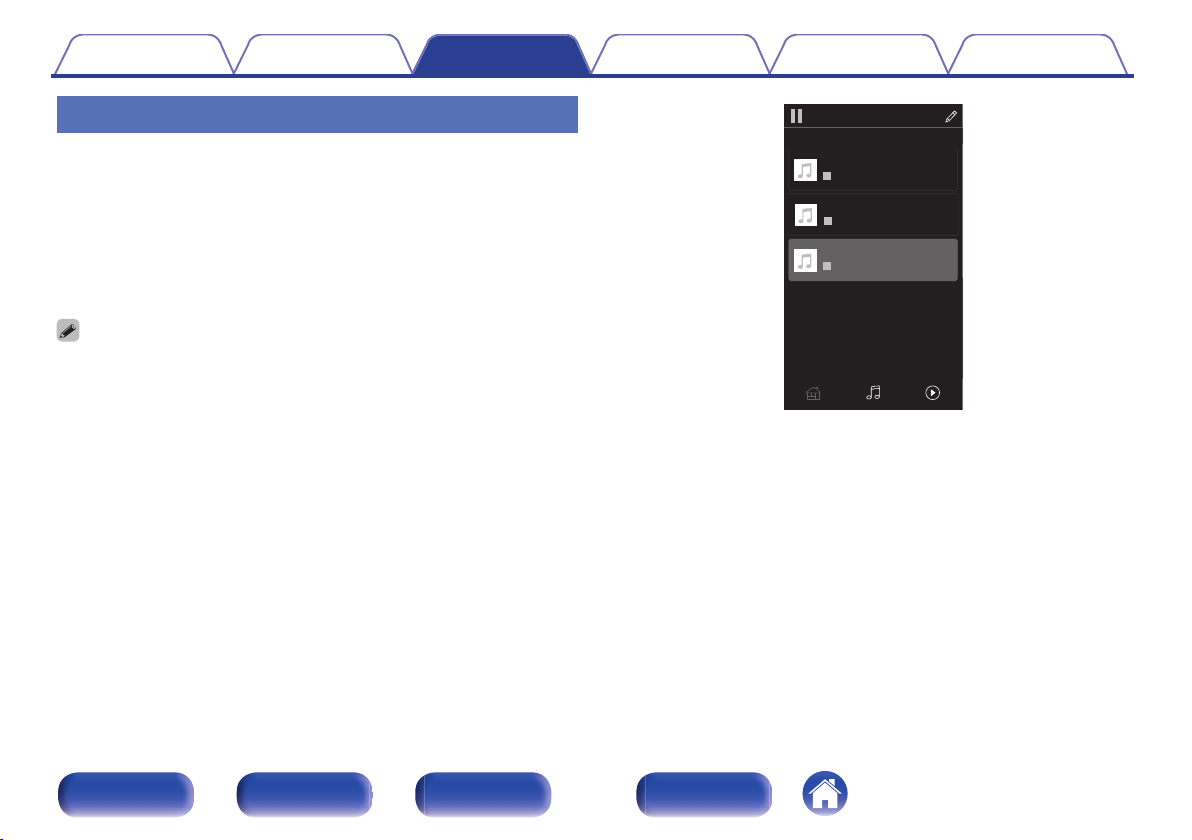
Playing from streaming music services
A music service is an online music company that provides access to vast
music collections via free and/or paid subscriptions. Depending upon your
geographical location, there are several options to choose from.
o
Selecting a room/device
1
Tap the “Rooms” tab, and select “Marantz ND8006” if
there are multiple HEOS devices.
0
Tap the Pencil icon e at the top right to switch edit mode. You can change the
displayed name.
.
Rooms
Drag one room into another to group them
Rooms
Now PlayingMusic
Song Name 3
Marantz ND8006
Song Name 1
Dining L + Dining R
Song Name 2
Kitchen
Contents
Connections Playback Settings Tips Appendix
48
Front panel Rear panel
Remote control
unit
Index
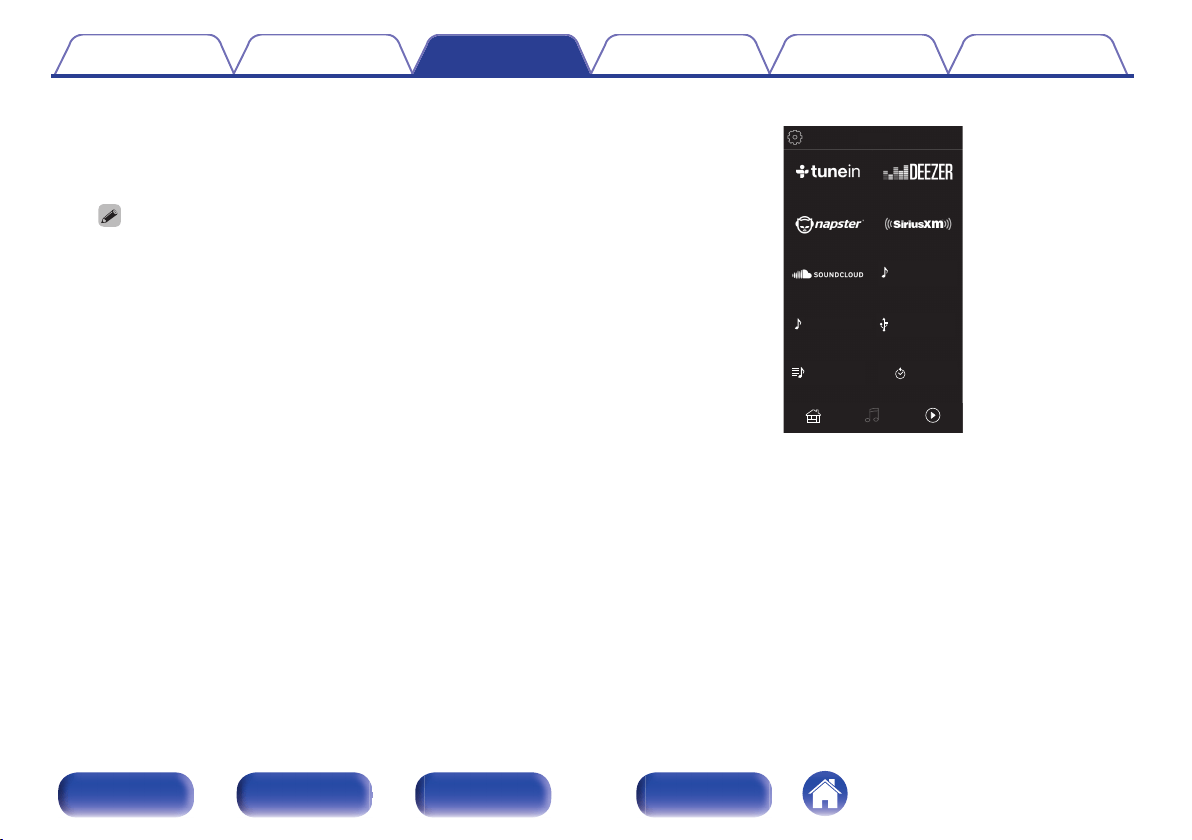
o
Selecting the music track or station from
music sources
1
Tap the “Music” tab and select a music source.
0
All music services displayed may not be available in your location.
.
Now PlayingMusicRooms
This Phone
Music
Music Servers
USB Music
Playlists
History
Contents
Connections Playback Settings Tips Appendix
49
Front panel Rear panel
Remote control
unit
Index
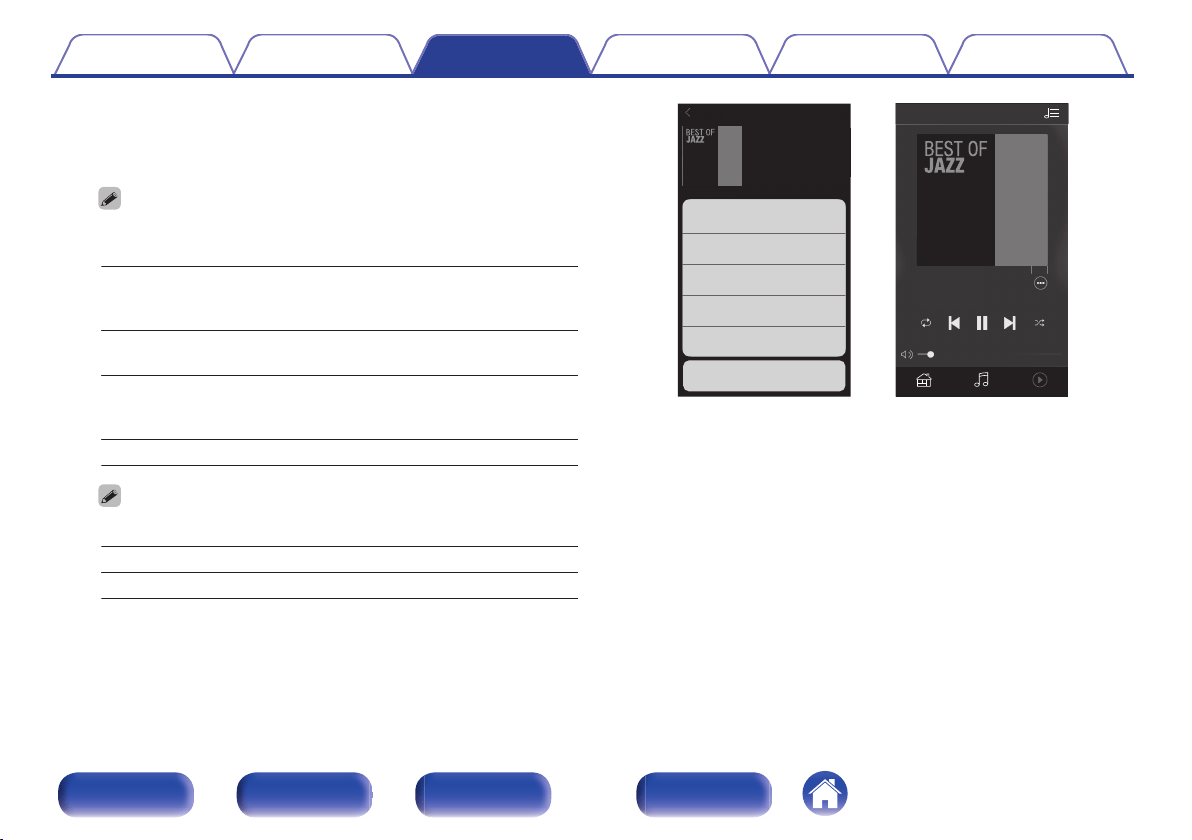
2
Browse the music to play.
After selecting a music track or radio station the app will
automatically change to the “Now Playing” screen.
0
When you select a music track to play you will be asked how you want to
queue up your music.
Play Now:
Inserts the item into the queue after the
currently playing track and plays the
selected item immediately.
Play Now & Replace
Queue:
Clears the queue and plays the
selected item immediately.
Play Next:
Inserts the item into the queue after the
current song and plays it when the
current song ends.
Add to End of Queue: Adds the item to the end of the queue.
0
When you select a radio station the following items are displayed.
Play Now: Plays the selected item immediately.
Add to HEOS Favorites: Adds to HEOS Favorites.
.
Music
Rooms Now Playing
Album
Album
Play Now
Cancel
Play Now & Replace Queue
Play Next
Add to End of Queue
Track 01
Rooms
10 Tracks,60 Mins.,2014
Artist
MusicRooms Now Playing
Track 01
Album
0:50
-
2:51
Artist
Now Playing
Contents
Connections Playback Settings Tips Appendix
50
Front panel Rear panel
Remote control
unit
Index
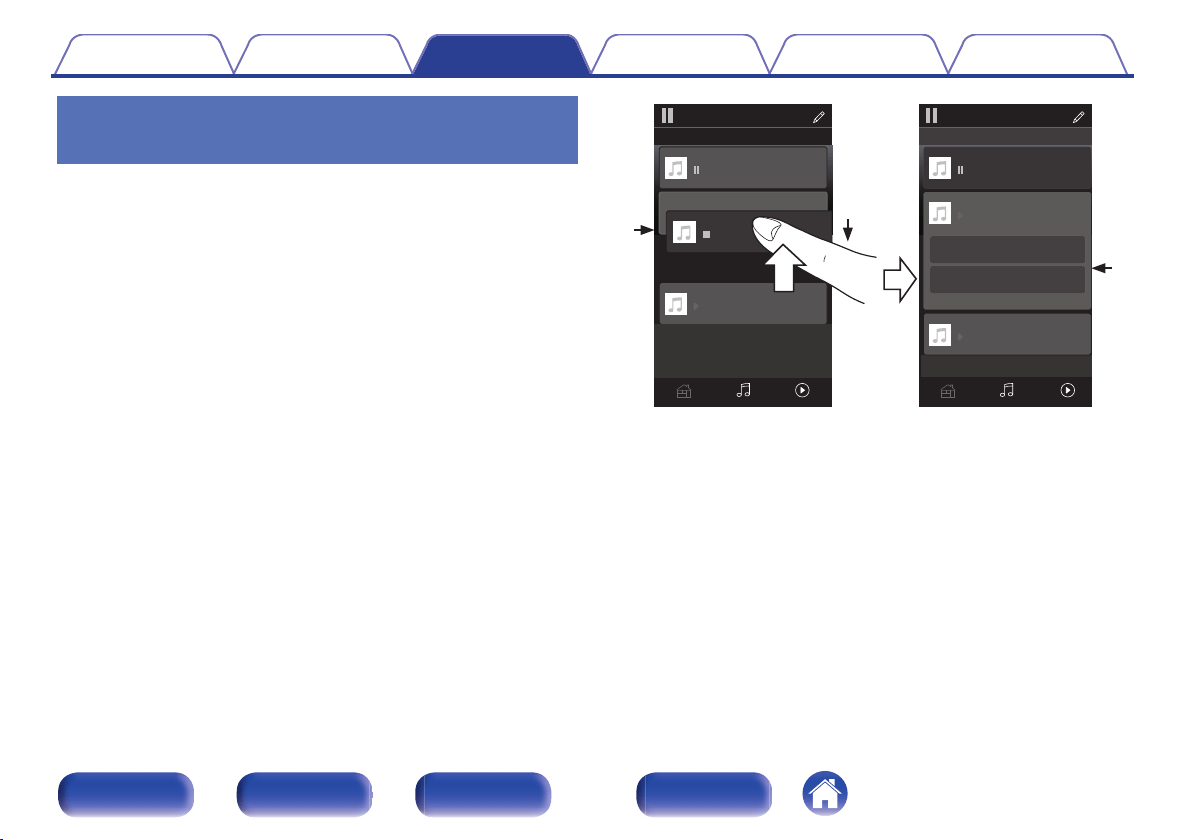
Listening to the same music in multiple
rooms
The HEOS system is a true multi-room audio system that automatically
synchronizes audio playback between multiple HEOS devices so that the
audio coming from different rooms is perfectly in sync and always sounds
amazing! You can easily add up to 32 HEOS devices to your HEOS
system. You can join or group up to 16 individual HEOS devices into a
group of HEOS devices that function as if they were a single HEOS
device.
o
Grouping rooms
1
Press and hold your finger on room that is not playing
music.
2
Drag it into the room that is playing music and lift your
finger.
3
The two rooms will be grouped together into a single
device group and both rooms will be playing the same
music in perfect sync.
.
2
1
3
Now PlayingMusicRooms
Song Name 1
Dining
Kitchen
Drag one room into another to group them
Rooms
Now PlayingMusicRooms
Song Name 3
Song Name 3
Song Name 2
Song Name 2
Song Name 1
Bedroom
Bedroom
Dining
Living
Kitchen
Drag one room into another to group them
Rooms
Living
Drag a room out of this group to ungroup it
Living+Kitchen
Contents
Connections Playback Settings Tips Appendix
51
Front panel Rear panel
Remote control
unit
Index
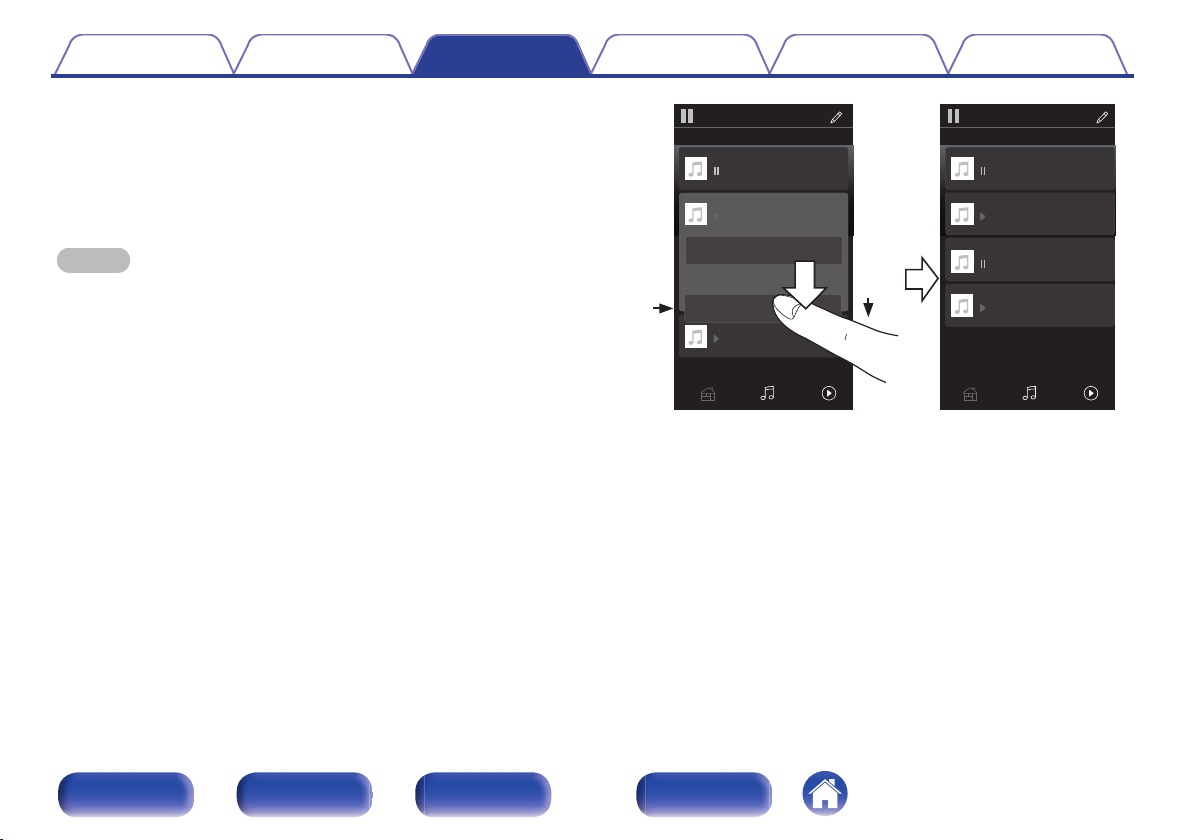
o
Ungrouping rooms
1
Press and hold your finger on room that you want to
remove from the group.
2
Drag it out of the group and lift your finger.
NOTE
0
You can not remove the first room that started playing the music before grouping.
.
2
1
Song Name 3
Song Name 2
Song Name 1
Bedroom
Dining
Living
Kitchen
Drag one room into another to group them
Rooms
Song Name 4
Song Name 3
Song Name 2
Song Name 1
Bedroom
Dining
Living
Kitchen
Drag one room into another to group them
Rooms
Living
Now PlayingMusicRoomsNow PlayingMusicRooms
Contents
Connections Playback Settings Tips Appendix
52
Front panel Rear panel
Remote control
unit
Index
o
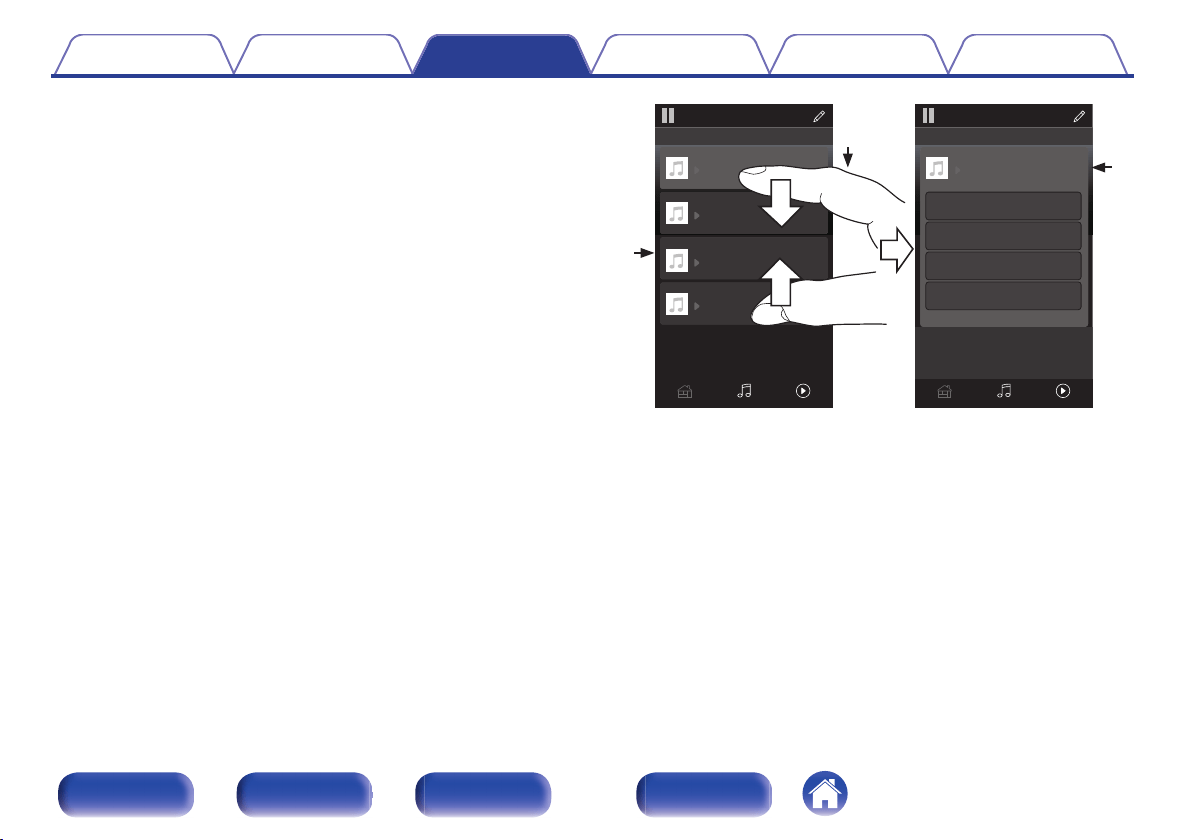
Grouping all rooms (party mode)
You can easily group 16 rooms together into Party Mode by using a
"pinch" gesture.
1
Place two fingers on the screen over the list of rooms.
2
Quickly pinch your two fingers together and release.
3
All of your rooms will be joined together and begin
playing the same music in perfect sync.
.
1
2
3
Song Name 1
Bedroom
Dining
Kitchen
Drag one room into another to group them
Rooms
Song Name 4
Song Name 3
Song Name 2
Song Name 1
Bedroom
Dining
Living
Kitchen
Drag one room into another to group them
Rooms
Living
Now PlayingMusicRooms Now PlayingMusicRooms
Drag a room out of this group to ungroup it
Dining+Living+...
Contents
Connections Playback Settings Tips Appendix
53
Front panel Rear panel
Remote control
unit
Index

o
Ungrouping all rooms
You can easily ungroup all of your rooms and exit Party Mode by using
a "spread" gesture.
1
Place two fingers close together on the screen over list
of rooms.
2
Quickly spread your two fingers apart from each other
and release.
3
All of your rooms will be ungrouped.
.
1
2
3
Song Name 1
Bedroom
Dining
Dining
Kitchen
Drag one room into another to group them
Rooms
Song Name 4
Song Name 3
Song Name 2
Song Name 1
Bedroom
Dining
Living
Kitchen
Drag one room into another to group them
Rooms
Living
Now PlayingMusicRooms
Now PlayingMusicRooms
Drag a room out of this group to ungroup it
Contents
Connections Playback Settings Tips Appendix
54
Front panel Rear panel
Remote control
unit
Index
Playing CDs
.
RANDOM
CLEAR
INFO
REPEAT
0 – 9, +10
PROGRAM
1
/
3
9
8
2
Playing CDs
1
Insert a disc. (v p. 132)
0
Press 5 on the unit to open/close the disc tray.
2
Press 1/3.
The 1 indicator lights on the display.
Playback starts.
NOTE
0
Do not place any foreign objects in the disc tray. Doing so could damage the set.
0
Do not push the disc tray in by hand when the power is turned off. Doing so could
damage the set.
Contents
Connections Playback Settings Tips Appendix
55
Front panel Rear panel
Remote control
unit
Index
Operation buttons Function
1/3
Playback / Pause
2
Stop
8 9
Skip to previous track / Skip to next track
(Press and hold) Fast-reverse / Fast-
forward
0 – 9, +10 Select the track
RANDOM P
Random playback
0
The random playback function only
works while stopped.
REPEAT L
Repeat playback
0
Switching between All-track repeat and
Single-track repeat.
INFO
Time display switching
0
Switching between elapsed time of the
current track, remaining time of the
current track and remaining time of all
tracks.
o
Playing a specific track (Direct searching)
1
Use 0 – 9 and +10 to select the tracks.
GExampleH
Track 4 :Press number 4 to select track 4.
Track 12 :Press numbers 1 and 2 consecutively to select track 12.
0
The number you enter is set about 1.5 seconds after you press
the number buttons. To enter a two-digit number, be sure to press
the two number buttons, one immediately after the other.
Contents Connections Playback Settings Tips Appendix
56
Front panel Rear panel
Remote control
unit
Index

Playing tracks in a specific order
(Program playback)
Up to 25 tracks can be programmed.
1
In the stop mode, press PROGRAM.
“Program” is displayed on the display.
2
Use 0 – 9 and +10 to select the tracks.
GExampleH
Track 4 : Press number 4 to select track 4.
Track 12 : Press numbers 1 and 2 consecutively to select track 12.
0
The number you enter is set about 1.5 seconds after you press
the number buttons. To enter a two-digit number, be sure to press
the two number buttons, one immediately after the other.
3
Press 1/3.
Playback starts in the programmed order.
NOTE
0
The program is cleared when the disc tray is opened or the power is turned off.
o
Checking the order of the programmed tracks
In the stop mode, press 9.
The tracks are shown in the programmed order in the display each
time 9 is pressed.
o
Clears the programmed tracks
In the stop mode, press CLEAR.
The last track programmed is cleared each time the button is pressed.
0
You can also select a track to be cleared by pressing 9.
o
Clearing the all programmed track
In the stop mode, press PROGRAM.
Contents
Connections Playback Settings Tips Appendix
57
Front panel Rear panel
Remote control
unit
Index
Playing DATA CDs
.
REPEAT
OPTION
BACK
ui
ENTER
RANDOM
1
/
3
9
8
2
0
This section explains how to playback music files that are recorded onto
a CD-R or CD-RW.
0
There are many music distribution sites on the Internet allowing you to
download music files in MP3 or WMA (Windows Media
®
Audio) format.
The music (files) downloaded from such sites can be stored on CD-R or
CD-RW discs and played on this unit.
0
The audio format types and specifications supported by this unit for
playback are as follows.
See “Playable files” for details. (v
p. 128)
0
MP3
0
WMA
NOTE
0
Copyright-protected files cannot be played.
0
Note that depending on the software used for burning and other conditions, some
files may not play or display correctly.
“Windows Media” and “Windows” are the trademarks or
registered trademarks of Microsoft Corporation in the United
States and other countries.
Contents
Connections Playback Settings Tips Appendix
58
Front panel Rear panel
Remote control
unit
Index
Playing files
1
Load a CD-R or CD-RW containing music files into the
disc tray. (v p. 132)
0
Press 5 on the unit to open/close the disc tray.
2
Use ui to select the folder to be played, then press
ENTER.
3
Use ui to select the file to be played, then press
ENTER.
Playback starts.
Operation buttons Function
1/3
Playback / Pause
2
Stop
8 9
Skip to previous track / Skip to next track
(Press and hold) Fast-reverse / Fast-
forward
BACK Moving up a level in the hierarchy
u i
Select the item
ENTER Enter the selected item / Playback
RANDOM P
Random playback
0
The random playback function only
works while stopped.
REPEAT L
Repeat playback
0
Switching between All-track repeat and
Single-track repeat.
0
To start playing another file during playback of a CD-R/CD-RW, first press BACK
to display the file tree. Next, use ui to select the file to be played and press
ENTER.
Contents Connections Playback Settings Tips Appendix
59
Front panel Rear panel
Remote control
unit
Index
o
Files that can be played back
0
See “Playable files”. (v p. 128)
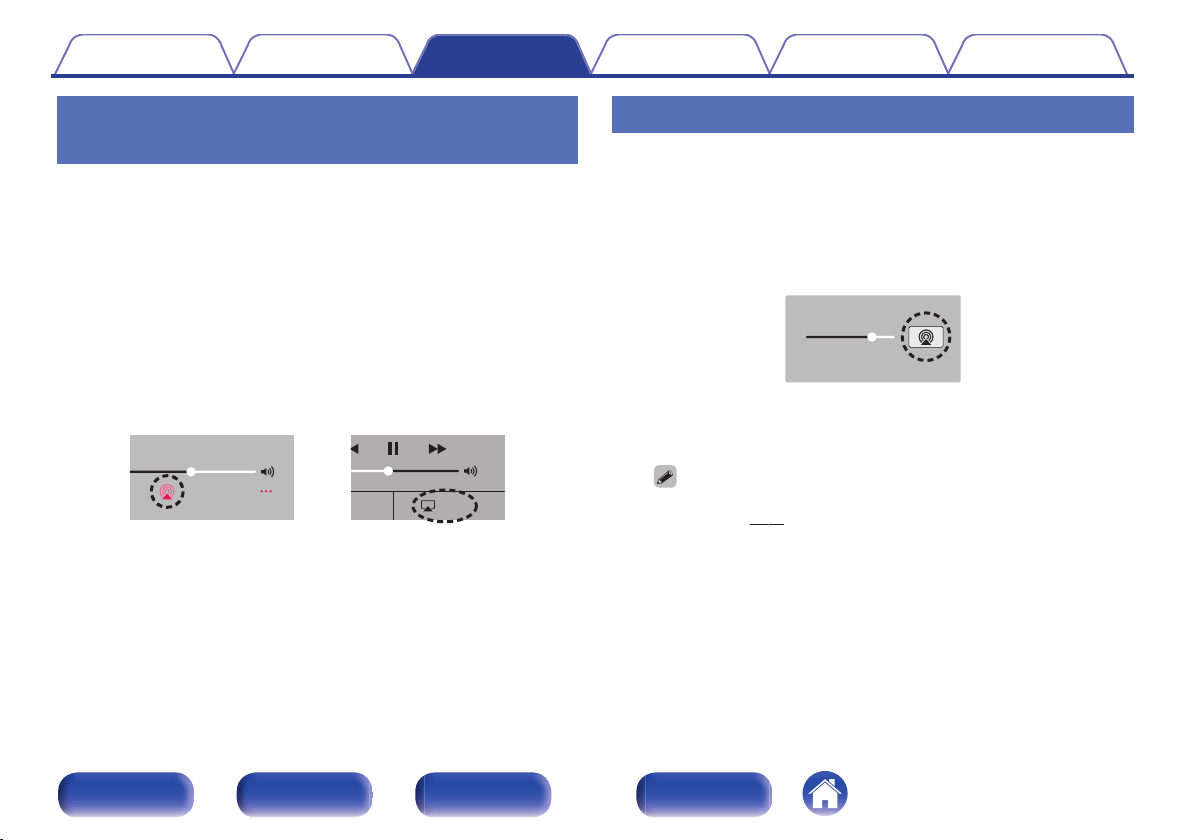
o
Switching the playback range
Press OPTION.
0
The playback range of a track can be set.
Folder mode:
U appears in the display and all tracks
in the selected folder are played.
All mode: All the files in the disc are played.
Contents Connections Playback Settings Tips Appendix
60
Front panel Rear panel
Remote control
unit
Index
Using as a D/A converter
.
POWER
X
COAXIAL
USB-DAC
OPTICAL1
OPTICAL2
Digital audio signals input from an external device or computer into this
unit can be converted and output as analog signals using this unit’s D/A
converter. (D/A converter function)
0
DSD is a registered trademark.
0
Microsoft, Windows 7, Windows 8, Windows 8.1 and Windows
10 are either registered trademarks or trademarks of Microsoft
Corporation in the United States and/or other countries.
0
ASIO is a trademark of Steinberg Media Technologies GmbH.
0
Apple, Macintosh and Mac OS are trademarks of Apple Inc.,
registered in the U.S. and other countries.
Contents Connections Playback Settings Tips Appendix
61
Front panel Rear panel
Remote control
unit
Index
Connecting and playing back from a
computer (USB-DAC)
You can enjoy high-quality audio playback from the D/A converter built in
to this unit by inputting music files into this unit from a computer via USB
connection.
0
Before USB connecting this unit to your computer, install the driver
software in your computer.
0
Drivers do not need to be installed for Mac OS.
0
Also, you can use whichever commercially available or downloadable
player software you like to playback files on your computer.
o
Computer (system requirements)
OS
0
Windows 7, Windows 8, Windows 8.1 or Windows 10
0
Mac OS X 10.10, 10.11 or macOS 10.12
USB
0
USB 2.0: USB High speed/USB Audio Class Ver.2.0
NOTE
0
This unit was checked the operation using the system requirements by us, but
it does not guarantee the operation of all systems.
Windows OS
Installing the dedicated driver (v p. 62)
Mac OS
Audio device settings (v p. 69)
o
Installing the dedicated driver
(Windows OS only)
n
Installing the driver software
1
Disconnect the USB cable between your PC and the
unit.
0
The driver software cannot be installed correctly if your PC is
connected to the unit by a USB cable.
0
If the unit and your computer are connected by a USB cable and
the computer is switched on before installation, disconnect the
USB and restart the computer.
2
Download the dedicated driver from the “Download”
section of the ND8006 page of the Marantz website
onto your PC.
3
Unzip the downloaded file, and double-click the exe
file.
Contents Connections Playback Settings Tips Appendix
62
Front panel Rear panel
Remote control
unit
Index
D
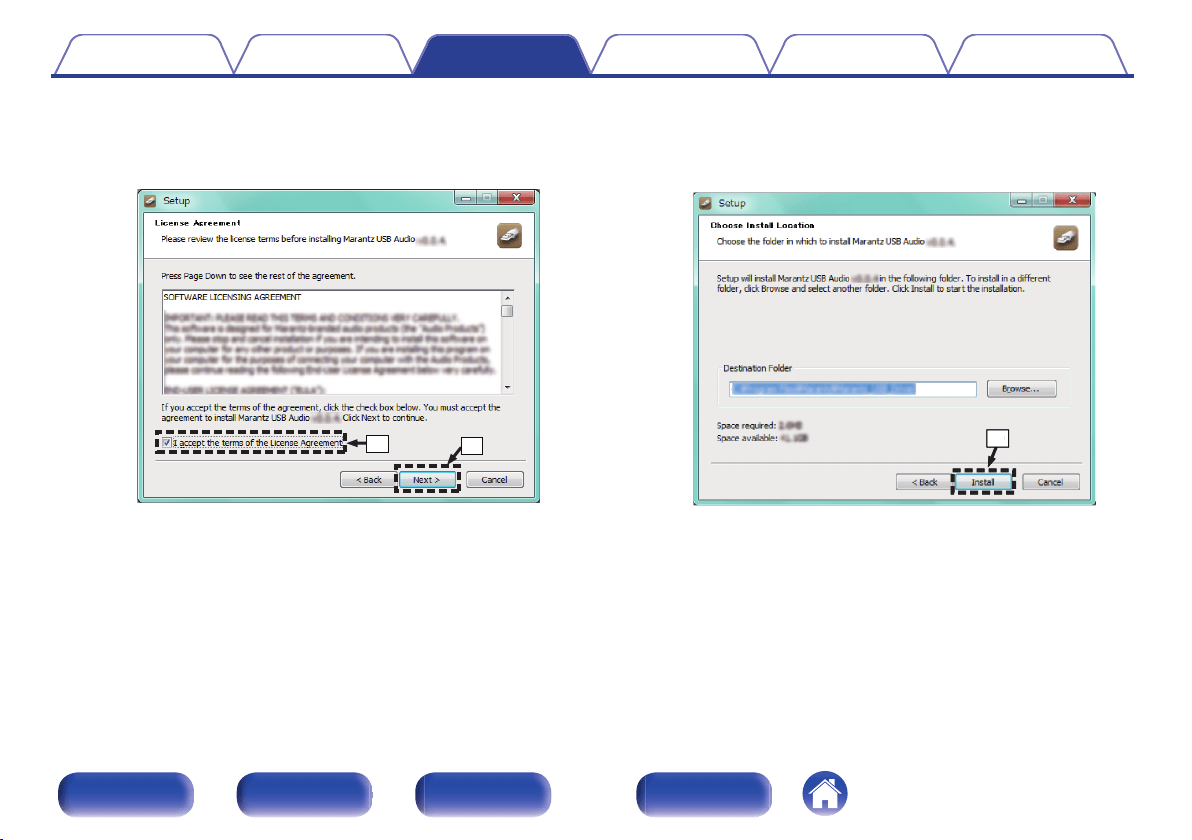
Read the Software Licensing Agreement, and click “I accept the
terms of the License Agreement”.
E
Click “Next”.
.
t
r
F
Click “Install” on the installation start dialog.
0
The installation starts. Do not perform any operation on the PC
until the installation is completed.
.
y
y
Contents
Connections Playback Settings Tips Appendix
64
Front panel Rear panel
Remote control
unit
Index
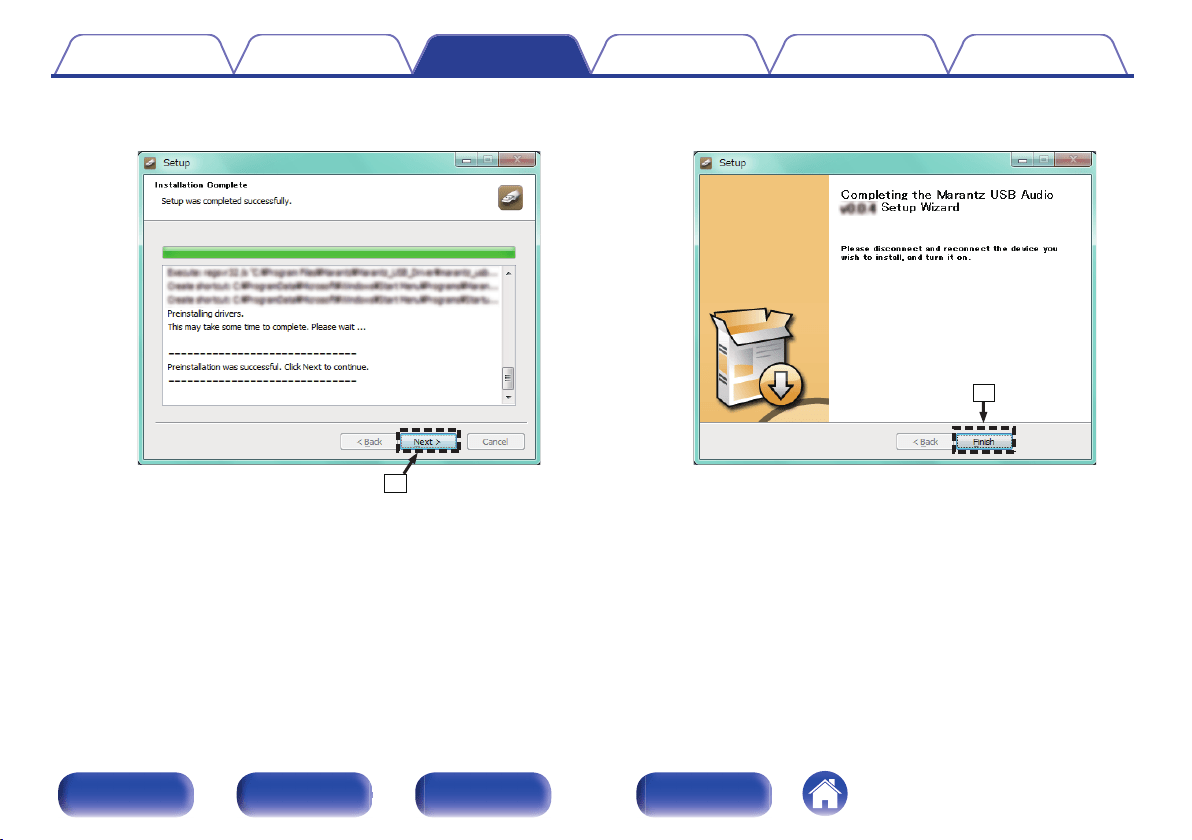
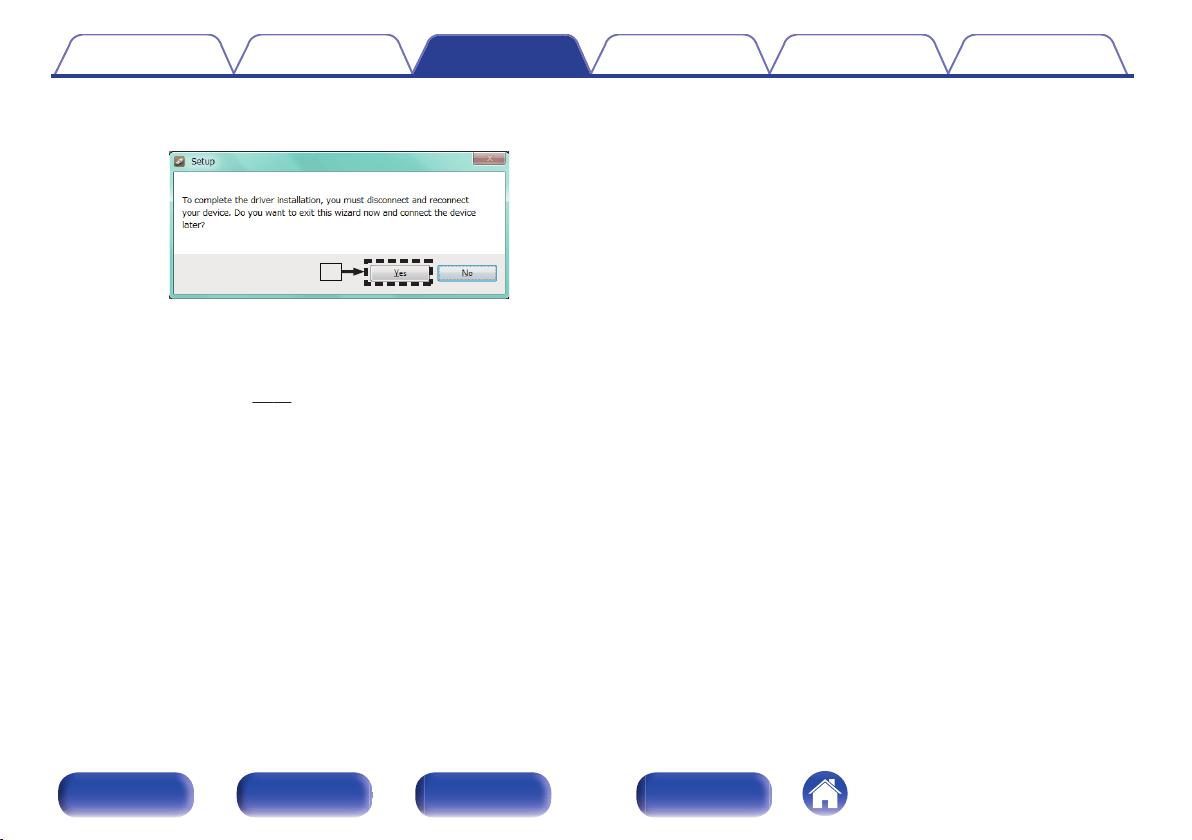
I
Click “Yes”.
.
o
5
With the unit power off, connect the unit and PC using
a USB cable (sold separately).
0
For the connection procedure, refer to the “Connecting a PC or
Mac” section. (v p. 24)
6
Press POWER X.
0
When the unit power is turned on, the PC automatically finds and
connects to the unit.
7
Press the input source select button (USB-DAC) to
switch the input source to “USB-DAC”.
8
Checking the installed driver.
A
Click the “Start” button and click “Control Panel” on the PC.
0
The control panel setting list is displayed.
B
Click the “Sound” icon.
0
The sound menu window is displayed.
C
Check that there is a checkmark next to “Default Device” under in
“ND8006” of the “Playback” tab.
0
When there is a checkmark for a different device, click ND8006
and “Set Default”.
Contents Connections Playback Settings Tips Appendix
66
Front panel Rear panel
Remote control
unit
Index
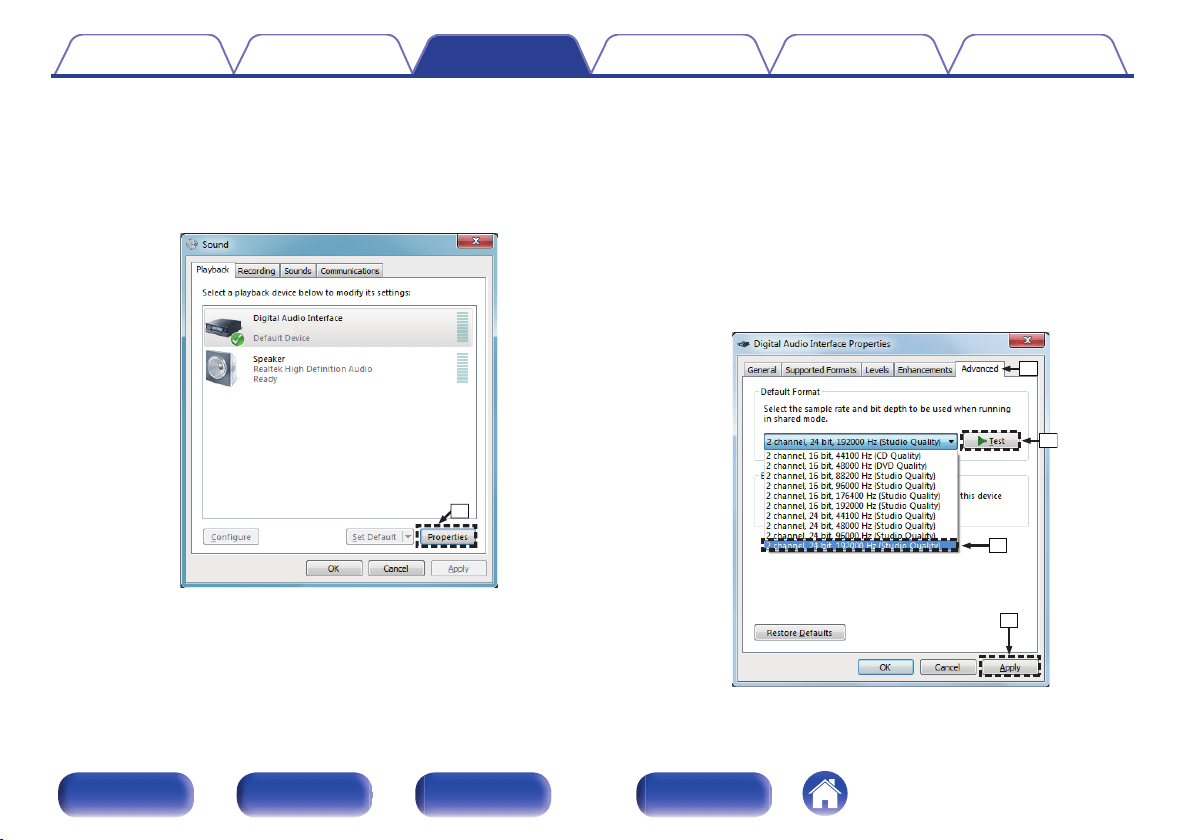
9
Checking audio output.
Outputs a TEST signal from the PC and checks the audio output
from the USB-DAC function.
A
Select “ND8006” and click “Properties”.
0
The ND8006 Properties window is displayed.
.
ND8006
q
B
Click the “Advanced” tab.
C
Select the sampling rate and bit rate to be applied to the D/A
converter.
0
It is recommended that “2 channel, 24 bit, 192000 Hz (Studio
Quality)” is selected (Windows 7).
0
It is recommended that “2 channel, 32 bit, 192000 Hz (Studio
Quality)” is selected (Windows 8/Windows 8.1/Windows 10).
D
Click “Apply”.
E
Click “Test”.
0
Check that audio from this unit is output from the PC.
.
w
e
r
t
Contents
Connections Playback Settings Tips Appendix
67
Front panel Rear panel
Remote control
unit
Index

NOTE
0
The dedicated driver must be installed in the PC before this unit is connected to a
PC. Operation will not occur correctly if connected to the PC before the dedicated
driver has been installed.
0
Player software supporting the Audio Stream Input Output (ASIO) driver is
required to play files with a sampling frequency of 352.8 kHz/384 kHz without
downsampling. Check your player software before playing files with the ASIO
driver.
0
Operation may fail in some PC hardware and software configurations.
0
Please see the FAQ at
www.marantz.com if you experience any issues getting
audio to play from your computer through the this unit. You may also want to check
the support pages for your audio player application.
Contents Connections Playback Settings Tips Appendix
68
Front panel Rear panel
Remote control
unit
Index
o
Audio device settings (Mac OS only)
A
With the unit power off, connect the unit and Mac using a USB cable
(sold separately).
0
For the connection procedure, refer to the “Connecting a PC or Mac”
section. (v p. 24)
B
Press POWER X.
C
Press USB-DAC to switch the input source to “USB-DAC”.
D
Move the cursor to “Go” on the computer screen, and then click
“Utilities”.
0
The utility list is displayed.
E
Double-click “Audio MIDI Setup”.
0
The “Audio Devices” window is displayed.
F
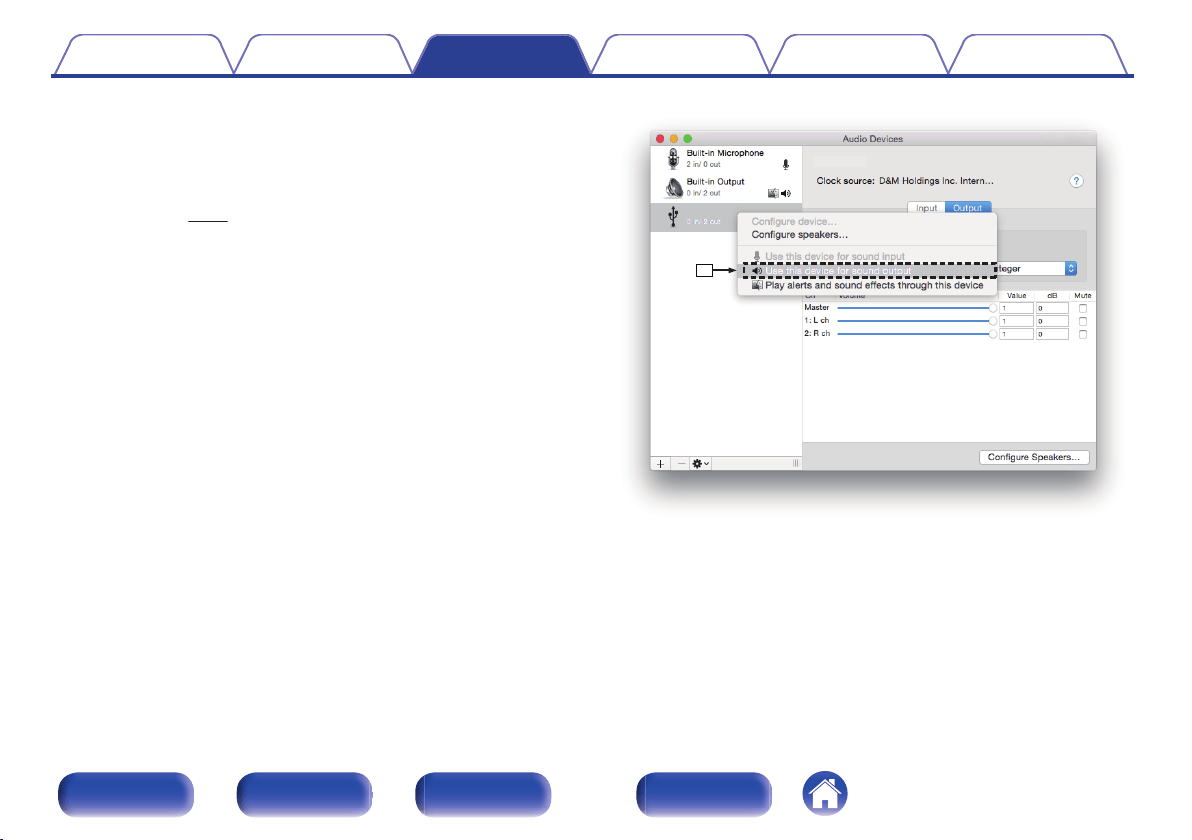
Check that “Use this device for sound output” is checked in “ND8006”.
0
If a different device is checked, select and “Secondary click” on
“ND8006”, and then select “Use this device for sound output”.
.
⑥
ND8006
ND8006
Contents
Connections Playback Settings Tips Appendix
69
Front panel Rear panel
Remote control
unit
Index
G
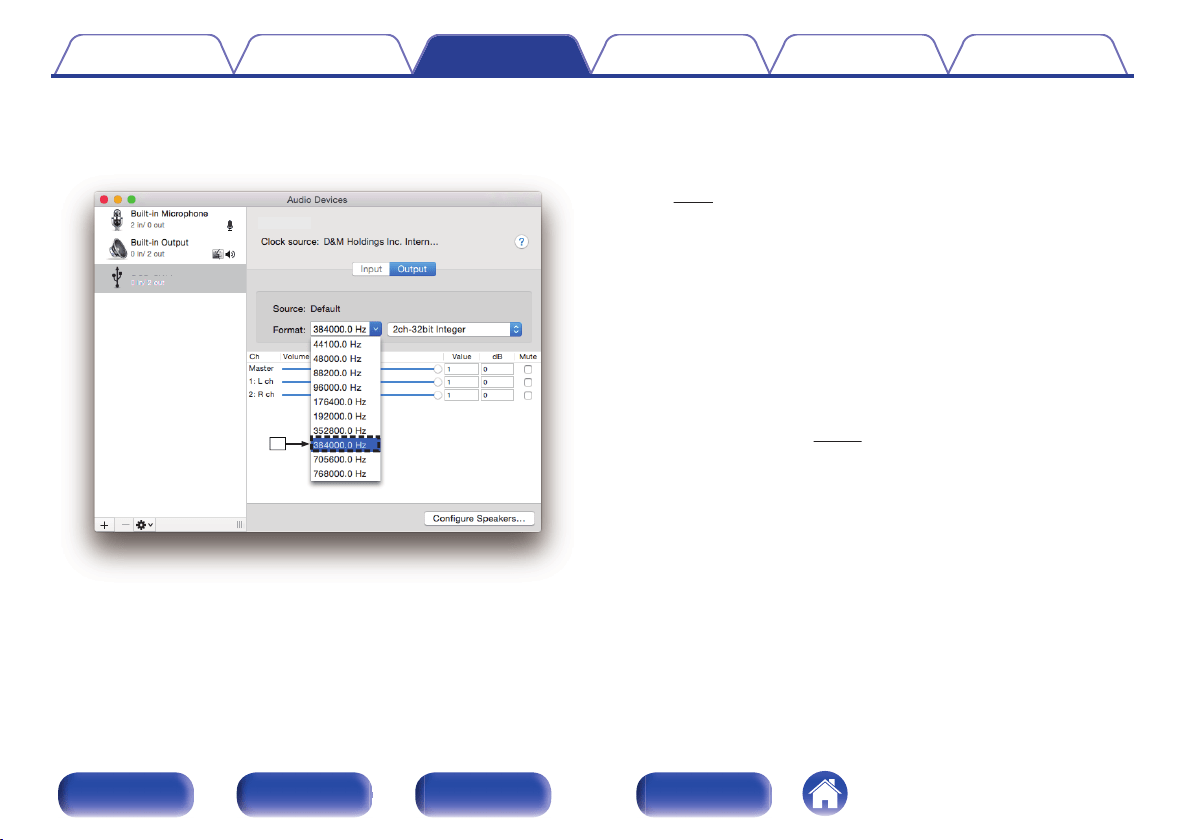
Select the “ND8006” format.
0
It is normally recommended to set the format to “384000.0 Hz” and
“2ch-32 bit Interger”.
.
⑦
ND8006
ND8006
H
Quit Audio MIDI Setup.
o
Playback
Install the desired player software on your computer beforehand.
Use the rear panel USB-DAC port to connect this unit to a computer.
(v p. 24)
1
Press USB-DAC to switch the input source to “USB-
DAC”.
Start playback on the computer’s player software.
0
If the sampling frequency cannot be detected, “Signal Unlock” will
be displayed.
0
“Unsupported” is displayed when audio signals that are not
supported by this unit are input.
o
Specifications of supported audio formats
See “D/A converter” (v p. 134).
Contents
Connections Playback Settings Tips Appendix
70
Front panel Rear panel
Remote control
unit
Index
NOTE
0
Perform operations such as playback and pause on the computer. At this time, you
cannot perform operations with buttons on this unit or the remote control.
0
When this unit is functioning as a D/A converter, sound is not output from the
computer’s speakers.
0
If the computer is disconnected from this unit while the computer music playback
software is running, the playback software may freeze. Always exit the playback
software before disconnecting the computer.
0
When an error occurs on the computer, disconnect the USB cable and restart the
computer.
0
The sampling frequency of the music playback software and sampling frequency
displayed on this unit may differ.
0
Use a cable that is 10 ft (3 m) or less to connect to the computer.
Connect and playback from a digital
device (Coaxial/Optical 1/Optical 2)
1
Press COAXIAL, OPTICAL 1 or OPTICAL 2 to switch the
input source to “Coaxial”, “Optical 1” or “Optical 2”.
0
If the sampling frequency cannot be detected, “Signal Unlock” will
be displayed.
0
“Unsupported” is displayed when audio signals that are not
supported by this unit are input.
o
Specifications of supported audio formats
See “D/A converter” (v p. 134).
NOTE
0
Do not input non-PCM signals, such as Dolby Digital and DTS. This causes noise
and could damage the speakers.
Contents Connections Playback Settings Tips Appendix
71
Front panel Rear panel
Remote control
unit
Index
AirPlay function
Music files stored on your iPhone, iPod touch, iPad or iTunes can be
played on this unit via the network.
0
Source input will be switched to “AirPlay” when AirPlay playback is started.
0
You can stop AirPlay playback by choosing other input source.
0
For information about how to use iTunes, also see the Help for iTunes.
0
The screen may differ depending on the OS and software versions.
NOTE
0
When the AirPlay function is used while a power amplifier is connected to this unit,
the volume set on the iPhone, iPod touch, iPad or in iTunes is output. Set the
minimum volume on the iPhone, iPod touch, iPad or in iTunes before starting
playback and then adjust to the appropriate volume.
.
PC
Router
This unit
Contents Connections Playback Settings Tips Appendix
72
Front panel Rear panel
Remote control
unit
Index
Playing songs from your iPhone, iPod
touch or iPad
If you update your “iPhone/iPod touch/iPad” to iOS 4.2.1 or later, you can
stream music stored in your “iPhone/iPod touch/iPad” directly to this unit.
1
Connect your iPhone, iPod touch or iPad Wi-Fi to the
same network as this unit.
0
For details, see your device’s manual.
2
Play the song on your iPhone, iPod touch or iPad.
AirPlay icon is displayed on the iPhone, iPod touch or iPad screen.
3
Tap the AirPlay icon.
.
AirPlay
AirPlay
D
rop:
AirDrop:
ryone
ryone
[Example] iOS 11
[Example] iOS 9
4
Select the speaker (devices) you want to use.
Playing iTunes music with this unit
1
Install iTunes 10, or later, on a Mac or Windows PC that
is connected to the same network as this unit.
2
Start iTunes and click the AirPlay icon to select the
main unit.
.
[Example] iTunes
3
Choose a song and click play in iTunes.
The music will stream to this unit.
0
When “Network Control” is set to “On”, you can turn on this unit by operating
iTunes. (v
p. 93)
Contents Connections Playback Settings Tips Appendix
73
Front panel Rear panel
Remote control
unit
Index

Perform iTunes playback operations
with the remote control unit of this unit
With this unit’s remote control unit, you can perform iTunes song play,
pause, and auto search (cue) operations.
1
Select the “Edit” - “Preferences...” in the iTunes menu.
2
Select “Devices” in the iTunes setting window.
3
Check “Allow iTunes audio control from remote
speakers”, and then click “OK”.
0
This does not need to be set if using version 12 or later of iTunes.
Contents Connections Playback Settings Tips Appendix
74
Front panel Rear panel
Remote control
unit
Index
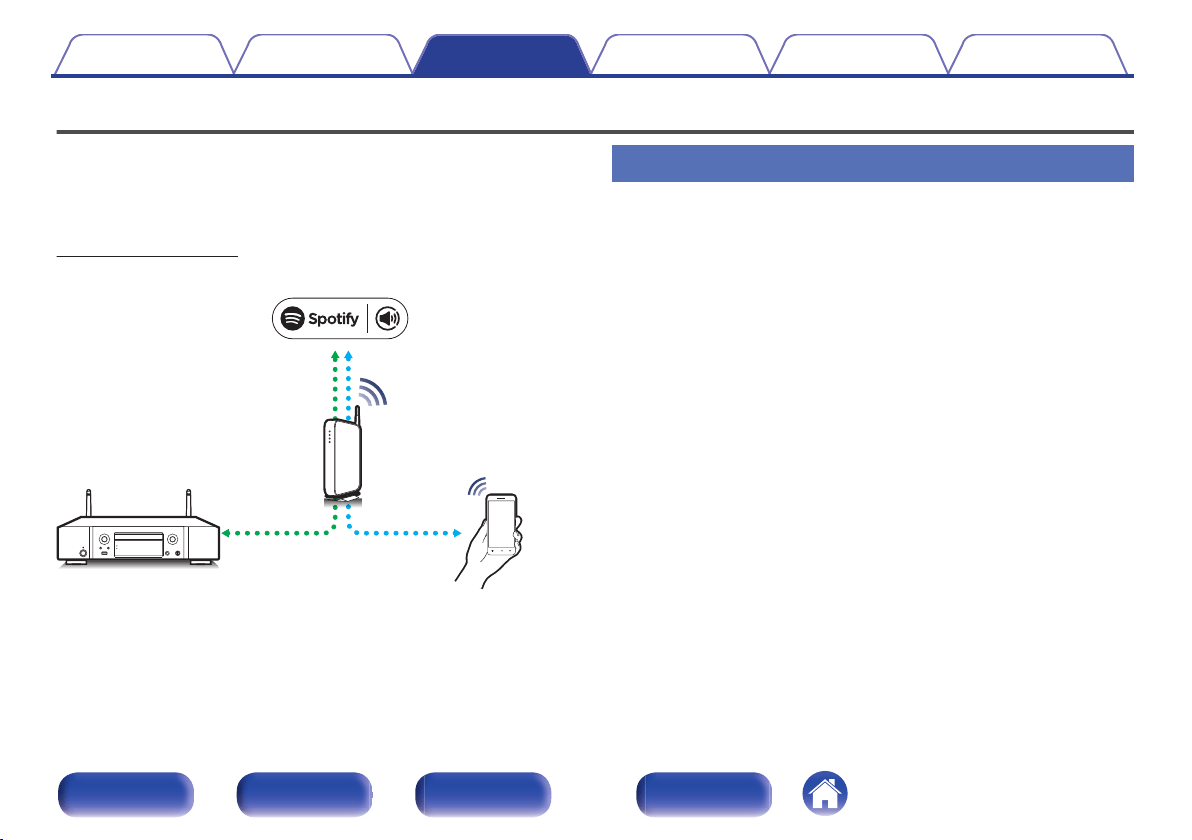
Spotify Connect function
Spotify is the world’s most popular streaming service. If you subscribe to
Spotify Premium, you can control your new speaker with your phone or
tablet. Because Spotify is built-in to your speaker, you can still take calls or
use other apps - the music never stops.
For information on how to set up and use Spotify Connect please visit
www.spotify.com/connect
.
Spotify server
Control
This unit
Spotify App
Audio
streaming/
control
Playing Spotify music with this unit
Download the “Spotify App” onto your Android or iOS device beforehand.
To play a Spotify track in this unit, you need to register in the Spotify
premium account first.
1
Connect the Wi-Fi settings of the iOS or Android device
in the same network as this unit.
2
Launch the Spotify App.
3
Play back the Spotify track.
4
Tap the Spotify icon F to select the unit.
The music will stream to this unit.
Contents Connections Playback Settings Tips Appendix
75
Front panel Rear panel
Remote control
unit
Index
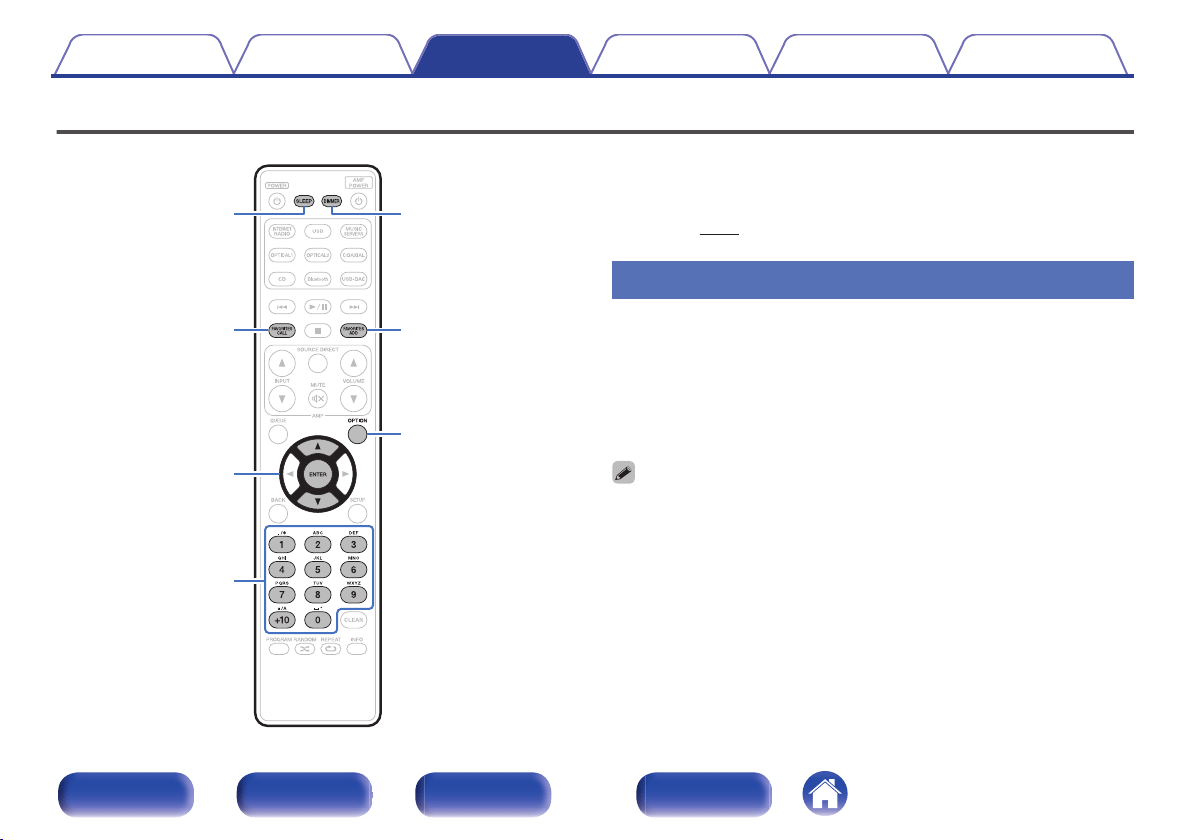
Convenience functions
.
OPTION
0 – 9, +10
ui
ENTER
DIMMERSLEEP
FAVORITES
ADD
FAVORITES
CALL
0
This section explains how to use convenient functions that can be used
for each input source.
0
Control of “HEOS Favorites” operations is optimized for the app. For
more information on acquiring the app, see “Getting the HEOS
App” (v p. 46).
Adding to HEOS Favorites
This function only works for streamed content.
1
While content is playing, press FAVORITES ADD.
The HEOS favorites list is displayed.
2
Use ui to select the “HEOS Favorites” number you
would like to save your contents to, then press ENTER.
0
Press OPTION on the remote control while content is playing back to display the
option menu. Content can also be added to “HEOS Favorites” from the option
menu.
Contents Connections Playback Settings Tips Appendix
76
Front panel Rear panel
Remote control
unit
Index
Playing back HEOS Favorites
1
Press FAVORITES CALL.
The “HEOS Favorites” is displayed.
2
Use ui to select the content you would like to
playback, then press ENTER.
0
You can select content you would like to playback from your HEOS Favorites by
pressing 0-9 and +10.
Deleting a HEOS Favorites
1
While the HEOS Favorites content list is displayed, use
ui to select the item you want to remove from HEOS
Favorites, then press ENTER.
2
Use ui to select “Remove from HEOS Favorites”, then
press ENTER.
Switching the display’s brightness
The display brightness can be adjusted between four levels. Switching the
display off reduces a source of noise that affects sound quality, enabling
higher sound quality playback.
1
Press DIMMER.
0
The brightness of the display switches each time the button is
pressed.
0
When the display is turned off, the “DISPLAY OFF” indicator lights up on the
display.
0
When “Off” is set, the display turns off temporarily when operating the buttons.
0
The display brightness is set to most brightly by default.
Contents Connections Playback Settings Tips Appendix
77
Front panel Rear panel
Remote control
unit
Index

Using the sleep timer
You can have the power automatically switched to standby once a set time
has elapsed. This is convenient for listening while going to sleep.
1
Press SLEEP during playback and select the setting
time.
0
The sleep timer can be set to up to 90 minutes, in steps of 10
minutes.
0
After about 5 seconds, the setting is entered and the display
returns to as it was before.
o
To cancel the sleep timer
1
Press SLEEP to set “Sleep 1Off”.
0
The sleep timer setting is canceled when the unit switches to standby mode.
0
To check the time remaining until the sleep timer is activated, press SLEEP.
Contents Connections Playback Settings Tips Appendix
78
Front panel Rear panel
Remote control
unit
Index
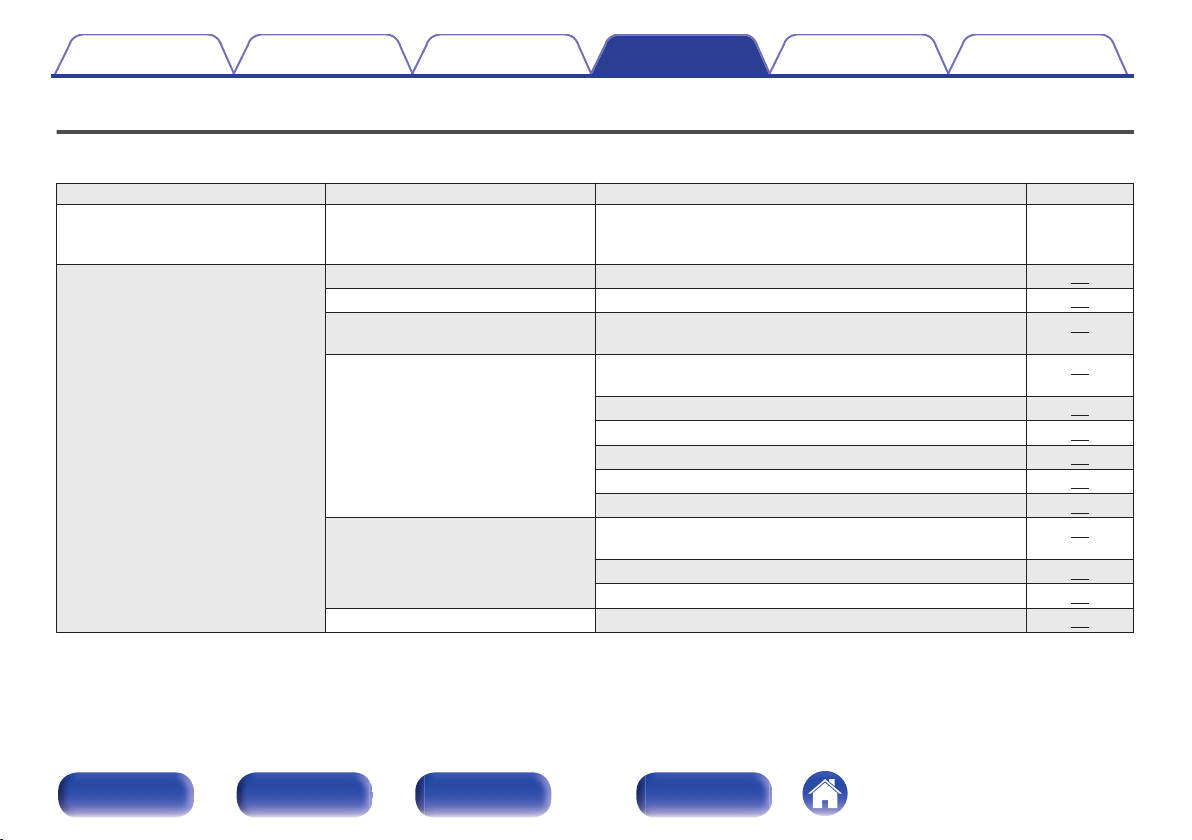
Menu map
For menu operations, see the following page.
By default, this unit has recommended settings defined. You can customize this unit based on your existing system and your preferences.
Setting items Detailed items Description/Detailed items Page
Quick Setup – Performs the network settings using a Wizard style window.
For details on the operations, see the separate “Quick Start
Guide”.
–
General Language Sets the language for display the menu. 87
Auto-Standby Sets the unit power to standby when the unit is not in use. 87
Usage Data Selects whether or not to send anonymous usage data to
Marantz.
88
Firmware Set whether or not to check for firmware update, update the
firmware, and display update and upgrade notifications.
88
Check for Update 88
Auto-Update 89
Allow Update 89
Upgrade Notification 89
Add New Feature 90
Information Displays and sets notifications. Also, sets whether or not to
display the notification when the power is turned on.
91
Notification Alerts 91
Notifications 91
Reset Various settings are reset to the factory default values. 91
Contents Connections Playback Settings Tips Appendix
79
Front panel Rear panel
Remote control
unit
Index

Setting items Detailed items Description/Detailed items Page
Network Network Information Displays various information about the network. 92
Network & USB-A The network and USB memory playback (USB-A) functions
can be stopped to prevent noise that affects the sound
quality.
92
Wi-Fi The Wi-Fi function can be stopped to prevent noise that
affects the sound quality.
92
Bluetooth Stopping Bluetooth function reduces a source of noise that
affects sound quality, enabling higher sound quality
playback.
92
Network Control Performs the on/off settings for the network function when in
standby mode.
93
Friendly Name Edits a name displayed on the Internet. 93
Connection Selects whether to connect the home network to a wireless
LAN or a wired LAN.
94
Wi-Fi Use the wireless LAN (Wi-Fi) function to connect to a
network.
94
Auto-Scan 94
Share Wi-Fi setting from an iOS device 95
WPS Router 95
Manual 96
Wired Use a LAN cable to connect to a network. 94
Contents Connections Playback Settings Tips Appendix
80
Front panel Rear panel
Remote control
unit
Index
Setting items Detailed items Description/Detailed items Page
Network Settings Used for manually setting the IP address. 97
DHCP 97
IP Address
z
97
Subnet Mask
z
97
Gateway
z
97
DNS
z
97
Save 97
Diagnostics Used to check the network connection. 98
Physical Connection 98
Router Access 98
Internet Access 98
z
Displayed when the “DHCP” setting is “Off”.
Contents Connections Playback Settings Tips Appendix
81
Front panel Rear panel
Remote control
unit
Index
Setting items Detailed items Description Page
HEOS Account 【When the user is signed out the HEOS Account】
I have a HEOS Account Selects to sign in. 99
Create Account Creates new HEOS Account. 99
Forgot Password If you forgot your password, we'll send you an email with
instructions about how to reset it.
99
【When the user is signed in the HEOS Account】
Signed in As Displays your HEOS Account. 99
Change Location Selects your location. 99
Change Password Changes your HEOS Account Password. 99
Delete Account Deletes your HEOS Account. 99
Sign Out Sign out of your HEOS Account. 99
Contents Connections Playback Settings Tips Appendix
82
Front panel Rear panel
Remote control
unit
Index
Setting items Detailed items Description Page
Audio Filter This unit is equipped with a sound quality adjusting function
which allows users to enjoy the desired playback sound
quality.
100
Lock Range Narrowing down the “Lock Range” setting reduces jittering,
providing clearer sound.
100
Variable Out You can stop the circuit that outputs audio from the analog
audio output terminals (VARIABLE) of this unit. This
prevents the audio signal output from the analog audio
output terminals (FIXED) from being affected.
101
Volume Limit Make a setting for the maximum volume of the audio signal
output from the analog audio output terminals (VARIABLE).
101
Digital Out Stopping digital audio output reduces a source of noise that
affects sound quality, enabling higher sound quality
playback.
101
Phones The headphones circuit operation can be stopped to
minimize noise from the headphones circuit which could
interfere with the analog audio output signal.
101
H/P Amplifier Gain Set the gain of the headphone amplifier. By setting
according to the impedance of your headphone, you can
enjoy playing headphones at an appropriate volume.
102
Contents Connections Playback Settings Tips Appendix
83
Front panel Rear panel
Remote control
unit
Index
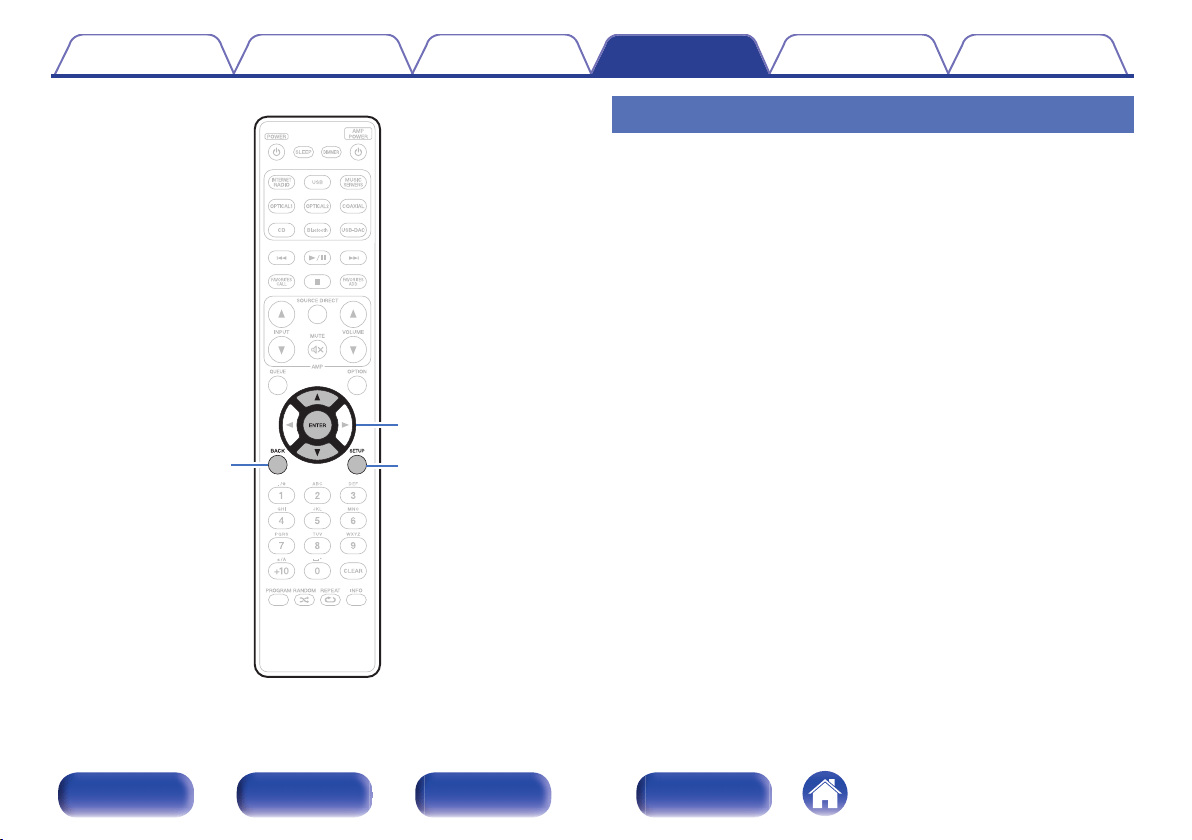
.
BACK
ui
ENTER
SETUP
Menu operation
1
Press SETUP.
The menu is displayed on the display.
2
Use ui to select the menu to be set or operated, then
press ENTER.
3
Use ui to change to desired setting.
4
Press ENTER to enter the setting.
0
To return to the previous item, press BACK.
0
Exiting the Menu, press SETUP while the menu is displayed.
The display returns to the normal display.
Contents Connections Playback Settings Tips Appendix
84
Front panel Rear panel
Remote control
unit
Index
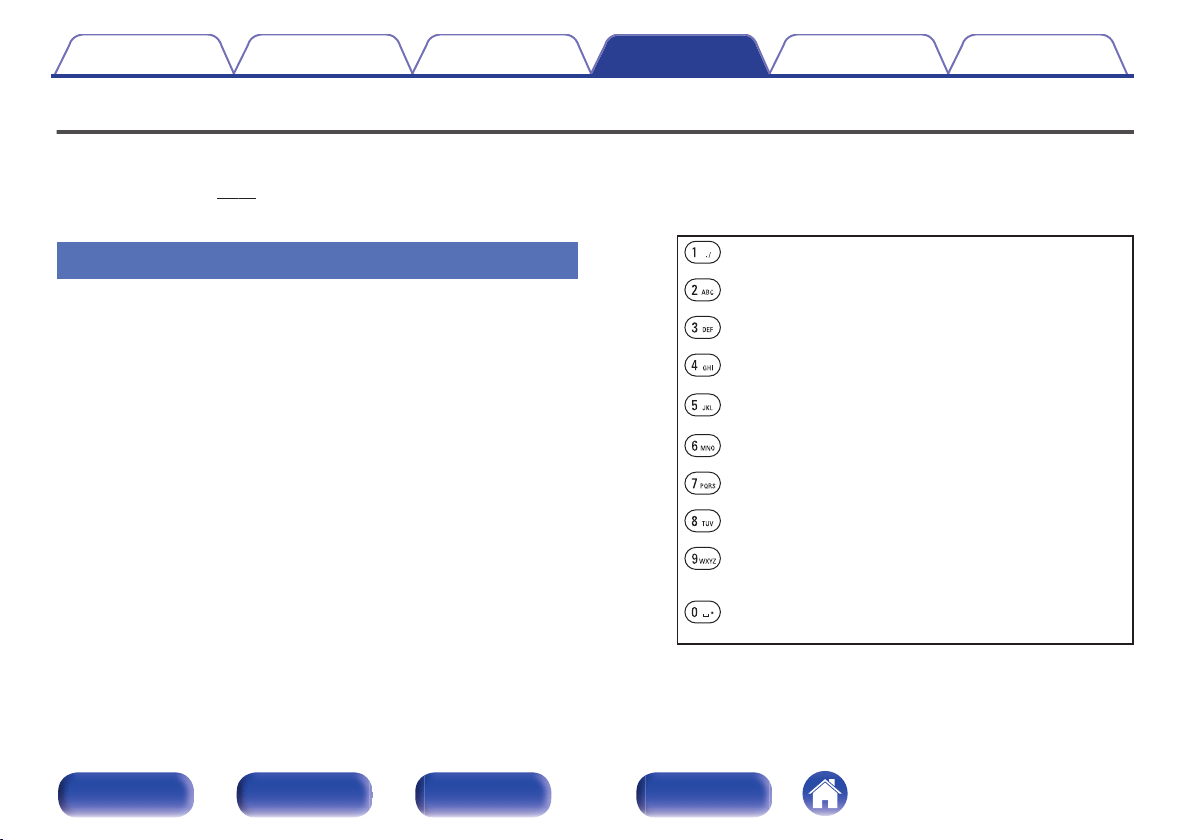
Inputting characters
On this unit, you can change the name displayed on the following screens
to the names that you prefer.
0
Friendly Name (v p. 93)
0
Character input for the network functions
Using the number buttons
1
Display the screen for inputting characters.
0
To change a character, use o p to align the cursor with the
character that you want to change.
2
Press +10 to select the character type (upper case,
lower case, characters with diacritical marks or
numeric characters).
3
Use 0 – 9, +10 until the desired character is displayed.
0
The types of characters that can be input are as shown in the
following table.
.
( )
1 . @ - _ / :
m n o M N O 6 ñ ö ò ó ô õ ø Ñ Ö Ò Ó Ô Õ Ø
a b c A B C 2 ä à á â ã å æ ć ç č Ä À Á Â Ã Å Æ Ć Ç Č
p q r s P Q R S 7 ß ŕ ř ś ş š ß Ŕ Ř Ś Ş Š
d e f D E F 3 ð ë è é ê Ð Ë È É Ê
t u v T U V 8 ü ù ú û Ü Ù Ú Û
g h i G H I 4 ï ì í î Ï Ì Í Î
w x y z W X Y Z 9 ý ź ž þ Ý Ź Ž Þ
j k l J K L 5
0
{ | } ¡ ¢ £ ¤ § © « ¯ ° ± » ¿
! “ # $ % & ‘ ( ) z
+ , ; < = > ? [ \ ] ^ `
Space
4
Repeat steps 2 and 3 to input characters then press
ENTER to register it.
Contents Connections Playback Settings Tips Appendix
85
Front panel Rear panel
Remote control
unit
Index

Using the cursor buttons
1
Display the screen for inputting characters.
0
To change a character, use o p to align the cursor with the
character that you want to change.
2
Use ui to change the character.
0
The types of characters that can be input are as shown below.
.
abcdefghijklmnopqrstuvwxyz
äàáâãåæćçčðëèéêïìíîñöòóôõøßŕřśşšüùúûýźžþ
ABCDEFGHIJKLMNOPQRSTUVWXYZ
ÄÀÁÂÃÅÆĆÇČÐËÈÉÊÏÌÍÎÑÖÒÓÔÕØŔŘŚŞŠÜÙÚÛÝŹŽÞ
z + , - . / : ; < = > ? @
! “ # $ % & ‘ ( )
[ \ ] ^ _ ` { | } ~ ¡ ¢ £ ¤ § © « ¯ ° ± » ¿
0123456789
GLower caseH
GUpper caseH
GSymbolsH
GNumbersH
(Space)
3
Repeat step 2 to input characters then press ENTER to
register it.
0
Press CLEAR to erase the character that is currently selected.
0
Press and hold CLEAR for 3 seconds or more to erase all characters.
0
Press 9 to insert a space.
Contents
Connections Playback Settings Tips Appendix
86
Front panel Rear panel
Remote control
unit
Index

General
Language
Sets the language for display the menu.
English / Français / Español (Default : English)
Auto-Standby
Sets the amount of time that must elapse without unit operation or an input
signal before the unit goes into standby automatically.
Off
(Default):
The unit does not go into standby
automatically.
1min: The unit goes into standby after 1 minutes.
5min: The unit goes into standby after 5 minutes.
15min: The unit goes into standby after 15 minutes.
Other:
Sets the minutes (between 1 and 99) before
the unit automatically goes into standby.
After setting the amount of time with 0 – 9,
+10 buttons, press ENTER to confirm the
setting.
Contents
Connections Playback Settings Tips Appendix
87
Front panel Rear panel
Remote control
unit
Index

Usage Data
To help us improve our products and customer service, Marantz collects
anonymous information about how you use this unit (such as frequently
used input sources and sound modes and speaker settings).
Marantz will never provide any information we collect to third parties.
Yes:
Provide information on the operating status
of this unit.
No:
Do not provide information on the operating
status of this unit.
Firmware
Checks for the latest firmware information about updates and upgrades,
updates the firmware, and sets up the notification message display for
upgrades.
o
Check for Update
Check for firmware updates.
The firmware can be updated if a firmware update has been released.
Update Now:
Execute the update process. During the
update, the progress is shown on the
display.
Update Later: Update later.
0
This unit automatically retries updating if updating fails. If an update still
cannot be performed, an “Update Error” message appears in the display. See
“Troubleshooting” – “Update/upgrade error messages” for information on
update error messages. (v
p. 125)
Check the conditions according to the message and try the update again.
0
This menu cannot be selected when “Allow Update” is set to “Off”.
Contents Connections Playback Settings Tips Appendix
88
Front panel Rear panel
Remote control
unit
Index
o
Auto-Update
Turns on Automatic Updates so that futures updates are automatically
downloaded and installed when this unit is in standby mode.
n
Auto-Update
This unit will automatically update to the newest firmware when in
standby mode.
On: Turns on Automatic Updates.
Off
(Default):
Turns off Automatic Updates.
n
Time Zone
Change the time zone.
Set the time zone that matches the area where you live.
0
This menu cannot be selected when “Allow Update” is set to “Off”.
o
Allow Update
Enable or disable updates and upgrades for this unit.
On
(Default):
Enables this unit to receive updates and
upgrades.
Off:
Prevents this unit from receiving update
and upgrade.
0
This unit and HEOS App may become incompatible when this setting is set to
“Off”.
o
Upgrade Notification
When the latest Upgrade firmware is available, a notification message
is displayed on the display of this unit at power on.
The notification message is displayed for about 40 seconds when the
power is turned on.
On
(Default):
Display upgrade message.
Off: Do not display upgrade message.
0
This menu cannot be selected when “Allow Update” is set to “Off”.
Contents Connections Playback Settings Tips Appendix
89
Front panel Rear panel
Remote control
unit
Index
o
Add New Feature
Display new features that can be downloaded to this unit and perform
an upgrade.
Upgrade Package: Display the items to be upgraded.
Upgrade ID:
The ID number shown on the display is
needed when carrying out the procedure.
Upgrade Status:
Display a list of the additional functions
provided by the upgrade.
Start Upgrade:
Execute the upgrade process.
During the upgrade, the amount of
upgrade time which has elapsed is
displayed.
0
Information regarding the “Update” function and “Add New Feature” will be
announced on the Marantz website each time related plans are defined. See
the Marantz website for details about upgrades.
0
When the procedure is complete, “Registered” is displayed in this menu and
upgrades can be carried out. If the procedure has not been carried out, “Not
Registered” is displayed.
0
If the upgrade is not successful, “Upgrade Error” message appears in the
display. See “Troubleshooting” – “Update/upgrade error messages” for
information on upgrade error messages. (v
p. 125)
Check the settings and network environment and then perform the upgrade
again.
0
This menu cannot be selected when “Allow Update” is set to “Off”.
Notes concerning use of “Update” and “Add New Feature”
0
In order to use these functions, you must have the correct system
requirements and settings for an Internet connection. (v
p. 26)
0
Do not turn off the power until updating or upgrading is completed.
0
Even with a broadband connection to the Internet, approximately 20
minutes is required for the updating/upgrading procedure to be
completed.
0
Once updating/upgrade starts, normal operations on this unit cannot
be performed until updating/upgrading is completed. Furthermore,
there may be cases where backup data is reset for the parameters,
etc., set on this unit.
0
If the update or upgrade fails, press and hold the X on the main unit for
more than 5 seconds, or remove and re-insert the power cord. After
about 1 minute, “Please wait” appears on the display and update
restarts. If the error continues, check the network environment.
Contents Connections Playback Settings Tips Appendix
90
Front panel Rear panel
Remote control
unit
Index
Information
o
Notification Alerts
Sets whether or not to display the notification when the power is turned
on.
On
(Default):
Notification messages are displayed.
Off: Notification messages are not displayed.
o
Notifications
Displays notifications.
Reset
Reset the unit if the display is incorrect or the unit cannot be operated.
Restores the contents of each setting to the factory settings. All settings
must be entered again.
Reset factory defaults: Unit is initialized.
Cancel: Unit is not initialized.
Contents Connections Playback Settings Tips Appendix
91
Front panel Rear panel
Remote control
unit
Index
Network
To use this unit by connecting it to a home network (LAN), you must configure network settings.
If you set up your home network (LAN) via DHCP, set “DHCP” to “On”. (Use the default setting.) This allows this unit to use your home network (LAN).
When assigning an IP address to each device manually, you need to assign an IP address to this unit using the “IP Address” settings, and enter
information about your home network (LAN) such as the gateway address and subnet mask, etc.
Network Information
Displays network information.
Friendly Name / Connection / SSID (Wi-Fi Signal Strength) / DHCP /
IP Address / MAC Address (Ethernet) / MAC Address (Wi-Fi)
Network & USB-A
The network and USB memory playback (USB-A) functions can be
stopped to prevent noise that affects the sound quality. This enables
playback with a high sound quality when using the CD playback and D/A
converter functions.
Enabled
(Default):
Enables the network and USB memory
playback (USB-A) functions.
Disabled:
Disables the network and USB memory
playback (USB-A) functions.
Wi-Fi
The Wi-Fi function can be stopped to prevent noise that affects the sound
quality. Using a wired LAN to connect this unit to the network enables
playback with a high sound quality.
Enabled
(Default):
Enables the Wi-Fi function.
Disabled: Disables the Wi-Fi function.
Bluetooth
Stopping Bluetooth function reduces a source of noise that affects sound
quality, enabling higher sound quality playback.
Enabled
(Default):
Enables the Bluetooth function.
Disabled: Disables the Bluetooth function.
Contents Connections Playback Settings Tips Appendix
92
Front panel Rear panel
Remote control
unit
Index
Network Control
Enables network communication in standby power mode.
On
(Default):
Network is on during standby. Main unit
operable with a network compatible
controller.
Off: Suspend network function during standby.
0
When using the HEOS App, use with the “Network Control” setting set to “On”.
NOTE
0
When “Network Control” is set to “On”, the unit consumes more standby power.
Friendly Name
The Friendly Name is the name of this unit displayed on the network. You
can change the Friendly Name according to your preferences.
o
Friendly Name
Selects Friendly Name from the list.
When you select “Other”, you can change the Friendly Name
according to your preferences.
Current Friendly Name / Home Theater / Living Room / Family
Room / Guest Room / Kitchen / Dining Room / Master Bedroom /
Bedroom / Den / Office / Marantz ND8006 / Other
0
Up to 30 characters can be input.
0
For character input, see “Inputting characters” (v
p. 85).
0
The default Friendly Name on first use is “Marantz ND8006”.
Contents
Connections Playback Settings Tips Appendix
93
Front panel Rear panel
Remote control
unit
Index

Connection
Choose whether to connect the home network to a wireless LAN or a
wired LAN.
When connecting to the network using wired LAN, select “Wired” after
connecting a LAN cable.
When connecting to the network using wireless LAN, select “Wi-Fi” and
configure the “Wi-Fi Setup”. (v
p. 94)
Wi-Fi:
Use the wireless LAN (Wi-Fi) function to
connect to a network.
Wired: Use a LAN cable to connect to a network.
o
Wi-Fi Setup
Connect to a wireless LAN (Wi-Fi) router.
The router can be connected in the following ways. Select the
connection method to suit your home environment.
0
“Wi-Fi Setup” is not displayed in the menu when “Connection” in the menu is
set to “Wired”.
n
Auto-Scan
Select the network you wish to connect to from the list of possible
networks shown on the display.
1. Select the network you wish to connect to from the list of wireless
networks.
Select “Rescan” if the network cannot be found.
2. Enter your password and press ENTER.
Contents Connections Playback Settings Tips Appendix
94
Front panel Rear panel
Remote control
unit
Index

n
Share Wi-Fi setting from an iOS device
Use your iOS device (iPhone/iPod/iPad) to connect to the network. By
connecting your iOS device to this unit using Wi-Fi, the unit can be
automatically connected to the same network as your device.
1. Select “Share Wi-Fi setting from an iOS device” on the display.
2. Check that your iOS device is connected to the wireless LAN (Wi-
Fi) router and select “Marantz ND8006” from “SET UP NEW
AIRPLAY SPEAKER...” at the bottom of the Wi-Fi configuration
screen of your iOS device.
3. Tap “Next” on the screen of the iOS device.
0
The iOS device firmware version needs to support iOS 7 or later.
n
WPS Router
Use a WPS-compatible router to connect using the push button
method.
1. Select “WPS Router” on the display.
2. Switch to the WPS mode by pressing the WPS button of the router
you wish to connect to.
0
The time for pressing the button varies depending on the router.
3. Press ENTER within 2 minutes.
Contents
Connections Playback Settings Tips Appendix
95
Front panel Rear panel
Remote control
unit
Index

n
Manual
Enter the name (SSID) and password of the network you wish to
connect to.
1. Set the following items.
SSID:
Input the name of the wireless network
(SSID).
Security:
Select the encryption method according
to the encryption setting of the access
point you are using.
Password: Input the password.
2. Select “Test Connection” at the end of the setting.
0
The wireless LAN (Wi-Fi) settings of this unit can also be configured from a PC
or tablet that supports wireless LAN connection.
1. Press and hold the INPUT and BACK buttons on the main unit for at least
3 seconds when the power of the unit is on.
2. Connect the wireless LAN of the PC or tablet used to “Marantz ND8006”
when the message “Connect your Wi-Fi device to Wi-Fi network
called “Marantz ND8006”” appears in the display.
3. Start up the browser and enter “192.168.1.16/Settings/” in the URL.
4. Use the browser to enter the settings, select “Save Settings” and then exit
the settings.
0
Set “1” as the default key setting of the router when connecting to a WEP
encrypted network. (The default key of this unit is fixed as “1”.)
Contents Connections Playback Settings Tips Appendix
96
Front panel Rear panel
Remote control
unit
Index
Settings
Configure the IP address.
0
If you are using a broadband router (DHCP function), the information
required for network connection such as the IP address will be
automatically configured since the DHCP function is set to “On” in the
default settings of this unit.
0
Set up the IP Address, Subnet Mask, Gateway and DNS server
information only when assigning a fixed IP address or when connecting
to a network without DHCP function.
o
DHCP
Selects how to connect to the network.
On
(Default):
Configure the network settings
automatically from your router.
Off: Configure the network settings manually.
o
IP Address
Set the IP address within the ranges shown below.
0
The Network Audio function cannot be used if other IP addresses
are set.
CLASS A:10.0.0.1 - 10.255.255.254
CLASS B:172.16.0.1 - 172.31.255.254
CLASS C:192.168.0.1 - 192.168.255.254
o
Subnet Mask
When connecting an xDSL modem or connector adapter directly to
this unit, input the subnet mask indicated in the documentation
supplied by your provider. Normally input 255.255.255.0.
o
Gateway
When connected to a gateway (router), input its IP address.
o
DNS
Enter the DNS address indicated in the documentation supplied by
your provider.
o
Save
Save settings
0
If you cannot connect to the Internet, recheck the connections and settings.
(v p. 26)
0
If you do not understand about Internet connection, contact your ISP (Internet
Service Provider) or the store from which you purchased your computer.
Contents
Connections Playback Settings Tips Appendix
97
Front panel Rear panel
Remote control
unit
Index
Diagnostics
Used to check the network connection.
o
Physical Connection
Checks the physical LAN port connection.
OK
Error:
The LAN cable is not connected. Check
the connection.
0
When connected using a wireless LAN, “Connection Wireless (Wi-Fi)” will
be displayed.
o
Router Access
Checks the connection from this unit to the router.
OK
Error:
Failed to communicate with the router.
Check the router settings.
o
Internet Access
Checks whether this unit has access to the Internet (WAN).
OK
Error:
Failed to connect to the Internet. Check
the Internet connection environment or
router settings.
Contents Connections Playback Settings Tips Appendix
98
Front panel Rear panel
Remote control
unit
Index
HEOS Account
Make HEOS Account-related settings.
HEOS Account is needed in order to use HEOS Favorites.
The menu displayed differs depending on the status of the HEOS Account.
You have not signed in
o
I have a HEOS Account
If you already have a HEOS Account, enter the current account name
and password to sign in.
o
Create Account
If you do not have a HEOS Account, create a new HEOS Account.
o
Forgot Password
If you have forgotten the password, an email explaining how to reset
the password will be sent.
You have already signed in
o
Signed in As
The currently signed in HEOS Account is displayed.
o
Change Location
Change the regional settings for the signed in HEOS Account.
o
Change Password
Change the password for the signed in HEOS Account.
o
Delete Account
Delete the signed in HEOS Account.
o
Sign Out
Sign out from the HEOS Account.
Contents
Connections Playback Settings Tips Appendix
99
Front panel Rear panel
Remote control
unit
Index
Audio
Make audio-related settings.
Filter
This unit is equipped with a sound quality adjusting function which allows
users to enjoy the desired playback sound quality. The unit supports PCM
signal.
Filter 1
(Default):
Offers a short impulse response for both
pre-echo and post-echo. Suitable for large-
informationcontent audio. Produces a deep
sound image with clearly-defined positional
relationships of the audio sources.
Filter 2:
This characteristic is known as
asymmetrical impulse response. The post
echo is slightly longer than the pre-echo.
The sound characteristics is more analog
like.
Lock Range
Narrowing down the “Lock Range” setting reduces jittering, providing
clearer sound. However, narrowing down the “Lock Range” too much can
cause noise or interruption of the sound during playback or when changing
to a song of a different sampling frequency. In this case, broaden the
“Lock Range” setting while listening to music until the music sounds
normal.
Narrow / Medium / Wide
0
The factory default setting for “Lock Range” differs depending on the input source.
Below are the factory default settings for each input source.
Default Input source
Narrow
CD
Wide
Network playback /
USB memory playback (USB-A) / Bluetooth /
USB-DAC / Coaxial / Optical 1 / Optical 2
0
A separate “Lock Range” setting is recorded for each input source, except for
Network playback, USB memory and Bluetooth, which have a common setting.
Contents Connections Playback Settings Tips Appendix
100
Front panel Rear panel
Remote control
unit
Index

Variable Out
You can stop the circuit that outputs audio from the analog audio output
terminals (VARIABLE) of this unit. This prevents the audio signal output
from the analog audio output terminals (FIXED) from being affected. If you
will not use the analog audio output terminals (VARIABLE), turning this
setting off enables a higher quality of sound.
On
(Default):
Enables variable audio output.
Off: Disables variable audio output.
Volume Limit
Make a setting for the maximum volume of the audio signal output from the
analog audio output terminals (VARIABLE).
Off
(Default):
Do not set a maximum volume.
95 (+1dB) / 90 (-4dB) / 85 (-9dB) / 80 (-14dB)
Digital Out
Stopping digital audio output reduces a source of noise that affects sound
quality, enabling higher sound quality playback.
On
(Default):
Digital audio output is enabled.
Off: Digital audio output is disabled.
0
The “DIG. OUT OFF” indicator lights on the display when this setting is set to “Off”.
Phones
The headphones circuit operation can be stopped to minimize noise from
the headphones circuit which could interfere with the analog audio output
signal.
On
(Default):
Enable the headphones output.
Off: Disable the headphones output.
0
When not using headphones, you can enjoy higher quality sound with Off mode.
Contents Connections Playback Settings Tips Appendix
101
Front panel Rear panel
Remote control
unit
Index
H/P Amplifier Gain
Set the gain of the headphone amplifier. Set this according to the
impedance of the connected headphones. It is recommended that this is
set on the “Low” side if the headphones have low impedance and on the
“High” side if they have high impedance.
High:
Set the gain of the headphone amplifier to
“High”.Set when there is insufficient
volume, even when the gain setting is
“Mid”.
Mid
(Default):
Set the gain of the headphone amplifier to
“Mid”.
Low:
Set the gain of the headphone amplifier to
“Low”. Set if the volume is too high when
the gain setting is “Mid”.
NOTE
0
The headphone volume varies depending on the H/P Amplifier Gain setting.
Decrease the volume or mute the audio first if changing this setting while listening
to audio.
Contents Connections Playback Settings Tips Appendix
102
Front panel Rear panel
Remote control
unit
Index
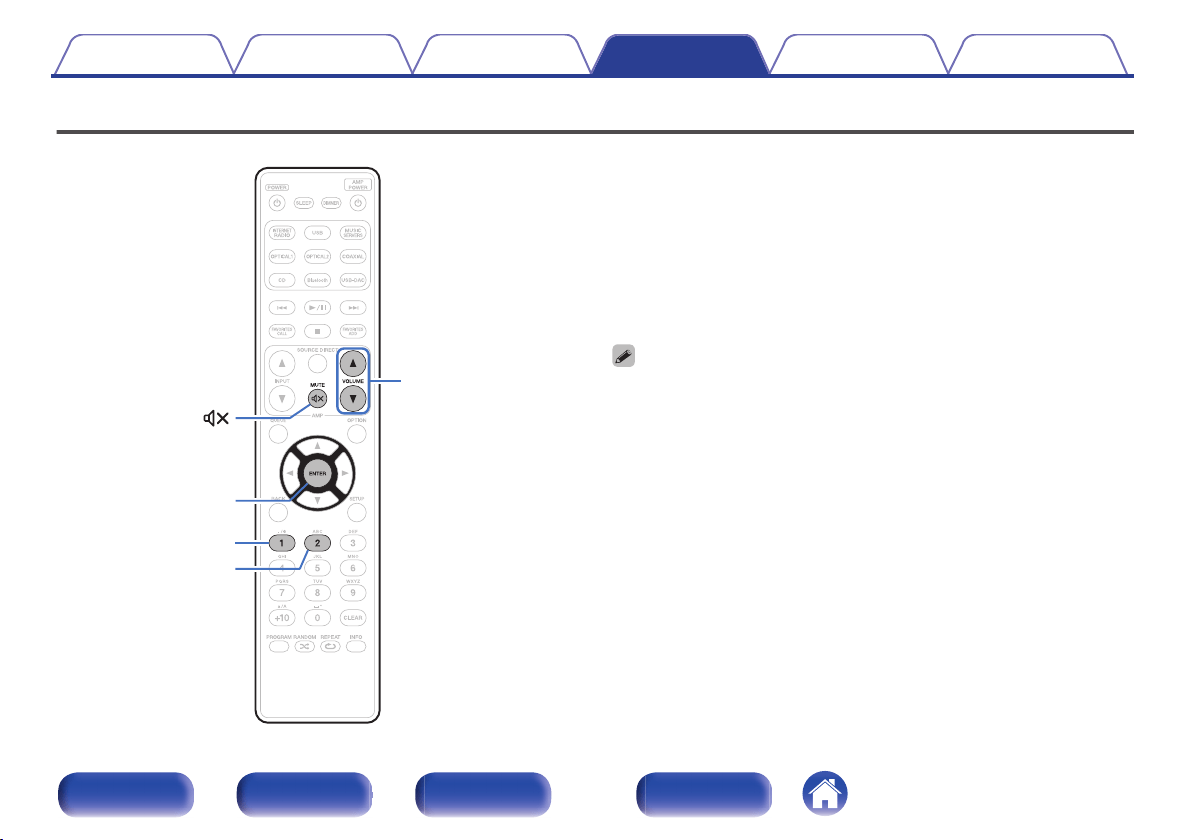
Switching the function of the volume buttons on the remote control
.
1
2
VOLUME
df
MUTE
ENTER
If connecting a power amplifier to the analog audio output terminals
(VARIABLE) of this unit, you can change the operation mode of the
included remote control so that the volume of the power amplifier can be
adjusted from this unit. There are two remote control operation modes:
amplifier operation mode and network CD player operation mode.
Amplifier operation mode adjusts the volume of a Marantz amplifier and
network CD player operation mode adjusts the volume of the audio signal
output from the analog audio output terminals (VARIABLE) of this unit. The
factory default setting for the remote control operation mode is the
amplifier operation mode.
0
Be sure to check the operation of each unit after setting the remote control
operation modes.
0
Switch between the remote control operation mode settings by pressing the
VOLUME df and MUTE : buttons.
Contents
Connections Playback Settings Tips Appendix
103
Front panel Rear panel
Remote control
unit
Index
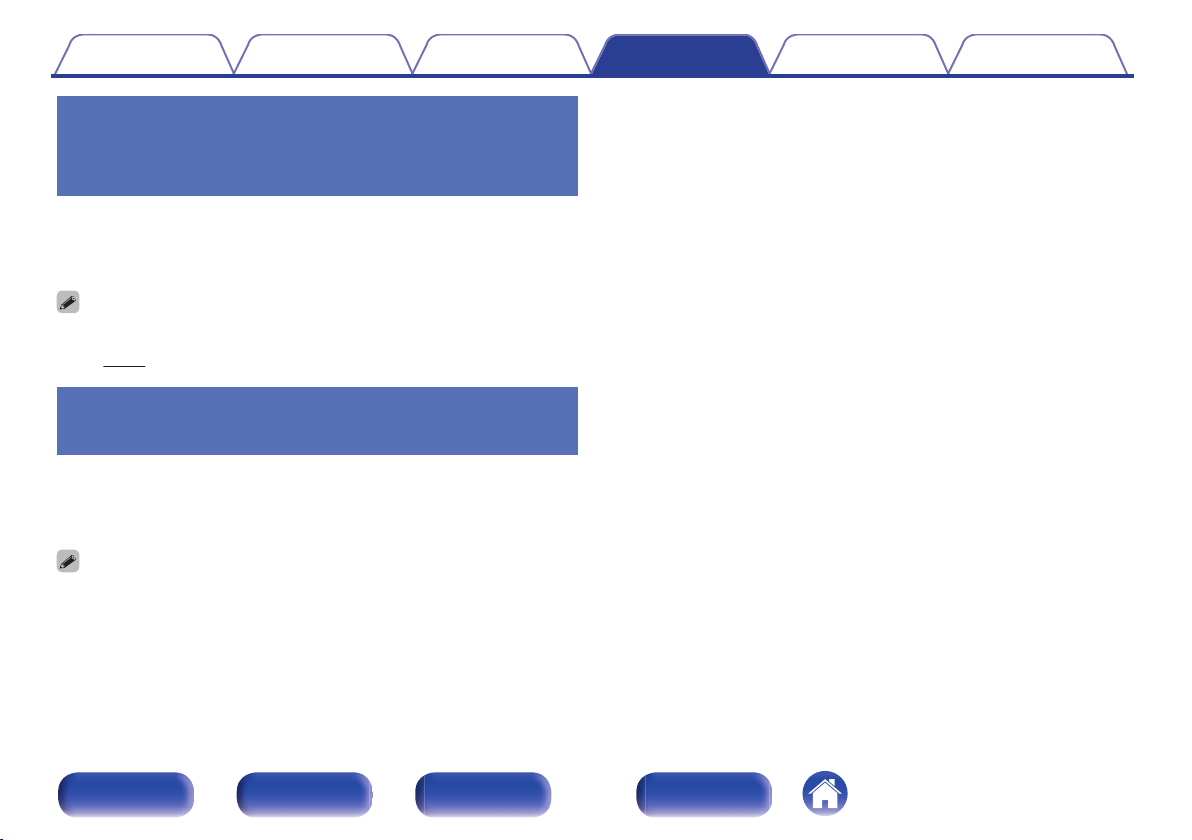
Setting the remote control operation
mode to network CD player operation
mode
1
Press and hold the ENTER and number 1 button on the
remote control unit down together for more than 5
seconds.
0
“Variable Out” in the menu must also be set to “On” to adjust the volume of the
audio signal output from the analog audio output connectors (VARIABLE).
(v p. 101)
Setting the remote control operation
mode to amplifier operation mode
1
Press and hold the ENTER and number 2 button on the
remote control unit down together for more than 5
seconds.
0
The remote control operation modes returns to the default settings when the
batteries are removed. Set the remote control operation modes again after
replacing the batteries.
Contents Connections Playback Settings Tips Appendix
104
Front panel Rear panel
Remote control
unit
Index
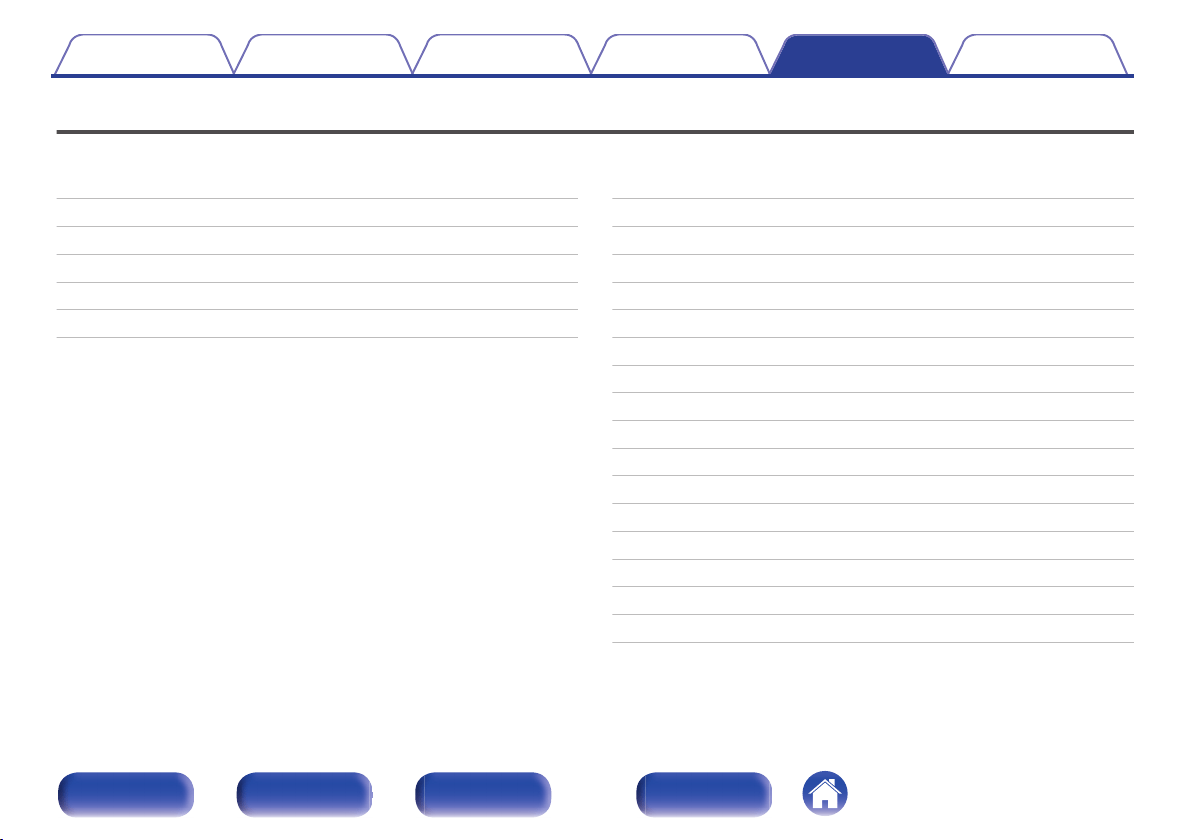
Contents
o
Tips
I want to switch the filter to change the desired sound quality 106
I want to enjoy analog output audio at higher quality 106
I want to listen to high sound performance playback 106
Simple operations in the power off state 107
I want to connect a power amplifier to this unit 107
I want the volume not to become too loud by mistake 107
o
Troubleshooting
Power does not turn on / Power is turned off 109
Operations cannot be performed through the remote control unit 110
Display on this unit shows nothing 110
No sound comes out 111
Sound is interrupted or noise occurs 112
Desired sound does not come out 114
AirPlay cannot be played back 114
USB memory devices cannot be played back 116
Bluetooth cannot be played back 117
The Internet radio cannot be played back 118
Music files on PC or NAS cannot be played back (Music server) 119
Various online services cannot be played 120
Cannot connect to a wireless LAN network 120
Cannot playback Discs 122
PC or Mac files cannot be played back (USB-DAC) 123
Audio from digital devices cannot be played back (Coaxial/Optical) 124
Update/upgrade error messages 125
Contents Connections Playback Settings Tips Appendix
105
Front panel Rear panel
Remote control
unit
Index

Tips
I want to switch the filter to change the desired sound quality
0
Switch the filter characteristics. (v p. 100)
I want to enjoy analog output audio at higher quality
0
Set “Digital Out” on the menu to “Off”. (v p. 101)
0
Press the DIMMER button to turn the display off. (v p. 77)
0
The headphones circuit operation can be stopped to minimize noise from the headphones circuit which could interfere with the analog audio output
signal. Set “Phones” to “Off” in the menu. (v
p. 101)
I want to listen to high sound performance playback
0
The network and USB memory playback (USB-A) functions can be stopped to prevent noise that affects the sound quality. Set “Network & USB-A” to
“Disabled” in the menu. (v p. 92)
0
The Wi-Fi function can be stopped to prevent noise that affects the sound quality. Set “Wi-Fi” to “Disabled” in the menu. (v p. 92)
0
Turning off the Bluetooth function suppresses a source of noise that affects sound quality, enabling high sound performance playback. Set “Bluetooth”
to “Disabled” in the menu. (v
p. 92)
0
You can stop the circuit that outputs audio from the analog audio output terminals (VARIABLE) of this unit. This prevents the audio signal output from
the analog audio output terminals (FIXED) from being affected. Set “Variable Out” to “Off” in the menu. (v p. 101)
Contents
Connections Playback Settings Tips Appendix
106
Front panel Rear panel
Remote control
unit
Index

Simple operations in the power off state
0
Press the 1/3 button to automatically turn the unit’s power supply on and start playback of the last selected input source.
0
When the “Network Control” function is set to “On”, you can perform playback, or other operations through AirPlay or HEOS App. (v p. 93)
I want to connect a power amplifier to this unit
0
A power amplifier can be connected to the analog audio output connectors (VARIABLE) on the rear panel. Set “Variable Out” to “On” in the menu and
set the remote control operation mode of the volume buttons on the remote control to network CD player operation mode to adjust the volume of the
audio signal output from the analog audio output connectors (VARIABLE) using the remote control.
I want the volume not to become too loud by mistake
0
Set the volume upper limit for “Volume Limit” in the menu beforehand. This prevents children or others from increasing the volume too much by mistake.
(v
p. 101)
Contents Connections Playback Settings Tips Appendix
107
Front panel Rear panel
Remote control
unit
Index

Troubleshooting
If a problem should arise, first check the following:
1. Are the connections correct?
2. Is the set being operated as described in the owner’s manual?
3. Are the other devices operating properly?
0
If steps 1 to 3 above do not improve the problem, restarting the device may improve the problem.
Continue pressing the X button on the unit until “Restart” appears in the display, or remove and re-insert the power cord of the unit.
If this unit does not operate properly, check the corresponding symptoms in this section.
If the symptoms do not match any of those described here, consult your dealer as it could be due to a fault in this unit. In this case, disconnect the power
immediately and contact the store where you purchased this unit.
Contents Connections Playback Settings Tips Appendix
108
Front panel Rear panel
Remote control
unit
Index

Power does not turn on / Power is turned off
Power is not turned on.
0
Check whether the power plug is correctly inserted into the power outlet. (v
p. 30)
0
This unit is in standby mode. Press the X button on the unit or the POWER X button on the remote control. (v p. 32)
Power automatically turns off.
0
The sleep timer is set. Turn on the power again. (v p. 78)
0
“Auto-Standby” is set. “Auto-Standby” is triggered when there is no operation for a set amount of time. To disable “Auto-Standby”, set “Auto-Standby”
on the menu to “Off”. (v p. 87)
Contents Connections Playback Settings Tips Appendix
109
Front panel Rear panel
Remote control
unit
Index
Operations cannot be performed through the remote control unit
Operations cannot be performed through the remote control unit.
0
Batteries are worn out. Replace with new batteries. (v
p. 7)
0
Operate the remote control unit within a distance of about 23 ft/7 m from this unit and at an angle of within 30°. (v p. 7)
0
Remove any obstacle between this unit and the remote control unit.
0
Insert the batteries in the proper direction, checking the q and w marks. (v p. 7)
0
The set’s remote control sensor is exposed to strong light (direct sunlight, inverter type fluorescent bulb light, etc.). Move the set to a place in which the
remote control sensor will not be exposed to strong light.
0
When using a 3D video device, the remote control unit of this unit may not function due to effects of infrared communications between units (such as TV
and glasses for 3D viewing). In this case, adjust the direction of units with the 3D communications function and their distance to ensure they do not
affect operations from the remote control unit of this unit.
0
When using this unit independently, set the switch to INTERNAL. (v p. 29)
Display on this unit shows nothing
Display is off.
0
Press the DIMMER button, and change the setting to anything other than off. (v p. 77)
Contents
Connections Playback Settings Tips Appendix
110
Front panel Rear panel
Remote control
unit
Index

No sound comes out
No sound is produced. Or sound is distorted.
0
Check the connections for all devices. (v
p. 20)
0
Insert connection cables all the way in.
0
Check that input connectors and output connectors are not reversely connected.
0
Check cables for damage.
0
Check the amplifier’s functions and controls and adjust as necessary.
0
When connecting to a device with digital audio input connectors, set “Digital Out” to “On”. (v
p. 101)
0
If using headphones, check that “Phones” is set to “On” in the menu. Sound is not output through the headphones jack if “Off” is set. (v p. 101)
0
Set “Variable Out” to “On” in the menu when connecting a power amplifier to the analog audio output connectors (VARIABLE). (v p. 101)
Contents Connections Playback Settings Tips Appendix
111
Front panel Rear panel
Remote control
unit
Index

Sound is interrupted or noise occurs
During playback from the Internet radio or USB memory device, sound is occasionally interrupted.
0
When the transfer speed of the USB memory device is slow, sound may occasionally be interrupted.
0
The network communication speed is slow or the radio station is busy.
Sound is interrupted during playback of tracks saved on a computer.
0
Do not start applications other than the player software while playing music on your computer.
0
The sound may be interrupted depending on the hardware or software configuration of the computer being used.
When making a call on mobile phone, noise occurs in audio output on this unit.
0
When making a call, keep a distance of 0.7 ft/20 cm or longer between mobile phone and this unit.
During playback from the CD-R/CD-RW, sound is occasionally interrupted.
0
The sound may skip during playback of a CD-R/CD-RW containing a high-resolution audio source.
0
This may be caused by poor recording conditions, or the disc itself may be of poor quality. Use a correctly recorded disc.
Contents
Connections Playback Settings Tips Appendix
112
Front panel Rear panel
Remote control
unit
Index

Sound cuts out when using Wi-Fi connection.
0
The frequency band used by the wireless LAN is also used by microwave ovens, cordless telephones, wireless game controllers and other wireless
LAN devices. Using such devices at the same time as this unit may cause sound to cut out due to electronic interference. Sound cut out can be
improved using the following methods. (v p. 26)
- Install devices that cause interference away from this unit.
- Turn off the power supply to devices that cause interference.
- Change the settings of the router channel to which this unit is connected to. (See the instruction manual of the wireless router for details on how to
change the channel.)
- Switch to a wired LAN connection.
0
Particularly when you play back large music files, depending on your wireless LAN environment, the playback sound may be interrupted. In this case,
make the wired LAN connection. (v
p. 94)
Sound is interrupted or noise occurs.
0
The “Lock Range” setting in the menu is too narrow. Broaden the “Lock Range” setting while listening to music until the music sounds
normal. (v p. 100)
Contents
Connections Playback Settings Tips Appendix
113
Front panel Rear panel
Remote control
unit
Index
Desired sound does not come out
The volume does not increase.
0
The maximum volume of the audio signal output from the analog audio output terminals (VARIABLE) is set too low. Set the maximum volume using
“Volume Limit” on the menu. (v p. 101)
Headphone volume is low.
0
Switch “H/P Amplifier Gain” to “High” if using headphones with high impedance or low sensitivity. (v p. 102)
AirPlay cannot be played back
The AirPlay icon is not displayed on iTunes / iPhone / iPod touch / iPad.
0
This unit and PC / iPhone / iPod touch / iPad are not connected to the same network (LAN). Connect it to the same LAN as this unit. (v
p. 26)
0
The firmware on iTunes / iPhone / iPod touch / iPad is not compatible with AirPlay. Update the firmware to the latest version.
0
Set “Network & USB-A” in the menu to “Enabled”. The AirPlay function does not work when “Network & USB-A” is “Disabled”. (v
p. 92)
Audio is not output.
0
The volume on iTunes / iPhone / iPod touch / iPad is set to the minimum level. The volume of the audio output from the analog audio output connectors
(VARIABLE) is linked to the volume of your iTunes / iPhone / iPod touch / iPad. Set a proper volume level.
0
The AirPlay playback is not performed, or this unit is not selected. Click the AirPlay icon on the iTunes / iPhone / iPod touch / iPad screen and select this
unit. (v p. 73)
Contents
Connections Playback Settings Tips Appendix
114
Front panel Rear panel
Remote control
unit
Index

Audio is interrupted during the AirPlay playback on iPhone / iPod touch / iPad.
0
Quit the application running in the background of the iPhone/iPod touch/iPad, and then play using AirPlay.
0
Some external factors may be affecting the wireless connection. Modify the network environment by taking measures such as shortening the distance
from the wireless LAN access point.
iTunes cannot be played back through the remote control unit.
0
Enable the “Allow iTunes audio control from remote speakers” setting on iTunes. Then, you can perform playback, pause, and skip operations through
the remote control unit.
Contents Connections Playback Settings Tips Appendix
115
Front panel Rear panel
Remote control
unit
Index
USB memory devices cannot be played back
USB memory device is not recognized.
0
Disconnect and reconnect the USB memory device. (v
p. 25)
0
Mass storage class compatible USB memory devices are supported.
0
This unit does not support a connection through a USB hub. Connect the USB memory device directly to the USB port.
0
The USB memory device must be formatted to FAT16 or FAT32.
0
Not all USB memory devices are guaranteed to work. Some USB memory devices are not recognized. When using a type of portable hard disc drive
compatible with the USB connection that requires power from an AC adapter, use the AC adapter that came with the drive.
0
Set “Network & USB-A” in the menu to “Enabled”. The USB memory device playback function does not work when “Network & USB-A” is
“Disabled”. (v
p. 92)
Files on the USB memory device are not displayed.
0
Files of a type not supported by this unit are not displayed. (v
p. 39)
0
This unit is able to display files in a maximum of eight folder layers. A maximum of 5000 files (folders) can also be displayed for each layer. Modify the
folder structure of the USB memory device.
0
When multiple partitions exist on the USB memory device, only files on the first partition are displayed.
iOS and Android devices are not recognized.
0
The USB port of this unit does not support playback from iOS and Android devices.
Files on a USB memory device cannot be played.
0
Files are created in a format that is not supported by this unit. Check the formats supported by this unit. (v p. 130)
0
You are attempting to play a file that is copyright protected. Files that are copyright protected cannot be played on this unit.
0
Playback may not be possible if the album art file size exceeds 2 MB.
Contents
Connections Playback Settings Tips Appendix
116
Front panel Rear panel
Remote control
unit
Index
Bluetooth cannot be played back
Bluetooth devices cannot be connected to this unit.
0
The Bluetooth function in the Bluetooth device has not been enabled. See the Owner’s Manual of the Bluetooth device to enable the Bluetooth function.
0
Bring the Bluetooth device near to this unit.
0
The Bluetooth device cannot connect with this unit if it is not compatible with the A2DP profile.
0
Turn the power of the Bluetooth device off and on again, and then try again.
0
Set “Bluetooth” in the menu to “Enabled”. The Bluetooth function does not work when “Bluetooth” is “Disabled”. (v p. 92)
The sound is cut off.
0
Bring the Bluetooth device near to this unit.
0
Remove obstructions between the Bluetooth device and this unit.
0
To prevent electromagnetic interference, locate this unit away from microwave ovens, wireless LAN devices and other Bluetooth devices.
0
Reconnect the Bluetooth device.
Contents
Connections Playback Settings Tips Appendix
117
Front panel Rear panel
Remote control
unit
Index

The Internet radio cannot be played back
A list of broadcasting stations is not displayed.
0
The LAN cable is not properly connected, or the network is disconnected. Check the connection status. (v
p. 26)
0
Perform the network diagnostic mode.
Internet Radio cannot be played.
0
The selected radio station is broadcasting in a format that is not supported by this unit. Formats that can be played back in this unit are WMA, MP3 and
MPEG-4 AAC. (v p. 136)
0
The firewall function is enabled on the router. Check the firewall setting.
0
The IP address is not properly set. (v p. 97)
0
Check the power of the router is on.
0
To obtain the IP address automatically, enable the DHCP server function on the router. Also, set the DHCP setting to “On” on this unit. (v p. 97)
0
To obtain the IP address manually, set the IP address on this unit. (v
p. 97)
0
Some radio stations broadcast silently during some time period. In this case, no audio is output. Wait for a while and select the same radio station, or
select another radio station. (v p. 35)
0
The selected radio station is not in service. Select a radio station in service.
Cannot connect to favorite radio stations.
0
Radio station is not currently in service. Register radio stations in service.
Contents
Connections Playback Settings Tips Appendix
118
Front panel Rear panel
Remote control
unit
Index
Music files on PC or NAS cannot be played back (Music server)
Files stored on a computer cannot be played.
0
Files are stored in a non-compatible format. Record in a compatible format. (v
p. 135)
0
Files that are copyright protected cannot be played on this unit.
0
Media sharing settings on the server or NAS do not allow this unit. Change the settings to allow this unit. For details, see the owner’s manual of the
server or NAS.
Server is not found, or it is not possible to connect to the server.
0
The computer’s or router’s firewall is activated. Check the computer’s or router’s firewall settings.
0
Computer’s power is not turned on. Turn on the power.
0
Server is not running. Launch the server.
0
IP address of this unit is wrong. Check the IP address of this unit. (v
p. 92)
Files on PC or NAS are not displayed.
0
Files of a type not supported by this unit are not displayed. (v
p. 135)
Music stored on a NAS cannot be played.
0
If you use a NAS in conformity with the DLNA standard, enable the DLNA server function in the NAS setting.
0
If you use a NAS that does not conform with the DLNA standard, play the music via a PC. Set Windows Media Player’s media sharing function and add
NAS to the selected play folder.
0
If connection is restricted, set audio equipment as the connection target.
Contents
Connections Playback Settings Tips Appendix
119
Front panel Rear panel
Remote control
unit
Index
Various online services cannot be played
Various online services cannot be played.
0
The online service may have been discontinued.
Cannot connect to a wireless LAN network
Cannot connect to the network.
0
The network name (SSID), password and encryption setting have not been set up correctly. Configure the network settings according to the setting
details of this unit. (v p. 96)
0
Shorten the distance from the wireless LAN access point and remove any obstructions to improve access first before re-connecting again. Place the
unit away from microwave ovens and other network access points.
0
Configure the access point channel settings away from channels that are being used by other networks.
0
This unit is not compatible with WEP (TSN).
Contents
Connections Playback Settings Tips Appendix
120
Front panel Rear panel
Remote control
unit
Index

Cannot connect to a WPS Router.
0
Check that the WPS mode of the router is operating.
0
Press the WPS button on the router and then press the ENTER button within 2 minutes.
0
A router/settings that are compatible with WPS 2.0 standards are required. Set the encryption time to “None”, WPA-PSK (AES) or WPA2-PSK (AES).
(v p. 95)
0
If the router encryption method is WEP/WPA-TKIP/WPA2-TKIP, you cannot connect by using the WPS button on the router. In this case, use the “Auto-
Scan” or “Manual” method to connect.
Cannot connect to the network using iPhone/iPod touch/iPad.
0
Update the iPhone/iPod touch/iPad firmware to the latest version.
0
When configuring the settings via a wireless connection, iOS 7 or later needs to be supported.
Contents Connections Playback Settings Tips Appendix
121
Front panel Rear panel
Remote control
unit
Index

Cannot playback Discs
Cannot playback when the play button is pressed, or cannot correctly play back a specific part of the disc.
0
The disc is dirty or scratched. Either clean the disc, or insert a different disc. (v
p. 133)
Cannot playback CD-R/CD-RW.
0
Discs cannot be played back unless they have been finalized. Use a finalized disc. (v p. 127)
0
This may be caused by poor recording conditions, or the disc itself may be of poor quality. Use a correctly recorded disc.
0
Files are created in a format that is not supported by this unit. Check the formats supported by this unit. (v
p. 128)
“No Disc” is displayed.
0
“No Disc” is displayed if the disc is loaded upside-down or if no disc is loaded. (v p. 132)
“Unsupported” is displayed.
0
“Unsupported” is displayed if a disc that cannot be played is loaded. (v p. 132)
Contents
Connections Playback Settings Tips Appendix
122
Front panel Rear panel
Remote control
unit
Index

PC or Mac files cannot be played back (USB-DAC)
This unit is not recognized on the computer.
0
Reconnect the USB cable to the USB port on your computer. When this unit is still not recognized after reconnection, connect to a different USB
port. (v p. 24)
0
Restart your computer.
0
Check the OS of your computer. (v p. 62)
0
When your computer is running on Windows, a dedicated driver software should be installed. (v p. 62)
This unit is not selected as the playback device.
0
Select this unit as the playback device in the sound settings on the computer. (v p. 61)
“Signal Unlock” is displayed.
0
When digital audio signals cannot be detected properly, “Signal Unlock” is displayed. (v
p. 70)
“Unsupported” is displayed.
0
“Unsupported” is displayed when audio signals that are not supported by this unit are input. Check the settings on your computer or player software.
(v p. 70)
0
If the computer you use is Mac OS, please check if the ND8006 format is set below 384000.0 Hz using the Audio MIDI Setup. (v p. 70)
Contents
Connections Playback Settings Tips Appendix
123
Front panel Rear panel
Remote control
unit
Index

Audio from digital devices cannot be played back (Coaxial/Optical)
“Signal Unlock” is displayed.
0
When digital audio signals cannot be detected properly, “Signal Unlock” is displayed. (v
p. 71)
“Unsupported” is displayed.
0
“Unsupported” is displayed when audio signals that are not supported by this unit are input. Check the audio output signal format from your digital
device. (v p. 71)
Contents Connections Playback Settings Tips Appendix
124
Front panel Rear panel
Remote control
unit
Index
Update/upgrade error messages
If an update/upgrade is interrupted or fails, an error message appears.
Display Description
Connection failed. Please check your network, then try
again.
The network connection is unstable.
Connection to the server failed.
Check your network environment and try the update again.
Update failed. Please check your network, then try
again.
The download of the firmware failed.
Check your network environment and try the update again.
Upgrade failed. Please check your network, then try
again.
The download of the firmware failed.
Check your network environment and try the upgrade again.
Please check your network, unplug and reconnect the
power cord, and try again.
The update failed.
Press and hold the X on the main unit for more than 5 seconds, or remove and re-insert the
power cord.
The update restarts automatically.
Please contact customer service in your area. This unit may be broken.
Contact our Customer Service Center in your area.
Contents Connections Playback Settings Tips Appendix
125
Front panel Rear panel
Remote control
unit
Index
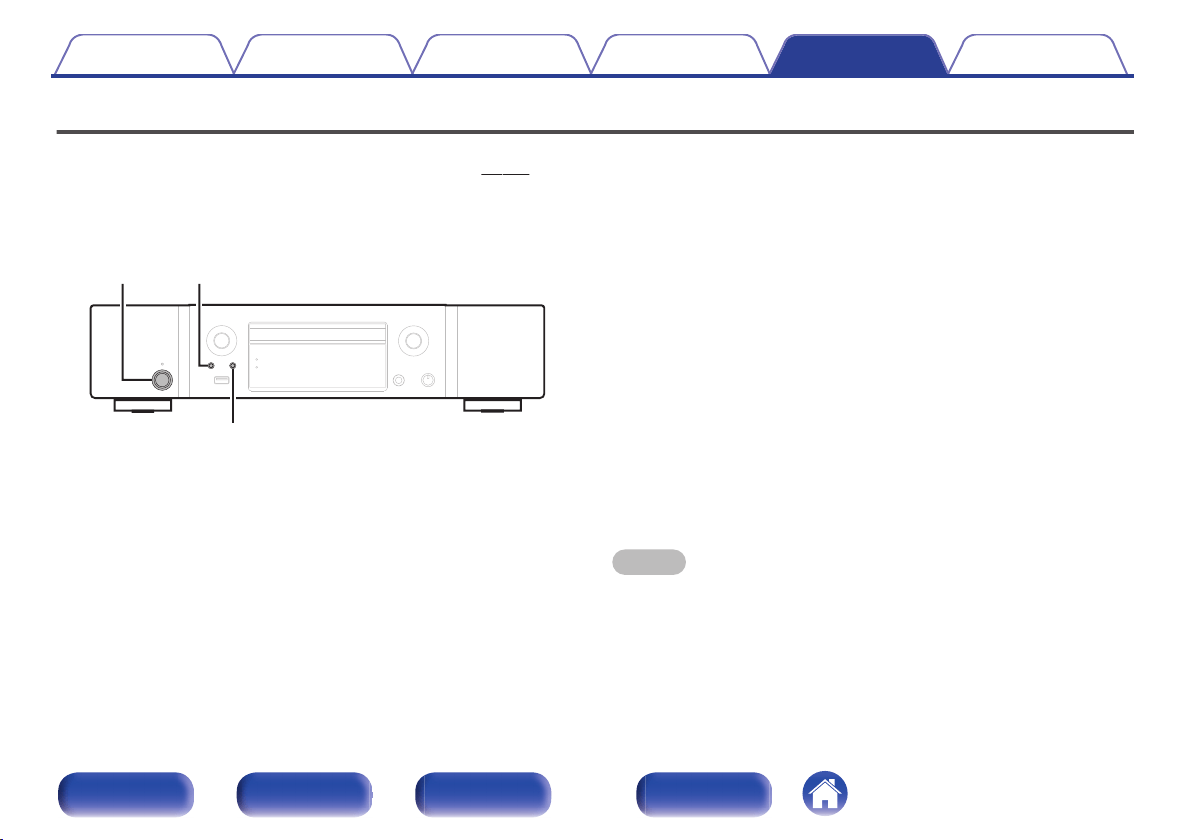
Resetting network settings
If network contents cannot be played or the unit cannot connect to the network, restarting the unit may improve the problem. We recommend restarting the
unit before returning the settings to the default settings. (v p. 108)
If the operations are not improved by restarting the unit, follow the steps below.
Network settings are reset to the factory default values. Make settings again.
However, the menu “Audio” settings are not reset.
.
INPUT
BACK
X
1
Press X to turn on power to the unit.
2
Press INPUT to select “Internet Radio”, “Music
Servers” or “USB Music”.
3
Press and hold the main unit's X and BACK at the
same time for at least 3 seconds.
4
Remove your fingers from the two buttons when
“Please wait...” appears on the display.
5
“Completed” is shown in the display when reset is
complete.
NOTE
0
Do not turn the power off until reset is complete.
Contents Connections Playback Settings Tips Appendix
126
Front panel Rear panel
Remote control
unit
Index
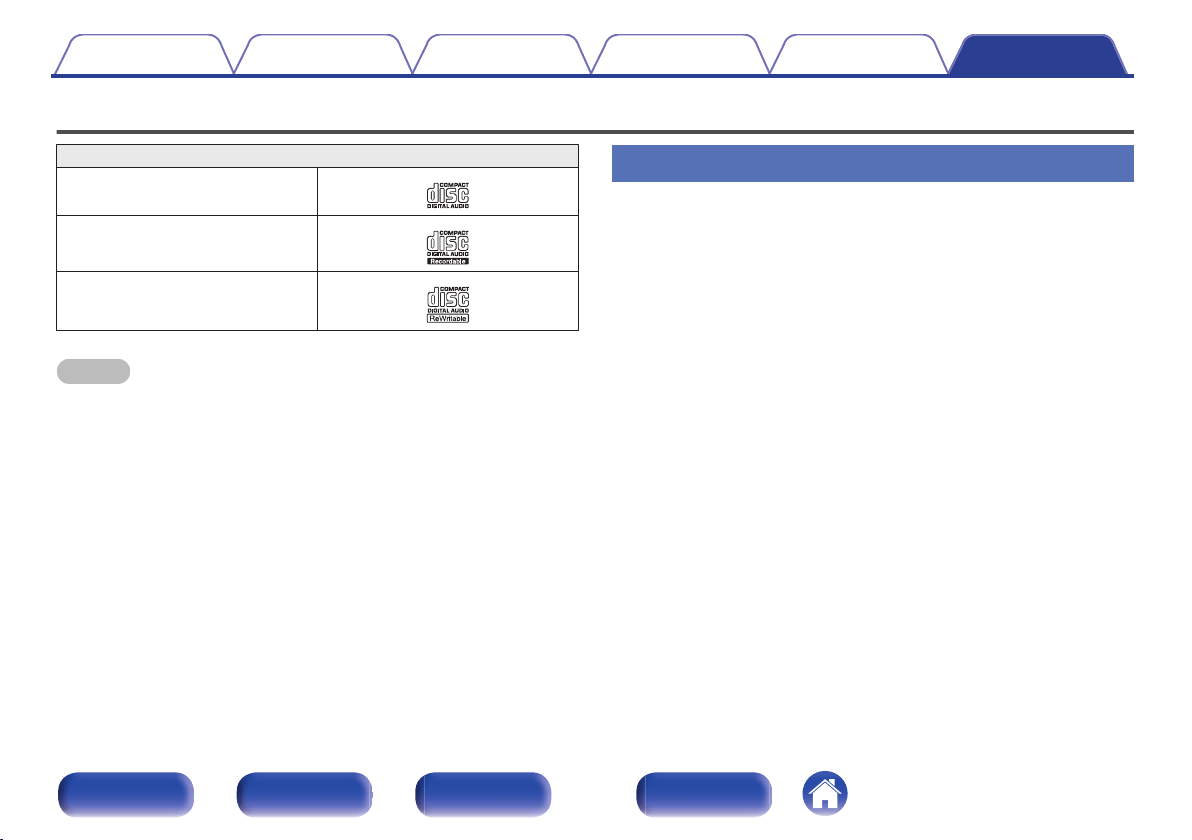
Playing back Discs
Playable media
CD
.
CD-R
.
CD-RW
.
NOTE
0
Some discs and some recording formats may not be playable.
0
Non-finalized discs cannot be played.
Files
CD-R and CD-RW discs created in the format described below can be
played.
o
Writing software format
ISO9660 level 1
0
When written in other formats, it may not be possible to play the disc
properly.
o
Maximum number of playable files and folders
Total number of folders and files : 512
Maximum number of folders : 256
o
File format
MPEG-1 Audio Layer-3
WMA (Windows Media Audio)
o
Tag data
ID3-TAG (Ver.1.x and 2.x)
META-Tag (Compatible with title, artist and album names)
Contents
Connections Playback Settings Tips Appendix
127
Front panel Rear panel
Remote control
unit
Index
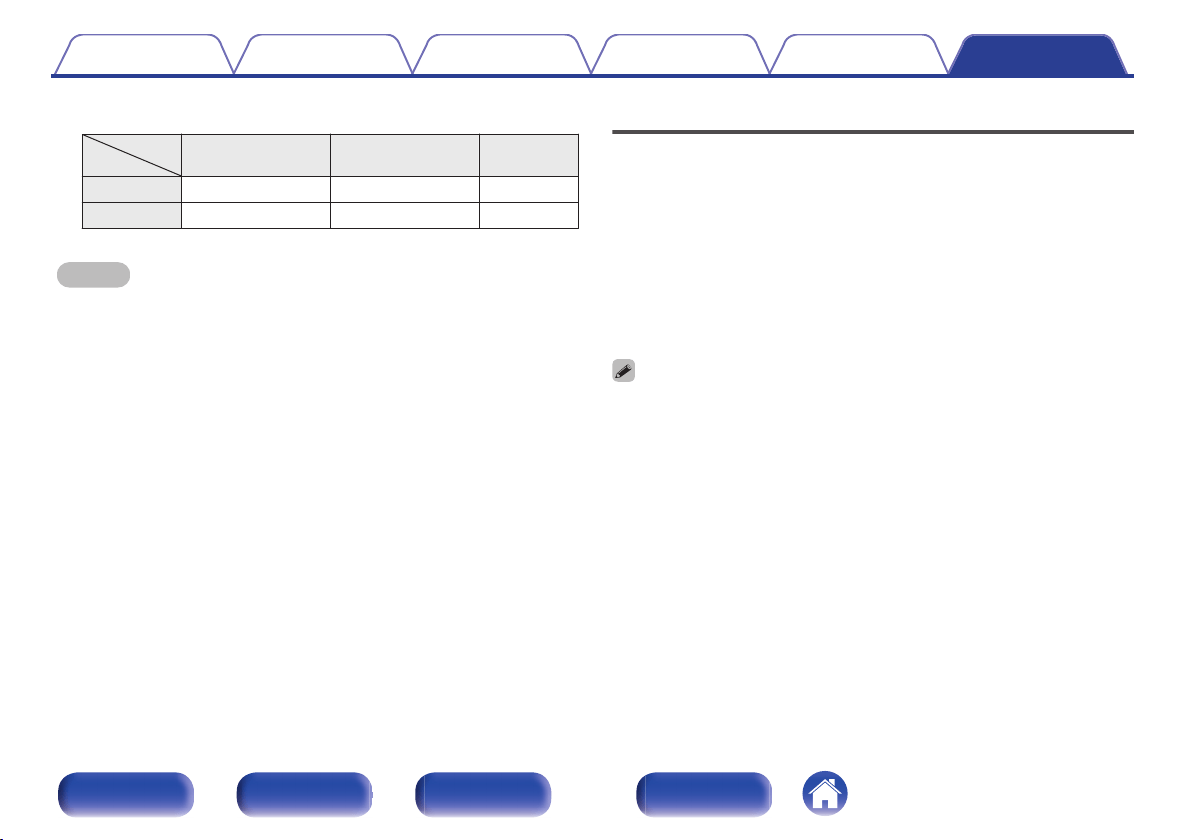
o
Playable files
Sampling
frequency
Bit rate Extension
MP3 44.1/48 kHz 32 – 320 kbps .mp3
WMA 44.1/48 kHz 64 – 192 kbps .wma
NOTE
0
Be sure to give files the extension. Files with any other extensions or files with no
extensions cannot be played.
0
Mac OS files assigned with filenames that begin with “._” are not music data and
cannot be played back.
0
Recordings you have made should only be used for your personal enjoyment, and
as per copyright laws may not be used in other ways without permission of the
copyright holder.
Playback order of music files
When there are multiple folders containing music files, the playback order
of folders is automatically set when this unit reads the media. The files in
each folder are played back in the order in which the files were recorded
on the media, from the oldest date and time.
CD-R/CD-RW
For playback of files on CD-R or CD-RW, files in the first folder on the first
partition are played first, next folders on the second partition in the folder,
then next on the third partition, and so on in this order. Then accordingly
files on another first partition are played.
0
The playback order displayed on a PC may differ from the actual playback order.
0
The playback order with a CD-R/CD-RW may differ, depending on the writing
software.
Contents Connections Playback Settings Tips Appendix
128
Front panel Rear panel
Remote control
unit
Index
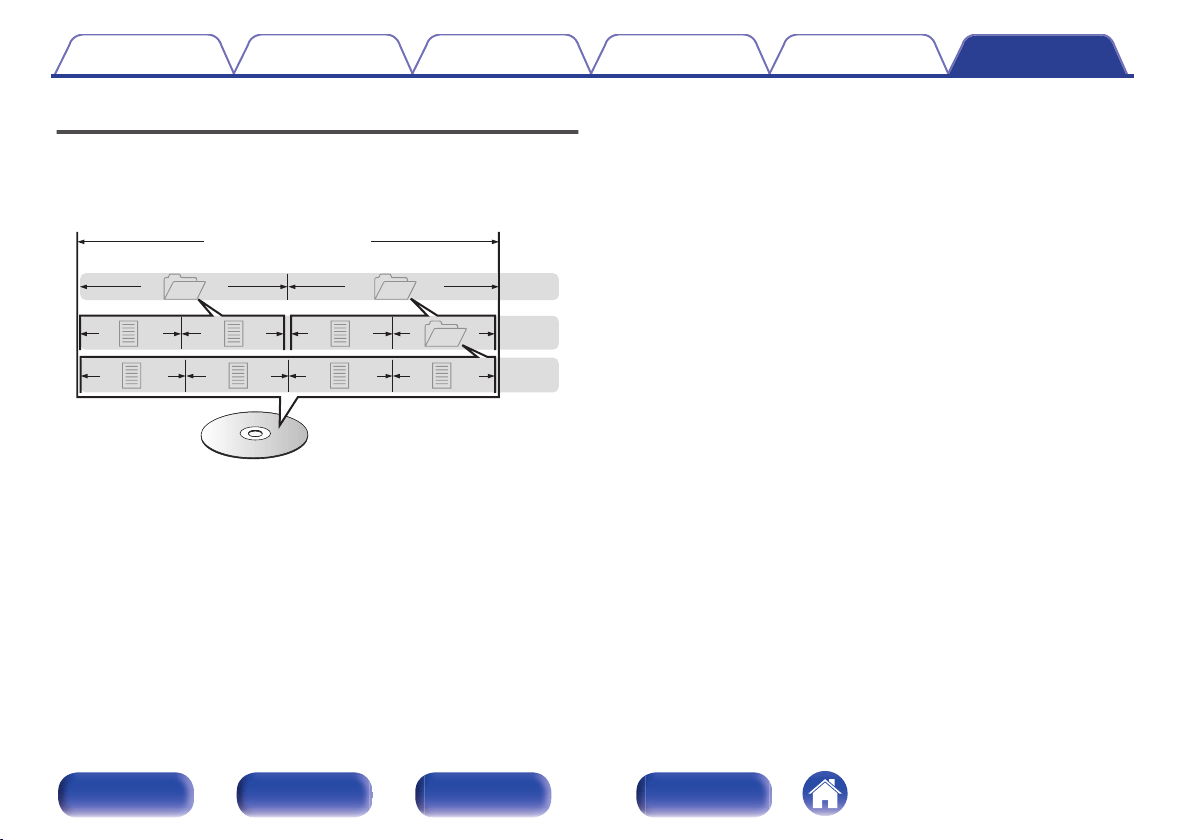
About discs and files
Music files recorded on CD-R/CD-RW are divided into large segments
(folders) and small segments (files). Files are stored in folders, and folders
can be placed for storage in a hierarchy. The unit can recognize up to 8
levels of folders.
.
3rd level
File 7
File 6
File 5
File 4
2nd level
Folder 3
File 3File 2
File 1
1st level
Folder 1 Folder 2
CD-R/CD-RW
0
When writing music files on a CD-R/CD-RW disc, set the writing
software’s format to “ISO9660”. The files may not play properly if they
are recorded in other formats. For details, refer to the instructions of
your writing software.
Contents
Connections Playback Settings Tips Appendix
129
Front panel Rear panel
Remote control
unit
Index
Playing back a USB memory devices
0
This unit is compatible with MP3 ID3-Tag (Ver. 2) standard.
0
This unit is compatible with WMA META tags.
0
If the image size (pixels) of an album artwork exceeds 500 × 500 (WMA/MP3/Apple Lossless/DSD) or 349 × 349 (MPEG-4 AAC), then music may not
be played back properly.
o
Compatible formats
Sampling frequency Bit rate Extension
WMA
z
1
32/44.1/48 kHz 48 – 192 kbps .wma
MP3 32/44.1/48 kHz 32 – 320 kbps .mp3
WAV
32/44.1/48/88.2/
96/176.4/192 kHz
– .wav
MPEG-4 AAC
z
1
32/44.1/48 kHz 16 – 320 kbps .aac/.m4a/.mp4
FLAC
32/44.1/48/88.2/
96/176.4/192 kHz
– .flac
Apple Lossless
z
2
32/44.1/48/88.2/
96/192 kHz
– .m4a
DSD 2.8/5.6 MHz – .dsf/.dff
z1
Only files that are not protected by copyright can be played on this unit.
Content downloaded from pay sites on the Internet are copyright protected. Also, files encoded in WMA format when ripped from a CD, etc. on a computer may be
copyright protected, depending on the computer’s settings.
z2
The Apple Lossless Audio Codec (ALAC) decoder is distributed under the Apache License, Version 2.0 (
http://www.apache.org/licenses/LICENSE-2.0).
Contents
Connections Playback Settings Tips Appendix
130
Front panel Rear panel
Remote control
unit
Index
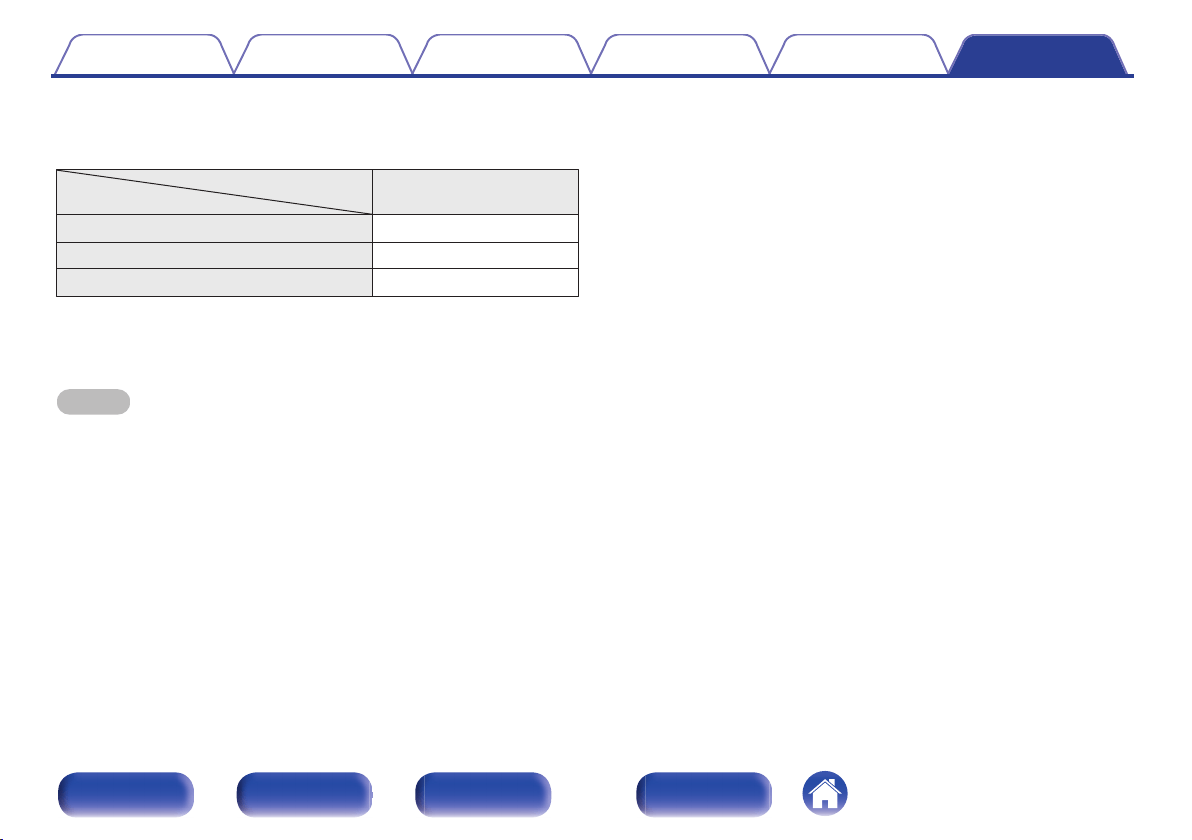
o
Maximum number of playable files and folder
The limits on the number of folders and files that can be displayed by
this unit are as follows.
Media
Item
USB memory device
Number of folder directory levels
z
1
8 levels
Number of folders 500
Number of files
z
2
5000
z1
The limited number includes the root folder.
z2
The allowable number of files may differ according to the USB memory device
capacity and the file size.
NOTE
0
Digital audio output is stopped during playback of the DSD files.
Contents Connections Playback Settings Tips Appendix
131
Front panel Rear panel
Remote control
unit
Index
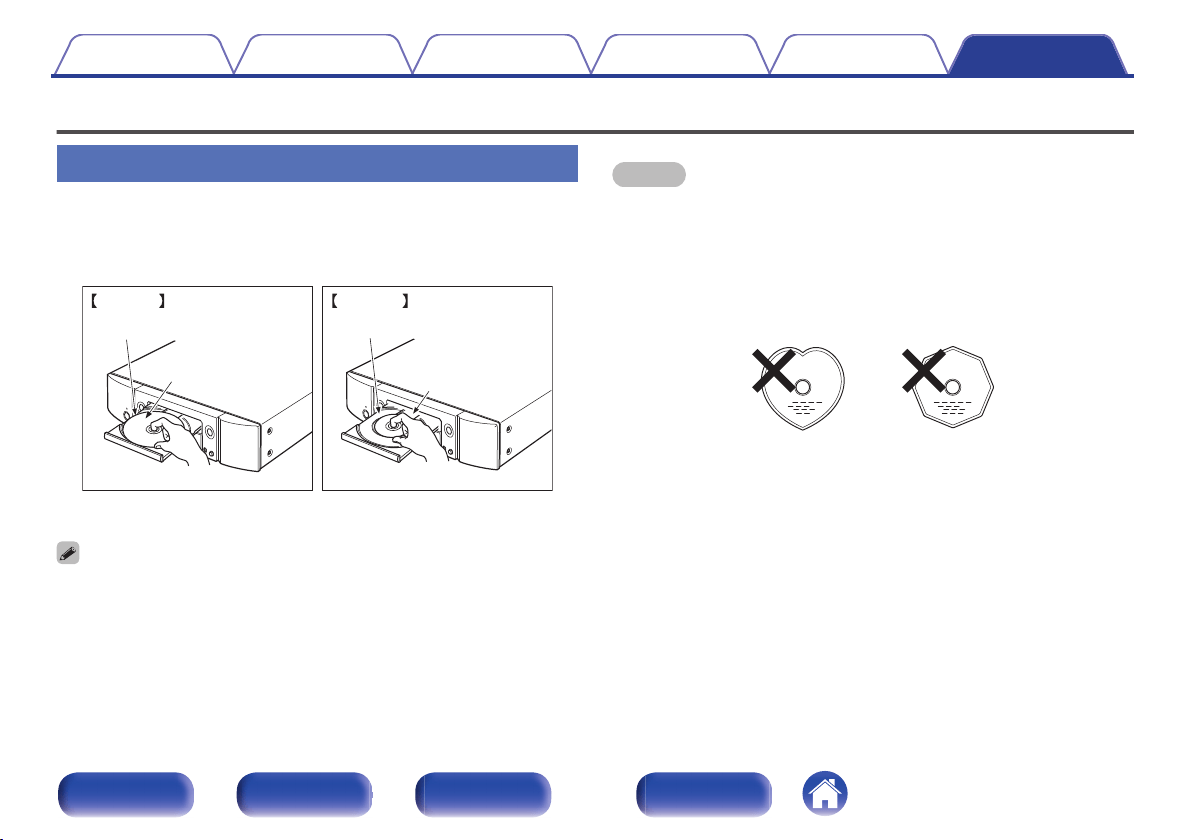
Cautions on using media
Inserting a disc
0
Set the disc in the tray label side up.
0
Make sure the disc tray is fully open when inserting the disc.
0
Place the discs flatly, 5 inch/12 cm discs in the outer tray guide (Figure
1), 3 inch/8 cm discs in the inner tray guide (Figure 2).
.
Outer tray guide Inner tray guide
5 inch/12 cm disc
3 inch/8 cm disc
Figure 2Figure 1
0
Place 3 inch/8 cm discs in the inner tray guide without using an adapter.
0
“Unsupported” is displayed if a disc that cannot be played is loaded.
0
“No Disc” is displayed if the disc is loaded upside-down or if no disc is loaded.
NOTE
0
Only load one disc at a time. Loading two or more discs can damage the unit or
scratch the discs.
0
Do not use cracked or warped discs or discs that have been repaired with
adhesive, etc.
0
Do not use discs on which the sticky part of cellophane tape or labels is exposed
or on which there are traces of where labels have been removed. Such discs can
get caught inside the player and damage it.
0
Do not use discs in special shapes, as they may damage the unit.
.
0
Do not push the disc tray in by hand when the power is off. Doing so could
damage the unit.
0
If the unit is left in a room full of smoke from cigarettes, etc., for long periods of
time, the surface of the optical pickup may get dirty, preventing it from receiving
signals properly.
Contents
Connections Playback Settings Tips Appendix
132
Front panel Rear panel
Remote control
unit
Index
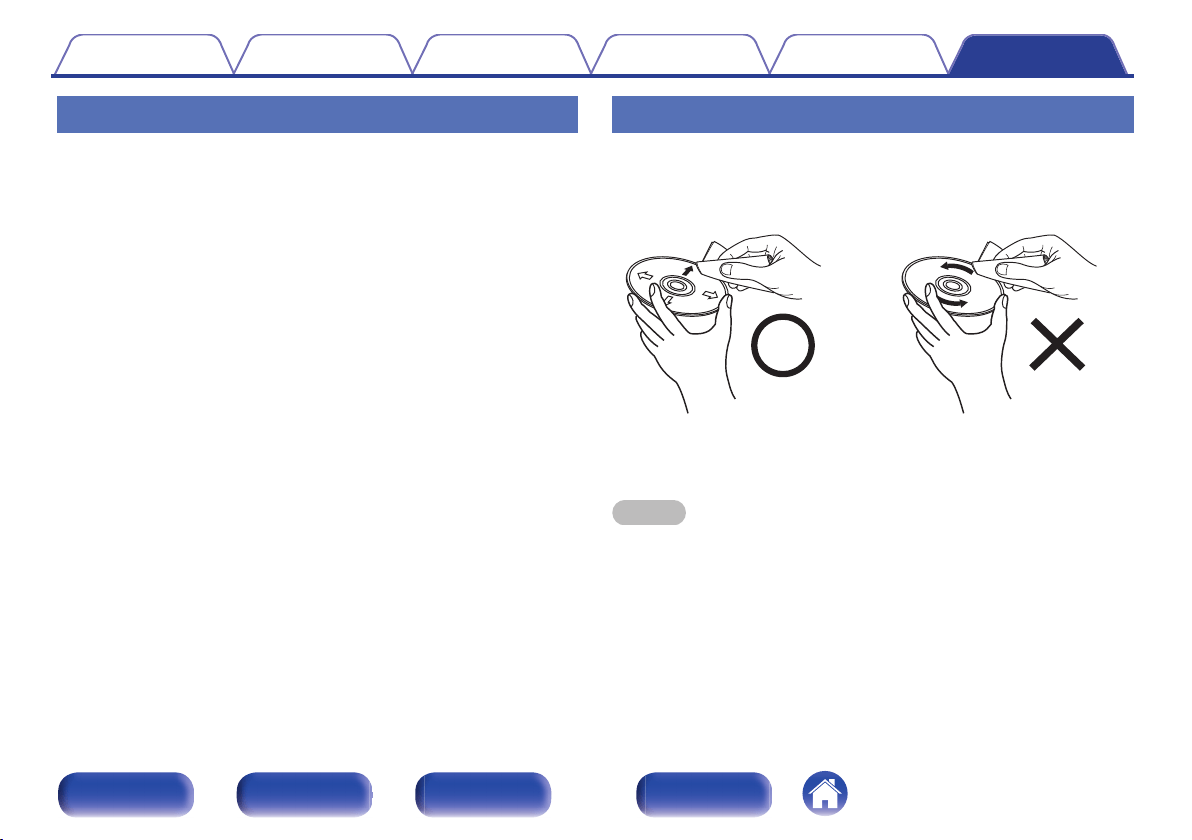
How to handle media
0
Do not get fingerprints, oil or dirt on discs.
0
Take special care not to scratch discs when removing them from their
cases.
0
Do not bend or heat discs.
0
Do not enlarge the hole in the center.
0
Do not write on the labeled (printed) surface with ball-point pens,
pencils, etc., or stick new labels on discs.
0
Condensation may form on discs if they are moved suddenly from a
cold place (outdoors for example) to a warm place, but do not try to dry
discs with a hairdryer, etc.
0
Do not eject a USB memory device or turn off the unit while a USB
memory device is being played. This may result in malfunction or loss of
the USB memory device’s data.
0
Do not attempt to open or modify a USB memory device.
0
USB memory device and files can be damaged by static electricity. Do
not touch the metal contacts of a USB memory device with your fingers.
0
Do not use warped USB memory device.
0
After use, be sure to remove any disc or USB memory device, and store
it in its proper case, to avoid dust, scratches and deformation.
0
Do not store discs in the following places:
1. Places exposed to direct sunlight for long periods of time
2. Dusty or humid places
3. Places exposed to heat from heaters, etc.
Cleaning discs
0
If there are fingerprints or dirt on a disc, wipe them off before using the
disc.
0
Use a commercially available disc cleaning set or a soft cloth to clean
discs.
.
Gently wipe the disc from the
inside towards the outside.
Do not wipe with a circular
motion.
NOTE
0
Do not use record spray, antistatic agents, benzene, thinner or other solvents.
Contents Connections Playback Settings Tips Appendix
133
Front panel Rear panel
Remote control
unit
Index
D/A converter
o
Specifications of supported audio formats
n
USB-DAC
Sampling frequency Bit length
DSD (2-channel) 2.8/5.6/11.2 MHz 1 bit
Linear PCM (2-channel)
44.1/48/88.2/96/
176.4/192/352.8/
384 kHz
16/24/32 bits
NOTE
0
Digital audio output is stopped during playback of the DSD signals and linear PCM
signals that have a 352.8/384 kHz sampling frequency.
n
Coaxial/Optical
Sampling frequency Bit length
Linear PCM (2-channel)
44.1/48/88.2/96/176.4/
192 kHz
16/24 bits
Playing back a Bluetooth device
This unit supports the following Bluetooth profile.
0
A2DP (Advanced Audio Distribution Profile):
When a Bluetooth device that supports this standard is connected,
monaural and stereo sound data can be streamed at a high quality.
0
AVRCP (Audio/Video Remote Control Profile):
When a Bluetooth device that supports this standard is connected, the
Bluetooth device can be operated from this unit.
o
About Bluetooth communications
Radio waves broadcast from this unit may interfere with the operation
of medical devices. Make sure you turn off the power of this unit and
Bluetooth device in the following locations as radio wave interference
may cause malfunctions.
0
Hospitals, trains, aircraft, petrol kiosks and places where flammable
gases are generated
0
Near automatic doors and fire alarms
Contents
Connections Playback Settings Tips Appendix
134
Front panel Rear panel
Remote control
unit
Index
Playing back files stored on a PC and NAS
0
This unit is compatible with MP3 ID3-Tag (Ver. 2) standard.
0
This unit is compatible with WMA META tags.
0
If the image size (pixels) of an album artwork exceeds 500 × 500 (WMA/MP3/WAV/FLAC) or 349 × 349 (MPEG-4 AAC), then music may not be played
back properly.
0
A server or server software compatible with distribution in the corresponding formats is required to play music files via a network.
For playing mentioned audio formats via a network a server software, for example Twonky Media Server or jRiver Media Server, needs to be installed
on your computer or NAS for full support. There are other server software available too. Please check supported formats.
o
Specifications of supported files
Sampling frequency Bit rate Extension
WMA
z
1
32/44.1/48 kHz 48 – 192 kbps .wma
MP3 32/44.1/48 kHz 32 – 320 kbps .mp3
WAV 32/44.1/48/88.2/96/176.4/192 kHz – .wav
MPEG-4 AAC
z
1
32/44.1/48 kHz 16 – 320 kbps .aac/.m4a/.mp4
FLAC 32/44.1/48/88.2/96/176.4/192 kHz – .flac
Apple Lossless
z
2
32/44.1/48/88.2/96/192 kHz – .m4a
DSD 2.8/5.6 MHz – .dsf/.dff
z1
Only files that are not protected by copyright can be played on this unit.
Content downloaded from pay sites on the Internet are copyright protected. Also, files encoded in WMA format when ripped from a CD, etc., on a computer may be
copyright protected, depending on the computer’s settings.
z2
The Apple Lossless Audio Codec (ALAC) decoder is distributed under the Apache License, Version 2.0 (
http://www.apache.org/licenses/LICENSE-2.0).
NOTE
0
Digital audio output is stopped during playback of the DSD files.
Contents Connections Playback Settings Tips Appendix
135
Front panel Rear panel
Remote control
unit
Index
Playing back Internet Radio
o
Playable broadcast station specifications
Sampling frequency Bit rate Extension
WMA 32/44.1/48 kHz 48 – 192 kbps .wma
MP3 32/44.1/48 kHz 32 – 320 kbps .mp3
MPEG-4 AAC 32/44.1/48 kHz 16 – 320 kbps
.aac/
.m4a/
.mp4
Contents Connections Playback Settings Tips Appendix
136
Front panel Rear panel
Remote control
unit
Index
Explanation of terms
o
Audio
Apple Lossless Audio Codec
This is a codec for lossless audio compression method developed by
Apple Inc. This codec can be played back on iTunes, iPod or iPhone. Data
compressed to approximately 60 – 70 % can be decompressed to exactly
the same original data.
DSD (Direct-Stream Digital)
One of the audio data recording methods, it is the signal aspect used to
store audio signals on a super audio CD, and is Δ-Σ modulated digital
audio.
FLAC (Free Lossless Audio Codec)
FLAC stands for Free lossless Audio Codec, and is a lossless free audio
file format. Lossless means that the audio is compressed without any loss
in quality.
The FLAC license is as shown below.
Copyright (C) 2000,2001,2002,2003,2004,2005,2006,2007,2008,2009
Josh Coalson
Redistribution and use in source and binary forms, with or without
modification, are permitted provided that the following conditions are met:
0
Redistributions of source code must retain the above copyright notice,
this list of conditions and the following disclaimer.
0
Redistributions in binary form must reproduce the above copyright
notice, this list of conditions and the following disclaimer in the
documentation and/or other materials provided with the distribution.
0
Neither the name of the Xiph.org Foundation nor the names of its
contributors may be used to endorse or promote products derived from
this software without specific prior written permission.
Contents
Connections Playback Settings Tips Appendix
137
Front panel Rear panel
Remote control
unit
Index

THIS SOFTWARE IS PROVIDED BY THE COPYRIGHT HOLDERS AND
CONTRIBUTORS “AS IS” AND ANY EXPRESS OR IMPLIED
WARRANTIES, INCLUDING, BUT NOT LIMITED TO, THE IMPLIED
WARRANTIES OF MERCHANTABILITY AND FITNESS FOR A
PARTICULAR PURPOSE ARE DISCLAIMED. IN NO EVENT SHALL THE
FOUNDATION OR CONTRIBUTORS BE LIABLE FOR ANY DIRECT,
INDIRECT, INCIDENTAL, SPECIAL, EXEMPLARY, OR
CONSEQUENTIAL DAMAGES (INCLUDING, BUT NOT LIMITED TO,
PROCUREMENT OF SUBSTITUTE GOODS OR SERVICES; LOSS OF
USE, DATA, OR PROFITS; OR BUSINESS INTERRUPTION) HOWEVER
CAUSED AND ON ANY THEORY OF LIABILITY, WHETHER IN
CONTRACT, STRICT LIABILITY, OR TORT (INCLUDING NEGLIGENCE
OR OTHERWISE) ARISING IN ANY WAY OUT OF THE USE OF THIS
SOFTWARE, EVEN IF ADVISED OF THE POSSIBILITY OF SUCH
DAMAGE.
MP3 (MPEG Audio Layer-3)
This is an internationally standardized audio data compression scheme,
using the “MPEG-1” video compression standard. It compresses the data
volume to about one eleventh its original size while maintaining sound
quality equivalent to a music CD.
MPEG (Moving Picture Experts Group), MPEG-2, MPEG-4
These are the names for digital compression format standards used for
the encoding of video and audio. Video standards include “MPEG-1
Video”, “MPEG-2 Video”, “MPEG-4 Visual”, “MPEG-4 AVC”. Audio
standards include “MPEG-1 Audio”, “MPEG-2 Audio”, “MPEG-4 AAC”.
WMA (Windows Media Audio)
This is the audio compression technology developed by Microsoft
Corporation.
WMA data can be encoded using Windows Media
®
Player.
To encode WMA files, only use applications authorized by Microsoft
Corporation. If you use an unauthorized application, the file may not work
properly.
Sampling frequency
Sampling involves taking a reading of a sound wave (analog signal) at
regular intervals and expressing the height of the wave at each reading in
digitized format (producing a digital signal).
The number of readings taken in one second is called the “sampling
frequency”. The larger the value, the closer the reproduced sound is to the
original.
Bit rate
This expresses the read amount per 1 second of video/audio data
recorded in a disc. A larger number means higher sound quality, but also
means a larger file size.
Contents
Connections Playback Settings Tips Appendix
138
Front panel Rear panel
Remote control
unit
Index

o
Network
AirPlay
AirPlay sends (plays) contents recorded in iTunes or on an iPhone/iPod
touch to a compatible device via the network.
WEP Key (network key)
This is key information used for encrypting data when conducting data
transfer. On this unit, the same WEP key is used for data encryption and
decryption, so the same WEP key must be set on both devices in order for
communications to be established between them.
Wi-Fi
®
Wi-Fi Certification assures tested and proven interoperability by the Wi-Fi
Alliance, a group certifying interoperability among wireless LAN devices.
WPA (Wi-Fi Protected Access)
This is a security standard established by the Wi-Fi Alliance. In addition to
the conventional SSID (network name) and WEP key (network key), it also
uses a user identification function and encrypting protocol for stronger
security.
WPA2 (Wi-Fi Protected Access 2)
This is a new version of the WPA established by the Wi-Fi Alliance,
compatible with more secure AES encryption.
WPA-PSK/WPA2-PSK (Pre-shared Key)
This is a simple authentication system for mutual authentication when a
preset character string matches on the wireless LAN access point and
client.
Network Names (SSID: Service Set Identifier)
When forming wireless LAN networks, groups are formed to prevent
interference, data theft, etc. These groups are based on “SSID (network
names)”. For enhanced security, a WEP key is set so that communication
is unavailable unless both the “SSID” and the WEP key match. This is
suitable for constructing a simplified network.
o
Other
Pairing
Pairing (registration) is an operation that is required in order to connect a
Bluetooth device to this unit using Bluetooth. When paired, the devices
authenticate each other and can connect without mistaken connections
occurring.
When using Bluetooth connection for the first time, you need to pair this
unit and the Bluetooth device to be connected.
Contents
Connections Playback Settings Tips Appendix
139
Front panel Rear panel
Remote control
unit
Index
Trademark information
.
“Made for iPod”, “Made for iPhone” and “Made for iPad” mean that an
electronic accessory has been designed to connect specifically to iPod,
iPhone or iPad, respectively, and has been certified by the developer to
meet Apple performance standards.
Apple is not responsible for the operation of this device or its compliance
with safety and regulatory standards.
Please note that the use of this accessory with iPod, iPhone, or iPad may
affect wireless performance.
AirPlay, iPad, iPhone, iPod touch, and Retina are trademarks of Apple
Inc., registered in the U.S. and other countries.
iPad Pro, iPad Air, iPad mini, and Lightning are trademarks of Apple Inc.
0
Individual users are permitted to use iPhone, iPod, iPod classic, iPod
nano, iPod shuffle, and iPod touch for private copy and playback of
non-copyrighted contents and contents whose copy and playback is
permitted by law. Copyright infringement is prohibited by law.
.
The Bluetooth
®
word mark and logos are registered trademarks owned
by Bluetooth SIG, Inc. and any use of such marks by D&M Holdings Inc.
is under license. Other trademarks and trade names are those of their
respective owners.
Contents Connections Playback Settings Tips Appendix
140
Front panel Rear panel
Remote control
unit
Index
.
The Wi-Fi CERTIFIED logo is a registered trademark of the Wi-Fi
Alliance.
Wi-Fi Certification provides assurance that the device has passed the
interoperability test conducted by the Wi-Fi Alliance, a group that certifies
interoperability among wireless LAN devices.
.
Adobe, the Adobe logo and Reader are either registered trademarks or
trademarks of Adobe Systems Incorporated in the United States and/or
other countries.
Contents Connections Playback Settings Tips Appendix
141
Front panel Rear panel
Remote control
unit
Index
Specifications
o
Audio section
0
Analog output [DSD] [PCM]
Channels: 2-channels 2-channels
Playable frequency range: 2 Hz – 100 kHz 2 Hz – 96 kHz (Sampling frequency: 192 kHz)
2 Hz – 20 kHz (Sampling frequency: 44.1 kHz)
Playable frequency response: 2 Hz – 50 kHz (–3 dB) 2 Hz – 50 kHz (–3 dB)
(Sampling frequency: 192 kHz)
2 Hz – 20 kHz (Sampling frequency: 44.1 kHz)
S/N: 110 dB (Audible range) 110 dB
Dynamic range: 106 dB (Audible range) 106 dB (24 bit)
101 dB (16 bit)
Harmonic distortion: 0.0010 % (Audible range) 0.0010 % (24 bit)
0.0016 % (16 bit)
Output level
Unbalanced output (FIXED):
Unbalanced output (VARIABLE):
2.2 V RMS
4.5 V RMS (variable maximum)
2.2 V RMS
4.5 V RMS (variable maximum)
Headphone output: 30 mW / 32 Ω/ohms (variable maximum) 30 mW / 32 Ω/ohms (variable maximum)
Contents Connections Playback Settings Tips Appendix
142
Front panel Rear panel
Remote control
unit
Index

0
Optical readout system
Laser: AlGaAs
Wave length: 780 nm
Signal type: 16-bit linear PCM
Sampling frequency: 44.1 kHz
0
Digital output
Coaxial: 0.5 Vp-p / 75 Ω/ohms
Optical : -15 – -21 dBm
0
Digital input
Coaxial: 0.5 Vp-p / 75 Ω/ohms
Optical : –27 dBm or lator
USB (Front): USB Type A (USB 2.0 High speed)
USB (Rear): USB Type B (USB 2.0 High speed)
Contents Connections Playback Settings Tips Appendix
143
Front panel Rear panel
Remote control
unit
Index

o
Wireless LAN section
Network type (wireless LAN standard): Conforming to IEEE 802.11a/b/g/n
(Wi-Fi
®
compliant)
z
1
Security: WEP 64 bit, WEP 128 bit
WPA/WPA2-PSK (AES)
WPA/WPA2-PSK (TKIP)
Used frequency range: 2.4 GHz, 5 GHz
z1
The Wi-Fi
®
CERTIFIED Logo and the Wi-Fi CERTIFIED On-Product Logo are registered trademarks of the Wi-Fi Alliance.
o
Bluetooth section
Communications system: Bluetooth Specification Version 3.0 + EDR (Enhanced Data Rate)
Transmission power: Bluetooth Specification Power Class 1
Maximum communication range:
Approx. 98.4 ft/30 m in line of sight
z
2
Used frequency range: 2.4 GHz
Modulation scheme: FHSS (Frequency-Hopping Spread Spectrum)
Supported profiles: A2DP (Advanced Audio Distribution Profile) 1.2
AVRCP (Audio Video Remote Control Profile) 1.5
Corresponding codec: SBC
Transmission range (A2DP): 20 Hz – 20,000 Hz
z2
The actual communication range varies depending on the influence of such factors as obstructions between devices, electromagnetic waves from
microwave ovens, static electricity, cordless phones, reception sensitivity, antenna performance, operating system, application software etc.
Contents
Connections Playback Settings Tips Appendix
144
Front panel Rear panel
Remote control
unit
Index

o
General
Power supply voltage/frequency: AC120 V, 60 Hz
Power consumption : 42 W
Power consumption in standby mode: 0.3 W
Power consumption in “Network Control”
– “On” mode:
4 W
For the purpose of improvement, the specifications and design are subject to change without notice.
Contents Connections Playback Settings Tips Appendix
145
Front panel Rear panel
Remote control
unit
Index

o
Dimensions (Unit : in. (mm))
.
11 7/8 (300)
1 1/8 (28)
1 1/2 (35)
3/8
(7)
14 5/8 (369)
8 7/8 (225)
2 3/8
(58)
1 7/8
(45)
1 3/8
(34)
17 3/8 (440)
5/8
(15)
3 5/8
(91)
4 1/4 (106)
13 1/2 (340)
5 1/4 (133)
5 1/4 (132)
2
(50)
2 (50)
6 1/2 (165)
2 1/4
(56)
o
Weight : 17 lbs 10 oz (8.0 kg)
Contents Connections Playback Settings Tips Appendix
146
Front panel Rear panel
Remote control
unit
Index
Index
v A
AirPlay ............................................................ 72
Amplifier ......................................................... 21
Auto Standby ................................................. 87
v B
Bluetooth device ............................................ 42
v C
CD .................................................................. 55
v D
D/A converter function ............................ 61, 134
DATA CD ....................................................... 58
Display’s brightness ....................................... 77
v E
External control device ................................... 28
v F
Firmware update ............................................ 88
Front panel ..................................................... 11
v H
HEOS Account ......................................... 47, 99
HEOS Favorites ............................................. 76
v I
Input source ................................................... 33
Inputting characters ........................................ 85
Internet Radio ................................................. 34
v M
Menu map ...................................................... 79
v N
NAS ........................................................ 36, 135
Network settings ............................................ 92
v P
Pairing ............................................................ 42
PC .................................................... 24, 36, 135
Program playback .......................................... 57
v Q
Queue ................................................ 37, 40, 50
Contents
Connections Playback Settings Tips Appendix
147
Front panel Rear panel
Remote control
unit
Index
v R
Rear panel ...................................................... 13
Remote control unit ........................................ 16
Resetting network settings ........................... 126
v S
Sleep timer ..................................................... 78
Spotify ............................................................ 75
v T
Tips .............................................................. 106
Troubleshooting ........................................... 108
v U
USB memory device ................................ 25, 39
USB-DAC ......................................... 24, 61, 134
v W
Wi-Fi settings ................................................. 94
Wired LAN ................................................ 26, 94
Wireless LAN ........................................... 27, 94
Contents Connections Playback Settings Tips Appendix
148
Front panel Rear panel
Remote control
unit
Index
License
o
License information for the software used in
the unit
About GPL (GNU-General Public License), LGPL (GNU Lesser
General Public License) License
This product uses GPL/LGPL software and software made by other
companies.
After you purchase this product, you may procure, modify or distribute
the source code of the GPL/LGPL software that is used in the product.
Marantz provides the source code based on the GPL and LPGL
licenses at the actual cost upon your request to our customer service
center. However, note that we make no guarantees concerning the
source code. Please also understand that we do not offer support for
the contents of the source code.
This section describes software license used for this unit. To maintain
the correct content, the original (English) is used.
n
GPL
Open Source Used Version
bridge-utils 2.8
busybox 1.21.1
ebtables 2.0.10-4
Linux kernel 3.10.74
mtd-utils 1.4.3
ntfs-3g_ntfsprogs 2011.4.12
ntpclient 2007
u-boot 2015.01
wireless-tools version 29
Contents Connections Playback Settings Tips Appendix
149
Front panel Rear panel
Remote control
unit
Index
n
LGPL
Open Source Used Version
ffmpeg 0.8.3
glibc 2.9
libmms 0.6.2
n
curl-7.24.0
COPYRIGHT AND PERMISSION NOTICE
Copyright (c) 1996 - 2014, Daniel Stenberg, <[email protected]>
All rights reserved.
Permission to use, copy, modify, and distribute this software for any
purpose with or without fee is hereby granted, provided that the above
copyright notice and this permission notice appear in all copies.
THE SOFTWARE IS PROVIDED “AS IS”, WITHOUT WARRANTY OF
ANY KIND, EXPRESS OR IMPLIED, INCLUDING BUT NOT LIMITED
TO THE WARRANTIES OF MERCHANTABILITY, FITNESS FOR A
PARTICULAR PURPOSE AND NONINFRINGEMENT OF THIRD
PARTY RIGHTS. IN NO EVENT SHALL THE AUTHORS OR
COPYRIGHT HOLDERS BE LIABLE FOR ANY CLAIM, DAMAGES
OR OTHER LIABILITY, WHETHER IN AN ACTION OF CONTRACT,
TORT OR OTHERWISE, ARISING FROM, OUT OF OR IN
CONNECTION WITH THE SOFTWARE OR THE USE OR OTHER
DEALINGS IN THE SOFTWARE.
Except as contained in this notice, the name of a copyright holder shall
not be used in advertising or otherwise to promote the sale, use or
other dealings in this Software without prior written authorization of the
copyright holder.
n
e2fsprogs-libs-1.40.8/lib/uuid
Redistribution and use in source and binary forms, with or without
modification, are permitted provided that the following conditions are
met:
1. Redistributions of source code must retain the above copyright
notice, and the entire permission notice in its entirety, including the
disclaimer of warranties.
2. Redistributions in binary form must reproduce the above copyright
notice, this list of conditions and the following disclaimer in the
documentation and/or other materials provided with the distribution.
3. The name of the author may not be used to endorse or promote
products derived from this software without specific prior written
permission.
THIS SOFTWARE IS PROVIDED “AS IS” AND ANY EXPRESS OR
IMPLIED WARRANTIES, INCLUDING, BUT NOT LIMITED TO, THE
IMPLIED WARRANTIES OF MERCHANTABILITY AND FITNESS
FOR A PARTICULAR PURPOSE, ALL OF WHICH ARE HEREBY
DISCLAIMED. IN NO EVENT SHALL THE AUTHOR BE LIABLE FOR
ANY DIRECT, INDIRECT, INCIDENTAL, SPECIAL, EXEMPLARY, OR
CONSEQUENTIAL DAMAGES (INCLUDING, BUT NOT LIMITED TO,
PROCUREMENT OF SUBSTITUTE GOODS OR SERVICES; LOSS
OF USE, DATA, OR PROFITS; OR BUSINESS INTERRUPTION)
HOWEVER CAUSED AND ON ANY THEORY OF LIABILITY,
WHETHER IN CONTRACT, STRICT LIABILITY, OR TORT
(INCLUDING NEGLIGENCE OR OTHERWISE) ARISING IN ANY
WAY OUT OF THE USE OF THIS SOFTWARE, EVEN IF NOT
ADVISED OF THE POSSIBILITY OF SUCH DAMAGE.
Contents
Connections Playback Settings Tips Appendix
150
Front panel Rear panel
Remote control
unit
Index

n
expat-2.0.1
Copyright (c) 1998, 1999, 2000 Thai Open Source Software Center Ltd
and Clark Cooper
Copyright (c) 2001, 2002, 2003, 2004, 2005, 2006 Expat maintainers.
Permission is hereby granted, free of charge, to any person obtaining a
copy of this software and associated documentation files (the
“Software”), to deal in the Software without restriction, including
without limitation the rights to use, copy, modify, merge, publish,
distribute, sublicense, and/or sell copies of the Software, and to permit
persons to whom the Software is furnished to do so, subject to the
following conditions:
The above copyright notice and this permission notice shall be
included in all copies or substantial portions of the Software.
THE SOFTWARE IS PROVIDED “AS IS”, WITHOUT WARRANTY OF
ANY KIND, EXPRESS OR IMPLIED, INCLUDING BUT NOT LIMITED
TO THE WARRANTIES OF MERCHANTABILITY, FITNESS FOR A
PARTICULAR PURPOSE AND NONINFRINGEMENT.
IN NO EVENT SHALL THE AUTHORS OR COPYRIGHT HOLDERS
BE LIABLE FOR ANY CLAIM, DAMAGES OR OTHER LIABILITY,
WHETHER IN AN ACTION OF CONTRACT, TORT OR OTHERWISE,
ARISING FROM, OUT OF OR IN CONNECTION WITH THE
SOFTWARE OR THE USE OR OTHER DEALINGS IN THE
SOFTWARE.
n
getopt
http://cvsweb.netbsd.org/bsdweb.cgi/src/lib/libc/stdlib/
Copyright (c) 1987, 1993, 1994 The Regents of the University of
California. All rights reserved.
Redistribution and use in source and binary forms, with or without
modification, are permitted provided that the following conditions are
met:
1. Redistributions of source code must retain the above copyright
notice, this list of conditions and the following disclaimer.
2. Redistributions in binary form must reproduce the above copyright
notice, this list of conditions and the following disclaimer in the
documentation and/or other materials provided with the distribution.
3. Neither the name of the University nor the names of its contributors
may be used to endorse or promote products derived from this
software without specific prior written permission.
THIS SOFTWARE IS PROVIDED BY THE REGENTS AND
CONTRIBUTORS “AS IS” AND ANY EXPRESS OR IMPLIED
WARRANTIES, INCLUDING, BUT NOT LIMITED TO, THE IMPLIED
WARRANTIES OF MERCHANTABILITY AND FITNESS FOR A
PARTICULAR PURPOSE ARE DISCLAIMED. IN NO EVENT SHALL
THE REGENTS OR CONTRIBUTORS BE LIABLE FOR ANY DIRECT,
INDIRECT, INCIDENTAL, SPECIAL, EXEMPLARY, OR
CONSEQUENTIAL DAMAGES (INCLUDING, BUT NOT LIMITED TO,
PROCUREMENT OF SUBSTITUTE GOODS OR SERVICES; LOSS
OF USE, DATA, OR PROFITS; OR BUSINESS INTERRUPTION)
HOWEVER CAUSED AND ON ANY THEORY OF LIABILITY,
WHETHER IN CONTRACT, STRICT LIABILITY, OR TORT
(INCLUDING NEGLIGENCE OR OTHERWISE) ARISING IN ANY
WAY OUT OF THE USE OF THIS SOFTWARE, EVEN IF ADVISED
OF THE POSSIBILITY OF SUCH DAMAGE.
Contents
Connections Playback Settings Tips Appendix
151
Front panel Rear panel
Remote control
unit
Index

n
jQuery
Copyright 2014 jQuery Foundation and other contributors
http://jquery.com/
Permission is hereby granted, free of charge, to any person obtaining a
copy of this software and associated documentation files (the
“Software”), to deal in the Software without restriction, including
without limitation the rights to use, copy, modify, merge, publish,
distribute, sublicense, and/or sell copies of the Software, and to permit
persons to whom the Software is furnished to do so, subject to the
following conditions:
The above copyright notice and this permission notice shall be
included in all copies or substantial portions of the Software.
THE SOFTWARE IS PROVIDED “AS IS”, WITHOUT WARRANTY OF
ANY KIND, EXPRESS OR IMPLIED, INCLUDING BUT NOT LIMITED
TO THE WARRANTIES OF MERCHANTABILITY, FITNESS FOR A
PARTICULAR PURPOSE AND NONINFRINGEMENT. IN NO EVENT
SHALL THE AUTHORS OR COPYRIGHT HOLDERS BE LIABLE FOR
ANY CLAIM, DAMAGES OR OTHER LIABILITY, WHETHER IN AN
ACTION OF CONTRACT, TORT OR OTHERWISE, ARISING FROM,
OUT OF OR IN CONNECTION WITH THE SOFTWARE OR THE USE
OR OTHER DEALINGS IN THE SOFTWARE.
n
libpcap-1.4.0
License: BSD
Redistribution and use in source and binary forms, with or without
modification, are permitted provided that the following conditions are
met:
1. Redistributions of source code must retain the above copyright
notice, this list of conditions and the following disclaimer.
2. Redistributions in binary form must reproduce the above copyright
notice, this list of conditions and the following disclaimer in the
documentation and/or other materials provided with the distribution.
3. The names of the authors may not be used to endorse or promote
products derived from this software without specific prior written
permission.
THIS SOFTWARE IS PROVIDED “AS IS” AND WITHOUT ANY
EXPRESS OR IMPLIED WARRANTIES, INCLUDING, WITHOUT
LIMITATION, THE IMPLIED WARRANTIES OF MERCHANTABILITY
AND FITNESS FOR A PARTICULAR PURPOSE.
Contents
Connections Playback Settings Tips Appendix
152
Front panel Rear panel
Remote control
unit
Index
n
libtar-1.2.11
Copyright (c) 1998-2003 University of Illinois Board of Trustees
Copyright (c) 1998-2003 Mark D. Roth
All rights reserved.
Developed by: Campus Information Technologies and Educational
Services, University of Illinois at Urbana-Champaign
Permission is hereby granted, free of charge, to any person obtaining a
copy of this software and associated documentation files (the “Software”),
to deal with the Software without restriction, including without limitation
the rights to use, copy, modify, merge, publish, distribute, sublicense,
and/or sell copies of the Software, and to permit persons to whom the
Software is furnished to do so, subject to the following conditions:
0
Redistributions of source code must retain the above copyright
notice, this list of conditions and the following disclaimers.
0
Redistributions in binary form must reproduce the above copyright
notice, this list of conditions and the following disclaimers in the
documentation and/or other materials provided with the distribution.
0
Neither the names of Campus Information Technologies and
Educational Services, University of Illinois at Urbana-Champaign,
nor the names of its contributors may be used to endorse or
promote products derived from this Software without specific prior
written permission.
THE SOFTWARE IS PROVIDED “AS IS”, WITHOUT WARRANTY OF
ANY KIND, EXPRESS OR IMPLIED, INCLUDING BUT NOT LIMITED TO
THE WARRANTIES OF MERCHANTABILITY, FITNESS FOR A
PARTICULAR PURPOSE AND NONINFRINGEMENT.
IN NO EVENT SHALL THE CONTRIBUTORS OR COPYRIGHT
HOLDERS BE LIABLE FOR ANY CLAIM, DAMAGES OR OTHER
LIABILITY, WHETHER IN AN ACTION OF CONTRACT, TORT OR
OTHERWISE, ARISING FROM, OUT OF OR IN CONNECTION WITH
THE SOFTWARE OR THE USE OR OTHER DEALINGS WITH THE
SOFTWARE.
n
mDNS 320.10.80
The majority of the source code in the mDNSResponder project is licensed
under the terms of the Apache License, Version 2.0, available from:
<http://www.apache.org/licenses/LICENSE-2.0>
To accommodate license compatibility with the widest possible range
of client code licenses, the shared library code, which is linked at
runtime into the same address space as the client using it, is licensed
under the terms of the “Three-Clause BSD License”.
The Linux Name Service Switch code, contributed by National ICT
Australia Ltd (NICTA) is licensed under the terms of the NICTA Public
Software Licence (which is substantially similar to the “Three-Clause BSD
License”, with some additional language pertaining to Australian law).
Contents Connections Playback Settings Tips Appendix
153
Front panel Rear panel
Remote control
unit
Index
n
mongoose
https://github.com/cesanta/mongoose/
Copyright (c) 2004-2013 Sergey Lyubka
Permission is hereby granted, free of charge, to any person obtaining a
copy of this software and associated documentation files (the
“Software”), to deal in the Software without restriction, including
without limitation the rights to use, copy, modify, merge, publish,
distribute, sublicense, and/or sell copies of the Software, and to permit
persons to whom the Software is furnished to do so, subject to the
following conditions:
The above copyright notice and this permission notice shall be
included in all copies or substantial portions of the Software.
THE SOFTWARE IS PROVIDED “AS IS”, WITHOUT WARRANTY OF
ANY KIND, EXPRESS OR IMPLIED, INCLUDING BUT NOT LIMITED
TO THE WARRANTIES OF MERCHANTABILITY, FITNESS FOR A
PARTICULAR PURPOSE AND NONINFRINGEMENT. IN NO EVENT
SHALL THE AUTHORS OR COPYRIGHT HOLDERS BE LIABLE FOR
ANY CLAIM, DAMAGES OR OTHER LIABILITY, WHETHER IN AN
ACTION OF CONTRACT, TORT OR OTHERWISE, ARISING FROM,
OUT OF OR IN CONNECTION WITH THE SOFTWARE OR THE USE
OR OTHER DEALINGS IN THE SOFTWARE.
n
openssl-1.0.0d
Copyright (c) 1998-2011 The OpenSSL Project. All rights reserved.
Redistribution and use in source and binary forms, with or without
modification, are permitted provided that the following conditions are
met:
1. Redistributions of source code must retain the above copyright
notice, this list of conditions and the following disclaimer.
2. Redistributions in binary form must reproduce the above copyright
notice, this list of conditions and the following disclaimer in the
documentation and/or other materials provided with the distribution.
3. All advertising materials mentioning features or use of this software
must display the following acknowledgment:
“This product includes software developed by the OpenSSL Project
for use in the OpenSSL Toolkit. (
http://www.openssl.org/)”
4. The names “OpenSSL Toolkit” and “OpenSSL Project” must not be
used to endorse or promote products derived from this software
without prior written permission. For written permission, please
contact
5. Products derived from this software may not be called “OpenSSL”
nor may “OpenSSL” appear in their names without prior written
permission of the OpenSSL Project.
6. Redistributions of any form whatsoever must retain the following
acknowledgment:
“This product includes software developed by the OpenSSL Project
for use in the OpenSSL Toolkit (
http://www.openssl.org/)”
Contents
Connections Playback Settings Tips Appendix
154
Front panel Rear panel
Remote control
unit
Index
THIS SOFTWARE IS PROVIDED BY THE OpenSSL PROJECT “AS
IS” AND ANY EXPRESSED OR IMPLIED WARRANTIES,
INCLUDING, BUT NOT LIMITED TO, THE IMPLIED WARRANTIES
OF MERCHANTABILITY AND FITNESS FOR A PARTICULAR
PURPOSE ARE DISCLAIMED. IN NO EVENT SHALL THE OpenSSL
PROJECT OR ITS CONTRIBUTORS BE LIABLE FOR ANY DIRECT,
INDIRECT, INCIDENTAL, SPECIAL, EXEMPLARY, OR
CONSEQUENTIAL DAMAGES (INCLUDING, BUT NOT LIMITED TO,
PROCUREMENT OF SUBSTITUTE GOODS OR SERVICES; LOSS
OF USE, DATA, OR PROFITS; OR BUSINESS INTERRUPTION)
HOWEVER CAUSED AND ON ANY THEORY OF LIABILITY,
WHETHER IN CONTRACT, STRICT LIABILITY, OR TORT
(INCLUDING NEGLIGENCE OR OTHERWISE) ARISING IN ANY
WAY OUT OF THE USE OF THIS SOFTWARE, EVEN IF ADVISED
OF THE POSSIBILITY OF SUCH DAMAGE.
This product includes cryptographic software written by Eric Young
(
[email protected]). This product includes software written by Tim
Hudson ([email protected]).
n
portmap-6.0
Copyright (c) 1990 The Regents of the University of California.
0
All rights reserved.
0
Redistribution and use in source and binary forms, with or without
modification, are permitted provided that the following conditions
are met:
1. Redistributions of source code must retain the above copyright
notice, this list of conditions and the following disclaimer.
2. Redistributions in binary form must reproduce the above copyright
notice, this list of conditions and the following disclaimer in the
documentation and/or other materials provided with the distribution.
3. A ll advertising materials mentioning features or use of this software
must display the following acknowledgement:
This product includes software developed by the University of
California, Berkeley and its contributors.
4. Neither the name of the University nor the names of its contributors
may be used to endorse or promote products derived from this
software without specific prior written permission.
0
THIS SOFTWARE IS PROVIDED BY THE REGENTS AND
CONTRIBUTORS “AS IS” AND ANY EXPRESS OR IMPLIED
WARRANTIES, INCLUDING, BUT NOT LIMITED TO, THE IMPLIED
WARRANTIES OF MERCHANTABILITY AND FITNESS FOR A
PARTICULAR PURPOSE ARE DISCLAIMED. IN NO EVENT SHALL
THE REGENTS OR CONTRIBUTORS BE LIABLE FOR ANY DIRECT,
INDIRECT, INCIDENTAL, SPECIAL, EXEMPLARY, OR
CONSEQUENTIAL DAMAGES (INCLUDING, BUT NOT LIMITED TO,
PROCUREMENT OF SUBSTITUTE GOODS OR SERVICES; LOSS OF
USE, DATA, OR PROFITS; OR BUSINESS INTERRUPTION)
HOWEVER CAUSED AND ON ANY THEORY OF LIABILITY,
WHETHER IN CONTRACT, STRICT LIABILITY, OR TORT (INCLUDING
NEGLIGENCE OR OTHERWISE) ARISING IN ANY WAY OUT OF THE
USE OF THIS SOFTWARE, EVEN IF ADVISED OF THE POSSIBILITY
OF SUCH DAMAGE.
Contents
Connections Playback Settings Tips Appendix
155
Front panel Rear panel
Remote control
unit
Index
n
pstdint.h-0.1.12
0
BSD License:
0
Copyright (c) 2005-2011 Paul Hsieh
0
All rights reserved.
0
Redistribution and use in source and binary forms, with or without
modification, are permitted provided that the following conditions
are met:
1. Redistributions of source code must retain the above copyright
notice, this list of conditions and the following disclaimer.
2. Redistributions in binary form must reproduce the above copyright
notice, this list of conditions and the following disclaimer in the
documentation and/or other materials provided with the distribution.
3. The name of the author may not be used to endorse or promote
products derived from this software without specific prior written
permission.
0
THIS SOFTWARE IS PROVIDED BY THE AUTHOR “AS IS” AND
ANY EXPRESS OR IMPLIED WARRANTIES, INCLUDING, BUT
NOT LIMITED TO, THE IMPLIED WARRANTIES OF
MERCHANTABILITY AND FITNESS FOR A PARTICULAR
PURPOSE ARE DISCLAIMED.
0
IN NO EVENT SHALL THE AUTHOR BE LIABLE FOR ANY
DIRECT, INDIRECT, INCIDENTAL, SPECIAL, EXEMPLARY, OR
CONSEQUENTIAL DAMAGES (INCLUDING, BUT NOT LIMITED
TO, PROCUREMENT OF SUBSTITUTE GOODS OR SERVICES;
LOSS OF USE, DATA, OR PROFITS; OR BUSINESS
INTERRUPTION) HOWEVER CAUSED AND ON ANY THEORY OF
LIABILITY, WHETHER IN CONTRACT, STRICT LIABILITY, OR
TORT (INCLUDING NEGLIGENCE OR OTHERWISE) ARISING IN
ANY WAY OUT OF THE USE OF THIS SOFTWARE, EVEN IF
ADVISED OF THE POSSIBILITY OF SUCH DAMAGE.
n
rl78flash 2000.3.1
License
=======
The MIT License (MIT)
Copyright (c) 2012 Maxim Salov
Permission is hereby granted, free of charge, to any person obtaining a
copy of this software and associated documentation files (the
“Software”), to deal in the Software without restriction, including
without limitation the rights to use, copy, modify, merge, publish,
distribute, sublicense, and/or sell copies of the Software, and to permit
persons to whom the Software is furnished to do so, subject to the
following conditions:
The above copyright notice and this permission notice shall be
included in all copies or substantial portions of the Software.
THE SOFTWARE IS PROVIDED “AS IS”, WITHOUT WARRANTY OF
ANY KIND, EXPRESS OR IMPLIED, INCLUDING BUT NOT LIMITED
TO THE WARRANTIES OF MERCHANTABILITY, FITNESS FOR A
PARTICULAR PURPOSE AND NONINFRINGEMENT. IN NO EVENT
SHALL THE AUTHORS OR COPYRIGHT HOLDERS BE LIABLE FOR
ANY CLAIM, DAMAGES OR OTHER LIABILITY, WHETHER IN AN
ACTION OF CONTRACT, TORT OR OTHERWISE, ARISING FROM,
OUT OF OR IN CONNECTION WITH THE SOFTWARE OR THE USE
OR OTHER DEALINGS IN THE SOFTWARE.
Contents
Connections Playback Settings Tips Appendix
156
Front panel Rear panel
Remote control
unit
Index
n
sqlite 2003.5.7
SQLite Copyright
SQLite is in the
Public Domain
All of the code and documentation in SQLite has been dedicated to the
public domain by the authors. All code authors, and representatives of
the companies they work for, have signed affidavits dedicating their
contributions to the public domain and originals of those signed
affidavits are stored in a firesafe at the main offices of Hwaci. Anyone
is free to copy, modify, publish, use, compile, sell, or distribute the
original SQLite code, either in source code form or as a compiled
binary, for any purpose, commercial or non-commercial, and by any
means.
The previous paragraph applies to the deliverable code and
documentation in SQLite - those parts of the SQLite library that you
actually bundle and ship with a larger application. Some scripts used
as part of the build process (for example the “configure” scripts
generated by autoconf) might fall under other open-source licenses.
Nothing from these build scripts ever reaches the final deliverable
SQLite library, however, and so the licenses associated with those
scripts should not be a factor in assessing your rights to copy and use
the SQLite library.
All of the deliverable code in SQLite has been written from scratch. No
code has been taken from other projects or from the open internet.
Every line of code can be traced back to its original author, and all of
those authors have public domain dedications on file. So the SQLite
code base is clean and is uncontaminated with licensed code from
other projects.
n
strlcpy.c , v1.11
0
Copyright (c) 1998 Todd C. Miller <[email protected]>
0
Permission to use, copy, modify, and distribute this software for any
purpose with or without fee is hereby granted, provided that the
above copyright notice and this permission notice appear in all
copies.
0
THE SOFTWARE IS PROVIDED “AS IS” AND THE AUTHOR
DISCLAIMS ALL WARRANTIES WITH REGARD TO THIS
SOFTWARE INCLUDING ALL IMPLIED WARRANTIES OF
MERCHANTABILITY AND FITNESS. IN NO EVENT SHALL THE
AUTHOR BE LIABLE FOR ANY SPECIAL, DIRECT, INDIRECT, OR
CONSEQUENTIAL DAMAGES OR ANY DAMAGES
WHATSOEVER RESULTING FROM LOSS OF USE, DATA OR
PROFITS, WHETHER IN AN ACTION OF CONTRACT,
NEGLIGENCE OR OTHER TORTIOUS ACTION, ARISING OUT OF
OR IN CONNECTION WITH THE USE OR PERFORMANCE OF
THIS SOFTWARE.
n
taglib-1.5
copyright : (C) 2002 - 2008 by Scott Wheeler
email :
“The contents of this file are subject to the Mozilla Public License
Version 1.1 (the “License”); you may not use this file except in
compliance with the License. You may obtain a copy of the License at
http://www.mozilla.org/MPL/
Software distributed under the License is distributed on an “AS IS”
basis, WITHOUT WARRANTY OF ANY KIND, either express or
implied. See the License for the specific language governing rights and
limitations under the License.
Contents
Connections Playback Settings Tips Appendix
157
Front panel Rear panel
Remote control
unit
Index

n
tinyxml 2002.4.3
www.sourceforge.net/projects/tinyxml
This software is provided 'as-is', without any express or implied
warranty. In no event will the authors be held liable for any damages
arising from the use of this software.
Permission is granted to anyone to use this software for any purpose,
including commercial applications, and to alter it and redistribute it
freely, subject to the following restrictions:
1. The origin of this software must not be misrepresented; you must
not claim that you wrote the original software. If you use this
software in a product, an acknowledgment in the product
documentation would be appreciated but is not required.
2. Altered source versions must be plainly marked as such, and must
not be misrepresented as being the original software.
3. This notice may not be removed or altered from any source
distribution.
n
Tremor
http://wiki.xiph.org/index.php/Tremor
Copyright (c) 2002, Xiph.org Foundation
Redistribution and use in source and binary forms, with or without
modification, are permitted provided that the following conditions are
met:
1. Redistributions of source code must retain the above copyright
notice, this list of conditions and the following disclaimer.
2. Redistributions in binary form must reproduce the above copyright
notice, this list of conditions and the following disclaimer in the
documentation and/or other materials provided with the distribution.
3. Neither the name of the Xiph.org Foundation nor the names of its
contributors may be used to endorse or promote products derived
from this software without specific prior written permission.
THIS SOFTWARE IS PROVIDED BY THE COPYRIGHT HOLDERS
AND CONTRIBUTORS “AS IS” AND ANY EXPRESS OR IMPLIED
WARRANTIES, INCLUDING, BUT NOT LIMITED TO, THE IMPLIED
WARRANTIES OF MERCHANTABILITY AND FITNESS FOR A
PARTICULAR PURPOSE ARE DISCLAIMED. IN NO EVENT SHALL
THE FOUNDATION OR CONTRIBUTORS BE LIABLE FOR ANY
DIRECT, INDIRECT, INCIDENTAL, SPECIAL, EXEMPLARY, OR
CONSEQUENTIAL DAMAGES (INCLUDING, BUT NOT LIMITED TO,
PROCUREMENT OF SUBSTITUTE GOODS OR SERVICES; LOSS
OF USE, DATA, OR PROFITS; OR BUSINESS INTERRUPTION)
HOWEVER CAUSED AND ON ANY THEORY OF LIABILITY,
WHETHER IN CONTRACT, STRICT LIABILITY, OR TORT
(INCLUDING NEGLIGENCE OR OTHERWISE) ARISING IN ANY
WAY OUT OF THE USE OF THIS SOFTWARE, EVEN IF ADVISED
OF THE POSSIBILITY OF SUCH DAMAGE.
Contents
Connections Playback Settings Tips Appendix
158
Front panel Rear panel
Remote control
unit
Index
n
zlib
http://www.zlib.net/
zlib.h -- interface of the ‘zlib’ general purpose compression library
version 1.2.3, July 18th, 2005
Copyright (C) 1995-2004 Jean-loup Gailly and Mark Adler
This software is provided ‘as-is’, without any express or implied
warranty. In no event will the authors be held liable for any damages
arising from the use of this software.
Permission is granted to anyone to use this software for any purpose,
including commercial applications, and to alter it and redistribute it
freely, subject to the following restrictions:
1. The origin of this software must not be misrepresented; you must
not claim that you wrote the original software. If you use this
software in a product, an acknowledgment in the product
documentation would be appreciated but is not required.
2. Altered source versions must be plainly marked as such, and must
not be misrepresented as being the original software.
3. This notice may not be removed or altered from any source
distribution.
Jean-loup Gailly [email protected], Mark Adler
n
The Spotify software is subject to third party
licenses found here:
www.spotify.com/connect/third-party-licenses
Contents
Connections Playback Settings Tips Appendix
159
Front panel Rear panel
Remote control
unit
Index

.
3520 10567 00AM
Copyright ©2017 D&M Holdings Inc. All Rights Reserved.
160