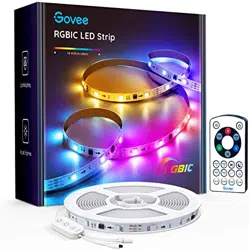

Model:H6130
User Manual
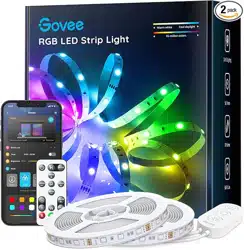
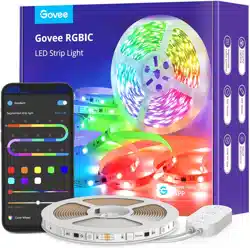
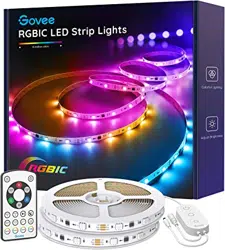
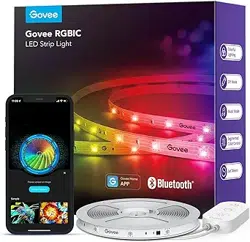
RGBIC LED Strip Lights

English 01
Deutsch 08
Français 15
Español 22
Italiano 29
日本語
36

English
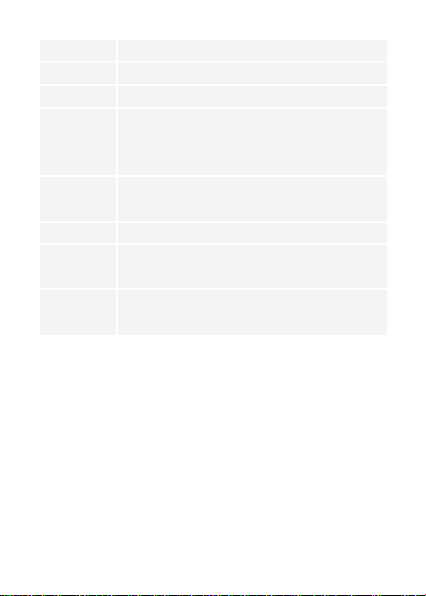
Length
Lighting Color
Waterproof
Control Method
Power Supply
5m/16.4ft
RGBIC
No
IR Remote & Control Box
Adapter 12V
Specifications
Strip Light
Power Adapter
User Manual
Service Card
1
1
1
1
What You Get
01
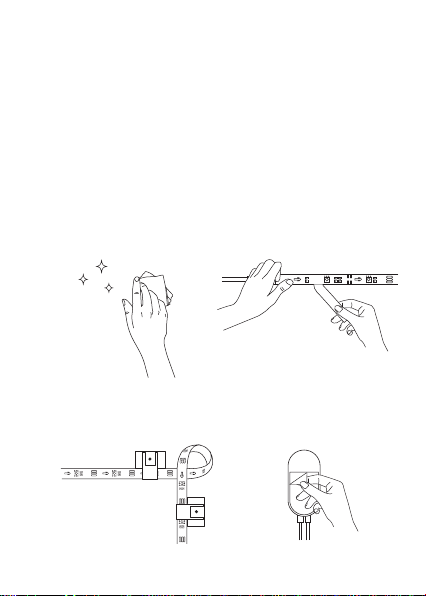
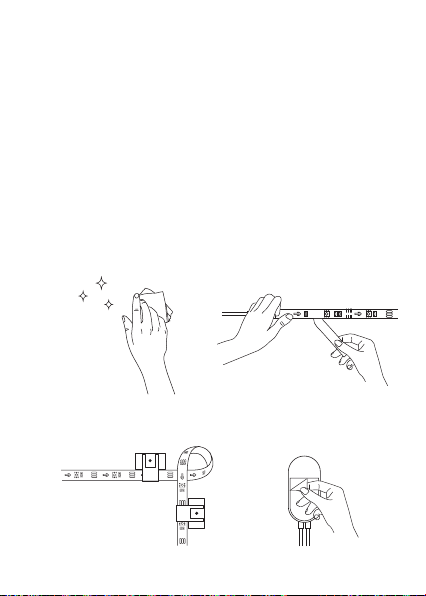
a. Unpack the box and check all items listed in the packing list.
❶
Preparation Before Installing
Installing Your Strip Lights
a.Wipe the surface to make
sure it's clean and dry.
b. Peel off the protective film on
the tape, stick the strip on and
press over it firmly.
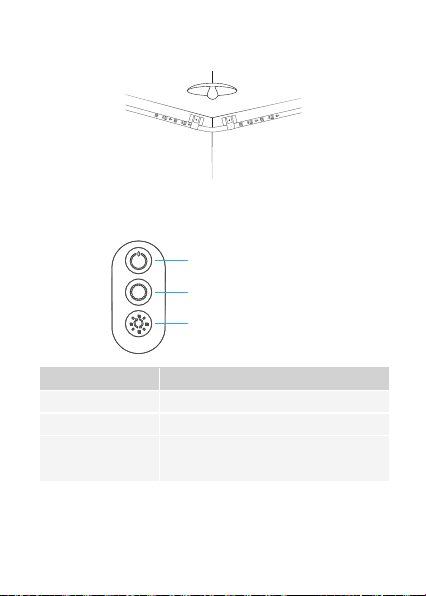
c. Reinforce via clips around
corners.
❷
Installing Steps
d. Peel off the protective film on
the control box and stick it on.
Power on the strip lights and check whether they light up.
b.
02
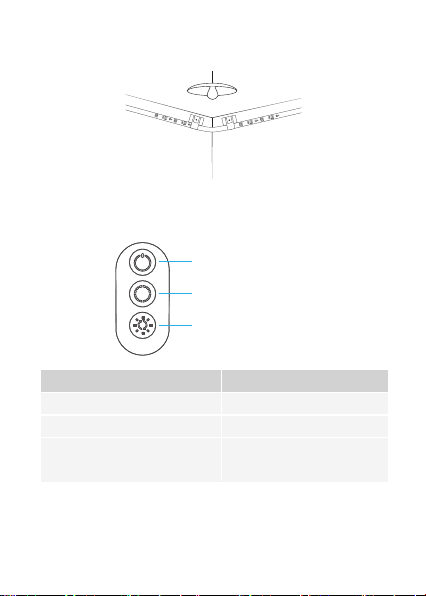
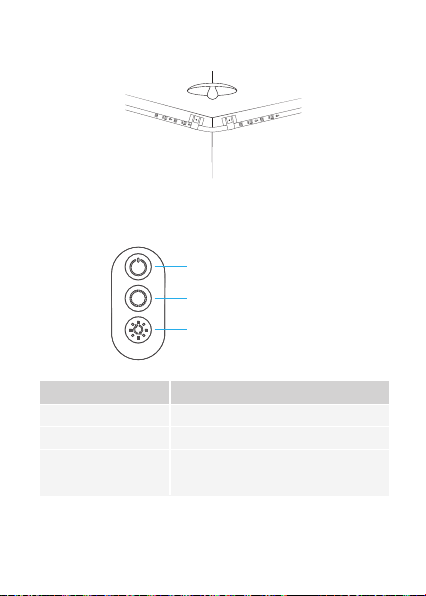
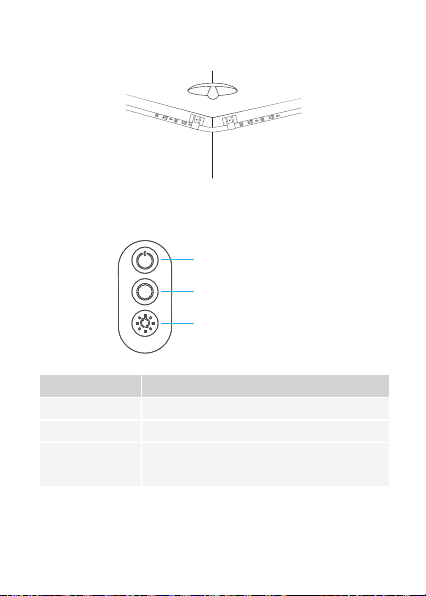
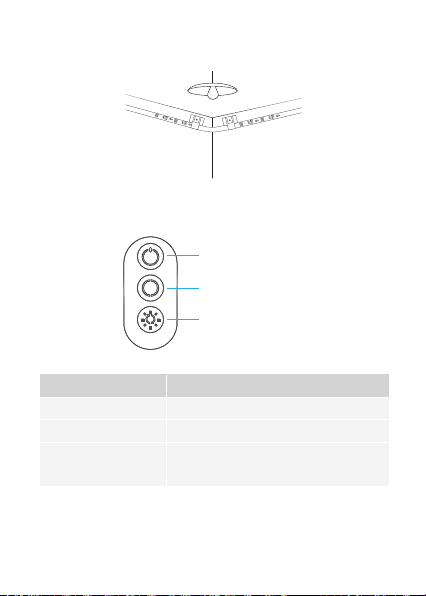
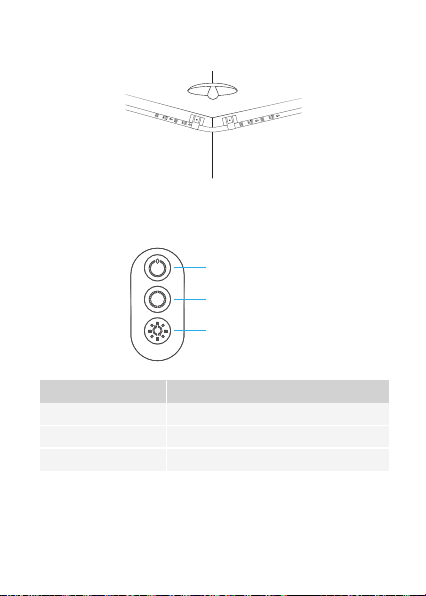
Controlling with the Control Box
On/Off
Color Changing
Brightness Adjusting
Button Function
Turn the light on/off.
Press to cycle through 9 colors.
Press and hold to cycle through
6 brightness levels.
On/Off
Color Changing
Brightness Adjusting
e.Power on the strip lights and begin using.
03
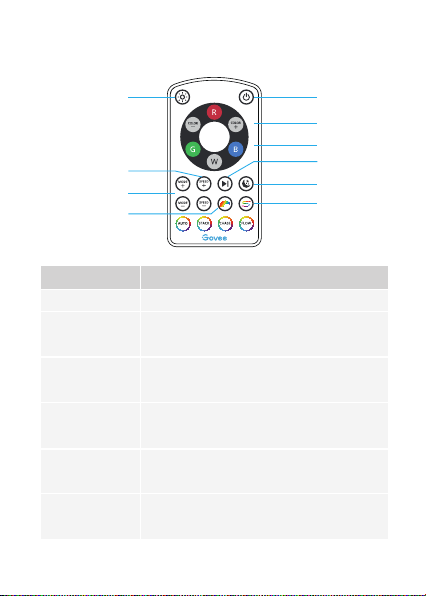
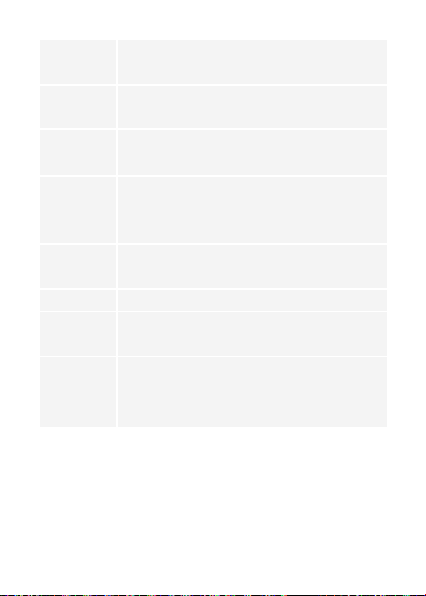
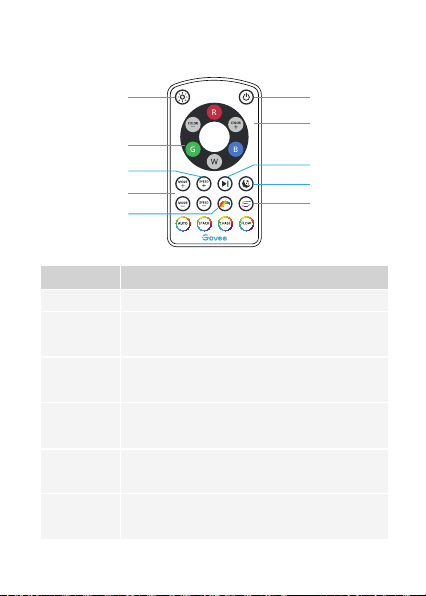
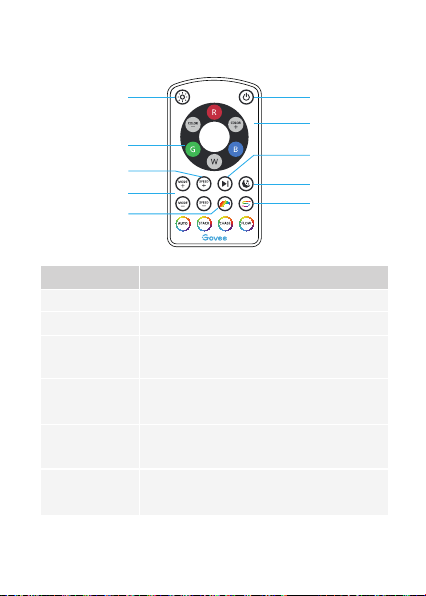
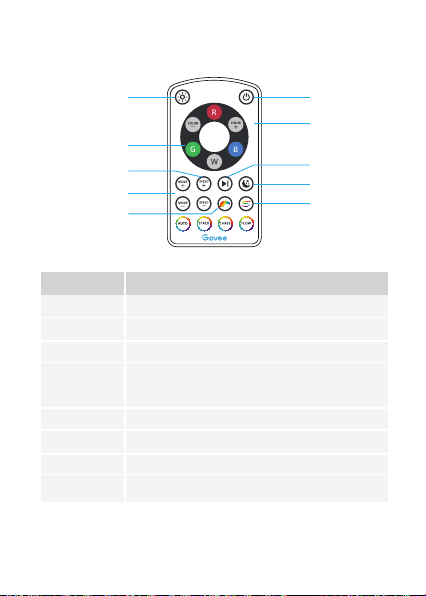
On/Off
Adjust
Brightness
Color Changing
Color Selecting
Mode
Speed
Button Function
Press to turn the light on/off.
Press and hold to cycle through 6 brightness
levels.
COLOR +/-: Press to cycle forward or backward
through 33 colors.
Press to change the color.
R: Red, G: Green, B: Blue, W: White
MODE +/-: Press to cycle forward or backward
through 11 scene modes.
SPEED +/-: For scene mode, press it to speed
up or slow down the changing of lights.
Controlling with the Remote Control
On/Off
Color Changing
Color Selecting
Pause/Play
Sleep
Segment
Adjust Brightness
Mode
Rainbow
Speed
04
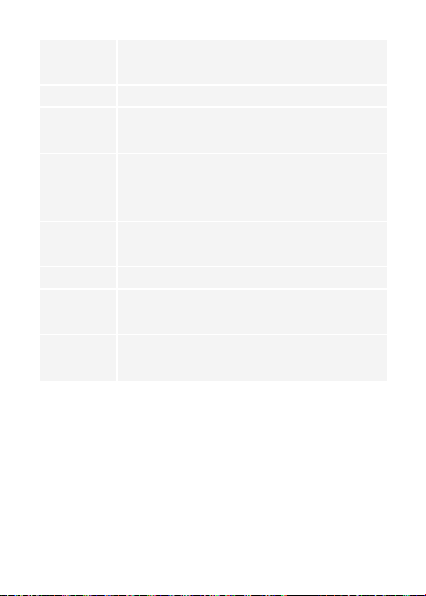
Pause/Play
Sleep
Rainbow
Segment
Stack
Chase
Flow
Auto
Press to pause/continue the dynamic lighting effects.
Press to set the color to warm white.
Press it and 8 lighting colors flow one after another.
Press it and 7 default lighting colors display on the
strip lights simultaneously.
Press again to change colors.
Press it and the color segments stack next to each
other one by one.
Press it and the lighting colors cross each other.
Press it and one lighting color flows throughout the
strip lights.
1. Switch the Scene Mode between 11 options at random.
2. Every mode lasts for 30s.
a.
b.
c.
Make sure the installation surface is clean and dry.
Firmly press over the strip after sticking.
Reinforce the installation via more clips and tape.
Troubleshooting
❶
The adhesive tape is not strong enough.
05

❹
❸
Some LED beads don’t light up.
Please contact Govee support team in time for return.
a.
b.
Pull out every connective part of the strip lights and firmly
re-connect them.
Tap On/Off button on the control box or app to check whether
it is a strip quality issue.
The strip lights don't work.
a.
b.
c.
d.
e.
f.
❷
The strip lights don’t match the same color.
Make sure the strip lights have been connected to the control box.
Do not connect different sets of strip lights.
Firmly re-connect the control box to the strip lights.
Please use the adapter provided.
Make sure the pin connector aligns to pin holes while splicing up
strip lights.
Press R, G and B buttons on the remote control to check
whether RGB LEDs work well.
06
Customer Service
Warranty: 12-Month Limited Warranty
Support: Lifetime Technical Support
Email: [email protected]
Official Website: www.govee.com
@Govee
@Govee
@Goveeofficial
@Govee
07

Deutsch
08
Länge
Beleuchtungsfarbe
Wasserdicht
Kontrollmethode
Energieversorgung
Spezifikationen
LED-Streifen Licht
Steuerbox
Adapter
Servicekarte
1
1
1
1
Überblick
5m/16.4ft
RGBIC
Nein
IR Remote & Steuerbox
Adapter 12V

a.Packen Sie die Schachtel aus und überprüfen Sie alle in der
Packliste aufgeführten Artikel.
❶
Vorbereitung vor der Installation
Installieren Sie Ihre Lichtleiste
Schalten Sie das Lichtband ein und prüfen Sie, ob es aufleuchtet.
b.
Wischen Sie die Oberfläche
ab, um sie sauber und
trocken zu halten.
❷
Installationsschritte
a.
b.Ziehen Sie die Schutzfolie vom
Klebeband ab, kleben Sie den
Streifen auf und drücken Sie ihn
fest an.
c. Verstärken Sie über Clips
um Ecken.
d.Ziehen Sie die Schutzfolie von
der Steuerbox ab und kleben
Sie sie auf.
09
e.Schalten Sie das Lichtband ein und verwenden.
Steuern mit der Steuerbox
Ein/ Aus
Farbwechsel
Helligkeitsanpassung
Drucktaste Funktion
Schalten Sie das Licht ein / aus.
Drücken Sie, um durch 9 Farben zu blättern.
Halten Sie gedrückt, um die
6-stufige Helligkeit zu durchlaufen.
Ein/ Aus
Farbwechsel
Helligkeitsanpassung
10

Steuern mit der Fernbedienung
11
Ein/ Aus
Farbwechsel
Farbauswahl
Anhalten/Spielen
Schlaf
Segment
Helligkeit anpassen
Modus
Regenbogen
Tempo
Ein/ Aus
Helligkeit
anpassen
Farbwechsel
Farbauswahl
Modus
Tempo
Drucktaste Funktion
Drücken Sie, um das Licht ein- oder auszuschalten.
Halten Sie gedrückt, um die 6-stufige Helligkeit zu
durchlaufen.
FARBE +/-: Drücken Sie, um 33 Farben vorwärts oder
rückwärts zu durchlaufen.
Drücken Sie, um die Farbe zu ändern.
R: Rot, G: Grün, B: Blau, W: Weiß
MODUS +/-: Drücken Sie, um durch 11 Szenenmodi
vorwärts oder rückwärts zu blättern.
Tempo +/-: Drücken Sie im Szenenmodus darauf, um
den Lichtwechsel zu beschleunigen oder zu
verlangsamen.
12
Anhalten/
Spielen
Schlaf
Regenbogen
Segment
Stack
Chase
Flow
Automatisch
Drücken Sie auf , um die dynamischen Lichteffekte
anzuhalten/fortzusetzen.
Drücken Sie auf , um die Farbe auf Warmweiß
einzustellen.
Wenn Sie darauf drücken, fließen 8 Lichtfarben
nacheinander.
Wenn Sie darauf drücken, werden 7 Standard-Licht-
farben gleichzeitig auf den Leuchtstreifen angezeigt.
Drücken Sie erneut, um die Farben zu ändern.
Wenn Sie darauf drücken, werden die Farbeseg-
mente nacheinander nebeneinander stapeln.
Wenn Sie darauf drücken, jagen die Farben hin und her.
Wenn Sie darauf drücken, fließt eine Lichtfarbe durch
die Leuchtstreifen.
1. Schalten Sie den Szenenmodus zwischen 11
Optionen nach dem Zufallsprinzip um.
2. Jeder Modus dauert 30 Sekunden.

Fehlerbehebung
❶
Das Klebeband ist nicht stark genug.
Stellen Sie sicher, dass die Installationsfläche sauber und trocken ist.
Drücken Sie nach dem Aufkleben fest auf den Streifen.
Verstärken Sie die Installation durch weitere Clips und Bänder.
a.
b.
c.
❸
Einige Lampenperlen leuchten nicht auf.
Bitte kontaktieren Sie das Govee-Support-Team rechtzeitig für die
Rücksendung.
13
Stellen Sie sicher, dass zwei Rollen Lichtleisten an den Power-Brick
angeschlossen sind.
Schließen Sie keine verschiedenen Sätze von Lichtbändern an.
Schließen Sie den Power Brick wieder fest an das Lichtband an.
Bitte verwenden Sie den mitgelieferten Adapter.
Stellen Sie sicher, dass der Stiftstecker mit den Nadellöchern
übereinstimmt, während Sie die Lichtbänder aufspleißen.
Drücken Sie die Tasten R, G und B auf der Fernbedienung, um zu
überprüfen, ob die RGB-LEDs ordnungsgemäß funktionieren.
a.
b.
c.
d.
e.
f.
❷
Der Streifen entspricht nicht der gleichen Farbe.
❹
Das Lichtband funktioniert nicht.
a.
b.
Ziehen Sie jeden Verbindungsteil der Lichtleiste heraus und
schließen Sie sie wieder fest an.
Tippen Sie im Kontrollkästchen oder in der App auf die
Schaltfläche Ein / Aus, um zu überprüfen, ob es sich um ein
Problem mit der Streifenqualität handelt.
14
Die Kundenbetreuung
Warranty:12-Monate Beschränkte Garantie
Support:Lifetime Technische Unterstützung
Email:[email protected]
Offiziell Website:www.govee.com
@Govee
@Govee
@Goveeofficial
@Govee

Français
15
Longueur
Couleur
Étanche
Méthode de Contrôle
Alimentation électrique
Spécifications
Kit de Ruban LED
Boîte de Contrôle
Adaptateur
Carte de Service
1
1
1
1
Schéma
5m/16.4ft
RGBIC
NON
Télécommande & Boîtier de Commande
Adaptateur 12V

b.Allumez la bande LED et vérifiez si elle s’allume.
a.Essuyez la surface pour la
garder propre et sèche;
❷
Étapes d’installation
b. Retirez le film protecteur de la
bande, collez la bande et
appuyez fermement dessus;
c. Renforcez le ruban par des
clips autour des coins;
d.Enlevez le colle du boîtier de
commande et le collez;
a.Déballez la boîte et vérifiez tous les éléments énumérés dans la
liste d'emballage.
❶
Préparation avant l'installation
Installez votre Ruban LED
16
e.Allumez la bande LED et commencez à l'utiliser.
Controllez avec le Boîtier de Commande
Bouton Allumer / Éteindre
Changement de couleur
Réglage de la Luminosité
Bouton Fonction
Allumer / Éteindre la lumière.
Appuyez pour changer parmi les 9 couleurs.
Appuyez et maintenez pour changer la
luminosité à 6 niveaux.
Bouton Allumer / Éteindre
Changement de couleur
Réglage de la Luminosité
17
Controllez avec le Télécommande
18
On/Off
Changement
de couleur
Sélection
de la couleur
Arrêter/Continuer
Veille
Entassé
Ajustement de la
luminosité
Mode
Arc-en-Ciel
Speed
On/Off
Ajustement de
la luminosité
Changement
de couleur
Sélection de la
couleur
Mode
Speed
Bouton Fonction
Allumer / Éteindre la lumière.
Appuyez et maintenez pour changer la luminosité à 6
niveaux.
COLOR +/- : Appuyez sur cette touche pour avancer ou
reculer dans 33 couleurs.
Appuyez sur pour changer de couleur.
R : Rouge, G : Vert, B : Bleu, W : Blanc
MODE +/- : Appuyez sur cette touche pour avancer ou
reculer dans les 11 modes de scène.
SPEED +/- : Pour le mode scène, appuyez sur cette touche
pour accélérer ou ralentir le changement de lumière.
19
Arrêter/
Continuer
Veille
Arc-en-Ciel
Entassé
Stack
Chase
Flow
Auto
Appuyez sur ce bouton pour arrêter/continuer le
mode d'éclairage dynamique.
Pressez pour mettre la couleur en blanc chaud.
En appuyant ce bouton, 8 couleurs d'éclairage
s'écoulent l'une après l'autre.
Appuyez dessus et 7 couleurs d'éclairage prédéfinies
s'affichent simultanément sur la bande LED.
Appuyez encore une fois pour changer de couleur.
Appuyez sur ce bouton et les segments de couleur
s’empilent un par un.
Appuyez sur ce bouton et les couleurs se croisent.
Appuyez sur ce bouton et une seule couleur circule
dans la bande LED.
1. Change le Mode Scène parmi 11 options au hasard;
2. Chaque mode dure 30 secondes.

a.
b.
c.
Assurez-vous que la surface d'installation est propre et sèche.
Appuyez fermement sur la bande après l'avoir collée.
Renforcez l'installation en utilisant plus de clips et de rubans
adhésifs.
Dépannage
❶
Le ruban adhésif n'est pas assez solide.
20
a.
b.
c.
d.
e.
f.
Assurez-vous que deux rouleaux de bande LED ont été
connectés au contrôleur RGB.
Ne connectez pas des rouleaux de bandes LED différents.
Reconnectez fermement le contrôleur RGB à la bande LED.
Utilisez l'adaptateur fourni.
Assurez-vous que le connecteur à broche s'aligne sur les trous
de broche lorsque vous raccordez les bandes LED.
Appuyez sur les boutons R, G et B de la télécommande pour
vérifier si les LED RGB fonctionnent bien.
❷
La bande ne correspond pas à la même couleur.
Certaines perles du ruban ne s'allument pas.
Veuillez contacter l'équipe de Govee à temps pour le retour.
❸
❹
Retirez toutes les parties connectives de la bande LED et
rebranchez-les fermement.
Appuyez sur le bouton On/Off de la boîte de contrôle ou de
l'app pour vérifier s'il s'agit d'un problème de qualité de la
bande.
La bande LED ne fonctionne pas.
a.
b.
21
Service Clientèle
Garantie:Garantie limitée de 12 mois
Support:Technique de support à vie
Email : [email protected]
Site officiel : www.govee.com
@Govee
@Govee
@Goveeofficial
@Govee

Español
22
Longitud
Color de Iluminación
Impermeable
Manera de Control
Fuente de Alimentación
Especificaciones
Tira de Luz LED
Adaptador
Manual de Usuario
Tarjeta de Servicio
1
1
1
1
En un vistazo
5m/16.4ft
RGBIC
NO
Remoto & Caja de Control
Adaptador 12V

a.Limpie la superficie para
mantenerla limpia y seca;
b.Encienda la luz de tira y verifique si se enciende.
❷
Pasos de instalación
b.Retire la película protectora de la
cinta, pegue la tira y presione
firmemente sobre ella;
c. Refuerce a través de clips
alrededor de las esquinas;
d.Retire la película protectora de la
caja de control y péguela;
a.
Desempaquete la caja y verifique todos los artículos
enumerados en la lista de empaque;
❶
Preparación antes de la instalación
Instalación de su tira de luz
23
e.Encienda la tira de luz y empieza a usarla.
Controlando con la caja de control
Encender/Apagar
Cambio de Color
Ajuste de Brillo
Botón Función
Enciende/apaga la luz.
Presione para recorrer 9 colores.
Mantenga presionado para recorrer el brillo
de 6 niveles.
Encender/Apagar
Cambio de Color
Ajuste de Brillo
24

Control con el control remoto
25
Encender/Apagar
Cambio de Color
Selección de Color
Pausar/Jugar
Dormir
Segmento
Ajuste de Brillo
Modo
Arco Iris
Velocidad
Encender/Apagar
Ajuste de Brillo
Cambio de Color
Selección de Color
Modo
Velocidad
Botón Función
Presione para encender/apagar la luz.
Mantenga presionado para recorrer el brillo de 6
niveles.
COLOR +/-: Presione para avanzar o retroceder
entre 33 colores.
Presione para cambiar el color.
R: Rojo, G: Verde, B: Azul, W: Blanco
MODE +/-: Presione para avanzar o retroceder por
los 11 modos de escena.
VELOCIDAD +/-: Para el modo de escena, presiónelo
para acelerar o ralentizar el cambio de luces;

26
Pausar/Jugar
Dormir
Arco Iris
Segmento
Stack
Chase
Flow
Auto
Presione para pausar/continuar los efectos dinámicos
de iluminación.
Presione para establecer el color en blanco cálido.
Presiónelo y 8 colores de iluminación fluyen uno tras otro.
Presiónelo y se mostrarán 7 colores de iluminación
predeterminados en la tira de luces simultáneamente.
Presione nuevamente para cambiar los colores.
Presiónelo y los segmentos de color se apilan uno al
lado del otro, uno por uno.
Presiónelo y los colores de iluminación se cruzan entre sí.
Presiónelo y un color de iluminación fluye a través de
las luces de tira.
1. Cambie el Modo de Escena entre 11 opciones al azar;
2. Cada modo dura 30s.
a.
b.
c.
Asegúrese de que la superficie de instalación esté limpia y seca.
Presione firmemente la tira después de pegarla.
Refuerce la instalación a través de más clips y cintas.
Solución de problemas
❶
La cinta adhesiva no es lo suficientemente fuerte.

27
b.
c.
d.
e.
f.
Asegúrese de que se hayan conectado dos rollos de luces de tira
al bloque de alimentación.
No conecte diferentes conjuntos de luces de tira.
Vuelva a conectar firmemente el bloque de alimentación a la tira
de luz.
Utilice el adaptador provisto.
Asegúrese de que el conector de clavija esté alineado con los
agujeros de clavija mientras empalma las luces de tira.
Presione los botones R, G y B en el control remoto para verificar si
los LED RGB funcionan bien.
Algunas cuentas de lámpara no se iluminan.
Póngase en contacto con el equipo de soporte de Govee a tiempo
para la devolución.
❸
❹
La tira de luz no funciona.
a. Saque todas las partes conectivas de la tira de luz y vuelva a
conectarlas firmemente.
Pulse el botón de encendido/apagado en la caja de control o
aplicación para verificar si se trata de un problema de calidad
de la tira.
b.
❷
La tira no coincide con el mismo color.
a.

28
Servicio de atención al cliente
Warranty:12-Garantía limitada de un mes
Support:Lifetime Soporte técnico
Email:[email protected]
Oficial Website:www.govee.com
@Govee
@Govee
@Goveeofficial
@Govee
Italiano
29
Lunghezza
Colore di Luci
Impermeabilità
Modalità di controllo
Alimentazione
Specifiche
Striscia Luce LED
Adattatore
Manuale d'Uso
Carta di Servizio
1
1
1
1
Manuale d'Uso
5m/16.4ft
RGBIC
NO
Telecomando e Scatola di Controllo
Adattatore 12V

a.Pulire la superficie per
renderla pulita e asciutta;
❷
Procedura di Installazione
b. Staccare la pellicola protettiva dal
nastro, attaccare la striscia e
premerla con forza;
c. Rinforzare intorno agli
angoli con le clip;
d. Staccare la pellicola protettiva
sulla scatola di controllo e
incollarla;
a. Disimballare la scatola e controllare tutti gli articoli elencati nella
lista di imballaggio;
❶
Preparazione Prima dell'Installazione
Installazione della Luci di Striscia LED
Accendi la Luci di Striscia LED e controlla se si accende. b.
30
e.Accendere la Striscia LED e iniziare a usarla.
Controllo tramite scatola di controllo
Acceso / Spento
Cambio di colore
Regolazione
Luminosità
Pulsante Funzione
Accende / Spegne la luce
Premere per scorrere tra 9 colori.
Tenere premuto per scorrere la
luminosità a 6 livelli.
Acceso / Spento
cambio di colore
Regolazione Luminosità
Installazione della Luci di Striscia LED
31
Funzione
Acceso / Spento
cambio di colore
Regolazione Luminosità
Controllare con Telecomando
32
Acceso spento
Cambio colore
Selezione colore
Pausa /
Roproduzione
Dormire
Segmento
Regola luminosità
Modalità
Arcobaleno
Velocità
Acceso spento
Regola luminosità
Cambio colore
Selezione colore
Modalità
Velocità
Pulsante Funzione
Premere per accendere / spegnere la luce.
Tenere premuto per scorrere la luminosità a 6
livelli.
COLORE +/-: premere per scorrere in avanti o
indietro 33 colori.
Premere per cambiare colore.
R: Rosso, G: Verde, B: Blu, W: Bianco
MODALITA’ +/-: premere per spostarsi avanti o
indietro tra 11 modalità.
VELOCITÀ +/-: premere per accelerare o rallentare il
33
Pausar/Jugar
Sleep
Rainbow
Segment
Stack
Chase
Flow
Auto
Premere per mettere in pausa / continuare gli effetti di
luci dinamice.
Premilo per impostare il colore a caldo o bianco
Premilo e 8 colori di luci scorrono uno dopo l'altro.
Premilo e 7 colori di luci predefiniti vengono visualizzati
contemporaneamente sulle luci di striscia.Premere di
nuovo per cambiare i colori
Premilo e i segmenti di colore si accatastano uno
accanto all'altro.
Premilo e i colori dei luci si incrociano.
Premilo e un colore di luci scorre attraverso le strisce LED.
1. Cambie el Modo de Escena entre 11 opciones al azar;
2. Cada modo dura 30s.
Risoluzioni dei problemi
❶
Il nastro adesivo non è abbastanza forte.
a.
b.
c.
Assicurarsi che la superficie di installazione sia pulita e asciutta.
Premere con forza sopra la striscia dopo averlo incollato.
Rafforzare l'installazione tramite più clip e nastri.

34
❷
a.
b.
c.
d.
e.
f.
Assicurati che entrambi i rotoli di strisce di luce siano stati
connessi all'alimentatore.
Non connettere i dispositivi differenti di strisce di luci.
Riconnetti saldamente l'alimentatore alla striscia di luci.
Si prega di utilizzare l'adattatore fornito.
Assicurati che il connettore con i perni sia correttamente allineato
ai fori per i perni quando unisci le strisce di luci.
Premi i pulsanti R, G e B sul telecomando per assicurarti che i LED
RGB funzionino correttamente.
La striscia non è dello stesso colore.
Alcune luci non si accendono.
Contatta il team di supporto di Govee in tempo per il reso.
❸
❹
La striscia LED non funziona.
a.
b.
Estrarre ogni parte connettiva della striscia e ricollegarla
saldamente.
Toccare il pulsante On / Off sulla scatola di controllo: sulla
scatola di controllo o sull'app per verificare se si tratta di un
problema di qualità della striscia.
35
Servizio clienti
Garanzia: Garanzia limitata di 12 mesi
Supporto: Supporto tecnico a vita
Email: [email protected]
Sito web ufficiale:www.govee.com
@Govee
@Govee
@Goveeofficial
@Govee
日本語
36
仕様
LEDテープライト
リモコン
日本語取扱説明書
サービスカード
1
1
1
1
長さ
カラー
防水
制御モード
電源
一覧
5m/16.4ft
RGBIC
非防水
リモコン&コントローラ
アダプター 12V
a.
取り付けた表面をきれいに
拭いて、清潔で乾燥をお保っ
てくだ さい 。
❷
インストー ル 手 順
b.
3m 両面テープを剝がして、取り
付けた表面にテープライトをしっ
かりと押してください。
c.
も し 角 が あ れ ば 、角 の 両 側
にクリックで固定してくださ
い。
d.
コントローラにある3m 両面テー
プ を 剝 が し て 、取 り 付 け た 表 面 に
粘 着してくだ さい 。
a.パッケージ内容はすべて揃っているかどうかことをご確認してく
ださい。
❶
インストール前のご準備:
インストール
テープライトに給電し、光りかどうかことをご確認してください。b.
37
インストール
e.
テープライトに給電し、ご利用してください。
コントローラで操作
オン/オフ
カラー
明るさ調節
ボタン 機能
ラ イ ト を オ ン / オ フ に 切 り 替 え ま す 。
九種類の色を切り替えます。
六 レ ベ ル ラ イト の 明 るさ を 調 整し ま す。
オン/オフ
カラー
明るさ調節
38
機能
リモコンでコントローラ
39
オン/オフ
カラー
カラー選択
停止/再生
スリープモード
セ グメント
コ ントロ ー ル
明るさ調節
モード
虹モード
スピード
オン/オフ
明るさ調節
カラー
カラー選択
モード
スピード
停止/再生
スリープモード
ボタン 機能
ライトを オン / オフ に 切 り替 え ま す。
六 レ ベ ル ラ イト の 明 るさ を 調 整し ま す。
三十三種類の色を切り替えます。
カラーを切り替えます。
赤はR、緑はG、青はB、白はWです。
モード+/-: 十一種類のシーンモードを変えます。
シーンモードで点 滅スピードを調 整します。
押して、ライトの照明モードを一時停止/続行します。
押 して 、ライトをウォー ム ホ ワ イト に 設 定 し ま す。
40
虹モード
セグメント
コントロ ール
ス タック
チェイス
フロー
オート
押 し て 、レ ッ ド 、オ レ ン ジ 、イ エ ロ ー 、グ リ ー ン 、ブ ル ー 、イ ン
ディゴ、コールド、ホワイト八種類のカラーで点灯します。
押して、一時に七種類のカラーで点灯します。もう一度
押 し て 、カ ラ ー を 変 え ま す 。
押して、光はテープライトの側面から中央に集めます。
押して、一時に三種類のカラーでライトは交差的に光り
ます。
ラ ン ニ ン グ モ ー ド を オ ン に す る と 、光 は テ ー プ ラ イ ト の
最初から最後まで流れてから戻ります。
1. 11種類のシーンモードをオートに切り替えます。
2. シーンモードごとに30s以上続きます。
よくあ るご質 問とおすす め
❶ 3m 両面テープの接着力は弱い
a.
b.
c.
取り付けたところの表面に清潔、乾燥をお保ってください。
テープライトをしっかりと押してください。
クリップ で 固 定 してくだ さい 。

❷
a.
b.
c.
d.
e.
f.
一巻きライトはコンバータとしっかり連接したことをご確認して
くだ さい 。
違ったシリーズライトを一緒に連接して使用しないでください。
テープライトはコンバータとしっかり連接したことをご確認して
くだ さい 。
付属されたアダプターをご利用ください。
テープライトを組み合わせたとき、4ピンメスは穴にしかっりと
差し込んて下さい。
リモコンにあるR、G、Bボタンを押して、テープライトはよく点灯
できるかどうかことをご確認してください。
テープライトは一回に同じカラーで光らない
❸
41
少数のLEDsは光らない
Goveeカスタマーにお問い合わせください。
テープライトは使用できない
a.
b.
テープライトをもう一度組み合わせてみてください。
コントローラとアプリにあるオン/オフ を押して、テープライト
はよく点灯できるかどうかことをご確認してください。
❹
保証とアフターサービス
保証:12ヶ月の安心保証
アフターサービス:技術サポート
イーメール: support@govee.com
ホームページ: www.govee.com
@Govee
@Govee
@Goveeofficial
@Govee
42
EU Compliance Statement:
Shenzhen Intellirocks Tech Co. Ltd. hereby declares that this device
is in compliance with the essential requirements and other relevant
provisions of the Directive 2014/30/EU.
A copy of the EU Declaration of Conformity is available online at
www.govee.com/
EU contact address:
BellaCocoolGmbH (E-mail: [email protected])
Pettenkoferstraße 18, 10247 Berlin,Germany
Compliance Information
EU-Compliance:
Hiermit erklärt Shenzhen Intellirocks Tech Co. Ltd., dass dieses
Gerät den wesentlichen Anforderungen und anderen einschlägi-
gen Bestimmungen der EU-Richtlinie 2014/30/EU entspricht.
Eine Kopie der EU-Konformitätserklärung finden Sie online auf
www.govee.com/
Kontaktadresse innerhalb der EU:
BellaCocoolGmbH (E-mail: [email protected])
Pettenkoferstraße 18, 10247 Berlin,Germany
Déclaration de conformité UE:
Par la présente, Shenzhen Intellirocks Tech Co. Ltd. déclare que
cet appareil est conforme aux principales exigences et autres
clauses pertinentes de la directive européenne 2014/30/EU.
Une copie de la déclaration de conformité UE est disponible sur le
site www.govee.com/
Adresse de contact pour l'UE :
BellaCocoolGmbH (E-mail: [email protected])
Pettenkoferstraße 18, 10247 Berlin,Germany
Declaración de cumplimiento UE:
Shenzhen Intellirocks Tech Co. Ltd. por la presente declara que
este dispositivo cumple los requisitos básicos y el resto de
provisiones relevantes de la Directiva 2014/30/EU.
Environmentally friendly disposal
Old electrical appliances must not be disposed of together with the residual
waste, but have to be disposed of separately. The disposal at the communal
collecting point via private persons is for free. The owner of old appliances is
responsible to bring the appliances to these collecting points or to similar
collection points.With this little personal effort, you contribute to recycle
valuable raw materials and the treatment of toxic substances.
Hay disponible online una copia de la Declaración de conformidad
UE en www.govee.com/
Dirección de contacto de la UE:
BellaCocoolGmbH (E-mail: [email protected])
Pettenkoferstraße 18, 10247 Berlin,Germany
Dichiarazione di conformità UE:
Shenzhen Intellirocks Tech Co. Ltd. dichiara che il presente
dispositivo è conforme ai requisiti essenziali e alle altre disposizioni
rilevanti della direttiva 2014/30/EU.
Una copia della dichiarazione di conformità UE è disponibile online
all'indirizzo Web www.govee.com/
Indirizzo di contatto UE:
BellaCocoolGmbH (E-mail: [email protected])
Pettenkoferstraße 18, 10247 Berlin,Germany
Govee is a trademark of Shenzhen Intellirocks Tech Co.Ltd.
Copyright ©2020 Shenzhen Intellirocks Tech Co.Ltd. All Rights
Reserved.
CAUTION:
RISK OF EXPLOSION IF BATTERY IS REPLACED BY AN INCORRECT TYPE.
DISPOSE OF USED BATTERIES ACCORDING TO THE INSTRUCTIONS.

Umweltfreundliche Entsorgung
Elektro-Altgeräte dürfen nicht mit gewöhnlichem Abfall entsorgt werden
und müssen separat entsorgt werden. Die Entsorgung an kommunalen
Sammelstellen ist für Privatpersonen kostenlos.Die Eigentümer der
Altgeräte sind für den Transport zu den Sammelstellen verantwortlich.
Durch diesen geringen Aufwand können Sie zur Wiederverwertung von
wertvollen Rohmaterialien beitragen und dafür sorgen, dass umweltschädli-
che und giftige Substanzen ordnungsgemäß unschädlich gemacht werden.
Mise au rebut écologique
Les appareils électriques usagés ne doivent pas être éliminés avec les
déchets résiduels. Ils doivent être éliminés séparément. La mise au rebut au
point de collecte municipal par l'intermédiaire de particuliers est gratuite. Il
incombe au propriétaire des appareils usagés de les apporter à ces points
de collecte ou à des points de collecte similaires. Avec ce petit effort
personnel, vous contribuez au recyclage de matières premières précieuses
et au traitement des substances toxiques.
Tratamiento de residuos responsable con el medio ambiente
Los aparatos eléctricos viejos no pueden desecharse junto con los residuos
orgánicos, sino que deben ser desechados por separado. Existen puntos
limpios donde los ciudadanos pueden dejar estos aparatos gratis. El
propietario de los aparatos viejos es responsable de llevarlos a estos puntos
limpios o similares puntos de recogida. Con este pequeño esfuerzo estás
contribuyendo a reciclar valiosas materias primas y al tratamiento de
residuos tóxicos.
Smaltimento ecologico
I vecchi dispositivi elettrici non devono essere smaltiti insieme ai rifiuti
residui, ma devono essere smaltiti separatamente. Lo smaltimento da parte
di soggetti privati presso i punti di raccolta pubblici è gratis. È responsabilità
del proprietario dei vecchi dispositivi portarli presso tali punti di raccolta o
punti di raccolta analoghi. Grazie a questo piccolo impegno personale
contribuirete al riciclo di materie prime preziose e al corretto trattamento di
sostanze tossiche.

FCC Statement
This device complies with Part 15 of the FCC Rules. Operation is
subject to the following two conditions:
(1) This device may not cause harmful interference, and (2) This device
must accept any interference received, including interference that
may cause undesired operation.
Warning: Changes or modifications not expressly approved by the
party responsible for compliance could void the user's authority to
operate the equipment.
NOTE: This equipment has been tested and found to comply with the
limits for a Class B digital device, pursuant to Part 15 of the FCC Rules.
These limits are designed to provide reasonable protection against
harmful interference in a residential installation. This equipment
generates uses and can radiate radio frequency energy and, if not
installed and used in accordance with the instructions, may cause
harmful interference to radio communications. However, there is no
guarantee that interference will not occur in a particular installation. If
this equipment does cause harmful interference to radio or television
reception, which can be determined by turning the equipment off and
on, the user is encouraged to try to correct the interference by one or
more of the following measures:
Reorient or relocate the receiving antenna.
Increase the separation between the equipment and receiver.
Connect the equipment into an outlet on a circuit different from that
to which the receiver is connected.
Consult the dealer or an experienced radio/TV technician for help.
1.
2.
3.
4.
1.Do not connect the rope light to the supply while it is in the packing or wound
onto a reel;
2.Do not use the rope light when covered or recessed into a surface;
3.Do not open or cut the rope light;
Non-user replaceable light sources
Not intended for illumination. Only used for creating ambiance.

www.govee.com
For FAQs and more information,
please visit: