Loading ...
Loading ...
Loading ...

3
4
10
Attach the Electrode Wire and the Ground
Wire to the Ignitor.
Feed Wires through hole in Handle, Side.
Screw Ignitor into Handle as shown in
detail A.
Assemble Handle, Side and Ground Wire to
Bottom using two
Attach the Electrode Wire to end of Electrode.
#10-24x3/4’’ machine
screws, #10-24 hex nuts and fiber washers
per handle.
Rest the notches at ends of Heat Plate on
handle screws inside bottom, as shown B.
Place Wind Shield onto burner tube, as
shown B. Attach Wind Shield to burner tube
with one #8-32x3/8'' sheet metal screw, as
shown C.
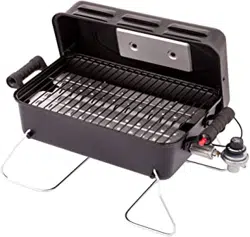
Handle, Top
Lid
Cooking Grate
#10-24x3/4’’
Machine Screw
Qty. 4
Heat Plate
Handle, Side
Ignitor
#10-24x3/4’’
Machine Screw
#10-24
Hex Nut
7x15
Flat Washer
Qty. 2
1/4’’-20x1/2’’
Machine Screw
Qty. 2
#10-24x3/8’’
Machine Screw
Qty. 4
Fiber Washer
Qty. 2
Fiber Washer
#10-24x3/8’’
Machine Screw
1/4’’-20x1/2’’
Machine Screw
7x15 Flat Washer
#10-24
Hex Nut
Qty. 4
Hinge Bracket
#10-24 Hex Nut
Electrode Wire
Ground Wire
Fiber Washer
Fiber Washer
Qty. 4
#10-24
Hex Nut
Qty. 4
Bottom
A
Attach Handle, Top and Heat Shield, F/Handle
using two fiber washers, 7x15 flat washers and 1/4’’-
20x1/2’’ machine screws.
NOTE: Fiber washers should be between
handle and lid.
Install Hinge Brackets to inside of Lid using two
#10-24x3/8’’ machine screws and #10-24 hex
nuts per bracket. Make sure notches in Hinge
Brackets are toward the bottom edge of Lid and
are facing the same direction.
Place Cooking Grate into Bottom.
Place lid onto Bottom.
to lid
Heat Shield, F/Handle
Electrode Wire
Ground Wire
Wind Shield
C
#8-32X3/8''
Sheet Metal Screw
Qty. 1
#8-32X3/8''
Sheet Metal Screw
B
Loading ...
Loading ...
Loading ...