User manual

i
Table of contents
Features 1
Meet Bixby 1
Camera 1
Mobile continuity 1
Dark mode 1
Security 1
Expandable storage 1
Getting started 2
Galaxy S9 3
Galaxy S9+ 4
Assemble your device 5
Charge the battery 6
Start using your device 6
Use the Setup Wizard 6
Transfer data from an old device 7
Lock or unlock your device 8
Accounts 9
Set up voicemail 10
TMO_G960U_G965U_EN_UM_TN_TA8_030320_FINAL

Table of contents
ii
Navigation 11
Navigation bar 16
Customize your home screen 18
Bixby 26
Digital wellbeing and parental controls 27
Always On Display 28
Flexible security 29
Mobile continuity 33
Multi window 36
Edge screen 37
Enter text 44
Emergency mode 47
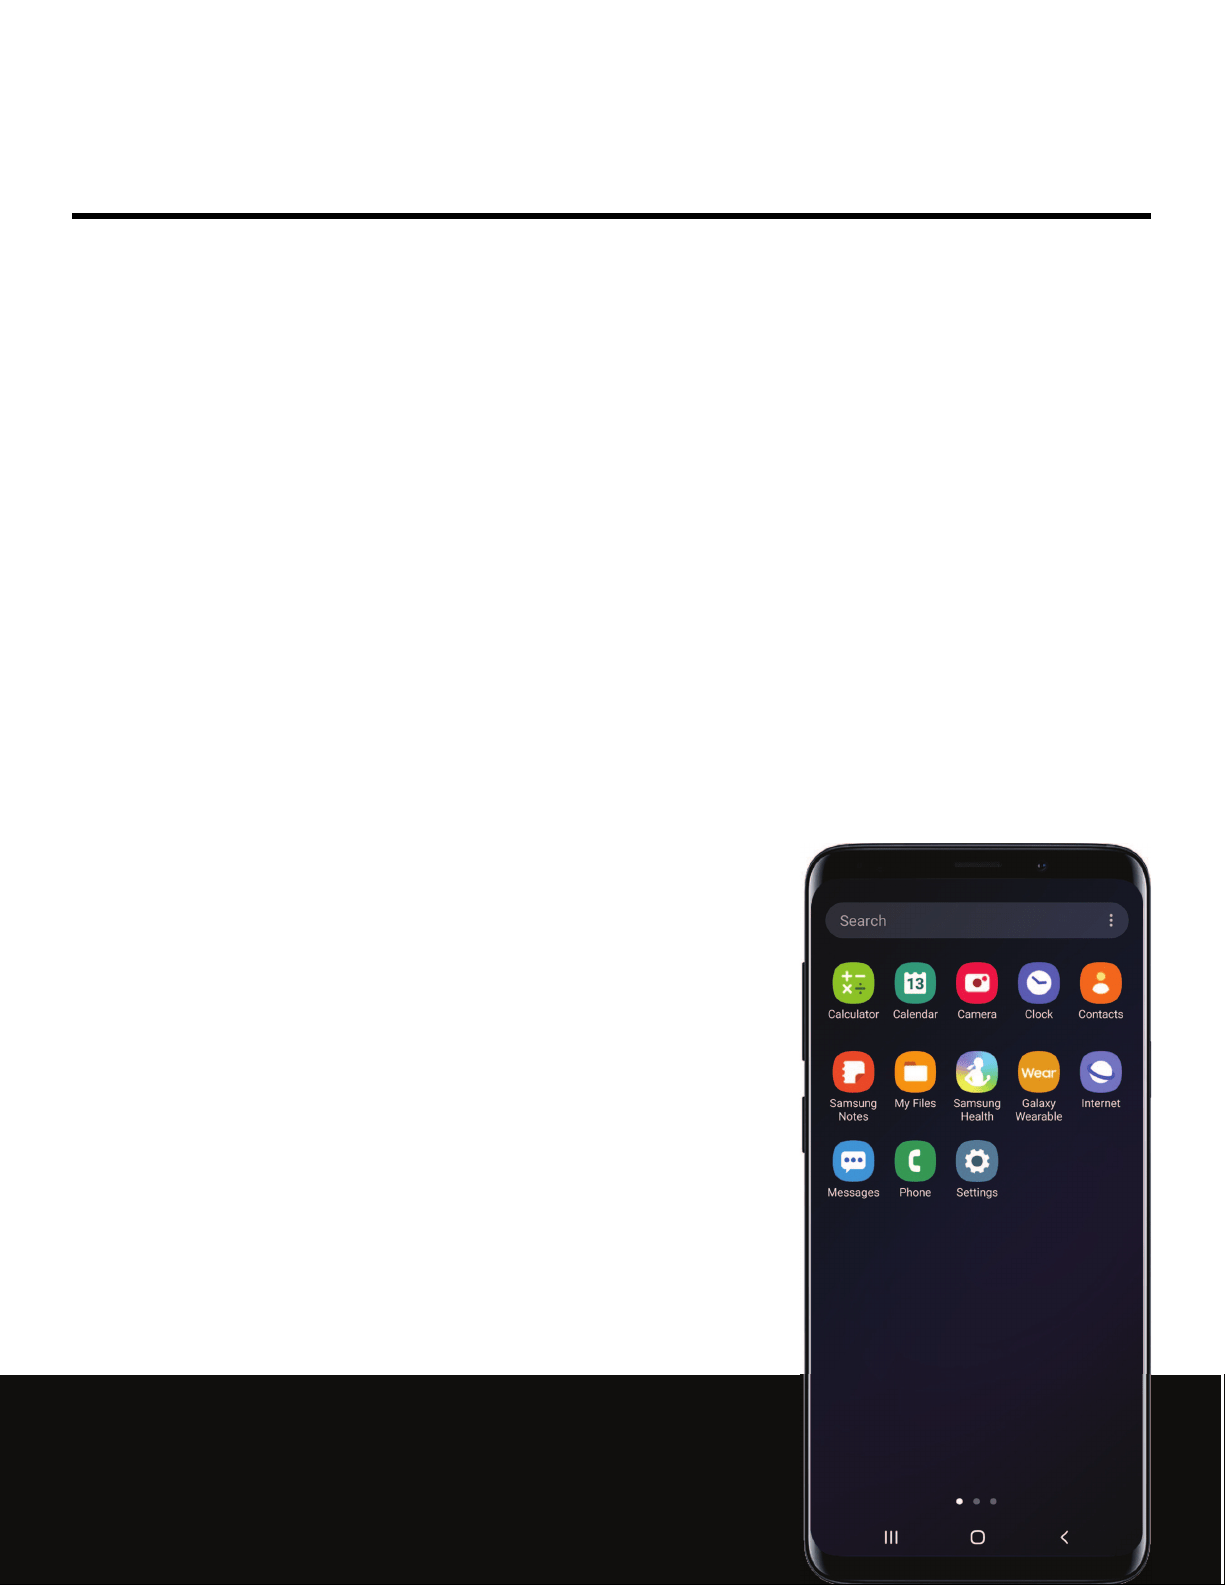
Apps 49
Using apps 50
Uninstall or disable apps 50
Search for apps 50
Sort apps 50
Create and use folders 51
Game Booster 51


Table of contents
vii
Separate app sound
126
Notifications
127
Manage notifications
127
Customize app notifications
127
Smart alert
128
Smart pop-up view
128
Display
128
Screen brightness
128
Blue light filter
129
Dark mode
129
Screen mode
129
Font size and style
130
Screen zoom
130
Screen resolution
130
Full screen apps
130
Screen timeout
131
Accidental touch protection
131
Touch sensitivity
131
Screen saver
131

Table of contents
viii
Reduce animations
132
Lift to wake
132
Smart stay
132
One-handed mode
132
Device maintenance
133
Quick optimization
133
Battery
133
Storage
134
Memory
135
Advanced options
135
Language and input
136
Date and time
139
Troubleshooting
139
Lock screen and security
142
Screen lock types
142
Google Play Protect
144
Find My Mobile
144
Security update
145
Samsung Pass
145


Getting started
3
Galaxy S9
Front camera
Rear camera
Volume keys
Bixby key
Fingerprint
scanner
USB charger/
Accessory port
Flash
Iris scanner
Proximity/Light
sensors
Headset jack
Power key

Getting started
4
Galaxy S9+
Front camera
Dual cameras
Volume keys
Bixby key
Fingerprint
scanner
USB charger/
Accessory port
Flash
Iris scanner
Proximity/Light
sensors
Headset jack
Power key
Getting started
5
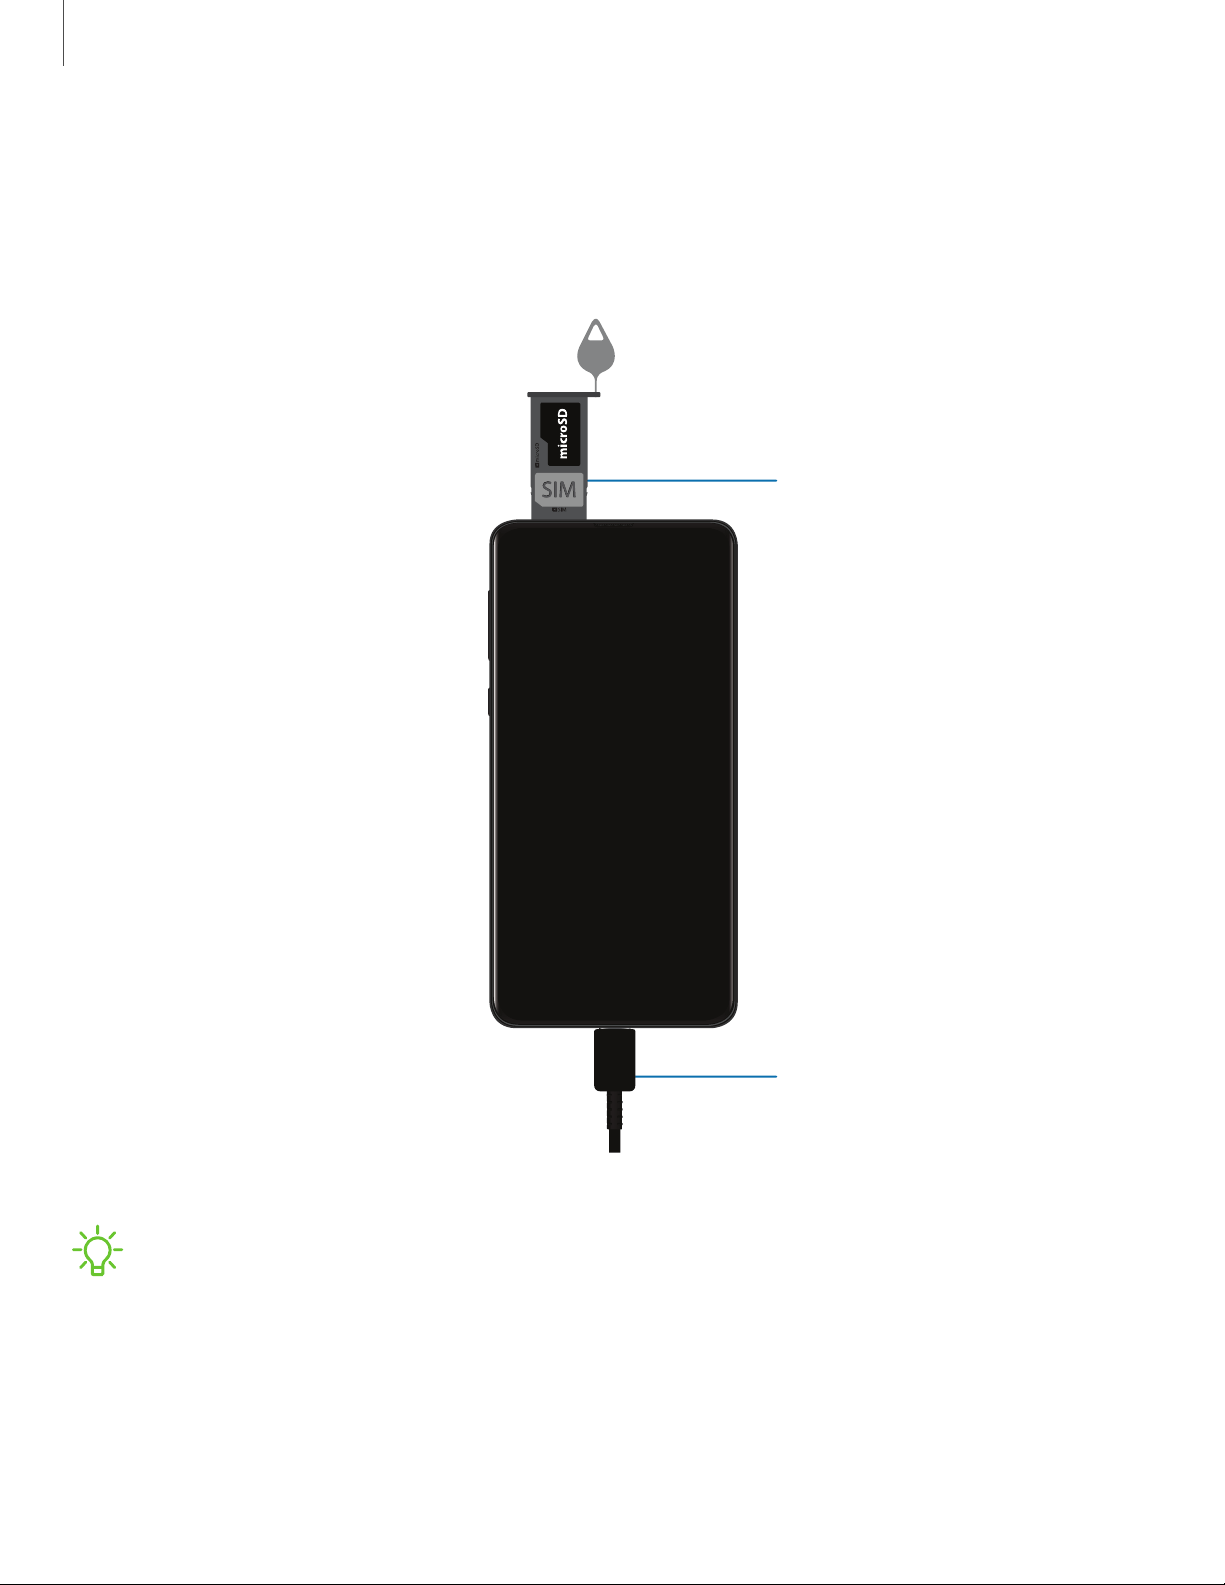
Assemble your device
Your device uses a nano-SIM card. A SIM card may be preinstalled, or you may be able
to use your previous SIM card. Contact your carrier for details.
Install SIM/microSD card
Place the SIM card and
optional microSD card (sold
separately) into the tray
with the gold contacts
facing down.
Charge your device
Before turning on your
device, charge it fully.
Devices and software are constantly evolving — the illustrations you see here are for reference only.
NOTE Use only charging devices and batteries (if applicable) that are approved
by Samsung. Samsung charging devices and batteries are designed for your
device to maximize battery life. Using other charging devices and batteries may
void your warranty and may cause damage.

Getting started
6
NOTE Your device is IP68 rated for dust and water resistance. To maintain the
water-resistant and dust-resistant features of your device, make sure that the
SIM card/Memory card tray openings are maintained free of dust and water, and
the tray is securely inserted prior to any exposure to liquids. For more
information, see Maintaining water and dust resistance on page 163.
Charge the battery
Your device is powered by a rechargeable battery. A charger (charging head and USB
Type-C cable) is included with the device for charging the battery from a power
outlet.
TIP While charging, the device and the charger may become hot and stop
charging. This usually does not affect the device’s lifespan or performance and is
in the device’s normal range of operation. Disconnect the charger from the device
and wait for the device to cool down. For more information, visit
samsung.com/us/support/answer/ANS00076952.
Start using your device
Use the Power key to turn your device on or off. Do not use the device if the body is
cracked or broken. Use the device only after it has been repaired.
◌
Press and hold the Power key.
•
To turn the device off, press and hold the
Power
key, and tap
Power off
.
Confirm when prompted.
•
To restart your device, press and hold the
Power
key, and tap
Restart
.
Confirm when prompted.
Use the Setup Wizard
The first time you turn your device on, the Setup Wizard guides you through the basics
of setting up your device.
Follow the prompts to choose a default language, connect to a Wi-Fi
®
network, set up
accounts, choose location services, learn about your device’s features, and more.
Getting started
7
Transfer data from an old device
Use Smart Switch
™
to transfer contacts, photos, music, videos, messages, notes,
calendars, and more from your old device. Smart Switch can transfer your data via
USB cable, Wi-Fi, or computer. You can also use the included On-the-Go adapter to
transfer content quickly and easily from your old device without installing the Smart
Switch app.
Visit samsung.com/us/support/owners/app/smart-switch to learn more.
1.
From Settings, tap
Accounts and backup > Smart Switch.
2. Follow the prompts and select the content to transfer.
New Galaxy
Old device
Devices and software are constantly evolving — the illustrations you see here are for reference only.
NOTE Transferring content with a USB cable may increase battery consumption.
Make sure your battery is fully charged.
Visit samsun
g.com/smartswitch for more information and to learn how to use the
On-the-Go adapter to transfer content faster.
Getting started
8
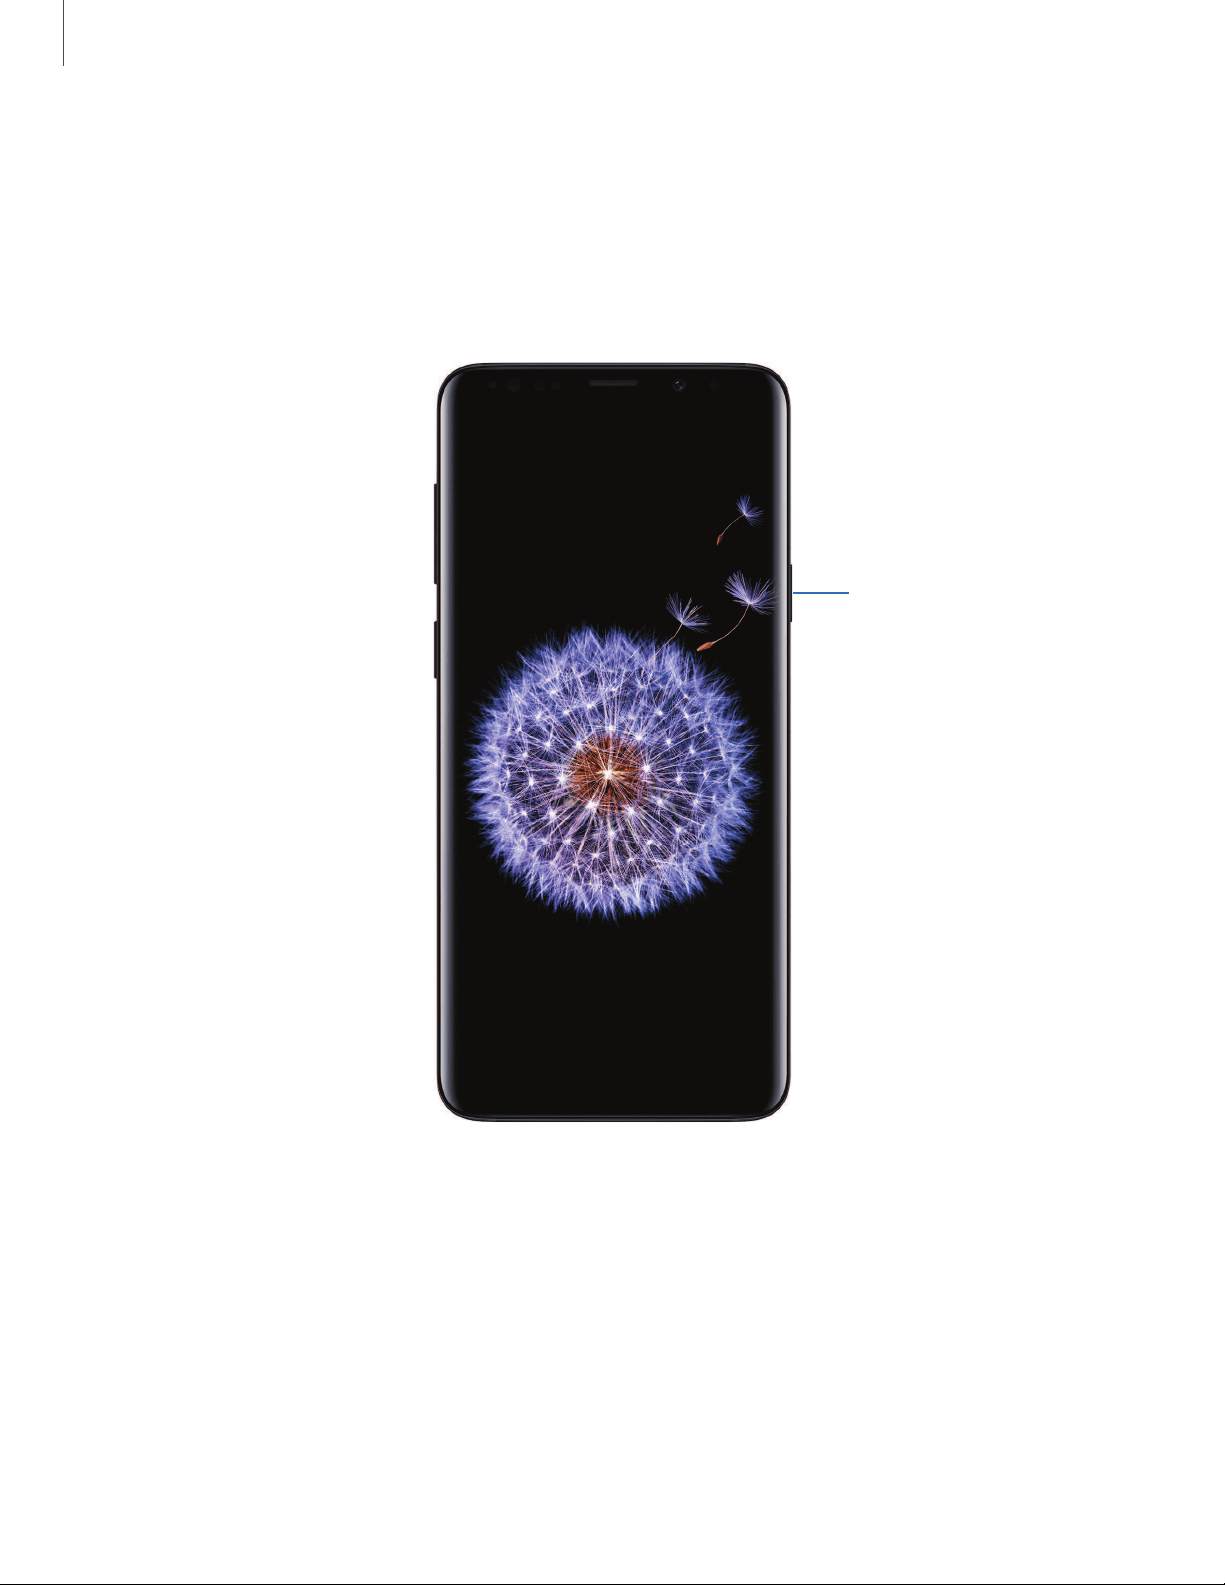
Lock or unlock your device
Use your device’s screen lock features to secure your device. By default, the device
locks automatically when the screen times out. For more information about screen
locks, see Lock screen and security on page 142.
Power key
Press to lock.
Press to turn on the
screen, and then
swipe the screen to
unlock it.
Devices and software are constantly evolving — the illustrations you see here are for reference only.
Getting started
11
Navigation
A touch screen responds best to a light touch from the pad of your finger or a
capacitive stylus. Using excessive force or a metallic object on the touch screen may
damage the surface of the screen and the damage will not be covered by the
warranty.
Tap
Devices and software are constantly evolving — the illustrations you see here are for reference only.
Lightly touch items to select or launch them.
l Tap an item to select it.
l Double-tap an image to zoom in or out.

Getting started
12
Swipe
Devices and software are constantly evolving — the illustrations you see here are for reference only.
Lightly drag your finger across the screen.
l Swipe the screen to unlock the device.
l Swipe the screen to scroll through the Home screens or menu options.
Getting started
13
Drag and drop
Devices and software are constantly evolving — the illustrations you see here are for reference only.
Touch and hold an item, and then move it to a new location.
l Drag an app shortcut to add it to a Home screen.
l Drag a widget to place it in a new location.

Getting started
18
– Allow back gesture on keyboard: Allow back gestures from the sides of the
screen while a keyboard is open.
– Back gesture sensitivity: Drag the slider to adjust your device’s sensitivity
to detecting back gestures.
Customize your home screen
The Home screen is the starting point for navigating your device. You can place your
favorite apps and widgets here, in addition to setting up additional Home screens,
removing screens, changing the order of screens, and choosing a main Home screen.
App icons
Use app icons to launch an app from any Home screen.
◌
From Apps, touch and hold an app icon, and tap Add to Home.
To remove an icon:
◌
From a Home screen, touch and hold an app icon, and then tap Remove from
Home.
NOTE Removing an icon does not delete the app, it just removes the icon from a
Home screen.
Use folders
Organize App shortcuts in folders on an Apps screen or Home screen. For more
information, see Create and use folders on page 51.
Getting started
23
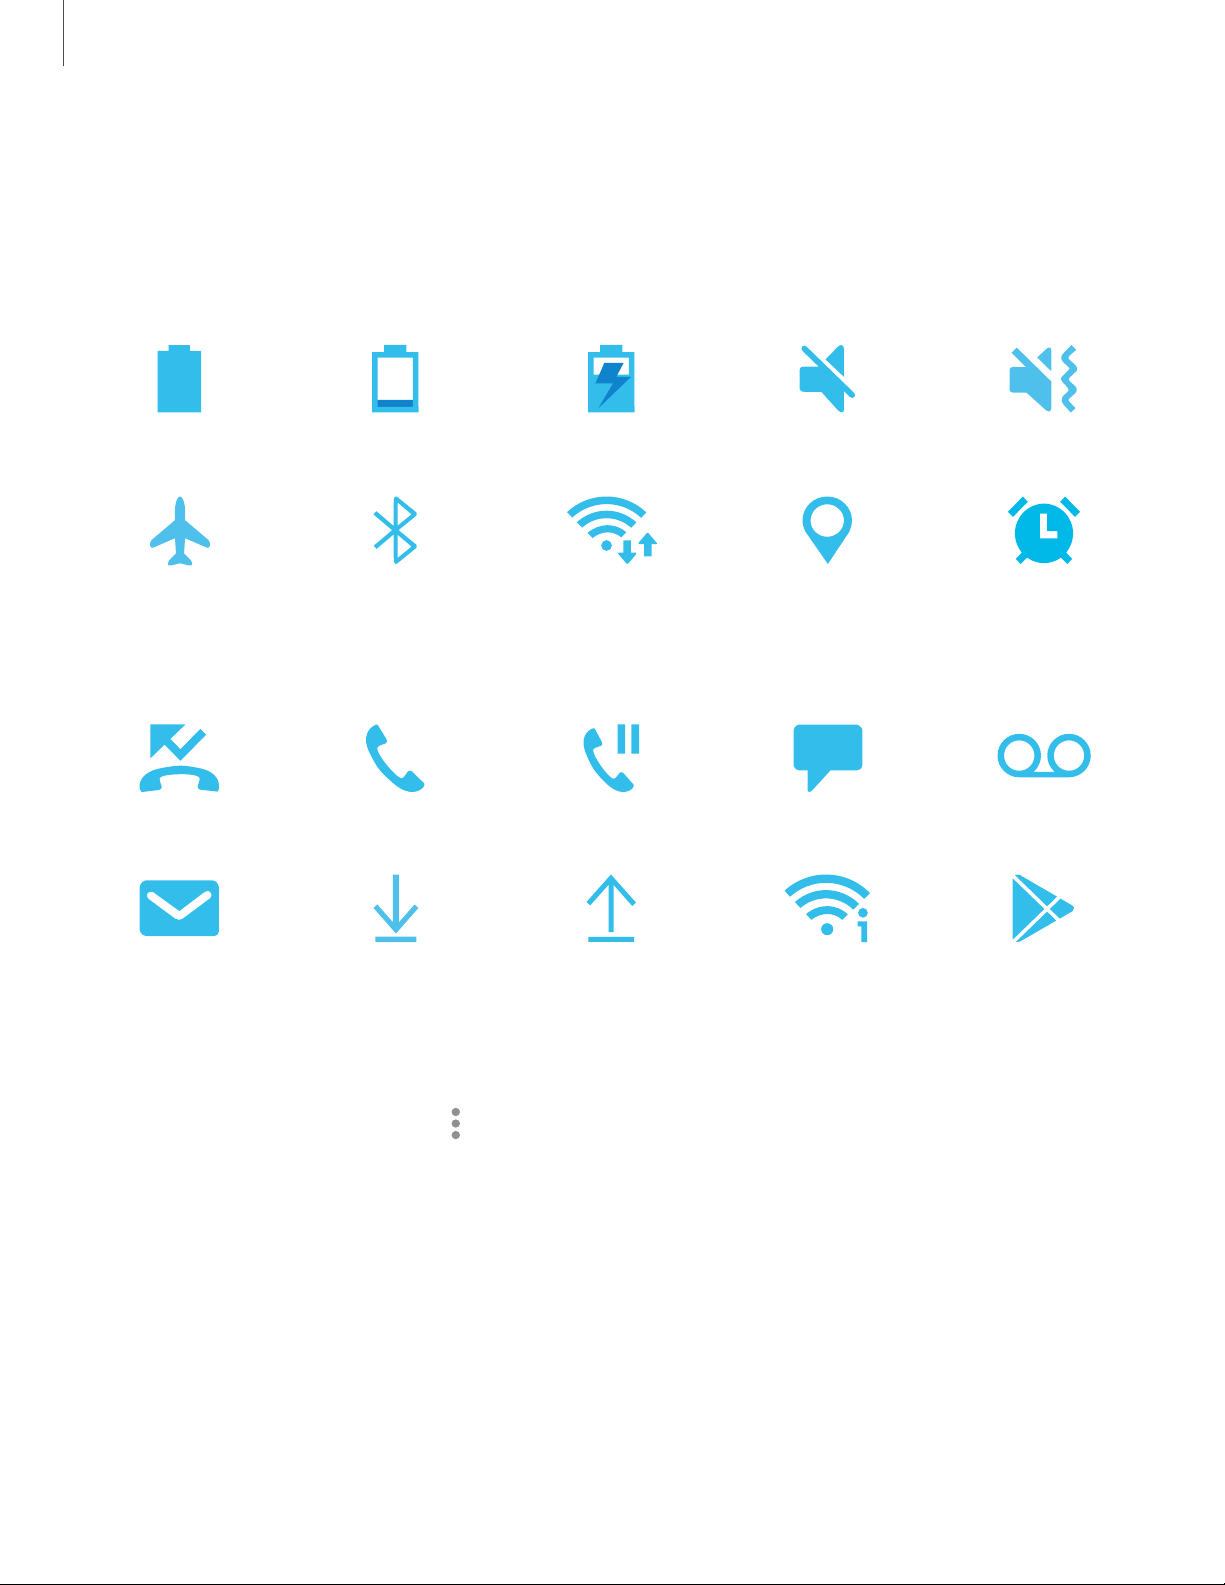
Status bar
The Status bar provides device information on the right side and notification alerts on
the left.
Status icons
Battery full Battery low Charging Mute Vibrate
Airplane mode Bluetooth active Wi-Fi active Location active Alarm
Notification icons
Missed calls Call in progress Call on hold New message Voicemail
New email Download Upload Wi-Fi available App update
Configure display options for the Status bar.
◌
From Quick settings, tap More options > Status bar for the following options:
•
Show notification icons: Choose how to display notification icons on the
Status bar.
•
Show battery percentage: Display the battery charge percentage next to the
battery icon on the Status bar.

Getting started
24
Notification panel
For quick access to notifications, settings, and more, simply open the Notification
panel.
Devices and software are constantly evolving — the illustrations you see here are for reference only.
Device settings
Notification cards
Quick settings
View all

Getting started
25
View the Notification panel
You can access the Notification panel from any screen.
1. Drag the Status bar down to display the Notification panel.
2. Swipe down the list to see notification details.
• To open an item, tap it.
• To clear a single notification, drag the notification left or right.
• To clear all notifications, tap Clear.
• To customize notifications, tap Notification settings.
3.
Drag upward from the bottom of the screen or tap
Back to close the
Notification panel.
Finger sensor gestures
You can also open or close the Notification panel by swiping up or down on the
fingerprint sensor.
1.
From Settings, tap
Advanced features > Motions and gestures > Finger sensor
gestures.
2. Tap
to enable the feature.
Quick settings
The Notification panel also provides quick access to device functions using Quick
settings.
1. Drag the Status bar down to display the Notification panel.
2.
Drag
View all downward.
• Tap a quick setting icon to turn it on or off.
• Touch and hold a quick setting icon to open the setting.
•
Tap
Finder search to search the device.
•
Tap Open settings to quickly access the device's settings menu.
•
Tap
More options to reorder Quick settings or to change the button layout.
3.
Drag
View all upward to close Quick settings.

Getting started
27
Digital wellbeing and parental controls
You can monitor and manage your digital habits by getting a daily view of how
frequently you use apps, how many notifications you receive, and how often you check
your device. You can also set your device to help you wind down before going to bed.
◌
From Settings, tap Digital wellbeing and parental controls for the following
features:
•
Screen time: Tap the time value in the dashboard for details on how long
each app has been opened and used today.
•
Notifications: Tap to see how many notifications have been received from
each app today.
•
Unlocks: Tap to see how many times each app has been opened today.
•
App timers: Set a daily limit for how long you use each app.
•
Focus mode: Configure times and activities to avoid distractions from your
phone.
•
Wind down: Enable to turn the screen to grayscale and limit notifications
before going to bed.
•
Parental controls: Supervise your children’s digital life with Google’s Family
Link app. You can choose apps, set content filters, keep an eye on screen
time, and set screen time limits.

Getting started
28
Always On Display
View missed calls and message alerts, check the time and date, and view other
customized information without unlocking your device using Always On Display
(AOD).
1.
From Settings, tap
Lock screen > Always On Display.
2. Tap
to enable the feature, and then set the following options:
• Choose to show one of the following on the screen when your device isn't in
use: Home button and clock, Clock, or Home button.
• Choose when to show a clock and notifications on the screen when your
device is not in use: Tap to show, Show always, or Show as scheduled.
• Clock style: Change the style and color options for the clock on the Lock
screen and Always on Display.
• Show music information: Show music details when the FaceWidgets music
controller is in use.
• Auto brightness: Automatically adjust the brightness of Always On Display.
• About Always On Display: View the current software version and license
information.
NOTE Some display settings can appear on both the Lock screen and Always On
Display. For more information, see Clock and information on page 143.
AOD themes
Apply custom themes for Always On Display.
1.
From a Home screen, touch and hold the screen, and tap
Themes > AODs.
• Tap an AOD to preview and download it to My Always On Displays.
2.
Tap
My page > AODs to see downloaded AODs.
3. Tap an AOD, and then tap Apply.

Getting started
30
Face recognition
You can enable Face Recognition to unlock your screen. To use your face to unlock
your device, you must set a pattern, PIN, or password.
•
Face recognition is less secure than Pattern, PIN, or Password. Your device could
be unlocked by someone or something that looks like your image.
•
Some conditions may affect face recognition, including wearing glasses, hats,
beards, or heavy make-up.
•
When registering your face, ensure that you are in a well-lit area and the camera
lens is clean.
1.
From Settings, tap
Biometrics and security > Face recognition.
2. Follow the prompts to register your face.
Face recognition management
Customize how face recognition works.
◌
From Settings, tap Biometrics and security > Face recognition.
•
Remove face data: Delete existing faces.
•
Add alternative look: Enhance face recognition by adding an alternative
appearance.
•
Face unlock: Enable or disable face recognition security.
•
Stay on Lock screen: When you unlock your device with face recognition, stay
on the Lock screen until you swipe the screen.
•
Faster recognition: Turn on for faster face recognition. Turn off to increase
security and make it harder to unlock using an image or video of your
likeness.
•
Require open eyes: Facial recognition will only recognize your face when
your eyes are open.
•
Brighten screen: Increase the screen brightness temporarily so that your face
can be recognized in dark conditions.
•
Samsung Pass: Access your online accounts using face recognition.

Getting started
31
Iris scanner
Use iris recognition as an alternative to entering passwords in certain apps. You can
also use your irises to verify your identity when logging in to your Samsung account.
For support, visit samsung.com/us/irisscanner.
NOTE The Iris scanner is not intended to be used as a medical device and the
biometric data collected and stored locally by the mechanism is not intended to
be used for any diagnostic, therapeutic, or preventative purposes. Please follow
all instructions for use of this feature.
1.
From Settings, tap
Biometrics and security > Irises.
2. Follow the prompts to register your irises.
NOTE To register just one of your eyes, tap the option on the setup screen to
register one iris.
Iris verification
Iris verification can be used for other accounts accessed from your device.
◌
From Settings, tap Biometrics and security > Irises.
•
Remove iris data: Delete existing irises.
•
Preview screen mask: Choose a mask to display when using the iris scanner.
•
Iris unlock: Enable to unlock the device using your irises.
•
Screen-on iris recognition: Unlock your device with your irises as soon as the
screen turns on.
•
Stay on Lock screen: When you unlock your device with iris recognition, stay
on the Lock screen until you swipe the screen.
•
Samsung Pass: Use your irises for identification when using supported apps.
•
Samsung Pay: Use your irises to make payments quickly and securely.
•
Tips for using iris recognition: View a tutorial on how to use the iris scanner.

Getting started
34
App mirroring
•
Live stream your phone screen on your PC.
•
Interact with your phone using the keyboard and mouse.
•
Use Windows Accessibility.
Link your device to your computer
1.
From Settings, tap
Advanced features > Link to Windows.
2. Tap
to enable this feature.
3. Follow the prompts to connect your device to your PC.
TIP You can also enable this feature from the Quick settings menu.
Samsung DeX for PC
Connect your device to a PC for an enhanced, multitasking experience.
•
Use your device and PC apps side-by-side.
•
Share the keyboard, mouse, and screen between the two devices.
•
Make phone calls or send texts while using DeX.
Visit samsung.com/us/explore/dex for more information.
Set up DeX on your PC
1. Connect your mobile device to a PC with a standard USB-C cable.
2. Follow the instructions on your device for downloading and installing the
DeX for PC software on your computer.

Getting started
35
Call & text on other devices
This feature allows you to make and answer calls and text messages from your Galaxy
devices that are signed in to your Samsung account.
1.
From Settings, tap
Advanced features > Call & text on other devices.
2. Tap
to turn on the feature. Connection occurs automatically.
3. Sign in to your Samsung account on your Galaxy devices.
TIP Move your contacts from your phone to your Samsung account so you can
access them on all registered devices.

Getting started
36
Multi window
Multitask by using multiple apps at the same time. Apps that support Multi window
™
can be displayed together on a split screen. You can switch between the apps and
adjust the size of their windows.
Split screen control
Devices and software are constantly evolving — the illustrations you see here are for reference only.
1.
From any screen, tap
Recent apps.
2. Tap the app icon, and then tap Open in split screen view.
3. Tap an app in the other window to add it to the split screen view.
• Drag the middle of the window border to adjust the window size.
G
etting started
38
Apps panel
You can add up to ten apps in two columns to the Apps panel.
1. From any screen, drag the Edge handle to the center of the screen. Swipe until
the Apps panel is displayed.
2. Tap an app or app pair to open it.
To configure the Apps panel:
1. From any screen, drag the Edge handle to the center of the screen. Swipe until
the Apps panel is displayed.
2.
Tap
Add apps to folder to add other apps to the Apps panel.
• To add an app to the Apps panel , find it on the left side of the screen and tap
it to add it to an available space on the right column.
• To create a shortcut for two apps to open in Multi window, tap Create app
pair.
• To create a folder shortcut, drag an app from the left side of the screen on
top of an app in the columns on the right.
• To change the order of the apps on the panel, drag each app to the desired
location.
•
To remove an app, tap
Remove.
3.
Tap
Back to save changes.
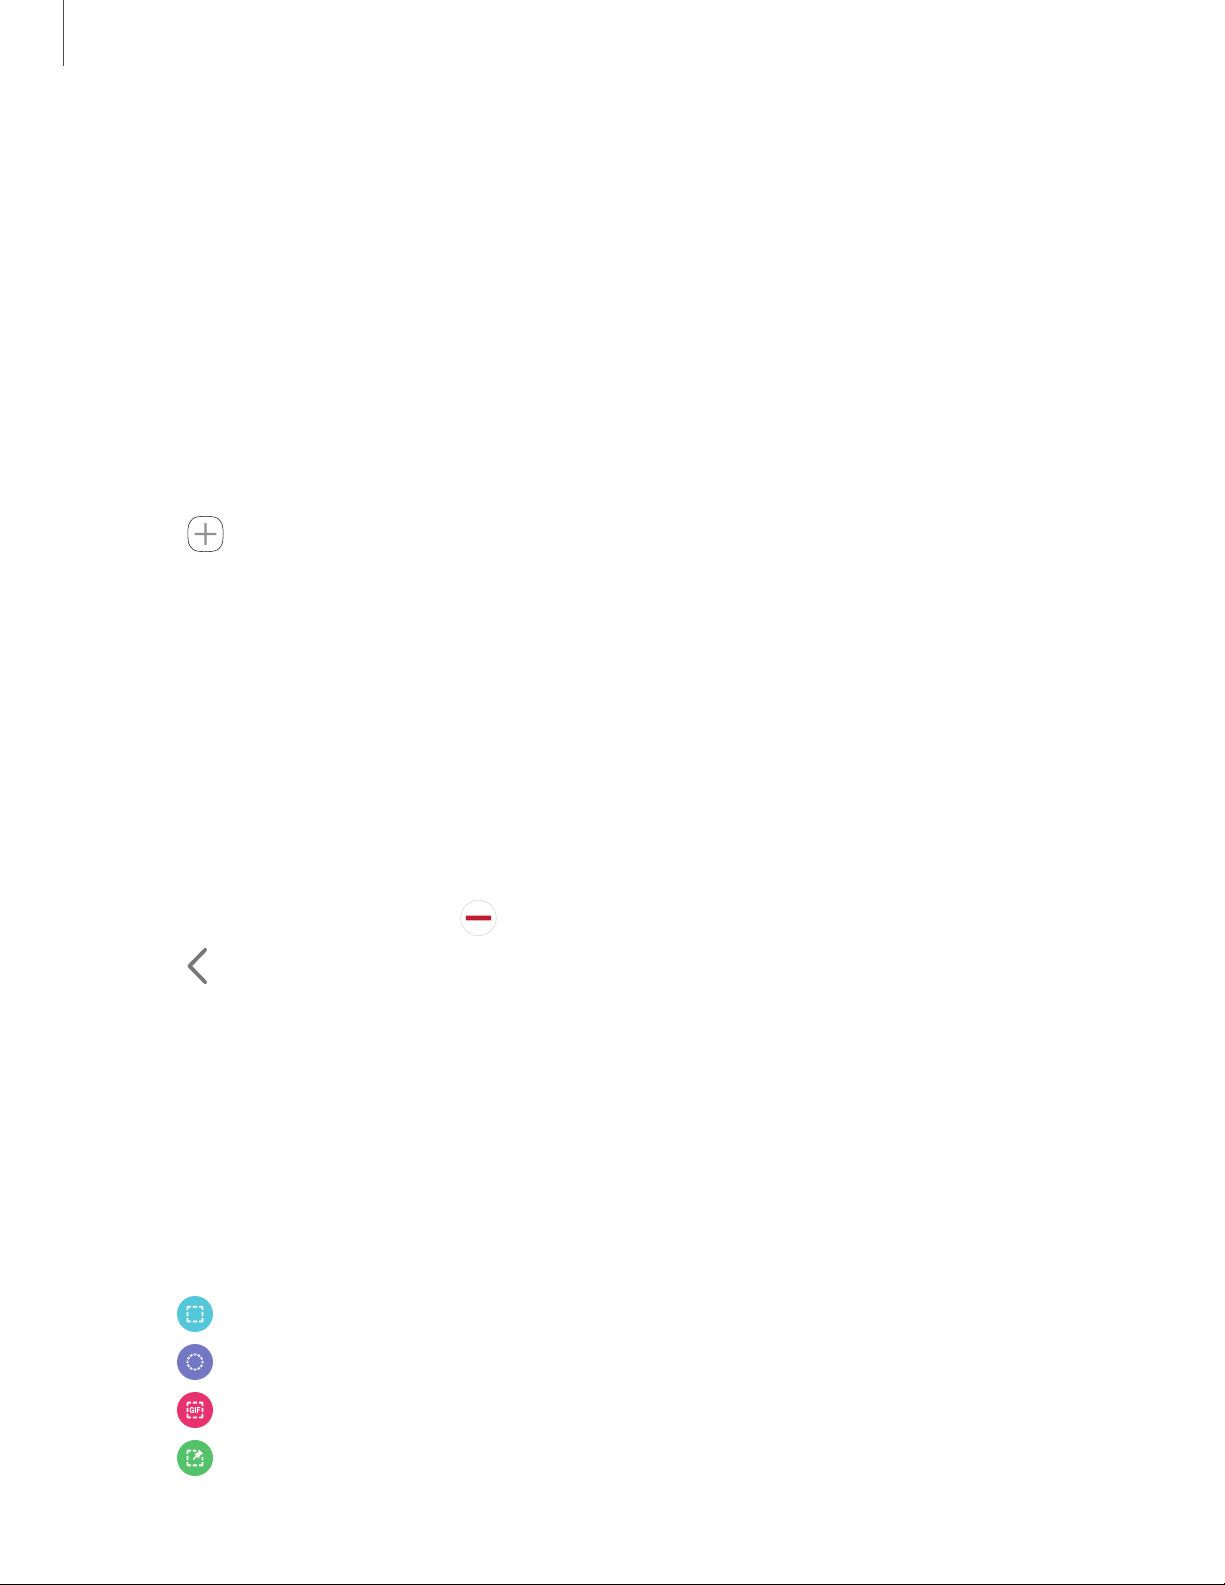
Smart Select
The Smart select feature captures an area of the screen as an image or animation
that you can share or pin to the screen.
1. From any screen, drag the Edge handle to the center of the screen. Swipe until
the Smart select panel is displayed.
2. Tap a Smart select tool to use:
•
Rectangle: Capture a rectangular area of the screen.
•
Oval: Capture an oval area of the screen.
•
Animation: Record activity on the screen as an animated GIF.
•
Pin to screen: Capture an area and pin it to the screen.

Getting started
40
•
More options:
– Reorder: Change the order of the panels by dragging them to the left
or right.
– Uninstall: Remove an Edge panel from your device.
– Handle settings: Customize the position and style of the Edge handle.
• Galaxy Store: Search for and download more Edge panels from Galaxy
Store.
3.
Tap
Back to save changes.
Edge panel position
You can change the position of the Edge handle.
1.
From the Edge screen, tap
Settings.
2.
Tap
More options > Handle settings for the following options:
•
Edge handle: Drag to change the position of the Edge handle along the
edge of the screen.
• Position: Choose either Right or Left to set which side the Edge screen
displays on.
• Lock handle position: Enable to prevent the handle position from being
moved when touched and held.
Edge panel style
Change the style of the Edge handle.
1.
From the Edge screen, tap
Settings.
2.
Tap
More options > Handle settings for the following options:
• Colors: Choose a color for the Edge handle.
• Transparency: Drag the slider to adjust the transparency of the Edge handle.
• Size: Drag the slider to adjust the size of the Edge handle.

Getting started
42
Lighting style
Customize the color, width, and transparency of the Edge lighting feature.
1.
From Settings, tap
Display > Edge screen > Edge lighting.
2. Tap Lighting style to customize:
• Effect: Choose an edge effect.
• Color: Choose a preset or custom color, and enable app colors.
– Tap Add keyword to configure a custom lighting effect for specific text
that appears in notification titles.
• Advanced: Adjust other Edge lighting qualities.
– Transparency: Drag the slider to adjust the transparency of the Edge
lighting.
– Width: Drag the slider to adjust the width of the Edge lighting.
– Duration: Drag the slider to adjust how short or long the Edge lighting
displays.
3. Tap Done when finished.
Choose apps
Choose which apps activate Edge lighting.
1.
From Settings, tap
Display > Edge screen > Edge lighting.
2. Tap Choose apps to choose the apps that can activate Edge lighting when a
notification is received.

Getting started
45
Toolbar functions
The toolbar provides additional helpful functions.
◌
From the Samsung keyboard, tap Expand toolbar for the following options:
•
Clipboard
: Access the clipboard.
•
Emojis
: Insert an emoji.
•
GIF keyboard
: Add animated GIFs.
•
Modes
: Select a keyboard layout.
•
Settings
: Access keyboard settings.
•
Stickers
: Add illustrated stickers.
•
Text editing
: Use an editing panel to help pinpoint text that you want to
cut, copy, and paste.
•
Voice input
: Use Samsung voice input.
Configure the Samsung keyboard
Set customized options for the Samsung keyboard.
◌
From the Samsung keyboard, tap Settings for the following options:
•
Languages and types: Set the keyboard type and choose which languages are
available on the keyboard.
– To switch between languages, swipe the Space bar left or right.
•
Smart typing: Use predictive text and auto-correction features to prevent
common typing mistakes. Type by swiping between letters.
•
Style and layout: Customize the appearance and function of the keyboard.
•
Swipe, touch, and feedback: Customize gestures and feedback.
•
Reset to default settings: Return keyboard to original settings and clear
personalized data.
•
About Samsung keyboard: View version and legal information for the
Samsung keyboard.

Getting started
47
Configure Samsung voice input
Set customized options for Samsung voice input.
1.
From the Samsung keyboard, tap
Voice input.
2.
Tap
Settings for options.
• Keyboard language: Choose the language for the keyboard.
• Voice input language: Select the language for Samsung voice input.
• Hide offensive words: Hide potentially offensive words with asterisks.
• About Samsung voice input: View version and legal information for Samsung
voice input.
Emergency mode
Use Emergency mode to access helpful emergency features and conserve your
device’s power during an emergency situation.
To save battery power, Emergency mode:
•
Restricts application usage to only essential applications and those you select.
•
Turns off connectivity features and Mobile data when the screen is off.
Activate Emergency mode
To activate Emergency mode:
1. Press and hold the Power key.
2.
Tap
Emergency mode.
• When accessing for the first time, read and accept the terms and conditions.
3. Tap Turn on.
Emergency mode features
While in Emergency mode, only the following apps and features are available on the
Home screen:
l Flashlight: Use the device’s flash as a steady source of light.
l Emergency alarm: Sound an audible siren.

Apps
51
Create and use folders
You can make folders to organize App shortcuts on the Apps list.
1. From Apps, touch and hold an app shortcut, and then drag it on top of another
app shortcut until it is highlighted.
2. Release the app shortcut to create the folder.
• Folder name: Name the folder.
•
Palette: Change the folder color.
•
Add apps: Place more apps in the folder. Tap apps to select them, and
then tap Done.
3.
Tap
Back to close the folder.
Copy a folder to a Home screen
You can copy a folder to a Home screen.
◌
From Apps, touch and hold a folder, and tap Add to Home.
Delete a folder
When you delete a folder, the app shortcuts return to the Apps list.
1. From Apps, touch and hold a folder to delete.
2.
Tap
Delete folder, and confirm when prompted.
Game Booster
Get optimized performance while playing games based on usage. Block calls or other
notifications, and enable features such as Bixby or Dolby Atmos.
◌
While playing a game, swipe up from the bottom of the screen to view the
navigation bar. The following options are seen on the far right and left sides:
•
Screen touch lock
: Lock the screen to prevent accidental taps. This is
the default option.
•
Game Booster
: Configure other options, including performance
monitoring and blocking the navigation bar, screen touches, and
screenshots.

Apps
53
App info options
• Open: Launch the app. Not all apps have this option.
• Uninstall/Disable: Uninstall or disable the app. Some preloaded apps can only
be disabled, not uninstalled.
• Force stop: Stop an app that is not working correctly.

Apps
56
Calculator
The Calculator app features both basic and scientific math functions, as well as a unit
converter.
◌
From Apps, tap Calculator.
View past
calculations.
Convert between
measurements.
If the icon is not
visible, turn your
device to landscape.
Devices and software are constantly evolving — the illustrations you see here are for reference only.
Scientific mode
History
Unit converter

Apps
60
Navigate the camera screen
Take stunning pictures with your device’s front and rear cameras.
1.
From
Camera, set up your shot with the following features:
• Tap the screen where you want the camera to focus.
– When you tap the screen, a brightness scale appears. Drag the circle to
adjust the brightness.
• To quickly switch between the front and rear cameras, swipe the screen up or
down.
• To change to a different shooting mode, swipe the screen right or left.
•
To change camera settings, tap
Settings.
2.
Tap
Capture.
Camera Features
Your device features several camera modes and settings that are designed to take
your photography to the next level. See below for some useful tips about your camera.
Super Slow-mo
Record videos at a high frame rate for viewing in slow motion.
1.
From
Camera, swipe to More, and then tap Super slow-mo.
2.
Tap
Super Slow-mo to record.
TIP Hold your device steady for best results.
AR Emoji
Turn yourself into an emoji that you can add to text messages.
1.
From
Camera, swipe to More.
2. Tap AR Emoji.
3.
Tap
Capture, and follow the prompts to create your emoji.

Apps
61
Live focus
Add interactive focus effects to your pictures.
1.
From
Camera, swipe to More, and then tap Live focus.
2. Drag the slider to fine-tune the effect.
Scene optimizer
Your camera can automatically detect what is in frame and adjusts accordingly to
help you get beautiful photos by changing the exposure, contrast, white balance, and
more. The Scene optimizer is only available when using the rear camera.
◌
From Camera, swipe to Photo.
•
The
Scene optimizer
icon changes automatically based on what the
camera detects, such as
when taking nature photos or when taking
photos in a dark setting.
Record videos
Record high-quality videos using your device.
1.
From
Camera, swipe right or left to change the shooting mode to Video.
2.
Tap
Capture to begin recording a video.
•
To take a picture while recording, tap
Capture.
•
To temporarily stop recording, tap
Pause. To continue recording, tap
Resume.
3.
Tap
Stop when you are finished recording.

Apps
63
Camera settings
Use the icons on the main camera screen and the settings menu to configure your
camera’s settings.
◌
From Camera, tap Settings for the following options:
Intell
igent features
•
Scene
optimizer: Automatically adjust the color settings of your pictures to
match the subject matter.
•
Scan QR codes: Au
tomatically detect QR codes when using the camera.
Pictures
•
Rear picture size: Choose resolution and aspect ratio for pictures captured
with the rear camera.
•
Front picture size: Choose resolution and aspect ratio for pictures captured
with the front camera.
•
Hold shutter button to: Choose whether to take a picture, take a burst shot,
or create a GIF when holding the shutter button down.
•
Save RAW copies: Save JPEG and RAW copies of pictures taken in Pro mode.
Videos
•
Rear v
ideo size: Select a resolution. Selecting a higher resolution for higher
quality requires more memory.
•
Front video size: Select a resolution. Selecting a higher resolution for higher
quality requires more memory.
•
Advanced recording options: Enhance your videos with advanced recording
formats.
– High efficiency video: Record videos in HEVC format to save space. Other
devices or sharing sites may not support playback of this format.
•
Super slow-mo: Select how you want to record super slow motion videos.
•
Video stabilization: Activate anti-shake to keep the focus steady when the
camera is moving.

Apps
67
World clock
The World clock lets you keep track of the current time in multiple cities around the
globe.
Location
Center the globe on
your current location.
City
View the current
time and add to your
list of cities.
Search
Find a particular city.
Globe
Drag to spin and
see times around
the world.
Devices and software are constantly evolving — the illustrations you see here are for reference only.
1.
From
Clock, tap World clock.
2.
Tap
Add city > Search for a city, and enter the name of the city.
3. Tap the city name in the list, and then tap Add.
•
To remove a city, touch and hold it, and tap
Delete.

Apps
68
Time zone converter
Set a time in a city on your World clock list to see what the local times would be in
the other listed cities.
1.
From
Clock, tap World clock.
2.
Tap
More options > Time zone converter.
3.
Tap
Menu to choose a different city.
•
To add a city to the list, tap
Add city.
4. Swipe the hours, minutes, and period (AM or PM) on the clock to set a time. Local
times for the other cities listed are automatically updated.
• To return the clock to the current time, tap Reset.
Weather settings
Show weather information on your World clock.
1.
From
Clock, tap World clock.
2.
Tap
More options > Settings > Show weather to enable or disable weather
information.
3. Tap Unit to change from Fahrenheit to Celsius.
Stopwatch
The Stopwatch lets you time events down to a hundredth of a second.
1.
From
Clock, tap Stopwatch.
2. Tap Start to begin timing.
• To keep track of lap times, tap Lap.
3. Tap Stop to end timing.
• To continue timing after stopping the clock, tap Resume.
• To reset the Stopwatch to zero, tap Reset.

Apps
69
Timer
Set a countdown timer for up to 99 hours, 59 minutes, and 59 seconds.
1.
From
Clock, tap Timer.
2. Use the keypad and tap Hours, Minutes, and Seconds to set the Timer.
3. Tap Start to begin the Timer.
• To temporarily stop the Timer, tap Pause. To continue, tap Resume.
• To stop and reset the Timer, tap Cancel.
Preset timer
Name and save preset timers.
1.
From
Clock, tap Timer > Add preset timer.
2. Configure the countdown time and timer name.
3. Tap Add to save the timer.
•
To edit a saved preset timer, tap
More options > Edit preset timers.
Timer options
You can customize the Timer options.
1.
From
Clock, tap Timer.
2.
Tap
More options > Settings.
• Sound: Choose a preloaded timer sound or add your own.
• Vibration: Enable to disable vibration for the timer.
General settings
View and configure settings for all Clock tools.
◌
From Clock, tap More options > Settings.
•
Vibrate for alarms and timers: Enable to always vibrate for alarms and timers
if the Sound mode is set to either Mute or Vibrate.
•
Customization Service: Sign in to your Samsung account to customize
personal content in supported apps.
•
About Clock: View the current software version and check for updates.

Apps
70
Contacts
Store and manage your contacts. You can synchronize with personal accounts added
to your device. Accounts may also support email, calendars, and other features.
◌
From Apps, tap Contacts > Create contact.
Add profile picture
Add, delete, and
expand fields
Devices and software are constantly evolving — the illustrations you see here are for reference only.
Apps
71
Edit a contact
When editing a contact, you can tap a field and change or delete information, or you
can add more fields to the contact’s list of information.
1.
From
Contacts, tap a contact.
2.
Tap
Edit.
3. Tap any of the fields to add, change, or delete information.
4. Tap Save.
Call or message a contact
You can quickly call or message a contact using their default phone number.
1.
From
Contacts, tap a contact.
2.
Tap
Call or Message.
Favorites
When you mark contacts as favorites, they are easily accessible from other apps.
1.
From
Contacts, tap a contact.
2.
Tap
Add to Favorites to mark the contact as a favorite.
•
To remove the contact from Favorites, tap
Favorite.
Share a contact
Share a contact with others by using various sharing methods and services.
1.
From
Contacts, tap a contact.
2.
Tap
Share.
3. Tap either File or Text.
4. Choose a sharing method and follow the prompts.
TIP When viewing a contact, tap QR code to quickly share the information
with friends or family. The QR code automatically updates when you change the
contact information fields.
Apps
73
Send an email to a group
Send an email to members of a group.
1.
From
Contacts, tap Open drawer > Groups, and then tap a group.
2.
Tap
More options > Send email.
3. Tap contacts to select them, or tap the All checkbox at the top of the screen to
select all, and then tap Done.
• Only group members that have an email address in their records are
displayed.
4. Choose an email account and follow the prompts.
Delete a group
Delete a group you have created.
1.
From
Contacts, tap Open drawer > Groups, and then tap a group.
2.
Tap
More options > Delete.
• To only delete the group, tap Group only.
• To delete the group and the contacts in the group, tap Group and members.
Manage contacts
You can import or export contacts, as well as link multiple contacts into one contact
entry.
Import contacts
Import contacts to your device as vCard files (VCF).
1.
From
Contacts, tap Open drawer > Manage contacts.
2. Tap Import or export contacts.
3. Tap Import and follow the prompts.

Apps
77
View multiple email accounts
You can view email you receive for multiple accounts, or you can view email accounts
individually.
◌
From Email, tap Navigation drawer for the following options:
•
[Account name]: View email for only one email account.
•
All accounts: View all email in a combined inbox.
TIP Accounts may also support calendars, contacts, and other features.
Email settings
Modify settings associated with using the Email app.
◌
From Email, tap Navigation drawer > Settings.
•
Under General, tap an option, and then follow the prompts.
•
Tap an account to configure specific settings for only that account.
Remove email accounts
Should you need to remove an email account from your device, you can do so through
the Settings menu.
1.
From
Email, tap Navigation drawer > Settings.
2. Tap the account you want to remove.
3. Tap Remove, and confirm when prompted.

Apps
78
Gallery
Go to the Gallery to look at the all the visual media stored on your device. You can
view, edit, and manage pictures and videos.
◌
From Apps, tap Gallery.
Customize collections
of pictures and videos
Share pictures
and videos
View pictures
and videos
Sort images into
custom albums
Devices and software are constantly evolving — the illustrations you see here are for reference only.
Apps
79
View pictures
Pictures stored on your device are viewable in the Gallery app.
1.
From
Gallery, tap Pictures.
2. Tap a picture to view it. Swipe left or right to view other pictures or videos.
•
To use Bixby Vision on the current picture, tap
Bixby Vision. For more
information, see Bixby on p
age 26.
•
To mark the picture as a favorite, tap
Favorite.
•
To access the following features, tap
More options:
– Details: View and edit information about the picture.
– Set as wallpaper: Set the picture as wallpaper.
– Set as Always On Display image: Set the picture as the background
image for the Always On Display.
– Move to Secure Folder: Move the picture to a Secure Folder.
– Print: Send the picture to a connected printer.
Edit pictures
Enhance your pictures using the Gallery's editing tools.
1.
From
Gallery, tap Pictures.
2.
Tap a picture to view it, and then tap
Edit for the following options:
•
Transform: Rotate, flip, crop, or make other changes to the overall
appearance of the picture.
•
Filters: Add color effects.
•
Sticker: Overlay illustrated or animated stickers.
•
Text: Add text to the picture.
•
Draw: Add handwritten text or hand drawn content.
•
Tone: Adjust brightness image controls.
3. Tap Save when finished.

Apps
83
Screen recorder settings
Control the sound and quality settings for the screen recorder.
◌
From Settings, tap Advanced features > Screenshots and screen recorder >
Screen recorder settings.
l Sound: Choose what sounds to record while using the screen recorder.
l Video quality: Select a resolution. Selecting a higher resolution for higher
quality requires more memory.
l Selfie video size: Drag the slider to set the size of the video overlay.

Apps
84
Internet
Samsung Internet is a simple, fast, and reliable web browser for your device.
Experience more secure Web browsing features with Secret Mode, Biometric Web
Login, and Contents Blocker.
◌
From Apps, tap Samsung folder > Internet.
Access Bookmarks
Reload w
ebpage
Add to
Bookmarks
Navigate
Access Tabs
Devices and software are constantly evolving — the illustrations you see here are for reference only.
TIP Visit samsung.com/us/support/owners/app/samsung-internet for more
information.
Apps
85
Browser tabs
Use tabs to view multiple web pages at the same time.
◌
From Internet, tap Tabs > New tab.
•
To close a tab, tap
Tabs > Close tab
.
Bookmarks
The Bookmarks page stores Bookmarks, Saved pages, and your browsing History.
Open a Bookmark
Quickly launch a web page from the Bookmarks page.
1.
From Internet, tap Bookmarks.
2. Tap a bookmark entry.
Save a web page
Saving a web page stores its content on your device so that you can access it offline.
◌
From Internet, tap Tools > Add page to > Saved pages.
NOTE To v
iew saved web pages, tap Tools > Saved pages.
View history
To view a list of r
ecently visited web pages:
◌
From Internet, tap Tools > History.
TIP To cl
ear your browsing history, tap More options > Clear history.
Share pages
Web pages can be shared with your contacts.
◌
From Internet, tap Tools > Share, and follow the prompts.
Apps
89
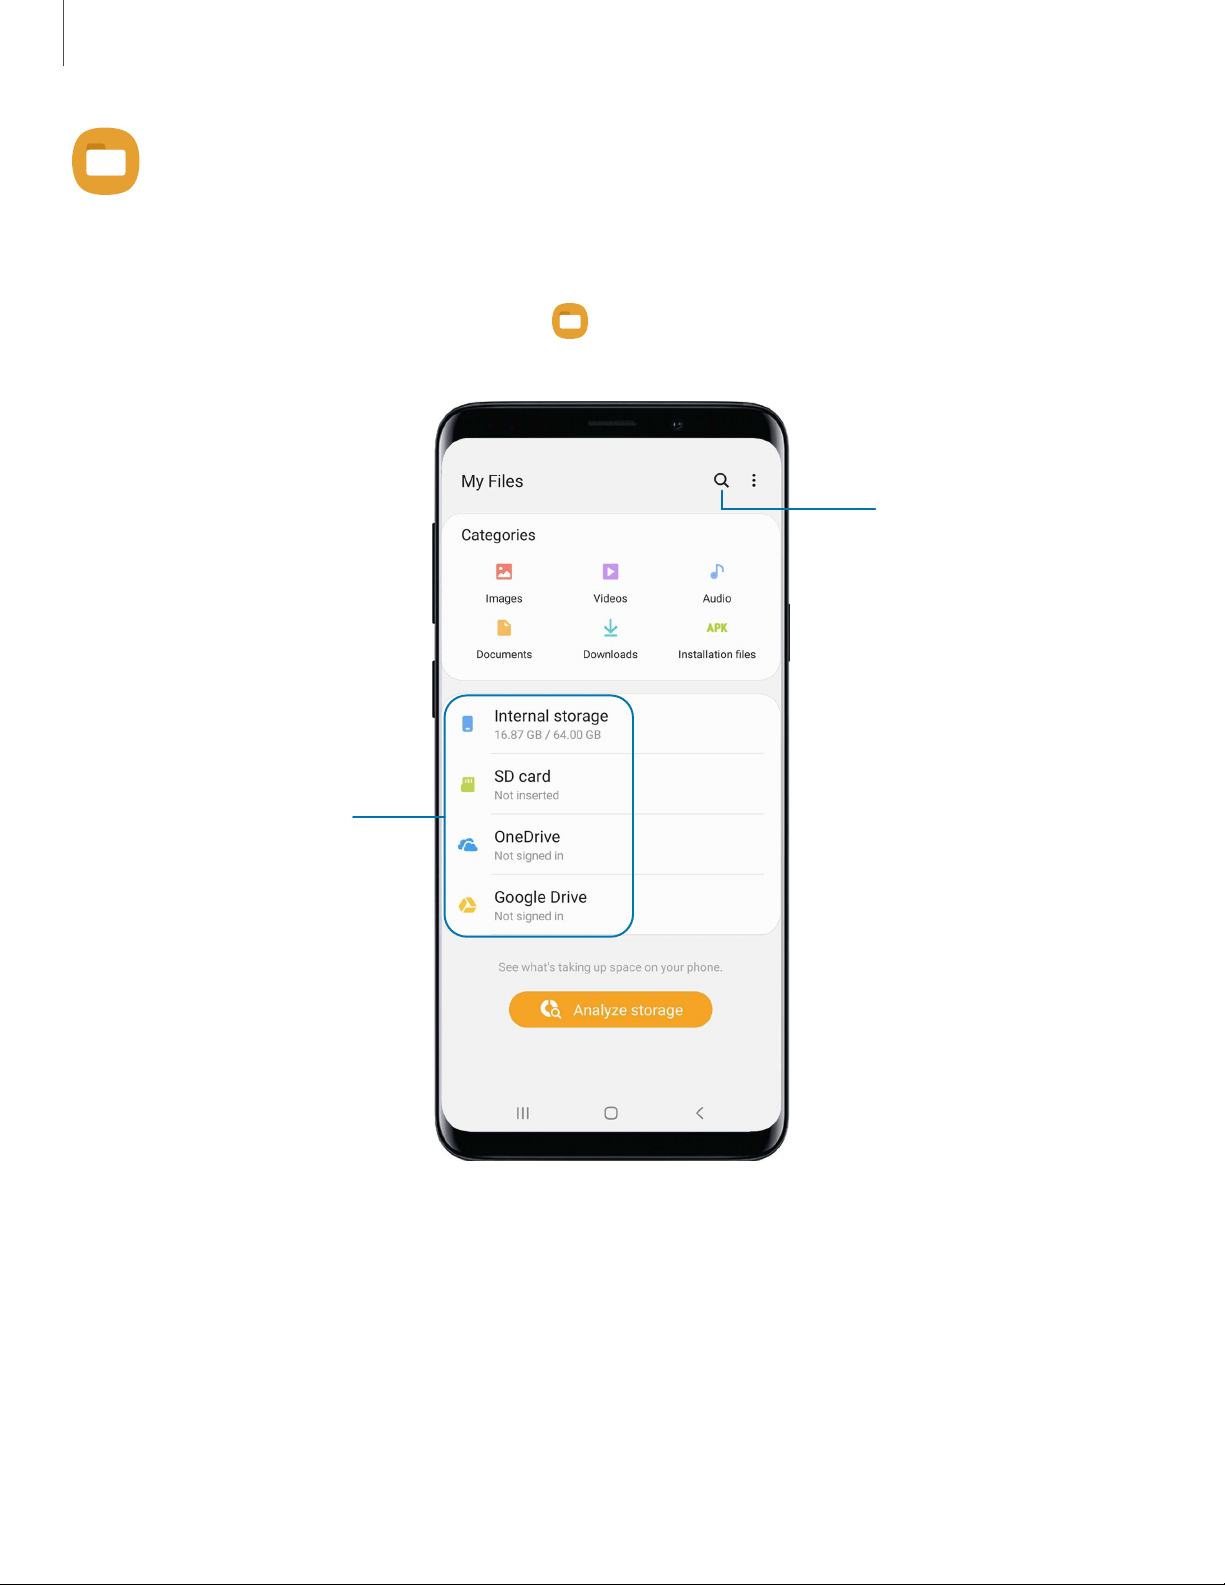
My Files
View and manage files stored on your device, including images, videos, music, and
sound clips.
◌
From Apps, tap Samsung folder > My Files.
Search
Storage locations
Devices and software are constantly evolving — the illustrations you see here are for reference only.

Apps
90
File groups
Files stored in the device are organized into the following groups:
•
Recent files: View recently accessed files.
–
This option is displayed if one or more files have been accessed recently.
•
Categories: View your files based on the file type.
•
Storage: View files saved on your device, optional SD card, and cloud accounts.
–
Cloud drives vary depending on the services you sign in to.
•
Analyze storage: See what’s taking up space in your storage.
My Files options
Use My Files options to search, edit, clear file history, and more.
◌
From My Files, the following options are available:
•
Search
: Search for a file or folder.
•
More options
:
– Clear Recent files list: Remove the list of recently accessed files. This
option is only available after a file has been opened through My Files.
– Analyze storage: See what’s taking up space in your storage.
– Trash: Choose to restore or permanently remove files that you delete.
– Settings: View settings for the app.

Apps
92
Calls
The Phone app allows you to make and answer calls from the Home screen, Recents
tab, Contacts and more.
Make a call
Use your phone to make and answer calls from a Home screen.
◌
From Phone, enter a number on the keypad and tap Call.
•
Tap Keypad if the keypad is not displayed.
Enable swipe to call
Swipe a contact or number to the right to make a call.
1.
From Settings, tap
Advanced features > Motions and gestures > Swipe to call
or send messages.
2. Tap
to enable this feature.
Make a call from Recents
All incoming, outgoing, and missed calls are recorded in the Call log.
1.
From
Phone, tap Recents to display a list of recent calls.
2.
Tap a contact, and then tap
Call.
Make a call from Contacts
Call a contact from the Contacts app.
◌
From Contacts, swipe your finger across a contact to the right to call the
contact.
Direct calls
Call the contact whose call log, message, or contact details are currently on the
screen by bringing the device close to your ear.
◌
From Settings, tap Advanced features > Motions and gestures > Direct call,
and tap
to enable.

Apps
93
Answer a call
When a call is received, the phone rings and the caller’s phone number or name is
displayed. If you are using an app, a pop-up screen is displayed for the incoming call.
◌
On the incoming call screen, drag Answer to the right to answer the call.
TIP On the incoming call pop-up screen, tap Answer to answer the call.
Decline a call
You can choose to decline an incoming call. If you are using an app, a pop-up screen is
displayed for the incoming call.
◌
On the incoming call screen, drag Decline to the left to reject the call and
send it to your voicemail.
TIP On the incoming pop-up screen, tap Decline to reject the call and send it
to your voicemail.
Decline with a message
You can choose to decline an incoming call with a text message response.
◌
On the incoming call screen, drag Send message upward and select a message.
TIP On the incoming call pop-up screen, tap Send message and select a
message.
End a call
◌
Tap End when you are ready to end your call.
Actions while on a call
You can adjust call volume, switch to a headset or speaker, and even multitask while
on a call.
◌
Press the Volume keys to increase or decrease the volume.
Apps
97
Emergency calls
You can dial the emergency telephone number in your region regardless of the
phone’s service status. If your phone is not activated, you can only make an
emergency call.
1.
From
Phone, enter the emergency telephone number (911 in North America)
and tap
Call.
2. Complete your call. During this type of call, you have access to most in-call
features.
TIP The emergency telephone number can be dialed even if the phone is locked,
allowing anyone to use your phone to call for help in an emergency. When
accessed from a locked screen, only the emergency calling feature is accessible
to the caller. The rest of the phone remains secured.
Phone settings
These settings allow you to modify settings associated with the Phone app.
◌
From Phone, tap More options > Settings.
Optional calling services
If available with your service plan, the following calling services are supported.
Place a multi-party call
If your service plan supports this feature, you can make another call while a call is in
progress.
1.
From the active call, tap
Add call to dial the second call.
2.
Dial the new number and tap
Call. When the call is answered:
•
Tap
Swap to switch between the two calls.
•
Tap Merge to hear both callers at once (multi-conferencing).
Apps
98
Video calls
To make Video calls:
◌
Tap Phone, enter a number, and then tap Video call.
NOTE Not all devices support video calling. The receiver has the option to accept
the video call or answer the call as a regular voice call.
Wi-Fi calling
Make calls over Wi-Fi when you are connected to a Wi-Fi network. If your mobile
network supports this feature, contact your carrier for details.
1.
From
Phone, tap More options > Settings > Wi-Fi calling.
2. Tap
to enable this feature.
3. Follow the prompts to set up and configure Wi-Fi calling.
Real Time Text (RTT)
Type back and forth in real time with the other person while on a call.
You can use RTT whenever you are calling someone whose phone also supports RTT or
is connected to a teletypewriter (TTY) device. The RTT icon appears on all incoming
RTT calls.
1.
From
Phone, tap More options > Settings.
2. Tap Real time text for the following options:
• Always visible: Show the RTT call button on the keypad and during calls.
• Use external TTY keyboard: Hide the RTT keyboard when an external
TTY keyboard is connected.
• TTY mode: Choose the preferred TTY mode for the keyboard in use.
NOTE To use RTT, you must be connected to a mobile or Wi-Fi network.

Apps
99
Samsung Health
Use Samsung Health
™
to plan, track various aspects of daily life contributing to
well-being such as physical activity, diet, and sleep. For more information, visit
samsung.com/us/support/owners/app/samsung-health.
◌
From Apps, tap Samsung folder > Samsung Health.
NOTE The information gathered from this device, Samsung Health, or related
software is not intended for use in the diagnosis of disease or other conditions, or
in the cure, mitigation, treatment or prevention of disease.
The accuracy of the information and data provided by this device and its related
software, including heart rate readings, may be affected by factors such as
environmental conditions, skin condition, specific activity performed while
using/wearing the device, settings of the device, user configuration/user-provided
information, placement of the sensor on the body, and other end-user interactions.
For more information on proper wear and use, visit samsung.com/us/heartratesensor.
Before you start exercising
Although the Samsung Health application is a great companion to your exercise
routine, it is always best to make sure you consult with your physician before
beginning any exercise regimen. While moderate physical activity, such as brisk
walking, is safe for most people, health experts suggest that you talk with your doctor
before you start an exercise program, particularly if you have any of the following
conditions:
•
Heart disease; Asthma or lung disease; Diabetes, or liver or kidney disease; and
Arthritis.
Before beginning your exercise regimen check with your doctor if you have symptoms
suggestive of heart, lung, or other serious disease, such as:
•
Pain or discomfort in your chest, neck, jaw, or arms during physical activity;
•
Dizziness or loss of consciousness;
•
Shortness of breath with mild exertion or at rest, or when lying down or going to
bed;
Apps
103
Samsung Pay
Samsung Pay
™
lets you make payments with your device. It is accepted almost
anywhere you can swipe or tap your credit card. A Samsung account is required.
For support, visit samsung.com/us/support/owners/app/samsung-pay.
◌
From Apps, tap Samsung Pay, and tap Get started and follow the prompts.
NOTE For added security, your credit and debit card information is not stored on
a cloud service. If you are using the Samsung Pay app on multiple devices, you
must sign in to the app and confirm all payment cards on each device. Some card
issuers may limit the number of devices.
Use Samsung Pay
Use Samsung Pay by opening the app and holding your device over the store's card
reader.
1.
From Apps, tap
Samsung Pay, select a card to pay with and authorize
payments by scanning your finger or iris, or by entering your Samsung Pay PIN.
2. Hold your phone over the store’s card reader.
• When your payment is complete, a receipt is sent to your registered email.
NOTE Make sure the NFC feature is enabled on your device. For more
information, see NFC and payment on page 115.
Simple Pay
Use Simply Pay to access Samsung Pay from the Lock Screen, Home screen, or Always
On Display.
1.
From Apps, tap
Samsung Pay, tap Menu > Settings > Use Favorite Cards.
2. Tap
to enable Simple Pay on each screen.

Apps
104
To use Simple Pay:
1. From any screen, swipe up from the bottom of the screen.
• Your payment card and Simple Pay are displayed.
2. Drag the card down to close Simple Pay.
Use gift cards with Samsung Pay
Purchase, send, and redeem gift cards from an expanding selection of your favorite
retailers.
To view the list of supported banks and gift card merchants, visit
samsung.com/us/samsung-pay/compatible-cards/#bank.
Secure your information
Samsung Pay is designed with the latest security technology and works on most
recent Samsung Galaxy devices. Payments are authorized with your fingerprint, iris, or
PIN, and each transaction uses a unique token each time, so your device only allows
payments with your consent.
If your device is ever lost, you can use the Find My Mobile function to remotely wipe
your data for even more protection. For more information, see Find My Mobile on
page 144.
Apps
105
Google apps
Enjoy these apps from Google. Certain apps require a Google Account. Visit
google.com to learn more.
Chrome
Browse the Internet with Chrome
™
and bring your open tabs, bookmarks, and address
bar data from your computer to your mobile device.
Visit support.google.com/chrome to learn more.
Drive
Open, view, rename, and share files saved to your Google Drive
™
cloud account.
Visit support.google.com/drive to learn more.
Duo
Make one-to-one video calls.
Visit support.google.com/duo to learn more.
Gmail
Send and receive email with Google’s web-based email service.
Visit support.google.com/mail to learn more.
Google Pay
Pay with your Android phone at participating stores and within mobile apps with
Google Pay
™
.
Visit support.google.com/pay to learn more.


Apps
108
Carrier apps
Some apps require a data plan or paid subscription. Contact your carrier for additional
information.
Device Unlock
Your device is network locked. Use Device Unlock to inquire about your device’s unlock
eligibility.
Name ID
Modify Caller ID information. Name ID identifies unknown callers by Name, City, and
State.
T-Mobile
Get online access to account information such as your current activity, billing
information, service plans, downloads, and more.
Visual Voicemail
Easily manage your inbox without ever dialing into your voicemail.

Apps
109
Additional apps
The following apps are preloaded or downloaded over-the-air to your device.
Amazon Shopping
Shop at amazon.com
™
from your device.
Facebook
Keep up with friends and family with the Facebook
™
app. Share updates, photos, and
videos, as well as text, chat, and play games.
McAfee Security
Protect and enhance your phone’s performance with award-winning security features.

Settings
111
Access Settings
There are a couple of ways to access your device settings.
Drag down the Status bar, and then tap Settings.
From Apps, tap Settings.
Search for Settings
If you are not sure exactly where to find a certain setting, you can search for it.
1.
From Settings, tap
Search, and enter keywords.
2. Tap an entry to go to that setting.
Connections
Manage connections between your device and a variety of networks and other
devices.
Wi-Fi
You can connect your device to a Wi-Fi network to access the Internet without using
your mobile data.
1.
From Settings, tap
Connections > Wi-Fi, and then tap to turn on Wi-Fi
and scan for available networks.
2. Tap a network, and enter a password if required.
Manually connect to a Wi-Fi network
If the Wi-Fi network you want is not listed after a scan, you can still connect to it by
entering the information manually.
Ask the Wi-Fi network administrator for the name and password before you begin.
1.
From Settings, tap
Connections > Wi-Fi, and then tap to turn on Wi-Fi.
2.
Tap
Add network at the bottom of the list.

Settings
114
Rename a paired device
You can rename a paired device to make it easier to recognize.
1.
From Settings, tap
Connections > Bluetooth, and then tap to turn on
Bluetooth.
2.
Tap
Settings next to the device name, and then tap Rename.
3. Enter a new name, and tap Rename.
Unpair from a Bluetooth device
When you unpair from a Bluetooth device, the two devices no longer recognize each
other.
1.
From Settings, tap
Connections > Bluetooth, and then tap to turn on
Bluetooth.
2.
Tap
Settings next to the device, and then tap Unpair.
TIP You will need to pair with the device again in order to connect to it.
Advanced options
Additional Bluetooth features are available in the Advanced menu.
1.
From Settings, tap
Connections > Bluetooth.
2. Tap Advanced for the following options:
• Ringtone sync: Use the ringtone set on your phone when you receive calls
through a connected Bluetooth device.
• Bluetooth control history: View apps that have used Bluetooth recently.
Dual audio
You can play audio from your device to two connected Bluetooth audio devices.
1. Connect Bluetooth audio devices to your smartphone.
2.
From the Notification panel, tap
Media.
3.
Under Audio output, tap
next to each audio device to play audio to them (up
to two devices).

Settings
115
Phone visibility
Turn on visibility to allow other Bluetooth devices to find your device.
◌
From Settings, tap Connections > Phone visibility, and then tap to make
your device visible.
NFC and payment
Near Field Communication (NFC) allows you to communicate with another device
without connecting to a network. This technology is used by Android Beam and
certain payment apps. The device that you are transferring to needs to support NFC,
and it needs to be within four centimeters of your device.
◌
From Settings, tap Connections > NFC and payment, and then tap to
turn on this feature.
Android Beam
Use Android Beam to share photos, contacts, or other data between NFC-enabled
devices.
1.
From Settings, tap
Connections > NFC and payment, and then tap to
turn on NFC.
2. Tap Android Beam, and then tap
to turn on this feature.
TIP When sharing a file, tap Android Beam to use this feature.
Tap and pay
Use an NFC payment app to make payments by touching your device to a compatible
credit card reader.
1.
From Settings, tap
Connections > NFC and payment, and then tap to
turn on NFC.
2. Tap Tap and pay > Payment to see the default payment app.
• To use another payment app when it is open instead of the default app, tap
Tap and pay with open apps.
• To set another payment app as the default, tap Others, and then tap the app
you prefer.
Settings
117
Turn on Data saver
Use Data saver to reduce your data consumption by preventing selected apps from
sending or receiving data in the background.
1.
From Settings, tap
Connections > Data usage > Data saver.
2.
Tap
to turn on Data saver.
• To allow some apps to have unrestricted data usage, tap Allow app while
Data saver on, and tap
next to each app to specify restrictions.
Monitor mobile data
You can customize your mobile data access by setting limits and restrictions.
◌
From Settings, tap Connections > Data usage. The following options are
available:
•
Mobile data: Use mobile data from your plan.
•
Mobile data only apps: Set apps to always use mobile data, even when your
device is connected to Wi-Fi.
•
Mobile data usage: View data usage over mobile connections over a period of
time. You can view total usage as well as usage by app.
•
Billing cycle and data warning: Change the monthly date to align with your
carrier’s billing date.
TIP Use these features to keep an eye on your estimated data usage.
Monitor Wi-Fi data
You can restrict Wi-Fi data access by customizing usage limits and networks.
1.
From Settings, tap
Connections > Data usage.
2. Tap Wi-Fi data usage to view data usage over Wi-Fi connections over a period of
time. You can view total usage as well as usage by app.
Settings
11
9
• Timeout settings: Select the amount of time to allow devices to be idle while
connected to the hotspot.
• Protected management frames: Enable this feature for additional privacy
protections.
Wi-Fi sharing
Turn on Wi-Fi sharing to quickly share your Wi-Fi network with other devices.
1.
From Settings, tap
Connections > Mobile hotspot and tethering >
Mobile hotspot.
2.
Tap
More options > Wi-Fi sharing to turn on this feature.
TIP Use this feature to share your Wi-Fi network without giving out your Wi-Fi
password.
Band
Select one of the available bandwidth options.
1.
From Settings, tap
Connections > Mobile hotspot and tethering > Mobile
hotspot.
2. Tap Band, and tap an option.
Auto hotspot
Share your hotspot connection with other devices signed in to your Samsung account.
1.
From Settings, tap
Connections > Mobile hotspot and tethering > Mobile
hotspot.
2. Tap Auto hotspot, and tap
to enable the feature.
Tethering
You can use tethering to share your device’s Internet connection with another device.
1.
From Settings, tap
Connections > Mobile hotspot and tethering.
2. Connect the computer to the device using a USB cable, and then tap USB
tethering.

Settings
122
Private DNS
You can configure your device to connect to a private DNS host.
1.
From Settings, tap
Connections > More connection settings > Private DNS.
2. Tap one of the available options to configure a private DNS connection.
3. Tap Save.
Ethernet
If wireless network connection is not available, you can use an Ethernet cable to
connect your device to a local network.
1. Connect an Ethernet cable to your device.
2.
From Settings, tap
Connections > More connection settings > Ethernet, and
follow the prompts.
TIP You need an adapter (not included) to connect an Ethernet cable to your
device.
Sounds and vibration
You can control the sounds and vibrations used to indicate notifications, screen
touches, and other interactions.
Sound mode
You can change the sound mode on your device without using the volume keys.
◌
From Settings, tap Sounds and vibration, and then choose a mode:
•
Sound: Use the sounds, vibrations, and volume levels you have chosen in
Sound settings for notifications and alerts.
– Vibrate while ringing: Set your device to vibrate in addition to ringing
when you receive a call.
•
Vibrate: Use vibration only for notifications and alerts.
•
Mute: Set your device to make no sounds.
– Temporary mute: Set a time limit for muting the device.

Settings
127
Notifications
You can prioritize and streamline app alerts by changing which apps send
notifications and how notifications alert you.
Manage notifications
You can configure notifications from apps and services.
◌
From Settings, tap Notifications.
•
Suggest actions and replies: Get applicable suggestions for actions to
notifications and replies to messages.
•
Show snooze option: Get an option to snooze a notification for a later time.
•
App icon badges: Identify which apps have active notifications with badges
that appear on their icons. Tap to choose whether or not badges indicate the
number of unread notifications.
•
Status bar: Modify how many notifications appear on the Status bar.
•
LED indicator: Use the LED indicator for status notifications, like sound
recording, unread notifications, and battery charging.
•
Do not disturb: Block sounds and notifications while this mode is turned on.
Specify exceptions for people, apps, and alarms.
•
To block notifications from an app, tap
next to the app. Tap See all to
open the complete list of apps.
Customize app notifications
You can change notification settings for each app.
1.
From Settings, tap
Notifications > See all.
2. Tap an app for the following options:
• Show notifications: Receive notifications from this app.
• Categories: Configure notification options that are specific to this app.
• App icon badges: Show a badge on the icon when there are notifications.
Settings
128
Smart alert
You can set the device to notify you about missed calls and messages by vibrating
when you pick it up.
◌
From Settings, tap Advanced features > Motions and gestures > Smart alert,
and tap
to enable.
Smart pop-up view
Receive notifications as icons that can be tapped and expanded in pop-up view.
◌
From Settings, tap Advanced features > Smart pop-up view, and tap to
enable.
Display
You can configure the screen brightness, timeout delay, font size, and many other
display settings.
Screen brightness
Adjust the screen brightness according to lighting conditions or personal preference.
1.
From Settings, tap
Display.
2. Customize options under Brightness:
• Drag the Brightness slider to set a custom brightness level.
• Tap Adaptive brightness to automatically adjust the screen brightness based
on the lighting conditions.

Settings
129
Blue light filter
The Blue light filter can help you sleep better if you use your device at night. You can
set a schedule to automatically turn this feature on and off.
◌
From Settings, tap Display > Blue light filter, and then choose one of the
following options:
•
Drag the Opacity slider to set the opacity of the filter.
•
Tap Turn on now to enable this feature.
•
Tap Turn on as scheduled to set a schedule for when Blue light filter should
be enabled. You can choose Sunset to sunrise or Custom schedule.
Dark mode
Dark mode allows you to switch to a darker theme to keep your eyes more
comfortable at night, darkening white or bright screens and notifications.
◌
From Settings, tap Display > Dark mode for the following options:
•
Turn on now: Put your device in Dark mode.
•
Turn on as scheduled: Configure Dark mode for either Sunset to sunrise or
Custom schedule.
•
Apply to wallpaper: Apply Dark mode settings to the wallpaper when it is
active.
•
Adaptive color filter: Turn on Blue light filter automatically between sunset
and sunrise to reduce eye strain.
Screen mode
Your device has several screen mode options which adjust the screen quality for
different situations. You can select the mode according to your preference.
1.
From Settings, tap
Display > Screen mode.
2. Tap an option to set a different screen mode.

Settings
130
Font size and style
You can change the font size and style to customize your device.
◌
From Settings, tap Display > Font size and style for the following options:
•
Tap Font style to choose a different font.
–
Tap a font to select it, or tap
Download fonts to add fonts from
Galaxy Store.
•
Tap Bold font to make all fonts appear with bold weight.
•
Drag the Font size slider to adjust the size of text.
Screen zoom
Adjust the zoom level to increase or decrease the size of content on the screen.
1.
From Settings, tap
Display > Screen zoom.
2. Drag the Screen zoom slider to adjust the zoom level.
Screen resolution
You can lower the screen resolution to save battery power, or increase it to sharpen
the image quality.
1.
From Settings, tap
Display > Screen resolution.
2. Tap your preferred resolution, and then tap Apply.
NOTE Some apps may not support higher or lower screen resolution settings and
may close when you change the resolution.
Full screen apps
You can choose which apps you want to use in the full screen aspect ratio.
◌
From Settings, tap Display > Full screen apps and tap apps to enable this
feature.

Settings
132
Reduce animations
Decrease certain motion effects, such as when opening apps.
◌
From Settings, tap Advanced features > Reduce animations to enable the
feature.
Lift to wake
Turn on the screen by lifting the device.
◌
From Settings, tap Advanced features > Motions and gestures > Lift to wake
to enable this feature.
Smart stay
Smart stay uses the front camera to detect your face so that the screen stays on while
you are looking at it.
◌
From Settings, tap Advanced features > Motions and gestures > Smart stay,
and tap
to enable the feature.
One-handed mode
You can change the screen layout to accommodate operating your device with one
hand.
1.
From Settings, tap
Advanced features > One-handed mode.
2. Tap Use One-handed mode to enable the feature and select one of the following
options:
• Gesture: Swipe down in the center of the bottom edge of the screen.
•
Button: Tap
Home two times in quick succession to reduce the display size.

Settings
133
Device maintenance
View the status of your device’s battery, storage, and memory. You can also
automatically optimize your device’s system resources.
Quick optimization
The quick optimization feature improves device performance through the following
actions:
•
Identifying apps that use excessive battery power and clearing unneeded items
from memory.
•
Deleting unnecessary files and closing apps running in the background.
•
Scanning for malware.
To use the quick optimization feature:
◌
From Settings, tap Device care > Optimize now.
Battery
View how battery power is used for your various device activities.
◌
From Settings, tap Device care > Battery for options:
•
Battery usage: View power usage by app and service.
•
Power mode: Select a power mode to extend battery life.
•
App power management: Configure battery usage for apps that are used
infrequently.
•
Charging: Enable the following options to support fast charging capabilities:
– Fast cable charging
– Fast wireless charging

Settings
136
•
Auto restart: Automatically restart the device on a custom schedule.
– Days: Choose one or more days to restart the device.
– Time: Choose a time of day to restart the device.
•
Optimize settings: Save battery power by optimizing settings when the
device is not in use.
– Brightness: Reduce brightness.
– Screen timeout: Turn off the screen after 30 seconds of inactivity.
– Media volume: Limit playback volume to 46%.
Language and input
Configure your device’s language and input settings.
Change the device language
You can add languages to your list and organize them according to preference. If an
app does not support your default language, then it will move to the next supported
language in your list.
1.
From Settings, tap
General management > Language and input > Language.
2.
Tap
Add language, and select a language from the list.
3. Tap Set as default to change the device language.
• To switch to another language on the list, tap the desired language, and then
tap Apply.
Default keyboard
You can select a default keyboard for your device’s menus and keyboards. Additional
keyboards can be downloaded from the Google Play store.
1.
From Settings, tap
General management > Language and input.
2. Tap On-screen keyboard > Default keyboard and choose a keyboard.

Settings
137
Google Voice typing
Speak rather than type your text entries using Google Voice
™
typing.
1.
From Settings, tap
General management > Language and input.
2. Tap On-screen keyboard > Google Voice typing to customize settings.
Manage on-screen keyboards
Enable or disable on-screen keyboards.
1.
From Settings, tap
General management > Language and input.
2.
Tap On-screen keyboard >
Manage keyboards.
3. Tap each keyboard to enable or disable.
Show keyboard button
Show a button on the Navigation bar to quickly switch between keyboards.
1.
From Settings, tap
General management > Language and input > On-screen
keyboard.
2. Tap Show keyboard button to enable this feature.
Physical keyboards
Customize options when you have a physical keyboard connected to your device (sold
separately).
1.
From Settings, tap
General management > Language and input.
2. Tap Physical keyboard, and then choose an option:
• Show on-screen keyboard: Show the on-screen keyboard while a physical
keyboard is also being used.
• Keyboard shortcuts: Show explanations of the keyboard shortcuts on the
screen.
• Change language shortcut: Enable or disable language key shortcuts for your
physical keyboard.

Settings
141
Factory Data Reset
You can reset your device to factory defaults, erasing all data from your device.
This action permanently erases ALL data from the device, including Google or other
account settings, system and application data and settings, downloaded applications,
as well as your music, photos, videos, and other files. Any data stored on an external
SD card is not affected.
When you sign in to a Google Account on your device, Factory Reset Protection (FRP)
is activated. This protects your device in the event it is lost or stolen.
If you reset your device to factory default settings with the FRP feature activated, you
must enter the user name and password for a registered Google Account to regain
access to the device. You will not be able to access the device without the correct
credentials.
NOTE If you reset your Google Account password, it can take 24 hours for the
password reset to sync with all devices registered to the account.
Before resetting your device:
1. Verify that the information you want to keep has transferred to your storage
area.
2. Log in to your Google Account and confirm your user name and password.
To reset your device:
1.
From Settings, tap
General management > Reset > Factory data reset.
2. Tap Reset and follow the prompts to perform the reset.
3. When the device restarts, follow the prompts to set up your device.
Factory Reset Protection
When you sign in to a Google Account on your device, Factory Reset Protection (FRP)
is activated. FRP prevents other people from using your device if it is reset to factory
settings without your permission. For example, if your device is lost or stolen and a
factory data reset is performed, only someone with your Google Account username
and password can use the device.

Settings
142
You will not be able to access the device after a factory data reset if you do not have
your Google Account username and password.
CAUTION Before sending your device to Samsung or taking it to a Samsung-
authorized service center, remove your Google Account and then perform a
factory data reset. For more information, visit samsung.com/us/support/frp.
Enable Factory Reset Protection
Adding a Google Account to your device automatically activates the FRP security
feature.
Disable Factory Reset Protection
To disable FRP, remove all Google Accounts from the device.
1.
From Settings, tap
Accounts and backup > Accounts > [Google Account].
2. Tap Remove account.
Lock screen and security
You can secure your device and protect your data by setting a screen lock.
Screen lock types
You can choose from the following screen lock types that offer high, medium, or no
security: Swipe, Pattern, PIN, Password, and None.
NOTE Biometric locks are also available to protect access to your device and
sensitive data on your device. For more information, see Flexible security on
page 29.
Set a secure screen lock
It is recommended that you secure your device using a secure screen lock (Pattern,
PIN, or Password). This is necessary to set up and enable biometric locks.
1.
From Settings, tap
Lock screen > Screen lock type and tap a secure screen
lock (Pattern, PIN, or Password).

Settings
143
2. Tap
to enable showing notifications on the lock screen. The following
options are available:
• View style: Display notification details or hide them and show only an icon.
• Hide content: Do not show notifications in the Notification panel.
• Notifications to show: Choose which notifications to show on the Lock screen.
3. Tap Done when finished.
4. Configure the following screen lock options:
• Smart Lock: Unlock your device automatically when trusted locations or
other devices have been detected. A secure screen lock is required for this
feature.
• Secure lock settings: Customize your secure lock settings. A secure screen
lock is required for this feature.
• Always On Display: Enable the Always On Display screen. For more
information, see Alw
ays On Display on page 28.
Clock and information
You can configure features that appear on the Lock screen, like the clock and other
useful information.
◌
From Settings, tap Lock screen for the following options:
•
Wallpaper services: Enable additional features such as guide page and
Dynamic Lock Screen.
•
Clock style: Set the type and color of the clock on the Lock screen and
Always On Display screen.
•
Roaming clock: Change to digital clocks showing both local and home time
zones when roaming.
•
FaceWidgets: Enable widgets on the Lock screen and Always On Display
screen to get quick access to useful information.
•
Contact information: Show your contact information, such as your phone
number or email address.
•
Notifications: Select which notifications to display on the Lock screen and
Always On Display screen.

Settings
144
•
Shortcuts: Select which app shortcuts to add to the Lock screen.
•
About Lock screen: Update the Lock screen’s software.
Google Play Protect
You can configure Google Play to regularly check your apps and device for security
risks and threats.
◌
From Settings, tap Biometrics and security > Google Play Protect.
•
Updates are checked for automatically.
Find My Mobile
You can protect your device from loss or theft by allowing your device to be locked,
tracked online, and for your data to be deleted remotely. A Samsung account is
required, and Google location service must be turned on in order to use Find My
Mobile. For more information, visit samsung.com/us/support/owners/app/find-my-
mobile.
Turn on Find My Mobile
Before you can use the Find My Mobile feature, you must turn it on and customize the
options. To access your device remotely, visit findmymobile.samsung.com.
1.
From Settings, tap
Biometrics and security > Find My Mobile.
2. Tap
to enable Find My Mobile and log in to your Samsung account. The
following options are available:
• Remote unlock: Allow Samsung to store your PIN, pattern, or password,
allowing you to unlock and control your device remotely.
• Send last location: Allow your device to send its last location to the Find My
Mobile server when the remaining battery charge falls below a certain level.

Settings
146
Secure Wi-Fi
Get extra privacy protection while using unsecured Wi-Fi networks. You must sign in
to your Samsung account to set up and use Secure Wi-Fi.
◌
From Settings, tap Biometrics and security > Secure Wi-Fi and follow the
prompts to configure privacy protection.
Secure startup
You can protect your device by requiring a PIN, pattern, or password when your device
is turned on.
TIP A secure screen lock (Pattern, PIN, or Password) is required to use Secure
startup.
◌
From Settings, tap Biometrics and security > Secure startup and select an
option.
Encrypt or decrypt SD card
You can encrypt your optional memory card (not included) to protect its data. This
only allows the SD card information to be accessed from your device with a password.
1.
From Settings, tap
Biometrics and security > Encrypt or decrypt SD card.
2. Tap Encrypt SD card and follow the prompts to encrypt all data on your memory
card.
NOTE Performing a Factory data reset on your device prevents it from accessing
an encrypted SD card. Before initiating a Factory data reset, make sure to decrypt
the installed SD card first.

Settings
1
4
7
Decrypt SD card
You can decrypt an optional memory card (not included) if it was encrypted by this
device. You may want to decrypt the memory card if you plan to use it with another
device or before performing a Factory data reset.
1.
From Settings, tap
Biometrics and security > Encrypt or decrypt SD card.
2. Tap Decrypt SD card and follow the prompts to decrypt all data on your memory
card.
Set up SIM card lock
You can set up a PIN to lock your SIM card, which prevents unauthorized use of your
SIM card if someone attempts to use it another device.
◌
From Settings, tap Biometrics and security > Other security settings > Set up
SIM card lock and follow the prompts.
•
Tap Lock SIM card to turn on the feature.
•
Tap Change SIM card PIN to create a new PIN.
View passwords
You can have characters displayed briefly in password fields as you type them.
◌
From Settings, tap Biometrics and security > Other security settings >
Make passwords visible to turn on the feature.
Device administration
You can authorize security features and apps (like Find My Mobile) to have
administrative access to your device.
1.
From Settings, tap
Biometrics and security > Other security settings >
Device admin apps.
2. Tap an option to turn it on as a device administrator.

Settings
150
App permissions
Configure permissions for apps that want to access your location information.
1.
From Settings, tap
Location > App permissions.
2. Tap an app and select which of the following location permissions to grant it:
• Allow all the time
• Allow only while using the app
• Deny
Improve accuracy
Enable other location scanning tools.
1.
From Settings, tap
Location > Improve accuracy.
2. Tap connection method to add or remove from location services:
• Wi-Fi scanning: Allow apps and services to scan for Wi-Fi networks
automatically, even when Wi-Fi is turned off.
• Bluetooth scanning: Allow apps to scan for and connect to nearby devices
automatically through Bluetooth, even when Bluetooth is turned off.
Recent location requests
View a list of apps that have requested your location.
1.
From Settings, tap
Location.
2. Tap
to turn on Location services.
3. Tap an entry under Recent location requests to view the app’s settings.
Location services
Location services store and use your device’s most recent location data. Certain apps
can use this data to improve your search results based on places that you have visited.
1.
From Settings, tap
Location.
2. Tap an entry under Location services to see how your location information is
used.

Settings
151
Accounts
You can connect to and manage your accounts, including your Google Account,
Samsung account, email, and social networking accounts.
Samsung Cloud
You can keep your data safe by backing up and restoring your device. You can also
sync your data from multiple devices. For more information, visit
samsung.com/us/support/owners/app/samsung-cloud.
1.
From Settings, tap
Accounts and backup > Samsung Cloud.
l If a Samsung account has not been added, the screens explain how to create
or sign in to your account.
2. Once a Samsung account is configured, you can view and manage items stored in
the Samsung Cloud.
Account settings
Each account has its own custom settings. You can configure common settings for all
accounts of the same type. Account settings and available features vary between
account types.
1.
From Settings, tap
Accounts and backup > Accounts.
2. Tap an account to configure that account’s sync settings.
3. Tap other available options for the account type.
Remove an account
You can remove accounts from your device.
1.
From Settings, tap
Accounts and backup > Accounts.
2. Tap the account and then tap Remove account.

Settings
153
Accessibility
There are accessibility settings for people who need help seeing, hearing, or
otherwise operating their device. Accessibility services are special features that make
using the device easier for everyone. For more information about Accessibility for
Samsung products, please contact us at accessibility@sea.samsung.com.
Screen Reader
Use special controls and settings that let you navigate without needing to see the
screen.
◌
From Settings, tap Accessibility > Screen reader and tap an option:
•
Voice assistant: Receive spoken feedback when using your device, such as
what you touch, select, or activate.
•
Tutorial: Lean how to use Voice assistant.
•
Settings: Configure Voice assistant to better assist you.
Visibility enhancements
You can configure Accessibility features to assist with visual aspects of your device.
Colors and clarity
You can adjust the colors and contrast of text and other screen elements for easier
viewing.
◌
From Settings, tap Accessibility > Visibility enhancements and tap an option:
•
High contrast theme: Adjust colors and screen fonts to increase the contrast
for easier viewing.
•
High contrast fonts: Adjust the color and outline of fonts to increase the
contrast with the background.
•
High contrast keyboard: Adjust the size of the Samsung keyboard and change
its colors to increase the contrast between the keys and the background.
•
Show button shapes: Show buttons with shaded backgrounds to make them
stand out better against the wallpaper.

Settings
154
•
Color inversion: Reverse the display of colors from white text on a black
background to black text on a white background.
•
Color adjustment: Adjust the color of the screen if you find it difficult to see
some colors.
•
Color lens: Adjust the screen colors if you have difficulty reading the text.
•
Remove animations: Remove certain screen effects if you are sensitive to
motion.
Size and zoom
You can increase the size of supported screen elements and create shortcuts for
accessibility features on your device.
◌
From Settings, tap Accessibility > Visibility enhancements and tap an option:
•
Magnifier window: Magnify content shown on the screen.
•
Magnification: Use exaggerated gestures such as triple-tapping, double
pinching, and dragging two fingers across the screen.
•
Large mouse/touchpad pointer: Use a large pointer for a connected mouse or
touchpad (accessories not included).
•
Font size and style: Configure screen fonts.
•
Screen zoom: Configure the screen zoom level.

Settings
155
Hearing enhancements
You can configure Accessibility features to assist with audial aspects of the device.
Sounds
You can adjust audio quality when using hearing aids or earphones.
◌
From Settings, tap Accessibility > Hearing enhancements and tap an option:
•
Real time text: Activate real-time text (RTT) calling.
•
Hearing aid support: Improve the sound quality to work better with hearing
aids.
•
Amplify ambient sound: Enable this feature and connect headphones to your
device to amplify the sounds of conversations.
•
Adapt sound: Customize the sound for each ear and enhance your listening
experience. See Adapt sound on page 126.
•
Left/right sound balance: Use the slider to adjust the left and right balance
when listening to audio in stereo.
•
Mono audio: Switch audio from stereo to mono when using one earphone.
•
Mute all sounds: Turn off all notifications and audio for privacy.
Text display
You can convert speech to text and watch closed captions when viewing multimedia.
◌
From Settings, tap Accessibility > Hearing enhancements and tap an option:
•
Live transcribe: Use the microphone to record speech and convert it to text.
•
Subtitle settings: Configure closed caption and subtitle services.
•
Sound detectors: Receive alerts when the device detects a baby crying or a
doorbell.


Legal information
163
Maintaining water and dust resistance
CAUTION To avoid electric shock and damage to your device, do not charge
device while it is wet or in an area where it could get wet. Do not handle device,
charger or cords with wet hands while charging.
The device is not impervious to dust and water damage in any situation. It is important
that all compartments are closed tightly.
Follow these tips carefully to prevent damage to the device and maintain dust and
water resistance performance:
Water resistant based on IP68 rating, which tests submersion in fresh water deeper
than 1.5 meters or keep it submerged for more than 30 minutes. If device is exposed
to fresh water, dry it thoroughly with a clean, soft cloth; if exposed to liquid other
than fresh water, rinse with fresh water and dry as directed.
Any device which uses accessible compartments or ports that can be opened should
have these sealed or closed tightly to prevent liquid from entering the system.
If the device has been immersed in water or the microphone or speaker is wet,
sound may not be heard clearly during a call. After wiping the device with a dry
cloth, dry it thoroughly before using it.
Do not expose the device to water at high pressure.
If the device is dropped or receives an impact, the water and dust resistant features
of the device may be damaged.
NOTE Liquid other than fresh water may enter the device faster. Failure to rinse
the device in fresh water and dry it as instructed may cause the device to suffer
from operability or cosmetic issues.

Legal information
164
Restricting children’s access to your
mobile device
Your mobile device is not a toy. Do not allow children under the age of 3 to play with
it because they could hurt themselves or others or damage the device. If parents
choose to allow children 3 or older to use the device, they should make sure that
there is adequate supervision to guard against injury or damage and use of services
that may increase data costs or other charges.
Parental control settings should be enabled to ensure that children do not have
access to services or content not approved by the parent. Routinely check this device
to ensure it is working properly and is safe for children to use.
Samsung Electronics America, Inc.
Address:
85 Challenger Road
Ridgefield Park
New Jersey 07660
Phone: 1-800-SAMSUNG (726-7864)
Internet: samsung.com
©2020 Samsung Electronics America, Inc. Samsung, Samsung Galaxy, Multi Window,
Samsung Health, Samsung Pay, and Smart Switch are all trademarks of Samsung
Electronics Co., Ltd.
Other marks are the property of their respective owners.
Manufactured under license from Dolby Laboratories. Dolby, Dolby Atmos, and the
double-D symbol are trademarks of Dolby Laboratories.

Legal information
165
Some multimedia (audio/video) files contain Digital Rights Management (DRM)
technology to verify you have the right to use the files. Preloaded apps on your
device may not be compatible with DRM-protected files.
Screen images are simulated. Appearance of device may vary.
The actual available capacity of the internal memory is less than the specified
capacity because the operating system and default applications occupy part of the
memory. The available capacity may change when you upgrade the device.
Please check with your service provider to verify qualifying services/features.