
www.philips.com/welcome
55BDL3050Q
V1.10
User Manual (English)

55BDL3050Q
ii
Safety Instructions
Safety precautions and maintenance
WARNING: Use of controls, adjustments or procedures other than those specied in this documentation may result in exposure to
shock, electrical hazards and/or mechanical hazards.
Read and follow these instructions when connecting and using your display:
Operation:
• Keepthedisplayoutofdirectsunlightandawayfromstovesoranyotherheatsources.
• Removeanyobjectthatcouldfallintoventilationholesorpreventpropercoolingofthedisplay’selectronics.
• Donotblocktheventilationholesonthecabinet.
• Whenpositioningthedisplay,makesurethepowerplugandoutletareeasilyaccessible.
• Whenturningoffthedisplaybydetachingthepowercord,wait6secondsbeforere-attachingthepowercordfornormaloperation.
• EnsuretheuseofanapprovedpowercordprovidedbyPhilipsatalltimes.Ifyourpowercordismissing,pleasecontactyourlocalservicecenter.
• Donotsubjectthedisplaytoseverevibrationorhighimpactconditionsduringoperation.
• Donotknockordropthedisplayduringoperationortransportation.
• Theeyeboltisforusageinshort-timemaintenanceandinstallation.Wesuggestnottousetheeyeboltformorethan1hour.Prolongusageis
prohibited.Pleasekeepaclearsafetyareaunderthedisplaywhileusingtheeyebolt.
Maintenance:
• Toprotectyourdisplayfrompossibledamage,donotputexcessivepressureontheLCDpanel.Whenmovingyourdisplay,grasptheframetolift;do
notliftthedisplaybyplacingyourhandorngersontheLCDpanel.
• Unplugthedisplayifyouarenotgoingtouseitforanextensiveperiodoftime.
• Unplugthedisplayifyouneedtocleanitwithaslightlydampcloth.Thescreenmaybewipedwithadryclothwhenthepowerisoff.However,never
useorganicsolvent,suchas,alcohol,orammonia-basedliquidstocleanyourdisplay.
• Toavoidtheriskofshockorpermanentdamagetotheset,donotexposethedisplaytodust,rain,wateroranexcessivelymoistenvironment.
• Ifyourdisplaybecomeswet,wipeitwithdryclothassoonaspossible.
• Ifaforeignsubstanceorwatergetsinyourdisplay,turnthepoweroffimmediatelyanddisconnectthepowercord.Thenremovetheforeignsubstance
orwater,andsendtheunittothemaintenancecenter.
• Donotstoreorusethedisplayinlocationsexposedtoheat,directsunlightorextremecold.
• Inordertomaintainthebestperformanceofyourdisplayandensurealongerlifetime,westronglyrecommendusingthedisplayinalocationthatfalls
withinthefollowingtemperatureandhumidityranges.
- Temperature:0-40°C32-104°F
- Humidity:20-80%RH
• LCDpaneltemperatureneedtobe25degreesCelsiusatalltimeforbetterluminanceperformance.
IMPORTANT:Alwaysactivateamovingscreensaverprogramwhenyouleaveyourdisplayunattended.Alwaysactivateaperiodicscreenrefresh
applicationiftheunitwilldisplayunchangingstaticcontent.Uninterrupteddisplayofstillorstaticimagesoveranextendedperiodmaycause“burnin”,
alsoknownas“after-imaging”or“ghostimaging”,onyourscreen.Thisisawell-knownphenomenoninLCDpaneltechnology.Inmostcases,the“burned
in”or“after-imaging”or“ghostimaging”willdisappeargraduallyoveraperiodoftimeafterthepowerhasbeenswitchedoff.
WARNING:Severe“burn-in”or“after-image”or“ghostimage”symptomswillnotdisappearandcannotberepaired.Thisisalsonotcoveredunderthe
termsofyourwarranty.
Service:
• Thecasingcovershouldbeopenedonlybyqualiedservicepersonnel.
• Ifthereisanyneedforrepairorintegration,pleasecontactyourlocalservicecenter.
• Donotleaveyourdisplayunderdirectsunlight.
Ifyourdisplaydoesnotoperatenormally,havingfollowedtheinstructionssetoutinthisdocument,pleasecontactatechnicianoryour
localservicecenter.

55BDL3050Q
iii
Read and follow these instructions when connecting and using your display:
• Unplugthedisplayifyouarenotgoingtouseitforanextensiveperiodoftime.
• Unplugthedisplayifyouneedtocleanitwithaslightlydampcloth.Thescreenmanybewipedwithadryclothwhenthepoweris
off.However,neverusealcohol,solventsorammonia-basedliquids.
• Consultaservicetechnicianifthedisplaydoesnotoperatenormallywhenyouhavefollowedtheinstructionsinthismanual.
• Thecasingcovershouldbeopenedonlybyqualiedservicepersonnel.
• Keepthedisplayoutofdirectsunlightandawayfromstovesoranyotherheatsources.
• Removeanyobjectthatcouldfallintotheventsorpreventpropercoolingofthedisplay’selectronics.
• Donotblocktheventilationholesonthecabinet.
• Keepthedisplaydry.Toavoidelectricshock,donotexposeittorainorexcessivemoisture.
• WhenturningoffthedisplaybydetachingthepowercableorDCpowercord,waitfor6secondsbeforere-attachingthepower
cableorDCpowercordfornormaloperation..
• Toavoidtheriskofshockorpermanentdamagetothesetdonotexposethedisplaytorainorexcessivemoisture.
• Whenpositioningthedisplay,makesurethepowerplugandoutletareeasilyaccessible.
• IMPORTANT:Alwaysactivateascreensaverprogramduringyourapplication.Ifastillimageinhighcontrastremainsonthe
screenforanextendedperiodoftime,itmayleavean‘after-image’or‘ghostimage’onthefrontofthescreen.Thisisawell-known
phenomenonthatiscausedbytheshortcomingsinherentinLCDtechnology.Inmostcasestheafterimagewilldisappeargradually
overaperiodoftimeafterthepowerhasbeenswitchedoff.Beawarethattheafter-imagesymptomcannotberepairedandisnot
coveredunderwarranty.
EU Declaration of Conformity
ThisdevicecomplieswiththerequirementssetoutintheCouncilDirectiveontheApproximationoftheLawsoftheMemberStatesrelatingto
ElectromagneticCompatibility(2014/30/EU),Low-voltageDirective(2014/35/EU),RoHSdirective(2011/65/EU).
ThisproducthasbeentestedandfoundtocomplywiththeharmonizedstandardsforInformationTechnologyEquipment,theseharmonizedstandards
publishedunderDirectivesofOfcialJournaloftheEuropeanUnion.
ESD Warnings
Whenuserclosetothemonitormaycausetheequipmentdischargeandreboottothedisplayofmainmenu.
Warning:
ThisequipmentiscompliantwithClassAofEN55032/CISPR32.Inaresidentialenvironmentthisequipmentmaycauseradiointerference.
Federal Communications Commission (FCC) Notice (U.S. Only)
NOTE:ThisequipmenthasbeentestedandfoundtocomplywiththelimitsforaClassAdigitaldevice,pursuanttopart15ofthe
FCCRules.Theselimitsaredesignedtoprovidereasonableprotectionagainstharmfulinterferencewhentheequipmentisoperated
inacommercialenvironment.Thisequipmentgenerates,uses,andcanradiateradiofrequencyenergyand,ifnotinstalledandusedin
accordancewiththeinstructionmanual,maycauseharmfulinterferencetoradiocommunications.Operationofthisequipmentina
residentialareaislikelytocauseharmfulinterferenceinwhichcasetheuserwillberequiredtocorrecttheinterferenceathisown
expense.
Changesormodicationsnotexpresslyapprovedbythepartyresponsibleforcompliancecouldvoidtheuser’sauthoritytooperatethe
equipment.
UseonlyanRFshieldedcablethatwassuppliedwiththedisplaywhenconnectingthisdisplaytoacomputerdevice.
Topreventdamagewhichmayresultinreorshockhazard,donotexposethisappliancetorainorexcessivemoisture.
ThisdevicecomplieswithPart15oftheFCCRules.Operationissubjecttothefollowingtwoconditions:(1)Thisdevicemaynotcauseharmful
interference,and(2)thisdevicemustacceptanyinterferencereceived,includinginterferencethatmaycauseundesiredoperation.
EnvisionPeripheralsInc.
47409SeabridgeDrive
Fremont,CA94538
Tel.510-770-9988
55BDL3050Q
iv
Canada:
IndustryCanadastatement:
ThisdevicecomplieswithRSS-247oftheIndustryCanadaRules.Operationissubjecttothefollowingtwoconditions:(1)Thisdevicemaynotcause
harmfulinterference,and(2)thisdevicemustacceptanyinterferencereceived,includinginterferencethatmaycauseundesiredoperation.
CedispositifestconformeàlanormeCNR-247d’IndustrieCanadaapplicableauxappareilsradioexemptsdelicence.Sonfonctionnementestsujetaux
deuxconditionssuivantes:(1)ledispositifnedoitpasproduiredebrouillagepréjudiciable,et(2)cedispositifdoitacceptertoutbrouillagereçu,ycompris
unbrouillagesusceptibledeprovoquerunfonctionnementin
Brazil:
ANATELRFSTATEMENT
PerArticle6ofResolution506,equipmentofrestrictedradiationmustcarrythefollowingstatementinavisiblelocation
“Esteequipamentooperaemcarátersecundário,istoé,nãotemdireitoaproteçãocontrainterferênciaprejudicial,mesmodeestaçõesdomesmotipo,e
nãopodecausarinterferênciaasistemasoperandoemcaráterprimário.”
ANATELBODYSARSTATEMENT
“Esteprodutoatendeaosrequisitostécnicosaplicados,incluindooslimitesdeexposiçãodaTaxadeAbsorçãoEspecícareferenteacamposelétricos,
magnéticoseeletromagnéticosderadiofrequência,deacordocomasresoluçõesn°303/2002e533/2009.Esteprodutoatendeàsdiretrizesdeexposição
àRFnaposiçãonormaldeusoapelomenosXcentímetroslongedocorpo,tendosidoosensaiosdeSARparacorporealizadoaXcmdeacordocom
oinformativoderecomendaçãoapresentadonomanualdofabricante.”
Polish Center for Testing and Certication Notice
Theequipmentshoulddrawpowerfromasocketwithanattachedprotectioncircuit(athree-prongsocket).Allequipmentthatworkstogether(computer,
display,printer,andsoon)shouldhavethesamepowersupplysource.
Thephasingconductoroftheroom’selectricalinstallationshouldhaveareserveshort-circuitprotectiondeviceintheformofafusewithanominalvalue
nolargerthan16amperes(A).
Tocompletelyswitchofftheequipment,thepowersupplycablemustberemovedfromthepowersupplysocket,whichshouldbelocatednearthe
equipmentandeasilyaccessible.
Aprotectionmark“B”conrmsthattheequipmentisincompliancewiththeprotectionusagerequirementsofstandardsPN-93/T-42107andPN-89/
E-06251.
55BDL3050Q
v
Electric, Magnetic and Electromagnetic Fields (“EMF”)
1. Wemanufactureandsellmanyproductstargetedatconsumers,which,likeanyelectronicapparatus,ingeneralhavetheabilitytoemitandreceive
electromagneticsignals.
2. OneofourleadingBusinessPrinciplesistotakeallnecessaryhealthandsafetymeasuresforourproducts,tocomplywithallapplicablelegal
requirementsandtostaywellwithintheEMFstandardsapplicableatthetimeofproducingtheproducts.
3. Wearecommittedtodevelop,produceandmarketproductsthatcausenoadversehealtheffects.
4. Weconrmthatifitsproductsarehandledproperlyfortheirintendeduse,theyaresafetouseaccordingtoscienticevidenceavailabletoday.
5. WeplayanactiveroleinthedevelopmentofinternationalEMFandsafetystandards,enablingustoanticipatefurtherdevelopmentsinstandardization
forearlyintegrationinitsproducts.
Information for U.K. only
(A)
(B)
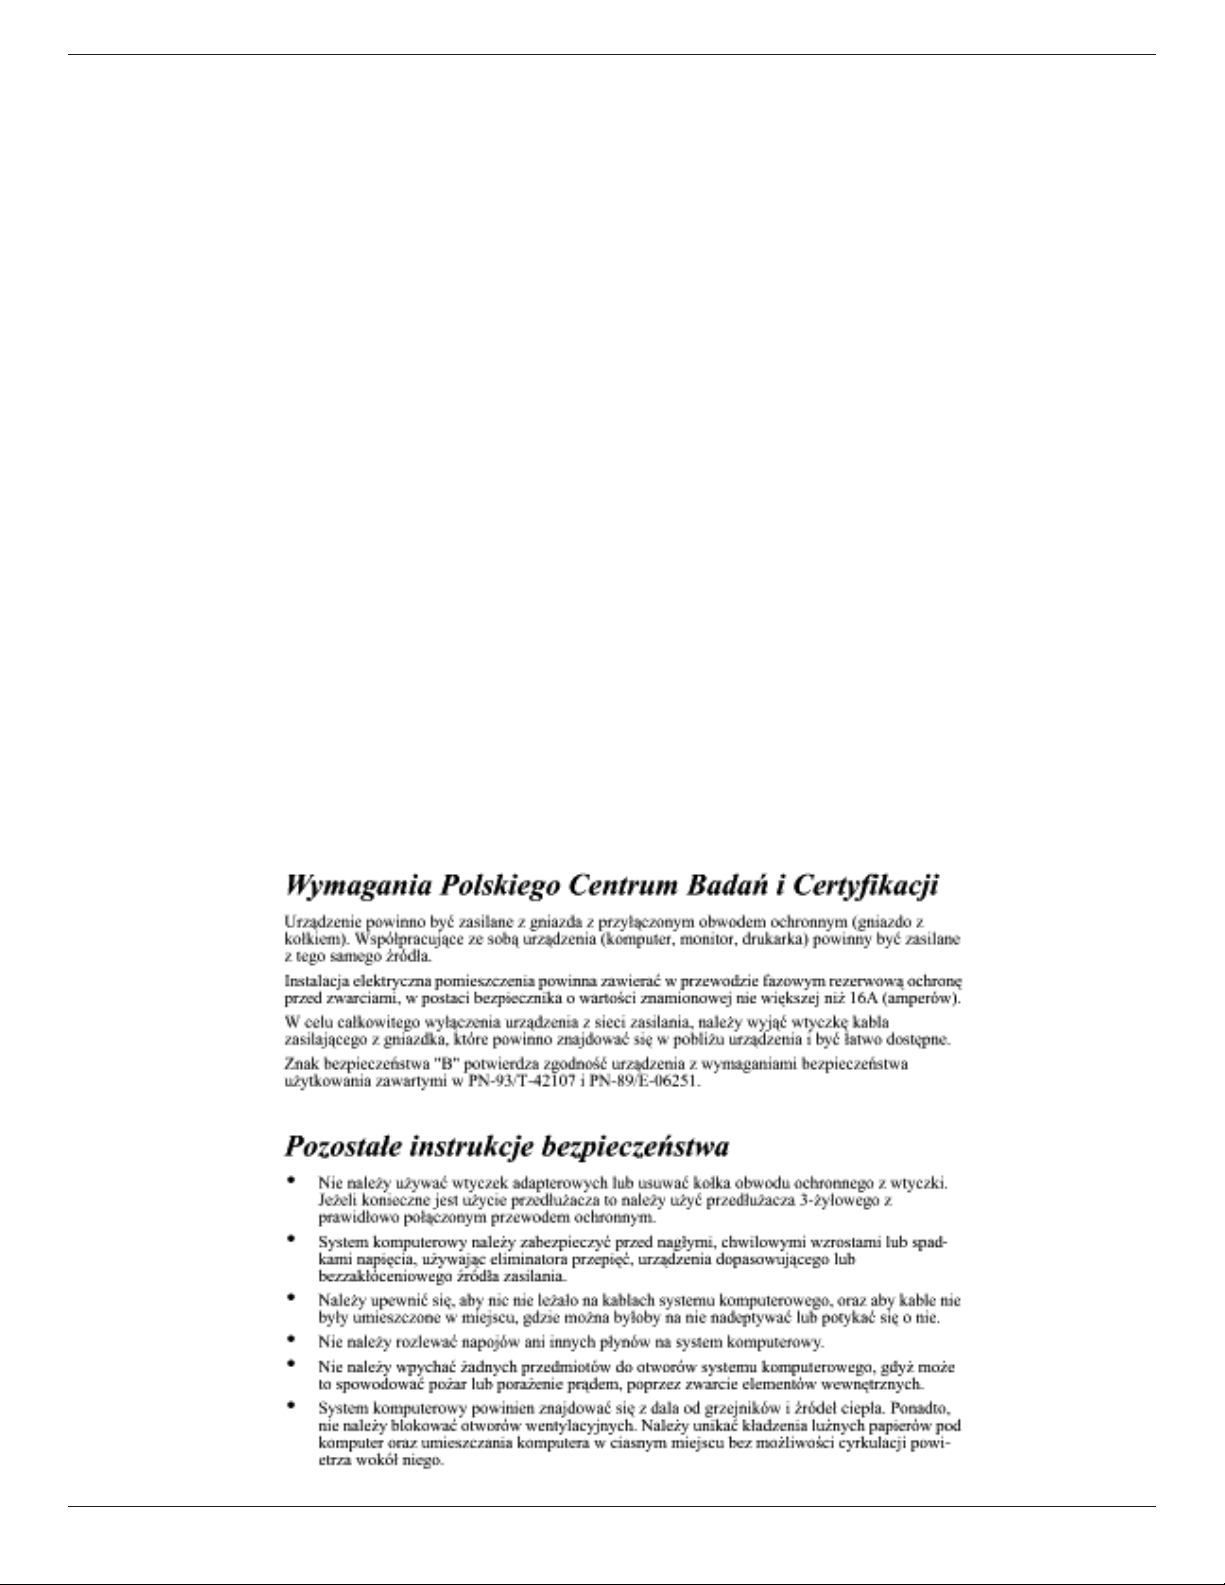
WARNING - THIS APPLIANCE MUST BE EARTHED.
Important:
Thisapparatusissuppliedwithanapprovedmoulded13Aplug.Tochangeafuseinthistypeofplug
proceedasfollows:+
1. Removefusecoverandfuse.
2. FitnewfusewhichshouldbeaBS13625A,A.S.T.A.orBSIapprovedtype.
3. Retthefusecover.
Ifthettedplugisnotsuitableforyoursocketoutlets,itshouldbecutoffandanappropriate3-pin
plugttedinitsplace.
Ifthemainsplugcontainsafuse,thisshouldhaveavalueof5A.Ifaplugwithoutafuseisused,thefuse
atthedistributionboardshouldnotbegreaterthan5A.
NOTE: Theseveredplugmustbedestroyedtoavoidapossibleshockhazardshoulditbeinserted
intoa13Asocketelsewhere.
How to connect a plug
Thewiresinthemainsleadarecolouredinaccordancewiththefollowingcode:
BLUE-“NEUTRAL”(“N”)
BROWN-“LIVE”(“L”)
GREEN&YELLOW-“EARTH”(“E”)
1. TheGREEN&YELLOWwiremustbeconnectedtotheterminalintheplugwhichismarkedwith
theletter“E”orbytheEarthsymbolorcolouredGREENorGREEN&YELLOW.
2. TheBLUEwiremustbeconnectedtotheterminalwhichismarkedwiththeletter“N”orcoloured
BLACK.
3. TheBROWNwiremustbeconnectedtotheterminalwhichmarkedwiththeletter“L”or
colouredRED.
Beforereplacingtheplugcover,makecertainthatthecordgripisclampedoverthesheathofthelead
-notsimplyoverthethreewires.
North Europe (Nordic Countries) Information
Placering/Ventilation
VARNING:
FÖRSÄKRADIGOMATTHUVUDBRYTAREOCHUTTAGÄRLÄTÅTKOMLIGA,NÄRDUSTÄLLERDINUTRUSTNINGPÅPLATS.
Placering/Ventilation
ADVARSEL:
SØRGVEDPLACERINGENFOR,ATNETLEDNINGENSSTIKOGSTIKKONTAKTERNEMTTILGÆNGELIGE.

55BDL3050Q
vi
Paikka/Ilmankierto
VAROITUS:
SIJOITALAITESITEN,ETTÄVERKKOJOHTOVOIDAANTARVITTAESSAHELPOSTIIRROTTAAPISTORASIASTA.
Plassering/Ventilasjon
ADVARSEL:
NÅRDETTEUTSTYRETPLASSERES,MÅDUPASSEPÅATKONTAKTENEFORSTØMTILFØRSELERLETTEÅNÅ.
China RoHS
根据中国大陆《电子电气产品有害物质限制使用标识要求》,以下部分列出了本产品中可能包含的有害物
质的名称和含量。
部件名称
有害物质
铅
(Pb)
汞
(Hg)
镉
(Cd)
六价铬
(Cr (VI))
多溴联苯
(PBB)
多溴二苯醚
(PBDE)
外壳 ○ ○ ○ ○ ○ ○
液晶显示屏 × ○ ○ ○ ○ ○
电路板组件* × ○ ○ ○ ○ ○
电源适配器 × ○ ○ ○ ○ ○
电源线/连接线 × ○ ○ ○ ○ ○
遥控器 X ○ ○ ○ ○ ○
本表格依据SJ/T 11364 的规定编制。
*: 电路板组件包括印刷电路板及其构成的零部件,如电阻、电容、集成电路、连接器等。
O: 表示该有害物质在该部件所有均质材料中的含量均在 GB/T 26572规定的限量要求以下。
X: 表示该有害物质至少在该部件的某一均质材料中的含量超出GB/T 26572规定的限量要求。
上表中打“×”的部件,应功能需要,部分有害物质含量超出GB/T 26572规定的限量要求,但符合欧盟RoHS
法规要求(属于豁免部分)。
备注:上表仅做为范例,实际标示时应依照各产品的实际部件及所含有害物质进行标示。
10
環保使用期限
此標識指期限(十年),電子電氣產品中含有的有害物質在正常使用的條件下不會發生外泄或突變,電子
電氣產品用戶使用該電子電氣產品不會對環境造成嚴重污染或對其人身、財產造成嚴重損害的期限。

55BDL3050Q
vii
《废弃电器电子产品回收处理管理条例》提示性说明
为了更好地关爱及保护地球,当用户不再需要此产品或产品寿命终止时,请遵守国家废弃电器电子产品
回收处理相关法律法规,将其交给当地具有国家认可的回收处理资质的厂商进行回收处理。
娤⌈
㨢᳸$䵥ᵥ⍿Ʋ◦䏝㯹䉭❁ᳫ濕媣ᵥ⍿⊭侻廞ノ㒞䵽䏳ⴰㄮƲ◦店䢋⾃濕⊭侻斾堿䏦ヵ
⪷ⴰㄮ悅⊔⩜⊭圊䕂㉨㑻Ʋ
單元
限用物質及其化學符號
鉛
(Pb)
汞
(Hg)
鎘
(Cd)
六價鉻
(Cr
+6
)
多溴聯苯
(PBB)
多溴二苯醚
(PBDE)
塑料外框 ○ ○ ○ ○ ○ ○
後殼 ○ ○ ○ ○ ○ ○
液晶面板 - ○ ○ ○ ○ ○
電路板組件 - ○ ○ ○ ○ ○
底座 ○ ○ ○ ○ ○ ○
電源線 - ○ ○ ○ ○ ○
其他線材 - ○ ○ ○ ○ ○
遙控器 - ○ ○ ○ ○ ○
喇叭 - ○ ○ ○ ○ ○
備考1.〝○〞係指該項限用物質之百分比含量未超出百分比含量基準值。
備考2.〝-〞係指該項限用物質為排除項目。
警語 : 使用過度恐傷害視力。
注意事項 :
(1) 使用30分鐘請休息10分鐘。
(2) 未滿2歲幼兒不看螢幕,2歲以上每天看螢幕不要超過1小時。
警告使用者 :
此為甲類資訊技術設備 , 於居住環境中使用時 , 可能會造成射頻擾動 , 在此種情況下 , 使用者會被
要求採取某些適當的對策。
Turkey RoHS:
TürkiyeCumhuriyeti:EEEYönetmeliğineUygundur
Ukraine RoHS:
ОбладнаннявідповідаєвимогамТехнічногорегламентущодообмеженнявикористаннядеякихнебезпечнихречовинвелектричномута
електронномуобладнанні,затвердженогопостановоюКабінетуМіністрівУкраїнивід3грудня2008№1057
55BDL3050Q
viii
End-of-Life Disposal
YournewPublicInformationDisplaycontainsmaterialsthatcanberecycledandreused.Specializedcompaniescanrecycleyourproducttoincreasethe
amountofreusablematerialsandtominimizetheamounttobedisposedof.
PleasendoutaboutthelocalregulationsonhowtodisposeofyourolddisplayfromyourlocalPhilipsdealer.
(For customers in Canada and U.S.A.)
Thisproductmaycontainleadand/ormercury.Disposeofinaccordancetolocal-stateandfederalregulations.Foradditionalinformationonrecycling
contactwww.eia.org(ConsumerEducationInitiative)
Waste Electrical and Electronic Equipment-WEEE
Attention users in European Union private households
Thismarkingontheproductoronitspackagingillustratesthat,underEuropeanDirective2012/19/EUgoverningusedelectricaland
electronicappliances,thisproductmaynotbedisposedofwithnormalhouseholdwaste.Youareresponsiblefordisposalofthis
equipmentthroughadesignatedwasteelectricalandelectronicequipmentcollection.Todeterminethelocationsfordroppingoffsuch
wasteelectricalandelectronic,contactyourlocalgovernmentofce,thewastedisposalorganizationthatservesyourhouseholdorthe
storeatwhichyoupurchasedtheproduct.
Attention users in United States:
PleasedisposeofaccordingtoallLocal,StateandFederalLaws.Forthedisposalorrecyclinginformation,contact:www.mygreenelectronics.comorwww.
eiae.org.
End of Life Directives-Recycling
YournewPublicInformationDisplaycontainsseveralmaterialsthatcanberecycledfornewusers.
PleasedisposeofaccordingtoallLocal,State,andFederallaws.
AsanENERGYSTARPartner,wehavedeterminedthatthisproductmeetstheENERGYSTARguidelinesforenergyefciency.
Restriction on Hazardous Substances statement (India)
Thisproductcomplieswiththe“E-Waste(Management)Rules,2016”CHAPTERV,rule16,sub-rule(1).WhereasNewElectricalandElectronic
EquipmentandtheircomponentsorconsumablesorpartsorsparesdonotcontainLead,Mercury,Cadmium,HexavalentChromium,polybrominated
biphenylsandpolybrominateddiphenylethersbeyondamaximumconcentrationvalueof0.1%byweightinhomogenousmaterialsforlead,mercury,
hexavalentchromium,polybrominatedbiphenylsandpolybrominateddiphenylethersandof0.01%byweightinhomogenousmaterialsforcadmium.
exceptofexemptionssetinSchedule2oftheRule.
E-Waste Declaration for India
Thissymbolontheproductoronitspackagingindicatesthatthisproductmustnotbedisposedofwithyourotherhouseholdwaste.
Insteaditisyourresponsibilitytodisposeofyourwasteequipmentbyhandingitovertoadesignatedcollectionpointfortherecycling
ofwasteelectricalandelectronicequipment.Theseparatecollectionandrecyclingofyourwasteequipmentatthetimeofdisposal
willhelptoconservenaturalresourcesandensurethatitisrecycledinamannerthatprotectshumanhealthandtheenvironment.
FormoreinformationaboutE-wastepleasevisithttp://www.india.philips.com/about/sustainability/recycling/index.pageandtoknow
whereyoucandropoffyourwasteequipmentforrecyclinginIndiapleasecontactonbelowgivencontactdetails.
Helplinenumber:1800-425-6396(MondaytoSaturday,9a.m.to5:30pm)
CentralizedE-wastecollectioncenter
Address:TPVTechnologyIndiaPrivateLimited,
59,MaheswariNagar,1stMainRoad,MahadevapuraPost,WhiteeldRoad
Bangalore,Karnataka,PIN:560048,Tel:080-3023-1000
E-mail:[email protected]
55BDL3050Q
ix
Batteries
ForEU:Thecrossed-outwheeledbinimpliesthatusedbatteriesshouldnotbeputtothegeneralhouseholdwaste!Thereisaseparate
collectionsystemforusedbatteries,toallowpropertreatmentandrecyclinginaccordancewithlegislation.
Pleasecontactyourlocalauthorityfordetailsonthecollectionandrecyclingschemes.
ForSwitzerland:Theusedbatteryistobereturnedtothesellingpoint.
Forothernon-EUcountries:Pleasecontactyourlocalauthorityforcorrectmethodofdisposaloftheusedbattery.
According to EU directive 2006/66/EC, the battery can’t be disposed improperly. The battery shall be separated
to collect by local service.
Após o uso, as pilhas
deverão ser entregues ao
estabelecimento comercial
ou
e/ou baterias
rede de assistência técnica
autorizada.
Information for EAC
Month and year of manufacturing please refer information in Rating label.
Name and location of manufacturer ООО “Профтехника”
Адрес: 3-й Проезд Марьиной рощи, 40/1 офис 1. Москва, 127018, Россия
Importer and information Наименование организации: ООО “Профтехника”
Адрес: 3-й Проезд Марьиной рощи, 40/1 офис 1. Москва, 127018, Россия
Контактное лицо: Наталья Астафьева,
+7 495 640 20 20
nat@profdisplays.ru

55BDL3050Q
x
Table Of Contents
1. Unpacking and Installation .......................................................1
1.1. Unpacking.........................................................................................1
1.2. PackageContents........................................................................1
1.3. InstallationNotes.........................................................................1
1.4. MountingonaWall....................................................................2
2. Parts and Functions ...................................................................3
2.1. ControlPanel.................................................................................3
2.2. Input/OutputTerminals.............................................................4
2.3. UsingofRemotesensorandpowerindicator............5
2.4. RemoteControl...........................................................................7
3. Connecting External Equipment.......................................... 11
3.1. ConnectingExternalEquipment(DVD/VCR/
VCD)...............................................................................................11
3.2. ConnectingaPC.......................................................................11
3.3. ConnectingAudioEquipment...........................................12
3.4. ConnectingMultipleDisplaysinaDaisy-chain
Conguration..............................................................................12
3.5. IRconnection..............................................................................13
3.6. IRPass-throughConnection...............................................14
4. Operation ................................................................................. 15
4.1. WatchtheConnectedVideoSource............................15
4.2. ChangePictureFormat.........................................................15
4.3. Overview.......................................................................................15
4.4. MediaPlayerintroduction:...................................................16
4.5. Browsermanual.........................................................................18
4.6. PDFreaderplay.........................................................................21
4.7. CMND&Play.............................................................................23
4.8. CustomApp................................................................................23
5. Signage display ......................................................................... 25
5.1. Setting..............................................................................................25
5.2. Wi-Fi................................................................................................25
5.3. Ethernet..........................................................................................25
5.4. Proxy................................................................................................26
5.5. SignageDisplay...........................................................................26
5.6. SystemTools................................................................................34
5.7. CloneMediaFile.......................................................................35
5.8. Display...........................................................................................36
5.9. Apps.................................................................................................36
5.10. Security...........................................................................................36
5.11. Date&time.................................................................................36
5.12. Developeroptions...................................................................36
5.13. About..............................................................................................37
5.14. Supplementary...........................................................................37
6. OSD Menu ............................................................................... 40
6.1. NavigatingtheOSDMenu..................................................40
6.2. OSDMenuOverview...........................................................40
7. Supported Media Formats .................................................... 46
8. Input Mode ............................................................................... 48
9. Pixel Defect Policy .................................................................. 49
9.1. PixelsandSub-Pixels...............................................................49
9.2. TypesofPixelDefects+DotDenition....................49
9.3. BrightDotDefects...................................................................49
9.4. DarkDotDefects.....................................................................50
9.5. ProximityofPixelDefects...................................................50
9.6. PixelDefectTolerances.........................................................50
9.7. MURA.............................................................................................50
10. Cleaning and Troubleshooting .............................................. 51
10.1. Cleaning..........................................................................................51
10.2. Troubleshooting.........................................................................52
11. Technical Specications ......................................................... 54
55BDL3050Q
1
1. Unpacking and Installation
1.1. Unpacking
• Thisproductispackedinacarton,togetherwiththestandardaccessories.
• Anyotheroptionalaccessorieswillbepackedseparately.
• Duetothesizeandweightofthisdisplayitisrecommendedfortwopeopletomoveit.
• Afteropeningthecarton,ensurethatthecontentsarecompleteandingoodcondition.
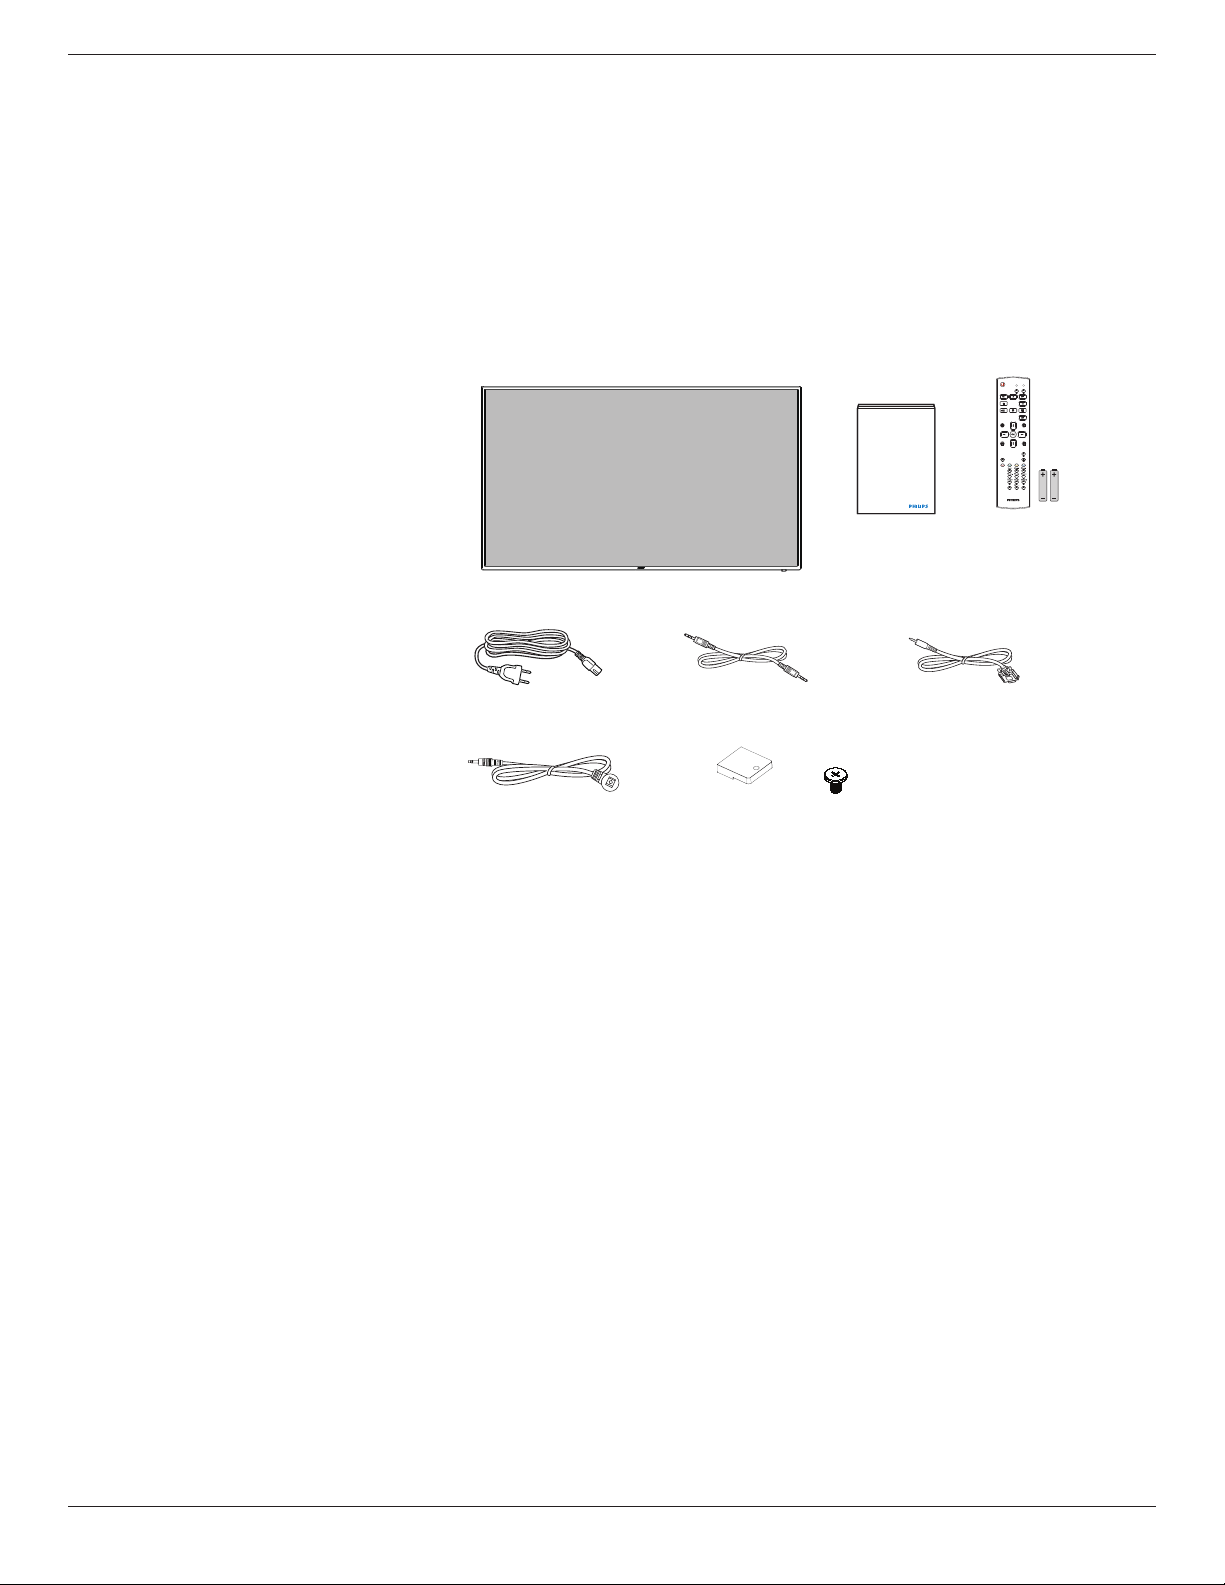
1.2. Package Contents
Pleaseverifythatyoureceivedthefollowingitemswithyourpackagecontent:
• LCDdisplay
• Quickstartguide
• RemotecontrolwithAAAbatteries
• Powercord
• RS232cable
• RS232daisychaincable
• IRsensorcable
• USBcoverandscrewx1
* The supplied power cord varies depending on destination.
Power Cord
Quick start guide
Remote Control
and AAA Batteries
RS232 Daisy Chain Cable
FORMAT
SOURCE
INFOLIST
OPTIONSADJUST
VOL
NORMAL
ID
ID SET ENTER
RS232 Cable
IR Sensor Cable
USB Cover x1
*Differencesaccordingtoregions
Displaydesignandaccessoriesmaydifferfromthoseillustratedabove.
NOTES:
• Forallotherregions,applyapowercordthatconformstotheACvoltageofthepowersocketandhasbeenapprovedbyandcomplieswiththe
safetyregulationsoftheparticularcountry(TypeH05W-F,2Gor3G,0.75or1mm
2
shouldbeused).
• Youmightliketosavethepackageboxandpackingmaterialforshippingthedisplay.
1.3. Installation Notes
• Duetothehighpowerconsumption,alwaysusetheplugexclusivelydesignedforthisproduct.Ifanextendedlineisrequired,pleaseconsultyour
serviceagent.
• Theproductshouldbeinstalledonaatsurfacetoavoidtipping.Thedistancebetweenthebackoftheproductandthewallshouldbemaintained
forproperventilation.Avoidinstallingtheproductinthekitchen,bathroomoranyotherplaceswithhighhumiditysoasnottoshortentheservicelife
oftheelectroniccomponents.
• Theproductcannormallyoperateonlyunder3000minaltitude.Ininstallationsataltitudesabove3000m,someabnormalitiesmaybeexperienced.
55BDL3050Q
2
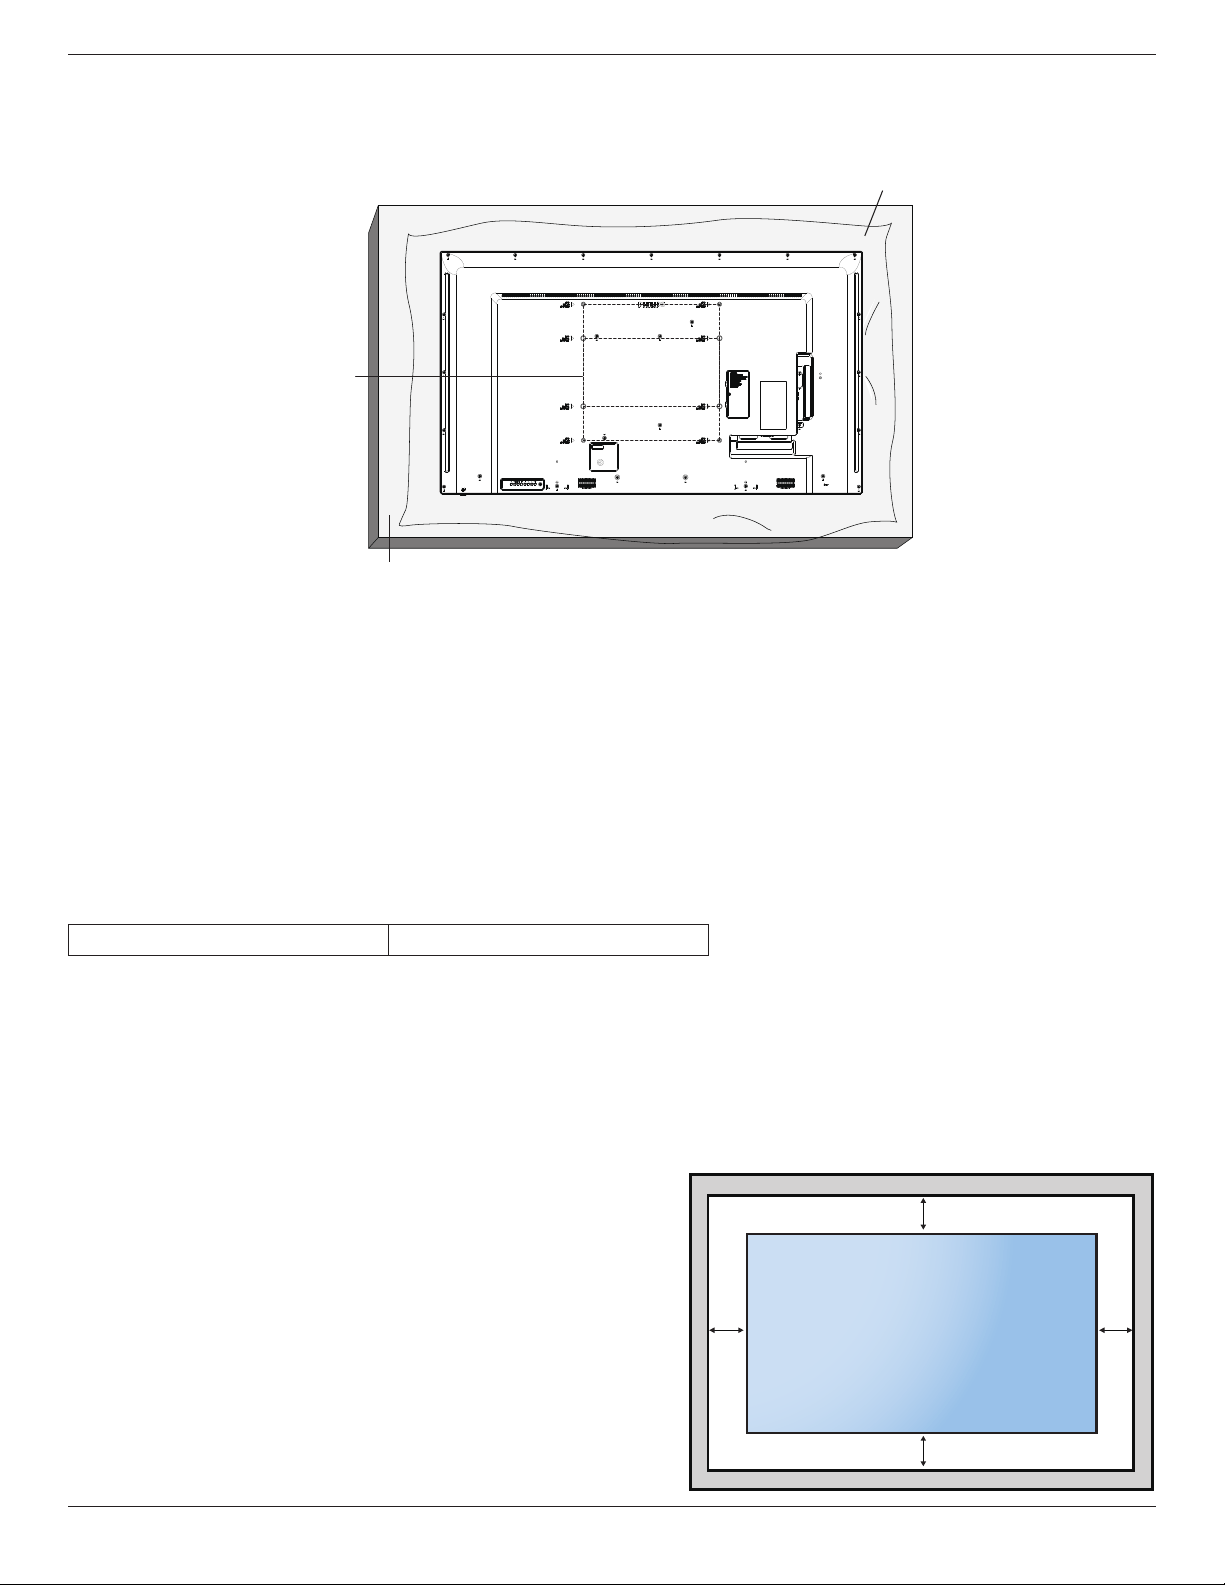
1.4. Mounting on a Wall
Tomountthisdisplaytoawall,youwillhavetoobtainastandardwall-mountingkit(commerciallyavailable).Werecommendusingamountinginterface
thatcomplieswithTUV-GSand/orUL1678standardinNorthAmerica.
Protective Sheet
VESA Grid
Table
1. Layaprotectivesheetonatable,whichwaswrappedaroundthedisplaywhenitwaspackaged,beneaththescreensurfacesoasnottoscratchthe
screenface.
2. Ensureyouhaveallaccessoriesformountingthisdisplay(wallmount,ceilingmount,tablestand,etc).
3. Followtheinstructionsthatcomewiththebasemountingkit.Failuretofollowcorrectmountingprocedurescouldresultindamagetotheequipment
orinjurytotheuserorinstaller.Productwarrantydoesnotcoverdamagecausedbyimproperinstallation.
4. Forthewall-mountingkit,useM6mountingscrews(havingalength10mmlongerthanthethicknessofthemountingbracket)andtightenthem
securely.
5. Unitwithoutbaseweight=15.96kg.Theequipmentanditsassociatedmountingmeansstillremainsecureduringthetest.ForuseonlywithULListed
WallMountBracketwithminimumweight/load:15.96kg.
6. Portraitisnotallowed.
1.4.1. VESA Grid
55BDL3050Q
400(H)x400(V)mm,400(H)x200(V)
Caution:
Topreventthedisplayfromfalling:
• Forwallorceilinginstallation,werecommendinstallingthedisplaywithmetalbracketswhicharecommerciallyavailable.Fordetailedinstallation
instructions,refertotheguidereceivedwiththerespectivebracket.
• Tolessentheprobabilityofinjuryanddamageresultingfromfallofthedisplayincaseofearthquakeorothernaturaldisaster,besuretoconsultthe
bracketmanufacturerforinstallationlocation.
Ventilation Requirements for enclosure locating
Toallowheattodisperse,leavespacebetweensurroundingobjectsasshowninthe
diagrambelow.
100 mm 100 mm
100 mm
100 mm
55BDL3050Q
3
2. Parts and Functions
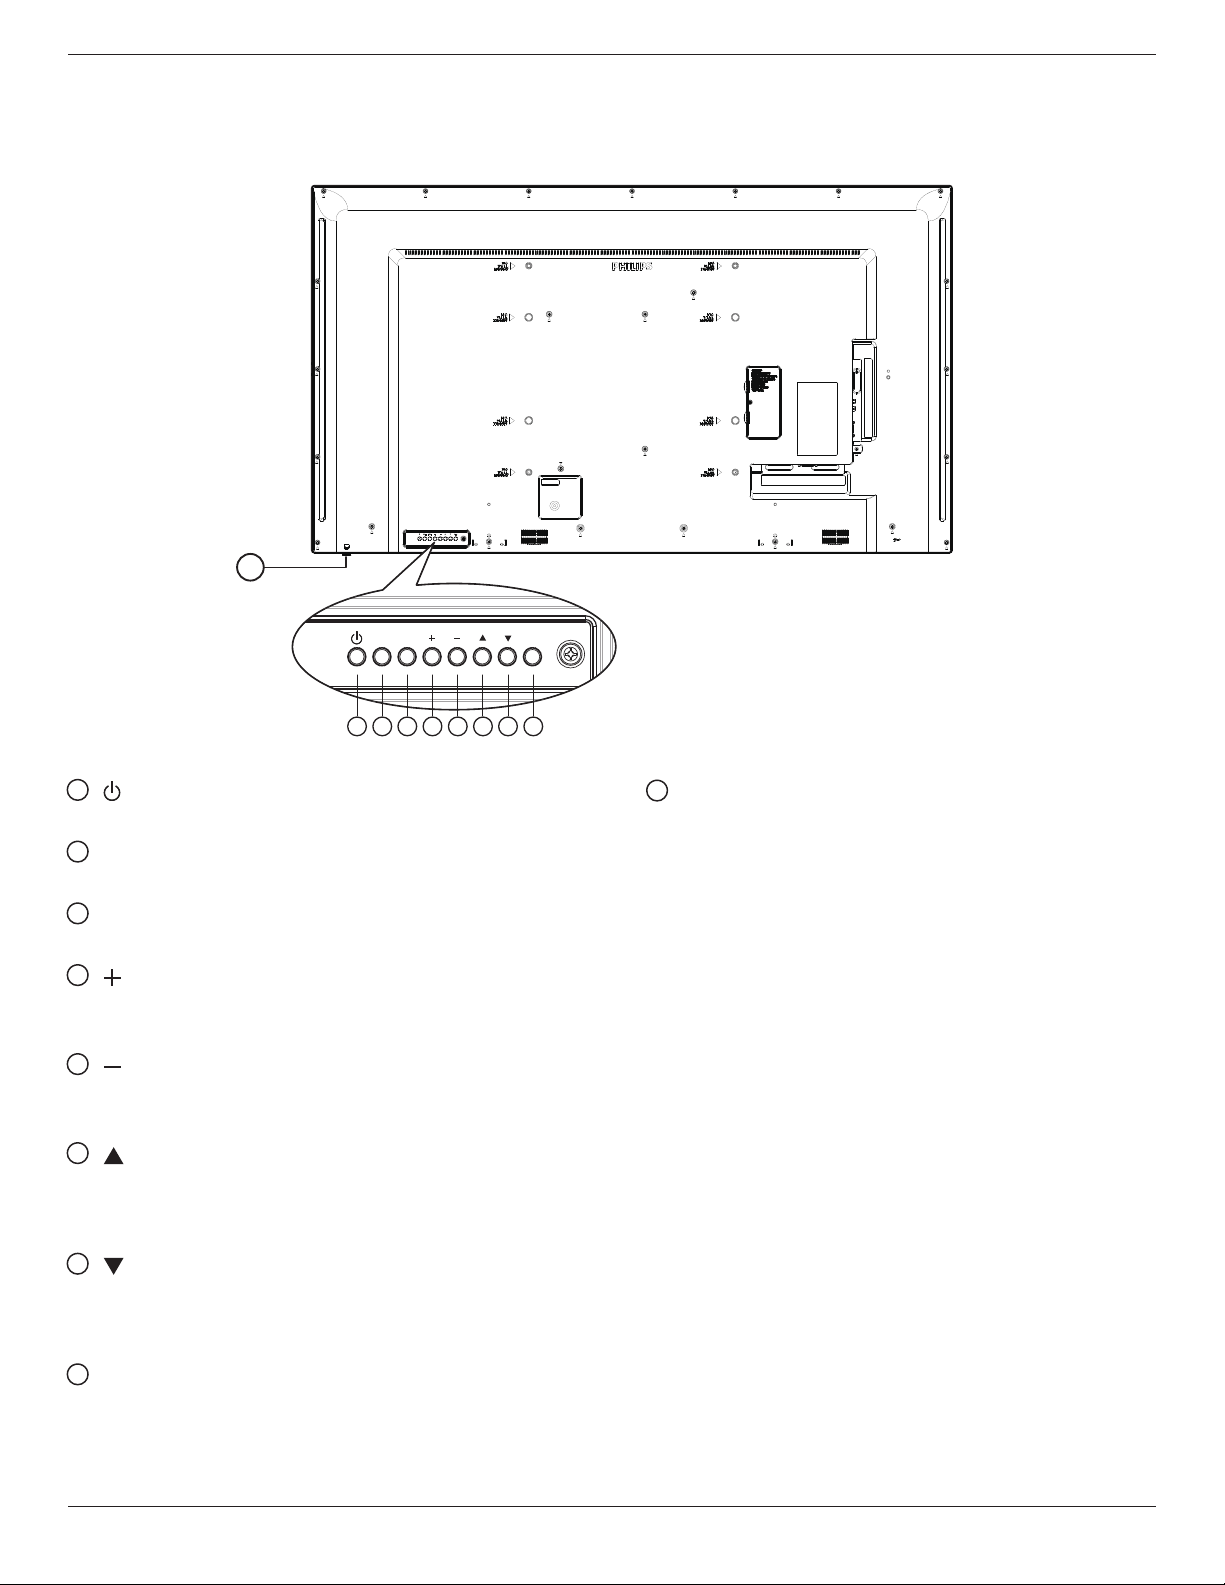
2.1. Control Panel
MUTE INPUT
MENU
1 2 3 4 5 6 7 8
9
1
[ ] button
Usethisbuttontoturnthedisplayonorputthedisplaytostandby.
2
[MUTE] button
SwitchtheaudiomuteON/OFF.
3
[INPUT] button
Choosetheinputsource.
4
[ ] button
• Increasethevolume
• EnterintosubmenuwhileOSDmenuison
5
[ ] button
• Decreasethevolume
• BacktopreviousmenuwhileOSDmenuison
6
[ ] button
• Movethehighlightbaruptoadjusttheselecteditemwhile
OSDmenuison
• Increasetheadjustmentwhileadjustvalue.
7
[ ] button
• Movethehighlightbardowntoadjusttheselecteditemwhile
OSDmenuison.
• Decreasetheadjustmentwhileadjustvalue.
8
[MENU] button
ReturntopreviousmenuwhileOSDmenuison,ortoactivatethe
OSDmenuwhenOSDmenuisoff.
9
Remote control sensor and power status indicator
• Receivescommandsignalsfromtheremotecontrol.
• IndicatestheoperatingstatusofthedisplaywithoutOPS:
- Lightsgreenwhenthedisplayisturnedon
- Lightsredwhenthedisplayisinstandbymode
- When{SCHEDULE}isenabled,thelightblinksgreenandred
- Ifthelightblinksred,itindicatesthatafailurehasbeen
detected
- Lightsoffwhenthemainpowerofthedisplayisturnedoff
* Using IR sensor cable for better remote control performance.
(Please refer to the instructions of 3.5)
55BDL3050Q
4
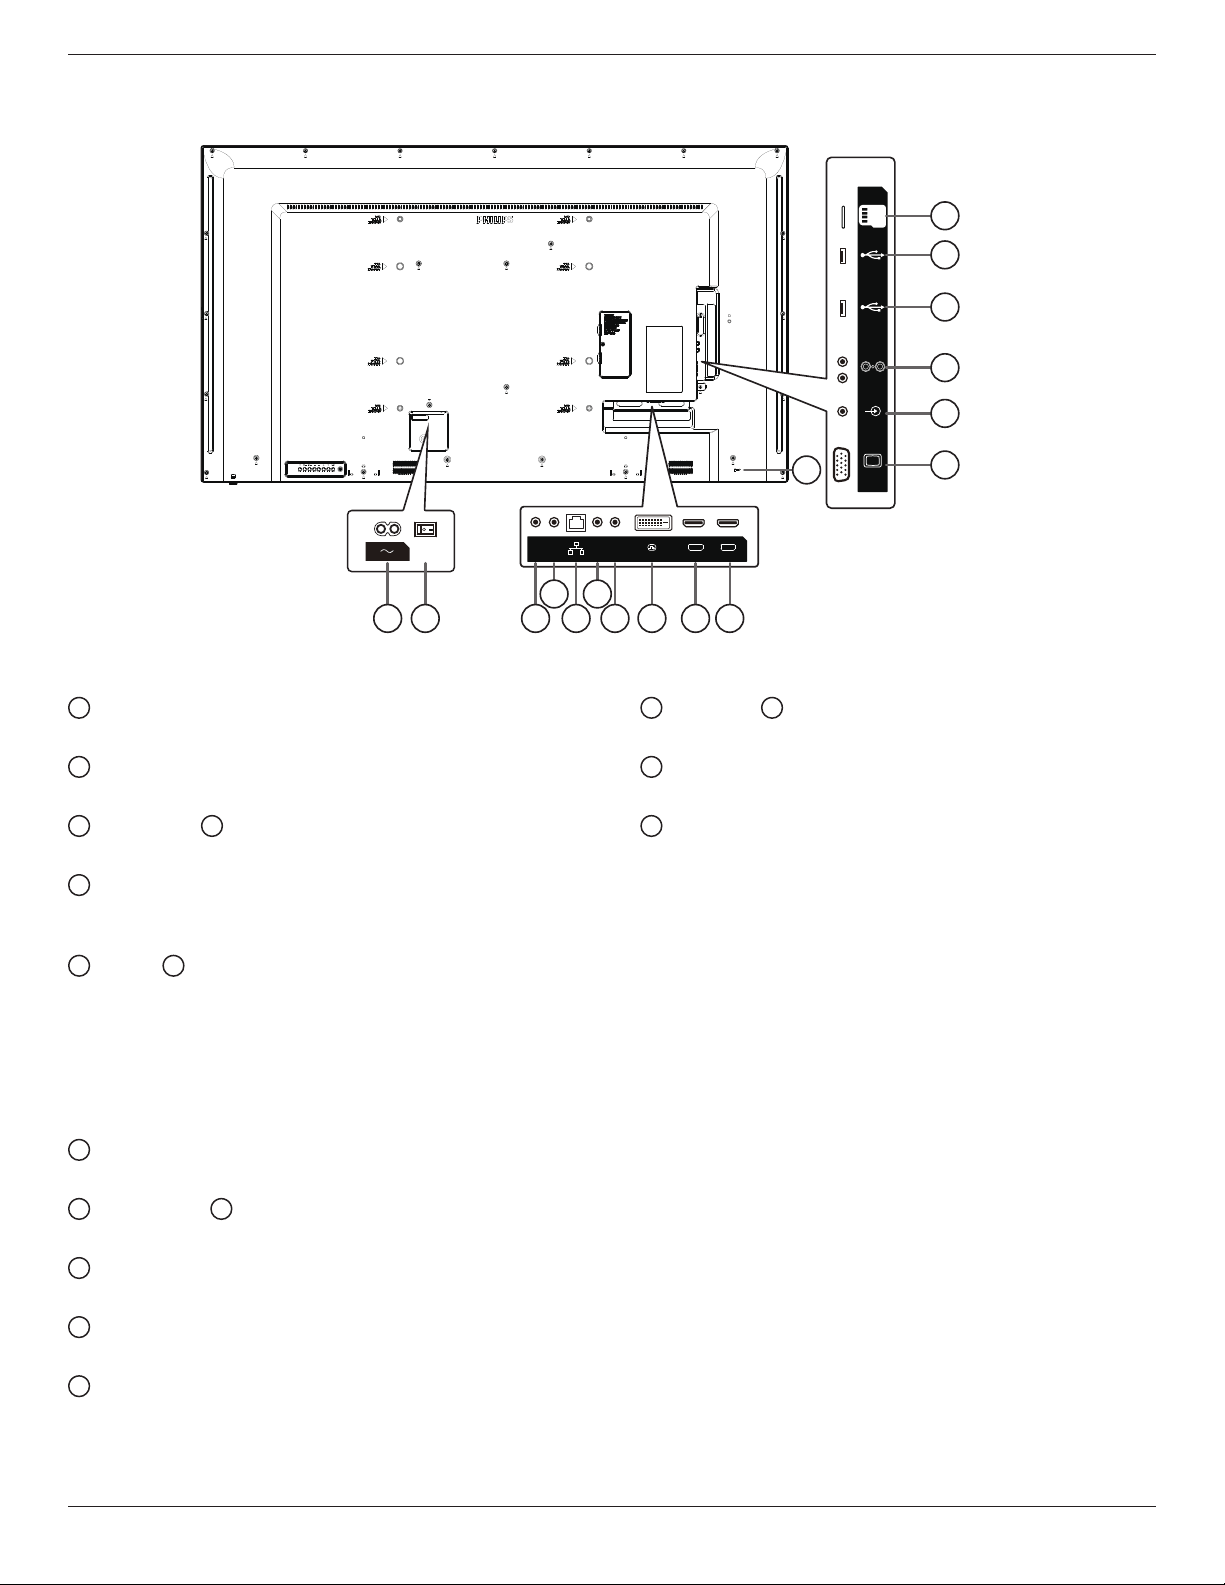
2.2. Input/Output Terminals
PC LINE IN
VGA IN
USB 3.0
USB 2.0
AUDIO OUT
MICRO SD
11
17
12
13
15
14
16
1 32 5
4 6
7 98 10
HDMI 1 IN HDMI 2 IN
IR-IN IR-OUT
RJ45
RS232
OUT
RS232
IN
DVI IN
AUDIO OUT
1
AC IN
ACpowerinputfromthewalloutlet.
2
MAIN POWER SWITCH
Switchthemainpoweron/off.
3
RS232 IN /
4
RS232 OUT
RS232networkinput/outputfortheloop-throughfunction.
5
RJ-45
LANcontrolfunctionfortheuseofremotecontrolsignalfrom
controlcenter.
6
IR IN /
7
IR OUT
IRsignalinput/outputfortheloop-throughfunction.
NOTES:
• Thisdisplay’sremotecontrolsensorwillstopworkingifthejack
[IRIN]isconnected.
• ToremotelycontrolyourA/Vdeviceviathisdisplay,refertopage
14fororIRPassThroughconnection.
8
DVI IN
DVIvideoinput.
9
HDMI1 IN /
10
HDMI2 IN
HDMIvideo/audioinput.
11
VGA IN (D-Sub)
VGAvideoinput.
12
PC LINE IN
AudioinputforVGAsource(3.5mmstereophone).
13
AUDIO OUT
AudiooutputtoexternalAVdevice.
14
USB 2.0 /
15
USB 3.0 PORT
ConnectyourUSBstoragedevice
16
MICRO SD CARD
ConnectyourMICROSDCARD.
17
SECURITY LOCK
Usedforsecurityandtheftprevention.
55BDL3050Q
5
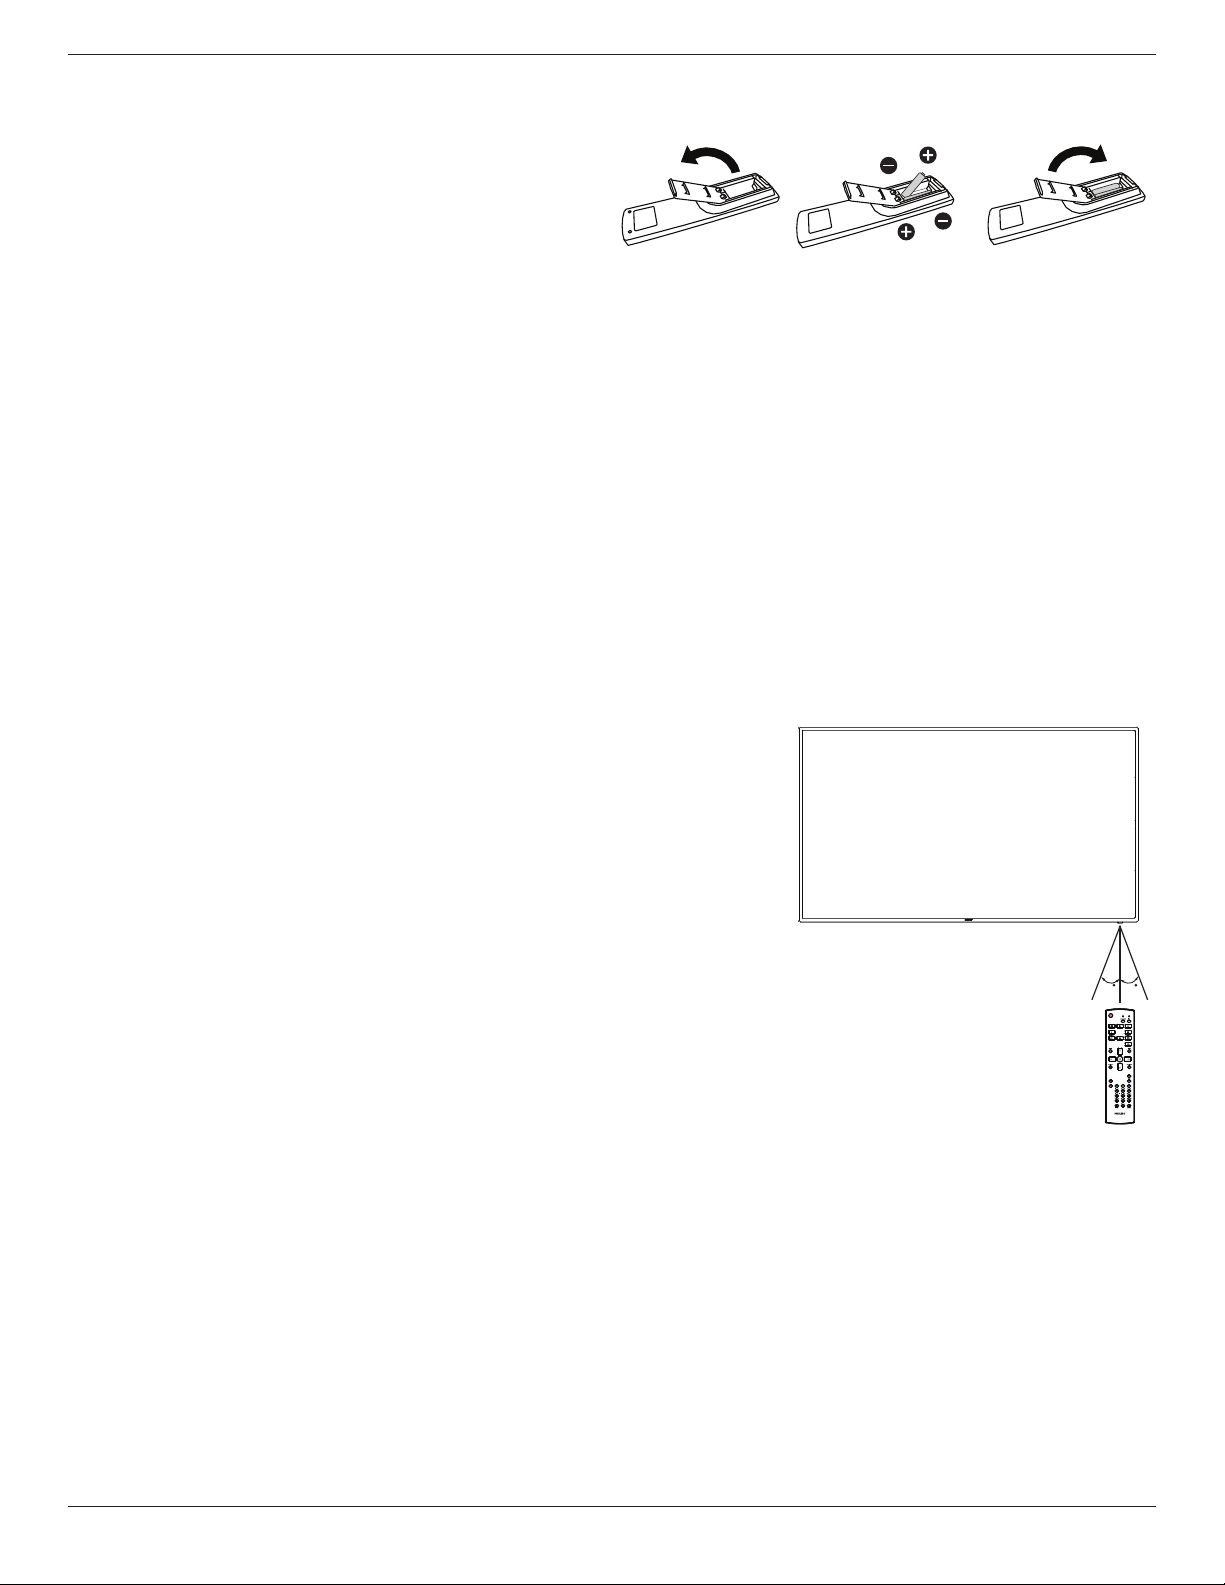
2.2.1. Inserting the batteries in the remote control
Theremotecontrolispoweredbytwo1.5VAAAbatteries.
Toinstallorreplacebatteries:
1. Pressandthenslidethecovertoopenit.
2. Alignthebatteriesaccordingtothe(+)and(–)indicationsinsidethe
batterycompartment.
3. Replacethecover.
Caution:
Theincorrectuseofbatteriescanresultinleaksorbursting.Besuretofollowtheseinstructions:
• Place“AAA”batteriesmatchingthe(+)and(–)signsoneachbatterytothe(+)and(–)signsofthebatterycompartment.
• Donotmixbatterytypes.
• Donotcombinenewbatterieswithusedones.Itcausesshorterlifeorleakageofbatteries.
• Removethedeadbatteriesimmediatelytopreventthemfromliquidleakinginthebatterycompartment.Don’ttouchexposedbatteryacid,asitcan
damageyourskin.
NOTE: Ifyoudonotintendtousetheremotecontrolforalongperiod,removethebatteries.
2.2.2. Handling the remote control
• Donotsubjecttostrongshock.
• Donotallowwaterorotherliquidtosplashtheremotecontrol.Iftheremotecontrolgetswet,wipeitdryimmediately.
• Avoidexposuretoheatandsteam.
• Otherthantoinstallthebatteries,donotopentheremotecontrol.
2.2.3. Operating range of the remote control
Pointthetopoftheremotecontroltowardthedisplay’sremotecontrolsensorwhenpressinga
button.
Usetheremotecontrolwithinadistanceoflessthan6m(pullthelensdownandusetheremote
controlfromthefront)/19ftfromthedisplay’ssensor,andahorizontalandverticalangleofless
than20degrees.
NOTE: Theremotecontrolmaynotfunctionproperlywhentheremotecontrolsensoronthe
displayisunderdirectsunlightorstrongillumination,orwhenthereisanobstacleinthe
pathofsignaltransmission.
2020
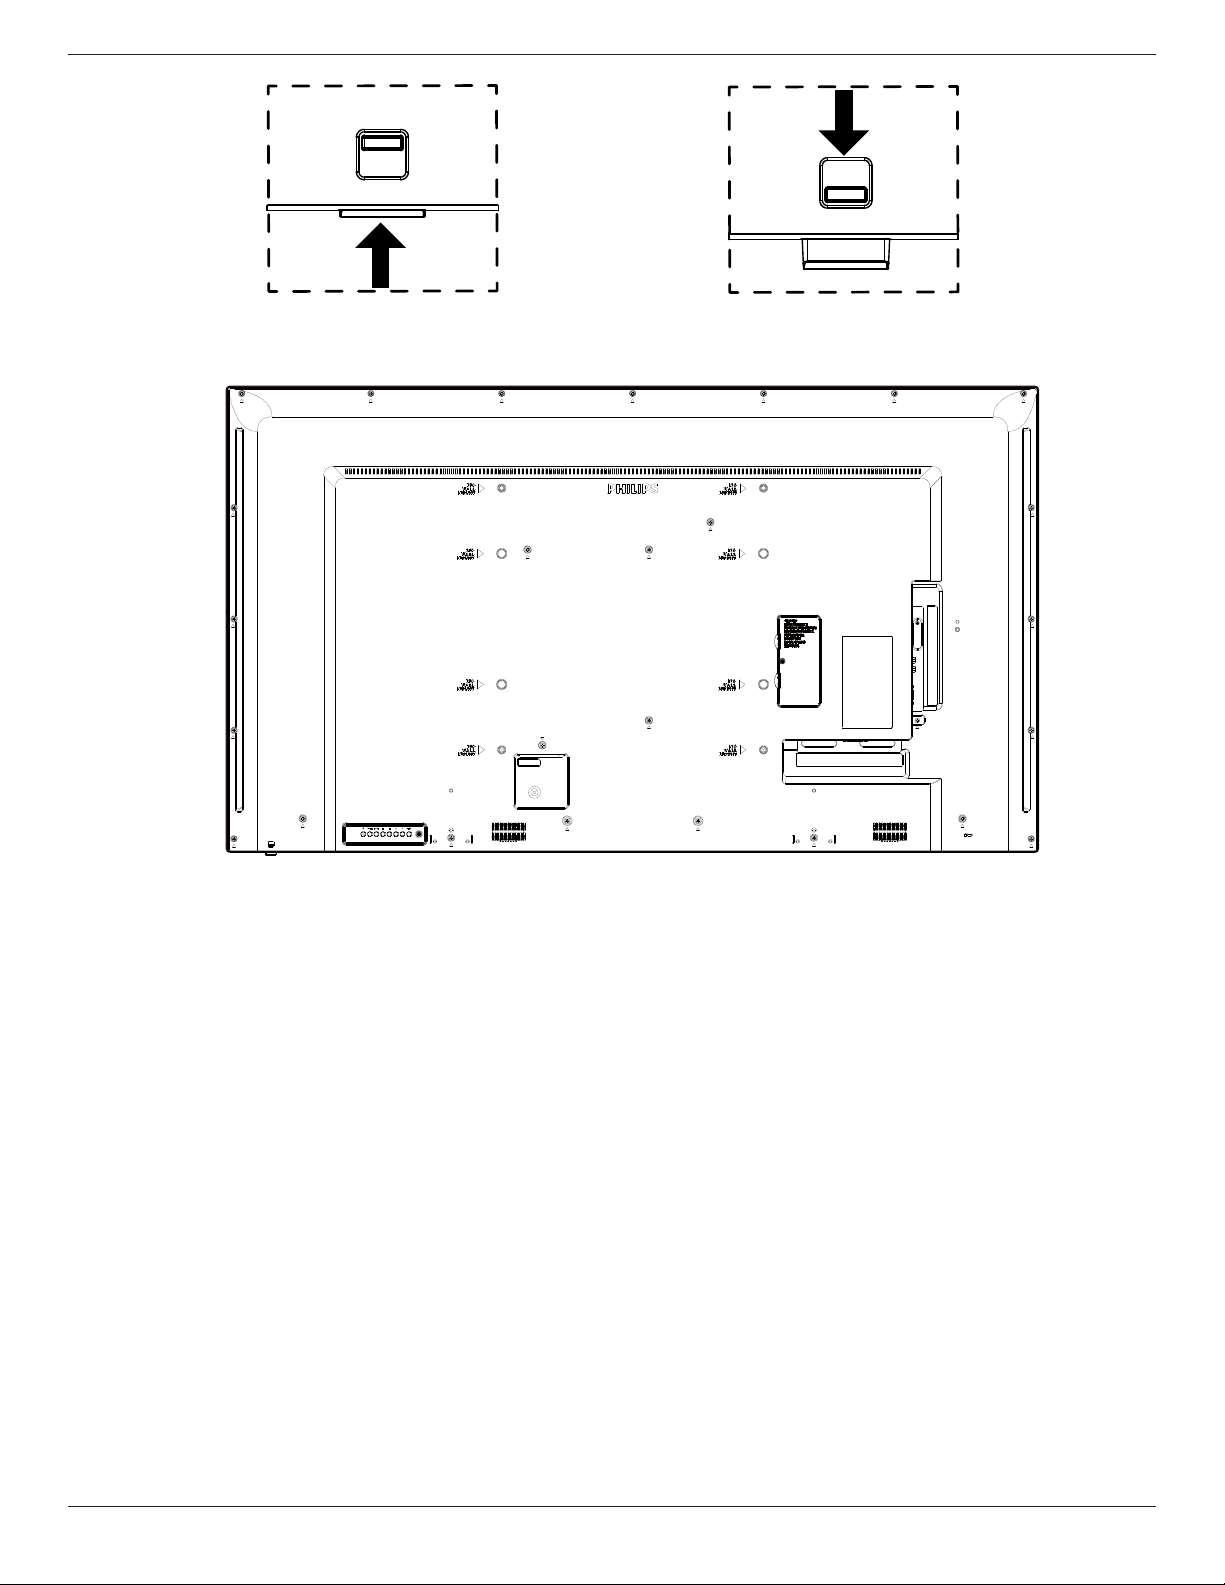
2.3. Using of Remote sensor and power indicator
1. Pushdownthelenstohavebetterremotecontrolperformanceandeasytoobservethelightinformationofpowerstatus
2. Pullupthelensbeforemountingthedisplayforvideowallapplication
3. Pull/Pushthelensuntilhearingtheclicksound
55BDL3050Q
6
Push up to collapse the lens Push down to extend the lens
55BDL3050Q
7
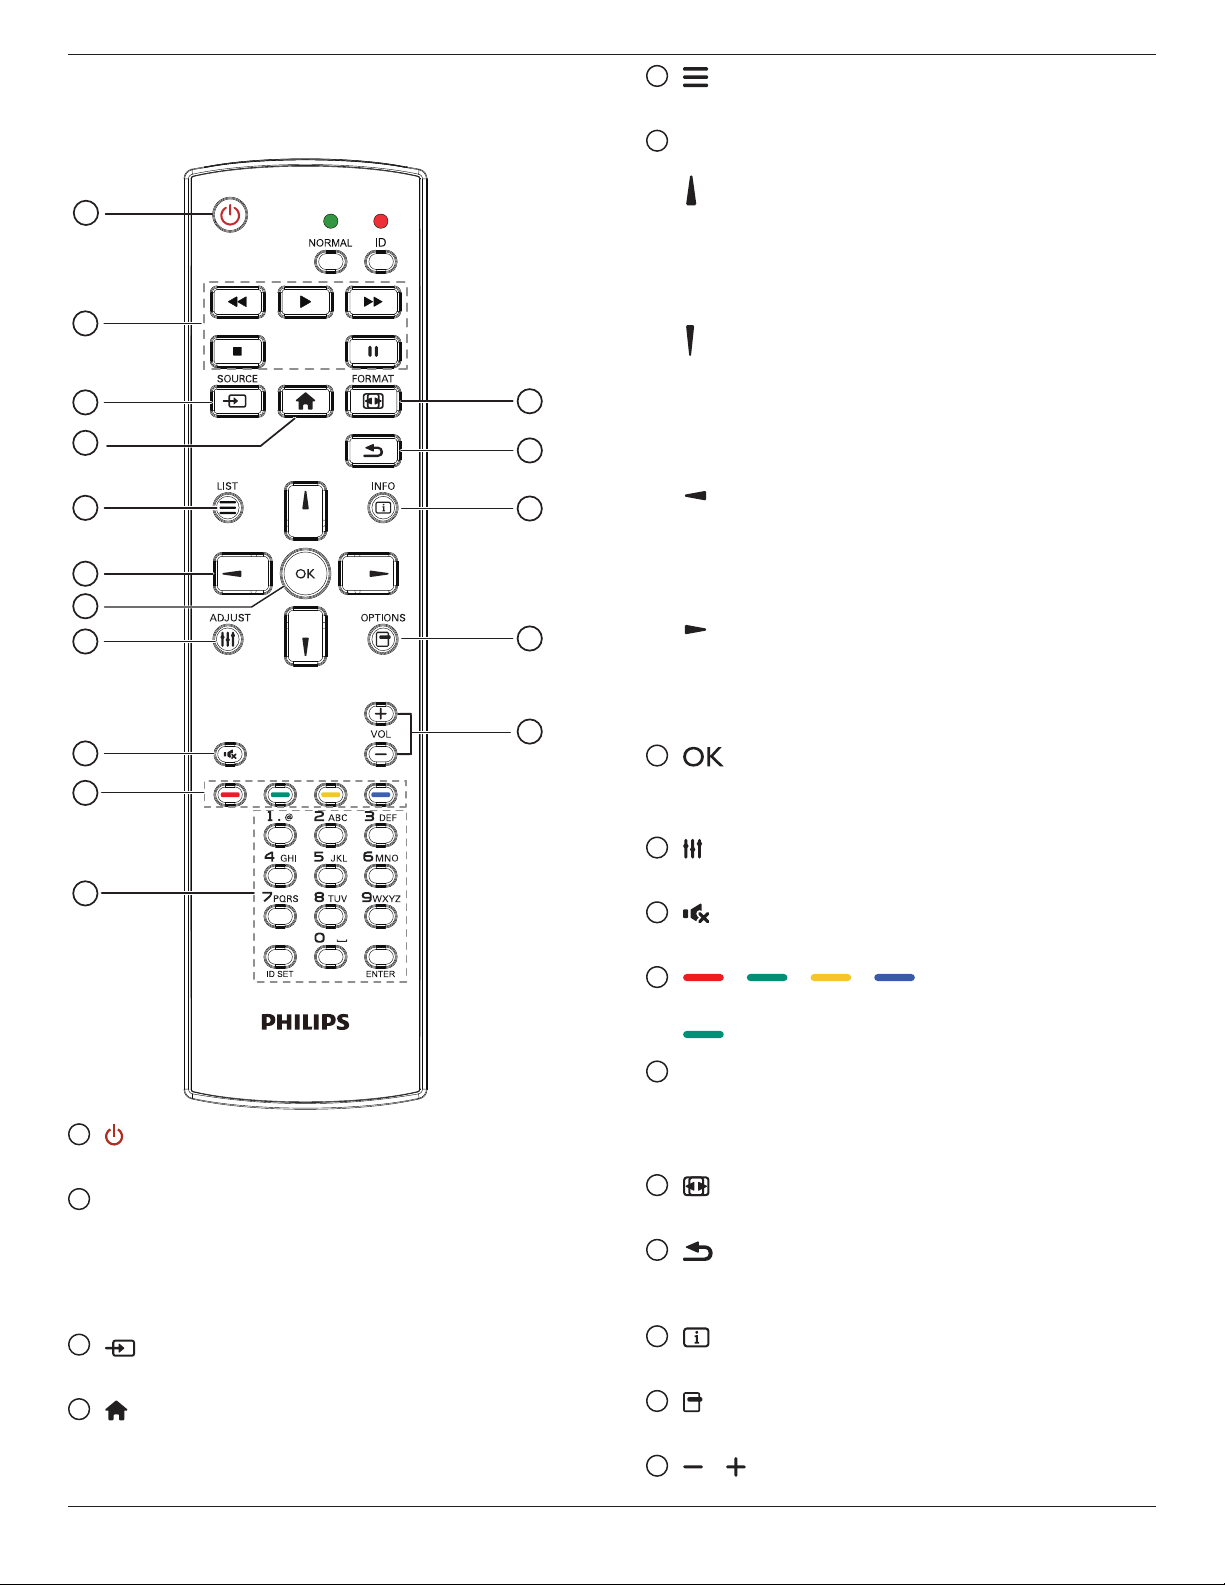
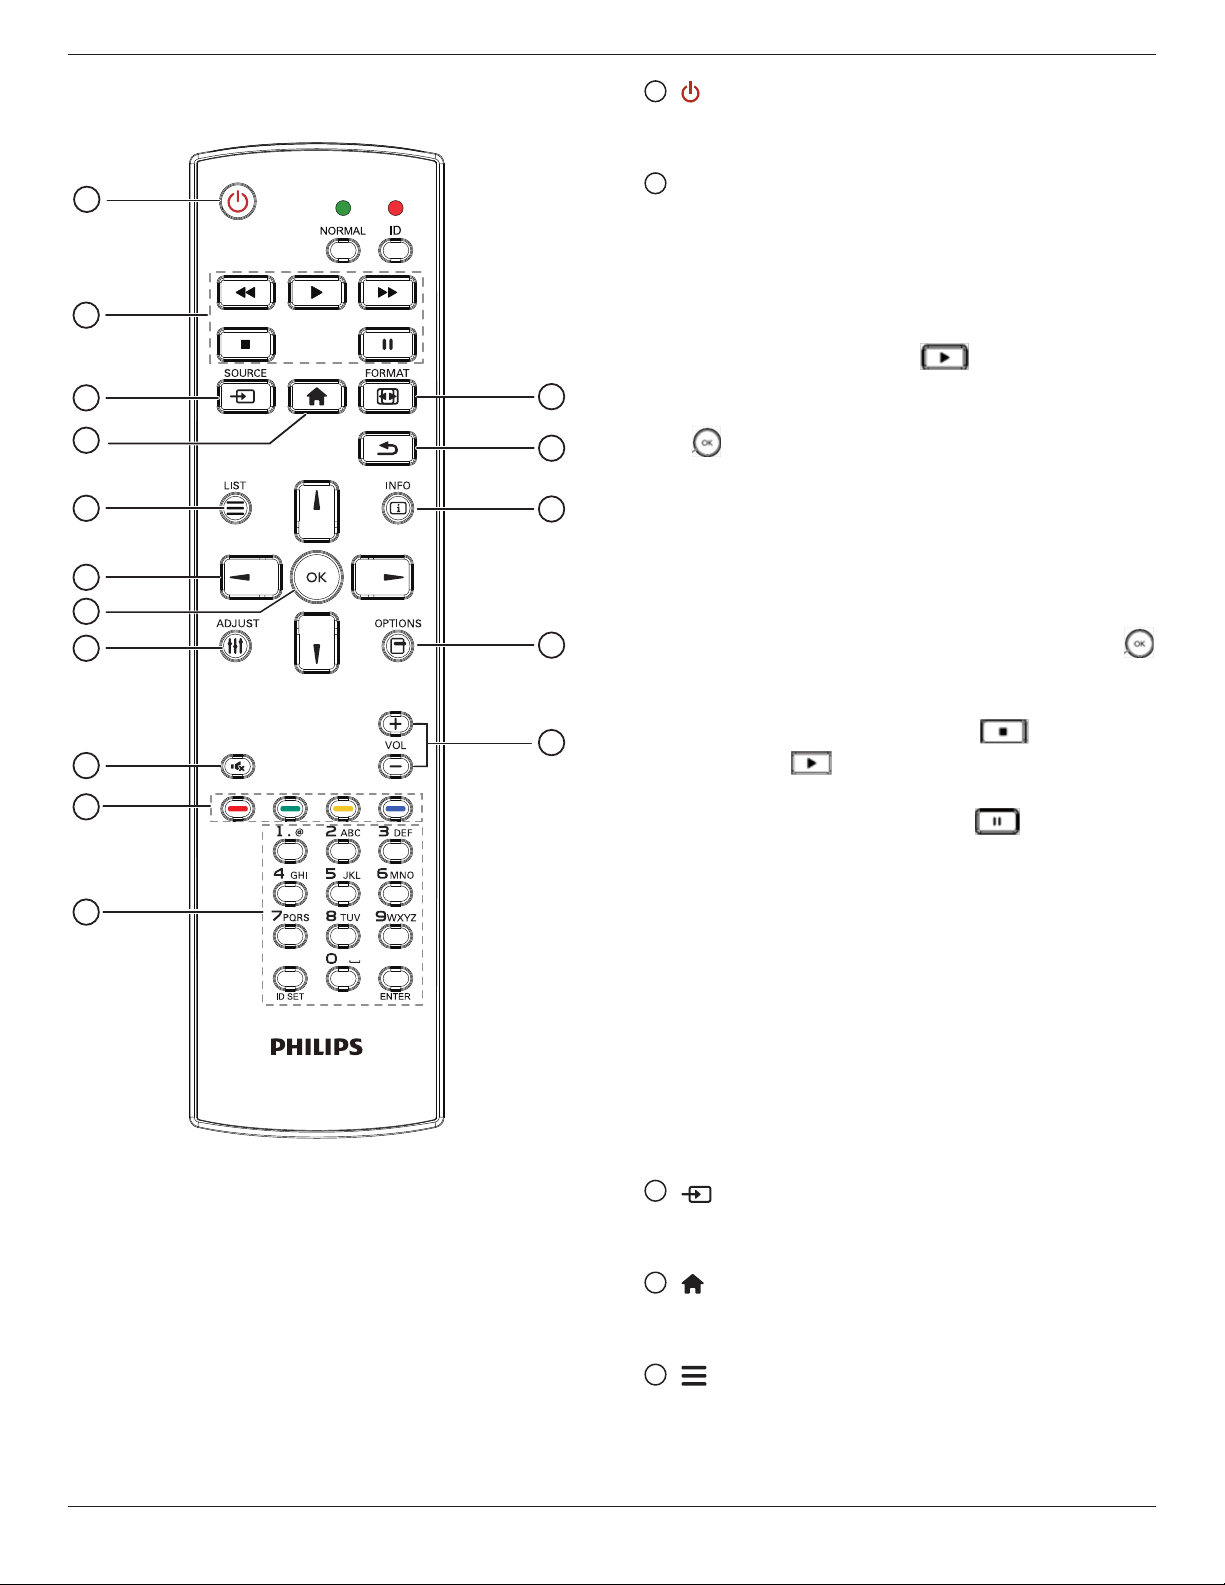
2.4. Remote Control
2.4.1. General functions
1
2
3
4
5
6
7
8
10
9
12
14
15
11
13
16
1
[ ] POWER button
PowerON/OFF.
2
[PLAY] buttons
Controlplaybackofmediales.(forMediaInputonly)
Freeze feature
Pause:Freezehotkeyforallinputscontent.
Play:Unfreezehotkeyforallinputcontent.
3
[ ] SOURCE button
Root Menu:GotoVideosourceOSD.
4
[ ] HOME button
Root Menu:GotoMainMenuOSD.
Others:ExitOSD.
5
[ ] LIST button
Nofunction.
6
NAVIGATION buttons
[ ]
Root Menu:GotoSmartpictureOSD.
Main Menu:Movethehighlightbaruptoadjusttheselecteditem.
IR Daisy Chain Menu:IncreasecontrolledGroupIDnumber.
[ ]
Root Menu:GotoAudiosourceOSD.
Main Menu:Movethehighlightbardowntoadjusttheselected
item.
IR Daisy Chain Menu:DecreasecontrolledGroupIDnumber.
[ ]
Main Menu:gotopreviouslevelmenu.
Source Menu:Exitsourcemenu.
Volume Menu:DecreaseAudioVolume.
[ ]
Main Menu:gotonextlevelmenuorsetselectedoption.
Source Menu:Gotoselectedsource.
Volume Menu:IncreaseAudioVolume.
7
[ ] button
Root Menu:GotoIRdaisychainOSDinPrimary/Secondarymode.
Main Menu:Conrmanentryorselection.
8
[ ] ADJUST button
GotoAutoAdjustOSDforVGAonly.
9
[ ] MUTE button
ToggleAudioMute/Unmute.
10
[ ] [ ] [ ] [ ] COLOR buttons
Choosetasksoroptions.(forMediaInputonly)
[ ]
HotkeyforWindowselectionfunction.
11
[Number/ ID SET/ ENTER] button
Entertextfornetworksetting.
PresstosetthedisplayID.Referto2.4.2. ID Remote Control
formoredetail.
12
[ ] FORMAT button
ChangeImageZoomMode[Full][4:3][1:1][16:9][21:9][Custom].
13
[ ] BACK button
Returntothepreviousmenupageorexitfromtheprevious
function.
14
[ ] INFO button
ShowInformationOSD
15
[ ] OPTIONS button
Nofunction.
16
[ ] [ ] VOLUME button
Adjustvolume.

55BDL3050Q
8
2.4.2. ID Remote Control
YoucansettheremotecontrolIDwhenyouwanttousethisremote
controlononeofseveraldifferentdisplays.
Press[ID]button.TheredLEDblinkstwice.
1. Press[IDSET]buttonformorethan1secondtoentertheID
Mode.TheredLEDlightsup.
Pressthe[IDSET]buttonagainwillexittheIDMode.TheredLED
lightsoff.
Pressthedigitnumbers[0]~[9]toselectthedisplayyouwantto
control.
Forexample:press[0]and[1]fordisplayNo.1,press[1]and[1]for
displayNo.11.
Thenumbersavailablearefrom[01]~[255].
2. Notpressinganybuttonwithin10secondswillexittheIDMode.
3. Ifanerrorpressingofbuttonsotherthanthedigitsoccured,wait
1secondaftertheredLEDlightsoffandthenlightsupagain,then
pressthecorrectdigitsagain.
4. Press[ENTER]buttontoconrm.TheredLEDblinkstwiceand
thenlightsoff.
NOTE:
• Press[NORMAL]button.ThegreenLEDblinkstwice,indicatingthe
displayisinnormaloperation.
• ItisnecessarytosetuptheIDnumberforeachdisplaybefore
selectingitsIDnumber.
55BDL3050Q
9
2.4.3. Remote Control buttons on Android
source
1
2
3
4
5
6
7
8
10
9
12
14
15
11
13
16
1
[ ] POWER button
Turnthedisplayonorputthedisplaytostandby.
ThebuttonisonlycontrolledbyScalar.
2
[PLAY] buttons
1.Controlplaybackofmedia(video/audio/picture)les.
Thereare4waystoplaymediales.
1)FileManager
FindthemedialefromtheFileManagerandselectittoplay.
2)MediaPlayer->Compose->editornewaddplaylist->
chooseanymediales->press toplaythemediale
directly.
3)MediaPlayer->Play->choosenon-emptyplaylist->press
toplayallthemedialesintheplaylist.
4)SetmediaplaylistinBootonSourceorSchedulebyOSD
menu.
2.PlayPDFle
Thereare3waystoplaymediales.
1)FileManager
FindthepdflefromtheFileManagerandselectittoplay.
2)PDFPlayer->Play->choosenon-emptyplaylist->press
toplayallthePDFlesintheplaylist.
3)SetpdfplaylistinBootonSourceorSchedulebyOSDmenu.
3.WhenplayingPDF,videoormusic,press tostopplaying.
Thenifpressing again,playingwillbestartedfromthe
beginningofthele.
4.WhenplayingPDF,videoormusic,press buttontopause
playing.
5.Allmediaorpdflesshouldbeputatthefolder,whichisnamed
“philips”withsub-folder,undertherootdirectoryofthespecied
storage(internal/USB/SDCard).Allsub-folders(video/photo/music/
pdf)arenamedbymediatypesandshouldn’tbechanged.
videos: {root dir of storage}/philips/video/
photos: {root dir of storage}/philips/photo/
music : {root dir of storage}/philips/music/
pdfs : {root dir of storage}/philips/pdf/
Notethattherootdirectoriesofthreestoragesare
Internal storage: /sdcard
USB storage: /mnt/usb_storage
SD card : /mnt/external_sd
3
[ ] SOURCE button
Chooseinputsource.
ThebuttonisonlycontrolledbyScalar.
4
[ ] HOME button
AccessOSDmenu.
ThebuttonisonlycontrolledbyScalar.
5
[ ] LIST button
1.Inthecontentofthewebpage,movethefocusuptothenext
clickableitems.
2.Movethefocusuptothenextcontrolorwidgetsuchasbuttons.

55BDL3050Q
10
6
NAVIGATION buttons
1.Navigatethroughmenusandchooseitems.
2.Inthecontentofthewebpage,thesebuttonsaretocontrolthe
scrollbarofthescreen.Press or isformovingverticalscroll
barupordown.Press or isformovinghorizontal
scrollbarleftorright.
3.ForPDFles,
»
whenzoomin/outhasbeenperformed,
Press , , or toadjustthepositionofthe
screen.
»
whenzoomin/outhasbeennotperformed,
Press togotothenextpage.
Press togotothepreviouspage.
7
[ ] button
Conrmanentryorselection.
8
[ ] ADJUST button
1.Inthecontentofthewebpage,movethefocusdowntothenext
clickableitems.
2.Movethefocusdowntothenextcontrolorwidgetsuchas
buttons.
9
[ ] MUTE button
Presstoturnthemutefunctionon/off.
ThebuttonisonlycontrolledbyScalar.
10
[ ] [ ] [ ] [ ] COLOR buttons
1. :NofunctiononAndroidsource.Thesetwobuttons
areonlycontrolledbyScalar.
2.ForPDFles,
press buttontoperformzoom-in;
press buttontoperformzoom-out.
Afterzoom-inorzoom-out,press buttontorevertthepdfle
totheoriginalsize.
11
[Number/ ID SET/ ENTER] button
1.NofunctionsforIDSET andENTER onAndroid
source.ThesebuttonsareonlycontrolledbyScalar.
2.ForPDFle,enterthepagenumberbypressingnumberbuttons
andthenpress buttontojumptothespecicpage.
12
[ ] FORMAT button
Changepictureformat.ThebuttonisonlycontrolledbyScalar.
13
[ ] BACK button
Returntothepreviouspageorexitfromthepreviousfunction.
14
[ ] INFO button
1.Displayinformationaboutcurrentinputsignal.Itisshownby
Scalar.
2.MediaPlayer->Compose->editornewaddplaylist->choose
anymediales->press toshowtheinformationofthe
chosenmediale.
15
[ ] OPTIONS button
OpentoolboxinMediaPlayerorPDFPlayer.
1.MediaPlayer->Compose->Editornewaddplaylist->press
toopentoolbox.Toolboxwillbeslidefromtheleftsideof
thescreen.
2.PDFPlayer->Compose->Editornewaddplaylist->press
toopentoolbox.Toolboxwillbeslidefromtheleftsideof
thescreen.
16
[ ] [ ] VOLUME button
Adjustvolume.ThebuttonsareonlycontrolledbyScalar.

55BDL3050Q
11
3. Connecting External Equipment
3.1. Connecting External Equipment (DVD/VCR/VCD)
3.1.1. Using HDMI video input
DVD / VCR / VCD
HDMI 1 IN HDMI 2 IN
HDMI Out
[HDMI IN]
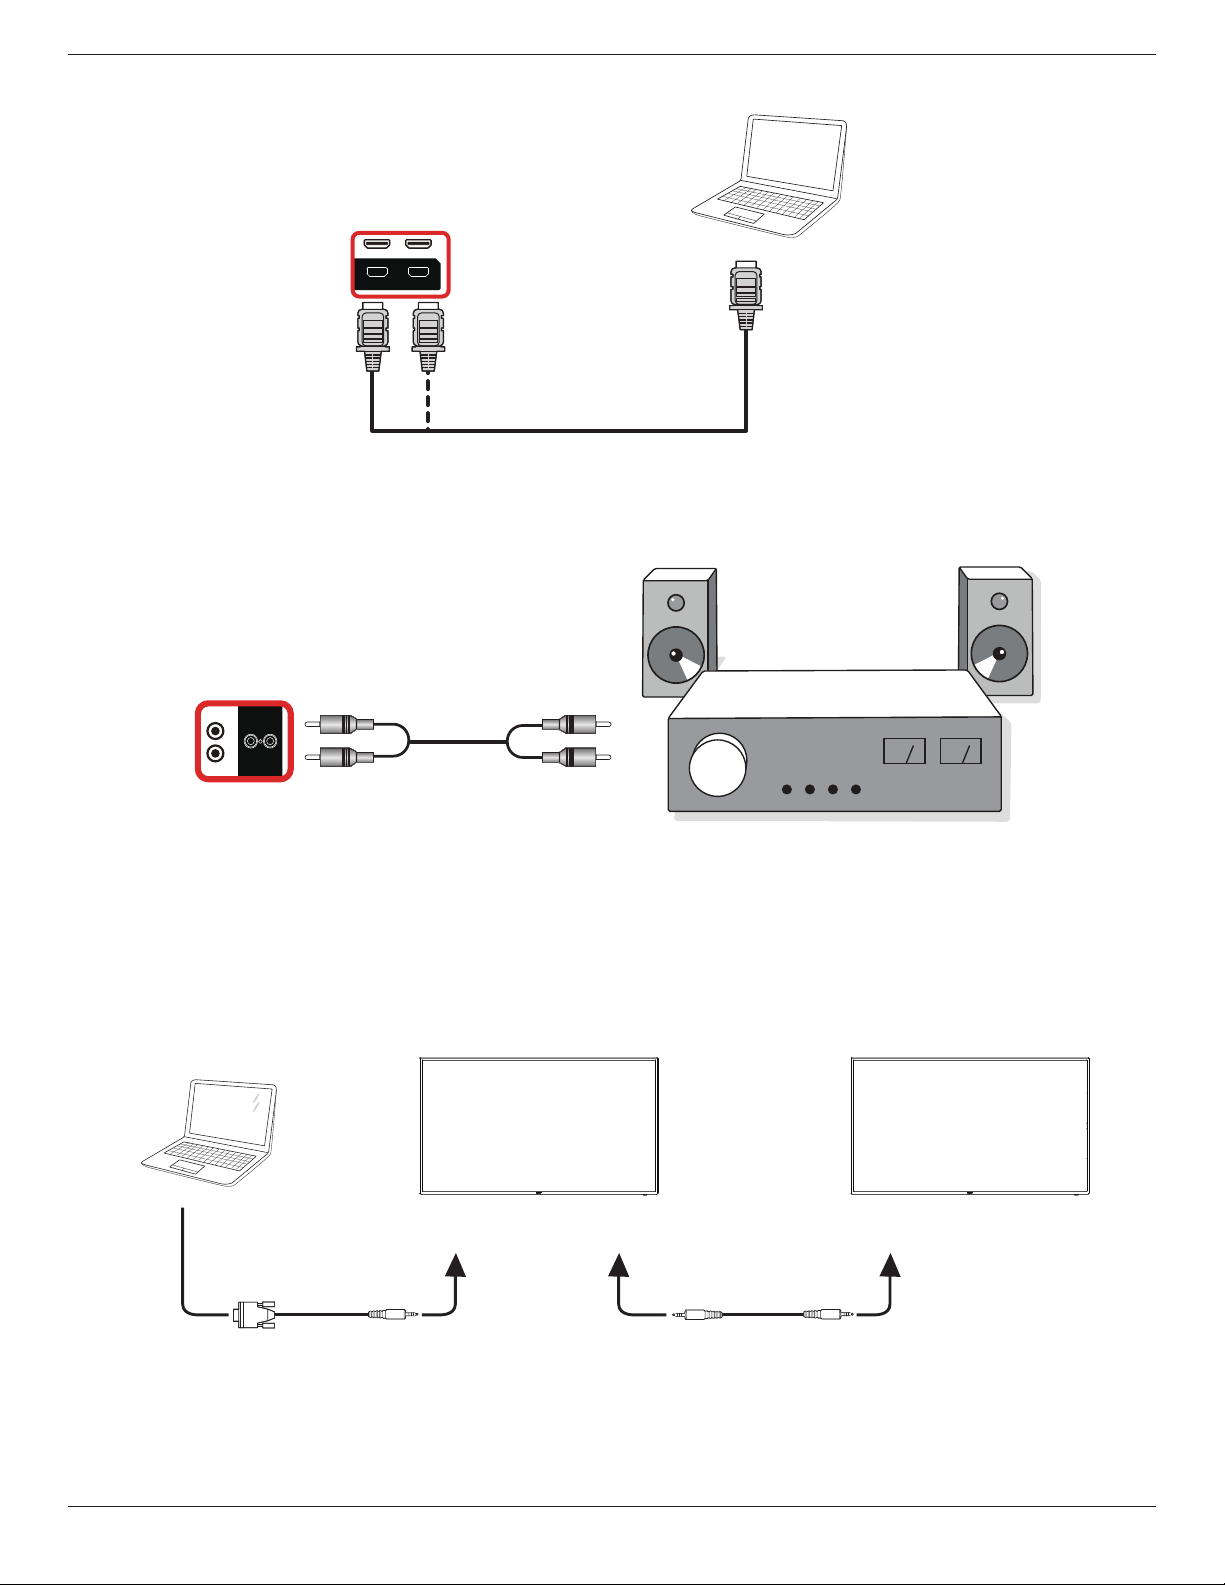
3.2. Connecting a PC
3.2.1. Using VGA input
PC
PC LINE IN
VGA IN
[VGA IN]
[VGA AUDIO IN]
VGA Out
D-Sub 15 pin
Audio Out
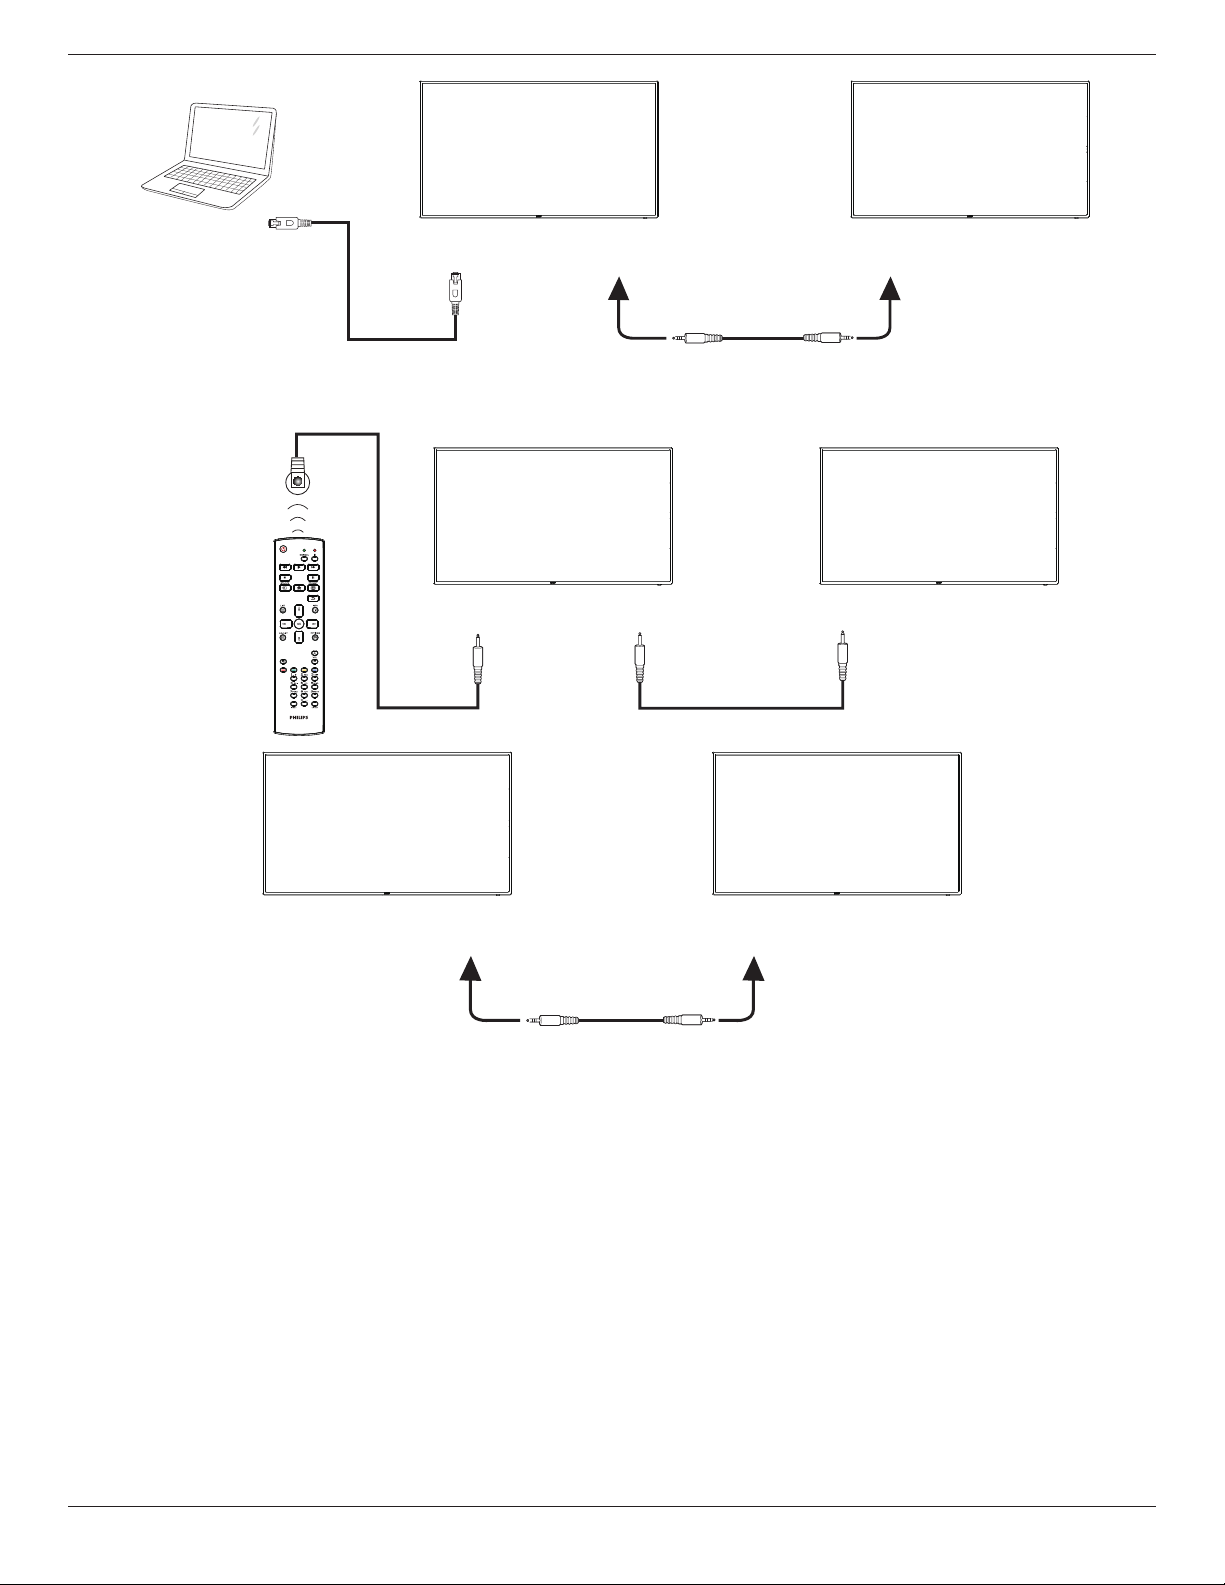
3.2.2. Using DVI input
PC
DVI Out
[DVI IN]
DVI IN
55BDL3050Q
12
3.2.3. Using HDMI input
PC
HDMI 1 IN HDMI 2 IN
HDMI Out
[HDMI IN]
3.3. Connecting Audio Equipment
3.3.1. Connecting an external audio device
Stereo Amplifier
[AUDIO OUT] Audio In
AUDIO OUT
3.4. Connecting Multiple Displays in a Daisy-chain Configuration
Youcaninterconnectmultipledisplaystocreateadaisy-chaincongurationforapplicationssuchasamenuboard.
3.4.1. Display control connection
Connectthe[RS232OUT]connectorofDISPLAY1tothe[RS232IN]connectorofDISPLAY2.
DISPLAY 1
PC
DISPLAY 2
[RS-232C IN]
[RS-232C]
[RS-232C OUT] [RS-232C IN]
55BDL3050Q
13
DISPLAY 1
PC
DISPLAY 2
[RJ-45] [RS-232C OUT] [RS-232C IN]
[RJ-45]
3.5. IR connection
[IR IN]
External
IR Receiver
[IR IN]
[IR OUT]
DISPLAY 1
DISPLAY 2
DISPLAY 1 DISPLAY 2
[RS-232C OUT] [RS-232C IN]
NOTE:
1. Thisdisplay’sremotecontrolsensorwillstopworkingifthe[IR IN]isconnected.
2. IRloopthroughconnectioncansupportupto9displays.
3. IRindaisychainviaRS232connectioncansupportupto9displays.
55BDL3050Q
14
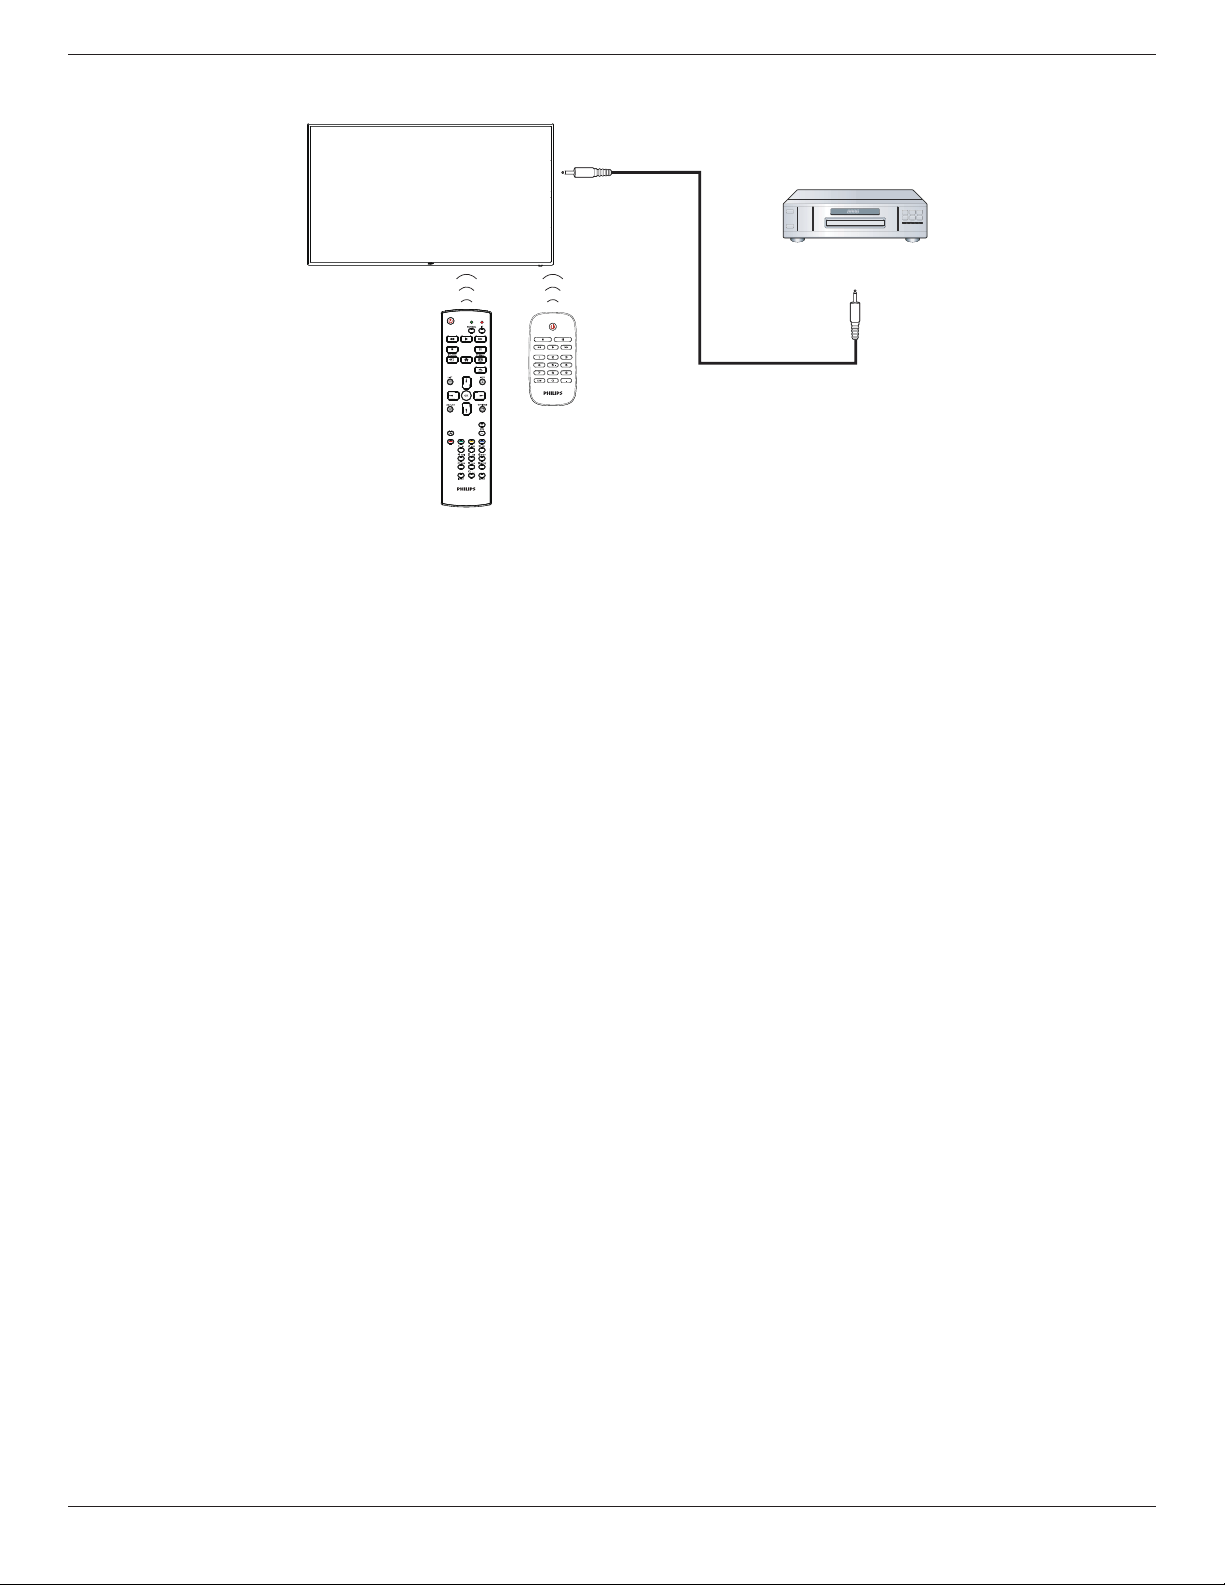
3.6. IR Pass-through Connection
DVD / VCR / VCD
(DVD / VCR / VCD)
Remote Control
[IR OUT]
[IR IN]
55BDL3050Q
15
4. Operation
NOTE: Thecontrolbuttondescribedinthissectionismainlyonthe
remotecontrolunlessspeciedotherwise.
4.1. Watch the Connected Video Source
1. Press
[ ] SOURCEbutton.
2. Press[ ]
or[ ]buttontochooseadevice,thenpress[ ]
button.
4.2. Change Picture Format
Youcanchangethepictureformattosuitthevideosource.Eachvideo
sourcehasitsavailablepictureformats.
Theavailablepictureformatsdependonthevideosource:
1. Press[ ] FORMATbuttontochooseapictureformat.
• PCmode:{Full}/{4:3}/{Real}/{21:9}/{Custom}.
• Videomode:{Full}/{4:3}/{Real}/{21:9}/{Custom}.
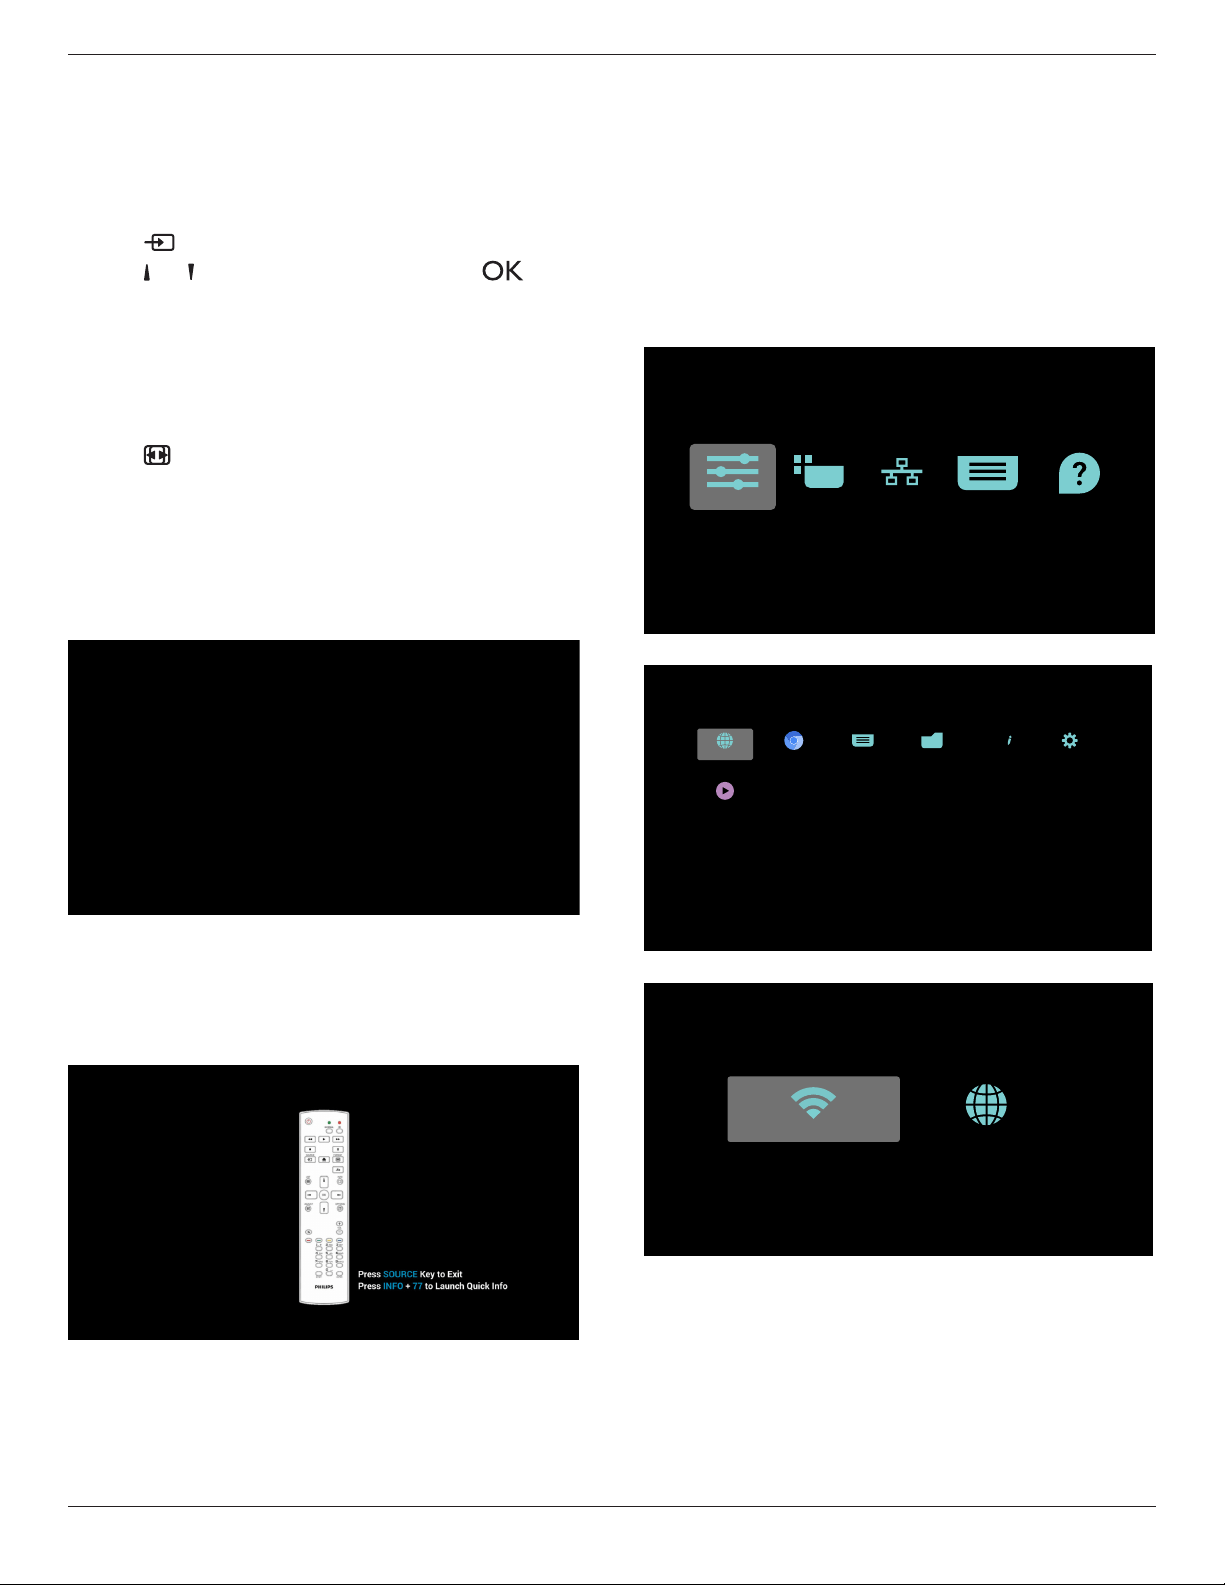
4.3. Overview
1. AndroidPDlauncher:
• AndroidPDlauncherisblackpage,asbelow:
• Everyappsleavebypressbackkey,thescreenwillgotoandroid
PDlauncher.
• WhenyoureturntoandroidPDlauncher,thescreenwillshow
hintimage,thehintimageonlyshow5second,asbelow:
• Thehintimagewillnotifyyoucanpresssourcekeytochange
source.
2. Adminmode:
• Youcanpress“Home+1888”toenteradminmode.Please
makesureyouseetheHomeOSDmenuafter“Home”is
pressed,andthenpress1888insequence.Twocontinuous
“Home”keyswillnotbeavalidhotkey.
• Adminmodewillshowveicons:“Settings”,“Apps”,“Network”
“Storage”and“Help”.
• Whenyouleaveadminmode,systemwillreturntolastsource.
1)Homepageofadminmode,thispagehasveitems:“Settings”,
“Apps”,“Network”“Storage”and“Help”.
Settings:gotosettingsapp.
Applications:showallapps.
Network:setWi-Fi(optional),Ethernet
Storage:displaycurrentPDAndroidstorageinformation.
Help:displayQRcode.
Settings Apps Network Storage Help
2.)Applicationpage:
PDF PlayerMedia PlayerFile ManagerChromium
SmartCMS
Browser Settings
ABC
3
)
Networkpage
EthernetWi-Fi
55BDL3050Q
16
4
)
Ethernetpage
5)Wi-Fi(Optional)
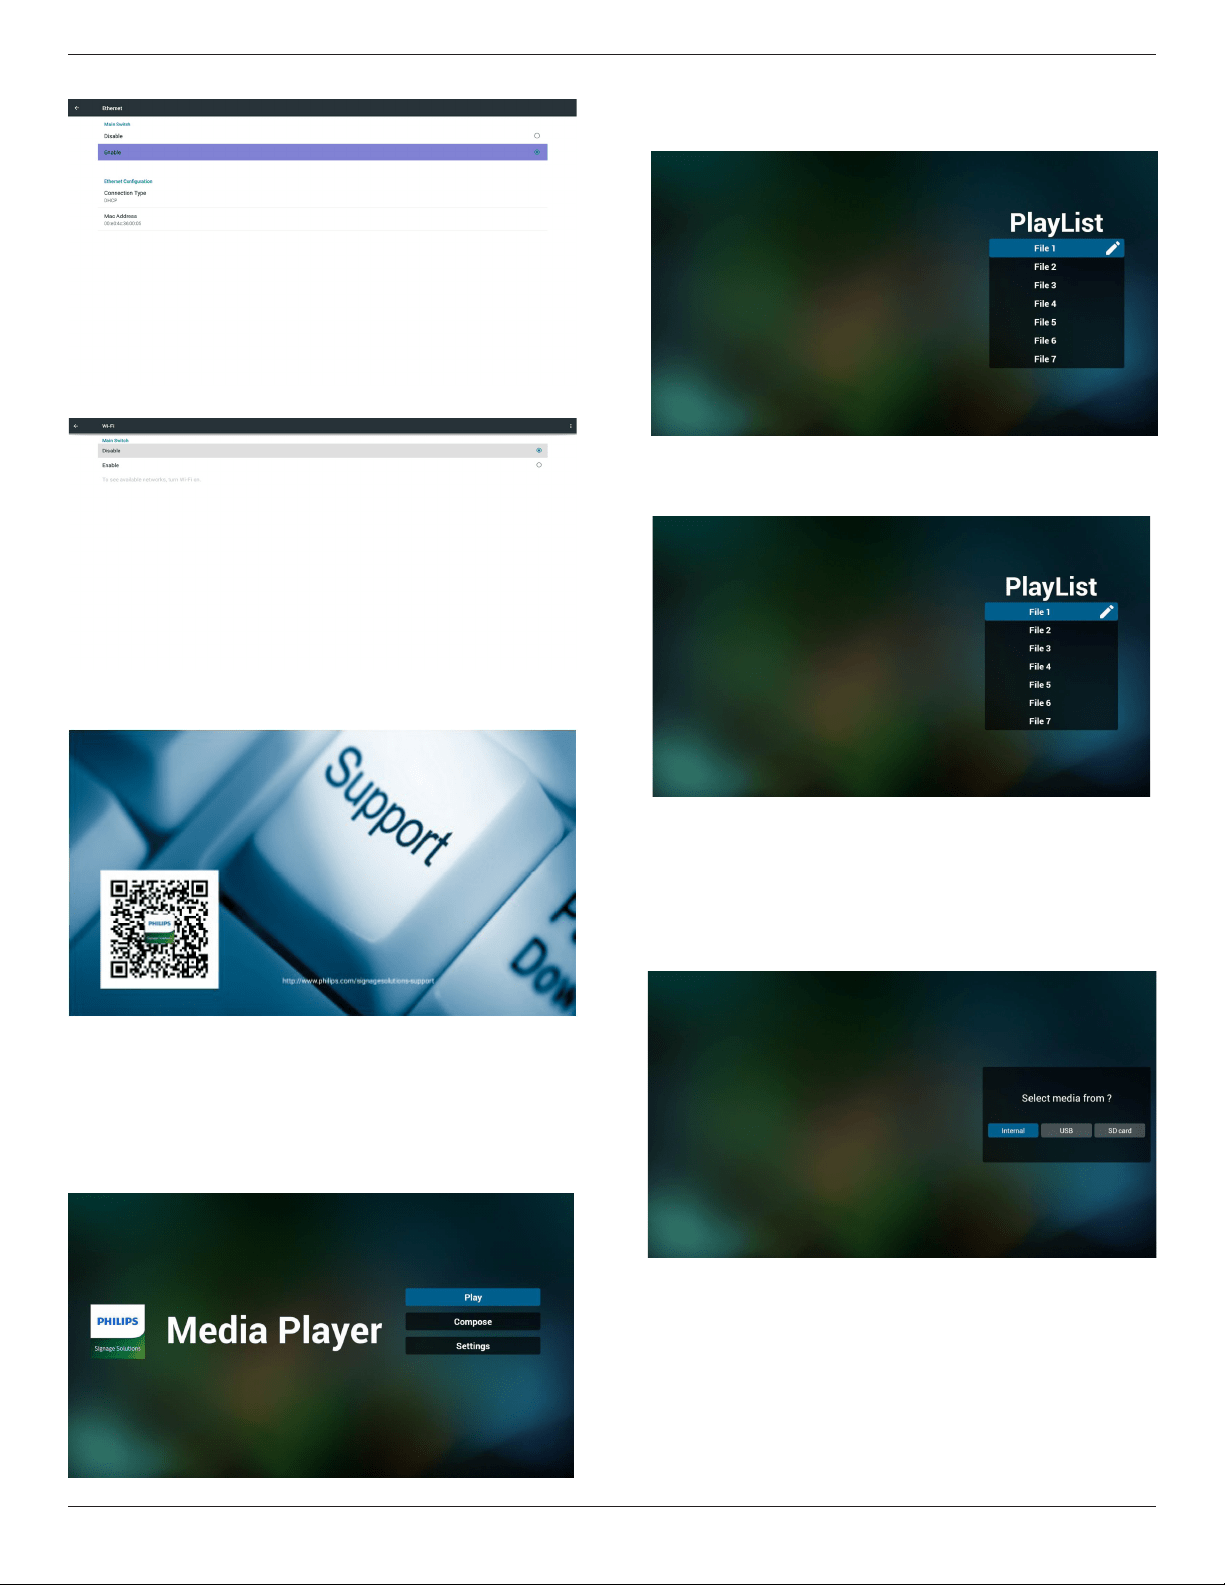
6)Helppage:
DisplayQRcodepage.
4.4. Media Player introduction:
1. HomepageofMediaPlayer,thispagehasthreeitems:“Play”,
“Compose”and“Settings”.
Play:selectplaylisttoplay.
Compose:editplaylist.
Settings:settingplayproperties.
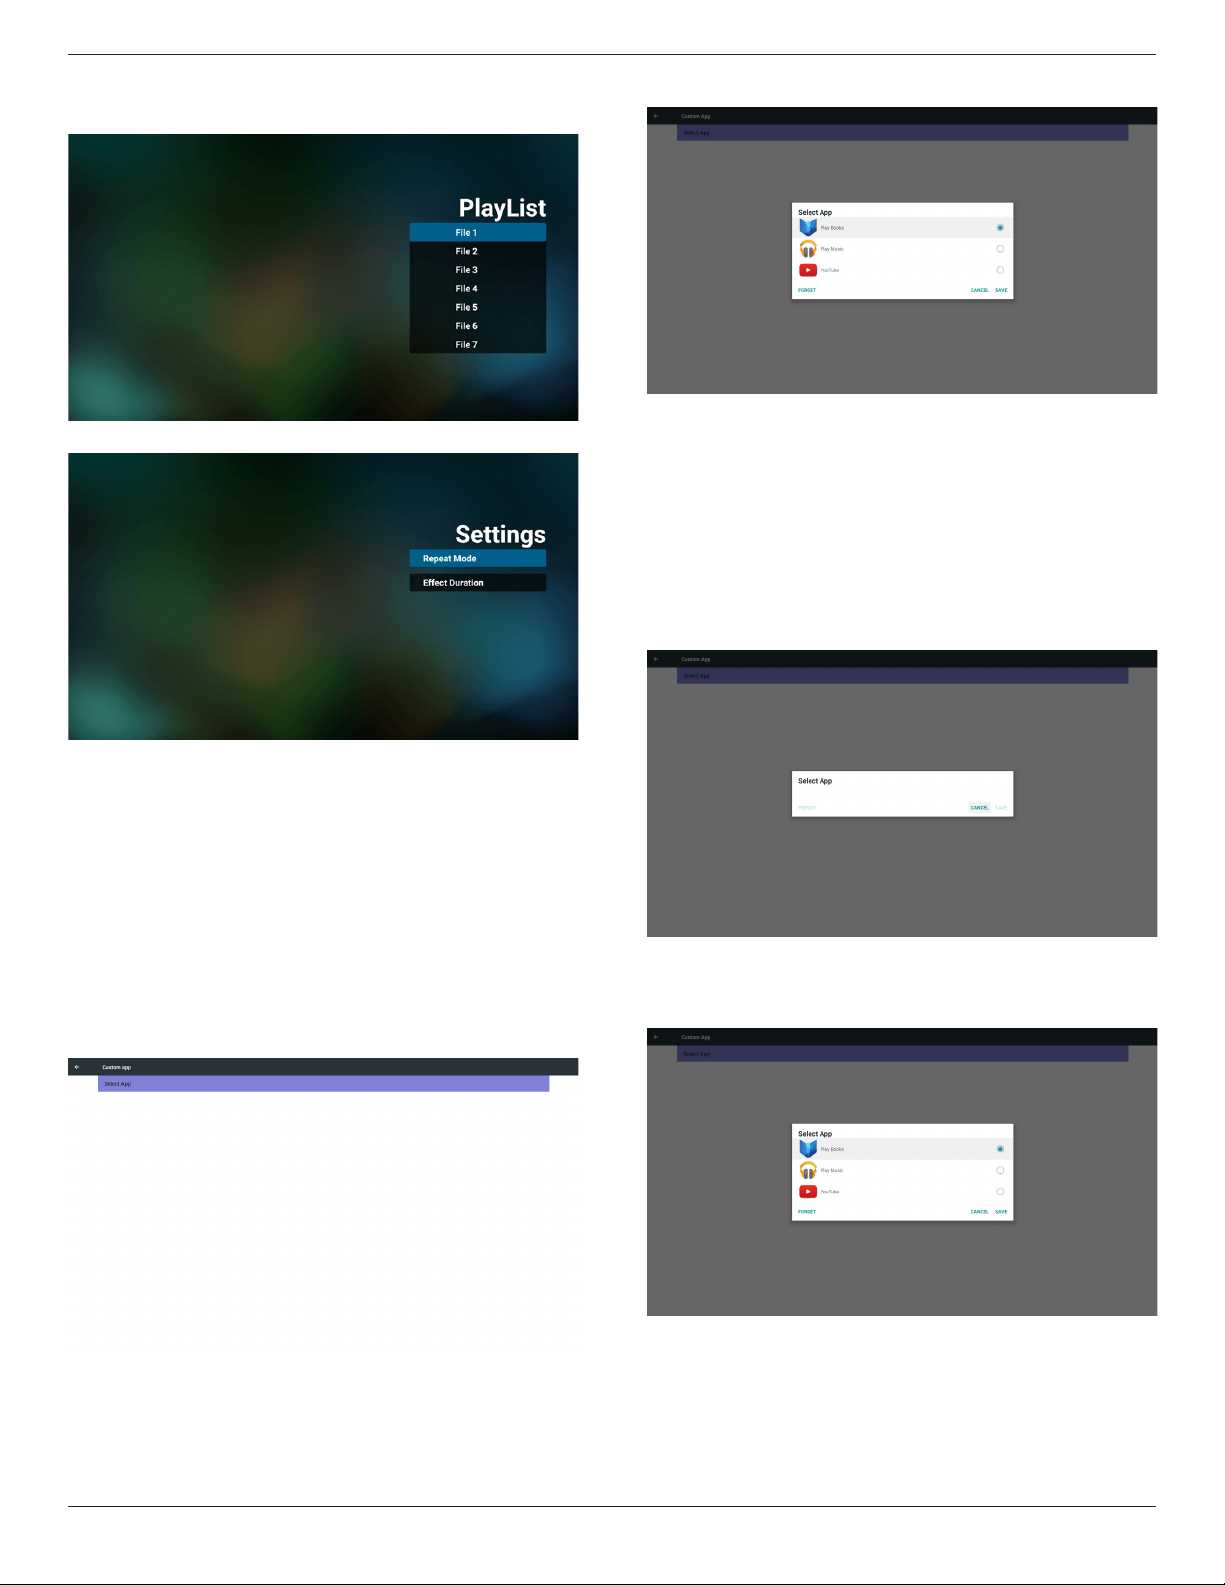
2. Select“Play”onhomepage,rstyoushouldchooseoneplaylistto
playbetweenFILE1andFILE7.
Thepenciliconmeanstheplaylistisnon-empty.
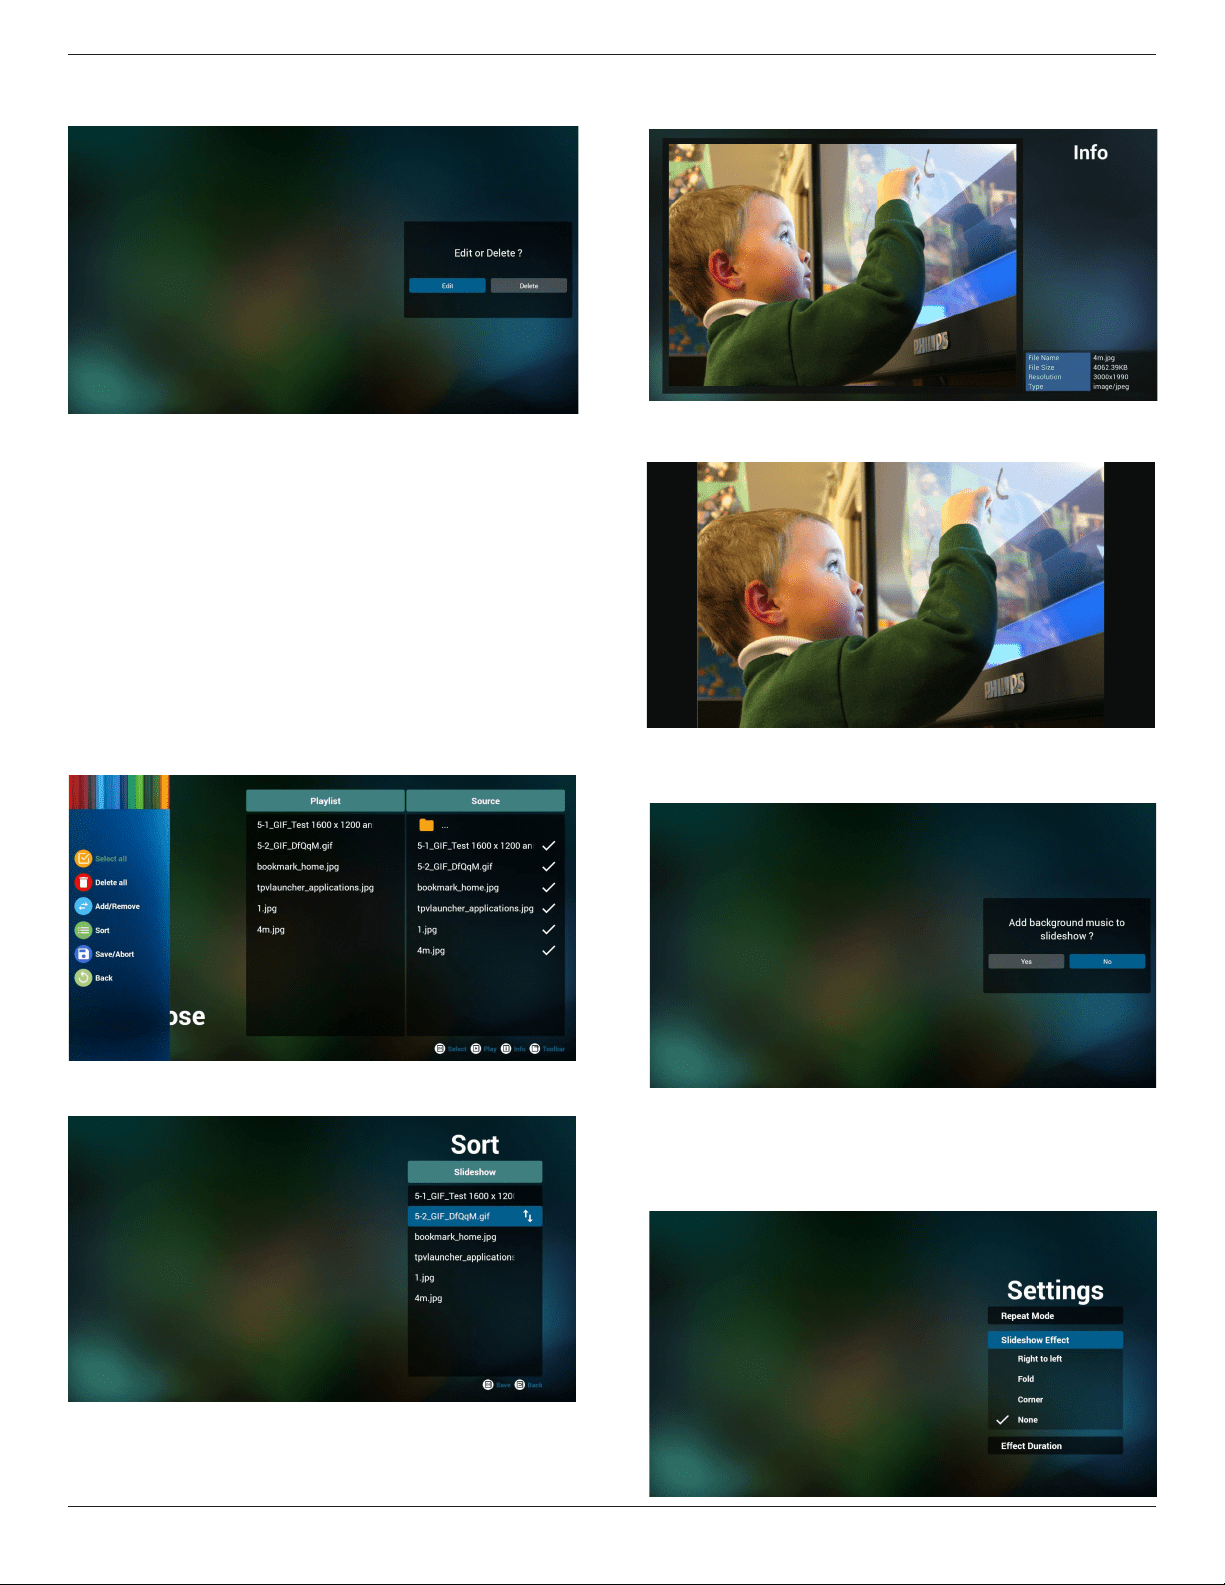
3. Select“Compose”onhomepage,rstyoushouldchooseone
playlisttoeditbetweenFILE1andFILE7.
Thepenciliconmeanstheplaylistisnon-empty.
4. Ifanemptyplaylistischosen,theappwillguideyoutoselectthe
mediasource.
Allmedialesshouldbeplacedin/philips/ofrootdirectory.
Forexample,
videos: {root dir of storage}/philips/video/
photos: {root dir of storage}/philips/photo/
music : {root dir of storage}/philips/music/
55BDL3050Q
17
5. Youcouldeditordeleteanon-emptyplaylist,justchoosethe
desiredplaylistwhichiswithpencilicon.
6. Onceyoustarttoeditaplaylist,youwillseebelowscreen.
Source-lesinstorage.
Playlist–lesinplaylist.
Thereare4iconswhichmaptothekeysofremotecontroller.
Optionkey–launchslidebar
Playkey–playmediale.
Infokey–showmediainfo.
Okkey–select/unselectle.
6-1Intheslidebar,ithelpsyoutodothefollowing:
-selectall:selectallstorageles.
-deleteall:deleteallplaylistles.
-add/remove:updateplaylistfromsource.
-sort:sortplaylist.
-save/abort:saveorabortplaylist.
-back:return.
7. Ifyouchoose“Sort”intheslidebar,youcanchangetheorderof
lesonebyone.
8. Pressinfokeyafteryouchoosedesiredle,youwillgetthedetail
information.
9. Pressplaykeyafteryouchoosedesiredle,youwillplaythemedia
ledirectly.
10. Ifyoumakeaplaylistwithallimagesles,beforesaving,theapp
willaskyouifyouwanttohavebackgroundmusicwhileplaying
slideshow.
11. Select“Settings”onhomepage,thispagehasthreeparts,“Repeat
Mode”,“SlideshowEffect”and“EffectDuration”.
RepeatMode:playmode.
SlideshowEffect:photoslideshoweffect.
EffectDuration:photoeffectduration.
55BDL3050Q
18
12. MediaHotkey
Play:Playbackle.
Pause:Pausele.
Fastforward:forward10second.
Rewind:back10second.
Stop:Stopleandreturntostart.Ifthegifle,itlikethepause.
13. MediaformatpleaserefertoSupported Media Formats.
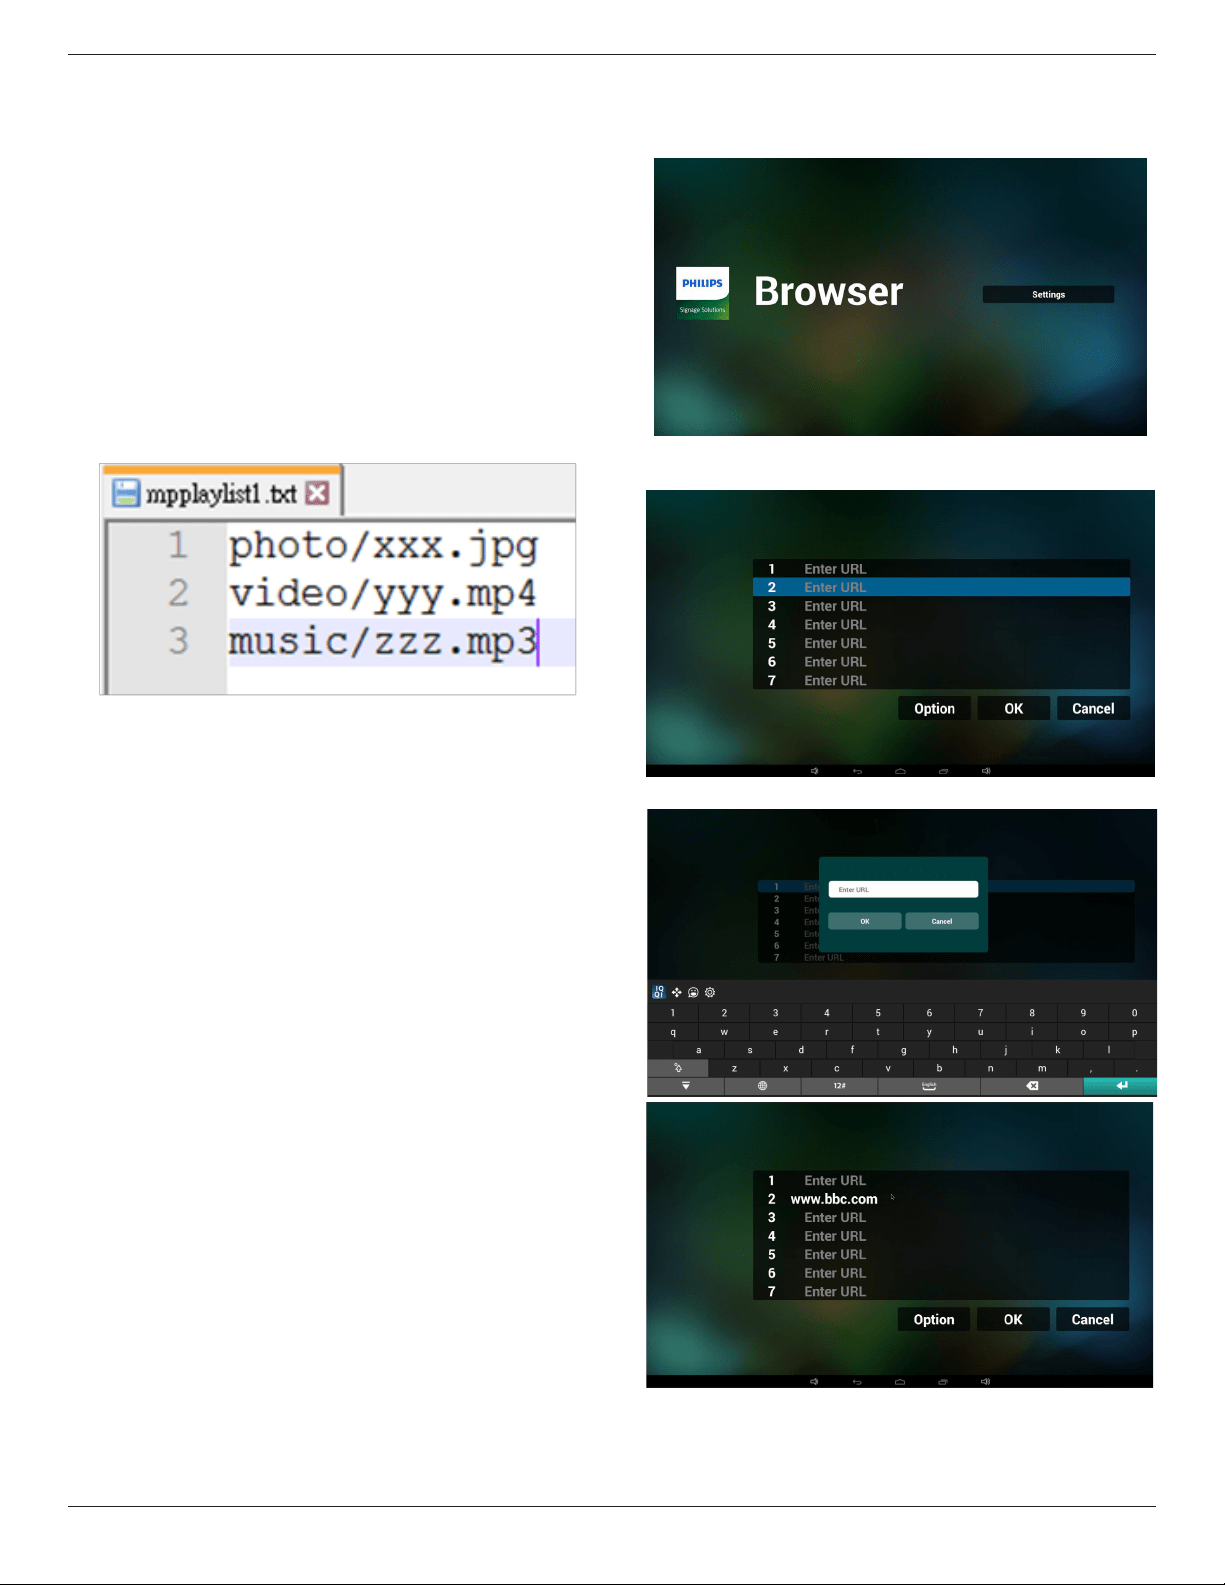
14. HowtoeditplaylistviaFTP.
Step1.Createmediaplayertextle.
- Filename:mpplaylistX.txt,“X”meansplaylist
number(1,2,3,4,5,6,7).
Ex.mpplaylist1.txt,mpplaylist2.txt
- Content:
Note:ifplaylistlecontainsvideoandmusic,whenthepdplays
musicle,thescreenwillbeblack.
Step2.CopympplaylistX.txtto“philips”folderofinternalstorage.
YoumayuseFTPtodothis.
- Filepath:/storage/emulated/legacy/philips
Ex./storage/emulated/legacy/philips/mpplaylist1.txt
Step3.Preparemedialesto“photo”,“video”and“music”folder
under“philips”folder,internalstorageonly.
- Ex./storage/emulated/legacy/philips/photo/xxx.jpg
/storage/emulated/legacy/philips/video/yyy.mp4
/storage/emulated/legacy/philips/photo/zzz.mp3
Step4.Startmediaplayerapp,itwillautoimportmediaplayertext
le.
PS.Oncetheplaylistle(text)isimported,ifanuserchangeplaylist
byremotecontroller,thischangewillnotbewrittentoplaylisttext
le.
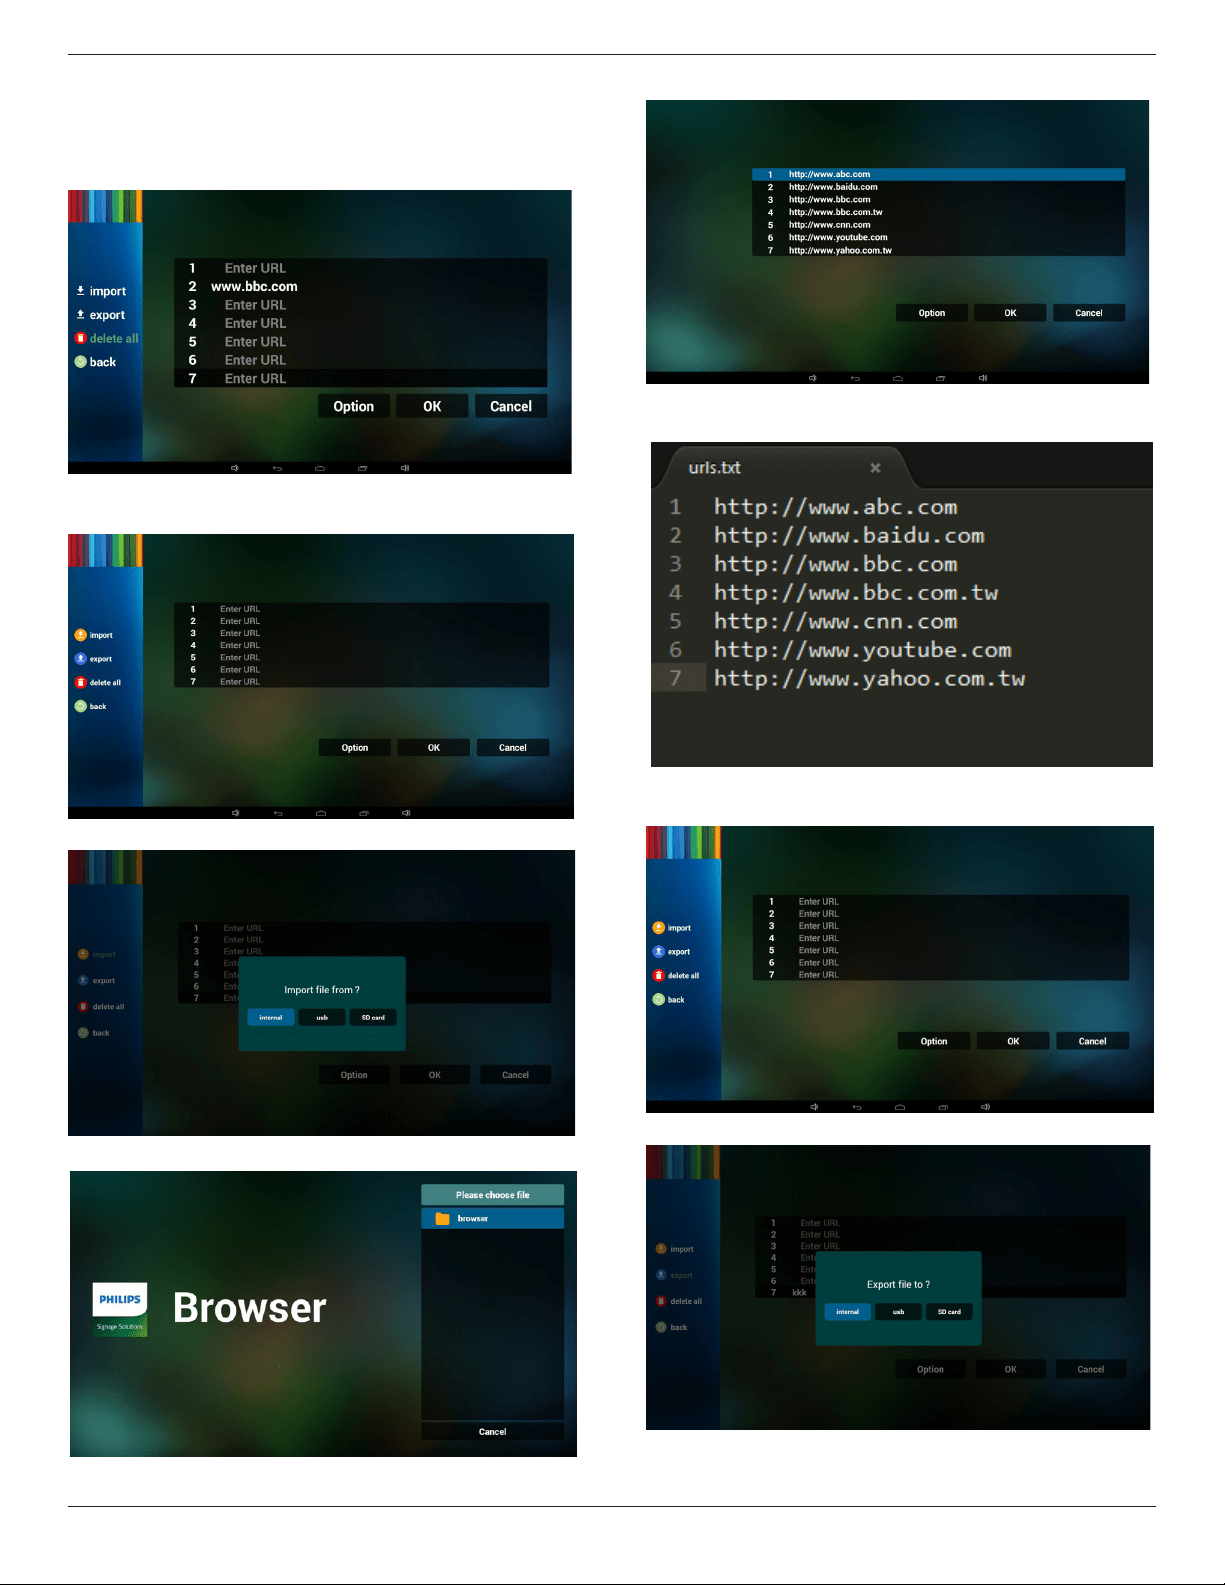
4.5. Browser manual
1. HomepageofBrowserapp,thispagehasoneitem:“Settings”.
PressSettingsthenenternextpage.
2. Userscanchoose1~7.
Pressanyonewillshowadialog.
3. EnterurlandpressOKthendatawillsaveonList
55BDL3050Q
19
4. Press“Option”thenleftsidewillpopupalist
Import:Importurllistle
Export:Exporturllistle
Deleteall:Deleteallurlrecordonrightside
Back:leftsidelistwillbeclosed.
4.1Import
• Clickimport
• Choosestorage
• Chooselecontainsurls
• Importleandurlwillshowonlist
• Fileformatforimport
Formatshouldbelikebelowwithleextension“txt”
4.2Export:
• Clickexport
• Choosestorage
55BDL3050Q
20
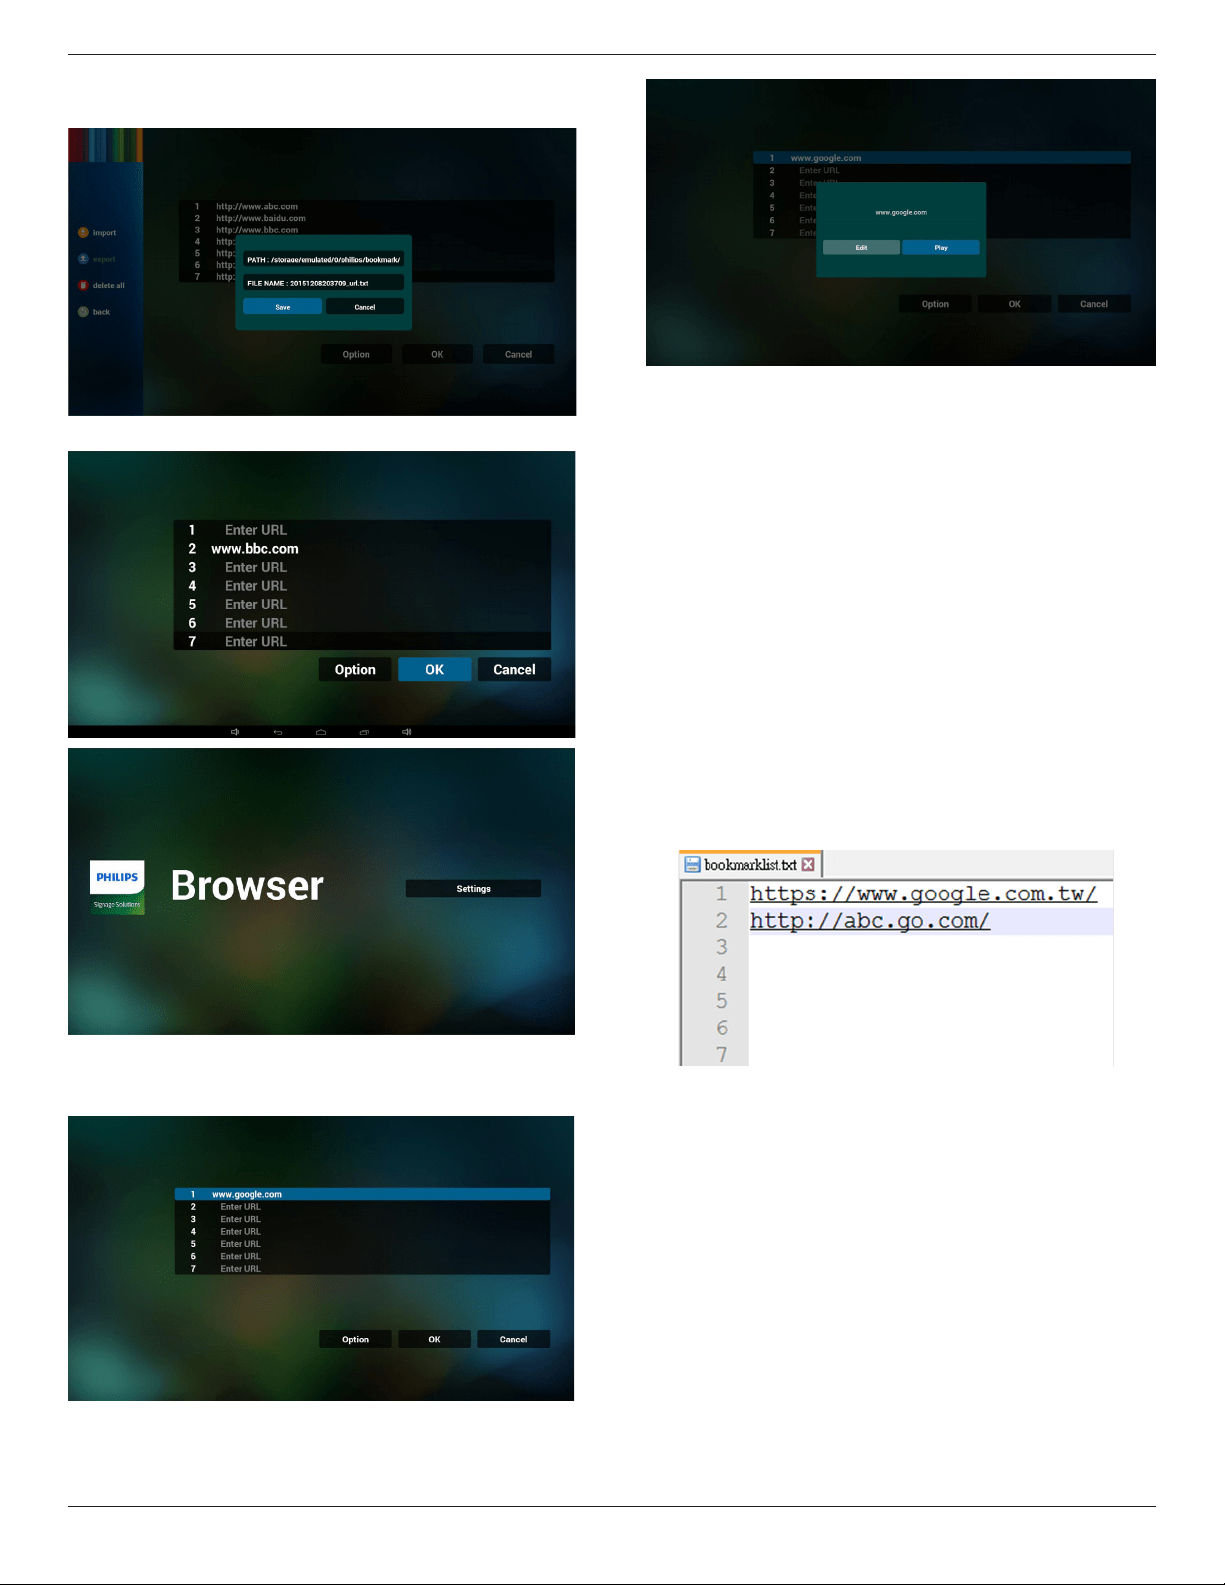
• Dialogshowspathlewillbesavedandle’sname.
Press“save”buttonthenurlsonlistwillbesaved.
5. PressOKthenurlrecordswillbesaved
.
6. Onurllistpage,ifyouselectnon-emptyitem,itwillshowadialog
toaskeditorplayurl.Ifpress“Edit”,itwillshowediturldialog,if
press“Play”,itwillshowwebpageofitem’surl.
7. OSDmenuinteractionwithBrowser
7.1Bootonsource
• SetOSDmenu=>Conuration1=>Bootonsource=>Input
beBROWERPlayListbe0.
ThenPDwillshowBrowserafterreboot.
• SetOSDmenu=>Conuration1=>Bootonsource=>Inputbe
BROWERPlayListbe1.
ThenPDwillshowwebpagewith1stUrlinBrowserapp.
7.2Schedule
SetOSDmenu=>Advancedoption=>Schedule=>
Ontime1,Offtime2,InputbeBROWSER,anydayyouwantofweek,
andPlayList.
Finallychecktherightbox.
ThenPDwillshowwebpagewithUrlinBrowserappattime1and
nishattime2.
8. HowtoediturllistviaFTP
Step1.Createmediaplayertextle.
- Filename:bookmarklist.txt.
- Content:
Step2.Copybookmarklist.txtto“philips”folderofinternalstorage.
YoumayuseFTPtodothis.
- Filepath:/storage/emulated/legacy/philips(forDL,PL)
Ex./storage/emulated/legacy/philips/bookmarklist.txt
Step3.Startbrowserapp,itwillautoimportbrowsertextle.
PS.Oncetheplaylistle(text)isimported,ifanuserchangeplaylist
byremotecontroller,thischangewillnotbewrittentoplaylisttext
le.
55BDL3050Q
21
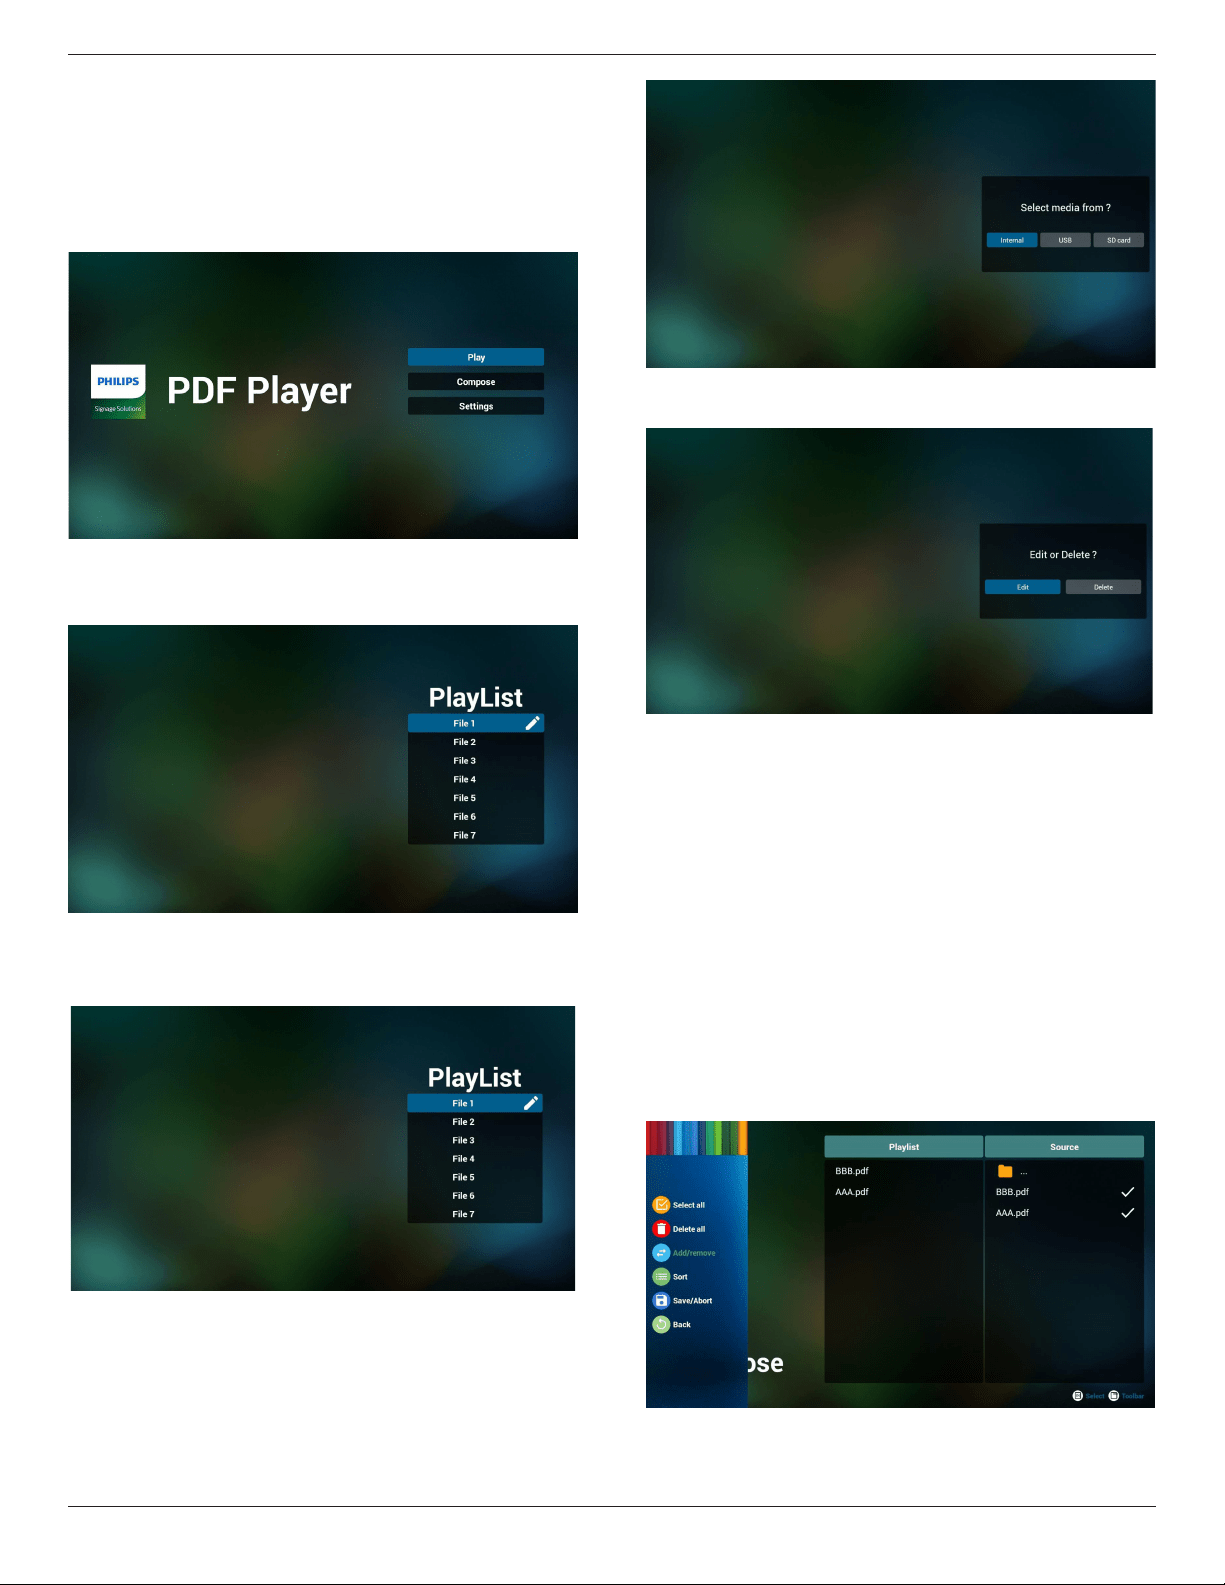
4.6. PDF reader play
1. HomepageofPDFPlayer,thispagehasthreeitems:“Play”,
“Compose”and“Settings”.
Play:selectplaylisttoplay.
Compose:editplaylist.
Settings:settingplayproperties.
2. Select“Play”onhomepage,rstyoushouldchooseoneplaylistto
playbetweenFILE1andFILE7.
Thepenciliconmeanstheplaylistisnon-empty.
3. Select“Compose”onhomepage,rstyoushouldchooseone
playlisttoeditbetweenFILE1andFILE7.
Thepenciliconmeanstheplaylistisnon-empty.
4. Ifanemptyplaylistischosen,theappwillguideyoutoselectthe
mediasource.
Allmedialesshouldbeplacedin/philips/ofrootdirectory.For
example,
pdfs : {root dir of storage}/philips/pdf/
5. Youcouldeditordeleteanon-emptyplaylist,justchoosethe
desiredplaylistwhichiswithpencilicon.
6. Onceyoustarttoeditaplaylist,youwillseebelowscreen.
Source-lesinstorage.
Playlist–lesinplaylist.
Thereare4iconswhichmaptothekeysofremotecontroller.
Optionkey–launchslidebar
Playkey–playmediale.
Infokey–showmediainfo.
Okkey–select/unselectle.
6-1.Intheslidebar,ithelpsyoutodothefollowing:
-selectall:selectallstorageles.
-deleteall:deleteallplaylistles.
-add/remove:updateplaylistfromsource.
-sort:sortplaylist.
-save/abort:saveorabortplaylist.
-back:return.
55BDL3050Q
22
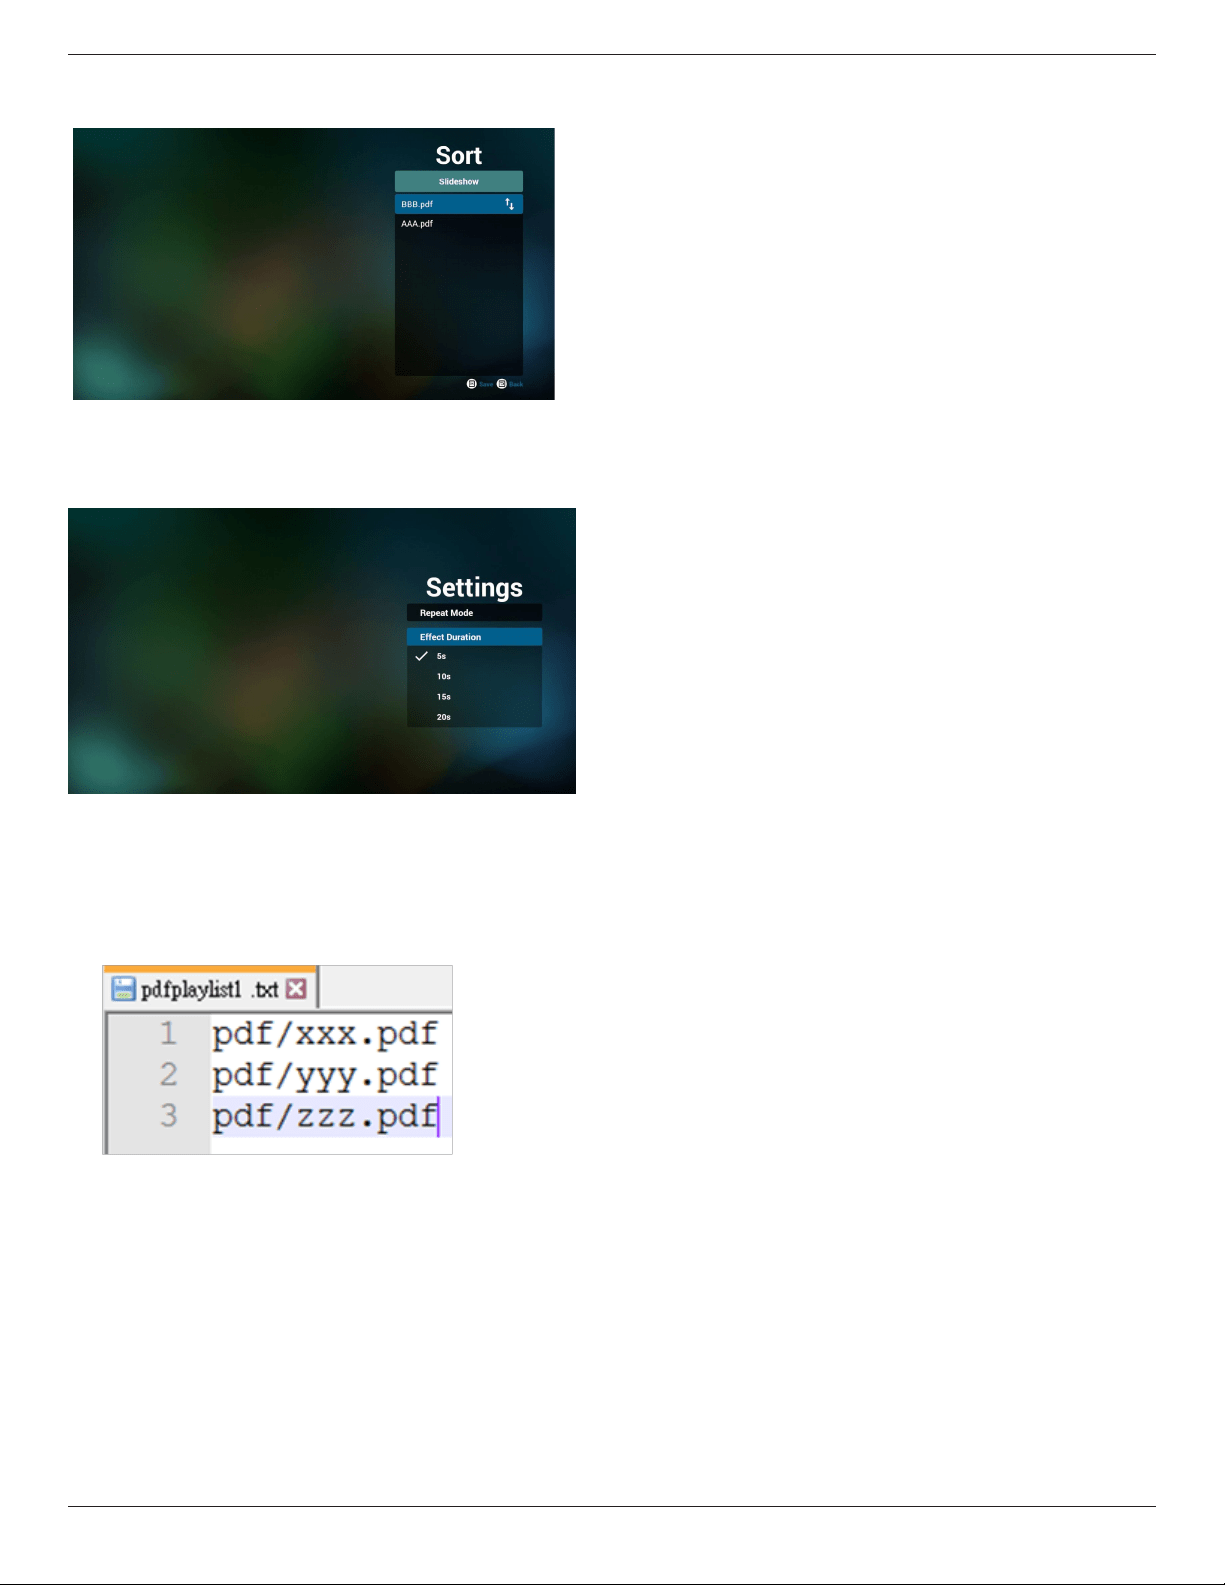
7. Ifyouchoose“Sort”intheslidebar,youcanchangetheorderof
lesonebyone.
8. Select“Settings”onhomepage,thispagehastwoparts,“Repeat
Mode”and“EffectDuration”.
RepeatMode:playmode.
EffectDuration:photoeffectduration.
9. HowtoeditpdflistviaFTP.
Step1.Createpdfplayertextle.
- Filename:pdfplaylistX.txt,“X”meansplaylist
number(1,2,3,4,5,6,7).
Ex.pdfplaylist1.txt,pdfplaylist2.txt
- Content:
Step2.CopypdfplaylistX.txtto“philips”folderofinternalstorage.
YoumayuseFTPtodothis.
- Filepath:/storage/emulated/legacy/philips(forDL,PL)
Ex./storage/emulated/legacy/philips/pdfplaylist1.txt
Step3.Preparepdflesto“pdf”folderunder“philips”folder,
internalstorageonly.
- Ex./storage/emulated/legacy/philips/pdf/xxx.pdf
/storage/emulated/legacy/philips/pdf/yyy.pdf
/storage/emulated/legacy/philips/pdf/zzz.pdf
Step4.Startpdfplayerapp,itwillautoimportpdfplayertextle.
PS.Oncetheplaylistle(text)isimported,ifanuserchangeplaylist
byremotecontroller,thischangewillnotbewrittentoplaylisttext
le.
Media Hotkey:
Play:Playbackle.
Pause:Pausepage.
Fastforward:gotonextpage,ifthepageisendofthele,itwillgo
tonextle.
Rewind:backtolastpage,ifthepageisrstofthele,itwillbackto
lastle.
Stop:returntorstpageofle
Color Hotkey:
Blue:Zoomin.(+10%)
Yellow:Zoomout.(-10%)
OK:Restorezoom
Arrow keys:
Up/Down/Left/Right:Adjustpage.(Whenthepagehaszoomedin/
out)
Left:PreviousPage.(Whenthepagehasnotzoomedin/out)
Right:NextPage.(Whenthepagehasnotzoomedin/out)
Combination key:
Numberkey+OKkey:selectspecicpage,andpressokkeyto
changepage.
-Pressnumberkey.
-PressOKkey,thebottomofthepagewillshowthepagenumber,
ifpagenumberovertotalpagenumber,itwillnotchangepageand
showcurrentpagenumberatthebottomofthepage.
55BDL3050Q
23
4.7. CMND & Play
1) Server
SetupCMND&Playserveraddress
2)Account
SetupCMND&Playaccount
3) PINCode
SetupCMND&PlayPINcode
(4)Version
Therearetwooptions,Ver.2andVer.3
Ver.2
use2.0/2.2agreement
Ver.3
use3.0/3.1agreement
(5)Content
Thereareinternalstorage/SDcard/USBstorage3optionsfor
selecting.
WhenVer.2,Server/Account/PINcodewillbegrayandunavailable.
Internal storage
SD card
USB storage
CONTENT
Settings
Server
Account
PIN Code
Version
Ver.2
CMND & Play
WhenVer.3,Server/Account/PINcodeisavailable.
Internal storage
SD card
USB storage
CONTENT
Settings
Server
Account
PIN Code
Version
Ver.3
CMND & Play
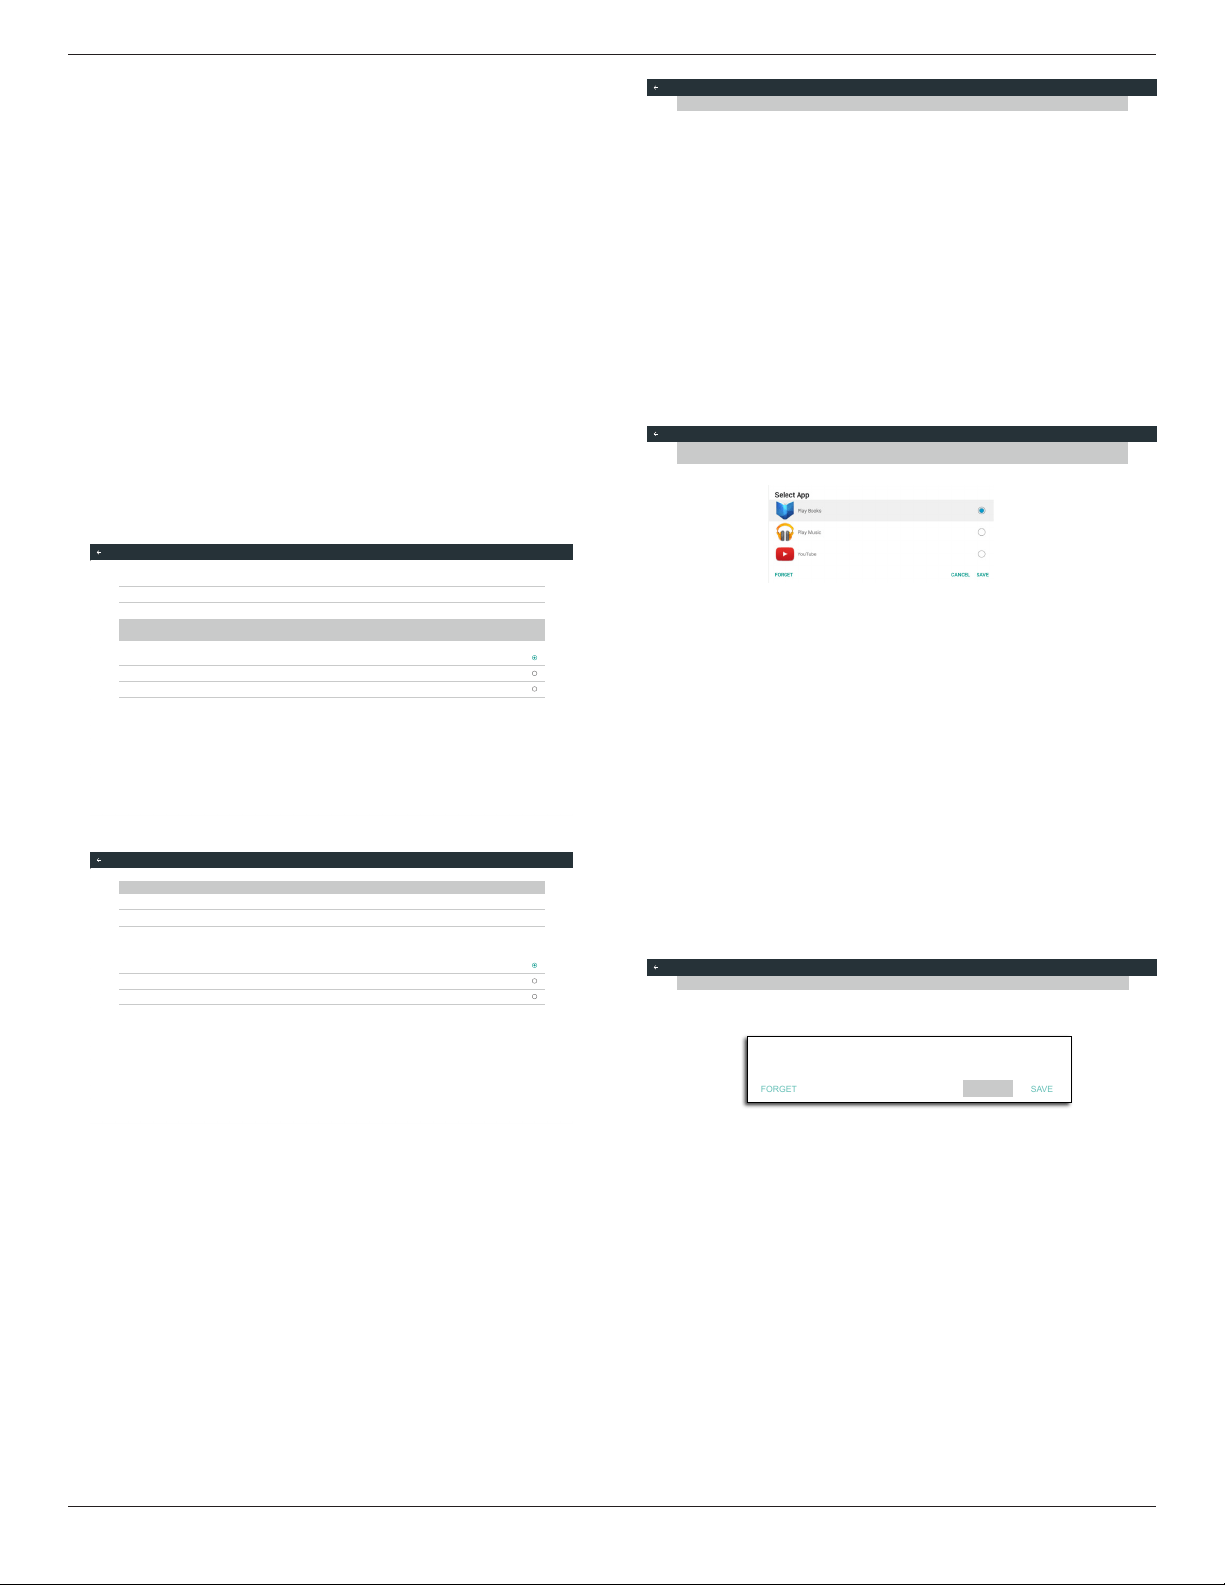
4.8. Custom App
UsercansetuptheapplicationforCustomerSource
Note:
(1)OnlydisplayUserInstalledapp.
(2)Willnotshowupsystempre-installapp.
4.8.1. OSD Menu operation:
RCU:Source->Custom
IfsetupcustomerAPK,PDwillopencustomerappwhenswitchsource
toCustomermode.
IfnosetupcustomerAPK,PDwillshowBlackscreenwhenswitch
sourcetoCustomermode.
Select App
Custom App
4.8.2. Function Introduction
Custom App
Select App
Play Books
Save
SelecttheApp,clicktheSavewillperformthefunctionofstorage.
Forget
AfterpresstheForget,canremovepreviouslystoredinformation.
Cancel
Don’tdoanychange,directlyclosedWindows.
Ifnocustomerinstalledapk,thelistwillbeblank.
Thelistwillbeblankand“Save””Forget”willbegrayanduseless.
Select App
Select App
FORGET
CANCEL
SAVE
Custom App
55BDL3050Q
24
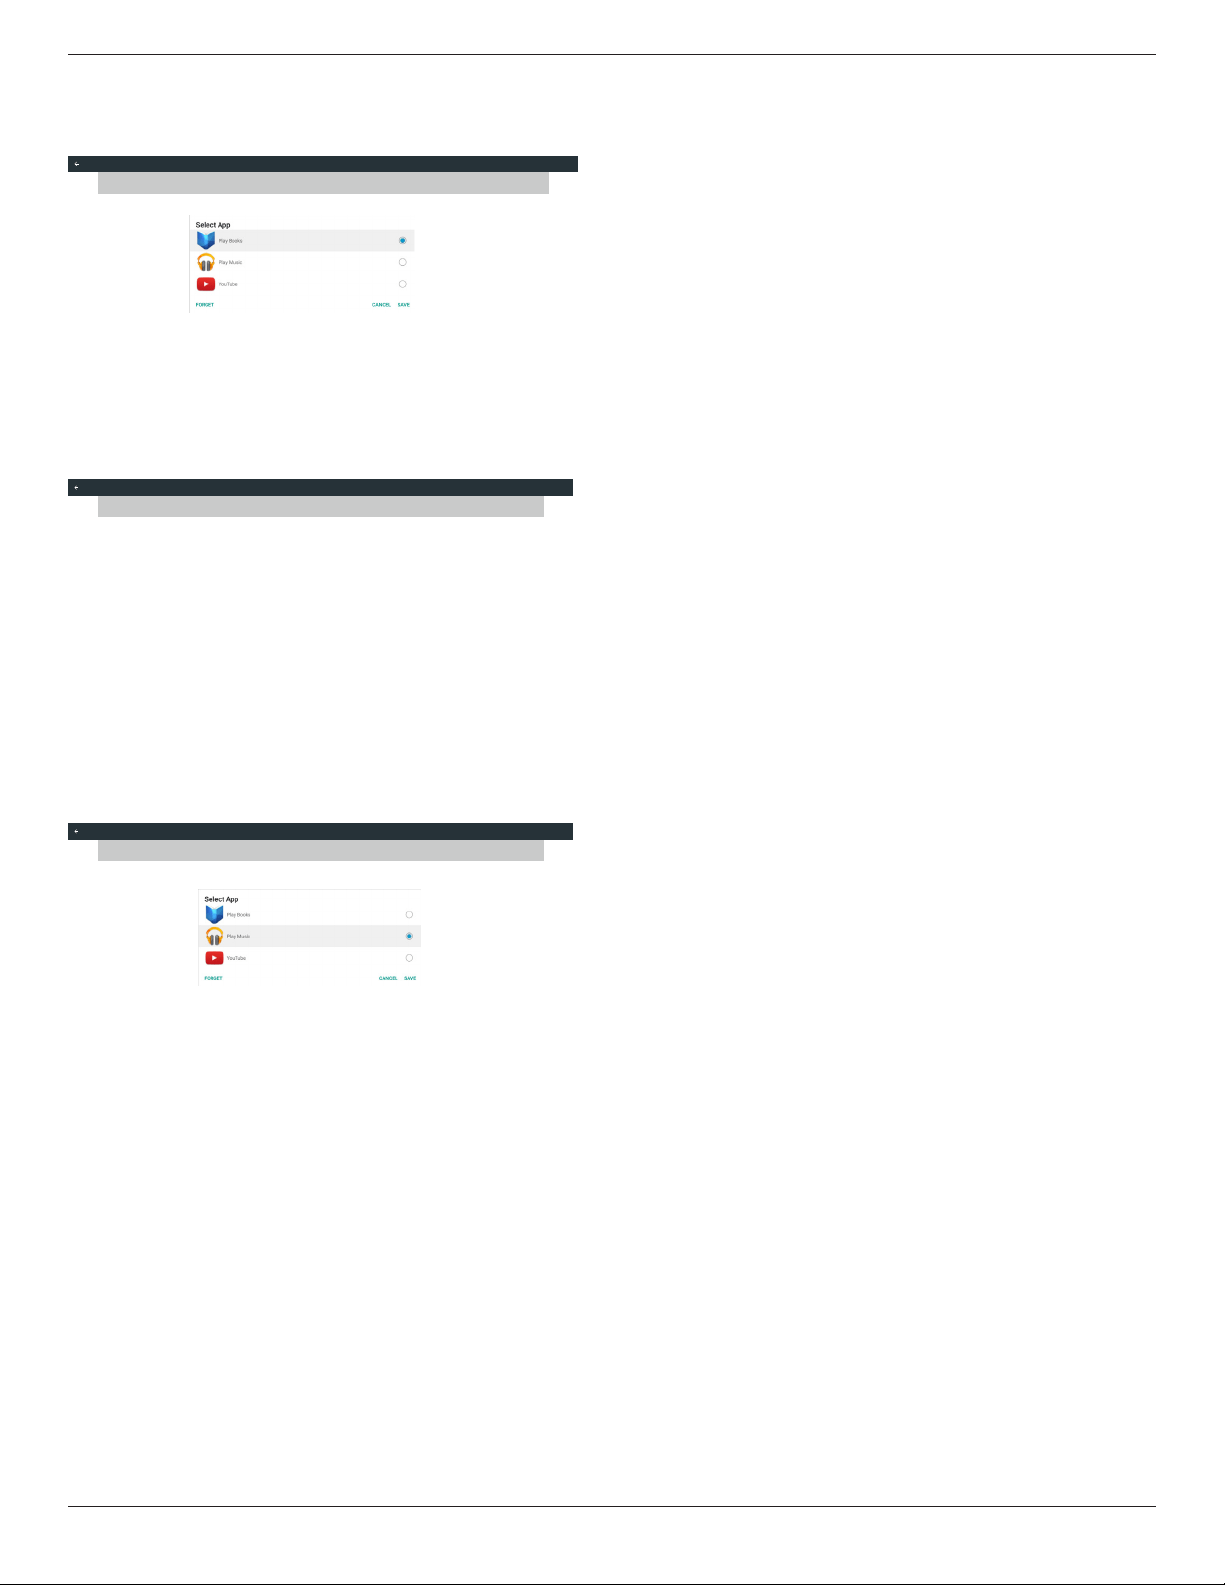
Ifcustomerinstalledapk,usercanselectcustomerinstalledapkinlist
• Case1:NotsetupCustomAppcase.
Customerappwillshowupandfocusonrstitemautomatically.
Custom App
Select App
Play Books
Aftersetup,thesettingscreendisplaytheappname.
Select App
Play Books
Custom App
• Case2:SetupCustomAppcase(thereisentitycircletotherightof
icon)
Custom App
Select App
Play Music
55BDL3050Q
25
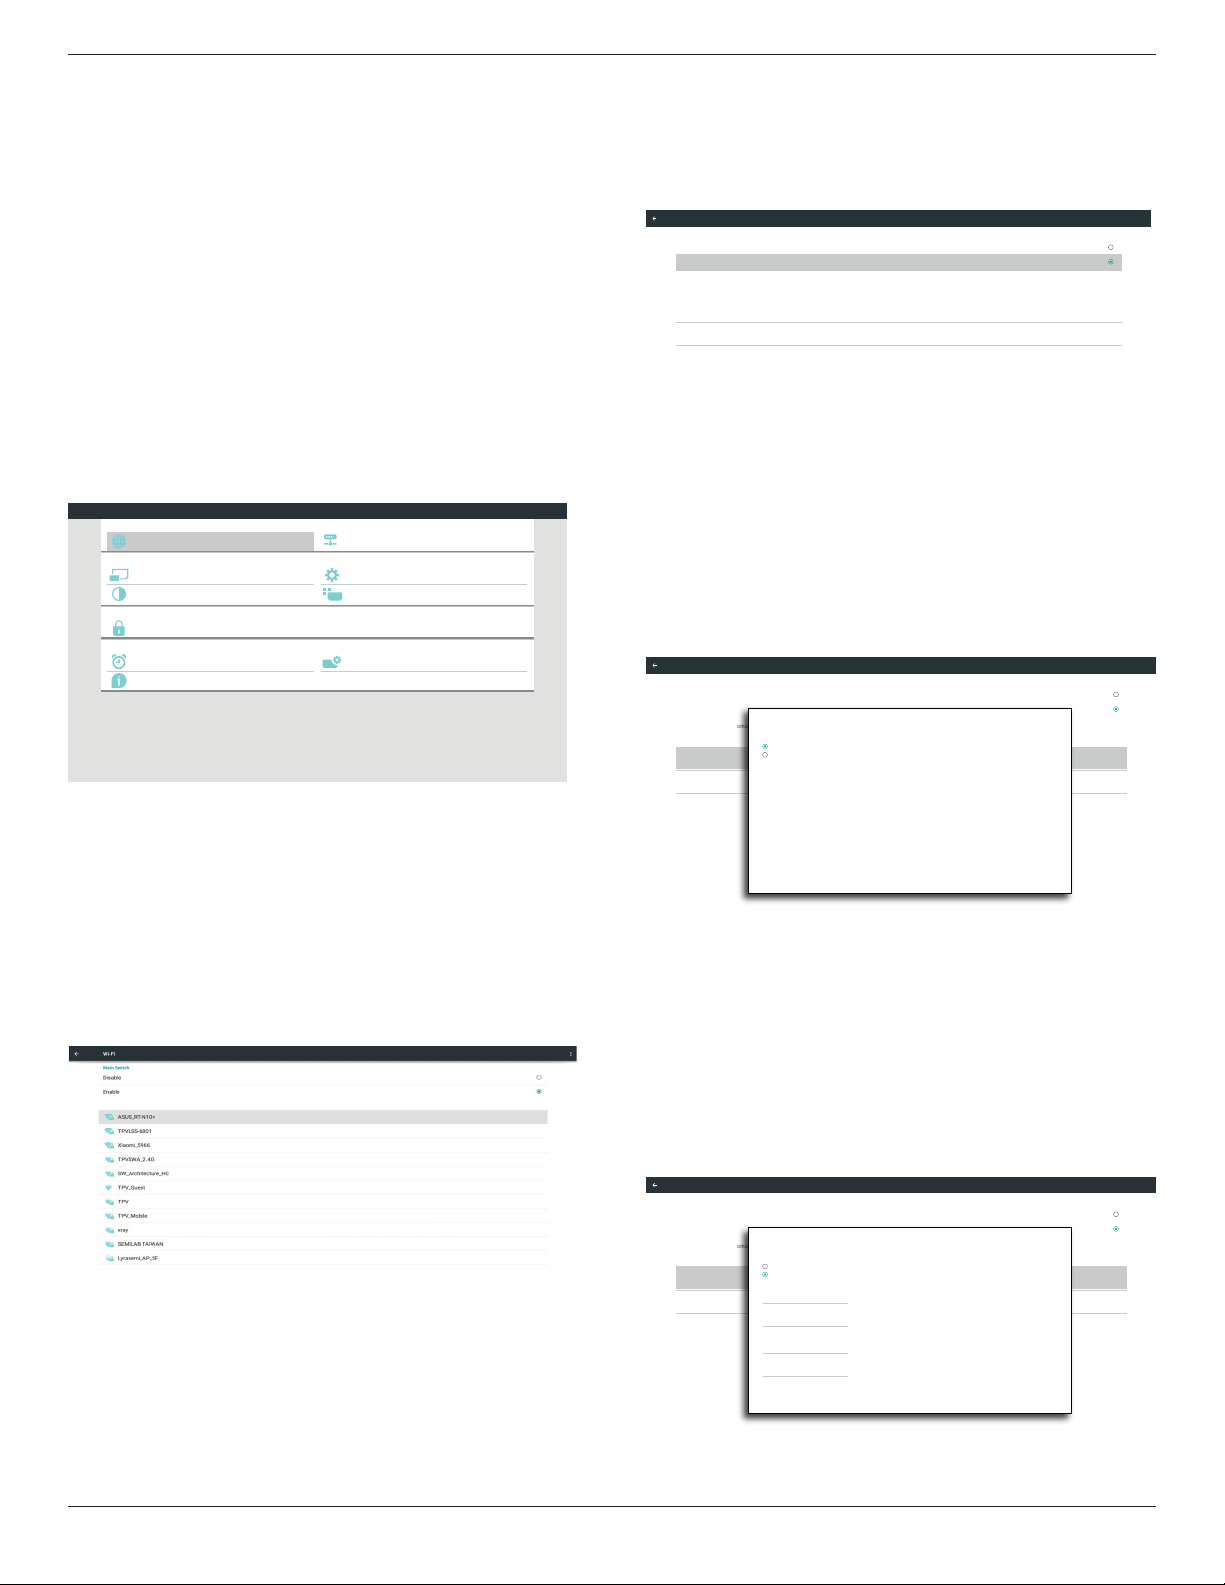
5. Signage display
5.1. Setting
Mainitems:
(1)Wi
-Fi(ShowupwhenpluginWi-Fidongle)
(2)Ethernet
(3)Proxy
(4)SignageDisplay
(5)SystemTools
(6)Display
(7)Apps
(8)Security
(9)Date&time
(10)Developeroptions
(11)About
Developer options
System Tools
Proxy
Signage Display
Ethernet
Display
Apps
Security
Date & time
About
System
Personal
Device
Network
Settings
5.2. Wi-Fi
ViaEnable/DisabletocontrolWi-FiOn/OFF.AfterEnable,thescreen
willlistallavailableWi-FiAP.
Note:
1. EthernetwillbedisableautomaticallyifWi-Fiturnonand
connecttonetwork.
2. AparticularmodelofWi-Fimoduleisrequired.Pleaseconsult
thedealerorservicetechnicianforhelp.
5.3. Ethernet
Enable/Disabletoturnon/offEthernet
AfterenableEthernet,thesettingswillshow:
(1)ConnectionType(Availableconnectiontype:DHCP/StaticIP)
A.DHCP
B.StaticIP
C.IPAddress
D.Netmask
E.DNSAddress
F.Gateway
(2)MacAddress
Connection Type
Static IP
Mac Address
00:24:67:21:57:ea
Ethernet Configuration
Main Switch
Disable
Enable
To see available networks, turn Ethernet on.
Ethernet
5.3.1. DHCP
DHCPmode:
(1)CannotmodifyIPAddress,Netmask,DNSAddressandGateway.
(2)Ifconnectsuccessfully,itwilldisplaycurrentnetwork
conguration.
Connection Type
DHCP
Mac Address
00:24:67:21:57:ea
Ethernet Configuration
Main Switch
Disable
Enable
To see available networks, turn Ethernet on.
Ethernet
Ethernet Configuration
DISCARD SAVE
Connection Type
DHCP
Static IP
IP Address
172.17.2.12
Netmask
255.255.255.0
DNS Address
172.16.0.178
Gateway
172.17.2.254
5.3.2. Static IP
InStaticIPmode,usercaninputIPAddress,Netmask,DNSaddressand
Gateway
Note:
IPaddress,netmask,DNSaddressandgatewayaddressinputlimitation
(1)Format:
I. number0-9
II. decimalpoint“.”
Connection Type
Static IP
Mac Address
00:24:67:21:57:ea
Ethernet Configuration
Main Switch
Disable
Enable
To see available networks, turn Ethernet on.
Ethernet
Ethernet Configuration
DISCARD SAVE
Connection Type
DHCP
Static IP
IP Address
Netmask
DNS Address
Gateway
55BDL3050Q
26
5.4. Proxy
BrowserconnecttoProxyserverandaskProxyservertoconnect
somewebsiteonInternet.
Enable/Disabletoturnon/offProxyserver.
• Click“Enable”toswitchproxyfunction“ON”
• Inputthe“Proxyhostname”.(ProxyserverIPaddress)
• Inputthe“Proxyport”.(Proxyserverportnumber)
• Selectan“Type”.(Proxyservertype.)
• Done.
- Iftheproxyserverisneedanauthenticationtoconnect,please
“checkon”theAuthenticationandinputUsername&Password.
- Iftheproxyserverisnotneedanauthenticationtoconnect.
Proxy hostname
Proxy port
Type
HTTP
Proxy settings
Authentication
Username
Password
Authentication
Main Switch
Disable
Enable
Proxy
Note:
• ProxytypeinHTTP,HTTPS,SOCKS4,SOCKS5aresupport.
• Onlysupporttheconnectionthroughtheproxyserverwith
TCPport80&443&5228.
• ProxyserverwithauthenticationonWindowsSeverSeriesis
notsupport.
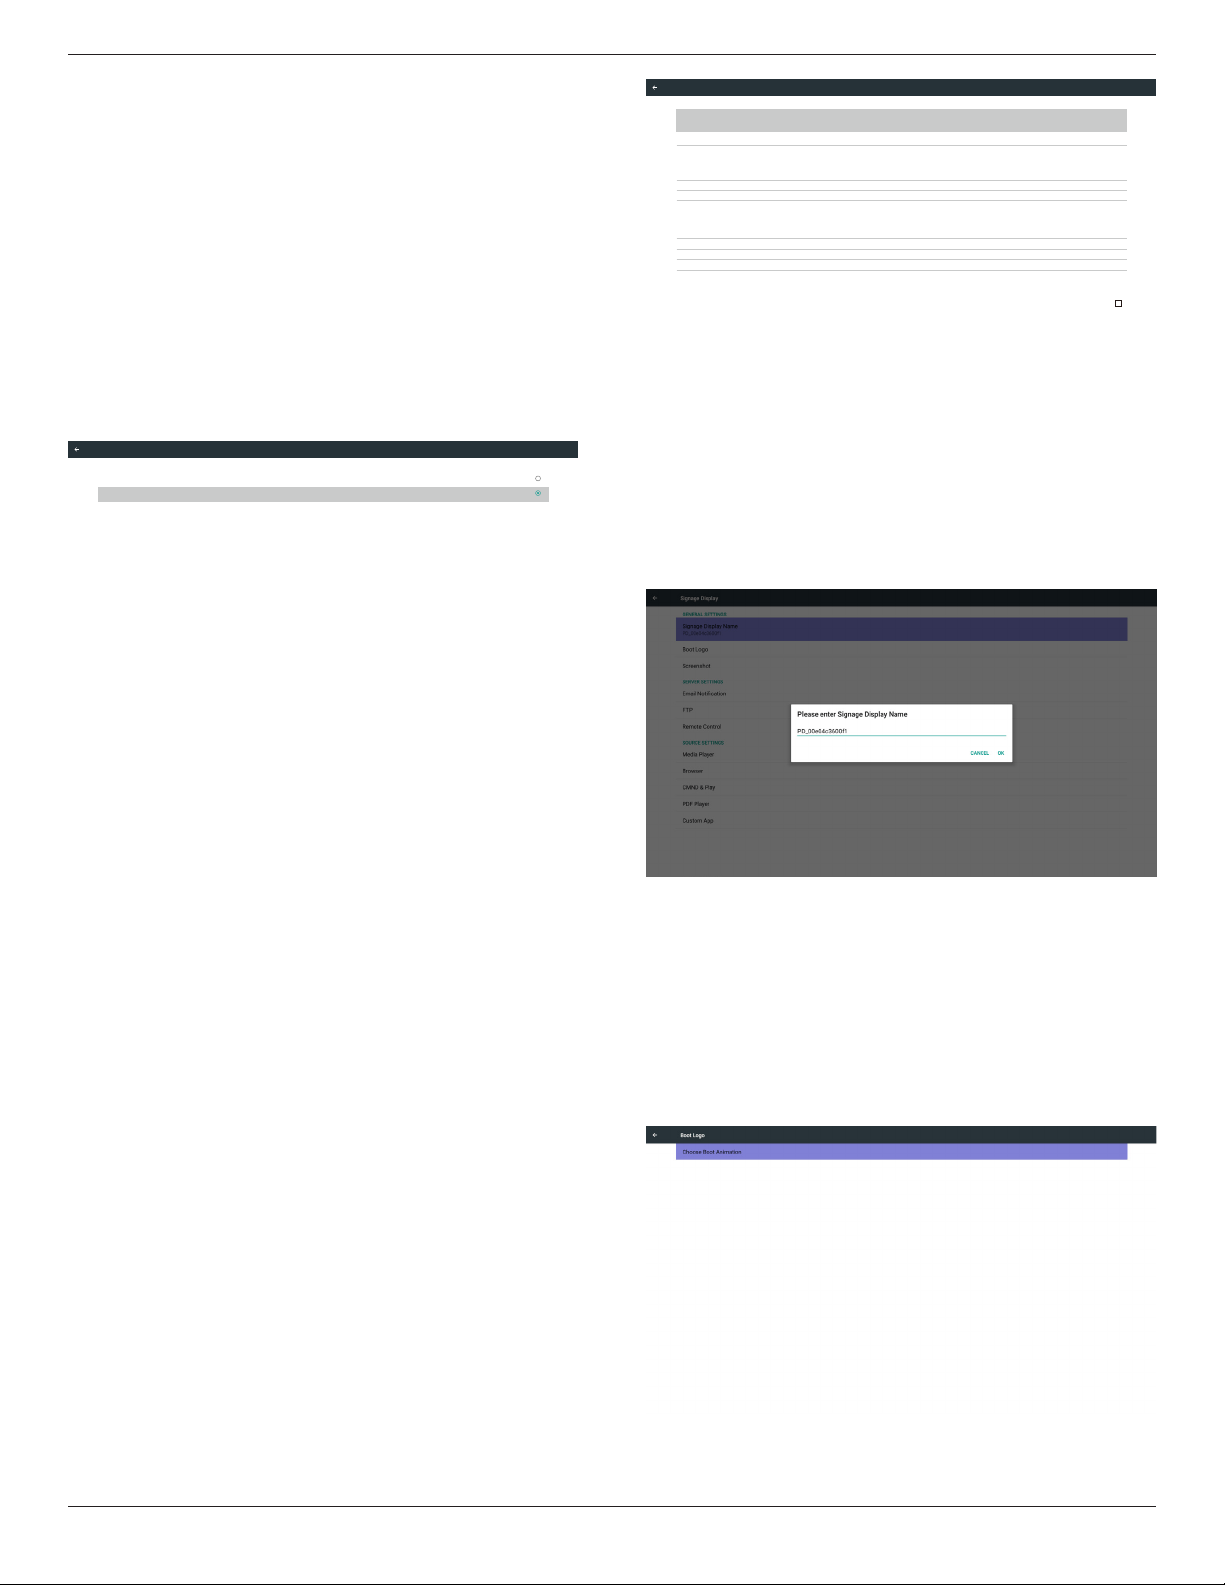
5.5. Signage Display
Divideinto4groups:GeneralSettings/ServerSettings/SourceSettings
/Security
(1)GeneralSettings
A. SignageDisplayName
B. BootLogo
C. Screenshot
(2)ServerSettings
A. EmailNotication
B. FTP
C. RemoteControl
D. SICPNetworkPort
(3)SourceSettings
A. MediaPlayer
B. Browser
C. CMND&Play
D. PDFPlayer
E. Customapp
(4)Security
A. ExternalStorage
(5)Other
A. TeamViewerSupport
B. PlatformWebAPI
Email Notification
FTP
Remote Control
SCIP Network Port
Server settings
Media Player
Browser
CMND & Play
PDF Player
Custom App
Source settings
General settings
Signage Display Name
PD_0024672157ea
Security
External Storage
SD card/USB External Storage Unlock
Boot Logo
Screenshot
Signage Display
5.5.1. General Settings
1. SignageDisplayName
SetupPDname“PD_”+EthernetMacAddress.
Note:
Inputlimitation:
(1)length:Max36characters
(2)format:nolimit
2. BootLogo
1)ScalarOSDmenutocontrolAndroidbootlogoenable/disable
ScalarOSDmenuoperation
RCU:Home->Conguration2->Logo->On/Off/User
Inusermode,usercanchoosetheirownbootlogoanimationle.
Note:
(1)Bootanimationlename:bootanimation.zip
(2)Willpop-upawindowforusertoselectUSBandSDcard.No
priorityissue.
55BDL3050Q
27
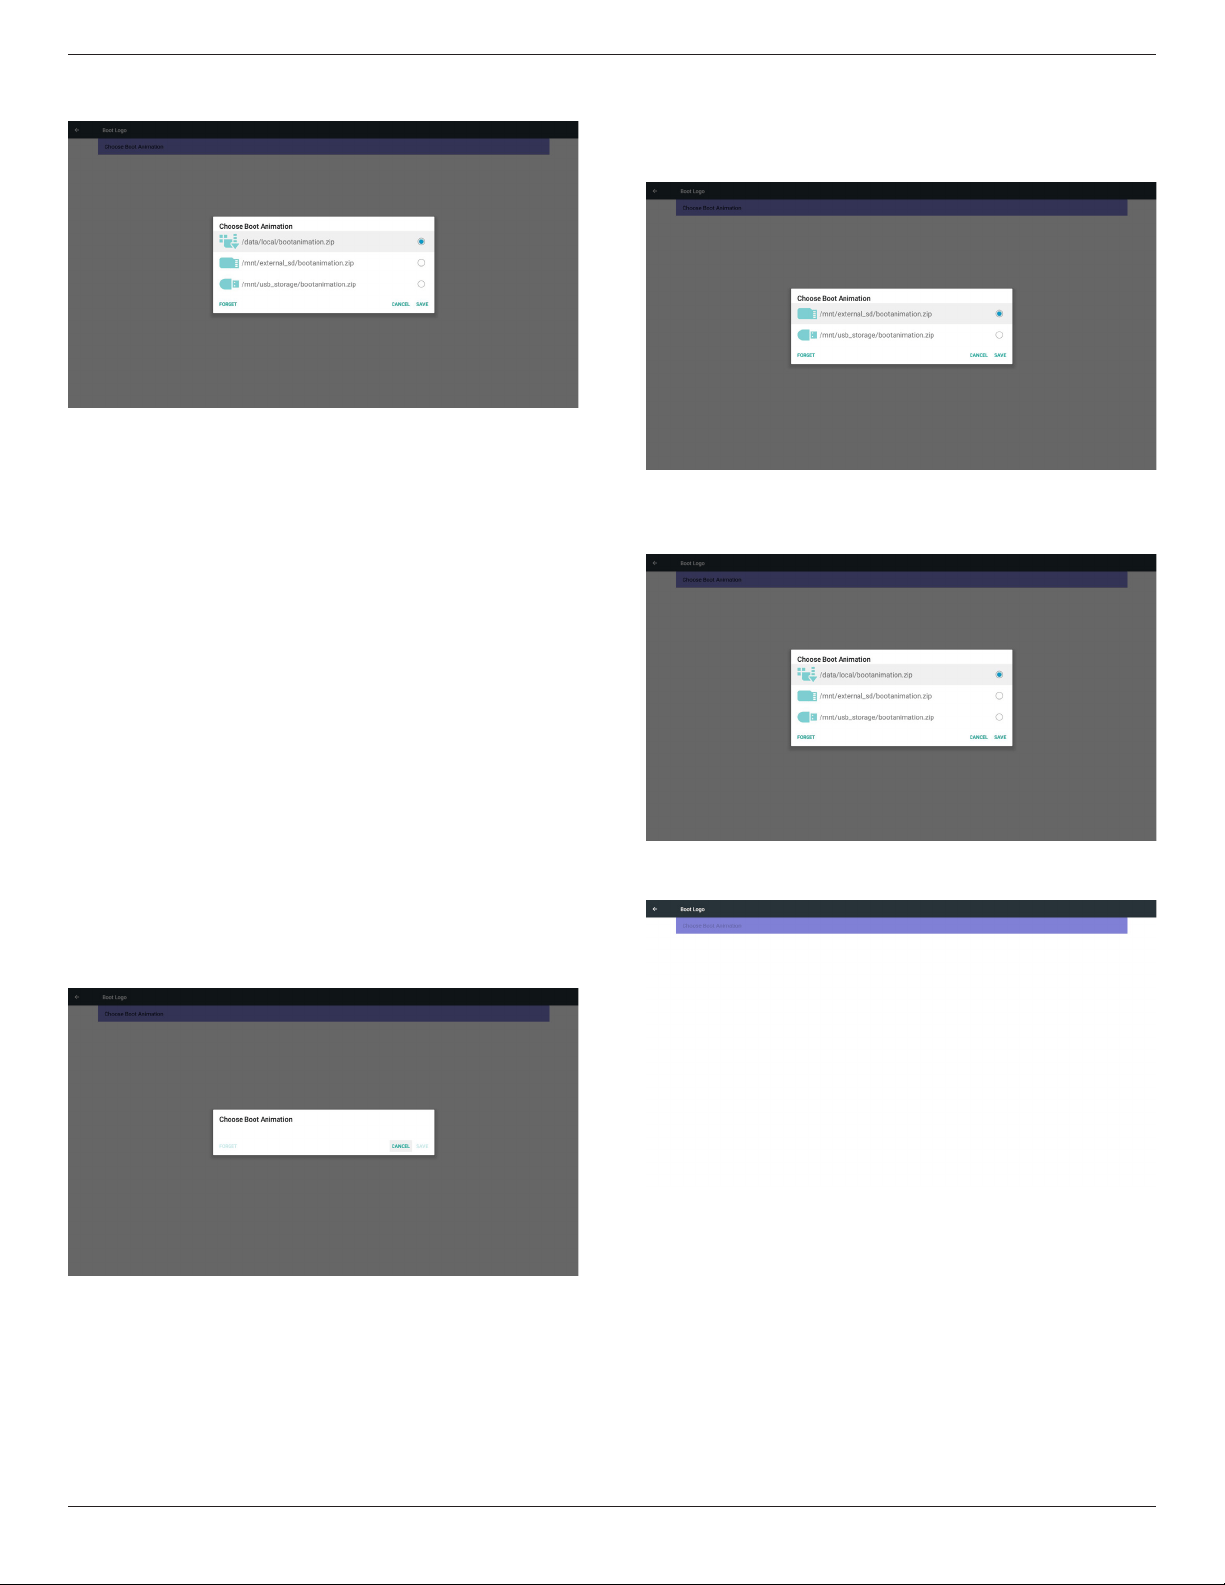
2)Whenbootlogoselected,PDwillcheckifthereisbootanimation.
zipunderUSBandSDcard.
Functionintroduction:
a. Optiondescription
/data/local
UsecustomizedbootanimationlewhichiscopiedfromSDcardor
USB
/mnt/external_sd
UsebootanimationsleunderSDcard
/mnt/usb_storage
UsebootanimationsleunderUSB
b. Save
PresssavekeytosaveSDcardorUSBbootanimation.zipto/data/
localandsetitasbootlogo.
c. Forget
PressForgetkeytodelete/data/localbootanimation.zipandnot
showbootlogo.
d. Cancel
Closedialoguew/ochanges.
Scenariointroduction:
Case1
Theuserdon’tsettlecustomizedbootlogo.PDdoesnotndany
bootanimation.zipleunderSDandUSB.Thelistwillbeblank.Save
andForgetbuttonwillbegrayanduseless.
Case2
Theusersdonotsettlecustomizedbootlogo.PDnd
bootanimation.zipleunderSDandUSB.Thescreenwillshow
bootanimation.zipandselecttherstleautomatically.
Case3
Theusersettlecustomizedbootlogo,thescreenwillshow/data/
local/bootanimation.zip.
3)IfOSDmenuLogoitemisOnorOff,theuserscannotchoose
bootanimationinAndroidsettings.
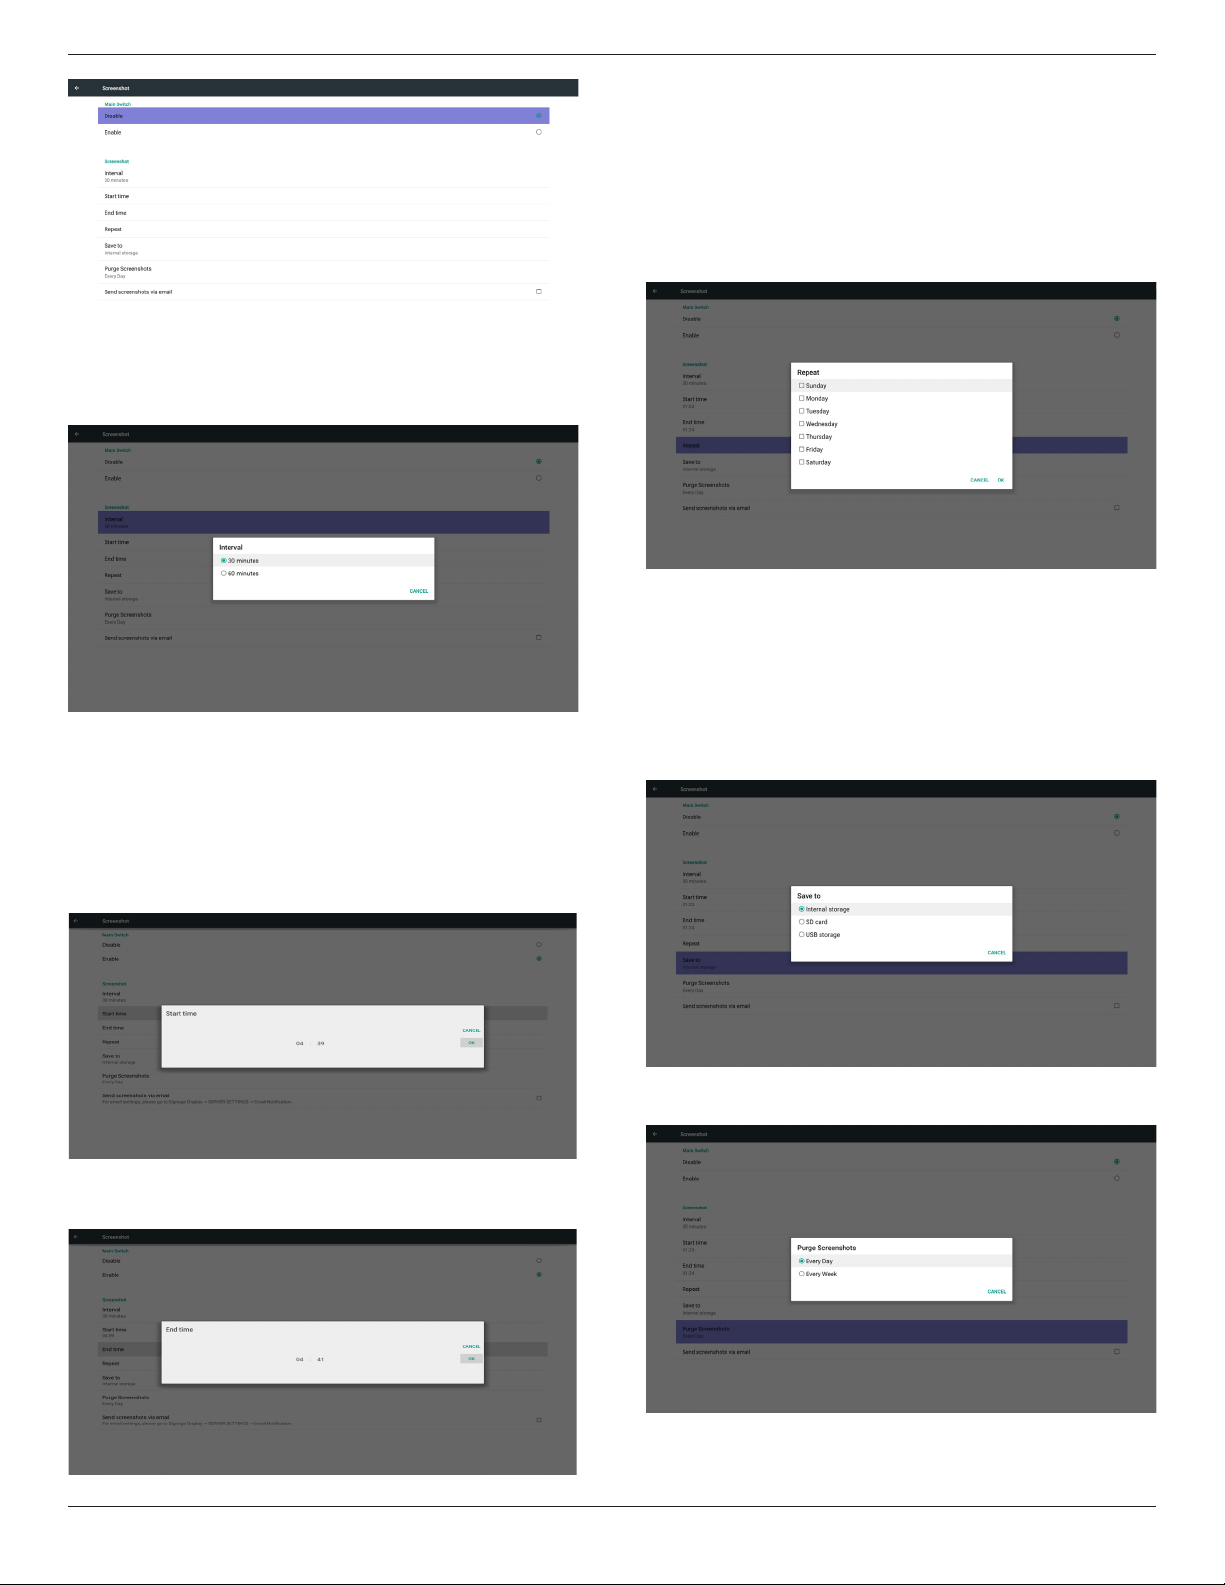
3. Screenshot
ViaEnable/DisabletocontrolscreenshotOn/Off.
AfterEnable,usercansetscreenshottimeslotandsavepath.
Note:
Timeslotofdeletionandscreenshot:
(1)Willdeletepictureatinitialtime0sec.
(2)Willscreeshotatrst40sec.
(3)Mediaplayer,Browser,CMND&play,PDFreader,Customsource
aresupported.
(4)Screenshotwillnotincludevideocontainer
55BDL3050Q
28
1)Interval
Setupintervaltimeframe.30minsor60mins.
2)StartTime
Setupscreenshotstarttime.
Note:
(1)Ifnostarttime,thescreenwillshowcurrenttimeautomatically
(2)JustpressBackkeytoexitdialogforSetup
(3)StarttimecannotbenewerthanEndtime.ItwillshowError
toast.
3)EndTime
Set up screenshot End time
Note:
(1)IfnoEndtime,thescreenwillshowcurrenttimeautomatically
(2)StarttimecannotbenewerthanEndtime.Itwillshowerror
toast.
4)Repeat
Setscreenshotrepeatcycle.Usercanchoosescreenshottimeframe.
(Multipleselection)
5)Saveto
Setupscreenshotsavepath.Internalstorage,SDcardorUSB
storage.)
Note:
picturestoragepath
(1)Inrootofinternalstorage/usbstorage/sdcard,PDwillcreate
folderautomatically.
(2)Thepicturewillsavetophilips/Screenshot/.
6)PurgeScreenshots
Setuppurgetimeframe.OnedayorOneweek.
55BDL3050Q
29
(7)Sendscreenshotsviaemail
Aftercheckthisitem,itwillsendscreenshottoemailofadministrator
PleaserefertoEmailnotication
Note:
PleaseconrmEmailsettingisdone.
5.5.2. Server Settings
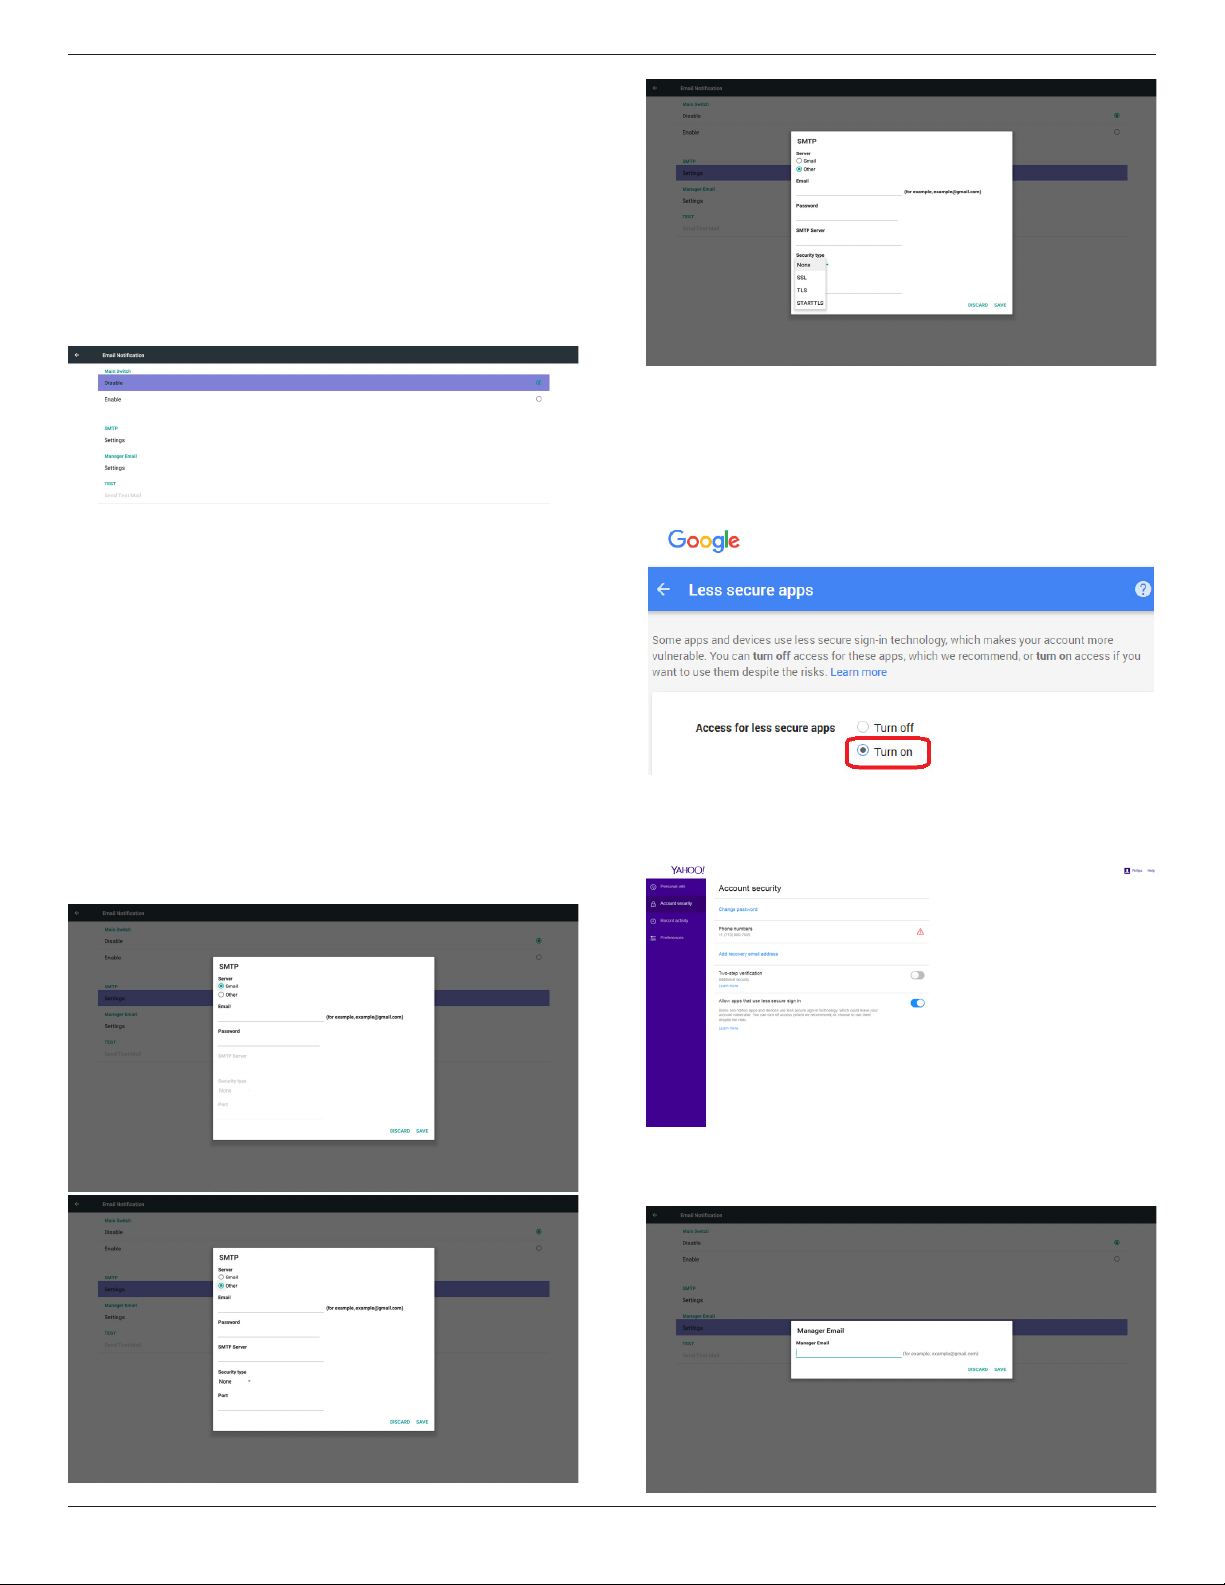
1. EmailNotication
ViaEnable/DisabletocontrolEmailOn/Off)
AfterEnable,usercansetupEmailnoticationconguration.
1)SMTP
SetSMTPconguration)
UsercansetGmailaccountorothermailaccount.
UsercanselectothermailaccountandsetupSMTPserver,Security
typeandportitem
Note
Passwordinputlimitation
(1)Length:6-20characters
(2)Format:nolimit
(3)unavailableport:5000
Gmailsafetysetting
IfGmailisnotworkingwhenthesettingsarecompleted,pleasetest
theGmailaccountviaaPCandthebelowlink
https://www.google.com/settings/security/lesssecureapps
Andconrmon“Accessforlesssecureapps”the“Turnon”itemis
selected.
YahooEmailSecuritySetting
IfYahooEmailisnotworkingwhensettingcomplete,pleaseconrm
“Allowappsthatuselesssecuresignin”itemisenabled.
2)ManagerEmail
Email
SetupReceivermailaccount

55BDL3050Q
30
3)Test
SendTestMail
TotestGmailaccountreceive/sendfunction.
Note
(1)WhenEmailisDisable,“SendTestMailButton”buttonwillgray
out
2. FTP
ViaEnable/DisabletocontrolFTPOn/Off.Aftersetup,PDcanshare
FTPles.
1)Account
SetupFTPaccount
Note:
Inputlimitation
(1)Length:4-20characters
(2)Format:
I. Englisha-zandA-Z
II. Number0-9
2)Password
SetupFTPpassword.
Note:
Inputlimitation
(1)Length:6-20characters
(2)Format:
I. Englisha-zandA-Z
II. Number0-9
FTPpassworddisplay
(1)Willshow“*”symboltoinsteadpasswordifsetuppasswordvia
remotecontrol.
(2)Aftersetup,thepasswordtextwillshowas“*”symbol.
Beforepasswordinput:
Afterpasswordinput:
Setupcompletedscreen:
3)StoragePath
Showdefaultpath:Internalstorage
Note:
CanonlydisplayInternalstorage,cannotbemodied.(Onlyshow
path)

55BDL3050Q
31
4)WillshowServerisunbindedifRemotecontrolserverfeedback
unbindedstatus.
5)Port
SetupFTPportnumber.Default:2121
Note:
Inputlimitation
(1)Length:Max5characters
(2)Range:1024~65535
(3)Format:Number0-9
(4)Unavailableport:5000
(5)Theportnumbermustmorethan1024
3.RemoteControl
ViaEnable/DisabletoControlRemoteControlOn/Off
UsercaninputServeraddress.Ifserverdoesnotregistered,itwillask
userforPINcode.
Bindstatus:
(1)Willshownetworkisdisconnectedifnotyetconnectsto
network.
(2)WillshowServerisdisconnectedifnetworkconnectedbut
remotecontrolserverdisconnected.
(3)WillshowServerisunbindedifRemotecontrolserverfeedback
unbindedstatus.
(4)WillshowServerisbindedifSeverbindedsuccessfully.
(5)WillshowErrorPINcodeifinputincorrectPINcode.
4.SICPNetworkPort
ChangeSICPNetworkPort.
Note:
1.Range:1025-65535
2.unavailableport:8000/9988/15220/28123/28124
55BDL3050Q
32
5.5.3. Source Settings
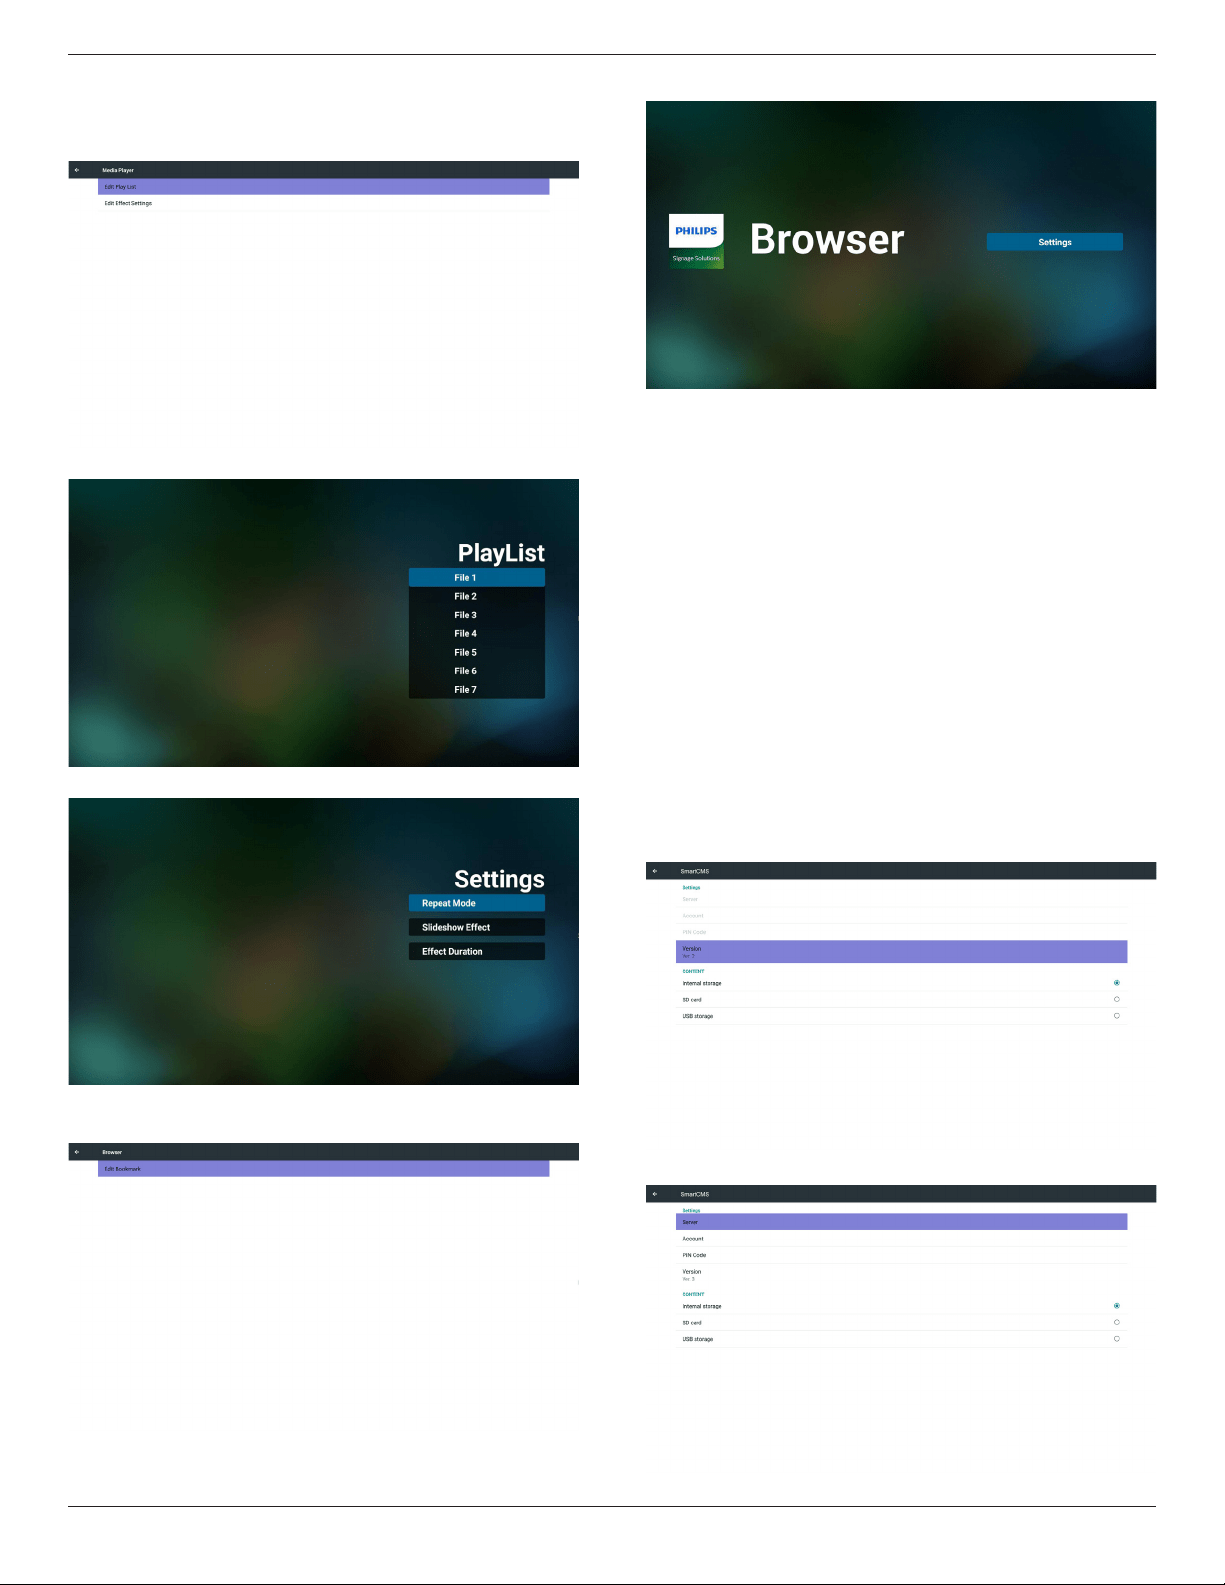
1. MediaPlayer
CanEditMediaPlayerplaylistandeffectsettings.
(1)OpenMediaPlayerPlayerListeditpage.
(2)OpenMediaPlayerslideshoweffecteditpage.
2. Browser
CaneditBookmarkconguration.
OpenBrowsersettingpage.
3. CMND&Play
1)Server
SetupCMND&Playserveraddress
2)Account
SetupCMND&Playaccount
3)PINCode
SetupCMND&PlayPINcode
(4)Version
Therearetwooptions,Ver.2andVer.3
Ver.2
use2.0/2.2agreement
Ver.3
use3.0/3.1agreement
(5)Content
Thereareinternalstorage/SDcard/USBstorage3optionsfor
selecting.
WhenVer.2,Server/Account/PINcodewillbegrayandunavailable
.
WhenVer.3,Server/Account/PINcodeisavailable.
55BDL3050Q
33
4. PDFPlayer
(1)OpenPDFPlayerPlayerListeditpage.
(2)OpenPDFPlayereffecteditpage.
5. CustomApp
UsercansetuptheapplicationforCustomerSource.
Note
(1)OnlydisplayUserInstalledapp.
(2)Willnotshowupsystempre-installapp.
ScalarOSDmenuoperation
RCU:Source->Custom
IfsetupcustomerAPK,PDwillopencustomerappwhenswitchsource
toCustomermode.
IfnosetupcustomerAPK,PDwillshowBlackscreenwhenswitch
sourcetoCustomermode.
Functionintroduction
(1)Save
SelectAppandpressSavekeytosaveit.
(2)Forget
PressForgetkeytocleanpreviousstoreddata
(3)Cancel
Nochange,closewindowdirectly
Ifnocustomerinstalledapk,thelistwillbeblank.
Nooptionforchoose.SaveandForgetkeywillbegrayand
unavailable.
Usercanselectcustomerinstalledapkinlist
NosetupCustomApp
Screenwillshowavailableappsandfocusonrstappitemautomatically.
55BDL3050Q
34
Aftersetup,itwillshowAppname
Case2.SetupCustomApp.(thereisacheckedcircleonright)
5.5.4. Security
1. ExternalStorage
Enable:SDcard/USBExternalStorageLock.
Disable:SDcard/USBExternalStorageUnlock.
Note:
Mustre-plugSDcard/USBExternalStorageafterunlockthe
externalstorage.
5.5.5. Other
(1)TeamViewerSupport
Enable/DisableTeamViewersupport.
(2)PlatformWebAPI
Enable/DisablePlatformWebAPI.
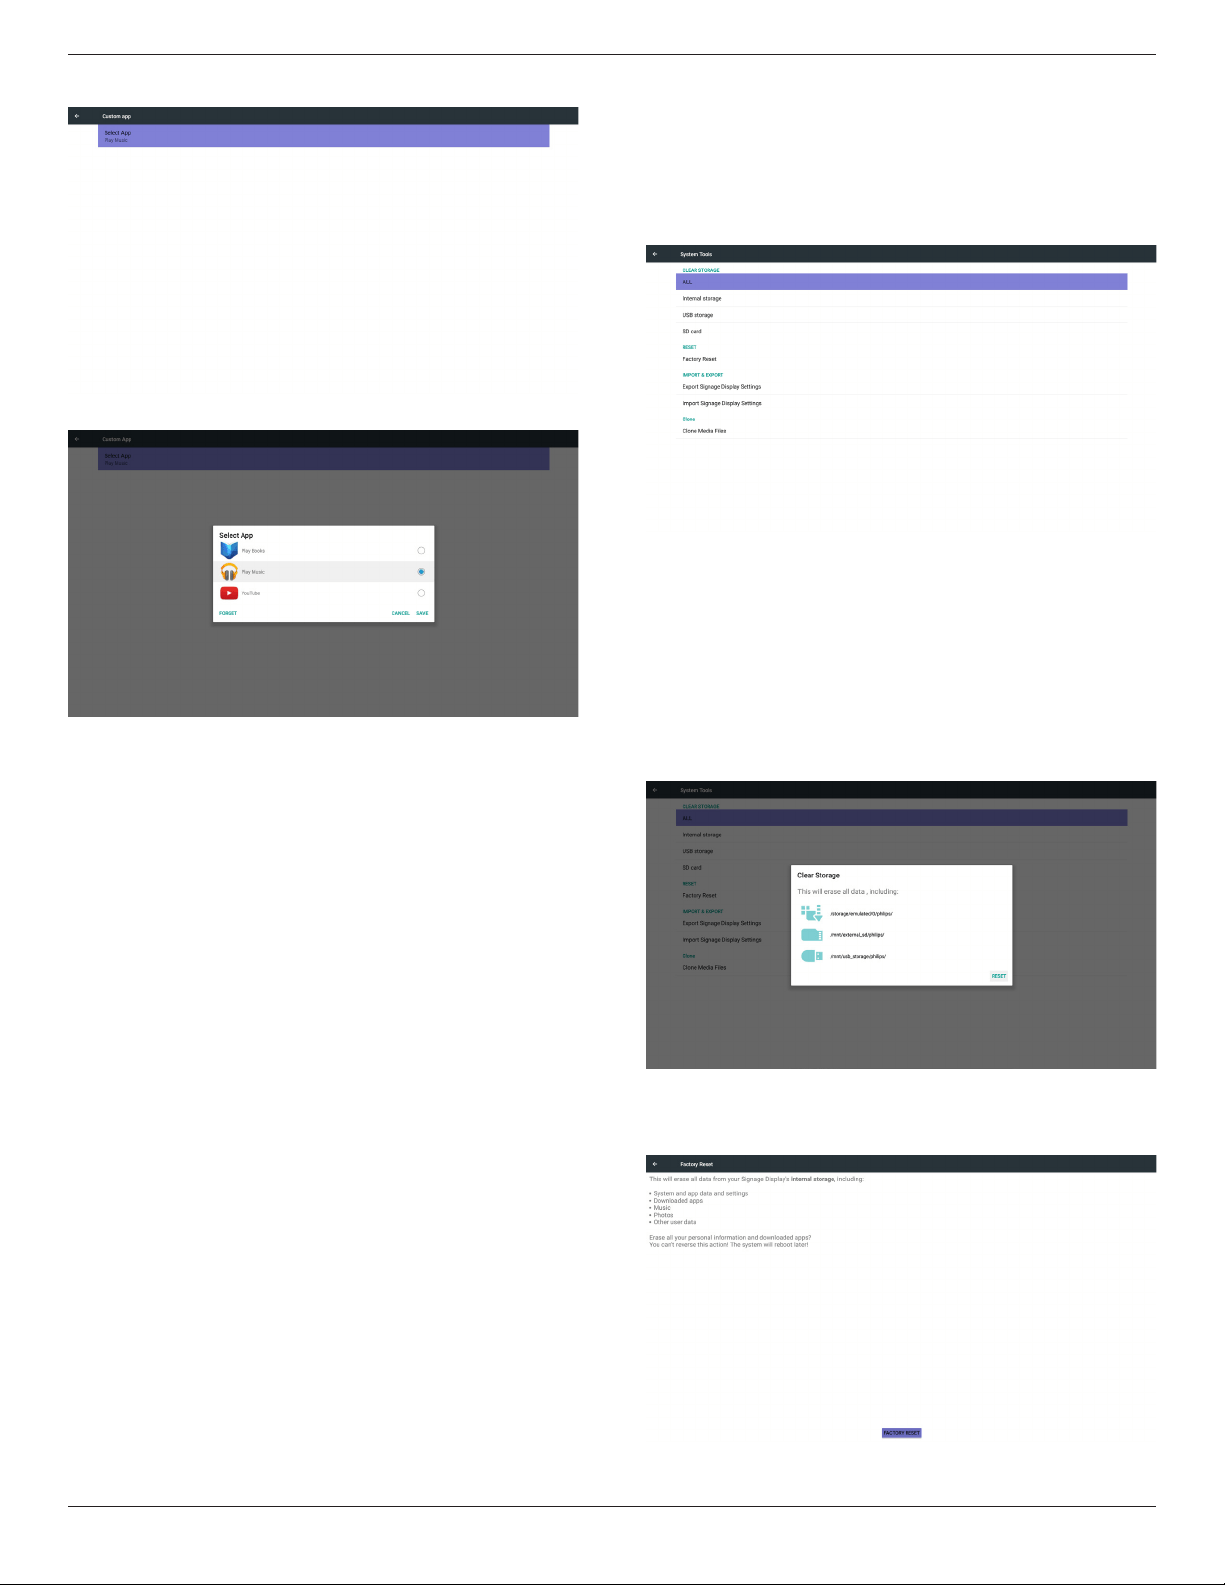
5.6. System Tools
Systemtools4mainfunctions:
(1)ClearStorage
(2)FactoryReset
(3)Import&Export
(4)CloneMediaFiles
5.6.1. Clear Storage
ThepurposeistoclearalldatainPhilipsfolders.
Dividedinto4mode:
(1)ClearallPhilipsfolders
(2)OnlyclearPhilipsfolderunderInternalstorage.
(3)OnlyclearPhilipsfolderunderUSBstorage.
(4)OnlyclearPhilipsfolderunderSDcard.
Pop-upthewindowtodisplayallfolderswhichcanbeclear.
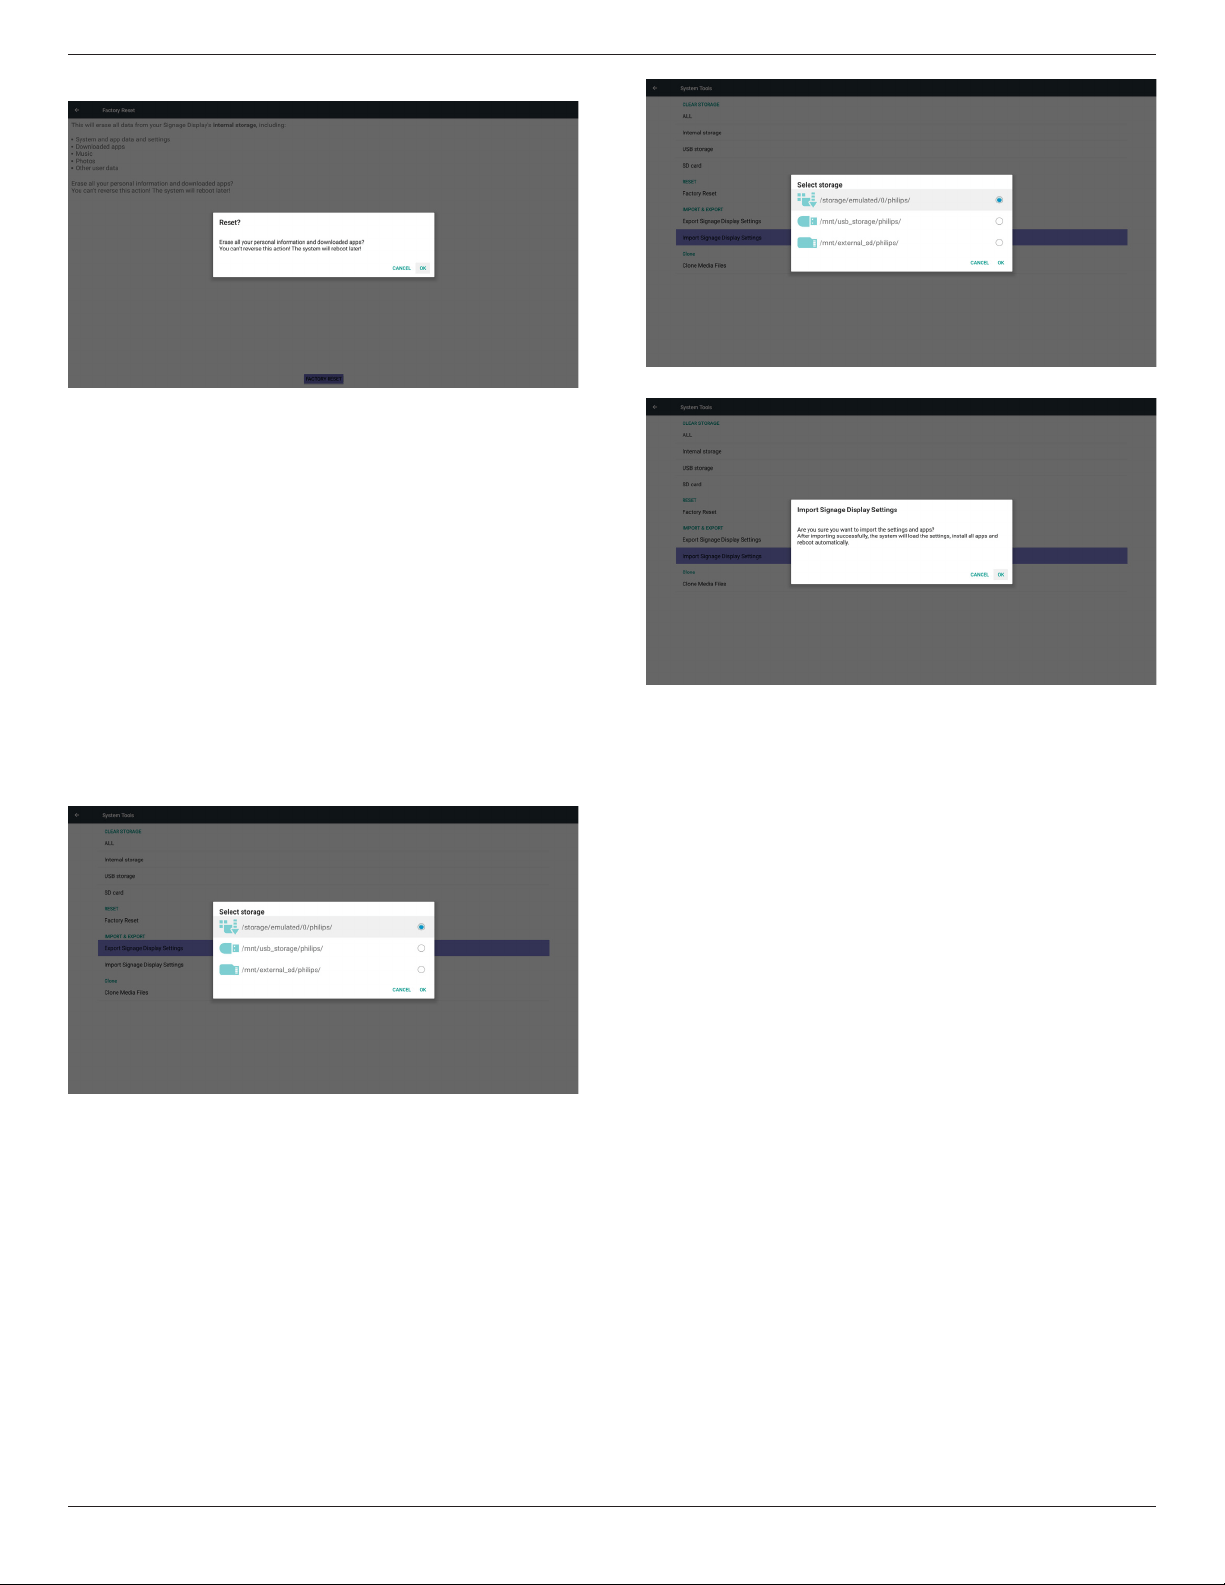
5.6.2. Factory Reset
FactoryResetcanrecovertoFactorydefaultsettings.
55BDL3050Q
35
PressOKtoexecuteResetfunctionautomatically
.
5.6.3. Import & Export
ThefunctionofImport&ExportPDsettins.
Notes.
(1)Settings.db(Savedlename:settings.db)
(2)WillsavetoPhilipsfolderinstorage
5.6.3.1. Export Signage Display Settings
WillexporttoPhilipsfolderunderUSBorSDcard
(1)Exportsettings.db.IncludeOSDsetting,Androidsettingsbut
“SignageDisplayName”and“BootLogo”
(2)Export3
rd
partyapktoPhilips/app/
Note:
IfnoPhilipsfolderexistsinUSBorSDcard,itwillbecreated
automatically.
Listallavailablestorage(internal/SD/USB)
5.6.3.2. Import Signage Display Settings
Importsettings.dbfromPhilipsfolderunderUSBorSDcard.
(1)Importsettings.db.IncludeOSDsetting,Androidsettingsbut
“SignageDisplayName”and“BootLogo”
(2)Autoinstall3
rd
partyapkfromPhilips/app/
Listallavailablestorage(Internal/SD/USB)
Shownoticationdialogbeforedatabaseimport
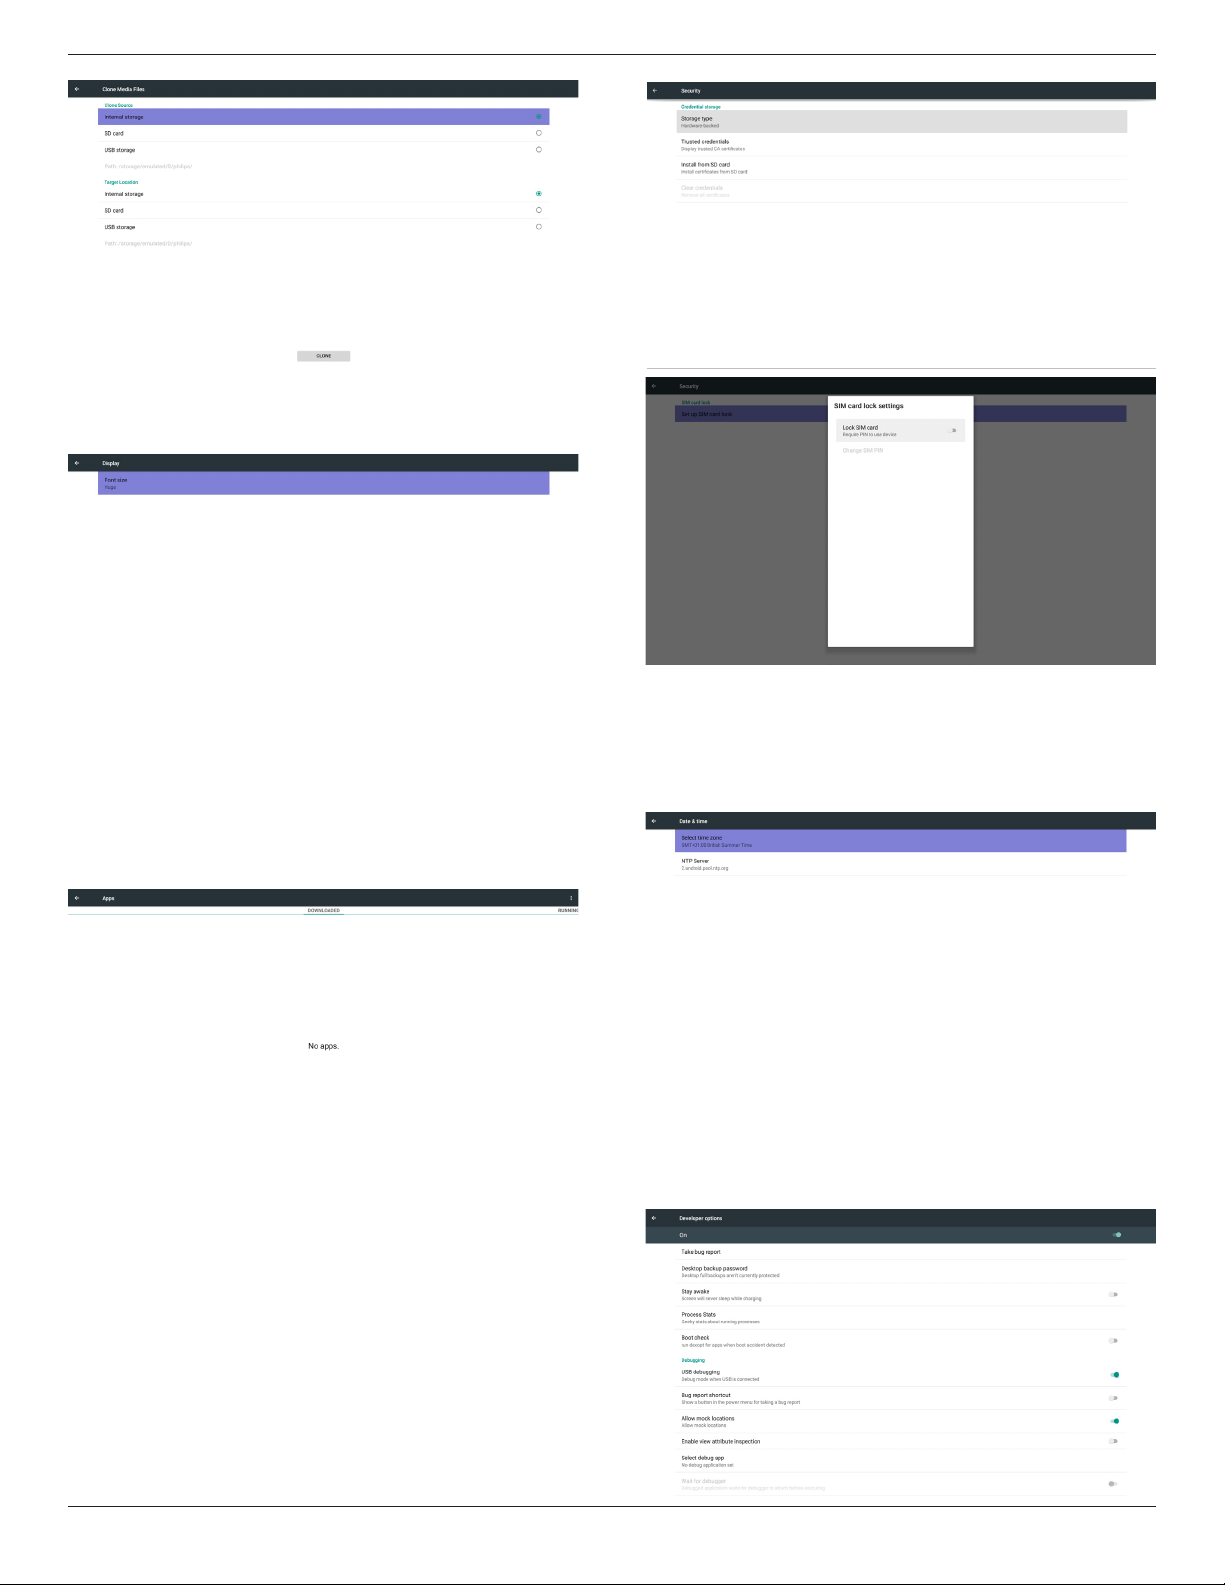
5.7. Clone Media File
ClonemedialefromInternal,SDorUSBPhilipsfolder.
1.TheclonedfoldernameunderPhilipsfolder
(1)philips/photo
(2)philips/music
(3)philips/video
(4)philips/cms
(5)philips/pdf
(6)philips/browser
2.Theclonedleextensionnameis“.cms”)
CloneSource
(1)Internalstorage
(a)checkFTP
(b)check/Philips/
(2)SD/USB
Filesunderroot
TargetLocation
(1)Internalstorage
Saveto/Philips/
(2)SD/USB
Savetoroot
55BDL3050Q
36
5.8. Display
Usercanmodifythefontsize,canchoose:Small/Normal/Large/Huge
5.9. Apps
Displayapplicationsinformation.
Note
(1)UseroptionskeyonRCUtoshowsettingoption.
5.10. Security
(1)Credentialstorage
Controlpanelofcerticates
5.11. Date & time
ViaScalarOSDmenutocontrolAutoTimeOn/Off.
Note:
AddnewNTPservertodisplaycurrentserverIP
.
5.12. Developer options
Androiddeveloperoptions.Formoreinformationpleasevisit
https://developer.android.com/index.html
55BDL3050Q
37
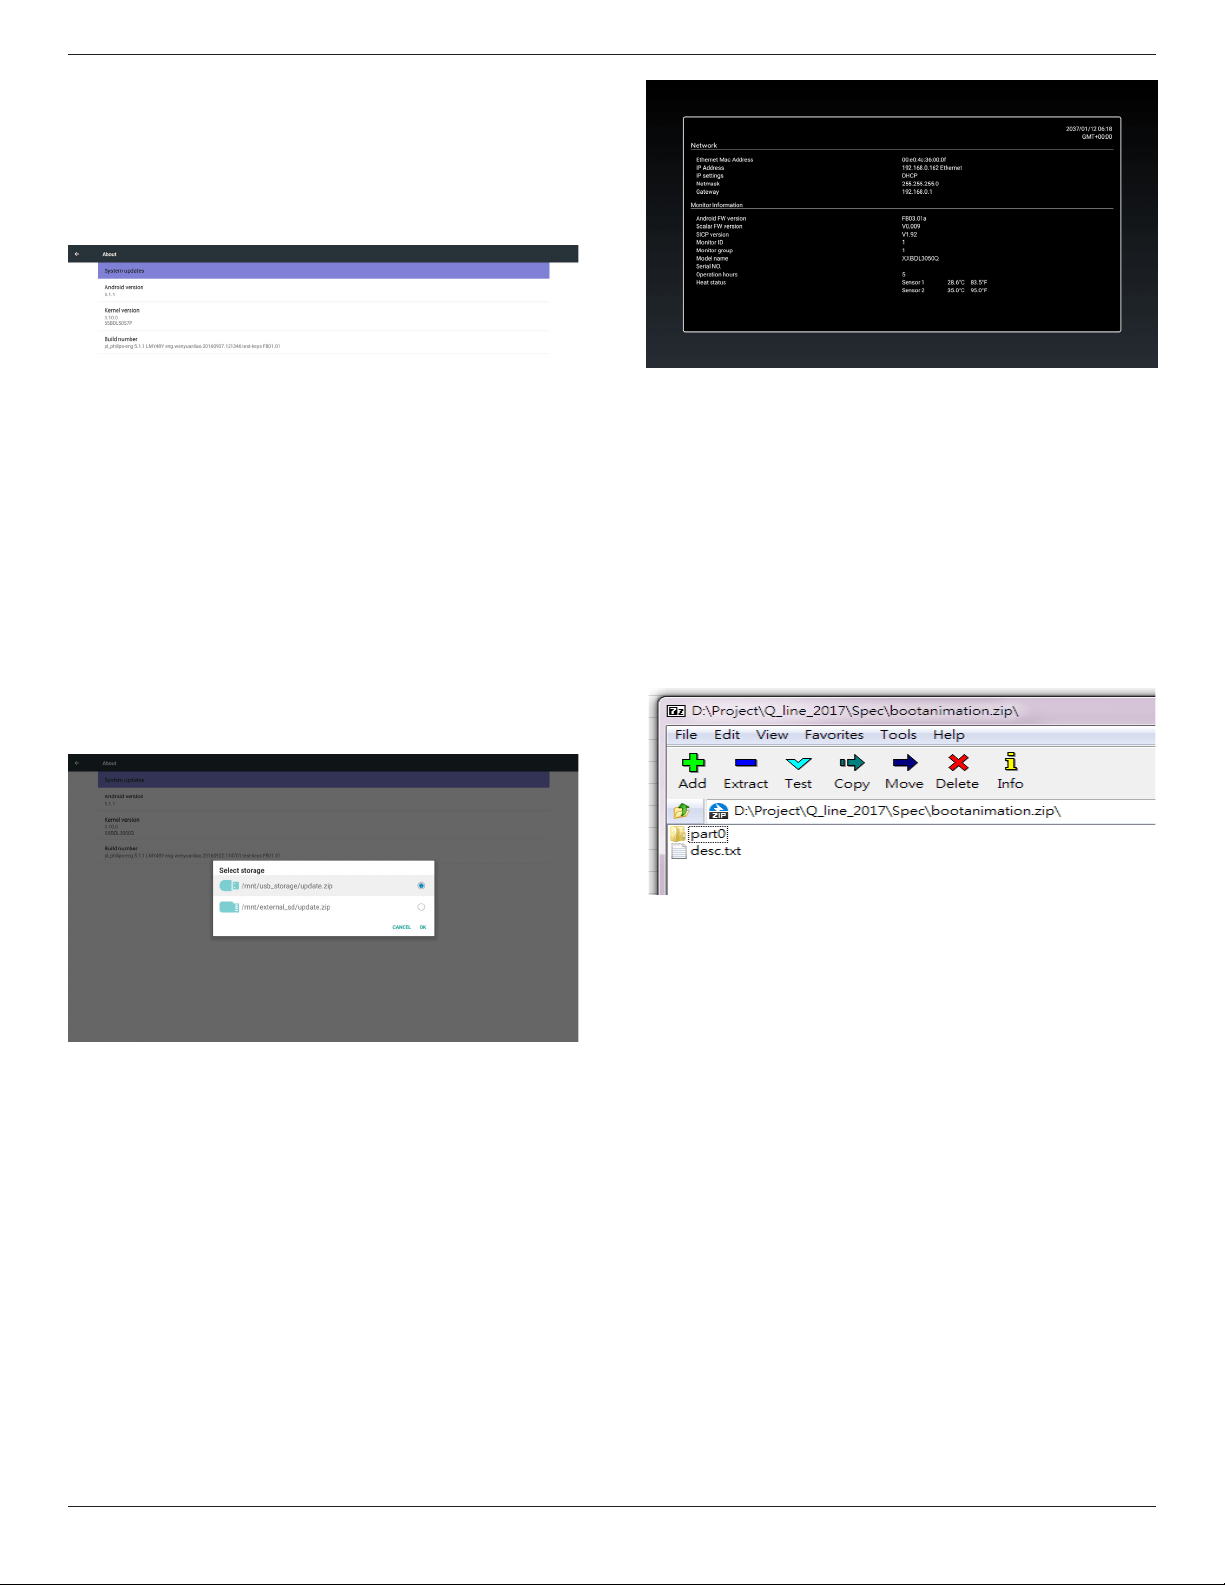
5.13. About
MaininfoinAbout:
(1)Systemupdates
(2)Androidversion
(3)Kernelversion
(4)Buildnumber
5.13.1. System updates
Willautomaticallysearchupdate.zipinUSB.
Willbeshowninlistforuserselectioniffound
Note:
(1)OnlysupportAndroidFullimage.
(2)lenameshouldbeupdate.zip.
(3)theleshouldbelocatedinrootofstorage.
Afterselectupdate.ziple,PDwillrestartandstarttoupdate.
5.14. Supplementary
5.14.1. Quick Info
Youcanpress“Info+77”tostartupquickinfo.
Quickinfowillshow“Network”and“MonitorInformation”,asbelow:
Note:
Operationhours:Itisupdatedeveryminute.
Heatstatus:Itisupdatedevery5seconds.
5.14.2. How to custom an Android boot
animation?
1. Overview
TheAndroidbootanimationisusedscripttoloadPNGleswhen
thedeviceboots.Itiscontainedwithinanuncompressedziplecalled
bootanimation.zip.
2. Insidethebootanimation.ziple
Thebootanimation.zipasfollow:
• Theimagefolder(ContainsPNGimagesnamedinincremental
numbers)
• Thedesc.txtle
(1)Theimagefolder
ThesecontainPNGimagesnamedinnumbers,startingfrom
somethinglike0000.pngor0001.pngandproceedingwith
incrementsof1.Therehastobeatleastonefolderandthereisno
knownupperlimittothenumberoffolders.
(2)Thedesc.txtle
Thisledeneshowtheimagesinthefolder(s)aredisplayedduring
thebootanimation,inthefollowingformat:
- WidthHeightFrame-rate
- modeLoopdelay-timeFolder1
- modeLoopdelay-timeFolder2
Anexampleofadesc.txtleis:
- 1920108030
- p10part0
- p00part1
a.Therstline
1920and1080denethewidthandheightofthescreen
resolution.
30istheframerateinfps(framespersecond)i.e.numberof
imagestodisplaypersecond.
b.Thesecondandthirdlineshaveasameformat.
55BDL3050Q
38
Therst‘p’denesplaymodeisimmediatelystopplayingwhen
bootcomplete.
Thenumberafter‘p’denesrepeatmode
- specifying0wouldmakethepartloopindefinitelytillthe
devicehasbootcomplete.
- specifying1wouldmakethepartplaybackonce.
Thenextnumberdenesthedelaytime(ms).Forexample,ifset
10,whenallimageleshasbeenplayback,systemwilldelay10ms.
Thepart0andpart1areimagefoldername.
Theaboveexample,thebootanimationwillplayataresolutionof1920
by1080pixels,ataframerateof30fps,startingwiththecontentsof
part0folderandafterplayingtheminoneloop,switchingtocontents
ofpart1folderandplayingthemcontinuouslytillthedeviceboot
complete.
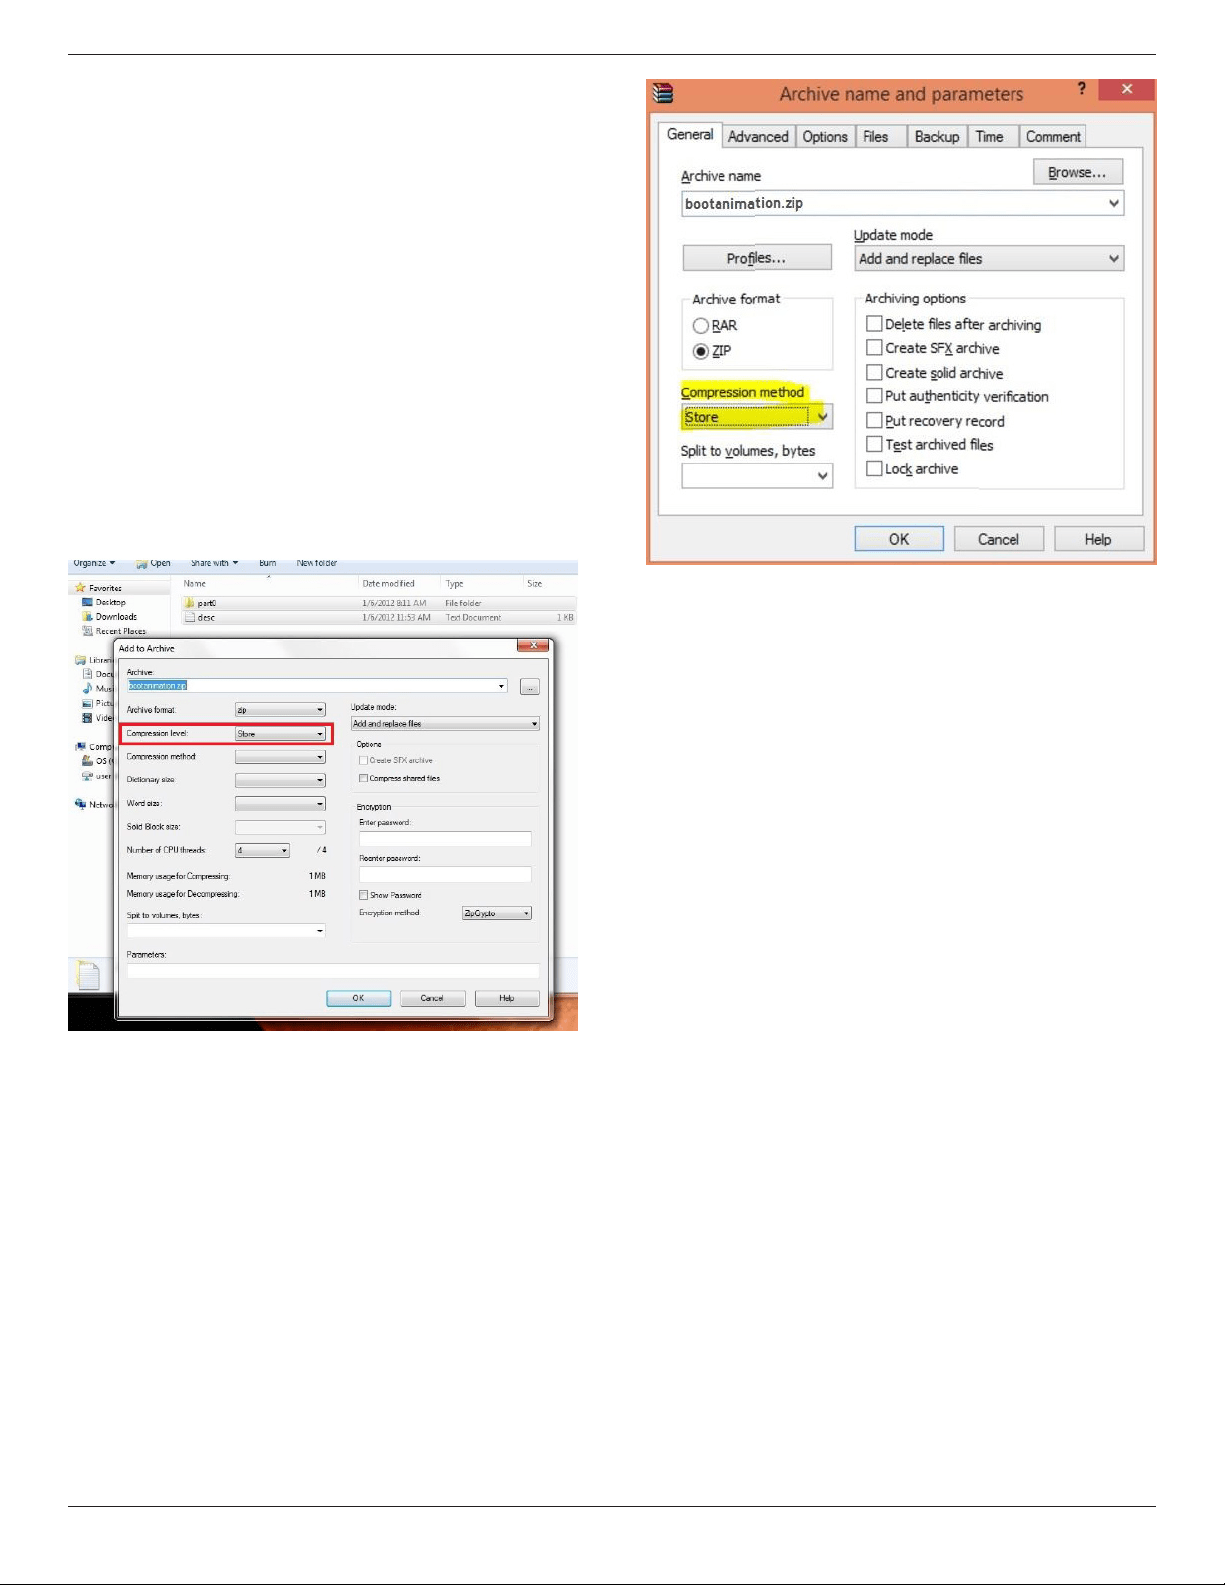
3. Ziple:
Selecteverything(imagefoldersanddesc.txt)insidetheBootanimation
folderandzipthemintoanewuncompressed zip archiveusingyour
favoritecompressionutilitylike7ziporWinRARandsoon.
Ifusing7zip,setcompressionlevelto“Store”
IfusingWinRAR,set“Compressionmethod”to“Store”
orelsebootanimationWON’Twork
4. Applythecustombootanimation
Procedure:
(1).Putyourcustombootanimztion.zipleintoexternalSDcardor
USBandplugintoPhillipsPDplatform.
(2.)MakesuretheLogooptionisenabled.
PressHomekeyonRCU:OSDmenu->Conguration2->Logo
->set“User”
(3.)Presscombinationkey“Home+1888”onRCUtogotoAdmin
mode:
Settings->SignageDisplay->GENERALSETTINGS->BootLogo
(4).Thesystemwillndthebootanimation.zipinexternalSDcardor
USBautomaticallyandcopyitto/data/local
(5.)Oncestep1~4hasbeendone,restartthesystem.Thenew
customizedbootanimationshouldbedisplayedduringboottime.

55BDL3050Q
39
5.14.3. How to Install Android app?
Thereare3waystoinstallyourownandroidapp.
(a)ViaFileManagerinAdminMode
1.Ifyouhaveapkalready
1.1copyyourapktoUSBdiskorSDcard,andthenplugthem
intoPhilipsAndroidSignageDisplay.
1.2GotoAdminMode>Apps>FileManager
1.3UsingFileManagerandndoutyourapkandthenyoucan
install.Justpress“ok”ontheselectedapk.
2.DownloadapkbyChromiumbrowser,andthengoto<internal
storagepath>/Download/byFileManager.
2.1Therestofstepsisthesameasabove.Pleasenote,eachmodel
mayhavedifferent<internalstoragepath>.
(b)ViaAdbShell
1.MakesurethatyourPCcanconnecttoPhilipsAndroidSignage
Displayusingadb.
2.Prepareyourapkinafolder(forexample,C:\apkfolder)onPC.
3.Executethefollowinginstructionbycommandlinetool.
C:\apkfolder>adbinstall-rapk_name.apk
(c)ViaCustomizedIntent
1.Ifyoudevelopanapkwhichcandownloadanyandroidapp,then
yourapkcanissueacustomizedintent.
2.Givingtheapknameandthepathitwasstored.Thesystemwill
helpyoutoinstallbyprogram.
Description Intent Parameters
SwUpdate
php.intent.
action.
UPDATE_APK
lePath
Theabsolutelepath
includingthelename.
Keep
Indicatethatyouwant
tokeeptheleornot
afterupdating.Thedefault
valueisfalse.
packageName
Thetargetpackage
youwanttolaunch
automaticallyafter
updating.
activityName
Thetargetactivity
youwanttolaunch
automaticallyafter
updating.Butifcurrent
topactivityisnot
activityName,nothing
happened.
Forexample,
Intentintent=newIntent();
intent.setAction(“php.intent.action.UPDATE_APK”);
intent.putExtra(“lePath”,“/sdcard/Download/apk_name.apk”);
intent.putExtra(“keep”,true);
intent.putExtra(“packageName”,“com.example.apk_name”);
intent.putExtra(“activityName”,“com.example.apk_name.MainActivity”);
sendBroadcast(intent);
55BDL3050Q
40
6. OSD Menu
AnoverallviewoftheOn-ScreenDisplay(OSD)structureisshown
below.Youcanuseitasareferenceforfurtheradjustingyourdisplay.
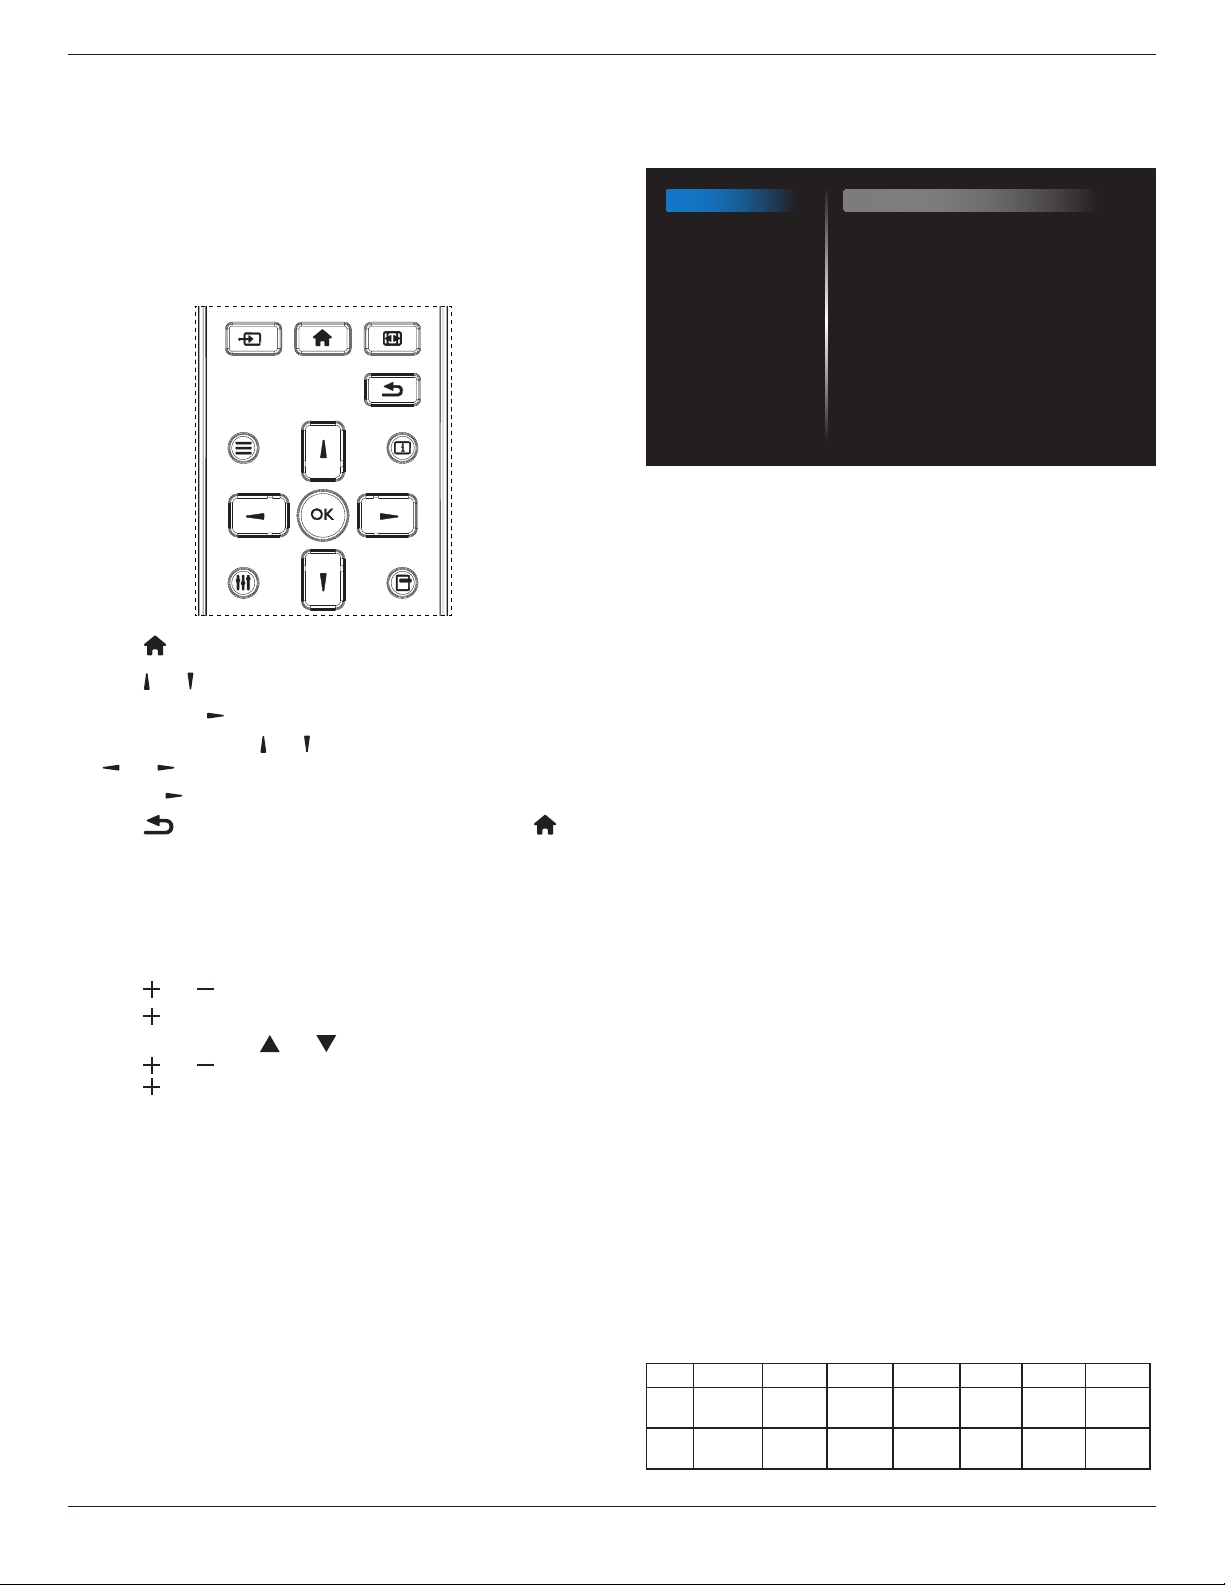
6.1. Navigating the OSD Menu
6.1.1. Navigating the OSD menu using the
remote control
FORMAT
SOURCE
INFOLIST
OPTIONSADJUST
1. Press[ ] buttonontheremotecontroltodisplaytheOSDmenu.
2. Press[ ] or[ ] buttontochoosetheitemyouwanttoadjust.
3. Press[OK]or[ ] buttontoenterthesubmenu.
4. Inthesubmenu,press[ ] or[ ]buttontotoggleamongitems,press
[ ]
or[ ]buttontoadjustsettings.Ifthereisasubmenu,press
[OK]or[ ]buttontoenterthesubmenu.
5. Press[ ]buttontoreturntothepreviousmenu,orpress[ ]
buttontoexittheOSDmenu.
6.1.2. Navigating the OSD menu using the
display’s control buttons
1. Press[MENU]buttontodisplaytheOSDmenu.
2. Press[ ]or[ ]buttontochoosetheitemyouwanttoadjust.
3. Press[ ]buttontoenterthesubmenu.
4. Inthesubmenu,press[ ]or[ ]buttontotoggleamongitems,
press[ ]or[ ]buttontoadjustsettings.Ifthereisasubmenu,
press[ ]buttontoenterthesubmenu.
5. Press[MENU]buttontoreturntothepreviousmenu,orpress
[MENU]buttonseveraltimestoexittheOSDmenu.
6.2. OSD Menu Overview
6.2.1. Picture menu
Picture
Screen
Audio
Configuration 1
Configuration 2
Advanced option
Brightness
Contrast
Sharpness
Black level
Tint
Color
Noise reduction
Gamma selection
Color temperature
Color control
Smart power
Overscan
90
50
20
50
50
55
Medium
Native
Native
Action
Off
Off
Brightness(Picture)
Adjusttheoverallimageandbackgroundscreenbrightness(backlight).
Contrast
Adjusttheimagecontrastratiofortheinputsignal.
Sharpness
Thisfunctionisdigitallycapabletokeepcrispimageatanytimings.
Itisadjustabletogetadistinctimageorasoftoneasyoupreferandset
independentlyforeachpicturemode.
Black level
Adjusttheimagebrightnessforthebackground.
NOTE:sRGBpicturemodeisstandardandcannotbechanged.
Tint (Hue)
Adjustthetintofthescreen.
Press+buttontheeshtonecolorbecomesgreenish.
Press-buttontheeshtonecolorbecomespurplish.
NOTE:VIDEOmodeonly.
Color(Saturation)
Adjustthecolorofthescreen.
Press+buttontoincreasecolordepth.
Press-buttontodecreasecolordepth.
NOTE:VIDEOmodeonly
Noise Reduction
Adjustthenoisereductionlevel.
Gamma selection
Selectadisplaygamma.It’srefertothebrightnessperformancecurveof
signalinput.Choosefrom{Native}/{2.2}/{2.4}/{sgamma}/{D-image}.
NOTE:sRGBpicturemodeisstandardandcannotbechanged.
Color temperature
Itisusedtoadjustthecolortemperature.
Theimagebecomesreddishasthecolortemperaturedecreases,and
becomesbluishasthecolortemperatureincreases.
CCT
10000ºK 9300ºK 7500ºK 6500ºK 5000ºK 4000ºK 3000ºK
X
0.279±
0.030
0.283±
0.030
0.299±
0.030
0.313±
0.030
0.346±
0.030
0.382±
0.030
0.440±
0.030
Y
0.292±
0.030
0.298±
0.030
0.315±
0.030
0.329±
0.030
0.359±
0.030
0.384±
0.030
0.403±
0.030
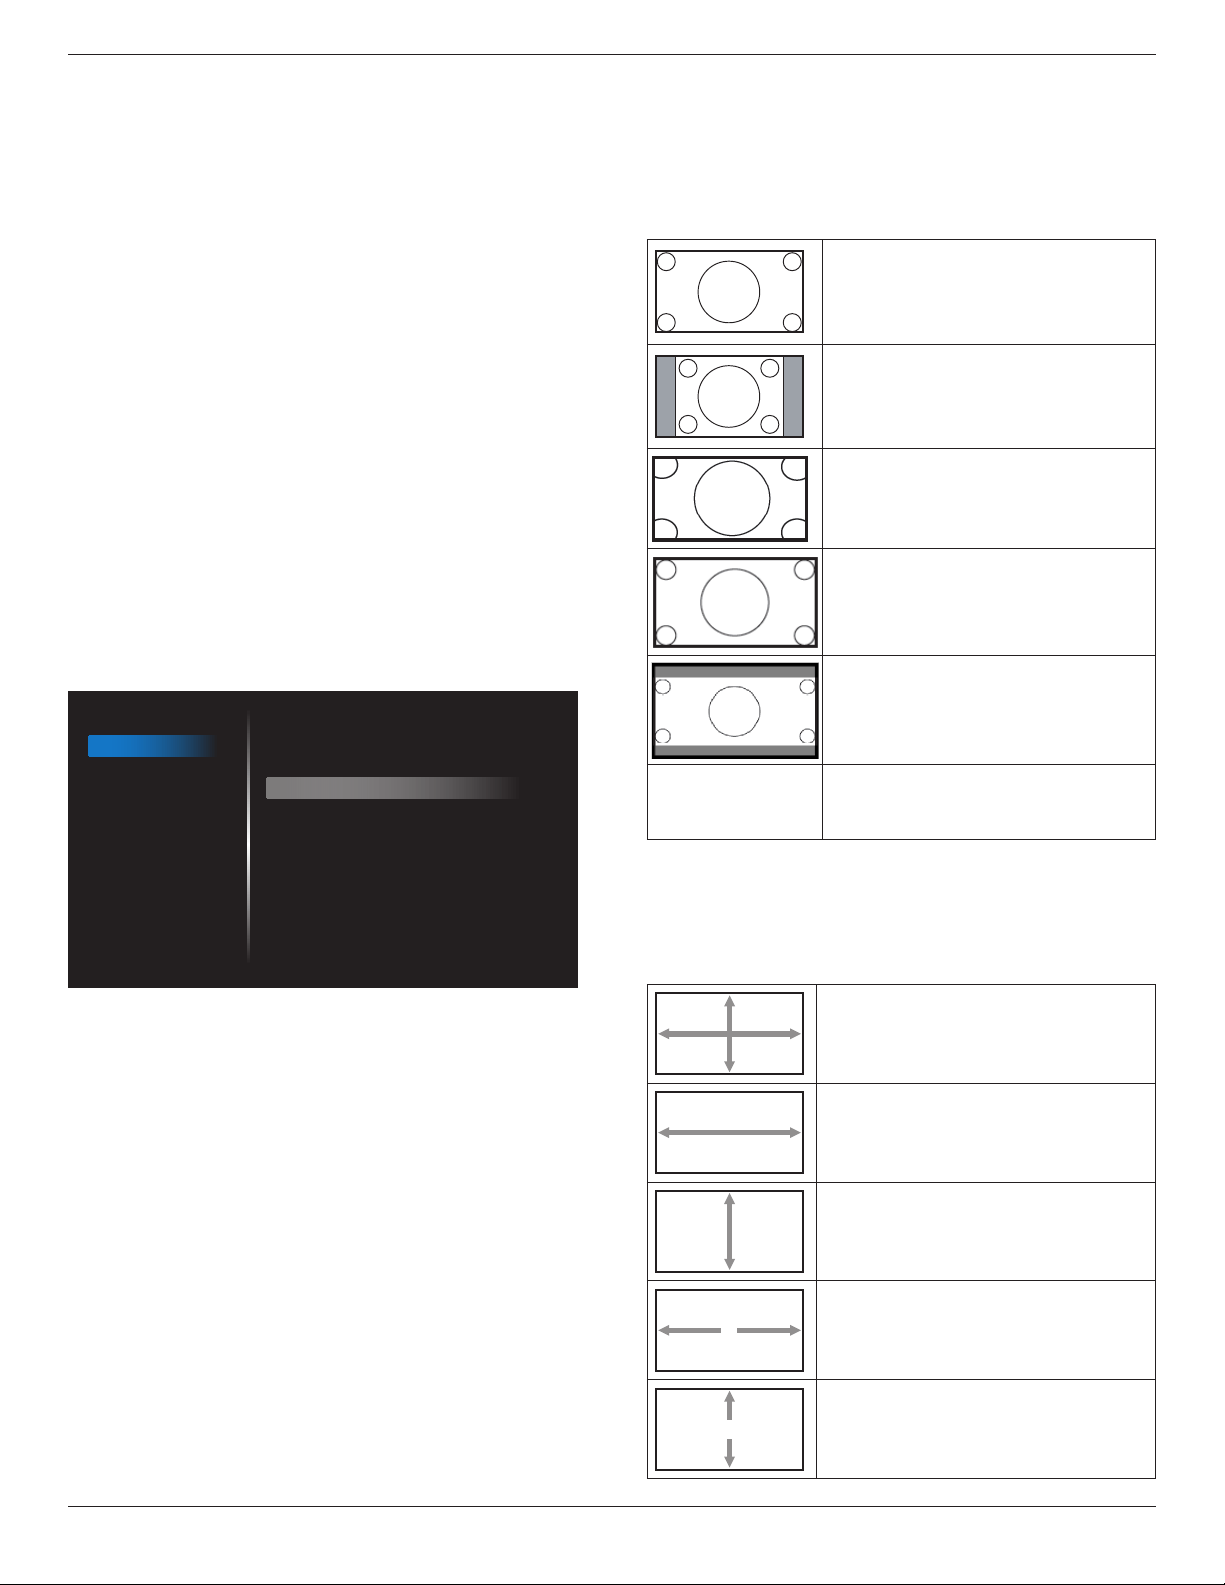
55BDL3050Q
41
Color control
Thecolorlevelsofred,green,andblueareadjustedbythecolorbars.
R:Redgain,G:Greengain,B:Bluegain.
Smart power
SmartPowercontrolisnotrelativetobrightnesscontrol:
1. InitialsettingBrigthness
70(intherangefrom0-100)
Powerconsumption70%ofmaximumpowerconsumption
2. SmartPower
OFF:noadaptation
MEDIUM:80%ofpowerconsumptionrelativetocurrentsettings
HIGH:65%ofpowerconsumptionrelativetocurrentsettings
Overscan
Changethedisplayareaoftheimage.
ON:Settodisplayareaabout95%.
OFF:Settodisplayareaabout100%.
Picture reset
ResetallsettingsinthePicturemenu.
Select“Yes”andpress“SET”buttontorestoretofactorypresetdata.
Press“EXIT”buttontocancelandthenreturntothepreviousmenu.
6.2.2. Screen menu
Picture
Screen
Audio
Configuration 1
Configuration 2
Advanced option
H position
V position
Clock
Zoom mode
Custom zoom
Auto adjust
Screen reset
50
50
97
Full
Action
Action
Action
H position
ControlHorizontalImagepositionwithinthedisplayareaoftheLCD.
Press+buttontomovescreentoright.
Press-buttontomovescreentoleft.
NOTE:VGAinputonly.
V position
ControlVerticalImagepositionwithinthedisplayareaoftheLCD.
Press+buttontomovescreentoup.
Press-buttontomovescreentodown.
NOTE:VGAinputonly.
Clock
Press+buttontoexpandthewidthoftheimageonthescreenthe
right.
Press-buttontonarrowthewidthoftheimageonthescreentheleft.
NOTE:VGAinputonly.
Zoom mode
HDMI,DVI,VGA:{Full} / {4:3} / {Real} / {21:9}/ {Custom}.
PlayingmediainMediaPlayer:{Full} / {4:3} / {Real} / {21:9}
TherearenofunctionwhenBROWSER,CMND&Play,PDFPlayer,PDF
Player,CustomandMediaPlayerUIandAndroidUI
ZoomModewillbe“Full”whentiling
Full
Thismoderestoresthecorrectproportions
ofpicturestransmittedin16:9usingthefull
screendisplay.
4:3
Thepictureisreproducedin4:3formatand
ablackbandisdisplayedoneithersideofthe
picture.
Real
Thismodedisplaystheimagepixel-by-pixel
onscreenwithoutscalingtheoriginalimage
size.
16:9
Thepictureisreproducedin16:9formatand
ablackbandatthetopandbottom.
21:9
Thepictureisreproducedin21:9formatand
ablackbandatthetopandbottom.
Custom
Choosetoapplythecustomzoomsettingsin
theCustomZoomsubmenu.
Custom zoom
Youcanusethisfunctiontofurthercustomizethezoomsettingstosuit
theimageyouwanttodisplay.
NOTE: Thisitemisfunctionalonlywhenthe{Zoom mode}issetto
{Custom}.
Zoom
Expandsthehorizontalandverticalsizesofthe
imagesimultaneously.
H zoom
Expandsthehorizontalsizeoftheimageonly.
V zoom
Expandstheverticalsizeoftheimageonly.
H position
Movesthehorizontalpositionoftheimageleft
orright.
V position
Movestheverticalpositionoftheimageupor
down.

55BDL3050Q
42
Auto adjust
Press“Set”todetectandadjustHposition,Vposition,Clock,Phase
automatically.
NOTE:VGAinputonly.
Screen reset
ResetallsettingsintheScreenmenutofactorypresetvalues.
6.2.3. Audio menu
Picture
Screen
Audio
Configuration 1
Configuration 2
Advanced option
Balance
Treble
Bass
Volume
Audio Out (Line Out)
Maximum Volume
Minimum Volume
Mute
Audio source
Audio reset
Audio Out Sync
50
50
50
30
30
100
0
Off
Digital
Action
Off
Balance
Adjusttoemphasizeleftorrightaudiooutputbalance.
Treble
Adjusttoincreaseordecreasehigher-pitchedsounds.
Bass
Adjusttoincreaseordecreaselower-pitchedsounds.
Volume
Adjusttoincreaseordecreasetheaudiooutputlevel.
Audio out (line out)
Adjusttoincreaseordecreaselineoutoutputlevel.
Maximum volume
Adjustyourownlimitationforthemaximumvolumesetting.Thisstops
thevolumefrombeingplayingattooloudalevel.
Minimum volume
Adjustyourownlimitationfortheminimumvolumesetting.
Mute
Turnthemutefunctionon/off.
Audio source
Selecttheaudioinputsource.Therearenoaudiooutputwhennovideo
signal.
Analog:audiofromaudioinput
Digital:audiofromHDMIaudio.
Audio reset
ResetallsettingsintheAudiomenutofactorypresetvalues.
Audio Out Sync
Enable/disableaudioout(lineout)volumeadjustabilitytosyncwith
internalspeakers.
6.2.4. Configuration1 menu
Picture
Screen
Audio
Configuration 1
Configuration 2
Advanced option
Switch on state
Panel saving
RS232 routing
Boot on source
WOL
Configuration1 reset
Factory reset
Force on
Action
RS232
Action
Off
Action
Action
Switch on state
Selectthedisplaystatususedforthenexttimeyouconnectthepower
cord.
• {Power off}-Thedisplaywillremainoffwhenthepowercordis
connectedtoawalloutlet.
• {Forced on}-Thedisplaywillturnonwhenthepowercordis
connectedtoawalloutlet.
• {Last status}-Thedisplaywillreturntothepreviouspowerstatus
(on/off/standby)whenremovingandreplacingthepowercord.
Panel saving
Choosetoenablethepanelsavingfunctionsandthusreducetheriskof
“imagepersistence”or“ghost-imaging”.
• {Brightness}-Select{On}andtheimagebrightnesswillbereduced
toanappropriatelevel.TheBrightnesssettinginthePicturemenu
willbeunavailablewhenselected.
• {Pixel shift}-Selectthetimeinterval({Auto} / {10 ~ 900}Seconds/
{Off})forthedisplaytoslightlyexpandtheimagesizeandshift
thepositionofpixelsinfourdirections(up,down,left,orright).
ActivatingPixelShiftwilldisableHPosition,VPositionandZoom
ModeintheScreenMenu.
Note:Onlysupportexternalinputsource(HDMI,VGA,DVI).
RS232-Routing
Selectthenetworkcontrolport.
Choosefrom:{RS232} / {LAN -> RS232}/{CardOPSRS232 (OPS
model only)}.
Boot on source
Choosetoselectsourcewhenbootup.
Input:selectinputsourcewhenbootup.
Playlist:selectplaylistindexforMediaplayer,Browser,PDFplayer.
0:noplaylist.SameasswitchsourcefromOSD.1~7:playlistnumber.
Nofailoverfunction,systemwillkeepsourceeventhesourceisno
signalinput.
Wake on Lan (WOL)
ChoosetoturnonoroffthewakeonLANfunction.
Choosefrom:{Off}/{On}
Conguration1 reset
ResetallsettingsinConguration1menutothefactorypresetvalues.
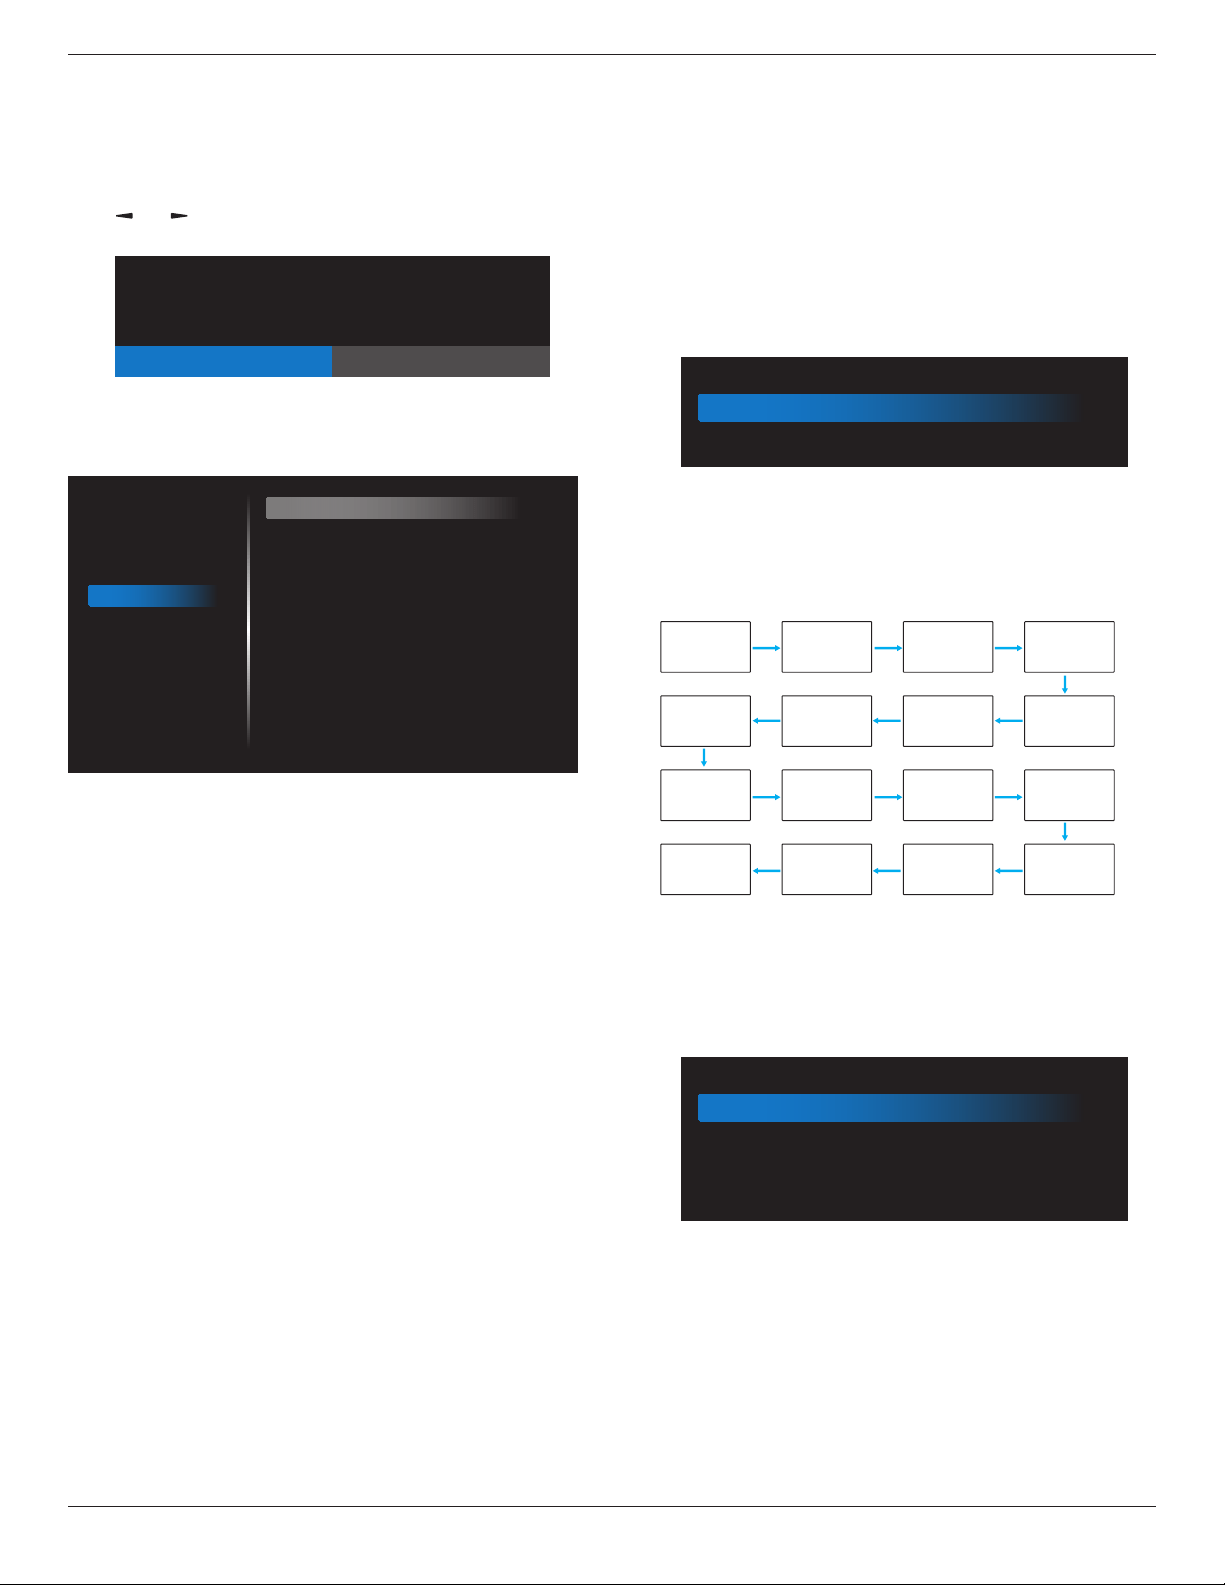
55BDL3050Q
43
Factory reset
ResetallsettingsintheOSDmenusof{Picture},{Screen},{Audio},
{Conguration1},{Conguration2},and{Advanced option}tothe
factorypresetvalues.
Androidsettingswillalsoresetwhenfactoryreset.
Press[ ]
or[ ]buttontoselect{Reset},andpress[OK]buttonto
dothereset.
Factory reset
CANCEL Reset
6.2.5. Configuration2 menu
Picture
Screen
Audio
Configuration 1
Configuration 2
Advanced option
OSD turn off
OSD H position
OSD V position
Information OSD
Logo
Monitor ID
Heat status
Monitor information
HDMI Version
Configuration2 reset
45
50
50
10
On
Action
24.21°C 75.57°F
Action
Action
OSD turn off
SettheperiodoftimetheOSD(on-screendisplay)menustaysonthe
screen.
Theoptionsare:{Off, 5 ~ 120}seconds.
*{0ff}doesnotdisappearautomatically.
OSD H-position
AdjustthehorizontalpositionoftheOSDmenu.
OSD V-position
AdjusttheverticalpositionoftheOSDmenu.
Information OSD
SettheperiodoftimetheinformationOSDisdisplayedontheupper
rightcornerofthescreen.TheinformationOSDwilldisplaywheninput
signalischanged.
TheinformationOSDwillremainonthescreenwith{Off}selection.
Theoptionsare:{1 ~ 60}seconds.
Logo
ChoosetoenableordisablethepictureofLogowhenturnonyour
display.
Theoptionsare:
• {Off}
•
{On}(Default)
• {User}
1.
IfLogosettoON,bothscalarPhilipslogoandandroidanimation
Philipslogowillshow.
2. IfLogsettoOFF,neitherscalarPhilipslogonorandroidanimation
logowillnotshow.
3. IfLogosettoUSER,customlogooptioninandroidisnotset,then
therewillbenobootlogowhenpoweron.
4. IfLogosettoUSER,customlogooptioninandroidisset,therewill
beonlycustomlogowhenpowerup.
Monitor ID
SettheIDnumberforcontrollingthedisplayviatheRS232C
connection.EachdisplaymusthaveauniqueIDnumberwhenmultiple
setsofthisdisplayareconnected.MonitorIDnumberrangeisbetween
1to255.
Theoptionare:{Monitor group}
Monitor ID
Monitor ID
Monitor group
1
1
• {Monitor group}
Theoptionsare:{Off}/{1-254}
•
{Off}–{Monitorgroup}arenotsupported.
• {1-254}–{Monitorgroup}aresupported.Thedefaultsettingis
1.
1 2
5 6
3
4
7 8
9 10 11 12
13 14 15 16
Heat status
Thisfunctionallowsyoutocheckthethermalstatusatanytime.
Monitor information
Showsinformationaboutyourdisplay,includingmodelnumber,serial
number,operatinghoursandsoftwareversion.
Monitor information
Model name
Serial NO.
Operation hours
SW Version
XXBDL3050Q
N/A
0
FBXX.XX
HDMI Version
SettheHDMIversionto1.4or2.0,thissettingisonlyvalidonHDMI
input
Conguration2 reset
ResetallsettingsinConguration2menutothefactorypresetvalues.
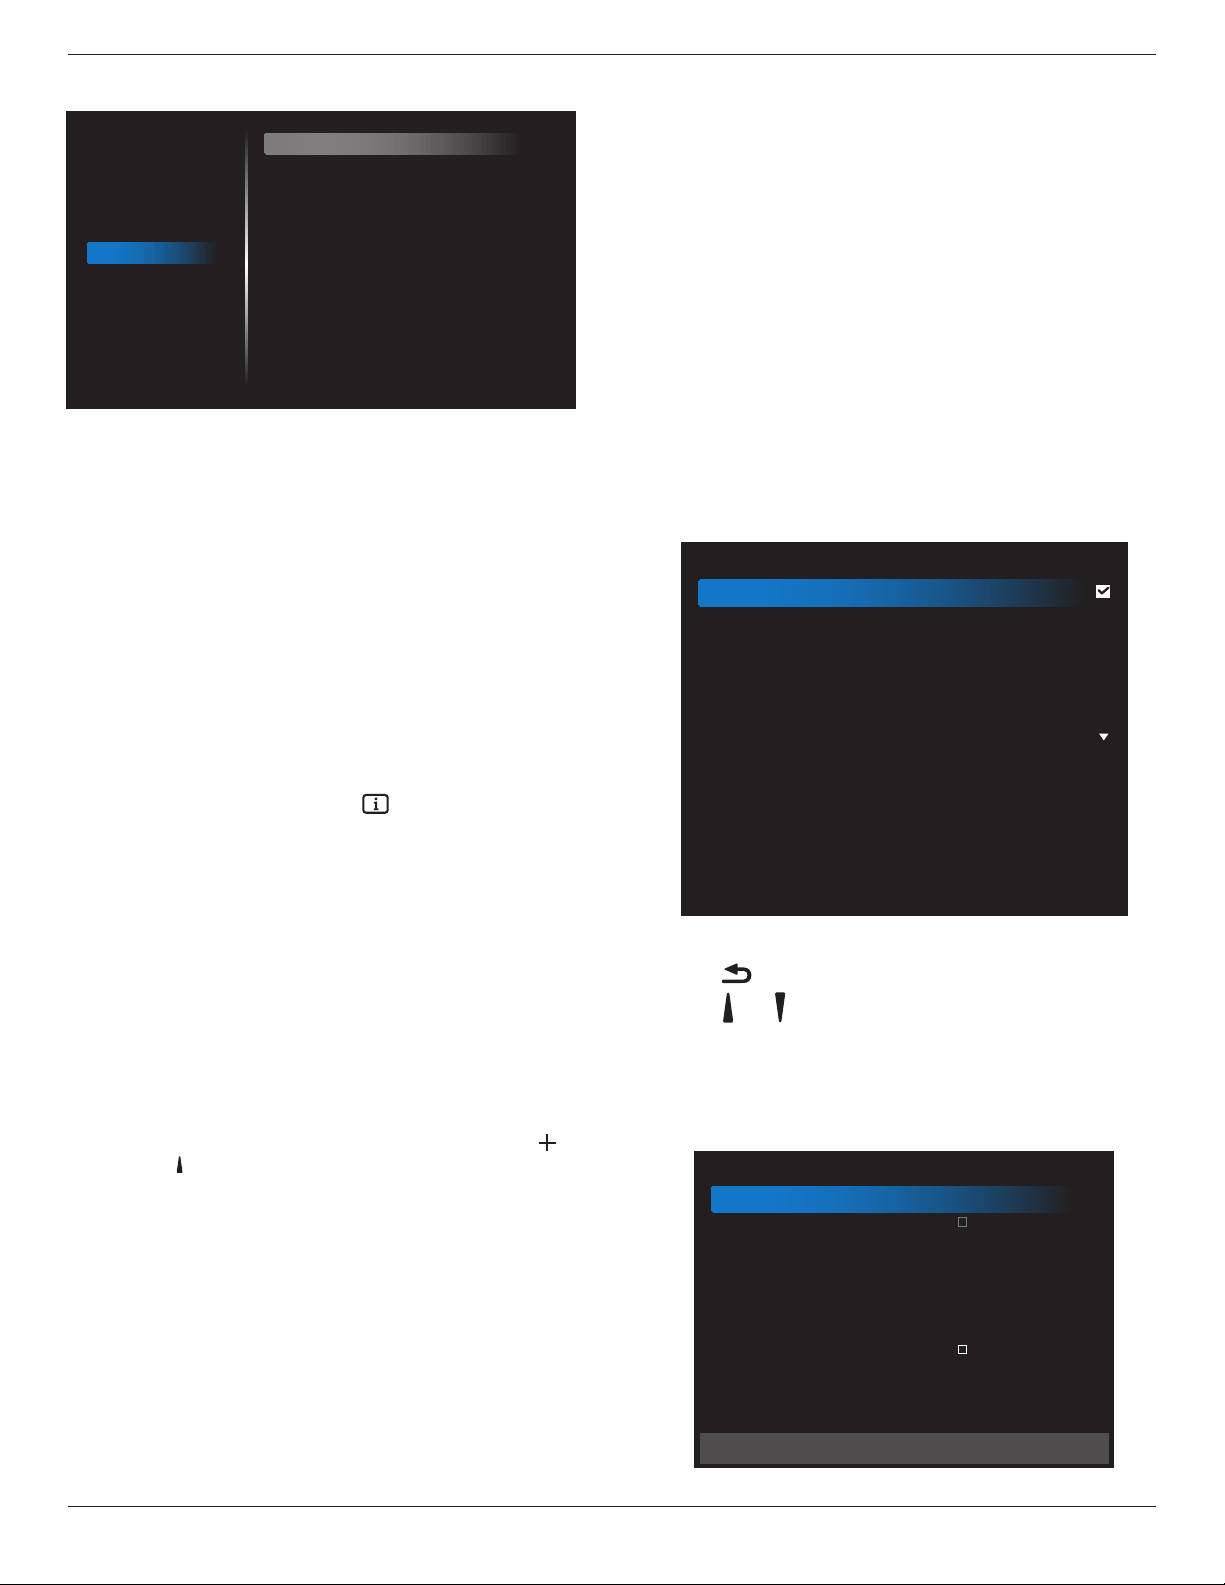
55BDL3050Q
44
6.2.6. Advanced option menu
Picture
Screen
Audio
Configuration 1
Configuration 2
Advanced option
IR control
Power LED Light
Keyboard control
Tiling
Off Timer
Date and time
Schedule
HDMI with One Wire
Language
OSD Transparency
Power Save
Advanced option reset
Unlock
On
Unlock
Action
Off
Action
Action
Off
English
Off
Mode 1
Action
IR control
Selecttheoperationmodeoftheremotecontrolwhenmultiple
displaysareconnectedviaanRS232Cconnection.
• {Unlock} -Alldisplayscanbeoperatednormallybytheremote
controlunit.
• {Primary}-Designatethisdisplayastheprimarydisplayfor
remotecontroloperation.Onlythisdisplaycanbeoperatedbythe
remotecontrol.(Inprimarymode,IRkeywillalwaysbeprocessed
regardlessthemonitorid/groupsettings).
• {Secondary}-Designatethisdisplayasthesecondarydisplay.This
displaycannotbeoperatedbytheremotecontrol,andwillonly
receivethecontrolsignalfromtheprimarydisplayviatheRS232C
connection.
• {Lock All}/{Lock all but Volume}/{Lock all but Power}/{Lock
all except PWR & VOL}-Locktheremotecontrolfunctionofthis
display.Tounlock,pressandholdthe[ ]INFObuttononthe
remotecontrolfor6(six)seconds.
Power LED light
ChoosetosetpowerindicateLEDonoroff.
Choose{On}fornormaluse.
Keyboard control
Choosetoenableordisablethedisplaykeyboard(controlbuttons)
function.
• {Unlock}-Enablethekeyboardfunction.
• {Lock All}/{Lock all but Volume}/{Lock all but Power}/{Lock
all except PWR & VOL}-Disablethekeyboardfunction.
NOTE: “KeyboardControlLockMode”Thisfunctioncompletely
disablestheaccesstoallKeyboardControlfunctions.To
enableordisablethekeyboardcontrollock,pressboth[ ]
and[ ]buttonsandholddowncontinuouslyformorethan3
seconds.
Tiling
Withthisfunctionyoucancreateasinglelarge-screenmatrix(video
wall)thatconsistsofupto150setsofthisdisplay(up to 10-sets on
the vertical and 15-sets on the horizontal sides).Thisfunctionrequires
adaisy-chainconnection.
• Switch on delay:Setthepower-ondelayingtime(inseconds).The
defaultoption{Auto}allowsasequentialpowering-onforeach
displaybytheirIDnumberwhenmultipledisplaysareconnected.
Theoptionsare:{Off(0)/Auto(1)/2-255}
• Brightness:{Normal}/{ACS}
• {Normal}:Adjusttheoverallimageandbackgroundscreen
brightness(backlight).
• {ACS}:Applybrightnessvalue(backlight)whichisadjustedby
MICtool.Thedefaultvaluebeforeadjustmentisthesameas
OSDbrightnessvalue,e.g.,70)
• Type:{Off}(Default)/{SWTool}/{OSDOnly}
• Source resolution:{FullHD}(Default)/{4K}
• H monitors-Selectthenumberofdisplaysonthehorizontalside.
• V monitors-Selectthenumberofdisplaysontheverticalside.
• Position-Selectthepositionofthisdisplayinthescreenmatrix.
• Frame comp. -Choosetoturntheframecompensationfunction
onoroff.Ifselected{Yes},thedisplaywilladjusttheimageto
compensateforthewidthofthedisplaybezelsinorderto
accuratelydisplaytheimage.
NOTE: Doesn’tsupportscreenformatfunctionintilingusingcascade
mode.
Off Timer
Setautomaticallypowerofftime(inhours).
Date and time
Adjustthecurrentdateandtimeforthedisplay’sinternalclock.
Date and time
Auto Sync
Set date
Set time
Choose time zone
London, Dublin
GMT+1:00
NTP Server
Current date time
2.android.pool.ntp.org
2017/06/27 13:17:33
1. Press[OK]buttontoenterorchoose
2. Press[ ] backbuttontoreturn.
3. Press[ ]
or[ ]buttontoadjustthem.
*Cannotsettimetodateafteryear2037.
Schedule
Thisfunctionallowsyoutoprogramupto7(seven)differentscheduled
timeintervalsforthedisplaytoactivate.
Schedule
Schedule list
Enable
Start time
End time
Input
Playlist
Days of the week
Every week
1
Back SAVE

55BDL3050Q
45
• Schedule list:Youcanset7schedules.
• Enable:Enable/disableschedule.Ifsetstart/endtimeisconictor
empty,inputisemptyortimeconictwithotherschedulelist,you
cannotenableschedule.
• Start time: Setstarttime.
• End time:Setendtime.
• Input:Platformwillgotothisselectsourceautomaticallyafterthe
scheduleon.
• Play list:1-7:playbackFile1-File7ofplaylistautomatically,only
mediaplayer,pdfplayerandbrowsercanset.
• Days of the week:SetSunday,Monday,Tuesday,Wednesday,
Thursday,Friday,Saturday.
• Every week: Setlifecycle.
• Back: Doesnotchangescheduledata.
• Save: Savescheduledata.
HDMI with One Wire
CECcontrol.
• {Off} -DisableCEC.(Default)
• {On}-EnableCEC.
Language
SelectthelanguageusedintheOSDmenu.
Theoptionsare:English/Deutsch/
简体中文
/Français/Italiano/Español/
Pyccкий/Polski/Türkçe/
繁體中文
/
日本語
/Português/ /Danish/
Svenska/Finnish/Norsk/Nederlands.
OSD Transparency
AdjustOSDtransparency.
• {Off}-Transparencyoff.
• {1-100}-Transparencylevel1-100.
Power Save
Mode1[TCPoff,WOLon,autooff]
Mode2[TCPoff,WOLon,autoon/off]
Mode3[TCPon,WOLoff,autoon/off]
Mode4[TCPon,WOLoff,noautoon/off]
Powersavemodes
Mode1:DCoff->Poweroff.LED:Red.
PowerSave->Poweroff,LED:Red
Mode2:DCoff->Poweroff,LED:Red.
PowerSave->PowerSaving.LED:Orange.Canbewakeup.
Mode3:DCoff->Backlightoff,LED:Red
PowerSave->Backlightoff,LED:Orange.Canbewakeup.
Mode4:DCoff->Backlightoff,LED:Red
PowerSave->Willnotenterpowersavemode.show“nosignal”only.
RCUPower
ButtonOff
NoSignal WoL Android
(ARM)
Mode1[TCPoff,WOLon,
autooff]
DCOFF DCOFF V ARMOFF
Mode2[TCPoff,WOLon,
autoon/off](garyout)
DCOFF Whensignalisback,
systemwakeup
V ARMOFF
Mode3[TCPoff,WOLoff,
autoon/off]
BacklightOFF BacklightOFF X ARMOFF
Mode4[TCPoff,WOLoff,
noautoon/off]
BacklightOFF BacklightON,show
nosignal
X ARMOFF
*ThisproductdoesnotsupportMode2
FollowingtableistheactionforAndroidboardwithdifferentpower
mode.
DCoff/on:presspowerbuttonbyRC
PowermodeinOSD Mode1/2 Mode3/4
DCoff shutdown 1.ThecurrentsourceAPK(such
asMediaPlayer,Broswer,PDFor
SmartCMS)willbeclosed.
2.Androidsystemwillgotothe
defaultblacklauncher.
DCon Bootup 1.Androidsystemreboots
Advanced option reset
Resetallsettingsexcept{Date and Time}intheAdvanced optionmenu
tofactorypresetvalues.
1. Press[OK]or[ ]buttontoenterthesubmenu.
2. Press[ ]
or[ ]buttontoselect{Reset}andpressthe[OK]
buttontorestoresettingstofactorypresetvalues.
3.
Pressthe[ ]buttonorselect{Cancel}andpressthe[OK]
buttontocancelandthenreturntothepreviousmenu.

55BDL3050Q
46
7. Supported Media Formats
USB Multimedia Codec Formats
Video Decode
Type VideoCodec Container Decode Encode Channel
Remark
MPEG1/2 MPEG1/2
MPEGprogramstream
(.DAT,.VOB,.MPG,.MPEG)
MPEGtransportstream(.ts)
MP4(.mp4)
AVI(.avi)
MKV(.mkv)
V
MaxResolution:1080P@60fps
MaxBitRats:40Mbps
MPEG-4 MPEG4
MP4(.mp4)
AVI(.avi)
MKV(.mkv)
V
MaxResolution:1080P@60fps
MaxBitRats:40Mbps
H.263 H.263
FLV(.v)
AVI(.avi)
V
MaxResolution:1080P@60fps
MaxBitRats:40Mbps
H.264 H.264
FLV(.v)
MP4(.mp4)
MPEGtransportstream(.ts)
ASF(.asf)
WMV(.wmv)
AVI(.avi)
MKV(.mkv)
V
MaxResolution:1080P@60fps
MaxBitRats:135Mbps
4K2K@30fps
H.265 H.265
MP4(.mp4)
MPEGtransportstream(.ts)
MKV(.mkv)
V
MaxResolution:4K2K@60fps
MaxBitRats:100Mbps
GOOGLEVP8 VP8 MKV(.mkv)WebM(.webm) V
MaxResolution:1080P@30fps
MaxBitRats:20Mbps
MotionJPEG MJPEG
AVI(.avi)
MP4(.mp4)MKV(.mkv)
V
MaxResolution:1920*1080@30fps
MaxBitRats:40Mbps
Audio Decode
Type AudioCodec Container Decode Encode Channel Remark
MPEGAudio
MPEG1/2/2.5Audio
Layer1/2/3
MP3 V 2
BitRate:8kbps~320Kbps
SamplingRate:16KHZ~48KHz
Windows
MediaAudio
WMAVersion7,8,
9,10proM0,10Pro
M1,M10ProM2
Decode:WMA V 2
BitRate:8kbps~768Kbps
SamplingRate:8KHZ~96(M10)KHz
Non-supportLBR
AACAudio
MAIN,ADIF,ATDS
HeaderAAC-LCand
AAC-HE
FileFormat:AAC,M4A V 5.1
BitRate:N/A
SamplingRate:8KHZ~48KHz

55BDL3050Q
47
Image Decode
Type ImageCodec Photo Decode Encode Channel Remark
JPEG JFIFleformat1.02 FileFormat:JPG,JPEG V
MaxResolution:7000x7000
Thelimitationofmaxresolutiondependson
DRAM
BMP BMP FileFormat:BMP V
MaxResolution:15360x8640
Thelimitationofmaxresolutiondependson
DRAM
PNG PNG FileFormat:PNG V
MaxResolution:15360x8640
Thelimitationofmaxresolutiondependson
DRAM
NOTES:
• Soundorvideomaynotworkifthecontentshaveastandardbitrate/framerateabovethecompatibleFrame/seclistedinthetableabove.
• VideocontentwithaBitrateorFrameratelargerthantheratespeciedinthetableabovecancausechoppyvideoduringplayback.

55BDL3050Q
48
8. Input Mode
VGA Resolution:
Standard
Resolution
ActiveResolution
RefreshRate PixelRate AspectRatio StandforMode
HPixels VLines
VGA 640 480
60Hz 25.175MHz
4:3 VideoGraphicArray72Hz 31.5MHz
75Hz 31.5MHz
WVGA 720 400 70Hz 33.75MHz 16:9 WideVideoGraphicArray
SVGA 800 600
60Hz 40MHz
4:3 SuperVGA
75Hz 49.5MHz
XGA 1024 768
60Hz 65MHz
4:3 ExtendedGraphicArray
75Hz 78.75MHz
WXGA 1280 768 60Hz 79.5MHz 5:3 WideXGA
WXGA 1280 800 60Hz 79.5MHz 16:10 WideXGA
SXGA 1280 1024 60Hz 108MHz 5:4 SuperXGA
WXGA 1360 768 60Hz 85.5MHz 16:9 WideXGA
UXGA 1600 1200 60Hz 162MHz 4:3 UltraXGA
HD1080 1920 1080 60Hz 148.5MHz 16:9 HD1080
Note:1280x768@60HzcanbesupportedbutnotshowninEDIDtable.
SD Resolution:
StandardResolution
ActiveResolution
RefreshRate PixelRate AspectRatio
HPixels VLines
480i
720 480
29.97Hz 13.5MHz
4:3
480p 59.94Hz 27MHz
576i
720 576
25Hz 13.5MHz
4:3
576p 50Hz 27MHz
HD Resolution:
StandardResolution
ActiveResolution
RefreshRate PixelRate AspectRatio
HPixels VLines
720p 1280 720
50Hz
74.25MHz 16:9
60Hz
1080i 1920 1080
25Hz
74.25MHz 16:9
30Hz
1080p 1920 1080
50Hz
148.5MHz 16:9
60Hz
2160p(HDMIonly) 3840 2160
30Hz 297MHz
16:950Hz
594MHz
60Hz
• ThePCtextqualityisoptimuminHD1080mode(1920x1080,60Hz).
• YourPCdisplayscreenmightappeardifferentdependingonthemanufacturer(andyourparticularversionofWindows).
• CheckyourPCinstructionbookforinformationaboutconnectingyourPCtoadisplay.
• Ifaverticalandhorizontalfrequency-selectmodeexists,select60Hz(vertical)and31.5KHz(horizontal).Insomecases,abnormalsignals(suchas
stripes)mightappearonthescreenwhenthePCpoweristurnedoff(orifthePCisdisconnected).Ifso,pressthe[INPUT]buttontoenterthe
videomode.Also,makesurethatthePCisconnected.
• WhenhorizontalsynchronoussignalsseemirregularinRGBmode,checkPCpowersavingmodeorcableconnections.
• ThedisplaysettingstablecompliestotheIBM/VESAstandards,andbasedontheanaloginput.
• TheDVIsupportmodeisregardedassametothePCsupportmode.
• Thebesttimingfortheverticalfrequencytoeachmodeis60Hz.
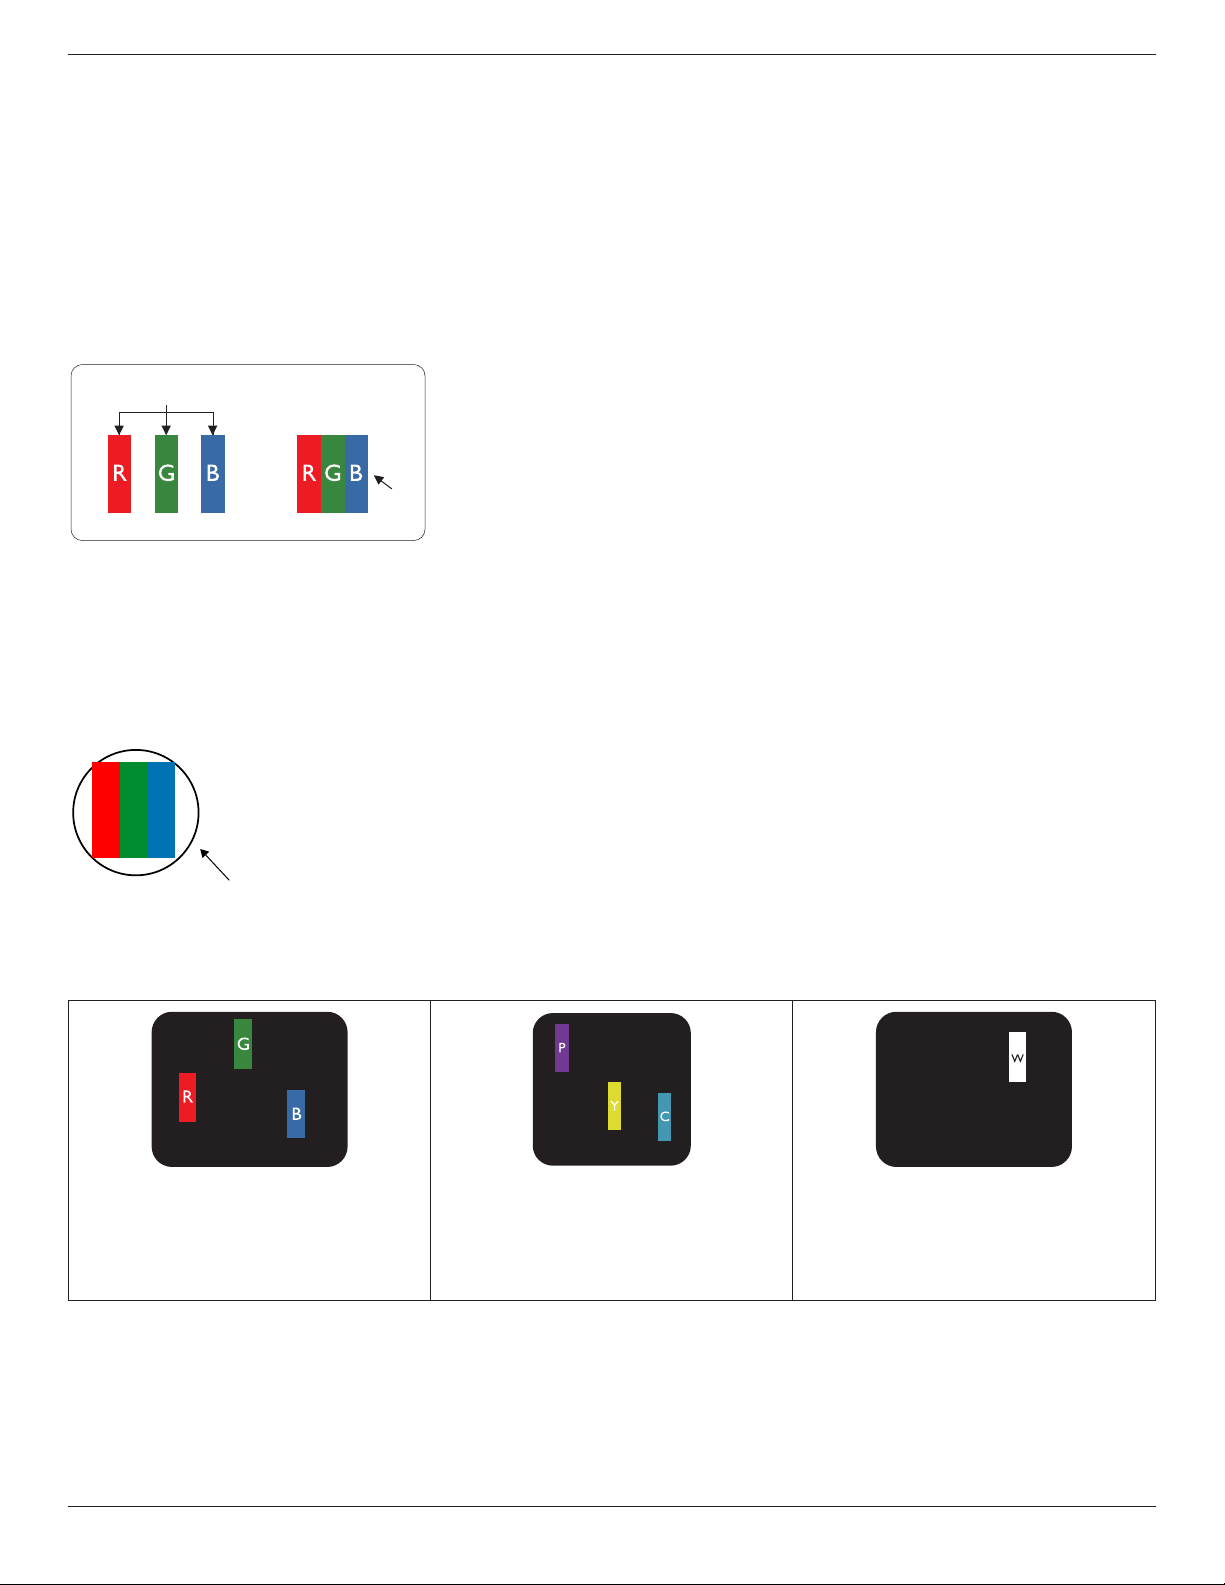
55BDL3050Q
49
9. Pixel Defect Policy
Westrivetodeliverthehighestqualityproductsandusesomeoftheindustry’smostadvancedmanufacturingprocesseswhilstpracticingstringentquality
control.However,pixelorsub-pixeldefectsonthePDP/TFTpanelsusedinPlasma-&LCD-displaysaresometimesunavoidable.Nomanufacturercan
guaranteethatallpanelswillbefreefrompixeldefects,butPhilipsguaranteesthatanyPlasma-&LCD-displayswithanunacceptablenumberofdefects
willberepairedduringthewarrantyperiodinlinewithyourlocalguaranteeconditions.
ThisnoticeexplainsthedifferenttypesofpixeldefectsanddenestheacceptabledefectlevelfortheLCDscreen.Inordertoqualifyforrepairunder
warranty,thenumberofpixeldefectsmustexceedacertainlevelasshowninthereferencetable.IftheLCDscreeniswithinspecicationawarranty
exchange/claimbackwillberefused.Additionally,becausesometypesorcombinationsofpixeldefectsaremorenoticeablethanothers,Philipssetseven
higherqualitystandardsforthose.
9.1. Pixels and Sub-Pixels
subpixel
pixel
Apixel,orpictureelement,iscomposedofthreesub-pixelsintheprimarycolorsofred,greenand
blue.Manypixelstogetherformanimage.Whenallsub-pixelsofapixelarelit,thethreecolored
sub-pixelstogetherappearasasinglewhitepixel.Whenallaredark,thethreecoloredsub-pixels
togetherappearasasingleblackpixel.Othercombinationsoflitanddarksub-pixelsappearas
singlepixelsofothercolors.
9.2. Types of Pixel Defects + Dot Definition
Pixelandsub-pixeldefectsappearonthescreenindifferentways.Therearethreecategoriesofpixeldefectsandseveraltypesofsub-pixeldefectswithin
eachcategory.
Dot denition = What is a defective “Dot”? :
Oneormoredefective,adjacentsub-pixelaredenedasone“dot”.Theno.ofdefectivesub-pixelsarenotrelevanttodeneadefectivedot.Thismeans
thatadefectivedotcanconsistofone,twoorthreedefectivesub-pixelswhichcanbedarkorlit.
RR G B
Onedot=OnePixel;consistsofthreesub-pixelsofRed,Green,andBlue.
9.3. Bright Dot Defects
Brightdotdefectsappearaspixelsorsub-pixelsthatarealwayslitor“on”.Thesearetheexamplesofbrightdotdefects:
Onelitred,greenorbluesubpixel Twoadjacentlitsubpixels:
Red+Blue=Purple
Red+Green=Yellow
Green+Blue=Cyan(LightBlue)
Threeadjacentlitsubpixels(onewhitepixel)
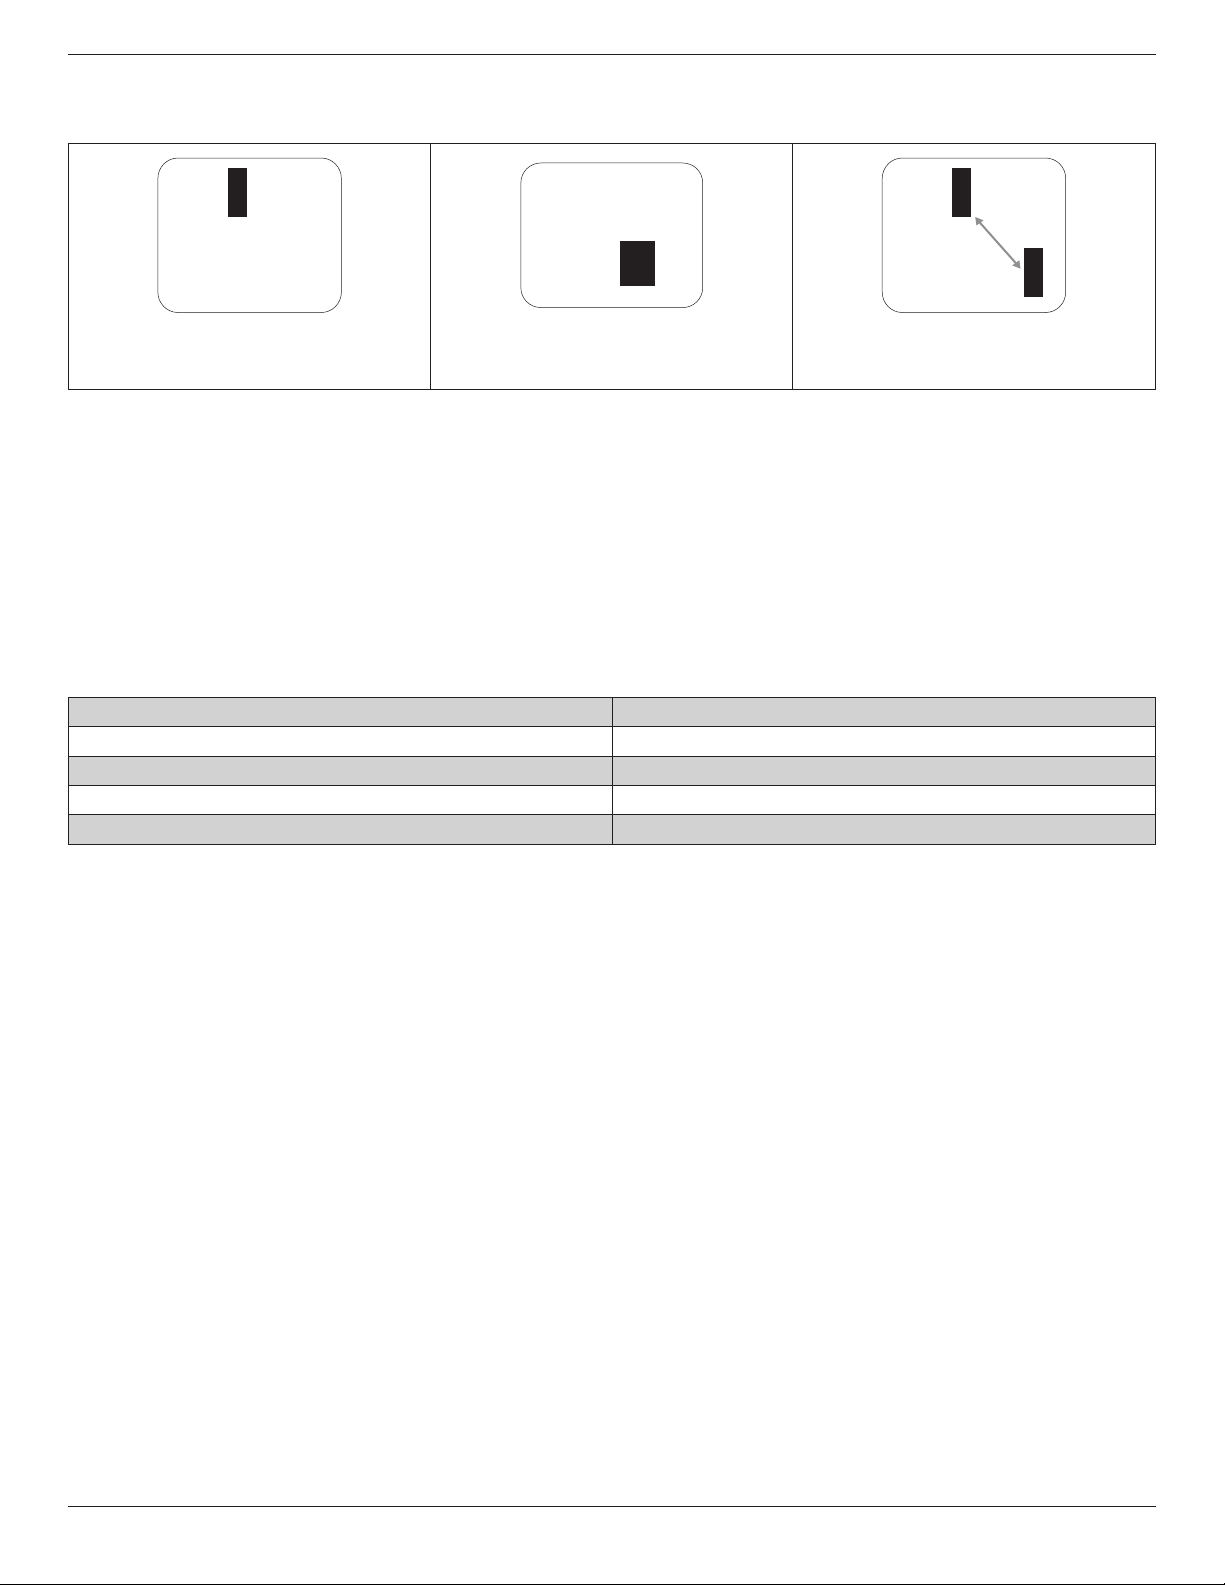
55BDL3050Q
50
9.4. Dark Dot Defects
Blackdotdefectsappearaspixelsorsub-pixelsthatarealwaysdarkor“off”.Thesearetheexamplesofblackdotdefects:
Onedarkdot Twoadjacentdarkdots=1pairofdarkdots Twodarkdots,specicationsdenesthe
minimumdistancebetweendarkdots
9.5. Proximity of Pixel Defects
Becausepixelandsub-pixelsdefectsofthesametypethatarenearbyoneanothermaybemorenoticeable,Philipsalsospeciestolerancesforthe
proximityofpixeldefects.Inthetablebelowyoucanndspecicationsabout:
• Allowedamountofadjacentdarkdots=(adjacentdarkdots=1pairofdarkdots)
• Minimumdistancebetweendarkdots
• Totalno.ofalldefectivedots
9.6. Pixel Defect Tolerances
Inordertoqualifyforrepairduetopixeldefectsduringthewarrantyperiod,aPDP/TFTpanelinaPhilipsPlasma/LCD-displaymusthavepixelorsub-
pixeldefectsexceedingthetoleranceslistedinthefollowingtable.
BRIGHTDOTEFFECT ACCEPTABLELEVEL
1litsubpixel 2
BLACKDOTEFFECT ACCEPTABLELEVEL
1darksubpixel 10
TOTALDOTDEFECTSOFALLTYPES 12
NOTE:*1or2adjacentsubpixeldefects=1dotdefect
9.7. MURA
Darkspotsorpatchesmayoccasionallyappearonsomeliquidcrystaldisplay(LCD)panels.ThisisknownwithintheindustryasMura,whichisaJapanese
termfor“unevenness.”Itisusedtodescribeanirregularpatternorareainwhichunevenscreenuniformityappearsundercertainconditions.Muraisa
resultofthedeteriorationoftheliquidcrystalalignmentlayerandismostcommonlycausedbylong-termoperationunderhighambienttemperatures.It
isanindustry-widephenomenonandMuraisnotrepairable.Itisalsonotcoveredbyourwarrantyterms.
MurahasbeenaroundsincetheintroductionofLCDtechnologyandwithscreensgettingbiggerandinoperation24/7,manydisplaysarerunninginlow
lightconditions.ThisalladdstothepossibilityofMuraaffectingdisplays.
HOW TO SPOT MURA
TherearemanysymptomsofMuraandalsomultiplecauses.Severalofthesearelistedbelow:
• Impuritiesorforeignparticlesinthecrystalmatrix
• UnevendistributionofLCDmatrixduringmanufacturing
• Non-uniformluminancedistributionofthebacklight
• Panelassemblyinducedstress
• FlawswithintheLCDcells
• Thermalinducedstress-hightemperatureoperationoverlongperiodsoftime
HOW TO AVOID MURA
AlthoughwecannotguaranteethecompleteeradicationofMuraeverytime,ingeneraltheappearanceofMuracanbeminimizedbythesemethods:
• Lowerthebacklightbrightness
• Useascreensaver
• Reducetheambienttemperaturearoundtheunit

55BDL3050Q
51
10. Cleaning and Troubleshooting
10.1. Cleaning
Caution When Using the Display
• Donotbringyourhands,faceorobjectsclosetotheventilationholesofthedisplay.Thetopofthedisplayisusuallyveryhotduetothehigh
temperatureofexhaustairbeingreleasedthroughtheventilationholes.Burnsorpersonalinjuriesmayoccurifanybodypartsarebroughttoo
close.Placinganyobjectnearthetopofthedisplaycouldalsoresultinheatrelateddamagetotheobjectaswellasthedisplayitself.
• Besuretodisconnectallcablesbeforemovingthedisplay.Movingthedisplaywithitscablesattachedmaydamagethecablesandthuscausere
orelectricshock.
• Disconnectthepowerplugfromthewalloutletasasafetyprecautionbeforecarryingoutanytypeofcleaningormaintenanceprocedure.
Front Panel Cleaning Instructions
• Thefrontofthedisplayhasbeenspeciallytreated.Wipethesurfacegentlyusingonlyacleaningclothorasoft,lint-freecloth.
• Ifthesurfacebecomesdirty,soakasoft,lint-freeclothinamilddetergentsolution.Wringtheclothtoremoveexcessliquid.Wipethesurfaceof
thedisplaytoremovedirt.Thenuseadryclothofthesametypetodry.
• Donotscratchorhitthesurfaceofthepanelwithngersorhardobjectsofanykind.
• Donotusevolatilesubstancessuchasinsertsprays,solventsandthinners.
Cabinet Cleaning Instructions
• Ifthecabinetbecomesdirty,wipethecabinetwithasoft,drycloth.
• Ifthecabinetisextremelydirty,soakalint-freeclothinamilddetergentsolution.Wringtheclothtoremoveasmuchmoistureaspossible.Wipe
thecabinet.Useanotherdryclothtowipeoveruntilthesurfaceisdry.
• Donotallowanywaterordetergenttocomeintocontactwiththesurfaceofthedisplay.Ifwaterormoisturegetsinsidetheunit,operating
problems,electricalandshockhazardsmayresult.
• Donotscratchorhitthecabinetwithngersorhardobjectsofanykind.
• Donotusevolatilesubstancessuchasinsertsprays,solventsandthinnersonthecabinet.
• DonotplaceanythingmadefromrubberorPVCnearthecabinetforanyextendedperiodsoftime.

55BDL3050Q
52
10.2. Troubleshooting
Symptom Possible Cause Remedy
No picture is displayed 1. Thepowercordisdisconnected.
2. Themainpowerswitchonthebackofthe
displayisnotswitchedon.
3. Theselectedinputhasnoconnection.
4. Thedisplayisinstandbymode.
1. Pluginthepowercord.
2. Makesurethepowerswitchisswitchedon.
3. Connectasignalconnectiontothedisplay.
Interference displayed on the display or audible
noise is heard
Causedbysurroundingelectricalappliancesor
uorescentlights.
Movethedisplaytoanotherlocationtoseeisthe
interferenceisreduced.
Color is abnormal Thesignalcableisnotconnectedproperly. Makesurethatthesignalcableisattachedrmly
tothebackofthedisplay.
Picture is distorted with abnormal patterns 1. Thesignalcableisnotconnectedproperly.
2. Theinputsignalisbeyondthecapabilitiesof
thedisplay.
1. Makesurethatthesignalcableisattached
rmly.
2. Checkthevideosignalsourcetoseeifit
isbeyondtherangeofthedisplay.Please
verifyitsspecicationswiththisdisplay’s
specicationsection.
Display image doesn’t ll up the full size of the
screen
1. Thezoommodeisnotsetcorrectly.
2. ScanModemaybesetincorrectlyto
underscan.
3. Iftheimageexceedsthescreensize,Scan
ModemayneedtobesettoUnderscan.
UsetheZoommodeorCustomzoomfunction
intheScreenmenutonetunedisplaygeometry
andtimefrequencyparameter.
Can hear sound, but no picture Improperlyconnectedsourcesignalcable. Makesurethatbothvideoinputsandsound
inputsarecorrectlyconnected.
Can see picture but no sound is heard 1. Improperlyconnectedsourcesignalcable.
2. Volumeisturnedallthewaydown.
3. {Mute}isturnedon.
4. Noexternalspeakerconnected.
1. Makesurethatbothvideoinputsandsound
inputsarecorrectlyconnected.
2. Press[ ]or[ ]buttontohearsound.
3. SwitchMUTEoffbyusingthe[ ]button.
4. Connectexternalspeakersandadjustthe
volumetoasuitablelevel.
Some picture elements do not light up Somepixelsofthedisplaymaynotturnon. Thisdisplayismanufacturedusinganextremely
highlevelofprecisiontechnology:however,
sometimessomepixelsofthedisplaymaynot
display.Thisisnotamalfunction.
After-Images can still be seen on the display
after the display is powered off. (Examples
of still pictures include logos, video games,
computer images, and images displayed in 4:3
normal mode)
Astillpictureisdisplayedforanoverextended
periodoftime
Donotallowastillimagetobedisplayedfor
anextendedperiodoftimeasthiscancausea
permanentafter-imagetoremainonthedisplay.

55BDL3050Q
53
How to setup the settings in the menu to
control all the monitors at the same time and
individually via RC?
DaisychainedbyRS232andnoIRcable 1.Therstdisplaysetsas“Primary”onOSD
(Advancedoption/IRcontrolitem),otherssetas
“Secondary”.
2.ThesetupOSDwillshowonTop-Leftofdisplay.
(ToggleMENUwillshowagainifitdisappear)
3.Defaultsetting:IDNO:0,GPNO:0,thissetting
cancontrolalldisplaysbyIR.
The“+”,“-”canchange“IDNO”tocontrol
signaldisplayby“MonitorID”.
The“UP”,“DOWN”canchange“GPNO”to
controlmulti-displayby“GroupID”.
*TherstdisplayalwaysbecontrolledbyIR.
How is the RC working? Daisychain:noRS232connectedandIRcable Noneedsetting,justtoconnectwithIRcables
andcontrolbyIR.
*Thiswayhasout-of-synchronizmphenomenon.
SuggesttouseabovesettingwithRS-232cable.

55BDL3050Q
54
11. Technical Specifications
Display:
Item Specications
ScreenSize(ActiveArea) 138.7cm/54.6inch
AspectRatio 16:9
Numberofpixels 3840(H)x2160(V)
Pixelpitch 0.315(H)x0.315(V)[mm]
Displayablecolors 10bits(D),1.07Billioncolors
Brightness(typical) 350cd/m
2
Contrastratio(typical) 4000:1
Viewingangle 178degrees
In/Out Terminals:
Item Specications
SpeakerOutput InternalSpeakers 10W(L)+10W(R)[RMS]/8Ω
82dB/W/M/160Hz~13KHz
AudioOutput RCAR/Lx1 0.5V[rms](Normal)/2Channel(L+R)
AudioInput 3.5mmphonejackx1 0.5V[rms](Normal)/2Channel(L+R)
RS232C 2.5mmPhonejackx2 RS232Cin/RS232Cout
RJ-45 RJ-45Jackx1(8pin) 10/100LANPort
HDMIInput HDMIJackx2
(TypeA)(19pin)
DigitalRGB:TMDS(Video+Audio)
MAX:
Video-720p,1080p,3840x2160/60Hz
Audio-48KHz/2Channel(L+R)
SupportsLPCMonly
VGAInput D-SUBjack(15pin) DigitalRGB:TMDS(Video)
AnalogRGB:0.7V[p-p](75Ω),H/CS/V:TTL(2.2kΩ),SOG:1V[p-p](75Ω)
MAX:1920x1080/60Hz(WUXGA)
DVI-DInput DVI-DJack DigitalRGB:TMDS(Video)
IRInput/Output 3.5mmx2 IRpassthroughorIRdaisychain
USBInput USBx2(TypeA) USB2.0,Multimediaplayandserviceport/USB3.0,Multimediaplayonly

55BDL3050Q
55
General:
Item Specications
PowerInput 100-240V~,50-60Hz,2.5A
PowerConsumption(Max) 200W
PowerConsumption(typ.) 150W
PowerConsumption(Standby&Off) <0.5W
Dimensions(WithoutStand)[WxHxD] 1239.2x727x61.7mm
Weight(WithoutStand) 15.96Kg
GrossWeight(WithoutStand) 23.0Kg
Product Fiche :
Item Specications
EnergyEfciencyClass B
VisibleScreenSize 138.7cm/54.6inch
OnModePowerConsumption(W) 145W
AnnualEnergyConsumption(kWh) 212kWh
StandbyPowerConsumption(W) 0.50W
OffModePowerConsumption(W) 0.50W
DisplayResolution(Pixels) 3840x2160
NetworkStandby(W) 2W
Environmental Condition:
Item Specications
Temperature Operational 0~40°C
Storage -20~60°C
Humidity Operational 20~80%RH(Nocondensation)
Storage 5~95%RH(Nocondensation)
Altitude Operational 0~3,000m
Storage/Shipment 0~9,000m

2017 © Koninklijke Philips N.V. All rights reserved.
Philips and the Philips Shield Emblem are registered trademarks of
Koninklijke Philips N.V. and are used under license from
Koninklijke Philips N.V.
Specications are subject to change without notice.