Loading ...
Loading ...
Loading ...
www.oster.com www.oster.com
5 6
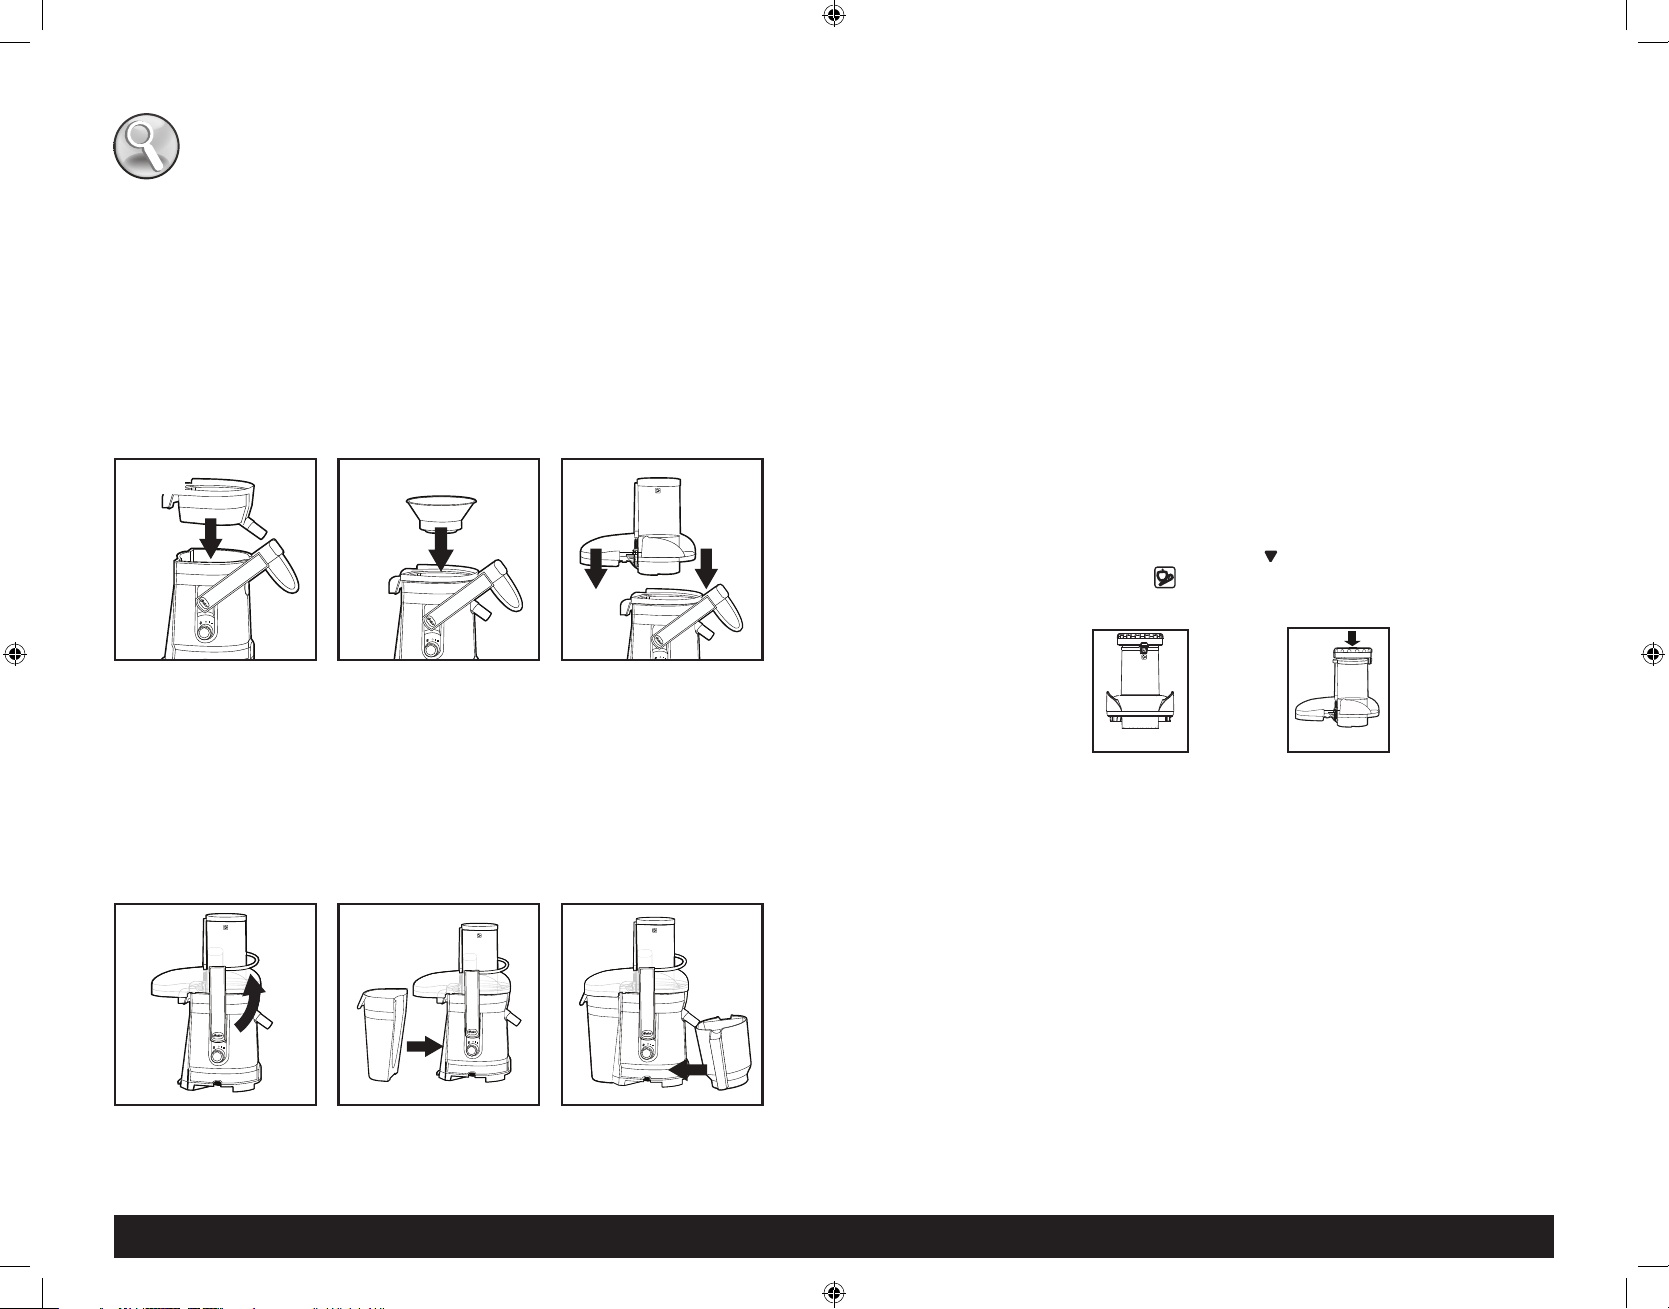
ASSEMBLING THE JUICE EXTRACTOR
Follow the assembling instructions listed below before using your Oster
®
Juice Extractor:
1. Before you start assembling your juice extractor, make sure it is unplugged
and it is placed on a dry and level surface.
2. Place filter basket on top of the motor base (Figure 1).
3. Place the stainless steel filter on top of the filter basket pushing down and
turning it until it fits into the grooves of the motor shaft (Figure 2).
4. Place juicer cover/lid on top of the filter basket (Figure 3).
Fig. 1 Fig. 2 Fig. 3
5. Raise the stainless steel locking arm and place it on the grooves on the
sides of the lid. Your juice extractor is equipped with a safety feature that
will ensure the unit will not operate unless the lid is properly locked.
(Figure 4).
6. Place the pulp container into position by tilting it slightly (Figure 5). Push
pulp container forward until it snaps into place.
IMPORTANT: Make sure Pulp Container edge is underneath basket.
7. Place the 1.25 liter jar under the spout located on the right hand side of
the juicer by tilting it slightly. Other jars or glasses can be used as well
(Figure 6).
Fig. 4 Fig. 5 Fig. 6
OPERATING INSTRUCTIONS
USING THE JUICE EXTRACTOR
Prepare your fruits and vegetables by washing them thoroughly and peeling
off any skin that needs removing.
NOTE: Your juice extractor is equipped with an extra-wide food chute that is
designed to allow most whole fruits and vegetables to fit inside the chute.
Fruits and vegetables larger than the food chute will need to be cut into
smaller pieces to ensure they will fit in the chute.
1. Make sure your juice extractor is properly assembled. Please follow the
instructions from the section “Before Using Your Appliance.”
2. Ensure the juice extractor and its accessories are clean by following the
cleaning and maintenance section of this manual.
3. Place the jar or any other container/glass you may wish to use to collect
the juice under the spout and make sure the pulp collector is in place prior
to begin juicing. Do not allow the pulp collector container to overfill as
this may cause the unit to stall.
4. Plug the power cord into an electrical outlet and select your desired
speed. Use “I” for soft foods or “II” for tougher foods.
5. Once the juicer is on, place the fruits and vegetables on the food chute
and use the food pusher slowly to drive them down. Place the food pusher
in the food chute, making sure the tab “ ” in the food pusher aligns with
the juicing indicator icon “ ” (Figures 1 and 2). In order to extract the
maximum amount of juice, it is important to push the food pusher slowly.
6. The juice extractor will separate the pulp from the juice. Juice will collect
in the jar, and pulp will collect in the pulp collector while you are juicing.
NOTE: Both the pulp container as well as the jar can be emptied during
juicing by turning the juice extractor off “O”. Make sure to place both
containers back in place before you resume juicing.
7. When you are done, turn off the unit and turn around the adjustable
rubber sleeve to prevent dripping.
CAUTION: NEVER USE HAND OR FINGERS TO PUSH FOOD DOWN THE FOOD
CHUTE OR TO CLEAR THE FOOD CHUTE. ALWAYS USE THE FOOD PUSHER
PROVIDED.
CAUTION: DO NOT USE THIS UNIT CONTINUOUSLY FOR MORE THAN
5 MIN.
Figure 1 Figure 2
FPSTJE317_FPSTJE318_20ESM1 (US).indd 5-6FPSTJE317_FPSTJE318_20ESM1 (US).indd 5-6 6/5/20 09:376/5/20 09:37
Loading ...
Loading ...
Loading ...