For product questions contact:
Sunbeam Consumer Service
USA : 1.800.334.0759
www.oster.com
©2020 Sunbeam Products, Inc. All rights reserved. Distributed by Sunbeam Products, Inc. Boca
Raton, Florida 33431.
Para preguntas sobre los productos llame:
Sunbeam Consumer Service
EE.UU.: 1.800.334.0759
www.oster.com
© 2020 Sunbeam Products, Inc. Todos los derechos reservados. Distribuido por Sunbeam Products,
Inc. Boca Raton, Florida 33431.
Printed in China Impreso en China
P.N. 202237 FPSTJE317_FPSTJE318_20ESM1 (US)
GCDS-OST-JC
www.oster.com
Safety
How to use
Cleaning
Recipes
Guarantee
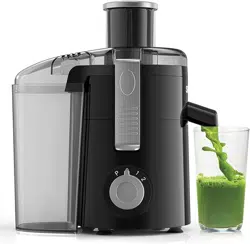
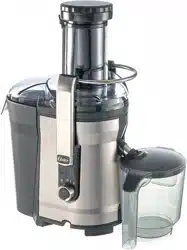
USER GUIDE
EXTRACTOR DE JUGOS
DE AUTO-LIMPIEZA
SELF CLEANING
JUICE EXTRACTOR
MODELS/MODELOS: FPSTJE317/FPSTJE318
FPSTJE317_FPSTJE318_20ESM1 (US).indd 2FPSTJE317_FPSTJE318_20ESM1 (US).indd 2 6/5/20 09:376/5/20 09:37

www.oster.com www.oster.com
1 2
When using electrical appliances, basic safety precautions should always be
followed to reduce the risk of fire, electric shock, and/or injury to persons
including the following:
1. Read all instructions before using this product.
2. To protect against electric shock, do not place or immerse cord, plugs, or
appliance in water or other liquid.
3. This appliance is not intended for use by children or by persons with
reduced physical, sensory, or mental capabilities, or lack of experience and
knowledge. Close supervision is necessary when any appliance is used
near children. Children should be supervised to ensure that they do not
play with the appliance. Keep the appliance and its cord out of reach of
children.
4. Turn the appliance OFF, then unplug from outlet when not in use, before
putting on or taking off parts and before cleaning. Allow to cool before
putting on or taking off parts, and before cleaning. To unplug, grasp the
plug and pull from the outlet. Never pull from the power cord.
5. Avoid any contact with blades or moveable parts.
6. Do not operate any appliance with a damaged cord or plug or after the
appliance malfunctions, or has been damaged in any manner. Do not
attempt to replace or splice a damaged cord. Return appliance to the
manufacturer (see warranty) for examination, repair or adjustment.
7. For appliances with markings on plug blade: This appliance has important
markings on the plug blade. The attachment plug or entire cordset (if
plug is molded onto cord) is not suitable for replacement. If damaged, the
appliance shall be replaced.
8. The use of accessory attachments, including canning jars, not
recommended or sold by the appliance manufacturer may cause fire,
electric shock or injury.
9. Do not use outdoors or for commercial purposes.
10. Do not let cord hang over edge of table or counter, or touch hot surfaces,
including the stove.
11. Always make sure juicer cover is clamped securely in place before motor
is turned on. Do not unfasten clamps while juicer is in operation. Do not
attempt to defeat the clamps interlock mechanism.
12. Be sure to turn switch to OFF position after each use of the unit. Make sure
the motor stops completely before disassembling.
13. Do not put your fingers or other objects into the juicer opening while it
is in operation. If food becomes lodged in opening, use food pusher or
another piece of fruit or vegetable to push it down. When this method
is not possible turn the motor off and disassemble juicer to remove the
remaining food.
14. Do not use the appliance if the rotating sieve/filter or the protecting cover
is damaged or has visible cracks.
15. Models with a separable pulp container: Do not operate without the pulp
container in place.
16. Do not use appliance for other than intended use. Misuse can cause
injuries. Always use appliance on a dry, stable, level surface.
17. Do not cycle this appliance continuously for more than 5 minutes to avoid
overheating the motor. Allow to cool for 1 minute between cycles.
SAVE THESE INSTRUCTIONS
HOUSEHOLD USE ONLY
IMPORTANT SAFEGUARDS
FPSTJE317_FPSTJE318_20ESM1 (US).indd 1-2FPSTJE317_FPSTJE318_20ESM1 (US).indd 1-2 6/5/20 09:376/5/20 09:37
www.oster.com www.oster.com
3 4
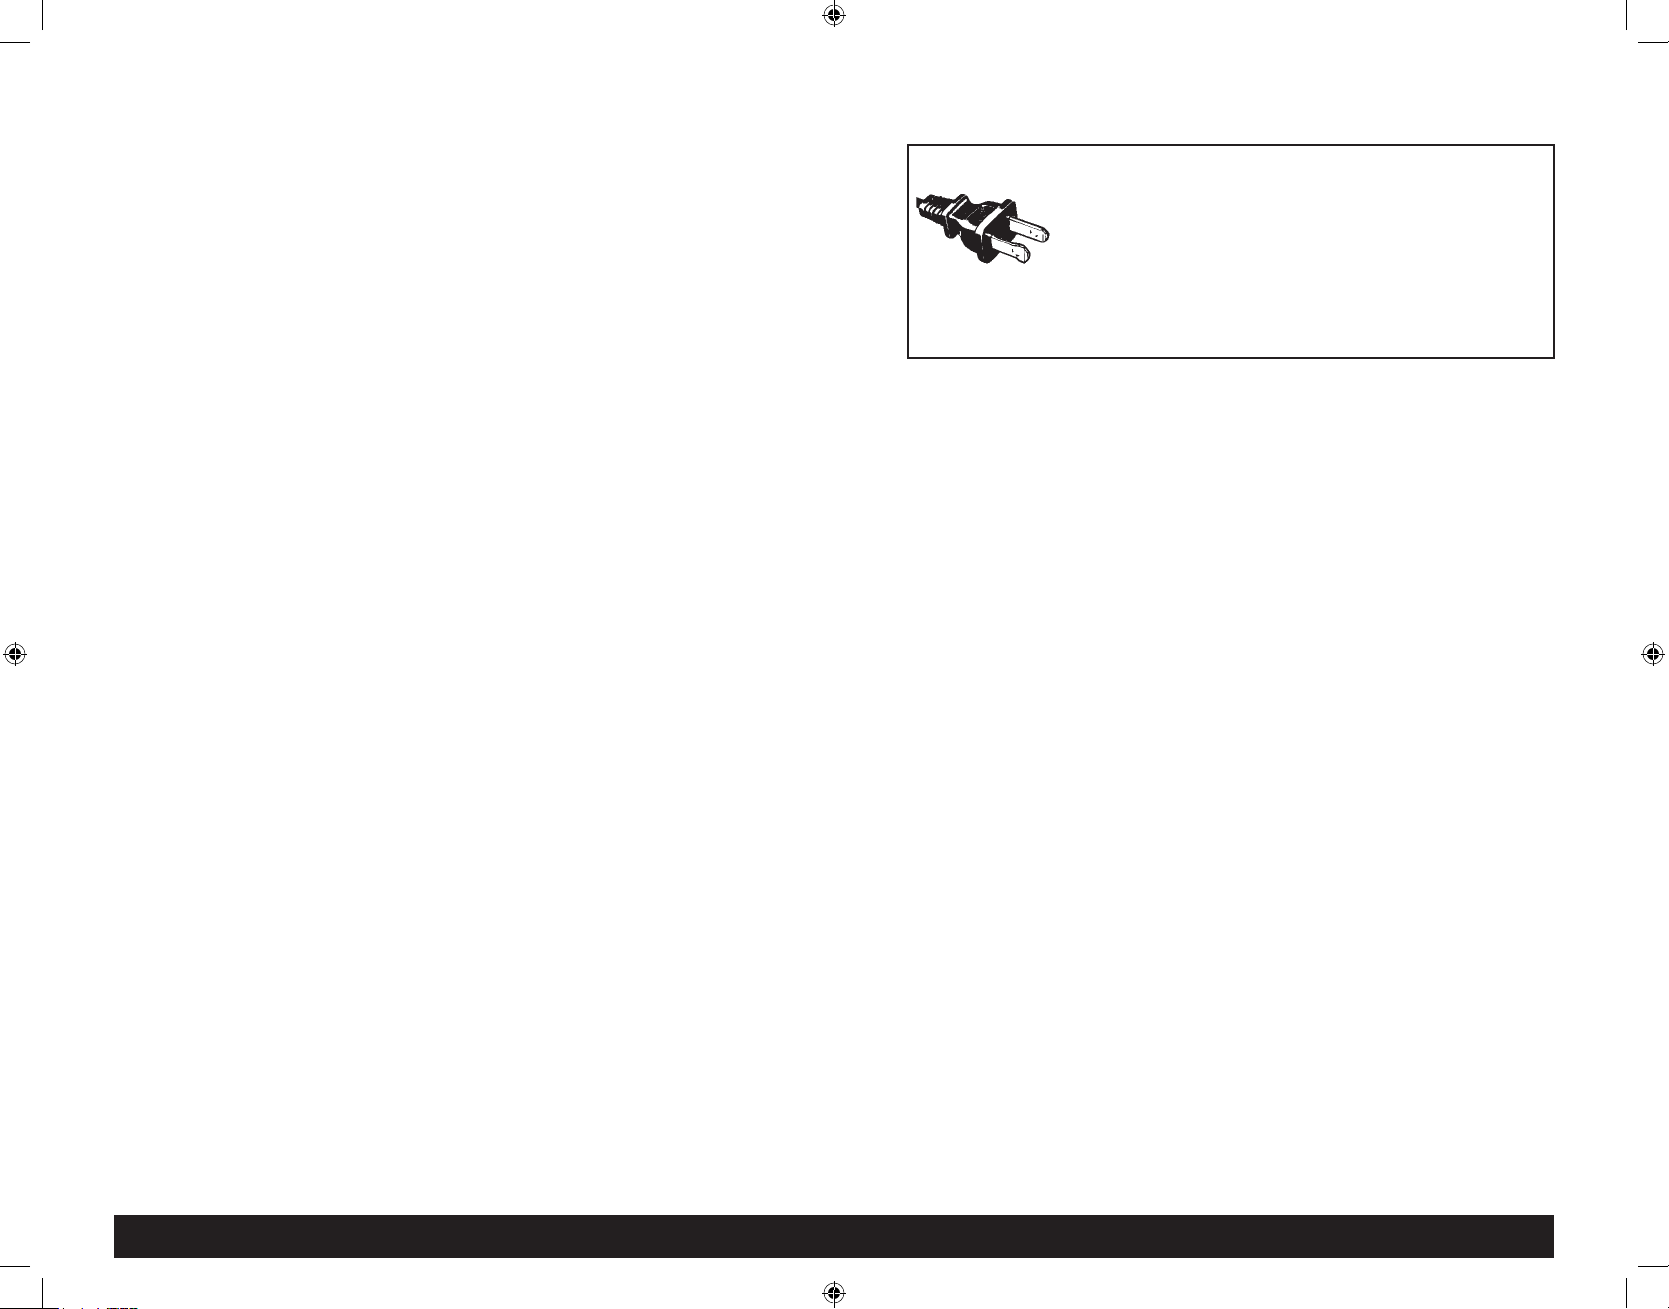
North American models with polarized plugs:
POLARIZED PLUG
This appliance has a polarized plug (one blade is wider
than the other). To reduce the risk of electric shock, this
plug is intended to fit into a polarized outlet only one way.
If the plug does not fit fully into the outlet, reverse the
plug. If it still does not fit, contact a qualified electrician.
Do not attempt to modify the plug in any way. If the plug fits loosely into
the AC outlet or if the AC outlet feels warm do not use that outlet.
POWER SUPPLY CORD INSTRUCTIONS
A short power-supply cord or detachable power-supply cord is provided
to reduce risks resulting from becoming entangled in or tripping over a
longer cord. Longer detachable power-supply cords or extension cords
are available and may be used if care is exercised in their use. If a long
detachable power-supply cord or extension cord is used on short-cord
models:
a. The marked electrical rating of the detachable power-supply cord or
extension cord should be at least as great as the electrical rating of the
appliance;
b. When the product is of the grounded type, the extension cord shall be a
grounding type 3-wire cord; and
c. The longer cord should be arranged so that it will not drape over the
counter top or table top where it can be pulled on by children or tripped
over unintentionally.
Do not pull, twist or otherwise abuse the power cord.
Do not wrap the power cord around the main body of the appliance
during or after use.
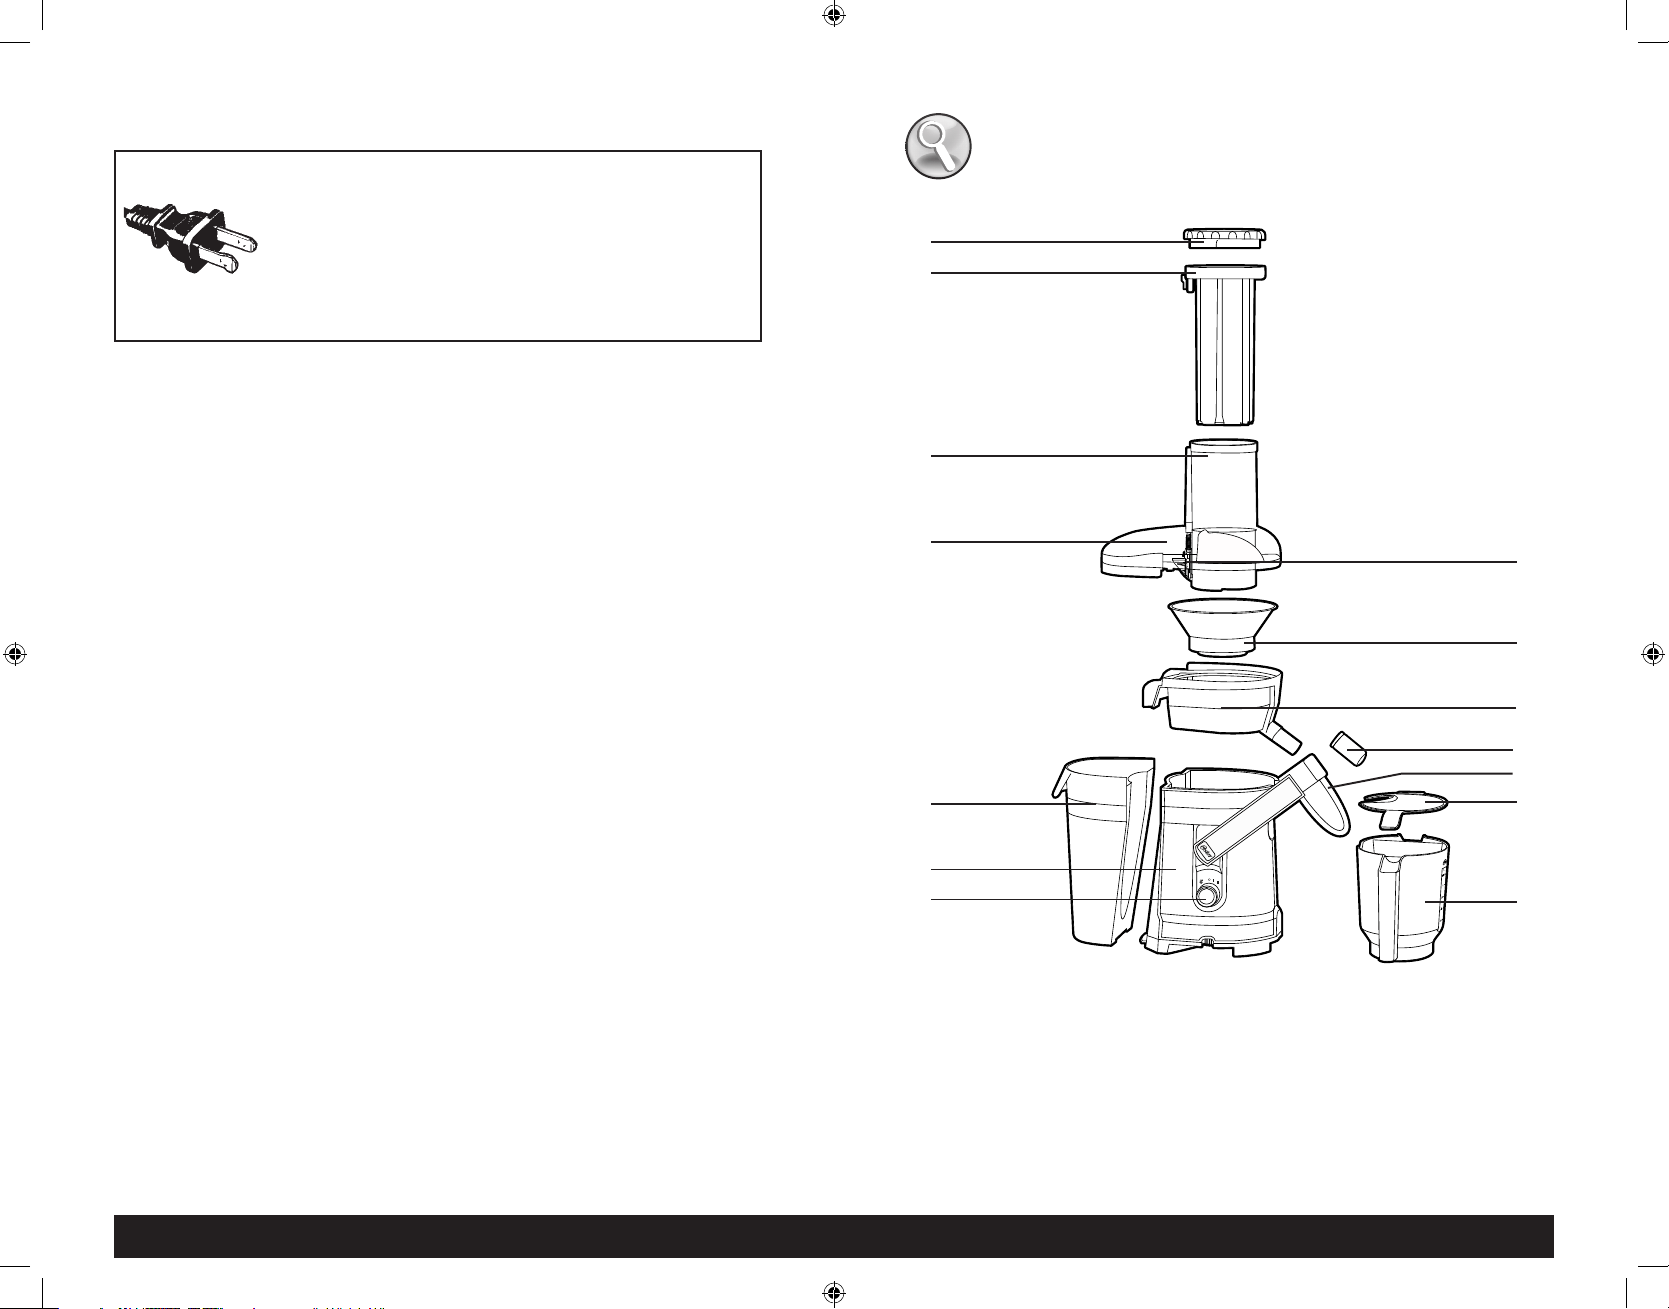
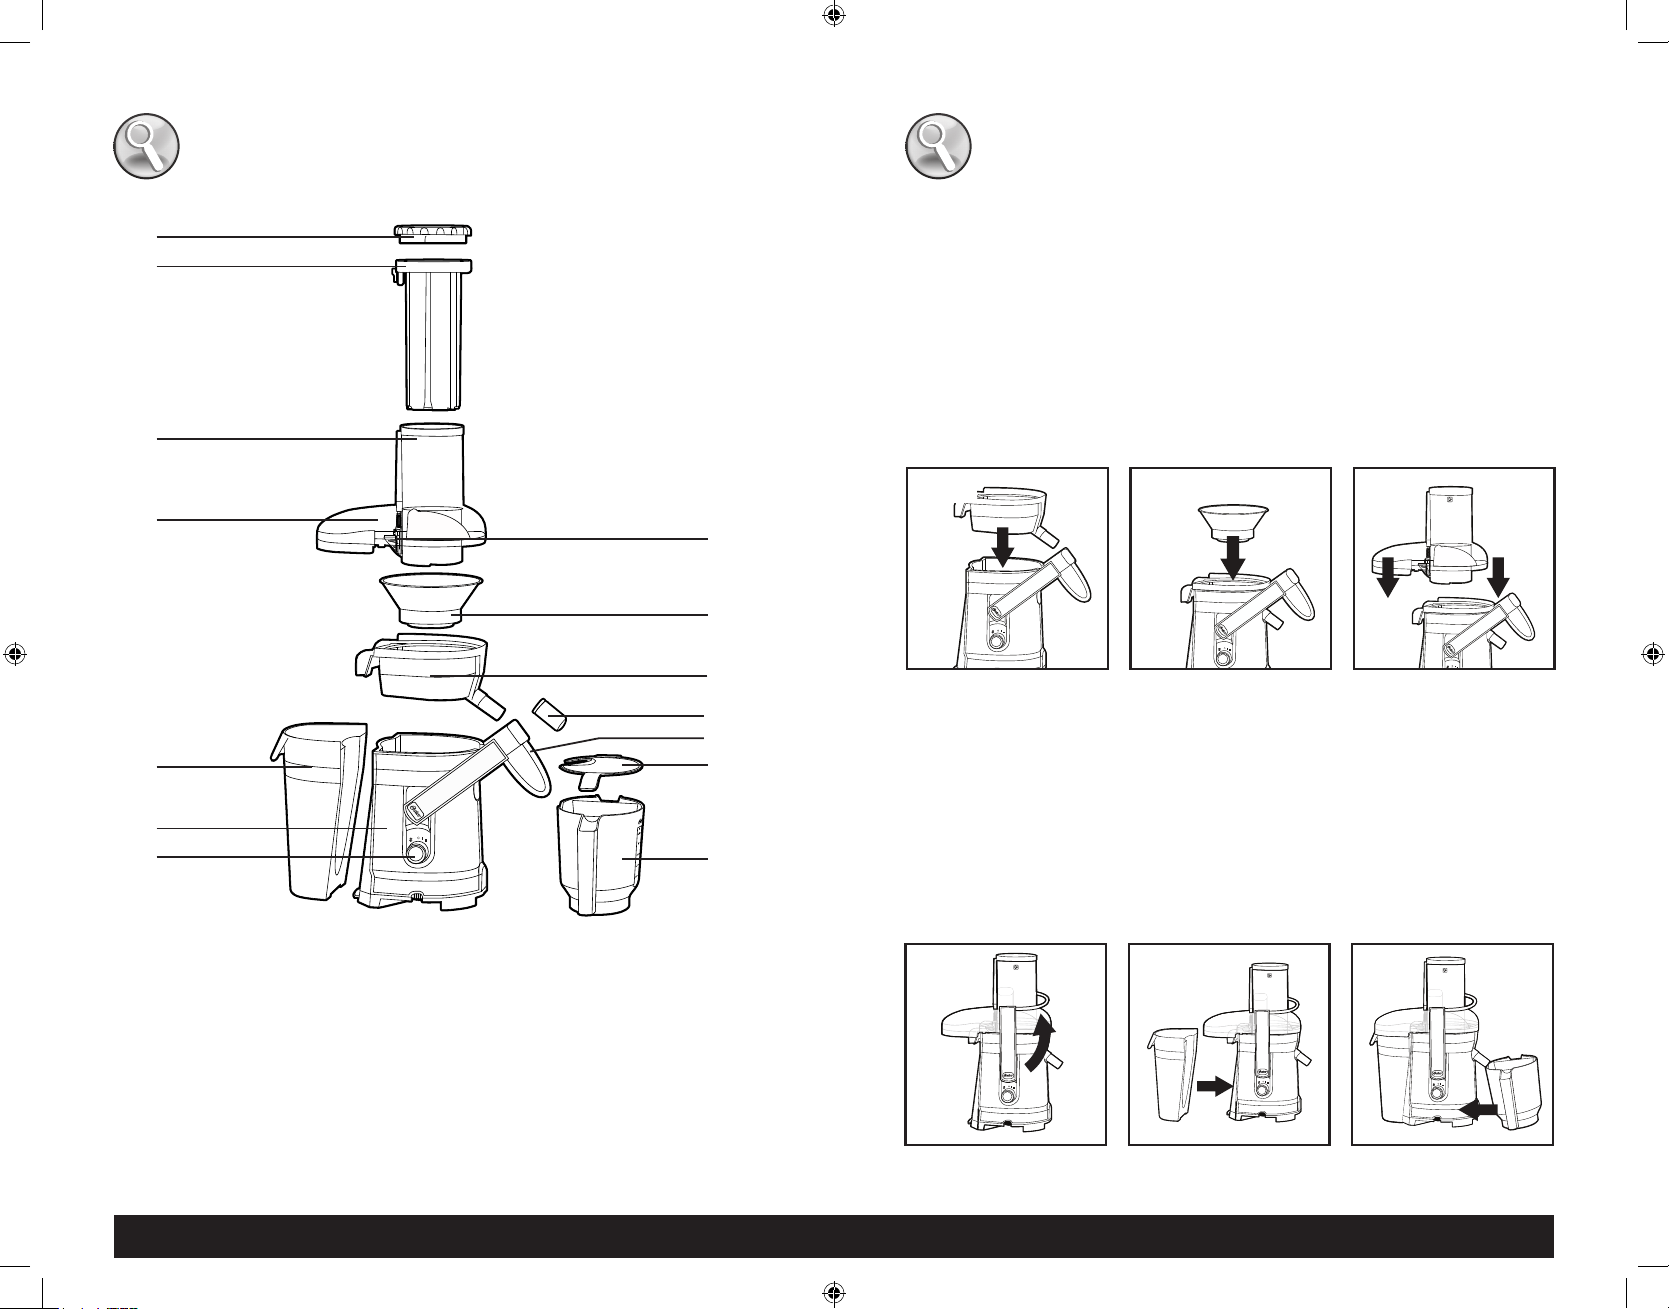
1. Food Pusher with Water
Compartment for Auto-Clean
2. Food Pusher Lid
3. Food Chute
4. Juice Extractor Cover
5. Large Pulp Collector Container
6. Motor Base Housing
7. Control Knob
8. Mechanism for Auto-Clean
9. Stainless Steel Filter
10. Filter Basket
11. Stainless Steel Locking Arm
12. Anti-Drip Adjustable Rubber Sleeve
for the Spout
13. 1.25-Liter Jar with Froth Separator
14. Jar Lid
2
3
4
5
1
6
7
8
13
14
12
10
11
9
NOTE: Parts and unit design may vary depending on the model.
Model FPSTJE318 is represented in above image.
DESCRIPTION OF THE APPLIANCE
FPSTJE317_FPSTJE318_20ESM1 (US).indd 3-4FPSTJE317_FPSTJE318_20ESM1 (US).indd 3-4 6/5/20 09:376/5/20 09:37
www.oster.com www.oster.com
5 6
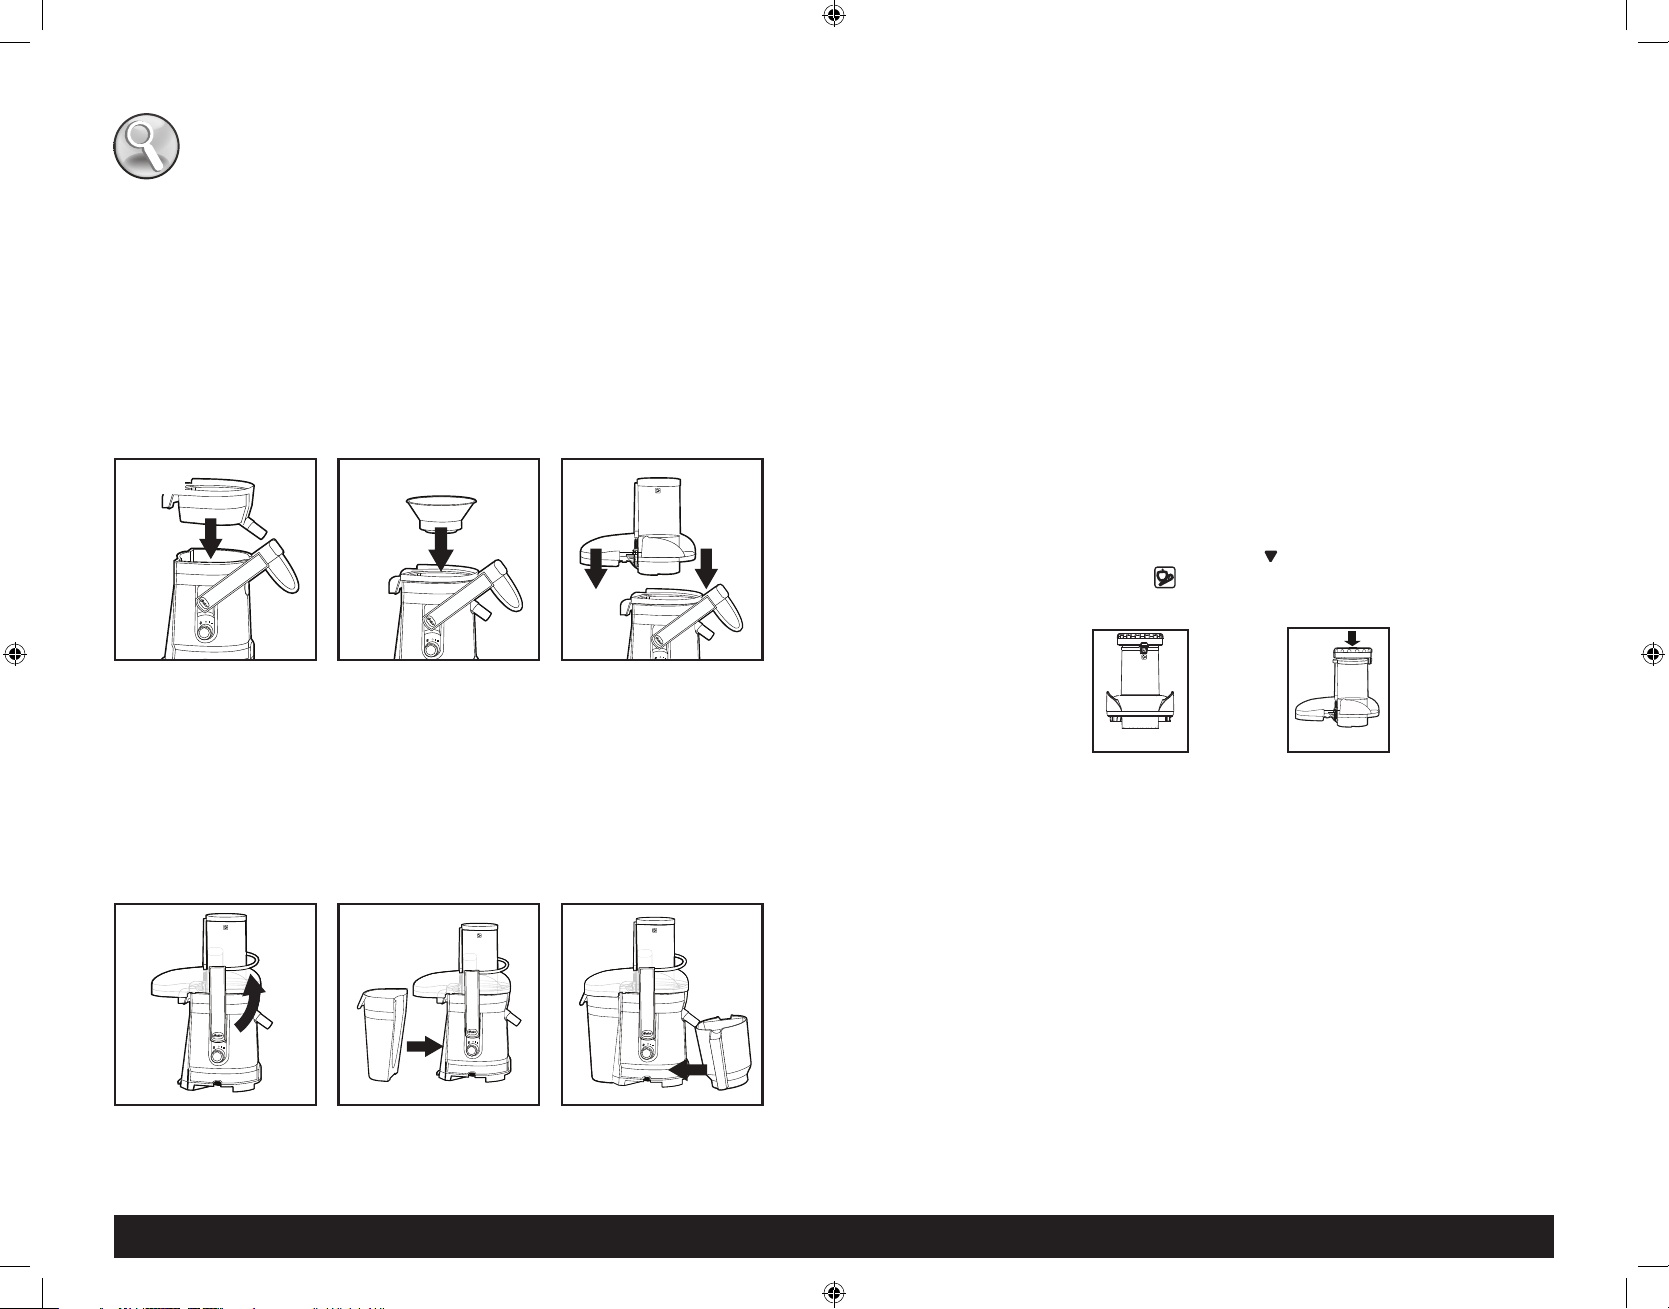
ASSEMBLING THE JUICE EXTRACTOR
Follow the assembling instructions listed below before using your Oster
®
Juice Extractor:
1. Before you start assembling your juice extractor, make sure it is unplugged
and it is placed on a dry and level surface.
2. Place filter basket on top of the motor base (Figure 1).
3. Place the stainless steel filter on top of the filter basket pushing down and
turning it until it fits into the grooves of the motor shaft (Figure 2).
4. Place juicer cover/lid on top of the filter basket (Figure 3).
Fig. 1 Fig. 2 Fig. 3
5. Raise the stainless steel locking arm and place it on the grooves on the
sides of the lid. Your juice extractor is equipped with a safety feature that
will ensure the unit will not operate unless the lid is properly locked.
(Figure 4).
6. Place the pulp container into position by tilting it slightly (Figure 5). Push
pulp container forward until it snaps into place.
IMPORTANT: Make sure Pulp Container edge is underneath basket.
7. Place the 1.25 liter jar under the spout located on the right hand side of
the juicer by tilting it slightly. Other jars or glasses can be used as well
(Figure 6).
Fig. 4 Fig. 5 Fig. 6
OPERATING INSTRUCTIONS
USING THE JUICE EXTRACTOR
Prepare your fruits and vegetables by washing them thoroughly and peeling
off any skin that needs removing.
NOTE: Your juice extractor is equipped with an extra-wide food chute that is
designed to allow most whole fruits and vegetables to fit inside the chute.
Fruits and vegetables larger than the food chute will need to be cut into
smaller pieces to ensure they will fit in the chute.
1. Make sure your juice extractor is properly assembled. Please follow the
instructions from the section “Before Using Your Appliance.”
2. Ensure the juice extractor and its accessories are clean by following the
cleaning and maintenance section of this manual.
3. Place the jar or any other container/glass you may wish to use to collect
the juice under the spout and make sure the pulp collector is in place prior
to begin juicing. Do not allow the pulp collector container to overfill as
this may cause the unit to stall.
4. Plug the power cord into an electrical outlet and select your desired
speed. Use “I” for soft foods or “II” for tougher foods.
5. Once the juicer is on, place the fruits and vegetables on the food chute
and use the food pusher slowly to drive them down. Place the food pusher
in the food chute, making sure the tab “ ” in the food pusher aligns with
the juicing indicator icon “ ” (Figures 1 and 2). In order to extract the
maximum amount of juice, it is important to push the food pusher slowly.
6. The juice extractor will separate the pulp from the juice. Juice will collect
in the jar, and pulp will collect in the pulp collector while you are juicing.
NOTE: Both the pulp container as well as the jar can be emptied during
juicing by turning the juice extractor off “O”. Make sure to place both
containers back in place before you resume juicing.
7. When you are done, turn off the unit and turn around the adjustable
rubber sleeve to prevent dripping.
CAUTION: NEVER USE HAND OR FINGERS TO PUSH FOOD DOWN THE FOOD
CHUTE OR TO CLEAR THE FOOD CHUTE. ALWAYS USE THE FOOD PUSHER
PROVIDED.
CAUTION: DO NOT USE THIS UNIT CONTINUOUSLY FOR MORE THAN
5 MIN.
Figure 1 Figure 2
FPSTJE317_FPSTJE318_20ESM1 (US).indd 5-6FPSTJE317_FPSTJE318_20ESM1 (US).indd 5-6 6/5/20 09:376/5/20 09:37
www.oster.com www.oster.com
7 8
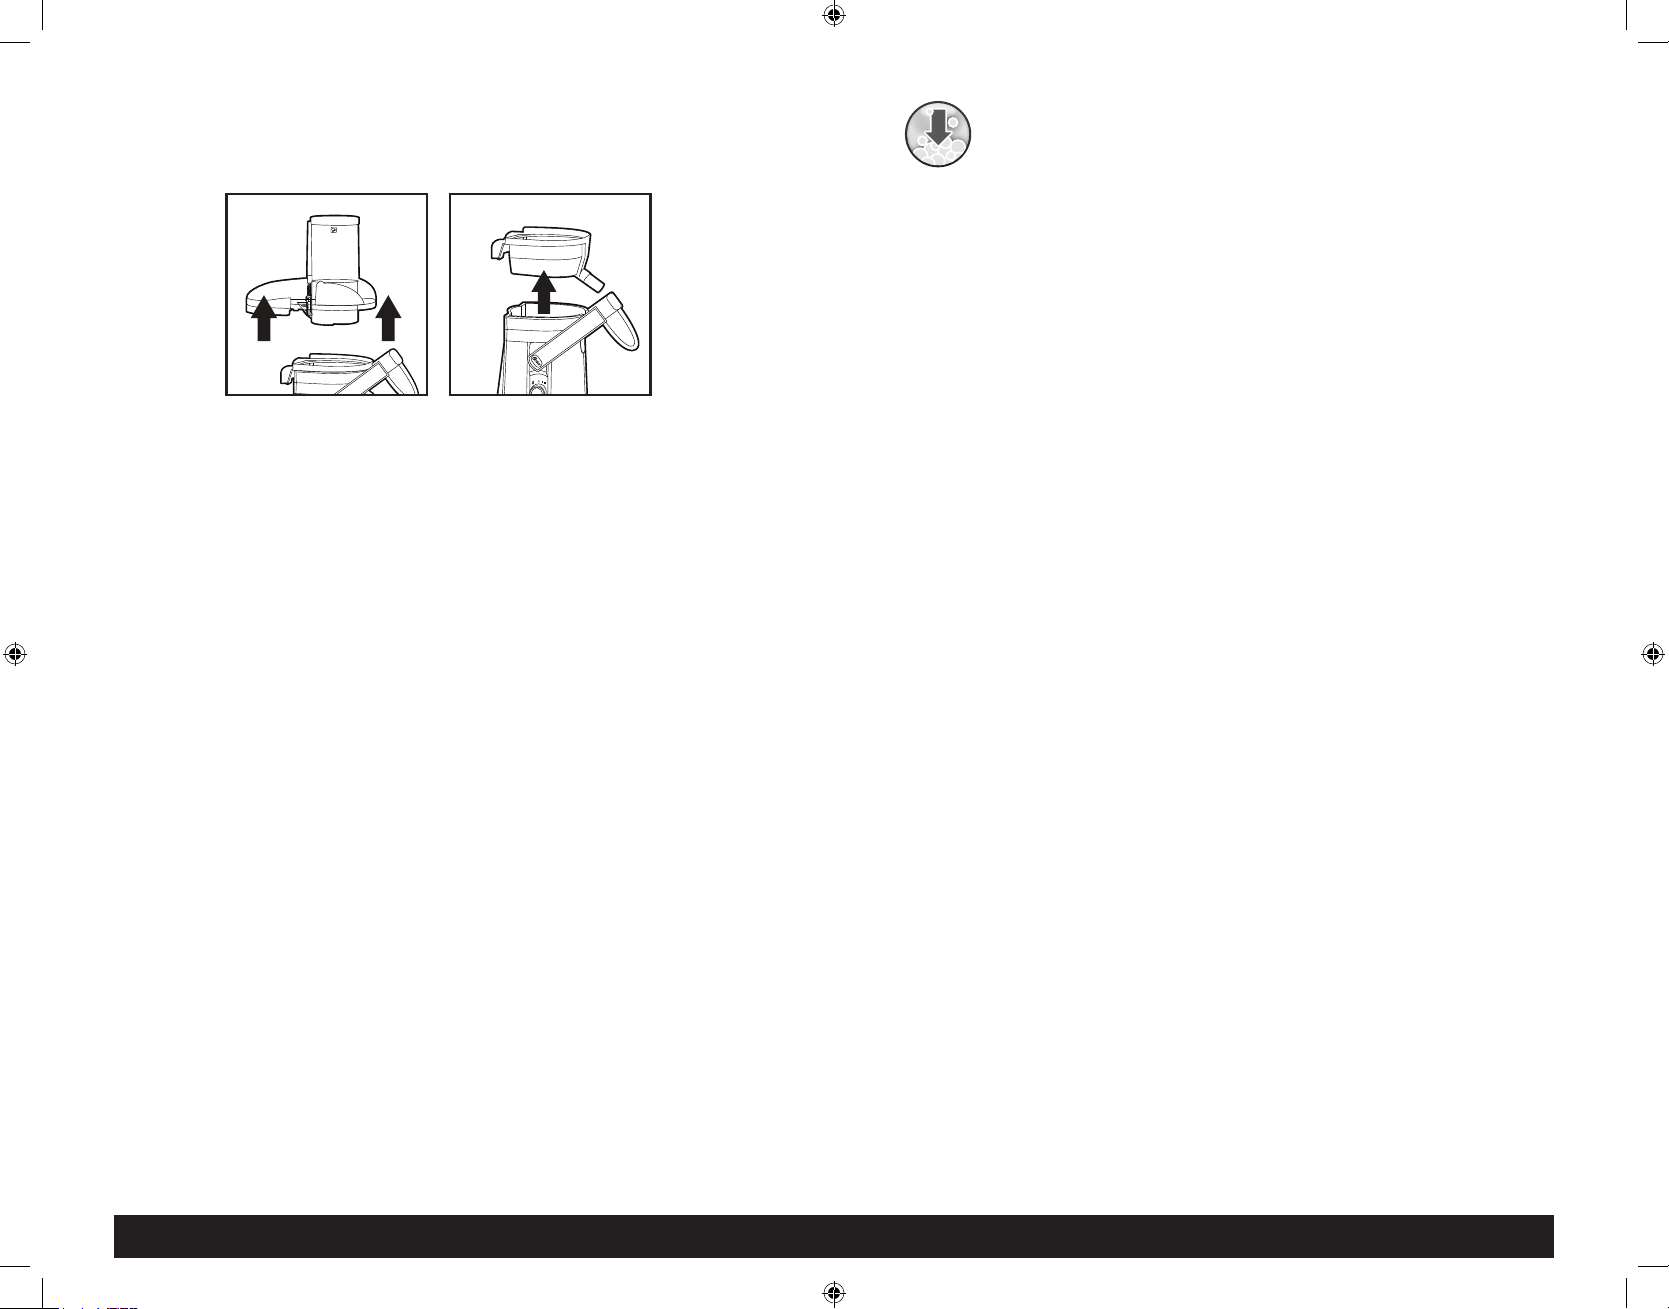
EXCLUSIVE FILTER AUTO-CLEAN TECHNOLOGY
Your juice extractor includes a patented and innovative filter auto-clean
technology that will make cleaning a fast and easy task.
1. Remove food pusher from food chute.
2. Twist open food pusher lid.
3. Completely fill water compartment inside food pusher “ ”. Be careful not
to turn the filled food pusher on it’s side as water could spill out.
4. Replace lid and turn it clockwise to lock it into place on food pusher.
5. Place food pusher back on food chute, ensuring the tab “ ” on the food
pusher aligns with the top of the mechanism for auto-clean “ ” (Figure 1).
6. Turn the control knob to the auto-clean position “ ”.
7. Press and hold down “ ” the food pusher while pressing the button
(Figure 2). Auto-clean feature will automatically shut off after 25 s. You can
also pulse the food pusher up and down when in self cleaning mode for the
allocated 25 seconds as well.
8. Stop pressing down on food pusher.
9. Turn control knob to the off position “O”.
10. Remove and empty out the jar and pulp collector container and wash them.
Your juice extractor is now clean and ready to be used again.
NOTE: Never use the Auto Clean mechanism during juicing or in dry
condition.
AFTER USING THE JUICE EXTRACTOR
Before cleaning and storing your juice extractor, follow the instructions below
to disassemble the unit:
1. Turn juice extractor off “O” and unplug it from the electrical outlet (Figure 1).
2. Remove the jar and the pulp collector container by tilting them slightly
(Figure 2).
3. Unlock the stainless steel locking arm and move it to the right and down
to release the cover/lid (Figure 3).
Fig. 1 Fig. 2 Fig. 3
Figure 1
Figure 2
4. Lift the lid up and remove it from the juice extractor (Figure 4).
5. In order to remove the filter basket and the filter, hold the filter basket with two
hands and then lift it straight up (Figure 5).
Fig. 4
Fig. 5
WARNING: THE STAINLESS STEEL FILTER BASKET CONTAINS SMALL SHARP
BLADES TO CUT AND PROCESS FRUITS AND VEGETABLES. DO NOT TOUCH
BLADES WHEN HANDLING THE FILTER BASKET.
FPSTJE317_FPSTJE318_20ESM1 (US).indd 7-8FPSTJE317_FPSTJE318_20ESM1 (US).indd 7-8 6/5/20 09:376/5/20 09:37
www.oster.com www.oster.com
9 10
1. Unplug from outlet before disassembling and cleaning.
2. After disassembling all removable parts of the juice extractor, wash them
by hand with warm soapy water or in the dishwasher (top shelf only). If
the pulp dries out in the pulp collector container, the filter or the filter
basket, let it soak in water for approximately 10 min before washing it.
3. Wipe the motor base with a damp cloth.
4. It is very important to keep the filter very clean, free of residue blocking
the holes in order to ensure optimal performance. Wash it thoroughly
with warm soapy water. If the holes in the mesh remain blocked, soak the
filter in hot water with a water solution with 10% lemon juice.
CAUTION: DO NOT IMMERSE THE MOTOR BASE IN WATER OR ANY OTHER
LIQUID.
CAUTION: MAKE SURE THE PARTS ARE NOT DAMAGED BEFORE
ASSEMBLING THEM BACK TOGETHER.
WARNING: To reduce the risk of personal injury before and after juicing,
always visually examine the stainless steel filter for any damage or dents in
the metal surface. If present, replace the stainless steel filter and dispose of
any juice that was made.
EXCLUSIVE FILTER AUTOCLEAN TECHNOLOGY
Your juice extractor includes a patented innovative filter auto-clean
technology that makes cleaning a fast and easy task.
1. Remove food pusher from food chute.
2. Twist open food pusher lid.
3. Fill water compartment inside food pusher to the “MAX” level .
4. Replace and turn lid clockwise to lock it into place on food pusher.
5. Place food pusher back on food chute ensuring the tab on the food pusher
aligns with the top of the mechanism for auto-clean.
6. Turn the control knob to the auto-clean position.
7. Press and hold down the food pusher. Auto-clean feature will
automatically shut off after 25 s.
8. Stop pressing down on food pusher.
9. Turn control knob to the off position.
10. Remove and empty out the jar and pulp collector container and wash them.
Your juice extractor is now clean and ready to be used again.
NOTE: Never use the Auto Clean mechanism during juicing or in dry
condition.
MAINTENANCE
Some plastic parts might stain when in contact with some fruits and
vegetables for too long. In order to avoid this from happening, all parts
should be washed immediately after each use.
This appliance has no user serviceable parts. Any servicing beyond that
described in the Cleaning Section should be performed by an Authorized
Service Representative only. See warranty section.
CARE AND CLEANING
Your Oster® appliance has been carefully designed to give you many years
of trouble free service. In the unlikely event that your new appliance does
not operate properly, please review the following potential problems and
try the steps recommended BEFORE you call or take it to an Authorized
Oster® Service Center.
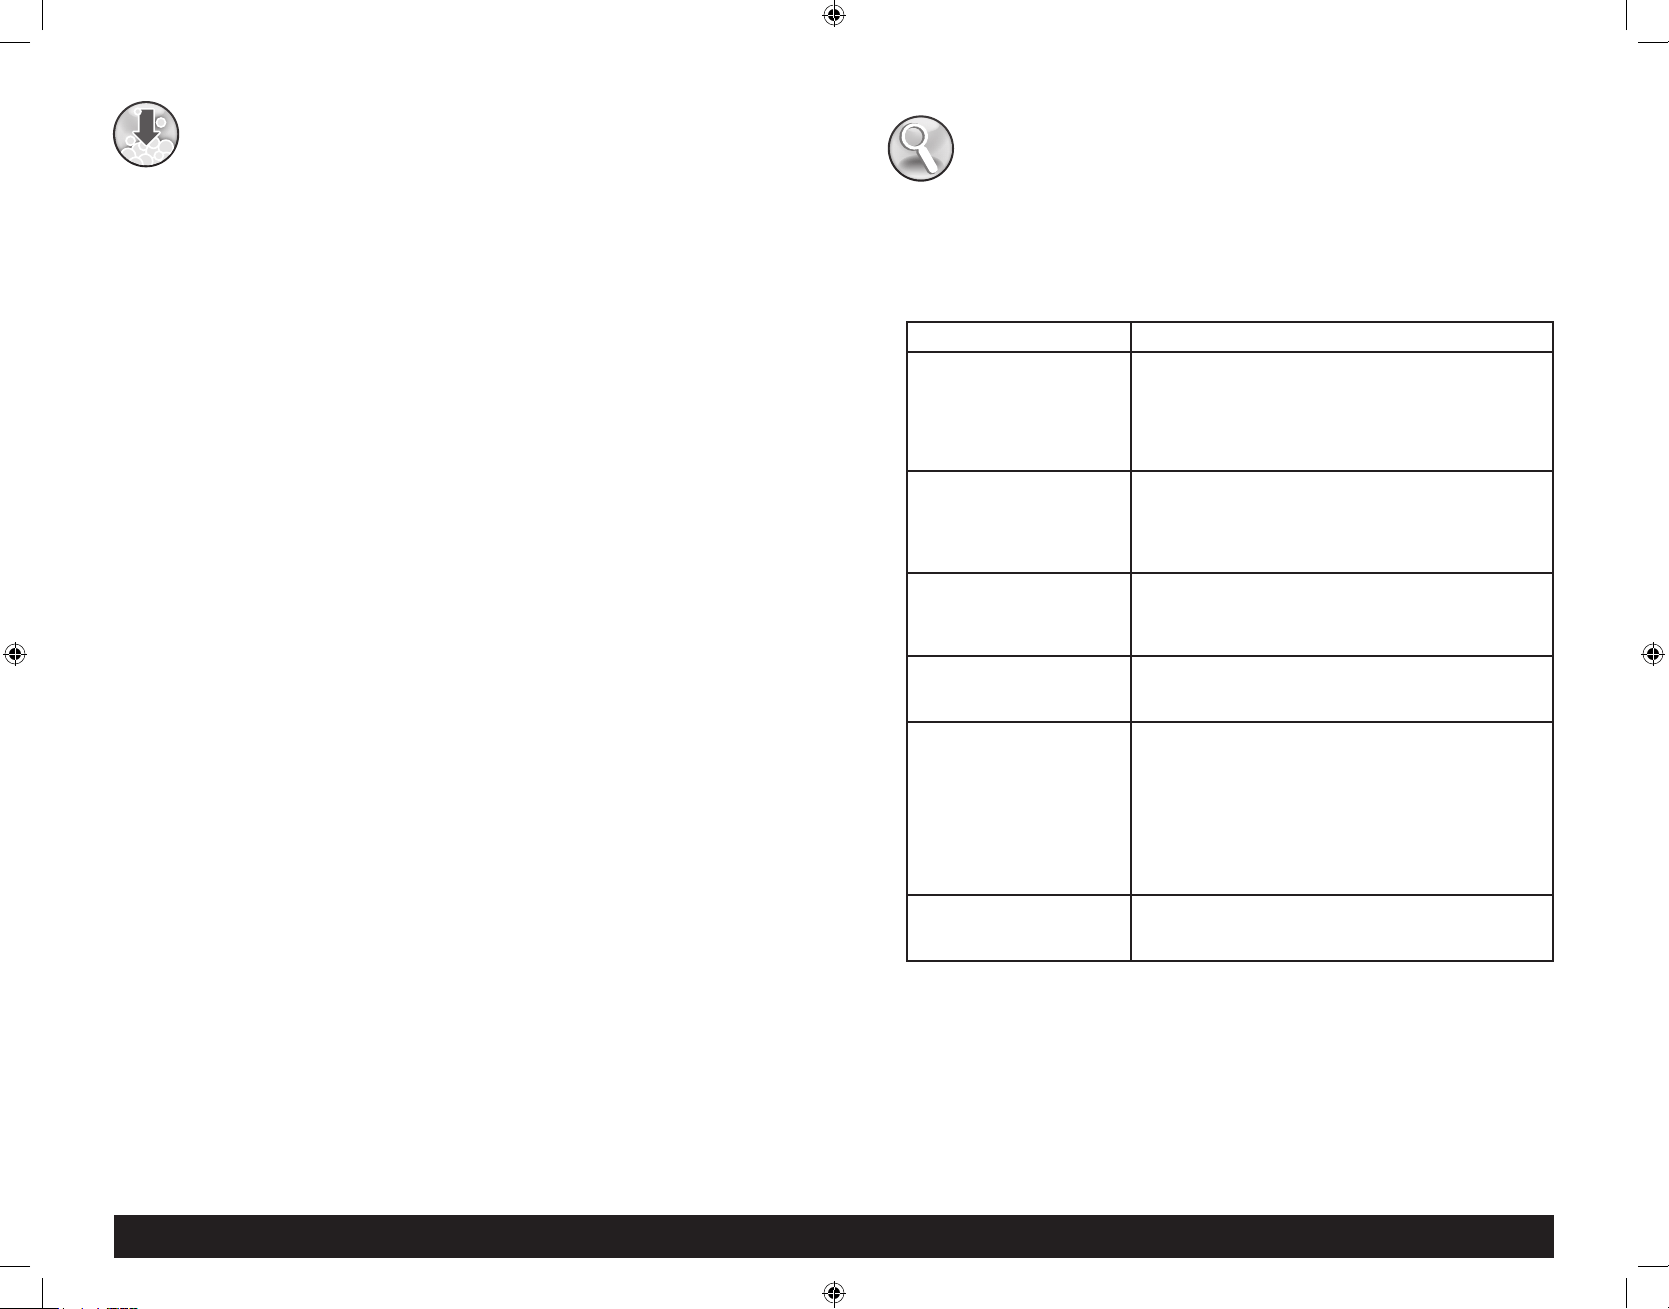
PROBLEM SOLUTION
Juice Extractor will not
work
after switching on “I” or “II”.
• Stainless steel locking arm may not be locked
properly in its position.
• Turn o and unplug unit and ensure all parts are
assembled properly.
• Turn o and unplug unit and check if there is any
residue blocking the unit.
Motor makes loud noise
and
unit starts vibrating.
• Turn o and unplug unit and ensure all parts are
assembled properly.
• Juicing overripe fruits may produce too much pulp
and clog the lter. Turn o and unplug unit and
clean the lter thoroughly.
Motor appears to stall
when juicing.
• If pulp starts building up under the lid, slow down
the juicing process. Turn o and unplug unit and
clean the lter basket, the stainless steel lter and
the lid.
Too much pulp build up. • Follow the instructions to disassemble the unit
included in the “After Using Your Juice Extractor”
section. Clean up pulp from the lter.
Pulp too wet and reduced
juice extraction.
• Try a slower juicing action. Remove stainless steel
mesh lter and thoroughly clean mesh with a nylon
brush. Rinse the lter basket with hot water. If the
ne mesh holes are blocked, soak the basket in
a solution of hot water with 10% lemon juice to
unblock the holes or wash in the dishwasher. This
will remove excess ber build up (from fruit or
vegetables), which could be reducing the ow of
juice.
Juice leaks between the rim
of the Juicer and Juice
Extractor Cover.
• Try a slower juicing action by pushing the Food
Pusher down slower.
TROUBLESHOOTING
FPSTJE317_FPSTJE318_20ESM1 (US).indd 9-10FPSTJE317_FPSTJE318_20ESM1 (US).indd 9-10 6/5/20 09:376/5/20 09:37

www.oster.com www.oster.com
11 12
• Do not place any fruits or vegetables inside juicer until you turn the
unit on. Allow unit to run for at least 10 s before you start juicing.
• Do not allow the pulp container to overfill as this may prevent correct
operation or damage the unit.
• Be sure to remove large pits from fruits such as peach, mango, etc. as
they can damage the unit.
• You can use a plastic bag inside the pulp collector container to avoid
having to clean it.
• Do not use bananas or avocados as they do not contain juice and will
clog the unit. You can use a blender to add them to the juice.
• You can use the pulp of the juices you prepare in a variety of ways. The
pulp from fruits and vegetables contains high amounts of fiber and
cellulose, which are essential for a healthy and well balanced diet. You
can use the pulp to thicken soups and casseroles, or to enhance your
desserts. Make sure to use the pulp the same day you juice to avoid
loss of vitamins.
RECIPES
FRUIT POTPOURRI
Ingredients:
4 medium apricots
2 cups cubed melon
1 large apple
1 orange
Preparation:
Process the fruits in the Oster
®
Juice
Extractor, mix well and add a few ice
cubes. Serve immediately.
PINK CLOUD
Ingredients:
1 cup strawberries
1 cored orange
1 cup cubed pear
1 small carrot
Preparation:
Process the fruits in the Oster
®
Juice
Extractor, mix thoroughly. Serve
immediately. Add a few ice cubes.
TIPS AND SUGGESTIONS
MIRACLE EXTRACT
Ingredients:
1 cup pineapple cubes
1 apple cubes
2 small carrots
1 cored orange
2 celery stalks
1 lime with peal
Preparation:
Process the fruits with the Oster
®
Juice Extractor, mix well. Add a few
ice cubes. Serve immediately.
ENERGY COCKTAIL
Ingredients:
2 cups carrot
½ cup cucumber
12 spinach leaves
1 lime with peel
1 cup celery
1 apple
2 tablespoons honey
1 tomato
Preparation:
Process ingredients in the Oster
®
Juice Extractor, except the honey.
Mix honey and juice well. Serve
immediately, adding a few ice cubes
as desired.
TOMATO COCKTAIL
Ingredients:
8 tomatoes
4 celery stalks
1 lime, peeled
1 carrot
½ teaspoon salt
1 tablespoon Worcestershire sauce
Procedure:
Wash vegetables thoroughly.
Process the tomatoes, celery, lime
and cucumbers. Mix the juices, add
condiments, and stir well. Serve
over ice in tall glasses. Garnish with
a celery leaf. Yields 4 servings.
TEMPTATION
Ingredients:
6 apricots
2 cups melon
½ cup orange juice
Preparation:
Process the fruits with the Oster
®
Juice Extractor. Mix the resulting
extract well. Add 6 ice-cubes. Serve
immediately in medium glasses
garnished with strawberries or a
maraschino cherry and an orange
slice.
FPSTJE317_FPSTJE318_20ESM1 (US).indd 11-12FPSTJE317_FPSTJE318_20ESM1 (US).indd 11-12 6/5/20 09:376/5/20 09:37

www.oster.com www.oster.com
13 14
SURPRISE PINEAPPLE CAKE
Ingredients:
¾ cup pineapple extract
10 tablespoons butter
1 tablespoon powdered sugar
2 egg yolks
1 cup sweet condensed milk
54 lady-finger biscuits
Caramel:
¼ cup water
1 cup sugar
Decoration:
1 can sliced pineapple
6-10 maraschino- cherries
Preparation:
Use the Oster
®
Juice Extractor to obtain the pineapple extract. With an
Oster
®
mixer, beat the butter until creamy. Slowly add the sugar, yolks and
sweetened condensed milk. Continue beating until fluffy, and then add
the pineapple extract. Grease a spring mold lightly with butter, and build
the cake by covering bottom and sides of the pan with the lady-finger
biscuits slightly moistened with the canned pineapple’s syrup.
Then add a layer of cream. Followed by a layer of biscuits, and so on until
finishing with a layer of cream. Cool cake in refrigerator for three hours
and unmold. Make caramel by boiling sugar and water. Decorate the cake
with pineapple slices, maraschino cherries and caramel threads. Using a
spring mold will yield the best results.
1 YEAR LIMITED WARRANTY
Sunbeam Products, Inc. (collectively “Sunbeam”) warrants that for a
period of one year from the date of purchase, this product will be free
from defects in material and workmanship. Sunbeam, at its option, will
repair or replace this product or any component of the product found
to be defective during the warranty period. Replacement will be made
with a new or remanufactured product or compo-nent. If the product is
no longer available, replacement may be made with a similar product of
equal or greater value. This is your exclusive warranty. Do NOT attempt to
repair or adjust any electrical or mechanical functions on this product.
Doing so will void this warranty.
This warranty is valid for the original retail purchaser from the date of
initial retail purchase and is not trans-ferable. Keep the original sales
receipt. Proof of purchase is required to obtain warranty performance.
Sunbeam dealers, service centers, or retail stores selling Sunbeam
products do not have the right to alter, modify or any way change the
terms and conditions of this warranty.
This warranty does not cover normal wear of parts or damage resulting
from any of the following: negligent use or misuse of the product, use on
improper voltage or current, use contrary to the operating instructions,
disassembly, repair or alteration by anyone other than Sunbeam or an
authorized Sunbeam service center. Further, the warranty does not cover:
Acts of God, such as fire, flood, hurricanes and tornadoes.
What are the limits on Sunbeam’s Liability?
Sunbeam shall not be liable for any incidental or consequential damages
caused by the breach of any express, implied or statutory warranty or
condition.
Except to the extent prohibited by applicable law, any implied warranty or
condition of merchantability or fitness for a particular purpose is limited in
duration to the duration of the above warranty.
Sunbeam disclaims all other warranties, conditions or representations,
express, implied, statutory or otherwise.
Sunbeam shall not be liable for any damages of any kind resulting from
the purchase, use or misuse of, or inability to use the product including
incidental, special, consequential or similar damages or loss of profits,
or for any breach of contract, fundamental or otherwise, or for any claim
brought against purchaser by any other party.
FPSTJE317_FPSTJE318_20ESM1 (US).indd 13-14FPSTJE317_FPSTJE318_20ESM1 (US).indd 13-14 6/5/20 09:376/5/20 09:37

www.oster.com www.oster.com
15 16
Some provinces, states or jurisdictions do not allow the exclusion or
limitation of incidental or consequential damages or limitations on how
long an implied warranty lasts, so the above limitations or exclusion may
not apply to you.
This warranty gives you specific legal rights, and you may also have other
rights that vary from province to province, state to state or jurisdiction to
jurisdiction.
How to Obtain Satisfaction Guarantee Service
In the U.S.A.
If you have any question regarding this warranty or would like to obtain
warranty service, please call 1-800-334-0759 and a convenient service
center address will be provided to you.
In the U.S.A., this guarantee is offered by Sunbeam Products, Inc. located
in Boca Raton, Florida 33431. If you have any other problem or claim
in connection with this product, please write our Consumer Service
Department.
PLEASE DO NOT RETURN THIS PRODUCT TO ANY OF THESE
ADDRESSES OR TO THE PLACE OF PURCHASE.
A fin de reducir el riesgo de incendios, descargas eléctricas y/o lesiones
personales cuando se utilizan aparatos eléctricos, siempre se deben seguir
precauciones básicas de seguridad, incluyendo las siguientes:
1. Lea todas las instrucciones antes de utilizar este producto.
2. Para protegerse contra una descarga eléctrica, no coloque ni sumerja el
cable, los enchufes o el aparato en agua ni en ningún otro líquido.
3. Este aparato no está diseñado para ser utilizado por los niños ni por
personas cuyas capacidades físicas, sensoriales o mentales estén
reducidas, o carezcan de experiencia y conocimiento. Todo aparato
utilizado cerca de los niños requiere la supervisión cercana de un adulto.
Los niños deberán estar bajo supervisión para cerciorarse de que no
jueguen con el aparato. Mantenga el aparato y su cable alejados del
alcance de los niños.
4. Apague el aparato y luego desenchúfelo del tomacorriente cuando no
esté en uso, antes de instalarle o retirarle piezas y antes de limpiarlo.
Permita que se enfríe antes de instalarle o retirarle piezas y antes de
limpiarlo. Para desenchufar, sujete firmemente el enchufe y hálelo fuera
del tomacorriente.
5. Evite el contacto con las cuchillas o piezas móviles.
6. No opere ningún aparato que tenga un cable o enchufe dañado o después
de presentar un fallo en su funcionamiento o si se ha dañado de manera
alguna. No intente reemplazar o cortar un cable dañado. Devuelva el
aparato al fabricante (consulte la garantía) para su revisión, reparación o
ajuste.
7. Para aparatos con marcas en el contacto del enchufe: Este aparato
tiene marcas importantes en el contacto del enchufe. Ni el enchufe del
accesorio ni el cable (si el enchufe está moldeado en el cable) debe ser
reemplazado. Si alguno de los dos se daña, se debe reemplazar el aparato.
8. El uso de accesorios, incluyendo frascos para conservas, no recomendados
ni vendidos por el fabricante del producto podría ocasionar incendio,
descarga eléctrica o lesión personal.
9. No utilice el aparato al exterior ni para propósitos comerciales.
10. No permita que el cable cuelgue del borde de la mesa o del mostrador ni
que entre en contacto con superficies calientes, incluyendo la estufa.
11. Siempre asegúrese de que la tapa del extractor de jugo este firmemente
fijada en su lugar antes de activar el motor. No destrabe el brazo de
seguridad mientras el extractor de jugo esté funcionando. No intente
ignorar el mecanismo de seguridad del brazo de seguridad.
12. Asegúrese de mover el interruptor a la posición de apagado (OFF) después
de cada uso. Verifique que el motor se haya detenido completamente
antes de desensamblar el aparato.
MEDIDAS DE SEGURIDAD
IMPORTANTES
FPSTJE317_FPSTJE318_20ESM1 (US).indd 15-16FPSTJE317_FPSTJE318_20ESM1 (US).indd 15-16 6/5/20 09:376/5/20 09:37
www.oster.com www.oster.com
17 18
13. No coloque los dedos ni otros objetos en la abertura de la unidad mientras
esté funcionando. Si los alimentos quedan atascados en la abertura, use
el empujador de alimentos u otra fruta o verdura para empujarlos hacia
abajo. Cuando no sea posible utilizar este método, apague el motor,
desenchufe del tomacorriente y desemsamble el extractor de jugo para
sacar los restos de alimentos.
14. No utilice el aparato si el tamiz/filtro giratorio o la tapa protectora está
dañado o tiene rajaduras visibles.
15. Para modelos con recipiente de pulpa separable: No use sin antes colocar
en su lugar el recipiente de pulpa.
16. No utilice el aparato para otro fin que no sea para el que ha sido diseñado.
El uso incorrecto puede ocasionar lesiones personales. Siempre utilice el
aparato sobre una superficie seca, estable y nivelada.
17. Para evitar sobrecalentamiento del motor, no utilice este aparato por más
de 5 minutos a la vez. Permita que se enfríe por 1 minuto entre cada ciclo.
CONSERVE ESTAS
INSTRUCCIONES
SOLAMENTE PARA USO
DOMÉSTICO
Modelos estadounidenses con enchufes polarizados:
ENCHUFE POLARIZADO
Este producto tiene un enchufe polarizado. Para disminuir
el riesgo de descarga eléctrica, este enchufe está diseñado
para insertarse en un tomacorriente polarizado en un
solo sentido. Si el enchufe no entra completamente en
el tomacorriente, inviértalo. Si aun así no entra, contacte
a un electricista calificado. No intente modificar el enchufe de ninguna
manera. Si el enchufe encaja suelto en el tomacorriente de CA o si el
tomacorriente de CA se siente caliente, no utilice ese tomacorriente.
INSTRUCCIONES PARA EL CABLE DE ALIMENTACIÓN
Un cable de alimentación corto u cable de alimentación separable es
proporcionado para reducir los riesgos de enredarse o tropezar con un
cable más largo. Existen cables de alimentación separables más largos
o cables de extensión disponibles y estos pueden utilizarse si se toma el
cuidado debido en su uso. Si se utiliza un cable de alimentación separable
o cable de extensión en modelos de cable corto:
a. La clasificación eléctrica marcada del cable de alimentación separable o
cable de extensión debe ser, como mínimo, igual a la clasificación eléctrica
del aparato;
b. Si el aparato es del tipo de conexión a tierra, el cable de extensión debe
ser un cable de tres alambres de conexión a tierra; y
c. El cable más largo debe ser acomodado de manera que no cuelgue sobre
el mostrador o la mesa donde pueda ser halado por los niños o tropezarse
con el mismo sin darse cuenta.
No hale, tuerza ni maltrate de manera alguna el cable de alimentación.
No enrolle el cable alrededor del cuerpo del aparato durante o después de
su uso.
FPSTJE317_FPSTJE318_20ESM1 (US).indd 17-18FPSTJE317_FPSTJE318_20ESM1 (US).indd 17-18 6/5/20 09:376/5/20 09:37
www.oster.com www.oster.com
19 20
1. Empujador de alimentos con
compartimiento de agua para auto-
limpieza
2. Tapa del empujador de alimentos
3. Tubo de alimentación
4. Cubierta del extractor de jugo
5. Contenedor de gran capacidad para
recolectar la pulpa
6. Base del motor
7. Perilla de control
8. Mecanismo para auto-limpieza
9. Filtro de acero inoxidable
10. Canasta del filtro
11. Brazo de seguridad de acero
inoxidable
12. Punta de goma ajustable a prueba de
goteo para la boquilla
13. Jarra de 1,25 litros con separador de
espuma
14. Tapa de la jarra
2
3
4
5
1
6
7
8
13
14
12
10
11
9
NOTA: Las piezas y el diseño de la unidad pueden variar dependiendo del modelo.
La imagen de arriba representa el Modelo FPSTJE318.
DESCRIPCIÓN DEL ARTEFACTO
ENSAMBLANDO EL EXTRACTOR DE JUGOS
Siga las siguientes instrucciones de ensamblaje listadas a continuación
antes de utilizar su extractor de jugos Oster
®
:
1. Antes de comenzar a ensamblar su extractor de jugos, asegúrese de
desenchufar el cable del tomacorriente y colocar el artefacto sobre una
superficie seca y nivelada.
2. Coloque la canasta encima de la base del motor (Figura 1).
3. Coloque el filtro de acero inoxidable encima de la canasta apretándolo
hacia abajo y girándolo hasta que quede bien ajustado en las ranuras del
eje del motor (Figura 2).
4. Coloque la tapa encima de la canasta (Figura 3).
Fig. 1 Fig. 2 Fig. 3
5. Levante el brazo de seguridad de acero inoxidable y colóquela en las
ranuras localizadas a los lados de la tapa. Su extractor de jugo esta
equipado con un dispositivo de seguridad que garantiza que la unidad no
operará a menos que la tapa esté apropiadamente asegurada. (Figura 4).
6. Coloque el contenedor de pulpa en su posición inclinándolo ligeramente
(Figura 5). Empuje el contenedor de pulpa hacia adelante hasta que encaje
en su lugar. Importante: Cerciórese de que el contenedor de pulpa se
encuentre colocado debajo de la canasta.
7. Coloque la jarra de 1,25 litros inclinándola ligeramente hasta que quede
justo debajo de la boquilla localizada en la parte derecha del extractor de
jugos (Figura 6).
.
Fig. 4 Fig. 5 Fig. 6
INSTRUCCIONES DE USO
FPSTJE317_FPSTJE318_20ESM1 (US).indd 19-20FPSTJE317_FPSTJE318_20ESM1 (US).indd 19-20 6/5/20 09:376/5/20 09:37
www.oster.com www.oster.com
21 22
Figura 1 Figura 2
USANDO EL EXTRACTOR DE JUGOS
Prepare sus frutas y vegetales lavándolas minuciosamente y pelando aquellas que
necesiten que la piel sea removida.
NOTA: Su extractor de jugos está equipado con un tubo de alimentación extra ancho,
diseñado para poder acomodar dentro del tubo la mayoría de las frutas y verduras
enteras. Las frutas y verduras más grandes que el tubo deberán ser cortadas en un
trozos más pequeños para asegurar que quepan en el tubo de alimentación.
1. Asegúrese de que su extractor de jugos está correctamente ensamblado. Por favor
siga las instrucciones de la sección “Antes de Utilizar su Artefacto”.
2. Asegúrese de que su extractor de jugos y los accesorios están limpios siguiendo las
instrucciones de la sección de limpieza y mantenimiento de este manual.
3. Coloque la jarra o cualquier otro recipiente/vaso que usted desee utilizar para
colectar el jugo debajo de la boquilla, asegurándose de que la punta de goma
ajustable de la boquilla está apuntando hacia abajo y adentro de la jarra.
Asegúrese que el recolector de pulpa está en su lugar antes de comenzar a utilizar
su extractor de jugos. No permita que el recolector de pulpa se llene más, ya que
esto podria trabar la unidad.
4. Enchufe el cable en el tomacorriente eléctrico y seleccione la velocidad deseada.
Use “I” para comidas suaves o “II” para comidas más duras.
5. Una vez que el extractor de jugos esté encendido, coloque las frutas y verduras
dentro del tubo de alimentación y utilice el empujador de alimentos para
empujarlas hacia abajo lentamente. Coloque el empujador de alimentos en el
tubo de alimentación asegurándose de que la pestaña “ ” en el empujador de
alimentos se alinea con la parte con el ícono “ ” indicador de extracción de jugos
(Figuras 1 y 2). Para extraer la máxima cantidad de jugo, es importante empujar los
alimentos lentamente.
6. El extractor de jugos separará la pulpa del jugo. El jugo se colectara en la jarra
y la pulpa se colectará en el recolector de pulpa, mientras está en el proceso de
extracción.
NOTA: Tanto el contenedor de la pulpa como la jarra deben vaciarse durante
el proceso de extracción colocando su extractor de jugos en la posición de
apagado “O”. Asegúrese de colocar en su lugar ambos recipientes antes de seguir
extrayendo el jugo.
7. Cuando termine apague la unidad “O” y volteé la punta de goma ajustable para
que la boquilla no quede goteando.
PRECAUCIÓN: NUNCA UTILICE LAS MANOS O LOS DEDOS PARA EMPUJAR LAS
FRUTAS Y LOS VEGETALES HACIA ABAJO POR EL TUBO DE ALIMENTACIÓN.
SIEMPRE UTILICE EL EMPUJADOR DE ALIMENTOS PROVEÍDO ESPECIALMENTE
PARA ESTE PROPÓSITO.
PRECAUCIÓN:
NO UTILICE EL ARTEFACTO DE FORMA CONTINUA POR MÁS DE
5 MIN.
FILTRO EXCLUSIVO CON TECNOLOGÍA DE AUTOLIMPIEZA
Su extractor de jugos incluye un innovador filtro patentado con tecnología de
auto-limpieza que facilita y agiliza el proceso de limpieza.
1. Retire el empujador de alimentos del tubo de alimentación.
2. Gire la tapa del empujador de alimentos.
3. Llene el compartimiento de agua dentro del empujador de alimentos “ ”. Tenga
cuidado de no colocar sobre su costado el empujador de alimentos lleno de
alimentos ya que el agua podría salirse del tubo.
4. Coloque de nuevo la tapa y gírela hacia la derecha hasta que encaje en su lugar en
el empujador de alimentos.
5. Coloque de nuevo el empujador de alimentos en el tubo de alimentación
asegurándose de que la pestaña “ ” en el empujador de alimentos se alinea con la
parte superior del mecanismo de auto-limpieza “ ” (Figura 1).
6. Gire la perilla de control a la posición de auto-limpieza “ ”.
7. Mantenga pulsado el empujador de alimentos “ ” mientras pressiona el botón
(Figura 2). La función de auto-limpieza se apagará automáticamente después
de 25 s. También puede presionar el empujador de alimentos hacia arriba y
hacia abajo cuando esté en el modo de auto-limpieza durante los 25 segundos
asignados.
8. Pare de presionar hacia abajo el empujador de alimentos.
9. Gire la perilla de control a la posición de apagado “O”.
10. Retire y vacíe la jarra y el contenedor para recolectar la pulpa y lávelos.
Su extractor de jugo está ahora limpio y listo para ser utilizado de nuevo.
NOTA: Nunca utilice el mecanismo de auto-limpieza durante el ciclo de extracción de
jugo ni en seco.
DESPUÉS DE UTILIZAR EL EXTRACTOR DE JUGOS
Antes de limpiar y guardar su extractor de jugos, siga las siguientes instrucciones para
desensamblar la unidad.
1. Apague su extractor de jugos colocándolo en la posición “O” y desenchúfelo del
tomacorriente (Figura 1).
2. Remueva la jarra y el recolector de jugo inclinándolos ligeramente (Figura 2).
3. Abra el brazo de seguridad de acero inoxidable moviéndolo hacia la derecha y
hacia abajo para liberar la tapa del extractor (Figura 3).
Figura 1
Figura 2
Fig. 1 Fig. 2 Fig. 3
FPSTJE317_FPSTJE318_20ESM1 (US).indd 21-22FPSTJE317_FPSTJE318_20ESM1 (US).indd 21-22 6/5/20 09:376/5/20 09:37
www.oster.com www.oster.com
23 24
4. Levante la tapa y remuévala del extractor de jugos (Figura 4).
5. Para poder remover el filtro y la canasta del filtro, sostenga la base del
motor y levante la canasta del filtro hacia arriba (Figura 5).
Fig. 4
Fig. 5
ADVERTENCIA: EL FILTRO DE ACERO INOXIDABLE CONTIENE PEQUEÑAS
CUCHILLAS CORTANTES PARA CORTAR Y PROCESAR FRUTAS Y LOS
VEGETALES. NO TOQUE LAS CUCHILLAS CUANDO ESTÉ MANIPULANDO EL
FILTRO.
1. Desenchufe el aparato del tomacorriente antes desensamblar y limpiarlo.
2. Una vez desensambladas todas las partes removibles del electrodoméstico,
lávelas a mano con agua caliente y jabón o en el lavaplatos automático (en la
parte superior exclusivamente). Si la pulpa se llegase a secar dentro del recolector
de pulpa, el filtro o la canasta del filtro, déjelo remojando en agua por 10 min
aproximadamente antes de lavarlos.
3. Limpie la base del motor con un paño húmedo.
4. Para asegurar un óptimo desempeño es muy importante mantener el filtro limpio,
libre de cualquier residuo que pueda bloquear los agujeros. Lávelo bien con agua
caliente y jabón. Si los agujeros del filtro siguen bloqueados, remoje el filtro con
una solución de agua con 10% de limón.
PRECAUCIÓN: NO SUMERJA LA BASE DEL MOTOR EN AGUA NI EN NINGÚN OTRO
LIQUIDO.
PRECAUCIÓN: Compruebe que las piezas no estén dañadas antes de
colocarlas nuevamente.
ADVERTENCIA: Para reducir el riesgo de lesión personal antes y después la
extracción de jugo, siempre revise el filtro de acero inoxidable para ver si está
dañado o si la superficie tiene hendiduras. Si esto sucediera, reemplace el
filtro de acero inoxidable y deseche el jugo extraído.
TECNOLOGÍA EXCLUSIVA DE AUTOLIMPIEZA PARA EL FILTRO
Su extractor de jugos incluye una tecnología patentada de auto-limpieza para el
filtro que convierte la limpieza en una tarea rápida y fácil.
1. Retire el empujador de alimentos del tubo de alimentación.
2. Gire la tapa del empujador de alimentos para abrirla.
3. Llene el compartimiento dentro del empujador de alimentos hasta el nivel “MAX”.
4. Coloque la tapa de nuevo en su lugar y gírela hacia la derecha para asegurarla
firmemente en su lugar sobre el empujador de alimentos.
5. Coloque el empujador de alimentos de nuevo en el tubo de alimentación,
asegurándose de que la lengüeta en el empujador de alimentos se alinee con la
parte superior del mecanismo de auto-limpieza.
6. Gire la perilla de control hasta la posición de auto-limpieza.
7. Presione y sostenga el empujador de alimentos. La función de auto-limpieza se
apagará automáticamente después de 25 segundos.
8. Deje de presionar el empujador de alimentos.
9. Gire la perilla de control hasta la posición de apagado.
10. Retire y vacíe la jarra y el recipiente de pulpa, y lávelos.
Su extractor de jugo ahora está limpio y listo para utilizarse de nuevo.
NOTA: Nunca utilice el mecanismo de auto-limpieza durante el ciclo de extracción de
jugo ni en seco.
MANTENIMIENTO
Una decoloración del plástico podría ocurrir con frutas y vegetales que cuentan
con un color fuerte. Para ayudar a prevenir esto, lave las partes inmediatamente
después de cada uso.
Este aparato no tiene piezas que deban ser reparadas por el usuario. Cualquier
servicio que se extienda más allá de lo descrito en la sección de limpieza, debe
ser realizado solo por un representante de servicio autorizado. Ver la sección de
garantía.
CUIDADO Y LIMPIEZA
FPSTJE317_FPSTJE318_20ESM1 (US).indd 23-24FPSTJE317_FPSTJE318_20ESM1 (US).indd 23-24 6/5/20 09:376/5/20 09:37

www.oster.com www.oster.com
25 26
Su artefacto Oster
®
ha sido cuidadosamente diseñado para proporcionarle
muchos años de servicio sin ocasionarle problemas. En el caso poco probable
de que su
artefacto
nuevo no funcione satisfactoriamente, sírvase revisar la
siguiente lista de posibles problemas e intente seguir los pasos recomendados
ANTES de llamar a un Centro de Servicio Autorizado de Oster
®
.
PROBLEMA SOLUCIÓN
La unidad no trabaja
cuando se coloca el
interruptor de encendido
en “I” o “II”.
• El brazo de seguridad de acero inoxidable quizás no
está correctamente enganchadas.
• Desenchufe la unidad y asegúrese de que todas las
partes estén ensambladas correctamente.
• Desenchufe la unidad y asegúrese de que ningún
residuo esté bloqueando la unidad.
El motor está haciendo
mucho ruido y la unidad
comienza a vibrar.
• Desenchufe la unidad y asegúrese de que todas las
partes estén ensambladas correctamente.
• El procesar frutas puede producir un exceso
de pulpa y atascar el ltro. Apague la unidad,
desenchúfela y limpie exhaustivamente el ltro.
El motor parece estancarse
cuando está en el proceso
de extracción.
• Apague la unidad y limpie la canasta del ltro, el
ltro de acero inoxidable y la tapa.
Un exceso de pulpa se
acumuló en el ltro de
acero inoxidable.
• Siga las instrucciones de cómo desensamblar de
la unidad, incluyendo la sección “Mantenimiento y
Limpieza”.
La pulpa está demasiado
mojada y reduce el proceso
de extracción.
• Trate de extraer el jugo más lentamente. Remueva
el ltro de acero inoxidable y limpie generosamente
las paredes de la malla con un cepillo de nylon.
Enjuague el ltro con agua caliente. Si los agujeros
de la malla siguen obstruidos, sumerja el ltro en
una solución de agua caliente con 10% de jugo de
limón para destapar los pequeños agujeros, o si lo
preere, lávelo en la parte superior de su lavaplatos
automático. Esto removerá el exceso de bra
acumulada de las frutas o vegetales que podrían
estar inhibiendo el ujo del jugo.
El jugo está goteando entre
el borde del extractor y la
cubierta del extractor de
jugo
.
• Trate de llevar a cabo más lentamente el proceso
de extracción de jugos colocando los alimentos
despacio por el tubo de alimentación.
• No coloque ninguna fruta o vegetal dentro de la unidad hasta que se
encuentre encendida. Deje que la unidad esté encendida por lo menos
por 10 s antes de comenzar el proceso de extracción de jugos.
• No permita que el contenedor de pulpa se llene, esto puede ocasionar
mal funcionamiento o dañar la unidad.
• Asegúrese de retirar las semillas grandes de las frutas, tales como las
de duraznos, mangos, etc., que puedan dañar la unidad.
• Usted puede colocar una bolsa de plástico adentro del contenedor de
la pulpa para no tener que limpiarlo.
• No utilice bananas o aguacates, ya que éstos no contienen ningún tipo
de jugos y obstruyen la unidad. Utilice una licuadora para agregarlos a
otros tipos de jugos.
• Usted puede utilizar la pulpa de los jugos para prepararla en una gran
variedad de maneras. La pulpa de las frutas y vegetales cuenta con un
alto contenido de fibra y celulosa, esenciales para una dieta saludable
y bien balanceada. La pulpa puede ser utilizada para darle gusto a las
sopas y otras recetas, así como para endulzar postres. Asegúrese de
usar la pulpa el mismo día que extrajo el jugo para evitar la pérdida del
contenido vitamínico.
RECETAS
POUPURRI DE FRUTAS
Ingredientes:
4 albaricoques medianos
2 tazas de trozos de melón
1 manzana grande
1 naranja
Preparación:
Procesar las frutas mencionadas en
el Extractor de Jugos Oster
®
, mezclar
bien y agregar unos cubitos de hielo
al gusto. Servir inmediatamente.
NUBE ROSA
Ingredientes:
1 taza de fresas
1 naranja pelada
1 taza de peras en trozos
1 zanahoria chica
Preparación:
Procesar las frutas en el Extractor de
Jugos Oster
®
, mezclar incorporando
los jugos. Servir inmediatamente
después de agregar algunos cubos
de hielo.
PROBLEMAS Y SOLUCIONES
CONSEJOS Y SUGERENCIAS
FPSTJE317_FPSTJE318_20ESM1 (US).indd 25-26FPSTJE317_FPSTJE318_20ESM1 (US).indd 25-26 6/5/20 09:376/5/20 09:37

www.oster.com www.oster.com
27 28
Lave bien los vegetales,
procese los tomates, el
apio, zanahoria, limón y el
pepino. Mezcle los jugos,
agregue los condimentos
y revuelva bien. Sirva en
vasos altos sobre hielo,
coloque una rama de apio
como decoración. Rinde 4
porciones.
EXTRACTO MILAGROSO
Ingredientes:
1 taza de piña en trozos
1 taza de manzana en trozos
2 zanahorias chicas
1 naranja pelada
2 tallos de apio
1 limón con cáscara
Preparación:
Procesar las frutas mencionadas en
el Extractor de Jugos Oster
®
, mezclar
bien y agregar cuatro cubitos de
hielo. Servir inmediatamente.
COCTEL DE ENERGÍA
Ingredientes:
2 tazas de zanahorias
½ taza de pepino
12 hojas de espinaca
1 limón con cáscara
1 taza de apio
1 manzana
2 cucharadas de miel
1 tomate
Preparación:
Procesar todo en el Extractor de
Jugos Oster
®
, a excepción de la miel
que se debe mezclar con el jugo.
Sirva inmediatamente y si desea
agregue unos cubitos de hielo.
COCTEL DE TOMATE
Ingredientes:
8 tomates
4 ramas de apio
1 limón pelado
1 zanahoria
1 pepino pelado
½ cucharadita de sal
¼ cucharadita de pimienta
1 cucharada de salsa inglesa
(Worcestershire)
Preparación:
TENTACIÓN
Ingredientes:
6 duraznos
2 tazas de melón
½ taza de jugo de naranja
Preparación:
Procese las frutas en el Extractor
de Jugos Oster
®
, mezcle el extracto
resultante y agregue 6 cubitos de
hielo. Sirva inmediatamente en
vasos medianos, decore con fresas
o marrasquinos en una lasca de
naranja.
TORTA SORPRESA DE PIÑA
Ingredientes:
¾ taza de extracto de piña
10 cucharadas de mantequilla
1 cucharada de azúcar en polvo
2 yemas de huevo
1 lata de leche condensada (dulce)
54 bizcotelas/ dedos de ángel
Caramelo:
¼ taza de agua
1 taza de azúcar
Decoración:
1 lata de piña en rodajas
6 a 10 cerezas en almíbar
(marrasquinos)
Preparación:
Utilice el Extractor de Jugos Oster
®
para obtener el extracto de piña. En
una batidora Oster
®
, bata la mantequilla hasta que esté cremosa. Añada el
azúcar, las yemas de huevo y la leche condensada poco a poco. Continúe
batiendo hasta que esponje y finalmente añada el extracto de piña.
Engrase con mantequilla un molde de aro y arme la torta forrando el
fondo y las paredes laterales con las bizcotelas ligeramente humedecidas
en el jugo de la lata de ananás, luego ponga una capa de la preparación
anterior, nuevamente coloque bizcotelas y así sucesivamente hasta
terminar con una capa de crema. Lleve al refrigerador por tres horas,
desmóldela. Prepare el caramelo llevando al fuego el agua con el azúcar,
dejando hervir.
FPSTJE317_FPSTJE318_20ESM1 (US).indd 27-28FPSTJE317_FPSTJE318_20ESM1 (US).indd 27-28 6/5/20 09:376/5/20 09:37

www.oster.com www.oster.com
29 30
GARANTÍA LIMITADA DE 1 AÑO
Sunbeam Products, Inc., (en conjunto denomi-nadas “Sunbeam”),
garantiza que este producto no presentará defectos ni en el material ni
en la mano de obra du-rante el período de un año a partir de la fecha de
compra. Sunbeam, a su discreción, reparará o reemplazará este producto
o cualquier componente de este que se considere defectuoso durante el
período de garantía.
El reemplazo se efectuará por un producto o un componente nuevo
o reacondicionado. Si el producto ya no estuviera disponible, se
reemplazará por un producto similar de igual o mayor valor. Esta es su
garantía exclusiva. NO intente reparar ni ajustar ninguna de las funciones
eléctricas o mecánicas de este producto. Si lo hace, anulará la garantía.
Esta garantía tiene validez para el comprador minorista original a partir de
la fecha de la compra inicial y dicha garantía no es transferible. Conserve
la factura original. Para hacer valer la garantía se necesita el com-probante
de compra. Ni los distribuidores de Sunbeam, ni los centros de servicio
ni las tiendas minoristas que vendan productos de Sunbeam tienen
potestad para alterar, modificar ni cambiar de forma alguna los términos y
condiciones de esta garantía.
Esta garantía no cubre el desgaste normal de las piezas ni los daños a
consecuencia de cualquiera de las siguientes acciones: uso negligente
o inadecuado del producto, uso con un voltaje o corriente inapropia-
dos, uso contrario a las instrucciones de funcionamiento, desarmado,
reparación o alteración por parte de terceros distintos a Sunbeam o un
centro de servicio autorizado de Sunbeam. Asimismo, la garantía no
ampara: actos de fuerza mayor tales como incendios, inundaciones,
huracanes y tornados.
¿Cuáles son los límites de la responsabilidad de Sunbeam?
Sunbeam no será responsable de daños accidentales o resultantes
ocasionados por el incumplimiento de una garantía o condición expresa,
implícita o estatutaria. Salvo en la medida en que lo prohíban las leyes
pertinentes, toda garantía o condición de comerciabilidad o idoneidad
para un fin determinado tendrá una duración limitada al plazo de la
garantía antes mencionada. Sunbeam desconoce cualesquiera otras
garantías, condiciones o declaraciones, expresas, implícitas, estatutarias o
de cualquier otra naturaleza.
Sunbeam no se hará responsable de daños de ningún tipo que resulten de
la compra, utilización o uso inadecuado del producto, o la imposibilidad
de uso del mismo, lo que comprende daños accidentales, es-peciales,
resultantes o similares, o la pérdida de ganancias, ni por ningún
incumplimiento contractual, fun-damental o de otra naturaleza, ni por
ninguna acción emprendida por terceros en contra del comprador.
Algunas provincias, estados o jurisdicciones no permiten la exclusión o
limitación de los daños accidentales o resultantes ni las limitaciones en
cuanto a la duración de una garantía implícita, por lo tanto, es posible que
las limitaciones o exclusiones anteriores no sean pertinentes en su caso.
Esta garantía le otorga ciertos derechos legales pero quizás usted goce
además de otros derechos que varían de un estado, una provincia o una
jurisdicción a otra.
Cómo obtener servicio garantizado
En EE. UU.
Si tiene preguntas relativas a esta garantía o desea obtener servicio
en garantía, sírvase llamar al 1-800-334-0759 y le proporcionaremos la
dirección del centro de servicio que le resulte más conveniente.
En EE. UU., esta garantía la ofrece Sunbeam Products, Inc., que ubicada en
Boca Raton, Florida 33431. Si tiene algún problema o reclamo en relación
con este producto, sírvase escribir a nuestro departamento de atención al
cliente.
LE ROGAMOS QUE NO DEVUELVA ESTE PRODUCTO A NINGUNA DE
LAS DIRECCIONES ANTERIORES NI AL LUGAR DONDE LO ADQUIRIÓ.
FPSTJE317_FPSTJE318_20ESM1 (US).indd 29-30FPSTJE317_FPSTJE318_20ESM1 (US).indd 29-30 6/5/20 09:376/5/20 09:37