ENGLISH
POLSKI
NEDERLANDS
RI8749 (SUP050P)
GAGGIA NAVIGLIO
MILK
User manual
Bedieningshandleiding
Instrukcja obsługi
Naviglio milk en-nl-pl.indd 1 01/08/2019 09:46:15

2
ITALIANO
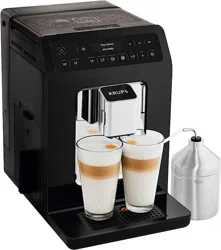
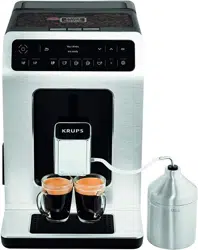
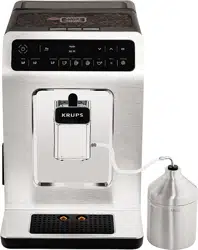
Congratulations on your purchase of a Gaggia Naviglio Milk fully automatic coffee
machine!
This appliance is suitable for preparing espresso coffee using coffee beans. To
ensure perfect performance, all our high-quality machines undergo rigorous testing
in our laboratories prior to packaging. Because real coffee is used during testing,
some residue may remain. However, this does not compromise the integrity of the
product. Please be assured that this is a brand new machine.
In this user manual you will find all the information needed to install, use, clean
and descale your machine. Please read the safety manual carefully before using
the appliance for the first time. This is provided separately and should be kept for
future reference.
ENGLISH
Gefeliciteerd met de aankoop van de volautomatische Gaggia Naviglio Milk
koemachine!
Deze machine is bedoeld voor de bereiding van espresso met gebruik van
koebonen. Alvorens verpakt te worden, ondergaat elke machine strenge tests in
onze laboratoria om de hoge kwaliteit en correcte werking ervan te garanderen. Er
wordt tijdens het testen ook koffie gebruikt, dus het is mogelijk dat er wat residu
achterblijft. Dit doet geen afbreuk aan de integriteit van het product: het is een
volledig nieuwe machine.
In deze handleiding zult u alle nodige informatie vinden om uw machine te
installeren, te gebruiken, schoon te maken en te ontkalken. Lees de aparte
veiligheidsbrochure zorgvuldig door voordat u de machine voor het eerst gebruikt
en bewaar deze voor toekomstige raadpleging.
Gratulujemy zakupu super automatycznego ekspresu do kawy Gaggia Naviglio
Milk!
Urządzenie to jest przeznaczone do przygotowania kawy espresso z kawy
ziarnistej. Przed zapakowaniem każde urządzenie przechodzi szereg
rygorystycznych testów w naszych laboratoriach, aby zapewnić ich wysoką jakość
i prawidłowe działanie. Podczas testowania urządzenia używa się kawy, dlatego
mogą pozostać w nim jej pozostałości. Nie wpływa to jednak na integralność
produktu: jest to urządzenie całkowicie nowe.
W niniejszej instrukcji zawarto wszelkie informacje niezbędne do zainstalowania,
użytkowania, czyszczenia i odwapniania urządzenia. Przed jego pierwszym
użyciem zapoznaj się uważnie z dostarczoną osobno broszurą dotyczącą
bezpieczeństwa i zachowaj ją w razie potrzeby skorzystania z niej w przyszłości.
POLSKI
NEDERLANDS
Naviglio milk en-nl-pl.indd 2 01/08/2019 09:46:15
3
Installation / Installatie / Instalacja
Product overview / Productoverzicht / Przegląd produktu
ENGLISH NEDERLANDS POLSKI
7
2
3
34 3133 3032
1 8
15 16 18
9
10
11
12
13
14
36 28
5
35
29
24
23
22
17
272625
19
20
21
4
6
Naviglio milk en-nl-pl.indd 3 01/08/2019 09:46:18

ENGLISH
Contents
Installation ...........................................................................................................................................................................................................................................................................................................................................................................................................................................................................................................................................................................................................................3
Product overview ..................................................................................................................................................................................................................................................................................................................................................................................................................................................................................................................................................................3
General Description .................................................................................................................................................................................................................................................................................................................................................................................................................................................................................................................................................5
Preparing for Use ....................................................................................................................................................................................................................................................................................................................................................................................................................................................................................................................................................................6
Machine packaging ....................................................................................................................................................................................................................................................................................................................................................................................................................................................................................................................................................6
Machine Installation .................................................................................................................................................................................................................................................................................................................................................................................................................................................................................................................................................6
Using the Machine for the First Time ................................................................................................................................................................................................................................................................................................................................................................................................................8
Circuit Priming ..................................................................................................................................................................................................................................................................................................................................................................................................................................................................................................................................................................................8
Automatic rinse cycle ........................................................................................................................................................................................................................................................................................................................................................................................................................................................................................................................................9
Manual rinse cycle .........................................................................................................................................................................................................................................................................................................................................................................................................................................................................................................................................................9
“INTENZA+” Water Filter Installation .......................................................................................................................................................................................................................................................................................................................................................................................................10
Beverage brewing .......................................................................................................................................................................................................................................................................................................................................................................................................................................................................................................................................................11
Espresso brewing .........................................................................................................................................................................................................................................................................................................................................................................................................................................................................................................................................................................................12
How to assemble the Capp in Cup system ................................................................................................................................................................................................................................................................................................................................................................................................................................12
How to brew a cappuccino ...................................................................................................................................................................................................................................................................................................................................................................................................................................................................................................................................13
How to Froth Milk ...........................................................................................................................................................................................................................................................................................................................................................................................................................................................................................................................................................14
Dispensing hot water ...............................................................................................................................................................................................................................................................................................................................................................................................................................................................................................................................14
Customisation .....................................................................................................................................................................................................................................................................................................................................................................................................................................................................................................................................................................................15
Coee grind settings ....................................................................................................................................................................................................................................................................................................................................................................................................................................................................................................................................15
Adjusting the aroma intensity ...............................................................................................................................................................................................................................................................................................................................................................................................................................................................................16
Adjusting the amount of coee in the cup ...................................................................................................................................................................................................................................................................................................................................................................................................17
Adjusting the amount of cappuccino in the cup .................................................................................................................................................................................................................................................................................................................................................................17
Cleaning and maintenance .................................................................................................................................................................................................................................................................................................................................................................................................................................................................................18
Cleaning table ............................................................................................................................................................................................................................................................................................................................................................................................................................................................................................................................................................................18
Quick clean of Capp in Cup system .......................................................................................................................................................................................................................................................................................................................................................................................................................................19
Deep clean of Capp in Cup system .........................................................................................................................................................................................................................................................................................................................................................................................................................................19
Cleaning the classic Pannarello ...............................................................................................................................................................................................................................................................................................................................................................................................................................................................22
Cleaning the brew group ...........................................................................................................................................................................................................................................................................................................................................................................................................................................................................................................22
Lubricating the brew group .............................................................................................................................................................................................................................................................................................................................................................................................................................................................................................24
Descaling ........................................................................................................................................................................................................................................................................................................................................................................................................................................................................................................................................................................................................................25
Accidental interruption of the descaling cycle ....................................................................................................................................................................................................................................................................................................................................28
Understanding the dierent lights ...............................................................................................................................................................................................................................................................................................................................................................................................................................29
Control panel display ..................................................................................................................................................................................................................................................................................................................................................................................................................................................................................................................................29
Troubleshooting ......................................................................................................................................................................................................................................................................................................................................................................................................................................................................................................................................................................32
Energy saving .....................................................................................................................................................................................................................................................................................................................................................................................................................................................................................................................................................................................33
Stand-by ..............................................................................................................................................................................................................................................................................................................................................................................................................................................................................................................................................................................................................33
Accessories ......................................................................................................................................................................................................................................................................................................................................................................................................................................................................................................................................................................................................34
Technical Specications ........................................................................................................................................................................................................................................................................................................................................................................................................................................................................................................34
Naviglio milk en-nl-pl.indd 4 01/08/2019 09:46:19

5
ENGLISH
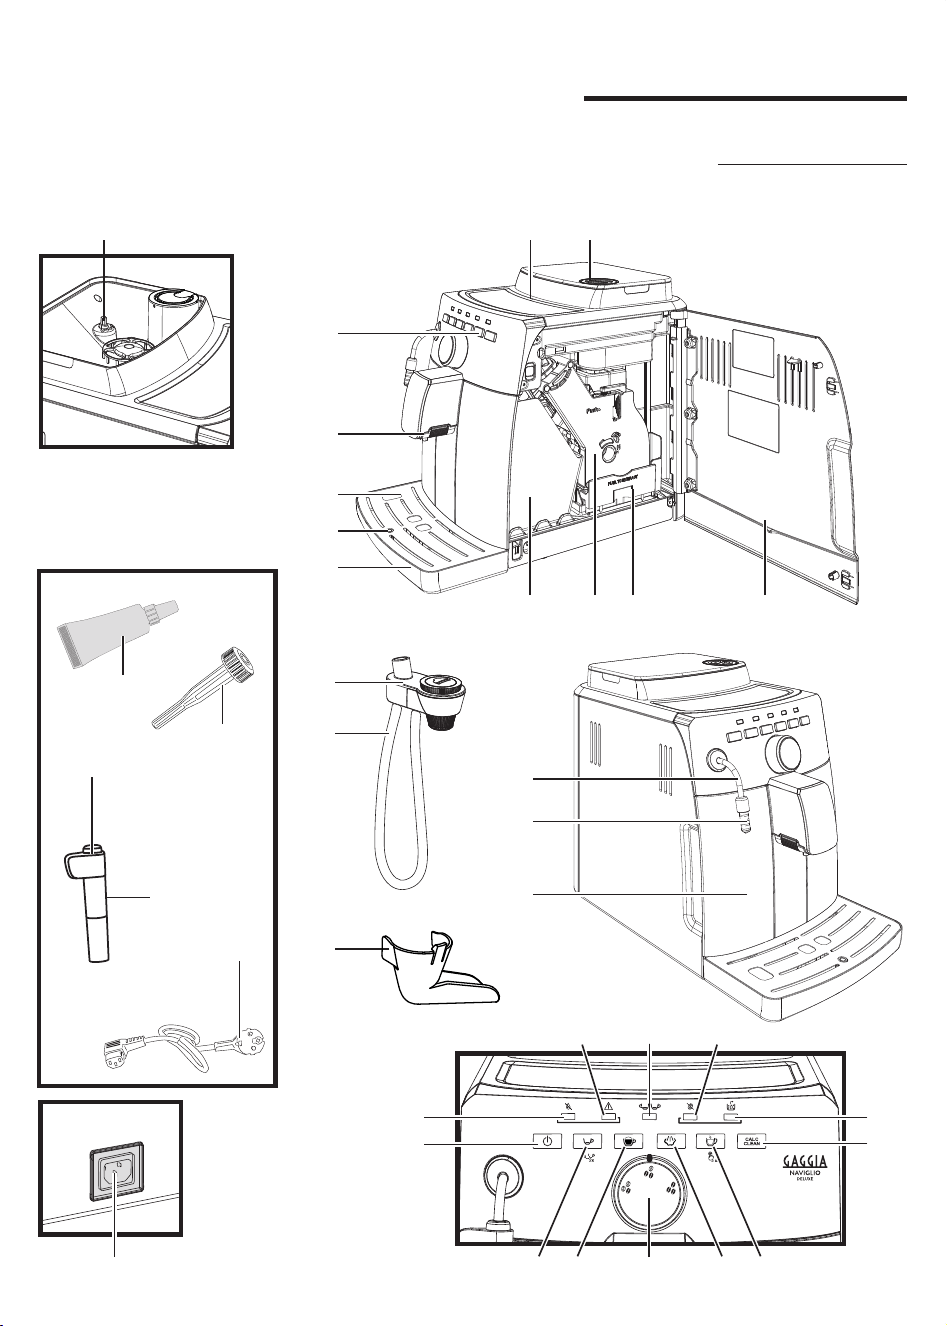
General Description
1 Coffee grinder adjustment knob 19 Main body of Capp in Cup system
2 Grease for the brew group 20 Milk suction tube
3 Coffee grinder adjustment key 21 Spout for Capp in Cup system
4 Classic Pannarello handle 22 Steam wand
5 Classic Pannarello 23 Capp in Cup system handle
6 Power cord 24 Water tank
7 Power cord socket 25 "Warning" LED light
8 Coffee bean container 26 "Double shot espresso" LED light
9 Coffee bean container lid 27 "No coffee" LED light
10 Control panel 28 “Coffee pucks container” LED light
11 Adjustable dispensing spout 29 Descaling button
12 Drip tray grid 30 Hot water dispensing button
13 Full drip tray indicator 31 Steam button
14 Drip tray 32 "Aroma" selector switch
15 Coffee pucks container 33 Cappuccino brew button
16 Brew group 34 Espresso brew button
17 Coffee residues drawer 35 ON/OFF button
18 Service door 36 "No water" LED light
Naviglio milk en-nl-pl.indd 5 01/08/2019 09:46:20
6
ENGLISH
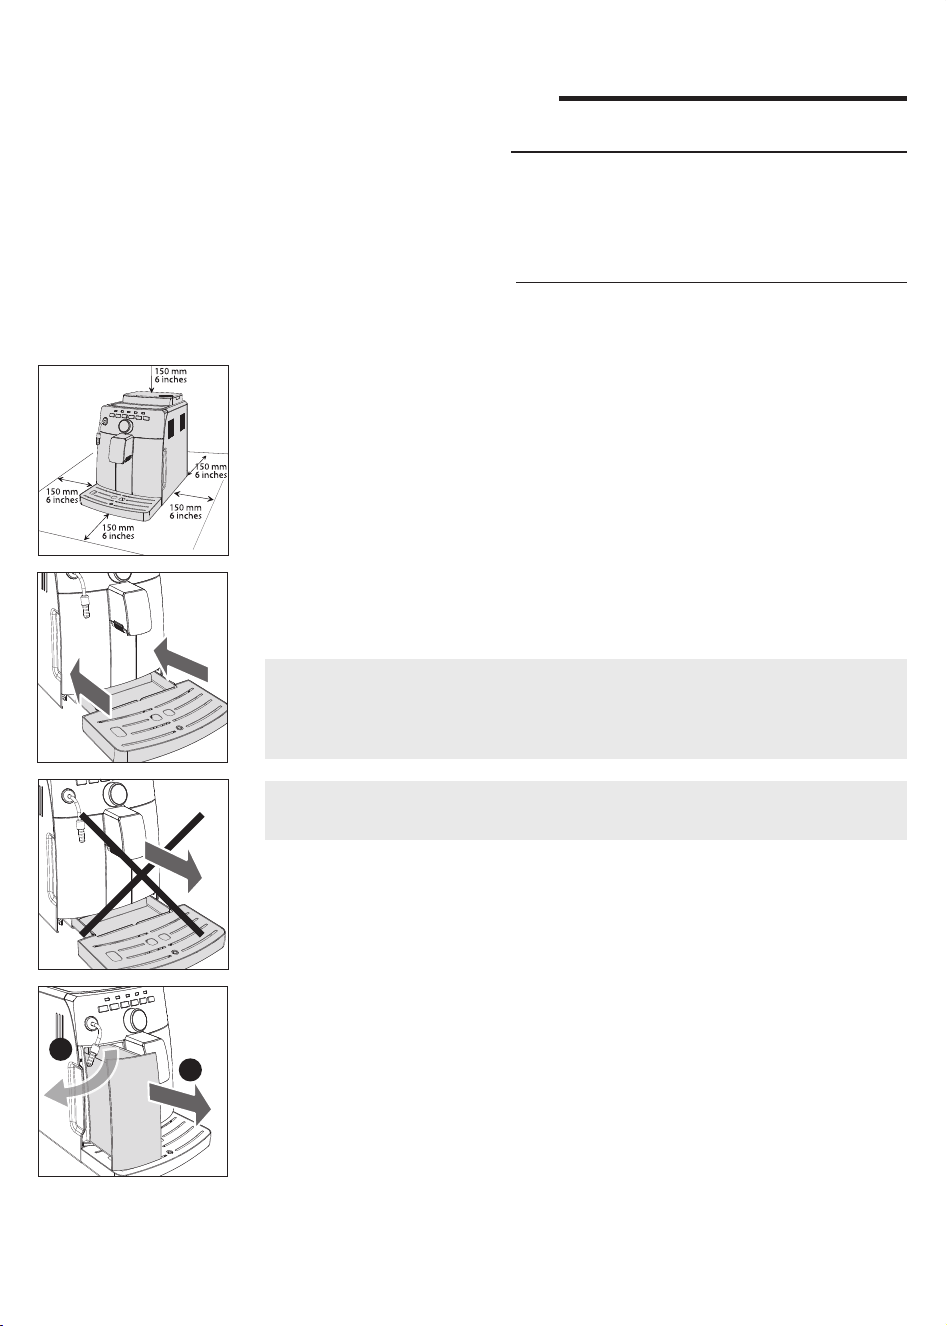
Preparing for Use
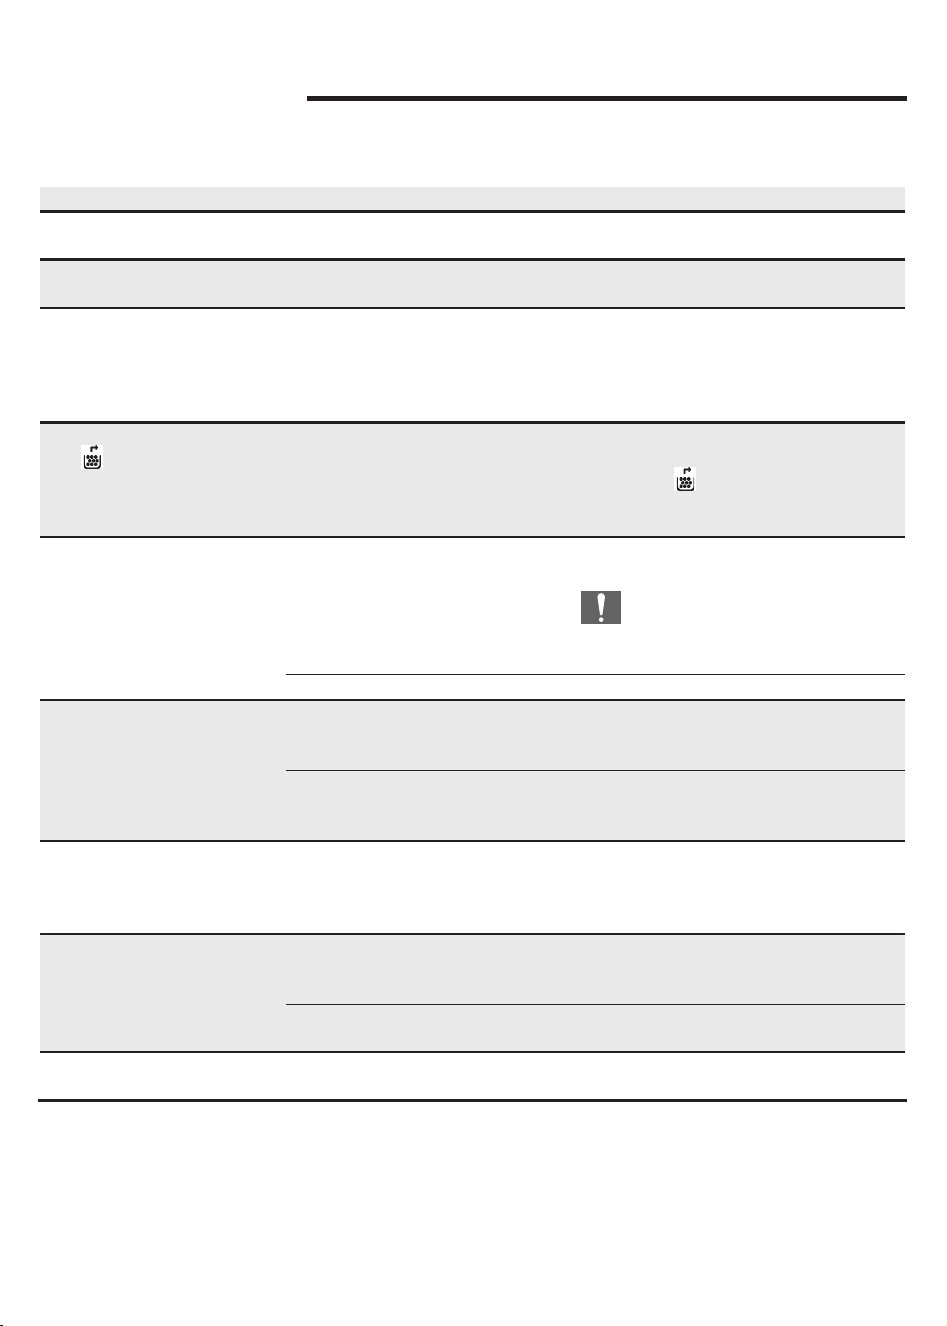
Note: The drip tray collects the water that comes out of the dispensing spout
during each rinse cycle, as well as coffee that might be spilled during beverage
preparation. Empty and wash the drip tray daily and each time the full drip tray
indicator is raised.
Warning: NEVER remove the drip tray when the machine has just been turned on.
Wait a couple of minutes for the machine to carry out a rinse/self-cleaning cycle.
1
2
4 Insert the drip tray with grid into the machine. Make sure it is fully inserted.
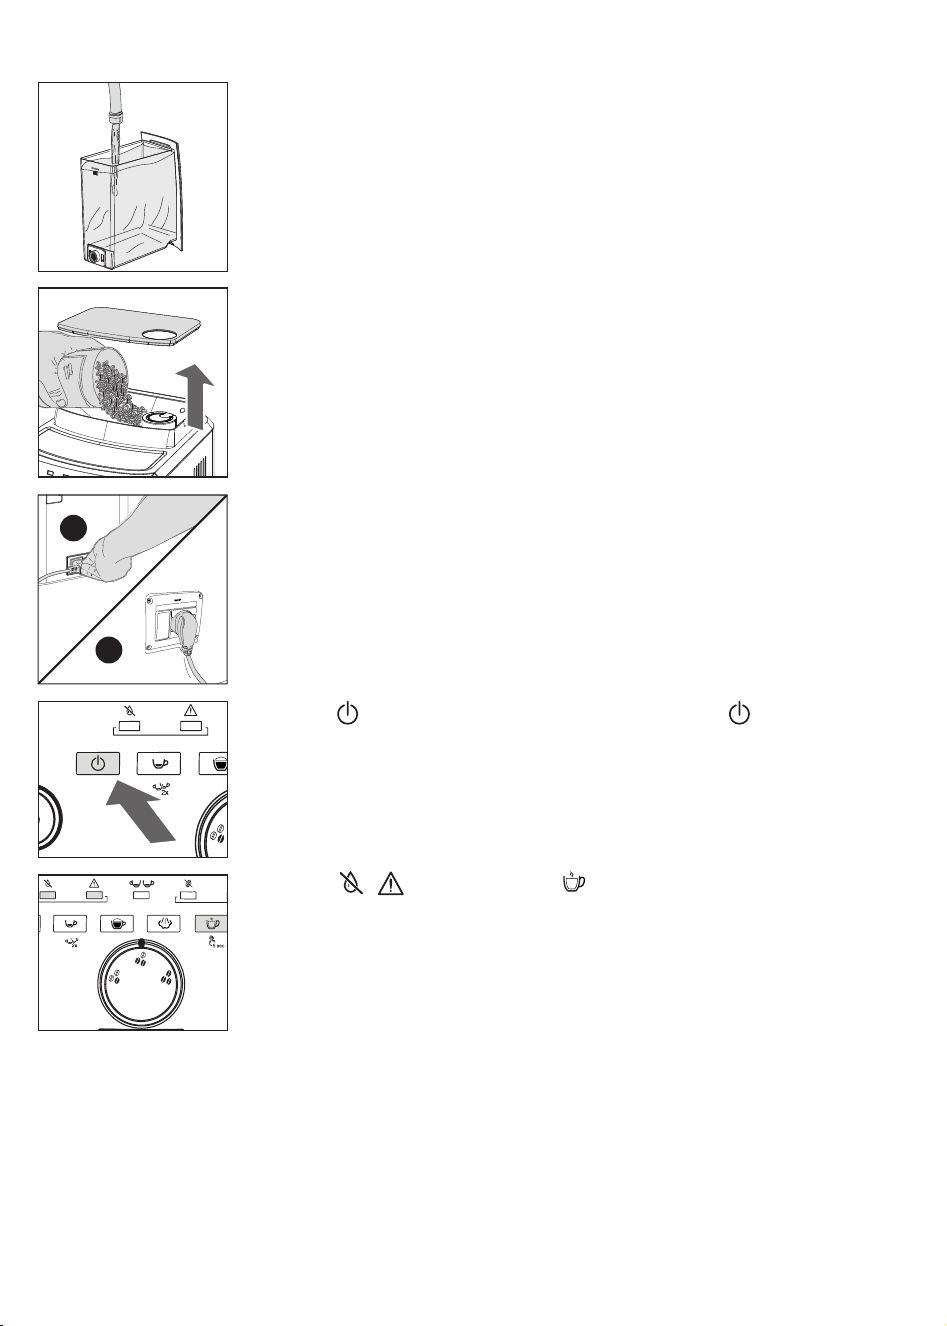
5 Remove the water tank.
6 Rinse the water tank with fresh water.
Machine packaging
The original packaging has been designed and manufactured to protect the
machine during transport. We recommend keeping the packaging material for
possible future transport.
Machine Installation
1 Remove the drip tray with grid from the packaging.
2 Remove the machine from the packaging.
3 For best use, we recommend to:
- choose a safe and level surface, where there will be no danger of overturning
the machine or being injured;
- choose a location that is suciently lit, clean and near an easily reachable
socket;
- allow for a minimum distance from the machine sides as shown in the gure.
Naviglio milk en-nl-pl.indd 6 01/08/2019 09:46:21
7
ENGLISH
7 Fill the water tank with fresh water up to the MAX level and insert it back into
the machine. Make sure it is fully inserted.
8 Remove the coffee bean container lid and slowly pour in the coffee beans.
9 Put the lid back on the coffee bean container.
10 Insert the plug into the socket on the back of the machine.
11 Insert the plug at the other end of the power cord into a wall socket with
suitable power voltage.
1
2
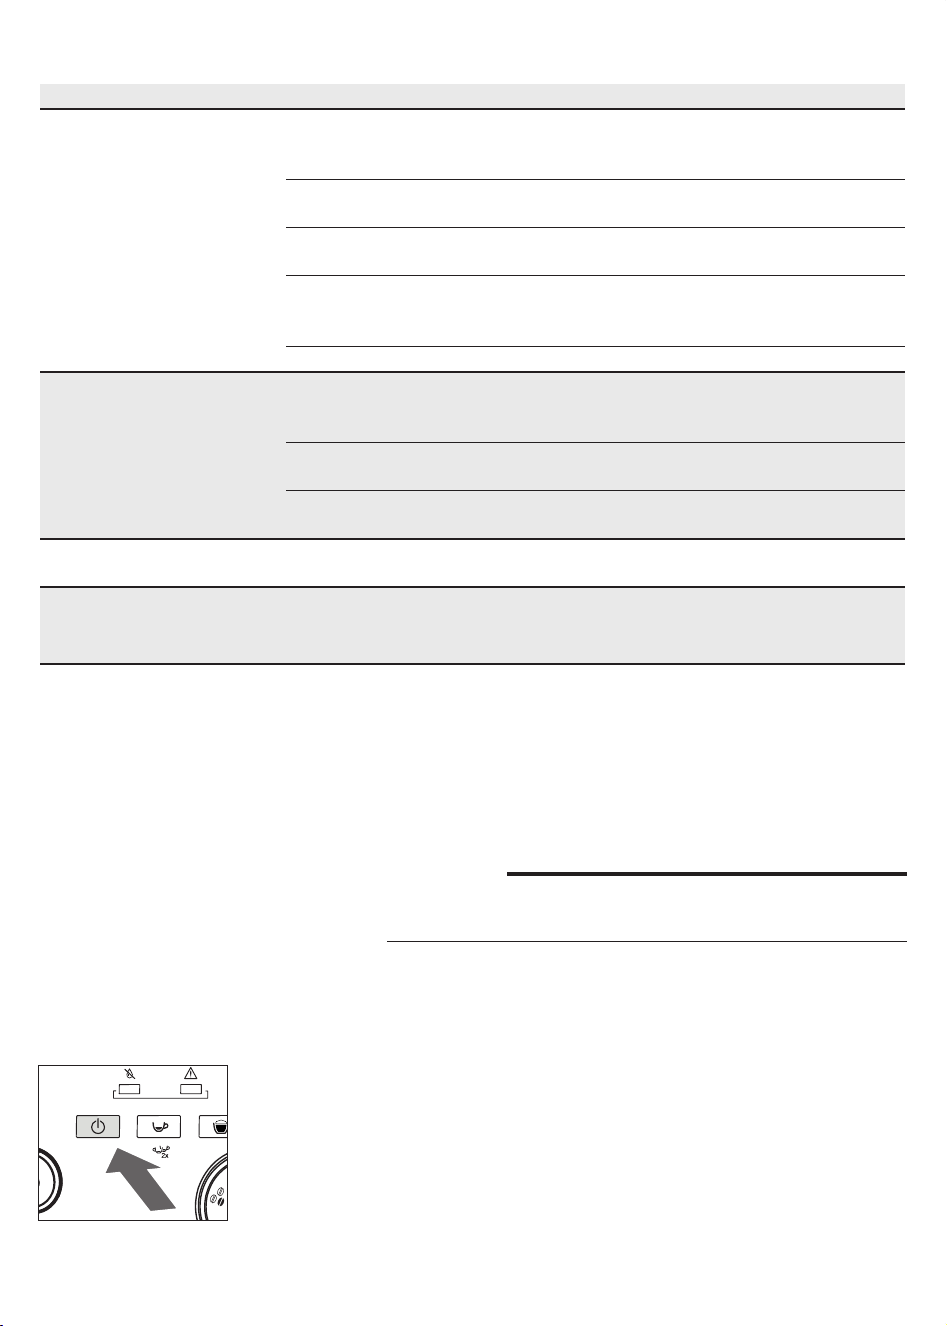
13 The “ ” button ashes on the control panel. Press the “ ” button to turn on
the machine.
14 The “ ” “ ” LED lights and the “ ” button LED light start to ash slowly
to indicate that the water circuit needs to be primed.
Naviglio milk en-nl-pl.indd 7 01/08/2019 09:46:23
8
ENGLISH
Using the Machine for the First Time
When using the machine for the rst time, the following activities need to happen:
1 the circuit needs to be primed;
2 the machine will perform an automatic rinse cycle.
3 you need to perform a manual rinse cycle.
Circuit Priming
During this process, fresh water ows through the internal circuit to heat up the
machine. This takes a few minutes.
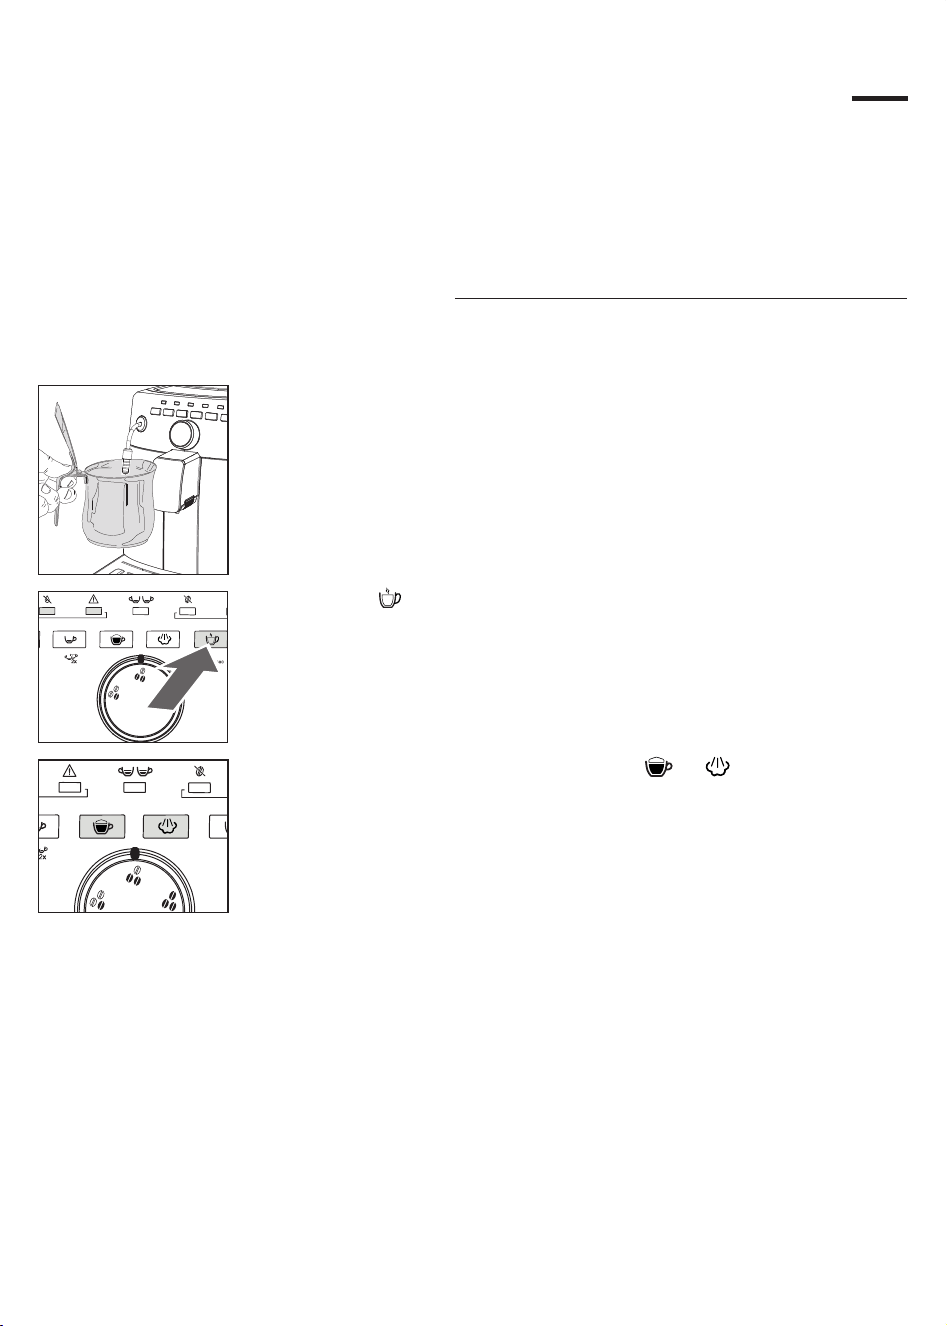
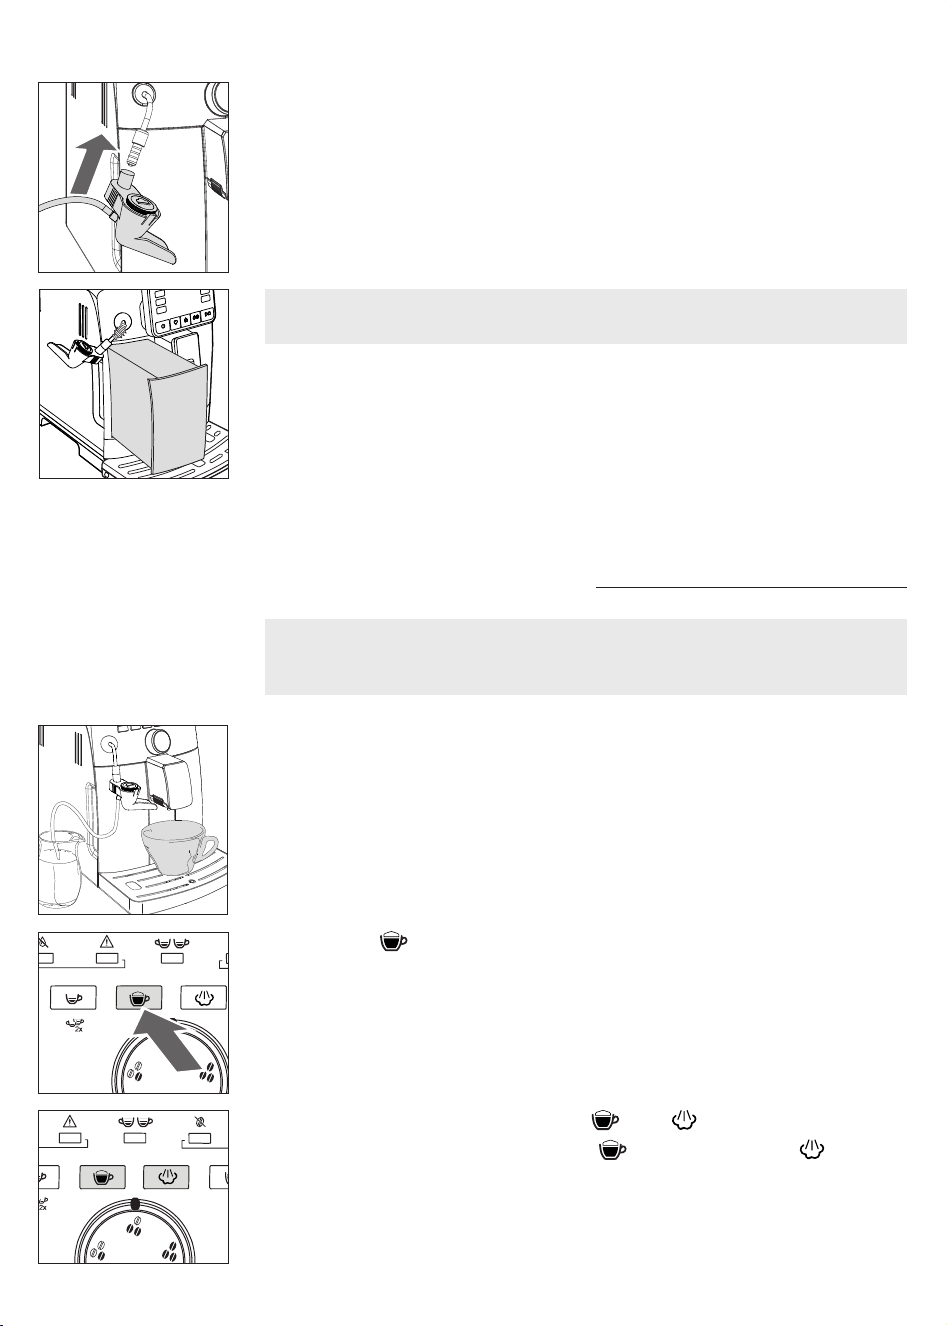
1 Place a container under the steam wand.
2 Press the “ ” button for 5 seconds to start the cycle. The machine starts the
automatic priming of the circuit by dispensing some water through the steam
wand.
3 When this process has been completed, the “ ” e “ ” buttons will ash.
The machine is heating up.
Naviglio milk en-nl-pl.indd 8 01/08/2019 09:46:24
9
ENGLISH
Automatic rinse cycle
When the correct temperature is reached, the machine automatically performs a
rinse cycle of the internal circuits with fresh water. This takes less than a minute.
1 Place a container under the dispensing spout to collect the small quantity of
water which will be discharged.
2 The “ ” and “ ” buttons ash during this entire process.
3 Wait for the cycle to nish automatically.
4 When the above steps are complete, check that the “ ”, “ ”, “ ” and “
” buttons are lit.
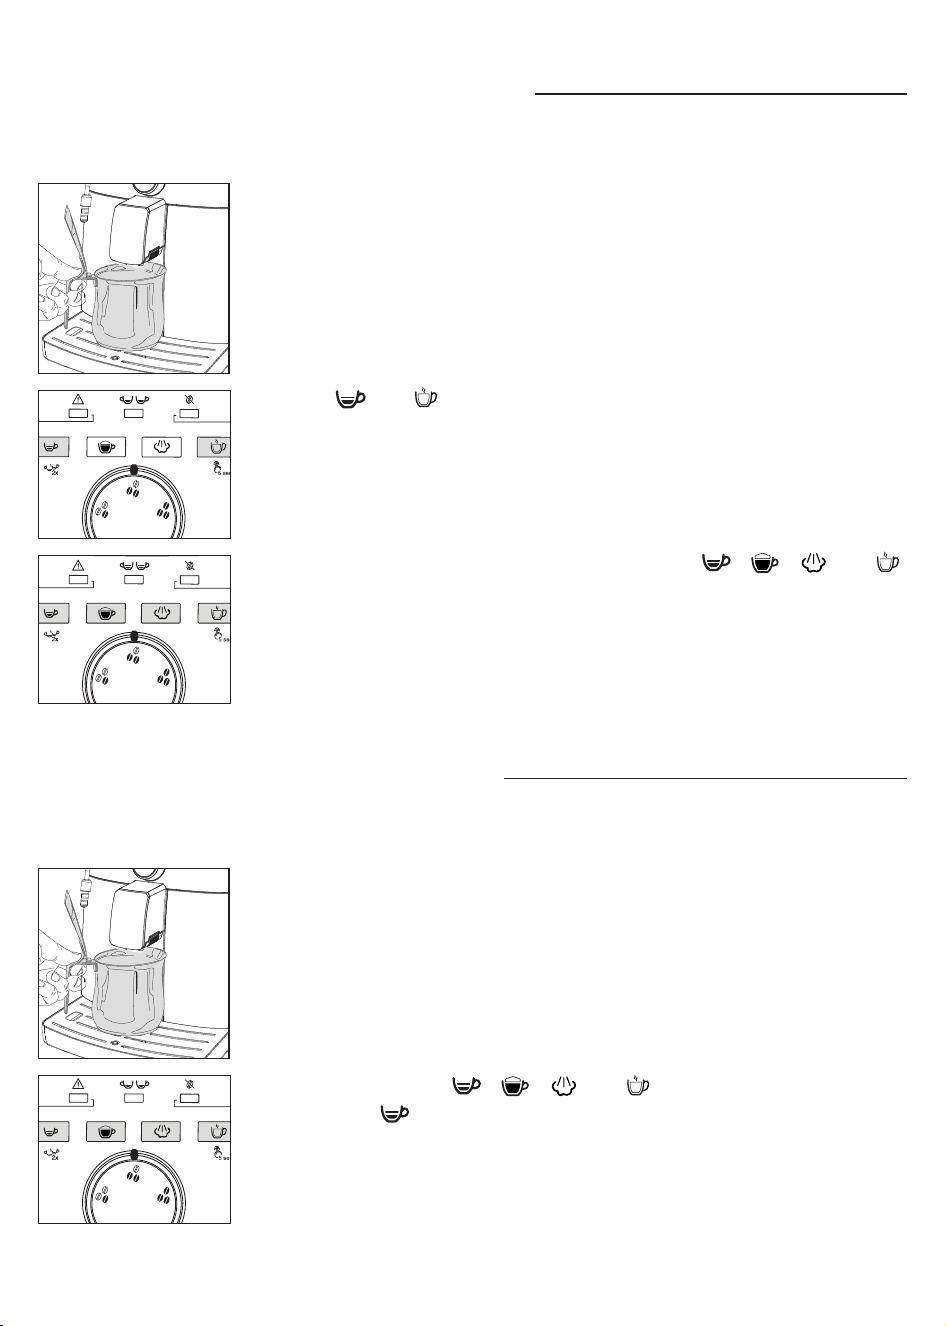
Manual rinse cycle
During this process a coffee is brewed and fresh water ows through the steam/
hot water circuit. This takes a few minutes.
1 Place a container under the coffee dispensing spout.
2 Make sure that the “ ”, “ ”, “ ” and “ ” LED lights are lit.
3 Press the “ ” button. The machine will start brewing a coffee.
4 Wait until brewing has nished, then empty the container.
Repeat the operations from step 1 to step 3 twice, then continue with step 5.
Naviglio milk en-nl-pl.indd 9 01/08/2019 09:46:27
10
ENGLISH
5 Place a container under the steam wand.
6 Press the “ ” button for 5 seconds to start dispensing hot water.
7 Dispense water until the no water LED light “ ” remains on.
8 At the end of this operation, ll the water tank again up to the MAX level. The
machine is now ready for use.
The automatic rinse cycle also starts automatically when the machine has been in
stand-by mode or turned off for more than 15 minutes.
At the end of the cycle, you can brew a coffee.
Note: When you have not used the machine for two or more weeks, the machine
will automatically perform an automatic rinse cycle after you turn it on. Following
this, you need to perform a manual rinse cycle as described above.
“INTENZA+” Water Filter Installation
We recommend installing the “INTENZA+” water lter as this prevents limescale
build-up and preserves a more intense aroma to your espresso.
Water is a crucial part of every espresso, so it is most important to always have
it professionally ltered. Using the “INTENZA+” water lter will prevent mineral
deposits from building up and improve your water quality.
1 Remove the small white lter from the water tank and store it in a dry place.
Naviglio milk en-nl-pl.indd 10 01/08/2019 09:46:28

11
ENGLISH
2 Remove the "INTENZA+" water lter from its packaging.
Immerse it vertically in cold water (with the opening positioned upwards) and
gently press its sides so as to let the air bubbles out.
3 Set the lter according to the water hardness in your area. The settings can be
found on the lter packaging.
A = Soft water
B = Hard water (standard)
C = Very hard water
4 Insert the lter inside the empty water tank. Press it down until it cannot move
any further.
5 Fill the water tank with fresh water and insert it back into the machine.
Write down the date of the next water lter replacement (+ 2 months).
6 Dispense all the water in the tank by using the hot water function
(see the “Dispensing Hot Water” chapter).
7 Fill the water tank again.
Beverage brewing
Before brewing a beverage, check that both the water tank and the coffee bean
container are lled. Make sure that the dispensing spout is placed at the correct
distance from the cup edge.
Naviglio milk en-nl-pl.indd 11 01/08/2019 09:46:28

12
ENGLISH
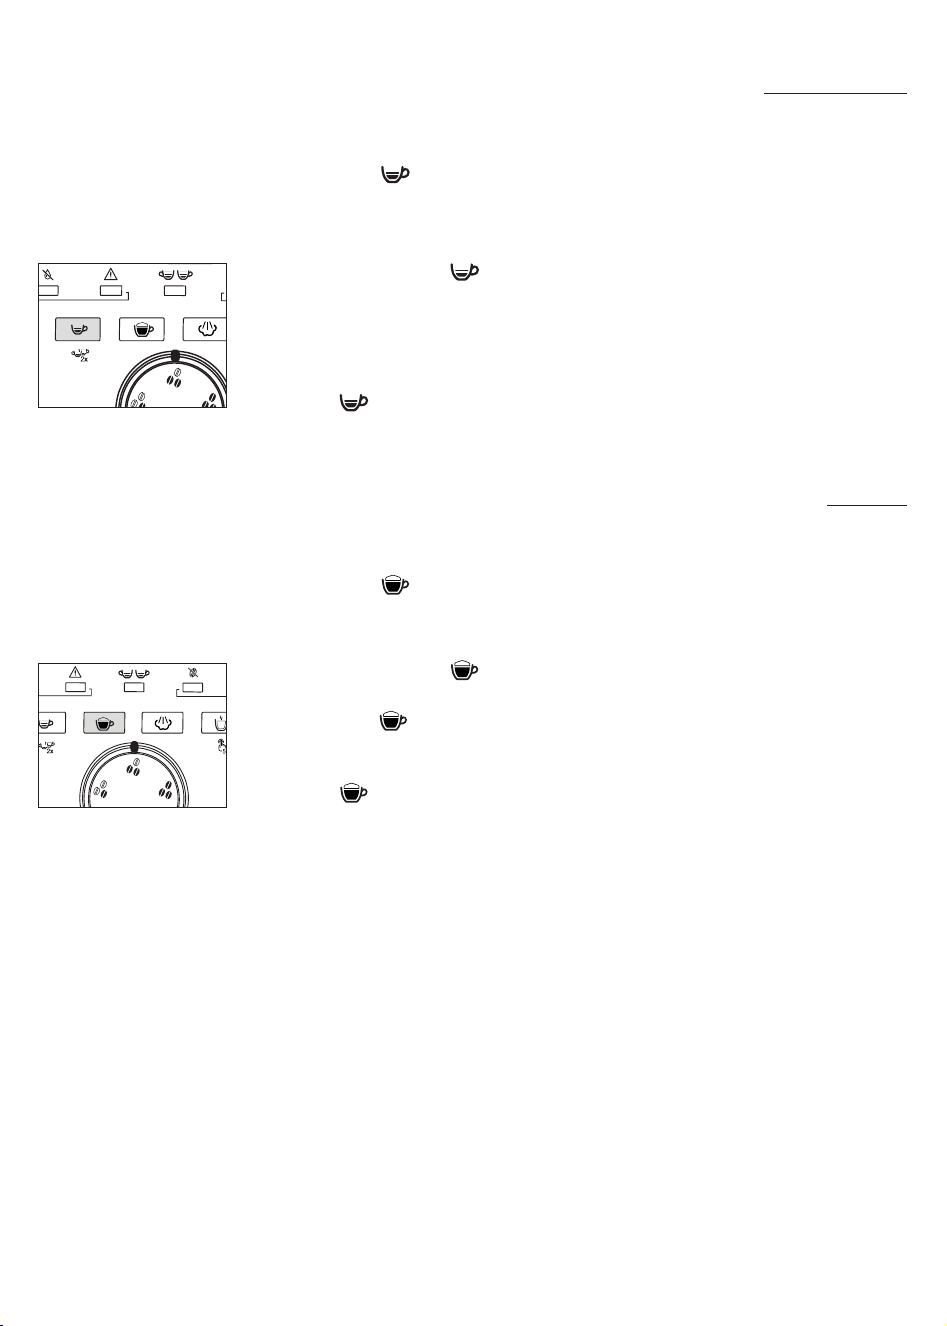
3 Press the “ ” button to brew an espresso cup.
4 To brew 2 cups of espresso, press the “ ” button twice consecutively.
The
“ ”
LED light turns on.
5 After the pre-brewing cycle, coffee begins to pour out of the dispensing spout.
6
The coffee brewing process stops automatically when the preset level is
reached. However, it is possible to interrupt this operation sooner by pressing
the “ ” button again.
Espresso brewing
1 Turn the aroma selector switch to select the desired aroma.
2 Place 1 or 2 cups under the dispensing spout.
How to assemble the Capp in Cup system
Note: Before preparing any milk-based beverage, make sure that the Milk in Cup
system is correctly installed on the machine.
1 Fix the spout to the Capp in Cup system main body.
Naviglio milk en-nl-pl.indd 12 01/08/2019 09:46:30
13
ENGLISH
2 Insert the Capp in Cup system in the rubber handle on the steam wand until it
is locked in position.
How to brew a cappuccino
Tip: Use cold (~5°C / 41°F) milk with a protein content of at least 3% to ensure
optimum results when preparing a cappuccino. Whole milk or skimmed milk may
be used depending on individual taste.
1 Insert the milk suction tube inside the milk container. Then place a cup or a
glass under the coffee dispensing spout and the Capp in Cup system.
Tip: If you need to ll the water tank without removing the Capp in Cup system,
please position the system as shown to avoid splashes on your worktop.
2 Press the “ ” button.
3 Whilst the machine is heating up, the “ ” and “ ” buttons ash.
4 The machine starts brewing when the “ ” remains on and the “ ” button
turns off.
- Frothed milk;
- Coffee;
Naviglio milk en-nl-pl.indd 13 01/08/2019 09:46:32
14
ENGLISH
Dispensing hot water
Warning: Danger of burning! Dispensing may be preceded by small jets of hot wa-
ter. The steam/hot water wand may reach high temperatures: never touch it with
bare hands. Use the appropriate protective handle only.
Before dispensing hot water, check that the “ ”, “ ”, “ ” and “ ” LED lights
are permanently on and that the water tank is full.
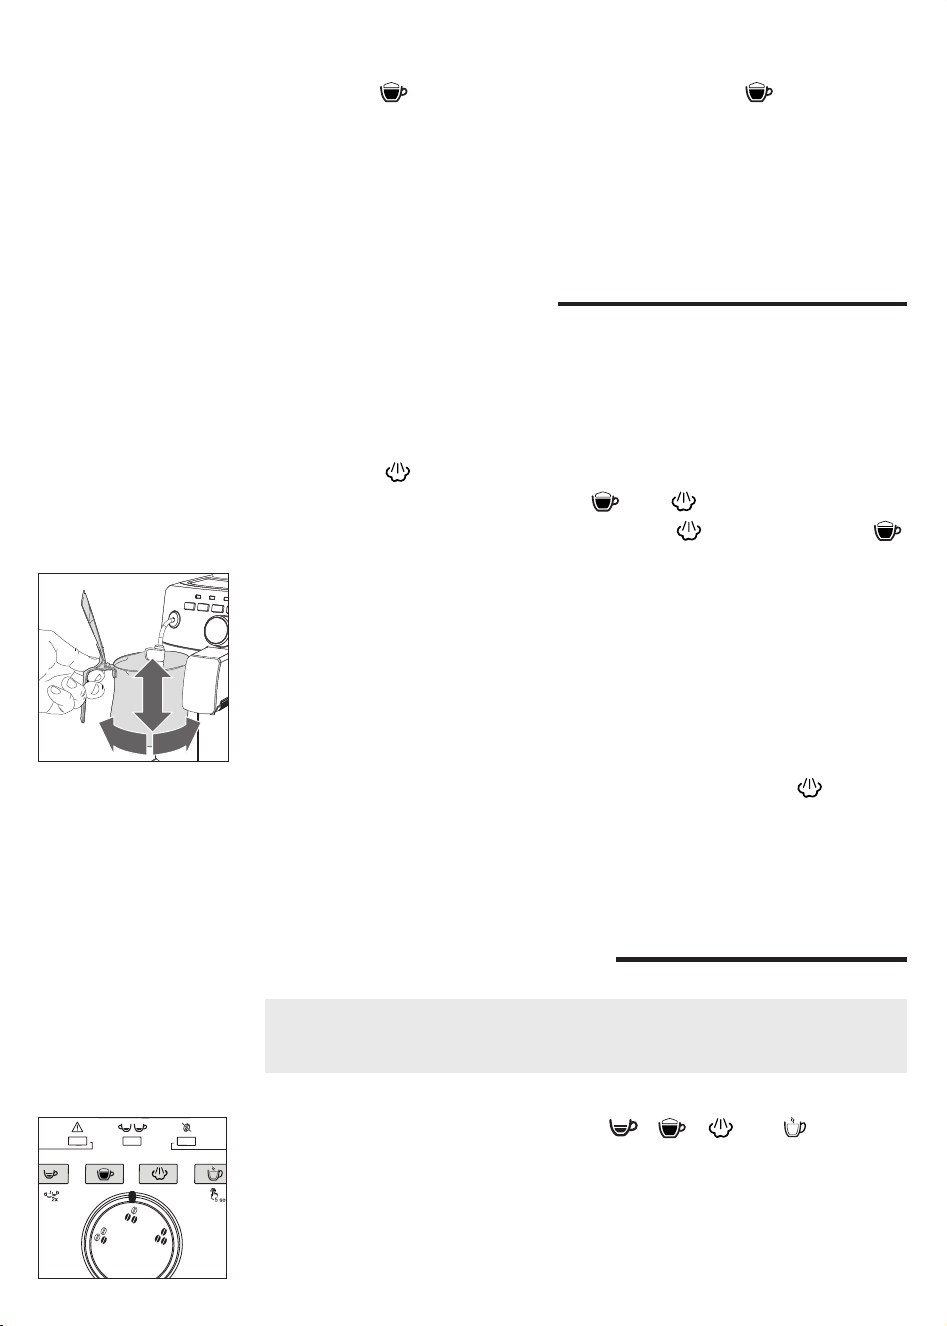
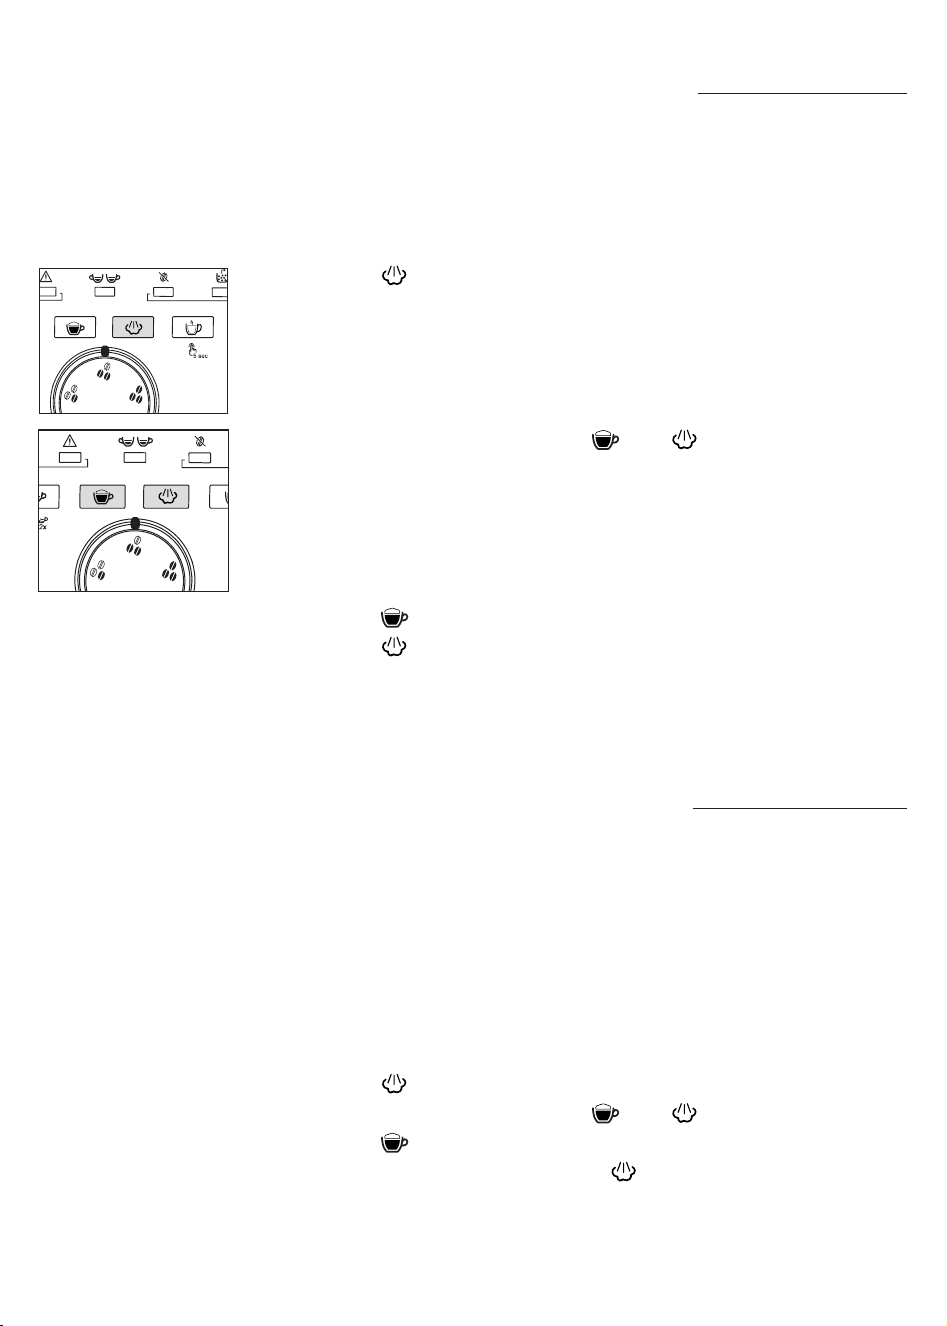
How to Froth Milk
The classic Pannarello, included as a standard accessory in the machine
packaging, allows to froth milk through the steam function;
1 Fill 1/3 of a carafe with cold milk.
2 after removing the Capp in Cup system handle, insert the classic Pannarello
using the handle on the steam wand.
3 Select the “ ” button.
4 Whilst the machine is heating up, the " " and " " buttons ash.
5 The machine starts dispensing steam when the “ ” remains on and the “
” button turns off.
6 Froth milk by gently swirling the container and moving it up and down.
7 When milk froth has reached the desired consistency, press the “ ” button to
stop steam dispensing.
5 Press the “ ” button to stop dispensing milk. Press the “ ” button again to
nish the coffee brewing process.
After frothing the milk, clean the Capp in Cup system by dispensing a small
amount of hot water, as described in the "Cleaning and Maintenance" chapter, and
rinse the spout with fresh water.
Naviglio milk en-nl-pl.indd 14 01/08/2019 09:46:34
15
ENGLISH
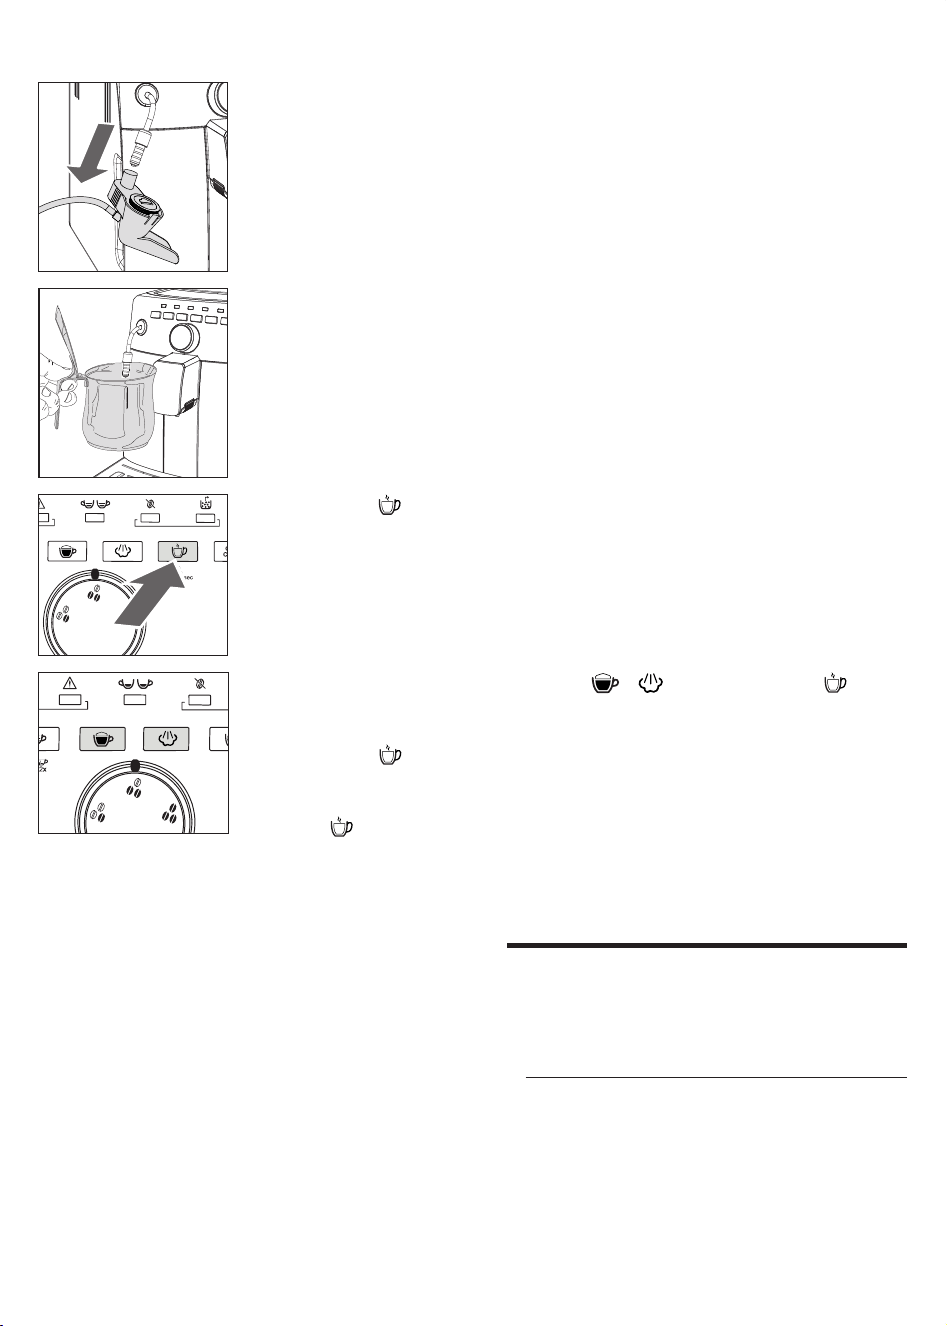
2 Place a container under the steam wand.
3 Press the “ ” button for 5 seconds to start dispensing hot water.
4 Whilst the machine is heating up, the “ ” “ ” buttons ash. The “ ” button
turns off.
5 When the “ ” button turns on again, the machine starts dispensing hot water.
6 Dispense the desired amount of hot water. To stop hot water dispensing, press
the
“ ”
button.
1 Remove the Capp in Cup system as shown.
Customisation
The machine allows for certain adjustments so that you can brew the best tasting
beverages according to preference.
Coee grind settings
You can adjust the grind setting using the grinder adjustment knob on the coffee
bean container. The ceramic coffee grinder guarantees perfect, even grinding for
the preparation of every cup of coffee. The aroma is thus preserved, ensuring the
perfect avour every time.
Naviglio milk en-nl-pl.indd 15 01/08/2019 09:46:35
16
ENGLISH
4 Using the adjustment key provided, press and rotate the coffee grinder
adjustment knob placed in the coffee bean container. You can do this whilst
the machine is grinding the coffee.
Adjusting the aroma intensity
Choose your favourite coffee blend and adjust the amount of coffee to be ground
according to your personal taste.
1
2
Note: you can only adjust the grind setting whilst the machine is grinding the
coffee beans. The difference in avour will be noticeable after 2-3 cups of coffee
have been brewed.
Warning: to avoid damaging the coffee grinder, do not rotate the its adjustment
knob more than one notch at a time.
1 Place a cup under the coffee dispensing spout.
2 Remove the lid of the coffee bean container.
3 Prepare an espresso as described in the “Brewing coffee using coffee beans”
chapter.
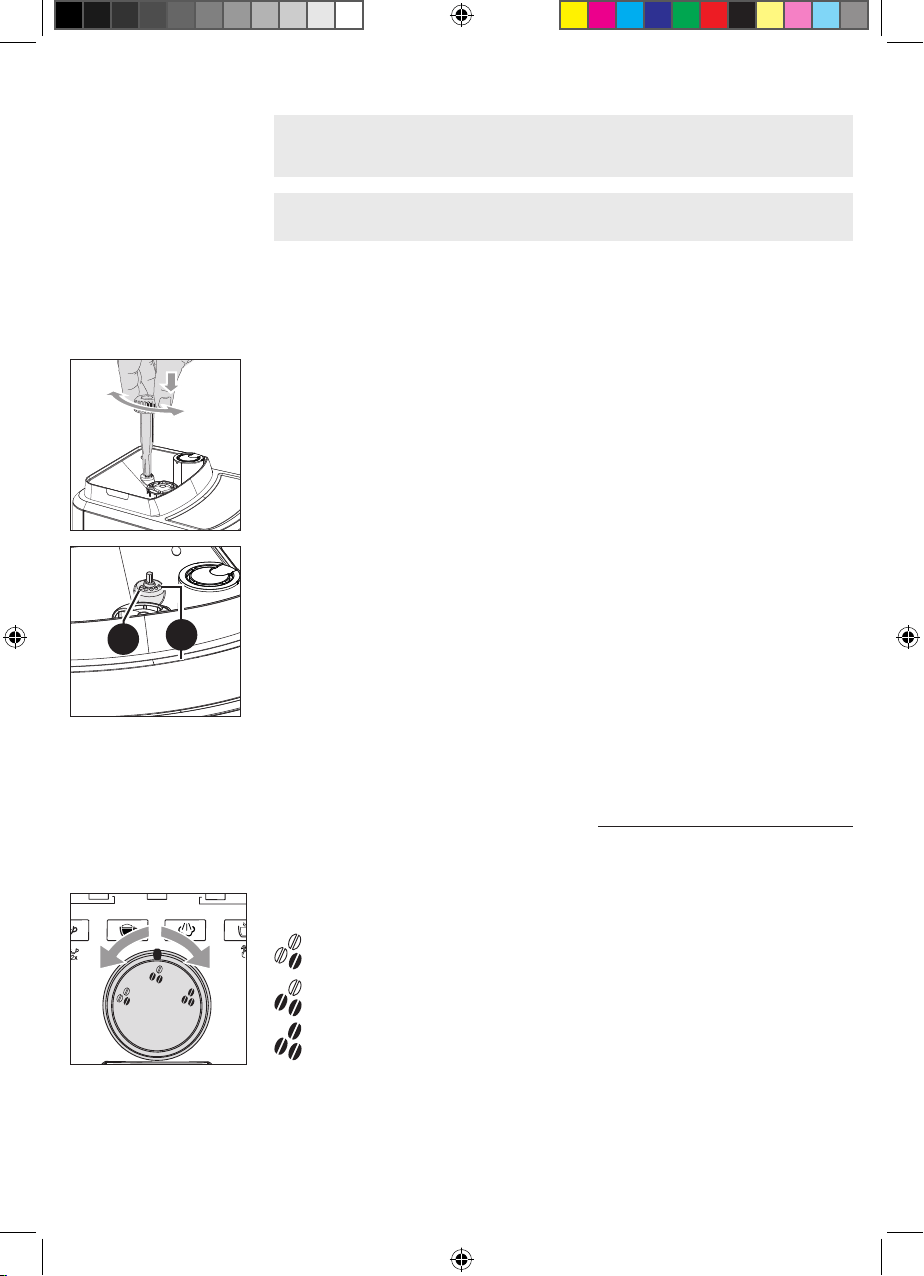
5 You can select from 5 grinding settings, from ne to course. The smaller the
notch, the stronger and richer the coffee.
- Coarse grind: lighter taste, for dark roasted coffee blends;
- Fine grind: stronger taste, for light roasted coffee blends;
By rotating the selector switch you can choose from three options. The aroma will
vary depending on the chosen position:
= mild aroma
= medium aroma
= strong aroma
Naviglio milk en-nl-pl.indd 16 01/08/2019 09:46:37
17
ENGLISH
Adjusting the amount of coee in the cup
The machine allows the amount of brewed espresso coffee to be adjusted
according to taste and cup size.
Each time the “ ” button is pressed, the machine brews a pre-set amount of
coffee.
1 Place a cup under the dispensing spout.
2 Press and hold the “ ” button, and release it when it starts to ash: the
machine is programming.
The machine starts brewing coffee.
3 When the desired quantity of coffee is in the cup, press the “” button.
Now the “ ” button is programmed. Whenever pressed, it will make the machine
brew the same preset amount of espresso coffee.
Adjusting the amount of cappuccino in the cup
The machine allows you to adjust the amount of milk and brewed coffee according
to your taste and the size of your cups.
Each time the “ ” button is pressed, the machine brews a pre-set amount of
coffee and milk.
1 Place a cup under the coffee dispensing spout and the Capp in Cup system.
2 Press and hold the “ ” button, and release it when it starts to ash. The
machine is in programming mode and will start dispensing milk.
3 Press the “ ” button when the desired quantity of milk
is reached and press it again to stop brewing coffee.
Now the “ ” button is programmed. Whenever pressed, the machine will brew
the same preset amount of cappuccino.
Naviglio milk en-nl-pl.indd 17 01/08/2019 09:46:38

18
ENGLISH
Cleaning table
Part description When to clean How to clean
Capp in Cup system After use Perform the "Quick clean of the Capp in Cup
system" following the instructions described in
the concerning chapter. Disassemble and wash
the Capp in Cup system spout under running
water.
Monthly Perform the "Deep clean of the Capp in Cup
system" following the instructions described in
the concerning chapter. For this cleaning cycle,
use the Philips milk circuit cleaner. Remove
the Capp in Cup system and wash all the
components under running water.
Classic Pannarello After use Disassemble the classic Pannarello and rinse
under running water.
Weekly Disassemble the classic Pannarello and its
handle rinse under running water.
Brew group Weekly Remove the brew group and clean it under
running water.
Depending on usage See the “Cleaning and lubricating the brew group”
chapter.
Drip tray full When the red indicator pin comes
out of the grid of the drip tray
Empty the drip tray and clean it under running
water.
Coffee pucks
container
Whenever the machine requires it Empty the coffee pucks container and clean it
under running water. Ensure that the machine is
switched on during this procedure, or the coffee
pucks container will not reset.
Water tank Weekly Clean under running water.
Coffee outlet duct Weekly Clean with a spoon handle as shown in the
chapter "Cleaning the brew group under running
water".
Cleaning and maintenance
Regular cleaning and maintenance keep the machine in perfect condition,
guaranteeing a perfect coffee avour. Please refer to the following table to know
when and how to clean the removable parts of the machine. For more detailed
information, please read the relevant chapters.
Naviglio milk en-nl-pl.indd 18 01/08/2019 09:46:38
19
ENGLISH
Quick clean of Capp in Cup system
It is important that you clean the Capp in Cup system daily or after each use as it
preserves hygiene and ensures perfect milk froth consistency.
After each milk frothing, you always need to:
1 Insert the milk suction tube into a container full of fresh water.
2 Place an empty container under the Capp in Cup system.
3 Press the “ ” button.
4 Whilst the machine is heating up, the “ ” and “ ” buttons ash.
5 When the “ ” button goes out, the water is dispensed to clean the circuit.
6 Press the “ ” button to stop dispensing.
7 Disassemble and wash the Capp in Cup system spout under running water.
8 Clean the milk suction tube with a damp cloth.
Deep clean of Capp in Cup system
The deep clean programme for the Capp in Cup system includes the careful
cleaning of the whole milk circuit, using the Philips “Milk circuit cleaner”, and the
manual cleaning of all system components.
1 Make sure that the Capp in Cup system is correctly installed.
2 Pour the milk circuit cleaner into a container.
Add 1/2 litre of lukewarm water and wait for the product to dissolve
completely.
3 Insert the milk suction tube into the container.
4 Place a container of at least 1.5 litres under the Capp in Cup system.
5 Press the “ ” button.
6 Whilst the machine is heating up, the “ ” and “ ” buttons ash.
7 When the “ ” button goes out, the water is dispensed to clean the circuit.
8 When the solution is nished, press the “ ” button to stop dispensing.
Naviglio milk en-nl-pl.indd 19 01/08/2019 09:46:39
20
ENGLISH
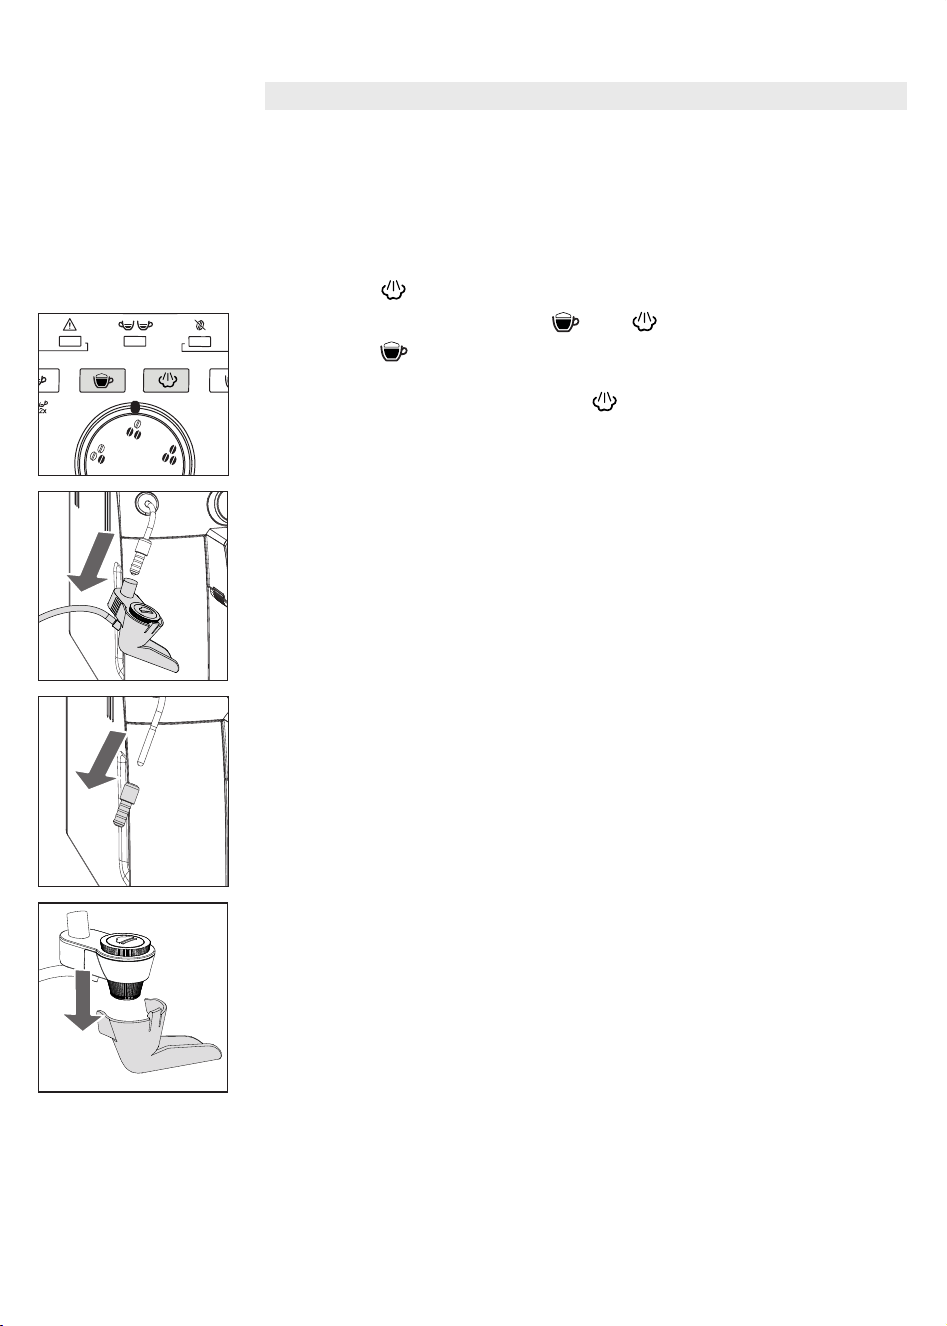
17 Remove the rubber handle from the steam wand.
18 Remove the spout from the Capp in Cup system.
16 Remove the Capp in Cup system from the steam wand..
9 Rinse the container thoroughly and ll it with ½ litre of fresh water to be used
for the rinse cycle.
10 Insert the suction tube into the container.
11 Empty the container and place it back under the Capp in Cup system.
12 Press the “ ” button to start the dispensing procedure.
Warning: Never drink the solution dispensed during the procedure.
13 The machine warms up and the “ ” and “ ” buttons ash.
14 When the “ ” button turns off, the machine starts dispensing water to be
used for rinsing.
15 When the water is nished, press the “ ” button to stop dispensing.
Naviglio milk en-nl-pl.indd 20 01/08/2019 09:46:40
21
ENGLISH
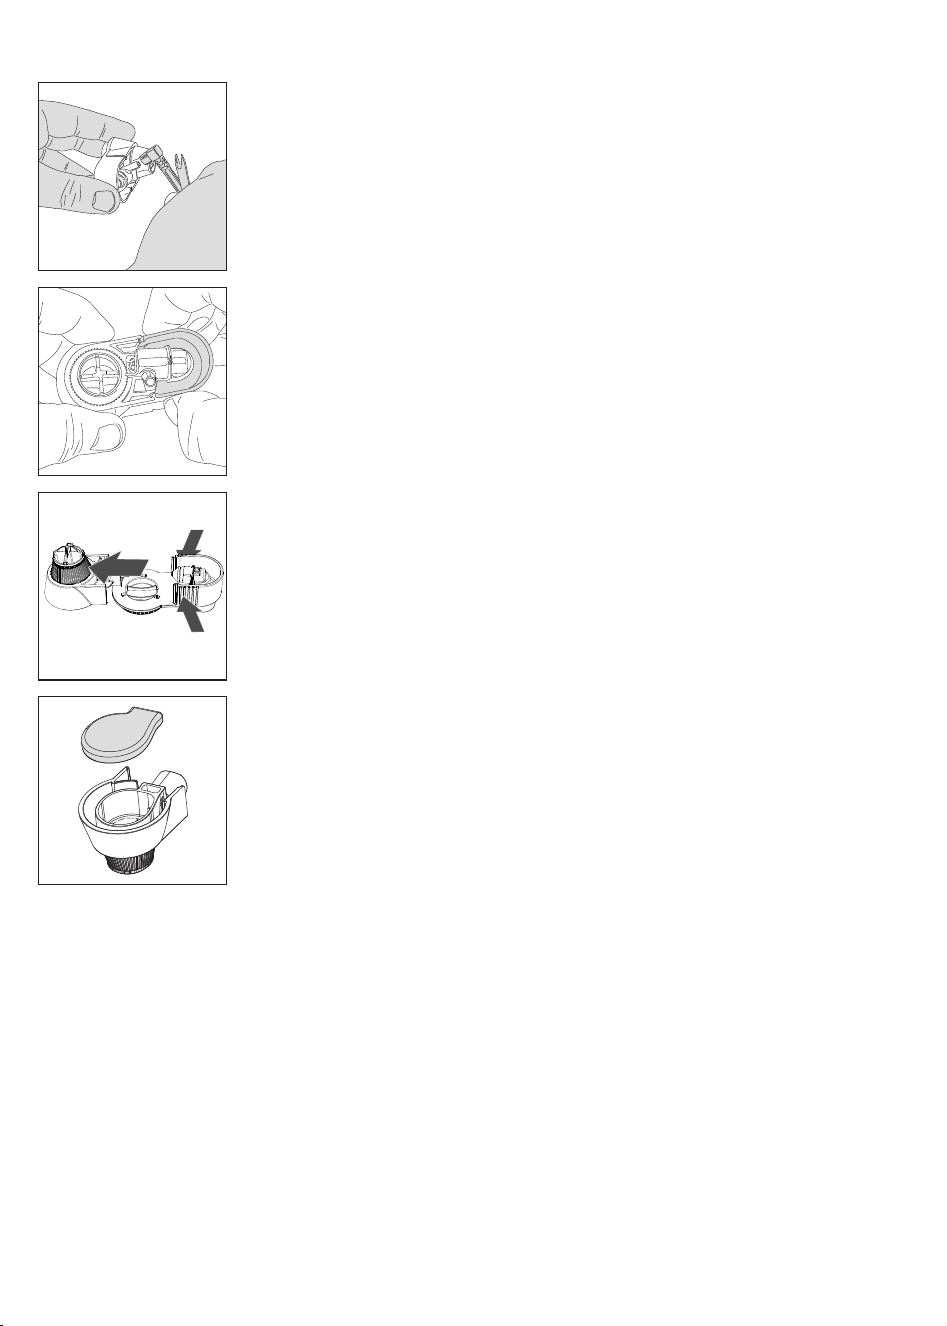
19 Remove the milk suction tube from the main body of the Capp in Cup system.
20 To disassemble the main body:
- hold it tight from the sides as shown;
21 Remove the rubber lid.
- pull and extract the left part as shown;
22 Wash all parts under running water.
23 After cleaning, reassemble all the components by following the same
procedure in reverse order.
Naviglio milk en-nl-pl.indd 21 01/08/2019 09:46:41
22
ENGLISH
Cleaning the classic Pannarello
1 Remove both the classic Pannarello and the handle from the steam wand then
rinse them.
2 Clean the steam wand with a damp cloth.
3 Reassemble the components.
Cleaning the brew group
Warning: do not wash the brew group in the dishwasher and do not use dish-
washing detergents, since they may cause the malfunctioning of the brew group
and alter the coffee avour.
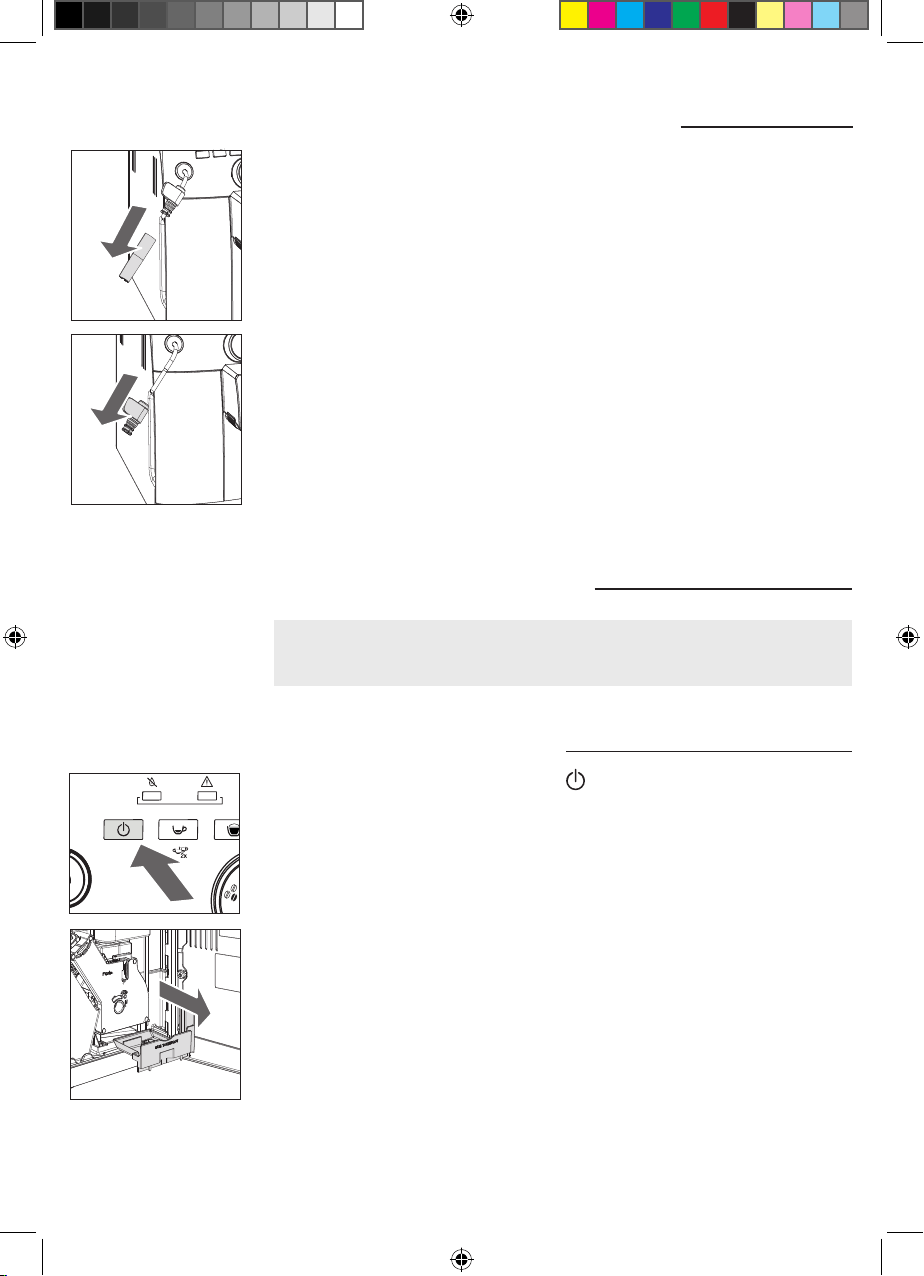
Removing the brew group
1 Turn off the machine by pressing the “ ” button and remove the plug from the
socket.
2 Remove the coffee pucks container and open the service door.
3 Remove the coffee residues drawer.
Naviglio milk en-nl-pl.indd 22 01/08/2019 09:46:42

23
ENGLISH
4 To remove the brew group, press the «PUSH» button and pull it by the handle.
Cleaning the brew group under running water
1 Clean the coffee outlet duct thoroughly with a spoon handle or with another
round-tipped kitchen utensil.
2 Thoroughly rinse the brew group using lukewarm water. Carefully wash the
upper lter.
3 Let the brew group air dry.
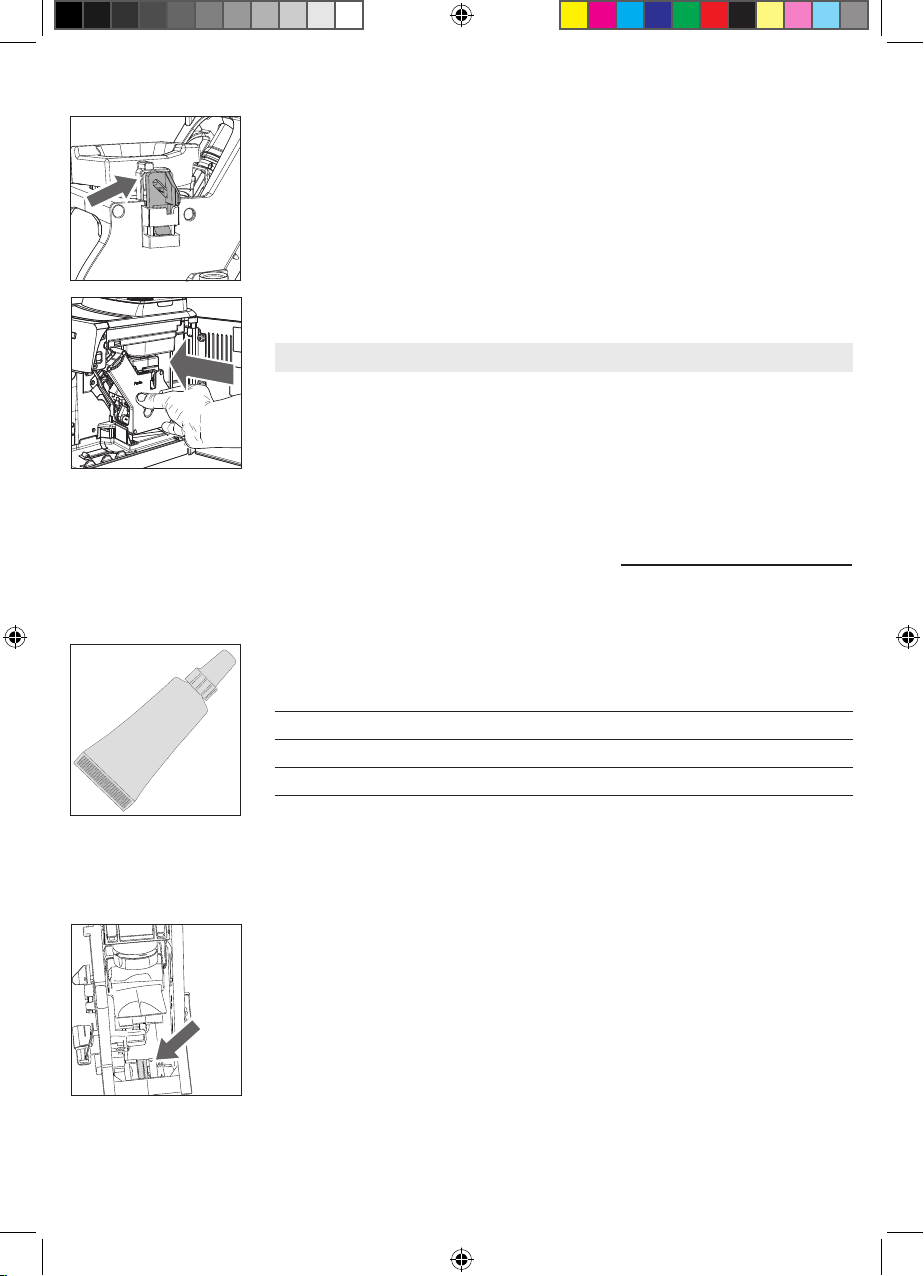
Reinserting the brew group
1 Before reinserting the brew group into the machine, ensure that the two yellow
reference indicators on the side coincide. If this is not the case, perform the
following step:
Note: to avoid the build-up of bres in its interior, do not dry the brew group with
cloth.
Make sure that the lever comes into contact with the base of the brew group.
Naviglio milk en-nl-pl.indd 23 01/08/2019 09:46:44
24
ENGLISH
2 Make sure that the yellow locking hook of the brew group is in the right
position.
To correctly position the hook, push it upwards to the highest possible position.
3 Reinsert the brew group in the machine along the side guides until it locks in
the right position with a click.
Warning: do not press the PUSH lever.
4 Close the service door.
Lubricating the brew group
In order to ensure the perfect performance of the machine, it is necessary
to lubricate the brew group. Refer to the following table for the frequency of
lubrication.
Frequency of use
Number of beverages prepared
daily
Frequency of
lubrication
Low 1-5 Every 4 months
Regular 6-10 Every 2 months
High >10 Every month
1 Turn off the appliance and disconnect the power cord.
2 Remove the brew group and rinse it using lukewarm water (see “Brew Group
Cleaning under Running Water”).
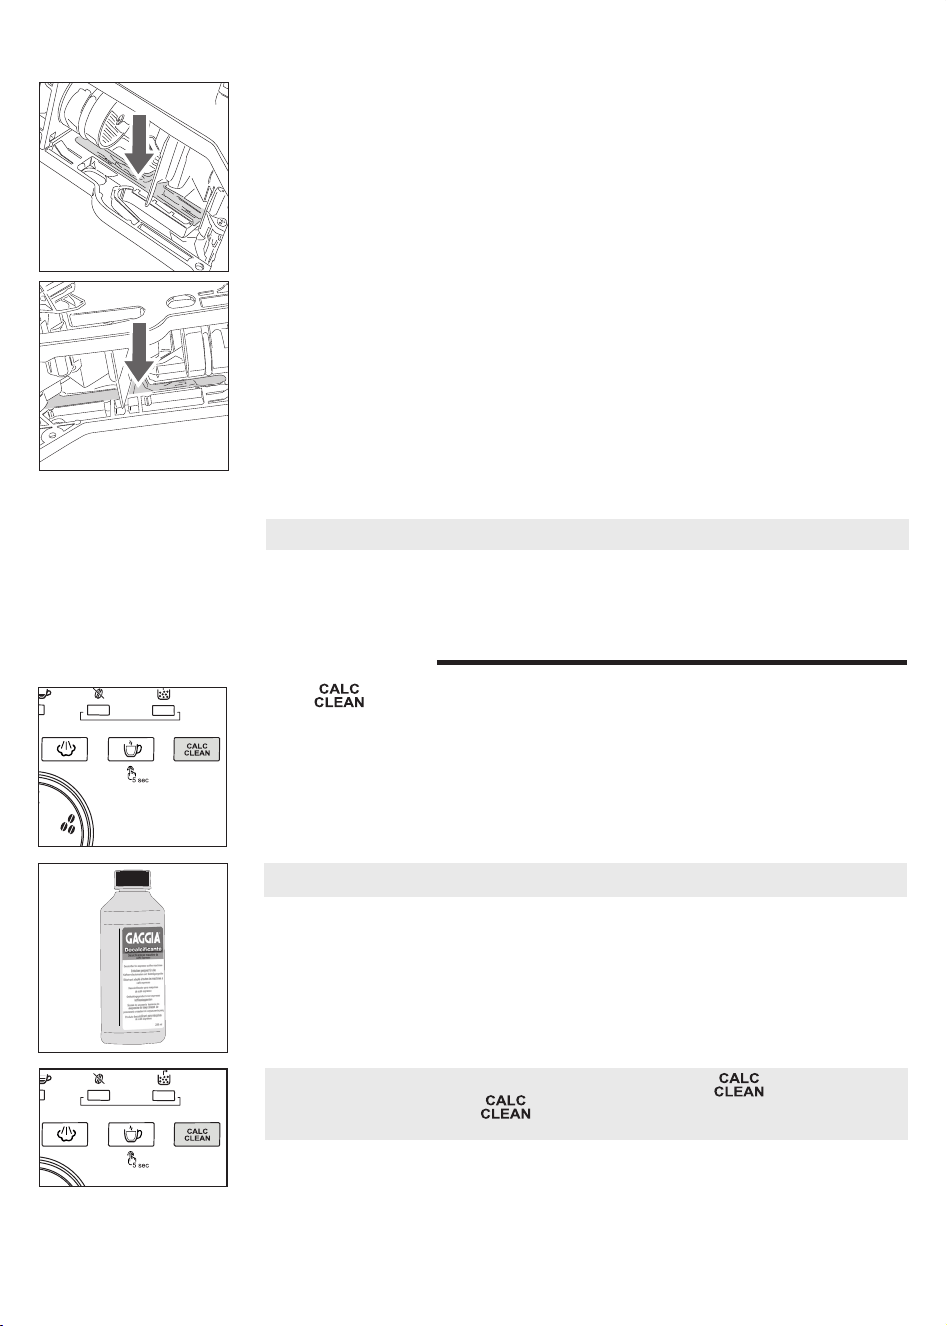
3 Apply a thin layer of the lubricant provided around the inserting pin on the
lower part of the brew group.
Naviglio milk en-nl-pl.indd 24 01/08/2019 09:46:45
25
ENGLISH
4 Apply a thin layer of lubricant to the guides, on both sides (see gure).
5 Reinsert the brew group (see the “Reinserting the Brew Group” chapter).
Note: you can use the lubricant tube multiple times.
Descaling
If the “ ” LED light remains on, the machine must be descaled.
The descaling cycle takes approx. 35 minutes.
Use only the Gaggia descaling solution designed to guarantee the machine’s
excellent performance. The use of other products may damage the machine and
leave residues in the water. Failure to descale the machine will void the warranty.
Note: Do not remove the brew group during the descaling process.
Note: The descaling cycle may be paused by pressing the button. To
resume the cycle, press the button again. This allows you to empty the con-
tainer or to leave the machine unattended for a short time.
Naviglio milk en-nl-pl.indd 25 01/08/2019 09:46:46
26
ENGLISH
1 Empty the drip tray and place it back. Remove the INTENZA+ lter (if tted).
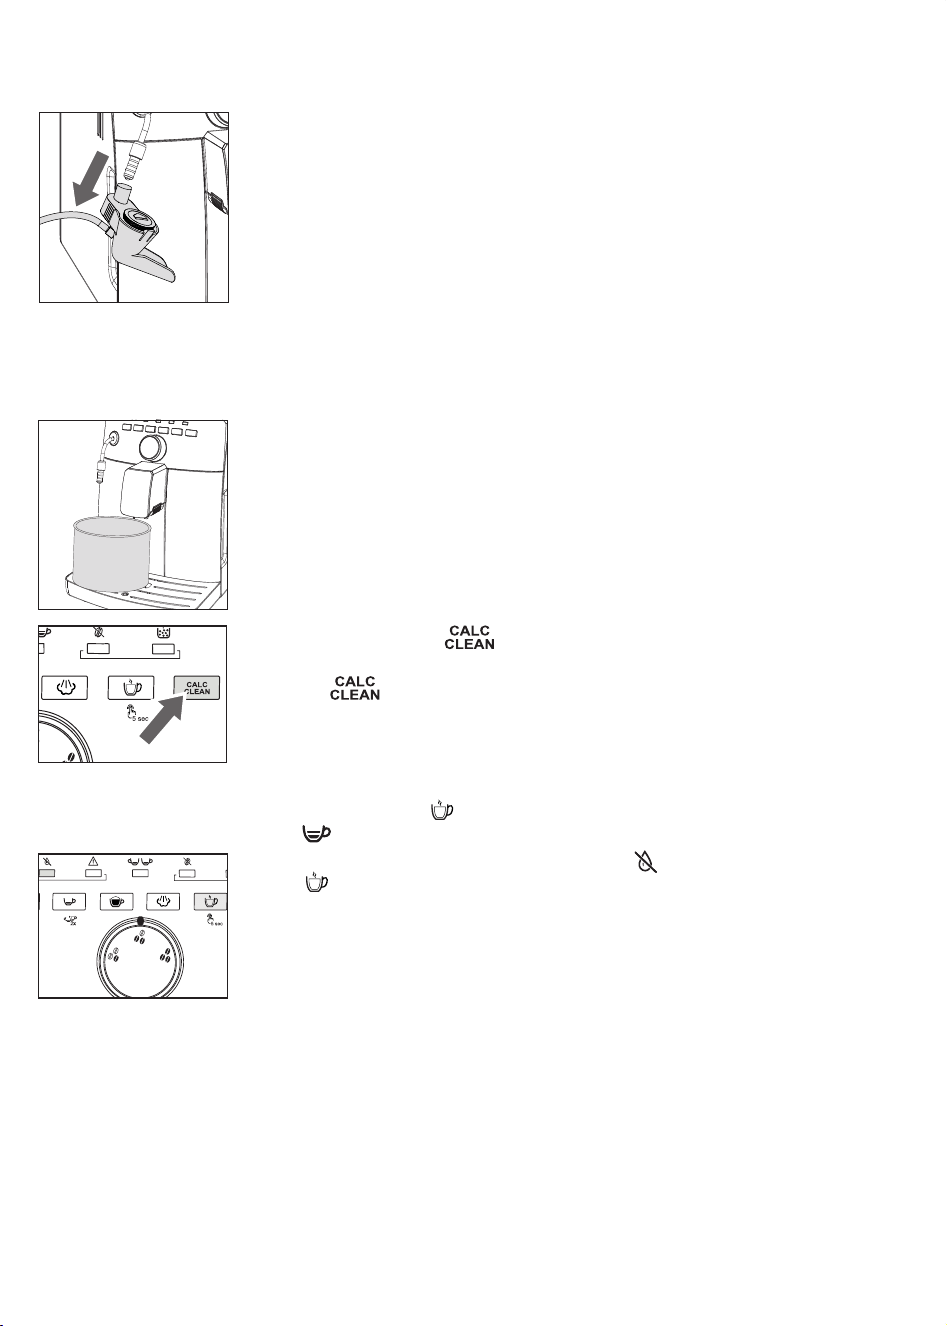
2 Remove the Capp in Cup system from the steam/hot water wand.
5 Place a large container (1.5 l) under the steam/hot water wand and the
dispensing spout.
3 Remove and empty the water tank. Pour in the entire content of the
Gaggia descaling solution.
4 Fill the water tank with fresh water up to the CALC CLEAN level. Put the water
tank back into the machine.
6 Press and hold the " button for 3 seconds. When the button starts
ashing, release it to start the cycle.
The button ashes during the whole descaling cycle.
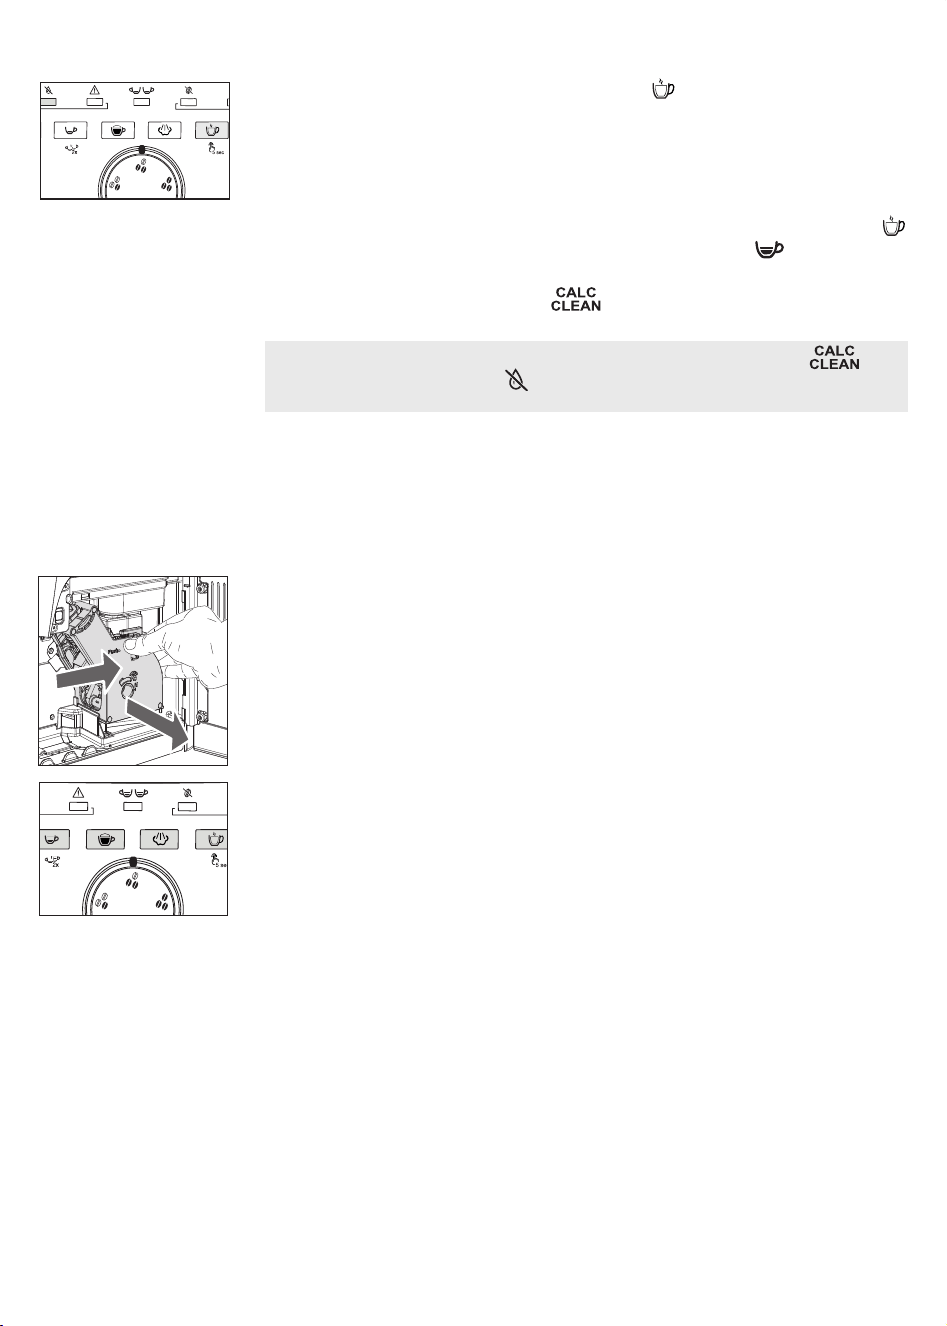
7 The machine starts dispensing the descaling solution from the steam/hot
water wand (the “ ” button glows steady) and from the dispensing spout (the
“ ” button glows steady), at intervals of about 1 minute.
8 When the descaling solution is nished, the LED light turns on and the
“ ” button ashes.
9 Empty the container and place it back under the steam/hot water wand and
under the dispensing spout.
10 Remove the water tank, rinse it and ll it up with fresh water up to the MAX
level.
Place the water tank back into the machine.
11 Empty the drip tray and place it back. Insert the
container.
Naviglio milk en-nl-pl.indd 26 01/08/2019 09:46:48
27
ENGLISH
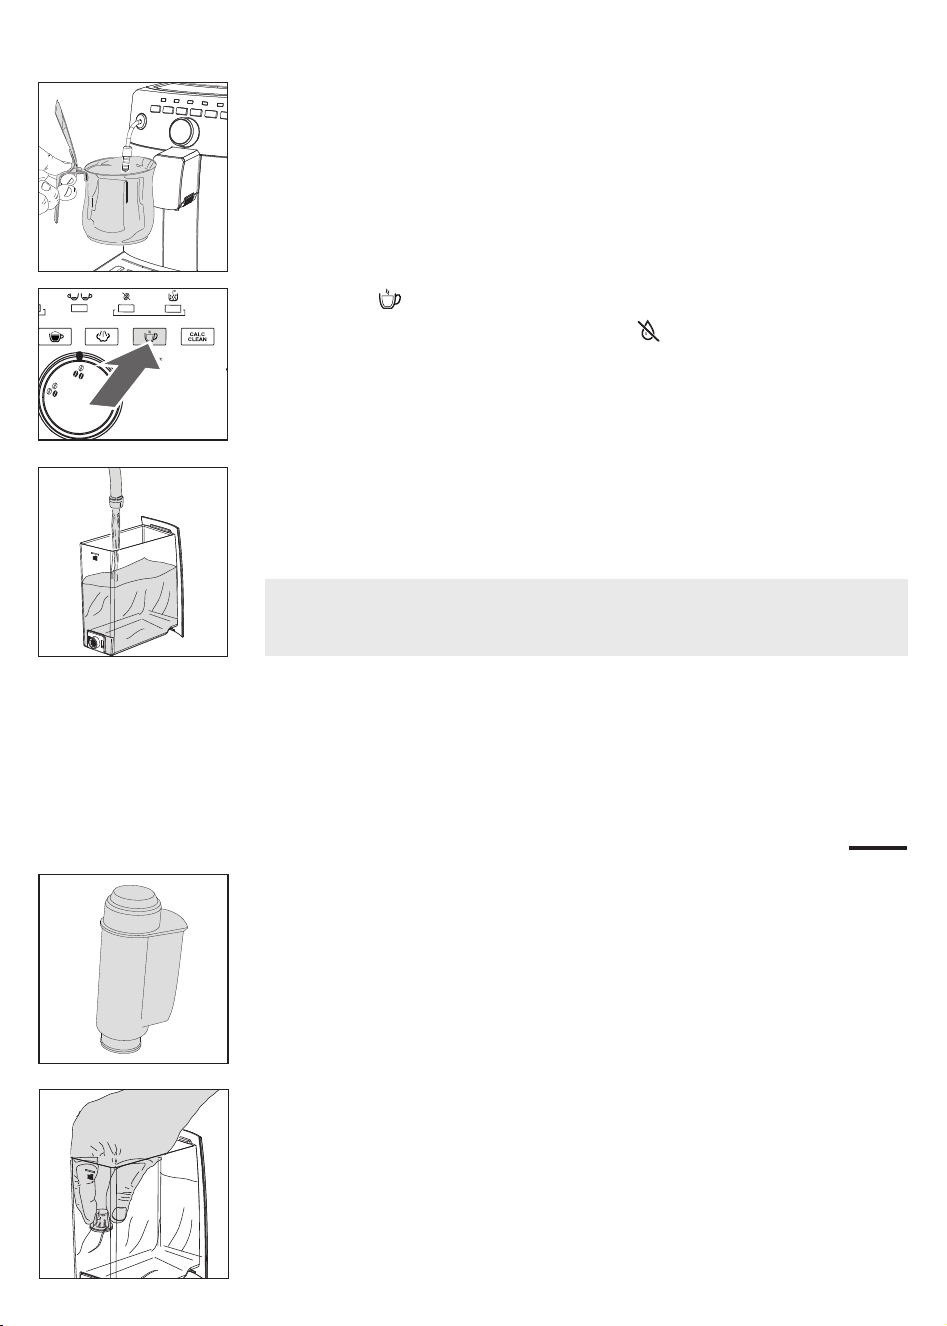
12 Start the rinse cycle by pressing the ashing “ ” button.
13 The machine starts dispensing water from the steam/hot water wand (the “
” button glows steady) and from the dispensing spout (the “ ” button glows
steady).
14 At the end of the rinse cycle, the LED light turns off and the descaling
process has been completed.
Note: If the tank is not lled up to the MAX level for the rinse cycle, the LED
light keeps on ashing and the LED light turns on; another cycle may need to be
performed; repeat steps 9 to 13.
15 Remove and empty the container.
16 Empty the drip tray and place it back.
17 Remove the water tank, rinse it carefully. Reinstall the "INTENZA+" water lter
(if any). Fill the water tank with fresh water up to the MAX level and insert it back
into the machine.
18 Remove and rinse the brew group (see "Coffee Group Cleaning" chapter).
19 The machine is now ready for use.
Naviglio milk en-nl-pl.indd 27 01/08/2019 09:46:50
28
ENGLISH
Accidental interruption of the descaling
cycle
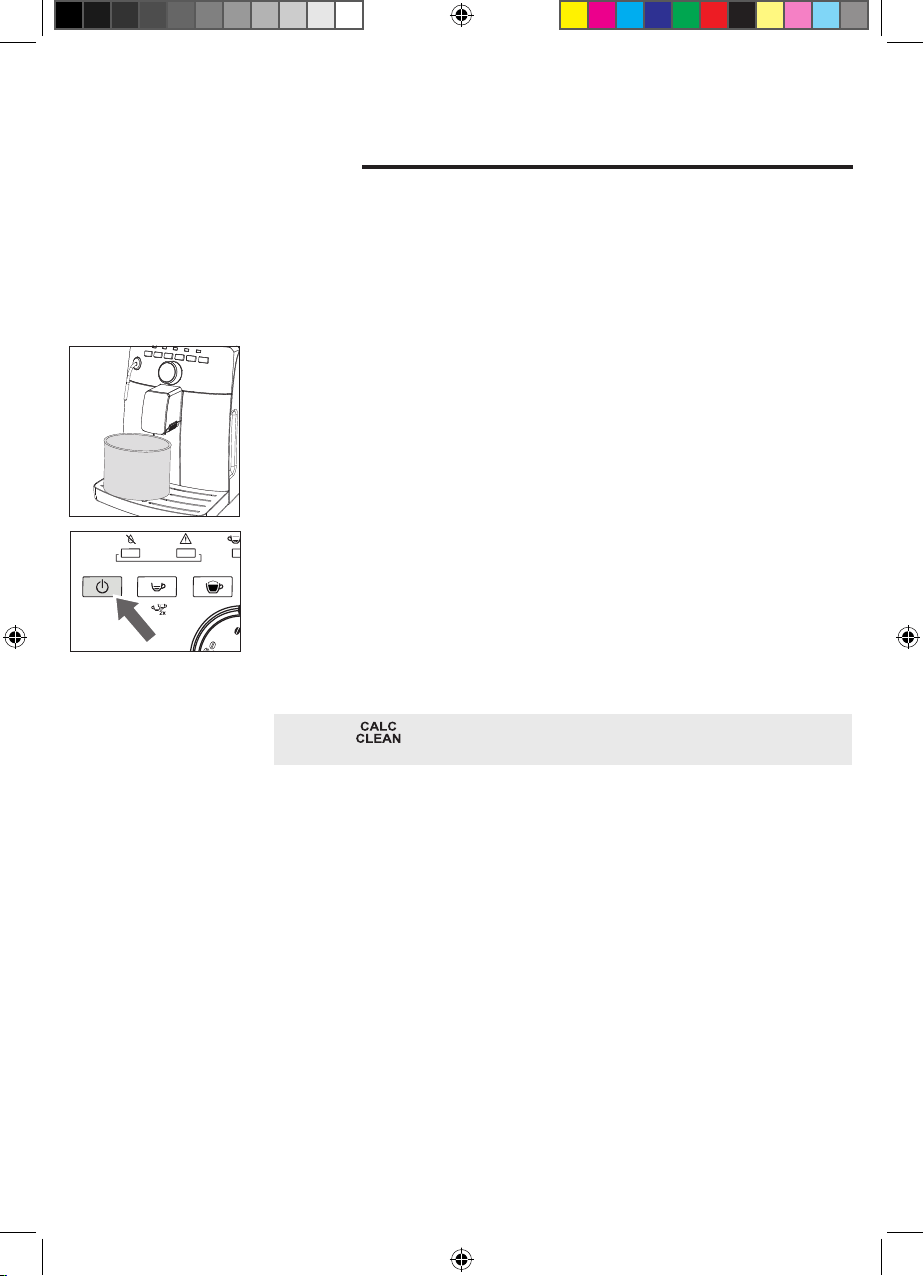
You can exit the descaling procedure by pressing the ON/OFF button on the control
panel. If the descaling procedure is interrupted before its completion, proceed as
follows:
1 Empty the drip tray and place it back.
2 Empty and rinse the water tank thoroughly. Then ll it with fresh water up to
the CALC CLEAN level and insert it back into the machine.
4 Turn on the machine. The machine will start the automatic rinse cycle.
5 Before preparing any beverages, carry out a manual rinse cycle as described in
the dedicated chapter.
Note: If the orange LED light does not turn off, it is necessary to perform
another descaling cycle as soon as possible.
3 Place a container under the coffee dispensing spout and under the water
dispensing spout.
Naviglio milk en-nl-pl.indd 28 01/08/2019 09:46:50
29
ENGLISH
Understanding the dierent lights
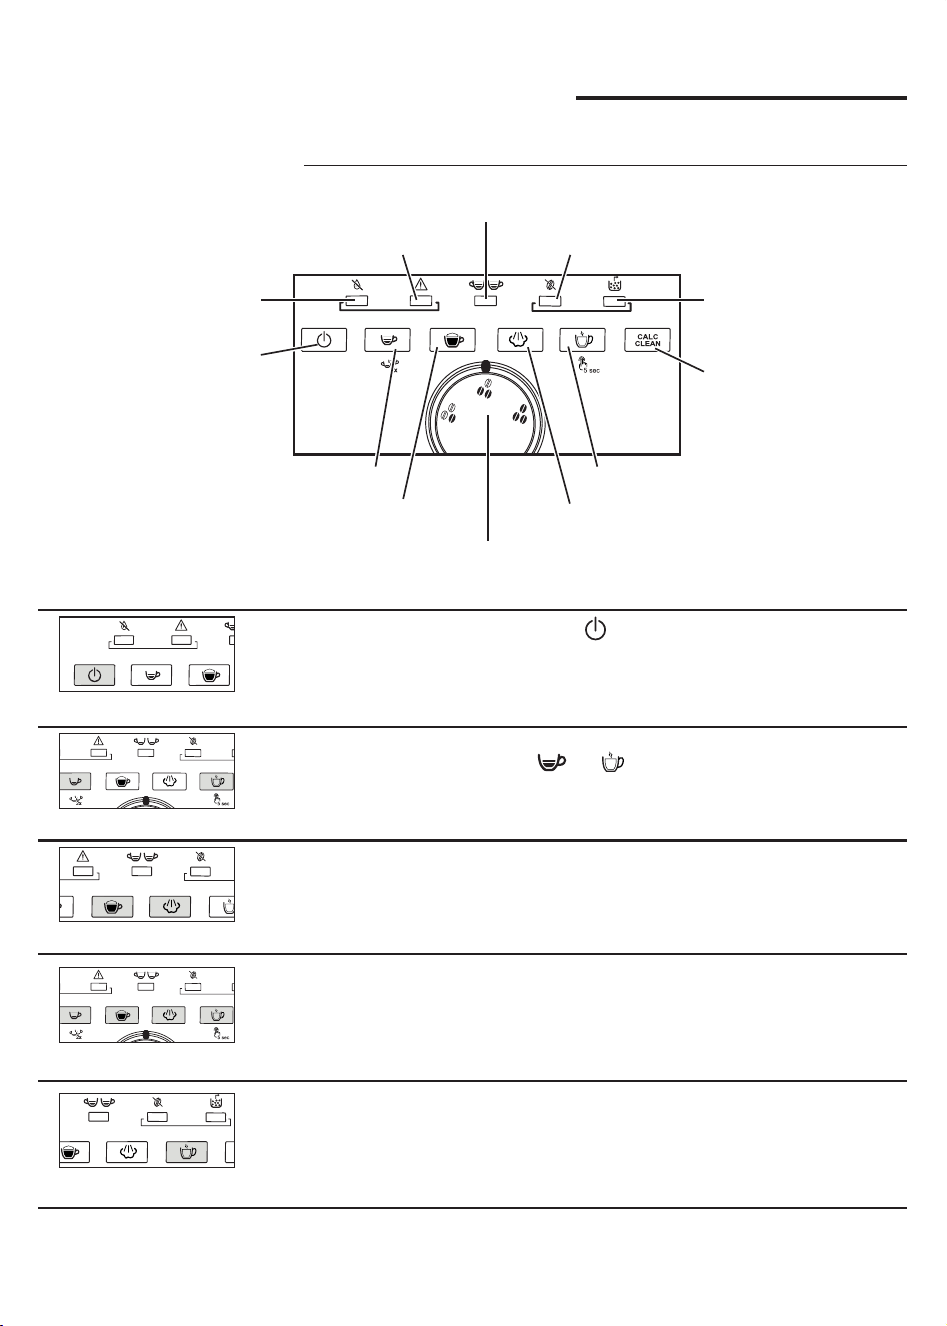
Control panel display
LED light icons Meaning Action
FLASHING
Machine in stand-by.
Press the " " button to turn on the machine.
FLASHING SLOWLY
The machine is performing
the rinse cycle.
The machine ends the cycle automatically. Press
the “ ” or " " button to stop the cycle before
the end.
FLASHING SLOWLY
The machine is heating up
for beverage brewing
STEADY ON
The machine is ready for use.
STEADY ON
The machine is in the hot
water dispensing phase.
Espresso brew button
Steam dispensing button
Cappuccino brew button
Hot water dispensing button
"No water" LED light
“Coffee pucks
container” LED light
ON/OFF button
Descaling button
"No coffee" LED light
"Double shot espresso" LED light
"Warning" LED light
"Aroma" selector switch
Naviglio milk en-nl-pl.indd 29 01/08/2019 09:46:52

30
ENGLISH
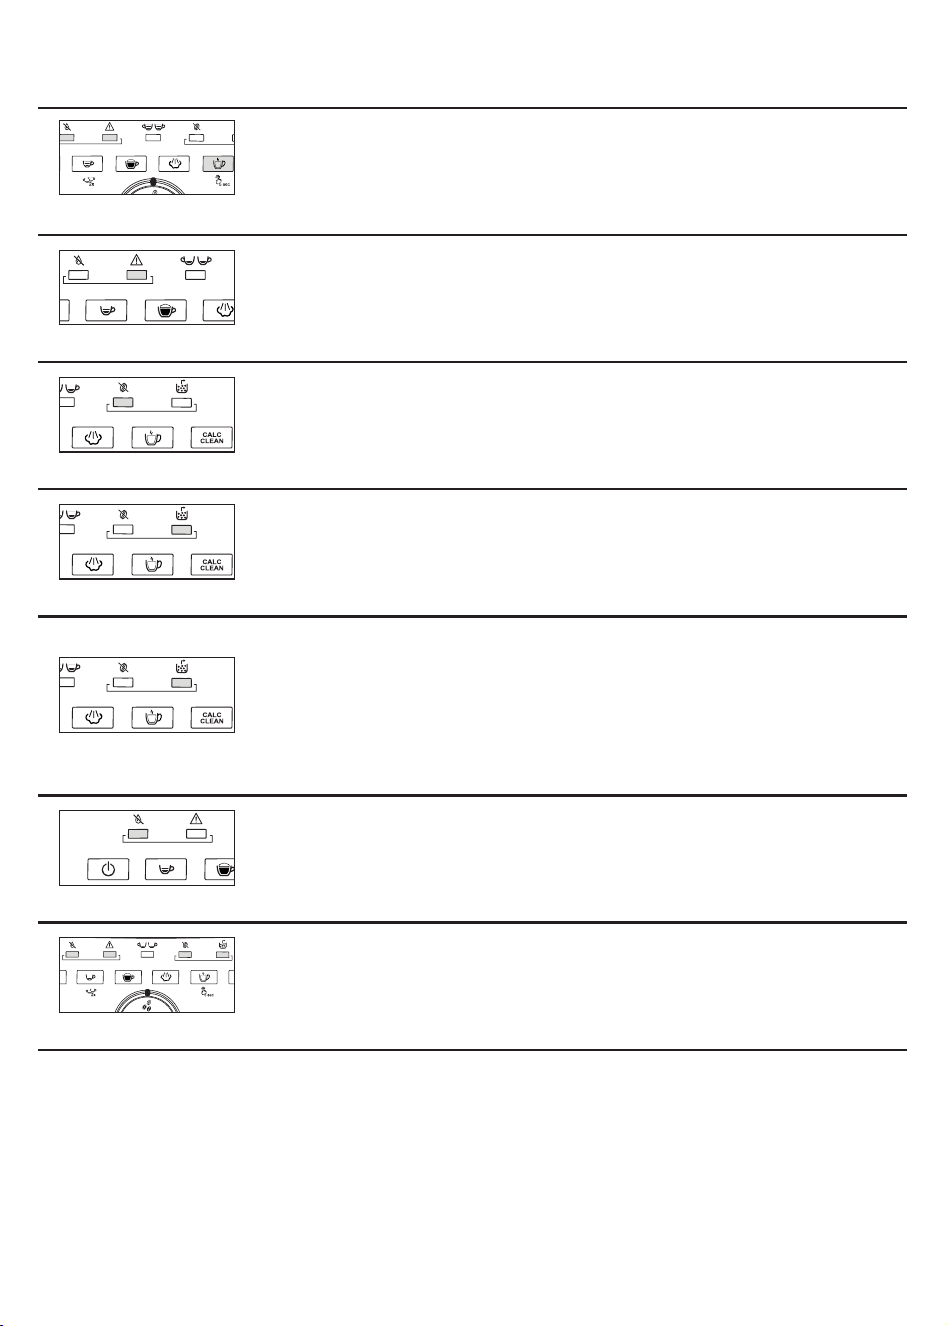
LED light icons Meaning Action
STEADY ON
The machine is brewing one
cup of espresso.
STEADY ON
The machine is brewing two
cups of espresso.
STEADY ON
The machine is brewing one
cappuccino.
FLASHING SLOWLY
The machine is programming
the amount of espresso to be
brewed.
FLASHING SLOWLY
The machine is programming
the amount of cappuccino to
be brewed.
STEADY ON
The machine is dispensing
steam.
STEADY ON
You need to descale the
machine.
Start the descaling cycle. If not descaled regularly,
the machine will stop working correctly. Any
malfunction will not be covered by the warranty.
FLASHING SLOWLY
The machine is in the
descaling phase.
Press the “ ” button to pause the cycle.
FLASHING QUICKLY
Machine "PAUSED" during the
descaling cycle.
Press the “ ” button to start the cycle.
Naviglio milk en-nl-pl.indd 30 01/08/2019 09:46:53
31
ENGLISH
LED light icons Meaning Action
FLASHING SLOWLY
Prime the circuit. Fill the water tank with fresh water and prime
the water circuit as described in the “Using the
Machine for the First Time” chapter.
FLASHING SLOWLY
- Close the service door.
- Insert the brew group.
Make sure that all components have been correctly
inserted and closed.
STEADY ON
The coffee bean container is
empty.
Fill the coffee bean hopper with coffee beans and
restart the brewing cycle.
FLASHING QUICKLY
Coffee pucks container not
inserted.
Empty the coffee pucks container and wait for the
LED light to ash slowly before reinserting it.
STEADY ON
The coffee pucks container
is full.
With the machine turned on, empty the coffee
pucks container and the drip tray. If the coffee
pucks container is emptied with the machine
turned off, or when the indicator light is not
illuminated, the coffee cycle counter is not reset. In
this case, the indicator light indicating to empty the
coffee pucks container may illuminate even when
it is not full.
STEADY ON
The water tank is empty. Fill the water tank with fresh water.
FLASHING SLOWLY
A fault has occurred in the
machine and espresso,
water or steam cannot be
dispensed.
Turn off the machine, wait for 30 seconds and then
turn it on again.
Try this 2 or 3 times.
Naviglio milk en-nl-pl.indd 31 01/08/2019 09:46:54
32
ENGLISH
Troubleshooting
This chapter summarises the most common problems you could encounter with
your machine.
Machine actions Causes Solutions
The machine does not switch
on.
The machine is not connected to
the electric network.
Connect the machine to the electric
network.
The coffee dispensed is not
hot enough.
The cups are cold. Preheat the cups with hot water.
The drip tray gets lled
although no water is drained.
Water is sometimes drained
automatically by the machine into
the drip tray to manage circuit
rinsing and ensure optimum
machine performance.
This is a normal behaviour of the
machine.
The machine displays the red
LED light on steady even
after the coffee pucks have
been emptied.
The coffee pucks container has
been emptied when the machine
was off.
The coffee pucks container must always
be emptied with the machine on. Wait
until the red LED light starts ashing
more slowly before reinserting the
drawer.
No hot water or steam is
dispensed.
The hole of the steam wand is
clogged.
Clean the hole of the steam wand using
a pin.
Caution: Make sure that the
machine is off and has cooled down
before performing this operation.
Dirty Capp in Cup system (if any). Clean the Capp in Cup system.
Coffee does not have enough
crema.
(see note)
The machine is performing the
autoregulation operation.
Dispense several cups of coffee so
that the machine regulates itself
automatically.
The blend is unsuitable, coffee is
not freshly roasted or the grind is
too coarse.
Change coffee blend or adjust the grind
as explained in the "Adjusting the Coffee
Grinder" section.
The machine takes a long
time to warm up or the
amount of water dispensed
from the wand is too little.
The machine circuit is clogged by
limescale.
Descale the machine.
The brew group does not
come out.
The brew group is out of place. Turn on the machine. Close the service
door. The brew group automatically
returns to the initial position.
The coffee pucks container is
inserted.
Remove the coffee pucks container
before removing the brew group.
There is a lot of ground coffee
under the brew group.
The coffee used is not suitable for
automatic machines.
It may be necessary to change the type
of coffee or the coffee grinder settings.
Naviglio milk en-nl-pl.indd 32 01/08/2019 09:46:55
33
ENGLISH
Machine actions Causes Solutions
The machine grinds coffee
beans but no coffee comes
out.
(see note)
There is no water. Fill the water tank and prime the circuit
(see the "Using the Machine for the First
Time" chapter).
The brew group is dirty. Clean the brew group (see the "Weekly
Cleaning of the Brew Group" chapter).
The circuit is not primed. Prime the circuit (see the "Using the
Machine for the First Time" chapter).
This might occur when the
machine is automatically
adjusting the dose.
Brew some cups of coffee as described
in the “Gaggia Adapting System” chapter.
The dispensing spout is dirty. Clean the dispensing spout.
Coffee is dispensed slowly.
(see note)
The coffee grind is too ne. Change coffee blend or adjust grinding
as explained in the “Adjusting the
Ceramic Coffee Grinder” chapter.
The circuit is not primed. Prime the circuit (see the "Using the
Machine for the First Time" chapter).
The brew group is dirty. Clean the brew group (see the "Weekly
Cleaning of the Brew Group" chapter).
Coffee leaks out of the
dispensing spout.
The dispensing spout is clogged. Clean the dispensing spout and its
holes.
Milk does not froth. The Capp in Cup system is
inserted too deep. No milk is being
suctioned.
Allow the Capp in Cup system to cool off.
Move it slightly downwards. Reposition it
in its correct seat.
Frothed milk is too cold. The cups are cold. Preheat the cups with hot water.
Energy saving
Stand-by
The super-automatic
Gaggia
espresso coffee machine is designed for energy
saving.
After 30 minutes of inactivity, the machine turns off automatically. If a product has
been brewed, the machine performs a rinse cycle.
In stand-by mode, the energy consumption is below 1Wh.
To turn on the machine, press this button (if the power button on the back of the
machine is set to “I”). If the boiler is cold, the machine performs a rinse cycle.
Naviglio milk en-nl-pl.indd 33 01/08/2019 09:46:55
34
ENGLISH
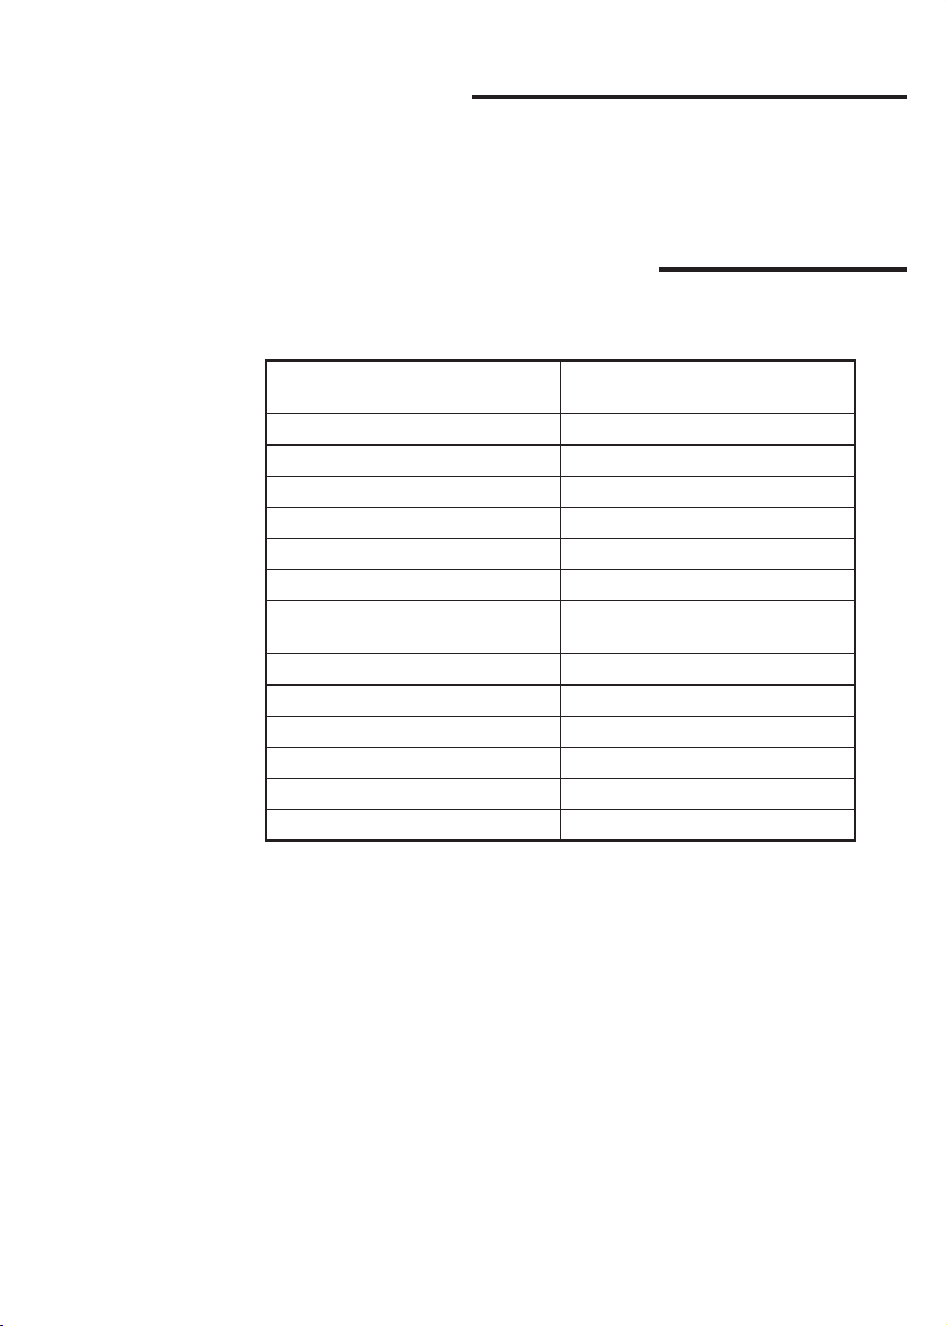
Technical Specications
The manufacturer reserves the right to make changes to the technical
specications of the product.
Nominal voltage - Power rating -
Power supply
See data plate on the inside of the
service door
Housing material Thermoplastic type
Size (w x h x d) 256 x 340 x 440 mm
Weight 9 kg
Power cord length 800 - 1200 mm
Control panel Front panel
Classic Milk Frother Especially for cappuccinos
Maximum height of the cup under
the dispensing spout (mm)
110
Water tank 1.5 litres - Removable type
Coffee bean container capacity 300 g
Coffee pucks container capacity 10
Pump pressure 15 bar
Boiler Stainless steel
Safety devices Thermal Fuse
Accessories
Coffee and accessories are available through authorised centres or distributors in
your country. The contact info is listed on www.gaggia.com and www.gaggia.it.
Naviglio milk en-nl-pl.indd 34 01/08/2019 09:46:56

35
NEDERLANDS
Inhoudsopgave
Installatie .....................................................................................................................................................................................................................................................................................................................................................................................................................................................................................................................................................................................................................................3
Productoverzicht .....................................................................................................................................................................................................................................................................................................................................................................................................................................................................................................................................................................3
Algemene beschrijving .......................................................................................................................................................................................................................................................................................................................................................................................................................................................................................................................36
Voorbereidende handelingen .................................................................................................................................................................................................................................................................................................................................................................................................................................................................37
Verpakking van de machine .......................................................................................................................................................................................................................................................................................................................................................................................................................................................................................37
Installatie van de machine ..................................................................................................................................................................................................................................................................................................................................................................................................................................................................................................37
Eerste inschakeling ...........................................................................................................................................................................................................................................................................................................................................................................................................................................................................................................................................39
Het vullen van het circuit ...........................................................................................................................................................................................................................................................................................................................................................................................................................................................................................................39
Automatische spoelcyclus ..................................................................................................................................................................................................................................................................................................................................................................................................................................................................................................40
Handmatige spoelcyclus ............................................................................................................................................................................................................................................................................................................................................................................................................................................................................................................40
Installatie “INTENZA+” waterlter ...............................................................................................................................................................................................................................................................................................................................................................................................................................41
Bereiding van de dranken ..........................................................................................................................................................................................................................................................................................................................................................................................................................................................................................42
Afgifte van espresso .........................................................................................................................................................................................................................................................................................................................................................................................................................................................................................................................................................................43
Het Capp in Cup-systeem monteren ......................................................................................................................................................................................................................................................................................................................................................................................................................................................................43
Cappuccino zetten ....................................................................................................................................................................................................................................................................................................................................................................................................................................................................................................................................................................................44
Melk opschuimen ...........................................................................................................................................................................................................................................................................................................................................................................................................................................................................................................................................................45
Afgifte van heet water .........................................................................................................................................................................................................................................................................................................................................................................................................................................................................................................................45
Aanpassing van de dranken ........................................................................................................................................................................................................................................................................................................................................................................................................................................................................46
Aanpassing van de maaljnheid .............................................................................................................................................................................................................................................................................................................................................................................................................................................................46
Instelling van de intensiteit van het aroma ...............................................................................................................................................................................................................................................................................................................................................................................................47
Instelling van de hoeveelheid koe in een kopje .......................................................................................................................................................................................................................................................................................................................................................48
Instelling van de hoeveelheid cappuccino in een kopje ................................................................................................................................................................................................................................................................................................................48
Reiniging en onderhoud ........................................................................................................................................................................................................................................................................................................................................................................................................................................................................................................49
Reinigingstabel ......................................................................................................................................................................................................................................................................................................................................................................................................................................................................................................................................................................49
Snelle reiniging van het Capp in Cup-systeem ....................................................................................................................................................................................................................................................................................................................................................................50
Intensieve reiniging van het Capp in Cup-systeem ..........................................................................................................................................................................................................................................................................................................................................50
Reiniging van de klassieke pannarello ......................................................................................................................................................................................................................................................................................................................................................................................................................53
Reiniging van de zetgroep .................................................................................................................................................................................................................................................................................................................................................................................................................................................................................................53
Invetten van de zetgroep .........................................................................................................................................................................................................................................................................................................................................................................................................................................................................................................55
Ontkalking ..................................................................................................................................................................................................................................................................................................................................................................................................................................................................................................................................................................................................................56
Onverwachte onderbreking van de ontkalkingscyclus ...................................................................................................................................................................................................................................................................59
Betekenis van de verlichte signalen .............................................................................................................................................................................................................................................................................................................................................................................................................60
Display van het bedieningspaneel .................................................................................................................................................................................................................................................................................................................................................................................................................................................60
Oplossing van problemen ...........................................................................................................................................................................................................................................................................................................................................................................................................................................................................................63
Energiebesparing ..........................................................................................................................................................................................................................................................................................................................................................................................................................................................................................................................................................64
Stand-by ..............................................................................................................................................................................................................................................................................................................................................................................................................................................................................................................................................................................................................64
Accessoires ......................................................................................................................................................................................................................................................................................................................................................................................................................................................................................................................................................................................................65
Technische kenmerken ...............................................................................................................................................................................................................................................................................................................................................................................................................................................................................................................65
Naviglio milk en-nl-pl.indd 35 01/08/2019 09:46:56

36
NEDERLANDS
Algemene beschrijving
1 Instelknop van de koemolen 19 Centrale behuizing van het Capp in Cup-
systeem
2 Vet voor de zetgroep 20 Melkaanzuigbuisje
3 Sleutel voor instelling koemolen 21 Pijpje van het Capp in Cup-systeem
4 Handgreep van de klassieke pannarello 22 Stoompijpje
5 Klassieke pannarello 23 Handgreep van het Capp in Cup-systeem
6 Voedingskabel 24 Waterreservoir
7 Aansluiting voor voedingskabel 25 Led voor “Alarm”
8 Koebonenreservoir 26 Led voor “Dubbele koe”
9 Deksel van het koebonenreservoir 27 Led voor “Geen koe”
10 Bedieningspaneel 28 Led “Koeresidureservoir”
11 Verstelbare koetuit 29 Toets voor ontkalking
12 Rooster lekbakje 30 Toets voor de afgifte van heet water
13 Indicator lekbakje vol 31 Stoomknop
14 Lekbakje 32 Keuzeschakelaar voor “Aroma”
15 Koeresidureservoir 33 Toets voor het zetten van cappuccino
16 Zetgroep 34 Toets voor het zetten van espresso
17 Koeopvanglade 35 Toets ON/OFF
18 Servicedeur 36 Led voor “Geen water”
Naviglio milk en-nl-pl.indd 36 01/08/2019 09:46:57
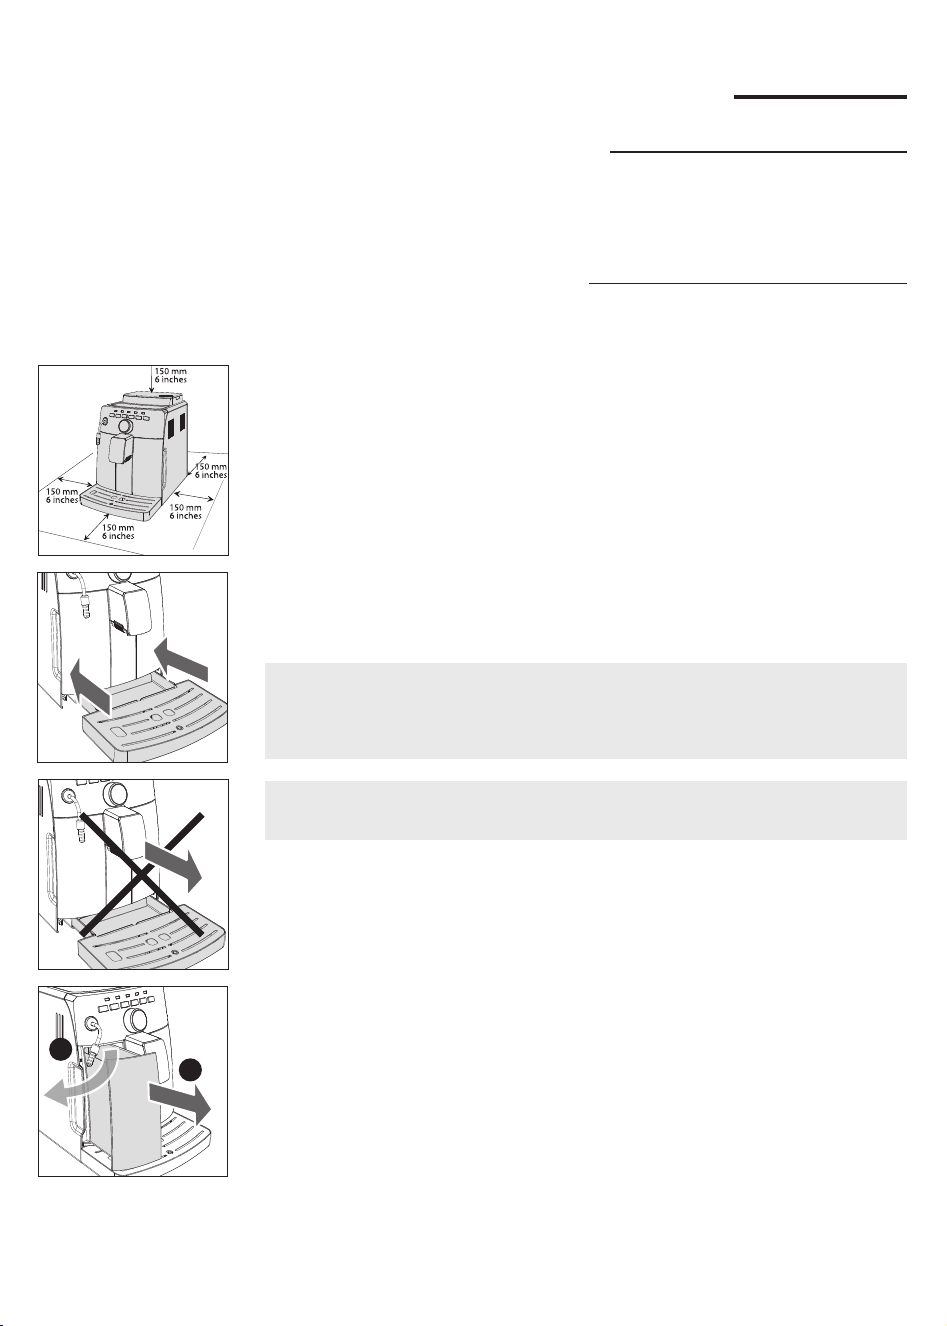
37
NEDERLANDS
Voorbereidende handelingen
Opmerking: Het lekbakje heeft de taak het water op te vangen dat uit de koffietuit
komt tijdens de spoelcycli en de eventuele koffie die wordt gemorst tijdens de
bereiding van de dranken. Leeg en was het lekbakje dagelijks en elke keer wanneer
de indicator voor lekbakje vol omhoog is gekomen.
Let op: Verwijder het lekbakje NOOIT meteen na inschakeling van de machine.
Wacht een paar minuten totdat de machine de spoelcyclus heeft uitgevoerd.
1
2
4 Plaats het lekbakje met rooster in de machine. Controleer of het goed geplaatst
is.
5 Haal het waterreservoir uit de machine.
6 Spoel het reservoir met vers water.
Verpakking van de machine
De originele verpakking is ontworpen en vervaardigd om de machine tijdens het
transport te beschermen. Het is raadzaam om de verpakking te bewaren voor
eventueel transport in de toekomst.
Installatie van de machine
1 Haal het lekbakje met rooster uit de verpakking.
2 Haal de machine uit de verpakking.
3 Voor een optimaal gebruik, wordt het aangeraden om:
- een veilige ondergrond te kiezen die goed geëffend is, waar niemand de
machine kan omgooien of zich eraan kan verwonden;
- een voldoende verlichte, hygiënische omgeving te kiezen met een gemakkelijk
toegankelijk stopcontact;
- ervoor te zorgen dat er rondom de machine voldoende ruimte vrij is, zoals op
de afbeelding is aangegeven.
Naviglio milk en-nl-pl.indd 37 01/08/2019 09:46:57
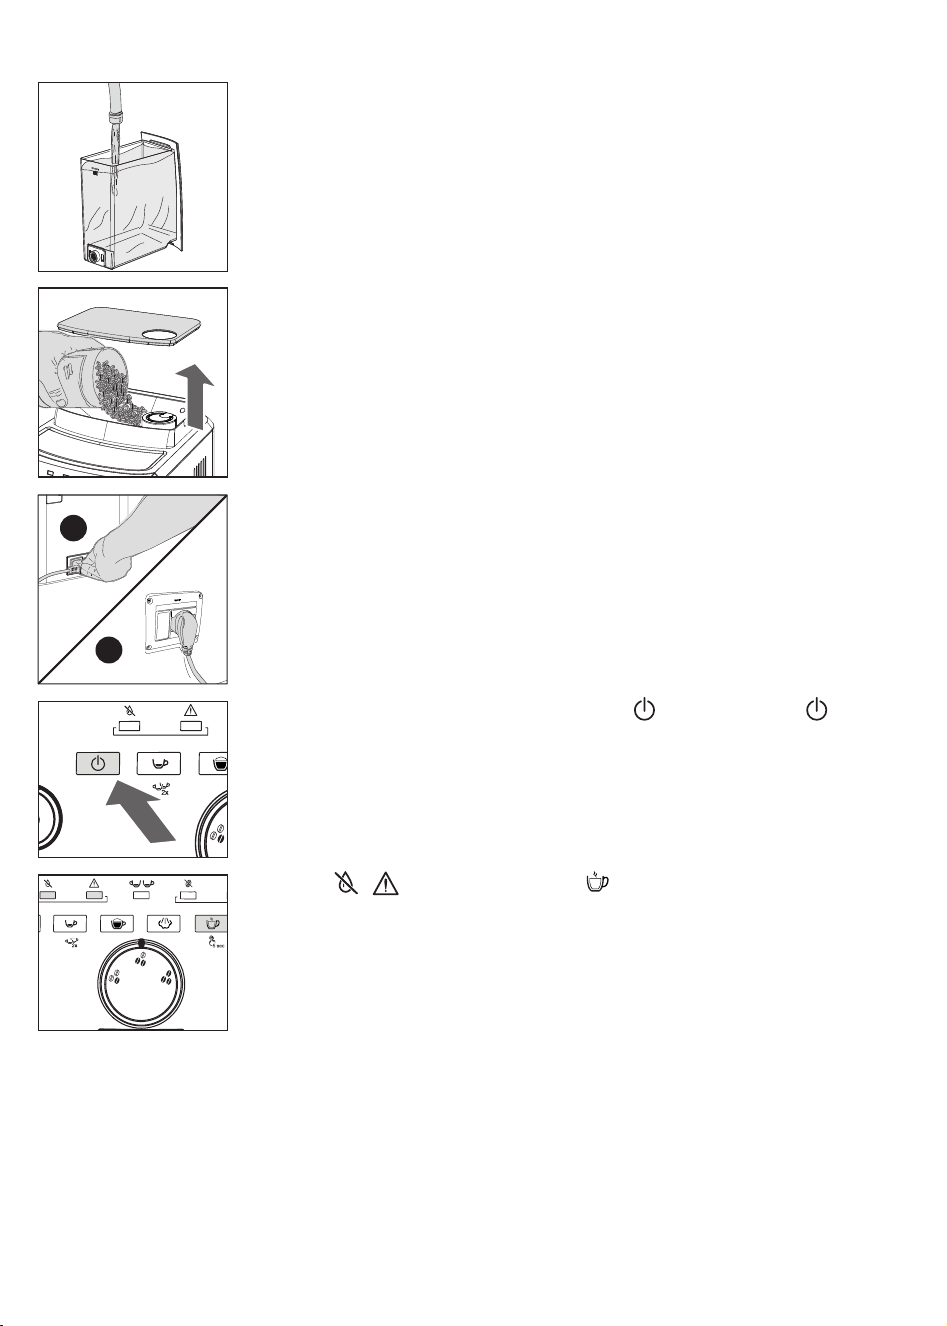
38
NEDERLANDS
7 Vul het waterreservoir met vers water tot het MAX niveau en plaats het terug in
de machine. Controleer of het goed geplaatst is.
8 Verwijder het deksel van het koebonenreservoir en giet langzaam de
koebonen in het reservoir.
9 Plaats het deksel op het koebonenreservoir.
10 Steek de stekker in het contact aan de achterkant van de machine.
11 Steek de stekker aan het andere uiteinde van de voedingskabel in een stop
contact met de juiste spanning.
1
2
13 Op het bedieningspaneel knippert de toets “ ”. Druk op de toets " " om
de machine aan te zetten.
14 Led “ ” “ ” en de led van de toets “ ” beginnen langzaam te knipperen
om aan te geven dat het nodig is om het watercircuit te vullen.
Naviglio milk en-nl-pl.indd 38 01/08/2019 09:46:59
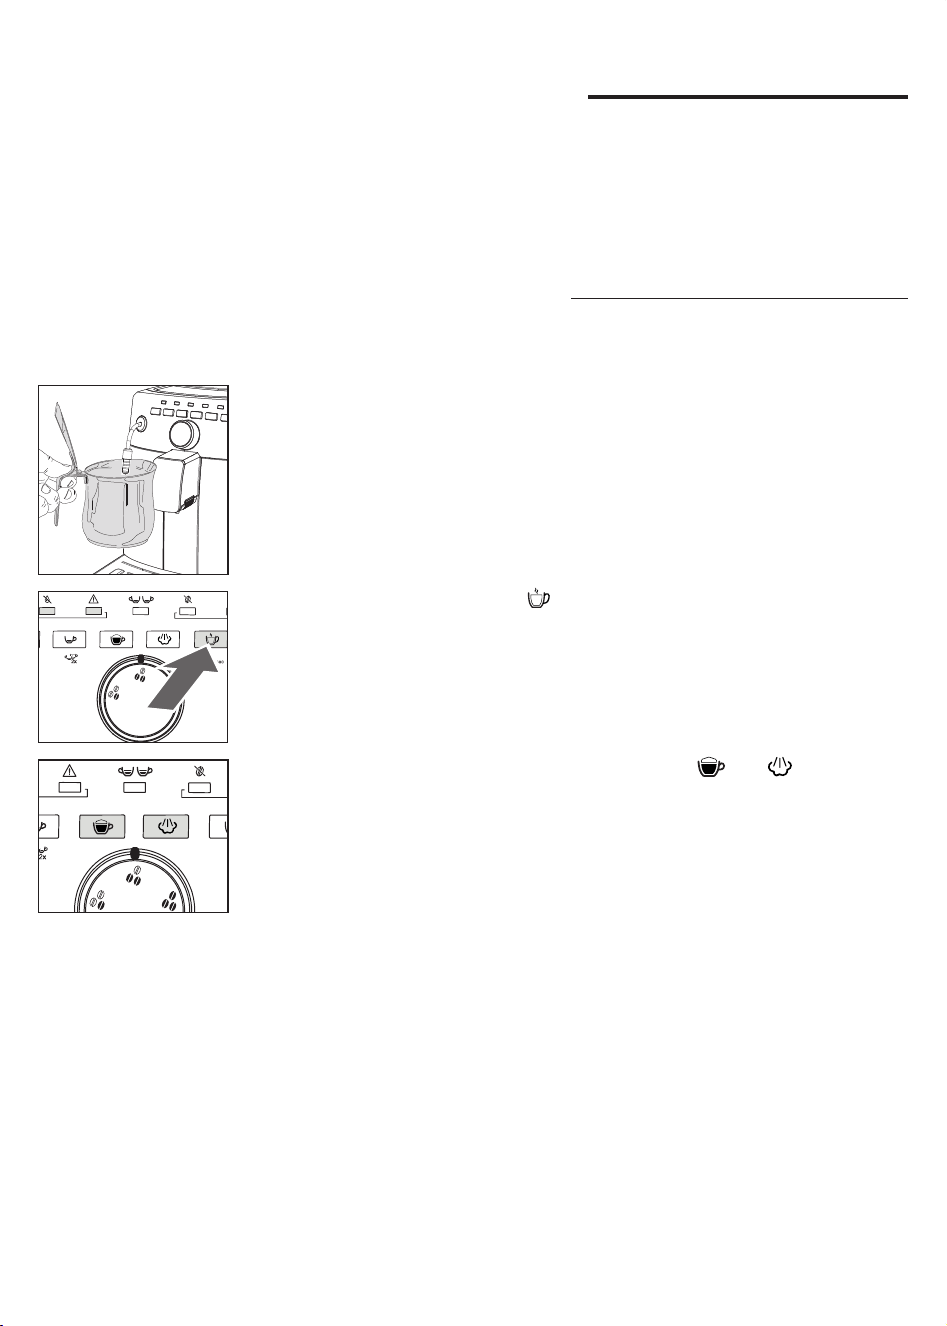
39
NEDERLANDS
Eerste inschakeling
Voor het eerste gebruik moet het volgende gebeuren:
1 het circuit moet gevuld worden;
2 de machine voert een automatische spoelcyclus uit;
3 er moet een handmatige spoelcyclus gestart worden.
Het vullen van het circuit
Tijdens dit proces stroomt het verse water in het interne circuit van de machine en
wordt de machine verwarmd. De handeling vergt enkele minuten.
1 Plaats een kannetje onder het stoompijpje.
2 Druk 5 seconden op de toets “ ” om de cyclus te starten. De machine zal nu
automatisch het circuit vullen waarbij een beperkte hoeveelheid water uit het
stoompijpje stroomt.
3 Aan het einde van het proces knipperen de toetsen “ ” en “ ”. De machine
is bezig met opwarmen.
Naviglio milk en-nl-pl.indd 39 01/08/2019 09:46:59
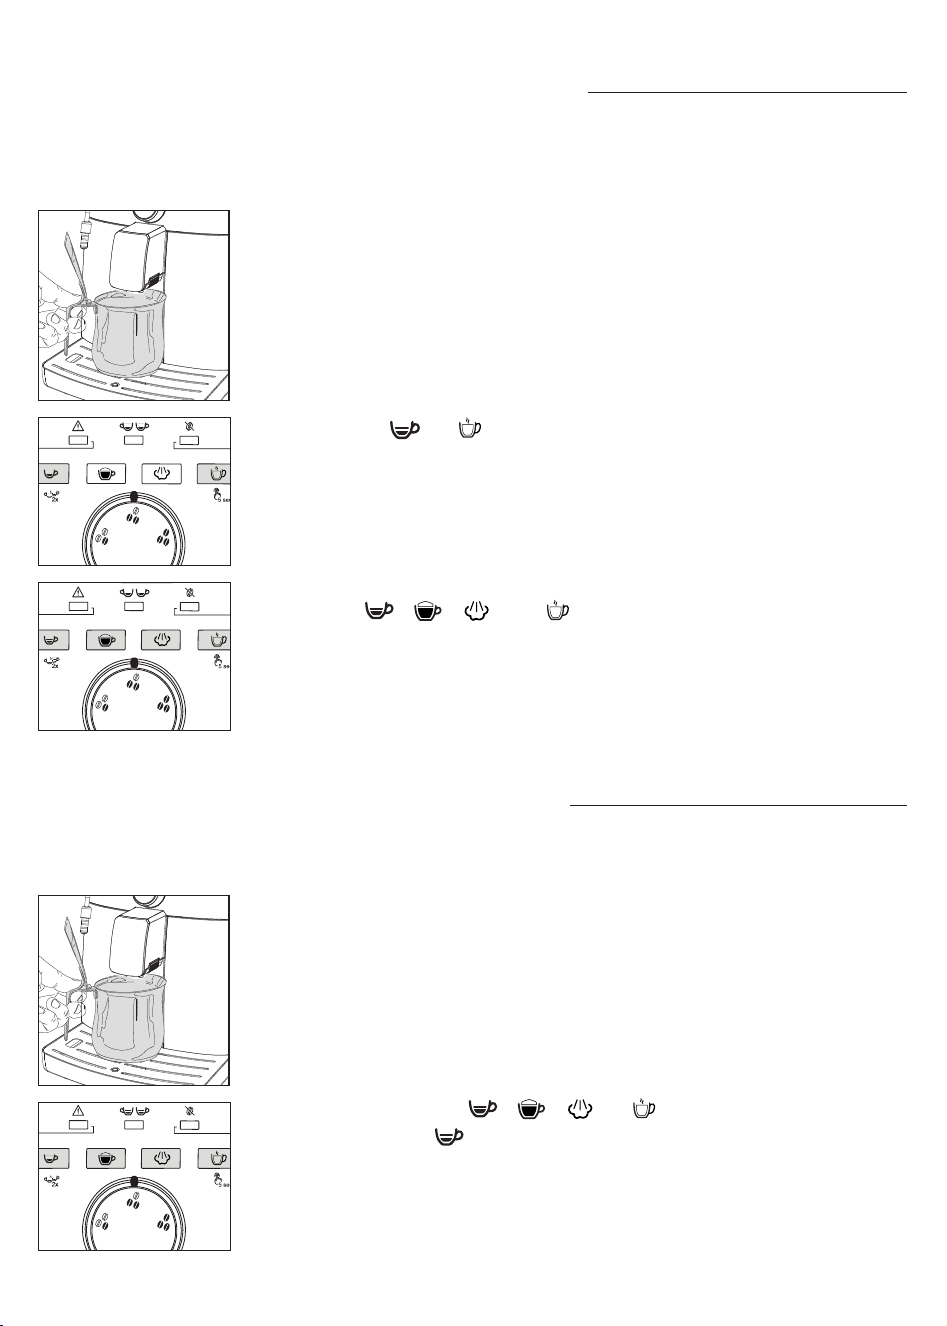
40
NEDERLANDS
Automatische spoelcyclus
Nadat de machine is opgewarmd, voert de machine een automatische spoelcyclus
uit van de interne circuits met vers water. De handeling vergt minder dan een
minuut.
1 Plaats een kannetje onder de koetuit om de kleine hoeveelheid water die eruit
komt op te vangen.
2 De toetsen “ ” en “ ” knipperen tijdens het gehele proces.
3 Wacht totdat de cyclus automatisch eindigt.
4 Wanneer de bovenstaande handelingen beëindigd zijn, controleert u of de
toetsen “ ”, “ ”, “ ” en “ ” branden.
Handmatige spoelcyclus
Tijdens dit proces wordt er een koe verstrekt en via het stoom-/heet water circuit
komt er vers water uit. De handeling vergt enkele minuten.
1 Plaats een kannetje onder de koetuit.
2 Controleer of de leds “ ”, “ ”, “ ” en “ ” branden.
3 Druk op de toets “ ”. De machine begint met koe te zetten.
4 Leeg het kannetje na beëindiging van de afgifte.
Herhaal twee keer de handelingen van stap 1 tot stap 3; ga vervolgens verder
met stap 5.
Naviglio milk en-nl-pl.indd 40 01/08/2019 09:47:01
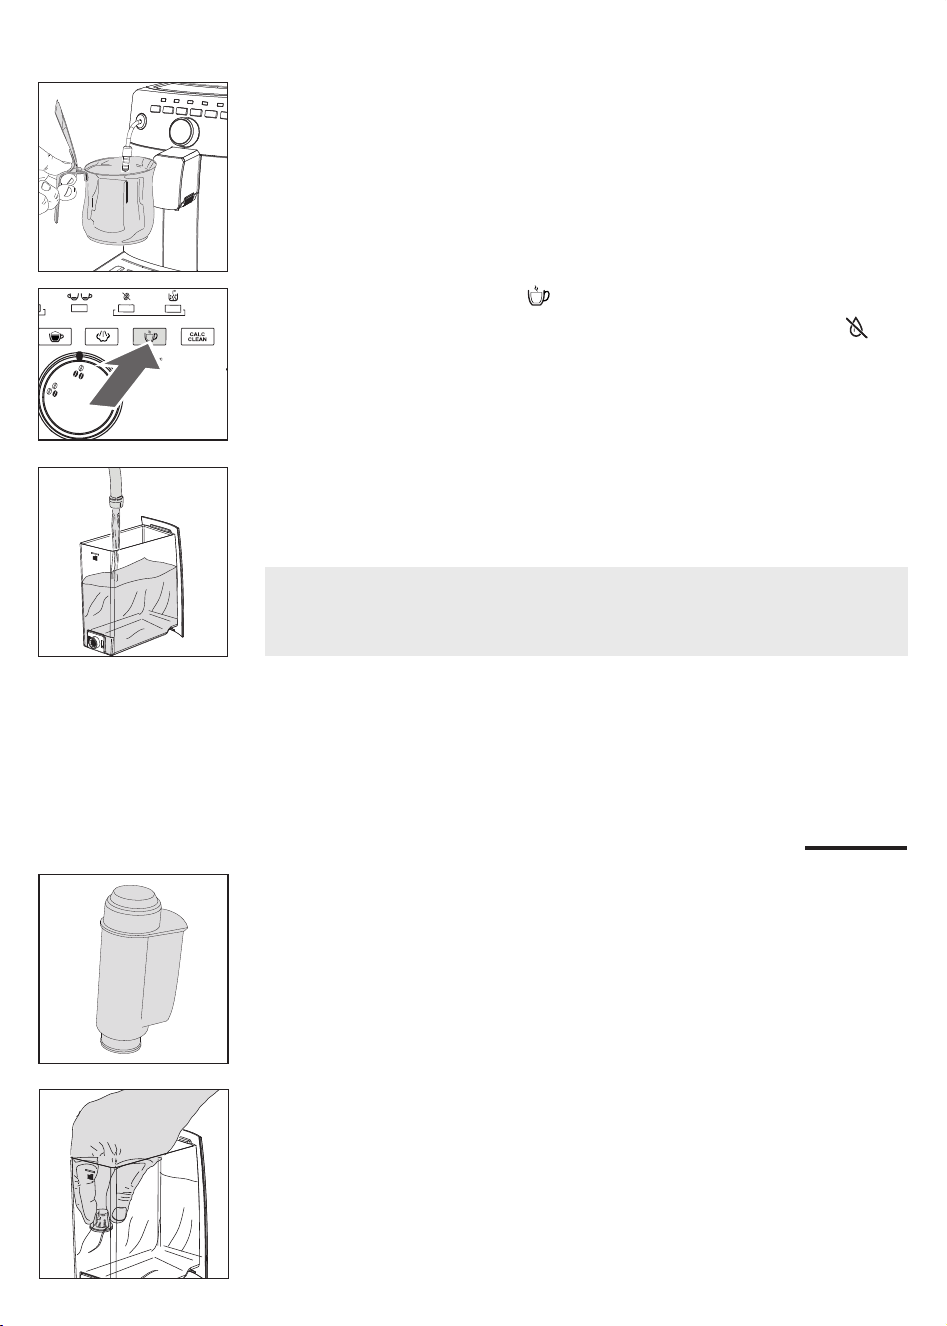
41
NEDERLANDS
5 Plaats een kannetje onder het stoompijpje.
6 Druk 5 seconden op de toets “ ” om de afgifte van heet water te starten.
7 Blijf water verstrekken totdat de led die het gebrek aan water aangeeft “ ” niet
meer continu blijft branden.
8 Vul na beëindiging het waterreservoir opnieuw tot het MAX niveau. De machine
is klaar voor de werking.
De automatische spoelcyclus wordt ook opgestart wanneer de machine langer dan
15 min. in stand-by staat of uitgeschakeld is geweest.
Na beëindiging van de cyclus kan er koe worden gezet.
Opmerking: Als de machine gedurende twee of meer weken niet is gebruikt, zal
er bij inschakeling een automatische spoelcyclus worden uitgevoerd. Vervolgens
moet er een handmatige spoelcyclus worden uitgevoerd, zoals hierboven
beschreven.
Installatie "INTENZA+" waterlter
Het wordt aangeraden om het “INTENZA+” waterlter te installeren; dit lter houdt
de vorming van kalkaanslag in de machine tegen en geeft een sterker aroma aan
uw espresso.
Water is een fundamenteel bestanddeel bij de bereiding van een espresso: daarom
is het buitengewoon belangrijk dit altijd professioneel te ltreren. Het “INTENZA+”
waterlter kan de vorming van mineraalafzettingen voorkomen, waardoor de
kwaliteit van het water wordt verbeterd.
1 Verwijder het witte ltertje dat zich in het waterreservoir bevindt en bewaar het
op een droge plaats.
Naviglio milk en-nl-pl.indd 41 01/08/2019 09:47:02
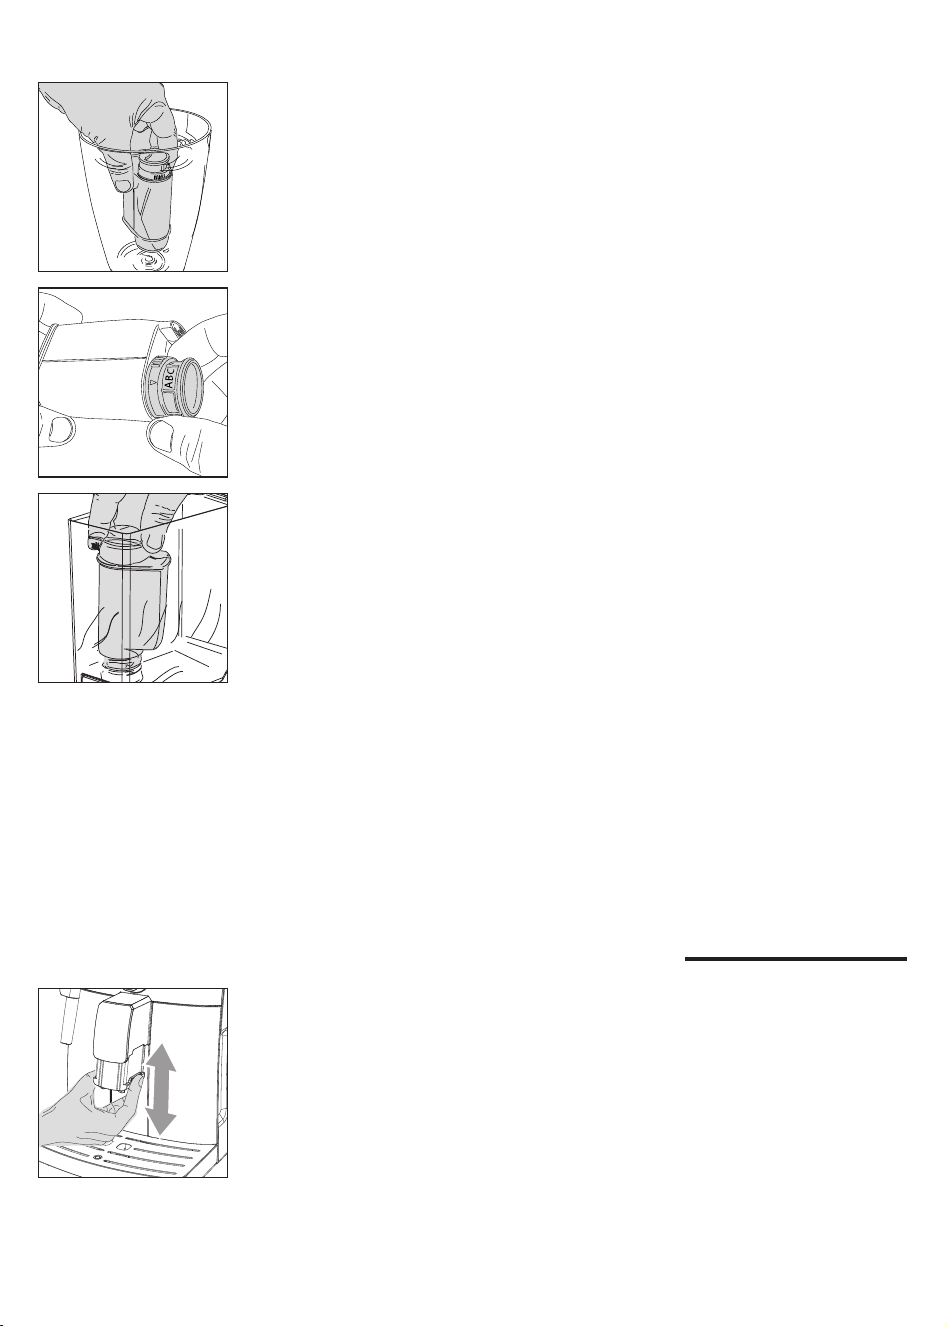
42
NEDERLANDS
2 Haal het "INTENZA+" waterlter uit de verpakking, dompel het in in verticale
positie (met de opening naar boven) in koud water en druk zachtjes op de
zijkanten om de luchtbelletjes er uit te laten.
3 Stel het lter in op basis van de waterhardheid in uw gebied. De instellingen
worden vermeld op de verpakking van het lter.
A = Zacht water
B = Hard water (standaard)
C = Zeer hard water
4 Plaats het lter in het lege waterreservoir. Duw het zo ver mogelijk naar
beneden.
5 Vul het waterreservoir met vers water en plaats het terug in de machine.
Noteer de datum voor de volgende vervanging van het waterlter (+ 2 maanden).
6 Gebruik de heetwaterfunctie om de machine al het water dat in het reservoir
zit, te laten verstrekken (zie hoofdstuk “Afgifte van heet water”).
7 Vul het waterreservoir opnieuw.
Bereiding van de dranken
Controleer vóór het zetten van een drank of het waterreservoir en het
koebonenreservoir beide vol zijn. En of de koetuit zich op de juiste hoogte van
het kopje bevindt.
Naviglio milk en-nl-pl.indd 42 01/08/2019 09:47:03
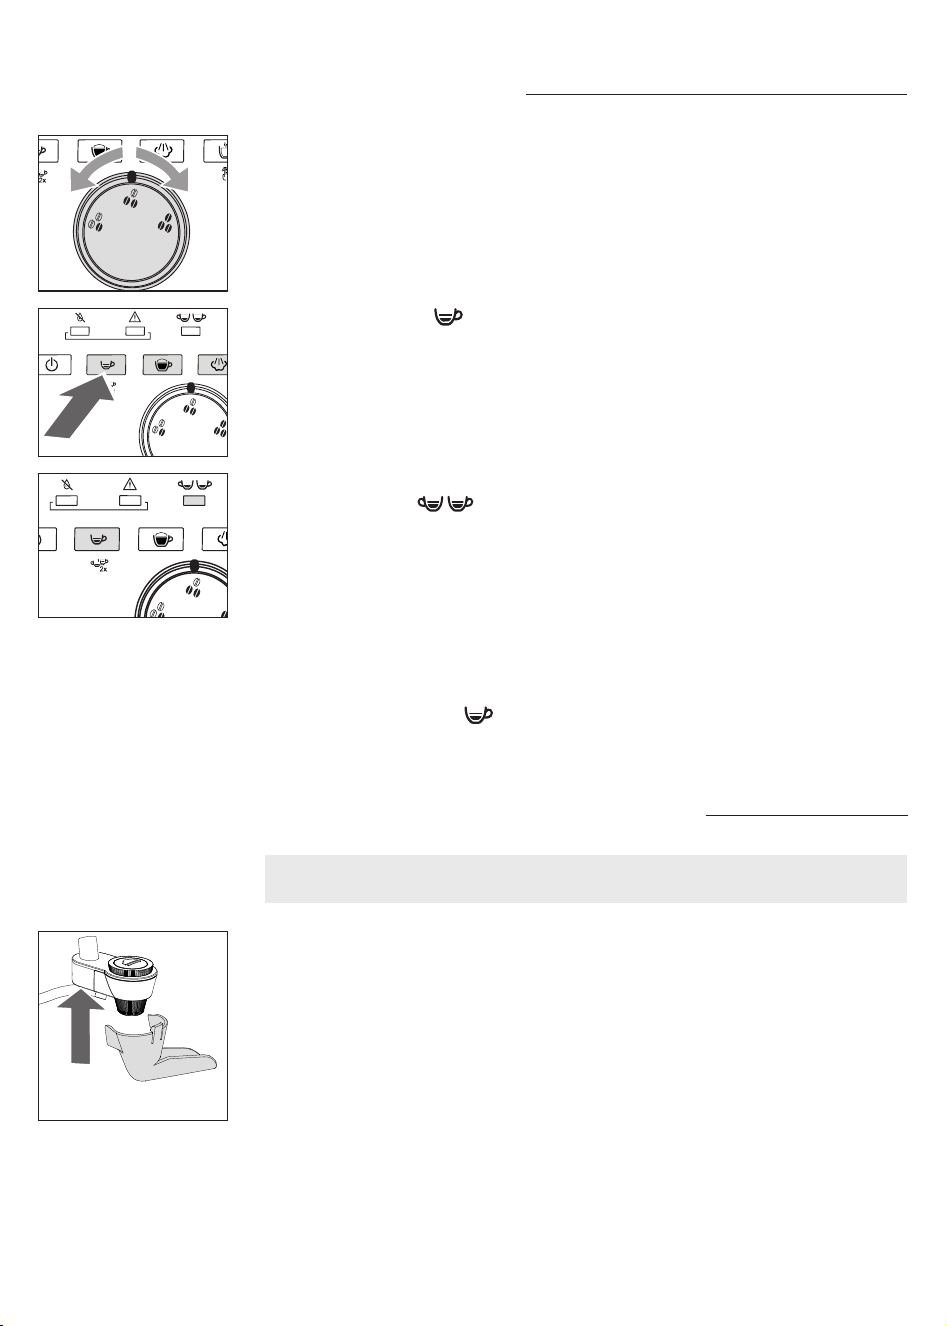
43
NEDERLANDS
3 Druk op de toets " " voor een espresso.
4 Voor het zetten van 2 espresso's, drukt u twee maal achter elkaar op de
toets “”. De led
“ ”
gaat branden.
5 Na de voorinfusiecyclus zal de koe uit de koetuit beginnen te stromen.
6 De koeafgifte zal automatisch stoppen wanneer het vooraf ingestelde niveau
is bereikt; het blijft echter mogelijk om de afgifte eerder te onderbreken door
opnieuw op de toets “ ” te drukken.
Afgifte van espresso
1 Draai de keuzeschakelaar voor aroma om het gewenste aroma te kiezen.
2 Plaats 1 of 2 kopjes onder de koetuit.
Het Capp in Cup-systeem monteren
Opmerking: Voordat u een drank op basis van melk bereidt, moet u zich ervan
vergewissen dat het Capp in Cup-systeem correct op de machine gemonteerd is.
1 Monteer het pijpje op het centrale huis van het Capp in Cup-systeem.
Naviglio milk en-nl-pl.indd 43 01/08/2019 09:47:03
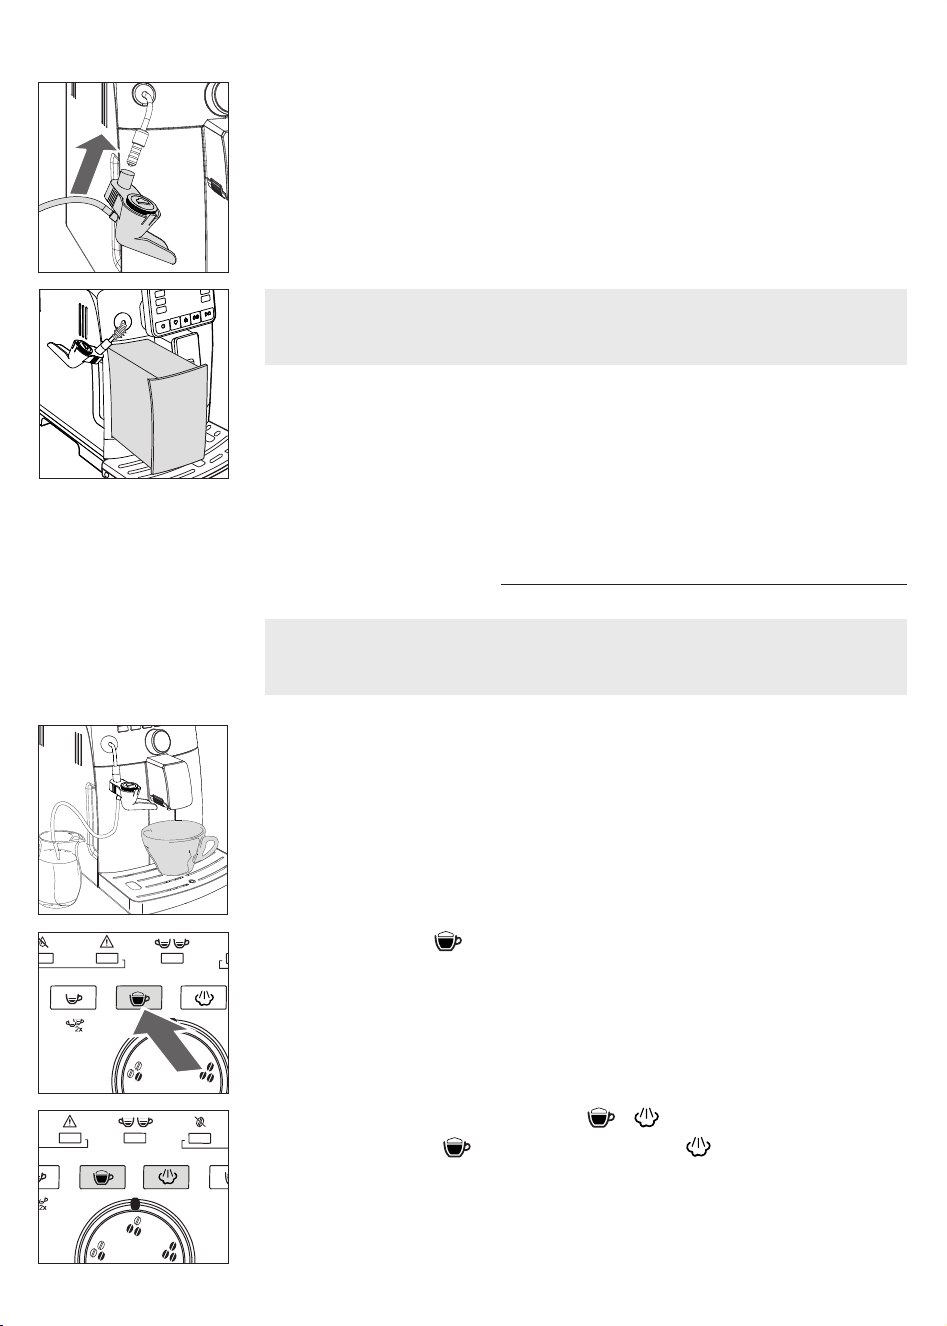
44
NEDERLANDS
2 Plaats het Capp in Cup-systeem in de rubberen handgreep van het stoompijpje
totdat het op zijn plaats klikt.
Cappuccino zetten
Advies: gebruik koude melk (~5°C / 41°F) met een proteïnegehalte van minstens
3% om een cappuccino van goede kwaliteit te krijgen. Het is mogelijk om zowel
volle melk als halfvolle melk te gebruiken afhankelijk van uw persoonlijke smaak.
1 Plaats het melkaanzuigbuisje in de melkkan en plaats een kopje of een beker
onder de koetuit en het Capp in Cup-systeem.
Advies: als het waterreservoir gevuld moet worden zonder het Capp in Cup-
systeem te verwijderen, plaats het systeem dan, zoals weergegeven in de
afbeelding, om de werkbank niet te bevuilen.
2 Druk op de toets “ ”.
3 De machine warmt op en de toetsen “ ” “ ” knipperen.
4 Wanneer de toets “ ” blijft branden en de toets “ ” gaat uit, wordt de
afgifte gestart:
- Opgeschuimde melk;
- Koe;
Naviglio milk en-nl-pl.indd 44 01/08/2019 09:47:05
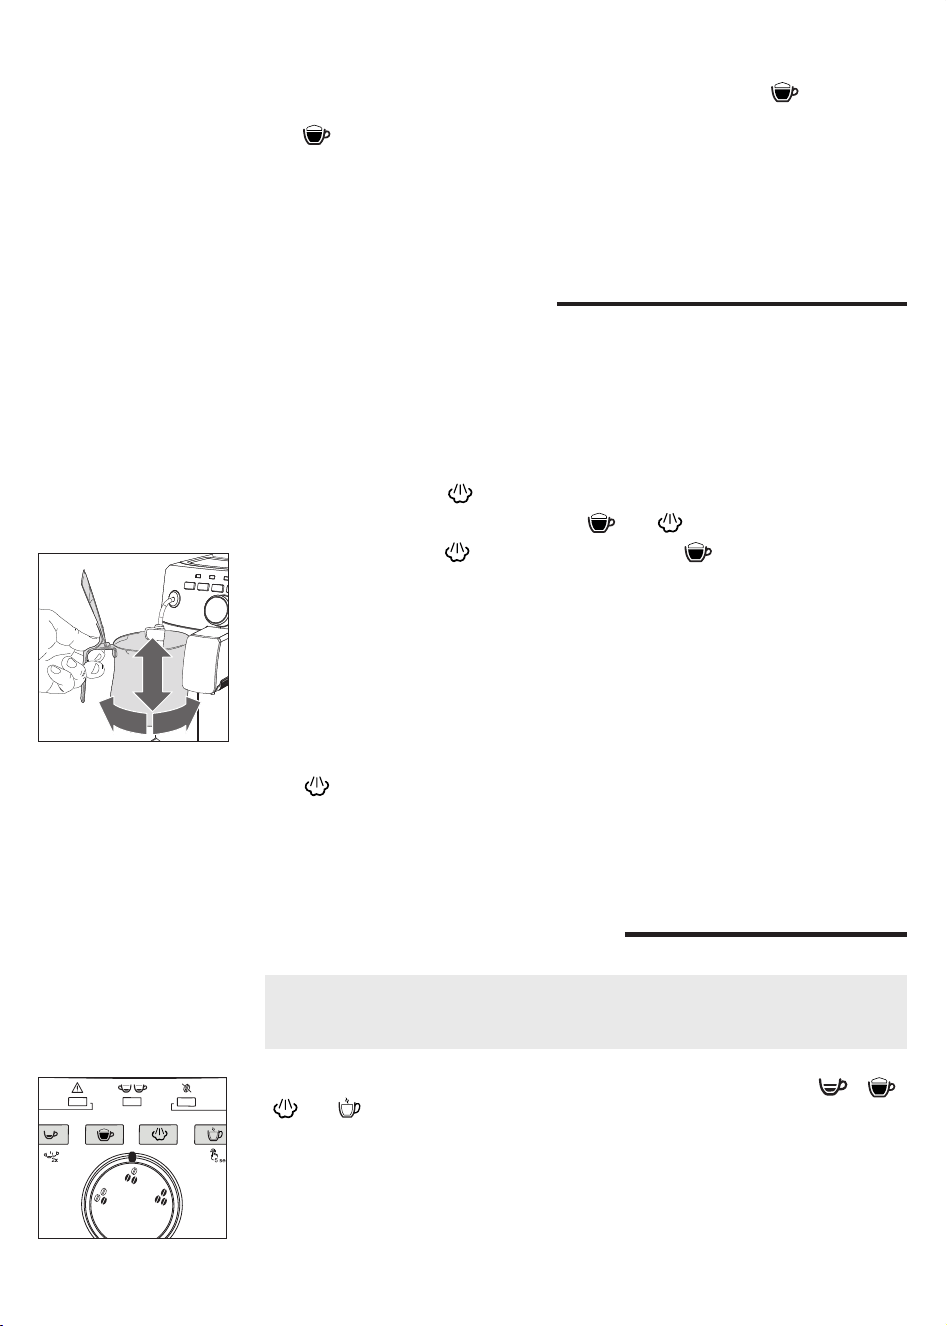
45
NEDERLANDS
Afgifte van heet water
Let op: gevaar voor brandwonden! Aan het begin van de afgifte kan er wat heet
water vrijkomen. Het heetwater- of stoompijpje kan erg heet worden: vermijd direct
contact met de handen. Gebruik alleen de speciale beschermende handgreep.
Alvorens heet water te verstrekken, dient men te controleren of de leds “ ”, “ ”,
“ ” en “ ” continu branden en of het waterreservoir vol is.
Melk opschuimen
Met de klassieke pannarello, inbegrepen als accessoire in de verpakking van
de machine is het mogelijk om door middel van de stoomfunctie de melk op te
schuimen;
1 Vul een kan voor 1/3 met koude melk.
2 Plaats de klassieke pannarello met de handgreep op het stoompijpje, na de
handgreep van het Capp in Cup-systeem te hebben verwijderd.
3 Selecteer de toets “ ”.
4 De machine warmt op en de toetsen “ ” en “ ” knipperen.
5 Wanneer de toets “ ” blijft branden en de toets “ ” gaat uit, wordt de
afgifte van stoom gestart.
6 Schuim de melk op door met het kannetje kleine ronddraaiende bewegingen
omhoog en omlaag te maken.
7 Wanneer het melkschuim de gewenste dikte heeft bereikt, drukt u op de toets
“ ” om de afgifte van stoom te stoppen.
5 Om de afgifte van de melk te beëindigen, drukt u op de toets “ ”; om
vervolgens de afgifte van de koe te stoppen, drukt u opnieuw op de toets
“ ”.
Nadat u de melk hebt opgeschuimd, reinigt u het Capp in Cup-systeem door de
afgifte van een kleine hoeveelheid heet water, zoals beschreven in het hoofdstuk
“Reiniging en onderhoud” en spoelt u het pijpje met vers water.
Naviglio milk en-nl-pl.indd 45 01/08/2019 09:47:06
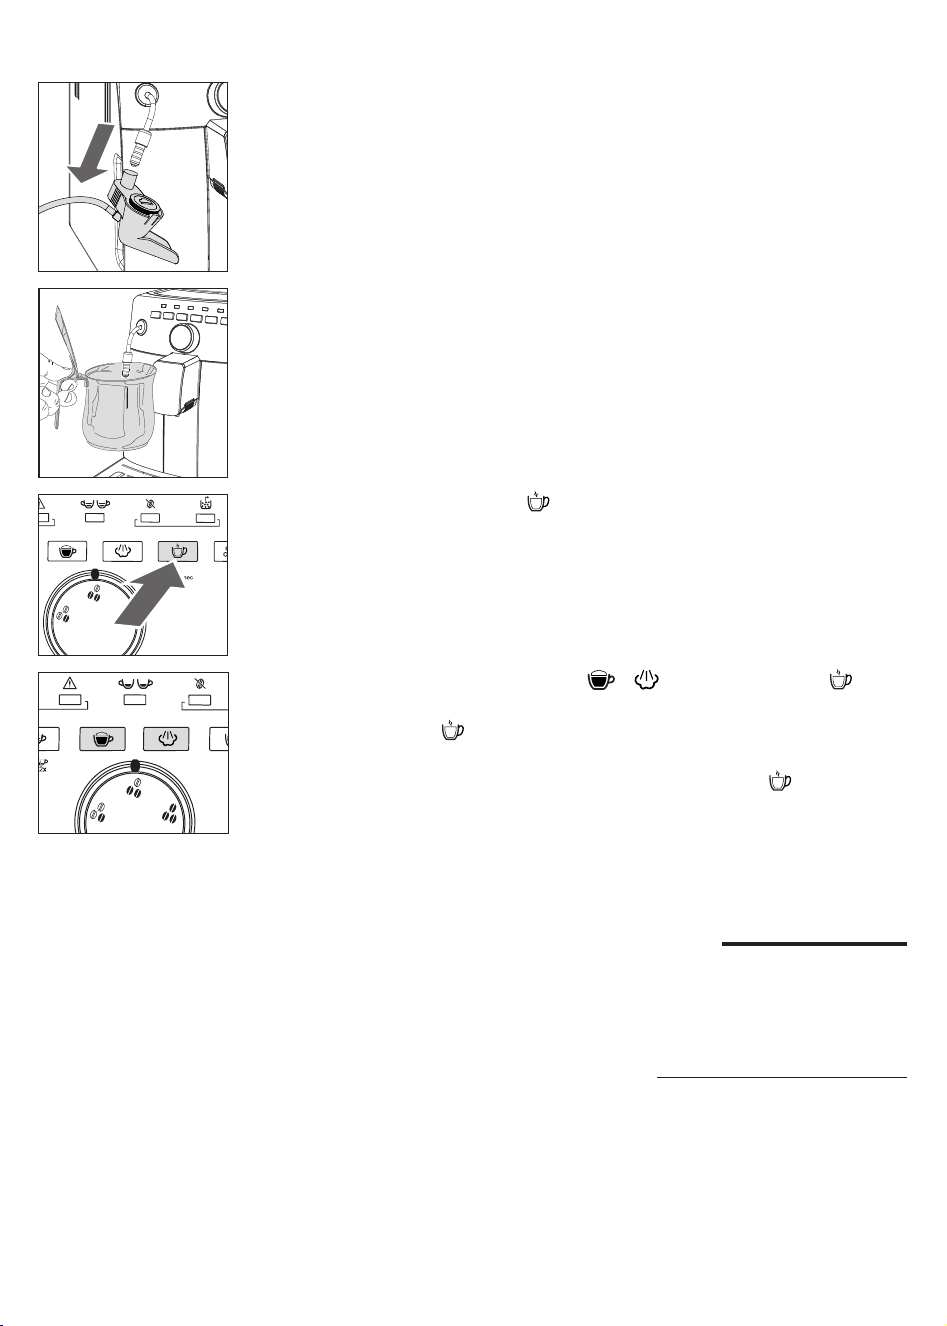
46
NEDERLANDS
2 Plaats een kannetje onder het stoompijpje.
3 Druk 5 seconden op de toets “ ” totdat de afgifte van heet water start.
4 De machine warmt op en de toetsen “ ” “ ” knipperen. De toets “ ”
gaat uit.
5 Wanneer de toets “ ” opnieuw aan gaat, wordt de afgifte van heet water
gestart.
6 Neem de gewenste hoeveelheid heet water. Druk op de toets
“ ”
om de
afgifte van heet water te beëindigen.
1 Verwijder het Capp in Cup-systeem zoals getoond in de afbeelding.
Aanpassing van de dranken
De machine kan worden ingesteld om de dranken te zetten op basis van uw
voorkeur.
Aanpassing van de maaljnheid
U kunt de maaljnheid aanpassen met de regelknop voor de instelling van
de koemolen, die zich in het koebonenreservoir bevindt. De keramische
koemolen garandeert een perfecte en homogene maling voor de bereiding van
elk kopje koe. Zo wordt het aroma behouden, om altijd een perfecte smaak te
garanderen.
Naviglio milk en-nl-pl.indd 46 01/08/2019 09:47:08
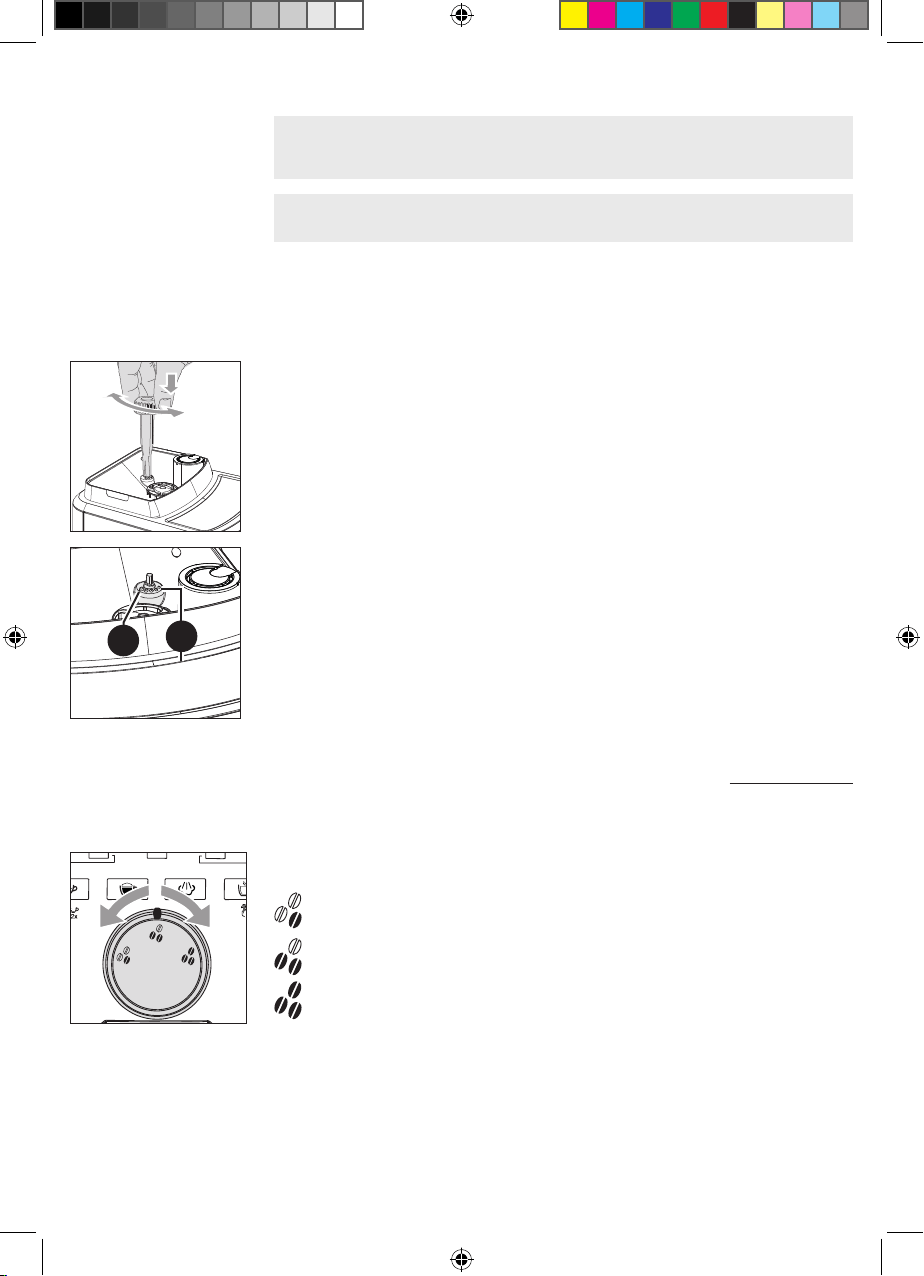
47
NEDERLANDS
4 Terwijl de machine de koe maalt, drukt en draait u de regelknop voor de
instelling van de koemolen die zich in het koebonenreservoir bevindt, met
gebruik van de speciaal daarvoor bestemde sleutel.
Instelling van de intensiteit van het aroma
Kies uw favoriete koemelange en stel de hoeveelheid te malen koe in op basis
van uw persoonlijke smaak.
1
2
Opmerking: de maaljnheid kan alleen worden aangepast terwijl de machine de
koebonen maalt. Het verschil in smaak zal na de afgifte van 2-3 kopjes koe
geproefd worden.
Let op: Draai de selectieknop van de maaljnheid niet meer dan één klik tegelijk,
om beschadiging van de koemolen te voorkomen.
1 Plaats een beker onder de koetuit.
2 Open het deksel van het koebonenreservoir.
3 Zet een espresso zoals beschreven in het hoofdstuk “Afgifte van de koe met
koebonen”.
5 Er zijn 5 verschillende graden van maaljnheid beschikbaar waaruit men kan
kiezen. Hoe kleiner het streepje, des te sterker en ronder de koe.
- Grove maling: mildere smaak, voor koemelanges met donkere branding;
- Fijne maling: intensere smaak, voor lichtgebrande koemelanges;
Door de keuzeschakelaar te draaien, zijn er drie selecties mogelijk. Het aroma
wijzigt aan de hand van de gekozen stand:
= mild aroma
= normaal aroma
= sterk aroma
Naviglio milk en-nl-pl.indd 47 01/08/2019 09:47:09
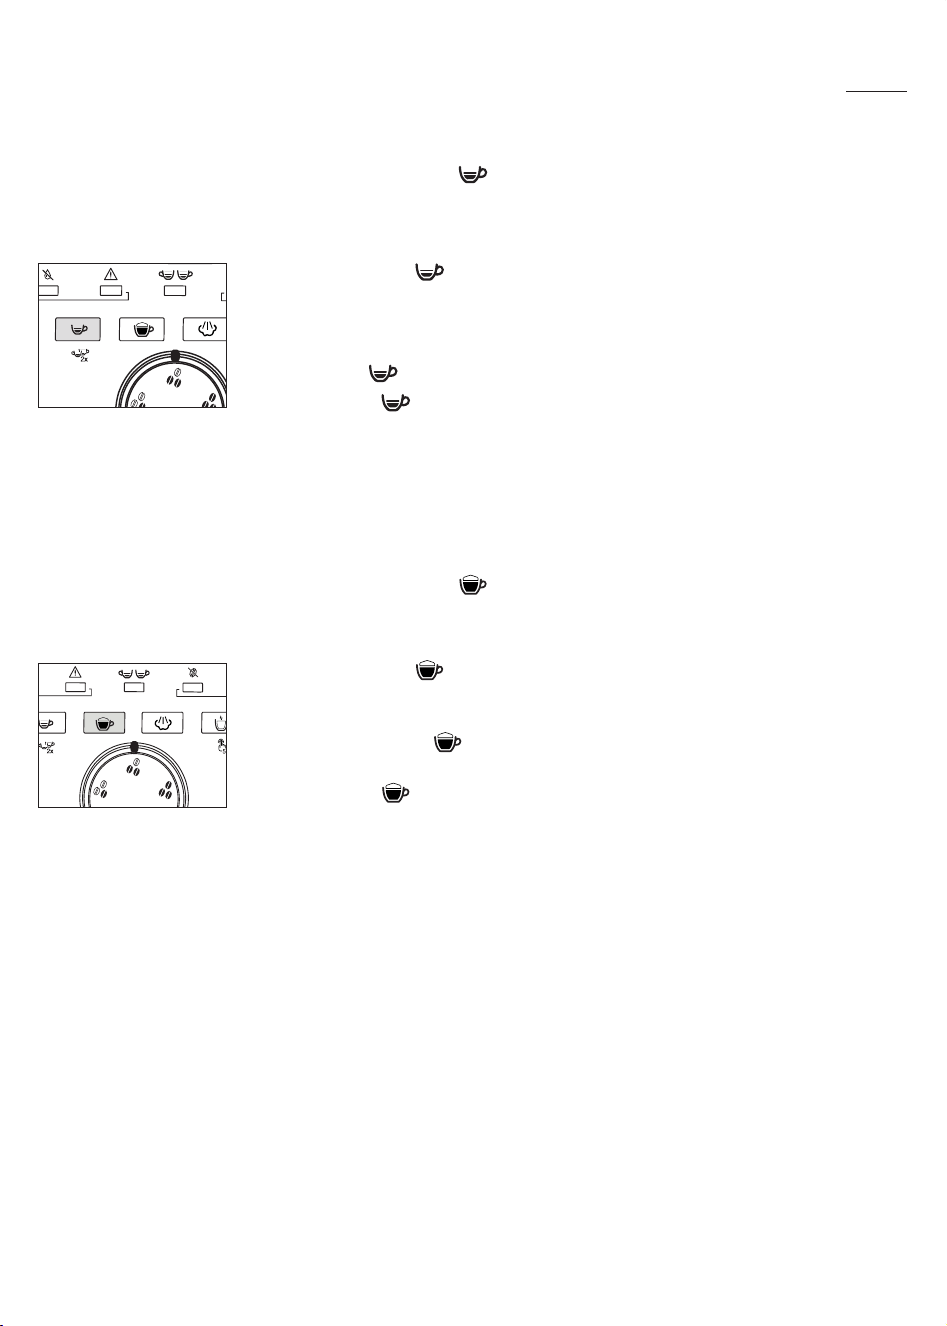
48
NEDERLANDS
Instelling van de hoeveelheid koe in een kopje
De machine biedt de mogelijkheid om de hoeveelheid verstrekte espresso in te
stellen afhankelijk van uw persoonlijke smaak en de grootte van de bekers/kopjes.
Bij elke druk op de toets “ ” zet de machine een geprogrammeerde hoeveelheid
koe.
1 Plaats een kopje onder de koetuit.
2 Houd de toets “ ” ingedrukt en laat hem weer los wanneer hij begint te
knipperen: de machine is nu bezig met programmeren.
De machine begint met de afgifte van de koe.
3 Wanneer het kopje de gewenste hoeveelheid koe bevat, drukt u op
de toets “ ”.
Nu is de toets “ ” geprogrammeerd; bij elke druk op de toets zal de machine de
zojuist ingestelde hoeveelheid espresso zetten.
Instelling van de hoeveelheid cappuccino in een kopje
De machine biedt de mogelijkheid om de hoeveelheid verstrekte koe en melk in te
stellen afhankelijk van uw persoonlijke smaak en van de grootte van de kopjes.
Bij elke druk op de toets “ ” verstrekt de machine eerst een geprogrammeerde
hoeveelheid melk en vervolgens koe.
1 Plaats een kopje onder de koetuit en het Capp in Cup-systeem.
2 Houd de toets “ ” ingedrukt en laat hem weer los wanneer hij begint te
knipperen: de machine is nu bezig met programmeren en begint met het
verstrekken van melk.
3 Druk op de toets “ ” wanneer de gewenste hoeveelheid melk is bereikt en
druk opnieuw op deze toets wanneer de gewenste hoeveelheid koe is bereikt.
Nu is de toets “ ” geprogrammeerd; bij elke druk op de toets zal de machine de
zojuist ingestelde hoeveelheid cappuccino zetten.
Naviglio milk en-nl-pl.indd 48 01/08/2019 09:47:10
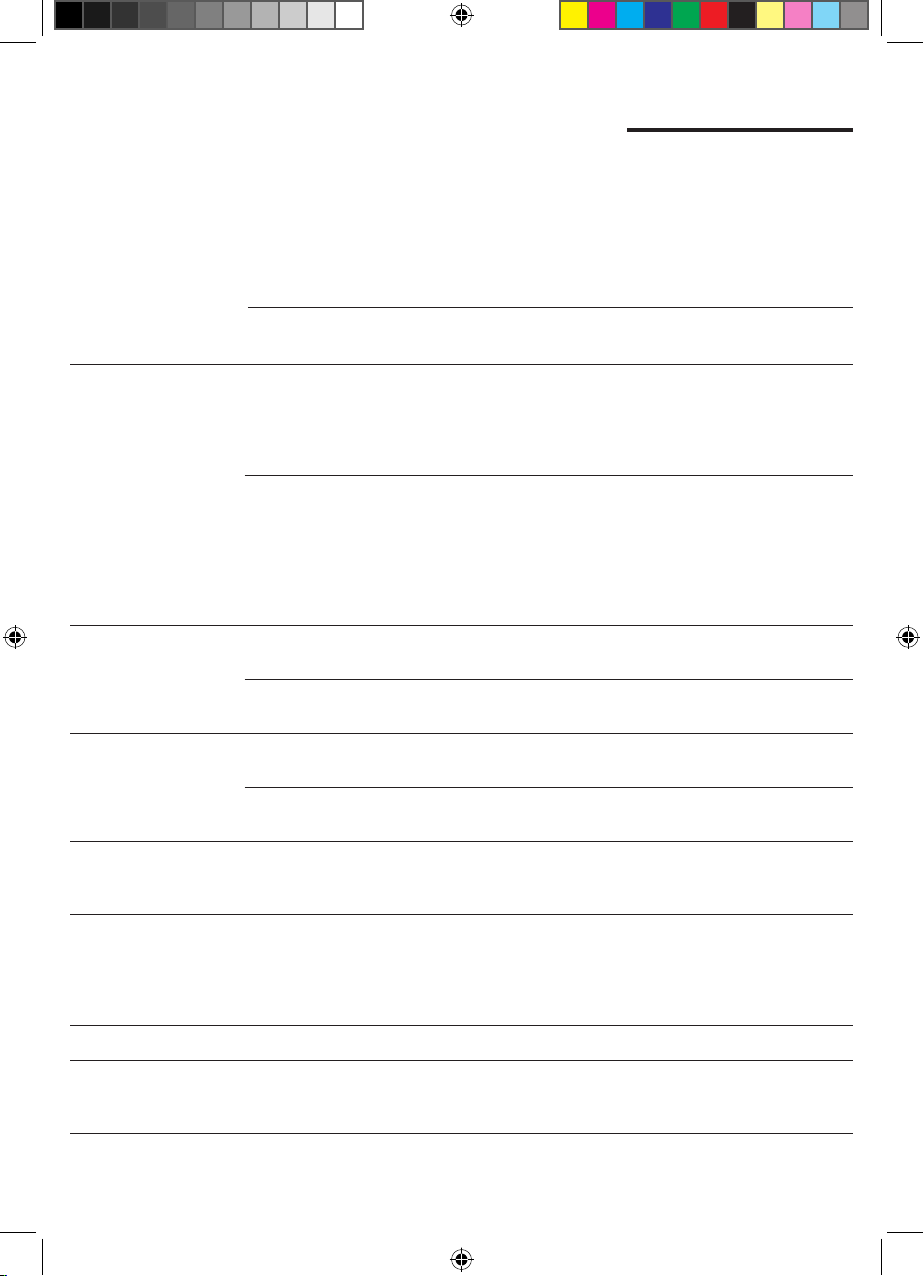
49
NEDERLANDS
Reinigingstabel
Beschrijving deel Wanneer reinigen Hoe reinigen
Capp in Cup-systeem Na gebruik Voer de “Snelle reiniging van het Capp in Cup-
systeem“ uit volgens de instructies beschreven in
het hoofdstuk. Demonteer en was het pijpje van
het Capp in Cup-systeem onder het stromende
water.
Maandelijks Voer de “Intensieve reiniging van het Capp in Cup-
systeem“ uit volgens de instructies beschreven in
het hoofdstuk. Gebruik voor deze reinigingscyclus
het product voor de reiniging van het melkcircuit
van Philips. Demonteer vervolgens het Capp in
Cup-systeem en was alle onderdelen onder het
stromende water.
Klassieke pannarello Na gebruik Demonteer de klassieke pannarello en spoel hem
af onder het stromende water.
Wekelijks Demonteer de klassieke pannarello en de
handgreep was deze onder het stromende water.
Zetgroep Wekelijks Verwijder de zetgroep en was hem onder het
stromende water.
In functie van het type gebruik Zie het hoofdstuk "Reiniging en smering van de
zetgroep".
Lekbakje vol Wanneer de speciale rode
indicator uit het rooster van het
lekbakje komt
Leeg het lekbakje en reinig het onder het
stromende water.
Koeresidureservoir Wanneer de machine dit vereist Leeg het koeresidureservoir en reinig het
onder het stromende water. Verzeker u ervan
dat de machine tijdens deze werkzaamheid
is ingeschakeld, anders wordt het
koeresidureservoir niet op nul gezet.
Waterreservoir Wekelijks Onder het stromende water reinigen.
Koeleiding Wekelijks Reinigen met het handvat van een lepel zoals
afgebeeld in het hoofdstuk “Reiniging van de
zetgroep onder vers water”.
Reiniging en onderhoud
Regelmatige reiniging en onderhoud houden de machine in optimale staat en
garanderen een altijd uitstekende koe. Raadpleeg de onderstaande tabel om te
weten wanneer en hoe u alle verwijderbare delen van de machine moet reinigen.
Lees de desbetreffende hoofdstukken voor meer gedetailleerde informatie.
Naviglio milk en-nl-pl.indd 49 01/08/2019 09:47:10
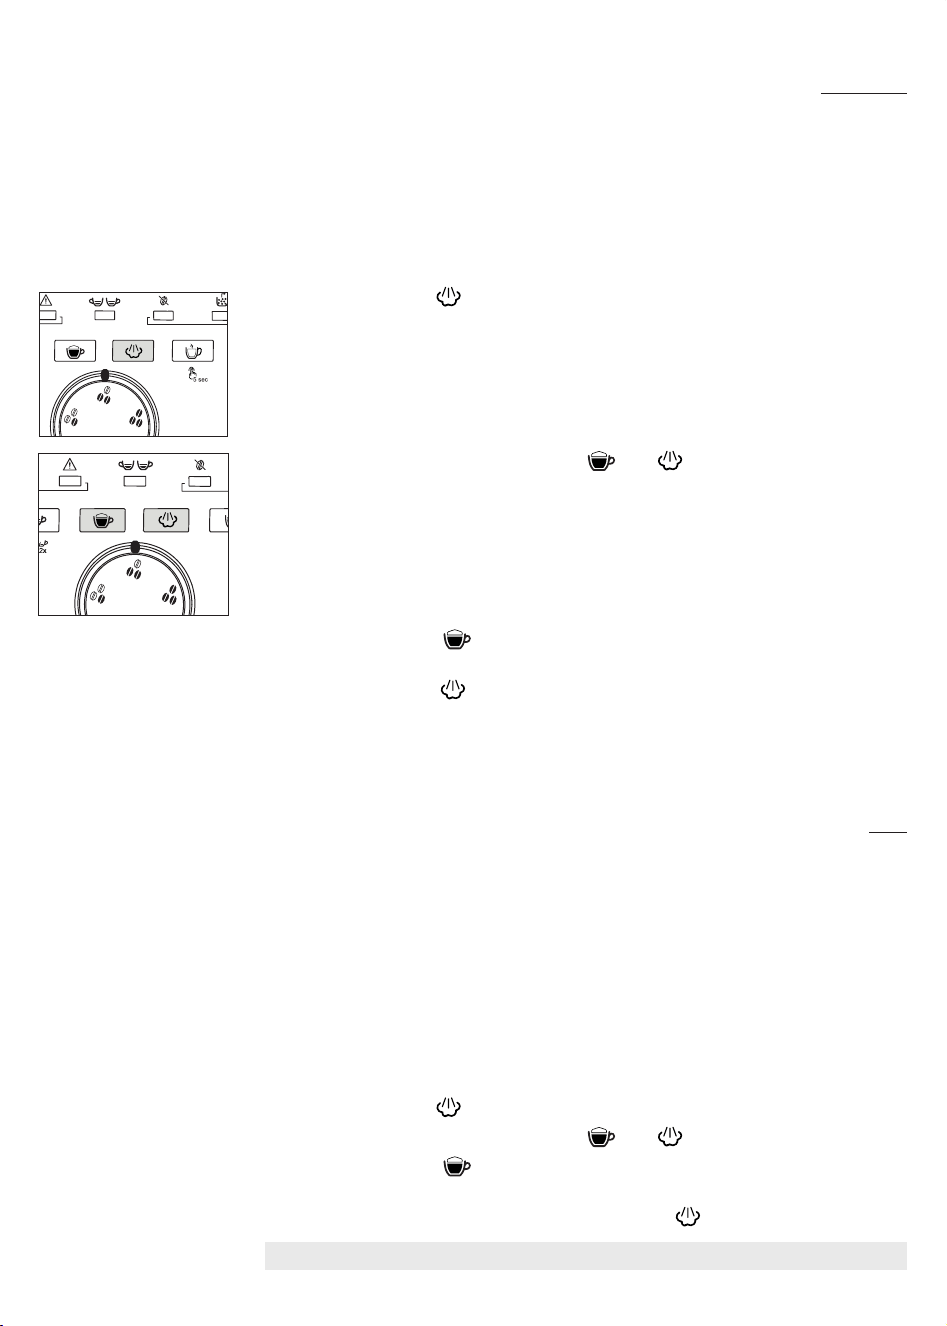
50
NEDERLANDS
Snelle reiniging van het Capp in Cup-systeem
Het is belangrijk het Capp in Cup-systeem dagelijks en na elk gebruik te reinigen
om de hygiëne te behouden en de bereiding van een melkschuim van perfecte
consistentie te garanderen.
Na het opschuimen van de melk dient altijd het volgende te gebeuren:
1 Steek het aanzuigbuisje van de melk in een bak gevuld met vers water.
2 Plaats een lege bak onder het Capp in Cup-systeem.
3 Druk op de toets “ ”.
4 De machine warmt op en de toetsen “ ” en “ ” knipperen.
5 Wanneer de toets “ ” uitgaat, wordt de afgifte gestart van het water dat het
circuit reinigt.
6 Druk op de toets “ ” om de afgifte te beëindigen.
7 Demonteer en was het pijpje van het Capp in Cup-systeem onder het
stromende water.
8 Reinig het aanzuigbuisje van de melk met een vochtige doek.
Intensieve reiniging van het Capp in Cup-systeem
Het programma voor de intensieve reiniging van het Capp in Cup-systeem voorziet
in een reiniging van het gehele melkcircuit met gebruik van de Philips “Milk Circuit
Cleaner”, het product voor de reiniging van de melkcircuits en de handmatige
reiniging van alle systeemcomponenten.
1 Controleer of het Capp in Cup-systeem juist is geïnstalleerd.
2 Giet het product voor de reiniging van het melkcircuit in een bak.
Voeg 1/2 liter lauw water toe en wacht tot het product geheel is opgelost.
3 Steek het aanzuigbuisje van de melk in de bak.
4 Zet een lege bak van minstens 1,5 liter onder het Capp in Cup-systeem.
5 Druk op de toets “ ”.
6 De machine warmt op en de toetsen “ ” en “ ” knipperen.
7 Wanneer de toets “ ” uitgaat, wordt de afgifte gestart van het water dat het
circuit reinigt.
8 Wanneer de oplossing op is, drukt u op de toets “ ” om de afgifte te stoppen.
Let op: drink niet de in dit proces verstrekte oplossing.
Naviglio milk en-nl-pl.indd 50 01/08/2019 09:47:11
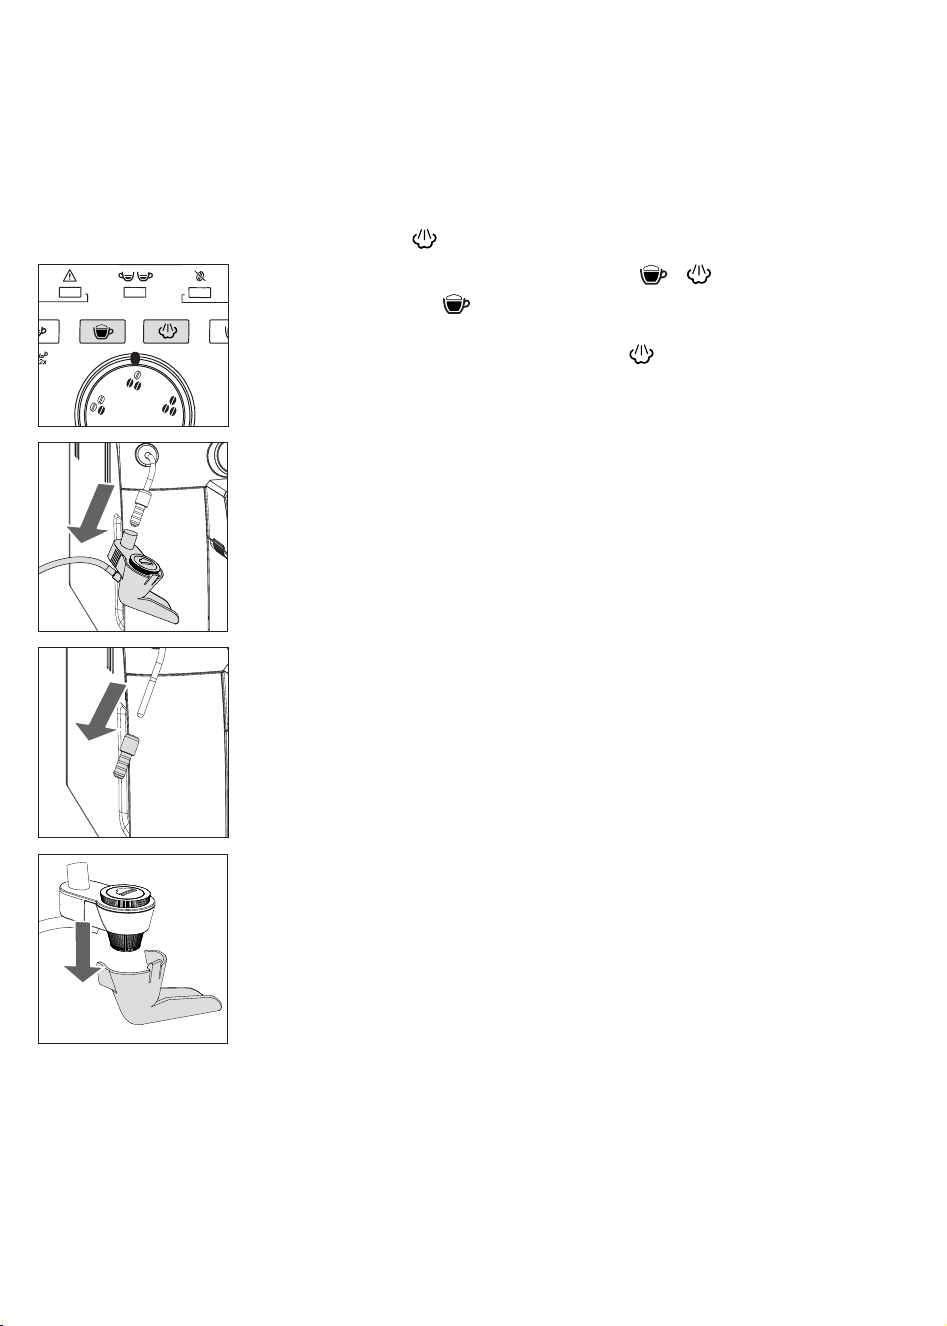
51
NEDERLANDS
9 Was het kannetje grondig af en vul het met een ½ l vers water dat gebruikt zal
worden voor de spoelcyclus.
10 Steek het aanzuigbuisje in het kannetje.
11 Leeg de kom en plaats het terug onder het Capp in Cup-systeem.
12 Druk op toets “ ” om de afgifte te starten.
13 De machine wordt verwarmd en de toetsen “ ” “ ” knipperen.
14 Wanneer de toets “ ” uitgaat, begint de machine de afgifte van water voor de
spoeling.
15 Wanneer het water op is, druk op de toets “ ” om de afgifte te stoppen.
17 Verwijder de rubberen handgreep van het stoompijpje.
18 Verwijder het pijpje van het Capp in Cup-systeem.
16 Verwijder het Capp in Cup-systeem van het stoompijpje.
Naviglio milk en-nl-pl.indd 51 01/08/2019 09:47:12

52
NEDERLANDS
19 Verwijder het aanzuigbuisje van de melk van de centrale behuizing van het
Capp in Cup-systeem.
20 Om de centrale behuizing te demonteren:
- haal hem aan de gemarkeerde kanten aan;
21 Verwijder het rubberen dopje.
- trek aan het linkerdeel en verwijder het zoals aangegeven op de afbeelding;
22 Was alle onderdelen onder het stromende water.
23 Na voltooiing van de reiniging monteert u alle onderdelen opnieuw door de
procedure in omgekeerde volgorde uit te voeren.
Naviglio milk en-nl-pl.indd 52 01/08/2019 09:47:13
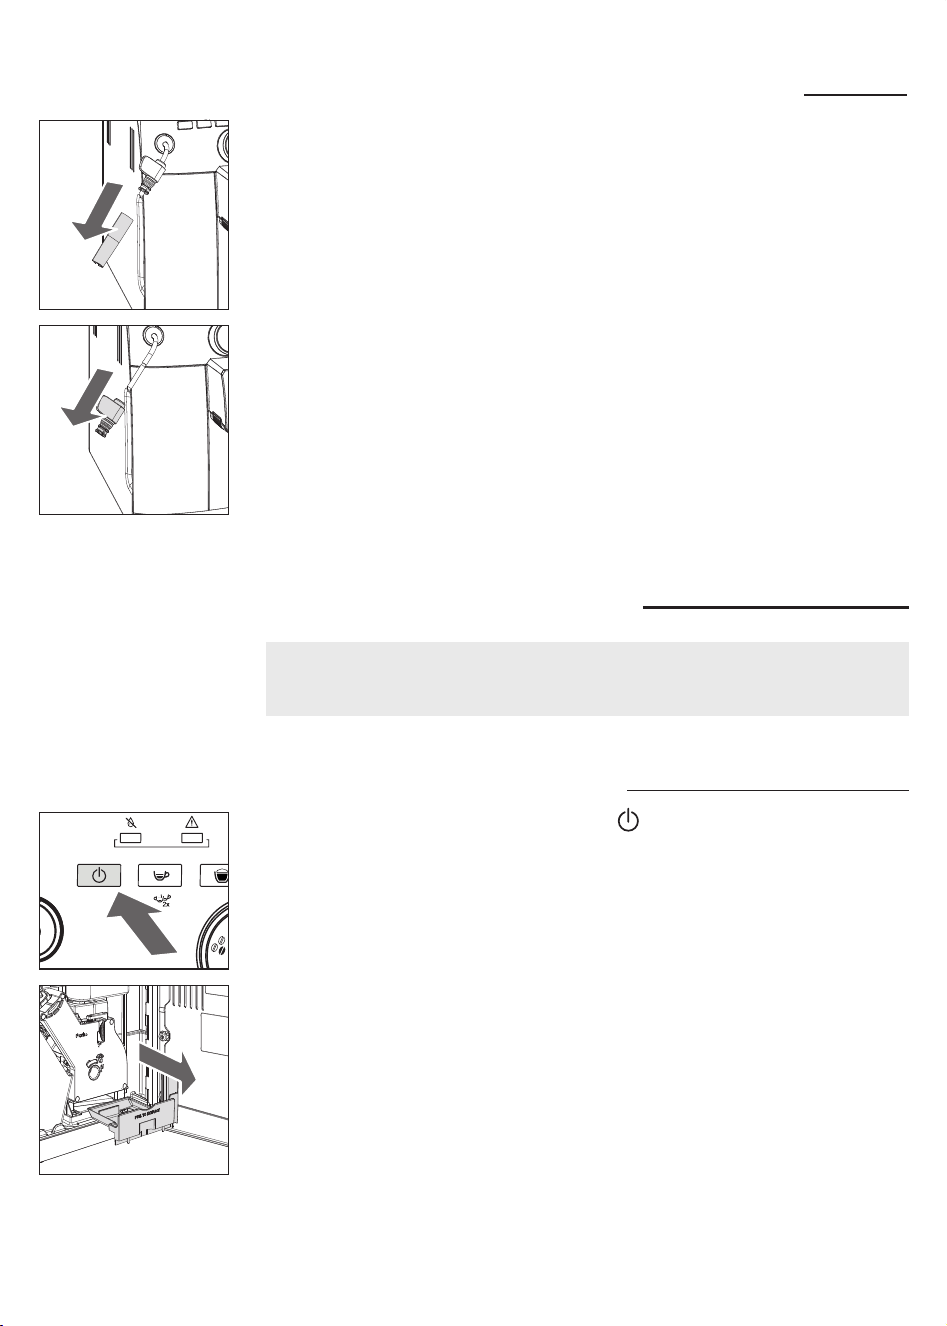
53
NEDERLANDS
Reiniging van de klassieke pannarello
1 Verwijder de klassieke pannarello en de handgreep van het stoompijpje en
spoel ze af.
2 Reinig het stoompijpje met een vochtige doek.
3 Zet de onderdelen weer in elkaar.
Reiniging van de zetgroep
Let op: was de zetgroep niet in de vaatwasmachine en gebruik geen afwas- of
reinigingsmiddelen, omdat dit de zetgroep kan beschadigen en de smaak van de
koe kan beïnvloeden.
Verwijdering van de zetgroep
1 Schakel de machine uit door op de toets “ ” te drukken en haal de stekker
uit het stopcontact.
2 Verwijder het koeresidureservoir en open de servicedeur.
3 Verwijder de koeopvanglade.
Naviglio milk en-nl-pl.indd 53 01/08/2019 09:47:14
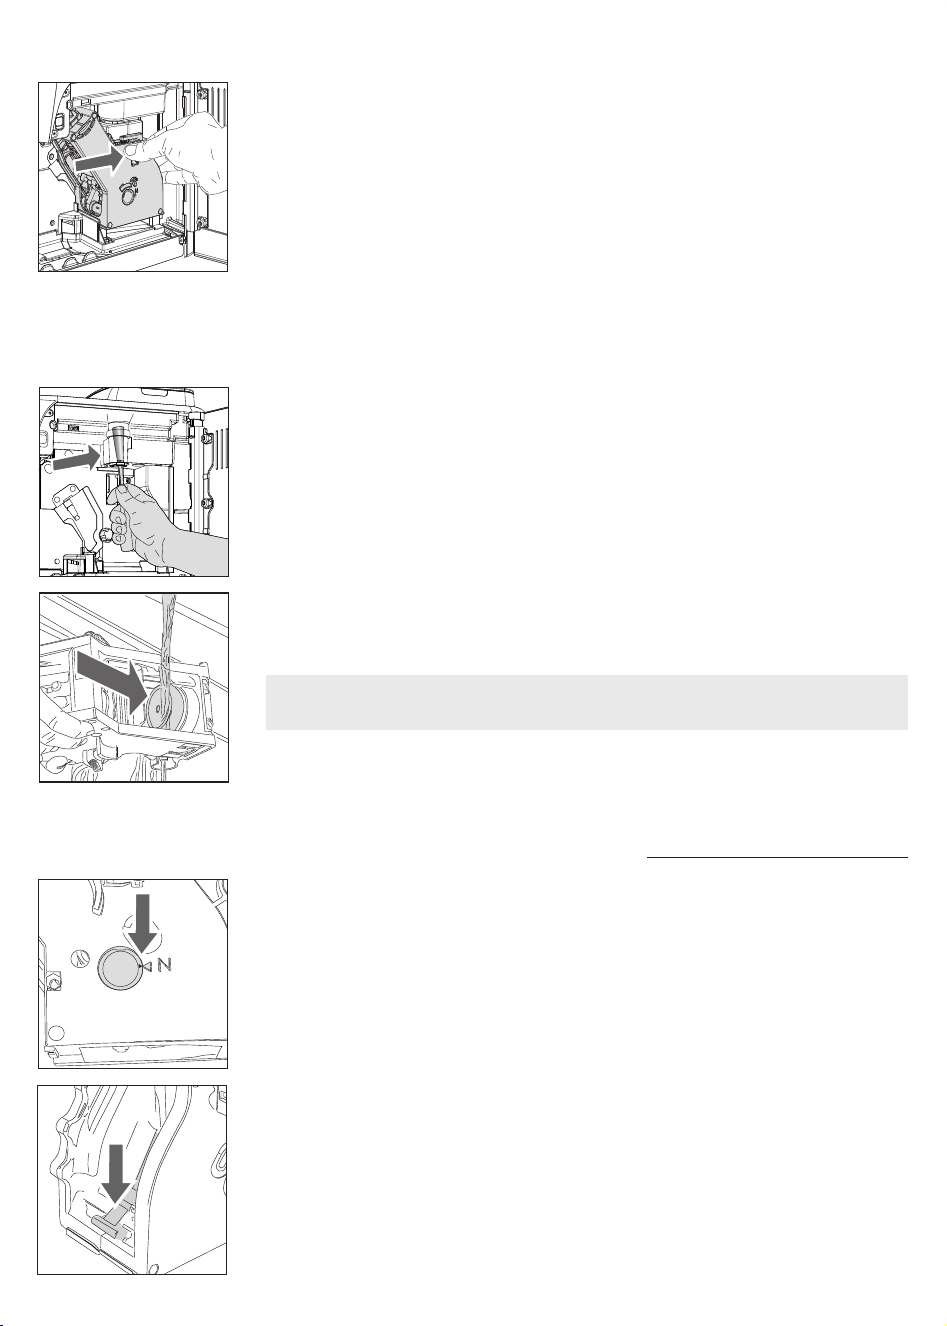
54
NEDERLANDS
Reiniging van de zetgroep onder het stromende water
1 Reinig grondig de koeleiding met het handvat van een lepeltje of met een
ander afgerond keukengereedschap.
2 Spoel de zetgroep grondig met lauw water. Reinig zorgvuldig het bovenste
lter.
3 Laat de zetgroep aan de lucht drogen.
Terugplaatsen van de zetgroep
1 Voordat u de zetgroep in de machine terugplaatst, moet u ervoor zorgen dat
de twee gele referentietekens aan de zijkant overeenkomen. Als dit niet zo is,
handelt u als volgt:
Opmerking:droog de zetgroep niet met doeken af om de ophoping van stofvezels
in de groep te vermijden.
Zorg ervoor dat de hendel in contact staat met de basis van de zetgroep.
4 Druk op de toets «PUSH» en trek daarbij aan het handvat om de zetgroep eruit
te halen.
Naviglio milk en-nl-pl.indd 54 01/08/2019 09:47:15
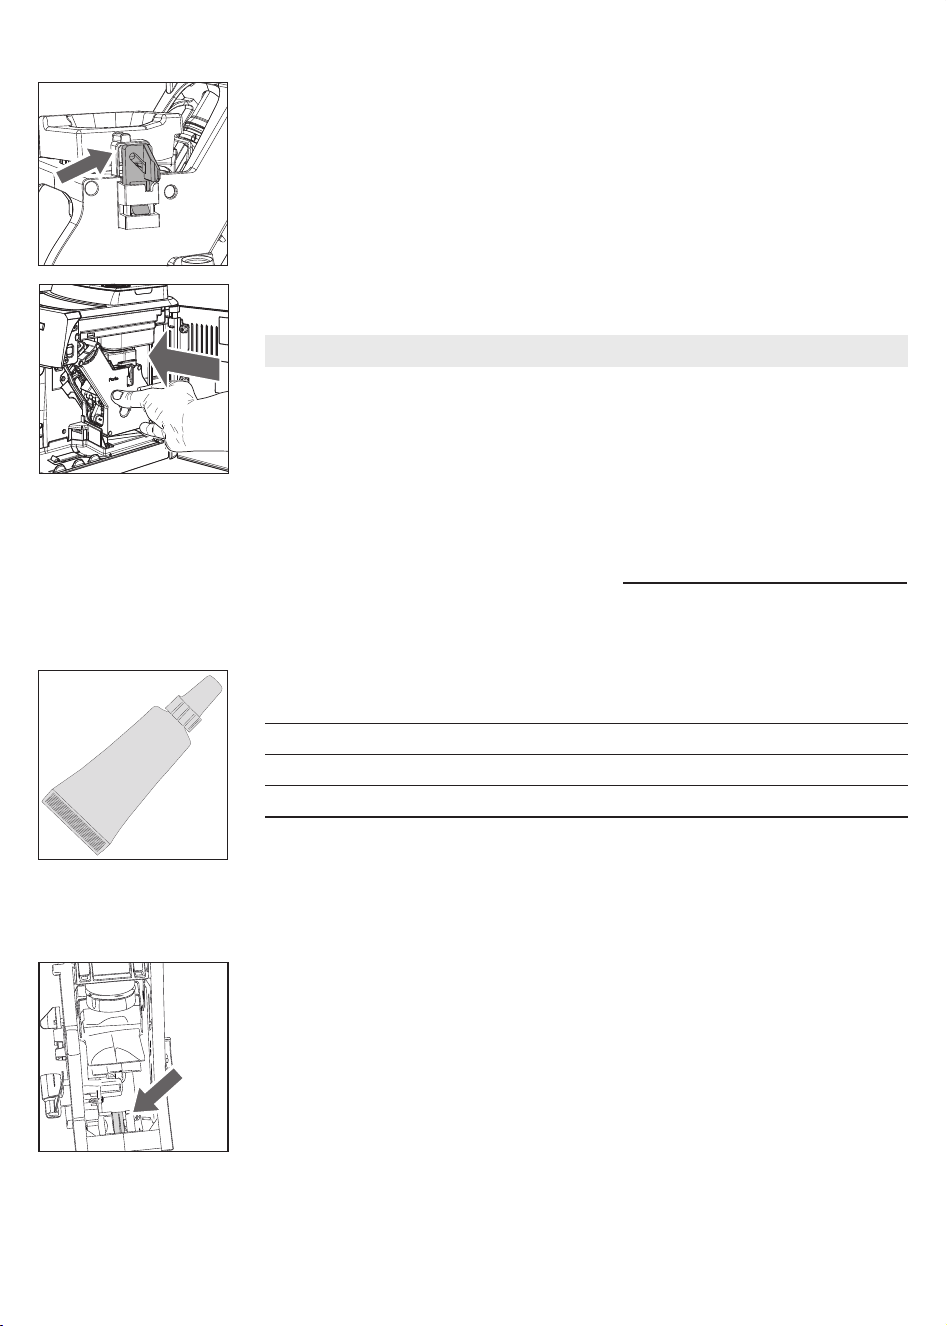
55
NEDERLANDS
2 Vergewis u ervan dat de gele vergrendelingshaak van de zetgroep in de juiste
stand staat.
Om de haak correct te plaatsen, duwt u hem omhoog tot de maximaal bereikbare
stand.
3 Plaats de zetgroep terug in de machine langs de geleiders aan de zijkanten
totdat deze met een klik op zijn plaats blokkeert.
Let op: druk niet op de PUSH-hendel.
4 Sluit de servicedeur.
Invetten van de zetgroep
Voor optimale machineprestaties moet de zetgroep gesmeerd worden. Raadpleeg
de volgende tabel voor de frequentie voor invetten.
Frequentie van gebruik
Dagelijks aantal bereide
dranken
Frequentie voor
invetten
Laag 1-5 Om de 4 maanden
Normaal 6-10 Om de 2 maanden
Hoog >10 Elke maand
1 Schakel het apparaat uit en koppel de voedingskabel los.
2 Verwijder de zetgroep en spoel deze af met lauw water (zie het hoofdstuk
“Reiniging van de zetgroep onder het stromende water”).
3 Breng een dunne laag van het meegeleverde smeervet aan rond de
plaatsingspin, onderaan de zetgroep.
Naviglio milk en-nl-pl.indd 55 01/08/2019 09:47:16
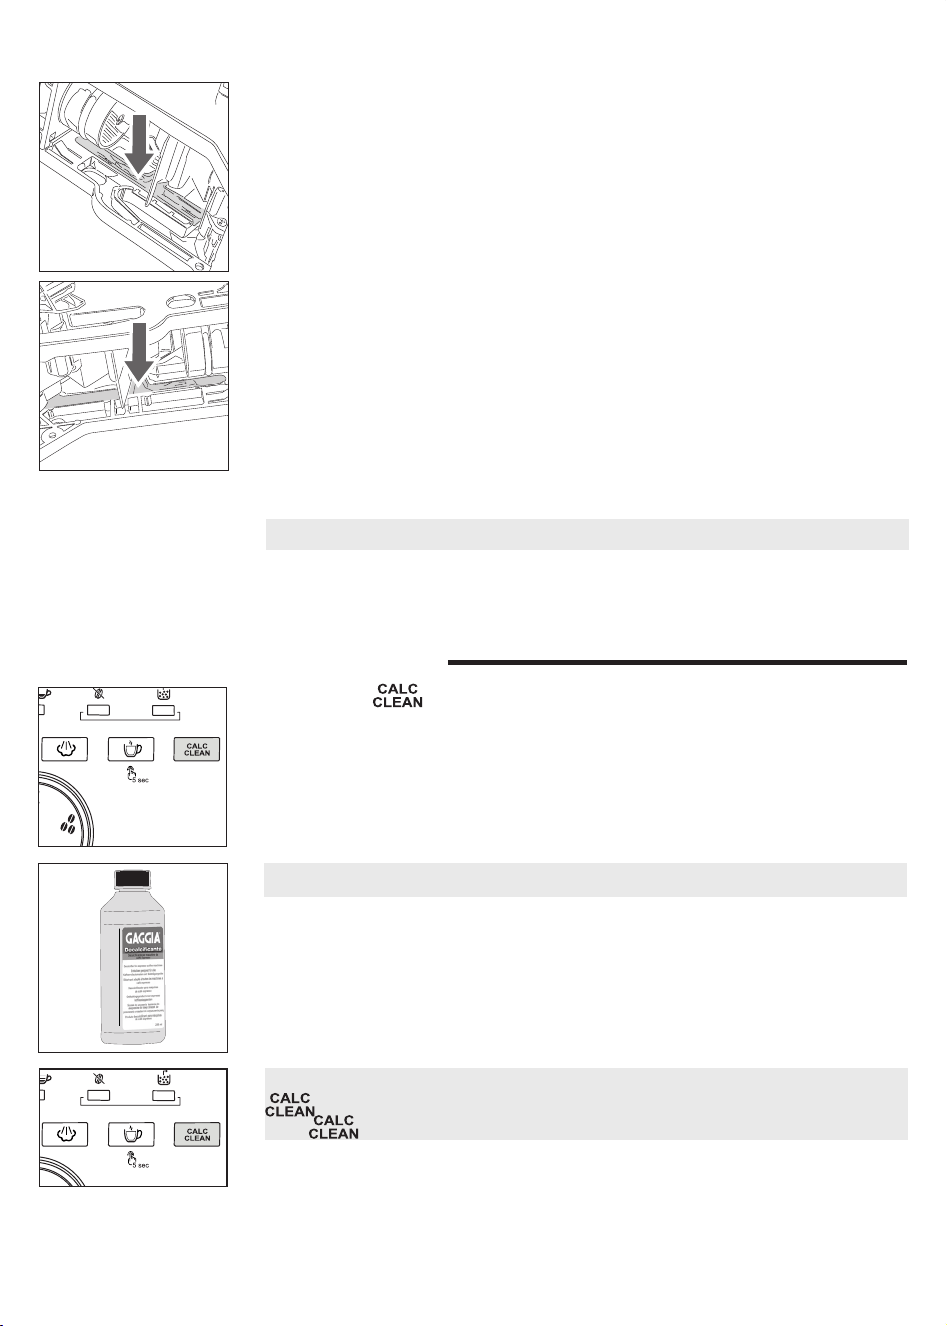
56
NEDERLANDS
4 Breng een dunne laag smeervet aan op de geleiders, aan beide kanten (zie
afbeelding).
5 Plaats de zetgroep terug (zie het hoofdstuk “Terugplaatsen van de zetgroep”).
Opmerking: u kunt de tube smeervet meerdere keren hergebruiken.
Ontkalking
Indien de led “ ” continu blijft branden, dient de ontkalking uitgevoerd te
worden.
De ontkalkingscyclus duurt ongeveer 35 minuten.
Gebruik alleen de ontkalkingsoplossing van Gaggia die ontworpen is om optimale
prestaties van de machine te garanderen. Het gebruik van andere producten kan
schade aan de machine veroorzaken en resten in het water achterlaten. Indien de
ontkalking van de machine niet uitgevoerd wordt, vervalt de garantie.
Opmerking: Haal de zetgroep tijdens het ontkalkingsproces nooit uit de machine.
Opmerking: De ontkalkingscyclus kan op pauze gezet worden door op de toets
te drukken. Om de cyclus weer verder te laten gaan, moet u opnieuw op de
toets drukken. Hierdoor kan men de bak legen of even weggaan.
Naviglio milk en-nl-pl.indd 56 01/08/2019 09:47:17

57
NEDERLANDS
1 Leeg het lekbakje en plaats het weer terug. Verwijder het INTENZA+ waterlter
(indien geïnstalleerd).
2 Verwijder het Capp in Cup-systeem van het stoom-/heetwaterpijpje.
5 Plaats een grote bak (1,5 l) onder het stoom-/heetwaterpijpje en onder de
koetuit.
3 Haal het waterreservoir uit de machine en leeg het. Giet de volledige inhoud
van het Gaggia ontkalkingsmiddel in het reservoir.
4 Vul het reservoir met vers water tot het CALC CLEAN niveau. Plaats het
waterreservoir terug in de machine.
6 Houd de toets 3 seconden ingedrukt. Wanneer de toets begint te
knipperen, laat u hem los om de cyclus te starten.
De toets knippert tijdens de uitvoering van de gehele ontkalkingscyclus.
7 De machine start met de afgifte van het ontkalkingsmiddel met tussenpozen
(van ongeveer 1 min.), uit het stoom-/heetwaterpijpje (de toets “ ” brandt
continu) en uit de koetuit (de toets “ ” brandt continu).
8 Wanneer de ontkalkingsoplossing op is, gaat de led aan en de
toets “ ” knippert.
9 Leeg de bak en plaats hem weer onder het stoom-/heetwaterpijpje en
onder de koetuit.
10 Haal het waterreservoir eruit, spoel zorgvuldig om en vul het met
vers water tot het MAX niveau.
Plaats het waterreservoir weer in de machine.
11 Leeg het lekbakje en plaats deze weer terug. Plaats
de bak.
Naviglio milk en-nl-pl.indd 57 01/08/2019 09:47:18
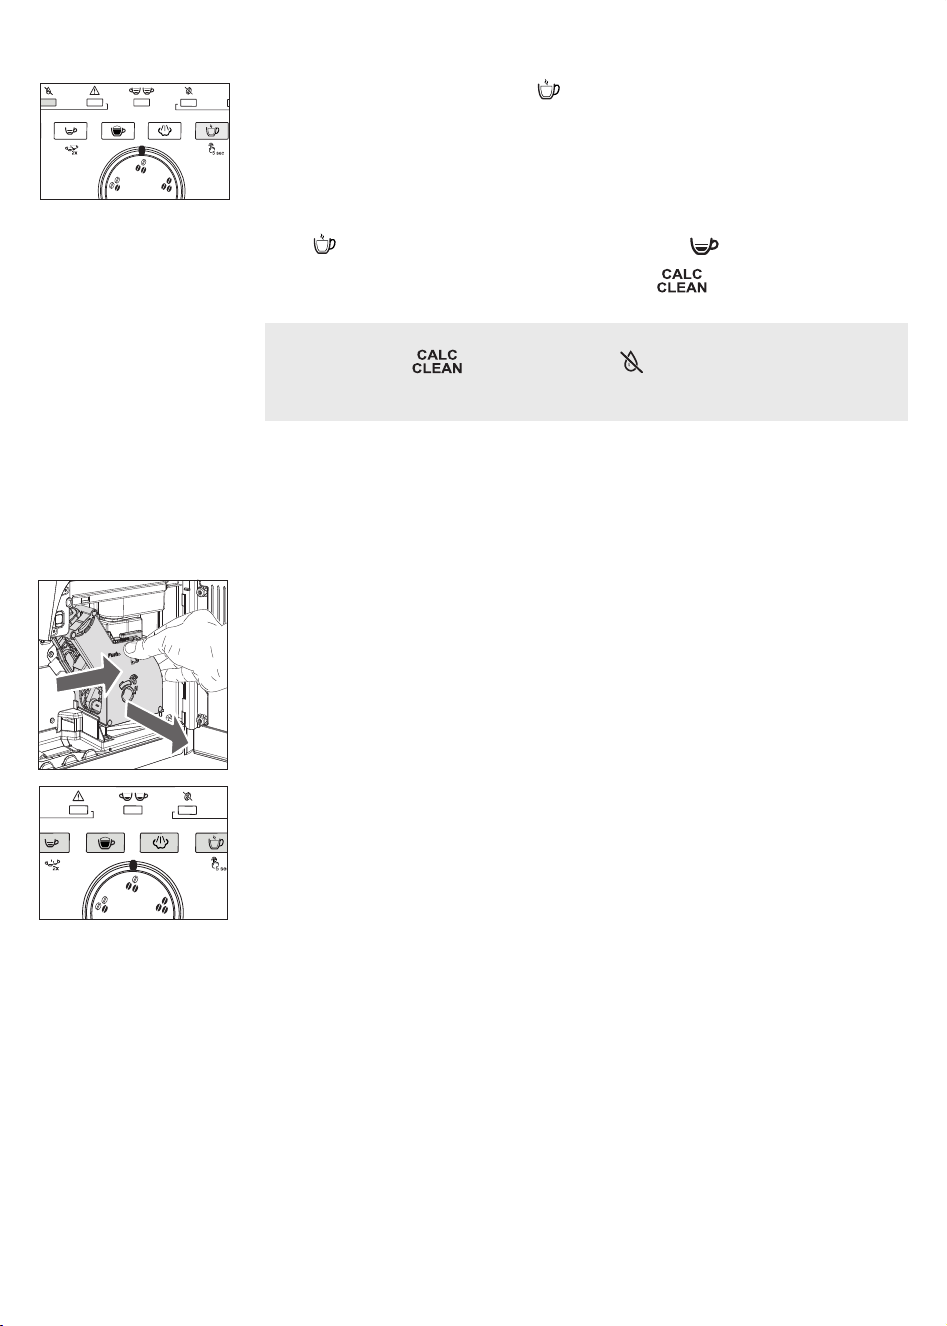
58
NEDERLANDS
12 Druk op de knipperende toets “ ” om de spoelcyclus te starten.
13 De machine start met de afgifte van water uit het stoom-/heetwaterpijpje (de
toets “ ” brandt continu) en uit de koetuit (de toets “ ” brandt continu).
14 Wanneer de spoeling is beëindigd, gaat de led uit; de ontkalking is
klaar.
Opmerking: Indien voor de spoeling het reservoir niet tot het MAX niveau wordt
gevuld, blijft de led knipperen en de led gaat branden: voor de machine is
de uitvoering van een andere cyclus vereist; herhaal nogmaals de handelingen van
punt 9 tot punt 13.
15 Verwijder de bak en maak hem leeg.
16 Leeg het lekbakje en plaats deze weer terug.
17 Haal het waterreservoir eruit en spoel het zorgvuldig om. Plaats het
Intenza+ waterlter weer terug (indien aanwezig). Vul het reservoir met vers
water tot het MAX niveau en plaats het terug in de machine.
18 Haal de zetgroep eruit en spoel hem af (zie hoofdstuk "Reiniging van de
zetgroep").
19 De machine is gereed voor gebruik.
Naviglio milk en-nl-pl.indd 58 01/08/2019 09:47:19
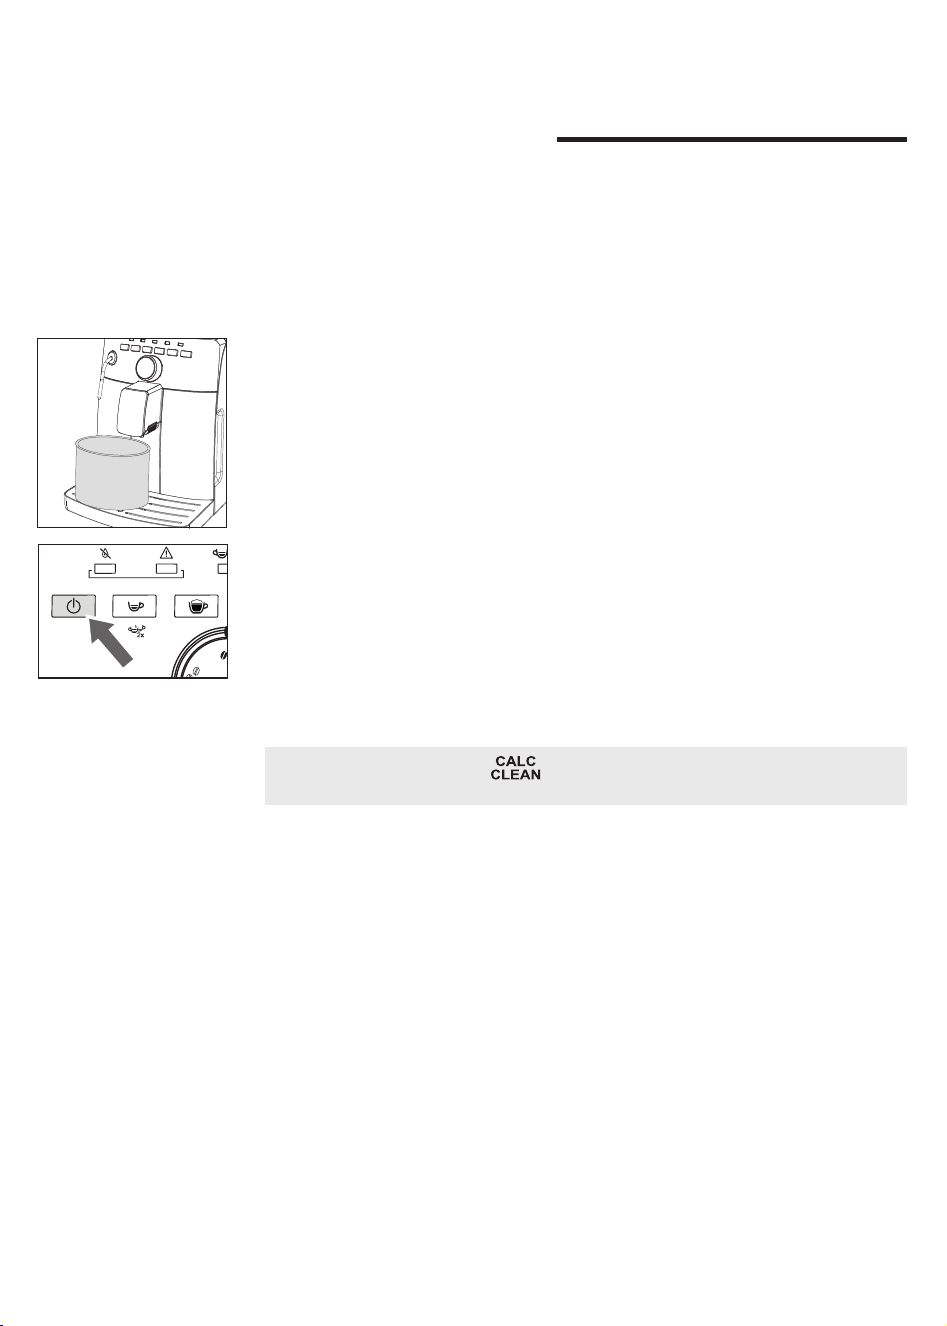
59
NEDERLANDS
Onverwachte onderbreking van de
ontkalkingscyclus
U kunt de ontkalkingsprocedure verlaten door op de toets “ON/OFF” op het
controlepaneel te drukken. Als de ontkalkingsprocedure wordt onderbroken
voordat deze is voltooid, handelt u als volgt
1 Leeg het lekbakje en plaats het weer terug.
2 Leeg het waterreservoir en spoel het zorgvuldig af, vul het met vers water tot
het CALC CLEAN niveau en plaats het terug in de machine.
4 Zet de machine aan. De machine voert een automatische spoeling uit.
5 Alvorens ongeacht welke drank u gaat bereiden, voert u een handmatige
spoelcyclus uit zoals beschreven in het betreffende hoofdstuk.
Opmerking: als de oranje led niet uitgaat, moet zo snel mogelijk een nieuwe
ontkalkingscyclus worden uitgevoerd.
3 Plaats een kannetje onder de koetuit en het stoom-/heetwaterpijpje.
Naviglio milk en-nl-pl.indd 59 01/08/2019 09:47:20
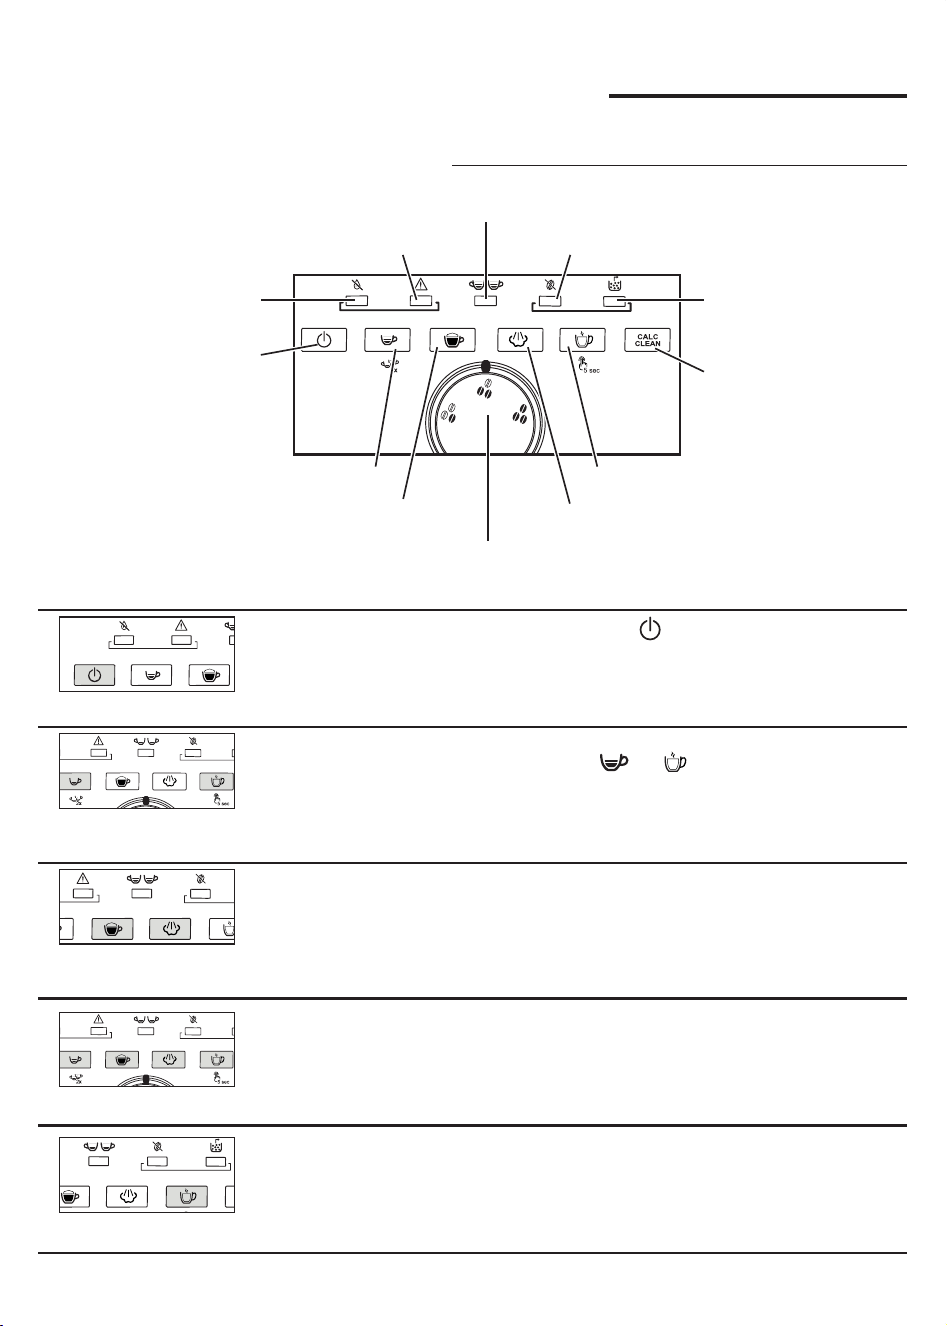
60
NEDERLANDS
Betekenis van de verlichte signalen
Display van het bedieningspaneel
Led symbolen Betekenis Acties
KNIPPEREND
Machine in stand-by.
Druk op de toets “ ” om de machine aan te zetten.
LANGZAAM KNIPPE-
REND
Machine in de spoelfase. De machine beëindigt de cyclus automatisch. Druk
op de toets “ ” of “ ” om de cyclus eerder te
stoppen.
LANGZAAM KNIPPE-
REND
Machine in verwarmingsfase
voor de afgifte van dranken.
CONTINU AAN
De machine is klaar voor
gebruik.
CONTINU AAN
De machine is bezig met de
afgifte van heet water.
Toets voor het zetten van espresso
Toets voor stoomafgifte
Toets voor het zetten van cappuccino
Toets voor de afgifte van heet
water
Led voor “Geen water”
Led
“Koeresidureservoir”
Toets ON/OFF
Toets voor ontkalking
Led voor “Geen koe”
Led voor “Dubbele koe”
Led voor “Alarm”
Keuzeschakelaar voor “Aroma”
Naviglio milk en-nl-pl.indd 60 01/08/2019 09:47:21
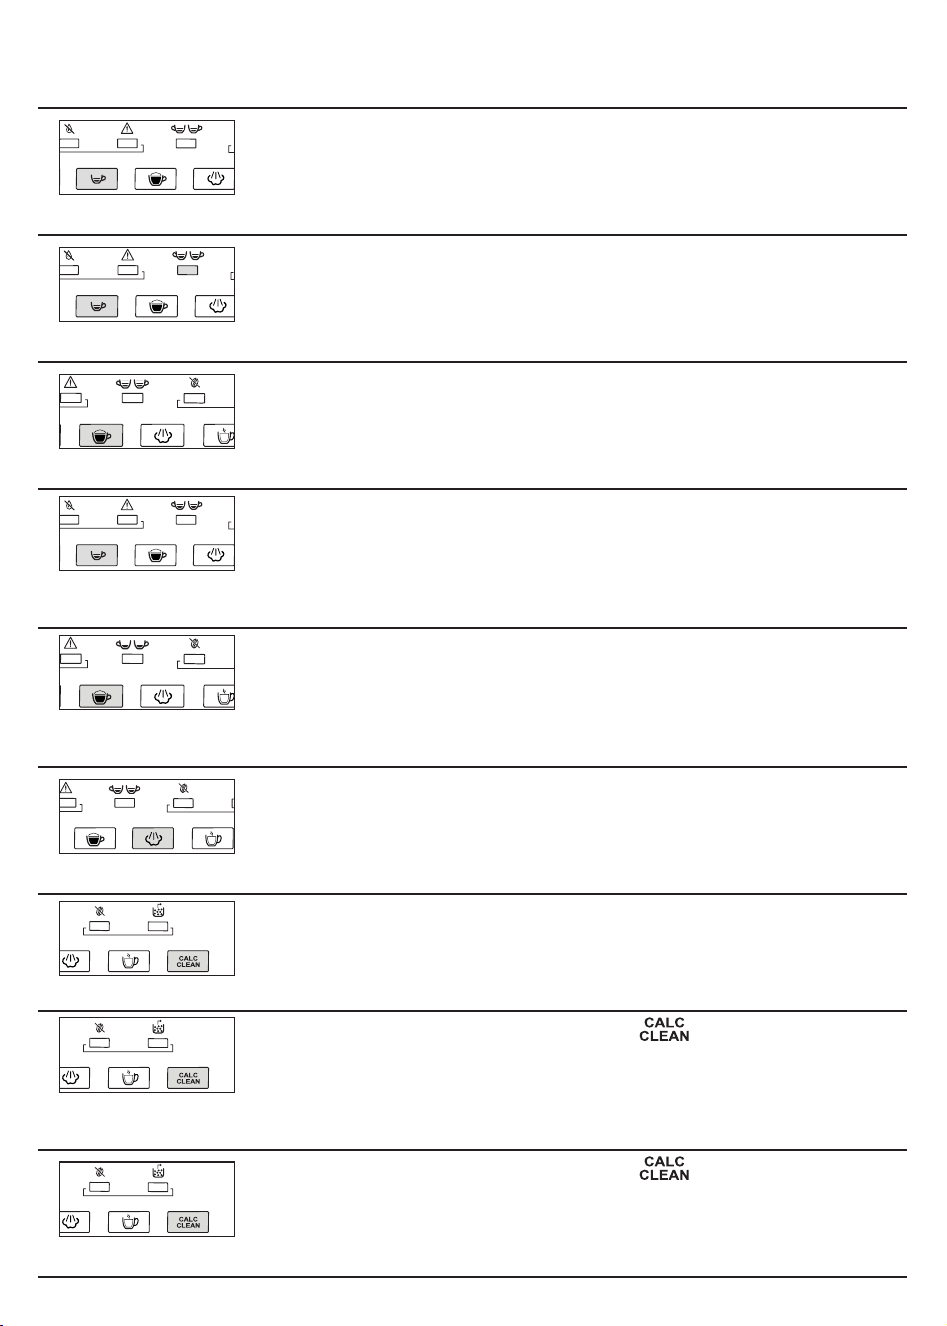
61
NEDERLANDS
Led symbolen Betekenis Acties
CONTINU AAN
De machine is bezig de
afgifte van een espresso.
CONTINU AAN
De machine is bezig met de
afgifte van 2 espresso's.
CONTINU AAN
De machine is bezig met de
afgifte van een cappuccino.
LANGZAAM KNIPPE-
REND
De machine is bezig met
het programmeren van
de hoeveelheid te zetten
espresso.
LANGZAAM KNIPPE-
REND
De machine is bezig met
het programmeren van
de hoeveelheid te zetten
cappuccino.
CONTINU AAN
De machine verstrekt stoom.
CONTINU AAN
De machine moet ontkalkt
worden.
Start de ontkalkingscyclus. Indien de machine
niet regelmatig wordt ontkalkt, zal de machine
ophouden om goed te functioneren. Deze storing
valt niet onder de garantie.
LANGZAAM KNIPPE-
REND
De machine is bezig met
ontkalken.
Druk op de toets “ ” om de cyclus op pauze
te zetten.
SNEL KNIPPEREND
De machine staat op "PAUZE"
tijdens de ontkalkingscyclus.
Druk op de toets “ ” om de cyclus te starten.
Naviglio milk en-nl-pl.indd 61 01/08/2019 09:47:22
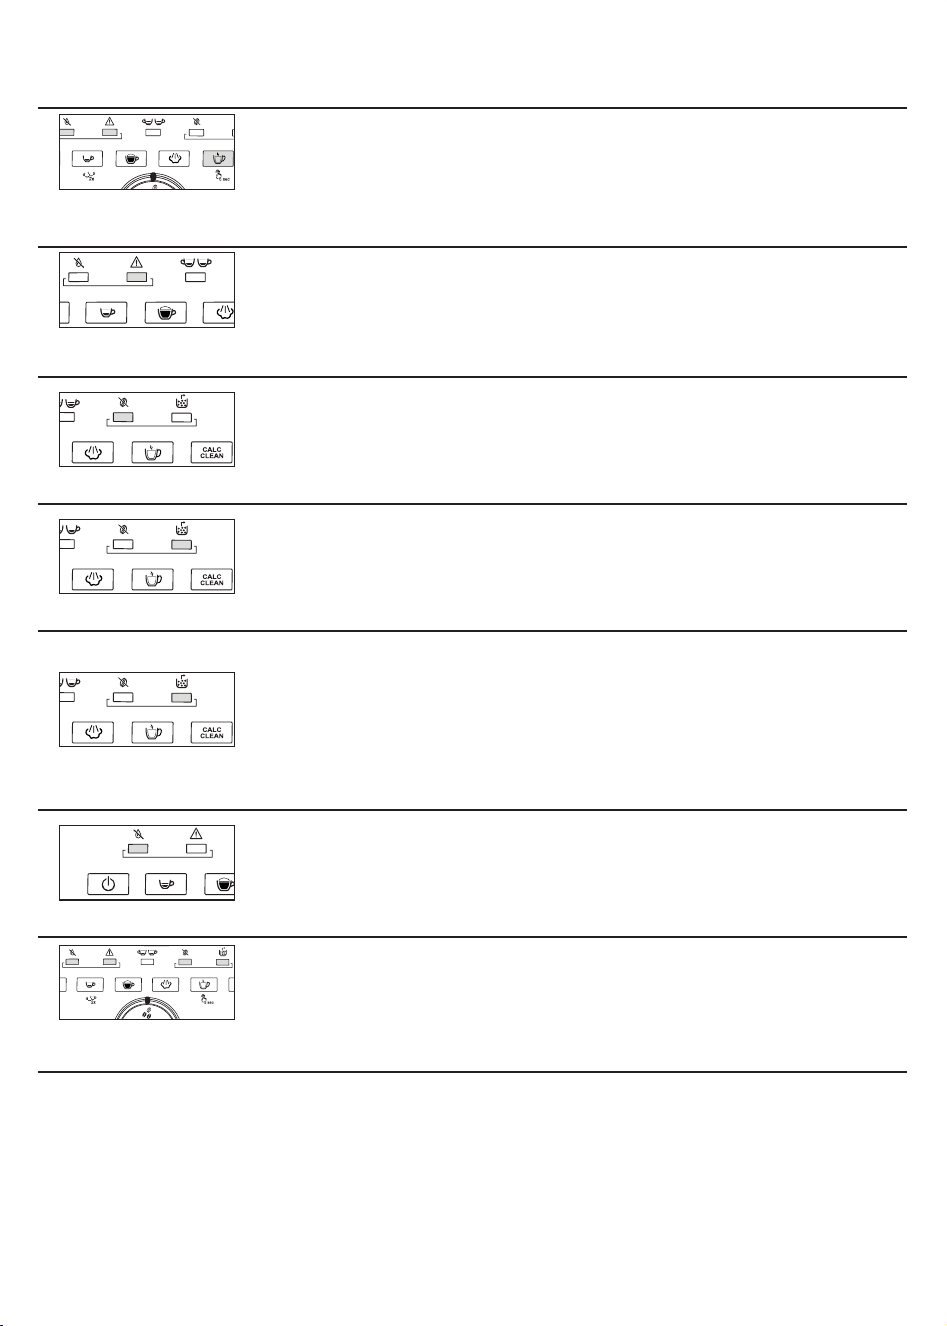
62
NEDERLANDS
Led symbolen Betekenis Acties
LANGZAAM KNIPPE-
REND
Laat het circuit vollopen. Vul het reservoir met vers water en vul het
watercircuit zoals beschreven in het hoofdstuk
"Eerste inschakeling".
LANGZAAM KNIPPE-
REND
- Sluit de servicedeur.
- Plaats de zetgroep.
Controleer of alle onderdelen correct geïnstalleerd
en gesloten zijn.
CONTINU AAN
Het koebonenreservoir is
leeg.
Vul het reservoir met koebonen en start de
afgiftecyclus opnieuw.
SNEL KNIPPEREND
Koeresidureservoir niet
geplaatst.
Leeg het koeresidureservoir en wacht tot de led
langzaam knippert alvorens deze weer terug te
plaatsen.
CONTINU AAN
Het koeresidureservoir is
vol.
Leeg het koeresidureservoir en het lekbakje
terwijl de machine ingeschakeld is. Wanneer het
koeresidureservoir wordt geleegd als de machine
uit is of als het controlelampje niet brandt, wordt
de telling van de koecycli niet op nul gezet. In dat
geval kan het controlelampje dat aangeeft om het
koeresidureservoir te legen, gaan knipperen ook
als de lade nog niet vol is.
CONTINU AAN
Het waterreservoir is leeg. Vul het waterreservoir met vers water.
LANGZAAM KNIPPE-
REND
De machine heeft een storing
en
staat de afgifte van espresso,
cappuccino, water of stoom
niet toe.
Zet de machine uit en na 30 seconden weer aan.
Probeer dit 2 of 3 keer.
Naviglio milk en-nl-pl.indd 62 01/08/2019 09:47:23

63
NEDERLANDS
Oplossing van problemen
Dit hoofdstuk vat de meest voorkomende problemen samen waarmee uw machine
te maken zou kunnen hebben.
Verschijnselen Oorzaken Oplossingen
De machine gaat niet aan. De machine is niet op het elektrici-
teitsnet aangesloten.
Sluit de machine op het elektriciteitsnet
aan.
De koe is niet warm
genoeg.
De kopjes zijn koud. Warm de kopjes op met heet water.
Het lekbakje wordt gevuld,
ook wanneer er geen water
wordt afgevoerd.
Soms voert de machine het water
automatisch af in het lekbakje
om de spoeling van de circuits
te beheren en om een optimale
werking te garanderen.
Dit gedrag wordt als normaal
beschouwd.
De rode led van de
machine brandt continu ook
na het koeresidureservoir te
hebben geleegd.
Het koeresidureservoir werd
geleegd terwijl de machine uitge-
schakeld was.
Het koeresidureservoir moet altijd
worden geleegd wanneer de machine
ingeschakeld is. Wacht tot de rode led
langzamer begint te knipperen alvorens
de lade terug in de machine te plaatsen.
Er komt geen heet water of
stoom uit.
De opening van het stoompijpje is
verstopt.
Reinig de opening van het stoompijpje
met een naald.
Let op:vergewis u ervan dat de
machine uitgeschakeld en afgekoeld is,
alvorens deze handeling uit te voeren.
Capp in Cup-systeem vuil (indien
aanwezig).
Reinig het Capp in Cup-systeem.
De koe heeft weinig room.
(Zie opmerking)
De machine voert de zelfregulatie
uit.
Zet enkele kopjes koe zodat de
machine de zelfregulatie uitvoert.
De melange is niet geschikt, de
koe is niet vers gebrand of de
koe is te grof gemalen.
Gebruik een andere koemelange of pas
de maling aan zoals in paragraaf
“Instelling van de koemolen”.
De machine warmt te
langzaam op of er komt te
weinig water uit het pijpje.
Het circuit van de machine is door
kalkaanslag verstopt.
Voer de ontkalkingscyclus van de
machine uit.
De zetgroep kan er niet
worden uitgehaald.
De zetgroep zit niet op zijn plaats. Zet de machine aan. Sluit de servicedeur.
De zetgroep keert automatisch naar zijn
beginpositie terug.
Het koeresidureservoir is
geplaatst.
Haal het koeresidureservoir eruit
alvorens de zetgroep te verwijderen.
Er ligt veel gemalen koe
onder de zetgroep.
De koe is niet geschikt voor
automatische machines.
Het zou nodig kunnen zijn om van
koesoort te veranderen of om de
instelling van de koemolen te wijzigen.
Naviglio milk en-nl-pl.indd 63 01/08/2019 09:47:24
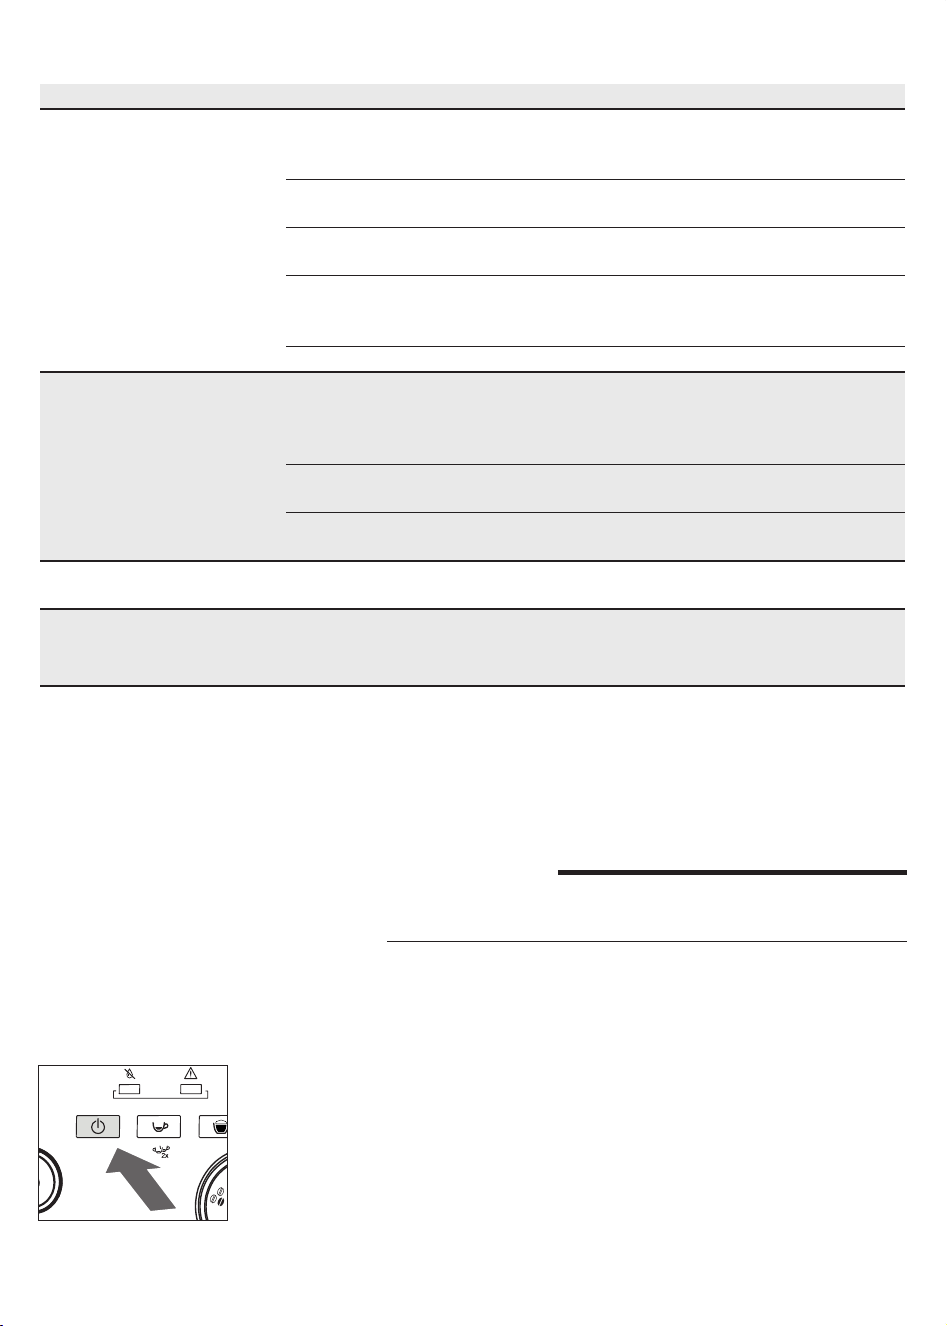
64
NEDERLANDS
Verschijnselen Oorzaken Oplossingen
De machine maalt de
koebonen, maar er komt
geen koe uit.
(Zie opmerking)
Het water is op. Vul het waterreservoir en laat het circuit
opnieuw vollopen (hoofdstuk "Eerste
inschakeling").
De zetgroep is vuil. Reinig de zetgroep (hoofdstuk
“Wekelijkse reiniging van de zetgroep”).
Het circuit is niet gevuld. Vul het circuit (hoofdstuk “Eerste
inschakeling”).
Dit zou zich voor kunnen doen
wanneer de machine bezig is
automatisch de dosis af te stellen.
Zet een paar kopjes koe volgens de
beschrijving in het hoofdstuk “Gaggia
Adapting System”.
De koetuit is vuil. Reinig de koetuit.
De koe stroomt langzaam
uit de machine
(Zie opmerking)
De koe is te jn. Gebruik een andere koemelange of
pas de maaljnheid aan zoals staat
beschreven in het hoofdstuk “Instelling
van de keramische koemolen”.
Het circuit is niet gevuld. Vul het circuit (hoofdstuk “Eerste
inschakeling”).
De zetgroep is vuil. Reinig de zetgroep (hoofdstuk
“Wekelijkse reiniging van de zetgroep”).
Koe stroomt aan de buiten-
kant langs de koetuit.
De koetuit is verstopt. Reinig de koetuit en de openingen
ervan.
De melk wordt niet
opgeschuimd.
Het Capp in Cup-systeem is te
diep geplaatst. De melk wordt niet
aangezogen.
Laat het Capp in Cup-systeem afkoelen.
Beweeg het voorzichtig naar beneden.
Plaats het terug op de juiste plek.
De opgeschuimde melk is te
koud.
De bekers zijn koud. Verwarm de bekers met heet water.
Energiebesparing
Stand-by
De volautomatische espressomachine
Gaggia
is ontworpen voor energiebesparing.
Na 30 min. van inactiviteit gaat de machine automatisch uit. Als er een product is
afgegeven, voert de machine een spoelcyclus uit.
In de stand-by modus is het energieverbruik minder dan 1Wh.
Om de machine in te schakelen, dient men op deze toets te drukken (indien de
hoofdschakelaar in de stand “I” staat). Als de ketel koud is, voert de machine een
spoelcyclus uit.
Naviglio milk en-nl-pl.indd 64 01/08/2019 09:47:24
65
NEDERLANDS
Technische kenmerken
De fabrikant behoudt zich het recht voor om de technische eigenschappen van het
product te wijzigen.
Nominale spanning - Nominaal
vermogen - Voeding
Zie plaatje aan de binnenkant van
de servicedeur
Materiaal behuizing Thermoplast
Afmetingen (l x h x d) 256 x 340 x 440 mm
Gewicht 9 kg
Kabellengte 800 - 1200 mm
Bedieningspaneel Front
Klassieke Melkopschuimer Speciaal voor cappuccino's
Maximum hoogte van kopje onder
de koetuit (mm)
110
Waterreservoir 1,5 liter - Uitneembaar
Inhoud koebonenreservoir 300 g
Inhoud koeresidureservoir 10
Pompdruk 15 bar
Waterketel Roestvrij staal
Veiligheidsinrichtingen Thermozekering
Accessoires
De accessoires zijn beschikbaar in de erkende centra of via de dealers van uw
land. U vindt de contactgegevens op de website www.gaggia.com en www.gaggia.
it.
Naviglio milk en-nl-pl.indd 65 01/08/2019 09:47:24

66
POLSKI
Spis treści
Instalacja .....................................................................................................................................................................................................................................................................................................................................................................................................................................................................................................................................................................................................................................3
Przegląd produktu ...........................................................................................................................................................................................................................................................................................................................................................................................................................................................................................................................................................3
Opis ogólny ............................................................................................................................................................................................................................................................................................................................................................................................................................................................................................................................................................................................67
Operacje wstępne ......................................................................................................................................................................................................................................................................................................................................................................................................................................................................................................................................................68
Opakowanie urządzenia ..............................................................................................................................................................................................................................................................................................................................................................................................................................................................................................................68
Instalacja urządzenia .................................................................................................................................................................................................................................................................................................................................................................................................................................................................................................................................68
Pierwsze uruchomienie .............................................................................................................................................................................................................................................................................................................................................................................................................................................................................................................70
Napełnianie obwodu .....................................................................................................................................................................................................................................................................................................................................................................................................................................................................................................................................70
Cykl automatycznego płukania .....................................................................................................................................................................................................................................................................................................................................................................................................................................................................71
Ręczny cykl płukania ..................................................................................................................................................................................................................................................................................................................................................................................................................................................................................................................................71
Instalacja ltra wody „INTENZA+” ............................................................................................................................................................................................................................................................................................................................................................................................................................72
Przygotowanie napojów .........................................................................................................................................................................................................................................................................................................................................................................................................................................................................................................73
Parzenie kawy espresso ................................................................................................................................................................................................................................................................................................................................................................................................................................................................................................................................................74
Jak zamontować system Capp in Cup ...........................................................................................................................................................................................................................................................................................................................................................................................................................................................74
Jak przygotować cappuccino ....................................................................................................................................................................................................................................................................................................................................................................................................................................................................................................................75
Jak spienić mleko .........................................................................................................................................................................................................................................................................................................................................................................................................................................................................................................................................................76
Nalewanie gorącej wody ....................................................................................................................................................................................................................................................................................................................................................................................................................................................................................................76
Indywidualne ustawienia napojów ............................................................................................................................................................................................................................................................................................................................................................................................................................77
Regulacja stopnia mielenia ............................................................................................................................................................................................................................................................................................................................................................................................................................................................................................77
Regulacja intensywności aromatu ..................................................................................................................................................................................................................................................................................................................................................................................................................................................78
Pokrętło do regulacji ilości kawy w liżance ......................................................................................................................................................................................................................................................................................................................................................................................79
Pokrętło do regulacji ilości cappuccino w liżance ..............................................................................................................................................................................................................................................................................................................................................79
Czyszczenie i konserwacja ................................................................................................................................................................................................................................................................................................................................................................................................................................................................................80
Tabela czyszczenia ............................................................................................................................................................................................................................................................................................................................................................................................................................................................................................................................................80
Szybkie czyszczenie systemu Capp in Cup ......................................................................................................................................................................................................................................................................................................................................................................................81
Gruntowne czyszczenie systemu Capp in Cup ..................................................................................................................................................................................................................................................................................................................................................................81
Czyszczenie przystawki pannarello do spieniania mleka .....................................................................................................................................................................................................................................................................................................84
Czyszczenie bloku zaparzającego ...............................................................................................................................................................................................................................................................................................................................................................................................................................................84
Smarowanie bloku zaparzającego ................................................................................................................................................................................................................................................................................................................................................................................................................................................86
Odkamienianie ...............................................................................................................................................................................................................................................................................................................................................................................................................................................................................................................................................................................87
Przypadkowe przerwanie cyklu odwapniania ......................................................................................................................................................................................................................................................................................................................................90
Znaczenie sygnalizacji świetlnej .........................................................................................................................................................................................................................................................................................................................................................................................................................................91
Wyświetlacz panelu sterowania ................................................................................................................................................................................................................................................................................................................................................................................................................................................................91
Rozwiązywanie problemów ..............................................................................................................................................................................................................................................................................................................................................................................................................................................................................94
Oszczędność energii ................................................................................................................................................................................................................................................................................................................................................................................................................................................................................................................................95
Stand-by ..............................................................................................................................................................................................................................................................................................................................................................................................................................................................................................................................................................................................................95
Akcesoria ........................................................................................................................................................................................................................................................................................................................................................................................................................................................................................................................................................................................................................96
Właściwości techniczne ..........................................................................................................................................................................................................................................................................................................................................................................................................................................................................................................96
Naviglio milk en-nl-pl.indd 66 01/08/2019 09:47:25
67
POLSKI
Opis ogólny
1 Pokrętło regulacji młynka 19 Korpus środkowy systemu Capp in Cup
2 Środek do smarowania bloku zaparzającego 20 Rurka zasysająca mleko
3 Klucz do regulacji młynka 21 Dozownik systemu Capp in Cup
4 Uchwyt do pannarello (przystawki spieniacza
mleka)
22 Rurka wylotu pary
5 Pannarello (przystawka spieniacza mleka) 23 Uchwyt systemu Capp in Cup
6 Przewód zasilający 24 Zbiornik na wodę
7 Gniazdo do kabla zasilającego 25 Kontrolka „Alarm”
8 Pojemnik na kawę ziarnistą 26 Kontrolka „Kawa podwójna”
9 Pokrywa pojemnika na kawę ziarnistą 27 Kontrolka „Brak kawy”
10 Panel sterowania 28 Kontrolka „Pojemnik na fusy”
11 Dozownik (regulowany na wysokość) 29 Przycisk odwapniania
12 Kratka ociekowa 30 Przycisk nalewania gorącej wody
13 Wskaźnik pełnej tacy ociekowej 31 Przycisk pary
14 Taca ociekowa 32 Przełącznik „Aromat”
15 Pojemnik na fusy 33 Przycisk parzenia cappuccino
16 Blok zaparzający 34 Przycisk do parzenia kawy Espresso
17 Kasetka na resztki kawy 35 Przycisk ON/OFF
18 Drzwiczki serwisowe 36 Kontrolka „Brak wody”
Naviglio milk en-nl-pl.indd 67 01/08/2019 09:47:25

68
POLSKI
Operacje wstępne
Informacja: Taca ociekowa zbiera wodę wypływającą z dozownika podczas cykli
płukania/automatycznego czyszczenia oraz kawę, która mogła się wylać w trakcie
przygotowywania napojów. Tackę ociekową należy codziennie opróżniać i myć
oraz za każdym razem, gdy wskaźnik pełnej tacy ociekowej jest podniesiony.
Uwaga: NIE wyjmować tacy ociekowej zaraz po włączeniu urządzenia. Odczekać
kilka minut, aż urządzenie wykona cykl płukania.
1
2
4 Włożyć tackę ociekową z kratką do urządzenia. Sprawdzić, czy jest włożona do
samego końca.
5 Wyjąć pojemnik na wodę.
6 Opłukać pojemnik pod bieżącą wodą.
Opakowanie urządzenia
Oryginalne opakowanie zostało zaprojektowane i wyprodukowane w celu ochrony
urządzenia podczas transportu. Zaleca się jego zachowanie do ewentualnej
potrzeby transportu w przyszłości.
Instalacja urządzenia
1 Wyjąć z opakowania tacę ociekową z kratką.
2 Wyjąć urządzenie z opakowania.
3 Aby zapewnić prawidłowe użytkowanie urządzenia, należy:
- wybrać bezpieczne i dobrze wypoziomowane podłoże, które zapewni
stabilność urządzenia i bezpieczeństwo użytkowników;
- wybrać odpowiednio oświetlone pomieszczenie zapewniające higienę, z łatwo
dostępnym gniazdkiem elektrycznym;
- umieścić urządzenie w odpowiedniej odległości od ścian, jak pokazano na
rysunku.
Naviglio milk en-nl-pl.indd 68 01/08/2019 09:47:26
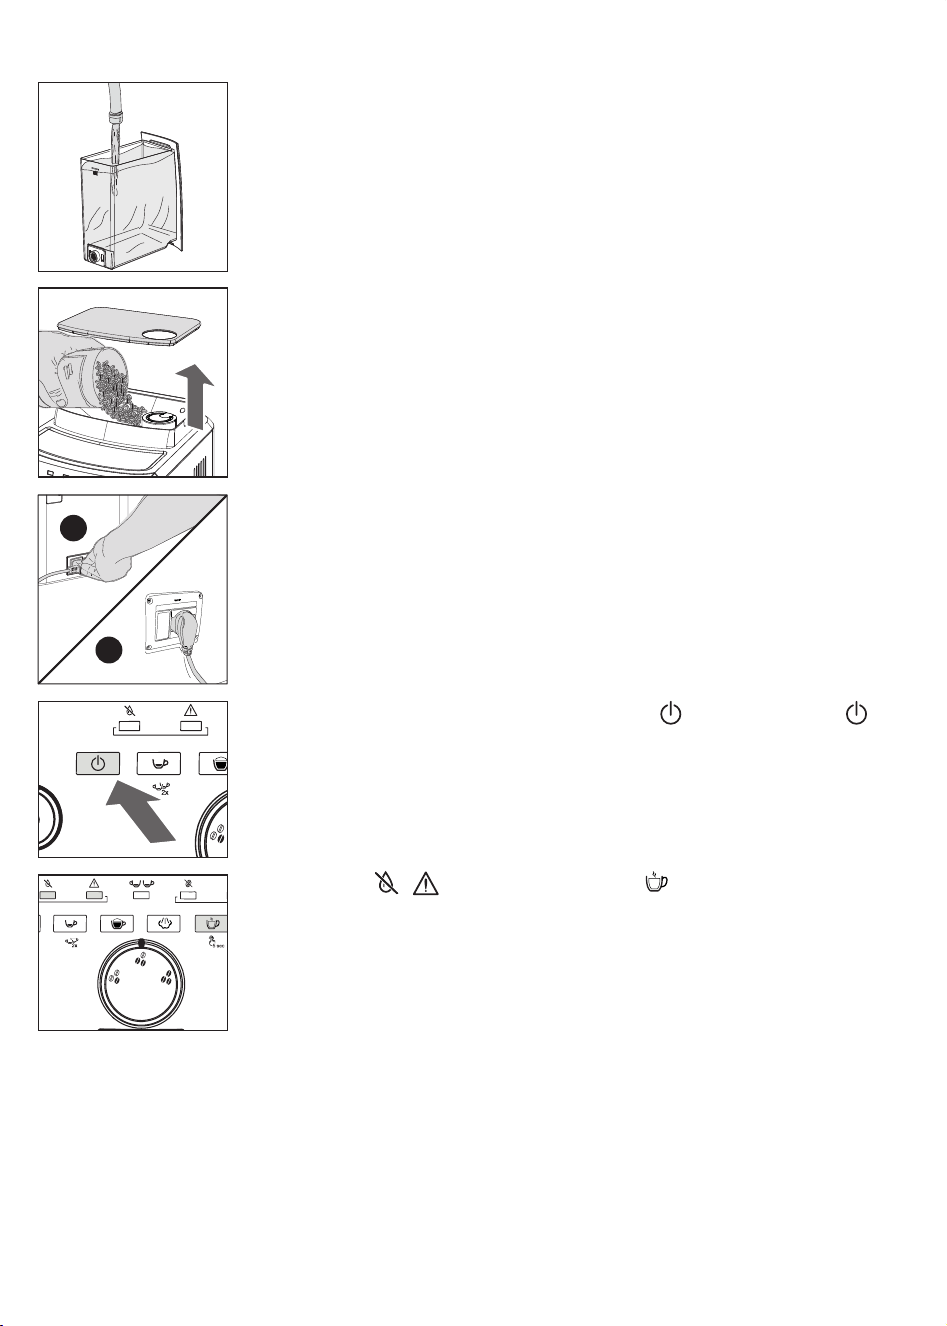
69
POLSKI
7 Napełnić pojemnik na wodę świeżą wodą do poziomu MAX. i ponownie włożyć
go do urządzenia. Sprawdzić, czy jest włożony do samego końca.
8 Zdjąć pokrywę pojemnika na kawę ziarnistą i powoli wsypać do pojemnika
ziarna kawy.
9 Umieścić pokrywę na pojemniku na kawę ziarnistą.
10 Włożyć wtyczkę do gniazdka elektrycznego znajdującą się z tyłu urządzenia.
11 Włożyć wtyczkę znajdującą się na drugim końcu kabla zasilającego do
gniazdka o odpowiednim napięciu znajdującego się na ścianie.
1
2
13 Na panelu sterowania zacznie migać przycisk „ ”. Nacisnąć przycisk „ ”,
aby włączyć urządzenie.
14 Kontrolki „ ” „ ” oraz kontrolka przycisku „ ” zaczną powoli migać
wskazując, że należy przystąpić do napełnienia obwodu hydraulicznego.
Naviglio milk en-nl-pl.indd 69 01/08/2019 09:47:27
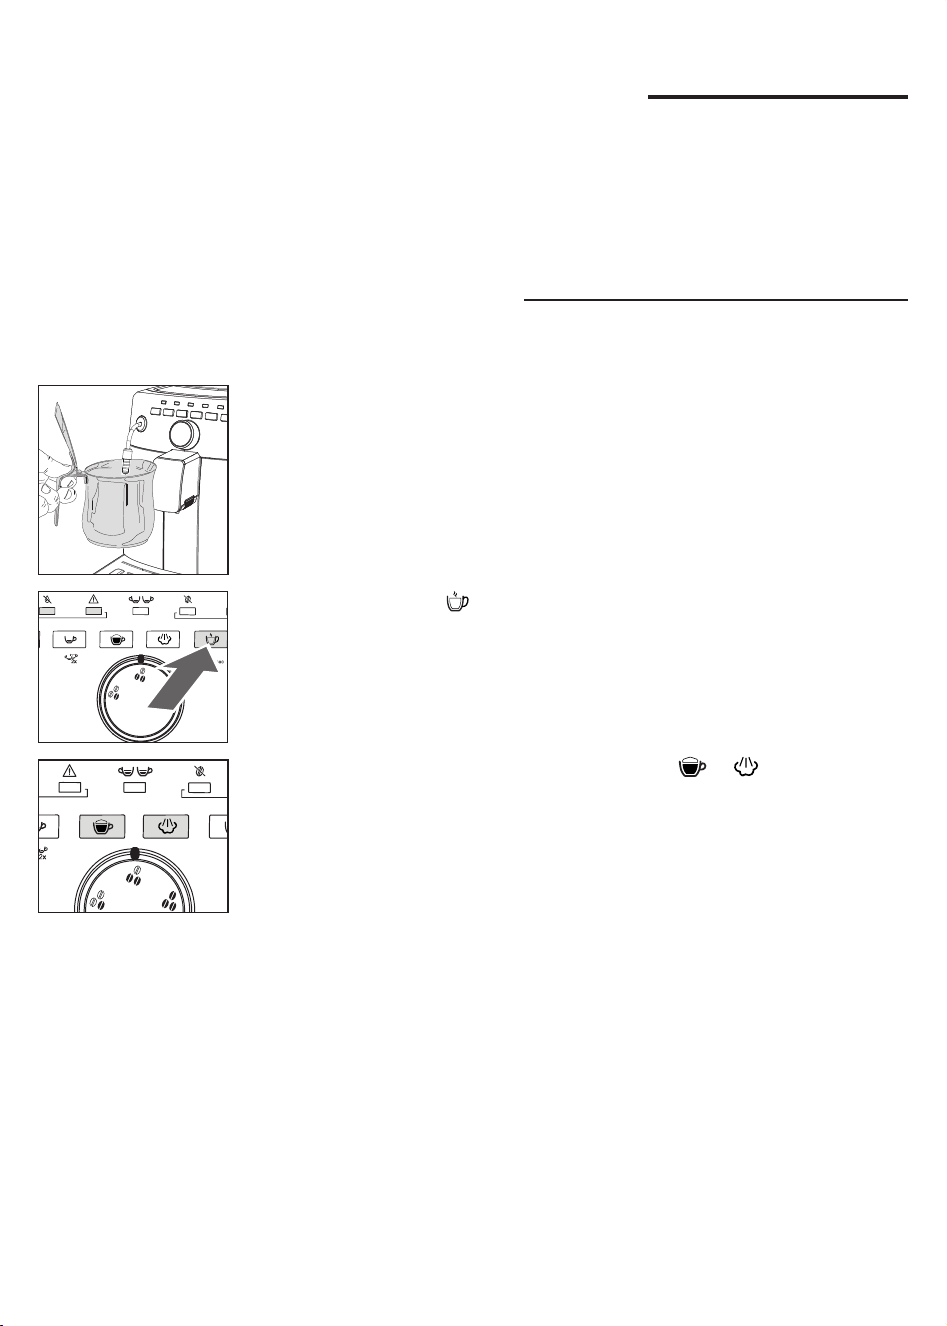
70
POLSKI
Pierwsze uruchomienie
Przed pierwszym użyciem należy wykonać następujące czynności:
1 uruchomić obwód;
2 urządzenie wykona automatyczny cykl płukania;
3 uruchomić ręczny cykl płukania.
Napełnianie obwodu
W tym procesie świeża woda przepływa przez wewnętrzny obwód i nagrzewa
urządzenie. Operacja trwa kilka minut.
1 Ustawić pojemnik pod rurkę wylotu pary.
2 Nacisnąć przycisk „ ” i przytrzymać go 5 sekund, aby uruchomić cykl.
Urządzenie przystąpi do automatycznego napełniania obwodu, wypuszczając
niewielką ilość wody przez rurkę wylotu pary.
3 Po zakończeniu operacji zaczną migać przyciski „ ” i „ ”. Urządzenie
nagrzewa się.
Naviglio milk en-nl-pl.indd 70 01/08/2019 09:47:28
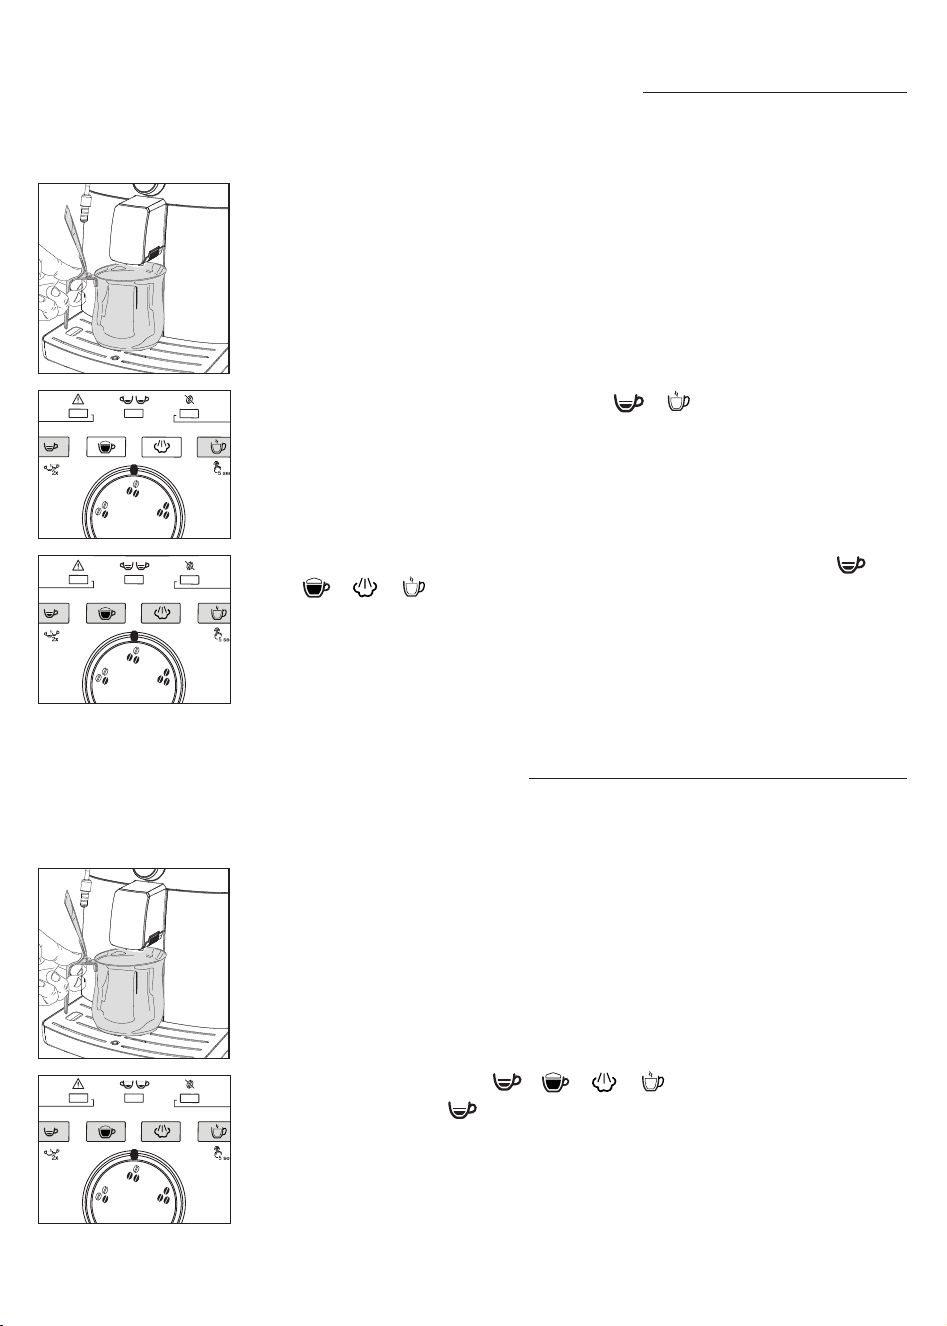
71
POLSKI
Cykl automatycznego płukania
Po zakończeniu podgrzewania urządzenie wykonuje automatyczny cykl płukania
obwodów wewnętrznych świeżą wodą. Operacja trwa krócej niż jedną minutę.
1 Ustawić pojemnik pod dozownikiem, aby zebrać niewielką ilość wypływającej
wody.
2 W trakcie całej operacji migają przyciski „ ” i „ ”.
3 Poczekać, aż cykl automatycznie się zakończy.
4 Po zakończeniu powyższych operacji należy sprawdzić, czy przyciski „ ”,
„ ”, „ ” i „ ” są zapalone.
Ręczny cykl płukania
W tym procesie zostaje zaparzona kawa, a z obwodu pary/gorącej wody wypływa
świeża woda. Operacja trwa kilka minut.
1 Ustawić pojemnik pod dozownikiem kawy.
2 Sprawdzić, czy kontrolki „ ”, „ ”, „ ” i „ ” świecą się światłem ciągłym.
3 Nacisnąć przycisk „ ”. Urządzenie rozpoczyna nalewanie kawy.
4 Po zakończeniu nalewania kawy opróżnić pojemnik.
Dwukrotnie powtórzyć czynności od punktu 1 do punktu 3, a następnie przejść
do punktu 5.
Naviglio milk en-nl-pl.indd 71 01/08/2019 09:47:30
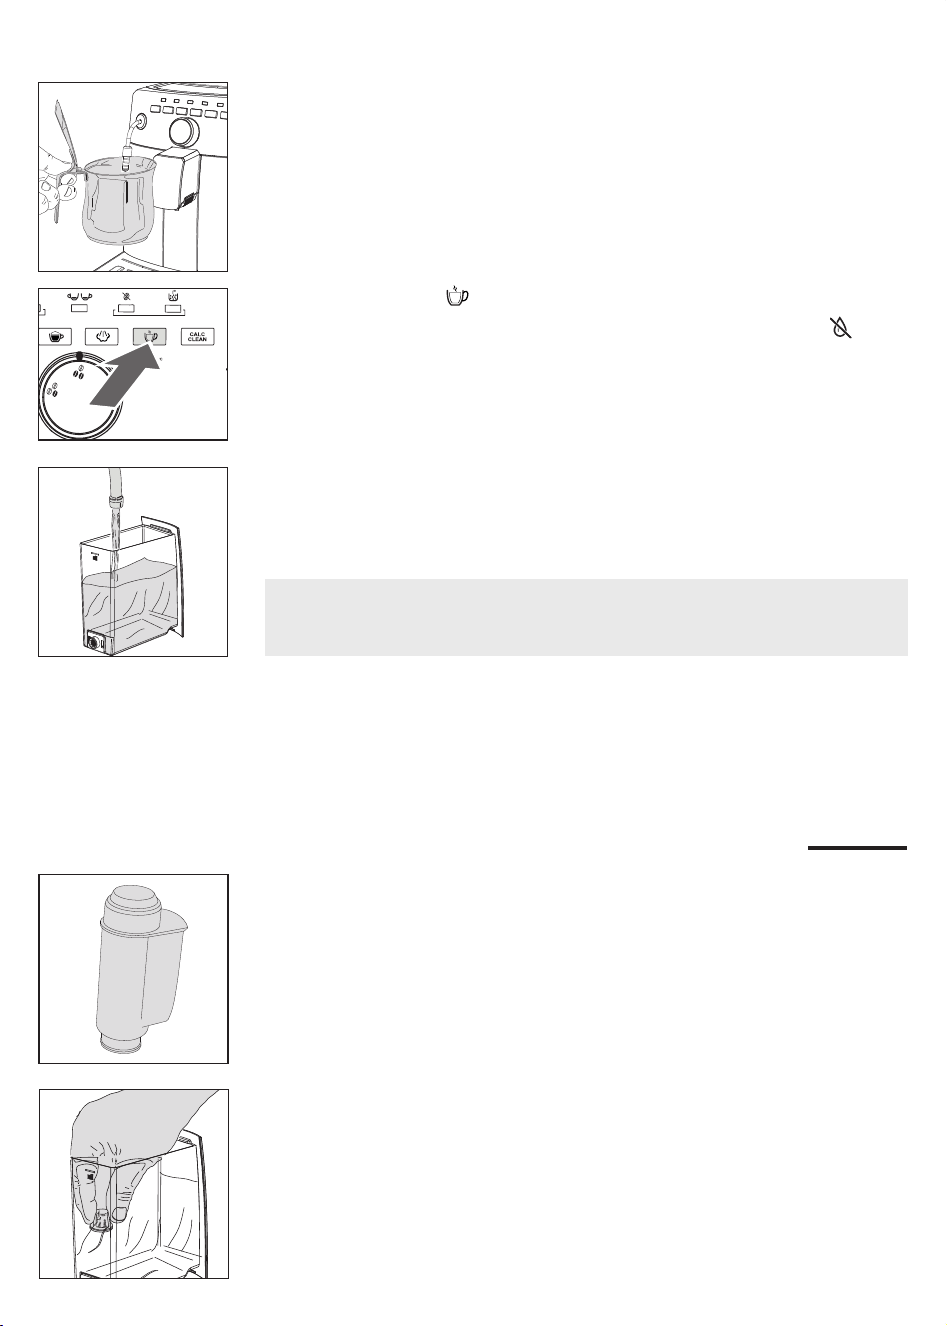
72
POLSKI
5 Ustawić pojemnik pod rurką wylotu pary.
6 Nacisnąć przycisk „ ” na 5 sekund, aby rozpocząć nalewanie gorącej wody.
7 Wodę nalewać do momentu, gdy kontrolka sygnalizująca brak wody „ ”
zacznie świecić się światłem ciągłym.
8 Po zakończeniu napełnić ponownie pojemnik na wodę do poziomu MAX.
Urządzenie jest gotowe do pracy.
Automatyczny cykl płukania jest automatycznie uruchamiany również wtedy, gdy
urządzenie znajduje się w trybie stand-by lub zostało wyłączone ponad 15 minut
wcześniej.
Po zakończeniu cyklu można zaparzyć kawę.
Informacja: Jeżeli urządzenie nie było używane przed dwa tygodnie lub dłużej, po
włączeniu wykona automatyczny cykl płukania. Następnie należy wykonać ręczny
cykl płukania zgodnie z powyższym opisem.
Instalacja ltra wody „INTENZA+”
Zalecamy zainstalowanie ltra wody „INTENZA+”, który ogranicza tworzenie się
kamienia w urządzeniu oraz nadaje bardziej intensywny aromat kawie espresso.
Woda jest podstawowym składnikiem każdej kawy espresso. Bardzo ważna jest
zatem jej odpowiednia ltracja. Filtr wody „INTENZA+” zapobiega tworzeniu się
osadów mineralnych i poprawia jakość wody.
1 Wyjąć mały biały ltr znajdujący się w pojemniku na wodę i przechowywać go
w suchym miejscu.
Naviglio milk en-nl-pl.indd 72 01/08/2019 09:47:31

73
POLSKI
2 Wyjąć ltr wody „INTENZA+” z opakowania, po czym zanurzyć go w pozycji
pionowej (otworem do góry) w zimnej wodzie naciskając delikatnie na brzegi,
aby wypuścić pęcherzyki powietrza.
3 Ustawić ltr odpowiednio do twardości wody stosowanej przez użytkownika.
Ustawienia podane są na opakowaniu ltra.
A = Woda miękka
B = Woda twarda (standard)
C = Woda bardzo twarda
4 Włożyć ltr do pustego pojemnika na wodę. Wepchnąć go
możliwie jak najniżej.
5 Pojemnik na wodę napełnić świeżą wodą i włożyć go ponownie
do urządzenia. Zanotować datę kolejnej wymiany ltra wody (+2 miesiące).
6 Nalać całą wodę znajdującą się w zbiorniku poprzez zastosowanie funkcji
woda gorąca (patrz rozdział „Nalewanie gorącej wody”).
7 Ponownie napełnić pojemnik na wodę.
Przygotowanie napojów
Przed zaparzeniem kawy należy sprawdzić, czy pojemnik na wodę i pojemnik na
kawę ziarnistą są napełnione. A dozownik znajduje się na odpowiedniej wysokości
liżanki.
Naviglio milk en-nl-pl.indd 73 01/08/2019 09:47:31

74
POLSKI
3 Wcisnąć przycisk „ ”, aby zaparzyć kawę espresso.
4 Aby zaparzyć 2 kawy espresso, należy nacisnąć przycisk „ ” dwa kolejne
razy. Zaświeci się kontrolka
„ ”
.
5 Po zakończeniu cyklu wstępnego parzenia, kawa zacznie wypływać z
dozownika.
6 Dozowanie kawy zostanie automatycznie przerwane po osiągnięciu
ustawionego wcześniej poziomu; możliwe jest również wcześniejsze
przerwanie nalewania kawy wciskając ponownie przycisk „ ”.
Parzenie kawy espresso
1 Obrócić przełącznik aromatu, aby wybrać jego odpowiedni rodzaj.
2 Ustawić 1 lub 2 liżanki pod dozownikiem.
Jak zamontować system Capp in Cup
Informacja: przed przygotowaniem jakiegokolwiek napoju na bazie mleka
należy się upewnić, że system Capp in Cup został prawidłowo zamontowany w
urządzeniu.
1 Zainstalować dozownik (rynienkę) w środkowym korpusie systemu Capp in
Cup.
Naviglio milk en-nl-pl.indd 74 01/08/2019 09:47:32
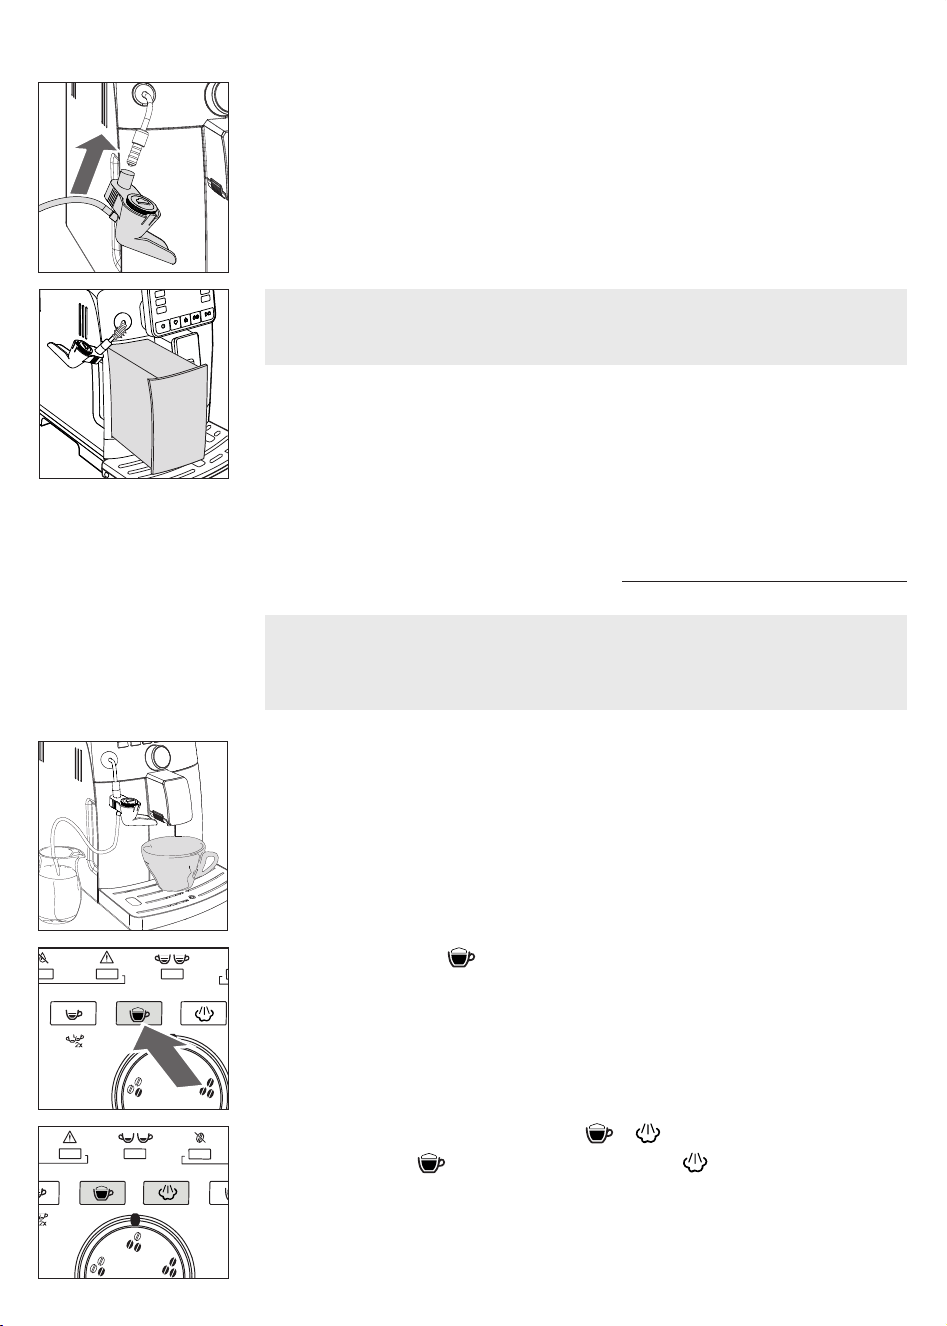
75
POLSKI
2 Włożyć system Capp in Cup do gumowego uchwytu znajdującego się na rurce
wylotu pary do momentu jego blokady w określonym położeniu.
Jak przygotować cappuccino
Wskazówka:aby otrzymać dobrej jakości cappuccino zaleca się stosowanie zim-
nego mleka (~5°C / 41°F) o zawartości białka co najmniej 3%. Można stosować
zarówno mleko pełnotłuste jak i odtłuszczone, w zależności od indywidualnych
upodobań.
1 Rurkę zasysającą mleko wprowadzić do zbiornika na mleko, a następnie
podstawić liżankę lub szklankę pod dozownikiem kawy i systemem Capp in
Cup.
Wskazówka: w razie potrzeby wypełnienia zbiornika na wodę bez wyjmowania
systemu Capp in Cup, aby nie ubrudzić blatu roboczego, należy ustawić system
tak, jak pokazano na rysunku.
2 Nacisnąć przycisk „ ”.
3 Urządzenie nagrzewa się a przyciski „ ”, „ ” migają.
4 Kiedy przycisk „ ” zostaje zapalony, a przycisk „ ” zgaśnie, rozpocznie się
dozowanie:
- Spienionego mleka;
- Kawy;
Naviglio milk en-nl-pl.indd 75 01/08/2019 09:47:34
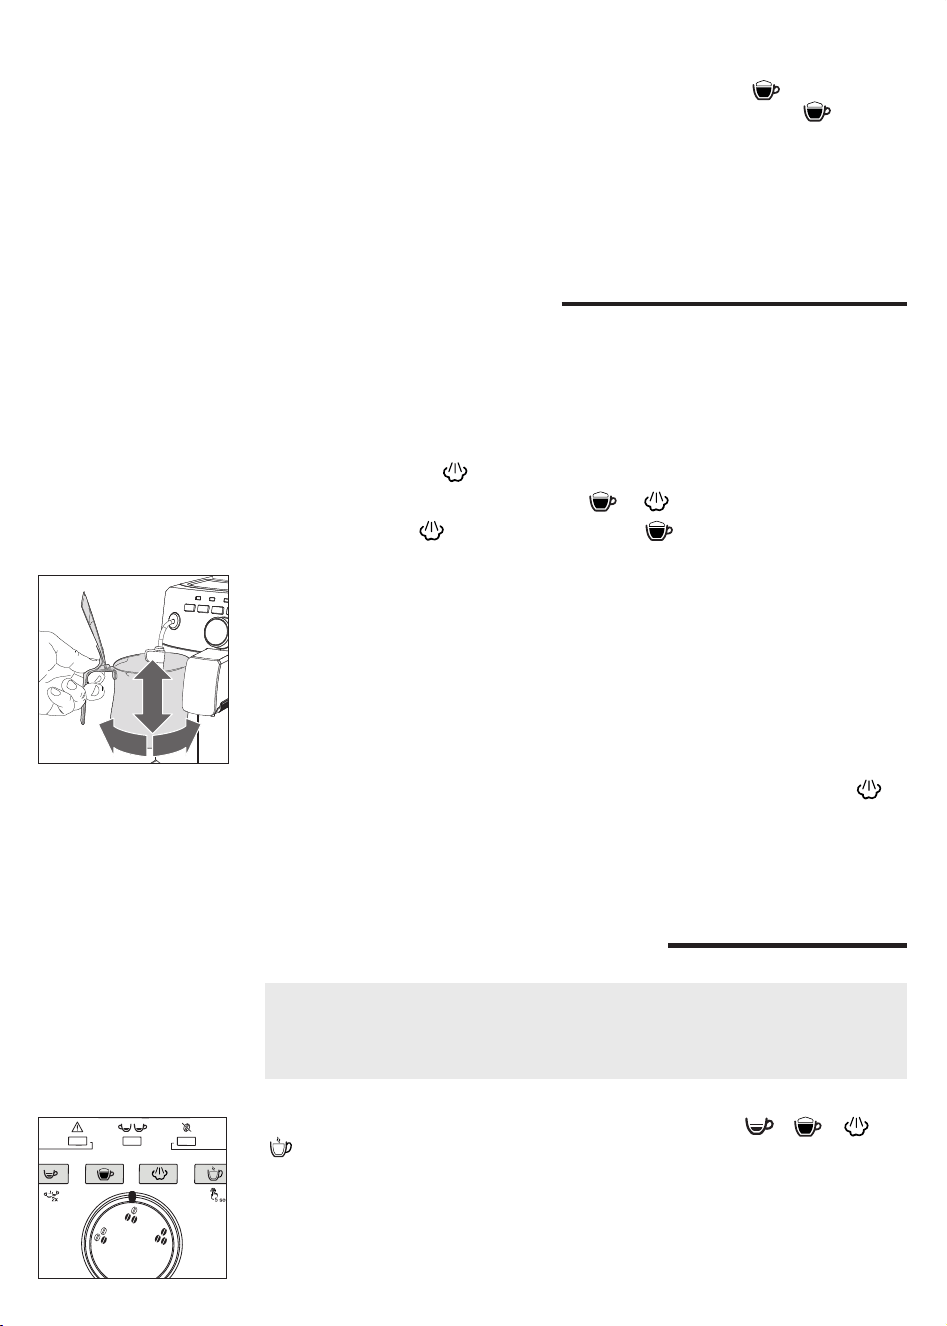
76
POLSKI
Nalewanie gorącej wody
Uwaga: Niebezpieczeństwo poparzeń! Na początku zaparzania może przez chwilę
pryskać gorąca woda. Rurka wylotu gorącej wody lub pary może być bardzo
gorąca: starać się nie dotknąć jej bezpośrednio rękami. Zaleca się stosowanie
specjalnego uchwytu ochronnego.
Przed nalaniem gorącej wody należy sprawdzić, czy kontrolki „ ”, „ ”, „ ” i
„ ” świecą się światłem ciągłym oraz czy pojemnik na wodę jest pełny.
Jak spienić mleko
Przy użyciu pannarello (przystawki do spieniania mleka) dołączonej do opakowania
urządzenia, możliwe jest spienianie mleka za pomocą funkcji pary;
1 Napełnić 1/3 dzbanka zimnym mlekiem.
2 Nałożyć przystawkę do spieniania mleka wraz z uchwytem na rurkę wylotu
pary, po wyjęciu uchwytu systemu Capp in Cup.
3 Wcisnąć przycisk „ ”.
4 Urządzenie nagrzewa się, a przyciski „ ” i „ ” migają.
5 Kiedy przycisk „ ” zaświeci się, a przycisk „ ” zgaśnie, rozpocznie się
wytwarzanie pary.
6 Spienić mleko, wykonując pojemnikiem delikatne ruchy okrężne w górę i w dół.
7 Gdy piana mleka osiągnie odpowiednią konsystencję, wcisnąć przycisk „ ”,
aby przerwać wytwarzanie pary.
5 Aby zakończyć dozowanie mleka należy wcisnąć przycisk „ ”, natomiast
nalewanie kawy przerwiemy po ponownym wciśnięciu przycisku „ ”.
Po spienieniu mleka, należy wyczyścić system Capp in Cup nalewając niewielką
ilość gorącej wody zgodnie z opisem w rozdziale „Czyszczenie i Konserwacja”, a
następnie wypłukać dyszę pod bieżącą wodą.
Naviglio milk en-nl-pl.indd 76 01/08/2019 09:47:36
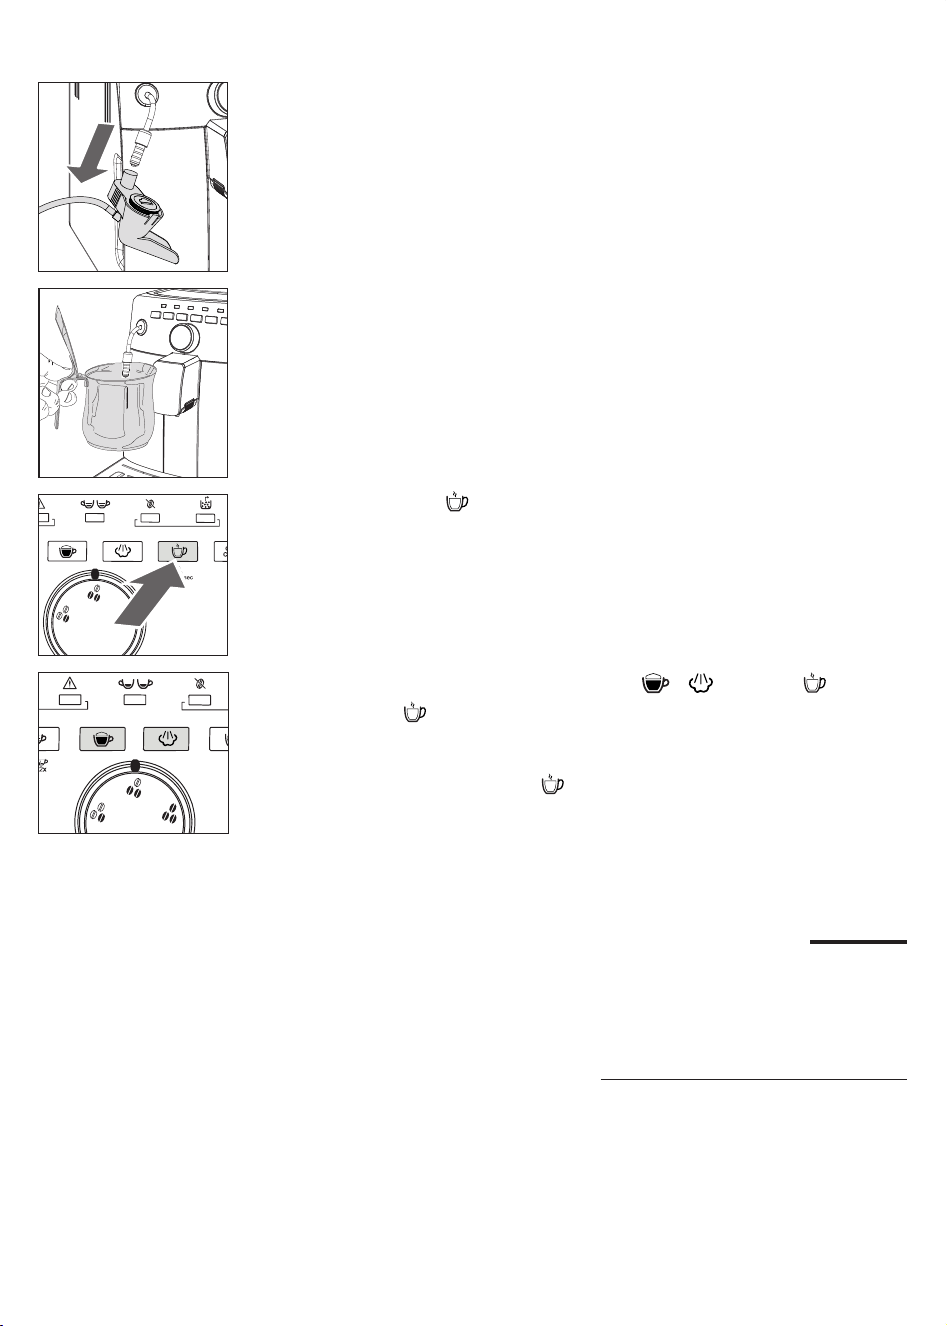
77
POLSKI
2 Ustawić pojemnik pod rurką wylotu pary.
3 Nacisnąć przycisk „ ” na 5 sekund, aby rozpocząć nalewanie gorącej wody.
4 Urządzenie rozgrzewa się i migają przyciski „ ” „ ”. Przycisk „ ” zgaśnie.
5 Gdy przycisk „ ” ponownie się zaświeci, rozpocznie się nalewanie gorącej
wody.
6 Pobrać odpowiednią ilość gorącej wody. Aby przerwać nalewanie gorącej
wody, należy nacisnąć przycisk
„ ”
.
1 Wyjąć system Capp in Cup zgodnie z załączonym rysunkiem.
Indywidualne ustawienia napojów
Urządzenie pozwala wykonać pewne regulacje pozwalające na przygotowanie
naszej ulubionej kawy.
Regulacja stopnia mielenia
Stopień mielenia można regulować za pomocą pokrętła do regulacji młynka
znajdującego się w pojemniku na kawę ziarnistą. Młynek ceramiczny zapewnia
idealne i jednolite mielenie ziaren przy przygotowywaniu każdej liżanki kawy. W
ten sposób zachowywany zostaje aromat, który zapewnia zawsze doskonały smak
kawy.
Naviglio milk en-nl-pl.indd 77 01/08/2019 09:47:37

78
POLSKI
4 Podczas mielenia przez urządzenie kawy, wcisnąć i przekręcić pokrętło
regulacji młynka znajdujące się w zbiorniku na kawę ziarnistą używając do
tego odpowiedniego klucza do regulacji.
Regulacja intensywności aromatu
Wybierz ulubioną mieszankę kawy i ustaw ilość kawy do zmielenia według
indywidualnych upodobań.
1
2
Informacja: stopień mielenia można regulować tylko podczas mielenia przez
urządzenie ziaren kawy. Różnicę w smaku będzie można dostrzec po zaparzeniu
2-3 liżanek kawy.
Uwaga : aby uniknąć uszkodzenia młynka, nie należy obracać pokrętłem regulacji
mielenia więcej niż o jedną pozycję na raz.
1 Ustawić liżankę pod dozownikiem kawy.
2 Otworzyć pokrywę pojemnika na kawę ziarnistą.
3 Przygotować kawęespresso zgodnie ze wskazówkami zawartymi w rozdziale
„Parzenie kawy z kawy ziarnistej”.
5 Dostępnych jest 5 różnych stopni mielenia. Im niższy wskaźnik, tym smak
kawy będzie silniejszy i pełniejszy.
- Mielenie grube: lżejszy smak, przeznaczony do mieszanek ziaren kawy
palonych w sposób ciemny;
- Mielenie drobne: bardziej intensywny smak, do mieszanek ziaren kawy
palonych jasno;
Obracając pokrętło, można wybrać jedno z trzech ustawień. Aromat różni się w
zależności od wybranego położenia:
= lekki aromat
- średni aromat
- silny aromat
Naviglio milk en-nl-pl.indd 78 01/08/2019 09:47:38

79
POLSKI
Pokrętło do regulacji ilości kawy w liżance
Urządzenie pozwala na regulację ilości parzonej kawy espresso zgodnie z
indywidualnymi gustami i wielkością kubków/liżanek.
Po każdym naciśnięciu przycisku „ ” urządzenie naleje zaprogramowaną ilość
kawy.
1 Ustawić liżankę pod dozownikiem.
2 Przytrzymać wciśnięty przycisk „ ” aż do chwili, kiedy zacznie migać: wtedy
urządzenie znajdować się będzie w fazie programowania.
Urządzenie rozpoczyna zaparzanie kawy.
3 Kiedy urządzenie naleje do liżanki wybraną ilość kawy, należy nacisnąć
przycisk „ ”.
W tym momencie przycisk „ ” jest już zaprogramowany; po każdym naciśnięciu
przycisku urządzenie zaparzy taką samą ilość kawy espresso, jaka została
wcześniej ustawiona.
Pokrętło do regulacji ilości cappuccino w liżance
Urządzenie pozwala na ustawienie ilości parzonej kawy i mleka zgodnie z
indywidualnymi gustami i wielkością liżanek.
Po każdym naciśnięciu przycisku „ ” urządzenie najpierw naleje
zaprogramowaną ilość mleka a potem kawy.
1 Umieścić liżankę pod dozownikiem kawy i systemem Capp in Cup.
2 Przytrzymać wciśnięty przycisk „ ” aż do chwili, kiedy zacznie migać:
wtedy urządzenie znajdować się będzie w fazie programowania i rozpocznie
nalewanie mleka.
3 Wcisnąć przycisk „“ ”, po osiągnięciu żądanej ilości mleka, a następnie
ponownie go wcisnąć po nalaniu przez urządzenie żądanej ilości kawy.
W tym momencie przycisk „ ” jest już zaprogramowany; po każdym naciśnięciu
przycisku urządzenie zaparzy taką samą ilość kawy cappuccino, jaka została
ustawiona.
Naviglio milk en-nl-pl.indd 79 01/08/2019 09:47:39

80
POLSKI
Tabela czyszczenia
Opis części Kiedy czyścić Jak czyścić
System Capp in Cup Po użyciu Przeprowadzić „Szybkie czyszczenie systemu
Capp in Cup” przestrzegając wskazówek
zawartych w rozdziale. Wymontować i umyć
dozownik systemu Capp in Cup pod bieżącą
wodą.
Co miesiąc Przeprowadzić „Szybkie czyszczenie systemu
Capp in Cup” przestrzegając wskazówek
zawartych w rozdziale. Do tego cyklu czyszczenia
należy użyć produktu do czyszczenia obwodu
mleka marki Philips. Następnie zdemontować
system Capp in Cup i umyć wszystkie jego
komponenty pod bieżącą wodą.
Pannarello
(przystawka
spieniacza mleka)
Po użyciu Zdjąć przystawkę do spieniania mleka i
przepłukać ją pod bieżącą wodą.
Co tydzień Zdjąć przystawkę do spieniania mleka pannarello
wraz z uchwytem i przepłukać je pod bieżącą
wodą.
Blok zaparzający Co tydzień Wyjąć blok zaparzający i umyć go pod bieżącą
wodą.
W zależności od sposobu
użytkowania
Patrz rozdział „Czyszczenie i smarowanie bloku
zaparzającego”.
Taca ociekowa pełna Kiedy specjalny czerwony
wskaźnik wystaje poza kartkę
tacy ociekowej
Opróżnić tacę ociekową i wyczyścić ją pod
bieżącą wodą.
Pojemnik na fusy Kiedy wymaga tego urządzenie Opróżnić pojemnik na fusy i wyczyścić go pod
bieżącą wodą. Upewnić się, czy podczas tej
czynności urządzenie pozostanie włączone, w
przeciwnym razie pojemnik na fusy nie zostanie
zresetowany.
Opróżnić zbiornik na
wodę.
Co tydzień Oczyścić pod bieżącą wodą.
Przewód wylotowy
kawy
Co tydzień Wyczyścić za pomocą rączki łyżki, jak opisano w
rozdziale „Czyszczenie bloku zaparzającego pod
bieżącą wodą”.
Czyszczenie i konserwacja
Regularne czyszczenie i konserwacja pozwalają na utrzymanie urządzenia w
optymalnym stanie gwarantując zawsze doskonały smak kawy. Zapoznać się
z poniższą tabelą, aby dowiedzieć się, kiedy i jak czyścić wszystkie wyjmowane
części urządzenia. W celu uzyskania bardziej szczegółowych informacji należy
przeczytać odpowiednie rozdziały.
Naviglio milk en-nl-pl.indd 80 01/08/2019 09:47:39
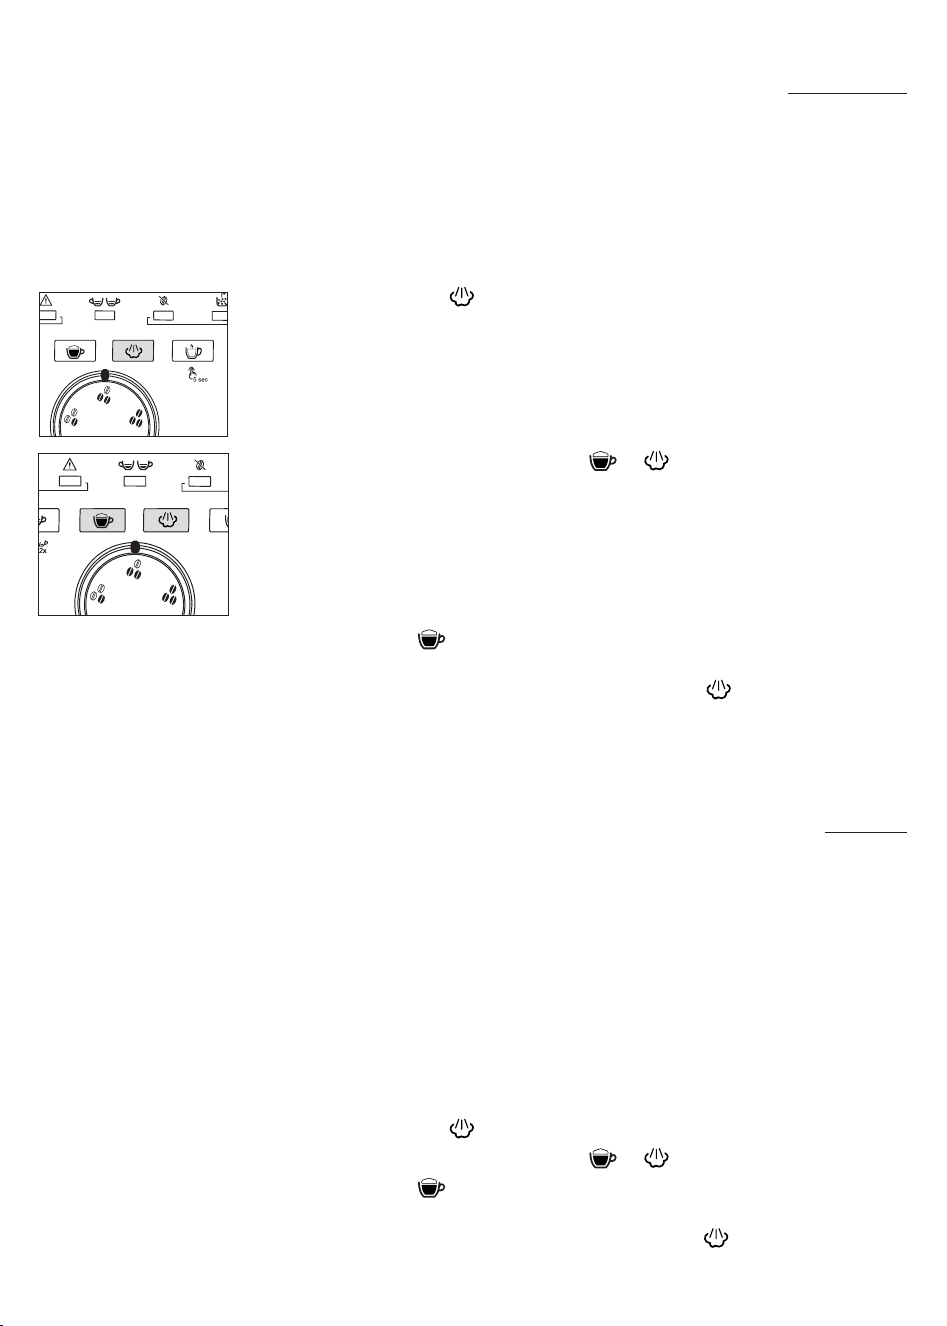
81
POLSKI
Szybkie czyszczenie systemu Capp in Cup
Należy pamiętać o czyszczeniu systemu Capp in Cup codziennie i po każdym
użyciu, aby utrzymać higienę i zapewnić przygotowywanie piany z mleka o idealnej
konsystencji.
Po spienieniu mleka zawsze należy:
1 Włożyć rurkę zasysającą mleko do pojemnika ze świeżą wodą.
2 Ustawić pusty pojemnik pod systemem Capp in Cup.
3 Nacisnąć przycisk „ ”.
4 Urządzenie nagrzewa się, a przyciski „ ” i „ ” migają.
5 Kiedy przycisk „ ” zgaśnie, rozpocznie się dozowanie wody do czyszczenia
obwodu.
6 Aby zakończyć nalewanie, należy nacisnąć przycisk „ ”.
7 Wymontować i umyć dozownik systemu Capp in Cup pod bieżącą wodą.
8 Wyczyścić rurkę zasysającą mleko wilgotną ściereczką.
Gruntowne czyszczenie systemu Capp in Cup
Program dokładnego czyszczenia systemu Capp in Cup przewiduje dokładne
wyczyszczenie całego obwodu mleka przy użyciu produktu do czyszczenia
obwodów mleka marki Philips „Milk Circuit Cleaner” oraz do czyszczenia ręcznego
wszystkich elementów systemu.
1 Upewnić się, czy system Capp in Cup jest prawidłowo zainstalowany.
2 Wlać do pojemnika środek do czyszczenia obwodu mleka.
Dolać 1/2 litra letniej wody i poczekać, aż środek całkowicie się rozpuści.
3 Włożyć rurkę zasysającą mleko do pojemnika.
4 Ustawić pusty pojemnik o pojemności co najmniej 1,5 litra pod systemem
Capp in Cup.
5 Nacisnąć przycisk „ ”.
6 Urządzenie nagrzewa się, a przyciski „ ” i „ ” migają.
7 Kiedy przycisk „ ” zgaśnie, rozpocznie się dozowanie wody do czyszczenia
obwodu.
8 Gdy wyczerpie się roztwór, należy wcisnąć przycisk „ ”, aby przerwać
dozowanie.
Naviglio milk en-nl-pl.indd 81 01/08/2019 09:47:40
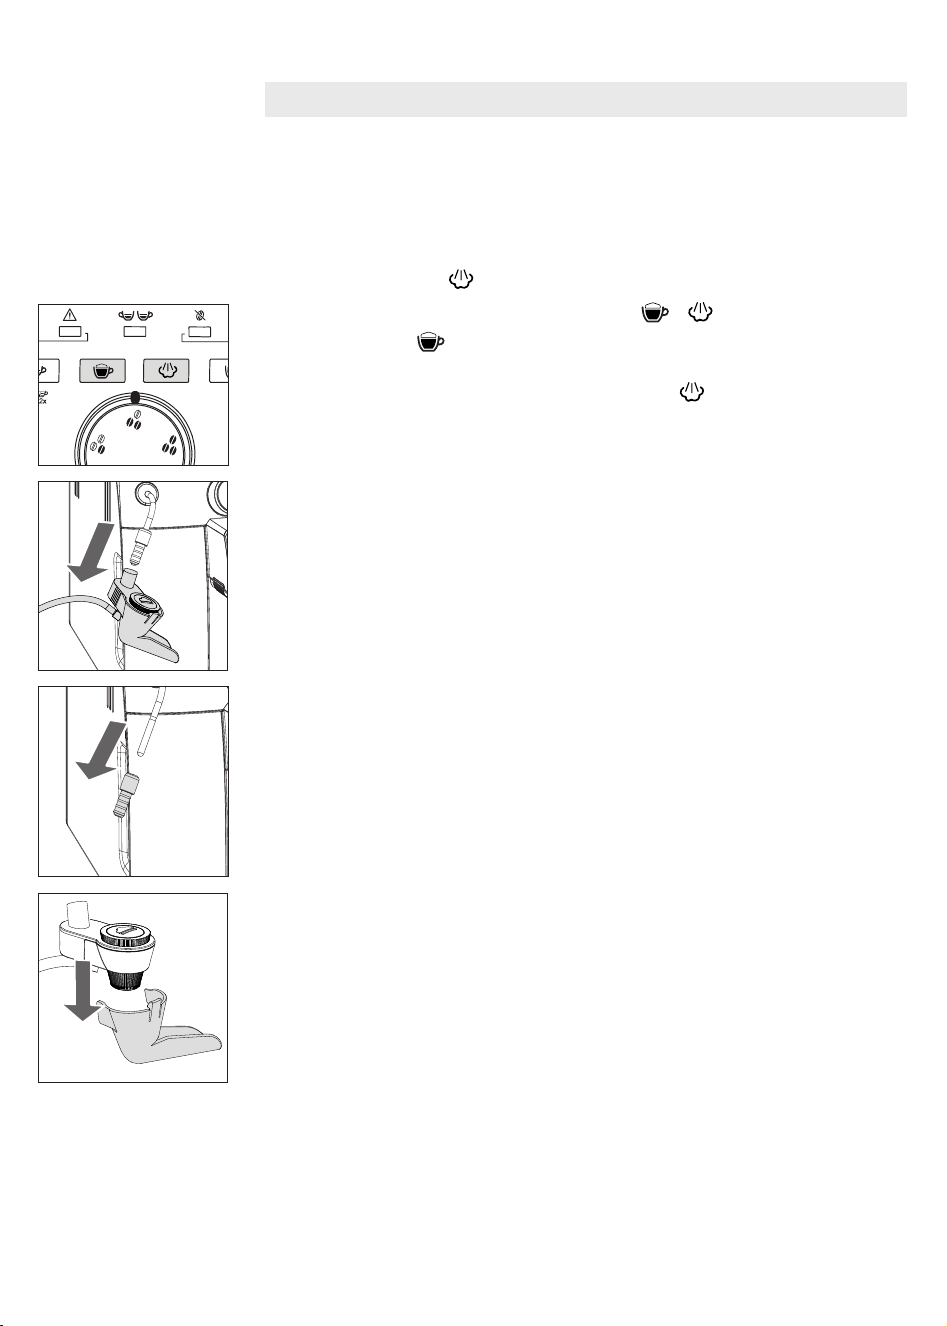
82
POLSKI
17 Zdjąć gumowy uchwyt z rurki wylotu pary.
18 Wyjąć dozownik z systemu Capp in Cup.
16 Usunąć z rurki wylotu pary system Capp in Cup.
9 Dokładnie wypłukać pojemnik i napełnić go ½ l świeżej wody, która następnie
zostanie użyta w cyklu płukania.
10 Włożyć rurkę zasysającą do pojemnika.
11 Opróżnić pojemnik i ustawić go z powrotem pod systemem Capp in Cup.
12 Nacisnąć przycisk „ ”, aby rozpocząć nalewanie.
Uwaga: nie wolno pić roztworu nalanego w tym procesie.
13 Urządzenie rozgrzewa się i migają przyciski „ ” „ ”.
14 Kiedy przycisk „ ” zgaśnie, urządzenie rozpoczyna nalewanie wody do
płukania.
15 Gdy skończy się woda, należy nacisnąć przycisk „ ”, aby przerwać
nalewanie.
Naviglio milk en-nl-pl.indd 82 01/08/2019 09:47:41
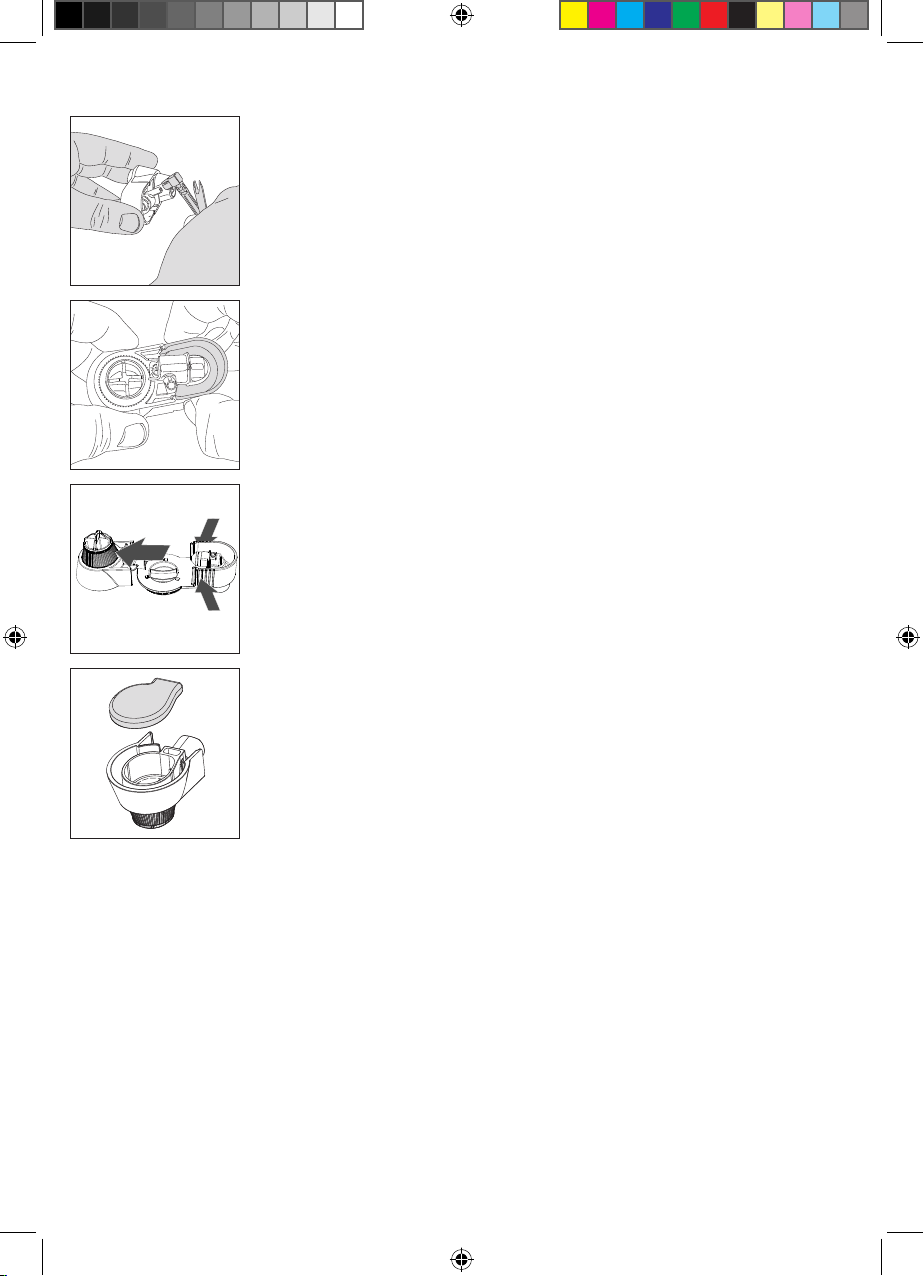
83
POLSKI
19 Wyjąć rurkę zasysającą mleko z korpusu środkowego systemu Capp in Cup.
20 Aby wymontować korpus środkowy, należy:
- ścisnąć go na wskazanych bokach;
21 Zdjąć gumową pokrywę.
- pociągnąć i wysunąć lewą część, jak pokazano na rysunku;
22 Wszystkie elementy umyć pod bieżącą wodą.
23 Po zakończeniu czyszczenia, ponownie zamontować wszystkie części
składowe urządzenia wykonując te same czynności w odwrotnej kolejności.
Naviglio milk en-nl-pl.indd 83 01/08/2019 09:47:42
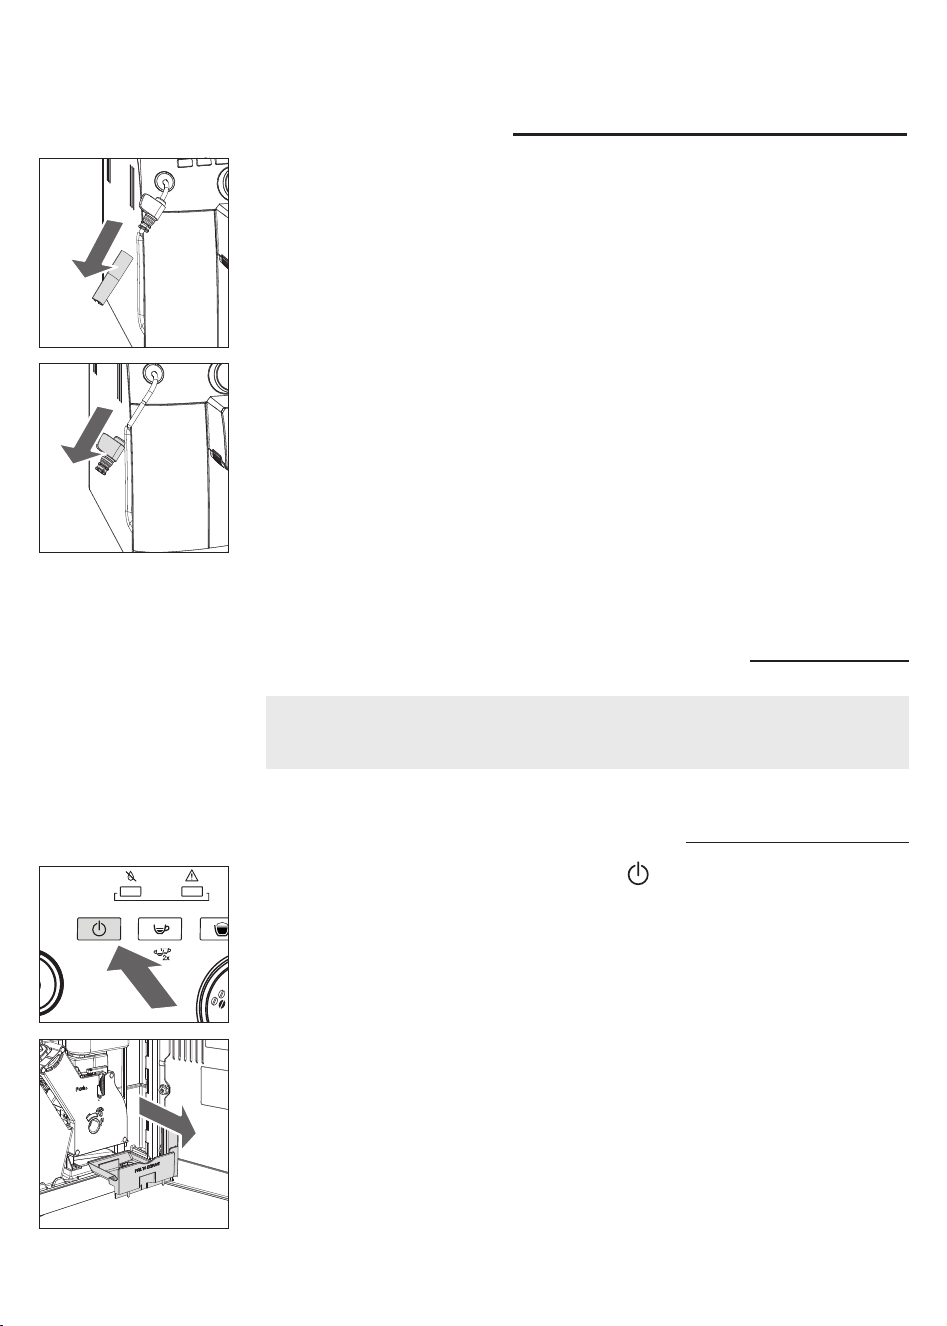
84
POLSKI
Czyszczenie przystawki pannarello do
spieniania mleka
1 Usunąć przystawkę pannarello do spieniania mleka wraz z uchwytem z rurki
wylotu pary, po czym całość wypłukać.
2 Wyczyścić rurkę wylotu pary za pomocą miękkiej szmatki.
3 Ponownie zamontować poszczególne części.
Czyszczenie bloku zaparzającego
Uwaga: nie należy myć bloku zaparzającego w zmywarce ani używać płynów do
mycia naczyń czy detergentów, gdyż może to spowodować uszkodzenie bloku
zaparzającego i wpłynąć na smak kawy.
Wyjmowanie bloku zaparzającego
1 Wyłączyć urządzenie, naciskając przycisk „ ” i wyjąć wtyczkę z gniazda
elektrycznego.
2 Wyjąć pojemnik na fusy i otworzyć drzwiczki serwisowe.
3 Wyjąć szuadkę na odpadki z kawy.
Naviglio milk en-nl-pl.indd 84 01/08/2019 09:47:43
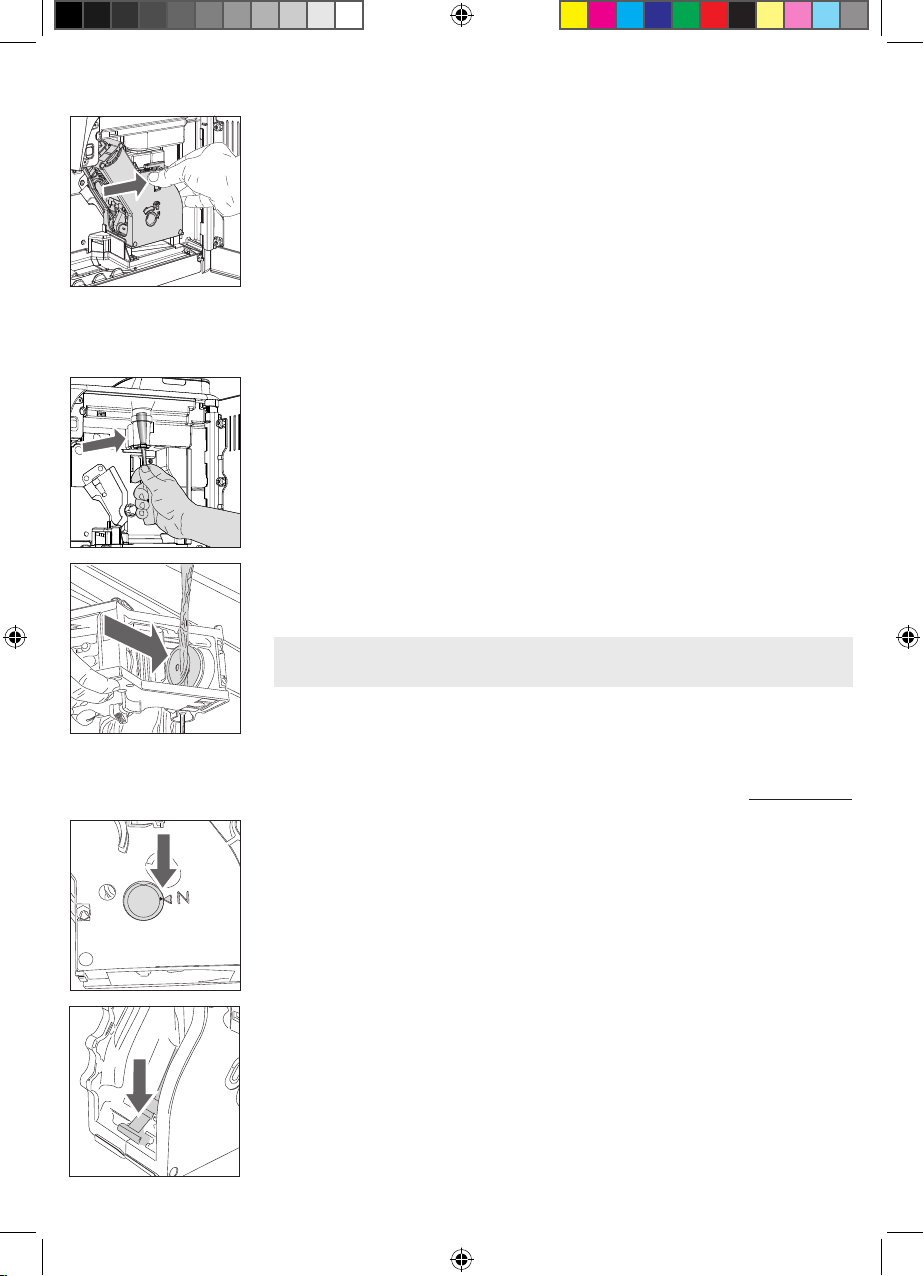
85
POLSKI
4 Aby wyjąć blok zaparzający należy nacisnąć przycisk «PUSH» i pociągnąć za
uchwyt.
Czyszczenie bloku zaparzającego pod bieżącą wodą
1 Wyczyścić dokładnie przewód wylotowy kawy wraz z uchwytem używając w
tym celu łyżeczki lub innego zaokrąglonego przyboru kuchennego.
2 Przepłukać dokładnie blok zaparzający letnią wodą. Dokładnie umyć górny ltr.
3 Blok zaparzający pozostawić do wyschnięcia.
Wkładanie bloku zaparzającego na miejsce
1 Przed ponownym włożeniem bloku zaparzającego do urządzenia należy się
upewnić, że dwa żółte znaki znajdujące się na części bocznej pokrywają się ze
sobą. Gdyby tak nie było, należy:
Informacja: nie osuszać bloku zaparzającego szmatkami, aby nie dopuścić do
nagromadzenia się w jego wnętrzu włókien.
Upewnić się, czy dźwignia styka się z podstawą bloku zaparzającego.
Naviglio milk en-nl-pl.indd 85 01/08/2019 09:47:44

86
POLSKI
2 Upewnić się, czy żółty zaczep blokujący bloku zaparzającego znajduje się w
prawidłowej pozycji.
Aby prawidłowo ustawić zaczep, należy popchnąć go w górę aż do osiągnięcia
maksymalnej pozycji.
3 Wprowadzić blok zaparzający do urządzenia wzdłuż prowadnic umieszczonych
po bokach, dopóki nie usłyszymy kliknięcia, które oznaczać będzie osiągnięcie
prawidłowej pozycji.
Uwaga: nie naciskać na dźwignię PUSH.
4 Zamknąć drzwiczki serwisowe.
Smarowanie bloku zaparzającego
Aby zapewnić optymalne działanie urządzenia, należy smarować blok zaparzający.
Z częstotliwością smarowania można się zapoznać w poniższej tabeli.
Częstotliwość
użytkowania
Liczba napojów robionych
codziennie
Częstotliwość
smarowania
Niska 1-5 Co 4 miesiące
Normalna 6-10 Co 2 miesiące
Wysoka >10 Co miesiąc
1 Wyłączyć urządzenie i odłączyć kabel zasilający.
2 Wyjąć blok zaparzający i przepłukać go letnią wodą (patrz rozdział
„Czyszczenie bloku zaparzającego pod bieżącą wodą”).
3 Cienką warstwę smaru dostarczonego z urządzeniem nanieść wokół sworznia
wprowadzającego znajdującego się w dolnej części bloku zaparzającego.
Naviglio milk en-nl-pl.indd 86 01/08/2019 09:47:45
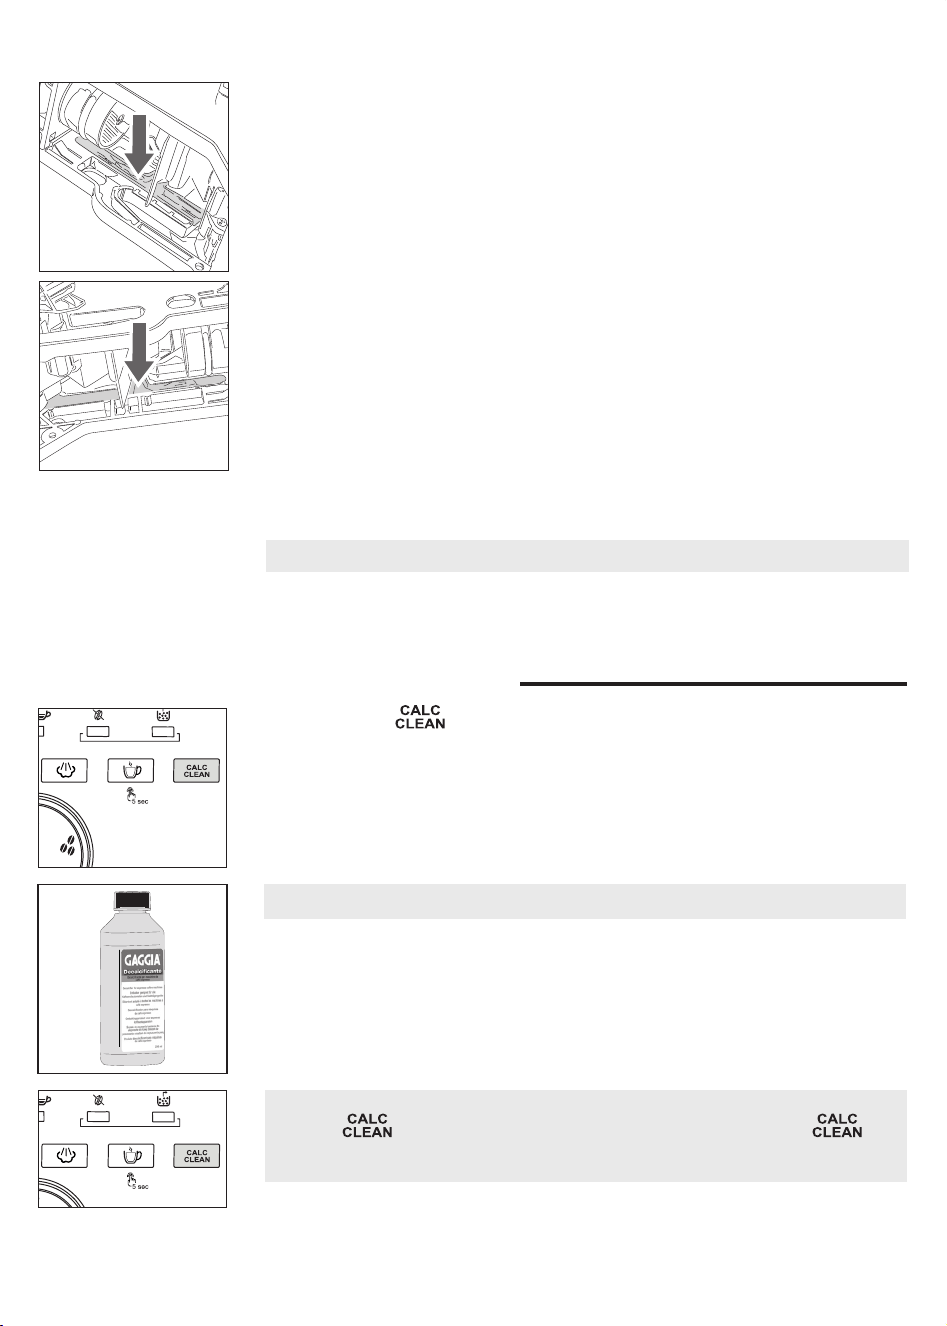
87
POLSKI
4 Nanieść cienką warstwę smaru na prowadnice, po obu stronach (patrz
rysunek).
5 Włożyć blok zaparzający na miejsce (patrz rozdział „Ponowne włożenie bloku
zaparzającego”).
Informacja: tubkę ze smarem można używać kilkukrotnie.
Odkamienianie
Jeżeli kontrolka „ ” świeci się światłem ciągłym, oznacza to, że konieczne jest
odkamienienie urządzenia.
Cykl odwapniania trwa około 35 minut.
Stosować wyłącznie roztwór odwapniający Gaggia, który przeznaczony jest do
zapewniania optymalnego działania urządzenia. Stosowanie innych produktów
może spowodować uszkodzenie urządzenia i pozostanie resztek w wodzie. Brak
odwapniania urządzenia spowoduje utratę gwarancji.
Informacja: W trakcie odwapniania nie należy wyjmować bloku zaparzającego.
Informacja: Cykl odwapniania może zostać przerwany poprzez naciśnięcie
przycisku ; aby wznowić cykl, należy ponownie wcisnąć przycisk .
Funkcja ta pozwoli na opróżnienie pojemnika lub na krótkotrwałe oddalenie się z
miejsca.
Naviglio milk en-nl-pl.indd 87 01/08/2019 09:47:46
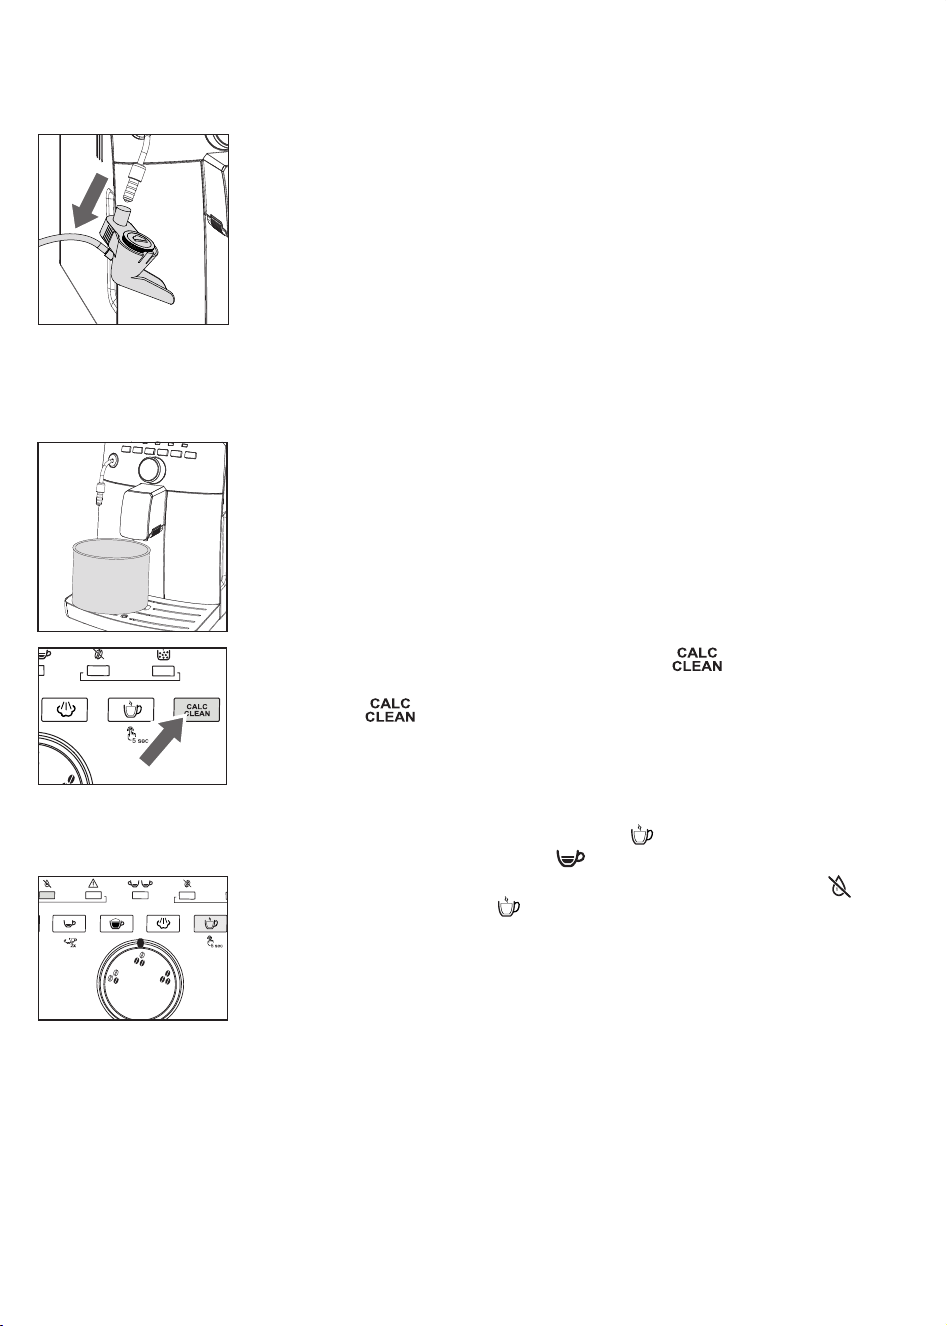
88
POLSKI
1 Opróżnić tackę ociekową i ponownie wprowadzić ją na miejsce. Wyjąć ltr
INTENZA+ (jeżeli jest zainstalowany).
2 Usunąć z rurki wylotu pary/gorącej wody system Capp in Cup.
5 Ustawić duży (1,5 l) pojemnik pod rurką wylotu pary/gorącej wody
i pod dozownikiem.
3 Wyjąć i opróżnić pojemnik na wodę. Wlać całą zawartość
odwapniacza Gaggia.
4 Napełnić pojemnik świeżą wodą do poziomu CALC CLEAN. Włożyć pojemnik
na wodę do urządzenia.
6 Przez 3 sekundy przytrzymać wciśnięty przycisk . Kiedy przycisk zacznie
migać należy go uwolnić, aby rozpocząć cykl.
Przycisk miga przez cały czas trwania cyklu odwapniania.
7 Urządzenie rozpocznie dozowanie odwapniacza w odstępach (około 1 minuty),
z rurki wylotu pary/gorącej wody (przycisk „ ” będzie się palił światłem
ciągłym) i z dozownika (przycisk „ ” będzie się palił światłem ciągłym).
8 Po wyczerpaniu się roztworu odwapniającego, zaświeci się kontrolka
i zacznie migać przycisk „ ”.
9 Opróżnić pojemnik i ustawić go pod rurką wylotu pary/gorącej wody oraz
pod dozownikiem.
10 Wyjąć pojemnik, dokładnie go opłukać i napełnić świeżą wodą do poziomu
MAX.
Ponownie włożyć do urządzenia pojemnik na wodę.
11 Opróżnić tacę ociekową i włożyć ją ponownie w odpowiednie miejsce. Włożyć
pojemnik.
Naviglio milk en-nl-pl.indd 88 01/08/2019 09:47:47
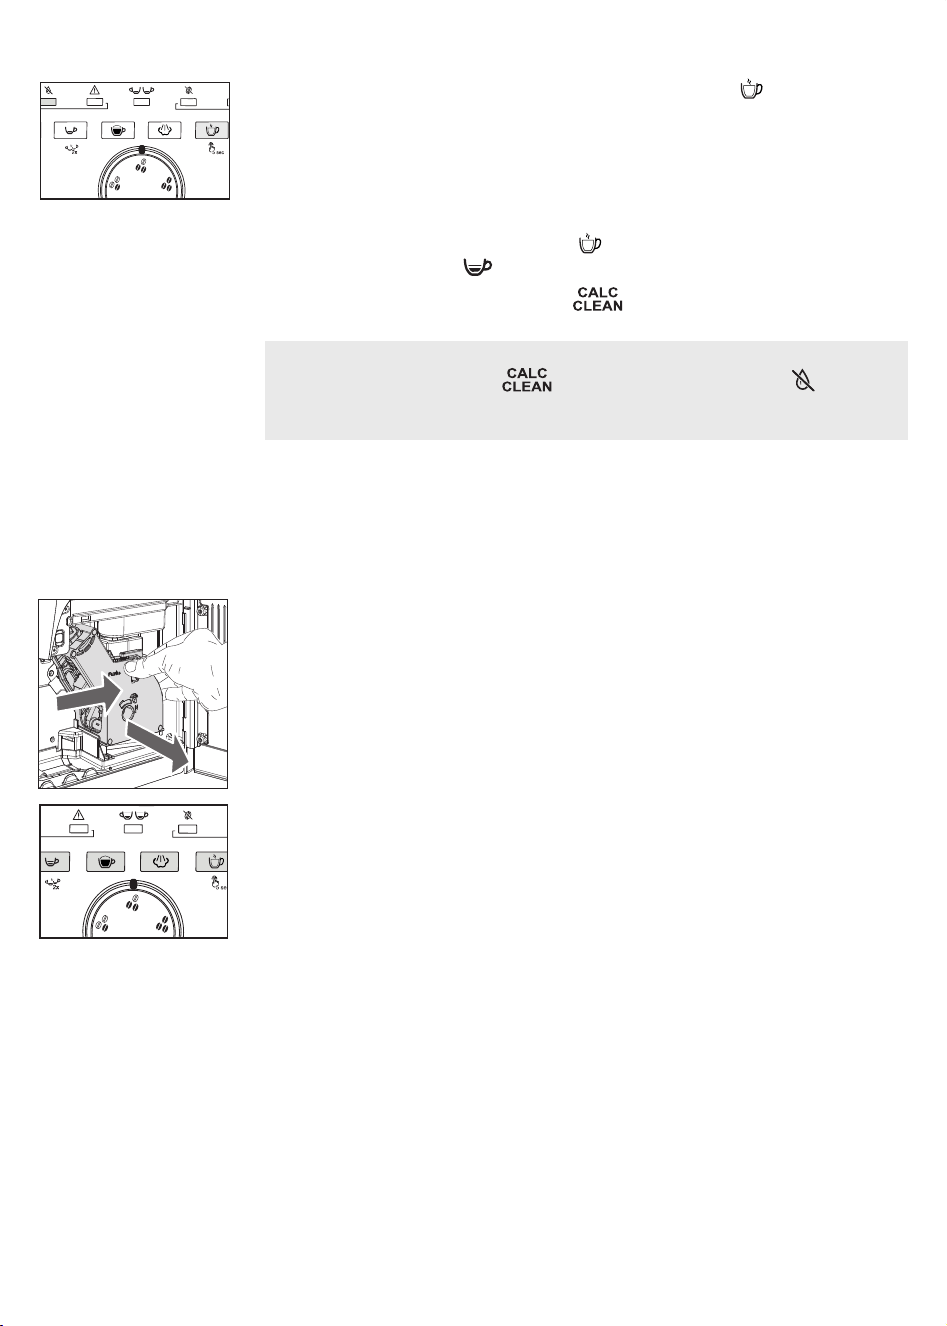
89
POLSKI
12 Aby rozpocząć cykl płukania wcisnąć migający przycisk „ ”.
13 Urządzenie rozpocznie nalewanie wody w odstępach (około 1 minuty), z rurki
wylotu pary/gorącej wody (przycisk „ ” będzie się palił światłem ciągłym) i z
dozownika (przycisk „ ” będzie się palił światłem ciągłym).
14 Po zakończeniu płukania kontrolka zgaśnie; odwapnianie zostało
zakończone.
Informacja: Jeżeli pojemnik nie zostanie napełniony do poziomu MAX, w celu
wykonania płukania, kontrolka nadal będzie migać a kontrola zapali się:
oznaczać to będzie konieczność wykonania kolejnego cyklu; należy powtórzyć
czynności od punktu 9 do punktu 13.
15 Wyjąć i opróżnić pojemnik.
16 Opróżnić tacę ociekową i włożyć ją ponownie w odpowiednie miejsce.
17 Wyjąć pojemnik i dokładnie go opłukać. Ponownie włożyć ltr wody Intenza+
(jeśli jest). Napełnić pojemnik świeżą wodą do poziomu MAX i włożyć go z
powrotem do urządzenia.
18 Wyjąć i opłukać blok zaparzający (patrz rozdział „Czyszczenie bloku
zaparzającego”).
19 Urządzenie jest gotowe do użytku.
Naviglio milk en-nl-pl.indd 89 01/08/2019 09:47:48
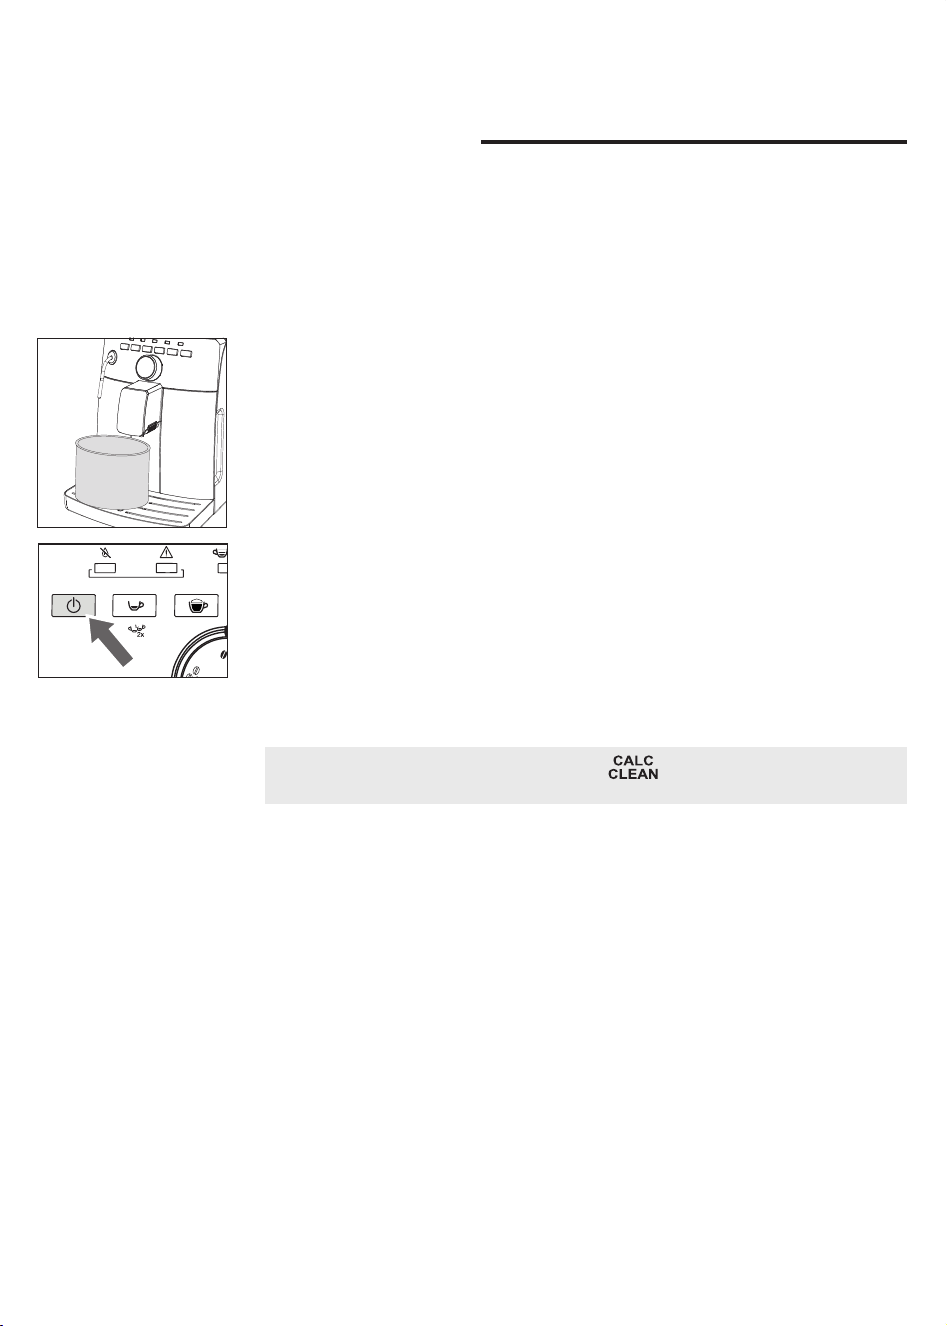
90
POLSKI
Przypadkowe przerwanie cyklu
odwapniania
Możliwe jest wyjście z operacji odwapniania po wciśnięciu przycisku „ON/OFF”
na panelu sterowania. Gdyby procedura odwapniania została przerwana przed jej
zakończeniem, należy:
1 Opróżnić tackę ociekową i włożyć ją ponownie w odpowiednie miejsce.
2 Opróżnić i dokładnie wypłukać pojemnik na wodę, a następnie napełnić go do
poziomu MAX i ponownie włożyć do urządzenia.
4 Włączyć urządzenie. Urządzenie wykona automatyczne płukanie.
5 Przed przyrządzeniem jakiegokolwiek napoju należy wykonać ręczny cykl
płukania, jak opisano w dedykowanym rozdziale.
Informacja: jeżeli pomarańczowa kontrolka nie zgaśnie, należy jak
najszybciej wykonać nowy cykl odkamieniania.
3 Ustawić pojemnik pod dozownikiem kawy i dozownikiem pary
gorącej wody.
Naviglio milk en-nl-pl.indd 90 01/08/2019 09:47:49

91
POLSKI
Znaczenie sygnalizacji świetlnej
Wyświetlacz panelu sterowania
Symbole kontrolek Objaśnienie Czynności
ŚWIATŁO MIGAJĄCE
Urządzenie w trybie stand-by.
Nacisnąć przycisk „ ”, aby włączyć urządzenie.
ŚWIATŁA WOLNO MIGA-
JĄCE
Urządzenie w fazie płukania. Urządzenie automatycznie zakończy cykl. Nacisnąć
przycisk „ ” lub „ ”, aby zatrzymać cykl przed
końcem.
ŚWIATŁA WOLNO MIGA-
JĄCE
Urządzenie w fazie
nagrzewania przed
rozpoczęciem dozowania
napojów.
ZAPALONE ŚWIATŁA
CIĄGŁE
Urządzenie jest gotowe do
pracy.
ZAPALONE ŚWIATŁO
CIĄGŁE
Urządzenie w fazie nalewania
gorącej wody.
Przycisk do parzenia kawy Espresso
Przycisk wytwarzania pary
Przycisk parzenia cappuccino
Przycisk nalewania gorącej
wody
Kontrolka „Brak wody”
Kontrolka „Pojemnik na
fusy”
Przycisk ON/OFF
Przycisk odwapniania
Kontrolka „Brak kawy”
Kontrolka „Kawa podwójna”
Kontrolka „Alarm”
Przełącznik „Aromat”
Naviglio milk en-nl-pl.indd 91 01/08/2019 09:47:50
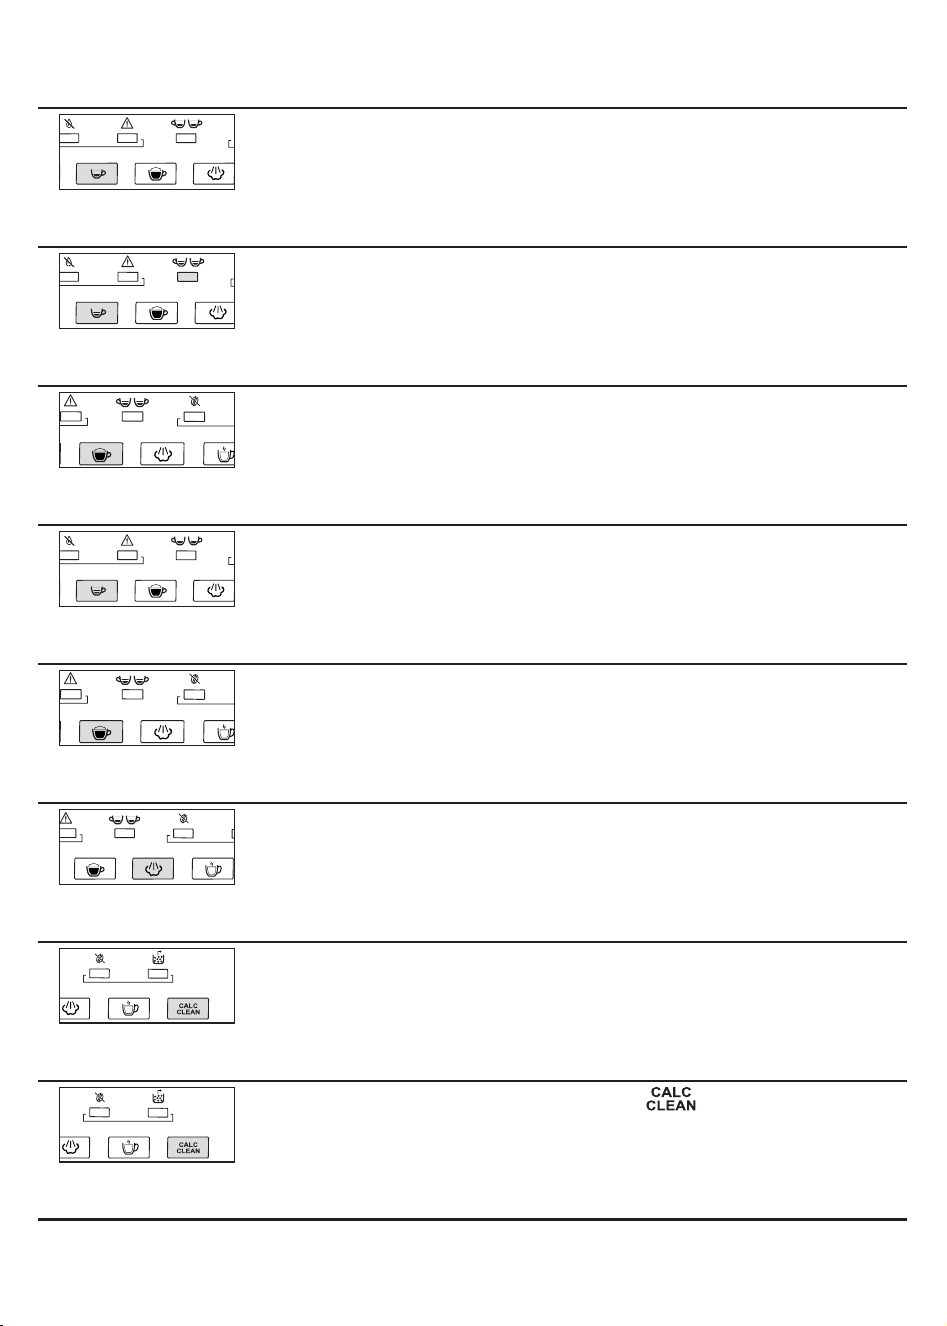
92
POLSKI
Symbole kontrolek Objaśnienie Czynności
ZAPALONE ŚWIATŁO
CIĄGŁE
Urządzenie w fazie parzenia
kawy espresso.
ZAPALONE ŚWIATŁA
CIĄGŁE
Urządzenie w fazie parzenia
2 kaw espresso.
ZAPALONE ŚWIATŁO
CIĄGŁE
Urządzenie w fazie parzenia
cappuccino.
ŚWIATŁA WOLNO MIGA-
JĄCE
Urządzenie w fazie
programowania ilości kawy
espresso do dozowania.
ŚWIATŁA WOLNO MIGA-
JĄCE
Urządzenie w fazie
programowania ilości
cappuccino do nalania.
ZAPALONE ŚWIATŁO
CIĄGŁE
Urządzenie wytwarza parę.
ZAPALONE ŚWIATŁO
CIĄGŁE
Należy wykonać odwapnianie
urządzenia.
Uruchomić cykl odwapniania. Jeżeli odwapnianie
nie będzie wykonywane regularnie, urządzenie
przestanie działać prawidłowo. Usterka nie jest
objęta gwarancją.
ŚWIATŁO WOLNO MIGA-
JĄCE
Urządzenie w fazie
odwapniania.
Wcisnąć przycisk „ ”, aby przerwać cykl.
Naviglio milk en-nl-pl.indd 92 01/08/2019 09:47:51
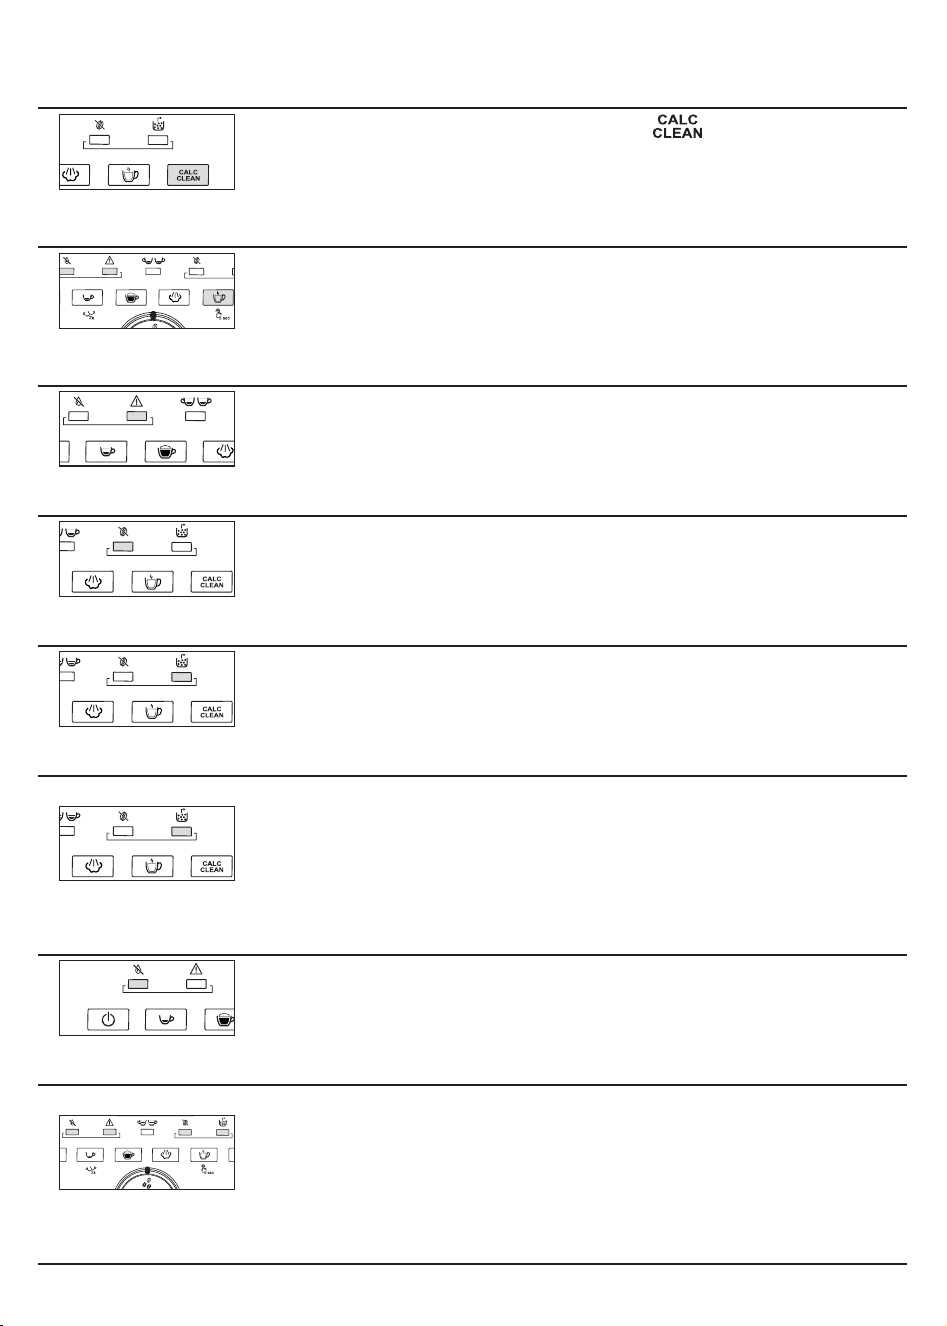
93
POLSKI
Symbole kontrolek Objaśnienie Czynności
ŚWIATŁO SZYBKO MI-
GAJĄCE
Ustawienie „PRZERWY”
urządzenia w trakcie cyklu
odwapniania.
Nacisnąć przycisk „ ”, aby rozpocząć cykl.
ŚWIATŁA WOLNO MIGA-
JĄCE
Napełnić obwód. Napełnić pojemnik świeżą wodą i napełnić
obwód hydrauliczny urządzenia zgodnie z opisem
zawartym w rozdziale „Pierwsze uruchomienie”.
ŚWIATŁO WOLNO MIGA-
JĄCE
- Zamknąć drzwiczki
serwisowe.
- Włożyć blok zaparzajacy.
Sprawdzić, czy wszystkie elementy zostały popraw-
nie zainstalowane i czy są zamknięte.
ZAPALONE ŚWIATŁO
CIĄGŁE
Pojemnik na kawę ziarnistą
jest pusty.
Napełnić pojemnik kawą ziarnistą i uruchomić cykl
parzenia.
ŚWIATŁO SZYBKO MI-
GAJĄCE
Nie włożono pojemnika na
fusy
Opróżnić pojemnik na fusy i włożyć go dopiero
wtedy, gdy kontrolka zacznie powoli migać.
ZAPALONE ŚWIATŁO
CIĄGŁE
Pojemnik na fusy jest pełny. Przy włączonym urządzeniu, opróżnić pojemnik
na fusy i tackę ociekową. Opróżnienie pojemnika
na fusy przy wyłączonym urządzeniu lub przy
zgaszonej kontrolce spowoduje, że licznik cykli
parzenia kawy nie zostanie wyzerowany. W takim
przypadku kontrolka sygnalizująca konieczność
opróżnienia pojemnika na fusy może migać, nawet
jeżeli pojemnik nie byłby pełny.
ZAPALONE ŚWIATŁO
CIĄGŁE
Pojemnik na wodę jest pusty. Napełnić pojemnik świeżą wodą.
ŚWIATŁA WOLNO MI-
GAJĄCE
Działanie urządzenia jest
nieprawidłowe i
nie jest możliwe
przygotowanie kawy
espresso, cappuccino,
nalanie wody ani
wytworzenie pary.
Wyłączyć urządzenie i włączyć je ponownie po
upływie 30 sekund.
Spróbować 2 lub 3 razy.
Naviglio milk en-nl-pl.indd 93 01/08/2019 09:47:52
94
POLSKI
Rozwiązywanie problemów
W niniejszym rozdziale przedstawiono najczęstsze problemy występujące w
urządzeniu.
Problem Przyczyny Środki zaradcze
Urządzenie nie włącza się. Urządzenie nie jest podłączone do
sieci elektrycznej.
Podłączyć urządzenie do sieci
elektrycznej.
Kawa nie jest wystarczająco
ciepła.
Filiżanki są zimne. Ogrzać liżanki gorącą wodą.
Tacka ociekowa napełnia się
nawet wtedy, gdy woda nie
jest odprowadzana.
Czasami woda jest automatycznie
odprowadzana przez urządzenie
do tacki ociekowej, aby umożliwić
płukanie obwodów i zapewnić
optymalne działanie.
Jest to normalne zjawisko.
Czerwona kontrolka pali
się światłem ciągłym nawet
po opróżnieniu fusów.
Pojemnik na fusy został
opróżniony przy wyłączonym
urządzeniu.
Pojemnik na fusy należy zawsze
opróżniać przy włączonym urządzeniu.
Przed ponownym włożeniem kasetki
należy poczekać, aż czerwona kontrolka
zacznie wolniej migać.
Nie wypływa gorąca woda
lub para.
Otwór rurki wylotu pary jest
zatkany.
Przeczyścić otwór rurki wylotu pary za
pomocą szpilki.
Uwaga:przed wykonaniem tej
czynności należy upewnić się, że urzą-
dzenie jest wyłączone i zimne.
System Capp in Cup jest
zanieczyszczony (jeśli jest).
Czyszczenie systemu Capp in Cup.
Kawa ma mało pianki.
(Patrz informacja)
Urządzenie wykonuje operację
samoregulacji.
Przyrządzić kilka liżanek kawy,
aby urządzenie wyregulowało się
automatycznie.
Mieszanka nie jest odpowiednia,
kawa nie była świeża w prażeniu
lub jest zbyt grubo zmielona.
Zmienić mieszankę kawy lub
wyregulować grubość mielenia, jak
opisano w punkcie „Regulacja młynka”.
Urządzenie nagrzewa się
zbyt długo lub ilość wody,
która wypływa z rurki, jest
zbyt mała.
Obwód urządzenia jest zatkany z
powodu osadów kamienia.
Odmienić urządzenie.
Nie można wyjąć bloku
zaparzajacego.
Blok zaparzający znajduje się w
niewłaściwym położeniu.
Włączyć urządzenie. Zamknąć
drzwiczki serwisowe. Blok zaparzający
automatycznie wraca do pozycji
początkowej.
Pojemnik na fusy jest włożony. Wyjąć pojemnik na fusy przed wyjęciem
bloku zaparzającego.
Pod blokiem zaparzającym
jest dużo zmielonej kawy.
Ten typ kawy jest nieodpowiedni
do automatycznych ekspresów.
Konieczna może być zmiana typu kawy
lub przeprowadzenie regulacji młynka.
Naviglio milk en-nl-pl.indd 94 01/08/2019 09:47:53
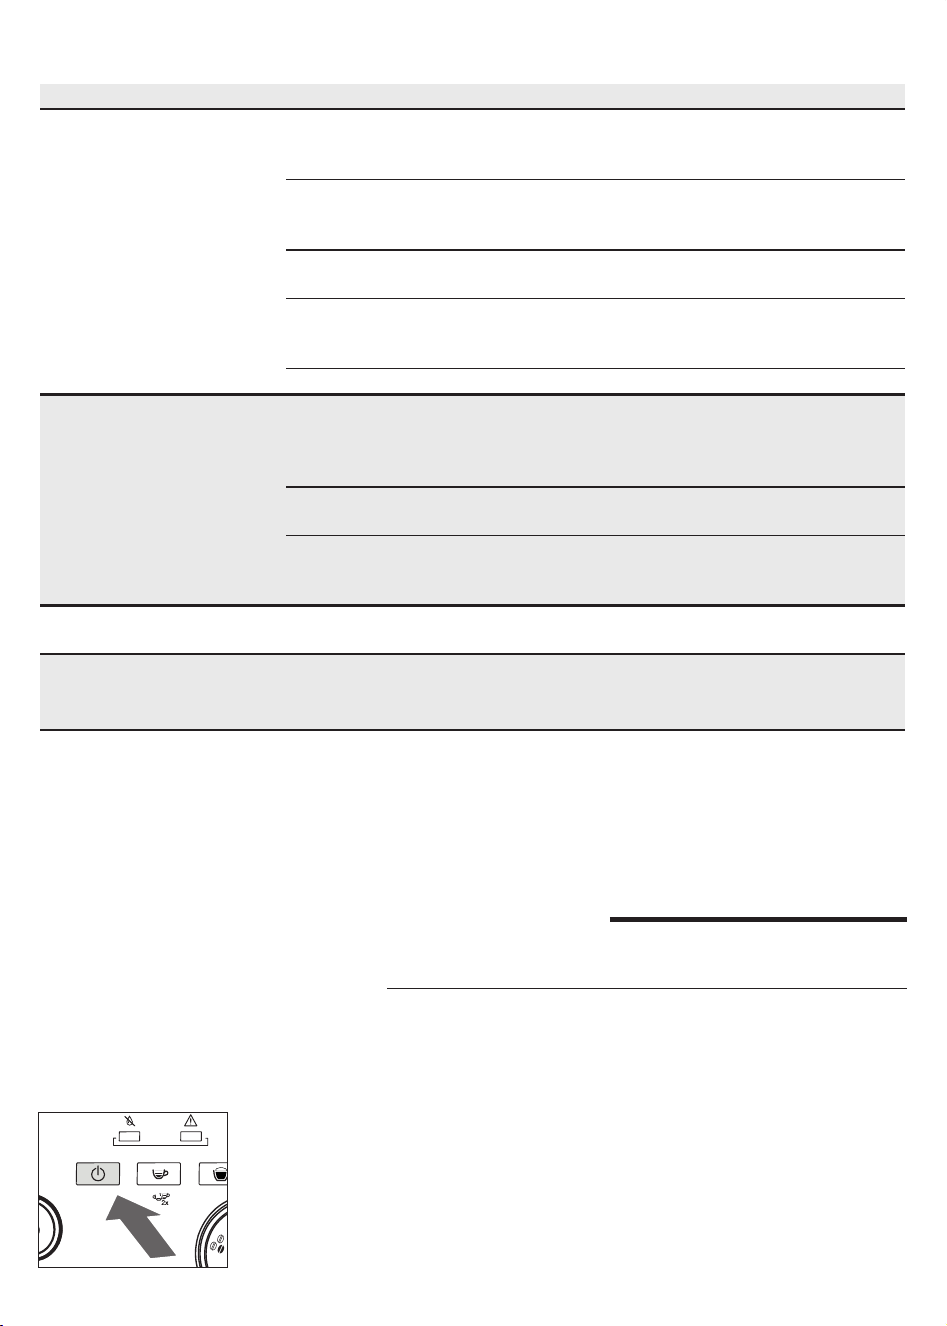
95
POLSKI
Problem Przyczyny Środki zaradcze
Urządzenie mieli ziarna
kawy, ale kawa nie leci z
dozownika.
(Patrz informacja)
Brakuje wody. Napełnić pojemnik na wodę i
napełnić obwód (rozdział „Pierwsze
uruchomienie”).
Blok zaparzajacy jest
zanieczyszczony.
Wyczyścić blok zaparzający (rozdział
„Cotygodniowe czyszczenie bloku
zaparzającego”).
Obwód jest pusty. Napełnić obwód (rozdział „Pierwsze
uruchomienie”).
Sytuacja ta występuje, kiedy
urządzenie automatycznie
reguluje dozę.
Zaparzyć kilka kaw zgodnie z opisem
zawartym w rozdziale „Gaggia Adapting
System”.
Dozownik jest brudny. Wyczyścić dozownik.
Kawa wypływa zbyt wolno.
(Patrz informacja)
Mielenie jest zbyt drobne. Zmienić mieszankę kawy lub
wyregulować stopień mielenia zgodnie z
opisem zawartym w rozdziale „Regulacja
młynka ceramicznego”.
Obwód jest pusty. Napełnić obwód (rozdział „Pierwsze
uruchomienie”).
Blok zaparzajacy jest
zanieczyszczony.
Wyczyścić blok zaparzający (rozdział
„Cotygodniowe czyszczenie bloku
zaparzającego”).
Kawa wypływa poza dozow-
nikiem.
Dozownik jest zatkany. Wyczyścić dozownik i jego otwory
wylotowe.
Mleko nie jest spieniane. System Capp in Cup został włożony
zbyt głęboko. Mleko nie jest
zasysane.
Pozostawić do schłodzenia system Capp
in Cup. Poruszyć go lekko w dół. Ustawić
go w prawidłowym położeniu.
Spienione mleko jest zbyt
zimne.
Filiżanki są zimne. Ogrzać liżanki gorącą wodą.
Oszczędność energii
Stand-by
Superautomatyczny ekspres do kawy
Gaggia
został zaprojektowany z myślą o
oszczędności energii.
Po 30 minutach bezczynności urządzenie automatycznie się wyłącza. Jeżeli
zaparzono jakiś produkt, urządzenie wykona cykl płukania.
W trybie stand-by zużycie energii nie przekracza 1Wh.
Aby włączyć urządzenie, należy nacisnąć ten przycisk (wyłącznik główny z tyłu
urządzenia jest w położeniu „I”). Jeżeli bojler jest zimny, urządzenie wykona cykl
płukania.
Naviglio milk en-nl-pl.indd 95 01/08/2019 09:47:53
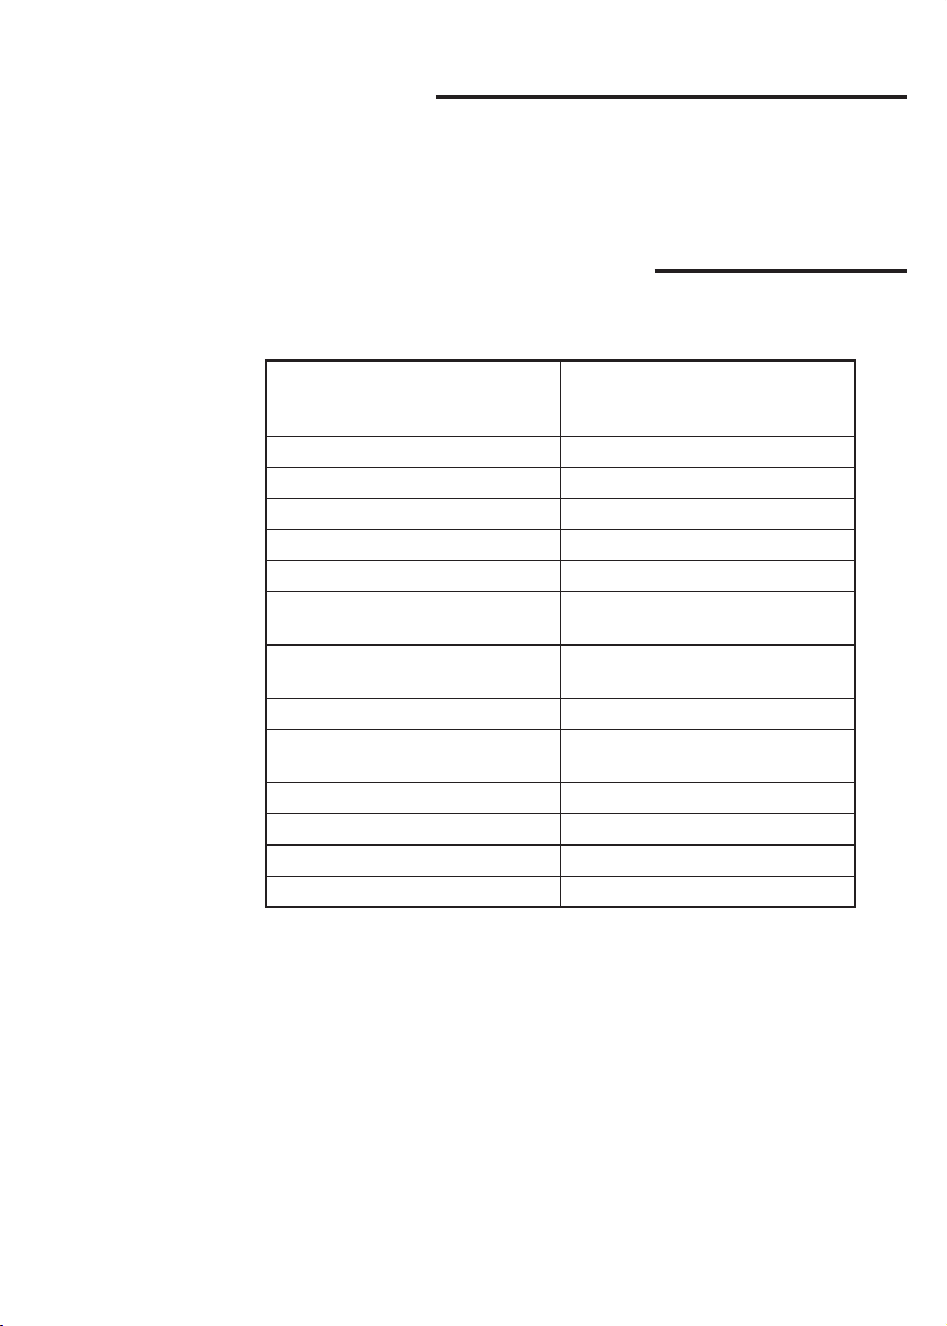
96
POLSKI
Właściwości techniczne
Producent zastrzega sobie prawo do modykacji właściwości technicznych
produktu.
Napięcie nominalne - Moc nominal-
na - Zasilanie
Patrz: tabliczka umieszczona po
wewnętrznej stronie drzwiczek
serwisowych
Materiał obudowy Tworzywo termoplastyczne
Wymiary (dł. x wys. x gł.) 256 x 340 x 440 mm
Ciężar 9 kg
Długość kabla 800-1200 mm
Panel sterowania Przedni
Klasyczna przystawka do spienia-
nia mleka
Specjalna do cappuccino
Maksymalna wysokość liżanki
pod dozownikiem (mm)
110
Zbiornik na wodę 1,5 litra - Wyjmowany
Pojemność pojemnika na kawę
ziarnistą
300 g
Pojemność pojemnika na fusy 10
Ciśnienie pompy 15 barów
Bojler Stal nierdzewna
Urządzenia zabezpieczające Bezpiecznik termiczny
Akcesoria
Akcesoria dostępne są w autoryzowanych salonach lub u lokalnych dystrybuto-
rów. Dane kontaktowe podano na stronie www.gaggia.com i www.gaggia.it.
Naviglio milk en-nl-pl.indd 96 01/08/2019 09:47:53

GAGGIA S.p.A. reserves the right to make any necessary modication.
GAGGIA S.p.a. behoudt zich het recht voor om alle wijzigingen die zij noodzakelijk acht aan te brengen.
GAGGIA S.p.a. zastrzega sobie prawo do wprowadzania dowolnych zmian.
GAGGIA S.p.A.
Società soggetta a direzione e
coordinamento di Philips Innovations S.p.A.
Sede Amministrativa/Administrative Oce
Via Torretta, 240
40041 Gaggio Montano - Bologna - Italia
+39 0534 771111 / Fax +39 0534 31025
Sede Legale/Registered Oce
Piazza A. Diaz, 1
20123 Milano - Italia
Capitale Sociale Euro 104.000 i.v.
REA MI1387376 - R.I. Cod.Fisc. 02069680367
Part. IVA : IT-13054780153
www.gaggia.it www.gaggia.com
COD. - Rev.00 - 30/07/19
Naviglio milk en-nl-pl.indd 100 01/08/2019 09:47:54