Instruction Manual & Warranty Card Police Body Worn Camera
Product Overview
- Police body camera often utilized by law enforcement to record their interactions with the public or gather video evidence at crime scenes.
- Nowadays it's also widely used in military, public service and citizen surveillance.
Product Features
- Max Pixel: 32 Mega Pixels
- Video Resolution: 2304x1296 30p/ 1920x1080 30p / 1440x1080 30p/ 1280x720 60p/ 1280x720 30p/ 848x480 60p/848x480 30p/
- Display Screen: 2 inch TFT-LCD HD Clear color display screen
- Wide Angle: 140° wide-angle lens. Image without deformity
- Memory Capacity: Build-in 32GB/64GB/128GB (optional)
- Data Interface: HDMI1.3 Support 1080p TV OutputJNTSC
- Continuous Recording" Time 11 hours
- Shoulder Microphone Support all kinds of walkie-talkie
- Positioning System(Optional): GPS / Beidou Positioning
- Car Mount(optional): Support
- ExtemalPowerSuppy(optional): Suppot
Quick Operation
Long press  to power on/off, short press it to turn screen on/off.
Short press  to start voice recording, and short press again to stop recording.
Short press  to take a photo.
Short press  to start video recording, and short press again to stop recording.
Short press  to turn on infrared light, and short press again to turn it off.
Short press  to playback the last photo, video or audio files.
Short press  to set the function and parameter.
Press  to return the last screen when camera in menu setting or playback mode.
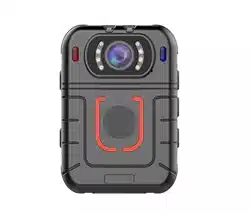
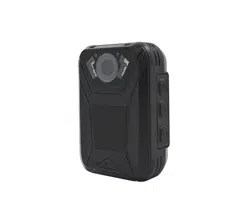
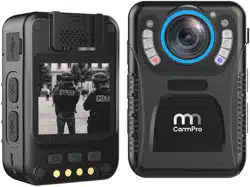
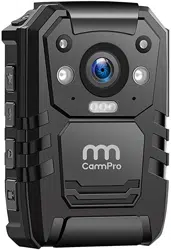
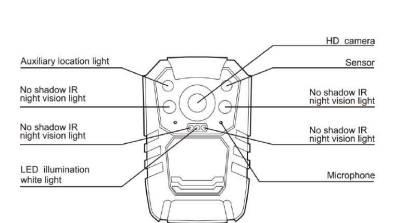
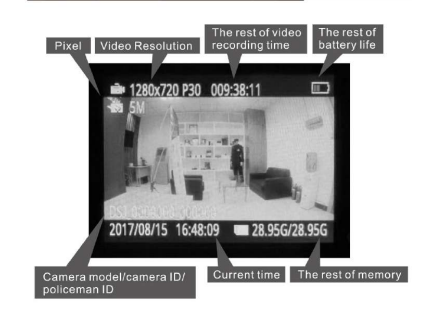
Appearance and Key description
Display Screen Description
Basic Operation Description
- Boot: Press for 2 seconds. the camera will beep on with a green LED. and the camera turn to standby mode with the screen lighted on.
- Audio Recording: Short press . the camera will shake. then the LED flash to yellow and the camera start audio recording. Press again when you want to end the audio recording. and the camera shakes again,with the yellow LED light off and the recording stored automatically.
- One Key Audio Recording: When the camera is off,long press key for 4 seconds to start one key recording.
- One Key Change Video Resolution: When the camera is in standby mode. long press key for 4 seconds. Device can be change the resolution between 1280*720 30pfs and 840*480 30pfs.
- Photo Taking:
- Short press key to take photo when the camera is in standby mode.
- Long press key for 4 seconds to turn on the LED flashlight. and the light will flash under specific frequency.
- Video Recording: When the cameras in standby mode,short press, then the camera body will shake with voice Guide Law-enforcement. video recording start. and afterwards the red video light flash on. which indicates the video recording start.Press key again to stop recording. and the camera body will shake again. with red video light off. and the recording is finished and saved. (Note: this function is close in default)
- One Key Video Recording: When the camera is off. Long press for 4 seconds to start one key video recording.
- Focus Adjustment: Long press key or to adjust the focus. (Note: Focus can't be adjusted under HD 1920*1080 video resolution)
- Laser Pointer: Long press for 4 seconds to open laser point light. Do it again to turn it off.
- Snapshot Under Video Recording: Short press key to take a photo in video recording mode.
- Switch Between IR Red Light and LED White Light: Short press to turn on IR red light. Press it again to shut down in video recording or standby mode. The IR red light can help to record video in the night or dark environment. Long press to turn on LED white light. Long press for 4 seconds again to turn the LED off.
- One Key Playback: Short press to fast browse the last photo. recorded audio or video file under standby mode.
- Fast Forward and Fast: Reverse short press or to fast forward or fast reverse at 2X, 4X,8x,16X, 32X,4X,128X under playback mode.
- OK Confirm: Short press
 to get into video,photo,audio folder and select a file to play. Long press for 4 seconds to open laser point light. do it again to turn off.
- Menu Selection: Short press to set the function and parameter as below in standby mode.
- Resolution: 8 modes of video resolution. 2304x1296 30p/ 1920x1080 30p / 1440*1080 30P/ 1280x720 60p /1280x720 30p / 848x480 60p/ 848*480 30P. Short press or a to select it. (is the PageUp key. is the PageDown key in selection mode.)
- Video Length Selection: 5mins,10mins,15mins,30mins and 45mins for selection. Short press and Short press or GB tosclect the tength.
- Video Quality: 3 modes are optional to adjust video quality: best, fine and standard. Short press Toenter and short press or tosciect.
- Photo Size: 5M,8M,10M,12M,16M,21M and 32M for the photo definition. Short press and short press or a to select.
- Continuous Shooting: Close (one shooting),2/3/5/10/15/20 continuous shootings for selection. Short press to enter. and short press or to select.
- Alert Tone: Shut down,voice guide,alert tone,shake modes for option to select the key tone and video audio. If choose shut down,the camera is mute. While choose voice guide,it will prompt Law-enforcementt.video recording start.
- Sound Volume: Adjust the alert tone and playback sound volume.
- Slide : It will get into slide browse mode during the photo playback.
- Video Pre-Recording : turn off, 10 seconds, 20 seconds and 1 minus for optinal, when you turn on pre record, the device can start the recording and save the video more than 10 seconds as the options you set before you press the start recording button
- IR Switch : Manula or automatic
- GPS(Optional) : Open or close.
- Timezone: - 12/+12, to set it in local timezone and after GPS positioning finalized, the date and time will be corrected automatically.
- Vehicle-Mounted(Optional): Open vehicle-mounted mode, and assemble the camera to the base, one side of data cable connect to mini USB port on the base, the other side connect to USB port of the car. Fire the car and it will auto-recording while fire off it will stop recording and save the video automatically. (Set it open or close in the menu)
- Screen Light Intensity : High, middle, low and auto adjust for options.
- Indicator Light: On or off.
- Video Classification: Traffic control, criminal investigation, public security can be selected by long press key
 for 4 seconds. Short press or to select the mode, and short press to confirm your selection. (Note: this function is close in default)
- Chime: Voice alert hourly. (Note: this function is closed in default)
- Default setting: To set device menu to restore factory mode, the data can saved and cann't deleted.
- Firmware: the device version information.
Indicator Light
- Standby Indicator Light (GREEN) : The light turns to green when the camera is powered on.
- Charge Indicator Light (RED): The light turns red during charging, and turn green when it is full.
- Video Recording Indicator Light (RED): The light turns red and flashing under video recording.
- Audio Indicator Light (YELLOW): The light turns yellow and flashing under audio recording.
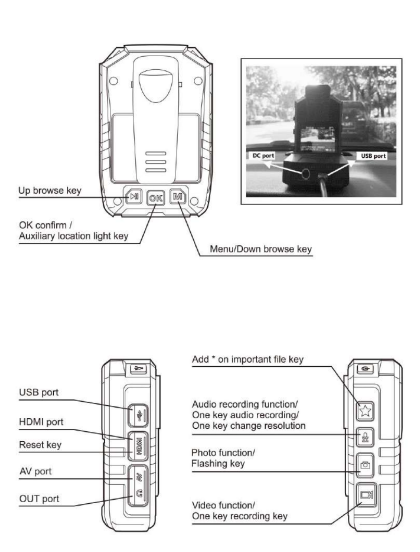
Key Function Description
- Reset Key
 : Reset it when the camera freezes by some errors.
- Combination Key
- One key play key: In standby mode, press this key to playback the last audio or video file.
- Page up key: Go to menu, press this key can select object to up and left.
- Focus adjustment function: Long press this key can adjust 8X focus change under standby or video recording mode. Press this key can fast reverse by 2X, 4X, 8X, 16X, 32X, 64X, 128X under video recording. (Note: Focus cannot be adjusted under HD 2304*1296 resolution)
- Combination Key
- OK confirm key: Press this key into video,photo,audio file browse mode and confirm it.
- Laser pointer key: Long press to open Laser Point light for the best positioning,and do it again to tum it off.
- Combination Key
- Walkie-talkie: After connect with the walkie-talkie. press this key start to talk.
- Add * on important file: Short press this key,then a * mark for important file can be marked on the top left corner of the screen.
- Video classification key: Traffic control,criminal investigation and public security can be selected when long press this key for 4 seconds. Short press or to select the mode,and short press to confirm.
- Combination Key
- Audio recording key: Press this key to start audio recording. press it again to stop it.
- One key audio recording key: When the camera is under tur off status. 4 seconds long press this key to start audio recording,press it again to stop it.
- Video resolution change key:When the camera is under standby mode. long press this key for 4 seconds, the video resolution can be changed to480 or 720.
- Combination Key
-
Combination Key
-
Video recording key: When the camera is in standby mode. press this key to start video recording. and press it again to stop it.
-
One key video recording key: Under turn off status. long press for 4 seconds to start video recording. and press it again to stop it.
-
Combination Key
-
Menu key: Press this key into system setting interface.
-
Page down key: Also press this key to select file from up and left when browse the files.
-
Zoom lens key: This key also has focus adjust function. Long press this key can adjust 8X focus change under standby or video recording status. Press this can fast reverse by 2X,4X,8X,16X,32X,64X,128X under video recording.(Note: Cannot adjust focus under HD 2304*1296 resolution )
-
Combination Key
-
No shadow IR night vi n light key: Short press it to open no shadow IR night vision light and help to calibrate the video object. Short Press it again to turn it off.
-
LED illumination light: Long press this key for 4 seconds to open LED illumination function. Long press it again to turn it off.
-
USB Port : Using cable connect this port with computer to get the file and charge the camera.
-
HDMI Port  : High Definition Multimedia Interface (HDMI) port. use it to connect with HD TV.
-
AV IN Port  : Connect to external camera. Picture and voice from external camera will show on the screen.
-
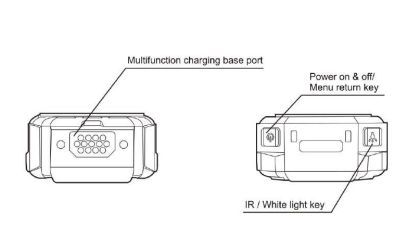
Power ON & OFF / Lock Screen Key: Long press this key to boot. long press it again to turn the camera off. Short press it to lock the screen,short press it again to unlock .
-
Abnormal Alarm
- Two kinds of abnormal alarms: When the battery is weak. Battery life flashes on the screen,at the same time the camera body shake and alarm with alert when the battery is full, the screen will alert storage full,the camera body shake with Alert tone alarm.
- Power Saving Mode
- When no operation after 1 min,3 min,5 min (optional in menu),the LCD screen will close automatically to save power. Press any key to reopenthe LCD.
- Short press key at a time to turn off LCD, short press any key LCD will reopen. and camera return to normal.
- Device added with MCU function,. it can switch to deep standby mode when not any operation in 15mins,. you can press any button to switch on the screen
- Charging ( Li-ion Rechargeable Battery )
- Battery will be full after 4 hours charging under the camera is power off (Using charger equipped). During the charging. indicator light will turn red. and turn green when it is full.
- While using multifunctioal base charger. plug the camera into the base. and connect the power. the red power light on the charger turn on. and camera boot automatically. You need to turn the camera off manually. and red indicator light on the camera body will turn on. which will turn green when the battery is full.
- Charging Ways
- USB connect to computer
- Multifunctional base charging
- Charger connect to 220V power charging
- Attention
- The focuscan is not adjusted under resolution 2304*1296.
- Two ways of charging. First one. charging in power off mode with 1A charging electricity. 4 hours to get full. Second one,charging in standby mode with 300mA charging electricity. 10hours to get full. (This way is to protect the circuit board and battery life)
- If the camera will be out of use for a long time. please charge it full at first .
- Please don't disassemble or repair the camera privately or by an unauthorized organization.
- Please use a pin to press the reset key to reboot the camera. when running hang or abnormal.
- To avoid short circuit or from corrosion and oxidation during using. please keep the bottom away from water.
- Remark: To meet the needs of the common users for convenient use, the Body Camera sold on! e has no password protection feature and no CD to| install Management System,while password and Management System can be added if they are essential for customization. Following is the detail guidance of Management System for professional use.
Cam Assistant (Management System)
Connect With Computer
- Install driver in computer. (If you install it before, no need to install again. If Click "read", camera ID, police ID, user name and department name are can no, ask sales to offer driver and installing instruction)
- Turn off camera and connect it with computer by USB. (Don't enter corresponding columns, then click "setting", password on camera)
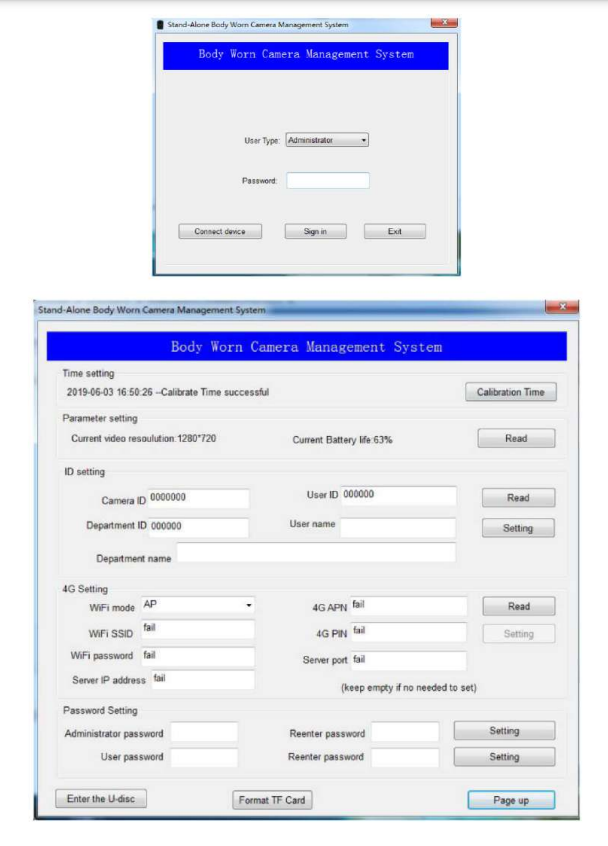
Login The Management System
- There are two roles (Administrator and User) for your selection when login.
- User can read the camera information and calibrate time, to revise user password and enter to camera disk are also allowed.
- Administrator has the highest authority to manage the cameras.
- Login steps: Enter password - Click "connect device". Click "sign in" Default password: 000000
Settings
- Time setting: Click "calibration time", camera time will be synced with computer.
- Parameter setting: Click "read", the current resolution and the remaining battery capacity of camera can be checked.
ID setting: Click “read”,camera ID,police ID,user name and department name are can be checked. if need to revise those information,type them directly to the corresponding columns,then click “setting”.
Password Setting: User and administrator can revise camera password here,remember to click “setting” after revising. (In user mode,it can revise common user's login password only,but in administrator mode, it can revise the all passwords. And please be noticed that that six digit number is needed,otherwise it will cause problems to device)
Enter to U-disk mode: Click “enter to U-disk”,it will cut off the connection with management software and enter to U-disk,data's delete and transfer are allowed in this mode.
Page up/Exit:
- Click “page up”, system will back to login interface.
- Click “exit”,it will cut off connection and exit system directly.
Instruction of Driver Installation
Unzip Files: Unzip the Windows.rar to release the Windows7&Above and WindowsXP files.
Driver: The “Windows 7 & above" file is for the PC with windows 7 or above systems,and “Window XP* file is for the PC with Windows XP system. Please install the right driver accordingly.
Driver Installation Instruction: Installation instruction of 32bit Wind7 OS as below.
- Click it and enter,there are two files with win32b and win64 setups,please select the one according with your PC system.
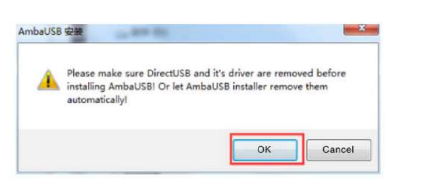
- Click “AmbaUSB-win32-Qt5-Win7-3.4.8-Setup”, it will pop-up a “AmbaUSB#3¢” window, click confirm button.
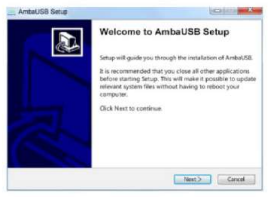
- It will pop-up a window as below figure after click the confirm button, and click "Next"
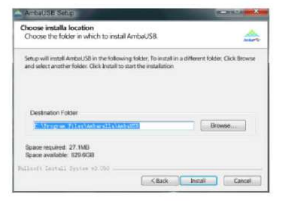
- Choose the install path, click "Install".
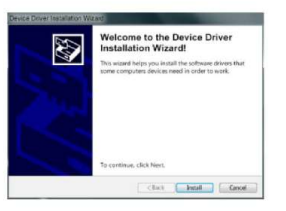
- After this installation, it will pop-up "Device driver installation wizard", click "Next", the installation procedure will be shown like below...
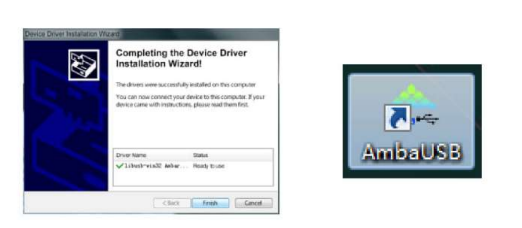
- When finish the driver installation, it shows an icon in your PC desktop as below figure
Notes: if the PC equips with fire wall, please choose "allow this operation" Or in the pop-up windows, click "always allow install this driver software" to finish the installation.
Troubleshooting
1. Software doesn't work
- Press reset button (inside HDMI port) to have camera resetting when camera works abnormally. Please note: DO NOT PRESS this button except maloperation.
2.Auxiliary camera port doesn't fit camera cable.
- If you buy other brand's auxiliary camera and try to attach it to our Cammpro body camera. there is chance that the cable of the auxiliary camera does not fit our port
3.How can i get the driver install in my window 10 computer? my computer is saying amba simple driver unavailable
- It may the USB drive don't allow you to install it. Here is the website link where you could download the software
- Or you could contact our technical support for the download link.
4.How to organize and delete video?
- Turn on your body cameras once you connect the computer.
- To press six zero into body cameras then it will be like a disk or flash in your computer.
- To delete something what you like.
5.How do you install on my Mac Book Pro?
- The Stand-alone software is only for Windows. Recently CammPro upgraded a simpler version firmware which can be used without stand-alone software. We'd be glad to help you to update your camera. so it can be connected with Mac Book Pro to read data
6.The software that operates the memory and function of the camera will not run on my computer
- As this camera have password protection to prevent unauthorized tampering. Before connect to computer,you should use the CD to install the driver onto the computer,after that,the camera could be read on computer and the software could run on the computer.
7.Successfully changed the password and now neither password works. locked out of camera and software.
- If you change the original password and happen to forget the new password you set. Then please contact our technical team for help