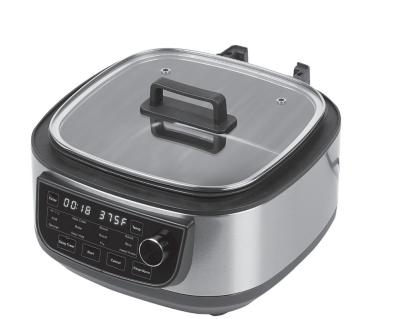
NOTE: Unpack all contents from the packaging. Contents vary by model. Check all packaging material carefully for parts. Please remove any clear or blue protective film on the components.
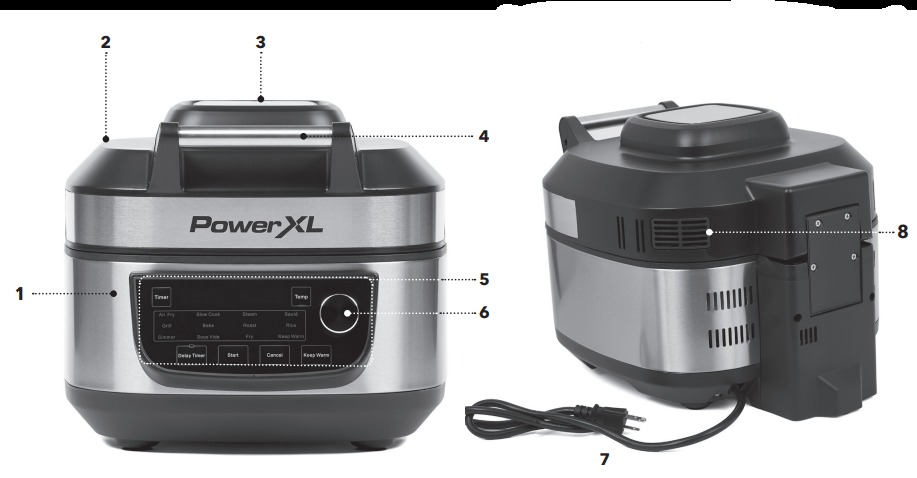
MAIN UNIT: Features sturdy stainless steel construction throughout. Cleans easily with a damp sponge or cloth and a mild detergent. Avoid harsh, abrasive cleaners. NEVER submerge this appliance in water or liquids of any kind.
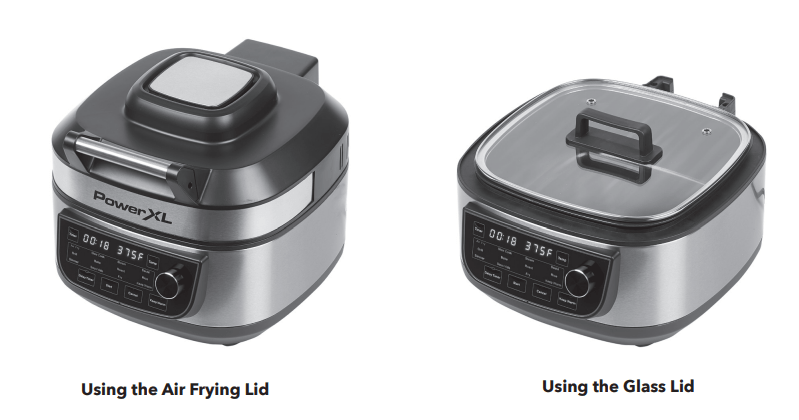
AIR FRYING LID: Attach the Air Frying Lid when using air frying cooking modes (see the "Attaching the Air Frying Lid" section).
AIR INLET VENT
LID HANDLE: Always use the handle and avoid touching the lid. The lid may become very hot during the cooking process and can cause injury.
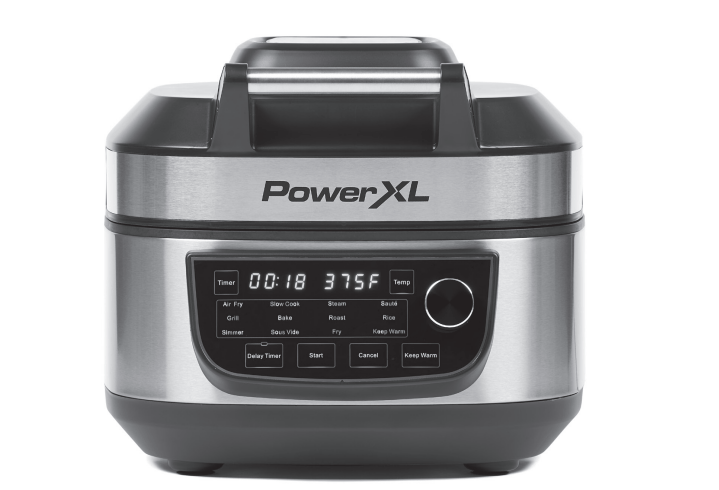
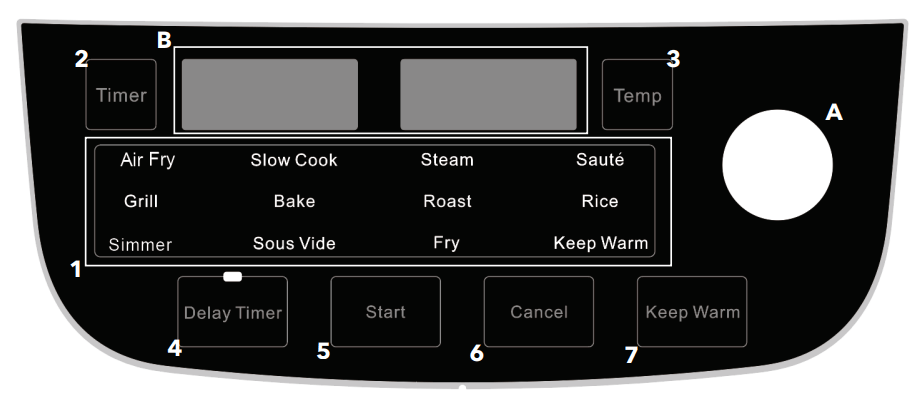
CONTROL PANEL: Use the Control Panel to use the cooking presets and set the cooking time and temperature (see “Using the Digital Control Panel” section).
CONTROL KNOB
POWER CORD
AIR OUTLET VENT
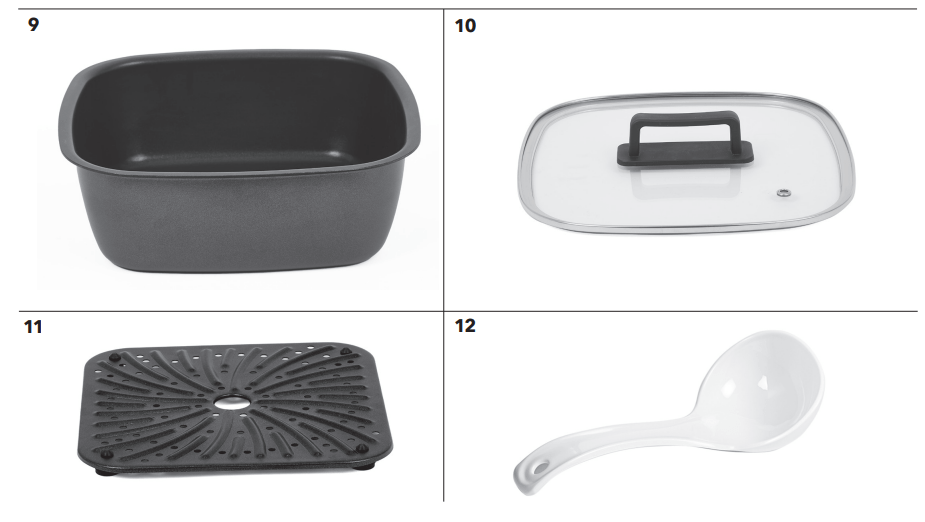
INNER POT: Must be used at all times.
GLASS LID
GRILL PLATE: Must be placed inside the Inner Pot. Preheat the Grill Plate to grill meat and vegetables. Use during Air Frying to circulate air under the food. Use for steaming to raise food above the liquid.
LADLE
Using The Digital Control Panel
TO START: Plug the Power Cord into the wall outlet.
The Digital LED Display will illuminate and a series of dashes will display.
Selecting a Preset Cooking Mode: 12 preset cooking modes are available: Air Fry, Slow Cook, Steam, Sauté, Grill, Bake, Roast, Rice, Simmer, Sous Vide, Fry, and Keep Warm. To select a cooking mode, rotate the Control Knob (A) to the right or left and the presets will be illuminated on the Digital LED Display (B). Once a preset is illuminated, press the Start Button to select it and the heating process will begin. The preset time and temperature will display.
Timer Button: To adjust the cooking time, press the Timer Button once and rotate the Control knob to the desired time. The time may be changed at any time during the cooking process.
Temperature Button: Press the Temperature Button and rotate the Control Knob to the desired temperature. The temperature may be changed at any time during the cooking process.
Delay Timer: The following presets allow use of the Delay Timer: slow cook, steam, bake, roast, rice, and simmer.
Start Button: Press the Start Button to choose a preset and begin the cooking process. You may also press the Start Button after the Time and Temperature are chosen.
Cancel Button will stop any cooking process immediately.
Keep Warm Function: Most presets will keep your food warm until you are ready to serve it. You may adjust the time for keeping food warm by selecting the Keep Warm Button and turning the Control Knob to select the desired time.
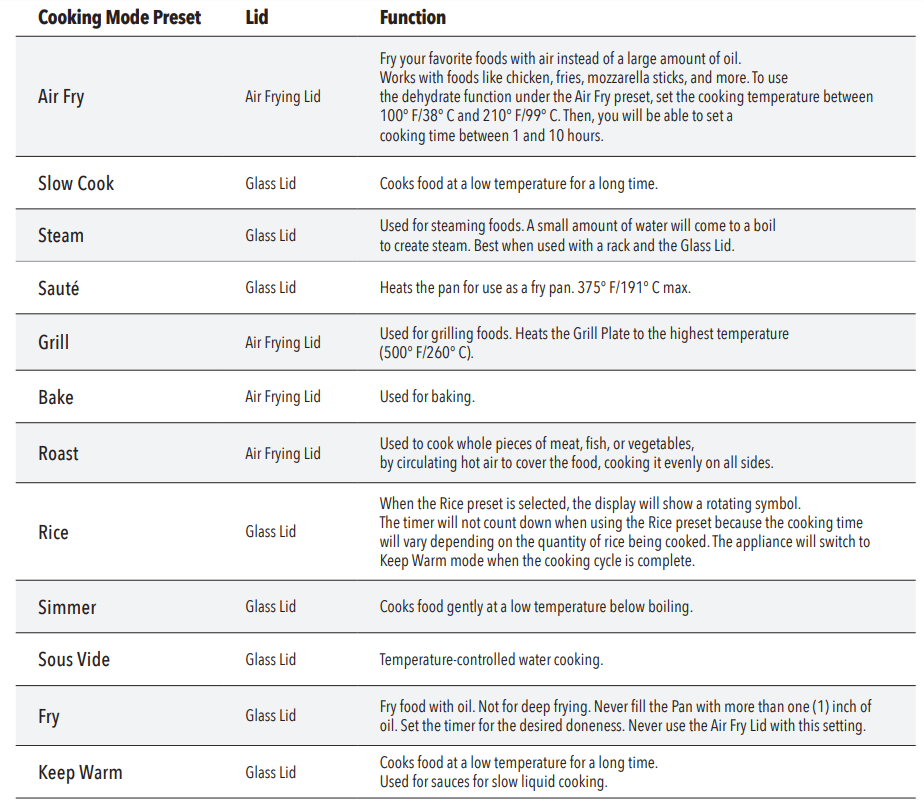
Cooking Mode Presets Explained
NOTE: See “Cooking Guidelines & Tips” section for more information.
Instructions for Use
Before Using for the First Time
Read all material, warning stickers, and labels.
Remove all packing materials, labels, stickers, and clear or blue protective film.
Wash the Inner Pot and Glass Lid with warm, soapy water. NOTE: Only the Inner Pot and Lid are dishwasher safe. Never wash or submerge the appliance Base in water or the dishwasher.
Wipe the inside and outside of the appliance Base with a clean, moist cloth.
Before cooking food, preheat the appliance for a few minutes to allow the appliance to burn off the manufacturer’s protective coating of oil. Wipe the appliance with warm, soapy water and a dishcloth after the burn-in cycle.
Preparing for Use
Place the appliance on a stable, level, horizontal, and heat-resistant surface.
Select or set the cooking mode for your recipe.
A Versatile Appliance
The PowerXL Grill Air Fryer Combo is designed to cook a wide variety of your favorite foods. The charts and tables provided within this manual and the Recipe Guide will help you get great results
Please refer to this information for proper time/ temperature settings and proper food quantities.
Recommendations & Tips
Proper Cooking Utensils: To prevent scratching the coating, we recommend using nonmetal utensils with your cookware. Do not cut food on the cookware using sharp utensils, such as forks, knives, mashers, or whisks, that can scratch the cooking surface.
Getting Started
NOTE: The Inner Pot must be inserted into the appliance Base to start a cooking cycle.
Select and prepare recipe for cooking.
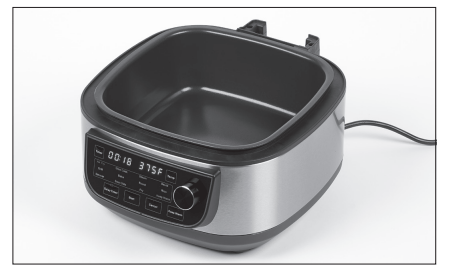
Place the Inner Pot in the Base as shown (see Fig. i).
Place all ingredients in the Inner Pot.
Add Lid if necessary.
FIG. i
NOTE: The Air Frying Lid is used only for air fry, grill, bake, and roast cooking functions. Keep the air fryer lid in the upward position or remove it and add the Glass Lid when using the other cooking functions. The Air Frying Lid cannot be closed when using non-air fryer cooking functions.
Attaching the Air Frying Lid
Place the Air Frying Lid on top of the Base, aligning the six pins in the Air Frying Lid’s Wire Harness with the six holes in the Base’s Wire Harness. The Air Fry preset will not function unless the Wire Harnesses are aligned properly. Do not twist the Air Frying Lid to close. The Air Frying Lid does not lock.
NOTE: Do not tilt or angle the lid when placing or removing. Lift or lower the lid straight up or down to ensure that the wire harnesses in the lid and base connect properly.
Never attempt to pick up the appliance with the Air Fry Lid or lid handle.
Step By Step
Once the appliance is plugged in, it will beep once. The screen will light up.
Rotate the Control Knob left or right and select the desired Preset Mode. The preset Time and Temperature will be displayed. Press the Start Button once to select the preset and start the cooking process
Depending upon the cooking mode, the time countdown will not begin until predetermined cooking temperature is reached.
When the cooking time has elapsed, the appliance will switch to Keep Warm for most cooking modes.
Customizing the Cooking Process
As you become more familiar with the appliance, you might want to tweak the settings to suit your individual taste. Adjusting the cooking time and temperature and setting up the cooker for Time Delay cooking and Manual Presets are all possible with the PowerXL Grill Air Fryer Combo. See the “Cooking Guidelines & Tips” section.
Cooking Guidelines & Tips
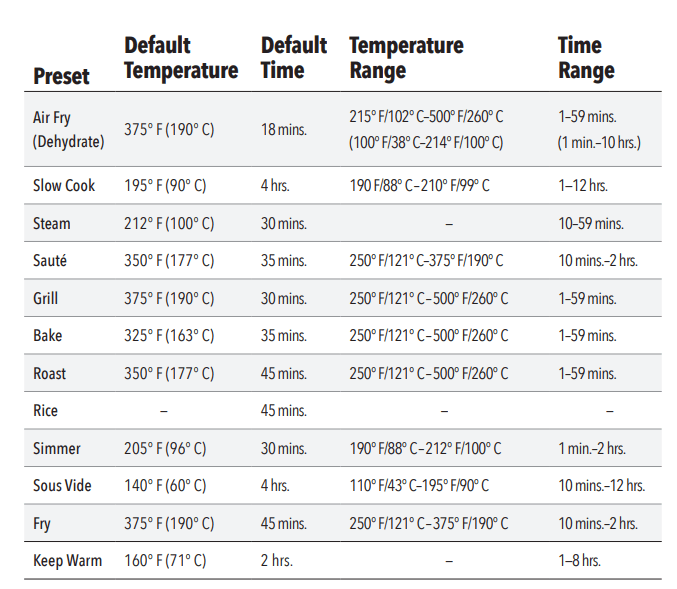
Preset Mode Chart
The times and temperatures on this chart show the basic default settings for the appliance. As you become familiar with the PowerXL Grill Air Fryer Combo, you will be able to make minor adjustments to suit your taste. NOTE: The Slow Cook, Simmer, and Sous Vide presets often require manual time and temperature settings.
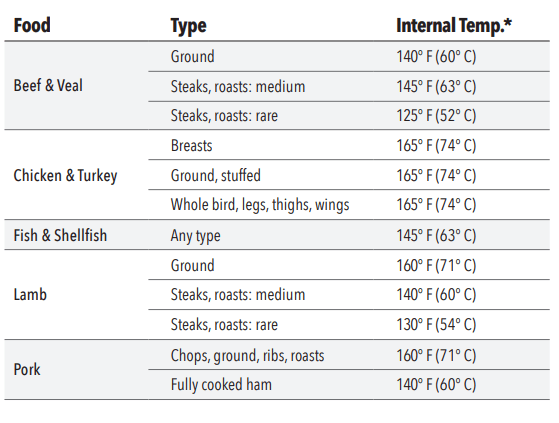
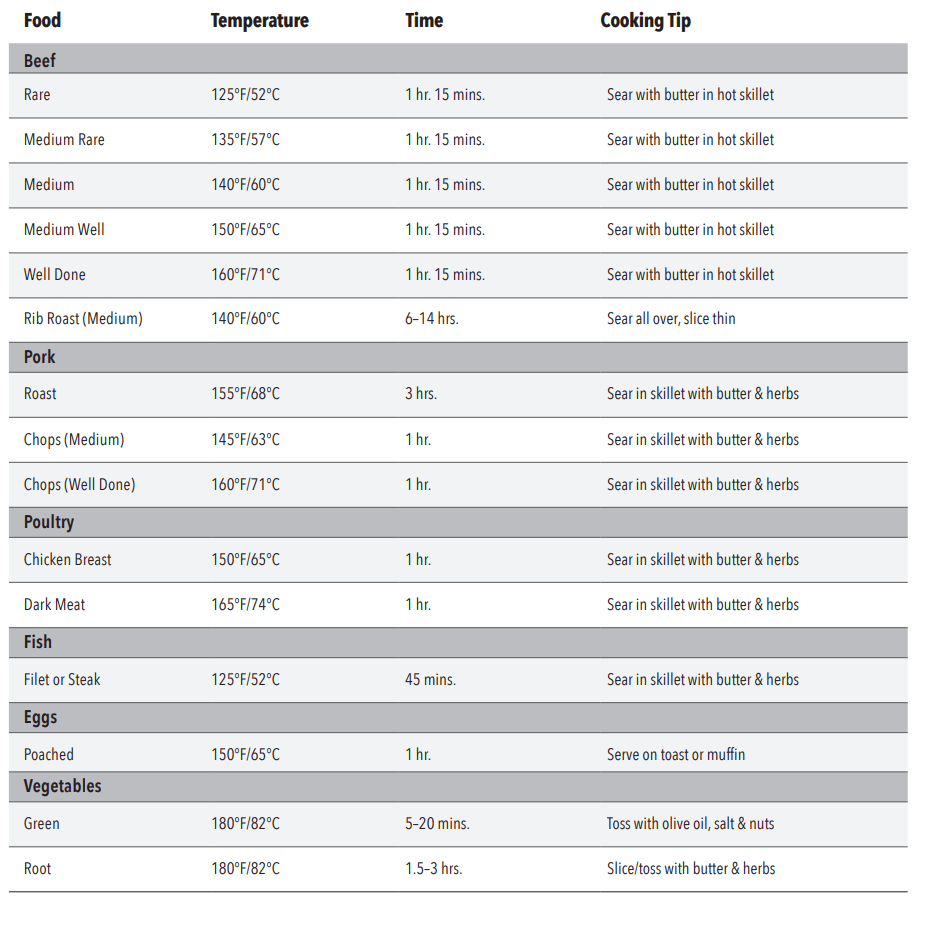
Internal Temperature Meat Chart
Use this chart and a food thermometer to ensure that meat, poultry, seafood, and other cooked foods reach a safe minimum internal temperature. *For maximum food safety, the U.S. Department of Agriculture recommends 165° F for all poultry; 160° F for ground beef, lamb, and pork; and 145° F, with a 3-minute resting period, for all other types of beef, lamb, and pork. Also review the USDA Food Safety Standards.
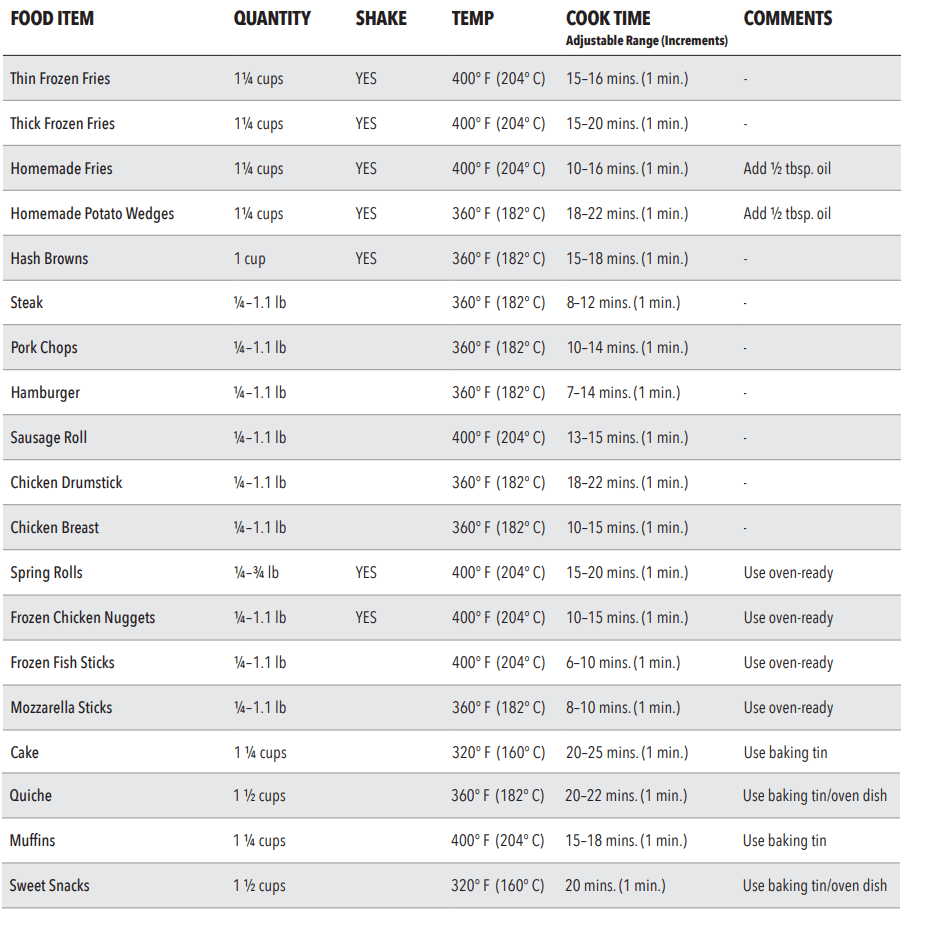
Air Frying Guidelines
NOTE: Keep in mind that these settings are guidelines. Since ingredients differ in origin, size, shape, and brand, we cannot guarantee the best settings for your ingredients.cooking results.
Sous Vide
What is Sous Vide?
In the sous vide method of cooking, food is sealed inside a plastic bag immersed in water and cooked at a lower temperature. Sous vide allows for greater control and evenly cooked results.
The sous vide method holds food at the perfect level of doneness for much longer than regular cooking methods would allow.
What are the Basic Steps?
The food must be in a sealed plastic bag or vacuum-sealed bag. Remove all air from sealed bags to prevent the bags from floating.
Submerge pouches into the water bath after the liquid has reached your desired temperature.
Cook for at least the minimum amount of time called for in your recipe.
Remove each pouch carefully from the water bath.
NOTE: Meat, poultry, or fish can be seared in a hot pan to create a crisp surface immediately before serving.
The Sous Vide Cooking Cycle
With the Inner Pot in the appliance, fill the Inner Pot with water. Turn the Control Knob to Sous Vide.
Adjust the cooking time and temperature and then press the Start Button to confirm.
Cover with the Glass Lid.
The appliance will beep once the water reaches the desired temperature. Add the sealed bags to the water. The timer begins once the appliance has reached the desired temperature and will beep again once the timer has expired.
CAUTION: Remove hot cooking bags with plastic tongs to prevent piercing and burns from hot water. Use oven mitts
Use the Glass Lid when using the Sous Vide method
Tip
When using the Sous Vide function the timer will not begin counting down until the desired temperature is reached. Reaching the desired temperature may take minutes or more.
Sous Vide Guidelines
Rice
Place the Inner Pot into the appliance.
Add the water, rice, salt, and oil.
Turn Control Knob to Rice.
Push the Start Button to confirm. Cover with the Glass Lid.
The display will state “rice” and the rotating circle will spin during the cooking cycle.
Ratio for Long-Grain White Rice
Combine 1 ½ cups of liquid with 1 cup of rice; this will yield about 2 cups rice or enough for 4 (½-cup) servings.
Ratio for Brown Rice
Combine 2 cups of liquid with 1 cup of brown rice; this will yield about 2 cups rice or enough for 4 (½-cup) servings.
Tips
Foods that are smaller in size usually require a slightly shorter cooking time than larger foods.
Large quantities of food only require a longer cooking time than smaller quantities.
Shaking smaller-sized foods halfway through the cooking process ensures that all the pieces are fried evenly.
Adding a bit of vegetable oil to fresh potatoes is suggested for a crispier result. When adding oil, do so just before cooking and add only a small amount onto the potato.
Snacks normally cooked in an oven can also be cooked in the appliance.
Use premade dough to prepare filled snacks quickly and easily. Premade dough also requires a shorter cooking time than homemade dough.
You can use the appliance to reheat foods. Simply set the temperature and time to however warm you want your food.
Shaking/Flipping (for Air Frying)
To ensure even cooking, some foods require shaking/flipping during the cooking process. Gently shake/flip the contents as needed and place them back in the appliance to continue cooking.
CAUTION: The appliance and Inner Pot will be hot. Wear an oven mitt during this procedure:
Open the Lid.
Flip the food in the Inner Pot.
Close the Lid on the appliance and continue cooking
Slow Cooking Tip
When slow cooking, the timer will not begin counting down until the desired temperature is reached. Reaching the desired temperature may take 30 minutes or more.
Troubleshooting
Symptom
Possible Cause
Solution
The appliance does not work
The appliance is not plugged in.
Plug the Power Cable into a wall socket.
You have not turned the appliance on by setting the cooking time and temperature.
Turn the Control Knob to select a preset and then press the Start Button to begin the cooking process.
The appliance is plugged into a shared outlet
The appliance must be the only item plugged into the outlet.
Food is not cooked
The Inner Pot is overloaded.
Use smaller batches for more even cooking.
The temperature is set too low.
Raise temperature and continue cooking.
Food is not fried evenly
Some foods need to be shaken during the cooking process.
See the “Shaking/Flipping (for Air Frying)” section.
White smoke coming from applliance
Too much oil is being used.
Wipe down to remove excess oil.
French fries are not fried evenly
Potatoes are not prepped properly.
Consult a recipe for potato type and prep.
Fries are not cut evenly.
Cut fries thinner or reshape fries.
Fries are too crowded.
Spread fries out or cook a smaller batch.
Potatoes are not rinsed properly during preparation
Pat dry to remove excess starch.
Fries are not crispy
Raw fries have too much water.
Dry potato sticks properly before misting oil.
Cut sticks smaller.
Add a bit more oil.
Error
E1 - Bottom temperature sensor open circuit.
E2 - Bottom temperature sensor short circuit.
E3 - Dry cooking due to empty pot.
LID - Wrong lid.
POT - Without inner pot, must insert inner pot.
E7 - Top temperature sensor open circuit.
E5 - Top temperature sensor short circuit.
E6 - Overheat.
Contact Customer Service.
Frequently Asked Questions
Can I use any type of pan to cook in my PowerXL Grill Air Fryer Combo?
No, only use the Inner Pot that comes with the appliance.
Does the appliance get hot?
The appliance gets hot during use and stays hot for a while after use. Avoid touching the appliance with your bare hands during and after use. Use oven mitts or potholders when handling food or parts of the appliance when hot.
Display Error Indicator
DO NOT USE OR ATTEMPT TO REPAIR A MALFUNCTIONING UNIT. Contact customer service for further information.
NOTE: E6 error may be caused by too little liquid in hot pan. The appliance will display E6. Shut off appliance, turn on appliance, add more liquid or turn down heat setting
Display Shown
Cause of Error
E1
Bottom temperature sensor open circuit.
E2
Bottom temperature sensor short circuit.
E3
Dry cooking due to empty pot.
LID
Wrong lid.
POT
Without inner pot, must insert inner pot.
E5
Top temperature sensor short circuit.
E6
Overheat. Too little liquid.
E7
Top temperature sensor open circuit.
Cleaning & Storage
Easy Maintenance
Be sure to let the appliance cool down and unplug it from the wall socket before cleaning.
When cleaning the Inner Pot, allow the Inner Pot to cool completely before washing. Never immerse hot cookware in water as this will cause irreparable warping.
Cleaning your Inner Pot is quick and easy. After each use, wash it in hot water with mild soap or dish detergent. Rinse thoroughly and wipe dry immediately with a soft dish towel. If any food particles remain, fill the cookware with hot water and liquid dish detergent, soak until the water becomes lukewarm, and use a sponge or soft cloth to remove any remaining food particles.
Do not use steel wool or metal pads. They could leave coarse scratches.
To keep the appliance clean, wipe away the enclosure with damp cloth and then dry it with a clean, dry cloth. Never immerse the main body of the appliance in water for cleaning!
To protect against electric shock, DO NOT immerse the main parts of the appliance, cord, or plug in water or other liquids.
Make sure that the device is properly cleaned before storing it in a dry place.
Removing Stubborn Residue
When food is burned on the cookware, a stubborn black residue may remain. If regular cleaning does not loosen it, soak in hot water and 1 tbsp. of non-lemon detergent for 15 mins. Allow the water to become lukewarm before you drain and rinse. Wipe with a plastic spatula or nonabrasive sponge to loosen residue. Repeat if necessary.
Dishwasher Safe
Only the Inner Pot and Glass Lid are dishwasher safe. Although these components are dishwasher safe, we recommend cleaning by hand. Hand-washing preserves the life of the cookware and helps to maintain its appearance. If cleaning in the dishwasher, follow the suggested guidelines:
Load the dishwasher carefully. Other dishes and flatware may mark the surface of your cookware.
Be sure to remove soil from other dishes and flatware.
It can be abrasive to nonstick coating.
We recommend using a non-lemon detergent.
Regular dishwasher cleaning will eventually scratch any surface.
To protect yourself from electric shock, NEVER immerse the device, or the Power Cord in water or other liquids.
DO NOT use any petroleum products, which will damage the outer appliance housing and the Control Panel.
DO NOT use/store any flammable, acid, or alkaline materials or substances near the device, as this may reduce the service life of the device and lead to deflagration (fire) when the device is turned on.
DO NOT stack heavy objects on top of the appliance. Excessive weight could possibly damage the appliance