User Manual
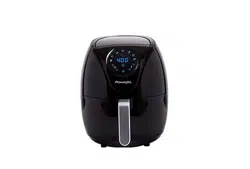
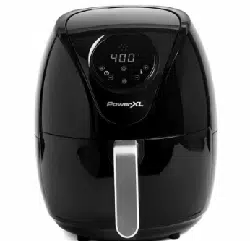
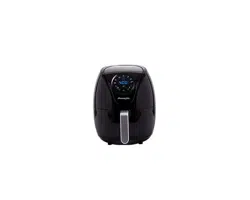
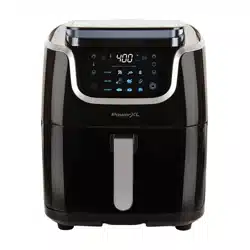
Parts & Accessories
1. MAIN UNIT HOUSING
2. CONTROL PANEL
3. AIR INLET VENT
4. HOT AIR OUTLET VENT
5. POWER CABLE
6. FRY TRAY
7. RUBBER BUMPERS*
8. BASKET
9. HANDLE
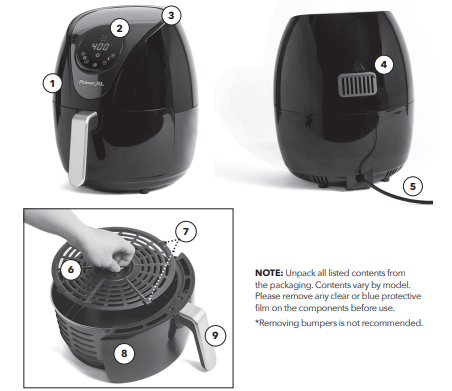
IMPORTANT: Please make sure that your PowerXL Classic Air Fryer has been shipped with the components that you ordered (some accessories may be sold separately). Check everything carefully before use. If any part is missing or damaged, do not use this product. Contact customer service using the number located on the back of the manual.
Appliance Specifications
CAUTION: Appliance may be hot. Be careful not to touch the appliance while in use. Keep the appliance away from other objects.
Technical Specifications

Using The Control Panel
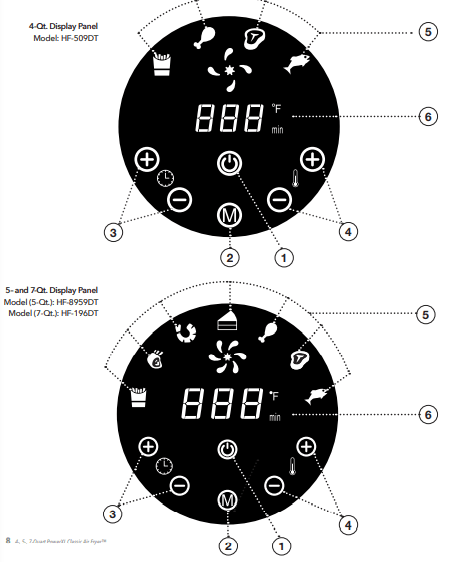
1. Power Button
Once the Basket and Fry Tray are properly placed in the Main Unit Housing, the Control Panel will be illuminated. Pressing the Power Button once will set the appliance to a default cooking temperature of 370° F/188° C and time of 15 minutes. Pressing the Power Button a second time will start the cooking process. Pressing the Power Button during the cooking cycle will turn the appliance off.
2. M Button
Press the M Button to cycle through the cooking presets.
3. Timer Control Buttons
The + and − symbols enable you to increase or decrease cooking time 1 minute at a time. Keeping the Button held down will rapidly change the time. Time control range: 0– 60 mins.
4. Temperature Control Buttons
The + and − symbols enable you to increase or decrease cooking temperature 10° F at a time. Keeping a button held down will rapidly change the temperature. Temperature control range: 180° F/82° C–400° F/204° C.
5. Cooking Presets
Press the M Button to cycle through the cooking presets (smaller models have fewer presets; see Fig. 1). See the Preset Chart below for the cooking times and temperatures associated with each preset.
NOTE: The running lights on the Control Panel will illuminate when the cooking cycle begins and will stay illuminated for up to 20 seconds after the cooking cycle is complete.
6. Time and Temperature
Display This display will keep track of the temperature and remaining cook time.
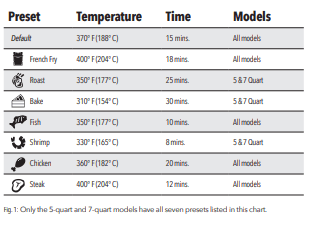
Preset Chart
Once you are familiar with the appliance, you may want to experiment with your own recipes. Simply choose the time and temperature that suits your personal taste.
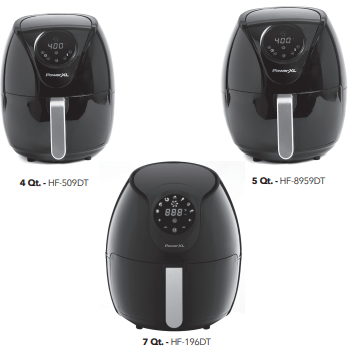
NOTE: The Roast, Bake, and Shrimp presets are only available with the 5-quart and 7-quart models.
Instructions for Use
Before First Use
1. Remove all the packaging material.
2. Remove any stickers or labels from the appliance.
3. Before initial use, wipe the inside and outside of the appliance with a warm, moist cloth and mild detergent. Handwash all cooking accessories.
4. Before cooking food, preheat the PowerXL Classic Air Fryer for a few minutes to allow the appliance to burn off the manufacturer’s protective coating of oil. Wipe the appliance with warm, soapy water and a washcloth after this burn-in cycle.
5. Place the appliance on a stable, horizontal, and level surface. Do not place the appliance on a surface that is not heat resistant. Ensure that the appliance is used in an area with good air circulation and away from hot surfaces and any combustible materials. Do not place on the stove top.
6. Place the Fry Tray in the Basket. Slide the Basket into the appliance. If the Basket is placed properly, it will click into place.
NOTE: The PowerXL Classic Air Fryer cooks using hot air. Do not fill the Basket with oil or frying fat. Do not put anything on top of the appliance. This disrupts the airflow and affects the cooking results.
Using the PowerXL Classic Air Fryer
1. Plug the appliance into a grounded wall socket.
2. To preheat, push the Power Button.
3. Press the Temperature Increase or Decrease Buttons to set the cooking temperature.
4. Press the Time Decrease Button to set the preheat time to 3 minutes. When the preheat cycle finishes, carefully pull the Basket out of the appliance and place the ingredients inside.
NOTE: For better performance, always use the Fry Tray with the Basket.
5. Do not touch the Basket directly because the Basket becomes very hot during operation. Only hold the Basket by its handle.
6. Press the Power Button. Set the appropriate time and temperature for the ingredients you are cooking.
7. When the timer beeps five times, the set cooking time has elapsed. Pull the Basket out of the appliance and place it on a heatresistant surface.
8. Use tongs to remove food.
CAUTION: Do not turn the Basket upside down because any excess oil that has collected on the bottom of the basket will leak onto the ingredients.
9. If the food is not fully cooked, simply slide the Basket back into the appliance and add a few minutes to the cooking time.
10.The appliance is instantly ready for preparing another batch.
Shaking
To ensure even cooking, some foods require shaking during the cooking process. Remove the Basket from the appliance. Gently shake the contents as needed and place them back in the appliance to continue cooking.
CAUTION: The Basket will be hot. Wear an oven mitt during this procedure.
- Place the Basket on a heat-resistant surface.
- Shake the ingredients in the Basket.
- Return the Basket to the appliance to finish cooking.
Tips
- Foods that are smaller in size usually require a slightly shorter cooking time than larger foods.
- Large quantities of food only require a longer cooking time than smaller quantities.
- Shaking smaller-sized foods halfway through the cooking process ensures that all the pieces are fried evenly.
- Adding a bit of vegetable oil to fresh potatoes is suggested for a crispier result. When adding oil, do so just before cooking and add only a small amount onto the potato.
- Snacks normally cooked in an oven can also be cooked in the PowerXL Classic Air Fryer.
- Use premade dough to prepare filled snacks quickly and easily. Premade dough also requires a shorter cooking time than homemade dough.
- You can use the PowerXL Classic Air Fryer to reheat foods. Simply set the temperature and time to however warm you want your food.
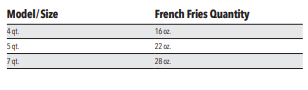
Capacity Chart
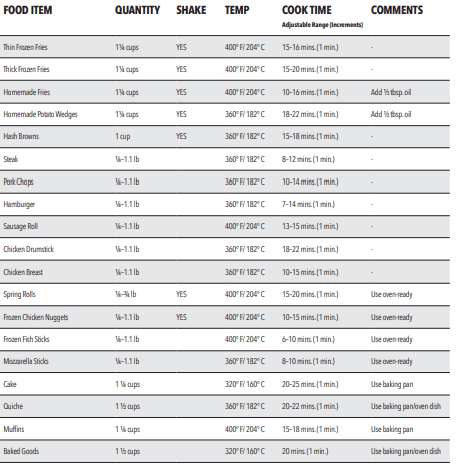
General Cooking Guidelines
NOTE: Keep in mind that these settings are guidelines. Since ingredients differ in origin, size, shape, and brand, we cannot guarantee the best settings for your ingredients.
Troubleshooting
The PowerXL Classic Air Fryer does not work
- The appliance is not plugged in.
- Plug the Power Cable into a wall socket.
- You have not turned the appliance on by setting the preparation time and temperature.
- Press the Power Button. Select a time and temperature. Press the Power Button again and cooking will begin.
- You have probably turned the appliance off. If you press the Power Button while the appliance is cooking, you will trigger the Auto Shut-Off mode.
- Press the Power Button. Select a time and temperature. Press the Power Button again and cooking will begin.
Food is not cooked
- The Basket is overloaded.
- Use smaller batches for more even frying.
- The temperature is set too low.
- Raise temperature and continue cooking.
Food is not fried evenly
- Some foods need to be shaken during the cooking process.
- See Shaking in Instructions for Use, p. 11.
Basket will not slide into appliance properly
- The Basket is overloaded.
- Do not fill the Basket above the Maximum line.
- The Fry Tray is not placed in the Basket correctly.
- Ensure the Fry Tray sits evenly on the bottom of the Basket.
White smoke coming from appliance
- Too much oil is being used.
- Wipe down to remove excess oil.
- The Basket has grease residue from the previous operation.
- Clean the Basket after each use.
French fries are not fried evenly
- Potatoes are not prepped properly.
- Consult a recipe for potato type and prep.
- Fries are not cut evenly
- Cut fries thinner or reshape fries.
- Fries are too crowded.
- Spread fries out or cook a smaller batch.
- Potatoes are not rinsed properly during preparation.
- Pat dry to remove excess starch.
Fries are not crispy
- Raw fries have too much water.
- Dry potato sticks properly before misting oil.
- Cut sticks smaller.
- Add a bit more oil.
Error
- E1 - Broken circuit of the thermal sensor
- E2 - Short circuit of the thermal sensor
- Call Customer Service at 973-287-5129
Frequently Asked Questions
- Can I prepare foods other than fried dishes with my PowerXL Classic Air Fryer? You can prepare a variety of dishes, including steaks, chops, burgers, and baked goods. See the PowerXL Classic Air Fryer Recipe Guide.
- Is the PowerXL Classic Air Fryer good for making or reheating soups and sauces? Never cook or reheat liquids in the appliance.
- Is it possible to shut off the appliance at any time? Press the Power Button once or remove the Basket.
- What do I do if the appliance shuts off while cooking? As a safety feature, the PowerXL Classic Air Fryer has an Auto Shut-Off device that prevents damage from overheating. Remove the Basket and set it on a heat-resistant surface. Allow the appliance to cool down. Remove the Power Cable from the outlet. Once cool, plug the Power Cable back into the socket. Restart by pressing the Power Button.
- Does the appliance need time to heat up? If you are cooking from a cold start, add 3 minutes to the cooking time to compensate.
- Can I check the food during the cooking process?You can remove the Basket at any time while cooking is in progress. During this time, you can shake the contents in the Basket if needed to ensure even cooking.
- Is the PowerXL Classic Air Fryer dishwasher safe? Only the Fry Tray is dishwasher safe. The appliance itself, which contains the heating coil and electronics, should never be submerged in liquid of any kind or cleaned with anything more than a warm, moist cloth or nonabrasive sponge with a small amount of mild detergent.
- What happens if the appliance still does not work after I have tried all the troubleshooting suggestions? Never attempt a home repair. Contact customer service and follow the procedures set forth by the guarantee. Failure to do so could render your guarantee null and void.
Cleaning
Clean the PowerXL Classic Air Fryer after each use. The Basket and the Fry Tray are coated with a special nonstick surface. Never use abrasive cleaning materials or utensils on these surfaces.
1. Remove the Power Cable from the wall socket and be certain the appliance is thoroughly cooled before cleaning.
2. Wipe the outside of the appliance with a warm, moist cloth and mild detergent.
3. Clean the Basket and the Fry Tray with hot water, a mild detergent, and a nonabrasive sponge.
NOTE: The Fry Tray is dishwasher safe.
TIP: Should the Fry Tray contain difficult-to-remove food particles, soak in hot, soapy water for 10 minutes.
NOTE: The rubber bumpers on the Fry Tray are part of the Fry Tray and should generally not be removed. However, if the rubber bumpers need to be cleaned, they can be removed and reattached: To remove the rubber bumpers, locate the capped end of the bumpers and push the capped end off of the Fry Tray. There will be some resistance, but keep pushing until the rubber bumpers come off of the Fry Tray. Take note of the slot on which the bumpers were sitting.
To reattach the rubber bumpers, align the hole in the rubber bumpers with the slots from which the rubber bumpers were removed. Slide the rubber bumpers all the way back onto the slot on the Fry Tray.
4. Clean the inside of the appliance with hot water, a mild detergent, and a nonabrasive sponge.
5. If necessary, remove unwanted food residue from the heating element with a soft cleaning brush.
Storage
- Unplug the appliance and let it cool down thoroughly.
- Make sure all components are clean and dry.
- Place the appliance in a clean, dry place.