OWNER’S / ASSEMBLY MANUALOWNER’S / ASSEMBLY MANUAL

Owner’s Manual
2
Important Safety Instructions ................................. 3
Safety Warning Labels and Serial Number............. 5
FCC Compliance .................................................... 5
Specications / Before Assembly ........................... 6
Parts ...................................................................... 7
Hardware / Tools .................................................... 9
Assembly ............................................................. 10
Storing Your Machine ........................................... 32
Leveling Your Machine ......................................... 32
Features ............................................................... 33
Connectivity on your tness machine ................... 37
Operations ............................................................ 39
Getting Started ..................................................... 40
Power Up Mode ................................................... 41
Edit a User Prole ................................................ 41
Workout Programs ............................................... 41
Paused/Results .................................................... 44
Add Time ............................................................. 44
Change Resistance Levels .................................. 45
Total Power score ................................................ 45
Machine Settings Mode ....................................... 46
Maintenance ......................................................... 47
Troubleshooting .................................................... 50
You’re about to experience an incredible workout that can help you lose weight and reshape your entire body so you’ll look and feel better than ever
before. We thank you for trusting in the Bowex brand.
Use this Manual as a guide to getting started on your Bowex™ workouts and for tips to keep your machine well maintained.
Yours in Health,
The Bowex Family
Table of Contents
Welcome to the Bowflex
™
HVT
™
machine!
Nautilus, Inc., www.nautilusinternational.com | Nautilus, Inc., 5415 Centerpoint Parkway, Groveport, OH 43125 USA | Printed in China | © 2017
Nautilus, Inc. | Bowex, the Bowex logo, Bowex Trainer, HVT, Bowex Toolbox, Nautilus, Schwinn, and Universal are trademarks owned or
licensed by Nautilus, Inc., registered or otherwise protected by common law in the U.S. and other countries. MyFitnessPal
® ,
Polar
®
, OwnCode
®
,
Android™, and Google Play™ are trademarks of their respective owners. Apple and the Apple logo are trademarks of Apple Inc., registered in
the U.S. and other countries. App Store is a service mark of Apple Inc. The Bluetooth
®
word mark and logos are registered trademarks owned by
Bluetooth SIG, Inc., and any use of such marks by Nautilus, Inc. is under license.
ORIGINAL MANUAL - ENGLISH VERSION ONLY
To validate warranty support, keep the original proof of purchase and record the following information:
Serial Number __________________________
Date of Purchase ____________________
To register your product warranty, contact your local distributor.
For details regarding product warranty or if you have questions or problems with your product, please contact your local Bowex
distributor. To nd your local distributor, go to: www.nautilusinternational.com

Owner’s Manual
3
Important Safety Instructions
When using an electrical appliance, basic precautions should always be followed, including the following:
This icon means a potentially hazardous situation which, if not avoided, could result in death or serious injury.
Obey the following warnings:
Read and understand all Warnings on this machine.
Carefully read and understand the Assembly/Owner’s Manual.
Carefully read and understand the Assembly instructions. Read and understand the complete Manual. Keep the Manual
for future reference.
To reduce the risk of electrical shock or unsupervised usage of the equipment, always unplug this machine from the
electrical outlet immediately after using and before cleaning.
To decrease the risk of burns, electric shock, or injury to persons, read and understand the complete Assembly/Owner’s
Manual. Failure to follow these guidelines can cause a serious or possibly fatal electrical shock or other serious injury.
• Keep bystanders and children away from the product you are assembling at all times.
• Do not connect power supply to the machine until instructed to do so.
• The machine should never be left unattended when plugged in. Unplug from outlet when not in use, and before putting on or taking off parts.
• Before each use, examine the machine for damage to power cord, loose parts or signs of wear. Do not use if found in this condition. Contact your
local distributor for repair information.
• Do not drop or put objects into any opening of the machine.
• Do not assemble this machine outdoors or in a wet or moist location.
• Make sure assembly is done in an appropriate work space away from foot traffic and exposure to bystanders.
• Some components of the machine can be heavy or awkward. Use a second person when doing the assembly steps involving these parts. Do not
do steps that involve heavy lifting or awkward movements on your own.
• Set up this machine on a solid, level, horizontal surface.
• Do not try to change the design or functionality of this machine. This could compromise the safety of this machine and will void the warranty.
• If replacement parts are necessary, use only genuine Nautilus replacement parts and hardware. Failure to use genuine replacement parts can
cause a risk to users, keep the machine from operating correctly and void the warranty.
• Do not use until the machine has been fully assembled and inspected for correct performance in accordance with the Manual.
• Use this machine only for its intended use as described in this manual. Do not use attachments not recommended by the manufacturer.
• Do all assembly steps in the sequence given. Incorrect assembly can lead to injury or incorrect function.
• Do not move the machine without aid. Injury to you or damage to the machine can occur.
• Connect this machine to a properly earthed outlet only.
• Keep the power cord away from heat sources and hot surfaces.
• Do no operate where aerosol products are being used.
• SAVE THESE INSTRUCTIONS.

Owner’s Manual
4
Before using this equipment, obey the following warnings:
Read and understand the complete Manual. Keep the Manual for future reference.
Read and understand all Warnings on this machine. If at any time the Warning stickers become loose, unreadable or dislodged,
contact your local distributor for replacement stickers.
To reduce the risk of unsupervised use of the equipment, remove the AC Adapter from the wall outlet and the machine. Place the
AC Adapter in a secure location
• Children must not be let on or near to this machine. Moving parts and other features of the machine can be dangerous to children.
• Not intended for use by anyone under 14 years of age.
• Consult a physician before you start an exercise program. Stop exercising if you feel pain or tightness in your chest, become short of breath, or
feel faint. Contact your doctor before you use the machine again. Use the values calculated or measured by the machine’s computer for reference
purposes only.
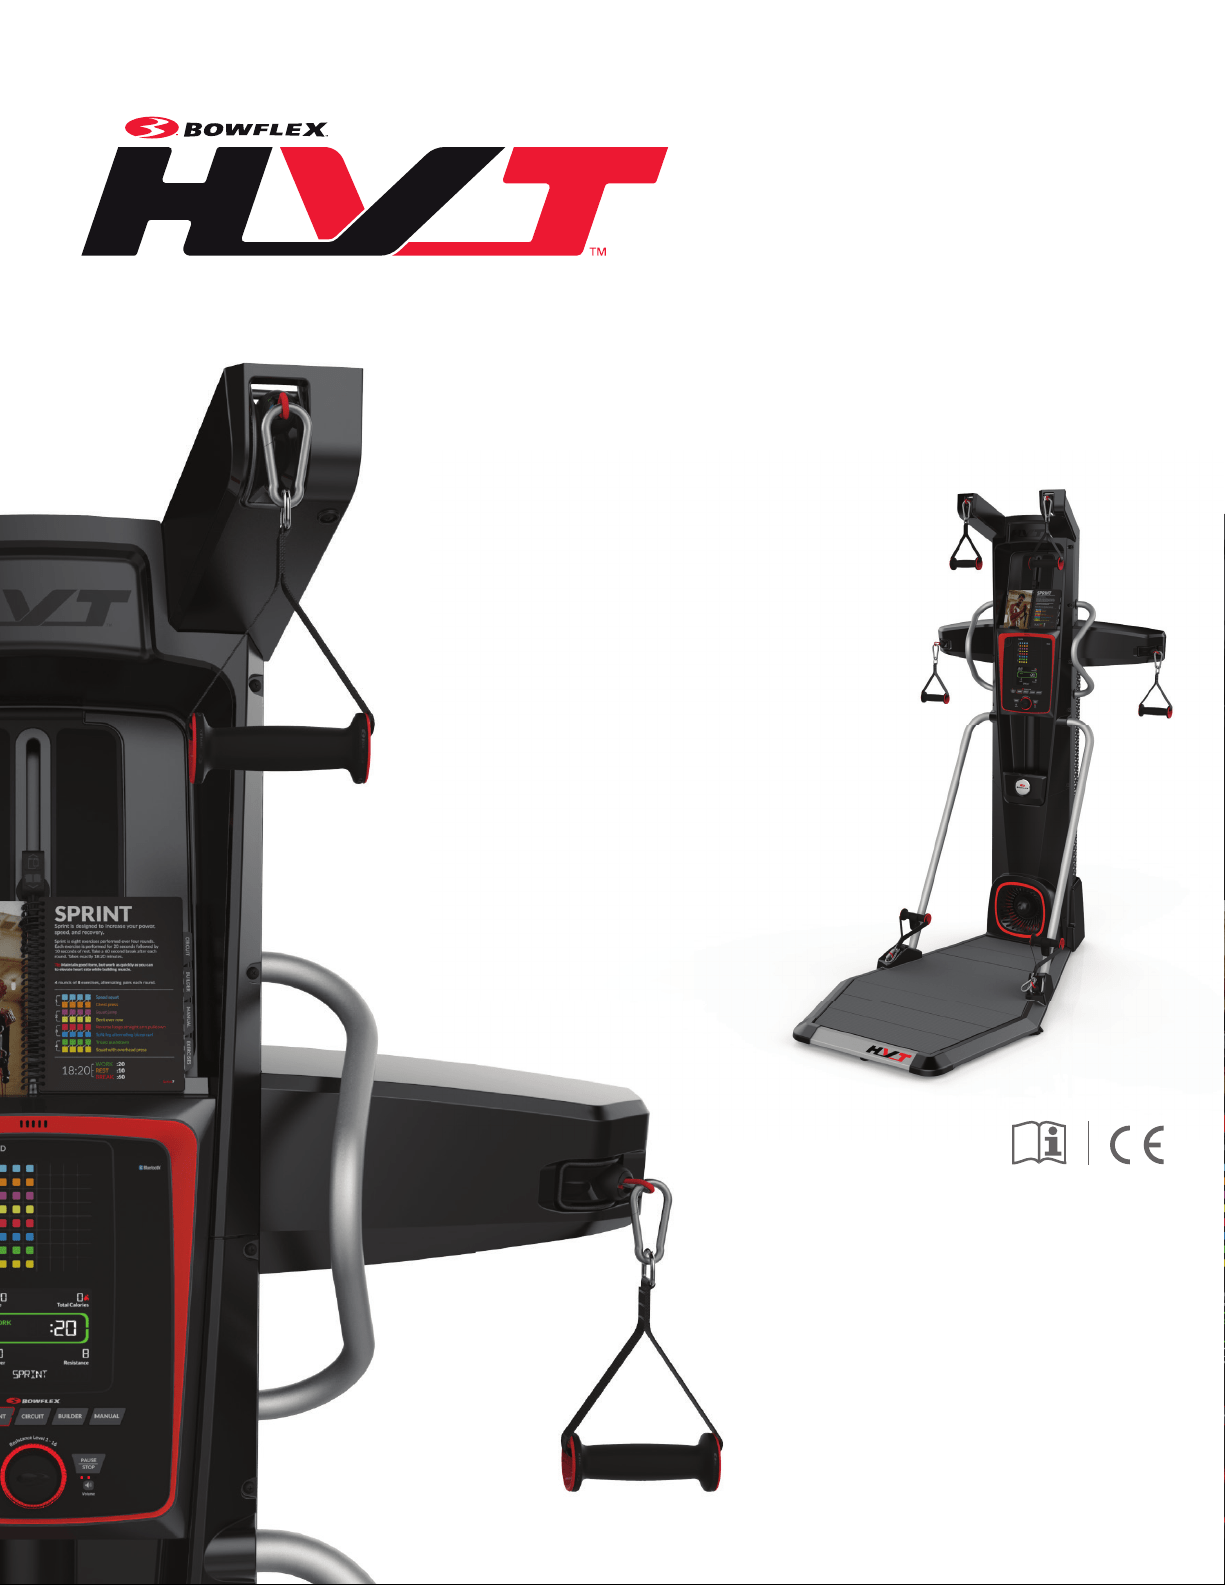
• Only operate this machine when standing in the safe workout area. The safe workout area is anywhere on the Platform, and outward from the
Front Platform Frame by 30.5cm (12”). Never operate the machine when standing to the sides or behind the machine. Doing so could lead to
equipment instability and harm to the user. If required to perform an exercise, the user can step off the platform with one foot but must stay within
the workout area. At least one foot must be kept on the Platform during a workout.
• Before each use, examine this machine for damage to power cord, power receptacle, loose parts or signs of wear. Inspect all cables, pulleys and
their connections, making sure they are properly secured and attached, and show no signs of visible wear or damage. Do not use if found in this
condition. Contact your local distributor for repair information.
• Do not let liquids touch the electronic controller. If it does, the controller must be inspected and tested for safety by an approved technician before
it can be used again.
• The electrical wiring for the residence in which the machine will be used must obey the applicable local and provincial requirements.
• This appliance should only be used with the power supply unit provided, or a replacement power supply unit supplied from Nautilus, Inc.
• Maximum user weight limit: 136 kg (300 lbs). Do not use if you are over this weight.
• This machine is for home use only.
• Do not wear loose clothing or jewelry. This machine contains moving parts. Do not put fingers, feet, or other objects into moving parts of the
exercise equipment.
• Always wear rubber soled athletic shoes when you use this machine. Do not use the machine with bare feet or only wearing socks.
• Set up and operate this machine on a solid, level, horizontal surface.
• Use caution when you step on and off the platform. Keep the Platform clean and dry.
• Do not operate this machine outdoors or in moist or wet locations.
• Keep at least 0.9 m (36”) to the right, left, and in front of the machine clear. This is the recommended safe distance for access and passage
around the machine, emergency dismounts, and the workout training area. Keep third parties out of this space when machine is in use.
• Do not over exert yourself during exercise. Operate the machine in the manner described in this manual.
• Be sure to correctly engage the Hand Grips to the Ropes.
• Keep clear of cable movement path during operation. Keep any bystanders clear of machine and out of exercise area during operation.
• Perform all regular and periodic maintenance procedures recommended in the Owner’s Manual.
• Do not drop or put objects into any opening of the machine.
• Exercise on this machine requires coordination and balance. Be sure to anticipate that changes in orientation, foot positioning, and resistance
level can occur during workouts, and be attentive in order to avoid loss of balance and possible injury.
• Use this machine only for its intended use as described in this manual. Do not use attachments not recommended by the manufacturer.
• This appliance is not intended for use by persons with reduced physical, sensory or mental capabilities, or lack of knowledge, unless they have
been given supervision or instruction concerning use of the appliance by a person responsible for their safety. Keep children under the age of 14
away from this machine.
Owner’s Manual
5
Serial Number
Product Specification
Power Inlet
Safety Warning Labels and Serial Number
CAUTION / ATTENTION
CAUTION
- Stay in safe workout area.
- Keep at least one foot on the platform during a
workout.
- Failure to do so could lead to equipment instability.
Owner’s Manual
6
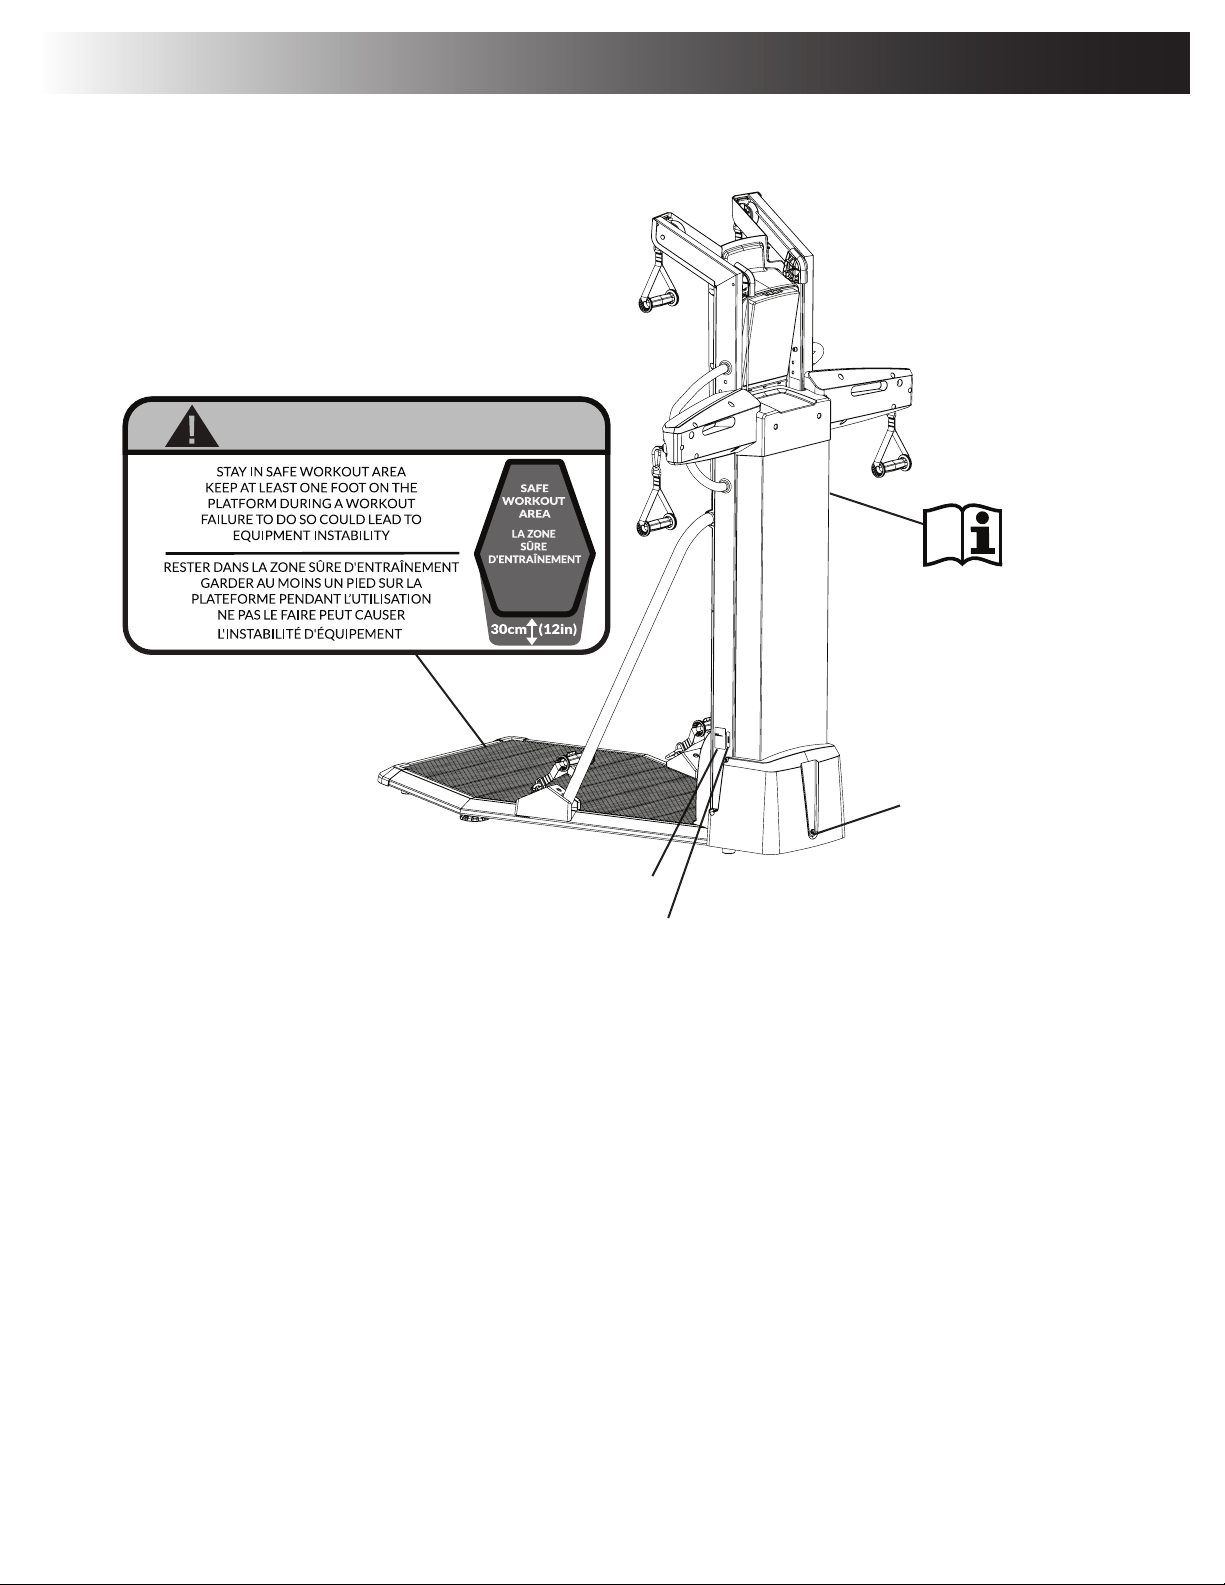
Specifications / Before Assembly
DO NOT dispose of this product as refuse. This product is to be recycled. For proper disposal of this product, please follow the
prescribed methods at an approved waste center.
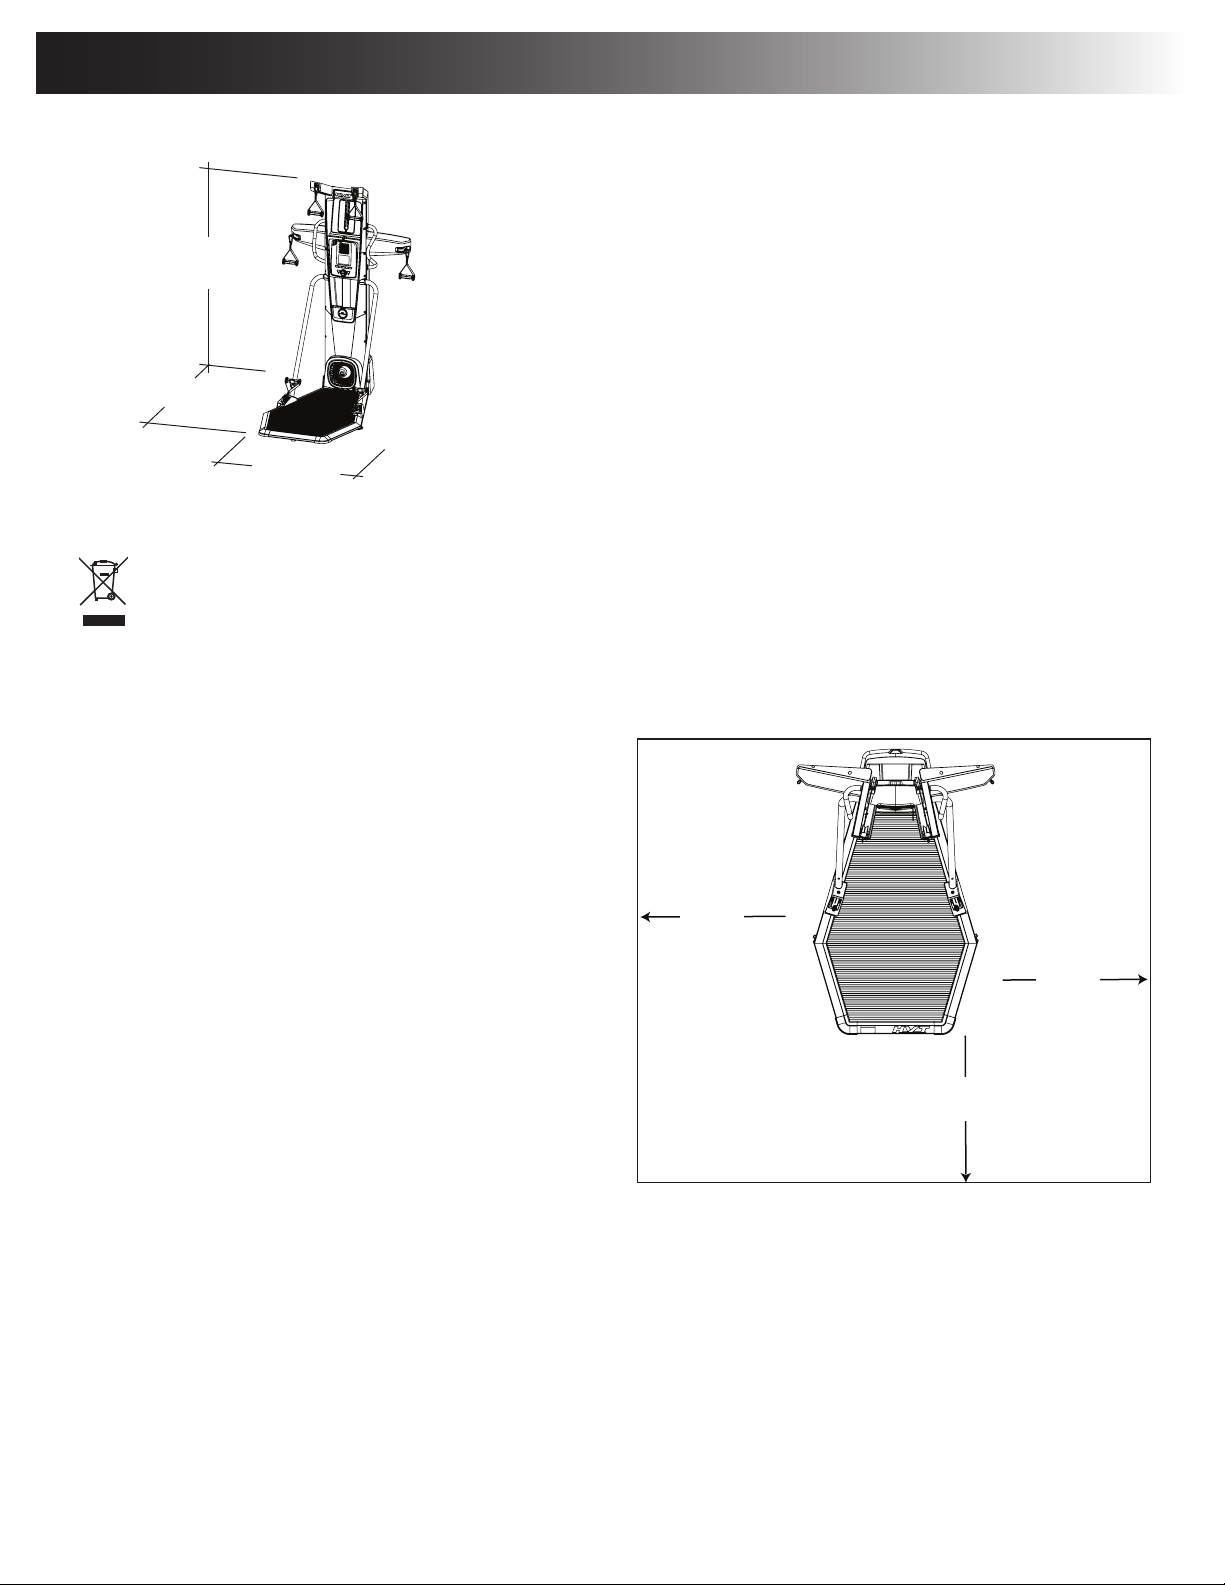
Before Assembly
Select the area where you are going to set up and operate your
machine. For safe operation, the location must be on a hard,
level surface. Allow a workout area of a minimum 257.3cm
x 297.7cm (101.3” x 117.2”). Be sure that the workout space
you are utilizing has adequate height clearance, taking into
consideration the height and the maximum reach overhead
of the user. It is recommended that assembly of the tness
machine should be done in the intended workout location.
Basic Assembly Tips
Follow these basic points when you assemble your machine:
• Read and understand the “Important Safety Instructions”
before assembly.
• Collect all the pieces necessary for each assembly step.
• Using the recommended wrenches, turn the bolts and nuts
to the right (clockwise) to tighten, and the left (counterclock-
wise) to loosen, unless instructed otherwise.
• When attaching 2 pieces, lightly lift and look through the bolt holes to help insert the bolt through the holes.
• The assembly requires 2 people.
Machine Mat
The Bowex™ HVT™ Machine Mat is an optional accessory that helps keep your workout area clear and adds a layer of protection to your oor. The
rubber machine mat provides a non-slip, rubber surface which limits static discharge and reduces the possibility of display or running errors. If pos-
sible, put your Bowex™ HVT™ Machine Mat in your selected workout area before you begin assembly.
To order the optional machine mat, contact your local distributor.
Maximum User Weight: 136 kg (300 lbs)
Assembled Weight: approx. 82.5kg (182 lbs)
Total Surface Area (footprint) of equipment: 19017.3 cm2
Power Requirements:
Operational Voltage: 9VDC
Operating Current: 1500 mA
210.9 cm
(83.0”)
165.8 cm
(65.3”)
114.7 cm
(45.2”)
45.2”
(114.7 cm)
2.98m ( 117.2” )
2.57m
( 101.3” )
0.9m
( 36” )
0.9m
( 36” )
0.9m
( 36” )
Owner’s Manual
7
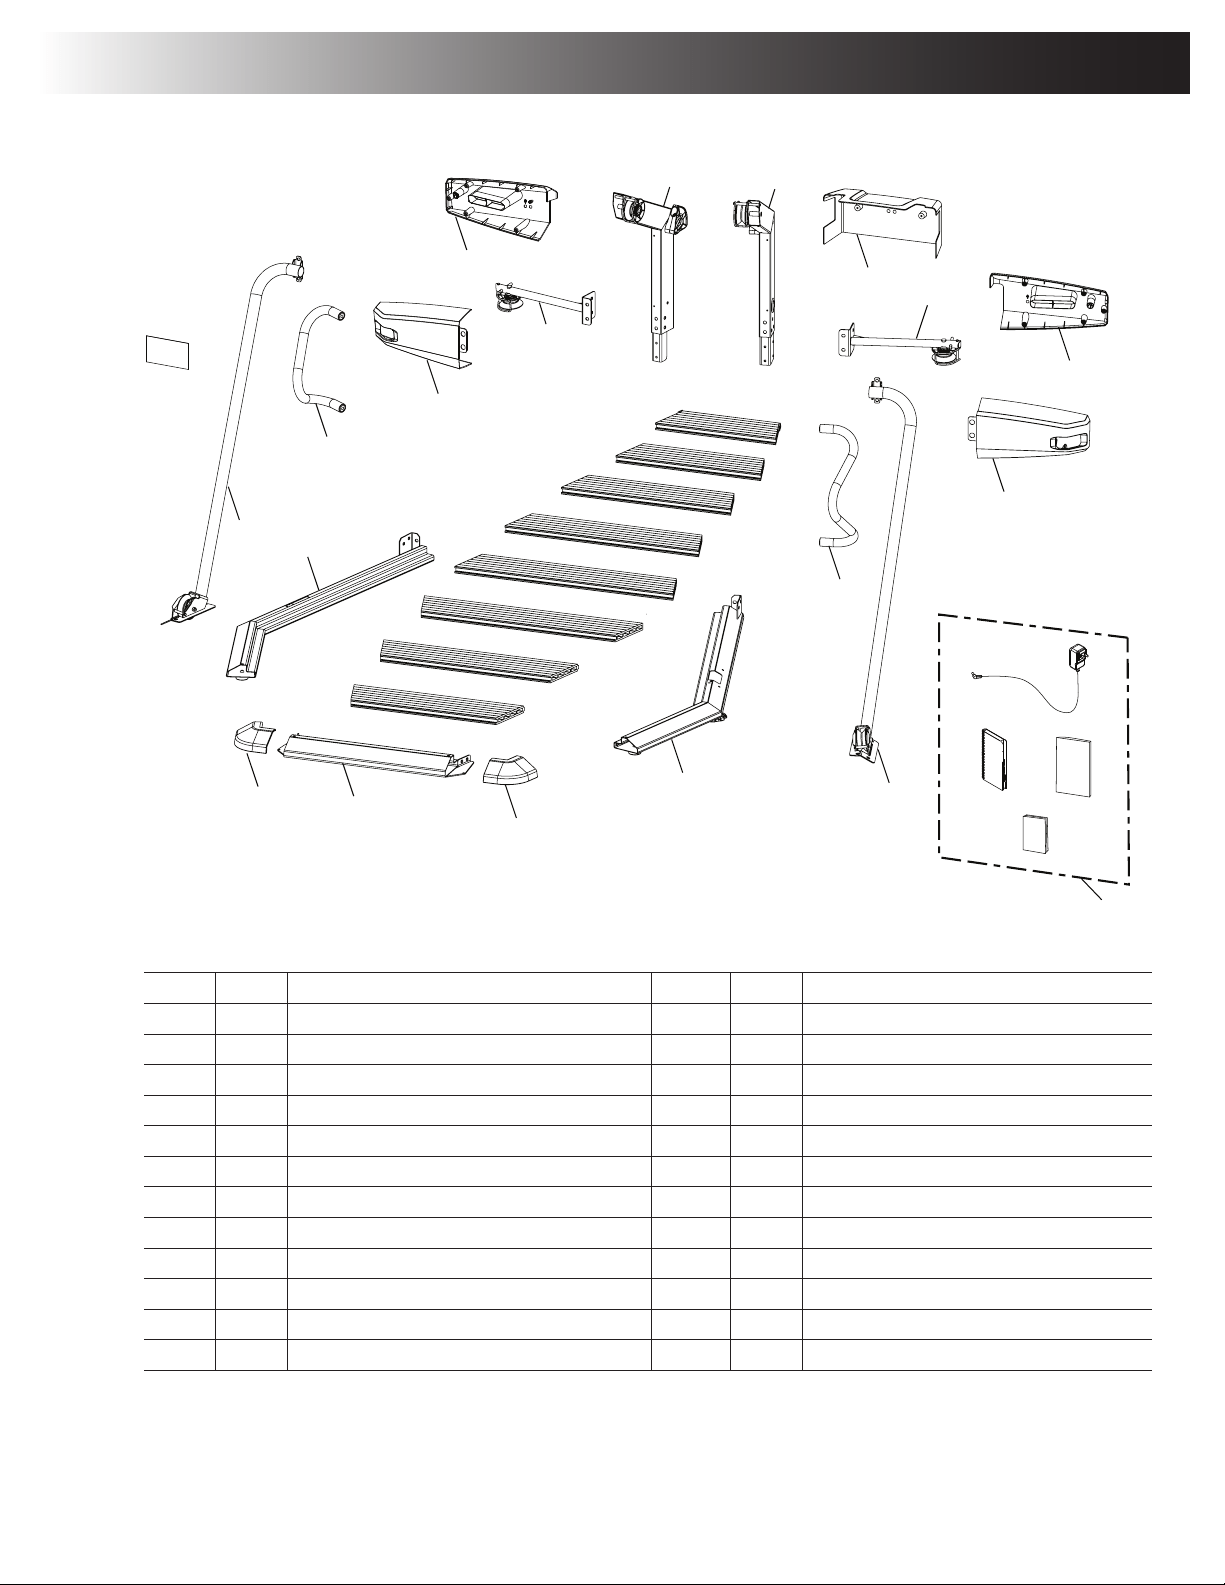
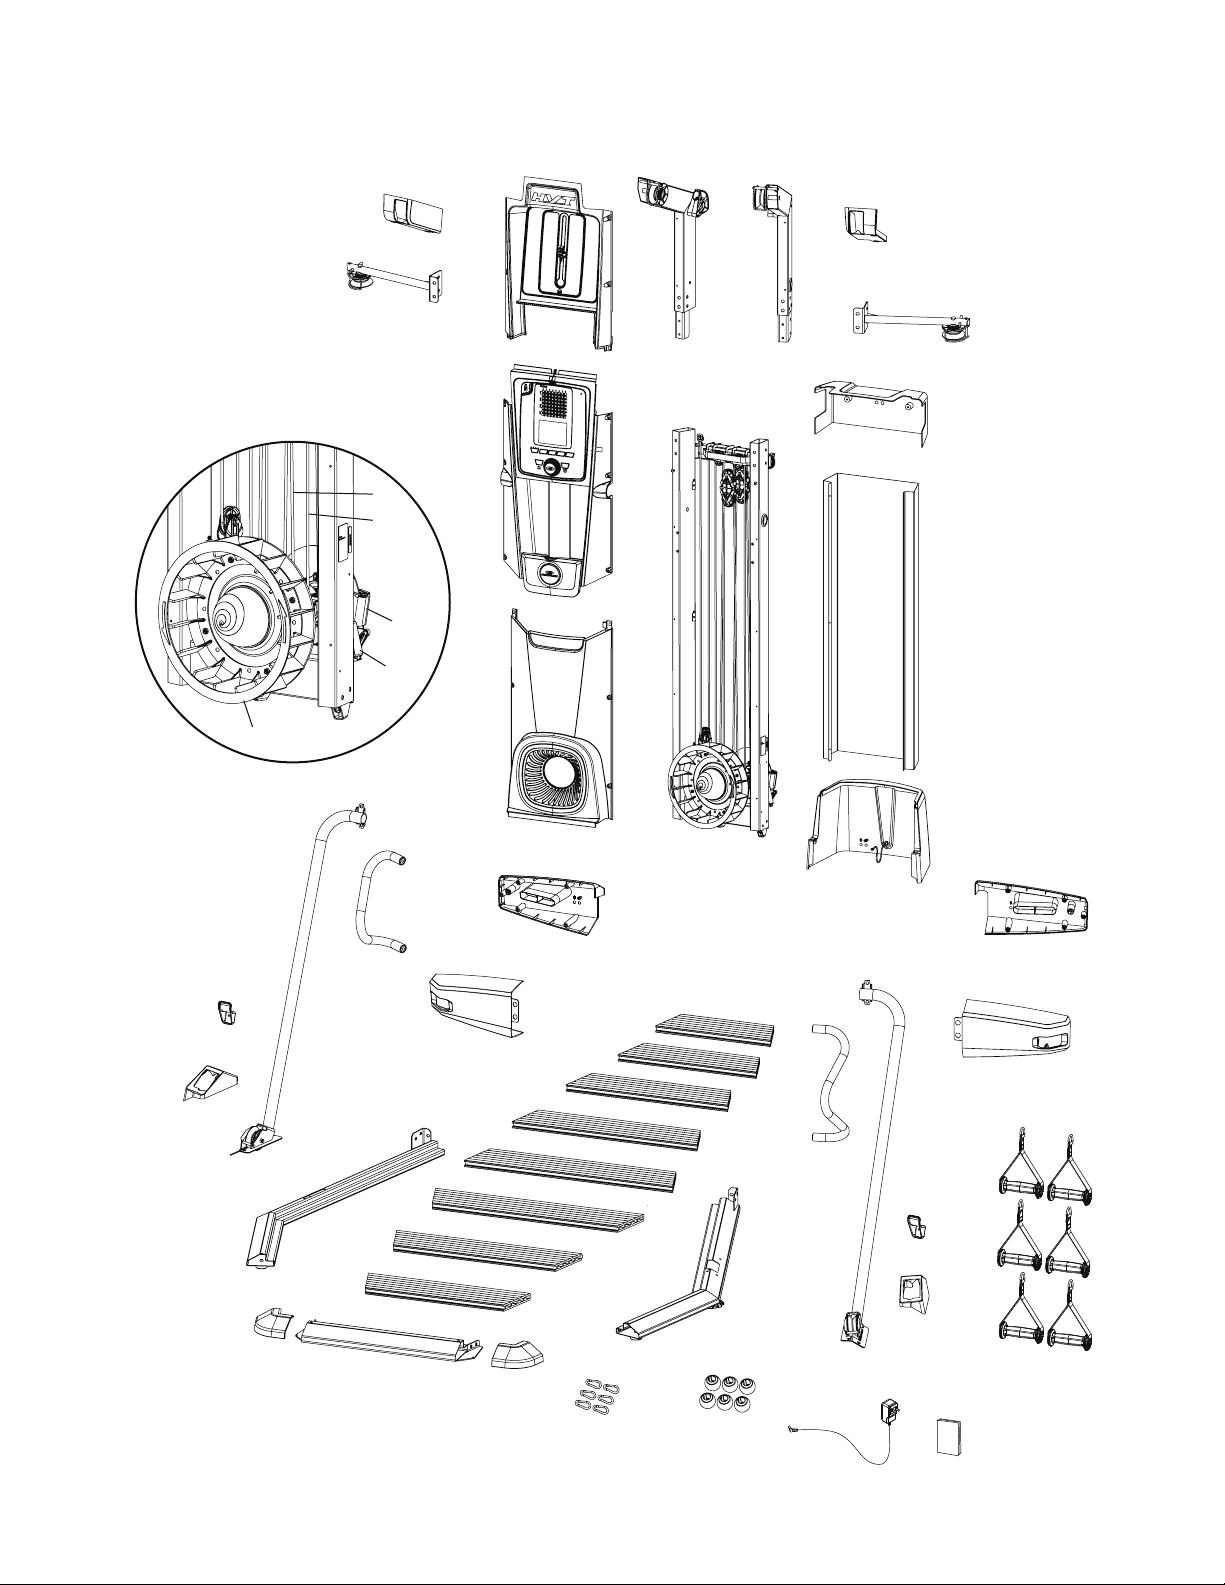
Parts
( 2 BOXES )
BOX 1
11
9
10
9
1
2
3
4
5
6
7
8
27
39
12
14
15
16
38
17
41
34
25
14
35
33
23
22
26
21
32
20
19
13
36
24
30
29
18
40
28
31
37
Item Qty Description Item Qty Description
1 - 8 1 each Platform Decking 20 1 Upper Pulley Arm, Left
9 2 Platform Corner Shroud 21 1 Middle Pulley Arm, Left
10 1 Platform Frame, Front 22 1 Middle Shroud, Left Back
11 1 Right Platform Frame 23 1 Middle Shroud, Left Front
12 1 Support Arm, Right 24 1 Hardware Card
13 1 AC Power Adapter 25 1 Support Arm, Left
14 2 Handlebar 26 1 Left Platform Frame
15 1 Middle Shroud, Right Front 27 1 Document Kit
16 1 Middle Shroud, Right Back 28 1 Quick Start Guide
17 1 Middle Pulley Arm, Right 29 1 Training Guide
18 1 Rear Shroud, Upper 30 1 Assembly / Owner’s Manual
19 1 Upper Pulley Arm, Right
Owner’s Manual
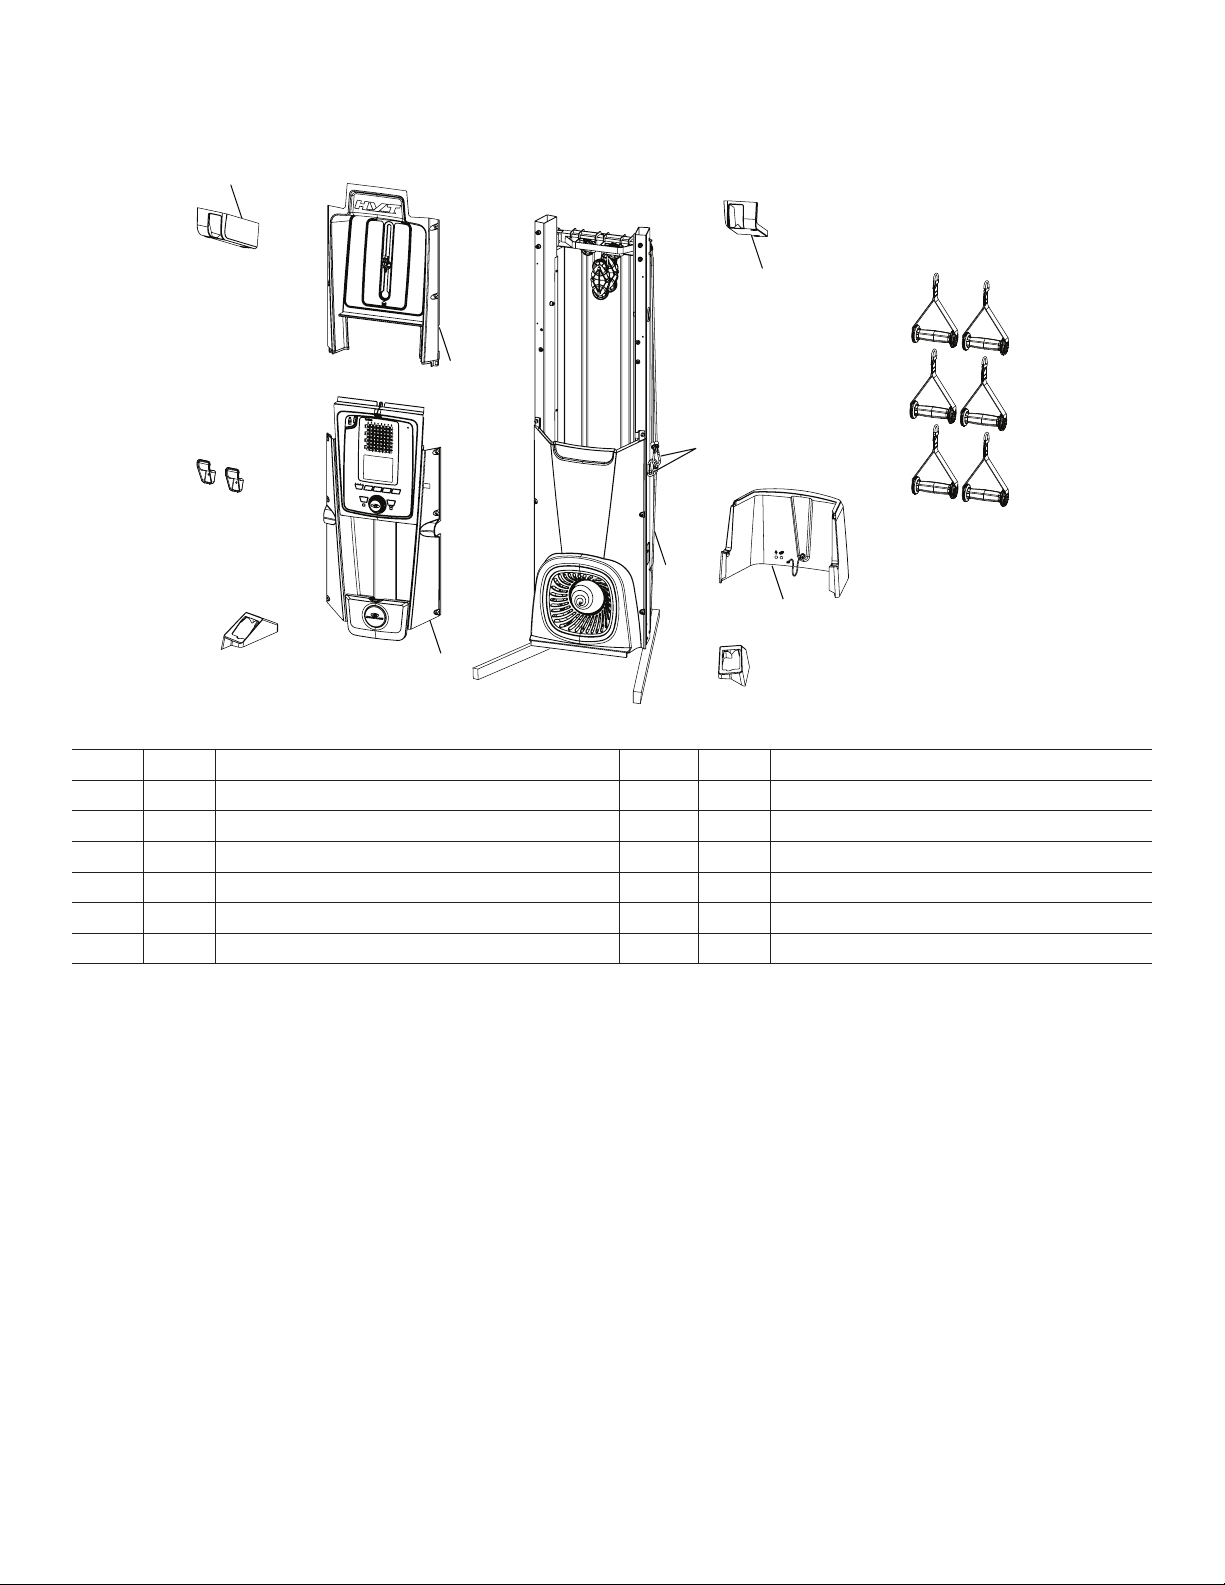
8
BOX 2
11
9
10
9
1
2
3
4
5
6
7
8
27
39
12
14
15
16
38
17
41
34
25
14
35
33
23
22
26
21
32
20
19
13
36
24
30
29
18
40
28
31
37
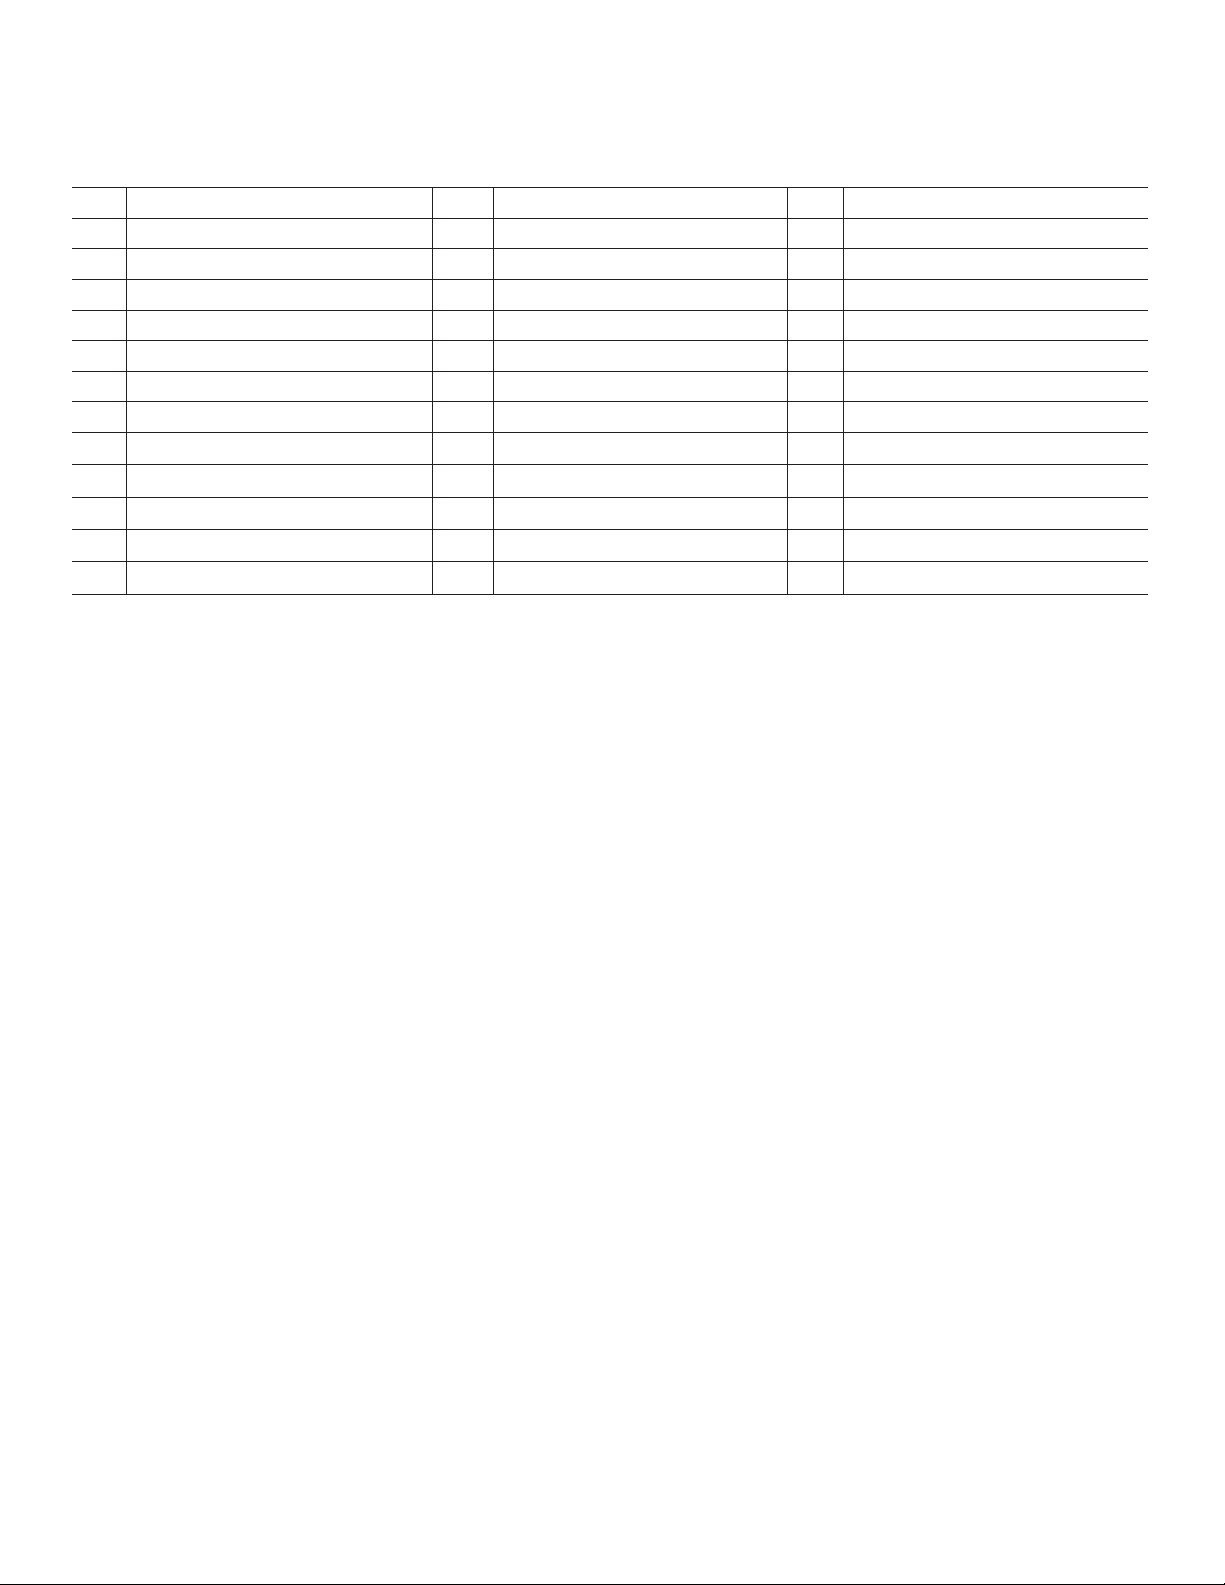
Item Qty Description Item Qty Description
31 2 Lower Grip Holder 37 6 Snap Hooks
32 1 Upper Pulley Shroud, Left 38 1 Upper Pulley Shroud, Right
33 1 Upper Front Shroud 39 6 Hand Grip, 1-D Ring
34 1 Lower Pulley Shroud, Left 40 1 Rear Shroud, Lower
35 1 Console Assembly 41 1 Lower Pulley Shroud, Right
36 1 Frame Assembly
Owner’s Manual
9
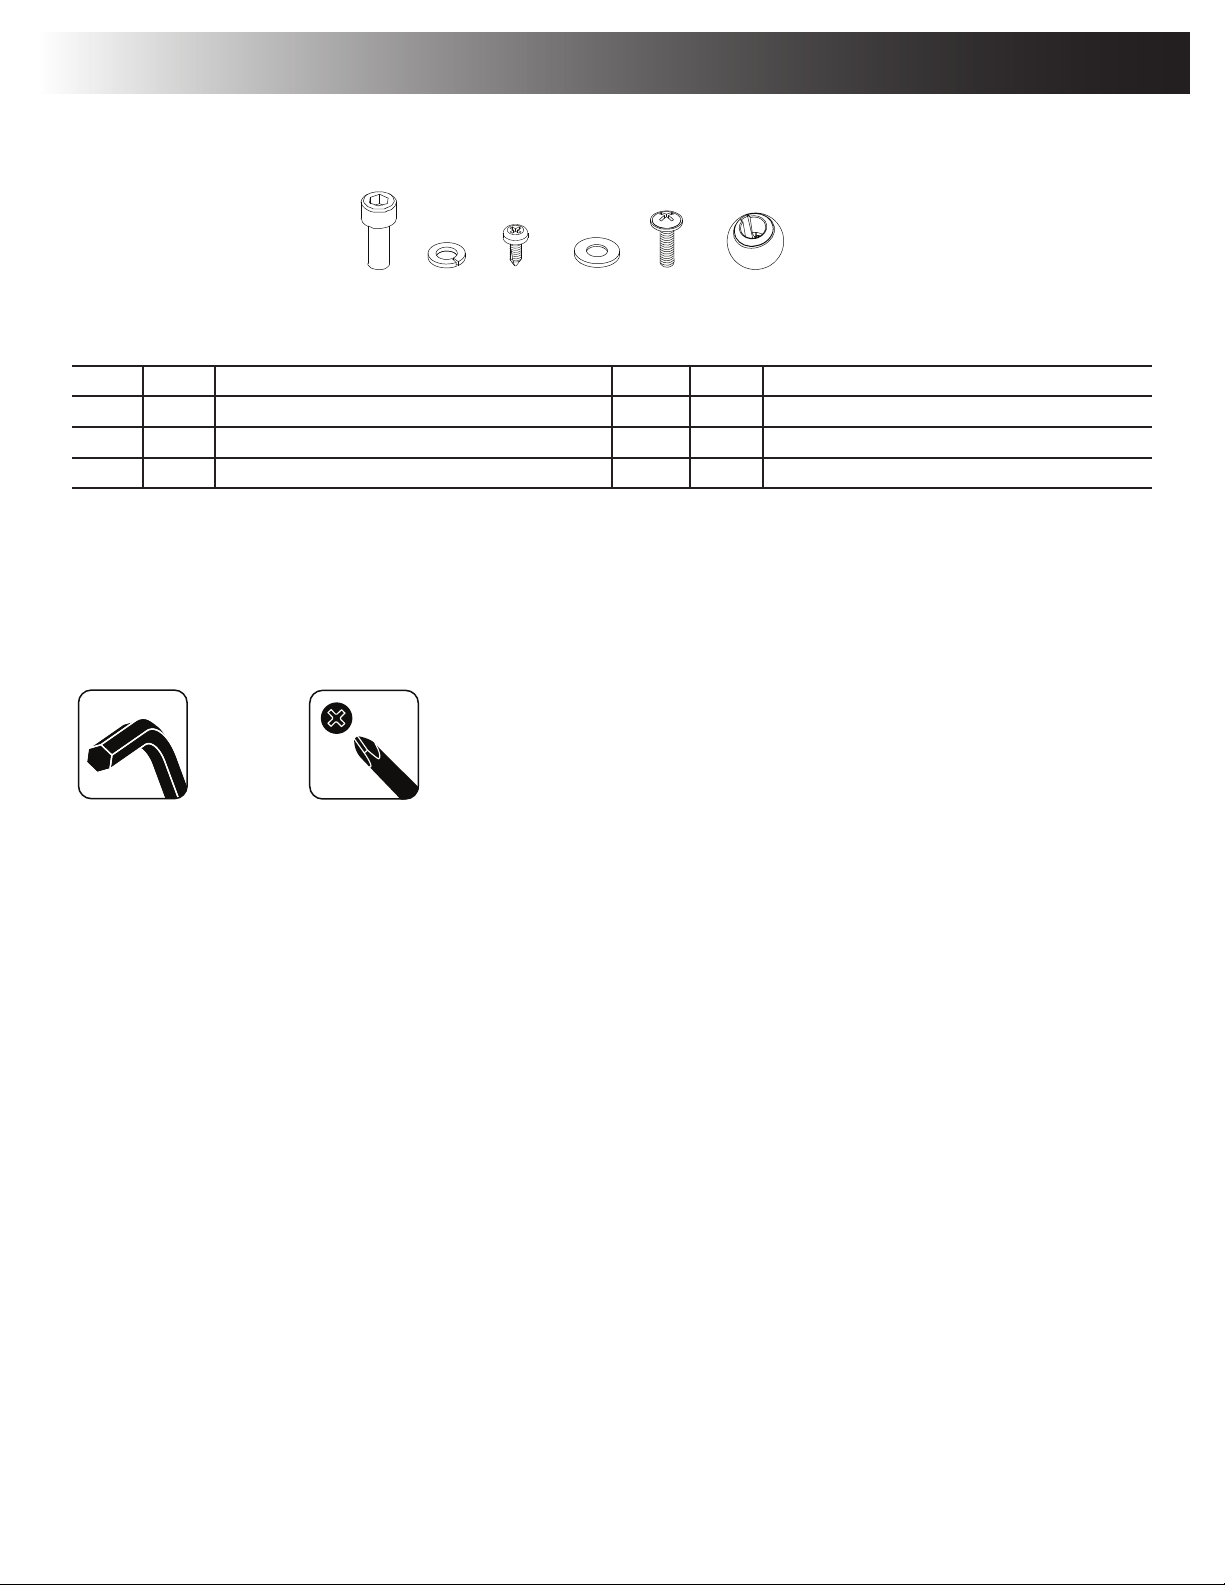
Item Qty Description Item Qty Description
A 32 Socket Hex Head Screw, M8x1.25x20 Black D 6 Flat Washer, M8x18 Black
B 32 Lock Washer, M8x14.8 Black E 24 Truss Phillips Head Screw, M5x16 Black
C 14 Phillips Head Screw, M4.2x16 Black F 6 Securing Ball
Note: Select pieces of Hardware have been provided as spares on the Hardware Card. Be aware that there may be remaining Hardware
after the proper assembly of your machine.
Tools
Included
6mm #2
Hardware / Tools / Assembly
A B C D E
E F
Owner’s Manual
10
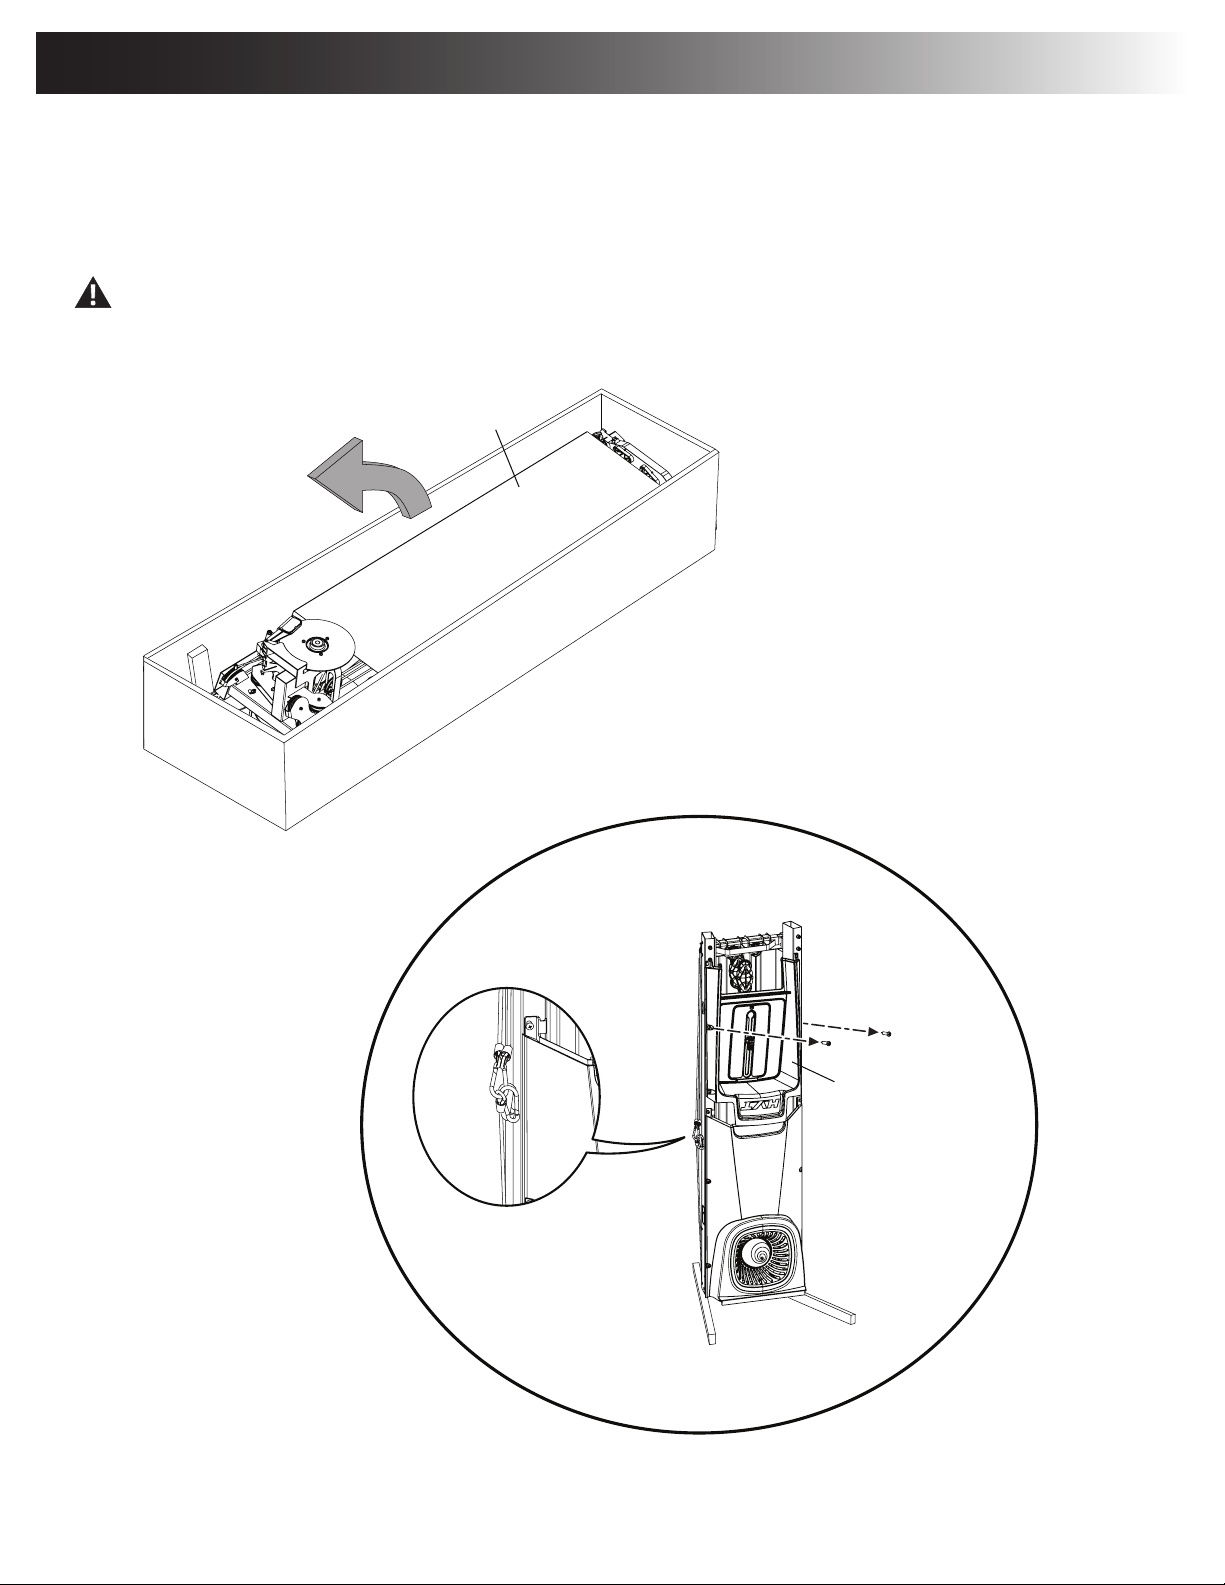
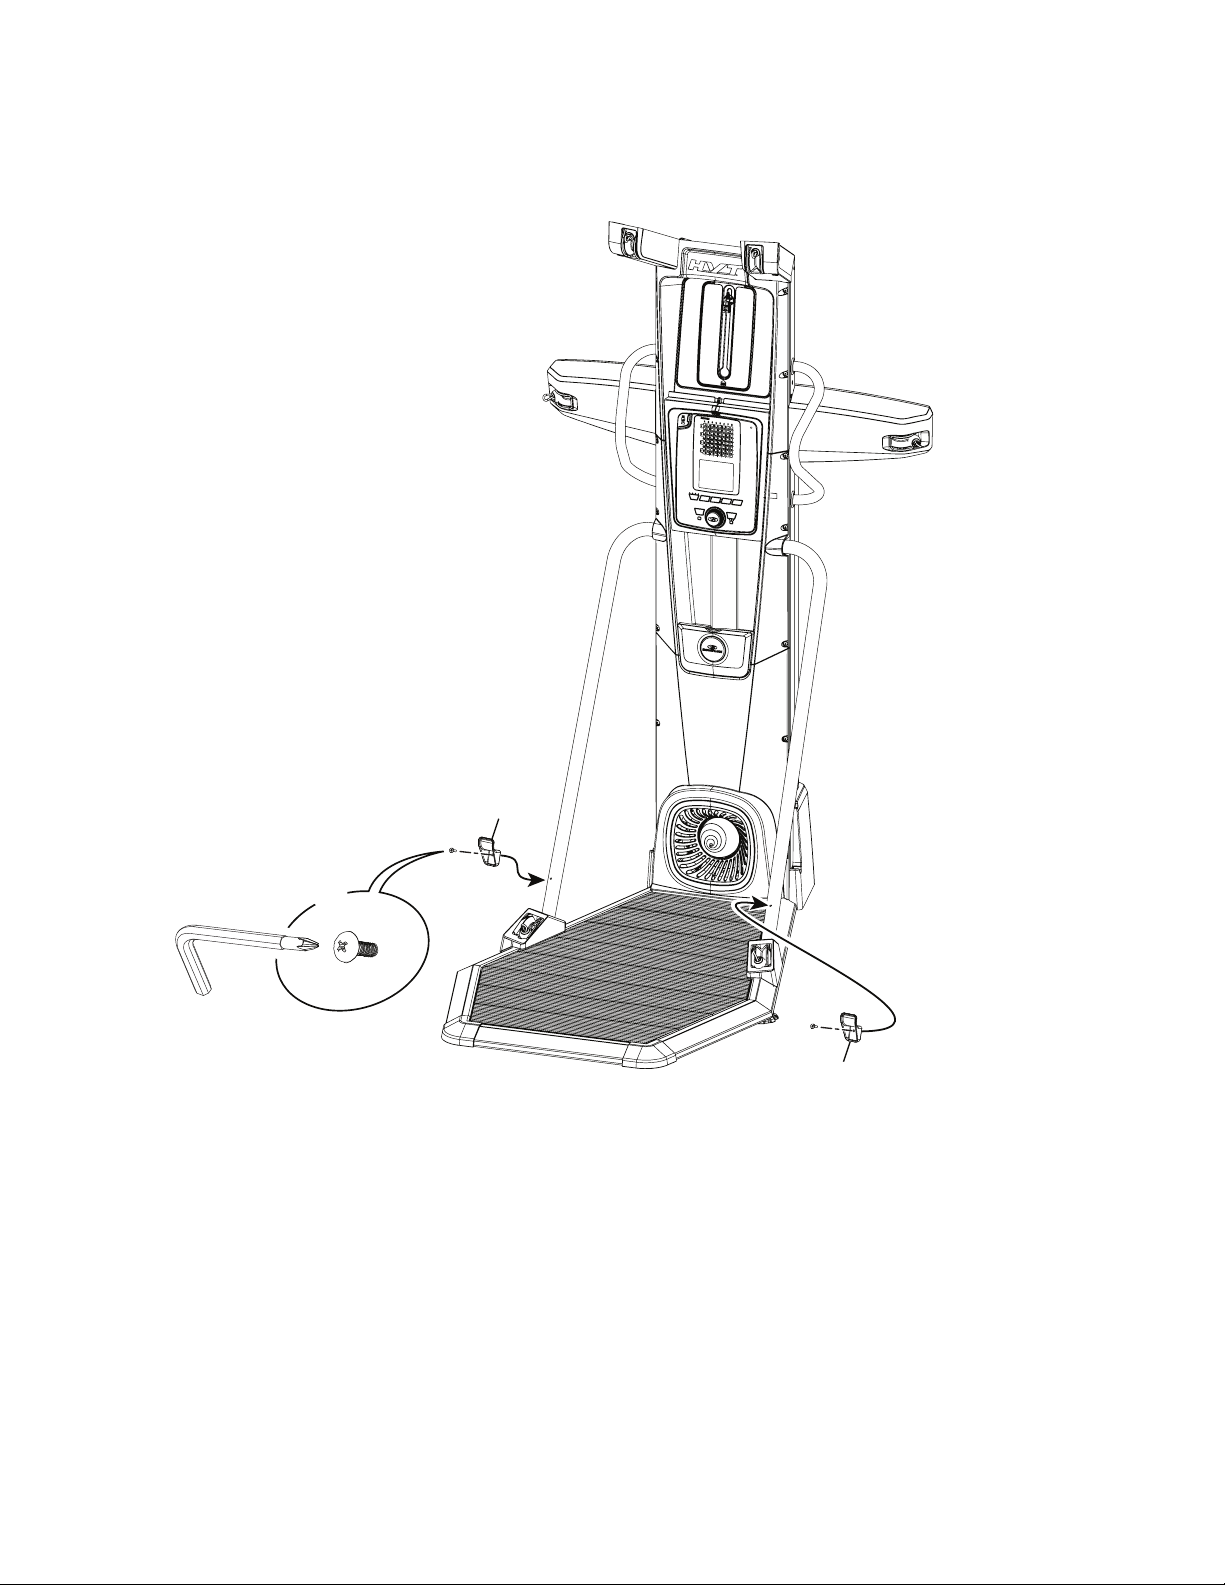
1. Safely Remove the Frame Assembly from the Shipping Box and Stand Upright in the Intended
Workout Area. Remove the Upper Shroud from Frame Assembly.
Note: Do not disconnect the indicated ropes and snap rings until instructed. Remove all the packaging from the parts to assist with
assembly.
Some components of the machine can be heavy or awkward. Use at least a second person when doing the assembly steps
involving these parts. Do not do steps that involve heavy lifting or awkward movements on your own.
36
33
Assembly
Owner’s Manual
11
A
B
X3
11
6mm
2. Safely Remove the Right Shipping Support and Attach the Right Platform Frame to the Frame
Assembly
Note: Only nger-tighten the hardware until instructed to fully tighten. Be sure not to pinch the ropes during assembly.
Owner’s Manual
12
A
B
X3
26
6mm
3. Safely Remove the Left Shipping Support and Attach the Left Platform Frame to the Frame
Assembly
Note: Only nger-tighten the hardware until instructed to fully tighten. The Shipping Supports and attached hardware are not used on the
nal assembly, and should be disposed of according to your local regulations.
Owner’s Manual
13
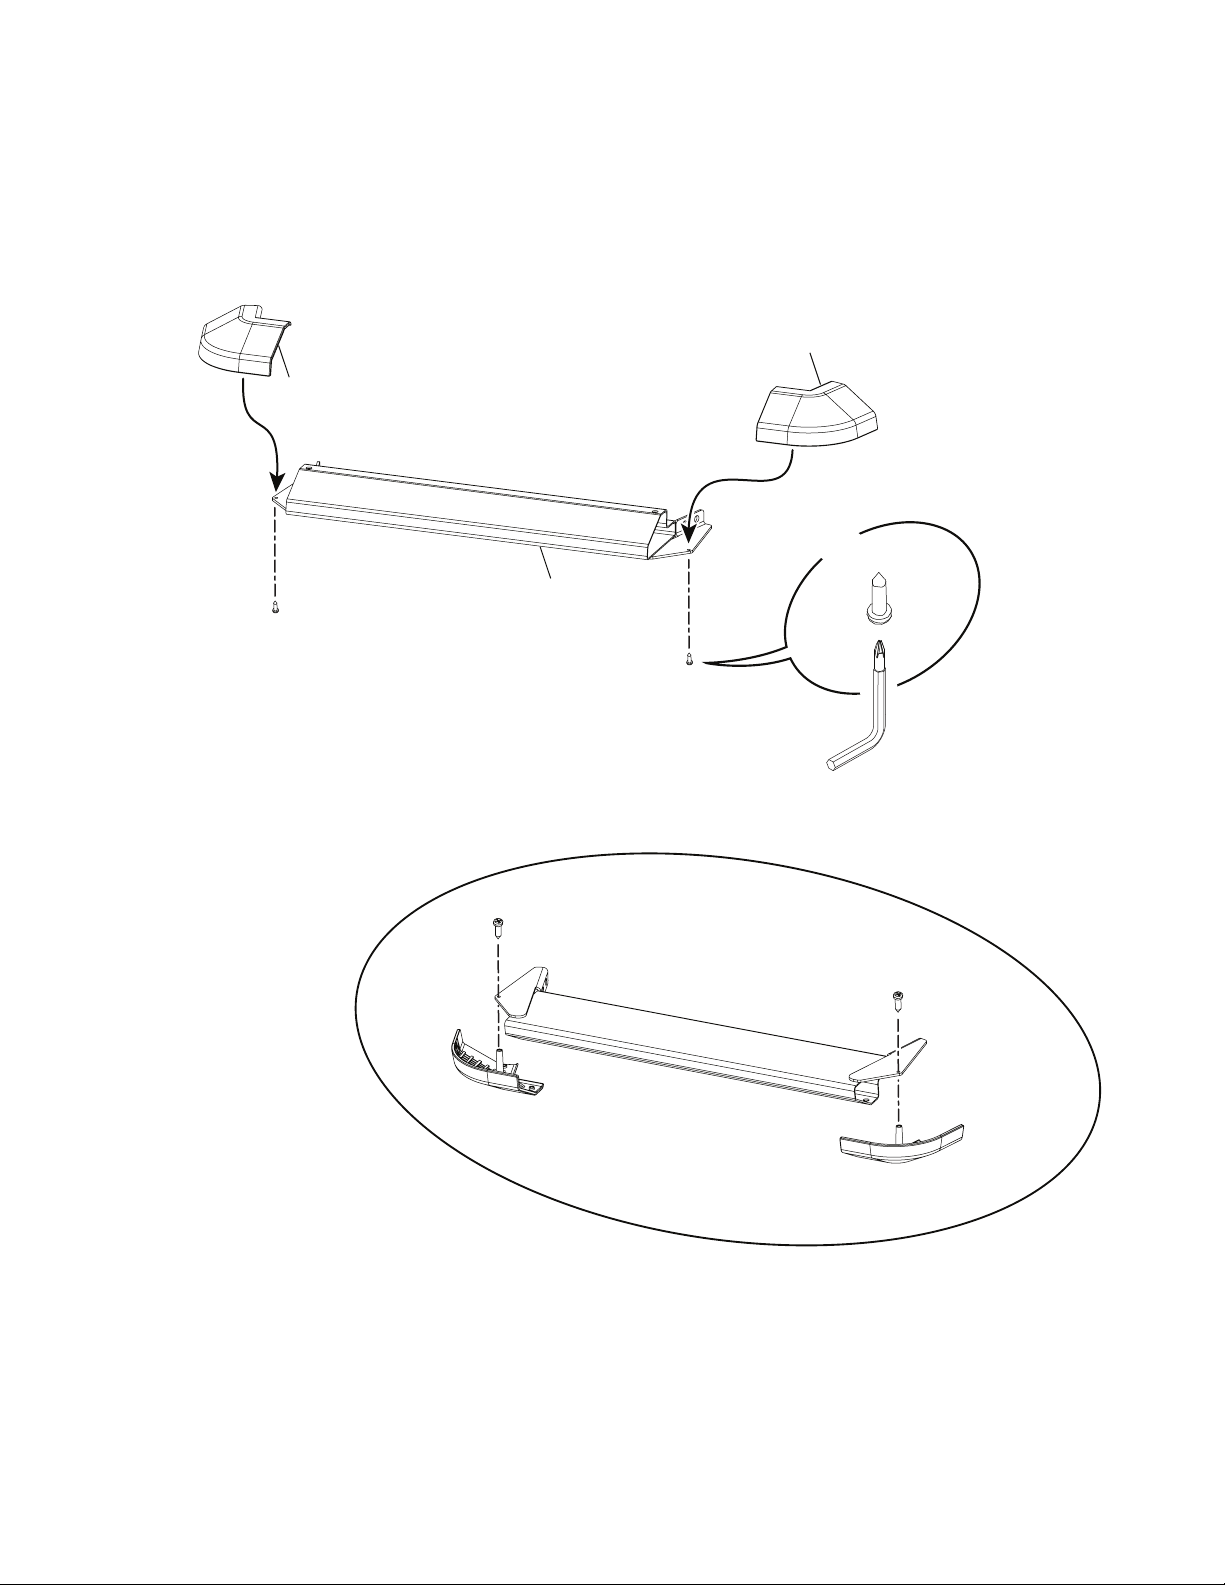
4. Flip the Front Platform Frame and Attach the Platform Corner Shrouds
C
X2
9
10
9
#2
Owner’s Manual
14
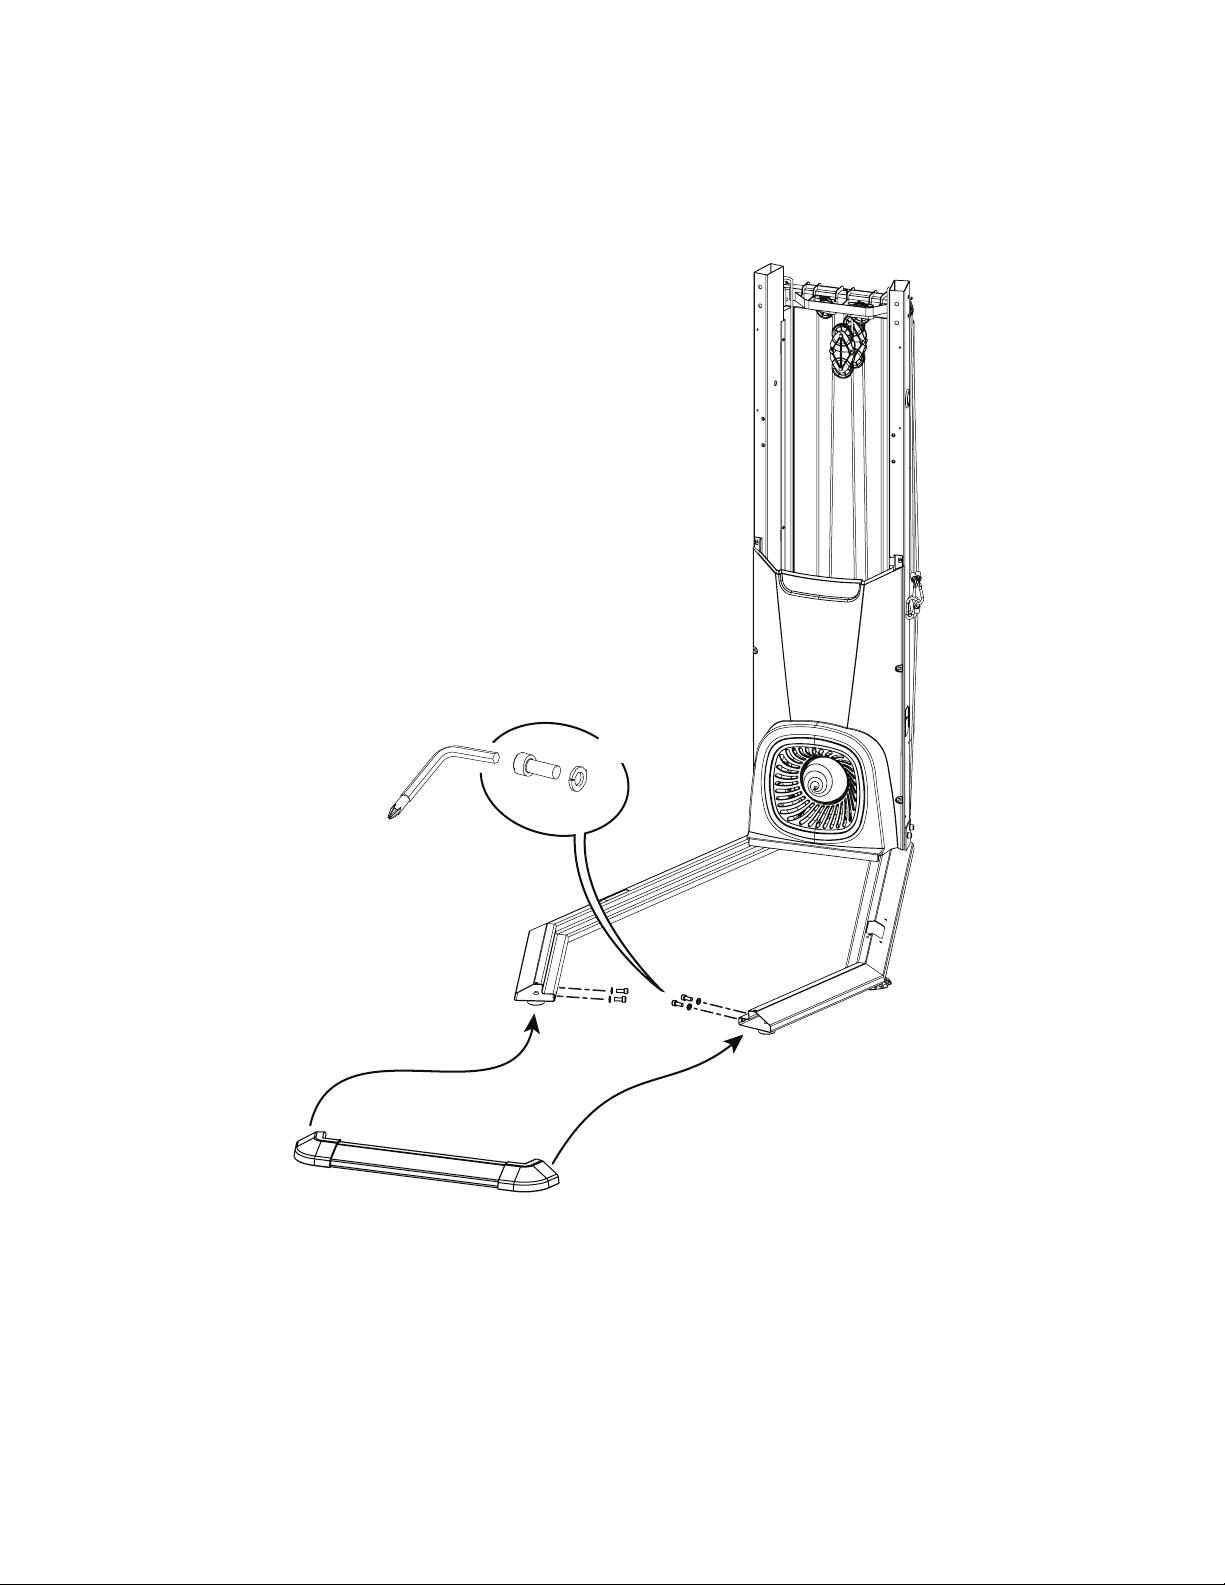
5. Attach Front Platform Frame Assembly to Platform Frames
Note: To assist with assembly, pivot the Front Platform Frame Assembly upward slightly until holes are aligned and install hardware.
A
B
X4
6mm
Owner’s Manual
15
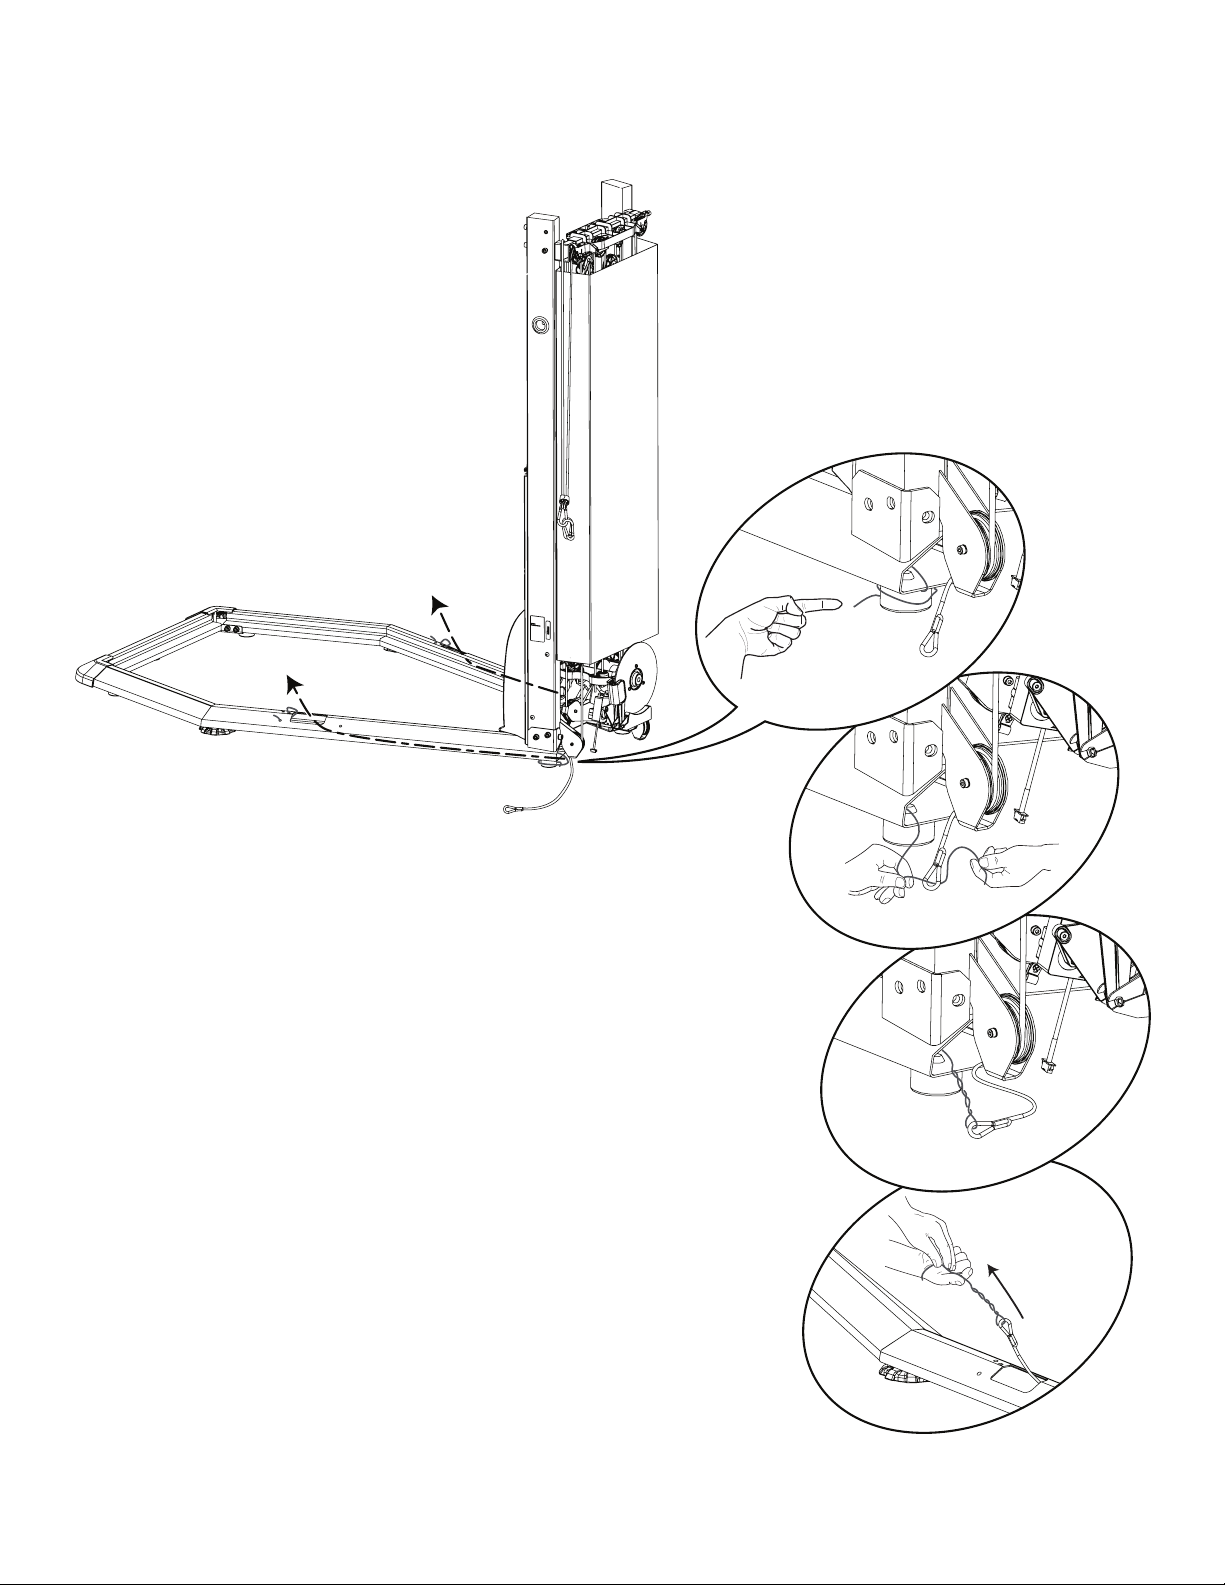
6. Release the Lower Ropes from the Snap Hooks and Route through the Platform Frames
Owner’s Manual
16
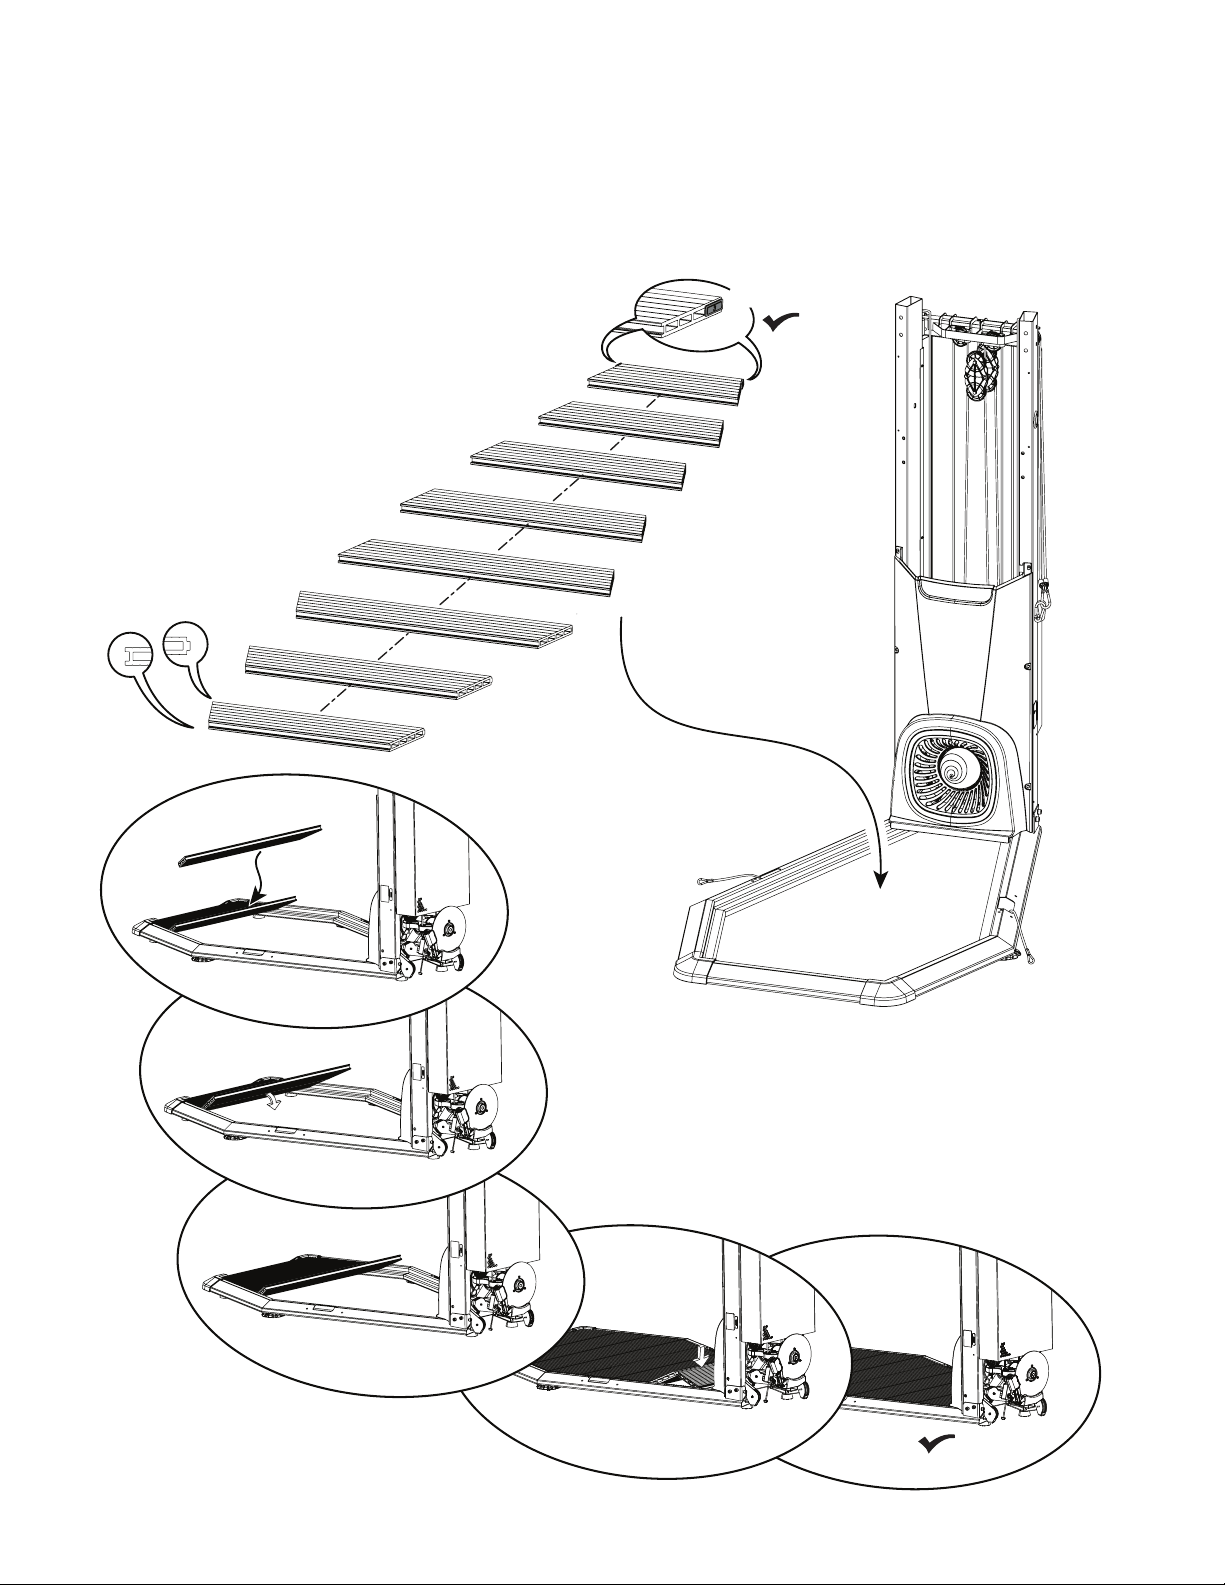
7. Pivot, Connect, and Place the Platform Decking into the Platform Frame Assembly
Note: Start with the piece marked “8” and work toward the Frame Assembly. With the initial piece pivoted up and toward the Frame
Assembly, insert the tab of the next piece and pivot the initial piece downward. With the last two pieces (marked “1” and “2”), place them so they form
a ‘v’ in the Platform Frame. With your foot centered on the piece marked ‘2’, push downward to set into place.
1
3
2
4
5
6
7
8
X2
Owner’s Manual
17
*
*
*
*
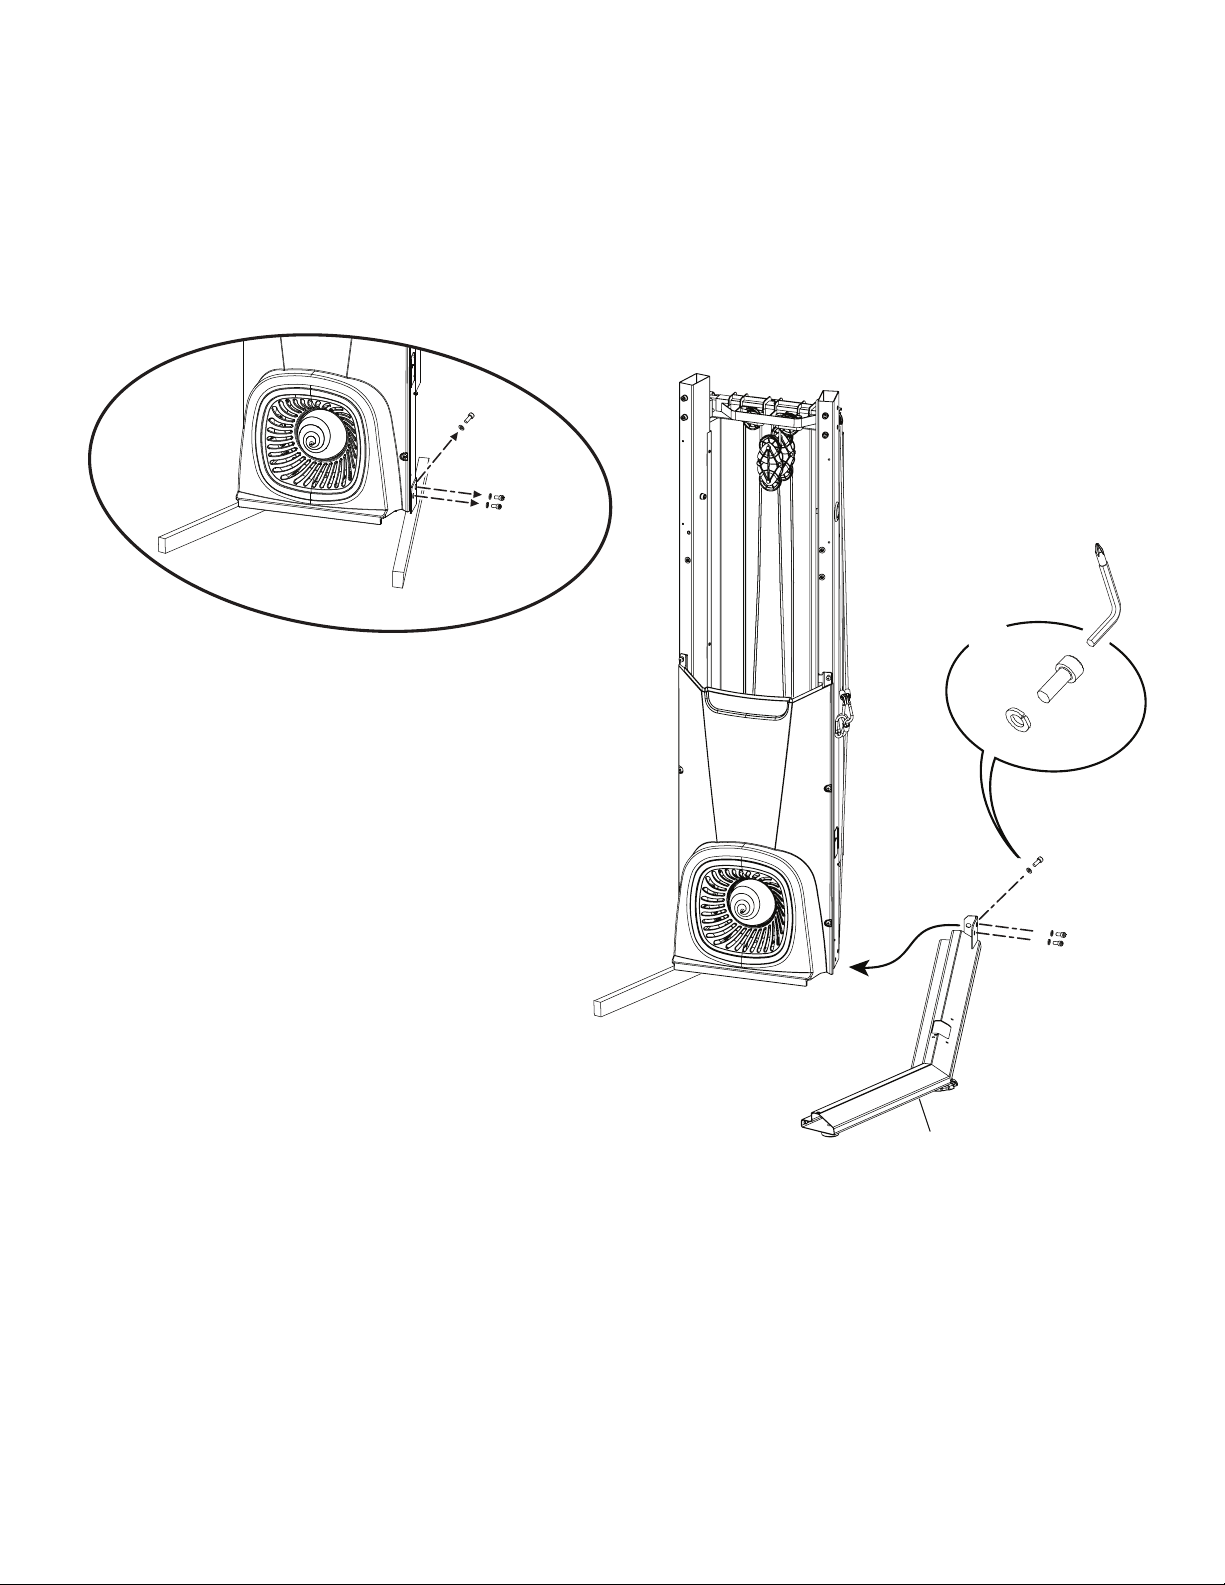
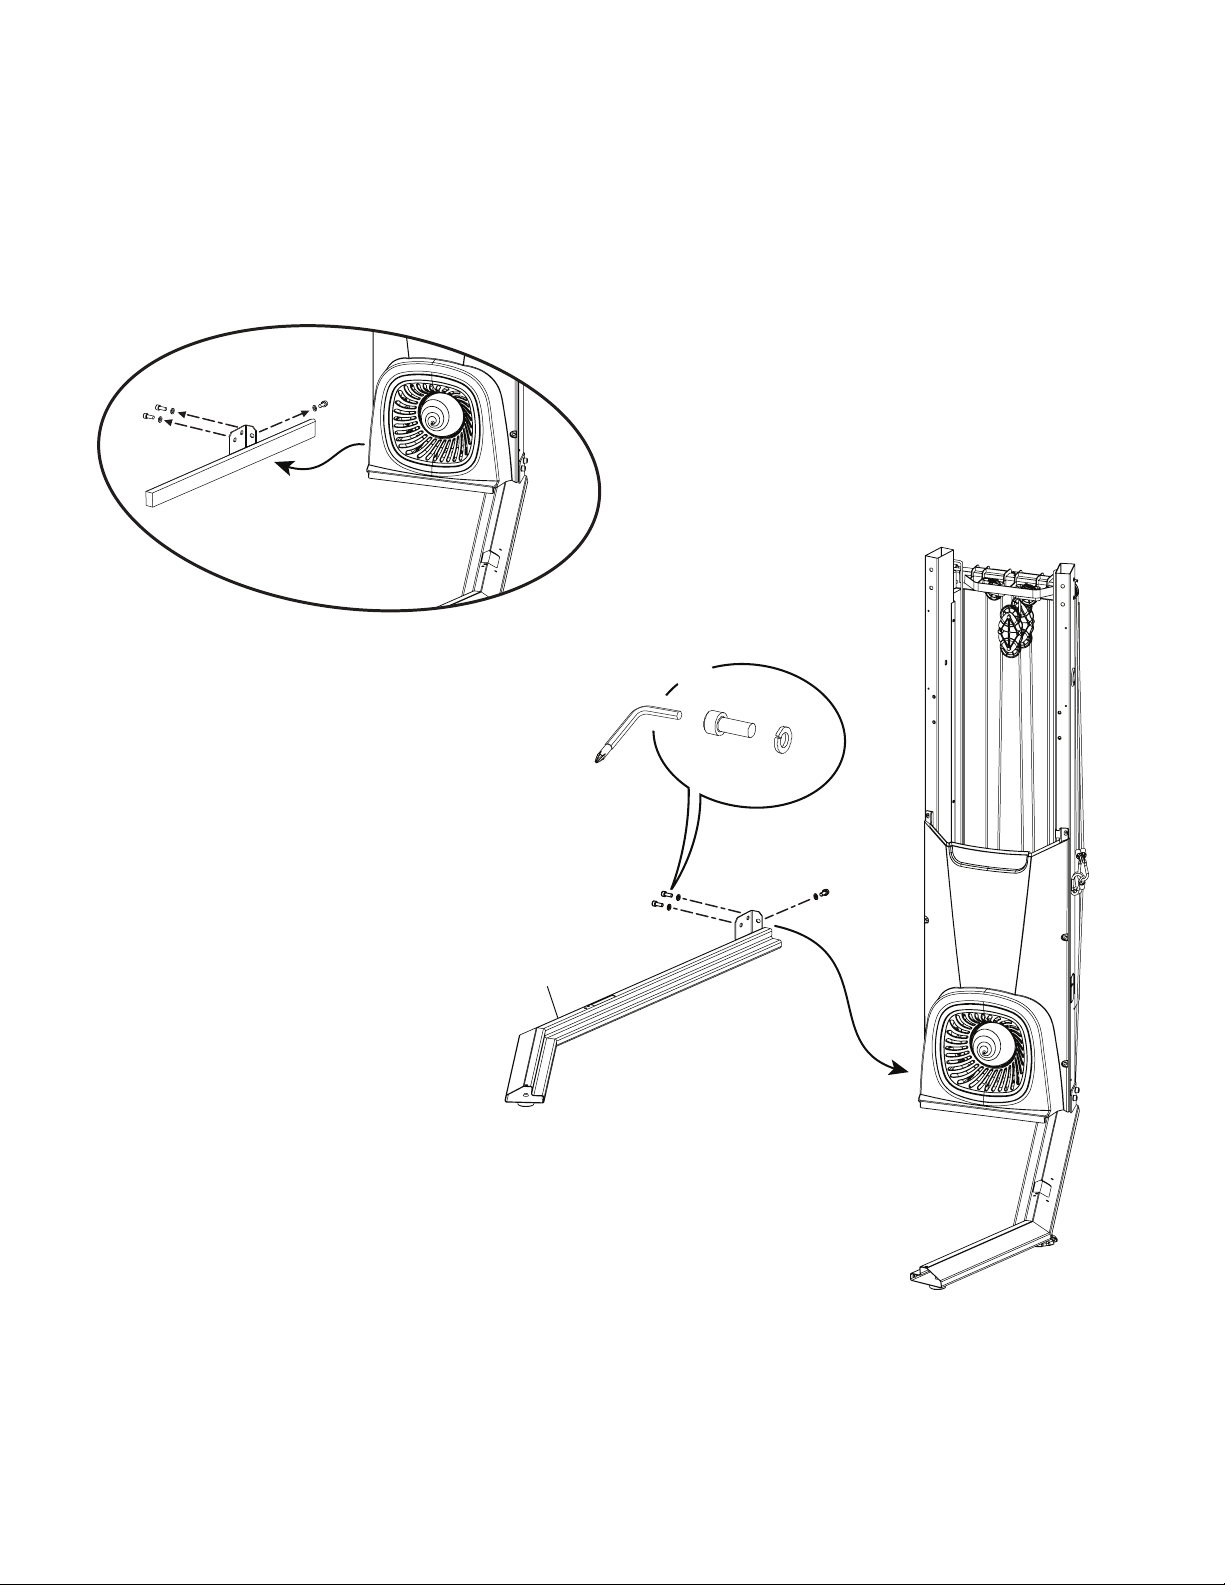
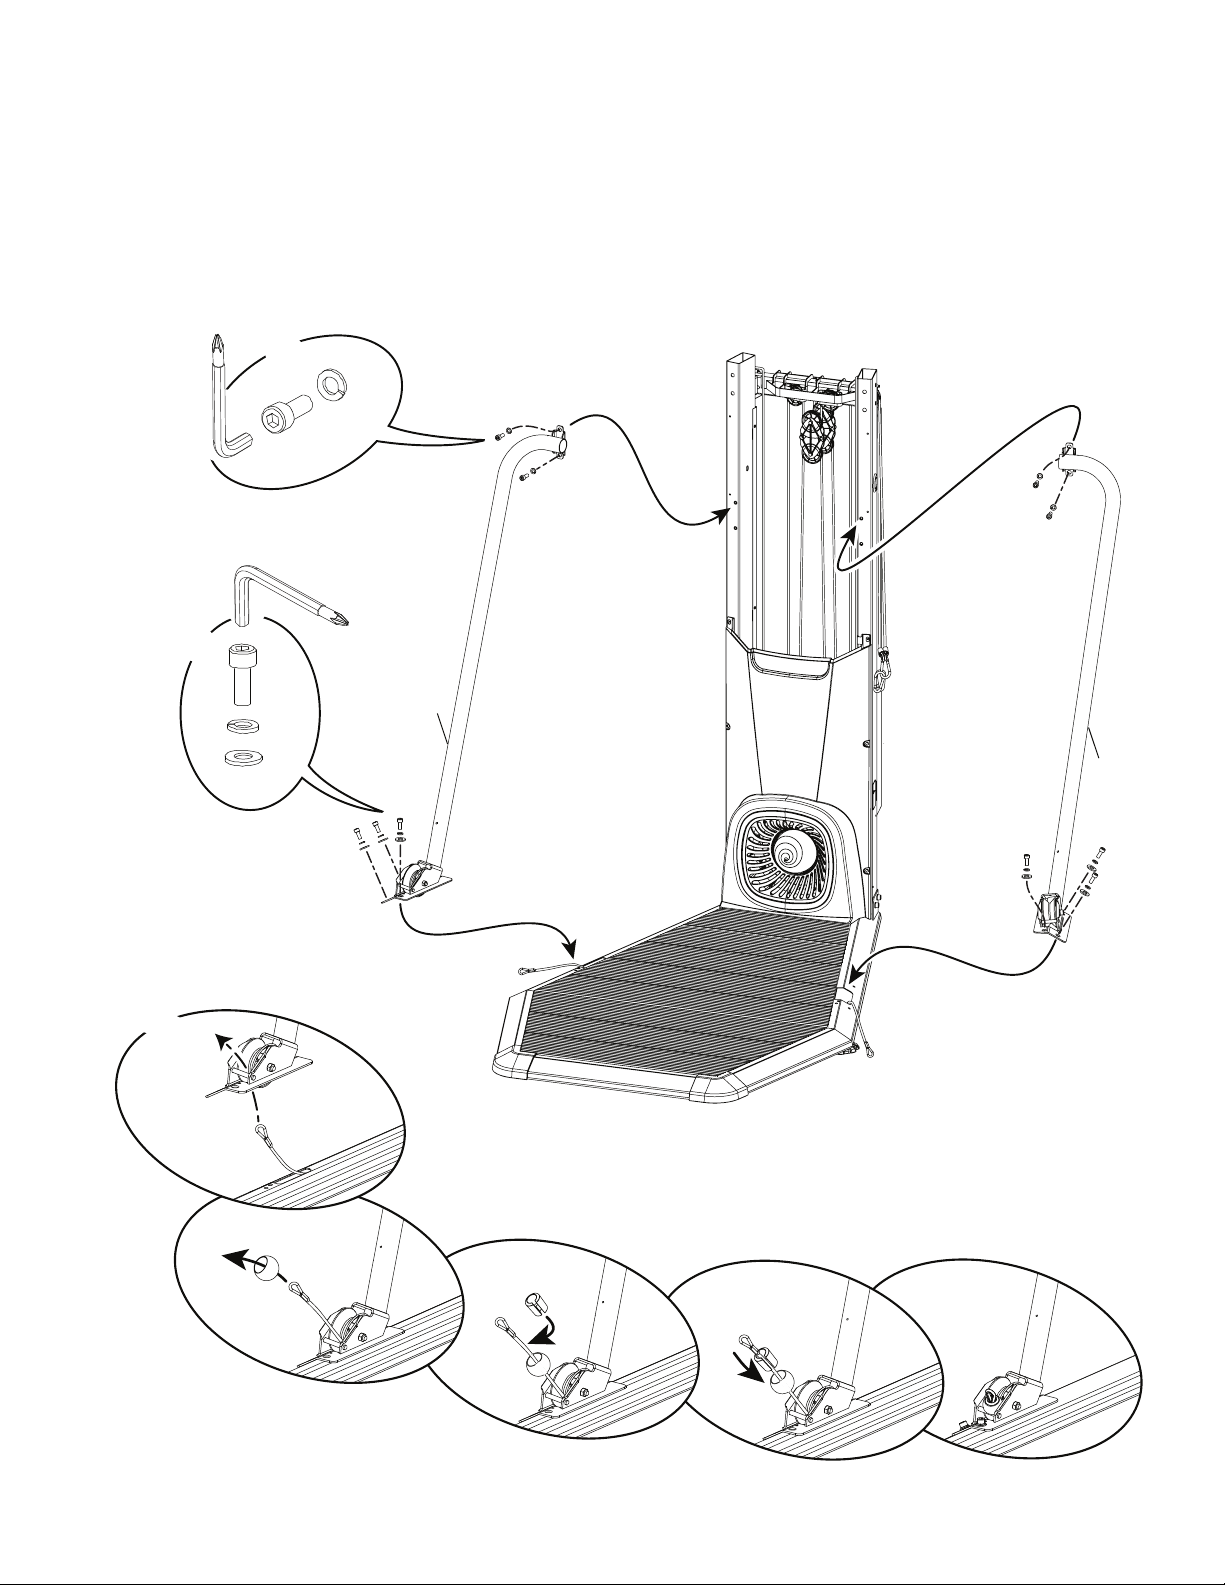
A
B
A
B
D
X6
X2
12
25
F
X4
6mm
6mm
8. Route the Lower Rope and Attach the Support Arms and Securing Ball
Note: Route Lower Rope through the Support Arm. Then attach the upper hardware rst ( * ). Only nger-tighten the hardware until
instructed to fully tighten. Attach Securing Ball to Rope and remove the routing wire. Start the rope through the oval opening of the securing ball, and
pull out of the round opening.
Owner’s Manual
18
9. Tighten All Hardware from Previous Steps
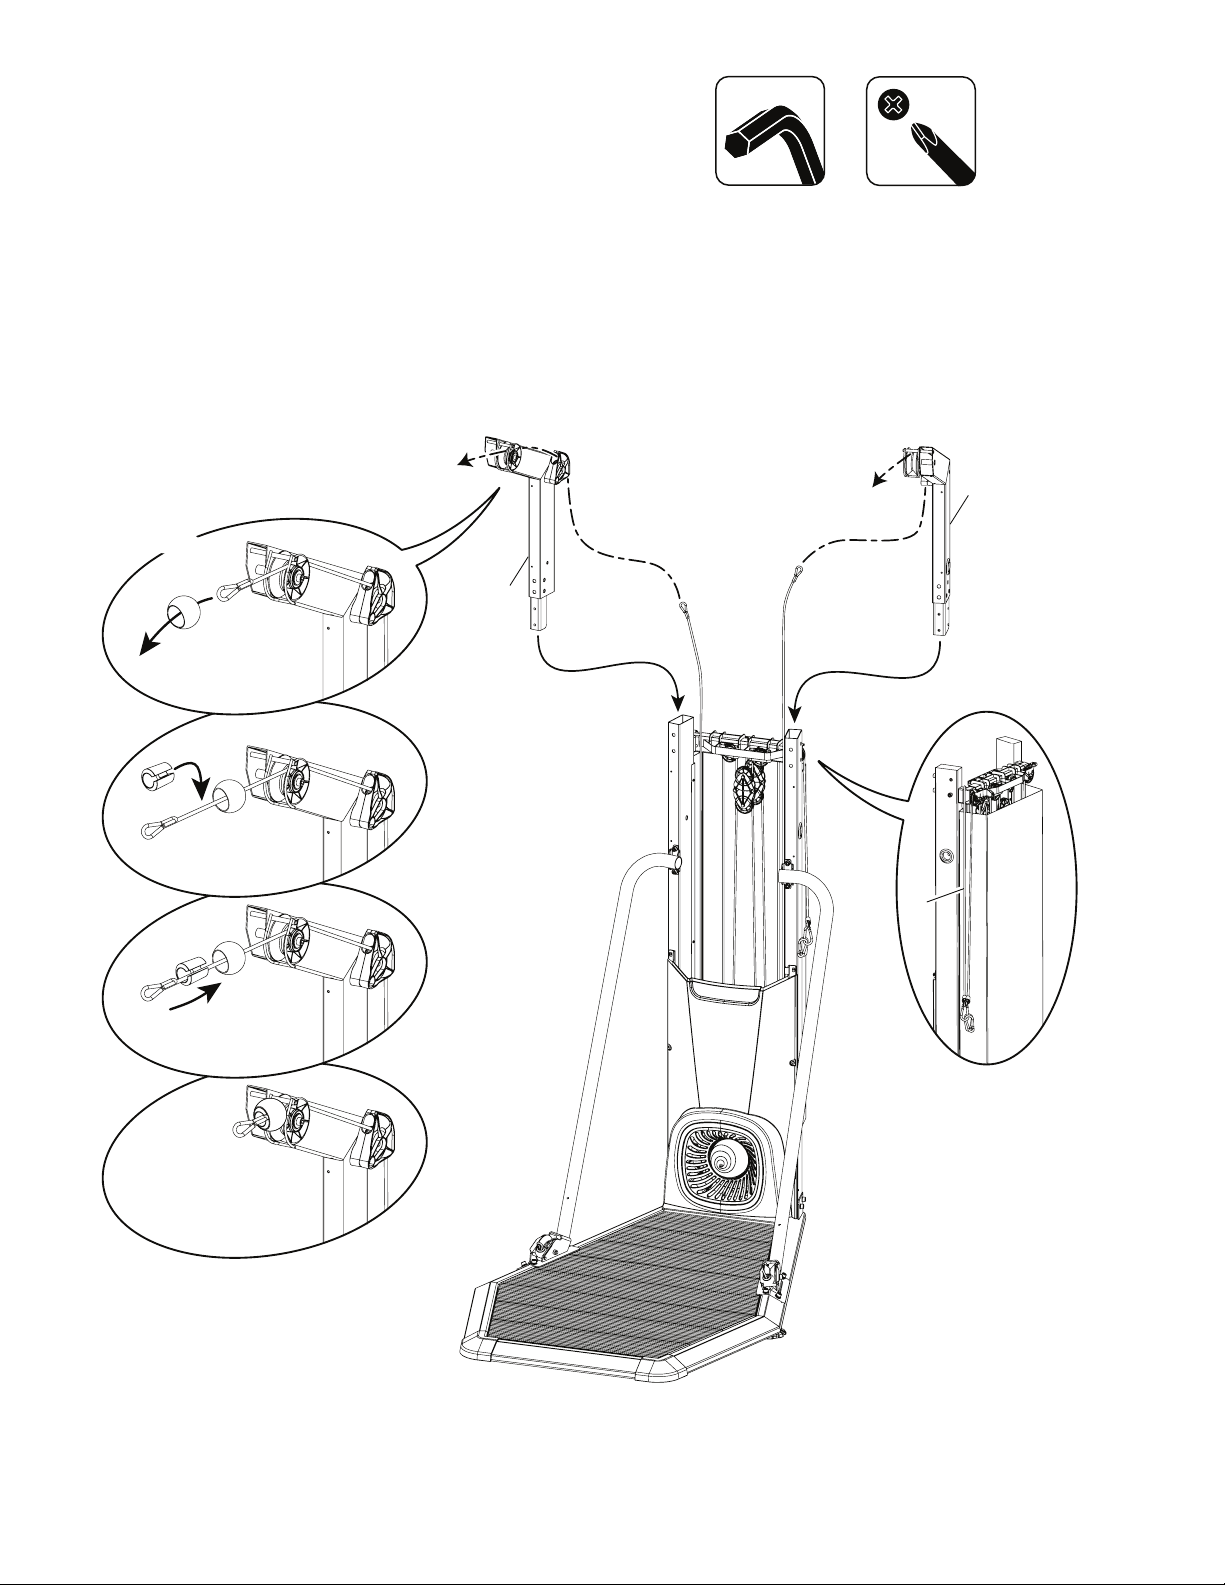
10. Disconnect the Ropes and Route the Front Rope (*) through Upper Pulley Arms and Insert to
Frame Assembly
Note: Attach a securing ball to the end of the rope after routing. Start the rope through the oval opening of the securing ball, and pull out of
the round opening.
*
19
20
F
X2
Owner’s Manual
19
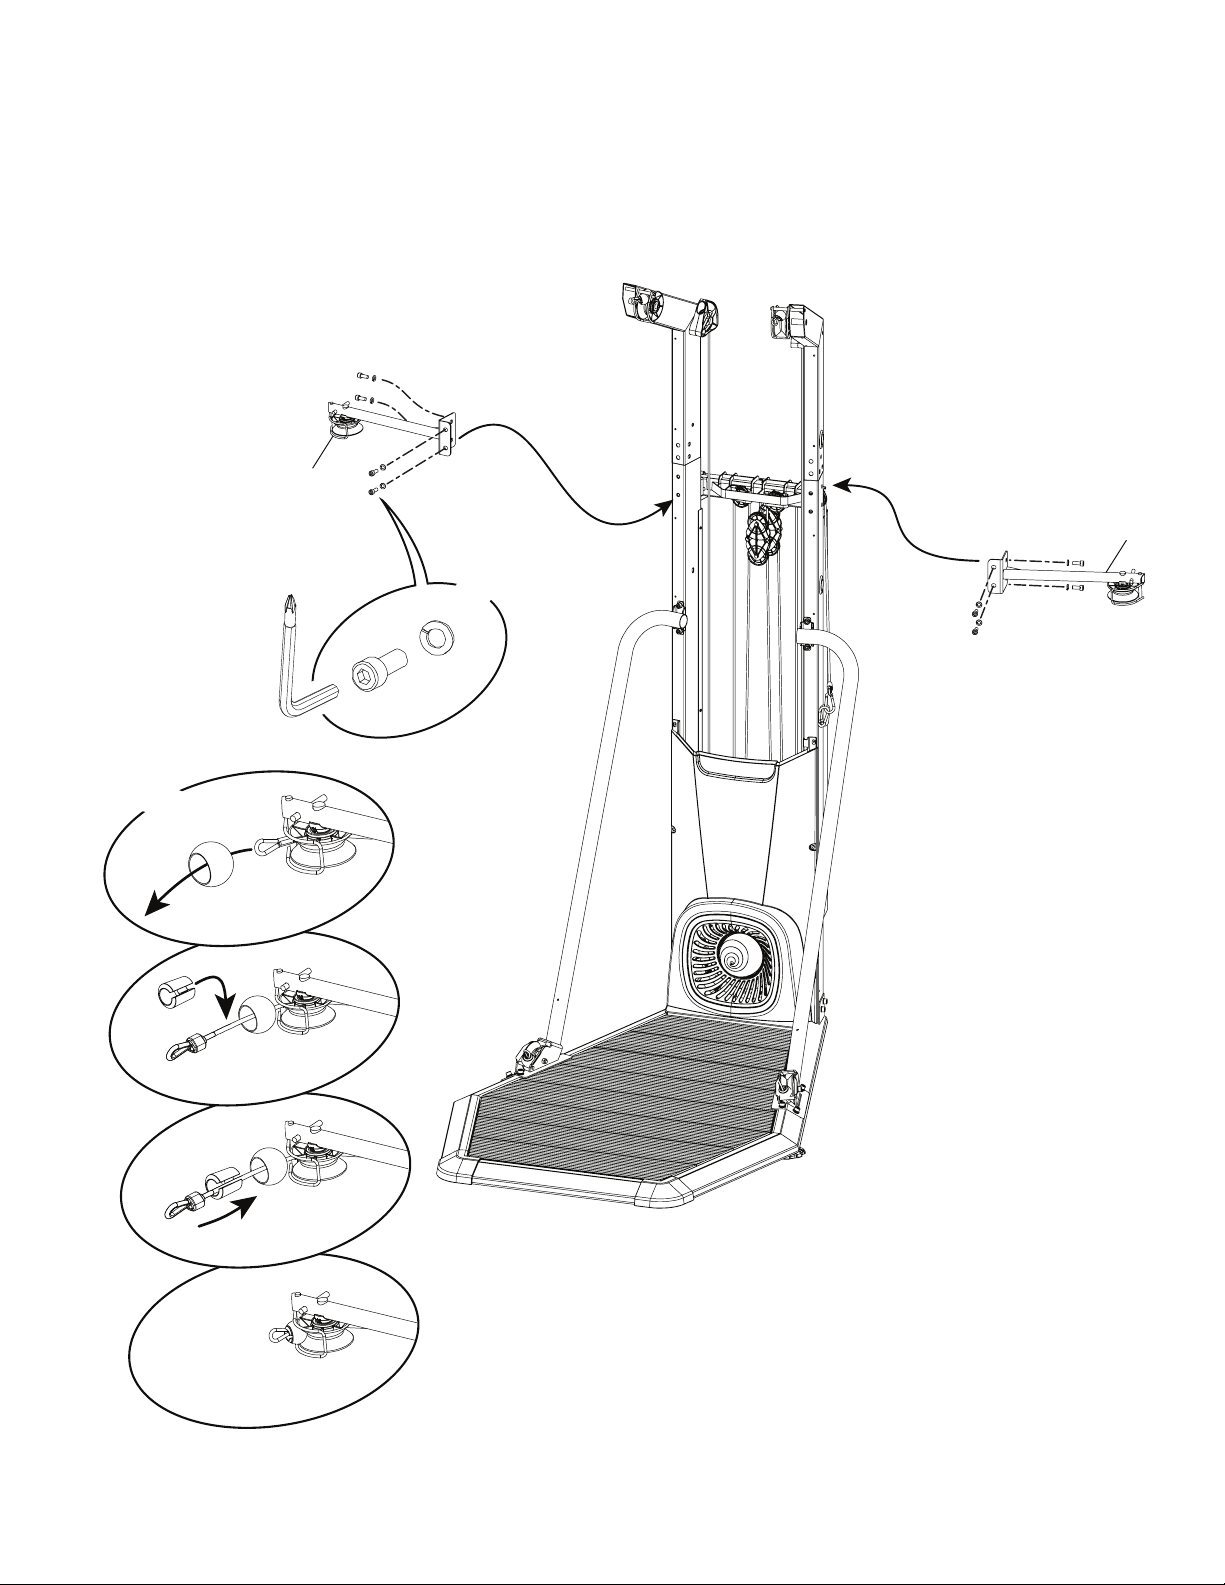
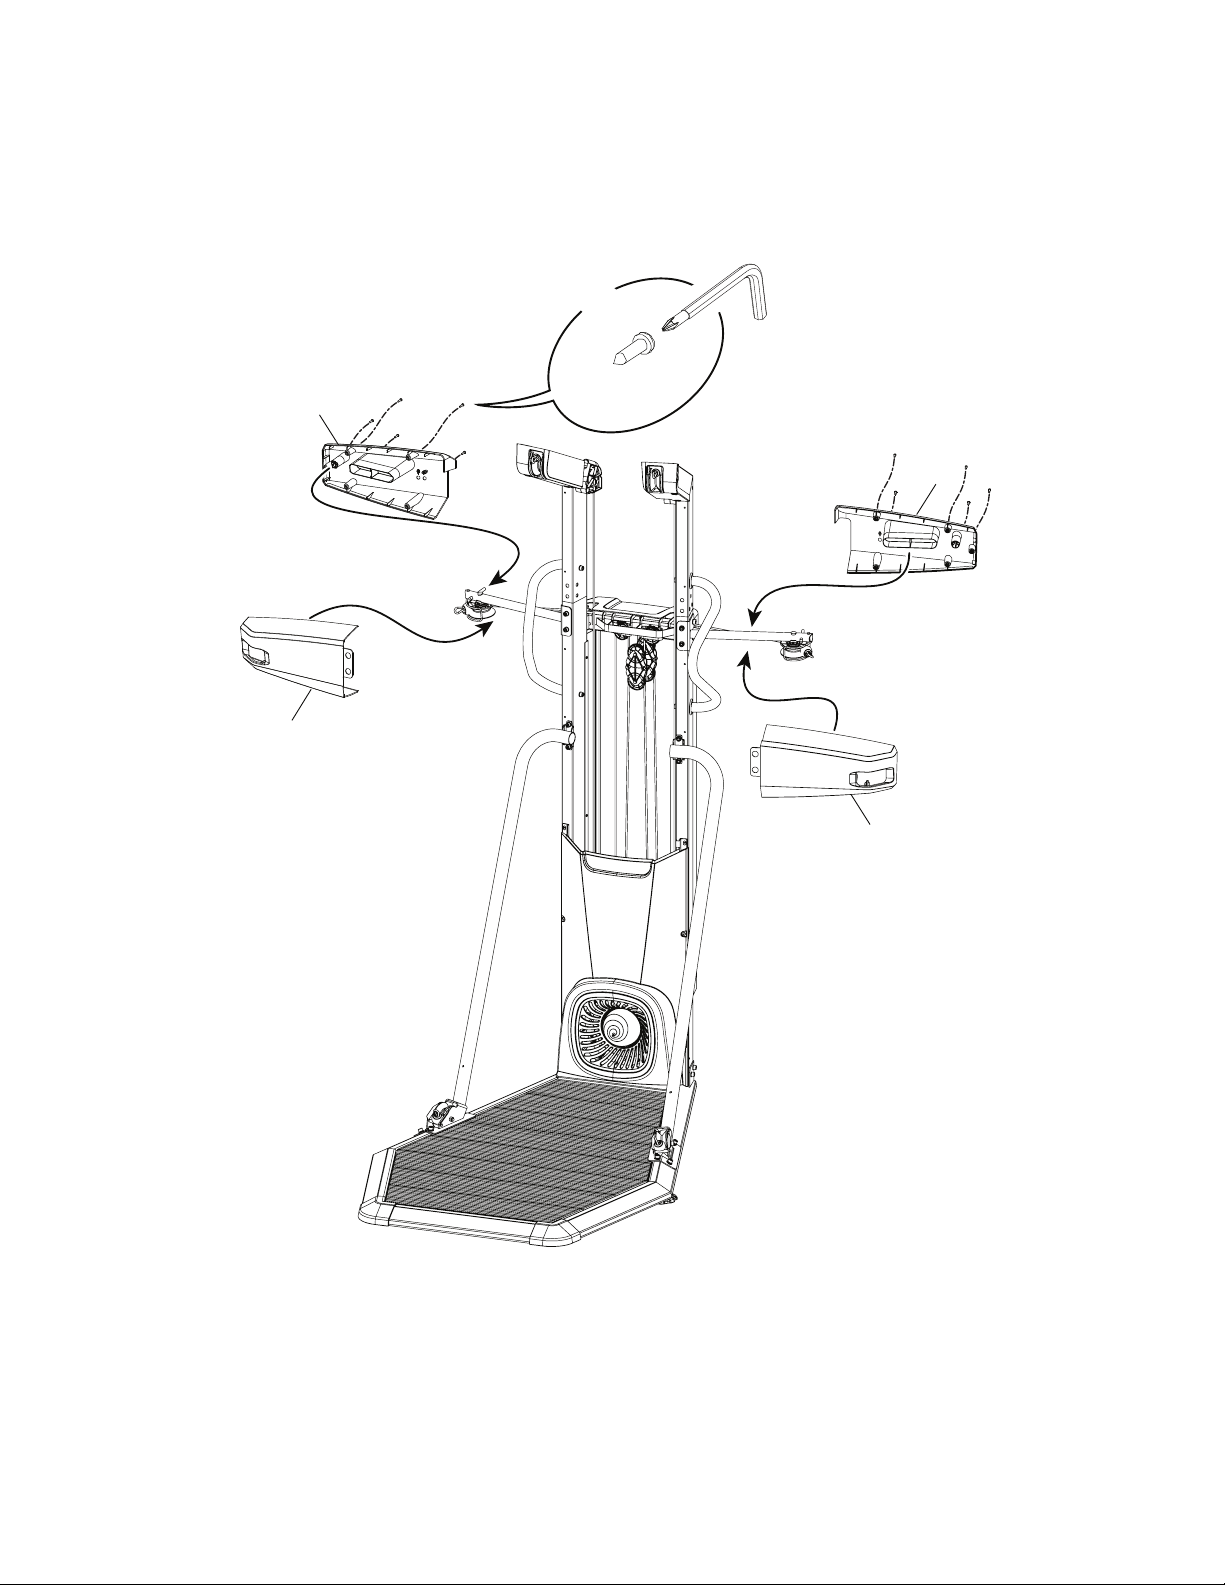
11. Attach the Middle Pulley Arms and Route the Middle Ropes
Note: The parts have a right (“ R ”) and left (“ L ”) mark to assist with assembly. If necessary, push the Upper Pulley Arms toward the back
to align the side hardware openings. Attach front hardware rst ( * ). Do not fully tighten until all hardware has been started. Attach a securing ball to
the end of the rope after routing. Start the rope through the oval opening of the securing ball, and pull out of the round opening.
*
A
B
X8
X2
*
*
*
17
21
F
6mm
Owner’s Manual
20
E
X4
32
38
#2
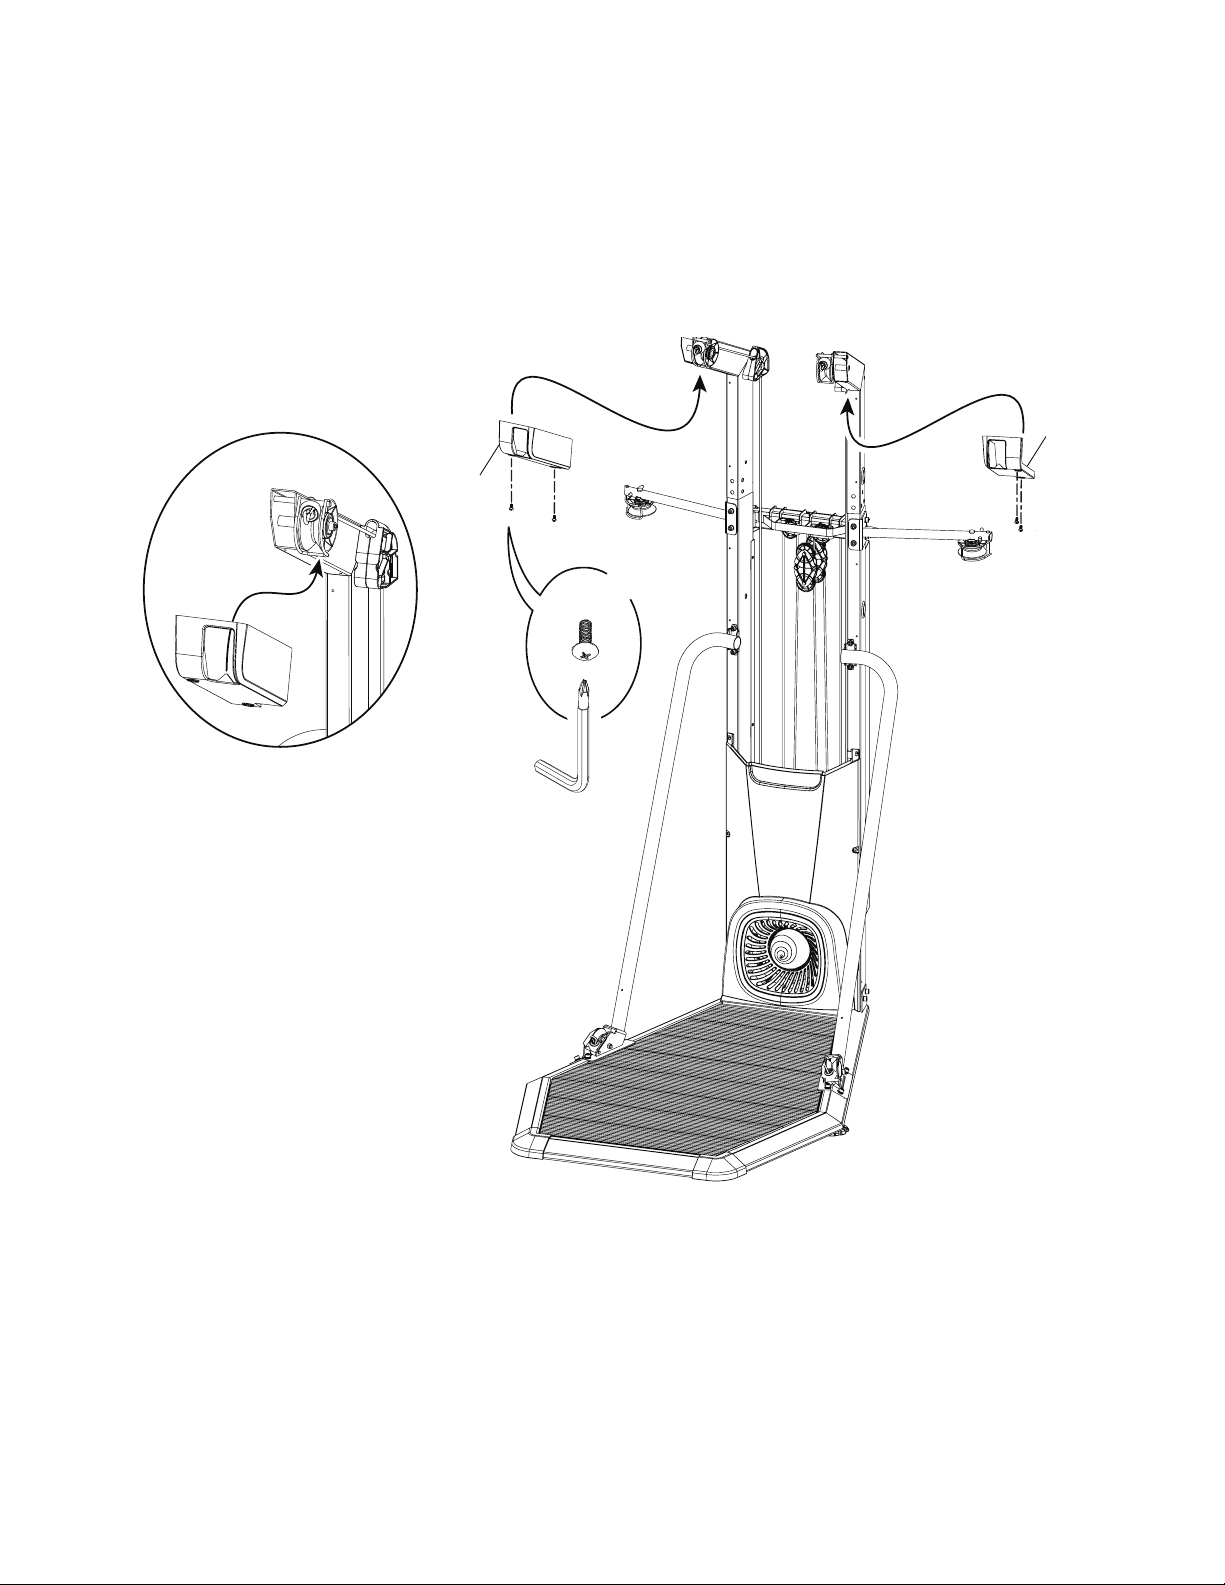
12. Attach Upper Pulley Shrouds to Upper Pulley Arms
Note: Be sure the tab on the Upper Pulley Shroud is behind the securing ball cage. Fully tighten this hardware and future hardware unless
specically instructed not to tighten.
Owner’s Manual
21
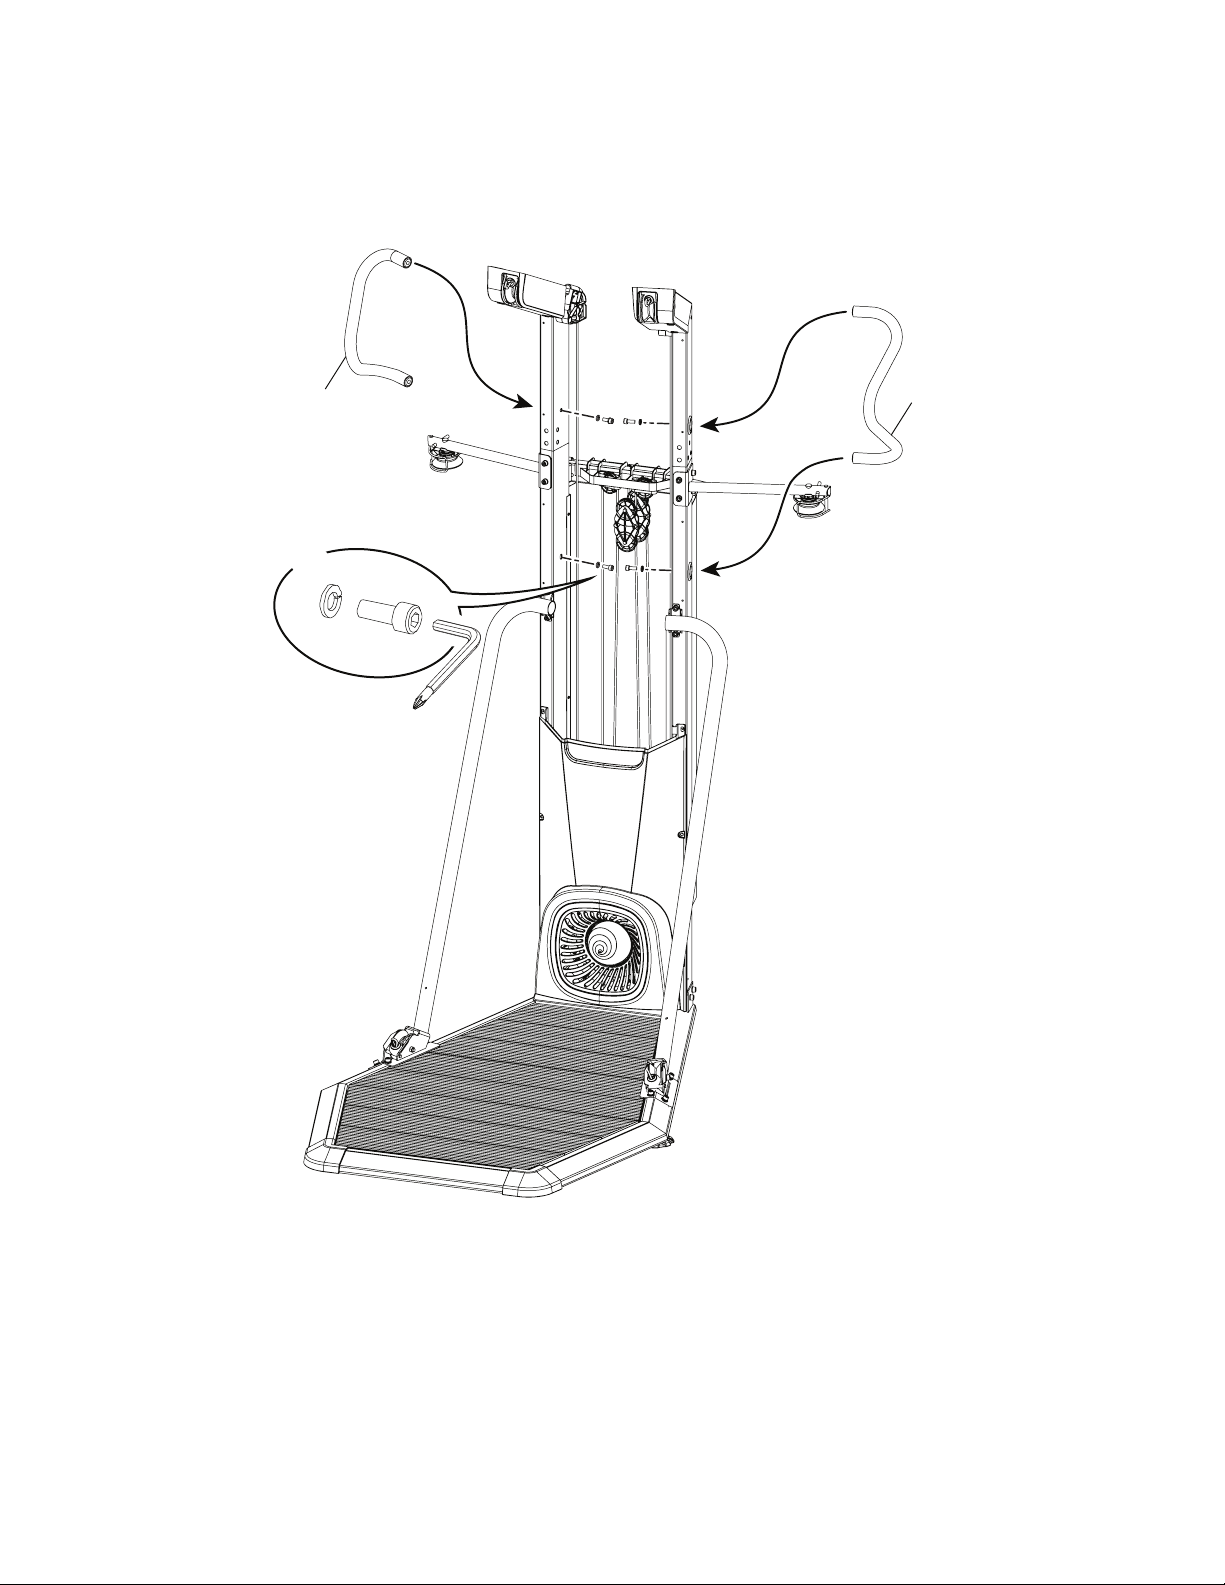
13. Attach the Handlebars to the Frame Assembly
A
B
X4
14
14
6mm
Owner’s Manual
22
C
X2
18
#2
14. Attach Upper Rear Shroud to Frame Assembly
Owner’s Manual
23
15. Attach the Middle Pulley Shrouds to the Frame Assembly
Note: The parts have a right (“ R ”) and left (“ L ”) mark to assist with assembly. Snap the Rear Shrouds onto the Middle Pulley Assemblies
rst (*).
C
X10
*
*
15
23
16
22
#2
Owner’s Manual
24
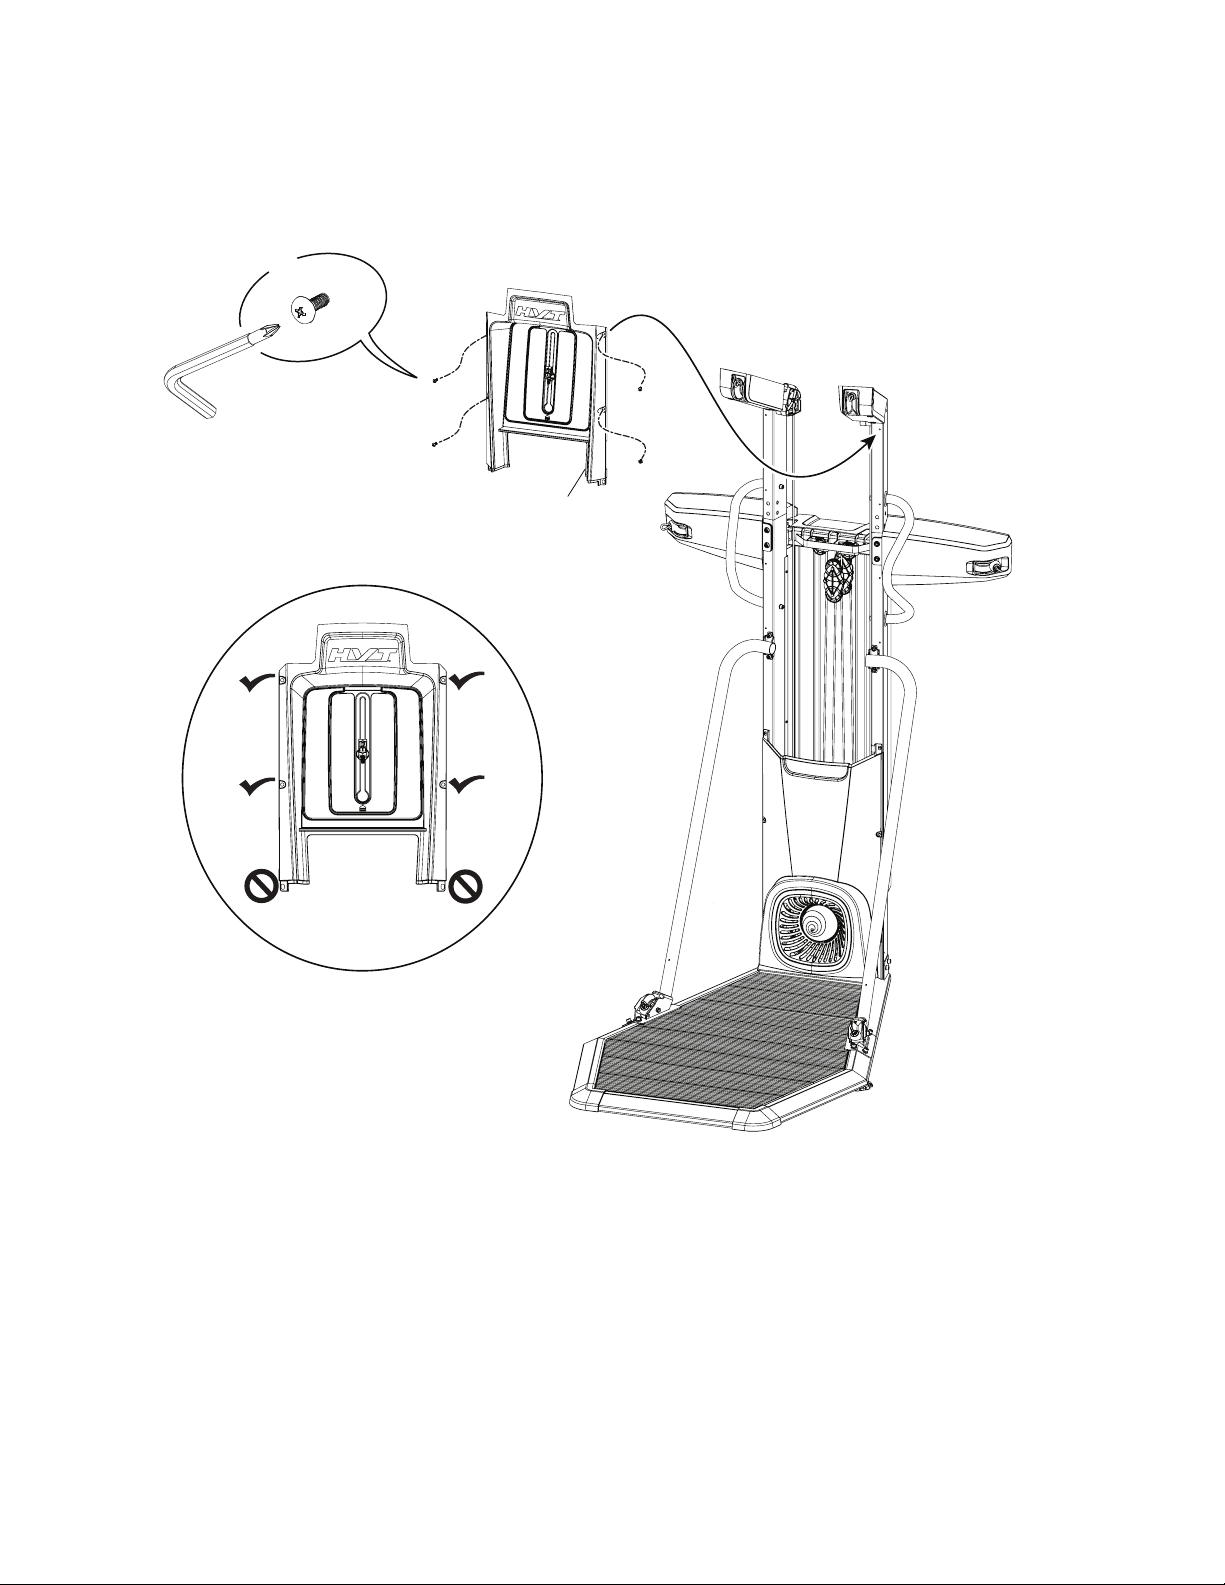
E
X4
33
#2
16. Attach Upper Shroud to Frame Assembly
Note: Do not install hardware in the lower openings. Do not fully tighten hardware until instructed.
Owner’s Manual
25
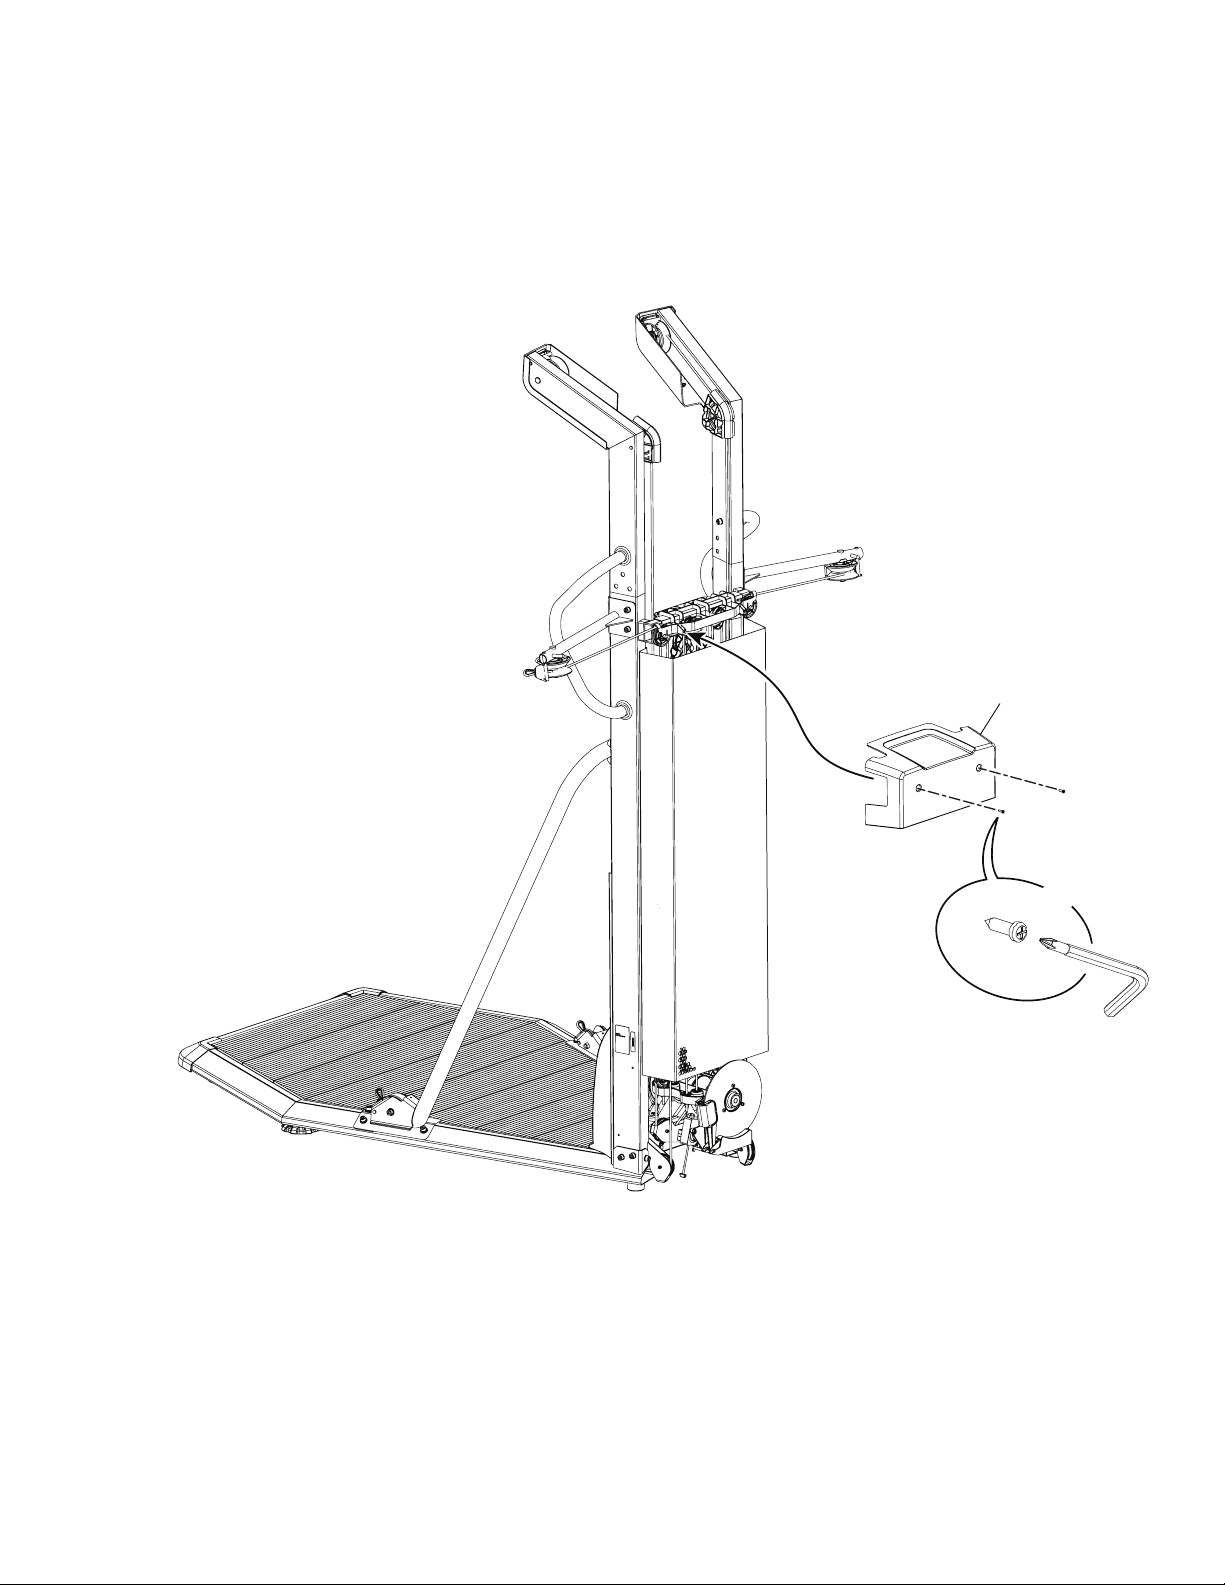
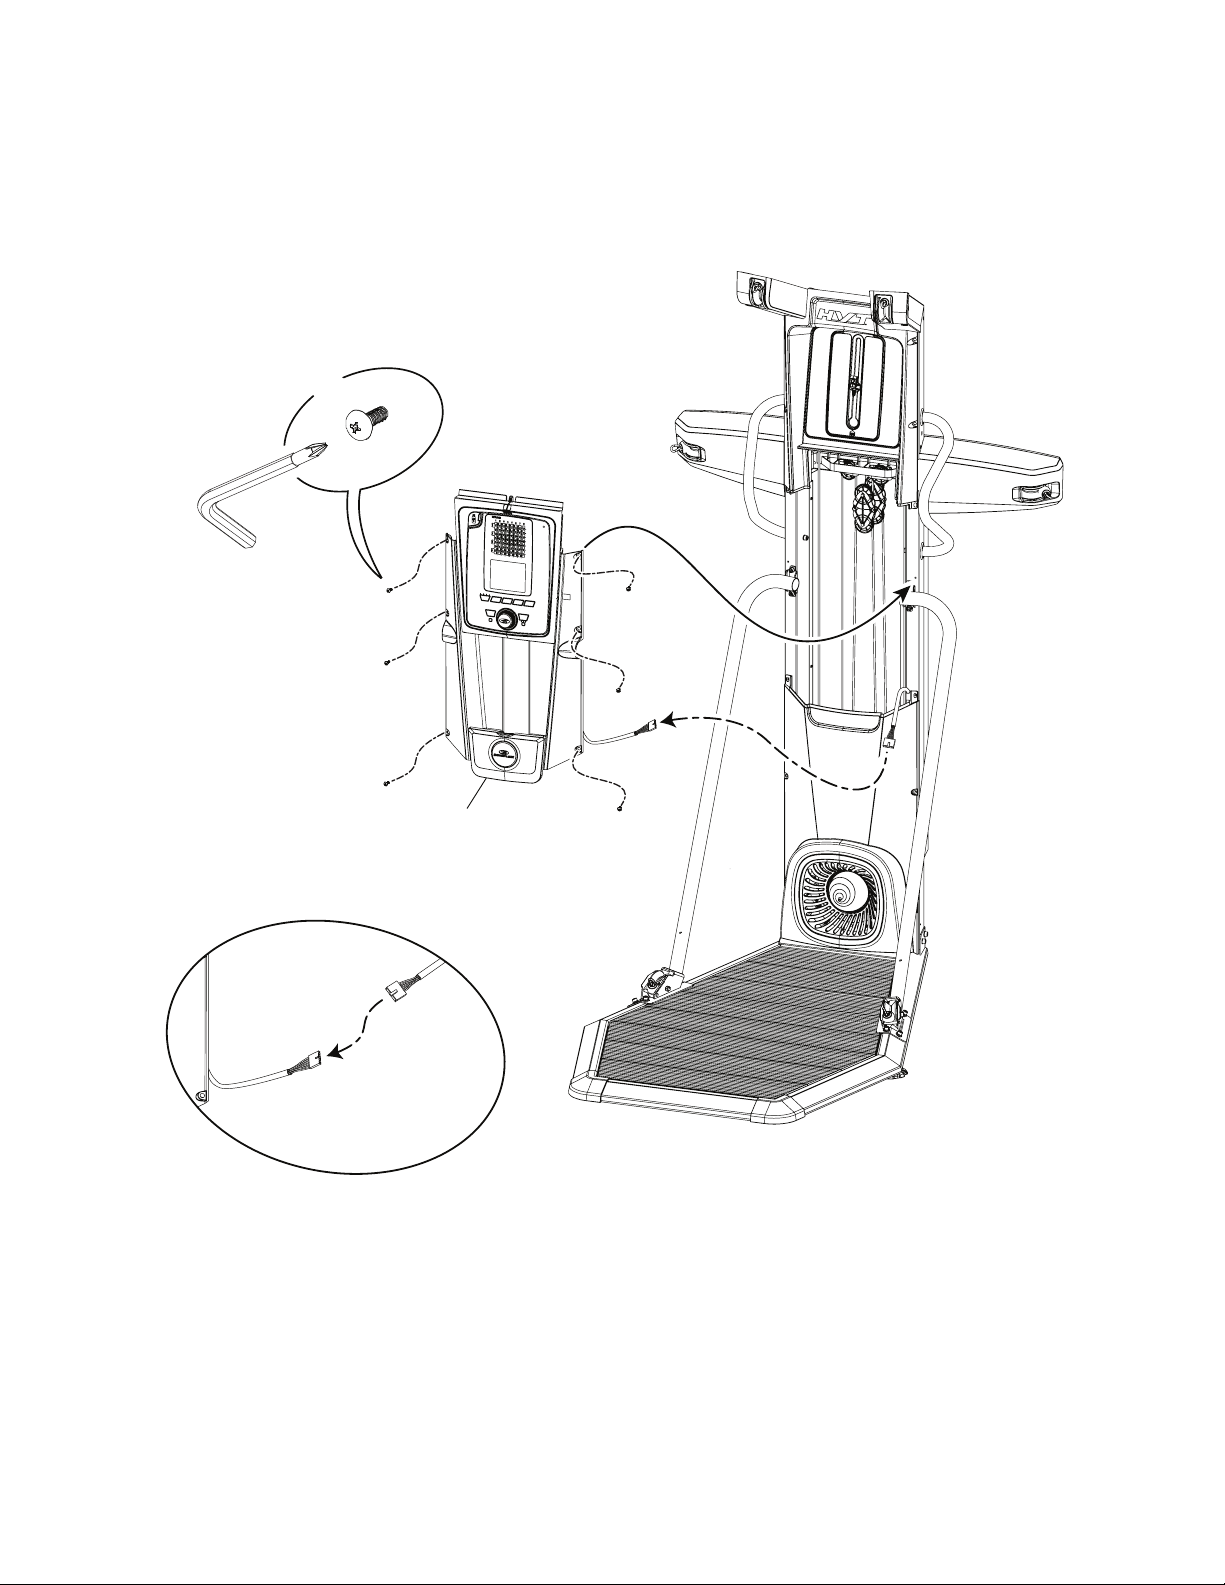
17. Connect the Cables and Attach the Console Assembly to Frame Assembly
Note: Do not crimp the Cables. Tighten all hardware from previous steps.
E
X6
35
#2
Owner’s Manual
26
18. Attach Lower Pulley Shrouds to Frame Assembly
E
X4
41
34
#2
Owner’s Manual
27
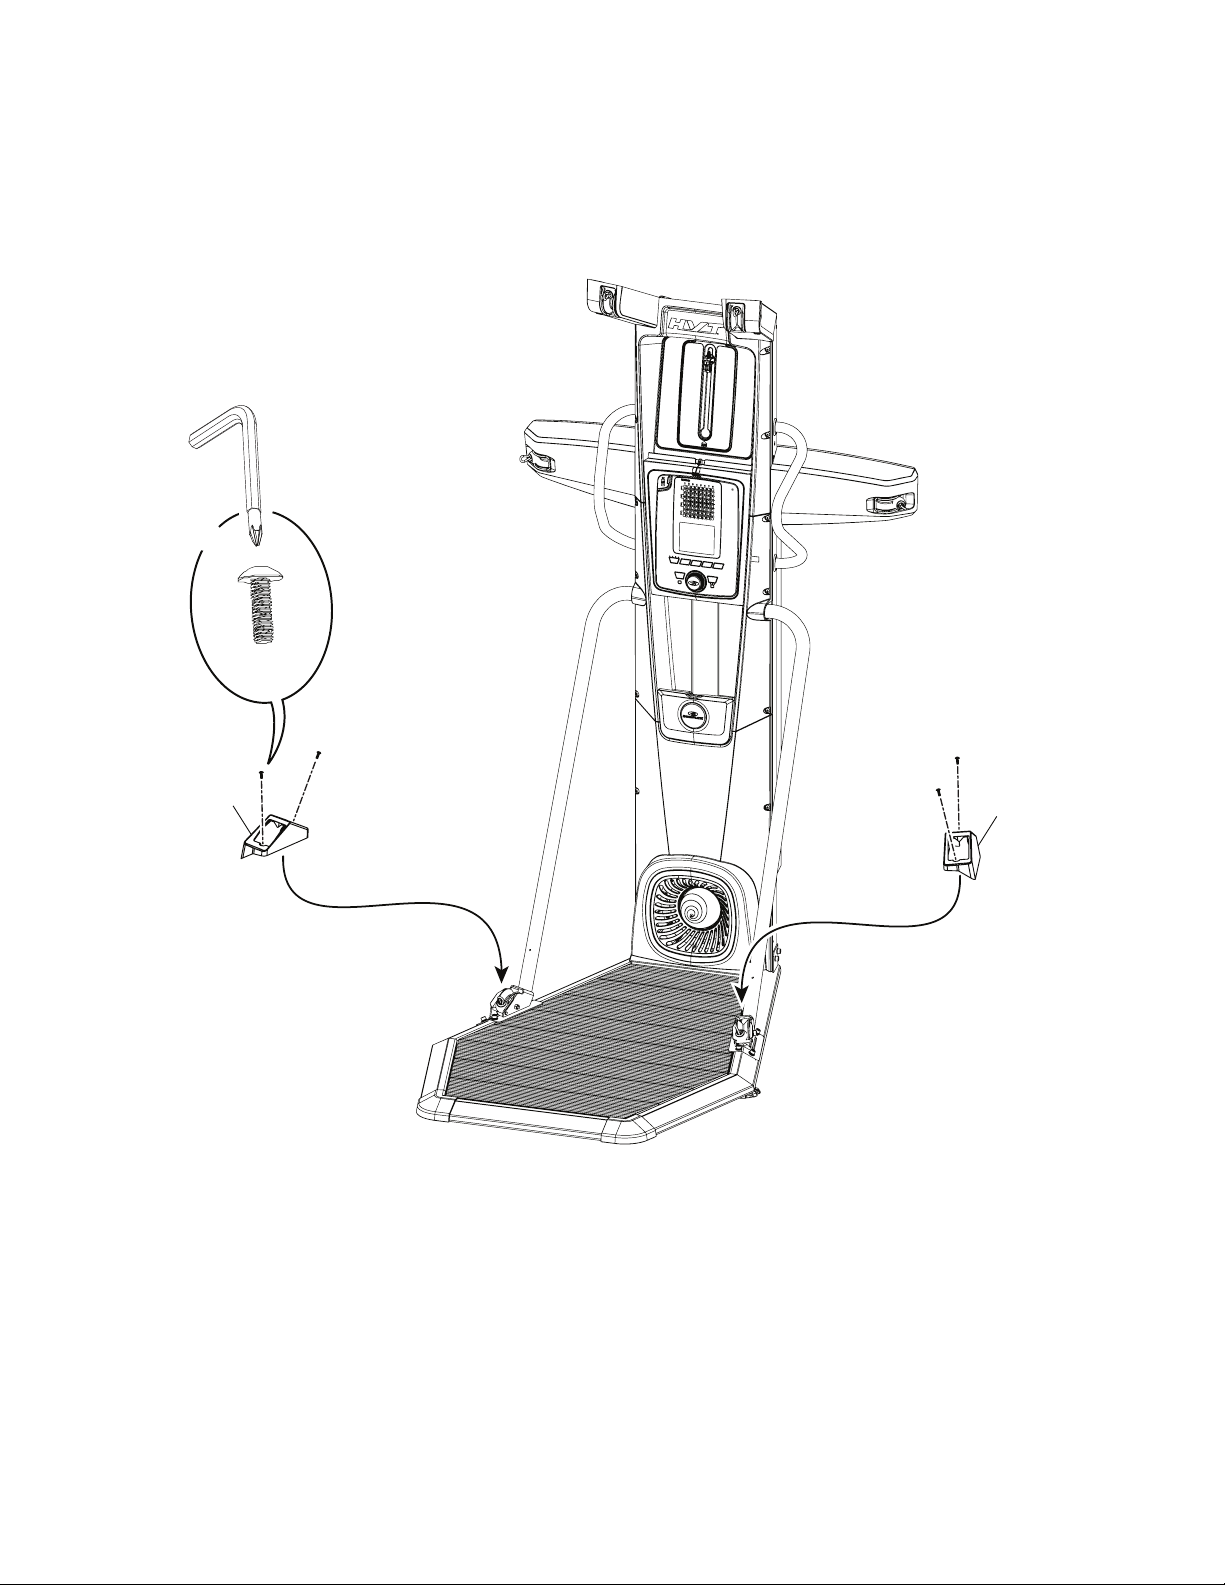
19. Attach Lower Grip Holders to Frame Assembly
E
X2
31
#2
31

Owner’s Manual
28
20. Connect the Power Input Cables and Attach the Lower Rear Shroud to Frame Assembly
Note: Be sure to remove any shipping cardboard before attaching the Rear Shroud. Do not crimp the Cables.
E
X4
40
#2
Owner’s Manual
29
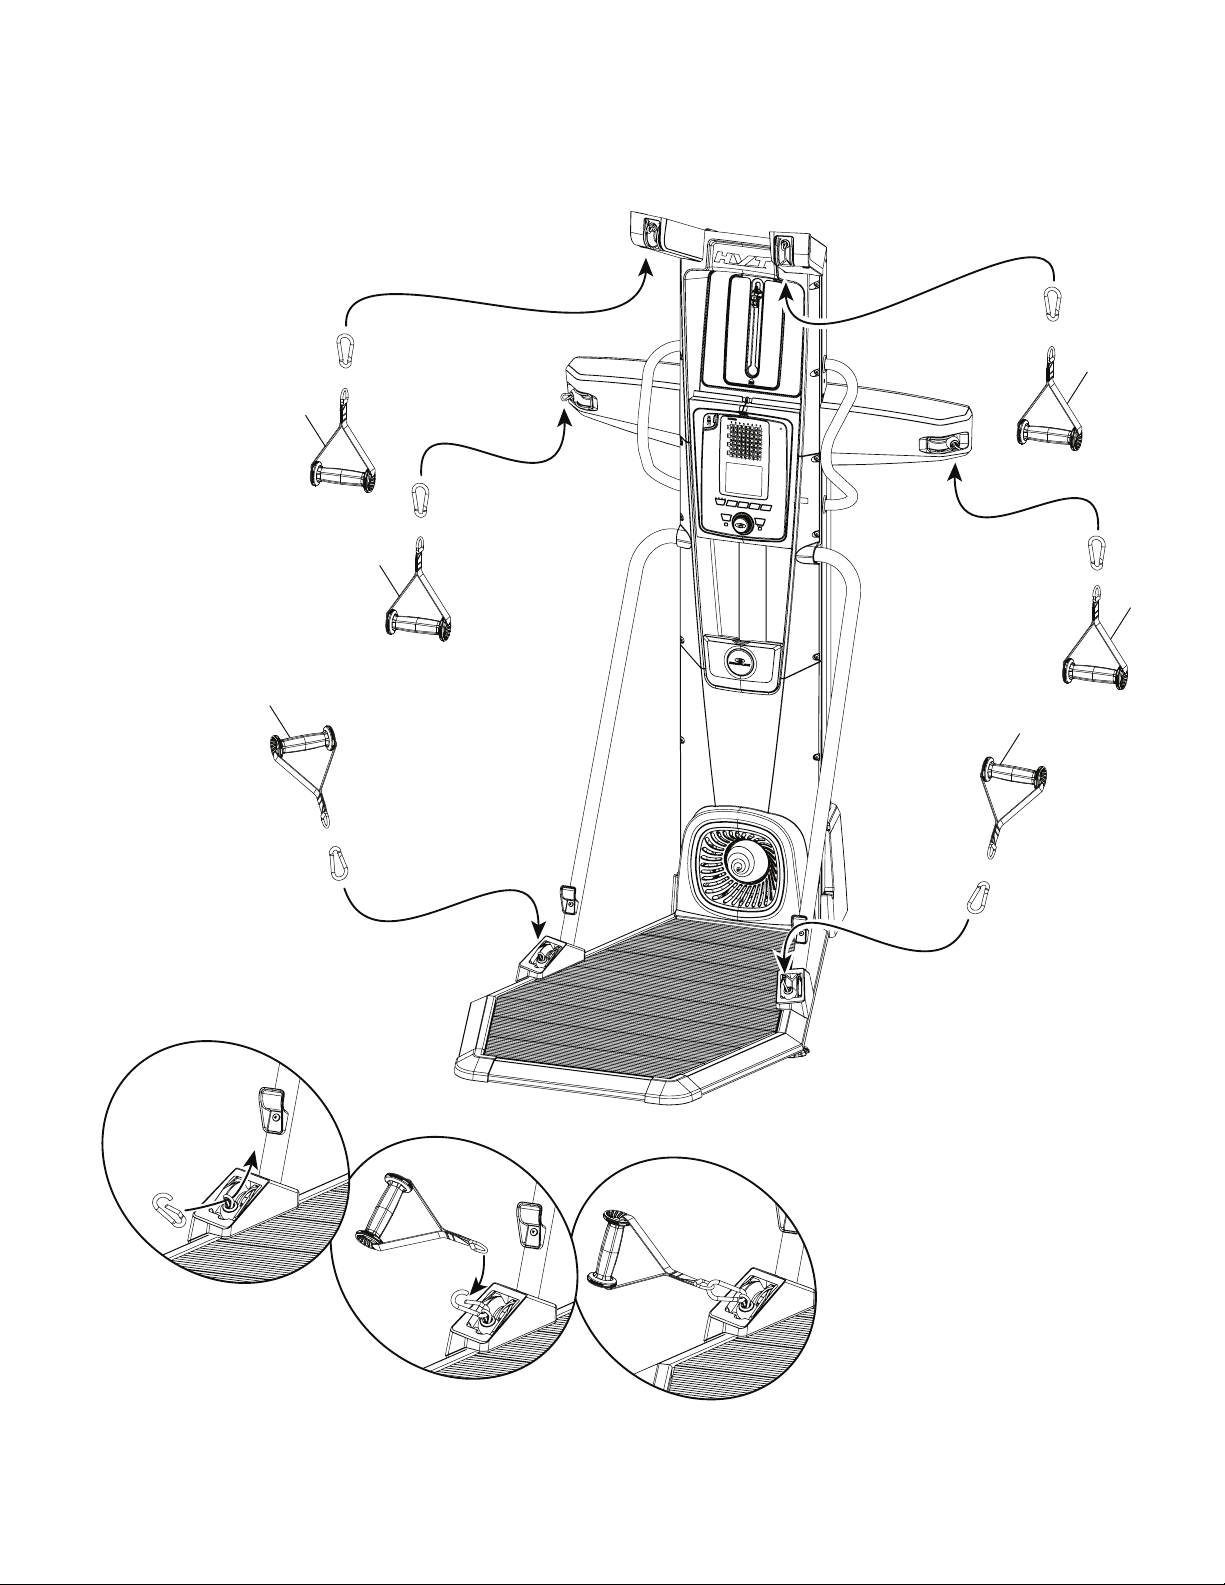
21. Carefully Attach Hand Grips to Ropes
Note: Be sure to keep your hands away from the snap hooks when attaching the Hand Grips.
39
39
39
39
39
39
37
37
37
37
37
37
Owner’s Manual
30
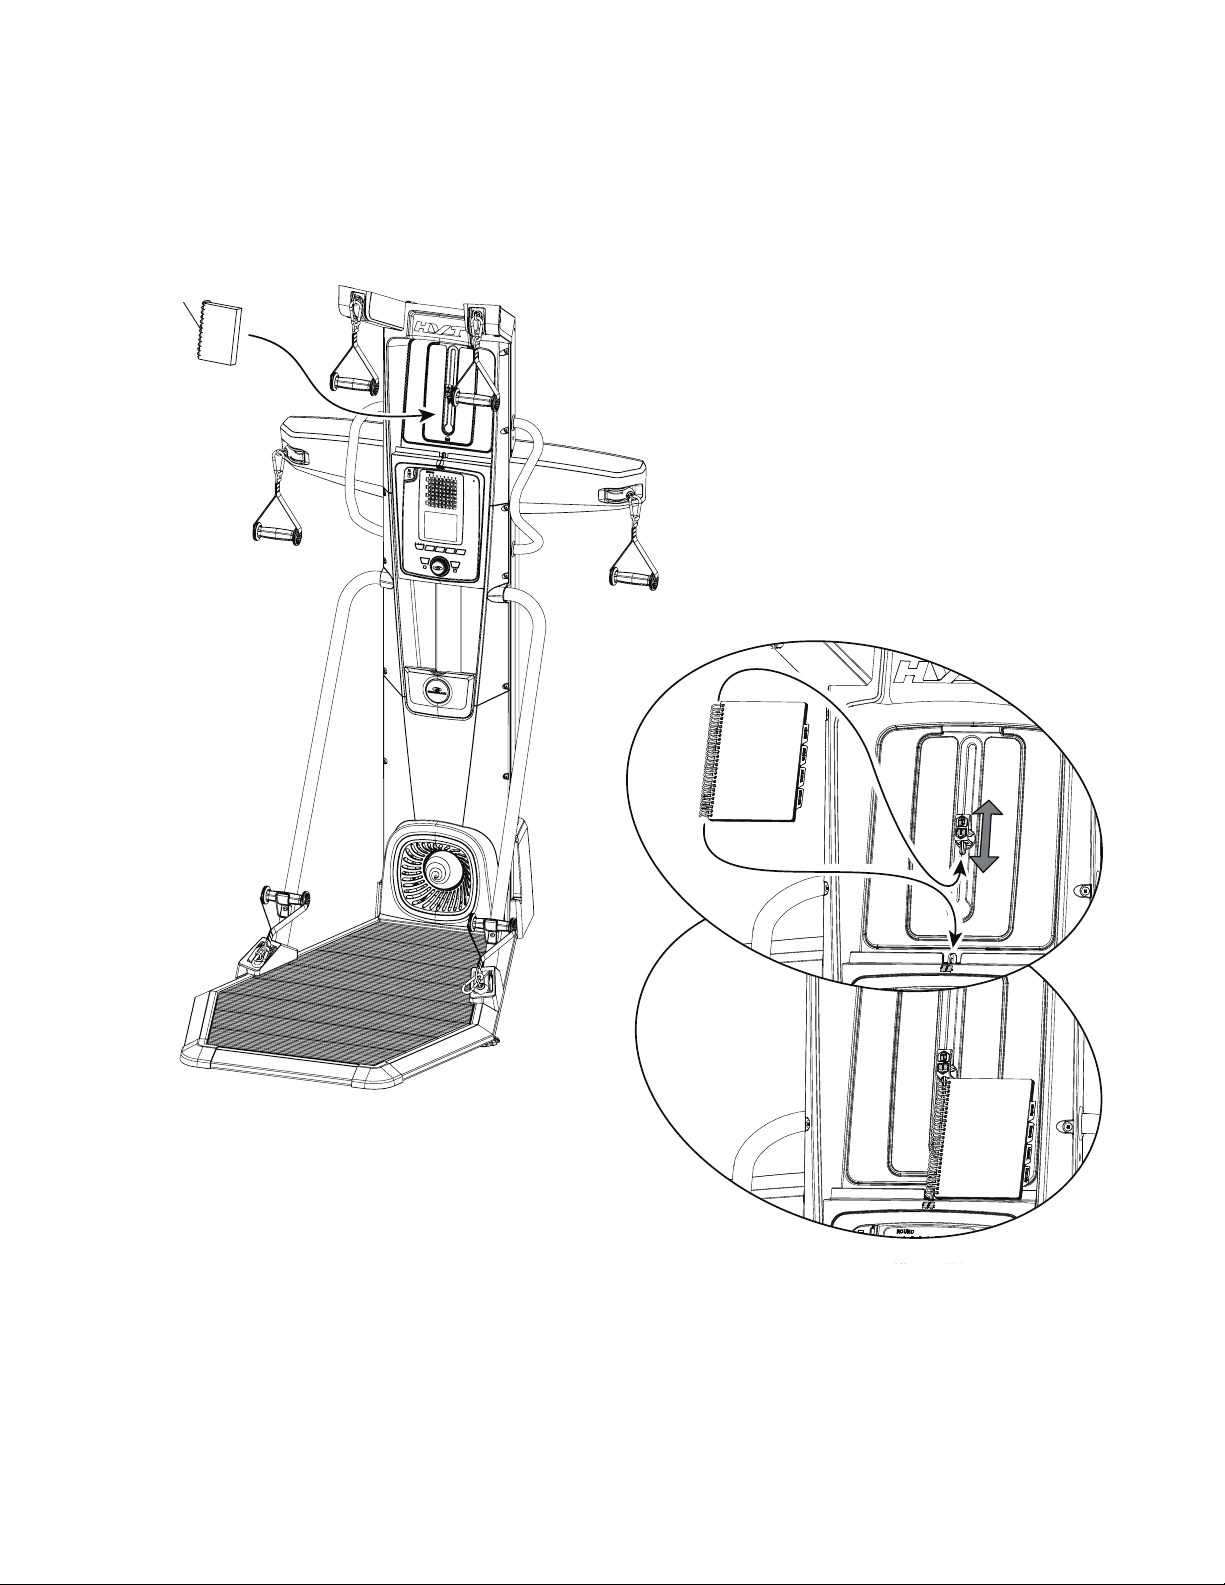
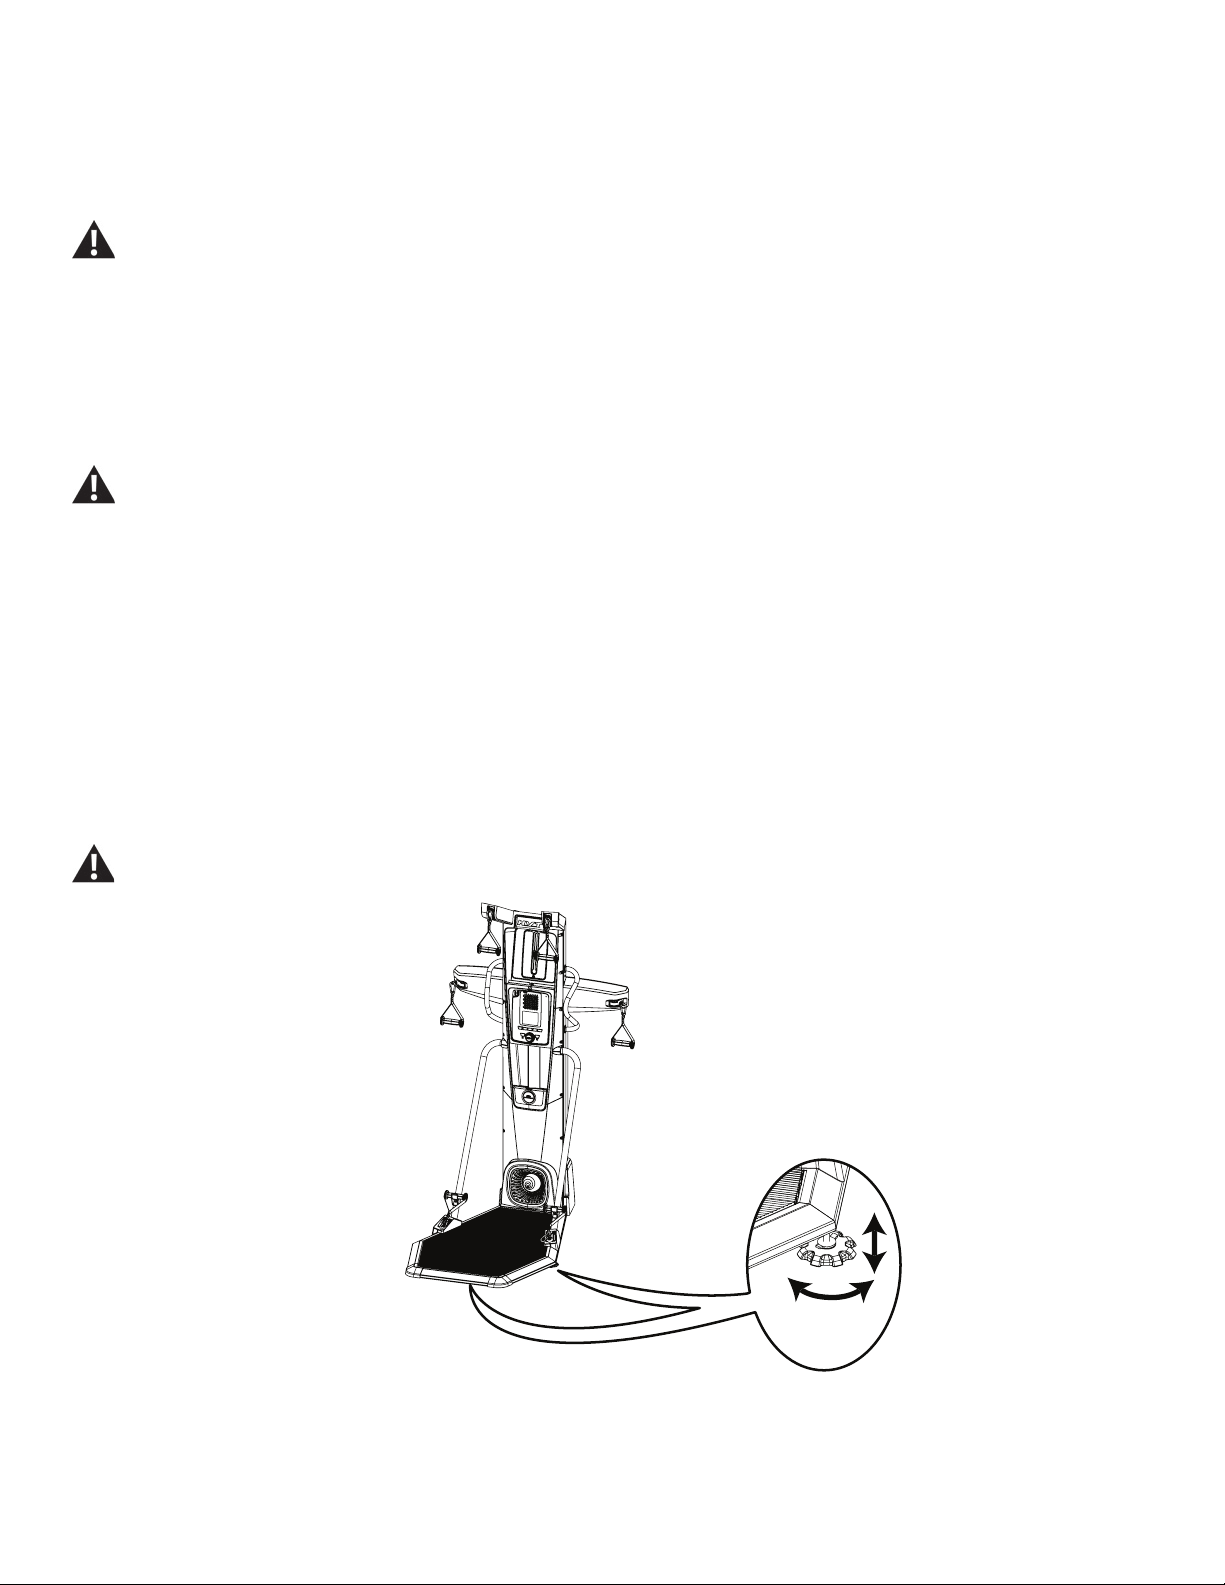
22. Secure the Training Guide to the Media Tray on the Upper Shroud
Note: Insert the Pointed Tabs into the spiral binding of the Training Guide. The Securing Clasp can be adjusted and rotated as necessary.
When placed properly, the Training Guide should be easily opened and the pages easily turned.
29
Owner’s Manual
31
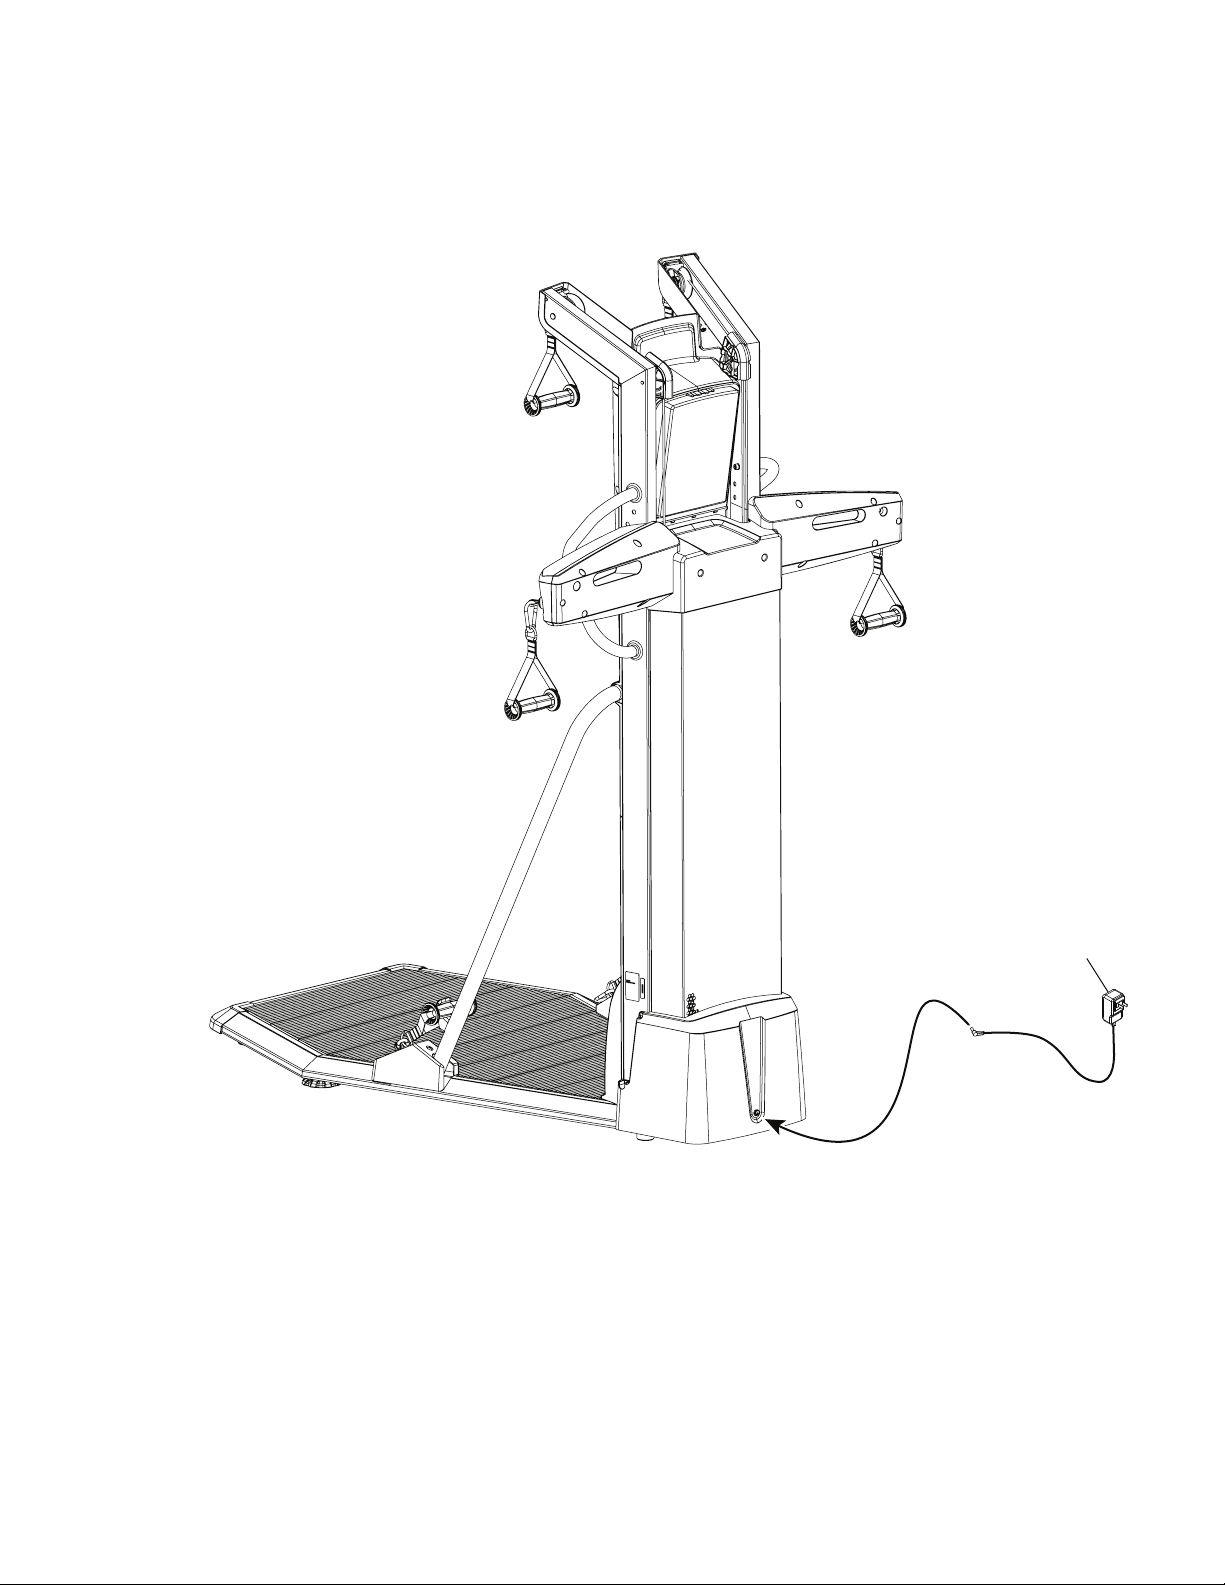
23. Attach Power Adapter to Frame Assembly
Note: Do not crimp the Cables.
13
Owner’s Manual
32
Moving and Storing the Machine
Do not move the machine without aid. Injury to you or damage to the machine can occur.
1. Remove the power adapter and hand grips, and place in a secure location.
Leveling the Machine
The machine needs to be leveled if your workout area is uneven. To adjust:
1. Place the machine in your workout area.
2. Adjust the levelers until they all contact the oor.
Do not adjust the levelers to such a height that they detach or unscrew from the machine. Injury to you or damage to the machine
can occur.
24. Final Inspection
Inspect your machine to ensure that all hardware is tight and components are properly assembled. Recycle or discard the Shipping Supports and
excess hardware according to your local regulations.
Be sure to record the serial number in the eld provided at the front of this manual.
Do not use until the machine has been fully assembled and inspected for correct performance in accordance with the Owner’s
Manual.
Owner’s Manual
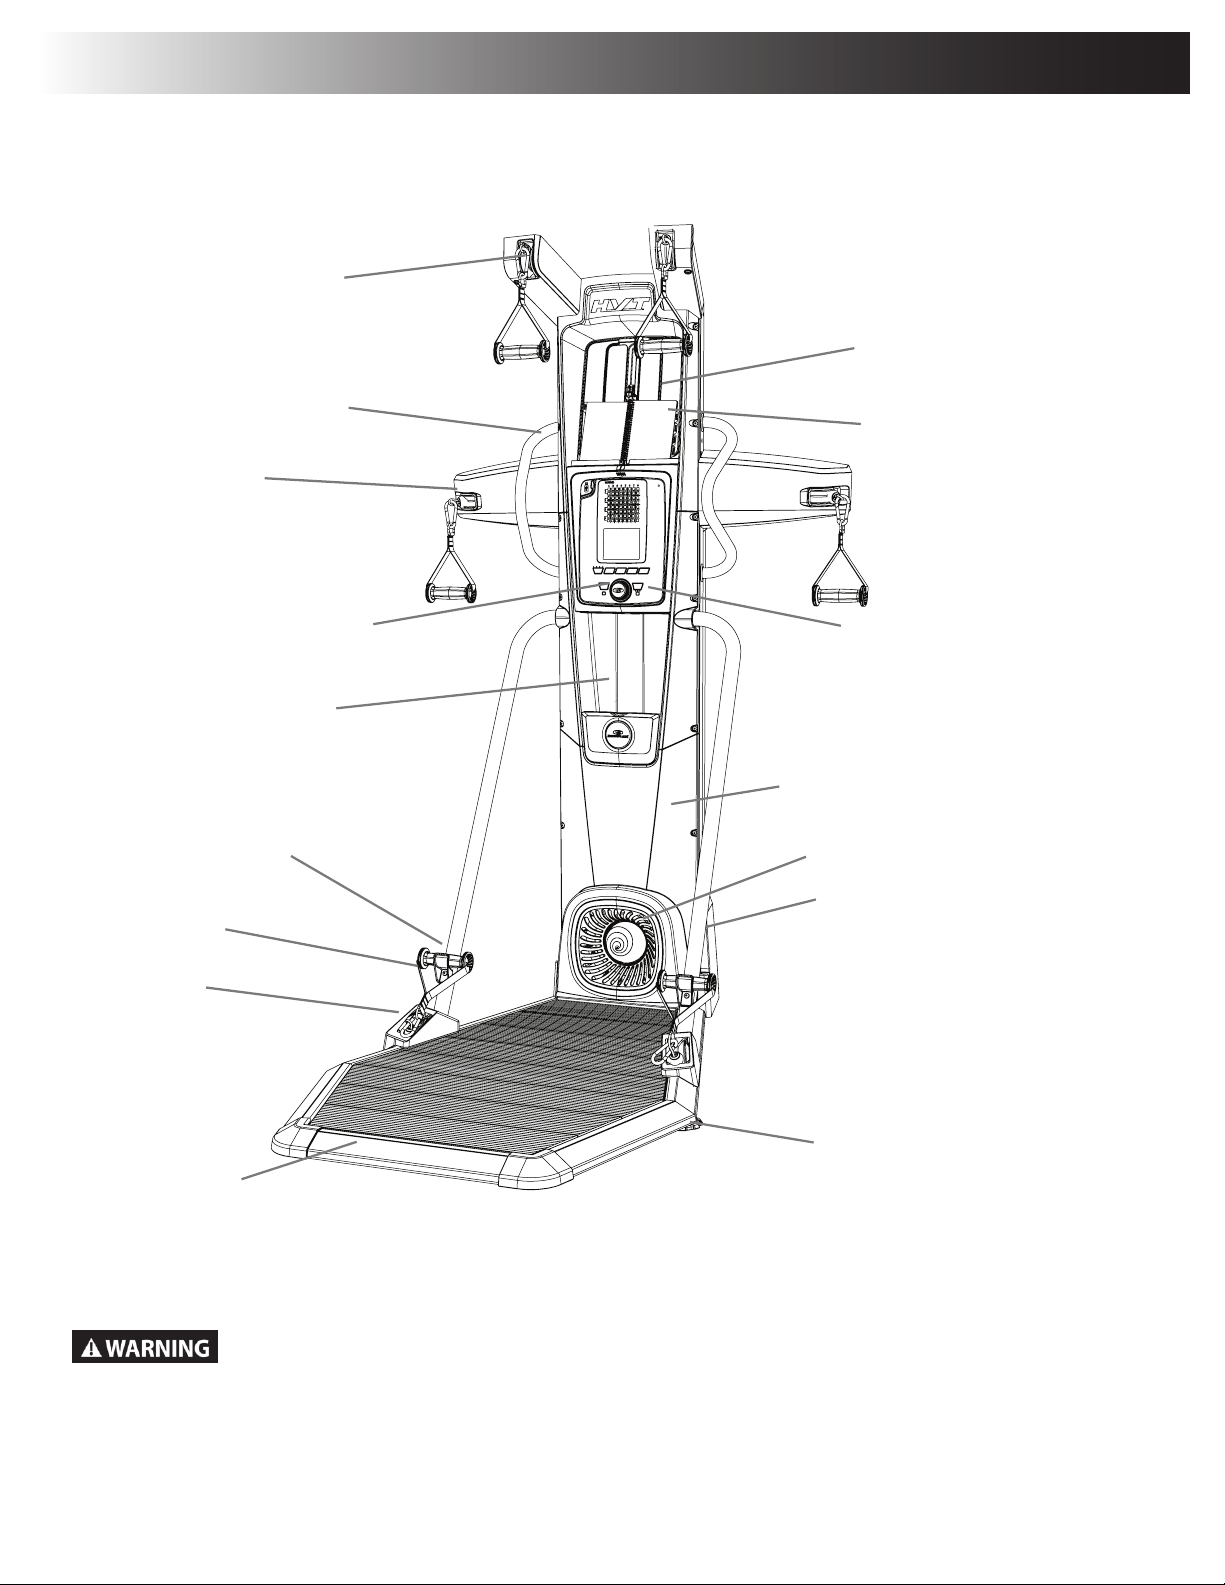
33
Platform
Leveler
Lower Pulley
Resistance Fan
Power Inlet
Upper Pulley
Middle Pulley
Static Handlebars
Media Shelf / Accessory
Storage Area
Console
Water Bottle Holder
Hand Grip
Resistance Engine
Use the values calculated or measured by the machine’s computer for reference purposes only. The heart rate
displayed is an approximation and should be used for reference only. Over exercising may result in serious injury or
death. If you feel faint stop exercising immediately.
Features
Resistance Level Dial
Hand Grip Holder
Training Guide
Owner’s Manual
34
Pulleys
The Bowex
®
HVT™ machine has three different pulley positions: Upper, Middle and Lower. Each exercise uses the hands grips attached to the
specic pulleys to affect the intended muscle group.
Platform
The Platform is a slightly raised stage dening the workout area. Most of the exercises involve the user being fully on the Platform. If required to
perform an exercise, the user can step off the platform with one foot but must stay within the Workout area. At least one foot must be kept on the
Platform during a workout. Be prepared for the step down from the Platform.
Note: If necessary, grab onto the Static Handlebars for stability.
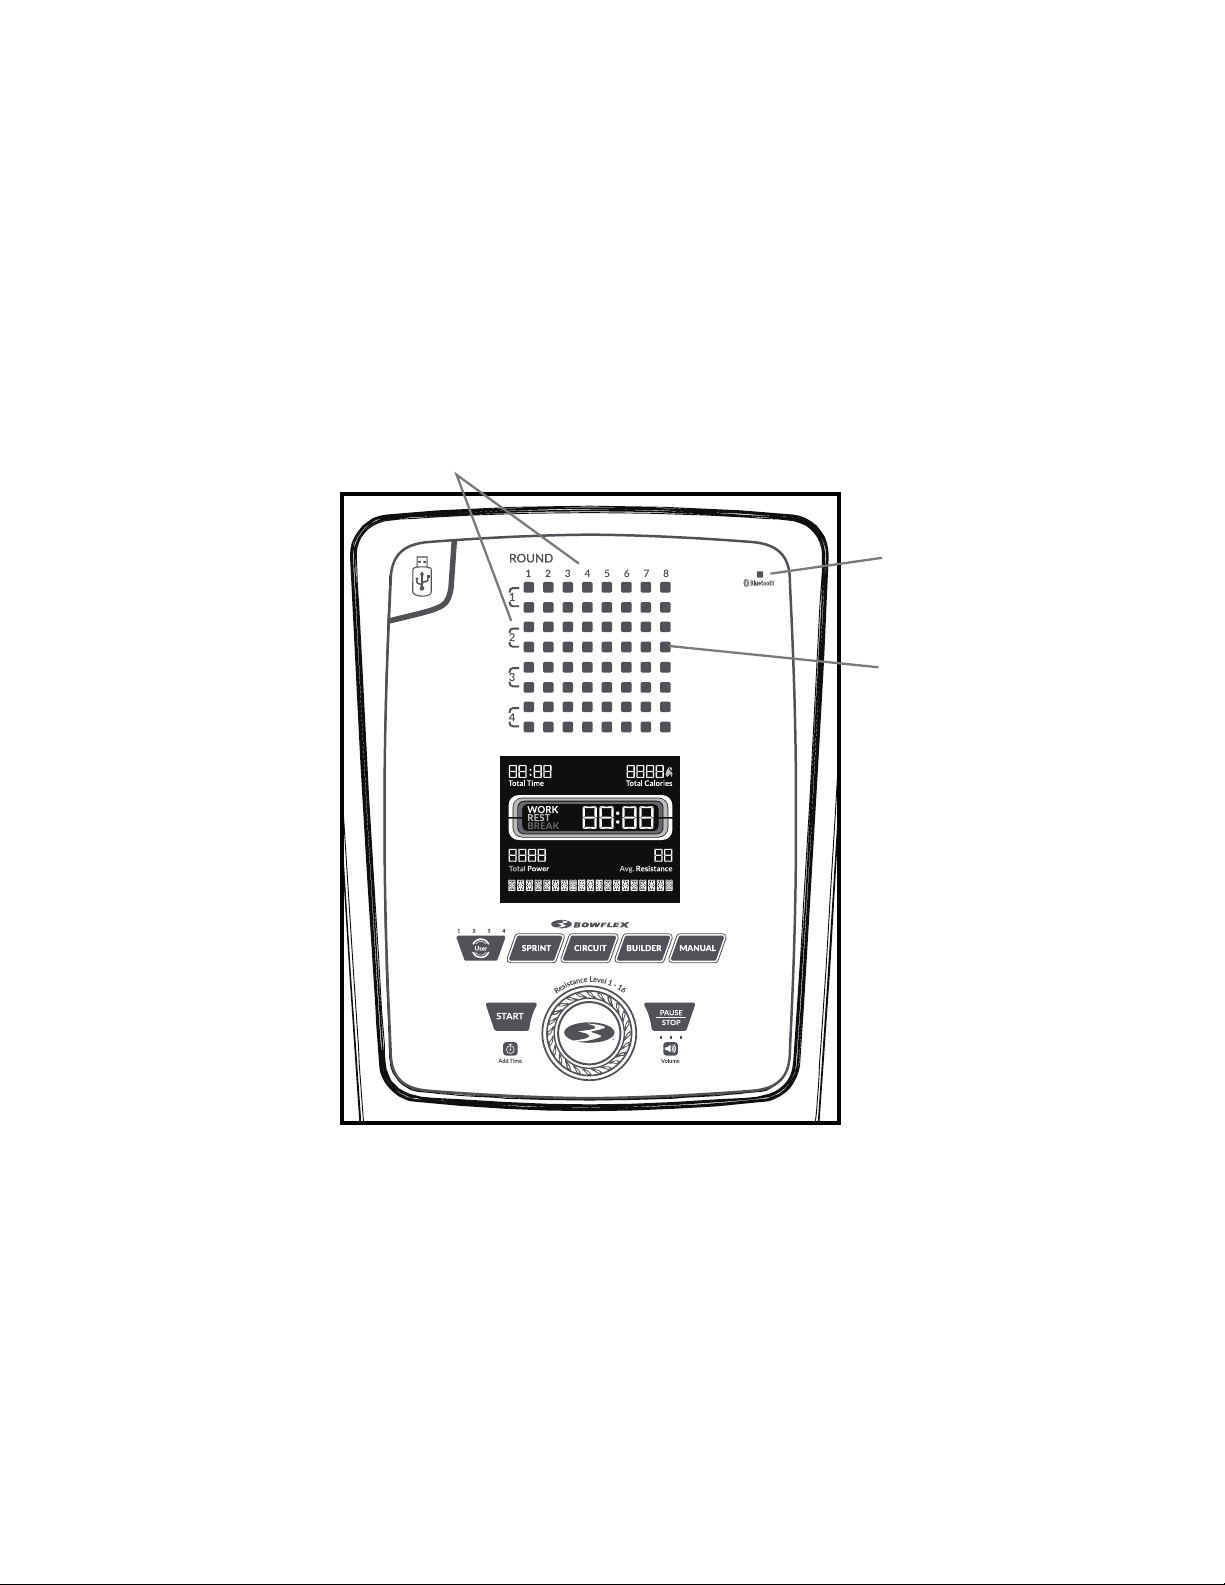
Console Features
The Console provides information about your workout on the display screen.
Bluetooth
®
icon
The Bluetooth
®
icon is displayed when a Bluetooth
®
enabled device is connected to the Console.
Round display
A Round is a series of exercises presented in a specic order for each Workout Program. Each Workout Program has a minimum number of Rounds.
At the end of each Round during a SPRINT or CIRCUIT Workout Program, a Break segment is provided before the next Round.
Note: The MANUAL Workout Program does not contain Rounds since it is an open-ended Workout Program.
Round display
Bluetooth
®
icon
Exercise segment
Owner’s Manual
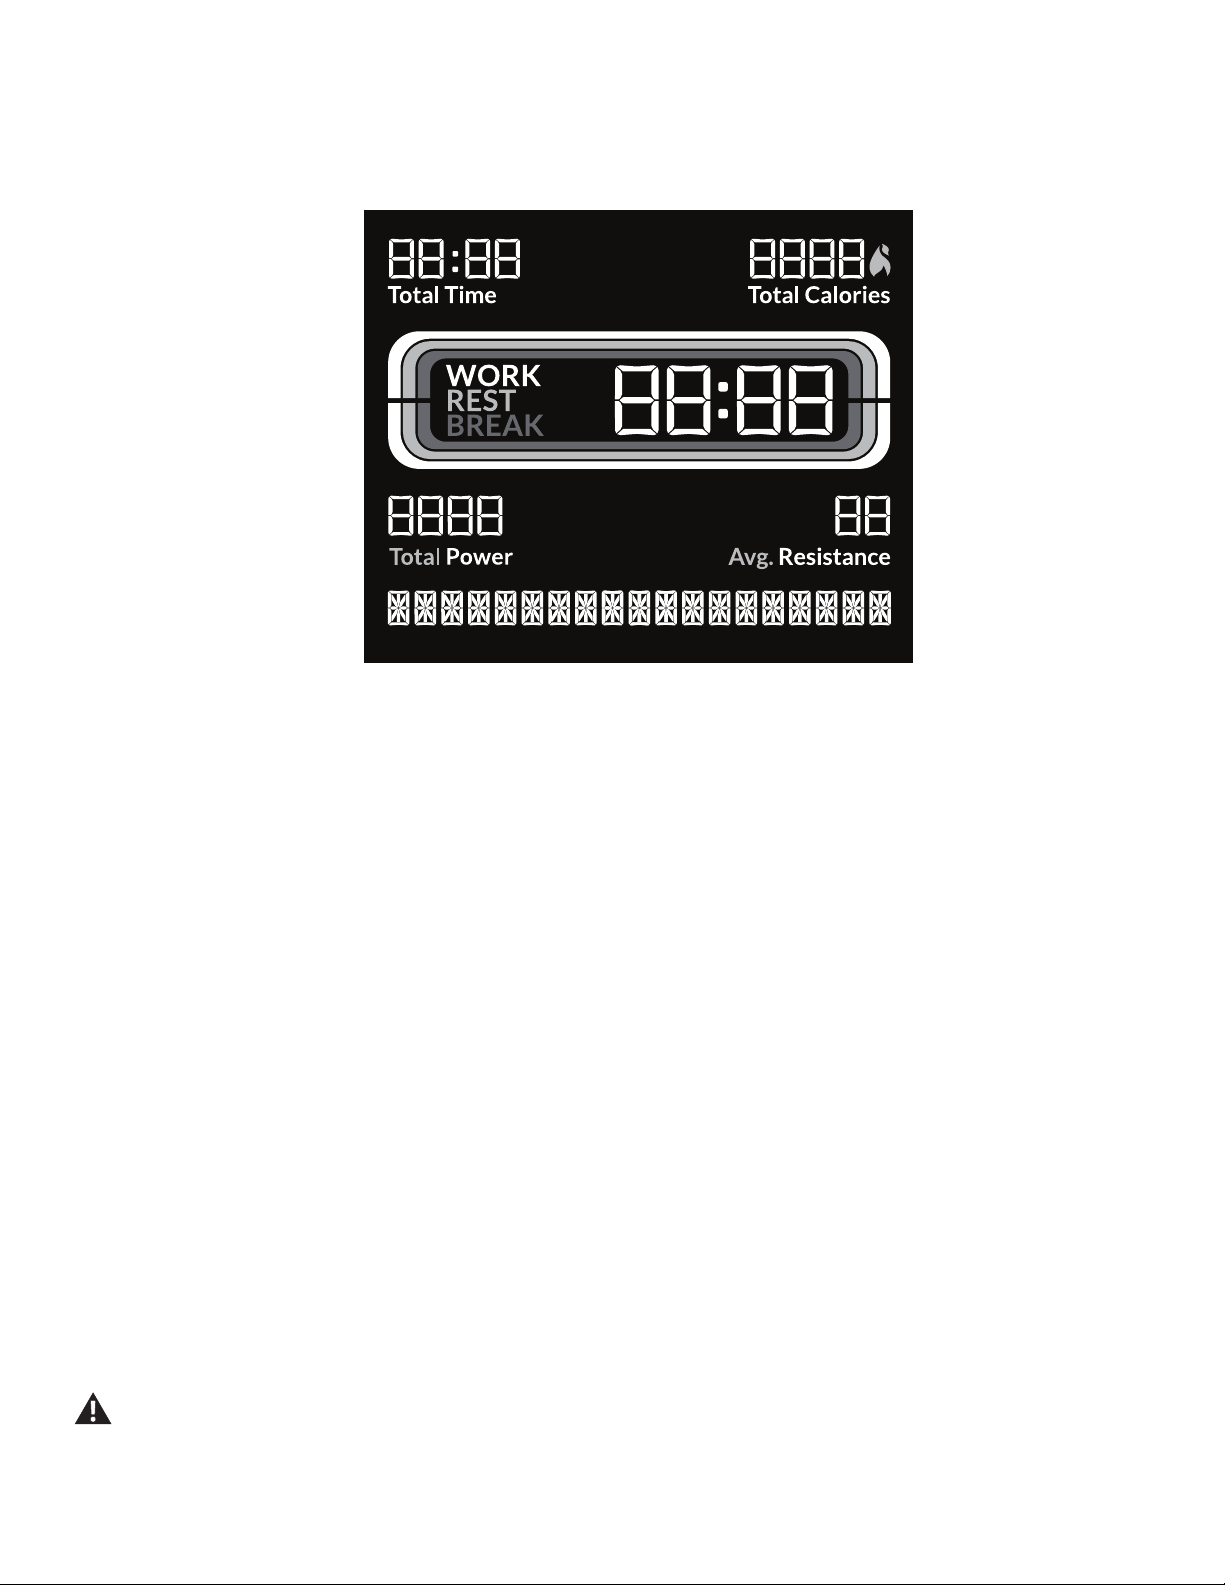
35
Exercise segment
Each segment on the Console is a specic exercise for the Workout Program. Exercise segments with matching colors are the same exercise for
that Workout Program.
Total Time display
The Total Time display shows the length of time for the selected Workout Program. The maximum time is 99:59 minutes.
Total Calories display
The Total Calories display shows the estimated calories that have been burned during a workout. The maximum display is 9999.
Active Exercise Segment Timers:
Work display
The Work, or active, segment for each exercise counts down to the next segment.
Rest display
The Rest segment counts down to the next Work segment. During rest, review the stance, hand grips, and motion for the next exercise.
Break display
The Break, or recovery, segment is at the end of a Round during a SPRINT or CIRCUIT Workout Program.
Total Power display
The Total Power display shows the Power score for the selected User. The maximum display is 9999.
Resistance display
The Resistance display shows the current Resistance level (1-16). The higher the level, the more resistance is applied to the fan.
Heart Rate (if supplied)
The Heart Rate display shows the heart rate in beats per minute (BPM) supplied by a remote heart rate monitor. The Console will replace the name
of the Program with the Heart Rate value when one is detected for more than 30 seconds.
Consult a physician before you start an exercise program. Stop exercising if you feel pain or tightness in your chest, become short
of breath, or feel faint. Contact your doctor before you use the machine again. The heart rate displayed on the console is an
approximation and should be used for reference only.
Owner’s Manual
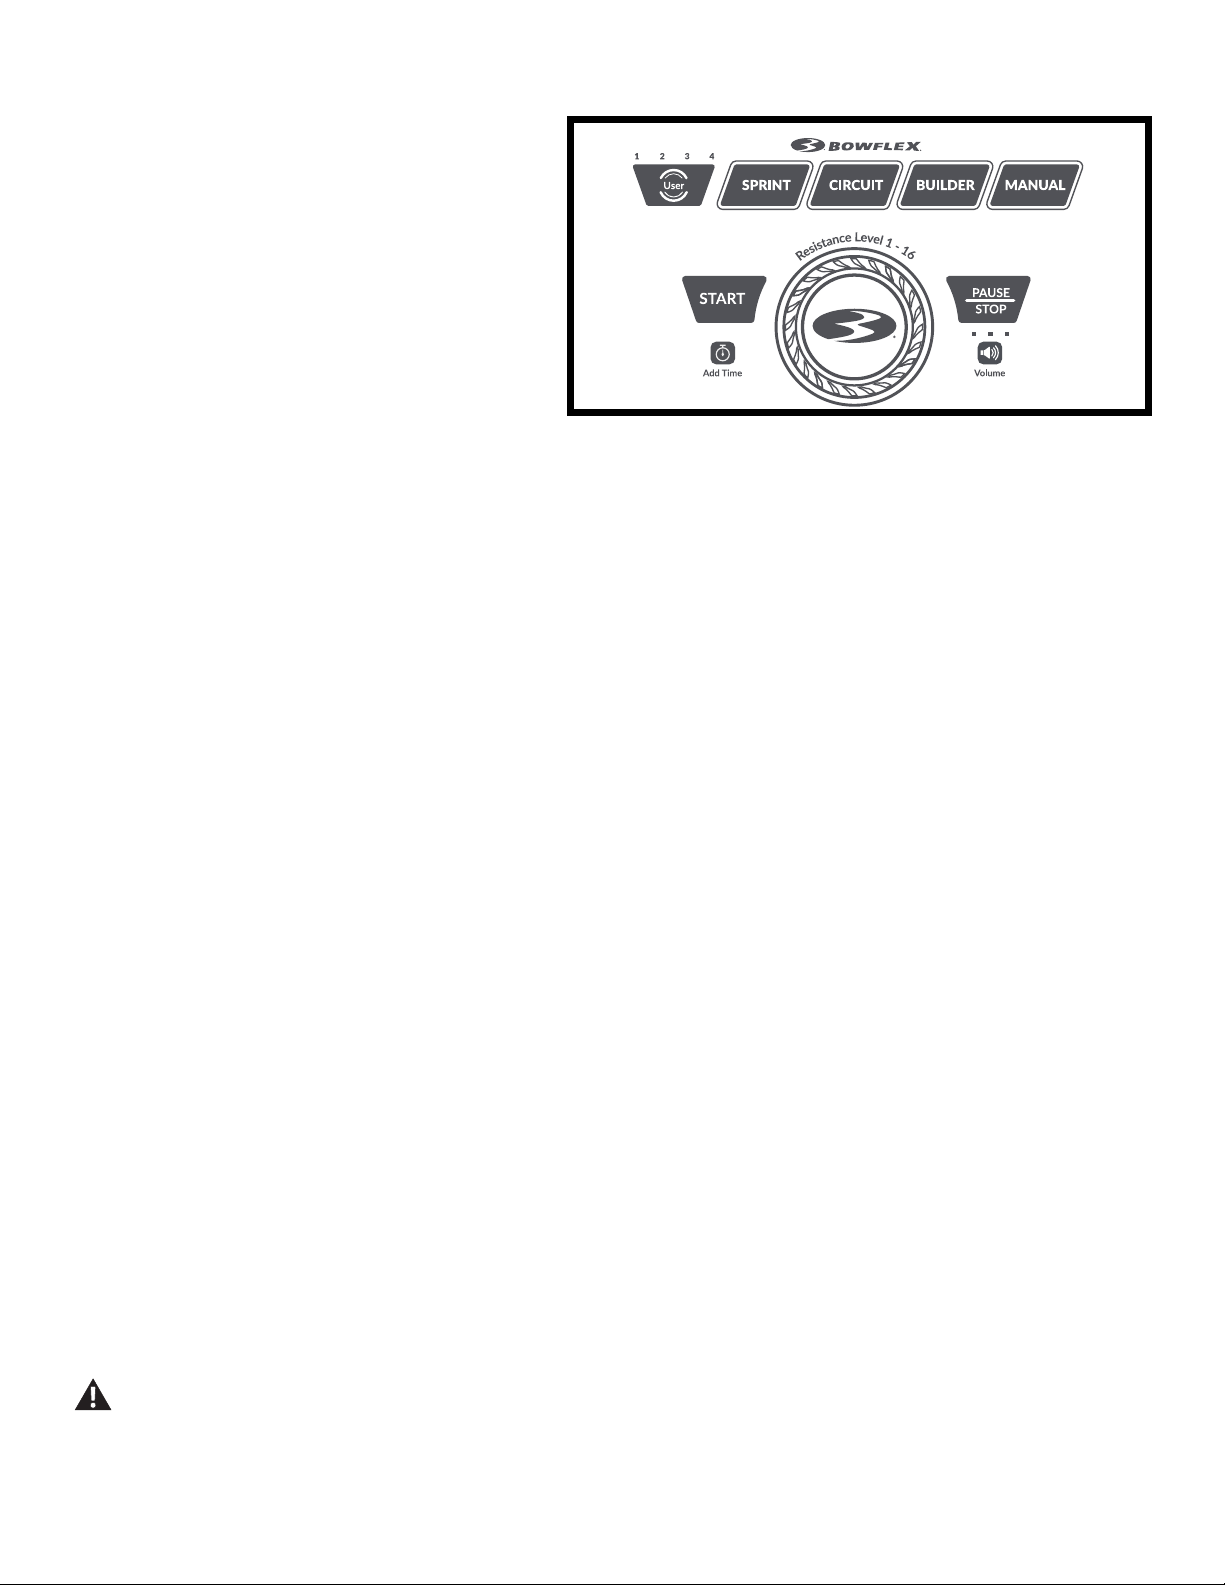
36
Keypad Functions
User button
Push to select the desired User Prole, push and hold for 3
seconds to edit the selected User Prole.
Active User display
The Active User display shows the selected User Prole. A User
Prole is always selected.
Note: For a more accurate calorie count, be sure to edit your
User Prole.
Workout Program buttons
Push the desired Workout Program button to select the program (SPRINT, CIRCUIT, BUILDER, or MANUAL). The illuminated light around the button
shows the currently selected program. A Workout Program is always selected.
START button
From the Power-Up/ Current Workout Program screen, begins the selected Workout Program or resumes a paused workout.
Resistance Level dial
Turn the dial to adjust a value (resistance level, units, weight, auto resistance, or erase workouts), and push it to accept a value. Clockwise will
increase a value, counter-clockwise will decrease a value.
PAUSE/STOP button
Pauses an active workout, ends a paused workout, or goes back to the previous screen.
Add Time button
Increases the time by adding an additional Round to the workout. The length of time added depends on the Workout Program (SPRINT: 4:50 min-
utes, CIRCUIT: 5:25 minutes, BUILDER: 4:30 minutes).
Note: The Add Time button is disabled for MANUAL workouts.
Volume button and indicator lights
The Volume button sets the sound level of the Console, and the indicator lights show the current setting; low (1 LED), medium (2 LEDs), high (3
LEDs), or off (no LEDs).
Training Guide
The Training Guide coaches the user through the three core Workout Programs, and contains all the exercises available with the Bowex™ HVT™
machine. Each of the Workout Programs have been designed to take full advantage of the Bowex™ HVT™ machine.
The Training Guide presents each exercise with the specic stance, pulley, grip, and motion to engage the intended muscle group in a certain orien-
tation. Since each Workout Program has a specic focus, the order of exercises performed is important. Perform the exercises in the order recom-
mended by the Workout Program. Follow along with the Training Guide for the descriptions, hints and photographs of each exercise.
Place the Training Guide on the media shelf to be an easy reference during a workout. Use the Workout Program tabs to quickly locate the start of
the program. The order and color of the Exercise segments on the Console match the exercises in the Guide.
Note: If desired, a smart device with the Bowex™ HVT™ App can be used in place of the Training Guide. Refer to the “Bowex™ HVT™
Software App” section on how to use the Software App with your smart device.
Exercise on this machine requires coordination and balance. Be sure to anticipate that changes to resistance level can occur
during workouts, and be attentive in order to avoid loss of balance and possible injury. Grab onto the Static Handlebars to stabilize
yourself at any moment.
Owner’s Manual
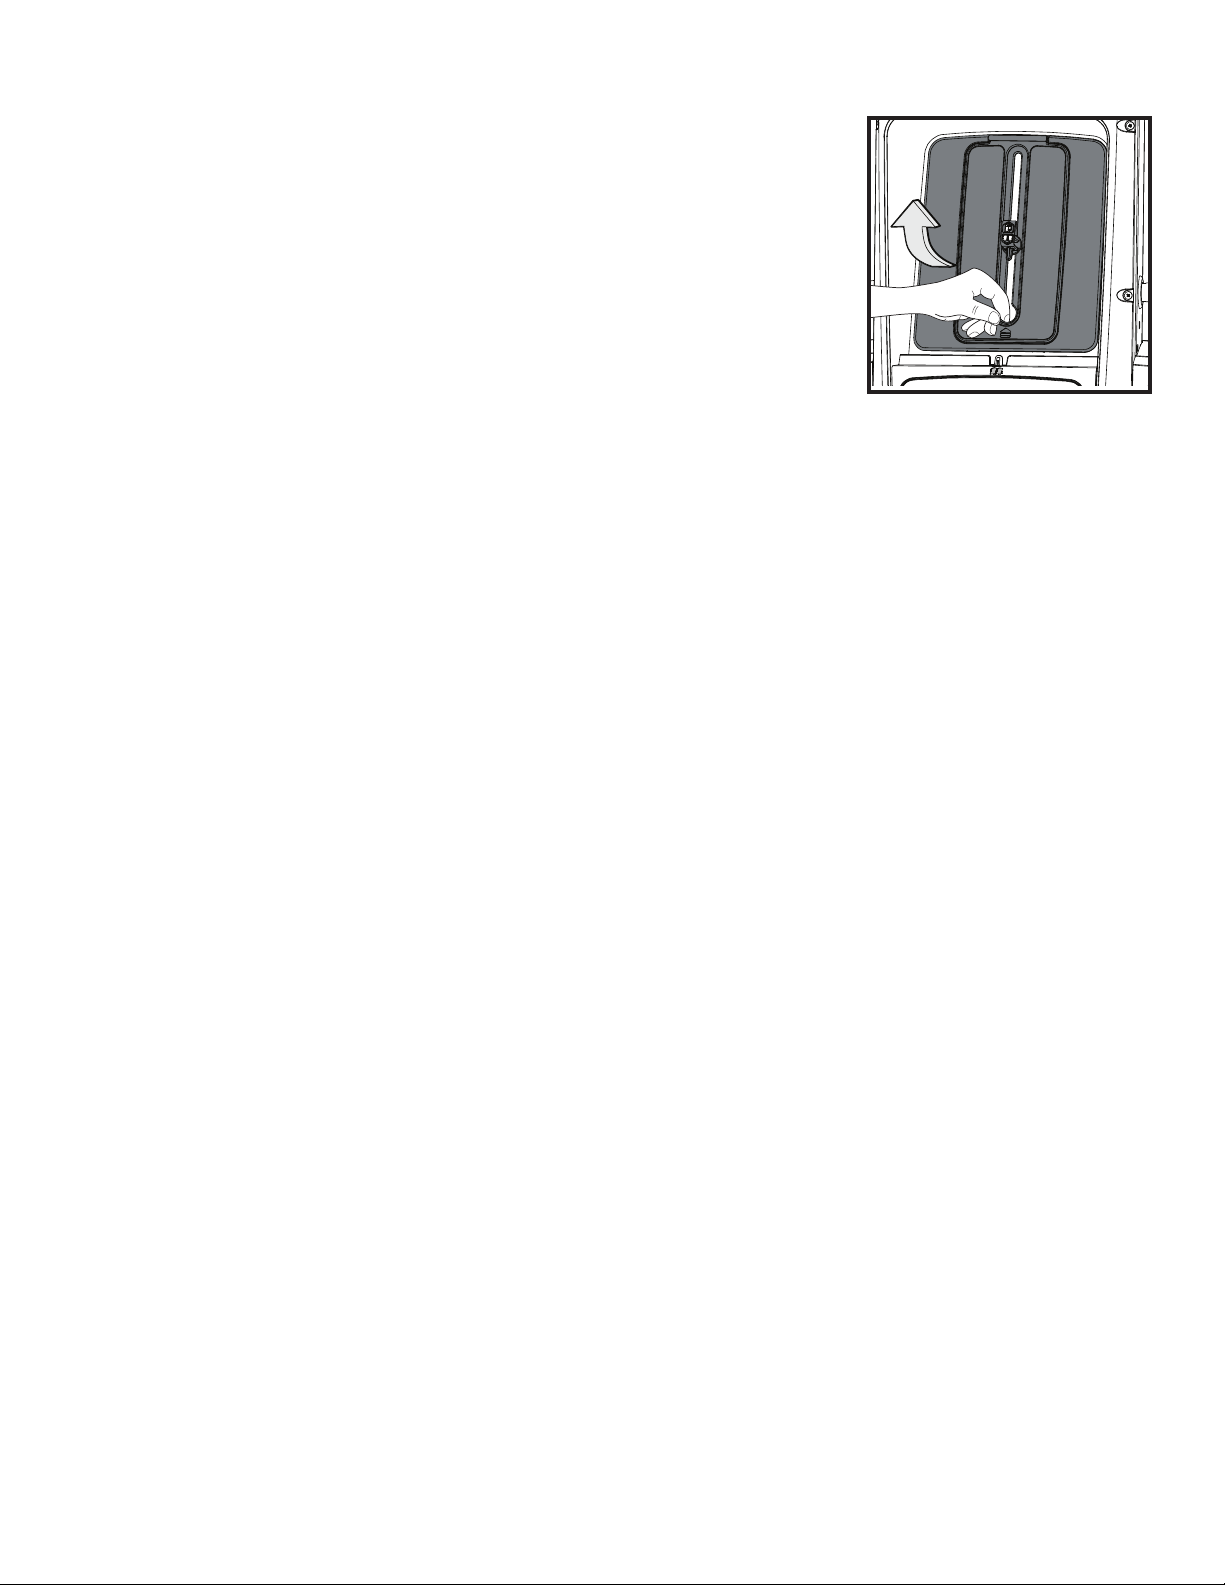
37
Accessory Storage Area behind Media Shelf
When the Bowex™ HVT™ machine is not in use, place the Training Guide inside the Accessory Storage
Area. The Accessory Storage Area is within the Upper Shroud behind the Media Shelf. With nothing on the
Media Shelf, lift and pull outward the Media Shelf backing.
The clasp can be rotated to hold the Training Guide by inserting it into the spiral binding, or rotate and adjust
to the height of the device you have on the Media Shelf.
Connectivity on your fitness machine
This tness machine is equipped with Bluetooth
®
connectivity and can wirelessly connect with the
“Bowex™ HVT™” Software Fitness App on supported iOS and Android™ devices. When connected with
the Software App, the Bluetooth
®
icon will activate. If the icon light is not on, then the tness machine is not connected to the device.
The “Bowflex™ HVT™” Software App
The “Bowex™ HVT™” Software App connects with your tness machine to provide the sequence of exercises that make each of the workout pro-
grams. Each exercise is presented with hints, descriptions, and video demonstrations. The Software App tracks the total time, calories burned, power
score, resistance, and heart rate (if supplied). Plus, it automatically posts your workout data to MyFitnessPal
®
to make hitting your tness goal easier
than ever! Track your results and share with friends and family. Once you understand how the Bowex™ HVT™ machine works with your body, you
can create your own workout program on the Software App.
1. Download the free Software App, named “Bowex™ HVT™” Software App. The Software App is available on the App Store and Google Play™.
2. Follow the instructions on the Software App to pair your device to your exercise machine.
Frequently asked questions and installation videos for the Software App can be found online at www.Bowex.com/help.
Updates to Your Machine using the “Bowflex Toolbox™” App
This tness machine is equipped with Bluetooth
®
connectivity and can be wirelessly updated with the “Bowex Toolbox™” App. Once the App is
installed on your device, the App will inform you of when there is an update to your machine.
1. Download the free App, named Bowex Toolbox™. The App is available on the App Store and Google Play™.
Note: For a complete list of supported devices, review the App on the App Store or Google Play™.
2. Install the App.
When notied that there is an update to your tness machine, follow the prompts on the App. Place the device that is running the App on the Media
Tray. The App will update the software on the machine with the latest version. Do not remove your device from the Media Tray until the update is
complete.
USB Charging
If a USB Device is attached to the USB Port, the Port will attempt to charge the Device. The power supplied from the USB Port may not be enough to
operate the Device and charge it at the same time.
Remote Heart Rate Monitor
Monitoring your Heart Rate is one of the best procedures to control the intensity of your exercise. The Console reads the telemetry HR signals from
the Heart Rate Chest Strap Transmitter that operates in the 4.5kHz - 5.5kHz range.
Note: The heart rate chest strap must be an uncoded heart rate strap from Polar Electro or an uncoded POLAR
®
compatible model. (Coded
Owner’s Manual
38
POLAR
®
heart rate straps such as POLAR
®
OwnCode
®
chest straps will not work with this equipment.)
If you have a pacemaker or other implanted electronic device, consult your doctor before using a wireless chest strap or other
telemetric heart rate monitor.
Heart Rate Calculations
Your maximum heart rate usually decreases from 220 Beats Per Minute (BPM) in childhood to approximately 160 BPM by age 60. This fall in heart
rate is usually linear, decreasing by approximately one BPM for each year. There is no indication that training inuences the decrease in maximum
heart rate. Individuals of the same age could have different maximum heart rates. It is more accurate to nd this value by getting a stress test than by
using an age related formula.
Your at rest heart rate is inuenced by endurance training. The typical adult has an at rest heart rate of approximately 72 BPM, where as highly
trained runners may have readings of 40 BPM or lower.
The Heart Rate table is an estimate of what Heart Rate Zone (HRZ) is effective to burn fat and improve your cardiovascular system. Physical condi-
tions vary, therefore your individual HRZ could be several beats higher or lower than what is shown.
The most efcient procedure to burn fat during exercise is to start at a slow pace and gradually increase your intensity until your heart rate reaches
between 60 – 85% of your maximum heart rate. Continue at that pace, keeping your heart rate in that target zone for over 20 minutes. The longer
you maintain your target heart rate, the more fat your body will burn.
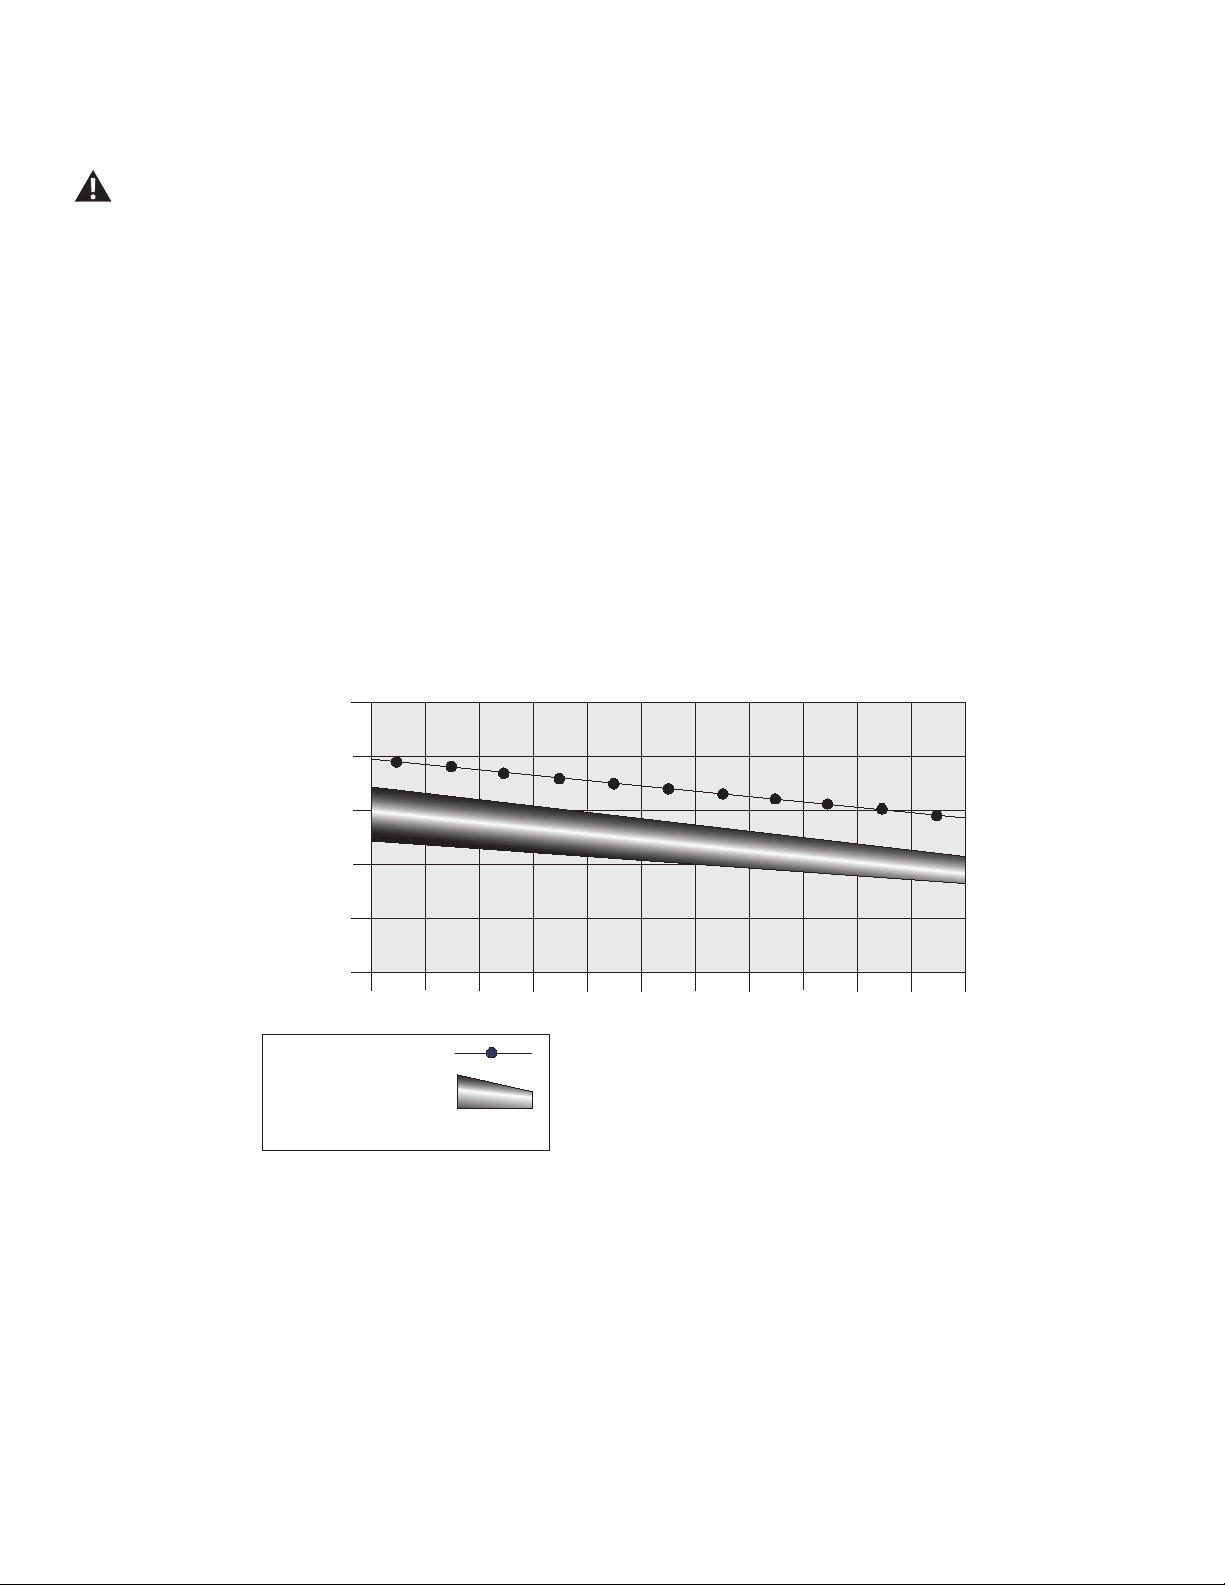
Fat-Burning Target Heart Rate
20-24
FAT-BURNING TARGET HEART RATE
Heart Rate BPM (beats per minute)
Age
25-29
0
50
100
150
200
250
30-34 35-39 40-44 45-49 50-54 55-59 60-64 65-69 70+
196
191
186
181
176
171
166
161
156
151
146
167
162
158
154
150
145
141
137
133
128
126
Maximum Heart Rate
Target Heart Rate Zone
(keep within this range
for optimum fat-burning)
118
115
112
109
106
103
100
97
94
91
88
The graph is a brief guideline, describing the generally suggested target heart rates based on age. As noted above, your optimal target rate may be
higher or lower. Consult your physician for your individual target heart rate zone.
Note: As with all exercises and tness regimens, always use your best judgment when you increase your exercise time or intensity.

Owner’s Manual
39
How Often Should You Exercise
Consult a physician before you start an exercise program. Stop exercising if you feel pain or tightness in your chest, become short
of breath, or feel faint. Contact your doctor before you use the machine again. Use the values calculated or measured by the
machine’s computer for reference purposes only. The heart rate displayed on the console is an approximation and should be used
for reference only.
It is highly recommended to warm up before any workout with the Bowex™ HVT™ machine.
• 3 times a week for about 20 minutes each day.
• Schedule workouts in advance and try to follow the schedule.
Note: If you are new to exercise (or returning to a regular exercise program), and you are unable to comfortably complete 20 minutes of con-
tinuous exercise at one time, select a few workouts and do them for 5 – 10 minutes. Gradually increase your workout time until you can
comfortably complete the total time for one of the Workout Programs.
Apparel
It is important to wear appropriate, safe and comfortable footwear and clothing when using the Bowex™ HVT™ machine, including:
• Rubber-soled athletic walking or running shoes.
• Exercise clothing that allows you to move freely, and keep comfortably cool.
• Athletic support that provides stability and comfort.
Do not wear loose clothing or jewelry. This machine contains moving parts. Do not put fingers, feet, or other objects into moving
parts of the exercise equipment.
Always wear rubber soled athletic shoes when you use this machine. Do not use the machine with bare feet or only wearing socks.
Intensity of Workout
To increase the intensity of your workout:
• Add another Round to the workout by pushing the Add Time button.
• Increase the resistance level while keeping the number of repetitions constant.
Note: If Save Resistance is active, the Console will automatically adjust the resistance to the ending resistance level the last time that exercise
was done.
• Push yourself to increase the number of repetitions during the Work segment of each exercise.
An Interval Training workout involves adjusting your workout intensity for specic lengths of time to raise and lower your breathing rate, heart rate
and calorie burn. This form of workout allows you to burn more calories than a standard workout in a shorter period of time.
The Bowex™ HVT™ machine combines “Work” and “Rest” segments to create an Interval workout. During a “Work” segment, push yourself to a
level of high calorie burn and maximum repetitions. Then during the “Rest” segment, allow yourself to relax and prepare for the next “Work” segment.
These extreme changes in intensity, along with pushing your body, is where the maximum benets are gained from Interval Training workouts.
Interval Training workouts provide variety, maximize calorie burn and improve tness.
Operations

Owner’s Manual
40
Getting Started
1. Place the Bowex™ HVT™ machine in your workout area. Be sure there is an adequate height clearance to safely perform the exercises. This
required clearance includes the full extent of your reach above your head.
Place the machine on a clean, hard, level surface, free from unwanted material or other objects that may hamper your ability to
move freely. A rubber mat can be used below the machine to prevent the release of static electricity and protect your ooring.
The machine can be moved by one or more persons. Make sure that your own physical strength is capable of safely moving the
machine.
2. Examine for any objects in the workout area and in the Resistance Fan. Be sure it is clear.
Be sure there is nothing in the workout area or in the Resistance Fan before moving anything on the machine. Do not put any
objects into an opening of the machine.
3. Connect the AC power adapter to the machine and into a grounded AC Wall Outlet.
4. If you use the Heart Rate Monitor, follow the Chest Strap directions.
5. Carefully mount the platform. Use the Static Handlebars to steady yourself at any time.
Care should be used when mounting or dismounting the platform.
Always wear rubber soled athletic shoes when you use this machine. Do not use the machine with bare feet or only wearing socks.
Be aware that the Hand Grips, Ropes, and the Resistance Fan are connected and when either of these parts move the other does as
well.
Be sure to stay in the safe workout area as marked on the Platform during a workout. Keep at least one foot on the Platform during
a workout. Failure to do so could lead to equipment instability and harm to the user.
6. Turn the Resistance Dial to adjust the resistance level so you can complete the Workout Program without changing it. During the initial workout
focus on proper form, motion, and order of exercises.
Note: When starting a full body workout program, consider reducing the resistance level for upper body exercises. If this is the first workout,
the current value for resistance will be the default value for the next exercise.
7. If you plan to use a smart device with your workout, open the software app and connect to the Bowex™ HVT™ machine. The Bluetooth
®
light
and icon will activate when connected.
Once connected, select the “WORKOUT NOW” option in the software app.
8. Push the User button to select the desired User Prole.
If using the software app, select the user on the smart device after selecting it on the Console.
9. Push and hold the User button to edit the User Prole.
10. The Console will display the Units value. Turn the Resistance Dial to adjust the value, and push the Resistance Dial to accept the value.
11. The Console will display the Weight value for the User Prole. Turn the Resistance Dial to adjust the value, and push the Resistance Dial to
accept the value.
12. Push the PAUSE/STOP button to exit the Edit User mode.
13. Push the SPRINT workout program button to select it.
If using the software app, select the SPRINT workout program after selecting it on the Console.
14. With the Training Guide on the media shelf, open it to the SPRINT workout program.
15. When ready to begin the SPRINT workout, push the START button.
If using the software app, the workout will automatically start on the connected smart device.
It is highly recommended to warm up before any workout with the Bowex™ HVT™ machine.
Do not release the Hand Grips until the Hand Grip Stops are at rest and the ropes are fully retracted. Releasing the Hand Grips
when not at rest may cause damage to the machine or injury to the user or bystanders.

Owner’s Manual
41
The SPRINT workout has 4 Rounds and a total time of 18:20.
Note: Be sure to place the Hand Grips back to their starting orientation without twisting them. If twists develop on the ropes, they may not
fully retract into the machine.
Power-Up Mode ( Start-Up screen )
The Console will display the Power-Up / last selected Workout Program screen when it is plugged into a power source, any button is pushed, or if it
receives a signal from the RPM (Revolutions per Minute) sensor on the Resistance Fan. The SPRINT Workout Program is the default program.
Auto Shut-Off (Sleep Mode)
From the Power-Up mode screen, if the Console does not receive any input in approximately 5 minutes, it will automatically shut off. The LCD
display is off while in Sleep Mode.
Note: The Console does not have an On/Off switch.
Edit a User Prole
For a more accurate calorie count, a User Prole should be customized to the User.
1. Push User button to select your User Prole (User 1- 4).
2. Push and hold the User button for 3 seconds to begin the Edit User mode.
Note: To exit the Edit User mode, push the PAUSE/STOP button. The current values will be saved to the User Profile.
3. The Console will display the LBS OR KG prompt with the default units value ( “LBS” ). Turn the Resistance Dial to adjust the value, and push
the Resistance Dial to set the value.
4. The Console will display the WEIGHT prompt with the default weight value ( 180 LBS / 82 KG ). Turn the Resistance Dial to adjust the value,
and push the Resistance Dial to set the value.
Maximum user weight limit: 300 lbs. (136 kg). Do not use if you are over this weight.
5. The Console will display the SAVE RESISTANCE prompt with the default value ( “ON” ). With save resistance on, the Console will automatically
adjust the resistance to the ending resistance level the last time that exercise was done.
Note: If this is the first workout, the current value for resistance will be the default value for the next exercise.
If necessary, turn the Resistance Dial to adjust the value. Push the Resistance Dial to accept the value.
6. The Console will display the ERASE WORKOUTS prompt with the default value ( “NO” ). Push the Resistance Dial to accept the value.
If necessary, turn the Resistance Dial to adjust the value to “YES” and push the Resistance Dial. The Console will now conrm if the User wants
to erase the workouts. Turn the Resistance Dial to change the value to “YES”, and push the Resistance Dial. The workouts for this User have
been erased.
7. The User Prole review is complete, and the Console will display the Power-Up / last selected Workout Program screen.
Workout Programs
The Bowex™ HVT™ machine has four Workout Programs; SPRINT, CIRCUIT, BUILDER, and MANUAL. Each Workout Program guides the user
through a unique sequence of exercises, quantity of Rounds, and times for each workout segment (Work, Rest, and Break).
Each Exercise Segment is an exercise for that the Workout Program. Using the Training Guide, nd the selected Workout Program and then the
matching exercise using the color of the Exercise Segment. As the Exercise Segment shifts colors, use the Training Guide to perform the next
workout.
Owner’s Manual
42
The Software App follows along with the Console, showing
the exercise and all the workout information to perform it. The
Software App automatically shifts to the next exercise in the
program.
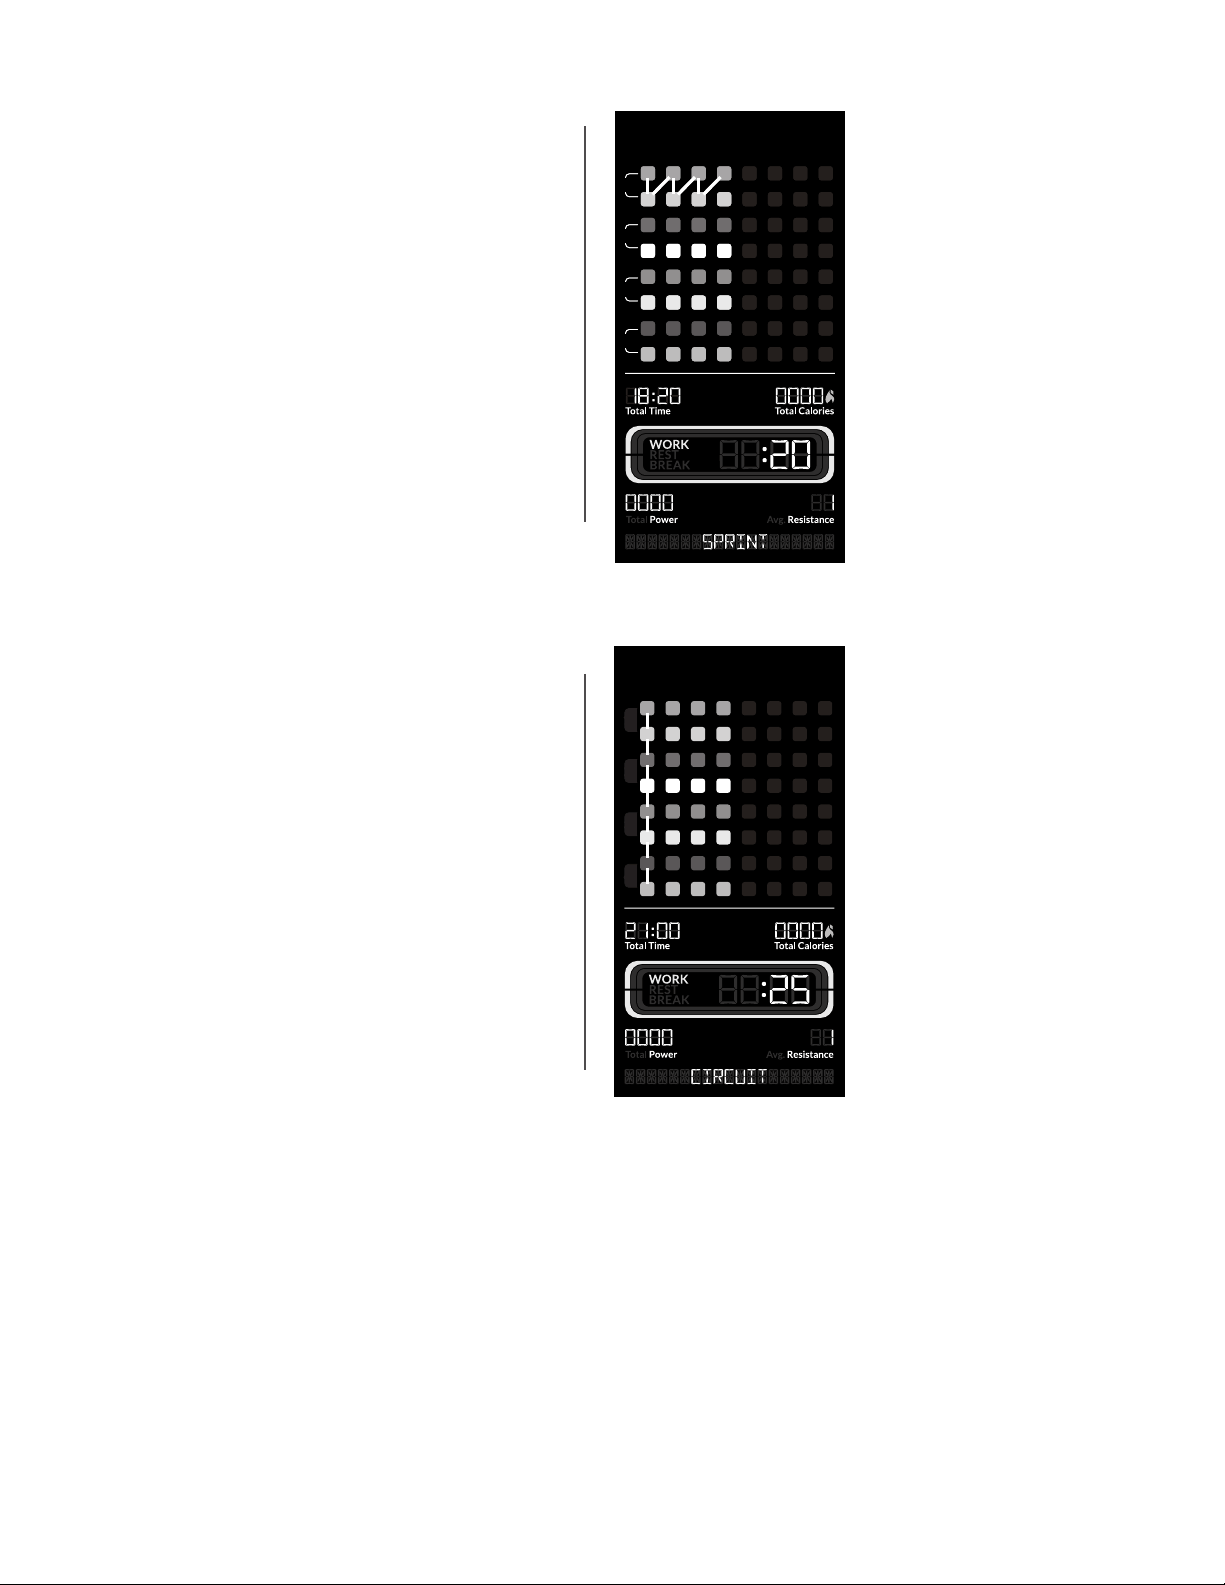
SPRINT program
( WORK: 20 seconds, REST: 10 seconds, BREAK: 60 seconds,
Total Time: 18:20 )
The SPRINT program has 4 Rounds, with each Round containing
two exercises. The program switches between the two exercises
until the Round is completed. A Break for 60 seconds is provided
at the end of the Round. Then the rst exercise of the next
Round starts, repeating the routine.
Each exercise is performed for 20 seconds (Work) followed by 10 seconds of Rest.
CIRCUIT program
( Work: 25 seconds, Rest: 15 seconds, Break: 20 seconds, Total
Time: 21:20 )
The CIRCUIT program has 4 Rounds, with each Round containing
all eight exercises. The program moves through each exercise until
the Round is completed, and a Break for 20 seconds is provided.
Then the next Round starts, and moves through all of the exercises
again.
Each exercise is performed for 25 seconds (Work) followed by 15
seconds of Rest.
R
e
s
i
s
t
a
n
c
e
L
e
v
e
l
1
-
1
6
Volume
Start
Start
Pause
Stop
1
2
User
3
4
Sprint Circuit Builder
Manual
Add Time
ROUND
1
2
3
4
1 2 3 4 5 6 7 8
ROUND
1
2
3
4
1 2 3 4 5 6 7 8
SPRINT Circuit Builder Manual
ROUND
1
2
3
4
1 2 3 4 5 6 7 8
ROUND
1
2
3
4
1 2 3 4 5 6 7 8
ROUND
1
2
3
4
1 2 3 4 5 6 7 8
ROUND
1
2
3
4
1 2 3 4 5 6 7 8
1
2
3
4
1 2 3 4 5 6 7 8
1. Speed squat
2. Chest press
3. Squat jump
4. Bent over row
5. Reverse lunge straight arm pulldown
6. Split leg alternating bicep curl
7. Tricep pushdown
8. Squat with overhead press
R
e
s
i
s
t
a
n
c
e
L
e
v
e
l
1
-
1
6
Volume
Start
Start
Pause
Stop
1
2
User
3
4
Sprint Circuit Builder
Manual
Add Time
ROUND
1
2
3
4
1 2 3 4 5 6 7 8
ROUND
1
2
3
4
1 2 3 4 5 6 7 8
SPRINT Circuit Builder Manual
ROUND
1
2
3
4
1 2 3 4 5 6 7 8
ROUND
1
2
3
4
1 2 3 4 5 6 7 8
ROUND
1
2
3
4
1 2 3 4 5 6 7 8
ROUND
1
2
3
4
1 2 3 4 5 6 7 8
1
2
3
4
1 2 3 4 5 6 7 8
1. Tricep pushdown
2. Forward lunge chest y
3. Crossover reverse y
4. Split jump
5. Lunge bicep curl
6. Lateral lunge high to low chop
7. Deadlift
8. Arm shoulder press split stance
Owner’s Manual
43
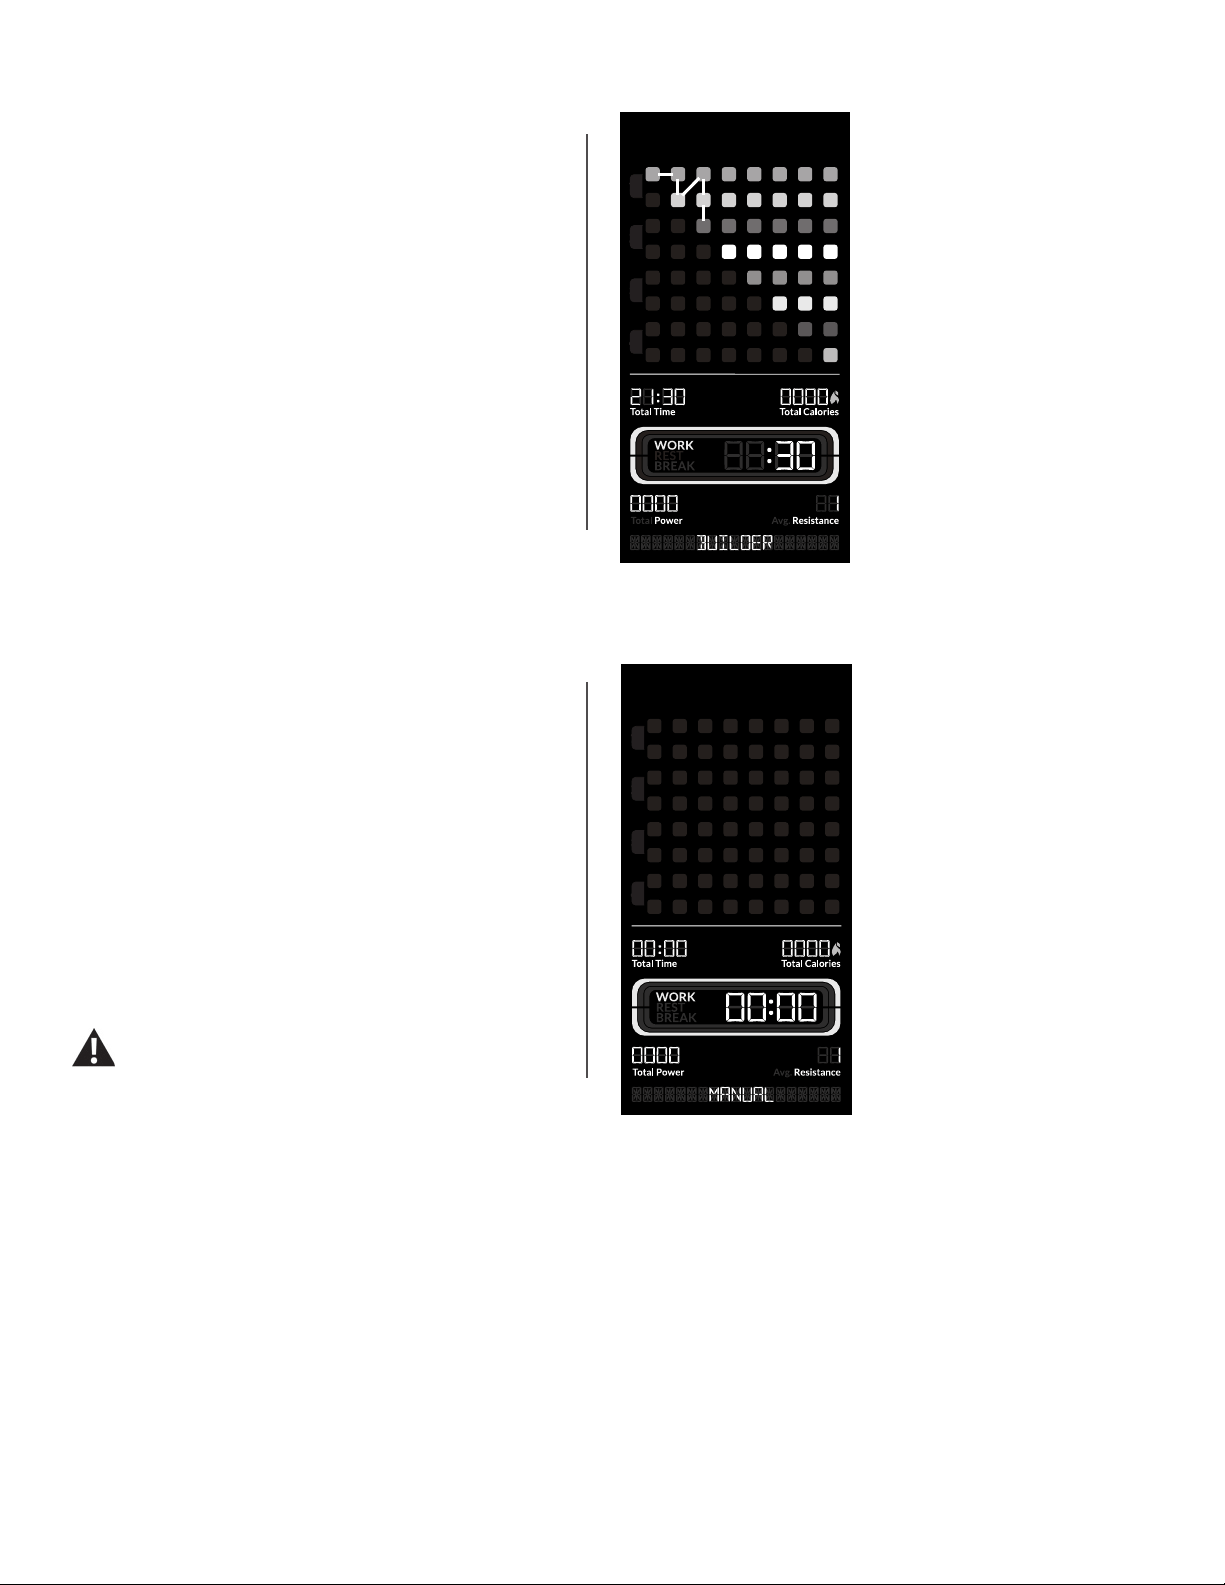
BUILDER program
( Work: 30 seconds, Rest: 0 seconds, Break: 30 seconds, Total
Time: 21:30 )
The BUILDER program has 8 Rounds, with each Round having
an additional exercise. Round 8 contains all eight exercises. The
program moves through each exercise for that Round, and then
provides a Break for 30 seconds. Then the next Round starts with
an additional exercise.
Each exercise is performed for 30 seconds (Work).
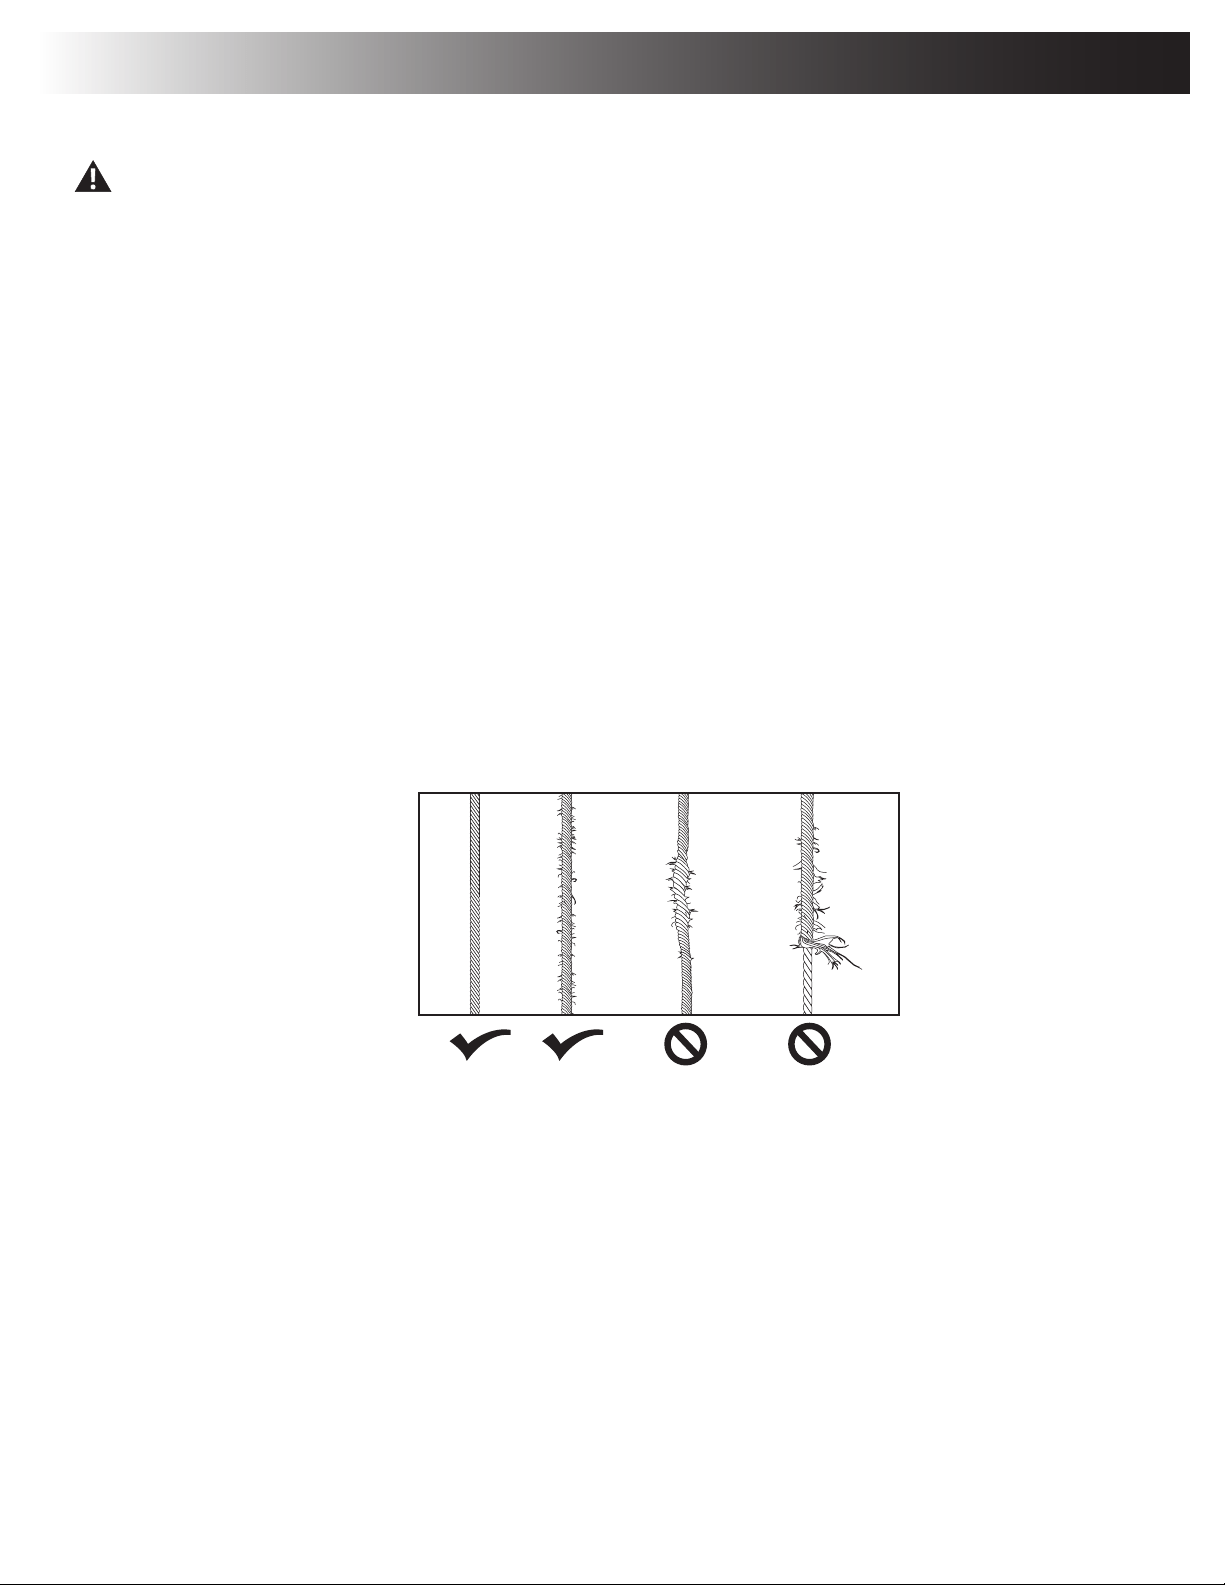
MANUAL program
The MANUAL workout program is an open-ended workout that
counts up the total time, total Work time, and total power. A MANUAL
program is completely dened by the user.
During a MANUAL program, the Work Active Segment counts up the
total time that the fan is moving. When the resistance fan stops, the
time count pauses, while the total time of the workout continues.
Note: Because of the open-ended design of the MANUAL workout,
the Add Time button is disabled. The maximum time is 99:59 minutes.
All exercises in this manual are based on the calibrated
resistance and capacity levels of this machine. Only
exercises included in this manual or in materials
authorized and supplied by Bowex are recommended
for operation with this machine.
R
e
s
i
s
t
a
n
c
e
L
e
v
e
l
1
-
1
6
Volume
Start
Start
Pause
Stop
1
2
User
3
4
Sprint Circuit Builder
Manual
Add Time
ROUND
1
2
3
4
1 2 3 4 5 6 7 8
ROUND
1
2
3
4
1 2 3 4 5 6 7 8
SPRINT Circuit Builder Manual
ROUND
1
2
3
4
1 2 3 4 5 6 7 8
ROUND
1
2
3
4
1 2 3 4 5 6 7 8
ROUND
1
2
3
4
1 2 3 4 5 6 7 8
ROUND
1
2
3
4
1 2 3 4 5 6 7 8
1
2
3
4
1 2 3 4 5 6 7 8
1. Speed squat
2. Chest y
3. Reverse lunge low row
4. Bicep curl
5. Abdominal chop high to low
6. Crossover reverse y
7. Combo tricep extension bicep curl
8. Forward lunge chest press

Owner’s Manual
44
To start a Workout Program:
1. Carefully step up onto the platform.
2. Place the Training Guide on the Media Shelf opened to the rst exercise of the Workout Program, or your synced smart device with the Soft-
ware App open.
3. Push the desired Workout Program; SPRINT, CIRCUIT, BUILDER, or MANUAL.
4. Push the START button to begin the selected Workout Program.
5. Grasp the appropriate Handle (Upper, Middle, or Lower Handles) and begin the first exercise of the Workout Program after the 3-2-1 countdown.
During the Work segment, safely do as many repetitions while following form and stance of the exercise. Be sure to alternate sides if the exercise
requires it.
6. At the end of the Work segment, the next segment begins. Depending on the Workout Program, after the initial Work segment will be a Rest
segment or another Work segment.
When a Rest or Break segment starts, safely lower and release the Hand Grips. Relax and prepare for the next exercise. Stretch if necessary.
When there are 3 seconds remaining in the Rest or Break segment, the next Work segment will flash allowing you to prepare for the next exercise.
Do not release the Hand Grips until the Hand Grip Stops are at rest and the ropes are fully retracted. Releasing the Hand Grips
when not at rest may cause damage to the machine or injury to the user or bystanders.
Note: The initial Work segment for MANUAL will not end until the fan stops revolving or the total time reaches 99:59 minutes. The Power value is
set to zero after each exercise segment. At the end of the workout, the Total Power value is displayed.
The Console shows the segments that need to be performed, hiding the completed segments. The Power value is reset to zero after each
exercise segment. At the end of the workout, the Total Power value is displayed.
Note: For every 100 calories burned during a workout, the Console will congratulate with an audible sound and a notification. When 30 seconds
remain in the workout, the Console will notify the user by displaying “30 SECONDS LEFT”.
Paused / Results Mode
To Pause a workout:
1. Push the PAUSE/STOP button to pause your workout.
When paused, the Console display will show “WORKOUT PAUSED”.
2. To continue your workout, push START or resume current exercise.
To end a paused workout, push the PAUSE/STOP button. The Console will display “WORKOUT COMPLETE”, save the workout, and then
display the workout result values (Total Time, Total Calories, Total Power, Average Resistance Level, and Average Heart Rate if supplied). The
completed exercise segments are displayed on the Console.
A SPRINT, CIRCUIT, or BUILDER workout will end when the last exercise is completed.
Note: If there is no input to the Console for 5 minutes, it automatically goes to the Power-Up / last selected Workout Program screen. If the
Console does not receive any further input, it will automatically shut off in approximately 5 minutes.
Add Time to a Workout Program
Push the Add Time button to add an additional Round to the Workout Program The amount of time added depends on the Workout Program
(SPRINT: 4:50 minutes, CIRCUIT: 5:25 minutes, BUILDER: 4:30 minutes), and can be done before or during a workout. When added during a work-
out, the adjusted Total Time of the workout is displayed for a few seconds, and then switches to the current workout time.

Owner’s Manual
45
Note: Because of the open-ended design of the MANUAL workout, the Add Time button is disabled.
Changing Resistance Levels
Turn the Resistance Dial to adjust the additional resistance applied to the fan at any time.
The Console is also equipped with a Save Resistance feature, which remembers the resistance level at the end of each exercise. When that exer-
cise occurs again, the Console automatically adjusts the resistance to the remembered resistance level. Save Resistance can be deactivated for
each User through the “Edit a User Prole” options. If the resistance level is manually adjusted during a workout, Save Resistance is deactivated for
that exercise segment.
Note: When starting a full body workout program, consider reducing the Resistance Level for upper body exercises.
The resistance settings supplied by the resistance fan can vary based on environmental and usage patterns and other factors. Supplied
resistance may degrade over time and after extensive usage.
Total Power score
The Total Power score is a unit-less point system that that dynamically represents a User’s performance on the Bowex™ HVT™ machine. The Total
Power score is made up of:
• SPEED – The speed at which you pull the cable.
• RESISTANCE – The amount of resistance applied to each exercise.
• RANGE OF MOTION – A combination of your body weight, body movement, and how far you pull the cable.
During a workout, a Total Power score is provided for each exercise. At the end of the workout, a Total Power score for the entire workout is also
displayed. The Total Power score may not change signicantly for a User that performs an entire workout at the same level of intensity. However,
if that same User were to increase resistance and/or speed for a given exercise, their score for that exercise as well as their overall score would
increase. Since the score is based on speed, resistance, and range of motion, even a small score increase shows a signicant shift in the User’s
tness level.
By tracking these three factors the Bowex™ HVT™ machine can provide instant and motivating feedback for Users as well as the ability to track
your improvement over time. As you increase your work rate and intensity, your Total Power score will also increase.
Note: For a more accurate score, be sure to enter your weight value for the user profile. A Total Power score should only be compared to
your previous scores and not to other User Profiles.

Owner’s Manual
46
Machine Settings Mode
The Machine Settings Mode lets you view maintenance statistics (Total Hours and Software Version) or fully reset the Console.
1. Push and hold down the ADD TIME and PAUSE/STOP buttons for 3 seconds while in the Power-Up Mode to go into the Machine Settings
Mode.
Note: Push PAUSE/STOP to exit the Machine Settings Mode and return to the Power-Up Mode screen.
2. The Console display shows the TOTAL HOURS the machine has operated.
3. Push the Resistance Dial for the next prompt.
4. The Console display shows the Firmware Version prompt.
5. Push the Resistance Dial for the next prompt.
6. The Console display shows the BLE VERSION prompt.
7. Push the Resistance Dial for the next prompt.
8. The Console displays the UPGRADE BLE NO prompt. This option is for Service Technicians use only.
9. Push the Resistance Dial for the next prompt.
10. The Console displays the DISCONNECT BLE NO prompt.
Note: If you want to disconnect the Bluetooth
®
transmitter, turn the Resistance Dial to select the DISCONNECT BLE YES option, and push the
dial. The Console will exit the Machine Settings Mode and return to the Power-Up Mode screen.
11. Push the Resistance Dial for the next prompt.
12. The Console displays the UPGRADE SOUND NO option. This option is for Service Technicians use only.
13. Push the Resistance Dial for the next prompt.
14. The Console displays the RESET CONSOLE NO prompt.
Note: If you want to reset the Console to factory settings, turn the Resistance Dial to select the RESET CONSOLE YES option, and push the
dial. Turn the machine off when the Console displays the POWER CYCLE NOW prompt.
15. Push the PAUSE/STOP button to exit the Machine Settings Mode.
The Console will display the Power-Up Mode screen.
Owner’s Manual
47
Maintenance
Read all maintenance instructions fully before you start any repair work. In some conditions, an assistant is required to do the necessary tasks.
Equipment must be regularly examined for damage and repairs. The owner is responsible to make sure that regular maintenance is
done. Worn or damaged components must be repaired or replaced immediately. Only manufacturer supplied components can be
used to maintain and repair the equipment.
If at any time the Warning labels become loose, unreadable or dislodged, contact your local distributor for re-placement labels.
To reduce the risk of unsupervised use of the equipment, remove the AC Adapter from the wall outlet and the machine. Place the
AC Adapter in a secure location.
Daily: Before each use, examine the exercise machine for loose, broken, damaged, or worn parts. Do not use if
found in this condition. Repair or replace all parts at the rst sign of wear or damage. After each workout, use
a damp cloth to wipe your machine and Console free of sweat.
Note: Avoid excessive moisture on the Console.
Weekly: Inspect all pulleys and their connections making sure they are properly secured and attached, and show no
signs of visible wear or damage. Inspect all ropes to be sure they have not been twisted. Remove any twists
from the ropes. Wipe the machine to remove dust, dirt, or grime. Clean the platform and front of machine with
a damp cloth.
Note: Do not use petroleum based products.
Monthly
or after 20
hours:
Make sure all bolts and screws are tight. Tighten as necessary. Be sure to fully inspect the condition of all
ropes for wear. Repair or replace the ropes at the rst sign of wear or damage based on the images below.
Yearly: Remove the front and rear shrouds, and inspect the condition of all ropes, elastic cords, and moving parts
for wear within the Frame Assembly. Repair or replace the ropes and elastic cords at the rst sign of wear or
damage based on the images above. Replace moving parts as necessary. Wipe the exposed area within the
Frame Assembly to remove dust, dirt, or grime.
NOTICE: Do not clean with a petroleum based solvent or an automotive cleaner. Be sure to keep the Console free of moisture.
Owner’s Manual
48
Maintenance Parts
U
W
AA
AA
Z
P
X
Y
O
N
G
F
R
GG
FF
Z
C
DD
EE
CC
A
B
D
E
T
H
M
S
Q
Q
K
L
J
I
BB
V
HH
JJ
II
KK
LL
Owner’s Manual
49
A Middle Pulley Arm, Left N Middle Shroud, Right Back AA Platform Corner Shrouds
B Upper Pulley Shroud, Left O Middle Shroud, Right Front BB Front Platform Frame
C Upper Front Shroud P Hand Grip, 1-D Ring CC Left Platform Frame
D Upper Pulley Arm, Left Q lower Grip Holder DD Middle Shroud, Left Front
E Upper Pulley Arm, Right R Lower Pulley Shroud, Right EE Middle Shroud, Left Back
F Upper Pulley Shroud, Right S Training Guide FF Left Support Arm
G Middle Pulley Arm, Right T AC Power Adapter GG Lower Pulley Shroud, Left
H Rear Shroud, Upper U Securing Ball HH Fan Assembly
I Rear Cover V Snap Clip II Servo Motor
J Frame Assembly W Right Platform Frame JJ Brake Assembly
K Console Assembly X Right Support Arm KK Elastic Cord
L Fan Shroud Y Handlebar LL Rope
M Rear Shroud, Lower Z Platform Decking
Owner’s Manual
50
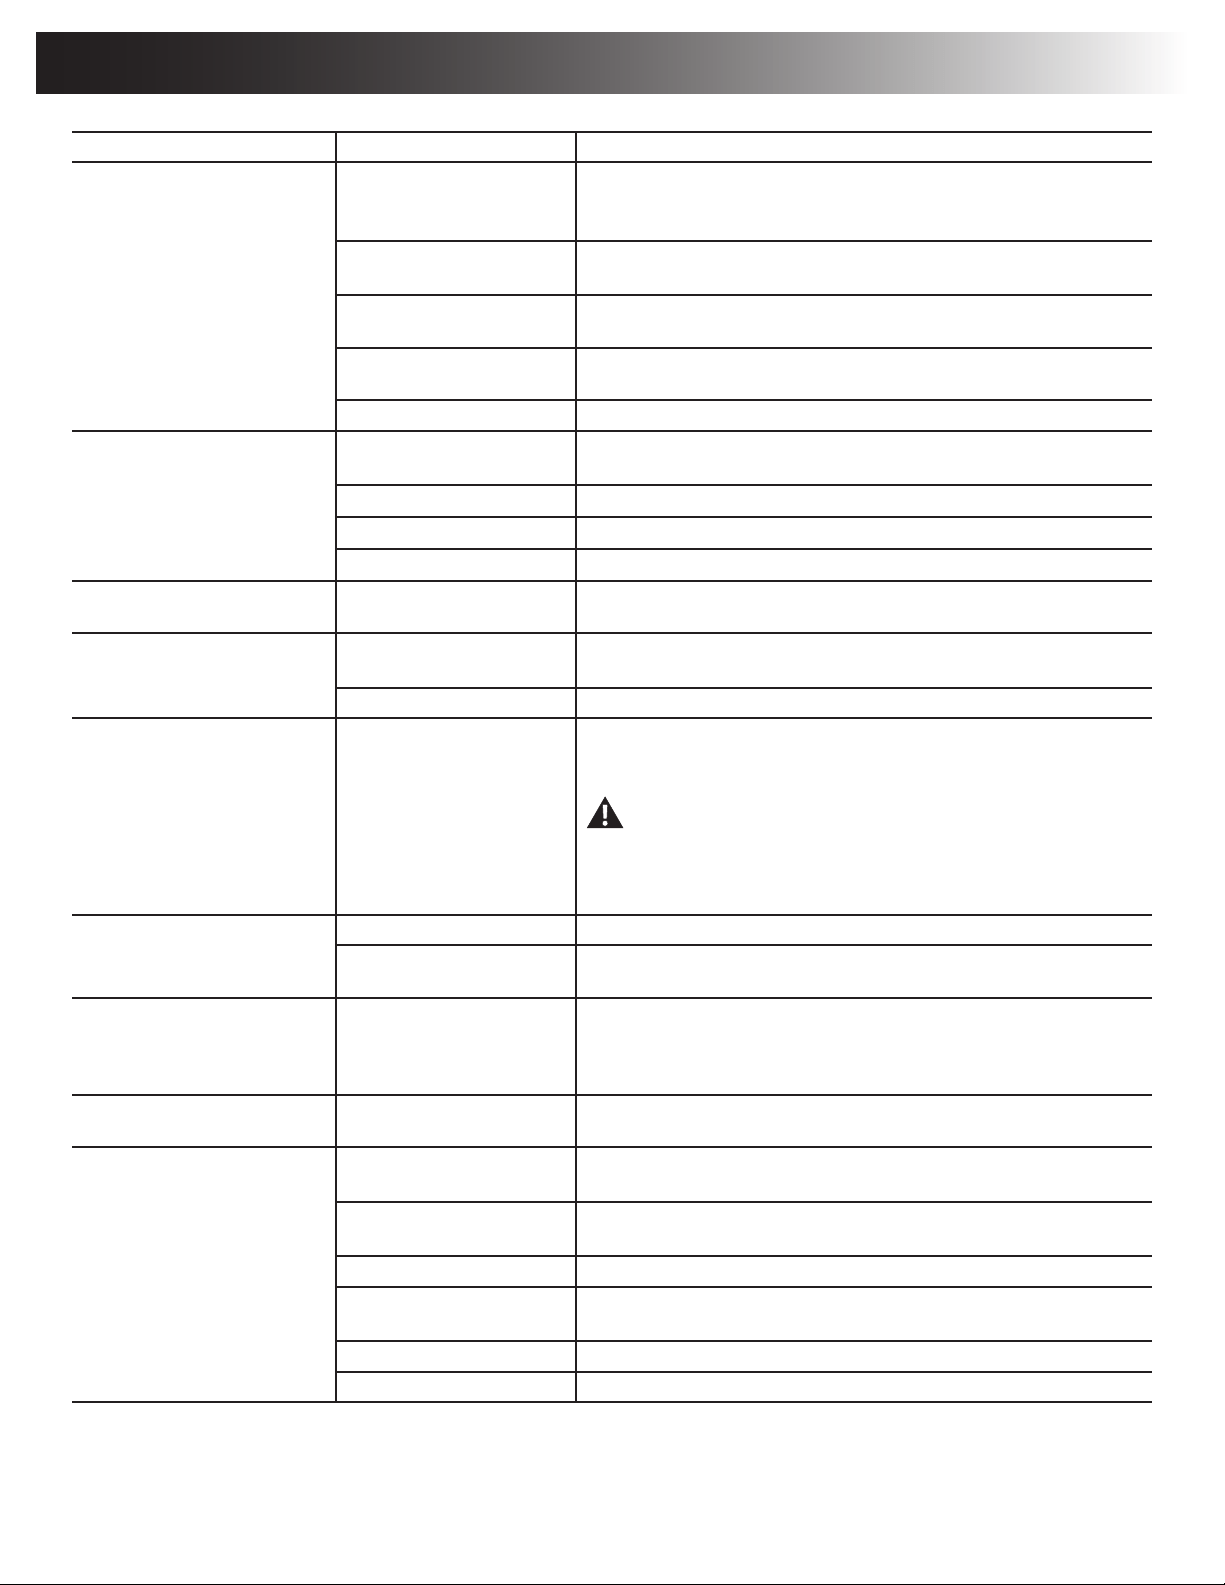
Troubleshooting
Condition/Problem Things to Check Solution
Unit will not power up/turn on/start Outlet Make sure outlet is functioning correctly. Verify this by plugging another
device (ex: lamp) into the outlet. If outlet is connected to a light switch, check
to make sure it is on. If outlet is not functioning nd a working outlet.
Power cord not plugged in Make sure the power cord is rmly secured to A/C inlet on the machine and
rmly inserted into a non-GFI/AFCI wall socket.
Check console display for
damage
Check for visual sign that console display is cracked or otherwise damaged.
Replace Console if damaged.
Console display If Console only has partial display and all connections are ne, replace the
Console.
If problem persists Contact your local distributor.
Unit operates but Telemetric HR
not displayed
Chest Strap (optional) Strap should be “POLAR
®
” compatible and uncoded. Make sure strap is
directly against skin and contact area is wet.
Interference Try moving unit away from sources of interference (TV, Microwave, etc).
Replace Chest Strap If interference is eliminated and HR does not function, replace strap.
Replace Console If HR still does not function, replace Console.
Unit operates but Telemetric HR
displayed incorrectly
Interference Make sure that the HR receiver is not blocked by a personal electronic
device in the left side of the media tray.
No resistance/ fan does not rotate
when rope is pulled
Ropes Inspect ropes to see if they are intact, and inspect all connections to be sure
they are connected.
If problem persists Contact your local distributor for further assistance.
Fan will not turn Check for blockage of fan Safely remove material from fan. Do not pull on ropes when removing mate-
rial because the fan will turn.
Be aware that the Fan, Ropes, and Elastic Cords are connected
and when either of the Ropes or Elastic Cords are pulled the Fan
will turn.
If necessary, detach the Shrouds to help with removal. Do not operate ma-
chine until Shrouds have been replaced.
Machine rocks/does not sit level Check leveler adjustment Adjust levelers until machine is level.
Check surface under unit Adjustment may not be able to compensate for extremely uneven surfaces.
Move machine to level area.
Squeaking noise that appears a
few minutes into a workout and
normally will get progressively
worse as the workout continues
Bolt that connects the pulleys Apply white lithium grease to bolt..
Ropes do not fully retract when
released
Inspect all ropes for a twist Pull out each rope and inspect; remove any twists in ropes.
Workout results will not sync with
Bluetooth
®
enabled device
Current console mode Machine must be in Idle Mode to sync. Push the PAUSE/STOP button until
the Power-Up Mode screen is displayed.
Total time of workout A workout must be longer than 1 minute to be saved and posted by the
Console.
Fitness machine Unplug unit from electrical outlet for 5 minutes. Reconnect to outlet.
Bluetooth
®
enabled device Consult your device to be sure that the Bluetooth
®
wireless feature has been
enabled on it.
Fitness App Review Specications of Fitness App and conrm your device is compatible.
Contact your local distributor for further assistance.

Owner’s Manual
51
8016934.011519.C
EN
™
™
™
™
™
™
