Wireless Weather Station
with Outdoor Sensor
User’s Guide
Step 3: Power the Weather Station
Your can power your weather station by installing 3 AAA batteries (not included) or by
plugging the power adapter into an AC outlet.
RCWS50 IB 01
Getting Started
Step 1: Set Up the Wireless Sensor
The weather station’s wireless sensor transmits outdoor weather information to the weather
station. You can hang it using the notch on its back or simply place it on a at surface. Keep
the following placement pointers in mind when choosing a location for your wireless sensor:
• Keep the wireless sensor within 98ft (30m) of the weather station. Try to minimize as much
as possible the number of obstacles between the sensor and the weather station—these
will decrease the wireless sensor’s range.
• Place the wireless sensor so that it avoids direct sunlight and moisture as much as
possible.
• Avoid exposing the sensor to temperatures below –30ºF (–35ºC). Extreme cold shortens
battery life and transmission range.
To install batteries in the wireless sensor:
1. Open the battery compartment on the back of the
wireless sensor.
2. Insert 2 AAA batteries (not included). Follow the+
and – indications printed on the compartment.
Note: If the wireless sensor is going to be exposed
to below-freezing temperatures, alkaline batteries
are recommended.
3. Close the battery compartment.
Once the wireless sensor has batteries, its indicator
blinks every minute, which means the sensor is transmitting weath-
er information!
Step 2: Lower the Weather Station’s Arm
The weather station has a rotating arm on its right side that serves
as the weather station’s stand when you lower it to the position
shown here.
Note: You can also lay the weather station at on a surface or hang
it using the notch on its back.
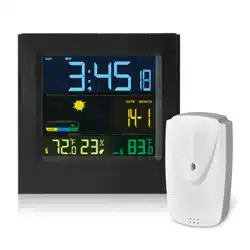
Wireless sensor
Front Back
Battery
compartment
Notch
Indicator
DC 5V jack
Step 4: Link the Weather Station with the Wireless Sensor
Once your weather station is powered, it starts establishing a
link with your wireless sensor. The reception indicator (
)
in the OUTDOOR section of the weather station’s display
ashes while the weather station and wireless sensor are
linking. The linking process can take up to 3 minutes.
Note: To manually start the weather station linking procedure
with the wireless sensor, press and hold the CHANNEL
button on the back of the weather station for 3 seconds.
Once the two are linked, the reception indicator disappears
from the weather station’s display and the weather station
shows the current outdoor temperature and humidity.
Wireless Sensor Troubleshooting
If your weather station display is having trouble establishing a consistent connection with the
wireless sensor, try the following steps to resolve the connection issue.
• Try moving the wireless sensor and weather station closer to each other. The maximum
distance for a reliable connection is 98ft (30m).
• Avoid placing the weather station or sensor close to large metal objects or household
appliances. These can interfere with the wireless link.
• Make sure the weather station and wireless sensor are communicating on the same
wireless channel. By default, they are both set to channel 1. Conrm that the OUTDOOR
section of the weather station display says
1
next to the reception indicator ( ). Then
check the channel switch on the wireless sensor. This switch is behind the batteries in the
sensor’s battery compartment.
• The weather station and wireless sensor offer different wireless channels. If you’re
experiencing interference on one of the channels, set the weather station and wireless
sensor to a different channel. The channel switch on the sensor is located inside the
battery compartment, behind the batteries. Remove the compartment door and batteries,
and set the switch to the next channel. Then replace the batteries and compartment door.
Press and hold the CHANNEL button until the channel shown in the OUTDOOR section of
the display matches the channel you chose on the sensor (
1
,
2
, or
3
).
To manually start the weather station linking procedure with the wireless sensor, press and
hold the CHANNEL button on the back of the weather station for 3 seconds. To make the
wireless sensor link instantly to the weather station in linking mode, remove the sensor’s
batteries then put them back in quickly.
Step 5: Set the Date and Time
When you rst plug it in, the weather station’s display shows 12:00.
1. Press and hold the MODE button on
the back of the weather station to enter
time/date set mode. The hour digits
blink.
2. Use the UP and DOWN buttons on the
arm to adjust the hour. Press the MODE
button to set the hour and move to the
minutes.
Weather station , back
Weather station , right side
To install batteries:
1. Open the battery compartment on the back
of the weather station.
2. Insert three AAA batteries (not included).
Follow the + and – indications printed on the
compartment.
3. Close the battery compartment.
Battery compartment
Note: When the weather is running on batteries alone (i.e.., when it’s not plugged in), the
display will time out after 8 seconds to extend battery life. To turn the display back on, press
the SNZ-LIGHT button.
Battery Precaution: Always remove old, weak or worn-out batteries promptly and recycle or
dispose of them in accordance with Local and National Regulations.
To use the power adapter:
1. Plug the included power adapter into the
DC 5V jack on the right side of the weather
station.
2. Plug the other end into a working AC outlet.
UP
DOWN
SNZ
LIGHT
INDOOR TEMPERATURE HUMIDITY
OUTDOOR TEMPERATURE HUMIDITY
UP
DOWN
SNZ
LIGHT
Weather station , back
Weather station, arm
3. Use the UP and DOWN buttons to adjust the minutes. Press the
MODE button to set the minutes and move to the year.
4. Use the UP and DOWN buttons to adjust the year. Press the MODE
button to set it and move to the month.
5. Use the UP and DOWN buttons to adjust the month. Press the
MODE button to set it and move to the date.
6. Use the UP and DOWN buttons to adjust the date. Then press
MODE to set it and move to the weekday language setting.
7. Press the UP or DOWN button to switch between languages
available for weekday (English, by default). Press MODE to choose
your preference and exit time/date setting.
TIP: Installing batteries is a good idea even if you’re plugging your weather station in for
power. Batteries will make sure your settings (like time and alarm) are saved even if there’s a
power outage.
Everyday Use
Setting Alarm 1 and Alarm 2
1. Press the MODE button on the back of the weather station to go to the Alarm 1display.
6:00 AL1 appears on the display.
2. Press and hold the MODE button until the hour digits start blinking.
3. Use the UP and DOWN buttons to adjust the hour for Alarm 1. Press the MODE button
to set it and move to the minutes.
4. Use the UP and DOWN buttons to adjust the minutes for Alarm 1. Press the MODE
button to nish setting Alarm 1.
5. Repeat steps 1 to 4 for Alarm 2 if desired.
To turn alarm1 and/or alarm 2 on/off: Press the ALARM once to turn on Alarm 1 only.
Press ALARM a second time to turn on Alarm 2 only. Press ALARM a third time to turn on
both Alarm 1 and Alarm 2. Press ALARM a fourth time to turn off both alarms.
Notes:
• The alarm sounds for two minutes when activated.
• Press SNZ/LIGHT to activate snooze. The alarm indicator remains on the clock display.
Press any other button to turn the alarm off.
• Press and hold SNZ/LIGHT to change the interval you want for each SNZ/LIGHT press.
Switching Temperature Display Between Celsius and Fahrenheit
By default, the weather station displays temperature in degrees Fahrenheit.
To switch between degrees Fahrenheit and Celsius: Press the UP button on the arm of the
weather station.
Setting Max / Min Alerts for Temperature
You can set up the weather station so that it alerts you when it registers a maximum or
minimum temperature beyond limits that you set.
To set max / min alerts for humidity and temperature:
1. Press and hold the ALERT button on the back of the weather station until the outdoor
temperature starts blinking.
2. Use the UP and DOWN buttons on the back of the weather station to set the maximum
outdoor temperature alert you want. Press ALERT to set it.
3. Use the UP and DOWN buttons on the back of the weather station to set the minimum
outdoor temperature alert you want. Press ALERT to set it.
4. Use the UP and DOWN buttons on the back of the weather station to set the maximum
indoor temperature alert you want. Press ALERT to set it.
5. Use the UP and DOWN buttons on the back of the weather station to set the minimum
indoor temperature alert you want. Press ALERT to nish setting min/max alerts.
To turn max / min alerts on and off: Press the ALERT button on the back of the weather
station repeatedly until you see the alert you want to turn on. Then press the UP or DOWN
button to turn it on or off.
To show the max/min temperature alerts for weather station and outdoor sensor: Press
the ALERT button on the back of the weather station to cycle through them.
One press displays the maximum outdoor temperature alert.
Two presses displays the minimum outdoor temperature alert.
Three presses displays the maximum indoor temperature alert.
Four presses displays the minimum indoor temperature alert.
Five presses displays the current humidity and temperature registered by the weather
station and wireless sensor.
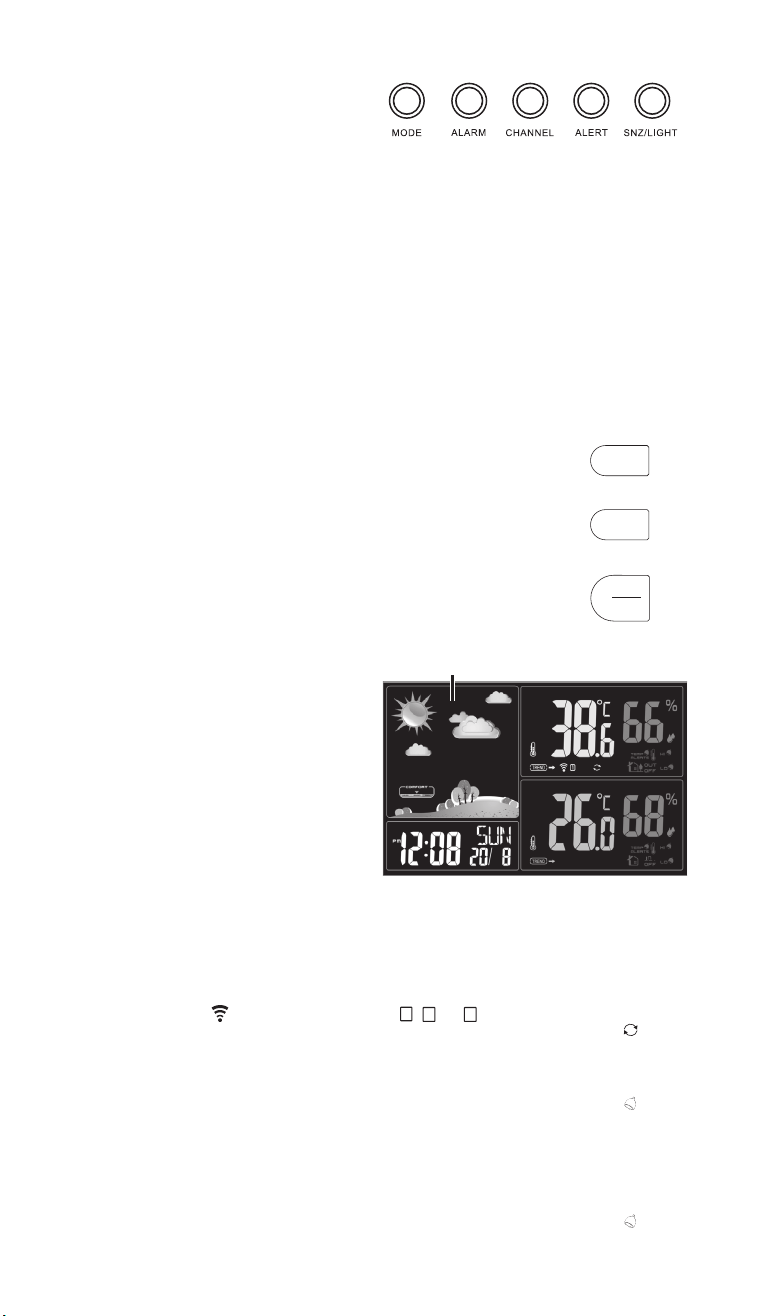
Tour of the Weather Station Alarm Clock
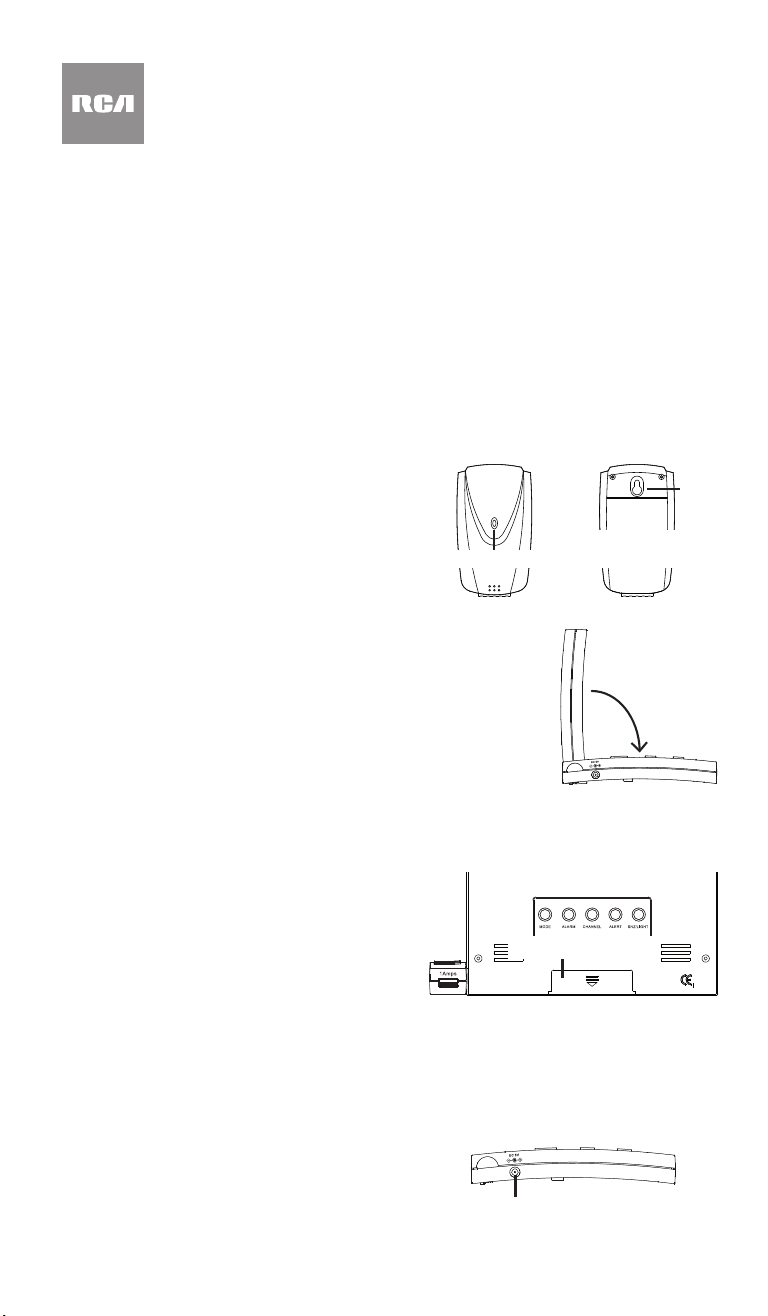
Wireless sensor
Front Back
Wireless Sensor
Battery compartment holds 2 AAA batteries (not
included) to power the wireless sensor.
1-2-3 switch (not shown, inside the battery
compartment) sets the wireless channel for transmitting
the wireless sensor’s data to the weather station.
Notch hangs on a nail or tack to attach the sensor where
you want to install it.
Indicator blinks every minute to show that the sensor is
powered on and transmitting.
Battery
compartment
Notch
Indicator
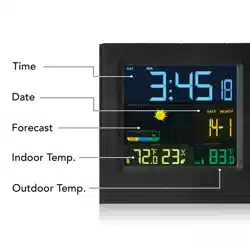
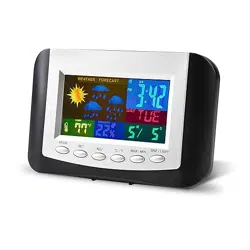
Display
Forecast shows the weather station’s estimated
forecast based on the ambient outdoor
temperature and humidity.
COMFORT indicates whether the air is humid,
good (comfortable), or dry.
AM/PM indicates the time displayed is AM or
PM (does not apply to 24-hour format).
Time digits show the current time or alarm time
(or setting values when adjusting). AL1 or AL2
appears when an alarm is set.
DAY shows the day of the week.
DATE and MONTH show the current date.
Back Panel
MODE button switches the display between
clock and alarm 1/2 display. Press and hold to
adjust the item displayed (time or alarm 1/2).
ALARM cycles through the alarm settings: Alarm 1 on, Alarm 2 on, Alarms 1 and 2 on, Alarms
off.
CHANNEL cycles through the different channels for outdoor wireless sensors. Press and
hold to manually start the linking procedure with a wireless sensor on the currently selected
channel.
ALERT cycles through the alerts for maximum and minimum temperature you’ve currently
set in the following order: max indoor temperature alert, min indoor temperature alert,
max outdoor temperature alert, min outdoor temperature alert. Press and hold to enter
temperature alert setting mode.
SNZ / LIGHT button snoozes the alarm when it’s sounding and activates the display backlight
when the clock is running on battery power. Press and hold to set the snooze interval.
Battery compartment (not shown) holds 3 AAA batteries (not included) to power the weather
station.
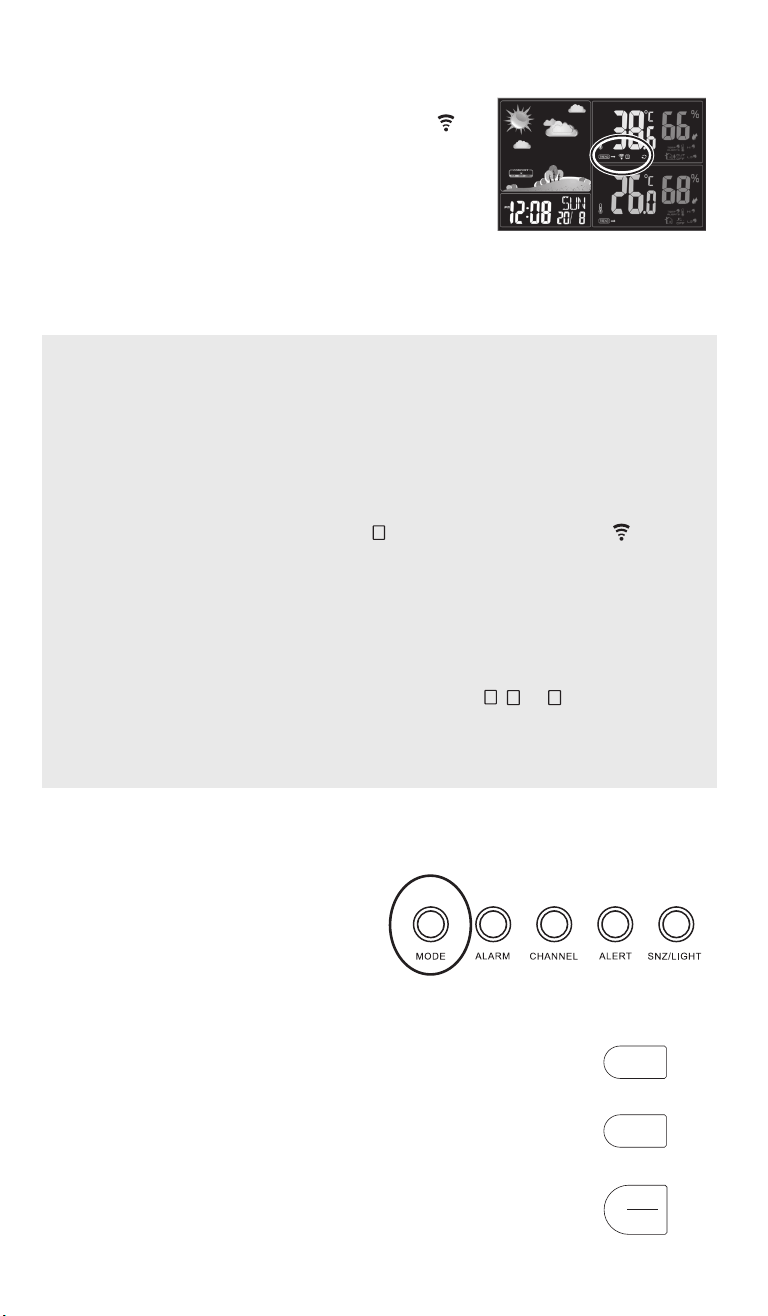
OUTDOOR TEMPERATURE and HUMIDITY shows the current temperature and humidity
registered by the wireless sensor.
The TREND indicator shows if the temperature has gone up, down, or remained steady in
the past hour.
The wireless reception (
) and channel indicator (
1
,
2
, or
3
) show which wireless
channel the weather station is using to communicate with the wireless sensor. The
symbol indicates the weather station is scanning through the channels for information from
multiple wireless sensors. If the battery of the wireless sensor is low, the low battery symbol
will appear in this area.
TEMP ALERTS show if HI (max) or LO (min) temperature alerts have been set. The
icon
appears next to alerts when they’ve been set.
INDOOR TEMPERATURE and HUMIDITY shows the current temperature and humidity
registered by the weather station.
The TREND indicator shows if the temperature has gone up, down, or remained steady in
the past hour.
TEMP ALERTS show if HI (max) or LO (min) temperature alerts have been set. The
icon
appears next to alerts when they’ve been set.
Weather station , back panel
Arm
UP and DOWN buttons adjust the current time, date, or alarm time
when setting. UP switches the temperature reading between Celsius
and Fahrenheit in regular display mode and turns temperature alerts
on and off in alert setting mode. DOWN switches between 12- and 24-
hour time display in regular display mode and turns temperature alerts
on and off in alert setting mode.
SNZ / LIGHT button snoozes the alarm when it’s sounding and
activates the display backlight when the clock is running on battery
power. It also goes through the brightness settings for the display.
Press and hold to adjust the amount of time for snoozing the alarm.
DC 5V jack (side, not shown) connects to the provided power adapter
to power the weather station.
UP
DOWN
SNZ
LIGHT
Weather station, arm
UP
DOWN
SNZ
LIGHT
INDOOR TEMPERATURE HUMIDITY
OUTDOOR TEMPERATURE HUMIDITY
Forecast
Station météo sans l
avec capteur extérieur
Guide de l’utilisateur
Étape 3 : Alimentation de la station météo
Il est possible d’alimenter la station météo en installant 3 piles AAA (non incluses) ou en
branchant l’adaptateur d’alimentation USB sur une prise secteur.
Installation des piles :
Guide de démarrage
Étape 1 : Conguration du capteur sans l
Le capteur sans l de la station météo transmet les informations météorologiques ex-
térieures à la station météo. Il est possible de l’accrocher à l’aide de l’encoche située sur
son dos ou simplement de le placer sur une surface plane. Garder à l’esprit les conseils de
placement suivants pour choisir un emplacement pour le capteur sans l :
• Garder le capteur sans l à moins de 30 m (98 pi) de la station météo. Essayer de
minimiser autant que possible le nombre d’obstacles entre le capteur et la station météo —
ceux-ci réduisent la portée du capteur sans l.
• Placer le capteur sans l de manière à éviter autant que possible la lumière directe du
soleil et l’humidité.
• Éviter d’exposer le capteur à des températures inférieures à –35 ºC (–30 ºF). Le froid
extrême réduit la durée de vie des piles et la portée de transmission.
Installation des piles dans le capteur sans l :
1. Ouvrir le compartiment à piles situé au dos du capteur
sans l.
2. Insérer les 2 piles AAA (non incluses). Respecter les
indications + et – imprimées dans le compartiment.
Remarque : Si le capteur sans l doit être exposé à des
températures inférieures au point de congélation, il est
recommandé d’utiliser des piles alcalines.
3. Refermer le compartiment à piles.
Une fois que le capteur sans l est muni de piles, son
indicateur clignote toutes les minutes, ce qui signie que
le capteur transmet des informations météorologiques !
Étape 2 : Abaisser le bras de la station météo
La station météo est dotée d’un bras rotatif sur son côté droit qui
sert de support à la station météo lorsqu’il est abaissé à la position
indiquée ci-contre.
Remarque : Il est aussi possible de poser la station météo sur une
surface ou de la suspendre à l’aide de l’encoche située sur son dos.
Capteur sans l
Devant Dos
Compartiment
à piles
Encoche
Indicateur
Prise 5 V c.c.
Station météo, dos
Station météo, côté droit
1. Ouvrir le compartiment à piles situé au dos de
la station météo.
2. Insérer les trois piles AAA (non incluses).
Respecter les indications + et - imprimées
dans le compartiment.
3. Refermer le compartiment à piles.
Remarque : Lorsque la station météo fonctionne
sur des piles seules (c’est-à-dire lorsqu’elle n’est
pas branchée), l’afchage s’éteint au bout de 8
secondes pour prolonger la durée de vie des
Compartiment à piles
piles. Pour réactiver l’afchage, appuyer sur le bouton SNZ-LIGHT (Répétition-éclairage).
Précautions à propos des piles : Toujours enlever les piles anciennes, faibles ou usagées
et les recycler rapidement ou les mettre au rebut en conformité avec les réglementations
locales et nationales.
Pour utiliser l’adaptateur d’alimentation :
1. Brancher l’adaptateur d’alimentation inclus
dans la prise DC 5V (5 V c.c.) située sur le
côté droit dela station météo.
2. Brancher l’autre extrémité sur une prise
secteur opérationnelle.
CONSEIL : L’installation de piles est une
bonne idée, même si la station météo est branchée pour l’alimenter. Les piles permettent de
sauvegarder les réglages (comme l’heure et l’alarme) même en cas de coupure de courant.
Étape 4 : Liaison de la station météo avec le capteur sans l
Une fois que la station météo est alimentée, elle commence
à établir une liaison avec le capteur sans l. L’indicateur de
réception (
) dans la section OUTDOOR (Extérieur) de
l’écran de la station météo clignote lorsque la station météo
et le capteur sans l sont en cours de liaison. Le processus
de liaison peut prendre jusqu’à 3 minutes.
Remarque : Pour lancer manuellement la procédure de
liaison de la station météo avec le capteur sans l, appuyer
sur le bouton CHANNEL (Canal) sur le dessus de la station
météo et le maintenir enfoncé pendant 3 secondes.
Une fois que les deux sont reliés, l’indicateur de réception
disparaît de l’écran de la station météo et la station météo
afche la température et l’humidité extérieures actuelles.
Dépannage du capteur sans l
Si l’écran de votre station météo a du mal à établir une connexion cohérente avec le capteur
sans l, essayer les étapes suivantes pour résoudre le problème de connexion.
• Essayer de rapprocher le capteur sans l et la station météo. La distance maximale pour
une connexion able est de 30 mètres.
• Éviter de placer la station météo ou le capteur à proximité de gros objets métalliques ou
d’appareils électroménagers. Ceux-ci peuvent interférer avec la liaison sans l.
• S’assurer que la station météo et le capteur sans l communiquent sur le même canal sans
l. Par défaut, ils sont tous deux réglés sur le canal 1. Conrmer que la section OUTDOOR
(Extérieur) de l’écran de la station météo indique
1
à côté de l’indicateur de réception
(
). Ensuite, vérier le commutateur de canal du capteur sans l. Ce commutateur se
trouve derrière les piles dans le compartiment à piles du capteur.
• La station météo et le capteur sans l offrent différents canaux sans l. Si des interférences
sur l’un des canaux sont rencontrées, régler la station météo et le capteur sans l
sur un canal différent. Le commutateur de canal du capteur est situé à l’intérieur du
compartiment à piles, derrière les piles. Retirer le couvercle du compartiment et les piles,
et régler l’interrupteur sur le canal suivant. Remettre ensuite les piles et le couvercle du
compartiment en place. Appuyer sur le bouton CHANNEL (Canal) jusqu’à ce que le canal
afché dans la section OUTDOOR de l’écran corresponde au canal choisi sur le capteur
(
1
,
2
,ou
3
).
Pour lancer manuellement la procédure de liaison de la station météo avec le capteur sans
l, appuyer sur le bouton CHANNEL (Canal) au dos de la station météo et le maintenir en-
foncé pendant 3 secondes. Pour que le capteur sans l soit instantanément relié à la station
météo en mode de liaison, retirer les piles du capteur puis les remettre rapidement en place.
Étape 5 : Réglage de la date et de l’heure
Lorsqu’il est branché pour la première fois, l’écran de la station météo indique 12:00.
1. Appuyer sur le bouton MODE sur le
dessus de la station météo et le maintenir
enfoncé pour entrer en mode de réglage
de l’heure/date. Les chiffres des heures
clignotent.
2. Appuyer sur les boutons UP (Haut) ou
DOWN (Bas) situés sur le bras pour
régler l’heure. Appuyer sur le bouton
MODE pour conrmer les heures et
passer au réglage des minutes.
UP
DOWN
SNZ
LIGHT
INDOOR TEMPERATURE HUMIDITY
OUTDOOR TEMPERATURE HUMIDITY
UP
DOWN
SNZ
LIGHT
Station météo, dos
Station météo, bras
3. Utiliser les boutons UP ou DOWN pour régler les minutes. Appuyer
sur le bouton MODE pour conrmer les minutes et passer au réglage
des années.
4. Utiliser les boutons UP ou DOWN pour régler l’année. Appuyer sur le
bouton MODE pour conrmer et passer au réglage des mois.
5. Utiliser les boutons UP ou DOWN pour régler le mois. Appuyer sur le
bouton MODE pour conrmer et passer au réglage de la date.
6. Utiliser les boutons UP ou DOWN pour régler la date. Appuyer
ensuite sur le bouton MODE pour la régler et passer au réglage de la
langue des jours de la semaine.
7. Appuyer sur le bouton UP ou DOWN pour passer d’une à l’autre des
langues disponibles pour le jour de la semaine (anglais, par défaut).
Appuyer sur le bouton MODE pour choisir sa préférence et quitter le
réglage de l’heure et de la date.
Wireless Weather Station
with Outdoor Sensor
User’s Guide
Step 3: Power the Weather Station
Your can power your weather station by installing 3 AAA batteries (not included) or by
plugging the power adapter into an AC outlet.
RCWS50 IB 01
Getting Started
Step 1: Set Up the Wireless Sensor
The weather station’s wireless sensor transmits outdoor weather information to the weather
station. You can hang it using the notch on its back or simply place it on a at surface. Keep
the following placement pointers in mind when choosing a location for your wireless sensor:
• Keep the wireless sensor within 98ft (30m) of the weather station. Try to minimize as much
as possible the number of obstacles between the sensor and the weather station—these
will decrease the wireless sensor’s range.
• Place the wireless sensor so that it avoids direct sunlight and moisture as much as
possible.
• Avoid exposing the sensor to temperatures below –30ºF (–35ºC). Extreme cold shortens
battery life and transmission range.
To install batteries in the wireless sensor:
1. Open the battery compartment on the back of the
wireless sensor.
2. Insert 2 AAA batteries (not included). Follow the+
and – indications printed on the compartment.
Note: If the wireless sensor is going to be exposed
to below-freezing temperatures, alkaline batteries
are recommended.
3. Close the battery compartment.
Once the wireless sensor has batteries, its indicator
blinks every minute, which means the sensor is transmitting weath-
er information!
Step 2: Lower the Weather Station’s Arm
The weather station has a rotating arm on its right side that serves
as the weather station’s stand when you lower it to the position
shown here.
Note: You can also lay the weather station at on a surface or hang
it using the notch on its back.
Wireless sensor
Front Back
Battery
compartment
Notch
Indicator
DC 5V jack
Step 4: Link the Weather Station with the Wireless Sensor
Once your weather station is powered, it starts establishing a
link with your wireless sensor. The reception indicator (
)
in the OUTDOOR section of the weather station’s display
ashes while the weather station and wireless sensor are
linking. The linking process can take up to 3 minutes.
Note: To manually start the weather station linking procedure
with the wireless sensor, press and hold the CHANNEL
button on the back of the weather station for 3 seconds.
Once the two are linked, the reception indicator disappears
from the weather station’s display and the weather station
shows the current outdoor temperature and humidity.
Wireless Sensor Troubleshooting
If your weather station display is having trouble establishing a consistent connection with the
wireless sensor, try the following steps to resolve the connection issue.
• Try moving the wireless sensor and weather station closer to each other. The maximum
distance for a reliable connection is 98ft (30m).
• Avoid placing the weather station or sensor close to large metal objects or household
appliances. These can interfere with the wireless link.
• Make sure the weather station and wireless sensor are communicating on the same
wireless channel. By default, they are both set to channel 1. Conrm that the OUTDOOR
section of the weather station display says
1
next to the reception indicator ( ). Then
check the channel switch on the wireless sensor. This switch is behind the batteries in the
sensor’s battery compartment.
• The weather station and wireless sensor offer different wireless channels. If you’re
experiencing interference on one of the channels, set the weather station and wireless
sensor to a different channel. The channel switch on the sensor is located inside the
battery compartment, behind the batteries. Remove the compartment door and batteries,
and set the switch to the next channel. Then replace the batteries and compartment door.
Press and hold the CHANNEL button until the channel shown in the OUTDOOR section of
the display matches the channel you chose on the sensor (
1
,
2
, or
3
).
To manually start the weather station linking procedure with the wireless sensor, press and
hold the CHANNEL button on the back of the weather station for 3 seconds. To make the
wireless sensor link instantly to the weather station in linking mode, remove the sensor’s
batteries then put them back in quickly.
Step 5: Set the Date and Time
When you rst plug it in, the weather station’s display shows 12:00.
1. Press and hold the MODE button on
the back of the weather station to enter
time/date set mode. The hour digits
blink.
2. Use the UP and DOWN buttons on the
arm to adjust the hour. Press the MODE
button to set the hour and move to the
minutes.
Weather station , back
Weather station , right side
To install batteries:
1. Open the battery compartment on the back
of the weather station.
2. Insert three AAA batteries (not included).
Follow the + and – indications printed on the
compartment.
3. Close the battery compartment.
Battery compartment
Note: When the weather is running on batteries alone (i.e.., when it’s not plugged in), the
display will time out after 8 seconds to extend battery life. To turn the display back on, press
the SNZ-LIGHT button.
Battery Precaution: Always remove old, weak or worn-out batteries promptly and recycle or
dispose of them in accordance with Local and National Regulations.
To use the power adapter:
1. Plug the included power adapter into the
DC 5V jack on the right side of the weather
station.
2. Plug the other end into a working AC outlet.
UP
DOWN
SNZ
LIGHT
INDOOR TEMPERATURE HUMIDITY
OUTDOOR TEMPERATURE HUMIDITY
UP
DOWN
SNZ
LIGHT
Weather station , back
Weather station, arm
3. Use the UP and DOWN buttons to adjust the minutes. Press the
MODE button to set the minutes and move to the year.
4. Use the UP and DOWN buttons to adjust the year. Press the MODE
button to set it and move to the month.
5. Use the UP and DOWN buttons to adjust the month. Press the
MODE button to set it and move to the date.
6. Use the UP and DOWN buttons to adjust the date. Then press
MODE to set it and move to the weekday language setting.
7. Press the UP or DOWN button to switch between languages
available for weekday (English, by default). Press MODE to choose
your preference and exit time/date setting.
TIP: Installing batteries is a good idea even if you’re plugging your weather station in for
power. Batteries will make sure your settings (like time and alarm) are saved even if there’s a
power outage.
Everyday Use
Setting Alarm 1 and Alarm 2
1. Press the MODE button on the back of the weather station to go to the Alarm 1display.
6:00 AL1 appears on the display.
2. Press and hold the MODE button until the hour digits start blinking.
3. Use the UP and DOWN buttons to adjust the hour for Alarm 1. Press the MODE button
to set it and move to the minutes.
4. Use the UP and DOWN buttons to adjust the minutes for Alarm 1. Press the MODE
button to nish setting Alarm 1.
5. Repeat steps 1 to 4 for Alarm 2 if desired.
To turn alarm1 and/or alarm 2 on/off: Press the ALARM once to turn on Alarm 1 only.
Press ALARM a second time to turn on Alarm 2 only. Press ALARM a third time to turn on
both Alarm 1 and Alarm 2. Press ALARM a fourth time to turn off both alarms.
Notes:
• The alarm sounds for two minutes when activated.
• Press SNZ/LIGHT to activate snooze. The alarm indicator remains on the clock display.
Press any other button to turn the alarm off.
• Press and hold SNZ/LIGHT to change the interval you want for each SNZ/LIGHT press.
Switching Temperature Display Between Celsius and Fahrenheit
By default, the weather station displays temperature in degrees Fahrenheit.
To switch between degrees Fahrenheit and Celsius: Press the UP button on the arm of the
weather station.
Setting Max / Min Alerts for Temperature
You can set up the weather station so that it alerts you when it registers a maximum or
minimum temperature beyond limits that you set.
To set max / min alerts for humidity and temperature:
1. Press and hold the ALERT button on the back of the weather station until the outdoor
temperature starts blinking.
2. Use the UP and DOWN buttons on the back of the weather station to set the maximum
outdoor temperature alert you want. Press ALERT to set it.
3. Use the UP and DOWN buttons on the back of the weather station to set the minimum
outdoor temperature alert you want. Press ALERT to set it.
4. Use the UP and DOWN buttons on the back of the weather station to set the maximum
indoor temperature alert you want. Press ALERT to set it.
5. Use the UP and DOWN buttons on the back of the weather station to set the minimum
indoor temperature alert you want. Press ALERT to nish setting min/max alerts.
To turn max / min alerts on and off: Press the ALERT button on the back of the weather
station repeatedly until you see the alert you want to turn on. Then press the UP or DOWN
button to turn it on or off.
To show the max/min temperature alerts for weather station and outdoor sensor: Press
the ALERT button on the back of the weather station to cycle through them.
One press displays the maximum outdoor temperature alert.
Two presses displays the minimum outdoor temperature alert.
Three presses displays the maximum indoor temperature alert.
Four presses displays the minimum indoor temperature alert.
Five presses displays the current humidity and temperature registered by the weather
station and wireless sensor.
Tour of the Weather Station Alarm Clock
Wireless sensor
Front Back
Wireless Sensor
Battery compartment holds 2 AAA batteries (not
included) to power the wireless sensor.
1-2-3 switch (not shown, inside the battery
compartment) sets the wireless channel for transmitting
the wireless sensor’s data to the weather station.
Notch hangs on a nail or tack to attach the sensor where
you want to install it.
Indicator blinks every minute to show that the sensor is
powered on and transmitting.
Battery
compartment
Notch
Indicator
Display
Forecast shows the weather station’s estimated
forecast based on the ambient outdoor
temperature and humidity.
COMFORT indicates whether the air is humid,
good (comfortable), or dry.
AM/PM indicates the time displayed is AM or
PM (does not apply to 24-hour format).
Time digits show the current time or alarm time
(or setting values when adjusting). AL1 or AL2
appears when an alarm is set.
DAY shows the day of the week.
DATE and MONTH show the current date.
Back Panel
MODE button switches the display between
clock and alarm 1/2 display. Press and hold to
adjust the item displayed (time or alarm 1/2).
ALARM cycles through the alarm settings: Alarm 1 on, Alarm 2 on, Alarms 1 and 2 on, Alarms
off.
CHANNEL cycles through the different channels for outdoor wireless sensors. Press and
hold to manually start the linking procedure with a wireless sensor on the currently selected
channel.
ALERT cycles through the alerts for maximum and minimum temperature you’ve currently
set in the following order: max indoor temperature alert, min indoor temperature alert,
max outdoor temperature alert, min outdoor temperature alert. Press and hold to enter
temperature alert setting mode.
SNZ / LIGHT button snoozes the alarm when it’s sounding and activates the display backlight
when the clock is running on battery power. Press and hold to set the snooze interval.
Battery compartment (not shown) holds 3 AAA batteries (not included) to power the weather
station.
OUTDOOR TEMPERATURE and HUMIDITY shows the current temperature and humidity
registered by the wireless sensor.
The TREND indicator shows if the temperature has gone up, down, or remained steady in
the past hour.
The wireless reception (
) and channel indicator (
1
,
2
, or
3
) show which wireless
channel the weather station is using to communicate with the wireless sensor. The
symbol indicates the weather station is scanning through the channels for information from
multiple wireless sensors. If the battery of the wireless sensor is low, the low battery symbol
will appear in this area.
TEMP ALERTS show if HI (max) or LO (min) temperature alerts have been set. The
icon
appears next to alerts when they’ve been set.
INDOOR TEMPERATURE and HUMIDITY shows the current temperature and humidity
registered by the weather station.
The TREND indicator shows if the temperature has gone up, down, or remained steady in
the past hour.
TEMP ALERTS show if HI (max) or LO (min) temperature alerts have been set. The
icon
appears next to alerts when they’ve been set.
Weather station , back panel
Arm
UP and DOWN buttons adjust the current time, date, or alarm time
when setting. UP switches the temperature reading between Celsius
and Fahrenheit in regular display mode and turns temperature alerts
on and off in alert setting mode. DOWN switches between 12- and 24-
hour time display in regular display mode and turns temperature alerts
on and off in alert setting mode.
SNZ / LIGHT button snoozes the alarm when it’s sounding and
activates the display backlight when the clock is running on battery
power. It also goes through the brightness settings for the display.
Press and hold to adjust the amount of time for snoozing the alarm.
DC 5V jack (side, not shown) connects to the provided power adapter
to power the weather station.
UP
DOWN
SNZ
LIGHT
Weather station, arm
UP
DOWN
SNZ
LIGHT
INDOOR TEMPERATURE HUMIDITY
OUTDOOR TEMPERATURE HUMIDITY
Forecast
Station météo sans l
avec capteur extérieur
Guide de l’utilisateur
Étape 3 : Alimentation de la station météo
Il est possible d’alimenter la station météo en installant 3 piles AAA (non incluses) ou en
branchant l’adaptateur d’alimentation USB sur une prise secteur.
Installation des piles :
Guide de démarrage
Étape 1 : Conguration du capteur sans l
Le capteur sans l de la station météo transmet les informations météorologiques ex-
térieures à la station météo. Il est possible de l’accrocher à l’aide de l’encoche située sur
son dos ou simplement de le placer sur une surface plane. Garder à l’esprit les conseils de
placement suivants pour choisir un emplacement pour le capteur sans l :
• Garder le capteur sans l à moins de 30 m (98 pi) de la station météo. Essayer de
minimiser autant que possible le nombre d’obstacles entre le capteur et la station météo —
ceux-ci réduisent la portée du capteur sans l.
• Placer le capteur sans l de manière à éviter autant que possible la lumière directe du
soleil et l’humidité.
• Éviter d’exposer le capteur à des températures inférieures à –35 ºC (–30 ºF). Le froid
extrême réduit la durée de vie des piles et la portée de transmission.
Installation des piles dans le capteur sans l :
1. Ouvrir le compartiment à piles situé au dos du capteur
sans l.
2. Insérer les 2 piles AAA (non incluses). Respecter les
indications + et – imprimées dans le compartiment.
Remarque : Si le capteur sans l doit être exposé à des
températures inférieures au point de congélation, il est
recommandé d’utiliser des piles alcalines.
3. Refermer le compartiment à piles.
Une fois que le capteur sans l est muni de piles, son
indicateur clignote toutes les minutes, ce qui signie que
le capteur transmet des informations météorologiques !
Étape 2 : Abaisser le bras de la station météo
La station météo est dotée d’un bras rotatif sur son côté droit qui
sert de support à la station météo lorsqu’il est abaissé à la position
indiquée ci-contre.
Remarque : Il est aussi possible de poser la station météo sur une
surface ou de la suspendre à l’aide de l’encoche située sur son dos.
Capteur sans l
Devant Dos
Compartiment
à piles
Encoche
Indicateur
Prise 5 V c.c.
Station météo, dos
Station météo, côté droit
1. Ouvrir le compartiment à piles situé au dos de
la station météo.
2. Insérer les trois piles AAA (non incluses).
Respecter les indications + et - imprimées
dans le compartiment.
3. Refermer le compartiment à piles.
Remarque : Lorsque la station météo fonctionne
sur des piles seules (c’est-à-dire lorsqu’elle n’est
pas branchée), l’afchage s’éteint au bout de 8
secondes pour prolonger la durée de vie des
Compartiment à piles
piles. Pour réactiver l’afchage, appuyer sur le bouton SNZ-LIGHT (Répétition-éclairage).
Précautions à propos des piles : Toujours enlever les piles anciennes, faibles ou usagées
et les recycler rapidement ou les mettre au rebut en conformité avec les réglementations
locales et nationales.
Pour utiliser l’adaptateur d’alimentation :
1. Brancher l’adaptateur d’alimentation inclus
dans la prise DC 5V (5 V c.c.) située sur le
côté droit dela station météo.
2. Brancher l’autre extrémité sur une prise
secteur opérationnelle.
CONSEIL : L’installation de piles est une
bonne idée, même si la station météo est branchée pour l’alimenter. Les piles permettent de
sauvegarder les réglages (comme l’heure et l’alarme) même en cas de coupure de courant.
Étape 4 : Liaison de la station météo avec le capteur sans l
Une fois que la station météo est alimentée, elle commence
à établir une liaison avec le capteur sans l. L’indicateur de
réception (
) dans la section OUTDOOR (Extérieur) de
l’écran de la station météo clignote lorsque la station météo
et le capteur sans l sont en cours de liaison. Le processus
de liaison peut prendre jusqu’à 3 minutes.
Remarque : Pour lancer manuellement la procédure de
liaison de la station météo avec le capteur sans l, appuyer
sur le bouton CHANNEL (Canal) sur le dessus de la station
météo et le maintenir enfoncé pendant 3 secondes.
Une fois que les deux sont reliés, l’indicateur de réception
disparaît de l’écran de la station météo et la station météo
afche la température et l’humidité extérieures actuelles.
Dépannage du capteur sans l
Si l’écran de votre station météo a du mal à établir une connexion cohérente avec le capteur
sans l, essayer les étapes suivantes pour résoudre le problème de connexion.
• Essayer de rapprocher le capteur sans l et la station météo. La distance maximale pour
une connexion able est de 30 mètres.
• Éviter de placer la station météo ou le capteur à proximité de gros objets métalliques ou
d’appareils électroménagers. Ceux-ci peuvent interférer avec la liaison sans l.
• S’assurer que la station météo et le capteur sans l communiquent sur le même canal sans
l. Par défaut, ils sont tous deux réglés sur le canal 1. Conrmer que la section OUTDOOR
(Extérieur) de l’écran de la station météo indique
1
à côté de l’indicateur de réception
(
). Ensuite, vérier le commutateur de canal du capteur sans l. Ce commutateur se
trouve derrière les piles dans le compartiment à piles du capteur.
• La station météo et le capteur sans l offrent différents canaux sans l. Si des interférences
sur l’un des canaux sont rencontrées, régler la station météo et le capteur sans l
sur un canal différent. Le commutateur de canal du capteur est situé à l’intérieur du
compartiment à piles, derrière les piles. Retirer le couvercle du compartiment et les piles,
et régler l’interrupteur sur le canal suivant. Remettre ensuite les piles et le couvercle du
compartiment en place. Appuyer sur le bouton CHANNEL (Canal) jusqu’à ce que le canal
afché dans la section OUTDOOR de l’écran corresponde au canal choisi sur le capteur
(
1
,
2
,ou
3
).
Pour lancer manuellement la procédure de liaison de la station météo avec le capteur sans
l, appuyer sur le bouton CHANNEL (Canal) au dos de la station météo et le maintenir en-
foncé pendant 3 secondes. Pour que le capteur sans l soit instantanément relié à la station
météo en mode de liaison, retirer les piles du capteur puis les remettre rapidement en place.
Étape 5 : Réglage de la date et de l’heure
Lorsqu’il est branché pour la première fois, l’écran de la station météo indique 12:00.
1. Appuyer sur le bouton MODE sur le
dessus de la station météo et le maintenir
enfoncé pour entrer en mode de réglage
de l’heure/date. Les chiffres des heures
clignotent.
2. Appuyer sur les boutons UP (Haut) ou
DOWN (Bas) situés sur le bras pour
régler l’heure. Appuyer sur le bouton
MODE pour conrmer les heures et
passer au réglage des minutes.
UP
DOWN
SNZ
LIGHT
INDOOR TEMPERATURE HUMIDITY
OUTDOOR TEMPERATURE HUMIDITY
UP
DOWN
SNZ
LIGHT
Station météo, dos
Station météo, bras
3. Utiliser les boutons UP ou DOWN pour régler les minutes. Appuyer
sur le bouton MODE pour conrmer les minutes et passer au réglage
des années.
4. Utiliser les boutons UP ou DOWN pour régler l’année. Appuyer sur le
bouton MODE pour conrmer et passer au réglage des mois.
5. Utiliser les boutons UP ou DOWN pour régler le mois. Appuyer sur le
bouton MODE pour conrmer et passer au réglage de la date.
6. Utiliser les boutons UP ou DOWN pour régler la date. Appuyer
ensuite sur le bouton MODE pour la régler et passer au réglage de la
langue des jours de la semaine.
7. Appuyer sur le bouton UP ou DOWN pour passer d’une à l’autre des
langues disponibles pour le jour de la semaine (anglais, par défaut).
Appuyer sur le bouton MODE pour choisir sa préférence et quitter le
réglage de l’heure et de la date.
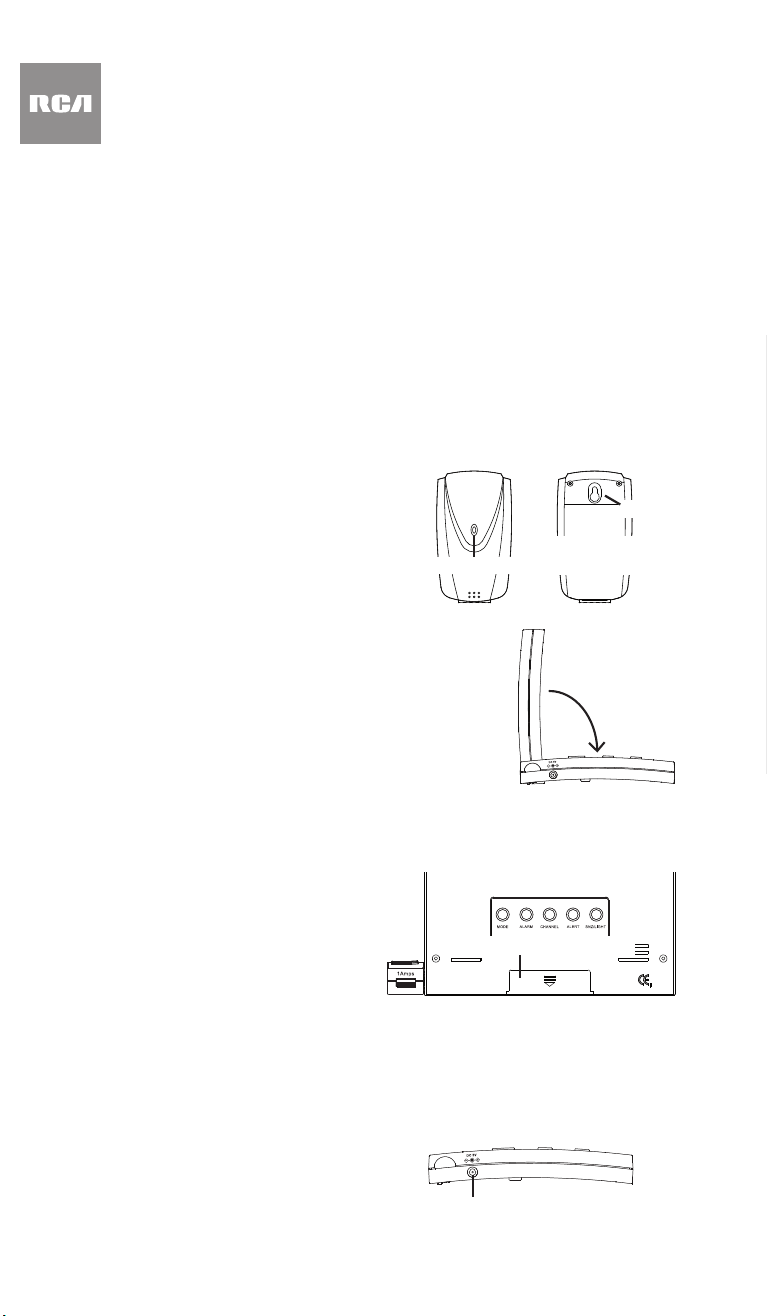
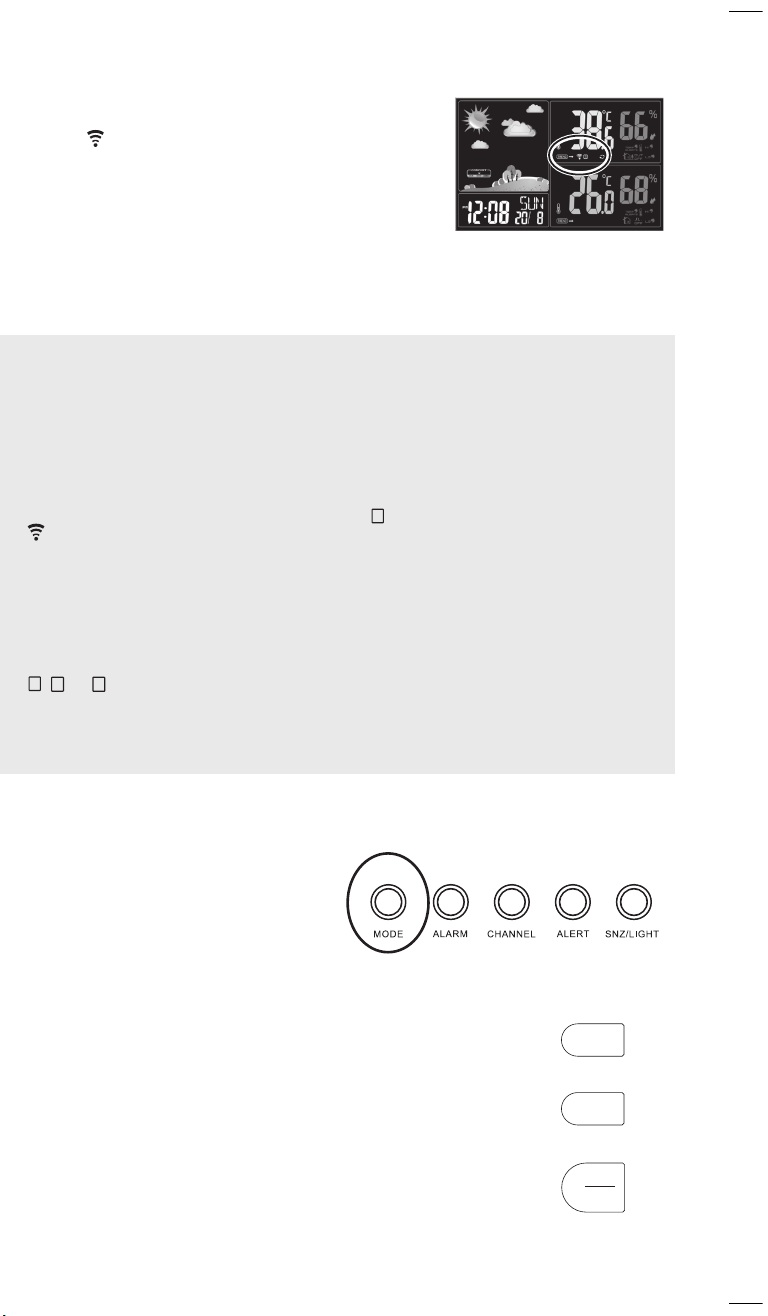

Utilisation quotidienne
Réglage de l’alarme 1 et de l’alarme 2
1. Appuyer sur le bouton MODE au dos de la station météo pour passer à l’afchage de
l’alarme 1. 6:00 AL1 apparaît sur l’écran.
2. Appuyer et maintenir enfoncé le bouton MODE jusqu’à ce que les chiffres des heures
commencent à clignoter.
3. Utiliser les boutons UP (Haut) ou DOWN (Bas) pour régler l’heure de l’alarme 1. Appuyer
sur le bouton MODE pour conrmer et passer au réglage des minutes.
4. Utiliser les boutons UP ou DOWN pour régler les minutes de l’alarme 1. Appuyer sur le
bouton MODE pour terminer le réglage de l’alarme 1.
5. Répéter les étapes 1 à 4 pour l’alarme 2 si souhaitée.
Pour activer / désactiver l’alarme 1 et/ou l’alarme 2 : Appuyer une fois sur le bouton
ALARM (Alarme) pour activer l’alarme 1 uniquement. Appuyer une deuxième fois sur le
bouton ALARM pour activer l’alarme 2 uniquement. Appuyer une troisième fois sur le
bouton ALARM pour activer l’alarme 1 et l’alarme 2. Appuyer une quatrième fois sur le
bouton ALARM pour désactiver les deux alarmes.
Remarques :
• L’alarme retentit pendant deux minutes lorsqu’elle est activée.
• Appuyer sur SNZ/LIGHT (Répétition/éclairage) pour activer la répétition. L’indicateur
d’alarme reste afché sur l’écran du réveil. Un appui sur n’importe quel autre bouton
désactive l’alarme.
• Appuyer sur le bouton SNZ/LIGHT et le maintenir enfoncé pour modier l’intervalle
souhaité pour chaque pression du bouton SNZ/LIGHT.
Commutation de l’afchage de la température
entre degrés Celsius et Fahrenheit
Par défaut, la station météo afche la température en degrés Fahrenheit. Pour commuter
entre les degrés Fahrenheit et Celsius : Appuyer sur le bouton UP (Haut) sur le bras de
la station météo.
Réglage des alertes Max / Min pour la température
Il est possible de congurer la station météorologique de manière à ce qu’elle avertisse lorsqu’elle
enregistre une température maximale ou minimale au-delà de limites préalablement xées.
Pour congurer des alertes max / min pour l’humidité et la température :
1. Appuyer et maintenir enfoncé le bouton ALERT (Alerte) au dos de la station météo
jusqu’à ce que la température extérieure commence à clignoter.
2. Utiliser les boutons UP ou DOWN au dos de la station météo pour dénir l’alerte de
température extérieure maximale souhaitée. Appuyer sur ALERT pour conrmer.
3. Utiliser les boutons UP ou DOWN au dos de la station météo pour dénir l’alerte de
température extérieure minimale souhaitée. Appuyer sur ALERT pour conrmer.
4. Utiliser les boutons UP ou DOWN au dos de la station météo pour dénir l’alerte de
température intérieure maximale souhaitée. Appuyer sur ALERT pour conrmer.
5. Utiliser les boutons UP ou DOWN au dos de la station météo pour dénir l’alerte de
température intérieure minimale souhaitée. Appuyer sur ALERT pour terminer le réglage
des alertes min/max.
Pour activer et désactiver les alertes max / min : Appuyer sur le bouton ALERT au dos de
la station météo à plusieurs reprises jusqu’à ce que l’alerte à activer s’afche. Ensuite, appuy-
er sur le bouton UP ou DOWN pour l’activer ou la désactiver.
Pour afcher les alertes de température max/min pour la station météo et le capteur
extérieur : Appuyer sur le bouton ALERT (Alerte) au dos de la station météo pour les parcourir.
Une pression permet d’afcher l’alerte de température extérieure maximale.
Deux pressions permettent d’afcher l’alerte de température extérieure minimale.
Trois pressions permettent d’afcher l’alerte de température intérieure maximale.
Quatre pressions permettent d’afcher l’alerte de température intérieure minimale.
Cinq pressions permettent d’afcher l’humidité et la température actuelles enregistrées
par la station météo et le capteur sans l.
Présentation du réveil de la station météorologique
Écran
Prévisions météorologiques indique les prévi-
sions de la station météo basées sur la tempéra-
ture et l’humidité extérieures ambiantes.
COMFORT (Confort) indique si l’air est humide,
bon (agréable) ou sec.
AM/PM indique si l’heure afchée est AM ou
PM (ne s’applique pas au format 24 heures).
Les chiffres de l’heure indiquent l’heure
actuelle, l’heure de l’alarme (ou les valeurs
de réglage lors de l’ajustement). L’icône AL1
(Alarme 1) ou AL2 (Alarme 2) apparaît quand
l’alarme correspondante est activée.
Jour afche le jour de la semaine.
Date et mois indiquent la date actuelle.
Panneau arrière
Le bouton MODE permet de basculer entre les
modes horloge et alarme 1/2. Appuyer sur le bouton
et le maintenir enfoncé pour régler l’élément afché
(heure ou alarme 1/2).
Le bouton ALARM (Alarme) permet de faire déler les réglages de l’alarme : Alarme 1 activée,
alarme 2 activée, alarmes 1 et 2 activées, alarmes désactivées.
Le bouton CHANNEL (Canal) fait déler les différents canaux pour les capteurs extérieurs sans l.
Appuyer sur le bouton et le maintenir enfoncé pour lancer manuellement la procédure de liaison
avec un capteur sans l sur le canal actuellement sélectionné.
Le bouton ALERT (Alerte) fait déler les alertes de température maximale et minimale qui ont été
préalablement dénies dans l’ordre suivant : alerte de température intérieure maximale, alerte de
température intérieure minimale, alerte de température extérieure maximale, alerte de tempéra-
ture extérieure minimale. Appuyer et maintenir enfoncé pour entrer en mode de réglage de l’alerte
de température.
Le bouton SNZ / LIGHT (Répétition / éclairage) permet d’effectuer la répétition de l’alarme lor-
squ’elle est activée et d’activer le rétro-éclairage de l’afchage lorsque le réveil fonctionne sur piles.
Appuyer sur le bouton et le maintenir enfoncé pour régler l’intervalle de répétition de réveil.
Le compartiment à piles (non illustré) contient 3 piles AAA (non incluses) pour alimenter la station
météo.
OUTDOOR TEMPERATURE and HUMIDITY (Température et humidité extérieures) indique
la température et l’humidité actuelles relevées par le capteur sans l.
L’indicateur TREND (Tendance) indique si la température a augmenté, diminué ou est
restée stable au cours de l’heure écoulée.
L’indicateur de réception sans l (
) et de canal (
1
,
2
, ou
3
) indiquent le canal sans l
utilisé par la station météo pour communiquer avec le capteur sans l. Le symbole (
)
indique que la station météo balaye les canaux à la recherche d’informations provenant de
plusieurs capteurs sans l. Si la pile du capteur sans l est faible, le symbole de pile faible
apparaîtra dans cette zone.
L’indicateur TEMP ALERTS (Alertes de température) indique si les températures d’alerte HI (max)
ou LO (min) ont été réglées. L’icône
apparaît à côté d’alertes lorsqu’elles ont été réglées.
INDOOR TEMPERATURE and HUMIDITY (Température et humidité intérieures) indique la
température et l’humidité actuelles relevées par la station météo.
L’indicateur TREND (Tendance) indique si la température a augmenté, diminué ou est
restée stable au cours de l’heure écoulée.
L’indicateur TEMP ALERTS (Alertes de température) indique si les températures d’alerte HI
(max) ou LO (min) ont été réglées. L’icône apparaît à côté d’alertes lorsqu’elles ont été réglées.
Capteur sans l
Devant Dos
Capteur sans l
Le compartiment à piles contient 2 piles AAA (non incluses)
pour alimenter le capteur sans l.
Le commutateur 1-2-3 (non illustré, à l’intérieur du
compartiment à piles) règle le canal sans l pour la transmission
des données du capteur sans l à la station météo.
L’encoche permet de xer le capteur à l’endroit souhaité pour
son installation à l’aide d’un clou ou d’une punaise.
L’indicateur clignote toutes les minutes pour indiquer que le
capteur est sous tension et qu’il transmet.
Compartiment
à piles
Encoche
Indicateur
Bras
Les boutons UP (Haut) et DOWN (Bas) permettent de régler l’heure, la date ou
l’heure d’alarme en cours lors du réglage. Le bouton UP permet de commuter la
température entre Celsius et Fahrenheit en mode d’afchage normal et active et
désactive les alertes de température en mode de réglage des alertes. Le bouton
DOWN permet de basculer entre l’afchage de l’heure sur 12 et 24 heures en
mode d’afchage normal et d’activer et de désactiver les alertes de température
en mode de réglage des alertes.
Le bouton SNZ / LIGHT (Répétition / éclairage) permet d’effectuer la répétition
de l’alarme lorsqu’elle est activée et d’activer le rétro-éclairage de l’afchage
lorsque le réveil fonctionne sur piles. Il fait aussi déler les réglages de luminosité
de l’écran. Appuyer sur le bouton et le maintenir enfoncé pour régler la duré de
la répétition de l’alarme.
La prise DC 5V (5 V c.c.) (sur le côté, non illustrée) permet de connecter l’adapta-
teur d’alimentation fourni pour alimenter la station météo.
UP
DOWN
SNZ
LIGHT
UP
DOWN
SNZ
LIGHT
INDOOR TEMPERATURE HUMIDITY
OUTDOOR TEMPERATURE HUMIDITY
Prévisions météorologiques
Station météo, dos
Station météo,
bras
Estación meteorológica inalámbrica
con sensor exterior
Guía de usuario
Paso 3: Alimentación de la estación inalámbrica
Puede proporcionar a la estación meteorológica colocando 3 baterías
“AAA” (no incluidas) o enchufando el adaptador de alimentación en un tomacorriente de CA.
Para instalar las baterías:
1. Abra el compartimiento de las baterías ubicado en la parte posterior de la estación
meteorológica.
Primeros pasos
Paso 1: Conguración del sensor inalámbrico
El sensor inalámbrico de la estación meteorológica transmite la información meteorológica
exterior a la estación meteorológica. Puede colgarlo utilizando la ranura ubicada en la parte
posterior o simplemente colocarlo sobre una supercie plana. Tenga en cuenta las siguien-
tes sugerencias prácticas de instalación al elegir una ubicación para el sensor inalámbrico:
• Mantenga el sensor a una distancia máxima de 98 pies (30 metros) de la estación
meteorológica. Intente minimizar lo más posible la cantidad de obstáculos entre el sensor
y la estación meteorológica, ya que se reducirá el alcance del sensor inalámbrico.
• Coloque el sensor inalámbrico de forma tal que se evite lo máximo posible la exposición a
la luz solar directa y la humedad.
• Evite la exposición del sensor a temperaturas inferiores a –30 ºF (–35 ºC). El frío extremo
reducirá la vida útil de las baterías y el alcance de transmisión.
Para instalar las baterías en el sensor inalámbrico:
1. Abra el compartimiento de las baterías ubicado en la
parte posterior del sensor inalámbrico.
2. Inserte las 2 baterías “AAA” (no incluidas). Respete las
polaridades “+” y “–” impresas en el compartimiento.
Nota: Si el sensor inalámbrico estará expuesto a
temperaturas bajo cero, se recomienda el uso de
baterías alcalinas.
3. Cierre el compartimiento de las baterías.
Una vez que el sensor inalámbrico tenga colocada las
baterías, su indicador parpadeará cada 1 minuto, lo que
signica que el sensor está transmitiendo la información meteorológica.
Paso 2: Baje el brazo de la estación meteorológica
La estación meteorológica tiene un brazo giratorio en su lado derecho
que se utiliza como la base de la estación meteorológica cuando lo baja
a la posición que se muestra aquí.
Nota: También puede colocar la estación meteorológica sobre una
supercie o colgarla utilizando la ranura ubicada en su parte posterior.
Sensor inalámbrico
Parte frontal Parte posterior
Compartimiento
de las baterías
Ranura
Indicador
Conector de CC de 5 V
Estación meteorológica,
parte posterior
Estación meteorológica, lado derecho.
2. Inserte las 3 baterías “AAA” (no incluidas).
Respete las polaridades “+” y “–” impresas en
el compartimiento.
3. Cierre el compartimiento de las baterías.
Nota: Cuando la estación meteorológica está
funcionando solo con las baterías (es decir,
cuando no esté enchufada), la pantalla se
apagará luego de 8 segundos para extender la
Compartimiento de las baterías
duración de las baterías. Para volver a encender la pantalla, oprima el botón SNZ-LIGHT.
Precaución sobre las baterías: Extraiga siempre las baterías antiguas, con poca carga o
agotadas por completo y recíclelas o deséchelas de acuerdo con las regulaciones locales y
nacionales.
Para utilizar el adaptador de alimentación:
1. Conecte el adaptador de alimentación
incluido al conector de CC de 5 V
ubicado en el lado derecho de la estación
meteorológica.
2. Enchufe el otro extremo en un tomacorriente
de CA en funcionamiento.
CONSEJO: La instalación de las baterías es una buena idea, incluso si enchufa la estación
meteorológica para su alimentación. Las baterías permitirán garantizar que se conserven sus
ajustes (como la hora y la alarma) incluso si existe un corte el en suministro eléctrico.
Paso 4: Vincule la estación meteorológica con el sensor inalámbrico
Una vez que la estación meteorológica esté encendida,
comenzará a establecer una vinculación con el sensor
inalámbrico. El indicador de recepción (
) de la sección
OUTDOOR (EXTERIOR) de la pantalla de la estación
meteorológica parpadeará cuando se estén vinculando la
estación meteorológica y el sensor inalámbrico. El proceso
de vinculación puede demorar hasta 3 minutos.
Nota: Para iniciar manualmente el procedimiento de vinculación
Resolución de problemas con el sensor inalámbrico
Si la pantalla de la estación meteorológica está teniendo problemas para establecer una conexión
con el sensor inalámbrico, pruebe los siguientes pasos para solucionar el problema de conexión.
• Intente acercar el sensor inalámbrico y la estación inalámbrica. La distancia máxima para
una conexión conable es 98 pies (30 metros).
• Evite colocar la estación meteorológica o el sensor cerca de objetos metálicos grandes o
electrodomésticos. Estos objetos podrían interferir con la conexión inalámbrica.
• Asegúrese de que la estación meteorológica y el sensor inalámbrico se estén comunican-
do en el mismo canal inalámbrico. De forma predeterminada, ambos se conguran en
el canal 1. Conrme que la sección OUTDOOR (EXTERIOR) de la pantalla de la estación
meteorológica indique
1
junto al indicador de recepción ( ). A continuación, revise el
interruptor de canal del sensor inalámbrico. Este interruptor está ubicado detrás de las
baterías en el compartimiento de las baterías del sensor.
• La estación meteorológica y el sensor inalámbrico poseen diferentes canales inalámbricos.
Si detecta interferencia en uno de los canales, ajuste la estación meteorológica y el sensor
inalámbrico en otro canal. El interruptor de canal del sensor está ubicado dentro del
compartimiento de las baterías, detrás de las baterías. Extraiga la tapa de compartimiento
y las baterías y, a continuación, ajuste el interruptor en el siguiente canal. A continuación,
vuelva a colocar las baterías y la tapa del compartimiento. Mantenga oprimido el botón
CHANNEL (CANAL) hasta que el canal que aparece en la sección OUTDOOR de la pan-
talla coincida con el canal que eligió en el sensor (
1
,
2
,ou
3
).
Para iniciar manualmente el procedimiento de vinculación de la estación meteorológica con
el sensor inalámbrico, mantenga oprimido el botón CHANNEL ubicado en la parte posterior
de la estación meteorológica durante 3 segundos. Para lograr que el sensor inalámbrico
se vincule al instante con la estación meteorológica en el modo de vinculación, extraiga las
baterías del sensor y luego vuelva a colocarlas.
Paso 5: Ajuste de fecha y hora
Cuando enchufe por primera vez, la pantalla de la estación meteorológica mostrará 12:00.
1. Mantenga oprimido el botón MODE
(MODO) ubicado en la parte posterior de
la estación meteorológica para ingresar
en el modo de ajuste de fecha/hora. Los
dígitos de hora comenzarán a parpadear.
2. Utilice los botones UP (ARRIBA) y DOWN
(ABAJO) del brazo para ajustar la hora.
Oprima el botón MODE para jar la hora
y moverse a los minutos.
3. Utilice los botones UP y DOWN para
UP
DOWN
SNZ
LIGHT
INDOOR TEMPERATURE HUMIDITY
OUTDOOR TEMPERATURE HUMIDITY
UP
DOWN
SNZ
LIGHT
Estación meteorológica,
parte posterior
Estación meteorológica,
brazo
ajustar los minutos. Oprima el botón MODE para jar los minutos y
moverse al año.
4. Utilice los botones UP y DOWN para ajustar el año. Oprima el botón
MODE para jar el año y moverse al mes.
5. Utilice los botones UP y DOWN para ajustar el mes. Oprima el botón
MODE para jar el mes y moverse al día.
6. Utilice los botones UP y DOWN para ajustar el día. A continuación,
oprima MODE para jarlo y moverse a la conguración de idioma de
día de la semana.
7. Oprima el botón UP y DOWN para cambiar entre los idiomas
disponibles para los días de la semana (inglés, de forma
predeterminada). Oprima MODE para elegir su preferencia y salir del
ajuste de fecha/hora .
de la estación meteorológica con el sensor inalámbrico, mantenga oprimido el botón CHANNEL
(CANAL) ubicado en la parte posterior de la estación meteorológica durante 3 segundos.
Una vez que se realice la vinculación, el indicador de recepción desaparecerá de la pantalla
de la estación meteorológica, y la estación inalámbrica mostrará la temperatura y la
humedad exteriores actuales.
Uso diario
Ajuste de alarma 1 y alarma 2
1. Oprima el botón MODE (MODO) ubicado en la parte posterior de la estación meteorológi-
ca para acceder a la pantalla de alarma 1. Aparecerá en la pantalla 6:00 AL1.
2. Mantenga oprimido el botón MODE hasta que los dígitos de hora comiencen a parpadear.
3. Utilice los botones UP (ARRIBA) y DOWN (ABAJO) para ajustar la hora para la alarma 1.
Oprima el botón MODE para jar la hora y moverse a los minutos.
4. Utilice los botones UP y DOWN para ajustar los minutos para la alarma 1. Oprima el botón
MODE para nalizar el ajuste de la alarma 1.
5. Repita los pasos 1 a 4 para la alarma 2, si lo desea.
Para activar/desactivar la alarma 1 y/o la alarma 2: oprima ALARM (ALARMA) una vez
para activar solo la alarma 1. Oprima ALARM una segunda vez para activar solo la alarma 2.
Oprima ALARM una tercera vez para activar la alarma 1 y 2. Oprima ALARM una cuarta vez
para desactivar ambas alarmas.
Notas:
• La alarma suena durante 2 minutos cuando está activada.
• Oprima SNZ/LIGHT (REPETICIÓN DE ALARMA/LUZ) para activar la repetición de alarma.
El indicador de alarma seguirá apareciendo en la pantalla del reloj. Oprima cualquier otro
botón para apagar la alarma.
• Mantenga oprimido SNZ/LIGHT para cambiar el intervalo que desea para cada vez que se
oprime SNZ/LIGHT.
Cambio de la visualización de temperatura entre grados Celsius y Fahrenheit
De forma predeterminada, la estación meteorológica muestra la temperaturas en grados
Fahrenheit. Para cambiar entre grados Fahrenheit y Celsius: oprima el botón UP
(ARRIBA) ubicado en el brazo de la estación meteorológica.
Ajuste de las alertas de temperatura máxima/mínima
Puede congurar la estación meteorológica para que lo alerte cuando registre una
temperatura máxima o mínima más allá de los límites denidos.
Para ajustar las alertas de temperatura y humedad mínimas/máximas:
1. Mantenga oprimido el botón ALERT (ALERTA) ubicado en la parte posterior de la
estación meteorológica hasta que la temperatura exterior comience a parpadear.
2. Utilice los botones UP (ARRIBA) y DOWN (ABAJO) ubicados en la parte posterior de la
estación meteorológica para ajustar la alerta de temperatura máxima exterior deseada.
Oprima ALERT para denirla.
3. Utilice los botones UP y DOWN ubicados en la parte posterior de la estación
meteorológica para ajustar la alerta de temperatura mínima exterior deseada. Oprima
ALERT para denirla.
4. Utilice los botones UP y DOWN ubicados en la parte posterior de la estación
meteorológica para ajustar la alerta de temperatura máxima interior deseada. Oprima
ALERT para denirla.
5. Utilice los botones UP y DOWN ubicados en la parte posterior de la estación
meteorológica para ajustar la alerta de temperatura mínima interior deseada. Oprima
ALERT para nalizar el ajuste de las alertas de mínima/máxima.
Para activar/desactivar las alertas de máximo/mínimo: oprima el botón ALERT ubicado
en la parte posterior de la estación meteorológica varias veces hasta que vea la alerta que
desea activar. A continuación, oprima el botón UP o DOWN para activar o desactivar.
Para mostrar las alertas de temperatura máxima/mínima para la estación meteorológica
y el sensor exterior: oprima el botón ALERT ubicado en la parte posterior de la estación
meteorológica para cambiar entre las opciones.
Al oprimir una vez, se muestra la alerta de temperatura exterior máxima.
Al oprimir dos veces, se muestra la alerta de temperatura exterior mínima.
Al oprimir tres veces, se muestra la alerta de temperatura interior máxima.
Al oprimir tres veces, se muestra la alerta de temperatura interior mínima.
Al oprimir cinco veces, se muestra la temperatura y humedad actuales registradas por la
estación meteorológica y el sensor inalámbrico.
Recorrido por el reloj despertador con estación meteorológica
Sensor inalámbrico
Parte frontal Parte posterior
Sensor inalámbrico
El compartimiento de las baterías permite colocar 2 baterías
“AAA” (no incluidas) para la alimentación del sensor inalámbrico.
El interruptor 1-2-3 (no mostrado, dentro del compartimiento
de las baterías) permite ajustar el canal inalámbrico para la
transmisión de los datos del sensor inalámbrico a la estación
meteorológica.
La ranura permite colgar en un clavo o tachuela para sujetar el
sensor a su lugar de instalación.
El indicador parpadea 1 vez por minuto para indicar que el
sensor está encendido y transmitiendo información.
Compartimiento
de las baterías
Ranura
Indicador
Pantalla
Pronóstico muestra el pronóstico estimado
de la estación meteorológica basándose en la
temperatura y humedad exteriores.
COMFORT (CONFORT) indica si el aire está
húmedo, adecuado (confortable) o seco.
AM/PM indica que la hora visualizada corre-
sponde a AM o PM (no se aplica al formato de
24 horas).
Los dígitos de hora muestran la hora actual o
la hora de la alarma (o los valores de congu-
ración al ajustar). Cuando se active una alarma,
Panel posterior
El botón MODE (MODO) permite cambiar la
pantalla entre la visualización del reloj y la alarma
1/2. Mantenga oprimido para ajustar el elemento
visualizado (hora o alarma 1/2).
ALARM (ALARMA) permite cambiar entre los ajustes de alarma: alarma 1 activada, alarma 2
activada, alarma 1 y 2 activadas, y alarmas desactivadas.
CHANNEL (CANAL) permite cambiar entre los diferentes canales para los sensores inalámbricos
exteriores. Mantenga oprimido para iniciar manualmente el procedimiento de vinculación con un
sensor inalámbrico en el canal actualmente seleccionado.
ALERT (ALERTA) permite cambiar entre las alertas de temperatura máxima y mínima estableci-
das en el siguiente orden: alerta de temperatura interior máxima, alerta de temperatura interior
mínima, alerta de temperatura exterior máxima y alerta de temperatura exterior mínima. Mantenga
oprimido para ingresar en el modo de ajuste de alerta de temperatura.
El botón SNZ/LIGHT (REPETICIÓN DE ALARMA/LUZ) permite activa la función de repetición
de alarma cuando está sonando y activar la retroiluminación de la pantalla cuando el reloj está
funcionando con la alimentación de las baterías. Mantenga oprimido para ajustar el intervalo de
repetición de alarma.
El compartimiento de las baterías (no mostrado) permite colocar 3 baterías “AAA” (no incluidas)
para la alimentación de la estación meteorológica.
aparecerá AL1 o AL2.
DÍA muestra el día de la semana.
FECHA y MES muestran la fecha actual.
OUTDOOR TEMPERATURE (TEMPERATURA EXTERIOR) y HUMIDITY (HUMEDAD) muestra
la temperatura y humedad actuales registradas por el sensor inalámbrico.
El indicador TREND (TENDENCIA) muestra si la temperatura ha subido, ha bajado o ha
permanecido estable en la última hora.
El indicador de recepción inalámbrica (
) y canal (
1
,
2
, o
3
) muestran qué canal está
utilizando la estación meteorológica para comunicarse con el sensor inalámbrico. El
símbolo indica si la estación inalámbrica está explorando por los canales para obtener
información desde varios sensores inalámbricos. Si la batería del sensor inalámbrico tiene
poca carga, aparecerá en esta área el símbolo de batería por agotarse.
TEMP ALERTS (ALERTAS DE TEMPERATURA) muestra si se han establecido alertas de
temperatura HI (ALTA) o LO (BAJA). El icono
aparece junto a las alertas cuando se las
haya establecido.
INDOOR TEMPERATURE (TEMPERATURA INTERIOR) y HUMIDITY (HUMEDAD) muestran la
temperatura y humedad actuales registradas por la estación meteorológica.
El indicador TREND (TENDENCIA) muestra si la temperatura ha subido, ha bajado o ha
permanecido estable en la última hora.
TEMP ALERTS (ALERTAS DE TEMPERATURA) muestra si se han establecido alertas de
temperatura HI (ALTA) o LO (BAJA). El icono aparece junto a las alertas cuando se las haya
establecido.
Brazo
Los botones UP (ARRIBA) y DOWN (ABAJO) permiten ajustar la hora actual,
la fecha o la hora de la alarma durante el ajuste. UP permite cambiar la lectura
de temperatura entre Celsius y Fahrenheit en el modo de visualización normal y
permite activar y desactivar las alertas de temperatura en el modo de ajuste de
alertas. DOWN permite cambiar entre la visualización de hora en formato de 12
y 24 horas en el modo de visualización normal y permite activar y desactivar las
alertas de temperatura en el modo de ajuste de alertas.
El botón SNZ/LIGHT (REPETICIÓN DE ALARMA/LUZ) permite activa la función
de repetición de alarma cuando está sonando y activar la retroiluminación de
la pantalla cuando el reloj está funcionando con la alimentación de las baterías.
También permite acceder a la conguración de brillo de la pantalla. Mantenga
oprimido para ajustar la cantidad de tiempo de repetición de la alarma.
El conector de CC de 5 V (parte lateral, no mostrado) permite la conexión con
el adaptador de alimentación suministrado para la alimentación de la estación
meteorológica.
UP
DOWN
SNZ
LIGHT
UP
DOWN
SNZ
LIGHT
INDOOR TEMPERATURE HUMIDITY
OUTDOOR TEMPERATURE HUMIDITY
Pronóstico
Estación meteorológica, parte posterior
Station météo,
bras
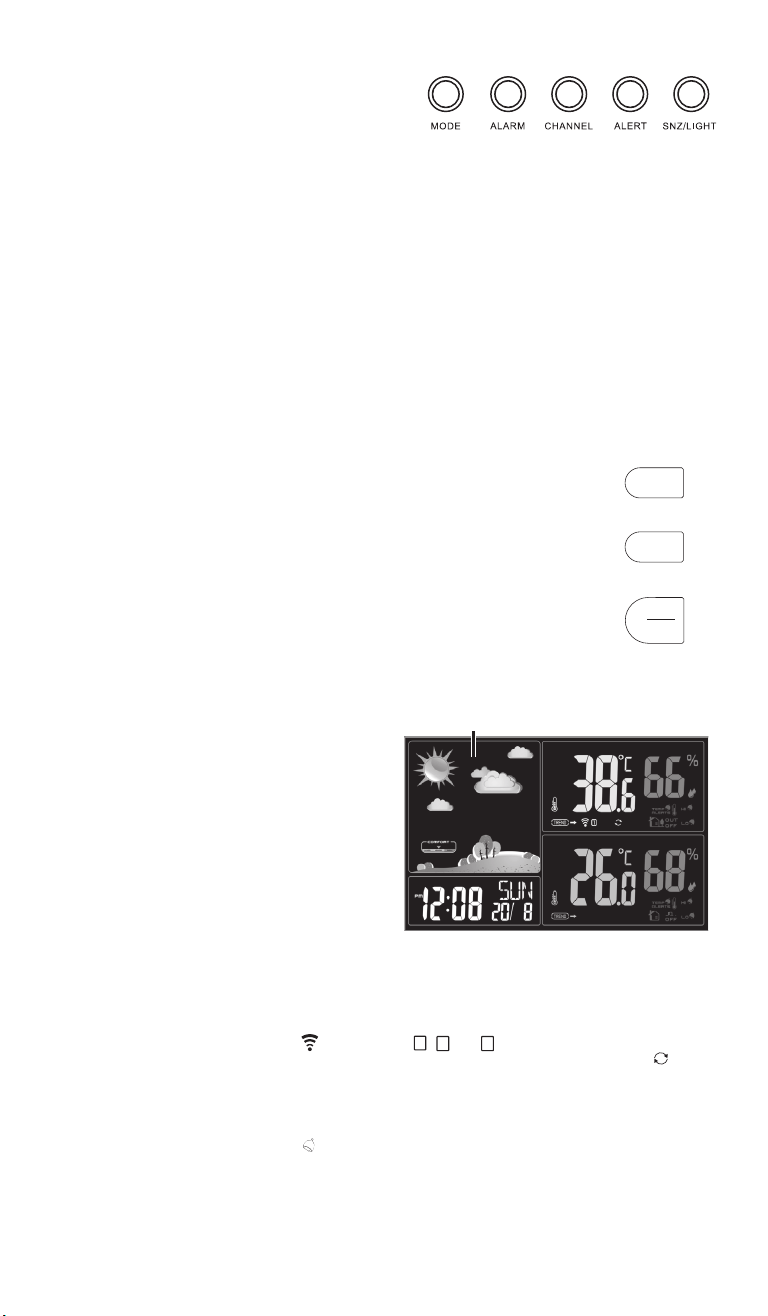
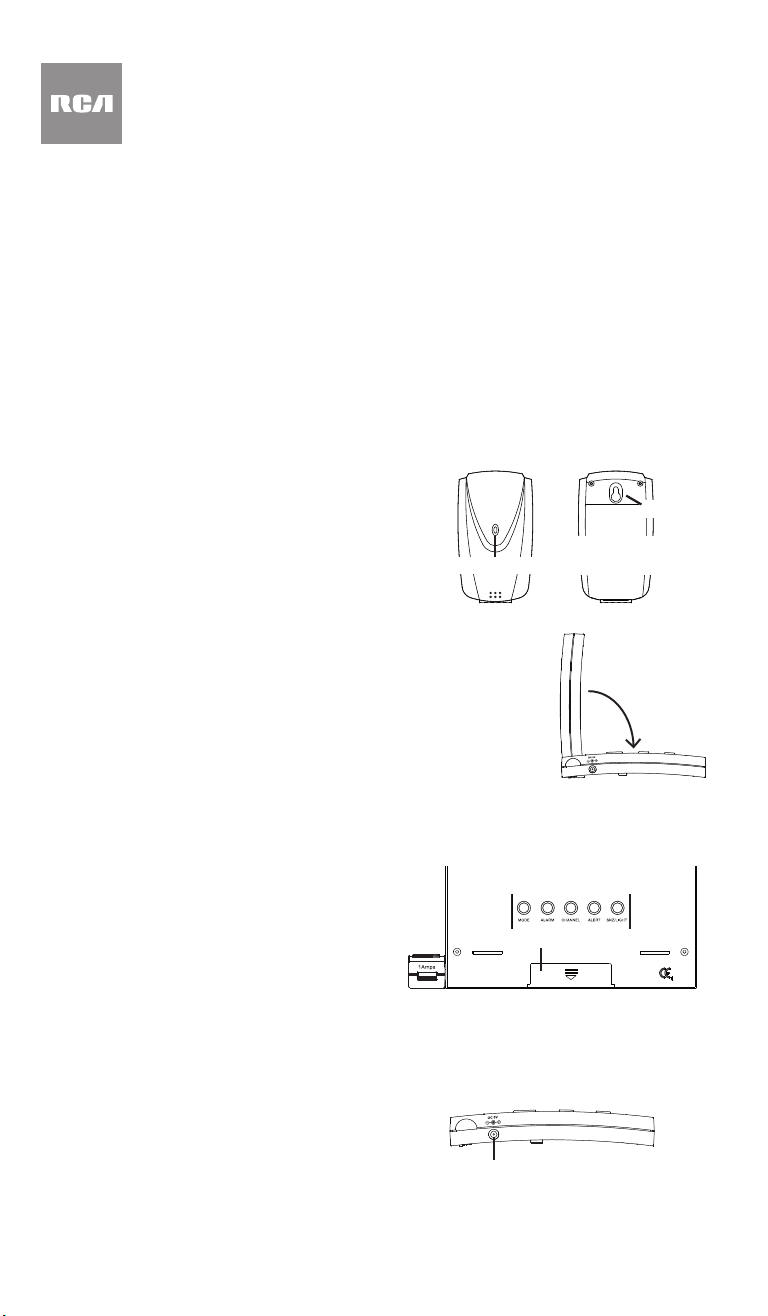
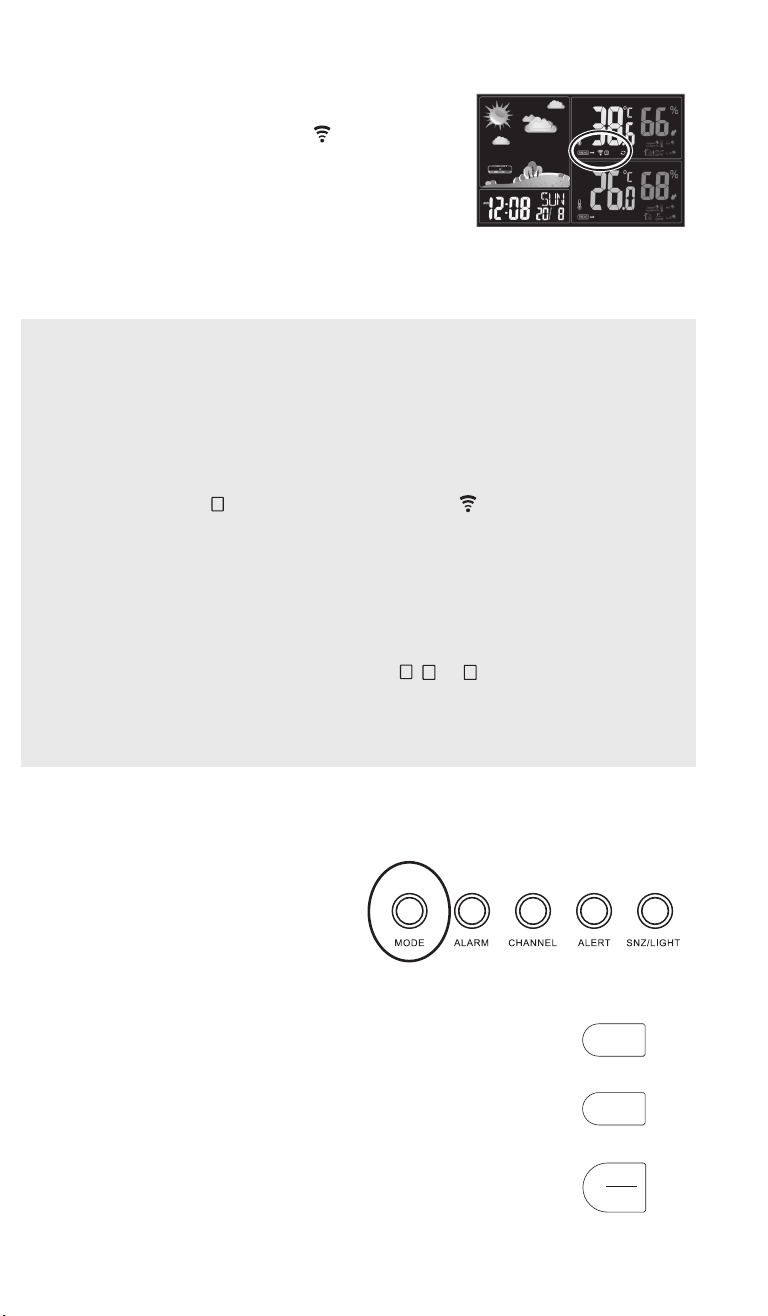