USER MANUAL Fridge Freezer
Operations
Feature panel
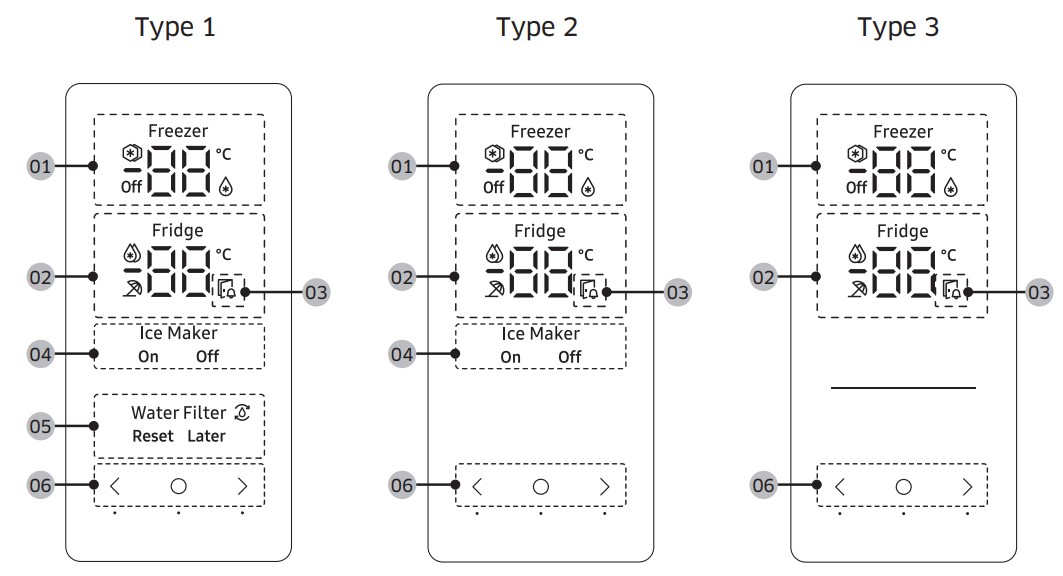
| 01 Freezer indicator |
- Displays the current or desired temperature of the freezer.
 indicates that the Power Freeze function is on. indicates that the Power Freeze function is on. indicates that the freezer is operating in Fridge mode. indicates that the freezer is operating in Fridge mode.- Off indicates that the freezer is off.
|
| 02 Fridge indicator |
- Displays the current or desired temperature of the fridge.
 indicates that the Power Cool function is on. indicates that the Power Cool function is on. indicates that the Vacation function is on. indicates that the Vacation function is on.
|
| 03 Door open indicator |
This indicator blinks with an alarm if the door is left open for more than 2 minutes. |
| 04 Ice Maker indicator |
- Displays the status of the ice maker.
- To enable ice making, you must turn on the ice maker.
|
| 05 Water Filter indicator |
 indicates that the water filter needs to be replaced. indicates that the water filter needs to be replaced.- When see the icon, you can replace the water filter and reset the water filter replace alarm, or dismiss the alarm and change the filter later. (For more information, see the "Resetting or dismissing the water filter replacement alarm"
|
| 06 Buttons |
- When the display is off, tap any button to wake up the display.
- Use
 to select the fridge or freezer and to select the fridge or freezer and  or or  to select the desired temperature or function for the selected compartment. to select the desired temperature or function for the selected compartment.
|
Turning on or off the ice maker
You can turn on or off the auto ice maker in the freezer.
1. Tap any button ( , , or ) to wake up the display.
- This step may not apply to some models.
2. Tap until the Ice Maker indicator blinks.
3. Tap or to turn on or off the ice maker.
- Tap to turn it on.
- Tap to turn it off.
4. Wait for 5 seconds or tap to confirm your selection.
- The Ice Maker indicator stops blinking.
Resetting or dismissing the water filter replacement alarm
The water filter replacement icon ( ) blinks to alert the user that it is time to replace the water filter. You can replace the water filter immediately and reset the water filter replacement alarm, or dismiss the alarm if you want to change the water filter later.
1. Tap any buttons ( , , or ) to wake up the display.
- This step may not apply to some models.
2. Tap until the Water Filter indicator blinks.
3. Tap or to select Reset or Later.
- If you have changed the water filter, tap to reset the water filter replacement alarm.
- If you want to change the water filter later and dismiss the alarm, tap .
4. Wait for 5 seconds or tap to confirm your selection.
- The Water Filter indicator stops blinking.
Special features
The refrigerator features user-oriented devices that you can use to benefit from.
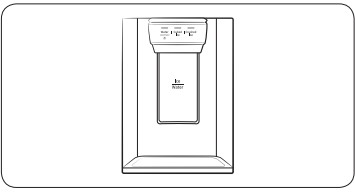
Water/Ice dispenser (applicable models only)
Using the dispenser, you can dispense water with or without ice.
The water dispenser offers 3 options: chilled water, cubed ice, and crushed ice. To dispense chilled water, press Water on the dispenser panel. Put a water glass under the dispenser, and then push the dispenser lever.
To dispense water with ice
 |
|
1. With the Ice Maker enabled, press Cubed Ice or Crushed Ice to select the ice type.
2. Put a water glass under the dispenser, and then push the dispenser lever with the glass. Ice will be dispensed from the dispenser.
3. Press Water to select water.
4. Push the dispenser lever with the glass. Water will be dispensed from the dispenser.
|
Ice maker (applicable models only)
The refrigerator has a built-in ice maker that automatically dispenses ice so that you can enjoy filtered water with cubed or crushed ice.
Ice making
After you have installed your refrigerator and plugged it in, follow these instructions to ensure proper ice making and to keep the ice bucket full of ice:
- Let the refrigerator operate for at least 24 hours to ensure optimal performance.
- Dispense the first 4 to 6 ice cubes into a glass
- Wait another 8 hours and dispense another 4 to 6 ice cubes.
- Then, wait another 16 hours and dispense the first glass-full of ice
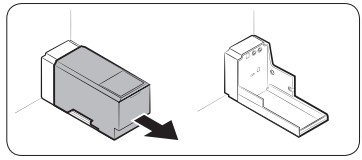
To fill the water tank (applicable models only)
 |
|
For first-time use, clean the inner side of the water tank and dry well.
1. Hold both handgrips on the front of the tank, and slide out as shown.
|
 |
|
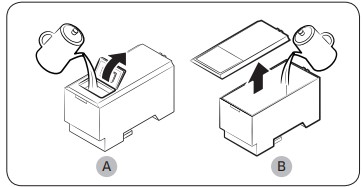
2. Open the front lid (A) of the cover or the entire cover (B) and fill the tank with a max of 5 litres water.
CAUTION
- Do not exceed the max line. Water overflows.
- Fill with potable water only.
|
 |
|
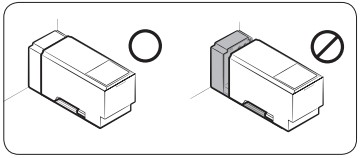
3. Reinsert the water tank and fit into the dispenser mechanism. Make sure the front side (with the front lid) of the tank faces to the front. |
CAUTION
- Make sure the water tank fits into the shelf. Otherwise, the water tank may not operate properly.
- Do not use the refrigerator without inserting the water tank. This may decrease the cooling performance.
- Fill the tank only with potable water such as mineral or purified water. Do not use other liquid.
- Use caution when moving a filled tank. Physical injury may occur if the tank is dropped.
- Do not try to disassemble the internal pump yourself. If the internal pump is damaged or disconnected from the water tank, the dispenser does not operate.
For first-time use
- Push the dispenser lever for 10 seconds to emit air from the hoses of the water supply system.
- Discard the first six glasses of water to remove impurities in the water supply system.
Maintenance
Handle and care
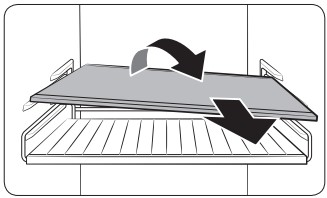
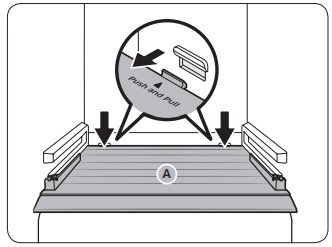
Shelves (fridge/freezer) / Wine rack (applicable models only)
 |
|
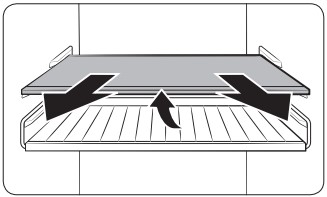
1. Pull out the shelf (or wine rack) a little. Then, while lifting the rear side, pull out. |
 |
|
2. Twist the shelf (or wine rack) diagonally to remove.
CAUTION
- The shelf must be inserted correctly. Do not insert upside down.
- Glass containers may scratch the surface of glass shelves
- Do not insert a shelf in the wine rack position. This may damage the refrigerator. (applicable models only)
|
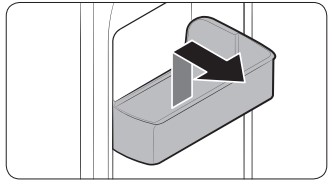
Door bins
 |
|
To remove a door bin, hold the front sides of the bin and gently lift up to remove. |
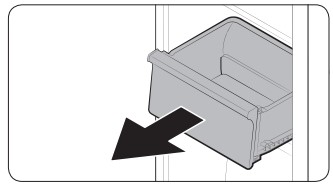
Drawers
 |
|
Gently lift up the front of the drawer and slide out. |
Vegetable / Dried food and meat storage drawer
 |
|
To remove the vegetable drawer from the fridge or the dry drawer from the freezer:
1. First, remove surrounding multipurpose drawers if necessary.
|
 |
|
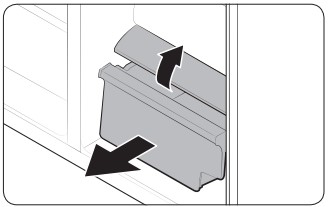
2. If your refrigerator has a cover (A) for the vegetable/dry drawer, remove it in the following method.
a. Pull the drawer halfway out.
b. Pull the cover while pressing the rear sides (as marked in the figure).
3. Gently pull out the vegetable/dry drawer.
|
Cleaning
Interior and exterior
WARNING
- Do not use benzene, thinner, or home/car detergent such as Clorox™ for cleaning purposes. They may damage the surface of the refrigerator and cause a fire.
- Do not spray water onto the refrigerator. This may cause electric shock.
- Do not put fingers or other objects into the dispenser hole.
Regularly use a dry cloth to remove all foreign substances such as dust or water from the power plug terminals and contact points.
- Unplug the power cord.
- Use a moistened, soft, lint-free cloth or paper towel to clean the refrigerator’s interior and exterior.
- When done, use a dry cloth or paper towel to dry well.
- Plug in the power cord.
Rubber seals
If the rubber seals of a door become dirty, the door may not close properly and reducing refrigerator performance and efficiency. Use a mild detergent and damp cloth to clean the rubber seals. Then, dry well with a cloth.
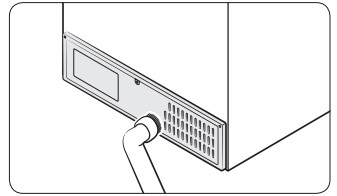
Rear panel
 |
|
To keep cords and exposed parts of the rear panel free of dirt, vacuum the panel once or twice a year. |
Replacement
Lamps
The lamps are not user-serviceable. To replace the lamps of the refrigerator, contact a local Samsung service centre.
Troubleshooting
General
Temperature
| Symptom |
Possible causes |
Solution |
| Fridge/freezer does not operate. Fridge/freezer temperature is warm. |
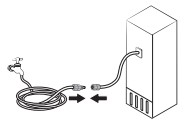
- Power cord is not plugged in properly.
|
- Properly plug in the power cord.
|
- Temperature control is not set correctly
|
- Set the temperature lower.
|
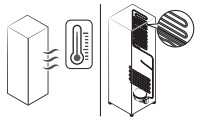
- Refrigerator is located near a heat source or direct sunlight.
|
- Keep the refrigerator away from direct sunlight or a heat source.
|
- Not enough clearance between refrigerator and nearby walls or cabinets.
|
- We recommend that the gap between the refrigerator and nearby walls (or cabinets) is more than 50 mm.
|
- The refrigerator is overloaded. Food is blocking the refrigerator vents.
|
- Do not overload the refrigerator. Do not allow food to block vents.
|
| Fridge/freezer is over-cooling. |
- Temperature control is not set correctly.
|
- Set the temperature higher.
|
| Interior wall is hot. |
- Refrigerator has heat-proof piping in the interior wall.
|
- To prevent condensation from forming, the refrigerator has heat-proof piping in the front corners. If the ambient temperature rises, this equipment may not work effectively. This is not a system failure.
|
Odour
| Symptom |
Possible causes |
Solution |
| Refrigerator has odours. |
|
- Clean the refrigerator and remove any spoiled food.
|
|
|
- Make sure strong smelling food is wrapped airtight.
|
Frost
| Symptom |
Possible causes |
Solution |
| Frost around the vents. |
- Food is blocking the vents.
|
- Make sure no food blocks the refrigerator vents.
|
| Frost on interior walls. |
- Door is not closed properly.
|
- Make sure food does not block the door. Clean the door gasket.
|
Condensation
| Symptom |
Possible causes |
Solution |
| Condensation forms on the interior walls. |
- If door is left open, moisture enters the refrigerator.
|
- Remove the moisture and do not leave a door open for extended periods of time
|
- Food with high moisture content.
|
- Make sure food is wrapped airtight.
|
Water/ice (dispenser models only)
| Symptom |
Possible causes |
Solution |
| Water flow is weaker than normal. |
- Water pressure is too low.
|
- Make sure the water pressure is between 30 to 125 psi.
|
| Ice maker makes a buzzing sound. |
- The ice maker function is activated, but the water supply to the refrigerator has not been connected.
|
|
| Ice maker does not make ice. |
- Ice maker has just been installed.
|
- You must wait for 12 hours for the refrigerator to make ice.
|
- Freezer temperature is too high.
|
- Set the freezer temperature below -18 °C (0 °F) or -20 °C (-4 °F) in warm ambient air.
|
- Dispenser panel Lock is activated.
|
- Deactivate dispenser panel Lock.
|
|
|
|
| Ice does not dispense. |
- Ice may jam if the ice dispenser is not used for a long time (approx. 3 weeks).
|
- If you won't be using the refrigerator for a long time, empty the ice bucket and turn off the ice maker.
|
- Ice bucket is not properly inserted.
|
- Make sure the ice bucket is properly inserted.
|
- Water line is not connected properly or water supply is not on.
|
- Check if the water line is installed correctly. Check if the water line stop cock is closed.
|
| Water does not dispense. |
- Water line is not connected properly or water supply is not on.
|
- Check if the water line is installed correctly. Check if the water line stop cock is closed.
|
- Dispenser panel Lock is activated.
|
- Deactivate dispenser panel Lock.
|
- A third-party water filter was installed.
|
- Use only Samsung-provided or approved filters.
- Unapproved filters may leak and damage the refrigerator.
|
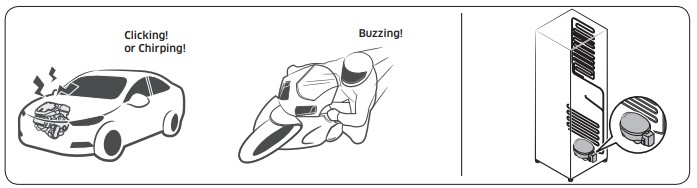
Do you hear abnormal sounds from the refrigerator?
Before calling for service, review the checkpoints below. Any service calls related to normal sounds will be charged to the user.
These sounds are normal.
- When starting or ending an operation, the refrigerator may make sounds similar to a car engine igniting. As the operation stabilizes, the sounds will decrease.
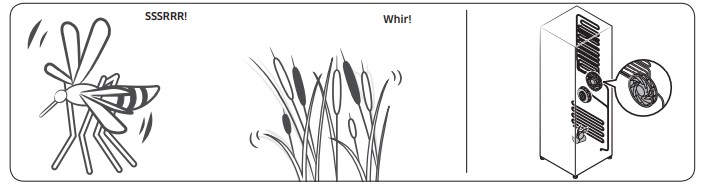
- While the fan is operating, these sounds may occur. When the refrigerator reaches the set temperature, no fan sound will occur.
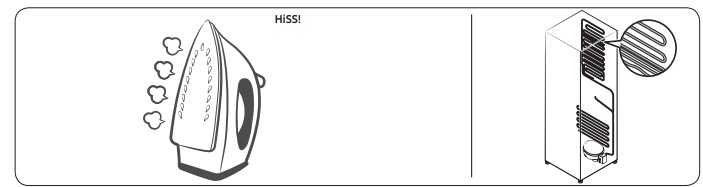
- During a defrost cycle, water may drip on the defrost heater, causing sizzling sounds.
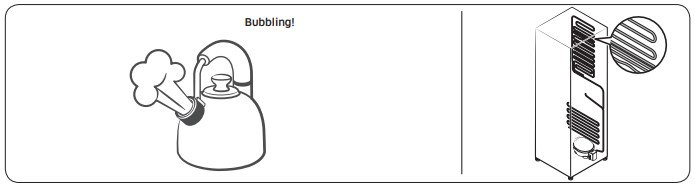
- As the refrigerator cools or freezes, refrigerant gas moves through sealed pipes, causing bubbling sounds.
- As the refrigerator temperature increases or decreases, plastic parts contract and expand, creating knocking noises. These noises occur during the defrosting cycle or when electronic parts are working.
- For ice maker models: When the water valve opens to fill the ice maker, buzzing sounds may occur.
- Due to pressure equalizing when opening and closing the refrigerator door, whooshing sounds may occur.