Loading ...
Loading ...
Loading ...
ASSEMBLING THE
PARTS
Before you process any food,
assemble the parts and try the HI and
LO processing speeds to get a feel for
how your Mini-Prep
®
Processor works.
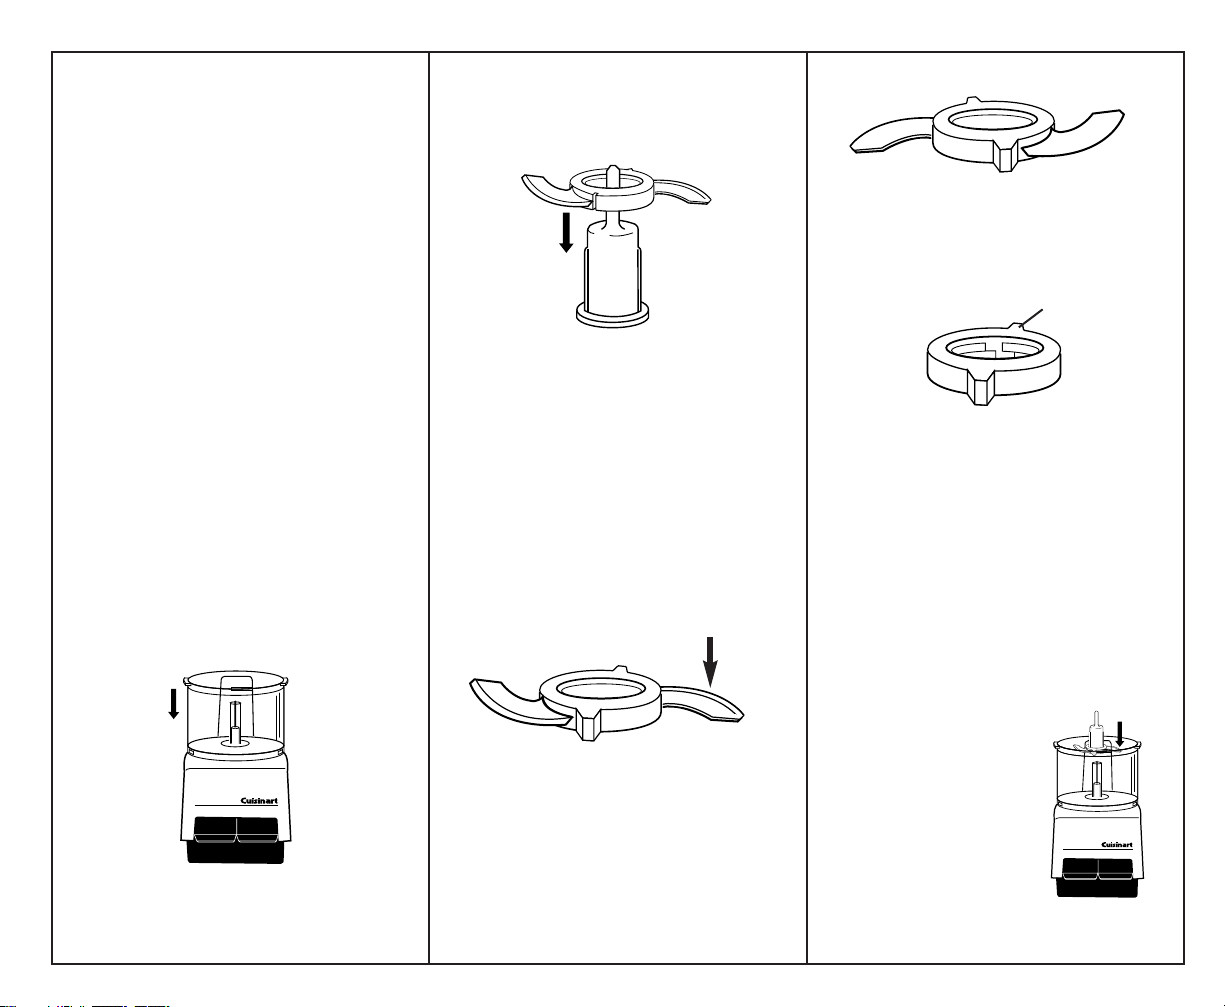
1. Place the Motor Base on a flat, dry,
stable surface. It should be close
to an electrical outlet of the same
voltage as that stated on the bottom
of the unit.
2. Locate part number on bottom of
Prep Bowl. Place the Prep Bowl on
the motor base with the Prep Bowl
part number slightly to the left of
center, then rotate it counterclockwise
until it locks and clicks into position.
Rotate Prep Bowl following direction
of Bowl Lock arrows printed on
motor base.
3. Connect the Blade Assembly to the
Blade Sheath. HOLD THE BLADE
ASSEMBLY BY THE CENTRAL HUB
HOLDING RIBS (grips) ONLY. DO NOT
TOUCH THE RAZOR-SHARP BLADES.
Note these important features of the
Blade Assembly.
• The Assembly can be placed over
the Sheath in two different ways.
If you hold it this way (A), you will
see the word "Sharp" on the blade.
Assemble the blade this side up to use
the sharp edge. (See the section on
processing food for information about
when to use the sharp edge.)
If you hold it this way (B), you will see
no writing on the blade. Assemble the
blade this side up to use the blunt edge.
(See the section on processing food
for infor-mation about when to use the
blunt edge.)
• There are notches (C) on opposite
sides of the interior of the hub.
These
fit over ridges on the sides of
the Sheath.
Place the Sheath, handle side up,
on a flat surface. Pick up the Blade
Assembly by its hub holding ribs (grips)
and line up the notches in the interior of
the hub with the ridges on the sides of
the Sheath. Let the Blade Assembly
slide down to the bottom of the Sheath.
Lift the Sheath by its handle. Hold the
Blade Assembly by its hub holding
ribs (grips) and turn it very slightly
clockwise. This locks it in place on
the Sheath and prevents it from
sliding up during processing.
4. Hold the Sheath by
its top handle, place
it over the central
opening of the Bowl,
and slide the Sheath
down over the motor
shaft. The lower blade
on the Blade Assembly
MINI PREP PROCESSOR
LO
HI
3
A.
SHARP SIDE
B.
BLUNT SIDE UP
C.
Notch
MINI PREP PROCESSOR
LO
HI
02CU13237 DLC-1 Series IB rev. 6/30/03 12:00 PM Page 5
Loading ...
Loading ...
Loading ...