User manual Inflator
-220982.png)
BATTERIES AND CHARGERS
The battery pack is not fully charged out of the carton. Before using the battery pack and charger, read the safety instructions below and then follow charging procedures outlined. When ordering replacement battery packs, be sure to include the catalog number and voltage.
Storage Recommendations
- The best storage place is one that is cool and dry, away from direct sunlight and excess heat or cold.
- For long storage, it is recommended to store a fully charged battery pack in a cool dry place out of the charger for optimal results.
NOTE: Battery packs should not be stored completely depleted of charge. The battery pack will need to be recharged before use.
Battery Pack Cleaning Instructions
Dirt and grease may be removed from the exterior of the battery using a cloth or soft non-metallic brush. Do not use water or any cleaning solutions.
Charging a Battery
NOTE: To ensure maximum performance and life of lithiumion battery packs, charge the battery pack fully before first use.
- Plug the charger into an appropriate outlet before inserting battery pack.
- Connect the charger and battery pack, making sure the battery is fully seated. The (charging) light will blink continuously indicating that the charging process has started.
- The completion of charge will be indicated by the light remaining ON continuously. The battery pack is fully charged and may be removed and used at this time or left in the charger.
NOTE: To remove the battery pack, some chargers require the battery pack release button to be pressed
-827243.png)
A charger will not charge a faulty battery pack. The charger refusing to light could indicate a problem with the charger.
NOTE: If the charger refuses to light, take the charger and battery pack to be tested at an authorized service center.
Hot/Cold Pack Delay
When the charger detects a battery pack that is too hot or too cold, it automatically starts a Hot/Cold Pack Delay, suspending charging until the battery pack has reached an appropriate temperature. The charger then automatically switches to the pack charging mode. This feature ensures maximum battery pack life.
A cold battery pack may charge at a slower rate than a warm battery pack.
Important Charging Notes
- Longest life and best performance can be obtained if the battery pack is charged when the air temperature is between 65 °F – 75 °F (18 ° –24 °C). DO NOT charge when the battery pack is below +40 °F (+4.5 °C), or above +104 °F (+40 °C). This is important and will prevent serious damage to the battery pack.
- The charger and battery pack may become warm to the touch while charging. This is a normal condition, and does not indicate a problem. To facilitate the cooling of the battery pack after use, avoid placing the charger or battery pack in a warm environment such as in a metal shed or an uninsulated trailer.
- If the battery pack does not charge properly:
- Check operation of receptacle by plugging in a lamp or other appliance;
- Check to see if receptacle is connected to a light switch which turns power off when you turn out the lights;
- Move the charger and battery pack to a location where the surrounding air temperature is approximately 65 °F–75 °F (18 ° –24 °C); d. If charging problems persist, take the tool, battery pack and charger to your local service center.
- The battery pack should be recharged when it fails to produce sufficient power on jobs which were easily done previously. DO NOT CONTINUE to use under these conditions. Follow the charging procedure. You may also charge a partially used pack whenever you desire with no adverse effect on the battery pack.
- Foreign materials of a conductive nature such as, but not limited to, grinding dust, metal chips, steel wool, aluminum foil, or any buildup of metallic particles should be kept away from charger cavities. Always unplug the charger from the power supply when there is no battery pack in the cavity. Unplug the charger before attempting to clean.
- Do not freeze or immerse the charger in water or any other liquid.
Charger Cleaning Instructions
-735401.png) WARNING:
WARNING:
Shock hazard. Disconnect the charger from the AC outlet before cleaning. Dirt and grease may be removed from the exterior of the charger using a cloth or soft non-metallic brush. Do not use water or any cleaning solutions.
Wall Mounting
These chargers are designed to be wall mountable or to sit upright on a table or work surface. If wall mounting, locate the charger within reach of an electrical outlet, and away from a corner or other obstructions which may impede air flow. Use the back of the charger as a template for the location of the mounting screws on the wall. Mount the charger securely using drywall screws (purchased separately) at least 1" (25.4 mm) long, with a screw head diameter of 0.28–0.35" (7–9 mm), screwed into wood to an optimal depth leaving approximately 7/32" (5.5 mm) of the screw exposed. Align the slots on the back of the charger with the exposed screws and fully engage them in the slots.
Versatrack
CRAFTSMAN chargers can be mounted to the wall using CRAFTSMAN Versatrack Trackwall. Hooks and accessories are sold separately. Please refer to the Versatrack Trackwall accessory sheet for further information
SAVE THESE INSTRUCTIONS FOR FUTURE USE
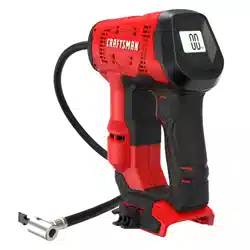
COMPONENTS (FIG. A)
Motor
Be sure your power supply agrees with the nameplate marking. Voltage decrease of more than 10% will cause loss of power and overheating. These tools are factory tested; if this tool does not operate, check power supply.
Intended Use
This inflator is designed for household use.
DO NOT use under wet conditions or in presence of flammable liquids or gases.
DO NOT let children come into contact with the tool. Supervision is required when inexperienced operators use this tool
THIS PRODUCT USES THE BATTERY AND CHARGER LISTED IN THE CHART BELOW
-478958.png)
ASSEMBLY AND ADJUSTMENTS
WARNING: To reduce the risk of serious personal injury, turn unit off and disconnect it from power source and remove the battery pack before making any adjustments or removing/ installing attachments or accessories. An accidental start-up can cause injury
Storage (Fig. A)
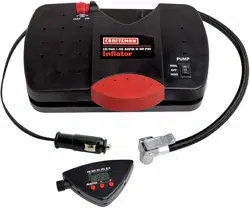
12V AC Adapter Storage
Wrap the 12V AC cord around the cord retainer located in the side of the inflator and snap the 12V AC connector 14 into its storage location on the cord retainer.
120V AC Cord Storage
Coil the 120V AC cord 13 into its storage location located on the side of the inflator.
Air Hose Storage
The high-pressure hose 10 is located in a storage channel around the face of the unit. Wrap the high-pressure hose inside the channel.
High-Volume Hose Storage
The high-volume hose 7 is located in a storage channel around the side of the unit. Wrap the high-volume hose inside the channel.
Accessories Storage
The accessories 15 , 16 , and 17 are stored in the back of the unit inside the accessory storage area.
Fitting the Accessories
Universal Valve Adapter (Fig. B)
Your inflator is supplied with the inflator needle valve 15 , a brass coupler 16 , and the standard tapered nozzle 17 , located on the side of the unit.
- To use the universal valve adapter 9 , make sure the lever is in the up position.
- Place the valve adapter over the stem of the inflator needle valve, brass coupler adapter or standard tapered nozzle.
- Press the lever 18 on the universal valve adapter down to lock it in place.
- Place the inflator needle valve, brass coupler adapter or tapered nozzle into the item to be inflated.
NOTE: Always make sure that the lever is in the up position when not in use. Operate your inflator only with the universal valve adapter or with the included nozzles.
NOTE: Make sure the universal valve adapter is firmly locked in place before turning the inflator on.
-94185.png)
High-Volume Hose (Fig. C)
- Remove the high-volume hose 7 from the storage location.
- Line up the notches 19 of the hose with the nubs 20 of the high volume pump inflator connection 12 . Then, slide the hose on and twist counter-clockwise to secure.
- To remove, twist the hose clockwise and slide hose off.
-366179.png)
NOTE: Many inflatables have an internal flap that prevents air loss during inflation, especially air mattresses. Unless this flap is displaced by the nozzle the inflatable will not inflate. Push the nozzle firmly into the valve to make sure that you push this flap out of the way.
WARNING: Risk of Bursting. Excessive air pressure may cause a hazardous risk of bursting or personal injury. Check the manufacturer's maximum pressure rating for items being inflated.
NOTE: If the pressure rating for the item being inflated is above 100 p.s.i.g., note that the maximum run time is 10 minutes, leave to rest for 20 minutes before reusing
OPERATION
WARNING: To reduce the risk of serious personal injury, turn unit off and disconnect it from power source and remove the battery pack before making any adjustments or removing/ installing attachments or accessories. An accidental start-up can cause injury.
Installing and Removing the Battery Pack (Fig. D)
NOTE: For best results, make sure your battery pack is fully charged.
To install the battery pack 21 into the inflator, align the battery pack with the rails inside inflator's battery port 22 and slide it into the port until the battery pack is firmly seated and ensure that it does not disengage.
To remove the battery pack from the tool, press the release button 23 and firmly pull the battery pack out of the tool handle. Insert it into the charger as described in the charger section of this manual.
-969332.png)
Switching On (Fig. A, E)
WARNING: Risk of Bursting. Do not leave unit running unattended. Overinflation of tires and other items could result in serious injury and property damage.
NOTE: When power is supplied to the inflator by 12V, 20V battery, or 120V AC the digital readout display will remain on for approximately 10 minutes before the display shuts off/goes into sleep mode. This occurs when the unit is not operating. To wake up the system, the user will need to push the pressure mode / reset button 5 . At this time the digital readout will turn on and the inflator is ready for use.
Before switching your inflator on, decide which power source you will be using; 12V AC adapter, 120V AC plug or a 20V Max* battery pack.
- To use the 12V AC adapter, or 20V Max* battery pack press the AC/DC power switch 1 located on the front of the unit to DC.
- If using the 12V AC vehicle adapter 14 , always fully extend the 12V AC cord before each use.
- Connect the 12V AC vehicle adapter 14 into your vehicles 12V AC accessory socket.
- To use the 120V AC cord, press the AC/DC switch 1 located on the front of the unit to AC.
- If using the 120V AC cord 13 , always fully extend the cord before each use.
- Connect the 120V AC cord 13 into either a wall outlet or an approapriate sized extension cord that is plugged into a wall outlet.
-466103.png)
To Turn on High-Volume
The high-volume hose is meant to be used for objects that hold large amounts of air, such as air mattresses, rafts, and swimming pool floats.
NOTE: The high-volume mode DOES NOT have an auto shut-off feature.
- Attach the high-volume hose 7 to the high volume pump inflator connection 12 as described in the High Volume Hose section.
- Insert the high-volume hose 7 , or it's tapered nozzle 8 into the object being inflated.
- Press the high-volume side of the mode power switch 2 , indicated by the air mattress symbol.
- To turn off, push the power switch to the center position.
To Turn on High-Pressure
The high-pressure hose is meant to be used for objects that need more air pressure, such as tires and basketballs.
- Remove the high-pressure hose 10 from the storage.
- Attach a nozzle as described in the Universal valve adapter section.
- Insert the nozzle into the object being inflated.
- Press the high-pressure side of the mode power switch 2 , indicated by the tire symbol.
- To turn off, push the power switch to the center position.
Deflate Using the High-Volume Hose (Fig. A, F)
WARNING: Beware of objects being ejected. When deflating, large amounts of air will exit the high volume pump inflator connection 12 . Ensure the universal valve adapter is not pointed at anyone or anything.
- Remove the high-volume hose 7 from the storage location.
- Line up the hose end 24 with the high-volume pump deflate connection 11 . Then, firmly slide in the hose so it is securly in place.
- Insert the hose, or it's tapered nozzle 8 into the object being deflated.
- Press the high-volume side of the mode power switch 2 , indicated by the air mattress symbol.
- To turn off, push the power switch to the center position.
- To remove the hose, twist the hose counterclockwise and slide hose off.
-464017.png)
Setting the Automatic Shut-Off Pressure (Fig. A)
NOTE: The digital readout will only show inflation pressures when the inflator is being used. In both inflation and pump mode the unit will show battery status.
- To switch between the different units (psi, bar or kPa), press the pressure mode/reset button 5 until the required units are displayed.
- Press the - or + pressure setting buttons 4 until the required pressure is displayed.
- After 3 seconds the display will flash and return to a reading of "0.0". This is normal.
- Connect the universal valve adapter 9 and accessories, if required, to the item to be inflated, making sure that the lever of the universal valve adapter is in the down position to lock it in place.
- To start the inflator press the mode power switch 2 , towards the side of the tire symbol.
- When the item to be inflated has reached the preset value the unit will automatically turn off.
- NOTE: You may notice the actual pressure reading may drop after a couple of seconds. This is normal.
- To stop the inflator at any time, press the main power button back to the center position.
NOTE: If the AC/DC power switch is turned off, all settings will be lost and will need to be reentered. This is a safety feature to prevent the risk of items OVER INFLATING.
Using the Inflator as a Pressure Gauge
- Connect the universal valve adapter 9 to the item to be checked.
- Press the mode power switch 2 , on the side of the tire symbol.
- The digital readout will display the item's pressure.
- After checking, press the mode power switch 2 back to the center position and return the air hose to the storage location.
MAINTENANCE
WARNING: To reduce the risk of serious personal injury, turn unit off and and disconnect it from power source and remove the battery pack before making any adjustments or removing/ installing attachments or accessories. An accidental start-up can cause injury
Accessories
WARNING: Since accessories, other than those offered by CRAFTSMAN, have not been tested with this product, use of such accessories with this tool could be hazardous. To reduce the risk of injury, only CRAFTSMAN recommended accessories should be used with this product.
Recommended accessories for use with your tool are available at extra cost from your local dealer or authorized service center. If you need assistance in locating any accessory, please contact CRAFTSMAN, call 1-888-331-4569.
Cleaning
WARNING: Blow dirt and dust out of all air vents with clean, dry air at least once a week. To minimize the risk of eye injury, always wear ANSI Z87.1 approved eye protection when performing this.
WARNING: Never use solvents or other harsh chemicals for cleaning the non-metallic parts of the tool. These chemicals may weaken the plastic materials used in these parts. Use a cloth dampened only with water and mild soap. Never let any liquid get inside the tool; never immerse any part of the tool into a liquid.
Repairs
The charger and battery pack are not serviceable. There are no servicable parts inside the charger or battery pack.
WARNING: To assure product SAFETY and RELIABILITY, repairs, maintenance and adjustment (including power cord repairs, and brush inspection and replacement, when applicable) should be performed by a CRAFTSMAN factory service center or a CRAFTSMAN authorized service center. Always use identical replacement parts
In a double-insulated product, two systems of insulation are provided instead of grounding. No grounding means is provided on a double-insulated product, nor should a means for grounding be added to the product. Servicing of a double-insulated product requires extreme care and knowledge of the system, and should be done only by qualified service personnel. Replacement parts for a doubleinsulated product must be identical to those parts in the product.