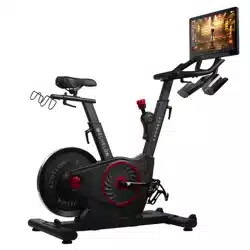
INSTRUCTION MANUAL
EX-3

2

3
Hello,
I am Lou Lentine, President of Echelon, and I would like to welcome you to the Echelon community. You’ve
made a great decision for yourself and your family. The Echelon Experience is an innovative combination
connects your family, friends, the Echelon community, and Echelon instructors together to help you with
there is always a new and exciting class for you to join.
through workout experiences that make an active lifestyle more accessible and sustainable.
Thank you again for choosing Echelon and I look forward to seeing you in the next live class!
Best personal regards,
Lou Lentine
4
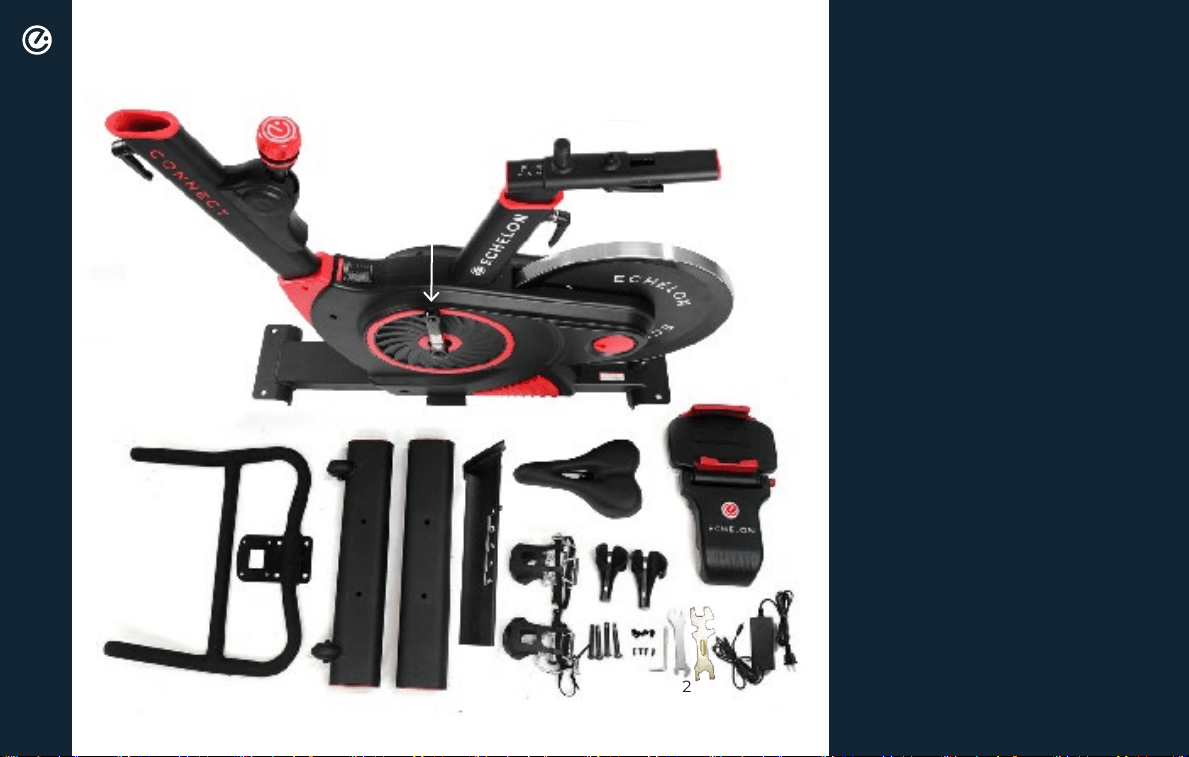
INCLUDES
PARTS LIST
3
1
8
7
5
6
9
10
11
14
12
13
15
17
16
18
19
21
22
24
4
20
2
23
1. Handlebar adjustment lever
2. Handlebar post frame
3. Resistance adjustment lever
4. Cranks
5. Seat post with dumbbell holder
6. Seat height adjustment lever
7. Seat slide adjustment lever
8. Front bracket
9. Rear bracket
10. Handlebars
11. Front foot
12. Rear foot
13. Seat
14. Console with tablet holder
15. Handlebar post
16. Pedals
17. Water bottle holders
18. Foot bolts
19. Handlebar bolts
20. Water bottle holder screws
21. Hex key with Phillips
screwdriver head
22. Double-sided wrench
23. Wrench
24. Power adapter

5
QUICK START GUIDE
ACCOUNT CREATION
If this product was purchased on the echelont.com website, you should have received
an activation email.
Go to member.echelont.com and follow the on-screen instructions to choose a plan and setup
your account. This info will be needed to login to your account on the Echelon Fit
TM
App.
All account info and plans are managed at member.echelont.com and use the same login. After creating your
account login on member.echelont.com, write down your login info. This will be the same login for the App.
1. Choose "sign up now"
2. Select Purchase location
3. Choose your plan
Monthly / 1 Year / 2 Year
Select purchase location and follow the
on-screen instructions.
4. Set up payment method
5. ENTER PERSONAL ACCOUNT INFO
Once assembly is complete, you will be required to
sign into your account, choose a class, and connect
your bike.
If this product was purchased on the echelont.com
website, you should have received an activation email.
Click the link in the activation email and follow the
on-screen instructions. Enter your information to verify
payment information. You will not be charged until
the next month.
ACCOUNT ACTIVATION
6. View YOUR ACCOUNT
Where you can edit your billing info, add family
members, manage subscriptions, and (if on your
mobile device) download the app and sign in.
6
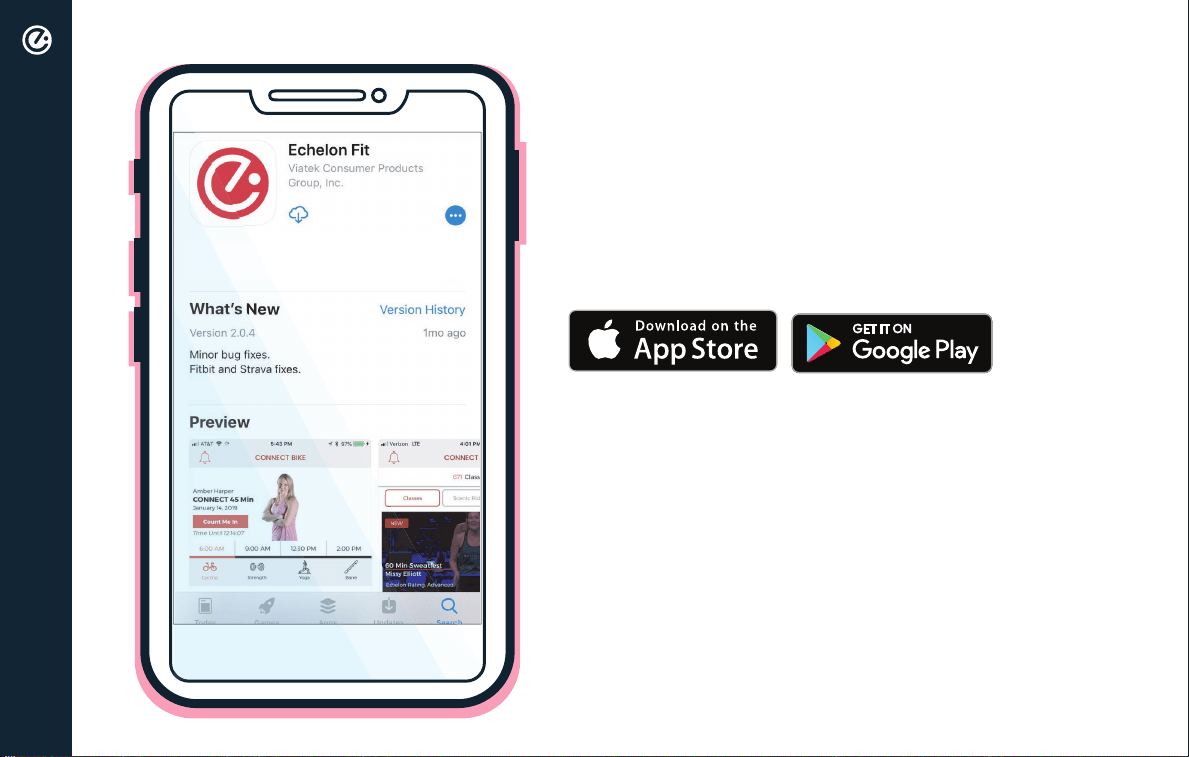
DOWNLOAD THE ECHELON FIT APP
Ensure latest version of the Echelon Fit™ App is
installed from the Google Play Store or the App Store.
OPERATIONAL INSTRUCTIONS
Connect to the Echelon Fit
TM
App to access tutorials
and operation instructions.
QUICK START GUIDE
7
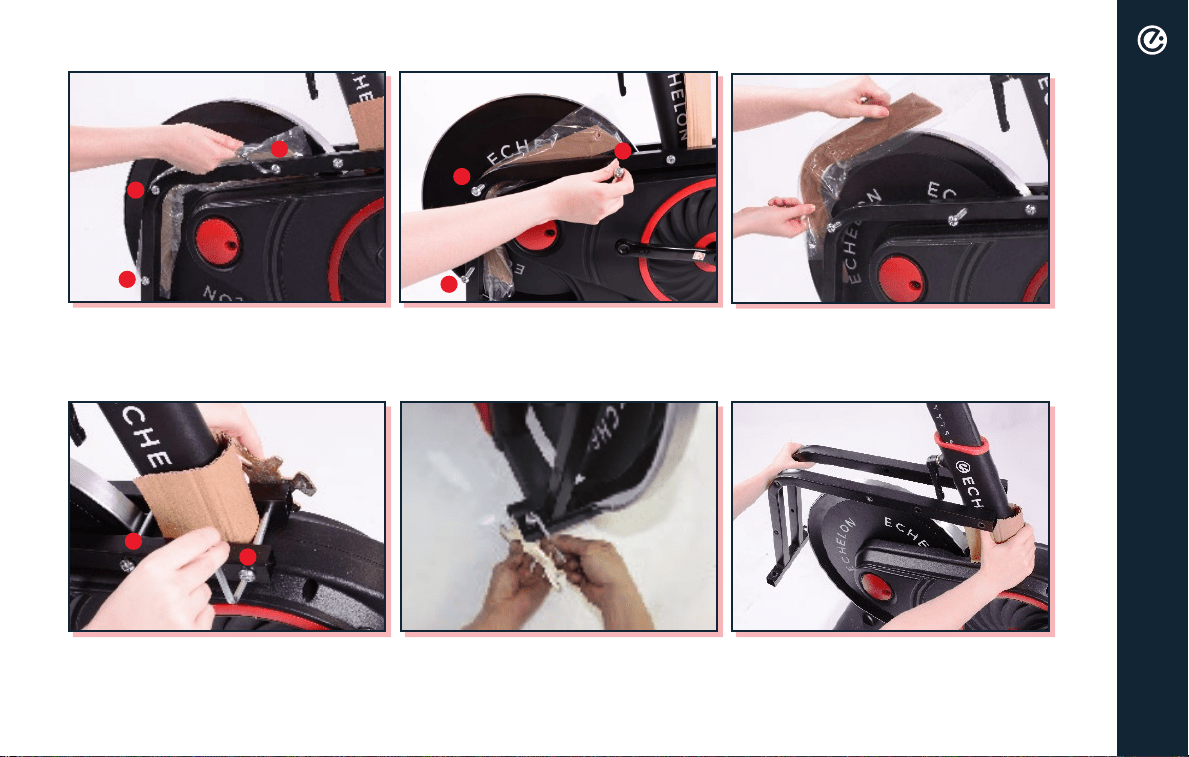
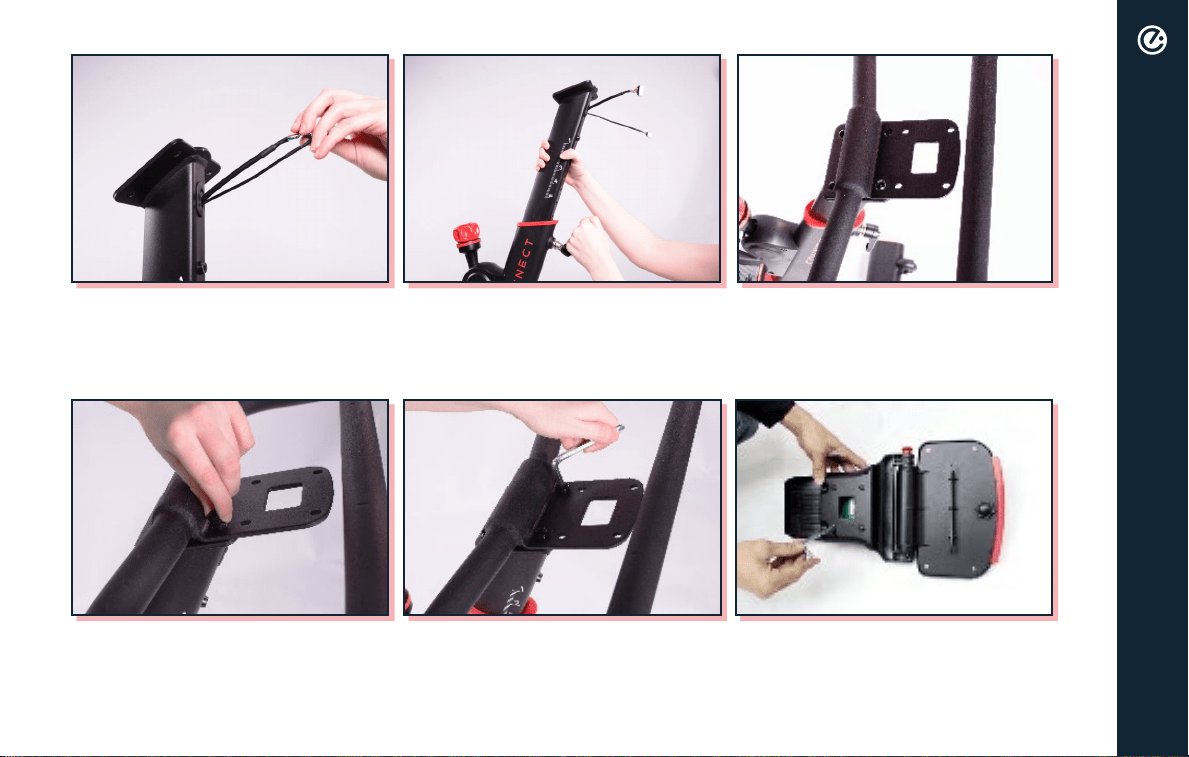
REMOVAL OF FRAME
Loosen bolts in order. Remove cardboard and then repeat
on other side.
Remove bolts on both sides with
included tools as shown.
Remove bolts in order.
Remove bolts in order with included
tools as shown.
Hold cardboard piece and remove
frame from bike.
3.
3.
2.
2.
2.
1.
1.
1.
8
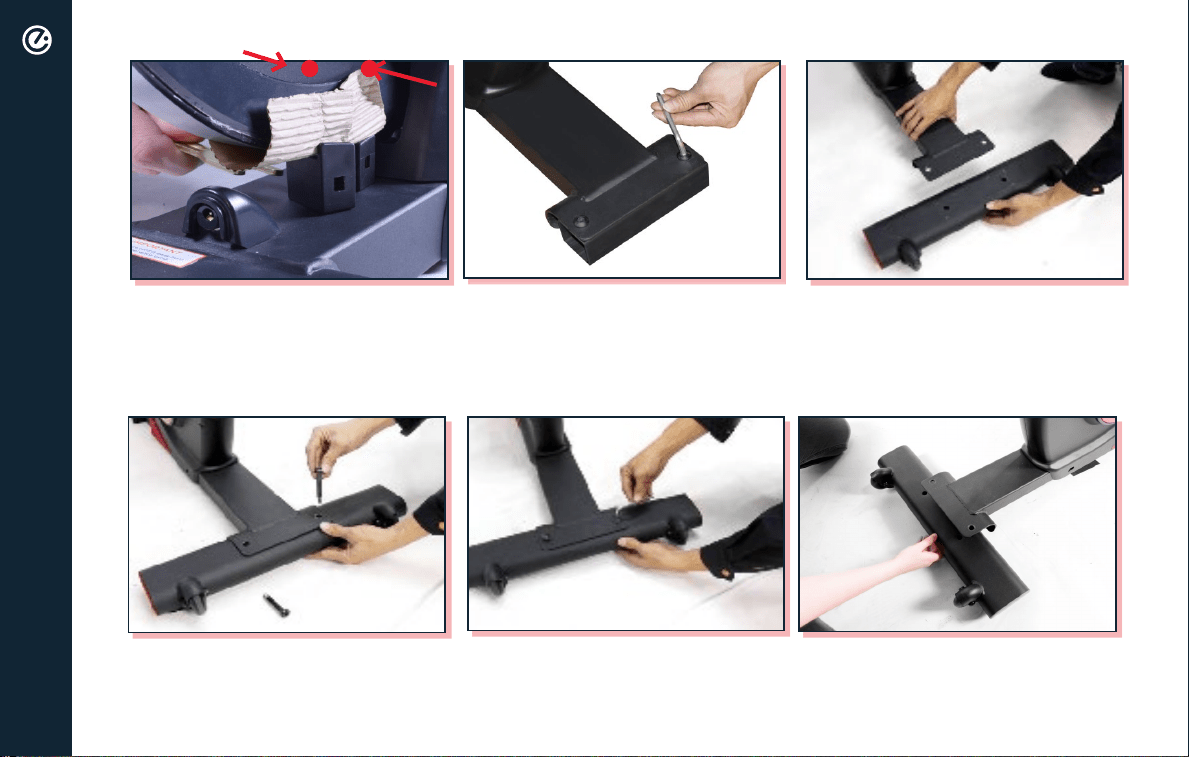
Place the front foot (with wheels)
under the front bracket.
Use a pair of scissors or wire cutters
to cut zip ties around wheel chocks.
Using one of the wrenches, knock
out the front then the back chock.
Use the included hex key to remove
the metal front bracket support.
Tighten down foot bolts with
included hex key.
Insert foot bolts into front foot. Place the rear foot under the
rear bracket.
1. 2.
ASSEMBLY
9
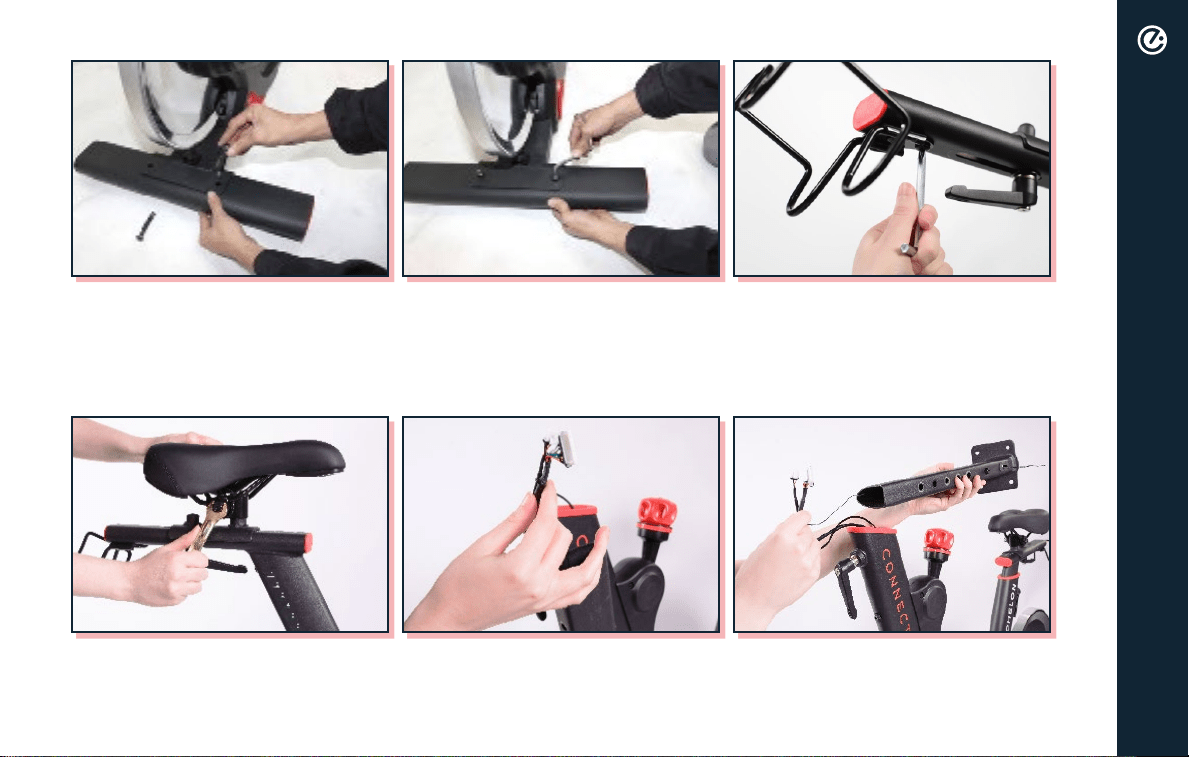
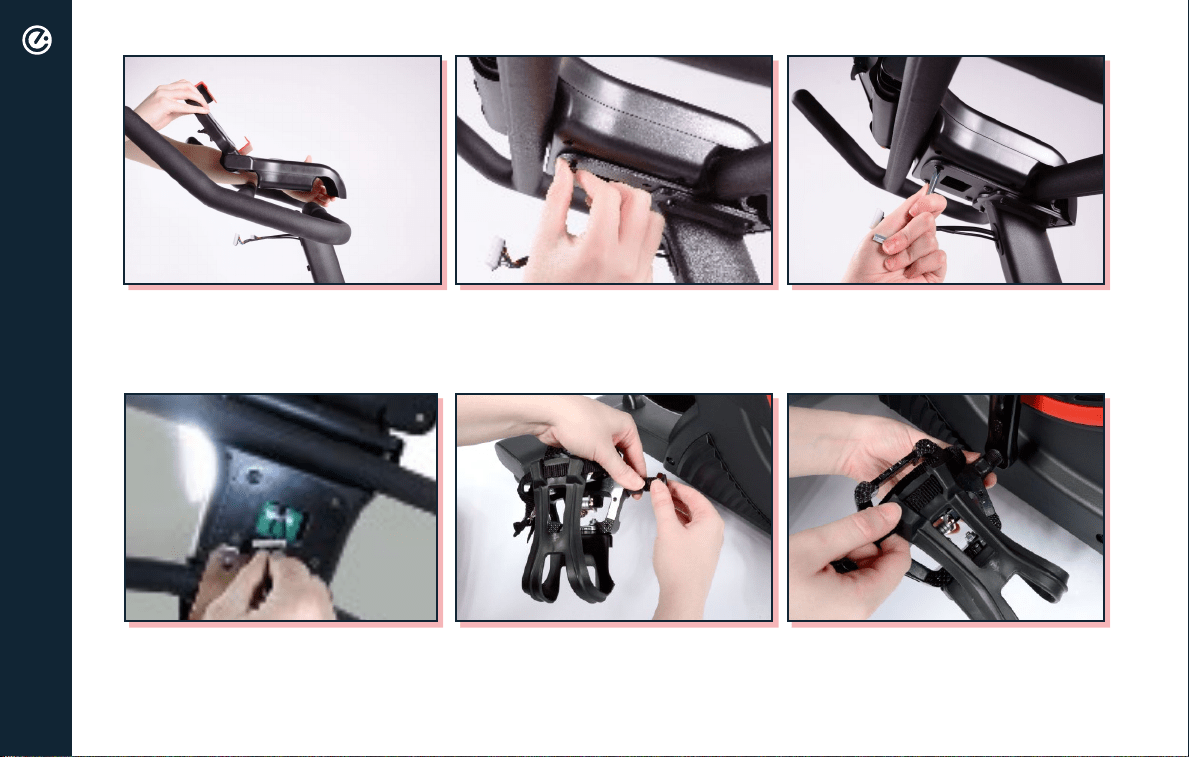
Bolt dumbbell holder onto seat post
with included hex key.
Pull the two wires out of frame and tie them together with included twist
tie that is attached to the handlebar post’s bracket.
Place seat onto seat post and
tighten down and secure with
included wrench.
Insert foot bolts into rear foot. Tighten down foot bolts with
included hex key.
ASSEMBLY

10
ASSEMBLY
Pull wires out of the hole at the top
of the post.
Unwrap the twist tie and separate the wires.
Gently work the wires through post.
Make sure to pull out enough length
to complete the next steps.
11
Place handlebars on handlebar post.
Use included hex key to tighten and
secure handlebars in place.
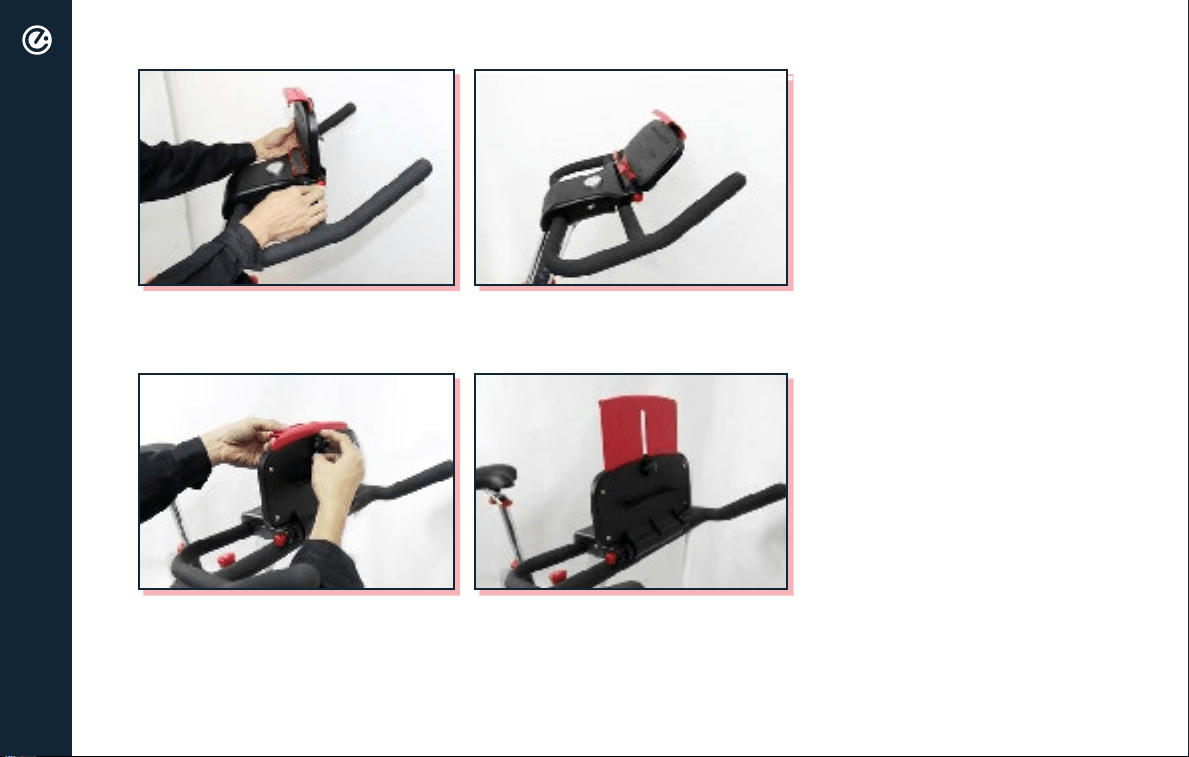
Remove screws from the back of
the console with screwdriver on
included hex key.
Ensure wires are still pulled out and insert post into the frame while
pulling out handlebar adjustment lever.
insert bolts and finger tighten.
ASSEMBLY
12
ASSEMBLY
Use screwdriver on included hex
key to tighten and secure console in
place.
Connect wires to console.
Place console onto handlebars. Attach back of console to
handlebars by inserting screws and
finger tightening.
Remove nut from right pedal by
turning counterclockwise.
Screw right pedal onto right
crank arm clockwise. Use double
sided wrench to ensure pedal is
firmly seated against crank arm.
13
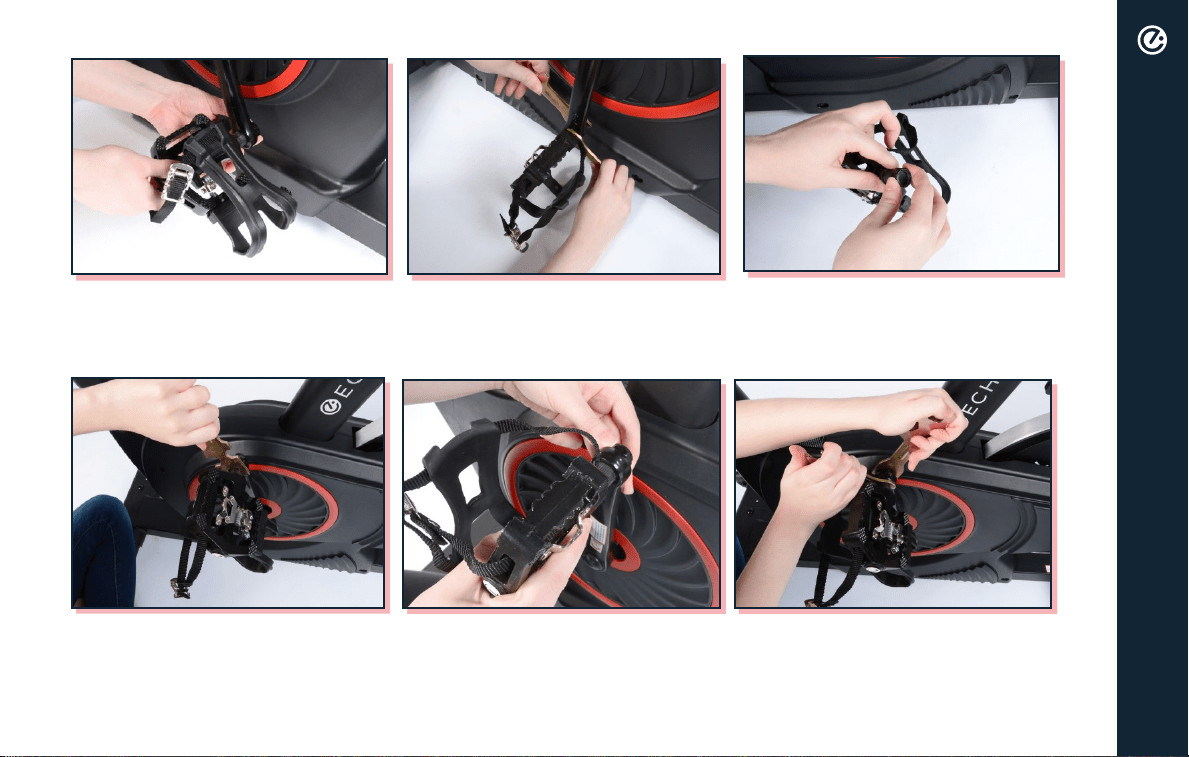
ASSEMBLY
onto pedal bolt.
Hold pedal with double sided
wrench and use single sided wrench
to tighten nut clockwise.
Remove nut from left pedal by
turning clockwise.
Screw left pedal onto crank arm
counterclockwise. Use double sided
wrench to ensure pedal is firmly
seated against crank arm.
back onto pedal bolt.
Hold pedal with double sided
wrench and use single sided wrench
to tighten nut counterclockwise.

14
ASSEMBLY
Hold water bottle holder against holes at the base of handlebar post frame
included hex key to secure. Repeat on opposite side.
Plug power adapter into port
located on the rear foot bracket,
then plug into wall outlet.
15
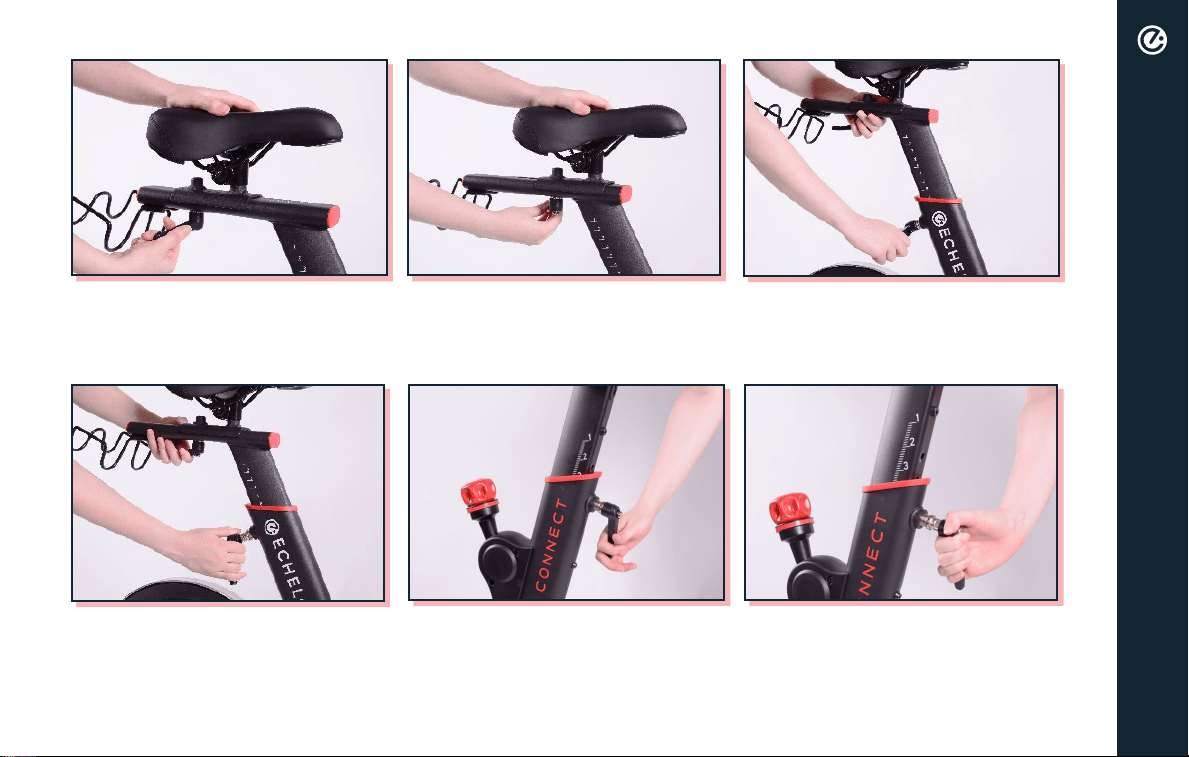
Turn seat slide adjustment lever
counterclockwise to loosen.
Turn seat height adjustment lever
counterclockwise until you are able
to pull the lever halfway out.
Move seat along track to desired
location. Turn seat slide adjustment
lever clockwise to tighten and
secure in place.
Pull and hold the seat height
adjustment lever and raise the seat
to desired position. Turn seat height
adjustment lever clockwise until
secure.
Turn handlebar adjustment lever
counterclockwise until you are able
to pull the lever halfway out.
Pull and hold the handlebar
adjustment lever and raise or lower
the handlebars to desired position.
Turn handlebar adjustment lever
clockwise until secure.
SEAT/HANDLEBAR ADJUSTMENT
16
Push red knob on the side of the console inward, then adjust tablet holder
to desired angle.
To accommodate various tablet sizes, turn knob on the back of tablet
holder counterclockwise release clamp. Adjust clamp to desired height and
turn knob clockwise to secure.
TABLET HOLDER ADJUSTMENT

17
FEDERAL COMMUNICATIONS COMMISSION (FCC) STATEMENT
15.21
15.105(B)
IS CONNECTED.
FCC RF RADIATION EXPOSURE STATEMENT:
OR TRANSMITTER.
THIS DEVICE COMPLIES WITH PART 15 OF THE FCC RULES. OPERATION IS SUBJECT TO THE FOLLOWING TWO
CONDITIONS:
UNDESIRED OPERATION.
SAFETY INFO AND WARNINGS

18
INNOVATION, SCIENCE AND ECONOMIC DEVELOPMENT CANADA (ISED)
INNOVATION, SCIENCE ET DÉVELOPPEMENT ÉCONOMIQUE CANADA (ISED)
CANADIAN NOTICE
AVIS CANADIEN
CAUTION: EXPOSURE TO RADIO FREQUENCY RADIATION.
ATTENTION: EXPOSITION AU RAYONNEMENT RADIOFRÉQUENCE.
TRANSMETTEUR.
SAFETY INFO AND WARNINGS

19
NOTE:
POSITION AND BRING THE MACHINE TO A COMPLETE STOP.
THE MANUFACTURER RECOMMENDS TO PLACE THE ECHELON® CONNECT BIKE IN A SPACE WHERE YOU HAVE
TWO FEET OF CLEARANCE ON ALL SIDES OF THE BIKE FOR SAFE MOUNTING AND DISMOUNTING OF THE
EXERCISE BIKE. THE MINIMUM DIMENSIONS ARE: 0.5 M (19.7 IN.) ON AT LEAST ONE SIDE, AND 0.5 M (19.7 IN.)
EITHER BEHIND OR IN FRONT OF THE EXERCISE BIKE.
WHILE CLEANING YOUR ECHELON
®
CONNECT BIKE, PLEASE USE A SOFT RAG WITH MILD DETERGENT OR WATER
TO WIPE DOWN THE MACHINE. DO NOT USE CORROSIVE CHEMICAL LIQUIDS WHICH MAY DAMAGE
THE COVER.
IMPORTANT SAFETY INSTRUCTIONS
Read all instructions before using THE ECHELON® CONNECT.
DANGER -
To reduce the risk of electric shock:
1. Always unplug this appliance from the electrical outlet immediately after using and
before cleaning.
WARNING - To reduce the risk of burns, fire, electric shock, or injury to
persons:
SAFETY INFO AND WARNINGS

20
1. An appliance should never be left unattended when plugged in. Unplug from outlet when
not in use, and before putting on or taking off parts.
shock, or injury to persons.
3. This appliance is not intended for use by persons with reduced physical, sensory or mental
capabilities, or lack of experience and knowledge, unless they have been given supervision
or instruction concerning use of the appliance by a person responsible for their safety. Keep
children under the age of 13 away from this machine.
4. Use this appliance only for its intended use as described in this manual. Do not use
attachments not recommended by the manufacturer.
5. Never operate this appliance if it has a damaged cord or plug, if it is not working properly, if
it has been dropped or damaged, or dropped into water. Return the appliance to a service
center for examination and repair.
6. Do not carry this appliance by supply cord or use cord as a handle.
7. Keep the cord away from heated surfaces.
8. Never operate the appliance with the air openings blocked. Keep the air openings free of lint,
hair, and the like.
9. Never drop or insert any object into any opening.
10. Do not use outdoors.
11. Do not operate where aerosol (spray) products are being used or where oxygen is being
administered.
12. To disconnect, turn all controls to the off position, then remove plug from outlet.
SAFETY INFO AND WARNINGS

21
BEFORE starting any fitness or strength program, consult with your physician or health
official. This will ensure that you engage in the proper strength or fitness program for your
age and physical condition.
Before using the Echelon
®
· Have you been sick recently?
· Have you had prolonged dizziness recently?
· Have you been out of breath for no reason recently?
· Have you had chest pain recently?
· Do you currently have any injuries preventing you from exercise?
· Are you pregnant?
· Do you have any conditions or reasons you should NOT exercise?
· Are you over 35 years old and physically inactive?
· Have you been told by a doctor that you should NOT exercise?
ECHELON® CONNECT.
Read the user manual fully and follow all instructions. This ensures your safety.
®
Connect on solid, level ground and in a well lit and ventilated area.
parts.
®
Connect offers up/down and
SAFETY INFO AND WARNINGS

22
•
Echelon
®
Connect if your body weight is in excess of 300 pounds.
®
Connect when sick or fatigued.
•
away. Ensure that shoelaces are tucked into your shoes.
•
• Echelon® Connect.
•
dismounting. Do not stand or climb on the handlebars.
•
rubber handlebar grip.
•
or other pains, STOP IMMEDIATELY! Consult your physician before using the Echelon® Connect again.
•
absorb sweat from your body and the handlebars.
• Echelon® Connect in a standing position at high revolutions per minute (RPM) (see
• Echelon
®
Connect.
• handlebars while in a standing position
•
attachments may cause injury or damage to the bike and will affect the warranty of the bike.
SAFETY INFO AND WARNINGS

23
SAFETY INFO AND WARNINGS
• Echelon
®
Connect is wiped down after each use to keep it sanitary.
• Cleaning and user maintenance shall not be made by children without supervision.
If any problems arise affecting the performance of the Echelon
®
Connect, contact the manufacturer
immediately. Always ensure that parts which undergo wear are checked regularly.
CHELON
®
CONNECT!
24
833-937-2453 (+1.423.402.9010) cs@echelonfit.com
Customer Service / Le service a la clientele / Servicio al Consumidor
MADE IN
CHINA
Read Instructions
Before Operating
PATENT
PENDING
DO NOT DISPOSE OF BATTERIES IN FIRE. ALWAYS DISPOSE OF BATTERIES PER LOCAL & FEDERAL GUIDELINES.
© 2020 ECHELON FITNESS MULTIMEDIA, LLC. All specifications are subject to change without notice. All rights reserved.
Echelon Fitness Multimedia, LLC 6011 Century Oaks Dr. Chattanooga, TN 37416
Rev:
Echelon
®
warrants this product to be free of manufacturing defects. Should any such defect develop or become evident within one year from the date
of purchase, Echelon
®
will replace the entire product or, at its option, repair or replace the defective part(s) without charge.
Contact Echelon
®
customer service at 833-937-2453 or at [email protected]om to determine whether it is necessary to return the unit. To return, securely
pack the entire unit. Be sure carton clearly identifies sender by name and address. Attach a letter or card describing defect and original sales receipt.
Mail prepaid to Echelon Fitness Multimedia, LLC 6011 Century Oaks Dr. Chattanooga, TN 37416.
This warranty is void if damage or malfunction is due to abuse or failure to operate product in accordance with instructions and on recommended
electrical current. This warranty gives you specific legal rights and you may also have other rights which vary from state to state. If you have any
questions, or would like to learn more about Echelon
®
, please contact us at 833-937-2453 or at cs@echelonfit.com.
Register your product online at echelonfit.com/pages/register-warranty/
Model:
ECHELONFIT.COM
For questions, assistance, or replacement parts, do not return to your retailer. Contact Echelon
®
customer
service below. For refunds on items not purchased from Echelon
®
directly, please contact your retailer.
ECHELON
®
FIT 1-YEAR LIMITED WARRANTY
060120
ECHEX-3
WARRANTY