Rev.02_011719

2
TABLE OF CONTENTS
Warranty ..................................................................3
Product Record
....................................................... 4
Important Safety Instructions
........................ 5-7
Electrical & Grounding Requirements ............ 7
Parts and Features
.............................................. 8
Refrigerator Installation
..............................9-18
Unpacking Your Refrigerator
..........................9
Installation
.......................................................10
Removing/Replacing Handles, Doors, and
Drawers.........................................................11-17
Leveling and Door Alignment
......................18
Using Your Refrigerator
............................19-33
Setting the Controls
..................................19-20
Smart Features
...............................................21
Instructions for Smart Grid
......................22-23
Automatic Icemaker
......................................24
Food Storage Guide ........................................25
Refrigerator Shelves
........................................26
Humidity Controlled Crisper
........................27
Temperature Controlled Pantry Drawer .......27
Door Bin
............................................................ 27
Air Filter
..................................................... 28
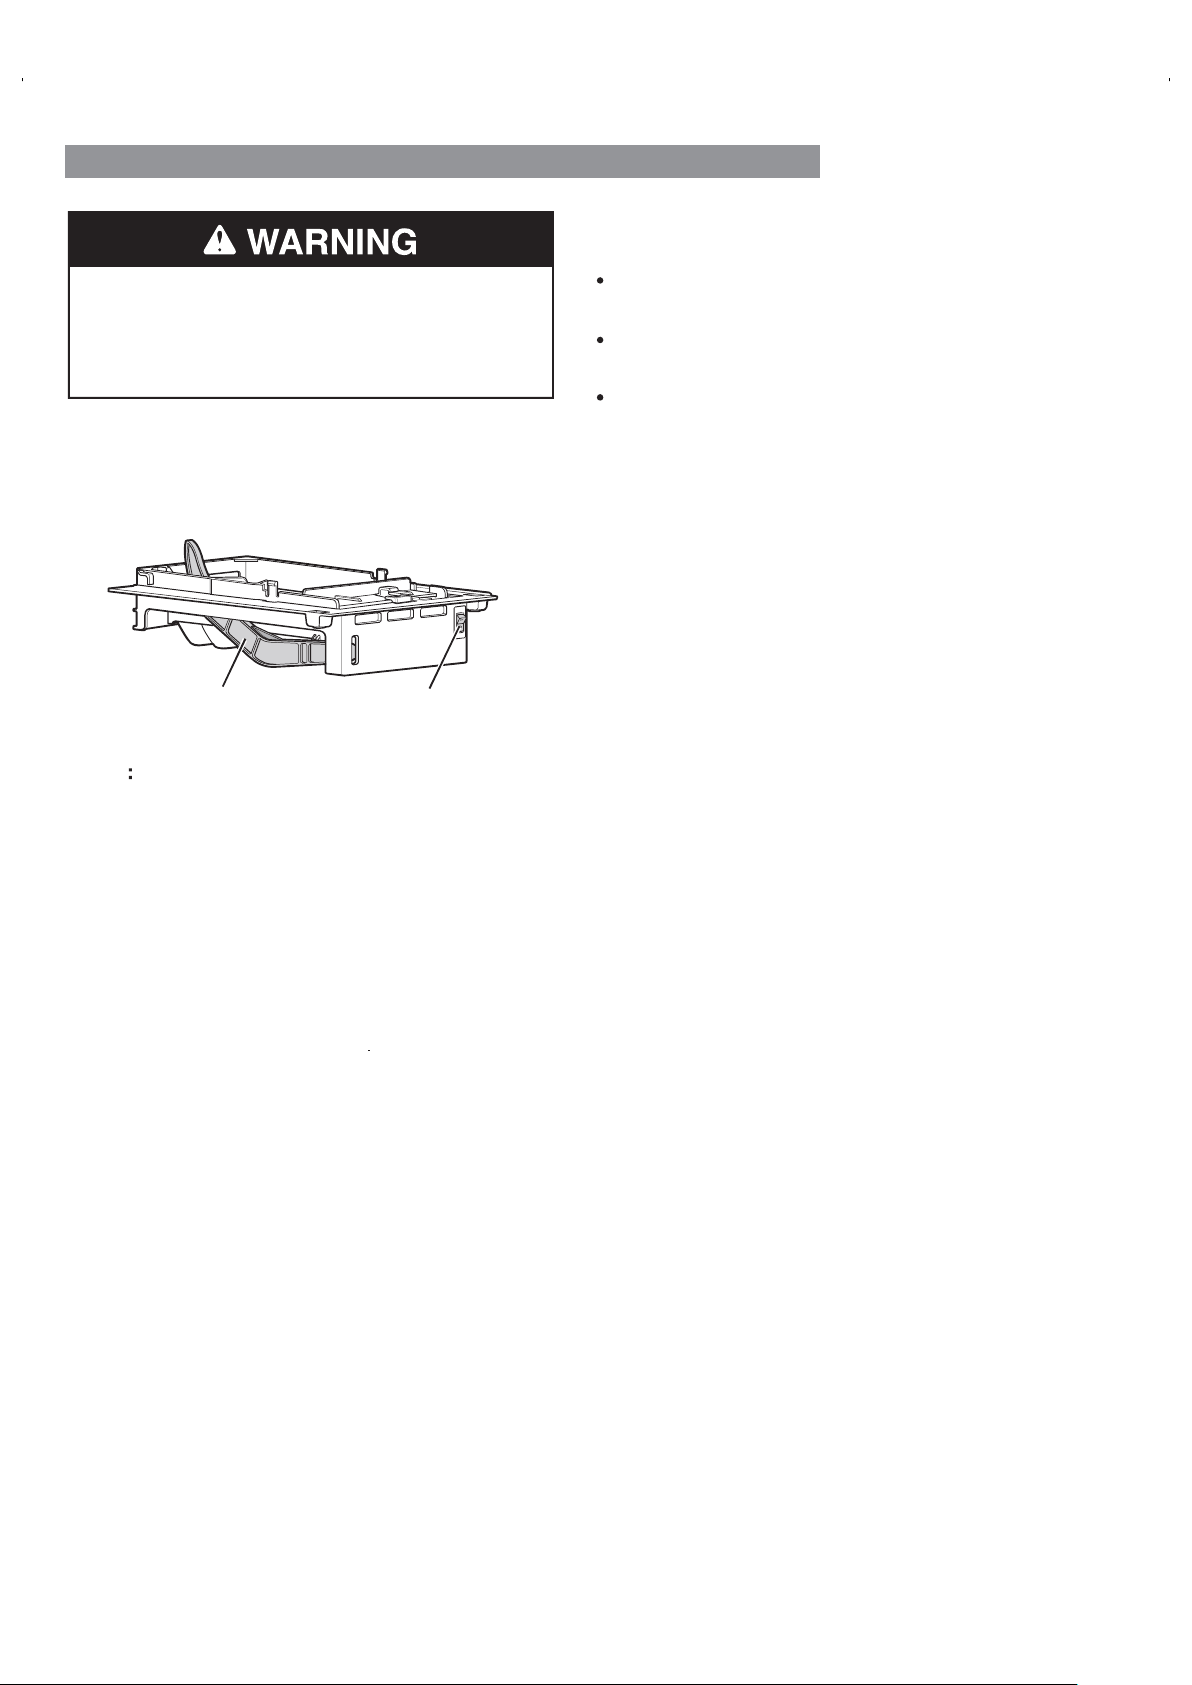
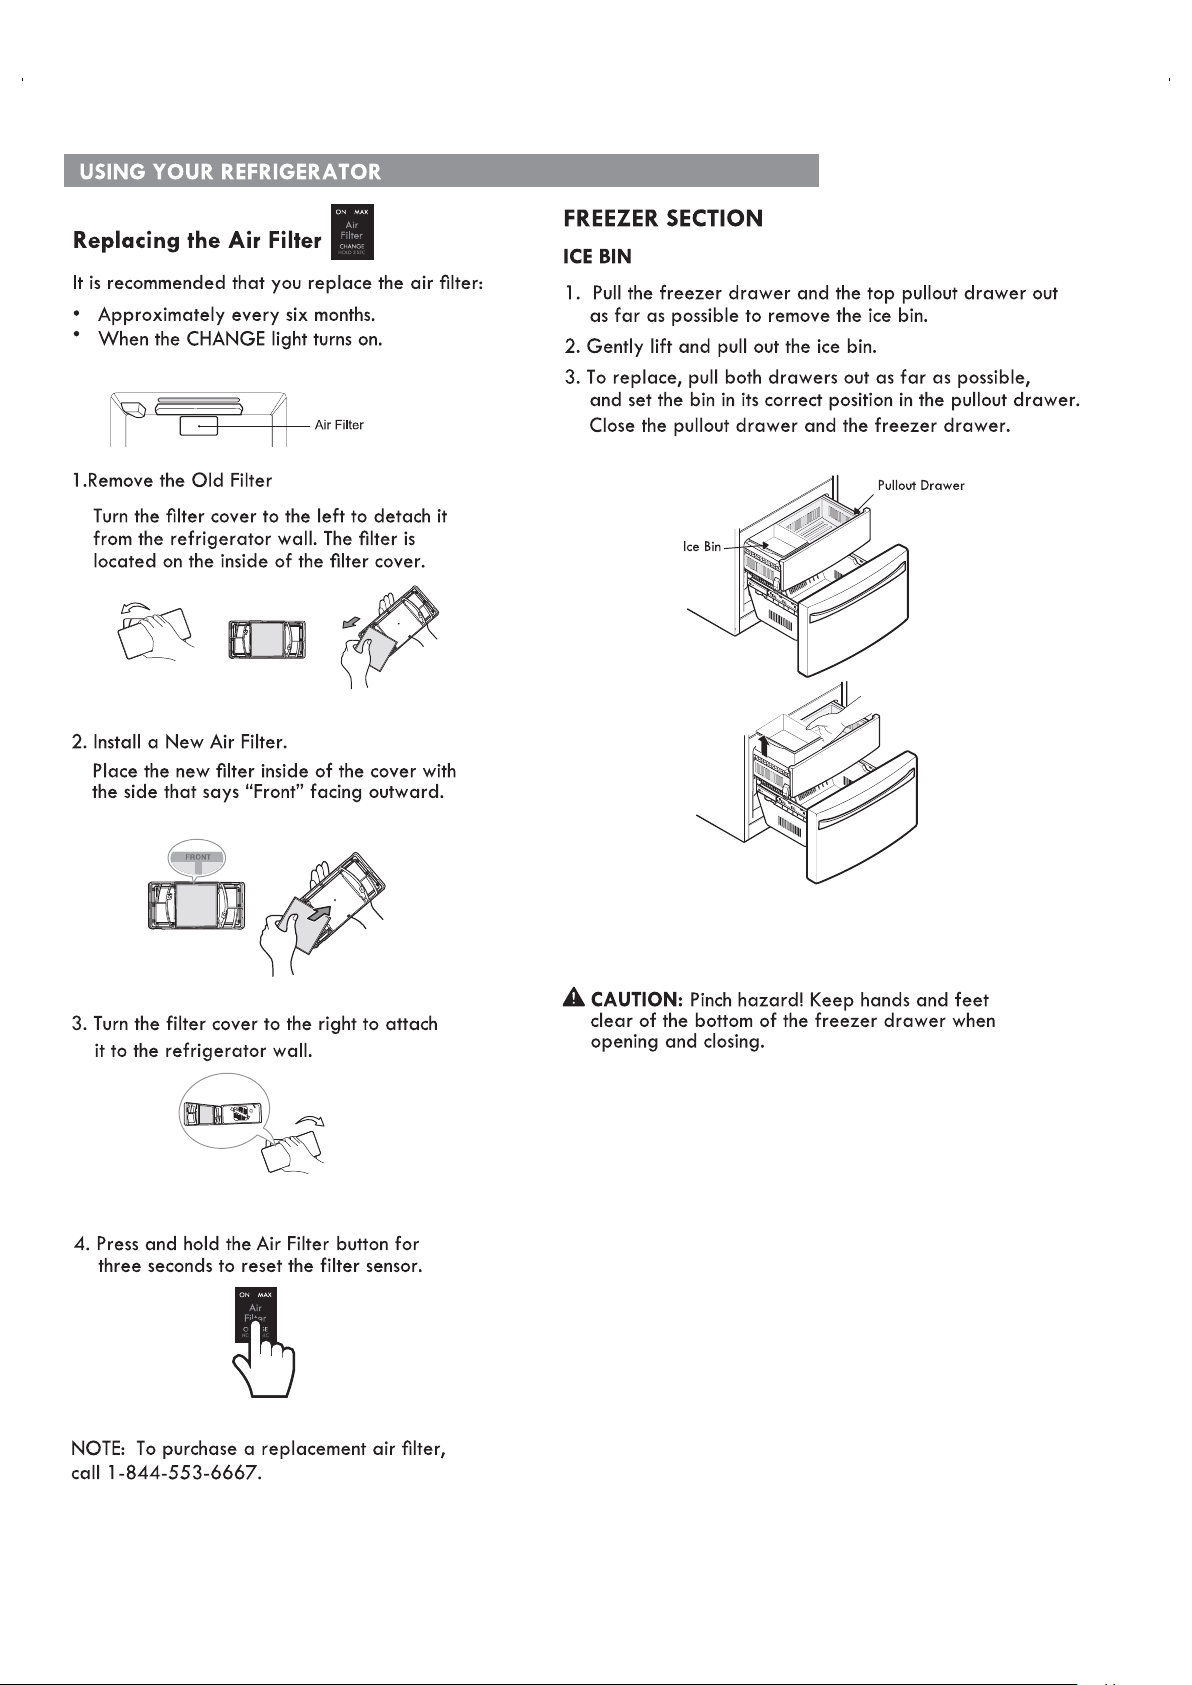
Freezer Section
28.................................................... niB ecI artxE
Durabase ........................................................29
29............................................. rediviD esabaruD
29............................................. Pullout Drawers
Water Filter ................................................30-33
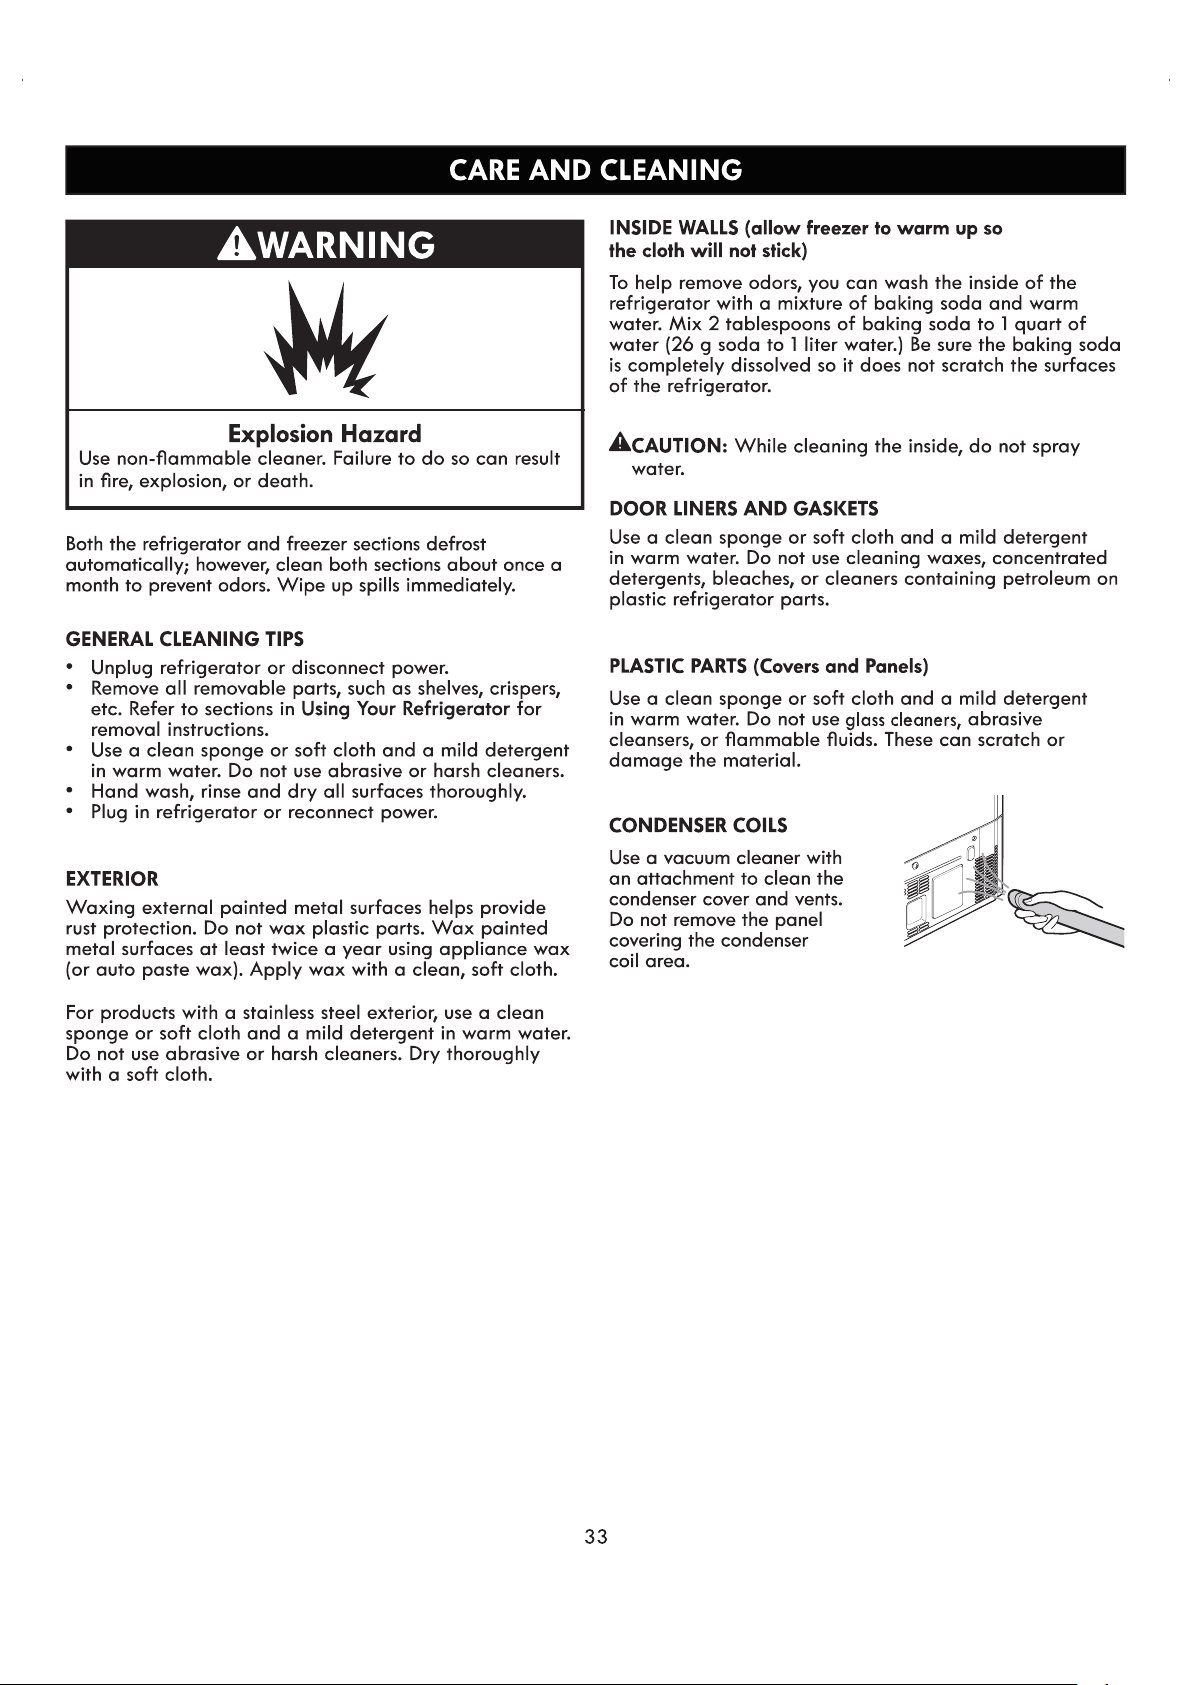
Care and Cleaning 43-33.....................................
33................................... spiT gninaelC lareneG
Exterior ..........................................................33
Inside Walls ...................................................33
33................................. steksaG dna reniL rooD
Plastic Parts ....................................................33
33.............................................. slioC resnednoC
Light Bulb Replacement .................................34
Power Interruptions ......................................34
43.......................... noitacaV nO oG uoY nehW
When You Move ..........................................34
Connecting the Water Line 37-35........................
Troubleshooting Guide 38-43..............................
Diagnostics ........................................................ 44
3
WARRANTY
REFRIGERATOR WARRANTY
KENMORE ELITE LIMITED WARRANTY
WITH PROOF OF SALE, the following warranty coverage applies when this appliance is correctly installed, operated and
maintained according to all supplied instructions.
One Year on Appliance
FOR ONE YEAR from the date of sale this appliance is warranted against defects in material or workmanship. A defective
appliance will receive free repair. If the appliance cannot be repaired it will be replaced free of charge. This warranty coverage
applies for only 90 days from the sale date if the appliance is ever used for other than private household purposes.
Five Years on Sealed Refrigerant System
FOR FIVE YEARS from the date of sale, the sealed refrigerant system of this appliance is warranted against defects in material
or workmanship.* If a system part is defective within the first year, a new part will be supplied and installed at no charge.
If a system part is defective after the first year, a new part will be supplied but not installed at no charge. You are responsible
for the labor cost of part installation after the first year from the date of sale. This warranty coverage applies for only one year
from the sale date if the appliance is ever used for other than private household purposes.
*Defects must be verified by a Sears authorized service representative.
Ten Years on Linear Compressor
FOR TEN YEARS from the date of sale, the linear compressor of this appliance is warranted against defects in material or
workmanship.* If the compressor is defective within the first year, a new one will be supplied and installed at no charge.
If the compressor is defective after the first year, a new one will be supplied but not installed at no charge.
You are responsible for the labor cost of part installation after the first year from the date of sale. This warranty coverage
applies for only two years from the sale date if the appliance is ever used for other than private household purposes.
*Defects must be verified by a Sears authorized service representative.
Lifetime on Storage Bins
FOR AS LONG AS IT IS USED from the date of sale, a free replacement will be supplied for a defective refrigerator or
freezer compartment storage bin.* If the defect appears within the first year, a new bin will be installed at no charge. If the
defect appears after the first year, a new bin will be supplied but not installed at no charge. This Lifetime warranty covers only
storage bins, and does not apply to any other related component or mechanism. You are responsible for the labor cost of bin
installation after the first year from the date of sale. This warranty coverage applies for only 90 days from the date of sale if
the appliance is ever used for other than private household purposes. *Warranty coverage applies to door bins, drawer bins
and basket bins. Defects must be verified by a Sears authorized service representative.
For warranty coverage details to obtain free repair or replacement, visit the web page: www.kenmore.com/warranty
This warranty covers ONLY defects in material and workmanship, and will NOT pay for:
1. Expendable items that can wear out from normal use, including but not limited to filters, belts, bags or screw-in base light bulbs.
2. A service technician to clean or maintain this appliance, or to instruct the user in correct appliance installation, operation and
maintenance.
3. Service calls to correct appliance installation not performed by Sears authorized service agents, or to repair problems with
house fuses, circuit breakers, house wiring, and plumbing or gas supply systems resulting from such installation.
4. Damage to or failure of this appliance resulting from installation not performed by Sears authorized service agents, including
installation that was not in accord with electrical, gas or plumbing codes.
5. Damage to or failure of this appliance, including discoloration or surface rust, if it is not correctly operated and maintained
according to all supplied instructions.
6. Damage to or failure of this appliance, including discoloration or surface rust, resulting from accident, alteration, abuse, misuse
or use for other than its intended purpose.
7. Damage to or failure of this appliance, including discoloration or surface rust, caused by the use of detergents, cleaners,
chemicals or utensils other than those recommended in all instructions supplied with the product.
8. Damage to or failure of parts or systems resulting from unauthorized modifications made to this appliance.
9. Service to an appliance if the model and serial plate is missing, altered, or cannot easily be determined to have the
appropriate certification logo.
Disclaimer of implied warranties; limitation of remedies
Customer’s sole and exclusive remedy under this limited warranty shall be product repair or replacement as provided herein.
Implied warranties, including warranties of merchantability or fitness for a particular purpose, are limited to one year on the
appliance, five years on the sealed refrigerant system, ten years on the linear compressor, and for as long as used on the storage
bins, or the shortest period allowed by law. Seller shall not be liable for incidental or consequential damages. Some states do not
allow the exclusion or limitation of incidental or consequential damages, or limitation on the duration of implied warranties of
merchantability or fitness, so these exclusions or limitations may not apply to you.
This warranty applies only while this appliance is used in the United States.
This warranty gives you specific legal rights, and you may also have other rights which vary from state to state.
Sears Brands Management Corporation, Hoffman Estates, IL 60179

4
PRODUCT RECORD
In the space below, record the date of purchase, model and serial number of your product. You will find the model and
serial number printed on an identification label located on the interior liner of the refrigerator compartment. Have these
items of information available whenever you contact Sears concerning your product.
Model No.___________________ Date of Purchase ___________________
Serial No.___________________
Save these instructions and attach your sales receipt for future reference.
6
WARNING
DANGER:
RISK OF CHILD ENTRAPMENT
SAVE THESE INSTRUCTIONS
Before replacing a burned-out or broken light bulb, •
unplug the refrigerator or turn off power at the circuit
breaker or fuse box in order to avoid contact with a live
wire filament. (A burned-out light bulb may break when
being replaced exposing the wire filament.)
NOTE: Some models have LED interior lighting and
service should be performed by a qualified technician.
WARNING: Setting either or both controls to the OFF
position does not remove power to the light circuit.
When you are finished, reconnect the refrigerator to •
the electrical source and reset the controls (Thermostat,
Refrigerator Control, and or Freezer Control, depending
on the model) to the desired setting.
This refrigerator must be properly installed in •
accordance with the Attention Installer Instructions that
were taped to the front of the refrigerator.
After your refrigerator is in operation, do not touch the •
cold surfaces in the freezer compartment when hands
are damp or wet. Skin may adhere to the extremely cold
surfaces.
Junked or abandoned refrigerators are dangerous, even
if they are sitting for only a few days. If you are getting
rid of your old refrigerator, please follow the instructions
at right to help prevent accidents (child entrapment and
suffocation).
DO NOT touch the automatic ice making mechanism •
while the refrigerator is plugged in.
DO NOT refreeze frozen foods which have thawed •
completely. The United States Department of
Agriculture in Home and Garden Bulletin No. 69 says:
…You may safely refreeze frozen foods that have
thawed if they still contain ice crystals or if they are
still cold—below 39°F (4°C).
…Thawed ground meats, poultry or fish that have any
off-odor or off-color should not be refrozen and should
not be eaten. Thawed ice cream should be discarded.
If the odor or color of any food is poor or questionable,
dispose of it. The food may be dangerous to eat.
Even partial thawing and refreezing reduces the
eating quality of foods, particularly fruits, vegetables
and prepared foods. The eating quality of red meats
is affected less than that of many other foods. Use
refrozen foods as soon as possible to save as much of
their quality as you can.
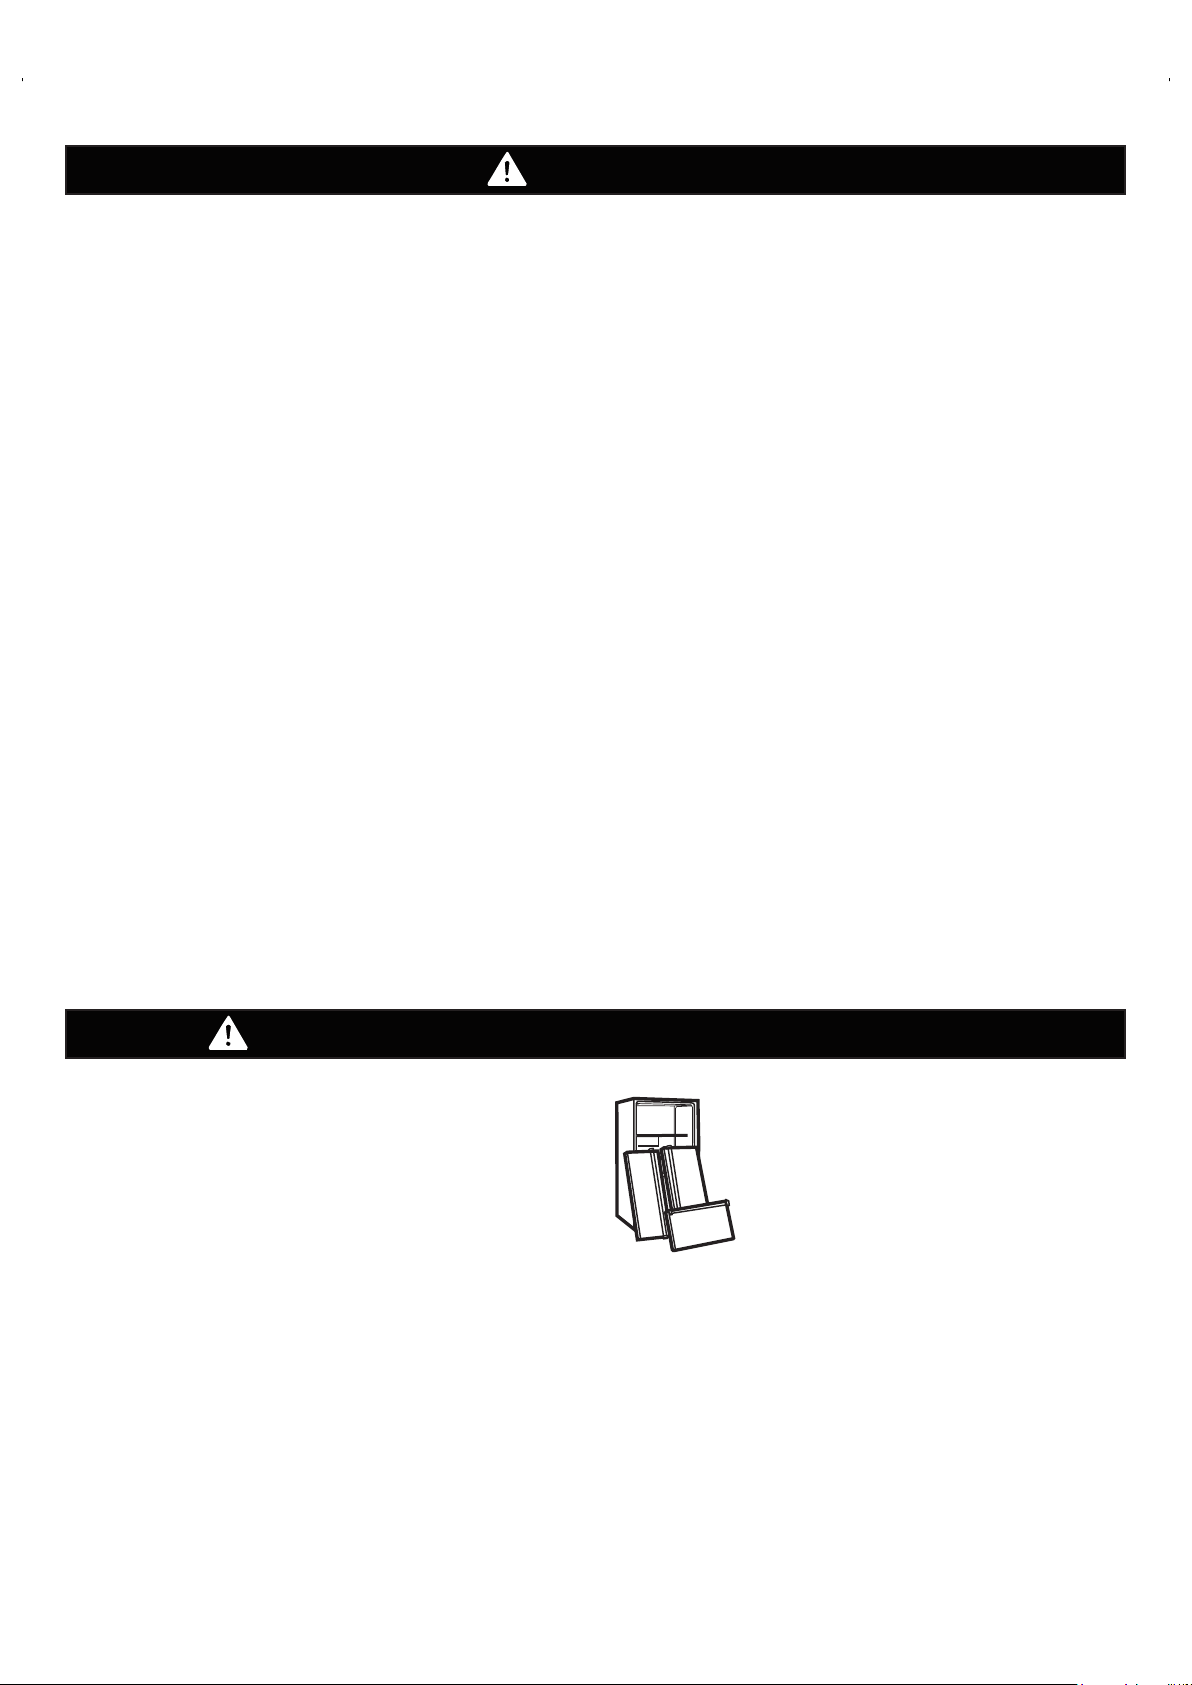
BEFORE YOU THROW AWAY
YOUR OLD REFRIGERATOR
OR FREEZER:
Take off the doors.•
Leave the shelves in place so that •
children may not easily climb inside
.
7
ELECTRICAL & GROUNDING REQUIREMENTS
WARNING
Your old refrigerator may have a cooling system
that used CFCs or HCFCs (chlorofluorocarbons or
hydrochlorofluorocarbons). CFCs and HCFCs are
believed to harm stratospheric ozone if released to the
atmosphere. Other refrigerants may also cause harm to
the environment if released to the atmosphere.
IMPORTANT: Please read carefully.
TO CONNECT ELECTRICITY
RECOMMENDED GROUNDING METHOD
The refrigerator should always be plugged into its own
individual properly grounded electrical outlet rated for
115 Volts, 60 Hz, AC only, and fused at 15 or 20 amperes.
This provides the best performance and also prevents
overloading house wiring circuits which could cause a fire
hazard from overheated wires. It is recommended that a
separate circuit serving only this appliance be provided.
Use a receptacle that cannot be turned off with a switch
or pull chain. Do not use an extension cord.
Where a standard two-prong wall outlet is encountered,
it is your personal responsibility and obligation to have
it replaced with a properly grounded three-prong wall
outlet.
Electrical Shock Hazard
FOR PERSONAL SAFETY, this appliance must be
properly grounded. Have the wall outlet and the circuit
checked by a qualified electrician to make sure the
outlet is properly grounded.
If you are throwing away your old refrigerator, make
sure the refrigerant is removed for proper disposal
by a qualified technician. If you intentionally release
refrigerant, you may be subject to fines and imprisonment
under provisions of environmental legislation.
USE OF EXTENSION CORDS
Because of potential safety hazards under certain conditions,
the use of an extension cord is not recommended. However,
if you still elect to use an extension cord, it is absolutely
necessary that it be a UL-listed (USA), 3-wire grounding type
appliance extension cord having a grounding type plug and
outlet, and that the electrical rating of the cord be 15 amperes
(minimum) and 120 volts.
Use of an extension cord will increase the clearance needed
for the back of the refrigerator.
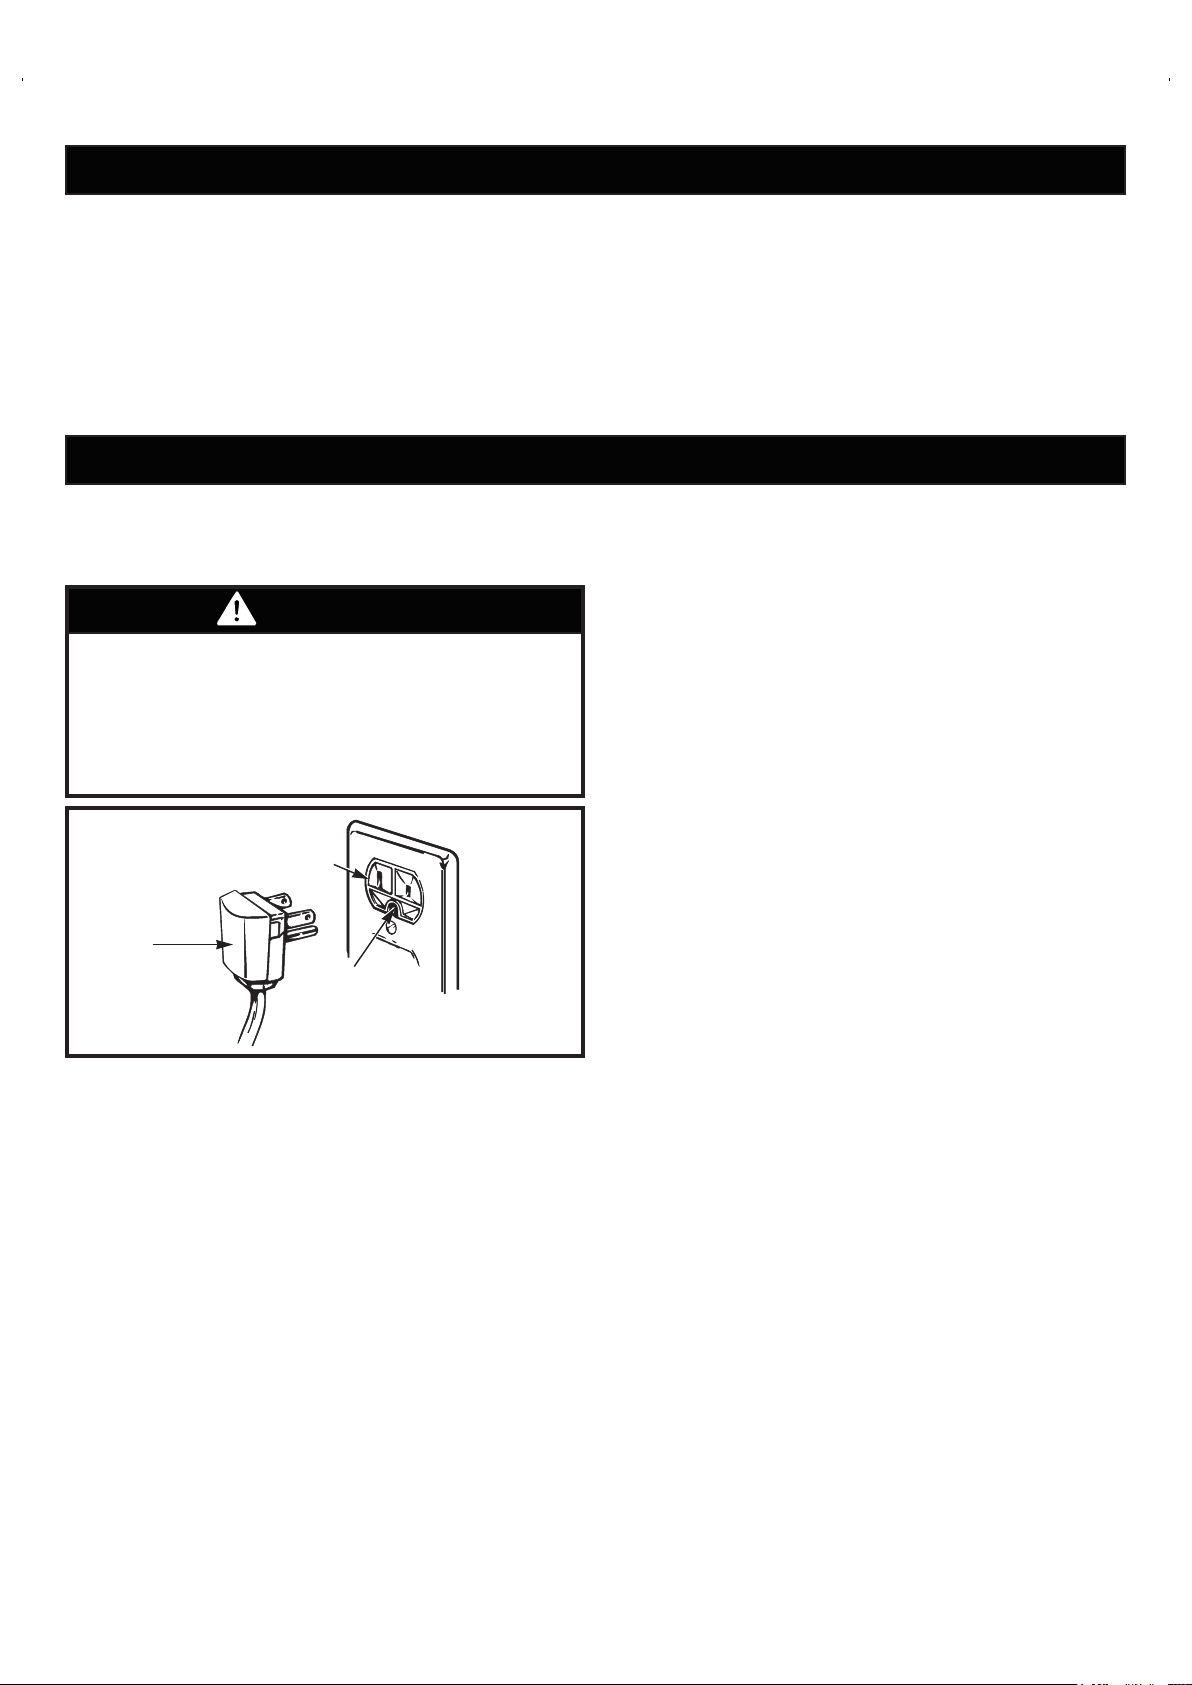
3-prong
grounding
plug
3-prong
grounding type
wall receptacle
Ensure proper
ground exists
before use.
CFC/HCFC DISPOSAL
8
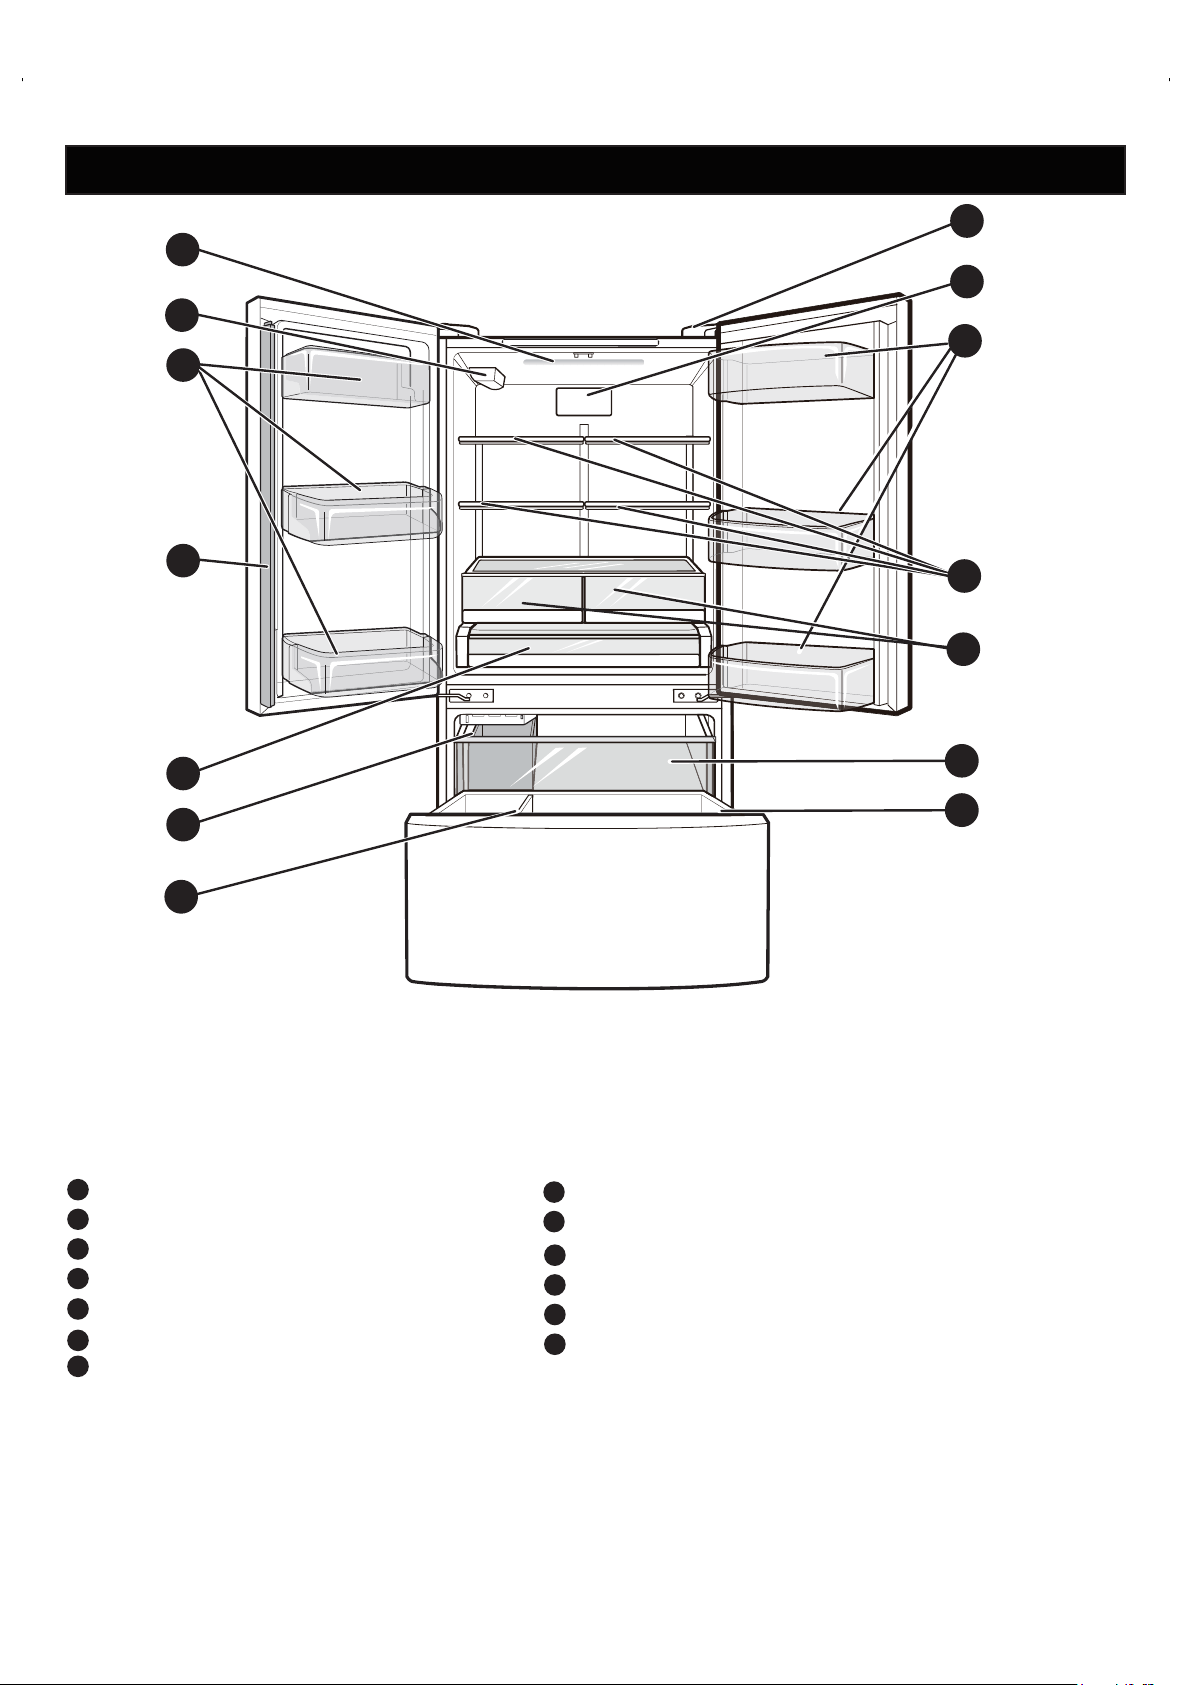
A
Refrigerator Light
B
Water Filter
C
D
E
F
G
H
I
J
Diagnostics Speaker
K
Refrigerator Shelves
L
Air Filter
M
Durabase
Door Bins
Pullout Drawer
Icemaker / Ice Bin
Articulating Mullion
Crisper
Pantry Drawer
Durabase Divider
PARTS AND FEATURES
Use this page to become more familiar with the parts and features of your refrigerator.
NOTE: This guide covers several different models. The refrigerator you have purchased may have some
or all of the items listed below. The locations of the features shown below may not match your model.
A
E
F
G
H
I
J
K
L
M
C
D
B
C
10
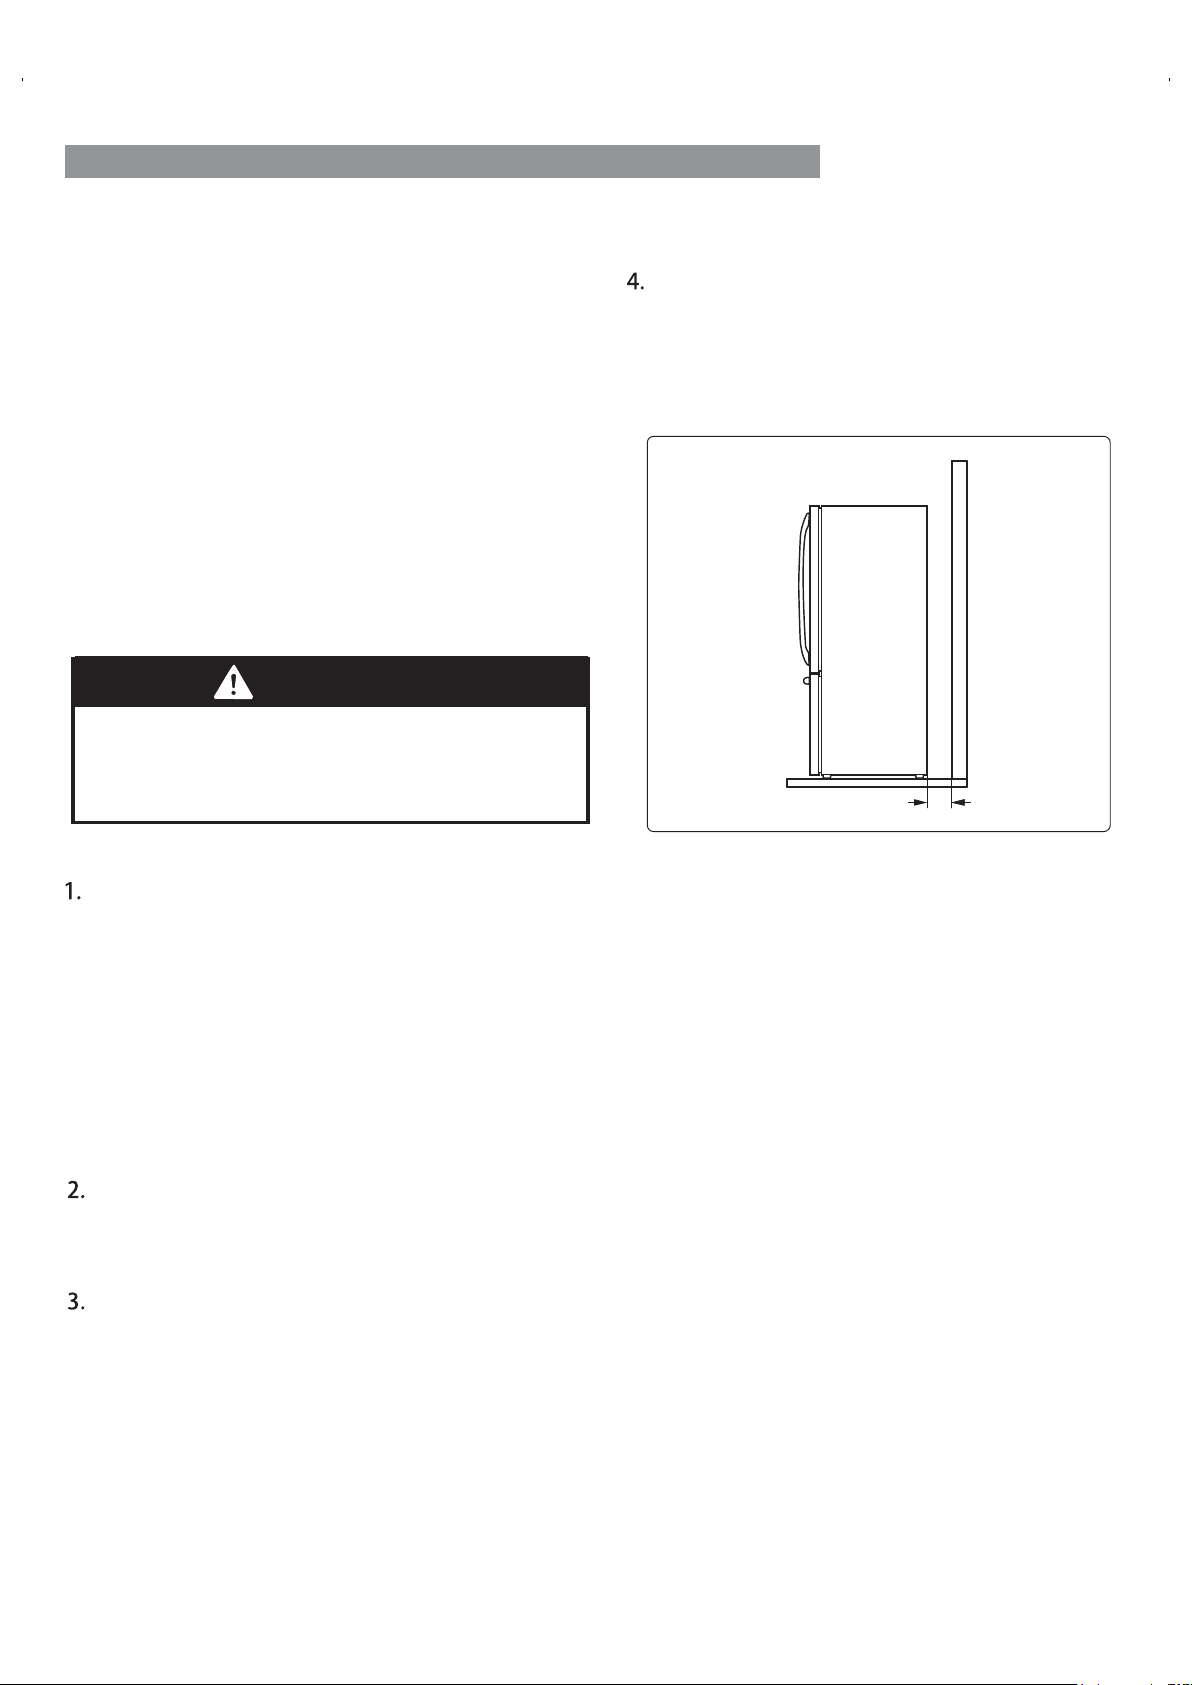
REFRIGERATOR INSTALLATION
To avoid noise and vibration, the unit must be leveled
and installed on a solidly constructed floor. If required,
adjust the leveling legs to compensate for unevenness
of the floor. The front should be slightly higher than
the rear to aid in door closing. Leveling legs can be
turned easily by tipping the cabinet slightly. Turn the
leveling legs to the left to raise the unit or to the right to
lower it. (See LEVELING AND DOOR ALIGNMENT.)
NOTE: Installing on carpeting, soft tile surfaces,
a platform or weakly supported structure is not
recommended.
Install this appliance in an area where the temperature
is between 55°F (13°C) and 110°F (43°C). If the
temperature around the appliance is too low or high,
cooling ability may be adversely affected.
Select a place where a water supply can be easily
connected for the automatic icemaker.
NOTE: The water pressure must be from 20-120 psi or
138-827 kPa or 1.4-8.4 kgf/cm². If the refrigerator is
installed in an area with low water pressure (below 20
psi), you can install a booster pump to compensate for
the low pressure.
Too small of a distance from adjacent items may
result in lowered freezing capability and increased
electricity consumption charges. Allow at least 24
inches (61 cm) in front of the refrigerator to open the
doors and at least 2 inches (5.08 cm) between the
back of the refrigerator and the wall.
INSTALLATION
The refrigerator should always be plugged into its own
individual properly grounded electrical outlet rated for
115 Volts, 60 Hz, AC only, and fused at 15 or 20 amperes.
This provides the best performance and also prevents
overloading house wiring circuits which could cause a fire
hazard from overheated wires. It is recommended that a
separate circuit serving only this appliance be provided.
REFRIGERATOR INSTALLATION
2" (5.08 cm)
Shock Hazard:
Toreducetheriskofelectricshock,donotinstallthe
refrigeratorinawetordamparea.
WARNING
This appliance is intended to be used in household and
similarapplicationssuchasstaffkitchenareasinshops,
officesandotherworkingenvironments;farmhouses
and by clients in hotels, motels and other residential
typeenvironments;bedandbreakfasttype
environments;cateringandsimilarnon-retailapplications.
PRIOR TO USE
1.Cleanyourrefrigeratorthoroughlyandwipeoffall
dustthataccumulatedduringshipping.
2.Installaccessoriessuchasicecubebin,drawers,
shelves,etc.,intheirproperplaces.Theyarepacked
togethertopreventpossibledamageduringshipment.
3.Allowyourrefrigeratortorunforatleasttwotothree
hoursbeforeputtingfoodinit.Checktheflowof
coldairinthefreezercompartmenttoensureproper
cooling.Yourrefrigeratorisnowreadyforuse.
11
REFRIGERATOR INSTALLATION
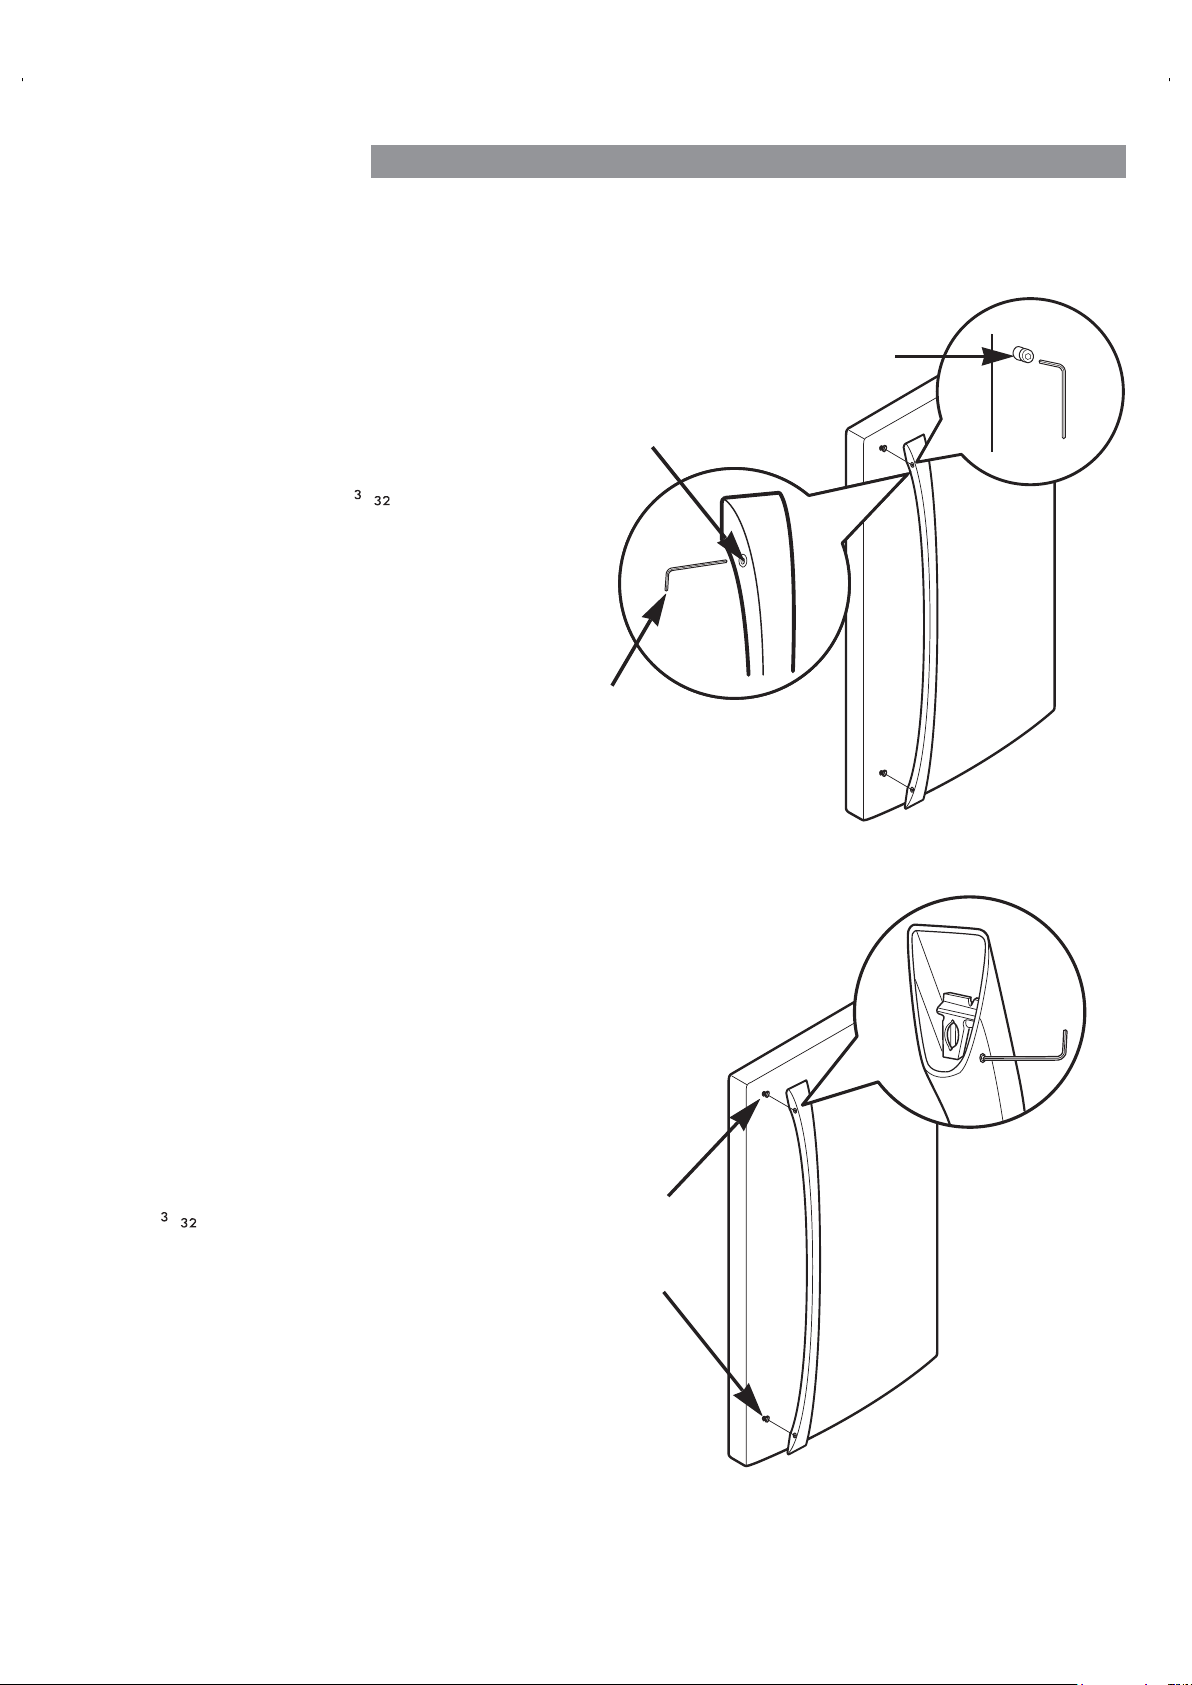
REMOVING AND REPLACING HANDLES
NOTE: Handle appearance may vary from the
illustrations on this page.
Removing Refrigerator Handle
Replacing Refrigerator Handle
Loosen the set screws with a / in. Allen
wrench and remove the handle.
NOTE: If the handle mounting fasteners need
to be tightened or removed, use a ¼ in. Allen
wrench.
NOTE: Removing the doors is always recommended when it is necessary to move the refrigerator through a narrow
opening. If it is necessary to remove the handles, follow the directions below.
Placethehandleonthedoorbyfitting
the handle footprints over the mounting
fasteners and tightening the set screws
with a / in Allen wrench.
NOTE: If the handle mounting fasteners
need to be tightened or removed, use a
¼ in. Allen wrench.
Mounting
Fasteners
Set Screw
Allen
Wrench
Mounting
Fasteners
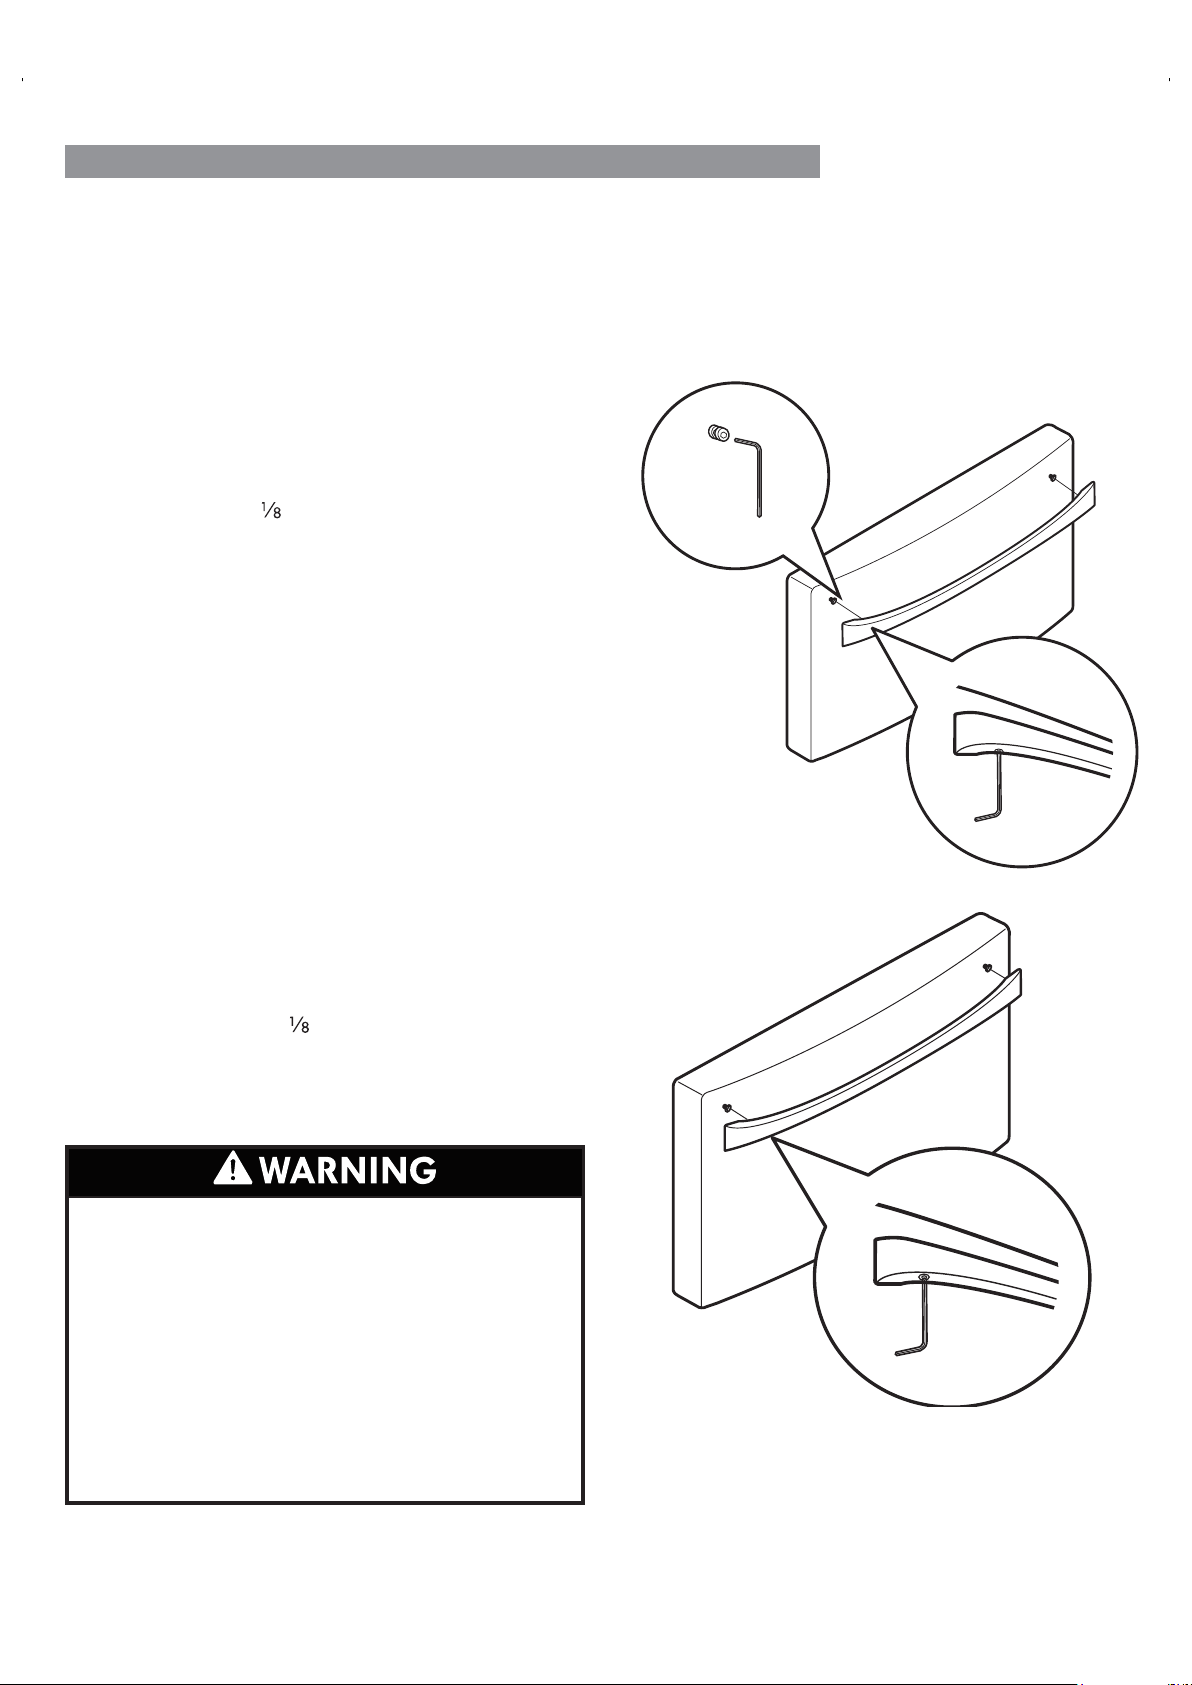
12
When assembling or disassembling the handles:
Graspthehandlefirmlytoensureitwillnotdropor
causeinjury.
Preventthehandlefromswingingtowardnearby
peopleoranimals.
Insert the bracket hole of the handle into the stopper
boltofthedoorexactly,thenassemblethesetscrews
tofixthehandleinplace.
Checkforanygapbetweenthedoorandhandle
•
•
•
•
afterthehandleisfixedinplace.
WARNING
REFRIGERATOR INSTALLATION
Replacing Freezer Drawer Handle
Placethehandleonthedoorbyfittingthehandle
footprintsoverthemountingfastenersandtightening
thesetscrewswithain.Allenwrench.
NOTE:Ifthehandlemountingfastenersneedtobe
tightenedorremoved,usea¼in.Allenwrench.
REMOVING AND REPLACING HANDLES (CONTINUED)
NOTE:Handleappearancemayvaryfromtheillustrations
onthispage.
Removing Freezer Drawer Handle
Loosenthesetscrewslocatedonthelowersideof
eht evomer dna hcnerw nellA .nia htiw eldnah eht
handle.
NOTE: Ifthehandlemountingfastenersneedtobe
tightenedorremoved,usea¼in.Allenwrench.
NOTE:Removingthedoorsisalwaysrecommendedwhenitisnecessarytomovetherefrigeratorthroughanarrow
opening.Ifitisnecessarytoremovethehandles,followthedirectionsbelow.
13

14
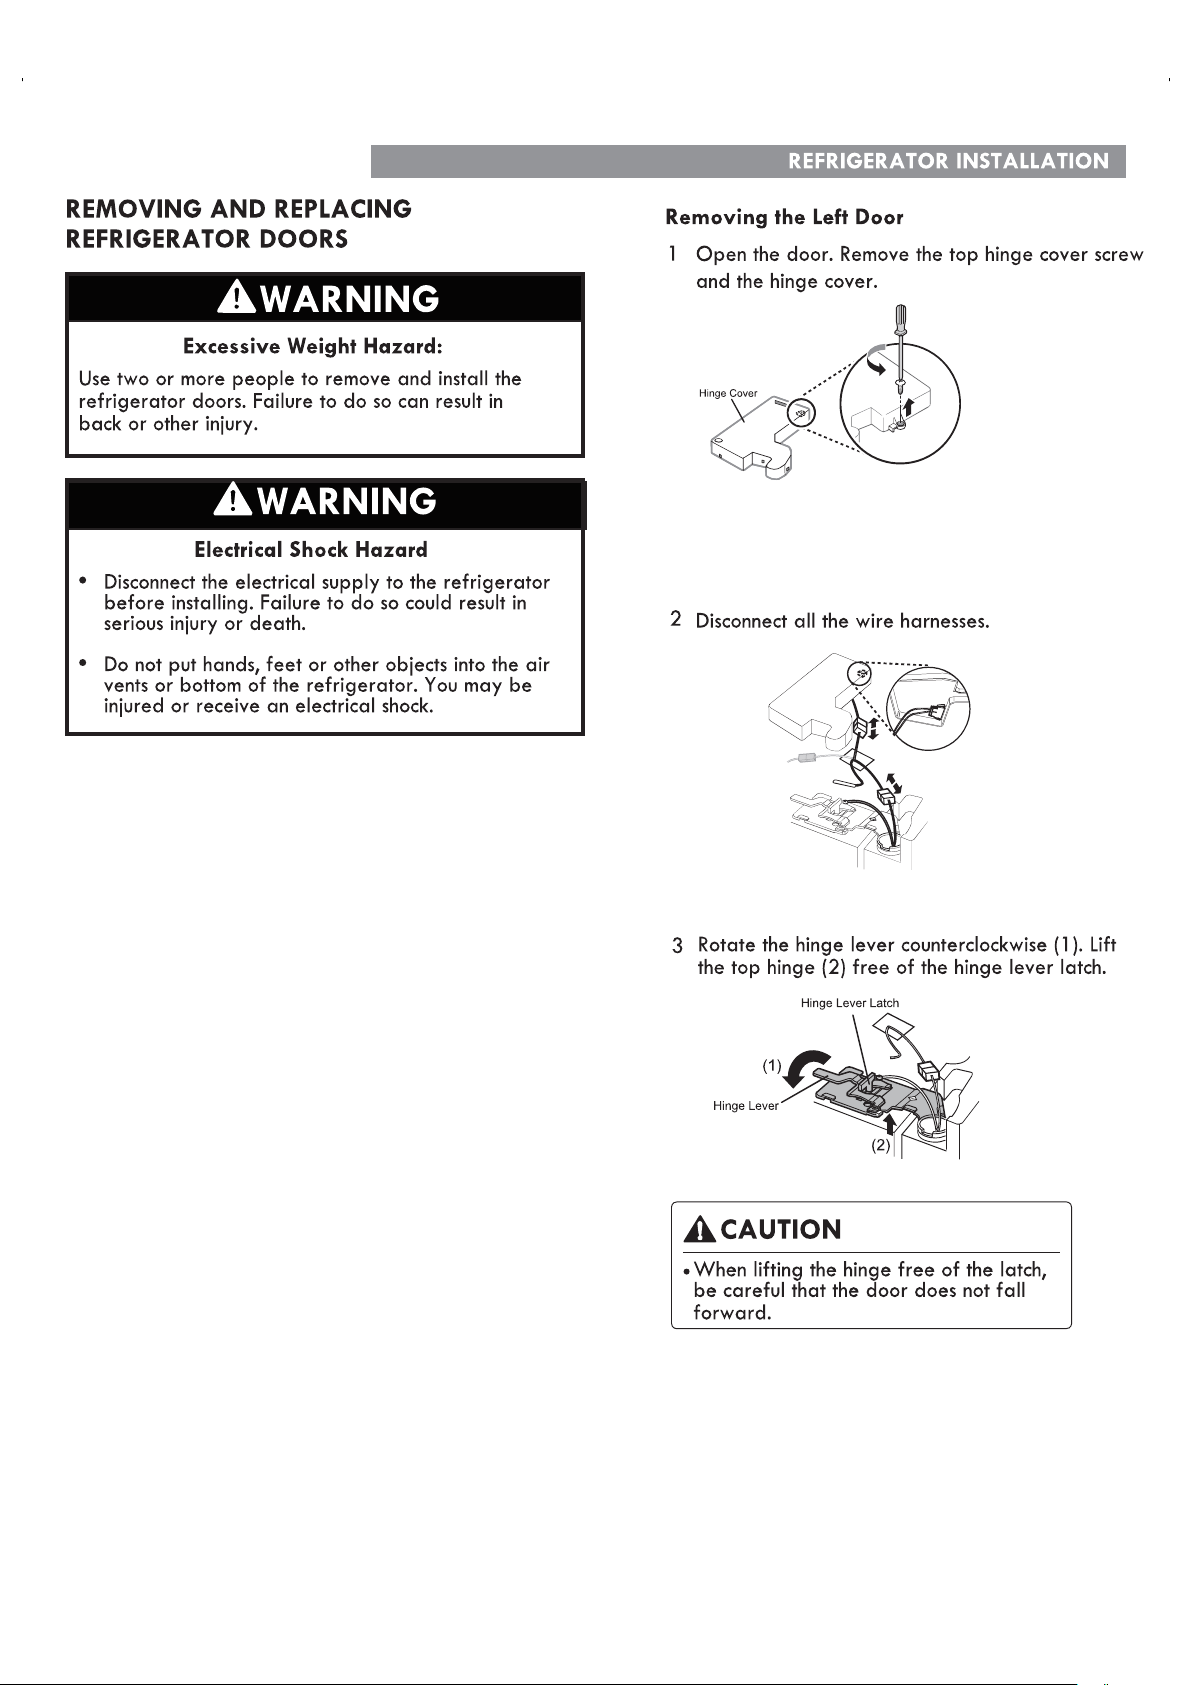
REFRIGERATOR INSTALLATION
Removing the Right Door
1
Remove the top hinge cover screw (1). Lift
the hook (not visible), located at the bottom of
screwdriver.
the front side of the cover (2), with a flat-head
2
Detach the wire harness (1).
3
Rotate the hinge lever (1) clockwise. Lift the top
hinge (2) free of the hinge lever latch.
CAUTION
When lifting the hinge free of the latch, be
careful that the door does not fall forward.
4
Lift the door from the middle hinge pin and
remove the door.
NOTE: Place the door, inside facing up,
on a nonscratching surface.
4
Lift the door from the middle hinge pin and
remove the door.
NOTE: Place the door, inside facing up, on a
nonscratching surface.
15
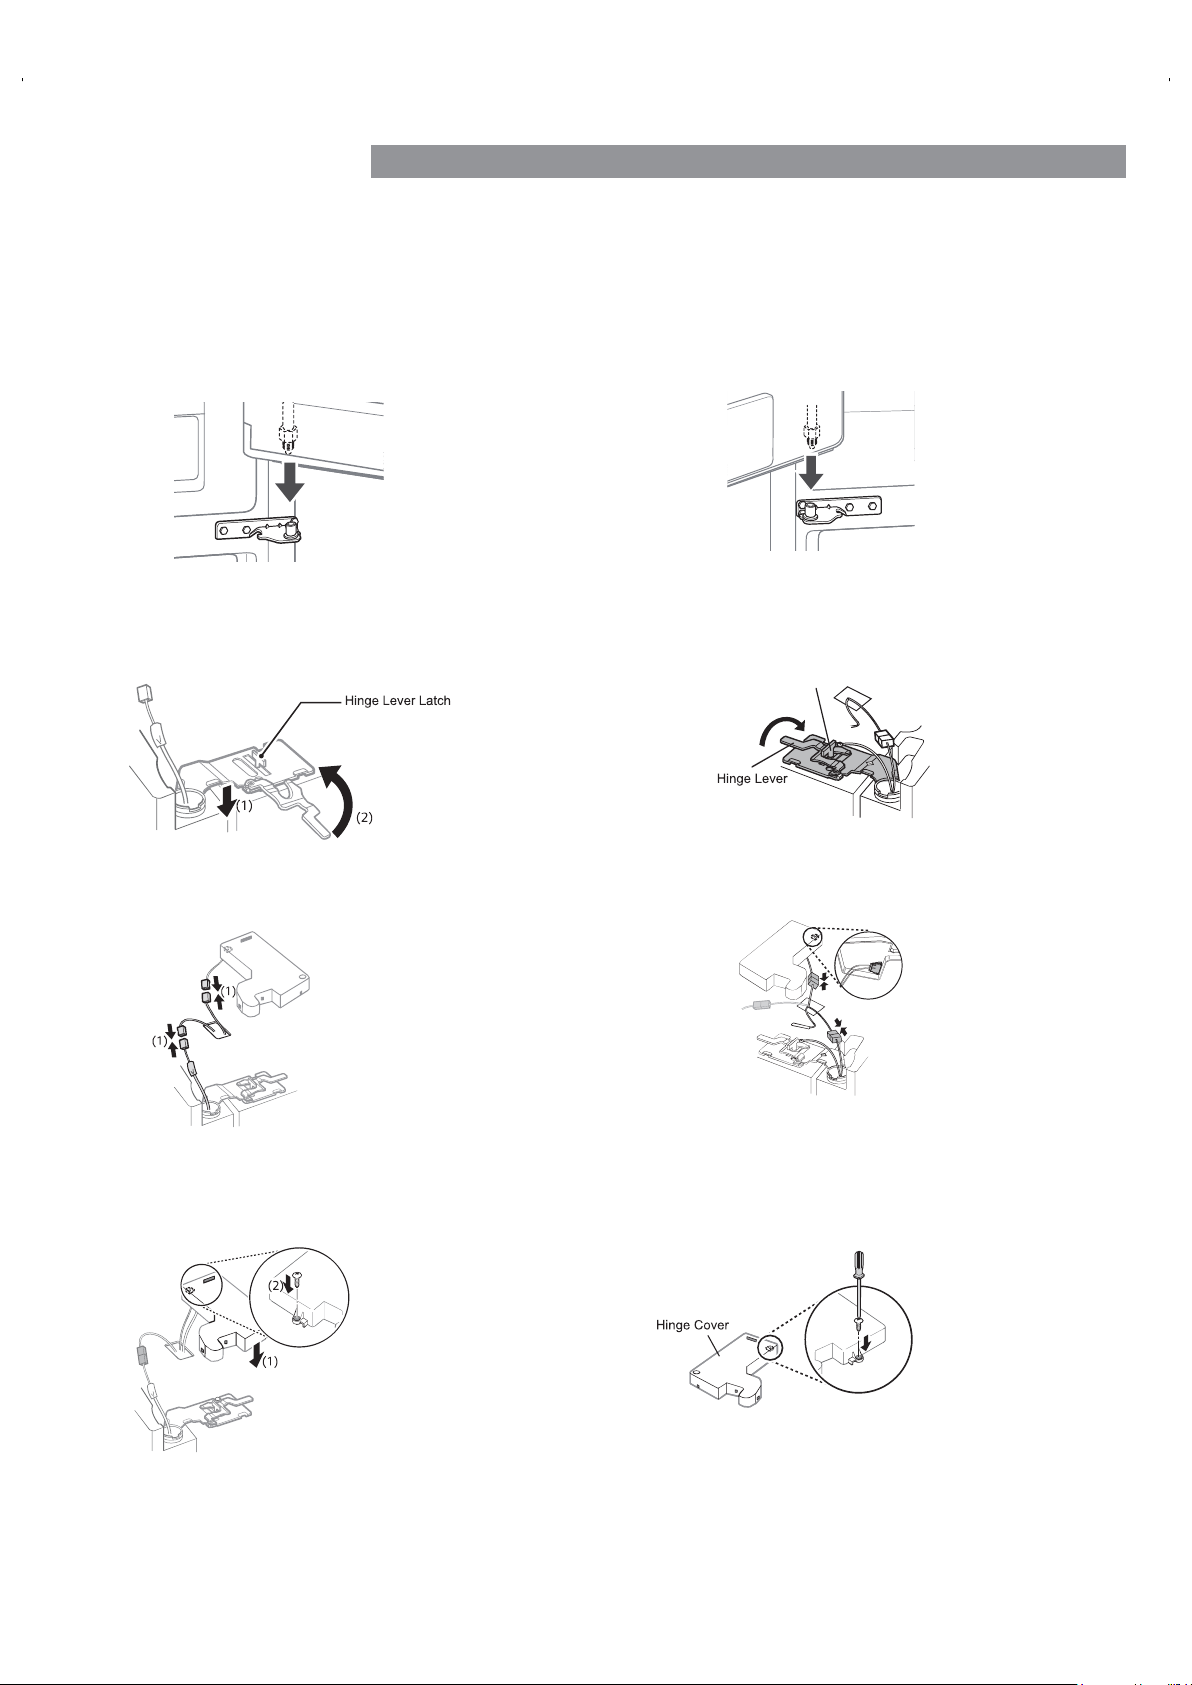
REFRIGERATOR INSTALLATION
Replacing the Left Door
Install the left refrigerator door after the right door is
installed.
1
Make sure that the plastic sleeve is inserted in
the bottom of the door. Install the refrigerator door
onto the middle hinge.
2
Rotate the hinge lever clockwise. Lift the top hinge
free of the hinge lever latch.
Hinge Lever Latch
3
Connect all the wire harnesses.
4
Place the cover in place. Insert and tighten the
cover screw.
Install the right-side door first.
Replacing the Right Door
1
Make sure that the plastic sleeve is inserted in
the bottom of the door. Lower the door onto
the middle hinge pin as shown in the figure.
2
Fit the hinge (1) over the hinge lever latch
and slot it into place. Rotate the lever (2)
counterclockwise to secure the hinge.
3
Connect the wire harness (1).
4
Place the cover (1) in its place. Insert and tighten
the cover screw (2).
16
REFRIGERATOR INSTALLATION
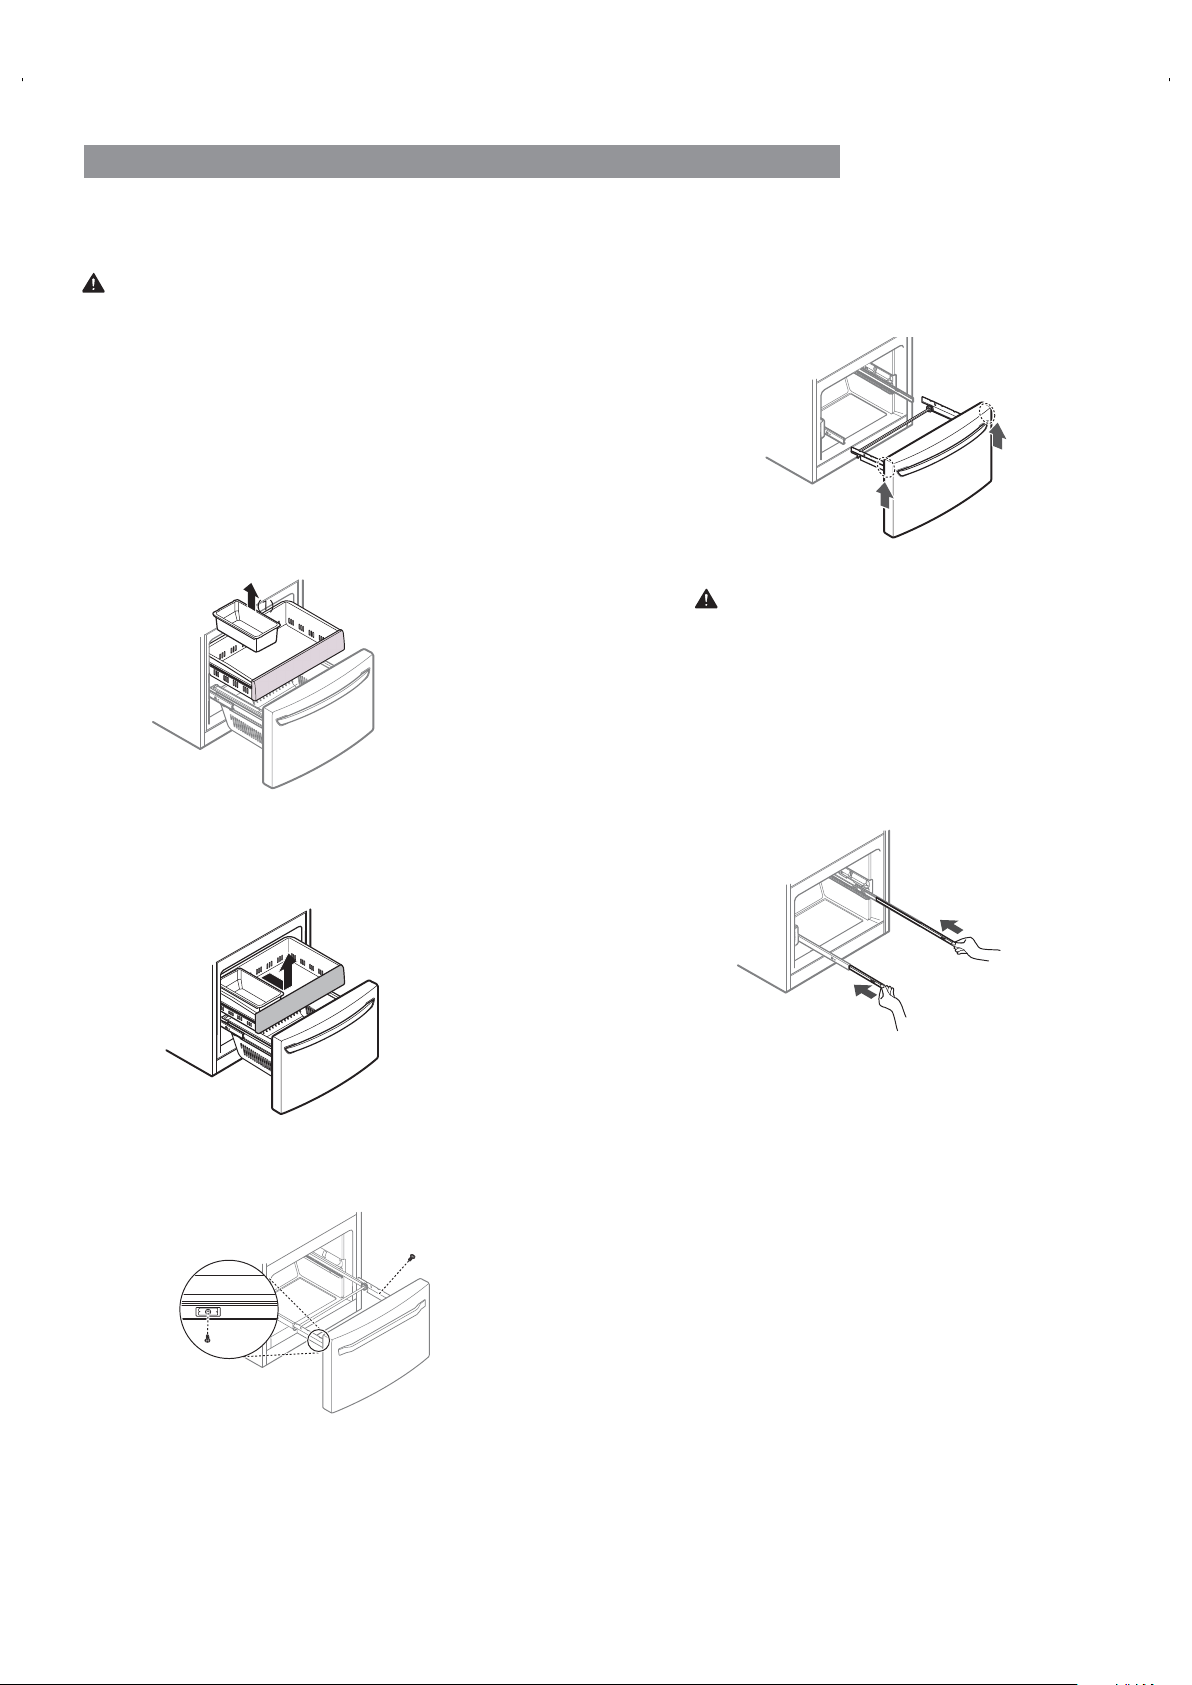
REMOVING FREEZER DRAWERS
Removing The Freezer Drawer
WARNING:
Use two or more people to remove and
install the freezer drawer. Failure to do so can result in
back or other injury.
NOTE: In the following images, the Pullout Drawer
located above the freezer drawer is not shown for clarity.
Pull the drawer open to full extension.
Gently lift and pull out the ice bin.
Lift the front of the drawer up, then pull it straight out.
Hold both rails and push them in simultaneously.
CAUTION:
When you remove the freezer drawer, do not hold
the handle. The handle may come off and it could
cause personal injury.
Remove the Durabase basket from the rails.
Remove the screws from the rails at both ends.
Grip both sides of the drawer and pull it up to
remove it from the rails.
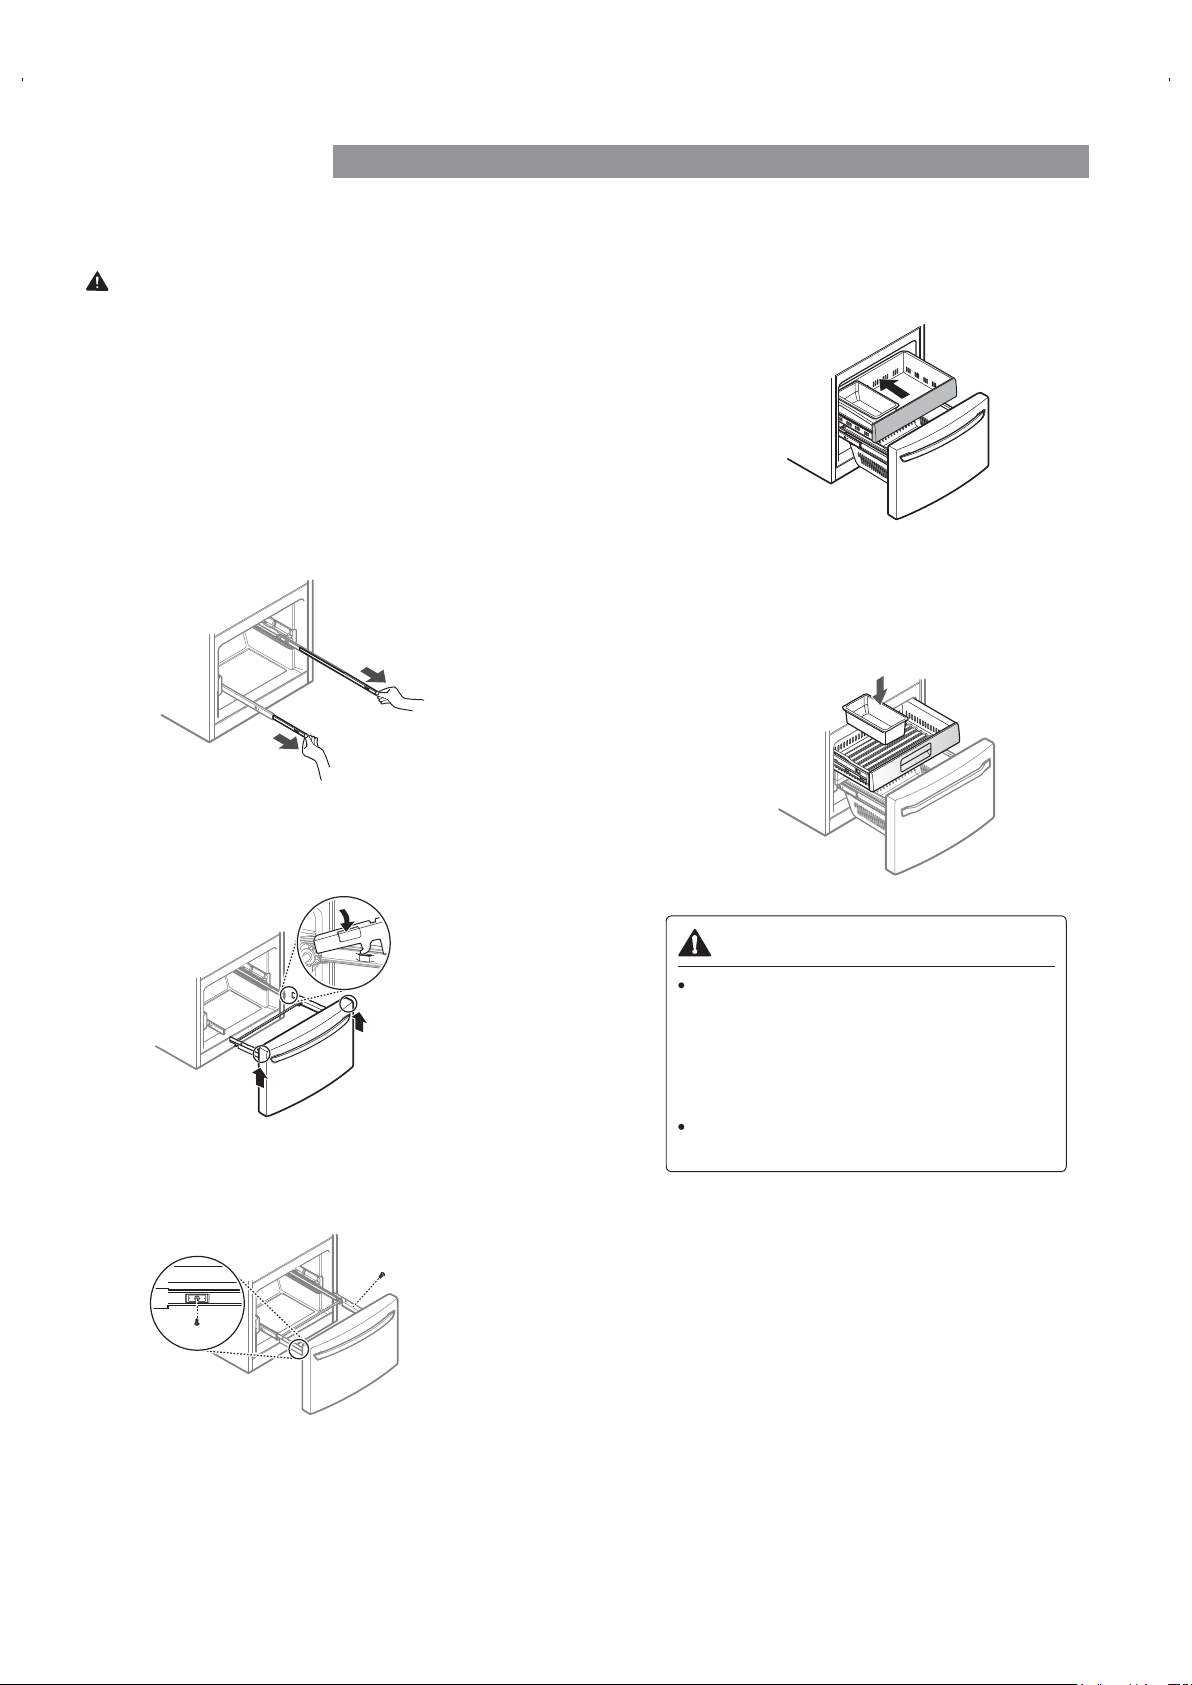
17
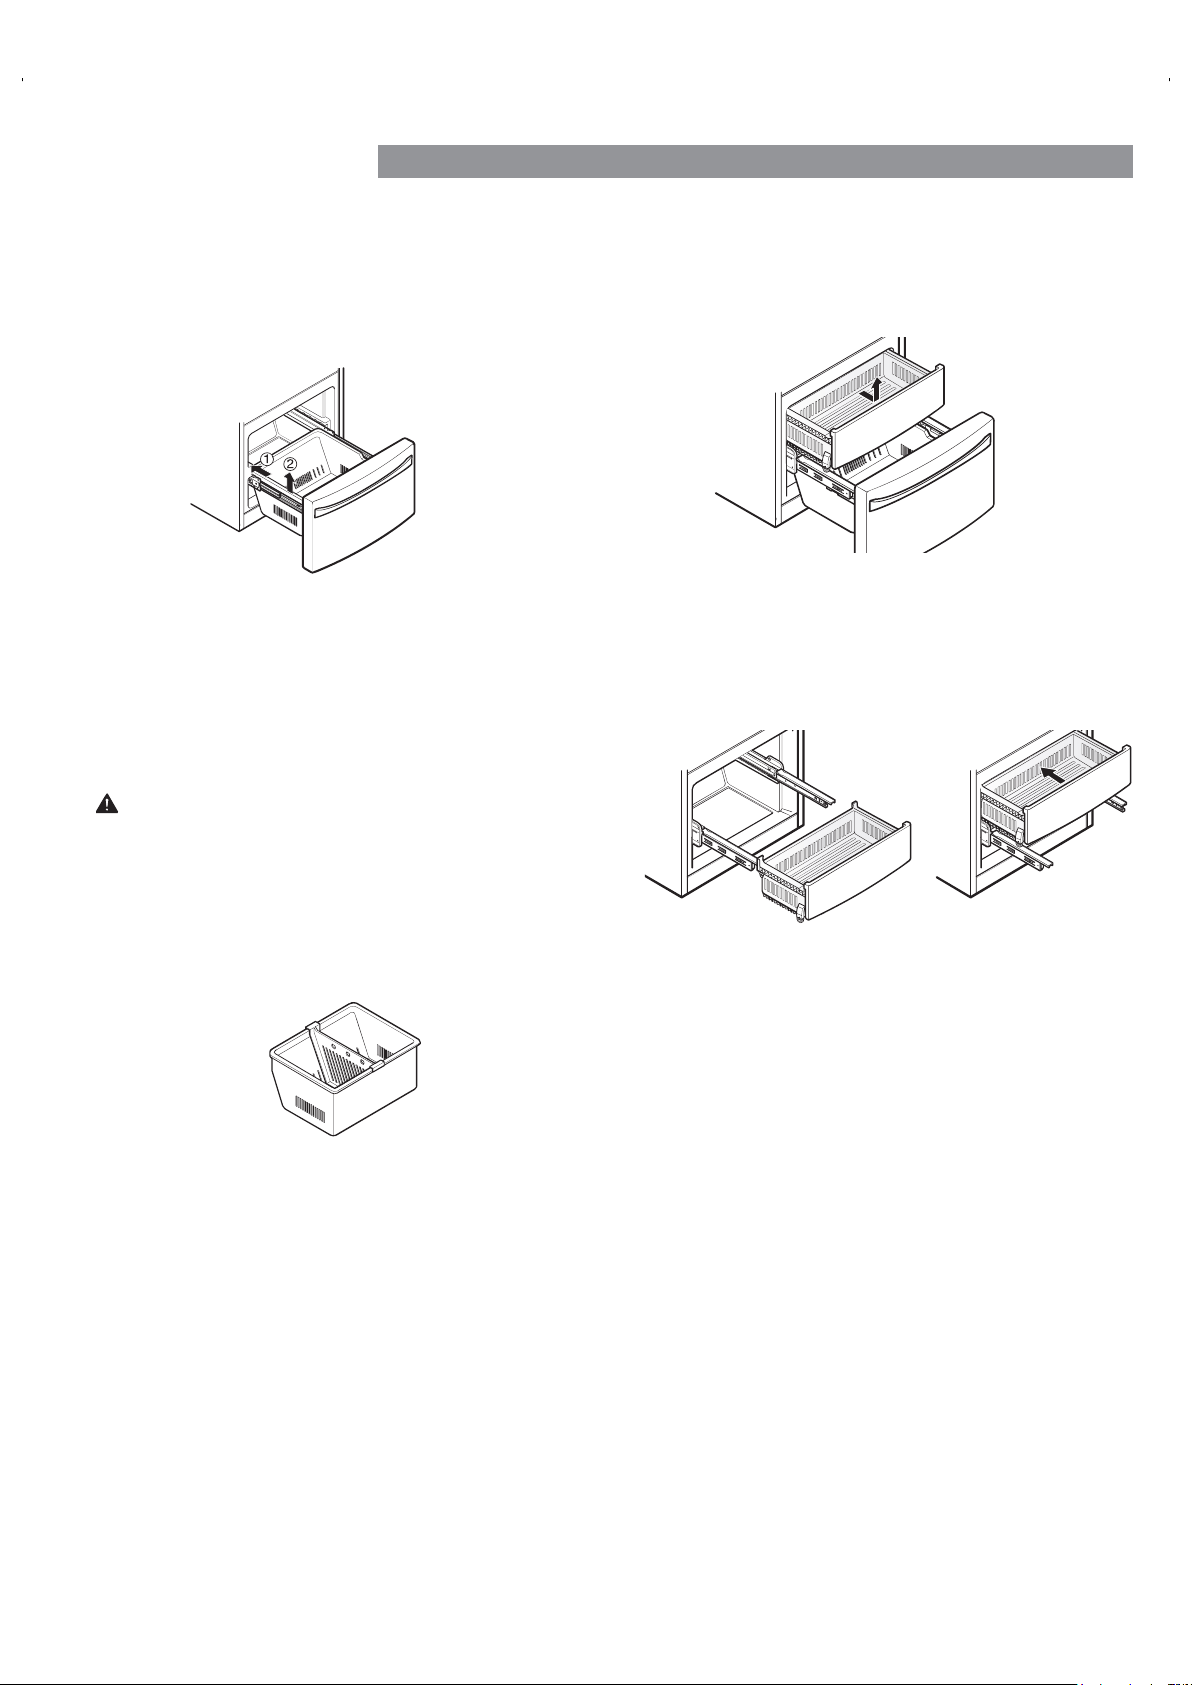
REFRIGERATOR INSTALLATION
REPLACING FREEZER DRAWERS
Replacing The Freezer Drawer
Pull out both rails simultaneously, until they are fully
extended.
WARNING
If the Durabase divider is removed, there
is enough open space for children or pets
to crawl inside. To prevent accidental
child and pet entrapment or suffocation
risk, DO NOT allow them to touch or go
near the freezer drawer.
DO NOT step or sit down on the freezer
drawer.
Grasp the drawer on each side and hook the
drawer supports into the rail tabs located on both
sides.
tighten the screws located on both sides.
Lower the door into its final position and
Insert the drawer and push it back until it
clicks into place.
Replace the ice bin in the drawer. Insert the
Durabase basket in the rail assembly.
WARNING:
Use two or more people to remove and
install the freezer drawer. Failure to do so can result in
back or other injury.
NOTE: In the following images, the Pullout Drawer
located above the freezer drawer is not shown for clarity.
18
screwdriver.
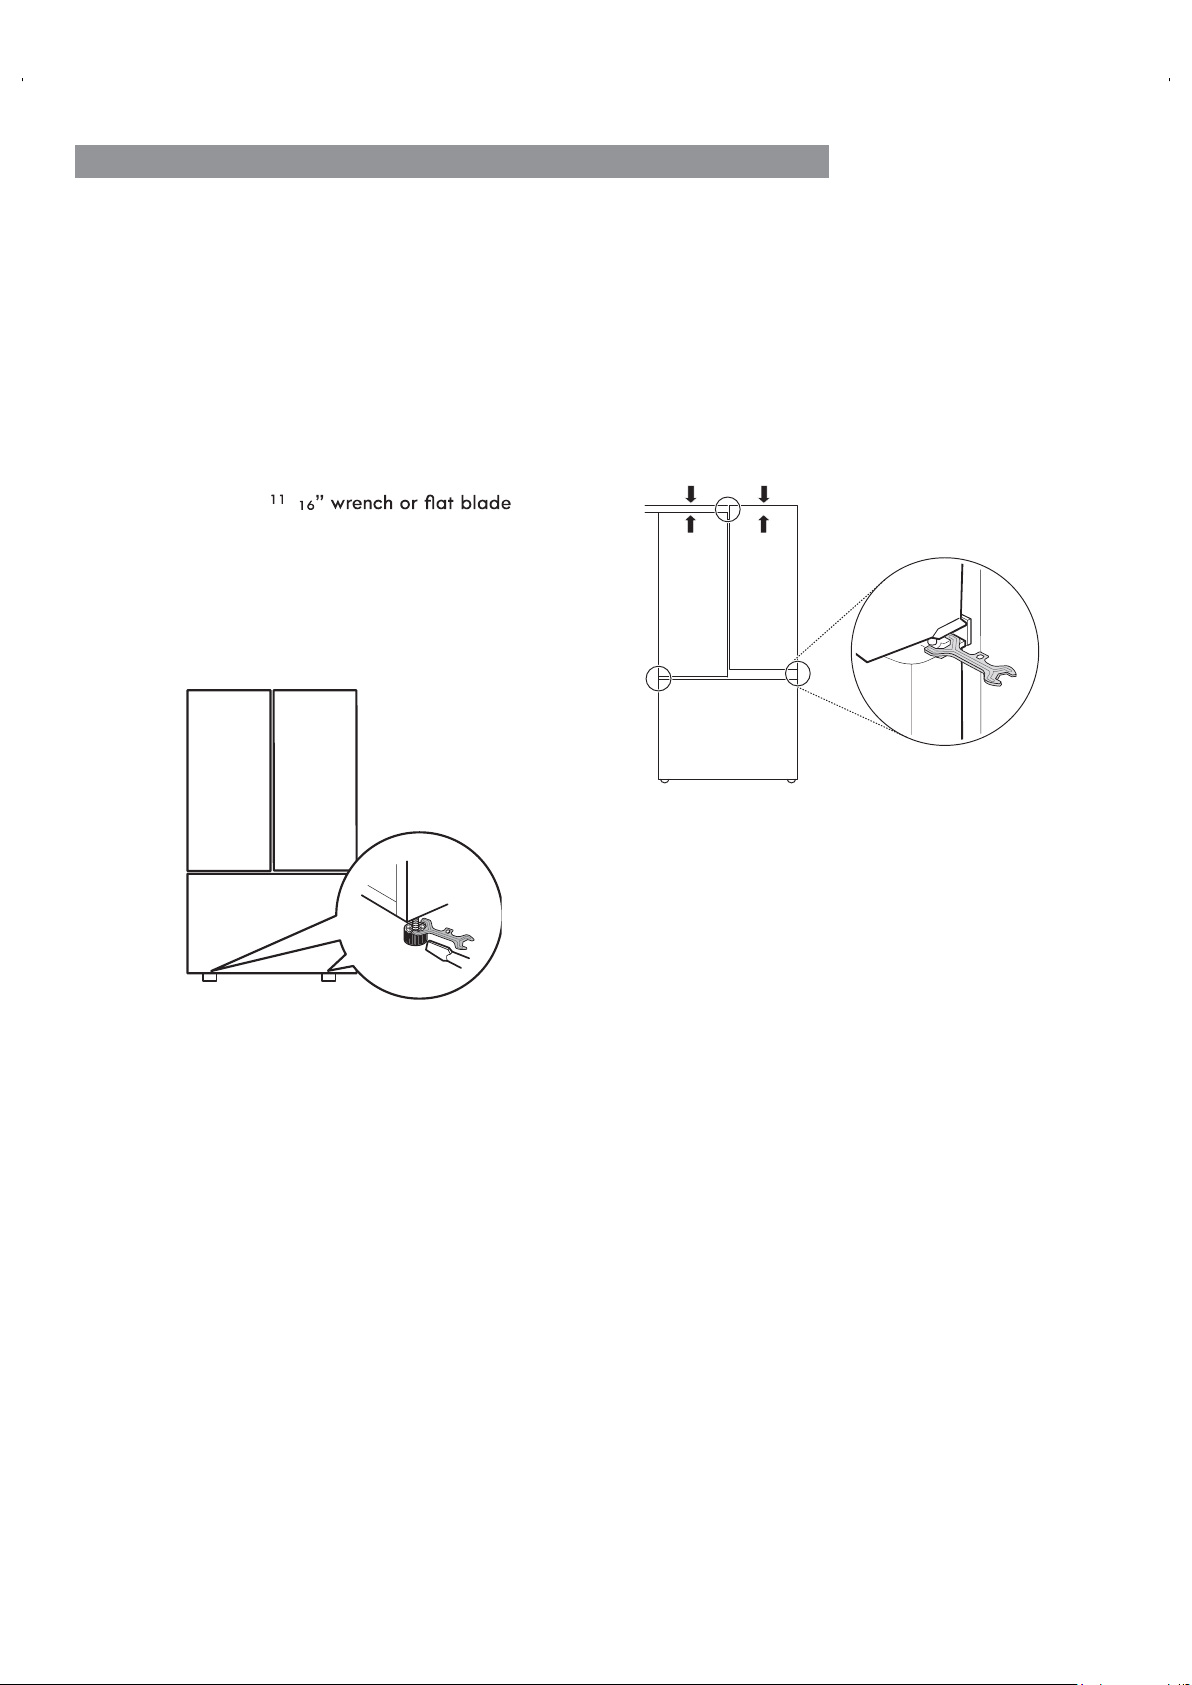
1. Turn the leveling leg to the left to raise that side of
the refrigerator or to the right to lower it. It may take
several turns of the leveling leg to adjust the tilt of the
refrigerator.
NOTE: Having someone push backward against the top of
the refrigerator takes some weight off of the leveling legs.
This makes it easier to adjust the legs.
2. Open both doors again and check to make sure that
they close easily. If the doors do not close easily, tilt
the refrigerator slightly more to the rear by turning
both leveling legs to the left. It may take several more
turns, and you should turn both leveling legs the same
amount.
NOTE: Your refrigerator is uniquely designed with
two fresh food doors. Either door can be opened or
closed independently of the other. You may have to
exert slight pressure on the doors to get them to close
completely.
REFRIGERATOR INSTALLATION
LEVELING AND DOOR ALIGNMENT
Leveling
After installing, plug the refrigerator’s power cord into a
3-prong grounded outlet and push the refrigerator into the
finalposition.
Your refrigerator has two front leveling legs—one on the
right and one on the left. Adjust the legs to alter the tilt
from front-to-back or side-to-side. If your refrigerator
seems unsteady, or you want the doors to close more
easily, adjust the refrigerator’s tilt using the instructions
below:
NOTE: Tools Required: /
Door Alignment
Both the left and right refrigerator doors have an
adjustable nut, located on the bottom hinge, to raise
and lower them to align properly.
If the space between the doors is uneven, follow the
instructions below to align the doors evenly:
Use the wrench (included with the owner's manual)
to turn the nut in the door hinge to adjust the height.
Turn the nut to the right to raise the door or to the left
to lower it.
USING YOUR REFRIGERATOR
CAUTION
To reduce the risk of scratching
the door or breaking the door
mullion, make sure that the
refrigerator door mullion is
always folded in.
Articulating Mullion
This feature is a metal strip attached to the left door
that articulates (rotates) 90 degrees as the door is
closed, forming a mullion (base) for the left and right
door gaskets to seal against.
Air Filter
The Air Filter helps remove odors from the
refrigerator. The Air Filter has two settings, Auto and
MAX. In Auto mode, the Air Filter will cycle on and
off in increments of ten minutes on and 110 minutes
off. If set to the M AX mode, the Air Filter will stay
on continuously for four hours, cycling on and off in
increments of ten minutes on and five minutes off.
After four hours, the Air Filter will switch to Auto
mode.
Auto mode is the default mode. (Max LED off)
•
Press the
•
Air Filter button once for Max mode.
(Max LED on)
Air Filter Reset
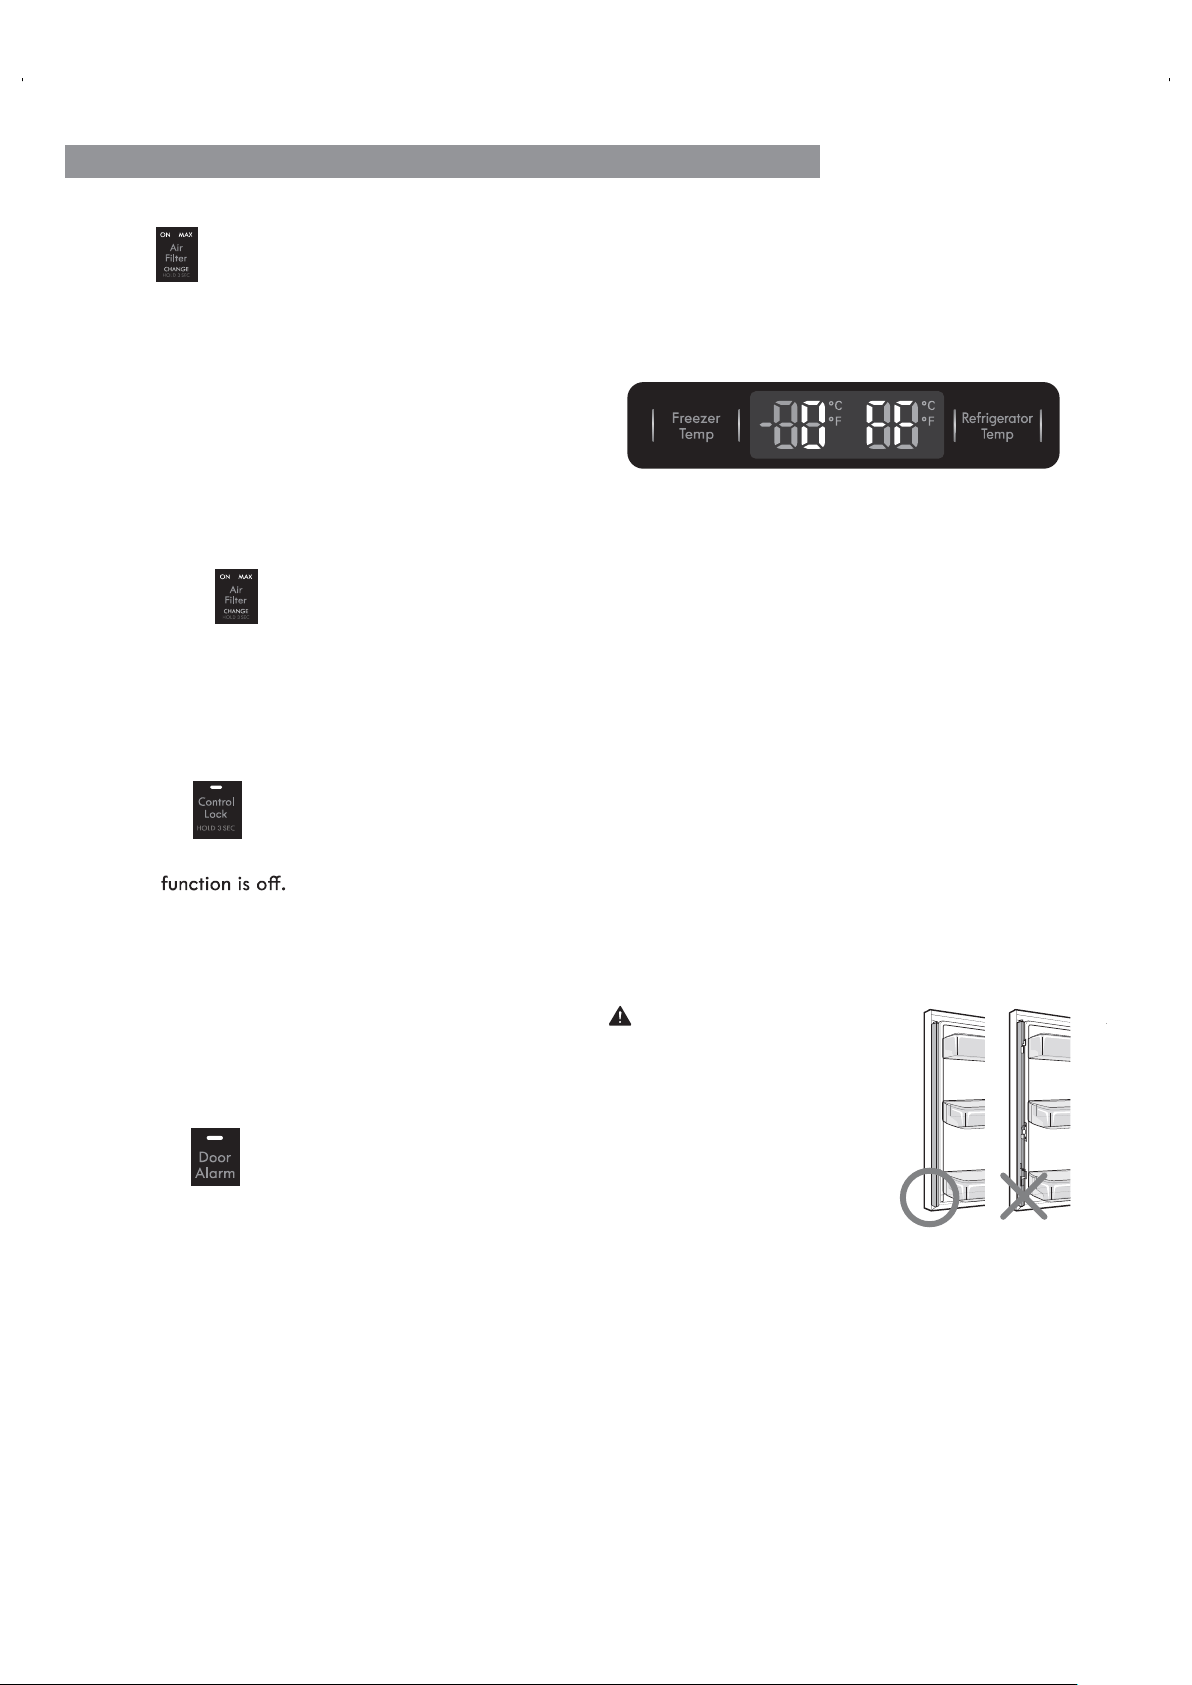
Control Lock
Door Alarm
When the “CHANGE” icon turns on, the air filter needs
to be replaced. After replacing the air filter, press
and hold the Air Filter button for three seconds to turn
the icon light off. Change the air filter approximately
every 6 months.
Temperature Mode Switch Function (°F <->°C)
To convert °F to °C or vice versa, press and hold the Freezer
Temp and Refrigerator Temp buttons at the same time for
approximately five seconds.
Demo Mode (For Store Use Only)
To Deactivate Demo Mode:
With either refrigerator door opened, press and hold the
Refrigerator Temp and
Accela Ice
buttons at the same
time for five seconds. The control panel will beep and the
temperature settings will display to confirm that Demo
Mode is deactivated. Use the same procedure to activate
the Demo Mode .
The Demo Mode disables all cooling in the refrigerator
and freezer sections to conserve energy while on display
in a retail store. When activated, OFF will display on the
control panel.
20
•
When power is initially connected to the refrigerator,
the Lock
•
To lock the controls, press and hold the Control Lock
button for three seconds until the LED illuminates and
the function is enabled.
•
When the Lock function is activated, no other buttons
will work.
•
To disable the Lock function, press and hold the Control
Lock button for approximately three seconds.
•
When power is connected to the refrigerator, the door
alarm is initially set to ON. To deactivate the Door
Alarm function, press the Door Alarm button.
(The LED turns off.)
When either the refrigerator or the freezer door is left
open for more than 60 seconds, the alarm tone will
sound to let you know that the door is open.
Close the doors to stop the alarm.

21
USING YOUR REFRIGERATOR
SMART LED (white):
DEFINTIONS
Notifiestheuserthattheapplianceisconnectedtothe
internet.
SmartGridLED (white):
Notifiestheuserthattheapplianceiscapableofreceiving
asignal,knownasaDemandResponseevent,fromautility
company’senergymanagementsystem.
GRIDMODELED(red):
Notifiestheuserthattheapplianceisreducingordelaying
energyusebasedonthesignalreceivedfromautility
companyenergymanagementsystem.TheLEDwillremain
illuminatedduringcriticalpeakpricing(CPP)andrealtime
pricing(RTP)orduringahighdemandforelectricity.
GETTING CONNECTED
CONNECTING THE REFRIGERATOR
Youneedthefollowingdevicesandapplicationtousethe
SmartGridandothersmartfeaturesonyourrefrigerator.
RequiredDevices: Awirelessrouter,KenmoreSmart
Refrigerator,andamobiledevice.
RequiredApplication
RefertotheQuickStartGuidethatcamewithyoursmart
appliancefordetailedinstructionsoncreatingaKenmore
accountandsettinguptheapplianceforconnectedoperation
fromyourmobiledevice.Foradditionalassistance,
visithttp://www.kenmore.com/smart
NOTE:
Whensuccessfullyconnectedtotheinternet,the
SMARTiconLEDontheunitcontrolpanelwillturnON.
: KenmoreSmartApp.
SMART FEATURES
OVERVIEW
KenmoreSmartconnectivitytransformsyourrelationshipwith
yourhome.YoucanpersonalizethewayKenmoreSmart
productsoperatebasedonyourscheduleanddailyroutines,
makinglifeeasierandprovidinggreaterpeaceofmind.
Thisapplianceisaconnected-readyappliance,allowingyou
toremotelymonitorandcontrolitfromyoursmartphonevia
. .ppa ™tramS eromneK eht
Togetstarted,youwillneedthefollowing:
• KenmoreSmart
™
Appliance
• Wi-Fihomerouterconnectedtotheinternet
• Smartphone
• KenmoreSmart™app
FormoreinformationaboutyourKenmoreSmart™
appliance,pleasevisitwww.Kenmore.com/smart.
TheSmartGridfunctioncontrolsenergyusage,whichhelps
yousaveenergyduringpeakusageperiods.Youcanoverride
theSMARTGRIDfunctionatanytime(usingtheSmartGrid
buttonorapplication).
SmartGridrespondstonotificationeventsfromyour
utilitycompanytorunhighenergy-consumingtasksonly
duringoff-peaktimeswhenelectricaldemandislower.
ThesenotificationeventsareknownasDemandResponse
(DR)signals.IftherefrigeratorreceivesaDRsignalfrom
theutilitycompany,therefrigeratorwillturnontheGRID
MODELEDontherefrigeratorcontrolpanelandregulate
powerconsumptionaccordingtothesignalreceived.The
refrigeratorwillrespondtothesignalsreceivedfromthe
utilitycompanyaslongastheapplianceisconnectedtothe
internetandSmartGridisenabled.

USING YOUR REFRIGERATOR
INSTRUCTIONS FOR SMART GRID
IMPORTANT:
You must connect your Kenmore Smart appliance to the
internet and then register the appliance to your account
in order to use the Smart Grid function.
Consult the Quick Start Guide supplied with the
appliance for instructions on how to register your
appliance using the Kenmore Smart™ application (app).
The Smart Grid Button serves two purposes:
1) internet connection or disconnection, 2) enable or
disable/override the appliance Demand Response
capability.
NOTE:
This appliance is a connected-ready appliance,
allowing you to remotely monitor and control it from your
smart phone via the Kenmore Smart™ app.
To connect the refrigerator to the Internet:
Refer to the Quick Start Guide that came with your smart
appliance for detailed instructions on creating a Kenmore
account and setting up your appliance for connected
operation from your smart phone. This Use & Care Guide
contains information and instructions for operating
your appliance from the appliance control panel. For
additional assistance, visit http://www.kenmore.com/
smart
NOTE:
If no connection is madeafterfiveminutesthe
blinking SMART GRID button LED will turn off.
Smart Grid Operation:
Once connected and registered, the appliance is capable
of accepting a signal from your electrical company. The
signal, known as a Demand Response (DR) signal, will adjust
refrigerator operation to reduce power consumption for
a period of time ranging from a few minutes up to a
maximum of 4 hours. Ice making will be delayed during
this time. Opening the refrigerator door may cancel
certain DR signals.
The Grid Mode LED (red) will be steadily lit when the
signal is in effect. To disable the signal and prevent
further signal acceptance, press and release the Smart
Grid button. Both the Grid Mode and Smart Grid LED
will turn off. Press and release the Smart Grid button
again to enable DR signal acceptance capability. The
Smart Grid button LED will relight. The Grid Mode LED
will light when another DR signal is sent.
22

USING YOUR REFRIGERATOR
FCC Notice
(For transmitter module contained in this product)
This equipment has been tested and found to comply with
the limits for a Class B digital device, pursuant to Part 15
of the FCC Rules. These limits are designed to provide
reasonable protection against harmful interference in a
residential installation. This equipment generates, uses, and
can radiate radio frequency energy and, if not installed and
used in accordance with the instructions, may cause harmful
interference to radio communications. However, there is no
guarantee that interference will not occur in a particular
installation. If this equipment does cause harmful interference
to radio or television reception, which can be determined
by turning the equipment off and on, the user is encouraged
to try to correct the interference by one or more of the
following measures:
- Reorient or relocate the receiving antenna.
- Increase the separation between the equipment
and the receiver.
- Connect the equipment to an outlet on a circuit
different from that to which the receiver is connected.
- Consult the dealer or an experienced radio/TV
technician for help.
This device complies with part 15 of the FCC Rules.
Operation is subject to the following two conditions:
1) this device may not cause harmful interference and
2) this device must accept any interference received,
including interference that may cause undesired
operation of the device.
Any changes or modifications in construction of this device
which are not expressly approved by the party responsible
for compliance could void the user’s authority to operate the
equipment.
Open Source Software Notice
To obtain the source code that is contained in this product
under LGPL and other open source licenses, visit http://
kenmore.com/opensource. In addition to the source code, all
referred license terms, warranty disclaimers, and copyright
notices are available for download.
FCC RF Radiation Exposure Statement
This equipment complies with FCC radiation exposure limits
set forth for an uncontrolled environment. This transmitter
must not be co-located or operating in conjunction with any
other antenna or transmitter.
This equipment should be installed and operated with a
minimum distance of 20 cm (7.8 inches) between the antenna
and your body. Users must follow the specificoperating
instructions for satisfying RF exposure compliance.
Wireless LAN Module Specifications
Model
2AHU4-KMTD17
Frequency Range
2412 to 2462 MHz
Output Power
(Max)
IEEE 802.11 b : 18.26 dBm
IEEE 802.11 g : 20.10 dBm
IEEE 802.11 n : 20.07 dBm
23
USING YOUR REFRIGERATOR
24
Turning the Automatic Icemaker On or Off
When you should set the icemaker power switch
to off (O)
To turn off the automatic icemaker, set the icemaker
switch to
OFF (O)
. To turn on the automatic icemaker,
set the switch to
ON (I)
.
Normal Sounds You May Hear
•
Keeping the power turned on to the icemaker
When the water supply will be shut off for several
hours.
When the ice storage bin is removed for more than
a minute or two.
When the refrigerator will not be used for several
days.
before the water line is connected can damage the
icemaker.
•
The icemaker water valve will buzz as the icemaker
fills with water. If the power switch is in the
ON (I)
position, it will buzz even if it has not yet been
hooked up to water . To stop the buzzing, move the
power switch to
OFF (O) .
•
You will hear the sound of cubes dropping into the
bin and water running in the pipes as the icemaker
refills.
Preparing for Vacation
Set the icemaker power switch to
OFF (O)
and shut
off the water supply to the refrigerator.
NOTE
•
The ice bin should be emptied any time the
icemaker on/off switch is turned to the
OFF (O)
position.
If the ambient temperature will drop below freezing,
system to prevent serious property damage due
have a qualified technician drain the water supply
to flooding caused by ruptured water lines or
connections.
Operation Instructions
Personal Injury Hazard
DO NOT place fingers or hands on the automatic ice
making mechanism while the refrigerator is plugged
in.
A newly-installed refrigerator may take 12 to 24
hours to begin making ice.
Auto shutoff Arm Power Switch
If the refrigerator is used before the water
connection is made to the icemaker, set the power
switch to Off (O).
The icemaker will produce 12 cubes per cycle-
approximately 100 cubes in a 24 hour period,
depending on freezer compartment temperature,
room temperature, number of door openings and
other operating conditions.
Discard the first few batches of ice to allow the
water line to clear.
The icemaker will fill with water when it cools to
freezing. A newly-installed refrigerator may take
12 to 24 hours to begin making ice cubes.
When the refrigerator has been connected to the
water supply, set the power switch to On (I).
Be sure nothing interferes with the sweep of the
automatic shutoff arm.
When the bin fills to the level of the automatic
shutoff arm, the icemaker will stop producing ice.
It is normal for several cubes to be stuck together.
If ice is not used frequently, old ice cubes will
become cloudy, taste stale,and shrink.
The water pressure must be between 20
and 120 psi (138 and 827 kPa) on models
without a water filter and between 40 and
120 psi (276 and 827 kPa) on models with
a water filter.
NOTE
FOOD STORAGE GUIDE
Wrap or store food in the refrigerator in airtight and
moisture-proof material unless otherwise noted. This
prevents food odor and taste transfer throughout the
refrigerator. For dated products, check date code to
ensure freshness.
STORING FROZEN FOOD
NOTE: Check a freezer guide or a reliable cookbook
for further information about preparing food for
freezing or food storage times.
Freezing
Your freezer will not quick-freeze a large quantity of
food. Do not put more unfrozen food into the freezer
than will freeze within 24 hours (no more than 2 to 3
lbs. of food per cubic foot of freezer space). Leave
enough space in the freezer for air to circulate around
packages. Be careful to leave enough room at the
front so the door can close tightly.
Storage times will vary according to the quality and
type of food, the type of packaging or wrap used
(how airtight and moisture-proof) and the storage
temperature. Ice crystals inside a sealed package are
normal. This simply means that moisture in the food
and air inside the package have condensed, creating
ice crystals.
NOTE: Allow hot foods to cool at room temperature
for 30 minutes, then package and freeze. Cooling hot
foods before freezing saves energy.
Packaging
Successful freezing depends on correct packaging.
When you close and seal the package, it must not
allow air or moisture in or out. If it does, you could
have food odor and taste transfer throughout the
refrigerator and could also dry out frozen food.
Packaging recommendations:
Rigid plastic containers with tight-fitting lids•
Straight-sided canning/freezing jars•
Heavy-duty aluminum foil•
Plastic-coated paper•
Non-permeable plastic wraps•
Specified freezer-grade self-sealing plastic bags•
Follow package or container instructions for proper
freezing methods.
Do not use
Bread wrappers•
Non-polyethylene plastic containers•
Containers without tight lids•
Wax paper or wax-coated freezer wrap•
Thin, semi-permeable wrap•
CAUTION: Do not keep beverage cans or plastic
food containers in the freezer compartment. They
may break or burst if they freeze.
Items How to
Butter or
margarine
Cheese
Milk
Eggs
Fruit
Leafy
vegetables
Vegetables
with skins
(carrots, peppers)
Fish
Leftovers
Keep opened butter in a covered
dish or closed compartment.
When storing an extra supply,
wrap in freezer packaging and
freeze.
Store in the original wrapping
until you are ready to use it. Once
opened, rewrap tightly in plastic
wrap or aluminum foil.
Wipe milk cartons. For best
storage, place milk on interior
shelf, not on door shelf.
Store in original carton on interior
shelf, not on door shelf.
Do not wash or hull the fruit
until it is ready to be used. Sort
and keep fruit in its original
container, in a crisper, or store in a
completely closed paper bag on a
refrigerator shelf.
Remove store wrapping and trim
or tear off bruised and discolored
areas. Wash in cold water and
drain. Place in plastic bag or
plastic container and store in
crisper.
Place in plastic bags or plastic
container and store in crisper.
Store fresh fish and shellfish in
the freezer section if they are not
being consumed the same day of
purchase. It is recommended to
consume fresh fish and shellfish the
same day purchased.
Cover leftovers with plastic wrap
or aluminum foil, or store in plastic
containers with tight lids.
25
USING YOUR REFRIGERATOR
USING YOUR REFRIGERATOR
26
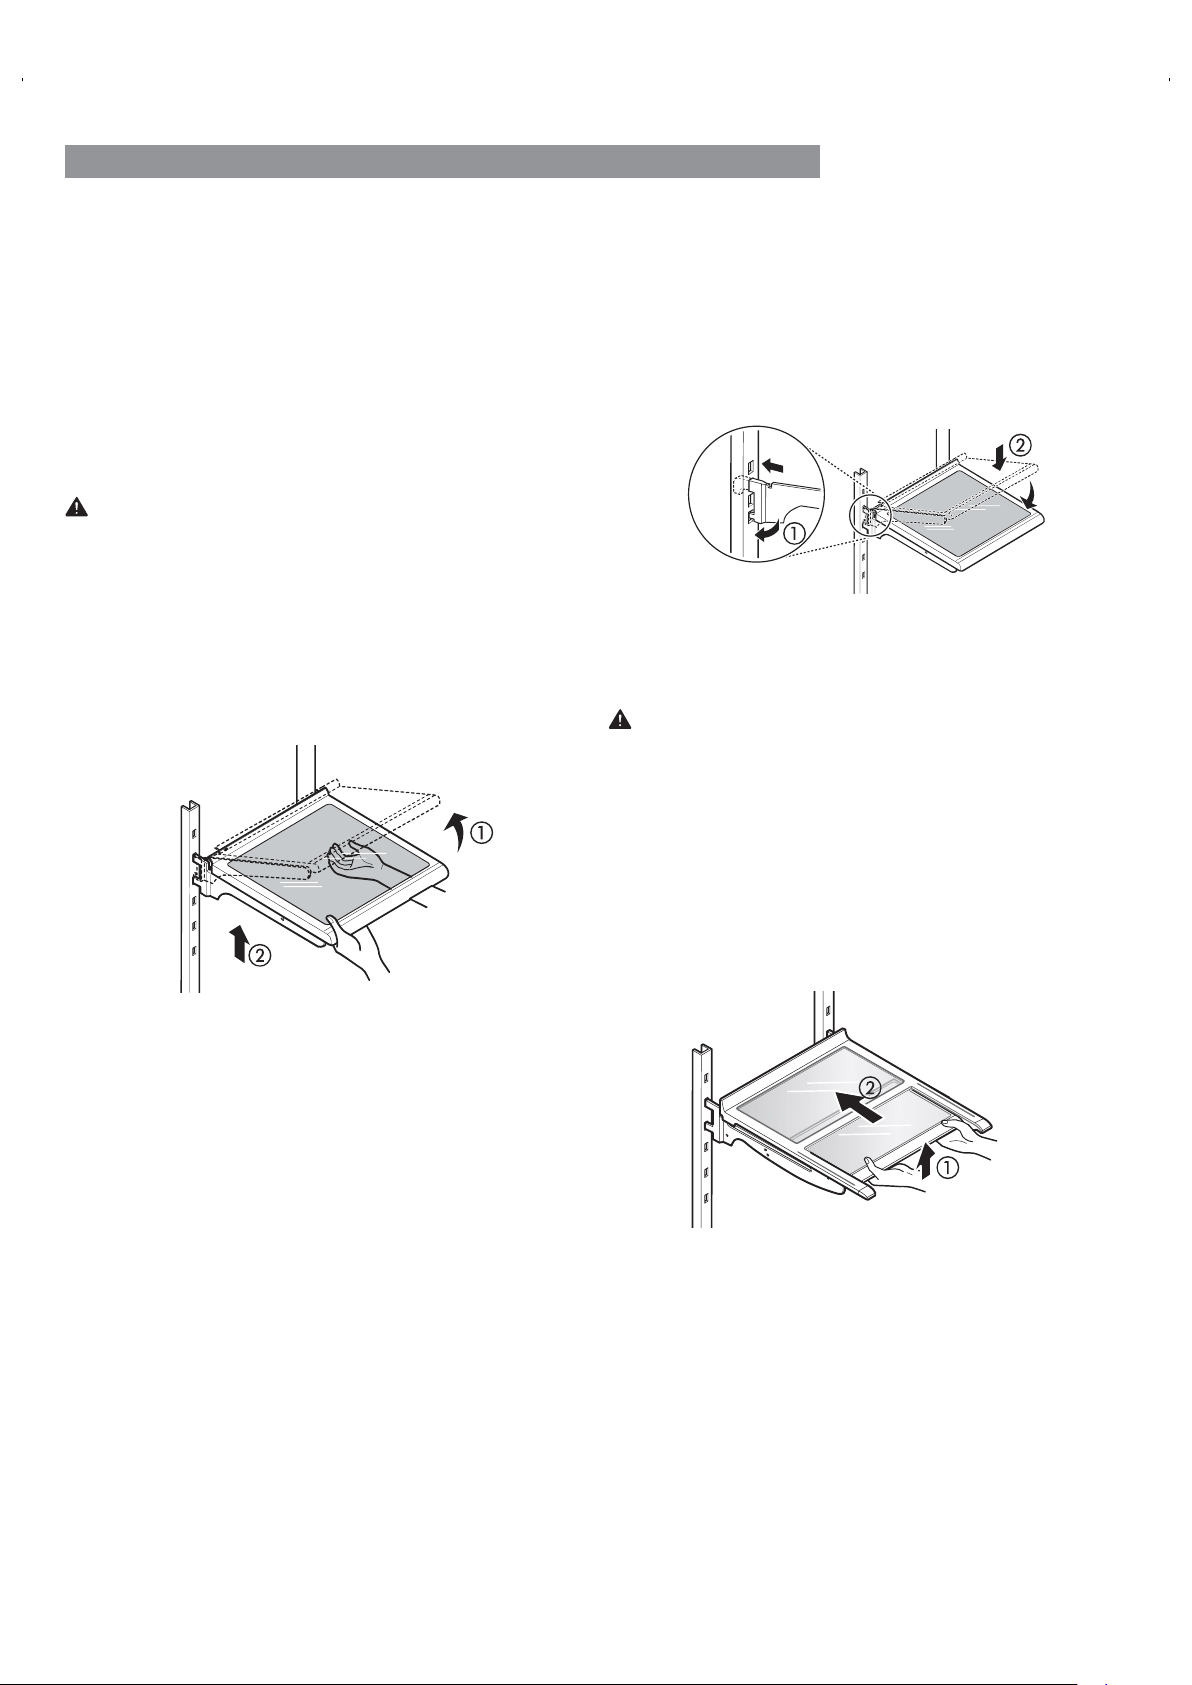
REFRIGERATOR SHELVES
The shelves in your refrigerator are adjustable to meet
your individual storage needs. Your model may have glass
or wire shelves.
Adjustingtheshelvestofititemsofdifferentheightswill
makefindingtheexactitemyouwanteasier.Doingsowill
alsoreducetheamountoftimetherefrigeratordooris
openwhichwillsaveenergy.
IMPORTANT:
Donotcleanglassshelveswithwarmwater
whiletheyarecold.Shelvesmaybreakifexposedto
suddentemperaturechangesorimpact.
CAUTION:
Glassshelvesareheavy.Usespecialcare
when removing them.
Detaching the Shelf (Half Shelf Type)
Folding Shelf (on some models)
Youcanstoretalleritems,suchasagalloncontainer
orbottles,bysimplypushingthefronthalfoftheshelf
underneaththebackhalfoftheshelf.Pullthefrontofthe
shelf toward you to return to a full shelf.
CAUTION:
Make sure that shelves are level from one
side to the other. Failure to do so may result in the shelf
falling or food spilling.
1
Tilt up the front of the shelf and then
lift the shelf straight up.
2
Pulltheshelfout.
1
Tilt the front of the shelf up and guide
the shelf hooks into the slots at a
desired height.
2
Lower the front of the shelf so that the
hooks drop into the slots.
Assembling the Shelf (Half Shelf Type)
make nding the exact item you want easier. Doing so will
27
HUMIDITY CONTROLLED CRISPER
The crispers provide fresher tasting fruit and vegetables by
letting you easily control humidity inside the drawer.
You can control the amount of humidity in the moisture-
sealed crispers by adjusting the control to any setting
between VEGETABLES and FRUIT
.
VEGETABLES
keeps moist air in
the crisper for best
storage of fresh,
leafy vegetables.
FRUIT lets moist air
out of the crisper for
best storage of fruit.
DOOR BIN
The door bins are removable for easy cleaning and
adjustment.
1. To remove the bin, simply lift the bin up and pull
straight out.
2. To replace the bin, slide it in above the desired support
and push down until it snaps into place.
REMOVING THE CRISPER OR PANTRY DRAWER
1
To remove, pull out the crisper (1) or drawer
(2) to full extension, lift the front up,
and pull straight out.
2
To install, slightly tilt up the front, insert the crisper
or drawer into the frame and push it back into
place.
Crisper Cover
To remove, lift the front of the cover up until it
detaches from the back wall of the cabinet, then pull
it out.
FRUIT VEGETABLES
FRUIT VEGETABLES
TEMPERATURE CONTROLLED PANTRY DRAWER
The Temperature Controlled Pantry Drawer provides storage
space with a variable temperature control that can keep the
compartment at a slightly different temperature than
the refrigerator section. This drawer can be used for
large party trays, deli items and beverages. (This
drawer should not be used to store vegetables that
require high humidity.)
Press the
Select
button to choose between
Produce
(Cold),
Deli
(Colder) and
Meat
(Coldest).
Do not store glass bottles in the pantry.
If they are frozen, they can break and cause personal injury.
CAUTION:
CAUTION
Regularly detach and wash the storage bins and shelves;
they can become easily contaminated by food.
Do not apply excessive force while detaching or
assembling the storage bins.
Do not use the dishwasher to clean the storage
bins and shelves.
USING YOUR REFRIGERATOR
28
29
USING YOUR REFRIGERATOR
PULLOUT DRAWERS
1. To remove, pull the drawer out to full extension.
Lift the front of the drawer up, then pull it straight
out.
2. To install, slightly tilt up the front and insert the
drawer into the frame and push it back into place.
DURABASE
1. To remove the Durabase, push it to the back as much
as possible. Tilt up the front of the Durabase and pull
straight out.
2. To replace, insert the Durabase in the rail assembly.
WARNING:
If the Durabase divider is removed, there is
enough open space for children or pets to crawl inside.
To prevent accidental child and pet entrapment or
suffocation risk, DO NOT allow children or pets to
touch or go near the drawer.
DURABASE DIVIDER
The Durabase divider allows you to organize the
Durabase area into sections.
WATER FILTER
WATER FILTER
It is recommended that you replace the water filter:
Approximately every six months.•
When the water filter indicator
turns on.
•
When the ice cubes are smaller •
than normal.
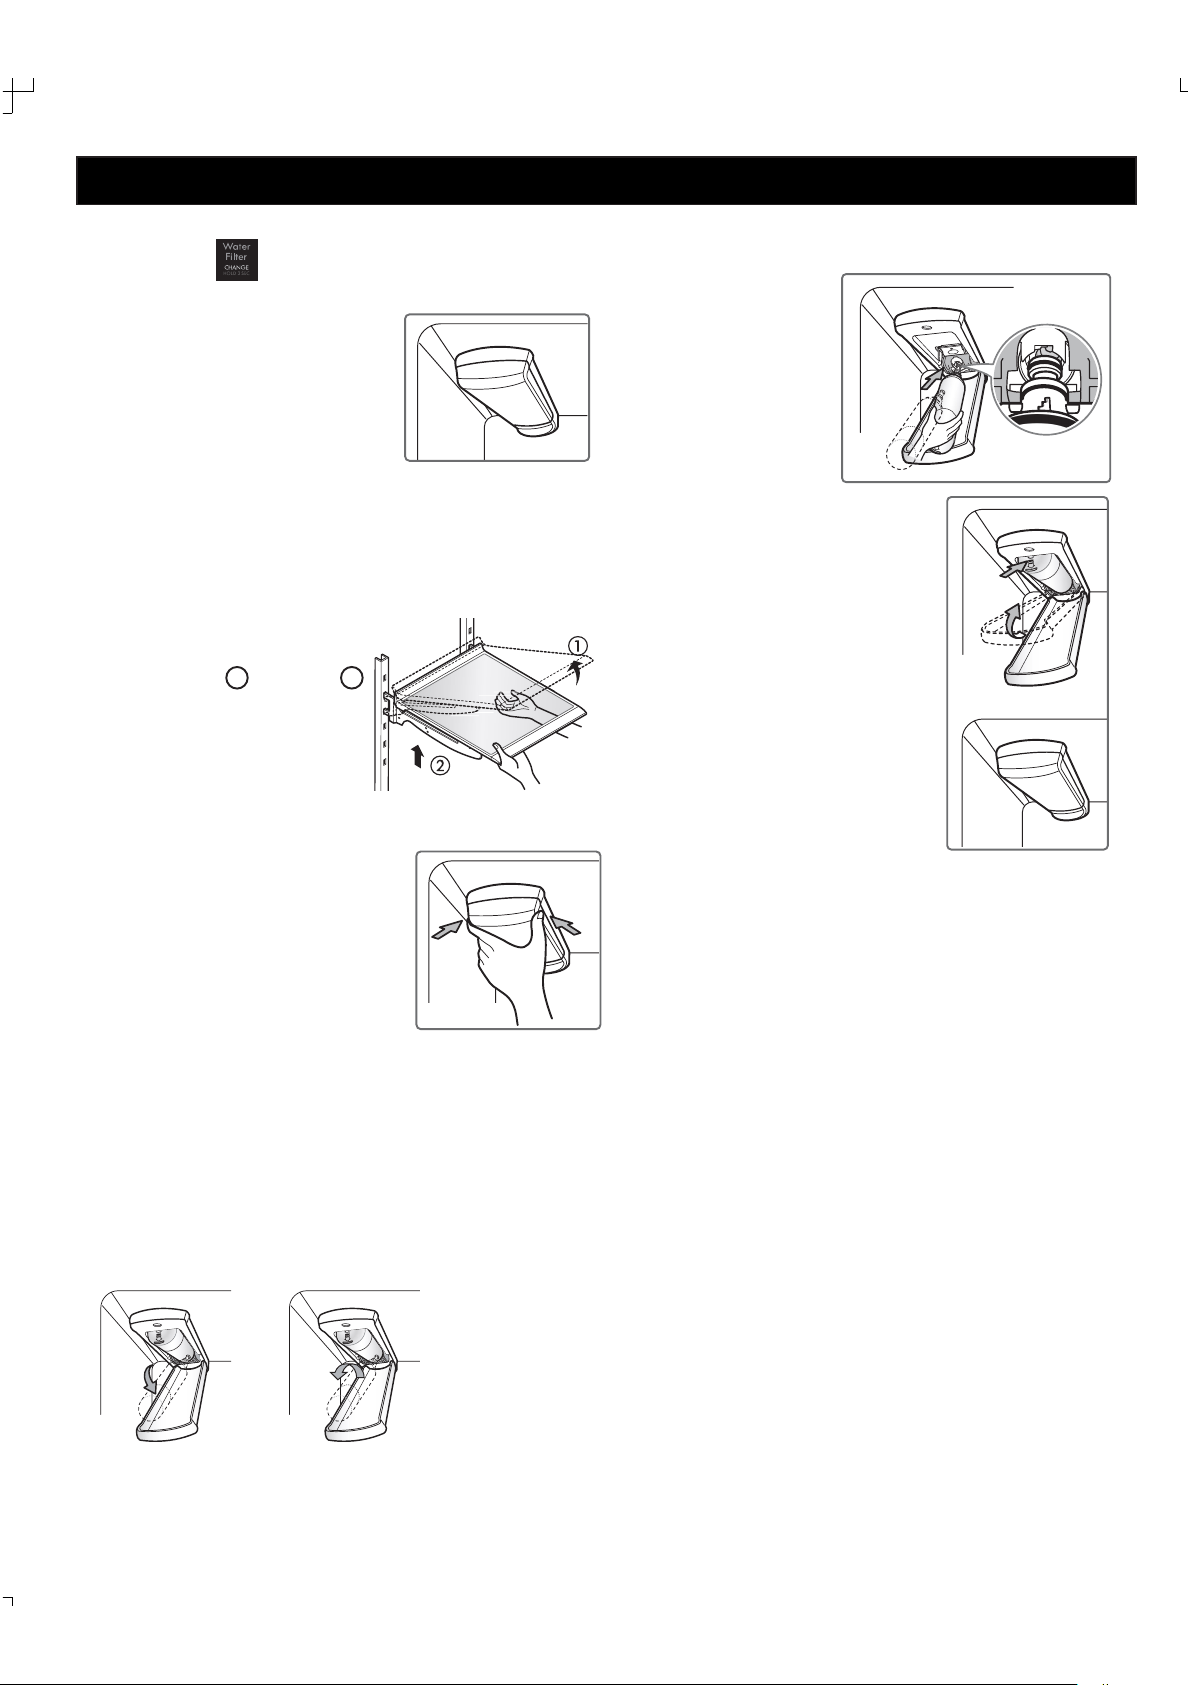
1. Remove the old water filter.
Lower or remove the top left shelf •
to allow the water filter to rotate
all the way down.
Pinch the sides to open the •
water filter cover.
NOTE: Replacing the water filter
causes a small amount of water
(around 1 oz. or 25 cc) to drain. Place
aclotharoundthefrontendofthewaterfiltercovertocollect
any leaking water. Hold the water filter upright, once it is
removed, to prevent any remaining water from spilling out of
the water filter.
Make sure to rotate the filter down completely before •
pulling it out of the manifold hole.
Pull the water filter downward and turn it counter-•
clockwise.
Before Replacing the Water Filter:
If the top shelf, located below the water filter, is in the
highest position, it will need to be removed prior to
replacing the water filter.
To remove any shelf–Tilt up the
front of the shelf
1
and lift it
2
.
Pull the shelf out.
2. Replace with a new water filter.
Take the new •
water filter out
of its packing
and remove the
protective cover
from the o-rings.
With the water filter tabs in
•
the horizontal position, push
the new water filter into the
manifold hole and turn it
clockwise.
Rotate the waterfilterupinto
positionandclosethecover.
Thecoverwillclickwhen
closedcorrectly.
•
3. After the water filter is replaced, dispense 2.5
gallons of water (flush for approximately 5 minutes)
to remove trapped air and contaminants from
the system. Do not dispense the entire 2.5 gallon
amount continuously. Depress and release the
dispenser pad for cycles of 30 seconds ON and 60
seconds OFF.
NOTE:Topurchaseareplacementfilter,visityourlocal
Searsstore,orcall1-844-553-6667,Youmayalsopurchase
onlineatwww.kenmore.com.
30
31
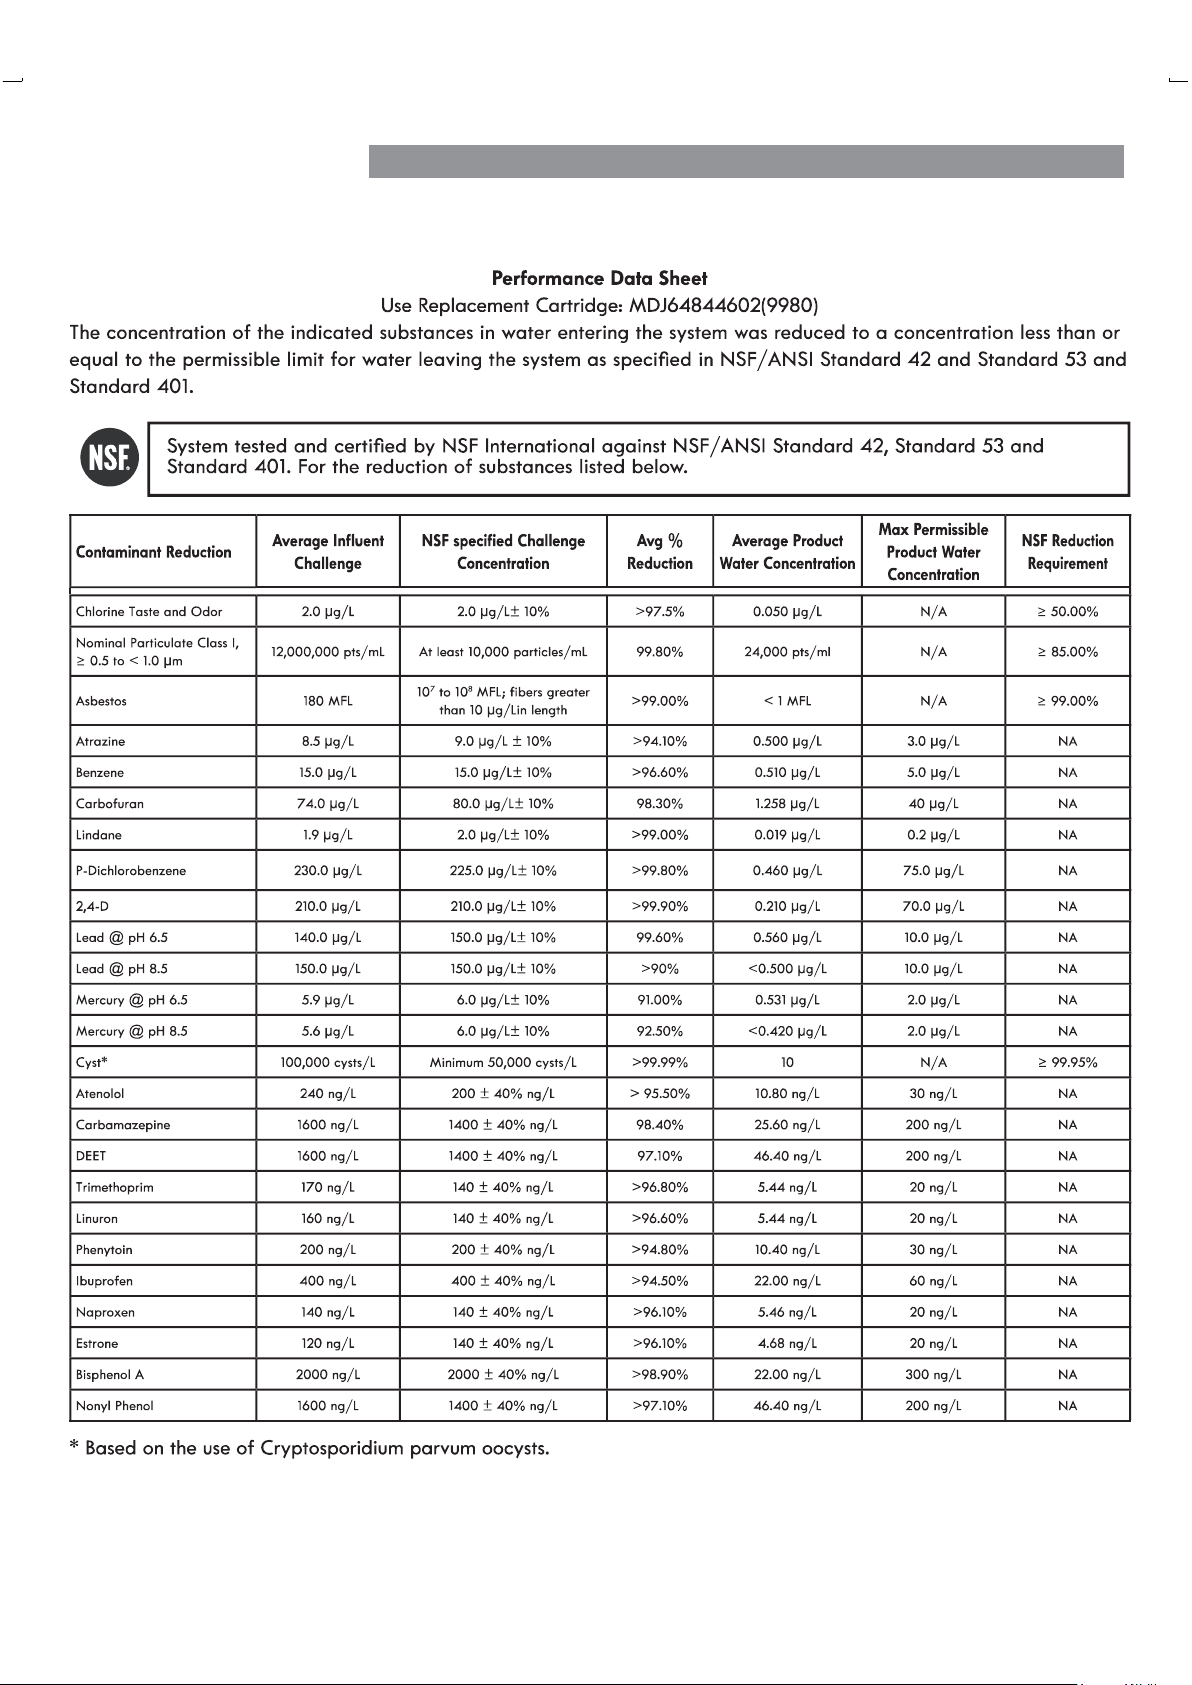
WATER FILTER
It is essential that the manufacturer’s recommended
installation, maintenance and water filter replacement
requirements be carried out for the product to perform as
advertised.
NOTE: While the testing was performed under standard
laboratory conditions, actual performance may vary.
NOTE: To purchase a replacementfilter,visityourlocal
Searsstore,orcall1-844-553-6667.
Youmayalsopurchaseonlineatwww.kenmore.com
Product distributed in the United States by Sears Brands
Management Corporation, Hoffman Estates, IL 60179.
NSF is a trademark of NSF International.
WARNING
CAUTION
To reduce the risk associated with ingestion of
contaminants: Do not use with water that is
microbiologically unsafe or of unknown quality
without adequate disinfection before and after the
system. Systems certified for cyst reduction may be
used on disinfected water that may contain filterable
cysts. EPA Establishment Number 10350-MN-005
To reduce the risk associated with property damage
due to water leakage:
Read and follow • the Water Filter instructions before
installation and use of this system.
Installation and use • MUST comply with all state and
local plumbing codes.
Do not• install if water pressure exceeds 120 psi (827
kPa). Contact a plumbing professional if you are
uncertain of how to check your water pressure.
Do not• install where water hammer conditions may
occur. If water hammer conditions exist, you must
install a water hammer arrester. Contact a plumbing
professional if you are uncertain of how to check for
this condition.
Do not• install on hot water supply lines.
The maximum operating water temperature of this
water filter system is 100°F (38°C).
Protect water filter from freezing. • Do not operate
refrigerator in ambient conditions below 55°F
(12.7°C). Drain water filter when storing unit in
temperatures below 40°F (4.4°C).
The disposable water filter must be replaced every •
six months, at the rated capacity, or if a noticeable
reduction in flow rate occurs.
Application Guidelines/Water Supply Parameters
Service Flow 0.5 gpm (1.9 lpm)
Water Supply Potable Water
Water Pressure 20-120 psi (138 - 827 kPa)
Water Temperature 33°F - 100°F (0.6°C - 38°C)
32
WATER FILTERWATER FILTER
removal
more easily

The water pressure must be between 20 and 120 psi.
If the refrigerator is installed in an area with low water
pressure (below 20 psi), you can install a booster pump
to compensate for the low pressure.
If a reverseosmosiswaterfiltrationsystem is connected
to your cold water supply, this water line installation is not
covered by the refrigerator warranty. Follow the instructions
carefully to minimize the risk of expensive water damage.
CONNECTING THE WATER LINE
INSTALLATION INSTRUCTIONS
Install the shutoff valve on the nearest frequently used
drinking water line.
1. SHUT OFF THE MAIN WATER SUPPLY
Turn on the nearest faucet to relieve the pressure on the
line.
2. CHOOSE THE VALVE LOCATION
Choose a location for the valve that is
easily accessible. It is best to connect
into the side of a vertical water pipe.
When it is necessary to connect into
a horizontal water pipe, make the
connection to the top or side, rather
than at the bottom, to avoid drawing
off any sediment from the water pipe.
3. DRILL THE HOLE FOR THE VALVE
Drill a ¼ in. hole in the water pipe using a sharp bit.
Remove any burrs resulting from
drilling the hole in the pipe. Be
careful not to allow water to
drain into the drill. Failure to
drill a ¼ in. hole may result
in reduced ice production or
smaller cubes.
36
NOTE: The hookup line cannot be white, plastic
tubing. Licensed plumbers must use only copper
tubing (NDA tubing #49595 or #49599) or Cross Link
Polyethylene (PEX) tubing.
4. FASTEN THE SHUTOFF VALVE
Fasten the shutoff valve to the cold water pipe with
the pipe clamp.
NOTE: Commonwealth of Massachusetts Plumbing
Codes 248CMR shall be adhered to. Saddle valves are
illegal and use is not permitted in Massachusetts.
Consult with your licensed plumber.
5. TIGHTEN THE PIPE CLAMP
Tighten the clamp screws until the sealing washer
begins to swell.
NOTE: Do not overtighten clamp or you may crush the
tubing.
6. ROUTE THE TUBING
Route the tubing between the cold water line and the
refrigerator.
Route the tubing through a hole drilled in the wall or
floor (behind the refrigerator or adjacent base cabinet)
as close to the wall as possible.
NOTE: Be sure there is sufficient extra tubing (about
8 feet coiled into 3 turns of about 10 in. diameter) to
allow the refrigerator to move out from the wall after
installation.
7. CONNECT THE TUBING TO THE VALVE
Place the compression nut and ferrule (sleeve) for
copper tubing onto the end of the tubing and connect
it to the shutoff valve. Make sure the tubing is fully
inserted into the valve. Tighten the compression nut
securely.
NOTE: Commonwealth of Massachusetts Plumbing
Codes 248CMR shall be adhered to. Saddle valves are
illegal and their use is not permitted in
Massachusetts. Consult with your licensed plumber.
Pipe Clamp
Saddle-Type
Shutoff Valve
Vertical Cold
Water Pipe
Pipe Clamp
Clamp Screw
Washer
Inlet End
Saddle-Type
Shutoff Valve
Packing Nut
Outlet Valve
Compression Nut
Ferrule (sleeve)
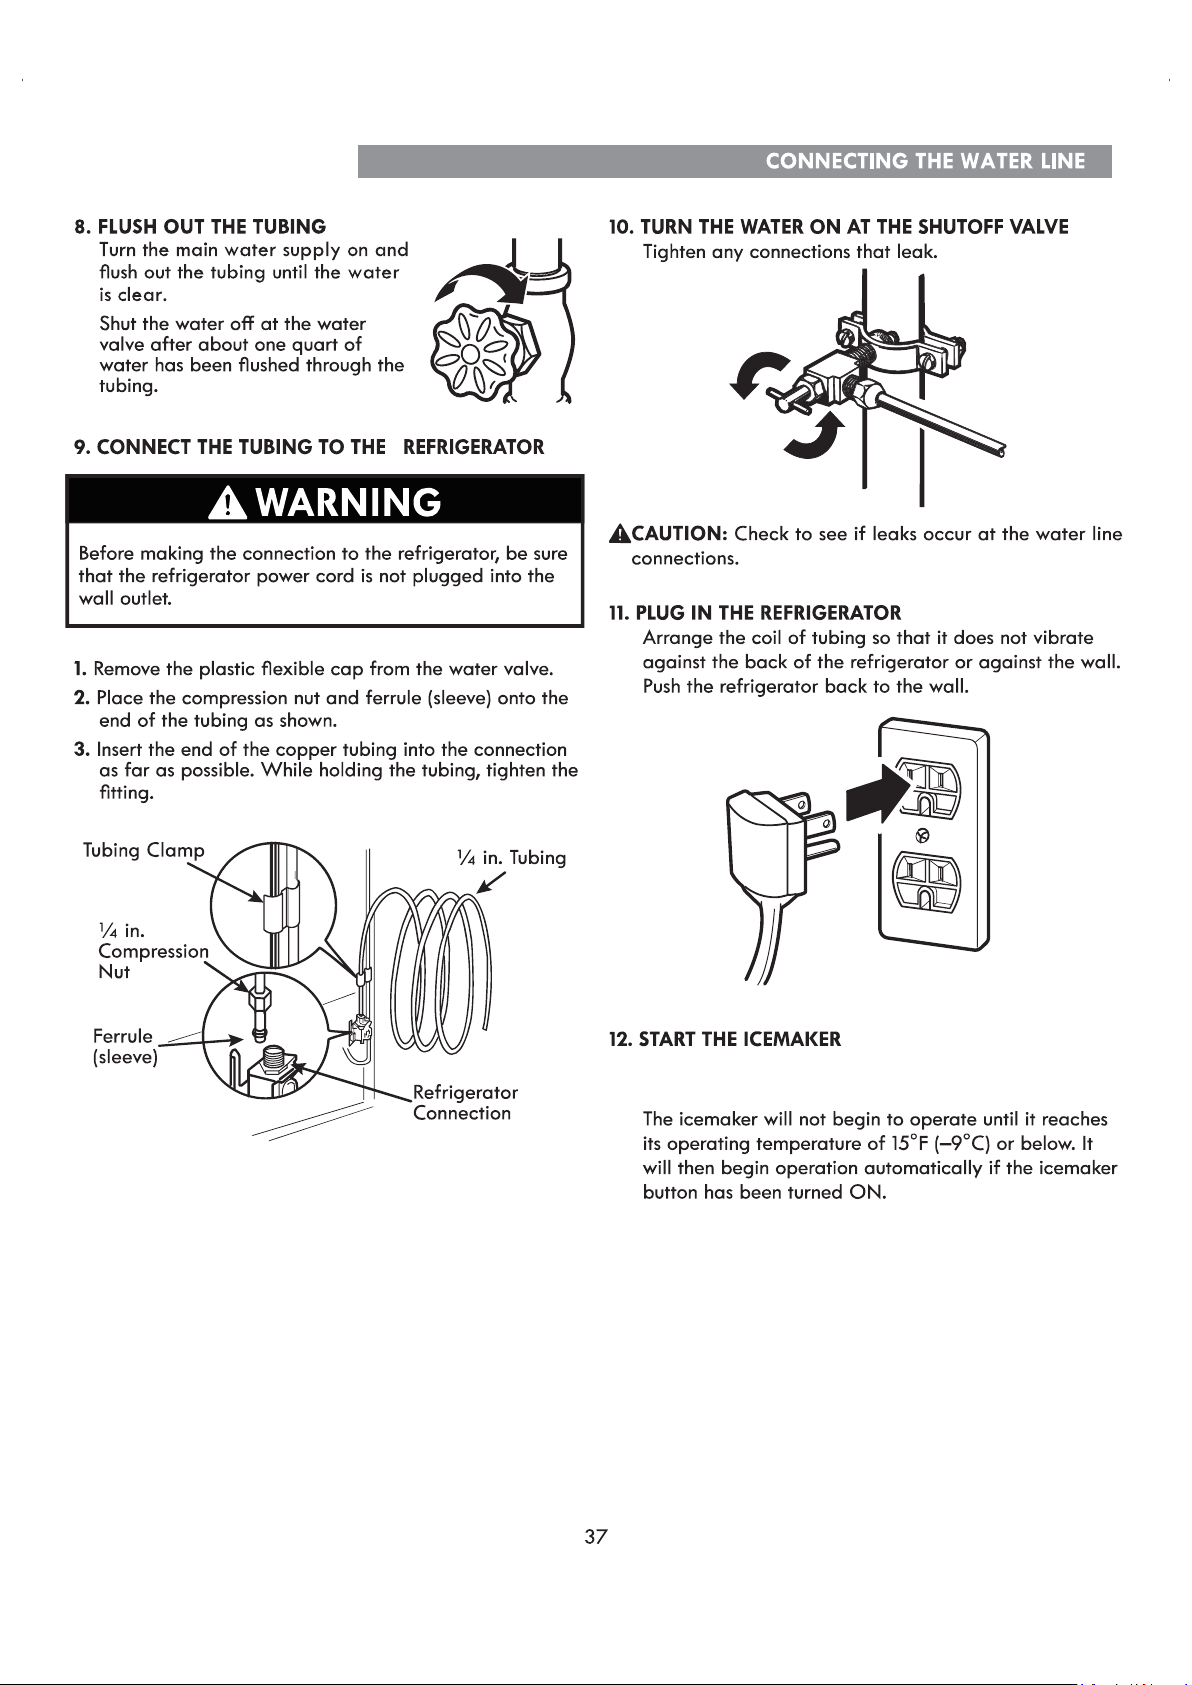
Set the icemaker power switch to the On (I) position.
NOTE: A newly installed refrigerator may take several
hours to start producing ice.
TROUBLESHOOTING GUIDE
38
Problem Possible Causes Solutions
Refrigerator and
Freezer section are
not cooling.
The refrigerator control is set to OFF
(some models).
Turn the control ON. Refer to the Setting the Controls
section for proper temperature settings.
Refrigerator is set to demo mode. Demo Mode allows the lights and control display to
work normally while disabling cooling to save energy
while on the showroom floor. Refer to the Setting the
Controls section for instructions on how to disable
Demo Mode.
Refrigerator is in the defrost cycle. During the defrost cycle, the temperature of each
compartment may rise slightly. Wait 30 minutes and
confirm the proper temperature has been restored
once the defrost cycle has completed.
Refrigerator was recently installed. It may take up to 24 hours for each compartment to
reach the desired temperature.
Refrigerator was recently relocated. If the refrigerator was stored for a long period of time
or moved on its side, it is necessary for the refrigerator
to stand upright for 24 hours before connecting it to
power.
Cooling system runs
too much.
Refrigerator is replacing an older
model.
Modern refrigerators require more operating time but
use less energy due to more effcient technology.
Refrigerator was recently plugged in
or power restored.
The refrigerator will take up to 24 hours to cool
completely.
Door opened often or a large amount
of food / hot food was added.
Adding food and opening the door warms the
refrigerator, requiring the compressor to run longer in
order to cool the refrigerator back down. In order to
conserve energy, try to get everything you need out of
the refrigerator at once, keep food organized so it is
easy to find, and close the door as soon as the food is
removed. (Refer to the Food Storage Guide .)
Doors are not closed completely. Firmly push the doors shut. If they will not shut all the
way, see the "Doors will not close completely or pop
open" section in Parts & Features Troubleshooting.
Refrigerator is installed in a hot
location.
The compressor will run longer under warm conditions.
At normal room temperatures (70°F) expect your
compressor to run about 40% to 80% of the time.
Under warmer conditions, expect it to run even more
often. The refrigerator should not be operated above
110°F.
Condenser / back cover is clogged. Use a vacuum cleaner with an attachment to clean the
condenser cover and vents. Do not remove the panel
covering the condenser coil area.
Before conducting troubleshooting, make sure that the following basic requirements are met:
COOLING
Service Flow 0.5 gpm (1.9 lpm)
Water Supply Potable Water
Water Pressure 20-120 psi (138 - 827 kPa)
Operating Ambient
Temperature Limits
55°F - 110°F
Electrical Ratings
115 Volts, 60 Hz, AC only, and fused
at 15 or 20 amperes.
Problem Possible Causes Solutions
Refrigerator or
Freezer section is too
warm.
Refrigerator was recently installed. It may take up to 24 hours for each compartment to
reach the desired temperature.
Air vents are blocked. Rearrange items to allow air to flow throughout the
compartment. Refer to the Airflow diagram in the
Using Your Refrigerator section.
Doors are opened often or for long
periods of time.
When the doors are opened often or for long periods
of time, warm, humid air enters the compartment.
This raises the temperature and moisture level within
the compartment. To lessen the effect, reduce the
frequency and duration of door openings.
Unit is installed in a hot location. The refrigerator should not be operated in
temperatures above 110°F.
A large amount of food or hot food
was added to either compartment.
Adding food warms the compartment requiring the
cooling system to run. Allowing hot food to cool to
room temperature before putting it in the refrigerator
will reduce this effect.
Doors not closed correctly. See the "Doors will not close correctly or pop open"
section in Parts & Features Troubleshooting.
Temperature control is not set
correctly.
If the temperature is too warm, adjust the control one
increment at a time and wait for the temperature to
stabilize. Refer to the Setting the Controls section for
more information.
Defrost cycle has recently completed. During the defrost cycle, the temperature of each
compartment may rise slightly and condensation may
form on the back wall. Wait 30 minutes and confirm
the proper temperature has been restored once the
defrost cycle has completed.
Interior moisture
buildup.
Doors are opened often or for long
periods of time.
When the doors are opened often or for long periods
of time, warm, humid air enters the compartment.
This raises the temperature and moisture level within
the compartment. To lessen the effect, reduce the
frequency and duration of door openings.
Doors not closed correctly. See the "Doors will not close correctly" section in the
Troubleshooting section.
Weather is humid. Humid weather allows additional moisture to enter the
compartments when the doors are opened leading to
condensation or frost. Maintaining a reasonable level
of humidity in the home will help to control the amount
of moisture that can enter the compartments.
Defrost cycle recently completed. During the defrost cycle, the temperature of each
compartment may rise slightly and condensation may
form on the back wall. Wait 30 minutes and confirm
that the proper temperature has been restored once
the defrost cycle has completed.
Food stored uncovered or unwrapped, and dampFood is not packaged correctly.
containers can lead to moisture accumulation within
each compartment. Wipe all containers dry and store
food in sealed packaging to prevent condensation and
frost.
39
TROUBLESHOOTING GUIDE
COOLING
Problem Possible Causes Solutions
Food is freezing
in the refrigerator
compartment.
Food with high water content was
placed near an air vent.
Rearrange items with high water content away from air
vents.
Refrigerator temperature control is set
incorrectly.
If the temperature is too cold, adjust the control one
increment at a time and wait for the temperature to
stabilize. Refer to the Setting the Controls section for
more information.
Refrigerator is installed in a cold
location.
When the refrigerator is operated in temperatures
below 41°F (5°C), food can freeze in the refrigerator
compartment. The refrigerator should not be operated
in temperatures below 55°F (13°C).
Frost or ice crystals
form on frozen food
(outside of package).
Door is opened frequently or for long
periods of time.
When the doors are opened often or for long periods
of time, warm, humid air enters the compartment. This
raises the temperature and moisture level within the
compartment. Increased moisture will lead to frost and
condensation. To lessen the effect, reduce the frequency
and duration of door openings.
Refer to the "Doors will not close correctly or pop open" Door is not closing properly.
section in the Troubleshooting section.
If the temperature is too cold, adjust the control one
Refrigerator or
Freezer section is too
cold.
Incorrect temperature control settings.
increment at a time and wait for the temperature to
stabilize. Refer to the Setting the Controls section for
more information.
Frost or ice crystals
on frozen food
(inside of sealed
package).
Condensation from food with a high
water content has frozen inside of the
food package.
This is normal for food items with a high water content.
Food has been left in the freezer for a
long period of time.
Do not store food items with high water content in the
freezer for a long period of time.
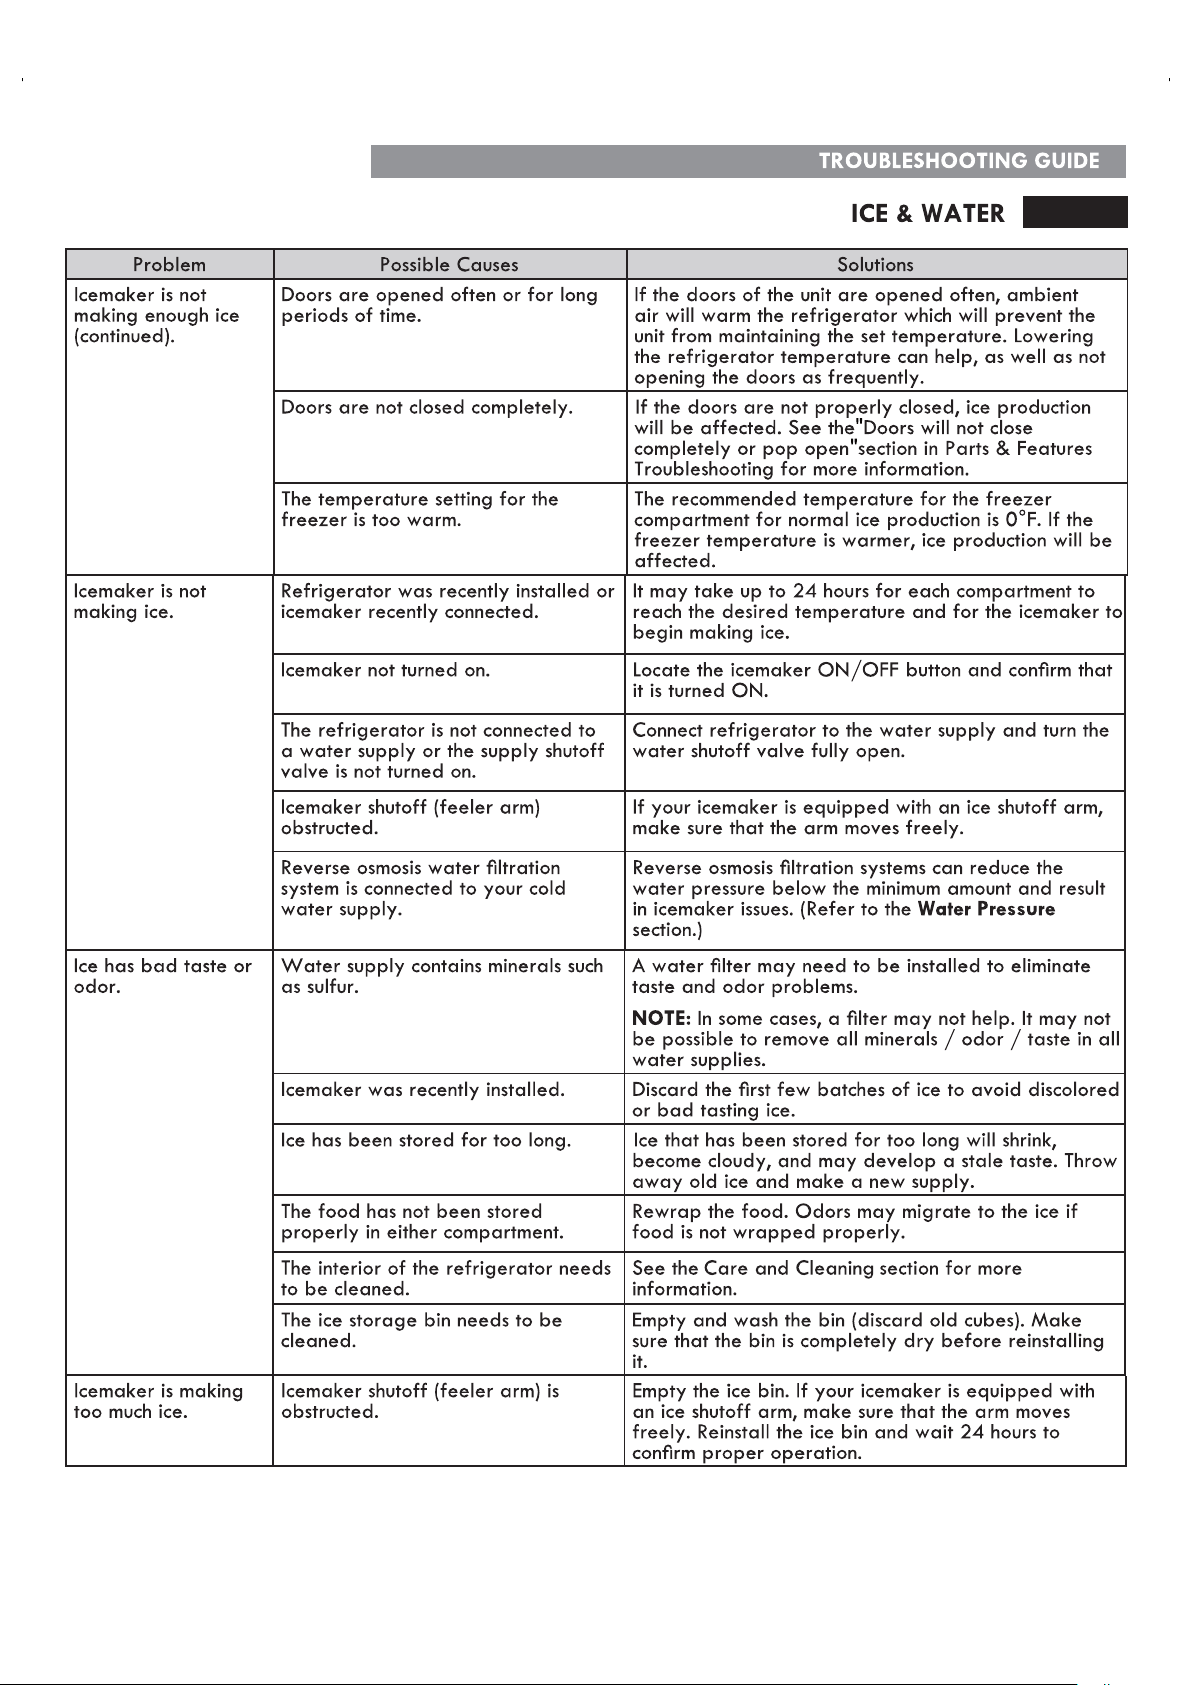
The icemaker will produce approximately 70-182
Icemaker is not
making enough ice.
Demand exceeds ice storage capacity.
cubes in a 24 hour period.
House water supply is not connected,
valve is not turned on fully, or valve is
clogged.
Connect the refrigerator to a cold water supply with
adequate pressure and turn the water shutoff valve
fully open.
If the problem persists, it may be necessary to contact a
It is recommended that you replace the water filter:
plumber.
Water filter has been exhausted.
Approximately every six months.•
When the waterfilter indicator turns on.
•
When the water dispenser output decreases.
•
When the ice cubes are smaller than normal.
•
Low house water supply pressure.
on models without a water filter and between 40 and
The water pressure must be between 20 and 120 psi
120 psi on models with a water filter.
If the problem persists, it may be necessary to contact
a plumber or install a booster pump to compensate for
the low pressure.
Reverse osmosis filtration system is
used.
Reverse osmosis filtration systems can reduce the water
pressure below the minimum amount and result in
icemaker issues. (Refer to Water Pressure section.)
Tubing connecting refrigerator to
house supply valve is kinked.
The tubing can kink when the refrigerator is moved
during installation or cleaning resulting in reduced
waterflow. Straighten or repair the water supply line
and arrange it to prevent future kinks.
COOLING/ICE & WATER
40
TROUBLESHOOTING GUIDE
41
42
Problem Possible Causes Solutions
Clicking The defrost control will click when
the automatic defrost cycle begins
and ends. The thermostat control (or
refrigerator control on some models)
will also click when cycling on and
off.
Normal Operation
Rattling Rattling noises may come from the
flow of refrigerant, the water line on
the back of the unit, or items stored
on top of or around the refrigerator.
Normal Operation
Refrigerator is not resting solidly on
the floor.
Floor is weak or uneven or leveling legs need to be
adjusted. See the Door Alignment section.
Refrigerator with linear compressor
was jarred while running.
Normal Operation
Whooshing Evaporator fan motor is circulating
air through the refrigerator and
freezer compartments.
Normal Operation
Air is being forced over the condenser
by the condenser fan.
Normal Operation
Gurgling Refrigerant flowing through the
cooling system.
Normal Operation
Popping Contraction and expansion of the
inside walls due to changes in
temperature.
Normal Operation
Sizzling Water dripping on the defrost heater
during a defrost cycle.
Normal Operation
Vibrating If the side or back of the refrigerator
is touching a cabinet or wall, some of
the normal vibrations may make an
audible sound.
To eliminate the noise, make sure that the sides and
back cannot vibrate against any wall or cabinet.
Dripping Water running into the drain pan
during the defrost cycle.
Normal Operation
Pulsating or High-
Pitched Sound
Your refrigerator is designed to run
more efficiently to keep your food
items at the desired temperature. The
high efficiency compressor may cause
your new refrigerator to run longer
than your old one, but it is still more
energy efficient than previous models.
While the refrigerator is running, it is
normal to hear a pulsating or high-
pitched sound.
Normal Operation
NOISE
TROUBLESHOOTING GUIDE
43
Problem Possible Causes Solutions
Doors will not close
correctly or pop
open.
Food packages are blocking the door
open.
Rearrange food containers to clear the door and door
shelves.
Ice bin, crisper cover, pans, shelves,
door bins, or drawers are out of
position.
Push bins all the way in and put crisper cover, pans,
shelves and drawers into their correct positions. See
the Using Your Refrigerator section for more information.
The doors were removed during
product installation and not properly
replaced.
Remove and replace the doors according to the
Removing and Replacing Refrigerator Handles and
Doors section.
Refrigerator is not leveled properly. Door Alignment in the Refrigeration Installation
section to level refrigerator.
See
Clean the gaskets and the surfaces that they touch.
Doors are diffcult to
open.
The gaskets are dirty or sticky.
Rub a thin coat of appliance polish or kitchen wax on
the gaskets after cleaning.
Door was recently closed.
LED interior lighting failure.
When you open the door, warmer air enters the
refrigerator. As the warm air cools, it can create a
vacuum. If the door is hard to open, wait one minute
to allow the air pressure to equalize, then see if it
opens more easily.
Refrigerator wobbles
or seems unstable.
Leveling legs are not adjusted
properly.
Refer to the Leveling and Door Alignment section.
Floor is not level. It may be necessary to add shims under the leveling
legs or rollers to complete installation.
Lights do not work.
lighting, and service should be performed by
The refrigerator compartment lamp is LED interior
aqualifiedtechnician.RefertotheLight Bulb
Replacement section.
Refrigerator has an
unusual odor.
The Air Filter may need to be set to
the MAX setting or replaced.
Set the Air Filter to the MAX setting. If the odor does
not go away within 24 hours, the filter may need to be
replaced. See the Replacing the Air Filter section for
replacement instructions.
The interior of
the refrigerator is
covered with dust or
soot.
The refrigerator is located near a fire
source, such as a fireplace, chimney
or candle.
Make sure that the refrigerator is not located near a
fire source, such as a fireplace, chimney or candle.
PARTS & FEATURES
TROUBLESHOOTING GUIDE
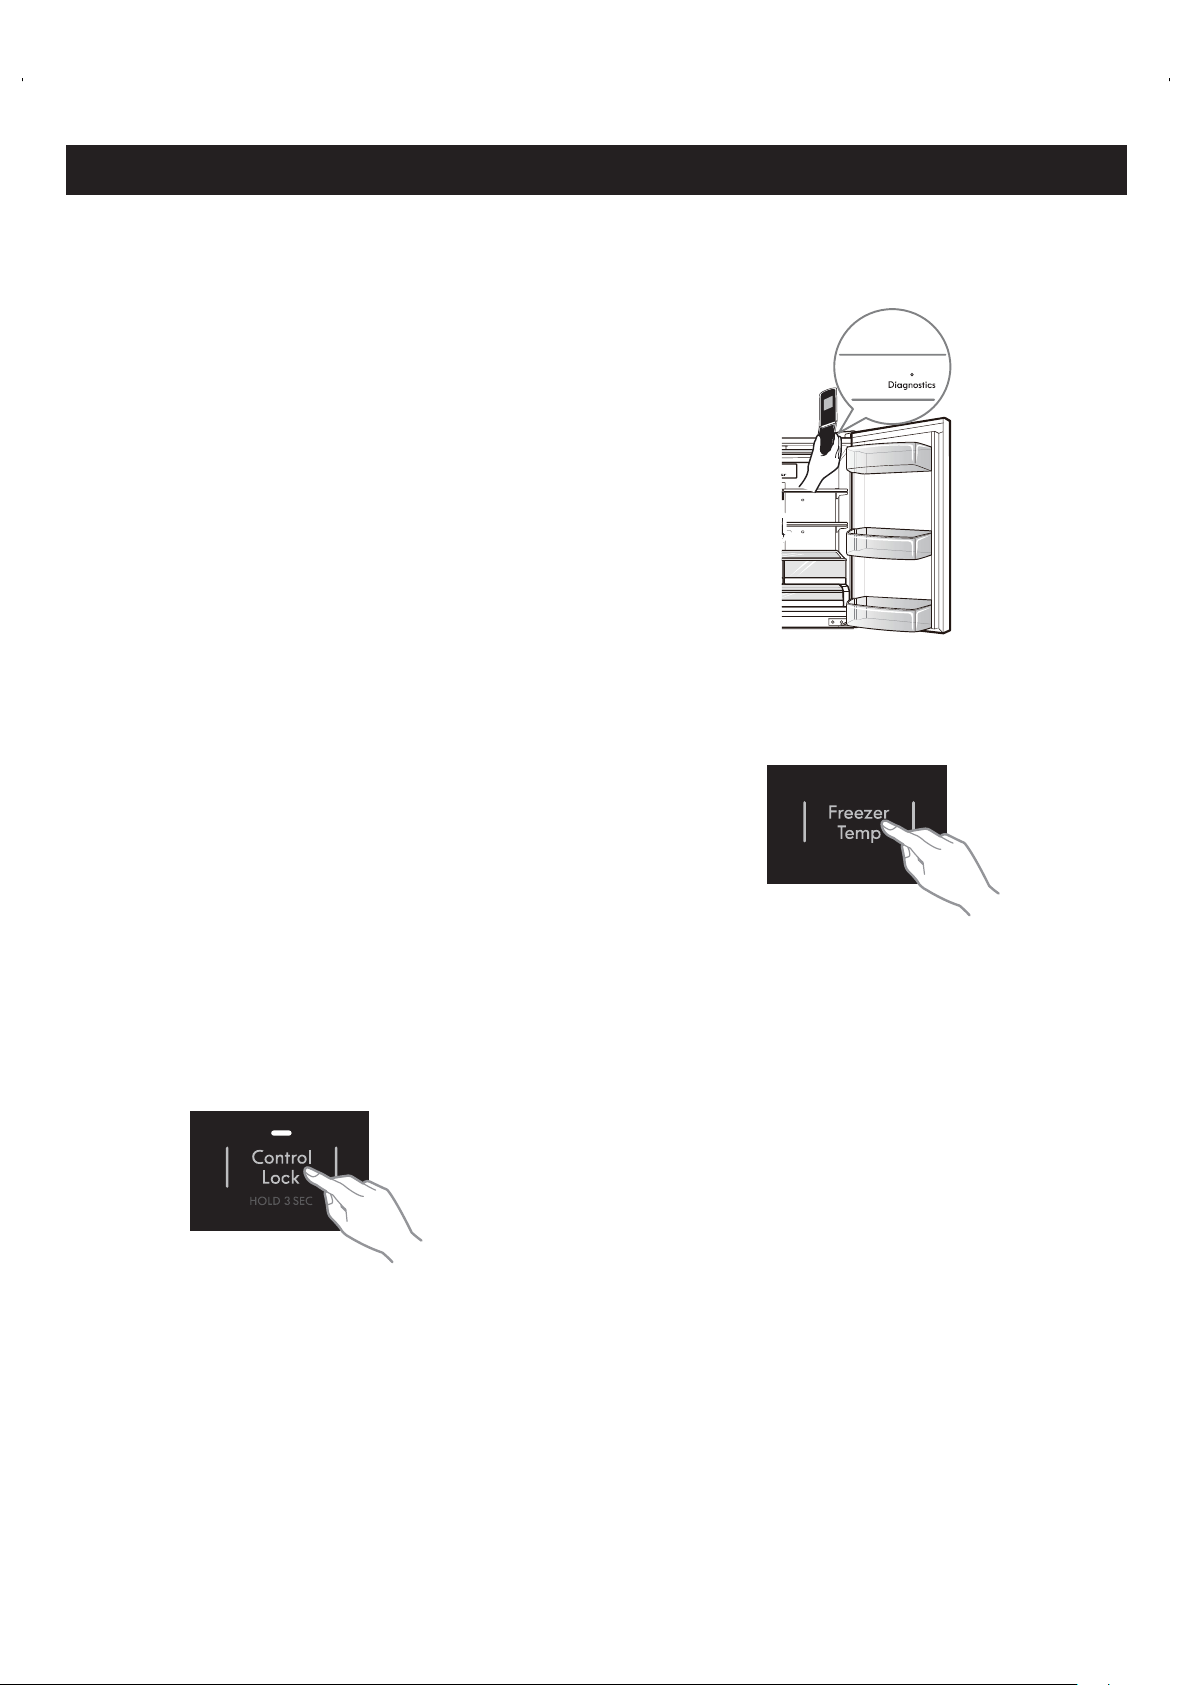
DIAGNOSTICS
Diagnostics
Should you experience any problems with your
refrigerator, it has the capability of transmitting data via
your telephone to the Diagnostics Team. This gives you the
capability of speaking directly to our trained specialists.
The specialist records the data transmitted from your
machine and uses it to analyze the issue, providing a fast,
effective diagnosis.
If you experience problems with your refrigerator,
call 1-844-553-6667.
Only use the Diagnostics feature when instructed
to do so by the Diagnostics Team agent.
The transmission sounds that you will hear are normal
and sound similar to a fax machine.
Diagnostics cannot be activated unless your refrigerator
is connected to power. If your refrigerator is unable to
turn on, then troubleshooting must be done without using
Diagnostics.
Using Diagnostics
First, call 1-844-553-6667. If the number of the phone
youareusingisonfileandisassociatedwithyour
refrigerator, you will be quickly relayed to a Diagnostics
team agent. Only use the Diagnostics feature when
instructed to do so by the Diagnostics Team agent.
1. Lock the display. To lock the display, press and hold
the Control Lock button for three seconds. (If the
displayhasbeenlockedforoverfiveminutes,youmust
deactivate the lock and then reactivate it.)
eht fo tnorf ni enohp ruoy fo eceiphtuom eht dloH .3
speaker that is located on the right hinge of the
refrigerator door, when instructed to do so by the call
center.
eerht rof nottub pmeT rezeerF eht dloh dna sserP .4
seconds while continuing to hold your phone to the
speaker.
pmeT rezeerF eht esaeler ,speeb eerht raeh uoy retfA .5
button.
sah noissimsnart enot eht litnu ecalp ni enohp eht peeK .6
finished.Thedisplaywillcountdownthetime.Once
the countdown is over and the tones have stopped,
resume your conversation with the specialist, who will
then be able to assist you in using the information
transmitted for analysis.
NOTE:
senot eht elihw enohp eht evom ton od ,stluser tseb roF -
are being transmitted.
etarucca na teg ot elba ton si tnega retnec llac eht fI -
recording of the data, you may be asked to try again.
2. Open the right refrigerator door.
44